The kitchen backsplash is more than just a wall covering; it’s an opportunity to infuse personality, style, and practicality into the heart of your home. It protects your walls from splashes and spills, but it also acts as a canvas, tying together your cabinets, countertops, and appliances into a cohesive design.

Choosing the right backsplash can seem daunting with so many materials, patterns, and colors available. Whether you dream of a sleek, modern look, a cozy farmhouse feel, or a vibrant artistic statement, there’s a perfect backsplash waiting to transform your kitchen.
In this comprehensive guide, we’ll explore 37 diverse kitchen backsplash ideas, ranging from classic tiles to unexpected materials. We’ll cover various styles, highlight their unique features, and provide clear, step-by-step DIY installation instructions to help you bring these visions to life. Get ready to discover the perfect backdrop for your culinary adventures!
1. Textured Glossy White Tile

White subway tile is a timeless choice for any kitchen. This look takes the classic style and adds a beautiful, modern feel. The tiles have a slightly wavy, uneven surface. This texture catches the light in a unique way, adding depth and character to the walls.
Your kitchen will feel bright and open with this backsplash. It creates a clean background that works well with many different cabinet colors and countertop materials. The glossy finish is also simple to wipe clean, making it a practical option behind the stove. This choice brings a subtle elegance to the space.
DIY Installation Steps
Here is how you can create this look at home. Ask a grown-up for help with any cutting or tricky parts!
- Prepare the Wall: First, make sure your wall is super clean. Wipe away any grease or dust with a cloth and some cleaner. The wall also needs to be flat and smooth.
- Plan Your First Row: Use a level tool to draw a straight line on the wall where your first row of tiles will go. This makes sure your whole backsplash will be straight.
- Mix the Tile Glue: You will use a special glue called thin-set mortar. An adult should help mix the powder with water until it looks like thick peanut butter.
- Spread the Glue: Take a small amount of the glue on a notched trowel (a tool that looks like a comb). Spread a thin, even layer onto a small section of the wall. The notches will make perfect ridges in the glue.
- Place Your First Tile: Gently press your first tile into the glue on the wall, right above your guideline. Give it a little wiggle to set it in place.
- Use Spacers: Place small plastic tile spacers at the corners of the tile. This leaves a small, even gap between tiles for the grout later.
- Continue Tiling: Keep adding tiles one by one, putting spacers between each one. After you finish a section, gently press a flat board over the tiles to make sure they are all level.
- Let it Dry: Once all the tiles are on the wall, let the glue dry for a full day. Don’t touch them!
- Fill the Gaps: Remove all the plastic spacers. Now, mix your grout. It’s another powder you mix with water. Schmear the grout all over the tiles, pushing it into the gaps.
- Clean the Tiles: Wait about 20 minutes for the grout to set a little. Then, use a large, damp sponge to gently wipe the extra grout off the face of the tiles. Rinse your sponge often.
- Final Wipe: After the grout dries for a few hours, a light haze might appear on the tiles. Just wipe it away with a clean, dry cloth. Your new backsplash is complete!
2. Marble Herringbone Backsplash

For a touch of elegance, a marble herringbone backsplash is an excellent selection. The pattern, which looks like zig-zagging arrows, creates a sense of movement and makes the wall a focal point. Using marble adds a luxurious feel to the kitchen.
This design brings a sophisticated texture to the room. It pairs well with simple, solid-colored cabinets, like the white and deep blue shown. The natural stone has unique veining, so every tile is slightly different. This backsplash elevates the entire look of the kitchen.
DIY Installation Steps
This pattern is a bit trickier, so take your time and have fun!
- Clean the Wall: Just like before, start with a very clean, dry, and flat wall.
- Find the Center: Use a tape measure to find the middle of your wall and draw a straight vertical line with your level. This is your guide for the center of the “V” shapes.
- Dry Layout: Before using any glue, lay your tiles out on the floor. Arrange them in the herringbone pattern to see how they will fit and where you will need to make cuts.
- Mix and Apply Mortar: Get your thin-set mortar ready. Apply a thin layer to a small area on the wall, starting at your center line.
- Place the First Tiles: Your first two tiles will form the point of a “V” right on your center line. Press them firmly into the mortar.
- Keep Going: Continue adding tiles, building your pattern out from the center. Remember to use your tile spacers to keep the gaps even.
- Cutting Tiles: You’ll need to cut tiles to fit at the edges of the backsplash. An adult must do this part using a special wet saw. Measure carefully before cutting.
- Let It Set: Allow the mortar to dry completely for at least 24 hours.
- Grout the Gaps: Take out all the spacers. Apply your grout over the whole surface, making sure to push it into all the little gaps. Use non-sanded grout to avoid scratching the marble.
- Wipe Clean: After about 20 minutes, use a damp sponge to clean the extra grout from the tile surfaces.
- Final Polish: Once the grout is fully dry, use a soft cloth to polish away any remaining haze.
3. Classic Beadboard Panels

Beadboard paneling offers a cozy, cottage-inspired charm to a kitchen. This style uses panels with decorative vertical grooves, which can make the room feel taller. It provides a clean, textured backdrop that is less busy than tile.
The look is warm and inviting. It works especially well in farmhouse or traditional kitchens. Paired with wooden countertops and a deep apron sink, beadboard completes a comfortable, homey atmosphere. It’s a straightforward way to add custom character.
DIY Installation Steps
This project uses big panels, so it comes together quickly!
- Measure and Cut: Measure the height and width of your backsplash area. An adult will need to help cut the large beadboard panels to the right size using a circular saw. They also need to cut out holes for any electrical outlets.
- Find the Studs: Use a stud finder to locate the wooden beams inside your wall. Mark their locations with a pencil. This is where you will nail the panel.
- Apply Glue: Squeeze a construction adhesive, which is a very strong glue, onto the back of your beadboard panel in a zig-zag pattern.
- Place the Panel: Carefully press the panel against the wall. Make sure it’s straight and level.
- Nail it Down: Use a nail gun or a hammer and small finishing nails to secure the panel to the wall. Drive the nails into the studs you marked earlier.
- Cover the Nail Holes: Use a little bit of wood putty to fill in the tiny holes left by the nails. Once it’s dry, you can sand it smooth.
- Caulk the Edges: Apply a thin line of caulk along the seams where the beadboard meets the counter and cabinets. This gives it a professional, sealed finish.
- Paint it Pretty: Once everything is dry, you can paint your beadboard. Use a good quality kitchen paint that is easy to wipe clean.
4. Rustic Stacked Stone

Bring the beauty of the outdoors inside with a stacked stone backsplash. This option provides incredible texture and a rustic, earthy feel. The thin pieces of natural stone are arranged in horizontal lines, creating a rugged and appealing wall surface.
This backsplash is full of character. It pairs beautifully with wood cabinets and natural countertops, enhancing a warm, lodge-like ambiance. Each stone has its own unique color and shape, so your backsplash will be completely one-of-a-kind.
DIY Installation Steps
Working with stone is like putting together a heavy puzzle.
- Wall Prep: Start with a clean wall. Some people add a layer of cement backer board for extra strength, which is a good idea for heavy stones.
- Bottom Support: Screw a temporary wood plank to the wall where the bottom of the backsplash will be. This will hold the heavy stones up while the glue dries.
- Plan Your Stones: Lay out your stone panels on the floor to arrange them in a way you like. Mix panels from different boxes to get a good blend of colors.
- Mix the Mortar: You’ll need a strong mortar for this. Mix it up until it’s thick, like cake frosting.
- Butter the Back: Instead of putting mortar on the wall, “butter” the back of each stone panel with a layer of mortar.
- Press in Place: Start at the bottom, resting your first panel on the support plank. Press it firmly against the wall with a slight twisting motion.
- Build Upwards: Continue adding panels, working your way up the wall. Most stacked stone panels are designed to interlock, so there’s no need for spacers or grout.
- Let it Cure: Let the wall dry for at least 48 hours. Then you can remove the wooden support plank at the bottom.
- Seal the Stone: To protect your new backsplash from food splatters and make it easier to clean, apply a stone sealer with a paintbrush.
5. Sleek Blue Glass Sheet

For a clean and contemporary look, a single sheet of glass is a fantastic option. This backsplash has no grout lines, which creates a seamless and smooth surface. The beautiful blue color adds a vibrant splash of personality to the minimalist kitchen.
The reflective quality of the glass makes the kitchen feel brighter and more spacious. It is exceptionally easy to clean since there are no crevices for dirt to hide. This choice is a statement of modern simplicity and style.
DIY Installation Steps
This is a job where measuring perfectly is the most important step.
- Measure, Measure, Measure: You or a professional need to measure the backsplash area exactly. This includes the precise locations for any outlets or light switches. The glass company will cut the glass and the holes for you.
- Paint the Wall: The wall behind the glass should be painted the color you want to see, or a a neutral color. Any bumps or marks on the wall might show through, so make sure it’s smooth and clean.
- Test the Fit: Before you use any glue, carefully hold the glass panel in place to make sure it fits perfectly.
- Apply Adhesive: Use a special, clear-drying silicone adhesive made for glass and mirrors. Apply it to the back of the glass panel in several vertical lines.
- Set in Place: With a helper, carefully lift the glass panel and press it against the wall. Press firmly all over the surface to make sure it sticks well.
- Support It: Use painter’s tape or a temporary wood ledge at the bottom to hold the glass in place and prevent it from sliding down while the adhesive dries.
- Let it Cure: Let the adhesive dry for the time recommended by the manufacturer, usually at least 24 hours.
- Seal the Edges: Apply a thin bead of clear caulk along the edges where the glass meets the counter and cabinets for a waterproof seal.
6. Vertical Tile with a Color Block

This backsplash design is modern and artistic. By laying long, thin tiles vertically, it draws the eye upward and creates a sense of height. The bold stripe of dark green and blue tiles acts as a stunning centerpiece.
This approach is a clever way to add a custom design element to your kitchen. It breaks up the wall of white tiles and introduces color in a structured, intentional way. It’s a fresh take on tiling that shows off your creative side.
DIY Installation Steps
This is like regular tiling, but you get to play with a cool pattern.
- Plan Your Stripe: Decide how wide you want your color stripe to be and where it will go. Use a level and a pencil to draw straight vertical lines on the wall to mark the edges of your stripe.
- Tile the Main Area First: It’s often easiest to install the main color (white, in this case) first. Tile the areas on both sides of your planned stripe, right up to the pencil lines.
- Leave a Gap: As you tile, leave the space for your accent stripe completely empty. Use tile spacers as usual.
- Let it Dry: Allow the white-tiled sections to dry for a day so they are solid and won’t move.
- Install the Accent Stripe: Now, fill in the empty gap with your colorful tiles. An adult may need to help cut some tiles to fit perfectly.
- Use Spacers: Remember to use spacers between your accent tiles to keep the grout lines consistent.
- Wait for it to Dry: Let the new tiles dry for another 24 hours.
- Grout Everything: Remove all the spacers. Apply grout over the entire backsplash, covering both the white and colored tiles.
- Sponge it Clean: Wait about 20 minutes, then use a damp sponge to wipe all the excess grout off the tiles.
- Final Buff: Once dry, buff away any remaining haze with a clean cloth.
7. Large Concrete-Look Tile

Achieve an industrial-chic vibe with large, concrete-look porcelain tiles. These oversized squares create a clean, modern aesthetic with very few grout lines. The finish mimics the raw, textured look of concrete, adding an urban edge to the kitchen.
This style is both durable and understated. It provides a neutral background that complements natural materials like wood and matte black fixtures. The large format makes a small space feel bigger. It is a practical and stylish choice for a contemporary home.
DIY Installation Steps
Big tiles can be heavy, so you might need a helper for this one.
- Ensure a Flat Wall: Large tiles need a very flat surface. Use a long level to check your wall. An adult might need to smooth it out with a joint compound if it’s wavy.
- Plan Your Layout: Lay the tiles on the floor to see how they will look. This helps you plan for any cuts you might need.
- Use the Right Mortar: You’ll need a special large-format tile mortar, which is stronger and stickier. Mix it according to the directions.
- Comb the Mortar: Spread the mortar on the wall with your notched trowel. For big tiles, it’s also a good idea to “butter” the back of the tile with a thin layer of mortar.
- Set the First Tile: Start from the bottom center of your backsplash. Press the first tile firmly into the mortar with a slight wiggle.
- Level It: Use your level to make sure the tile is perfectly straight, both horizontally and vertically.
- Keep Going: Add the next tiles, using spacers to maintain even grout lines. Check that each tile is level with its neighbors.
- Cure Time: Let the mortar dry for at least a day before touching the tiles.
- Grout and Clean: Remove the spacers, apply your grout, and push it into the joints. Wait a bit, then sponge the tiles clean.
- Seal if Needed: Check if your grout needs to be sealed. Sealing it protects it from stains.
8. High-Gloss Color Panels

Make a bold statement with high-gloss panels. This kitchen uses a dramatic combination of deep black and vibrant teal for a striking, ultra-modern effect. The panels have a mirror-like finish that reflects light and adds a sense of depth.
This is a very sleek and clean option because there are no grout lines at all. The surface is completely smooth and incredibly easy to wipe down. This choice is for those who want their kitchen to have a sharp, sophisticated, and colorful personality.
DIY Installation Steps
This is another project where careful measuring is key.
- Get Precise Measurements: Measure your backsplash area carefully. You will need one measurement for the teal section and another for the black section. An adult will need to cut the panels with a special saw blade that won’t chip the glossy finish.
- Clean Your Wall: The wall must be perfectly clean, smooth, and dry.
- Dry Fit the Panels: Hold the panels up to the wall without any glue to make sure they fit perfectly, especially around outlets.
- Apply Panel Adhesive: Use a strong construction adhesive that is recommended for the type of panel you are using (it could be acrylic or another material). Apply it to the back of the first panel.
- Press it Firmly: Carefully position the panel on the wall and press it firmly all over.
- Add the Second Panel: Repeat the process with the second color panel, making sure the seam between the two is tight and clean.
- Tape and Wait: Use painter’s tape to help hold the panels securely in place while the adhesive cures for at least 24 hours.
- Seal the Seams: Apply a very thin line of clear or color-matched silicone caulk along the edges and any seams for a waterproof finish.
9. Scalloped Art Deco Tiles

Add a touch of playful glamour with scalloped tiles. Often called fan or fish scale tiles, this shape creates a unique, eye-catching pattern. The mix of white, green, and dark blue tiles arranged in a dynamic pattern gives the wall an artistic, custom feel.
This style brings personality and vintage flair to the kitchen. It acts as a piece of art, becoming the main focus of the room. It’s a wonderful way to incorporate color and intricate design into your home.
DIY Installation Steps
These tiles often come on a mesh sheet, which makes them easier to handle.
- Clean Wall, Clean Start: You know the drill! Start with a clean, smooth wall.
- Plan the Layout: The sheets are like puzzle pieces. Lay them on the counter to see how the scalloped edges interlock. You want the pattern to look continuous.
- Mix Mortar and Apply: Mix your thin-set mortar. Spread a thin, even layer on a small section of the wall.
- Press the Sheet: Take your first sheet of tiles and gently press it into the mortar. Use a grout float (a flat, rubbery tool) to tap it gently and make sure all the little tiles are making contact.
- Add More Sheets: Add the next sheet, making sure to lock the pattern together with the first one. Use tile spacers between the full sheets.
- Tricky Cuts: An adult will need to use tile nippers or a wet saw to cut individual tiles to fit around corners and outlets. This part takes patience.
- Let it Dry: Wait a full day for the mortar to set completely.
- Grout the Curves: Remove spacers. Schmear grout all over, working it into all the curved gaps. Because of the shapes, you might need to push the grout in from different directions.
- Wipe and Clean: After 20 minutes, use a damp sponge to gently wipe away the excess grout. Be careful around the curved edges.
- Final Polish: When the grout is dry, polish away the haze with a soft rag.
10. Antique Mirror Tile Backsplash

Create a look of vintage glamour with an antique mirror backsplash. These are not just plain mirrors; they have a distressed, aged finish that adds texture and character. The diamond pattern of the tiles adds a classic geometric touch.
This backsplash works wonders in a smaller space. The reflection makes the room feel larger and brighter by bouncing light around. It’s a sophisticated choice that adds a sense of luxury and old-world charm to your kitchen or bar area.
DIY Installation Steps
Mirror tiles are fragile, so you need to be gentle.
- Prepare the Surface: Start with a clean and very flat wall. Any bumps might make the mirror tiles look distorted.
- Use Mirror-Safe Glue: You must use a special adhesive made for mirrors. Regular construction adhesive can damage the back of the mirror over time.
- Plan Your Center: Find the center of the wall and draw level guidelines. This will help you keep your diamond pattern straight.
- Apply Glue and Place Tile: Apply a small amount of the mirror adhesive to the back of your first tile. Place it on your guideline and press gently.
- Use Spacers: Place small plastic tile spacers at the corners of each tile to create uniform gaps for grout.
- Continue Tiling: Keep adding tiles, following your pattern. Be very careful not to scratch the front of the mirrors.
- Let it Set: Give the adhesive at least 24 hours to cure properly.
- Use Soft Grout: You MUST use a non-sanded grout. Grout with sand in it will scratch the mirror tiles badly. Mix the grout and carefully apply it.
- Clean Carefully: Remove the spacers. Gently push the grout into the gaps with a grout float.
- Wipe and Polish: After about 20 minutes, use a very soft, damp sponge to clean the excess grout off. Once it’s fully dry, use a microfiber cloth to polish your new backsplash until it shines.
11. Backlit Onyx Slab
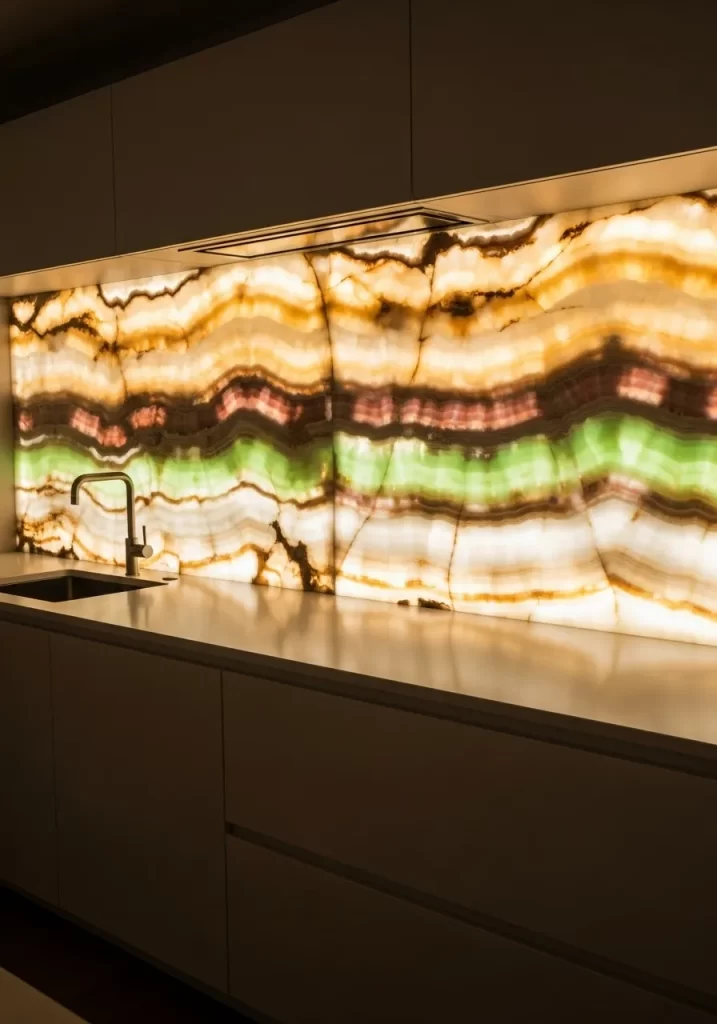
This choice creates a truly dramatic and high-end feature in any kitchen. An entire slab of onyx, a type of natural stone with beautiful bands of color, is installed as the backsplash. Lights are placed behind the stone, making it glow from within.
The effect is breathtaking. It turns the backsplash into a major piece of art, highlighting the natural patterns of the stone. This option provides both a functional surface and ambient lighting for the room. It is a stunning centerpiece for a modern, luxurious home.
DIY Installation Steps
This is a very advanced project that usually requires professionals. Here’s a simplified idea of how it’s done.
- Build a Frame: First, a shallow, sturdy frame is built on the wall. It needs to be strong enough to hold the heavy stone and deep enough to fit lights behind it.
- Install the Lights: LED light strips or panels are attached evenly inside the frame. This ensures the stone will glow without any hot spots. An adult who knows about electricity should do this part.
- Get a Custom Stone: The onyx slab is measured and cut by a stone professional to fit the backsplash area perfectly. Onyx is thin enough for light to pass through.
- Mount the Slab: The slab is carefully lifted and attached to the front of the frame. Special clips or a very strong, clear adhesive is used.
- Connect and Admire: The lights are connected to a switch. When you turn them on, your beautiful stone backsplash will light up the whole room.
12. Reclaimed Wood Wall with Tile Inset

Combine rustic charm and modern polish with this mixed-material backsplash. The majority of the wall is covered in reclaimed wood planks, each with its own history and texture. A clean, white herringbone tile section is set behind the stove.
This look is full of character and contrast. The warm, weathered wood creates a cozy, cabin-like feel, while the bright tile inset adds a practical, easy-to-clean surface where it’s needed most. It’s a creative way to get two different styles in one beautiful design.
DIY Installation Steps
This project combines two different skills: woodworking and tiling.
- Plan Your Inset: Decide on the size and location of your tile area. Draw its outline on the wall.
- Install the Tile First: It’s easiest to do the tile part first. Follow the steps for installing a herringbone pattern (like in number 2), but only inside the box you drew.
- Build a Frame: Once the tile is grouted and finished, nail thin wood trim around the edges of the tile section. This will give the wood planks a clean edge to butt up against.
- Cut Your Wood Planks: Measure and cut your reclaimed wood planks to fit the remaining wall space. An adult should help with the saw.
- Attach the Planks: Apply construction adhesive to the back of each plank and press it to the wall. Use a nail gun to add a few small nails for extra hold.
- Stagger the Seams: As you add more planks, make sure the seams don’t all line up. Staggering them looks more natural, like a real wood floor.
- Seal the Wood: Once all the wood is up, apply a clear, waterproof sealer to protect it from kitchen splashes.
13. Mixed Slate with a Herringbone Accent

This backsplash uses the deep, natural beauty of slate tiles in an interesting way. Larger rectangular tiles cover most of the area, showing off the stone’s dark colors and texture. A smaller, decorative section features tiny slate tiles in a mini-herringbone pattern.
This design adds a custom, detailed touch to a simple backsplash. It breaks up the pattern of the larger tiles and creates a sophisticated focal point. The subtle shift in pattern adds visual interest without being overwhelming, complementing the natural wood cabinets.
DIY Installation Steps
This is a fun way to practice two tile patterns at once.
- Map it Out: Decide where you want your small herringbone accent area to be. Draw its shape on the wall.
- Lay the Main Tiles: Begin by installing the large rectangular slate tiles around your accent box. Use spacers and get them all set on the wall.
- Let the Main Tiles Dry: Wait a full day for the main tiles to be completely set in the mortar. This will create a solid frame to work inside.
- Install the Accent: Now, work on the small herringbone section. These small tiles often come on a mesh sheet, which makes it easier. Cut the sheets to fit and press them into the mortar inside your box.
- Wait Again: Let the accent tiles dry for another 24 hours.
- Grout Everything: Remove all the spacers. Apply grout to the entire backsplash, covering both the large tiles and the small herringbone tiles.
- Sponge Clean: After about 20 minutes, wipe the excess grout off all the tiles with a damp sponge.
- Seal the Slate: Slate is a natural stone, so once the grout is fully cured, you should apply a stone sealer to protect it from stains.
14. Warm Venetian Plaster

For a soft, seamless, and earthy look, a Venetian plaster backsplash is a beautiful choice. This technique uses many thin layers of a special plaster, which are then burnished to create a smooth surface with gentle variations in color.
The final look is warm, organic, and has a subtle glow. There are no grout lines, making it feel both modern and timeless. It blends beautifully with natural materials and creates a serene, calming atmosphere in the kitchen.
DIY Installation Steps
This is like frosting a wall, but with a few more steps!
- Start with a Primed Wall: Your wall needs to be clean, smooth, and coated with a special primer designed for plaster.
- Apply the First Thin Coat: Use a flexible steel trowel to apply a very thin first layer of the Venetian plaster. Hold the trowel at a low angle and spread the plaster on in long, sweeping strokes.
- Let it Dry: Let the first coat dry for at least a few hours. It will look chalky.
- Apply the Second Coat: Apply another thin coat, but this time, use shorter, more random strokes. This creates the subtle texture and color variations.
- Burnish (Polish) the Wall: As the second coat is almost dry, use your clean trowel at a higher angle to rub and press the surface. This polishing action makes the plaster smooth and gives it a slight sheen.
- Apply a Top Coat: Once the plaster is completely dry (after a day or so), apply a special waterproof sealer with a soft cloth. This will protect your beautiful plaster from water and kitchen splatters.
15. Colorful Zellige Tile Patchwork

Embrace vibrant color and handcrafted charm with Zellige tiles. These are traditional Moroccan clay tiles, and each one is unique, with slight imperfections in shape and color. Arranging them in a patchwork of greens, blues, greys, and whites creates a lively and artistic backsplash.
This style is full of energy and personality. The glossy, uneven surfaces reflect light beautifully, and the mix-and-match colors make the wall feel like a work of art. It’s a great way to bring a bohemian, world-traveler feel into your home.
DIY Installation Steps
The fun of Zellige is that it’s not supposed to be straight!
- Soak Your Tiles: Real Zellige tiles are very thirsty! Soak them in water for a minute or two right before you set them. This stops them from drying out the mortar too quickly.
- Plan a Random Look: Mix tiles from all your different boxes to get a good blend of colors. Lay them out on the floor to create a patchwork that you like.
- Apply Mortar: Spread a layer of thin-set mortar on a small section of your clean wall.
- Set the Tiles: Place the tiles one by one. Here’s the special part: you don’t use tile spacers! The handmade edges should be set very close together, almost touching. Wiggle each tile into place.
- Embrace Imperfection: Don’t worry if the tiles are not perfectly flat or lined up. The little variations are what make this style so beautiful.
- Let it Dry: Once all the tiles are on the wall, let them dry for a full 24 hours.
- Grout the Surface: Use a special grout mixture or a regular unsanded grout. Schmear it all over the surface, pushing it into the very thin gaps between the tiles.
- Wipe Clean: Wait about 20 minutes, then use a damp sponge to clean the extra grout off the faces of the tiles.
16. Playful Terrazzo Backsplash

Terrazzo brings a fun, confetti-like pattern to the kitchen. Originally made by mixing chips of marble, quartz, and glass into cement, you can now get this look in easy-to-install large porcelain tiles. The white background with colorful chips feels both modern and a little retro.
This backsplash is a great way to add color and pattern in a subtle way. It’s less busy than some other mosaic tiles but still has a lot of visual interest. It’s durable, easy to clean, and pairs well with both neutral cabinets and modern light fixtures.
DIY Installation Steps
This is just like installing other large tiles, but with a fun pattern!
- Clean and Flat Wall: Make sure your wall is clean, dry, and flat.
- Lay Out the Pattern: Even though the pattern is random, it’s a good idea to lay your tiles on the floor first. You can turn them around to make sure the “confetti” chips are spread out nicely and don’t form any weird clumps.
- Use the Right Glue: Use a mortar that’s made for large-format tiles. Mix it up well.
- Apply Mortar: Spread the mortar on the wall with a notched trowel. It’s also a good idea to put a thin layer on the back of the tile itself (this is called “back-buttering”).
- Set Your Tiles: Start at the bottom and press your first tile firmly onto the wall. Use your level to make sure it is perfectly straight.
- Use Spacers and Leveling Clips: Place spacers at the corners. For large tiles, special leveling clips can help make sure the edges are perfectly flush with each other.
- Let it Cure: Wait a full day for the mortar to dry.
- Grout and Clean: Remove the spacers and clips. Apply your grout, wait a little bit, and then use a damp sponge to wipe the tiles clean.
17. Modern Geometric Mosaic

This backsplash puts a modern twist on classic mosaic tile. It uses small, rectangular tiles in a mix of white, grey, green, and black. Instead of a repeating pattern, the colored tiles are placed randomly, creating an abstract, geometric design that is unique and engaging.
The look is clean, bright, and interesting. It adds a pop of color and pattern without overwhelming the space. This is a great way to show off a creative flair while maintaining a crisp, contemporary kitchen design.
DIY Installation Steps
These tiny tiles usually come on a mesh sheet, making this project easier than it looks.
- Clean Wall Prep: Start with a clean, smooth wall surface.
- Plan Your “Random” Look: Lay the mesh sheets out on the floor. You can cut out some small tiles with a utility knife and swap them with other colors if you want to customize the random look even more.
- Mix and Spread Mortar: Mix your thin-set mortar. Spread a thin, even layer onto a small area of the wall.
- Press the Sheet: Gently press one sheet of the mosaic into the mortar. Use a grout float to lightly tap the whole sheet to make sure every tile is stuck on well.
- Interlock the Sheets: Add the next sheet, making sure the edges line up and the spacing between sheets is the same as the spacing between the tiles on the sheet.
- Let it Dry: Let the mortar cure for 24 hours.
- Grout Away: Remove any spacers you used between the sheets. Schmear grout over the entire surface, pushing it into all the little gaps.
- Clean it Up: After about 20 minutes, use a damp sponge to clean off the excess grout. Rinse your sponge often to keep it clean.
- Final Buff: Once the grout is dry, there might be a light haze on the tiles. Polish it off with a dry, soft cloth.
18. Hand-Painted Mural Feature

Turn your backsplash into a beautiful painting with a tile mural. This kitchen uses a lovely landscape scene, hand-painted across several tiles, as a focal point behind the stove. It is framed by a decorative border and surrounded by simple white subway tiles.
This approach adds a very personal and classic touch to the kitchen. The mural tells a story and becomes the heart of the room. It works wonderfully in traditional or country-style kitchens, especially when paired with matching decorative jars and plates.
DIY Installation Steps
A mural is like the prize piece of a puzzle.
- Find the Center: Your mural should be perfectly centered behind your stove. Measure the space and mark the center with a pencil.
- Lay it Out: Lay all your mural tiles out on the floor in the correct order to make sure you have the picture right.
- Install the Mural First: It’s easiest to start with the main feature. Apply thin-set mortar to the wall and carefully place your mural tiles one by one. Don’t use spacers if the mural is designed to be seamless.
- Install the Border: Next, install the decorative border tiles around your mural. Use spacers here if needed.
- Let it Set: Let the mural and border dry for a full day. This locks your centerpiece in place.
- Fill in the Rest: Now, you can tile the rest of your backsplash with your main field tile (like the white subway tiles). Cut tiles as needed to fit around the border.
- Grout Carefully: After everything has dried for another day, you can grout. Be extra gentle when spreading grout over the painted mural to avoid scratching it. Use unsanded grout if the manufacturer recommends it.
- Clean and Enjoy: Wipe away all the excess grout with a damp sponge and admire your beautiful kitchen art.
19. 3D Sculptural Wall Tiles

Add texture and modern drama with 3D sculptural tiles. These white tiles are not flat; each one has a raised, geometric, or wavy pattern. When placed together, they create a stunning wall of light and shadow that changes as you move around the room.
This is a bold, contemporary choice that makes a big impact. The texture is the main feature, so it works well in a minimalist kitchen with simple cabinets and countertops. The play of light across the different surfaces makes the wall feel alive and dynamic.
DIY Installation Steps
The trick here is to make the patterns line up perfectly.
- A Very Flat Wall: Because these tiles have dimension, the wall behind them needs to be very flat. An adult can smooth it with a joint compound if needed.
- Plan the Pattern: Decide if you want to arrange the different textured tiles randomly or create a specific pattern. Lay them out on the floor to plan your design.
- Start in the Middle: Find the center of your wall and start there. This makes sure your design looks balanced.
- Use a Strong Glue: You’ll need a strong, large-format tile mortar or a specific panel adhesive. “Back-butter” each tile with a layer of mortar before pressing it to the wall.
- Press and Level: Press each tile firmly in place. Use your level on every single tile to make sure they are perfectly straight. The 3D effect will look strange if the tiles are crooked.
- Use Leveling Clips: Special tile leveling clips are very helpful here. They hold the edges of the tiles perfectly even while the mortar dries.
- Cure for a Day: Let everything dry for at least 24 hours.
- Grout Carefully: Because of all the angles, grouting can be tricky. Use your finger or a small tool to make sure the grout gets into all the little crevices.
- Wipe and Clean: Use a damp sponge to clean the excess grout off the raised surfaces. This might take a little more time than with flat tiles.
20. Custom Mosaic Art Piece

For a truly personal and one-of-a-kind kitchen, a custom mosaic mural is the ultimate feature. This stunning example shows a portrait made from thousands of tiny, colorful glass tiles. It transforms the wall into a breathtaking piece of gallery-quality art.
This is more than just a backsplash; it’s a statement about your style and creativity. While a complex portrait like this is done by a professional artist, you can create your own simpler patterns or pictures. It makes the kitchen uniquely yours.
DIY Installation Steps
Creating a simple mosaic is a fun art project for your wall!
- Draw Your Design: On a piece of paper the size of your backsplash, draw a simple picture. It could be a flower, a simple geometric pattern, or your initial.
- Transfer the Drawing: Tape the drawing to the wall. Place carbon paper between the drawing and the wall, and trace your lines to transfer the design onto the wall.
- Pick Your Tiles: Get small mosaic tiles in the colors you need for your picture.
- Start Tiling Your Picture: Spread a very small amount of mortar inside one section of your drawing. Place your tiny tiles one by one, following your design. You can use tile nippers (with help from an adult) to cut or shape tiles if needed.
- Fill in the Background: Once you have finished your main picture, fill in the background with your main color.
- Let it Dry: This will take a lot of time and patience! Once all the tiles are set, let them dry for a full day.
- Grout the Masterpiece: Carefully schmear unsanded grout over the entire mosaic, pushing it into all the tiny gaps.
- Clean Gently: Wait about 20 minutes, then use a damp sponge to very gently clean the excess grout off your artwork.
- Final Polish: When it’s all dry, polish your mosaic with a soft cloth to make the colors shine.
21. Classic Marble Basketweave

This elegant backsplash features a timeless basketweave pattern. It uses small rectangular tiles of white marble, accented with tiny black marble squares. This combination creates a sophisticated, intricate look that feels both classic and fresh.
The pattern adds a wonderful texture and a sense of detailed craftsmanship to the kitchen. It’s a design that has been popular for a long time because it is so beautiful and versatile. This choice brings a touch of quiet luxury to the space without being too loud.
DIY Installation Steps
This detailed pattern is made easy because the tiles come on a mesh sheet.
- Prep the Wall: Start with a clean, smooth, and dry wall.
- Dry Fit the Sheets: Lay the mesh sheets out on the counter to see how they fit together. The edges are designed to interlock like puzzle pieces to hide the seams.
- Mix Your Mortar: Mix up a batch of white thin-set mortar. Using white mortar is important with light-colored marble, as grey mortar can sometimes darken the stone.
- Apply Mortar to the Wall: Spread a thin, even layer of the mortar onto a small section of the wall with your notched trowel.
- Press the Sheet in Place: Gently press the tile sheet into the mortar. Use a grout float to tap it lightly all over, ensuring all the little tiles are making good contact.
- Add the Next Sheet: Place the next sheet, interlocking it with the first one. Use your fingers to make sure the spacing between the sheets is the same as the spacing between the tiles on the sheet.
- Let it Dry: Wait a full 24 hours for the mortar to cure.
- Grout and Clean: Use unsanded grout to avoid scratching the marble. Schmear it over the whole surface, wait 20 minutes, and then clean the excess off with a damp sponge.
- Seal the Marble: After the grout is fully cured (usually a couple of days), apply a good quality stone sealer to protect the marble from stains.
22. Easy Peel-and-Stick Accent

For a quick, easy, and budget-friendly update, peel-and-stick tiles are a great solution. This kitchen uses them to create a colorful, patterned accent behind the stove. The tiles mimic the look of traditional hand-painted ceramic tiles, adding a splash of personality.
This is a fantastic option for renters or for anyone who wants to try a new look without a big commitment. The installation is simple and doesn’t involve any messy mortar or grout. You can completely change the feel of your kitchen in just an afternoon.
DIY Installation Steps
This is the easiest project of all. No glue or grout needed!
- Super Clean Surface: This is the most important step! Your existing wall or tiles must be spotlessly clean and dry. Use a good degreasing cleaner to remove any kitchen grease.
- Plan Your Layout: Use a level and a pencil to draw a straight guideline for your first row of sticker tiles.
- Peel: Carefully peel the backing paper off your first tile. Try not to touch the sticky part too much.
- Stick: Align the tile with your guideline and press it firmly onto the wall.
- Smooth It Out: Use a plastic smoother or a credit card to press out any air bubbles, working from the center out to the edges.
- Overlap and Repeat: Most peel-and-stick tiles are designed to overlap slightly. Line up the pattern of the next tile with the first one and press it into place.
- Cut to Fit: To fit around outlets or at the end of a row, an adult can easily cut the tiles with a sharp utility knife and a ruler.
- Let it Set: Even though it’s just a sticker, it’s a good idea to let the tiles set for about a day before wiping them down.
23. Functional Chalkboard Wall

A chalkboard backsplash is a fun, creative, and ever-changing option for the kitchen. The entire wall is coated in special chalkboard paint, turning it into a giant canvas for grocery lists, recipes, doodles, or messages for the family.
This choice is both practical and full of personality. It’s an inexpensive way to make a bold, dark statement wall. Paired with open shelving and some personal items, it creates a casual, café-like atmosphere that is warm and welcoming.
DIY Installation Steps
Painting is fun, but a few extra steps make a great chalkboard.
- Clean and Smooth the Wall: Start with a very clean wall. If there are any bumps or holes, an adult should fill them with spackle and sand it smooth. A smooth wall makes for better writing.
- Tape the Edges: Use painter’s tape to create clean lines along your countertops, cabinets, and any trim.
- Prime the Wall: It’s a good idea to use a coat of regular wall primer first. This helps the chalkboard paint stick better and cover more evenly. Let the primer dry completely.
- Stir the Paint Well: Chalkboard paint has special gritty particles in it. You need to stir it very, very well before and during painting to keep those particles mixed in.
- Apply the First Coat: Use a dense foam roller to apply a thin, even coat of the chalkboard paint. A roller will give you a smoother finish than a brush.
- Let it Dry: Let the first coat dry completely, following the time on the paint can (usually a few hours).
- Apply the Second Coat: Apply a second coat, this time rolling in the opposite direction (if you went up-and-down first, go side-to-side now). This ensures full coverage.
- Cure the Chalkboard: This is a very important step! Let the paint cure for at least 3 days. Don’t write on it yet!
- Season the Surface: Before you write your first list, you need to “season” the chalkboard. Rub the side of a piece of chalk all over the entire surface, then erase it with a dry cloth. This prevents your first drawings from getting “burned” into the paint forever.
24. DIY Stenciled Tile Pattern

Get the look of expensive, patterned cement tile for a fraction of the cost by stenciling. This project takes plain, inexpensive tiles and transforms them with paint and a stencil, creating a custom, high-end look.
This is a wonderful way to add a unique, personal touch to your kitchen. You can choose any pattern and any color combination you like. It’s a creative project that allows you to design a backsplash that is completely your own.
DIY Installation Steps
This is a super fun art project for your wall.
- Start with a Base: You can do this on a wall that already has plain tiles, or you can install new, inexpensive white or grey tiles first. Make sure the surface is very clean.
- Get Your Stencil and Paint: You’ll need a tile stencil in a pattern you love, some dense foam rollers (the small kind), and a good quality porch or floor paint, as it’s very durable.
- Tape the Stencil: Position your stencil over the first tile and tape it securely in place with painter’s tape.
- Load Your Roller: Pour a little paint into a tray. Roll your foam roller in the paint, then roll it off on a dry paper towel. You want the roller to be almost dry. Too much paint will bleed under the stencil.
- Paint the Stencil: Roll the paint over the stencil with light pressure. It’s better to do two thin coats than one thick one.
- Remove and Repeat: Carefully remove the stencil. Let the paint dry for a minute, then move the stencil to the next tile and repeat the process.
- Let it Cure: Let the paint cure for several days, according to the directions on the paint can.
- Seal for Protection: To make your beautiful work last, apply two or three thin coats of a clear, water-based polyurethane sealer over all the tiles. This will protect them from scratches and splashes.
25. Wallpaper with Glass Shield

Get the beautiful, intricate pattern of wallpaper with the practicality of an easy-to-clean surface. In this design, a vibrant floral wallpaper is applied to the wall, and then a clear sheet of glass is installed over it.
This is a brilliant way to use any wallpaper you love in the kitchen without worrying about it getting stained or wet. The glass protects the paper completely and provides a smooth surface that is simple to wipe down. It allows for endless design possibilities.
DIY Installation Steps
This combines two projects: wallpapering and glass fitting.
- Apply the Wallpaper: First, you need to hang the wallpaper. An adult can help with this. Make sure the wall is clean and primed, and use the correct wallpaper paste. Smooth out all the air bubbles.
- Let it Dry Completely: Let the wallpaper and paste dry for at least 48 hours. You want to be sure all the moisture is gone before you trap it behind glass.
- Precise Measurements for Glass: Just like with the solid color glass panel, you need to measure the area for the glass sheet exactly. An adult should help get the locations for outlets perfect. A professional glass shop will cut the glass for you.
- Drill Holes for Mounts: This design uses special “standoff” mounts, which are the little metal knobs that hold the glass off the wall slightly. An adult will need to drill holes in the wall for these mounts.
- Attach the Mounts: Screw the back half of the standoff mounts into the wall.
- Position the Glass: With a helper, carefully hold the glass panel up to the wall, lining up the holes in the glass with the mounts.
- Secure the Glass: Screw the front caps of the standoff mounts through the glass and into the backings. Don’t tighten them too much, just enough to be snug.
26. Professional Stainless Steel Panel

For a look inspired by a restaurant kitchen, a stainless steel backsplash is a choice. It’s incredibly durable, heat-resistant, and easy to keep clean and sanitary. The addition of matching shelves and hanging rods makes it highly functional.
This style provides a sleek, industrial look that is all about performance. It pairs well with high-end appliances and gives the kitchen a serious, ready-to-cook feel. The smooth, metallic surface reflects light and can make the space feel brighter.
DIY Installation Steps
This project requires careful handling of the metal sheet.
- Measure and Order: Measure your backsplash area. You can order a custom-cut sheet of stainless steel from a metal fabricator. They can also cut out holes for outlets.
- Prepare the Wall: The wall behind the steel should be clean and flat.
- Apply Adhesive: Use a strong construction adhesive that is made for bonding metal. Apply it to the back of the steel panel in a zig-zag pattern.
- Press in Place: With a helper (the metal can be floppy), carefully press the sheet against the wall. Use a J-roller (a small, hard rubber roller) to press firmly over the entire surface to ensure a good bond.
- Install Shelves (Optional): If you are adding shelves, an adult will need to find the studs in the wall. Drill holes through the stainless steel and into the studs, and then securely mount the shelf brackets.
- Clean and Polish: Wipe off any fingerprints or adhesive from the front of the panel. You can use a special stainless steel cleaner to give it a nice, streak-free shine.
27. Luminous Mother of Pearl Tile
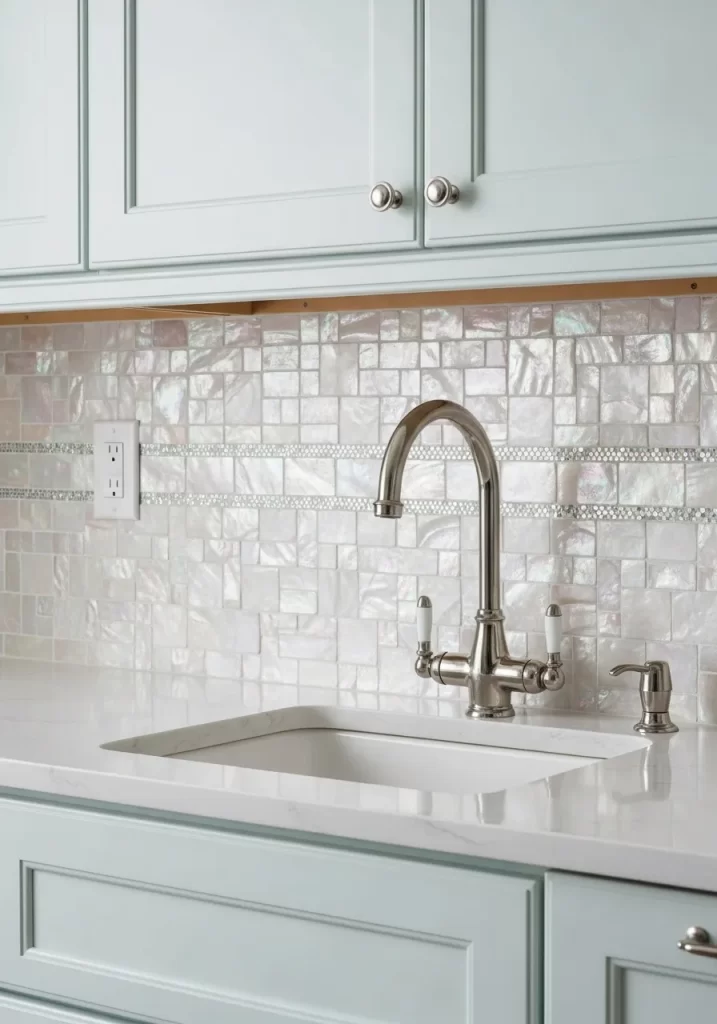
Bring a touch of iridescent shimmer to your kitchen with a mother of pearl backsplash. These tiles are made from the inner lining of shells, and they have a beautiful, natural glow that catches the light in a magical way.
This choice adds a definite touch of luxury and glamour. The tiles are often small and come in a mosaic pattern, creating a rich texture. The pearly white surface brightens the kitchen and works well with soft cabinet colors like the light blue shown here.
DIY Installation Steps
These tiles are delicate, so a gentle touch is needed.
- Start with a Clean Wall: Make sure your wall is clean, smooth, and dry.
- Use White Mortar: You must use a white, thin-set mortar. Grey mortar can show through the thin, slightly translucent tiles and make them look dull.
- Apply a Thin Layer: Spread a very thin, smooth layer of mortar on a small section of the wall.
- Press the Sheet: These tiles come on a mesh sheet. Gently press the sheet into the mortar. Use a grout float to tap it very lightly. Do not press too hard or you could crack the delicate shells.
- Cut with Care: An adult will need to cut these tiles. It’s often best to use a sharp utility knife to cut the mesh backing, or a wet saw with a special glass-cutting blade for the tiles themselves.
- Let it Cure: Let the mortar dry for a full 24 hours.
- Use Unsanded Grout: You must use unsanded grout. Grout with sand will scratch the beautiful, shiny surface of the mother of pearl.
- Grout and Clean Gently: Carefully apply the grout, and after 20 minutes, use a soft, damp sponge to gently wipe away the excess.
- Buff to a Shine: Once the grout is dry, use a soft microfiber cloth to polish the tiles and bring out their natural shine.
28. Vintage Pressed Metal Tiles

Pressed metal tiles, sometimes called tin tiles, bring a wonderful vintage and textural element to the kitchen. They come in a variety of ornate, embossed patterns that create a beautiful play of light and shadow. The metallic finish adds a bit of industrial charm.
This style is a great way to add a lot of character and detail to your wall. The tiles are lightweight and relatively easy to work with. You can leave them in their natural silver color or paint them to match your decor.
DIY Installation Steps
These tiles are thin and lightweight, which makes them fun to work with.
- Clean Your Wall: Start with a clean, dry wall.
- Find Your Centerline: Find the center of your backsplash area and draw a level line. Starting in the center will make your pattern look balanced.
- Cut the Tiles: You will need to cut some tiles to fit at the edges. An adult can do this using tin snips (special scissors for metal). They should wear gloves as the cut edges can be sharp.
- Apply Adhesive: Squeeze a strong construction adhesive onto the back of your first tile.
- Press in Place: Press the tile onto the wall, starting at your center line.
- Add a Few Nails: For extra security, you can add a few small, matching-color nails (called cone-head nails) into the corners or textured parts of the tile.
- Overlap and Repeat: Most tin tiles have a special overlapping edge. Make sure you overlap the next tile correctly to hide the seam and continue the pattern.
- Wipe Clean: Wipe away any extra adhesive that may have squeezed out from the seams.
29. Warm Copper and Tin Panel Mix

This backsplash combines the warm, rich glow of copper with the detailed pattern of pressed tin tiles. A smooth, flat sheet of copper is placed behind the stove for an easy-to-clean surface, while ornate, copper-colored tin tiles fill in the surrounding space.
The mix of textures and sheens creates a sophisticated and cozy look. The warm metallic tones pair beautifully with dark cabinet colors like the deep green shown. It’s a custom look that feels both historic and very stylish.
DIY Installation Steps
This project combines two different metal-working techniques.
- Install the Copper Sheet First: This will be your centerpiece. An adult should help measure and cut the copper sheet to size.
- Attach the Sheet: Apply construction adhesive to the back of the copper sheet and press it firmly to the wall behind the stove.
- Frame the Sheet (Optional): You can add a simple, thin metal trim around the copper sheet for a more finished look.
- Install the Tin Tiles: Now, install the decorative pressed tin tiles around the copper panel. Follow the steps from number 28: use adhesive, overlap the edges, and add a few small nails.
- Cut Tiles to Fit: An adult will need to use tin snips to cut the tin tiles to fit against the cabinets, countertop, and the central copper panel.
- Clean and Polish: Once everything is installed, wipe the entire backsplash down with a soft cloth. You can use a special copper cleaner to make the sheet really shine.
30. Playful Penny Round Mosaic

Penny round tiles are a fun, classic choice that brings a retro, graphic feel to the kitchen. These small, circular tiles create a beautiful, textured surface. By using different colors, you can create custom patterns, like the gentle wave or gradient effect shown here.
This style is playful and visually interesting. The small scale of the tiles allows for a lot of detail and creativity. It’s a versatile look that can feel both vintage and completely modern, depending on the colors you choose.
DIY Installation Steps
Creating a custom pattern is like making your own pixel art!
- Start with Clean Wall: As always, begin with a clean and smooth surface.
- Plan Your Design: If you want to create a special pattern, it’s best to plan it out first. You can use graph paper to map out where your different color tiles will go.
- Pop Out and Swap Tiles: Penny tiles come on mesh sheets. It’s very easy to pop individual tiles off the mesh and replace them with tiles of another color. Do this on the floor before you put the sheets on the wall.
- Spread Your Mortar: Mix your thin-set mortar and apply a thin layer to a small section of the wall.
- Set the Sheets: Press your customized sheets into the mortar. Use a grout float to tap them gently and make sure all the little circles are stuck well.
- Interlock and Continue: Add the next sheet, making sure the pattern continues seamlessly.
- Let it Dry: Wait a full 24 hours for the mortar to set.
- Grout, Grout, Grout: Penny tiles have a lot of grout lines! Schmear the grout all over the surface, making sure to push it into all the gaps between the circles.
- Wipe and Clean: After about 20 minutes, use a damp sponge to clean the excess grout off the tiles. This may take a few passes.
- Final Haze Removal: Once the grout is dry, use a soft cloth to buff away any final haze and make your new pattern pop.
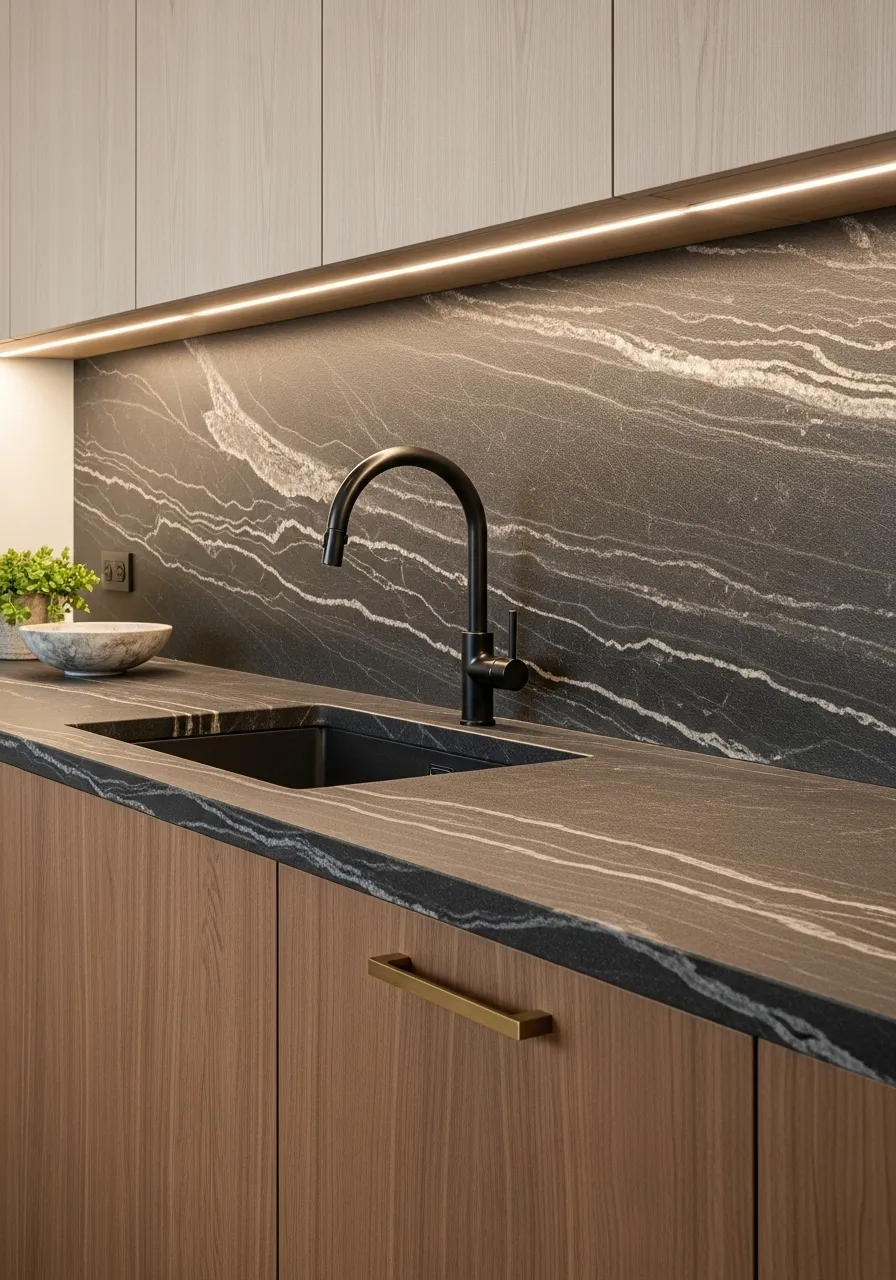
31. Seamless Stone Slab

For a bold, seamless, and luxurious look, a single slab of stone is an impressive choice. This design uses a dark, dramatic stone with striking white veins, continuing it from the countertop right up the wall. This creates a continuous, uninterrupted surface.
The effect is incredibly sleek and modern. With no grout lines to clean, it is very practical and easy to maintain. Using the same material for both the counter and backsplash makes the whole space feel cohesive and thoughtfully designed.
DIY Installation Steps
This is a job for professionals only, as large stone slabs are extremely heavy and fragile.
- Professional Templating: A stone fabricator will visit your home to make a precise digital or wooden template of your countertop and backsplash area.
- Choosing Your Slab: You will visit a stone yard to pick the exact slab of granite, marble, or quartzite you want. You can even decide which part of the slab’s pattern you want to feature.
- Cutting and Fabrication: The professionals use large, computer-guided saws and water jets to cut the stone to the exact shape of your template, including any holes for faucets or outlets.
- Professional Installation: A trained team will deliver the heavy slabs. They will apply a strong, specialized adhesive to the wall and countertop base before carefully lifting and setting the stone in place. They ensure everything is perfectly level and the seams are nearly invisible.
32. Geometric Tumbling Block Tile

Add a playful, three-dimensional illusion to your kitchen with a tumbling block tile pattern. This design uses diamond-shaped tiles in three different shades of a neutral color. When arranged together, they create a mesmerizing pattern of stacked cubes.
This backsplash is a fantastic way to add a dynamic, geometric feature to your wall. It’s visually engaging and modern, acting as a piece of art. The neutral color palette keeps it
sophisticated and easy to pair with various cabinet and counter styles.
DIY Installation Steps
These tiles often come on mesh sheets, which helps keep the complex pattern aligned.
- Start with a Clean, Flat Wall: Ensure your wall is prepared and ready for tile.
- Find the Center: Mark the horizontal and vertical center of your backsplash area. Starting your first sheet in the middle will ensure the pattern is balanced on both sides.
- Dry Fit First: Lay out some of the tile sheets on the floor to see how the pattern connects.
- Apply Mortar: Mix your thin-set mortar and apply a thin, even layer to a small section of the wall, starting from your center mark.
- Set the First Sheet: Press the first mesh sheet into the mortar. Use a grout float to tap it gently and ensure all the tiles are embedded well.
- Continue the Pattern: Add the next sheets, interlocking the pattern and using tile spacers between the full sheets to maintain consistent gaps.
- Let it Cure: Allow the mortar to dry completely for at least 24 hours.
- Grout and Clean: Remove the spacers, apply your grout over the whole surface, and after about 20 minutes, wipe the tiles clean with a damp sponge.
33. Mixed Finish Mosaic Accent

Create a unique and vibrant backsplash by mixing different tile finishes. This design uses a base of simple white subway tiles and then adds randomly placed accent tiles in various shades of blue and green. The accents include glittery, iridescent, and glossy finishes.
This approach is a wonderful way to personalize a classic look. It adds pops of color and sparkle in an artistic, scattered pattern. You can control how much or how little accent you want, making it a completely custom project.
DIY Installation Steps
This is like decorating a plain backsplash with your own custom jewels.
- Install the Main Tile: First, install your main field of subway tile, but leave out the spaces where you want to place your accent tiles. Use tile spacers as usual for the main tiles.
- Let it Dry: It’s best to let the main tiles set in the mortar for a full day. This gives you a solid grid to work in.
- “Back-Butter” the Accents: For each accent tile, apply a small amount of thin-set mortar to the back of the tile (this is called “back-buttering”).
- Set Your Accents: Gently press each accent tile into its empty spot in the backsplash. Make sure it is flush with the surrounding tiles.
- Wait Again: Let the accent tiles dry for another 24 hours.
- Grout the Whole Wall: Remove all the spacers. Apply grout over the entire backsplash, covering both the subway tiles and your new colorful accents.
- Wipe Clean: Wait about 20 minutes, then use a damp sponge to clean the excess grout off all the tiles. Be sure to reveal all that sparkle!
34. Custom Printed Tile Mural

Transform your kitchen into a unique art installation with a custom-printed tile mural. This stunning example features a realistic forest scene that is printed across standard ceramic tiles. An abstract, colorful map design is printed on the tiles covering the range hood for a creative twist.
This method allows for infinite possibilities—you can use any high-resolution photograph or digital artwork you want. It’s a way to make your backsplash incredibly personal, featuring a favorite vacation spot, a piece of art, or a family photo.
DIY Installation Steps
This is like putting together a puzzle where all the pieces are numbered.
- Order Your Custom Tiles: Find a company that prints images onto tiles. You will need to provide them with a high-resolution digital image and the exact dimensions of your backsplash. They will send you the tiles, often with numbers on the back.
- Lay Out the Puzzle: Before using any glue, lay all the tiles out on the floor in the correct order to make sure the picture looks right and you have all the pieces.
- Start from the Bottom Center: Find the center of your wall and begin with the bottom, middle tile of your mural.
- Apply Mortar and Set Tile: Apply a thin layer of mortar to the wall. Press your first tile firmly in place.
- Continue Building the Image: Add the surrounding tiles one by one, following the numbers on the back. Use very thin spacers, or no spacers at all, depending on the manufacturer’s recommendation, to keep the image seamless.
- Let it Cure: Let the mural set for a full 24 hours.
- Grout with Care: Use a non-sanded grout to avoid scratching the printed image. Carefully apply it, and after 20 minutes, gently wipe the tiles clean with a damp sponge.
35. Backlit Frosted Glass Panel

For an ultra-modern and minimalist look, a backlit frosted glass panel is a stunning choice. This design uses a sheet of frosted glass as the backsplash, with color-changing LED lights mounted behind it. The remote control allows you to change the color and mood of the kitchen lighting.
This creates a beautiful, soft glow that is both functional and atmospheric. The frosted finish hides the wall behind it while still allowing light to shine through. It’s a high-tech, sophisticated option that turns your backsplash into an interactive light feature.
DIY Installation Steps
This is an advanced project that involves wiring.
- Install the Lights: An adult who is comfortable with electrical wiring should install LED light strips around the perimeter of the backsplash area. These lights will be connected to a power source and a receiver for the remote control.
- Measure for the Glass: Get precise measurements of the backsplash area. A professional glass shop will cut a piece of frosted or acid-etched glass to size. They will also drill holes for the mounting hardware.
- Install Standoff Mounts: This design uses standoff mounts to hold the glass slightly away from the wall, giving the light space to diffuse. An adult should securely screw the back half of the mounts into the wall.
- Mount the Glass: With a helper, carefully hold the glass panel in place, lining up the holes with the mounts.
- Secure the Front Caps: Screw the front caps of the mounts through the glass. This will hold the panel securely.
- Test Your Lights: Grab the remote and have fun testing out all the different colors and settings of your new light-up backsplash!
36. Bold Chevron Tile

Make a powerful design statement with a bold chevron tile backsplash. This look uses large, plank-shaped tiles laid in a classic V-shaped pattern. The mix of solid black, green, white, and wood-look tiles creates a high-contrast, graphic effect that is full of energy.
This backsplash becomes the immediate focal point of the room. The strong diagonal lines draw the eye and create a sense of movement. It’s a modern and confident choice for someone who wants to add a lot of drama and style to their kitchen.
DIY Installation Steps
This pattern requires many precise angle cuts, so measure carefully!
- Find and Mark Your Centerline: Use a level to draw a straight vertical line down the center of your wall. This will be the guide for the points of your Vs.
- Set the First Tiles: An adult will need to use a tile saw to cut the first two tiles at a 45-degree angle. These two tiles will meet at the centerline to form the first “V” of your pattern.
- Apply Mortar and Set: Apply thin-set mortar to the wall and press your first two angled tiles into place.
- Build the Pattern: Continue adding tiles, building the chevron pattern outwards from the center.
- Cut the Edge Pieces: You will need to make many more angle cuts to fit the tiles at the top, bottom, and sides of the backsplash. Measure each one carefully before cutting.
- Use Spacers: Use small tile spacers to keep the grout lines consistent and straight.
- Let it Dry and Grout: Let the mortar dry for 24 hours. Then, remove the spacers, apply your grout, and wipe the tiles clean after about 20 minutes.
37. Pebble Tile Mosaic

Bring a natural, spa-like feeling to your kitchen with a pebble tile backsplash. This mosaic is made of smooth, flat, rounded stones that are attached to a mesh sheet. The mix of black, grey, and white pebbles creates a beautiful, organic texture.
This style is a great way to add a touch of nature to your home. The rounded shapes are softer than traditional square tiles, creating a calming and relaxed atmosphere. It pairs wonderfully with natural wood cabinets and simple, clean countertops.
DIY Installation Steps
The trick with pebble tile is to hide the seams between the sheets.
- Clean the Wall: Start with a clean, smooth wall.
- Dry Fit and Interlock: Lay your sheets out on the floor. You’ll see that the edges are like a puzzle. Plan how you will turn and interlock them so you can’t see the square sheet shape. You can even pull some individual pebbles off the edge of one sheet and add them to another to blend the seams.
- Use Plenty of Mortar: Apply a generous layer of thin-set mortar to the wall. You need enough for the pebbles to sink into it nicely.
- Set the First Sheet: Press the first sheet firmly into the mortar. Wiggle it a bit to make sure the mortar comes up between the stones.
- Blend the Seams: Add the next sheet, interlocking the edges with the first one. Add a few loose, individual pebbles into any larger gaps between the sheets to make it look like one continuous surface.
- Let it Cure: Let the mortar dry for a full 24-48 hours.
- Grouting Takes Time: Because of the deep gaps, you will use
From sleek stone slabs to playful mosaics, the world of kitchen backsplashes offers endless opportunities for customization and creativity. As you’ve seen, there’s a perfect style and material to suit every taste, budget, and DIY skill level.
Whether you’re embarking on a full kitchen renovation or simply looking to refresh your space, a new backsplash can make a dramatic difference. It’s a chance to add color, texture, and personality, transforming a functional area into a stunning design feature.
We hope this extensive guide has inspired you and equipped you with the knowledge to choose and even install the backsplash of your dreams. Happy decorating!
Key Takeaways
- Function Meets Style: Backsplashes offer both wall protection and a major design statement.
- Diverse Options: From classic tiles to modern panels and natural stones, there’s a material for every aesthetic.
- DIY Potential: Many backsplash projects are achievable for the enthusiastic DIYer, with varying levels of difficulty.
- Personalization: Backsplashes are a fantastic way to inject unique personality and artistic flair into your kitchen.
- Preparation is Key: For any installation, a clean, flat wall and careful planning are crucial for a successful result.