The bathroom often becomes a challenging storage space. We start every day here, yet clutter tends to build up quickly, turning a place of relaxation into one of stress. Achieving true tranquility requires clever solutions, not just tidying up.

To help you conquer chaos and welcome the new year with a fresh, organized space, we compiled 41 of the smartest storage ideas available. These solutions range from sophisticated built-in systems to simple DIY hacks using unexpected materials.
Get ready to transform your bathroom from a messy pile of products into a functional, beautiful sanctuary. You deserve a space where every item has a purpose and a place.
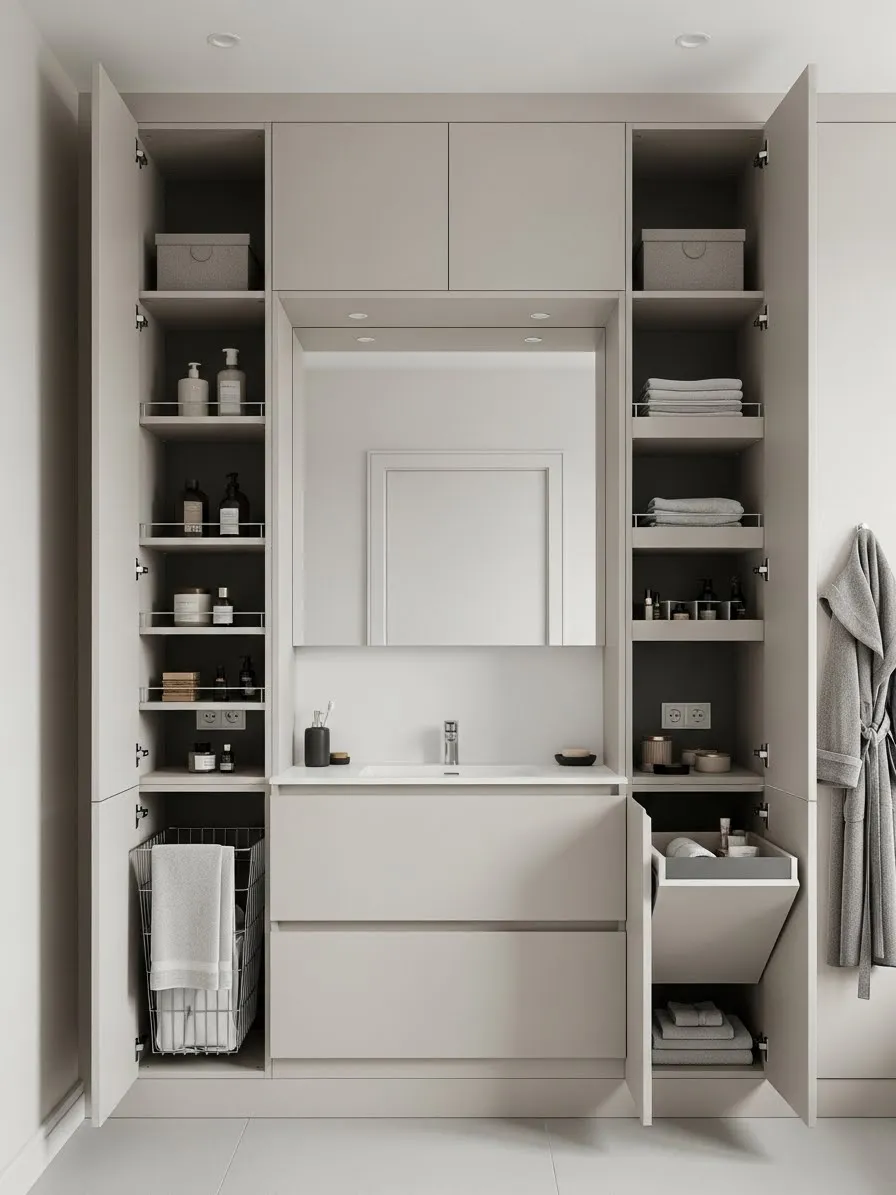
1. Floating Vanity and Tall Cabinet System

This beautiful wood system brings sophisticated storage right into your bathroom. Keeping things organized becomes easy when you use thoughtful design like this. The wide floating vanity features deep drawers, offering ample room to tuck away toiletries, cleaning supplies, and hair tools. Inside the drawers, subtle dividers help keep smaller items from tumbling into one messy pile.
Consider the tall, open shelving unit placed next to the mirror. This vertical piece creates an attractive display area for neatly folded towels and bottled products you use daily. Everything you need remains within reach, yet the overall look stays clean and spa-like. Notice the subtle accent lighting under the wall shelves; this brightens up your task area and adds a touch of warmth to the room. This smart combination of closed and open storage ensures your countertops remain clear, providing a truly peaceful start to your day.
????️ DIY Instruction: How to Customize Drawer Organizers for an Existing Vanity
This section focuses on maximizing the existing drawer space pictured by installing internal dividers, as building a new vanity is a large, complex project best left to professionals.
Materials Required
- Thin wooden boards (like hobby plywood or MDF) for the dividers, approximately 1/4 inch thick.
- Wood glue (a strong, fast-drying variety).
- Small finishing nails (optional, for extra security).
- Measuring tape.
- Fine-grit sandpaper.
Equipment Required
- Hand saw or a small table saw (to cut the boards).
- Clamps (to hold the dividers while the glue dries).
- Pencil.
- Small hammer (if using nails).
- Safety glasses.
DIY Instruction Step by Step
- Empty and Measure the Drawer: Completely clear out the vanity drawer you plan to organize. Use your measuring tape to determine the interior width, depth, and height of the drawer box. Write these dimensions down carefully.
- Plan Your Layout: Think about what you need to store (makeup, bottles, brushes, etc.). Draw a simple sketch showing where you want the long dividers and the shorter cross-dividers to go. Ensure the compartments are sized appropriately for your items. For instance, make one long section for hair tools and smaller squares for cosmetics.
- Measure and Cut the Long Dividers: Measure the length needed for your primary, long dividers. Cut the wood boards to this exact length and the full height of the drawer. Use a hand saw or table saw, working slowly and accurately. Smooth any rough edges with sandpaper.
- Measure and Cut the Cross Dividers: Determine the length required for the smaller cross-dividers that will create the individual sections. Cut these pieces to size, smoothing the edges as well.
- Assemble the Grid (The H-Slots): For a sturdy, non-shifting grid, you need to create interlocking joints. Where a long divider meets a cross divider, mark a half-thickness cut on both pieces. For example, if your wood is 1/4 inch thick, mark a 1/8 inch deep cut on the edge of each piece. Carefully cut out these small notches using your saw. This lets the pieces slide together like puzzle pieces, forming a stable grid.
- Apply Glue and Install: Put a small line of wood glue along the bottom edge of the longest dividers and along the edges where the interlocking joints meet. Gently place the long dividers into the drawer first. Then, slide the cross dividers into their notched slots to complete the grid.
- Secure and Cure: Press the dividers firmly against the drawer bottom. If desired, tap a few small finishing nails through the bottom of the drawer and into the dividers for maximum stability (ensure the nail size won’t pierce through the outside of the drawer). Use clamps across the top of the dividers if they are tall to hold them in place. Wipe away any excess glue with a damp cloth. Allow the glue to dry completely according to the manufacturer’s instructions, typically for several hours.
- Refill and Enjoy: Once the dividers are completely set and sturdy, you can place your bathroom items back into their new designated spaces.
2. Natural Wood Ladder and Wall Shelving

Embrace a serene, organized bathroom with these versatile storage solutions, each crafted from warm, natural wood. The tall ladder-style shelf unit provides a stylish way to keep essentials tidy. Its sloped design adds visual interest while offering multiple tiers for neatly folded towels, decorative baskets holding smaller items, and your favorite bottled products. This piece truly maximizes vertical space without feeling bulky in the room.
Adjacent to it, a complementary wall-mounted shelving unit offers additional open storage. This unit shares the same inviting wood tone, ensuring a cohesive look. It is an excellent spot for displaying decorative elements like plants or housing more woven baskets to categorize personal care items. Together, these open shelves make finding what you need simple, keeping your daily routine flowing smoothly. They create an airy, functional space that feels both inviting and remarkably organized.
????️ DIY Instruction: How to Create a Wall-Mounted Basket Organizer
This DIY focuses on adding functionality to an existing wall shelf, as seen in the image, by integrating a small basket for items like toothbrushes or small bottles.
Materials Required
- Small woven basket (suitable for wall mounting, with a flat back or ability to be flattened).
- Two small D-ring picture hangers or eye hooks.
- Two small screws (short enough not to go through the basket’s front).
- Strong adhesive (like construction adhesive or hot glue for initial hold).
- Drill with a small bit.
- Pencil.
- Measuring tape or ruler.
- Optional: Command strips for lightweight baskets.
Equipment Required
- Screwdriver (to match your chosen screws).
- Drill.
- Safety glasses.
DIY Instruction Step by Step
- Select Your Basket: Choose a small, lightweight woven basket that will complement your existing shelves. Make sure it is sturdy enough to hold your intended items and has a relatively flat back surface that can sit flush against the wall or shelf.
- Determine Placement: Decide where on your wall shelf you want to hang the basket. Consider what you will store inside to ensure it is easily accessible. Use a pencil to mark the two points where you will attach the D-rings or eye hooks on the back of the basket, near the top edge. Ensure the marks are level and spaced appropriately for stability.
- Attach Hangers to Basket: Use your drill to create small pilot holes at the marked spots on the back of the basket. Be gentle to avoid damaging the weaving. Then, screw the D-ring hangers or eye hooks into these pilot holes. Ensure they are securely fastened. For extra hold, you can add a small dab of strong adhesive around the screw base.
- Prepare Mounting Surface: If mounting directly to a wooden shelf, measure the distance between the two D-rings on your basket. Transfer these measurements to the underside of the shelf where you want the basket to hang. Mark these spots with a pencil.
- Install Basket to Shelf: Drill two small pilot holes into the underside of your wooden shelf at the marked points. Carefully screw two small screws into these pilot holes, leaving a small portion of the screw head exposed (enough for the D-ring to hook onto).
- Hang the Basket: Align the D-rings on the back of your basket with the exposed screw heads on the underside of the shelf. Gently hook the basket onto the screws, ensuring it hangs securely and level.
- Final Check and Load: Give the basket a gentle tug to confirm it is firmly attached. If it feels wobbly, you may need to tighten the screws or adjust the hangers. Once secure, you can place your chosen items inside, like toothbrushes, small lotions, or decorative soaps.
3. Modular Glass and Metal Cabinetry

This modern bathroom setup relies on sleek, integrated storage to maintain its minimalist aesthetic. The central feature is a stunning modular cabinet framed in metal with tinted glass doors. Using glass allows you to quickly see where items are stored, yet the tint keeps the contents from appearing messy. These closed compartments are fantastic for hiding away medicines, personal care products, and other clutter you do not want immediately visible.
Look at how the unit extends both upwards and downwards, creating maximum vertical storage within the vanity area itself. To the side, open glass shelving is recessed into the wall, offering a chance to showcase beautiful, coordinated bottles and neatly folded towels. Hidden LED lighting surrounds these shelves, drawing attention to your organized display and providing soft accent illumination. The entire system, paired with the expansive vanity drawers below, proves that storage can be highly functional while remaining utterly stylish.
????️ DIY Instruction: How to Add Backlighting to Open Shelves
This DIY focuses on adding strip LED lighting to an existing open shelf unit (similar to the glass shelves on the right) to enhance visibility and aesthetics.
Materials Required
- LED strip lighting kit (look for a water-resistant or IP65-rated strip suitable for bathrooms).
- Power adapter and controller (usually included with the kit).
- Small cable clips or channel (to secure wires neatly).
- Double-sided tape (often comes pre-attached to the LED strip).
- Optional: A timer or smart plug for easy on/off control.
Equipment Required
- Rubbing alcohol and clean cloth.
- Scissors (to cut the LED strip to length, only at designated cut lines).
- Measuring tape.
- Safety glasses.
DIY Instruction Step by Step
- Clean the Shelf Surface: Before applying any adhesive, clean the underside of the shelf (the surface where the light strip will stick) thoroughly. Use rubbing alcohol on a clean cloth to remove any dust, soap residue, or moisture. A clean surface ensures the adhesive tape sticks securely. Allow the area to dry completely.
- Measure and Plan the Path: Measure the length of the shelf where you want the light strip to run. If you are lighting multiple shelves, measure each one. Determine the most discreet path for the wires to connect the strips to the main power source, usually leading down the side of the shelving unit.
- Cut the LED Strip: Unroll the LED strip. Using scissors, carefully cut the strip to the required length at the designated cutting marks (usually indicated by a small copper line and a scissor icon). Never cut the strip anywhere else, or it will not work.
- Peel and Stick the Strip: Peel the protective backing off the double-sided tape on the back of the first LED strip section. Starting at the back edge of the shelf, press the strip firmly onto the clean, dry surface. Apply constant pressure across the entire length to ensure a strong bond.
- Connect and Conceal Wiring: Connect the cut strips using the provided connectors in the kit. Run the connecting wires down the corner of the wall or cabinet frame. Use small cable clips or adhesive channels to firmly secure the wires along the path, making them as invisible as possible. The wires should lead to the power adapter and controller.
- Plug in and Test: Plug the power adapter into a nearby wall outlet. Turn on the lights using the switch or remote control to test the installation. Check that the entire strip illuminates evenly and that all connecting wires are secure and out of sight.
- Finalize Placement: If everything works, gently adjust any visible wires and ensure all clips are holding firmly. If you are using a smart plug, pair it now for automated control.
4. Fluted Glass Tower and Vanity Drawer Inserts

This bathroom uses bright, clean lines and varied storage types to eliminate clutter completely. The striking tower cabinet immediately draws attention with its textured, fluted glass doors and sleek metal framing. This material obscures the exact contents just enough to maintain a tidy appearance while still hinting at what is inside. Inside the cabinet, clear glass shelving keeps products separated and easily visible, preventing items from getting lost in the back.
Look closer at the vanity drawer that pulls out beneath the sink. This deep drawer utilizes clear acrylic inserts and trays, creating custom compartments for cosmetics, cotton swabs, and smaller items. These removable dividers ensure everything stays in its assigned place, even when the drawer is opened quickly. The combination of tall vertical storage, which keeps linens and bottles tucked away, and organized vanity inserts ensures every inch of storage is maximized, leaving the countertop completely free.
????️ DIY Instruction: How to Create Custom Acrylic Drawer Organizers
This DIY focuses on making custom-fit acrylic organizers, as seen in the image, for a vanity drawer using acrylic sheets.
Materials Required
- Clear acrylic sheets (thin, easy-to-cut material like 1/8 inch or 3mm thick).
- Acrylic cement or specialized acrylic adhesive.
- Painter’s tape or clamps.
- Measuring tape.
- Fine-grit sandpaper.
Equipment Required
- Acrylic cutting tool (scoring tool specifically for acrylic) or a fine-toothed saw (if using thicker sheets).
- Safety gloves.
- Safety glasses.
DIY Instruction Step by Step
- Measure the Drawer: Fully empty the drawer where the organizer will go. Use a measuring tape to precisely determine the interior width, depth, and height of the drawer. Also, measure the dimensions of the items you wish to store (e.g., lipstick tube length, small bottle diameter).
- Design the Layout: Sketch a detailed plan of your desired organizer layout. Decide on the size of each compartment needed to hold your specific items. Remember that the dividers will take up a small amount of space. You will need pieces for the long side dividers and pieces for the cross-dividers.
- Measure and Score the Acrylic: Transfer your measurements onto the acrylic sheet. Put on your safety glasses and gloves. Using the acrylic scoring tool, score deeply along the cut lines. For 1/8 inch acrylic, score about 5 to 10 times. For thicker material, score more deeply.
- Snap and Smooth: Once scored deeply, place the sheet on the edge of a sturdy table or workbench, aligning the score line just over the edge. Apply firm, downward pressure to the overhanging side to snap the acrylic cleanly along the score line. Use fine-grit sandpaper to smooth any sharp edges on the cut pieces.
- Assemble the Structure: Begin assembling the grid, ensuring the pieces fit tightly. Apply a small amount of acrylic cement along the joining edges. Acrylic cement works by chemically welding the pieces together. Hold the pieces together firmly for a few minutes or use painter’s tape or clamps to hold them in place while the cement cures.
- Allow Full Curing: Acrylic cement usually sets quickly, but allow the entire assembled organizer to cure completely according to the product instructions, which might take up to 24 hours. A fully cured joint will be very strong and clear.
- Install and Organize: Once cured, place your custom organizer securely inside the vanity drawer. Now you can place your items into the newly created compartments, enjoying a perfectly organized space.
5. Industrial Pipe and Wood Shelving System

This striking corner utilizes an appealing industrial aesthetic to manage bathroom storage. The open shelving system features thick, rustic wooden planks supported by sturdy black metal piping and fittings. This design not only provides massive space for organization but also creates a compelling visual feature in the room. The contrast between the warm wood and the dark metal gives the system significant character.
The arrangement allows for both utilitarian and decorative storage. Notice how soft, neatly folded towels sit alongside metal wire baskets labeled for different contents, keeping everything categorized. Under the lower shelf, a row of hooks offers a simple solution for hanging hand towels or cleaning tools. Finally, the small, wheeled metal locker unit adds a playful, secure spot for cleaning chemicals and large containers. This entire setup demonstrates how to combine rugged style with high-capacity, accessible organization.
????️ DIY Instruction: How to Assemble Industrial Pipe Shelves
This DIY focuses on building the wall-mounted industrial pipe shelving unit shown in the image.
Materials Required
- Three or four wooden planks (pre-cut, sanded, and sealed or stained for moisture resistance).
- Black steel pipe sections (various lengths needed for vertical supports and horizontal spacers).
- Floor flanges (round bases that attach the pipe to the wall/shelf).
- Elbows and T-fittings (to connect the pipe sections).
- Wood screws (long enough to secure flanges firmly to the shelf).
- Wall anchors and screws (appropriate for your wall material—drywall, tile, or masonry).
Equipment Required
- Stud finder.
- Level.
- Measuring tape.
- Pencil.
- Power drill and drill bits.
- Pipe wrench (optional, for tightening joints).
- Safety glasses.
DIY Instruction Step by Step
- Measure and Mark Placement: Determine the exact height and width where your shelves will hang. Use a stud finder to locate wall studs, as this shelving is heavy. Mark the center points where the wall flanges will attach, ensuring the marks are level and spaced evenly across the planned shelf width.
- Mount the Wall Flanges: Pre-drill pilot holes at your marked locations. Using the appropriate wall anchors (if not mounting into a stud), securely attach the floor flanges to the wall using screws. Ensure these base supports are very tight, as they bear the weight.
- Assemble the Vertical Structure: Start screwing the pipe sections and fittings (elbows and T-fittings) together, beginning at the mounted wall flanges. Screw the vertical pipe pieces into the wall flanges. Continue building the frame by adding T-fittings at each shelf level and elbows at the top of the unit.
- Attach Flanges to Shelves (Optional Pre-Assembly): For the shelves that are not the top shelf, you need to secure the wood to the T-fittings. Attach a floor flange to the underside of the shelf plank using short wood screws. This flange will sit on the horizontal pipe piece coming out of the T-fitting.
- Insert and Secure the Shelves: Slide the wood planks onto the assembled pipe structure. The planks should rest securely on the horizontal pipe sections attached to the T-fittings. If you pre-assembled the flanges to the bottom of the shelf, simply slide that flange over the horizontal pipe.
- Install the Top Shelf: Once the main vertical structure is complete, attach the final shelf. Screw the remaining floor flanges onto the underside of the top shelf plank. Then, screw the top vertical pipe pieces directly into these flanges to hold the shelf firmly in place.
- Final Tightening and Leveling: Check all pipe joints to ensure they are firmly screwed together. Use a level one last time across each shelf plank to confirm they are straight. Adjust fittings as needed until the entire unit is stable and perfectly level.
6. Color-Coded Bin Tower and Pull-Out Drawers

Maximize every centimeter of bathroom space using a combination of vertical shelving and specialized drawers. The tall, dedicated shelving unit features open cubbies, which are perfectly sized to hold brightly colored plastic bins. Using consistent bins, especially those labeled for specific family members or item categories, makes organization straightforward and incredibly quick to maintain. This system is amazing for storing extra toilet paper, cleaning sprays, and towels, keeping everything neatly contained behind the pops of blue color.
The vanity area itself utilizes deep, smooth-gliding pull-out drawers instead of traditional cabinet shelves. These drawers allow you to see and access everything inside instantly without kneeling or reaching into dark corners. Inside one of the top drawers, adjustable dividers help sort smaller toiletries, while a lower drawer stores folded towels. Additionally, the side of the mirrored medicine cabinet uses a clever brush organizer, keeping heat tools and hairbrushes accessible but off the countertop.
????️ DIY Instruction: How to Create a Specialized Hair Tool Holder for Cabinet Door
This DIY focuses on building the slim, vertically mounted holder for brushes and hair tools seen on the inside of the medicine cabinet door.
Materials Required
- Thin wooden board (like MDF or plywood, 1/4 inch thick) or a pre-made slim wall organizer.
- Small wooden dowels or metal rods (about 1/4 inch diameter).
- Small screws or strong double-sided adhesive mounting tape.
- Wood glue.
- Pencil and measuring tape.
- Paint or sealant (to protect the wood from moisture).
Equipment Required
- Small hand saw or utility knife (for wood).
- Power drill and small drill bits (matching dowel diameter).
- Screwdriver.
- Clamps.
- Safety glasses.
DIY Instruction Step by Step
- Measure the Cabinet Door: Measure the available interior height and width of your medicine cabinet door. Your organizer must be narrow and tall to fit without interfering with the closing mechanism or the shelves inside the cabinet.
- Cut and Prepare the Back Panel: Cut the thin wooden board to the measured height and a narrow width (e.g., 4-6 inches wide) to serve as the back panel of the organizer. Sand the edges smooth and then apply paint or sealant for bathroom durability. Let it dry completely.
- Plan Dowel Placement: Mark where you want the hair tools (brushes, combs) to hang or sit. You will use the dowels as horizontal supports or ‘arms.’ Mark small pairs of points along the side edges of the back panel for drilling the dowel holes. The distance between the paired points should accommodate the handle width of your tools.
- Drill the Dowel Holes: Using a drill bit that is the exact size of your dowels, carefully drill shallow holes (about 1/4 inch deep) only partially through the back panel at each marked point. Be precise to ensure the dowels sit level when inserted.
- Cut and Insert Dowels: Cut the dowels to the necessary length (slightly less than the width of the back panel). Apply a small amount of wood glue into each drilled hole. Insert the dowel ends firmly into the holes, creating a series of horizontal bars on the organizer. Use clamps to hold the pieces while the glue cures overnight.
- Mount the Organizer: Once the glue is fully dry, decide on your mounting method. For removable: Apply strong double-sided mounting tape to the back of the panel. For permanent: Hold the organizer in place on the inside of the cabinet door, mark where mounting screws should go, and carefully pre-drill pilot holes through the cabinet door panel (avoiding drilling through the outside). Secure the organizer with small screws.
- Organize Your Tools: After mounting securely, hang your brushes and hair tools on the dowels, keeping them vertical, organized, and out of sight when the door is closed.
7. Floating Walnut Vanity with Jewelry and Linen Drawers

This stunning, expansive floating vanity combines beautiful walnut wood with outstanding internal organization. Mounting the vanity off the floor instantly creates a modern, spacious feel while making floor cleaning easier. Underneath the sleek white countertop, the system features multiple deep, full-extension drawers. These drawers maximize every inch of space, ensuring items stored at the very back are still easy to reach.
The vanity utilizes different drawers for specialized tasks. One large drawer is dedicated entirely to neatly stacked, fluffy towels and linens. Another drawer above it contains segmented, felt-lined trays, turning it into a private spot for organizing jewelry, watches, or small accessories. These custom inserts keep delicate pieces sorted and protected. The oversized, mirrored medicine cabinet above provides additional recessed storage, maintaining the clean, smooth lines of the wall. This setup proves storage can be both luxurious and highly functional.
????️ DIY Instruction: How to Line a Drawer for Jewelry and Small Accessories
This DIY focuses on creating a specialized, protective, felt-lined drawer insert for items like jewelry and delicate accessories, as pictured in the middle drawer.
Materials Required
- Thin plywood or foam board (for the base and dividers).
- Soft felt fabric (in your desired color).
- Spray adhesive (for fabric).
- Craft glue or hot glue (for assembling dividers).
- Measuring tape.
- Pencil.
- Utility knife or scissors.
Equipment Required
- Utility knife or fine-toothed saw (for cutting base and dividers).
- Straight edge or ruler.
- Safety glasses.
DIY Instruction Step by Step
- Measure the Drawer Interior: Completely empty the chosen drawer. Measure the interior dimensions: width, depth (front to back), and height. Decide on the desired depth for your jewelry tray insert; it should be shallower than the drawer height to allow the drawer to close easily.
- Cut the Base and Dividers: Use the measured width and depth to cut a piece of plywood or foam board for the base of the insert. Next, cut strips of the plywood or foam board to the height of your planned insert to use as dividers.
- Cover the Dividers with Felt: Lay your felt fabric flat. Spray the surface of one divider piece evenly with spray adhesive. Carefully press the divider piece onto the felt, smoothing out all wrinkles. Once dry, use a sharp utility knife or scissors to trim the felt around the edges, wrapping it slightly around the back side for a neat finish. Repeat this process for all divider pieces.
- Cover the Insert Base: Repeat the felt-covering process for the main base piece. Ensure the felt piece is slightly larger than the base. Place the base onto the fabric, spray with adhesive, smooth it out, and wrap the excess felt neatly underneath the edges.
- Assemble the Grid Structure: Plan the compartment layout directly on the felt-covered base. Use the craft glue or hot glue to secure the felt-covered divider strips upright onto the base, forming the small, organized compartments (e.g., long strips for necklaces, small squares for earrings).
- Cure and Place: Allow the glue to dry and cure completely. Once the entire insert is sturdy, gently place the finished felt-lined organizer into the vanity drawer.
- Organize and Protect: Start placing your jewelry and small items into the designated compartments. The soft felt protects delicate pieces from scratching against the wood or against each other.
8. Integrated Full-Wall Storage System

This sophisticated full-wall unit proves that comprehensive storage can be both aesthetically pleasing and highly functional. The entire system is built-in, surrounding the vanity and mirror with clean, floor-to-ceiling cabinetry finished in a calming, muted tone. This seamless design provides an enormous volume of space, keeping everything completely concealed behind closed doors. You will notice the upper cabinets are great for storing large, less frequently used items like extra supplies or linens.
The vertical cabinets flanking the mirror offer specialized internal features. Along the inner edges, narrow, adjustable shelves utilize thin metal railings to prevent bottles from tipping over when the doors open. Importantly, these sections include electrical outlets, making them the appropriate spot to plug in and hide away hair dryers and electric toothbrushes. Below, one side features a wire laundry hamper built right into the unit, while the opposite side cleverly uses a tilting, pull-out bin to store dirty towels or trash. This design truly optimizes storage for a tidy space.
????️ DIY Instruction: How to Add Interior Electrical Outlets to a Cabinet
This DIY focuses on adding a new outlet inside an existing cabinet (like the middle shelf pictured) to power electric grooming tools. Note: Always consult a qualified electrician for the actual wiring and final connection to meet local safety codes. This guide covers the preparation steps.
Materials Required
- Surface-mount outlet box (often plastic, suitable for interior cabinet mounting).
- Extension cord or power strip with a flat plug (for the final connection).
- Optional: Cord channels or clips.
- Silicone sealant (bathroom grade).
Equipment Required
- Power drill.
- Spade bit or hole saw (sized just large enough for the extension cord plug end).
- Pencil and measuring tape.
- Safety glasses.
DIY Instruction Step by Step
- Plan and Measure: Determine the precise location within the cabinet where the outlet box will sit (e.g., on a vertical partition or a shelf). Mark the spot where the cord needs to pass through the cabinet wall, leading out to the nearest existing wall socket. Ensure the hole is low on the shelf and discreetly placed.
- Drill the Access Hole: Put on your safety glasses. Using the power drill and the hole saw or spade bit, carefully drill a hole through the back or side wall of the cabinet at your marked location. This hole needs to be wide enough for the plug of your extension cord or power strip to pass through.
- Mount the Outlet Box: Place the surface-mount outlet box inside the cabinet where desired. Drill small pilot holes and then use screws to securely fasten the box to the cabinet surface (shelf or side panel).
- Install the Extension Cord: Feed the end of your flat-plug extension cord through the drilled access hole. If you are using a power strip, attach it to the interior of the cabinet using strong adhesive or screws. Plug your cord into the back of the newly mounted outlet box.
- Seal the Opening: Apply a small bead of bathroom-grade silicone sealant around the edge of the drilled access hole on both the interior and exterior of the cabinet. This helps prevent moisture from entering the wall cavity and gives a clean, finished appearance. Let the sealant cure completely.
- Final Connection (Electrician Step): Run the extension cord discreetly outside the cabinet to a nearby existing wall outlet and plug it in. Crucially, for a permanent, hard-wired, and code-compliant installation, you must have a licensed electrician perform the final connection to your home’s wiring.
- Organize Tools: Once the power is safely connected, you can plug in your hair tools or electric toothbrush and store them neatly on the shelf.
9. Modular Cube Shelving and Rolling Cart Vanity

This compact bathroom expertly blends multiple storage types to maximize organization in a smaller space. The tall, white modular cube shelving unit provides essential floor-to-ceiling storage. It utilizes contrasting storage boxes—some woven, some fabric bins in cheerful yellow and neutral tones—to keep various items categorized and out of sight. The consistency of the shelving unit and the containers creates a tidy, visually pleasing look, despite the large volume of items stored.
The open vanity area utilizes a sturdy wood-topped cart design, perfect for small bathrooms or rental properties. Below the sink, an open shelf stores neatly folded linens, while various bins continue the theme of categorization. Notice the clever use of vertical space on the side of the cart, where hanging wire baskets provide extra capacity for smaller rolls or containers. This setup employs a ‘place for everything’ philosophy, ensuring every towel, bottle, and spare roll has a dedicated home.
????️ DIY Instruction: How to Attach Hanging Wire Baskets to a Cart Side
This DIY focuses on adding the hanging wire baskets, as seen on the side of the vanity cart, to maximize vertical storage space.
Materials Required
- Small wire baskets or caddies designed for hanging (often available with over-the-cabinet hooks, but you will use screws).
- Small wood screws (appropriate length for the cart frame).
- Pencil.
- Measuring tape.
Equipment Required
- Power drill.
- Small drill bit (to pre-drill pilot holes).
- Screwdriver (to match your chosen screws).
- Level (optional, but recommended).
- Safety glasses.
DIY Instruction Step by Step
- Select Basket Location: Identify the vertical frame piece on the side of your cart or cabinet where you want to attach the wire basket. Ensure the placement does not interfere with drawers, doors, or movement around the cart.
- Mark Attachment Points: Hold the wire basket against the cart frame at the desired height. If the basket has a flat mounting surface or built-in holes, mark those points with a pencil. If it is a basic wire basket, choose two sturdy, flat sections of the wire frame near the top edge for attachment points.
- Pre-Drill Pilot Holes: Put on your safety glasses. Remove the basket. Use a drill and a drill bit slightly smaller than your screw diameter to carefully drill pilot holes into the marked points on the wood frame. Pilot holes prevent the wood from splitting when you drive the screws in.
- Mount the Basket: Hold the wire basket back up to the cart frame, aligning the holes in the basket (or the mounting points you chose) with the pilot holes in the wood.
- Secure the Screws: Drive the screws through the basket’s frame and into the pilot holes using a screwdriver. Tighten the screws until the basket is firmly pressed against the wood and does not wiggle or sag. Be careful not to overtighten and strip the wood.
- Test and Load: Give the basket a gentle tug to confirm it is firmly attached. Once secure, you can use the newly mounted caddy to store small bathroom essentials, like hand towels, wipes, or extra supplies.
10. Earthy Recessed Niche and Ladder Storage

This bathroom embraces a captivating, organic storage style using built-in recessed niches and natural materials. The main storage feature is the striking wall of cubbies, sculpted directly into the wall and finished with a warm, terracotta-colored interior and rough-hewn white edges. This method turns necessary storage into a dramatic architectural element. The various sized openings offer display space for decorative jars, small woven baskets, and personal items.
Some of the deeper niches include hidden LED strip lighting, adding a warm glow and highlighting the contents. Beneath this feature, the vanity area utilizes open shelving crafted from natural wood, making it easy to stack and access fresh towels. Complementing the vanity is a simple wooden ladder used as a vertical towel rack. This item utilizes vertical space wonderfully, adding rustic charm while keeping damp towels aired out and organized. The entire space focuses on natural textures and accessible, custom-built organization.
????️ DIY Instruction: How to Create a Simple Towel Ladder
This DIY focuses on building the rustic wooden ladder used as a towel rack, which requires minimal tools and skill.
Materials Required
- Two long wooden poles or dowels (for the vertical sides, approximately 6 feet long and 1.5 inches in diameter).
- Three to five shorter wooden dowels or rungs (for the steps, cut to your desired width, e.g., 18 to 24 inches).
- Wood glue (a strong variety).
- Sandpaper (medium and fine grit).
- Wood stain or sealant (optional, for aesthetics and moisture protection).
Equipment Required
- Measuring tape.
- Pencil.
- Power drill.
- Drill bit (the exact diameter of your shorter dowels/rungs).
- Clamps.
- Safety glasses.
DIY Instruction Step by Step
- Cut and Prepare the Wood: If your wood is not pre-cut, cut the long poles to your desired height and the rungs to the desired width. Lightly sand all pieces until they are smooth, paying special attention to the ends. If using stain or sealant, apply it now and allow it to dry completely according to the product instructions.
- Mark Rung Placement: Lay one long vertical pole on a flat surface. Use the measuring tape to mark the center points for each rung placement, ensuring even spacing. A good spacing is usually 10 to 12 inches between rungs, starting about 18 inches from the bottom. Mark the exact spot for the center of the drill hole on the inner side of the pole. Repeat this exact process on the second vertical pole, ensuring the marks align perfectly.
- Drill the Rung Holes: Put on your safety glasses. Using the drill and the bit that matches the diameter of your rungs, carefully drill holes into the marked spots on both vertical poles. Drill only about 1/2 to 3/4 of the way through the pole (not all the way through). These are called blind holes.
- Assemble the Ladder: Apply a generous amount of wood glue to the ends of one rung. Insert that rung into the corresponding hole on one vertical pole, twisting slightly to spread the glue. Repeat this for all rungs on that pole.
- Attach the Second Side: Apply glue to the free ends of all the installed rungs. Carefully align the second vertical pole with the rungs and push it onto the rung ends until it sits flush against all the shoulders of the rungs.
- Cure and Secure: Use long clamps across the width of the ladder to hold the two vertical poles tightly against the rungs while the glue cures. Wipe away any excess glue immediately with a damp cloth. Allow the ladder to dry completely, typically for at least 24 hours.
- Place the Ladder: Once fully cured, the ladder is ready to lean against the wall (perhaps securing the top with a small wall bracket for safety) and hold your towels.
11. Custom Pull-Out Under-Sink Drawers

This well-planned bathroom uses customized pull-out storage to solve the common issue of deep, dark under-sink cabinets. Instead of a single cavernous space, the vanity features two separate cabinet doors that reveal smoothly gliding drawers. These drawers utilize full extension runners, bringing all your toiletries, bottles, and cleaning supplies completely into view. The clear acrylic organizers and dividers keep every product standing upright and neatly separated, making refills or finding specific items effortless.
Notice the clever incorporation of a secondary organizer tray tucked just under the countertop in the upper section of each pull-out unit. This allows for quick access to smaller necessities like dental floss or cotton swabs without having to reach into the main lower area. Further optimizing storage is the tall, slim cabinet to the left. Its interior uses multiple wire pull-out basket drawers, providing easy access to towels and bulkier items. This system ensures maximized visibility and organization from the floor to the top of the cabinet.
????️ DIY Instruction: How to Install Pull-Out Drawers in an Existing Cabinet
This DIY focuses on retrofitting an existing under-sink cabinet with internal pull-out drawers to replace traditional shelving.
Materials Required
- Complete pull-out drawer kit (including wood or wire baskets, full-extension drawer slides, and mounting hardware).
- Measuring tape.
- Pencil.
- Screws (may or may not be included with the kit).
Equipment Required
- Power drill.
- Small drill bits (for pilot holes).
- Screwdriver (manual or electric).
- Level.
- Safety glasses.
DIY Instruction Step by Step
- Measure the Cabinet Opening: Open your cabinet door and measure the interior width, depth, and height of the opening. Be sure to account for the door hinges, which may limit the maximum width of your chosen drawer unit. Purchase a drawer kit that fits within these constraints.
- Determine Slide Placement: The drawer slides need to be mounted to the interior side walls of the cabinet. Use your measuring tape and pencil to mark the desired height for the first (bottom) drawer slide. Use a level to ensure this line is perfectly horizontal and repeat the mark on the opposite side wall. Repeat this process for any additional drawers you plan to install.
- Attach Slides to Cabinet Walls: Separate the drawer slides according to the kit instructions; one part attaches to the cabinet wall, and the other attaches to the drawer/basket. Hold the cabinet side of the slide along your marked line. Use the power drill to pre-drill pilot holes through the screw holes in the slide bracket and into the cabinet wall. Secure the slide firmly using screws. Repeat for the slide on the opposite wall.
- Attach Slides to Drawer/Basket: Attach the other half of the drawer slides to the sides of your pull-out basket or drawer unit according to the kit instructions. Ensure they are mounted level and parallel to each other.
- Install the Drawer: Gently insert the drawer or basket, lining up the slide mechanisms on the drawer with the slides already mounted in the cabinet. Push the drawer in until it clicks into place and operates smoothly.
- Test and Adjust: Pull the drawer in and out several times to check for smooth operation and ensure it clears the door hinges when fully extended. Adjust the slide placement if necessary before loading the drawer with your items.
12. Floating Cube Shelves and Recessed Shower Niche

This clean, contemporary bathroom uses geometry and white tile to highlight smart storage choices. A dramatic arrangement of five staggered, white cube shelves floats on the wall outside the shower area. These cubes offer open, accessible space for large towels, cleaning products, and decorative items. The asymmetrical stacking creates visual movement and interest while providing distinct cubbies for categorization. Wire mats placed in the lower shelves add grip and prevent items from sliding around.
Inside the shower, a large, deeply recessed niche is built directly into the wall. The back of this niche is tiled in a contrasting dark blue mosaic, turning a simple shelf into a focal point. This built-in solution keeps shampoo, soap, and conditioner bottles off the shower floor and out of the way, maintaining the sleek look of the surrounding white tile. Paired with a sleek wall-mounted towel warmer and a simple row of hooks, this system is a masterclass in clean, high-efficiency organization.
????️ DIY Instruction: How to Securely Mount Floating Box Shelves
This DIY focuses on the structural steps for mounting the large, open box shelves, ensuring they are secure and level.
Materials Required
- Box shelves (pre-assembled cubes or boxes).
- Heavy-duty mounting brackets or cleat system (ensure they support the weight of the shelf plus contents).
- Long, strong screws (suitable for brackets and capable of reaching a wall stud).
- Wall anchors (if you cannot hit a stud for every bracket).
- Measuring tape.
- Pencil.
Equipment Required
- Stud finder.
- Level (at least 2 feet long).
- Power drill and drill bits.
- Screwdriver (manual or electric).
- Safety glasses.
DIY Instruction Step by Step
- Plan the Staggered Layout: Replicate the staggered arrangement of the shelves from the image on your wall. Use a pencil to lightly mark the exact location and height of each shelf. Ensure you have enough clearance between each shelf for the items you plan to store.
- Locate Studs and Pre-Drill: Use a stud finder to locate the wall studs behind your marked shelf locations. It is absolutely vital to anchor at least one side of each shelf system directly into a stud for maximum stability. Mark the center of the stud. Hold the mounting bracket against the wall at the planned height, check it with a level, and mark the screw holes.
- Install Mounting Brackets: Put on your safety glasses. Pre-drill pilot holes at all marked points. Use long, heavy-duty screws to attach the mounting brackets securely to the wall, hitting the studs wherever possible. For screw holes that do not align with a stud, use appropriate heavy-duty wall anchors (like toggle bolts or self-drilling anchors).
- Mount the First (Bottom) Shelf: Starting with the lowest shelf, position the open box shelf onto the installed brackets or mounting cleat. Follow the specific instructions for your mounting hardware to lock the shelf onto the bracket. Ensure the shelf is perfectly level before proceeding.
- Mount Subsequent Shelves: Continue mounting the shelves one by one, using the level for each placement. Check the spacing between the shelves according to your design plan. If the shelves are designed to stack or butt against each other (like the bottom two cubes), ensure their adjoining sides are perfectly flush before securing.
- Final Security Check: Once all shelves are mounted, give each one a firm tug downwards and outwards to verify stability. Only when you are confident in the mounting should you begin placing your items on the shelves.
13. Skirted Vanity with Rolling Wire Cart Storage

This charming bathroom utilizes a clever combination of open and closed elements to achieve a homey, functional organization. The sink vanity is designed with an open frame and features a lovely, gathered fabric skirt. This skirt hides the clutter underneath, creating a clean, cottagecore aesthetic while allowing the entire area below the sink to be utilized for storage.
Tucked neatly under the skirt are two wheeled wire storage carts. These carts slide out easily, providing quick access to multiple tiers of wire baskets perfect for linens, cleaning supplies, and extra bottled products. Rolling storage is a game-changer for small spaces, as it allows items to be accessed easily and then tucked away again. To the right, the skirt covers a large hamper or bin, keeping dirty laundry out of sight. Above the sink, a mirrored cabinet maintains the traditional closed storage, and the inside back is lined with an appealing floral wallpaper, adding a delightful design touch to an otherwise plain cabinet.
????️ DIY Instruction: How to Create a Fabric Skirt for an Open Vanity
This DIY focuses on creating the gathered fabric skirt to conceal under-sink storage like the rolling carts shown.
Materials Required
- Fabric (a lightweight cotton or linen blend is easy to gather).
- Hook-and-loop fastener tape (like Velcro), the adhesive-backed kind is easiest.
- Thread matching the fabric color.
- Measuring tape.
- Iron and ironing board.
Equipment Required
- Sewing machine (or needle and thread for hand-sewing).
- Scissors.
- Pins.
DIY Instruction Step by Step
- Measure and Calculate Fabric: Measure the perimeter of the vanity frame where the skirt will attach (usually three sides: left, front, right). Add 1 inch to the height measurement for the hem. Multiply the total perimeter length by 1.5 to 2 to determine the necessary width of your fabric piece—this extra width creates the attractive ruffled/gathered effect.
- Hem the Fabric: Fold and press a narrow hem (about 1/2 inch) along the bottom and side edges of the fabric piece. Sew the hems using a straight stitch. This gives the skirt a finished, clean look.
- Create the Gathering Channel: Along the top edge, fold the fabric down about 1/2 inch and press it. Then, fold it down again, wide enough to accommodate the soft loop side of your hook-and-loop tape (usually about 1 inch). Pin this fold in place and sew a straight stitch along the bottom of this channel.
- Gather the Fabric (Optional): If your sewing machine has a gathering foot or setting, use it on the top edge to create the ruffles. If not, use a long basting stitch along the top edge and gently pull the bobbin threads to manually gather the fabric to match the exact perimeter length of your vanity frame. Distribute the ruffles evenly.
- Attach the Hook-and-Loop Tape: Cut the soft (loop) side of the adhesive-backed hook-and-loop tape to the length of the vanity perimeter. Peel the backing and press it firmly along the back of the gathered edge, ensuring the gathering remains consistent.
- Mount the Skirt to Vanity: Cut the rough (hook) side of the tape to match the length of the perimeter. Peel the backing and carefully press it onto the outside edges of the vanity frame. Ensure the placement is straight and level. Wait a few minutes for the adhesive to fully bond.
- Install the Skirt: Align the top edge of your skirt with the tape on the vanity frame and press the two sides of the hook-and-loop fastener together. The skirt should hang neatly, concealing the rolling carts underneath.
14. Smart Vanity with Custom LED Drawer Lighting

This high-tech, modern vanity is built for organization and convenience, using dark blue cabinetry accented by bright, futuristic lighting. The most prominent storage feature is the deep, wide, pull-out drawers that replace traditional cabinet space. When opened, these drawers illuminate with vibrant blue LED lighting, making it easy to find everything inside, even in low light.
Inside the upper drawer, custom, segmented trays with soft gray felt inserts are utilized for immediate organization. These trays hold small personal items, makeup, and grooming tools, keeping everything separated and protected. The lower drawer features modular, removable gray storage bins, demonstrating an ability to adapt the organization layout based on changing needs. The drawers maximize every inch of horizontal space and the stunning interior lighting turns the act of finding items into a simple, attractive experience.
????️ DIY Instruction: How to Add Motion-Sensing LED Lighting to a Drawer
This DIY focuses on adding the cool blue motion-sensing LED lights to the inside of a vanity drawer for immediate illumination upon opening.
Materials Required
- Motion-sensing LED strip light kit (Battery-powered is easiest for drawers).
- Thin wiring or cord channels (optional, for neatness).
- Rubbing alcohol and clean cloth.
- Measuring tape.
Equipment Required
- Scissors (for cutting the light strip at designated marks).
- Screwdriver (if the battery pack needs to be secured).
- Safety glasses.
DIY Instruction Step by Step
- Clean and Measure: Empty the drawer completely. Measure the length needed for the strip. Clean the surface where the light strip will be placed (usually the inner top frame or the underside of the drawer above) thoroughly using rubbing alcohol and a clean cloth. Clean surfaces ensure the adhesive on the strip and clips holds securely.
- Cut and Place the Strip: Cut the LED strip to the required length at the designated cut points only. Remove the adhesive backing from the strip. Starting from the back corner, firmly press the strip onto the cleaned surface of the drawer frame. Apply continuous, firm pressure to ensure the adhesive bonds well.
- Mount the Sensor/Battery Pack: The sensor needs to be positioned near the front of the drawer opening so it can detect movement when the drawer slides out. Secure the battery/sensor unit to the inside front corner of the cabinet frame (near the drawer face) or discreetly on the inside of the drawer itself using screws or strong adhesive.
- Test the Motion Sensor: Turn the light kit on. Close the drawer completely. Wait a few seconds for the sensor to reset. Slowly open the drawer to trigger the motion sensor. The light should turn on immediately upon movement and turn off automatically after a short delay once the drawer is closed.
- Conceal Wiring (If Necessary): If your kit has exposed wiring running to the battery pack, use small adhesive-backed cord channels or clips to secure the wires neatly along the edge of the drawer or cabinet frame. This keeps the installation tidy and prevents wires from being pinched when the drawer is opened and closed.
15. Eclectic Vintage and Apothecary Wall Display

This wall arrangement beautifully combines unique antique pieces and simple shelving to create highly personalized, functional storage. The distressed, four-pane window mirror serves as a charming focal point, reflecting light and making the space feel larger. Grouped around it are several types of specialized storage containers and displays.
A small, mint-colored apothecary cabinet hangs prominently, featuring multiple tiny drawers and open cubbies, which are perfect for organizing small items like pills, jewelry, or grooming accessories. Below this, simple dark-wood floating shelves, secured with sleek metal railings, hold various glass jars, vintage containers, and small boxes. These railings are a simple yet effective way to prevent tall bottles from being knocked over. Finally, a lower wooden panel features hooks for hanging towels and tools, completing this unique, clutter-free wall arrangement that feels highly curated and inviting.
????️ DIY Instruction: How to Create a Simple Towel and Tool Rack with Hooks
This DIY focuses on creating the functional wooden board with hooks (like the one near the bottom center) for hanging towels and tools.
Materials Required
- Single wooden board (cut to your desired width and about 4-6 inches tall).
- Three to five decorative metal hooks or coat hooks.
- Wood stain or paint (optional).
- Wood screws (short, for securing the hooks).
- Long wood screws or heavy-duty anchors (for securing the board to the wall).
- Measuring tape.
Equipment Required
- Power drill.
- Small drill bits (for pilot holes).
- Screwdriver.
- Sandpaper.
- Level.
- Stud finder.
- Safety glasses.
DIY Instruction Step by Step
- Prepare the Board: Cut the wooden board to the preferred width. Sand all surfaces and edges until smooth. If desired, apply a coat of wood stain or paint and allow it to dry completely.
- Mark Hook Placement: Use the measuring tape to determine and mark the desired spacing for your hooks along the face of the board. Ensure the spacing is even and wide enough for towels to hang freely.
- Attach the Hooks: Hold the decorative metal hooks in place over the marked points. Use a pencil to mark the screw holes for each hook. Pre-drill small pilot holes at these marks. Secure the hooks firmly to the board using the short wood screws.
- Plan Wall Mounting: Decide where the rack will hang. Use a stud finder to locate the wall studs within that area; anchoring the rack into at least one stud is crucial for supporting wet towels. Mark two points on the back of the board where you will drive the long screws to mount it to the wall.
- Pre-Drill Mounting Holes: Drill pilot holes through the board at the marked mounting points. Hold the board up to the wall, use a level to ensure it is straight, and lightly mark the corresponding screw locations on the wall.
- Mount to the Wall: Drill pilot holes into the wall. If you are not hitting a stud, install appropriate wall anchors at these locations. Hold the towel rack board against the wall, align the holes, and drive the long wood screws through the board and into the wall (or anchors). Tighten until the board is completely secure and does not move.
- Hang and Use: Hang your towels, brushes, and other tools on the hooks.
16. Chrome Rolling Storage Cart and Heated Towel Rack

This bathroom achieves a sleek, modern look by utilizing reflective metals and functional mobility. The centerpiece is the multi-tiered rolling cart, constructed of polished chrome with glass shelves. This cart is exceptionally versatile; it moves easily and brings essential items, like folded towels, toiletries, and grooming tools, right where you need them. The clear tray organizers on the top shelf keep small bottles and brushes neatly contained, preventing any clutter from spilling over.
Next to the cart, a tall, wall-mounted heated towel rack serves two purposes: it stores towels vertically, using minimal wall space, and keeps them warm and dry, preventing moisture issues. The floating vanity, though compact, adds a deep, full-extension drawer below the sink. This drawer maximizes hidden storage and uses internal dividers to keep cosmetics and supplies separated. The combination of mobile, open storage and specialized drawers ensures high efficiency in a limited space.
????️ DIY Instruction: How to Customize a Rolling Cart with Anti-Slip Mats
This DIY focuses on adding anti-slip mats to the glass shelves of the rolling cart to prevent bottles and items from shifting or tipping.
Materials Required
- Non-slip rubber or silicone matting (drawer liner material).
- Scissors or utility knife.
- Measuring tape.
- Pencil or marker.
Equipment Required
- None needed beyond the materials.
DIY Instruction Step by Step
- Measure the Shelf: Determine the exact interior dimensions (width and depth) of each shelf on the rolling cart. If the shelves are glass, measure carefully to ensure the mat fits edge to edge for a clean look.
- Mark the Matting: Unroll the non-slip matting. Using your measuring tape and a pencil or marker, transfer the shelf dimensions onto the matting. Double-check your measurements before cutting.
- Cut the Matting: Using sharp scissors or a utility knife, carefully cut the matting pieces to the marked dimensions. If the matting has a pattern or texture, ensure you cut straight lines for a professional finish.
- Clean the Shelves: Wipe down the glass or metal shelves of the cart with a clean cloth to remove any dust or residue. The matting sits better on a clean surface.
- Place the Mats: Gently place the cut matting pieces onto each shelf. Smooth them out with your hand, ensuring they lie flat and cover the shelf surface evenly. The inherent grip of the material will keep them in place without adhesive.
- Load the Cart: Place your bottles, trays, and folded towels back onto the newly lined shelves. The matting prevents items from sliding or rattling when the cart is moved.
17. Gold Geometric Wall Shelf and Towel Bar

This decorative storage system transforms wall space into a bold statement piece. The large, gold-toned shelf unit features a striking geometric design crafted from metal wire. It provides multiple irregular cubbies and horizontal surfaces perfect for organizing toiletries and displaying greenery or art. This open design maximizes vertical storage without making the space feel closed off.
The entire unit, which sits above a dark, contemporary floating vanity, includes several practical features. Various hooks hang along the frame, offering quick access spots for necklaces or small grooming tools. Below the sink, the gold metal frame extends to form a horizontal towel bar, keeping hand towels handy and contributing to the cohesive design. The vanity itself includes an open bottom shelf, providing a convenient place for additional, accessible towel storage that ties the whole look together.
????️ DIY Instruction: How to Install a Geometric Wall Shelf
This DIY focuses on the crucial steps for safely mounting the large, open metal wall shelf unit onto a wall.
Materials Required
- Large geometric metal wall shelf unit.
- Mounting hardware (screws, anchors, etc., typically included with the shelf).
- Pencil.
- Measuring tape.
Equipment Required
- Stud finder.
- Level (at least 2 feet long).
- Power drill and appropriate drill bits.
- Screwdriver.
- Safety glasses.
DIY Instruction Step by Step
- Map the Wall Location: Determine the exact height and center point where the shelf should hang above the vanity. Hold the large shelf unit against the wall. Ensure it is centered and mark the locations of all mounting points (usually reinforced loops or brackets on the shelf frame) onto the wall using a pencil.
- Locate Studs and Level: Use a level across the top edge of the shelf while holding it up to confirm your marks are straight. Use a stud finder to identify any wall studs near your marked mounting points. For a heavy, large piece like this, anchoring into at least one stud is strongly recommended.
- Drill Pilot Holes and Install Anchors: Put on your safety glasses. For mounting points that align with a stud, drill a pilot hole slightly smaller than your screw diameter. For points without a stud, drill the required hole size and carefully install the appropriate heavy-duty wall anchors (e.g., toggle bolts or self-drilling anchors) according to the anchor instructions.
- Mount the Shelf: Have a helper hold the unit while you align the shelf’s mounting points with the holes and anchors on the wall. Insert the screws and tighten them securely with a screwdriver. Start by securing the screws into the studs first, then move to the anchor points.
- Final Security Check: Once all screws are tight, give the shelf unit a firm but gentle pull in various directions to ensure it is completely stable and firmly secured to the wall before placing any items on it.
18. Bamboo Cubbies and Extensive Floating Drawers

This wide, spa-like storage system is built from warm bamboo wood, creating a tranquil environment. The upper section features a large bank of open cubbies, perfect for showcasing neatly rolled white towels and decorative glass jars holding bath salts and cotton. Accent lighting is recessed just below the cubbies, illuminating the countertop and adding a beautiful, ambient glow to the display.
The lower half of the unit features a long, floating countertop resting on a bank of deep drawers. The drawers are the true heroes of organization here. They utilize custom inserts and segmented trays to organize small items and grooming supplies (as seen in the top-left drawer). The deep drawers below are dedicated to linens and bulkier supplies. This massive combination of open, display-ready cubbies and concealed, segmented drawers ensures every item, big or small, has a clear and organized home.
????️ DIY Instruction: How to Add Recessed Under-Cabinet Lighting
This DIY focuses on installing the accent lighting strip seen under the upper cubby system to illuminate the counter space below.
Materials Required
- LED rigid bar light or strip light kit (look for a low-profile, cool-to-touch style).
- Power supply/driver (usually included).
- Cord channels or clips (for wire concealment).
- Screws or strong adhesive for mounting.
- Optional: Dimmer switch or plug-in timer.
Equipment Required
- Power drill and small drill bit (if screwing the light bars in).
- Measuring tape.
- Pencil.
- Safety glasses.
DIY Instruction Step by Step
- Plan the Lighting Run: Measure the length of the underside of the upper cubbies. The light strip or bars should cover the entire length or be spaced evenly for consistent illumination. Mark the exact placement of the light bar or strip.
- Clean and Prepare: Clean the underside of the cabinet with rubbing alcohol to ensure a clean surface if you are using adhesive mounting strips.
- Mount the Light Bars/Strip: If using screws, pre-drill small pilot holes for the light clips or bars. Secure the mounting clips or use the adhesive backing to firmly attach the LED light source along the marked line. Ensure the light is aimed downwards toward the countertop.
- Route and Conceal Wiring: Connect the light source to the power supply/driver. Route the connecting wires as discreetly as possible, likely along the top back edge of the cubbies and down the side to a nearby outlet. Use cord channels or small adhesive clips to neatly secure all wires out of sight.
- Test and Finalize: Plug in the power supply. Test the light to ensure even illumination. If you used cord channels, ensure they are firmly adhered to the cabinet. If the power source is concealed in a cabinet, make sure the door closes without pinching the wires.
19. Full-Length Mirror Cabinet with Customizable Storage

This floor-to-ceiling cabinet cleverly hides massive storage capacity behind a full-length mirrored door. This design is excellent for maximizing storage in a small footprint while providing a necessary mirror function. When the door is opened, the interior is revealed to be a highly adjustable and versatile storage paradise.
The interior cabinet features a column of adjustable wire baskets and shelves, providing easy access to many bottles and products. But the star is the innovative use of the inner door panel. It is lined with a pegboard system, along with various wire racks and hooks. This fully customizable area allows the user to hang keys, jewelry, scissors, and small wire baskets, utilizing every available inch of the door’s depth. This combination of deep cabinet shelving and fully customizable door storage turns a simple cabinet into a fully stocked, organized storage center.
????️ DIY Instruction: How to Install a Pegboard Organizer on a Cabinet Door
This DIY focuses on adding a functional pegboard to the inside of a large cabinet door (like the one shown) for hanging small items and wire baskets.
Materials Required
- Pegboard sheet (thin MDF or plastic, cut to the interior size of your cabinet door).
- Small wooden spacers or washers (to create clearance behind the pegboard).
- Pegboard hooks and accessories (e.g., small wire baskets, rings).
- Screws (short enough not to go through the outside of the door).
- Measuring tape and pencil.
Equipment Required
- Power drill and drill bit.
- Screwdriver.
- Safety glasses.
DIY Instruction Step by Step
- Measure the Door Panel: Measure the interior flat surface of your cabinet door precisely. Cut the pegboard sheet to fit within this space, ensuring it clears any hinges or frame edges.
- Prepare the Spacers: Pegboard needs a gap (about 1/2 inch to 3/4 inch) between the wall (or door) and the board itself for the hooks to fit. Cut small pieces of wood or use thick washers or plastic spacers to create this necessary clearance.
- Mark Mounting Points: Hold the pegboard in place on the door. Mark four corners and the center edges for where the mounting screws will go. These points will be where you place your spacers.
- Drill and Mount Spacers: Hold a wooden spacer at each marked mounting point. Drill a pilot hole through the pegboard hole, through the spacer, and into the cabinet door. Be extremely cautious about the screw length; it must not penetrate the outside of the door.
- Secure the Pegboard: Insert the screws through the pegboard and the spacers, and then drive them into the cabinet door. Ensure the pegboard is firmly secured but not so tight that the wood door is stressed. The spacers must be held tightly between the door and the board.
- Add Accessories: Insert your chosen pegboard hooks, trays, and wire baskets into the holes. You can now hang keys, jewelry, cleaning tools, or hold small bottles in the baskets.
20. Central Bathroom Island with Dual Sink Storage

This large, freestanding bathroom island maximizes storage with access from all sides. Designed for a spacious luxury bathroom, the island features a generous marble countertop with two sinks. The entire structure below utilizes a combination of drawers and cabinets, ensuring every type of item has a tailored space. The drawers around the perimeter pull out to reveal smaller items, providing organized storage for toiletries and grooming tools.
The center of the island is dedicated to bulky items and linens. Open the cabinet doors to find pull-out wire baskets for laundry or general storage, along with specialized pull-out racks for cleaning products. One section even features a built-in towel rack that cleverly swings out for easy access. This central location and multi-functional internal hardware eliminate the need for separate cabinets, keeping the room open and clutter-free while offering massive organizational capacity.
????️ DIY Instruction: How to Install a Swing-Out Towel Rack in a Cabinet
This DIY focuses on adding a swing-out towel rack to the inside of a bathroom cabinet door or side panel (like the one seen in the middle section of the island).
Materials Required
- Swing-out towel rack kit (often chrome or metal, designed for cabinet installation).
- Screws (typically included with the kit).
- Pencil.
- Measuring tape.
Equipment Required
- Power drill.
- Small drill bits (for pilot holes).
- Screwdriver.
- Level.
- Safety glasses.
DIY Instruction Step by Step
- Determine Placement: Decide whether the swing-out rack will mount to the inner side wall of the cabinet or the back of the door. If mounting on the door, ensure the rack’s depth will clear any internal shelving when the door is closed. Mark the desired height for the mounting bracket.
- Mark and Level: Hold the mounting plate or bracket from the towel rack kit against the chosen cabinet surface. Use a pencil to mark the screw holes. Use a level on the mounting plate to ensure it is perfectly vertical or horizontal, depending on the rack style.
- Pre-Drill Pilot Holes: Put on your safety glasses. Use the power drill and a drill bit slightly smaller than your screws to drill pilot holes at the marked locations. This prevents the wood from splitting.
- Attach the Mounting Bracket: Secure the mounting bracket firmly to the cabinet surface using the screws provided in the kit. Ensure the bracket is tightly fastened, as it will bear the weight of damp towels.
- Assemble the Rack: Attach the swing-out towel arm mechanism to the newly mounted bracket following the kit instructions. This usually involves clicking or sliding the arm piece onto the bracket. Test the arm to ensure it swings smoothly.
- Test for Clearance: Close the cabinet door slowly to ensure the towel rack clears the internal structure of the cabinet without catching or hitting shelves. Hang towels on the rack, testing that the weight does not cause any sagging or movement when the arm is extended.
21. Sculptural Organic Wall Shelf with Integrated Lighting

This dramatic shelving unit transforms basic storage into a stunning piece of modern art. The asymmetrical, curved form wraps organically around the wall, creating multiple recessed shelf areas. The material uses a contrasting dark interior against a smooth white exterior frame. This design maximizes vertical storage across a wide area without using any harsh straight lines.
The true genius lies in the integrated lighting. Thin strips of warm LED lighting trace the sweeping curves of the inner shelves, highlighting the stored items and adding a soft, ambient glow to the entire wall. This lighting draws the eye to the various cubbies, which are stocked with neatly folded towels, decorative bottles, and small, functional storage bins in an accent color. The sculptural nature of the unit makes it both a functional organizer and an architectural statement.
????️ DIY Instruction: How to Install Curved Accent Lighting on a Shelf
This DIY focuses on installing flexible LED strip lighting within a curved or non-linear shelf recess, similar to the one shown.
Materials Required
- Flexible LED light strip kit (low voltage, suitable for curved installations).
- Power supply/driver (usually included).
- Clear plastic mounting clips (small, for securing the strip to the curve).
- Strong adhesive or small screws (depending on the clip type).
- Rubbing alcohol and clean cloth.
Equipment Required
- Power drill and tiny drill bit (if using screw-in clips).
- Screwdriver.
- Measuring tape.
- Safety glasses.
DIY Instruction Step by Step
- Measure and Plan: Measure the entire length of the curve where the light strip will be placed. Ensure your LED strip is long enough, or plan where sections need to connect. Map the path for the wires to reach the power source discreetly.
- Clean the Surface: Thoroughly wipe down the curved shelf surface where the strip will adhere using rubbing alcohol and a clean cloth. Clean surfaces ensure the adhesive on the strip and clips holds securely.
- Install Mounting Clips (Optional): If the strip is heavy or the curve is steep, install clear mounting clips along the curve before placing the strip. Place a clip every 6 to 12 inches, securing them with adhesive or tiny screws, to prevent the strip from peeling off the curve over time.
- Install the Light Strip: Peel the backing off the LED strip. Slowly and carefully press the strip along the curve, working in small sections. Apply firm pressure along the entire length to ensure contact. If using clips, tuck the strip gently under the clips as you go.
- Connect and Conceal Wiring: Connect the strip to the power supply. Route the wiring along the back edges or inside the wall (if possible) to hide it. Use small adhesive cable clips to secure the power cord neatly along its path to the wall outlet.
- Test the Light: Plug the system in and test it. The flexible strip should follow the curve smoothly without buckling. Adjust any visible wires or loose sections of the strip or clips.
22. Wall-Mounted Corner Vanity with Over-Toilet Storage

This small-space bathroom utilizes every available wall surface to maximize storage. The corner medicine cabinet is a particularly effective solution, opening out to reveal internal storage while providing a mirrored front. It also features convenient side storage: a vertical strip on the door holds toothbrushes and other small, lightweight grooming tools.
Above the toilet, a sleek wall cabinet provides closed storage for things you do not want to display. Below this, a genius space-saving feature is integrated directly into the wall—a shallow, pull-out drawer perfectly sized for toothpaste, a razor, or other small essentials. Finally, the wall next to the sink features tiered corner shelving and mounted cups for toothbrushes and toiletries, ensuring the minimal counter space remains totally clear.
????️ DIY Instruction: How to Install Wall-Mounted Toothbrush Cups
This DIY focuses on securely mounting the small, functional cups or holders for toothbrushes and toothpaste near the sink, keeping the countertop clear.
Materials Required
- Wall-mounted toothbrush holder kit (usually includes cups, brackets, and hardware).
- Pencil.
- Measuring tape.
- Silicone sealant (bathroom grade).
Equipment Required
- Power drill.
- Drill bit (appropriate for your wall tile or material).
- Screwdriver.
- Level.
- Safety glasses.
DIY Instruction Step by Step
- Mark the Height and Location: Determine the best height for the holders (accessible but above the splash zone). Use the holder’s mounting bracket as a template. Hold the bracket against the wall and use a pencil to mark the screw locations. Use a level to ensure the marks are perfectly horizontal.
- Prepare to Drill Tile: If drilling into ceramic tile, use a piece of painter’s tape over the marked spot to prevent the drill bit from slipping (walking). If you have specialized tile bits, use those.
- Drill Pilot Holes: Put on your safety glasses. Slowly drill the pilot holes through the tile or drywall at the marked locations. Go slowly, especially through tile.
- Install Anchors and Bracket: If drilling into drywall, insert the appropriate wall anchors. If drilling into tile or a stud, anchors may not be needed. Position the mounting bracket over the holes and secure it firmly to the wall with screws.
- Seal the Edges (Crucial for Bathrooms): Apply a small bead of silicone sealant around the edges of the mounting bracket where it meets the wall. This prevents moisture from seeping into the wall cavity.
- Attach the Cups: Once the bracket is secured, attach the cups or holders to the bracket according to the kit instructions (they often slide or lock into place). Allow the sealant to cure before loading the cups with toothbrushes and other items.
23. Apothecary Style Vanity and Filing Cabinet Storage

This room embraces a vintage, organized aesthetic, turning the vanity into a high-capacity storage hub. The long, custom vanity is designed to look like a chest of small drawers, utilizing many shallow compartments instead of deep ones. This is the ultimate strategy for preventing small items like cosmetics, nail polish, and grooming tools from piling up. Each drawer uses clear, removable plastic or acrylic inserts, ensuring every compartment is perfectly sized for its contents.
Complementing the vanity is a tall, slim cabinet designed to look like a vintage filing cabinet. The many small, shallow drawers in this unit further reinforce the ‘place for everything’ philosophy, offering immense categorized storage for supplies, medicines, or extra toiletries. The consistent gray tone and metal label pulls on the drawers maintain a clean, library-like look, proving that high volume storage can be attractive and highly organized.
????️ DIY Instruction: How to Create Custom-Fit Drawer Dividers for Shallow Drawers
This DIY focuses on creating the segmented dividers, as seen in the many vanity drawers, to perfectly organize small cosmetics and accessories.
Materials Required
- Thin wood strips (e.g., basswood or hobby plywood, 1/8 inch thick) or sturdy plastic/foam board.
- Strong wood glue or craft glue.
- Measuring tape.
- Pencil.
- Fine-grit sandpaper.
Equipment Required
- Hand saw or utility knife.
- Clamps or painter’s tape (for holding joints).
- Straight edge or ruler.
- Safety glasses.
DIY Instruction Step by Step
- Measure the Drawer: Select a shallow drawer and measure its internal width, depth, and height. The dividers should be slightly shorter than the drawer height to allow the drawer to slide smoothly.
- Design the Grid: Sketch out the desired compartment sizes. Decide where the long dividers (length of the drawer) and the short dividers (width of the drawer) need to interlock to create your grid.
- Cut the Dividers: Cut the wood strips to the necessary lengths and heights based on your measurements. Use sandpaper to smooth all edges.
- Create Interlocking Joints (The Slots): Where a long piece and a short piece cross, you will create a notch, or slot, that is half the height of the divider strip and exactly the thickness of the material. Mark the area to be removed on both pieces. Carefully cut out these small rectangular notches using a saw or utility knife.
- Dry Fit the Grid: Slide all the long and short divider pieces together to form the grid. Place the assembled grid into the drawer to ensure it fits snugly but not tightly.
- Glue and Install: Once the fit is confirmed, take the grid out and apply wood glue to the bottom edge of the long dividers and at the joints where they meet. Gently place the grid back into the drawer. Use small clamps or painter’s tape to hold the joints together and ensure the base of the dividers sits flush against the drawer bottom.
- Cure and Load: Allow the glue to dry completely according to the manufacturer’s instructions. Once cured, the customized dividers are ready to hold your small accessories, keeping them neatly segregated and easy to find.
24. Black and White Modular Cube Storage
This bathroom makes a striking visual statement using a stack of modular, interlocking cube shelves in contrasting black and white high-gloss finishes. This arrangement maximizes vertical space, stretching from floor to ceiling, and provides incredibly versatile storage. The cubes are arranged to alternate between open shelving and closed cabinets, allowing the user to display decorative items and store unsightly clutter.
The open cubes are great for rolled towels and decorative soaps, while the closed cubes (some with brightly colored bins tucked inside) offer hidden capacity for cleaning supplies and fast refills. This system is exceptionally flexible; the cubes can be rearranged or expanded as needs change. The sleek floating sink and geometric mirror complement the modern, sharp lines of the storage tower, resulting in a bold, organized, and space-efficient design.
????️ DIY Instruction: How to Securely Stack Modular Cube Shelves
This DIY focuses on safely stacking and securing modular cube units to create a tall, stable storage tower, as shown in the image.
Materials Required
- Modular cube shelf units (must be identical in depth and width).
- Furniture connector bolts or metal plate connectors (small L-brackets or T-brackets).
- Short wood screws (suitable for the connectors and cube material).
- Measuring tape.
- Pencil.
Equipment Required
- Power drill.
- Small drill bits (for pilot holes).
- Screwdriver.
- Level.
- Safety glasses.
DIY Instruction Step by Step
- Determine Stack Order and Layout: Decide on the final arrangement of the cubes (which ones will be open, closed, black, or white). Start with the lowest cubes placed on the floor in their final position.
- Install Connectors on First Layer: Place small metal plate connectors or L-brackets on the top surface of the bottom layer of cubes near the back corners. Mark the screw holes with a pencil. Pre-drill small pilot holes and secure the bottom half of the connector to the first cube layer using the short wood screws.
- Place the Next Layer: Carefully lift and place the second layer of cubes directly on top of the first. Align them perfectly with the cube below.
- Secure the Second Layer: Drill pilot holes into the bottom surface of the second layer of cubes, aligning with the holes on the remaining half of the metal connector bracket. Secure the second layer to the connector using screws. Repeat this process of connecting the layers until the tower is at the desired height.
- Anchor to the Wall (Crucial Safety Step): For any unit over three feet tall, anchoring it to the wall is essential. Locate a wall stud near the top of the tower. Attach an L-bracket to the top back edge of the top cube and secure it firmly into the wall stud using a long wall screw. If a stud is not available, use a heavy-duty wall anchor.
- Level and Load: Use a level on the side and front of the tower to ensure it is plumb (straight). Once anchored, the stack is secure and ready to be loaded with items.
25. Patterned Tall Cabinet and Tiled Wall Niches

This bathroom uses beautiful patterned tile not only on the floor but also as a vibrant element in its storage design. The tall, slim storage cabinet has a smooth gray body, but its door is completely covered in a bold, patterned tile, turning a simple storage unit into an architectural feature. When the door is opened, the interior reveals deep, simple shelves, perfect for stacking towels and stashing bottled products out of sight.
The wall above the vanity complements this design with multiple recessed niches. These niches, also lined with the same tile pattern, break up the wall surface while providing small, decorative spots for displaying decorative jars and special items. The combination of the shallow display niches and the tall, deep cabinet offers a fantastic balance of open, eye-catching storage and concealed, high-volume capacity, maintaining a tidy look with striking style.
????️ DIY Instruction: How to Apply Decorative Tile to a Cabinet Door
This DIY focuses on applying decorative tile (or faux tile contact paper) to a flat cabinet door panel to achieve the striking look shown.
Materials Required
- Thin, lightweight tiles (ceramic or mosaic sheets) OR waterproof, textured contact paper/wallpaper.
- Tile adhesive (if using real tile).
- Grout (if using real tile).
- Caulk (for sealing edges).
- Measuring tape and pencil.
- Wood primer (optional, if using real tile).
Equipment Required
- Trowel (for adhesive, if using real tile).
- Grout float and sponge.
- Wet saw or tile cutter (if using real tile).
- Utility knife and straight edge (if using contact paper).
- Safety glasses.
DIY Instruction Step by Step (Focusing on Contact Paper for Ease)
- Remove and Prepare the Door: Carefully remove the cabinet door from the hinges. Remove any handles or knobs. Clean the surface thoroughly, ensuring it is smooth, dry, and free of grease.
- Measure and Cut the Material: Measure the flat, front surface of the cabinet door precisely. Transfer these dimensions onto the back of your contact paper or wallpaper. Use a straight edge and a utility knife to cut the piece exactly to size.
- Apply the Tile Covering: Peel a few inches of the backing from the top edge of the contact paper. Align the paper perfectly with the top edge of the cabinet door. Slowly peel the backing downward, using a credit card or smoothing tool to press the paper onto the door surface, working out all air bubbles as you go. Work slowly to prevent wrinkles.
- Trim and Finish Edges: If there is any slight overhang, carefully trim it using a sharp utility knife along the edge of the door.
- Re-Install Hardware: Once the decorative surface is applied smoothly, use a small tool or knife to locate and pierce the holes for the handle and hinges. Re-install the handle or knob.
- Re-Hang the Door: Reattach the finished cabinet door onto the hinges. The newly patterned door provides a bold, fresh storage accent.
26. Classic Linen Tower with Integrated Hamper

This traditional bathroom storage tower is a masterclass in combining high-volume capacity with specialized, hidden features. The tall cabinet is finished in an attractive gray tone and features a small row of vanity drawers to the left for immediate organization. The main cabinet, however, opens to reveal two distinct storage areas.
To the left, a series of very narrow, shallow shelves run floor-to-ceiling, creating a fantastic pantry for small bottles, cosmetics, and first-aid supplies. This slim design ensures no item gets lost in a deep cabinet corner. To the right, the lower section includes two tilt-out hampers concealed behind false drawer fronts. This system provides a clean, convenient way to manage laundry right where it starts. Above the hampers, deep shelving is perfect for storing extra towels and bulk items, maximizing space from top to bottom.
????️ DIY Instruction: How to Add a Tilt-Out Hamper to an Existing Cabinet
This DIY focuses on retrofitting a bottom cabinet area to include a tilt-out laundry hamper or bin, replacing a standard door.
Materials Required
- Hamper bin (preferably plastic or canvas, sized to fit the cabinet width and depth).
- Two hinge mechanisms (specific tilt-out hinge hardware).
- Two chain or cable stays (to control how far the panel opens).
- Wood screws (appropriate length for the hinges).
- Existing cabinet door or a new flat panel cut to fit the opening.
Equipment Required
- Power drill.
- Drill bits.
- Screwdriver.
- Measuring tape.
- Level.
- Safety glasses.
DIY Instruction Step by Step
- Remove Existing Door (If Necessary): If you are converting a standard cabinet, remove the existing door and hinges. If you are using a new panel (to mimic the double-hamper look), measure and cut the panel to fit the opening with appropriate gaps.
- Install Tilt-Out Hinges: Position the bottom tilt-out hinge mechanism inside the cabinet opening, along the bottom front edge. Use a level to ensure the hardware is straight. Pre-drill pilot holes and screw the hinge mechanism securely to the bottom of the cabinet frame.
- Attach Hinges to Panel: Attach the corresponding hinge parts to the bottom edge of the cabinet door/panel. These hinges must be aligned precisely with the fixed hardware in the cabinet frame.
- Mount the Panel: Carefully attach the door/panel to the cabinet frame via the newly installed hinges. Test the tilting motion—it should swing out smoothly from the bottom.
- Install Chain/Cable Stays: The cable stays prevent the door from swinging down too far. Measure the appropriate length for the chain or cable to stop the panel at a comfortable angle (usually 45-60 degrees). Secure one end of the chain/cable to the interior side wall of the cabinet and the other end to the inside of the tilting door panel using screws.
- Place the Hamper: Slide the plastic or canvas hamper bin into the cabinet cavity. The bin should be easily accessible when the door is tilted open. Re-install the drawer pull or handle on the tilting panel.
27. Concrete and Walnut Floating Vanity

This design relies on high-quality materials and clean lines to create an organized, minimalist aesthetic. The floating vanity features a striking contrast between a concrete-look frame and deep, solid walnut drawers. This heavy material combination is elevated by its wall-mounted installation, which creates an illusion of space underneath and simplifies cleaning.
The vanity uses two deep, full-extension drawers to house all supplies, preventing the need for external storage. The open bottom drawer reveals a divided interior, keeping toiletries and larger items neatly separated and visible. Above the sink, a large medicine cabinet framed in the same walnut wood provides additional hidden storage. This cabinet also features a small open shelf along the bottom edge, a perfect spot for hand towels and a few small, decorative items you need immediately accessible. This focus on hidden, customized drawer storage results in a sleek, tidy room.
????️ DIY Instruction: How to Add a Towel Bar to a Floating Vanity Side
This DIY focuses on adding a simple, sleek towel bar to the concrete-look side panel of the floating vanity for quick access to hand towels.
Materials Required
- Single-arm towel bar or ring (metal, with screw-on mounting).
- Heavy-duty masonry or tile drill bit (if drilling into concrete or faux concrete).
- Wall anchors (appropriate for mounting into your vanity material).
- Pencil.
- Measuring tape.
Equipment Required
- Power drill.
- Screwdriver.
- Level.
- Safety glasses.
DIY Instruction Step by Step
- Mark the Location: Decide on the best height for the towel bar on the side of the floating vanity, ensuring the towel clears the floor. Hold the mounting bracket (often part of the towel bar kit) against the vanity side panel. Use a pencil to mark the screw holes. Use a level to ensure the marks are perfectly vertical.
- Drill Pilot Holes: Put on your safety glasses. If the vanity material is thick and hard (like concrete or engineered wood), use the appropriate drill bit (masonry/tile bit for concrete, standard bit for wood). Drill pilot holes at the marked locations.
- Install Anchors: If the vanity side panel is hollow or thin, install the correct type of wall anchor (like a toggle bolt or molly bolt) into the pilot holes to ensure the towel bar can support the weight of a damp towel.
- Mount the Bracket: Secure the mounting bracket(s) from the towel bar kit firmly to the vanity side panel using the screws and anchors.
- Install the Towel Bar: Attach the towel bar arm or ring to the mounted bracket according to the kit instructions. This usually involves snapping it into place or tightening a small set screw.
- Test and Use: Give the bar a firm tug to ensure it is secure. Once confirmed, you can hang your hand towels for quick and easy access.
28. Woven Basket Shelving and Bohemian Style

This warm, inviting bathroom achieves high organization through a beautiful, consistent use of woven storage baskets. Open, chunky wooden floating shelves wrap around the corner, creating accessible space for display and storage. The shelves are then filled with various sized woven baskets, many featuring white fabric liners tied with bows. This method keeps clutter completely hidden while the consistent natural texture unifies the decorative look.
The use of baskets on open shelves is highly effective because it allows you to easily categorize items—one for cotton swabs, one for hair accessories, and one for clean hand towels. Below the sink, the open vanity structure continues the theme, with smaller tiered shelving and larger, floor-standing woven bins tucked underneath. This entire scheme emphasizes natural materials and the power of beautiful containers to contain clutter.
????️ DIY Instruction: How to Install Simple Floating Shelves for Basket Storage
This DIY focuses on installing the simple, sturdy floating shelves necessary to support the weight of loaded baskets.
Materials Required
- Thick wooden planks (pre-sanded and finished).
- Floating shelf brackets (heavy-duty, concealed rod style).
- Wood screws (to secure brackets to studs).
- Wall anchors (if studs are not available).
- Measuring tape and pencil.
Equipment Required
- Stud finder.
- Level (long).
- Power drill and drill bits.
- Screwdriver.
- Safety glasses.
DIY Instruction Step by Step
- Mark and Level: Determine the desired height and length for the shelf. Use a level and a pencil to draw a perfectly horizontal line on the wall for the bracket placement.
- Locate Studs: Use the stud finder to locate and mark the wall studs that fall along your horizontal line. Hitting studs with your brackets is critical for supporting heavy storage baskets.
- Install Brackets: Hold the floating shelf bracket against the wall, aligning the top edge with your drawn line. Mark the screw holes. Drill pilot holes and secure the bracket to the wall, using long wood screws for studs and appropriate heavy-duty anchors for areas without studs.
- Prepare the Shelf Plank: Most concealed rod floating shelf brackets require corresponding holes to be drilled horizontally into the back edge of the shelf plank. Measure the exact position of the bracket rods and drill holes into the back of the plank to match. The holes must be perfectly straight and deep enough for the plank to slide fully onto the rods.
- Mount the Shelf: Slide the wooden plank firmly onto the bracket rods until it sits flush against the wall. Some kits require a final set screw to secure the plank to the bracket.
- Test and Load: Check the shelf with the level one last time. Once secure, the shelf is ready to hold your beautiful woven storage baskets.
29. Salon-Style Vanity with Hot Tool Storage

This sophisticated, double-sink vanity is designed for dedicated grooming and makeup application. The deep purple cabinetry with white countertops creates a striking look. The storage system focuses on internal organization, particularly for electric tools and cosmetics. A power strip is built right into the shallow drawer space beneath the countertop, providing easy access to electricity for charging or using tools.
Below this power strip, the pull-out drawers are customized with soft gray, segmented organizers. These compartments are perfectly sized for lipsticks, makeup brushes, and foundation bottles. The deep lower drawers feature heat-resistant lining and specialized sections designed to hold hot tools like hair dryers and curling irons while they cool down or while they are being used, keeping cords contained and counters clear. This integrated organization turns grooming into an efficient, clutter-free experience.
????️ DIY Instruction: How to Line a Drawer for Heat-Resistant Tool Storage
This DIY focuses on lining a specific drawer with heat-resistant material to safely store curling irons and hair dryers.
Materials Required
- Heat-resistant silicone matting (like a grilling mat or specialized heat-resistant drawer liner).
- Strong adhesive spray (if the matting is not self-adhesive).
- Measuring tape.
- Utility knife or scissors.
Equipment Required
- Straight edge or ruler.
DIY Instruction Step by Step
- Measure and Clean: Empty the drawer completely. Measure the internal width and depth of the drawer. Clean the drawer bottom thoroughly to ensure any adhesive bonds properly.
- Mark the Matting: Transfer the drawer dimensions onto the back of the heat-resistant matting material. Be sure to account for any internal drawer curve or lip.
- Cut the Matting: Use a sharp utility knife or scissors and a straight edge to cut the matting precisely to size.
- Secure the Lining: If the matting is not self-adhesive, spray a thin, even layer of adhesive spray onto the bottom of the drawer. Carefully place the cut matting onto the glued surface, starting from one corner and smoothing it out to remove any air bubbles or wrinkles.
- Allow Curing: Allow the adhesive to cure fully according to the instructions.
- Organize Hot Tools: Once the liner is secure, place your hair dryers and curling irons into the drawer. The heat-resistant material protects the wood, and the contained space keeps the tools and their cords neatly out of sight.
30. Over-the-Toilet Vertical Storage Cabinet

This solution maximizes often-unused space right above the toilet tank. The vertical wall-mounted cabinet is slim and tall, providing multiple storage tiers without protruding awkwardly into the room. This unit cleverly uses a combination of open shelving and designated drawers to keep things categorized and tidy.
The open shelves are perfect for neatly folded towels and decorative items like diffusers. The lower section features pull-out trays and bins, many of which are labeled for items like toiletries, extra linens, or medicine. This use of labeled, contained storage makes finding specific supplies effortless. The cabinet even includes a small row of hooks mounted along the bottom edge, a simple but effective spot for hanging keys or small hand towels. A tray placed right on top of the toilet tank provides one final decorative spot for a guest book or a small plant.
????️ DIY Instruction: How to Create and Apply Labeled Storage Bins
This DIY focuses on creating the easily legible labels for the storage bins and trays within the cabinet, improving organization and maintenance.
Materials Required
- White vinyl sticker paper or label sheets (suitable for printing).
- Clear vinyl or clear tape (for waterproofing the label).
- Computer and printer.
- Scissors or paper cutter.
- Pencil.
Equipment Required
- Printer.
DIY Instruction Step by Step
- Design the Labels: Open a word processing or design program on your computer. Choose a clear, easy-to-read font (like sans-serif) and a large enough size (e.g., 40-70 point) to be legible from a distance. Type out the names for your categories (e.g., “TOILETRIES,” “SOAP,” “EXTRA LINENS”).
- Print and Cut: Print the labels onto the white vinyl sticker paper. Allow the ink to dry completely. Use scissors or a paper cutter to cut out each label precisely.
- Waterproof the Labels: To protect the paper labels from bathroom humidity and moisture, cut a piece of clear vinyl or wide clear packing tape slightly larger than the label. Carefully place the clear cover over the top of the printed label, smoothing out any bubbles.
- Prepare the Bin Surface: Wipe the surface of the plastic bins or trays where the label will be applied to ensure it is clean and dry.
- Apply the Label: Peel the backing off the printed vinyl sticker (or the sticky side of the clear tape, if you waterproofed a non-sticker label). Align the label carefully on the front of the bin or tray. Press it down firmly, working from the center outward to secure it neatly.
- Organize and Maintain: Place the labeled bins back into the cabinet shelves. The clear, consistent labeling makes it simple for everyone to know where items belong, ensuring the storage stays organized longer.
31. Multi-Functional Laundry Cabinetry and Bench

This thoughtful storage system provides a complete solution for laundry and utility items, often found within a larger bathroom or dedicated laundry room. Two tall cabinets flank a built-in window seat, maximizing storage space around the natural light source. The cabinets are finished in a calming, pale blue-green tone and feature louvered doors on top for necessary ventilation.
The interiors of these cabinets are incredibly versatile, utilizing both open shelves for stacking linens and durable wire baskets for sorting and holding supplies. On the right, notice the genius use of the cabinet side for hanging an ironing board. The window seat serves dual duty: it offers a comfortable spot to sit, and the hinged lid opens to reveal a deep storage chest below, perfect for toys or large bulk items. Hooks are also placed on the vertical cabinet sides for hanging robes and other items.
????️ DIY Instruction: How to Mount an Ironing Board Rack to a Cabinet Side
This DIY focuses on installing a dedicated metal rack to the side of a tall cabinet to store a folding ironing board (as seen on the right cabinet).
Materials Required
- Ironing board hanger/rack (metal, L-shaped, or hook style).
- Wood screws (appropriate length for the cabinet material).
- Measuring tape and pencil.
Equipment Required
- Power drill.
- Small drill bits (for pilot holes).
- Screwdriver.
- Level.
- Safety glasses.
DIY Instruction Step by Step
- Mark Rack Location: Hold the ironing board rack against the side of the cabinet where you want it placed. Ensure the height allows the board to hang without touching the floor and that the rack is positioned where the board will be balanced. Mark the screw holes onto the cabinet side panel.
- Ensure Vertical Alignment: Use a level to verify that your marked screw holes are vertically aligned. Adjust the marks if necessary to ensure the rack is mounted straight.
- Pre-Drill Pilot Holes: Put on your safety glasses. Use the power drill and a drill bit slightly smaller than your screws to drill pilot holes at the marked locations. This prevents the wood finish from splitting when screws are driven in.
- Secure the Rack: Align the rack over the pilot holes and secure it firmly to the cabinet side panel using the wood screws. Tighten the screws until the rack is completely stable.
- Hang and Test: Hang the folding ironing board onto the rack. Give it a small tug to ensure the rack holds the weight securely. The ironing board is now stored neatly and ready for use.
32. Sleek All-White Vanity and Mirror System

This striking bathroom utilizes a monochromatic, high-gloss white finish to achieve an illusion of vast, organized space. The entire wall is dedicated to storage, combining open shelving with mirrored cabinet doors. The mirrored medicine cabinets, flanked by vertical LED light strips, reflect the room, dramatically increasing the sense of depth. These mirrored panels hide essentials right above the sink.
The storage towers on either side feature full-height, open shelving with adjustable rails. This open design provides easily accessible storage for neatly folded towels and decorative items like vases. Subtle lighting is integrated into the shelving units, drawing attention to the pristine organization. The continuity of the white color across the shelves, walls, and floor creates a seamless, tidy, and incredibly luxurious aesthetic where clutter has no place.
????️ DIY Instruction: How to Install Subtle LED Strips within Open Shelving
This DIY focuses on adding concealed LED strip lighting to the underside of shelves to highlight items and provide ambient lighting (as seen on the open shelves).
Materials Required
- Thin LED tape lighting kit (low voltage, plug-in or battery).
- Adhesive-backed wire channels or clips.
- Rubbing alcohol and clean cloth.
- Measuring tape.
Equipment Required
- Scissors (to cut the strip).
- Screwdriver (if using screw-in clips).
DIY Instruction Step by Step
- Plan the Path: Measure the length of the shelf’s underside (the surface where the light strip will sit). Determine the most discreet path for the main power wire to run from the strip down the back corner of the shelving unit to the power source.
- Clean the Surface: Wipe down the underside of each shelf thoroughly with rubbing alcohol. This step is essential for the adhesive backing of the LED strip to stick firmly.
- Attach the Strip: Peel the backing off the LED strip. Starting at the back edge of the shelf, press the strip firmly along the entire underside, ensuring it is straight and hidden from view when viewed from eye level. Repeat for all shelves.
- Route and Conceal Wiring: Use the small adhesive wire channels or clips to secure the connecting wires along the vertical sides of the shelving unit or down the back corner. Ensure all wires are firmly pressed into the channels so they are nearly invisible.
- Connect and Test: Connect the main power cord to the last strip and plug it into the outlet. Test the lights to ensure all shelves are illuminated. If the shelf unit is designed to hide the power source, make sure the final wire connection is also concealed.
33. Colorful Modular Metal Locker Cubbies

This fun and dynamic storage unit uses industrial metal locker cabinets to create unique, assigned storage spaces. The nine individual cubbies, finished in bright primary and secondary colors, stack together to maximize vertical storage. This is an exciting solution, especially for a family bathroom, as each member can have their own private, lockable compartment.
Each door opens to reveal deep internal storage, often utilizing wire baskets to hold items like shampoo, hair products, or cleaning supplies. The perforated door fronts and keys add to the vintage, functional style. Some lockers are personalized with photos or labels, further encouraging ownership and organization. The contrasting bright colors against the neutral wall make this a bold, high-capacity, and very tidy statement piece.
????️ DIY Instruction: How to Assemble and Anchor Modular Metal Lockers
This DIY focuses on safely assembling and securing three stacks of three modular metal lockers (or similar cabinets) to form a stable wall unit.
Materials Required
- Nine individual metal locker cube units.
- Locker connectors or small bolts/nuts (to join the units horizontally).
- Wall anchor kit (L-brackets or cable ties for anti-tipping).
- Measuring tape and pencil.
Equipment Required
- Power drill (if using screw-in wall anchors).
- Screwdriver or wrench (to tighten bolts).
- Level.
- Safety glasses.
DIY Instruction Step by Step
- Assemble the Vertical Stacks: Start by assembling the individual three-unit vertical stacks according to the manufacturer’s instructions. If the lockers did not come with connecting hardware, use small bolts and nuts to join the cubes at their corners where they meet, ensuring each stack is sturdy.
- Position the Stacks: Place the three fully assembled vertical stacks side-by-side on the floor in their final location. Ensure they are perfectly aligned.
- Join the Stacks Horizontally: Use bolts, nuts, or small metal plates to connect the three vertical stacks to each other at their meeting points (top, middle, and bottom). This turns the three columns into one solid, stable block.
- Anchor to the Wall (Crucial Safety Step): This tall unit must be secured to the wall to prevent tipping. Use an L-bracket or a dedicated anti-tip cable tie system. Attach the bracket/tie to the top back corner of the central locker column. Locate a wall stud and secure the bracket firmly into the stud using a long screw. If a stud is not available, use a heavy-duty wall anchor.
- Level and Test: Use a level on the top surface and the side of the entire block to ensure it is plumb (straight). Gently rock the unit to confirm it is fully anchored and stable before loading the cabinets.
34. Bamboo Ladder Shelf and Vanity Combination

This organized arrangement uses the warm, natural look of bamboo for both the vanity base and a vertical ladder shelf. The lower vanity provides necessary under-sink storage, featuring closed doors to keep clutter hidden. When the door is opened, you see internal shelving populated with woven baskets for contained storage. A small light strip inside the door helps illuminate the contents.
The high ladder shelf rises above the vanity, maximizing vertical space. It features multiple tiers of open shelving, perfect for displaying decorative jars and holding easily accessible towels. A towel bar runs horizontally between the main vertical supports, providing a quick-access spot for hand towels right above the sink. This combination of concealed and open bamboo storage is stylish, highly functional, and space-conscious.
????️ DIY Instruction: How to Add Interior Lighting to a Cabinet Door
This DIY focuses on installing a simple, battery-powered LED bar light inside a cabinet door to automatically illuminate the contents upon opening.
Materials Required
- Battery-powered LED bar light with magnetic or adhesive mounting (look for one with a motion sensor or manual open/close switch).
- Measuring tape.
- Pencil.
- Rubbing alcohol and clean cloth.
Equipment Required
- Screwdriver (if battery pack needs to be opened).
DIY Instruction Step by Step
- Clean and Prepare: Empty the cabinet and clean the inside surface of the cabinet door or the inner frame where the light will mount. Use rubbing alcohol to ensure a clean, dry surface.
- Determine Placement: Decide where the light will best illuminate the shelves—usually near the top or middle of the door opening. Mark the exact placement of the light bar.
- Mount the Light: Peel the backing off the adhesive strips on the back of the LED bar or its mounting plate. Align the light bar with your marks and press it firmly onto the clean surface.
- Test the Switch (Important): If the light has a motion sensor, ensure the sensor is positioned to detect the door opening. If it has a manual switch, test that the light can be easily turned on when the door is open. If your door has a frame, mount the light bar to the inside of the frame where it is least visible when the door is closed.
- Finalize: Ensure the light bar is secure. Close and open the door several times to check that the light is functioning correctly and is not interfering with the closing mechanism.
35. Attic Eave Drawers and Custom Slanted Storage

This unique solution proves that awkward attic eaves or sloped ceilings can be transformed into high-efficiency storage. A series of deep, custom drawers is built directly into the slanted wall structure. These drawers vary in size, following the angle of the ceiling line. This innovative design maximizes otherwise unusable square footage.
The drawers utilize full-extension slides, revealing deep, custom wood dividers that ensure every item is contained and visible. The varying sizes make them useful for everything from linens and bulk supplies in the larger drawers to smaller toiletries and grooming tools in the shallower ones. The flat white drawer fronts maintain a clean aesthetic, making the sloped organization look intentional and sophisticated.
????️ DIY Instruction: How to Create Simple Angled Drawer Dividers
This DIY focuses on creating the wood dividers for the sloped drawers shown, ensuring they fit the tapered drawer interior.
Materials Required
- Thin plywood or wood strips (for the dividers).
- Wood glue.
- Measuring tape.
- Pencil.
- Fine-grit sandpaper.
Equipment Required
- Hand saw or table saw (for making straight and angled cuts).
- Angle finder or protractor (to measure the drawer’s slope).
- Clamps.
- Safety glasses.
DIY Instruction Step by Step
- Measure the Drawer and Angle: Empty the drawer. Measure the full interior width and depth. Most importantly, use an angle finder or protractor to determine the exact angle of the slope (the angle where the front divider will meet the side wall).
- Measure and Cut Side Dividers: Cut the long, horizontal side divider pieces to the required length. These pieces will be square-cut.
- Measure and Cut Slanted Dividers (The Angled Pieces): Measure the exact length needed for the front-to-back dividers. Cut the bottom edge of these pieces square, but cut the top edge to the angle you measured in step 1. This ensures the divider sits level within the sloped drawer.
- Assemble and Glue: Assemble the grid structure on a flat surface. Apply wood glue along the bottom edge of all dividers and at the joints where they meet.
- Install the Grid: Place the completed grid into the drawer. The angled dividers should sit flush with the sloped sides, creating straight, level compartments. Use clamps or painter’s tape to hold the pieces while the glue cures.
- Cure and Load: Allow the glue to dry completely. The custom compartments are now ready to efficiently organize items within the challenging sloped space.
36. Stacked Vintage Crate Storage System

This rustic storage solution uses old wooden crates, often labeled with stenciled text, to create a tall, unique, and highly categorized shelving system. The crates are stacked vertically, some secured to the wall, transforming these humble utility containers into attractive, high-capacity bathroom storage. The varied placement of the stacked crates and the single wall-mounted crate adds visual complexity.
The open nature of the crates makes them excellent for visible storage, perfect for rolled towels, baskets, and decorative mason jars holding cotton swabs or bath bombs. The large, bold labels, like “LINENS” and “SOAPS,” ensure that every item has a clear category and location. This entire look is tied together by the exposed piping under the sink, which also serves as a metal rack for hanging towels, reinforcing the vintage, industrial-rustic charm.
????️ DIY Instruction: How to Stencil and Secure Wooden Crate Storage
This DIY focuses on preparing the crates (stenciling) and safely securing them into a stacked shelving unit.
Materials Required
- Wooden crates (various sizes, sanded smooth).
- Paint (for stenciling).
- Stencils (for words like “LINENS” or “SOAPS”).
- Screws (long, for wall mounting).
- Small wood screws (for securing crates together).
- Measuring tape.
Equipment Required
- Sandpaper.
- Paint brush or foam stamper.
- Power drill and drill bits.
- Screwdriver.
- Stud finder.
- Level.
- Safety glasses.
DIY Instruction Step by Step
- Prepare and Stencil the Crates: Sand the wooden crates smooth. Place the stencil on the front of the crate. Use a small paintbrush or foam stamper to apply the paint evenly over the stencil openings. Let the paint dry completely before handling.
- Determine Stack Layout: Arrange the crates on the floor in the desired final stack. Use a pencil to mark the exact locations where the crates touch each other (at the top and bottom corners).
- Secure Crates Together: Put on your safety glasses. Use the power drill to pre-drill pilot holes through the marked touching points of the crate sides. Drive small wood screws through the pilot holes to securely fasten each crate to its neighbor, creating a single, stable tower.
- Anchor to the Wall (Essential): Use a level to ensure the finished tower is straight. Locate the wall studs behind the tower using the stud finder. Pre-drill two pilot holes through the top back edge of the highest crate and into the wall studs. Use long screws to anchor the entire crate tower firmly to the wall. If a stud is not available, use heavy-duty wall anchors.
- Final Placement and Load: Once securely stacked and anchored, the unit is ready to hold your linens and soaps.
37. Asymmetrical Floating Shelves with Integrated Light

This sleek storage system features an attractive, asymmetrical arrangement of dark wood floating shelves, turning a functional space into a modern art installation. The shelves vary in size and depth, creating a stepped, layered appearance that draws the eye upward. This open vertical arrangement is an outstanding way to display curated items and keep towels readily available.
The largest shelf section is a wide, open-box design that includes concealed LED lighting along the top edge. This lighting provides a soft, warm wash of light over the towels and decorative objects below. The entire installation hangs above a complementary dark-wood floating vanity with a bright white countertop, utilizing the space beneath the counter for accessible towel storage. The use of metal and glass boxes on the upper shelves adds another layer of organization and visual interest.
????️ DIY Instruction: How to Create and Mount Simple Box-Style Floating Shelves
This DIY focuses on building and securely mounting the box-style shelves that appear deeper and more substantial than simple plank shelves.
Materials Required
- Plywood or MDF board (to construct the box).
- Wood glue and clamps.
- Primer and dark wood stain or paint.
- Floating shelf brackets (heavy-duty, internal rod style).
- Measuring tape.
Equipment Required
- Table saw or circular saw (for straight cuts).
- Power drill and drill bits.
- Screwdriver.
- Level.
- Safety glasses.
DIY Instruction Step by Step
- Cut the Box Pieces: Measure and cut the plywood/MDF into six pieces for one box: top, bottom, two sides, and a front frame piece (optional, to hide edges). Cut a piece for the backing (optional, but recommended for stability).
- Assemble the Box: Apply wood glue along the edges where the pieces meet. Assemble the box shape (a basic cube or rectangle), using clamps to hold the joints tightly together. If using a backing piece, glue and nail it to the frame. Wipe away excess glue. Allow the glue to dry completely.
- Finish the Box: Once the glue is cured, sand the box smooth. Apply primer, then paint or stain the box in the desired dark wood tone. Allow the finish to cure fully.
- Mount the Bracket: Locate studs in the wall. Draw a level line where the shelf will sit. Secure the heavy-duty floating shelf bracket to the wall, hitting studs wherever possible.
- Drill Shelf Holes: Measure the position of the bracket rods. Carefully drill corresponding holes into the back of the finished shelf box, ensuring the drill is perfectly straight and level.
- Install the Shelf: Slide the shelf box onto the bracket rods until it sits flush against the wall. Secure the shelf box to the bracket with a small set screw if your hardware kit includes one. Repeat for all staggered shelves.
- Decorate and Load: Once secured, the substantial floating box shelf is ready for decorative items and towels.
38. Textured Vanity with Leather Pull Drawers

This elegant vanity achieves a high level of customized organization hidden behind a stunning textured exterior. The cabinet fronts are covered in a beautiful, natural linen or woven material, giving the piece a rich, tailored feel. The rich brown leather loop pulls on the drawers serve as both functional handles and a sharp design accent.
Opening the drawers reveals deep, segmented compartments built from natural wood. These internal boxes allow for easy categorization of items, keeping products from mixing together. The middle drawer is dedicated to soft, folded towels, while the outer drawers provide ample space for toiletries and supplies. This system proves that vanity storage can be highly aesthetic on the outside while maintaining rigid, clutter-free organization on the inside, keeping the counter surface beautifully clear.
????️ DIY Instruction: How to Make and Install Leather Drawer Pulls
This DIY focuses on creating and replacing standard metal hardware with the distinctive, leather loop drawer pulls shown on the vanity.
Materials Required
- Leather strip (thick, durable leather suitable for handles).
- Screw posts or cap rivets (to secure the loop).
- Measuring tape and pencil.
- Optional: Leather dye or conditioner.
Equipment Required
- Utility knife or rotary cutter (for cutting leather).
- Leather hole punch (with multiple sizes).
- Straight edge or ruler.
- Safety glasses.
DIY Instruction Step by Step
- Measure and Cut Leather: Determine the desired length of the leather loop (the exposed loop plus the portion hidden by the screw posts). The length shown in the image is typically 6 to 8 inches. Use a straight edge and a utility knife or rotary cutter to cut the leather strips to this length and your desired width (e.g., 1 inch).
- Mark and Punch Holes: Fold the leather strip into a loop. Mark the two points where the holes need to be punched to secure the loop. Use the leather punch to create clean, precise holes at these marked points. The holes should be sized to accommodate the screw posts or rivets you are using.
- Attach Screw Posts/Rivets: Insert the screw post base through the two aligned holes in the leather loop (so the leather is folded). If using rivets, use the rivet tool to securely attach the rivet cap. This creates the finished loop shape.
- Remove Old Hardware: Unscrew and remove the existing drawer handles or pulls from your vanity.
- Install the New Pulls: Align the screw posts or the secure point of the leather loop with the existing holes in your drawer front. Using new screws that thread into your screw posts (or simply using wood screws through the loop hole if mounting a single hole), carefully attach the leather pull to the drawer front. Ensure it is secured tightly enough to pull the drawer open easily.
- Repeat and Finish: Repeat the process for all drawers. The new leather pulls offer a rustic, updated look.
39. Ultra-Slim Hot Tool Pull-Out Cabinet

This ingenious solution maximizes the space between a vanity and an adjacent cabinet by installing a very narrow, full-height pull-out unit. This vertical drawer is designed specifically for electric grooming tools, which often cause cord clutter on countertops. The unit features a full-extension slide, bringing the entire contents into view.
The interior is structured with a slim profile metal frame, and it includes several thoughtful features. Built-in electrical outlets are mounted directly onto the interior back panel, allowing hair dryers and curling irons to remain plugged in and ready to use, even while the cabinet is closed. Specialized holders and hooks keep the tools secure and vertically organized, preventing tangled cords. The front door panel also features a magnetic strip, providing easy access storage for bobby pins and clips. This vertical organization completely removes the need to store tools on the countertop.
????️ DIY Instruction: How to Build a Magnetic Strip for Small Hair Clips
This DIY focuses on adding the magnetic strip, as seen on the side of the cabinet door, for quick storage of small metal hair clips and pins.
Materials Required
- Thin magnetic strip (adhesive-backed, like craft magnet tape, or a small metal strip).
- Strong metal adhesive (if using a non-adhesive metal strip).
- Measuring tape and pencil.
- Rubbing alcohol and clean cloth.
Equipment Required
- Scissors or utility knife.
DIY Instruction Step by Step
- Clean and Measure: Decide where on the cabinet door or panel the magnetic strip will be placed. Clean the surface thoroughly with rubbing alcohol. Measure and mark the length of the strip you plan to install.
- Cut the Magnetic Strip: Use scissors or a utility knife to cut the adhesive-backed magnetic tape to the measured length.
- Apply the Strip: Peel the backing from the adhesive tape. Carefully align the strip with your mark and press it firmly onto the cabinet surface. If using a non-adhesive metal strip, apply a small amount of strong metal adhesive to the back before pressing it firmly into place.
- Allow Adhesion: Allow the adhesive (if used) to cure fully according to the instructions.
- Test and Use: Place a few metal clips or bobby pins onto the strip to test the magnetic hold. The clips should stick firmly, providing instant, easy-access storage for small metal items.
40. Full-Length Swivel Storage Tower and Mirror

This revolutionary piece of furniture combines three essential functions into one, floor-to-ceiling unit: a full-length mirror, storage, and mobility. The tall cabinet rests on a sturdy swivel base, allowing it to rotate 360 degrees. One side features a full-length mirror, while the reverse side and interior panels are dedicated entirely to organization.
The storage side utilizes numerous open shelves, customizable cubbies, and clear drawers for maximum categorization. The arrangement ensures small items, linens, accessories, and bottled products are all neatly accounted for. Notably, there are dedicated vertical racks for hanging ties, scarves, or belts. This design is exceptional for smaller spaces, as it offers extensive, compartmentalized storage without requiring the footprint of a traditional separate mirror and cabinet.
????️ DIY Instruction: How to Add Hanging Scarf/Belt Racks to Open Shelving
This DIY focuses on adding small, simple rack hardware to the side of an open shelving unit to hang accessories like belts and scarves (as seen on the far left interior).
Materials Required
- Small metal robe hooks, adhesive hooks, or small decorative metal rods.
- Wood screws (if using metal hooks).
- Measuring tape and pencil.
- Optional: Wood glue.
Equipment Required
- Power drill and small drill bits.
- Screwdriver.
- Safety glasses.
DIY Instruction Step by Step
- Mark Hook Placement: Decide where on the vertical side panel of the open shelving you want the hooks to hang. Use a pencil to mark the desired vertical spacing for each hook (e.g., 6 to 8 inches apart).
- Pre-Drill Pilot Holes: Put on your safety glasses. Use a power drill and a small drill bit to pre-drill pilot holes at each marked location.
- Install the Hooks: Align the metal hooks over the pilot holes and secure them firmly to the cabinet panel using wood screws. Ensure they are straight and tight. If using adhesive hooks, simply peel the backing and press them firmly onto the cleaned cabinet surface.
- Test and Organize: Once the hooks are installed, use them to hang belts, scarves, or other long accessories, keeping them unwrinkled and easy to find.
41. Modular Stainless Steel Organizing System

This contemporary storage solution centers around a versatile, wall-mounted organizing system constructed primarily from stainless steel. A large sheet of stainless steel is mounted behind the sink, serving as a clean, reflective backsplash. This metal surface acts as a base for various modular magnetic or screw-on accessories, creating high-density vertical storage.
The system incorporates deep shelves for holding bottles and sprays, small caddies for toothbrushes and soaps, and specialized trays for charging phones or storing appliances. A separate, lower section organizes small bottles of spices or toiletries, keeping them clearly visible. This vertical, layered organization minimizes counter clutter completely. Even the toothbrushes and magnifying mirrors are mounted directly onto the wall, leveraging every available inch of vertical space around the sink area.
????️ DIY Instruction: How to Install a Modular Stainless Steel Backsplash Panel
This DIY focuses on safely mounting the main stainless steel panel onto the wall behind the sink to serve as the base for the modular accessories.
Materials Required
- Stainless steel sheet or pre-cut backsplash panel (thin gauge).
- Construction adhesive (strong, high-temp rated).
- Optional: Stud screws for extra security (if mounting into drywall/studs).
- Painter’s tape.
- Rubbing alcohol and clean cloth.
Equipment Required
- Caulk gun (for adhesive).
- Level.
- Measuring tape.
- Pencil.
- Safety glasses.
DIY Instruction Step by Step
- Measure and Clean: Measure the exact area where the panel will be mounted. Ensure the wall is clean, dry, and free of dust. Wipe down the back of the stainless steel panel with rubbing alcohol.
- Apply Adhesive: Apply a generous but even amount of construction adhesive to the back of the stainless steel panel. Apply the adhesive in a zig-zag pattern around the edges and center. Avoid putting adhesive too close to the edges, as it will squeeze out.
- Mount the Panel: Have a helper assist you. Carefully lift the panel and align it with the desired placement on the wall (above the sink). Press the panel firmly against the wall. Use a level immediately to ensure it is straight.
- Secure and Brace: Use painter’s tape to hold the edges of the panel temporarily in place while the adhesive cures. If possible, brace the bottom edge of the panel with a piece of wood resting on the countertop until the adhesive is set.
- Cure and Caulk: Allow the adhesive to cure fully (often 24-48 hours). Once set, carefully remove the painter’s tape. Apply a thin bead of silicone caulk (kitchen/bath grade) around the entire perimeter of the stainless steel panel where it meets the wall and the countertop. This seals out moisture and provides a finished look.
- Install Accessories: Once the caulk is cured, you can begin attaching your modular magnetic or screw-in stainless steel storage accessories to the panel.
You now have 41 distinct strategies to approach your bathroom storage challenges. Notice how these solutions emphasize vertical space, customized compartments, and concealed power sources. Applying just a few of these ideas can make a huge difference in your daily routine.
The main takeaway here is that organization is not about buying generic containers; it is about tailoring storage to fit your exact needs. Focus on maximizing drawer interiors, utilizing the often-forgotten space above the toilet, and using specialized materials like woven baskets or metal lockers for categorization.
Start small, perhaps by tackling just one cluttered drawer using a simple divider DIY. Then, gradually build toward a larger integrated system. Welcome a truly organized and peaceful new year.