
Starting a home renovation is incredibly exciting, filled with dreams of open concepts and beautiful new finishes. However, that excitement can quickly turn into anxiety if you bypass the critical planning phase. Many homeowners underestimate the sheer complexity of a large scale renovation, especially the demolition stage.
The demolition process is more than just tearing things down; it is the calculated and safe removal of the old structure to prepare for the new build. Mistakes made before demolition begins, from skipping permits to inadequate structural support, can lead to costly delays or, worse, dangerous structural failures.
This comprehensive guide is designed to make sure your renovation journey starts on solid ground. We’ve condensed the entire preparation process into 37 essential, nonnegotiable steps. Following this checklist ensures your project is legal, safe, on budget, and ready for a successful rebuild.
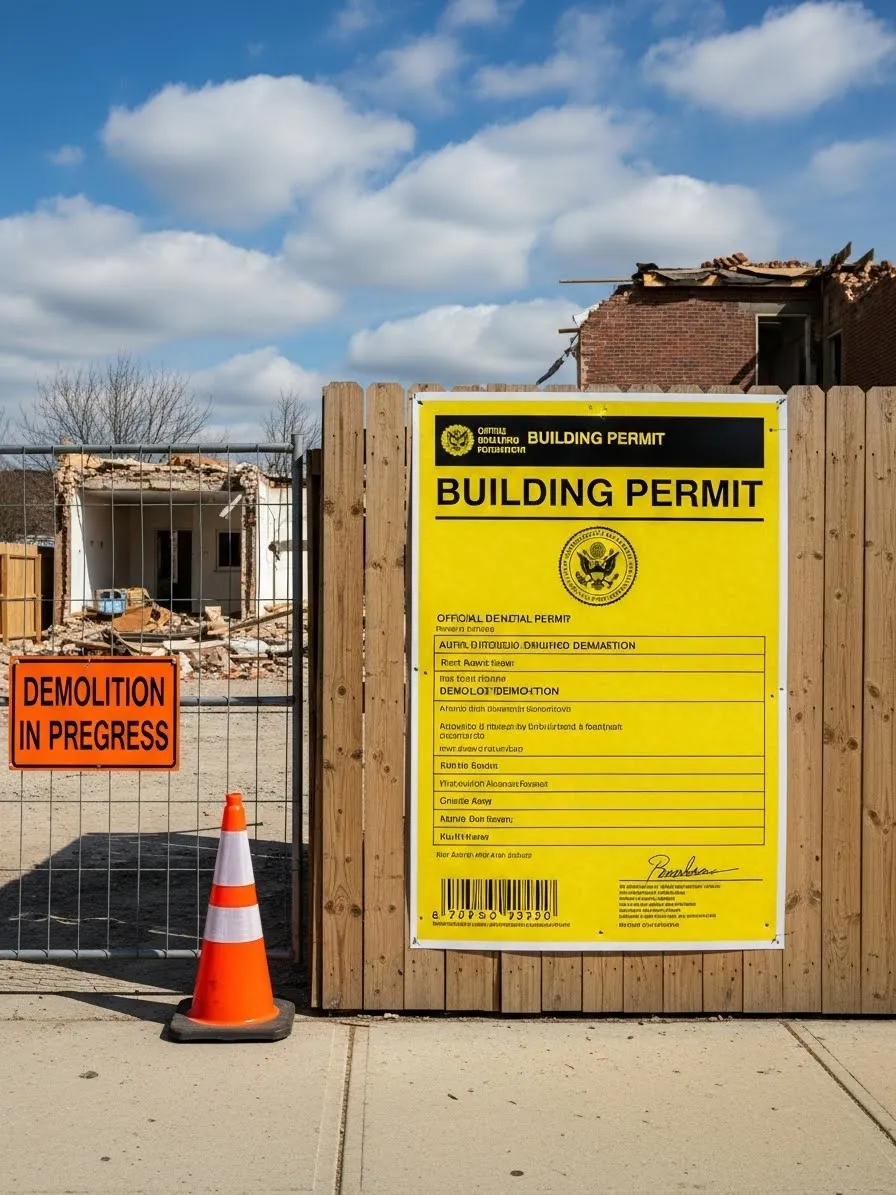
1. ????️ Essential Paperwork: The Building Permit
Relevant Item Name: Official Building Permit Signage

Starting a major home renovation demands more than just enthusiasm; it requires proper governmental authorization. Before picking up a sledgehammer, you must secure the official building permit, as this image clearly shows. Displaying the brightly colored permit sign legally grants you permission to begin work, proving your project meets local safety and zoning codes.
Failing to obtain the necessary documents can lead to massive delays, expensive fines, or even forced work stoppages. A valid permit also offers protection, ensuring all work performed, especially demolition, adheres to established building standards. Make certain to keep this paperwork posted and accessible throughout the entire construction process.
Obtaining the permit is truly the first foundational step in the 37 steps to success. This sign serves as both notification to the public and assurance that the project is proceeding legally and responsibly. Never start any major structural changes until this vital authorization is firmly in hand.
Material Required List (For Posting the Permit)
- The physical, signed Building Permit document.
- Plywood, poster board, or weatherproof plastic sheeting (to mount and protect the paper document).
- Weatherproof sealant or clear plastic document protector.
- Mounting hardware (screws or heavy duty zip ties).
Equipment Required List (For Posting the Permit)
- Drill or screwdriver (appropriate for the mounting hardware).
- Measuring tape (to ensure straight and level posting).
- Level.
- Safety glasses.
DIY Instruction Step by Step: How to Properly Post Your Building Permit
This process is critical for legal compliance, ensuring your permit is visible and protected from the elements.
- Preparation is Key: First, check the local municipal requirements regarding the permit’s size, required posting location (usually visible from the street), and height. Gather all materials before you begin.
- Mount the Document: Affix your physical permit document onto a sturdy backing material, such as plywood or a durable plastic board. Use staples or tape to secure the edges flatly.
- Ensure Weather Protection: Cover the entire document and backing with a clear, weatherproof layer. A heavy plastic sheet or a purpose made document holder works well here. This prevents rain, sun, or wind from destroying the legal document.
- Mark the Mounting Location: Find a secure, visible spot, like the temporary fence shown in the image, or a sturdy stake near the street. Use your measuring tape and level to mark where the top and bottom of the sign will sit, ensuring it is straight.
- Secure the Sign: Using the drill or screwdriver, attach the mounted permit sign securely to the fence or post. If using zip ties, thread them through holes punched near the corners and fasten them tightly. The sign must withstand wind and rain without falling down.
- Verify Visibility: Step back to confirm the permit is easily readable from the sidewalk or street. It needs to be clear to any passing inspector or neighbor. This official posting indicates you are ready to proceed with the next 36 steps!
2. ???? Setting Up Structural Support Before Demolition
Relevant Item Name: Temporary Shoring and Load Bearing Supports

Protecting the existing structure is paramount when preparing for demolition. This image clearly shows how temporary shoring posts and horizontal wooden beams are installed to handle the weight of the structure above. These supports become absolutely necessary when load bearing walls are slated for removal or significant alteration.
Engaging with a structural engineer is a crucial, early step to determine where this temporary support must be placed. Installing these supports prevents catastrophic collapse once the old walls are taken out. They provide a safe working environment and safeguard the home’s integrity throughout the project.
It takes careful measuring and sturdy materials to create this structural scaffold. Without proper shoring, the demolition phase becomes extremely dangerous and threatens the stability of your entire home. This step alone can save thousands in repairs and potential disaster.
Material Required List (Per Support Section)
- Adjustable steel shoring posts (telescopic jacks).
- Heavy duty lumber (e.g., $4 \times 4$ or $6 \times 6$ posts and $4 \times 6$ beams) for headers and spreaders.
- Plywood or steel plates (for base and top plates to spread the load).
- Nails or screws appropriate for heavy timber construction.
Equipment Required List
- Circular saw or reciprocating saw (to cut lumber to length).
- Hammer or impact driver.
- Measuring tape and level.
- Safety equipment: Hard hat, safety glasses, work gloves, steel toe boots.
- Jack post handle/wrench (to tighten and adjust the posts).
DIY Instruction Step by Step: Installing Temporary Load Bearing Shoring
Always consult a structural engineer before attempting this, as calculating load is a specialized task. This guide outlines the physical installation after professional assessment.
- Determine Bearing Points: The engineer will specify the exact locations on the floor (or foundation) and ceiling where the supports must be placed. Mark these spots clearly on both surfaces.
- Prepare the Base and Header: Cut lumber to create the horizontal header beam that will sit directly under the ceiling joists, and cut base plates (usually small pieces of wood or plywood) to sit on the floor to protect the surface and distribute the post load.
- Place the Header: Lift the horizontal header beam into place, ensuring it runs perpendicular to the ceiling joists you are supporting. Have an assistant help hold it steady.
- Set the First Post: Position an adjustable steel shoring post on its base plate under the beam at one end. Extend the post until its top plate makes snug contact with the beam.
- Snug the Support: Use the wrench or jack handle to slowly and incrementally tighten the post. Do not over tighten initially; you are simply ensuring firm, solid contact.
- Install Adjacent Posts: Repeat steps 4 and 5 for the remaining posts needed for this section, typically placing them 4 to 6 feet apart, as specified by the engineer.
- Apply Full Load (Gradually): Once all posts are snug, go back and tighten each post one rotation at a time, moving back and forth between them. This is how you gradually transfer the load from the wall being removed to the temporary supports. Use the level to ensure all posts remain plumb (perfectly vertical).
3. ????️ Designing the Site Logistics Map
Relevant Item Name: Construction Site Plan and Logistics Map

Effective site planning is essential for safety, efficiency, and neighbor relations during a home renovation. This diagram illustrates a detailed logistics map, outlining crucial operational zones. It shows the designated spots for material delivery, contractor parking, and, most importantly, the dumpster area.
Clearly defining the debris removal route ensures a tidy and predictable process, minimizing damage to existing property and landscaping. Notices about safety concerns reinforce the critical need to keep areas clear of obstacles. Every contractor should have this map to understand how the site operates.
Taking time to sketch out this logistical plan prevents chaos and confusion when materials and workers begin arriving. This step ensures that the demolition debris is handled responsibly and that the project moves forward without unnecessary bottlenecks.
Material Required List (For Creating the Map)
- Large sheet of paper or poster board.
- Ruler or straightedge.
- Colored pencils or markers (for different routes and zones).
- Blueprint of the property (essential for scale).
Equipment Required List
- Drafting compass or stencils (optional, for symbols).
- Standard desk supplies (pens, pencils, eraser).
DIY Instruction Step by Step: Creating Your Construction Site Logistics Map
A clear map communicated to all workers simplifies every day of the project.
- Acquire the Base Plan: Obtain a simple, scaled drawing of your lot, showing the house footprint, driveway, and property boundaries. Photocopy this base drawing so you can make several drafts.
- Designate Parking and Access: First, mark the area where contractor vehicles will park. Choose a zone that does not block public access or disrupt neighbors. Indicate clear entry points for workers.
- Define the Debris Zone: Locate the best placement for the dumpster or debris collection area. This must be a spot easily accessible by the delivery truck but out of the way of daily activity. Draw a clear route for carrying debris from the house to this container.
- Mark Material Drop Off: Select a clean, protected, and accessible zone for new material deliveries (lumber, drywall, fixtures). Draw an arrow indicating the flow of materials onto the site.
- Identify Safety Concerns: Highlight and label any potential hazards, like unstable areas, utility boxes, or narrow pathways. Use bright red markers for safety notes.
- Finalize and Distribute: Review the map with your general contractor for approval and any final adjustments. Print and post large copies on the site, and ensure every team member receives a digital or paper copy before the demolition begins.
4. ???? Scrutinizing the Contractor Contract
Relevant Item Name: Reviewing the Contractor Agreement and Scope of Work

The contract is the cornerstone of a successful renovation, and careful review is nonnegotiable. This image highlights the need to closely examine every clause, especially those governing the scope, schedule, and liability. Using a magnifying glass symbolizes the intense scrutiny required for this essential document.
Important sections like Timeline, Scope Schedule, and Change Order Process must be completely understood before signing. Furthermore, checking the Liability/Insurance section confirms that the contractor holds sufficient coverage, protecting you from responsibility should an accident happen. This document dictates the entire working relationship and financial outcomes.
Never rush the contract review; take ample time to ask questions and request clarification on ambiguous language. Ensuring all expectations are explicitly detailed on paper helps prevent expensive disputes and misunderstandings down the road.
Material Required List (For Review)
- The full, printed Contractor Contract (two copies).
- Highlighters (different colors for different sections).
- Magnifying glass (optional, but helpful).
- Notepads and pens (for jotting down questions).
Equipment Required List
- Calculator (for checking financial figures).
- Clock or timer (to ensure enough time is set aside for the task).
DIY Instruction Step by Step: Reviewing and Understanding Your Renovation Contract
The contract is legally binding, so you must know exactly what you are agreeing to.
- Read the Document Entirely: Read the contract from start to finish without skipping any sections. Do this in a quiet environment free of distraction.
- Highlight Key Areas: Use a yellow highlighter to mark all specific financial terms (payments, total cost, draw schedules). Use a different color to highlight the project Scope of Work, ensuring every item you discussed is listed.
- Scrutinize the Timeline: Examine the proposed start date, duration, and completion milestones. Mark any deadlines that seem vague or overly ambitious.
- Verify Insurance and Liability: Check for specific language regarding the contractor’s General Liability and Workers’ Compensation insurance. Verify that you, the homeowner, are indemnified (protected) from injury claims related to the workers.
- Understand Change Orders: Find the Change Order Process section. This explains how extra work, cost changes, or scope modifications are handled. Ensure the process is simple, written, and requires your signature before proceeding.
- List All Questions: On your notepad, write down every single question or confusing clause. Do not sign until your contractor or lawyer has answered every question to your complete satisfaction.
5. ????♀️ Contractor Collaboration on Blueprints
Relevant Item Name: Site Planning and Blueprint Review with Construction Team

Prior to demolition, it is crucial to review the construction documents with the individuals who will actually be doing the work. This image shows the client and contractor examining the blueprints together on site. This hands on collaboration ensures both parties are aligned on the vision and the technical feasibility of the plan.
Discussions focus not only on the architectural design but also on logistics and safety concerns, indicated by the background signage. This meeting allows the contractors to flag potential issues, suggest efficiencies, and confirm material requirements before any walls are opened. A well informed team makes far fewer mistakes.
Taking time to walk through the plans under the temporary lighting provides an excellent chance to catch errors or omissions early on. Final confirmation of the blueprints is an essential step before the renovation moves into the destructive phase.
Material Required List (For Meeting)
- Complete set of final, stamped blueprints.
- Drawing pencils or pens (for marking up notes).
- Rulers or scales (to check dimensions).
- A copy of the site safety plan.
Equipment Required List
- Hard hats and safety vests (as shown).
- Measuring tape (for spot checking dimensions on site).
- Portable lighting (if meeting in a dimly lit, pre demolition space).
DIY Instruction Step by Step: Conducting a Pre Demolition Blueprint Walkthrough
This meeting ensures everyone agrees on the plan before the dust flies.
- Set the Agenda: Clearly define the goal: reviewing the demolition scope, structural changes, and verifying utility cutoff locations.
- Gather the Team: Ensure the General Contractor, site supervisor, and the client are present. If possible, have the structural engineer available remotely for questions.
- Start at the Beginning: Open the blueprints to the site plan and walk the perimeter, confirming staging areas (as per step 3).
- Review the Demolition Plan: Go floor by floor, pointing out every wall, window, or fixture that is scheduled for removal. Have the contractor verbally confirm the scope.
- Check Critical Measurements: Use a measuring tape to spot check a few key dimensions on the site against the blueprints. This verifies the drawing matches the existing space.
- Address Utility Shutoffs: Walk to the main water shutoff, electrical panel, and gas line to ensure their locations and the cutoff procedures are clear to the site supervisor. Sign off on the final plan once all discrepancies are resolved and agreed upon.
6. ???? The Crucial Pre Construction Meeting
Relevant Item Name: Homeowner and Contractor Pre Construction Planning Meeting

Before starting any large renovation, a thorough meeting between the homeowners, the designer, and the contractor is absolutely required. This image captures that essential collaboration, where a calendar and notes on a whiteboard reinforce the importance of organization. This is where the 37 steps transition from paper planning to physical action.
Topics covered in this meeting include setting up the Timeline & Budget, defining Decision Makers (who approves costs/changes), and establishing a Meeting Schedule. The visible safety warning is an important reminder that safety protocols are part of the daily discussion, not an afterthought.
This session builds trust and ensures clear lines of communication, preventing minor issues from escalating into expensive setbacks. All parties must leave the table with a unified understanding of the project’s scope and process.
Material Required List (For Meeting)
- Detailed project proposal and budget breakdown.
- Shared digital or physical calendar.
- List of all key contacts and roles.
- Whiteboard or large paper pad.
Equipment Required List
- Laptop with access to shared planning documents (like the calendar shown).
- Pens and notepads.
- Coffee and water (keeping minds alert for a focused discussion).
DIY Instruction Step by Step: Leading an Effective Pre Construction Meeting
An organized meeting ensures all parties are literally on the same page.
- Distribute the Agenda: Send out a clear agenda 24 hours prior. Key points should include scope confirmation, budget review, decision making protocol, and communication plans.
- Confirm the Scope: Review the work to be completed, comparing it against the approved drawings and contract. Resolve any lingering questions about included or excluded tasks.
- Establish the Communication Protocol: Decide how often you will meet (e.g., weekly), who the main point person is for the contractor, and how unexpected issues will be communicated (text, email, or phone call).
- Review the Schedule: Look at the contractor’s proposed timeline. Highlight critical path items, especially material lead times and inspection dates. Sync the general meeting schedule onto a shared digital calendar.
- Set the Rules: Discuss site rules, such as working hours, noise restrictions, and bathroom use. Review and agree upon the written safety plan before concluding the meeting.
- Document and Follow Up: Have everyone sign an attendance sheet acknowledging they discussed the key points. Send a short email summary of all agreed upon decisions immediately following the meeting.
7. ????️ Protecting the Non Demolition Zones
Relevant Item Name: Temporary Dust Containment and Surface Protection
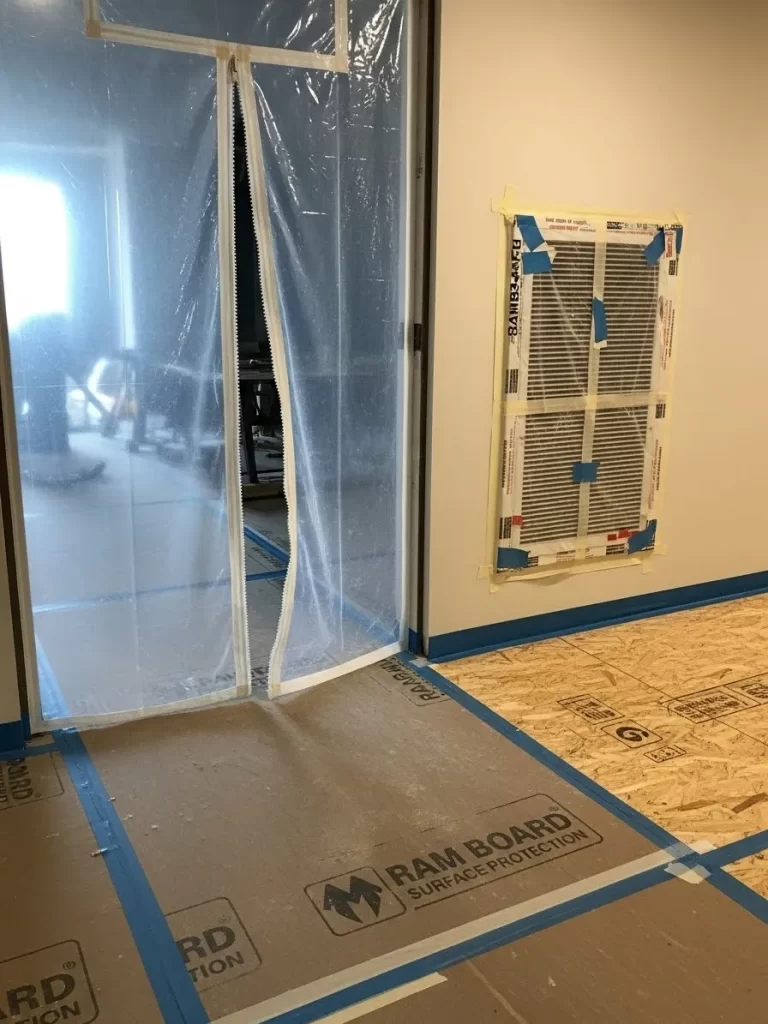
Protecting the parts of your home not under renovation is a crucial step often forgotten until it is too late. This image shows robust surface protection in place: Ram Board covering the hardwood floor and a plastic sheeting enclosure with a zipper door. This setup controls the inevitable dust and debris.
The clear plastic wall acts as a dust barrier, preventing construction dust from circulating through the home’s air systems. Taping off the HVAC return vents, as shown on the wall, is another nonnegotiable protective measure. Airborne dust will ruin furnishings, coating everything in a fine, gritty layer if not contained.
Investing time and money in these protective measures saves countless hours of cleaning later and shields undamaged areas from costly scratches or impact damage during demolition. Protection is always cheaper than replacement.
Material Required List
- Temporary surface protection board (like Ram Board) or heavy drop cloths.
- $6$ mil plastic sheeting (in large rolls).
- Builder’s tape or painter’s tape (low tack).
- Heavy duty, construction grade zipper door kits.
- HVAC filter material or plastic wrap (for vents).
Equipment Required List
- Utility knife or scissors.
- Tape measure.
- Broom and vacuum (for cleaning surfaces before applying protection).
DIY Instruction Step by Step: Installing Dust Barriers and Floor Protection
Creating a containment zone is essential for a healthy and clean job site.
- Clear the Area: Remove all movable furniture, art, and decor from the renovation zone and all adjacent areas.
- Protect the Vents: Cover all air return and supply vents in the renovation area and adjacent rooms with plastic sheeting, securing the edges tightly with tape. This stops dust from circulating throughout the HVAC system.
- Lay Floor Protection: Roll out the protective board (e.g., Ram Board) across all existing floors leading to, and inside, the demolition area. Overlap the edges slightly.
- Tape the Seams: Securely tape all seams of the floor protection board with builder’s tape to create a continuous, seamless shield against spills and damage.
- Install the Dust Barrier: Hang the $6$ mil plastic sheeting from the ceiling down to the floor at all doorways leading to the unaffected parts of the home. Use tape to create a tight seal along the ceiling and walls.
- Integrate the Door: Cut the plastic sheeting at a primary entry point and install a zipper door kit. This allows workers to pass through without tearing the barrier, helping keep the dust contained.
8. ????️ Securing Renovation Specific Insurance
Relevant Item Name: Reviewing Builder’s Risk and Renovation Insurance Policy

A standard homeowner’s policy is often inadequate for a major renovation, requiring homeowners to acquire specialized coverage. This image shows a person reviewing a document explicitly highlighting Builder’s Risk and Renovation Limits. This is an indispensable financial safeguard against unforeseen events.
Builder’s Risk insurance protects the home, materials, and equipment from damage during the construction period, such as fire, vandalism, or severe weather. The Liability Limits ensure that any significant injury or accident that occurs on the job site is covered beyond the contractor’s own policy limits. This review is a critical step in managing financial risk.
Never assume your current policy is sufficient; always contact your insurance broker to understand the policy changes needed when starting a significant renovation project. Protecting your investment and financial future is just as important as protecting the structure itself.
Material Required List (For Policy Review)
- Current Homeowner’s Insurance Policy documents.
- Proposed Builder’s Risk/Renovation Policy documents.
- Financial ledger or estimated total project cost.
- Contact information for your insurance broker.
Equipment Required List
- Calculator (to verify coverage limits against project cost).
- Pen and paper (to note questions and coverage gaps).
DIY Instruction Step by Step: Assessing Your Renovation Insurance Needs
Ensure you have comprehensive financial protection before construction starts.
- Contact Your Broker: Inform your current insurance agent about the detailed scope and timeline of the renovation. State clearly that structural changes, demolition, and the presence of workers will occur.
- Request Policy Comparison: Ask the broker to provide a clear, written comparison between your current policy and the required Builder’s Risk policy. Focus on what is not covered by the standard policy.
- Verify the Coverage Limits: Check that the policy’s dwelling coverage limit is sufficient to cover the new replacement value of the home after the renovation is complete, not just the current value.
- Confirm Liability: Ensure the liability portion of the policy covers accidents involving contractors, subcontractors, and their employees while they are working on your property. This is vital protection.
- Define the Term: Make certain the policy term is long enough to cover the entire construction timeline, including a buffer for delays.
- Obtain Certificates: Ask your broker to provide proof of coverage, and make sure your contractor also provides current certificates of their General Liability and Workers’ Compensation policies. Do not allow work to start until all certificates are in hand.
9. ???? Deep Reading the Contractor’s Bid
Relevant Item Name: Detailed Review of Contractor Specifications and Bids

The competitive bid process is one of the most important phases, ensuring the project aligns with both your expectations and budget. This image shows an array of construction documents, including technical Specifications and proposals from various contractors. Thorough analysis of these documents is a necessary early step.
Notice the envelopes labeled with contractor names; comparing multiple bids allows you to contrast pricing, scope details, and scheduling. Specifications documents, often bound in black, detail the exact materials, installation methods, and quality standards the contractor plans to use. This prevents cheap substitutions later.
Evaluating these documents is far more complex than simply comparing the bottom line price. Take the time to match the scope of work from each contractor precisely to make a fair and accurate selection.
Material Required List (For Bid Review)
- Specification documents and proposals from all bidding contractors.
- Printed spreadsheet or checklist for comparing bids.
- Pen and highlighters.
Equipment Required List
- Calculator (for unit cost analysis).
DIY Instruction Step by Step: Comparative Analysis of Contractor Bids
Choosing the right contractor means comparing much more than just the total price.
- Standardize the Request: Before soliciting bids, create a single, clear Request for Proposal (RFP) that details every aspect of the work. This ensures all contractors are bidding on the exact same scope.
- Create a Comparison Matrix: Develop a spreadsheet listing key metrics down the side: Total Price, Estimated Duration, Payment Schedule, Specific Materials Used, Warranty Length, and References.
- Transfer the Data: Carefully transfer the information from each contractor’s bid documents into your matrix. Use their technical specifications to fill in the material column (e.g., comparing tile type, fixture brand).
- Analyze the Scope Gaps: Look for any items included in your RFP that a specific contractor may have missed or explicitly excluded. These omissions are often hidden costs.
- Verify the Price and Timeline: Check that the proposed payment schedule matches the work milestones and that the overall duration is realistic based on the scope.
- Check References and Insurance: Call at least three references provided by the finalists, and ensure you have received current copies of their insurance certificates before moving on to the contract stage (Step 4).
10. ???? Tracking the Project Timeline with a Gantt Chart
Relevant Item Name: Construction Project Management Gantt Chart

Managing a renovation involves coordinating dozens of sequential tasks, from demolition to material deliveries. This image features a Gantt chart, a visual tool indispensable for tracking progress and anticipating bottlenecks. Demolition is clearly visible as one of the first bars on the chart.
The chart displays tasks like Demolition, Inspection, Material Deliveries, and Completion against a time axis. This visualization helps confirm that all prerequisite steps, such as receiving materials, are scheduled before the installation phase begins. It acts as a shared reference for everyone on site.
Regularly reviewing this chart with the General Contractor ensures the project remains on schedule and helps identify potential delays before they become severe. Project management is a huge part of the planning that happens long before the actual demolition begins.
Material Required List (For Creating the Chart)
- Project Management Software (digital) or large plotter paper (physical).
- Colored pens or markers (for color coding tasks).
- Rulers or straightedge.
Equipment Required List
- Computer or large format printer.
DIY Instruction Step by Step: Understanding and Using a Project Gantt Chart
Even if your contractor creates it, you must know how to read and use this scheduling tool.
- Identify All Tasks: List every single distinct task in the renovation (e.g., Demolition, Framing, Rough Plumbing, Electrical Inspection, Drywall, Painting).
- Determine Dependencies: For each task, figure out which other tasks must be finished before it can start. For example, framing must be complete before rough electrical can begin.
- Estimate Durations: Work with your contractor to assign a realistic number of days for each task.
- Build the Chart: Create a bar for each task on a timeline. Start the demolition bar first. Subsequent tasks should begin only after their dependent predecessors are complete. Use color coding for different phases (blue for structural, yellow for mechanical).
- Track Milestones: Highlight critical milestones, like inspections or major decisions. These points serve as essential check ins.
- Review Weekly: Commit to reviewing the chart weekly with your site supervisor. Adjust the schedule bars as needed to reflect any delays or accelerations, ensuring a proactive approach to staying on time.
11. ???? Shutting Off and Capping Utilities
Relevant Item Name: Disconnecting Main Water and Gas Lines

Before demolition starts, safely disconnecting all main utilities is a matter of life or death, not simply convenience. This image shows workers attending to external pipes and valves, highlighting the critical need to shut down the water and gas supply. The visible Caution: Demolition Zone tape reinforces the extreme risk involved.
Turning off and properly capping these services prevents accidental flooding, gas leaks, or electrical shorts when walls are breached. Always have licensed professionals perform this task. They possess the knowledge to isolate these systems safely from the rest of the home and the street supply.
Never attempt any demolition near active utility lines, even if they are only low voltage. Confirmation that these systems are inert is a nonnegotiable checklist item before the first hammer swings.
Material Required List (For Capping)
- Proper brass or copper caps (for water lines).
- Thread sealant tape (PTFE tape).
- Approved shutoff valves or lock out tags (for gas/water).
- Safety barricade tape (as shown).
Equipment Required List
- Pipe wrenches or crescent wrenches.
- Adjustable pliers.
- Safety equipment: Hard hat, gloves, safety glasses.
DIY Instruction Step by Step: Safely Shutting Off and Capping Main Utilities
Note: Gas and electrical shutoffs must be handled by licensed professionals (Plumbers and Electricians). This outlines homeowner preparation for water.
- Locate the Main Shutoff: Find the main water shutoff valve, which is usually located near the water meter, either outside in a ground box or inside where the water line enters the home.
- Turn Off the Water: Slowly turn the valve clockwise until the water flow is completely stopped. If the valve is seized, contact a plumber immediately; do not force it.
- Drain the Lines: Open the lowest tap in the house (like a basement sink or hose spigot) and the highest tap (an upstairs bathroom). This drains the remaining water from the pipes, relieving pressure.
- Verify Disconnection: Attempt to run a faucet inside the house to confirm the water is off completely.
- Tag and Secure: Affix a bright tag or lock out tag to the main shutoff valve. This warns all crew members that the line is intentionally off and must not be touched until authorized.
- Schedule Professional Gas/Electric: Ensure your licensed plumber and electrician confirm the gas and main electrical feed are de energized and capped before any wall or ceiling is touched.
12. ???? Verifying Load Bearing Walls on Blueprints
Relevant Item Name: Blueprint Review Highlighting Load Bearing Walls

Understanding which walls support the structure above is arguably the most critical planning step before a single wall is removed. This image shows blueprints clearly marked, with the term “Load Bearing Wall” highlighted for emphasis. Mistakes here can lead to partial or total structural failure.
An architect or structural engineer must conduct this assessment and confirm it on the final drawings. Reviewing these structural notes ensures that you and your contractor know exactly where temporary shoring must be installed. This detail is nonnegotiable for safety.
The magnifier symbolizes the intensity of detail required when reviewing the structural integrity of your home. Any planned wall removal requires a corresponding structural solution that must be drawn up, approved, and implemented before demolition.
Material Required List (For Verification)
- Final structural blueprints.
- Magnifying glass.
- Red marker or highlighter.
- Engineer’s contact information.
Equipment Required List
- Measuring tape (for spot checking wall locations).
- Level (for checking wall plumbness).
DIY Instruction Step by Step: Confirming Load Bearing Status of Walls
Knowing the difference between a partition wall and a structural wall is the foundation of safe demolition.
- Locate the Wall on the Blueprint: Find the wall you plan to remove on the architectural drawings.
- Check the Designation: Look for labels such as “Load Bearing,” “Shear Wall,” or “Header Above.” If the wall is exterior or if it runs perpendicular to the main floor joists, assume it is structural until proven otherwise.
- Inspect the Top Plate: If the wall is on the ground floor, look at the ceiling above it. If floor joists from the upper level or roof trusses rest directly upon the wall’s top plate, it is a load bearing wall.
- Inspect the Foundation: If the wall continues down into the basement or sits directly on a foundation beam, it is almost certainly load bearing.
- Consult the Engineer: If there is any doubt whatsoever, stop and call the structural engineer who designed the plans. Ask them to confirm the load bearing status of the wall in writing.
- Mark the Walls: Use the red marker to physically mark the planned removal area on the wall itself. Use a different colored marker to clearly label the temporary support placement locations.
13. ???? Confirming Arrival of Essential Materials
Relevant Item Name: Preordered Cabinets, Windows, and Fixtures Staging

Long lead time materials must be on site or confirmed for delivery before demolition commences. This image showcases kitchen cabinets, a window, and an oven, representing the items most likely to cause project delays. Renovations stall when the new materials needed for rebuild are not ready.
Having these essential items confirmed or delivered helps avoid the “wait and stop” cycle that plagues many projects. For instance, the exact dimensions of the new window shown here are required before the rough opening can be reframed. This is crucial for maintaining the timeline.
Securing and staging these items early provides insurance against supply chain disruptions. This simple step transforms a potentially rushed and disorganized project into a smooth transition from demolition to installation.
Material Required List (For Material Staging)
- Purchase orders and invoices for all major items (cabinets, windows, appliances).
- Sturdy shelving or pallets (to keep materials off the floor).
- Protective plastic wrap or drop cloths.
Equipment Required List
- Forklift or hand truck (for moving heavy items).
- Climate control devices (heaters/dehumidifiers if storing wood products).
DIY Instruction Step by Step: Receiving and Staging Materials Before Demolition
Ensure your investment is protected and verified before work starts.
- Coordinate Delivery: Schedule the delivery of all long lead items to occur before the planned demolition date.
- Perform Quality Check: As soon as the materials arrive, unpack and inspect them immediately. Check windows for cracked glass, cabinets for scratches, and appliances for dents. Compare items against the purchase order.
- Stage for Protection: Store all items in a clean, dry, and secure location away from the demolition zone. Place wood products like cabinets and trim on pallets or $2 \times 4$ lumber to keep them off the floor and away from any moisture.
- Ensure Environmental Stability: If the items are wood products (like cabinets or wood flooring), ensure the staging area has a stable temperature and humidity level. Wood needs time to acclimate to the home environment.
- Inventory and Label: Create a clear inventory list of all delivered items. Mark each box with its final destination room (e.g., “Kitchen Sink Base”) for easy retrieval later.
- Resolve Damages: If any damages or missing parts are found during inspection, immediately contact the supplier and contractor to arrange for replacement or repair, preventing future delays.
14. ????️ Inspecting the Existing Foundation for Flaws
Relevant Item Name: Foundation Crack Inspection and Measurement

Demolition can put temporary, intense stress on the home’s foundation, making a pre demolition inspection absolutely necessary. This image shows a construction professional pointing to a significant crack in the foundation wall, with a measuring tape nearby to document the size. Addressing underlying issues now prevents disastrous complications later.
Significant cracks, uneven settling, or moisture intrusion must be fully assessed and stabilized before any major load shifts occur during renovation. Ignoring a pre existing flaw could cause it to worsen when load bearing walls are temporarily removed or altered.
Documenting the crack’s size and location provides a benchmark. This ensures that any damage resulting from the construction process can be clearly identified and properly addressed before the new structure is built on top of it.
Material Required List (For Inspection)
- Marker or chalk.
- Foundation inspection report from an engineer.
- Camera or smartphone (for documentation).
Equipment Required List
- Measuring tape.
- Crack monitor or caliper (for precise measurement).
- Safety glasses and gloves.
DIY Instruction Step by Step: Preliminary Foundation Visual Inspection
A visual check can flag areas that require a professional engineer’s attention.
- Walk the Perimeter: Systematically walk the entire foundation of your home, both inside the basement/crawlspace and outside.
- Look for Visible Cracks: Search for any horizontal cracks, stair step cracks in block walls, or vertical cracks wider than $1/8$ inch. Look for signs of efflorescence (white, powdery residue) indicating water intrusion.
- Document and Measure: If you find a crack, use the measuring tape to determine its length and width at the widest point. Take multiple photos from different angles.
- Mark the Flaw: Use chalk or a marker to circle the crack and write the date next to it. This allows you to easily check if the crack grows over the course of the renovation.
- Check for Water: Look for standing water or damp spots, especially near planned demolition zones. Active moisture issues must be corrected before construction begins.
- Consult a Specialist: If any structural or major moisture concerns are noted, stop and immediately hire a foundation specialist or structural engineer for a professional assessment and repair plan.
15. ???? Calculating the Detailed Renovation Budget
Relevant Item Name: Renovation Budget Planning and Contingency Calculation

Accurate financial planning is a prerequisite for a stress free renovation. This image highlights a calculator and blueprints, emphasizing the precise mathematical work required to establish the budget. The calculator displays a significant number, representing the gravity of the financial commitment.
Planning should itemize every expected cost, including materials, labor, permits, and fees. Crucially, the visible text “Permits, Fees, Contingency” reminds you to allocate at least $15$ to $20$ percent of the total budget for unforeseen costs. Unforeseen issues inevitably arise during demolition.
This detailed budget serves as a road map for decision making throughout the project. Committing to a realistic budget now ensures you have the necessary funds to complete the entire build, not just the demolition phase.
Material Required List (For Budgeting)
- Detailed contractor bids and material quotes.
- Spreadsheet software or large ledger paper.
- Financial statements (to verify funding).
Equipment Required List
- Calculator.
- Pen or stylus.
DIY Instruction Step by Step: Developing a Realistic Renovation Budget
This step turns estimates into executable financial plans.
- Gather All Quotes: Collect all final quotes for labor, design fees, and materials. Enter these numbers into a spreadsheet, organizing them by category (e.g., Demolition, Framing, Electrical, Finishes).
- Calculate the Hard Costs: Sum up all the quotes and known material costs. This figure represents the hard construction cost.
- Add Soft Costs: Include all non construction related expenses, such as permit fees, temporary housing costs, insurance premiums, and specialized consultant fees (engineer, designer).
- Establish the Contingency: Calculate $15$ to $20$ percent of the total of the hard and soft costs. This money is exclusively for unexpected expenses that surface during demolition or construction. Do not touch this money for upgrades.
- Review and Secure Financing: Compare your calculated total budget against your available financing or savings. Ensure there is a comfortable buffer beyond the contingency fund.
- Create a Tracking System: Set up a system to track actual spending against the budgeted amounts for each category, allowing you to monitor finances in real time as the project progresses.
16. ???? Identifying Concealed Wires and Pipes
Relevant Item Name: On Site Coordination of Utility Runs

Understanding the exact location of concealed utilities is mandatory before commencing demolition in any wall or floor. This image shows a supervisor pointing to a wall section exposing pipes and wiring, while an engineer reviews a tablet displaying the building’s utility plans. This collaboration prevents costly accidents.
Demolition carries the risk of severing electrical lines, puncturing water pipes, or cutting gas lines, all of which present severe hazards. The team is confirming the digital plans against the actual conditions within the exposed wall. This step is usually required by the municipality.
Preemptive utility locating ensures the safety of the crew and protects the remaining structure from damage. Final confirmation of utility shutoff is made even more reliable when the locations of all services are precisely known.
Material Required List (For Utility Tracing)
- Current utility location maps (blueprints).
- Marker or paint (for marking utility path on walls).
- Utility flags (for marking outside runs).
Equipment Required List
- Stud finder/Wire tracer (electronic detection tools).
- Camera (for photo documentation).
- Safety equipment: Gloves, glasses.
DIY Instruction Step by Step: Tracing and Marking Utility Lines
Knowing where everything runs is critical to avoiding a serious mistake.
- Consult the Plans: Review the plumbing and electrical blueprints to get a rough idea of where main supply lines and junction boxes are located.
- Use Detection Tools: Use an electronic stud finder that also detects metal pipes and live wires. Slowly scan the wall surface where demolition is planned.
- Mark the Hazards: Use a colored marker to clearly label the exact path of any detected pipe or wire on the wall surface. Write clear warnings like “LIVE WIRE HERE” or “WATER PIPE.”
- Confirm External Runs: Outside the home, use utility flags to mark the path of buried gas, water, and electrical lines as provided by the “Call Before You Dig” service.
- Take Pictures: Photograph the marked walls before demolition starts. This documentation helps the contractor safely navigate the removal process.
- Final Review: Have the site supervisor, plumber, and electrician review the marked wall sections one last time before any part of the surface is broken.
17. ???? Defining the Construction Zone Perimeter
Relevant Item Name: Warning Signage and Site Perimeter Fencing

Establishing a secure perimeter is a fundamental safety requirement that protects the public and prevents unauthorized access. This construction zone sign, combined with the safety mesh fencing, clearly defines the area where demolition and heavy work are occurring.
The warning CONSTRUCTION ZONE, KEEP OUT communicates to neighbors and passersby that the area is hazardous. Fencing controls site access, reducing the risk of theft and liability. Unauthorized visitors, especially children, are kept safely away from heavy equipment, as seen in the background.
Setting up the perimeter is one of the very first physical steps taken on site. This preparation ensures the site is compliant with safety regulations, securing the area before any significant work begins.
Material Required List (For Perimeter Setup)
- Temporary safety fencing (mesh or wooden panels).
- Warning signs (e.g., “Construction Zone” or “Hard Hat Area”).
- T posts or wooden stakes (for supporting the fence).
- Zip ties or wire (for securing the mesh).
Equipment Required List
- Post pounder or sledgehammer.
- Utility knife.
- Safety gloves.
DIY Instruction Step by Step: Installing a Site Safety Perimeter
Protecting others from the job site is a liability and safety priority.
- Mark the Boundary: Use flags or spray paint to mark the desired boundary of the construction zone, ensuring it encompasses the dumpster, staging area, and all heavy equipment.
- Install the Posts: Drive T posts or sturdy wooden stakes into the ground along the marked boundary, spacing them approximately $6$ to $8$ feet apart.
- Attach the Fencing: Unroll the safety mesh or fencing material along the line of posts. Use zip ties or wire to tightly secure the mesh to each post from top to bottom.
- Install Signage: Affix the CONSTRUCTION ZONE, KEEP OUT sign clearly to the fence at the main access point and at visible corners. Signs must be facing the public area.
- Create a Gate: Establish a single, controlled entry point and install a simple gate or a chain that can be securely locked when work stops for the evening.
- Inspection: Walk the entire perimeter to ensure the fence is taut, securely fastened, and cannot be easily breached by a child or unauthorized person.
18. ???? Finalizing the Design Vision
Relevant Item Name: Homeowner Vision Confirmation and Design Walkthrough

Before demolition locks in the new layout, the homeowners must confirm they are completely satisfied with the final design. This image shows a couple pointing and discussing their vision, with thought bubbles representing the “before” and “after” look of the space. Alignment on the aesthetic outcome is key.
This step is about confirming the emotional and functional goals of the renovation. Are the final kitchen and living area concepts precisely what was envisioned? This is the last chance to make minor, inexpensive changes to the floor plan before walls come down.
Confirming the design prevents costly change orders later, which are much more expensive after materials are ordered and construction is underway. The final sign off on the plans ensures the construction team builds the right space.
Material Required List (For Confirmation)
- Final $3$D renderings or design sketches.
- Printed floor plans (with proposed furniture layout).
- Samples of key materials (flooring, paint, cabinetry).
Equipment Required List
- Measuring tape (to visualize the size of the new space).
- Laser pointer (to indicate flow and sightlines).
DIY Instruction Step by Step: Design Vision Confirmation Walkthrough
Ensure the final plan meets your functional and aesthetic goals.
- Print and Lay Out Plans: Lay the final, approved floor plans on a table in the existing space. Use a marker to trace the outline of the new walls on the existing floor or ceiling.
- Visualize Furniture: Use painter’s tape to mark the placement of major new furniture items (like the kitchen island or new sofa) on the floor. This verifies the room size is functional.
- Check Sightlines and Flow: Walk through the space, looking at the windows, doors, and how the rooms connect. Ensure the flow from one room to the next meets your daily needs.
- Confirm Key Features: Point to the existing location where a new feature will go (e.g., new appliance, fireplace, or light fixture) and confirm the dimensions and placement align with the drawings.
- Review Material Palette: Look at the material samples (cabinets, flooring) under the room’s current lighting to ensure the colors still work as expected.
- Formal Sign Off: Once completely satisfied, sign and date the final set of architectural drawings and design notes, indicating no further changes will be requested unless a hidden condition is discovered.
19. ???? Documentation of Pre Existing Conditions
Relevant Item Name: Digital Photo and Video Documentation of Current Structure

Documentation of the home’s pre existing state is an important legal and planning step. This image shows a worker using a tablet to photograph the current conditions of a damaged interior. Detailed photo and video logs serve as objective evidence should any disputes arise during or after construction.
It is essential to capture the condition of walls, floors, and adjacent structures before demolition begins. This documentation proves the extent of pre existing damage, such as peeling paint or cracks. This prevents the contractor from being held responsible for damage they did not cause.
Recording the ‘before’ state also provides a useful visual reference for the rebuild process. Ensure that every single room, hallway, and exterior facade is thoroughly documented before the first wall is breached.
Material Required List (For Documentation)
- High resolution digital camera or smartphone.
- External hard drive or cloud storage.
- Checklist of areas to document (e.g., all 4 exterior sides, all 4 interior walls of each room).
Equipment Required List
- Tripod (for steady, level shots).
- Measuring tape (to capture scale).
DIY Instruction Step by Step: Comprehensive Pre Construction Documentation
A complete photo log is your best insurance policy against future disputes.
- Clean the Space: Tidy up the area to be documented. Clutter makes it harder to see and prove pre existing conditions clearly.
- Create a System: Start at the exterior, taking a series of photos of all four facades. Then, move to the interior, proceeding in a consistent path (e.g., clockwise) through every room.
- Capture Detailed Shots: For each room, take wide angle shots, then focus on specific areas of concern like existing cracks, water damage, or electrical outlets. Always include a measuring tape next to any flaw to show the scale.
- Use Video: Shoot a continuous, slow video walkthrough of the house, narrating what you are seeing and pointing out any existing damages or flaws. State the date clearly in the video.
- Document Adjacent Properties: If you have zero lot line neighbors, take photos of their adjacent walls and yards, too. This protects you if they claim your construction caused damage.
- Backup the Files: Immediately upload and back up all photos and videos to a secure cloud server or external drive. Never delete these original files.
20. ♻️ Planning Debris Sorting and Disposal
Relevant Item Name: Waste Diversion and Roll Off Container Management

Responsible debris management is a critical and often expensive part of the demolition phase. This image shows workers safely loading construction waste into a large roll off dumpster, while an attached checklist indicates organized sorting is underway. This planning minimizes environmental impact and sometimes lowers costs.
Sorting materials such as wood, metal, drywall, and concrete allows for recycling and proper disposal, which is often required by local codes. The workers wear appropriate Personal Protective Equipment (PPE) like respirators and gloves, emphasizing safe handling of demolition debris.
Hiring the correct size dumpster and planning the pickup schedule early avoids overflow fees and keeps the site clear and safe. This step ensures waste is handled responsibly from day one.
Material Required List (For Waste Disposal)
- Different sized roll off dumpsters (or bins for sorting).
- Sorting signs (e.g., “Metal Scrap Only,” “Drywall Only”).
- Protective plastic sheeting (to cover bins from rain).
Equipment Required List
- Shovels and brooms.
- Heavy duty wheelbarrows.
- Saw (to cut long wood pieces to fit the bin).
- Personal Protective Equipment (respirators, safety glasses, gloves).
DIY Instruction Step by Step: Setting Up a Debris Management System
A clean site is a safe and efficient site.
- Order the Dumpster: Order the correctly sized roll off container based on your contractor’s debris estimate. Schedule the delivery to occur the day before demolition starts.
- Designate Sorting Areas: Set up separate bins or clearly marked piles near the demolition zone for recyclable materials like wood framing, metal pipes, and copper wire.
- Post the Rules: Post a sign clearly listing what can and cannot go into the main dumpster (e.g., no hazardous materials like paint or oil). The sign must also state the weight limit to avoid overage fees.
- Wear Appropriate PPE: Ensure that anyone handling demolition debris wears a minimum of safety glasses, heavy gloves, and an N$95$ mask or respirator, as dust contains hazardous particulates.
- Cut Debris to Fit: Instruct the crew to cut long items like $2 \times 4$ lumber or drywall sections into smaller pieces that fit flat in the dumpster. This maximizes volume and prevents fines.
- Schedule Pickup: Coordinate with the waste management company to schedule pickups as soon as the bin nears capacity, ensuring the project is not held up waiting for an empty container.
21. ???? Selecting Finishes and Fixtures Early
Relevant Item Name: Finalizing Tile, Fixture, and Layout Plans

Selecting the final finishes, such as tile and fixtures, before demolition is a crucial step that directly impacts the construction schedule. This image shows a person pointing to tile samples laid over blueprints, which are circled to highlight areas like the bathroom and kitchen layout. The tile thickness, for example, determines the subfloor preparation.
Finalizing these aesthetic decisions early prevents delays in the rebuild phase. When the demolition is complete and framing begins, the contractor will need the exact dimensions and specifications of the fixtures and finishes to plan the rough plumbing and electrical work accurately. Waiting to choose tile thickness or faucet type can halt the entire project.
Making these choices well in advance ensures that materials with long lead times are ordered and received on site before they are needed. This forward thinking approach keeps the renovation moving forward efficiently.
Material Required List (For Selection)
- Tile, flooring, and paint samples.
- Specification sheets for all major appliances and fixtures.
- The final architectural blueprints.
Equipment Required List
- Color wheel or light meter (to test samples in different light).
- Calculator (for unit cost and quantity calculations).
DIY Instruction Step by Step: Finalizing Finishes and Fixtures
Your aesthetic choices determine the rough in work, so they must be locked in early.
- Gather Samples: Collect physical samples of all major finishes: flooring, wall tile, countertop material, and cabinet colors.
- Test the Light: View the samples in the actual room they will be installed in, using both natural daylight and the proposed artificial lighting. Colors change dramatically depending on the light source.
- Confirm Specifications: For fixtures (faucets, tubs, sinks), ensure you have the precise specification sheets detailing dimensions and installation requirements. Give copies of these to the plumber and electrician.
- Verify Lead Times: Contact the suppliers to confirm the current delivery lead time for every selected item. If an item will take longer than the construction schedule allows, choose an alternative now.
- Mark Blueprints: Mark the blueprints with the name and model number of the chosen tile, fixture, and appliance in the appropriate room circle.
- Place the Orders: Immediately place the orders for all long lead time materials. Communicate the expected delivery dates to your general contractor so they can update the Gantt chart (Step 10).
22. ???? Notifying Neighbors of Upcoming Work
Relevant Item Name: Official Neighbor Notice and Project Contact Information

Maintaining a good relationship with neighbors is a subtle yet essential step in renovation planning. This image displays a “Neighbor Notice” posted publicly, detailing the upcoming work, duration, expected noise disruptions, and contact information. This simple act of courtesy prevents misunderstandings and complaints.
A major demolition project generates significant noise, dust, and traffic, which can be frustrating for neighbors. Providing advance warning and a specific contact person shows respect for their peace and property. It manages expectations about street parking and working hours.
This notice is part of being a responsible homeowner. Taking the time to communicate the project details upfront can solve small issues before they become major conflicts that could result in project delays.
Material Required List (For Notification)
- Printed notice with project details.
- Clear tape or pushpins (for posting).
- List of neighbor addresses (for mailing the notice).
Equipment Required List
- Printer and paper.
DIY Instruction Step by Step: Communicating with Your Neighbors
A considerate approach is key to smooth project execution.
- Draft the Notice: Write a concise letter or notice. Include the project start date, the expected duration of the loudest phase (demolition), the contractor’s approved working hours, and the name and phone number of the site supervisor or your main contact person.
- Apologize for Disruption: Include a brief, sincere apology for any inconvenience caused by noise or temporary loss of street parking.
- Identify the Zone: Define the specific geographic area where the notice will be distributed, usually houses immediately adjacent and directly across the street.
- Distribute the Notice: Hand deliver or mail the notice to all identified neighbors. Posting the notice in a visible, public spot, like a community mailbox area, as shown, is also helpful.
- Follow Up: If possible, have a brief, friendly conversation with immediate neighbors to personally address any questions they may have about the temporary disruption.
- Remind the Contractor: Ensure the contractor’s team knows the working hours specified in the notice and strictly adheres to them.
23. ???? Finalizing the Budget and Contingency Fund
Relevant Item Name: Budget Clipboard Highlighting 15% Contingency Fund

Financial preparation extends beyond the initial estimate; it requires setting aside an accessible Contingency Fund. This image emphasizes a clipboard with a budget showing a 15% of Total Construction Cost allocation for contingency. The “Safety First” stamp reminds us this fund is for unforeseen repairs.
Demolition often reveals hidden, expensive problems like mold, unexpected structural damage, or outdated wiring. This $15$ to $20$ percent cushion ensures you can pay for these necessary repairs without halting the entire project. This prevents you from making compromises later on finishes.
Securing these funds early and reserving them only for true emergencies is a sign of great planning. This vital step prevents budget crises and keeps the timeline on track.
Material Required List (For Finalization)
- Finalized project budget spreadsheet (Step 15).
- Bank statements or proof of financing.
Equipment Required List
- Calculator.
- Pen or stylus.
DIY Instruction Step by Step: Securing the Contingency Fund
This money is your renovation safety net and must be protected.
- Calculate the Final Amount: Take the final, agreed upon total construction cost (excluding land costs). Calculate $15\%$ of this figure. This is your target contingency fund amount.
- Verify Availability: Ensure this exact amount of money is immediately liquid (accessible cash or secured line of credit) and is not already allocated to any other part of the budget.
- Transfer and Isolate: Transfer the contingency fund amount into a separate, dedicated bank account that is not easily accessed for day to day spending. This prevents accidental use.
- Define Usage: Establish strict rules for using the fund with your contractor. It should only be used for unavoidable, unexpected costs revealed during demolition or rough in (e.g., unexpected asbestos removal or rotten joists).
- Track Contingency Spending: Create a separate ledger to meticulously track every dollar spent from the contingency fund, requiring contractor documentation and your approval before each withdrawal.
- Review Quarterly: If the project is lengthy, review the remaining contingency balance quarterly with your contractor to ensure the safety net is still sufficient for the remaining work.
24. ✅ Final Demolition Authorization Checklist
Relevant Item Name: Pre Demolition Checklist and Authorization Sign Off

Demolition is the physical start of the renovation, and it must only begin after a final, systematic verification of all preceding planning steps. This image shows a hard hat and safety vest, resting next to a clipboard checklist with most steps marked off. The stamp “DEMOLITION AUTHORIZED” is the final green light.
This clipboard represents the culmination of all the planning: permits are secured (Step 1), utilities are shut off (Step 11), temporary shoring is planned (Step 2), and insurance is verified (Step 8). The checklist ensures that no critical safety or legal steps were missed before the heavy machinery starts operating.
A comprehensive, authorized checklist transforms a chaotic event into a controlled, planned procedure. Only when this clipboard is fully signed off should the excavator, shown in the background, be allowed to commence work.
Material Required List (For Authorization)
- The complete 37 step Pre Demolition Checklist.
- Contractor’s signed authorization form.
Equipment Required List
- Pen (for the final authorization signature).
DIY Instruction Step by Step: Conducting the Final Pre Demolition Check
Before giving the green light, confirm every safety and legal box is ticked.
- Print the Full List: Print the entire 37 step checklist.
- Verify Compliance (Office): Review the office bound items: confirm the building permit number (Step 1), check the insurance policy dates (Step 8), verify the contract is signed (Step 4), and ensure the contingency fund is secured (Step 23).
- Verify Compliance (On Site): Walk the job site one final time to check physical readiness: confirm the utility shutoff valves are tagged (Step 11), ensure the load bearing walls are marked (Step 12), and inspect the installed dust barriers (Step 7).
- Confirm Material Readiness: Ensure the long lead materials (like windows and cabinets) are either on site or have a firm, documented delivery date (Step 13).
- Sign Off: Once all $37$ steps are completed and verified, the General Contractor and the homeowner (or project manager) must sign the document, granting the official “Demolition Authorized” status.
- Distribute and Post: Post a copy of the signed authorization on the site office wall, and ensure the demolition crew supervisor has a copy before they begin operating equipment.
25. ????️ Securing the First Construction Draw
Relevant Item Name: Finalizing the First Draw Payment and Construction Contract

The initial payment, known as the First Draw or Initial Draw, is typically required immediately before or at the start of construction. This image shows a contract with payment amounts highlighted and a stack of money nearby, signifying the immediate financial transaction. The Initial Draw funds are crucial for mobilizing the crew.
This first installment covers initial expenses like the building permit fees, purchasing some long lead materials, and the costs associated with site setup, including temporary shoring and dust barriers. The contract dictates the percentage of the total budget this first payment represents.
A clear, written agreement on the draw schedule, tied to milestones like this First Draw and the First Inspection, prevents financial disputes. Never release funds until the contract is signed and the associated work milestone is clearly defined.
Material Required List (For Draw)
- Signed Contract (Step 4) detailing the draw schedule.
- Final invoice for the First Draw amount.
Equipment Required List
- Bank transfer access or a checkbook.
DIY Instruction Step by Step: Processing the First Construction Draw
Pay only when the contractual conditions are met, protecting your investment.
- Review the Draw Schedule: Re read the contract section that outlines the conditions for the first payment. Often, this requires the building permit to be secured and site mobilization to be completed.
- Verify the Milestone: Confirm with the contractor that all conditions required for the First Draw release have been met (e.g., the permit is posted, the site is fenced, and initial materials are ordered).
- Confirm the Amount: Ensure the invoiced amount precisely matches the percentage or fixed figure stipulated in the contract for the Initial Draw.
- Process Payment: Make the payment via the agreed upon method (check, wire transfer). Retain a receipt or confirmation of the transaction.
- Document the Release: Have the contractor sign a lien waiver for the amount of the First Draw payment. This protects you by confirming they have received the payment and cannot place a lien on your property for that specific portion of the work.
- Update the Budget: Log the payment in your tracking spreadsheet (Step 15), reducing the outstanding balance and keeping your financial records current.
26. ???? Final Team Meeting at the Construction Site
Relevant Item Name: Team Blueprint Review at the Staging Area

A final, mandatory team meeting brings together the homeowners, the general contractor, and the site supervisor to review the plans at the actual construction location. This image shows the group gathered outdoors, reviewing the blueprints on a table, emphasizing a collective, on site commitment to the plan.
This meeting addresses logistical issues like material staging, the debris removal route, and safety protocols just before demolition starts. It is the last chance to unify all team members around the plan, ensuring everyone understands the first day’s activities.
This final check helps prevent costly errors. It is far easier to adjust a note on the blueprint right now than to correct a misaligned wall after it has been framed.
Material Required List (For Meeting)
- Final, current blueprints.
- Site logistics map (Step 3).
- Hard hats (as shown).
Equipment Required List
- Clipboard and pen.
DIY Instruction Step by Step: Leading the Final Site Huddle
Everyone must be aligned before the first wall comes down.
- Set the Stage: Meet at the designated staging area (as marked on the site map). Ensure all key players are present, including the site foreman.
- Review the Logistics Map: Point out the dumpster location, material drop off zone, and crew parking (Step 3). Confirm the hours of operation and noise rules.
- Walk the Demolition Zone: Briefly walk the interior area slated for demolition. Reconfirm the temporary support locations and the utility shutoff points.
- Discuss the First Day: Outline the exact tasks scheduled for the first day of demolition. This manages the scope and ensures the team starts immediately on high priority, low risk tasks.
- Address Safety: Review the safety plan once more, specifically focusing on the hazards of the demolition area and the use of Personal Protective Equipment (PPE).
- Confirm Contact: Verify the mobile phone numbers for all key contacts, ensuring the homeowner and site supervisor can reach each other instantly throughout the project.
27. ⚠️ Hazardous Material Abatement Planning
Relevant Item Name: Abatement Required Before Demolition Signage and Testing

Discovering hazardous materials like Lead Paint or Asbestos is common in older homes and requires immediate, professional attention. This image clearly illustrates the danger zones and the ABATEMENT REQUIRED BEFORE DEMOLITION sign. Ignoring this step is legally noncompliant and extremely dangerous.
Testing for these materials must occur before any demolition to protect the workers and prevent contamination of the rest of the home. If confirmed, certified contractors must follow strict protocols to safely remove the contaminants. Disturbing these materials releases harmful fibers and dust, making the house unsafe for future occupants.
Abatement must be scheduled and completed before all other demolition activities. This step is a financial and temporal nonnegotiable item on your planning checklist.
Material Required List (For Testing and Abatement)
- Professional testing kit or contact information for an environmental testing firm.
- Abatement plan documentation.
- Proper disposal manifests.
Equipment Required List
- Inspection tools (magnifying glass, tablet for reports).
DIY Instruction Step by Step: Handling Hazardous Material Abatement
Protecting your health and complying with the law is the first priority.
- Schedule Testing: Hire an accredited environmental firm to test all suspect areas (plaster, insulation, flooring, old paint) for asbestos and lead. Do this early, as lab results take time.
- Review the Report: If contaminants are found, obtain a detailed report outlining the location and concentration. The report will specify if removal (abatement) or containment is required.
- Hire Certified Abatement Contractor: Only hire a contractor who is specifically licensed and certified for asbestos and lead removal. Standard demolition contractors cannot legally perform this work.
- Confirm Containment: Before abatement starts, ensure the area is sealed with negative air pressure systems and all workers wear specialized PPE (full respirators and suits).
- Obtain Clearance: Once the abatement is complete, the area must be cleared by a third party hygienist who confirms that air samples show safe levels. This final clearance report is crucial documentation.
- Proceed with Demolition: Only after you receive the official clearance report for the area can the demolition team begin their work.
28. ???? Vetting Contractors: License and Insurance Review
Relevant Item Name: Reviewing Contractor Licenses and Credentials

Hiring licensed, bonded, and insured professionals is a critical planning step that protects you from financial and legal risk. This image shows a person reviewing a contractor’s LICENSE under a magnifying glass, surrounded by project portfolios. Vetting the team is as important as vetting the plans.
Checking licenses ensures the contractor is legally recognized by the state and meets professional standards. Verifying they are bonded and insured (General Liability and Workers Compensation) means you are protected if they fail to complete the work or if a worker is injured on your property.
This deep investigation into credentials should happen before any contract is signed or any money changes hands. Choose professionals with a proven track record, not just the lowest bid.
Material Required List (For Vetting)
- Checklist for vetting (as shown: Referrals, License, Portfolio).
- Contact list for past clients (references).
- State licensing board website access.
Equipment Required List
- Magnifying glass (for detailed contract review).
DIY Instruction Step by Step: Vetting and Verifying Contractor Credentials
A good contractor is licensed, insured, and experienced.
- Check the License Number: Obtain the contractor’s state license number. Go directly to the state’s licensing board website and verify the license is current, active, and has no pending disciplinary actions.
- Confirm Insurance: Request current certificates of insurance for both General Liability and Workers’ Compensation. Call the insurer directly to confirm the policy is in effect and lists your address.
- Check References: Call at least three previous clients who completed a similar scope of work (preferably recently). Ask specific questions about their communication, timeliness, and how change orders were handled.
- Review the Portfolio: Look closely at their past work. Does their aesthetic and quality match your expectations for your own home?
- Verify Bonding: For larger projects, confirm the contractor is bonded, which provides a layer of financial protection should they default on the contract.
- Final Selection: Compare the verified credentials of the top three bids alongside their price and scope. Select the one that offers the best balance of value, expertise, and safety.
29. ????♂️ Demolition Crew PPE and Site Safety
Relevant Item Name: Workers Wearing Full Personal Protective Equipment During Demolition

The image illustrates the absolute necessity of Personal Protective Equipment (PPE) during the demolition phase. Workers are shown wearing hard hats, safety vests, ear protection (muffs), eye protection (glasses/goggles), and respirators while heavy equipment is operating nearby. Safety must be enforced from the first minute.
Demolition is inherently dangerous, involving falling debris, airborne dust, and extreme noise. The use of specialized PPE protects the crew from preventable injuries. Noise pollution from the jackhammer, for instance, requires mandatory hearing protection.
Insisting that the crew wears the correct safety gear protects the individuals and limits your liability as the homeowner. Never allow work to proceed without proper PPE in use.
Material Required List (For Crew Safety)
- Hard hats (ANSI certified).
- High visibility vests or shirts.
- Ear protection (muffs or plugs).
- Safety glasses or goggles.
- N$95$ respirators or half face masks.
- Heavy duty work gloves and steel toe boots.
Equipment Required List
- First aid kit (readily accessible on site).
- Emergency contact list (posted).
DIY Instruction Step by Step: Ensuring Demolition Site Safety Compliance
Enforcing safety rules protects the workers and your project.
- Provide or Confirm PPE: Before the crew arrives, ensure the contractor has supplied all necessary PPE. The homeowner should also have a set for site visits.
- Conduct a Safety Briefing: The site supervisor must lead a mandatory safety briefing before starting work on the first day. This covers hazards, emergency procedures, and the correct use of safety gear.
- Enforce Mandatory Gear: Post clear signs stating that hard hats, safety glasses, and steel toe boots are mandatory inside the construction zone at all times.
- Monitor Dust and Noise: Ensure that whenever power tools or heavy equipment are operating, workers are wearing appropriate ear protection and respirators to guard against dust inhalation.
- Keep the Area Clear: Insist that the crew continuously clears debris into the proper dumpster (Step 20), preventing tripping hazards, which are a common cause of injury.
- Stop Work if Unsafe: The homeowner should be empowered, and should use that power, to stop work immediately if they witness a severe safety violation. Contact the General Contractor right away to resolve the issue.
30. ???????????????? Planning for Temporary Living Arrangements
Relevant Item Name: Family Standing Outside Home Under Renovation with Scaffolding

Major renovations, especially those involving demolition and structural changes, necessitate planning for where the family will live. This image shows a family standing outside their home, which is surrounded by scaffolding, emphasizing the unsuitability of the site for living. The mother holds a booklet titled “Temporary Housing Options.”
Living on a construction site poses risks due to noise, dust, and lack of utilities, especially during the demolition and rough in phases. Planning a temporary move (e.g., to a rental, hotel, or relative’s home) ensures the family’s comfort and safety.
Securing temporary housing early prevents a stressful, last minute scramble when the demolition start date approaches. This logistical step ensures the family’s well being throughout the project’s duration.
Material Required List (For Temporary Housing)
- Rental agreement or hotel reservation confirmation.
- Moving boxes and packing supplies.
- Contact list for utility providers (for temporary shutoff/transfer).
Equipment Required List
- Moving vehicle or hired moving service.
DIY Instruction Step by Step: Arranging Temporary Family Housing
A safe and comfortable temporary home is essential for family morale.
- Determine the Duration: Consult the Gantt chart (Step 10) to determine the absolute minimum duration the family must be out of the home. Add at least a four week buffer.
- Evaluate Options: Research local rental options (short term leases), hotels with extended stay rates, or staying with family. Weigh the cost against the convenience.
- Secure the Housing: Sign the lease or make the reservation far in advance, especially if the renovation falls during a busy season.
- Plan the Move: Schedule the moving company or truck rental for the week before demolition is slated to begin, giving yourself time to adjust.
- Transfer Mail/Utilities: Arrange for mail forwarding, and coordinate the temporary shutoff or transfer of utilities like cable and internet for the duration you will be absent.
- Create a Contact List: Provide your temporary address and contact phone number to the General Contractor and site supervisor in case of an emergency at the construction site.
31. ???? Reviewing Local Building Codes and Zoning
Relevant Item Name: Magnifying Glass Over Blueprints Showing Setbacks and Code Regulations

Compliance with local building codes and zoning restrictions is absolutely necessary for every renovation. This image highlights blueprints where crucial elements like setback requirements, maximum height, and other code references are visible. This level of detail shows the required deep review of the rules.
Municipal codes govern everything from structural safety and electrical installations to how close your new addition can be to the property line. Failing to comply with these rules can result in mandatory, expensive tear downs or fines.
Reviewing these codes early ensures your architect’s plans are legal and approvable before they are submitted for permitting. A knowledgeable contractor can help interpret these complex requirements.
Material Required List (For Review)
- Local Zoning Ordinances and Building Code books/PDFs.
- Final architectural drawings.
- Highlighters and ruler.
Equipment Required List
- Computer with internet access (for looking up codes).
- Magnifying glass (for reading fine print).
DIY Instruction Step by Step: Ensuring Code Compliance Pre Demolition
Compliance prevents expensive structural corrections later.
- Obtain Current Documents: Get the most recent versions of your local residential building codes and zoning ordinances from your municipality’s website or building department. Codes are updated often.
- Focus on Key Areas: Review sections relevant to your project: fire separation, structural requirements, maximum height, and lot setbacks (how far a building must be from property lines).
- Cross Reference with Plans: Take your architectural drawings and overlay the code requirements. Use a highlighter to mark on the plans where the setback requirement lines are, ensuring the proposed new walls do not cross them.
- Verify Structural Calculations: Check that your engineer has included stamp and signature confirming that structural elements meet load requirements, especially for snow loads or seismic zones.
- Confirm with the Architect: Schedule a meeting with your architect to explicitly ask for confirmation that every aspect of the final plan is $100\%$ compliant with current local codes.
- Maintain Documentation: Keep a printed copy of the relevant code sections with your project files to provide quick answers to your contractor or inspectors throughout the build.
32. ✍️ Formalizing Agreements with Consultants
Relevant Item Name: Signing Architectural and Engineering Services Contracts

A large renovation involves multiple specialized consultants, and formalizing their contracts is a critical pre-demolition step. This image shows professionals signing Architectural Design Services Agreements and Structural Engineer contracts. These documents define the scope of their responsibility.
Clear contracts with designers, architects, and structural engineers prevent conflicts over fees, deliverables, and liability. The structural engineer’s signed agreement is particularly vital, as their calculations directly impact the safety of the demolition and new framing.
Formalizing these agreements early ensures that the professional plans are finalized and that they accept liability for their designs. Never start demolition based on preliminary or unsigned drawings.
Material Required List (For Formalization)
- Draft service agreements for all consultants.
- Contact list for legal counsel (optional, but recommended).
Equipment Required List
- Pens and stamp/seal (for official signing).
- Clipboard (for organizing documents).
DIY Instruction Step by Step: Securing Consultant Contracts
Ensure every professional team member has a clear, signed role.
- Draft the Scope of Work (SOW): Create a detailed scope of work for each consultant (e.g., “Structural Engineer to design all load bearing elements for new kitchen opening and sign off on all temporary shoring plans”).
- Review the Fees: Ensure the fee structure is clearly defined, whether it is a fixed cost, hourly rate, or percentage of the construction budget. Look for any hidden costs or clauses.
- Confirm Liability: Check the contract language regarding professional liability and indemnification. The consultant must maintain professional liability insurance to protect you against design errors.
- Set Deliverables and Schedule: Define the exact documents and timeline for their delivery. For the structural engineer, deliverables must include the signed structural plans and the shoring plan before demolition day.
- Sign and Date: Have all parties review, sign, and date the final agreement. Keep original copies of all contracts in a secure project file.
- Communicate Roles: Provide the General Contractor with contact information for all key consultants. This ensures the builder knows exactly who to call if they have questions about the design or structure.
33. ???? Submitting and Securing Permit Applications
Relevant Item Name: Contractor Meeting with Building Department for Permit Applications

Before any demolition can begin, the formal permit application process must be completed with the local Building Department. This image shows a contractor reviewing blueprints with building officials at a counter marked Permit Applications. This interaction is necessary for legal work.
Submitting plans that comply with local codes (Step 31) and having them reviewed by the department ensures your project meets safety standards. This often involves multiple stages of review, from zoning compliance to structural integrity.
The time taken for permit processing can range from weeks to months, making this an essential early step. Never start work based on an application—wait for the official, signed Building Permit (Step 1) to be issued.
Material Required List (For Application)
- Complete set of stamped, final blueprints (architectural and structural).
- Application forms (filled out).
- Proof of contractor’s insurance and license.
Equipment Required List
- Computer terminal (for electronic submission, if required).
DIY Instruction Step by Step: Navigating the Permit Application Process
Patience and precision are key to a fast permit approval.
- Complete the Forms: Fill out all required municipal permit application forms accurately. Ensure the forms clearly state the scope is “Demolition and Renovation.”
- Gather Required Documents: Collect the required copies of the final blueprints, the structural engineer’s letter, and the contractor’s insurance and license details.
- Submit and Pay Fees: Submit the complete package to the Building Department. Pay the required application and review fees. Obtain a receipt and the official tracking number for your application.
- Track the Review: Stay in constant contact with the department to track the review process. Respond immediately to any requests for corrections or additional information from the plan reviewer.
- Address Corrections: If corrections are required, work with your architect or engineer immediately to revise the plans. Resubmit the updated drawings as quickly as possible.
- Receive the Permit: Once approved, pay the final issuance fee and receive the official Building Permit. Immediately post the permit sign conspicuously on the job site (Step 1).
34. ???? Mapping the New Utility Runs
Relevant Item Name: Blueprint Overlay Showing New Utility Line Locations

Planning where new utility lines will be installed is a vital preparatory step before demolition reveals the existing structure. This blueprint overlay clearly maps the New Electrical, Relocated Water Line, and Gas Service Line, with a safety key included.
Knowing the exact path of the future utilities informs the demolition strategy. It ensures that critical elements, like the new HVAC ducts or relocated plumbing stacks, do not interfere with the structure or the new design. This prevents conflicts during the rebuild.
The final utility map must be approved by the plumber and electrician to ensure feasibility. A precise plan minimizes the need for costly field adjustments after the walls are opened up.
Material Required List (For Utility Planning)
- Final architectural blueprints.
- Colored pencils (red, blue, yellow for marking utilities).
- Utility specification sheets (for new appliances).
Equipment Required List
- Ruler or straightedge.
DIY Instruction Step by Step: Mapping Out New Utility Routes
Efficient utility runs save money and maintain structural integrity.
- Review New Fixtures: Check the placement and requirements of all new appliances, sinks, and electrical devices. Note the required location of drains, vents, and power outlets.
- Overlay the Runs: On a separate copy of the blueprints, use colored pencils to draw the proposed routes for the new utilities. Use Red for electric, Blue for water, and Yellow for gas.
- Check for Conflicts: Examine the new utility paths against the new framing and any existing utility runs (Step 16). Ensure a new water line doesn’t run through the location of a new structural column.
- Confirm the Rough-in: Have the project plumber and electrician review the marked blueprints. They will confirm if the proposed runs are up to code and feasible for their rough in work.
- Finalize the Map: Once approved by the trades, transfer the final utility layout onto the main set of construction documents. This becomes the guide for the demolition team and the trades.
- Post the Safety Key: Ensure the utility plan includes a clear safety key (like the one shown) defining the colors used for new and existing lines.
35. ???? Structural Engineer Confirmation of Shoring Plans
Relevant Item Name: Engineer Stamped Blueprint with Load Bearing Elements and Shoring Requirements

The stamp of a Structural Engineer on the shoring plan is the single most important document before beginning demolition of load bearing elements. This blueprint highlights Confirmed Load Bearing Walls and mandatory Temporary Shoring Requirements. A professional certification is nonnegotiable.
The engineer calculates the precise weight being supported by the walls to be removed. They design the exact placement, size, and type of temporary shoring needed to transfer that weight safely to the foundation. This certification transfers the liability for structural safety to the professional.
Never, under any circumstance, proceed with removing a structural wall without the engineer’s stamped and signed plan for temporary support. This step ensures the safety of the entire building and everyone on site.
Material Required List (For Shoring)
- Engineer’s signed and stamped structural shoring plan.
- Copies of the plan for the demolition crew and site supervisor.
Equipment Required List
- None (focus is on documentation, not installation).
DIY Instruction Step by Step: Securing Structural Approval for Demolition
Safety is guaranteed by the engineer’s stamp.
- Request the Shoring Plan: Ensure your contract with the structural engineer (Step 32) explicitly includes the design and sign off for temporary shoring required for all wall removals.
- Review the Locations: Look closely at the plan. Verify that the temporary support locations match the wall sections you plan to remove. Pay attention to the size and spacing of the shoring posts.
- Confirm the Stamp: Check that the plan bears the engineer’s official stamp, signature, and date. This is the legal confirmation of the design’s safety and integrity.
- Communicate Requirements: Review the plan with the general contractor and the crew responsible for installing the shoring (Step 2). Ensure they understand the specified materials and installation method.
- Post the Plan: Post a copy of the stamped shoring plan directly adjacent to the walls that are scheduled for removal.
- Inspection Confirmation: Ensure the site supervisor confirms the shoring is installed exactly as specified in the stamped plan before any portion of the load bearing wall is touched.
36. ???? Reviewing Final Utility Disconnect Points
Relevant Item Name: Blueprint Detail Highlighting Water and Gas Disconnect Locations

A final, detailed review of all utility cutoff and disconnect points is necessary to ensure safety before demolition. This blueprint overlay clearly marks the locations of the Water Main Shut Off, Gas Line Disconnect, and Cut Power areas. Safety warnings are visible near the lines.
This specialized drawing focuses only on the services that pose a hazard. Confirmation of these points ensures that in case of an emergency (like a ruptured pipe during demolition), the crew knows exactly where to isolate the service instantly.
Having this information isolated from the complex architectural drawings makes it an invaluable, clear safety document. This final check of the disconnect points is a fundamental safety barrier before demolition.
Material Required List (For Review)
- Finalized utility disconnect blueprint detail.
- Marker (to physically mark the cutoffs on site).
Equipment Required List
- Flashlight (to check connections in dark areas).
- Safety equipment (gloves, safety glasses).
DIY Instruction Step by Step: Confirming Emergency Utility Disconnects
Knowing the location of every cutoff is a critical safety skill.
- Walk the Utility Room: Walk the basement or utility room with the site supervisor, referring to the Utility Disconnect blueprint.
- Locate Every Shutoff: Point to the physical location of the main water valve, the gas shutoff valve, and the main electrical breaker panel.
- Ensure Accessibility: Check that the path to these disconnects is clear of clutter, debris, and tools. They must be accessible in seconds, even if the power is out.
- Confirm Functionality: Verify that all valves turn easily and that the electrical breaker panel is correctly labeled. If a valve is stiff, have a plumber service it immediately.
- Post Emergency Info: Post a laminated sign directly next to each shutoff point clearly stating what it controls and the direction to turn for shutoff.
- Final Supervisor Review: Have the site supervisor sign a document confirming they have visually inspected and understood the location and operation of all emergency utility disconnects.
37. ????️ Final HVAC and Mechanical System Check
Relevant Item Name: Inspecting the Main HVAC System and Utility Connections

The final step is to check the condition of the main mechanical systems that are not being removed, like the furnace or water heater, and ensure they are protected. This image shows the furnace, water pipes with shutoff valves, and the electrical panel in the basement utility area.
Before demolition begins, you must confirm that the HVAC system is either properly sealed off or temporarily disabled. This prevents demolition dust from being sucked into the air handler and distributed through the home’s ductwork, causing thousands in cleaning or replacement costs.
Any systems staying must be protected with sheeting, and the vents in the demolition zone must be taped up securely (Step 7). This last check ensures the expensive mechanical heart of the home is safe from construction debris.
Material Required List (For Protection)
- Heavy plastic sheeting (6 mil).
- Duct tape or builder’s tape.
- Lock out tags (for the electrical panel).
Equipment Required List
- Step ladder (for reaching high vents).
DIY Instruction Step by Step: Protecting Mechanical Systems Pre Demolition
Preventing dust contamination is the final safeguard.
- Shut Off the System: Turn off the power to the furnace, air handler, and any zone control unit at the main electrical panel (Step 36). Place a lock out tag on the breaker switch.
- Seal the Vents: In the demolition zone and any adjacent rooms, securely cover all supply and return air vents with plastic sheeting and seal the edges with tape.
- Cover the Unit: Cover the main furnace and water heater units with heavy plastic sheeting, sealing the edges near the base, but ensuring no plastic covers any combustion air intake or exhaust vents.
- Clear the Area: Remove any stored flammable materials or clutter from the immediate vicinity of the HVAC system and electrical panel, creating a clean, safe zone.
- Remove Filters: Remove the filter from the air handler or furnace. This prevents it from getting clogged with the first rush of dust when the system is eventually reactivated.
- Final Walkthrough: Conduct a final walk through of the entire utility area, confirming all valves, panels, and equipment are either shut off, tagged, or completely protected from dust and debris.
Successfully completing all 37 of these steps proves you are not planning your renovation wrong; you are planning it right. By verifying your permits, securing temporary shoring, finalizing your budget, and properly vetting your contractors, you have established the necessary foundation for success. This deep planning transforms a potentially chaotic construction process into a predictable, well managed effort.
The key to a smooth renovation is control. You gain control by understanding the structural implications, communicating clearly with your neighbors, and having financial buffers in place. Never rush the pre-demolition phase. Time spent planning now saves triple the time, stress, and money later when the dust starts to fly.
Use this document as your authoritative checklist. Your commitment to detail in these early steps guarantees a much smoother, safer, and ultimately more rewarding journey to your newly renovated home.
Key Takeaways
Safety and Legality are First
- Never begin structural work without the official Building Permit prominently posted on site.
- Always ensure all main utilities (water, gas, electricity) are professionally shut off and tagged before starting demolition.
- Mandatory professional testing for hazardous materials like asbestos and lead must be completed and abatement finished before walls are opened.
Structural Integrity is Nonnegotiable
- A structural engineer must confirm all load bearing walls and provide a stamped plan for temporary shoring.
- Reviewing blueprints to verify load bearing elements is a critical planning task.
- Inspect the existing foundation for any pre existing cracks or flaws that must be addressed before the structural load shifts.
Financial and Logistical Buffers
- Create a detailed project budget and immediately set aside a 15% to 20% contingency fund specifically for unexpected costs.
- Finalize and order all long lead time materials, such as windows, cabinets, and major fixtures, before demolition.
- Establish clear communication protocols, safety rules, and temporary living arrangements for your family before the first day of work.