Many people struggle to get work done while sitting in a messy room. A bad desk setup can make your brain feel slow and tired. You might find yourself looking at piles of paper instead of finishing your tasks. This happens when your space does not support your goals.

Your surroundings have a direct impact on how well you think. A dark corner or a hard chair can ruin your focus for the whole day. You need a layout that matches your specific work style to stay on track. Small changes often lead to big wins in your daily output.
We have gathered forty unique ways to fix your home office today. These ideas help you remove clutter and find your hidden energy. You will learn how to build a space that makes you feel ready to win. Each setup offers a way to turn a dull room into a hub of growth.
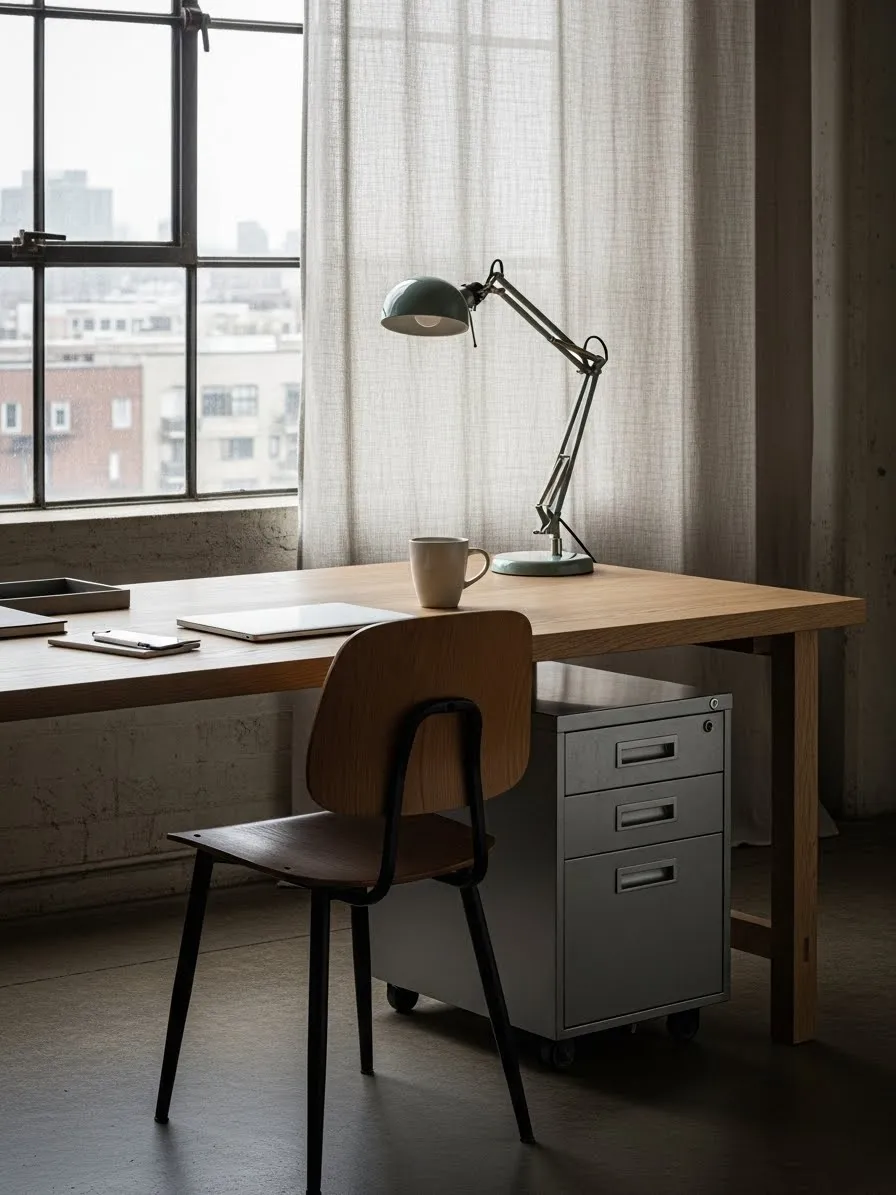
1 Minimalist Industrial Workspace
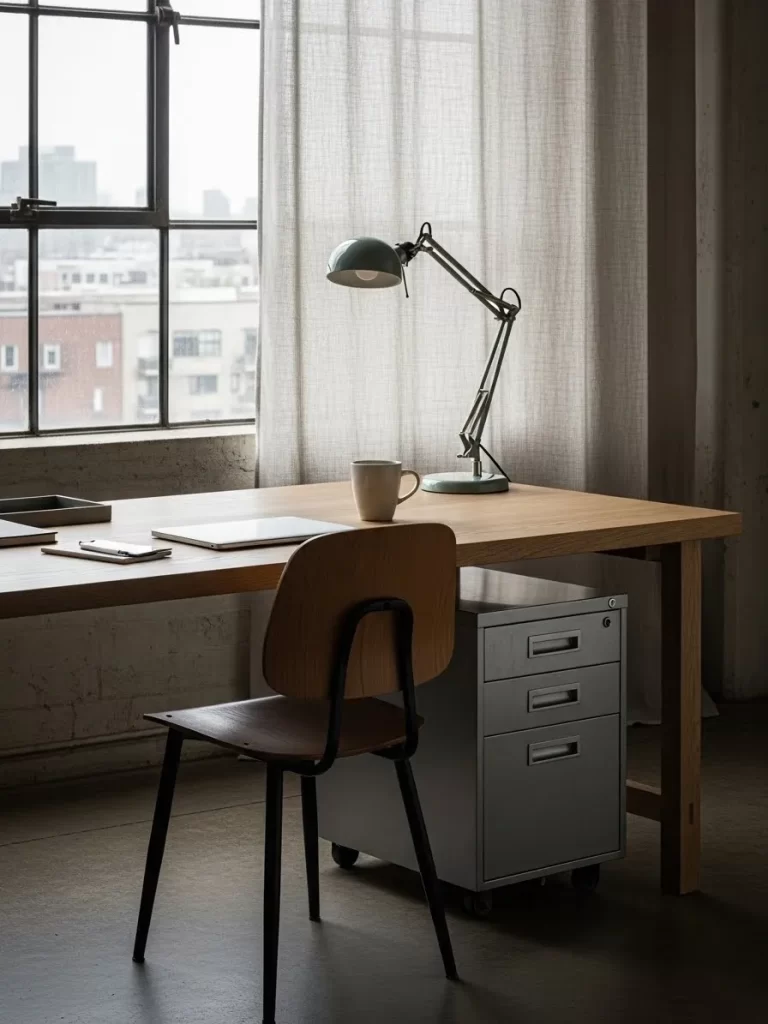
A clean wooden desk sits near a large window to invite natural light into your daily routine. This setup uses a metal filing cabinet on wheels to keep documents tucked away and out of sight. A vintage green task lamp provides focused lighting for late evening projects while keeping the surface clear of unnecessary bulk.
Minimalism helps remove mental fog by limiting visual distractions in your line of sight. Placing the desk facing a window offers a refreshing view during short breaks. This simple arrangement creates a calm atmosphere that encourages deep work and high concentration.
Materials Required List
- Sandpaper with fine grit
- Wood stain or clear sealant
- Four metal desk legs
- Solid wood board or butcher block
- Wood screws
Equipment Required List
- Power drill
- Measuring tape
- Paintbrush or lint free rag
- Screwdriver
DIY Instruction Step by Step
- Measure your available floor space to determine the length and width needed for your wooden board.
- Purchase a solid piece of wood or a pre cut butcher block from a local hardware store.
- Sand the top surface and the edges of the wood until they feel smooth to your touch.
- Wipe away all dust with a damp cloth and let the wood dry completely.
- Apply a thin layer of wood stain or sealant using a brush to protect the surface from coffee spills.
- Wait for the first coat to dry and apply a second coat if you want a richer color.
- Flip the board over so the bottom side faces up on a soft rug or towel.
- Position one metal leg at each corner and mark the screw holes with a pencil.
- Drill small pilot holes into the marks to prevent the wood from cracking.
- Secure each leg tightly using the power drill and wood screws.
- Turn the desk over and place it in front of your favorite window.
2 Professional Walnut Executive Office
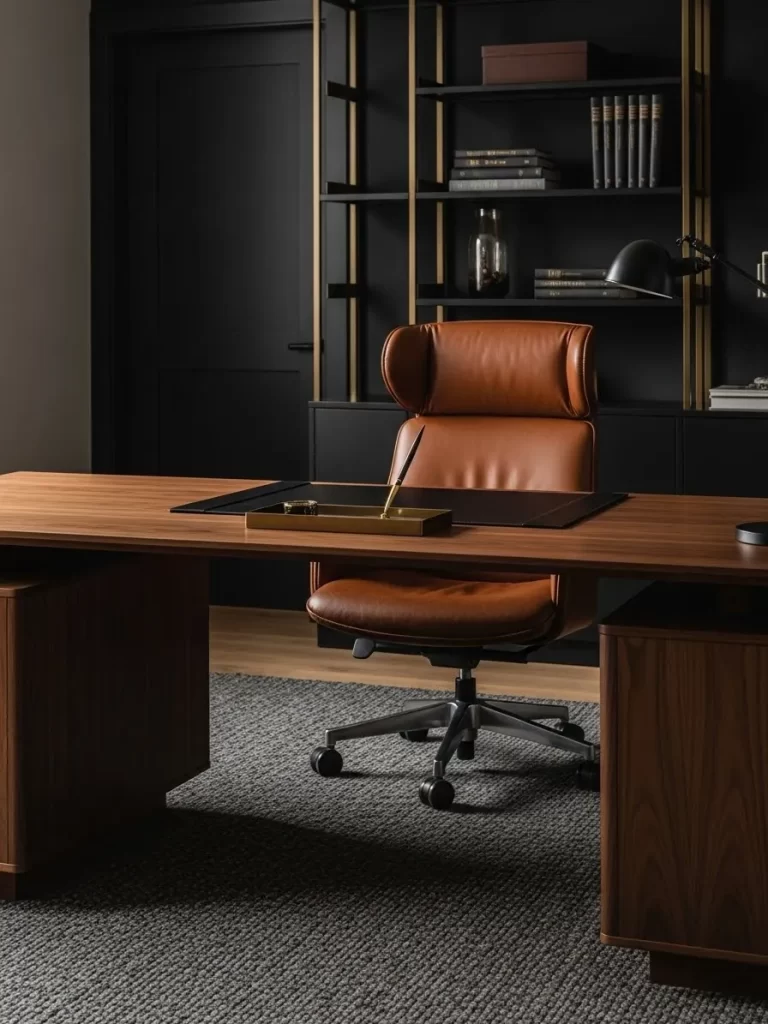
A heavy walnut desk provides a sturdy surface for high stakes decision making. This room pairs dark walls with a rich brown leather chair to create a sense of classic luxury. Tall black shelves store books behind the desk to keep your most important resources within a short reach.
Comfort plays a huge role in staying focused during long afternoon meetings. The soft leather seat supports your back while the wide desk offers plenty of room for your laptop and papers. Keeping the floor clear with a textured rug helps the space feel organized and quiet.
Materials Required List
- Large piece of faux leather fabric
- Thin sheet of stiff cardboard
- Tube of strong craft glue
Equipment Required List
- Long ruler
- Sharp scissors
- Heavy books for weights
DIY Instruction Step by Step
- Lay your big piece of leather fabric flat on a clean table with the pretty side facing down.
- Place your stiff cardboard on top of the leather to see how much space you need.
- Use your long ruler and a pencil to draw a rectangle on the leather that is two inches wider than the cardboard on all sides.
- Cut along the lines you drew using your sharp scissors very slowly to keep the edges straight.
- Spread a thin layer of glue all over one side of the cardboard.
- Press the cardboard onto the center of the leather fabric and rub it with your hand to remove air bubbles.
- Fold the extra edges of the leather over the back of the cardboard and glue them down tightly.
- Place several heavy books on top of the mat and let it sit overnight so the glue dries flat.
- Flip it over and place it on your desk to hold your keyboard and mouse.
3 Bright Architectural Nook
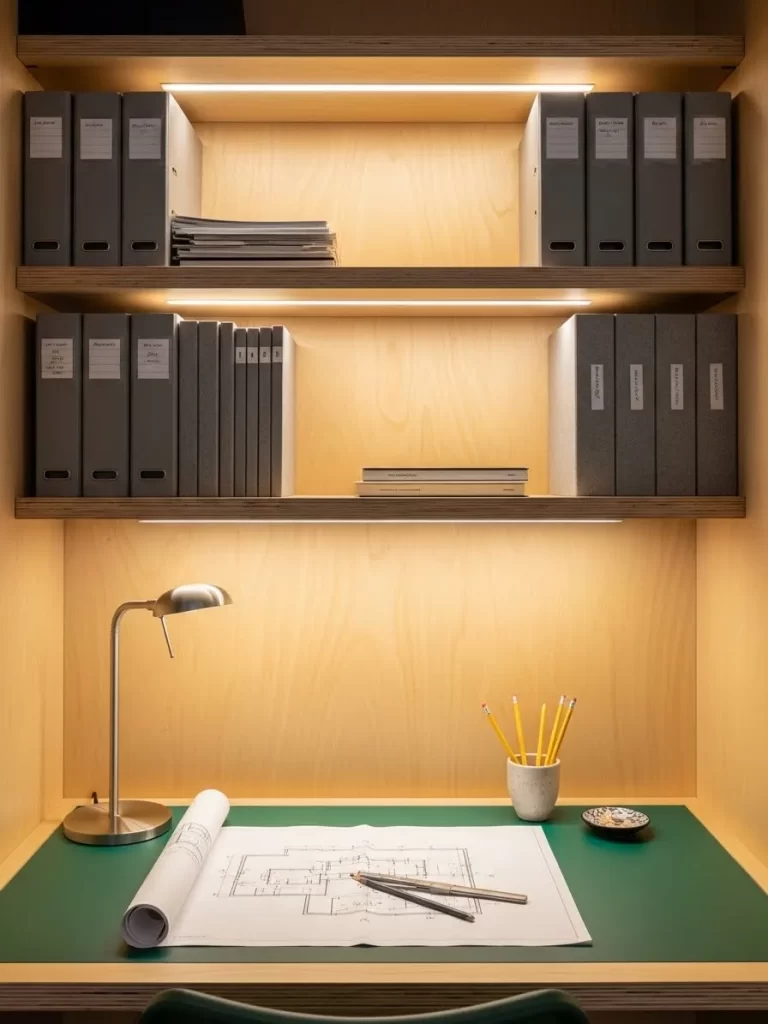
Warm LED strips hide under the wooden shelves to light up your blueprints and sketches. This small area uses a built in design to maximize every inch of the wall for storage. Grey boxes sit neatly on the upper levels to hold smaller tools and office supplies.
A green desk mat protects the wood surface from pen marks and spills. Having light directly above your work prevents shadows from blocking your view of fine details. This setup makes a small corner feel like a professional studio.
Materials Required List
- Pack of battery powered LED light strips
- Small plastic cord clips with sticky backs
- Fresh batteries
Equipment Required List
- Cleaning cloth
- Measuring tape
- Step stool
DIY Instruction Step by Step
- Use a damp cloth to wipe the underside of your wooden shelves to remove all the dust.
- Wait ten minutes for the wood to dry completely so the lights will stick well.
- Measure the length of your shelf with your tape measure to know where the lights will go.
- Peel the thin paper off the back of the light strip to reveal the sticky side.
- Press the light strip firmly against the bottom of the shelf starting from one end and moving to the other.
- Use your thumb to push down on the strip every few inches to make sure it stays in place.
- Stick a small plastic clip near the corner of the wall to hold the power wire out of the way.
- Put the batteries into the small power box and click the button to see your desk glow.
4 Patterned Closet Workspace
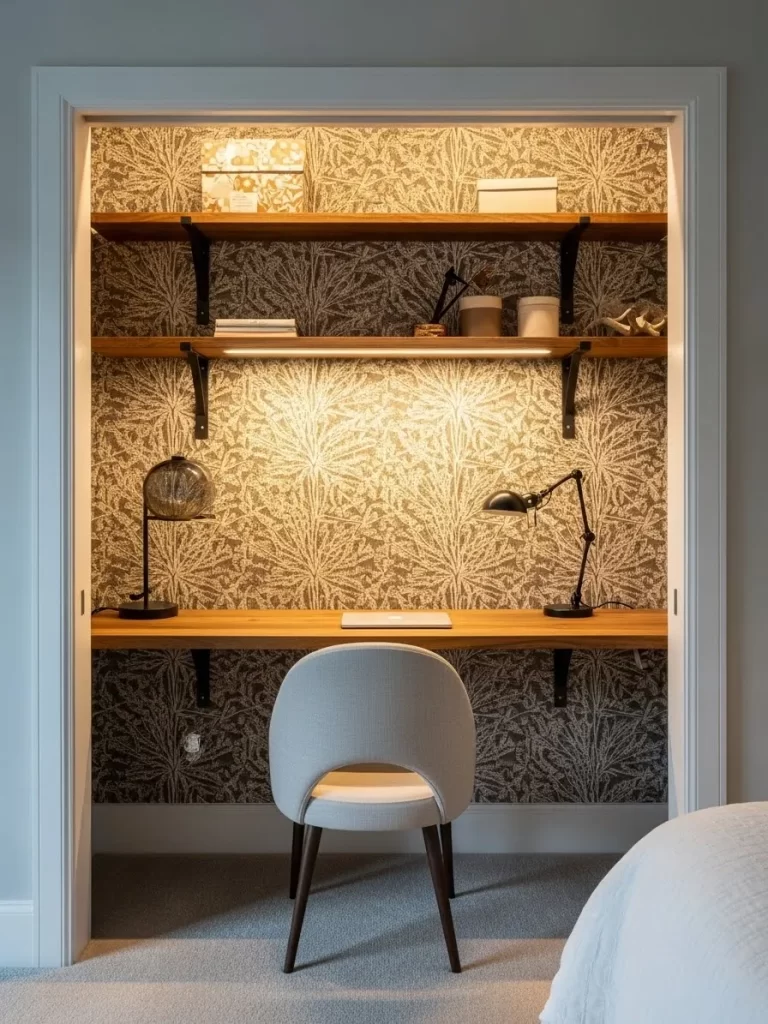
Floral wallpaper turns a standard closet into a secret place for productivity. Two thick floating shelves provide space for books and small decor items without cluttering the floor. A simple white chair fits easily under the narrow desk to save space when you finish your work.
Closing the closet doors at the end of the day helps you separate your job from your home life. The bright pattern on the wall adds energy to the small space. It is a smart way to use a spare closet if you do not have a full room available.
Materials Required List
- Two rolls of peel and stick wallpaper
- Small container of water
- Cleaning sponge
Equipment Required List
- Utility knife
- Plastic smoothing tool
- Measuring tape
DIY Instruction Step by Step
- Empty the closet and wipe the back wall with a damp sponge to get rid of dirt.
- Measure the height of the wall from the floor to the ceiling.
- Unroll your wallpaper and cut a piece that is three inches longer than the height of the wall.
- Peel back a small part of the paper at the top of the roll.
- Line up the top edge of the wallpaper with the top corner of the closet wall.
- Slowly pull the backing paper down with one hand while using the plastic smoothing tool with the other hand.
- Push the tool from the middle of the paper toward the edges to get rid of any trapped air.
- Use your utility knife to trim off the extra paper at the bottom where the wall meets the floor.
- Repeat these steps for the next piece of paper and make sure the floral patterns match up at the seams.
5 Symmetrical Shared Station

Two workstations sit back to back in this bright and open room. A tall grey divider separates the screens to give each person a sense of privacy. Large windows on both sides of the room let in plenty of daylight to keep the energy levels high.
Clean white furniture makes the office feel much larger than it actually is. Keeping matching chairs and monitors creates a visual balance that is very pleasing to the eye. This layout works great for couples or business partners who share a space.
Materials Required List
- Large sheet of thick foam board
- Two yards of grey fabric
- Can of spray adhesive glue
Equipment Required List
- Long ruler
- Utility knife
- Heavy duty tape
DIY Instruction Step by Step
- Measure the width of your desk to see how big your privacy screen should be.
- Use a ruler to draw a large rectangle on your foam board and cut it out with a utility knife.
- Lay your grey fabric on the floor and place the foam board on top of it.
- Cut the fabric so it is four inches larger than the foam board on all sides.
- Move outside or to a well ventilated room and spray the glue all over one side of the foam.
- Carefully press the fabric onto the glue and smooth it out with your hands so there are no wrinkles.
- Fold the edges of the fabric over the back of the board and secure them with heavy duty tape.
- Stand the board up in the middle of the shared desk to block the view of the other person.
6 Ambient L Shaped Corner
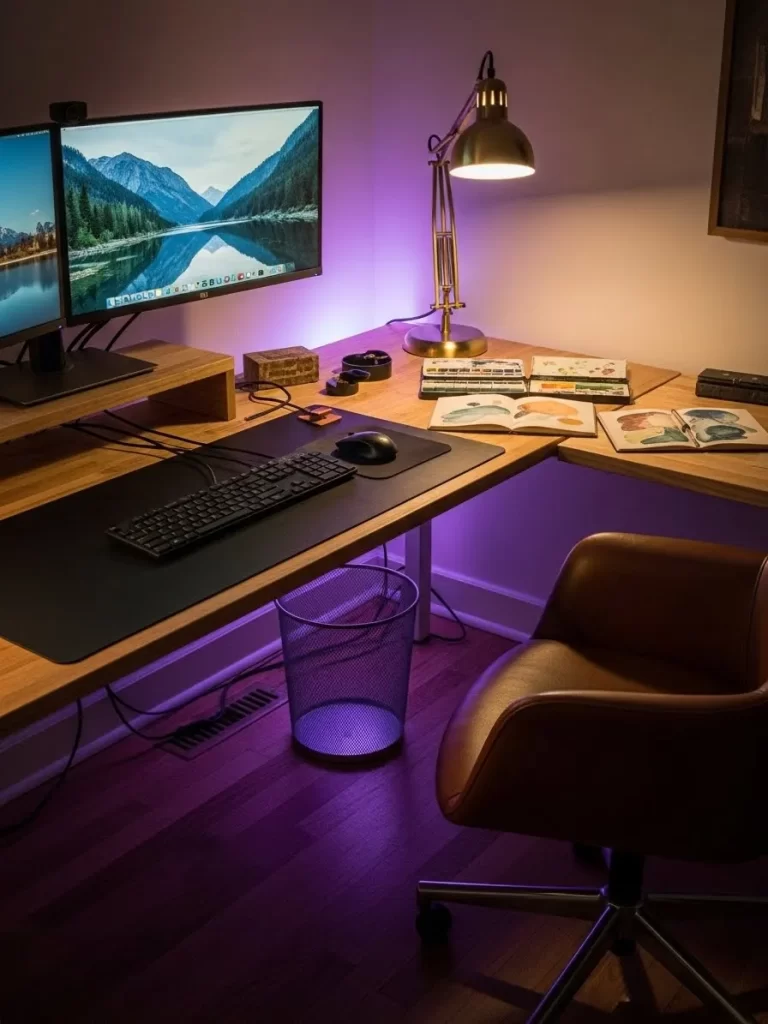
An L shaped desk wraps around the corner to provide a massive amount of surface area. Purple lights glow behind the monitors to create a modern and relaxing vibe. A mesh trash can and a wooden monitor riser keep the desk looking sharp and tidy.
The corner position allows you to spread out your art books and computer gear at the same time. Using a riser for your screen helps keep your neck straight while you type. This setup is excellent for anyone who works with both digital and physical tools.
Materials Required List
- One wide wooden board
- Two small wooden blocks for legs
- Bottle of wood glue
Equipment Required List
- Sandpaper
- Ruler
- Pencil
DIY Instruction Step by Step
- Buy a wooden board that is about ten inches wide and twenty inches long.
- Rub the board and the small wooden blocks with sandpaper until they feel very smooth.
- Wipe the wood with a dry cloth to get rid of the sawdust.
- Turn the big board upside down on your table.
- Put a large bead of wood glue on the top of each small wooden block.
- Press one block onto each end of the big board to make the legs.
- Let the glue dry for at least four hours without moving the pieces.
- Flip the stand over and place it on your desk.
- Set your computer monitor on top of the stand so the screen is at the same level as your eyes.
7 Creative Inspiration Wall

Three brass lamps hang above a collection of cork boards and framed art. The word FOCUS stands out in large letters to remind you of your goals every time you look up. This wall serves as a central hub for pinning notes and keeping track of important tasks.
Customizing your wall with personal photos and sketches makes the office feel like your own. The mix of textures from the cork and the glass frames adds visual interest to a flat wall. It keeps your desk clear because all your reminders are pinned up high.
Materials Required List
- One thick sheet of cork
- Large empty picture frame with the glass removed
- Strong wood glue
Equipment Required List
- Scissors
- Ruler
- Hammer and a small nail
DIY Instruction Step by Step
- Take the back piece out of your picture frame and set the frame aside.
- Use your ruler to measure the size of that back piece.
- Draw those same measurements onto your sheet of cork using a pencil.
- Cut the cork with your scissors so it is the exact same size as the back of the frame.
- Put glue all over the back piece of the frame and press the cork onto it.
- Put the back piece with the cork attached back into the frame and lock it in.
- Find a spot on your wall where you want to hang your new board.
- Tap a small nail into the wall using your hammer.
- Hang the frame on the nail and use colorful pins to hold your notes and photos on the cork.
8 Floating Live Edge Slab
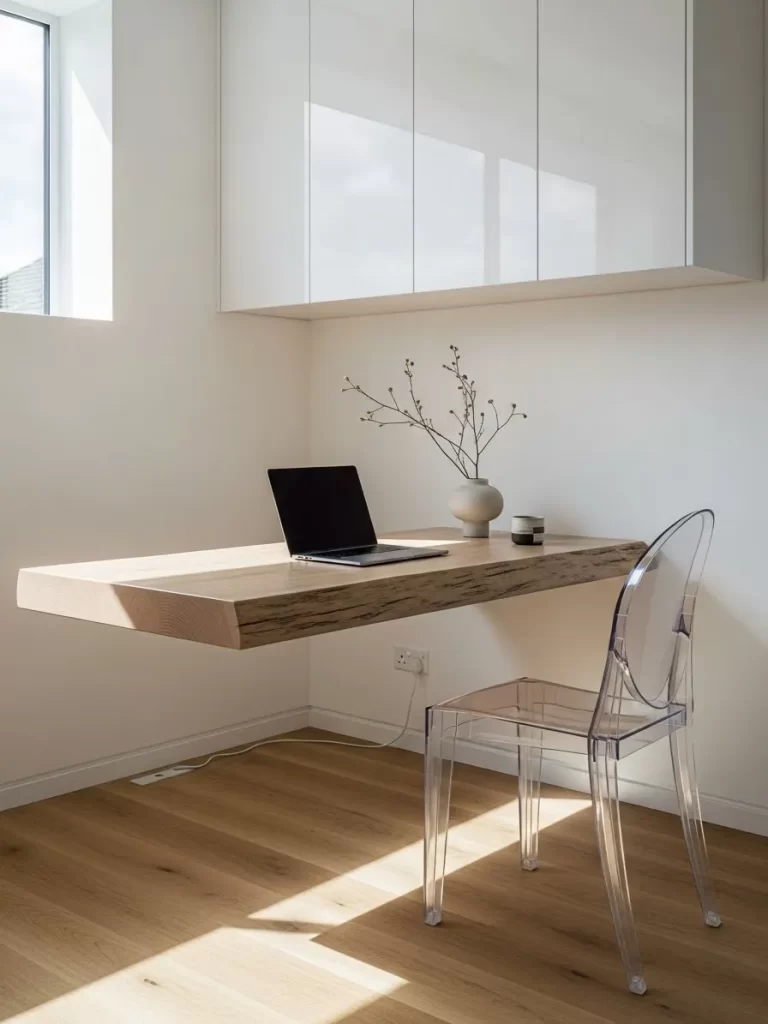
A thick slab of wood with natural edges floats against a white wall. This live edge desk looks like a piece of art while serving as a functional workspace. A clear plastic chair keeps the room looking light and airy because you can see right through it.
Mounting the desk to the wall removes the need for bulky legs that get in your way. A small vase with branches adds a touch of nature without taking up too much room. This design is great for minimalists who want a high end look.
Materials Required List
- One heavy wood slab with a flat back edge
- Two large metal wall brackets
- Box of long wall screws
Equipment Required List
- Power drill
- Level tool
- Stud finder tool
DIY Instruction Step by Step
- Hold the stud finder tool against your wall and move it sideways until it beeps to find the wooden beams inside the wall.
- Mark the spots where the beams are located using a pencil.
- Hold one metal bracket over a mark and use your level tool to make sure it is perfectly straight up and down.
- Drill small holes through the bracket holes and into the wall.
- Screw the bracket into the wall very tightly using your power drill and the long screws.
- Repeat these steps for the second bracket so they are both at the same height.
- Lift your heavy wood slab and place it on top of the brackets.
- Use shorter screws to attach the brackets to the bottom of the wood slab so it cannot slide off.
- Clear away any dust and pull your chair up to your new floating workspace.
9 Full Wall Storage Library
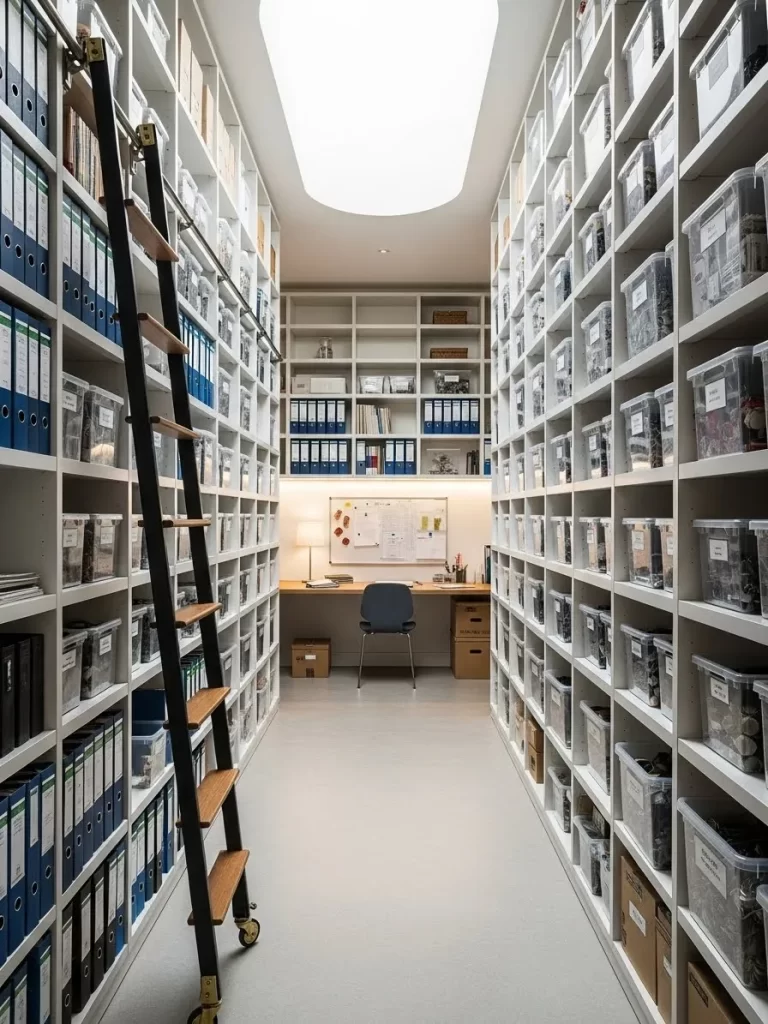
Floor to ceiling shelves fill the entire room to provide an incredible amount of storage. A rolling ladder allows you to reach the highest binders and bins with total ease. The white color of the shelves keeps the narrow room from feeling too dark or crowded.
Using clear bins allows you to see exactly what is inside without opening every box. This system is great for people who have many files or physical products to manage. A small desk at the far end provides a quiet spot to focus on deep tasks.
Materials Required List
- Set of clear plastic storage bins with lids
- Pack of white sticker labels
- Black permanent marker
Equipment Required List
- Ruler
- Step stool
DIY Instruction Step by Step
- Gather all the loose items in your office and sort them into piles like pens or paper clips.
- Put each pile of items into its own clear plastic bin and put the lid on tight.
- Take a white sticker label and place it on the front of the bin.
- Use the black marker to write the name of the items inside the bin in big letters.
- Use your ruler to make sure the label is centered and straight on every box so they look uniform.
- Use a step stool to climb up and place the bins you do not use often on the top shelves.
- Put the bins you use every day on the middle shelves where you can reach them easily.
- Line the bins up in a straight row so the labels are all facing forward.
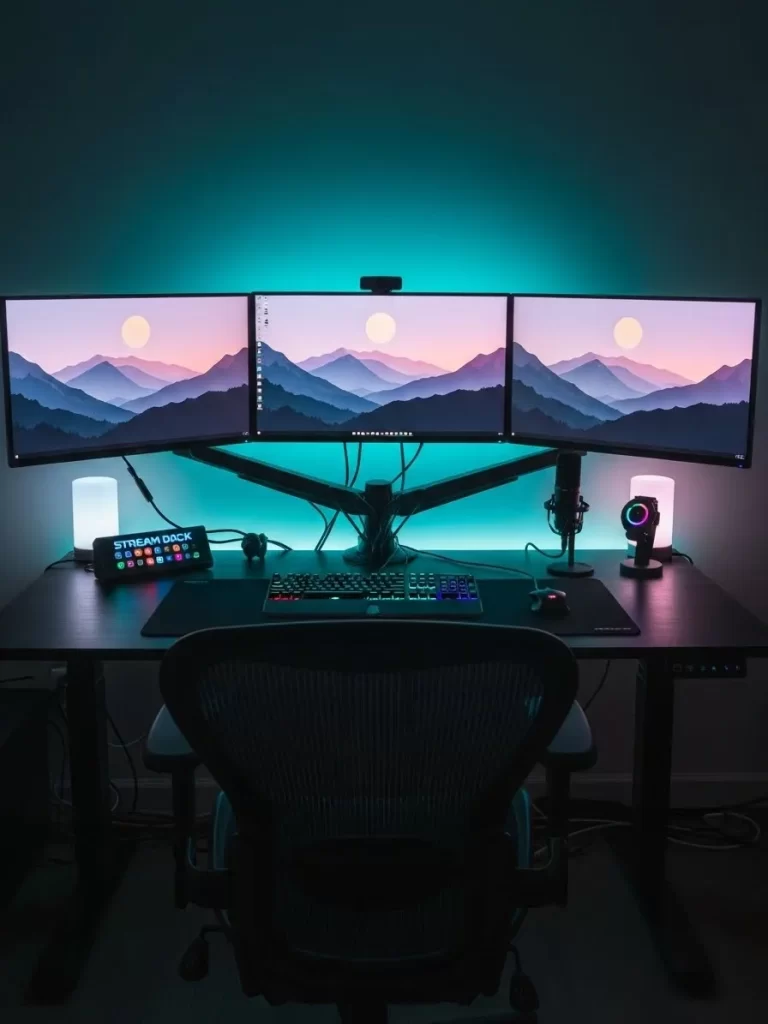
10 Immersive Triple Screen Setup
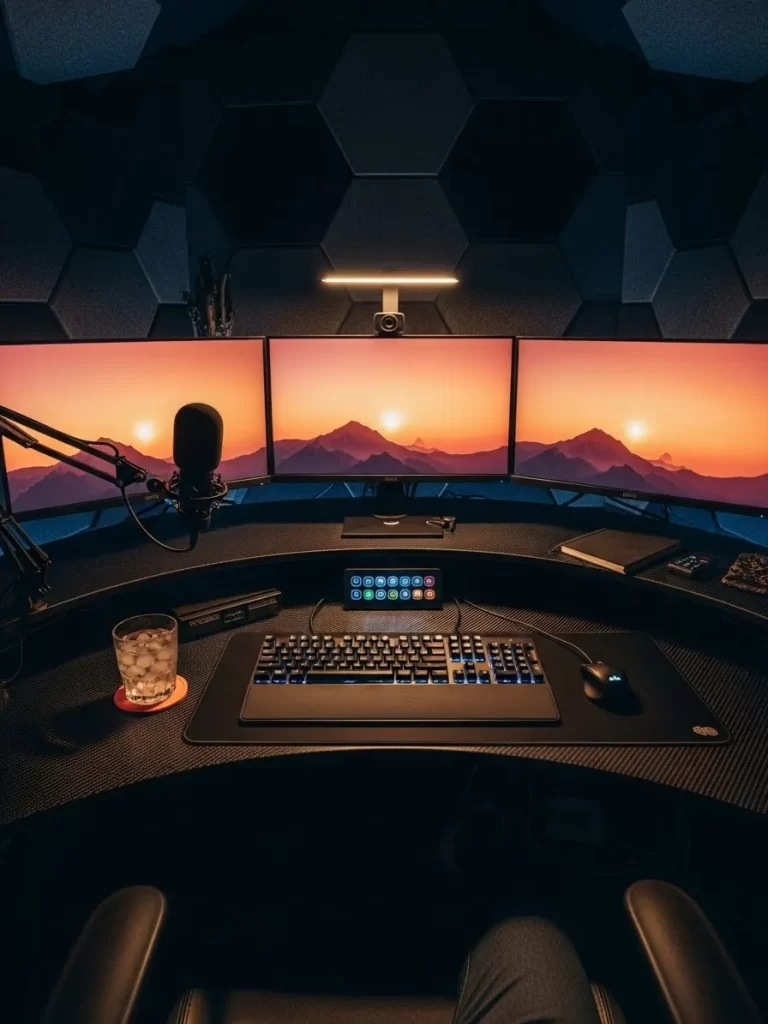
Three large monitors wrap around the user to create a fully immersive work environment. A warm light bar sits on top of the middle screen to shine light exactly where you need it. The dark walls and honeycomb panels give the room a high tech and quiet feeling.
Multiple screens allow you to keep many windows open at once without switching back and forth. This setup is a dream for gamers or data analysts who need to see everything at a glance. A comfortable black chair completes the command center look.
Materials Required List
- Pack of hexagon shaped foam wall tiles
- Roll of double sided mounting tape
Equipment Required List
- Level tool
- Measuring tape
- Pencil
DIY Instruction Step by Step
- Choose a wall behind your computer where you want to add some style.
- Use your measuring tape to find the center of the wall and mark it with a pencil.
- Cut several small strips of double sided tape and stick them to the back of one hexagon tile.
- Press the first tile onto the center mark you made on the wall.
- Use your level tool to make sure the top edge of the tile is flat and not tilted.
- Take another tile and place it right next to the first one so the edges touch perfectly.
- Continue adding tiles in a pattern until you have covered a large area of the wall.
- Step back and check your work to make sure the lines are straight.
11 Classic Armoire Hidden Desk
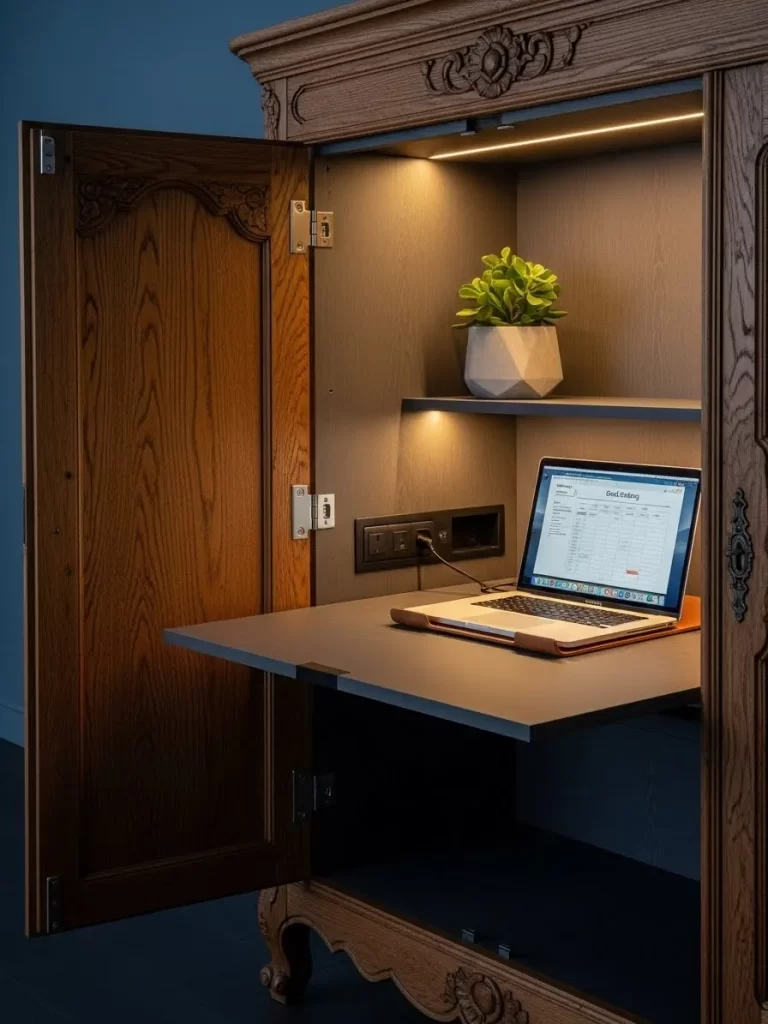
An old wooden cabinet opens to reveal a secret place for your laptop. A small green plant adds a fresh touch inside the dark wood interior. The built in light strip makes sure you can see your work even when the doors are half closed.
Using an antique piece of furniture adds character to your home. You can hide your work away in seconds by simply closing the cabinet doors. It is a smart way to keep a small apartment looking tidy.
Materials Required List
- Battery powered light bar
- Small potted succulent
- Sticky mounting strips
Equipment Required List
- Cleaning cloth
- Step stool
DIY Instruction Step by Step
- Open your cabinet doors and empty the middle shelf.
- Wipe the underside of the top shelf with a cloth to remove any old wax or dust.
- Stick two mounting strips to the back of your battery powered light bar.
- Press the light bar firmly against the underside of the shelf so it shines down on your laptop.
- Place your laptop on the middle shelf and plug it into a nearby wall outlet.
- Put your small plant on a side shelf to make the space feel more alive.
- Adjust the light so it does not shine directly into your eyes when you sit down.
- Close the doors when you finish working to keep your office hidden.
12 Active Treadmill Station
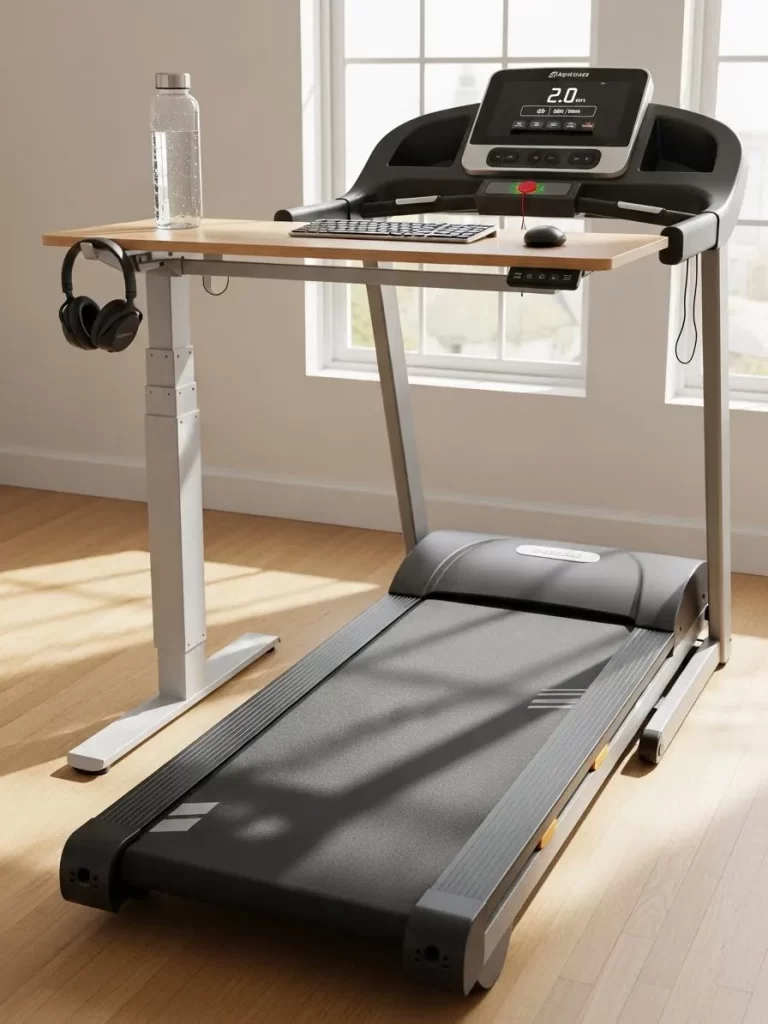
A wooden board sits across a treadmill to let you walk while you work. A water bottle and headphones stay close by to keep you moving through the afternoon. The bright window provides a great view to enjoy while you get your steps in.
Moving your body helps your brain think of new ideas more quickly. This setup turns a workout machine into a high energy office. You can track your miles and your emails at the same time.
Materials Required List
- One flat piece of plywood cut to the width of your treadmill
- Two small strips of wood for the bottom
- Wood glue
Equipment Required List
- Measuring tape
- Sandpaper
- Heavy books
DIY Instruction Step by Step
- Measure the distance between the two side rails of your treadmill.
- Cut your plywood board so it is four inches wider than that measurement.
- Sand the board until it is smooth so you do not get any splinters.
- Place the board on the treadmill rails to see where it sits.
- Mark the spot on the bottom of the board where the rails are located.
- Glue a small strip of wood onto the bottom of the board just inside your marks.
- These strips will act as a stopper so the desk does not slide off the rails.
- Place heavy books on the strips and let the glue dry for a full day.
- Set the desk on your treadmill and place your laptop on top.
13 Focused Drawing Station
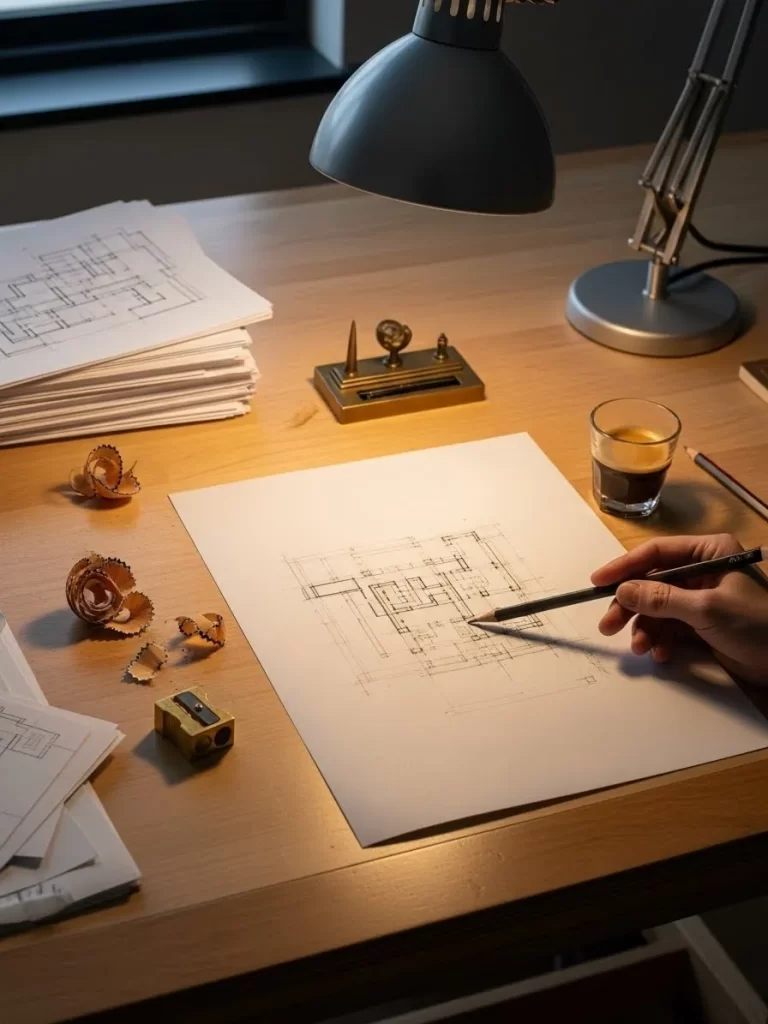
A hand draws detailed floor plans under the warm light of a grey lamp. Wood shavings from a pencil sharpener sit on the smooth table next to a stack of papers. A small cup of espresso provides the energy needed to finish the design.
Having a dedicated spot for physical drawing keeps your digital work separate. The simple wooden surface feels warm and natural under your hands. Clean lines on the paper show a project coming to life.
Materials Required List
- One heavy glass jar
- Decorative pebbles or sand
- Small piece of ribbon
Equipment Required List
- Cleaning cloth
- Scissors
DIY Instruction Step by Step
- Wash an old glass jar with soap and water to make it shine.
- Dry the jar completely with a clean cloth so no spots remain.
- Fill the bottom of the jar with two inches of decorative pebbles or sand.
- This weight will keep the jar from tipping over when you put heavy pens inside.
- Tie a colorful ribbon around the neck of the jar to add some style.
- Place your pencils and drawing tools into the jar with the sharp ends facing up.
- Put the jar on the corner of your desk so your tools are always ready.
14 Acrylic Action Center

A dark acrylic box holds papers labeled for action or filing on a grey counter. A leather tray keeps keys and pens from sliding around and getting lost. This small station acts as a filter for all the mail and notes that enter your home.
Knowing exactly where to put new papers stops clutter from growing on your main desk. The clear labels make it easy for everyone in the house to stay organized. It is a simple tool that saves a lot of time every morning.
Materials Required List
- Clear or tinted acrylic desktop bin
- Sheet of white sticker labels
- Fine point black marker
Equipment Required List
- Ruler
- Cleaning cloth
DIY Instruction Step by Step
- Wipe your acrylic bin with a soft cloth to remove any fingerprints.
- Decide which categories you need like To Do or To File.
- Write these names clearly on your sticker labels using the black marker.
- Use your ruler to find the exact center of the front of the bin.
- Peel the sticker and press it slowly onto the acrylic so there are no bubbles.
- Repeat this for each bin you want to use for your paper system.
- Place the bins in a row on your counter near the door or your desk.
- Put every new piece of paper into a bin as soon as you walk into the room.
15 Bright Bay Window Hub

A curved white desk fits into a large bay window overlooking a green yard. A bowl of fresh lemons and a cup of hot tea make the space feel inviting and calm. The soft cushions on the bench offer a comfortable place to sit for a quick meeting.
Natural light fills the room and keeps your mood high throughout the day. A hanging plant adds a splash of green to the white walls. This spot is great for light tasks or planning your weekly meals.
Materials Required List
- One healthy ivy plant in a plastic pot
- Decorative hanging basket
- Metal ceiling hook
Equipment Required List
- Power drill
- Step stool
- Pencil
DIY Instruction Step by Step
- Find a spot near your window where the plant will get plenty of light.
- Mark the ceiling with a pencil where you want the hook to go.
- Use your power drill to make a small hole on your pencil mark.
- Twist the metal hook into the hole until it is very tight and does not move.
- Place your ivy plant inside the decorative hanging basket.
- Climb the step stool carefully and hang the basket on the ceiling hook.
- Arrange the long vines so they hang down naturally toward the desk.
- Water the plant once a week to keep it looking green and healthy.
16 Neon Teal Triple Setup
Teal light glows behind three large monitors to create a cool and modern look. A black chair with a mesh back keeps you cool while you work on big projects. Small glowing lamps on each side of the desk provide a soft light that is easy on the eyes.
The long black desk has enough room for a keyboard and a large mouse pad. Keeping the cables hidden behind the screens makes the whole setup look very clean. This is a great space for someone who loves technology and style.
Materials Required List
- Roll of RGB LED light strips with a remote
- Small alcohol cleaning pads
- Clear plastic tape
Equipment Required List
- Measuring tape
- Scissors
DIY Instruction Step by Step
- Turn off your computer and unplug your monitors from the wall.
- Use the alcohol pads to clean the back edges of each monitor to remove dust.
- Measure the distance around the back of the three monitors combined.
- Cut the LED light strip at the marked cutting lines to match your measurement.
- Peel the sticky backing off the lights and press them onto the back of the screens.
- Use clear tape on the corners to make sure the strip stays flat.
- Plug the lights into a power outlet and use the remote to pick the teal color.
- Turn your monitors back on and enjoy the cool glow against the wall.
17 Moody Scholar Corner

A wooden desk with sawhorse legs sits in a corner surrounded by tall bookshelves. An hourglass and a vintage brass lamp create a timeless feeling for deep study. The dark rug on the floor adds warmth to the wood surfaces.
Seeing a goal like reading 52 books keeps you motivated to keep going. This quiet spot is far away from the noise of the TV or the kitchen. It feels like a private library inside your own home.
Materials Required List
- One large wooden door or tabletop
- Two wooden sawhorse frames
- Small bottle of wood finish or oil
Equipment Required List
- Sandpaper
- Lint free rag
- Level tool
DIY Instruction Step by Step
- Buy two matching sawhorse frames from a hardware store and put them together.
- Place the frames on the floor in the corner of your room where you want the desk.
- Sand the top and edges of your wooden door until the surface is smooth.
- Wipe the wood with a rag to remove all the dust from sanding.
- Apply a thin layer of wood oil to the surface to bring out the color.
- Let the oil dry for two hours and then wipe off any extra with a clean rag.
- Lift the wooden door and place it on top of the two sawhorse frames.
- Use your level tool to make sure the desk is flat and adjust the legs if needed.
18 Slim Wall Drop Desk
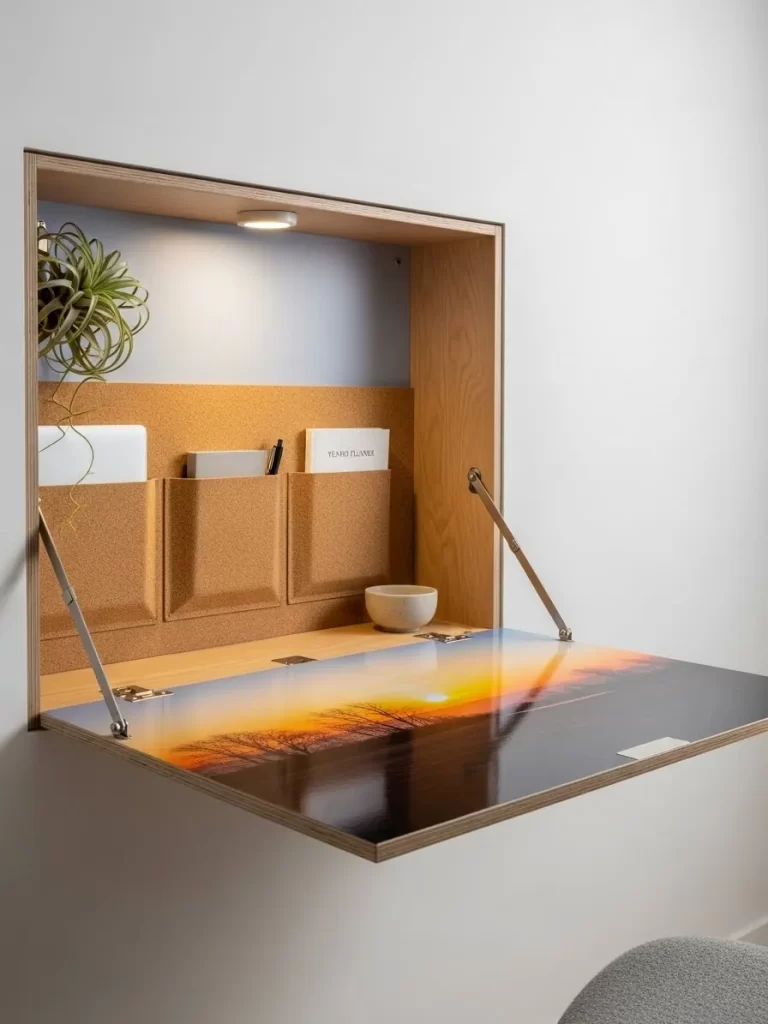
A small wooden box on the wall opens downward to create a tiny workspace. The inside features cork pockets to hold your laptop and planners. A picture of a sunset is printed on the desk surface to add a view to a blank wall.
This design is a lifesaver for very small rooms or apartments. It takes up zero floor space and hides your clutter when it is closed. A small light inside the box keeps the area bright and ready for use.
Materials Required List
- One pre made wooden wall cabinet with a drop front
- Heavy duty wall anchors and screws
- Small sheet of adhesive cork
Equipment Required List
- Power drill
- Level tool
- Pencil
DIY Instruction Step by Step
- Pick a wall that has enough space for the desk to open without hitting furniture.
- Hold the cabinet against the wall and use your level tool to make sure it is straight.
- Mark the mounting holes on the wall using your pencil.
- Drill holes into the wall and tap the heavy duty anchors into place.
- Screw the cabinet onto the wall tightly so it can hold the weight of a laptop.
- Cut your adhesive cork into squares and stick them to the inside back of the cabinet.
- These cork squares will hold your notes and keep your laptop from scratching the wood.
- Close the front panel and lock it to turn the desk back into a simple wall box.
19 Terrazzo Meeting Station
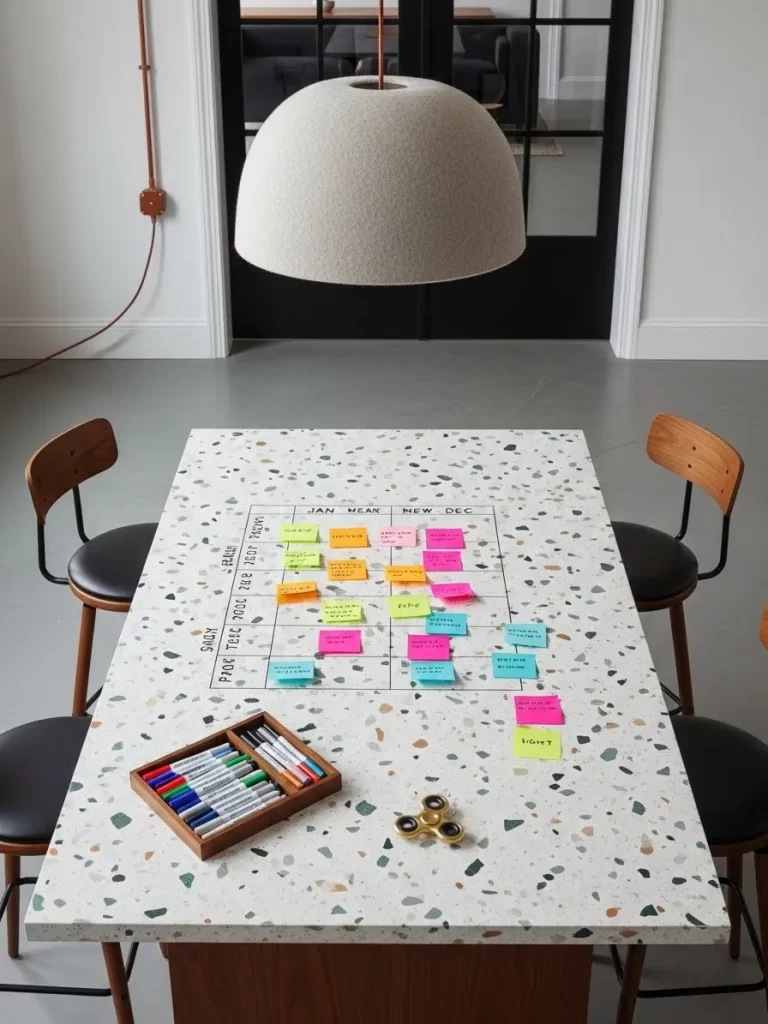
A large table with a colorful stone pattern holds a calendar made of sticky notes. Two wooden chairs sit ready for a team brainstorm or a family meeting. A large round light hangs from the ceiling to brighten the whole surface.
Using different colors of notes helps you sort tasks by person or importance. The table is big enough to spread out large maps or posters. It is a fun and creative place to plan your next big move.
Materials Required List
- Four packs of sticky notes in different colors
- Black permanent marker
- Long piece of painter’s tape
Equipment Required List
- Measuring tape
- Level tool
DIY Instruction Step by Step
- Clear your table and wipe it down so the surface is clean.
- Use your measuring tape to find the center of the table.
- Place a long piece of painter’s tape across the table to make a straight top line.
- Write the names of the months or days on the first row of sticky notes.
- Stick these notes along the edge of the painter’s tape to keep them in a line.
- Use one color of notes for work tasks and another color for personal tasks.
- Fill in the rest of the grid with your specific plans and deadlines.
- Peel off the painter’s tape when you are finished to see your clean calendar.
20 Pure White Focus Zone

A simple white desk sits against a textured white wall for a clean and quiet look. One white chair and a silver laptop are the only things in this empty space. This design removes all distractions so you can focus only on your screen.
The white color reflects light to make the room feel much larger. A smooth grey stone on the desk adds a tiny bit of nature to the room. It is a brave and bold choice for someone who wants a totally clear mind.
Materials Required List
- One gallon of white textured paint
- Roll of painter’s tape
- Plastic drop cloth
Equipment Required List
- Large paint roller with a thick nap
- Paint tray
- Step stool
DIY Instruction Step by Step
- Move your furniture away from the wall and cover the floor with a drop cloth.
- Use painter’s tape to protect the ceiling and the baseboards from paint.
- Pour the textured paint into your tray and coat your roller evenly.
- Roll the paint onto the wall using large V shaped motions to spread the texture.
- Work in small sections so the paint stays wet while you blend the edges.
- Let the first coat dry for four hours before checking for any thin spots.
- Apply a second coat if you want the texture to look more heavy and deep.
- Remove the tape while the paint is still slightly damp for a clean line.
21 Navy Modern Workspace
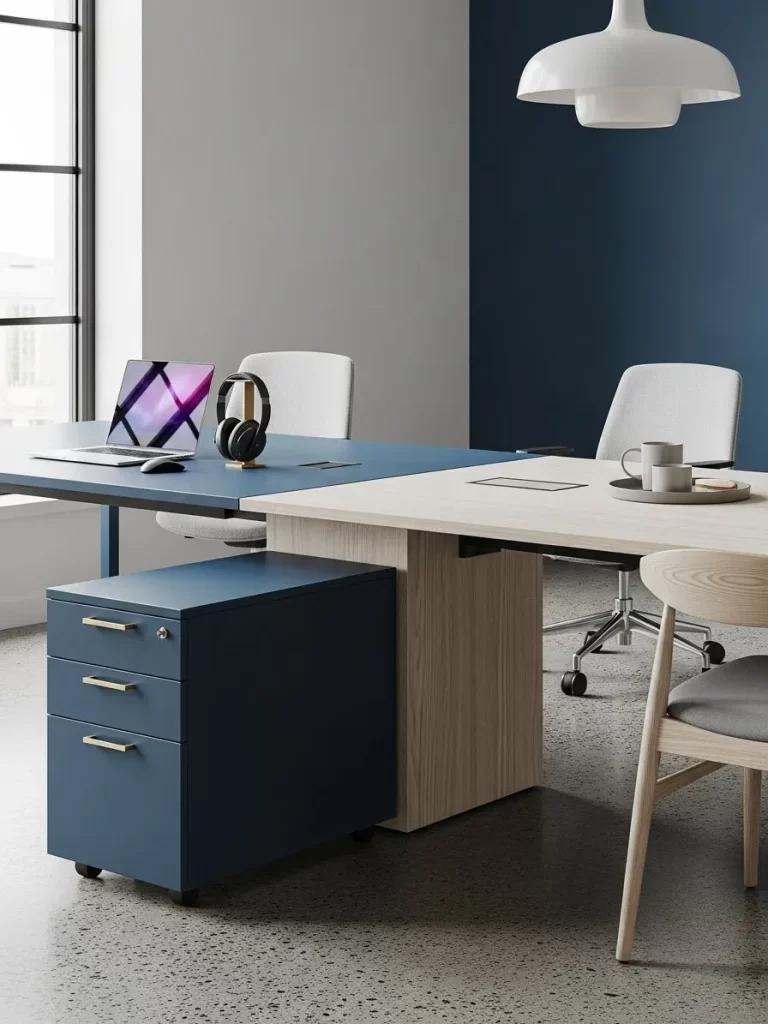
A deep navy blue desk offers a bold splash of color in this bright office. A matching filing cabinet on wheels keeps all your secret files locked away safely. Two white chairs provide a comfortable spot for collaborative projects or morning coffee.
Blue tones promote a sense of calm and logic during busy work hours. The contrast between the navy blue and the white furniture keeps the room feeling modern. Large windows allow light to bounce off the polished floors.
Materials Required List
- One gallon of navy blue furniture paint
- Small can of gold spray paint for handles
- Sandpaper
Equipment Required List
- Paint roller
- Screwdriver
- Drop cloth
DIY Instruction Step by Step
- Take an old desk and remove all the drawers and metal handles with a screwdriver.
- Sand the entire surface of the desk until the old finish is gone.
- Wipe the desk with a damp cloth to remove all the dust.
- Move the metal handles to a cardboard box and spray them with gold paint.
- Pour the navy blue paint into a tray and use a roller to apply a thin coat to the desk.
- Let the first coat dry for two hours before applying a second coat.
- Paint the fronts of the drawers and the filing cabinet to match.
- Once the paint is dry, screw the gold handles back onto the drawers.
- Place the desk in your office and pair it with white furniture.
22 Slide Out Tech Drawer
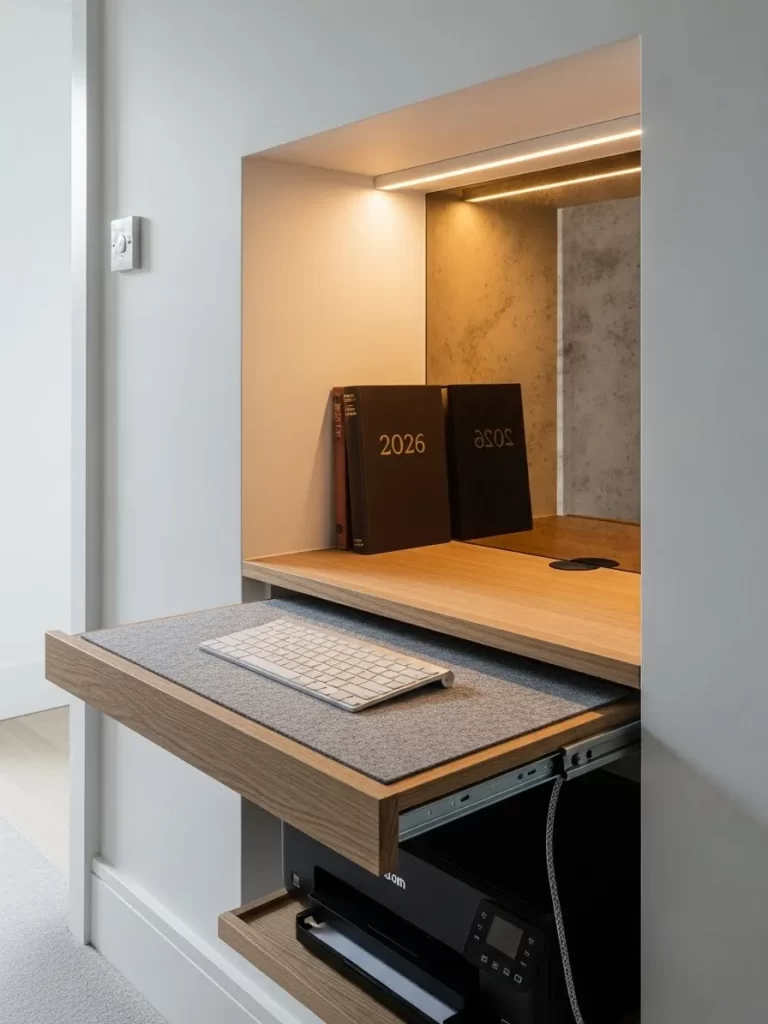
A hidden wooden shelf slides out to reveal a keyboard and mouse when you need to work. This smart design keeps the printer and heavy books tucked away in a neat wall nook. A built in light bar makes sure you can see every key clearly.
Using a slide out shelf saves space in small rooms or hallways. When you finish your tasks, you can simply push the shelf back to hide the tech. It keeps your home looking like a home and not just a busy office.
Materials Required List
- One wooden board for the shelf
- Set of heavy duty drawer slides
- Small box of wood screws
Equipment Required List
- Power drill
- Level tool
- Measuring tape
DIY Instruction Step by Step
- Measure the width of your wall nook to see how wide your shelf needs to be.
- Cut your wooden board so it is one inch narrower than the nook.
- Use a level tool to mark a straight line on both sides of the inner wall.
- Screw the cabinet part of the drawer slides onto the walls along those lines.
- Attach the other part of the slides to the sides of your wooden board.
- Slide the board into the tracks to make sure it moves smoothly back and forth.
- Place your keyboard and mouse on the shelf to test the height.
- Mount a small light above the shelf so you can work in the evening.
23 Ergo Dual Screen Station
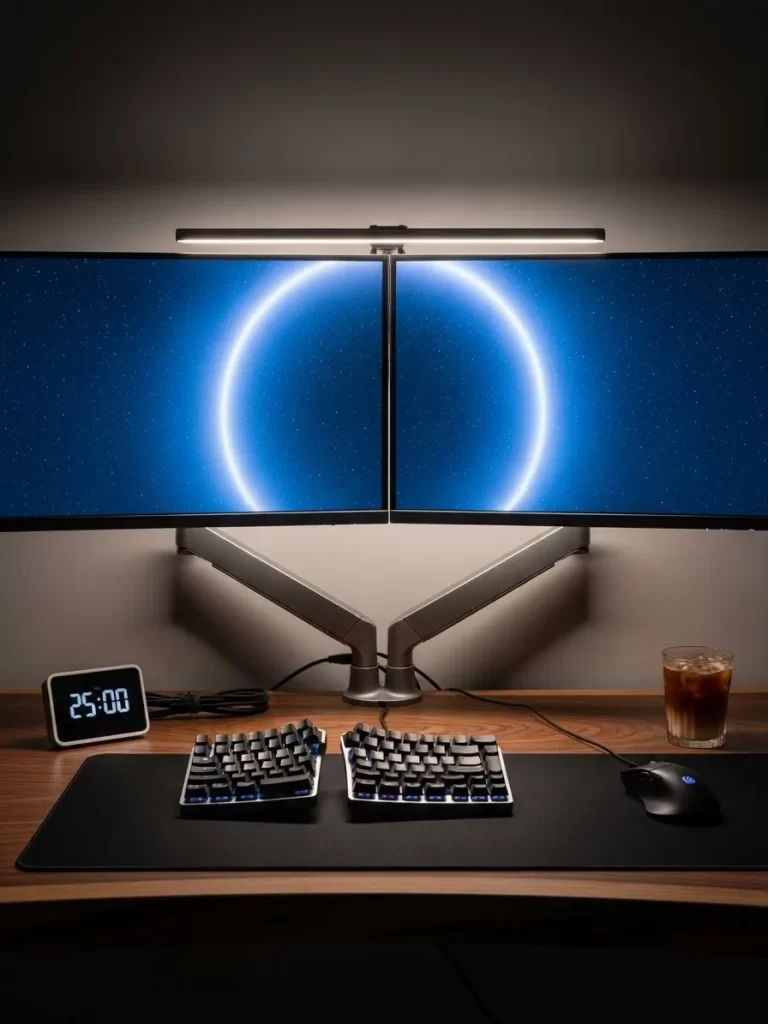
Two large monitors sit on a silver stand to keep your neck at a healthy angle. A split keyboard allows your hands to rest in a natural position while you type. A warm light bar on top of the screens helps prevent eye strain during long shifts.
This setup is built for people who spend many hours coding or writing. Having your screens raised keeps the desk surface clear for your morning coffee. The dark wooden desk adds a touch of warmth to the high tech gear.
Materials Required List
- Dual monitor arm stand
- Split ergonomic keyboard
- Screen light bar
Equipment Required List
- Allen wrench
- Cable ties
- Cleaning cloth
DIY Instruction Step by Step
- Clear your desk and wipe the surface to remove any dust or crumbs.
- Clamp the base of the monitor arm onto the back edge of your desk.
- Tighten the bolt using the Allen wrench until the stand does not wiggle.
- Attach your two monitors to the metal plates on the ends of the arms.
- Adjust the height so the top of the screens are at your eye level.
- Connect the power and video cables and tuck them into the arm clips.
- Place your split keyboard in front of you and adjust the angle for comfort.
- Clip the light bar onto the top of the monitors and plug it into a USB port.
24 Loft Bed Study Hub
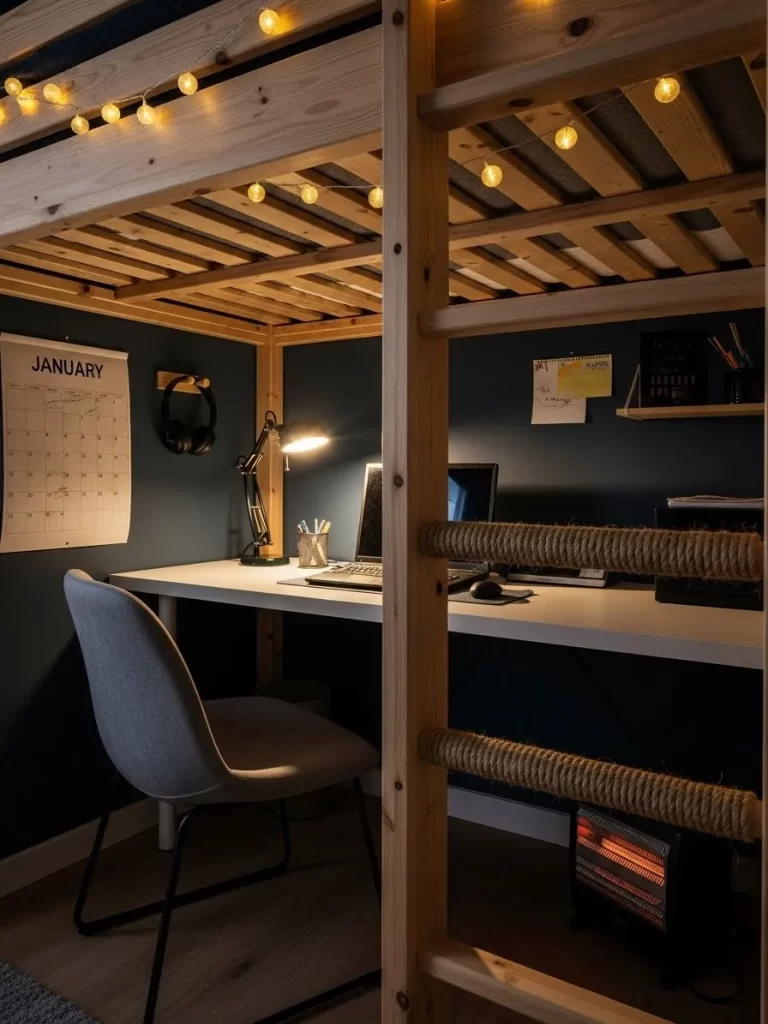
A white desk fits snugly under a wooden loft bed to make the most of a small bedroom. String lights hang from the bed frame to create a cozy and magical vibe. A simple calendar and a task lamp keep you on track with your school or work goals.
The dark walls make the small space feel like a private cave for focus. Using the area under a bed is a brilliant way to add an office to a studio apartment. A small space heater on the floor keeps your feet warm while you study.
Materials Required List
- String of globe lights
- Clear plastic adhesive hooks
- Small wall calendar
Equipment Required List
- Step stool
- Scissors
- Measuring tape
DIY Instruction Step by Step
- Use a step stool to reach the underside of your loft bed frame.
- Stick clear adhesive hooks along the wooden beams every twelve inches.
- Wait one hour for the glue on the hooks to set firmly.
- Drape the string lights over the hooks to light up the desk area.
- Plug the lights into a nearby outlet and hide the extra cord with tape.
- Use a small nail or a sticky hook to hang your calendar on the wall.
- Place your desk under the lights and arrange your books.
- Turn on the string lights and enjoy your new secret study spot.
25 Pegboard Tool Grid
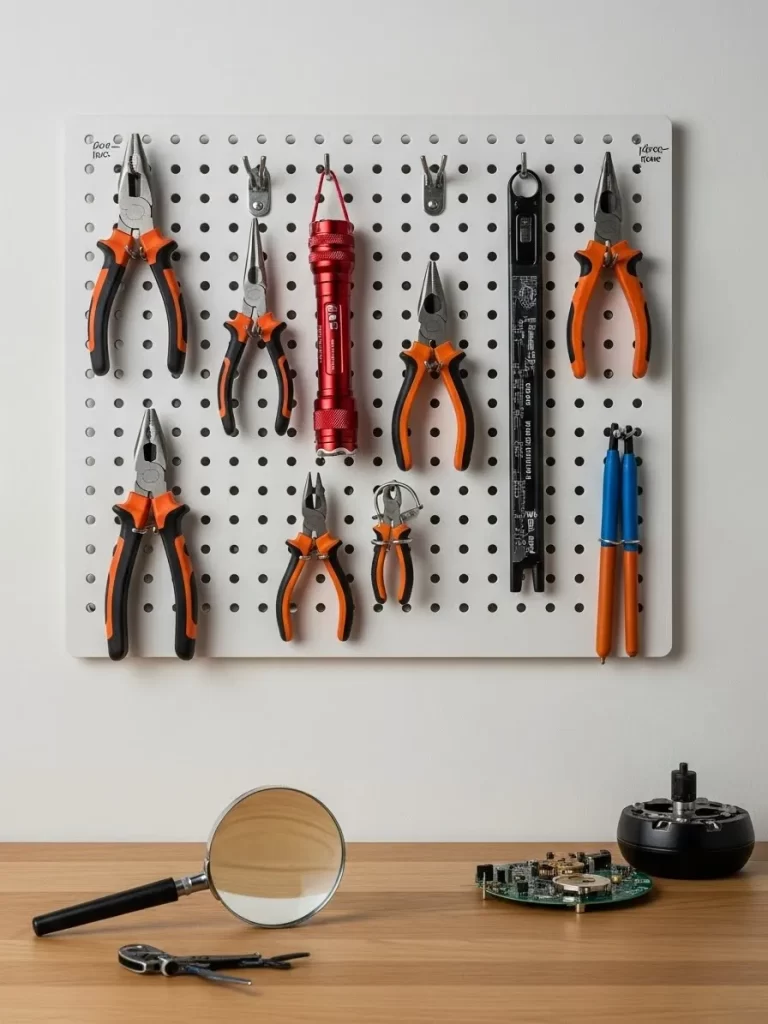
A white pegboard holds an organized collection of pliers and tools for electronic projects. Each tool has its own hook so you never have to search through a messy drawer again. A large magnifying glass sits on the wooden desk for delicate repair work.
Keeping your tools on the wall saves precious desk space for your projects. Seeing all your gear at once makes it easier to pick the right tool for the job. This setup is a must for anyone who loves to build or fix gadgets.
Materials Required List
- Large white pegboard
- Assorted pegboard hooks and bins
- Wall mounting spacers and screws
Equipment Required List
- Power drill
- Level tool
- Pencil
DIY Instruction Step by Step
- Choose a wall space directly above your workbench or desk.
- Hold the pegboard against the wall and use a level to make sure it is straight.
- Mark the four corner holes on the wall using your pencil.
- Drill holes into the marks and tap in plastic wall anchors.
- Place the spacers behind the board to keep it away from the wall.
- Screw the board into the wall through the spacers so hooks can fit in the back.
- Push your metal hooks into the holes in any pattern you like.
- Hang your pliers and flashlights on the hooks and place small parts in bins.
26 Twin Closet Studio

Two identical workstations sit side by side inside a large built in wardrobe. A tall bookshelf in the middle separates the two desks to give each person their own space. Large grey bins on the top shelves hide away extra papers and office supplies.
This design allows two people to work in the same room without feeling crowded. The white furniture and light wood floors keep the small space feeling open. Closing the large wardrobe doors at night hides the entire office from view.
Materials Required List
- Two small white desks
- One tall narrow bookshelf
- Large matching storage bins
Equipment Required List
- Measuring tape
- Level tool
- Screwdriver
DIY Instruction Step by Step
- Empty the closet and remove any low hanging rods or shelves.
- Measure the inner width of the closet and mark the exact center point.
- Place the tall narrow bookshelf in the center mark to divide the space.
- Slide one desk into the left side and the other desk into the right side.
- Use a level tool to make sure the desks are flat and adjust the legs if needed.
- Place your storage bins on the high shelves for a uniform look.
- Run power strips behind the bookshelf to plug in both computers.
- Put a comfortable chair at each desk and start your work day together.
27 Slate Mountain View Station
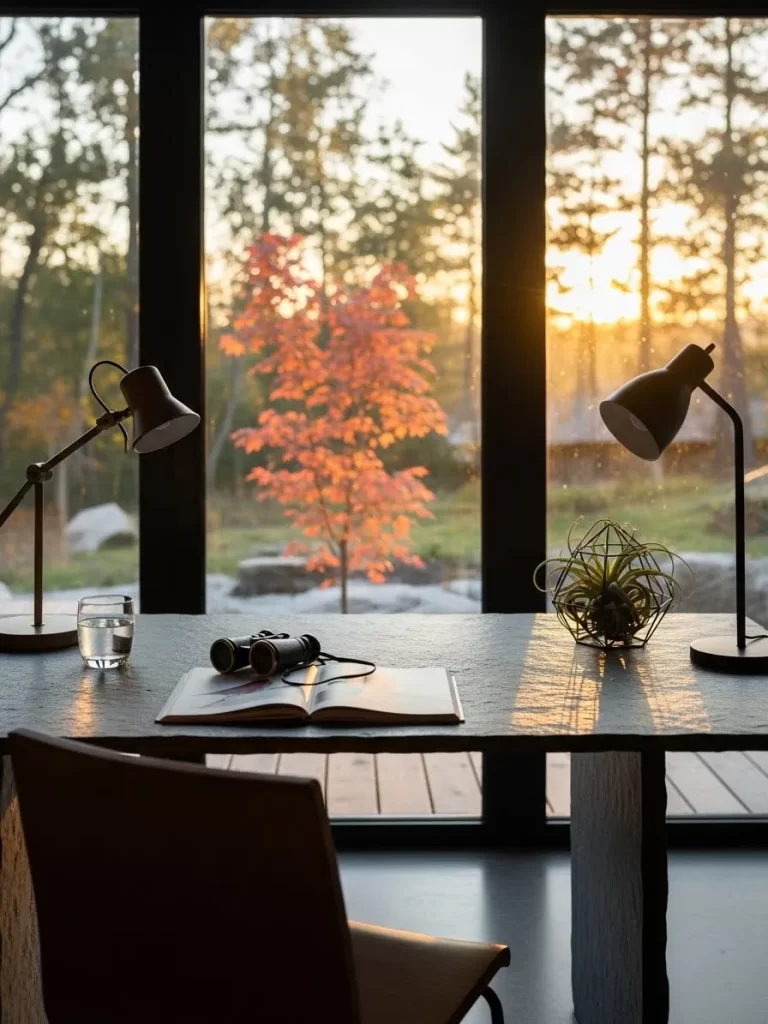
A heavy slate desk sits in front of a massive window with a view of the forest. The dark stone surface feels cool and natural under your hands during a busy day. Two small lamps provide soft light that does not distract from the beautiful sunset outside.
Watching the seasons change through the glass keeps you connected to nature. Binoculars sit ready for spotting birds or deer in the trees during your breaks. This peaceful layout is a great choice for writers and nature lovers.
Materials Required List
- Two large stone or concrete blocks for legs
- One thick slab of slate or dark stone
- Clear silicone adhesive
Equipment Required List
- Heavy duty gloves
- Cleaning cloth
- Measuring tape
DIY Instruction Step by Step
- Clear a space on the floor near your largest window and wipe it clean.
- Place the two heavy stone blocks on the floor about four feet apart.
- Measure the distance to make sure they are centered with the window.
- Wear heavy gloves and ask a friend to help you lift the large slate slab.
- Gently lower the slab onto the two blocks until it is centered.
- Use a small amount of silicone adhesive between the slab and the blocks to keep it from sliding.
- Let the glue dry for a full day before placing anything on the desk.
- Add a simple wooden chair and a soft rug to complete the natural look.
28 Glossy Executive Command Desk

A high gloss wooden desk with a striped pattern adds a touch of modern luxury to this room. A tall black leather chair and a silver laptop make the space feel like a high level office. Clear glass containers hold watches and small items to keep the surface tidy.
The polished surface reflects the light from the large window to brighten the whole room. This style is perfect for those who want to feel like a boss while they work. A black tray keeps your notebook and pen in one organized spot.
Materials Required List
- One gallon of high gloss clear varnish
- Sandpaper with very fine grit
- Small bottle of wood polish
Equipment Required List
- Paintbrush or foam roller
- Lint free cloth
- Screwdriver
DIY Instruction Step by Step
- Remove all the items from your desk and unscrew the drawer handles.
- Sand the wooden surface very lightly until any old scratches are gone.
- Wipe the desk with a dry cloth to remove every tiny piece of dust.
- Apply a thin coat of high gloss varnish using a foam roller for a smooth finish.
- Let the varnish dry for six hours in a room with no dust or wind.
- Sand the dry coat very lightly again and wipe it clean.
- Apply a second thin coat of varnish and let it dry for a full day.
- Screw the handles back on and buff the surface with wood polish and a cloth.
29 Zen Tatami Floor Desk
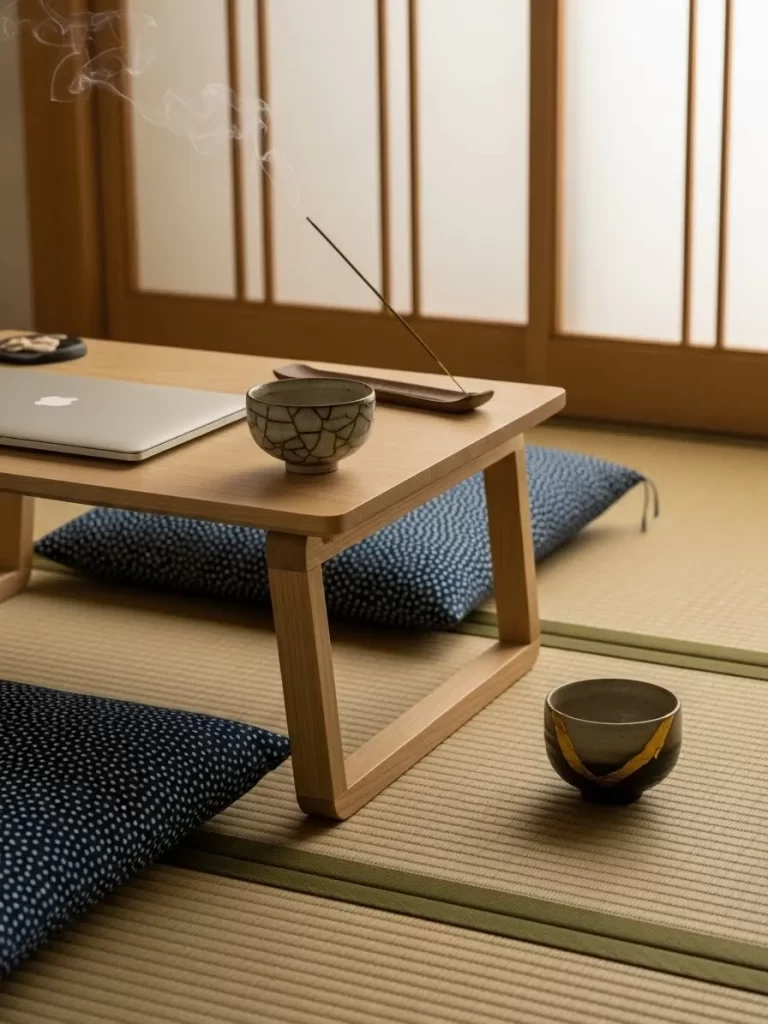
A low wooden table sits on a woven tatami mat for a traditional and relaxing workspace. Two soft blue cushions provide a comfortable place to sit on the floor while you work. A stick of incense and a cup of tea help create a calm mind for deep focus.
Sitting on the floor encourages better posture and keeps you grounded. This minimalist setup is easy to move and fits into any quiet corner of your home. It is a wonderful way to bring a sense of peace to a stressful job.
Materials Required List
- Low wooden coffee table
- Two large floor cushions
- One woven tatami or straw mat
Equipment Required List
- Measuring tape
- Cleaning cloth
DIY Instruction Step by Step
- Find a quiet corner of your home with plenty of floor space.
- Lay down your woven tatami mat and make sure it is flat with no bumps.
- Place your low wooden table in the center of the mat.
- Put one soft cushion on each side of the table for seating.
- Wipe the table with a damp cloth to remove any dust.
- Place your laptop in the center of the table and a small tea tray to the side.
- Light a stick of incense to fill the room with a pleasant scent.
- Sit cross legged on the cushion and begin your focused work session.
30 Rattan Privacy Nook
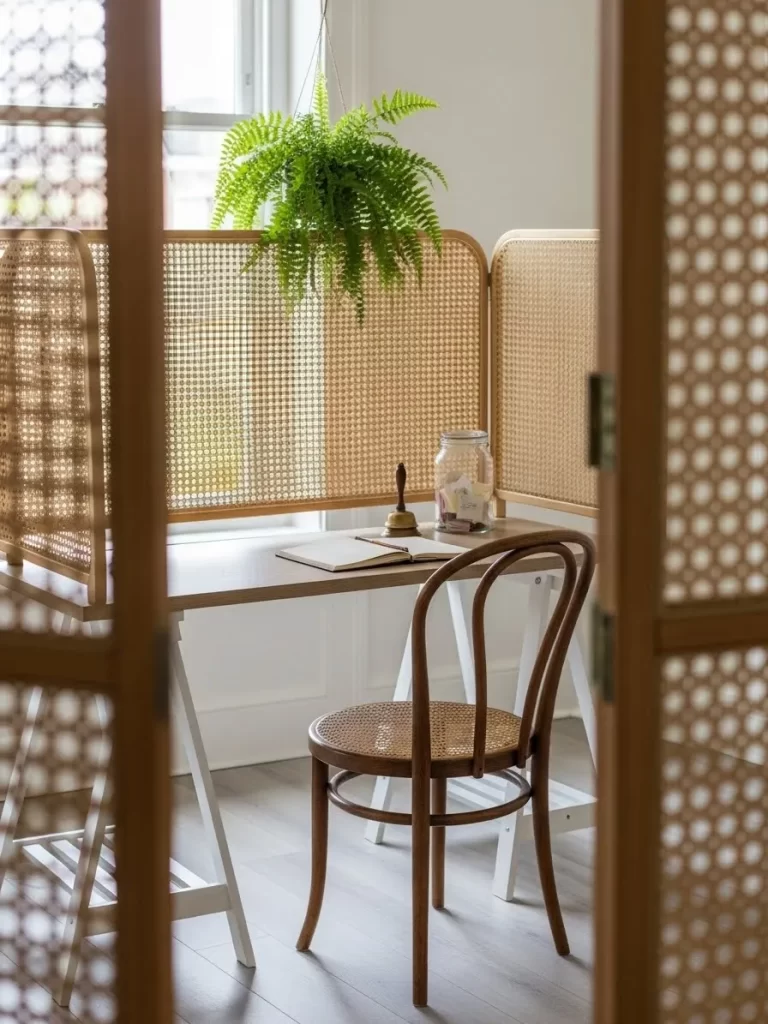
A tall rattan screen wraps around a simple white desk to create a private world for work. A matching wooden chair with a woven seat adds to the natural and airy feeling of the room. A green fern hangs above the screen to bring a touch of the outdoors inside.
The woven pattern of the screen allows light to pass through while blocking distractions. This is a smart solution for people who work in a busy living room. It defines your office space without the need for building permanent walls.
Materials Required List
- Three panel rattan or wicker screen
- One small white desk
- Hanging basket with a fern plant
Equipment Required List
- Measuring tape
- Ceiling hook
- Power drill
DIY Instruction Step by Step
- Measure the width of your desk and the space you need for your chair.
- Unfold the rattan screen and place it in a U shape around your desk area.
- Mark a spot on the ceiling above the screen with a pencil.
- Drill a small hole and screw in a sturdy metal ceiling hook.
- Hang your fern plant from the hook so the leaves drape over the screen.
- Place your desk and chair inside the screen to create your private nook.
- Adjust the panels of the screen to block out any views of the TV or kitchen.
- Enjoy your quiet and stylish hideaway in the middle of your home.
31 Mobile Industrial Workbench
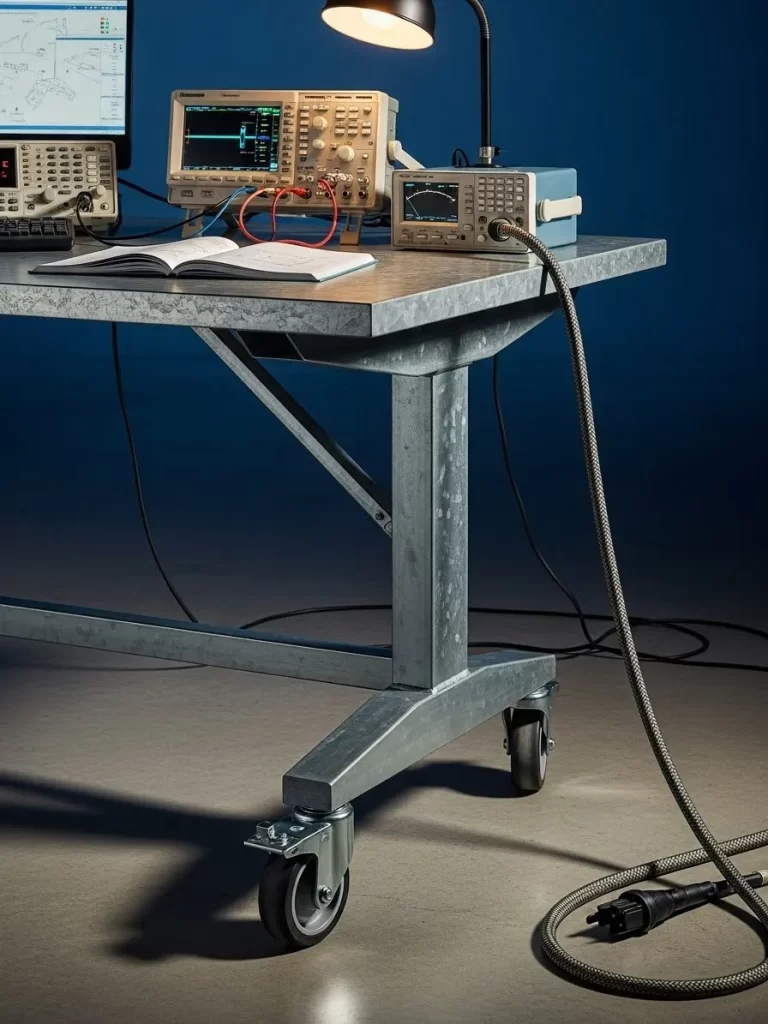
A heavy metal desk on large wheels allows you to move your entire office to any room. This industrial style setup is built to handle heavy gear like oscilloscopes and tech tools. A small task lamp provides bright light for reading complex diagrams and notebooks.
Being able to lock the wheels keeps the desk steady while you work on delicate electronics. This is a great choice for engineers or hobbyists who need a tough and flexible surface. The grey metal finish gives the room a professional and modern vibe.
Materials Required List
- Heavy duty metal workbench
- Four large locking caster wheels
- Set of bolts and washers
Equipment Required List
- Wrench set
- Power drill
- Measuring tape
DIY Instruction Step by Step
- Flip your metal workbench upside down on a soft rug or cardboard.
- Measure the holes in the bottom of each leg to match your wheels.
- Use a power drill to make new holes if the old ones do not fit.
- Place one wheel on each leg and secure it tightly with bolts and washers.
- Use a wrench to make sure every bolt is as tight as possible.
- Flip the desk back over and test the wheels on your floor.
- Push the desk to your favorite spot and step on the locks to keep it in place.
- Set up your computer and tools on the wide metal surface.
32 Elegant Hallway Console
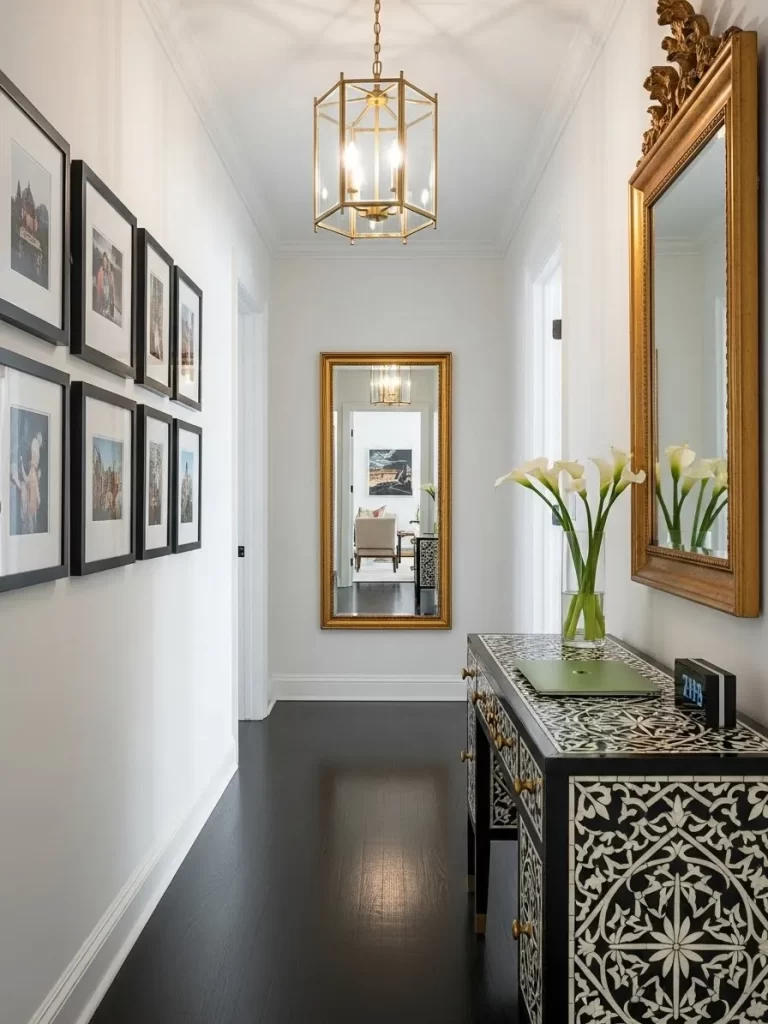
A long black console table with a white pattern acts as a slim desk in a bright hallway. Large gold framed mirrors reflect the light from a crystal chandelier to make the hall feel wider. A green laptop and a small clock are the only items on the tidy surface.
Using a hallway for an office is a brilliant way to save space in a small home. The beautiful design of the table keeps the area looking like a piece of decor. It is a great spot for checking emails or writing quick notes before leaving the house.
Materials Required List
- One long narrow console table
- Two large gold framed mirrors
- Small digital desk clock
Equipment Required List
- Hammer and nails
- Level tool
- Measuring tape
DIY Instruction Step by Step
- Measure the width of your hallway to make sure people can still walk past the table.
- Place the console table against a long white wall.
- Use a measuring tape to find the center of the wall above the table.
- Mark two spots for your mirrors and use a level to make sure they are even.
- Hammer two sturdy nails into the wall and hang your gold mirrors.
- Center your table under the mirrors to create a balanced look.
- Place your laptop and a small clock on the table.
- Add a vase of white flowers to make the space feel more inviting.
33 High Shelf Library Ladder
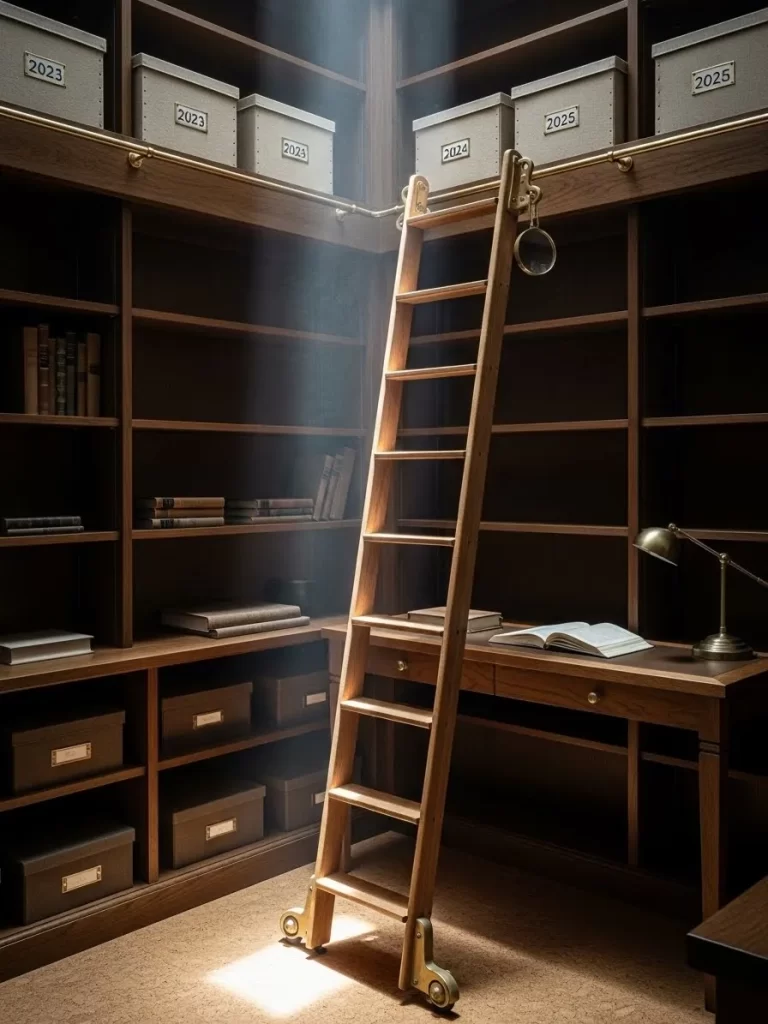
Tall wooden shelves reach toward a skylight to provide space for a massive book collection. A wooden ladder on a metal rail allows you to glide along the wall to reach every shelf. Grey bins on the highest levels are labeled with years to keep your archives organized.
The natural sunlight from the ceiling makes this library a dream spot for reading and research. Having a rolling ladder adds a sense of adventure and classic style to your home office. It is the ultimate layout for someone with a large physical library.
Materials Required List
- Rolling library ladder kit with a metal rail
- Set of tall wooden bookshelves
- Pack of storage bins with labels
Equipment Required List
- Power drill
- Level tool
- Screwdriver
DIY Instruction Step by Step
- Build and install your bookshelves along the tallest wall in your room.
- Measure the height for your metal rail about two feet from the top of the shelves.
- Use a level to mark a straight line across all the bookshelves.
- Screw the metal rail brackets into the wooden frames of the shelves.
- Slide the metal rail into the brackets and lock it in place.
- Assemble your wooden ladder and attach the rollers to the top.
- Hook the ladder onto the rail and test it to make sure it glides smoothly.
- Organize your books on the shelves and use the ladder to reach the top rows.
34 Color Coded Action Bins
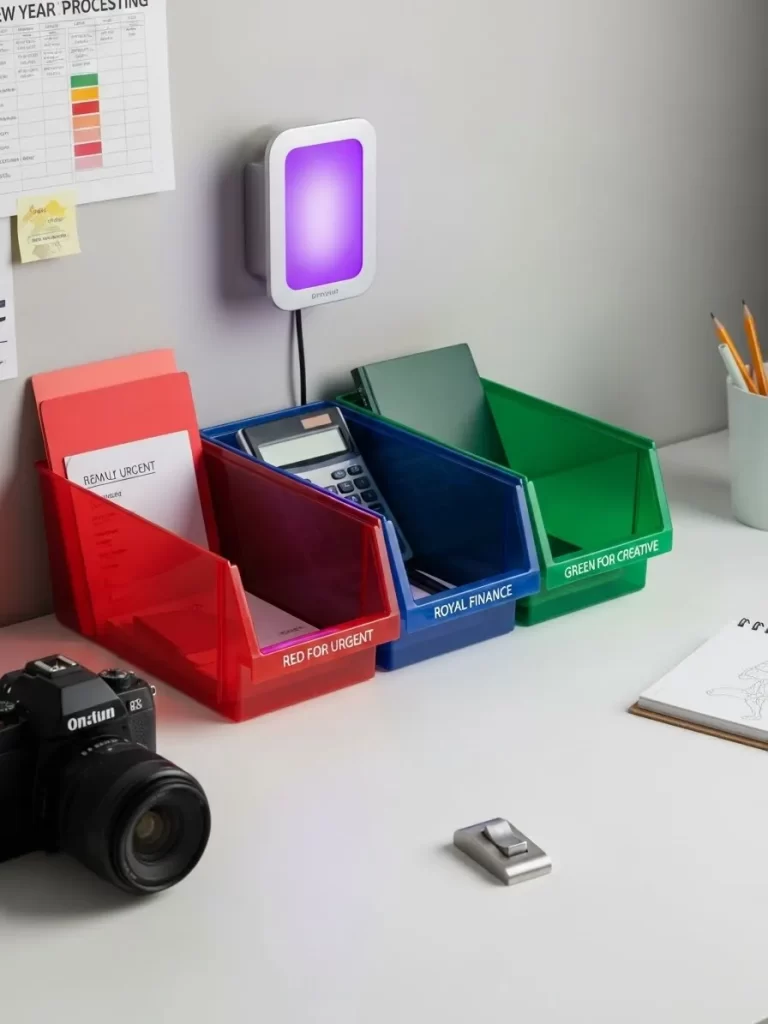
Three bright plastic bins in red, blue, and green help you sort your tasks by importance. A purple light on the wall adds a fun and modern glow to the white desk. This system makes it easy to see which projects need your attention right away.
Red is for urgent mail, blue is for bills, and green is for your creative ideas. Having a dedicated spot for every piece of paper prevents clutter from taking over your desk. It is a simple and effective tool for keeping your mind clear and focused.
Materials Required List
- Set of three colorful plastic bins
- White label tape or a permanent marker
- Small LED wall light with color options
Equipment Required List
- Cleaning cloth
- Measuring tape
- Sticky mounting strips
DIY Instruction Step by Step
- Wipe the front of your plastic bins with a cloth to remove any dust.
- Use a marker or label tape to write the names of your categories on each bin.
- Place the red bin on the left, the blue bin in the middle, and the green one on the right.
- Line them up in a straight row on the back edge of your desk.
- Use sticky mounting strips to attach the LED light to the wall above the bins.
- Plug the light in and use the remote to set the color to a soft purple.
- Place your papers into the bins as soon as you receive them.
- Check the red bin every morning to handle your most important tasks.
35 Ergo Standing Station
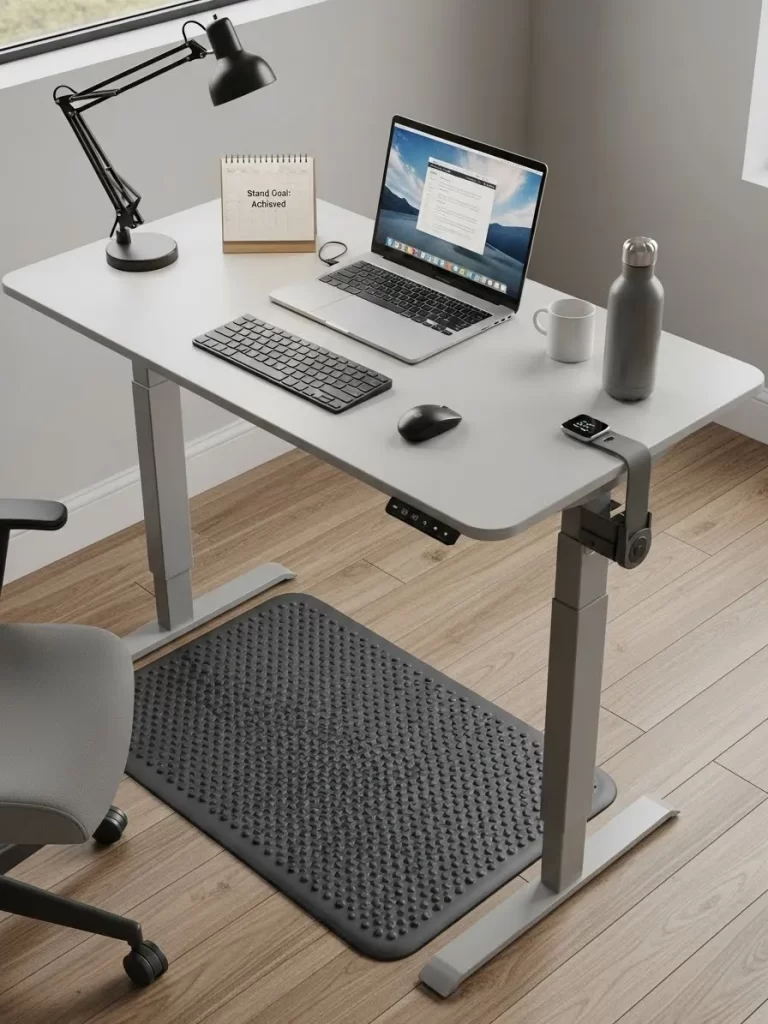
A grey standing desk allows you to change your position throughout the day to stay active. A bumpy black mat on the floor provides a soft and healthy surface for your feet. A silver laptop and a black lamp keep the setup looking clean and professional.
Standing while you work can help boost your energy and keep you from feeling tired. The simple design of the desk fits easily into a bedroom or a corner of the living room. A tall water bottle and a small calendar help you stay healthy and organized.
Materials Required List
- Electric height adjustable desk frame
- Solid grey desktop board
- Anti fatigue standing mat
Equipment Required List
- Power drill
- Allen wrench
- Measuring tape
DIY Instruction Step by Step
- Assemble the metal legs of your standing desk following the box instructions.
- Flip the grey desktop board upside down on a soft rug or towel.
- Center the leg frame on the board and mark the screw holes with a pencil.
- Drill small pilot holes into the marks being careful not to go through the wood.
- Screw the frame onto the board and tighten every bolt with an Allen wrench.
- Flip the desk over and plug the power cord into a wall outlet.
- Press the buttons to test the motor and find your favorite standing height.
- Place the anti fatigue mat on the floor where you will stand.
36 Glass Top Shared Desk

Two matching workstations sit under white cabinets to provide a tidy and balanced space. Clear glass tops over the desks protect the white surface while making the room feel open. Identical lamps and small plants at each station create a sense of harmony for two users.
Using glass allows you to slide notes or photos underneath for a personalized touch. The white binders on the high shelves keep all your projects organized and easy to find. This layout is a great choice for partners who share a home and a job.
Materials Required List
- Two white desks with glass tops
- Two matching silver task lamps
- Two small potted green plants
Equipment Required List
- Glass cleaner and a soft cloth
- Measuring tape
- Level tool
DIY Instruction Step by Step
- Place your two white desks side by side against a long wall.
- Use a level tool to make sure they are perfectly flat and at the same height.
- Clean the glass tops with a soft cloth and place them on the desks.
- Slide a few of your favorite photos or inspiration quotes under the glass.
- Place a silver lamp on the outer corner of each workstation.
- Put a small green plant next to each lamp to add a touch of life.
- Arrange your binders on the shelves above the desks for easy access.
- Pull up two matching grey chairs and start your collaborative work day.
37 Cozy Window Reading Nook
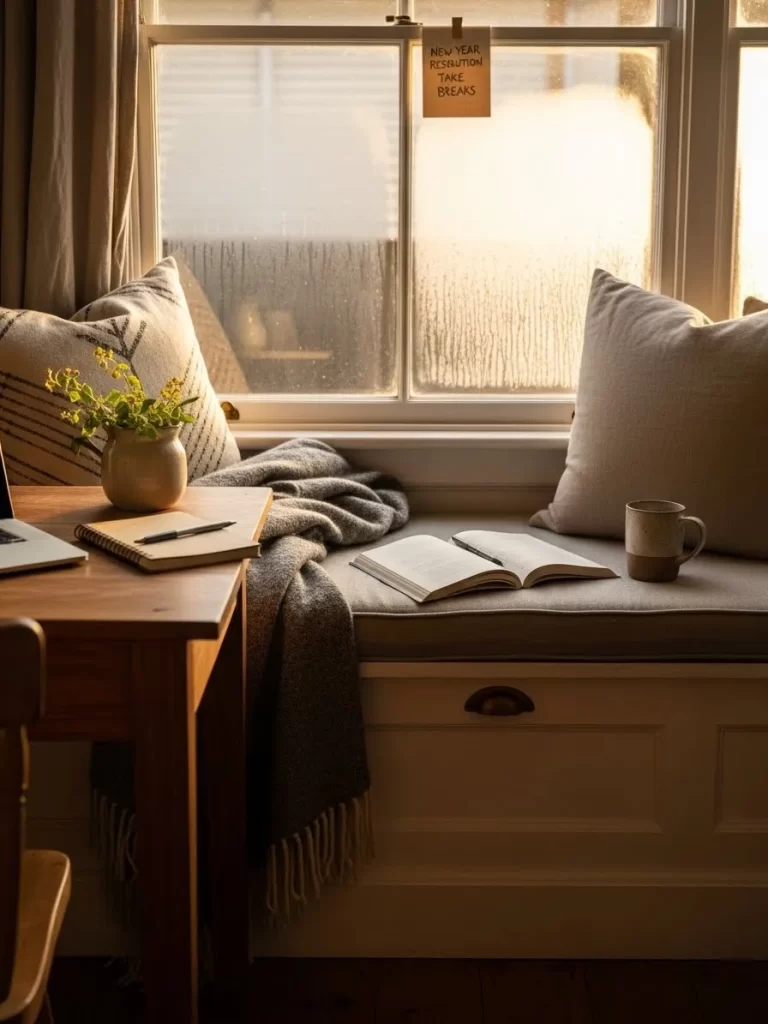
A soft grey bench with thick cushions sits under a frosted window to create a quiet spot. A warm blanket and a hot mug of coffee make it the best place for reading or brainstorming. The wooden desk nearby provides a surface for your laptop and notebook when you need it.
Natural light filters through the glass and creates a calm and peaceful mood. This nook is a great place to take a break from your computer screen during the day. A small plant on the desk adds a fresh and natural feel to the cozy room.
Materials Required List
- Wooden storage bench
- Large grey seat cushion
- Two soft throw pillows
Equipment Required List
- Measuring tape
- Cleaning cloth
- Screwdriver
DIY Instruction Step by Step
- Buy a wooden storage bench that fits the width of your window.
- Use a screwdriver to assemble the bench according to the instructions.
- Place the bench directly under the window and wipe it with a cloth.
- Lay the large grey cushion on the top of the bench.
- Place two soft pillows at the ends of the bench for back support.
- Fold a warm blanket and drape it over the middle of the seat.
- Set a small table next to the bench to hold your books and coffee.
- Sit down and enjoy a relaxing break from your busy work schedule.
38 Felt Panel Sound Zone
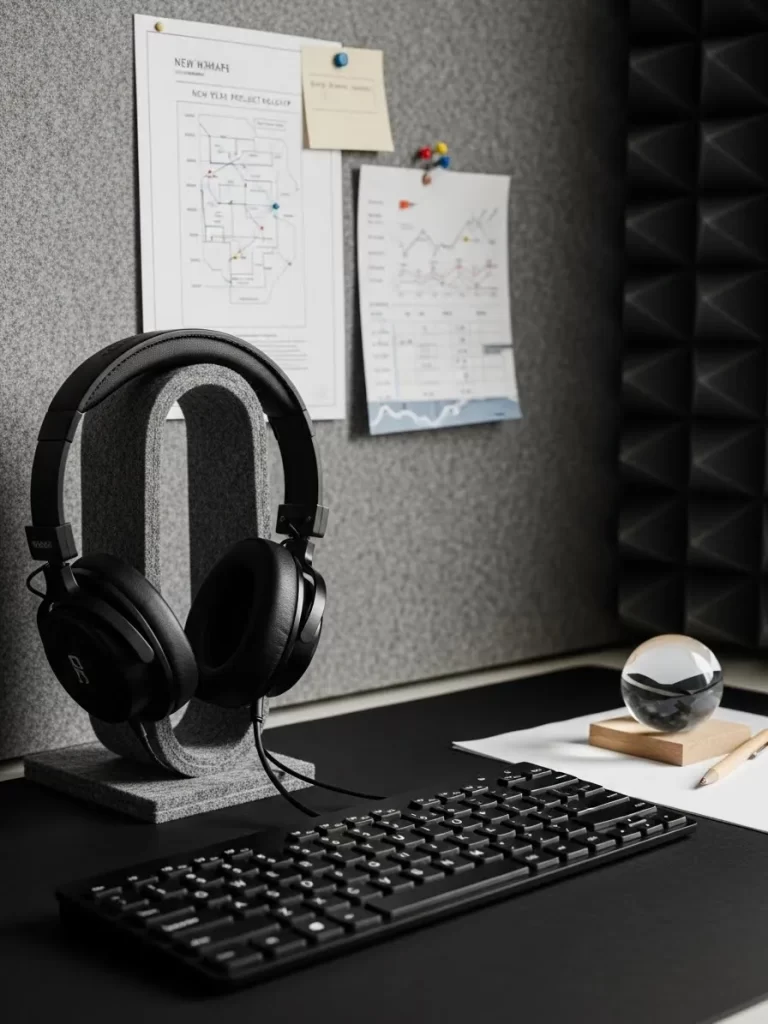
A large grey felt panel on the wall helps soak up noise for a quiet and focused office. A sleek black headphone stand keeps your gear ready for your next meeting or podcast. The mechanical keyboard and clear glass ball on the desk add a modern and cool look.
Felt panels are a smart way to stop echoes in a room with hard floors. It also acts as a giant pinboard for your charts and project notes. This setup is built for people who need a quiet and high quality audio environment.
Materials Required List
- Large sheet of thick grey acoustic felt
- Metal headphone stand
- Mechanical keyboard with a black finish
Equipment Required List
- Spray adhesive or mounting tape
- Level tool
- Utility knife
DIY Instruction Step by Step
- Choose a wall space directly behind or to the side of your computer.
- Use a utility knife to cut the felt into a large rectangle or several squares.
- Apply spray adhesive to the back of the felt in a well ventilated room.
- Use a level tool to make sure the felt is straight as you press it onto the wall.
- Hold the felt in place for one minute to make sure the glue sticks well.
- Use colorful pins to attach your charts and notes to the felt surface.
- Place your headphone stand on the desk and hang your best headphones.
- Plug in your keyboard and enjoy your quiet and professional workspace.
39 Wall Mounted Power Shelf
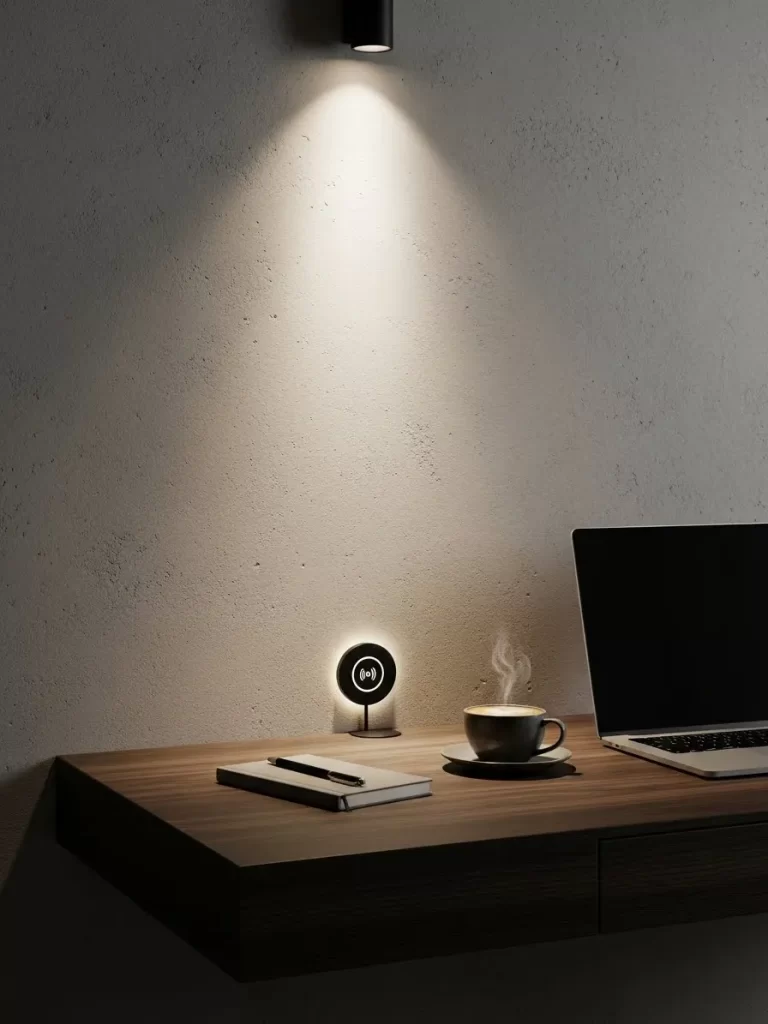
A thick wooden shelf floats on a textured wall and features a built in wireless charger. A small black light shines down from above to highlight your notebook and coffee cup. This minimalist design keeps your desk clear of messy wires and bulky lamps.
The wireless charger glowing on the wall makes it easy to power your phone while you work. Using a floating shelf removes the need for legs that take up floor space. It is a smart and stylish solution for a small and modern home office.
Materials Required List
- One thick wooden board for a shelf
- Hidden wall mounting brackets
- Built in wireless charging puck
Equipment Required List
- Power drill and a hole saw bit
- Wood glue
- Level tool
DIY Instruction Step by Step
- Use a hole saw bit to drill a circular hole into the bottom of your wooden board.
- The hole should be the exact size of your wireless charging puck.
- Apply a small amount of wood glue to the edge of the puck and press it into the hole.
- Run the charging wire through a small groove on the back of the shelf.
- Hold the mounting brackets against the wall and use a level to mark the holes.
- Drill holes into the wall and screw the brackets in tightly.
- Slide the wooden board onto the brackets until it clicks into place.
- Plug the charging wire into a wall outlet and set your phone on the shelf.
40 Tropical Jungle Office

Dense green plants surround a wooden desk to create a hidden office deep in the jungle. A small stone fountain provides the relaxing sound of flowing water while you work. The white task lamps and wooden chair fit perfectly into this natural and lush world.
Breathing the fresh air from all the plants helps you stay calm and creative. This unique setup turns a simple patio or sunroom into a private garden paradise. It is the ultimate choice for someone who wants to escape the city while they work.
Materials Required List
- Small tabletop stone fountain
- Five large indoor tropical plants
- One sturdy wooden desk and chair
Equipment Required List
- Watering can
- Power strip for the fountain and lamps
- Cleaning cloth
DIY Instruction Step by Step
- Choose a bright room or a sunroom with plenty of natural light.
- Place your wooden desk in the center of the room and wipe it clean.
- Arrange your large tropical plants in a circle around the desk.
- Make sure the plants are close together to create a feeling of privacy.
- Place the stone fountain on the floor or a small stand near the desk.
- Plug the fountain into a power strip and fill it with fresh water.
- Turn on the fountain and the white task lamps on your desk.
- Sit in your chair and enjoy the peaceful sounds of your indoor jungle.
Key Takeaways
- Natural light from a window keeps your mood high and your eyes fresh.
- Vertical storage on walls keeps your desk surface clear for active work.
- Ergonomic furniture prevents body pain so you can work for longer periods.
- Adding plants or nature elements helps lower stress during busy hours.
- Privacy screens or dividers block out household noise and distractions.
- Using color and light can change a boring room into a creative studio.
Changing the way your office looks can change your entire life. You do not need a huge budget to make a massive difference in your home. Simple DIY projects and smart sorting can clear your mind for deep work. Start with one small corner and see how much better you feel.
Focus is a skill that grows when you have the right tools around you. Pick a layout from this list that speaks to your personal needs. Once you conquer the clutter, you will find it much easier to stay productive. Your new workspace is the first step toward reaching your biggest goals.