The holiday season should be about joy. Yet, for many of us, it starts with a familiar frustration: opening a dusty box to find a tangled mess of lights, broken ornaments, and crushed decorations.

That moment can turn excitement into a chore. The happy memories of decorating get buried under the stress of untangling and searching. It feels chaotic, and it takes the fun out of the tradition.
But it doesn’t have to be this way.
Getting your holiday decor under control is easier than you think. This guide offers 40 straightforward and clever storage solutions. From simple DIY tricks to smart organizing systems, you will find a method here that works for your home and your budget, turning holiday chaos into calm.
1. See-Through Labeled Bins

Clear bins change how you store decorations. You can see everything inside without opening a single lid. This saves you a lot of time and frustration. No more guessing which box holds the silver bells or the green garland.
Labels add another layer of order. They tell you exactly what’s in the box, from “Grandma’s Glass Birds” to “Kid’s Ornaments.” This system makes finding specific items simple. Your holiday setup and cleanup will become much faster.
DIY Labeled Bins
What you need:
- Clear plastic bins you already own
- Paper or cardstock
- Scissors
- A marker or pen
- Clear packing tape
Instructions:
- Get Ready: First, put all of your similar decorations together. For example, put all your red ornaments in one pile and all your lights in another.
- Write the Label: Take a piece of paper and write down what’s in the pile. Use your marker to write big, clear letters. You could write “Tree Lights” or “Red Glass Ornaments.”
- Cut it Out: Use your scissors to carefully cut the name into a rectangle shape. This is your label.
- Stick it On: Place the paper label on the outside of the bin. Use a long piece of clear packing tape to stick it on. Make sure the tape covers the whole label so it stays clean and doesn’t fall off.
2. Holiday Color-Coding System

Assigning a color to each holiday makes storage simple. Use red and green bins just for Christmas items. Orange boxes can hold all your Halloween decorations. This way, you can grab the right colors from the attic without reading a single label.
This method is visual and quick. It helps you separate holidays at a glance. When you see a green bin, you know it’s for Christmas. It keeps your storage area neat and makes seasonal decorating much more efficient.
DIY Color-Coded Bins
What you need:
- Storage bins (they can be any color to start)
- Colored duct tape (like red, green, orange, blue)
- Scissors
Instructions:
- Choose Your Colors: Decide which color you want for each holiday. Let’s say green is for Christmas and orange is for Halloween.
- Clean the Bin: Wipe the outside of your bin with a cloth to make sure it’s clean and the tape will stick well.
- Start Taping: Take your colored duct tape. Cut a long strip with your scissors.
- Wrap the Bin: Carefully place the tape around the top part of the bin, like a big stripe. You can add another stripe at the bottom, too. You don’t have to cover the whole bin, just enough to see the color easily. Now your bin is color-coded!
3. Collapsible Fabric Cubes

Fabric cubes are a gentle choice for your decorations. They protect delicate items like wreaths or beaded garlands from getting scratched. Their soft sides won’t damage fragile pieces the way hard plastic can.
Some cubes come with a small see-through window. This lets you peek inside to see what you stored. When the holidays are over and the cubes are empty, you can fold them flat. They take up very little space until you need them again next year.
DIY Fabric Cube Window
What you need:
- A fabric storage cube
- A small piece of clear vinyl (from a craft store)
- Scissors
- A marker
- Fabric glue or a hot glue gun (ask a grown-up for help)
Instructions:
- Draw a Square: Place your fabric cube on a table. Use a marker to draw a square on the front of it. This is where your window will be.
- Cut the Hole: Carefully use your scissors to cut out the square you drew. You’ll have a hole in your box now.
- Prepare the Window: Take your piece of clear vinyl. Cut it so it’s a little bigger than the hole you just made.
- Glue it On: Put glue around the edges of the hole on the inside of the box. Gently press the vinyl window onto the glue. Let it dry completely. Now your fabric box has a window!
4. Ornament Organizer Chest

An organizer chest gives every special ornament its own safe spot. The small compartments prevent your precious glass balls from rolling around. This stops them from scratching or breaking while in storage.
Each drawer slides out so you can see all your ornaments at once. This makes decorating the tree easier because you can find the exact one you want. It is a very tidy way to keep your most fragile decorations safe for many years.
DIY Drawer Dividers
What you need:
- An empty box or drawer
- Thin cardboard (like from a cereal box)
- A ruler
- A pencil
- Scissors
Instructions:
- Measure the Box: Use your ruler to measure how long and wide your box is on the inside. Also, measure how deep it is.
- Cut the Strips: Cut long strips of cardboard. They should be as wide as the box is deep. You will need a few strips going one way, and a few going the other way.
- Make the Long Walls: Take the strips for the long side of the box. Cut little slits halfway through the cardboard every few inches. Don’t cut all the way through!
- Make the Short Walls: Now take the strips for the short side. Cut slits in them the same way.
- Fit Them Together: Slide the long strips and short strips together using the slits you cut. It will look like a grid. Place your new grid inside the box. You now have little spots for each ornament!
5. The Mobile Holiday Dolly

Decorating can be heavy work. A dolly, or a small cart with wheels, helps a lot. You can stack all your heavy bins on it at once. This saves you from carrying each box one by one.
You can roll your entire collection of holiday gear from the garage right to the living room. It makes the job of moving decorations much easier on your back. When everything is unpacked, the dolly stores away easily until it’s time to put everything back.
DIY Rolling Platform
What you need:
- A flat, square piece of strong wood (plywood is good)
- Four small wheels (called “caster wheels” at the store)
- A screwdriver and screws
- A pencil
Instructions:
- Get the Wood: Ask a grown-up to help you get a piece of wood that is a little bigger than the bottom of your storage bin.
- Mark the Corners: Flip the wood over. Place one wheel in each of the four corners. Use a pencil to mark where the little screw holes are.
- Attach the Wheels: Take the wheels off for a second. Now, line up the wheel with the marks you made. Use the screwdriver to put a screw in each hole. Make sure they are tight.
- Flip it Over: Once all four wheels are on, flip the board over. You just built a small dolly! You can set a heavy box on top and roll it around.
6. Under-the-Bed Rolling Storage

The space under your bed is often forgotten. You can use it for holiday storage. Special long, flat containers are made to fit in this unused area. This frees up closet space for other things.
Many of these containers have wheels. This lets you slide them in and out with very little effort. They are great for storing strings of lights, garlands, and wrapping paper. It’s a clever way to keep things hidden but still easy to get to.
DIY Under-Bed Roller
What you need:
- A shallow plastic bin that fits under your bed
- Four small, flat wheels (make sure they are not too tall)
- A hot glue gun or super strong glue (ask a grown-up for help)
Instructions:
- Empty the Bin: Make sure your plastic bin is empty and clean on the bottom.
- Plan the Wheels: Turn the bin upside down. Place one wheel in each corner of the bottom of the bin. This is where you will glue them.
- Glue the Wheels: Ask a grown-up to help you use the hot glue gun. Put a big glob of hot glue where you want the first wheel to go. Press the wheel down firmly into the glue.
- Repeat and Dry: Do the same thing for the other three wheels. Let the glue dry and get hard for about an hour. Now you can fill the bin and roll it right under your bed!
7. Weatherproof Locking Totes

If you store decorations in a garage, basement, or shed, you need extra protection. Weatherproof totes are built to keep things safe. They have strong seals around the lid that keep out moisture, dust, and even bugs.
The strong latches lock the lid on tight. This ensures nothing can get inside to ruin your sentimental items. These sturdy boxes protect your holiday treasures from damage, so they stay in great condition year after year.
DIY Weather-Resistant Bin
What you need:
- A regular plastic bin with a lid
- Weather-stripping tape (it’s foamy tape with a sticky back, used for doors)
- Scissors
- A clean cloth
Instructions:
- Clean the Lid: Take the lid off your bin. Use the cloth to wipe the inside edge of the lid where it touches the bin. Make sure it’s clean and dry.
- Measure the Tape: Take your roll of weather-stripping tape. You are going to stick it on the rim of the lid.
- Stick it On: Peel the paper off the back of the tape to show the sticky part. Carefully press the sticky side of the foam tape all the way around the inside rim of the lid.
- Cut and Press: When you get all the way back to the start, cut the tape with your scissors. Press down firmly all around the foam to make sure it’s stuck on well. When you put the lid back on the bin, the foam will create a tighter seal.
8. Archival Memory Boxes

Some ornaments are more than just decorations; they are family memories. Archival boxes help you preserve these heirlooms. They are made from materials that won’t harm your items over time.
Using special acid-free tissue paper adds another layer of protection. You can also create detailed labels that tell the story of each piece. Note who made it, or what year you got it. This turns a simple box into a treasure chest of family history.
DIY Heirloom Care Kit
What you need:
- A sturdy cardboard box with a lid
- Acid-free tissue paper (from a craft store)
- A pen
- Index cards or small pieces of paper
Instructions:
- Prepare the Box: Make sure your box is clean and dry inside.
- Wrap Your Treasure: Take your special ornament. Gently wrap it in a few sheets of acid-free tissue paper. This paper helps keep it from getting old and yellow.
- Write the Story: On an index card, write down why the ornament is special. For example: “Baby’s First Christmas, 2024” or “Made by Grandma Sue.”
- Put it All Inside: Carefully place the wrapped ornament in the box. Put the little card next to it. Don’t pack too many in one box. Now your memory is safely stored.
9. Custom Cardboard Dividers

You don’t need to buy a fancy organizer. You can make your own with a simple cardboard box. Creating your own dividers is a smart way to protect ornaments without spending much money.
The best part is that you can customize the size of each compartment. This is very useful if you have ornaments in many different shapes and sizes. A few pieces of cardboard can turn any old box into a safe and organized home for your decorations.
DIY Box Divider Grid
What you need:
- A cardboard box
- More cardboard (from other empty boxes)
- A ruler
- A pencil or marker
- A box cutter or strong scissors (ask a grown-up to do the cutting)
Instructions:
- Measure Your Box: Use your ruler to measure the length and width inside your box. You also need to measure the height.
- Cut the Walls: Ask a grown-up to cut big pieces of cardboard. These pieces should be as tall as your box and as long as your box. You’ll need about 4-5 “long” walls and 4-5 “short” walls.
- Cut the Slits: On the long walls, measure and mark a spot every few inches. Ask a grown-up to cut a slit that goes halfway down the cardboard at each mark.
- Cut More Slits: Do the same thing for the short walls.
- Build the Grid: Now, slide the long walls and short walls together where you cut the slits. It’s like a puzzle! It will make a grid that you can place inside your bigger box to hold ornaments.
10. Egg Carton Mini-Ornament Savers

Don’t throw away your egg cartons. They are great for storing your tiniest ornaments. The little cups in the carton are just the right size to hold small, delicate decorations safely.
Each small ornament gets its own cozy spot. This prevents them from getting lost or crushed by larger items. It’s a clever and free way to recycle something from your kitchen. It also keeps your smallest holiday treasures perfectly organized.
DIY Egg Carton Organizer
What you need:
- An empty cardboard egg carton (not the foam kind)
- A marker
- Your small ornaments
Instructions:
- Clean the Carton: Make sure your egg carton is clean and has no bits of eggshell in it.
- Place the Ornaments: Gently place one tiny ornament inside each little egg cup.
- Close and Label: Close the lid of the egg carton. On the top of the carton, use your marker to write what’s inside. You can write “Tiny Glass Ornaments” or “Mini Snowmen.”
- Store it: Now you can safely place the whole egg carton inside a larger storage bin. Your little ornaments won’t get lost!
11. Cardboard Light Spools

Tangled lights are a common holiday headache. Winding your light strings around a piece of cardboard prevents that mess. It keeps them neat and ready for next year. You will not have to spend hours untangling wires.
This simple solution costs nothing. You just need an empty box. Creating separate spools for each string of lights makes them easy to manage. When it’s time to decorate, they unroll smoothly, making the job quick and stress-free.
DIY Light Spool
What you need:
- A sturdy, flat piece of cardboard
- Scissors
- A pencil
Instructions:
- Draw the Shape: Take your piece of cardboard. Draw a rectangle that’s about the size of a book.
- Cut Notches: On both of the short ends of the rectangle, cut a small slit or notch in the middle. This will hold the ends of the lights.
- Start Winding: Plug the two ends of your light string together. Find the middle of the light string and slip it into one of the notches.
- Wrap it Up: Neatly wrap the lights around the long part of the cardboard. When you get to the end, tuck the plug into the other notch. Your lights are now tangle-free!
12. PVC Garland & Wreath Rack

Artificial garlands and wreaths can get crushed in boxes. A dedicated rack keeps them in good shape. Building a simple frame from PVC pipe gives you a place to hang them. This helps them keep their fluffy, full appearance.
This type of storage is great for a basement or garage. It keeps your greenery off the floor and away from potential damage. Your garlands will look just as good next year as they did this year.
DIY Simple Hanging Rod
What you need:
- Two strong ceiling hooks
- A wooden dowel or sturdy curtain rod
- A drill (ask a grown-up for help)
- S-hooks (from a hardware store)
Instructions:
- Find a Spot: Look for a good place in your garage or basement with some empty wall space.
- Install Hooks: Ask a grown-up to help you drill two holes in the ceiling, a few feet apart. They should then screw the strong ceiling hooks into these holes.
- Place the Rod: Rest the wooden dowel or curtain rod across the two hooks. It should be secure.
- Hang Your Greens: Place the S-hooks on the rod. Now you can hang your wreaths and drape your garlands over the hooks to keep them safe.
13. All-in-One Hanging Caddy

Keeping all your decorating supplies together is a challenge. A hanging organizer with many pockets solves this. You can store wrapping paper, extension cords, ornament hooks, and tape all in one spot. Everything is visible and easy to find.
This caddy can be hung in a closet or on the back of a door. It takes up very little floor space. This makes it a great choice for apartments or homes with limited storage areas.
DIY Repurposed Shoe Organizer
What you need:
- An over-the-door shoe organizer (the kind with clear pockets)
- Your small holiday supplies
Instructions:
- Hang it Up: Hang the shoe organizer over the back of a closet or storage room door.
- Start Filling: This is the easy part! Put your holiday items into the different pockets.
- Get Organized: You can put ornament hooks in one pocket, extra bulbs in another, and rolls of ribbon in a few more. Small tools like scissors can also go in the pockets.
- See Everything: Because the pockets are clear, you can see all your supplies without having to search through a big box.
14. Upcycled Light Wraps

You don’t need to buy special equipment to store lights. Everyday items from your kitchen can do the job. Wrapping lights around a sturdy disposable cup or an empty chip can keeps them from getting tangled.
This method is clever and good for the environment. It gives a second life to items you might otherwise throw away. Storing them upright in a box makes them easy to grab when you need them.
DIY Cup Light Holder
What you need:
- A clean, empty potato chip can (like a Pringles can) or a sturdy plastic cup
- A string of holiday lights
- A utility knife (ask a grown-up for help)
Instructions:
- Prepare the Can: Ask a grown-up to use the utility knife to cut a small slit in the plastic lid of the chip can.
- Start the Wrap: Take the end of the light string that plugs into the wall. Push it through the slit in the lid from the inside.
- Wrap Neatly: Wrap the rest of the light string around the outside of the can. Keep it snug so it doesn’t fall off.
- Secure the End: When you get to the other end of the string, you can use a small piece of tape to hold it in place on the can. Put the lid on, and your lights are ready for storage.
15. Vintage Suitcase Organizer

An old suitcase can become a beautiful and functional storage box. It adds a touch of charm to your holiday organizing. The hard sides of the suitcase protect fragile ornaments inside.
By adding your own dividers, you can create custom compartments. This keeps everything neat and prevents items from shifting around. It is a stylish way to store your decorations, turning a storage problem into a piece of decor itself.
DIY Suitcase Dividers
What you need:
- An old suitcase or a sturdy box
- Sheets of cardboard
- A ruler and pencil
- A box cutter or strong scissors (ask a grown-up for help)
Instructions:
- Measure Inside: Open the suitcase and use a ruler to measure the inside length, width, and depth.
- Cut Main Walls: Ask a grown-up to cut two large pieces of cardboard. One should fit the length of the suitcase, and the other should fit the width. Both should be as tall as the suitcase is deep.
- Create a Cross: Cut a slit halfway through the middle of the long piece. Cut another slit halfway through the middle of the short piece. Slide them together to make a “+” shape.
- Add More Dividers: You can cut smaller cardboard pieces and make more slits to create smaller sections inside the four main areas. Place the whole grid inside your suitcase.
16. Decorative Storage Jars

Why hide all your beautiful decorations? Storing some of them in clear glass jars allows you to enjoy them all year. You can mix colorful ornaments with natural items like pinecones for a rustic look.
These jars can be placed on a shelf or mantelpiece. They serve as a subtle, stylish decoration even when it’s not the holiday season. It is a smart way to store and display your favorite items at the same time.
DIY Display Jar
What you need:
- A large, clean glass jar with a lid (like a big cookie jar)
- A mix of small ornaments, pinecones, or beaded garlands
Instructions:
- Start with a Base: Place a layer of your bulkiest items at the bottom. Small pinecones work very well for this.
- Add Ornaments: Gently place a few of your pretty ornaments on top of the base layer. Choose colors that look nice together.
- Fill the Gaps: Add some more pinecones or drape a small beaded garland around the ornaments to fill in any empty spaces.
- Top it Off: Place the lid on the jar. You can now put your beautiful jar on a bookshelf as a decoration. It’s a storage box that you don’t have to hide!
17. Zippered Wreath Keepers

Wreaths are bulky and can be easily damaged. A special round, zippered bag is a great way to protect them. It keeps the dust off and prevents bows and decorations from getting crushed.
The handles on these bags make them easy to carry. You can hang them from a hook in your closet or garage. This keeps them off the floor and out of the way, ensuring they stay perfectly shaped and ready for the next holiday season.
DIY Wreath Dust Cover
What you need:
- An old, clean pillowcase (king size works best for bigger wreaths)
- A clothes hanger
- A safety pin
Instructions:
- Prepare the Hanger: Take a sturdy clothes hanger.
- Place the Wreath: Carefully slide the top of your wreath onto the hook of the hanger, so the wreath is hanging from it.
- Bag the Wreath: Slide the open end of the pillowcase up and over the wreath. Pull it all the way up to the hanger’s hook.
- Secure the Bag: Gather the extra pillowcase fabric at the top, near the hook. Use a large safety pin to close the opening. Now you can hang your covered wreath in a closet to keep it clean.
18. Over-the-Door Garland Hanger

Beaded garlands and other long decorations often end up in a tangled pile. An over-the-door organizer with hooks and pockets is a simple solution. It gives you a place to hang each garland individually.
The pockets are useful for storing smaller items that go with your garlands. This method keeps your closet floor clear. It uses the vertical space on your door, which is often wasted.
DIY Door Garland Holder
What you need:
- An over-the-door hook rack (the kind you use for coats)
- Sturdy ribbon or twine
- Scissors
Instructions:
- Hang the Rack: Place the hook rack over the top of any door in your storage area.
- Cut Ribbon Loops: Cut several pieces of ribbon, each about 6 inches long.
- Tie a Loop: Take one piece of ribbon and tie the ends together to make a circle or a loop.
- Attach to Garland: Gently tie the ribbon loop around the end of one of your beaded garlands. Now, you can hang that loop on one of the hooks. Do this for each garland, giving each one its own ribbon and hook.
19. Garage Ceiling Storage System

For large holiday items, look up. The ceiling in your garage offers a huge amount of storage space. Installing heavy-duty overhead racks lets you store many bins off the floor.
Some systems even have a pulley to lift heavy things like your artificial Christmas tree. This keeps bulky decorations out of your way until you need them. It is a very effective way to use every inch of your storage space.
DIY Ceiling Hook Storage
What you need:
- Heavy-duty garage hooks (the big, vinyl-coated kind)
- A drill (ask a grown-up for help)
- A stud finder
Instructions:
- Find the Beams: Use a stud finder to locate the strong wooden beams (joists) in your garage ceiling. You must screw the hooks into these, or they won’t be strong enough. Mark the spots with a pencil.
- Drill Pilot Holes: Ask a grown-up to drill a small guide hole (a pilot hole) at each spot you marked.
- Screw in the Hooks: Now, the grown-up can twist the large garage hooks into the pilot holes. Keep twisting until they are very tight and secure.
- Hang Your Items: You can now hang things like bagged wreaths or even a well-wrapped artificial tree from these strong hooks, freeing up your floor space.
20. Ribbon Garment Bag

Long spools of ribbon and tinsel can be tricky to store. They unroll easily and can become a big mess. A clear garment bag offers a simple and clever solution to keep them organized.
Just clip the ribbons to a clothes hanger and place it inside the bag. The bag keeps them clean and contained. You can hang it in a closet, and you’ll be able to see all your ribbon choices at a glance.
DIY Ribbon Hanger
What you need:
- A clothes hanger (the kind with clips for pants is great)
- If you don’t have one with clips, you’ll need clothespins
- Your spools of ribbon
Instructions:
- Secure the Ribbon: For each spool of ribbon, make sure the loose end is taped or tucked in so it doesn’t unravel.
- Clip it On: Open the clip on the hanger and clamp it onto the end of the ribbon spool. If you are using clothespins, simply use one to pin the top of the spool to the bottom bar of the hanger.
- Add More: You can fit many spools on one hanger. Continue clipping them on until the hanger is full.
- Hang it Up: Now you can hang your ribbon hanger in the closet. All your ribbons are neat, visible, and ready to be used.
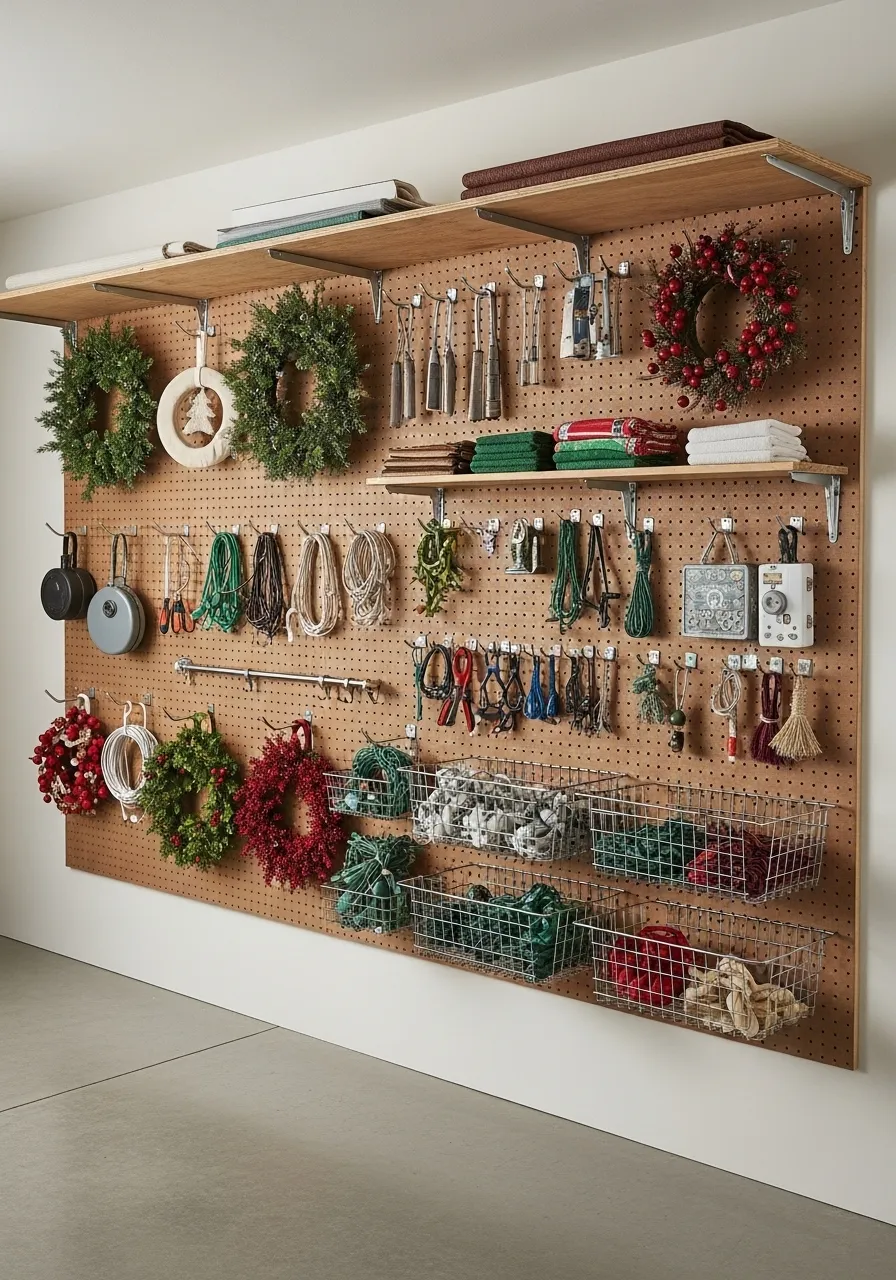
21. Pegboard Holiday Wall

A pegboard turns an empty wall into a storage masterpiece. It is a fantastic way to organize many different types of decorations in one place. You can see everything at a glance, from wreaths and garlands to tools and extra lights.
The system is completely flexible. You can move the hooks and baskets around to fit your collection perfectly. This setup works well in a garage, basement, or craft room, keeping your holiday items tidy and off the floor.
DIY Pegboard Station
What you need:
- An existing pegboard
- A set of pegboard hooks, loops, and baskets
- Your holiday decorations
Instructions:
- Sort Your Stuff: Group similar items together. Put all your small tools in one pile, garlands in another, and wreaths in a third.
- Place the Hooks: Start putting hooks into the pegboard. Use long, straight hooks for hanging wreaths and garlands. Use smaller, curved hooks for tools like scissors and wire cutters.
- Add Baskets: Attach the wire baskets to the pegboard. These are great for holding loose items like pinecones, ornament hooks, or small strands of lights.
- Arrange and Hang: Start hanging your decorations on the hooks and filling the baskets. Step back and see how it looks. You can easily move things around until you like the way it’s organized.
22. Hanging Holiday Linens

Holiday linens like stockings, tree skirts, and decorative towels can get wrinkled when folded in a box. Hanging them is a much better option. This simple method keeps them smooth and ready to display.
Using basic rings on a closet rod keeps each item separate and easy to find. Your fabrics will stay fresh and won’t get that musty smell from being packed away. It’s an efficient use of closet space that protects your festive textiles.
DIY Linen Hangers
What you need:
- A closet rod with some empty space
- Plastic shower curtain rings or large binder rings
- Your holiday linens (stockings, tree skirts, etc.)
Instructions:
- Open the Ring: Take one plastic shower curtain ring and open it up.
- Attach the Linen: Carefully thread the ring through a corner of your tree skirt or through the loop on a Christmas stocking.
- Close and Hang: Snap the ring closed so it forms a complete circle. Now, slide the ring onto the closet rod.
- Repeat for All: Do this for each of your holiday fabric items. Give each piece its own ring so they hang freely and don’t get bunched up.
23. Light Reel Wall Dispenser

For those who use a lot of lights, a wall-mounted reel system is a game-changer. It keeps very long strands of lights perfectly wound and free of tangles. Each reel can be dispensed easily when it’s time to decorate.
This is a serious setup for the dedicated decorator. The reels are stored neatly on the wall, saving floor space and protecting the bulbs. Taking down your lights becomes a quick and simple task of just winding them back onto the spools.
DIY Light Reel Holder
What you need:
- Two small wooden brackets
- A wooden dowel that fits through your light reels
- A drill and screws (ask a grown-up for help)
Instructions:
- Find a Wall: Find some empty wall space in your garage or storage room.
- Mount Brackets: Ask a grown-up to screw the two wooden brackets into the wall. They should be level with each other and just far enough apart for your dowel to rest on them.
- Load the Reel: Slide your big reel of holiday lights onto the wooden dowel.
- Place the Dowel: Rest the ends of the dowel on top of the two brackets. Now your light reel is hanging on the wall, and you can easily pull on the lights to unwind them.
24. Ceiling Tree Sling

An artificial Christmas tree takes up a lot of floor space. A tree sling lifts it up and out of the way. This clever hammock-like storage uses the empty space in your garage or basement ceiling.
The strong straps hold the tree securely. It keeps the branches from getting crushed under heavy boxes. This is a great solution if you are short on storage closets or floor area. Your tree will be safely stored and easy to access next season.
DIY Tree Hammock
What you need:
- An old, clean blanket or a small tarp
- Two heavy-duty ceiling hooks
- Two ratchet straps (from a hardware store)
Instructions:
- Install Hooks: Ask a grown-up to install two strong hooks into the ceiling joists, about 4-5 feet apart.
- Wrap the Tree: Lay your artificial tree (in a few sections) in the middle of the blanket or tarp. Fold the sides of the blanket over the tree.
- Attach the Straps: Loop the end of one ratchet strap around one end of the blanket bundle. Loop the second strap around the other end.
- Hoist it Up: Hook each ratchet strap to a ceiling hook. Ask a grown-up to help you slowly tighten the straps, which will lift your tree hammock up toward the ceiling.
25. Upright Rolling Tree Bag

Storing your Christmas tree can be as simple as wheeling it away. An upright storage bag lets you keep your tree mostly assembled. This saves a huge amount of time and effort during setup and takedown.
The bag protects the tree from dust and dirt while it’s stored. The wheels on the bottom mean you don’t have to do any heavy lifting. You can just roll your tree into a corner of the garage or a closet until next year.
DIY Rolling Tree Stand
What you need:
- Your artificial tree’s original stand
- A small, square piece of plywood
- Four caster wheels
- A drill and screws (ask a grown-up for help)
- A large tree disposal bag
Instructions:
- Build the Base: Ask a grown-up to help you screw the four wheels onto the corners of the plywood square. This is now a rolling platform.
- Mount the Stand: Place your tree stand in the center of the rolling platform. Ask a grown-up to secure it with a few more screws.
- Set Up the Tree: Put your tree together in its new rolling stand.
- Cover it Up: Gently pull the large tree disposal bag down over the top of the tree to act as a dust cover. Now you can roll your tree to its storage spot.
26. Beaded Garland Bottle Storage

Beaded garlands are notorious for getting into a tangled mess. A simple plastic bottle solves this problem completely. It’s a no-cost hack that keeps your delicate garlands safe and separated.
Just feed the strand into the bottle. It will stay contained and protected from knots and breaks. When you’re ready to decorate, the garland pulls out smoothly without any fuss. This is a smart way to reuse plastic bottles.
DIY Garland Bottle Keeper
What you need:
- A clean, empty plastic bottle (a soda bottle or water bottle works well)
- Your beaded garland
Instructions:
- Get Ready: Make sure the bottle is completely dry on the inside. Take the cap off and set it aside.
- Start Feeding: Take one end of your beaded garland.
- Drop it In: Drop that end into the mouth of the plastic bottle.
- Fill it Up: Keep feeding the rest of the garland into the bottle until the whole string is inside. You can put the cap back on if you like. The garland is now safe from tangles!
27. Holiday Electrical Kit

Every year, there’s a hunt for the extension cords, timers, and power strips. Keeping all these electrical supplies in one dedicated case makes life easier. A soft bag with pockets and loops is a good way to organize everything.
You will always know where to find your outdoor cords or extra fuses. A well-organized kit saves you time and reduces stress when you are setting up your holiday displays. Everything you need is in one convenient place.
DIY Electronics Organizer
What you need:
- A small toolbox or a zippered binder
- Resealable plastic bags (like Ziploc bags)
- A marker
- Your electrical supplies (cords, timers, etc.)
Instructions:
- Wrap Your Cords: Neatly coil each extension cord and secure it with a twist tie or a rubber band.
- Bag Small Items: Put smaller things into the plastic bags. For example, all your light timers can go in one bag, and all your spare bulbs can go in another.
- Label Everything: Use the marker to write on each bag what is inside. You could write “Indoor Timers” or “Green Extension Cords.”
- Pack the Kit: Place the neatly wrapped cords and the labeled bags inside your toolbox or binder. Now all your electrical gear is organized and ready to go.
28. Inflatable Storage Kit

Outdoor inflatable decorations need to be stored carefully to last. A dedicated bin is important, but how you pack it matters. Always make sure the inflatable is completely dry before you fold it to prevent mold.
Keeping the plastic stakes and ties in a separate bag is a key trick. This stops the sharp points from poking a hole in the fabric during storage. A labeled bin completes the system, so you know exactly where to find it.
DIY Inflatable Care Pack
What you need:
- A large plastic bin with a lid
- A large resealable plastic bag
- Your inflatable decoration and its stakes
Instructions:
- Clean and Dry: Lay your inflatable out on a clean, dry surface like a garage floor. Wipe off any dirt and make sure it is 100% dry.
- Fold it Up: Gently fold the inflatable into a neat rectangle or square. Try to push the extra air out as you fold.
- Pack the Stakes: Gather all the plastic stakes and rope tethers that came with your inflatable. Put all of them inside the resealable plastic bag and seal it shut.
- Store Together: Place the folded inflatable into the large plastic bin first. Then, place the bag of stakes on top of it. Put the lid on the bin, and it’s ready for storage.
29. Labeled Village Storage

The original styrofoam packaging for holiday village pieces is often the best protection. These containers are molded to fit each delicate house perfectly. Don’t throw them away!
To make finding the right building easier, tape a photo of the item to the outside of the box. This simple step saves you from having to open every single container to find the village church or toy store. You can see what is inside without disturbing the contents.
DIY Picture-Perfect Boxes
What you need:
- The original boxes for your village pieces
- A camera or a phone
- A printer
- Tape
Instructions:
- Take a Picture: Before you pack a village house away, take a clear picture of it with your phone.
- Print the Photo: Print the picture you took. It doesn’t have to be big or on fancy paper; regular printer paper is fine.
- Pack the Piece: Carefully place the holiday village house back into its original styrofoam box.
- Tape it On: Tape the photo you printed onto the outside of the box lid. Now, when you look at your stack of boxes, you’ll know exactly which house is inside each one.
30. Ribbon Dispenser Box

Spools of ribbon can easily unwind and create a tangled mess in a storage box. A dispenser box is a clever solution that keeps them neat. It works like a paper towel holder, but for your festive ribbons.
A simple dowel holds the spools in place. You can pull out just the amount of ribbon you need without the whole roll unraveling. This keeps your collection tidy and makes gift wrapping much more enjoyable.
DIY Ribbon Box
What you need:
- A plastic shoebox or a small photo box
- A wooden dowel (a thin stick from a craft store)
- A drill or a sharp tool to poke holes (ask a grown-up for help)
- Your spools of ribbon
Instructions:
- Make the Holes: Ask a grown-up to make a hole on each of the short sides of the plastic box. The holes should be in the middle and big enough for the dowel to pass through.
- Load the Ribbon: Slide your spools of ribbon onto the wooden dowel.
- Assemble the Box: Place the dowel with the ribbon on it inside the box, poking the ends of the dowel through the holes you made. The dowel should now be resting in the holes, holding the ribbon up.
- Get Wrapping: Put the lid on the box. You can now pull the end of a ribbon and it will unroll neatly.
31. Decorative Storage Trunk

A woven trunk is a storage solution you don’t have to hide. It can sit in your living room or bedroom and blend in with your regular furniture. This makes it a great place to store holiday items you might need to access easily, like throw blankets.
Inside, you can use smaller boxes or dividers to keep things organized. The trunk is both a functional storage container and a stylish piece of home decor. It cleverly hides your holiday clutter in plain sight.
DIY Trunk Tray
What you need:
- A shallow cardboard box that fits inside your trunk
- Pretty fabric or wrapping paper
- Glue or a glue stick
- Scissors
Instructions:
- Find a Box: Find a shallow box, like the lid of a shoebox, that fits easily inside the top of your trunk.
- Cover the Box: Cut a piece of fabric or wrapping paper that is big enough to cover the box.
- Glue it On: Use your glue to neatly cover the outside of the box with the pretty paper. Fold the edges inside and glue them down, too.
- Let it Dry: Let the glue dry completely. Now you have a beautiful tray that can sit inside your trunk to hold smaller, delicate items on top of everything else.
32. Tagged Fabric Bins

Fabric bins with rope handles add a touch of class to your storage shelves. They look much nicer than plain plastic totes. To make them even more functional, add a simple tag to each one.
A luggage tag or a simple cardstock tag tied to the handle tells you what’s inside. You can list the contents clearly. This system combines good looks with practical organization, making your storage closet a place you don’t mind looking at.
DIY Stamped Clay Tags
What you need:
- Air-dry clay
- A small cookie cutter (any shape)
- A straw
- Letter stamps (from a craft store)
- Twine or ribbon
Instructions:
- Roll the Clay: Take a small ball of air-dry clay and roll it out flat, like a cookie dough.
- Cut Your Shape: Use the cookie cutter to cut out a shape. This will be your tag.
- Make a Hole: Use the end of the straw to poke a hole near the top of the tag.
- Stamp a Word: Gently press the letter stamps into the clay to spell a word like “LIGHTS” or “REDS.”
- Let it Dry: Let the clay tag dry for a day or two until it is hard. Then, thread a piece of twine through the hole and tie it to the handle of your bin.
33. Digital QR Code Inventory

For the truly organized, a digital inventory is the next level. By placing a QR code on each bin, you can know its exact contents without opening it. A quick scan with your phone can pull up a detailed list of every item inside.
This method is very precise. It is great for people with large collections of decorations. You will never lose track of a specific ornament again. Several apps are available to help you create your own home inventory system.
DIY QR Code System
What you need:
- Your storage bins
- A smartphone
- A free QR code generator website
- A printer and paper
- Clear packing tape
Instructions:
- List Your Items: On your computer, open a notepad or a document. For one of your bins, type out a list of everything that is inside.
- Generate a Code: Go to a free QR code generator website. Copy your list of items and paste it into the text box on the website. The site will turn your list into a QR code picture.
- Print and Attach: Save the QR code picture and print it. Cut it out and tape it securely to the outside of the correct bin.
- Repeat: Do this for all of your bins. Now you can scan the code with your phone’s camera to see what’s inside each one!
34. Room-Specific “Go-Bags”

Packing away decorations can feel overwhelming. A “go-bag” system simplifies the process for next year. Create one labeled bin for each room or area you decorate, like the “Mantle Decor” or the “Kids’ Room Tree.”
When it’s time to decorate, you just grab the specific bag for the area you’re working on. All the items you need will be together. This strategy breaks down a huge job into smaller, more manageable tasks.
DIY Go-Bag Kit
What you need:
- Fabric storage cubes or open bins
- Cardstock or index cards
- A marker
- Safety pins or clips
Instructions:
- Gather by Room: Go to your living room mantle. Gather up all the decorations you used only on the mantle.
- Fill One Bin: Put all of those mantle decorations into one empty bin.
- Make a Big Label: On a piece of cardstock, use the marker to write “MANTLE” in big, bold letters.
- Attach the Label: Use a safety pin or a clip to attach the label to the front of the bin. Repeat this process for every area of your house, creating a separate, labeled “go-bag” for each one.
35. Hidden Ottoman Storage

For those with limited space, furniture that does double duty is a lifesaver. A storage ottoman in your living room can be the perfect hiding spot for holiday decor. It offers easy access while keeping clutter out of sight.
This is a great place to store items like holiday-themed pillows, blankets, or small wreaths. No one will ever guess that your stylish footrest is secretly holding your Christmas decorations. It is the ultimate in discreet storage.
DIY Ottoman Divider
What you need:
- A storage ottoman
- A sturdy piece of cardboard that is as wide and as deep as the inside of the ottoman
- A box cutter (ask a grown-up for help)
Instructions:
- Measure the Inside: Measure the inside of your ottoman from front to back and from top to bottom.
- Cut the Cardboard: Ask a grown-up to help you cut the piece of cardboard to these measurements.
- Slide it In: Slide the cardboard divider into the ottoman, splitting the space into two sections. You might have to bend it a little to get it in.
- Organize Both Sides: Now you can use one side for your holiday items and the other side for everyday things like blankets or remote controls.
36. Labeled Tray Organizers

Small, fragile items require special care. A cabinet with shallow, pull-out trays is an excellent way to store them. Each tray can be dedicated to a specific category, like “Hooks & Supplies” or “Linens.”
The labels on the front of each tray let you find what you need instantly. The shallow design means you don’t have to dig through layers of stuff. Everything is visible and within easy reach, which protects your delicate decorations from damage.
DIY Drawer Liners
What you need:
- A shallow drawer or tray
- A piece of felt or craft foam
- Scissors
Instructions:
- Measure Your Drawer: Take your drawer out and measure the inside bottom of it.
- Cut the Liner: Cut your piece of felt or foam to the same size as the drawer bottom.
- Place it Inside: Lay the felt liner in the bottom of the drawer.
- Add Your Ornaments: Now you can gently place your glass ornaments or other fragile items on top of the soft liner. It will help cushion them and stop them from rolling around and bumping into each other.
37. Protective Cedar Chest

For your most treasured holiday textiles, a cedar chest offers wonderful protection. Items like handmade stockings or a vintage tree skirt can be damaged by moths and mustiness. The natural oils in cedarwood help repel pests.
A cedar chest also keeps your linens in a dark, dry environment, which prevents colors from fading. It is a beautiful piece of furniture that also serves as the best possible protection for your fabric heirlooms.
DIY Cedar Sachets
What you need:
- A small fabric bag with a drawstring (like a small gift bag)
- Cedar chips or blocks (from a hardware or home store)
Instructions:
- Get the Cedar: Buy a small bag of cedar chips, the kind used for animal bedding or for closets.
- Fill Your Bag: Open your small fabric bag and fill it with a handful of the cedar chips.
- Close it Tight: Pull the drawstring tight and tie a small knot so the chips don’t fall out.
- Place it in Storage: You can now place this small bag, called a sachet, inside any regular plastic bin where you store your holiday stockings or tree skirt. The cedar smell will help keep bugs away.
38. Recycled Packing Materials

Don’t spend money on fancy packing supplies. You can effectively protect your decorations with items you already have. Shredded paper, old mushroom cartons, and empty egg cartons are all great for cushioning fragile items.
Filling glass jars with shredded paper not only protects what’s inside but also looks neat on a shelf. This approach is resourceful and good for the environment. It proves you can keep your holiday treasures safe without buying a lot of new plastic.
DIY Shredded Paper Filler
What you need:
- Old newspapers, junk mail, or used wrapping paper
- A paper shredder (or you can tear by hand)
- A cardboard box
Instructions:
- Shred the Paper: Ask a grown-up to help you run your old paper through a paper shredder. If you don’t have one, you can just spend a few minutes tearing the paper into thin strips.
- Make a Nest: Place a big handful of the shredded paper at the bottom of your empty box. Make it fluffy, like a bird’s nest.
- Place Your Item: Gently set your fragile decoration on top of the paper nest.
- Cover it Up: Add more shredded paper on top and around the sides of the item until it is safely cushioned and can’t move around in the box.
39. The Curated Collection Case

For a truly elegant storage solution, a custom case with fitted compartments is unmatched. It feels like a jewelry box for your favorite ornaments. Each piece has its own designated spot, keeping everything secure and beautifully displayed.
This type of case is great for a specific color scheme or theme, like your silver and white decorations. The sturdy exterior protects against bumps and drops. It turns the act of storing your decorations into a satisfying and organized experience.
DIY Custom Foam Insert
What you need:
- A sturdy box or small suitcase
- A thick piece of foam (from a craft or fabric store)
- A marker
- A craft knife (ask a grown-up to do all the cutting)
Instructions:
- Cut the Base: Ask a grown-up to cut the piece of foam so it fits perfectly in the bottom of your box.
- Trace Your Ornaments: Place your most special ornaments on top of the foam. Use a marker to carefully trace around each one.
- Cut the Shapes: Now, ask the grown-up to use the craft knife to carefully cut out the shapes you traced. Don’t cut all the way through the foam, just deep enough for the ornament to sit in.
- Place and Protect: You can now nestle each ornament into its own custom-cut spot. The foam will hold it securely so it can’t move at all.
40. Built-in Attic Shelving

For those with attic space, building simple shelves is the ultimate storage solution. It gets all of your holiday bins off the floor. This protects them from any potential water damage and makes the space easier to walk through.
The open shelves allow you to see all your labeled bins at once. You can easily find the holiday you’re looking for without having to unstack a huge pile of boxes. It is a weekend project that will make your holiday storage organized for years to come.
DIY Bin Sliders
What you need:
- Wooden shelves
- Furniture sliders (the smooth plastic discs you put under heavy chairs)
- A hot glue gun or strong adhesive (ask a grown-up for help)
Instructions:
- Prepare the Bin: Take one of your heavy, filled storage bins. Make sure the bottom is clean.
- Glue the Sliders: Ask a grown-up to help you glue one furniture slider to each of the four corners on the bottom of the bin.
- Let it Dry: Let the glue dry completely so the sliders are stuck on well.
- Slide with Ease: Now, when you put the bin on your wooden attic shelf, it will slide in and out smoothly. This makes it much easier to get to the bins at the back of the shelf without having to lift so much.
Putting decorations away at the end of the season shouldn’t feel like a punishment. With a little planning, it can be a simple and satisfying task that sets you up for an even easier start next year.
These 40 solutions show that you don’t need a lot of money or a huge storage room to be organized. You just need a better system. By protecting your treasured items and keeping them tidy, you are preserving memories and reducing future stress.
Ultimately, a well-organized collection gives you more time to enjoy what truly matters: a peaceful and happy holiday with the people you love.
Key Takeaways
- Use Overlooked Spaces: Your best storage areas might be hiding in plain sight. Use the space under your bed, on the back of a door, or even in your garage ceiling to keep bulky items out of the way.
- Repurpose Household Items: You don’t always need to buy new containers. Everyday things like egg cartons, plastic bottles, and cardboard boxes can be transformed into effective and free storage solutions.
- Label Everything: A simple label is the key to finding things quickly. Whether you use a marker, a QR code, or a photo, labeling saves you from having to open every single box next year.
- Protect Your Treasures: Fragile ornaments and delicate linens need extra care. Use dividers, soft padding, and protective coverings to keep your heirlooms safe from scratches, breaks, and dust.
- Group by Category: Store items together based on where or how you use them. Creating a “mantle” box or an “outdoor lights” kit makes the decorating process much faster and more logical.