The holiday season arrives with a flurry of excitement, but often, one central feature of our living room sits bare and overlooked: the mantel. It’s the heart of the room, the space that gathers everyone around the warm fire, yet it’s frequently the last thing we think to decorate.

This year, it’s time to change that. Your mantel holds the potential to be a stunning focal point, a canvas for your holiday creativity that sets the tone for your entire home. It’s the stage for twinkling lights, festive greenery, and personal touches that tell your unique holiday story.
Forget the stress of not knowing where to start. We’ve gathered 42 distinct and magical ideas to help you transform your unfinished mantel into a masterpiece. Whether your style is rustic, glamorous, minimalist, or wonderfully whimsical, you’ll find the inspiration and simple DIY steps to finally complete your holiday look.
1. Rustic Winter Woodland

This mantel brings the quiet beauty of a snowy forest indoors. A thick garland, heavy with faux snow and pinecones, creates a lush, natural base. The soft glow from fairy lights and pillar candles adds warmth, making the space feel incredibly cozy.
Chunky knit stockings in shades of cream and charcoal hang ready for holiday treats. Touches of gold from the reindeer figures and the simple round mirror provide a hint of elegance. This design uses layers of texture, from the rough birch logs to the soft faux fur rug, to build a welcoming scene. It is a calm and inviting holiday display.
DIY Snowy Woodland Garland
Let’s make a garland just like the one in the picture. It’s like bringing a little piece of a winter forest into your house!
What You’ll Need:
- A plain green garland (you can find these at a craft store)
- A can of white flocking spray (this is fake snow in a can)
- Some pinecones (you can collect these outside or buy them)
- A string of battery-powered fairy lights (the kind with thin wire are great)
- Thin floral wire or green pipe cleaners
- An old sheet or newspaper
Step-by-Step Instructions:
- Prepare Your Space: First, lay down your old sheet or newspaper outside or in a garage. The snow spray can get a little messy, so this will protect your floor.
- Make It Snowy: Place your green garland on the sheet. Shake the can of snow spray well, and then spray it all over the garland. You can add a light dusting or make it look like it was just in a snowstorm. Let it dry completely.
- Add the Pinecones: Take a piece of floral wire or a pipe cleaner and wrap it around the bottom of a pinecone. Now, use the ends of the wire to attach the pinecone to a branch on your garland. Twist it on tight! Add as many pinecones as you like, spreading them out evenly.
- Light It Up: Carefully wrap your string of fairy lights around the garland. Weave the wire in and out of the branches so it’s hidden, and only the little lights are showing.
- Place it on the Mantel: Now for the fun part! Drape your beautiful new garland across your mantel. You can let the ends hang down the sides for a nice effect. Fluff up the branches to make it look full.
- Finishing Touches: Add some chunky stockings, candles, and maybe some little animal figures to complete your cozy woodland look!
2. Simple Scandinavian Charm

This design celebrates simplicity and natural textures. A modest pine garland, brightened by warm fairy lights, rests on the clean white mantel. Above, a classic evergreen wreath hangs without any fuss. The overall feeling is calm and uncluttered, focusing on the beauty of the materials themselves.
Linen stockings in a neutral tone are personalized with simple initial tags. A whimsical felt garland adds a touch of handmade charm with its soft pom-poms, wooden stars, and cinnamon stick bundles. This look is all about creating a peaceful, cozy atmosphere that feels both festive and serene.
DIY Felt and Cinnamon Garland
Let’s create that cute, dangly garland. It’s easy to make and will make your room smell wonderful.
What You’ll Need:
- A long piece of twine or string (long enough to hang across your mantel)
- Felt balls (pom-poms) in colors like red, white, and grey
- Wooden stars or other holiday shapes with holes in them
- Cinnamon sticks (about 3 inches long)
- A large needle with a big eye
Step-by-Step Instructions:
- Plan Your Pattern: Lay out your string on a long table or the floor. Place your felt balls, stars, and cinnamon sticks along the string in the order you want them. A good pattern could be: red ball, grey ball, white ball, star, then repeat.
- Thread the Balls: Thread the end of your string through the big needle. Gently push the needle through the center of each felt ball and slide them down the string to their spot. It’s like making a necklace!
- Add the Stars: When you get to a spot for a star, just thread the string through the hole in the wooden shape. Easy!
- Tie the Cinnamon: To add a cinnamon stick bundle, take three sticks and hold them together. Cut a small piece of twine (about 6 inches) and tie a tight knot around the middle of the sticks. Use the ends of that small twine to tie the bundle onto your main garland string.
- Keep Going: Continue adding all your pieces until your garland is full and looks just right.
- Hang It Up: Tie loops at both ends of your string and hang your new handmade garland from the stockings or hooks on your mantel.
3. Emerald and Gold Glamour

This mantel offers a look of pure sophistication. A full, frosty garland in a champagne gold tone serves as a dramatic base. It is heavily decorated with shiny silver, deep black, and glittering gold ornaments. The mix of metals creates a rich and luxurious feel.
Velvet stockings in a deep emerald green add a pop of regal color. Matching green velvet ribbons are tied into beautiful bows, adding a soft texture. Above the scene, a gold sunburst mirror acts like a piece of jewelry for the wall. This display is bold, elegant, and full of festive sparkle.
DIY Elegant Velvet Bows
Let’s make those fancy green bows. They look complicated, but they are actually simple to create.
What You’ll Need:
- A roll of wide, wired velvet ribbon in a deep green color
- A pair of sharp scissors
- Thin floral wire or a pipe cleaner
Step-by-Step Instructions:
- Cut Your Ribbon: First, cut a long piece of ribbon. For a nice, big bow, about 2 feet long is a good start.
- Make the First Loop: Take one end of the ribbon and make a loop. Pinch the bottom of the loop between your thumb and finger. This will be the center of your bow.
- Make the Second Loop: Now, take the long end of the ribbon and make another loop on the other side. Make it about the same size as the first one. Pinch it in the middle along with the first loop. You should have a shape that looks like a figure-8.
- Create More Loops: Keep making loops on each side, holding them all together in the middle. Four to six loops will create a nice full bow.
- Secure the Center: Once you have all your loops, take a small piece of floral wire. Tightly wrap it around the center where you are pinching everything. Twist the wire in the back to hold it all together.
- Make the Tails: Cut another piece of ribbon for the “tails” that hang down. You can cut the ends at an angle to make them look finished. Place this tail piece behind the bow and use the same wire to attach it.
- Fluff and Shape: Now, because you used wired ribbon, you can fluff up the loops and shape your bow so it looks big and beautiful. Attach it to your garland using the wire.
4. Classic Christmas Nostalgia

This display is filled with timeless holiday spirit. A thick pine garland, dotted with red berries and warm lights, generously drapes over the mantel and down the sides. The whole scene feels abundant and joyful, just like a classic Christmas movie.
Personalized stockings in plaid and quilted patterns hang from the garland, waiting to be filled. A lineup of charming nutcracker soldiers stands at attention. An old-fashioned window frame and a simple “Merry Christmas” sign add to the rustic, welcoming feel. This mantel is all about tradition and happy memories.
DIY Vintage Window Frame Display
That old window frame adds so much character. You can make one yourself to hang your wreath on.
What You’ll Need:
- An old window frame (you can find these at flea markets or antique shops) or build a simple one with four pieces of wood.
- White chalk paint and a paintbrush
- Sandpaper (medium grit)
- A holiday wreath
- A wide ribbon for a bow
- A strong hook or nail to hang it on the wall
Step-by-Step Instructions:
- Clean the Frame: If you have an old window, wipe it down with a damp cloth to get rid of any dust or dirt. Let it dry.
- Paint it White: Use your chalk paint to paint the entire frame. Don’t worry about making it look brand new. One or two coats should be enough. Let the paint dry completely.
- Give it a Vintage Look: Once it’s dry, take your sandpaper and gently rub the edges and some flat spots on the frame. This will scrape a little paint off and make it look old and well-loved.
- Add a Wreath: Make a big, beautiful bow with your ribbon and attach it to your wreath.
- Hang it Up: Securely hang your painted window frame on the wall above your mantel. Then, hang your wreath right in the middle of the frame. It creates a lovely layered look.
5. Pastel Candyland Fantasy

This mantel is a sweet dream come to life. It avoids traditional reds and greens for a playful palette of pastel pink, mint, and baby blue. A small, frosted white tree is decorated with whimsical ornaments like tiny cupcakes and shiny baubles.
The scene is filled with delightful details. Jars of colorful candies line the mantel, looking good enough to eat. A pastel nutcracker and a collection of mint and pink bottle brush trees add to the sugary landscape. A fluffy pom-pom garland and big satin bows complete this magical, make-believe world.
DIY Candy Jar Display
The jars of candy are a super easy and colorful decoration. Here is how you can put them together.
What You’ll Need:
- Several clear glass jars with lids (mason jars work great)
- Different kinds of candy in your chosen colors (like pink, blue, and white jellybeans, marshmallows, or M&Ms)
- Fake snow or “snow-tex” from a craft store
- A small paintbrush or popsicle stick
Step-by-Step Instructions:
- Add a Snowy Top: Open your jar of fake snow. Use your paintbrush or popsicle stick to spread a layer of it on the lid of each jar. Make little peaks so it looks like freshly fallen snow. Let the lids dry completely.
- Fill the Jars: This is the easiest step! Carefully fill each jar with a different color of candy. You can fill one with all pink candies, one with all blue, and so on.
- Close Them Up: Once your snowy lids are dry, screw them back onto the candy-filled jars.
- Arrange Your Display: Place your candy jars on the mantel. You can group them together in the middle or spread them out between your other decorations, like the bottle brush trees. They add a pop of color and fun to your display.
6. Organic Greenery and Moss

This mantel brings the textures of the forest floor indoors with a modern twist. The star of the show is a unique garland made from a mix of fresh cedar boughs and silvery eucalyptus leaves. Clumps of green moss are tucked in, adding a rich, earthy element.
The design is simple and focuses on the beauty of the plants. Sleek, modern stockings in shades of charcoal and taupe provide a clean contrast to the wild greenery. A trio of tall, slender candles in simple brass holders adds an elegant touch of warm light. This look is fresh, calm, and effortlessly stylish.
DIY Mixed Greenery and Moss Garland
This garland looks like it was gathered on a walk in the woods. You can make your own version easily.
What You’ll Need:
- A basic rope or a plain pine garland to use as a base
- Bunches of fresh cedar and eucalyptus (you can find these at a flower shop or maybe in your yard)
- A bag of preserved sheet moss (from a craft store)
- Green floral wire
- Scissors or garden clippers
Step-by-Step Instructions:
- Start with a Base: Lay your rope or plain garland across a table. This will be the backbone that you attach everything to.
- Make Small Bundles: Take a few sprigs of cedar and a couple of eucalyptus stems and hold them together to make a small bouquet.
- Attach the Greenery: Place your small bouquet on top of the rope base. Use a piece of floral wire to wrap tightly around the stems and the rope, securing them together.
- Overlap and Repeat: Make another small bouquet and place it so it slightly overlaps the stems of the first one. Wire it on. Keep doing this all the way down the rope, always pointing the leaves in the same direction.
- Tuck in the Moss: Take small pieces of your sheet moss and gently tuck them into the garland. You can tuck them under branches or between stems. The greenery will help hold the moss in place.
- Fluff and Finish: Once your whole rope is covered, go back and fluff up the branches. Fill in any empty spots with more greenery or moss until it looks full and beautiful. Now you can drape it on your mantel!
7. Bohemian Holiday Gathering

This mantel is warm, inviting, and full of personality. It breaks from tradition with a layered, eclectic style. A colorful, patterned textile is used as a mantel runner, setting a vibrant base for the decorations. The look is rich with texture and global influences.
A lush garland of eucalyptus and greenery is woven with dried flowers and fluffy pampas grass. The hearth is a cozy oasis, decorated with glowing salt lamps and ornate metal lanterns. This free-spirited arrangement feels collected over time and tells a story of travel and creativity.
DIY Pampas Grass Garland Accents
Adding pampas grass gives your garland a soft, feathery look. It’s a very popular touch for bohemian style.
What You’ll Need:
- Your finished evergreen garland
- Several stems of dried pampas grass
- Hairspray (the extra-strong hold kind works best)
- Scissors or garden clippers
Step-by-Step Instructions:
- Prepare the Pampas Grass: Take your pampas grass stems outside. They can be a bit messy and shed. Gently shake each stem to fluff it out.
- Stop the Shedding: This is a key trick! Hold a can of hairspray about a foot away from the fluffy part of the grass and give it a good spray all over. This helps “set” the fluff so it doesn’t fall everywhere in your house. Let it dry for a few minutes.
- Cut the Stems: Cut the pampas grass stems into smaller, more manageable pieces. You’ll want pieces that are about 6 to 12 inches long.
- Tuck Them In: Now, simply take your cut pampas grass pieces and tuck them into your garland. Slide the stem end deep into the greenery so it’s secure. You don’t even need glue or wire.
- Arrange Creatively: Place the pampas grass pieces throughout your garland. You can have them sticking out at different angles to create a wild, natural look. Stand back and see where you need to add more until it looks feathery and full.
8. Coastal Christmas Calm

This design brings the serene feeling of a winter beach to the holiday season. The color palette is soft and sandy, with shades of white, beige, and sea blue. A flocked garland, reminiscent of seafoam, is artfully draped across the mantel.
The decorations are all inspired by the ocean. Starfish and sand dollars are nestled among the branches. A mirror framed with oyster shells serves as a stunning centerpiece. Candles flicker inside glass hurricane lamps, protecting them from a gentle sea breeze. This look is a peaceful and unique way to celebrate the holidays.
DIY Sand Dollar Ornaments
These sand dollar ornaments are simple to make and look so pretty on a coastal-themed garland or tree.
What You’ll Need:
- Real or craft sand dollars
- Gold craft paint
- A small, thin paintbrush
- Mod Podge or clear craft glue
- Fine gold glitter
- Thin ribbon or twine for hanging
Step-by-Step Instructions:
- Paint a Gold Edge: Squeeze a little bit of gold paint onto a paper plate. Using your thin paintbrush, carefully paint a thin line of gold all around the outside edge of each sand dollar. Let it dry.
- Add Some Sparkle: Now, use your paintbrush to apply a thin layer of Mod Podge or glue to the gold edge you just painted.
- Glitter Time: Before the glue dries, hold the sand dollar over a piece of paper and sprinkle the gold glitter onto the glue. The paper will catch any extra glitter. Gently tap the sand dollar to shake off any loose glitter.
- Let it Dry: Set your glittery sand dollars aside to dry completely.
- Add a Hanger: Cut a small piece of ribbon (about 5 inches long). Make a loop and use a small dab of strong glue to attach the ends to the back of the sand dollar. Once the glue is dry, you can hang your beautiful new ornament!
9. Midnight Celestial Celebration

This mantel decor is mysterious and enchanting, like a clear winter’s night sky. The deep, dark wall color provides a dramatic backdrop for the entire scene. A lush green garland is filled with ornaments in shades of midnight blue, silver, and gold.
The celestial theme truly shines with the accessories. Twinkling string lights in the shape of stars and moons hang above the mantel. A large, hammered-metal crescent moon adds a significant focal point. Navy blue candles in brass holders and matching velvet stockings complete this magical, cosmic display.
DIY Twinkling Star Garland
Let’s make the starry lights that hang above the mantel. This is a very simple way to add some magic to your room.
What You’ll Need:
- A string of plain fairy lights (the kind on a thin wire are best)
- Silver or gold glittery craft foam sheets
- A star-shaped cookie cutter or a star stencil
- A pencil
- Scissors
- A hot glue gun and glue sticks
Step-by-Step Instructions:
- Trace Your Stars: Place your star cookie cutter or stencil on the back of the glittery foam sheet. Use your pencil to trace as many stars as you can fit. You will need two star cutouts for every one star on your garland.
- Cut Them Out: Carefully cut out all the stars you traced. You should have a big pile of glittery stars.
- Glue Them On: Turn on your hot glue gun. Take one of your foam stars and put a few small dots of hot glue on the back (the not-glittery side).
- Make a Star Sandwich: Place the fairy light wire across the middle of the star. Quickly take a second star cutout and press it on top, sandwiching the wire in between. Press them together firmly for a few seconds. The glittery sides should be facing out.
- Space Them Out: Move down the wire about 4-5 inches and repeat the process. Keep making star sandwiches along the whole string of lights.
- Let it Cool and Hang: Once all your stars are attached and the glue has cooled, your new star garland is ready to hang. Drape it above your mantel for a beautiful, twinkling night sky effect.
10. A Very Vintage Toyland

This mantel is a delightful trip back in time to a classic childhood Christmas. The entire display is a celebration of nostalgia and play. It is crowded with vintage-style toys, from a handsome rocking horse to colorful wooden alphabet blocks.
A fresh green garland provides a simple backdrop, woven with bright red berries and colorful old-fashioned string lights. The stockings themselves have a charming, handmade quality with various patterns and little festive details. This look is not about being quiet or minimal; it is about the happy, busy excitement of Christmas morning.
DIY Vintage Alphabet Block Sign
You can spell out any message you want with these cute, toy-inspired blocks. It is a fun and personal touch.
What You’ll Need:
- Wooden craft blocks (you can find these at a craft store)
- Craft paint in different colors (red, green, blue, yellow)
- Letter stencils or stickers
- White craft paint
- A small paintbrush or stencil brush
- Sandpaper (optional, for a worn look)
Step-by-Step Instructions:
- Paint the Blocks: First, decide what word you want to spell, like “JOY,” “NOEL,” or a name. You will need one block for each letter. Paint each block a different bright color. Let them dry completely.
- Add the Letters: Once the blocks are dry, it’s time for the letters. If you’re using stencils, hold the stencil for your first letter firmly on one side of a block. Use your small brush and a tiny bit of white paint to dab the paint onto the stencil. Carefully lift the stencil off.
- Sticker Option: If you’re using stickers, just peel and stick one letter onto the front of each block. Press it down firmly.
- Make Them Look Old (Optional): If you want your blocks to look like old, well-loved toys, you can gently rub the edges and corners with a piece of sandpaper. This will wear away a little bit of the paint.
- Spell it Out: Arrange your finished blocks on your mantel to spell out your festive message. You can mix them in with other toys to complete the vintage look.
11. Earthy Winter Solstice

This mantel design feels grounded and serene. It is a tribute to the natural world during winter. A simple garland of holly and ivy rests below a collection of glowing white candles and healing crystals like selenite. The scene is deeply calming and almost spiritual.
Chunky cream-colored knit stockings add a layer of cozy texture. Bundles of dried herbs, cinnamon sticks, and dried orange slices hang below, bringing in natural fragrance. This look is about celebrating the quiet, peaceful side of the holiday season with elements from the earth.
DIY Dried Herb Bundles
These little bundles look beautiful and make the room smell amazing. They are very easy to assemble.
What You’ll Need:
- Sprigs of fresh herbs like rosemary, sage, or thyme
- A few cinnamon sticks
- Dried orange slices (you can buy these or make your own)
- Natural twine
Step-by-Step Instructions:
- Gather Your Bundle: Take a few sprigs of your favorite herbs and hold them together in a small bunch. This will be the center of your bundle.
- Add the Extras: Place a cinnamon stick or two alongside your herb bunch. You can also tuck in a dried orange slice.
- Tie it Up: Cut a long piece of twine (about 2 feet long). Start wrapping it tightly around the bottom stems of your bundle. Wrap it around several times to make sure everything is secure.
- Make a Hanging Loop: Don’t cut the twine yet! After wrapping the stems, leave a long tail of twine. Fold this tail in half and tie a knot to create a loop for hanging.
- Hang and Enjoy: Make a few more bundles and hang them from your mantel or garland. They will release a gentle, festive scent.
12. Gatsby’s Holiday Soirée

This mantel is all about 1920s glamour and opulence. A thick garland made of deep green magnolia leaves forms a luxurious base. Gold-painted leaves are tucked in, adding a metallic shine that catches the light beautifully.
The design is highly symmetrical, with matching gold reindeer and tall, elegant candles on either side. A striking piece of Art Deco art and a feather-filled vase create a dramatic focal point. Black and white stockings with unique, geometric ornaments complete this sophisticated and festive party look.
DIY Gilded Magnolia Leaf Garland
Adding gold leaves to a garland makes it look incredibly rich and stylish. Here’s how to get that gilded look.
What You’ll Need:
- A plain garland (magnolia, pine, or eucalyptus work well)
- A few extra magnolia leaves (real or faux)
- A can of metallic gold spray paint
- An old box or newspaper
- Thin floral wire
Step-by-Step Instructions:
- Prepare to Paint: Go outside or to a well-ventilated area. Lay your extra magnolia leaves on the newspaper or inside the box.
- Go for Gold: Shake the can of spray paint well. Hold it about 6-8 inches away from the leaves and spray them with a light, even coat of gold paint. Let them dry completely, then flip them over and paint the other side.
- Attach the Leaves: Once the golden leaves are dry, use small pieces of floral wire to attach them to your main garland. Wrap the wire around the stem of the gold leaf and then twist it onto a branch of the garland.
- Arrange and Fluff: Tuck your golden leaves in all along the garland. You can have them all facing one way or have them poking out at different angles. Fluff up the rest of the garland to make it look full and luxurious.
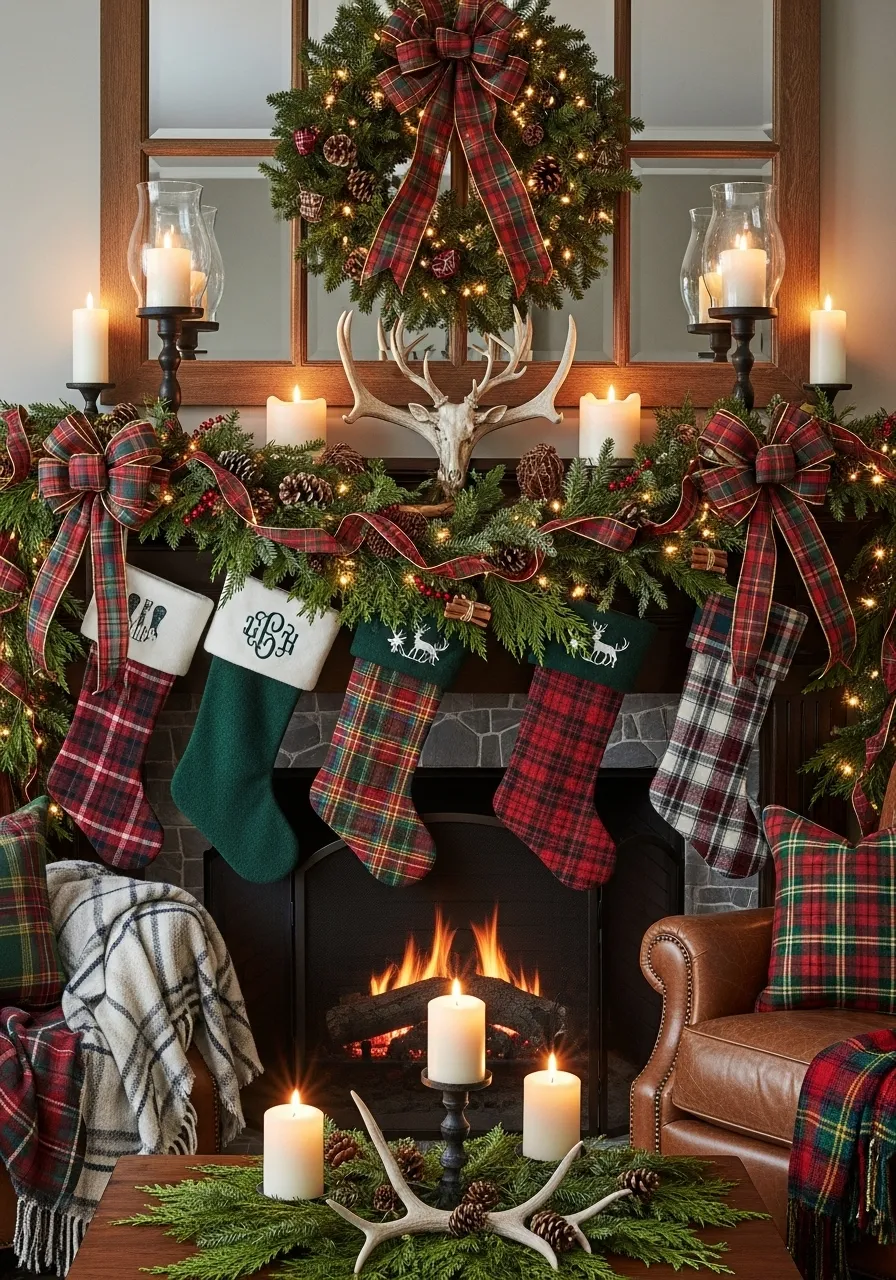
13. Cozy Highland Lodge

This mantel creates the warm, inviting feeling of a rustic mountain cabin. It is full of rich textures and traditional patterns. A lush pine garland is woven with pinecones and berries, then decorated with large, festive bows made from plaid ribbon.
The stockings are a charming mix of tartan plaids and cozy green knits. A set of antlers provides a rustic centerpiece above the fire. The whole scene is bathed in the warm, flickering light of many candles, making it a wonderful place to curl up on a cold night.
DIY No-Sew Plaid Bows
These big, beautiful plaid bows are a great way to add a pop of color and pattern to your garland.
What You’ll Need:
- A roll of wide, wired ribbon with a plaid pattern
- A pipe cleaner or floral wire
- Scissors
Step-by-Step Instructions:
- Make a Loop: Unroll a long section of ribbon but don’t cut it yet. Make a loop about 5 inches long. This will be the center of your bow.
- Twist It: Pinch the base of the loop and give it a half-twist. This makes the pretty side of the ribbon face forward for the next loop.
- Make More Loops: Make another loop on the other side of your pinched center, then twist again. Keep making loops on alternating sides until your bow is as big and full as you want it to be. Try making 6 to 8 loops in total.
- Secure the Center: Tightly wrap a pipe cleaner or a piece of wire around the center you’ve been pinching. Twist it securely in the back.
- Cut the Tails: Now you can cut the ribbon from the roll, leaving a long tail. You can cut the end of the tail into a “V” shape to make it look fancy.
- Fluff and Attach: Use your fingers to shape the wired loops so they are round and full. Use the ends of the pipe cleaner to attach your finished bow to the garland.
14. Frosted Winter Palace

This mantel looks like it was touched by Jack Frost himself. It is a dazzling display of white and silver, creating a magical, icy kingdom. A heavily flocked white garland is covered in silver ornaments, sparkling snowflakes, and dangling crystal icicles.
The stockings are white and silver, some trimmed with soft white fur. A matching flocked wreath hangs over an ornate silver mirror, adding to the layered, frosty look. This monochromatic design is incredibly elegant and shimmers beautifully in the light of the candles.
DIY Sparkling Icicle Ornaments
You can make ornaments that look like real icicles, dripping with frost and glitter.
What You’ll Need:
- Clear plastic or glass icicle ornaments (from a craft store)
- White school glue or Mod Podge
- A small paintbrush
- Clear or silver glitter
- A paper plate
- Ribbon or ornament hooks
Step-by-Step Instructions:
- Get Your Station Ready: Pour a good amount of glitter onto your paper plate. This will make it easy to cover your icicle.
- Paint with Glue: Use your paintbrush to apply a thin, even coat of glue all over one of the icicle ornaments.
- Add the Sparkle: Hold the glue-covered icicle over the paper plate and sprinkle it generously with glitter, turning it to make sure you cover all sides. You can also gently roll it in the pile of glitter.
- Let it Dry: Set the glittery icicle aside on a piece of wax paper or hang it up somewhere to dry completely.
- Add a Hanger: Once it’s dry, tie a loop of ribbon through the top or add an ornament hook. Make a whole set of them to hang from your frosty garland.
15. Sweet Gingerbread Village

This cheerful mantel is a tribute to a favorite holiday treat. The entire display is decorated in candy-shop reds and whites. A pine garland is adorned with gingham bows, candy canes, and smiling gingerbread man ornaments.
The real showstopper is the collection of charming gingerbread houses arranged below, creating a little festive village. Jars filled with gingerbread cookies add to the sweet theme. This look is playful, delicious, and full of homespun charm.
DIY Clay Gingerbread Man Ornaments
Let’s make some cute gingerbread men that you can hang on your garland year after year.
What You’ll Need:
- Brown air-dry clay
- A gingerbread man cookie cutter
- A straw or toothpick
- White and red puffy paint
- Rolling pin
- Wax paper
Step-by-Step Instructions:
- Roll Out the Clay: Place a ball of brown air-dry clay between two sheets of wax paper. Use a rolling pin to roll it out until it’s about as thick as a real cookie.
- Cut Out Your Shapes: Press your gingerbread man cookie cutter into the clay to cut out your shapes.
- Make a Hole for Hanging: Before the clay dries, use a straw to poke a hole at the top of each gingerbread man’s head. This is where the ribbon will go.
- Let Them Dry: Carefully place your clay gingerbread men on a flat surface and let them dry completely. This might take a day or two. Follow the instructions on the clay package.
- Decorate! Once they are hard, use your white puffy paint to draw a smiley face, squiggly lines for frosting on the arms and legs, and buttons down the front. You can use red puffy paint for a bow tie. Let the paint dry.
- Hang Them Up: Thread a piece of ribbon through the hole, tie a knot, and your adorable ornament is ready to hang.
16. Cosmic Christmas Voyage

This mantel is a spectacular journey through the stars. It uses a projector to cast a colorful nebula and galaxy onto the dark wall, creating an incredible backdrop. The decorations are all space-themed, turning the room into a personal planetarium.
A model of our solar system hangs in front of a round mirror that looks like a full moon. The garland is dotted with planet-like ornaments and celestial shapes. Even the stockings feature embroidered constellations. This design is imaginative and full of wonder.
DIY Solar System Mobile
You can create a simple version of the solar system to hang near your mantel.
What You’ll Need:
- Styrofoam balls in different sizes (for the planets and the sun)
- Craft paint in various colors (yellow, blue, green, red, etc.)
- Paintbrushes
- A wooden dowel or a sturdy stick
- Fishing line or clear string
- Screw eyes (tiny screws with a loop at the end)
Step-by-Step Instructions:
- Paint Your Planets: Paint your styrofoam balls to look like the planets. Use the biggest one for the sun (yellow), a blue and green one for Earth, a red one for Mars, and so on. Let them dry completely.
- Add Hangers: Carefully screw one of the small screw eyes into the “top” of each painted planet. This is where you will tie the string.
- Cut the Strings: Cut different lengths of fishing line for each planet. The planets are at different distances from the sun, so having different lengths looks great.
- Tie Them On: Tie one end of a string to the screw eye on each planet.
- Attach to the Hanger: Tie the other end of each string to your wooden dowel. You can arrange them in the order of the real solar system.
- Hang Your Universe: Tie one long piece of string to both ends of the dowel to create a hanger. Now you can hang your solar system mobile from the ceiling.
17. Modern Farmhouse Gathering

This mantel has a trendy and welcoming farmhouse style. It uses a clean palette of black, white, and natural wood tones. A gentle garland of pine and frosted leaves is brightened with simple string lights.
The details make this look special. A wooden bead garland adds a touch of texture. Galvanized metal stars, miniature houses, and a letterboard with a holiday message give it a personalized feel. The black and white buffalo check stocking is a classic farmhouse pattern.
DIY Wooden Bead Garland
This is one of the easiest garlands to make, and it looks great with so many styles.
What You’ll Need:
- Round wooden beads in various sizes (from a craft store)
- A long piece of jute twine or string
- A pair of scissors
Step-by-Step Instructions:
- Cut Your Twine: Cut a piece of twine that is a little longer than you want your finished garland to be.
- Tie a Starter Knot: Tie a big knot at one end of the twine, or tie it around one large bead. This will stop the other beads from sliding off.
- String the Beads: Start threading the wooden beads onto the twine. You can create a pattern with different sizes (like big, small, small, big) or just add them randomly. This is the fun and easy part!
- Keep Going: Continue stringing beads until your garland is the length you want.
- Finish it Off: Tie another big knot at the other end to secure the beads. You can add a tassel to the ends if you want to be extra fancy. Now you can drape it across your mantel.
18. Peppermint Candy Wonderland

This holiday display is a burst of cheerful energy. The entire room is committed to a crisp red and white candy cane theme. On the mantel, a white tinsel garland is decorated with shiny red ball ornaments, creating a simple but bold statement.
The decorations are playful and graphic. A large piece of art featuring a peppermint swirl hangs above the fireplace. Small, whimsical candy cane trees and more red ornaments line the mantel shelf. Even the tree and presents follow the strict red-and-white rule, making the whole space feel bright and exciting.
DIY Faux Peppermint Lollipops
Let’s make some of those big, swirly lollipops to add to your candy theme.
What You’ll Need:
- A round piece of cardboard or a sturdy paper plate
- Red and white ribbon (about 1 inch wide)
- A hot glue gun or strong craft glue
- A wooden dowel or a painted stick
- A cellophane treat bag and a ribbon for a bow (optional)
Step-by-Step Instructions:
- Start the Swirl: Take the end of your white ribbon and glue it right in the center of your cardboard circle.
- Wrap and Glue: Start coiling the ribbon around in a circle, adding a little bit of glue as you go to hold it in place. Keep the ribbon flat.
- Add the Red Stripe: After you’ve wrapped the white ribbon around a couple of times, glue the end of the red ribbon right next to it. Now, continue wrapping both ribbons at the same time, side-by-side, to create the red and white swirl.
- Cover the Circle: Keep wrapping and gluing until the entire cardboard circle is covered in the ribbon swirl. Cut and glue the ends on the back.
- Add the Stick: Glue the wooden dowel to the back of the circle to make the lollipop stick.
- Finishing Touches: If you want, you can slide the whole thing into a clear cellophane bag and tie a bow at the bottom, just like a real lollipop.
19. Renaissance Holiday Feast

This mantel is rich, dark, and dramatic. It looks like a beautiful painting from long ago. The garland is incredibly lush and full, overflowing with realistic-looking fruits like pomegranates, grapes, and figs, mixed with deep red berries and greenery.
The stockings are made of a heavy, tapestry-like fabric with ornate patterns and thick gold tassels. Everything is lit by the soft, warm glow of burgundy candles in antique-style brass holders. An old portrait in a gilded frame completes this opulent and timeless scene.
DIY Faux Fruit Garland Accents
Adding fruit to a garland is a classic way to make it look abundant and luxurious.
What You’ll Need:
- A plain pine garland
- A selection of fake fruit (like pomegranates, grapes, figs, or small apples) from a craft store
- Thin, green floral wire
- Wire cutters
Step-by-Step Instructions:
- Prepare the Fruit: For fruits like apples or pomegranates, take a 6-inch piece of floral wire and poke it straight through the center of the fruit. Bend both ends of the wire down.
- Wire the Grapes: For a bunch of grapes, you can simply wrap a piece of wire securely around the main stem at the top of the bunch.
- Attach to the Garland: Take your wired fruit and place it where you want it on the garland. Use the ends of the wire to wrap tightly around a sturdy branch of the garland, twisting it in the back to hide it.
- Create Clusters: Arrange the fruit in small groups or clusters to make it look more natural. You could have a bunch of grapes next to a pomegranate and a few figs.
- Fill it Out: Keep adding fruit along the whole length of the garland until it looks as full and bountiful as you like.
20. Desert Holiday Sunset

This mantel offers a unique and warm take on holiday decor. It swaps snowy scenes for the beauty of the desert. A green garland with eucalyptus and pinecones is decorated with copper-colored ornaments and dried grasses, echoing the colors of a desert sunset.
The fireplace is surrounded by a stunning collection of cacti and succulents in terracotta pots. A decorative cow skull and a macrame wall hanging add to the Southwestern vibe. A colorful tassel garland and a single rust-colored stocking complete this stylish and unconventional holiday look.
DIY Colorful Tassel Garland
This tassel garland is a fun way to add color and texture to any space, any time of year.
What You’ll Need:
- Yarn in several different colors (like teal, red, and beige)
- A small, flat piece of cardboard (about 4 inches tall)
- A pair of sharp scissors
- A long piece of twine for the garland base
Step-by-Step Instructions:
- Wrap the Yarn: Take your first color of yarn and start wrapping it around the piece of cardboard. Wrap it around about 20-30 times. The more you wrap, the fluffier your tassel will be.
- Tie the Top: Cut a separate 8-inch piece of yarn. Slide it under all the wrapped yarn at the top of the cardboard and tie a tight double knot. This holds the top of your tassel together.
- Cut the Bottom: Slide the wrapped yarn off the cardboard. You will have a loop of yarn. Use your scissors to cut through the bottom loops.
- Make the “Neck”: Cut another piece of yarn. About an inch down from the top of your tassel, wrap this piece of yarn tightly around the bunch several times to create a “neck.” Tie a secure knot and trim the extra ends.
- Repeat! Make several more tassels in all your different colors.
- String Them Together: Use the long strings from the knot at the very top of each tassel to tie them onto your long piece of twine. Space them out evenly and your colorful garland is ready to hang!
21. Cozy Hygge Holiday

This mantel is the definition of “hygge,” the Danish word for a feeling of cozy contentment. The look is built with soft textures and a warm, gentle glow. A fluffy white sheepskin throw acts as a snowy base for a collection of simple white candles and miniature ceramic houses.
A single, chunky grey knit stocking adds to the touchable quality of the display. A very simple cedar garland is the only touch of green. Large, handmade paper stars hang on either side, completing the clean, calm, and incredibly peaceful scene.
DIY 3D Paper Stars
These beautiful stars look complicated, but they are made with a simple folding technique.
What You’ll Need:
- Square pieces of paper (white or kraft paper works well)
- Scissors
- A ruler
- A pencil
- Glue stick or clear tape
- String for hanging
Step-by-Step Instructions:
- Fold Your Square: Take a square piece of paper. Fold it in half to make a triangle. Then fold it in half again to make a smaller triangle.
- Make a Cut: Unfold the paper once. You should have a triangle. On the open side of the triangle, draw a line from the corner up towards the folded edge, stopping about half an inch from the top. Cut along this line. Do not cut all the way through.
- Unfold and Glue: Open your paper up completely. It should look like a square with a smaller diamond shape cut in the middle. Take the two points of the inner diamond and glue them together to make a small loop.
- Flip and Repeat: Flip the whole paper over. Now take the two points of the next largest shape and glue them together. Keep flipping and gluing the points together until you have a finished, 3D star point.
- Make More Points: Repeat these steps to make five or six identical star points.
- Assemble the Star: Use your glue stick to glue the finished points together at their bases until you have a full, 3D star. Add a string to one of the points for hanging.
22. Spiced Winter Harvest

This mantel is a celebration of natural fragrance and rustic beauty. It looks and smells like a country kitchen during the holidays. Two layers of fresh cedar provide a lush green base for a bounty of harvest elements.
A beautiful garland made of dried orange slices is strung across the front. Bundles of cinnamon sticks, walnuts, and bright red apples are tucked into the greenery. The whole scene is lit by the warm glow of beeswax-colored candles resting on rustic wood slices.
DIY Dried Orange Slice Garland
This garland is beautiful, fragrant, and surprisingly easy to make.
What You’ll Need:
- 2-3 large oranges
- A sharp knife
- A baking sheet
- Parchment paper
- A large needle or a skewer
- Twine or string
Step-by-Step Instructions:
- Preheat Your Oven: Set your oven to a very low temperature, around 200°F (95°C).
- Slice the Oranges: Carefully cut your oranges into thin, even slices, about 1/4 inch thick. Thinner slices will dry faster.
- Pat Them Dry: Lay the orange slices on a paper towel and pat them gently to remove as much extra juice as you can.
- Bake Them: Place the slices in a single layer on a baking sheet lined with parchment paper. Bake them for 3-4 hours, flipping them over every hour or so. They are done when they are dry to the touch and slightly translucent.
- Let Them Cool: Let the orange slices cool down completely.
- String Them Up: Use your needle or skewer to poke a hole near the top of each orange slice. Thread your twine through the holes to create a beautiful, fragrant garland.
23. Rustic Aspen Lodge

This design is rugged yet refined. It feels like a luxurious cabin in the mountains. A gorgeous white faux fur runner is draped over the stone mantel, adding softness and a touch of glamour. A classic pine garland with warm lights winds its way along the top.
Stockings with fluffy faux fur cuffs hang below, continuing the cozy theme. Large, golden antlers serve as a handsome centerpiece. The warm light from lanterns and candles creates an inviting atmosphere, making this the wonderful spot to relax after a day on the slopes.
DIY No-Sew Faux Fur Stocking Cuffs
You can give any plain stocking a cozy, rustic upgrade with this simple trick.
What You’ll Need:
- A plain stocking
- A strip of faux fur fabric (long enough to wrap around the top of the stocking and about 6 inches wide)
- A hot glue gun and glue sticks
- Scissors
Step-by-Step Instructions:
- Measure Your Fabric: Wrap your strip of faux fur around the top of your stocking to make sure it fits. Trim it so the ends just meet.
- Fold the Cuff: Lay your fur strip face down. Fold it in half the long way, so it is now 3 inches wide.
- Glue the Seam: Run a line of hot glue along the long open edge of your folded fur and press it together to create a seam. You now have a fur tube.
- Turn it Right-Side-Out: Carefully turn your fur tube right-side-out so the seam is on the inside and the furry side is out.
- Attach to the Stocking: Slide the finished cuff over the top of your stocking. You can leave it loose or use a few dabs of hot glue on the inside to hold it in place.
24. Kitschy Retro Christmas

This mantel is a blast from the past. It is an explosion of bright colors, shiny tinsel, and nostalgic charm. The display is joyfully crowded with a collection of vintage-glowing ceramic Christmas trees in shades of pink, green, and yellow.
Silver tinsel garlands are draped everywhere, reflecting the light from the colorful bulbs. An assortment of quirky, old-fashioned figurines and ornaments adds to the playful, retro vibe. This look is all about fun and embracing the bright, cheerful spirit of a mid-century holiday.
DIY Mini Tinsel Wreath
You can make those little wreaths to hang or add to your display. They are super quick and easy.
What You’ll Need:
- A metal or foam craft ring (about 4-6 inches across)
- A fluffy silver tinsel garland
- A hot glue gun
- Small, colorful ball ornaments (optional)
Step-by-Step Instructions:
- Glue the End: Take the end of your tinsel garland and put a dab of hot glue on it. Press it firmly onto the craft ring.
- Wrap it Up: Start wrapping the tinsel garland tightly around and around the ring. Make sure you can’t see any of the ring underneath.
- Keep Wrapping: Continue wrapping until the entire ring is covered in fluffy tinsel.
- Secure the Other End: When you get back to where you started, cut the garland and use another dab of hot glue to secure the end.
- Decorate (Optional): If you want, you can use your hot glue gun to add a few small, colorful ball ornaments to your finished tinsel wreath.
25. An Irish Christmas Blessing

This display is a beautiful tribute to Irish heritage. It uses a rich palette of deep greens and natural textures. A full boxwood wreath with a simple green and gold bow hangs as a lovely centerpiece.
A garland of ivy and other greens is woven with a wide burlap ribbon. The stockings are a cozy cable knit, reminiscent of an Aran sweater. The decorations include wooden Celtic crosses and knots, along with shamrock ornaments, bringing a meaningful touch of the Emerald Isle to the holiday celebration.
DIY Celtic Knot Ornaments
These wooden ornaments add a simple, rustic, and meaningful touch.
What You’ll Need:
- Thin wooden craft circles or squares
- A pencil
- A dark green paint pen or permanent marker
- A drill with a very small drill bit
- Ribbon for hanging
Step-by-Step Instructions:
- Find a Design: Look online for a simple “Celtic knot” design that you like. There are many easy ones to choose from.
- Sketch it Out: Lightly sketch your chosen design onto the wooden circle with a pencil. Don’t worry if it’s not perfect.
- Trace with the Pen: Carefully go over your pencil lines with the dark green paint pen. The design is usually made of one continuous, weaving line. Take your time.
- Drill a Hole: Once the paint is dry, have a grown-up help you drill a small hole near the top of the ornament.
- Add a Hanger: Thread a piece of ribbon through the hole and tie it in a loop. Your beautiful Celtic ornament is now ready to hang.
26. Victorian Holiday Romance

This mantel is dark, moody, and full of antique charm. It feels like stepping into a classic holiday novel. A lush pine garland is heavily decorated with dried hydrangea blossoms, small red apples, and pinecones.
The scene is filled with curious objects. Old skeleton keys and handwritten sheet music hang from ribbons. Framed silhouette portraits rest against the large, gilded mirror. The whole display is lit by the flickering, romantic glow of tall candelabras.
DIY Antique Silhouette Ornaments
These silhouette ornaments look very elegant and are easy to personalize.
What You’ll Need:
- Small, oval wooden plaques or very stiff cardboard
- Black craft paint and a paintbrush
- A white or cream-colored paint pen
- Photos of your family’s side profiles
- A pencil and scissors
- Mod Podge and a foam brush
- Ribbon
Step-by-Step Instructions:
- Paint the Background: Paint your wooden plaques with the black craft paint. Let them dry completely.
- Create the Silhouette: Print out the profile photos of your family, making them small enough to fit on the plaques. Carefully cut out just the head and shoulders shape.
- Trace and Paint: Place the cutout shape on the black plaque. Use your white paint pen to carefully trace around the shape. Then, fill in the shape with the white paint. It will look like a white shadow on a black background.
- Seal It: Once the white paint is dry, you can paint a thin layer of Mod Podge over the top to seal it and give it a nice finish.
- Hang Them Up: Hot glue a loop of ribbon to the back of each silhouette. You can hang these on your garland or group them in a frame.
27. Graphic Black and White Cheer

This display is modern, bold, and incredibly chic. It sticks to a strict black and white color scheme for a high-impact look. A simple pine garland is decorated with black and white patterned ball ornaments.
A large, graphic art print with a festive message serves as the focal point. A collection of minimalist ceramic houses in black and white are lined up neatly. The stockings are a mix of solids, stripes, and patterns, all in the same bold color combination.
DIY Painted Minimalist Houses
You can create your own village of these simple, modern houses.
What You’ll Need:
- Small, unpainted wooden houses or birdhouses from a craft store
- White and black craft paint
- A small paintbrush
- Painter’s tape (optional)
Step-by-Step Instructions:
- Paint a Base Coat: First, paint your entire wooden house with white paint. This is your base coat. Let it dry completely. You might need two coats.
- Add Black Details: Now, use your black paint to add the details. You can paint the roof black. You can use the tip of your brush to carefully paint little squares for windows and a rectangle for a door.
- Use Tape for Clean Lines: If you want very straight lines for your roof, you can place painter’s tape along the edges before you paint the black part. Peel the tape off while the paint is still a little wet.
- Get Creative: Make a few different houses. You could paint one all white, one all black, and others with different window patterns to create a whole neighborhood for your mantel.
28. Parisian Pâtisserie Holiday

This mantel is a deliciously sweet dream of a French bakery. The theme is executed with whimsical charm and elegance. A snowy garland provides a base for a “Joyeux Noël” banner and is surrounded by two frosted trees.
The stars of the show are the countless, realistic ornaments shaped like French pastries. Colorful macarons, flaky croissants, and tiny, ornate cakes hang everywhere. The entire scene is a sugary fantasy, turning the fireplace into a chic Parisian sweet shop.
DIY Faux Macaron Ornaments
These little ornaments look good enough to eat and are very fun to make.
What You’ll Need:
- Air-dry clay in pastel colors like pink, mint green, and light blue
- A small round object for cutting, like a bottle cap
- A toothpick
- Small screw eyes
- Ribbon for hanging
Step-by-Step Instructions:
- Make the “Cookies”: Take a small piece of pink clay and roll it into a flat circle, about a quarter-inch thick. Use your bottle cap to cut out two identical circles. These are the top and bottom of your macaron.
- Create the “Feet”: This is the key part! Take your toothpick and gently poke and rough up the bottom edge of each cookie circle all the way around. This creates the bumpy “feet” that real macarons have.
- Make the Filling: Take a small piece of white clay and roll it into a flat circle that is slightly smaller than your cookie pieces.
- Assemble the Macaron: Sandwich the white filling piece between your two pink cookie pieces. Gently press them together.
- Add a Hanger: Before the clay dries, carefully screw a small screw eye into the top of the macaron filling.
- Let it Dry and Hang: Let your macaron dry completely according to the clay package directions. Once it’s hard, thread a ribbon through the screw eye and it’s ready for your tree!
29. Enchanted Woodland Friends

This mantel is a charming scene straight out of a storybook forest. A snowy, flocked garland dotted with red berries hangs above a gathering of adorable woodland creatures. The whole display is gentle and perfect for a family home.
Figurines of deer, foxes, squirrels, bears, and owls are arranged in a snowy landscape on the mantel shelf. Simple bottle brush trees and birch log slices create a forest setting. The burlap stockings add to the rustic, natural feel of this sweet and enchanting display.
DIY Birch Log Animal Stands
These little stands are a great way to display your animal figures and add a rustic touch.
What You’ll Need:
- A birch branch (about 2-3 inches thick)
- A handsaw
- Sandpaper
- Flat-bottomed animal figurines
- Hot glue gun
Step-by-Step Instructions:
- Cut the Wood Slices: Have a grown-up help you use the handsaw to carefully cut the birch branch into thin slices, about half an inch thick. You can cut them at different heights.
- Sand the Edges: The cut edges might be a little rough. Use a piece of sandpaper to smooth the top and bottom of each wood slice so they sit flat.
- Glue the Animals: Take one of your animal figurines and put a few dots of hot glue on the bottom of its feet.
- Place it on the Stand: Press the animal firmly onto the center of one of the birch wood slices. Hold it for a few seconds until the glue sets.
- Create a Forest Scene: Do this with all your animals and arrange them on your mantel to create a beautiful woodland scene.
30. The Nutcracker Ballet

This majestic mantel brings the magic of the beloved ballet to life. The display is regal and theatrical, filled with iconic characters from the story. It is a symmetrical and grand arrangement, anchored by a large Nutcracker Prince in the center.
Armies of nutcracker soldiers stand guard along the mantel and below. A lush green garland is decorated with golden ornaments and beads. The stockings, in royal red and blue velvet, are beautifully adorned with tiny ballet slippers, a nod to the Sugar Plum Fairy.
DIY Ballet Slipper Stocking Hangers
This is a simple and beautiful way to add a touch of the ballet to your stockings.
What You’ll Need:
- A pair of miniature ballet slipper ornaments or keychains (you can find these at craft or dance supply stores)
- A plain stocking
- A long piece of satin ribbon in a matching color
- A hot glue gun or a needle and thread
Step-by-Step Instructions:
- Prepare the Slippers: If your ballet slippers are on a keychain, carefully remove the metal ring.
- Criss-Cross the Ribbons: Cut two long pieces of satin ribbon. Glue or sew the middle of each ribbon to the back of the stocking, near the top, so you have four long ribbon ends.
- Wrap the Stocking: Take the two ribbons from one side and criss-cross them over the front of the stocking, like a real ballet shoe. Do the same with the other two ribbons.
- Attach the Slippers: Bring all four ribbon ends together in the front. Tie them into a beautiful bow, and in the center of the bow, tie on your miniature ballet slipper ornament.
- Secure It: You can add a small dab of hot glue behind the knot of the bow to hold it securely in place on the stocking.
31. Festive Fiesta Celebration

This mantel is a vibrant explosion of color and joyful energy. It is a true fiesta, decorated with elements from Mexican folk art. A simple pine garland serves as a green base for a riot of colorful pom-poms and a bright “papel picado” banner.
The stockings are intricately embroidered with bold, beautiful patterns. A stunning wreath made entirely of colorful yarn pom-poms makes a fun and fuzzy statement. This look is all about celebrating the holidays with maximum color, texture, and happiness.
DIY Papel Picado Banner
“Papel Picado” means “punched paper” and it’s a traditional Mexican folk art. You can make a simple version for your mantel.
What You’ll Need:
- Sheets of colorful tissue paper
- A pair of sharp scissors
- A glue stick
- A long piece of string
Step-by-Step Instructions:
- Fold the Paper: Take a sheet of tissue paper and fold it in half, then in half again, and maybe one more time. You’ll have a small, thick rectangle.
- Cut Out Shapes: This is the fun part! While the paper is folded, use your scissors to cut little shapes along the folded edges. You can cut out triangles, half-circles, or little diamonds.
- Unfold the Magic: Carefully unfold your tissue paper. You will have a beautiful, symmetrical pattern, like a paper snowflake.
- Make More: Do this with all your different colors of tissue paper.
- String Them Up: Take your long piece of string. Lay it out and one by one, attach your paper flags. Fold the top edge of a flag over the string and use your glue stick to secure it. Leave a little space between each flag.
32. An All-American Holiday

This mantel has a warm, nostalgic feel, like looking through an old family photo album. The decor is a tribute to a classic, mid-century American Christmas. A simple pine garland is decorated with a red and white striped ribbon bow.
The scene is filled with charming details. Vintage-style Christmas cards and an old framed photo sit on the mantel. Knit stockings in red and cream add a cozy touch. Popcorn is used as a fun, old-fashioned garland, adding to the heartwarming, homespun atmosphere.
DIY Old-Fashioned Popcorn Garland
This is a classic holiday craft that families have been making for generations.
What You’ll Need:
- A bag of plain popcorn (pop it yourself and let it cool, but don’t add butter or salt!)
- A large needle
- Strong thread or fishing line
- Fresh cranberries (optional, for adding color)
Step-by-Step Instructions:
- Let the Popcorn Sit: It’s actually easier to string popcorn that is a day or two old because it’s a little softer and less likely to break.
- Thread Your Needle: Cut a very long piece of thread and thread it through your needle. Tie a big knot at the other end.
- Start Stringing: Carefully push the needle through the thickest, toughest part of a piece of popcorn. Gently slide it down the thread to the end.
- Create a Pattern: You can string just popcorn, or you can create a pattern. A popular one is three pieces of popcorn, then one cranberry, and repeat.
- Keep Going: Continue stringing until your garland is as long as you want it to be.
- Hang it Carefully: This garland is a little delicate, so be gentle when you drape it over your mantel or tree branches.
33. White Christmas Wonderland

This mantel is a sparkling, snowy dream. The entire display is a study in white, creating a scene of pure winter magic. A heavily flocked garland is loaded with white and silver ball ornaments.
The decorations create a magical snowscape. A white ball wreath, glittery cone trees, and adorable snowman figurines add to the theme. Snowflakes of all shapes and sizes hang from the mirror and the mantel, making it feel like you’re inside a beautiful snow globe.
DIY Beaded Snowflake Ornaments
You can make beautiful, sparkling snowflakes to hang in your winter wonderland.
What You’ll Need:
- Pipe cleaners (white, silver, or light blue)
- A variety of clear, white, and silver plastic beads
- Scissors
- String for hanging
Step-by-Step Instructions:
- Make the Base: Take two pipe cleaners and twist them together in the middle to make a cross shape. Take a third pipe cleaner and twist it around the same center point, so you have a shape with six spokes, like a star.
- Thread the Beads: Start threading beads onto each of the six pipe cleaner spokes. You can make a pattern or just add them randomly.
- Leave Space at the End: Make sure to leave about half an inch of empty pipe cleaner at the end of each spoke.
- Secure the Beads: To stop the beads from falling off, fold that little empty end of the pipe cleaner back over the last bead.
- Add a Hanger: Tie a loop of string to one of the spokes and your beautiful snowflake is ready to hang.
34. Mele Kalikimaka Luau

This display is a tropical vacation for the holidays. It swaps snow for sand and pine trees for palms. The theme is a cheerful Hawaiian Christmas, full of bright colors and beachy fun. A garland of tropical flowers and palm leaves sets the festive mood.
The scene is filled with playful details. Santa is on vacation, dressed in a Hawaiian shirt and sandals. Flamingos and a ukulele add to the luau vibe. The “Mele Kalikimaka” banner (that’s how you say “Merry Christmas” in Hawaiian) makes it clear this is a holiday with a sunny attitude.
DIY Tropical Flower Garland
Bring the warmth of the islands to your home with this easy and colorful flower garland.
What You’ll Need:
- A long piece of twine or rope
- A variety of large, fake tropical flowers (like hibiscus) and leaves (like palm or monstera leaves)
- A hot glue gun
Step-by-Step Instructions:
- Prepare Your Flowers: Most fake flowers can be pulled right off their plastic stems. You just want the flower head and maybe a few of the leaves.
- Start with Leaves: Lay out your twine. Use your hot glue gun to glue some of the larger palm leaves onto the twine, spreading them out. This will be your green background.
- Add the Flowers: Now, fill in the spaces with your colorful hibiscus flowers. Put a generous dot of hot glue on the back of a flower and press it firmly onto the leaves and twine.
- Layer and Fill: Overlap the leaves and flowers to make the garland look full and lush. Keep adding flowers until you’re happy with how it looks.
- Let it Cool: Let the glue cool and harden completely before you hang your tropical garland.
35. Romantic Winter Garden

This mantel is soft, elegant, and full of floral beauty. The color palette is a romantic mix of dusty rose, deep burgundy, and soft greens. A garland of silver-dollar eucalyptus and lamb’s ear provides a gentle, frosted-looking base.
The decorations are lush and beautiful. Bouquets of hellebores, roses, and other winter blooms are tucked into the garland. Velvet stockings in shades of pink and wine are adorned with handmade rosettes. This look is sophisticated, feminine, and very romantic.
DIY No-Sew Velvet Rosettes
You can make these beautiful, cabbage-rose style flowers to decorate stockings, presents, or your garland.
What You’ll Need:
- A strip of velvet fabric (about 4 inches wide and 2 feet long)
- A hot glue gun
- A small circle of felt
- Scissors
Step-by-Step Instructions:
- Fold Your Strip: Take your strip of velvet and fold it in half the long way, with the pretty side facing out.
- Start the Center: Put a small dot of hot glue at one end of the folded strip and start rolling it up tightly for about an inch. This will be the center bud of your rose.
- Twist and Glue: Now, start twisting the long strip of fabric away from you as you wrap it around the center bud. Every so often, add a dot of hot glue at the bottom to hold the wrap in place.
- Keep Twisting and Wrapping: The twisting is what creates the look of petals. Keep twisting and wrapping the fabric around, letting the flower get bigger and bigger.
- Finish the Rose: When you get to the end of the strip, tuck the end under and secure it with a generous amount of hot glue.
- Add a Base: Glue the felt circle to the bottom of your finished rose. This gives it a flat, finished base and makes it easy to glue onto your stocking.
36. Amethyst and Gold Majesty

This mantel decor is rich, luxurious, and a little bit mystical. The color scheme is a stunning combination of deep purple, amethyst, and gold. A classic pine garland is absolutely loaded with ornaments in these regal shades.
The design is full of sparkle and shine. A large, dramatic piece of a real amethyst geode serves as a unique and powerful centerpiece. Purple candles, golden leaves, and delicate, dangling chains add layers of texture and light. This look is glamorous, bold, and truly magical.
DIY Faux Geode Ornaments
You can create ornaments that look like beautiful, sparkling crystal geodes.
What You’ll Need:
- Clear plastic ball ornaments that open in half
- Craft glue
- A paintbrush
- Purple, blue, and silver glitter
- Crushed craft crystals or coarse purple glitter (for texture)
Step-by-Step Instructions:
- Open the Ornament: Carefully separate your plastic ornament into two halves.
- Paint with Glue: Working on one half at a time, use your paintbrush to coat the entire inside surface with a thick layer of craft glue.
- Add the Crystals: Sprinkle your coarse glitter or crushed crystals into the glue first. This will be the center of your geode.
- Layer the Glitter: Now, sprinkle your different colors of glitter in rings around the crystals. You could do a ring of silver, then a ring of blue, and finish with a ring of purple at the outer edge.
- Let it Dry: Set the ornament halves aside and let the glue and glitter dry completely. This might take a full day.
- Put it Back Together: Once they are totally dry, you can snap the two halves of the ornament back together to create your beautiful, sparkling geode.
37. Snowy Scandinavian Village

This mantel is a vision of a peaceful, snowy village on a quiet winter night. The entire scene is decorated in crisp, clean white, with touches of natural wood and cozy textures. A flocked garland with a simple wooden bead accent sits on top of the mantel.
The main feature is a collection of charming white ceramic houses, lit from within to create a warm glow. Cable-knit stockings with faux fur cuffs add to the cozy feeling. This monochromatic look is serene, minimalist, and full of gentle holiday spirit.
DIY Glowing Paper Houses
Create a village of these simple little houses to light up your mantel.
What You’ll Need:
- White cardstock paper
- A printer and a house template (search online for “printable paper house template”)
- Scissors
- A glue stick or craft glue
- A craft knife (for an adult to use)
- Battery-powered LED tea lights
Step-by-Step Instructions:
- Print Your Template: Find a simple house template online and print it out onto your white cardstock.
- Cut it Out: Carefully cut out the house shape along the solid lines.
- Cut the Windows: This is a job for a grown-up! Use the craft knife to carefully cut out the little window and door shapes.
- Fold the Lines: Fold the paper along all the dotted lines. This will create the walls and roof of your house.
- Glue it Together: Use your glue stick to put glue on the little tabs and assemble your house. Press the seams together firmly.
- Light it Up: Make a few more houses to create a village. When it’s dark, turn on your LED tea lights and place a house over each one. The windows will glow beautifully.
38. North Pole Post Office

This mantel is a wonderfully creative and charming scene. It is decorated to look like Santa’s official post office at the North Pole. A classic pine garland is decorated with white poinsettias and cheerful red lanterns.
The theme is carried out in every detail. A wreath is filled with tiny letters addressed to Santa. The stockings look like mailbags, complete with postage stamps and “North Pole” postmarks. The hearth is overflowing with stacks of letters, packages, and official-looking signs, creating a fun and imaginative story.
DIY Tiny Letter Ornaments
These little letters are a cute way to decorate a wreath, garland, or tree.
What You’ll Need:
- Small white or cream-colored craft envelopes
- A red and a blue colored pencil or fine-tipped marker
- Holiday-themed postage stickers or old stamps
- Twine or thin ribbon
Step-by-Step Instructions:
- Address the Letter: On the front of a tiny envelope, write “Santa Claus, North Pole” in your neatest handwriting.
- Add the Details: Use your red and blue colored pencils to draw a simple border around the edge of the envelope, like airmail.
- Stamp It: Place a holiday postage sticker in the top right corner. You can even draw a little postmark circle with the date.
- Make it an Ornament: You can hang the letters in two ways. You can either use a small hole punch to make a hole in the corner and thread a ribbon through, or you can use a miniature clothespin to clip the letter directly onto your wreath.
39. A Naturalist’s Holiday Study

This mantel is dark, academic, and full of natural curiosities. It feels like the cozy, candlelit study of a 19th-century scientist. Instead of a traditional garland, a few simple ivy vines are draped over a collection of fascinating objects.
The scene is layered with vintage-style prints of animals and insects, old maps, and stacks of leather-bound books. Peacock feathers add a touch of iridescent color. Glass cloches protect delicate treasures like a bird’s nest and a single white rose. This look is unique, intellectual, and mysteriously beautiful.
DIY Display Cloche
A cloche (or bell jar) is a wonderful way to display a special object. You can make a simple version yourself.
What You’ll Need:
- A small, interesting object to display (like a pretty pinecone, a bird’s nest, or a large fake beetle)
- A round wooden base or a wood slice
- A clear glass vase or even a clean, clear plastic bottle with the bottom cut off (an adult’s job)
- Moss or small pebbles
Step-by-Step Instructions:
- Create a Base: Arrange a little bit of moss or a few pebbles on your wooden base.
- Place Your Treasure: Set your special object right in the middle of the moss.
- Cover It Up: Carefully place the glass vase or plastic dome over your object, resting it on the wooden base.
- Arrange Your Display: That’s it! You have created your own little museum display. You can make a few with different objects and arrange them on your mantel.
40. A French Country Christmas

This mantel is effortlessly chic and rustic. It brings the charm of the French countryside to the holidays. A garland of olive branches and eucalyptus is dotted with the soft purple of dried lavender bundles.
The look is simple and fragrant. Linen stockings in ticking stripes hang from the wooden mantel. A collection of rustic bells adds a gentle jingle. The whole scene is bathed in the warm light of many white candles and feels both relaxed and incredibly elegant.
DIY Lavender and Rosemary Bundles
These fragrant little bundles can be hung from your garland or placed around the room.
What You’ll Need:
- A few sprigs of fresh or dried lavender
- A few sprigs of fresh rosemary
- Natural twine
Step-by-Step Instructions:
- Gather Your Herbs: Take three sprigs of lavender and two sprigs of rosemary and hold them together in a small bunch.
- Tie the Stems: Cut a piece of twine about 12 inches long. Tightly wrap the twine around the stems of your herb bundle several times.
- Make a Knot: Tie a secure double knot to hold the bundle together.
- Create a Hanging Loop: Use the long ends of the twine to tie another knot, creating a loop for hanging.
- Trim and Hang: Trim any long, messy stems at the bottom. Make several of these simple, beautiful bundles to hang from your mantel.
41. Warm and Spicy Winter Welcome

This mantel is the essence of holiday warmth and fragrance. The entire scene is a feast for the senses, built around the scents of citrus and spice. A lush cedar garland is heavily adorned with pomander-style oranges, dried orange slices, and bundles of cinnamon sticks.
Velvet stockings in a warm ochre color perfectly complement the orange tones. The flickering firelight reflects beautifully off the brass candle holders and lanterns. This look is incredibly cozy, inviting, and smells as good as it looks.
DIY Clove-Studded Orange Pomanders
These are a classic, fragrant holiday decoration that are fun and easy for anyone to make.
What You’ll Need:
- Fresh, firm oranges
- A jar of whole cloves
- A toothpick or a small nail
- Ribbon (optional)
Step-by-Step Instructions:
- Plan Your Design: You can cover the whole orange in cloves, or you can create patterns like stripes, swirls, or even your initial.
- Poke the Holes: Orange peels are tough. To make it easier, use your toothpick to poke holes in the orange where you want to place your cloves.
- Push in the Cloves: Gently push the pointy end of a whole clove into each hole you’ve made. Keep going until you’ve finished your design.
- Add a Ribbon (Optional): If you want to hang your pomander, you can tie a ribbon tightly around it.
- Arrange Them: Place your finished pomanders in the garland, group them in a bowl, or hang them from ribbons. They will fill your room with a wonderful holiday scent as they dry.
42. Handmade Holiday Charm

This mantel has a wonderfully rustic and homespun feel. It celebrates the beauty of simple, handmade decorations. A fresh cedar garland is hung with an assortment of charming ornaments crafted from natural and recycled materials.
The ornaments tell a story of creativity. There are stars folded from old newspaper, simple clay shapes, and a garland of dried fruit. The stockings are also mismatched and handmade, adding to the authentic charm. This look is all about finding joy in simple materials and creating something special with your own hands.
DIY Folded Newspaper Stars
Turn yesterday’s news into a beautiful holiday decoration with this simple paper-folding craft.
What You’ll Need:
- Newspaper
- Scissors
- A ruler and pencil
- A glue stick
- String for hanging
Step-by-Step Instructions:
- Cut Your Strips: From a sheet of newspaper, cut out seven identical long strips. A good size to start with is 2 inches wide and 22 inches long (the width of a standard newspaper).
- Fold the Strips: Take one strip and fold it in half the long way to make it stronger. Do this for all seven strips.
- Create the Loops: Take one of your folded strips and form it into a loop, overlapping the ends by about an inch. Glue the ends together. This is your first star point. Do this for all seven strips so you have seven identical loops.
- Assemble the Star: Take two of your loops and glue them together at the bottom. Add a third loop next to them and glue it. Keep adding the loops in a circle, gluing them all together at the center point.
- Pinch and Glue the Tips: Once all seven loops are glued together in the center, you will have a flower shape. To make it a star, pinch the top of two neighboring loops together and secure them with a dot of glue. Go all the way around, pinching and gluing the tips of the loops together.
- Add a Hanger: Once the glue is dry, poke a small hole in the top of one point, thread a string through, and your recycled star is ready to hang.
Your holiday mantel is more than just a shelf above the fireplace; it’s a reflection of your personal style and the warm spirit of the season. It’s a place to create magic, display cherished memories, and build an atmosphere that feels like home.
With these 42 diverse ideas, the excuse of an “unfinished” mantel is a thing of the past. From a simple, fragrant garland of dried oranges to a dramatic celestial display, there is a concept that fits every taste, budget, and skill level.
Ultimately, the goal is to create a space that brings you joy. Don’t be afraid to mix and match ideas, get your hands dirty with a fun DIY project, and let your mantel become the beautiful, magical focal point your home deserves this holiday season.
Key Takeaways
- A Theme Creates Cohesion: Choosing a theme—whether it’s “Coastal Christmas” or “Victorian Romance”—is the easiest way to ensure all your decorative elements work together for a polished and intentional look.
- Texture is Essential: A truly stunning mantel appeals to the sense of touch as well as sight. Mix soft textures like velvet and knit stockings with natural elements like pinecones, birch logs, and fresh greenery to add depth and interest.
- Lighting Sets the Mood: Never underestimate the power of a warm glow. Combining layers of light, from the soft twinkle of fairy lights to the gentle flicker of candles, is the secret to creating a truly magical and inviting atmosphere.
- DIY Adds a Personal Touch: You don’t need to spend a fortune to create a beautiful display. The simple, step-by-step DIY projects included with each idea allow you to personalize your decor and add a unique, handmade charm.
- Don’t Be Afraid of the Unconventional: Your holiday decor doesn’t have to be limited to red and green. Themes like a tropical luau, a moody naturalist’s study, or a vibrant fiesta can be incredibly festive and show off your personality.