As the holidays approach, our living rooms become the heart of our homes. It’s where we gather with family, share stories, and create lasting memories. Preparing this space for the season doesn’t require a complete overhaul or a large budget.

A true holiday refresh is about capturing the spirit of the season through small, thoughtful changes. It’s about making your home feel warmer, more inviting, and a little more magical.
This guide is filled with simple swaps and creative DIY projects to help you do just that. You can transform your living room into a festive haven, one simple touch at a time. Get ready to be inspired.
1. Cozy Up with Festive Textiles

Changing the feel of your living room can be surprisingly simple. You don’t need to move furniture or paint walls. Swapping out your regular throw pillows and blankets for more seasonal ones makes an instant impact.
This is one of the quickest ways to introduce holiday colors and warmth. Think about rich textures. A deep green velvet pillow next to a chunky knit blanket in cream creates a welcoming scene. Add a pop of crimson or a classic checkered pattern. These small changes invite everyone to relax and enjoy the festive atmosphere.
DIY Project: No-Sew Tassel Pillow
Let’s make a fun and cozy pillow for your couch without using a needle and thread!
What You’ll Need:
- A plain pillow insert (or an old pillow you want to cover).
- A piece of soft fabric, like fleece (it should be big enough to fold over your pillow with extra room on the sides).
- Sharp scissors.
- A ball of yarn in a color you like.
- A small, stiff piece of cardboard (about 4 inches tall).
Step-by-Step Instructions:
- First, Let’s Make Four Tassels:
- Take your yarn and wrap it around the cardboard about 40 times. The more you wrap, the fluffier your tassel will be!
- Cut a small piece of yarn (about 6 inches long) and slip it under all the wrapped loops at the top of the cardboard. Tie a tight double knot. This little loop will be how you attach the tassel later.
- Carefully slide the yarn bundle off the cardboard.
- Cut through all the yarn loops at the bottom. Now it looks like a tassel!
- To give it a “neck,” cut another piece of yarn and wrap it tightly a few times about an inch down from the top knot. Tie it securely and snip any long ends.
- Repeat this three more times so you have four matching tassels.
- Time to Cover the Pillow:
- Lay your fabric down on a flat surface.
- Place your pillow right in the center.
- Cut the fabric into a rectangle, leaving about 5-6 inches of extra fabric on all four sides of the pillow.
- Create the Fringe:
- Now, on all four sides, cut straight lines from the edge of the fabric toward the pillow. Stop cutting about an inch before you reach the pillow’s edge. Make each strip about one inch wide.
- You will have a little square of uncut fabric at each of the four corners. Cut these small squares out completely. This helps the corners look neat.
- Tie It All Together:
- Take the top and bottom fringe strips and tie them together in a double knot. Work your way across one side.
- Before you tie up the last side, gently slide your pillow inside the cover.
- As you tie the knots on the corners, slip one of your yarn tassels into the knot before you tighten it. This will attach your fun tassels to each corner.
- Finish tying all the remaining fringe pieces together.
- Fluff and Display!
- Give your new pillow a good fluff. You just made a stylish holiday pillow all by yourself. Go place it on the sofa!
2. Introduce a Statement Throw Blanket

A cozy blanket instantly makes a room feel more inviting. This year, think beyond a simple throw. A large, chunky knit blanket with big tassels adds a dramatic and soft touch to your sofa.
It’s not just for warmth; it’s a statement piece. The thick texture begs you to curl up with a hot drink. Paired with a simple plaid throw, it creates layers of comfort. This simple addition transforms your couch into the best seat in the house for chilly winter evenings.
DIY Project: 30-Minute Arm-Knit Blanket
You can create a super soft and chunky blanket using just your arms!
What You’ll Need:
- 4 to 5 skeins of super chunky yarn (look for jumbo weight yarn).
- Your own two arms and a comfy place to sit.
Step-by-Step Instructions:
- Get Your Yarn Ready:
- Take the ends from 3 or 4 skeins of yarn and hold them together as if they are one thick strand. Make a slipknot big enough to fit your arm through.
- Place the slipknot on your right wrist. This is your first stitch.
- Cast On Your Stitches:
- Drape the working yarn (the long end) over your right thumb. Make a loop and pull it through the loop already on your wrist.
- Place this new loop onto your right arm. You just “cast on” a stitch!
- Repeat this until you have about 15 to 20 stitches on your right arm. This will determine the width of your blanket.
- Start Knitting Your First Row:
- Hold the working yarn in your right hand.
- Take the first stitch (the one closest to your hand) on your right arm. Pull it up and over your hand, completely off your arm.
- You will be left with a new loop from the working yarn. Place this new loop onto your left wrist.
- Repeat this with all the stitches, moving them one by one from your right arm to your left arm. That’s your first row!
- Knit Back and Forth:
- Now, just do the same thing in the other direction, moving the stitches from your left arm to your right arm.
- Keep knitting rows back and forth. You’ll see your blanket start to grow quickly!
- Finish Your Blanket:
- When your blanket is the length you want, it’s time to “cast off.”
- Knit two stitches onto your right arm. Then, take the first stitch and pull it up and over the second stitch, leaving only one stitch.
- Knit one more stitch onto your right arm. Pull the older stitch over the new one.
- Repeat this until you have only one loop left. Cut the yarn, pull the tail through the last loop, and tie a tight knot. You’re done!
3. Create a Candle Cluster

Nothing says “holiday” quite like the soft glow of candlelight. Grouping candles of different heights and sizes creates a beautiful focal point on a coffee table or mantel.
Place them on a stylish tray to protect your furniture and add a touch of elegance. The warm light reflecting off the surfaces makes the whole room feel magical. Mix scented and unscented candles to add a festive fragrance like pine or cinnamon without it being overwhelming.
DIY Project: Pinecone Candle Ring
Let’s make a beautiful and safe candle display for your table.
What You’ll Need:
- A round, flat tray (gold or brass looks festive).
- 3 to 5 pillar candles (battery-operated are safest!) in different heights.
- A handful of small pinecones.
- A few sprigs of fresh rosemary or pine (optional, for scent).
- Glue dots or a hot glue gun (ask an adult for help).
Step-by-Step Instructions:
- Set the Stage:
- Make sure your tray is clean and dry.
- Arrange Your Candles:
- Place your pillar candles in the center of the tray. A good way to do this is to put the tallest one in the middle and the shorter ones around it.
- Add the Pinecones:
- Place the pinecones around the base of the candles. To keep them from rolling around, an adult can help you put a small dot of hot glue on the bottom of each one.
- Tuck in Some Greenery:
- If you have some rosemary or pine sprigs, tuck them in between the pinecones. This adds a nice pop of color and a fresh, festive smell.
- Finishing Touches:
- Turn on your battery-operated candles and enjoy the warm glow. Your beautiful centerpiece is ready to be admired.
4. Layer Up with Rugs

Add extra comfort to your living room from the ground up. Layering rugs is a designer trick that makes any space feel cozier and more stylish for the holidays.
A soft, faux sheepskin rug on top of your main area rug adds a new dimension of texture. It helps define a space, like creating a special spot right in front of the sofa. The contrast between a flat-weave base rug and a fluffy top rug is visually interesting. It’s an unexpected touch that adds a lot of warmth.
DIY Project: No-Sew Faux Fur Accent Rug
You can make a fun accent rug without any sewing.
What You’ll Need:
- A piece of faux fur fabric from a craft store (about 2×3 feet is a good size).
- Sharp fabric scissors.
- A non-slip rug pad (cut slightly smaller than your fabric).
- Fabric glue or a hot glue gun (get an adult to help with this).
Step-by-Step Instructions:
- Design Your Shape:
- Lay your faux fur fabric on the floor with the furry side facing down.
- You can leave it as a rectangle, or you can draw a fun, curvy shape on the back with a marker to make it look like a natural hide.
- Cut It Out:
- Carefully cut along the lines you drew. Take your time to make the edges look nice and clean.
- Add the No-Slip Grip:
- Turn your fur cut-out over so the furry side is facing up.
- Ask an adult to help you glue the non-slip rug pad to the back of the fur piece. Make sure it’s centered and press it down firmly.
- Let It Dry:
- Let the glue dry completely according to the instructions on the bottle.
- Place Your Rug:
- Your new, super-soft accent rug is ready! Place it on top of your bigger rug or on a bare floor to add a cozy touch.
5. Bring Nature Indoors

A simple bowl filled with natural elements can become a stunning centerpiece. You don’t need fancy decorations to capture the holiday spirit.
Collect pinecones, acorns, and interesting twigs from your yard. Add some dried orange slices and cinnamon sticks for a wonderful, subtle scent. A few shiny ornaments tucked in can catch the light. This kind of decoration feels rustic and authentic, connecting your indoor space with the beauty of the winter season.
DIY Project: Scented Holiday Bowl
Let’s make a centerpiece that looks and smells amazing!
What You’ll Need:
- A wide, shallow bowl (a wooden one looks great).
- Pinecones, cinnamon sticks, and acorns.
- An orange.
- A small vase and an interesting twig from outside.
Step-by-Step Instructions:
- Dry the Orange Slices:
- Ask an adult to help you cut an orange into thin, round slices.
- They can bake these slices in an oven on low heat (about 200°F or 95°C) for a few hours until they are dry. This makes your house smell so good!
- Build Your Centerpiece:
- Place the small vase in the middle of your large bowl.
- Fill the Bowl:
- Arrange your pinecones in the bowl around the vase.
- Tuck the dried orange slices and cinnamon sticks in between the pinecones.
- Scatter the acorns on top to fill in any little gaps.
- Add Some Height:
- Place your cool twig inside the small vase. This makes your centerpiece look more interesting. Your beautiful, natural decoration is now complete!
6. Display Winter Branches

For a more modern and minimalist holiday look, try using branches. Find some interesting bare branches from your garden or a local park.
You can leave them natural or give them a light coat of white or metallic spray paint. Place them in a tall, clear glass vase. The simple, clean lines are very elegant. To make them festive, hang a few delicate ornaments from the twigs. This creates a striking display that doesn’t feel cluttered.
DIY Project: Starry Branch Bouquet
Create a simple and magical decoration with things from nature.
What You’ll Need:
- A tall, clear vase.
- Several bare branches.
- A few pretty, lightweight star ornaments.
- Clear string or ornament hooks.
Step-by-Step Instructions:
- Gather Your Branches:
- Go on a nature walk and find some branches that you think look cool. Make sure they are clean and dry before you start.
- Arrange Your Bouquet:
- Arrange the branches in the vase. Put the tallest ones in the back and shorter ones in the front.
- Decorate with Stars:
- Now for the fun part! Take your star ornaments and hang them from the little twigs on your branches.
- Space Them Out:
- Don’t hang all the stars in one spot. Space them out so they dangle at different heights.
- Find the Good Light:
- Place your vase on a side table or mantel where it can catch the light. It will look like a tiny, sparkling winter tree.
7. Greet with Greenery on Mirrors

Don’t forget your mirrors when decorating. Draping a fresh garland over the top of a large mirror adds an instant touch of holiday cheer and makes the room feel more alive.
The reflection doubles the greenery, making the room feel more lush and festive. Weave in some tiny battery-powered fairy lights for a magical twinkle in the evenings. The soft light reflecting in the mirror creates a warm and inviting glow. This simple trick makes a big statement.
DIY Project: Easy Mirror Garland
Let’s make a pretty garland to hang in your room.
What You’ll Need:
- A long piece of floral wire or thick twine.
- Several kinds of fresh greenery (like pine, cedar, and eucalyptus).
- Thin craft wire.
- A ribbon for a bow.
- Small, battery-powered fairy lights.
Step-by-Step Instructions:
- Make a Base:
- Cut a piece of floral wire or twine that is a little longer than the width of your mirror. Make a small loop at each end for hanging.
- Create Greenery Bundles:
- Cut your greenery into smaller pieces (about 6 inches long).
- Take 2-3 pieces and hold them together to make a small bundle.
- Attach the Greenery:
- Lay your first bundle on the wire base and use the thin craft wire to wrap tightly around the stems, attaching it to the base. Don’t cut the craft wire yet!
- Lay a second bundle so it covers the stems of the first one. Wrap the wire around its stems.
- Keep adding bundles this way until your base is covered.
- Add Lights and a Bow:
- Carefully wrap the fairy lights through your finished garland.
- Tie a big, beautiful bow in the middle of the garland.
- Hang It Up:
- Use small, clear adhesive hooks on the top corners of your mirror frame to hang your garland. Hide the battery pack for the lights behind the mirror.
8. Add a Touch of Green to Doors and Chairs

Holiday decorating doesn’t have to be a huge production. Small, simple touches can be just as effective and charming.
Mini wreaths made of fresh greenery, like boxwood or eucalyptus, are a great example. Hang one on an interior door for a subtle festive welcome. You can also tie them to the backs of your dining chairs with a beautiful silk ribbon. This adds a special detail for holiday meals and makes guests feel welcome.
DIY Project: Simple Hoop Wreath
You can make a stylish and modern wreath in just a few minutes.
What You’ll Need:
- A metal or wooden embroidery hoop.
- Fresh greenery (eucalyptus is great because it smells good and lasts a long time).
- Thin floral wire.
- A long piece of nice ribbon.
Step-by-Step Instructions:
- Prepare Your Greenery:
- Cut your greenery into small sprigs, about 4-5 inches long.
- Start Attaching:
- Make a small bundle with a few sprigs. Hold it against the hoop.
- Use the floral wire to wrap around the stems and the hoop several times to make sure it’s secure.
- Overlap and Repeat:
- Make another bundle and place it so the leaves cover the stems of the first one. Wrap it with wire.
- Keep doing this until you have covered about half of the hoop. You can have the greenery meet at the bottom.
- Add the Ribbon:
- Cut the wire and twist the end at the back to hide it.
- Take your ribbon and tie it onto the top of the hoop for hanging. You can also add a small bow at the bottom where the greenery ends. Your lovely wreath is ready!
9. Create a Holiday Memory Wall

The holidays are all about family and making memories. Why not make those memories part of your decor? Creating a special holiday gallery wall is a wonderful way to do this.
Swap out your everyday art for favorite family photos from past holidays or winter trips. Use a mix of frame styles and colors, like gold, black, and silver, to make it visually interesting. You can even add a simple print with a festive phrase. It’s a personal and meaningful way to decorate.
DIY Project: “Golden Memories” Wall Art
Let’s make a special sign for your holiday picture wall.
What You’ll Need:
- A picture frame you like.
- A piece of white cardstock or thick paper that fits your frame.
- A black marker.
- A pencil and a ruler.
Step-by-Step Instructions:
- Get Centered:
- Use your ruler and pencil to very lightly draw lines on your paper. This will help you write your words so they are straight and in the middle.
- Write Your Message:
- Using the black marker, write the words “GOLDEN MEMORIES” on the paper. You can use your neatest printing or try to make the letters look fancy.
- Make It Bold:
- Go over the letters a second time with the marker to make them stand out.
- Erase the Guides:
- After the ink is completely dry, gently erase the pencil lines you drew.
- Frame It!
- Place your new artwork inside the frame. Now you have a beautiful centerpiece for your wall of holiday photos.
10. Add Some Sparkle with a Mirrored Tray

A little bit of shimmer and shine goes a long way during the holidays. A mirrored tray on your coffee table is a fantastic base for a festive display.
It reflects light from candles and lamps, making the whole area brighter and more glamorous. Arrange a few mercury glass candle holders, some shiny ball ornaments, and maybe a small vase of flowers on the tray. The mix of metallic finishes adds a sophisticated sparkle.
DIY Project: Festive Coffee Table Tray
Let’s create a shiny and bright display for your table.
What You’ll Need:
- A tray with a mirror at the bottom.
- A few small, clear glass cups or votive candle holders.
- Metallic spray paint (gold or silver).
- A few shiny holiday ornaments.
- Battery-operated tea lights.
Step-by-Step Instructions:
- Make Faux Mercury Glass:
- Ask an adult to take the glass cups outside or to a spot with lots of fresh air.
- They can help you lightly spray the inside of the cups with the metallic paint. Don’t try to make it a perfect coat; a few splotches will make it look like real mercury glass.
- Let the paint dry completely.
- Arrange Your Tray:
- Place your newly painted candle holders on the mirrored tray.
- Add Safe “Candles”:
- Put one battery-operated tea light inside each holder. This is much safer than a real flame.
- Scatter Some Ornaments:
- Place a few shiny ball ornaments on the tray between the candle holders.
- Turn It On and Enjoy:
- Switch on your tea lights and watch how the light bounces off the mirror and the metallic paint. Your glamorous display is ready!
11. Fill Vases with Ornaments

Don’t let your extra tree ornaments sit in a box. Use them to create a simple yet striking decoration for a side table or bookshelf.
Filling a clear glass vase or hurricane lamp with shiny baubles is a modern and easy way to add a festive touch. Mix different sizes and finishes—like matte, glittery, and shiny—for more visual interest. Weaving a string of tiny fairy lights in with the ornaments will make the whole display glow from within.
DIY Project: Holiday Sparkle Jar
Let’s make a beautiful, glowing decoration in less than five minutes!
What You’ll Need:
- A clear glass vase, jar, or bowl.
- A collection of holiday ornaments.
- A short string of battery-powered fairy lights.
Step-by-Step Instructions:
- Start with the Lights:
- Turn your fairy lights on so you can see where they are.
- Place the battery pack at the very bottom of your clean, empty vase.
- Begin to Fill:
- Start adding your ornaments one by one. As you place them, loosely wrap the string of lights around them.
- Mix It Up:
- Continue adding ornaments and weaving the lights until the vase is full. Make sure some lights are near the glass so you can see them twinkle.
- Find the Good Spot:
- Place your new sparkle jar on a table or mantel. It looks especially magical at night!
12. Warm Up Your Lighting

The type of light in a room can completely change the atmosphere. During the holidays, you want a space that feels warm and cozy, not bright and harsh.
A simple swap can make a big difference. Change the regular bulbs in your lamps to Edison-style bulbs. These have a visible, glowing filament that gives off a much warmer, amber-colored light. This soft glow is welcoming and creates a relaxing environment for enjoying a quiet winter evening at home.
DIY Project: Simple Bottle Lamp
Let’s make a cool lamp from a glass bottle!
What You’ll Need:
- A clean, empty glass bottle with a cool shape.
- A “make a bottle lamp” kit from a craft or hardware store.
- A lampshade that will fit.
- An Edison-style lightbulb.
Step-by-Step Instructions:
- Get Help from an Adult:
- This project involves electricity, so you will need an adult to do all the work. You can be the design supervisor!
- Assemble the Kit:
- The adult will follow the instructions on the lamp kit. Usually, this involves feeding the cord through a special stopper that fits in the top of the bottle.
- Put It All Together:
- Once the lamp hardware is safely assembled, they will attach the part that holds the lampshade (it’s called a harp).
- Add the Finishing Touches:
- Now it’s your turn! Carefully screw in the Edison bulb.
- Place the lampshade on top.
- Light It Up:
- Plug in your new lamp and turn it on. You helped create a unique piece of glowing art for your room!
13. Embrace a Winter White Theme

Holiday decor doesn’t always have to be about bright colors. A serene and elegant living room can be created using a palette of winter whites.
Focus on texture to keep the look from feeling flat. A cable-knit pillow, a fringed throw blanket, and a smooth ceramic vase all in shades of cream and white create a sophisticated and cozy scene. This minimalist approach feels calm and peaceful, like a quiet snowy landscape.
DIY Project: Easy Fringed Blanket
You can add a fun fringe to any fleece blanket!
What You’ll Need:
- A piece of fleece fabric (the size you want your blanket to be).
- Sharp fabric scissors.
- A ruler.
Step-by-Step Instructions:
- Tidy Up the Edges:
- Lay your fleece flat and use your scissors and ruler to trim the edges so they are nice and straight.
- Cut Off the Corners:
- From each of the four corners, cut out a small square, about 4 inches by 4 inches. This helps the fringe lay flat.
- Start Cutting the Fringe:
- On one side of the blanket, start cutting strips that are about 1 inch wide and 4 inches deep. Use your ruler to help you keep them straight.
- Continue cutting strips all the way down one side.
- Finish All Sides:
- Do the same thing on the other three sides of the blanket.
- Knot the Fringe (Optional):
- You can leave the fringe as it is, or you can tie each piece into a small knot right at the base for a different look. Your super-soft fringed blanket is ready for cuddling!
14. Build a Miniature Winter Village

Create a magical little world on your mantelpiece or a windowsill. A collection of small ceramic houses can be turned into a charming holiday village.
Arrange the houses at different depths to create a sense of a real town. Add some small bottle brush trees to act as a forest. When you place battery-operated tea lights inside each house, their windows will glow warmly, bringing the tiny scene to life. It’s a classic decoration that sparks imagination.
DIY Project: Air-Dry Clay Village
Let’s make our own little houses that can glow!
What You’ll Need:
- A block of white air-dry clay.
- A small cup of water.
- A plastic knife or clay tool.
- A small rolling pin or smooth bottle.
- Battery-operated tea lights.
Step-by-Step Instructions:
- Roll Out the Clay:
- Take a piece of clay and roll it out until it’s about as thick as a cookie.
- Cut Out the Walls:
- Use your plastic knife to cut out four rectangles for the walls of your house. Make two of them a little taller; these will hold the roof.
- Add Windows:
- While the clay is flat, use your knife to carefully cut out small squares for windows.
- Stand It Up:
- Stand the four walls up to make a box shape. Gently press the corners together. You can use a tiny bit of water on your finger to smooth the seams. Leave the top and bottom open.
- Make the Roof:
- Cut out two more rectangles for the roof. Gently press them onto the top of your house to make a peak.
- Let It Dry:
- Let your little house dry completely. This might take a day or two.
- Light It Up:
- Once it’s hard, place your clay house over a battery-operated tea light and watch its windows glow. Make a few more to create a whole village!
15. Swap In Seasonal Art

One of the easiest ways to change the mood of your room is to change your wall art. Put away your usual pictures and hang something that reflects the winter season.
Simple, black and white photographs of snowy landscapes create a calm and sophisticated feeling. The stark beauty of bare trees and snow-covered fields can be very powerful. Look for prints with simple frames, like light wood or black, to maintain a clean, modern look.
DIY Project: Winter Photo Art
Let’s make some cool art for your walls using photos!
What You’ll Need:
- Picture frames you already have.
- A camera or a phone.
- A printer.
- White paper.
Step-by-Step Instructions:
- Go on a Photo Hunt:
- Go outside and take pictures of wintery things. Look for interesting tree branches, snowy fields, or even frost on a window.
- Make Them Black and White:
- Using the editing tool on your phone or computer, change your favorite pictures to black and white. This makes them look very artistic.
- Print Your Photos:
- Ask an adult to help you print your pictures onto plain white paper. Make sure you print them the right size to fit in your frames.
- Frame Your Art:
- Carefully place your new winter photos inside the frames.
- Create a Gallery:
- Hang your new art on the wall. You just became a featured artist in your own home!
16. Use Festive Coasters

Holiday decorating is all in the details. Protecting your tables from drink rings can also be a stylish moment.
Swap out your everyday coasters for something with a little more flair. Coasters made from slices of agate with a gold edge or elegant marble add a touch of luxury. They are like little pieces of jewelry for your coffee table. It’s a small change that guests will notice and appreciate.
DIY Project: Gilded-Edge Coasters
Let’s make some plain coasters look super fancy!
What You’ll Need:
- Plain coasters (cork or slate ones work well).
- Gold metallic craft paint.
- A small paintbrush.
Step-by-Step Instructions:
- Set Up Your Art Station:
- Lay down some newspaper to protect your table.
- Start Painting:
- Take your paintbrush, dip it in the gold paint, and carefully paint just the edge of one coaster.
- Get a Smooth Coat:
- Turn the coaster as you go, painting all the way around the rim. Try to make the line of gold as neat as you can.
- Let It Dry:
- Set the coaster aside to dry completely.
- Repeat!
- Do the same thing for all of your coasters. In just a few minutes, you’ve made a set of very glamorous coasters for your family to use.
17. Embrace Classic Plaid

Nothing feels quite as traditional and cozy for the holidays as plaid. This timeless pattern instantly brings a warm, cabin-like feel to a living room.
Don’t be afraid to use it generously. Plaid throw pillows paired with a contrasting checkered blanket create a layered and inviting look. The rich reds and deep greens are classic holiday colors that make any sofa look ready for a long winter’s nap.
DIY Project: No-Sew Plaid Pillow Wrap
Let’s give a plain pillow a festive sweater!
What You’ll Need:
- A plain pillow that’s already on your couch.
- A piece of plaid flannel fabric.
- Sharp fabric scissors.
- A few safety pins.
Step-by-Step Instructions:
- Measure Your Fabric:
- Drape your plaid fabric over the front of your pillow.
- You want enough fabric to wrap all the way around and overlap by a few inches in the back. Trim the fabric to the right size.
- Wrap It Like a Present:
- Lay the fabric flat and place the pillow face down in the center.
- Fold one side of the fabric over the back of the pillow.
- Fold the other side over it, so they overlap neatly in the middle.
- Pin It in Place:
- Use a few safety pins on the back to hold the fabric wrap securely in place. Make sure the pins are hidden in the overlap.
- Fluff and Admire:
- Turn your pillow over. It has a brand-new plaid cover, and you didn’t have to sew a single stitch! When the holidays are over, just unpin it.
18. Stand Up a Nutcracker Guard

Bring a touch of classic holiday magic and nostalgia into your home with a nutcracker. These colorful wooden soldiers are a symbol of the season.
A single nutcracker standing guard on a bookshelf or mantel adds a whimsical and traditional touch. They come in so many styles and colors, you can find one that fits your decor. It’s a simple decoration that brings a lot of personality and reminds everyone of childhood holiday stories.
DIY Project: Paint-Your-Own Nutcracker
Let’s give a nutcracker a custom uniform!
What You’ll Need:
- An unpainted wooden nutcracker (you can find these at craft stores).
- Craft paints in your favorite colors.
- Small paintbrushes.
- A cup of water and paper towels.
Step-by-Step Instructions:
- Plan Your Design:
- Decide which colors you want to paint each part of your nutcracker. His hat? His jacket? His boots? You’re the designer!
- Paint the Big Parts First:
- Start by painting the largest areas, like the jacket and pants. Let those parts dry before you add details.
- Add the Details:
- Use a smaller brush to paint the tiny details, like the buttons on his coat, the trim on his hat, and his rosy cheeks.
- Don’t Forget the Face:
- Carefully paint his eyes, eyebrows, and mustache.
- Let Him Dry:
- Let your nutcracker dry completely. Now you have a one-of-a-kind holiday guard, painted by you!
19. Tie It Up with a Bow

Sometimes the simplest decorations are the most elegant. A beautiful, well-placed ribbon can add a festive touch to almost anything in your living room.
Think beyond presents. Tie a wide, luxurious velvet ribbon around a plain lamp base. Add a simple plaid bow to the back of a dining chair. This is an inexpensive way to spread holiday color and texture throughout the room. It’s a quick and easy trick that looks thoughtful and polished.
DIY Project: The Perfect Floppy Bow
Let’s learn how to tie a big, beautiful bow that looks great every time.
What You’ll Need:
- A long piece of wide ribbon (wire-edged ribbon is easiest to shape).
Step-by-Step Instructions:
- Make Two Loops:
- Hold the ribbon in your hands. Make a loop on the left side, like you’re making a bunny ear.
- Make a second, same-sized loop on the right side.
- Cross Them Over:
- Cross the right loop over the left loop.
- Tuck and Pull:
- Take the loop that is now on top (the right one), and tuck it behind and through the hole in the middle.
- Tighten Gently:
- Pull both loops to tighten the knot in the center. Don’t pull too hard!
- Fluff and Adjust:
- Now you can pull on the loops and the tails to make them the size and shape you want. If you used wire ribbon, you can shape the loops so they are big and round. You just tied a designer-quality bow!
20. Stack Some Holiday Reads

Decorate your coffee table with a subtle nod to the season. A simple stack of books can become a festive focal point.
Gather books from your shelves that have spines in holiday colors like red, green, gold, or white. Stack them from largest to smallest. You can top the stack with a small decorative object, a pair of reading glasses, or a festive bookmark. It’s a smart and simple way to decorate that also invites guests to sit down and relax.
DIY Project: Holiday Book Covers
Let’s give some books a temporary holiday outfit!
What You’ll Need:
- A few books.
- Craft paper in festive colors or patterns.
- Scissors.
- Tape.
Step-by-Step Instructions:
- Measure the Cover:
- Open a book and lay it on top of your craft paper.
- Cut the paper so that it’s about two inches taller than the book and has about three inches of extra paper on each side.
- Fold the Top and Bottom:
- Place the book in the center of the paper. Fold the extra paper at the top and bottom down to make a neat crease. This will create flaps.
- Wrap the Book:
- Close the book. Wrap the paper around it so it’s snug.
- Tuck the Sides:
- Open the front cover. Tuck the extra paper on that side into the flap you made. Do the same thing for the back cover.
- Secure with Tape (Optional):
- You can add a small piece of tape on the inside to hold the flaps down. Now your books have festive new covers for the season!
21. Layer Scented Candles for Ambiance

Create a warm and inviting atmosphere by grouping several scented candles together. The combined fragrances can create a unique holiday scent profile for your home.
Placing candles of different sizes on a simple tray gives a layered, thoughtful look. As they burn, the flickering lights create a dynamic and soothing display. The soft, warm glow makes any corner of the room feel instantly more comfortable and ready for quiet holiday moments. It’s a simple setup with a big impact on the room’s mood.
DIY Project: Festive Candle Wraps
Let’s give your plain glass candles a cozy holiday sweater!
What You’ll Need:
- Plain glass candles.
- Twine or thin ribbon.
- Cinnamon sticks.
- Small sprigs of fresh rosemary or pine.
- Scissors.
Step-by-Step Instructions:
- Cut Your Twine:
- Cut a long piece of twine, about two feet long, for each candle.
- Start Wrapping:
- Hold the end of the twine against the glass and begin wrapping it around the middle of the candle several times.
- Add Your Decorations:
- Before you tie a knot, slip a cinnamon stick under the wrapped twine so it’s held tightly against the glass.
- Tuck a small sprig of rosemary next to the cinnamon stick.
- Tie a Bow:
- Finish by tying the twine into a neat bow. Snip any long ends.
- Display Your Candles:
- Your candles now have a rustic and festive look. Group them together on a tray and enjoy the beautiful sight and smell.
22. Simmer a Pot of Holiday Scents

One of the best ways to make your home feel like the holidays is through scent. A simmering pot of spices on the stove can fill your entire house with a wonderful aroma.
This natural air freshener is better than any spray. The combination of citrus, spice, and herbs creates a welcoming and nostalgic scent that is tied to happy holiday memories. It makes it seem like you’ve been baking all day, even if you haven’t. This little trick makes a house feel like a home.
DIY Project: Stovetop Holiday Potpourri
Let’s make your house smell like Christmas!
What You’ll Need:
- A small saucepan.
- Water.
- An orange or a clementine.
- A handful of fresh cranberries.
- 2 or 3 cinnamon sticks.
- A sprig of fresh rosemary.
Step-by-Step Instructions:
- Get Your Ingredients Ready:
- Ask an adult to help you slice the orange into round pieces.
- Fill the Pot:
- Put all your ingredients—the orange slices, cranberries, cinnamon sticks, and rosemary—into the saucepan.
- Add Water:
- Pour enough water into the pot to cover everything.
- Simmer Gently:
- Ask an adult to put the saucepan on the stove over low heat. It shouldn’t boil, just simmer gently.
- Enjoy the Scent:
- Soon, your whole house will be filled with a beautiful holiday smell. An adult should add more water every hour or so as it evaporates.
23. Adjust Your Light Temperature

The color of your lightbulbs can make your room feel warm and cozy or cool and sterile. For the holidays, a warmer light is always more inviting.
Smart bulbs make it easy to change the color temperature with your phone, from a bright white for daytime to a warm, candle-like glow for the evening. This subtle change has a major effect on the room’s atmosphere, making all your decorations look richer and the space more relaxing.
DIY Project: Warm Light Paper Lantern
Let’s make a simple shade to make any light feel warmer.
What You’ll Need:
- A piece of translucent vellum or parchment paper.
- Scissors.
- Tape.
- A ruler and a pencil.
Step-by-Step Instructions:
- Measure and Cut:
- Measure the height and circumference (the distance around) of a lamp that has a safe, cool-to-the-touch LED bulb.
- Cut your paper so it is the same height as the lamp and a little longer than the circumference.
- Decorate Your Paper:
- You can draw festive designs on your paper with markers or leave it plain.
- Form a Tube:
- Roll the paper into a tube that is a little wider than your lamp.
- Overlap the edges and secure them with a piece of tape running down the seam.
- Create a Warm Glow:
- Carefully place your paper lantern over the lamp. Make sure the paper is not touching the lightbulb. The paper will diffuse the light, making it softer and warmer.
24. Hang Festive Doorknob Decor

Don’t let your doors feel left out of the holiday fun. A small, festive decoration hanging from a doorknob is a charming surprise.
This little detail shows that you’ve thought about decorating your whole space. The gentle sound of jingle bells as a door opens and closes adds a cheerful soundtrack to the season. It’s an easy and inexpensive way to spread the holiday spirit from room to room.
DIY Project: Jingle Bell Door Hanger
Let’s make a decoration that jingles every time you open the door!
What You’ll Need:
- A long piece of leather cord or thick ribbon.
- Several jingle bells in different sizes and colors.
Step-by-Step Instructions:
- Make a Loop:
- Take your cord and fold it in half. Tie a knot near the fold to create a loop that’s big enough to hang over your doorknob.
- String the First Bell:
- Take one of the loose ends and thread on a jingle bell.
- Tie a simple knot underneath the bell to keep it from sliding all the way to the bottom.
- Add More Bells:
- Continue adding bells to both strands of the cord. Tie a knot after each one to space them out.
- Finish It Off:
- Once you have enough bells, tie a final knot at the bottom with both strands to keep the last bells from falling off.
- Hang and Jingle:
- Hang your new creation on a doorknob and give it a shake!
25. Adorn Chairs with Mini Wreaths

Make your dining room chairs part of the festive decor. A small wreath tied to the back of each chair adds a touch of elegance and makes holiday meals feel extra special.
This simple addition transforms your dining area and shows your guests that you’ve thought of every detail. Use a long, beautiful ribbon that complements your other decorations. It’s a lovely way to carry the holiday theme throughout your home.
DIY Project: Mistletoe Kissing Ball
Let’s make a tiny wreath that’s also a bit of holiday fun!
What You’ll Need:
- A small foam ball from a craft store.
- Lots of small sprigs of faux greenery and mistletoe.
- A hot glue gun (ask an adult for help).
- A long piece of ribbon.
Step-by-Step Instructions:
- Get Sticking:
- With an adult’s help, put a small dot of hot glue on the stem of a piece of greenery.
- Carefully poke the stem into the foam ball.
- Cover the Ball:
- Keep adding greenery sprigs this way until the entire foam ball is covered and looks like a little green puffball. Make sure to mix in the mistletoe!
- Add the Ribbon:
- Before the glue fully sets, have an adult help you glue the middle of your long ribbon to the foam ball, tucking the end under some leaves.
- Tie It On:
- Use the long ends of the ribbon to tie your mistletoe ball onto the back of a chair.
26. Drape a Beaded Garland

For a touch of modern, natural style, a wooden bead garland is a great choice. It adds texture and a handcrafted feel to your holiday decor.
Drape it over a stack of books, weave it through a mantel display, or spill it out of a decorative bowl. The simple, clean look of the natural wood beads is very versatile. A tassel at the end adds a soft, finishing touch. This is a subtle decoration that feels both festive and stylish.
DIY Project: Wooden Bead and Felt Ball Garland
Let’s make a colorful and fun garland for your room.
What You’ll Need:
- A long piece of twine.
- A bag of wooden beads.
- A bag of colorful felt balls.
- A large needle.
Step-by-Step Instructions:
- Thread Your Needle:
- Thread the end of your twine through the eye of the large needle. Tie a big knot at the other end of the twine so your beads don’t fall off.
- Create a Pattern:
- Decide on a pattern. Will you do two wood beads, then one felt ball? Or one of each? You’re the designer!
- Start Stringing:
- Carefully push the needle through the center of your first bead or felt ball and slide it all the way down to the knot.
- Keep Going!
- Continue stringing your beads and felt balls, following your pattern, until your garland is the length you want.
- Finish It Off:
- Cut the twine from the needle, and tie another big knot so your beads are secure. You can even add a yarn tassel to each end if you like!
27. Create a Forest of Bottle Brush Trees

There is something so charming about a collection of miniature bottle brush trees. They bring a vintage, whimsical feel to any holiday display.
Don’t just use one or two. Grouping a whole forest of them together on a windowsill or mantel makes a much bigger statement. Mix different sizes and colors, like green, white, and silver, to create a tiny, magical landscape. Weave a delicate string of fairy lights among them for a sparkling effect at night.
DIY Project: Snowy Bottle Brush Trees
Let’s turn plain green trees into a snowy wonderland.
What You’ll Need:
- A few bottle brush trees.
- White craft paint.
- A small, stiff paintbrush.
- A paper plate.
- Glitter (optional).
Step-by-Step Instructions:
- Set Up Your Paint:
- Squeeze a little bit of white paint onto your paper plate.
- Add Some Snow:
- Take your paintbrush and dip just the tips of the bristles into the white paint.
- Gently dab the paint onto the tips of your bottle brush tree’s branches. It will look like fresh snow has just fallen!
- Make It Sparkle:
- While the paint is still wet, you can sprinkle a little bit of glitter on the tree to make it look like sparkling ice.
- Let Them Dry:
- Set your trees aside to dry completely. Once they are dry, you can arrange your little snowy forest.
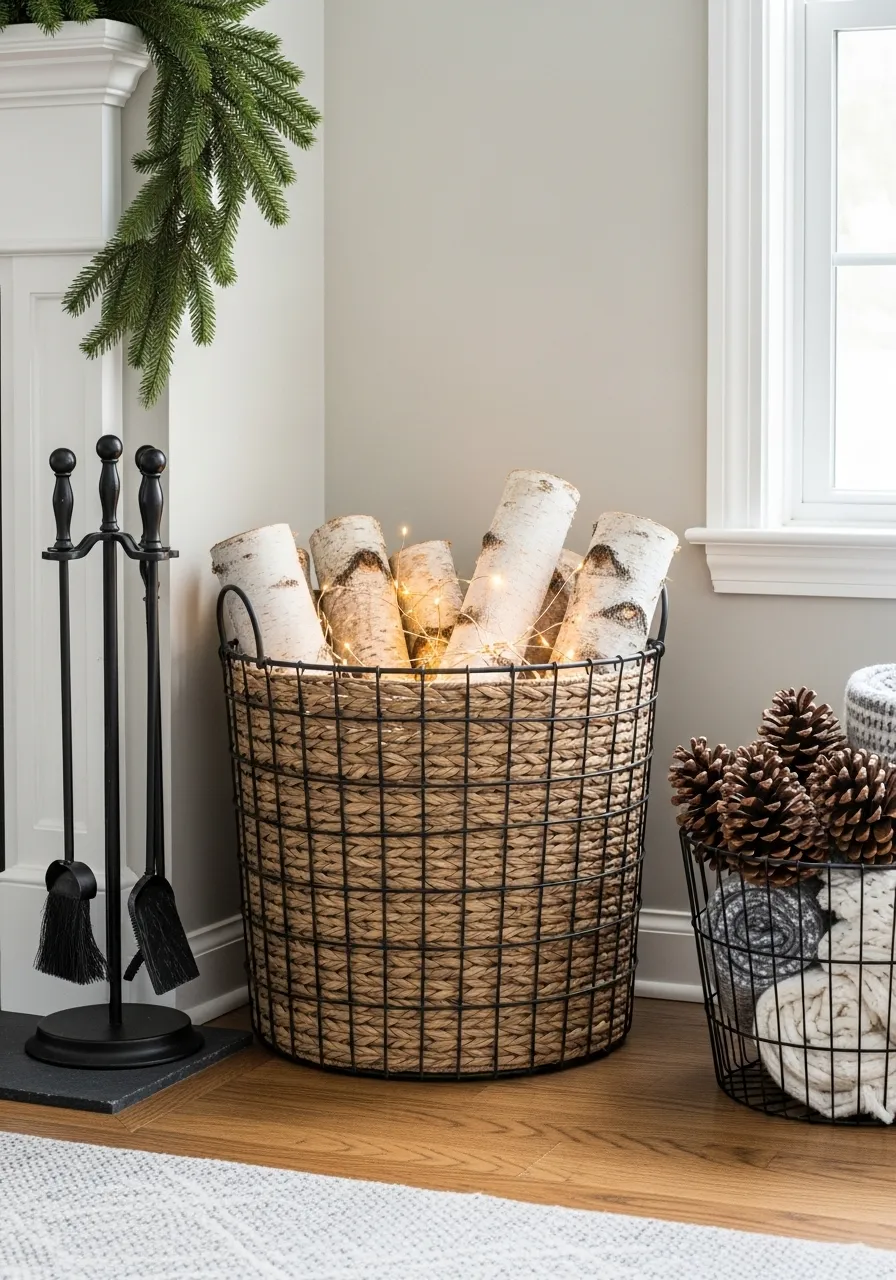
28. Style a Basket of Glowing Logs

You don’t need a real fireplace to get that cozy, fireside feeling. A simple basket filled with birch logs can create a similar rustic charm.
The white, papery bark of birch logs is beautiful on its own. To make the display feel magical, tuck a string of warm, white fairy lights in between the logs. The light will peek through the gaps and create a soft, welcoming glow. It’s a simple and safe way to add a bit of warmth to your hearth.
DIY Project: Magic Log Bundle
Let’s make a beautiful decoration that looks like glowing embers.
What You’ll Need:
- 3 to 5 small logs or thick branches.
- A string of battery-powered fairy lights with a thin wire.
- A piece of twine or ribbon.
Step-by-Step Instructions:
- Bundle Your Logs:
- Hold your logs together in a bundle.
- Start Wrapping:
- Take the end of your fairy light string and hold it against the logs.
- Begin to wrap the light string around and around the middle of the bundle of logs.
- Hide the Wire:
- As you wrap, try to tuck the wire in between the logs so it’s not as visible.
- Secure It:
- Once you’re done wrapping, tuck the battery pack into the center of the logs where it can’t be seen.
- Tie It with a Bow:
- Take your piece of twine or ribbon and tie it tightly around the logs, right over where you wrapped the lights. This will hide the wire and look pretty. Your glowing log bundle is ready for the fireplace or a cozy corner!
29. Swap to Seasonal Curtains

For a truly dramatic living room refresh, consider changing your curtains for the holiday season. This can completely transform the look and feel of the space.
Rich, heavy fabrics like velvet in deep holiday colors such as forest green or burgundy add a sense of warmth and luxury. They help to make the room feel cozier and more enclosed, which is wonderful on a cold winter night. It’s a bigger swap, but it makes a huge impact.
DIY Project: No-Sew Holiday Curtain Tie-Backs
Let’s make some fancy holders for your curtains.
What You’ll Need:
- Two long pieces of wide ribbon.
- Two small pinecones.
- A hot glue gun (ask an adult for help).
- A few small jingle bells (optional).
Step-by-Step Instructions:
- Prepare Your Ribbon:
- Cut two pieces of ribbon that are long enough to wrap around your curtain and be tied in a bow.
- Decorate the Ends:
- With an adult’s help, use the hot glue gun to attach a small pinecone to each end of both ribbons.
- You can also glue on a jingle bell next to the pinecone for a festive touch.
- Let It Dry:
- Let the glue cool and harden completely.
- Tie Back Your Curtains:
- Sweep one of your curtains to the side. Wrap one of your new, decorative ribbons around it and tie it in a beautiful bow. Do the same for the other curtain.
30. Hang a Flurry of Paper Snowflakes

Create your own indoor snow day by hanging a flurry of paper snowflakes from the ceiling. This is a whimsical and inexpensive way to create a big visual impact.
Make snowflakes in different sizes and designs for a more natural look. Hang them at various lengths using clear fishing line so they appear to be floating in mid-air. They will gently twirl with the air currents in the room, creating a truly magical and immersive winter wonderland.
DIY Project: Perfect 6-Pointed Snowflakes
Let’s make snowflakes that look just like the real ones!
What You’ll Need:
- White printer paper.
- Scissors.
Step-by-Step Instructions:
- Make a Square:
- Take a regular rectangular piece of paper. Fold one corner down to meet the opposite edge, making a triangle. You’ll have a small rectangle of paper left over. Cut that extra rectangle off. When you unfold the triangle, you’ll have a perfect square.
- Fold in Half:
- Keep your paper folded in a triangle. Now, fold that triangle in half again to make a smaller triangle.
- Fold into Thirds (The Tricky Part!):
- Hold the triangle with the long, folded edge at the bottom. Imagine it’s a pizza slice.
- Fold the right point over the middle, covering about one-third of the pizza slice.
- Fold the left point over on top of the right one. It should look like a pointy piece of pie.
- Cut the Top:
- You will see two little points sticking up at the wide end. Cut straight across to make the top flat.
- Start Cutting Your Design:
- Now, cut little shapes out of the two folded sides. Cut triangles, half-circles, or wavy lines. Don’t cut all the way across!
- The Grand Opening:
- Very, very carefully, unfold your paper. You will have a beautiful, six-pointed snowflake! Make a whole bunch to create your flurry.
31. Roll Out a Festive Welcome Mat

Extend the holiday cheer right to your living room’s entrance. Swapping your regular doormat for one with a festive design is a simple but effective touch.
A mat with a cheerful reindeer, a classic snowflake pattern, or a simple “Welcome” in a seasonal font sets a joyful tone. Layering it over a larger, patterned rug can add extra style and texture. It’s the first thing guests see, making it a small detail that offers a big, warm welcome.
DIY Project: Personalized Holiday Doormat
Let’s make a special doormat to greet your friends and family!
What You’ll Need:
- A plain coir doormat.
- Craft paint (black or other festive colors).
- A stiff-bristled paintbrush or a stencil brush.
- Letter stencils.
- Masking tape.
Step-by-Step Instructions:
- Plan Your Design:
- Decide what you want your mat to say. Maybe “Be Merry” or your family’s name.
- Position Your Stencils:
- Place your letter stencils on the mat to spell out your message. Use masking tape to hold them firmly in place so they don’t wiggle around.
- Time to Paint:
- Dip your stiff brush into the paint. Dab off any extra on a paper towel. You want a dry brush so the paint doesn’t bleed under the stencil.
- Use an up-and-down dabbing motion to fill in the stencil. Don’t brush side-to-side.
- Let It Dry, Then Reveal:
- Let the paint dry for a little while, and then carefully lift off the stencils.
- Final Touches:
- Let the mat dry completely for a full day before anyone steps on it. Now you have a custom holiday doormat!
32. Add a Jingle to Your Entryway

e bell hanging on a doorknob is a delightful and subtle holiday accent.
Every time the door opens, a gentle jingle sounds, adding a cheerful note to the comings and goings in your home. The addition of fresh greenery, like boxwood, and a festive ribbon makes it a complete miniature decoration. It’s a simple, charming touch that engages more than just the sense of sight.
DIY Project: Greenery and Bell Door Charm
Let’s make a pretty little decoration that jingles!
What You’ll Need:
- One large jingle bell.
- A small bunch of faux or fresh boxwood greenery.
- A piece of festive ribbon.
- A fun tassel.
- Thin craft wire.
Step-by-Step Instructions:
- Attach the Greenery:
- Arrange the greenery into a small, attractive bunch.
- Place it on top of the jingle bell and use a small piece of craft wire to attach it securely to the loop of the bell.
- Add a Bow:
- Tie your ribbon into a small, neat bow around the wire to hide it.
- Attach the Tassel:
- Use the string on your tassel to tie it onto the jingle bell’s loop, right behind the greenery.
- Create a Hanger:
- Use a longer piece of ribbon or twine to create a loop for hanging. Tie it to the top of the bell.
- Hang and Enjoy:
- Hang your charming new decoration on a doorknob and enjoy its festive little jingle.
33. Display Holiday Cards and Photos

The holidays bring a flurry of cards and photos from loved ones. Instead of letting them pile up on a counter, turn them into a festive display.
Stringing twine across an empty picture frame or along a wall creates a simple and rustic garland. Use small wooden clothespins to attach your favorite cards and family photos. It’s a wonderful way to showcase the faces of friends and family, making them a central part of your holiday decor.
DIY Project: Clothespin Photo Garland
Let’s make a beautiful way to show off all your favorite pictures.
What You’ll Need:
- A long piece of twine or string.
- A bag of small wooden clothespins.
- Your favorite photos and holiday cards.
- Tape or small hooks for hanging.
Step-by-Step Instructions:
- Hang Your Line:
- Decide where you want your garland to hang. Stretch the twine across the space and secure the ends with tape or by tying them to small hooks.
- You can hang it in one long line or create a few swooping layers.
- Get Pinning:
- Take your photos and cards and start clipping them onto the twine with the clothespins.
- Mix It Up:
- Don’t worry about making it look too perfect. Mix up the holiday cards with family pictures. You can even clip on a small piece of greenery here and there.
- Step Back and Admire:
- Your wall is now a beautiful and personal display of happy memories and holiday wishes.
34. Fill Bowls with Natural Elements

Bring the beauty of the outdoors inside with a simple bowl of pinecones. This is an effortless way to add a touch of rustic, natural charm to your decor.
The texture and shape of pinecones are interesting on their own. You can enhance the display by tucking in a few sprigs of eucalyptus for a pop of color and a fresh scent. Adding some star anise not only looks pretty but also contributes to the warm, spicy aroma of the season.
DIY Project: Scented Pinecone Display
Let’s make a bowl of pinecones that smells as good as it looks.
What You’ll Need:
- A wooden bowl.
- A collection of pinecones.
- Your favorite holiday-scented essential oil (like pine, cinnamon, or orange).
- A sealable plastic bag.
Step-by-Step Instructions:
- Clean Your Pinecones:
- If you collected your pinecones from outside, ask an adult to help you bake them on a foil-lined tray in a 200°F (95°C) oven for about 30 minutes. This gets rid of any little critters.
- Scent Them Up:
- Once the pinecones are cool, place them in the large plastic bag.
- Add about 10-15 drops of your essential oil. Seal the bag and give it a good shake to coat the pinecones.
- Let Them Marinate:
- Leave the pinecones in the sealed bag for a day or two so they can really soak up the scent.
- Arrange Your Display:
- Pour your wonderfully scented pinecones into the wooden bowl. Your room will now have a lovely, natural holiday fragrance.
35. Create an Ornament Chandelier

Look up for unexpected decorating opportunities. Hanging a cluster of ornaments from a light fixture can create a stunning and festive focal point in your living room.
Choose ornaments in a similar color palette, like silver and gold, for a cohesive and elegant look. Use varying lengths of ribbon to hang them so they form a beautiful, cascading shape. The light from the fixture will reflect off the shiny surfaces, creating a dazzling display.
DIY Project: Sparkling Ornament Cluster
Let’s make a beautiful hanging decoration that looks like a fancy chandelier.
What You’ll Need:
- Several shiny ornaments (disco ball ornaments are extra fun!).
- Ribbon in different colors.
- Scissors.
- A metal or wooden ring (like a large macrame hoop).
Step-by-Step Instructions:
- Prepare Your Ornaments:
- For each ornament, cut a piece of ribbon. Make the ribbons different lengths—some short, some medium, and some long.
- Tie a ribbon securely to the top of each ornament.
- Attach to the Ring:
- Take your ornaments and start tying them onto the ring.
- Spread them out all around the ring. The different ribbon lengths will make a cool waterfall effect.
- Create a Hanger:
- Cut three long, equal pieces of ribbon.
- Tie them evenly spaced around the ring. Then, bring the three ends together at the top and tie them in a single big knot.
- Hang Your Chandelier:
- Use the knot to hang your beautiful ornament cluster from a hook in the ceiling or from a light fixture (make sure it doesn’t touch the bulb!).
36. Arrange a Winter Greenery Bouquet

Flowers aren’t the only option for a beautiful arrangement. A bouquet of seasonal greenery can be just as striking and will last much longer.
Gather a variety of textures and shades of green. Cedar, pine, eucalyptus, and magnolia leaves create a lush and interesting mix. Add some branches with red holly berries for a traditional pop of color and some bare twigs for height and drama. Place it in a simple glass vase to let the greenery be the star.
DIY Project: Foraged Winter Arrangement
Let’s make a beautiful bouquet with things we find outside!
What You’ll Need:
- A tall glass vase.
- Clippers or strong scissors.
- A bucket of water.
- A variety of evergreen branches and interesting twigs.
Step-by-Step Instructions:
- Go on a Nature Walk:
- With an adult, go for a walk in your yard or a park and look for fallen evergreen branches, cool-looking bare twigs, and maybe even some branches with berries.
- Prepare Your Greenery:
- When you get home, snip off any leaves or needles from the very bottom of each stem.
- Place all your findings in a bucket of water for an hour so they can have a good drink.
- Build Your Foundation:
- Fill your vase with fresh water.
- Start by putting your biggest, bushiest branches in the vase. This will be the base of your arrangement.
- Add the Details:
- Next, add your more interesting pieces, like the eucalyptus or holly.
- Finally, add the tall, bare twigs to the middle to give your bouquet some height.
- Find the Good Spot:
- Place your beautiful, natural bouquet on a table and enjoy it. Change the water every few days to keep it fresh.
37. Create a Cozy Reading Nook

Designate a special spot in your living room for quiet winter relaxation. A comfortable armchair can be transformed into the ultimate cozy reading nook with a few simple additions.
Drape a soft, textured blanket over the arm of the chair. Add a plush pillow for back support. A nearby side table is a must for holding a warm drink and a good book. This little corner becomes a personal retreat from the holiday hustle and bustle, inviting you to slow down and unwind.
DIY Project: Basket of Cozy Blankets
Let’s make a welcoming spot for anyone who wants to get warm.
What You’ll Need:
- A nice wire or wicker basket.
- A collection of your softest, coziest blankets.
Step-by-Step Instructions:
- Fold, Don’t Stuff:
- Take your first blanket and fold it neatly into a rectangle.
- Roll It Up:
- Now, roll the folded blanket up into a snug log shape.
- Repeat:
- Do the same thing with your other blankets.
- Arrange Your Basket:
- Stand the rolled blankets up in the basket side-by-side. It will look like a neat bundle of cozy logs.
- Place and Invite:
- Place the basket next to your favorite chair. Now, whenever someone feels a chill, they can easily grab a warm blanket.
38. Layer Textiles on the Mantel

Give your fireplace mantel a soft and unexpected touch by decorating it with textiles. Layering different runners or scarves adds texture, color, and warmth.
Start with a base runner in a neutral color, like linen. Then, add a shorter, more luxurious runner on top, perhaps in a rich velvet or with a sequined edge for a bit of sparkle. The fabrics draping down the sides soften the hard lines of the mantel. This creates a beautiful foundation for your other decorations, like ceramic houses and candles.
DIY Project: Layered Mantel Scarf
Let’s dress up your mantel with some pretty fabrics.
What You’ll Need:
- Two long pieces of fabric that you like. Choose different textures, like a plain cotton and a sparkly velvet.
- Scissors with a pinking edge (the kind that cuts a zigzag pattern) are great for this, but regular scissors work too.
- A measuring tape.
Step-by-Step Instructions:
- Measure Your Mantel:
- Measure the length and width of the top of your fireplace mantel.
- Cut Your Base Layer:
- Cut your first piece of fabric so it’s the same length as the mantel plus about two feet extra. This will let it hang down nicely on both sides.
- Cut Your Top Layer:
- Cut your second, fancier piece of fabric so it’s a little shorter and not as wide as the first piece.
- Layer Them Up:
- Lay the first, bigger piece of fabric on the mantel. Center it so it hangs down evenly on both ends.
- Add the Final Touch:
- Now, lay the second, smaller piece on top of the first one. You can place it right in the middle or a little off to one side for a more casual look. Your mantel now has a beautiful, soft, and stylish new look!
Refreshing your living room for the holidays doesn’t have to be a daunting task. As we’ve seen, even the smallest changes can have a significant effect, making your space feel more festive and full of warmth.
The key is to focus on elements that bring you joy, whether it’s the texture of a cozy blanket, the scent of simmering spices, or the personal touch of a handmade decoration. You don’t need to try every idea; picking just a few favorites is enough to make your home feel special.
Ultimately, decorating is about creating a backdrop for the memories you’ll make with the people you love. So have fun with it, embrace the season, and enjoy your beautifully refreshed space.
Key Takeaways
- Focus on the Senses: A great holiday refresh engages more than just sight. Incorporate cozy textures (blankets, pillows), festive scents (candles, simmer pots), and even gentle sounds (jingle bells).
- Small Swaps, Big Impact: You don’t need to buy all new furniture. Simple swaps like changing cushion covers, adding a seasonal throw, or updating your doormat can instantly change the feel of a room.
- Bring Nature Indoors: Using natural elements like pinecones, fresh greenery, and bare branches is an inexpensive and authentic way to bring the beauty of the winter season into your home.
- Personalize Your Decor: Make your space truly your own by incorporating family photos, handmade ornaments, and personalized DIY projects. This makes your decor meaningful and unique.