The holiday season brings warmth, joy, and the wonderful chaos of a full house. But often, the heart of the home—the kitchen—can become the center of stress. You’re trying to cook a grand meal while guests search for glasses, kids look for snacks, and counters disappear under a mountain of prep work.

It doesn’t have to be this way. A little organization can transform your holiday hosting from a frantic scramble into a smooth, enjoyable experience. You can spend less time searching and more time celebrating with the people you love.
These 40 simple hacks are designed to bring order to your kitchen. They will help you create smart systems and clear spaces, ensuring you’re ready for everything from meal prep to the final cleanup. Get ready to host with confidence and ease.
1. Mobile Drink Station

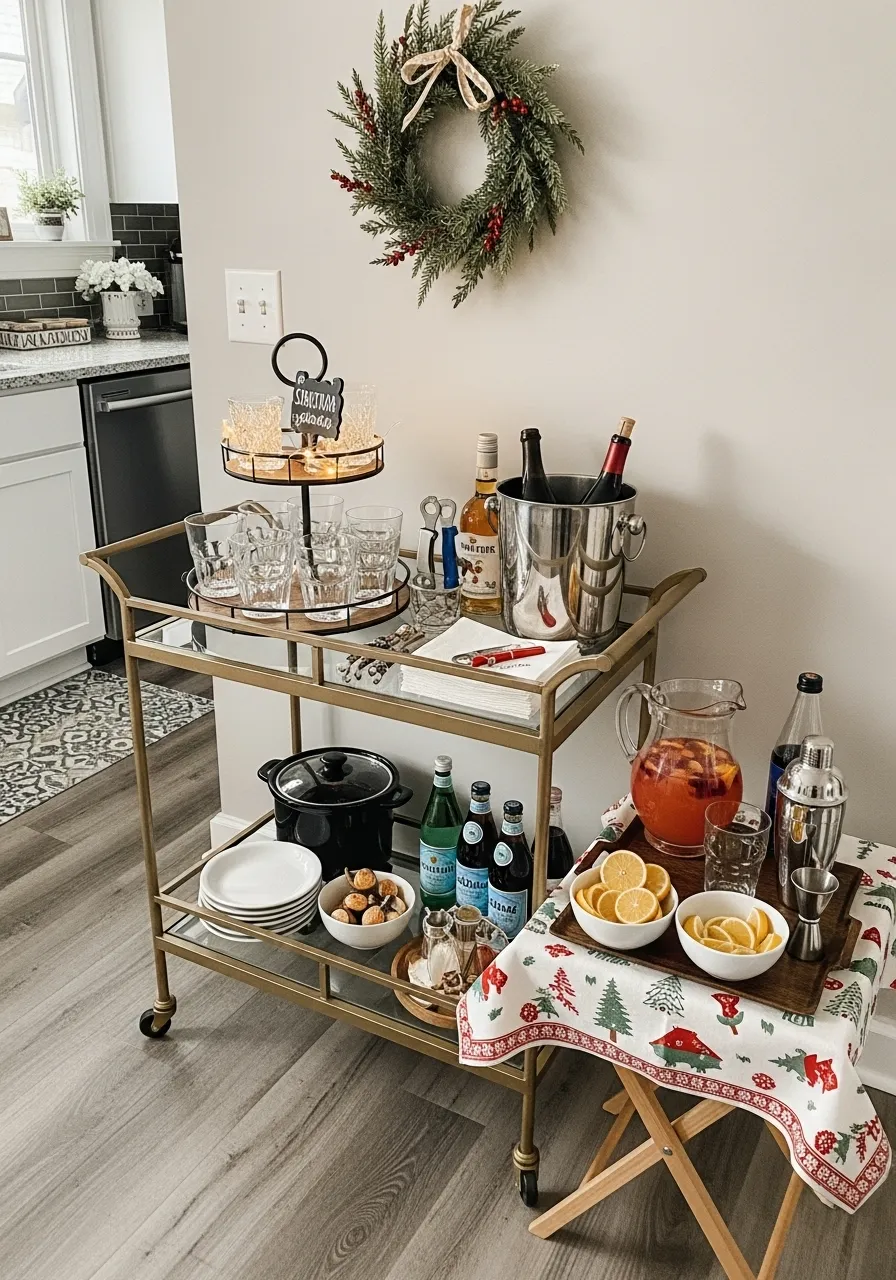
A bar cart is a versatile piece for holiday entertaining. It creates a dedicated beverage station away from the busy kitchen prep area. Guests can help themselves to drinks, freeing you up to focus on the food and conversation. This keeps foot traffic flowing smoothly and prevents bottlenecks.
Setting up a mobile drink station also adds a festive and organized touch to your decor. You can stock it with glasses, drink mixers, an ice bucket, and garnishes. Everything your guests need for a refreshing beverage is in one convenient, stylish spot.
DIY Instructions: Style a Festive Bar Cart
What You’ll Need:
- A bar cart or a small side table
- An ice bucket
- A variety of glasses
- Your favorite beverages (soda, wine, spirits)
- A small bowl for garnishes (like lemon slices or olives)
- A festive decoration (like a small wreath or a holiday-themed napkin)
Step-by-Step Guide:
- Find a Good Spot: First, wheel your cart to a place where guests can easily get to it without being in the way.
- Arrange the Glasses: Place your glasses on the top shelf of the cart. It’s nice to group them by type.
- Add the Drinks: Neatly arrange your bottles and drink pitchers on the cart. Put the taller bottles in the back.
- Don’t Forget the Ice: Fill your ice bucket and place it on the cart just before your guests arrive.
- Add the Finishing Touches: Put your lemon slices in the small bowl. You can also add a small holiday decoration to make it feel extra special.
2. Tiered Appetizer Stand

Maximize your serving space with a tiered stand. This vertical server allows you to present a variety of appetizers without taking up a large footprint on your table or counter. It’s an excellent way to offer everything from savory bites to sweet treats in an organized and appealing display.
Using a tiered stand also adds height and visual interest to your food presentation. It makes it easier for guests to see and reach the different options available. This simple tool helps to reduce clutter and makes your holiday spread look more abundant and thoughtfully arranged.
DIY Instructions: Create a Beautiful Appetizer Display
What You’ll Need:
- A two or three-tiered serving stand
- A variety of small appetizers
- Small tongs or serving spoons
- A garnish, like fresh rosemary or sugared cranberries
Step-by-Step Guide:
- Build Your Stand: First, make sure your tiered stand is put together correctly and is stable.
- Plan Your Layers: Decide which food will go on which level. It’s often best to put heavier or more popular items on the bottom tier.
- Arrange the Food: Neatly place your appetizers on each level. Leave a little space between items so guests can easily pick them up.
- Add Serving Tools: Place small tongs or spoons next to the foods that need them.
- Decorate It: For a festive look, tuck a few small sprigs of fresh rosemary or a sprinkle of sugared cranberries in the empty spaces.
3. Streamlined Cooking Station

Keep your essential cooking ingredients right where you need them. A tray next to the stove is a simple but effective way to organize your most-used oils, vinegars, and spices. This setup prevents you from having to search through cabinets while you’re in the middle of cooking.
A designated cooking station keeps your countertop tidy and your process efficient. When everything is within arm’s reach, cooking for a crowd feels less chaotic. You can also include a crock for your most-used utensils, like spatulas and wooden spoons.
DIY Instructions: Set Up a Stovetop Caddy
What You’ll Need:
- A decorative tray with a raised edge
- Your favorite cooking oils and vinegars
- Salt and pepper shakers
- A crock or a sturdy jar for utensils
Step-by-Step Guide:
- Clean Your Counter: First, clear and wipe down the area next to your stove where the tray will go.
- Place the Tray: Set your tray on the clean counter space.
- Arrange Your Bottles: Neatly place your bottles of oil and vinegar onto the tray. Put the taller ones in the back.
- Add Seasonings: Place your salt and pepper shakers on the tray where they are easy to grab.
- Include Your Tools: Put your most-used cooking spoons and spatulas into the crock and set it on the tray as well. Now your cooking station is ready for action!
4. Over-the-Sink Prep Station

Expand your counter space with a smart sink setup. An integrated cutting board and colander that fits over your sink creates a highly efficient food prep area. You can chop vegetables and slide the scraps directly into a bin, or rinse produce right after chopping without moving around the kitchen.
This system is especially useful in smaller kitchens or when you’re preparing a large holiday meal. It keeps your main counters free for other tasks and contains the mess from food prep in one easy-to-clean spot.
DIY Instructions: Create a Sink Workstation
What You’ll Need:
- A cutting board designed to fit over your sink (or a large, sturdy one that can sit safely on top)
- A small trash bin or compost pail
- A colander
Step-by-Step Guide:
- Position Your Board: First, place the cutting board so it sits securely over one side of your sink.
- Set Up Your Bin: Hang your small trash bin on the cabinet door directly below the cutting board.
- Chop and Scrape: As you chop your vegetables, you can easily sweep the peels and ends right off the board and into the bin below.
- Rinse and Drain: Place your colander in the other side of the sink. After chopping, you can slide your vegetables into the colander for a quick rinse.
- Easy Cleanup: When you’re done, all the mess is contained in one area, making cleanup fast and simple.
5. Hidden Appliance Garage

Keep your countertops clear and clutter-free by tucking away your small appliances. A “garage” or a pull-out shelf in a lower cabinet is a clever way to store items like your toaster, blender, and coffee maker. This keeps them out of sight but still easily accessible when you need them.
This solution is particularly helpful during the holidays when you need every inch of counter space for serving dishes and entertaining. A simple curtain or a roll-down door can hide the appliances, giving your kitchen a clean and streamlined look.
DIY Instructions: Make a Simple Appliance Curtain
What You’ll Need:
- A small tension rod that fits the width of your cabinet opening
- A piece of fabric (like a tea towel or a cloth napkin)
- Clip-on curtain rings
Step-by-Step Guide:
- Measure Your Space: First, measure the opening of the cabinet where your appliances are.
- Adjust the Rod: Twist your tension rod so it’s slightly longer than the cabinet opening.
- Attach Your Curtain: Clip the curtain rings evenly along the top edge of your piece of fabric.
- Hang the Curtain: Slide the rings onto the tension rod.
- Install the Rod: Squeeze the tension rod to make it shorter, then fit it into place at the top of the cabinet opening. The spring inside will hold it firmly in place, and the curtain will hide your appliances.
6. Labeled Pantry Canisters
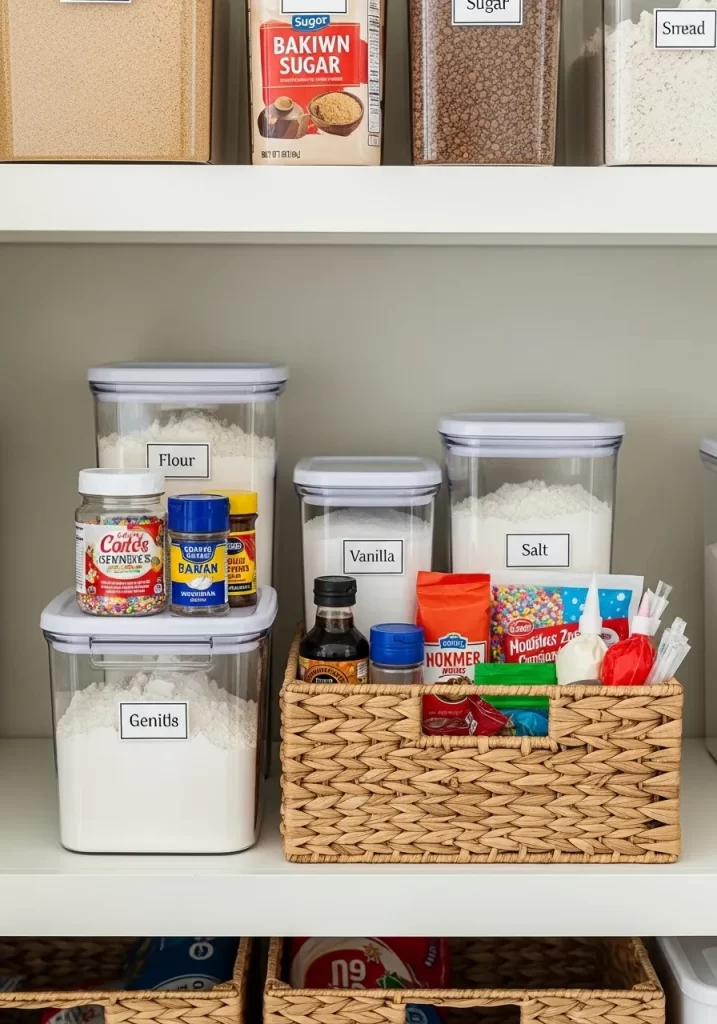
Bring order to your pantry shelves with clear, labeled containers. Transferring dry goods like flour, sugar, and pasta into uniform canisters makes it easy to see what you have at a glance. This prevents you from buying duplicates and helps you quickly find what you need for holiday baking.
Using labels on your containers takes the guesswork out of identifying your ingredients. A tidy, organized pantry not only looks great but also makes your cooking and baking process much more efficient and enjoyable.
DIY Instructions: Create Your Own Pantry Labels
What You’ll Need:
- Clear containers or canisters
- A label maker, or sticker labels and a pen
- Your pantry items (flour, sugar, etc.)
Step-by-Step Guide:
- Clean Your Canisters: Make sure all your containers are clean and completely dry before you start.
- Fill Them Up: Carefully pour your flour, sugar, and other dry goods into the canisters.
- Make the Labels: Using your label maker or a sticker and pen, create a clear label for each ingredient.
- Stick Them On: Peel the back off the label and press it firmly onto the front of the matching canister. Try to place it in the same spot on each one for a neat look.
- Arrange Your Pantry: Place your newly labeled canisters on your pantry shelf. Now everything is organized and easy to find!
7. Holiday Snack Welcome Basket

Make your guests feel welcome the moment they arrive. A basket filled with a variety of snacks is a thoughtful way to greet family and friends, especially those who have traveled. It provides easy-to-grab treats that can keep hunger at bay before the main meal is ready.
This self-serve snack station also takes some of the pressure off you as the host. Guests can help themselves whenever they feel peckish. Including a small, handwritten “Help Yourself!” sign adds a warm and personal touch to the display.
DIY Instructions: Assemble a Snack Basket
What You’ll Need:
- A nice basket
- A variety of single-serving snacks (like granola bars, bags of chips, fruit snacks)
- A small chalkboard sign or a piece of cardstock
- A marker or chalk pen
Step-by-Step Guide:
- Choose a Good Spot: Find a place for your basket where guests will see it, like on a kitchen counter or an entryway table.
- Arrange the Snacks: Start by placing the taller snack items in the back of the basket. Then, fill in the front with the smaller items.
- Create Your Sign: On your small sign, write a welcoming message like “Holiday Treats – Help Yourself!”
- Place the Sign: Tuck the sign into the front of the basket so it’s easy for everyone to read.
- Add a Finishing Touch: You can also include some juice boxes or small water bottles for a complete welcome station.
8. Over-the-Door Spice Rack

Utilize the often-overlooked space on the back of your pantry door. An over-the-door rack is an excellent way to organize your entire spice collection. It keeps your spices visible and easy to access, freeing up valuable cabinet or counter space.
This storage solution allows you to see all of your spices at once, so you can quickly find what you need for your holiday recipes. It’s a simple and affordable way to bring order to a chaotic spice collection and make your kitchen more functional.
DIY Instructions: Hang a Door Rack
What You’ll Need:
- An over-the-door rack organizer
- Your collection of spice jars
Step-by-Step Guide:
- Assemble the Rack: First, follow the simple instructions that came with your rack to put it together. Usually, you just need to attach the hooks at the top.
- Hang It Up: Open your pantry door and simply hang the rack over the top. No screws or tools are needed!
- Sort Your Spices: Before you put your spices on the rack, it’s helpful to group them. You could put them in alphabetical order or group them by type (like baking spices together).
- Load the Shelves: Neatly place your spice jars onto the shelves of the rack.
- Enjoy Your Tidy Pantry: Close the door, and your spices are now perfectly organized and out of the way.
9. Rotating Corner Cabinet Organizer

Tame the dreaded corner cabinet with a Lazy Susan. These rotating shelves are a brilliant solution for deep and hard-to-reach corner cabinets. They bring everything from the back of the cabinet to the front with a simple spin, so nothing gets lost or forgotten.
A Lazy Susan allows you to easily see and access all your oils, vinegars, and canned goods. It transforms a frustrating and cluttered space into a highly functional storage area. This simple upgrade makes finding your ingredients much faster and more convenient.
DIY Instructions: Organize with a Lazy Susan
What You’ll Need:
- A Lazy Susan turntable that fits on your cabinet shelf
- Canned goods, jars, and bottles from your cabinet
Step-by-Step Guide:
- Clear the Cabinet: Start by taking everything out of your corner cabinet.
- Place the Lazy Susan: Set the Lazy Susan inside on the shelf.
- Arrange Your Items: Place your cans and jars onto the turntable. It’s best to put taller items in the center and shorter items around the edge.
- Give It a Spin: Gently spin the Lazy Susan to make sure everything stays in place and nothing hits the sides of the cabinet.
- Fill the Gaps: You can place other items in the corners of the cabinet around the Lazy Susan. Now, with a quick turn, you can reach everything!
10. Under-Shelf Glassware Holder

Create a sophisticated and space-saving storage solution for your stemware. An under-shelf rack designed for wine glasses is a classic feature of bars and restaurants that you can easily add to your own kitchen cabinet. It keeps your delicate glasses safe, dust-free, and easily accessible.
This type of rack utilizes the unused vertical space in your cabinets, freeing up the shelf below for other items like tumblers or coffee mugs. It’s an elegant and practical way to organize your glassware and add a professional touch to your kitchen.
DIY Instructions: Install a Stemware Rack
What You’ll Need:
- An under-cabinet stemware rack
- A screwdriver or a small drill
- A pencil
Step-by-Step Guide:
- Choose Your Spot: Decide which cabinet shelf you want to hang the rack from.
- Mark the Holes: Hold the rack up to the underside of the shelf. Use a pencil to mark where the screw holes are.
- Make Pilot Holes: It’s helpful to drill very small “starter” holes on your pencil marks. This will make it easier to screw the rack in.
- Attach the Rack: Hold the rack back up in place and use your screwdriver to attach it to the shelf with the screws that came with it.
- Hang Your Glasses: Once the rack is secure, you can slide your wine glasses in upside down by their base.
11. Designated Party Fridge Zone

Prevent party-food chaos by dedicating a specific area of your refrigerator just for entertaining. By clearing a shelf or a drawer and labeling it “Party Food Only,” you create an organized hub for platters, desserts, and drinks. This makes it easy to find what you need without hunting behind everyday items.
This simple strategy keeps your party prep contained and accessible. When it’s time to serve, everything is ready to go. It also helps family members know which foods are for the event, avoiding any accidental snacking on the main course.
DIY Instructions: Create a “Party Only” Fridge Space
What You’ll Need:
- A roll of masking tape or a fun, colorful tape
- A dark marker
- Your prepared party dishes and drinks
Step-by-Step Guide:
- Choose Your Zone: First, decide which shelf or drawer in your fridge will be for party food. It’s a good idea to pick one that’s easy to reach.
- Clear It Out: Move any everyday items from that spot to another shelf.
- Make Your Label: Tear off a piece of tape. With your marker, write “Party Food Only!” in big, clear letters.
- Label the Zone: Stick the tape on the front edge of the shelf or on the drawer itself so everyone can see it.
- Load It Up: Carefully place your prepared party platters, cakes, and special drinks into the designated zone. Now everything is organized and ready for your guests!
12. Streamlined Beverage Drawer

Transform a refrigerator drawer into a self-serve drink station. Using clear organizer bins, you can neatly arrange cans of soda, juice boxes, and bottles. This system keeps beverages from rolling around and makes it simple for guests to see the choices and grab what they want.
An organized beverage drawer frees up valuable shelf space in the main part of your fridge. It also reduces the time the refrigerator door is left open as people hunt for a drink. It’s an efficient way to keep everyone refreshed and your fridge tidy.
DIY Instructions: Set Up a Drink Drawer
What You’ll Need:
- Clear plastic bins that fit in your fridge drawer
- A variety of canned and bottled drinks
Step-by-Step Guide:
- Measure Your Drawer: Before you get bins, measure the inside of your fridge drawer to make sure they will fit.
- Clean the Space: Take everything out of the drawer and give it a good wipe down.
- Place Your Bins: Set the empty plastic bins inside the drawer. You might use a few different sizes depending on your needs.
- Sort Your Drinks: Group similar drinks together. For example, put all the sodas in one bin and all the juice boxes in another.
- Fill the Bins: Neatly line up the drinks inside their assigned bins. Now you have a tidy drink drawer where everything is easy to find.
13. Magnetic Fresh Herb Savers

Keep your fresh herbs from getting lost in the refrigerator. Small magnetic containers on the side of your fridge provide a clever and convenient home for herbs like rosemary, thyme, and parsley. This method keeps them visible and within easy reach while you’re cooking your holiday meals.
Storing herbs this way also helps them stay fresher by preventing them from getting crushed in a crowded crisper drawer. It adds a touch of greenery to your kitchen and ensures you remember to use them before they wilt.
DIY Instructions: Make Your Own Magnetic Herb Jars
What You’ll Need:
- Small, clear containers with lids (plastic or magnetic spice tins work well)
- Strong craft magnets
- A hot glue gun or strong craft glue
- A label maker or small stickers and a pen
- A paper towel
Step-by-Step Guide:
- Prep Your Jars: Make sure your small containers are clean and completely dry.
- Attach the Magnets: Put a dot of hot glue on the back of a container and press a magnet firmly onto it. Hold it for a few seconds until the glue sets. Do this for all your containers.
- Label Them: Create labels for your herbs, like “Thyme” or “Rosemary,” and stick them on the front of the containers.
- Add Your Herbs: Gently place your fresh herbs inside. You can put a tiny piece of damp paper towel at the bottom to help keep them fresh.
- Stick Them Up: Place your new magnetic herb savers on the side of your refrigerator.
14. Freezer Door Inventory List

Avoid the mystery of what’s buried in your freezer. A small whiteboard or a simple list on the freezer door acts as an inventory system. This helps you keep track of all the make-ahead holiday dishes, cookie dough, and appetizers you’ve prepared.
An inventory list saves you from buying duplicates and helps prevent food from getting forgotten and wasted. When you’re planning your meals, a quick glance at the list tells you exactly what you have on hand. It makes holiday cooking much more organized.
DIY Instructions: Create a Freezer Tracker
What You’ll Need:
- A small magnetic whiteboard
- A dry-erase marker
- The food you are putting in the freezer
Step-by-Step Guide:
- Stick it On: Place the magnetic whiteboard on the front of your freezer door.
- Make Your Columns: Use the dry-erase marker to draw two lines down the board, creating three columns.
- Label Your Columns: At the top of the columns, write “What,” “How Many,” and “Date Made.”
- List Your Food: Every time you put a make-ahead meal in the freezer, write it down on the board. For example: “Cookie Dough,” “1 roll,” “Dec 10.”
- Erase When Used: When you take something out to use it, simply erase that line from your list. Your inventory will always be up to date!
15. Flat-Freeze for Maximum Space

Make your freezer feel twice as big with this simple technique. By freezing soups, stews, and sauces flat in resealable bags, you can stack them like books on a shelf. This method eliminates bulky containers that take up precious freezer space.
Freezing food flat also helps it to thaw more quickly and evenly. It’s an incredibly efficient way to prepare meals in advance for the holidays. You can store a large amount of food in an organized way, ready to be heated up for your guests.
DIY Instructions: How to Freeze Soups Flat
What You’ll Need:
- Resealable freezer bags (the zip-top kind)
- A baking sheet
- A ladle
- Your cooled soup or sauce
Step-by-Step Guide:
- Label First: Before you fill it, use a marker to write the name of the food and the date on the freezer bag.
- Fill the Bag: Place a freezer bag in a bowl and fold the top edges over to help it stand up. Use the ladle to carefully pour the soup into the bag. Don’t fill it all the way to the top.
- Remove the Air: Squeeze as much air out of the bag as you can, then seal it tightly.
- Lay it Flat: Place the sealed bag flat on the baking sheet. The sheet keeps it level and makes it easy to carry.
- Freeze It: Carefully slide the baking sheet into the freezer. Leave it there for a few hours until the soup is frozen solid.
- Stack It Up: Once it’s frozen, you can remove the baking sheet and stack your flat bags of soup neatly in the freezer.
16. Simple Buffet Dish Labels

Help your guests know exactly what they are eating. Clearly labeling each dish on a buffet table is a thoughtful touch, especially for those with allergies or dietary restrictions. Simple, handwritten labels are all you need to identify everything from the mashed potatoes to the green bean casserole.
This small detail prevents a lot of questions and keeps the buffet line moving smoothly. It shows your guests that you’ve considered their needs and adds a layer of organization to your holiday spread, making the meal more enjoyable for everyone.
DIY Instructions: Make Easy Food Tents
What You’ll Need:
- Plain note cards or thick paper (like cardstock)
- A pair of scissors (if using cardstock)
- A pen or marker
Step-by-Step Guide:
- Prepare Your Cards: If you are using a large piece of cardstock, cut it into smaller rectangles, about the size of a business card.
- Fold in Half: Take one of your cards and fold it in half the long way, like a little tent.
- Write the Name: On the front of the tent, write the name of the dish in clear, easy-to-read letters.
- Add Details (Optional): You can also add a little note below the name, like “(Contains Nuts)” or “(Gluten-Free).”
- Place the Label: Set the finished food tent on the table right in front of its matching dish. Repeat for all the food on your buffet!
17. Grab-and-Go Cutlery Bundles

Make your table setting simple and stylish. Rolling silverware in napkins creates convenient bundles that are easy for guests to grab. This is especially useful for a buffet-style holiday meal, as it keeps everything neat and allows guests to pick up their utensils all at once.
Preparing these bundles ahead of time saves you from a last-minute rush when setting the table. A festive ribbon or a sprig of fresh rosemary can be added for a decorative touch, turning a practical item into a beautiful part of your holiday decor.
DIY Instructions: Create Festive Silverware Rolls
What You’ll Need:
- Cloth or nice paper napkins
- A fork, knife, and spoon for each guest
- Ribbon, twine, or decorative paper strips
- Optional: A small sprig of a fresh herb like rosemary
Step-by-Step Guide:
- Lay Out Your Napkin: Place a napkin flat on the table in a diamond shape, with one corner pointing towards you.
- Stack Your Silverware: Place the knife, fork, and spoon together in a neat stack in the center of the napkin.
- Add a Garnish: If you’re using it, lay a small sprig of rosemary on top of the silverware.
- Start Rolling: Fold the bottom corner of the napkin up over the silverware. Then, fold the left and right sides in.
- Roll It Up: Tightly roll the silverware bundle up towards the top corner.
- Tie It Together: Take a piece of ribbon or twine and tie it around the middle of the napkin roll to keep it secure. Make a simple bow to finish it off.
18. Self-Serve Hot Cocoa Bar

Create a cozy and interactive experience for your guests. A hot cocoa bar lets everyone customize their own warm drink, and it’s a festive addition to any holiday gathering. Keep the cocoa warm in a slow cooker or thermal carafe for easy self-service.
Arrange a tray with mugs and a variety of toppings in small bowls, such as marshmallows, chocolate shavings, and crushed peppermint. This fun station frees you up from playing bartender and allows guests to mingle while they create their own tasty concoctions.
DIY Instructions: Assemble a Hot Cocoa Station
What You’ll Need:
- A slow cooker or large thermos for the hot cocoa
- Mugs
- A tray
- Small bowls for toppings
- A variety of toppings (mini marshmallows, chocolate chips, whipped cream, peppermint sticks, etc.)
- Small spoons for the toppings
Step-by-Step Guide:
- Prepare the Cocoa: Make your favorite hot cocoa recipe and pour it into the slow cooker on the “warm” setting.
- Set Up the Station: Find a spot on your counter or a side table. Place the slow cooker and a stack of clean mugs there.
- Arrange Toppings: Fill your small bowls with all the different toppings. Arrange these bowls on a tray to keep them organized.
- Add the Spoons: Place a small spoon in each topping bowl so guests can easily serve themselves.
- Invite Your Guests: Let everyone know they can help themselves to a warm cup of hot cocoa and create their own masterpiece!
19. Guided Cleanup Station

Make after-party cleanup less of a chore. By setting up a designated spot for dirty dishes and clearly labeling where things go, you can guide your guests to help out. A simple sign pointing to where plates should be scraped makes the process clear and easy for everyone.
This system prevents a huge pile-up of dishes in the sink and keeps your kitchen from becoming overwhelmed. Labels on cabinets for “Recycling” or “Trash” also help guests sort their waste correctly. It’s a simple way to make cleanup a team effort.
DIY Instructions: Create a Dish Drop-Off Zone
What You’ll Need:
- A trash can with a fresh liner
- A bin or large bowl for soaking silverware
- A stack of extra napkins or paper towels for wiping
- A piece of paper and a marker
- Tape
Step-by-Step Guide:
- Choose Your Spot: Find a clear area on your counter near the trash can. This will be your cleanup zone.
- Set Up the Bins: Place the trash can on the floor. On the counter above it, place the bin you’ll use for silverware. Fill it with a little bit of warm, soapy water.
- Make Your Sign: On the piece of paper, write “Scrape Plates Here” with an arrow pointing down towards the trash can.
- Post the Sign: Tape the sign to the wall or a cabinet right above your cleanup station.
- Direct Traffic: When guests are done eating, let them know where they can bring their plates. They can scrape any leftover food into the trash and drop their silverware into the soaking bin.
20. Centralized Waste Sorting Center

Keep your home tidy and make recycling easier during a busy party. A centralized waste station with clearly labeled bins for trash, recycling, and compost helps everyone know exactly where to put their waste. This prevents confusion and keeps recyclables out of the landfill.
Having large, dedicated bins in one convenient spot means you won’t have overflowing trash cans in your kitchen. Guests will appreciate the clear instructions, and you’ll appreciate a cleaner space and a more organized cleanup process after the party is over.
DIY Instructions: Set Up a Sorting Station
What You’ll Need:
- Two or three large trash bins or containers
- Large labels or a thick marker
- Trash bags
Step-by-Step Guide:
- Pick a Location: Find a spot for your station that’s easy to get to but out of the main way, like in a mudroom, garage, or a corner of the kitchen.
- Label Your Bins: Line each bin with a bag. On the front of the first bin, write “TRASH” in big letters. On the second, write “RECYCLING.” If you have a third, label it “COMPOST.”
- Line Them Up: Place your labeled bins next to each other in your chosen spot.
- Give a Quick Tour: When guests arrive, you can quickly point out the sorting station so they know where to go when they need to throw something away.
- Empty as Needed: During the party, keep an eye on the bins and take out the bags when they get full.
21. Portable Under-Sink Cleaning Caddy

Keep your cleaning supplies organized and ready for action. A portable caddy under the sink corrals all your bottles, sponges, and cloths into one grab-and-go container. This simple system prevents a jumble of supplies from getting lost in the back of the cabinet.
When a holiday spill happens, you can quickly grab the entire caddy and take it directly to the mess. There’s no frantic searching for the right cleaner. It keeps your most-used items tidy and accessible, making quick cleanups a breeze during any gathering.
DIY Instructions: Assemble Your Cleaning Kit
What You’ll Need:
- A plastic caddy or a small bucket with a handle
- Your favorite cleaning sprays (like glass cleaner and all-purpose spray)
- Sponges and cleaning cloths
- A roll of paper towels
Step-by-Step Guide:
- Gather Your Supplies: First, collect all the cleaning supplies you use the most.
- Organize the Caddy: Place the tall spray bottles in the center of the caddy. This keeps it balanced and easy to carry.
- Add Smaller Items: Tuck your sponges and folded cloths into the spaces around the bottles.
- Include Paper Towels: If your caddy is big enough, you can stand a roll of paper towels inside. If not, just place it next to the caddy under the sink.
- Store It Away: Slide your completed cleaning caddy into the cabinet under the sink. Now you’re prepared for any spill!
22. Systematic Dishwashing Station

Tackle a mountain of dirty dishes with an organized system. Setting up a series of bins for soaking, scraping, and rinsing creates an assembly line for washing up. This method breaks down a big job into small, manageable steps and prevents a messy pile-up in the sink.
This approach is especially helpful after a large holiday dinner. You can clear the table and sort the dishes efficiently, keeping the kitchen from feeling chaotic. Each dish moves through the process smoothly, making the final wash and dry much faster and less overwhelming.
DIY Instructions: Create a Dish-Sorting System
What You’ll Need:
- Three medium-sized plastic bins or tubs
- A waterproof marker or sticker labels
- A spatula or dish scraper
Step-by-Step Guide:
- Label Your Bins: On the first bin, write “SOAK” for tough, baked-on food. On the second, write “SCRAPE” for leftover food bits. On the third, write “READY TO WASH.”
- Set Up Your Station: Place the three labeled bins in a row on the counter next to your sink.
- Start with Soaking: Fill the “SOAK” bin with a little warm, soapy water. Put very dirty pots and pans in here first.
- Scrape the Plates: As you clear the table, use a spatula to scrape leftover food from plates into the “SCRAPE” bin or directly into the trash/compost.
- Rinse and Stack: Give the scraped dishes a quick rinse and place them in the “READY TO WASH” bin. Now you have a neat pile of dishes, ready for the dishwasher or hand washing.
23. Mise en Place Spice Tray

Make cooking your holiday recipes feel calm and professional. The French technique “mise en place” simply means “everything in its place.” By measuring out all your spices and small ingredients beforehand, you can streamline the cooking process.
Using small bowls on a tray or even a muffin tin keeps your ingredients organized. When it’s time to cook, you’re not fumbling with spice jars or measurement spoons. Everything is prepped and ready to be added at the right moment, which helps prevent mistakes and reduces stress.
DIY Instructions: Set Up Your Recipe Prep Station
What You’ll Need:
- A small baking sheet or a tray
- A mini muffin tin or several small bowls
- Your recipe
- All the spices and small ingredients for the recipe
- Measuring spoons
Step-by-Step Guide:
- Read Your Recipe: First, read through your recipe and find all the small ingredients you’ll need, like spices, herbs, and baking powder.
- Measure Everything: Carefully measure out each ingredient. For spices, you can put each one in a separate cup of the mini muffin tin.
- Use the Bowls: For slightly larger ingredients like chopped herbs or minced garlic, use the small bowls.
- Organize on the Tray: Place all your filled muffin tin cups and small bowls onto the baking sheet.
- Ready to Cook: Set the tray next to your stove. As you follow the recipe, you can just grab and add each ingredient as you need it. No more searching while you cook!
24. Vertical Bakeware Dividers

Stop the noisy avalanche of falling pans every time you open a cabinet. Storing your bakeware vertically is a game-changing solution. Adjustable wire dividers turn a messy stack into a neat file of cookie sheets, cutting boards, and muffin tins.
This method allows you to see everything at a glance and easily slide out the exact item you need without disturbing the rest. It maximizes your cabinet space and makes accessing your bakeware much less of a hassle.
DIY Instructions: Install Cabinet Organizers
What You’ll Need:
- An adjustable cabinet organizer rack (tension-based or with screws)
- All your flat bakeware, like baking sheets and cutting boards
Step-by-Step Guide:
- Empty and Clean: Start by taking everything out of the cabinet and giving it a quick wipe.
- Assemble the Rack: Follow the instructions that came with your organizer. Many are simple tension rods that you just twist to fit the space.
- Position the Rack: Place the organizer inside your cabinet. If it’s a tension rack, adjust it until it fits snugly from top to bottom or side to side.
- Arrange Your Bakeware: Slide your baking sheets, pans, and cutting boards into the slots of the organizer. They should stand up on their sides like books on a shelf.
- Enjoy the Order: Now you can easily see and grab any pan you need without a clatter.
25. Hands-Free Digital Recipe Holder

Keep your tablet or phone clean and viewable while you cook. A simple cabinet or shelf-mounted holder for your device creates a hands-free recipe station. This positions the screen at eye level, so you can easily follow along with the steps without constantly picking up your device with messy hands.
This setup protects your electronics from spills and splatters on the counter. For paper recipes, a simple clip on the inside of a cabinet door works just as well. It’s a smart way to keep your recipe in sight and your workspace clear.
DIY Instructions: Create a No-Drill Recipe Mount
What You’ll Need:
- An over-the-cabinet-door hook
- A large binder clip
- Your printed recipe
Step-by-Step Guide:
- Hang the Hook: Open the cabinet door where you want your recipe to hang. Place the hook over the top of the door.
- Clip the Recipe: Take your printed recipe pages and clip them together securely with the large binder clip.
- Hang It Up: One of the metal loops on the binder clip can be flipped up. Hang this loop on the hook you placed on the cabinet door.
- Close the Door: Gently close the cabinet door. Your recipe should now be hanging at a comfortable height for you to read while you cook.
26. Magnetic Wall and Fridge Storage

Free up precious counter and drawer space by using magnetic surfaces. A magnetic knife strip mounted on the wall keeps your most-used knives safely organized and within easy reach. This is often safer than a knife block, as it allows blades to air dry and prevents dulling.
The side of your refrigerator is another magnetic goldmine. A magnetic rack can hold utensils, spice jars, or even a paper towel roll. This utilizes vertical space that is often ignored, helping to declutter your work surfaces.
DIY Instructions: Install a Magnetic Knife Strip
What You’ll Need:
- A magnetic knife strip kit (should include the strip, screws, and wall anchors)
- A pencil
- A level
- A drill
Step-by-Step Guide:
- Choose Your Spot: Find a clear spot on your kitchen wall where you want to hang your knives. Make sure it’s high enough to be out of reach of small children.
- Mark the Wall: Hold the knife strip against the wall. Use the level to make sure it’s perfectly straight. Use your pencil to mark the wall through the screw holes.
- Drill the Holes: Set the knife strip aside. Drill small pilot holes where you made your pencil marks. If the instructions call for wall anchors, gently tap them into the holes.
- Attach the Strip: Hold the knife strip back up to the wall, lining up its holes with the holes you drilled. Use the drill to screw the provided screws into place.
- Add Your Knives: Carefully place your knives onto the magnetic strip. They should hold firmly.
27. Pegboard Pot and Pan Organizer

Turn the inside of a deep cabinet or pantry into a highly efficient storage wall. A pegboard system allows you to completely customize your storage for pots, pans, lids, and utensils. You can arrange the hooks to perfectly fit your collection, keeping everything visible and easy to grab.
This method prevents you from having to unstack a heavy pile of pans to get to the one at the bottom. Lids can be hung, and frequently used utensils can be placed right where you need them. It’s a versatile solution for taming even the most chaotic cookware collection.
DIY Instructions: Set Up a Small Pegboard
What You’ll Need:
- A small pegboard panel that fits inside your cabinet
- Pegboard hooks and hangers
- Screws
- A drill
Step-by-Step Guide:
- Measure Your Space: First, measure the back wall of the cabinet where you want to hang the pegboard to make sure the panel will fit.
- Position the Pegboard: Hold the pegboard inside the cabinet against the back wall.
- Secure It: While holding it in place, use your drill to drive screws through the corner holes of the pegboard and into the back of the cabinet. Make sure it’s secure.
- Insert Your Hooks: Now for the fun part. Start placing the pegboard hooks into the holes. Think about where you want to hang your different pans and tools.
- Hang Your Cookware: Hang your pots, pans, and utensils on the hooks. You can rearrange them anytime you want!
28. Open Shelf Coffee and Mug Display

Create a charming and functional coffee station with open shelving. This approach turns your collection of mugs into a part of your kitchen decor. Open shelves make it easy for family and guests to find a mug and help themselves to a warm beverage.
Adding small hooks to the underside of a shelf doubles your storage capacity and adds visual interest. This setup keeps your mugs out of cluttered cabinets and creates a cozy, café-like corner in your home, which is especially welcoming during the holidays.
DIY Instructions: Add Under-Shelf Mug Hooks
What You’ll Need:
- Small screw-in hooks (cup hooks)
- A ruler or tape measure
- A pencil
Step-by-Step Guide:
- Plan Your Spacing: Decide how many mugs you want to hang under your shelf. Use a ruler to measure and mark evenly spaced spots for the hooks with a pencil. Make sure to leave enough room so the mugs won’t bump into each other.
- Start the Hole: To make screwing the hooks in easier, you can gently tap a small nail into your pencil mark to create a starting hole. Then, remove the nail.
- Screw in the Hooks: Take a hook and press the pointy, threaded end into the starting hole. Twist the hook by hand, pushing gently as you turn it.
- Keep Twisting: Continue twisting the hook until the threaded part is completely in the wood and the hook is facing forward.
- Hang Your Mugs: Repeat for all your hooks. Once they are all in place, you can hang your favorite mugs by their handles.
29. Adjustable Drawer Dividers

Tame the utensil drawer with dividers that can be customized to your needs. Standard drawer trays often don’t fit oddly shaped tools like whisks, rolling pins, and large serving spoons. Adjustable dividers allow you to create custom-sized compartments for every item.
These spring-loaded or slide-to-fit dividers are easy to install and rearrange. They create a specific home for each utensil, keeping the drawer neat and making it much faster to find the tool you’re looking for. A tidy utensil drawer is a small change that brings a lot of calm to a busy kitchen.
DIY Instructions: Install Tension Drawer Dividers
What You’ll Need:
- Spring-loaded drawer dividers (make sure they are the right height and length for your drawer)
Step-by-Step Guide:
- Empty the Drawer: Take everything out of your utensil drawer and give it a quick wipe.
- Compress the Divider: A spring-loaded divider works like a tension rod. Squeeze the ends together to make it shorter.
- Place it in the Drawer: While it’s compressed, place the divider inside the drawer where you want your first section to be.
- Let it Expand: Slowly release the ends. The spring will push them outwards until they are pressed firmly against the front and back (or sides) of the drawer.
- Add More Dividers: Repeat the process to create as many custom-sized compartments as you need for your different utensils.
- Organize Your Tools: Place your utensils into their new, perfectly sized homes.
30. Host’s Emergency Toolkit Drawer

Be prepared for any small hosting emergency with a dedicated toolkit. A “Host’s Helpkit” is a drawer or box filled with all the little things you might need during a party. This can include items like a bottle opener, a lighter for candles, extra batteries, scissors, and tape.
Having these essentials organized in one spot saves you from a frantic search when you need something quickly. It’s a simple prep step that ensures you can handle minor issues smoothly and stay focused on your guests and the celebration.
DIY Instructions: Assemble a Host’s Helpkit
What You’ll Need:
- A small box (like a shoebox) or a drawer organizer tray
- A label and a marker
- Items you might need in a pinch: a bottle opener, corkscrew, scissors, tape, a lighter or matches, pens, extra batteries, twist ties.
Step-by-Step Guide:
- Choose Your Container: Find a box or a drawer tray that will hold all your items.
- Label It: Write “Host’s Helpkit” on a label and stick it on the box. This helps you remember what it is and find it easily.
- Gather Your Items: Collect all the small but important tools you might need during a party. Think about things you’ve had to search for in the past.
- Organize the Kit: Neatly arrange everything in the box or drawer tray. A tray with built-in compartments is great for keeping small things like batteries from rolling around.
- Store It: Place your completed kit in an easy-to-access drawer or cabinet in your kitchen. Now you’re ready for anything!
31. Centralized Gift Wrap Station

Avoid the yearly hunt for scissors and tape by creating a dedicated gift-wrapping drawer. Using a simple drawer organizer, you can neatly arrange wrapping paper rolls, gift tags, ribbons, and pens all in one place. Everything has a designated spot, keeping your supplies tidy and ready for use.
This organized system turns a potentially chaotic task into a smooth and enjoyable process. When you need to wrap a last-minute gift, you can simply open the drawer and find everything you need instantly. It’s a smart way to keep your holiday prep stress-free.
DIY Instructions: Create a Gift Wrap Drawer
What You’ll Need:
- A deep drawer
- A drawer organizer insert or a few small boxes
- Your wrapping paper, tape, scissors, ribbons, and gift tags
Step-by-Step Guide:
- Empty and Clean: First, take everything out of the drawer you’ve chosen and give it a quick wipe.
- Place Your Organizer: Put your drawer organizer insert inside. If you’re using small boxes, arrange them to create different compartments.
- Sort Your Supplies: Group your wrapping supplies. Put all the gift tags in one spot, ribbons in another.
- Fill the Drawer: Lay the rolls of wrapping paper in the long compartments. Place your tape dispenser, scissors, and pens in the smaller sections.
- Neatly Arrange: Tuck your tags and ribbons into their own spots. Now your gift wrap station is complete and ready for the holidays!
32. Kid-Friendly Self-Serve Drawer

Empower your youngest guests and make hosting easier with a kid-friendly drawer. By stocking a low, easy-to-reach drawer with children’s plates, cups, utensils, and healthy snacks, you allow them to help themselves. This fosters independence and means fewer interruptions for you.
Using small bins and dividers keeps the drawer organized and makes it easy for little hands to find what they’re looking for. It’s a thoughtful way to show that you’ve considered the needs of all your guests, no matter their size.
DIY Instructions: Set Up a Kids’ Station Drawer
What You’ll Need:
- A low drawer that kids can reach safely
- Several small, open-top plastic bins
- Kid-safe cups, plates, and utensils
- A variety of pre-packaged, kid-friendly snacks
Step-by-Step Guide:
- Choose Your Drawer: Pick a drawer that is low to the ground and easy for a child to open.
- Clean the Space: Empty the drawer and wipe it clean.
- Arrange Your Bins: Place the empty plastic bins inside the drawer to create separate sections.
- Sort the Items: Designate one bin for cups, one for snacks, one for utensils, and so on.
- Stock It Up: Fill the bins with your kid-friendly items. Stack the plates neatly next to the bins. Now, little ones can get what they need all by themselves.
33. Above-Cabinet Storage Solutions

Claim the valuable but often-forgotten real estate on top of your kitchen cabinets. This space is well-suited for storing items you don’t use every day, such as large serving platters, seasonal decor, or bulk pantry items. It frees up your more accessible cabinets for everyday essentials.
Using wire or wicker baskets keeps the area looking intentional and tidy rather than cluttered. It turns a dust-collecting surface into a functional and visually appealing storage zone, helping you to maximize every inch of your kitchen.
DIY Instructions: Organize Above Your Cabinets
What You’ll Need:
- A sturdy step stool
- Baskets or decorative bins
- Items you don’t use very often (like holiday cookie jars or large serving bowls)
Step-by-Step Guide:
- Clean the Surface: Safely use your step stool to get up high and wipe down the dusty tops of your cabinets.
- Sort Your Items: Gather the things you want to store up there. Group similar items together.
- Fill Your Baskets: Place the items neatly into your baskets. For example, put all your extra paper towels in one basket and your large mixing bowls in another.
- Arrange Them Nicely: Carefully place the filled baskets on top of the cabinets. Leave a little space between them so it doesn’t look too crowded.
34. Vertical Linen and Tablecloth Storage

Stop searching through a messy pile of linens. Storing your tablecloths, placemats, and napkins vertically in a drawer is a brilliant way to keep them organized. By “filing” them instead of stacking them, you can see every color and pattern at a glance.
This method makes it easy to pull out the exact linen you need without disturbing the others. It also helps to minimize wrinkles. You can use simple drawer dividers or even small boxes to keep everything upright and in its proper place.
DIY Instructions: File Your Linens
What You’ll Need:
- A deep drawer
- Drawer dividers or a few open boxes that fit inside the drawer
- Your collection of tablecloths and napkins
Step-by-Step Guide:
- Fold for Filing: Fold your tablecloths and napkins into neat, flat rectangles that are about the height of your drawer.
- Set Up Dividers: Place your drawer dividers or boxes inside the drawer to create sections. This will help your folded linens stand up.
- “File” Your Linens: Place the folded linens into the drawer vertically, like you’re putting files in a filing cabinet.
- Organize by Color or Season: You can arrange them by color or put all your holiday-themed linens together. Now you can see and grab what you need in an instant.
35. Make-Ahead Meal Kits and Mixes

Save precious time during the busy holiday season by preparing recipe kits in advance. Measure out the dry ingredients for your favorite cookies, pancakes, or soups and store them in labeled jars or bags. These “Go-Bags” are ready when you are.
When it’s time to bake or cook, you just need to add the wet ingredients. This simple prep step eliminates the need to take out and measure multiple ingredients, streamlining your cooking process. These also make wonderful and thoughtful gifts for friends and neighbors.
DIY Instructions: Create a “Cookies in a Jar” Kit
What You’ll Need:
- A large, clean glass jar with a lid (like a Mason jar)
- All the dry ingredients for your favorite cookie recipe (flour, sugar, brown sugar, baking soda, salt, chocolate chips)
- A small card, a hole punch, and a piece of twine or ribbon
Step-by-Step Guide:
- Layer Your Ingredients: Pour the dry ingredients into the jar one at a time to create pretty layers. A good order is: flour mixture, brown sugar, white sugar, and then chocolate chips on top.
- Seal the Jar: Pack the ingredients down firmly and seal the lid tightly.
- Write the Instructions: On the card, write down the “wet” ingredients the person will need (e.g., “Add 1 egg, 1/2 cup butter”) and the baking instructions (temperature and time).
- Attach the Tag: Punch a hole in the corner of the instruction card and use the twine to tie it around the neck of the jar.
36. Windowsill Fresh Herb Garden

Elevate your holiday cooking with the bright flavors of fresh herbs. A small garden on your kitchen windowsill is an easy and beautiful way to keep herbs like rosemary, thyme, and parsley on hand. You can snip off what you need for recipes, cocktails, and garnishes.
Having fresh herbs available saves you from buying expensive packages at the store, which often go to waste. The living plants add a touch of natural beauty and a wonderful aroma to your kitchen, making it feel even more welcoming.
DIY Instructions: Start a Simple Herb Garden
What You’ll Need:
- A few small pots with drainage holes
- Saucers to go under the pots
- Potting soil
- Small herb plants or seeds (parsley, rosemary, and thyme are good starters)
Step-by-Step Guide:
- Prepare Your Pots: Place a saucer under each pot to catch any extra water.
- Add the Soil: Fill each pot about three-quarters full with potting soil.
- Plant Your Herbs: If you have small plants, gently take one out of its container, place it in your new pot, and add more soil around it. If you’re using seeds, sprinkle a few on top of the soil and cover them with a thin layer of soil.
- Water Them In: Give your newly planted herbs a little bit of water.
- Find a Sunny Spot: Place your pots on a windowsill that gets at least a few hours of sunlight each day. Water them whenever the soil feels dry.
37. Strategic Dishwasher Loading Plan

Make your dishwasher work for you, not against you. A little strategy when loading can make a huge difference in how many dishes you can wash at once and how clean they get. Following a few simple rules prevents you from having to re-wash items.
This efficiency is key after a big holiday meal. By loading correctly, you can fit more in each cycle, clear the counters faster, and use less water and energy. You’ll be able to relax sooner knowing the cleanup is handled effectively.
DIY Instructions: The Basics of Loading a Dishwasher
What You’ll Need:
- Your dirty dishes
- A dishwasher
Step-by-Step Guide:
- Scrape, Don’t Rinse: Scrape any large pieces of food off your plates into the trash. You don’t need to rinse them completely.
- Bottom Rack for Big Stuff: Place your large, heavy items like dinner plates and pots on the bottom rack. Face them towards the center where the water spray is strongest.
- Top Rack for Small Stuff: Put glasses, cups, and small bowls on the top rack, placing them upside down so they don’t fill with water.
- Silverware Smarts: Place forks and spoons in the silverware basket with their handles facing both up and down. This stops them from “nesting” together so they get cleaner. Place knives with the blade down for safety.
- Check for Blockages: Before you start the cycle, give the spray arms a little spin with your hand to make sure nothing is blocking them from turning.
38. Create Conversational Flow Zones

Design your party space to encourage mingling and prevent traffic jams. Instead of putting all the food in one spot, create a few different stations. You might have appetizers on the kitchen island, drinks on a side table, and dessert in another area.
This layout naturally encourages guests to move around the space and interact with different people. It prevents a big crowd from forming in one area and makes it easier for everyone to access the food and drinks. A well-planned flow makes your home feel more spacious and the party more dynamic.
DIY Instructions: Plan Your Party Layout
What You’ll Need:
- Your food and drink items
- The tables, counters, and surfaces you’ll be using
Step-by-Step Guide:
- Think About a Path: Imagine how your guests will walk through the room. Try not to block main pathways, like the way to the bathroom or the exit.
- Separate Food and Drinks: Place your main food buffet in one area and the drink station in another. This immediately splits the crowd into two smaller groups.
- Use Different Surfaces: Put a bowl of snacks on the coffee table, appetizers on the kitchen counter, and maybe a dessert stand on a small side table.
- Create a Landing Zone: Make sure there are places for guests to put down their empty plates and glasses.
- Walk Through It: Before guests arrive, walk the path yourself to make sure it feels open and easy to navigate.
39. Quick-Access Stain Removal Kit

Be ready for the inevitable holiday spills with a pre-made stain removal kit. A small basket with a few essentials can be a lifesaver when someone drips red wine on the carpet or a child drops a plate of food. Quick action is the key to preventing a permanent stain.
Keep this kit in an accessible but out-of-the-way spot. When a spill happens, you can calmly grab your kit and tackle the problem without a frantic search for supplies. It’s a small bit of prep that provides great peace of mind.
DIY Instructions: Make a “Spill Station” Basket
What You’ll Need:
- A small basket or bin
- A can of club soda
- A small shaker of salt
- A stain-remover pen or wipes
- A few clean white cloths or paper towels
Step-by-Step Guide:
- Gather Your Stain Fighters: Collect your club soda, salt, stain pen, and clean cloths. These are the basics that can handle most common spills.
- Fill Your Basket: Neatly arrange all the items in your basket.
- Know Your Basics: For a red wine spill, blot the spot, pour on a little club soda, and then cover it with salt to lift the stain. For other spills, the stain wipes are great for immediate treatment.
- Store It Smartly: Place your completed kit on a shelf in a laundry room or hall closet where you can grab it in a hurry.
40. Interactive Cookie Decorating Center

Turn dessert into a fun and memorable activity for all ages. A cookie or cupcake decorating station is a wonderful way to entertain guests, especially children. It keeps them engaged and allows everyone to get creative with their food.
Using a lazy susan in the center of the table is a great way to share toppings. Fill small bowls with a variety of sprinkles, candies, and icings so everyone can reach. This interactive setup contains the mess and makes the experience fun and collaborative.
DIY Instructions: Set Up a Sweet Station
What You’ll Need:
- A large tray or a lazy susan
- Several small bowls
- A variety of sprinkles, small candies, and other toppings
- Tubes or piping bags of different colored icing
- Plain sugar cookies or cupcakes
- Small spoons or knives for spreading
Step-by-Step Guide:
- Cover Your Table: Protect your table surface by covering it with craft paper or a disposable tablecloth.
- Create the Centerpiece: Place the lazy susan in the middle of the table.
- Fill the Bowls: Pour each type of sprinkle or candy into its own small bowl. Arrange these bowls on the lazy susan.
- Set Out the Treats: Arrange the plain cookies or cupcakes on platters around the decorating station.
- Provide the Tools: Put out the icing and small plastic knives so everyone can decorate their own creation. Now let the fun begin!
Hosting during the holidays is about creating memories, not managing messes. By using these organization strategies, you take control of your kitchen and set the stage for a celebration that is joyful for everyone, including you. A little planning goes a long way.
You don’t need a new kitchen; you just need a new approach. From designated drink stations to smart cleanup systems, these small changes have a big impact. They allow you to be present and enjoy the company of your loved ones.
So, embrace the season with a prepared space and a calm mind. Here’s to a holiday filled with good food, great company, and a wonderfully organized home.
Key Takeaways
- Create Designated Zones: Set up specific spots for tasks like a drink station, a coffee bar, or a kids’ snack drawer. This keeps guests out of your main workspace and makes it easy for them to help themselves.
- Prep Ahead of Time: Do as much as you can before the party starts. This includes bundling silverware, assembling make-ahead meal kits, and setting up a “help yourself” snack basket to keep things running smoothly.
- Utilize Vertical and Unused Space: Maximize your storage by using the space on top of cabinets, on the back of doors, and under shelves. Storing items like bakeware and linens vertically saves a surprising amount of room.
- Guide Your Guests: Simple labels and clear stations for things like buffet dishes and recycling make it easy for guests to navigate your home. A guided cleanup station also makes the post-party process much less daunting.