The holidays are filled with the joy of giving. You’ve spent weeks searching for that special something for the people you love. But what happens when you put it in a box?

Often, the wrapping doesn’t match the thoughtfulness inside. A simple paper and a quick bow can leave a wonderful present looking a little forgotten. The presentation is the first part of the gift they see.
This guide is here to change that. We have gathered 39 creative wrapping ideas that will make your presents stand out. These simple DIY projects will add a personal touch that shows just how much you care. Let’s make the outside of your gift as special as the inside.
1. Natural Elegance Gift Wrap

This wrapping style brings the outdoors inside. Clean white paper creates a simple backdrop. This allows the natural decorations to stand out. A piece of twine holds everything together for a rustic feel.
You can see small touches of nature here. A green pine sprig and bright red berries add holiday color. A single cinnamon stick brings a warm, spicy scent. It’s a treat for the eyes and the nose. This approach shows that thoughtful details make a gift feel special, turning a simple box into a beautiful presentation.
DIY Instructions:
What You’ll Need:
- A roll of plain white paper
- Scissors
- Tape
- A ball of brown twine or string
- A small branch from a pine or fir tree
- A few small red berries (you can find these at a craft store)
- One cinnamon stick
- A small paper tag
Step-by-Step Guide:
- Wrap Your Box: First, roll out your white paper and place your gift box on top. Cut enough paper to cover the whole box. Fold the paper tightly around the box, just like you’re wrapping a normal present. Use tape to hold it closed.
- Tie the Twine: Cut a long piece of twine. Wrap it around the box one way, then cross it and wrap it the other way, so it makes a “+” shape. Pull it snug and tie a simple knot on top, leaving some extra string hanging.
- Add Your Nature Pieces: Take your little pine branch and gently tuck it underneath the twine where it crosses in the middle. Do the same thing with the red berries and the cinnamon stick. Arrange them so they look like a tiny bouquet.
- Attach the Tag: Write the name of the person the gift is for on your paper tag. Use the extra string from your knot to tie the tag onto the gift. Make another little knot to keep it in place. Now your beautiful, nature-inspired gift is ready!
2. Whimsical Dream Pouch

This wrapping transforms a gift into a magical treasure. Soft, shimmering fabric in pastel shades creates an ethereal look. It feels like something pulled from a fairy tale. The iridescent material catches the light, glowing with different colors.
A delicate ribbon holds the pouch together, topped with a sparkling star wand. This style moves away from sharp corners and crisp paper. Instead, it offers a soft and enchanting presentation. The design is playful and full of wonder, promising something delightful is hidden inside the gentle folds.
DIY Instructions:
What You’ll Need:
- A large square of iridescent cellophane
- A large square of light, see-through fabric (tulle works well) in a pastel color
- Scissors
- A long piece of thin, white ribbon
- A small, sparkly star wand (from a craft or party store)
- A gift tag
Step-by-Step Guide:
- Layer Your Wraps: Place the iridescent cellophane on a flat surface. Lay your tulle fabric squarely on top of it.
- Center the Gift: Put your gift right in the middle of the layered squares.
- Gather It Up: Carefully pick up all four corners of both the cellophane and the fabric. Bring them together above the gift, creating a pouch or bag shape.
- Tie a Bow: Use one hand to hold the gathered material together. With your other hand, take your ribbon and tie it tightly around the gathered spot to secure it. Tie a nice bow.
- Add the Magic: Gently slide the star wand into the knot of the bow. Finally, attach your gift tag to the ribbon. Your magical gift pouch is complete!
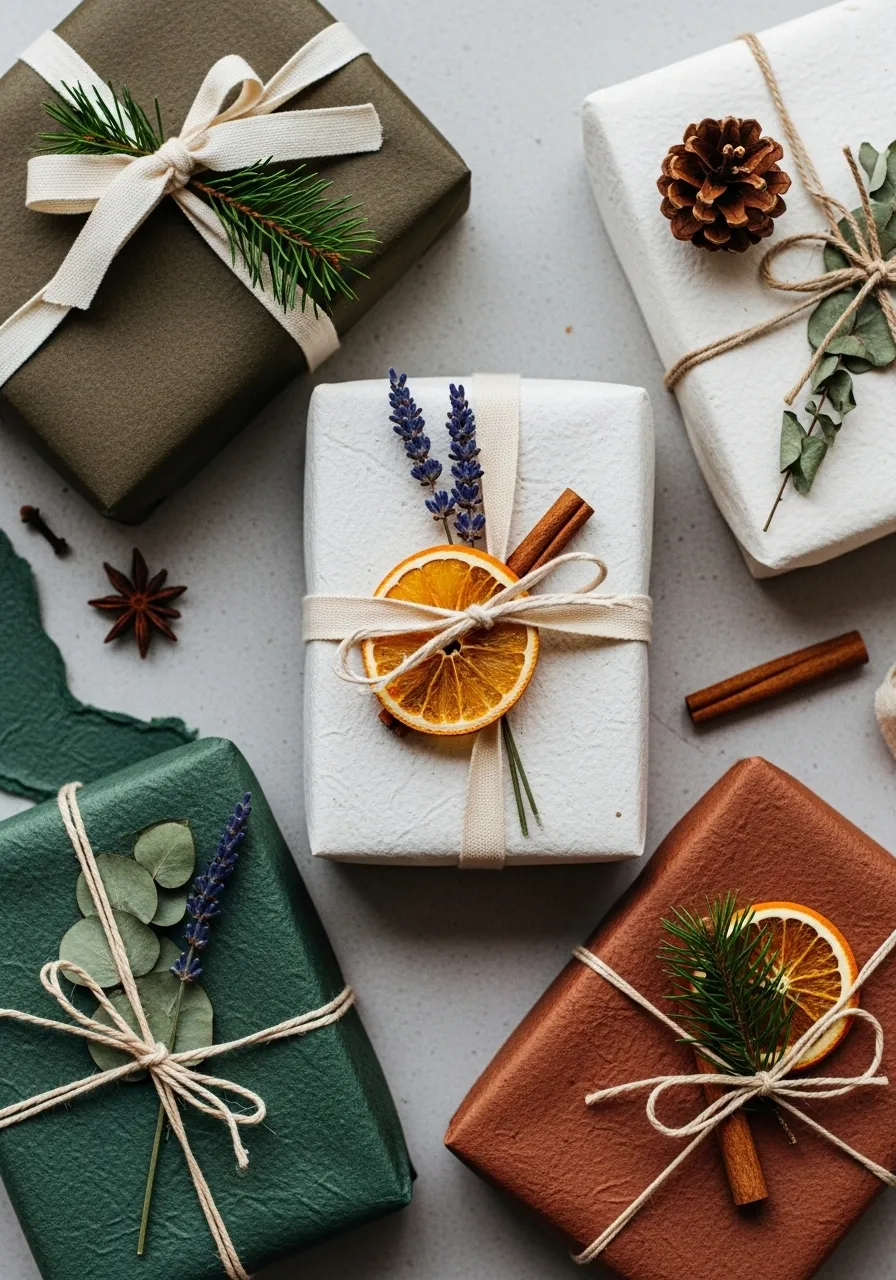
3. Gilded Age Glamour Wrap

This present makes a bold and luxurious statement. The dark paper features a striking Art Deco pattern in gold, creating a sense of classic glamour. It brings to mind the elegance of a bygone era. Strong lines and repeating fans give the design energy and sophistication.
A wide, pleated silver bow sits at the center, contrasting with the gold. Special details complete the look. A single black feather adds a touch of drama, while a wax seal provides a personal, old-world finish. This wrapping is for a gift that deserves to be presented with style and confidence.
DIY Instructions:
What You’ll Need:
- Wrapping paper with a gold and black geometric pattern
- Scissors and tape
- A wide silver ribbon
- A small black craft feather
- A pre-made wax seal sticker (found at craft stores)
- A matching gift tag
Step-by-Step Guide:
- Wrap the Box: Carefully wrap your gift box with the patterned paper. Make sure your corners are neat and the edges are taped down smoothly.
- Make a Bow: Tie the wide silver ribbon around the box, making a simple, classic bow on top.
- Place the Feather: Gently tuck the bottom end of the black feather underneath the knot of the silver bow so it peeks out to one side.
- Add the Seal: Take your wax seal sticker and press it firmly onto the center of the bow’s knot. This hides the knot and adds a fancy touch.
- Tag It: Attach your gift tag to the ribbon, and your glamorous gift is ready to impress.
4. Celestial Night Sky Gift

This wrapping captures the mystery and beauty of a starry night. The deep blue paper serves as a canvas for hand-drawn constellations in silver and gold. It feels personal and full of imagination. Each star and line seems to tell a story.
A silky blue ribbon holds a small quartz crystal, adding a natural, earthy element. A crescent moon charm and a wax seal with a star on it continue the cosmic theme. This design is thoughtful and serene, making the gift inside feel like a special, cosmic discovery.
DIY Instructions:
What You’ll Need:
- A roll of plain dark blue or black paper
- A silver or gold metallic marker
- Scissors and tape
- A piece of dark blue ribbon
- A small charm shaped like a moon
- A thin piece of string
- A star-shaped gift tag
Step-by-Step Guide:
- Wrap the Gift: First, wrap your present using the plain dark blue paper.
- Draw the Stars: Use your metallic marker to draw little stars all over the paper. You can connect some of them with lines to create your own constellations. Don’t worry about making them look real; just have fun with it.
- Add the Ribbon: Tie the dark blue ribbon around the middle of the box. Instead of a bow, just make a simple knot.
- Attach the Charm: Thread the moon charm onto your thin piece of string. Tie the string around the knot of the ribbon.
- Write the Tag: Write a name on your star-shaped tag and tie it on next to the charm. Now your gift looks like a piece of the night sky.
5. Cozy Sweater Embrace

This unique wrapping feels like a warm hug. It skips paper entirely, opting for soft, textured materials. A band of grey felt encircles neatly folded sweaters, decorated with simple wooden buttons. This gives the gift a comfortable, homemade appearance.
A thin leather cord is tied around the middle, holding a sprig of evergreen and a small pinecone. These natural touches add a fresh, woodsy scent. The tag is a simple clay piece, adding to the rustic charm. This style is all about comfort, making it a wonderful choice for a cozy gift.
DIY Instructions:
What You’ll Need:
- A strip of grey felt, wide enough to make a “belt” for your gift
- A hot glue gun (ask an adult for help!)
- Two large wooden buttons
- A thin leather cord or brown ribbon
- A small pinecone
- A gift tag
Step-by-Step Guide:
- Prepare Your Gift: This works best on soft gifts like a sweater, scarf, or blanket. Fold the item neatly into a rectangle.
- Make the Felt Band: Wrap the strip of felt around the middle of your folded gift. Cut it so the ends overlap just a little at the back. Ask an adult to help you glue the ends together with the hot glue gun.
- Add Buttons: Glue the two wooden buttons onto the front of the felt band to make it look like a piece of a sweater.
- Tie the Cord: Wrap the leather cord around the felt band and tie a simple knot or bow in the front.
- Decorate: Tuck the small pinecone under the leather cord. Attach your tag to the cord, and your cozy gift is ready.
6. Modern Monochrome Pop

This wrapping style is clean, sharp, and playful. It uses a simple palette of black, white, and grey with bold, graphic patterns like stripes and grids. The look is modern and confident. Each gift stands on its own while being part of a coordinated set.
The real star of the show is the unexpected burst of color. A single, bright neon yellow ribbon cuts through the black and white, adding energy and excitement. This small detail completely changes the mood, making the classic patterns feel fresh and fun. It’s a lesson in how one bold choice can make a big impact.
DIY Instructions:
What You’ll Need:
- Wrapping paper in solid black, solid white, and black-and-white patterns (like stripes)
- Scissors and tape
- A roll of very bright ribbon (neon yellow, pink, or green)
Step-by-Step Guide:
- Wrap Your Gifts: You can wrap several gifts to create this look. Wrap one box in solid black paper. Wrap another in a striped paper. Wrap a third one in solid white.
- Create a Color Block: For one of the boxes wrapped in white, cut a wide strip of the black paper. Wrap this strip around the middle of the box, like a belt, and tape it in the back.
- Add the Pop: Now, take your bright neon ribbon. Choose one of your wrapped gifts—it will stand out most on a solid black or white box.
- Tie a Simple Bow: Tie the neon ribbon around the box and make a simple, clean bow. The bright color will immediately make your gift look exciting and modern.
7. Vintage Traveler’s Parcel

This gift looks like it has traveled across the world to arrive. The base is a layer of map-patterned paper, suggesting adventure and far-off places. An aged piece of paper sits on top, stamped and addressed like a historic letter.
Red and white baker’s twine is tied neatly around the parcel. The details make this design special. Old-fashioned postage stamps, postal cancellation marks, and a red wax seal add to the authenticity. Even the tag looks like a vintage postcard. This wrapping tells a story before the gift is even opened.
DIY Instructions:
What You’ll Need:
- Wrapping paper that looks like an old map
- A smaller piece of tan or brownish paper
- A pen
- Some postage stamp stickers
- Red and white string (baker’s twine)
- A red sticker that looks like a wax seal
- A gift tag
Step-by-Step Guide:
- Wrap with the Map: Cover your gift box with the map paper.
- Create the Label: Take the smaller piece of tan paper and write a fun, fake address on it with your pen. Glue this paper onto the top of the box.
- Add Stamps: Stick two or three postage stamp stickers near your fake address, just like on a real letter.
- Tie it Up: Wrap the red and white string around the box, first one way and then the other to make a cross (+). Tie a bow in the middle.
- Seal the Deal: Place your red seal sticker near the bow.
- Attach the Tag: Write on your gift tag and tuck it under the string. Your world-traveler gift is ready for delivery!
8. The Gingerbread Gift House

This gift wrap is a sweet treat you can hide a present in. The box is designed to look like a charming gingerbread house, complete with white icing details and colorful candy decorations. It’s a completely delightful and festive way to give a gift.
A cheerful red and white striped ribbon is tied around the whole house, finished with a bow and a tiny gingerbread man. This isn’t just wrapping; it’s a second gift. It turns the act of giving into a playful and delicious-looking experience, building excitement for the surprise waiting inside.
DIY Instructions:
What You’ll Need:
- A small, plain gift box with a separate lid
- Brown craft paper
- A white paint pen (or white puffy paint)
- Scissors and tape
- Glue
- Some small, colorful buttons or beads
- A red and white striped ribbon
Step-by-Step Guide:
- Cover the Box: First, wrap the bottom part of your box and the lid separately with the brown craft paper. This will be the “gingerbread.”
- Decorate with “Icing”: Use your white paint pen to draw on the box. On the lid, draw wavy lines along the bottom edge. On the sides of the box, draw square windows and a rectangle for a door.
- Add “Candy”: Use your glue to stick the colorful buttons or beads onto your house. You can put them on the roof (the lid) or around the door.
- Hide the Gift: Place your real gift inside the box and put the lid on top.
- Tie the Ribbon: Wrap your ribbon all the way around the house, from top to bottom and side to side. Finish it with a big bow on top.
9. Enchanted Forest Floor

This gift looks like a magical piece of the forest was scooped up and brought indoors. The wrapping uses layers of green and torn brown paper to create a natural, earthy base. Real craft moss is added on top, giving it a soft and woodsy texture.
The scene is decorated with tiny treasures from the woods. You can see small mushrooms, smooth grey pebbles, a snail shell, and even a single gold leaf for a touch of magic. It is a wonderfully imaginative design that connects the gift to the beauty of nature.
DIY Instructions:
What You’ll Need:
- Green wrapping paper
- A piece of brown construction paper
- Scissors and tape
- A bag of craft moss (from a craft store)
- Glue
- A long piece of brown twine
- A few small, fake mushrooms and a tiny fake gold leaf (from a craft store)
Step-by-Step Guide:
- Wrap in Green: First, wrap your gift using the green paper.
- Add the “Dirt” Layer: Take your brown construction paper and tear the edges so they are rough and uneven. Glue this torn piece onto the top of your green box.
- Create a Mossy Patch: Put a good amount of glue on top of the brown paper and press a clump of craft moss down onto it.
- Tie with Twine: Wrap the brown twine around the box several times, crisscrossing over the moss, and tie a simple knot.
- Build Your Forest Scene: Use glue to add your decorations. Stick the tiny mushrooms into the moss. Glue on the gold leaf so it looks like it just fell there. Your forest gift is now complete.
10. Furoshiki Fabric Bloom

This method offers a beautiful and waste-free way to wrap a present. It uses a brightly patterned square of fabric, a traditional Japanese technique called Furoshiki. The cloth is folded and knotted artfully around the gift, creating a soft and elegant package.
The knots themselves become the decoration, forming a flower-like bow on top. Tucked into the center is a small sprig of fresh flowers and a pair of chopsticks, adding to the Japanese-inspired aesthetic. This wrapping is a gift in itself, as the beautiful fabric can be kept and reused.
DIY Instructions:
What You’ll Need:
- A square piece of fabric with a pretty pattern (a cloth napkin or a small scarf works well)
- Your gift (a box shape is easiest to start with)
Step-by-Step Guide:
- Position the Fabric: Lay your fabric on a flat surface in a diamond shape, so one corner is pointing towards you. Place your gift box in the very center.
- First Fold: Take the fabric corner that is closest to you and fold it up and over the top of the box. Tuck the point of the corner underneath the box.
- Second Fold: Now take the corner on the opposite side (the one farthest away from you) and fold it down over the box.
- Gather the Sides: You should have two corners left, one on the right and one on the left. Pick both of them up, one in each hand.
- Tie the Knot: Bring the two corners to the middle, above the box. Tie them together once, like the first step of tying your shoes. Then tie them again to make a secure knot that looks like a bow. You can arrange the ends to look nice. That’s it—no tape needed!
11. Watercolor Galaxy Wrap

This wrapping paper is a piece of art. It uses a watercolor wash of deep blues, purples, and pinks to create a dreamy galaxy effect. The colors bleed into each other softly, mimicking a vibrant nebula in the night sky.
White paint is splattered across the surface, looking like a dense field of distant stars. A simple, translucent ribbon is tied around the middle, adding a touch of elegance without distracting from the painted scene. This design turns your gift into a small masterpiece, promising something truly special is held within its cosmic swirls.
DIY Instructions:
What You’ll Need:
- A sheet of thick white paper (watercolor paper is best)
- Watercolor paints (blue, purple, pink, orange)
- A paintbrush and a cup of water
- A small amount of white paint (like acrylic)
- An old toothbrush or a small, stiff brush
- A thin ribbon
Step-by-Step Guide:
- Paint Your Galaxy: Get your watercolor paper wet with the paintbrush. Dab on different colors like blue, purple, and pink, and let them mix and flow together on the paper. Let it dry completely.
- Splatter the Stars: Dip the tips of the old toothbrush into the white paint. Point the brush at your paper and use your thumb to flick the bristles. This will create a spray of tiny white dots that look like stars. Let the paint dry again.
- Wrap Your Gift: Once everything is dry, carefully wrap your gift with your beautiful, hand-painted paper.
- Add the Ribbon: Tie the thin ribbon around the box and make a small, simple bow on top. Your galaxy gift is ready to travel.
12. Victorian Keepsake Box

This gift is wrapped with opulent, old-world charm. It uses layers of rich, patterned paper and luxurious velvet ribbons in deep red and blue. The combination of textures creates a sense of history and romance, as if you’ve discovered a hidden treasure.
A delicate paper doily sits beneath an elaborate bow, which is adorned with vintage cameo charms. A dried orange slice and cinnamon sticks add a fragrant, festive touch. This wrapping is not just a covering; it’s an experience, hinting at a thoughtful and cherished item inside.
DIY Instructions:
What You’ll Need:
- Wrapping paper with a vintage pattern
- Wide velvet ribbon (in two different colors)
- A paper doily
- A hot glue gun (ask an adult for help!)
- A small cameo charm or an old button
- Two cinnamon sticks
- One dried orange slice (you can buy these at a craft store)
Step-by-Step Guide:
- Wrap Your Box: Cover your gift box with the vintage-patterned paper.
- Add a Ribbon Base: Wrap one of your wide velvet ribbons around the box from top to bottom, and another from side to side, creating a cross in the middle. Glue it in place at the back.
- Create the Bow: Make a separate, fancy bow with your other colored ribbon.
- Layer the Decorations: Glue the paper doily onto the center of the box where the ribbons cross. Then, glue your big bow on top of the doily.
- Add the Final Touches: Glue the cameo charm into the center of the bow. Finally, glue the cinnamon sticks and the dried orange slice next to the bow.
13. Plantable Wildflower Gift

This wrapping is a gift that keeps on giving. It uses special paper made with wildflower seeds embedded right into the pulp. The paper has a lovely, natural texture with flecks of dried petals, showing that it’s something unique.
A simple raffia bow holds a tag in place, all of which can be planted. This is a thoughtful, zero-waste approach to gift-giving. After the present is opened, the wrapping can be planted in soil to grow a patch of beautiful flowers. It’s a wonderful way to give two gifts in one.
DIY Instructions:
What You’ll Need:
- A sheet of seed paper (you can buy this online or at specialty paper stores)
- Scissors
- A piece of natural raffia or twine
- A gift tag made from seed paper
Step-by-Step Guide:
- Wrap with Care: Seed paper can be a bit thicker than normal paper. Carefully fold it around your gift. You don’t need tape; the folds and raffia will hold it.
- Fold the Top: Gently fold the top flaps down over your gift, like you’re closing a paper bag.
- Tie it Together: Wrap the piece of raffia around the folded flaps to hold them closed. Tie a simple bow on the front.
- Add the Tag: Attach your seed paper tag to the raffia bow.
- Include Instructions: Make sure to tell the person who gets the gift that they can plant the paper! Just tear it up, place it under a thin layer of soil, and water it.
14. Electric Neon Pop

This gift wrap is loud, fun, and full of energy. It pairs solid black or bright lime green paper with bold stripes of neon pink, yellow, and blue. The high-contrast colors create a look that is modern and exciting, inspired by the 80s and 90s.
Sharp black and pink ribbons are tied in crisp bows, holding graphic tags with lightning bolts and fun lettering. The style is playful and confident. This wrapping is a great way to show off a fun personality and build excitement for the gift inside.
DIY Instructions:
What You’ll Need:
- A roll of solid black or bright neon wrapping paper
- Strips of paper or craft tape in other neon colors
- Scissors and tape
- A black or neon ribbon
- A fun, brightly colored charm (like the flamingo)
- A paper gift tag
Step-by-Step Guide:
- Wrap the Base: Cover your gift box completely with the solid black or neon paper.
- Add Stripes: Take your strips of colored paper or tape and wrap them around the box to create bold stripes. You can put one or two next to each other for a cool effect.
- Tie the Ribbon: Wrap your ribbon around the box, right over the stripes, and tie a bow.
- Decorate the Tag: Use markers to make a fun design or write a cool message on your gift tag.
- Attach Everything: Tie the tag and the little charm onto the bow. Your awesome neon gift is ready to party.
15. Modern Terrazzo Pattern

This wrapping is chic and contemporary. The paper features a popular terrazzo pattern, with colorful, abstract shapes scattered across a white background. The colors are muted and stylish—terracotta, blush pink, and sage green—with little specks of gold foil for a hint of sparkle.
A simple cream-colored cotton ribbon is tied in a neat knot, keeping the look clean and uncluttered. A matching circular tag, cut from the same paper, completes the cohesive design. This style is artistic and modern, showing a great eye for design.
DIY Instructions:
What You’ll Need:
- A roll of terrazzo-patterned wrapping paper
- Scissors and tape
- A piece of cream or white cotton ribbon
- A circle punch or a cup to trace a circle
Step-by-Step Guide:
- Wrap the Box: Carefully wrap your gift with the terrazzo paper. Make your folds as clean and straight as possible.
- Tie the Ribbon: Cut a long piece of ribbon. Wrap it around the box from top to bottom and then side to side, so it makes a cross in the middle. Tie a simple, neat knot where they cross.
- Make a Matching Tag: Take a leftover scrap of your wrapping paper. Use the circle punch to cut out a tag. If you don’t have a punch, trace a circle using a cup and cut it out.
- Attach the Tag: Punch a small hole in your circular tag and thread it onto the ribbon before you finish tying your knot.
16. Antique Library Parcel

This gift looks like it came from the shelves of a mysterious, old library. The box is cleverly wrapped in paper that looks like the cover and pages of an antique book. The spine is detailed and ornate, while another side is covered in printed text.
A simple piece of twine and a sophisticated blue velvet ribbon hold everything together. A wax seal with a monogram adds a personal touch. An old-fashioned key charm hangs from the twine, hinting at secrets and stories. This is a wonderfully creative wrap for any book lover.
DIY Instructions:
What You’ll Need:
- Paper that looks like the spine of an old book
- Paper that looks like a page from an old book
- Scissors and tape or glue
- A piece of twine
- A sticker that looks like a wax seal
- A small, old-looking key charm
Step-by-Step Guide:
- Create the Book Cover: First, wrap your gift box with the paper that looks like a page from a book.
- Add the Spine: Now, take the paper that looks like a book spine. Cut a strip that is the same height as your box. Wrap this strip around one side of the box to create the spine. Glue or tape it down.
- Tie it Up: Wrap the piece of twine around the middle of the “book” and tie a knot.
- Add the Details: Press the wax seal sticker onto the twine.
- Attach the Key: Thread your key charm onto another small piece of twine and tie it to the main twine on the box.
17. Cozy Cabin Plaid

This wrapping has a warm, rustic feel, like a cozy flannel shirt. It combines two different but complementary plaid patterns—one red and green, the other blue and white. The mix of patterns creates visual interest while keeping the look coordinated and homey.
A natural-colored twine is wrapped around the box multiple times. Tucked into the twine is a small bundle of frosted pine, tiny wooden skis, and a wooden snowflake ornament. This collection of embellishments evokes a feeling of a winter getaway in a snowy mountain cabin.
DIY Instructions:
What You’ll Need:
- Two different kinds of plaid wrapping paper
- Scissors and tape
- A long piece of twine
- A small sprig from a pine tree (real or fake)
- A small wooden snowflake ornament (from a craft store)
- Two small wooden craft sticks for “skis”
Step-by-Step Guide:
- Wrap with Two Patterns: First, wrap the top half of your box in one plaid paper. Then, wrap the bottom half in the other plaid paper, overlapping them slightly in the middle.
- Tie the Twine: Wrap your twine around the box several times, both up and down and side to side, and tie a knot on top.
- Make a Bundle: Take your pine sprig and the wooden snowflake. Use another small piece of twine to tie them together into a little bundle. You can also glue the two craft sticks together in a cross to look like skis and add them to the bundle.
- Attach the Bundle: Tuck your little decoration bundle securely under the twine on top of the box.
18. Frosted Winter Wonderland

This gift wrap is cool, crisp, and magical. It uses layers of textured paper, vellum, and sheer fabric in shades of icy blue, silver, and white. The layers create depth and a soft, frosted appearance, like a window on a cold winter morning.
An iridescent ribbon shimmers with different colors, secured with a silver wax seal. Sprinkles of coarse salt or glitter look like freshly fallen snow. A glass icicle ornament and a tiny silver polar bear charm complete the arctic scene. This wrapping is delicate and beautiful, capturing the quiet magic of winter.
DIY Instructions:
What You’ll Need:
- A sheet of light blue or grey paper
- A smaller sheet of see-through vellum paper
- A thin, shimmery ribbon
- White glue and a paintbrush
- Coarse sea salt or white glitter
- A small icicle ornament
- A silver sticker that looks like a wax seal
Step-by-Step Guide:
- Layer the Paper: First, wrap your gift in the light blue or grey paper. Then, place the smaller sheet of vellum on top in the center.
- Add the “Snow”: Use the paintbrush to paint a few wavy lines of glue across the vellum. While the glue is still wet, sprinkle the sea salt or glitter over it. Shake off the extra. Let it dry.
- Tie the Ribbon: Wrap your shimmery ribbon around the box and over the vellum, and tie a simple knot.
- Add the Final Touches: Press the wax seal sticker onto the ribbon. Use the ribbon to tie on the little icicle ornament. Your frosty gift is complete.
19. Sweet Holiday Bake

This wrapping is for a delicious, homemade treat. A small cake or sweet bread is wrapped in a festive paper band and placed in a clear cellophane bag. This allows the baked good to be the star of the show while still feeling festive and special.
Red and white baker’s twine is tied around the package, holding a tag, a tiny wooden scoop, and a star-shaped cookie. The presentation is simple, clean, and charming. It’s a wonderful way to gift something made with love from your own kitchen.
DIY Instructions:
What You’ll Need:
- Your baked good (like a mini loaf of bread or a small cake)
- A strip of holiday-themed scrapbook paper
- A clear cellophane bag that is large enough for your treat
- Red and white baker’s twine
- A gift tag
- A decorated cookie for a final touch
Step-by-Step Guide:
- Make the Band: Cut your scrapbook paper into a wide strip. Wrap it around the middle of your cake or bread and tape it in the back.
- Bag It Up: Carefully place your treat inside the cellophane bag. Gather the top of the bag and twist it closed.
- Tie it All Together: Use a long piece of the red and white twine to tie the bag closed. Wrap it around a few times and make a bow.
- Add the Extras: Before you finish your bow, slide on your gift tag and your decorated cookie (you can punch a small hole in it for the string). Your yummy gift is ready to be shared.
20. Tropical Holiday Escape

This wrapping brings a touch of sunshine to the holiday season. The gifts are wrapped in vibrant papers filled with tropical leaves, hibiscus flowers, and other sunny patterns. It’s a fun and unexpected departure from traditional winter themes.
Natural raffia is used instead of ribbon, tied in simple, rustic bows. The embellishments continue the theme. You can see colorful tassels, a seashell, a carved pineapple ornament, and tags shaped like monstera leaves. This style feels like a mini-vacation, promising something bright and cheerful inside.
DIY Instructions:
What You’ll Need:
- Wrapping paper with a tropical leaf or flower pattern
- Natural raffia (it looks like dried grass)
- Scissors and tape
- A fun tropical-themed item, like a seashell or a colorful tassel
Step-by-Step Guide:
- Wrap with Sunshine: Cover your gift box with the tropical-themed paper.
- Use Raffia for a Bow: Take a few strands of raffia and hold them together. Wrap them around your box and tie them in a simple, fluffy bow. Raffia is a bit stiff, so your bow will have a nice, full shape.
- Add a Tropical Touch: Pick your fun item. You can use a bit of glue to stick a seashell onto the box near the bow, or you can tie a colorful tassel onto the center of the bow.
- Make a Themed Tag: You can even cut your gift tag into the shape of a leaf to match the paper. Attach it to the raffia bow.
21. Sumi-e Ink Wash Art

This wrapping is a masterclass in elegant simplicity. It uses textured white paper as a canvas for a beautiful Japanese ink wash painting, or Sumi-e. The artwork features bamboo stalks, distant mountains, and a branch of cherry blossoms, all painted with skillful, minimalist brushstrokes.
A simple black and red cord is wrapped around the gift, secured with a smooth, grey stone. A vertical tag with calligraphy completes the artistic and serene presentation. This style shows that thoughtful, handcrafted details can turn a simple package into a work of art.
DIY Instructions:
What You’ll Need:
- A roll of plain white wrapping paper (textured paper is nice)
- Black watercolor or ink and a paintbrush
- A bit of red paint
- Scissors and tape
- A thin black or red cord
- A smooth, flat stone
- A hot glue gun (ask an adult for help!)
- A long, thin gift tag
Step-by-Step Guide:
- Wrap the Box: First, cover your gift box with the plain white paper.
- Paint Your Design: Use your black ink or watercolor to paint a simple design on the paper. You could try painting a bamboo stalk (a few straight lines with little leaves) or some simple mountains. Add a few small red dots for blossoms. Let it dry completely.
- Tie the Cord: Wrap the thin cord around your box and tie a knot.
- Add the Stone: Ask an adult to help you use the hot glue gun to attach the smooth stone right on top of the knot.
- Attach the Tag: Write a name on your tag and tuck it under the cord.
22. Country Quilt Patchwork

This gift wrap has a wonderfully cozy and handmade charm. The paper is printed to look like a patchwork quilt, with different squares of fabric patterns pieced together. You can see florals, ginghams, and simple cross-stitches, creating a feeling of warmth and nostalgia.
Red and white baker’s twine is wrapped around the box and tied in a bow. A large, simple button is threaded through the center of the bow. The gift tag is decorated with a drawing of a thimble, completing the sewing theme. It’s a sweet, thoughtful style for a heartfelt gift.
DIY Instructions:
What You’ll Need:
- Wrapping paper that looks like a quilt, or many small squares of different scrapbook papers
- Scissors and tape or a glue stick
- Red and white baker’s twine
- A large button
- A gift tag
- A pen to draw on the tag
Step-by-Step Guide:
- Create the Patchwork: If you don’t have quilt-patterned paper, you can make your own! Cut out many small squares from different scrapbook papers and glue them all over your gift box to create a patchwork look. If you have the patterned paper, just wrap the box normally.
- Tie with Twine: Wrap the baker’s twine around the box, first one way and then the other, and tie a bow on top.
- Add the Button: Before you tighten your bow, thread both ends of the twine through the holes in your button. Then, pull the bow tight. The button will sit right in the middle.
- Decorate the Tag: Draw a little picture of something sewing-related, like a needle and thread or a thimble, on your tag. Attach it to the twine.
23. Layered Garden Ensemble

This gift is wrapped with layers of texture and color, creating a beautiful, garden-inspired look. The base is a simple kraft paper box. Over that, a layer of dark, subtly speckled paper is folded into a diamond shape. Finally, a smaller box wrapped in bright floral paper sits on top.
A band of natural linen fabric is folded around the floral gift, softening the look. A simple twine bow holds a vintage key and a rustic tag. This multi-layered approach creates a stunning presentation that is both elegant and charming.
DIY Instructions:
What You’ll Need:
- A gift box (this style works best if your gift is in a box)
- A piece of bright, floral wrapping paper
- A larger piece of solid-colored paper
- A wide strip of plain fabric, like linen or canvas
- A piece of twine
- An old-fashioned key charm
Step-by-Step Guide:
- Wrap the Gift: Wrap your gift box with the floral paper.
- Create the Background: Place your wrapped gift in the center of the larger, solid-colored paper. Fold the corners of this paper up and over the gift to create a diamond shape on top. Tape it down.
- Add the Fabric Band: Wrap the strip of fabric around the middle of your gift and tape it in the back.
- Tie it Up: Wrap the twine around the fabric band and tie a simple bow.
- Add the Key: Before you finish the bow, thread the key charm onto the twine. Your beautiful layered gift is ready.
24. Bauhaus Geometric Design

This wrapping is a tribute to modern art and design. The paper features a bold, graphic pattern made of simple geometric shapes—circles, triangles, and rectangles. The use of primary colors (red, blue, yellow) against black and white is a hallmark of the Bauhaus style.
The look is clean, crisp, and confident. A simple silver cord is tied around the package, a minimalist choice that doesn’t compete with the busy pattern. The tag is also part of the design, repeating the shapes and colors. This is a sophisticated and artistic way to wrap a gift.
DIY Instructions:
What You’ll Need:
- Plain white wrapping paper
- Construction paper in red, blue, yellow, and black
- Scissors and a glue stick
- A thin silver string
- A paper gift tag
Step-by-Step Guide:
- Wrap the Box: Cover your gift box in plain white paper.
- Cut Out Shapes: Cut different shapes out of your colored construction paper. Make some half-circles, some triangles, and some squares.
- Create Your Design: Arrange your colored shapes on the white box to create a cool, modern pattern. Glue them down. Don’t be afraid to let them overlap.
- Add the String: Tie the thin silver string around the middle of the box.
- Make a Matching Tag: Glue a few small leftover shapes onto your gift tag to make it match the box. Tie it to the silver string.
25. Geode and Velvet Luxury

This gift wrap is rich, dramatic, and luxurious. The paper has a stunning agate or geode pattern, with deep blues, greens, and purples swirling together. Glimmering gold lines trace the edges of the colorful bands, adding a touch of opulence.
A wide, emerald green velvet ribbon is tied in a soft bow around the middle. The centerpiece of the bow is a real slice of polished agate, perfectly matching the paper. This wrapping is all about texture and deep, saturated color, creating a truly glamorous and impressive presentation.
DIY Instructions:
What You’ll Need:
- Wrapping paper with a geode or agate pattern
- A wide, green velvet ribbon
- A hot glue gun (ask an adult for help!)
- One thin slice of a real agate stone (you can find these at a craft or rock shop)
Step-by-Step Guide:
- Wrap the Gift: Cover your box with the beautiful geode-patterned paper.
- Add the Ribbon: Wrap the velvet ribbon around the middle of the box. Instead of tying a bow directly on the box, just cross the ends in the back and glue them down.
- Make a Separate Bow: Make a simple, elegant bow with another piece of the velvet ribbon.
- Assemble the Topper: Ask an adult to help you use the hot glue gun to attach the agate slice to the center of the bow you just made.
- Attach the Bow: Glue the finished bow onto the ribbon on the front of your box.
26. Newsprint and Neon Highlight

This wrapping style is a creative mix of old and new. It uses simple newspaper as the wrapping paper, giving the gift a classic, monochrome look full of interesting text and images. This is a great, low-cost way to wrap a present.
The surprise comes from the bright shock of color. Neon pink and yellow-green twine is wrapped around the box multiple times, creating a vibrant web of color that pops against the black and white newsprint. A spray-painted tag adds to the modern, edgy feel.
DIY Instructions:
What You’ll Need:
- A sheet of newspaper (pick a page without any bad news!)
- Scissors and tape
- Brightly colored neon string or yarn
- A paper gift tag
- Neon spray paint (ask an adult for help!)
Step-by-Step Guide:
- Wrap with News: Carefully wrap your gift using the sheet of newspaper.
- Prepare the Tag: Ask an adult to help you spray paint your gift tag with a bright neon color. You can even spray two colors to make a cool gradient. Let it dry.
- Wrap with String: Take your neon string and wrap it around the box many times. Go in different directions to create a fun, messy pattern. Tie a knot to hold it in place.
- Attach the Tag: Punch a hole in your dry tag and use another piece of the neon string to tie it onto the box.
27. Torn Paper Mountainscape

This gift wrap creates a beautiful, layered landscape scene. The base is a soft, ombre paper that fades from blue to purple to pink. Over this, different colored papers are torn and layered to look like mountain ranges, creating a sense of depth and texture.
A simple band of ribbon is wrapped around the gift, and a small, delicate snowflake charm is attached to the tag. The tag itself mirrors the layered, colorful look of the paper. This is a creative and artistic style that turns a simple box into a piece of scenic art.
DIY Instructions:
What You’ll Need:
- Plain white or light blue wrapping paper
- Several sheets of colored paper in shades of pink, orange, purple, and blue
- Scissors and a glue stick
- A thin ribbon
- A gift tag and a small snowflake charm
Step-by-Step Guide:
- Wrap the Box: First, cover your gift box in the plain white or light blue paper. This will be your “sky.”
- Tear Your Mountains: Take your colored sheets of paper and tear them into long strips with wavy, uneven tops. These will be your mountains.
- Create the Landscape: Start with the darkest color. Glue a strip of it along the bottom of your box. Then, take the next lightest color and glue it on top, overlapping a little. Keep doing this with all your colors until you have a layered mountain scene.
- Add the Finishing Touches: Wrap the thin ribbon around your box. Attach the gift tag and the snowflake charm to the ribbon.
28. Hand-Embroidered Gift Wrap

This wrapping is personal, charming, and full of care. It uses a band of white paper over a simple kraft paper base. On the white paper, simple holiday designs—a holly leaf, a snowflake, and a monogram—are hand-stitched with colorful embroidery floss.
The hand-stitching gives the gift a wonderfully textured and homemade feel. Red, green, and white baker’s twine is tied in a bow, and the tag is also decorated with a few simple stitches. This is a thoughtful way to show someone you spent extra time on their gift.
DIY Instructions:
What You’ll Need:
- Brown kraft wrapping paper
- A wide strip of plain white paper
- A pencil
- A thick needle and embroidery floss (in red and green)
- Scissors and tape
- Baker’s twine
Step-by-Step Guide:
- Wrap the Base: Cover your gift in the brown kraft paper.
- Prepare Your Stitching Paper: Cut a strip of white paper that is wide enough to wrap around your gift. Lightly draw a simple design on it with a pencil, like the first letter of someone’s name or a simple star.
- Start Stitching: Carefully use the needle and embroidery floss to poke holes and stitch along your pencil lines. You can make a simple running stitch (like —) or a backstitch to make a solid line. (You can look up simple stitches online!)
- Attach the Band: Once you’re done stitching, wrap your embroidered paper band around the gift and tape it in the back.
- Tie the Twine: Finish it off by tying a bow with the baker’s twine.
29. Escape Room Puzzle Box

This wrapping turns opening a gift into a fun and interactive game. The box is wrapped simply, with a plain paper band. But the decorations are what make it special: a number-coded ribbon, a real combination lock, and a tag with a riddle on it.
The recipient has to solve the riddle to figure out the combination for the lock. It’s an escape room in a box! This is a highly creative and engaging way to present a gift, making the experience of opening it just as exciting as the gift itself.
DIY Instructions:
What You’ll Need:
- A gift box
- Plain paper to wrap it
- A ribbon with numbers on it (or you can write numbers on a plain ribbon with a marker)
- A small combination lock (that you can set the code for)
- A gift tag
- A pen
Step-by-Step Guide:
- Wrap the Box: Wrap your gift box in plain paper.
- Add the Ribbon: Wrap the numbered ribbon around the box, one way and then the other. Tie a knot.
- Attach the Lock: Before you close the lock, loop it through the knot in the ribbon. Then, scramble the numbers so it’s locked.
- Write the Riddle: Think of a secret number for your combination. On the gift tag, write a riddle or a clue that will help the person guess your number. For example, if your code is 25, you could write “What day is Christmas Day?”
- Attach the Clue: Tie the tag with the riddle onto the ribbon. Now the fun can begin!
30. Pressed Flower Botanical Frame

This gift wrap is delicate, natural, and beautiful. It starts with a base of simple, brown kraft paper. On top, a collection of real pressed flowers and ferns is carefully arranged and displayed between two sheets of clear plastic or glass, creating a botanical frame.
A simple, thin cream-colored ribbon is tied around the gift, holding the frame in place. The gift tag is also handmade, decorated with loose petals and leaves. This wrapping style is a lovely way to preserve the beauty of nature and add a gentle, artistic touch to your present.
DIY Instructions:
What You’ll Need:
- Brown kraft wrapping paper
- A piece of plain white paper
- A clear plastic frame or two pieces of stiff, clear plastic (like from a report cover)
- A few different pressed flowers and leaves (you can press them in a book for a week)
- A glue stick
- A thin ribbon
Step-by-Step Guide:
- Wrap the Box: Cover your gift box with the brown kraft paper.
- Create the Background: Glue the plain white piece of paper onto the center of the box. This will help your flowers stand out.
- Arrange Your Flowers: Carefully arrange your pressed flowers and leaves on top of the white paper.
- Frame Your Art: Place your clear plastic frame or sheet of plastic directly over your flower arrangement.
- Secure Everything: Use your thin ribbon to tie the frame in place. Wrap it around the whole box and tie a simple bow on the side.
31. Molten Metal Drip Art

This gift wrap is dramatic, artistic, and incredibly stylish. It begins with a deep, matte navy blue paper that creates a sophisticated, dark canvas. The real showstopper is the thick, metallic paint that has been dripped over the top corner, with realistic drops running down the side.
The paint—one side gold, one side silver—looks like liquid metal, creating a stunning textural and visual contrast with the smooth paper. A simple, thin black ribbon is tied around the middle, adding a final touch of understated elegance. This is a bold, modern look for a truly special gift.
DIY Instructions:
What You’ll Need:
- Dark, plain wrapping paper (like navy blue or black)
- Thick acrylic paint in metallic gold and silver
- Scissors and tape
- A thin, dark ribbon
Step-by-Step Guide:
- Wrap the Box: Cover your gift box with the dark wrapping paper. Make your corners as neat as possible.
- Prepare for Painting: Lay your wrapped gift on some newspaper to protect your work surface.
- Create the Drips: Squeeze a generous amount of the gold paint near one of the top corners of the box. Gently tilt the box so the paint starts to run down the side, creating drips. Do the same thing right next to it with the silver paint.
- Let it Dry: This is the most important step! You need to let the thick paint dry completely. This might take several hours, so be patient.
- Add the Ribbon: Once the paint is totally dry, tie your thin ribbon around the box and add a simple tag.
32. Lace and Lavender Linen Pouch

This wrapping style is soft, romantic, and full of gentle charm. The gift is enclosed in a pouch made of natural linen and floral-patterned fabric, giving it a comfortable, rustic feel. There are no sharp corners, only soft folds.
A wide band of intricate lace is wrapped around the middle, adding a touch of vintage elegance. A simple twine bow is tied on top, holding a sprig of dried lavender and baby’s breath. A single button secures the bow. This is a lovely, thoughtful presentation, especially for a handmade or personal gift.
DIY Instructions:
What You’ll Need:
- A rectangular piece of linen or other soft fabric
- A wide strip of lace ribbon
- A piece of twine
- A small, pretty button
- A small sprig of dried flowers, like lavender
Step-by-Step Guide:
- Position the Gift: Lay your fabric down and place your gift in the center.
- Fold the Sides: Fold the two long sides of the fabric in over your gift so they meet in the middle.
- Fold the Ends: Now, fold the top and bottom ends of the fabric in, tucking them neatly. It will look like a little fabric parcel.
- Add the Lace: Wrap your wide lace ribbon around the middle of the parcel to hold the folds in place. Secure it in the back with a safety pin or a few stitches.
- Tie it Up: Wrap the twine around the lace band and tie a bow. Before you tighten the bow, slide the button on and tuck in your sprig of dried flowers.
33. Architectural Blueprint Wrap

This is a brilliantly creative idea for an architect, designer, or anyone who loves building and creating. The gift is rolled up and wrapped to look exactly like a professional blueprint. The bright blue paper with white lines and technical drawings is instantly recognizable.
The details make this design a standout. A small, real-life key and a miniature ruler are attached to the tag, which is designed to look like a project information label. The “Project Title”? Holiday Cheer. This is a fun, clever, and personalized way to present a gift.
DIY Instructions:
What You’ll Need:
- Blueprint wrapping paper (you can find this online or at specialty stores)
- Scissors and tape
- A gift that can be rolled (like a poster, a shirt, or a bottle)
- A key and a small ruler charm
- A gift tag
Step-by-Step Guide:
- Roll the Gift: Lay your gift on the blueprint paper and roll it up tightly, just like a real set of plans. Tape it to hold the roll closed.
- Make the Tag: On your gift tag, write things like “Project Name:” and “For:” to make it look like a real project label.
- Assemble the Details: Put the key on a small keychain ring.
- Attach Everything: Use a piece of string to tie the tag, the key, and the ruler charm onto your rolled-up gift. You can tie it around the middle or near one of the ends.
34. Botanical Garden Furoshiki

This wrapping uses the elegant, eco-friendly Furoshiki technique. A square of fabric printed with a beautiful botanical pattern of eucalyptus leaves and rosebuds is used to wrap the gift. The soft colors and natural design create a feeling of calm and sophistication.
The fabric is knotted on top to create a simple and beautiful bow. Tucked into the knot is a single bay leaf, adding a touch of fresh greenery and a subtle, pleasant scent. This method is not only beautiful but also reusable, making the wrapping a thoughtful part of the gift itself.
DIY Instructions:
What You’ll Need:
- A square piece of fabric with a pretty plant or flower pattern
- Your gift (a box shape is easy to work with)
- A single fresh leaf, like a bay leaf or eucalyptus leaf
Step-by-Step Guide:
- Position the Fabric: Lay your fabric on a table in a diamond shape, with one corner pointing toward you. Place your gift in the center.
- First Fold: Take the corner closest to you and fold it up and over the box.
- Second Fold: Take the opposite corner (the one farthest from you) and fold it down over the box.
- Gather and Tie: Pick up the two remaining corners on the left and right. Bring them together in the middle, above the box, and tie them in a secure double knot.
- Add the Leaf: Gently tuck your fresh leaf into the center of the knot.
35. The Scrabble Player’s Gift

This is a fun and personal wrapping idea for anyone who loves word games. The gift is wrapped in simple brown kraft paper, a classic and versatile choice. The decorations are what make it special and clever.
Red and green baker’s twine is tied around the box, holding a small pencil and a tag designed to look exactly like a Scrabble score sheet. It’s a playful and interactive theme. This is a wonderful way to tailor a gift to someone’s specific hobby or passion.
DIY Instructions:
What You’ll Need:
- Brown kraft wrapping paper
- Scissors and tape
- Red and green baker’s twine
- A gift tag
- A pen or marker
- A small pencil
Step-by-Step Guide:
- Wrap the Box: Cover your gift box with the brown kraft paper.
- Make the Score Sheet Tag: On your gift tag, use your pen to draw a few lines to make it look like a scorecard. You can write “Player 1” and leave a space to write the person’s name. You could even write “SCRABBLE” at the top.
- Tie it Up: Wrap the red and green twine around your box and tie a simple bow.
- Add the Pencil: Before you finish the bow, slide the small pencil under the twine so it’s held in place.
- Attach the Tag: Tie your Scrabble score sheet tag onto the bow.
36. Glow-in-the-Dark Constellations

This gift wrap holds a magical secret. During the day, it looks like a simple, elegant package wrapped in dark navy paper with star patterns. But the real surprise is revealed when the lights go out.
The constellations, moon, and telescope are all painted with glow-in-the-dark paint, creating an amazing starry night scene that appears in the darkness. A tag with the message “Look closer. Wait til dark.” adds to the mystery and excitement. This is an incredibly fun and imaginative way to make a gift memorable.
DIY Instructions:
What You’ll Need:
- Dark blue or black wrapping paper
- A bottle of glow-in-the-dark puffy paint
- Scissors and tape
- A thin ribbon
- A gift tag
Step-by-Step Guide:
- Wrap the Box: Cover your gift in the dark-colored paper.
- Paint the Stars: Use your glow-in-the-dark paint to draw stars and constellations on the paper. You can connect some dots to make shapes like the Big Dipper, or you can draw a moon and a telescope.
- Let it “Charge”: Let the paint dry completely. To make it glow extra bright, let the wrapped gift sit under a lamp for a few minutes to “charge” the paint.
- Add the Final Touches: Tie your ribbon around the box. On your gift tag, write a message like “Wait until it’s dark!” and attach it.
37. Paper Fan Medallion

This gift wrap is a striking example of how simple materials can create a big impact. The box is wrapped in a color-blocked style, half red and half white. This creates a bold, graphic base for the main decoration.
The topper is a large, circular medallion made from folded paper fans in red, white, and black. The sharp pleats and contrasting colors create a dynamic and sculptural element that is both elegant and modern. A simple white tag is attached to the center, keeping the focus on the impressive papercraft.
DIY Instructions:
What You’ll Need:
- Red and white wrapping paper
- Construction paper in red, white, and black
- Scissors and tape
- A hot glue gun (ask an adult for help!)
- A small gift tag
Step-by-Step Guide:
- Wrap the Box: First, wrap your gift box completely in white paper. Then, cut a piece of red paper that is wide enough to cover half of the box. Wrap this around one side to create the color-blocked look.
- Make Paper Fans: Take your construction paper and cut a few rectangular strips. Fold them back and forth, like you’re making an accordion.
- Form the Circles: Take one of your folded strips and glue the two ends together to make a small fan circle. Do this with several strips of different colors.
- Build the Medallion: Ask an adult to help you use the hot glue gun to glue your paper fan circles together in a pleasing arrangement on top of the box.
- Add the Tag: Attach your gift tag to the center of your paper medallion.
38. Aromatic and Earthy Textures

This collection of gifts is a feast for the senses. Each present is wrapped in textured, handmade paper in deep, earthy tones like olive green, burnt orange, and cream. The paper itself adds a tactile, rustic element.
The gifts are tied with simple cotton ribbons and natural twine. Each one is adorned with a different aromatic treasure—a dried orange slice, lavender sprigs, cinnamon sticks, or star anise. These natural decorations not only look beautiful but also add a wonderful holiday fragrance.
DIY Instructions:
What You’ll Need:
- Textured or handmade paper
- Scissors and tape
- Twine or simple cotton ribbon
- Your choice of decorations: dried orange slices, cinnamon sticks, small pinecones, or sprigs of dried lavender.
Step-by-Step Guide:
- Wrap with Textured Paper: Cover your gift box with the nice, textured paper. The unique feel of the paper is part of the charm.
- Tie a Simple Bow: Use your twine or cotton ribbon to tie a simple bow around the box. Don’t make it too fancy; the look is supposed to be natural.
- Add Your Scented Decoration: Choose one of your aromatic items. Gently tuck it under the knot of your bow. You can combine things too, like a cinnamon stick with an orange slice.
- Repeat for Other Gifts: You can make a whole set of these gifts, each with a slightly different decoration, for a beautiful, coordinated look.
39. Living Plant Gift Basket

This is a beautiful and sustainable gift idea for any plant lover. Instead of a box, the gift is a living plant, like a small evergreen or a flowering cyclamen. The pot is wrapped in decorative green paper, creating a festive “basket.”
A simple raffia bow is tied around the paper, holding a tag. This presentation turns a simple potted plant into a thoughtful and complete gift. It’s a present that will continue to grow and bring joy long after the holidays are over.
DIY Instructions:
What You’ll Need:
- A small potted plant
- A large square of decorative paper
- A long piece of raffia or twine
- A gift tag
Step-by-Step Guide:
- Center the Plant: Place your potted plant in the middle of your square of decorative paper.
- Gather the Paper: Bring all the corners and sides of the paper up and around the pot, gathering it together.
- Secure with Raffia: Use one hand to hold the gathered paper in place. With your other hand, wrap the raffia around the paper several times to hold it snugly against the pot.
- Tie a Bow: Finish by tying a nice, rustic bow with the raffia.
- Add the Tag: Attach your gift tag to the bow. Your living gift is ready to be given!
Wrapping a gift is more than just covering it up. It’s the final, loving touch on a thoughtful present. As you’ve seen, you don’t need to be a professional to create something beautiful. A little creativity goes a long way.
From rustic natural elements to bold modern designs, the possibilities are endless. The next time you have a gift to give, think of the wrapping as part of the fun. It’s another chance to show your personality and make someone feel truly special.
Key Takeaways
- Personalize Your Presents: Adding a small, unique detail—like a sprig of pine, a hand-drawn tag, or a special charm—makes a gift feel more personal and thoughtful.
- Think Beyond Paper: Don’t be afraid to use other materials. Fabric, felt, newspaper, and even living plants can be used to create unforgettable presentations.
- Wrapping is Part of the Gift: The presentation builds excitement and shows care. A beautifully wrapped gift enhances the entire experience of giving and receiving.