The music has faded. The last of the cookies are gone. Now, you face the great tangle of lights and the mountain of boxes.

Putting away the holiday decor is the final chore of the season. It is easy to just shove things into bins. We promise ourselves we will organize it “next year.”
That disorganization is what makes decorating so stressful. You cannot find the ornament hooks. The lights are a single, giant knot.
This guide changes that. It provides 35 smart ways to store your tree, lights, and treasured items. You can finally end the post-holiday chaos.
1. The Vertical Tree Rolling Bag

Putting the tree away can be the worst part of January. You fight with branches. You try to squeeze it back into the original, torn cardboard box.
This storage bag changes that. It’s a tall bag on wheels. You can store your tree standing upright, or in a few large sections.
Simply zip the bag around your tree. Cinch the straps to make it snug. The wheels let you roll it easily into a closet, basement, or garage. It keeps the dust off all year. Next Christmas, you just roll it out and unzip.
How to Use Your Rolling Tree Bag
- Step 1: Get Ready: Unzip the bag all the way and open it up wide. Lay it flat on the floor next to your tree.
- Step 2: Section Your Tree: Most artificial trees come in 2 or 3 large pieces. Gently lift the top section out of the middle section. Then, lift the middle section out of the base.
- Step 3: Bag the Pieces: Place the biggest piece (the bottom) into the bag. Put the middle piece next to it. Finally, lay the top piece inside.
- Step 4: Zip It Up: Carefully pull the zipper all the way around. Go slowly so you don’t snag any branches.
- Step 5: Buckle Up: Click the buckles on the straps across the front. Pull the straps tight, like a seatbelt for your tree. This squishes the tree down so it takes up less space.
- Step 6: Pack the Pocket: Put your tree remote, stand, or extra bulbs in the front zipper pocket.
- Step 7: Roll Away! Grab the handle and tilt the bag. Roll your tree to its storage spot.
2. The Sentimental Ornament Tray

Delicate ornaments break easily. Storing them in flimsy boxes is a bad gamble. These stackable trays offer a sturdy solution.
Each ornament gets its own compartment. This stops them from scratching or knocking together. You can see everything at a glance. The trays fit neatly inside larger plastic bins. This protects your memories from dust and moisture. Adding photos creates a nice personal touch.
How to Pack Your Ornament Trays
- Step 1: Get your trays ready. Make sure all the cardboard dividers are in place, creating little squares.
- Step 2: Gently pick up one ornament. If it has a metal hook, take the hook off. Put all the hooks in a small zip-top bag.
- Step 3: Place the ornament in its own square slot. Do not try to force a big ornament into a small slot.
- Step 4: Continue this until the tray is full. Do not put more than one ornament in a slot.
- Step 5: If you have special ornaments, tape a photo of them (or the person who gave them to you) to the side. This makes it fun to open next year.
- Step 6: Stack the trays. Carefully slide them into a large, lidded plastic bin. Store the bin in a safe, dry place.
3. The Tangle-Free Light Spool

Everyone knows the pain of “The Great Light Tangle.” It is a frustrating ball of wires that steals your holiday cheer. Storing lights on spools prevents this mess.
You simply wrap each strand around a spool, just like thread. This keeps them neat and separate. Next year, you just unroll them. The labels are a great touch. You know exactly which strand goes on the front porch.
DIY Cardboard Light Spool
- Step 1: Find a sturdy cardboard box (like a shipping box).
- Step 2: Draw a large rectangle on the side, about the size of a piece of paper (8.5 x 11 inches).
- Step 3: On both of the short ends (the 8.5-inch sides), draw a large “V” shape or a U-shape. This will be where you wrap the lights.
- Step 4: Ask an adult to help you cut the shape out with a utility knife or strong scissors. You should have a shape that looks like a giant spool for thread.
- Step 5: Cut a small slit or hole near one edge. This will hold the end of your light string.
- Step 6: Plug the light strand in to make sure it works. Then, unplug it.
- Step 7: Stick the plug end (the part with the prongs) into the slit you cut.
- Step 8: Start wrapping the lights around the “V” grooves, laying them flat. Do not wrap too tight.
- Step 9: Label your spool (“Front Porch,” “Tree Lights”). Store it in a bin.
4. The Crush-Proof Wreath Case

Wreaths are big, puffy, and hard to store. If you put one in a garbage bag, it gets smashed. If you leave it on a shelf, it gets covered in dust.
This hard-shell case is the answer. It is built to protect the shape of your wreath. The see-through lid lets you know which one is inside. A sturdy handle makes it easy to carry to the attic or garage. It keeps your wreath looking full and new for next season.
How to Use Your Wreath Case
- Step 1: Open the wreath case by releasing the latches or zippers.
- Step 2: Gently dust off your wreath. Pick off any loose pine needles or glitter.
- Step 3: Carefully lay the wreath inside the case. Make sure it sits flat in the round container.
- Step 4: If your case has internal straps (like the one in the picture), buckle them over the wreath. This holds it in place so it does not slide around.
- Step 5: Place the lid on top and secure all the latches.
- Step 6: Carry it by the handle. You can stack these cases flat on a shelf in the garage or a closet.
5. The Under-the-Bed Hideaway

Why let that space under your bed go to waste? It is a great spot for holiday items you only need once a year.
These long, flat bins are made to slide right under a bed frame. They are good for storing softer items. This includes tree skirts, stockings, and holiday blankets. They also work for wrapping paper, ribbons, and gift bags. The lids keep everything clean. Out of sight, out of mind.
How to Pack Your Under-Bed Bins
- Step 1: Pull the empty bin out from under the bed.
- Step 2: First, get your soft items, like the tree skirt and stockings. Fold them neatly.
- Step 3: Place the folded items flat in the bin. Do not just stuff them in.
- Step 4: Add other flat items, like holiday placemats or towels.
- Step 5: You can also lay wrapping paper tubes or spools of ribbon in the bin.
- Step 6: Write on the label what’s inside (“Tree Skirt & Stockings”).
- Step 7: Put the lid on and slide it back under the bed.
6. The Garage Pegboard Organizer

Garages and sheds often have open wall space. A pegboard system turns that blank wall into a storage powerhouse. It gets your holiday gear off the floor.
Use different hooks to hang wreaths, garlands, and strands of lights. Baskets attached to the board can hold smaller items. This includes light clips, tools, and extra bulbs. You can see everything you own in one organized spot. It is easy to change the layout as your collection grows.
How to Set Up Your Pegboard
- Step 1: Get a large pegboard sheet from a hardware store. You also need small wood strips (called furring strips) and screws.
- Step 2: Ask an adult to help you find the studs (the strong wood beams) in the wall.
- Step 3: Screw the wood strips into the wall studs first. This creates a small gap behind the pegboard for the hooks.
- Step 4: Screw the pegboard sheet onto the wood strips.
- Step 5: Get a pack of pegboard hooks. Push the hooks into the holes. You can move them anywhere.
- Step 6: Hang your wreaths and garlands on the big hooks.
- Step 7: Attach a wire basket to the pegboard and fill it with your string lights.
7. The Smart QR Code System

Do you have “Bin Amnesia?” You stack 10 identical bins in the attic. Next year, you have no idea what is in them. This system solves that problem.
You use an app to log what you put in each bin. The app makes a special QR code for you. You stick that code on the bin. Next December, you just scan the code with your phone. A list (and even photos) of everything inside pops up. No more opening every single bin.
How to Make Your Smart Bins
- Step 1: Get an organizing app for your phone (like Sortly, or even just a free QR code generator app).
- Step 2: Get one of your empty bins. Give it a number, like “Bin 1.”
- Step 3: As you put items in Bin 1, take a picture of them. Or, just type a list in the app: “Living Room Mantle, 2 Garlands, 4 Stocking Holders.”
- Step 4: Link that list or photos to “Bin 1” in the app.
- Step 5: The app will create a QR code. Print this code on a sticker label.
- Step 6: Stick the QR code label on the outside of Bin 1.
- Step 7: Repeat for all your bins. Next year, just scan the sticker!
8. The Recycled Egg Carton Caddy

Small, round ornaments are the hardest to pack. They roll around and break. Before you recycle those paper egg cartons, save them.
They are a free and simple way to protect your small, fragile ornaments. Each ornament fits snugly in an egg cup. This stops them from moving. You can stack the closed cartons inside a larger box. It is a clever way to reuse something you already have.
How to Pack with Egg Cartons
- Step 1: Make sure your paper egg cartons are clean and dry. Do not use styrofoam ones.
- Step 2: Gather all your small, round ornaments (the ones about the size of an egg).
- Step 3: Gently place one ornament into each cup of the egg carton.
- Step 4: Close the lid of the egg carton. It should shut easily. If it does not, your ornament is too big.
- Step 5: Use a marker to write “Ornaments” on the outside of the carton.
- Step 6: Carefully place the full, closed cartons into a larger cardboard box or plastic bin.
9. The “Hidden in Plain Sight” Cabinet

Who says holiday storage has to be in the garage? If you lack attic space, use a piece of furniture. A beautiful armoire or trunk can blend into your home decor all year.
It looks like a normal part of your living room or hallway. But inside, it holds your most treasured decorations. Using boxes with dividers keeps everything neat. This protects fragile items and keeps them close by for next year.
How to Pack Your Decor Cabinet
- Step 1: Empty the cabinet or armoire you want to use.
- Step 2: Get boxes that fit nicely on the shelves. Fabric bins or ornament boxes work well.
- Step 3: Fill one box just with your delicate glass ornaments. Use dividers.
- Step 4: Fold holiday linens (like table runners) and stack them on a shelf.
- Step 5: Use a basket for oddly shaped items, like bead garlands or stocking holders.
- Step 6: Put the heaviest boxes on the bottom shelf.
- Step 7: Close the doors. Your decorations are hidden and safe right in your living space.
10. The Overhead Garage Hoist

The best storage spot is often the one no one thinks about: the ceiling. Garage ceilings have a lot of unused space.
This heavy-duty storage rack lifts your items up and out of the way. It is a great place for the tree bag and all your bins. Some systems even have a motor. You can lower the rack, load it up, and then hoist it back to the ceiling with the push of a button. It frees up your floor space.
How to Use Your Ceiling Lift
- Step 1: (Installation) This is a job for an adult. The lift must be screwed safely into the ceiling joists (the big beams).
- Step 2: (Loading) Use the remote or hand crank to lower the metal rack all the way to the floor.
- Step 3: Load your heavy items first. Place your big plastic bins and the tree bag onto the rack.
- Step 4: Make sure the weight is balanced. Do not put everything on one side.
- Step 5: Stand back and make sure nothing is hanging over the edges.
- Step 6: Use the remote or crank to slowly lift the rack all the way up to the ceiling.
11. The Closet Peek-a-Boo Bin

Holiday-themed pillows, blankets, and table runners can take up a lot of space. Storing them in a guest room closet is a smart move.
These fabric bins are softer than plastic. They will not snag delicate fabrics. A clear window on the front lets you see what is inside without unzipping the whole container. Sturdy handles make them easy to pull down from a high shelf.
How to Pack Your Fabric Bins
- Step 1: Get your holiday linens, like pillows and blankets. Make sure they are clean.
- Step 2: Fold the blankets and tree skirts neatly into rectangles.
- Step 3: Place the folded items into the bin. Put the items you want to see in the window facing front.
- Step 4: Place pillows on top. Do not over-stuff the bin. You should be able to zip it easily.
- Step 5: Zip the bin closed.
- Step 6: Slide the bin onto your closet shelf. Make sure the clear window is facing out.
12. The “By-Room” Bin System

This is a setup for a fast decorator. Instead of packing all ornaments in one bin and all garlands in another, you pack by room.
All the “Family Room Mantle” items go in one bin. The “Dining Room” decor goes in another. This way, you can take one labeled bin to each room and have everything you need. Clear bins let you double-check the contents.
How to Set Up Your By-Room Bins
- Step 1: Get several clear plastic bins with lids.
- Step 2: Get a label maker or wide masking tape and a thick marker.
- Step 3: Go to your family room. Take down all the decorations from that room only.
- Step 4: Carefully pack those items into one bin. (Use ornament dividers or egg cartons for breakables).
- Step 5: Create a label that says “Family Room” or “Mantle Kit” and stick it on the bin.
- Step 6: Repeat this for every room (Kitchen, Dining Room, etc.). Stack the bins in your storage area.
13. The “Shrink-Your-Decor” Bag

Bulky items like faux garlands, wreaths, and large tree skirts are mostly air. Vacuum-sealed bags suck all that air out.
This shrinks them down to a fraction of their size. It saves a huge amount of shelf space. It also protects your items from dust, bugs, and moisture. This is a great solution for anyone with limited storage space in an apartment or closet.
How to Use Your Vacuum Bag
- Step 1: Get a large, vacuum-seal “space bag.”
- Step 2: Open the bag and neatly fold your soft items inside. This works for garlands, tree skirts, pillows, and holiday stuffed animals.
- Step 3: Do not fill the bag past the “fill line” printed on it.
- Step 4: Press the zip-seal at the top closed. Slide the plastic zipper piece across it 2-3 times to be sure it is sealed tight.
- Step 5: Open the little cap on the vacuum valve.
- Step 6: Press the end of a vacuum cleaner hose onto the valve. Turn the vacuum on.
- Step 7: Watch the bag shrink! Once it stops shrinking, turn off the vacuum, pull the hose away, and quickly twist the valve cap back on.
14. The Holiday Color-Code

This system makes finding your bins fast. You assign a specific color to each holiday. Christmas might be red and green bins. Halloween is orange. Easter is white or green.
You do not even need to read the labels. When it is time to decorate, you just grab the right-colored bins. It is a simple visual trick that saves time and keeps your shelves looking tidy.
How to Start Your Color-Coded System
- Step 1: Decide on your colors. (Example: Red/Green = Christmas, Orange = Halloween/Fall).
- Step 2: Buy plastic bins in those colors.
- Step 3: As you take down your Christmas decorations, sort them into the red and green bins.
- Step 4: You can get more specific. Maybe “Red = Ornaments” and “Green = Garlands.”
- Step 5: Make a simple cheat sheet or list, just in case you forget.
- Step 6: Hang the list on the wall next to your shelves, like in the picture.
15. The All-in-One Light & Garland Bag

This bag is a clever way to store multiple types of decorations together without them getting tangled. It is built around a central spool.
You wrap your string lights, bead garlands, and tinsel around the spool. The bag zips up around the whole thing. This keeps everything protected and in one place. Handles on the side make it easy to carry.
How to Load Your Spool Bag
- Step 1: Open the bag and set up the internal spool.
- Step 2: Find the plug end of your first string of lights.
- Step 3: Start wrapping the lights around the spool, just like wrapping thread.
- Step 4: When you finish one strand, plug the next strand into it and keep wrapping.
- Step 5: After your lights are wrapped, you can wrap your bead garlands in the same way, right on top of the lights.
- Step 6: Carefully place the full spool back into the bag and zip it closed.
16. The Entryway Storage Bench

If you are short on closet or attic space, use your furniture. This storage ottoman looks like a stylish bench for your entryway or living room.
The top lifts up, revealing a large, hidden storage space. It is a handy spot for stashing smaller, non-fragile items. You can fit gift-wrapping supplies, tree skirts, or small, flat-pack boxes. It keeps items nearby but completely out of sight.
How to Pack Your Storage Bench
- Step 1: Lift the lid of your storage bench.
- Step 2: Get smaller plastic bins or trays that fit inside. This keeps things from becoming a jumbled mess.
- Step 3: Use one bin for ribbons and bows. Use another for tape, scissors, and gift tags.
- Step 4: Neatly fold your holiday table runners or small blankets and place them next to the bins.
- Step 5: Close the lid. Now it is a seat!
17. The Custom Figurine Protector

Collections like Christmas villages or nativity sets are precious and break easily. This case uses special foam to give every single piece a custom-fit slot.
The foam absorbs bumps and shocks, keeping your figurines safe. You can even cut the foam yourself to match your collection. This stops pieces from rattling around in a box, which is how most breaks happen.
DIY Your Own Foam Insert
- Step 1: Get a sturdy plastic case with a lid.
- Step 2: Buy a “pick-and-pull” foam insert online or from a craft store. This foam is pre-cut into tiny squares.
- Step 3: Lay one of your village houses on top of the foam.
- Step 4: Use your fingers to pluck out the small foam squares, tracing the shape of your house.
- Step 5: Keep plucking until you have a hole that is the right shape and depth for your house.
- Step 6: Gently place the house into the hole. It should fit snugly.
- Step 7: Repeat for all your figurines.
18. The “Keep-the-Box” Method

Sometimes the simplest solution is the best one. The cardboard box your small, artificial tree came in was made to hold it.
These boxes are tall, narrow, and strong. They are designed to fit the tree sections perfectly. They also slide easily into a closet, under a bed, or into a corner of the attic. Just be sure to tape the ends shut to keep out dust.
How to Repack Your Tree’s Original Box
- Step 1: Find the original box for your tree. If the ends are torn, get some strong packing tape.
- Step 2: Take your tree apart. It is usually 2 or 3 sections.
- Step 3: Gently fold the branches on the bottom (biggest) section up toward the center pole.
- Step 4: Slide that section into the box, pole-first.
- Step 5: Fold the branches up on the middle section. Slide it in next.
- Step 6: Finally, fold the branches on the top section and slide it in.
- Step 7: Add the tree stand (if it fits) and tape the box shut.
19. The Off-Site Storage Unit

When your holiday collection is too big for your home, it is time to think bigger. A storage unit is a blank canvas for organization.
Renting a small, climate-controlled unit keeps your items safe. Adding metal shelving is key. This lets you use the full height of the unit. You can stack bins, boxes, and tree bags neatly. Label everything clearly so you can find it next year.
How to Organize Your Storage Unit
- Step 1: Rent a storage unit. A “climate-controlled” one is better because it does not get too hot or too cold.
- Step 2: Buy and build metal shelving units. Place them along the walls.
- Step 3: Pack all your items at home into sturdy, lidded bins. Label every bin.
- Step 4: When you get to the unit, place your heaviest bins on the bottom shelves.
- Step 5: Put items you might need (like other holiday bins) near the front.
- Step 6: Leave a small walkway down the middle so you can reach the bins in the back.
20. The “Like-with-Like” Bin Shelf

This is for the person with lots of small decor items. Instead of mixing them, this method gives each category its own bin.
One bin is just for bead garlands. Another is just for wooden ornaments. A third is for felt items. Using clear, matching containers makes the shelf look clean. You can find exactly what you need for a specific project or tree.
How to Sort Your Small Decor
- Step 1: Get many clear, shoebox-sized bins.
- Step 2: Dump all your small decorations onto a clean floor or bed.
- Step 3: Start making piles. Make a pile for “Red Bead Garlands.” Make a pile for “Wooden Snowflakes.” Make a pile for “Felt Santas.”
- Step 4: Keep sorting until everything is in a “like-with-like” pile.
- Step 5: Put each pile into its own clear bin.
- Step 6: Put the lids on and stack the bins neatly on a shelf.
21. The Slim Gift Wrap Caddy

Wrapping paper rolls are awkward. They get crushed in a closet or unravel under a bed. This tall, thin organizer solves that problem.
It stands neatly in a corner or next to a desk, using vertical space. The mesh pockets hold all your supplies. You can store scissors, tape, ribbons, and gift tags. Everything you need for wrapping is in one place. It keeps your paper rolls tidy and stops the edges from tearing.
How to Use Your Gift Wrap Caddy
- Step 1: Stand the caddy up. A corner of a room or inside a closet works well.
- Step 2: Slide your wrapping paper rolls into the main, tall sections.
- Step 3: Gather your tools. Put your scissors in one of the small mesh pockets on the side.
- Step 4: Put your rolls of tape in another pocket.
- Step 5: Collect your gift tags, bows, and pens. Put them in the other pockets.
- Step 6: When you need to wrap a gift, you have everything ready to go.
22. The Attic Ceiling Hammock

Attic floors get cluttered fast. But the space up by the roof is often empty. This cargo net acts like a hammock for your bulky, lightweight items.
It is a great way to store faux wreaths and garlands, especially if they are in bags. This gets them off the floor. It frees up your floor space for heavy bins and boxes. It is a smart use of space that most people ignore.
DIY Your Own Ceiling Hammock
- Step 1: Get a strong cargo net. A net made for a truck bed works well.
- Step 2: You also need four heavy-duty screw hooks.
- Step 3: Ask an adult to help you find the strong wood beams (joists) in the attic ceiling.
- Step 4: Screw the four hooks deep into the beams, making a large rectangle shape.
- Step 5: Attach the four corners of the cargo net to the four hooks. The net will hang down.
- Step 6: Put your light items, like bagged garlands or pillows, into the net.
- Step 7: Do not put anything heavy in it. This is for light, puffy things only.
23. The “Priority Setup” System

Decorating can be a huge job. This system makes it logical. You number your bins based on when you need them.
“Priority 1” holds the first things you put up. This might be the tree and the main lights. “Priority 2” could be the mantle decor. “Priority 4” would be the special, final touches. This way, you only open one box at a time. It turns a big mess into a simple, step-by-step plan.
How to Pack Your Priority Bins
- Step 1: As you take your decorations down, think about the order you put them up.
- Step 2: Get your first empty bin. Put the last things you put up into this bin. This might be small table figurines. Label this bin “SETUP PRIORY 4”.
- Step 3: In the next bin, pack the next-to-last items. Maybe this is the mantle decor. Label it “SETUP PRIORY 3”.
- Step 4: Keep packing in reverse order.
- Step 5: The bin you pack last should have the tree stand and the tree lights. Label this last bin “SETUP PRIORY 1”.
- Step 6: Next year, just grab Bin 1 and start. No hunting!
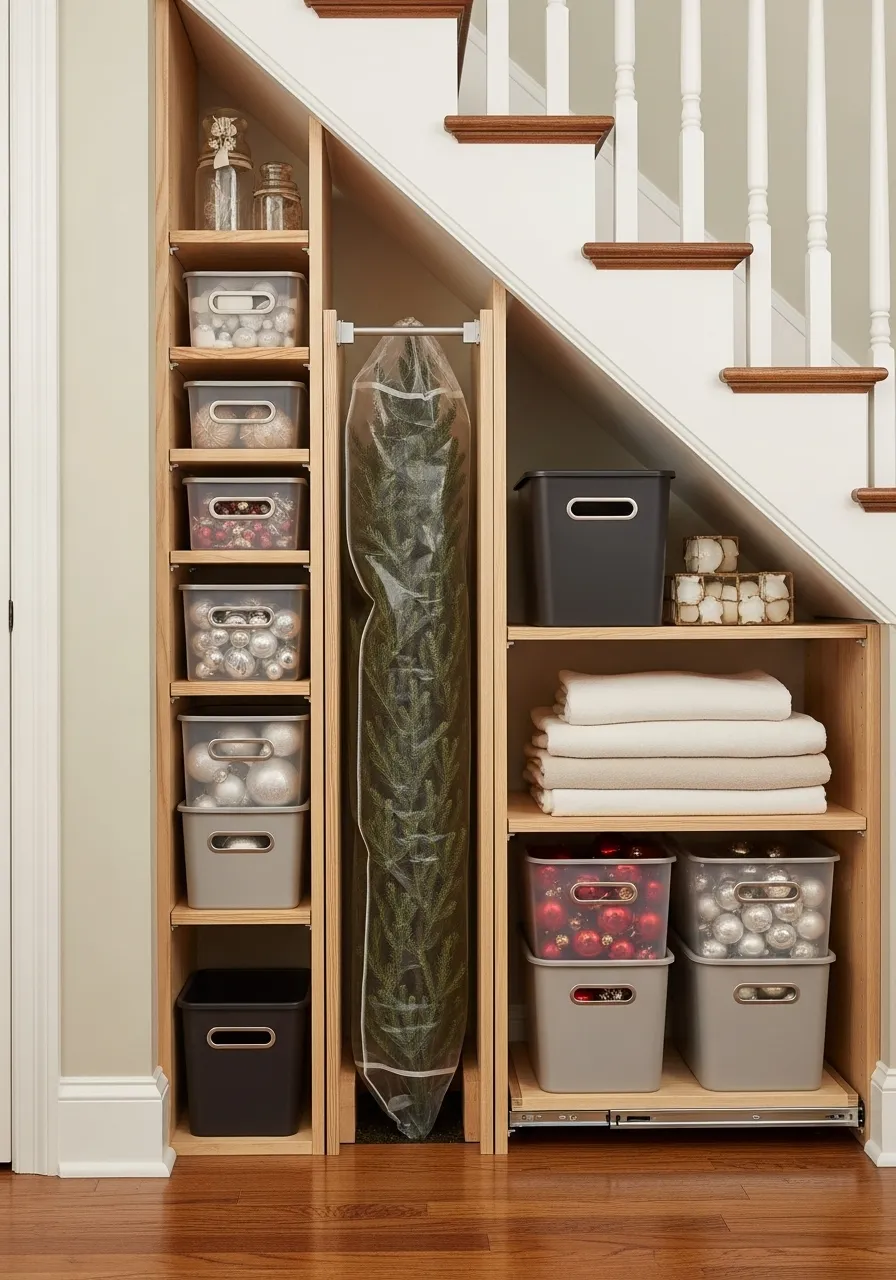
24. The Under-Stair Storage Nook

The triangle space under a staircase is often wasted. This solution turns that awkward nook into a super-organized holiday closet.
Custom shelves hold bins of ornaments. Slide-out drawers make it easy to reach things in the back. A hanging rod provides a clever spot for a bagged tree. This keeps the tree upright and off the floor. It is a very smart way to use every inch of your home.
How to Organize Your Stair Nook
- Step 1: Clean out the closet or space under your stairs.
- Step 2: Ask an adult to help you install simple shelves on the walls.
- Step 3: Ask an adult to install a strong closet rod near the tallest part of the closet.
- Step 4: Put your artificial tree in a tall, upright storage bag.
- Step 5: Hang the tree bag from the closet rod.
- Step 6: Fill clear bins with your ornaments and slide them onto the shelves.
- Step 7: Place heavier items, like the tree stand, on the floor at the bottom.
25. The Acid-Free Linen Bin

Special holiday fabrics can be damaged over time. An embroidered tree skirt or a special tablecloth can turn yellow. Regular cardboard boxes have acids that can stain them.
This special bin is “acid-free.” It protects your valuable fabrics from damage and yellowing. The dividers keep items separated. They stop any colors from bleeding onto each other. This keeps your heirlooms safe for many years.
How to Store Your Special Linens
- Step 1: Make sure your tree skirt and tablecloths are clean and completely dry.
- Step 2: Get an “acid-free” or “archival” storage box. You can find these at craft or container stores.
- Step 3: (Optional) Get some acid-free tissue paper.
- Step 4: Loosely fold your tree skirt. Do not make sharp, hard creases. Place it in the box. You can put tissue paper between the folds.
- Step 5: Fold your other holiday linens and place them in the other side of the box.
- Step 6: Put the lid on. Store the box in a cool, dry, dark place (like a closet), not a hot attic.
26. The Over-the-Door Odds & Ends Caddy

Where do you put all the little things? The ornament hooks, the extra bulbs, the light remotes, the floral picks?
This is a great solution. A clear, over-the-door shoe organizer is a cheap and easy way to store them all. The clear pockets let you see everything at a glance. It uses the wasted space on the back of a closet door. No more digging in a “junk drawer.”
How to Set Up Your Door Caddy
- Step 1: Get a clear, over-the-door shoe organizer.
- Step 2: Hang it over the inside of your storage closet door.
- Step 3: Start filling the pockets! Put all your ornament hooks in one pocket.
- Step 4: Put your light-strand remotes in another.
- Step 5: Use other pockets for spools of ribbon, floral picks, small figurines, or spare bulbs.
- Step 6: Now, all your small items are organized and easy to find.
27. The Canvas Tree Cinch-Bag

This is a simple, no-fuss way to store your tree. It is a large, durable canvas bag. You store your tree in its main sections.
The bag wraps around the tree pieces. The external handles and straps “cinch” everything down. This compresses the branches. It makes the tree a tight, easy-to-carry bundle. It is less structured than a rolling bag but offers great protection from dust and dirt.
How to Use Your Cinch-Bag
- Step 1: Get your canvas tree bag and lay it out flat on the floor.
- Step 2: Take your tree apart into its 2 or 3 sections.
- Step 3: Lay the sections on top of the open bag.
- Step 4: Fold the bag up and around the tree sections, like a big taco.
- Step 5: Buckle the straps that go around the bag.
- Step 6: Pull all the straps tight to cinch the tree down.
- Step 7: Use the side handles to carry the tree to your storage spot.
28. The “Cupcake Liner” Ornament Box

This is a very clever upgrade for a standard ornament box. You add a simple paper cupcake liner to each little compartment.
This gives your delicate, round ornaments an extra-soft cushion. It stops them from rolling or scratching against the cardboard dividers. It is a cheap and simple trick. It gives your fragile glass ornaments extra protection during the year.
DIY Your Cushioned Ornament Box
- Step 1: Get a storage bin that has cardboard ornament dividers.
- Step 2: Assemble the cardboard dividers so you have many small squares.
- Step 3: Get a pack of paper cupcake liners. The simple, plain paper ones are fine.
- Step 4: Place one cupcake liner inside each small square. It will open up to line the slot.
- Step 5: Gently place one ornament into each cupcake liner.
- Step 6: Put the lid on the bin and store it in a safe place.
29. The “Go-To” Holiday Closet

This is a great setup for someone with a spare closet. It turns a simple linen closet into a dedicated holiday headquarters.
Using matching bins creates a clean, uniform look. The labels are clear and easy to read. Baskets on the top shelf can hold softer, odd-shaped items. Everything has a place. It makes finding your supplies easy and stress-free. No more hunting through the whole house.
How to Organize Your Holiday Closet
- Step 1: Empty a closet you want to use for storage.
- Step 2: Buy matching bins (like all gray or all clear) that fit your shelves.
- Step 3: Buy some nice wicker baskets for the top shelf.
- Step 4: Sort your decorations into the bins. (Example: “Ornaments,” “Linens,” “Garlands”).
- Step 5: Use a label maker to create clear, easy-to-read labels for every bin.
- Step 6: Use the top-shelf baskets for soft items like tree skirts or holiday pillows.
- Step 7: Place your bins neatly on the shelves.
30. The Stylish Utility Shelf

Your storage does not have to be ugly. This heavy-duty metal shelf is very practical. But the choice of containers makes it look stylish.
Using a mix of matching bins, baskets, and even faux-leather trunks looks organized, not messy. It shows you can store your items in plain sight, like in a garage or utility room. It can still look good while being functional.
How to Set Up Your Stylish Shelf
- Step 1: Ask an adult to help you assemble a strong, metal shelving unit.
- Step 2: Get a mix of storage containers that look nice together. (Example: gray bins, black trunks, and woven baskets).
- Step 3: Put your heaviest items (like tree stands) in the strongest boxes on the bottom shelf.
- Step 4: Use the decorative trunks for things like fragile ornaments or special linens.
- Step 5: Use the open bins for lights and garlands.
- Step 6: Use the woven baskets on the top shelf for light items like bows and ribbons.
31. The Decorative Storage Trunk

This solution hides your holiday items in plain sight. A vintage-style wooden trunk looks like a beautiful piece of decor. You can leave it at the foot of a bed or in a living room all year.
Inside, it holds your non-fragile items. It is a good spot for garlands, ornaments, and holiday tins. This method combines storage with style. It is a great choice for apartments or homes without a lot of closet space.
How to Pack Your Storage Trunk
- Step 1: Open your decorative trunk.
- Step 2: Place your softest, biggest items in the bottom, like a folded tree skirt or faux garlands.
- Step 3: Next, add your sturdy items. This includes ornaments that will not break easily (like wood, fabric, or shatterproof plastic).
- Step 4: Place any decorative holiday gift boxes or tins on top.
- Step 5: Close the lid. Your “storage” now looks like a piece of designer furniture.
32. The Inflatable Storage Bag

Outdoor inflatable decorations are big, poofy, and hard to store. The original boxes tear apart after one use.
This large duffel bag is made just for them. After you deflate your Santa or snowman, you fold it and place it in the bag. The bag protects the fabric from rips, dirt, and moisture. Strong handles make it easy to carry into the garage or shed.
How to Store Your Inflatables
- Step 1: Lay your inflatable out flat on a clean, dry surface (like a garage floor).
- Step 2: Make sure it is completely dry. Storing it wet will cause mildew.
- Step 3: Fold the inflatable neatly, like you are folding a big blanket.
- Step 4: Press down as you fold to push any extra air out.
- Step 5: Once it is a neat rectangle, place it inside the duffel bag.
- Step 6: Zip the bag closed and hang it on a sturdy hook or place it on a shelf.
33. The Recycled Bottle Caddy

This is a smart, no-cost storage trick for small items. Large, clear plastic bottles (like water jugs or soda bottles) make great containers.
They are a good way to store bead garlands. Just feed the strand into the bottle. It keeps them from becoming a tangled mess. The clear plastic lets you see the color inside. You can also store ornament hooks or other small bits.
DIY Your Recycled Bottle Caddy
- Step 1: Get a large, empty plastic bottle. Make sure it is clean and completely dry inside.
- Step 2: Take one of your bead garlands. Find one end of the strand.
- Step 3: Start feeding the bead garland into the mouth of the bottle.
- Step 4: Keep pushing the strand in until the whole garland is inside.
- Step 5: Screw the cap on the bottle.
- Step 6: Store the bottle on a shelf in your garage or closet. Next year, just pull the strand out.
34. The “Ornament Valet” Rack

Some special ornaments are too big or too fragile for a box. They have delicate parts that could snap off.
This solution treats them like tiny, fancy clothes. A simple wooden rack with S-hooks is installed under a shelf. This lets your special ornaments hang freely. They are safe from being crushed. They will not get scratched. It keeps them in plain view and protected.
DIY Your Ornament Rack
- Step 1: Get a small, wooden strip (like a piece of 1×2 lumber).
- Step 2: Get a pack of small “S-hooks” or “cup hooks.”
- Step 3: If you are using cup hooks, ask an adult to help you screw them into the wood strip, spaced a few inches apart.
- Step 4: Ask an adult to screw the wood strip to the underside of a sturdy shelf in your closet.
- Step 5: If you are using S-hooks, install a simple rod instead of the wood strip.
- Step 6: Gently hang your most delicate ornaments from the hooks.
35. The Setup & Takedown Kit

This is the most important “box” of all. It is not for decorations. It is a tool bag that holds everything you need for the setup and takedown process.
No more hunting for scissors, zip ties, or batteries. You keep it all in one kit. This bag holds spare bulbs, fuses, tape, and packing labels. It saves you so much time and frustration.
How to Build Your Go-Bag
- Step 1: Get a small, sturdy tool bag.
- Step 2: Go through your house and gather your decorating tools.
- Step 3: Put these items in the bag: scissors, zip ties (and a zip tie cutter), floral wire, and packing tape.
- Step 4: Add your “fix-it” items: a pack of extra batteries (AA and AAA), spare fuses for your lights, and extra bulbs.
- Step 5: Add your packing items: a marker and a roll of labels.
- Step 6: Zip the bag shut and store it right next to your “Priority 1” bin. It is the first thing you will grab next year.
An organized storage closet is a gift you give to your future self. It turns a day of frustration into a few hours of easy setup.
You do not need a giant attic to be organized. You just need a better system. Using a hanging rack, a labeled bin, or a simple tool kit makes a huge difference.
Take an extra hour this January. Pack your items with care.
Next December, you will be glad you did. You can simply open your bins and let the holiday cheer begin.
Key Takeaways
- Protect Fragile Items: Use dividers, foam inserts, and even cupcake liners to keep delicate ornaments and figurines safe.
- Use Hidden Space: Furniture like storage benches, trunks, and under-bed bins can hide decor in plain sight.
- Go Vertical: Do not forget your walls and ceilings. Pegboards, overhead hoists, and attic hammocks free up valuable floor space.
- Label Everything: A good system beats a good memory. Use clear labels, color-coded bins, or QR codes so you know exactly what is in every box.
- Group Small Items: Keep tiny, easy-to-lose pieces together. Use door caddies, recycled bottles, and tool kits for hooks, spare bulbs, and remotes.