The holiday season brings joy and excitement. It also brings busy schedules and crowded gatherings. Your bedroom should be a quiet place to rest. It can be your personal escape from all the hustle.

This year, think about bringing the festive spirit into your own private sanctuary. Decorating your bedroom for the holidays is a wonderful act of self-care. It creates a space where you can truly unwind and savor the magic of the season.
You do not need grand gestures or a big budget. A simple garland, a few cozy textures, or the soft glow of fairy lights can transform your room. We have gathered 42 beautiful ideas to inspire you. Each one comes with simple instructions to help you create a serene and festive escape of your own.
1. Embrace a Coastal Holiday Vibe

Escape to a seaside retreat this holiday season. This bedroom design swaps traditional snowflakes for beautiful seashells, creating a unique festive look. The soft blue and white bedding mimics a calm ocean, providing a tranquil backdrop for your holiday rest. This approach feels wonderfully fresh and peaceful.
Natural textures bring the coast right into your room. A simple garland made of starfish and sand dollars hangs gracefully above the bed. The look is complemented by a driftwood mirror and a bowl of smooth stones. It all comes together for a quiet, festive feeling without the usual busy holiday colors.
DIY: Easy Starfish Garland
What You’ll Need:
- A long piece of twine or string
- A few starfish (you can find these at a craft store)
- A few sand dollars (also at the craft store)
- A hot glue gun (ask a grown-up to help you with this part!)
Step-by-Step Guide:
Step 1: Plan Your Pattern. Lay your long string on a table or the floor. Place your starfish and sand dollars along the string to decide how far apart you want them. You could make a fun pattern, like starfish, sand dollar, starfish, sand dollar.
Step 2: Time to Glue! Ask your adult helper to put a small dot of hot glue on the back of your first starfish. Quickly and carefully press the string onto the glue. Hold it for a few seconds until it sticks tight.
Step 3: Keep Going. Continue gluing your starfish and sand dollars onto the string, following the pattern you planned. Remember to leave some empty string at both ends for hanging later.
Step 4: Let it Dry. Wait about 10-15 minutes for the glue to cool down and get really hard. This makes sure your beautiful sea treasures won’t fall off.
Step 5: Hang Your Creation. Your coastal garland is ready! You can hang it above your bed, on a window, or across a mirror to bring a little bit of the beach to your holiday room.
2. Craft a Vintage-Inspired Holiday Dream

This bedroom bursts with cheerful, nostalgic charm. It uses bright pastel ornaments and whimsical patterns to create a space that feels like a storybook scene. The look is playful and full of life, turning the room into a sweet holiday sanctuary. The combination of pinks, mints, and golds feels both festive and unique.
Garlands of vintage-style glass ornaments hang above the bed, catching the light beautifully. The bedding features adorable Christmas tree and snowflake prints, adding to the room’s joyful character. This decor style is a wonderful way to celebrate the season with a touch of retro flair and lighthearted fun.
DIY: Simple Retro Ornament Garland
What You’ll Need:
- A long piece of ribbon or sturdy string
- A box of vintage-style ornaments (look for fun shapes and colors at a craft or holiday store)
- Scissors
Step-by-Step Guide:
Step 1: Get Your Supplies Ready. Lay out your ribbon on a flat surface. Pick out the ornaments you want to use and arrange them in the order you like. This helps you see how your garland will look before you start.
Step 2: Start Stringing. Take your first ornament. Thread your ribbon through the little metal loop at the top. You can slide it along the ribbon to where you want it to be.
Step 3: Tie a Simple Knot (Optional). If you want your ornaments to stay in one place, you can tie a small, loose knot on the ribbon on either side of the ornament’s loop. This will keep it from sliding around. Or, you can just let them hang close together.
Step 4: Add More Ornaments. Keep adding your ornaments one by one. You can make a pattern with the colors or just make it look fun and random. Leave some extra ribbon at both ends for hanging.
Step 5: Hang Your Garland. Once all your ornaments are on, your garland is finished! Ask a grown-up to help you hang it safely over your headboard or on a wall to make your room look extra festive.
3. Add a Touch of Natural Zest

Bring the fresh scents of the season into your bedroom with this natural approach. This decor uses real dried orange slices and fragrant eucalyptus leaves to create a beautiful garland. The look is simple, clean, and feels very refreshing. It connects your space to the simple beauties of winter.
The bright color of the oranges pops against the white walls and soft green bedding. Tiny fairy lights are woven through the garland, adding a gentle, warm glow. This style proves that holiday decorations can be both stunning and wonderfully organic, filling your room with a light, citrusy aroma.
DIY: Fragrant Dried Orange Garland
What You’ll Need:
- 2-3 large oranges
- A knife (ask an adult to do the cutting)
- An oven
- A baking sheet with a rack on top
- Twine or string
- A needle with a big eye, or a small skewer
- Fresh eucalyptus branches (optional)
Step-by-Step Guide:
Step 1: Slice the Oranges. Ask an adult to carefully slice the oranges into thin, round pieces, about 1/4 inch thick. Try to make them all about the same thickness.
Step 2: Bake the Slices. Place the orange slices in a single layer on the wire rack over the baking sheet. An adult should put them in the oven at a very low temperature (around 200°F or 100°C) for about 2-3 hours. They need to be flipped over halfway through. The goal is to dry them out completely, so they look like stained glass.
Step 3: Let Them Cool. Once the orange slices are dry and hard, take them out of the oven and let them cool down all the way. They will get even crispier as they cool.
Step 4: String Your Garland. Carefully use the needle or skewer to poke two holes in each orange slice, near the top. Then, thread your twine through the holes. You can add small branches of eucalyptus between the orange slices for extra decoration and a lovely smell.
Step 5: Display Your Creation. Hang your beautiful, handmade garland above your bed. You can even wrap tiny battery-powered fairy lights around it for a magical sparkle.
4. Create a Cozy Cabin Getaway

Transform your bedroom into a warm and inviting cabin retreat. This style layers textures and classic holiday elements for ultimate coziness. A chunky knit blanket in a warm caramel color rests on the bed, inviting you to snuggle in. The look is grounded by rustic lanterns and an electric fireplace, creating a safe and warm ambiance.
Evergreen garlands and wreaths bring a touch of the outdoors inside. Plaid patterns on the pillows and throw blankets add a traditional, woodsy feel. Stacks of firewood complete the scene, making the room feel like a genuine escape to a snowy lodge in the mountains.
DIY: Safe & Cozy Lantern Display
What You’ll Need:
- One or two old-fashioned lanterns (you can find these at craft or hardware stores)
- Battery-operated LED candles (make sure they fit inside the lanterns)
- A little bit of faux greenery or a pinecone (optional)
Step-by-Step Guide:
Step 1: Check Your Candles. First, make sure your battery-operated candles have batteries and that they work. Turn them on to see their pretty flicker. Using these candles is much safer than real ones, especially in a bedroom.
Step 2: Place the Candle Inside. Carefully open the little door on your lantern. Place one LED candle inside, right in the center. Close the door securely.
Step 3: Add a Festive Touch. If you want to make it look even more festive, you can place a small piece of fake pine branch or a single pinecone next to the lantern. This adds a little touch of nature.
Step 4: Find the Right Spot. Place your finished lantern on your nightstand, on the floor by your bed, or on a sturdy stool. You can use two lanterns on either side of the bed to make it look balanced.
Step 5: Turn Them On and Enjoy. Switch on your LED candles when it gets dark. Your lanterns will give off a warm, gentle glow that makes your whole room feel comfortable and peaceful, just like a real cabin.
5. Design a Glamorous Holiday Masquerade

This bedroom decor is all about drama and sophistication. Deep black fabrics and shimmering gold accents come together for a luxurious holiday look. It creates an atmosphere of mystery and celebration, like a grand New Year’s Eve ball. The sleek, satin bedding feels incredibly elegant.
A beautiful garland made of black feathers and gold ornaments is the main attraction above the bed. Gilded mirrors and a masquerade mask add to the opulent theme. This style is for anyone who loves a touch of glamour and wants to make a bold statement with their holiday decorations.
DIY: Glamorous Feather Garland
What You’ll Need:
- A long, black feather boa (from a craft or party store)
- Small, shatterproof ornaments in gold or black
- Thin gold ribbon or ornament hooks
- Scissors
Step-by-Step Guide:
Step 1: Lay Out Your Boa. Spread your feather boa out on a large, flat surface. This will be the base of your fancy garland.
Step 2: Prepare Your Ornaments. Cut small pieces of your gold ribbon, about 4-5 inches long. Tie a piece of ribbon into a loop on each of your ornaments so they are ready to hang. If you have ornament hooks, you can use those instead.
Step 3: Attach the Ornaments. Decide where you want your ornaments to go. Gently tie them onto the feather boa using the ribbon loops. You can space them out evenly or group them together in little clusters. Make sure you tie them tight enough so they don’t fall off.
Step 4: Fluff It Up. Once all the ornaments are attached, gently shake and fluff the feather boa. This will make it look full and luxurious, and it will help the ornaments settle in among the feathers.
Step 5: Hang with Style. Ask an adult for help hanging your glamorous garland. You can drape it over your headboard or attach it to the wall with a few small, clear hooks for a truly elegant holiday look.
6. Settle into Farmhouse Holiday Comfort

This bedroom captures the essence of a classic, country Christmas. It relies on traditional colors and natural textures to create a welcoming and comfortable space. Red plaid bedding is paired with cozy cable-knit and faux fur pillows, making the bed look incredibly inviting on a cold winter day.
Natural elements are key to this farmhouse style. A simple garland of pinecones and red berries drapes across the headboard and foot of the bed. A rustic wreath adds another layer of festive greenery. The entire room feels heartwarming and timeless, celebrating the simple joys of the season.
DIY: Farmhouse Pinecone and Berry Runner
What You’ll Need:
- A long piece of jute twine
- Small pinecones
- Faux red berries (you can find these on a garland or as individual picks at a craft store)
- A hot glue gun (get an adult’s help for this)
Step-by-Step Guide:
Step 1: Design Your Runner. Lay your piece of twine down on a table. Place your pinecones and little bunches of red berries along the twine to plan out your design. You could try a pattern like pinecone, berries, pinecone, berries.
Step 2: Heat Up the Glue Gun. Ask your adult helper to plug in the hot glue gun and let it get warm. Remember, the tip and the glue get very hot!
Step 3: Start Gluing. Your adult helper should put a dab of hot glue on the bottom of a pinecone. Then, quickly press the twine into the glue. Hold it for a few seconds until it sticks.
Step 4: Add the Berries. Next, put a dab of glue on a small bunch of berries and press it onto the twine next to the pinecone. Continue your pattern until your whole piece of twine is decorated. Leave a little bit of empty twine at the ends.
Step 5: Let It Cool and Display. Let the glue dry completely for about 15-20 minutes. Once everything is secure, you can lay your finished runner along the foot of your bed or drape it on your headboard for a touch of rustic holiday charm.
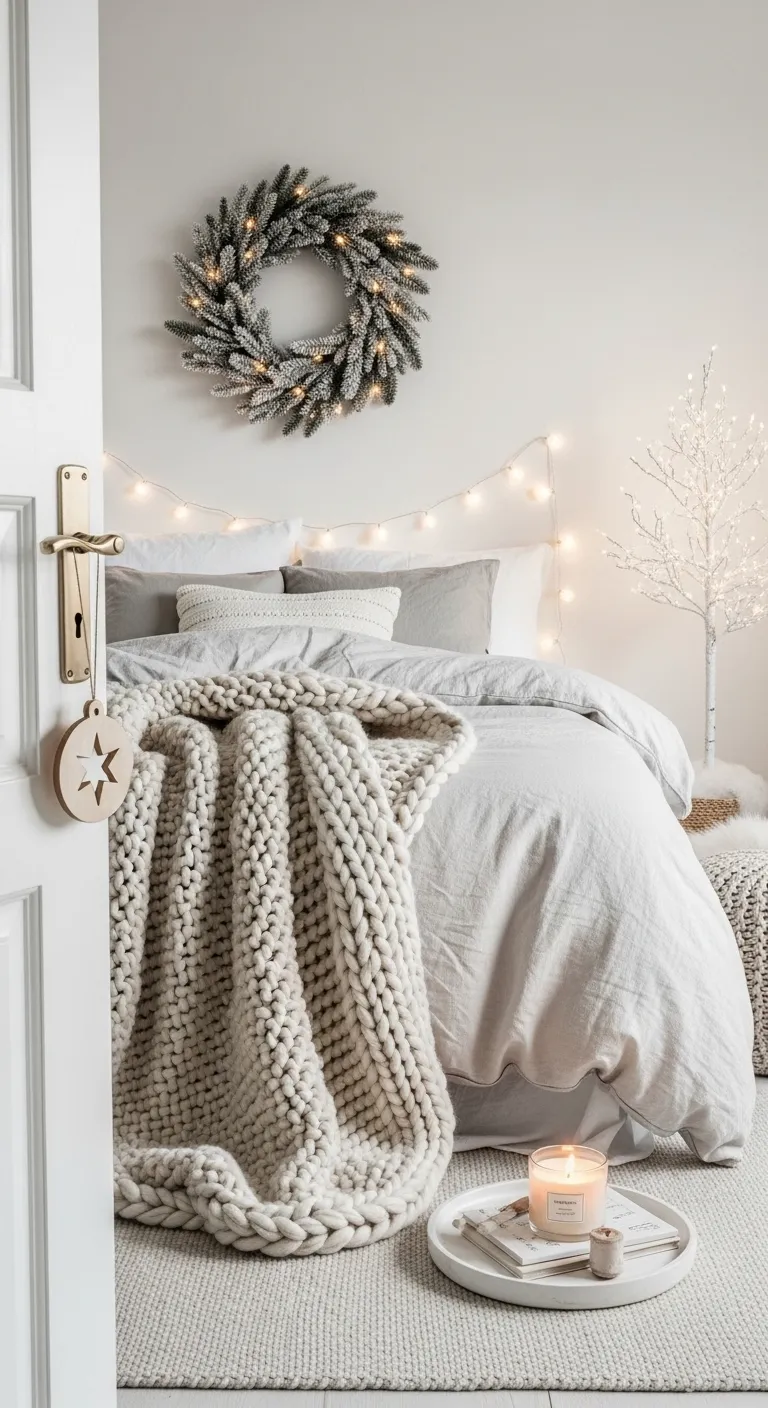
7. Build a Serene Snowflake Haven

Step into a calm and peaceful winter landscape. This bedroom uses a cool color palette of icy blues, silver, and crisp white to create a serene holiday atmosphere. The snowflake-patterned bedding immediately sets a frosty, seasonal tone. It’s a refreshing alternative to warmer holiday colors.
A beautiful garland with frosted evergreen branches, blue baubles, and silver ornaments hangs above the headboard. A small, white tree decorated with matching ornaments adds another layer of winter magic. This decor scheme is all about capturing the quiet beauty of a fresh snowfall.
DIY: Easy Frosted Ornament Garland
What You’ll Need:
- A plain faux evergreen garland
- Shatterproof ornaments in shades of blue and silver
- Ornament hooks or thin floral wire
- Faux snow spray (optional, and needs adult supervision in a well-ventilated area)
Step-by-Step Guide:
Step 1: Frost Your Garland (Optional). If you want a snowy look, ask an adult to take the garland outside or to a garage. They can lightly spray it with the faux snow spray. Let it dry completely before bringing it back inside.
Step 2: Prepare Your Ornaments. Put ornament hooks on all of your blue and silver ornaments. Make sure the hooks are closed tightly so they won’t fall off.
Step 3: Attach the Ornaments. Lay your garland on the floor. Start attaching the ornaments by hooking them onto the green branches. Spread the different colors and sizes out evenly along the whole garland. You can put bigger ones on first, then fill in the gaps with smaller ones.
Step 4: Check Your Work. Once you think you’re done, pick up the garland and give it a gentle shake to make sure all the ornaments are secure. Add more if you see any empty spots.
Step 5: Hang Your Wintery Creation. With a grown-up’s help, hang your beautiful, frosty garland above your bed. It will look like a sparkling, snowy branch brought in from the outdoors.
8. Illuminate with Modern Simplicity

Holiday decor can be both modern and deeply meaningful. This bedroom shows how a few simple elements can make a powerful statement. A dark blue accent wall creates a dramatic backdrop, making the warm white lights stand out beautifully. The look is clean, uncluttered, and very chic.
A single strand of globe string lights is draped elegantly on the wall, adding a soft and gentle glow. On the nightstand, a silver menorah brings a sense of tradition and celebration to the minimalist space. This design demonstrates that you don’t need a lot of decorations to create a festive and personal holiday atmosphere.
DIY: Wall-Draped String Lights
What You’ll Need:
- A set of globe string lights (battery-operated can be easier)
- Small, clear, self-adhesive wall hooks (like Command hooks)
- A pencil and a ruler or measuring tape (optional)
Step-by-Step Guide:
Step 1: Plan Your Shape. Decide what shape you want your lights to make on the wall. You could do a gentle wave, a zig-zag, or just a simple drape like in the picture. You can use a pencil to make tiny, light marks on the wall where you want to place your hooks.
Step 2: Stick on the Hooks. Follow the instructions on the hook package to stick them to the wall. Press each one firmly for about 30 seconds to make sure it’s secure. Let them sit for about an hour before you hang anything on them.
Step 3: Drape the Lights. Start at one end and gently wrap the string light wire around the first hook. Drape the string to the next hook, letting it hang down a little in the middle. Continue this until you’ve hung the whole string.
Step 4: Hide the Battery Pack. If your lights are battery-operated, you can tuck the battery pack behind your headboard, your nightstand, or a pillow so it’s out of sight.
Step 5: Light It Up. Turn on your lights and enjoy the warm, cozy glow. This is a super easy way to make a big impact and add some holiday magic to your room.
9. Create a Glistening Winter Palace

This bedroom is a true winter wonderland, designed to look like a magical ice palace. The decor is all about shimmer, sparkle, and light. Long, glistening icicles hang from the ceiling, creating a breathtaking canopy over the bed. This creates a dreamy and immersive holiday experience.
The color scheme is a cool mix of silver, grey, and white. A mirrored nightstand and a modern hexagonal mirror reflect the light from the icicles and candles, making the whole room sparkle. This elegant and frosty design turns a simple bedroom into a glamorous and enchanting winter escape.
DIY: Magical Hanging Icicle Canopy
What You’ll Need:
- Lightweight acrylic or plastic icicle ornaments (get various lengths)
- Clear fishing line or transparent thread
- Scissors
- Small, clear self-adhesive ceiling hooks
Step-by-Step Guide:
Step 1: Get Your Icicles Ready. Cut different lengths of fishing line for your icicles. Some can be long, and some can be shorter. Tie one end of a piece of fishing line securely to the little loop on top of an icicle ornament.
Step 2: Attach Hooks to the Ceiling. Ask a grown-up to help you with this part. Following the package instructions, stick the clear adhesive hooks to the ceiling above your bed. You can arrange them in a random pattern to look more natural, like real icicles.
Step 3: Hang the First Icicle. Take your first icicle with the fishing line attached. Tie the other end of the line to one of the ceiling hooks. Let the icicle hang down. You can adjust the length by re-tying the knot.
Step 4: Create Your Canopy. Continue hanging all of your icicles from the ceiling hooks. Use different lengths of fishing line to make them hang at different heights. This will create a beautiful, layered look.
Step 5: Enjoy Your Icy Wonderland. Step back and look at your amazing work. The clear string will be almost invisible, so it will look like the icicles are magically floating in the air. Your room will feel just like a frozen palace.
10. Dream Under a Starry Holiday Sky

This bedroom offers a cozy escape into a magical, starry night. The deep, moody wall color creates an intimate and restful setting. It’s the perfect canvas for decorations that twinkle and shine. The rich blue bedding adds to the deep, celestial feeling of the space.
Simple, silver star garlands are draped across the wall and the bed, mimicking a beautiful night sky. The soft glow from the candles enhances the serene atmosphere, making the room feel warm and peaceful. This decor is a gentle and enchanting way to celebrate the holiday season, inspiring sweet dreams.
DIY: Simple Twinkling Star Garland
What You’ll Need:
- Glittery cardstock paper (silver or gold looks great)
- A star-shaped hole punch or a star stencil and a pencil
- Scissors
- A long piece of string or thin silver thread
- A glue stick or a hot glue gun (with adult help)
Step-by-Step Guide:
Step 1: Make Your Stars. Use the star-shaped hole punch to punch out a lot of stars from your glittery paper. If you’re using a stencil, trace the star shape onto the paper many times and then carefully cut them out with scissors.
Step 2: Lay Out Your String. Place your long piece of string on a table. Decide how far apart you want your stars to be. This will be your guide for gluing.
Step 3: Glue the Stars. If you’re using a glue stick, you’ll need two star cutouts for each spot. Put glue on the back of one star, press the string down in the middle of it, and then place another star on top, sandwiching the string in between. If an adult is helping with a hot glue gun, they can just put a small dot of glue on the back of one star and press the string into it.
Step 4: Finish Your Garland. Keep adding stars along your string until your garland is the length you want. Remember to leave some extra string at both ends for hanging.
Step 5: Hang and Admire. Let the glue dry completely. Then, hang your starry garland on the wall above your bed. It will look like your very own constellation, adding a touch of holiday magic to your room every night.
11. Infuse Your Room with Citrus Cheer

This bedroom brings a wonderfully unique and natural feel to the holidays. A garland made of bright, dried orange slices and fresh green leaves creates a vibrant and cheerful focal point. Paired with soft green and sunny yellow textiles, the room feels alive and full of positive energy. The look is simple, organic, and smells amazing.
Twinkling fairy lights woven through the citrus garland add a touch of evening magic. This decor style is a beautiful reminder of the simple, natural joys of the season. It’s a creative way to decorate that feels both festive and incredibly refreshing, moving away from more traditional themes.
DIY: Simple Citrus and Leaf Garland
What You’ll Need:
- Dried orange slices (you can buy these or make them by baking thin slices in the oven at a low temperature for a few hours)
- A long piece of twine
- Fresh or faux leaves (like bay leaves or eucalyptus)
- A large needle or a skewer
Step-by-Step Guide:
Step 1: Plan Your Pattern. Lay your twine on a table and place your orange slices and leaves along it. This helps you decide how you want it to look. A fun pattern could be: orange slice, leaf, leaf, orange slice.
Step 2: Start Threading. Carefully poke a hole through the center of a leaf with your needle or skewer. Push the twine through the hole. Now, carefully poke the needle through the fleshy part of a dried orange slice and thread it onto the twine next to the leaf.
Step 3: Build Your Garland. Continue threading your leaves and orange slices onto the twine, following your pattern. Keep going until your garland is long enough to hang above your bed.
Step 4: Secure the Ends. Once you’re done, you can tie a big knot at each end of the twine to make sure none of your beautiful decorations slide off. Leave some extra twine for hanging.
Step 5: Hang and Enjoy. Ask a grown-up to help you hang your fresh and fragrant garland. You can wrap tiny battery-powered lights around it to make it sparkle in the evening.
12. Cultivate a Romantic Winter Garden

This holiday decor creates a soft and romantic mood, like a garden blooming in the snow. The design uses lush florals and gentle greenery, avoiding the usual bold holiday colors. A beautiful garland filled with dusty pink roses, deep red berries, and eucalyptus leaves drapes gracefully, setting a dreamy tone.
A lighted birch tree adds a magical glow, while a cozy floral quilt invites you to relax. This style is gentle and elegant, perfect for creating a peaceful and beautiful holiday escape. It shows that festive decor can be wonderfully delicate and full of natural grace.
DIY: Easy Faux Flower Garland
What You’ll Need:
- A plain faux evergreen or eucalyptus garland
- Faux flowers (like roses or peonies in your favorite colors)
- Thin floral wire
- Wire cutters (ask an adult to help with these)
Step-by-Step Guide:
Step 1: Prepare Your Flowers. Ask an adult to help you snip the flower heads from their long stems, leaving just an inch or two of the stem at the base of the flower.
Step 2: Cut Your Wire. Have your adult helper cut several pieces of floral wire, each about 4-5 inches long. You will need one piece of wire for each flower you want to add.
Step 3: Attach Wire to the Flowers. Take a piece of wire and wrap it tightly around the short stem at the base of a flower head. You should have two long ends of wire sticking out, like little arms.
Step 4: Add Flowers to the Garland. Place your flower onto the garland where you want it to go. Take the two wire ends and wrap them around a sturdy branch of the garland, twisting them together at the back to hold the flower securely in place.
Step 5: Fill Your Garland. Continue adding flowers, spreading them out evenly along your garland. You can add as many as you like to make it look full and beautiful. Once you’re done, hang it up to bring a touch of winter garden romance to your room.
13. Go Classic with a Cheerful Twist

This bedroom is all about traditional holiday cheer. It uses the timeless combination of red and green to create a space that feels instantly festive and familiar. A classic plaid quilt brings warmth and pattern, while bright red pillows add a pop of vibrant color against the deep green headboard.
What makes this look special is the string of oversized, retro-style ornament lights hanging above. They add a playful and bold touch to the classic decor. This style is comforting and joyful, capturing the merry spirit of a traditional Christmas celebration.
DIY: Faux Retro Bulb Garland
What You’ll Need:
- Large, round plastic ornaments in different colors (like red, green, and white)
- A long piece of thick ribbon or rope
- A hot glue gun (with a grown-up’s help)
Step-by-Step Guide:
Step 1: Remove the Hangers. First, carefully pop the little metal or plastic tops off of your ornaments. You won’t need them for this project. This will leave a small hole at the top of each ornament.
Step 2: Plan Your Layout. Lay your ribbon on the floor and place your ornaments along it to decide on the color pattern and spacing. This helps you see how it will look.
Step 3: Get the Glue Gun Ready. Ask your adult helper to plug in the hot glue gun. Remember to be very careful because it gets super hot.
Step 4: Glue the Ornaments. Your adult helper should put a circle of hot glue around the edge of the hole at the top of an ornament. Then, quickly and carefully, press the ribbon onto the glue. Hold it for a few seconds until it sticks.
Step 5: Keep Going! Continue gluing the ornaments to your ribbon, one by one, following your plan. Once all the ornaments are attached and the glue is completely cool and hard, your awesome retro garland is ready to be hung!
14. Style an Elegant Emerald Escape

This bedroom design is pure holiday luxury. It uses a rich palette of deep emerald green, shimmering gold, and dramatic black to create a sophisticated and glamorous atmosphere. The velvet green bedding looks and feels incredibly plush, making the room a truly opulent retreat for the holidays.
A thick evergreen garland, heavily decorated with large gold ornaments and cascading gold ribbons, hangs over the window. Gilded furniture, a crystal lamp, and a classic ornate mirror complete the elegant look. This style is bold and beautiful, perfect for a grand holiday celebration.
DIY: Elegant Ribbon-Draped Garland
What You’ll Need:
- A plain faux evergreen garland
- Wide, wire-edged ribbon in gold or another fancy color
- Scissors
- A few beautiful ornaments with hooks
Step-by-Step Guide:
Step 1: Attach the Ribbon at the Start. Take one end of your ribbon and tuck it deep into the branches at the end of the garland. You can secure it by twisting a piece of the garland’s greenery around it.
Step 2: Weave the Ribbon. Loosely wrap and weave your ribbon around the garland. Let it puff out in some places and tuck it in at others. The wire in the ribbon’s edge will let you shape it into beautiful, full loops.
Step 3: Let Some Ribbon Hang Down. About halfway through, let a long piece of the ribbon hang down, like a streamer. You can even cut it and then start a new piece, tucking the end in just like you did at the beginning. This makes it look extra fancy.
Step 4: Finish It Off. Continue weaving the ribbon to the end of the garland and secure it. Trim any extra ribbon. The wire edges will help it stay exactly how you shaped it.
Step 5: Add Ornaments. As a final touch, hang a few of your favorite elegant ornaments along the garland. Now it’s ready to be hung for a truly luxurious holiday look.
15. Host a Celestial Holiday Movie Night

This bedroom is transformed into a magical observatory for watching your favorite holiday movies. The deep blue color scheme, from the walls to the velvet bedding, creates the feeling of a vast night sky. It’s an immersive and cozy setup for a special holiday experience.
A curtain of twinkling fairy lights creates a stunning backdrop behind the bed, looking like a cascade of falling stars. A small projector is ready to cast a movie onto the wall, turning the room into a personal cinema. This creative idea is all about making magical memories during the holiday season.
DIY: Easy Fairy Light Backdrop
What You’ll Need:
- One or two sets of “curtain” style string lights (these have many strings of lights hanging down from one main wire)
- A curtain rod, or several clear, self-adhesive wall hooks
Step-by-Step Guide:
Step 1: Choose Your Hanging Method. The easiest way is to use a curtain rod installed on the wall behind your bed. If you can’t do that, ask a grown-up to help you place a row of clear wall hooks along the top of the wall. Space the hooks about 6-12 inches apart.
Step 2: Hang the Lights. If you’re using a rod, simply drape the main horizontal wire of the light curtain over the rod. If you’re using hooks, carefully hang the main wire on the hooks, letting the vertical strings of light fall down.
Step 3: Spread Them Out. Gently separate and untangle each vertical string of lights so they hang straight down. Make sure they are spread out evenly to create a full wall of light.
Step 4: Hide the Wires. Plug in your lights. You can use a thin extension cord if you need to. Try to hide the main plug and any extra wire behind your bed or a nightstand.
Step 5: Lights, Camera, Action! Turn on your lights and see your wall transform! It’s the best backdrop for watching movies or just relaxing in a magical, starry room.
16. Retreat to a Cozy Woodland Lodge

This bedroom feels like a warm, inviting cabin deep in a snowy forest. The rich wood-paneled wall provides a rustic backdrop for layers of cozy textures. A super chunky knit blanket and pillows with winter motifs like reindeer and snowflakes make the bed a haven of comfort.
An evergreen garland studded with red berries and woven with warm white lights frames the bed, adding a classic festive touch. The soft glow from the lights, candles, and a bedside humidifier creates a peaceful and relaxing ambiance. This decor is all about creating a snug and restful sanctuary from the cold outside.
DIY: Weaving Lights into a Garland
What You’ll Need:
- A faux evergreen garland (one with berries is great!)
- A string of battery-operated fairy lights with a thin, flexible wire (warm white is a cozy color)
Step-by-Step Guide:
Step 1: Lay Out Your Garland. Place your garland flat on the floor or a long table. This makes it much easier to work with.
Step 2: Start at One End. Take the end of your string of lights (not the battery pack end) and tuck it deep into the branches of the garland. Wrap the wire around a sturdy branch a couple of times to hold it in place.
Step 3: Wrap the Lights. Begin to loosely wrap the light string around the garland. As you go, gently weave it in and out of the branches. Don’t pull it too tight; you want it to look natural and a little bit random.
Step 4: Tuck as You Go. Make sure you are tucking some lights deeper into the garland and leaving some closer to the surface. This will make it look like it’s glowing from within.
Step 5: Secure the End. When you get to the other end of the garland, wrap the last bit of the light string securely around a branch. Tuck the battery pack behind the garland where it can be hidden when you hang it up. Turn it on and watch your garland glow!
17. Dance in a Sugar Plum Fairy Dreamland

This bedroom is straight out of a fairytale, perfect for anyone who dreams of ballerinas and enchanted kingdoms. The color palette is a soft mix of pastel pink, mint green, and lavender, creating a sweet and magical atmosphere. Sheer tulle fabric drapes around the bed, making it feel like a whimsical canopy.
A garland of delicate, patterned ornaments and fairy lights adds a gentle sparkle. The ballerina-themed bedding and a small, lighted tree with crystal ornaments complete this enchanting scene. It’s a wonderfully imaginative way to celebrate the holidays.
DIY: Simple Tulle Bed Canopy
What You’ll Need:
- A large embroidery hoop
- A few long pieces of sheer tulle fabric in your favorite pastel colors
- Ribbon
- Scissors
- String for hanging
Step-by-Step Guide:
Step 1: Separate the Hoop. An embroidery hoop has two parts, an inner ring and an outer ring. Loosen the screw on the outer ring and separate the two pieces. You will only need one of the rings for this project (either one will work).
Step 2: Prepare Your Fabric. Cut your long pieces of tulle fabric. They should be long enough to reach from your ceiling all the way down to the floor.
Step 3: Attach the Tulle. Take your first piece of tulle. Fold it in half to find the middle. Lay the middle of the fabric over the hoop and tie a simple knot to secure it. Let the two long ends hang down.
Step 4: Cover the Hoop. Continue tying your pieces of tulle onto the hoop, right next to each other. Use all your different colors to create a beautiful pastel mix. Keep going until the whole hoop is covered in draped fabric.
Step 5: Hang Your Canopy. Cut four long, equal pieces of string. Tie them evenly spaced around the hoop. Then, gather the four strings together at the top and tie them in one big knot. Ask a grown-up to help you hang your canopy from a secure hook in the ceiling above your bed. Let the fabric drape beautifully around you.
18. Camp Out in a Whimsical Winter Forest

This bedroom brings the charm of a woodland forest indoors for the holidays. The decor is filled with adorable creatures and natural elements, creating a playful and earthy vibe. A quilt featuring foxes and mushrooms sets the scene for a cozy, forest-themed adventure.
A pine garland decorated with cute, red-and-white toadstool mushrooms hangs on the wall. Little fox and deer figurines sit amongst the pillows, and a miniature tree is decorated with more woodland treasures. This style is imaginative and fun, making the room a delightful place for any nature lover to spend the holidays.
DIY: Easy Clay Mushroom Ornaments
What You’ll Need:
- Air-dry clay (white is best)
- Red and white craft paint
- Paintbrushes
- A small bowl of water
- A toothpick or skewer
- String or twine for hanging
Step-by-Step Guide:
Step 1: Make the Stems. Take a small piece of clay and roll it between your palms to make a short, thick log shape. This will be the mushroom stem. Use your finger to flatten the bottom a little so it could stand up.
Step 2: Make the Caps. Take another piece of clay and roll it into a ball. Gently flatten it into a dome shape, like the top of a mushroom. Use your fingers and a little water to smooth out any cracks.
Step 3: Put Them Together. Gently press the mushroom cap onto the top of the stem. Use a tiny bit of water to help them stick together. While the clay is still soft, use a skewer to poke a hole all the way through the top of the mushroom cap for hanging later.
Step 4: Let Them Dry. Let your clay mushrooms dry completely. This might take a day or two. Follow the directions on the clay package.
Step 5: Paint Your Mushrooms. Once they are dry and hard, paint the mushroom caps red. Let the red paint dry. Then, use the end of your paintbrush or a toothpick to add little white dots on top. After the paint is all dry, thread a piece of string through the hole and tie a loop. You can hang them on a tree or add them to a garland!
19. Snuggle Up with Nordic Holiday Charm

This bedroom is filled with the cozy, handcrafted charm of a Scandinavian winter. The decor features traditional patterns and simple, heartfelt decorations. Pillows with knitted snowflake designs and bedding with folk-art illustrations create a warm and inviting atmosphere that feels both festive and timeless.
A simple garland of red, white, and blue knitted hearts hangs above the bed, adding a touch of handmade love. A small, real tree is decorated with more simple, rustic ornaments. This style celebrates comfort, tradition, and the beauty of simple, handcrafted items.
DIY: No-Sew Felt Heart Garland
What You’ll Need:
- Felt in holiday colors (like red, white, and blue)
- A heart-shaped stencil or cookie cutter
- A pencil
- Scissors
- Cotton balls or stuffing
- Fabric glue
- A long piece of twine
Step-by-Step Guide:
Step 1: Cut Out Your Hearts. Trace your heart shape onto the felt with a pencil. For each finished heart, you will need to cut out two identical felt heart shapes.
Step 2: Start Gluing. Take one of your heart cutouts and put a thin line of fabric glue along the inside edge, leaving a small opening at the top (about an inch wide). Place the second heart cutout exactly on top of the first and press the edges together firmly.
Step 3: Stuff Your Heart. Let the glue dry for a little while. Then, gently push small pieces of cotton balls or stuffing through the opening you left, until your heart is soft and puffy. Don’t stuff it too full!
Step 4: Seal It Up. Put a little bit of glue inside the opening and press it closed. Let your puffy heart dry completely. Make several hearts in all your different colors.
Step 5: String Your Garland. You can attach your hearts to the twine by gluing a small loop of ribbon to the back of each one and threading the twine through. Or, a grown-up can help you carefully use a hot glue gun to stick the hearts directly onto the twine. Hang it up for a dose of cozy, handmade charm.
20. Drape Your Room in Floral Elegance

This beautiful space proves that flowers aren’t just for spring and summer. The decor creates an atmosphere of sophisticated, natural elegance for the holidays. A stunning arrangement of winter florals, including blush peonies and eucalyptus, hangs like a chandelier, drawing the eye upward.
A white, lighted birch tree adds a touch of modern, woodsy magic, while a classic floral quilt ties the whole look together. The combination of fresh flowers and festive lights feels both refreshing and romantic. This is a wonderfully unique way to bring beauty and light into your bedroom during the winter season.
DIY: Hanging Faux Flower Chandelier
What You’ll Need:
- A large embroidery hoop or a sturdy wire wreath frame
- Faux greenery garlands (like eucalyptus or ivy)
- Faux flowers of your choice
- Green floral wire
- Twine or ribbon for hanging
Step-by-Step Guide:
Step 1: Cover the Hoop with Greenery. Take your greenery garland and wrap it all the way around your embroidery hoop or wire frame. Use small pieces of floral wire to secure it tightly in place so none of the hoop is showing.
Step 2: Add Your Flowers. Ask an adult to help you snip the flower heads from their stems, leaving a small, 2-inch stem on each. Poke the stems of the flowers into the greenery garland. You can secure them by wrapping a small piece of floral wire around the stem and the hoop.
Step 3: Arrange Your Design. Continue adding flowers around the hoop. You can cluster them together in some spots and spread them out in others. Make sure it looks beautiful from all angles, especially from below, since it will be hanging up.
Step 4: Create a Hanger. Cut three or four long, equal pieces of twine or ribbon. Tie them evenly spaced around your finished floral hoop. Gather the ends together at the top and tie them in a strong knot.
Step 5: Hang Your Creation. Ask a grown-up to help you hang your floral chandelier from a secure hook in the ceiling. It will look like a beautiful, floating garden in your room.
21. Build a Rustic Lumberjack Retreat

This bedroom has a rugged, outdoorsy charm that feels incredibly cozy. The bold, red and black buffalo check pattern on the bedding and curtains sets a classic lumberjack tone. The look is grounded in natural textures and simple, rustic elements, creating a warm and welcoming cabin-like atmosphere.
A simple banner made of burlap squares and faux evergreen sprigs hangs in the window, adding a touch of handmade character. The decor is straightforward and comfortable, celebrating the simple comforts of a winter lodge. It’s a style that feels both timeless and full of woodsy character.
DIY: Easy No-Sew Burlap Banner
What You’ll Need:
- A roll of burlap fabric or a few burlap squares
- Scissors
- Twine
- A hot glue gun (ask a grown-up to help with this)
- Small sprigs of faux evergreen or other greenery
Step-by-Step Guide:
Step 1: Cut Your Burlap Flags. Cut the burlap into several identical rectangular or triangle shapes. These will be the flags for your banner. Five to seven flags is usually a good number for hanging in a window.
Step 2: Lay Out Your Twine. Cut a piece of twine that is long enough to hang across your window, with a little extra on each end for tying. Lay it straight on a flat surface.
Step 3: Glue on the Flags. Ask your adult helper to run a thin line of hot glue along the top edge of one of your burlap flags. Quickly fold this glued edge over the twine and press it down firmly. This will attach the flag to your banner.
Step 4: Space Them Out. Continue gluing your burlap flags onto the twine, leaving a little bit of space between each one. Make sure they are all facing the same direction.
Step 5: Add the Greenery. Once all the flags are attached, use another small dot of hot glue to stick a little sprig of faux evergreen onto the top corner of each flag. This adds a festive, natural touch. Let the glue cool completely before hanging your rustic banner.
22. Get Lost in a Cozy Celestial Night

This bedroom invites you to sleep under the stars. The deep navy blue walls and bedding create an intimate, night-sky atmosphere that feels both cozy and mysterious. It’s a sophisticated take on holiday decor that focuses on shimmer and mood over traditional colors.
A simple garland of silver, glittery stars hangs above the bed, mimicking a distant constellation. The pillows feature intricate celestial patterns, adding to the theme. Soft, warm light from candles creates a gentle glow, making the room a peaceful and enchanting place to unwind during the busy holiday season.
DIY: Simple Puffy Star Garland
What You’ll Need:
- Stiff, glittery silver felt or cardstock
- A star-shaped stencil or cookie cutter
- A pencil
- Scissors
- Cotton balls
- A hot glue gun (with adult supervision)
- Thin silver thread or fishing line
Step-by-Step Guide:
Step 1: Cut Out Your Stars. Trace your star shape onto the back of your felt or cardstock. For every one puffy star, you will need to cut out two identical star shapes.
Step 2: Start Gluing. Ask your adult helper to take one of the star cutouts. They should carefully apply a thin line of hot glue along the edge of the star’s points, leaving one side open. Quickly place the second star cutout on top and press the edges together.
Step 3: Stuff Your Star. Gently pull apart a cotton ball to make the stuffing fluffy. Carefully push small bits of the cotton into the star through the opening you left. Use a pencil to gently poke it into the points of the star.
Step 4: Seal and Attach. Once the star is lightly stuffed, have your adult helper glue the opening shut. Then, they can put another small dot of hot glue on the back of the star at the top point and press your silver thread into it.
Step 5: Build Your Constellation. Continue making and attaching puffy stars to your thread until your garland is the desired length. Let them cool completely, then hang your beautiful 3D star garland.
23. Settle in with Country Christmas Charm

This cozy corner is bursting with the sights and smells of a country Christmas. The decor is warm, inviting, and full of homespun charm. Classic red plaid patterns on the pillows and blanket create a festive foundation, while pillows featuring cute woodland creatures add a touch of playful character.
A beautiful wreath made from fresh greenery, pinecones, and dried orange slices serves as a lovely focal point. It brings a wonderful natural fragrance into the room. This style is all about celebrating tradition and the simple, sensory joys of the holiday season.
DIY: Easy Pinecone and Orange Wreath
What You’ll Need:
- A plain grapevine wreath base
- Small pinecones
- Dried orange slices
- A hot glue gun (get an adult’s help)
- Floral wire (optional)
- A ribbon for hanging
Step-by-Step Guide:
Step 1: Get Your Glue Gun Ready. Ask an adult to plug in the hot glue gun and let it heat up. Make sure you have a protected surface to work on, like an old newspaper.
Step 2: Plan Your Design. Place your pinecones and orange slices on top of the grapevine wreath without any glue first. This helps you figure out where you want everything to go before you stick it down for good.
Step 3: Start Gluing the Big Pieces. Your adult helper should put a generous dot of hot glue on the bottom of a pinecone and press it firmly onto the wreath. Hold it in place for about 10 seconds. Glue down all of your pinecones first, spreading them out around the wreath.
Step 4: Add the Orange Slices. Now, find empty spots to tuck in your dried orange slices. An adult can add a dot of glue to the edge of a slice and press it onto the wreath, nestled between the pinecones and vines.
Step 5: Add a Hanger. Once all the glue is cool, flip the wreath over. Loop a long piece of ribbon around the top of the wreath and tie a strong knot. Now your beautiful, fragrant wreath is ready to hang.
24. Escape to a Frosted Forest Sanctuary

This bedroom is a dreamy escape into a silent, snowy forest. The decor uses a palette of crisp white and shimmering silver to create a serene and magical winter wonderland. A stunning wallpaper mural of birch trees sets an immersive backdrop, making you feel like you’re in another world.
Layers of soft textures are key to this look. A plush faux fur throw and pillows make the bed look incredibly inviting, while a fluffy rug feels wonderful underfoot. A frosted silver tree and sparkling ornaments enhance the icy, glamorous feel, turning the room into a truly enchanting retreat.
DIY: No-Sew Faux Fur Garland
What You’ll Need:
- A small piece of white or silver faux fur fabric
- Scissors
- Twine or pretty ribbon
- Fabric glue or a hot glue gun (with an adult’s help)
- A ruler
Step-by-Step Guide:
Step 1: Cut Your Fabric. Lay your faux fur fabric face down. Use a ruler to measure and draw long, thin strips, about 1-2 inches wide. Carefully cut out the strips. It’s okay if the fur gets a little messy.
Step 2: Lay Out Your Twine. Cut a piece of twine to the length you want for your garland and lay it on your work surface.
Step 3: Tie on the Fur Strips. Take one strip of faux fur and tie it onto the twine with a simple, single knot. Let the two furry ends hang down.
Step 4: Fill Your Garland. Slide the first knot over a bit and tie another fur strip right next to it. Keep tying on your fur strips, pushing them close together on the twine. The closer they are, the fluffier and fuller your garland will look.
Step 5: Fluff and Hang. Once the entire middle section of your twine is covered in fur strips, your garland is done! Gently run your fingers through it to fluff it up. This super soft and snowy-looking garland is ready to be draped over your headboard or a mirror.
25. Celebrate a Festival of Luminous Stars

This bedroom is decorated for a sophisticated and modern Festival of Lights. A deep blue velvet headboard and matching comforter create a rich, luxurious backdrop that makes the decorative lights truly shine. The mood is celebratory, serene, and full of elegant warmth.
The space is illuminated by beautiful star-shaped lights. A string of smaller stars is draped across the headboard, while larger, three-dimensional paper star lanterns add a significant glow on the bed and floor. Combined with a silver menorah on the nightstand, the room is a beautiful tribute to the holiday.
DIY: Simple Paper Star Lantern (Decoration)
What You’ll Need:
- 5 square pieces of sturdy paper (white or yellow)
- A glue stick
- Scissors
- A pencil and ruler
- A battery-operated LED tea light
Step-by-Step Guide:
Step 1: Make a Diamond. Take one square of paper. Fold it in half to make a triangle. Unfold it. Then fold it in half the other way to make another triangle. Unfold it. You will have a cross crease. Now, fold two opposite corners into the center line, so it looks like a kite.
Step 2: Fold the Flaps. Take the top flaps you just folded in and fold them back out, so their new edge lines up with the outer edge of the kite. This will create two small triangular flaps on each side.
Step 3: Create a Point. You now have one of the five points of your star. It will have a little pocket on one side and a tab on the other.
Step 4: Make Four More. Repeat steps 1-3 with your other four pieces of paper. Now you should have five identical star points.
Step 5: Assemble the Star. Take two of your star points. Put glue on the side tab of one point and slide it into the pocket of the other point. Press them together firmly. Continue adding the other points in the same way, always gluing a tab into the next pocket, until you have a 3D star. Before you close the last one, pop your LED tea light inside.
26. Embrace Quiet Holiday Minimalism

This bedroom shows that holiday decorating doesn’t have to be complicated. The style is all about simplicity, serenity, and a single, well-chosen touch of nature. With clean white bedding and uncluttered surfaces, the room is a calm and peaceful escape from holiday chaos.
The only festive decoration is a single, beautiful pine branch placed in a simple white vase. Paired with the warm glow of a candle and a modern lamp, it creates a quiet, thoughtful holiday mood. This minimalist approach is elegant, modern, and proves that sometimes, less is truly more.
DIY: Lasting Pine Branch Arrangement
What You’ll Need:
- A nice-looking branch from a pine, fir, or cedar tree (you might find one in your yard!)
- A clean, medium-sized vase
- Water
- Scissors or garden clippers (ask an adult to help)
Step-by-Step Guide:
Step 1: Choose Your Branch. Look for a branch that has a nice shape and healthy-looking needles. It shouldn’t be too big for your vase or your nightstand.
Step 2: Prepare the Branch. Ask an adult to help you trim the end of the branch. They should cut the bottom of the stem at an angle. This helps the branch drink up water and stay fresh longer. Also, pull off any small needles from the part of the stem that will be underwater in the vase.
Step 3: Fill Your Vase. Fill your vase about halfway with fresh, cool water.
Step 4: Arrange Your Branch. Place your prepared pine branch into the vase. Turn it around until you like the way it looks. It’s okay if it’s simple and doesn’t look totally straight.
Step 5: Find the Right Spot. Place your beautiful, simple arrangement on your nightstand. Remember to check the water every couple of days and add more if it gets low. This will help your branch stay green and fresh through the holiday season.
27. Wrap Yourself in a Quilted Holiday Hug

This bedroom is a celebration of handcrafted warmth and folk-art traditions. The entire space is filled with the cozy, loving feeling of handmade quilts and decorations. The intricate patterns and classic red-and-green color scheme create a nostalgic and deeply comforting holiday atmosphere.
Beautiful quilts are used as bedding, pillows, and even as a wall hanging. A charming garland of handmade-style ornaments, featuring little bells and Santas, adds to the homespun feel. This decor style is like a warm hug, filled with the joy and care of holiday crafting traditions.
DIY: Easy Pom-Pom and Bell Garland
What You’ll Need:
- Yarn in your favorite holiday colors
- A fork
- Scissors
- A long piece of twine
- Small jingle bells
Step-by-Step Guide:
Step 1: Start Wrapping. Take your yarn and start wrapping it around the tines of your fork. Keep wrapping until you have a thick bundle of yarn. The more you wrap, the fluffier your pom-pom will be.
Step 2: Tie It Off. Cut another small piece of yarn, about 6 inches long. Thread it through the middle tine of the fork, under your wrapped yarn bundle. Tie a very tight double knot around the middle of the bundle.
Step 3: Cut the Loops. Carefully slide the yarn bundle off the fork. You will see loops on both sides. Use your scissors to snip all the loops open.
Step 4: Fluff and Trim. You now have a messy-looking pom-pom! Roll it in your hands to fluff it up, and then give it a little haircut with your scissors to make it look nice and round. Leave the two long strings you used to tie the knot.
Step 5: String Your Garland. Use the long strings on your pom-pom to tie it onto your long piece of twine. Then, thread a jingle bell onto the twine next to it. Continue tying on pom-poms and adding bells until your garland is complete.
28. Indulge in Opulent Holiday Glamour

This bedroom is a masterful blend of glamour and festive opulence. The deep teal accent wall provides a rich, dramatic canvas for the luxurious decor. Gold is the star here, appearing in the ornate mirror, cascading ribbons, and shimmering ornaments, creating a truly regal holiday experience.
An evergreen garland is draped asymmetrically over the window, dripping with gold ornaments and lavish, curling ribbons. The plush velvet comforter and crystal lamps amplify the sophisticated, high-end feel. This is a bold and confident style for a truly glamorous holiday.
DIY: Cascading Ribbon Garland Accent
What You’ll Need:
- A plain faux evergreen garland, already hung
- A roll of wide, wire-edged ribbon
- A few beautiful, lightweight ornaments
- Thin floral wire
Step-by-Step Guide:
Step 1: Choose Your Focal Point. Decide on one spot on your garland where you want your ribbon cascade to begin. A corner or a spot about one-third of the way along the garland usually looks great.
Step 2: Create a Big Bow (Optional). You can start by making a big, loopy bow with your ribbon. Secure the center of the bow with a piece of floral wire, leaving two long tails of wire. Use the wire to attach the bow firmly to the garland.
Step 3: Let the Ribbon Fall. Take the long end of your ribbon from the roll. Let it hang down from where you attached your bow. You can let it fall in one long piece, or you can loosely tuck it back into the garland a foot or two lower down to create a soft loop.
Step 4: Cut Different Lengths. Let several pieces of ribbon cascade down from this one point. Cut them at different lengths to make it look more interesting and natural. The wire edge will allow you to give them a gentle curl.
Step 5: Add Ornaments. Use floral wire or hooks to hang a few of your pretty ornaments right in the center of your ribbon cascade. This will draw the eye and add a final touch of sparkle.
29. Unwind in a Moody, Studious Retreat

This bedroom creates a sophisticated and cozy atmosphere, like a quiet corner in a classic library. The deep, warm burgundy walls provide an intimate and relaxing backdrop. The space is filled with books, soft throws, and the gentle light of a reading lamp, making it the perfect place to curl up on a cold winter day.
The holiday touches are natural and understated. A simple wreath made of evergreen and dried orange slices hangs on the wall, and a matching garland is draped over the headboard. The decor feels thoughtful and mature, blending seamlessly with the room’s studious, comfortable character.
DIY: Easy Mini Orange and Herb Wreath
What You’ll Need:
- A small grapevine wreath base (about 6-8 inches)
- Dried orange slices
- Small sprigs of dried herbs like rosemary or eucalyptus
- A hot glue gun (with an adult’s help)
- A piece of ribbon for hanging
Step-by-Step Guide:
Step 1: Prepare Your Materials. Lay out your wreath and all your decorative pieces so you can see everything you have to work with. Plug in the hot glue gun so it can warm up.
Step 2: Glue on the Orange Slices. Ask your adult helper to put a dot of hot glue on the back of a dried orange slice. Press it onto the grapevine wreath. Add a few more orange slices, leaving some space between them. You don’t have to cover the whole wreath.
Step 3: Tuck in the Herbs. Take your small sprigs of dried rosemary or other herbs. You can often just poke the stems directly into the woven grapevine base. They should hold securely. If they feel loose, your adult helper can add a tiny dot of hot glue to hold them in place.
Step 4: Create a Natural Look. Tuck the herbs in and around the orange slices. The goal is to make it look natural and not too perfect. It’s okay if some of the grapevine shows through.
Step 5: Add a Hanger. Once you are happy with how it looks and the glue is cool, loop a piece of ribbon around the top of your mini wreath and tie it in a knot. Now it’s ready to hang on a doorknob, a drawer pull, or on your wall.
30. Enjoy a Modern Farmhouse Holiday

This bedroom perfectly balances modern design with rustic farmhouse warmth. The crisp shiplap wall provides a clean, bright backdrop, while the rich brown leather headboard and warm wood tones add a touch of earthy comfort. The look is stylish, uncluttered, and effortlessly cozy.
A garland of pine and red berries is casually draped over the headboard, with modern, exposed-bulb string lights woven through it. This mix of the natural and the industrial is key to the modern farmhouse style. A simple wreath, plaid pillows, and a chunky knit throw complete this inviting and chic holiday scene.
DIY: Combining Greenery and String Lights
What You’ll Need:
- A faux pine or evergreen garland
- A set of string lights with larger, “exposed” style bulbs (LED versions are safest)
- Green floral wire or zip ties
Step-by-Step Guide:
Step 1: Lay Everything Out. Lay your garland down straight on the floor. Then, lay your string of lights down next to it. This helps you see how to space the bulbs along the greenery.
Step 2: Place the Lights on Top. Carefully place your string of lights on top of the garland. Arrange the wire so that the big bulbs are nestled nicely among the pine needles and are evenly spaced out.
Step 3: Secure the Wire. Take small pieces of your green floral wire. At several points along the garland, use the wire to attach the light string’s main wire to a sturdy branch of the garland. Twist the floral wire tightly so it’s secure, then hide the twisted ends in the pine needles. Green zip ties also work very well for this.
Step 4: Check Your Work. Gently pick up the garland to make sure the light string doesn’t droop or pull away. Add more wire ties if needed.
Step 5: Drape and Glow. Now that your lights and garland are one piece, it’s easy to hang. Ask a grown-up to help you drape it over your headboard or a doorway. Plug it in and enjoy the beautiful combination of rustic greenery and modern light.
31. Create a Majestic Winter Wildlife Scene

This bedroom is a tribute to the quiet majesty of winter wildlife. The decor creates a serene, snowy forest atmosphere where beautiful creatures are the main focus. A large, stunning snowy owl decal on the wall immediately sets a magical and peaceful tone. The color palette of white, silver, and deep blue is crisp and cool, like a moonlit winter night.
Soft textures, like a plush faux fur throw and a navy sheepskin rug, add warmth and comfort. Silver branches and a string of star lights enhance the enchanting, frosted feeling. This style is a beautiful way to bring the serene beauty of nature indoors for the holidays.
DIY: Simple Snowy Pinecone Owl
What You’ll Need:
- A medium-sized pinecone
- Cotton balls
- Felt (white, black, and yellow)
- Scissors
- A hot glue gun or craft glue (ask an adult for help with hot glue)
Step-by-Step Guide:
Step 1: Make It Snowy. Gently pull apart your cotton balls to make the cotton fluffy. Put a little bit of glue on the tips of the pinecone “petals.” Press small bits of the fluffy cotton onto the glue to make your pinecone look like it’s covered in snow.
Step 2: Create the Eyes. Cut out two medium-sized circles from the white felt. Then, cut two smaller circles from the black felt. Glue the black circles onto the center of the white circles to make the eyes.
Step 3: Make the Beak. Cut a tiny triangle shape out of the yellow felt. This will be the owl’s beak.
Step 4: Put It All Together. Glue the two big eyes onto the top half of your snowy pinecone, right next to each other. Then, glue the yellow beak just below the eyes, right in the middle.
Step 5: Let It Dry. Let your cute pinecone owl sit for a while so the glue can dry completely. You can make a few of them and place them on your nightstand or a shelf for a touch of winter wildlife charm.
32. Soften the Season with Blush and Berries

This bedroom offers a soft, modern, and romantic take on holiday decorating. The gentle color palette of dusty rose, deep burgundy, and soft grey creates a warm and inviting atmosphere that feels very chic. This style moves away from traditional red and green, offering a more subtle and sophisticated holiday vibe.
A simple branch of eucalyptus decorated with delicate rose gold ornaments hangs gracefully over the bed. The embroidered details on the pillows and the cozy knit throw add layers of texture and elegance. This is a beautiful way to celebrate the season with understated grace.
DIY: Simple Eucalyptus Ornament Branch
What You’ll Need:
- One long, nice-looking branch of faux eucalyptus
- A few lightweight, small ornaments in your favorite color (like rose gold or silver)
- Thin ribbon or ornament hooks
- Clear, self-adhesive wall hooks for hanging
Step-by-Step Guide:
Step 1: Prepare Your Ornaments. If your ornaments don’t have hangers, tie a small loop of thin ribbon to the top of each one. Make sure the knot is tight.
Step 2: Lay Out Your Branch. Place your eucalyptus branch on a table or the floor. This makes it easy to see where you want to hang your ornaments.
Step 3: Hang the Ornaments on the Branch. Carefully hang your ornaments from the little stems on the eucalyptus branch. Spread them out evenly from one end to the other. Don’t use too many; a few beautiful ones will look very elegant.
Step 4: Prepare to Hang. Ask a grown-up to help you stick two or three clear wall hooks on the wall above your bed. Space them out to support the length of your branch.
Step 5: Display Your Creation. Gently place your decorated eucalyptus branch onto the hooks. You might need to adjust the ornaments a little bit. Now you have a simple, beautiful piece of modern holiday decor.
33. Double Down on Cabin-Inspired Comfort

This bedroom fully embraces the cozy feeling of a rustic mountain cabin. It is a masterclass in layering patterns and textures for ultimate comfort. The bold, multi-colored buffalo check bedding is the star, creating a warm and inviting focal point that makes you want to snuggle in.
The room is filled with classic cabin elements, from the rustic burlap banner to the warm, industrial-style lamps. Pillows with woodland creatures add a touch of charm, while a soft, sherpa-lined throw provides another layer of warmth. This is a timeless holiday look that is all about feeling safe and snug.
DIY: No-Sew Flannel Pine Tree Pillow
What You’ll Need:
- A plain, light-colored pillow cover
- A small piece of green flannel or felt fabric
- Scissors
- A pencil
- Fabric glue
- A piece of paper to make a stencil
Step-by-Step Guide:
Step 1: Make Your Tree Stencil. Draw a simple pine tree shape on your piece of paper. It can look like three triangles stacked on top of each other, getting bigger at the bottom. Cut out your paper tree to create a stencil.
Step 2: Trace Your Tree. Place your stencil onto the green flannel fabric and carefully trace around it with a pencil. Make one, two, or even three trees.
Step 3: Cut Out the Fabric Trees. Carefully cut out the tree shapes you traced on the flannel. Take your time to make the edges nice and neat.
Step 4: Glue on Your Trees. Lay your pillow cover flat on a table. Arrange your flannel trees on the pillow to decide where you want them to go. Then, one by one, put a thin layer of fabric glue on the back of each tree and press it firmly onto the pillow cover.
Step 5: Let It Dry. Let the glue dry completely, which might take a few hours. Once it’s dry, you can put your pillow insert inside the cover, and you’ll have a brand new, cozy cabin-style pillow!
34. Come Home for a Country Cottage Holiday

This bedroom setting feels like coming home for the holidays. It is overflowing with nostalgic, country cottage charm. The warm plaid quilt and abundance of cozy pillows create an atmosphere that is incredibly welcoming and full of festive spirit. The detailed needlepoint pillows, showing cozy winter cabins, are the heart of this look.
Natural garlands made from pinecones, dried oranges, and evergreen branches add a fragrant, homespun touch. The warm glow from the candles in mercury glass votives makes the whole space feel magical. This style is all about celebrating the comforting traditions of a family Christmas.
DIY: Easy Pinecone and Orange Garland
What You’ll Need:
- Small pinecones
- Dried orange slices
- A long piece of twine
- A hot glue gun (and a grown-up to help you use it)
Step-by-Step Guide:
Step 1: Plan Your Garland’s Pattern. Lay your long piece of twine on the floor. Place your pinecones and orange slices along the twine to decide how you want your pattern to look. You could do two pinecones, then an orange slice, and repeat.
Step 2: Get the Glue Gun Ready. Ask your adult helper to plug in the hot glue gun and let it get warm. Make sure to be careful, as the glue and the tip get very hot.
Step 3: Start Gluing. Your adult helper should put a generous dot of hot glue on the bottom of a pinecone. Then, quickly press the twine into the glue and hold it for a few seconds until it sticks.
Step 4: Add the Orange Slices. Next, have your adult helper put a line of hot glue along the top edge of a dried orange slice. Press the twine into the glue and hold it.
Step 5: Complete Your Garland. Continue gluing your pinecones and orange slices onto the twine until your garland is the perfect length. Let all the glue cool down completely, and then it’s ready to hang on a shelf or your headboard.
35. Relax in a Serene Scandinavian Winter

This bedroom is a peaceful retreat, inspired by the simple, clean beauty of a Scandinavian winter. The color palette is calm and neutral, using shades of white and soft grey to create a serene atmosphere. The focus is on texture, with a super chunky knit blanket adding a wonderful touch of cozy warmth.
The holiday decorations are simple and elegant. A beautiful frosted wreath, woven with warm fairy lights, hangs on the wall like a piece of art. A small, lighted birch tree adds another source of soft, magical light. This minimalist style is perfect for creating a tranquil and restful holiday escape.
DIY: Frosted Pinecone Wreath
What You’ll Need:
- A simple grapevine wreath base
- Pinecones of various sizes
- White craft paint
- A small paintbrush or a paper plate
- A hot glue gun (with an adult’s help)
Step-by-Step Guide:
Step 1: Frost Your Pinecones. Pour a little bit of white paint onto a paper plate. Take a pinecone and dip the tips of its “petals” into the paint. You can also use a paintbrush to add white paint to the tips. This will make them look like they are tipped with frost or snow. Let all your pinecones dry.
Step 2: Get the Glue Gun Ready. Ask your adult helper to warm up the hot glue gun while your pinecones are drying.
Step 3: Attach the Big Pinecones. Have your adult helper put a good amount of hot glue on the bottom of your largest frosted pinecones. Press them firmly onto the grapevine wreath, spacing them out evenly.
Step 4: Fill in with Smaller Ones. Now, use the smaller frosted pinecones to fill in the gaps. Your adult helper can add glue and you can show them where you want the pinecones to go. Keep adding them until your wreath looks full and beautiful.
Step 5: Let It Cool and Hang. Let the glue cool and harden completely. Then you can add a ribbon to hang your beautiful, frosty wreath on a door or a wall.
36. Decorate with Modern Graphic Cheer

This bedroom showcases a clean, modern, and graphic approach to holiday decorating. The high-contrast look, with a black headboard and crisp white walls, serves as a stylish canvas for simple, bold decorations. The style is uncluttered and intentional, proving that holiday cheer can be very chic.
A simple evergreen garland with warm lights rests on the headboard. The bedding is kept simple, allowing the geometrically patterned pillow to stand out. Framed modern art adds another graphic element. This is a great look for those who love clean lines and a minimalist feel.
DIY: No-Sew Geometric Pillow Cover
What You’ll Need:
- A plain white or light-colored pillow cover
- Felt in holiday colors (like red and green)
- Fabric glue
- Scissors
- A ruler and a pencil
Step-by-Step Guide:
Step 1: Plan Your Design. Decide what kind of geometric pattern you want to make. You can cut out lots of small triangles, squares, or long rectangles. Use your ruler and pencil to draw the shapes on your felt.
Step 2: Cut Out Your Shapes. Carefully cut out all the felt shapes you have drawn. You can make them all one color or use a few different colors for a fun pattern.
Step 3: Arrange Your Pattern. Lay your pillow cover on a flat surface. Place your felt shapes on top of it without any glue to create your design. You could make stripes, a chevron pattern, or a cool mosaic.
Step 4: Glue Everything Down. Once you are happy with your design, carefully lift up one felt piece at a time. Put a thin layer of fabric glue on the back and press it back into place on the pillow cover. Do this for all of your pieces.
Step 5: Let It Dry. Let your pillow cover sit for several hours to make sure the fabric glue is completely dry. Then you can put your pillow inside and show off your cool, modern holiday creation.
37. Dream in a Delicate Snowflake Wonderland

This bedroom is a whimsical dream, filled with delicate and romantic holiday touches. The atmosphere is soft and sweet, created by layers of gentle textures and pretty details. A sheer canopy drapes around the bed, making it feel like a cozy, private hideaway.
A beautiful garland made of intricate paper snowflakes is strung with fairy lights, adding a magical, wintery glow. The bedding features soft floral patterns and pillows with delicate lace details. This charming style is all about creating a personal and enchanting space to dream in during the holidays.
DIY: Classic 6-Sided Paper Snowflakes
What You’ll Need:
- White paper (regular printer paper works great)
- Scissors
Step-by-Step Guide:
Step 1: Make a Square. Start with a rectangular piece of paper. Take one corner and fold it down to meet the opposite edge, making a triangle. You’ll have a small rectangular strip left over. Cut off this strip. When you unfold the triangle, you’ll have a perfect square.
Step 2: Fold a Triangle. Fold your square in half diagonally to make a triangle.
Step 3: Fold in Thirds. Fold that triangle into thirds. To do this, imagine the triangle is a piece of pizza. Fold one side over the middle, then fold the other side over on top of that. It should look like a pointy piece of pie. Make sure the edges line up nicely.
Step 4: Make Your First Cut. Cut across the bottom of your folded paper. You can cut it straight across, in a curve, or in a zig-zag. This will shape the outside of your snowflake.
Step 5: Cut Out Your Designs. Now, carefully cut small shapes out of the folded sides of your paper. You can cut out little triangles, half-circles, or skinny rectangles. Be careful not to cut all the way across from one side to the other, or your snowflake will fall apart!
Step 6: Unfold and Admire! Gently unfold your paper all the way. You will have a beautiful, unique, six-sided snowflake! Make a bunch and string them together for a lovely garland.
38. Wander into an Enchanted Forest

This bedroom decor takes you deep into a magical, enchanted forest. The mood is earthy, mysterious, and incredibly cozy. The rich, dark colors of the walls and the deep green velvet bedding create an intimate space that feels like a secret woodland hideaway.
The decorations are wonderfully natural and unique. A garland made of real moss and tiny mushrooms is draped across the bed. Pillows with fern patterns, real moss in bowls, and rustic wooden candle holders complete the forest-floor theme. This is a creative and imaginative style for anyone who loves the magic of nature.
DIY: Enchanted Mossy Centerpiece
What You’ll Need:
- A wooden tray or a piece of bark
- Preserved moss (you can find this at a craft store)
- A few small twigs or a cool-looking branch
- A hot glue gun (with an adult’s help)
- A few small decorative items like mini pinecones, faux mushrooms, or smooth stones
Step-by-Step Guide:
Step 1: Create a Mossy Base. Ask your adult helper to use the hot glue gun to stick down pieces of moss onto your tray or piece of bark. Cover most of the surface so it looks like a patch of forest floor.
Step 2: Add Your Branch. Choose a spot for your main branch or a few twigs. Have your adult helper put a good amount of hot glue on the bottom and hold it in place on the moss until it stands up on its own.
Step 3: Decorate Your Forest Scene. Now for the fun part! Use small dabs of hot glue to add your little decorations. You can nestle a few tiny pinecones at the base of the branch, or have a few fake mushrooms “growing” out of the moss. Place your smooth stones around to add more texture.
Step 4: Find the Perfect Spot. Let everything cool down. Your enchanted forest scene is complete! You can place it on your nightstand or a dresser. You can even add a battery-operated tea light in the middle for a magical glow.
39. Celebrate a Chic and Luminous Hanukkah

This bedroom is beautifully styled for a modern and elegant Hanukkah celebration. The deep, luxurious blue of the velvet headboard and comforter creates a perfect night-sky backdrop for the shining silver and warm lights. The atmosphere is festive, sophisticated, and full of joy.
Star-shaped string lights cascade down the headboard, adding a magical, celebratory glow. Two stunning silver menorahs are ready for the nightly candle lighting, one on the nightstand and one on a tray on the bed. This decor is a chic and beautiful way to honor the Festival of Lights.
DIY: Faux Mercury Glass Votives
What You’ll Need:
- A small glass jar or votive candle holder
- Krylon Looking Glass spray paint (this is a special mirror-effect paint)
- A spray bottle with a mix of one part vinegar and one part water
- Paper towels
- A well-ventilated area to work in (like outside)
- Battery-operated tea lights
Step-by-Step Guide:
Step 1: Clean Your Jar. Make sure your glass jar is very clean and dry on the inside and outside.
Step 2: Spray with Water and Vinegar. Lightly spritz the inside of your jar with the water and vinegar mixture. You want it to have little droplets of water, not be completely soaked.
Step 3: Spray with Mirror Paint. Quickly, while the water droplets are still there, spray a light coat of the Looking Glass paint on the inside of the jar. Let it dry for about a minute.
Step 4: Blot and Repeat. Gently blot the inside of the jar with a crumpled paper towel. This will lift off the paint where the water droplets were, creating the spotty look of old mercury glass. Repeat the process of spritzing and spraying a few more times to build up the mirror effect.
Step 5: Let It Dry and Enjoy. Let your jar dry completely. The outside will still be shiny glass, but the inside will have a beautiful, speckled, silvery finish. Pop a battery-operated tea light inside and watch it glow.
40. Embrace a Moody, Botanical Winter

This bedroom design is sophisticated, moody, and deeply connected to nature. The dark grey walls and earthy tones of olive green and rust orange create a cozy, den-like atmosphere that is perfect for hibernating in winter. The style is mature, textural, and very calming.
The holiday decorations are subtle and organic. A beautiful eucalyptus and pinecone garland is draped on the wall above botanical prints. Large glass apothecary jars are filled with natural elements like dried orange slices and cinnamon sticks, adding a touch of rustic, fragrant charm. This look is about finding beauty in the quiet, natural elements of the season.
DIY: Holiday Apothecary Jars
What You’ll Need:
- A clean glass jar with a lid
- A variety of dried natural items
- Fun ideas for fillers: dried orange slices, cinnamon sticks, pinecones, star anise, whole nuts, or even faux cranberries.
Step-by-Step Guide:
Step 1: Make Sure Your Jar is Clean. Wash and thoroughly dry your glass jar and its lid. You want it to be sparkling clean so you can see your beautiful arrangement inside.
Step 2: Choose Your Fillers. Decide what you want to put in your jar. You can use just one thing, like a whole jar full of tiny pinecones, or you can make a mix. A mix of dried orange slices, cinnamon sticks, and star anise will look and smell wonderful.
Step 3: Layer Your Items. Carefully start placing your items inside the jar. If you are using a mix of things, it looks nice to create layers. You could do a layer of pinecones at the bottom, then a layer of orange slices, and top it off with some cinnamon sticks.
Step 4: Fill It Up. Continue adding your items until the jar is full. You can gently shake the jar a little to help the items settle.
Step 5: Put a Lid On It. Place the lid on your jar. You can display just one jar or make a few with different natural fillers inside. They look great grouped together on a nightstand or a dresser.
41. Find Peace in a Modern Mountain Lodge

This bedroom is the essence of modern, sophisticated cabin style. The clean lines of the wooden furniture and the neutral color palette create a calm and uncluttered space. It’s a mature and stylish take on holiday decor, where texture and simplicity are the main focus.
Holiday touches are subtle and thoughtfully chosen. A simple, unadorned evergreen wreath hangs on the door, adding a touch of natural green without overwhelming the space. A luxurious faux fur throw and a stack of firewood bring in warmth and rustic texture. This design proves that a festive feeling can be achieved with quiet, understated elegance.
DIY: Simple Modern Hoop Wreath
What You’ll Need:
- A metal hoop (gold or black looks great)
- A few sprigs of real or faux greenery (like eucalyptus or pine)
- Thin floral wire
- Wire cutters (ask an adult for help)
- A piece of ribbon for hanging
Step-by-Step Guide:
Step 1: Prepare Your Greenery. Take your sprigs of greenery and arrange them in a small bundle. You want them to cover about one-third of your metal hoop.
Step 2: Attach the Bundle. Place your bundle of greenery on top of the metal hoop. Ask your adult helper to cut a few small pieces of floral wire. Use one piece of wire to wrap tightly around the stems of the greenery and the hoop, securing them together.
Step 3: Secure the Other End. Use another piece of floral wire to wrap around the tips of your greenery and the hoop. This will keep the whole bundle lying flat against the hoop. You can add another wire tie in the middle if you need to.
Step 4: Keep It Simple. The beauty of this wreath is that most of the hoop is left bare. It looks very modern and clean. Make sure your greenery is attached securely.
Step 5: Add a Hanger and Display. Loop a long piece of ribbon around the top of your hoop, opposite your greenery, and tie a knot. Your simple, modern wreath is now ready to hang on a door or a wall for a touch of minimalist holiday style.
42. Rest in a Glistening Snowflake Dream

Step into a magical, frosted dreamscape with this beautiful bedroom decor. The room is bathed in the cool, serene light of an icy winter’s night. A palette of soft blues, crisp whites, and shimmering silver creates an enchanting atmosphere that is both festive and deeply peaceful.
Pillows embroidered with delicate snowflakes make the bed look like a soft snowdrift. A lighted tree with glowing branches adds to the magic, while a garland of silver baubles shimmers on the wall. The most unique touch is the hanging snow globe ornaments, which seem to float in the air like magical bubbles. This is a truly enchanting winter wonderland.
DIY: Easy Snow Globe Ornament
What You’ll Need:
- A clear, plastic fillable ornament that opens into two halves
- White or silver glitter
- A tiny bottle brush tree or other small holiday figurine
- A hot glue gun (and a grown-up to help)
- Ribbon for hanging
Step-by-Step Guide:
Step 1: Create Your Scene. Take one half of your plastic ornament. Ask your adult helper to put a dot of hot glue on the bottom of your tiny tree or figurine. Quickly and carefully, stick it to the inside bottom of the ornament half. Hold it for a few seconds until it stands up on its own.
Step 2: Add the Snow. Pour a little bit of glitter into the ornament half where you just glued your tree. This will be the sparkling snow in your winter scene. Don’t add too much, just enough to make a little pile at the bottom.
Step 3: Close the Ornament. Carefully take the other half of the plastic ornament and snap it together with the first half. Make sure it closes tightly so none of the glitter can escape.
Step 4: Shake It Up! Gently shake your new ornament and watch the glittery snow swirl around your little tree.
Step 5: Add a Hanger. Thread a pretty piece of ribbon through the loop at the top of the ornament and tie it in a knot. Now your magical snow globe ornament is ready to be hung on a tree or from your ceiling.
Creating a festive bedroom is about making space for peace. It is about crafting a personal retreat that brings you comfort and joy. The holidays are for sharing, but they are also for quiet reflection. Your personal space should reflect that.
You have seen many styles, from coastal charm to rustic cabins. You have learned how to make simple, beautiful decorations. Now you can choose the ideas that speak to you. Mix them, match them, or use them as a starting point for your own creativity.
This season, give yourself the gift of a serene escape. Let your bedroom be a place where the holiday spirit feels calm, personal, and wonderfully restful.
Key Takeaways
- Think Beyond the Living Room: Bringing festive decor into your bedroom creates a personal holiday sanctuary.
- Texture is Key: Cozy textures like chunky knits, faux fur, and velvet instantly make a room feel warmer and more inviting for winter.
- Embrace Natural Elements: Greenery, pinecones, and dried citrus add a simple, fragrant, and beautiful touch to any style.
- Lighting Creates Magic: The soft glow of fairy lights, string lights, or battery-operated candles is a simple way to create a warm and enchanting atmosphere.
- DIY Adds a Personal Touch: Crafting your own decorations is a rewarding way to personalize your space and make your holiday decor truly unique.
- Unconventional Colors Work: Don’t be afraid to try holiday palettes beyond red and green. Soft pastels, deep blues, or earthy tones can be just as festive.