The hallway is often the most overlooked space in the home. It is frequently seen as a transition zone rather than a fully realized room. However, this narrow passage is the first thing guests see and the last thing you see when you leave. It deserves just as much thought and personality as your living room. A dull hallway can silently undermine the aesthetic of the entire house, giving off an uninspired first impression. It is time to reclaim that space.

This comprehensive guide brings you 38 incredible, actionable ideas to transform your entry or hallway. From dramatic paint treatments and architectural detailing to clever storage and museum-worthy lighting, we have solutions for every style and budget. Stop walking through a bland corridor. Start walking through a statement.
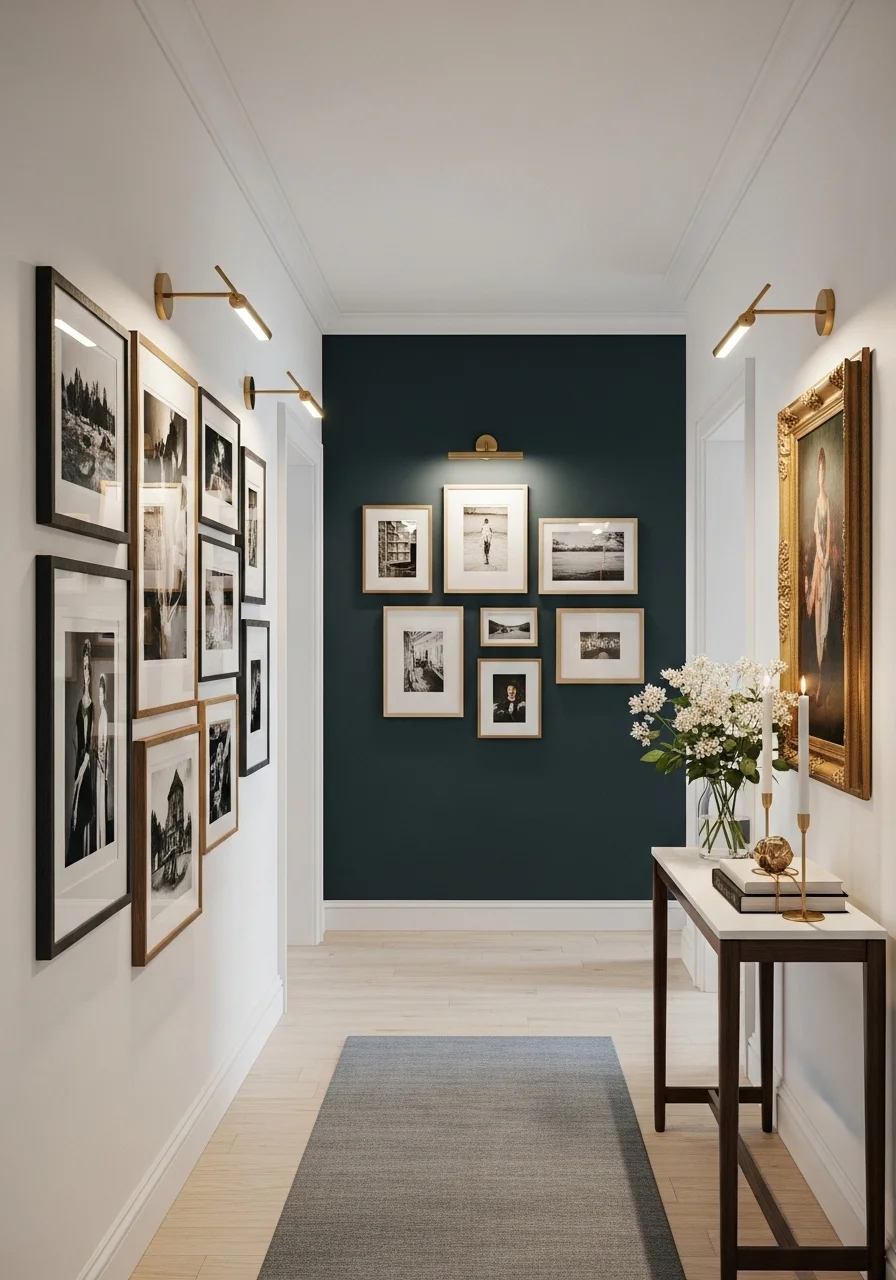
1. The Curated Contrast Gallery

A hallway often suffers from bland, forgotten walls. Consider how this space utilizes dramatic color and thoughtful arrangement to grab attention immediately. A deep, handsome teal or charcoal accent wall at the end of the hall provides a powerful focal point, drawing the eye down the length of the space.
Notice the clever use of picture frames. They employ a mix of sizes, orientations, and frame colors—blacks, whites, and warm woods—to create visual texture and movement. Bright, focused brass sconces are mounted above the galleries. These fixtures not only illuminate the artwork beautifully but also add a sophisticated, upscale touch. The lighting transforms simple prints into museum-worthy displays, making the entire hallway feel like an intentional, well-designed room rather than just a pass-through.
Material Required List (Accent Wall & Gallery)
- One gallon of high-quality, deep-colored interior latex paint (e.g., deep charcoal, teal, or navy).
- Assortment of picture frames in various sizes (e.g., three 8×10, two 11×14, one 16×20).
- Black and white photographic prints or personal family photos.
- Painter’s tape (low-tack).
- Drop cloths or old sheets.
Equipment Required List (Accent Wall & Gallery)
- Paint roller frame and roller covers (for smooth walls).
- Angled paintbrush (for cutting in edges).
- Level and tape measure.
- Hammer or power drill with wall anchors and screws (depending on frame weight and wall type).
- Pencil.
- Wall cleaning solution (e.g., mild soap and water).
DIY Instruction Step by Step
Creating the Accent Wall
- Prep the Area: Move any furniture away from the wall you plan to paint. Lay drop cloths completely over the floor and tape off the ceiling, adjacent walls, and baseboards using painter’s tape.
- Clean the Surface: Thoroughly wash the wall with a mild soap solution and allow it to dry fully. This ensures the paint adheres properly.
- Cut In: Use the angled brush to carefully paint along the edges, corners, and near the painter’s tape. Apply the paint in long, smooth strokes.
- Roll the Wall: Use the roller to apply the first coat of paint to the large, central areas of the wall. Apply in a consistent ‘W’ pattern, overlapping slightly to ensure even coverage.
- Second Coat: Let the first coat dry according to the manufacturer’s instructions. Apply a second coat, repeating the ‘cut in’ and ‘rolling’ process for a rich, opaque finish.
- Remove Tape: While the paint is still slightly wet, carefully peel off the painter’s tape. This prevents the tape from pulling off dried paint and ensures clean lines.
Arranging the Gallery
- Plan the Layout: Before drilling, lay your frames on the floor and experiment with different arrangements. Use large sheets of butcher paper or wrapping paper to trace the outline of each frame. Cut out these templates.
- Map the Wall: Tape the paper templates to your accent wall using painter’s tape. Adjust the placement until you find a balanced and appealing grouping. This lets you visualize the final look without making unnecessary holes.
- Mark Hanging Points: Mark the exact spot on the paper template where the hook or nail for each frame needs to go.
- Install Hardware: Remove one template at a time and install the necessary wall anchors or nails into the marked spot. Ensure your hardware is sturdy enough to hold the weight of the frame.
- Hang and Adjust: Hang the frames onto the wall, following the placement of the templates. Use your level to check that each frame is hanging perfectly straight. Step back often to admire your new, eye-catching gallery!
2. Textured Utility Bench

Hallways often become dumping grounds, but this entrance shows how to maintain serenity while maximizing storage. The design embraces a calming, organic aesthetic using light woods and woven materials. Notice the main feature: a long wooden bench with built-in shoe storage underneath and a cushioned top for comfortable seating. This piece is immensely practical, transforming a simple act—taking off shoes—into a neat experience.
The use of texture is key here; a woven jute or sisal runner anchors the space, complementing the striking woven pendant light overhead. Simple, framed abstract art keeps the walls from feeling bare without creating clutter. Furthermore, the light wood tones of the bench and the entryway mirror add warmth against the clean white walls, creating a welcoming, Scandinavian-inspired feel. This setup proves functionality and beauty can coexist perfectly in a busy entry point.
Material Required List (DIY Entryway Bench)
- Two long pieces of solid lumber (e.g., pine or oak), roughly $4$ feet long (for the top and bottom frames).
- Four shorter pieces of solid lumber, about $18$ inches tall (for the legs/supports).
- Plywood or MDF board for the internal shelving (optional).
- Wood screws ($2.5$ inches long).
- Wood glue.
- Sandpaper (various grits: $80, 120, 220$).
- Wood stain or sealant (clear or light oak finish).
- Cushion foam or purchased cushion, roughly $4$ feet by $15$ inches.
- Upholstery fabric (durable, neutral linen or cotton).
- Batting for cushion stuffing (optional).
Equipment Required List (DIY Entryway Bench)
- Measuring tape and pencil.
- Miter saw or handsaw.
- Power drill with screwdriver bits and countersink drill bit.
- Clamps.
- Orbital sander (or sanding block).
- Staple gun and staples (for upholstery).
DIY Instruction Step by Step
Constructing the Wooden Frame
- Measure and Cut: Carefully measure and cut all your lumber pieces according to your desired bench dimensions. Double check that the leg pieces are all exactly the same height.
- Assemble the Sides: Apply wood glue to the ends of two leg pieces. Attach one long lumber piece (your bench side rail) to the top of the legs, forming an upside-down ‘U’ shape. Pre-drill pilot holes using a countersink bit to prevent splitting. Secure with wood screws. Repeat this step for the opposite side.
- Attach the Top and Bottom: Apply glue to the top edge of both assembled ‘U’ shapes. Place the second long lumber piece (the bench top) on top and clamp it securely. Secure this piece with screws, driving them down through the top and into the legs.
- Add Shelving (Optional): If you are adding internal shelving for shoes, measure and cut your plywood or MDF to fit inside the frame. Install support cleats inside the bench frame and set the shelf board on top, securing it with small screws or nails.
- Sand and Finish: Once the glue is completely dry (follow the glue manufacturer’s instructions), sand the entire bench smooth, starting with the coarsest grit and moving to the finest ($220$ grit). Wipe away all dust. Apply your chosen wood stain or sealant according to the product directions, allowing sufficient drying time between coats.
Creating the Cushion Top
- Cut the Foam: Measure and cut your foam pad to fit the top of your bench perfectly. Use an electric knife or very sharp scissors for a clean edge.
- Wrap the Foam: Lay your upholstery fabric face-down on a clean surface. Place the batting on the fabric, and then place the foam on top of the batting. The batting helps smooth out the foam’s edges.
- Secure the Fabric: Pull the fabric tightly up and over the foam and batting. Beginning in the center of one long side, use the staple gun to secure the fabric to the underside of the foam/batting. Work your way outwards, pulling the fabric taut as you go. Repeat on the opposite long side, ensuring there are no wrinkles.
- Handle the Corners: Fold the corners neatly, similar to wrapping a present, pulling the fabric taut, and secure them with staples. Place the finished cushion on your bench.
3. Industrial Edge Entryway

Transforming a passage into a powerful statement often requires commitment to a bold style, like this industrial look. The use of raw, exposed materials—such as the distressed brick and concrete walls—creates an immediate sense of rugged authenticity. Notice the functional, utilitarian pieces: antique metal lockers serve as unique, closed storage, keeping coats and clutter neatly hidden.
The lighting choices significantly enhance the atmosphere. Black, linear track lighting on the ceiling offers directed, flexible illumination, while vintage-style Edison bulbs hang in exposed, dark piping sconces along the walls, providing warm, ambient light. A large, grid-paned mirror leaning against the far wall brilliantly reflects light, making the narrow space feel much larger. This design successfully blends rustic textures with clean, modern lines, proving that your hallway can easily become the most memorable room in your home.
Material Required List (DIY Faux Brick Wall)
- Thin brick veneer panels or individual brick veneer pieces.
- Construction adhesive rated for your wall type (e.g., panel adhesive).
- Grout mix (color should be appropriate for rustic look, such as gray or off-white).
- Wood planks or metal trim (for finishing the edges if using panels).
- Primer and paint (if you plan to whitewash or distress the brick).
Equipment Required List (DIY Faux Brick Wall)
- Caulk gun (for the adhesive).
- Measuring tape and level.
- Safety glasses and gloves.
- Notched trowel (for spreading grout).
- Grout float or bag (for application).
- Sponges and buckets (for cleaning).
- Utility knife or saw (for cutting veneer panels/bricks).
DIY Instruction Step by Step
Installing the Faux Brick Accent Wall
- Prep the Wall: Ensure the wall surface is clean, dry, and structurally sound. Remove any nails or screws. Mark a level reference line on the wall using a pencil to guide your first row of brick or panel placement.
- Apply Adhesive: Use the caulk gun to apply a generous layer of construction adhesive to the back of the first brick veneer piece or panel. If using individual bricks, start applying them from the bottom up, following your level line.
- Place and Press: Carefully press the brick piece onto the wall, holding it firmly for a few seconds. If using panels, ensure they interlock properly with the next piece. Use a level frequently to check that your rows remain straight, correcting any misalignment immediately.
- Cut for Fit: As you reach corners, edges, or obstacles, measure the gap carefully. Use a utility knife or saw to cut the brick veneer pieces to fit snugly. Stagger the joints between rows to mimic genuine brickwork.
- Let it Cure: Allow the adhesive to cure completely. This usually takes $24$ to $48$ hours, depending on the thickness and humidity. Do not apply grout until the bricks are firmly adhered.
Applying the Grout (Optional for Individual Bricks)
- Mix the Grout: Following the package directions, mix your grout powder with water until it reaches a thick, workable consistency, similar to peanut butter.
- Apply the Grout: Use a grout float to push the mixture into the gaps (joints) between the bricks. Alternatively, for a neater application, use a grout bag (like a large pastry bag) to pipe the mixture directly into the joints.
- Tool the Joints: Once the grout starts to firm up slightly (it should still be damp, but not wet), use a specialized tooling stick or the rounded end of a spoon handle to smooth and shape the grout lines. This makes the wall look finished.
- Clean Up: Using a damp (not soaking wet) sponge, carefully wipe away any excess grout from the face of the bricks. Change your water frequently to avoid smearing the grout across the brick surfaces. Allow the grout to fully cure before disturbing the wall.
4. Coastal Calm Console

If your home leans toward breezy, relaxed aesthetics, this look transforms a narrow passage into a seaside retreat. The key design element is the white shiplap paneling on the walls, which instantly adds a clean, architectural texture without overwhelming the space. This bright backdrop allows natural elements to shine through.
Woven textures are used generously, providing essential warmth and utility. A wicker pendant light fixture immediately draws the eye upward, while woven baskets tucked beneath the console table offer accessible storage for gloves or scarves. The console itself is dressed with objects found in nature—driftwood and seashells—which are displayed both on the table and within large glass jars flanking the space. A large round mirror with a natural wood frame amplifies the abundant light, reinforcing the serene, open atmosphere.
Material Required List (DIY Driftwood Art)
- Various pieces of found driftwood, cleaned and dried (aim for $100$ to $200$ small to medium pieces).
- One rectangular plywood backing board (size depends on your desired artwork dimensions, e.g., $24$ inches by $36$ inches).
- Wood glue (heavy duty).
- Wood stain or paint (optional, for the backing board).
- Small picture wire and hanging hardware.
Equipment Required List (DIY Driftwood Art)
- Hot glue gun and glue sticks (optional, for temporary placement).
- Clamps or heavy objects.
- Saw (if you need to cut the backing board or modify driftwood pieces).
- Safety gloves.
DIY Instruction Step by Step
Creating the Dimensional Driftwood Wall Art
- Prepare the Backing: If your plywood board is unfinished, sand it lightly and apply a stain or paint color that complements your driftwood (natural wood or a dark neutral works well). Allow it to dry completely. Install the picture wire or hanging hardware on the back of the board now, before attaching the driftwood.
- Sort the Driftwood: Lay out your clean driftwood pieces. Separate them by size and shape. You want to create variation, using a mix of short, long, chunky, and thin pieces to build up the texture.
- Start the Base Layer: Begin gluing the driftwood pieces onto the backing board using the heavy-duty wood glue. Work in small sections. Place the flatter, larger pieces first to cover the backing entirely. Use clamps or heavy objects to hold pieces down until the glue sets slightly.
- Build the Dimension: Once the base is secure, start building outwards and upwards. This is where the creative arrangement comes in. Glue thinner pieces across the initial layer, pointing them in different directions to create a chaotic, natural look. For pieces that need to dry quickly while you hold them, use a dot of hot glue alongside the wood glue for a fast, temporary bond.
- Fill the Gaps: Examine the piece from a distance. Look for any areas where the backing board is visible or where the texture feels flat. Use small, carefully placed pieces of driftwood to fill those gaps, ensuring a dense, layered appearance across the entire surface.
- Cure and Hang: Allow the entire piece to dry and cure for at least $48$ hours before attempting to hang it. The glue must be completely set to hold the weight of the wood. Hang your finished piece securely on your hallway wall.
5. Maximalist Manor Passage

For those who believe a hallway should be as richly decorated as any other room, this design is pure inspiration. It immediately rejects the notion that small spaces must be minimalist. The walls are wrapped in a deeply saturated, detailed botanical wallpaper, creating an opulent and enveloping feel. Every element in this passage is chosen to complement the dramatic pattern.
Rich jewel tones, like the emerald green of the velvety, fringed bench, pop against the dark blue door frames and baseboards. Notice the stunning gallery wall on the right side. It features an array of ornate, antique-style gold mirrors and frames, catching the light and breaking up the pattern. This look is completed by the elegant crystal bead chandelier and the vintage Persian runner, adding layers of texture and color underfoot. This passage proves that embracing bold design choices can make a truly unforgettable first impression.
Material Required List (Ornate Mirror Gallery)
- Assortment of $5$ to $7$ ornate, gold-finished frames and mirrors in various shapes and sizes (thrift stores or flea markets are great sources).
- Wall putty or spackle (for filling existing holes).
- Gold leafing paint or spray paint (if existing frames need updating).
- Hanging hardware specific to the back of your frames (e.g., D-rings, wire).
- Small decorative prints or photos (if using frames).
Equipment Required List (Ornate Mirror Gallery)
- Level and tape measure.
- Hammer or power drill with wall anchors and screws (depending on frame weight and wall type).
- Pencil.
- Painter’s tape or craft paper (for planning the layout).
- Cleaning cloths.
DIY Instruction Step by Step
Creating the Statement Mirror Gallery Wall
- Prepare and Paint Frames (If Needed): If you found vintage frames that need a fresh look, clean them thoroughly. Apply gold leafing spray paint outdoors in a well-ventilated area, following the product directions for an even, luxurious finish. Allow them to dry completely.
- Plan the Layout: Before drilling, measure the entire wall space you intend to cover. Lay all your frames and mirrors out on the floor, arranging them until the grouping looks visually balanced. The goal here is to keep the spacing close—about $2$ to $3$ inches between pieces—to create a unified cluster, typical of a maximalist style.
- Use Templates for Precision: To transfer your floor layout to the wall, trace the outline of each frame onto craft paper or butcher paper. Cut out these templates. Tape the paper templates onto your wall, adjusting them until the spacing and overall shape perfectly match your plan.
- Mark Hanging Points: For each template, carefully mark the exact spot where the nail or screw will go. This might be a D-ring point or where the hanging wire will rest.
- Install Hardware: Peel off one template at a time and install the corresponding nail, screw, or wall anchor in the marked spot. Ensure the hardware is robust enough to securely hold the heavier mirrors.
- Hang and Refine: Start hanging the actual mirrors and frames onto their hardware. Use your level to ensure all pieces, especially the rectangular ones, are hanging straight. Step back to check the overall effect, and congratulate yourself on achieving a sophisticated, visually rich entryway!
6. Mid-Century Modern Marvel

For hallway design that feels instantly warm, structured, and vibrant, look no further than Mid-Century Modern style. This passage is defined by its clean lines, warm teak or walnut wood tones, and bold pops of color. The floating storage solutions on the right—a bench and cubbies—maintain the area’s open feel while providing essential hanging space and organization.
Notice the symmetrical placement of the console tables, both featuring iconic tapered legs and simple drawer pulls. The starburst mirrors on opposing walls are signature touches of this era, adding geometric flair and light reflection. Color comes in through the accessories: vivid orange and turquoise vases and lamps, expertly coordinating with the multicolored geometric runner that grounds the whole space. This approach is highly effective because it balances functional, built-in storage with decorative, eye-catching elements.
Material Required List (DIY Floating Storage Bench)
- Plywood or MDF board (for the box structure).
- Wood veneer or contact paper (in teak, walnut, or desired mid-century finish).
- Wood glue.
- Wood screws ($1.5$ inches and $2.5$ inches).
- Heavy-duty French cleat hanging system or similar floating shelf brackets.
- Edging tape (to cover plywood edges).
Equipment Required List (DIY Floating Storage Bench)
- Table saw or circular saw (for cutting main pieces).
- Measuring tape and pencil.
- Power drill with screwdriver bits.
- Level.
- Iron (for applying edging tape).
- Clamps.
DIY Instruction Step by Step
Constructing and Installing the Floating Bench
- Measure and Cut Components: Decide on the bench’s dimensions (e.g., $4$ feet long, $14$ inches deep, $6$ inches tall). Cut the plywood/MDF into six pieces: a top, a bottom, two sides, and two pieces for internal cubbies (if desired).
- Assemble the Box: Apply wood glue to the edges and join the pieces to form a simple open box structure. Pre-drill pilot holes and secure the joints with $1.5$-inch wood screws. Use clamps to hold the box square while the glue dries completely.
- Finish the Exterior: Apply the wood veneer or contact paper to all exposed exterior surfaces, including the front edges, for the authentic mid-century wood look. If using iron-on edging tape, use a household iron to activate the adhesive and press it firmly onto the raw plywood edges. Trim excess tape carefully.
- Attach the French Cleat: Secure one half of the French cleat system (the wall-side piece) to the back of the assembled bench using $1.5$-inch screws. Ensure this piece is perfectly centered and runs straight along the length of the bench.
- Mark the Wall: Determine the desired height for your bench. Use a stud finder to locate the wall studs where the bench will hang. Hold the second half of the French cleat (the wall piece) against the wall and use your level to draw a straight, horizontal line.
- Secure to Wall: Drill pilot holes through the wall piece of the cleat and into the wall studs for maximum stability. Use long, heavy-duty $2.5$-inch screws to securely attach the cleat to the wall. This is a critical step; the cleat must be fastened into solid support.
- Mount the Bench: Lift the finished bench and slide the cleat attached to its back down onto the cleat on the wall. The interlocking design should hold the bench firmly and level. Apply any coordinating upper cubbies (as seen in the image) using the same cleat method for a clean, cohesive look.
7. Vertical Biophilic Retreat

For a dramatic, spa-like atmosphere, integrating natural elements on a vertical scale is incredibly effective. This design uses biophilic elements to bring life and texture to the end of a long, otherwise minimalist passage. The primary feature is a framed living wall, or a preserved moss wall, which provides a rich, forest-green backdrop that is visually stunning.
The inclusion of plants, specifically the trailing Pothos, softens the geometric lines of the space and adds movement. Horizontal white planters are stacked and dramatically lit from beneath with recessed LED strips. This directed lighting emphasizes the vivid greenery, turning the feature into a radiant focal point. The small, recirculating water fountain at the base adds a soothing auditory element. This hallway is transformed from a static passageway into a sensory, invigorating experience.
Material Required List (DIY Preserved Moss Wall Art)
- Large sheet of backing material (e.g., thin plywood or foam board) cut to your desired size).
- Wooden trim pieces (for the frame).
- Preserved moss (various types, such as sheet moss, reindeer moss, and ball moss, for texture).
- Heavy-duty spray adhesive or hot glue sticks.
- Wood stain or paint (for the frame).
- Mounting hardware (e.g., D-rings and picture wire).
Equipment Required List (DIY Preserved Moss Wall Art)
- Hot glue gun (for precise placement).
- Safety mask and gloves (especially when using spray adhesive).
- Measuring tape and utility knife.
- Miter box or saw (for cutting frame corners).
DIY Instruction Step by Step
Constructing the Preserved Moss Wall Panel
- Prepare the Backing: Cut your plywood or foam board to the required dimensions. If using plywood, apply a coat of black or dark green paint to the surface and edges. This helps hide any gaps between the moss pieces and ensures a deep, rich background. Let it dry completely.
- Build and Finish the Frame: Measure and cut the wooden trim pieces to frame the backing board. If using a miter box, cut the corners at a $45$-degree angle for neat joints. Assemble the frame using wood glue and small nails. Stain or paint the frame (a natural wood tone, as seen in the image, works well) and allow it to dry.
- Attach the Frame: Glue or screw the finished wooden frame onto the edges of the backing board.
- Start the Moss Application: Working in a small section, apply a thin, even coat of heavy-duty spray adhesive to the backing board. Alternatively, apply hot glue directly to the back of the moss piece.
- Place the Moss: Begin with the sheet moss or large pieces to cover the entire backing surface. Press firmly and hold for a moment to ensure adhesion. Work outward from the center, covering the backing completely.
- Add Texture and Dimension: Once the base layer is secure, begin adding the dimensional moss types (like ball moss or reindeer moss). Use hot glue to place these pieces strategically to create varying heights and textures. Cluster the different moss types for visual interest, mimicking the natural growth patterns found outdoors.
- Finalize and Hang: Let the adhesive fully cure, typically $24$ hours. Attach your mounting hardware to the back of the frame, ensuring it is secure enough to hold the weight of the finished panel. Hang your new biophilic art piece in the hallway for an immediate boost of fresh color.
8. Moroccan-Inspired Passage

This design transports the viewer through its intense use of pattern, texture, and handcrafted elements. The striking floor is the star here—a beautiful installation of patterned, possibly cement or ceramic, tiles that creates dynamic movement throughout the entire passage. This dramatic base is complemented by a richly colored runner rug featuring geometric, tribal patterns, layering pattern upon pattern for a cozy, maximalist feel.
Above, a statement lantern hangs dramatically. The intricate ironwork of this light fixture casts fascinating shadows and immediately sets an exotic mood. Throughout the space, the clean white walls and the warmth of the natural wood trim and doors provide necessary contrast. The final touches include a highly textured console mirror and a simple, symmetrical botanical gallery wall, adding small points of visual rest among the powerful patterns.
Material Required List (DIY Lantern-Style Lighting Upgrade)
- New, oversized hanging lantern fixture with intricate metalwork (often labeled Moroccan, Moorish, or sometimes Turkish style).
- Matching chain or cord cover kit (if the fixture does not include a decorative cover).
- Energy-efficient LED bulb (warm white tone is recommended for ambiance).
- Existing junction box wiring (check local building codes for safety).
Equipment Required List (DIY Lantern-Style Lighting Upgrade)
- Ladder or step stool.
- Voltage tester.
- Screwdriver set (Phillips and flathead).
- Wire strippers.
- Electrical tape.
- Safety glasses.
DIY Instruction Step by Step
Replacing an Existing Hallway Light with a Statement Lantern
Safety First: Before starting any electrical work, locate your breaker panel and turn off the power to the circuit that controls the hallway light. Test the existing switch and the light wires with a voltage tester to ensure the power is completely off.
- Remove the Old Fixture: Carefully unscrew the screws or nuts holding the existing ceiling fixture (canopy) in place. Lower the fixture slowly. Disconnect the wires by untwisting the wire nuts. If the wires are taped, remove the tape.
- Prepare the New Fixture: Following the new lantern’s instructions, thread the fixture wires and chain through the new canopy/mounting plate. Adjust the chain length to hang the lantern at your desired height—make sure it is high enough that tall people won’t bump it.
- Install the Mounting Plate: Screw the new fixture’s mounting plate securely onto the electrical junction box in the ceiling.
- Connect the Wires: This step is crucial.
- Connect the Black (hot) wire from the ceiling to the Black wire from the new fixture. Twist the ends together and secure them with a wire nut.
- Connect the White (neutral) wire from the ceiling to the White wire from the new fixture. Twist and secure with a wire nut.
- Connect the Green or Bare Copper (ground) wire from the ceiling to the ground wire/screw on the mounting plate or new fixture.
- Secure and Test: Gently tuck the connected wires back into the junction box. Align the new fixture’s canopy (the decorative plate that covers the junction box) with the mounting plate and secure it with the provided screws or nuts. Screw in the LED bulb.
- Restore Power: Go back to your breaker panel and turn the power back on. Test your stunning new lantern light!
9. Bold Black and White Geometry

A hallway can feel incredibly sophisticated by committing to a striking, monochromatic palette. This design embraces a strong graphic identity using only black and white, but layers different patterns to avoid flatness. The most impressive feature is the ceiling, adorned with a complex, dizzying maze-like wallpaper pattern that instantly elevates the passage from mundane to memorable.
The floor complements the ceiling with sleek, black marble tiles veined with white. The graphic theme continues with a bold, wide-striped runner rug, guiding the eye down the length of the hall. Furnishings are equally dramatic: a mirrored console table reflects light and the opposite wall’s gallery, while a classic black console table is centered at the end. The use of repetitive square-framed art on the right wall reinforces the clean, structured aesthetic.
Material Required List (DIY Graphic Ceiling Treatment)
- Black and white patterned wallpaper (vinyl is often easier to handle).
- Wallpaper adhesive (or self-adhesive wallpaper).
- Wallpaper primer (optional, but recommended for better adhesion).
- Seam roller.
- Smoothing brush or plastic smoother.
- Utility knife with plenty of fresh, sharp blades.
Equipment Required List (DIY Graphic Ceiling Treatment)
- Measuring tape and pencil.
- Ladder or sturdy scaffolding (essential for ceiling work).
- Large bucket and sponge.
- Level or plumb line (to establish a starting straight edge).
- Screwdriver (to remove light fixtures).
DIY Instruction Step by Step
Applying Patterned Wallpaper to the Ceiling
- Safety and Prep: Turn off power to the light fixture. Remove the chandelier or ceiling light fixture. Clear the hallway and set up a stable ladder or scaffolding. Clean the ceiling surface thoroughly and patch any major imperfections. Apply wallpaper primer if you are not using self-adhesive paper; allow it to dry fully.
- Establish a Centerline: Measure the width of the ceiling and use a chalk line or pencil and a long level to mark a straight line down the absolute center of the ceiling. This provides a crucial straight edge for aligning your first strip.
- Cut and Paste: Measure the length of your ceiling. Cut the first strip of wallpaper, adding a few extra inches to the length for trimming. Apply adhesive to the back of the paper (if not pre-pasted or self-adhesive) or directly to the ceiling, following the adhesive instructions.
- Install the First Strip: Start at one end of the hall. Carefully align the edge of the paper with your centerline and press it into place. Use the smoothing brush to press out air bubbles, working from the center outward.
- Match the Pattern: Cut the second strip, carefully aligning the pattern with the end of the first strip before applying it to the ceiling. Repeat the alignment, application, and smoothing process. Hang all subsequent strips, ensuring the seams are lightly abutted but not overlapped.
- Trim and Finish: Once all the wallpaper is in place, use the utility knife and a straight edge to carefully trim the excess paper along the wall lines and around the light fixture opening. Use a seam roller over the seams to ensure they are fully pressed down.
- Reinstall Fixture: Allow the adhesive to cure completely. Once dry, reinstall your light fixture, taking care not to puncture or scratch the new paper.
10. Shaker Peg Rail Storage System

Hallways often benefit from hardworking, built-in organization, and this image features a classic, timeless solution. The design centers around an extended Shaker-style peg rail, a highly versatile piece that instantly solves the problem of entryway clutter. The natural, unstained wood of the peg rail and the accompanying bench below add a beautiful, subtle warmth against the soft gray walls.
Above the main rail, a contrasting black shelf on brackets offers additional storage and display space for items like woven baskets and hats. The long, continuous bench provides a place to sit while removing shoes and keeps the floor clear. This entire system is incredibly adaptable: it handles everything from coats and bags to small decorative items, maintaining a clean, orderly, and beautifully rustic aesthetic.
Material Required List (DIY Shaker Peg Rail)
- One piece of solid wood lumber (e.g., pine or oak), roughly $4$ to $6$ feet long, about $1$ inch thick and $4$ inches wide.
- Wooden shaker pegs (e.g., $3$-inch long pegs with a slightly tapered base), quantity depends on length (space them about $6$ inches apart).
- Wood glue.
- Wood stain or sealant (optional, to match the wood in the image).
- Long wood screws ($3$ inches) for mounting the rail to wall studs.
Equipment Required List (DIY Shaker Peg Rail)
- Miter saw or handsaw (for cutting the rail to length).
- Measuring tape and pencil.
- Power drill.
- $3/8$-inch or $1/2$-inch drill bit (matching the base diameter of your pegs).
- Level and stud finder.
- Clamp (optional, for holding the rail while drilling).
DIY Instruction Step by Step
Constructing and Installing the Shaker Peg Rail
- Cut the Rail: Measure the hallway wall and cut the solid lumber piece to the desired length. Sand the piece lightly to remove any rough edges. If staining, apply your stain or sealant now and allow it to dry completely.
- Mark the Peg Holes: Lay the rail flat. Measure and mark the placement of your pegs with a pencil. A spacing of $6$ inches between centers works well for utility. Mark the center of the board’s width for consistent peg placement.
- Drill the Holes: Using a drill bit that matches the base size of your wooden pegs, drill shallow holes (about $1/2$ inch deep) at the marked spots. If your pegs are tapered, drilling the hole at a slight upward angle can help the pegs stay secure and hold items better.
- Install the Pegs: Apply a small amount of wood glue inside each drilled hole. Insert the wooden pegs firmly into the holes. Wipe away any excess glue immediately with a damp cloth. Allow the glue to dry completely (check the drying time on the glue bottle).
- Locate Wall Studs: Use a stud finder to locate and mark the wall studs where the rail will be installed. Mounting into studs is essential for supporting the weight of coats and bags.
- Drill Pilot Holes for Mounting: Hold the rail against the wall, using a level to ensure it is straight. Use a pencil to mark where the studs line up on the rail. Pre-drill pilot holes through the peg rail at these marked points.
- Secure the Rail: Hold the rail in place against the wall. Drive the long $3$-inch wood screws through the pilot holes in the rail and deep into the wall studs. Ensure the rail is securely fastened and can bear significant weight.
11. Antique Mirrored Feature Wall

This technique demonstrates how to add instant drama, texture, and light to a hallway entrance. The entire wall is covered in rectangular panels of antiqued, distressed mirror glass. This treatment brilliantly maximizes light and visually doubles the size of the space, a crucial move for any narrow area. The distressed patina on the mirror adds vintage character, preventing the look from feeling too modern or cold.
The choice of furnishings complements this elegance. A slender, mirrored console table sits in front, its light surface reflecting the aged glass. Above, twin chandeliers with crystal drops introduce luxurious sparkle, and the white distressed cabinet reflected in the panels adds depth. This entire assembly proves that treating one wall as a monumental feature can transform the entire feel of your home’s entry.
Material Required List (DIY Antiqued Mirror Panels)
- Large mirror tiles or custom-cut mirror pieces (ensure all edges are polished).
- Spray bottle.
- Water and white vinegar solution (50/50 mix).
- Muriatic acid or paint stripper (Use with extreme caution and protective gear).
- Black or gray spray paint.
- Mounting adhesive (mirror-safe).
- Safety glasses and rubber gloves.
Equipment Required List (DIY Antiqued Mirror Panels)
- Clean rags and newspaper.
- Measuring tape and level.
- Glass cleaner.
- Utility knife (optional, for scoring if needed).
DIY Instruction Step by Step
Creating the Antiqued Mirror Effect
- Safety First: Wear gloves and safety glasses. Work in a very well-ventilated area, preferably outdoors, as the chemicals are strong. Lay the mirror tiles or pieces flat, glass-side down, on newspaper.
- Remove the Backing: The goal is to remove the silver reflective layer from the back of the mirror. Carefully spray the back of the mirror with a small amount of muriatic acid or paint stripper (test a small area first). Let it sit for the time recommended on the product label.
- Scrape and Wipe: Gently scrape the silver backing off using a rag or a very soft brush. Do not use anything sharp that might scratch the glass. You want to remove most of the silver, leaving scattered patches for a distressed look. Clean the entire back surface with glass cleaner once the silver is mostly removed.
- Create the Spots: Turn the mirror over so the glass side is facing up. Prepare the vinegar-water spray bottle. Flip the mirror back to the treated side. Spray light, random spots of the vinegar solution onto the exposed glass (where the silver backing was removed). These drops will resist the paint.
- Re-Paint the Back: Immediately and lightly spray the entire back surface with black or gray spray paint. This dark color will be what shows through the glass where the silver was removed. The vinegar droplets will cause the paint to bubble or separate, creating the characteristic mottled, aged look.
- Cure and Mount: Let the paint dry completely. Wipe away the vinegar residue and any loose paint with a soft cloth. Apply mirror-safe adhesive to the back of the panels. Using your level, carefully press the panels onto the wall, leaving a small, consistent gap between them to create the gridded look seen in the image.
12. Floor-to-Ceiling Library Hallway

This idea demonstrates an outstanding use of vertical space, transforming a simple passage into a functional, sophisticated, and deeply personal library. Floor-to-ceiling built-in shelving, painted in a deep, matte color (like charcoal or navy), provides a magnificent, tailored look. This built-in quality instantly elevates the entire home’s aesthetic.
Functionally, the shelves offer vast storage for books and display space for curated collections. The design brilliance lies in the integrated lighting: hidden LED strips run along the inside front edge of the shelves. This lighting bathes the contents in a warm glow, turning everyday objects into museum exhibits. Furthermore, the inclusion of a rolling ladder gives the space an authentic, academic charm while providing access to the highest storage areas.
Material Required List (DIY Built-In Shelving Unit)
- Plywood sheets (or MDF) for the vertical dividers and horizontal shelves.
- $1 \times 2$ inch lumber (for face frames and trim).
- Wood screws, nails, and wood glue.
- Primer and paint (deep color like navy or charcoal).
- Drawer slides and hooks (for the rolling ladder rail).
- LED strip lighting kit (with power supply and dimmer).
Equipment Required List (DIY Built-In Shelving Unit)
- Table saw or circular saw (for cutting large panels).
- Power drill and driver.
- Nail gun or hammer.
- Clamps.
- Level and stud finder.
- Router (optional, for clean edges or grooves).
DIY Instruction Step by Step
Building and Installing the Built-In Bookcase
- Measure and Design: Precisely measure the wall from floor to ceiling and wall to wall. Design the shelf layout, ensuring the shelf height allows for both books and display items. Note where the shelving units will meet wall studs for secure attachment.
- Construct the Boxes: Cut the plywood into the large vertical side pieces and the horizontal shelf pieces. Assemble the main cabinet boxes (the large compartments) using wood glue and screws. Ensure all corners are perfectly square.
- Install the Boxes: Move the assembled boxes into the hallway. Secure them to the wall studs using long screws driven through the rear of the cabinet boxes. Use shims if the floor or wall is uneven, ensuring the entire structure is level and plumb.
- Add Face Frames and Trim: This step is crucial for the “built-in” look. Use the $1 \times 2$ lumber to create a face frame, covering the raw plywood edges of the shelving units. Attach trim pieces to the top (crown molding) and bottom (baseboard) to seamlessly integrate the shelves with the existing architecture.
- Prime and Paint: Fill all nail holes and gaps with wood filler and caulk. Sand everything smooth. Apply a high-quality primer, followed by two coats of your deep, matte finish paint.
- Install LED Lighting: Measure the depth and width of each shelf opening. Cut the LED strip lighting to fit inside each section. Run the strips along the front edge or underside of the shelf above, aiming the light toward the contents. Conceal the wiring behind the face frame and run the power supply wires down to a hidden outlet.
13. Functional Farmhouse Mudroom

For busy households, the hallway needs to be a highly functional transition zone, and this design achieves that with clean, integrated style. The entire wall unit is painted a crisp white, ensuring the space feels open and bright despite the amount of storage. This piece effectively combines multiple storage types: tall cabinets for seasonal items, open upper cubbies for displaying woven baskets, and heavy-duty coat hooks on a textured shiplap backdrop.
The built-in bench is exceptionally smart, featuring a hinged top that opens for large item storage. Below the bench, individual cubbies are perfectly sized to hold woven storage baskets, which conceal shoes and clutter beautifully. Dark metal hardware on the hooks and cabinets provides a subtle contrast against the white woodwork. This custom unit eliminates entryway chaos while maintaining an appealing, classic look.
Material Required List (DIY Hallway Mudroom Bench and Cubbies)
- Plywood or MDF board (for the box structure and vertical dividers).
- $1 \times 4$ inch lumber (for the face frames and baseboard trim).
- $1 \times 6$ inch lumber (for the hinged bench top).
- Piano hinge (for the bench lid).
- Wood glue, wood filler, and screws.
- Primer and white paint.
- Woven storage baskets (to fit the cubbies).
Equipment Required List (DIY Hallway Mudroom Bench and Cubbies)
- Measuring tape, level, and pencil.
- Table saw or circular saw.
- Power drill and driver.
- Pocket hole jig (highly recommended for strong, hidden joints).
- Nail gun or hammer.
- Clamps.
DIY Instruction Step by Step
Building and Finishing the Mudroom Bench Unit
- Construct the Cubby Base: Cut the plywood into the base pieces for the cubbies (bottom, sides, and vertical dividers). Use a pocket hole jig to create strong, hidden joints. Assemble the rectangular box and the internal dividers using wood glue and pocket hole screws.
- Attach Face Frames: Use the $1 \times 4$ lumber to create a face frame, attaching it to the front edges of the cubby structure. This covers raw plywood and gives it a professional, finished look.
- Install the Base: Secure the assembled cubby base to the wall, finding studs for firm attachment. Cover the open bottom with baseboard trim to match the rest of the room.
- Create the Hinged Bench Box: Build a simple, open box structure to sit on top of the cubbies. This box should be slightly shorter than the depth of the cubbies. Attach the piano hinge to the back edge of the $1 \times 6$ lumber top piece and the back edge of the open box frame.
- Install the Backboard and Hooks: Attach horizontal shiplap or thin wood boards to the wall above the bench area. Paint or finish this backboard. Install your chosen coat hooks securely into the shiplap and wall studs.
- Finishing Touches: Fill all screw holes and gaps with wood filler and caulk. Sand the unit smooth. Apply primer and two coats of high-quality paint. Once dry, place your woven baskets into the cubbies below.
14. Organic Texture Wall Treatment

If you desire a hallway with earthy warmth and artistic interest, applying texture to the walls is an immediate solution. This design utilizes a soft, almost stucco-like finish, giving the wall a beautiful depth and a handcrafted, artisan feel. The monochromatic color palette—creams, linens, and light taupes—keeps the space feeling calm and open.
The furnishing choices enhance this organic feel. A thick, rustic console table made from natural, raw wood is the centerpiece. It is minimally styled with abstract-shaped ceramics and a contemporary framed artwork, which uses complementary, muted tones. A large ceramic floor vessel and a simple floor lamp complete the look, proving that texture, not bright color, can create sophisticated visual impact.
Material Required List (DIY Textured Wall Finish)
- Drywall joint compound (pre-mixed, lightweight).
- Wall primer.
- Paint (in a creamy or light taupe shade).
- Water.
- Plastic sheeting and painter’s tape.
Equipment Required List (DIY Textured Wall Finish)
- Large trowel or putty knife.
- Small trowel or flexible plastic spreader.
- Large bucket for mixing.
- Paint roller and tray.
DIY Instruction Step by Step
Creating the Rustic Troweled Texture
- Prep the Wall: Lay plastic sheeting on the floor and tape off the baseboards and adjacent walls using painter’s tape. Wipe the wall clean to remove any dust or dirt. Apply a coat of primer and let it dry.
- Mix the Compound (Optional Thinning): If the joint compound is too stiff to work with, add a small amount of water to your bucket and mix thoroughly until it reaches a thick, yogurt-like consistency.
- Apply the First Layer: Scoop a generous amount of compound onto your large trowel. Starting in one corner, randomly and thinly spread the compound onto the wall. The goal is not smooth coverage, but intentional, imperfect strokes.
- Create the Texture: Continue applying the compound in overlapping, sweeping motions. Use a smaller plastic spreader or the edge of the trowel to create peaks, valleys, and swirling patterns. You are looking for an inconsistent, deliberately distressed look. Do not try to make it even. Work quickly, covering the entire area.
- Cure Time: Allow the compound to dry completely. This may take up to $24$ hours, depending on the thickness and humidity. The texture will lighten as it dries.
- Paint and Finish: Once the compound is fully dry, gently knock down any sharp, extreme peaks with light sanding. Wipe off the dust. Use a paint roller to apply two coats of your chosen paint color over the entire textured surface. The paint will settle into the crevices, highlighting the rustic texture beautifully.
15. The Bold Door Frame Statement

Sometimes, the simplest architectural elements can be used to create the most dramatic impact. This hallway utilizes a high-contrast strategy by painting all the door frames, baseboards, and interior doors in a single, vivid color—a deep cobalt or sapphire blue. Against the otherwise clean white walls, the blue creates a spectacular visual rhythm down the length of the hall.
This technique is incredibly effective in breaking up the monotony of a long, narrow space. The repetition of the blue door frames draws the eye from one room to the next, creating depth and a sophisticated, tailored feel. Simple brass sconces on the wall provide necessary light, and their warm gold tone coordinates beautifully with the brass door knobs, enhancing the rich jewel-toned look.
Material Required List (Door and Trim Painting)
- High-quality interior paint (semi-gloss or satin finish recommended for trim and doors) in a bold color.
- Painter’s tape (high-quality, like Frog Tape, for sharp lines).
- Primer (if painting over a dark color or untreated wood).
- Drop cloths.
- Paint brush (angled $1.5$ inches for cutting in).
- Mini foam roller (for a smooth finish on the doors).
Equipment Required List (Door and Trim Painting)
- Screwdriver (for removing door hardware).
- Sandpaper ($120$ and $220$ grit).
- Caulk (for filling gaps between trim and wall).
- Clean rags.
DIY Instruction Step by Step
Painting Door Frames and Doors in a Bold Color
- Preparation is Key: Use a screwdriver to carefully remove all door handles, hinges, and hardware. Store these items safely. Lay drop cloths along the baseboards. Use painter’s tape to meticulously mask off the surrounding wall area where the trim meets the drywall. Use caulk to fill any gaps between the trim and the wall for the cleanest lines, then let the caulk dry.
- Clean and Sand: Wash all the trim and doors with a mild detergent to remove dirt and oils. Lightly sand all surfaces with $120$ grit sandpaper, then follow with $220$ grit. This step ensures proper paint adhesion and a smooth final finish. Wipe away all sanding dust.
- Apply Primer: Apply a coat of quality primer, especially if the current trim is varnished or if you are using a dramatic color shift. Let the primer dry completely according to manufacturer instructions.
- Cut In the Trim: Use the angled brush to carefully paint the trim (door frames and baseboards). Load the brush lightly and use slow, steady strokes to apply the paint right up to the edge of the painter’s tape.
- Paint the Doors: Use the mini foam roller to apply the paint to the flat surfaces of the doors. This yields the smoothest finish, minimizing brush marks. For recessed panels, use the brush first, then smooth with the roller.
- Second Coat and Tape Removal: Allow the first coat to dry. Apply a second coat, repeating the process for depth of color. Crucially, once the second coat is applied, but while the paint is still wet, carefully and slowly peel away all the painter’s tape to reveal crisp, clean lines.
- Reinstall Hardware: Allow the paint to fully cure (this may take $24$ to $48$ hours) before reinstalling the door hardware.
16. Seamless Hidden Storage Wall

Hallways are often starved for storage, and this design offers the ultimate solution: custom, floor-to-ceiling cabinetry that practically disappears. The white, Shaker-style fronts with minimal hardware create a clean, architectural backdrop. This immense wall of storage provides a place for coats, cleaning supplies, and general household overflow, keeping the entire rest of the home clutter-free.
A clever detail is the occasional open niche, framed in warm wood, which provides small spots for display or quick access. Notice the designated, open “utility closet” section near the end. It’s framed and illuminated with warm LED lighting, providing easy access to hung coats and a vacuum cleaner. This functional yet streamlined approach shows that utility can be hidden behind beautiful, cohesive millwork.
Material Required List (DIY Hallway Closet Niche)
- Plywood or MDF board (for the niche frame and back).
- Wood veneer sheeting or contact paper (in warm oak or maple tone).
- Wood glue and screws.
- LED strip lighting kit (battery-powered or plug-in for ease).
- Wardrobe rail and supports.
- Small wood trim pieces (for edging).
Equipment Required List (DIY Hallway Closet Niche)
- Measuring tape and level.
- Power saw (for cutting plywood).
- Drill and driver.
- Sander and fine-grit sandpaper.
- Iron (for applying heat-activated veneer).
DIY Instruction Step by Step
Creating the Illuminated Wood-Lined Niche
- Measure and Cut Frame Pieces: Measure the interior dimensions of the cabinet opening where you wish to install the niche. Cut the plywood/MDF into three main pieces (back, top, and bottom) to line the space. The side walls are typically the existing cabinet structure.
- Apply Wood Finish: Apply the wood veneer sheeting or contact paper to all faces of the three cut pieces. If using veneer, follow the instructions for heat-activation using an iron to get a secure bond. Trim the edges neatly.
- Install the Niche Lining: Apply wood glue and use screws to secure the veneer-covered pieces inside the cabinet opening. Start with the back piece, then fit the top and bottom pieces so the exposed cabinet faces are now covered in the warm wood finish.
- Install the Rail: Measure the width of the niche and cut the wardrobe rail to size. Install the rail supports near the top of the side walls and insert the rail. This is where your coats will hang.
- Install LED Lighting: Measure the top perimeter of the niche opening. Cut the LED strip lighting to fit under the top lip of the niche, aiming the light downward. Install the lights using the adhesive backing. Conceal the battery pack or run the power cord discreetly to an outlet. The light should be positioned to warmly illuminate the hanging area.
- Add Trim (Optional): If the edges of the niche look unfinished, apply small pieces of wood trim around the opening to provide a clean, frame-like transition between the white cabinet face and the wood interior.
17. Relaxed Bohemian Gallery

This hallway is a beautiful demonstration of how to incorporate relaxed, global style using layered natural textures. The entire space relies on a neutral color palette—creams, tans, and warm taupes—which allows the varied materials to provide the interest. Jute runners and woven light fixtures establish the earthy foundation.
The walls feature a collection of round, woven mirrors and macrame hangings, creating a textural gallery that feels organic and handcrafted. The furnishing is simple: low, slatted wooden benches are piled with textiles, faux fur throws, and patterned pillows for comfortable seating. Furthermore, the use of pampas grass and potted plants introduces necessary vertical elements and vibrant life. This look is about embracing softness, warmth, and curated collected items.
Material Required List (DIY Boho Wall Hangings)
- Wooden dowel or stick (for the hanging rod).
- Cotton macrame cord (or rope) in a neutral color (e.g., natural, cream, or beige).
- Scissors.
- Measuring tape.
- Beads or found wooden pieces (optional, for decoration).
Equipment Required List (DIY Boho Wall Hangings)
- S-hooks or clamps (to hold the dowel steady while working).
DIY Instruction Step by Step
Knotting a Simple Macrame Wall Hanging
- Prepare the Rod: Cut your wooden dowel to the desired width. Tie a loop of cord to each end of the dowel to create a hanger. Secure the dowel to a sturdy surface using clamps or S-hooks so you can work with both hands.
- Cut the Cord Lengths: Determine the final length you want your hanging to be. Cut all the macrame cords to four times that length. The knotting process uses up a lot of cord. For a small piece, you might cut $20$ to $30$ strands.
- Attach Cords (Lark’s Head Knot): Fold a cut cord in half, creating a loop. Place the loop over the top of the dowel and bring the two cord ends down and through the loop. Pull tight to secure the cord to the dowel. Repeat this process until all the cords are evenly spaced along the rod.
- Create the Knots: Macrame typically uses two main knots. Practice the Square Knot and the Half Hitch. For a simple piece, alternate rows of square knots to create a textured block pattern.
- Square Knot: Requires four strands. The left cord goes over the middle two and under the right cord. The right cord goes under the middle two and up through the loop on the left. Pull tight. Then reverse (right over, left under) to complete the knot.
- Form the Design: Continue knotting, leaving space between rows to allow the hanging to drape. Vary the patterns or leave sections unknotted for a mixed look. You can also create triangular or diamond shapes by selectively knotting certain sections.
- Trim and Hang: When finished, let the remaining cords hang freely. Use sharp scissors to trim the bottom ends into a clean straight line or a tapered ‘V’ shape. Hang your new textile art piece!
18. Architectural Light Washing

This technique focuses entirely on light and texture to make a sophisticated statement. Instead of relying on art or furniture, the walls themselves are the feature, emphasized by specialized lighting. The wall is treated with a rough, textured finish (like Venetian plaster or a heavily textured paint) in a light, neutral color.
The main impact comes from the unique sconces. These fixtures have fluted or ribbed glass shades and direct light both up and down. They are installed at regular intervals down the hallway. The resulting effect is a dramatic ‘light washing’—the illumination skims across the textured wall, creating high contrast shadows and brilliant highlights. This transforms the plain wall into a sculptural feature that draws the eye down the entire length of the passage.
Material Required List (DIY Textured Wall Finish – Alternative)
- Ready-mixed joint compound or drywall mud.
- Water.
- Paint (flat or eggshell finish).
- Clear coat sealant (optional, for durability).
Equipment Required List (DIY Textured Wall Finish – Alternative)
- Paint roller with a thick nap ($1$ inch or more).
- Texture brush, whisk broom, or sea sponge (for creating unique patterns).
- Bucket.
- Protective gear.
DIY Instruction Step by Step
Creating the Random Knock-Down Texture
- Prep and Prime: Tape off the baseboards and ceiling. Apply a coat of primer and let it dry.
- Prepare the Compound: Mix the joint compound with water to achieve a paintable consistency—slightly thicker than pancake batter.
- Apply the Texture Base: Use a regular paint roller (or the special thick-nap texture roller) to roll the thinned compound onto the wall in sections. Apply a reasonably thick, even layer.
- Create the Pattern: Immediately after rolling the compound onto a section, use your chosen tool (a sea sponge, a texture brush, or even a plastic bag crumpled up) to lightly press and pull the wet compound. This creates the randomized peaks and valleys. If using a knock-down technique, wait a few minutes until the peaks slightly stiffen (the mud should look “dull”) and then lightly drag a wide, clean trowel across the surface to knock down the sharp points, leaving the soft, mottled texture.
- Repeat and Blend: Continue working in small sections, always blending the edges of the new section into the previous one to avoid harsh lines.
- Cure, Sand, and Paint: Allow the texture to dry completely ($24$ hours). Lightly sand any areas that feel too sharp or bulky. Wipe off the dust. Use a paint roller to apply two coats of your chosen neutral paint color over the entire textured area.
19. Two-Tone Panel Wainscoting

This hallway solves the problem of visual blandness by dividing the wall horizontally, using color and architectural trim to stunning effect. The lower half features classic picture frame wainscoting, painted a crisp white. This adds a beautiful, traditional depth and formality to the space.
The upper half is painted a dramatically contrasting color—a deep, sophisticated shade of dusty blue or slate gray. This dark color contrasts sharply with the white wainscoting and trim, highlighting the architecture and making the upper wall color feel rich and luxurious. The inclusion of a massive, leaning silver-framed mirror reflects the opposite door and light source, further brightening the space and adding an element of grand scale.
Material Required List (DIY Picture Frame Wainscoting)
- Pre-primed MDF or wood trim strips (about $1.5$ inches wide) for the picture frame boxes).
- Small brad nails.
- Wood glue.
- Caulk (paintable).
- Wood filler.
- Primer and white semi-gloss paint.
- Paint for the upper wall color.
Equipment Required List (DIY Picture Frame Wainscoting)
- Measuring tape, level, and pencil.
- Miter saw (essential for cutting $45$-degree corners).
- Nail gun (or hammer).
- Caulk gun.
- Sandpaper.
DIY Instruction Step by Step
Installing Picture Frame Wainscoting
- Plan the Layout: Determine the height of your wainscoting (it typically sits $32$ to $36$ inches from the floor). Mark a level line across the wall at this height. Then, measure the wall length. Design the size and spacing of your decorative “picture frames,” ensuring consistent gaps between the boxes and the baseboard/top line.
- Cut the Trim Pieces: Using the miter saw, cut the trim strips for the boxes. Every corner must be cut at a $45$-degree angle so they fit together perfectly to form a $90$-degree corner.
- Attach the Boxes: Apply a small bead of wood glue to the back of the first frame piece. Hold it up to the wall, lining it up with your measurements and checking it with a level. Secure it with brad nails. Repeat this for the remaining three sides of the first box. Continue this process for all the frames down the hallway, ensuring uniform spacing.
- Fill and Caulk: Use wood filler to patch all the nail holes. Once dry, sand the filler smooth. Run a thin bead of paintable caulk along every joint where the trim meets the wall and where the trim corners meet each other. This step is critical for a smooth, professional, built-in look.
- Paint the Wainscoting: Once the caulk and filler are dry, apply primer, followed by two coats of white semi-gloss paint to all the new trim, including the baseboards and any existing chair rail (if applicable).
- Paint the Upper Wall: Once the wainscoting is dry, tape off the top edge of the trim. Paint the upper wall area with your chosen bold color. Remove the tape before the paint fully dries for a clean transition.
20. Bold Half-Painted Walls

A simple yet highly dramatic way to upgrade a dull hallway is through two-tone painting, which adds architectural interest without trim. This design uses a deep, calming shade of olive green on the bottom half of the walls, contrasted sharply with bright white on the top. The horizontal line draws the eye forward, making the space feel longer and grounding the furnishings.
Notice how the furniture echoes the color scheme. A warm wooden console table is paired with a sleek, gold-framed console table, providing visual variety. The lighting—a single, clean globe pendant—maintains the modern feel. Accessorizing is minimal, allowing the strong color block to be the main focal point. This creative paint treatment offers high impact with a relatively low budget.
Material Required List (DIY Two-Tone Paint Job)
- Interior latex paint (flat or eggshell) in your chosen deep color (e.g., olive green).
- Interior latex paint in white (for touch-ups if needed).
- Painter’s tape (high-quality, like Frog Tape, for a super-sharp edge).
- Drop cloths.
- Paint brush (angled $1.5$ inches for cutting in).
- Paint roller and tray.
Equipment Required List (DIY Two-Tone Paint Job)
- Laser level or a long, traditional level.
- Measuring tape and pencil.
DIY Instruction Step by Step
Executing the Horizontal Color Block
- Mark the Line: Decide on the height for your color break (typically $36$ to $42$ inches from the floor, or higher if desired). Use a measuring tape and pencil to mark this height along the entire length of the wall.
- Establish the Level Line: Use a laser level or a long traditional level and pencil to connect all your marks, drawing one perfectly straight, horizontal line across all the walls in the hallway.
- Apply Painter’s Tape: Place the painter’s tape immediately below the pencil line. Run the tape tightly along the entire hallway, pressing the edge firmly onto the wall. This pencil line will now be hidden by the top edge of your tape, ensuring the painted line is clean.
- Seal the Tape (Crucial Step): To prevent the dark paint from bleeding under the tape, take a small amount of the white paint and paint a thin line over the top edge of the tape. Let this white sealant coat dry completely. This locks the tape’s edge.
- Apply the Color: Once the white sealant is dry, use your angled brush to carefully paint the dark color right up to and slightly over the taped edge. Use the roller to cover the rest of the bottom wall section. Apply a second coat after the first coat has dried.
- Remove the Tape: As soon as the second coat is applied, but while the paint is still wet, slowly and carefully peel off the painter’s tape. This method yields the cleanest, sharpest line imaginable. Touch up the white section if necessary once the dark color is dry.
21. Illuminated Shoji Screen Wall

This hallway transforms a structural wall into an architectural light source, creating a sophisticated and futuristic atmosphere. A series of vertical panels, resembling modern Shoji screens, line the wall. These panels are constructed from a translucent material—perhaps fluted or corrugated acrylic or glass—framed in light wood or metal.
The most striking element is the light source hidden behind these panels. Integrated LED lighting runs vertically, evenly distributing a cool, soft glow that illuminates the entire passage. In some panels, natural elements like preserved leaves or flowers are embedded within the material, adding unexpected organic detail. This solution is exceptionally clever for dark hallways, as it provides ambient light while also serving as the primary design feature.
Material Required List (DIY Fluted Translucent Panel)
- Fluted polycarbonate or acrylic sheet (cut to desired panel size).
- Wood lumber (for framing, e.g., $1 \times 2$ inch).
- Wood stain or sealant (optional).
- LED strip lights (long, waterproof if possible).
- Mounting brackets or screws.
Equipment Required List (DIY Fluted Translucent Panel)
- Circular saw (for cutting wood frame pieces).
- Miter box (for $45$-degree frame corners).
- Drill and driver.
- Measuring tape and level.
DIY Instruction Step by Step
Building and Installing the Backlit Panels
- Build the Frame: Measure and cut the $1 \times 2$ lumber to build a rectangular frame for your first panel. Use $45$-degree miter cuts at the corners for a professional finish. Assemble the frame using wood glue and screws.
- Mount the Lighting: Along the inside perimeter of the frame, install the LED strip lighting. Ensure the lights are positioned to shine inward and that the power cord can be discreetly routed (perhaps through a hole in the top or side of the frame).
- Secure the Translucent Panel: Place the cut fluted polycarbonate sheet inside the back of the wooden frame. You can use small plastic clips, silicon adhesive, or small screws to hold the sheet securely in place from the back.
- Prepare the Wall: Find the wall studs where you plan to install the panels. The panels need to be mounted with a small air gap between the frame and the wall to allow for ventilation and to diffuse the light without harsh shadows.
- Install the Panel: Attach mounting brackets to the back of the wooden frame. Hold the frame up to the wall, check for level, and secure it by driving screws through the brackets and into the wall studs.
- Connect Power: Route the power cord from the LED light to a hidden outlet. If building multiple panels, connect the power from one panel to the next using specialized connectors for a seamless lighting strip. Turn on the lights to enjoy the illuminated feature.
22. Leaning Oversized Mirror

A simple, large object can be the most effective way to make a statement in a hallway. Here, an enormously scaled floor mirror, encased in a richly ornate, gold-finished frame, dominates the space. Leaning the mirror against a dark accent wall provides an immediate sense of luxurious depth and height.
This piece is brilliant for several reasons: it reflects light from the window or door opposite, visually doubling the width of the narrow hallway. The intricate gold detailing of the frame provides historical elegance against the modern, dark gray wall. It is paired with simple, light furnishings like a padded bench and a rustic ceramic vase, ensuring the massive mirror remains the undisputed focal point.
Material Required List (Securing a Leaning Floor Mirror)
- Oversized floor mirror with a decorative frame.
- D-rings or other appropriate hanging hardware (if the mirror does not have them).
- Heavy-duty screws (long enough to go through drywall and into a wall stud).
- Metal wire or specialized safety tether/strap.
- Wall anchor (if you cannot hit a stud).
Equipment Required List (Securing a Leaning Floor Mirror)
- Stud finder.
- Level.
- Power drill.
- Pencil.
DIY Instruction Step by Step
Safely Securing a Leaning Mirror
- Place the Mirror: Carefully lean the mirror against the wall in your desired position. Ensure the bottom edge is firmly resting on the floor or baseboard.
- Determine Securing Point: You are not hanging the mirror, but securing its top edge to prevent it from tipping forward. Find the metal D-rings or loops on the back of the mirror frame, likely about three-quarters of the way up. Mark the position on the wall directly above these points.
- Locate Wall Support: Use a stud finder to locate a wooden wall stud near your marked point. Securing the anchor to a stud is always the strongest and safest option for heavy mirrors.
- Install the Anchor (or Screw): If you found a stud, drill a pilot hole and drive a heavy-duty screw into the stud. If you cannot find a stud, use a high-quality, heavy-duty wall anchor (like a toggle bolt) rated for the weight of your mirror. Install the anchor according to the package directions.
- Attach the Tether: Connect a strong metal wire or a specialized safety tether strap between the D-ring on the back of the mirror and the securely fastened screw/anchor in the wall. The tether should be pulled taut when the mirror is leaned back against the wall, but not tight enough to pull the mirror away from the wall.
- Test for Safety: Gently push the top edge of the mirror forward. It should only move a fraction of an inch before the tether strap catches it. This secures the mirror against accidental tipping while maintaining the desired leaned aesthetic.
23. Curated Traveler’s Showcase

This design transforms a hallway into a gallery of personal history and world exploration, moving beyond simple transit. The key features are deep, open shelves built directly into the wall on one side. These shelves, stained a dark walnut, contrast sharply with the white trim and are used to display a rich collection of artifacts, pottery, books, and framed photos—each item telling a story.
On the opposite wall, a massive, framed map provides a stunning focal point, acting as a dynamic inspiration board covered in postcards, photos, and mementos from various trips. A geometric lantern pendant hangs overhead, echoing the sense of global travel. This passage invites guests to pause and look, making the hallway an active, engaging part of the home’s narrative.
Material Required List (DIY Floating Shelves)
- $2 \times 4$ lumber (for the internal shelf support frame).
- Plywood or MDF (for the shelf cladding).
- Dark wood stain and sealant.
- Wood glue and screws.
- $3$-inch screws (for securing frame to studs).
Equipment Required List (DIY Floating Shelves)
- Miter saw or circular saw.
- Power drill and driver.
- Level and stud finder.
- Measuring tape.
DIY Instruction Step by Step
Installing Deep Floating Shelves
- Plan and Locate Studs: Mark the position and height of your shelves on the wall. Use a stud finder to mark the location of every wall stud along the length of the shelf. This is where the structural support frame will attach.
- Build the Support Frame: For each shelf, measure and cut $2 \times 4$ lumber to create a rectangular frame that is slightly narrower than your finished shelf depth. Cut short pieces of $2 \times 4$ to act as spacers between the long front and back pieces.
- Attach the Frame: Hold the frame structure up to the wall, ensuring it is perfectly level. Drive long $3$-inch screws through the back piece of the frame and into the wall studs at every possible point. The frame must be immovably secured to the wall.
- Clad the Frame: Measure and cut the plywood/MDF to cover the top, bottom, and front edge of the installed frame. These pieces form the smooth, visible surface of the shelf.
- Assemble the Shelf Cladding: Apply wood glue to the $2 \times 4$ frame and carefully attach the plywood top and bottom pieces using small finishing nails or screws. Attach the long front piece last, covering the exposed $2 \times 4$ face.
- Stain and Finish: Fill all nail holes and seams with wood filler. Sand the shelf smooth. Apply your dark wood stain and then seal it with polyurethane for durability. The result is a seamless, deep, built-in floating shelf ready to hold your treasures.
24. Elegant Gilded Symmetry

For an entry hall that exudes high-end luxury, this design proves that dark colors can be welcoming. The walls are painted a sophisticated deep slate gray or black, providing an enveloping, dramatic atmosphere. This dark backdrop makes the light-colored wooden floor and the white ceilings visually pop.
Symmetry is the key design principle here. Matching black console tables flank the walls, each holding a crisp white lamp. The mirrors above, ornate and finished in brilliant gold, are also perfectly paired. These gilded mirrors and the central gold oval mirror reflect the light from the white drum light fixtures, preventing the dark walls from feeling oppressive. The result is a balanced, intimate, and highly glamorous passage.
Material Required List (DIY Symmetrical Mirror Mounting)
- Two matching ornate mirrors (gold or brass finish).
- Mounting hardware (D-rings, picture wire, and wall anchors).
- Power drill and $3$-inch screws.
- Level and tape measure.
Equipment Required List (DIY Symmetrical Mirror Mounting)
- Pencil.
- Stud finder.
DIY Instruction Step by Step
Achieving Precise Symmetrical Mirror Placement
- Mark the Center Point: Decide on the vertical height for the center point of your mirrors (this should be visually coordinated with the height of your console tables and lamps). Mark this height on both the left and right walls.
- Determine Horizontal Placement: Measure the space available on the left wall and decide how far from the door frame or corner the center of the mirror should be. Mark this horizontal center. Repeat this exact measurement on the right wall to ensure perfect symmetry.
- Find Hanging Points: Measure the distance from the center point of the back of your mirror to the actual hanging wire or D-rings. Transfer these measurements onto the wall, adjusting vertically and horizontally from the center marks you made.
- Install Hardware: Use a stud finder. If you can hit a stud at the hanging point, use a long screw. If not, install a high-quality, heavy-duty wall anchor rated for the weight of your mirrors.
- Hang and Verify: Hang the first mirror and use a level to ensure it is perfectly straight. Then, hang the second mirror. Step back and use your eyes to confirm that the mirrors are at the same height and the same distance from the central axis. Adjust as necessary until the symmetry is flawless.
25. Architectural Wood Grille Wall

A stunning way to introduce texture and visual complexity is by applying a decorative grille wall. This design uses light-toned wood strips to create a dense, geometric grid that covers the entire wall surface. The wood lattice is mounted over a white wall, making the structure pop with crisp, modern definition.
This technique adds a dynamic three-dimensional layer, transforming a plain drywall surface into a piece of architectural art. The repeating pattern creates a rhythmic structure, drawing the eye down the hall. A simple, sculptural wooden handle is integrated into the grid, suggesting the wall is actually a hidden door or storage panel. This approach is contemporary, custom, and highly effective for adding warmth and movement.
Material Required List (DIY Wood Lattice Wall)
- Thin wood strips (e.g., $1/4$ inch thick by $1$ inch wide) in a light wood species (e.g., maple or oak).
- Wood glue.
- Small brad nails ($1$ inch).
- Sandpaper.
- Wood sealant or clear varnish (optional).
Equipment Required List (DIY Wood Lattice Wall)
- Miter saw (essential for precise cuts).
- Brad nailer or small hammer.
- Measuring tape and pencil.
- Level (at least $4$ feet long).
- Spacers (small blocks of wood cut to the exact size of the desired gap between strips, e.g., $4$ inches).
DIY Instruction Step by Step
Creating the Dimensional Wood Grid
- Prep the Wall: Ensure the wall is clean and painted in a solid, contrasting color (like the white seen here) before starting.
- Install Vertical Strips: Measure the width and height of the wall. Using your level and pencil, mark a line for the placement of the first vertical strip. Apply wood glue to the back of the strip, press it onto the wall, and secure it with brad nails.
- Space the Verticals: Use your custom-cut spacer block to determine the precise distance for the next vertical strip. Apply glue, position the strip using the spacer, and secure it with brad nails. Repeat this process until all the vertical strips cover the wall.
- Install Horizontal Strips: Now, begin the horizontal strips. Use the level to ensure the first horizontal strip is perfectly straight. Apply glue, position the strip, and secure it with brad nails where it crosses the vertical strips.
- Space the Horizontals: Use your spacer block again, placing it on top of the first horizontal strip to position the second one precisely. Continue this process, ensuring every horizontal strip is level and the pattern remains consistent across the entire wall.
- Finishing: Once the entire grid is installed, fill any visible nail holes with wood filler and lightly sand any rough edges. Apply a clear sealant or varnish to protect the wood.
26. Custom Pet Nook Integration

Hallways are often overlooked as spaces for integrating necessities, but this design shows how to do it beautifully and respectfully. Two recesses are built into the drywall beneath the art. These built-in niches are trimmed with classic millwork, giving them the appearance of intentional architectural elements, not afterthoughts.
One nook is used to house a comfortable pet bed, creating a cozy resting spot. The other cleverly contains a covered litter box or feeding station, keeping necessary but often unsightly items completely contained and out of the main traffic flow. The wall above is decorated with large, framed black and white portraits of the pets, celebrating them as part of the family and transforming the functional area into a personalized gallery.
Material Required List (DIY Drywall Niche Frame)
- Pre-primed MDF or wood trim pieces (casing trim for the sides and top, and baseboard trim for the bottom).
- Wood glue and brad nails.
- Caulk (paintable) and wood filler.
- Primer and white semi-gloss paint.
Equipment Required List (DIY Drywall Niche Frame)
- Miter saw (for $45$-degree corners).
- Brad nailer or hammer.
- Measuring tape and level.
- Stud finder (to ensure you are cutting into open cavity).
- Drywall saw (optional, if you need to create the opening).
DIY Instruction Step by Step
Framing a Recessed Wall Niche
- Locate Opening: Determine the size and location of your niche. Use a stud finder to ensure the area you are cutting is between two vertical wall studs (the studs will form the side boundaries of your niche). Mark the exact outline of the desired opening.
- Cut the Opening: Use a drywall saw to carefully cut out the rectangular opening. Check the depth to ensure the pet items will fit.
- Finish the Interior: Paint the interior of the niche opening with your white paint for a clean, finished look.
- Cut the Trim: Measure the perimeter of the opening. Using the miter saw, cut the casing trim pieces at $45$-degree angles to create the picture frame effect around the opening. Cut a small piece of baseboard trim to go along the bottom, giving the niche a grounded, finished look.
- Install the Trim: Apply wood glue to the back of the trim pieces and carefully nail them into the wall around the opening using the brad nailer. Install the baseboard piece at the bottom.
- Caulk and Paint: Fill all nail holes with wood filler and sand smooth. Run a bead of paintable caulk along every joint where the trim meets the wall. Once dry, apply two coats of white semi-gloss paint to the entire frame. The finished, framed opening looks intentional, not amateur.
27. Dedicated Achievement Gallery

A hallway offers the perfect opportunity to celebrate accomplishments and passions, turning an empty wall into a visual biography. This design is built around showcasing trophies, medals, and memorabilia. The floating wooden shelves are mixed with translucent glass shelves, creating varying visual weights and depths.
The glass shelves lighten the look and prevent the large number of items from feeling too heavy. Wood-framed display boxes are integrated directly onto the shelves to highlight important balls or cameras. Small patches of artificial turf on the lower shelf add a fun, sports-themed texture. This entire layout is expertly lit and organized, transforming collections that might otherwise clutter a room into a sophisticated, personal museum.
Material Required List (DIY Display Boxes)
- Thin plywood (e.g., $1/4$ inch thick) for the box structure).
- Clear acrylic sheet or plexiglass (for the viewing window).
- Wood glue and small nails.
- Wood stain or paint (to match the shelves).
Equipment Required List (DIY Display Boxes)
- Table saw or handsaw (for cutting plywood).
- Clamps.
- Sandpaper.
- Measuring tape.
DIY Instruction Step by Step
Constructing a Simple Wooden Display Box
- Measure and Cut: Determine the size of the box needed for your item (e.g., a soccer ball). Cut the plywood into five pieces: a top, a bottom, and two sides. Note that one side remains open for access, and the other side is where the viewing window will be.
- Assemble the Box Frame: Apply wood glue to the edges and assemble the box using small nails, leaving one end open. Clamp the box and allow the glue to dry fully.
- Prepare the Viewing Window: Measure the side of the box where you want the window. Cut the acrylic sheet to fit this opening precisely. You will need to carefully cut a slightly smaller opening in the plywood side panel to reveal the viewing space.
- Install the Window: Apply a thin bead of wood glue or use clear silicone caulk around the inside edge of the opening. Carefully press the acrylic sheet into place from the inside of the box. Wipe away excess glue immediately.
- Stain and Finish: Fill nail holes with wood filler and sand the entire box smooth. Stain or paint the box to match your existing shelves.
- Display: Once dry, place the display box onto your shelf. Your treasured item can be easily placed inside through the open end, transforming a regular shelf into a curated exhibit.
28. High-Gloss Reflective Ceiling

For a spectacular, high-impact ceiling treatment, consider using a lacquered or high-gloss finish. This design features a recessed ceiling area painted or treated with a highly reflective, dark material (often a stretch ceiling membrane or specialty high-gloss paint). The surface acts like a mirror.
The dramatic reflection immediately creates an illusion of infinite height, making the hallway feel grander and more spacious. The light fixture hanging down the center is reflected perfectly, doubling its impact and scattering light dramatically. Paired with modern brass sconces on the white walls, this look uses light and reflection as the main design elements to create a luxurious, boundary-pushing effect.
Material Required List (DIY High-Gloss Paint Treatment)
- High-gloss or lacquered paint (oil-based or specialty water-based recommended for best reflection).
- Primer (mandatory for proper adhesion).
- Painter’s tape and drop cloths.
- Paint brush and roller.
- Paint thinner (if using oil-based paint).
Equipment Required List (DIY High-Gloss Paint Treatment)
- Ladder or scaffolding.
- Extremely high-quality roller covers (often foam or specialized fine-finish covers).
- Sandpaper ($220$ grit or higher).
DIY Instruction Step by Step
Achieving a Mirror-Like Ceiling Finish
- Prep and Clean: Remove all light fixtures. Clear the hallway and cover the floors and walls with drop cloths and painter’s tape. Clean the ceiling thoroughly.
- Perfect the Surface (Crucial): High-gloss paint reveals every imperfection. Sand the ceiling surface with fine-grit sandpaper ($220$ or higher) to ensure it is perfectly smooth. Fill any nail holes or cracks with spackle. Sand again and wipe away all dust.
- Prime: Apply a high-quality primer to the ceiling. This prepares the surface to accept the gloss paint evenly. Allow it to dry fully.
- Apply First Coat: Use the specialty high-quality roller and angled brush to apply the first coat of the high-gloss paint. Roll slowly and in one direction, avoiding overlap as much as possible, as the paint is self-leveling.
- Sand Between Coats: Allow the first coat to dry completely. Very lightly sand the surface with extra-fine sandpaper ($320$ grit or higher), taking care not to sand through the paint. Wipe off all dust with a tack cloth.
- Apply Subsequent Coats: Apply a second and, if necessary, a third coat of the high-gloss paint, following the same careful application process. Allow each coat to dry completely. The more thin coats you apply, the deeper the reflective shine will be.
- Reinstall Fixture: Once the final coat is cured, carefully reinstall your light fixture.
29. Rustic Stone Veneer Wall

Introducing natural, rugged texture is a strong strategy for transforming an uninspired hall. This design uses split-face stone veneer (either natural or faux) to cover the entire length of one wall. The irregular gray tones and rough surface of the stone add immense depth and a grounded, outdoor feeling.
This textured wall is paired with a minimal, modern approach to the rest of the space: a simple wood slab bench, a natural jute runner, and a sleek black door. Framed art is leaned against the stone, complementing the organic texture. The use of a simple spotlight from the ceiling beautifully highlights the stone’s rough surface, creating a stunning play of light and shadow.
Material Required List (DIY Stone Veneer Wall)
- Stone veneer panels or individual pieces (lightweight, faux stone is often easier).
- Polymer-modified thin-set mortar.
- Joint compound or mortar mix (for filling seams if using individual pieces).
- Water.
Equipment Required List (DIY Stone Veneer Wall)
- Safety glasses and gloves.
- Notched trowel (for spreading mortar).
- Grout float or sponge.
- Wet saw or angle grinder with masonry blade (for cutting stone).
- Measuring tape and level.
DIY Instruction Step by Step
Installing Faux Stone Veneer Panels
- Prep the Wall: Ensure the wall is clean and structurally sound. Remove any baseboards or trim from the installation area. Mark a level reference line on the wall at the bottom of where the stone will start.
- Mix the Mortar: Follow the manufacturer’s instructions to mix the thin-set mortar. The consistency should be like thick peanut butter.
- Apply Mortar: Use the notched trowel to spread a thin, even layer of mortar onto a small working section of the wall (or directly onto the back of the veneer panel, a method called back-buttering).
- Place the Stone: Press the stone veneer panel firmly into the mortar. Twist it slightly to ensure good adhesion. Start at the bottom level line and work your way up, ensuring the panels interlock tightly. If using individual stones, stagger the joints for a natural look.
- Cut the Stone: When you reach the edges or corners, measure the piece needed. Use a wet saw or angle grinder to carefully cut the stone to fit. Always wear safety glasses and a mask when cutting stone.
- Cure and Clean: Allow the mortar to cure completely. Wipe off any excess mortar from the face of the stone immediately using a damp sponge. Once cured, reinstall your baseboards and admire the dramatic transformation.
30. Playful Pop-Color Lockers

For a fun, high-energy hallway, especially in a family home, utilitarian furniture can be transformed with color. This design utilizes a stack of vertical metal lockers, which are immensely practical for stashing backpacks, sports gear, and coats. Painting or purchasing the lockers in varying, bold colors (like white, olive green, and navy blue) makes them an intentional, playful design statement.
The lockers are paired with a simple industrial-style bench with a leather top and shoe rack underneath, creating a dedicated drop zone. A large cork board provides a central spot for notes and reminders. This is a brilliant example of using highly durable, functional objects and color blocking to inject personality and organizational power into a transitional space.
Material Required List (DIY Locker Color Blocking)
- Metal lockers (new or secondhand).
- Metal-specific primer (essential for proper paint adhesion).
- Spray paint or liquid paint in your chosen bold, contrasting colors (e.g., white, green, blue).
- Drop cloths and painter’s tape.
- Paint thinner or rubbing alcohol (for cleaning).
Equipment Required List (DIY Locker Color Blocking)
- Screwdriver or wrench (for removing hardware).
- Sandpaper (fine grit).
- Safety mask and gloves.
DIY Instruction Step by Step
Painting Metal Lockers for a Color-Blocked Look
- Disassemble and Prep: Use a screwdriver or wrench to remove all hardware, including handles, latches, and hooks, from the lockers. Lay the locker doors and body sections on drop cloths in a well-ventilated area (preferably outdoors).
- Clean and Sand: Clean the metal surfaces thoroughly with soap and water, then wipe down with paint thinner or rubbing alcohol to remove any grease or residue. Lightly sand the entire surface with fine-grit sandpaper. This creates a surface texture for the primer to grip.
- Prime: Apply an even coat of metal-specific primer to all surfaces you plan to paint. Allow the primer to dry completely according to the manufacturer’s instructions.
- Apply Color: Using spray paint or a brush/roller (if using liquid paint), apply the first coat of your chosen color to the designated locker sections (e.g., white to the top left door). Keep the paint thin and even to avoid drips. Apply two or three thin coats for rich, opaque color. Allow each coat to dry completely.
- Color Block (If using tape): If you are changing colors on the same continuous surface, use high-quality painter’s tape to meticulously mask off the area of the finished color before applying the second color.
- Cure and Reassemble: Let the paint cure fully (this may take several days depending on the paint type). Reinstall all the handles, latches, and hooks. Place the color-blocked lockers in your hallway for a fun, functional statement.
31. Illuminated Shadow Box Display

For adding a focal point that is both dramatic and deeply personal, consider a wall of shadow boxes. This design features a collection of custom-built, oak-framed shadow boxes mounted on a deeply painted accent wall (like this rich emerald green). The varying sizes and staggered arrangement create a dynamic art piece.
The true brilliance lies in the detail: each box is lined with velvet or cloth in a contrasting color and is individually lit with subtle LED strips inside the frame. This illumination highlights the collected items—such as antique keys and shells—turning them into museum-worthy artifacts. A long, simple console shelf below provides a visual anchor and a space for minimal, elegant accessories.
Material Required List (DIY Illuminated Shadow Box)
- Thin wood lumber (e.g., $1 \times 4$ pine) for the box sides and frame.
- Plywood or MDF (for the box back).
- Velvet or felt fabric (for lining the interior).
- Wood glue and small nails.
- Small battery-powered LED strip lights.
- Wood stain or sealant (e.g., light oak).
- Clear acrylic sheet or glass (for the front cover, optional).
Equipment Required List (DIY Illuminated Shadow Box)
- Miter saw (for $45$-degree cuts).
- Brad nailer or small hammer.
- Measuring tape and level.
- Hot glue gun (for securing fabric).
DIY Instruction Step by Step
Building and Lighting a Display Box
- Cut and Assemble the Box: Decide on the size. Cut the $1 \times 4$ lumber into four pieces for the box sides, using $45$-degree miter cuts for the corners. Cut the plywood for the back. Assemble the box using wood glue and brad nails.
- Stain and Finish: Apply your wood stain and sealant to the exterior of the box frame. Allow it to dry completely.
- Line the Interior: Cut the velvet or felt fabric to fit the back and inside sides of the box. Use hot glue to carefully secure the fabric inside the box, ensuring the material is smooth and taut.
- Install the Lighting: Affix the battery-powered LED strip lighting along the inside front perimeter of the box, aiming the light toward the back. Strategically position the battery pack so it is hidden but accessible inside the box.
- Mount to Wall: Drill mounting holes through the back of the box (ensure they won’t interfere with the interior items). Secure the shadow box to the wall using screws, checking with a level. Place your antique keys or artifacts inside using small dots of museum putty or pins.
32. Geometric Wood Chevron Accent

For a graphic statement that brings warmth and depth, applying a wood treatment in a chevron pattern is incredibly effective. This design uses narrow wood strips mounted over a dark painted wall (here, a deep navy or black), creating a bold, three-dimensional geometric pattern. The natural wood tone sharply contrasts with the dark background, making the pattern visually vibrate.
The chevron arrangement, meeting in the center of the wall, directs the eye immediately down the hallway, adding a sense of dynamic movement. Furnishings are kept simple: a minimal console table and a round mirror with black trim reinforce the graphic, modern aesthetic. This texture is unique and instantly elevates a flat wall into a piece of contemporary installation art.
Material Required List (DIY Chevron Wood Wall)
- Thin wood strips (e.g., $1/4$ inch thick by $1$ inch wide).
- Deep colored wall paint (e.g., navy or charcoal).
- Wood glue and brad nails.
- Fine-grit sandpaper.
Equipment Required List (DIY Chevron Wood Wall)
- Miter saw (essential for precise $45$-degree cuts).
- Level and tape measure.
- Brad nailer or small hammer.
- Paint brush and roller.
DIY Instruction Step by Step
Creating the Chevron Wood Feature
- Paint the Background: Paint the entire accent wall with your chosen deep color (navy or black). Allow two coats and ensure the paint is completely dry.
- Find and Mark the Center: Use a level and a long straight edge to mark a precise vertical line down the center of the wall. This is where the tips of your chevron pattern will meet.
- Cut the Wood Strips: Using the miter saw, cut one end of all your wood strips at a precise $45$-degree angle. You will need left-side cuts and right-side cuts.
- Install the First Strip: Start at the bottom center. Take a left-cut strip, apply wood glue, and align its $45$-degree edge exactly on the center line. Secure it with brad nails. Take a right-cut strip, align its $45$-degree edge to meet the first one on the center line, and secure it. This forms the first “V” shape.
- Continue the Pattern: Work outward and upward from the first “V,” installing the strips parallel to the previous ones. Keep the strips tightly butted against each other for a dense pattern. Use the level frequently to ensure the strips remain consistent.
- Finishing: When the wall is covered, cut the ends of the strips flush with the ceiling, floor, and side walls. Fill nail holes, sand lightly, and seal the wood with a clear topcoat if desired.
33. Layered Backlit Display Niches

This idea provides a sophisticated alternative to traditional shelving, offering deep recesses for dramatic display. This hallway features a series of built-in wall niches of various sizes, framed in warm wood and backed with a deep-colored surface (like navy or black). This creates a stunning contrast against the white wall.
The recesses are enhanced by lighting—small recessed spotlights in the ceiling of each niche highlight the items inside, such as pottery, art, and personal collections. The variation in height and size breaks up the long wall beautifully. Notice the lowest row, which is lined in bright white marble, adding an extra layer of luxury and contrast. This customized storage approach elevates the display of items into a gallery presentation.
Material Required List (DIY Recessed Wall Niche)
- Plywood or MDF board (for the box structure).
- Thin wood trim (for the facing frame).
- Wood glue and screws.
- Interior paint (deep navy or black).
- Small LED recessed puck light (battery-operated or hardwired).
Equipment Required List (DIY Recessed Wall Niche)
- Drywall saw and utility knife.
- Drill and driver.
- Level and stud finder.
- Miter saw (for framing).
DIY Instruction Step by Step
Installing and Lighting a Recessed Wall Niche
- Locate and Cut Opening: Decide on the size of your niche. Use a stud finder to locate the studs and cut the rectangular opening in the drywall between two vertical studs. Cut your niche box plywood to fit snugly inside this opening.
- Build and Finish the Box: Assemble the box (top, bottom, back, sides) using wood glue and screws. Paint the inside of the box with your deep navy or black paint.
- Install the Light: Drill a hole in the ceiling of the niche box for the recessed puck light wire. Install the light fixture. If using a hardwired light, ensure the wiring is safely routed. If battery-powered, hide the battery box inside the top or bottom of the niche.
- Install the Box: Slide the finished box into the wall opening. Secure it to the studs on the side using long screws driven through the sides of the box. Ensure the front edge of the box is flush with the drywall.
- Frame and Finish: Cut thin wood trim pieces to frame the front opening of the niche, creating a clean wood border. Secure the trim with brad nails. Caulk all seams where the frame meets the wall, paint the surrounding wall, and enjoy your new custom display!
34. Whimsical Botanical Wallpaper

Sometimes, the answer to an uninspired hallway is simply bold, joyful pattern. This passage features a striking wallpaper with a lush, nature-inspired print full of fungi, leaves, and berries. This maximalist wallpaper treatment instantly transforms the hallway, giving it a playful, country-chic cottage feel.
Since the wallcovering is so busy, the furnishings are kept light and simple. A floating white console shelf provides essential functionality without cluttering the floor. A round globe pendant light with a brass fixture maintains a clean, modern touch, preventing the space from feeling overwhelmingly antique. The bold pattern makes the wall a destination in itself.
Material Required List (DIY Wallpaper Installation)
- Quality wallpaper (pre-pasted, self-adhesive, or traditional).
- Wallpaper adhesive (if not pre-pasted).
- Wallpaper primer (recommended).
- Smoothing brush and seam roller.
- Utility knife and sharp blades.
Equipment Required List (DIY Wallpaper Installation)
- Measuring tape and pencil.
- Level or plumb line.
- Seam roller.
- Ladder or step stool.
DIY Instruction Step by Step
Applying Patterned Wallpaper
- Prep the Wall: Clean the wall and apply wallpaper primer. Turn off power if working near outlets, and remove all switch plates and outlet covers.
- Establish Plumb Line: Measure the width of your wallpaper. Starting a few inches from a corner, use a level to draw a perfectly straight, vertical line (a plumb line) down the wall. This ensures your first strip is straight.
- Cut and Paste: Cut the first strip, adding a few extra inches to the top and bottom. Apply adhesive to the wall or the back of the paper, following the product instructions.
- Install the First Strip: Align the edge of the first strip precisely with your plumb line. Gently press the paper onto the wall. Use the smoothing brush to press out air bubbles, working from the center outward.
- Match the Pattern: Cut the second strip, aligning the pattern carefully before applying it next to the first strip. Do not overlap the edges; simply butt them tightly together.
- Trim and Finish: Once all strips are applied, use the utility knife and a straight edge to carefully trim the excess paper at the ceiling, floor, and around windows or doors. Use a seam roller to gently flatten the seams. Reinstall all switch plate covers.
35. Layered Woven Basket Display

For a rich, globally-inspired look, this technique uses repetition and texture to spectacular effect. One wall is covered in a dense, overlapping arrangement of flat, woven baskets and trays. The baskets, often originating from African or Southeast Asian weaving traditions, feature varied patterns, sizes, and colors (neutrals with black, red, and brown accents).
This arrangement creates a massive, three-dimensional art piece that is inherently warm and textural. The rest of the hallway is kept simple with a wood console table and a jute runner, allowing the basket wall to be the star. Woven storage racks below the baskets add practical, coordinating storage.
Material Required List (DIY Basket Wall)
- Assortment of woven baskets, trays, and chargers in various sizes and patterns ($15$ to $25$ pieces recommended).
- Small finishing nails or picture hanging hooks.
Equipment Required List (DIY Basket Wall)
- Hammer.
- Measuring tape (optional, for planning gaps).
- Pencil.
DIY Instruction Step by Step
Arranging the Overlapping Basket Gallery
- Sort the Baskets: Lay all the baskets on the floor. Separate them by size and color. Decide which are your largest ‘anchor’ pieces and which smaller pieces you will use to fill the gaps and create layers.
- Start the Anchors: Begin on the wall by hanging the two or three largest baskets first. Place them slightly off-center and not perfectly straight. This immediately breaks the grid and encourages a more organic arrangement. Use a single nail or hook for each.
- Build and Layer: Begin placing the next tier of medium-sized baskets. Allow the edges of these baskets to overlap the anchor pieces slightly. The overlap is essential for achieving the dense, layered, three-dimensional look.
- Fill the Gaps: Use the smaller baskets and trays to fill the open spaces between the larger pieces. This is where you create visual movement, mixing patterns and colors. Step back frequently to ensure the arrangement is balanced. You want the overall wall shape to feel organic, with no large empty patches.
- Secure the Layers: Where baskets overlap, use an extra small finishing nail through the edge of the top basket and into the bottom basket (or the wall behind it) to prevent them from shifting.
36. Ultra-Modern Perimeter Lighting

This design showcases the power of integrated linear light to create a sleek, architectural statement. Instead of using traditional fixtures, this hallway features hidden LED strips installed along the perimeter of the ceiling and floor, and around the recessed ceiling tray.
The light seems to emanate from the walls themselves, washing the vertical surfaces in a soft, continuous glow. The illumination is uniform and eliminates harsh shadows, giving the hallway a gallery-like, futuristic feel. The effect is minimalist, clean, and highly sophisticated, relying solely on lighting design to create the atmosphere and define the space.
Material Required List (DIY Recessed Strip Lighting)
- LED strip lighting (flexible, bright white, $3000$K is warm).
- Aluminum channels or diffusers (essential for a clean line of light).
- Mounting clips or adhesive for the channels.
- Power supply (transformer) and wiring.
- Drywall mud and tape (for creating the recess).
Equipment Required List (DIY Recessed Strip Lighting)
- Power drill.
- Utility knife and wire cutters.
- Measuring tape and level.
- Safety gear (glasses).
DIY Instruction Step by Step
Installing Recessed Perimeter LED Strips
- Prepare the Recess: Determine where the light strip will go (e.g., along the ceiling edge). Use drywall and wood framing to create a small, shallow channel or recess (about $1$ inch deep) along the ceiling line. This channel will hide the aluminum channel and the light source.
- Measure and Cut Channels: Measure the length of the recess. Cut the aluminum channels (or diffusers) to fit precisely within the recess. The channels provide a clean housing for the LED strip.
- Install the Channels: Secure the aluminum channels inside the recess using the provided mounting clips or adhesive. Ensure they are perfectly straight.
- Install the LED Strips: Peel the adhesive backing from the LED strips and carefully press them inside the aluminum channels.
- Wire the System: Connect the LED strips to the power supply (transformer), following the product instructions. Position the transformer in a hidden but accessible location (e.g., inside a nearby closet or attic space). Route the wires discreetly behind the finished drywall.
- Seal and Finish: Snap the diffuser cover onto the aluminum channel. Patch and paint the surrounding drywall, leaving only the clean line of the channel exposed. The result is a seamless, architectural light source.
37. Vintage Map Wall Mural

This hallway makes a powerful statement about travel and history by covering the entire wall surface, including the door, in a huge, vintage map mural. The warm, aged tones of the map paper instantly add color and personality. Using the wallpaper right over the door creates an amazing seamless effect, disguising the entrance when the door is closed.
Dark trim—black baseboards and door casings—provide a sharp, modern outline against the historical map, giving the space structure. Furnishings continue the theme: a small globe and a dark wood console table are paired with a unique floor runner that features a contrasting map-like street pattern. This maximalist approach is highly personal and inspiring.
Material Required List (DIY Map Mural Wallpaper)
- Large format map mural wallpaper (designed for seamless application).
- Wallpaper adhesive (or self-adhesive backing).
- Wallpaper primer.
- Smoothing brush and seam roller.
- Utility knife and sharp blades.
Equipment Required List (DIY Map Mural Wallpaper)
- Ladder or step stool.
- Measuring tape and pencil.
- Level or plumb line.
- Scissors.
DIY Instruction Step by Step
Applying a Large-Scale Map Wall Mural
- Prep and Prime: Clean the wall and apply wallpaper primer. Remove the door and all hardware (hinges, handle) from the surface you plan to paper over.
- Plan the Layout: Lay out the map panels on the floor to ensure the image alignment is correct. Identify the starting point (usually the center or a corner) and draw a precise plumb line on the wall.
- Install the First Panel: Cut the first panel, adding a few inches of extra material at the top and bottom. Apply adhesive (if necessary) and align the panel with your plumb line. Smooth out air bubbles.
- Install Subsequent Panels: Install the remaining panels, meticulously aligning the map image at the seams. Use the seam roller gently over the seams.
- Paper the Door: Once the wall panels are dry, apply the remaining map section to the door panel that you removed. Let it dry completely.
- Trim and Finish: Use a utility knife and a straight edge to carefully trim the paper at the ceiling, floor, and around all trim edges. For the door, use a very sharp blade to cut around the edges and where the handle and hinge holes belong. Reinstall the door and hardware once everything is fully cured.
38. Floating Wood Console and Shelves

This design achieves a minimalist yet warm aesthetic through simple, seamless construction. The main elements are two thick, light-toned wooden floating shelves above a longer, floating console cabinet. The pieces are mounted without visible hardware, giving them a clean, architectural look.
This configuration is highly functional: the console cabinet provides hidden storage, while the shelves offer space for curated accessories like abstract line art, white ceramics, and a modern mushroom lamp. Hidden LED strip lighting runs beneath the long console cabinet, washing the wall below in a soft glow, making the furniture appear weightless. The look is airy, organized, and quietly sophisticated.
Material Required List (DIY Floating Console Cabinet)
- Plywood or MDF board (for the box structure).
- Wood veneer or contact paper (in a light oak or maple finish).
- Heavy-duty French cleat hanging system.
- LED strip lighting and power supply.
- Screws, wood glue, and finishing nails.
Equipment Required List (DIY Floating Console Cabinet)
- Table saw or circular saw.
- Power drill and driver.
- Measuring tape, level, and stud finder.
- Iron (for applying veneer, if used).
DIY Instruction Step by Step
Building and Lighting the Floating Console
- Build the Box: Cut the plywood/MDF into the pieces for the console box (top, bottom, sides, back). Assemble the box using wood glue and screws.
- Finish the Exterior: Apply the wood veneer or contact paper to all exterior surfaces, ensuring the front edges are covered for a finished look.
- Attach the Cleat: Secure one half of the heavy-duty French cleat system to the back of the console box using screws.
- Install the Lighting Channel: Affix the LED strip lighting along the bottom back edge of the console box. This positions the light to shine downward onto the wall and floor. Connect the light to the power supply.
- Mount Wall Cleat: Locate and mark the wall studs. Hold the second half of the French cleat (the wall piece) against the wall at the desired height. Use a level and secure the cleat into the wall studs using long, heavy-duty screws.
- Hang the Console: Lift the finished console and slide its cleat down onto the wall cleat until it locks securely.
- Install Floating Shelves: Install the two floating shelves above the cabinet using a separate set of heavy-duty floating shelf brackets, securing the brackets into studs where possible. Slide the finished shelf boards over the brackets.
- Connect Power: Route the console’s power cord discreetly to an outlet.
We have explored 38 distinct ways to ensure your hallway makes a powerful, lasting impression. From the rustic warmth of stone veneer to the sophisticated drama of high-gloss ceilings, these concepts prove that square footage is no obstacle to style. The secret lies in treating this passage as a destination, not just a route. Focus on texture, strategic lighting, and smart, hidden storage to maximize impact.
The best hallway design is one that reflects your personal journey and meets the functional demands of daily life. Now is the moment to stop settling for white walls and scattered shoes. Pick the idea that speaks most to you, gather your materials, and begin the transformation. Your home deserves a welcome as compelling as the rooms it leads to.
Key Takeaways
- Prioritize Architectural Detail: Adding elements like wainscoting, wood cladding, or decorative wallpaper instantly moves the hallway beyond basic drywall.
- Embrace Strategic Lighting: Layered lighting, including sconces, pendants, and especially integrated LED strips, is the single most effective way to create depth and drama in narrow spaces.
- Maximize Vertical Space: Utilize floor-to-ceiling built-ins, tall gallery walls, or unique vertical displays (like the moss or basket walls) to draw the eye up and expand the perception of space.
- Function Must Be Beautiful: Incorporate practical storage solutions—such as floating benches, custom cubbies, or antique lockers—that are designed to conceal clutter while adding to the aesthetic.
- Use Reflection and Pattern: Large mirrors visually double the square footage, while bold runners and graphic paint treatments guide the eye and add essential movement to long, static corridors.