As the leaves begin to turn and a crisp chill fills the air, there’s no denying that spooky season is upon us. Halloween isn’t just for costumes and candy; it’s also the perfect excuse to transform your home into a haven of autumnal charm and playful frights.

Forget the flimsy plastic decorations of yesteryear. This year, we’re all about blending the cozy comfort of fall with the enchanting magic of Halloween. Think plush throws, whimsical pillows, and subtle touches that invite warmth as much as they spark curiosity.
Whether you’re hosting a ghoulish gathering or simply want to bask in the seasonal spirit, our collection of 37 cozy Halloween decor ideas will guide you. From elegant gothic touches to adorable monster pals and glowing accents, there’s something here to enchant every home.
Get ready to snuggle up, sip some cider, and embrace the delightful spookiness of the season. Let’s make your home the coziest (and cutest) haunted house on the block!
1. Cozy Woodland Owl Cushion

This charming owl pillow brings a touch of whimsical forest magic to your home. Its chunky knit texture and detailed feather patterns create a wonderfully tactile experience. The large, inquisitive button eyes give it a friendly and curious personality that is sure to delight both kids and adults.
The warm, earthy tones of grey, brown, and cream make it a versatile piece for your autumn decor. Place this little creature on an armchair or nestle it among other seasonal cushions on your sofa. It provides a comforting presence for those cool, spooky evenings spent indoors.
DIY Your Own Cozy Owl Pal
You can make a similar cuddly friend with just a few simple craft supplies. It’s a fun project!
What You’ll Need:
- An old, thick sweater (grey or brown works well) or two pieces of felt fabric (about 12×12 inches each).
- Pillow stuffing (you can use cotton balls, poly-fil, or even old fabric scraps).
- Fabric glue or a needle and thread (ask a grown-up for help if you’re sewing!).
- A pair of scissors.
- Two large black buttons for the eyes.
- Small scraps of yellow, white, and black felt.
Step-by-Step Instructions:
- Make the Owl’s Body: Place your two pieces of sweater or felt on top of each other. Draw a simple owl shape on the top piece. Think of it like a rectangle with two small, curved bumps on top for ears.
- Cut it Out: Carefully cut along the lines you drew. You should now have two identical owl-shaped pieces of fabric.
- Stick it Together: Take one piece and set it aside. On the other piece, glue the eyes and beak in place. First, cut out two big white felt circles, then two slightly smaller yellow circles. Glue the yellow circles onto the white ones. Then, glue your two big black buttons in the middle of the yellow circles. For the beak, just cut a small black felt triangle and glue it below the eyes.
- Create the Body: Now, take your two owl pieces. Put the one without the face down. Squeeze a line of fabric glue all around the very edge, but leave a small gap at the bottom (about the width of your hand). Place the owl piece with the face on top and press the edges together firmly. Let the glue dry.
- Stuff Your Owl: Once the glue is dry, gently push your stuffing through the opening you left at the bottom. Keep stuffing until your owl is as fluffy and plump as you like.
- Seal It Up: Squeeze some more fabric glue into the opening and press it shut. Hold it for a minute to make sure it sticks.
2. Celestial Equinox Reversible Blanket

This woven blanket captures the balance between day and night. One side features warm, sun-drenched symbols on a cream background, evoking the feeling of a crisp autumn afternoon. A simple flip reveals a dramatic night scene, with bright moons and stars shining against a dark sky.
The fringed edges add a classic, rustic touch to the design. It’s a substantial piece that provides warmth and a strong graphic element to your room. Drape it over your sofa or bed to instantly set a mystical, seasonal mood.
DIY Your Own Sun & Moon Throw
You don’t need a loom to create a blanket with a similar vibe. This no-sew project is all about creativity.
What You’ll Need:
- A plain, solid-colored blanket (a dark color like black or navy, or a light one like cream).
- Felt sheets in a contrasting color (e.g., yellow or white felt for a black blanket).
- Fabric glue.
- Scissors.
- Chalk or a pencil.
Step-by-Step Instructions:
- Plan Your Design: Lay your blanket flat on the floor. Think about what patterns you want. You could draw simple crescent moons, full suns with triangle rays, and little stars.
- Draw Your Shapes: Using chalk or a pencil, lightly draw your celestial shapes onto the felt sheets. You can find simple shapes online to trace if you need ideas. Make several of them.
- Cut Them Out: Carefully cut out all the felt shapes you drew. Take your time to make the edges neat.
- Arrange Your Universe: Place your felt cutouts on the blanket. Move them around until you like the way they look. You can make a repeating pattern or a random scatter of stars and moons.
- Glue Them Down: One by one, lift each felt shape. Squeeze a thin line of fabric glue on the back, especially around the edges. Press it firmly back onto the blanket.
- Let it Dry: Let the glue dry completely for a few hours before you move or use your new celestial throw. Now you have a blanket that’s out of this world!
3. Dapper Gentleman Ghost Pillow

Who says ghosts can’t be sophisticated? This adorable ghost pillow adds a touch of playful elegance to your spooky decor. Its soft, fleecy texture makes you want to give it a squeeze, while the tiny top hat and monocle provide a surprising and funny detail.
This isn’t your average scary specter; it’s a friendly spirit with a lot of personality. It serves as a fun conversation starter and a whimsical addition to a cozy reading chair or a child’s bed during the Halloween season.
DIY Your Own Fancy Phantom Pillow
Making this little guy is easier than saying “Boo!” and requires no sewing at all.
What You’ll Need:
- Two pieces of white fleece or fluffy felt (about 12×15 inches each).
- Pillow stuffing.
- Black felt for the eyes, hat, and monocle.
- A small piece of grey or silver felt for the monocle lens.
- Fabric glue.
- Scissors.
Step-by-Step Instructions:
- Shape Your Ghost: Place the two white fleece pieces on top of each other. Draw a classic ghost shape—wavy at the bottom with a rounded head—on the top piece.
- Cut Out the Ghost: Carefully cut out the ghost shape through both layers of fabric. You’ll now have a front and a back piece.
- Create the Face and Hat: On one of the ghost pieces, let’s make the face. Cut two small circles from the black felt for eyes and glue them on. For the monocle, cut a small black ring and a slightly smaller grey circle. Glue the grey circle inside the black ring, then glue it over one eye. Cut a tiny string shape from black felt and glue it from the monocle to the side of the head.
- Make the Top Hat: Cut a rectangle and a slightly wider, shorter rectangle from the black felt. The first one is the hat, the second is the brim. Glue the brim to the bottom of the hat piece, then glue the whole hat onto the ghost’s head.
- Glue the Body: Take the plain ghost piece and lay it down. Squeeze fabric glue around the edge, but leave an opening at the bottom big enough for your hand. Place the ghost piece with the face on top and press the edges together.
- Stuff and Seal: Let the glue dry. Then, push stuffing into the opening until your ghost is nice and puffy. Glue the opening shut to keep the fluff inside. Your dapper ghost is ready to haunt your couch!
4. Pumpkin Spice Sherpa Throw

This blanket is the definition of cozy. One side offers a smooth, velvety fabric in a rich, warm pumpkin-spice hue. The other side is a thick, fluffy sherpa fleece that feels like snuggling with a friendly sheep.
The combination of textures makes it a sensory delight. It’s the kind of blanket you want to wrap around yourself while sipping hot cider and watching a scary movie. The simple, elegant design and autumnal color make it a staple for the entire fall season.
DIY Your Own Double-Sided Cozy Blanket
This project requires a little sewing, but it’s a great way to learn a basic stitch. Ask an adult for help with the sewing machine or needle.
What You’ll Need:
- A large piece of fleece or velvet fabric in a fall color (like orange, brown, or gold).
- An equally large piece of sherpa fabric.
- Scissors.
- Fabric pins.
- A sewing machine or a needle and thread.
Step-by-Step Instructions:
- Lay Out Your Fabric: Spread both pieces of fabric out on a large, flat surface. Place them on top of each other with the soft, pretty sides facing inward (touching each other).
- Trim and Pin: Make sure both pieces are the exact same size. Trim any uneven edges. Then, use fabric pins to pin the edges of the two pieces of fabric together all the way around. Place a pin every few inches.
- Sew It Up: Start sewing about half an inch in from the edge. Sew all the way around the blanket, but remember to leave a large gap (about the length of a ruler) on one side. This is how you’ll turn it right-side out.
- Clip the Corners: Before you turn it, carefully snip off the very tip of each of the four corners. Be careful not to cut the stitches! This makes the corners look sharp and neat.
- Turn it Right-Side Out: Reach into the hole you left open and grab the fabric inside. Gently pull the entire blanket through the hole. Now the soft, pretty sides should be on the outside! Poke out the corners so they are nice and square.
- Close the Gap: Neatly fold the raw edges of the opening inward and pin them shut. You can now sew this final little section closed with your machine or by hand using a simple stitch. Your super-cozy, two-sided blanket is complete!
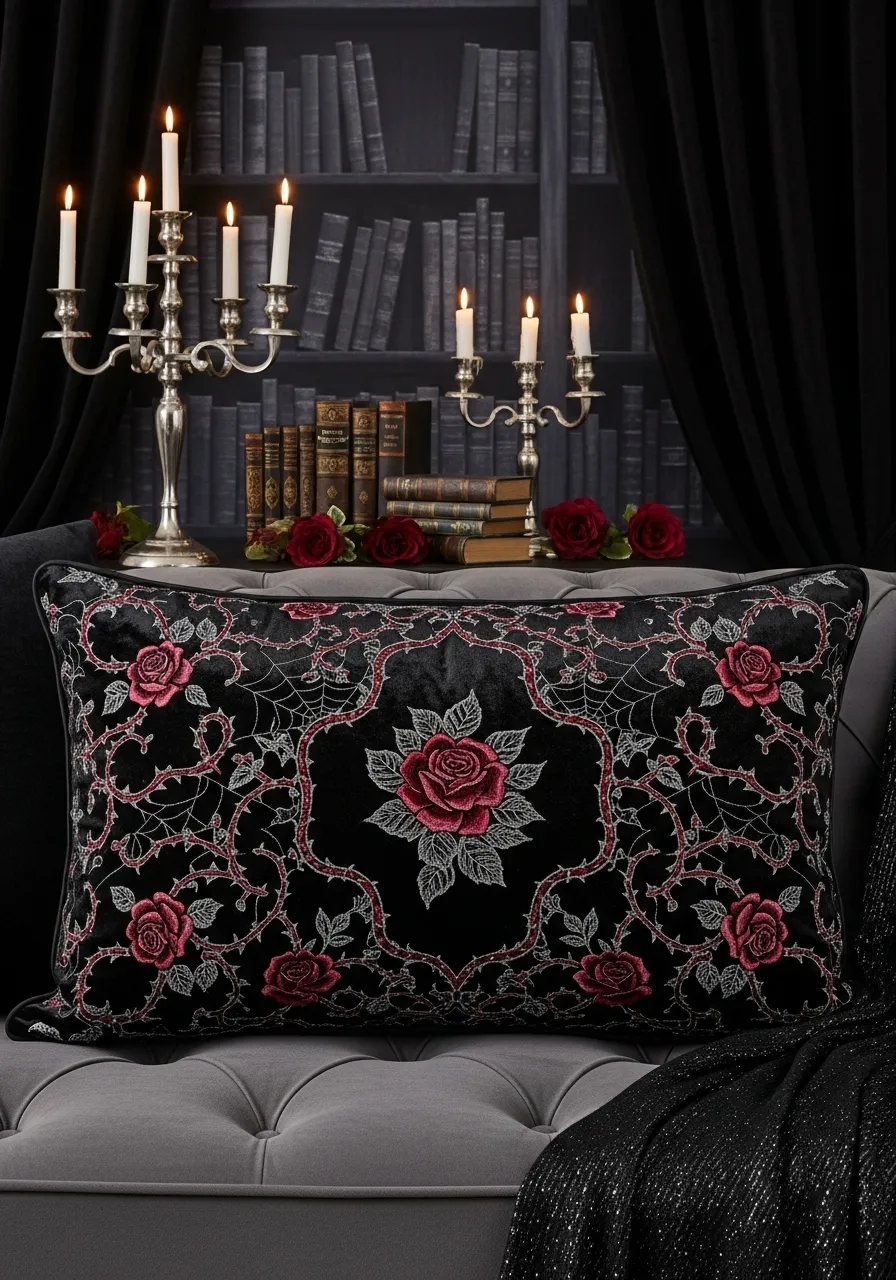
5. Gothic Rose & Cobweb Pillow

This pillow combines spooky and beautiful elements for a truly unique look. The deep black velvet provides a dramatic background for the intricate pattern. Thorny vines of crimson roses twist and turn, their romantic beauty tangled up in delicate, silvery spiderwebs.
It’s a statement piece that fits a gothic or vampire-themed decor. The design feels both elegant and slightly dangerous, making it a sophisticated way to acknowledge the Halloween season without using traditional pumpkins or ghosts.
DIY Your Own Spooky Garden Pillow
Unleash your inner artist with fabric markers to create this elegant pillow.
What You’ll Need:
- A plain black pillowcase (cotton or velvet).
- A pillow insert.
- Fabric markers or paint pens in silver, red, and green.
- A piece of cardboard that fits inside the pillowcase.
- A pencil or chalk.
Step-by-Step Instructions:
- Prepare Your Canvas: Iron the pillowcase to get rid of any wrinkles. Slide the piece of cardboard inside. This prevents the marker ink from bleeding through to the other side.
- Sketch the Cobwebs: Using a pencil or chalk, lightly draw spiderwebs on your pillowcase. A good way to do this is to draw a few lines coming out from one point, like bicycle spokes. Then, connect these lines with curved, drooping lines. You can put one in each corner.
- Draw the Vines: Next, sketch out some curvy vine lines twisting around the pillow. Make them look like they are growing from the edges.
- Add Roses and Thorns: Along the vines, draw some simple rose shapes. A rose can be made by drawing a spiral. Then, add little pointy thorns along the green vines.
- Trace with Fabric Markers: Once you are happy with your sketch, it’s time to color it in. Use your silver fabric marker to carefully trace over the spiderweb lines.
- Color the Roses: Use the red marker to color in your roses and the green marker for the vines and thorns. Take your time.
- Heat Set the Ink: Let the ink dry completely. To make the design permanent, have a grown-up help you iron over it according to the fabric marker’s instructions. This “sets” the ink so it won’t wash out. Remove the cardboard, put your pillow insert inside, and you’re done!
6. Protective Evil Eye Tassel Pillow

Keep watch over your Halloween festivities with this striking evil eye pillow. The bold, graphic design immediately draws attention. Layers of texture in the eye itself give it a handmade, artisanal feel, while the plush black tassels at the corners add a dash of playful flair.
While it’s a fun and quirky piece for Halloween, the ancient symbol of the evil eye is also believed to ward off bad vibes. It’s a stylish and meaningful cushion that adds a layer of mystique to your couch or bed.
DIY Your Own Watchful Eye Pillow
This project uses simple felt shapes and easy-to-make yarn tassels to get a similar look.
What You’ll Need:
- A plain, light-colored rectangular pillowcase and insert.
- Felt sheets in dark blue, light blue, black, and white.
- Black yarn.
- Fabric glue.
- Scissors.
- A small piece of cardboard.
Step-by-Step Instructions:
- Cut Out the Eye Shapes: Start by cutting a large eye shape (like a lemon or a football) out of the white felt. Then, cut a slightly smaller circle from the light blue felt, an even smaller circle from the dark blue, and a tiny circle from the black felt for the pupil.
- Assemble the Eye: Glue the felt pieces together. Start by gluing the light blue circle in the middle of the white eye shape. Then glue the dark blue circle on top of the light blue one, and finally the tiny black pupil in the center.
- Add Eyelashes: Cut several small, thick strips from the black felt to be the eyelashes. Glue them around the top and bottom of the white eye shape.
- Attach to the Pillow: Carefully glue the entire finished eye onto the center of your pillowcase. Let it dry flat.
- Make the Tassels: To make a tassel, wrap the black yarn around the small piece of cardboard about 20 times. Slide the loops off the cardboard. Tightly tie another piece of yarn around the top of the loops. Cut the bottom of the loops to create the fringe. Make four of these.
- Attach the Tassels: Use fabric glue or a few simple stitches to attach one tassel to each of the four corners of the pillowcase. Once the glue is dry, insert your pillow, and it’s ready to watch over your room!
7. Midnight Velvet Cat Cushion

Sleek, mysterious, and utterly charming, this black cat pillow is a must-have for classic Halloween decor. Its unique shape breaks away from the standard square cushion, making it a standout piece. The soft velvet finish invites you to pet it, while its piercing green eyes seem to glow in the dark.
The elegantly curled tail, forming a subtle heart shape, adds a sweet touch to this otherwise spooky familiar. It’s the kind of decorative accent that looks right at home curled up on a dark armchair or lounging on a bed.
DIY Your Own Lucky Black Cat Pillow
Create your own feline friend with some soft fabric and stuffing.
What You’ll Need:
- Two pieces of black velvet or fleece (about 15×15 inches each).
- Scaps of green and pink felt for the eyes and nose.
- Gold or yellow embroidery thread and a needle (or a gold paint pen).
- Pillow stuffing.
- Fabric glue.
- Scissors.
Step-by-Step Instructions:
- Draw the Cat Shape: Place your two black fabric pieces together. On the top one, draw the outline of a sitting cat. Draw the body, head with pointy ears, and a long, curly tail.
- Cut it Out: Carefully cut along the cat outline through both pieces of fabric. Now you have a front and a back for your cat pillow.
- Make the Face: Set one cat piece aside. On the other one, let’s create the face. Cut two almond shapes from the green felt for the eyes and glue them on. Cut a tiny pink triangle for the nose and glue it on.
- Add Whiskers: Have an adult help you use the needle and embroidery thread to stitch a few long whiskers on each side of the nose. If you don’t want to sew, you can carefully draw them on with a gold paint pen.
- Glue the Body: Lay the plain cat piece down. Put fabric glue all around the edge, but leave a small gap at the bottom for stuffing. Place the cat piece with the face on top and press the edges together.
- Stuff Your Cat: After the glue dries, gently push stuffing into the opening. Make sure you get stuffing into the ears and the tail. Keep going until your cat is plump.
- Seal It: Use more fabric glue to close the opening. Your new velvet cat is ready to bring some good luck and spooky style to your room.
8. Midnight Moon & Bats Velvet Pillows

These pillows bring a touch of celestial elegance to Halloween. The deep, rich navy velvet feels luxurious and mimics the color of a midnight sky. On the round cushion, a brilliant gold crescent moon shines brightly, with a flight of bats silhouetted against it.
The combination of the soft velvet and the metallic gold creates a sophisticated and chic look. These aren’t just for Halloween; their stylish, cosmic design works well for anyone who loves astronomy or a touch of dark academia in their decor.
DIY Your Own Gilded Moon Pillow
You can easily add this metallic magic to a plain pillow using iron-on vinyl.
What You’ll Need:
- A plain round pillowcase in navy blue or black.
- A sheet of gold iron-on vinyl (also called heat transfer vinyl or HTV).
- An iron.
- Scissors or a craft cutting machine.
- A piece of thin cloth (like a tea towel).
Step-by-Step Instructions:
- Design Your Moon and Bats: On the paper backing of the iron-on vinyl, draw a large crescent moon shape. Also, draw a few small, simple bat shapes. Remember to draw them as a mirror image, because you’ll be flipping them over!
- Cut Out Your Shapes: Carefully cut out the moon and bat shapes from the vinyl sheet.
- Position the Design: Place your pillowcase on a flat, hard surface that’s safe for ironing. Arrange your gold moon and bats on the pillowcase with the shiny plastic side facing up.
- Iron It On: Ask a grown-up for help with this part. Heat the iron according to the instructions for your vinyl. Place the thin cloth over your vinyl design to protect it. Press the hot iron firmly onto the design for about 15-30 seconds. Don’t slide the iron around; just press down.
- Peel the Plastic: Let the design cool down for a moment. Then, carefully and slowly peel off the clear plastic sheet. The gold design should stick to the fabric. If it lifts up, put the plastic and cloth back and iron it a little more.
- Finish Up: Once all the plastic is peeled off, your gilded moon pillow is ready to shine. Put the pillow insert inside and place it on your favorite chair.
9. Charcoal Cable Knit Throw

There is nothing quite like the comforting weight of a chunky knit blanket on a chilly night. This throw’s deep charcoal color is moody and versatile, fitting with Halloween decor but also working beautifully throughout the winter. The intricate cable-knit pattern adds a rich texture that looks and feels incredibly cozy.
This is a timeless piece that brings warmth and a sense of rustic craftsmanship to any space. It’s for anyone who wants to create a snug, inviting atmosphere. Imagine curling up under this with a good book while the wind howls outside.
DIY Your Own No-Knit Chunky Blanket
You don’t need knitting needles to make a chunky blanket! You can use your hands and some special yarn.
What You’ll Need:
- Several skeins of super-chunky chenille or merino wool yarn (the thicker, the better!).
- A flat surface like a table or the floor.
- Scissors.
Step-by-Step Instructions:
- Make a Slip Knot: This is the first step in any knitting project. Make a loop with your yarn, then pull another loop through it to create a knot that can be tightened.
- Create Your First Chain: Lay the yarn out. Reach through your first loop, grab the long “working” yarn, and pull it through to create a new loop. Keep doing this—reaching through the new loop to pull through another one—to create a chain. Make this chain as wide as you want your blanket to be.
- Start the First Row: Now, skip the very first loop in your chain. In the second loop, poke your finger through, grab the working yarn, and pull up a new loop. Continue doing this in every loop all the way down your starting chain. You should now have a row of loops.
- Knit the Next Row: To go back the other way, take your long working yarn and lay it across your row of loops. Now, starting with the last loop you made, pull it over the working yarn and through the loop next to it. It’s a bit like making a series of little yarn tunnels. It can be tricky, so it might be helpful to watch a video on “hand knitting” or “finger looping a blanket.”
- Keep Going: Continue making rows back and forth. You’ll see your blanket start to grow! Keep going until it’s as long as you want it to be.
- Finish It Off: To finish, you’ll need to “cast off.” When you get to the end of your last row, cut the yarn, leaving a tail. Then, pull that tail through the very last loop and tighten it to make a knot. Weave the tail end into your blanket to hide it. Enjoy your super soft, handmade throw!
10. Gothic Monogram Bat Pillow

Add a personal and sophisticated touch to your Halloween decorations with this custom monogram pillow. The elegant, old-fashioned lettering in a fiery orange-red stands out boldly against the black fabric. A small colony of bats flying across the letter adds the final spooky detail.
This is a great way to claim your spot on the couch for a horror movie marathon. It feels special and unique, blending a classic home decor element—the monogram—with a fun, seasonal twist. It’s a subtle yet impactful piece of decor.
DIY Your Own Spooky Initial Pillow
Personalize a plain pillowcase with your own initial for a custom Halloween look.
What You’ll Need:
- A plain black pillowcase and insert.
- Fabric paint or paint pens in a spooky color like orange, red, or silver.
- A small paintbrush (if using paint).
- A stencil of the letter of your choice in a gothic or fancy font (you can print one from the internet).
- A few small bat-shaped stencils or stickers.
- Tape.
- A piece of cardboard.
Step-by-Step Instructions:
- Set Up Your Workspace: Make sure your pillowcase is smooth and ironed. Place the cardboard inside it to stop paint from seeping through.
- Position Your Stencil: Place your large letter stencil in the center of the pillowcase. Use a few pieces of tape to hold it firmly in place so it doesn’t wiggle around.
- Paint Your Initial: Using your fabric paint pen or paint and brush, carefully fill in the stencil. Use dabbing motions rather than brushing strokes to prevent paint from getting under the stencil’s edge. Apply an even coat.
- Add the Bats: While the big letter is still wet, you can place your small bat stencils around it. Carefully fill them in with black fabric paint. Or, for an easier way, you can wait for the letter to dry and stick on some bat-shaped stickers.
- Remove the Stencil: Once you’re done painting, carefully lift the stencils straight up. Try not to smudge your work.
- Let it Dry and Set: Let the paint dry completely, which might take a few hours. Just like with the fabric markers, ask a grown-up to help you heat-set the paint with an iron if the paint instructions say to. This will make it last. Now your personalized spooky pillow is ready!
11. Golden Harvest Tassel Throw

This blanket brings a cheerful and luxurious feel to autumn decor. The rich, golden-mustard color is reminiscent of harvest time and changing leaves. Its wonderfully bumpy texture invites you to run your hands over it.
The real stars are the oversized tassels and pom-poms. They add a sense of bohemian fun and drama to the cozy throw. This is the kind of blanket that doesn’t just keep you warm; it makes a bold style statement on your sofa.
DIY Your Own Giant Tassel Blanket
You can add this playful touch to any blanket you already own.
What You’ll Need:
- A plain blanket.
- Lots of thick yarn in a matching or contrasting color.
- A small book or a thick piece of cardboard.
- Scissors.
Step-by-Step Instructions:
- Wrap Your Yarn: Take the yarn and start wrapping it around the width of your book. For a big, fluffy tassel, wrap it around at least 50 times. The more you wrap, the fatter your tassel will be.
- Tie the Top: Once you’re done wrapping, cut the yarn. Take another small piece of yarn (about 6 inches long) and slide it under all the loops at the top of the book. Tie a very tight double knot. This holds your tassel together.
- Cut the Bottom: Slide the bundle of yarn loops off the book. You’ll see it looks like a big loop. Use your scissors to cut through the bottom of all the loops. Now you have a fringe!
- Make the Tassel Head: Take one more piece of yarn. About an inch down from the top knot, wrap this piece tightly around the whole bundle of yarn several times. Tie a secure knot to create the little “head” of the tassel.
- Trim and Attach: Trim the bottom of the fringe so all the strands are the same length. Now, use the two long strings from the very first knot you tied to securely attach the tassel to the corner of your blanket. Make as many as you like!
12. Woven Spiderweb Circular Throw

Catch some cozy vibes with this incredible spiderweb blanket. The unique circular shape and intricate woven design make it a standout piece. It’s a clever and stylish way to decorate for Halloween without being too scary.
The black and grey design is classic and dramatic. You can drape it over a round table as a spooky tablecloth, or let it hang off the side of an armchair like a freshly spun web. It’s a graphic and impressive accent for any room.
DIY a No-Knit Web Blanket
Create a similar look without any complicated knitting.
What You’ll Need:
- A plain black round blanket or a large piece of black fleece cut into a circle.
- White or silver fabric paint in a puffy paint bottle (this gives a 3D effect).
- Chalk.
- A ruler or yardstick.
Step-by-Step Instructions:
- Find the Center: Lay your black circle flat on the floor. Find the very center and mark it with a small dot of chalk.
- Draw the Spokes: Using your ruler, draw long, straight chalk lines from the center dot all the way to the edge of the circle. Think of it like cutting a pizza. Draw about 8 to 10 of these lines, evenly spaced. These are the main threads of your web.
- Draw the Webbing: Now, connect the spoke lines with curved lines. Start near the center and draw a drooping line from one spoke to the next, all the way around. Move a few inches out and do it again. Keep making bigger and bigger rings of these curved lines until you reach the edge.
- Paint the Web: Carefully trace over all of your chalk lines with the puffy paint. Squeeze the bottle gently to get a nice, even line.
- Let it Dry: This is the most important part! Puffy paint can take a long time to dry completely. Let it sit flat for at least 24 hours so it doesn’t smudge. Once dry, your spooky web blanket is ready.
13. Sleepy Hollow Toile Pillow

Tell a spooky story without saying a word. This pillow features a classic toile pattern with a terrifying twist. Instead of peaceful country scenes, it depicts the thrilling chase of the Headless Horseman from “The Legend of Sleepy Hollow.”
The detailed, black-and-white illustration gives it a vintage, literary feel. The striped rope trim frames the scene nicely. It is a sophisticated nod to a classic piece of American folklore and a handsome addition to a traditional living room.
DIY Your Own Spooky Story Pillow
Use iron-on paper to put your favorite spooky scene on a pillow.
What You’ll Need:
- A plain, light-colored pillowcase (cotton works best).
- Iron-on transfer paper for light fabrics.
- A computer and printer.
- An image of a spooky scene (search for “vintage Halloween public domain images”).
- An iron.
- Scissors.
Step-by-Step Instructions:
- Find and Print Your Image: Find a cool, spooky black and white drawing online. It could be a haunted house, a skeleton, or a spooky forest. Save the image to your computer. Remember to flip the image horizontally (mirror image) using a simple photo editor before you print. This is very important!
- Print on Transfer Paper: Print the mirrored image onto the special iron-on transfer paper. Make sure you print on the correct side (the instructions will tell you which side).
- Cut it Out: Carefully cut out the design, leaving a small border around the edges.
- Iron it On: Ask an adult to help with the iron. Place your pillowcase on a hard, heat-safe surface and iron it smooth. Place your printed design face-down on the pillowcase where you want it to go.
- Press Firmly: Following the instructions on your transfer paper, press the hot iron firmly over the design for the recommended amount of time. Keep the iron moving to heat it evenly.
- Peel and Reveal: Let the paper cool down completely. Once it’s cool, carefully peel the paper backing away. Your spooky image should now be transferred onto the pillowcase!
14. Bubbling Cauldron Novelty Pillow

Double, double, toil and trouble! This fun pillow looks like it came straight from a witch’s kitchen. The classic black cauldron shape is playful, and the potion bubbling over the top adds a pop of color and amazing texture.
The bright green, purple, and white “bubbles” are made from a loopy, soft fabric that makes you want to touch them. This is a whimsical and three-dimensional piece that brings a lot of character and fun to your Halloween setup.
DIY a No-Sew Cauldron Cushion
This is a fun project using felt and pom-poms.
What You’ll Need:
- Two large pieces of black felt.
- Pillow stuffing.
- Large pom-poms in lime green, purple, and white.
- Fabric glue.
- Scissors.
- White chalk.
Step-by-Step Instructions:
- Draw the Cauldron: Place the two pieces of black felt on top of each other. Use your chalk to draw a big cauldron shape on the top piece. Don’t forget to add two little handles on the sides and a rim at the top.
- Cut it Out: Carefully cut out the cauldron shape through both layers of felt.
- Glue the Body: Set one cauldron piece aside. Take the other piece and lay it down. Squeeze fabric glue along the edges, but leave an opening at the top between the rim. Place the other cauldron piece on top and press the edges together.
- Stuff the Cauldron: Let the glue dry. Then, gently push stuffing into the opening until the cauldron is full and puffy. Don’t stuff it too tight.
- Add the Bubbles: Now for the fun part! Arrange your colorful pom-poms at the top opening of the cauldron so they look like they are bubbling over. Use plenty of fabric glue to stick them in place, gluing them to each other and to the inside rim of the cauldron.
- Seal and Dry: Glue the opening of the cauldron shut around the pom-poms. Let everything dry completely, and your magical cauldron is ready to display.
15. Autumn Gradient Chunky Knit Blanket

This blanket is like watching the seasons change. The incredibly thick, chunky knit transitions through a beautiful gradient of autumn colors, from rich earth brown and deep red to sunset orange, golden yellow, and finally a soft green.
The texture is luxurious and weighty, providing a comforting pressure when you snuggle under it. It’s a stunning work of art that serves as a focal point in any room. This throw is for someone who wants to wrap themselves in all the colors of fall.
DIY a Color-Change Hand-Knit Blanket
Learn how to switch colors while hand-knitting a chunky throw.
What You’ll Need:
- Several skeins of super-chunky yarn in different fall colors.
- Scissors.
Step-by-Step Instructions:
- Start Your Blanket: Begin by making a hand-knit blanket using the method described in item #9. Start with your darkest color (like brown) and knit several rows until you have a nice color block.
- Prepare to Change Colors: When you’re ready to switch to the next color (like red), finish your last row. Cut the brown yarn, leaving a tail about 6 inches long.
- Introduce the New Color: Take the end of your new red yarn and tie it to the tail of the brown yarn with a tight, secure double knot.
- Continue Knitting: Now, just keep knitting! When you get to the knot, just treat it as part of the yarn and pull it through a loop as you normally would. The new color will seamlessly continue the blanket.
- Keep Switching: Continue this process for each color change. Knit a block of red, then switch to orange, then yellow, and so on.
- Finishing Touches: When you finish your blanket, you’ll have a few knots where you changed colors. You can use your fingers to carefully tuck the knotty ends into the stitches to hide them. Now you have a beautiful, multi-colored chunky blanket!
16. Enchanted Forest Floor Blanket

Bring the magic of a hidden forest into your home. This circular throw looks like a realistic patch of mossy ground, complete with a variety of wild mushrooms, ferns, and fallen autumn leaves. It makes you feel like you’ve stumbled into a fairy ring.
The vibrant, detailed print is captivating and creates a sense of wonder. It’s an unusual and beautiful piece that connects your indoor space with the natural world. This is for anyone who loves fairy tales, foraging, or the cottagecore aesthetic.
DIY a Felt Forest Floor Playmat
While a realistic print is tough to make, a felt version is a fun craft.
What You’ll Need:
- A large piece of green felt for the base, cut into a circle.
- Various colors of felt: red, white, brown, tan, and dark green.
- Fabric glue.
- Scissors.
Step-by-Step Instructions:
- Create the Base: Lay your large green circle flat. This is your mossy ground.
- Make some Mushrooms: Let’s make a classic red-and-white toadstool. Cut a red half-circle for the mushroom cap and a thick white rectangle for the stem. Glue the stem onto your green base. Then, glue the red cap on top of the stem. Cut tiny white dots and glue them onto the red cap.
- Design Other Fungi: Get creative! Make other kinds of mushrooms. Cut out simple brown mushroom shapes or tall, skinny white ones. You can look at pictures of mushrooms online for ideas. Arrange and glue them all over your green circle.
- Add Ferns and Leaves: Cut some fern shapes from the dark green felt. A fern looks like a stem with lots of little leaves coming off the sides. Cut out some simple leaf shapes from brown and yellow felt.
- Arrange Your Forest: Glue the ferns and leaves around the mushrooms to fill in the space. Let all the glue dry, and you have a magical forest floor mat, great for playing on or using as a decoration.
17. Bioluminescent Fungi Fleece Throw

Step into a forest at midnight with this mesmerizing blanket. Against a deep, dark background, a cluster of fantastical mushrooms seems to glow with an eerie, magical light. The cool blue and teal colors give the design a mysterious, otherworldly feel.
This fleece throw is soft, lightweight, and perfect for adding a layer of warmth. The design sparks the imagination, making you think of enchanted woods and hidden magic. It’s a wonderful choice for anyone who loves fantasy and spooky, beautiful things.
DIY Your Own Glowing Mushroom Blanket
Use special fabric paint to create a design that glows in the dark!
What You’ll Need:
- A plain dark-colored blanket (black or navy blue).
- Glow-in-the-dark puffy fabric paint (usually a greenish or bluish color).
- A piece of chalk.
- A piece of cardboard to place under your work area.
Step-by-Step Instructions:
- Plan Your Design: Lay your blanket flat over the cardboard. Use your chalk to lightly sketch some mushroom shapes on the blanket. Draw different sizes—some tall and skinny, some short and stout. Draw a cluster of them growing on a log.
- Outline with Paint: Carefully trace the outlines of your mushrooms with the glow-in-the-dark paint. Squeeze the bottle gently to make a steady line.
- Add Details: Add some details to your mushrooms. You can draw spots on the caps or lines (gills) on the underside of the caps. Draw a few little floating dots around the mushrooms to look like glowing spores.
- Let It Dry: Let the paint dry completely. This might take several hours. Don’t touch it while it’s wet.
- Charge It Up!: Once it’s totally dry, your blanket is ready. To make it glow, you need to “charge” the paint. Just hold the blanket up to a bright light for a few minutes.
- See the Magic: Now, take the blanket into a dark room and watch your mushrooms glow! The spooky, magical light will appear right before your eyes.
18. “Creep It Real” Patchwork Pillow

This pillow has a fun message and a ton of personality. The playful phrase “Creep It Real” is spelled out in large, mismatched letters, giving it a cool, ransom-note vibe. Each letter has a different color, pattern, or texture.
You can see corduroy, glitter, cow print, and chevron patterns all working together. This mix-and-match style is energetic and modern. It’s a lighthearted and trendy way to add some Halloween spirit to your living room or bedroom.
DIY a Fun Phrase Pillow
Use fabric scraps to spell out your own spooky message.
What You’ll Need:
- A plain, light-colored pillowcase.
- Scraps of different fabrics (felt, cotton, corduroy, anything you have!).
- Fabric glue.
- Scissors.
- A pencil and paper.
Step-by-Step Instructions:
- Choose Your Phrase: Think of a short, spooky phrase. “Boo!” “Eek!” or “Spooky” are great options.
- Draw Your Letters: On a piece of paper, draw big, blocky bubble letters to spell your word. Cut these paper letters out. These are your templates.
- Trace onto Fabric: Take your paper letters and trace them onto the back of your different fabric scraps. Trace one letter on one fabric, the next letter on another, and so on. Remember to trace them backward (as a mirror image)!
- Cut Out Fabric Letters: Carefully cut out the letters from the fabric.
- Arrange Your Message: Lay your pillowcase flat. Arrange your fabric letters on the pillowcase to spell out your word. Move them around until you like how they look.
- Glue Them Down: One by one, lift each fabric letter. Squeeze a thin line of fabric glue around the back edge. Press it down firmly onto the pillowcase. Let everything dry completely before putting a pillow insert inside.
19. Candy Corn Chunky Knit Throw

This blanket looks good enough to eat! It perfectly captures the classic Halloween candy with its bold stripes of orange, yellow, and white. The super chunky knit makes it look incredibly soft and inviting.
Playful tassels made from all three colors hang from the corners, adding an extra bit of fun. This is a cheerful and festive throw that screams Halloween. It’s a sweet and cozy way to add a big splash of seasonal color to your couch.
DIY a Candy Corn Hand-Knit Blanket
This is another fun hand-knitting project that focuses on color blocking.
What You’ll Need:
- Super-chunky chenille yarn in white, yellow, and orange.
- Scissors.
Step-by-Step Instructions:
- Start with White: Using the hand-knitting technique, start your blanket with the white yarn. Knit a block of white that is about one-third of the total length you want your blanket to be.
- Switch to Yellow: When your white section is done, it’s time to switch colors. Cut the white yarn, leaving a 6-inch tail. Tie the end of your yellow yarn to the white yarn tail with a tight double knot.
- Knit the Middle: Continue hand-knitting with the yellow yarn. The color will change right where you tied the knot. Make the yellow stripe about the same size as the white stripe.
- Switch to Orange: Repeat the process. Cut the yellow yarn and tie on the orange yarn.
- Finish the Blanket: Knit with the orange yarn until the blanket is the length you want. Finish it off by casting off the last row and tying a knot.
- Hide the Knots: Weave in the yarn tails from your knots to hide them within the stitches. Now you have a sweet treat of a blanket!
20. Vintage Halloween Postcard Pillow

Send some spooky greetings with this clever postcard pillow. The design beautifully imitates a piece of mail from a bygone era, complete with a faded postmark and a spot for a message. The artwork itself is charmingly retro.
A black cat and its witchy kitten sit on a crescent moon, surrounded by jack-o’-lanterns. It’s a nostalgic and detailed piece that evokes the feeling of Halloweens past. The rectangular shape enhances the postcard illusion, making it a unique and thoughtful decoration.
DIY a Fabric Postcard Pillow
This is another great project for iron-on transfer paper.
What You’ll Need:
- A plain, light-colored rectangular pillowcase.
- Iron-on transfer paper.
- A computer and printer.
- Scissors.
- An iron.
Step-by-Step Instructions:
- Design Your Postcard: On your computer, use a simple program like Word or Paint to design a postcard. Find a vintage Halloween picture online that you like. Place it on the left side. On the right side, type “To:” and “From:”. You can also add a vertical line down the middle. Find an image of a vintage stamp and put it in the top right corner.
- Mirror and Print: Before you print, you must flip the entire design horizontally so it’s a mirror image. Then, print it onto your iron-on transfer paper.
- Cut and Position: Cut out the rectangular postcard design. Place it face-down onto your pillowcase where you want it to be.
- Iron It On: With help from an adult, use a hot iron to press the design onto the fabric. Follow the directions that came with your transfer paper.
- Peel Carefully: Let it cool down completely. This is very important for a clean transfer. Once it’s cool to the touch, slowly peel off the paper backing.
- Display Your Mail: Your vintage postcard design should now be on your pillowcase. Stuff it with a pillow insert, and you’re ready to deliver some spooky cheer.
21. Gothic Damask Ghost & Skull Throw

This woven throw is elegance with an edge. At first glance, it looks like a classic, fancy damask pattern. But look closer, and you’ll find spooky surprises hidden in the design. Little ghosts float among the swirls, and grinning skulls peek out from the centers of the flowers.
The detailed, two-tone grey and black pattern is sophisticated and subtle. The thick fringe and braided tassels add a bit of extra texture and weight. This is a great choice for someone who wants their Halloween decor to be a little more grown-up and mysterious.
DIY Your Own Spooky Stenciled Blanket
Use stencils to add a hidden spooky layer to a plain patterned blanket.
What You’ll Need:
- A blanket with a simple, repeating pattern (like stripes or plaid).
- Fabric paint in a color that will show up on your blanket.
- Stencils of small, simple Halloween shapes (ghosts, bats, skulls).
- A stencil brush or a small sponge.
- Painter’s tape.
- A paper plate.
Step-by-Step Instructions:
- Prepare Your Blanket: Lay your blanket out flat on a protected surface.
- Position Your Stencil: Pick a spot inside one of the pattern’s shapes. Place your ghost or skull stencil down and use painter’s tape to hold it in place.
- Get Your Paint Ready: Squeeze a small amount of fabric paint onto a paper plate. Dab your stencil brush or sponge into the paint, then dab most of it off onto a clean part of the plate. You want the brush to be almost dry.
- Stencil the Shape: Gently dab the brush over the stencil, from the edges inward. A light, pouncing motion works better than a brushing one. This helps prevent paint from seeping under the stencil.
- Reveal and Repeat: Carefully lift your stencil. You should have a crisp shape on your blanket. Let it dry a bit, then move your stencil to another spot and repeat the process. You can hide little spooky shapes all over your blanket.
- Set the Paint: Let the paint dry completely. Ask a grown-up to help you heat-set it with an iron if the paint’s instructions require it.
22. Lunar Phases Lumbar Pillow

Bring the magic of the night sky to your bedroom or sofa with this beautiful lunar pillow. The long, rectangular shape is great for supporting your back. It features the full cycle of the moon, from a sliver of a crescent to a bright full moon and back again.
The creamy white felt moons stand out against the dark grey fabric. The simple, clean design is modern and peaceful. It’s a stylish piece that works all year round, but feels especially fitting during the enchanting nights of October.
DIY a No-Sew Moon Phase Pillow
This is an easy and fun felt project with no sewing required.
What You’ll Need:
- A plain, dark-colored rectangular pillowcase and insert.
- A sheet of white or cream-colored felt.
- Fabric glue.
- Scissors.
- A few different-sized circular objects to trace (like a cup, a lid, and a small bowl).
- A pencil.
Step-by-Step Instructions:
- Trace Your Full Moon: Place the largest circular object (the bowl) on your felt and trace around it. This will be your full moon.
- Create the Other Phases: Now use your other circular objects to create the other shapes. To make a crescent moon, trace a circle, then move the tracer slightly and trace again to create a crescent shape. Make two of each different phase.
- Cut Them All Out: Carefully cut out all your felt moon shapes. You should have one full moon, and pairs of the other phases (gibbous, half, and crescent).
- Arrange the Cycle: Lay your pillowcase flat. Place your felt full moon in the very center.
- Create the Waxing and Waning: Arrange the other phases on either side of the full moon, making sure they are mirror images of each other. The moons should get smaller and smaller as they move away from the center.
- Glue Everything Down: Once you’re happy with the layout, carefully glue each felt piece onto the pillowcase. Let it dry completely before you put the pillow insert inside.
23. Sanderson Sisters Spellbook Throw

“Amuck, amuck, amuck!” This blanket is a must-have for any fan of the movie Hocus Pocus. It looks like a page from a witch’s spellbook, featuring famous quotes and names associated with the mischievous Sanderson Sisters.
The mix of fun, spooky fonts against the starry black background is eye-catching and fun. It’s made of soft fleece, making it great for snuggling up on the couch for a Halloween movie marathon. This is a blanket that is sure to put a spell on you.
DIY a Movie Quote Blanket
Use fabric markers to write your favorite spooky movie quotes on a plain blanket.
What You’ll Need:
- A plain, solid-colored blanket.
- Fabric markers in a contrasting color (like white or silver for a black blanket).
- A piece of cardboard to put underneath.
- A pencil or chalk (optional).
Step-by-Step Instructions:
- Choose Your Quotes: Pick a few of your favorite short quotes from a Halloween movie. “I’m a ghost with the most, babe.” or “Whatever you do, don’t fall asleep.” are fun ones.
- Plan Your Layout: Lay your blanket flat. Think about where you want to write your quotes. You can write them in straight lines or make them swirl around.
- Practice Your Writing: It’s a good idea to practice writing the quotes on a piece of paper first. Try writing them in a spooky or cool-looking font.
- Write on the Blanket: If you want, you can lightly write the words with chalk first to make sure your spacing is right. Then, carefully trace over them with your fabric marker. Or, if you’re feeling brave, you can write directly with the marker.
- Add Some Doodles: You can add little stars, bats, or swirl designs around your words to fill in the space.
- Let it Dry and Set: Let the marker ink dry completely. Have an adult help you heat-set the ink with an iron if needed. Now you’re ready to get cozy with your favorite movie lines.
24. Glow-in-the-Dark “BOO” Pillow

Simple, spooky, and so much fun. This soft, dark grey pillow has one simple job: to surprise you in the dark! The plush, fleece-like material is wonderfully cozy for daytime naps.
But the real magic happens when you turn out the lights. The raised, puffy letters spelling “BOO” are made from a special material that glows with an eerie green light. It’s a playful and classic Halloween decoration that is sure to get a fun reaction.
DIY a Glowing Message Pillow
Use glow-in-the-dark paint to make your own surprise pillow.
What You’ll Need:
- A plain, dark-colored pillowcase.
- Glow-in-the-dark puffy fabric paint.
- Large stencils for the letters B and O.
- Tape.
- A piece of cardboard.
Step-by-Step Instructions:
- Set Up Your Pillow: Iron your pillowcase so it’s smooth. Slide the cardboard inside to protect the other side from paint.
- Position the Stencils: Place your letter stencils in the center of the pillowcase to spell out “BOO.” Use tape to hold them down securely.
- Apply the Paint: Squeeze the puffy paint to fill in the stencils. Try to make a thick, even layer of paint. The thicker the paint, the brighter it will glow.
- Remove Stencils: Carefully lift the stencils straight up to avoid smudging the paint.
- Let It Dry: Puffy paint needs a lot of time to dry. Let the pillowcase lie flat for at least 24 hours, or until the paint is completely hard.
- Charge and Glow: Once it’s dry, “charge” your pillow by holding it under a bright light for a few minutes. Then, take it into a dark room and watch your spooky message appear!
25. Minimalist Knit Ghost Pillow

Sometimes, the simplest things are the cutest. This ghost pillow is all about clean lines and cozy texture. Its simple, friendly ghost shape is instantly recognizable, and the soft, knit material makes it feel like a favorite sweater.
With no extra frills or decorations, this pillow fits beautifully into a modern or minimalist home. Its charm comes from its shape and the comforting feel of the knit. It is a sweet, gentle spirit that adds a touch of Halloween whimsy without being loud.
DIY a Sweater Ghost Pillow
Upcycle an old sweater to make this simple and soft ghost friend.
What You’ll Need:
- An old white or cream-colored sweater you don’t wear anymore.
- Pillow stuffing.
- A needle and white thread.
- Black embroidery thread.
- Scissors.
- A marker.
Step-by-Step Instructions:
- Prepare the Sweater: Lay the sweater flat. You’ll be using the main body part of it.
- Draw the Shape: On the front of the sweater, use a marker to draw a simple ghost shape. Make it nice and big.
- Cut It Out: Cut through both the front and back of the sweater at the same time, following the ghost shape you drew. You should now have two identical ghost pieces.
- Sew the Face: On one of the ghost pieces, use the black embroidery thread to sew on a simple face. You can make three ovals for the eyes and mouth, or simple cross-stitches. Ask a grown-up for help if you’re new to sewing.
- Stitch It Together: Place the two ghost pieces together with the face on the inside. Using a simple stitch, sew all the way around the edge of the ghost, leaving a small opening at the bottom.
- Turn and Stuff: Turn the ghost right-side out through the opening. Now the face should be on the outside and the seams on the inside. Push pillow stuffing into the opening until your ghost is plump.
- Close It Up: Neatly fold in the edges of the opening and sew it shut with a few hidden stitches. Your cozy sweater ghost is ready for hugs.
26. Autumn Plaid Sherpa Throw

Nothing says “fall” quite like a classic plaid pattern. This super-soft blanket features a beautiful plaid in warm, earthy tones of orange, brown, and red. It makes you think of pumpkin patches and hayrides.
The top side is a smooth, velvety fleece, while the reverse is a thick, fluffy white sherpa for extra warmth and comfort. The crisp white edge frames the blanket nicely. This is a timeless and versatile throw that will keep you cozy from the first crisp day of autumn through the cold winter months.
DIY a No-Sew Plaid-Edged Blanket
Add a cozy plaid border to a plain fleece blanket.
What You’ll Need:
- A solid-colored fleece blanket (cream, brown, or orange would be nice).
- A long strip of plaid fleece fabric, about 6 inches wide.
- Fabric glue or iron-on hem tape.
- Scissors.
- A ruler.
Step-by-Step Instructions:
- Measure Your Blanket: Measure all four sides of your main blanket and add the numbers together. This is the total length of plaid fabric you’ll need.
- Cut Your Strips: Cut your plaid fleece into four strips that match the lengths of the four sides of your blanket. Make sure all the strips are the same width (about 6 inches).
- Attach the Border: Lay your main blanket flat. Take one of your plaid strips and fold it in half lengthwise, like a hot dog bun. “Sandwich” the edge of the blanket inside this fold.
- Glue It Down: Open the fold. Squeeze a line of fabric glue along both inside edges of the plaid strip. Carefully press it back over the edge of the blanket, making sure it’s straight. Do this for all four sides. If you’re using hem tape, have an adult help you iron it in place.
- Let it Dry: Let the glue dry completely. Now your plain blanket has a beautiful, cozy plaid border to give it that extra touch of fall style.
27. Velvet Pumpkin Tufted Pillows

These pillows are a chic and clever nod to the season’s most famous gourd. Their round shape and deep, vertical pleats look just like a plump pumpkin. The button tuft in the center completes the illusion.
Made from soft, corduroy-like velvet, they have a beautiful texture and a slight sheen. The rich, autumnal colors of burnt orange and cream are warm and inviting. These are a stylish and sophisticated way to bring a touch of the pumpkin patch indoors.
DIY Your Own Tufted Pumpkin Pillow
This project involves a bit of sewing but the result is amazing.
What You’ll Need:
- A large circle of velvet or fleece fabric (about 24 inches across).
- Pillow stuffing.
- A very long needle (called a doll needle or upholstery needle).
- Strong thread or embroidery floss that matches your fabric.
- A covered button kit (optional, or just use a regular button).
- A regular needle and thread.
Step-by-Step Instructions:
- Sew a Pouch: Using a regular needle and thread, sew a loose running stitch all the way around the very edge of your fabric circle. Don’t knot the end!
- Stuff It: Gently pull both ends of the thread to start closing the circle, like a drawstring bag. Before it closes all the way, start pushing lots of pillow stuffing inside. Make it really full and round.
- Close the Bag: Once it’s stuffed, pull the threads tight to close the opening and tie a very secure knot. You should now have a fabric ball.
- Create the Pumpkin Shape: This is the fun part. Thread your long upholstery needle with a very long piece of your strong thread. Push the needle straight through the center of your ball, from the gathered part at the top all the way through to the bottom.
- Wrap and Pull: Pull the needle out, but leave a tail of thread at the top. Now, wrap the thread around the outside of the ball and back to the top, and push the needle through the center again. Pull the thread tight. This will create the first pumpkin groove.
- Repeat: Keep doing this—wrapping the thread around the outside and pulling it tight through the center—to create all the pumpkin sections. Tie a secure knot at the end.
- Add a Button: To cover the messy part in the middle, you can sew a button in the center on the top and bottom. Your beautiful pumpkin pillow is ready!
28. Earthy Checkered Tassel Throw

This blanket blends modern style with rustic charm. The checkered or gingham pattern uses a warm and soothing palette of brown, tan, orange, and cream. The colors feel grounded and natural, like a walk in the woods on a sunny autumn day.
The blanket itself has a soft, brushed feel, making it nice and cozy. The chunky, knotted tassels at the corners add a handmade, bohemian touch. This is a stylish throw that feels both contemporary and timeless.
DIY a No-Sew Checkered Blanket
Use fabric glue and felt squares to create a simple checkered pattern.
What You’ll Need:
- A plain, solid-colored fleece blanket in a light color like cream or tan.
- Several sheets of felt in different fall colors (brown, orange, gold).
- Fabric glue.
- Scissors.
- A ruler and a pencil.
Step-by-Step Instructions:
- Cut Your Squares: Using your ruler, measure and cut lots of identical squares from your different colored felt sheets. 3×3 inches is a good size to work with.
- Plan Your Pattern: Lay your blanket flat. Start placing your felt squares on the blanket in a checkered pattern. You can make a simple two-color pattern, or a more random one with all your different colors.
- Create a Guide: To keep your lines straight, you can lay down a yardstick or a piece of painter’s tape to be your guide for the first row.
- Glue Them Down: Once you have a row planned out, start gluing. Pick up one square at a time, put a thin layer of fabric glue on the back, and press it firmly onto the blanket.
- Keep Going: Continue this process, row by row, until you’ve covered your whole blanket or made a large checkered section in the middle.
- Let it Dry: Let the glue dry completely before you use your new, custom-made checkered blanket.
29. Haunted Library Bookshelf Pillow

For the book lover with a spooky side, this pillow is a treasure. It’s designed to look like a shelf of old, leather-bound books. But these aren’t just any books; they have creepy, clever titles like “Ghoulish Tales,” “Gray’s Anatomy” (with a skull!), and “Poe’s Poems.”
The long, rectangular shape is perfect for a sofa or bed. The detailed, realistic print makes you want to reach out and pull a book off the shelf. It’s a witty and imaginative decoration that is sure to be a conversation starter.
DIY a Spooky Book Pillow
This is another fantastic use for iron-on transfer paper and a computer.
What You’ll Need:
- A plain rectangular pillowcase (lumbar shape).
- Iron-on transfer paper.
- A computer and printer.
- An iron.
- Scissors.
Step-by-Step Instructions:
- Find Your Images: Search online for “vintage book spine images.” Find several different ones that you like.
- Design Your Bookshelf: On your computer, arrange the book spine images side-by-side to create a row of books.
- Add Spooky Titles: Use a simple photo editor to add new, spooky titles to the book spines. You can get creative! “A Ghostly Guide,” “Vampire Stories,” or “101 Potions” are fun ideas.
- Mirror and Print: Make sure your final design will fit on your pillowcase. Now, flip the whole image horizontally so it’s a mirror image. Print it onto your iron-on transfer paper.
- Iron it On: Carefully cut out your printed design. With an adult’s help, iron it onto your pillowcase, following the paper’s instructions. Press firmly and evenly.
- Peel and Read: Let it cool down completely, then peel off the paper backing. Your library of spooky stories is now ready to be displayed on your couch.
30. Festive Sugar Skull Pillow

Celebrate the season with this vibrant and beautiful sugar skull pillow. Inspired by the traditions of Día de los Muertos, this pillow is bursting with joyful color and intricate detail. The bright floral and swirl patterns are beautifully embroidered, giving the cushion a rich, touchable texture.
The unique, skull-shaped design makes it a true statement piece. This is not a scary skull, but a happy one. It brings a festive and artistic energy to its surroundings, celebrating life and memory in a colorful way.
DIY Your Own Colorful Skull Pillow
Use fabric markers to design your own sugar skull.
What You’ll Need:
- Two pieces of white or off-white felt or cotton fabric.
- Pillow stuffing.
- Fabric markers in lots of bright colors.
- Fabric glue or a needle and thread.
- Scissors.
- A pencil.
Step-by-Step Instructions:
- Make the Skull Shape: Place your two pieces of white fabric together. On the top piece, draw a simple, friendly skull shape. Think of a circle with a jaw shape at the bottom.
- Cut it Out: Cut out the skull shape through both layers of fabric.
- Draw the Face: Take one of the skull pieces. Use a pencil to lightly draw on two big circles for eyes, an upside-down heart for the nose, and a line with vertical stitches for the mouth.
- Decorate!: Now, get creative with your fabric markers! Draw flower petals around the eyes. Add swirls, dots, and wavy lines on the forehead and cheeks. Use as many bright colors as you can. Fill in the different shapes. There’s no wrong way to do it!
- Assemble the Pillow: Lay the plain skull piece down. If you’re using glue, squeeze it around the edges, leaving an opening. If you’re sewing, stitch around the edge. Place the decorated piece on top (face-side up if gluing, face-side down if sewing) and press together.
- Stuff and Finish: Let the glue dry. If you sewed it, turn it right-side out. Push stuffing inside until it’s nice and full. Glue or sew the opening shut. Your colorful and festive skull pillow is finished!
31. Swirling Bat Colony Velvet Throw

This is a truly mesmerizing piece. A vortex of countless tiny bats swirls across the fabric, creating a hypnotic and dizzying pattern. The design is both spooky and strangely beautiful, capturing the chaotic energy of a bat colony taking flight at dusk.
The material appears to be a sheer or burnout velvet, which gives the pattern a wonderful texture and depth. It’s an artistic and dramatic throw that makes a powerful statement.
DIY a Bat Swarm Stamped Blanket
You can create a similar swirling pattern using a simple stamp.
What You’ll Need:
- A plain, solid-colored blanket.
- Black fabric paint.
- A small bat-shaped rubber stamp (you can find these at craft stores or make one out of a potato).
- A paper plate.
- A piece of cardboard to protect your work surface.
Step-by-Step Instructions:
- Get Ready to Stamp: Lay your blanket flat over the cardboard. Squeeze some black fabric paint onto your paper plate.
- Start in the Center: Dip your bat stamp into the paint, making sure it’s evenly coated. Press it down firmly in the center of your blanket.
- Create the Swirl: Begin stamping more bats in a circular, swirling pattern, starting from the center and working your way out.
- Vary the Direction: As you stamp, turn the stamp in your hand a little each time. This will make the bats look like they are all flying in different directions, creating that chaotic, swirling look.
- Fill it In: Continue stamping until you have a dense swarm of bats. You can make the swarm fade out towards the edges of the blanket by stamping less and less.
- Dry and Set: Let the paint dry completely. Ask a grown-up to help you heat-set the paint with an iron if the instructions on the bottle say to.
32. Haunted Cemetery Gate Fleece Throw

This blanket sets a wonderfully spooky and atmospheric scene. The black and white photograph of ornate, wrought iron cemetery gates is moody and dramatic. You can almost feel the chill in the air and see the mist swirling behind the bars.
It’s a great way to add a touch of gothic horror to your decor. This soft fleece throw is perfect for wrapping up in while telling ghost stories or watching a classic black and white monster movie.
DIY Your Own Spooky Photo Blanket
Put your favorite spooky photo on a blanket with this simple project.
What You’ll Need:
- A plain, light-colored fleece throw.
- Iron-on transfer paper for light fabrics (you might need a few sheets).
- A computer and printer.
- A spooky, high-resolution photo you like (search for “public domain cemetery photos”).
- An iron.
- Scissors.
Step-by-Step Instructions:
- Prepare Your Image: Find a spooky photo you love. It works best if it’s a simple, bold image. On your computer, make sure to mirror the image (flip it horizontally). This is the most important step!
- Print it Out: Print your mirrored image onto the iron-on transfer paper. If your image is bigger than one sheet, you can print it in sections.
- Cut and Arrange: Carefully cut out your printed image. If you printed it in sections, trim the edges so they will line up perfectly.
- Iron it On: Ask an adult to help you with the iron. Place your blanket on a hard, flat surface. Arrange your transfer paper image face-down on the blanket.
- Press and Transfer: Following the instructions on the paper, press the hot iron firmly all over the design. Make sure to get the edges and corners.
- The Big Reveal: Let the paper cool down completely. Once it is cool, slowly and carefully peel the paper backing off. Your spooky scene is now a cozy blanket!
33. Fuzzy One-Eyed Monster Pal

This little monster is more cuddly than creepy. Its bright, friendly colors and super-soft, fuzzy texture make it an irresistible friend for the Halloween season. The single, big eye gives it a curious and slightly goofy personality.
With its plump, round body, little horns, and mismatched arms, this pillow is full of playful charm. It’s a wonderful, not-so-scary addition to a child’s room or for anyone who loves cute and quirky monsters.
DIY Your Own Cuddly Monster Pillow
Create a monster friend from colorful fleece.
What You’ll Need:
- Two large pieces of fleece in a main color (like purple).
- Scraps of fleece in other bright colors for the arms and horns.
- A piece of white felt and a piece of black felt for the eye.
- Pillow stuffing.
- Fabric glue.
- Scissors.
Step-by-Step Instructions:
- Make the Body: Place your two large pieces of purple fleece together. Cut out a big, round, slightly lumpy circle shape. This will be the monster’s body.
- Cut Out the Limbs: From your other fleece colors, cut out two arm shapes and two small triangle horn shapes. They don’t have to be perfect!
- Make the Eye: Cut a large circle from the white felt and a smaller circle from the black felt. Glue the black circle onto the center of the white one to make the eye.
- Assemble the Front: Take one of your purple body pieces. Glue the big eye right in the middle.
- Glue it Together: Lay the plain purple body piece on your work surface. Arrange the arms and horns around the edges so they are pointing inward, toward the center of the body. Squeeze fabric glue all around the edge of this piece.
- Seal and Stuff: Place the monster’s face piece on top and press the edges together. Leave a small opening at the bottom. Let the glue dry, then turn your monster right-side out. The arms and horns should pop out! Push stuffing inside until your monster is plump, then glue the opening shut.
34. Country Pumpkin Patchwork Quilt

This blanket feels like a warm hug from grandma. The classic patchwork design uses a cozy palette of fall colors like olive green, burnt orange, plaid, and gold. Appliqued pumpkins are scattered across the squares, making it a celebration of the harvest season.
The quilted texture and soft sherpa backing make it extra cozy. This is a timeless piece with a lot of rustic, country charm. It’s the kind of blanket that becomes a family favorite to be brought out year after year.
DIY a No-Sew Patchwork Blanket
Get the patchwork look without any sewing.
What You’ll Need:
- A plain fleece blanket to use as the base.
- Lots of fabric squares in different fall colors and patterns (you can buy pre-cut squares or cut up old clothes).
- Fabric glue or iron-on hem tape.
- A few pumpkin-shaped felt cutouts.
- Scissors and a ruler.
Step-by-Step Instructions:
- Plan Your Quilt: Lay your fleece base blanket flat. Arrange your fabric squares on top in a grid pattern. Mix up the colors and patterns so it looks interesting.
- Start Gluing: Once you’re happy with the layout, start gluing the squares down one by one. Use fabric glue around the edges of each square and press it firmly onto the base blanket.
- Keep the Lines Straight: Try to keep your rows and columns as straight as possible. You can leave a little gap between the squares to create a grid look.
- Add the Pumpkins: Decide which squares you want to decorate. Glue your felt pumpkin shapes onto the center of a few of the fabric squares.
- Let it Dry: Let the entire blanket lie flat until all the glue is completely dry.
- Optional Edge: For a finished look, you can fold the edges of the base blanket over the front by about an inch and glue them down to create a simple border.
35. Reversible Sequin Trick-or-Treat Pillow

Add some interactive sparkle to your Halloween decor. This pillow is covered in reversible sequins that are black on one side and a brilliant Halloween orange on the other. You can “draw” on the pillow with your finger to reveal the color underneath.
The words “Trick or Treat” are spelled out, but you can change the look with a simple swipe of your hand. It’s a fun, glamorous, and wonderfully fidgety piece of decor that everyone will want to play with.
DIY a Glittering Halloween Message Pillow
While reversible sequins are tricky, you can get a similar sparkly effect with glitter.
What You’ll Need:
- A plain black pillowcase.
- Fabric glue that dries clear.
- Loose glitter in a bright orange color.
- Letter stencils to spell “TRICK OR TREAT.”
- Tape.
- A piece of cardboard and a paper plate.
Step-by-Step Instructions:
- Set Up: Place the cardboard inside your pillowcase. Lay the pillowcase flat.
- Position Your Stencils: Arrange your letter stencils on the pillowcase to spell out your message. Use tape to hold them in place.
- Apply the Glue: Using a small brush or your finger, spread a thin, even layer of fabric glue inside each letter stencil. Make sure you cover the whole area.
- Add the Glitter: Before the glue dries, generously sprinkle the orange glitter all over the glued areas. Don’t be shy! Cover the letters completely.
- Let it Sit: Let the glue and glitter sit for about 10-15 minutes.
- The Reveal: Carefully lift the stencils off. Then, take your pillowcase and gently shake the excess glitter off onto a paper plate (you can save it for another project). Let the glue dry completely, and you’ll have a super sparkly, dazzling Halloween pillow.
36. Mystic Wolf Faux Fur Throw

Unleash your wild side with this luxurious faux fur blanket. The thick, plush fur has a beautiful mix of natural colors—grey, brown, and black—that mimics the coat of a wild wolf or husky. It looks incredibly soft and warm.
The blanket is backed with a solid, soft green fabric, providing a nice contrast. This is a wonderfully cozy and slightly untamed throw for anyone who feels a connection to the wild woods, especially on a spooky, full-moon night.
DIY a Simple Faux Fur Blanket
This project requires just one simple line of sewing.
What You’ll Need:
- A piece of faux fur fabric (as big as you want your blanket).
- An equally sized piece of soft fleece or flannel for the backing.
- Fabric pins.
- A sewing machine or a needle and thread.
- Scissors.
Step-by-Step Instructions:
- Lay Out Your Fabric: Place your two pieces of fabric on top of each other with the pretty sides (the fur side and the soft side of the fleece) facing each other.
- Pin the Edges: Carefully line up the edges and pin them together all the way around. Faux fur can be slippery, so use plenty of pins.
- Sew Almost All the Way: Ask a grown-up for help with the sewing machine. Sew around all four sides of the blanket, about half an inch from the edge. But remember to leave a big opening on one side, large enough to fit your arm through.
- Trim the Corners: Snip the very tip of each corner off, being careful not to cut your stitches. This helps make the corners look neat when you turn it.
- Turn it Right-Side Out: Reach into the hole and pull the blanket through. The fur and the fleece should now be on the outside. Gently poke out the corners.
- Close the Hole: Neatly fold the raw edges of the opening inward and pin them together. You can close this final gap with a few careful, hidden hand stitches. Now go enjoy your incredibly soft and wild new blanket!
37. Embroidered Celestial Constellation Pillow

This pillow is a map to the magical night sky. The beautiful, detailed embroidery creates a stunning scene on the deep blue fabric. A decorated crescent moon is surrounded by famous constellations, with their names stitched right beside them.
The golden tassels at the corners add a final touch of luxury. This is an elegant and educational piece that celebrates the beauty of the cosmos. It’s a wonderful decoration for anyone who loves stargazing, astrology, or the quiet magic of a clear autumn night.
DIY a Star Map Pillow
Use a fabric marker to draw your own starry sky.
What You’ll Need:
- A plain navy blue or black rectangular pillowcase.
- A white or metallic gold fine-tipped fabric paint pen.
- A piece of cardboard.
- Chalk.
- A ruler (optional).
Step-by-Step Instructions:
- Prepare your Pillowcase: Iron the pillowcase and slide the cardboard inside.
- Draw a Moon: Use chalk to lightly draw a large crescent moon on one side of the pillowcase.
- Find a Constellation: Look up a picture of a simple constellation you like, such as the Big Dipper or Orion.
- Mark the Stars: Looking at the picture, use your chalk to make small dots on your pillowcase where the main stars of the constellation should go.
- Connect the Dots: Now, use your fabric paint pen to carefully connect the dots, drawing the lines of the constellation. You can also trace over your crescent moon.
- Add More Stars: Fill in the empty space around your main drawing with lots of little dots and starburst shapes to create a whole galaxy. You can even write the name of your constellation. Let the paint dry, set it with an iron if needed, and your cosmic pillow is ready for dreaming.
From the soft glow of a “BOO” pillow to the elegant swirl of a bat-printed throw, we’ve journeyed through 37 ways to infuse your home with cozy Halloween charm. We hope this collection has sparked your imagination and given you plenty of inspiration to make your space feel warm, inviting, and wonderfully spooky this season.
Remember, Halloween decor doesn’t have to be garish or over-the-top. It can be a beautiful blend of autumnal comfort and playful, mysterious accents. Whether you choose to go all out with a haunted library theme or simply add a few plush pumpkin pillows, the goal is to create a space that feels uniquely yours.
So, go ahead and embrace the magic of the season. Snuggle up under a festive blanket, light a candle, and enjoy the enchanting atmosphere you’ve created. Happy decorating, and may your Halloween be filled with warmth, wonder, and just the right amount of fright!
Key Takeaways
- Embrace Textures: Velvet, faux fur, chunky knits, and soft fleece are your best friends for creating a cozy atmosphere. Layer them generously for maximum comfort.
- Mix Spooky with Subtle: Halloween decor can be sophisticated. Look for pieces that blend classic patterns (like plaid or damask) with hidden spooky elements (ghosts, bats, skulls) for an elegant touch.
- Don’t Forget DIY: Many unique and personalized decorations can be created with simple crafts like fabric markers, iron-on transfers, and no-sew techniques. Get creative!
- Warm Color Palettes: While black and orange are classic, incorporate earthy fall tones like deep reds, golden yellows, olive greens, and rich browns to enhance the cozy autumn vibe.
- Lighting is Key: Consider glow-in-the-dark elements, soft lamps, and candles to create a mysterious and inviting ambiance, perfect for spooky nights.
- Personalize Your Space: From monogrammed pillows to custom quotes, add your unique touch to make your Halloween decor feel special and truly your own.