When the air turns crisp and shadows grow long, you know Halloween is creeping near. It’s a time for costumes, candy, and creating a delightfully spooky atmosphere right in your own home. While cobwebs on the porch and jack-o’-lanterns on the steps are classic touches, the true heart of any celebration is the feast.

Transforming your dining table is the ultimate way to immerse your guests in the spirit of the season. A well-designed tablescape turns a simple meal into a memorable, theatrical experience. It sets the stage for storytelling, laughter, and maybe even a few ghostly encounters.
Forget generic decorations. We have gathered 40 unique, themed ideas that range from the elegantly eerie to the playfully monstrous. Better yet, each one comes with simple, step-by-step DIY instructions designed for any skill level. Get ready to create a haunting feast that your guests will never forget.
1. Call of Cthulhu Feast

This table setting plunges your guests into a deep-sea mystery. An eerie glow illuminates the dark tablescape, hinting at ancient secrets from forgotten worlds. The scene is dominated by shades of deep black and royal purple, creating a feeling of forbidden luxury. Every detail contributes to the unsettling atmosphere.
Tentacles and mysterious symbols adorn the place settings, pulling visitors deeper into the theme. Black candles stand tall, their flames flickering like lone lights in an abyss. A smoking cauldron at the center promises a magical, perhaps menacing, main course. This setup transforms a simple dinner into a narrative experience from a classic horror tale.
DIY Instructions: Create Your Own Sunken City
Let’s build this spooky underwater world. It’s like making a movie set on your table!
Step 1: Dress the Table First, find a dark black tablecloth. Think of it as the deep, dark ocean floor. Now, lay a teal or bright blue-green runner down the middle. This is like a mysterious path leading to the treasure… or the monster!
Step 2: The Mighty Monster Centerpiece Every spooky sea needs a monster. Find a cool-looking octopus or monster statue to place right in the center. This will be the star of your table. Place a simple black bowl right in front of it.
Step 3: Make a Spooky Fog (Get a Grown-Up’s Help!) This is the fun part. Ask a grown-up to put a few small pieces of dry ice into the bowl. Then, they can pour a little warm water in. Watch the fog bubble and spill over the table! Remember, only adults should handle dry ice, and they must wear thick gloves because it’s super cold.
Step 4: Add an Eerie Glow Get some plastic skulls from a party store. Paint them with green glow-in-the-dark paint. Once they’re dry, place them around your monster centerpiece and along the runner. Turn off the lights to see them glow!
Step 5: Set the Spooky Plates Use black plates and black cups. Place a folded purple napkin on each plate. Now for the coolest part: the napkin rings.
Step 6: Craft Some Tentacle Napkin Rings Take some black or purple modeling clay. Roll a piece into a long, skinny snake shape. Make one end a little fatter than the other. Gently wrap the clay snake around your finger to make a ring shape. Now, carefully curl the skinny end to look like a tentacle. You can even use the tip of a pencil to poke little dots on it for suckers. Let the clay air-dry until it’s hard. Then, you can slip your purple napkins through them!
Step 7: Light It Up Finally, add some tall black candles in holders around the table. Ask an adult to light them when your guests arrive to complete the spooky scene.
2. Sunken Siren’s Grotto

Invite guests to a dinner party beneath the waves, where treasure and terror mingle. This tablescape uses shades of ocean blue and seafoam green to create a mysterious underwater world. A fishing net runner is strewn with bits of driftwood and moss, as if washed ashore from a shipwreck.
The centerpiece is a fishbowl holding a skeletal secret, lit by the gentle flicker of candlelight. Each guest finds their seat marked by their name on a smooth, grey stone. It’s a beautiful yet haunting scene, suggesting a long-lost feast attended by phantom pirates or ghostly mermaids.
DIY Instructions: Make a Mermaid’s Grave
Let’s create this spooky underwater scene. It’s like building an aquarium on your table!
Step 1: Lay the Ocean Floor Cover your table with a bright blue or turquoise tablecloth. This is the base of your ocean.
Step 2: Add the Shipwrecked Runner Drape a fishing net down the center of the table. Arrange some small pieces of driftwood and clumps of green moss along the net.
Step 3: Create the Sunken Treasure Centerpiece Get a big, round fishbowl. Pour a layer of sand or small gravel on the bottom. Stick a plastic skeleton hand into the sand so it looks like it’s reaching out. Add a few plastic aquarium plants around it. Slowly fill the bowl with water. For an extra spooky touch, an adult can add one drop of blue or green food coloring to the water.
Step 4: Set the Seafloor Plates Use blue or green plates. Place a folded green napkin on each one.
Step 5: Write on Stone Place Cards Find some smooth, flat, grey rocks. Wash and dry them. Use a white paint pen to write each guest’s name on a rock. Place one on each napkin.
Step 6: Light the Deep Sea Place some blue and green candles in simple glass holders along the net runner. Have an adult light them to make the whole table glow.
3. Graveyard Smash Banquet

Turn your dining table into a delightfully dreary graveyard. This setting features a centerpiece of crooked tombstones and a spooky, leafless tree, all set on a bed of dark moss. The entire scene is fenced in, creating a miniature cemetery for your guests to dine around.
Slate-grey plates and black goblets look like they were carved from ancient stone. Even the place cards are tiny tombstones, giving each guest their own funny final resting place. A few scattered autumn leaves complete this grimly playful tablescape.
DIY Instructions: Build a Mini Cemetery
Ready to play in the dirt without getting messy? Let’s build a tiny graveyard!
Step 1: Roll Out the Graveyard Grass Get a long runner made of fake moss or green turf from a craft store. Lay it down the middle of your table. This is your cemetery ground.
Step 2: Plant a Spooky Tree Find a cool, twisty branch in your yard. Spray paint it black. To make it stand up, stick the bottom end into a small block of green floral foam. Hide the foam block in the middle of your moss runner.
Step 3: Make the Tombstones Ask a grown-up to help you cut tombstone shapes out of a sheet of styrofoam. Paint them grey. When they are dry, use a black marker to write silly things on them, like “Here Lies John, Died of Laughter.” Poke the finished tombstones into the moss runner.
Step 4: Fence it In Use small sections of black miniature garden fencing (you can find this at a craft store) to create a border around your graveyard scene.
Step 5: Eerie Place Settings Use dark grey plates and black cups. Place a grey napkin on each plate. For the place cards, cut small tombstone shapes out of grey paper and write your guests’ names on them.
Step 6: Final Touches Scatter a few real or fake autumn leaves on the moss. Add a few battery-powered tea light candles for a spooky, flickering glow.
4. The Raven’s Perch

This table setting is inspired by dark poetry and feathered omens. A stark black and white color scheme creates an elegant but unsettling mood. The centerpiece features tall, black branches in vases, providing a perch for a flock of watchful black crows.
Black feathers are scattered across the white tablecloth like fallen secrets. Simple white plates rest on black chargers, and each napkin is tied with a black ribbon holding a single feather. The entire scene is minimalist yet full of dark atmosphere, making guests feel they are dining under the gaze of mysterious birds.
DIY Instructions: Host a Flock of Crows
Let’s make a table that’s spooky and super stylish, with some feathered friends.
Step 1: Set a Black and White Scene Use a white tablecloth. Lay a sheer, see-through black runner down the middle.
Step 2: Grow Your Spooky Trees Find two tall, clear vases. Go outside and find some nice, bare branches with lots of little twigs. Spray paint the branches completely black. Let them dry, then place them inside the vases.
Step 3: Invite the Crows Buy a few fake black crows from a Halloween or craft store. They usually have little wires on their feet. Use the wires to attach the crows to the branches in your vases so they look like they are sitting on them.
Step 4: Feathered Place Settings Place a large black plate (this is called a charger) down first. Then put a smaller white plate on top. Fold a white napkin and wrap a simple black ribbon around the middle. Before you tie the bow, tuck one single black feather into the ribbon.
Step 5: A Feather Finishing Scatter a few more black feathers along the black runner. Use tall, skinny black candles in simple holders for a dramatic look.
5. Creepy Carnival Concessions

Step right up and take a seat at the strangest show on Earth! This table uses bold black-and-white stripes and pops of carnival red to create a fun but unsettling circus theme. Familiar treats like popcorn and fries are served alongside jars of mysterious “specimens.”
Glass domes display creepy curiosities, like a skull resting on a bed of popcorn. Each guest gets their very own admission ticket to find their seat. This setting is playful and vibrant, mixing the joy of the carnival with the spooky feeling of a forgotten freak show.
DIY Instructions: Create a Spooky Big Top
Let’s build a creepy circus right on your dinner table!
Step 1: Set the Stage If you can, hang a backdrop of black-and-white striped fabric or wrapping paper on the wall behind the table. Use a white tablecloth and a striped runner.
Step 2: Display Your Freaky Finds The main decorations are glass domes called cloches. Put a plastic skull under one. For extra fun, put some popcorn under it first. Under another, you could place a creepy old doll or a large toy spider.
Step 3: Circus Place Settings Use bright red charger plates with smaller white plates on top. Fold a red napkin and place it on the plate.
Step 4: Make Ticket Place Cards You can find printable “Admit One” ticket templates online. Print them on cardstock. Write each guest’s name on a ticket. Prop one up at each place setting.
Step 5: Serve Spooky Snacks Get some red-and-white striped paper boxes and serve french fries or popcorn in them. Find some old glass jars. Fill one with water, a few drops of green food coloring, and some peeled grapes (for eyeballs!). Fill another with gummy worms. Make labels for your jars that say things like “Specimens.”
6. Sleepy Hollow Supper

This table brings the legend of the Headless Horseman to life with a rustic, haunted harvest theme. A tangled centerpiece of gnarled branches runs down the length of the table, looking like it was pulled from a spooky forest. Small lanterns and a carved pumpkin glow from within the branches.
Dark plates and mugs sit on a rough burlap runner, enhancing the outdoorsy feel. Each place setting features an apple and a name card made from aged paper, as if it were a note left in a hurry. Colorful autumn leaves are scattered everywhere, making it feel like a chase is about to begin.
DIY Instructions: A Headless Horseman’s Harvest
Let’s make a table that looks like it’s straight out of a spooky forest story.
Step 1: The Rustic Runner Instead of a fancy cloth, use a runner made of burlap. It looks like an old potato sack and gives a great farm-in-the-woods feeling.
Step 2: The Tangled Branch Centerpiece Go on a nature walk and collect a bunch of cool, twisty branches. Don’t worry about them being neat! Lay them down the middle of the burlap runner and tangle them all together.
Step 3: Add a Forest Glow Carve a spooky face in a medium-sized pumpkin and place it in the middle of your branches. Then, get a few small black lanterns. Put battery-powered candles inside them (never real ones near branches!) and tuck them in between the twigs.
Step 4: Set a Woodsman’s Table Use dark, heavy-looking plates and mugs, in black or dark grey. Use bright orange napkins to look like autumn leaves.
Step 5: Old-Fashioned Place Cards Get some tan or cream-colored paper. Ask a grown-up to help you very carefully singe the edges with a lighter to make the paper look old and burnt. Write a guest’s name on each piece of paper. Place a shiny red apple on top of the paper at each seat.
Step 6: The Final Leaf Fall Get a big handful of real or fake autumn leaves and scatter them all over the branches and the table.
7. Devil’s Delight Dinner

This table setting is a fiery invitation to a dinner in the underworld. A rich, black patterned tablecloth sets a dark and luxurious stage. The main feature is a glowing “river of lava” runner, made from sheer red fabric and fairy lights, that seems to flow down the table.
Black rocks are scattered along the lava’s edge, enhancing the volcanic effect. The place settings are just as devilish, with red napkins held by black horned rings. Tall red candles and gold silverware add a final touch of sinful elegance to this wonderfully wicked feast.
DIY Instructions: Cook Up a Lava Table
Time to turn up the heat! We’re going to make a table that looks like a volcano.
Step 1: The Underworld Base Use a black tablecloth. If you can find one with a fancy pattern, that’s even better!
Step 2: The Glowing Lava Runner Take a long string of orange or yellow fairy lights and lay it down the center of the table. Now, take a long piece of sheer red or orange fabric and lay it over the lights. Bunch and scrunch the fabric so it looks wavy, like flowing lava. When you plug in the lights, it will glow from the inside!
Step 3: Add Volcanic Rocks Find some smooth, round rocks from outside. Wash them and paint them solid black. Once they’re dry, place them along the sides of your glowing lava runner.
Step 4: A Devilish Place Setting Use black plates and bright red napkins. Use shiny gold silverware if you have it.
Step 5: Craft Devil Horn Napkin Rings Get some simple, plain black napkin rings. Take some black air-dry clay. Roll two small pieces into little cone shapes, like tiny horns. Gently press the flat bottom of the horns onto the top of a napkin ring. Let the clay dry completely. Now you have a devilish holder for your napkin!
Step 6: Add More Fire Use tall, skinny red candles in black holders to make the table look even more fiery.
8. Haunted Heirloom Banquet

Dine with the ghosts of the past at this elegantly eerie table. A delicate lace tablecloth sets the stage for a meal in a haunted mansion. The centerpiece is a tarnished silver candelabra, dripping with waxy tears from grey candles, and surrounded by dusty, faded flowers.
Old, creepy portraits in antique frames watch over the guests. The plates themselves are a fright, appearing to be touched by ghostly hands. Every detail, from the yellowed place cards to the vintage glassware, makes it feel as if the original owners of the house have just stepped away.
DIY Instructions: A Ghostly Dinner Party
Let’s set a table so spooky, it looks like ghosts might join you for dinner!
Step 1: The Dusty Tablecloth Start with a plain white tablecloth. Then, drape a lace tablecloth over it. The lace looks like old-fashioned cobwebs.
Step 2: The Drippy Candle Centerpiece Find a candelabra or a few old silver candlesticks. Put grey or white candles in them. Now for the fun part: ask a grown-up to light a candle and carefully tilt it, letting the melted wax drip all down the sides of the candlestick. Let the wax cool and harden. It will look like it’s been melting for 100 years! Add some fake flowers and spray them with a tiny bit of fake cobweb spray.
Step 3: Invite the Ghostly Family Search online for “creepy vintage portraits” and print out a few in black and white. Put them in old-looking picture frames and stand them up on the table.
Step 4: Ghost-Touched Plates You need clear glass plates for this trick. On a piece of paper, draw the shape of a hand. Place the clear plate on top of your drawing. Now, using black paint made for glass, trace the handprint onto the BOTTOM of the plate. Let it dry. When you set the table, the hand will look like it’s on top!
Step 5: Age Your Paper To make place cards, write guests’ names on small pieces of paper. Make some strong, dark tea and let it cool. Crumple up the paper, then flatten it out and use a paintbrush to “paint” it with the cold tea. As it dries, it will get stained and look very old.
9. Mummy’s Curse Menu

Unlock the secrets of the tomb with this ancient Egyptian-themed table. The colors of gold and black rule this royal setting, accented by the rich blue of the Nile. A golden sarcophagus and a pharaoh’s bust serve as a centerpiece, surrounded by sacred scarab beetles.
The table runner is covered in mysterious hieroglyphics. White napkins are held in golden, bejeweled rings, and guests drink from brilliant blue goblets. This feast is fit for a pharaoh, but beware—you might just awaken an ancient curse.
DIY Instructions: Dine Like a Pharaoh
Let’s travel back in time to build a table fit for an Egyptian king!
Step 1: The Hieroglyphic Runner Find a table runner that has Egyptian pictures or symbols on it. A plain black or gold one works too!
Step 2: The Pharaoh’s Treasure The centerpiece is the most important part. You can buy a plastic golden pharaoh mask and a small sarcophagus from a party or Halloween store. Place them right in the middle of the table.
Step 3: Scatter Golden Beetles In ancient Egypt, scarab beetles were good luck. Buy some large plastic bug toys (beetles are best) and spray paint them shiny metallic gold. Scatter your golden bugs all along the runner.
Step 4: A Royal Place Setting Use large gold plates as chargers. Put smaller black plates on top of them. Fold a white napkin and place it on the black plate.
Step 5: Make Jeweled Napkin Rings Take an empty toilet paper tube and cut it into rings that are about one inch wide. Take a plastic gem from a craft store (blue or red looks great) and glue it to the front of the cardboard ring. Now, spray paint the whole ring shiny gold. Once it’s dry, you can slide your napkin through.
Step 6: Drinks from the Nile Use deep blue cups or glasses to add that special pop of Egyptian color.
10. Modern Skullscape Dinner

This table proves that spooky can also be sophisticated. Using a clean palette of black, white, and grey, this setting is for the minimalist monster. The starkness of the design makes the few decorations stand out even more.
The centerpiece is simple but dramatic: a single, realistic skull next to a vase holding one bare, wispy branch. Modern black silverware and grey linen napkins keep the look sleek. A few tall, black candles in elegant brass holders provide all the light needed. This is a grown-up Halloween, proving less can be more.
DIY Instructions: A Simple and Spooky Table
This look is for people who like things clean and cool, but still a little creepy.
Step 1: The Layered Runner On a white or wood table, lay down a dark grey runner. Then, lay a skinnier black runner on top of the grey one. This layering looks very stylish.
Step 2: The Simple Centerpiece This is the easiest centerpiece ever! First, find a simple white or grey vase. Next, find one single, interesting-looking branch from outside—one that is thin and has a few little twigs. Put the branch in the vase. Beside the vase, place one cool, realistic-looking plastic skull. That’s all you need!
Step 3: A Modern Place Setting Use white plates on grey placemats. Use black forks, knives, and spoons.
Step 4: Clean and Classy Napkins Nicely fold a grey cloth napkin. For a place card, just use a simple white piece of cardstock with the guest’s name written in a clean, simple font. Place the card on top of the napkin.
Step 5: Add a Little Shine Use a few tall, skinny black candles. Put them in simple candle holders made of brass or gold. The shiny metal will look great with all the black and grey. Place them around your skull and branch.
11. Day of the Dead Fiesta

This table is not about spooky scares, but about a vibrant celebration of life. The scene explodes with color, from the embroidered runner to the bright paper banners hanging overhead. A mountain of orange marigold flowers creates a stunning centerpiece, dotted with decorated sugar skulls and colorful candles.
Each place setting is a work of art, with brightly patterned plates and jewel-toned glasses. The atmosphere is joyful and respectful, honoring tradition with a feast for the eyes and the soul. It’s a beautiful way to remember loved ones.
DIY Instructions: Host a Colorful Celebration
Let’s build a bright and beautiful table to celebrate the Day of the Dead!
Step 1: Set a Colorful Foundation Start with a black tablecloth. This will make all the other colors pop! Then, find a table runner with colorful Mexican-style embroidery.
Step 2: Hang the Papel Picado Buy or make “papel picado,” which are colorful paper banners with cut-out designs. String them above the table to create a festive ceiling.
Step 3: Build a Marigold Mountain Get lots of fake marigold flowers. Pile them up in the center of your runner to make a long, beautiful centerpiece. Place some colorfully painted plastic skulls and tall, skinny candles in bright colors like pink, yellow, and orange among the flowers.
Step 4: Festive Place Settings Use colorful plates. If you can find plates with flower or skull designs, that’s even better! Use bright napkins in colors like orange, pink, and turquoise.
Step 5: Make Sugar Skull Place Cards Buy some small, plain plastic skulls. Use colorful permanent markers to draw pretty designs on them, like flowers, swirls, and hearts. These are your sugar skulls! Write each guest’s name on a small card and place it in front of a skull.
12. Forgotten Attic Supper

This table looks like it was discovered in a dusty attic, untouched for a hundred years. A faded floral tablecloth and delicate lace create a vintage base. The room is filled with forgotten treasures: a rocking horse, an old lantern, and a creepy doll watching from her rocking chair.
Thick layers of cobwebs are draped over everything, catching the light from a single bare bulb. The plates are old and mismatched, and the napkins are tied with simple twine. This setting tells a story of a time long past, leaving guests to wonder who used to live here.
DIY Instructions: Create a Dusty Discovery
Let’s make a table that looks like a secret you found in a creepy old attic!
Step 1: The Old-Fashioned Tablecloth Find a tablecloth with a faded flower pattern. If you have a piece of old lace, you can put that on top in the middle.
Step 2: Add Attic Treasures Look for old things to decorate with. A creepy doll sitting on a small chair is a great start. You could also use an old rocking horse, a rusty lantern, or a stack of old books tied with string.
Step 3: Spin a Web This is the most important part. Get a bag of stretchy spider web decoration. Gently pull it apart and stretch it over everything—the doll, the chairs, the table, the lantern. The more webs, the better!
Step 4: Set a Forgotten Table Use plates with a flower pattern. It’s even better if the plates don’t match perfectly. Use simple glasses and silverware.
Step 5: Simple Place Cards Fold a small piece of tan paper in half. Write the guest’s name on it. Punch a hole in the corner and tie it to a rolled-up napkin with a piece of brown twine.
13. Zombie Apocalypse Hideout

Welcome to the end of the world! This table is set in a survivor’s bunker, where every meal is a victory. The centerpiece is a makeshift campfire, surrounded by rocks and ready to heat up the rations. Warning signs and scavenged supplies are everywhere.
Guests eat directly from cans of beans set on sturdy pewter plates. Drinks are served in old bottles. The whole scene is rough and rugged, from the burlap tablecloth to the baseball bats leaning nearby. It’s a creative setup for fans of a good zombie story.
DIY Instructions: Survive the Zombie Feast
Let’s build a cool hideout to eat in after the zombies have come!
Step 1: The Bunker Tablecloth Use a rough, brown burlap tablecloth. It looks like it was made from old sacks.
Step 2: Build a Safe Campfire Make a circle of rocks in the middle of the table. Find some small logs or thick sticks and stack them inside the rock circle like you’re building a fire. Now, get some orange and yellow fairy lights and tuck them in between the logs. When you turn them on, it will look like a glowing fire, but it’s totally safe!
Step 3: Post Your Warnings Print some “Warning: Zombies” signs from the internet. Tape them to the wall behind the table or prop them up on some old wooden boxes.
Step 4: A Survivor’s Meal Use metal or dark grey plates. For a super fun touch, open a can of beans or spaghetti for each guest and place it right on their plate with a fork. Use red bandanas as napkins.
Step 5: Scavenged Supplies Decorate the table with things you might find in a hideout. Use old lanterns, tin cups, and maybe even a toy baseball bat wrapped in fake barbed wire (made from grey pipe cleaners!).
14. Witches’ Coven Gathering

This table is set for a magical meeting in an enchanted forest. A bed of rich green moss serves as a runner, scattered with healing crystals, bundles of fresh herbs, and beeswax candles. The centerpiece is a small, black cauldron, bubbling with mysterious smoke.
The place settings are earthy and natural, with plates resting on slices of real wood. Each napkin is tied with twine and holds a sprig of fragrant lavender. Guests might even find their fortunes in the tarot cards left at their seats.
DIY Instructions: A Magical Forest Feast
Let’s mix up a potion for the most magical dinner party ever!
Step 1: The Forest Floor Runner Buy sheets of fake moss from a craft store and lay them down the center of your table to create a beautiful, green runner.
Step 2: The Bubbling Cauldron Place a small, black cauldron in the middle of the moss. To make it smoke, have a grown-up put a small piece of dry ice inside and add a little warm water. Remember, only grown-ups with gloves should touch dry ice!
Step 3: Add Magical Ingredients Scatter some cool-looking rocks (purple ones look like amethyst!) and bundles of herbs like rosemary on the moss. Use candles of different heights and colors, especially purple, orange, and natural yellow beeswax.
Step 4: Earthy Place Settings Use wood slices (from a craft store) as chargers. Put your plates on top of them.
Step 5: Aromatic Napkins Fold a grey or purple napkin. Get some dried lavender and some dried straw or grass. Tie a little bundle of the lavender and straw together with twine. Then, use the twine to tie it around your napkin. It will look and smell amazing!
15. Ghostly Pirate’s Treasure

Yo ho ho and a table of doom! This setting looks like a pirate’s treasure chest has exploded all over a haunted shipwreck. A tattered blue cloth is covered with fishing nets, seashells, and starfish. A skull sits in the middle, draped with pearls and guarding a pile of gold coins.
The single lantern casts a spooky glow on the scene. Each place setting is a treasure itself, with a knotted rope napkin ring and a place card held by a seashell. It’s a feast for a ghostly crew who went down with their ship.
DIY Instructions: A Sunken Treasure Trove
Ahoy, matey! Let’s build a table fit for a ghost pirate.
Step 1: The Ocean Depths Use a dark blue or teal tablecloth. Bunch it up so it looks like waves. Drape some fishing nets over the top.
Step 2: The Pirate’s Loot Centerpiece Place a plastic skull right in the middle of the table. Get some fake pearl necklaces and plastic gold coins from a party store and pile them all around the skull. Add a rustic, battery-powered lantern next to it for a spooky glow.
Step 3: Scatter Seashore Treasures Sprinkle seashells, starfish, and more gold coins all over the table and in the nets.
Step 4: A Captain’s Place Setting Use plates that have a rustic, cracked look. Use blue napkins.
Step 5: Rope and Shell Napkin Rings Take a piece of thick, natural rope. Tie a simple sailor’s knot in it to form a loop for the napkin. For the place card, write the guest’s name on a small piece of paper. Find a pretty seashell with a flat side and use a tiny bit of glue to attach the paper to the shell.
16. Ethereal Phantom Ball

This table is set for a dance with the spirits. Everything is a ghostly white, creating a dreamy and delicate atmosphere. Sheer, gauzy fabric is draped from the ceiling and over the chairs, making the whole room feel like it’s floating in a cloud.
A bouquet of baby’s breath sits in a silver vase, surrounded by floating candles. Cute, simple ghosts hang from above, watching the feast. The table itself is lit from underneath, giving everything an otherworldly glow. It’s a beautiful and haunting setting that is more sweet than scary.
DIY Instructions: A Dinner for Friendly Ghosts
Let’s create a beautiful, glowing table where friendly ghosts would love to float around.
Step 1: Drape Everything in White Use a white tablecloth. Get lots of cheap, see-through white fabric, like tulle or cheesecloth. Drape it from the ceiling, over the backs of the chairs, and even on the table itself.
Step 2: Light it from Below This is a cool trick. Take a string of white holiday lights and place them on the floor under your table. When you turn them on, the light will shine up through the tablecloth and make the whole table glow!
Step 3: Make Floating Ghosts Take a small styrofoam ball. Drape a square of white fabric over it. Cinch the fabric under the ball with a rubber band to make the ghost’s head. Use a black marker to draw two simple eyes. Use a needle to pull a piece of clear fishing line through the top of the head and hang your ghosts from the ceiling.
Step 4: A Ghostly Centerpiece Keep it simple. A vase of white flowers, like baby’s breath, is all you need. Place some floating candles (the kind that float in water) in tall, clear glasses around the vase.
Step 5: All-White Place Settings Use clear or white plates, white napkins, and clear glasses. The simpler, the better!
17. Spider’s Lair Luncheon

Don’t look up! A giant spiderweb stretches over this entire table, creating a canopy of creepy crawlies. The color scheme is a stark black and white, with pops of poisonous red from the drinks. Large and small spiders hang from the web and crawl along the runner.
The place settings are elegant but infested, with a large, jeweled spider guarding each plate. Even the cake has a web design. This immersive setting is not for the faint of heart and will make your guests feel like they’ve been caught in a trap.
DIY Instructions: Weave a Wicked Web
Are you afraid of spiders? Let’s hope not, because we’re inviting a LOT of them to dinner!
Step 1: The Giant Web Canopy This is the main event! Get a giant, stretchy spiderweb decoration. You’ll need to use tape or hooks to attach the corners of the web to the walls or ceiling around your table, so it stretches out over the table like a giant tent.
Step 2: Infest the Web Get lots of plastic spiders in different sizes. Hook them onto the giant web so they look like they are crawling on it or hanging down.
Step 3: Set a Trapped Table Use a black tablecloth. A lacy, web-patterned runner looks great down the middle.
Step 4: Paint a Spooky Centerpiece Find some bare branches. Spray paint them white or silver. Put them in a simple black vase in the middle of the table. You can hang a few more spiders from the branches.
Step 5: Spider-Guarded Plates Use black plates and white napkins. The coolest part is the napkin holder. Buy a few large, fake spiders. Use a hot glue gun (ask a grown-up for help) to glue a fancy plastic gem to the spider’s back. Place one spider on top of each folded napkin.
18. Mad Scientist’s Laboratory

Welcome to the lab, where dinner is an experiment. This table is styled like a creepy, old-fashioned operating room or laboratory. A surgical lamp hangs over a metal table, ready for the procedure—or the main course.
Guests sit on chairs draped in white cloth, like patients waiting for treatment. Beakers filled with strange colored liquids and jars of questionable specimens serve as decorations. Each plate is served on a metal tray, and the place cards look like hospital patient tags.
DIY Instructions: An Experimental Eatery
Put on your lab coat! It’s time to create a creepy laboratory for your friends to eat in.
Step 1: The Operating Table If you have a metal or grey table, that’s great! If not, cover your table with a plain grey or white tablecloth. A simple burlap runner down the middle looks like an old lab table.
Step 2: Mix Your Potions Collect glass jars and vases of different sizes. Fill them with water and add a few drops of food coloring. Green, blue, and red look extra spooky. You can even add weird things to the jars, like plastic eyeballs or gummy worms.
Step 3: The Surgical Tools Go to a party store and find a plastic “mad scientist” kit, which might have fake plastic syringes, scissors, and tweezers. Arrange them neatly on a metal tray in the middle of the table.
Step 4: Patient Place Settings Use simple white plates and metal cups. Place each setting on a small metal baking sheet or tray.
Step 5: Make Patient Tag Place Cards Get some shipping tags (the kind with the string). On the tag, write a guest’s name, and maybe a silly “Diagnosis,” like “Suffers from Candy Cravings.” Tie the tag around a rolled-up white napkin.
19. Apothecary’s Poison Pantry

Enter a mysterious old shop filled with strange potions and powerful herbs. This table is set up like an apothecary’s workbench, crowded with dark glass bottles of all shapes and sizes. Bundles of dried herbs are tied up and ready for brewing.
An old-fashioned scale and a mortar and pestle sit among the bottles, as if the poison-maker just stepped away. The lighting is dim, and the place settings are simple, with place cards that look like prescription labels from a bygone era.Apothecary’s Poison PantryAn old-fashioned scale and a mortar and pestle sit among the bottles, as if the poison-maker just stepped away. The lighting is dim, and the place settings are simple, with place cards that look like prescription labels from a bygone era.
DIY Instructions: A Potion-Maker’s Dinner
Let’s set up a spooky shop where every bottle holds a secret!
Step 1: The Apothecary’s Runner Use a simple, plain linen or canvas runner on a dark wood table. This looks like a real workbench.
Step 2: Collect Your Potion Bottles Start saving empty glass bottles and jars (shampoo bottles, vinegar bottles, etc.). Wash them well. Fill them with colored water, oil, or even just leave them empty. The more different shapes and sizes you have, the better! Arrange them all down the center of your runner.
Step 3: Make Spooky Labels This is the most fun part. Print out some old-fashioned looking labels with words like “Dragon’s Blood,” “Wolfsbane,” and “Gillyweed.” Use glue to stick them onto your bottles.
Step 4: Add Some Herbs Buy some bundles of dried herbs like rosemary or thyme from the grocery store. Tie them with string and lay them among the bottles.
Step 5: A Simple Setting Use plain black plates and simple silverware. Fold a white napkin and place a small potion bottle on top as a weight. For a place card, use a shipping tag and write the guest’s name on it, then tie it to the napkin.
20. Classic Pumpkin Patch Feast

Celebrate the season with a table that is overflowing with autumn’s bounty. This setting is cozy and traditional, featuring a huge centerpiece made of pumpkins and gourds of all shapes, sizes, and colors. Corn husks and colorful leaves fill in the gaps.
Some of the pumpkins are carved into smiling jack-o’-lanterns, with candles flickering inside. The place settings are warm and inviting, with orange napkins and woven placemats. Best of all, each guest gets their very own mini pumpkin, hollowed out to be used as a soup bowl.
DIY Instructions: A Bountiful Harvest Table
Let’s make the coziest, most pumpkin-filled table you’ve ever seen!
Step 1: The Pumpkin Runner You don’t even need a cloth runner for this one! Just start piling pumpkins, gourds, and squash of all different kinds down the middle of your table. Use big ones, small ones, green ones, and orange ones.
Step 2: Carve Some Smiles Choose a few of the medium-sized pumpkins in your centerpiece. Carve happy, classic jack-o’-lantern faces into them. Put a battery-powered candle inside each one to make them glow.
Step 3: Fill in the Gaps Tuck some dried corn cobs, colorful autumn leaves, and bunches of wheat or straw in between all the pumpkins to make your centerpiece look full and beautiful.
Step 4: A Cozy Place Setting Use woven straw placemats. Place your plates on top and use bright orange napkins. For cups, you can use simple mason jars!
Step 5: Make Pumpkin Soup Bowls This is so cool! Get one small pumpkin for each guest. Ask a grown-up to help you carefully cut the top off and scoop out all the seeds and strings from inside. Now you have a little orange bowl, which is amazing for serving soup or chili in!
21. Bayou Voodoo Vigil

Step into the mysterious bayou with this spooky voodoo-themed setting. A cascade of Spanish moss hangs from above, creating a swampy canopy. The centerpiece is a tangled mound of driftwood and moss, where a skull and shrunken heads keep watch.
Tarot cards are scattered across the table, hinting at the future fortunes of your guests. Each place setting is marked with a handmade voodoo doll, adding a personal and slightly menacing touch. This immersive table transforms your dining room into a witch doctor’s hidden sanctuary.
DIY Instructions: Build a Swampy Sanctuary
Let’s cook up some magic with this spooky bayou table!
Step 1: Hang the Spanish Moss This is the most important part! Get a few bags of fake Spanish moss from a craft store. Hang it from a light fixture or the ceiling above your table so it dangles down like in a real swamp.
Step 2: The Driftwood Centerpiece Find a cool piece of driftwood or a large, interesting branch. Place it in the center of the table. Drape more Spanish moss over it and tuck a plastic skull into the moss.
Step 3: Make Shrunken Heads Ask a grown-up for help with this. Peel a few large apples. Carefully carve a simple, spooky face into each one (two eyes, a nose, a mouth). Dip them in a mix of lemon juice and salt for a few minutes. Then, let them dry out in a warm, dry place for several days. They will shrink and wrinkle and look like shrunken heads! Hang them from your moss canopy with twine.
Step 4: Craft Voodoo Doll Place Cards Take two sticks and make a cross shape, tying them together with brown twine. Keep wrapping the twine around the “shoulders” and “waist” to form a body. Hot glue a button on for an eye. Tie a folded red napkin to a dark plate with more twine, and tuck your voodoo doll into the knot.
Step 5: Tell the Future Scatter a few tarot cards or regular playing cards around the centerpiece for a final mysterious touch.
22. Frankenstein’s Feast of Creation

It’s alive! This table is a chaotic and colorful tribute to Frankenstein’s laboratory. A glowing plasma ball crackles with energy at the center, surrounded by beakers and test tubes filled with bubbling, glowing liquids.
Gummy brains, candy eyeballs, and other edible experiments are served in petri dishes and jars. Every corner of the table is filled with the tools of a mad scientist, from syringes to colorful tubing. It’s a playful and slightly mad setup that invites guests to create their own monstrous concoctions.
DIY Instructions: A Monster-Making Laboratory
Let’s get experimenting and build a table fit for a mad scientist!
Step 1: The Electric Centerpiece The star of the show is a plasma ball! You can find these at novelty or science stores. Place it in the center of the table.
Step 2: Mix the Chemicals Collect glass jars, beakers, and test tubes. Fill them with water and add different colors of food coloring. For a bubbling effect, an adult can drop a piece of an Alka-Seltzer tablet into the water!
Step 3: Serve Edible Experiments Use clear glass petri dishes or small bowls. Fill them with gummy brains, candy eyeballs, and gummy worms. Put some green Jell-O in a jar and call it “Monster Slime.”
Step 4: A Lab-Ready Place Setting Use simple square white plates on top of placemats that look like graph paper. Use a plastic syringe (without the needle!) to hold a rolled-up napkin.
Step 5: Connect the Creations Get some colorful plastic tubing from a hardware store. Drape it around the beakers and jars on the table to make it look like everything is connected in one big, crazy experiment.
23. Scarecrow’s Harvest Hootenanny

This charming table is less about frights and more about farmhouse fun. A cozy red-and-white checkered tablecloth sets a rustic, picnic-like scene. The centerpiece is a simple collection of autumn harvest items: a rusty lantern, corn cobs, apples, and small pumpkins.
A friendly scarecrow often watches over the feast from a nearby corner. The place settings are simple and down-to-earth, with enamel plates and mason jar glasses. It feels like a well-earned supper after a long day of work on the farm.
DIY Instructions: A Friendly Farmhouse Feast
Let’s set a cozy table that feels like a happy autumn day on the farm!
Step 1: The Picnic Tablecloth Use a red-and-white checkered tablecloth. It instantly makes everything feel friendly and rustic. Place burlap squares on top as placemats.
Step 2: The Simple Harvest Centerpiece You don’t need much! Get an old-looking lantern (battery-powered is safest) and place it in the center. Arrange a few small pumpkins, gourds, apples, and dried corn cobs around it. A bundle of wheat tied with twine also looks great.
Step 3: The Farmhand’s Place Setting Use white plates with a colored rim (enamel camp plates are great). Use checkered napkins to match the tablecloth.
Step 4: Mason Jar Drinks Instead of fancy glasses, use classic mason jars for water or apple cider. They are simple and fit the farm theme perfectly.
Step 5: Twine-Tied Place Cards Get some simple tan shipping tags. Write each guest’s name on a tag. Roll up your napkin with the silverware inside, and tie the tag around the bundle with a piece of brown twine.
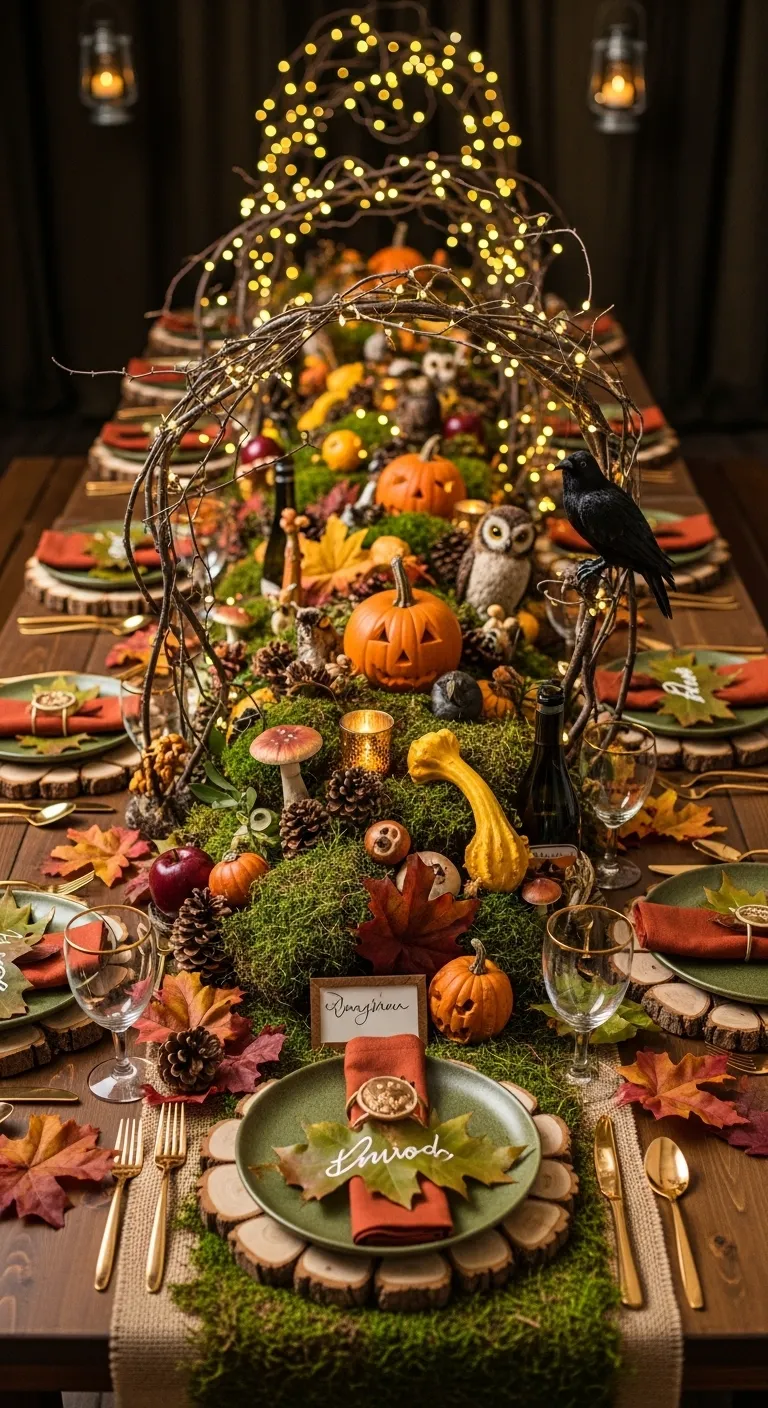
24. Enchanted Woodland Gathering

Dine in a magical forest where fairy lights twinkle like fireflies. This stunning tablescape features a long runner of green moss dotted with pumpkins, pinecones, and whimsical little owls. The main attraction is a beautiful arch of tangled grapevine, woven with glowing fairy lights, that stretches over the table.
Each plate rests on a slice of real wood, bringing the textures of the forest to the table. Place cards are handwritten on autumn leaves, adding a natural, personal touch. It’s a breathtaking scene that feels pulled from a storybook.
DIY Instructions: Create a Twinkling Forest
Let’s build a magical forest where fairies and friendly creatures would love to have a party!
Step 1: The Forest Floor Lay a runner made of fake green moss down the center of your table.
Step 2: Build the Twinkling Arch This is the magical part! Buy two small grapevine wreaths from a craft store. Gently pull and stretch them to open them up into long, arching shapes. Place the ends on the table so they form an arch. Now, carefully wrap strings of warm-white fairy lights all around the grapevine.
Step 3: Populate Your Forest Place small pumpkins, gourds, pinecones, and little toy owls and birds on the mossy runner underneath your arch.
Step 4: Wooden Place Settings Use slices of real wood as placemats. Place your plates on top. Use earthy-colored napkins, like green or burnt orange.
Step 5: Leafy Place Cards Find some pretty, clean, and dry autumn leaves. Use a gold or white paint pen to carefully write each guest’s name on a leaf. Place one at each setting.
25. Gnomish Mushroom Grotto

Venture deep into the earth for a dinner in a magical mushroom forest. This table is an earthy and enchanting scene, with a mossy runner sprouting all kinds of fascinating fungi. Little glowing skulls, like mischievous spirits, peek out from between the mushroom stems.
The place settings are natural and rustic, with wooden utensils and slate place cards. It feels like a secret feast hosted by gnomes or forest sprites, hidden away from the human world. The whole setting is a tribute to the strange beauty of the forest floor.
DIY Instructions: Grow a Mushroom Forest
Let’s get our hands dirty (not really!) and build a weird and wonderful mushroom world.
Step 1: The Mossy Ground Create a runner down the center of your table using sheets of fake moss.
Step 2: Plant the Mushrooms Go to a craft store and buy a variety of fake mushrooms in different shapes, sizes, and colors. Arrange them on the moss, making some stand tall and others cluster in groups. You can add a few pieces of bark and some real fern leaves to make it look more realistic.
Step 3: Add a Ghostly Glow Get some very small plastic skulls. Paint them with blue or green glow-in-the-dark paint. Once they’re dry, tuck them into the moss at the base of the mushrooms, so they are peeking out.
Step 4: An Earthy Plate Use plates that look like stone or pottery. Use rich, dark-colored napkins like maroon or forest green.
Step 5: Slate Name Tags Buy small, flat pieces of slate (you can find these at a craft store). Use a chalk pen to write each guest’s name on a piece of slate and place it at their seat.
26. Scholar of Skulls Study

This table is set in the private library of a collector of curiosities. It has a “dark academia” feel, with a centerpiece built on a foundation of old, leather-bound books. Skulls, an hourglass, and a magnifying glass suggest a long night of studying forbidden subjects.
Insects are displayed under glass domes, as if they are precious specimens. The entire scene is lit by the flickering of tall, white candles in brass holders. It is a sophisticated and slightly spooky setting for intellectuals with dark secrets.
DIY Instructions: A Creepy Collector’s Desk
Let’s turn your table into the desk of a super smart and super spooky scholar.
Step 1: The Bookish Centerpiece Find a bunch of old, hardcover books. Stack them up in the middle of the table to create different levels.
Step 2: Add the Skulls Place one or two realistic plastic skulls on top of your book stacks. They are the main attraction!
Step 3: Display Your Specimen Find a large plastic toy bug, like a beetle or a fly. Place it on the table. Now, take a clear drinking glass and turn it upside down over the bug. It looks just like a fancy specimen dome!
Step 4: The Scholar’s Tools Decorate the table with other “smart” things, like an old-fashioned magnifying glass, an hourglass, or even a pair of old reading glasses.
Step 5: A Studious Place Setting Use plaid napkins to give a cozy, library feel. Use simple white plates. The place cards can be made to look like old library checkout cards.
27. Vampire’s Crimson Ball

Welcome to a lavish feast, fit for the king of all vampires. This table is drenched in dramatic reds and blacks. A black lace runner lies over a blood-red tablecloth, setting a dangerously elegant tone. Towering silver candelabras and bouquets of deep red roses add to the gothic romance.
The place settings are fit for royalty, with ornate silver plates and sparkling crystal glasses. Every detail is luxurious and a little bit deadly, from the tiny potion bottles to the bat-wing napkin rings.
DIY Instructions: A Gothic Gala
Let’s set a table that’s so fancy and spooky, even Dracula would be impressed!
Step 1: A Bloody and Black Base Use a bright red tablecloth. Then, lay a black lace runner down the middle.
Step 2: Towering Silver and Roses The centerpiece should be tall and dramatic. Use silver candelabras with red candles. If you don’t have those, a few tall silver vases filled with deep red roses will look just as stunning.
Step 3: A Vampire’s Plate Use fancy silver charger plates. Place a plain black plate on top. Use bright red napkins to match the tablecloth.
Step 4: Make Bat-Wing Napkin Rings Draw a simple bat-wing shape on a piece of paper. Cut it out and trace it twice onto a sheet of black craft foam. Cut out the two foam wings. Take a plain black napkin ring and use a hot glue gun (with a grown-up’s help) to glue one wing to each side.
Step 5: A Drop of “Blood” Find some tiny glass bottles with corks at a craft store. Fill them with red-colored water or juice and place one at each seat.
28. A Nightmare of a Dinner

What’s this? A dinner party straight out of Halloween Town! This table captures the whimsical, spooky style of “The Nightmare Before Christmas.” The iconic spiral hill rises as the centerpiece, set against a purple and orange background.
Jack-o’-lanterns grin from the tabletop, and the plates feature black-and-white patterns and spooky character silhouettes. Even the glasses are caught in spiderwebs. It is a fantastically fun setup that brings a beloved movie to life.
DIY Instructions: A Halloween Town Celebration
Let’s build a table that Jack Skellington himself would love!
Step 1: The Two-Toned Tablecloth This is a fun trick! Get two cheap plastic tablecloths, one purple and one orange. Cut them both in half down the middle. Tape one purple half and one orange half together to make one tablecloth that is two different colors!
Step 2: The Black and White Runner Lay a runner with bold black and white stripes right down the middle, where the two colors meet.
Step 3: Build Spiral Hill Ask a grown-up for a large piece of cardboard. Draw the shape of the curvy, spiral hill and cut it out. Paint it black, then paint a white swirl on it. You can make a base for it to stand up in, or just lean it against something in the middle of the table.
Step 4: A Spooky Place Setting Use plates with a swirly black and white pattern. For a fun touch, cut a small black cat face out of black paper and place it in the center of the plate.
Step 5: Spiderweb Glasses Get some stretchy spiderweb decoration. Pull off a very small piece and gently stretch it over your drinking glasses for a spooky, web-covered look.
29. The Alley Cat Club

Step into a secret speakeasy where cool cats and mysterious characters gather. This table is pure 1920s glamour with a spooky twist. A glittering gold sequin runner sparkles on a black tablecloth, setting a luxurious stage.
A tall vase with elegant white flowers and dramatic black feathers creates a stunning centerpiece. Sleek black cat statues guard the table, and everything is lit by the soft glow of candlelight. It is a sophisticated, stylish, and slightly superstitious theme.
DIY Instructions: A Glamorous Speakeasy
Let’s create a super fancy and mysterious party, inspired by the roaring twenties!
Step 1: Add Some Sparkle Use a black tablecloth. Then, lay a runner covered in gold sequins down the middle. This will make your table glitter!
Step 2: The Feathered Centerpiece Find a tall, clear glass vase. Put some beautiful white flowers in it, like calla lilies. Then, add a few large, fluffy black feathers to the bouquet for a dramatic touch.
Step 3: Invite the Cool Cats Find a few black cat statues or figurines. They don’t have to be Halloween-y, just sleek and elegant. Place them along your sparkling runner.
Step 4: A Golden Place Setting Use gold charger plates with black plates on top. Use white napkins. Use gold-colored forks, knives, and spoons if you can!
Step 5: A Classy Napkin Ring Find some cute black cat stickers or cutouts. Take a plain white napkin ring and stick the cat silhouette on the front. It’s simple and very stylish!
30. We’ve Come in Peace… for Dinner

This dinner is out of this world! The table is set for an alien invasion, with a futuristic silver tablecloth and glowing green lights. A flying saucer has landed in the center, surrounded by bubbling lava lamps and crackling plasma balls.
The place settings are sleek and modern, with square plates featuring a green alien head. The whole scene has a fun, retro sci-fi feel, as if you’re about to share a meal with visitors from another planet.
DIY Instructions: An Alien Landing Zone
3… 2… 1… Blast off! Let’s build a table for some friendly alien visitors.
Step 1: The Spaceship Surface Use a shiny silver or metallic tablecloth. This will look like the inside of a spaceship!
Step 2: Land the UFO Find a toy flying saucer (UFO). To make it look like it’s hovering, place it on top of a clear plastic box. You can even put a green battery-powered light inside the box to make it glow!
Step 3: Add Alien Tech This is the fun part! Decorate the table with lava lamps and plasma balls. They provide cool, weird light and look like alien technology.
Step 4: An Intergalactic Place Setting Use square plates in black or silver. Find some green alien head stickers and put one in the middle of each plate. Use bright green napkins.
Step 5: Flexible Tubing Go to a hardware store and get some flexible metal tubing (like for a dryer vent). You can bend it and wrap it around your centerpiece to look like spaceship pipes and wires.
31. Poe’s Midnight Dreary Dinner

This table is set for a dinner of dark poetry and gothic romance. The scene is elegant and moody, with a raven keeping watch over old books and a silver candelabra. A single red rose, preserved under glass, hints at a timeless, tragic love story.
Deep blue and black fabrics create a somber, sophisticated atmosphere. Each place setting has a handwritten note, as if penned by a long-lost poet. It is a beautiful and melancholic table, perfect for a night of telling spooky stories by candlelight.
DIY Instructions: A Poet’s Gothic Table
Let’s write a spooky story with this dark and romantic table setting.
Step 1: The Newsprint Runner Use a dark blue or black tablecloth. For a runner, find some newspaper-print scrapbook paper or even use real newspaper pages, and tape them together to create a long, literary runner.
Step 2: The Scholar’s Centerpiece Stack a few old, dark-colored books in the center of the table. Place a fake black crow or raven on top so it looks like it’s guarding them. Add a tall, silver candelabra with white candles.
Step 3: Preserve a Rose Get a fake red rose. Place it on the table. Take a clear drinking glass and turn it upside down over the rose. It looks like a beautiful, protected specimen.
Step 4: A Poet’s Place Setting Use dark blue plates on top of white ones. Use dark blue napkins.
Step 5: Quill and Ink Place Cards Get some tan or cream-colored paper and carefully tear the edges to make it look old. Use a black marker to write each guest’s name in a fancy, curly script. Place a single black feather on the paper to look like a quill pen.
32. A Dish to Die For

There’s been a murder! This table transforms your dinner party into an active crime scene. A stark black-and-white setting is splattered with “blood” and cordoned off with evidence tape. The clues are everywhere, from the murder weapons to the evidence folders at each seat.
A single, bloody fingerprint on the menu card suggests everyone is a suspect. It’s an interactive and thrilling theme that will have your guests talking and trying to solve the mystery all night long.
DIY Instructions: Create a Crime Scene
Let’s get our detective hats on and create a thrilling murder mystery dinner!
Step 1: The Blood-Splattered Runner On a white tablecloth, lay a black runner down the middle. Now, get some red craft paint. Dip a paintbrush in the paint and flick it at the runner to create a realistic “blood spatter” effect. Let it dry completely.
Step 2: Cordon Off the Area Get some yellow “Caution” or “Police Line” tape from a party store. Drape it around the centerpiece and along the table.
Step 3: The Evidence Centerpiece The murder weapons are the centerpiece! Place a few safe “weapons” like a coil of rope, a candlestick, and a toy knife on the table. For a super cool effect, cover one of the items with a glass dome (a cake cover works great!).
Step 4: Make Evidence Folder Placemats Get a tan file folder for each guest. On the front tab, write “EVIDENCE.” You can put their real placemat inside the folder.
Step 5: Fingerprint Place Cards On a white card, write the guest’s name. Now, press your thumb onto a red ink pad and press it onto the card to leave a “bloody” fingerprint clue.
33. Masquerade of Lost Souls

This table is set for a mysterious and lavish masquerade ball. A rich, black velvet tablecloth and a deep red runner create a feeling of gothic luxury. The centerpiece is a stunning collection of red roses, black feathers, and golden skulls, all lit by the glow of black candles in silver holders.
Ornate masks, golden keys, and scattered jewels hint at the secrets hidden by the guests. This is a glamorous and dramatic setting, perfect for a night of intrigue, elegance, and dark romance.
DIY Instructions: A Venetian Vampire Feast
Let’s host a fancy party for mysterious, masked guests.
Step 1: A Luxurious Base Use a black tablecloth, preferably one made of a rich fabric like velvet. Lay a deep red or burgundy runner down the middle.
Step 2: The Golden Skull Centerpiece Buy a few plastic skulls and spray paint them a shiny metallic gold. Arrange them down the center of your runner. Tuck deep red roses (fake ones work great) and some fluffy black feathers in between the skulls.
Step 3: A Mask for Every Guest Buy some small, simple plastic masks from a craft store. You can leave them black or spray paint them gold. For a place card, write the guest’s name on a small tag and tie it to the mask with a ribbon. Place one at each seat.
Step 4: An Opulent Place Setting Use black plates on top of lacy, black placemats. For napkin rings, take a plain black ring and hot glue a small, golden plastic skull to the front.
Step 5: Scatter Some Secrets Scatter a few old-fashioned keys (painted gold) and some large plastic gems on the runner to complete the decadent look.
34. Sweet & Spooky Candy Corn Spread
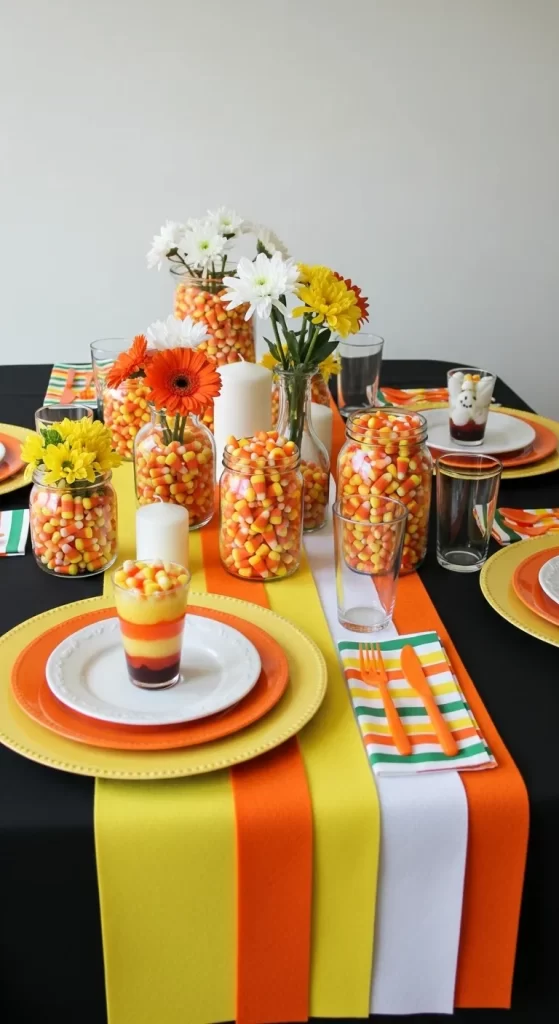
This table is a cheerful and bright celebration of a classic Halloween treat. The iconic colors of candy corn—yellow, orange, and white—create a fun and festive atmosphere. Jars and vases are filled to the brim with candy corn, serving as both decoration and a sweet snack.
Fresh flowers in matching colors pop out of the candy-filled vases. The whole look is clean, bright, and playful. It’s a sweet take on Halloween that’s more about treats than tricks.
DIY Instructions: A Candy-Colored Celebration
Let’s make a table that’s super sweet and colorful!
Step 1: The Layered Felt Runner This is a fun and easy craft! Get three pieces of felt: one yellow, one orange, and one white. Cut the yellow piece to be the widest. Cut the orange piece a little skinnier, and the white piece the skinniest of all. Lay the orange on top of the yellow, and the white on top of the orange, to create a striped runner.
Step 2: The Candy Corn Vases Get a few clear glass mason jars or vases. Fill them about three-quarters full with candy corn. Now you can use them as they are, or you can stick some pretty flowers (in yellow, orange, and white, of course!) right into the candy.
Step 3: A Colorful Plate Layer your plates with the candy corn colors. Start with a large orange charger plate, then a yellow plate, and a smaller white plate on top.
Step 4: Striped Napkins Find napkins that have yellow, orange, and white stripes to tie the whole look together.
Step 5: A Layered Dessert Serve a dessert that matches the theme! You can layer vanilla, butterscotch, and lemon pudding in a clear glass to make a delicious and beautiful candy corn-colored treat.
35. Film Noir Final Meal

This table is a scene from a black-and-white detective movie. The high-contrast world of film noir is created with stark blacks and whites and dramatic shadows. An evidence board, covered in cryptic photos and notes, serves as the centerpiece.
An old rotary phone, a whiskey decanter, and a smoldering cigarette in an ashtray complete the moody scene. The only color is a single, blood-red flower. It’s a suspenseful and stylish setting that will make your guests feel like they are part of a classic mystery.
DIY Instructions: A Detective’s Dossier Dinner
Let’s create a scene full of shadows and secrets, just like in an old movie!
Step 1: Set a Black and White Scene Use a white tablecloth. Lay a solid black runner down the middle. Use square white plates on square black placemats.
Step 2: Create the Evidence Board Get a piece of black foam board. Print out a few old black-and-white photos. Tack them to the board with thumbtacks. Connect the photos with pieces of white string to make it look like you’re solving a case. Stand this up in the middle of your table.
Step 3: The Detective’s Desk Place a few props on the table, like an old-fashioned telephone and an ashtray. (You can make fake cigarettes by rolling up paper!).
Step 4: Create a Shadow This is a cool trick to make it look like light is coming through window blinds. Cut stripes out of a large piece of cardboard. Ask a grown-up to help you shine a lamp through the cardboard and onto the wall behind your table.
Step 5: Number Your Suspects Instead of names, give your guests numbers. You can find “police evidence marker” templates online to print and fold for your place cards.
36. Celestial Supper

Dine under the stars with this magical, celestial-themed table. A deep navy blue tablecloth creates the perfect backdrop for a sparkling night sky. The centerpiece is a glowing moon lamp, surrounded by glittering geodes, silver orbs, and bouquets of baby’s breath that look like distant galaxies.Celestial SupperDine under the stars with this magical, celestial-themed table. A deep navy blue tablecloth creates the perfect backdrop for a sparkling night sky. The centerpiece is a glowing moon lamp, surrounded by glittering geodes, silver orbs, and bouquets of baby’s breath that look like distant galaxies.
The place settings are cosmic and beautiful, with constellation-themed placemats and star-folded napkins. It is a dreamy and enchanting setting that will fill your guests with a sense of wonder.
DIY Instructions: A Midnight Constellation Feast
Let’s have a dinner party on the moon!
Step 1: The Night Sky Tablecloth Use a dark, navy blue tablecloth to be the backdrop for your universe.
Step 2: The Glowing Moon Centerpiece The main event is a moon lamp! You can buy these online and they cast a beautiful, soft glow. Place it in the center of the table. Surround it with silver Christmas ornaments, some white flowers, and some glittery star confetti.
Step 3: Constellation Placemats Get some dark blue or black paper. Use a white or silver paint pen to draw some simple constellations on them. Just draw a few dots and connect them with lines!
Step 4: Star-Shaped Napkins There are lots of easy tutorials online that show you how to fold a napkin into a beautiful star shape. Use dark blue napkins for this.
Step 5: Add Some Crescent Moons Buy some small, gold crescent moon charms from a craft store. You can scatter them on the table, or tie one to each guest’s place card.
37. Entomologist’s Exhibit

This table is for the brave bug-lover! It is styled like a museum exhibit from a creepy, crawly insect collector. A dark green tablecloth sets the stage for a collection of fascinating and frightening bugs.
Large, colorful beetles and moths are displayed under glass domes and in specimen frames. The place settings are elegant, with gold silverware and velvet napkins held by beetle-themed rings. It’s a strangely beautiful and spine-tingling theme for the curious at heart.
DIY Instructions: A Beetle Banquet
Let’s create a beautiful exhibit of creepy crawlers for your friends to admire.
Step 1: The Specimen Cases This is the main decoration. Buy a bunch of realistic-looking plastic toy bugs, especially large, colorful beetles. To display them, you can either place them in shadow box frames or put them under glass domes (which you can make by turning a clear glass upside down over the bug!). Arrange these all down the center of the table.
Step 2: A Studious Placemat Use scrapbook paper that looks like the page of a dictionary or an old book as your placemat.
Step 3: A Velvety Napkin Use rich, dark green velvet napkins to add a touch of elegance.
Step 4: Make Beetle Napkin Rings Get some plain, simple napkin rings. Buy some smaller plastic beetles and use a hot glue gun (with an adult’s help) to glue one bug to the top of each ring. You can even spray paint the whole thing gold first!
Step 5: Let Some Bugs Escape! Scatter a few extra plastic spiders and bugs around the table, as if they’ve escaped from the collection!
38. Ghoulish Gothic Gathering

This dinner is creepy, kooky, and altogether spooky! The table is set for a darkly humorous gothic feast. A severed hand serves cheese from a platter, while a miniature guillotine stands ready to slice it.
Tall black candles in silver holders cast a dim, flickering light on the scene. The only color comes from single red roses and scattered petals, hinting at a deadly romance. It is a macabre and elegant table that is sure to make your guests smile… nervously.
DIY Instructions: A Hand-Served Horror
Let’s make a table that’s spooky, silly, and a little bit fancy.
Step 1: The Lacy Runner On a black tablecloth, lay a runner made of grey or black spiderweb lace.
Step 2: A Handy Centerpiece Get a fake, plastic monster or zombie hand. Place it in the center of the table on a black plate or platter. You can arrange cheese and crackers around it, so it looks like the hand is serving the food!
Step 3: A Deadly Cheese Slicer For a super fun and spooky touch, look online for a miniature guillotine cheese slicer. It’s a real, working kitchen gadget that fits the theme.
Step 4: A Single Deadly Rose Use simple white plates on top of fancy black and silver chargers. Instead of a fancy napkin fold, just tie a simple black ribbon around a rolled white napkin. Tuck one single, beautiful red rose into the ribbon.
Step 5: Drippy Candles Use lots of tall, skinny black candles in silver holders. The more, the better!
39. The Haunting of Dinner Table

This ghostly gathering looks as though it has been waiting for guests for a hundred years. The entire scene is draped in dusty grey fabrics and covered in cobwebs. Sheeted ghosts stand silently in the corners, and creepy portraits watch from the walls.
A skull sits under a glass dome, and the candles have melted into pools of waxy tears. The plates are old and spider-infested. It’s a classic haunted house theme that will give your guests a delightful fright.
DIY Instructions: A Spectral Soiree
Let’s make your dining room look like the most haunted house on the block!
Step 1: Drape Everything in Grey Use a grey tablecloth. Drape torn and shredded grey cheesecloth over the table, the chairs, and even hanging from the ceiling. The messier it looks, the better!
Step 2: Make Some Easy Ghosts Ask a grown-up for an old white bedsheet. Drape it over a tall lamp or a coat rack in the corner of the room to create a life-sized ghost!
Step 3: Age Your Decor Find a cool plastic skull and place it under a glass cake dome. Find a thick black candle and let a grown-up help you burn it for a while, letting the wax drip all down the sides onto an old book.
Step 4: A Ghostly Place Setting Use old-fashioned plates with a floral pattern. Use gauzy, grey napkins. For a creepy touch, place one large, fake spider on each plate.
Step 5: Print a Creepy Family Search for “creepy vintage portraits” online. Print them out and put them in old, dark frames on the walls around the table.
40. Bone Appétit Banquet

Have a seat, if you dare! A full-sized skeleton is the host of this party, sitting at the head of the table. The centerpiece is a massive pile of skulls and bones, creating a visually stunning and macabre tower.
The color scheme is a stark black and white. Each guest’s placemat is a bone x-ray, and a skeletal hand holds their napkin. It is a bold, graphic, and wonderfully spooky theme that celebrates the beauty of bones.
DIY Instructions: A Skeleton Crew Supper
Let’s get ready to rattle some bones with this awesome skeleton-themed table!
Step 1: The Host with the Most If you can, get a full-size, posable plastic skeleton. Sit him in the chair at the head of the table. You can even put a napkin in his lap!
Step 2: The Skull Pile Centerpiece This is easier than it looks! Buy a bunch of plastic skulls of different sizes from a Halloween store. Use a hot glue gun (with an adult’s help) to carefully glue them together in a big, tall pile in the center of your table.
Step 3: A Medical Place Setting Use black placemats. Search online for “hand x-ray printable” and print one for each guest. Place the x-ray image on top of the black placemat. Put a clear glass plate on top of that, so you can see the bones through the plate!
Step 4: A Handy Napkin Holder Buy some plastic skeleton hands. They are the perfect size to hold a rolled-up white napkin for each guest.
Step 5: Skeletons Under the Table For a final spooky surprise, use tape or wire to attach some extra skulls and bones to the legs of your chairs, so they peek out at your guests’ feet!
With so many paths to a perfectly haunted Halloween table, the only limit is your imagination. Whether you prefer the glamorous gothic allure of a vampire’s ball or the rustic charm of a scarecrow’s supper, the power to create a memorable night is in your hands.
Don’t be afraid to mix and match elements from different themes to create a tablescape that is uniquely yours. The most important ingredient, after all, is a sense of fun and a touch of spooky spirit. So gather your supplies, summon your creativity, and get ready to host a haunting feast that will be the talk of the town. Happy haunting!
Key Takeaways
- Transform Your Meal: A themed table turns a simple dinner into a memorable Halloween experience.
- Creativity is Key: You don’t need a huge budget. Simple items like branches, old books, and craft supplies can create stunning effects.
- DIY Made Easy: Our step-by-step instructions are designed for all skill levels, making it simple to recreate these looks.
- Something for Everyone: With 40 diverse themes, you’ll find inspiration whether you love classic horror, elegant gothic, or playful spookiness.