As the air turns crisp and leaves begin to fall, our thoughts turn to the coziest and spookiest season of the year. Halloween is a time for fun, frights, and creative expression, and there’s no better place to showcase your festive spirit than the heart of your home: the fireplace mantel.

Your mantel is a natural focal point, a stage just waiting to be set for the season. Moving beyond a few simple pumpkins can transform your entire living space, creating a captivating scene that tells a story. Whether you love terrifying thrills, whimsical charm, or elegant gothic vibes, the possibilities are endless.
This collection of ideas is here to spark your imagination. We have gathered a huge variety of themes, from cinematic horror nights to enchanting witch’s lairs. Each one comes with simple, step-by-step DIY instructions to help you bring these creative visions to life, no matter your skill level. Get ready to be inspired and turn your mantel into a Halloween masterpiece.
1. Horror Movie Night Mantel

Bring the thrills of the cinema right to your living room. This mantel setup is a wonderful homage to classic slasher films. Iconic props, like a hockey mask and a bladed glove, immediately set a spooky scene. The display feels like a real movie premiere with its lighted marquee frame and red velvet rope.
Old-fashioned film reels and “Admit One” tickets add a touch of nostalgia. Freshly popped popcorn, crawling with creepy spiders, completes the concession stand vibe. It’s a creative way to celebrate your favorite scary movies and get everyone in the mood for a Halloween film festival.
DIY Instructions:
Here is how you can make your own movie night mantel.
What You’ll Need:
- A large piece of black or red fabric/poster board for the background.
- String lights or vanity mirror lights.
- A letter board.
- Horror movie props (you can buy these cheap or make them).
- Popcorn, popcorn boxes, and plastic spiders.
- Toy film reels and film strips (or black construction paper).
- Red rope or thick red yarn.
- Paper to print “Admit One” tickets.
Step-by-Step Guide:
- Set the Stage: First, create your background. Safely hang the red or black fabric or poster board behind your mantel. Frame it with the string lights to make it look like a movie sign.
- Create Your Marquee: Take your letter board and put a spooky movie-themed message on it. Place this in the center of your mantel.
- Gather Your Props: Now for the fun part! Find a simple white mask and draw the red marks on it to look like Jason’s. For Freddy’s glove, you can glue plastic knives carefully onto an old winter glove. Place these scary items on your mantel.
- Add Cinema Details: Make your own “Admit One” tickets by printing them from your computer. If you can’t find toy film reels, cut out two large black circles from construction paper and connect them with a smaller paper roll. Drape some film strip toys or long strips of black paper around the props.
- Prepare the Snacks: Fill your popcorn boxes. Then, place a few plastic spiders right on top of the popcorn to make it look spooky. Set the boxes on the mantel.
- Final Touches: Lay down the red rope in front of your display. Scatter a few more plastic spiders around to finish the creepy look!
2. Tim Burton’s Halloween Town Mantel

Step into a world of whimsical spookiness with this display. It’s a fantastic tribute to a beloved Halloween classic. The iconic curly hill and character figurines bring Halloween Town to life. Little jack-o’-lanterns and a Santa-themed pumpkin add to the movie’s unique holiday mashup.
A bare, twisted tree with festive lights captures the film’s distinct visual style. The entire scene sits on a bed of fluffy white “snow,” making it feel like two holidays have collided in the most wonderful way.
DIY Instructions:
Follow these steps to build your own Halloween Town.
What You’ll Need:
- White fluffy fabric or cotton batting for snow.
- Figurines of the movie’s characters.
- A small, bare branchy tree.
- Orange and multi-colored string lights.
- Black craft foam or cardboard.
- Small plastic pumpkins and white paint for “Sandy Claws.”
- A small whiteboard or sign for the “Naughty or Nice” list.
Step-by-Step Guide:
- Lay the Foundation: Cover your mantel with the white fluffy fabric to create a snowy landscape.
- Build the Hill: Cut the black craft foam or cardboard into the shape of the famous curly hill. Place it in the center of your snowy scene.
- Place Your Characters: Arrange your character figurines around the hill and on the snow.
- Decorate the Tree: Set up your bare-branch tree behind the hill. Wrap it with the multi-colored string lights.
- Add Lighting and Pumpkins: Drape the orange lights around the scene. Paint one pumpkin white with a spooky face and add a Santa hat. Arrange the other small pumpkins.
- Make the List: Write a “Naughty or Nice” list on your small sign and place it on one side of the display.
3. Gothic Glasshouse Mantel

This mantel creates a feeling of elegant mystery. It uses glass domes to showcase miniature haunted worlds. Inside each dome, you’ll find tiny haunted houses, skulls, and spooky plants. It’s like a collection of captured spirits.
The dark green background and trailing ivy give it a lush, overgrown graveyard feel. Black taper candles and bouquets of dark flowers complete the moody and sophisticated look. This display is both beautiful and unsettling.
DIY Instructions:
You can create these tiny haunted worlds at home.
What You’ll Need:
- Glass domes (cloches) in different sizes.
- Old, thick books to use as stands.
- Craft moss and black craft sand or soil.
- Miniature haunted house figures (or small birdhouses painted black).
- Tiny plastic skulls and bones.
- Fake ivy vines.
- Battery-powered fairy lights.
- Black taper candles and holders.
Step-by-Step Guide:
- Create Levels: Stack the old books on your mantel to create platforms of different heights.
- Build Your Scenes: For each glass dome, start with a layer of black sand and moss at the bottom.
- Add Spooky Items: Place a miniature haunted house or a small skull inside each dome.
- Light It Up: Weave a string of fairy lights inside one or two of the larger domes before placing them over the scene.
- Arrange the Domes: Set your finished glass domes on top of the books.
- Add Greenery: Drape the fake ivy vines so they twist and turn around the books and domes.
- Final Touches: Place the black candles in their holders and arrange them among the domes to add a spooky glow.
4. Creepy Crawler Spider Nest

Transform your fireplace into a spider’s lair. This design uses layers of thick, stretchy webbing to create a massive nest. Spiders of all sizes, from tiny babies to a huge mother spider, crawl all over the web.
The dense webbing covers the entire mantel and drips down to the floor, making it feel like a true infestation. White egg sacs are tucked into the corners, hinting that more spiders are on the way. It’s a bold look for anyone who wants to give their guests a good scare.
DIY Instructions:
Weaving this web of fear is simple.
What You’ll Need:
- Lots of stretchy spider web material (the more the better).
- A variety of plastic spiders, including one very large one.
- Small white foam balls.
- A hot glue gun.
- Removable wall hooks.
Step-by-Step Guide:
- Set Your Anchors: Place removable hooks on the wall around your mantel. This will give you points to attach the web.
- Stretch the Web: Start pulling and stretching the web material. Hook it onto the corners and pull it tight across the mantel opening. The more you stretch it, the more realistic it looks. Keep adding layers.
- Make Egg Sacs: Take a small foam ball and wrap it in a thin layer of the web material. Use the hot glue gun to attach a few tiny spiders onto it. Make a few of these sacs.
- Place Your Spiders: Put the giant spider right in the middle of the web. Then, stick the smaller spiders all over, making some crawl up, some down, and some towards the egg sacs.
- Extend the Infestation: Drape some webbing and a few spiders onto the floor to make it look like they are taking over the room.
5. Radiant Rainbow Skull Display

Who says Halloween has to be dark and gloomy? This mantel uses a blast of bright, neon colors for a fun and playful vibe. Skulls and pumpkins are painted in a vibrant rainbow sequence, creating an eye-catching and energetic display.
Fluffy pom-pom garlands in matching colors add a soft texture and enhance the cheerful mood. Little paper bats and ghosts on the wall are a classic touch, but the neon colors make them feel fresh and modern.
DIY Instructions:
Making this colorful creation is a blast.
What You’ll Need:
- Plastic skulls and pumpkins.
- Brightly colored craft paint (like pink, blue, green, and orange).
- Paintbrushes.
- Yarn in various bright colors.
- Cardboard to make pom-poms.
- String.
- Black paper for bat cutouts.
Step-by-Step Guide:
- Paint Everything: Give each skull and pumpkin a solid coat of bright paint. Use a different color for each one. Let them dry completely.
- Arrange in Rainbow Order: Place your painted skulls and pumpkins on the mantel. Line them up in the order of the colors of the rainbow.
- Make Pom-Poms: To make a pom-pom, wrap yarn around a small piece of cardboard many times. Carefully slide it off, tie a piece of string tightly around the middle, and then snip the loops on both sides. Fluff it up into a ball.
- Create the Garland: Make lots of pom-poms in different colors. Thread them onto a long piece of string to create a garland. Hang it from your mantel.
- Add Final Touches: Cut out some simple bat shapes from black paper and stick them to the wall around your colorful display.
6. Vampire’s Welcoming Crypt

This display is dark, dramatic, and fit for a vampire lord. A miniature tombstone and a coffin-shaped box create the feeling of a gothic crypt. Silver candelabras with blood-red candles cast a flickering, eerie light.
Perched gargoyles stand guard on either side. Glasses filled with a deep red liquid wait for a thirsty creature of the night. It’s a sophisticated and slightly scary setup that feels both ancient and elegant.
DIY Instructions:
You can build your own vampire crypt with a few supplies.
What You’ll Need:
- A large piece of gray foam board.
- A small cardboard box (a shoebox works).
- Black and gray paint.
- Red and black fabric.
- Silver candelabras and red candles.
- Plastic gargoyle statues.
- Wine glasses and red juice.
- Small plastic bats.
Step-by-Step Guide:
- Make the Tombstone: Cut the top of the foam board into a rounded tombstone shape. Paint it gray, dabbing on some black paint with a sponge to make it look like old stone.
- Create the Coffin: Cut the cardboard box into a coffin shape and paint it black. You can write “Welcome” on it if you like.
- Set the Scene: Drape the black and red fabric over your mantel. Place the tombstone at the back and the coffin in front.
- Add the Guardians: Position a gargoyle statue on each end of the mantel.
- Bring in the Light: Place the candelabras with the red candles on either side of the coffin.
- Pour the “Wine”: Fill the wine glasses with red juice and set them on the mantel.
- Final Touches: Use a little tape or glue to attach the plastic bats to the tombstone.
7. Ghostly Pirate’s Cove

Set sail for a spooky adventure with this pirate-themed mantel. The display is draped in weathered fishing nets, making it look like a ghost ship’s treasure has washed ashore. A model ship with tattered sails is the main attraction, surrounded by ghostly skulls.
Old lanterns with flickering, battery-powered candles provide a mysterious glow. Blue lights under the netting create the illusion of deep ocean water. It’s a fun and imaginative setup for anyone who loves tales of the sea.
DIY Instructions:
It’s easy to bring this pirate’s cove to your home.
What You’ll Need:
- Two or three decorative fishing nets.
- A model ship.
- Plastic skulls (one with a pirate hat is a plus).
- Battery-powered lanterns.
- A string of blue Christmas lights.
- Plastic starfish and seashells.
- Twine or thick rope.
Step-by-Step Guide:
- Drape the Nets: Cover your mantel with the fishing nets, letting them hang down in the front and on the sides.
- Create an Ocean Glow: Place the string of blue lights on the mantel, underneath the top layer of netting.
- Position the Ghost Ship: Set your model ship in the middle of the mantel.
- Add Skulls and Lanterns: Arrange the skulls and lanterns around the ship. Put a pirate hat on one skull to make him the captain.
- Scatter the Treasure: Sprinkle the plastic starfish and seashells around the scene.
- Final Touches: Tie a few knots in the rope and let it hang off the side of the mantel as if it’s tied to a dock.
8. Extraterrestrial Encounter Shelf

This display is straight out of a science fiction movie. The scene is set against a starry backdrop, looking into the depths of space. Glowing crystals and beakers filled with bubbling green liquid suggest a strange experiment is underway.
Little green aliens are inspecting the area, but the human skull hints that things may have gone wrong. The cool blue and green lights give the whole setup a futuristic and mysterious glow. It’s a creative choice for sci-fi fans.
DIY Instructions:
You can create your own alien laboratory.
What You’ll Need:
- Black poster board and a white paint pen.
- A strip of LED lights.
- Clear plastic crystals or real quartz rocks.
- Small, battery-powered push lights.
- A plastic skull.
- Glass beakers or jars.
- Water and green food coloring.
- Toy alien figures.
Step-by-Step Guide:
- Create Your Galaxy: Use the white paint pen to dot stars all over the black poster board. Place this as your background.
- Add Cool Lighting: Stick the LED light strip along the top or bottom edge of your shelf or mantel.
- Make Glowing Crystals: Place a small push light underneath each of your clear crystals to make them light up from within. Arrange them on the shelf.
- Mix the Alien Goo: Fill your beakers or jars with water and add a few drops of green food coloring.
- Set the Scene: Place the human skull in the middle of the display. Arrange the toy aliens around it as if they are exploring.
- Finishing Touches: Add any other sci-fi looking items you have, like silver tubes or wires, to complete the lab look.
9. Mystic Fortune Teller’s Altar

Peer into the future with this magical mantel display. It’s set up like a fortune teller’s table, with a glowing crystal ball at its heart. Tarot cards are spread out, ready for a reading, surrounded by beautiful amethyst and quartz crystals.
Richly colored fabrics and mysterious purple candles create an enchanting mood. The air seems thick with magic and secrets. This is a beautiful and intriguing theme for anyone who loves the mystical side of Halloween.
DIY Instructions:
You can set up your own fortune teller’s altar easily.
What You’ll Need:
- A dark purple or blue piece of fabric or a scarf.
- A clear glass ball or a toy crystal ball.
- A deck of tarot cards (or playing cards).
- Purple and blue candles.
- Various cool-looking rocks and crystals.
- A small stand for the crystal ball.
- A small light to place under the ball.
Step-by-Step Guide:
- Lay the Tablecloth: Drape your dark, colorful fabric over the mantel.
- Feature the Crystal Ball: Place the small stand in the center and set the crystal ball on top. Put the small light underneath it to make it glow.
- Spread the Cards: Arrange some of the tarot cards in a fan shape in front of the crystal ball.
- Add Candlelight: Safely place the purple and blue candles around the display. Ask an adult to help you light them.
- Scatter Crystals: Arrange all of your other cool rocks and crystals around the candles and cards.
- Final Touches: You can add other mystical items, like a decorative hand model for palm reading, to complete the look.
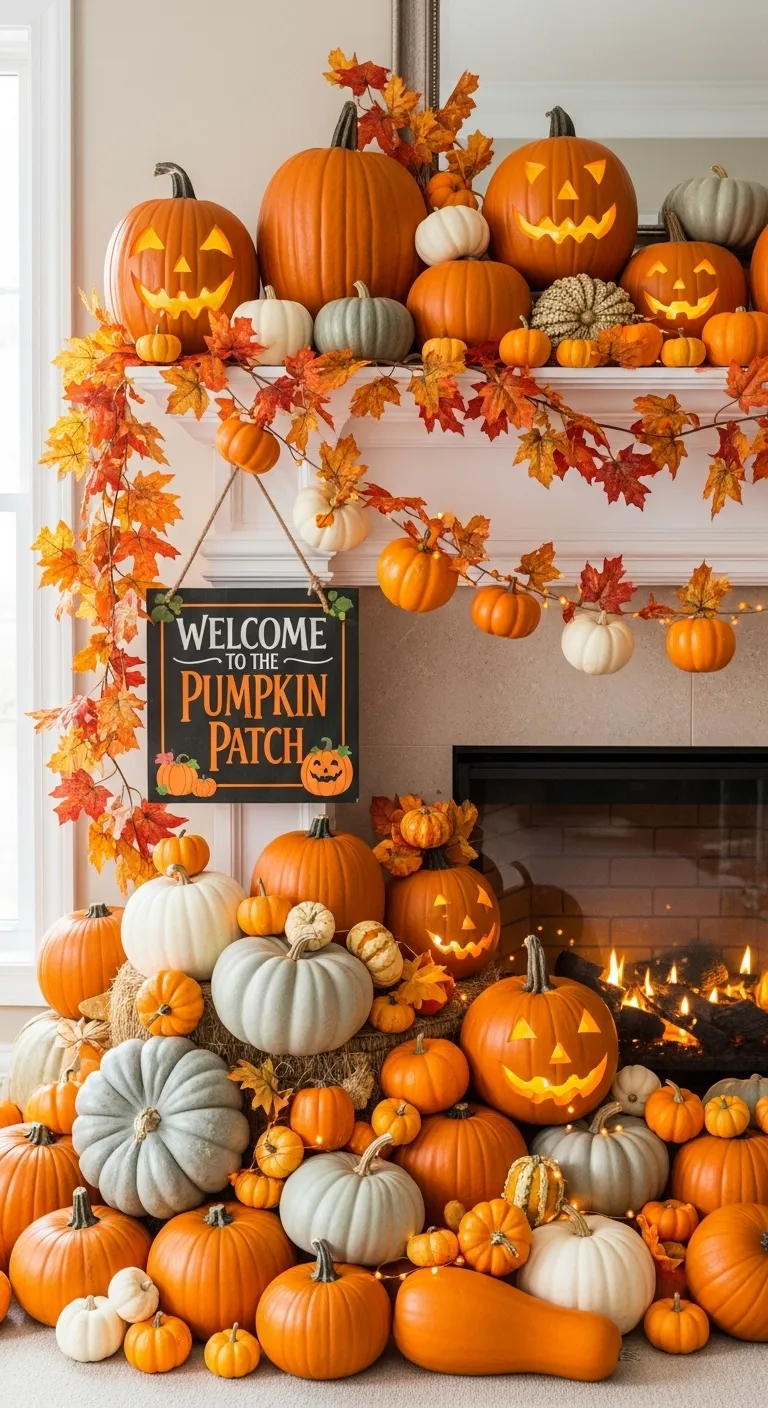
10. Harvest Farmhouse Halloween Porch

This Halloween display is cozy and welcoming. It uses natural, rustic elements to create a charming farmhouse feel. A hay bale serves as the base for a collection of white and orange pumpkins in all shapes and sizes.
Weathered lanterns with warm, glowing candles add a gentle light. Bundles of dried wheat and a burlap garland with dried corn cobs bring in textures from the harvest. It’s a friendly and festive way to say “Happy Halloween” without being too scary.
DIY Instructions:
Create this warm and rustic scene with these steps.
What You’ll Need:
- A small hay bale (or a box covered in burlap).
- A variety of pumpkins (real or fake).
- A wooden “Happy Halloween” sign.
- Rustic metal lanterns with battery-powered candles.
- Bundles of dried wheat or corn stalks.
- A burlap ribbon.
- Cute scarecrow figures.
Step-by-Step Guide:
- Set Up Your Base: Place the hay bale on your mantel or porch steps.
- Arrange Your Pumpkins: Group the pumpkins of different sizes on and around the hay bale. Put the biggest ones on the bottom.
- Place Your Sign: Lean the “Happy Halloween” sign against the hay bale so it’s easy to read.
- Add a Warm Glow: Position the lanterns in different spots around the pumpkins.
- Add Harvest Touches: Tuck the bundles of dried wheat in between the pumpkins. You can make a simple garland by tying pieces of burlap ribbon together and hang it above your display.
- Invite Some Friends: Add the small scarecrow figures, sitting them on the pumpkins or the hay bale to finish your friendly harvest scene.
11. Gilded Entomologist’s Collection

This display combines creepy crawlies with a touch of glamour. It’s designed to look like a museum exhibit from a mysterious collector. Framed insects, all painted in brilliant gold, are arranged neatly against a black background.
The metallic shine makes the bugs and spiders feel like precious jewels. Black pumpkins and candles add to the dark, academic vibe. It is a sophisticated and stunning way to make insects beautiful instead of just scary.
DIY Instructions:
You can assemble your own gilded bug collection.
What You’ll Need:
- Plastic toy insects (spiders, beetles, moths).
- Gold spray paint.
- Black picture frames or shadow boxes of various sizes.
- Black construction paper.
- A hot glue gun.
- Black craft pumpkins.
Step-by-Step Guide:
- Gild Your Bugs: In a well-ventilated area, lay your plastic insects on some newspaper. Spray paint them all with a coat of gold paint. Let them dry completely.
- Prepare Your Frames: Cut the black construction paper to fit inside each of your frames.
- Mount Your Specimens: Use a small dot of hot glue to attach one or two of your golden insects inside each frame.
- Arrange Your Exhibit: Lean and stack your framed insects on the mantel. Create different levels for visual interest.
- Add Accessories: Place the black pumpkins among the frames. You can also glue a few smaller golden bugs onto the pumpkins.
12. Sweet Candy Corn Delight

This mantel is a sweet tribute to a classic Halloween candy. The entire display is an explosion of orange, yellow, and white. Large glass apothecary jars are filled to the brim with candy corn, creating a colorful and tempting sight.
A wreath made entirely of the little candies adds a fun focal point. Even the garland is made of strung-together candy corn. Striped pumpkins and warm candles complete this cheerful and delicious-looking theme.
DIY Instructions:
Here’s how to cook up this sweet display.
What You’ll Need:
- Lots of candy corn.
- Large glass jars with lids.
- A foam wreath form (the flat kind works best).
- A hot glue gun.
- A needle and strong thread or fishing line.
- Small pumpkins (real or fake).
- White and orange craft paint.
Step-by-Step Guide:
- Fill Your Jars: This is the easiest step! Carefully fill your glass jars with candy corn and put the lids on. Arrange them on your mantel.
- Make the Wreath: Working in small sections, apply hot glue directly to the foam wreath form. Press the candy corn pieces onto the glue, side-by-side, until the whole form is covered.
- String the Garland: Carefully thread your needle. Push the needle through the center of each piece of candy corn. Keep adding candy until your garland is the length you want.
- Paint the Pumpkins: Paint some of your small pumpkins solid white. Once they are dry, add orange stripes.
- Assemble the Scene: Hang your candy corn wreath on the wall. Drape the garland in front of the jars. Place your striped pumpkins and a few candles in between everything.
13. Pastel “Wicked” Mantel

This look mixes sweet and spooky for a modern Halloween vibe. The pastel colors of pink, mint green, and lavender are a fresh change from traditional orange and black. An iridescent skull and a pink neon “Wicked” sign are the stars of the show.
Pumpkins get a makeover with pastel paint and spooky black drips. The soft colors and cute ghost garland make it feel playful. This is a great choice for someone who loves a trendy, less scary style.
DIY Instructions:
You can create this stylishly spooky scene.
What You’ll Need:
- An iridescent or chrome-colored plastic skull.
- A pink neon-style sign.
- Craft pumpkins.
- Pastel-colored craft paint.
- Black paint.
- Black vases and dark flowers.
- Felt or paper for a ghost and pom-pom garland.
Step-by-Step Guide:
- Paint Your Pumpkins: Paint your craft pumpkins in solid pastel colors. Let them dry.
- Add the Drips: Turn the pumpkins upside down. Pour a little bit of black paint around the stem area and let it drip down the sides.
- Set the Centerpiece: Place the iridescent skull in the middle of the mantel. Hang the neon sign on the wall just above it.
- Arrange Everything: Place your drip-painted pumpkins on either side of the skull. Add the black vases with dark flowers.
- Make a Garland: Cut out some cute ghost shapes from glittery paper. Make some small pom-poms from pastel yarn. String them all together to create a garland and hang it on the wall.
14. Escaping Bat Swarm

This is a simple idea with a huge impact. A massive swarm of black paper bats appears to be flying right out of the fireplace and across the wall. The movement creates a dramatic and slightly startling effect.
The rest of the mantel is kept simple with a black mirror and a few black candles. This minimalist approach makes the bat swarm the undeniable focus. It proves that you don’t need a lot of stuff to create a powerful Halloween look.
DIY Instructions:
Unleash your own bat swarm in a few easy steps.
What You’ll Need:
- Black cardstock or construction paper.
- A bat-shaped stencil or cookie cutter (or you can draw your own).
- Scissors.
- Removable wall-safe tape or sticky tack.
Step-by-Step Guide:
- Create Your Bats: Trace the bat shape onto the black paper many, many times. Try making them in a few different sizes to look more realistic.
- Cut Them Out: Carefully cut out all of your bat shapes. This is the most time-consuming part, so maybe put on a spooky movie while you do it!
- Give Them Life: Fold each bat’s wings up slightly on either side of its body. This makes them look 3D and like they are really flying.
- Plan Your Path: Decide where you want your swarm to start and end. It looks great starting from a corner, a mirror, or the fireplace opening.
- Stick Them Up: Take a small piece of wall-safe tape and stick one bat on the wall. Keep adding more, placing them close together at the start and spreading them out as they fly across the room.
15. Legend of Sleepy Hollow Scene

Bring a classic ghost story to life on your mantel. This miniature scene captures the terrifying mood of Sleepy Hollow. A gnarled, spooky tree looms over a glowing jack-o’-lantern, waiting for Ichabod Crane.
A wooden sign points the way to the haunted village. A dark raven watches from above, and a layer of fog rolls across the ground. It feels like you’ve stepped right into the pages of the famous tale.
DIY Instructions:
Build your own spooky Sleepy Hollow.
What You’ll Need:
- Craft moss.
- A few spooky-looking branches from your yard.
- A craft pumpkin and a battery-powered light.
- A toy raven or crow.
- Small craft wood pieces and a brown marker for the sign.
- A small fog machine or dry ice (with adult supervision).
Step-by-Step Guide:
- Create the Ground: Lay the craft moss across your mantel to look like a grassy, haunted hill.
- Plant the Tree: Stick the spooky branches into the moss at one end so they stand up like a scary old tree.
- Carve Your Pumpkin: Carefully carve a menacing face into your craft pumpkin. Place the battery-powered light inside and set it on the moss.
- Make the Sign: Write “Sleepy Hollow” on the small piece of craft wood with the marker. Glue it to a small stick and poke it into the moss.
- Add the Fog: If you have a small fog machine, place it behind your scene. For a similar effect, an adult can place a small bowl with a little water and a piece of dry ice behind the display.
- Final Touches: Perch the toy raven on a branch of your spooky tree.
16. Cthulhu’s Cosmic Study

This mantel looks like it belongs to a sea-faring explorer who discovered ancient, otherworldly secrets. The scene is filled with old books, nautical charts, and strange artifacts from the deep.
Several octopuses, representing a cosmic horror, crawl over the display. Glowing green geometric shapes and a telescope hint at knowledge from beyond the stars. It is a wonderfully detailed and creepy theme for fans of sci-fi and horror.
DIY Instructions:
Assemble your own desk of cosmic horrors.
What You’ll Need:
- A stack of old-looking books.
- Toy octopus figures.
- A printed star chart or old map.
- Glass domes or jars.
- Green glow sticks or battery-powered green lights.
- A toy telescope.
- Other old-looking items like magnifying glasses or compasses.
Step-by-Step Guide:
- Set the Scene: Tape the star chart to the wall behind your mantel. Stack the old books in several piles of different heights.
- Unleash the Octopus: Drape your toy octopuses over the books and around the mantel.
- Create Glowing Artifacts: Activate your green glow sticks and place them inside the glass domes or jars. This will create a mysterious, alien glow.
- Add Explorer’s Tools: Place the toy telescope on one side of the display. Scatter other items like a magnifying glass or an old compass around the books.
- Final Touches: Arrange everything to look like the messy desk of a very busy and possibly mad scientist or explorer.
17. The Archaeologist’s Forbidden Finds

Turn your mantel into a natural history museum exhibit. This display is filled with fascinating and spooky specimens. Skulls, skeletons, and giant insects are presented as if they are priceless scientific discoveries.
Glass domes, old books, and magnifying glasses add to the academic feel. Little signs that say “Do Not Touch” make the collection feel even more mysterious and important. It is a clever and educational approach to Halloween decor.
DIY Instructions:
You can curate your own spooky museum exhibit.
What You’ll Need:
- Plastic skulls (human and animal).
- A small toy dinosaur skeleton.
- A large plastic insect toy.
- Glass domes.
- A stack of old books.
- A magnifying glass.
- Small pieces of paper and a pen to make labels.
- A desk lamp for lighting.
Step-by-Step Guide:
- Stack Your Platforms: Use the old books to create different levels for your display items.
- Display Your Specimens: Arrange the skulls and the dinosaur skeleton on top of the books.
- Protect the Prize: Place your most interesting items, like a large skull or the giant insect, underneath the glass domes.
- Make Your Labels: Write spooky or scientific-sounding names on the small pieces of paper. Place a label in front of each skull or skeleton. You can even make a “Do Not Touch” sign.
- Add the Final Touches: Place the magnifying glass near one of the smaller items. Position the desk lamp to shine a spotlight on your amazing collection.
18. Modern Minimalist Ghosts

This Halloween decor is clean, simple, and very chic. It shows that you can be spooky without a lot of clutter. The main decorations are cute, ghost-shaped candles that add a touch of whimsy.
Matte black vases with a single bare branch provide a stark, artistic contrast to the white mantel. A simple piece of black and white line art ties the whole look together. This is a great choice for a modern home.
DIY Instructions:
Achieve this simple and stylish look at home.
What You’ll Need:
- White ghost-shaped candles.
- Several glass vases in different shapes.
- Matte black spray paint.
- A thin, bare branch from outside.
- A simple black picture frame.
- A piece of white paper and a black marker.
Step-by-Step Guide:
- Paint Your Vases: In a well-ventilated area, spray paint your glass vases with the matte black paint. Let them dry completely.
- Create Your Art: On the piece of white paper, use the black marker to draw a very simple spooky picture, like a single spiderweb in a corner. Put it in the frame.
- Arrange the Vases: Group your black vases on one side of the mantel. Place the bare branch in the tallest vase.
- Place Your Ghosts: Arrange the cute ghost candles on the other side of the mantel.
- Final Placement: Lean your framed drawing against the wall in the center of the display. That’s it!
19. Celestial Moon Witch Altar

This mantel is filled with magic and cosmic energy. The theme is inspired by the moon, stars, and modern witchcraft. A beautiful garland of moon phases and glittering stars hangs above the display.
Deep blue fabrics and candles create a night-sky atmosphere. White selenite crystal towers and sage bundles add to the mystical feeling. It’s a serene and enchanting setup that feels both powerful and peaceful.
DIY Instructions:
You can build your own magical moon altar.
What You’ll Need:
- Dark blue velvet fabric.
- Glittery silver and blue craft paper.
- Scissors and string.
- Blue candles.
- White rocks or crystals.
- Jars with cork lids filled with herbs or tea.
Step-by-Step Guide:
- Drape Your Fabric: Cover your mantel with the dark blue fabric to create a base that looks like the night sky.
- Make the Garland: Cut out crescent moon, full moon, and star shapes from the glittery paper. Use a hole punch and some string to connect them all into a long garland. Hang it on the wall above the mantel.
- Set Up Your Altar: Arrange the blue candles safely on the mantel. Place your white rocks or crystals in groups.
- Add Magical Items: Place your jars of herbs around the display. You can also add other magical-looking items like bundles of dried herbs (sage) or a deck of tarot cards.
- Final Touches: Sprinkle a little bit of silver glitter on the blue fabric to look like distant stars.
20. Vibrant Day of the Dead Fiesta

This display is a colorful and joyful celebration. It is inspired by the beautiful traditions of Día de los Muertos (Day of the Dead). The mantel is covered with pumpkins that have been painted to look like festive sugar skulls.
Jars are filled with colorful candies, and cupcakes are decorated with their own tiny skulls. The whole scene is bright, cheerful, and full of life. It’s a wonderful way to honor the holiday with art and sweet treats.
DIY Instructions:
You can host your own Day of the Dead celebration on your mantel.
What You’ll Need:
- White craft pumpkins.
- Brightly colored paint pens (pinks, blues, oranges, greens).
- Black paint pen.
- Glass jars.
- Colorful candy.
- Cupcakes with white frosting.
- Black and white ribbon.
Step-by-Step Guide:
- Paint Your Sugar Skulls: Use the black paint pen to draw two big circles for eyes, an upside-down heart for a nose, and a line with stitches for a mouth on a white pumpkin.
- Add Color and Detail: Use the colorful paint pens to draw flower shapes around the eyes. Add dots, swirls, and other fun designs all over the pumpkin’s “face.” Decorate all your pumpkins this way.
- Set Up Your Treat Table: Cover your mantel with a black cloth. Arrange your painted pumpkins on cake stands to give them different heights.
- Fill the Jars: Fill your glass jars with different kinds of colorful and black-and-white candy. Tie a piece of black and white ribbon around the top of each jar.
- Decorate the Cupcakes: Use a black paint pen or black icing to draw simple skull faces on your cupcakes. Arrange them on the mantel with the pumpkins and candy jars.
21. Film Noir Detective’s Office

Step back in time to a smoky, black-and-white mystery. This scene is set up like a private eye’s desk from a classic 1940s film. The dramatic shadows from window blinds, a vintage rotary phone, and a tilted fedora create an unmistakable mood.
A wisp of smoke rises mysteriously, hinting that the detective has just stepped away. A “Top Secret” case file and a lone bullet on the desk suggest a dangerous new case has just begun.
DIY Instructions:
You can create your own detective story scene.
What You’ll Need:
- A desk lamp.
- An old-style hat like a fedora.
- A toy rotary phone or an old phone.
- Some file folders and a black marker.
- A small glass and a bottle.
- A window blind or black paper cut into strips.
Step-by-Step Guide:
- Set the Scene: Place your lamp, phone, and file folders on the mantel or a small table. Write “Case File” or “Top Secret” on the folders.
- Create Dramatic Lighting: If you don’t have a window with blinds, you can make your own shadows. Cut long, even strips from black paper and tape them to a wall. Shine the lamp through them onto your display.
- Add the Props: Place the fedora hat on a corner of the desk. Set out the glass and bottle.
- Hint at a Mystery: You can add other small, mysterious items like a single key, a magnifying glass, or a fake bullet to make the scene more interesting.
- Turn Down the Lights: This look works best in a dimly lit room to make the shadows stand out.
22. Haunted Shadow Box Theatre

This is a beautiful and clever way to tell a spooky story. A backlit picture frame is transformed into a miniature theatre. Inside, black paper silhouettes of a haunted house, a witch, and trick-or-treaters create a magical scene.
The layers of paper cutouts give the display amazing depth. The soft glow from behind makes it feel like you are looking into another world. It’s a charming and artistic piece that captures the fun of Halloween night.
DIY Instructions:
You can build your own little haunted theatre.
What You’ll Need:
- A deep picture frame (a shadow box).
- Black cardstock or stiff paper.
- Scissors or a craft knife.
- Thin wooden skewers or sticks.
- White tissue paper.
- Battery-powered string lights (fairy lights).
- Tape or a glue gun.
Step-by-Step Guide:
- Create Your Silhouettes: Draw or trace spooky shapes onto the black paper. Think of a haunted house, a gnarled tree, bats, and character shapes. Carefully cut them out.
- Make Your Puppets: Glue some of your smaller shapes, like the witch or the kids, onto the ends of the wooden skewers so they can stand up.
- Prepare the Stage: Cut the tissue paper to fit the back of the frame and tape it in place. This will soften the light.
- Set Up the Lights: Tape the string of battery-powered lights to the very back of the shadow box, behind the tissue paper.
- Assemble the Scene: Place your silhouette shapes inside the box. Put the larger items like the house and tree in the back. Place the stick puppets in the front to create layers.
- Turn it On: Switch on the lights and watch your spooky scene glow!
23. Mystical Moonlit Fairy Ring

This enchanting display looks like a magical scene from a deep forest. A tiny cauldron bubbles with a green potion in the center of a mossy clearing. The whole scene is watched over by a giant, glowing full moon.
Bare, twisted branches frame the scene like spooky trees, while tiny fairies and gnomes hide among toadstools and crystals. The purple and green lights give it a supernatural and whimsical feeling.
DIY Instructions:
You can grow your own magical fairy ring.
What You’ll Need:
- A round base (like a pizza pan or large piece of cardboard).
- Craft moss.
- A small black pot for the cauldron.
- A small water mister/fogger, or cotton balls.
- A large white circle cut from foam board for the moon.
- Bare branches and twigs.
- Purple string lights.
- Small fairy, gnome, and mushroom figurines.
Step-by-Step Guide:
- Build Your Forest Floor: Glue craft moss all over your round base.
- Place the Cauldron: Set the small black pot in the middle of the moss. To make it “bubble,” you can use a mini water fogger. Or, you can stretch out some cotton balls and add a drop of green food coloring.
- Hang the Moon: Attach your large white moon to the wall behind the mantel.
- Add the Trees: Stick the bare branches into the mossy base around the edges of your scene. Drape them with the purple string lights.
- Invite the Fairies: Arrange your fairy, gnome, and mushroom figurines around the cauldron to complete your magical forest scene.
24. The Final Hour Clock Collection

This mantel creates a spooky feeling that time is running out. A large collection of antique and old-fashioned clocks are stacked together. They are all covered in cobwebs and tangled in rusty chains.
Tiny ghosts pop out from behind the clocks, as if they are haunting time itself. A sign that reads “The Final Hour” adds to the suspense. A single, bare Edison bulb hanging from above casts a dim, eerie light over the whole scene.
DIY Instructions:
It’s easy to make time stand still with this display.
What You’ll Need:
- Old clocks (check thrift stores or print pictures of clock faces).
- Sturdy boxes to stack.
- Black or brown fabric.
- Stretchy spider web material.
- Plastic chains.
- Small ghost figurines.
- A hanging light bulb (battery-powered is safest).
Step-by-Step Guide:
- Build Your Tower: Stack the boxes on your mantel to create a tower of different heights. Drape the dark fabric over them.
- Arrange the Clocks: Place your old clocks all over the tower. If you are using pictures, glue them onto cardboard cutouts first. Lean them against the boxes.
- Add Chains and Cobwebs: Drape the plastic chains over and around the clocks. Stretch the spider web material all over everything to make it look old and dusty.
- Add Your Ghosts: Hide the small ghost figures so they are peeking out from behind the clocks.
- Light the Scene: Safely hang your light bulb so it shines down on your clock collection.
25. Elegant Gothic Dinner Party

This display is set for a fancy and frightening dinner party. The table is decorated with rich, dark colors and luxurious textures. Red and gray velvet pumpkins are a centerpiece, surrounded by ornate silver candelabras.
Dozens of white candles are dripping with melted wax, making the scene feel old and romantic. A vintage mirror covered in spiderwebs and a black lace table runner complete the elegant vampire theme.
DIY Instructions:
You can set your own spooky, sophisticated table.
What You’ll Need:
- A black tablecloth and a black lace runner.
- Silver-colored candle holders.
- Lots of white taper candles.
- Craft pumpkins and different colors of velvet fabric.
- A hot glue gun.
- An old, fancy mirror.
- Stretchy spider web material.
Step-by-Step Guide:
- Set the Table: Lay down your black tablecloth and put the lace runner down the middle.
- Make Velvet Pumpkins: Cut a circle out of the velvet fabric. Place a craft pumpkin in the middle and pull the fabric up and around it. Use the hot glue gun to secure the fabric at the stem.
- Arrange the Centerpiece: Place your velvet pumpkins in the center of the table. Arrange the silver candle holders around them.
- Add the Candles: Put the white candles in the holders. For a drippy look, you can light them for a few minutes and let the wax run down the sides before you put them on display.
- Final Touches: Lean the old mirror against the wall behind your table. Stretch a thin layer of spiderwebs over it.
26. Murder Mystery Evidence Board

This mantel invites your guests to solve a crime. The display is a detective’s evidence board from a murder mystery. Black and white photos of the suspects are pinned up and connected with ominous red string.
Various clues, like a lipstick tube, a key, and a feather, are tagged as “Evidence.” Blood spatters on the board show that this was a messy crime. It’s an interactive and engaging theme that will get everyone talking.
DIY Instructions:
You can create your own “whodunit” mystery board.
What You’ll Need:
- A black foam board or corkboard.
- Old black and white photos (you can print these from the internet).
- Red yarn or string.
- Thumbtacks.
- White paper tags.
- A black marker.
- Small, mysterious items (a key, a feather, etc.).
- Red paint.
Step-by-Step Guide:
- Set Up Your Board: Lean your black board against the wall on your mantel.
- Identify Your Suspects: Pin the black and white photos onto the board in different spots.
- Connect the Clues: Use the red yarn to connect the different photos. Criss-cross the yarn all over the board. Secure it with thumbtacks.
- Tag the Evidence: Write “EVIDENCE” on the paper tags. Attach a tag to your small mystery items and pin them to the board.
- Add the Blood: Dip an old toothbrush in the red paint. Flick the bristles with your thumb to create a blood spatter effect on the board. Let it dry completely.
27. Edgar Allan Poe’s Gothic Study

This mantel is a tribute to the master of macabre literature. The scene looks like the dark and cluttered desk of a gothic writer. Stacks of old, leather-bound books are everywhere, topped with human skulls.
A black raven, inspired by the famous poem, perches on a stack of books. Framed quotes, quill pens in inkwells, and flickering candles create a scholarly and spooky atmosphere. It’s a great theme for book lovers.
DIY Instructions:
You can build your own writer’s gothic retreat.
What You’ll Need:
- Lots of old-looking books.
- A toy raven or crow.
- Two plastic skulls.
- White candles in holders.
- A feather and a small bottle for an inkwell.
- A few simple picture frames.
- A printer to print quotes.
- An old-style lamp.
Step-by-Step Guide:
- Stack the Books: Create several tall stacks of books on your mantel.
- Place the Skulls: Use the plastic skulls as bookends or place them on top of some of the book stacks.
- Add the Raven: Perch your toy raven on the highest stack of books so it can look over the whole scene.
- Frame the Quotes: Print out a few spooky lines from a poem in a fancy font. Put them in the picture frames and lean them against the books.
- Add Writer’s Tools: Place your feather quill in the “inkwell” bottle. You can also add a magnifying glass or old-fashioned spectacles.
- Light the Scene: Arrange the candles safely among the books. Use the lamp to cast a warm, moody light.
28. Apothecary of Potions & Elixirs

These shelves are stocked for a busy witch or wizard. The display is an old-fashioned apothecary, filled with glass jars and bottles. Each container has a creepy, handwritten label for ingredients like “Wolfsbane” and “Dragon’s Breath.”
Dried herbs, mysterious mushrooms, and old books are squeezed in between the potions. A stone mortar and pestle sits ready to grind up new ingredients. The green and purple lights give the whole collection a magical glow.
DIY Instructions:
You can mix up your own shelf of spooky potions.
What You’ll Need:
- A collection of empty glass bottles and jars in different shapes and sizes.
- Paper, a pen, and a tea bag.
- A hot glue gun and red wax (from a crayon or candle).
- Things to fill your jars: colored water, dried beans, glitter, herbs, plastic bugs.
- Dried flowers or weeds from the yard.
- A small bowl and a stone or small rock.
Step-by-Step Guide:
- Age Your Labels: Write spooky ingredient names on small pieces of paper. Brew a cup of tea, then dab the wet tea bag all over the labels to make them look old and stained.
- Fill Your Bottles: Fill each bottle with something different. Glue the aged labels onto the front.
- Seal the Potions: Put the corks or lids on your bottles. To make a wax seal, carefully melt a red crayon and let a few drops fall onto the cork. Press a coin or button into the warm wax.
- Stock Your Shelves: Arrange your finished potion bottles on the mantel or some shelves.
- Add a Mortar and Pestle: Place some dried herbs in a small bowl and add a smooth rock to look like you are ready to grind ingredients.
- Final Touches: Tuck the dried flowers and weeds in between the bottles to complete the look.
29. Biohazard Zone Breakout

This mantel looks like a science experiment has gone terribly wrong. The whole scene is bathed in a toxic green glow. Small barrels with biohazard symbols are overflowing with slimy, neon green goo.
Beakers and flasks filled with the same glowing liquid are lined up, ready for a mad scientist. The area is quarantined with yellow “CAUTION” tape, but it looks like the toxic ooze is already escaping.
DIY Instructions:
You can create your own toxic waste spill.
What You’ll Need:
- Small black containers (like coffee cans or small buckets).
- Biohazard stickers or a yellow paint pen.
- Green glow-in-the-dark paint or clear glue mixed with green food coloring.
- Clear glass or plastic bottles.
- Green glow sticks.
- Yellow “CAUTION” tape.
Step-by-Step Guide:
- Label Your Barrels: Place the biohazard stickers on your black containers. If you don’t have stickers, you can draw the symbol with a yellow paint pen.
- Create the Slime: Mix up your green slime. Drip it all over the tops of the barrels and let it run down the sides.
- Fill the Beakers: Fill your clear bottles with water. Activate the green glow sticks, drop them inside, and put the lids on. The water will glow bright green.
- Arrange the Scene: Place your barrels and glowing beakers on the mantel.
- Quarantine the Area: Drape the yellow “CAUTION” tape across the front of the mantel and on the wall behind it.
30. Hall of Haunting Spirits

This simple but very effective display fills the room with ghosts. The spirits are made from white sheets draped over mirrors, making it look like they are floating out of the reflections.
The ghosts have dark, hollow eyes and hang in the air with their tattered ends drifting down. The only light comes from a cluster of white candles, which makes the ghosts and their reflections flicker and dance. It’s a beautifully spooky and ethereal scene.
DIY Instructions:
You can easily invite these friendly ghosts into your home.
What You’ll Need:
- A few old mirrors in different sizes.
- Old white bedsheets or cheesecloth.
- Scissors.
- Small foam balls or balloons.
- String or fishing line.
- Black felt and glue.
- White battery-powered candles.
Step-by-Step Guide:
- Arrange Your Mirrors: Lean the mirrors against the wall on your mantel.
- Create the Ghost’s Head: Place a foam ball or a small, inflated balloon on a table.
- Drape the Sheet: Cut a piece of the sheet and drape it over the ball. The size of the sheet will determine the size of your ghost.
- Shape Your Ghost: Tie a piece of string under the ball to create a neck. Cut the bottom of the sheet into tattered strips.
- Give It a Face: Cut out two oval shapes from the black felt and glue them on as eyes.
- Hang Your Ghosts: Use fishing line to hang your ghosts from the ceiling or tape them to the wall so they float in front of the mirrors. Make a few ghosts of different sizes and place them around the candles.
31. Mad Scientist’s Glowing Laboratory

This mantel looks like a chaotic laboratory where a brilliant but dangerous experiment is happening. The scene is cluttered with anatomical charts, smoking beakers, and jars filled with glowing eyeballs. A plasma ball crackles with energy in the center.
Vintage light bulbs and strange metal contraptions add to the scientific vibe. The bright colors of the bubbling liquids—blue, green, and red—create a vibrant and exciting display. It feels like you’ve stumbled into a classic monster movie.
DIY Instructions:
You can build your own mad scientist’s lab.
What You’ll Need:
- A plasma ball.
- Glass jars and beakers.
- Water and food coloring.
- Glow sticks (green, blue, red).
- Toy eyeballs.
- Old charts or diagrams of the human body.
- A few old-looking books.
Step-by-Step Guide:
- Set the Scene: Tape the anatomical charts to the wall behind your mantel.
- Activate the Centerpiece: Place your plasma ball in the middle of the display.
- Mix Your Concoctions: Fill your jars and beakers with water. Add a few drops of different colored food coloring to each one. To make them glow, activate a glow stick and drop it inside.
- Create Specimen Jars: Fill a few jars with water and the toy eyeballs. You can make little labels that say “Freshly Picked” for a creepy touch.
- Add Scientific Clutter: Stack the old books and place any other science-y items like test tubes or gears around the display.
32. Creepy Carnival Sideshow

Welcome to the scariest show on earth. This mantel is a vintage carnival sideshow full of creepy clowns and unsettling attractions. The dolls are the main focus, with their cracked faces and sinister smiles, displayed under glass domes like prized possessions.
A faded “Carnival” banner hangs over a red and white striped background. Spider-infested popcorn and old-timey admission tickets are scattered about, making it feel like a real, haunted circus.
DIY Instructions:
You can run away and join this creepy circus.
What You’ll Need:
- Red and white striped fabric or paper for the background.
- Creepy-looking clown dolls.
- Glass domes or large glass jars.
- A printer to make a “Carnival” sign and tickets.
- Popcorn boxes and plastic spiders.
- A few old wooden boxes to use as stands.
Step-by-Step Guide:
- Create the Big Top: Hang the red and white striped fabric as your backdrop. Print out the letters for “CARNIVAL,” cut them out, and string them together to make a banner.
- Display Your Freaks: Place your creepy clown dolls on top of the old wooden boxes. Cover the most unsettling ones with the glass domes.
- Add the Details: Scatter your printed admission tickets around the scene.
- Serve Spooky Snacks: Fill the popcorn boxes and add a few plastic spiders on top.
- Final Touches: Use dim, warm lighting to make the whole scene feel old and mysterious, just like a traveling carnival from a scary story.
33. Don’t Blink! Weeping Angel Garden

This mantel is a terrifying tribute to a famous TV monster. A whole flock of stone angels has gathered in a graveyard scene. They are all covering their eyes, but you know they are just waiting for you to look away.
A single, stark light bulb hangs over them, casting long shadows. A small, simple sign gives a clear warning: “Don’t Blink.” It’s a powerful and scary display that uses suspense to create a truly chilling effect.
DIY Instructions:
You can build your own terrifying angel trap.
What You’ll Need:
- Small angel or cherub statues (from a garden or craft store).
- Gray craft paint and a sponge.
- Craft moss.
- A few small stone-like blocks or pillars.
- A small piece of wood for the sign and a black marker.
- A single hanging light bulb (battery-powered is safest).
Step-by-Step Guide:
- Make Your Statues: If your angels aren’t already stone-colored, paint them gray. Dab on some darker gray or black paint with a sponge to make them look like old, weathered stone.
- Create the Graveyard: Lay down the craft moss on your mantel. Arrange the stone blocks and pillars to create a cemetery look.
- Place the Angels: Arrange your painted angel statues on the moss and pillars. Make sure most of them have their faces hidden.
- Write the Warning: Use the black marker to write “DON’T BLINK” on the small piece of wood. Stick it in the moss.
- Set the Mood: Hang the single light bulb over the center of your scene to create dramatic, scary shadows.
34. A Raven’s Midnight Roost

This display is a dark and poetic scene straight from a gothic story. A whole flock of black ravens and a few watchful owls have taken over some bare, spooky branches. In the center, a vintage birdcage stands open, as if its prisoner has just escaped.
A framed portrait of Edgar Allan Poe, author of “The Raven,” watches over the scene. The dark, moody lighting and the full moon in the background make this a beautifully eerie and literary display.
DIY Instructions:
You can create this dark gathering of birds.
What You’ll Need:
- Several bare branches from your yard.
- A vase or pot to hold the branches.
- Toy ravens and owls of different sizes.
- A white or silver vintage-style birdcage.
- A printed picture of Edgar Allan Poe and a simple black frame.
- A few old keys and a toy bird’s nest.
Step-by-Step Guide:
- Set Up Your Trees: Arrange the bare branches in the vase so they spread out over your mantel.
- Gather the Birds: Perch the toy ravens and owls on the branches. Use a little hot glue to secure them if needed.
- Place the Cage: Set the birdcage in the middle of the branches. You can put one or two small bats or ravens inside.
- Add a Literary Touch: Lean the framed portrait of Poe against the vase.
- Final Details: Scatter a few old keys on the mantel. Place the bird’s nest near the cage to complete your spooky, poetic scene.
35. Cozy & Cute Boho Ghosts

This Halloween decor is light, friendly, and totally charming. The look uses natural textures and a soft color palette for a modern, bohemian vibe. Adorable, smiling ghosts made of white clay are the main attraction.
White pumpkins, little wooden houses, and a chunky knit table runner add to the cozy feeling. A simple garland made of wooden beads and black bats provides a festive touch without being scary.
DIY Instructions:
You can make your own sweet and stylish ghost scene.
What You’ll Need:
- White air-dry clay.
- A black permanent marker.
- Small white craft pumpkins.
- A strand of large wooden beads.
- Black craft paper and string for the garland.
- Small, unpainted wooden houses (from a craft store).
Step-by-Step Guide:
- Make Your Ghosts: Roll the air-dry clay into a ball, then flatten the bottom so it can stand up. Gently pull the top up to form a classic ghost shape. Let it dry completely. Once dry, draw on a cute, smiling face with the marker.
- Create the Garland: Cut out a few bat shapes from the black paper. Use a hole punch to make a hole in each one. String them onto the strand of wooden beads.
- Set Your Table: Lay down your cozy runner. Arrange the white pumpkins and wooden houses on top.
- Add Your Ghosts: Place your handmade clay ghosts among the pumpkins.
- Final Touches: Hang your wooden bead and bat garland in front of your display to finish this cute and simple look.
36. Desert Goth Altar

This unique display mixes desert vibes with a dark, gothic style. The centerpiece is a striking ram’s skull, which rests on a bed of black and natural-colored sand. The scene is a miniature desert landscape.
Potted cacti and succulents are arranged around the skull, along with dark, glittering crystals. A black snake slithers through the sand. The whole thing is lit by candles in modern, geometric holders.
DIY Instructions:
You can build your own desert-inspired spooky scene.
What You’ll Need:
- A tray or shallow box to hold your scene.
- Craft sand in two colors: black and natural.
- A faux animal skull with horns.
- Several small potted cacti and succulents.
- A toy rubber snake.
- A few dark-colored rocks or crystals.
- Tea light candles and geometric holders.
Step-by-Step Guide:
- Create Your Landscape: Pour the sand into your tray. Make a winding “river” of black sand through the middle of the natural-colored sand.
- Place the Centerpiece: Set the animal skull in the middle of the black sand.
- Add the Plants: Arrange your potted cacti and succulents around the skull.
- Add Your Creatures and Crystals: Weave the toy snake through the sand. Place your dark crystals near the skull.
- Light Your Altar: Place the tea lights in their geometric holders and scatter them around the edges of your desert scene.
37. Overflowing Pumpkin Patch

This mantel is a celebration of the most iconic symbol of Halloween. The fireplace is overflowing with a huge pile of pumpkins. There are big ones, small ones, and pumpkins in shades of orange, white, and green.
A few of the pumpkins are carved into smiling jack-o’-lanterns, their faces glowing warmly. A garland of autumn leaves and tiny pumpkins is draped across the mantel. A welcoming sign completes the festive, harvest-time feeling.
DIY Instructions:
You can grow your own amazing pumpkin patch.
What You’ll Need:
- Lots and lots of craft pumpkins in different shapes, sizes, and colors.
- A few small hay bales or boxes to create height.
- Battery-powered lights or tea lights.
- A craft knife to carve a few pumpkins.
- A garland of fake autumn leaves.
- A small chalkboard sign.
Step-by-Step Guide:
- Build Your Base: Stack the small hay bales or boxes in and around your fireplace opening. This will help you use fewer pumpkins and create a fuller look.
- Start Piling Pumpkins: Begin placing your largest pumpkins on and around the base. Fill in the gaps with the smaller ones until it looks like a giant, overflowing pile.
- Carve Your Jack-o’-Lanterns: Carefully carve friendly, smiling faces into two or three of the orange pumpkins. Place a battery-powered light inside each one.
- Add the Garland: Weave the autumn leaf garland through the pumpkins on the mantel.
- Write Your Welcome: Use chalk to write “Welcome to the Pumpkin Patch” on your sign and hang it from the mantel.
38. Macabre Skeletal Menagerie

This display turns a shelf into a creepy collector’s cabinet of curiosities. The collection features the full skeletons of different animals, like a cat, a bird, and even a tiny dragon. Each one is mounted like a precious museum piece.
The skeletons are arranged on stacks of old books. Framed scientific drawings of animal anatomy hang on the wall behind them. It’s a sophisticated and spooky theme that is both fascinating and a little frightening.
DIY Instructions:
You can assemble your own creepy collection of bones.
What You’ll Need:
- Toy animal skeletons (you can find these at Halloween stores).
- Several old, dark-colored books.
- A few simple black stands (or you can make them from small blocks of wood painted black).
- A printer and a frame.
- A label maker or small strips of paper and a pen.
Step-by-Step Guide:
- Mount Your Skeletons: Hot glue the feet of each animal skeleton to a black stand or the spine of an old book so it can stand up.
- Create Your Museum: Stack the books on your shelves to create platforms of different heights. Arrange your mounted skeletons on the books.
- Add the Artwork: Find a vintage-style scientific drawing of a skeleton online and print it out. Put it in a simple gold or black frame and hang it behind your display.
- Label Everything: Use your label maker to create official-looking labels with fake Latin names for each animal. Stick a label on the stand in front of each skeleton.
39. Hedge Witch’s Herb Drying Rack

This mantel has a natural, earthy, and magical feeling. It looks like a rustic witch’s cottage where herbs are being dried for potions and spells. Large bundles of fragrant herbs like lavender and eucalyptus hang from a simple tree branch.
Below, the mantel holds everything a witch might need. Amber-colored glass jars, a stone mortar and pestle for grinding ingredients, and stacks of spellbooks tied with twine sit among glowing candles.
DIY Instructions:
You can create your own magical herb-drying station.
What You’ll Need:
- A sturdy tree branch.
- Twine.
- Bunches of dried or fake herbs (like lavender, rosemary, or eucalyptus).
- A few amber or brown glass jars.
- A small stone bowl (mortar) and a smooth rock (pestle).
- A few old books or notebooks.
- White candles.
Step-by-Step Guide:
- Hang Your Herbs: Tie the stems of your herb bunches together tightly with twine. Leave a long piece of twine at the end. Tie these bunches to your large tree branch so they hang down.
- Mount Your Rack: Safely mount the branch on the wall above your mantel.
- Arrange Your Supplies: Place the amber jars and candles on the mantel.
- Add Your Tools: Put some herbs in the stone bowl with the rock on top to create your own mortar and pestle.
- Final Touches: Tie a few of the old books together with twine and add them to your display to look like old spellbooks.
40. Glamorous Gatsby Masquerade

This Halloween theme is all about glamour and mystery. It’s styled like a lavish 1920s masquerade ball from “The Great Gatsby.” The color scheme is a dazzling mix of gold, black, and white.
Large vases are filled with dramatic white and gold feathers. A tower of champagne glasses waits for a toast. Elegant masquerade masks, strings of pearls, and glowing candles complete the luxurious and festive party atmosphere.
DIY Instructions:
You can host your own grand and glamorous Halloween ball.
What You’ll Need:
- Gold, black, and white balloons and decorations.
- Tall vases.
- Large craft feathers in white and gold.
- Plastic champagne glasses.
- A gold-colored serving tray or cake stand.
- Fancy masquerade masks.
- Strings of fake pearls and lots of candles.
Step-by-Step Guide:
- Set the Scene: Create a backdrop with black fabric and hang gold and white balloons.
- Build Your Centerpieces: Fill the tall vases with the large white and gold feathers and place them on either side of your display.
- Create a Champagne Tower: Carefully stack the plastic champagne glasses in a pyramid shape on a gold tray.
- Add the Mystery: Scatter the masquerade masks and strings of pearls all around the table.
- Light It Up: Place lots of candles in fancy holders all around the display to make everything glitter and shine. A gold sunburst mirror on the wall adds an extra touch of art deco style.
41. Bayou Voodoo Altar

This mantel is dripping with the mysterious magic of the Louisiana bayou. The scene is dominated by a gnarled piece of driftwood, draped in spooky Spanish moss. This creates the feeling of an ancient swamp tree.
Voodoo dolls, shrunken heads, and jars filled with strange herbs are scattered around the altar. Skulls marked with mysterious symbols and colorful Mardi Gras beads complete the spooky, supernatural theme. A green light and a layer of fog from below make it feel truly haunted.
DIY Instructions:
You can conjure up your own bayou magic.
What You’ll Need:
- A large, interesting piece of driftwood or several gnarled branches.
- Fake Spanish moss.
- A few plastic skulls.
- A black permanent marker.
- Glass jars filled with water and green herbs or leaves.
- A simple cloth doll.
- Colorful plastic beads.
- A green light bulb or green string lights.
Step-by-Step Guide:
- Build Your Swamp Tree: Place the driftwood in the center of your mantel. Drape it with lots of Spanish moss.
- Mark Your Skulls: Use the black marker to draw a simple, spooky symbol on the forehead of your plastic skulls.
- Create a Voodoo Doll: Take your simple cloth doll and stick a few straight pins in it. You can also wrap it with some twine to make it look older.
- Arrange Your Altar: Place your marked skulls, jars of herbs, and the voodoo doll around the base of the driftwood tree.
- Add a Touch of Mardi Gras: Drape the colorful plastic beads over the branches and around the skulls.
- Make It Glow: Place the green light on the floor in front of the mantel, aimed up at your display, to create a spooky, foggy glow.
42. Colorful Day of the Dead Ofrenda

This beautiful display is a traditional ofrenda, or altar, for the Day of the Dead. It’s a joyful and colorful way to remember loved ones. The altar is built in tiers, covered with vibrant, cut-paper banners called papel picado.
Photos of family members are placed on the altar, surrounded by bright orange marigold flowers and decorated sugar skulls. Offerings of special bread (pan de muerto), salt, and water are set out for the visiting spirits. It’s a meaningful and stunning cultural celebration.
DIY Instructions:
You can build your own beautiful and colorful ofrenda.
What You’ll Need:
- Several sturdy boxes to create tiers.
- A black tablecloth and a colorful striped blanket or serape.
- Papel picado banners (you can buy these or make them by folding and cutting colored tissue paper).
- Photos of family or loved ones in colorful frames.
- Craft skulls and colorful paint pens.
- Orange flowers (marigolds are traditional).
- Small bowls for offerings, and some bread rolls.
Step-by-Step Guide:
- Build Your Altar: Stack the boxes on your mantel to create at least three levels. Cover the whole thing with the black tablecloth.
- Add Color: Drape the colorful striped blanket over the front of your altar. Hang the papel picado banners on the wall behind it and along the front of the tiers.
- Decorate Your Skulls: Use the colorful paint pens to decorate the craft skulls with flowers, dots, and swirls to look like sugar skulls.
- Arrange the Altar: Place the framed photos on the different levels. Arrange the decorated skulls and vases of orange flowers around them.
- Set Out the Offerings: Place the small bowls on the bottom level. You can fill them with salt, beans, or other small items. Add the bread rolls to complete your beautiful and respectful ofrenda.
Decorating your mantel for Halloween is about more than just setting out a few spooky items. It’s an opportunity to create a mood, tell a story, and express your own unique style. From cozy and cute to glamorous and gothic, there is truly a theme for everyone.
The best part about these ideas is their accessibility. With a little creativity and some basic craft supplies, you can bring any of these worlds to life. Don’t be afraid to mix and match elements or put your own personal spin on a design.
Ultimately, Halloween is about having fun and embracing the magic of the season. So pick a theme that excites you, gather your materials, and get ready to create a Halloween mantel that will enchant and entertain all who see it.
Key Takeaways
- Find Your Theme: Choosing a specific theme, like “mad scientist” or “boho ghosts,” is the key to a cohesive and impressive display.
- DIY Makes It Yours: You don’t need to spend a lot of money. Simple DIY projects using craft paper, paint, and items from around the house can have a huge impact.
- Lighting is Everything: The right lighting, whether it’s from candles, string lights, or a spooky green bulb, is crucial for setting a spooky atmosphere.
- Layering Creates Depth: Create visual interest by using objects of different heights and textures. Stacking items on books or boxes and using garlands in the foreground adds a professional touch.