The front door is the first thing your guests will see this Halloween. It sets the tone for everything else. Your entryway is a chance to make a strong first impression, whether you want to inspire terror, delight, or wonder. A great display greets trick-or-treaters and tells a story before they even ring the bell.

This collection of ideas is here to help you get started. You will find themes that range from the truly frightening to the fun and family-friendly. There are simple, modern designs and large, elaborate scenes that can transform your entire porch.
Each idea comes with its own set of simple instructions. You can follow them step-by-step to recreate these looks. Or, you can use them as a starting point for your own unique and spooky creations. Let’s begin.
1. Cinematic Horror Scene

This entryway transforms a simple porch into a black and white horror movie scene. The use of stark, high-contrast cutouts creates a world of shadow and dread. Jagged, cartoonish buildings and twisted trees give the impression of a haunted, surreal city.
A grim reaper figure stands silently, adding a chilling human (or inhuman) element. The scene is lit dramatically, with a projector casting an old film onto the wall. Signs with ominous phrases complete the immersive, cinematic experience. It is a wonderfully creative and unsettling display.
DIY Instructions: Spooky Cityscape Cutouts
Let’s make some creepy cardboard buildings to create your own haunted city.
What You’ll Need:
- Large cardboard boxes
- Black and white paint
- A paintbrush
- A pencil
- A box cutter or strong scissors (for adult use only!)
Step-by-Step Guide:
- Flatten Your Boxes: First, open up your cardboard boxes and lay them flat. This gives you a big, flat surface to work with, like a giant piece of paper.
- Draw Your Buildings: Use a pencil to draw the outlines of spooky houses and crooked trees. Make the windows jagged and the roofs pointy. You can make them look like they are leaning over. Don’t worry about making them straight; the weirder, the better!
- Cut Them Out (Adults Only!): This is a job for a grown-up. They will need to use the box cutter to carefully cut out the building and tree shapes you drew.
- Paint Your City: Now, paint your cutouts. You can paint some all black to look like shadows, and others you can paint white with black details, like windows and doors.
- Set Up Your Scene: Once the paint is dry, you can stand your cutouts up on your porch. Lean them against the wall or each other to create a spooky, shadowy city for your guests to walk through.
2. Zombie Apocalypse Barricade

This house is not welcoming visitors; it’s desperately trying to keep something out. The front door and windows are boarded up with fake, blood-stained planks. Warning signs for “Biohazard” and “Keep Out” make it clear that this is a quarantine zone.
Bloody handprints are smeared across every surface, telling a story of a terrifying struggle. Severed zombie hands and a crawling undead figure complete the gruesome scene. This entryway creates an immersive narrative of a zombie apocalypse, turning the home into a last-stand shelter.
DIY Instructions: Bloody Barricade Boards
Let’s make some fake boards to make it look like you’ve barricaded your house against zombies!
What You’ll Need:
- Long, flat pieces of cardboard
- Brown paint
- A black marker
- Red paint
- A paintbrush
- Strong tape (like duct tape)
Step-by-Step Guide:
- Cut Your Planks: Take your cardboard and cut it into long, rectangular “plank” shapes. Don’t make the edges perfectly straight; wobbly edges look more like real, rough wood.
- Paint Them to Look Like Wood: Paint your cardboard planks with brown paint. Before the paint dries, you can use your finger or the end of your brush to draw lines in it to look like wood grain. Let them dry completely.
- Add Details: Use a black marker to draw little circles on your boards to look like nails or bolts.
- Add the Blood: Now for the fun part! Dip your hands in the red paint and press your handprints onto the boards. You can also flick the brush to create blood splatters.
- Board Up the House: Use your strong tape to stick the finished bloody planks across your doors and windows. Crisscross them to make it look like you were in a hurry to keep the zombies out.
3. Black Cat Invasion

A legion of spooky black cats has taken over this front porch. With their glowing green eyes and arched backs, these feline silhouettes create an atmosphere of quiet, creepy magic. The cats are posed in various positions—some sitting, some stretching, some ready to pounce.
They perch on pumpkins, railings, and steps, seeming to appear from nowhere. The simplicity of the design is its strength. The bold black shapes stand out against the house, and the glowing eyes are the only source of color, drawing you into their mysterious gaze.
DIY Instructions: Spooky Cat Silhouettes
Let’s make some cool black cats with glowing eyes to decorate your porch.
What You’ll Need:
- Large sheets of black poster board or cardboard
- A pencil
- Scissors
- Glow-in-the-dark or green reflective tape
- Tape or sticky tack for hanging
Step-by-Step Guide:
- Draw Your Cat Shapes: On the black poster board, use your pencil to draw the outline of a cat. You can draw one sitting up, one stretching, and one with an arched back like it’s scared.
- Cut Them Out: Carefully cut out your cat shapes with scissors. You can make a whole family of them.
- Give Them Glowing Eyes: Cut two small, almond-shaped eyes from your glowing or reflective tape. Stick them onto your cat cutout where the eyes should be.
- Create Your Cat Invasion: Use regular tape or sticky tack to place your cats all over your porch. You can have them peeking from behind pumpkins, sitting on the steps, or even looking out a window. When it gets dark, their eyes will glow, making it look like real magic cats are visiting.
4. Mad Scientist’s Laboratory

This entryway has been transformed into the chaotic laboratory of a mad scientist. The room is a maze of wires, vintage radios, and strange electrical equipment. Glowing beakers and flasks filled with bubbling, colorful liquids are everywhere, connected by a network of tubes.
A skeleton, perhaps a former assistant, sits at a desk. The lighting is moody, with green and blue glows from the experiments casting strange shadows. A heavy, bolted door with a “Biohazard” sign suggests that something dangerous is being contained within.
DIY Instructions: Bubbling Lab Beakers
Let’s make some cool, glowing beakers that look like they are part of a crazy experiment.
What You’ll Need:
- Clear glass jars or plastic bottles
- Water
- Food coloring (green, blue, and yellow are great)
- A glow stick or a small, waterproof LED light
- Clear tubing (from a hardware store) (optional)
Step-by-Step Guide:
- Mix Your “Chemicals”: Fill your jars and bottles with water. Add a few drops of food coloring to each one to make them bright, crazy colors.
- Make Them Glow: Activate your glow stick by cracking it and shaking it. Drop the whole glow stick into the colored water. If you are using an LED light, just drop it in and turn it on. The color of the water will now glow from the inside.
- Create a Bubbling Effect: For an extra cool effect, have an adult help you break an Alka-Seltzer tablet in half and drop it into the jar. It will start fizzing and bubbling like a real science experiment!
- Connect Your Lab: If you have clear tubing, you can put one end in one jar and the other end in another. It will look like you are transferring your weird chemicals.
- Set the Scene: Arrange your glowing, bubbling beakers on a table or shelf. Turn down the lights and it will look like you’re in a real mad scientist’s lab.
5. Arachnid Infestation

If you have a fear of spiders, this entryway is your worst nightmare. The entire porch is draped in thick, stretchy spiderwebs, creating a creepy, cocoon-like tunnel to the front door. Spiders of all sizes, from tiny crawlers to giant, hairy monsters, are caught in the webs.
The scene is lit with an eerie purple light, which makes the white webs glow and casts long, spooky shadows. It’s a classic Halloween theme executed on a massive scale, creating a truly immersive and skin-crawling experience.
DIY Instructions: Giant Porch Spiderweb
Let’s spin a giant web to cover your whole porch and scare away the grown-ups!
What You’ll Need:
- One big bag of stretchy spiderweb material
- Lots of plastic spiders in different sizes
- A purple or green light bulb (optional)
Step-by-Step Guide:
- Start with a Corner: Take a big chunk of the web material. Hook it onto a corner of your porch railing or a light fixture. This is your anchor point.
- Stretch It Out: Now, gently pull and stretch the web material across your porch. The more you stretch it, the more it will look like a real, thin web. Don’t be afraid to pull it really far.
- Hook as You Go: As you stretch the web, hook it onto everything you can: other railings, posts, door handles, and even plants. Keep stretching and hooking until your whole porch is covered.
- Add Your Spiders: Once your web is up, it’s time for the spiders to move in. Stick the plastic spiders all over the web. Put some big ones in the middle and lots of little ones crawling all over.
- Spooky Lighting: If you want to make it extra creepy, have an adult help you change your porch light to a purple or green bulb. At night, the colored light will make your web glow and look super spooky.
6. Museum of Haunted Antiquities

This room has been curated into a private museum of cursed and haunted objects. Each creepy artifact is carefully displayed on tables with red cloths, lit by small lamps as if in a real exhibit. Velvet ropes keep visitors at a safe distance from the dangerous items.
The collection includes creepy old dolls, a disembodied hand, and other mysterious relics. Handwritten labels describe the terrifying history of each piece. The dim lighting and crowded displays create a claustrophobic and unsettling atmosphere, making you feel like you’ve discovered a secret, forbidden collection.
DIY Instructions: Cursed Museum Display
Let’s turn a table into a display of spooky, cursed objects from your very own haunted museum.
What You’ll Need:
- A small table
- A dark-colored tablecloth (red or black is good)
- Creepy old items (like an old doll, a weird-looking bottle, or a fake skull)
- Paper, a pen, and a wet tea bag
- An empty picture frame
- A desk lamp
Step-by-Step Guide:
- Age Your Labels: Take your paper and have an adult help you stain it by dabbing it with a wet tea bag. This makes the paper look old and brown.
- Write Cursed Descriptions: Once the paper is dry, tear it into small squares. For each of your creepy items, write a spooky, fake description like, “The Doll That Watches You” or “Do Not Touch This Bottle.”
- Set Up Your Museum Table: Drape the tablecloth over your table. Place your creepy objects on it, leaving some space between them.
- Display Your Labels: Lean a label in front of each object. You can place one inside the empty picture frame to make it look extra official.
- Light Your Exhibit: Place the desk lamp on the table and aim it at your display. When you turn it on in a dark room, it will highlight your cursed collection and make it feel like a real, spooky museum.
7. Deep Sea Terror

Something ancient and terrible has risen from the ocean depths to claim this doorway. Giant, green octopus tentacles, covered in suckers, snake their way around the columns and over the doorframe, as if the creature is pulling itself into our world.
The scene is lit with a mysterious blue-green glow, and a thick fog rolls out from the entrance, creating the illusion of sea mist. A monstrous, Cthulhu-like idol stands guard. This is a unique and terrifying theme that brings a touch of cosmic horror to the neighborhood.
DIY Instructions: Monster Tentacle Attack
Let’s make some creepy monster tentacles that look like they are grabbing your house!
What You’ll Need:
- A few long pool noodles
- Green or purple paint
- A paintbrush
- White or light-colored craft foam or paper
- A circle punch or scissors
- A hot glue gun (for adult use)
Step-by-Step Guide:
- Paint Your Tentacles: Take your pool noodles and paint them a monster-y color like green or purple. Let them dry completely.
- Make the Suckers: While the paint is drying, use your circle punch or scissors to cut out lots of circles from your craft foam. These will be the suckers on the tentacles.
- Glue on the Suckers: This is a job for a grown-up. Have them use the hot glue gun to stick rows of the foam circles onto one side of your painted pool noodles.
- Attack the House!: Your tentacles are ready! Pool noodles are very bendy, so you can wrap them around your porch posts, drape them over your door, or have them look like they are coming out of a window. You can use wire or string to help hold them in place.
8. Silly Monster Mash

This entryway is all about fun, not fright. A gang of colorful and goofy monsters has gathered to welcome trick-or-treaters. These creatures are made of bright, simple shapes with big, googly eyes, silly teeth, and fuzzy feather boa accents.
One monster is a furry wreath, and another is a “Feed the Monster” game, inviting kids to toss a pumpkin into its mouth. The bright colors and friendly faces make this a delightful and cheerful display, showing that Halloween monsters can be sweet and silly, too.
DIY Instructions: Goofy Monster Door
Let’s turn your front door into a big, silly monster face that will make everyone laugh.
What You’ll Need:
- Two large white paper plates
- Two smaller black paper plates or black paper circles
- A long, wavy piece of black poster board for the mouth
- White paper triangles for teeth
- Tape or sticky tack
Step-by-Step Guide:
- Make the Eyes: Take your two large white paper plates. These are the monster’s eyeballs. Tape or glue the smaller black circles onto the middle of the white plates to be the pupils. You can make the pupils look in different directions to be extra goofy.
- Create a Silly Mouth: Cut a long, wiggly mouth shape out of your black poster board.
- Add the Teeth: Cut out several triangles from your white paper. Tape these triangles along the inside of your monster’s mouth to look like big, goofy teeth.
- Assemble Your Monster: Use your tape to stick the eyes and the mouth onto your front door. You can also add paper horns or a unibrow above the eyes. Now, every time someone comes to your house, they will be greeted by a giant, friendly monster!
9. Creepy Crawly Critters

This porch has been overrun by giant, terrifying insects and arachnids. Huge, realistic-looking moths, spiders, and centipedes crawl over the walls and among the plants. A massive spiderweb has been spun in one corner, a testament to the giant spider that lurks nearby.
The scene is lit with a sickly green light, making the lush greenery feel sinister and alien. This display plays on the common fear of bugs, magnifying them to monstrous proportions. It’s a creepy and effective theme that will make your skin crawl.
DIY Instructions: Giant Garden Bugs
Let’s make some huge, creepy bugs to hide in your plants.
What You’ll Need:
- A few empty plastic bottles
- Black paint
- A paintbrush
- Black pipe cleaners
- A hot glue gun or strong tape (for adult use)
- Googly eyes
Step-by-Step Guide:
- Make the Bug’s Body: Take an empty plastic bottle. This will be the main body of your giant ant or beetle. Paint the whole bottle black and let it dry.
- Give It Legs: Take three long black pipe cleaners. Bunch them together and have an adult help you tape or hot glue them to the bottom of the painted bottle.
- Bend the Legs: Once the pipe cleaners are attached, bend them so they look like insect legs. You should have six legs in total, three on each side.
- Add Eyes and Antennae: Stick two big googly eyes on the front of the bottle. You can also attach two shorter pipe cleaners on top for antennae.
- Hide Your Critters: Your giant bug is ready! Make a few of them and hide them in the bushes, on your lawn, or climbing up your wall. It will look like your garden has been invaded by monstrous pests.
10. Enchanted Ghost Forest

This magical entryway creates a path through an enchanted, haunted forest. An archway made of bare, twisted branches is covered in twinkling purple fairy lights, forming a beautiful but eerie tunnel. The ground is a soft carpet of moss and autumn leaves.
Cute, simple ghosts with big black eyes hang from the archway, floating in the air. Whimsical, oversized mushrooms sprout from the mossy ground. The combination of spooky ghosts and enchanting lights creates a unique, fairy-tale atmosphere that is more magical than menacing.
DIY Instructions: Floating Twinkle Ghosts
Let’s make some adorable little ghosts that will float and twinkle in the air.
What You’ll Need:
- A small styrofoam ball
- A square piece of white cloth (like from an old t-shirt)
- A black marker
- A small screw eye hook
- Fishing line or clear string
Step-by-Step Guide:
- Form the Ghost’s Head: Drape the white cloth over the styrofoam ball. Gather the cloth at the “neck” and tie it with a piece of string to hold the head shape.
- Draw a Cute Face: Use your black marker to draw two big, simple circles for eyes. A simple, cute face is less scary and more magical.
- Add the Hanger: This is a job for a grown-up. Have them twist the small screw eye hook into the very top of the styrofoam head, going through the cloth.
- Make it Float: Tie a long piece of fishing line to the hook.
- Hang Your Ghosts: Tie the other end of the fishing line to a tree branch, your porch ceiling, or a doorway. Make a few of them and hang them at different heights. Because the string is clear, they will look like they are really floating in the air, especially at night.
11. Candy Corn Pathway

This entryway is a cheerful celebration of a classic Halloween treat. The path to the door is lined with giant, handmade candy corn cones and overflowing with the iconic tri-colored candy. This bright and friendly display uses a simple color palette of orange, yellow, and white to great effect.
Wreaths made entirely of candy corn hang by the door, and a large bowl invites guests to take a handful. It’s a sweet and welcoming scene that avoids scares in favor of pure, sugary fun. This setup is a wonderful way to greet trick-or-treaters of all ages.
DIY Instructions: Giant Candy Corn Cones
Let’s make some huge candy corn decorations to sweeten up your walkway!
What You’ll Need:
- Orange safety cones OR large sheets of white poster board
- Yellow and white duct tape or craft paint
- Scissors
- Pencil (if using poster board)
- A stapler or strong tape (if using poster board)
Step-by-Step Guide:
- Form Your Cone: If you are using poster board, roll it into a cone shape, making the bottom wide and the top pointy. Have an adult help you staple or tape it securely so it holds its shape. If you are using safety cones, you can skip this step!
- Create the White Tip: The top of a candy corn is white. Use your white duct tape to wrap the top point of your cone. If you’re painting, use a brush to paint the top section white.
- Add the Yellow Bottom: The bottom of a candy corn is yellow. Use your yellow duct tape to wrap the wide, bottom part of the cone. If you’re painting, carefully paint the bottom third of the cone yellow.
- Leave the Orange Middle: The orange part is already done for you! The middle of your poster board cone will be white (which you can paint orange) or your safety cone is already orange. Make sure you have three distinct color sections: white at the top, orange in the middle, and yellow at the bottom.
- Set Up Your Candy Lane: Once your paint or tape is done, your giant candy corns are ready! Line them up along your sidewalk or on your porch steps to create a fun and colorful path to your door.
12. Modern Witch’s Altar

This porch offers a stylish and modern take on witchcraft. The arrangement feels less like decoration and more like a sacred space. Macrame wall hangings featuring bird skulls set a mystical tone. A gnarled witch’s broom stands ready by the door, hinting at magical travels.
The centerpiece is a circle of black and white pumpkins on a bed of dark leaves. Flameless candles are scattered throughout, providing a safe and steady glow. The scene is chic and subtle, using texture and a clean color scheme to create an atmosphere of quiet power and modern magic.
DIY Instructions: Mystical Pumpkin & Candle Circle
You can create this cool, witchy circle to bring some magic to your porch.
What You’ll Need:
- A collection of small and medium pumpkins
- Black and white craft paint
- Paintbrushes
- A dark-colored wreath base or fake leafy garland
- Battery-operated candles of different sizes
- A glass orb or ball (optional)
Step-by-Step Guide:
- Paint Your Pumpkins: Take your pumpkins and paint them. Paint half of them solid white and the other half solid black. You can even paint one with black and white stripes for fun. Let them dry completely.
- Create Your Circle Base: Lay your wreath base or leafy garland on the ground in a circle where you want your display to be. This will be the border of your magical space.
- Arrange the Pumpkins: Place your painted pumpkins around the inside edge of your leafy circle. Mix up the black and white ones so it looks balanced and interesting.
- Add the Candlelight: Now, place your battery-operated candles in the spaces between the pumpkins. Use different heights to make it look more dynamic. Turn them on.
- Place the Centerpiece: If you have a glass orb, place it right in the middle of the pumpkin circle. You can put a small string of fairy lights inside it to make it glow. If not, a single large white pumpkin in the center also looks great. Your modern altar is now ready!
13. Jack-o’-Lantern Jubilee

A cheerful army of jack-o’-lanterns has gathered on these steps. This display is a classic tribute to Halloween, with dozens of pumpkins creating a warm, inviting glow. Pumpkins of all shapes and sizes are stacked on hay bales and wooden crates, forming a cascading river of light.
Each pumpkin has its own unique, hand-carved personality, from spooky grimaces to happy smiles. The sheer number of them is impressive, turning the entryway into a bountiful pumpkin patch. This is a timeless look that captures the joyful spirit of the season.
DIY Instructions: Pumpkin Patch Steps
Let’s make an amazing pile of glowing pumpkins to light up your porch!
What You’ll Need:
- Lots of pumpkins in different sizes
- Pumpkin carving tools (ask an adult for help)
- A marker or pen
- A big spoon or scoop
- Battery-operated tea lights or candles
- Sturdy boxes, wooden crates, or hay bales
Step-by-Step Guide:
- Draw Your Faces: First, decide what face each pumpkin will have. Use your marker to draw silly, spooky, or happy faces on them. Give each one a different expression!
- Carve Them Out (Adults Only!): This is a job for a grown-up. They will need to use the carving tools to cut a lid on the top of the pumpkin and then carefully follow the lines you drew to cut out the face.
- Scoop Out the Guts: Now you can help! Reach inside the pumpkin and use a big spoon to scoop out all the seeds and stringy stuff. You want it to be clean inside.
- Build Your Pumpkin Hill: Place your boxes or hay bales on your steps. This helps you make your pumpkin display tall instead of just flat. Start by putting the biggest pumpkins on the bottom and on top of the boxes.
- Fill in the Gaps: Use the smaller pumpkins to fill in all the empty spaces. The goal is to make it look like a giant, overflowing pile of jack-o’-lanterns.
- Light Them Up: Place a battery-operated candle inside each carved pumpkin. Turn them on when it gets dark and watch your entire porch glow with happy, spooky pumpkin faces.
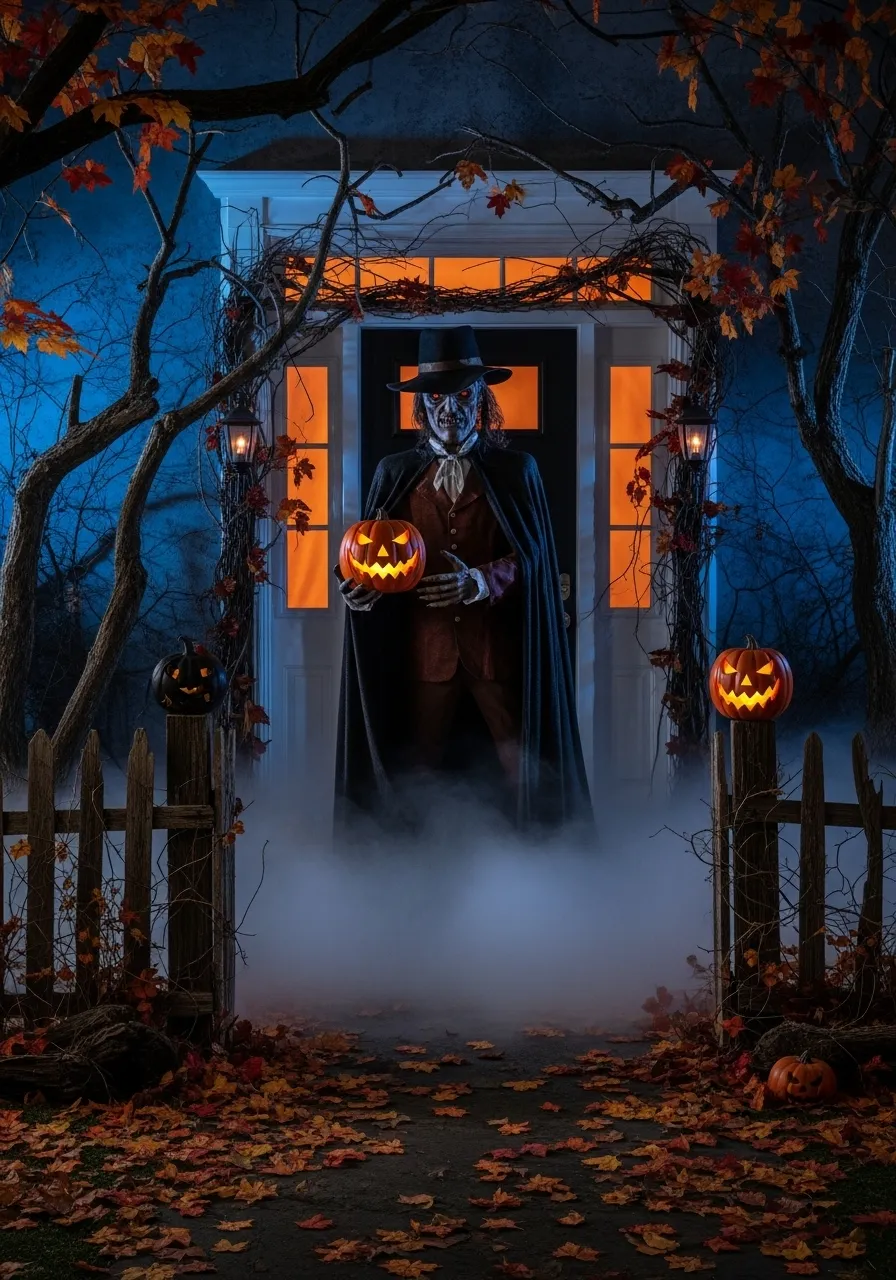
14. The Harvester’s Return

An ominous figure stands silhouetted in the doorway, bathed in a sinister orange glow. This eerie guardian, with its menacing mask and wide-brimmed hat, holds a glowing jack-o’-lantern as if offering a warning. A thick layer of fog rolls across the ground, obscuring the path and adding to the suspense.
Bare, twisted trees frame the scene, their branches like skeletal fingers reaching for unwary visitors. This entryway is pure atmospheric horror, using light, shadow, and fog to create a truly frightening moment. It feels like you’ve stumbled upon a creature that has been waiting for you.
DIY Instructions: Spooky Doorway Guardian
Let’s build a creepy creature to stand in your yard and scare your friends! An adult’s help is definitely needed.
What You’ll Need:
- A tall garden stake or a simple frame made of PVC pipes
- A scary Halloween mask
- An old dark coat or cloak, and a dark hat
- Some old clothes for stuffing (like t-shirts or towels)
- Safety pins or duct tape
- A plastic jack-o’-lantern with a battery-operated light inside
- A fog machine (optional, but makes it extra spooky)
Step-by-Step Guide:
- Build the Body: Have an adult help you build a simple cross shape with your stake or pipes for the body and shoulders. Place this “scarecrow” frame where you want your creature to stand.
- Dress Your Guardian: Put the old dark coat or cloak onto the frame. This will be the main part of its body.
- Stuff the Body: Use the old clothes to stuff the inside of the coat to make it look like there is a body inside. Make the chest and shoulders puffy.
- Add the Head and Hands: Place the scary mask at the top of the frame, where the head should be. You can stuff an old pair of gloves and attach them to the ends of the sleeves for hands.
- Position the Pumpkin: Use safety pins or tape to attach the plastic jack-o’-lantern to the creature’s hands, so it looks like it’s holding it out. Make sure the light inside is turned on.
- Final Touches: Put the dark hat on the mask. If you have a fog machine, place it on the ground behind your guardian. When you turn it on, the fog will roll out from its feet, making it look incredibly creepy as it stands in the mist.
15. The Witch’s Apothecary

This corner has been transformed into a witch’s personal pantry, brimming with magical ingredients. Wooden shelves are packed with countless glass bottles and jars, each holding mysterious potions and colorful liquids. Bunches of dried herbs and flowers hang from the ceiling and walls, ready to be used in a spell.
A large black cauldron sits below, bubbling with a magical green glow. Old, leather-bound books are stacked everywhere, filled with ancient secrets. The scene is lit by warm string lights, creating a cozy yet supernatural atmosphere.
DIY Instructions: Your Own Potion Shelf
Let’s make a shelf full of bubbly, creepy, and colorful potions for your own witch’s corner.
What You’ll Need:
- An empty bookshelf or a few sturdy boxes to stack
- Lots of empty glass jars and bottles (ask for old food jars)
- Water and food coloring (various colors)
- Cooking oil and glitter (for cool effects)
- Paper, a pen, and a wet tea bag
- String or twine
- A black pot or plastic cauldron
- Green tissue paper and a small battery-operated light
Step-by-Step Guide:
- Make “Aged” Labels: Take your paper and have an adult help you stain it with a wet tea bag to make it look old. Once dry, tear it into small label shapes. Write creepy ingredient names on them, like “Frog’s Breath” or “Spider Venom.”
- Mix Your Potions: Fill your jars with water. Add a few drops of food coloring to each. For a cool effect, add a layer of cooking oil on top—it will separate and look like a real potion. You can also add glitter for a bit of magic.
- Label Your Jars: Use twine to tie your aged labels onto your potion bottles.
- Create a Glowing Cauldron: Place the light in the bottom of your cauldron and turn it on. Loosely bunch up the green tissue paper and stuff it on top of the light. The light will shine through and make it look like your cauldron is glowing from a magic brew.
- Set Up Your Apothecary: Arrange your potion bottles on your shelf or boxes. Place your glowing cauldron on the floor or a small table. You can also add some old books and hang some herbs (or even weeds from the yard!) to complete the look.
16. Ghostly Pirate Cove

This porch has become the cursed resting place of a ghostly pirate crew. Skeletons lounge on treasure chests and wooden crates, forever guarding their ill-gotten loot. A chest overflows with golden skulls and coins, hinting at a vast, sunken treasure.
The scene is draped in tattered fishing nets and lit by old-fashioned lanterns. A life preserver from a doomed ship hangs above the door. A layer of fog drifts across a sand-covered floor, creating the illusion of a haunted, misty shoreline where pirate spirits still linger.
DIY Instructions: Sunken Treasure Scene
Arr matey! Let’s build a spooky pirate treasure scene for your front porch.
What You’ll Need:
- A few plastic skeletons
- A large cardboard box
- Brown and black paint
- Yellow or gold spray paint
- Small plastic skulls and plastic gold coins
- A bag of play sand (optional)
- Old fish netting or cheesecloth
- Battery-operated lanterns
Step-by-Step Guide:
- Make the Treasure Chest: Take your large cardboard box. Paint it all over with brown paint. When it’s dry, use some black paint to add lines to make it look like wooden planks. Have an adult cut the top so it has a lid that can be propped open.
- Create Golden Treasure: Take your small plastic skulls and coins. Spread them out on newspaper outside and have an adult help you spray paint them gold. Let them dry.
- Set the Scene: If you’re using sand, pour it on the floor of your porch to make a beach. Place your treasure chest in the middle.
- Arrange the Treasure and Skeletons: Fill the open treasure chest with your golden skulls and coins, letting them spill out onto the sand. Sit your skeletons around the chest, like they are guarding it. You can prop them up against the wall or on old boxes.
- Add Pirate Details: Drape the fish netting over the walls and railings. You can even tear some holes in it to make it look old.
- Light the Cove: Place a few battery-operated lanterns around the scene. The flickering light will make your pirate cove look extra spooky and mysterious at night.
17. Neon Nightmare Entrance

Step into a glowing world of electric color. This entryway uses blacklights and fluorescent materials to create a stunning visual effect. A massive, intricate spiderweb, woven from glowing neon string, forms a tunnel leading to the front door. The effect is mesmerizing and disorienting.
Skeletons and skulls, painted in vibrant neon hues, stand guard on either side. Even the pumpkins are painted with fluorescent colors, making them pop in the otherworldly light. This is a highly creative and modern approach to Halloween decor that feels like a spooky rave.
DIY Instructions: Glowing Blacklight Web
Let’s make a super bright, glowing spiderweb that will wow everyone in the neighborhood.
What You’ll Need:
- A blacklight bulb or fixture
- Several rolls of fluorescent or neon-colored yarn (green, yellow, orange, and pink work best)
- Lots of small hooks or strong tape
- Scissors
- A plastic skeleton and some pumpkins (optional)
- Neon craft paint (optional)
Step-by-Step Guide:
- Set Up Your Blacklight: First, have an adult swap your regular porch light with a blacklight bulb, or set up a blacklight fixture aiming at your door. The magic won’t work without it!
- Create the Web’s Frame: Start by making the main “spokes” of your web. Tape or hook the end of your yarn high up on the wall above your door. Stretch it down and out to a point on the side wall or railing and attach it. Do this several times to create a big fan of strings coming from the top.
- Weave the Web: Now, take another piece of yarn and start weaving it between the spokes. Tie it to one spoke, then stretch it to the next, loop it, and continue. Go around in circles, starting from the outside and working your way in.
- Block the Door: For an extra cool effect, crisscross some different colored strings right in front of the door itself, like a laser grid.
- Make Glowing Props: If you want, you can paint a plastic skeleton and some pumpkins with neon paint. When you place them under the blacklight, they will glow just like your web. Place them on the sides of your glowing tunnel to complete the scene.
18. The Chained Ghosts

Four spectral figures have appeared on this porch, bound by heavy chains. Their simple, white-sheet forms and hollow, dark eyes make them look like classic, tormented spirits. They seem to be holding the chains themselves, creating a web that blocks the front door in a protective or menacing gesture.
The scene is lit from below, casting long, distorted shadows up the front of the house and highlighting the stark white of the ghosts against the dark night. It’s a simple but incredibly effective display that relies on shadow play and a powerful central idea to create a sense of unease.
DIY Instructions: Trapped Porch Spirits
Let’s make some spooky ghosts and trap them on your porch with chains!
What You’ll Need:
- 3-4 tall garden stakes or wooden poles
- 3-4 styrofoam mannequin heads or large foam balls
- Old white sheets
- Black felt or craft foam
- Lightweight plastic chains (from a Halloween store)
- Scissors and a hot glue gun (for adult use)
- A spotlight or bright flashlight
Step-by-Step Guide:
- Build Your Ghost Frames: Place your garden stakes where you want your ghosts to stand on your porch or in your yard. Firmly press the styrofoam heads onto the top of each stake.
- Drape the Sheets: Take an old white sheet and drape it over one of the heads. Arrange it so it flows nicely and looks like a ghostly figure. Do this for all of your ghost frames.
- Give Them Faces: Cut out two oval shapes for eyes and a circle or oval for a mouth from the black felt. Ask an adult to help you hot glue them onto the sheet where the face should be. The simple, dark holes look very creepy.
- Chain Them Up: Take your plastic chains and start wrapping them around the ghosts and your porch railings. Crisscross the chains in front of the door. You can have the chains rest on the “arms” of the ghosts to make it look like they are holding them.
- Add Spooky Lighting: The final touch is the most important. Place your spotlight or flashlight on the ground and aim it up at your ghosts. When you turn it on at night, it will create huge, scary shadows and make your chained spirits look truly terrifying.
19. Gothic Skeleton Soiree

This entryway is dressed for a grand and gloomy affair. Four skeletons, impeccably dressed in tattered but formal suits with velvet collars, act as undead butlers. They stand among lavish arrangements of black and red roses, a beautiful yet morbid combination.
Ornate, silver candelabras hold flickering candles, casting a dramatic light on the scene. The porch is lit with a rich purple glow, adding to the gothic, vampire-like atmosphere. This is a sophisticated and elegant display that blends horror with high society.
DIY Instructions: Dapper Skeleton Doormen
Let’s dress up some skeletons to make them look like fancy butlers for a spooky party.
What You’ll Need:
- 2-4 posable plastic skeletons
- Old black suit jackets or blazers (from a thrift store)
- White fabric scraps
- Red or black velvet fabric scraps
- Safety pins and scissors
- Hot glue gun (for adult use)
- Fake red and black roses
- Tall candle holders or candelabras
Step-by-Step Guide:
- Dress the Skeletons: Carefully put the black jackets on your skeletons. Don’t worry if they are a little big or torn; that adds to the spooky, old look.
- Make a Jabot (Fancy Neck Ruffle): Take a rectangle of white fabric. Fold it back and forth like you’re making a paper fan. Pinch it at the top and secure it with a safety pin. Pin this to the neck of the skeleton’s jacket to look like a fancy, old-fashioned shirt ruffle.
- Add Velvet Accents: Have an adult help you use a hot glue gun to add pieces of the velvet fabric to the jacket collars. This makes them look extra fancy.
- Position Your Butlers: Stand your dapper skeletons up on either side of your front door. You may need to lean them against a wall or post to keep them standing.
- Decorate with Roses: Arrange the fake red and black roses in bunches around the skeletons’ feet. This adds a pop of gothic color.
- Add Candlelight: Place the tall candelabras near your skeletons. Use battery-operated candles for safety. The flickering light will make your undead butlers look like they are welcoming guests to a haunted mansion.
20. The Boneyard Big Band

The party is just getting started at this front door, hosted by a lively skeleton jazz band. An entire ensemble of the undead is mid-performance, complete with trumpets, saxophones, a double bass, and even a drummer. Each skeleton is posed realistically, bringing a surprising amount of energy and movement to the scene.
Set against a simple black curtain with a single spotlight, the scene feels like a secret, supernatural nightclub. Music stands and scattered sheet music complete the illusion. It’s a wonderfully creative and fun display that proves even skeletons love to swing.
DIY Instructions: Skeleton Jazz Club
Let’s put together a cool skeleton band that’s ready to play some spooky tunes!
What You’ll Need:
- Several posable plastic skeletons
- Toy instruments (from a dollar store or party store)
- Black poster board and a white paint pen
- A black sheet or curtain for a backdrop
- A clamp light or a bright flashlight
- Some black chairs or stools
- Fishing line or clear string
Step-by-Step Guide:
- Set Your Stage: First, hang the black sheet or curtain against the wall where your band will play. This is your stage background.
- Create the Music Stands: Cut your black poster board into rectangles for the music holder part. Cut some longer, thinner strips for the stand’s pole and base. Tape them together to create simple music stands. Use the white paint pen to draw music notes on them.
- Pose Your Musicians: This is the fun part! Carefully bend your posable skeletons into sitting or standing positions. Place them on the chairs and stools. It might take a bit of work to get them to balance.
- Give Them Their Instruments: Use the fishing line to help the skeletons hold their instruments. Tie the string around the instrument and then loop it around the skeleton’s hands or neck so it stays in place. Position them like they are really playing.
- Light Up the Show: Place your spotlight on the floor and aim it up at your boney band. This single light will make it look like a real stage show. Your skeleton speakeasy is now open for business!
21. Día de los Muertos Ofrenda

This beautiful entryway is a vibrant tribute to Día de los Muertos, the Day of the Dead. It is filled with brilliant color and meaningful tradition. Bright orange marigolds, the flower of the dead, are everywhere, framing the door in thick garlands and wreaths.
Colorful “papel picado” banners hang overhead, their intricate designs dancing in the air. An “ofrenda,” or altar, is set up to honor loved ones, featuring their photos alongside decorative sugar skulls and candles. It’s a stunning display that is rich in culture, focusing on remembrance and celebration rather than fear.
DIY Instructions: Colorful Sugar Skull Altar
Let’s build a beautiful and colorful altar to celebrate the Day of the Dead.
What You’ll Need:
- A small table or a few sturdy, stacked boxes
- A colorful blanket or tablecloth (purple, orange, or pink is great)
- Fake marigold flowers (lots of them!)
- Battery-operated candles
- Picture frames with photos of family, friends, or even pets you want to remember
- White paper plates or cardboard
- Brightly colored markers or paint
Step-by-Step Guide:
- Set Up Your Altar: Cover your table or boxes with the colorful blanket. This will be the base for your ofrenda.
- Make Your Sugar Skulls: Take your paper plates or cut circles from cardboard. Use your bright markers to draw beautiful sugar skull designs on them. Add flowers, swirls, and bright patterns. These are meant to be happy, not scary.
- Frame the Door with Flowers: Take your fake marigold garlands and drape them around your doorway. You can use tape or hooks to hold them in place. The more flowers, the better!
- Arrange Your Ofrenda: Place the framed photos on your altar. Arrange the battery-operated candles around them. This is a way of showing you are thinking of them.
- Add Your Skulls and Final Touches: Place your homemade sugar skulls on the altar as well. You can also add things that the people or pets in your photos loved, like a favorite toy or a special snack. This beautiful display is a wonderful way to celebrate and remember.
22. Afterlife Waiting Room

Say his name three times and see what happens. This porch is a fantastic tribute to the ghost with the most, Beetlejuice. The iconic black and white stripes are everywhere, from the door covering to the massive sandworms coiling around the porch columns. A spooky green light gives the whole scene a supernatural glow.
Pumpkin-headed figures in familiar outfits stand guard, and a “Now Serving” sign adds to the feeling of being stuck in the Netherworld waiting room. It’s a fun, detailed, and instantly recognizable theme for any fan of the classic movie.
DIY Instructions: Spooky Sandworm Arch
Let’s make some giant sandworms to create a creepy, striped entrance!
What You’ll Need:
- A pool noodle or flexible vent tubing
- Black duct tape and white duct tape
- Scissors
- A large styrofoam ball for the head (optional)
- Black and red craft paint (optional)
Step-by-Step Guide:
- Create the Stripes: Take your pool noodle or tubing. Start at one end and wrap a strip of white duct tape around it. Right next to it, wrap a strip of black duct tape. Keep alternating black and white stripes all the way down the noodle. This is what gives the sandworm its classic look.
- Make a Few Worms: Repeat the process to make several striped worm sections. You can make them different lengths.
- Build the Head (Optional): If you want a head for your worm, take the styrofoam ball and have an adult help you carve a mouth into it. Paint the inside of the mouth red with black teeth. Then stick it on one end of your striped noodle.
- Assemble Your Worm Arch: Carefully bend and wrap your sandworm sections around your porch posts and over the door. You can use wire or more tape to hold them in place. Have them loop and twist to look like they are crawling all over the place.
- Add Green Light: To finish the effect, have an adult help you change your porch light to a green bulb. The green light will make your black and white sandworms look like they came straight from another world.
23. Creepy Carnival Entrance

Step right up to the scariest show on Earth. This entryway has been transformed into the ticket booth for a haunted circus or freak show. Tattered red-and-white striped curtains hang in the doorway, creating a grand but decaying entrance. Aged, hand-painted signs advertise a “Fortune Teller” and “Freak Show.”
Creepy clown masks and faces peer out from the shadows, some smiling, some frowning. Hay bales and scattered popcorn boxes add to the authentic, yet unsettling, carnival atmosphere. You half expect a sinister ringmaster to emerge from the darkness.
DIY Instructions: Haunted Circus Tent Doorway
Let’s turn your front door into the entrance to a creepy, old circus tent.
What You’ll Need:
- 2 long red plastic tablecloths and 1 white plastic tablecloth
- Scissors
- Strong tape
- Cardboard for signs
- Black and red markers
- String and clothespins (optional)
Step-by-Step Guide:
- Make the Striped Curtains: Lay the white tablecloth flat. Have an adult help you cut the red tablecloths into long, wide strips. Tape these red strips onto the white tablecloth, leaving white spaces in between, to create the red and white stripe pattern of a circus tent.
- Tatter the Edges: To make your tent look old and spooky, use scissors to cut little snips along the bottom of your striped curtain. Then, gently tear the strips upwards to make them look ragged and old.
- Hang Your Curtains: Tape the top of your striped curtain above your doorway. Part it in the middle and tape the sides back so it looks like an open tent entrance.
- Create the Carnival Signs: Take your cardboard and cut it into rectangle shapes. Use your markers to write spooky carnival signs like “TICKET BOOTH” or “BEWARE.” You can smudge some brown paint or a wet tea bag on them to make them look old.
- Set the Scene: Hang your signs around the doorway. If you have any scary clown masks, you can hang them up too. Toss some hay or crumpled paper on the ground to complete the creepy carnival vibe.
24. Friendly Harvest Ghosts

This porch is the picture of a happy, wholesome autumn. It’s a warm and inviting scene, perfect for families with young children. Hay bales and corn stalks create a rustic, harvest festival feeling. Cheerful, smiling ghosts made from simple white sheets pop up from behind pumpkins and mums.
A wheelbarrow overflows with gourds and pumpkins of all colors and sizes. The decor focuses on the fun and friendly side of Halloween, using traditional fall elements to create a scene that is more sweet than spooky.
DIY Instructions: Happy Hay Bale Ghosts
Let’s make some cute, friendly ghosts that can pop up and say hello from your porch decorations.
What You’ll Need:
- A small white cloth or piece of an old white sheet
- A balloon or a styrofoam ball
- A stick or a wooden dowel
- A rubber band or a piece of string
- A black marker
- A hay bale or a large flower pot
Step-by-Step Guide:
- Build the Ghost’s Head: Blow up the balloon a little bit (not too big!) or use your styrofoam ball. This will be the ghost’s head.
- Attach the Body Stick: Gently push the stick into the bottom of the styrofoam ball. If you are using a balloon, have an adult help you carefully tape the stick to the tied end of the balloon.
- Drape the Sheet: Drape your white cloth over the head. Make sure it’s centered so the ghost is even on all sides.
- Form the Head Shape: Gather the cloth under the head and secure it to the stick with a rubber band or a piece of string. This creates the classic ghost shape.
- Draw a Friendly Face: Use your black marker to draw a simple, happy face on your ghost. Two circles for eyes and a smiling mouth are all you need.
- Plant Your Ghost: Take your finished friendly ghost and push the bottom of the stick deep into a hay bale or into the dirt of a large flower pot. Make it look like it’s peeking out from behind the pumpkins. You can make a few of them to create a whole group of happy haunts!
25. Bayou Voodoo Porch

A powerful magic is at work on this spooky Southern porch. The air feels heavy with mystery, as if you’ve stumbled upon a voodoo priestess’s private collection. Spanish moss hangs from the ceiling like ghostly hair, framing a bizarre altar.
On display are shrunken heads, creepy dolls, and a large snake coiling around a severed head. Voodoo dolls sit on rustic chairs, waiting for their next victim. Large glass jars are filled with unsettling objects, glowing with a purple and green light. This is a deeply atmospheric and genuinely creepy display.
DIY Instructions: Spooky Voodoo Doll
Let’s create a creepy little voodoo doll. It’s a fun craft that is more spooky than scary.
What You’ll Need:
- Twine or brown yarn
- Two sturdy sticks (one a little shorter than the other)
- Scissors
- A few buttons
- A hot glue gun (for adult use)
- A few large, straight pins
Step-by-Step Guide:
- Build the Body Frame: Take your two sticks and arrange them in a cross shape, like a scarecrow. The shorter stick will be the arms. Use your twine to wrap around the center where the sticks cross, tying them tightly together.
- Start Wrapping: Start wrapping the twine around your stick frame. Go up and down the body, and back and forth across the arms. Keep wrapping until the whole stick person is covered and looks puffy. Tuck the end of the twine in to secure it.
- Give It Button Eyes: Have an adult help you use the hot glue gun to stick two mismatched buttons onto the head for eyes. One big and one small looks extra creepy.
- Add a Stitched Mouth: With an adult’s help, glue a small piece of twine in a straight line for the mouth. Then glue tiny pieces of twine across it to look like stitches.
- Finish with Pins: For the final touch, carefully stick a few of the large pins into the doll’s body. Your spooky voodoo doll is now ready to be placed on a chair or in a basket on your porch.
26. The Overlook Hotel Lobby

All work and no play makes for a very scary entryway. This hallway has been expertly transformed into the lobby of the infamous Overlook Hotel. A skeleton bellhop stands ready with a luggage cart, and another waits at the front desk. The peeling, blood-stained wallpaper sets a terrifying tone.
Key details from the movie are everywhere, from the “Room 237” key rack to the ghostly twin girls standing at the end of the hall. It’s an immersive and detailed tribute that will give any horror movie fan chills.
DIY Instructions: Haunted Hotel Key Rack
Let’s make a creepy key rack for your haunted hotel entrance, featuring the scariest room of all.
What You’ll Need:
- A small, dark-colored picture frame or piece of wood
- A few small hooks that can screw in
- White or gold paint pens
- A few old, fancy-looking keys (from a craft or hardware store)
- A printer and paper (optional)
Step-by-Step Guide:
- Prepare Your Board: Take your picture frame and remove the glass and back. You just want the empty frame. If you’re using a piece of wood, you can paint it black or dark brown.
- Label the Rooms: Use your paint pen to write spooky “room numbers” above where the keys will hang. Make sure one of them is the famous “ROOM 237.” You can also write “Room Key” at the top.
- Attach the Hooks: Have an adult help you screw the small hooks into the frame or board, one under each room number.
- Add the Keys: Hang your old, spooky keys from the hooks.
- Create Key Tags: To make it even more authentic, you can print or hand-draw little hotel key tags. Write “The Overlook Hotel” on them, punch a hole, and hang them with the keys. Hang your finished key rack on the door or a nearby wall to welcome guests to their doom.
27. The Raven’s Perch

Quoth the raven, “Nevermore.” This monochromatic porch is a literary nightmare brought to life, inspired by Edgar Allan Poe’s famous poem. A flock of black ravens has descended, perching on ghostly white branches and stacks of old, leather-bound books.
A single sign on a black chair bears the iconic word “Nevermore.” The scene is stark and dramatic, using only black and white to create a sense of gothic melancholy and dread. It’s a clever and sophisticated theme that is both beautiful and deeply unsettling.
DIY Instructions: “Nevermore” Raven Display
Let’s create a spooky and smart display inspired by a famous scary poem.
What You’ll Need:
- A small black chair or stool
- A collection of old, hardcover books (from a thrift store)
- A fake black crow or raven (from a craft or Halloween store)
- A small piece of white cardboard or wood
- A black marker
- White paint and a paintbrush (optional, for branches)
Step-by-Step Guide:
- Paint Your Branches (Optional): If you want to make the scene more dramatic, find some bare branches from your yard and paint them completely white. Let them dry.
- Create the “Nevermore” Sign: Take your piece of white cardboard. Use the black marker to carefully write the word “NEVERMORE” in big, spooky letters.
- Build Your Book Stacks: Stack the old books in piles on your porch steps. Don’t make the piles too neat; messy looks more dramatic. You can place your white branches behind the books.
- Set the Main Scene: Place the small black chair in the middle of your book piles. Open one book and lay it on the seat of the chair. Place your “Nevermore” sign on top of the open book.
- Position the Raven: Finally, place your fake black raven so it’s perched on the sign or the back of the chair, like it’s watching over the scene. You can add more ravens perched on the book stacks to make it look like a whole flock has arrived.
28. Scarecrow Corn Maze

This entryway feels like you’re about to step into a haunted corn maze. The path is lined with tall corn stalks, creating a narrow, claustrophobic walkway. A gang of smiling, silent scarecrows stands guard, their button eyes watching you from all sides.
Warm, glowing lights that look like corn cobs hang from the stalks, lighting the way. The ground is littered with straw, corn husks, and pumpkins. While the scarecrows are smiling, there’s a definite sense that you are being watched by these silent guardians of the harvest.
DIY Instructions: Your Own Scarecrow Guard
Let’s build a friendly (or spooky!) scarecrow to stand by your door.
What You’ll Need:
- An old plaid shirt and a pair of old jeans or overalls
- Two long garden stakes or wooden poles
- Rope or twine
- Straw, hay, or crumpled newspapers for stuffing
- A burlap sack or an old pillowcase for the head
- Black and red markers
Step-by-Step Guide:
- Build the Scarecrow Frame: Have an adult help you tie the two wooden stakes together in a cross shape, with the shorter one for the arms. This is the skeleton of your scarecrow.
- Dress Your Scarecrow: Put the plaid shirt and jeans onto the frame. Button up the shirt.
- Stuff Your Scarecrow: This is the fun part! Start stuffing the shirt and pants with straw or crumpled newspaper. Make your scarecrow as fat and puffy as you want. Use twine to tie off the ends of the sleeves and pant legs so the stuffing doesn’t fall out.
- Make the Head: Stuff the burlap sack or pillowcase until it’s round and full. Use your markers to draw a face. You can make it happy with a stitched smile or spooky with triangle eyes.
- Attach the Head: Place the stuffed head on top of the vertical pole of your frame and tie it securely at the “neck” with more twine.
- Put Him on Duty: Stand your finished scarecrow up by pushing the bottom of the pole into the ground or into a large pot filled with dirt. You can even give him a hat to complete the look.
29. Night of the Werewolf

Beware the full moon. This front door has become the scene of a terrifying werewolf transformation. A huge, glowing full moon dominates the door, scarred with three massive, bloody claw marks. More claw marks appear on the surrounding walls.
The ground is littered with torn, plaid flannel shirts, sticks, and dirt, as if a violent struggle took place. Large, muddy paw prints lead the way to the door, evidence of the beast that was just here. This is a great example of telling a scary story with just a few powerful elements.
DIY Instructions: Werewolf Attack Door
Let’s make it look like a werewolf tried to claw its way through your front door!
What You’ll Need:
- A giant piece of white or gray paper or poster board
- A dinner plate or other large round object
- A pencil and scissors
- Red and black craft paint
- A paintbrush
- Tape
- An old plaid flannel shirt
Step-by-Step Guide:
- Create the Full Moon: Use your dinner plate to trace a large circle on your white paper. Cut out the circle. This is your full moon. You can dab a little gray or black paint on it with a sponge to make it look like it has craters.
- Make the Claw Marks: Dip your fingers in the red paint. Drag them down across your paper moon to create three or four long, bloody claw marks. Let it dry.
- Tape it to the Door: Once your moon is dry, use tape to stick it right in the center of your front door.
- Create Paw Prints: Cut a large paw print shape out of cardboard to use as a stencil. Place the stencil on your sidewalk and use black paint to create a trail of paw prints leading to your door.
- The Aftermath: To complete the scene, tear up the old flannel shirt into strips. Toss the strips on the ground near the door, along with some sticks and leaves. Now it looks like a werewolf was definitely here!
30. Glamorous Gold and Black Porch

Halloween can be glamorous, too. This entryway proves it with a stunning and chic display of black and gold. A cascade of pumpkins in shimmering gold and matte black tumbles down the steps. The arrangement is accented with fluffy black feather boas, adding a touch of old Hollywood elegance.
Bare, black branches woven with warm fairy lights rise up on either side, adding height and a bit of sparkle. One pumpkin even features an intricate, golden spiderweb design. This is a sophisticated and stylish way to celebrate the season.
DIY Instructions: Elegant Gold Pumpkins
Let’s make some super fancy pumpkins that will make your porch look rich and glamorous.
What You’ll Need:
- A few pumpkins of different sizes
- Gold spray paint and black spray paint
- A black feather boa (from a craft or party store)
- A gold paint pen (optional)
- Newspaper or a drop cloth
Step-by-Step Guide:
- Prepare Your Painting Area: This part can be messy, so do it outside. Lay down lots of newspaper to protect the ground.
- Spray Paint the Pumpkins: With an adult’s help, spray paint half of your pumpkins completely gold and the other half completely black. Make sure to get them covered on all sides. You might need two coats. Let them dry completely.
- Add a Golden Web (Optional): If you’re feeling extra artistic, take one of your black pumpkins. Use the gold paint pen to carefully draw a spiderweb pattern on it. Start with lines coming from the stem, then connect them with curved lines.
- Arrange Your Display: Once all the pumpkins are dry, start arranging them on your steps. Create a big, flowing pile, mixing the black and gold ones together.
- Add the Feathers: Take your black feather boa and weave it in and out of your pumpkin pile. Let it curl around the pumpkins to add a soft, fancy texture. This is the final touch that makes your porch look super stylish for Halloween.
31. Alien Crash Site

We are not alone. This front yard has been transformed into the crash site of an unidentified flying object. A large, silver UFO sits damaged on the lawn, its lights still blinking. The area is cordoned off with yellow caution tape, suggesting a government cover-up.
Small green aliens stand around the wreckage, some still in glowing containment pods. The whole scene is bathed in an eerie green light, giving it a classic sci-fi movie feel. It’s a fun and imaginative theme that is truly out of this world.
DIY Instructions: Backyard UFO Wreckage
Let’s make it look like a flying saucer crash-landed in your yard!
What You’ll Need:
- Two large, shallow plastic bowls or two plastic snow sleds
- Silver spray paint
- A hot glue gun (for adult use) or strong epoxy
- A string of battery-powered LED lights
- A roll of yellow caution tape
- Small green alien toys
Step-by-Step Guide:
- Build Your UFO: Take your two plastic bowls or sleds. Have an adult help you spray paint them silver. This will make the body of your spaceship.
- Assemble the Saucer: Once the paint is dry, have an adult use a hot glue gun to glue the rims of the two bowls together, creating that classic flying saucer shape.
- Add the Lights: Carefully tape or glue your string of LED lights around the seam where the two halves meet. This will make your UFO look like it’s still powered on.
- Set Up the Crash Site: Place your finished UFO in your yard, maybe tilted a little to look like it crashed.
- Secure the Area: Run the yellow caution tape around the crash site, tying it to stakes or porch railings. This makes it look like an official, secret location.
- Place Your Aliens: Put your little green alien toys in and around the spaceship. You can place some inside clear jars with a green glow stick to look like they are in specimen pods.
32. Midnight Bat Swarm

Sometimes, simple is the most effective. This entryway uses a clean, high-contrast design to create a sense of dread. A colony of black paper bats appears to be flying out from behind the door, swarming across the white surface in a chaotic, upward spiral.
The minimalist theme is continued with sleek, black-painted pumpkins and the silhouette of a dead tree. A “BEWARE” doormat is the only text needed to complete the chilling message. This is a modern and stylish take on Halloween that is both spooky and sophisticated.
DIY Instructions: 3D Paper Bat Attack
Let’s make a swarm of bats that look like they are flying right off your door!
What You’ll Need:
- Black construction paper or cardstock
- A bat shape template (you can find one online and print it)
- A pencil
- Scissors
- Double-sided tape or sticky tack
Step-by-Step Guide:
- Create Your Bat Template: Find a simple bat silhouette online and print it. Cut it out. This will be your guide.
- Trace Your Bats: Place your template on the black paper and trace around it with a pencil. Trace as many bats as you can. You’ll want a lot to make it look like a real swarm.
- Cut Them All Out: Carefully cut out all the bat shapes you traced.
- Make Them 3D: This is the trick that makes them look real. Take each paper bat and fold it gently in the middle. Then, fold the wings up slightly on each side of the body. Don’t make a sharp crease. This will make them look like they are in mid-flight.
- Plan Your Swarm: Place a small piece of double-sided tape on the back of each bat’s body. Start sticking them on your door, clustering them tightly in one spot and having them spread out as they “fly” across the door and onto the wall. Your spooky bat swarm is now ready to take flight!
33. Vampire’s Decadent Den

Welcome to the lap of gothic luxury. This entryway is not just decorated; it’s staged like the private parlor of a wealthy and ancient vampire. Rich, heavy red velvet curtains create a theatrical, dramatic entrance, hiding the world from the creatures of the night.
Ornate, throne-like chairs sit beside a tall, black coffin. Silver candelabras drip with wax, and goblets of red wine wait on crimson-covered tables. It is a scene of dark opulence and timeless horror, suggesting that someone with very old and very refined tastes lives here.
DIY Instructions: Lavish Vampire Curtains
You can create this dramatic and fancy vampire entrance with some simple materials.
What You’ll Need:
- Two long, dark red tablecloths or sheets
- A tension curtain rod, or a sturdy string and some hooks
- Rope or ribbon for tie-backs
- A few plastic bats
- Safety pins
Step-by-Step Guide:
- Hang Your Rod: Have an adult help you install the tension rod in your doorway, as high up as you can. If you are using a string, screw hooks into the wall on either side of the doorframe and tie the string tightly between them.
- Drape the “Curtains”: Take your red tablecloths or sheets and drape them over the rod or string. You want them to be long enough to touch the floor and bunch up a little bit.
- Create the Grand Opening: Pull each curtain to the side and gather the fabric. Use a piece of fancy rope or a black ribbon to tie it back, creating a beautiful, draped opening to your vampire’s lair.
- Add the Bats: Use safety pins to attach a few plastic bats to the curtains, as if they are just flying by.
- Set the Mood: Complete the scene by placing some battery-operated candles nearby. The flickering light on the red fabric will look very rich and spooky.
34. Swamp Creature’s Sanctum

A monster lurks in the misty depths of this front porch bog. The entryway is overgrown with lush, tropical plants, cattails, and hanging Spanish moss, creating a humid, swampy atmosphere. A “Beware of Swamp Monster” sign serves as a grim warning to anyone who dares to approach.
A pair of creepy, webbed hands reaches out from the reeds, and glowing eyes peer from the undergrowth. Snakes coil around the porch railings, and a thick fog obscures the ground. It’s an immersive, creature-feature scene that makes you feel like you are truly in a monster’s territory.
DIY Instructions: Glowing Swamp Monster Eyes
Let’s make some creepy monster eyes that will peer out from the plants on your porch.
What You’ll Need:
- An empty cardboard paper towel tube
- Scissors
- A pencil
- Glow sticks (green or yellow)
- Duct tape
Step-by-Step Guide:
- Cut Your Tube: First, take your empty paper towel tube and cut it in half. Each half will make one set of glowing eyes.
- Draw the Eye Shapes: Use your pencil to draw two eye shapes on the side of one of the cardboard tubes. You can make them almond-shaped, angry, or round and surprised.
- Cut Out the Eyes: Carefully use your scissors to cut out the eye shapes you drew. This is where the light will shine through.
- Prepare the Glow Stick: Activate a glow stick by cracking it and shaking it up.
- Assemble Your Spooky Eyes: Place the glowing glow stick inside the cardboard tube. Use a piece of duct tape to cover each end of the tube so the glow stick doesn’t fall out.
- Hide Your Monster: Take your finished glowing eyes and hide them in a bush, a flower pot, or behind some leaves on your porch. When it gets dark, it will look like a real swamp monster is hiding in the shadows and watching your guests.
35. Haunted Garden Cemetery

This beautiful and eerie display turns the front steps into a haunted cemetery garden. The stone-like faces of weeping statues emerge from planters filled with ghostly white roses and baby’s breath. Skeletal hands reach out from among the flowers, as if the dead are trying to escape their graves.
A large, elegant wreath of white roses on the door continues the theme of beautiful decay. Bare, thorny branches snake across the steps, and creepy Venus flytrap plants add a touch of danger. It’s a hauntingly beautiful scene that is both elegant and unsettling.
DIY Instructions: Reaching Zombie Planter
Let’s make a creepy flower pot that looks like a zombie is climbing out of it.
What You’ll Need:
- A plastic flower pot
- A plastic skeleton hand
- Fake white flowers
- Floral foam or dirt
- Gray or stone-effect spray paint (optional)
Step-by-Step Guide:
- Prepare Your Pot: If you want your pot to look like stone, have an adult help you spray paint it with the stone-effect paint. Let it dry completely. A plain black or gray pot also works well.
- Create the Base: Place the floral foam inside your pot, or just fill it with dirt. This will give you something to stick the flowers and hand into.
- Arrange Your Flowers: Take your fake white flowers and start sticking them into the foam or dirt. Arrange them so they look nice and full.
- Add the Zombie Hand: Now for the spooky part! Take your plastic skeleton hand and push the wrist part deep into the center of the flowers. You want it to look like the hand is reaching up and out of the arrangement.
- Final Touches: You can drape a little bit of cheesecloth or fake spiderwebs over the pot to make it look older. Place your finished planter on your steps to add a touch of graveyard elegance to your decor.
36. The Pumpkin King’s Throne

What’s this? This incredible display is a massive tribute to “The Nightmare Before Christmas.” The Pumpkin King himself, Jack Skellington, stands tall on a throne made of hay bales and wooden crates. His iconic pinstripe suit and sly grin are perfectly captured.
The scene is filled with details from the movie, including the spiraling black and white hills and dozens of grinning jack-o’-lanterns. It’s an ambitious and wonderfully executed theme that brings the magic of Halloween Town right to your front door.
DIY Instructions: Halloween Town Hills
Let’s make the famous curly, swirly hills from “The Nightmare Before Christmas.”
What You’ll Need:
- Large sheets of cardboard or black foam board
- A roll of white paper or white paint
- A pencil
- Scissors or a craft knife (for adult use)
- Glue or tape
Step-by-Step Guide:
- Draw Your Hill Shape: On a large piece of cardboard, use your pencil to draw the shape of a tall, thin hill that curls into a spiral at the top. Don’t worry about making it perfect; the hills in the movie are all a little crooked.
- Cut It Out: Have an adult help you use a craft knife or strong scissors to carefully cut out the hill shape.
- Make it Black and White: If you used cardboard, paint the whole hill black. If you used black foam board, you can skip this step.
- Add the White Stripe: Now, cut a long, thin, wavy strip of white paper. Glue this strip along the edge of your black hill to create the iconic pinstripe look. Alternatively, you can use white paint to carefully paint the stripe on.
- Set Up Your Scene: Make two or three of these hills. Stand them up on your porch by leaning them against a wall or using small stands made of leftover cardboard. Place them behind your pumpkins to create an instant Halloween Town backdrop.
Your entryway is a blank canvas for Halloween creativity. We have journeyed through haunted mansions, creepy carnivals, and magical forests. We have met silly monsters, spooky skeletons, and creatures from the deep. Now it’s your turn to bring these ideas to life.
Remember that the goal is to have fun with it. Whether you build an entire movie set on your porch or just add a few simple, handmade touches, your effort will make the holiday more special for everyone who comes to your door.
So pick a theme, gather your materials, and start creating. We hope these ideas have sparked your imagination for a wonderfully spooky Halloween.
Key Takeaways
- Choose a Clear Theme: A focused theme, whether it’s “vampire’s den” or “friendly ghosts,” makes your decor look more cohesive and impactful.
- Lighting is Everything: The right lighting can turn a simple display into a terrifying scene. Use spotlights, blacklights, or colored bulbs to create drama and atmosphere.
- Embrace DIY: You don’t need expensive props to create a great look. Simple materials like cardboard, paint, and fabric can be transformed into amazing decorations.
- Tell a Story: The most memorable entryways suggest a story. Is it a crash site? A haunted museum? A zombie outbreak? Adding narrative details makes your decor more engaging.
- Use Different Levels: Don’t just decorate on the ground. Use your walls, door, porch ceiling, and steps to create a full, immersive experience for your visitors.