Halloween is the one time of year when you can let your home’s spooky side shine. Your front door is the first thing trick-or-treaters and party guests will see, making it the perfect canvas for your creative spirit.

Ready to move beyond a simple pumpkin on the porch? This year, it’s all about creating a scene that tells a story, whether it’s chic and spooky, playfully cute, or downright terrifying.
We have gathered 39 of the most engaging and stylish Halloween door decor ideas to inspire you. Best of all, each one comes with simple step-by-step instructions to help you bring the look to life, no matter your crafting skill level.
1. Glamorous Ghostly Gala

This front door design offers a sophisticated welcome for Halloween night. A bold, golden wreath creates a striking centerpiece against the dark door, mixing glamour with a hint of darkness from black feathers. Friendly ghosts seem to float and fly all around, adding a playful and spooky touch to the scene. The entire entrance is framed with dramatic black feathers in silver urns and lighted branches.
This look proves that Halloween decorations can be both chic and fun. It moves beyond typical orange and black, using a rich palette of gold, silver, and black to create an upscale haunted mansion feel. Every element, from the glowing lanterns to the cascading crystals, works together for a truly memorable entrance.
Create This Look: A Step-by-Step Guide
Here is how you can make this fancy haunted doorway at your own home.
Step 1: Make Your Ghosts Fly First, you need lots of little ghosts. You can buy white ghost stickers, which are called vinyl decals, from a craft store or online. Then, just peel and stick them onto your door and windows. Make them look like they are flying all around!
Step 2: Craft a Golden Sun Wreath Find a round foam or wire circle from a craft store to be your wreath base. Get a bunch of thin wooden sticks, called dowels, of different lengths. Ask a grown-up to help you carefully poke the sticks into the foam circle, pointing outwards like sunshine rays. Once they are all in, take the wreath outside and spray paint it all gold. Let it dry completely before hanging it on your door.
Step 3: Set Up Your Spooky Sides Find two tall stands or small tables to place on each side of your door. Put a vase or an urn on top of each one. Fill the vases with big, fluffy black feathers. Then, place some branches that have little lights on them in vases or buckets behind your stands for a magical glow.
Step 4: Add the Final Touches Place a lantern with a battery-powered candle on the floor next to each stand. This will add a spooky, flickering light without being a fire hazard. Now your glamorous ghost gala is ready to welcome trick-or-treaters!
2. Sunken Pirate’s Grotto

Transform your doorway into a scene from the ocean depths with this creative pirate theme. Two skeletons, dressed as swashbucklers, guard a treasure chest filled with forgotten loot. The eerie blue light gives the impression of being underwater, while fishing nets, seaweed, and skulls complete the ghostly grotto.
This setup tells a story of a long-lost pirate ship. It is an immersive display that will capture the imagination of every guest who dares to approach your door for treasure of their own.
Create This Look: A Step-by-Step Guide
Step 1: Go Underwater Hang blue or green see-through fabric in your doorway. Shine a blue light or use a projector with a water effect onto the fabric. This will make it look like everything is underwater.
Step 2: Position Your Pirate Crew Get two skeletons that you can bend and pose. Put a pirate bandana on their heads. Sit one skeleton down next to a box, and have the other one standing guard with a toy sword.
Step 3: Pile Up the Treasure Find an old wooden box or chest. Fill it with plastic gold coins, shiny beaded necklaces, and fake jewels. Let some of the treasure spill out onto the ground.
Step 4: Add Ocean Details Drape fishing nets all around your door. You can stick plastic starfish and seashells onto the net. Use green streamers to look like seaweed hanging down. An old anchor or a ship’s steering wheel makes it even more realistic.
3. Midnight Celestial Dream

This doorway is pure magic, taking inspiration from a starry night sky. A large, glittering crescent moon acts as a stunning wreath. Twinkling star-shaped lights frame the door, casting a soft, enchanting glow. The deep blue pumpkins are painted with constellations, bringing the cosmos right to your doorstep.
The entire display feels mystical and serene. It’s a beautiful alternative to scary decorations, creating a sense of wonder and inviting guests into a celestial dream.
Create This Look: A Step-by-Step Guide
Step 1: Make a Magical Moon Buy a big moon shape from a craft store. Paint it black. While the paint is wet, sprinkle black glitter all over it. Cut smaller star and moon shapes from silver glittery paper and glue them on. Hang little clear beads from fishing line on the moon so they sparkle.
Step 2: Hang the Stars Get strings of lights that have star-shaped bulbs. Hang them all around the frame of your door to create a starry border.
Step 3: Paint Starry Pumpkins Paint some pumpkins with dark blue paint. When they are dry, use a small brush and white or silver paint to make little dots for stars. Connect some of the dots to draw simple star pictures, like the Big Dipper.
Step 4: Set the Scene Place your decorated pumpkins on both sides of your door. Put a doormat with a zodiac or star sign on it to finish your magical entrance.
4. Spooky-Cute Pastel Party

Who says Halloween has to be dark and scary? This adorable entrance uses a palette of soft pastel colors for a friendly and cheerful vibe. A big, fluffy wreath made of colorful pom-poms is decorated with the cutest little ghosts and bats. Even the pumpkins are painted in sweet shades with happy, smiling faces.
This is a wonderful way to celebrate the fun of Halloween without any of the fright. It’s a sweet treat for the eyes that will make even the smallest trick-or-treaters smile.
Create This Look: A Step-by-Step Guide
Step 1: Make a Big Fluffy Wreath Get a foam circle from a craft store. Buy yarn in pastel colors like light pink, mint green, and lavender. Make lots of yarn pom-poms. You can do this by wrapping yarn around your fingers, tying it in the middle, and cutting the loops. Tie all the pom-poms onto the foam circle until it’s completely covered.
Step 2: Add Cute Friends Cut out friendly ghost and bat shapes from felt. Use a grown-up to help you hot glue them onto your pom-pom wreath. Add some little fuzzy craft spiders, too!
Step 3: Decorate Sweet Pumpkins Paint some pumpkins in the same pastel colors as your wreath. Use a black marker to draw cute, smiling faces on them. You can also paint one to look like it has dripping pink frosting.
Step 4: Hang Some Lights Find a string of lights shaped like little skulls or bats. Hang them around the door to complete your super cute and not-so-scary porch.
5. Harvest Moon Farmhouse

This entrance has a warm and cozy farmhouse feeling. It celebrates the autumn harvest with natural textures and classic colors. A wreath made from dried corn husks and corn cobs makes a beautiful statement on the door. A small hay bale, rustic lanterns, and a bounty of pumpkins in white and orange complete this welcoming display.
It’s a timeless look that feels both festive for Halloween and celebratory of the whole autumn season. The simple wooden signs add a touch of handcrafted charm.
Create This Look: A Step-by-Step Guide
Step 1: Craft a Harvest Wreath Start with a wire wreath circle. Get dried corn husks from a craft store. Fold each husk in half over the wire and tie it on with floral wire. Keep doing this until the wreath is full. Add a big bow from burlap ribbon.
Step 2: Build a Base Place a small hay bale next to your door. This is a great spot to stack your other decorations.
Step 3: Gather Your Pumpkins Arrange lots of pumpkins on and around the hay. Use a mix of white, grey, and orange pumpkins in different sizes to make it look interesting.
Step 4: Add Lanterns and Corn Place a few old-fashioned lanterns with battery candles on your steps. Stand up a big bundle of dried corn stalks in a metal bucket to add some height to your display. You can also paint a simple wooden sign that says “Boo.”
6. Glittering Spider’s Lair

This decor is spooky and glamorous all at once. An oversized, sparkling silver web is stretched across the door, home to a giant, jewel-covered spider. Smaller arachnids crawl nearby, ready to welcome guests. The look is completed with chic, metallic silver and glossy black pumpkins at the base.
This is a great choice for someone who loves a little glitz with their ghouls. The shimmering details catch the light and create a display that is both creepy and captivating.
Create This Look: A Step-by-Step Guide
Step 1: Spin a Giant Web You can buy a giant stretchy spider web at a Halloween store. Stretch it to cover your whole door. Or, you can make one with silver yarn and use clear sticky hooks to attach it to the door.
Step 2: Make a Fancy Spider Get a big, black plastic spider. Ask a grown-up to help you use a hot glue gun to stick sparkly rhinestones and plastic jewels on its back. This will be your queen spider. Place her in the middle of the web.
Step 3: Invite More Spiders Stick smaller black plastic spiders all around the big web and on the door frame.
Step 4: Add Sleek Pumpkins Get some craft pumpkins. Spray paint half of them with shiny silver paint and the other half with glossy black paint. Arrange them on the ground on both sides of your door for a modern and polished look.
7. Haunted Lumberjack’s Cabin

This front porch looks like it belongs to a scary movie set in the woods. It creates a chilling and suspenseful atmosphere. A wreath made of fake barbed wire is decorated with a scrap of red plaid fabric. A rusty axe, a carved pumpkin, and a hand-painted “KEEP OUT” sign suggest that visitors should be very careful.
This is a truly spooky theme that tells a scary story without using any ghosts or monsters. The rustic and rugged elements combine to make a scene that is very unsettling.
Create This Look: A Step-by-Step Guide
Step 1: Make a Scary Wreath Important: Use fake barbed wire only! You can buy a garland of fake, safe barbed wire made from rope or plastic at a Halloween store. Wrap this around a wire wreath circle. Tie a piece of a red and black flannel shirt around one side.
Step 2: Set a Creepy Scene Place one or two large logs or tree stumps by your door. Drape some old burlap fabric over them.
Step 3: Add Dangerous Tools (Safely!) Lean a plastic toy axe against the logs. Never use a real one. You can paint it to look old and rusty. Carve a face into a pumpkin and carefully stick a small toy hatchet in the top of it.
Step 4: Create a Warning Sign Find a flat piece of wood. Use black paint or a thick marker to write “KEEP OUT” in messy, scary letters. Hang the sign where everyone can see it.
8. Old Hollywood Horror Premiere

Step right up to a glamorous and spooky movie premiere from the golden age of Hollywood. This entrance uses a red carpet, sequin curtains, and vintage movie props to create a one-of-a-kind theme. A fluffy white wreath and photos of classic movie stars add to the nostalgic and dramatic effect.
This idea is an entertaining way to mix horror with high fashion. It invites guests to be the stars of their own spooky show for the night.
Create This Look: A Step-by-Step Guide
Step 1: Lay Down the Red Carpet Place a long red rug or piece of red fabric leading up to your door. This is your premiere red carpet.
Step 2: Hang the Curtains Hang shiny silver sequin fabric panels on both sides of your door to create a sparkly entrance.
Step 3: Make a Glam Wreath and Props Buy a white feather boa from a craft store and wrap it around a foam wreath circle. Add a black and white polka dot bow. You can print out pictures of old movie clapperboards and film strips to decorate with.
Step 4: Add Star Quality Fill tall vases with more white feathers. Put black-and-white photos of old movie stars in frames and set them on a small table. Sprinkle silver confetti on the ground for extra sparkle.
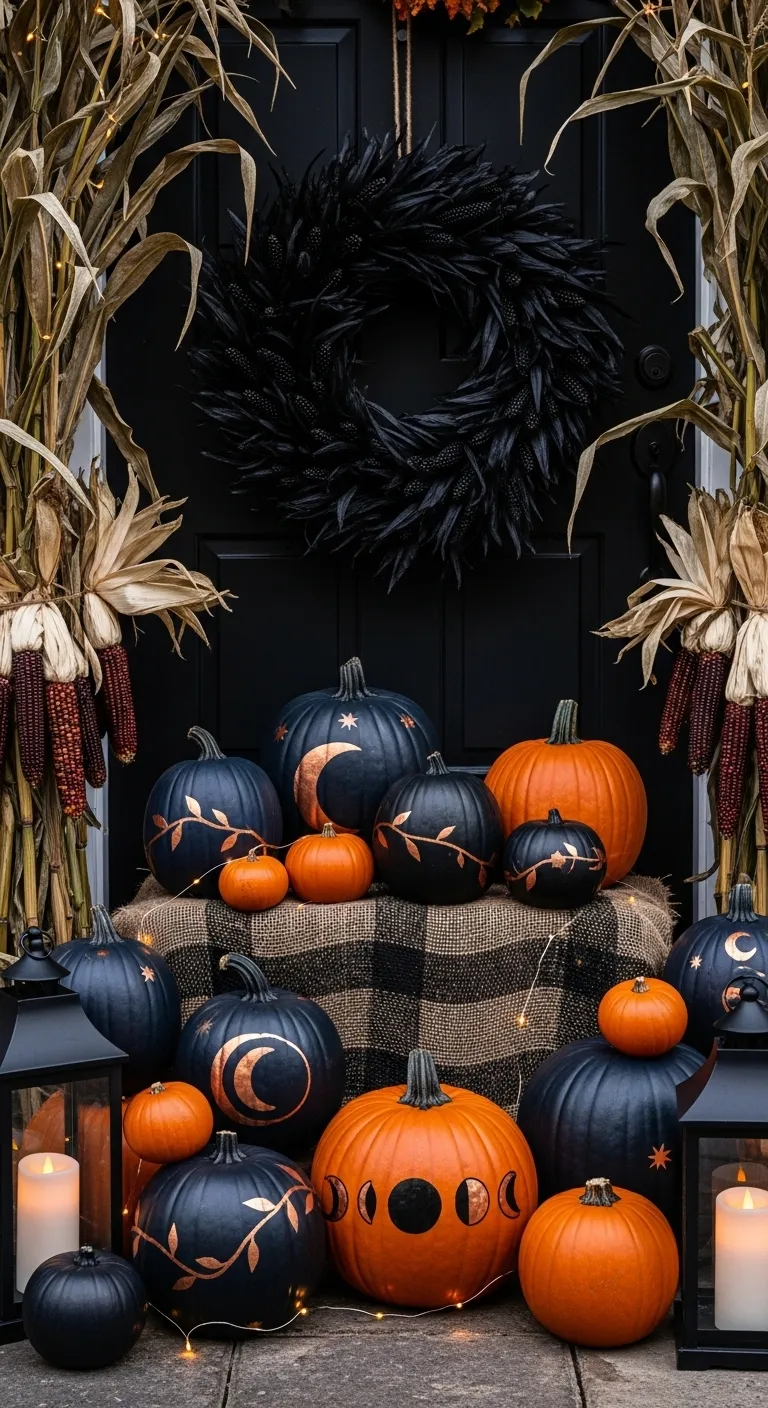
9. Midnight Harvest Gathering

This beautiful display combines the best of autumn with a touch of dark magic. A lush black wreath hangs on the door, creating a dramatic focal point. A wonderful collection of pumpkins, some painted black with golden moons and stars, tumbles down the steps. The scene is framed with dried corn stalks, adding a rustic, harvest texture.
This look feels elegant and enchanting. The contrast between the bright orange pumpkins and the deep black ones creates a rich and moody atmosphere.
Create This Look: A Step-by-Step Guide
Step 1: Get a Dark Wreath You can buy a wreath made of black feathers or black leaves at a craft store. Or, you can take a plain grapevine wreath and spray paint it black.
Step 2: Paint Your Pumpkins Get a bunch of pumpkins in all sizes. Paint about half of them with black paint. Leave the other half bright orange.
Step 3: Add Gold Magic After the black pumpkins are dry, use a thin paintbrush and gold paint to draw on them. You can paint crescent moons, little stars, or swirling vines.
Step 4: Build Your Harvest Display Tie bundles of dried corn stalks together and stand them up on both sides of your door. Put down some burlap fabric on your steps. Arrange all of your pumpkins on top, mixing the orange and black ones together.
10. Minimalist Bat Invasion

This design shows that sometimes, less is more. It creates a dramatic effect using very simple elements. A swarm of black paper bats seems to burst from a corner and fly across the door. The simple word “Boo” delivers the Halloween message loud and clear.
This is a modern and stylish way to decorate. The clean lines and sharp contrast make it stand out, proving you don’t need clutter to be spooky.
Create This Look: A Step-by-Step Guide
Step 1: Cut Out Your Bats Get some black construction paper or cardstock. Find a bat shape you like online, print it, and cut it out. Use this as a stencil to trace and cut out lots of bats. Make them in a few different sizes.
Step 2: Make the Bats 3D Gently fold each paper bat in the middle. This will make their wings pop out a little and look like they are really flying.
Step 3: Stick Them On Use a small piece of double-sided tape or sticky tack on the body of each bat. Start sticking them on the wall next to your door, very close together. Then, have them spread out as they fly across the door.
Step 4: Say Boo! You can buy big black letter stickers from a craft store to spell out “Boo” on your door. Or, you can cut the letters out of black paper. Place a single white pumpkin on the ground to complete the clean, modern look.
11. Wicked Queen’s Poison Apples

This doorway looks like something from a dark fairytale. A sinister black twig wreath is adorned with glossy red and black apples, some sparkling with evil magic. A basket of more tempting apples sits below, creating a scene that is both beautiful and dangerous. It is a wickedly wonderful way to greet your guests.
The theme hints at the story of Snow White, but with a chic and spooky twist. The “Pick Your Poison” sign is a fun detail that completes the story.
Create This Look: A Step-by-Step Guide
Step 1: Create a Twig Wreath Start with a plain grapevine twig wreath. You can leave it natural or spray paint it black for a spookier look.
Step 2: Prepare Your Apples Get some fake apples from a craft store. Paint half of them with glossy black paint. To make a glittery apple, cover one in craft glue and roll it in gold glitter.
Step 3: Decorate the Wreath Ask a grown-up to help you hot glue the red, black, and gold apples onto your wreath. You can also add some small red berries and fake leaves.
Step 4: Set the Scene Fill a wicker basket with more fake apples and some red fairy lights. Place a small sign that says “Pick Your Poison” next to a black cauldron for a final touch.
12. Gilded Entomologist’s Collection

This display is strangely beautiful and a little bit creepy. It turns your door into a sophisticated collection of rare insects. A dark wreath and matte black pumpkins are decorated with large, shiny golden beetles, moths, and other bugs. The entire scene is lit by the warm glow of lanterns, making the gold shimmer.
This unique theme mixes natural science with gothic glamour. It is a very elegant and unexpected way to decorate for Halloween.
Create This Look: A Step-by-Step Guide
Step 1: Go Bug Hunting Go to a toy store or craft store and find some large plastic bugs like beetles and moths. Take them outside and spray paint them all with a shiny gold color.
Step 2: Prepare Your Pumpkins Paint several craft pumpkins with matte black chalk paint. This will make the shiny gold bugs really stand out.
Step 3: Design Your Wreath and Pumpkins Get a wreath made of dark leaves or ferns. Use hot glue with a grown-up’s help to attach the biggest gold bugs to it. You can also glue smaller bugs or use bug stencils to paint gold designs on your pumpkins.
Step 4: Light It Up Place your decorated pumpkins around your door. Add a few black lanterns with flickering battery-powered candles to make all the gold details glow.
13. Enchanted Forest Entrance

Step into a magical, haunted forest with this enchanting door decor. Gnarled black branches covered in glowing purple lights frame the doorway. A wise black raven perches atop a wreath made of moss and silvery ferns, guarding the entrance. The shimmering silver pumpkins and mystical green light add to the otherworldly feel.
This design creates a fairytale world that is both beautiful and a little bit spooky, perfect for a magical Halloween night.
Create This Look: A Step-by-Step Guide
Step 1: Grow a Spooky Frame Buy some fake black tree branches from a Halloween store. Wrap purple string lights around them. Use hooks or wire to attach the branches around your door frame.
Step 2: Make a Forest Wreath Start with a grapevine wreath base. Hot glue patches of green moss onto it. Then, stick in some fake silvery fern leaves and a few glittery purple mushrooms.
Step 3: Add a Forest Guardian Get a fake black crow or raven from a craft store. Perch it on top of your wreath so it looks like it’s watching over your door.
Step 4: Plant Some Magic Spray paint some small pumpkins with shiny silver paint. Arrange them on patches of moss at the base of your door. You can even place a small green light in a lantern for an extra magical glow.
14. Vibrant Day of the Dead Fiesta

Celebrate Halloween with a burst of joyful color! This entrance is inspired by the traditions of Día de los Muertos. Brightly colored paper banners, called papel picado, create a festive frame. A huge wreath made of paper marigolds and a friendly sugar skull welcome everyone to the party.
This is a beautiful and meaningful way to decorate. It focuses on celebration and remembrance with a lively and artistic style that is full of happiness.
Create This Look: A Step-by-Step Guide
Step 1: Hang the Banners Buy strings of colorful papel picado banners from a party store or online. Hang them around and down the sides of your door.
Step 2: Craft a Marigold Wreath Get a foam wreath circle. Make lots of flowers from orange, yellow, and blue tissue paper. You can do this by folding and cutting layers of paper. Glue them onto the foam circle until it is completely full and fluffy.
Step 3: Decorate Sugar Skull Pumpkins Paint several white pumpkins with colorful and detailed sugar skull designs. Look online for inspiration! You can use markers or paint to draw flowers, swirls, and hearts. Place a big decorated skull in the center.
Step 4: Add a Warm Glow Arrange dozens of battery-powered candles of all sizes on your steps. This will create a beautiful, warm light and make the whole display feel welcoming.
15. Gothic Romance Roses

This doorway is all about dark, vampire-like romance. A magnificent wreath overflowing with deep red roses and black feathers makes a dramatic statement. Elegant black lace, flickering candelabras, and warm string lights create a feeling of timeless, gothic beauty.
The look is sophisticated and moody. It swaps scary for stunning, using luxurious textures and a rich color palette to create an unforgettable entrance.
Create This Look: A Step-by-Step Guide
Step 1: Design a Dramatic Wreath Buy a large wreath and fill it with high-quality fake red roses. Tuck black feathers in between the flowers. Add a beautiful ribbon in a dusty rose or deep red color at the top.
Step 2: Drape with Lace Get some tall candelabras and drape them with black lace fabric and velvet ribbons. You can also hang lace down from the wreath.
Step 3: Carve a Chic Pumpkin Find a large craft pumpkin and paint it black. Carve a traditional, spooky jack-o’-lantern face into it. The contrast of the orange light through the black pumpkin looks amazing.
Step 4: Use Candlelight Place your candelabras on each side of the door. Fill them with battery-powered taper candles. Arrange more pillar candles on the ground for layers of flickering light.
16. Mad Hatter’s Halloween Tea Party

Tumble down the rabbit hole with this fantastically mad entrance. It’s a whimsical and chaotic celebration inspired by Alice in Wonderland. The wreath is a wild mix of colorful moss, playing cards, mini top hats, and teacups. Cheshire Cat pumpkins grin mischievously from the stoop, welcoming guests to a very merry un-Halloween.
This is a fun and creative theme that is full of personality. The rising smoke adds a touch of mystery to this wacky tea party.
Create This Look: A Step-by-Step Guide
Step 1: Build a Mad Wreath Start with a moss-covered wreath. Ask a grown-up to help you hot glue on fun items like playing cards, small keys, mini top hats, and clock gears. Add a little banner that says “We’re All Mad Here.”
Step 2: Stack the Teacups Go to a thrift store and buy some old teacups. Carefully stack and glue them on top of each other to create a topsy-turvy tower.
Step 3: Paint Grinning Pumpkins Paint a few pumpkins with the Cheshire Cat’s famous wide grin. You can even paint one to look like the Mad Hatter. Use bright, crazy colors!
Step 4: Add Some Mystery Place a small, safe fog machine behind your decorations. The smoke will pour out and make your tea party look even more magical and mysterious.
17. Sweet Candy Corn Corner

This adorable porch is a sweet tribute to a classic Halloween treat. The entire design uses the cheerful orange, yellow, and white colors of candy corn. A big, cozy wreath wrapped in yarn and pumpkins painted with bold stripes create a look that is playful and fun.
This is a simple yet very effective idea. It’s a happy and welcoming theme that celebrates the sweet side of the holiday.
Create This Look: A Step-by-Step Guide
Step 1: Wrap a Yarn Wreath Get a big foam wreath form. Buy chunky yarn in orange, yellow, and white. Wrap the yarn tightly around the foam in big sections to create the candy corn stripes.
Step 2: Paint Candy Corn Pumpkins Get a few pumpkins in different sizes. Use painter’s tape to create clean lines. Paint the bottom third yellow, the middle third orange, and the top third white.
Step 3: String a Sweet Garland Cut out candy corn shapes from colored craft foam or felt. Use a hole punch and some string to turn them into a cute little banner to hang across your door.
Step 4: Stack Your Treats Arrange your pumpkins by the door. You can stack a smaller one on top of a larger one to add some height and create a fun look.
18. Spooky Shadow Theater

This clever idea uses light and darkness to create a truly scary scene right on your front door. Simple black cutouts of creepy things—like a zombie hand and a black cat—are placed in front of spotlights. This casts huge, terrifying shadows that look like monsters are lurking just out of sight.
It’s a powerful way to decorate that relies on imagination. It proves you don’t need expensive props to create a big scare.
Create This Look: A Step-by-Step Guide
Step 1: Make a Simple Wreath A thin, messy wreath made of bare twigs works best for this look. It will cast its own spooky, branch-like shadow on the door.
Step 2: Cut Out Scary Shapes Draw and cut out scary shapes from black poster board or thin cardboard. Good ideas are a hissing cat, a hand coming out of the ground, or a spooky tree.
Step 3: Make Your Shapes Stand Up Tape or glue your cutouts to garden stakes or long sticks. This will let you “plant” them in your yard or in a flower pot.
Step 4: Set Your Stage Lights Place two or three small spotlights on the ground a few feet from your door. Aim them right at the door. Put your scary shape cutouts in between the lights and the door to create the huge shadows.
19. Film Noir Detective Story

This entrance turns your home into a scene from a black-and-white mystery movie. The spooky effect comes from the dramatic shadows cast by window blinds. A mysterious message on the door and a few clues—a hat and a tie—left on the doormat invite guests to solve the puzzle.
This is a creative and intelligent way to decorate. It uses light and suggestion to tell a story and create a feeling of suspense.
Create This Look: A Step-by-Step Guide
Step 1: Create the Main Effect This works best if you have a window next to your door with blinds. Open the blinds and place a bright lamp inside the house, shining out through them. The light will create those dramatic striped shadows. If you don’t have blinds, you can cut stripes out of a big piece of cardboard and place it in front of a light.
Step 2: Leave a Cryptic Clue Use black vinyl letter stickers to write a mysterious phrase on your door, like “…She Walked In.”
Step 3: Set the Scene Place a simple black doormat on your porch. You can even paint part of your mysterious phrase on it.
Step 4: Drop Some Hints Leave a couple of props on the doormat to help tell the story. An old-fashioned fedora hat and a red tie are great choices for a detective movie theme.
20. The Haunted Hotel Check-In

Welcome your guests to a hotel they will never leave! This incredible display transforms your entryway into the creepy reception desk of a haunted hotel, inspired by the classic movie “The Shining.” With a guest register, vintage keys, and a “No Vacancy” sign, it’s an immersive experience that will give everyone chills.
This theme is all about the small details. It’s a brilliant idea for horror movie fans who want to give their trick-or-treaters a truly memorable scare.
Create This Look: A Step-by-Step Guide
Step 1: Set Up the Front Desk Place a small, old-looking table next to your door. This will be the check-in desk for your haunted hotel.
Step 2: Create a Guest Book Find an old, thick book and leave it open on the table. You can write some spooky names in it. Place a little bell next to it for guests to ring for “service.”
Step 3: Make Your Hotel Signs Design and print some signs that look like they belong in an old hotel. One should be a welcome sign for “The Overlook” and another should say “No Vacancy.”
Step 4: Don’t Forget the Keys Find some old-fashioned skeleton keys at a craft or hardware store. You can hang one from your doorknob and leave a few more on the check-in desk. A “Haunted” doormat is the final touch.
21. Witch’s Apothecary Shelf

This doorway is brewing up some trouble with a wonderfully wicked apothecary display. An old wooden crate becomes a shelf for a collection of mysterious potion bottles. A wreath made of sage bundles hangs on the door, ready for spell-casting. Skulls, spiders, and dried herbs complete this magical scene.
This look is a sophisticated and detailed way to create a witch’s corner. It focuses on the natural and mystical elements of witchcraft, making it feel authentic and chic.
Create This Look: A Step-by-Step Guide
Step 1: Collect Your Bottles Find glass bottles and jars in different shapes and sizes. You can find these at a craft store or recycle them from your kitchen.
Step 2: Create Potion Labels Print out spooky labels with names like “Wolfsbane” or “Dragon’s Blood.” You can make them look old by staining the paper with a wet tea bag and letting it dry. Glue the labels onto your bottles.
Step 3: Build Your Shelf Find two old wooden crates. Stand one up and lay the other on its side on top to create shelves.
Step 4: Arrange Your Potions Place your potion bottles on the shelves. Add other witchy things like little skulls, fake spiders, and a mortar and pestle. Drape some old, stained paper on the shelves to complete the look.
22. The Purple Pumpkin Patch

Make a bold statement with a striking monochromatic theme. This entrance is an explosion of purple, from the massive pumpkin wreath to the piles of painted pumpkins below. The vibrant purple pops against the dark door, while black bat silhouettes add a classic Halloween touch. A single green light bulb casts a wicked glow over everything.
This is a fun and modern take on Halloween decor. It proves that you can move beyond orange and create a look that is both spooky and stylish.
Create This Look: A Step-by-Step Guide
Step 1: Go Pumpkin Picking Get a lot of fake pumpkins in many different sizes. Take them outside and spray paint them all a bright shade of purple.
Step 2: Craft a Purple Wreath Buy a wreath and lots of small plastic pumpkins and gourds. Paint them all purple. When they’re dry, ask a grown-up to help you hot glue them onto the wreath until it’s full. Add a big purple ribbon.
Step 3: Plant Your Pumpkin Patch Place your purple pumpkins in piles on both sides of your door. You can put some in purple flower pots to add different heights.
Step 4: Let the Bats Fly Cut out bat shapes from black paper. Use sticky tack to put them on the wall and windows around your door. For the final touch, swap your porch lightbulb for a green one.
23. Skeleton Guards of the Gala

This doorway makes a bone-chilling first impression. Two life-sized skeletons stand as silent guards, each holding a lantern to light the way. The door itself is decorated with unique wreaths made entirely of bones. It’s a clean, modern, and very spooky look using a simple black-and-white color palette.
The symmetrical design is very striking and dramatic. These bony doormen are ready to give a formal but frightening welcome to all your guests.
Create This Look: A Step-by-Step Guide
Step 1: Hire Your Guards Get two life-sized, posable skeletons from a Halloween store. You will also need two black lanterns with battery-powered candles.
Step 2: Position the Skeletons Stand a skeleton on each side of your door. Bend their arms so they are holding the lanterns. You might need to use some wire to help them hold on.
Step 3: Build a Ribcage Wreath Get a black twig wreath. Use wire to attach a plastic skeleton ribcage to the front of it. Hang this on the top half of your door.
Step 4: Make a Hand Wreath Get another black twig wreath. Buy a bag of plastic skeleton hands. With a grown-up’s help, use a hot glue gun to attach the hands all the way around the wreath, facing inward.
24. A Murder of Crows Invasion

This entryway looks like a scene from a horror movie. A massive swarm of black crows seems to be bursting out of the door and flying off into the night. The use of a single spotlight creates long, spooky shadows that make the scene even more dramatic. It is a simple idea that has a huge visual impact.
The feeling of movement is what makes this design so effective. It’s a terrifying and thrilling way to greet trick-or-treaters.
Create This Look: A Step-by-Step Guide
Step 1: Make Your Crows Find a silhouette of a flying crow online. Print it out and use it as a stencil to trace onto black cardstock paper. Cut out lots of crows in a few different sizes.
Step 2: Create the Swarm’s Center Buy a simple black wreath. Use hot glue to attach a bunch of your paper crows onto it, packed tightly together.
Step 3: Start the Invasion Hang the wreath on your door. Now, use double-sided tape or sticky tack to attach the rest of your crows to the door and the wall, spreading them out like they are flying away from the wreath.
Step 4: Add Dramatic Light Place a single spotlight on the ground and aim it at your door. This will make the crows look even scarier at night.
25. The Gathering of Glimmering Ghosts

This all-white doorway is beautifully haunting. A whole group of friendly, flowing ghosts seems to float around the entrance. A delicate wreath made of baby’s breath adds an ethereal touch, while clean white pumpkins complete the ghostly scene. Some of the spirits even have eyes that softly glow in the dark.
It’s an elegant and otherworldly display. This design proves that Halloween decor can be more magical than monstrous.
Create This Look: A Step-by-Step Guide
Step 1: Craft Your Ghosts Drape a square piece of white cheesecloth or other thin fabric over a small styrofoam ball. Secure the fabric at the “neck” with a clear rubber band.
Step 2: Make Them Glow Draw eyes on your ghosts with a black marker. For some of them, carefully poke a tiny, battery-powered “fairy” light through the fabric from behind to make the whole head glow.
Step 3: Hang Your Spirits Use clear fishing line and thumbtacks to hang your ghosts from the ceiling of your porch at different heights.
Step 4: Add Final Touches Hang a wreath made from white baby’s breath on the door. Arrange a few white-painted pumpkins on the ground to complete your ghostly gathering.
26. The Haunted Museum Heist

This clever doorway tells a story of a spooky crime in progress. The door is protected by a web of red “laser beams.” On the floor, the tape outline shows where a valuable artifact once stood. A fancy museum plaque on the wall lists the cursed items that have been stolen, inviting guests to solve the mystery.
This is a fun, interactive theme that is more mysterious than scary. It’s a great way to engage your visitors’ imaginations.
Create This Look: A Step-by-Step Guide
Step 1: Set Up the Laser Grid Use red yarn for your laser beams. Use clear tape or small hooks to tack the yarn to the wall and door frame. Crisscross the yarn over the door opening.
Step 2: Outline the Crime Scene Use white painter’s tape to create an outline on the floor of a broken vase or a missing statue.
Step 3: Make a Museum Plaque Find a fancy gold frame. On a piece of paper, type up a list of the “stolen” items, like “Portrait of Dorian Gray” or “Mummy’s Amulet.” Put the paper in the frame and hang it on the wall.
Step 4: Secure the Door To add to the story, you can have one red string that looks like it’s been cut, with the ends dangling.
27. Polka Dot Party Porch

This modern and cheerful design uses bold patterns for a fun Halloween look. A playful mix of polka-dotted pumpkins and layered, graphic doormats creates a whimsical welcome. The classic black and white color scheme keeps it looking sharp and stylish, topped off with a big striped bow.
This look is all about having fun with patterns. It’s a chic and graphic way to decorate that feels both festive and fashionable.
Create This Look: A Step-by-Step Guide
Step 1: Find Funky Doormats Look for doormats with bold black and white patterns. In the picture, a striped mat is layered under a polka-dotted one.
Step 2: Paint Polka Dot Pumpkins Get fake pumpkins in orange, white, and black. Use a round sponge pouncer or a stencil to paint polka dots on them. Paint white dots on the black pumpkins, black dots on the white pumpkins, and black dots on the orange ones.
Step 3: Make a Simple Wreath Buy a black twig wreath. The only thing you need to add is a big, beautiful bow.
Step 4: Tie a Big Bow Get some wide ribbon that has black and white stripes. Tie it into a big, fluffy bow and use wire to attach it to the top of your wreath.
28. The Aviary of Apparitions

This doorway is a scene from a gothic fairytale. Stark white birch branches create a ghostly frame for the door. A flock of black raven silhouettes flies across the door, while real (fake) ravens sit trapped in vintage cages. A beautiful and silent snowy owl stands guard over the haunting scene.
The black and white color palette makes this design incredibly striking and elegant. It’s a spooky look that is also very beautiful.
Create This Look: A Step-by-Step Guide
Step 1: Frame the Door Find two tall, pale branches. You can often buy fake white birch branches at a craft store. Place one on each side of the door.
Step 2: Cage Your Birds Buy two or three old-looking birdcages. Place fake black ravens inside them. You can add a fake white snowy owl for a surprising touch.
Step 3: Scatter Some Feathers Place the cages at the base of the branches. Scatter some fluffy white feathers on the ground around the cages.
Step 4: Create a Flock Cut raven silhouettes out of black paper. Use double-sided tape to stick them to your door in a pattern that looks like they are flying upwards.
29. The Witch’s Garden Wreath

This beautiful wreath is deceptively spooky. At first glance, it looks like a rustic autumn wreath made with twigs, dried flowers, and fairy lights. But when you look closer, you see creepy details hidden within—tiny skulls, little bones, and black spiders are tucked among the faded roses.
This is a wonderful example of subtle Halloween decor. It’s elegant and natural, with just enough spookiness to surprise your guests.
Create This Look: A Step-by-Step Guide
Step 1: Start with a Natural Base Get a plain grapevine twig wreath. This will give you that rustic, messy look.
Step 2: Add Flowers and Twigs Use a hot glue gun to add some fake dried flowers, like faded pink and black roses. Stick in some smaller twigs to make it look wilder.
Step 3: Hide Spooky Surprises Buy a bag of small Halloween toys, like tiny plastic skulls, bones, and spiders. Glue these into the wreath, tucking them behind flowers so people have to look closely to see them.
Step 4: Add a Magical Glow Weave a thin copper wire string of warm white fairy lights throughout the wreath. This will make it look enchanting at night.
30. The Fortune Teller’s Finery

This luxurious wreath looks like it belongs to a mysterious fortune teller. It’s wrapped in rich, colorful velvets and dripping with jewels, coins, and charms. Sinister little skulls and dramatic black feathers hint at dark magic. It’s an opulent and mystical piece that is sure to cast a spell on your visitors.
This design is all about texture and detail. The mix of soft velvet, shiny metal, and spooky skulls creates a powerful and magical look.
Create This Look: A Step-by-Step Guide
Step 1: Wrap in Velvet Get a foam wreath form. Cut strips of velvet fabric in rich colors like dark purple, royal blue, and emerald green. Wrap the strips tightly around the wreath, securing the ends with hot glue.
Step 2: Add Dripping Jewels Find old beaded necklaces and gold coin trim at a craft store. Glue them to the wreath so they hang down.
Step 3: Include Magical Items Use hot glue to add a few small, detailed skulls. You can find these at Halloween stores. Tuck in some long, black feathers for a dramatic touch.
Step 4: Create a Moody Scene Hang your wreath on the door. To complete the look, place a candelabra with colorful candles on a small table nearby to create a spooky, flickering light.
31. Nordic Gnome Harvest

This simple and charming display has a cozy, Scandinavian feel. Two adorable gnomes with fluffy white beards stand guard over a pair of smiling jack-o’-lanterns. The scene is decorated with natural elements like moss, birch logs, and a minimalist wreath with red berries. It is a calm and gentle way to celebrate the autumn season.
This look moves away from scary and focuses on a feeling of rustic comfort. It is wonderfully understated and full of charm.
Create This Look: A Step-by-Step Guide
Step 1: Find Some Gnome Friends You can buy cute gnome figures like these at many home decor or craft stores, especially in the fall.
Step 2: Build a Natural Base Place a small black bench or table by your door. Cover the top with a layer of green craft moss. Arrange a few small birch logs on top.
Step 3: Make a Simple Wreath Buy a very simple, thin twig wreath. Use floral wire to attach a small branch of fake red berries to one side.
Step 4: Add Pumpkins and Light Carve two friendly faces into real pumpkins and place them on the ground. For a final touch, add a black lantern and a single candlestick with a battery-powered candle.
32. Mad Scientist’s Laboratory

It’s alive! This doorway has been transformed into the entrance of a mad scientist’s secret lab. A wreath made of thick black cables is tangled with glowing wires. Beakers bubble with strange liquids and plasma balls crackle with electricity. The giant knife and emergency pull station suggest an experiment has gone horribly wrong.
This is a really fun and creative theme that tells a story. It is filled with clever details that will make visitors feel like they are part of the experiment.
Create This Look: A Step-by-Step Guide
Step 1: Create a Cable Wreath Get a foam wreath circle. Buy a few cheap, thick black cables or tubes and wrap them around the wreath. Weave in some bright blue “plasma” wire or EL wire for a cool glowing effect.
Step 2: Mix Some Potions Collect glass jars and beakers. Fill them with water and a few drops of different food coloring. You can add things like fake spiders or a cauliflower “brain” to the jars.
Step 3: Generate Some Power You can buy small, safe plasma balls at a science or novelty store. Place them on top of upside-down metal trash cans.
Step 4: Add the Final Details Make a big fake knife out of cardboard and silver paint. You can also print out a sign that says “IT’S ALIVE!” and attach a red fire alarm pull station toy from a party store.
33. Creepy Circus Sideshow

Step right up to the creepiest show on Earth! This doorway becomes the entrance to a haunted circus tent. A red and white striped awning hangs over the door, which is decorated with a wreath made of popcorn boxes. Vintage-style signs with spooky fonts and a scary jack-in-the-box complete this unsettling carnival scene.
This theme is great for a big scare. It takes something that is supposed to be fun, like a circus, and gives it a very spooky twist.
Create This Look: A Step-by-Step Guide
Step 1: Set the Stage Create an arched frame around your door with wood or sturdy cardboard. Paint it to look old and weathered. Hang a red and white striped curtain or fabric at the top to look like a circus tent.
Step 2: Make a Popcorn Wreath Get a foam wreath circle. Buy a bunch of small, empty popcorn boxes from a party store. With a grown-up’s help, use a hot glue gun to attach them all around the wreath.
Step 3: Create Old-Fashioned Signs Find some pieces of wood or cardboard. Paint them with spooky phrases like “CREEPY CIRCUS” and “ADMIT ONE” using a scary-looking font. You can make them look old by sanding the edges.
Step 4: Add a Scary Prop Find a small box and paint it. Buy a scary clown mask from a Halloween store and attach it to a spring so it looks like it is popping out of the box.
34. Desert Gothic entryway

This look brings a dry, desert heat to Halloween. The style is rustic and a little haunting, using sun-bleached skulls and natural textures. A wild wreath made of dried grasses is decorated with animal skulls, while a large bull skull hangs ominously above. A collection of cacti and white pumpkins ties the whole desert theme together.
This is a very unique and stylish way to decorate. It creates a spooky atmosphere without using any traditional Halloween monsters.
Create This Look: A Step-by-Step Guide
Step 1: Find Your Skulls You can buy realistic-looking fake animal skulls made of plastic or resin from craft stores or online. You’ll want one big one and a few smaller ones.
Step 2: Build a Desert Wreath Start with a grapevine wreath. Go on a nature walk and collect some interesting dried grasses and thin, wispy twigs. Stick them into the wreath to make it look wild and messy. Attach two smaller skulls with wire.
Step 3: Plant a Spooky Garden Gather a few terracotta pots in different sizes. Plant some real or fake cacti and succulents in them.
Step 4: Arrange the Scene Hang the big skull above your door and the wreath on it. Place your potted cacti by the door, and add a few white-painted pumpkins for a touch of autumn.
35. Nevermore Raven’s Roost

This doorway is a dark and poetic tribute to Edgar Allan Poe’s famous poem, “The Raven.” A huge, magnificent black feather wreath creates a dramatic and moody centerpiece. Ominous ravens perch on stark white branches, while old books and a single white pumpkin inscribed with “Nevermore” complete the literary scene.
This is a very sophisticated and intelligent theme. It creates a feeling of gothic melancholy that is both beautiful and haunting.
Create This Look: A Step-by-Step Guide
Step 1: Make a Feather Wreath Buy a large wreath form and several black feather boas from a craft store. Wrap the boas around the wreath form until it is completely covered and fluffy.
Step 2: Add Ghostly Branches Find some bare branches in your yard. Spray paint them completely white. Once they are dry, tuck them into the wreath and place a few around your door.
Step 3: Gather Your Ravens Buy a few fake black ravens from a Halloween store. Perch them on the white branches.
Step 4: Create a Poet’s Corner Stack a few old, dark-colored books. Get a white craft pumpkin and use a black marker to write the word “Nevermore” on it in a fancy, old-fashioned script. Scatter some loose black feathers on the ground.
36. Venus Flytrap Invasion

Feed me! This front porch has been taken over by a horde of hungry, man-eating plants. A lush garland and wreath made of creepy carnivorous plants wrap around the door. The vibrant pinks and greens of the plants glow with an eerie light, creating a scene that feels like it is from another planet.
This is a fantastically creative and creepy idea. It’s a great way to use color and light to create a display that is both beautiful and monstrous.
Create This Look: A Step-by-Step Guide
Step 1: Find Your Monster Plants You can buy fake Venus flytraps and pitcher plants at some craft stores or online. You will need a lot of them!
Step 2: Build a Hungry Garland Start with a plain green garland. Use floral wire to attach your fake carnivorous plants all over it. Weave in some fake purple flowers for extra color.
Step 3: Make a Biting Wreath Decorate a wreath in the same way as the garland, packing the monster plants on tightly.
Step 4: Make It Glow Place a few blacklight bulbs or colored LED spotlights on the ground and aim them up at your plant display. This will make the bright colors of the plants glow in the dark and look extra creepy.
37. The Ghost Writer’s Study

This spooky setup transforms your porch into a haunted library or a ghost writer’s desk. The centerpiece is an amazing wreath made from the folded pages of an old book. A stack of antique books, a skull, feather quills, and inkwells create a scene that is both creepy and classic.
This is an elegant and clever theme for any book lover. It uses simple, literary objects to create a very spooky atmosphere.
Create This Look: A Step-by-Step Guide
Step 1: Make a Book Page Wreath Go to a thrift store and find an old, thick book that is falling apart. Carefully tear out the pages. Fold each page in half or into a fan shape. Ask a grown-up to help you hot glue the folded pages onto a flat cardboard circle until it is full.
Step 2: Create a Writer’s Desk Drape a small table with black fabric. Stack several old, dark-colored books on top of it.
Step 3: Add Spooky Details Place a plastic skull on top of your book stack. You can find feather quill pens and fake inkwells at a craft store.
Step 4: Set the Mood Drape some creepy, gauzy cheesecloth over your display. Add a couple of battery-powered candles for a flickering, spooky light.
38. Modern Marble Masterpiece

This entrance is a work of art. It uses a modern and sophisticated marbling technique to create a chic and unique Halloween look. The pumpkins and wreath are all decorated with a swirling pattern of black, white, and copper, which looks stunning against the dark door.
This is a very stylish and on-trend way to decorate. It shows that Halloween decor can be as elegant as the art you would hang inside your home.
Create This Look: A Step-by-Step Guide
Step 1: Get Ready to Marble This is a fun but messy project, so do it outside! Fill a bucket with water. Choose a few nail polish colors you like, such as black, white, and metallic copper.
Step 2: Drip and Swirl Drip the nail polish onto the surface of the water. Use a toothpick to gently swirl the colors together to create a marble pattern.
Step 3: Dip Your Pumpkins Wear gloves! Slowly dip a white craft pumpkin into the water and pull it back out. The nail polish film will stick to the pumpkin, creating the marbled effect. Let it dry completely.
Step 4: Make a Marbled Wreath Buy a simple fabric-covered wreath form or wrap one in white fabric. Use the same dipping technique to marble the wreath.
39. Ombre Pumpkin Cascade

This is a modern, stylish, and eye-catching way to display pumpkins. Instead of a traditional pile, the pumpkins are stacked in a tall column, creating a beautiful gradient of color. The colors flow from white at the top, down through shades of peach and orange, to grey and finally black at the bottom.
This design is a minimalist’s dream. It’s a very clean and artistic approach to autumn decorating that makes a huge statement.
Create This Look: A Step-by-Step Guide
Step 1: Gather Your Pumpkins You will need a lot of craft pumpkins in several different sizes. It’s best if they are all white or a light color to start with.
Step 2: Plan Your Colors Get spray paint in the colors you want for your gradient. For this look, you need white, peach, orange, grey, and black.
Step 3: Start Painting Spray paint a few pumpkins in each color. You will want more of the colors in the middle of your stack. Let them all dry completely.
Step 4: Build Your Tower This is the tricky part! Start with the largest black pumpkins at the bottom. Carefully stack the pumpkins on top of each other, going up through your colors from dark to light. You may need to use a strong glue or even drill holes and use a dowel rod through the center to keep your tower stable.
With so many creative avenues to explore, there is no reason to have a boring front door this Halloween. Whether you prefer a glamorous gala, a creepy carnival, or a modern masterpiece, the key is to choose a theme that excites you.
Don’t be afraid to mix elements from different ideas or to put your own unique spin on a design. The most memorable Halloween decorations are the ones that show off your personality.
So, gather your craft supplies, pick your favorite spooky story to tell, and get ready to create a welcoming entrance that will be the talk of the neighborhood. Happy haunting!
Key Takeaways
- A Good Theme is Everything: Choosing a clear theme—like “haunted hotel” or “pastel party”—makes it easier to select decorations that work well together and tell a cohesive story.
- DIY is Your Best Friend: Many of the most impressive displays are made with simple, budget-friendly craft supplies. A little paint, paper, and creativity can go a long way.
- Lighting Creates the Mood: Never underestimate the power of good lighting. Spotlights, colored light bulbs, and flickering battery-powered candles can transform a simple setup into a dramatic scene.
- Think Beyond Orange and Black: While classic colors are great, don’t be afraid to experiment. Palettes using purple, pastels, metallics, or a stark black-and-white scheme can make your door stand out.
- The Details Matter: Small props—like a guest book, a poison apple, or a raven—are what complete the story and make your entryway truly immersive and memorable for visitors.