
Does the phrase “guest room” conjure up visions of peace, or does it make you think of that pile of laundry, forgotten holiday decorations, and half finished DIY projects? You are certainly not alone if your spare room has secretly become a massive, cluttered holding zone.
We often assign our least important items to this shared space, turning a potential retreat into a permanent storage overflow. It is time to reclaim that valuable square footage and transform your guest room into the welcoming, tidy, and functional space it was always meant to be.
We have compiled 49 smart, stylish, and highly practical organization solutions designed to banish clutter forever. From discreet wall storage to multi functional furniture, these ideas will help you conquer the chaos and welcome your next visitor with confidence. Say goodbye to the dumping ground, and hello to a beautifully organized home.
1. Wall Mounted Charging Nightstand
Image Description: Floating Storage Solution

This wall mounted unit offers a fantastic way to keep your guest room neat and free of clutter. The light colored wood grain gives the piece a fresh, contemporary feeling that complements various decor styles. It truly makes a small space feel much larger by keeping the floor clear.
Guests will appreciate the thoughtfulness of built in technology features. Notice the illuminated cubby area, which provides a convenient place to charge phones and other devices without searching for an outlet. The integrated power strip is a huge bonus, ensuring cords are contained and easy to access.
Furthermore, the design maximizes every inch of space for guest room storage. Two smooth gliding drawers with contrasting blue interiors offer concealed storage for personal belongings. On the right, a clever vertical cabinet is the spot for magazines or smaller items, proving that functional furniture can also be sleek and stylish.
Materials Required for a Similar DIY Project (Floating Accent Shelf)
- Plywood or Medium Density Fiberboard (MDF) (approximately 3/4 inch thick)
- Wood veneer or laminate (for a professional finish)
- Drawer slides (2 sets, full extension)
- Pulls or handles (2 for drawers)
- Concealed hinges (for the side cabinet, if adding)
- Wood screws (various lengths)
- Wall anchors and mounting hardware (heavy duty, suited for your wall type)
- Wood glue
- Edge banding (if using veneer)
- Wood filler (for filling nail or screw holes)
- Paint or stain (optional)
Equipment Required
- Circular saw or table saw (for cutting main pieces)
- Drill and various drill bits (for pilot holes and hardware installation)
- Kreg jig or similar pocket hole jig (highly recommended for strong joints)
- Screwdriver (manual or electric)
- Measuring tape and straight edge
- Clamps (various sizes)
- Router (optional, for edge profiles or recessed areas)
- Safety gear (safety glasses, dust mask)
- Level
Detailed DIY Instructions: Building a Basic Floating Nightstand
A practical, clean floating shelf storage solution instantly upgrades a guest space. Follow these steps to build a functional unit for your room.
Step 1: Design and Precut the Pieces
Begin by planning the dimensions you want for your shelf. You will need pieces for the top, bottom, two sides, and the internal dividers. Use your saw to carefully cut the plywood or MDF pieces to your specifications. Label each piece immediately so you do not mix them up later. Remember, measure twice and cut once!
Step 2: Assemble the Outer Box
Start assembling the main rectangular box (top, bottom, and two sides) using wood glue and screws. Pocket holes, created with a Kreg jig, offer the neatest and strongest connections for a floating shelf. Apply glue to the edges, align the pieces, clamp them tightly, and then drive in the screws. Ensure the corners are square by checking with a square tool.
Step 3: Add Internal Dividers and Supports
Install the inner pieces that will create your compartments for the drawers, open cubby, and any side sections. Use wood glue and screws (again, pocket holes are helpful here) to firmly attach these dividers inside the main box structure. This step is crucial, as these supports hold the weight of the drawers and items.
Step 4: Finish the Exterior (Sanding and Painting/Veneer)
Once the main structure is assembled and the glue is dry, fill any visible screw holes or gaps with wood filler. Allow the filler to dry completely, and then sand the entire unit until it is completely smooth. At this point, you can apply your chosen finish, whether it is paint, stain, or applying a wood veneer with edge banding for that polished look.
Step 5: Construct and Install the Drawers
Build the drawer boxes, making them slightly smaller than the openings in your nightstand frame. Attach the drawer slides to both the inside of the nightstand frame and the sides of the drawer boxes according to the manufacturer’s instructions. Slide the drawers into place, making sure they open and close smoothly. Finally, attach the drawer fronts and the pulls or handles.
Step 6: Wall Mounting
This is the most critical step for a floating unit. Locate the studs in your wall. If you cannot hit a stud, you must use heavy duty, reliable wall anchors appropriate for the shelf’s weight and its contents. Attach a sturdy mounting cleat (or use keyhole hangers) to the back of the nightstand. Mark the wall, pre drill holes, and securely fasten the shelf to the wall, making certain it is perfectly level.
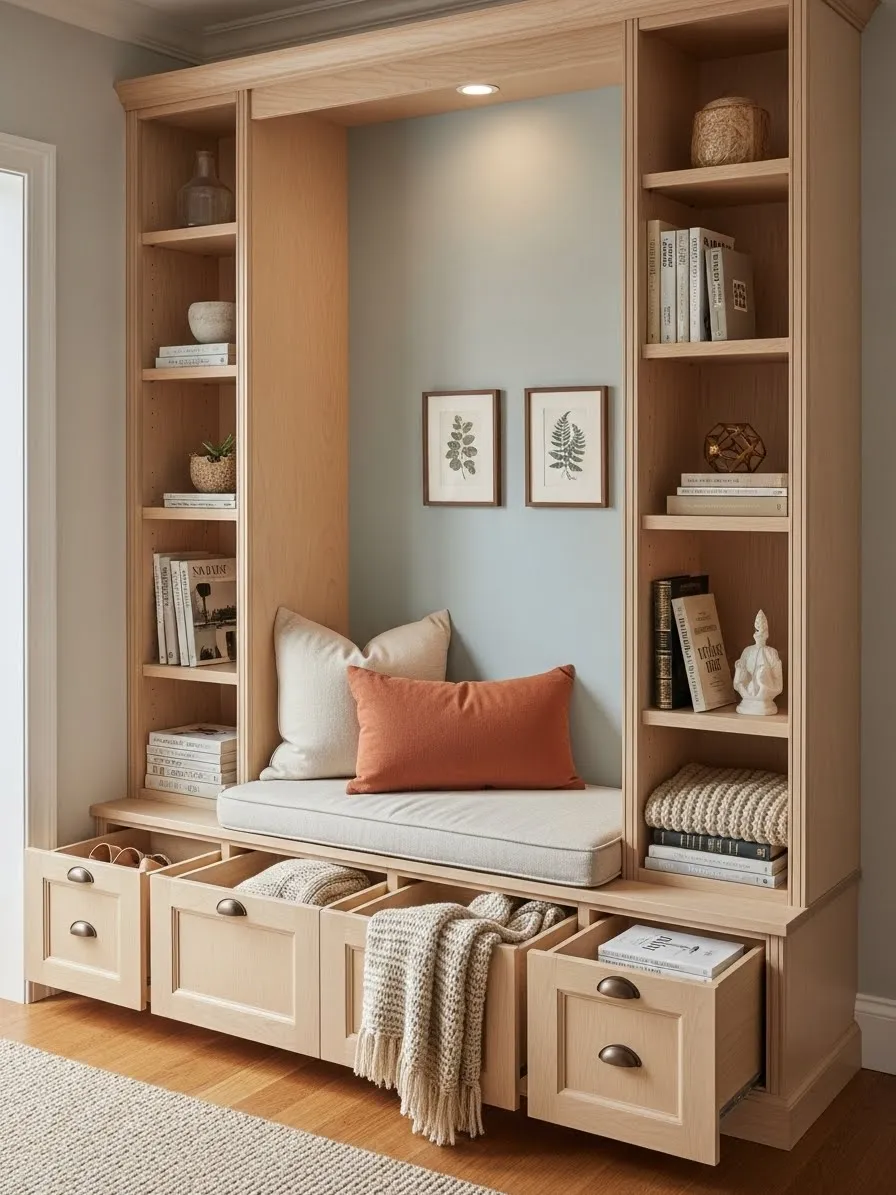
2. All Purpose Hall Tree Storage Unit
Image Description: Stylish Entryway Organizer

This stunning floor to ceiling unit features a beautiful light oak wood grain complemented by a refreshing sage green backing, creating a warm and welcoming feel. It offers diverse guest room organization options, combining open shelving with specialized storage compartments. The design utilizes vertical space smartly, making it particularly suitable for rooms that need to serve multiple functions.
Multiple open cubbies and strong hooks provide ample space for hanging coats, scarves, and backpacks, ensuring immediate access upon arrival or departure. Below the hanging area, two cleverly designed tilt out compartments keep shoes neatly concealed, eliminating trip hazards and minimizing visual clutter. The top shelves are helpful for keeping decorative baskets or folded linens.
One side features a full length vertical cabinet with a mirror and a lower drawer, adding convenience for quick touch ups before heading out. This versatile piece proves that even a small guest room or mudroom can benefit from comprehensive, cohesive storage that looks like a beautiful piece of furniture. It is truly a multi functional home organization solution.
Materials Required for a Similar DIY Project (Modern Entryway Tree)
- Plywood or MDF (at least 3/4 inch thick for stability)
- Wood edge banding (for finishing cut edges)
- Melamine or laminate panels (optional, for the colored back panels)
- Strong coat hooks (6 or more)
- Tilt out shoe hinges and hardware (2 sets)
- Cabinet pulls or handles
- Wood screws, nails, and wood glue
- Drawer slides and a small mirror panel (optional)
- Paint or stain (in desired colors)
Equipment Required
- Table saw or circular saw
- Drill and driver
- Pocket hole jig (for strong, hidden joints)
- Clamps
- Measuring tape and level
- Router (for edge profiling, if desired)
- Safety glasses and hearing protection
Detailed DIY Instructions: Building a Basic Hall Tree Unit
Creating a comprehensive storage solution like this requires careful planning, but the result is a beautifully organized storage organizer.
Step 1: Cutting the Components
First, measure and cut all the large pieces: the two outer sides, the central vertical divider, the top shelf, the bottom base, and all horizontal shelves. Next, cut the back panels, which can be thin plywood painted green for a pop of color, matching the image. Accurately measure and cut the smaller pieces for the drawer box and the tilt out shoe compartments.
Step 2: Assembling the Outer Frames
Start assembling the three main vertical sections. Using wood glue and pocket hole screws, attach the top and bottom shelves to the sides and the central divider. Make sure all corners are square and the pieces are flush. Clamping the pieces before driving screws will help prevent shifting.
Step 3: Installing Interior Elements
Inside the central sections, install the middle horizontal shelf that separates the hanging area from the shoe cubbies. Carefully mount the pre cut back panels into the frames. Attach the coat hooks to the back panels at a comfortable height.
Step 4: Constructing the Shoe Compartments
This step involves specialized hardware. Assemble the inner boxes for the tilt out shoe storage. Following the hardware instructions precisely, attach the tilt out hinges to the shoe boxes and then mount them into the lower cubbies. This mechanism allows the door to swing out while the shoes remain upright.
Step 5: Finishing Touches
If you included a mirror section, secure the mirror panel into its designated space with appropriate adhesive or mounting brackets. Install the small drawer and the cabinet door using the appropriate slides and hinges. Fill any visible screw holes with wood filler, sand the entire unit smooth, and apply paint or stain to match your decor. Attach the handles and pulls last.
3. Modular Cube Organizer
Image Description: Customizable Storage System

This multi tiered unit offers incredible flexibility, making it an excellent choice for dynamic guest room storage. The bright white frames and doors create a light, airy look, while the colorful pull out bins add lively contrast and warmth. Because it uses a modular system, the arrangement can be changed easily to suit different needs, whether it is for folded clothing, books, or toys.
The cube design allows for a combination of open shelving, closed cupboards, and larger bin spaces, maximizing the utility of every section. The middle section incorporates a lower, horizontal segment that serves as a seating bench, offering a convenient spot to pause or put on shoes. This clever integration of rest and organization solution is especially helpful in smaller rooms.
The structure is clearly built for functionality and adaptability. The closed doors conceal less attractive items, maintaining a clean look, while the bins are wonderful for quick cleanup and organizing bulkier articles. The whimsical, cloud shaped tops add a gentle, inviting feel, showing that utility furniture can also be charming.
Materials Required for a Similar DIY Project (Modular Cube Shelving)
- Square or rectangular plastic or wire grid panels (the sides of the cubes)
- Connectors (plastic, multi sided pieces that join the panels)
- Fabric storage bins or canvas boxes (sized to fit the cube openings)
- Thin plastic sheets or boards (optional, for solid cube backs or doors)
- Small hinges (if adding doors)
- Seat cushion material (foam and fabric)
Equipment Required
- Rubber mallet or hammer (for securing connectors)
- Utility knife (for trimming any plastic pieces)
- Measuring tape
- Scissors (for cutting fabric)
Detailed DIY Instructions: Assembling a Modular Cube System
A modular system is one of the easiest ways to create customizable guest room organization without specialized tools.
Step 1: Plan Your Layout
Before you start connecting anything, draw a sketch of your desired arrangement. Note how many cubes wide and how many cubes high you want the unit to be, and where you want the seating bench to fall. This will help you count the exact number of panels and connectors you need.
Step 2: Build the Base Layer
Begin with the bottom row of cubes. Take four panels and four connectors, and tap the corners of the panels securely into the connector slots to form the first cube’s base. Continue connecting panels side by side to create the full length of your base row. Ensure all connections are tight by tapping them with the rubber mallet.
Step 3: Stack and Connect
Once the base is complete, begin building the vertical sides of the second layer by adding panels upward from the first layer’s connectors. Add the top panels for the second layer of cubes. Continue this process, stacking cube layer upon cube layer, until you reach your desired height and shape.
Step 4: Adding the Seat and Storage
If your design includes a bench area, simply leave the top panel off the designated cubes and place your pre cut cushion directly on the supporting panels. If you are adding doors, secure the small hinges to the cube frame and the door panels. Slide the fabric storage bins into the open cubes to complete your accessible storage solution.
4. Multi Function Entryway Wardrobe
Image Description: Streamlined Storage System

This tall, narrow cabinet is a masterclass in space saving design, featuring an elegant taupe finish that would blend seamlessly into any guest room decor. The system combines multiple utility features into one compact vertical unit, making it an exceptionally effective organization solution for tight spaces. It uses a very clean, minimalist aesthetic.
The unit incorporates a full length mirror with built in illumination, providing both practicality and a modern touch. Behind the mirrored door, thin glass shelves offer concealed storage, useful for delicate items or folded accessories. The adjacent cabinet provides a hanging rod and hooks, giving guests a place for coats or dresses without wrinkling.
Perhaps the most inventive feature is the lower tilt out shoe drawer, which cleverly stores multiple pairs of shoes in a small footprint. With its thoughtful combination of hanging space, display shelving, and hidden shoe storage, this piece is a highly functional and attractive component for keeping a guest space tidy and presentable.
Materials Required for a Similar DIY Project (Tall Utility Closet)
- High quality Plywood or MDF (3/4 inch thick)
- Mirrored door panel (with optional integrated LED lighting strip)
- Glass shelves and shelf pins
- Full extension hinges (for the main doors)
- Tilt out shoe hardware (one set)
- Hanging rod and closet hooks
- Cabinet pulls
- Wood glue, screws, and wood filler
- Paint or laminate (in a neutral color)
Equipment Required
- Table saw or circular saw
- Drill and driver
- Pocket hole jig
- Clamps
- Level and measuring tape
- Router (for creating door and shelf recesses)
Detailed DIY Instructions: Constructing a Tall, Narrow Wardrobe
Building a tall wardrobe requires precision to ensure the doors align. This streamlined organization approach will help you maximize a small space.
Step 1: Cutting and Assembling the Main Box
Cut the pieces for the two side panels, the top, bottom, and any internal horizontal dividers. Assemble the main cabinet box using wood glue and pocket hole screws to ensure a strong, rigid structure. Remember to leave the back panel off until the internal components are set.
Step 2: Creating Internal Storage Compartments
Install the fixed horizontal shelves that divide the hanging section from the lower storage. In the mirrored cabinet section, drill the holes for the shelf pins that will support the adjustable glass shelves. Install the hanging rod and coat hooks in the designated section.
Step 3: Building the Shoe Drawer and Doors
Assemble the inner box for the shoe tilt out unit. Following the hardware instructions precisely, attach the tilt out hinges to the shoe boxes and then mount them into the lower section of the cabinet. Attach the cabinet door using the full extension hinges and install the pulls.
Step 4: Finishing the Exterior
Fill all screw holes, sand the wood smooth, and apply your paint or laminate finish. Once the finish is dry, attach the mirror panel to its door using strong adhesive or mounting brackets. Finally, install the cabinet pulls and any specialized lighting strips you chose to include.
5. Storage Bench with Woven Baskets
Image Description: Natural Rattan Accent Bench

This beautiful bench offers a soft, inviting place to sit while providing three distinct areas for hidden guest room storage. The light oak frame and thick, neutral cushion give it a charming, handcrafted look. The combination of natural textures, including woven rattan baskets and a caned lift top, introduces a relaxed, welcoming feeling into the room.
The three large woven baskets slide easily into their cubbies, making them the straightforward spot for storing linens, extra blankets, or personal items. The open shelving concept allows for quick access and the beauty of the baskets themselves becomes part of the decor. Guests will appreciate the easy visibility and retrieval of items.
On the end, a dedicated lift top cubby reveals a unique, separate storage area, likely intended for charging electronics or storing smaller, valuable items out of sight. The clever inclusion of this hinged section and the use of natural materials elevates this from a simple bench to a versatile, organized, and attractive guest room accent.
Materials Required for a Similar DIY Project (Accent Bench with Storage)
- Solid wood lumber (such as oak, pine, or similar) or high quality plywood (for the main frame)
- Thick foam cushion and durable upholstery fabric
- Woven or rattan storage baskets (3, sized to fit your cubbies)
- Small hinges (for the lift top section)
- Leather pulls or handles (optional, for the lift top)
- Wood glue, screws, and nails
- Wood stain or clear sealant
Equipment Required
- Miter saw or circular saw
- Drill and driver
- Pocket hole jig
- Clamps
- Measuring tape and level
- Router (for edge profiling, if desired)
- Safety glasses and hearing protection
Detailed DIY Instructions: Building a Wooden Storage Bench
A simple wooden bench with custom sized cubbies is a great way to add both seating and practical organization to a guest room.
Step 1: Cutting and Assembling the Bench Frame
Cut all the frame pieces: the four legs, the long side rails, and the cross supports for the base and the top of the bench. Use wood glue and pocket hole screws to join the pieces into a solid, rectangular box frame. Ensure the bench is square and extremely sturdy, as it will be used for seating.
Step 2: Creating the Basket Cubbies
Install the vertical and horizontal dividers inside the main frame to create the three openings for the woven baskets. Measure your baskets precisely to ensure the cubbies are the right size for a smooth, easy fit. Secure these dividers firmly with glue and screws.
Step 3: Constructing the Lift Top Section
If you are including the lift top, build a small, separate box frame onto the end of the main bench. Cut the lid panel and attach it to the top of this small box using the small hinges. Test the lid to ensure it opens and closes smoothly.
Step 4: Finishing the Wood
Fill all screw or nail holes with wood filler. Once dry, sand the entire bench thoroughly, starting with coarse paper and finishing with fine grit for a smooth touch. Apply your chosen wood stain or a clear protective sealant to ensure it is protected.
Step 5: Upholstering the Cushion
Cut the foam to the size of the main bench top. Wrap the foam tightly with your upholstery fabric, pulling it taut, and secure the fabric to the underside of a thin plywood base using the staple gun. Place the completed cushion on the bench top for comfortable seating.
6. Circular Rotating Storage Cabinet
Image Description: Spinning Vertical Organizer

This innovative piece is an amazing answer to maximizing guest room storage in a minimal footprint. Its cylindrical, rotating design allows it to hold a large volume of items while taking up only a small corner space. The white, slatted exterior gives it a clean, modern yet textured aesthetic.
When spun around, the unit reveals different layers of organization. One section features a long vertical mirror, which is invaluable in a small bedroom for quick checks. Other sides offer open shelving for easy access to folded clothes or towels, as well as several stylish hooks for hanging robes or bags.
At the bottom, a dedicated section of exposed natural wood provides small cubbies specifically designed for storing shoes neatly and visibly. This comprehensive piece successfully combines a mirror, coat rack, shelves, and shoe storage, making it a highly efficient, multi functional small space solution for any cluttered area.
Materials Required for a Similar DIY Project (Simple Rotating Cabinet)
- Plywood or MDF (3/4 inch thick) for the internal structure and shelves
- Plywood or veneer sheets (thin, flexible) for the curved exterior
- Lazy Susan bearing or hardware (heavy duty, for rotation)
- Small mirror panel
- Metal hooks or wooden pegs
- Wood glue and screws
- Paint or laminate (in white and a natural wood color)
Equipment Required
- Jigsaw or band saw (for cutting circular pieces)
- Drill and driver
- Clamps
- Measuring tape
- Router (optional, for decorative slats)
Detailed DIY Instructions: Building a Rotating Storage Tower
A rotating tower is a project that requires patience, but it offers a unique and highly efficient organization solution.
Step 1: Cutting the Base and Internal Shelves
Using a compass or a large string and pencil, draw a large circle onto the plywood. Cut out two identical circular pieces—one for the base and one for the top. Cut your internal vertical panels and horizontal shelves.
Step 2: Installing the Rotating Mechanism
Mount the heavy duty Lazy Susan bearing securely onto the center of the base circle piece. Attach a second mounting plate to the bottom of the cabinet’s internal frame, centered precisely over the bearing. This ensures smooth, stable rotation.
Step 3: Assembling the Internal Structure
Stand the vertical panels upright on the base. Secure the shelves between the vertical panels using glue and screws, creating the desired compartments (shoe cubbies, open shelves, etc.). Ensure the unit is structurally sound before proceeding.
Step 4: Adding the Exterior Finish
If you are adding a mirror, recess and secure the mirror panel into one of the vertical panels. For the curved exterior, bend a thin sheet of flexible plywood or individual wood slats around the entire structure and secure it with glue and small finishing nails. Finish the unit by painting the exterior white and highlighting the shoe cubbies with a natural wood stain.
Step 5: Final Assembly and Rotation Check
Test the rotation of the unit to ensure it spins smoothly and quietly, revealing the accessory storage without wobbling.
7. Wooden Bench with Tilt Out Shoe Storage
Image Description: Mid Century Shoe Bench

This rich, dark wood bench provides a sophisticated yet practical seating and storage solution for a guest room or foyer. The plush green cushion immediately invites guests to sit down, perhaps while getting ready. Its simple, clean lines align with a timeless furniture aesthetic.
The genius of this design lies in its multi compartment function. The top surface offers comfortable seating, accented by complementary throw pillows. Beneath the seat, two small central drawers pull out, offering discreet spots for small keys, wallet items, or charging cables—essentials that are often misplaced.
The lower half features two large, tilt out drawers specifically designed for shoes. This mechanism keeps footwear completely out of sight and off the floor, dramatically reducing visual mess and freeing up guest room space. The combination of seating, hidden drawers, and specialized shoe compartments makes this a fantastic triple duty piece of furniture.
Materials Required for a Similar DIY Project (Shoe Bench with Drawers)
- Solid wood lumber (such as walnut or mahogany) or stained plywood
- Thick foam and durable fabric (for the seating cushion)
- Drawer slides (2 sets, standard or soft close)
- Tilt out shoe hardware (2 sets)
- Cabinet pulls (4, one for each drawer/tilt unit)
- Wood glue, screws, and nails
- Wood stain (in a dark, rich tone)
Equipment Required
- Table saw or miter saw
- Drill and driver
- Pocket hole jig
- Clamps
- Staple gun (for cushion upholstery)
- Measuring tape and level
Detailed DIY Instructions: Crafting a Shoe Storage Bench
Building a simple wooden bench with custom sized cubbies is a great way to add both seating and practical organization to a guest room.
Step 1: Building the Main Bench Box
Cut the pieces for the long top and bottom panels, and the two end sides. Assemble the main box structure using wood glue and pocket hole screws to ensure a strong, rigid structure. Ensure the frame is extremely sturdy, as it will be used for seating.
Step 2: Creating the Central Drawer Housing
Install the inner vertical and horizontal dividers that will form the space for the two small, central drawers and the two outer tilt out shoe units. Mount the small drawer slides inside the middle cubby area.
Step 3: Constructing and Installing Drawers and Tilt Outs
Build the two small, standard drawers. Attach the drawer slides and install them in the center compartment. Next, assemble the two inner boxes for the tilt out shoe units. Following the hardware instructions carefully, attach the tilt out mechanism and mount these units into the outer compartments. Attach the drawer and tilt unit fronts.
Step 4: Finishing and Cushioning
Fill all screw holes, sand the wood smooth, and apply a rich, dark wood stain or varnish. Once dry, attach the cabinet pulls. Upholster the cushion using foam and fabric secured to a thin wood base with a staple gun, then place it securely on the bench top.
8. Large Multi Compartment Locker Style Unit
Image Description: Farmhouse Storage Locker

This impressive floor to ceiling storage unit is designed to hold everything, offering a stylish solution for serious guest room organization. Its distressed white, farmhouse style finish features slatted cabinet fronts, adding texture and rustic charm. The dark interior contrasting with the light exterior gives it visual depth and highlights the items stored within.
The unit is cleverly divided into individual locker compartments, making it easy to assign a dedicated space for multiple guests or different types of items. Each locker features a top shelf, a central hanging area, and a lower cubby, maximizing every inch of space. Some doors feature chalkboard labels and personalized wooden tags, adding a customizable and fun touch.
At the very bottom, small pull out drawers and ventilated cubbies offer additional space for shoes and smaller accessories. This comprehensive piece serves as a beautiful accent wall while simultaneously conquering all clutter, providing an organized and welcoming storage system for a busy household or large guest space.
Materials Required for a Similar DIY Project (Simplified Locker System)
- Plywood or MDF (3/4 inch thick)
- Shutter or slatted panels (for door fronts)
- Magnetic or spring loaded catches (for doors)
- Small metal drawer slides (for lower drawers)
- Cabinet pulls and hinges (for multiple doors)
- Wood glue, screws, and nails
- Chalkboard paint (for inner door panels)
- Distressed white paint or finish
Equipment Required
- Table saw or circular saw
- Drill and driver
- Pocket hole jig
- Clamps
- Measuring tape
Detailed DIY Instructions: Building a Multi Section Storage Unit
Building a large, partitioned unit requires careful measuring but is essentially a series of joined boxes for maximum organization solution.
Step 1: Cutting and Building the Frames
Cut all the large side and horizontal pieces. Assemble the main outer rectangular box. Next, cut and install the vertical dividers that separate the unit into the four main locker columns. Secure these strongly with glue and screws.
Step 2: Installing Shelves and Dividers
Inside each vertical column, install the fixed horizontal shelves that separate the top, middle (hanging), and bottom sections. This creates a uniform look and adds strength. Use a hole saw or drill to cut ventilation holes into the wood panels for the lower shoe cubbies.
Step 3: Constructing and Hanging the Doors
Cut the cabinet door frames. If using slatted panels, secure the panels into the door frames. Paint the inner door panels with chalkboard paint before mounting. Attach the hinges to the door frames and hang all the doors onto the main unit. Add the magnetic catches to keep them securely closed.
Step 4: Adding Drawers and Finishing
Build the small lower drawers and install the drawer slides in the corresponding openings. Sand the entire unit. Apply the distressed white paint finish. Finally, attach all the pulls, handles, and any decorative items, such as the personalized name tags.
9. Colorful Children’s Storage Console
Image Description: Playful Low Organizer

This cheerful, low profile console brings a burst of color and fun into any room, making it a fantastic solution for organizing a child’s guest room space. The soft, rounded edges and bright, contrasting colors (mint green, pale yellow, and soft teal) create an inviting and safe environment. This unit is intentionally designed for easy access by small hands.
The console offers a creative mix of hidden and open children’s organization options. Closed doors conceal less attractive items, while open cubbies below provide easy drop zones for boots, shoes, and helmets. The colorful, oversized ring handles are easy for children to grasp and add a playful design element.
The top includes a shallow, undulating backboard with useful features like a small chalkboard area and a central caddy for art supplies or pencils. With dedicated spaces for backpacks, shoes, and toys, this piece encourages little guests to keep their area tidy and everything off the floor.
Materials Required for a Similar DIY Project (Kid Friendly Console)
- Plywood (high quality, for a smooth finish)
- Non toxic, water based paint (in bright, varied colors)
- Oversized plastic or wooden ring handles
- Blackboard material or chalkboard paint
- Wood glue, screws, and nails
- Wood filler (for smooth edges)
Equipment Required
- Jigsaw or band saw (for cutting the curved shapes)
- Drill and driver
- Clamps
- Sandpaper or electric sander
- Measuring tape
Detailed DIY Instructions: Creating a Child’s Storage Bench
A low, sturdy console with curved edges is safer and more accessible for young guests. This provides a clear organization solution for their belongings.
Step 1: Cutting the Curved Shapes
Cut the main rectangular pieces for the top, bottom, and sides. Next, use a jigsaw or band saw to carefully cut the rounded wave pattern for the tall backboard and the curved side pieces for the front of the console. Sand all edges, especially the curves, until they are very smooth.
Step 2: Assembling the Console Box
Assemble the main rectangular box using glue and screws. Then, install the inner vertical and horizontal dividers that will create the separate cubbies and closed cabinet sections. Reinforce the low, front ledge or trim piece, as it will likely see a lot of use.
Step 3: Building the Cabinet Doors
Cut the cabinet doors. Drill the holes for the oversized ring handles, making sure they are securely attached to the doors. Attach the doors to the main frame using small, sturdy hinges.
Step 4: Painting and Finishing
This is the fun part! Fill all screw holes and sand again. Apply a primer, and then paint each section with the bright, contrasting colors. Use a quality, low VOC, child safe paint. Apply chalkboard paint to the designated area on the backboard. Allow the paint to cure completely before use.
10. Wall Mounted Grid Organizer
Image Description: Modular Wall Display

This eye catching wall organizer replaces traditional shelving with a dynamic, artistic grid, making it an excellent guest room organization feature that doubles as modern decor. The black wire grid is mounted securely against a white wall, providing a versatile framework for arranging various colorful modules.
The system uses a variety of nested boxes and bins in unexpected colors—coral, mint, teal, and black—allowing the user to customize the look and function instantly. The boxes offer both open shelving for plants and decorations and closed storage for private items. A small chalkboard square is handy for quick notes or personalized welcome messages.
Additional practical components, like a wire key basket and a mail slot, make this a true command center. This modular design is fantastic for small guest rooms or offices where floor space is limited, providing vertical wall storage that can be endlessly reconfigured to suit the needs of the moment.
Materials Required for a Similar DIY Project (Wall Grid System)
- Large metal wire grid panel (pre cut, square grid pattern)
- Wall mounting hardware (heavy duty screws and anchors)
- Plywood or MDF (for building the nested box shelves)
- Small hinges (for any box doors)
- Specialized wire hooks or clips (to attach the boxes to the grid)
- Small wire basket or metal shelf (for key hooks)
- Various paints (coral, teal, black, natural wood stain)
- Cork or chalkboard square
Equipment Required
- Drill and driver
- Measuring tape and level
- Saw (circular or table saw, for cutting box pieces)
- Paint brushes or rollers
- Clamps
Detailed DIY Instructions: Installing a Modular Grid System
This DIY wall storage project is simple to install but allows for highly creative organizational possibilities.
Step 1: Prepare and Paint the Boxes
Cut the plywood or MDF into the pieces needed to construct several simple, open top boxes of varying sizes. Assemble these boxes using wood glue and small finishing nails. Once assembled, sand the boxes smooth and paint them in your chosen colorful palette. Affix the cork or chalkboard square to one of the box fronts.
Step 2: Mounting the Grid Panel
Measure and mark the desired location for the grid on the wall, ensuring the grid will be perfectly level. Using the drill, install the mounting hardware (often standoff screws) onto the wall. Lift the wire grid panel and securely attach it to the wall mounts. Ensure it is firmly fixed and stable.
Step 3: Attaching the Modular Components
Attach the prepared wooden boxes and bins to the grid using specialized clips or wire hooks designed to hold weight. Space them out creatively, varying the colors and sizes to achieve an appealing, modern look. Hook the wire basket or key holder onto the lower section of the grid. Place small plants or personal items in the open cubbies for a welcoming touch.
11. Corner Ladder Shelf with Closed Storage
Image Description: Tall Corner Organizer

This slim, tall corner shelf is an ingenious space saving solution for reclaiming unused vertical space in a guest room. The piece features a light wood and white finish with a modern metal frame, giving it a clean, contemporary aesthetic. The design efficiently utilizes an often forgotten corner area.
The open shelving above the cabinet provides accessible storage for books, decorations, and even a charging area for electronics, visible thanks to the lower cord management hole. This blend of closed and open compartments is crucial for maintaining a tidy look. Guest room organization benefits from easy access mixed with concealed clutter spots.
At the bottom, a closed white cabinet with a wood accent drawer front conceals bulkier or less attractive items. This secure storage area is essential for keeping linens, cleaning supplies, or extra amenities out of sight. The narrow profile, complete with a small mirror leaning nearby, ensures the room feels larger, not smaller.
Materials Required for a Similar DIY Project (Corner Storage Ladder)
- Plywood or MDF (3/4 inch thick for shelves and cabinet)
- Metal tubing or wooden dowels (for the ladder frame)
- Shelf brackets or screws (for attaching shelves to the frame)
- Cabinet hinges and a pull
- Wood glue, screws, and nails
- White paint and wood stain (for contrasting finish)
Equipment Required
- Miter saw or circular saw (for precise angle cuts)
- Drill and driver
- Pocket hole jig (for cabinet assembly)
- Measuring tape, level, and square
- Clamps
Detailed DIY Instructions: Building a Corner Storage Unit
A corner unit is a clever approach to adding significant vertical storage without encroaching on the main living area.
Step 1: Cutting the Corner Shelves and Cabinet Sides
Cut the trapezoid shapes for the shelves, ensuring all have the correct 90 degree corner for fitting against the walls. Cut the pieces for the lower square cabinet box, including the sides, bottom, and door. Note that the cabinet door itself will likely be rectangular, while the side walls will have a tapered edge to meet the corner.
Step 2: Assembling the Cabinet Base
Construct the lower cabinet box using wood glue and screws. Install the cabinet door using the hinges and attach the pull. Paint or finish the cabinet exterior in white for a crisp look, contrasting with the wood drawer front.
Step 3: Building the Ladder Frame
If using wooden dowels, cut them to the full height of the unit and join them with the corner shelves using strong screws or brackets. If using metal tubing, assemble the frame according to your design specifications. This frame provides the structure for the open shelves.
Step 4: Installing the Shelves
Measure and mark the height for each shelf along the vertical frame members. Secure the finished wood shelves to the frame supports using brackets or screws. Ensure each shelf is perfectly level. Add the small accent drawer front to the cabinet, even if it is just a façade for a pull out cubby.
Step 5: Wall Mounting
Due to its height and narrow profile, this unit must be anchored to the wall for safety. Secure the top sections of the frame to the wall studs using appropriate mounting hardware, ensuring the unit is stable and does not wobble.
12. Wall Mounted Woven Basket Array
Image Description: Natural Vertical Storage

This arrangement of woven baskets provides a stunning, textural solution for guest room organization while maximizing wall space. The natural, light colored material brings a rustic, coastal, or Bohemian feel to the decor. Grouping them vertically transforms simple storage into a charming design element.
These durable baskets, made from natural fiber or rattan, feature sturdy fabric linings and white tabs, making them easy to grab and pull off their wall hooks. They offer varied sizes and shapes, allowing for the storage of different items, from rolled towels and extra toiletries to keys and accessories. One basket even has a blue and coral stripe, adding a welcome splash of color.
Mounting the baskets at varying heights, secured by simple wall hooks, keeps everything off the floor and easily accessible. This is a wonderfully practical and visually appealing way to add accessible wall storage, especially where floor space is precious.
Materials Required for a Similar DIY Project (Woven Wall Pockets)
- Woven storage baskets (various sizes, with handles or loops)
- Strong wall hooks or mounting brackets (metal or sturdy wood pegs)
- Screws and wall anchors (appropriate for your wall type)
- Heavy duty thread and needle (optional, for reinforcing loops)
Equipment Required
- Drill and driver
- Measuring tape and level
- Pencil (for marking the wall)
Detailed DIY Instructions: Installing a Basket Wall Array
Adding this kind of wall organization is one of the quickest ways to create functional storage that also elevates the look of the room.
Step 1: Planning the Layout
Before drilling, lay your baskets out on the floor and decide on the arrangement you like best. Use a piece of tracing paper or simply measure the distances between each hook point. Remember to vary the heights and sizes for visual interest. Mark the planned hook locations lightly on the wall with a pencil.
Step 2: Installing the Hooks
Using the drill, install the wall anchors into the marked spots if you are not hitting a wall stud. Screw the chosen wall hooks or wooden pegs firmly into the anchors. Ensure the hooks are sturdy enough to bear the weight of the full basket. For very heavy baskets, consider using mounting brackets instead of simple hooks.
Step 3: Attaching the Baskets
Hang the baskets onto the newly installed hooks. If your baskets do not have a strong loop or handle, reinforce the mounting spot with strong thread or by adding a small leather tab. Place items like small rolled hand towels, gloves, or keys into the baskets.
13. Built in Pull Out Wire Shoe Rack
Image Description: Concealed Shoe Drawer

This sophisticated, hidden shoe organization system is integrated directly into a lower cabinet or closet unit, providing the cleanest possible storage aesthetic. The light gray cabinet door with a sleek metal handle conceals the contents completely, maintaining a seamless, clutter free look in the room.
When the cabinet door opens, two tiers of wire shelving slide out smoothly on heavy duty runners. This pull out mechanism makes it incredibly easy to see and access every pair of shoes, eliminating the usual digging and mess. The wire design is also practical, allowing air to circulate and preventing dirt from accumulating.
Integrated low profile lighting within the cabinet further enhances visibility, making it simple for guests to select their footwear. This solution proves that specialized hardware is worth the investment for maximizing guest room storage efficiency and maintaining a high end finish.
Materials Required for a Similar DIY Project (Under Cabinet Shoe Drawer)
- Cabinet door (sized to fit your existing or new cabinet opening)
- Full extension, soft close drawer slides (heavy duty, 2 pairs)
- Ventilated wire shoe racks or slatted wood shelves (2 tiers)
- Cabinet handle or pull
- Wood for framing the drawer box (if building from scratch)
- Wood glue and screws
Equipment Required
- Drill and driver
- Measuring tape and level
- Saw (if building the cabinet frame)
- Pencil (for precise marking)
Detailed DIY Instructions: Installing a Slide Out Shoe Unit
Integrating a slide out unit into an existing space provides highly efficient, hidden organization.
Step 1: Measuring and Preparing the Opening
Carefully measure the height, width, and depth of the cabinet opening where the shoe rack will be installed. Ensure you have enough depth for the full extension drawer slides and the shoe racks. If installing into a built in unit, make sure the interior is clean and ready.
Step 2: Installing the Drawer Slides
Attach the lower section of the two pairs of drawer slides securely to the inside walls of the cabinet opening, following the manufacturer’s directions. It is absolutely essential that the slides are installed perfectly parallel and level to ensure smooth operation.
Step 3: Attaching the Shoe Racks
Secure the ventilated wire shoe racks (or custom built slatted shelves) to the upper section of the drawer slides. If the racks are not designed to attach directly to the slides, you may need to build a simple wooden frame for each rack that then connects to the slides.
Step 4: Attaching the Cabinet Front
Build the cabinet door slightly larger than the opening to overlap the edges. Attach the cabinet door front to the fully assembled, two tiered, pull out unit. This step requires careful alignment, as the door must sit flush with the surrounding cabinetry when closed. Finally, secure the cabinet handle onto the door front.
14. Wall Mounted Vertical File Organizer
Image Description: Plywood Mail Center

This wall mounted unit offers a highly organized vertical solution for tackling paper clutter, perfect for a guest room that doubles as a home office or study space. The natural plywood construction with a gentle, pale green accent color gives it a clean, Nordic inspired aesthetic. This is a must have for home office organization that also serves guest needs.
The organizer features multiple labeled vertical slots, offering dedicated zones for “Incoming Mail,” “To Pay/Action,” and “Magazines.” This clear separation of paper types instantly eliminates stacks of documents on desks or nightstands. The labels, set in gold toned metal frames, add a touch of sophisticated professionalism.
At the bottom, a small drawer and an open ledge provide utility for essentials. The drawer is great for keeping pens and stamps out of sight, while the ledge offers a convenient spot to set a phone for charging or display a temporary item. Adding a clipboard and scissors hooks shows thoughtful attention to functional detail in guest room storage.
Materials Required for a Similar DIY Project (Plywood Mail Sorter)
- Birch or other light plywood (1/4 inch or 1/2 inch thick)
- Small metal label holders and corresponding paper inserts
- Wood glue and small nails
- Wood stain or clear sealant
- Wall mounting hardware (screws and keyhole hangers)
- Small metal drawer pull
Equipment Required
- Table saw or circular saw (for straight, precise cuts)
- Drill and driver
- Clamps
- Sandpaper (for finishing edges)
- Measuring tape and level
Detailed DIY Instructions: Building a Vertical Mail Sorter
A wall organizer like this is an excellent organization solution that uses simple materials to achieve great functionality.
Step 1: Cutting the Slotted Pockets
Cut all the pieces for the backboard, the sides, and the sloped fronts of the pockets. This requires careful, repetitive cutting to ensure all the pockets are the same size and angle. Use a saw to cut the label notches into the top edge of each front piece.
Step 2: Assembling the Pockets
Using wood glue and small finishing nails, assemble each individual pocket. Attach the sides to the front and bottom pieces. Once the glue is dry, secure these individual pockets onto the main backboard piece in a vertical stack. Clamps will help ensure a tight fit.
Step 3: Building the Lower Drawer
Construct the small, shallow drawer box to fit into the base of the unit. Install a small drawer pull on the front. Build a small open shelf ledge below the drawer for the charging area. Finish the entire unit with a clear sealant or light stain.
Step 4: Adding Labels and Mounting
Attach the metal label holders to the fronts of each pocket using small nails or glue. Insert the printed category labels. Secure the wall mounting hardware (like keyhole hangers) to the back of the unit. Mount the organizer to the wall, making certain it is perfectly level and stable.
15. Wall Mounted Zen Console with Display
Image Description: Decorative Storage Shelf

This beautiful, low profile floating console combines tranquility and hidden organization in an elegant piece of furniture. Made of light toned bamboo or a similar wood, its clean lines give it a Japanese inspired aesthetic that promotes calm in a busy guest room. It is a stunning example of form meeting function.
The top surface features three distinct recessed sections covered by clear glass panels. These sections serve as beautiful display zones—one holds a miniature Zen garden with sand and a small stone, and another holds polished stones and pinecones. The glass protects the items while creating visual interest, offering guests a calming element in the room.
Crucially, the unit also provides practical storage. Two drawers pull out from beneath the display, lined with soft green velvet for storing delicate items like jewelry, watches, keys, and wallets. This makes it an organization solution for personal belongings that might otherwise be scattered across a dresser top.
Materials Required for a Similar DIY Project (Floating Display Shelf)
- Bamboo or light colored wood panels (3/4 inch thick)
- Clear glass panels (3, sized to fit the display recesses)
- Drawer slides (2 sets, standard extension)
- Thin velvet or felt fabric (in a jewel tone, for lining drawers)
- Drawer pulls (2, modern metal design)
- Wall mounting hardware (cleats or brackets)
- Wood glue and screws
Equipment Required
- Table saw or router (for cutting the display recesses)
- Drill and driver
- Clamps
- Measuring tape and level
- Sandpaper
Detailed DIY Instructions: Crafting a Bamboo Display Console
This project uses standard construction techniques but adds the challenge of routing precise recesses for the glass display tops for beautiful guest room storage.
Step 1: Cutting and Assembling the Box Frame
Cut all the pieces for the main rectangular box (top, bottom, and two sides). Assemble the box frame using wood glue and screws. Ensure the front opening is correctly sized for the two drawers.
Step 2: Creating the Display Recesses
This is the most specialized step. Use a router to carefully cut three rectangular recesses into the top panel of the box, ensuring the depth matches the thickness of your glass panels. The glass should sit flush or slightly below the surrounding wood surface.
Step 3: Building and Lining the Drawers
Build the two shallow drawer boxes. Install the drawer slides inside the console frame and attach them to the drawer boxes. Cut the velvet or felt fabric and carefully glue it into the bottom of the drawers for the plush lining. Install the drawer pulls.
Step 4: Mounting and Adding Display Elements
Affix the wall mounting hardware (a French cleat is excellent for heavy floating shelves) to the back of the console and the wall. Mount the console securely to the wall, making sure it is perfectly level. Place the Zen garden materials and decorative elements into the recesses. Carefully set the glass panels into their slots.
16. Wall Mounted Pegboard Organizer
Image Description: Bright Utility Grid

This robust, black metal grid offers a highly flexible and customizable wall storage system, ideal for an active guest or a multifunctional room. The dark grid provides a strong contrast for the bright, specialized yellow and navy blue accessories, creating a bold, industrial look that is still fun and accessible.
The system is designed for utility and efficiency. It features various sized bins, hooks, and trays, all of which clip securely onto the grid in countless configurations. Larger bins can hold items like helmets or shoes, while smaller cups are perfect for pens, keys, and small tools. This setup ensures everything has an exact place, which is fundamental to guest room organization.
A dedicated key rail and an open white board further enhance its practicality. Because the components can be moved at any time, the unit can evolve easily, shifting from a storage station for sports gear to a simple organization system for travel documents and accessories.
Materials Required for a Similar DIY Project (Metal Grid System)
- Large metal wire grid panel (pre painted in black or dark color)
- Wall mounting hardware (screws and anchors)
- Plastic or metal bins, trays, and hooks (with clips designed for grid mounting)
- Small white board or magnetic sheet
- Key rack insert
- Spray paint (yellow and blue, for customizing components)
Equipment Required
- Drill and driver
- Measuring tape and level
- Rubber mallet (optional, for tapping hooks into place)
Detailed DIY Instructions: Setting up a Modular Grid Board
Setting up a modular grid is one of the quickest and most adaptable ways to create versatile wall organization.
Step 1: Mounting the Grid Panel
Measure and mark the location for the grid on the wall. Install the wall anchors where needed. Attach the four corner mounting points for the grid panel and secure the grid firmly to the wall mounts. Use a level to ensure it is mounted straight.
Step 2: Preparing the Components
If your bins and trays are a neutral color, use spray paint to achieve the bright yellow and navy contrast shown in the image, ensuring you use paint suitable for plastic or metal. Let them dry completely. Attach the clips to the back of each bin and tray.
Step 3: Arranging the System
Start arranging the components on the grid. Begin with the larger, heavier items (like the bottom bins) and then fill in the space with the smaller accessories. Clip the specialized key rail and the small white board onto the grid at accessible heights.
Step 4: Customizing the Setup
Experiment with placement. Put items needed most often, like keys and a notepad, at eye level. Use the larger bins for bulkier items that need to be contained, creating distinct zones for different guest needs. The beauty of this system is that it can be changed at a moment’s notice.
17. Tall Vertical Wardrobe with Interior Lighting
Image Description: Sleek Integrated Closet

This floor to ceiling wardrobe represents the ultimate in streamlined guest room storage, offering a dedicated space for hanging clothes and keeping shoes tidy. The exterior features a modern gray finish with a contrasting white door, creating a sophisticated and clean appearance.
When the door is opened, the interior is brightly illuminated with integrated LED lighting, making it easy to see clothes and accessories. This is a crucial detail for making a guest feel welcome and providing a touch of luxury. The full width hanging rod accommodates coats, dresses, and shirts, preventing wrinkles.
The unit also features dedicated lower shelves for boots and shoes, complete with ventilation for freshness. At the top, a shelf provides space for storage boxes or luggage. This sleek design ensures that all essential wardrobe items are organized, well lit, and fully concealed, transforming the look of a cluttered room.
Materials Required for a Similar DIY Project (Narrow Wardrobe)
- Plywood or MDF (3/4 inch thick)
- Full length door and hinges (soft close preferred)
- Closet hanging rod and supports
- Cabinet handle
- LED strip lighting (battery powered or plug in, with switch)
- Ventilated shoe shelves or wire rack
- Wood glue, screws, and hardware
- Paint (gray and white)
Equipment Required
- Table saw or circular saw
- Drill and driver
- Pocket hole jig
- Measuring tape and level
- Clamps
Detailed DIY Instructions: Building a Single Column Wardrobe
A tall, narrow cabinet is one of the best organization solutions for adding full hanging capabilities to a small guest room.
Step 1: Cutting and Assembling the Shell
Cut the pieces for the two side panels, the top, and the bottom. Assemble the main cabinet shell using wood glue and screws. Install the fixed bottom shelf that separates the hanging area from the shoe storage.
Step 2: Preparing the Interior
Install the supports for the hanging rod near the top of the cabinet and mount the rod itself. Build and install the lower shoe shelves, making sure to include some ventilation holes in the base or back for air circulation.
Step 3: Installing Lighting
Measure and cut the LED strip lighting to fit under the top shelf and along the inside perimeter of the cabinet opening. Secure the lighting in place, routing the wires neatly to the power source or battery pack.
Step 4: Hanging the Door and Finishing
Attach the cabinet door to the shell using the full length hinges. Ensure the door opens and closes smoothly and aligns correctly. Fill any holes, sand, and paint the exterior in your chosen colors. Install the handle and the interior light switch, if applicable.
18. Wall Mounted Slimline Cabinet
Image Description: Discreet Floating Storage

This mid height, wall mounted cabinet is an example of highly effective discreet storage that blends seamlessly into the wall. The rich, dark wood grain adds warmth and texture to the room. By floating off the floor, it preserves floor space, a key strategy for making a guest room feel more spacious.
The cabinet features two doors, likely sliding or hinged, which conceal the contents completely. The depth of the unit is shallow, making it suitable for hallways or smaller rooms where a traditional cabinet would impede movement. This unit is an excellent way to contain general clutter—remote controls, cables, media components, or cleaning supplies.
Its simple, horizontal shape and minimalist hardware make it look more like a piece of contemporary art than a heavy storage unit. For guest room organization, concealing the bulk of storage items behind closed, elegant doors is the ultimate way to maintain a clean aesthetic.
Materials Required for a Similar DIY Project (Shallow Wall Cabinet)
- Plywood or MDF (3/4 inch thick, with wood veneer or laminate)
- Cabinet hinges or sliding door hardware (depending on design choice)
- Handles or integrated pulls
- Wall mounting hardware (heavy duty French cleat system is highly recommended)
- Wood glue and screws
Equipment Required
- Table saw or circular saw
- Drill and driver
- Clamps
- Measuring tape and level
Detailed DIY Instructions: Building a Floating Wall Cabinet
Creating a floating cabinet is a stylish way to add storage solution without losing precious square footage.
Step 1: Cutting and Assembling the Shell
Cut the pieces for the top, bottom, and two sides. Because this unit is shallow, ensure all dimensions are precisely cut. Assemble the rectangular box using wood glue and screws. Install any internal fixed shelves at this stage.
Step 2: Preparing the Doors and Hanging Hardware
Cut the cabinet doors. If using sliding doors, install the track hardware on the top and bottom interior of the cabinet. If using hinged doors, attach the hinges to the cabinet frame. Install the handle on the door fronts.
Step 3: Installing the Wall Mount
For a heavy floating cabinet, a French cleat system is safest. Cut two pieces of wood with a 45 degree bevel along one edge. Secure one cleat piece horizontally to the back of the cabinet.
Step 4: Mounting the Cabinet
Locate and mark the wall studs. Attach the second French cleat piece to the wall, ensuring it is level and screwed securely into the studs (or heavy duty anchors). Lift the cabinet and lock the cabinet cleat onto the wall cleat. This ensures a strong, hidden mount.
19. Bench with Integrated Pet Crate and Storage
Image Description: Pet Friendly Storage Bench

This innovative bench serves three distinct functions, making it the supreme multi functional organization solution for guest rooms that host furry friends. The bamboo frame and olive green cushion give it a natural, spa like look. It cleverly integrates storage, seating, and a dedicated pet zone.
One side features a comfortable seat cushion on top, perfect for the human guest. Below the cushion, a deep, full extension drawer with dividers offers organized space for pet supplies, treats, or guest amenities. Adjacent to the drawer, a large woven basket provides open guest room storage for blankets or toys.
The other side is ingeniously designed as a secure, built in pet crate with a slatted door and a comfortable interior. This keeps the pet contained and safe without the clutter of a bulky metal crate, ensuring the room remains tidy and welcoming for all occupants, human and animal.
Materials Required for a Similar DIY Project (Dog Crate Bench)
- Bamboo or sturdy wood panels (3/4 inch thick)
- Metal rods or wooden dowels (for the crate door and sides)
- Heavy duty hinges and a latch (for the crate door)
- Drawer slides and wood for drawer construction
- Foam cushion and upholstery fabric
- Wood glue and screws
Equipment Required
- Table saw or circular saw
- Drill and driver
- Pocket hole jig
- Clamps
- Staple gun (for cushion upholstery)
Detailed DIY Instructions: Building a Combined Crate and Storage Bench
A furniture piece that accommodates a pet is an incredibly thoughtful and practical guest room storage addition.
Step 1: Building the Main Box and Divider
Cut the pieces for the main bench box. Install the central vertical divider that separates the pet crate section from the storage section. Secure the top and bottom panels firmly with glue and screws, ensuring the structure is robust enough for seating.
Step 2: Constructing the Pet Crate
In the crate section, drill holes into the top and bottom panels. Insert and secure the metal rods or wooden dowels into these holes to create the side walls of the crate. Assemble the crate door, mimicking the barred design, and attach it to the crate opening using heavy duty hinges and a secure latch.
Step 3: Installing the Drawer
Build the storage drawer box. Install the drawer slides inside the drawer compartment and then slide the completed drawer into place. Add the woven basket cubby below the drawer.
Step 4: Finishing and Cushioning
Fill all screw holes, sand the entire bench smooth, and apply a clear protective finish or light stain to the wood. Upholster the cushion using foam and fabric secured to a thin wood base with a staple gun. Place the cushion atop the bench.
20. Simple Bench with Utility Boot Tray
Image Description: Functional Slatted Mud Bench

This simple, rustic bench is the epitome of functional entryway organization, solving the common problem of wet or dirty footwear cluttering the floor. The dark stained wood, with a slatted top, gives it a robust, weather resistant appearance suitable for a mudroom or entryway guest space.
The design is brilliant in its simplicity. The slatted construction of the bench allows air circulation and prevents water from pooling on the wood. Beneath the bench, a large, low galvanized metal tray catches dirt, mud, and water dripping from rain boots and shoes. This completely contains the mess, protecting the floor.
This storage solution is specifically designed for practical utility, ensuring that wet or dirty guest items are contained immediately upon entry. The bench also offers a convenient spot to sit and remove shoes or set down a bag, keeping the entire guest entry area tidy and functional.
Materials Required for a Similar DIY Project (Slatted Boot Bench)
- Pressure treated or exterior grade lumber (2x4s or 2x2s)
- Large, shallow galvanized steel tray or plastic boot tray
- Exterior grade screws or deck screws
- Dark wood stain or sealant
- Wood glue (optional, for extra strength)
Equipment Required
- Miter saw or circular saw
- Drill and driver
- Measuring tape and level
- Clamps
Detailed DIY Instructions: Building a Slatted Utility Bench
A slatted bench is a straightforward project that creates a highly functional organization solution for dirty guest items.
Step 1: Cutting the Bench Frame
Cut the pieces for the four legs, the long side rails, and the shorter end rails. Assemble the rectangular frame using wood glue and exterior grade screws, ensuring the corners are square. The height must be sufficient to slide your boot tray underneath with clearance.
Step 2: Creating the Slatted Top
Cut the slats for the bench top. Lay them across the top frame, spacing them evenly to allow for drainage. Secure each slat to the side rails using screws. Counter sink the screw heads slightly for a smoother finish.
Step 3: Finishing the Wood
Sand down any rough edges or splinters. Apply a dark wood stain or a clear exterior sealant to the entire bench. This protects the wood from moisture and dirt, making cleanup easier.
Step 4: Adding the Boot Tray
Once the bench is completely dry, slide the large galvanized steel or heavy duty plastic boot tray directly beneath the bench. Position it so that wet boots placed on the slats drip directly into the tray. Place a sturdy welcome mat next to the bench to complete the effective mud zone.
21. Industrial Pipe Shelf and Coat Rack
Image Description: Rustic Utility Station

This rugged, farmhouse style wall unit offers durable and efficient entryway organization using reclaimed wood and industrial pipe fittings. The combination of dark stained, distressed wood and copper toned metal plumbing creates a striking, unique aesthetic that is both sturdy and stylish. This entire setup mounts to the wall, preserving valuable floor space.
The upper shelf provides a strong platform for placing decorative items or storing accessories in a small box, keeping them off the main bench. Beneath the shelf, a copper rod acts as a useful hanging bar for umbrellas or scarves, while a separate wooden plank features several heavy duty black hooks for coats and bags. This focused design ensures every item has a dedicated spot.
The lower bench, also made of thick, distressed wood, offers a place to sit while removing or putting on shoes. A matching copper rod beneath the bench can hold boots or shoes off the floor or act as a stabilizing footrest. It is a fantastic, complete DIY storage solution that handles the heavy duty needs of a busy entry area.
Materials Required for a Similar DIY Project (Pipe and Wood Storage)
- Rough cut lumber or thick planks (for two shelves and the hook board)
- Black metal pipe flanges, elbows, and threaded pipe sections (in desired lengths)
- Copper pipe or metal rod (for hanging rails)
- Heavy duty coat hooks
- Wood stain (dark color)
- Screws and wall anchors (heavy duty, essential for wall weight support)
Equipment Required
- Pipe wrench or channel locks
- Drill and driver
- Miter saw or circular saw (for cutting wood planks)
- Measuring tape and level
- Sandpaper
Detailed DIY Instructions: Building an Industrial Shelf Unit
Creating this industrial wall organization piece is a popular project that uses readily available plumbing parts for a custom look.
Step 1: Prepping and Staining the Wood
Cut the wood planks to the desired length for the top shelf, the hook board, and the bottom bench. Sand all surfaces, paying extra attention to the edges. Apply the dark wood stain or sealant to all three planks. Allow them to dry completely before assembly.
Step 2: Assembling the Pipe Supports
Thread the pipe pieces together to create the upper and lower shelf supports and the hanging rail supports. Attach the metal flanges to the ends of these pipe assemblies. The flanges will be the points that screw into the wall and the underside of the wood planks.
Step 3: Attaching the Hook Board
Screw the coat hooks onto the pre stained hook board plank, ensuring they are evenly spaced. Mark the position on the wall where this hook board will go, use the level, and secure the board firmly to the wall studs or with heavy duty anchors.
Step 4: Mounting the Shelves
Attach the pipe support assemblies to the underside of the top shelf and the bottom bench plank using the flanges and screws. Mark the wall mounting points for the pipe flanges, then secure the top shelf unit to the wall first. Finally, mount the lower bench unit to the wall, ensuring the brackets are firmly anchored and the bench is perfectly level and secure enough for sitting.
22. Full Length Rotating Jewelry Mirror
Image Description: Hidden Accessory Organizer

This tall, rotating mirror cabinet offers a high level of hidden guest room organization specifically for accessories, jewelry, and belts. The full length mirror is essential for any guest room, making the overall piece a multi functional powerhouse. The dark, sleek wood finish with subtle integrated lighting gives it a luxurious, modern feel.
The unit rotates easily on its base, revealing a complete storage system on the back side. Inside, multiple shelves are lined with velvet or felt and feature soft, downward facing LED lighting. This lighting illuminates necklaces, earrings, and rings, making them easy to select and preventing items from being misplaced.
Below the shelves, dedicated hooks and bars provide organized storage for belts and scarves, keeping them wrinkle free and tidy. The entire concept ensures that the clutter of accessories is entirely concealed when the mirror is facing forward, providing a clean, elegant storage solution that maximizes vertical space.
Materials Required for a Similar DIY Project (Accessory Tower)
- Plywood or MDF (3/4 inch thick for the cabinet structure)
- Full length mirror panel
- Heavy duty rotating hardware (Lazy Susan bearing, base plate, and top mount)
- LED strip lighting and power supply
- Thin felt or velvet fabric (for shelf lining)
- Small hooks, bars, and wooden dowels (for belts and scarves)
- Wood veneer or paint (dark, rich color)
Equipment Required
- Drill and driver
- Jigsaw or band saw (for cutting the rotating base)
- Measuring tape and level
- Sandpaper
Detailed DIY Instructions: Creating a Rotating Mirror Cabinet
Building a rotating tower requires careful centering of the base mechanism, but the result is a stunning organization solution.
Step 1: Building the Cabinet Structure
Cut the pieces for the two long vertical sides, the top, bottom, and all internal shelves. Assemble the tall, narrow box structure using wood glue and screws. Ensure the opening for the mirror panel is precisely sized.
Step 2: Installing Internal Features
Line the shelves with the felt or velvet fabric using strong adhesive. Install the small hooks and bars for belts and scarves on the internal walls. Install the LED strip lighting along the front edge of the shelves to illuminate the accessories.
Step 3: Mounting the Rotating Base
Attach the full length mirror panel securely into its opening on the front of the cabinet. Attach the base plate of the heavy duty rotating hardware to the bottom of the cabinet structure. Attach the corresponding mounting plate to a separate, heavy base platform that will rest on the floor. Center the cabinet precisely on the base platform.
Step 4: Final Assembly and Rotation Check
Mount the top stabilizing hardware to the ceiling or upper wall if necessary for safety and stability (optional, depending on height). Test the rotation of the unit to ensure it spins smoothly and quietly, revealing the accessory storage without wobbling.
23. Pallet Wood Shoe Bench with Cushion
Image Description: Upcycled Rustic Shoe Rack

This incredibly clever unit demonstrates how reclaimed materials can create a highly functional and sustainable storage solution. It is built entirely from stacked and modified wooden shipping pallets, giving it a strong, rustic, and industrial vibe. The rough hewn wood grain contrasts nicely with the soft gray cushion on top.
The pallet structure naturally forms three levels of horizontal slats, which function perfectly as ventilated shoe shelves. This design allows air to circulate, keeping footwear fresh. The simple gray cushion turns the top level into a comfortable bench, giving guests a place to sit while taking off shoes.
To maximize utility, a small vertical caddy has been added to the side, built from pallet scraps. This provides a dedicated spot for shoe cleaning supplies, brushes, or sprays, keeping them neatly contained. The entire unit sits on a large, shallow, ribbed rubber mat, providing floor protection and catching dirt from shoes and boots.
Materials Required for a Similar DIY Project (Pallet Shoe Rack)
- Wooden shipping pallets (2 to 3, ensure they are heat treated, labeled “HT”)
- Thick foam cushion and durable fabric (for the seat)
- Wood screws and nails
- Sandpaper (lots, as pallet wood is rough)
- Wood stain or clear sealant
- Large rubber or plastic boot tray
Equipment Required
- Pry bar or hammer (for dismantling pallets)
- Miter saw or circular saw
- Drill and driver
- Staple gun (for cushion upholstery)
- Safety gear (gloves, safety glasses)
Detailed DIY Instructions: Building a Pallet Bench
Pallet projects offer great organization solution potential but require thorough cleaning and de nailing first.
Step 1: Disassembling and Prepping Pallets
Carefully dismantle the pallets using a pry bar to salvage the planks and support blocks. Crucially, remove all old nails and screws. Sand all the salvaged wood thoroughly to eliminate splinters and smooth the surfaces.
Step 2: Building the Main Frame
Cut the salvaged pallet wood pieces to create the four corner posts and the side rails for the two main shelf tiers. Assemble the central rectangular frame using wood screws, ensuring the structure is solid and square.
Step 3: Adding the Slats and Top
Secure the horizontal slats to the side rails, spacing them slightly apart to form the two shoe shelves and the solid bench top surface. Build the small side caddy using small pieces of pallet wood and attach it firmly to one end of the bench frame.
Step 4: Finishing Touches
Apply a coat of clear sealant or stain to the entire wooden structure to protect the wood and make it easier to clean. Upholster the cushion using foam and fabric secured to a thin wood base with a staple gun. Place the large rubber mat on the floor and set the completed bench on top of it.
24. Lockable Charging Station Nightstand
Image Description: Secure Device Hub

This compact, robust charging station is an invaluable guest room organization solution for modern travelers, addressing the clutter of cords and devices. The dark gray, metal locker style cabinet gives it a sturdy, institutional look that suggests security and utility.
When the front door opens, it reveals an organized interior dedicated entirely to electronics management. The top shelf contains accessible power outlets and a designated spot for a power strip, keeping the wiring contained. Below, vertical dividers, color coded in orange, blue, and black, hold multiple phones and tablets while they charge.
A key feature is the security aspect: a small lock and key are provided, allowing guests to safely store valuable devices while they are away from the room. A small dish on top offers a designated spot for keys or accessories. This unit is the ultimate technology organization piece, ensuring privacy and keeping all devices contained and ready for use.
Materials Required for a Similar DIY Project (Charging Locker)
- Plywood or MDF (for the cabinet shell and internal dividers)
- Cabinet door, hinges, and handle
- Small electronic lock or traditional cabinet lock (with key)
- Vertical plastic or wood dividers (for organizing devices)
- Power strip, extension cord, and surge protector
- Wood glue, screws, and hardware
- Dark gray paint or laminate
Equipment Required
- Drill and driver
- Hole saw or spade bit (for drilling cable holes)
- Measuring tape
- Clamps
Detailed DIY Instructions: Building a Dedicated Charging Hub
Creating a secure charging hub requires careful planning for both power access and cord organization.
Step 1: Building the Cabinet Box
Cut the pieces for the square cabinet box (top, bottom, and four sides). Assemble the box using wood glue and screws. Install a fixed horizontal shelf inside to separate the power supply area from the device storage area.
Step 2: Incorporating Power and Ventilation
Drill a large hole in the back or side of the cabinet to pass the main power strip cord through. Cut a small vent opening or use a grill on the back or side to allow heat to escape, which is crucial when charging multiple devices.
Step 3: Installing Dividers and Door
Install the vertical dividers on the lower shelf, spacing them appropriately for phones and tablets. Attach the cabinet door using strong hinges. Install the chosen lock mechanism and the door handle.
Step 4: Final Setup
Run the power strip cable out the back hole and plug it into the wall. Place the power strip inside the cabinet. Use Velcro ties or clips to manage excess cable length. Place a small dish on top for keys to complete the organization solution.
25. Terra Cotta Umbrella and Cane Holder
Image Description: Decorative Floor Storage

This charming collection of cylindrical holders provides a lovely, decorative floor storage solution for bulky, hard to store items like umbrellas, canes, and walking sticks. The pieces use natural materials, mainly terra cotta and white ceramic, giving them a warm, earthy, and appealing presence.
The varying heights and diameters of the cylinders create visual interest. Importantly, each planter or cylinder is lifted off the floor by a shallow terra cotta base that sits on a round, ridged rubber or plastic mat. This configuration is highly practical: the mat protects the floor from moisture and the gap prevents the wet umbrella from sitting directly in water, allowing some air circulation.
Beyond utility, the containers are a beautiful way to introduce natural elements into the guest room or entryway. The tallest one even holds decorative bare branches, proving this organization solution can also be used for non utility, aesthetic items like yoga mats or large scrolls.
Materials Required for a Similar DIY Project (Decorative Container Storage)
- Large, tall ceramic or terra cotta planters/vases (cylindrical shape is best)
- Matching or coordinating terra cotta pot bases (shallow saucers)
- Round, non slip, ridged rubber or plastic mats (one per container)
- Optional: White paint or masking tape (for adding decorative stripes)
Equipment Required
- None, this is mostly assembly
Detailed DIY Instructions: Assembling a Container Storage Solution
This organization solution is incredibly simple and relies entirely on selecting the right components to prevent water damage.
Step 1: Selecting the Containers
Choose containers that are tall enough to hold an umbrella or cane without tipping over. Ensure the opening is wide enough for easy insertion and retrieval. Vases or tall planters without drainage holes are a great option.
Step 2: Pairing with Bases and Mats
Select a saucer or base for each container that is slightly wider than the container itself. Select a round, non slip mat that is wide enough to catch any overflow water from the saucers.
Step 3: Assembly
Place the rubber or plastic mats directly on the floor where you want the arrangement. Center the saucers on the mats. Place the tall containers firmly on top of the saucers. The saucer provides a small buffer, and the mat catches any drips that roll over the saucer edge.
Step 4: Loading the Items
Place the umbrellas, canes, and other tall items into the containers. The tall, heavy containers will provide the necessary stability to keep the items upright and organized near the entryway.
26. Tall Rotating Closet Shoe Rack
Image Description: Carousel Shoe Tower

This towering, cylindrical shoe rack is the ultimate luxury solution for closet organization and is fantastic for a highly valued guest or owner’s closet. The vertical, rotating design maximizes storage capacity in a small area, offering clear visibility and easy access to dozens of pairs of shoes.
Each circular shelf rotates independently on a central axis, functioning like a carousel. This allows a guest to simply spin the shelf to find the exact pair of shoes they need without digging through boxes or drawers. The shelves are tiered, making the selection process smooth and effortless.
Integrated floor and ceiling lighting illuminates the shoes beautifully, turning the collection into a stunning visual display. This level of specialized storage ensures the entire footwear collection is maintained in a neat, organized, and accessible manner, eliminating any potential floor clutter.
Materials Required for a Similar DIY Project (Multi Tiered Rotating Shoe Rack)
- Plywood or MDF (for the circular shelves and vertical supports)
- Heavy duty, multi tier rotating hardware (bearings and central pole)
- Edging material (for finishing the circular shelves)
- Screws, glue, and hardware
- Paint or laminate (in white or light color)
Equipment Required
- Jigsaw or band saw (for cutting circular shelves)
- Drill and driver
- Measuring tape and level
- Compass or template (for drawing circles)
Detailed DIY Instructions: Building a Rotating Shoe Tower
This organization solution is a challenging project that demands precision in centering the rotating mechanism.
Step 1: Cutting the Circular Shelves
Use a template or compass to draw many identically sized circles onto the plywood or MDF. Carefully cut out all the circular shelves and the base piece. Cut a small center hole into each shelf for the central rotating pole.
Step 2: Preparing the Central Axis
Install the heavy duty bearings and base plate onto the floor and ceiling (or a heavy, stable base box). Insert the central metal pole that will support the entire weight of the tower. Ensure it is perfectly vertical.
Step 3: Stacking and Securing the Shelves
Slide the first shelf onto the pole at the desired height. Secure it firmly to the central pole using screws or collars designed to fix the shelf height while allowing the pole to remain fixed. Repeat this process for all subsequent shelves, ensuring even spacing for various shoe types.
Step 4: Testing and Finishing
Test each shelf for smooth, quiet rotation. If desired, finish the edges of the circular shelves with edging material or paint. The final result is a massive capacity, visually appealing shoe storage solution.
27. Sliding Door Art Cabinet
Image Description: Wall Mounted Storage with Disguise

This innovative, wall mounted unit is the ultimate example of hidden organization, using large sliding doors to disguise comprehensive storage behind beautiful artwork. The doors feature an ethereal, painterly image of a misty landscape in blues and tans, transforming a utilitarian cabinet into a striking piece of decor.
The light wood frame of the cabinet gives it a contemporary feel. The large sliding doors move smoothly on a track, revealing different sections of the storage unit as needed. When fully opened, the sections reveal shelving, a designated charging area with a power box, and small compartments for keys and mail.
One door even has a small mirrored front, useful for quick checks before heading out. The entire unit floats off the floor, maximizing the feeling of space. This is an exceptional storage solution for a guest room or entry, offering functionality while maintaining a serene and clutter free appearance.
Materials Required for a Similar DIY Project (Disguised Wall Cabinet)
- Plywood or MDF (for the cabinet frame)
- Sliding door track system and hardware
- Door panels (3 or more)
- Printed vinyl wrap or large decals (with art, for the door faces)
- Internal hardware (small mail slots, key hooks, shelves)
- LED strip lighting (for the interior)
- Wall mounting hardware (French cleat)
Equipment Required
- Table saw or circular saw
- Drill and driver
- Router (for door recesses, if needed)
- Measuring tape and level
Detailed DIY Instructions: Building a Sliding Door Wall Cabinet
A sliding door cabinet provides excellent organization solution potential but requires careful track installation.
Step 1: Building the Cabinet Shell
Cut the pieces for the top, bottom, and sides. Assemble the main cabinet box. Install the internal shelves and dividers, including the specialized charging cubby and the small key/mail slots. Run electrical conduit or drill holes for the interior LED lighting strip.
Step 2: Installing the Sliding Tracks
Attach the sliding door track hardware to the top and bottom interior edges of the cabinet opening. The track must be perfectly parallel for smooth door movement.
Step 3: Preparing and Hanging the Doors
Cut the door panels. Apply the chosen artwork (printed vinyl or decal) carefully to the front face of the doors. Install the roller hardware onto the top and bottom of the door panels. Lift and hang the doors onto the tracks, ensuring they glide smoothly past one another.
Step 4: Mounting and Lighting
Install the wall mounting hardware (like a French cleat) to the back of the cabinet. Secure the cabinet firmly to the wall. Install the LED strip lighting inside the cabinet interior, ensuring the light illuminates the storage areas when the doors are opened.
28. Floating Live Edge Bench and Coat Rack
Image Description: Natural Wood Console

This visually striking setup features a floating bench crafted from a thick, live edge slab of natural wood, offering a rich, warm, and organic feel to the guest entryway. Mounting the bench to the wall using heavy duty black metal brackets frees up floor space, enhancing the perception of openness in the room.
The natural wood grain and rough edge of the slab become a centerpiece. The open area beneath the bench provides clear shoe organization space, perfect for keeping frequently worn pairs lined up neatly. The wide surface area can also hold neatly folded blankets or towels for quick access.
Above the bench, a simple white plank holds five heavy duty black coat hooks, providing a clear spot for hanging jackets, bags, and accessories. The entire composition is minimalist, relying on the beauty of the materials and the practicality of the open layout to deliver a highly functional and attractive storage solution.
Materials Required for a Similar DIY Project (Floating Live Edge Shelf)
- Live edge wood slab (thick, wide, and flat)
- Heavy duty metal floating shelf brackets (4 or more, depending on length)
- Wood plank (for the coat rack backer)
- Heavy duty coat hooks
- Wood screws and wall anchors (essential for supporting weight)
- Clear wood sealant or wax (to protect the live edge)
Equipment Required
- Planer (optional, for flattening the slab)
- Orbital sander (for smoothing the surface)
- Drill and driver
- Measuring tape and level
- Router (optional, for recessed brackets)
Detailed DIY Instructions: Mounting a Floating Slab Bench
A floating bench requires extremely strong wall mounting to ensure safety and stability for this organization solution.
Step 1: Prepping the Live Edge Slab
Sand the live edge slab thoroughly, focusing on smoothing the top and front edge where people will sit or touch. Apply a clear protective sealant or wax to enhance the natural grain and protect the wood from moisture and dirt.
Step 2: Attaching the Shelf Brackets
Mark the locations where the heavy duty metal brackets will attach to the underside of the slab. Screw the brackets firmly to the wood slab using long, strong wood screws. The number of brackets should be determined by the length and expected load of the bench.
Step 3: Mounting the Bench to the Wall
Locate and mark the wall studs. This bench must be secured directly into the studs, or heavy duty toggle bolts must be used. Hold the bench assembly up to the wall, use the level, and secure the metal brackets firmly to the wall using heavy duty wood screws or anchors.
Step 4: Installing the Coat Rack
Cut the coat rack backer plank to size. Screw the coat hooks onto the plank. Mount this hook plank above the floating bench, ensuring it is level and secured into wall studs.
29. Hidden Compartment Clock Cabinet
Image Description: Secret Storage Console

This decorative wall unit is a brilliant example of discreet storage—a collection of decorative clocks that conceals a secure utility console. The clocks, in varying sizes and neutral taupe tones with copper accents, act as a stunning focal point, drawing attention away from the hidden storage compartments.
The main, largest clock face is actually the center of the unit. Small side and bottom panels open on hinges to reveal hidden storage pockets for valuable guest items. One side compartment holds sunglasses, while another features a shallow compartment specifically for stashing cash and a lockable cubby for a small padlock.
Below the main clock, a large panel opens downward, revealing a brightly illuminated interior space—likely for a small laptop, wallet, or other large essentials. This piece is the ultimate security and organization solution, ensuring that valuables and personal items are stored completely out of sight and are immediately accessible before heading out the door.
Materials Required for a Similar DIY Project (Concealed Clock Cabinet)
- Plywood or MDF (for the cabinet structure)
- Decorative clock faces (various sizes, without working mechanism)
- Small cabinet hinges (for the doors)
- Magnetic or spring loaded catches (to keep doors closed)
- Small lock and key or padlock hardware
- LED strip light (for interior)
- Paint (taupe or neutral color)
- Wood glue and screws
Equipment Required
- Jigsaw (for cutting clock openings in the wood)
- Drill and driver
- Measuring tape and level
Detailed DIY Instructions: Creating a Secret Storage Clock
Creating hidden organization that is disguised as decor requires precision in fitting the clock faces.
Step 1: Building the Cabinet Structure
Cut and assemble the main rectangular cabinet box. Install the internal shelves and dividers to create the various small compartments (for sunglasses, keys, etc.). Install the fixed back panel.
Step 2: Preparing the Clock Doors
Cut the main clock face panel and the smaller surrounding door panels. Carefully use a jigsaw to cut out circular openings in the panels to fit the decorative clock faces. Secure the clock faces into these openings, making sure the clock faces are fixed but the panels can still move.
Step 3: Installing the Doors and Latch
Attach the small door panels to the main cabinet structure using hinges. Install magnetic or spring loaded catches to ensure the doors remain closed and flush, maintaining the illusion of a solid wall hanging. Install the small lockable cubby hardware.
Step 4: Finishing and Mounting
Paint the entire cabinet structure in the chosen neutral color. Install a small LED strip light inside the main compartment. Secure the clock console to the wall using heavy duty mounting hardware.
30. Glass Top Travel Console
Image Description: World Map Organization Table

This stunning, dark wood console is the ultimate traveler’s organization solution, transforming a beautiful piece of furniture into a command center for travel documents and accessories. The rich, warm wood finish complements the unique glass top, which has a world map graphic underneath.
The top surface features a clear glass panel that protects the world map while serving as a useful display area for a globe or photo frame. The functionality is concentrated in the drawers. Two full extension drawers open to reveal custom fitted, velvet lined dividers perfect for organizing travel essentials.
Small compartments are specifically sized for passports, foreign currency, and credit cards, ensuring everything a guest needs for travel is centralized. Other sections hold folded clothing, glasses, and keys. The open lower shelf provides additional guest room storage for travel books and magazines. This piece eliminates the frantic search for travel documents before a journey.
Materials Required for a Similar DIY Project (Travel Console)
- Solid wood or high quality plywood (for the console frame and drawers)
- Full extension drawer slides (2 sets)
- Custom cut glass panel (for the top)
- World map graphic print (sized to fit under the glass)
- Velvet or felt fabric (for drawer lining and dividers)
- Brass or metal drawer pulls
- Wood stain (rich, dark color)
Equipment Required
- Table saw or miter saw
- Drill and driver
- Pocket hole jig
- Clamps
- Measuring tape and level
Detailed DIY Instructions: Building a Specialized Travel Console
This organization solution requires custom drawer work but results in a highly functional piece of furniture.
Step 1: Building the Console Frame
Cut and assemble the four legs, the side rails, and the top and bottom supports to create a strong console table frame. Install the fixed bottom shelf. Apply the dark wood stain or finish.
Step 2: Constructing the Drawers
Build the two shallow, wide drawer boxes. Line the bottom and sides of the drawers with velvet or felt fabric. Install the drawer slides into the console frame and attach the drawers.
Step 3: Creating Custom Dividers
Cut thin strips of wood or dense foam to create the internal dividers within the drawers. Space these dividers to create compartments specifically sized for passports, currency, and small accessories. Glue these dividers securely into the drawers.
Step 4: Installing the Glass Top
Place the world map graphic print onto the top surface of the console. Carefully set the custom cut glass panel on top of the map. The glass should be secured with small, clear rubber bumpers or a thin decorative wood trim to prevent sliding. Install the metal drawer pulls.
31. Vertical Lockable Wardrobe System
Image Description: Dual Tone Closet Unit

This tall, streamlined wardrobe combines two distinct sections into one powerful guest room storage piece. The contrast between the bright white storage side and the deep navy blue hanging cabinet creates a modern, sophisticated look that adds structure to any wall. This unit is built to manage everything from coats to shoes, even incorporating a rain utility zone.
The white section features a high hanging rod, providing wrinkle free space for longer coats and dresses. Below the rod, clever cubbies hold wire baskets and shoe racks, ensuring every pair of shoes has a neat, ventilated spot. The top shelf is easily accessible for storing linens or travel bags.
The contrasting navy door panel is incredibly clever. It opens to reveal a dedicated space for umbrellas, complete with a specialized holder and a wet mat below to catch drips. This dual function unit, complete with a protective boot mat on the floor, is an outstanding example of maximizing vertical organization and preparing for all types of weather.
Materials Required for a Similar DIY Project (Tall Utility Wardrobe)
- Plywood or MDF (3/4 inch thick)
- Cabinet hinges (full overlay)
- Hanging rod and supports
- Wire shoe racks or custom wooden shoe shelves
- Umbrella holder attachments and a small drip tray
- Metal or plastic boot tray (for floor protection)
- Paint (white and deep navy blue)
- Handles or pulls
- Wood glue and screws
Equipment Required
- Table saw or circular saw
- Drill and driver
- Pocket hole jig
- Measuring tape and level
- Clamps
Detailed DIY Instructions: Constructing a Dual Function Wardrobe
Building a tall wardrobe is manageable with careful assembly, resulting in a comprehensive organization solution.
Step 1: Cutting and Assembling the White Shell
Cut all pieces for the main white cabinet box (sides, top, and base). Assemble the box using wood glue and screws. Install the internal fixed shelf that separates the hanging area from the shoe cubbies.
Step 2: Interior Fit Out
Install the hanging rod and supports in the upper section. Build or install the lower shoe racks, ensuring they fit securely within the cubbies. The lighting shown in the image is a simple LED strip, which should be installed along the cabinet sides for better visibility.
Step 3: Building and Installing the Navy Door Unit
Cut the pieces for the navy blue door and its frame. Assemble a shallow secondary box or frame if needed to house the umbrella holder, which adds depth to the door. Attach the umbrella holder hardware and a small drip tray to the back of the door panel.
Step 4: Finishing and Door Alignment
Attach the cabinet handles. Fill all holes, sand the surfaces, and apply the white and navy paint finishes. Hang the navy door onto the white cabinet frame using the hinges. Ensure the door is perfectly aligned and closes cleanly against the main structure. Place the floor boot mat beneath the unit.
32. Wall Mounted Umbrella and Coat Rack
Image Description: Compact Rain Gear Center

This military green wall system is a compact, highly practical answer to handling outdoor gear in a small entryway or guest room. Its distinct, neutral color makes it blend well with many decors while providing a powerful vertical organization punch. This is a crucial area for containing outdoor clutter and preventing wet items from damaging floors.
The top green board features several large, sturdy hooks, providing easy access for hanging coats, rain jackets, or bags. Below the coat hooks, a separate vertical panel is dedicated solely to umbrellas, holding them securely by their handles. This prevents umbrellas from being thrown into a corner or pooling water on the floor.
At the bottom, two stacked, shallow trays sit ready to catch dirt and water from shoes or boots. The slotted white tray allows air circulation, and the solid orange tray below catches the moisture. This simple but thoughtful tiered system is an amazing entryway organization piece for keeping the guest area clean and dry.
Materials Required for a Similar DIY Project (Wall Utility Rack)
- Plywood or MDF (for the two wall panels)
- Large, strong wall hooks (3 to 5)
- Small metal brackets or specialized clips (for holding umbrella handles)
- Two shallow utility trays (one slotted, one solid)
- Wall screws and anchors
- Paint (matte green and orange)
Equipment Required
- Drill and driver
- Miter saw or circular saw
- Measuring tape and level
Detailed DIY Instructions: Installing a Dual Wall Rack
This is a straightforward mounting project that creates zones for different types of organization solution needs.
Step 1: Cutting and Painting the Panels
Cut the two wall panels (one wide for coats, one narrow for umbrellas) to your desired size and shape. Sand the edges. Apply the matte green paint to both panels and allow them to dry completely.
Step 2: Attaching Hooks and Umbrella Clips
Attach the large coat hooks to the upper, wider panel, ensuring they are screwed securely from the back or use appropriate hardware. On the lower, narrower panel, attach the small metal brackets or clips at a height that will securely hold the umbrella handles vertically.
Step 3: Mounting to the Wall
Mark the wall where the panels will be mounted. Use a level to ensure they are straight. Secure the two panels firmly to the wall using screws and anchors, making certain the coat panel is strong enough to hold several heavy winter coats.
Step 4: Positioning the Trays
Install two small, sturdy brackets directly below the lower umbrella panel to hold the trays. Place the solid orange tray on the bottom bracket, and stack the slotted white tray on top. The trays should be easily removable for cleaning.
33. Game Console and Accessory Bench
Image Description: Dedicated Gaming Station

This specialized black console bench is an ultimate guest room organization piece for the modern gamer, turning clutter into a dedicated, visually appealing entertainment hub. The dark color and sleek profile with metal mesh accents give it a high tech, industrial appearance. The top surface features a comfortable gray cushion, transforming it into extra seating.
The unit is meticulously organized into zones. One side features a custom lit compartment, complete with neon LED strips, sized perfectly for the main game console, ensuring necessary ventilation through the mesh sides. Adjacent to that, a ventilated cubby holds game controllers neatly stacked and ready for use.
The center features a wide, pull out drawer specifically labeled “Games and Accessories,” providing concealed storage for headsets, virtual reality gear, and physical games. This bench is designed for full function, keeping all gaming gear centralized, protected, and off the floor.
Materials Required for a Similar DIY Project (Gaming Console Cabinet)
- Plywood or MDF (3/4 inch thick)
- Metal mesh sheeting or ventilation grills
- Full extension drawer slides
- Hinges and handle (for the console cabinet door)
- LED strip lighting (color changing, with power supply)
- Foam cushion and upholstery fabric
- Matte black paint or laminate
Equipment Required
- Table saw or circular saw
- Drill and driver
- Jigsaw (for cutting ventilation openings)
- Measuring tape and level
- Staple gun (for cushion)
Detailed DIY Instructions: Building a Gaming Storage Bench
This project requires precise measurements to ensure game consoles and controllers fit snugly for this organization solution.
Step 1: Building the Console Frame
Cut and assemble the main rectangular bench box. Install the internal vertical and horizontal dividers to create the three main zones: the console compartment, the controller cubby, and the large accessory drawer area.
Step 2: Creating Ventilation and Lighting
Cut large openings into the sides and back of the console compartment. Cover these openings with the metal mesh sheeting, securing it with small screws. Install the LED strip lighting around the inner perimeter of the console compartment opening.
Step 3: Installing the Drawer and Controller Cubby
Build the large accessory drawer box. Install the full extension drawer slides and slide the drawer into place. In the controller cubby, consider building small, vertical dividers to keep controllers separated and organized.
Step 4: Finishing and Cushioning
Fill all holes, sand the wood smooth, and apply the matte black paint or laminate. Upholster the cushion using thick foam and durable fabric, securing it to a thin wood base with a staple gun. Place the cushion atop the bench.
34. Wooden Slatted Accordion Coat Rack
Image Description: Expandable Wall Hooks

This ingenious, space saving coat rack is an aesthetically pleasing and highly practical wall organization solution. The light wood finish and sleek, modern design integrate seamlessly into contemporary or minimalist guest room decor. It solves the common problem of too many coats and not enough hanging space.
The unit uses an accordion or slatted mechanism, allowing the hooks to pull out and extend, increasing the hanging capacity significantly when guests arrive. When not in use, the hooks fold flat, creating a slim, decorative wood panel that barely projects from the wall. This dual functionality is incredibly clever.
The repeating pattern of the wood slats, curved at the bottom to form the actual hooks, adds a textured, architectural detail. This customizable storage solution is perfect for temporary use, providing ample hanging space for coats, scarves, and bags without permanently cluttering the entryway.
Materials Required for a Similar DIY Project (Folding Slatted Rack)
- Thin, strong wood veneer or plywood (for the slats)
- Small hinges or dowels (for the pivot points)
- Wood glue and screws
- Wall mounting hardware
- Clear wood sealant
Equipment Required
- Laser cutter or band saw (for precise curved cuts)
- Drill press (for uniform pivot holes)
- Measuring tape and level
- Clamps
Detailed DIY Instructions: Assembling a Slatted Hook Rack
This is a precise woodworking project that demands accuracy to ensure the folding mechanism works correctly for this organization solution.
Step 1: Cutting the Slats and Hook Pieces
Cut the long backer board that mounts to the wall. Carefully cut the numerous small, identical wood slats that will form the body of the rack. Cut the hook pieces, ensuring the bottom curve is smooth and strong enough to hold weight.
Step 2: Drilling the Pivot Holes
Drill the pivot holes into the backer board and the slats. These holes must be perfectly aligned and spaced evenly along the entire length of the rack. These holes will accommodate the dowels or screws that allow the slats to pivot and slide.
Step 3: Assembling the Accordion Mechanism
Start building the slatted mechanism by securing the dowels or pivot screws through the backer board and the individual slats. This creates the folding action. Attach the curved hook pieces to the bottom of the front slats.
Step 4: Finishing and Mounting
Apply a clear wood sealant to protect the light wood finish. Install the wall mounting hardware to the back of the backer board. Secure the completed rack firmly to the wall, making certain it is level. Test the extension mechanism to ensure the hooks pull out and fold flat smoothly.
35. Decorative Wire and Stone Storage
Image Description: Textural Accent Baskets

This unique display features a set of four robust wire baskets filled with smooth river stones. While unconventional, these pieces serve a dual purpose: they function as striking, sculptural decor and also provide substantial floor storage capacity in a guest room or entry area. The combination of industrial wire and natural rock creates a powerful, textural contrast.
The heavy wire construction with sturdy rope handles makes these baskets durable and easy to move (before filling with stones, of course). The stones themselves add weight, ensuring the baskets are stable and act as excellent bookends or room dividers without the risk of tipping.
When not used as a decorative filling, the baskets themselves are excellent for bulk storage of items that do not require concealment, such as large children’s toys, yoga blocks, or rolled blankets. Using the baskets empty provides a rustic, airy feel, or they can be lined with fabric to hold smaller items, making them a versatile organization solution.
Materials Required for a Similar DIY Project (Wire Storage Bins)
- Heavy gauge galvanized wire mesh or hardware cloth
- Metal wire cutters
- Thick rope or wire (for the handles)
- Smooth river stones or decorative rocks (optional, for filling)
- Heavy duty wire ties or solder (for securing the seams)
Equipment Required
- Metal wire cutters
- Heavy duty gloves
- Pliers
Detailed DIY Instructions: Constructing Wire Storage Bins
Building wire baskets is a simple, industrial organization solution that focuses on material and shape.
Step 1: Cutting the Wire Mesh
Determine the circumference and height of your desired basket. Cut the wire mesh to form the side wall of the cylinder, allowing for a slight overlap for the seam. Cut a separate circular piece for the bottom base.
Step 2: Forming and Securing the Shape
Bend the rectangular wire piece into a cylinder. Secure the vertical seam using heavy duty wire ties or by carefully bending the wire ends around each other. Attach the circular base piece to the bottom edge of the cylinder using wire ties to create a strong bottom.
Step 3: Adding Handles
Create handles by securing thick rope or wire to the top rim of the basket on two opposite sides. Ensure the handles are fastened securely to handle the weight of the basket and its contents.
Step 4: Filling and Placement
If using them as decorative accents, fill the wire baskets with the smooth river stones. For a guest room, use the baskets to hold rolled extra towels or blankets, providing accessible bulk storage in a visually interesting way.
36. Floating Slatted Mail and Key Console
Image Description: Horizontal Hidden Organizer

This striking, low profile console features a natural wood finish composed entirely of vertical slats, creating a rich texture that adds incredible visual interest to the wall. The piece is mounted above the floor, maximizing the feeling of space and providing an elegant floating storage solution.
The slatted exterior is not just decorative; it cleverly conceals tilt out and flip up compartments. The dark, textured top provides a subtle contrast. This design is focused on immediate entry organization, managing small items that tend to cause desk clutter.
Three front compartments tilt out for easy access. These compartments are specifically sized for holding keys, mail, and accessories, keeping them out of sight when closed. A lift up lid section on the top reveals a hidden charging station with cable management holes, proving that aesthetics and high function can coexist beautifully in guest room organization.
Materials Required for a Similar DIY Project (Slatted Wall Console)
- Plywood or MDF (for the cabinet shell)
- Thin wooden slats (for the exterior cladding)
- Tilt out hardware (3 sets)
- Hinges (for the flip up lid)
- Charging station components (power strip, cable management grommets)
- Small metal pulls
- Wood glue and screws
Equipment Required
- Table saw (for precise, repetitive slat cuts)
- Drill and driver
- Measuring tape and level
- Clamps
Detailed DIY Instructions: Building a Slatted Console
This project requires many repetitive cuts for the slats, but the final textured look is worth the effort for this organization solution.
Step 1: Building the Cabinet Box
Cut and assemble the main rectangular box frame. Install the internal dividers to create the three tilt out compartments and the top charging cubby. This structure must be sturdy to support the weight of the slatted exterior.
Step 2: Installing the Tilt Out Hardware
Assemble the three inner boxes for the tilt out compartments. Attach the tilt out hardware to these boxes and mount them into the cabinet frame. Cut the front door panels and clad them with the thin wooden slats, securing the slats with glue and small nails.
Step 3: Creating the Slatted Exterior Cladding
Clad the entire exterior of the cabinet shell (top, sides, and bottom) with the matching wooden slats, securing them with glue and small nails. This creates a visually seamless, textured look.
Step 4: Finishing and Mounting
Cut the lift up lid and install the hinges. Drill a hole in the top charging cubby for cable access. Install the wall mounting hardware (like a French cleat) to the back and secure the console firmly to the wall. Install the small metal pulls onto the tilt out panels and the lift up lid.
37. Glass and Chrome Vertical Shoe Rack
Image Description: Minimalist Display Shelving

This sleek, open shelving unit is a sophisticated and modern vertical organization system, using clear tempered glass and bright chrome accents. Its airy, transparent design is fantastic for small guest rooms because it occupies space without adding visual weight, making the room feel larger.
The structure is built from chrome or stainless steel tubing, providing stability and an elegant shine. Multiple tiers of clear glass shelves provide ample shoe storage or general display space. The transparency of the glass shelves allows light to pass through, keeping the area bright.
X shaped chrome supports on the sides add an attractive architectural detail and prevent the shelving from swaying. This unit is well suited for folded towels, amenities, or shoes that are dry and clean, turning organized storage into a minimalist visual feature. The open design encourages tidiness since everything is fully visible.
Materials Required for a Similar DIY Project (Glass Display Rack)
- Chrome or stainless steel tubing (for the frame and supports)
- Tempered glass shelves (multiple tiers)
- Shelf clips or specialized brackets (for securing glass to metal)
- Plastic or rubber feet (for floor protection)
- Metal fasteners (for securing the frame joints)
Equipment Required
- Pipe or tube cutter (if building the frame from scratch)
- Drill (with metal bit, if required)
- Measuring tape and level
Detailed DIY Instructions: Assembling a Glass Shelf Unit
Assembling a chrome and glass unit relies heavily on the quality of the hardware and precision in fitting the glass for this organization solution.
Step 1: Assembling the Metal Frame
Assemble the vertical and horizontal metal tubing pieces to create the main rectangular frame structure. Use specialized metal fasteners or solder the joints to ensure maximum stability and strength. Install the X shaped cross supports on the sides.
Step 2: Preparing the Glass Shelves
Ensure the edges of the tempered glass shelves are completely smooth. Apply small, non slip rubber bumpers to the corners of the glass where they will rest on the metal supports.
Step 3: Installing the Glass
Secure the metal shelf clips or brackets to the horizontal metal tubing at the predetermined shelf heights. Carefully set the glass shelves onto the supports, ensuring they sit level and securely within the clips.
Step 4: Final Placement
Install the plastic or rubber feet onto the bottom of the metal frame to prevent scratching the floor. Place the unit against the wall. Use this transparent unit to display clean, folded guest linens or to neatly organize shoes.
38. Built in Reading Nook with Storage Drawers
Image Description: Custom Millwork Bench

This stunning, light wood built in unit transforms a cluttered wall into a welcoming, multi functional guest room storage and relaxation spot. The natural wood tone and tall, symmetrical shelving provide an elegant, library inspired aesthetic. The center features a cushioned reading nook with comfortable pillows.
The vertical towers on either side are filled with open shelving, offering significant book and display storage space for decor, plants, and reading materials. The built in nature of this unit makes the room look custom and polished, providing a designated area for quiet relaxation.
Beneath the bench seat, four wide, deep pull out drawers offer generous concealed storage. Some drawers are designed for linens, while others feature dividers for storing footwear or accessories. This piece perfectly integrates comfortable seating with massive, hidden capacity, making it the ultimate organization solution for a dual purpose room.
Materials Required for a Similar DIY Project (Built In Bench)
- Plywood or MDF (3/4 inch thick, for the cabinets and drawers)
- Drawer slides (full extension, heavy duty)
- Custom cushion material (foam and upholstery fabric)
- Decorative trim and molding (for a built in look)
- Cabinet pulls (brass or metal)
- Wood filler, paint, or stain (light natural tone)
Equipment Required
- Table saw (essential for long, straight cuts)
- Drill and driver
- Pocket hole jig
- Clamps
- Staple gun (for cushion)
Detailed DIY Instructions: Constructing a Built In Nook
Building a built in unit requires careful scribing to match the walls, but the result is a massive organization solution with a high end look.
Step 1: Building the Shelf Towers
Cut and assemble the two tall side shelf towers. Install the fixed horizontal shelves and vertical dividers. Secure these towers firmly to the back wall and floor, ensuring they are perfectly plumb and level.
Step 2: Constructing the Bench Frame
Build the base bench frame that spans between the two shelf towers. This frame will house the drawers. Ensure the top surface is flat and sturdy to support the cushion and seating weight.
Step 3: Installing the Drawers
Build the drawer boxes, including the ones with specialized dividers for shoes or accessories. Install the full extension drawer slides inside the bench frame. Attach the decorative drawer fronts and the cabinet pulls, ensuring the drawers slide smoothly.
Step 4: Finishing and Cushioning
Apply wood filler to all visible screw holes and seams. Sand the entire unit smooth and apply the light stain or paint finish. Add the decorative trim and crown molding to give it the seamless, built in look. Upholster the custom sized bench cushion and set it in place.
39. Seamless Flush Shoe Cabinet
Image Description: Secret Shoe Storage Wall

This beautiful design is the pinnacle of hidden organization, creating an entire wall of floor to ceiling wardrobe storage that completely conceals its contents. The simple, white paneled doors with classic trim molding look like architectural elements, blending seamlessly into the room’s traditional decor.
The door in the middle, slightly wider than the others, opens to reveal a stunning contrast: a bright teal interior dedicated entirely to shoe organization. The space is outfitted with shelves that can hold dozens of pairs of shoes, keeping them ventilated and completely out of sight.
The brass handle on the door adds a touch of elegance. This level of customization ensures that the guest room remains serene, beautiful, and utterly clutter free. This is the storage solution for a room where aesthetics and discrete functionality are top priorities.
Materials Required for a Similar DIY Project (Built In Shoe Closet)
- Plywood or MDF (3/4 inch thick)
- Custom cabinet doors (with paneling detail)
- Full overlay or concealed hinges
- Adjustable shelf pins and shelving material
- Decorative door handles (brass or dark metal)
- Paint (white for exterior, bright teal for interior)
- Trim and molding
- Wood glue and screws
Equipment Required
- Table saw (for precise sizing)
- Drill and driver
- Brad nailer (for trim and paneling)
- Measuring tape and level
Detailed DIY Instructions: Creating a Hidden Shoe Closet
Building a flush cabinet wall requires advanced carpentry skills to ensure the doors align perfectly, providing an ultimate organization solution.
Step 1: Building the Interior Shell
Construct the entire rectangular cabinet shell structure. This shell must be built right up to the ceiling and fit precisely between the surrounding walls. Install the vertical dividers to create the separate compartments.
Step 2: Creating Shoe Shelves
Drill the holes for the adjustable shelf pins inside the central shoe cabinet section. Cut the shelves to fit. Paint the interior of this section with the bright teal or contrasting color.
Step 3: Preparing and Hanging the Doors
Cut and detail the front cabinet doors with the desired paneling trim. Paint the exterior of all doors white and the interior of the central door teal. Attach the concealed hinges to the doors and mount them onto the cabinet frame, ensuring they are perfectly flush with each other.
Step 4: Adding Trim and Handles
Install the decorative baseboard trim and any surrounding molding to complete the built in look, hiding any slight gaps between the cabinet and the walls. This is what truly makes it look like part of the house. Install the decorative door handles to complete your hidden storage system.
40. Recessed Tile and Pebble Boot Mat
Image Description: Integrated Mud Zone

This highly clever design is a permanent, elegant solution for managing entry mess, creating a dedicated floor organization zone that is flush with the main flooring. This integrated mud area is a custom detail that looks sophisticated and is incredibly functional for a guest entryway.
The area is recessed into the hardwood floor, framed by a smooth wood border and a thin metal strip, providing a seamless transition. The space is divided into two distinct utility areas: one filled with smooth, dark river pebbles and the other with attractive patterned ceramic tiles.
The pebble area, equipped with a metal boot scraper, is perfect for dirty boots, allowing mud and water to drain away into the hidden subfloor. The tile area provides a cleaner, easy to wipe zone for dry shoes. This custom built, dual texture system is the ultimate entryway organization piece, ensuring every trace of outdoor mess stays contained.
Materials Required for a Similar DIY Project (Integrated Floor Mat)
- Hardwood flooring material or wood trim (for the border)
- Thin metal edging strip
- Ceramic tiles (decorative pattern)
- Small river pebbles or stones
- Thin-set mortar and grout (for the tiles)
- Waterproof membrane or heavy duty plastic sheeting (to line the recess)
- Metal boot scraper (optional)
Equipment Required
- Circular saw or miter saw (for cutting wood frame)
- Tile cutter (for cutting ceramic tiles)
- Trowel and grout float
- Measuring tape and level
Detailed DIY Instructions: Creating a Recessed Floor Mat
Creating a recessed floor area is an ambitious but rewarding organization solution that protects your main flooring.
Step 1: Planning and Cutting the Floor
Carefully mark and cut the section of the existing flooring where the mud zone will be recessed. The depth should accommodate the waterproofing layer, the setting materials (mortar/pebbles), and the height of the tiles, ensuring the finished surface is flush with the surrounding floor.
Step 2: Waterproofing the Base
Line the entire recessed area with a waterproof membrane or heavy duty plastic sheeting, ensuring the liner wraps slightly up the side walls. This step is critical to prevent moisture from damaging the subfloor.
Step 3: Installing the Pebble and Tile Zones
Build a small wooden divider to separate the pebble zone from the tile zone. Lay a bed of thin-set mortar for the tiles and carefully place the ceramic tiles into position. For the pebble zone, pour a shallow layer of mortar or use a stable, well draining base layer, and then fill the remaining space with the river pebbles.
Step 4: Finishing the Edges
Install the wood trim border around the entire recessed area, securing it to the surrounding main floor. Place the thin metal edging strip between the wood border and the tiles/pebbles for a clean line. Allow the mortar and grout to fully cure before using the integrated mud zone.
41. Modular Corner Laundry Tower
Image Description: Rolling Utility Cabinet

This bright white, modular storage tower is a superb organization solution for a utility space or a guest room that includes laundry facilities. The simple cube design allows it to stack vertically, maximizing storage in a corner while its rolling castor wheels offer mobility. The clean, modern look keeps everything tidy and contained.
The unit efficiently combines various types of storage. The top section features open cubbies, which are useful for storing folded towels or immediately accessible cleaning sprays and detergents. The middle includes two shallow drawers, providing concealed storage for smaller items or laundry pods. A clever pull out caddy on the side, accessible even when tucked away, offers easy access to small bottles or spices.
The lower section features a combination of open shelving and a full height cabinet with a door, perfect for stashing away large detergent bottles or a hamper. The casters mean this entire storage system can be rolled into a closet or moved effortlessly during cleaning, providing amazing flexibility in a busy area.
Materials Required for a Similar DIY Project (Rolling Cube Storage)
- Plywood or MDF (3/4 inch thick)
- Heavy duty castor wheels (4, with locks)
- Full extension drawer slides (2 sets)
- Cabinet hinges (for the lower door)
- Drawer and door pulls
- Wood glue, screws, and nails
- White paint or laminate
Equipment Required
- Table saw or circular saw
- Drill and driver
- Pocket hole jig
- Clamps
- Measuring tape and level
Detailed DIY Instructions: Building a Rolling Storage Tower
Adding wheels to a storage unit provides a versatile and movable organization solution.
Step 1: Cutting and Assembling the Cubes
Cut the pieces for the various cube sections and the drawers. Assemble the upper open cube section and the lower cabinet cube section separately using wood glue and screws. Install the internal shelves and dividers in the lower cabinet.
Step 2: Installing Drawers and Doors
Build the two shallow drawer boxes and the side caddy drawer. Install the drawer slides into the middle section frame. Hang the lower cabinet door using hinges and attach the pulls to all doors and drawers.
Step 3: Attaching the Castor Wheels
Turn the bottom cabinet section upside down. Secure the heavy duty castor wheels firmly to the base corners, ensuring the screws are long enough for a strong hold. If possible, use locking castors for stability.
Step 4: Stacking and Finishing
Stack the upper cube section neatly onto the lower, wheeled section. Secure them together with specialized connector hardware or screws running down from the top unit’s base into the lower unit’s top. Fill all holes, sand, and paint the entire unit white for a clean finish.
42. Copper Pipe Heated Drying Rack
Image Description: Radiant Gear Hanger

This highly specialized unit is an exceptional storage solution for cold or wet climates, combining vertical organization with the utility of a heated drying rack. Constructed entirely from copper piping and fittings, the structure is industrial, durable, and eye catching. It mounts directly to the wall, saving all floor space.
The copper pipes form a grid, perfect for draping scarves and hanging hats and gloves on simple S hooks. Crucially, the middle section of the rack incorporates specialized radiant heating elements that emit warmth. This transforms the unit into a quick dryer for wet outerwear, preventing mold and mildew and ensuring guests’ gear is always warm and ready.
This is the ultimate in functional mudroom organization, specifically designed to handle the mess and moisture associated with rain and snow. It keeps all accessories centralized and off the floor, dramatically reducing cold weather clutter while adding a beautiful metallic texture to the room.
Materials Required for a Similar DIY Project (Industrial Pipe Rack)
- Copper pipe sections and fittings (elbows, Ts, and couplers)
- Pipe hangers or flanges (for wall mounting)
- Heavy duty S hooks (for hanging items)
- Optional: Low voltage, water resistant radiant heating elements or heat lamps (requires professional electrical installation)
- Copper cleaner or clear sealant (to maintain shine)
- Screws and wall anchors
Equipment Required
- Pipe cutter
- Pipe threader (optional, for custom lengths)
- Drill and driver
- Measuring tape and level
- Pipe wrench
Detailed DIY Instructions: Building a Copper Pipe Rack
Building a copper pipe rack requires precise cutting and joining, resulting in a beautiful vertical storage unit.
Step 1: Cutting and Assembling the Frame
Measure and cut all the copper pipe sections, ensuring they are sized to create a uniform rectangular grid. Begin assembling the frame, starting with the outer perimeter, by joining the pipes using the copper fittings (elbows and Ts). Do a dry fit of the entire grid structure first.
Step 2: Incorporating Heating (Optional)
If adding a heating element, leave a section of the frame open to house the radiant heat strips. This step is complex and should involve a qualified electrician to ensure safety and proper wiring.
Step 3: Attaching the Wall Flanges
Attach the pipe flanges to the connection points on the vertical sides of the rack. These flanges will be the points that screw the entire structure to the wall.
Step 4: Mounting the Rack
Mark the wall where the flanges will be mounted, using a level to ensure the unit is perfectly straight. Secure the flanges firmly to the wall studs or with heavy duty anchors. Screw the entire copper rack structure onto the secured flanges. Hang the S hooks onto the horizontal bars.
43. Swivel Corner Wardrobe with Mirror
Image Description: Rotating Closet Organizer

This sophisticated, free standing closet unit is a stunning piece of multi functional organization, combining open shelving, hanging space, and a full mirror into one rotating vertical tower. The contrasting walnut wood grain and crisp white panels, accented with brass trim, give it a high end, bespoke look.
The tower rotates smoothly on a circular base, allowing both sides to be accessed easily. One side features open shelves, providing accessible display space for vases, books, and smaller storage baskets. A central drawer adds concealed storage for personal items, and a charging spot is built into one of the shelves.
The opposite side, revealed when spun, features a wardrobe door with a long mirror panel. Behind the door, a well appointed closet holds hanging clothes, shelves for shoes, and a small built in drawer for accessories. This clever design maximizes the utility of a small corner, offering a complete wardrobe solution in minimal floor space.
Materials Required for a Similar DIY Project (Rotating Storage Tower)
- Plywood or MDF (3/4 inch thick, with walnut veneer and white laminate)
- Heavy duty rotating hardware (base bearing and center pole, if needed)
- Full length mirror panel
- Closet hanging rod, shoe shelves, and drawer slides
- Decorative trim (brass or gold color)
- Wood glue, screws, and hardware
Equipment Required
- Table saw or circular saw
- Drill and driver
- Jigsaw (for the circular base)
- Measuring tape and level
- Sandpaper
Detailed DIY Instructions: Building a Rotating Wardrobe
A spinning unit offers incredible vertical storage and accessibility, but requires precision for smooth rotation.
Step 1: Building the Tower Shells
Cut and assemble the two main, vertical box structures (one open shelf unit, one closed wardrobe unit). Apply the wood veneer to the open shelf unit and the white laminate to the wardrobe unit.
Step 2: Creating the Rotating Base
Cut a heavy, circular base platform. Mount the heavy duty rotating bearing hardware (Lazy Susan type) securely to the center of the base platform and the bottom of the assembled tower structures. Ensure the center of the tower is perfectly aligned with the center of the base.
Step 3: Interior Fit Out
In the open shelf unit, install the fixed shelves, ensuring one shelf is designed for easy power access (charging spot). In the wardrobe unit, install the hanging rod and the fixed shoe shelves.
Step 4: Door and Mirror Installation
Attach the door to the wardrobe section using sturdy hinges. Secure the full length mirror panel to the front of the door. Attach the decorative brass trim to the edges of the tower sections.
44. Live Edge Bench with Rolling Storage
Image Description: Natural Wood Rolling Console

This beautiful console bench features a thick, live edge wood slab that offers a dramatic, natural focal point. The slab sits atop a sleek, black metal frame on one side, contrasting the organic material with modern lines. It is a stunning piece of multi functional organization for a guest room or entry area.
The genius of this design is the integration of a massive, rolling storage basket underneath the main bench. This large, woven basket, in a durable olive green wicker, acts as a drawer on small castor wheels, providing massive hidden organization capacity. This drawer is an easy spot to contain bulky items like extra blankets, pillows, or large shoe collections.
The exposed lower shelf beneath the live edge slab is a useful display space or a spot for smaller items like keys and remote controls. The entire piece maximizes storage capacity while maintaining a high end, designer look, thanks to the combination of rich wood, metal, and woven texture.
Materials Required for a Similar DIY Project (Rolling Storage Bench)
- Live edge wood slab (thick, wide, and flat)
- Steel or metal tubing (for the side legs)
- Large, woven storage basket (must be strong and rectangular)
- Small castor wheels (4, for the basket)
- Small metal drawer pull (for the basket)
- Wood screws and metal fasteners
- Clear wood sealant or wax
Equipment Required
- Welder (for metal frame, if custom building) or drill (for assembling pre cut metal)
- Orbital sander (for the slab)
- Drill and driver
- Measuring tape and level
Detailed DIY Instructions: Building a Live Edge Rolling Bench
This project focuses on combining contrasting materials for a unique storage solution.
Step 1: Prepping the Wood Slab
Sand the live edge slab thoroughly and apply a protective sealant or wax. Ensure the underside is flat where it will meet the metal frame and the wooden base.
Step 2: Constructing the Frame and Base
Assemble the metal legs. Build a simple wooden box base that will sit underneath the slab, providing a lower shelf and guiding the rolling basket. Secure the slab to the metal legs and the wooden base frame using strong metal fasteners or brackets.
Step 3: Customizing the Basket
Secure the small castor wheels to the bottom of the large woven basket. Attach the small metal drawer pull to the front of the basket. The wooden base frame should act as a smooth track for the rolling basket to slide in and out easily.
Step 4: Finishing and Placement
Place the completed bench in the desired location. Use the top surface for keys and accessories. The rolling basket provides an accessible, large capacity hidden storage option for extra guest comforts.
45. Wireless Charging Key Shelf
Image Description: Smart Minimalist Console

This sleek, single floating shelf is the ultimate minimalist solution for entryway organization and technology integration. Crafted from brushed stainless steel or aluminum, the shelf provides a simple, clean surface that seems to float off the wall.
The genius of this piece is its smart technology: a dedicated spot on the shelf is embedded with a wireless charging pad. When a compatible phone or smart key fob is placed on the green glowing circle, charging begins instantly. This eliminates the clutter of charging cables on the entry table.
A small silver knob extends from the shelf edge, serving as a dedicated hook for a car key or keychain. The neon blue key icon above the shelf acts as a visual cue for the key drop zone. This organization solution is perfect for the guest who needs to drop their keys and charge their phone immediately upon entering, creating a high tech, clutter free zone.
Materials Required for a Similar DIY Project (Induction Charging Shelf)
- Stainless steel or thick aluminum sheet (for the shelf)
- Wall mounting brackets (for floating shelf)
- Integrated wireless charging pad (induction technology)
- Small metal knob or hook
- LED light strips or neon sign material (for the key icon)
- Screws and wall anchors
Equipment Required
- Metal bender (if custom fabricating the shelf)
- Drill and driver
- Measuring tape and level
Detailed DIY Instructions: Building a Charging Shelf
Integrating wireless charging into a simple shelf is a modern DIY organization challenge.
Step 1: Fabricating the Shelf
Cut and bend the stainless steel sheet into the shelf shape with a small backboard. Ensure the shelf is incredibly sturdy. Cut a recessed opening on the back of the shelf to house the wireless charging pad and its wiring.
Step 2: Integrating the Charging Pad
Secure the wireless charging pad into the recess on the underside of the shelf surface, ensuring the charging area is clearly marked on the top surface (e.g., with a decal or etching). Run the charging pad’s power cable neatly out the back of the shelf.
Step 3: Adding the Key Hook and Icon
Drill a hole and secure the small metal knob or hook onto the underside of the shelf. Install the decorative LED key icon above the shelf, running its power cord (if necessary) discreetly down the wall.
Step 4: Mounting
Secure the mounting brackets to the back of the shelf. Mark the wall and secure the brackets firmly to the wall studs or heavy duty anchors. Slide the shelf onto the brackets to complete the seamless, high tech key and charging solution.
46. Vertical Family Mail Sorter
Image Description: Personalized Wall Organizer

This classic, solid wood wall sorter is an excellent, practical solution for tackling paper clutter in a guest room or high traffic area. The tall, narrow design uses vertical space efficiently, offering multiple compartments for personalized organization. The rich wood finish is warm and inviting.
The sorter features a vertical stack of shallow slots, each clearly labeled with a sliding wood tab for a different category or family member, making it an amazing mail organization hub. Labels like “Dad,” “Mom,” “Coupons,” and “School” ensure every piece of paper has a designated home immediately upon arrival.
On the right side, deep vertical slots are available for holding larger magazines, files, or manila envelopes. At the very bottom, small cubbies provide quick grab zones for sticky notes or pens. This unit eliminates the need for messy piles on a counter, keeping important documents centralized and visible.
Materials Required for a Similar DIY Project (Wall Mail Organizer)
- Solid wood lumber (oak or pine) or high quality plywood
- Small sliding wood tabs or metal label holders
- Wood glue and small nails
- Wood stain or clear sealant
- Wall mounting hardware (keyhole hangers or screws)
Equipment Required
- Table saw (for precise slot cuts)
- Drill and driver
- Measuring tape and level
- Router (optional, for decorative edges)
Detailed DIY Instructions: Building a Vertical Mail Sorter
Building a wall sorter requires precise, repetitive cuts for the dividers, resulting in an efficient organization solution.
Step 1: Cutting the Outer Shell
Cut the long backboard, the two sides, and the top and bottom pieces. Assemble the main rectangular box using wood glue and screws.
Step 2: Cutting and Installing Dividers
Cut the many thin, horizontal pieces that will act as the mail slot dividers. Install these dividers into the main box, ensuring they are evenly spaced. Use small notches or grooves routed into the sides to ensure the dividers sit securely.
Step 3: Creating the Vertical File Slots
On the right side, install a few full length vertical dividers to create the deep slots for magazines and files.
Step 4: Finishing and Labeling
Sand the entire unit smooth and apply the wood stain or clear sealant. Create the sliding wood tabs or install the metal label holders onto the front edge of each horizontal divider. Secure the wall mounting hardware to the back of the organizer and mount it to the wall, ensuring it is level and accessible.
47. Picture Frame Hidden Coat Rack
Image Description: Gallery Wall Storage System

This incredible gallery wall offers the ultimate blend of style and hidden organization, transforming a large display of personal photos into a functional entryway storage system. The display features a cohesive arrangement of light wood framed photos and art pieces.
The visual trickery lies in the frame depth. Some of the frames are actually small, deep boxes. When a specific frame is pushed or pulled, it reveals a concealed section. The largest frame near the bottom pulls down to expose a metal hanging bar with sturdy coat hooks, perfect for jackets and bags.
Other, smaller frames pull open to reveal subtle storage hooks for keys and leashes, or small shelves for wallets and notes. When closed, the wall looks like nothing more than a beautiful family gallery. This is an exceptional, elegant, and space saving storage solution for a sophisticated guest area.
Materials Required for a Similar DIY Project (Hinged Frame Storage)
- Deep picture frames (wood or MDF)
- Full size photographs or art prints
- Small hinges (concealed type)
- Magnetic or spring loaded catches (to keep frames closed)
- Coat hooks or metal rail
- Key hooks and small shelves (for the interior)
- Wall screws and anchors
Equipment Required
- Drill and driver
- Brad nailer (for assembling deep frame boxes)
- Measuring tape and level
Detailed DIY Instructions: Installing a Hidden Frame System
Creating a gallery wall with hidden storage requires careful construction of the box frames and precise installation for this organization solution.
Step 1: Constructing the Deep Frame Boxes
Assemble the deep frame boxes using four sides, ensuring the depth is sufficient to hold the hooks and items. Secure the photo or art print into the front of the frame.
Step 2: Creating the Hinged Mechanism
Attach the small, concealed hinges to the side of the box frame and the wall. Use high quality hinges that can support the weight when opened. Alternatively, for the push mechanism, attach the spring loaded catches to the side that opens.
Step 3: Installing Interior Hooks
Inside the largest frame box, install the metal hanging bar and coat hooks. In the smaller frame boxes, install the small key hooks or tiny shelves.
Step 4: Mounting and Alignment
Mount all the frame boxes to the wall, aligning them carefully to maintain the gallery wall aesthetic. Ensure they are all perfectly level and spaced evenly. Test each frame to make certain it opens smoothly and closes securely with the magnetic or spring catch.
48. Push Open Secret Picture Frames
Image Description: Floating Hidden Cubbies

This stunning display is an elegant twist on the gallery wall concept, where every frame serves as a secret storage compartment. Unlike the hinged version, these frames are designed to float slightly off the wall, and when pushed, they swing open to reveal small hidden cubbies.
The cohesive look is achieved through matching dark wood frames and scenic, nature themed prints. The discreet “PUSH” label on the side of each frame gives guests a hint about the hidden function. The frames are mounted at various depths, adding a three dimensional, floating quality to the wall.
The small cubbies behind the frames are the ideal size for storing small items that cause the most clutter: wallets, keys, change, medication, or small electronics. One large frame even conceals a pull down coat rack, similar to a valet hook. This provides massive concealed organization power without impacting the room’s visual tranquility.
Materials Required for a Similar DIY Project (Push Open Frames)
- Deep picture frames (dark wood finish)
- Spring loaded push-to-open cabinet hardware (one per frame)
- Small shelves or hooks (for the interior)
- Wall mounting hardware (screws or brackets)
- Photo prints
- Wood glue and screws
Equipment Required
- Drill and driver
- Measuring tape and level
Detailed DIY Instructions: Building Push to Open Frames
This DIY hidden storage method is fantastic for creating seamless wall organization.
Step 1: Building the Deep Boxes
Construct the deep, square or rectangular box frames, similar to the previous project, but focus on precise alignment for the push mechanism. Secure the photos into the front of the frames.
Step 2: Installing the Push Hardware
Attach the frame box to the wall using hinges on one side. On the opposite side, install the spring loaded, push to open hardware. This mechanism allows the frame to sit flush until the front is gently pushed, causing the frame to pop open.
Step 3: Interior Fit Out
Install small hooks, shelves, or dividers within the cubby space behind the frame. Ensure the interior items do not interfere with the closing mechanism.
Step 4: Final Alignment
Mount all the frames to the wall, making sure they align perfectly to maintain the gallery wall aesthetic. Adjust the spring tension on the push mechanisms so all frames open easily but remain securely closed when not in use.
49. Wall Mounted Modular Cube Shelves
Image Description: Floating Geometric Display

This unique wall mounted system offers a fun, geometric, and completely customizable vertical organization solution. The shelves are constructed from clear and frosted plastic panels with white connectors, creating an airy, light look that suits contemporary decor. The design is modular, allowing the user to create an artistic, staggered arrangement.
The shelves feature a mix of open cubbies for displaying decorative items (like plants and art) and closed cubbies with frosted doors, perfect for concealing clutter while keeping items accessible. The addition of teal and light green backs to some cubbies adds a modern color block effect.
The staggered placement of the cubes is incredibly visually appealing and draws the eye upward, making the room feel taller. This modular nature means the system can easily be expanded or reconfigured to serve changing guest room organization needs, offering both display and closed storage in one flexible package.
Materials Required for a Similar DIY Project (Floating Modular Cubes)
- Modular plastic or wire grid panels (clear and colored)
- Multi sided plastic connectors
- Small hinges and clips (for securing the cube doors)
- Wall mounting brackets (for securing the cube structure to the wall)
- Screws and anchors
Equipment Required
- Rubber mallet (for securing connectors)
- Drill and driver
- Measuring tape and level
Detailed DIY Instructions: Assembling a Modular Wall Unit
A modular system is the simplest way to create customizable wall storage with a unique shape.
Step 1: Designing and Assembling the Cubes
Lay out your desired staggered pattern on the floor first. Assemble the individual cubes using the plastic panels and connectors, tapping the connectors firmly with a rubber mallet. Create a mix of open cubes and cubes with frosted or colored door panels.
Step 2: Securing the Structure
Because the unit is staggered, secure it by joining the individual cubes together firmly at every point of contact using the connectors. Ensure the entire assembled structure is rigid and stable.
Step 3: Wall Mounting
Identify several secure points on the back of the assembled structure. Attach strong wall mounting brackets or secure connectors directly to these points. Mark the corresponding locations on the wall.
Step 4: Final Installation
Securely fasten the brackets or specialized connectors to the wall studs or heavy duty anchors. Lift the assembled cube unit and attach it firmly to the wall mounting points. Ensure the unit is level and strong enough to support the weight of the items placed inside.
We have explored 49 distinct ways to conquer clutter and reclaim your guest room, proving that every corner and wall can be utilized for smarter storage. Implementing just a few of these targeted organization solutions—from vertical storage towers to hidden charging stations—can make a dramatic difference in both the look and feel of the space.
The goal is to create a seamless, welcoming environment where guests feel prioritized and every item has a specific, designated spot. Remember, the best strategy is often to choose multi functional pieces that combine seating, display, and hidden storage all in one. That single upgrade can eliminate three different sources of mess.
It is time to take action. Start small, perhaps with a simple wall mounted key organizer or a rolling shoe basket, and build your system one piece at a time. You will soon discover that your former “dumping ground” has become the cleanest, most functional room in your house.
Key Takeaways
Vertical Storage is Your Best Friend
Look up! Utilizing wall mounted systems like floating shelves, modular grids, and tall wardrobes maximizes space without sacrificing precious floor area. Vertical storage immediately draws the eye upward, making the entire room feel larger and more open.
Multi Function Furniture Solves Complex Problems
Invest in pieces that do double or triple duty. Benches that incorporate hidden tilt out shoe racks, cabinets that serve as charging stations, and mirrored towers that conceal jewelry storage are excellent choices. Combining functions dramatically reduces the overall furniture footprint.
Hide the Clutter, Not the Style
Use concealed organization to keep your space serene and visually quiet. Hidden storage solutions, such as picture frames that open to reveal hooks or flush cabinets disguised as millwork, ensure clutter is contained while maintaining a sophisticated aesthetic.
Dedicated Zones Prevent Mess
Create specialized drop zones for common guest items. Dedicated spots for keys, phones (charging stations), shoes (boot trays), and wet gear (umbrella holders) prevent items from migrating to nightstands or the floor. Everything should have a clear, easy to access home.