
Walking into a cluttered garage can feel like entering a maze of forgotten boxes and tangled tools. Many homeowners struggle to find even an inch of clear floor space because clutter builds up so quickly. You likely feel frustrated every time you search for a simple screwdriver or a garden rake.

Organizing this large room is often the most avoided chore on the weekend list. Items without a specific home tend to pile up in corners and on workbenches. This guide provides forty five smart ways to reclaim your space and keep things tidy forever.
Creating a functional system does not have to be expensive or difficult. You can transform your workshop into a professional and stress free environment with simple steps. Let us explore the ultimate solutions to turn your messy garage into a masterpiece of order.
1 Wall Mounted Workshop and Storage System
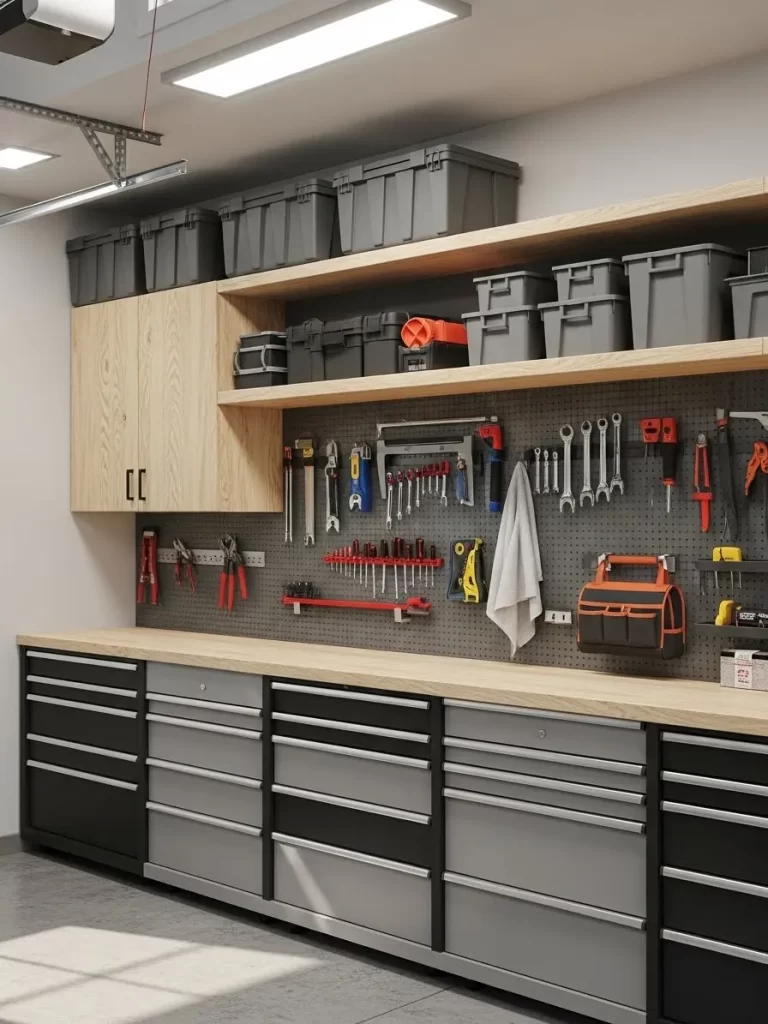
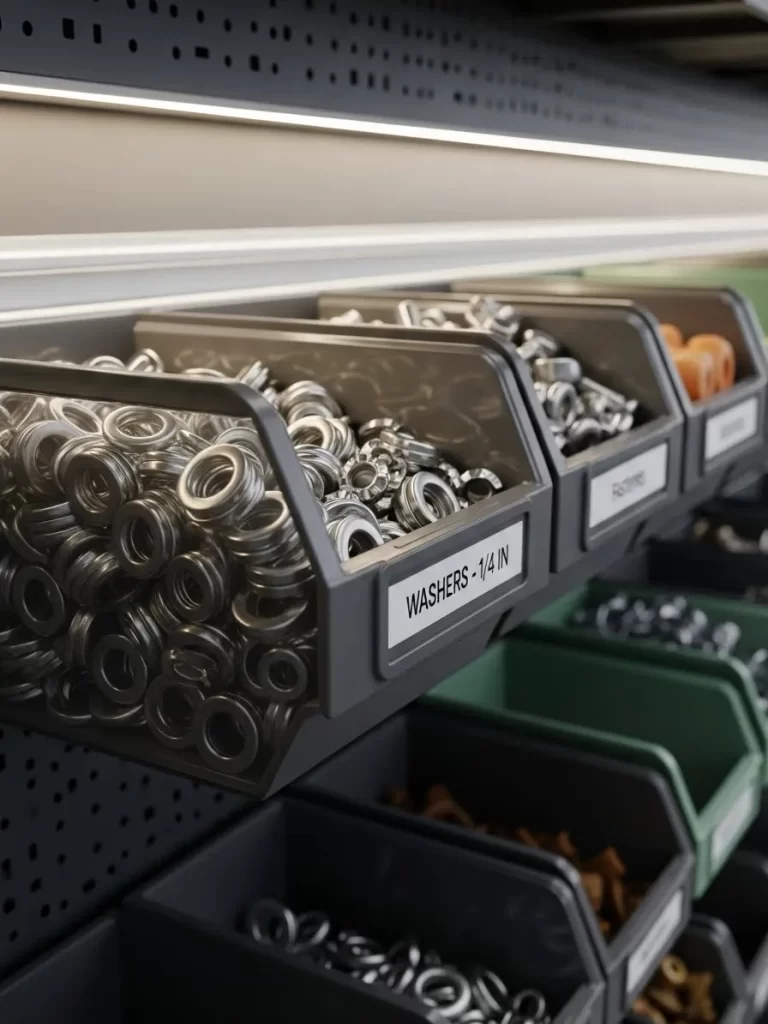
A messy garage often lacks a clear workspace. This workstation solves that problem by using every inch of wall space. The base consists of long steel cabinets with many drawers. These drawers store heavy tools and hardware out of sight. A thick wooden top provides a smooth area for repairs or crafts.
The wall above features a large pegboard system. You can hang your most used tools right in front of you. This keeps the work surface clear and ready for use. It also makes cleaning up much faster because every tool has a specific home.
Stacked wooden shelves sit above the pegboard to hold storage bins. These containers are great for items you do not use every day. Utilizing the high space keeps the floor clear for your car or larger equipment. This design creates a professional look while being very practical.
Material Required List
- Two large sheets of three quarter inch plywood
- Five steel base cabinets with drawers
- Two large pegboard panels
- Set of various pegboard hooks
- Box of two inch wood screws
- Heavy duty wall anchors
Equipment Required List
- Electric power drill
- Level tool
- Metal measuring tape
- Circular saw
- Electronic stud finder
DIY Instructions
- Start by measuring the total width of your garage wall. Mark where you want the workbench to end.
- Use a stud finder to locate the wooden beams behind your drywall. Mark these spots with a pencil for later.
- Position your steel cabinets against the wall. Ensure they are level by placing a level on top of them.
- Place your plywood sheets over the cabinets. Secure the wood to the cabinets using short screws from underneath.
- Mount the pegboard panels to the wall studs above the bench. Use spacers behind the board so hooks can fit into the holes.
- Install the upper wooden shelves by attaching brackets directly into the wall studs. This ensures they can hold heavy weight.
- Place your storage bins on the top shelves and organize your tools on the pegboard hooks.
2 Overhead Sliding Tote Rack
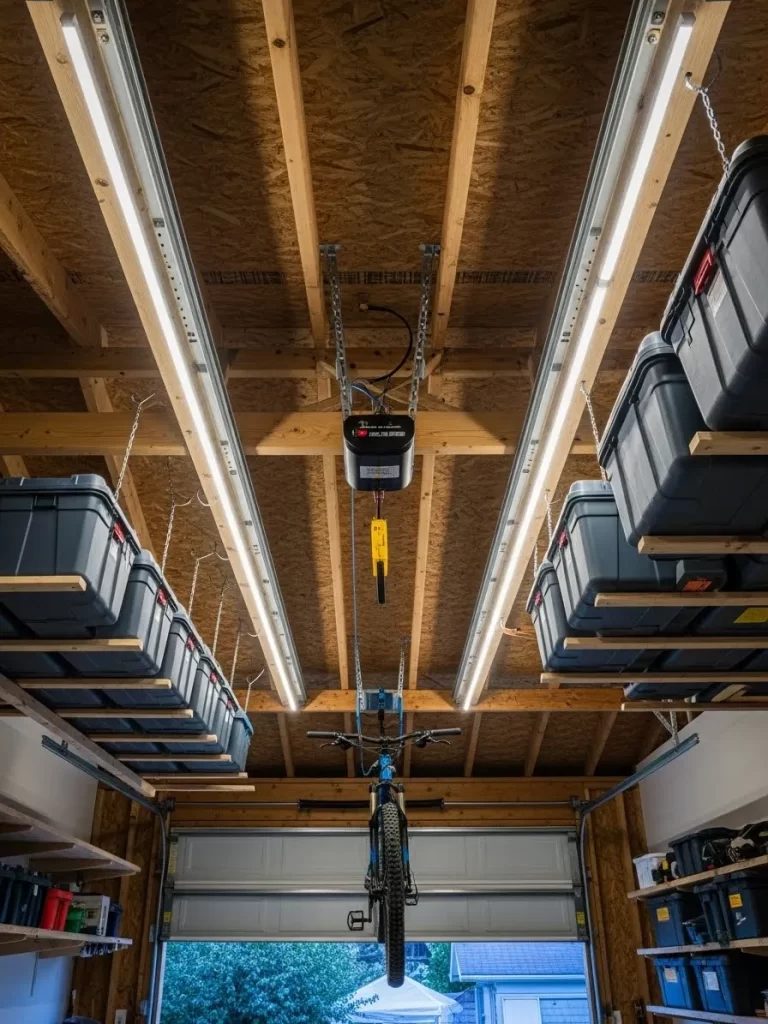
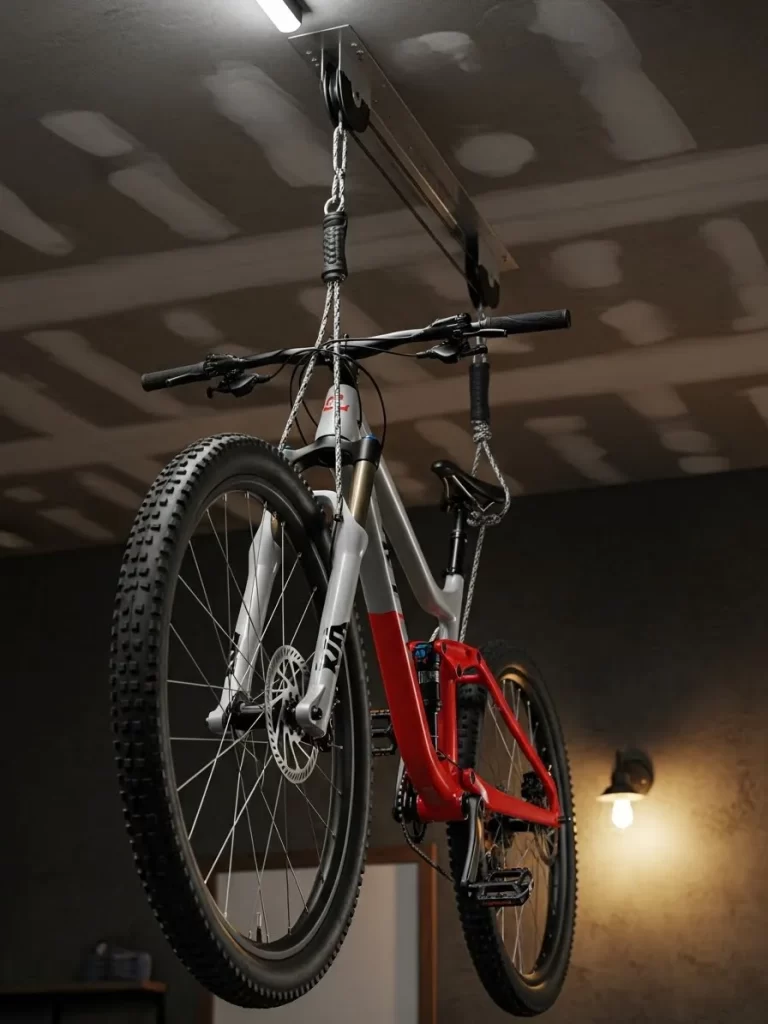
Ceiling space often goes to waste in a crowded garage. This sliding rack system turns that empty area into a massive storage zone. You can tuck away seasonal items or extra supplies without taking up any floor area. It utilizes the overhead joists to hold heavy bins securely.
Each plastic bin slides into a wooden rail attached to the ceiling. Clear bins allow you to see what is inside while keeping everything dust free. This method keeps your floor open for parking or large projects. Utilizing vertical space is a smart way to manage a small room.
The setup looks clean and keeps your belongings safe from floor moisture. Sturdy wooden supports ensure that the weight is distributed across multiple beams. This project changes how you look at your garage ceiling forever. It makes finding holiday decorations or camping gear much faster.
Material Required List
- Eight foot long wooden two by fours
- Heavy duty plastic storage bins with wide lips
- Large wood screws
- Flat washers
- Wood glue
Equipment Required List
- Power drill
- Measuring tape
- Stepladder
- Level
- Hand saw or miter saw
DIY Instructions
- Measure the width of the lip on your plastic storage bins first.
- Cut your wooden boards to the length of your garage ceiling area.
- Locate the ceiling joists using a stud finder and mark them clearly.
- Screw the first wooden rail into the ceiling joists using long screws.
- Use a bin as a spacer to find the exact spot for the second rail.
- Mount the second rail so the bin lip slides easily between the boards.
- Test the fit by sliding a bin into the new track to ensure it stays up.
- Repeat this process for as many rows as your ceiling can hold.
3 Rotating Storage Carousel
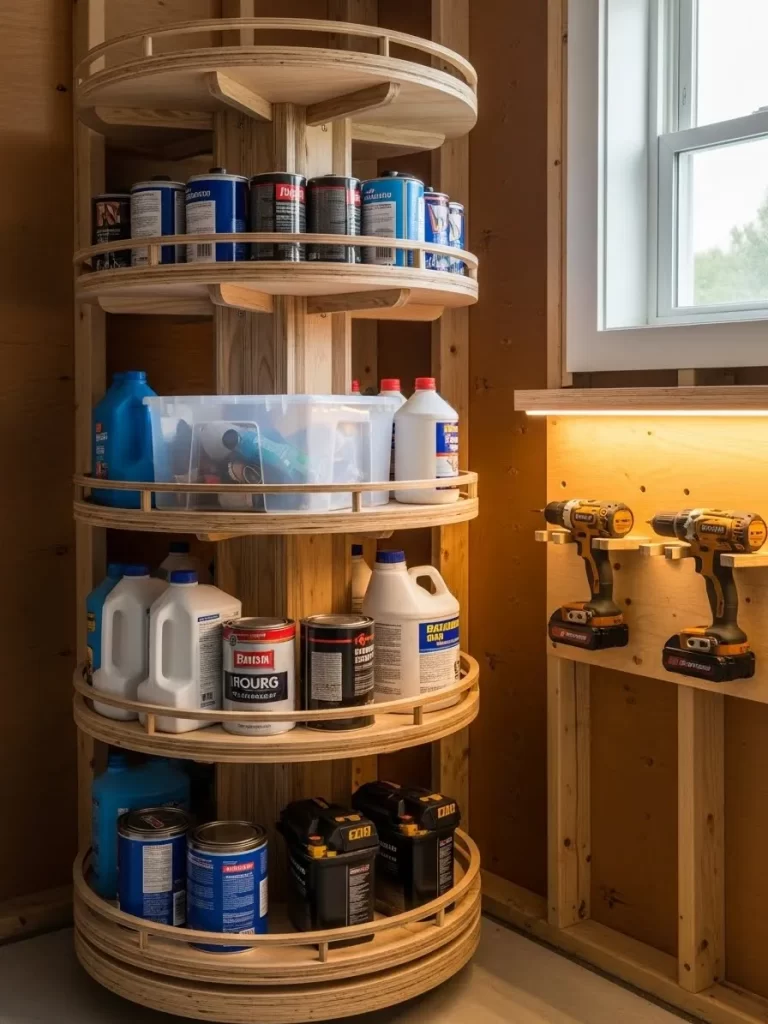
Small bottles and paint cans often create a cluttered mess on flat shelves. This rotating carousel brings everything to your fingertips with a simple spin. It fits into tight corners and holds dozens of items in a tiny footprint. Each level has a small rim to prevent items from falling off.
Multiple tiers provide separate spaces for cleaners, paints, and lubricants. The central wooden pillar provides a strong backbone for the entire structure. This design stops you from digging through rows of cans to find one specific color. You can see every label by just turning the unit.
Building this rack helps you reclaim lost corner space in your workshop. The circular shelves maximize the surface area available for storage. Natural wood finishes give the garage a warm and organized feeling. It is a great solution for anyone with a large collection of bottled supplies.
Material Required List
- Three quarter inch thick plywood sheets
- One thick wooden center post
- Heavy duty lazy susan swivel bearing
- Small wooden trim pieces for rims
- Wood screws and finishing nails
Equipment Required List
- Jigsaw to cut circles
- Cordless drill
- Compass for drawing circles
- Sandpaper
- Hammer
DIY Instructions
- Draw several large circles on your plywood using a compass tool.
- Cut out the circles carefully using your jigsaw and sand the edges smooth.
- Attach the lazy susan bearing to the very bottom of the center post.
- Mount the bottom plywood circle onto the bearing so it can spin.
- Slide the remaining circles onto the center post at equal heights.
- Secure each shelf to the post using screws and wood glue for strength.
- Nail the thin trim pieces around the edge of each circle to create a lip.
- Place your cans and bottles onto the tiers and test the rotation.
4 Custom Foam Drawer Organizers
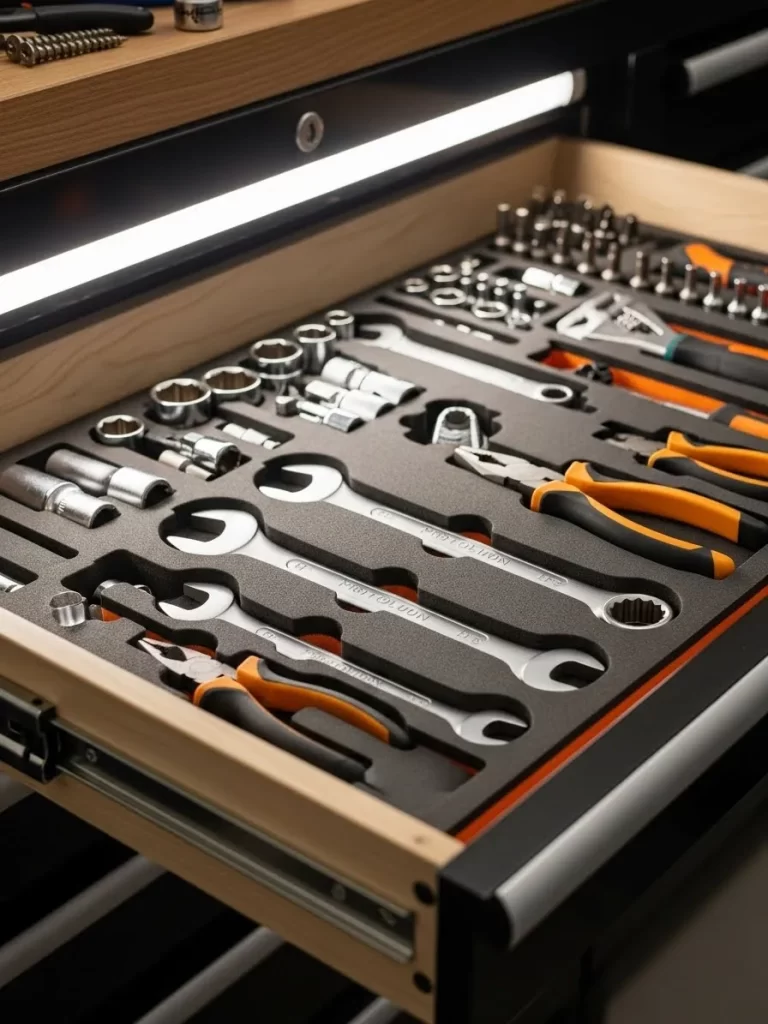
Loose tools in a drawer can become damaged or difficult to find. These foam inserts provide a specific home for every wrench and pair of pliers. You can see instantly if a tool is missing from your collection. The dark foam creates a professional look that mirrors high end mechanic shops.
Each cutout matches the exact shape of your specific equipment. This prevents tools from sliding around when you open or close the heavy metal drawers. The soft material also protects the finish of your expensive gear. Organization becomes a visual game rather than a chore.
The bright color beneath the top layer makes empty spots stand out. You will never leave a tool behind on a job site again with this system. It transforms a chaotic junk drawer into a precision storage unit. Your workflow will improve because you stop searching for the right size.
Material Required List
- Dual color layered foam sheets
- Spray adhesive
- Cardboard for templates
- Cleaning rags
Equipment Required List
- Sharp utility knife or hobby blade
- Permanent marker
- Metal straight edge ruler
- Heat gun for smoothing edges
DIY Instructions
- Empty your tool drawer and wipe the bottom surface clean.
- Cut a piece of foam to fit the exact interior dimensions of the drawer.
- Lay your tools out on top of the foam in the arrangement you prefer.
- Trace around each tool carefully using a thin permanent marker.
- Use a sharp utility knife to cut out the shapes you just traced.
- Peel away the cut foam sections to reveal the colored layer underneath.
- Place the foam insert into the drawer and press it down firmly.
- Put each tool into its matching slot to complete the organization.
5 Wall Mounted Entryway Hub
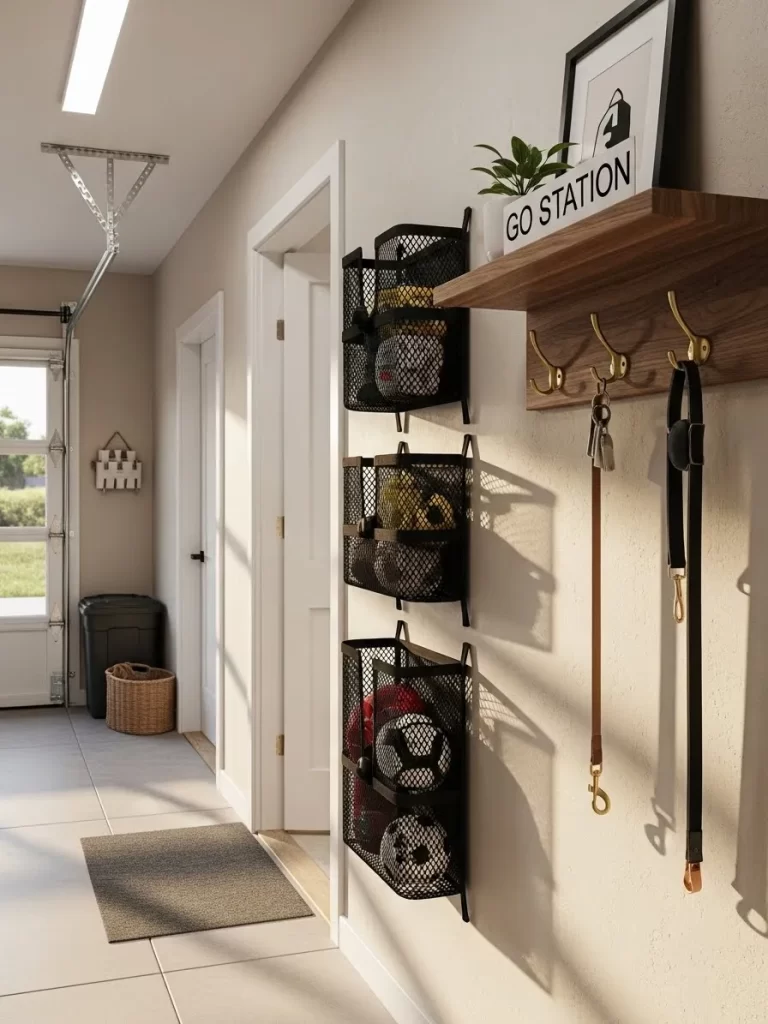
This station serves as the transition point between your home and the garage. It features wire baskets for sports balls and hooks for everyday essentials. Keeping keys and leashes near the door prevents frantic morning searches. The compact design fits on narrow wall sections near the entry.
Wire baskets allow you to see exactly which ball or glove is inside. Air circulates through the mesh to help damp sports gear dry out quickly. A small wooden shelf on top holds decorative items or outgoing mail. This hub keeps the floor clear of tripping hazards like soccer balls.
Sturdy brass hooks hold heavy bags and dog leads without bending. The combination of wood and metal creates an attractive look for your entryway. Every family member gets a dedicated spot for their gear. This setup simplifies your daily routine and keeps the garage tidy.
Material Required List
- One large wooden mounting board
- Three black wire wall baskets
- Four heavy duty brass hooks
- Wall mounting anchors and screws
- Wood stain or paint
Equipment Required List
- Power drill
- Bubble level
- Screwdriver
- Measuring tape
- Pencil
DIY Instructions
- Sand the wooden board and apply your choice of stain or paint.
- Measure the back of your wire baskets to find the mounting holes.
- Mark the positions for the baskets on the front of the wooden board.
- Screw the baskets into the board using short wood screws.
- Space the brass hooks evenly along the bottom edge of the board.
- Use a level to mark a straight line on your garage wall.
- Drill holes into the wall and insert your heavy duty anchors.
- Secure the entire hub to the wall using long screws through the anchors.
6 Retractable Attic Access Ladder
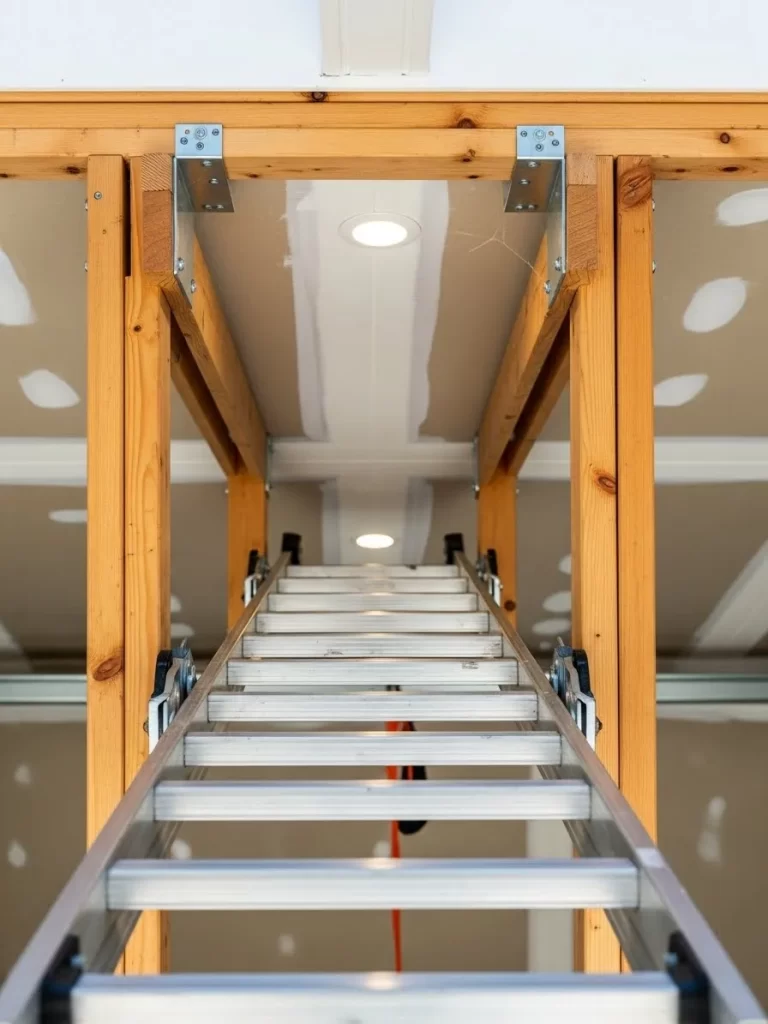
Garages with high ceilings often have hidden storage space above the rafters. This retractable ladder provides a safe way to reach that upper attic area. It folds up into the ceiling so it stays out of the way when not in use. This system is much safer than using a standard step ladder.
The aluminum construction is lightweight but can support a lot of weight. Deep treads on the steps provide a firm grip for your feet as you climb. Reclaiming the attic space allows you to store items that you only need once a year. This keeps your main garage area focused on daily tasks.
Gas struts or springs make opening the hatch smooth and easy for anyone. The white frame blends into the ceiling for a very clean appearance. Installing this ladder increases the usable square footage of your home storage. It is a permanent upgrade that adds real value to your property.
Material Required List
- Pre assembled attic ladder kit
- Wooden framing lumber for the opening
- Trim molding for the ceiling
- Long lag bolts
- Wood shims
Equipment Required List
- Reciprocating saw or hand saw
- Power drill with bits
- Hammer
- Framing square
- Safety glasses
DIY Instructions
- Pick a spot in the ceiling between the joists for your new opening.
- Cut a hole in the ceiling drywall matching the size of the ladder frame.
- Build a wooden box frame inside the ceiling to support the ladder.
- Lift the ladder unit into the opening with the help of a friend.
- Secure the ladder frame to your wooden box using heavy lag bolts.
- Use shims to ensure the frame is perfectly level and square.
- Adjust the length of the ladder legs so they rest flat on the floor.
- Install the trim molding around the ceiling hole to hide the gaps.
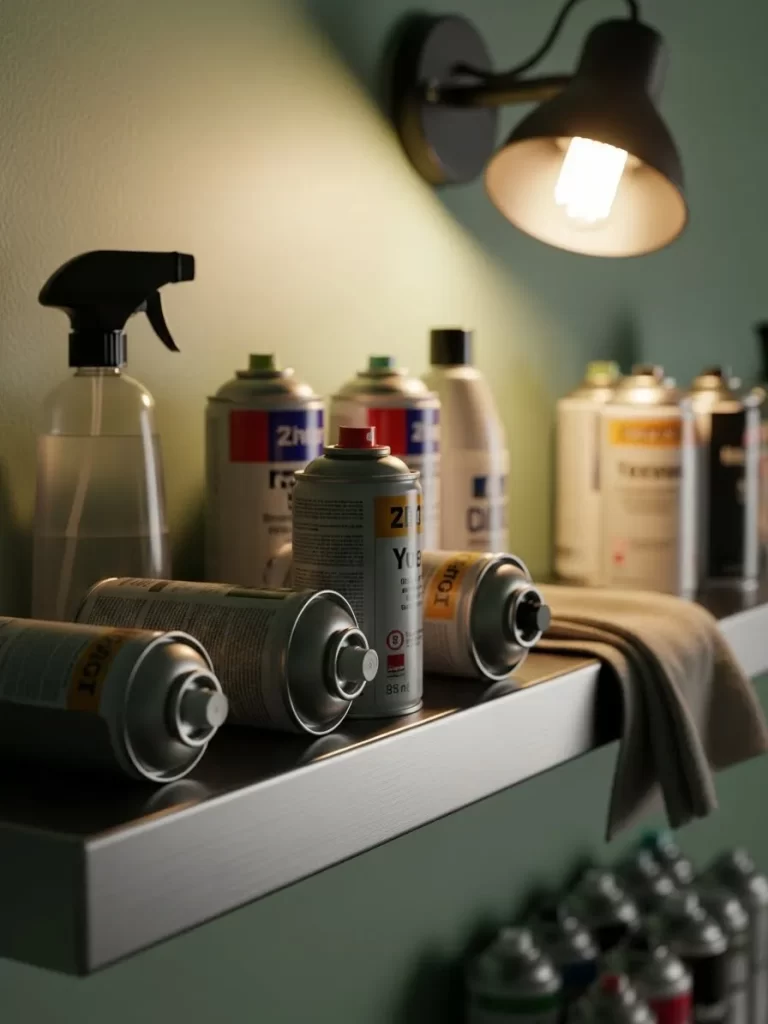
7 Metal Chemical Storage Shelf
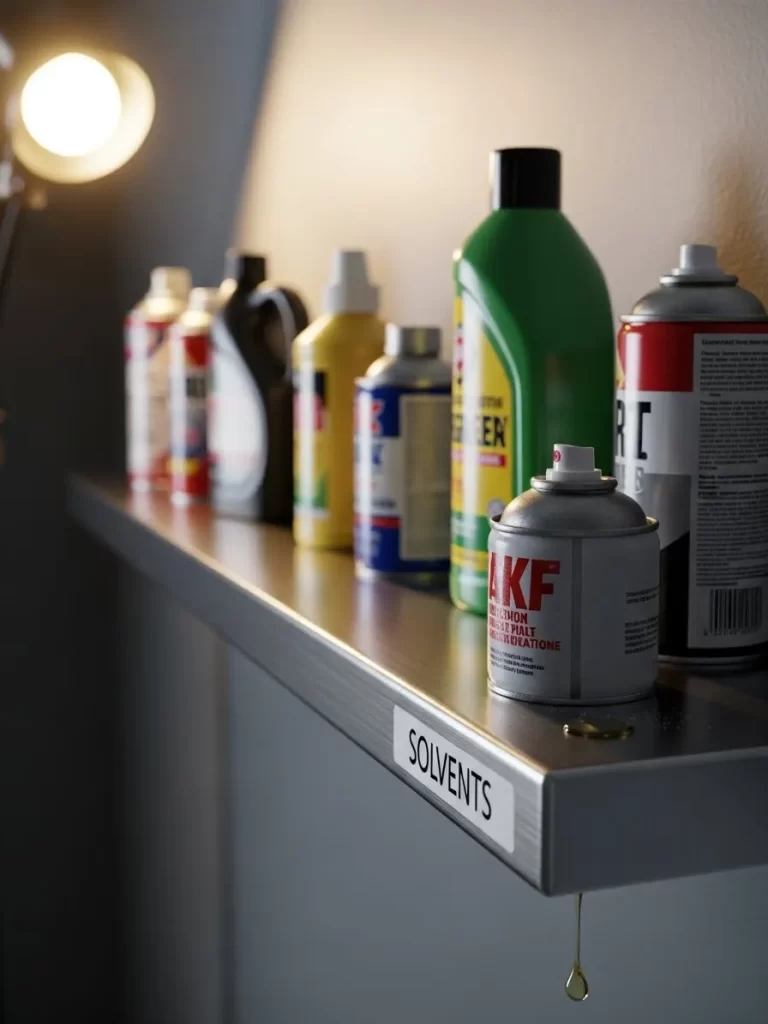
Storing liquids and sprays requires a surface that is easy to wipe clean. This slim metal shelf is designed specifically for solvents and automotive chemicals. The narrow profile ensures it does not stick out too far into your walking path. It keeps dangerous substances away from the floor and out of reach.
Labels on the front of the shelf help you group similar items together. You can keep all your cleaners in one spot and lubricants in another. The brushed metal finish resists stains from oils or leaking cans. This is a durable choice for the harsh environment of a garage.
A raised edge prevents bottles from vibrating off the shelf when the garage door moves. Keeping chemicals organized prevents accidental spills and keeps the air cleaner. This simple addition makes your maintenance tasks go much smoother. You will always know when you are running low on a specific fluid.
Material Required List
- Stainless steel or aluminum wall shelf
- Label maker or pre printed stickers
- Metal wall brackets
- Heavy duty wall toggles
- Cleaning alcohol
Equipment Required List
- Power drill
- Level
- Metal drill bits
- Screwdriver
- Measuring tape
DIY Instructions
- Choose a height on your wall that is away from heat sources.
- Use a level to mark a horizontal line for the shelf placement.
- Drill holes into the wall for your heavy duty mounting toggles.
- Attach the metal brackets to the wall using the toggles and screws.
- Place the metal shelf onto the brackets and secure it if required.
- Wipe the front edge of the shelf with alcohol to remove any grease.
- Print labels for your chemical categories and stick them to the shelf.
- Arrange your bottles on the shelf according to the new labels.
8 Ceiling Mounted Kayak Lift
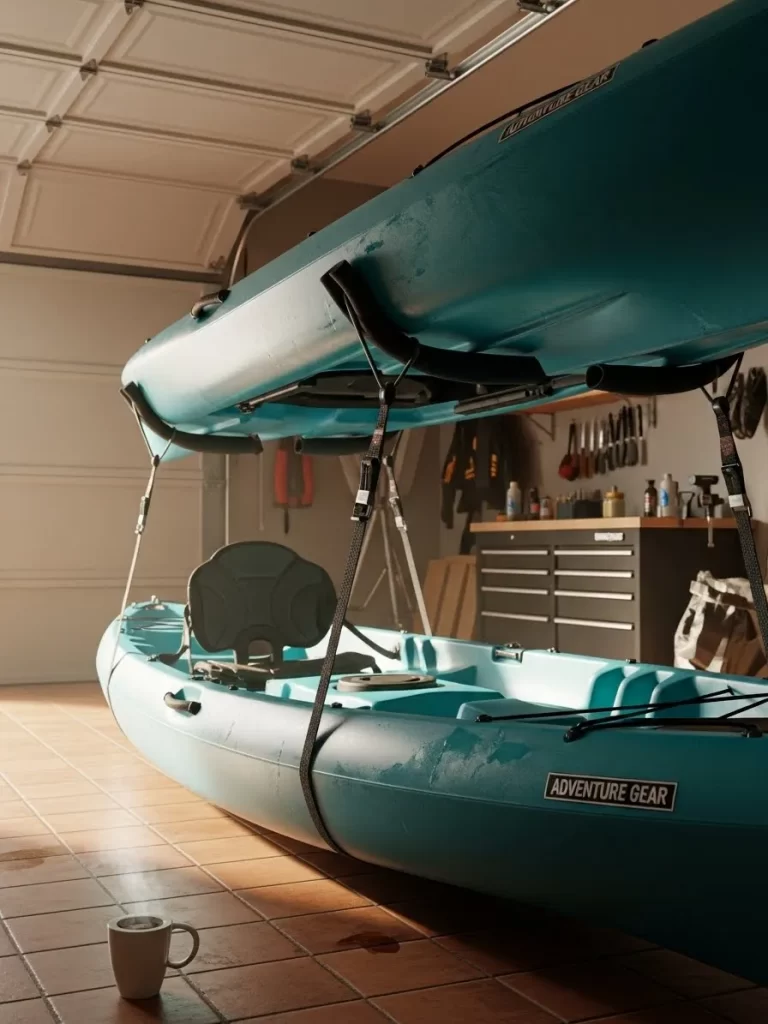
Large watercraft can take up an entire bay in your garage if left on the floor. This pulley system lifts your kayak up to the ceiling for easy storage. It uses mechanical advantage to make lifting heavy boats feel very light. Your kayak stays safe from scratches and out of the way of your car.
Padded straps wrap around the hull to protect the plastic or fiberglass finish. The hoist locks into place so the boat cannot slip back down. This setup is great for seasonal items that you do not use every day. It keeps your garage looking organized and professional.
You can lower the kayak directly onto your car roof rack when you are ready to travel. This saves your back from the strain of heavy lifting. The rope system is simple to operate and very reliable over time. It is a must have for any outdoor enthusiast with limited space.
Material Required List
- Kayak hoist kit with pulleys and rope
- Padded nylon lifting straps
- Wood blocks for mounting
- Large eye bolts
- Heavy duty screws
Equipment Required List
- Power drill
- Stepladder
- Stud finder
- Measuring tape
- Socket wrench
DIY Instructions
- Locate the ceiling joists that run above your parking area.
- Measure the distance between the two handles on your kayak.
- Mount the pulley brackets to the ceiling joists at that same distance.
- Thread the lifting rope through the pulleys according to the kit manual.
- Attach the padded straps to the hooks at the end of the ropes.
- Slide the straps under the front and back of your kayak hull.
- Pull the rope slowly to lift the kayak a few inches off the ground.
- Continue pulling until the boat is near the ceiling and lock the rope.
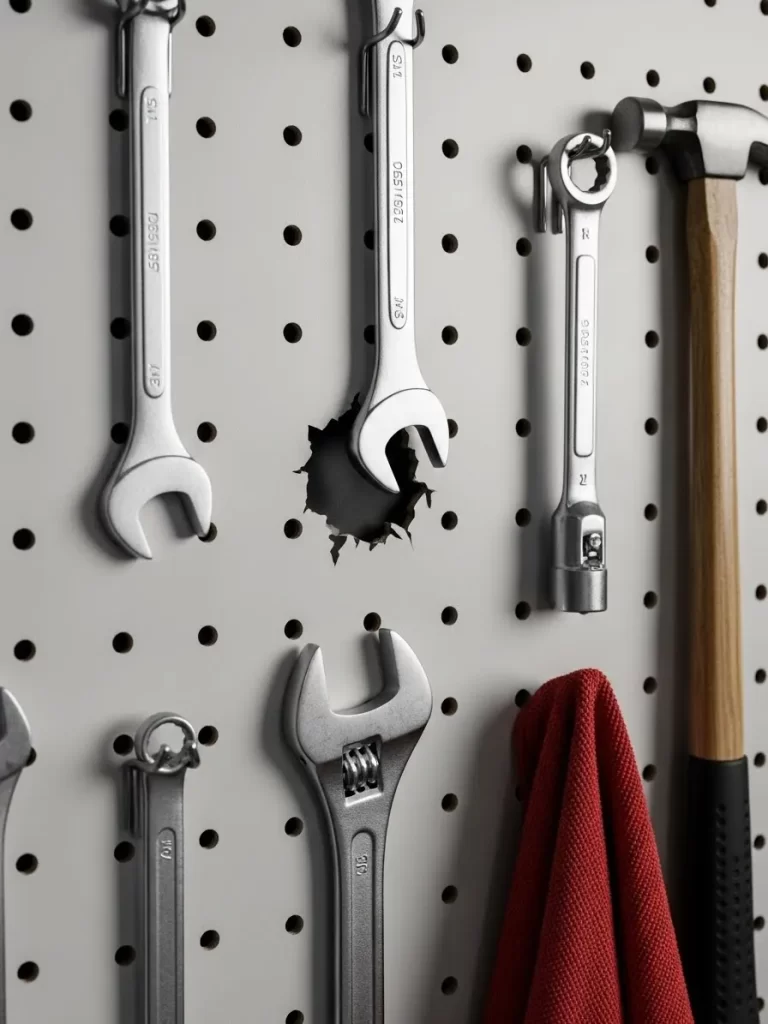
9 Industrial Metal Pegboard
Standard wooden pegboards can warp or break under the weight of heavy tools. This metal version provides a much stronger foundation for your workshop. The silver finish reflects light and makes your workspace feel brighter. It features many holes for various hooks, bins, and specialized holders.
Tools stay organized and easy to reach while you are working on a project. You can arrange your wrenches and hammers in a way that makes sense for your workflow. The metal surface is easy to clean and will not absorb grease or oil. This board will last for many years even with daily use.
Customized hooks snap into the board and stay put when you grab a tool. This eliminates the frustration of hooks falling off the wall. The clean lines and organized layout will inspire you to start new projects. It is a functional piece of art for any handyman.
Material Required List
- Two metal pegboard panels
- Assorted metal pegboard hooks and bins
- Wall spacers
- Mounting screws
- Masonry or drywall anchors
Equipment Required List
- Power drill
- Level
- Screwdriver
- Measuring tape
- Pencil
DIY Instructions
- Determine where on your workbench wall you want to place the panels.
- Use a level to ensure the panels will be straight before drilling.
- Hold the first panel against the wall and mark the mounting holes.
- Drill holes at your marks and insert the appropriate wall anchors.
- Place the spacers behind the panel so it sits away from the wall.
- Drive the screws through the panel and spacers into the wall anchors.
- Repeat this for the second panel to create a larger work area.
- Insert your hooks and hang your tools in an organized pattern.
10 Wooden Tape Dispenser Rod
Finding the end of a tape roll is annoying when your hands are full. This simple wooden dowel system keeps all your tape rolls in one convenient line. It allows you to pull and tear exactly what you need with one hand. Different types of tape are organized by size and color for quick identification.
The rod is mounted between two sturdy brackets on your wall or workbench. You can easily slide the rod out to add new rolls or remove empty ones. This setup prevents rolls from getting lost under piles of wood or metal. It is a very cheap but effective way to organize small supplies.
Using a natural wood rod adds a classic look to your garage storage. You can mount it at eye level so you never have to search again. This project takes very little time but provides a huge boost to your efficiency. It is the little details like this that conquer garage clutter.
Material Required List
- One inch thick wooden dowel
- Two wooden mounting brackets
- Wood screws
- Sandpaper
- Small metal pin or clip
Equipment Required List
- Handsaw
- Power drill
- Measuring tape
- Level
- Screwdriver
DIY Instructions
- Cut the wooden dowel to the length of the space on your wall.
- Sand the dowel until it is very smooth so rolls can slide easily.
- Measure the width of your tape rolls to ensure they fit the rod.
- Mark the spots for the two brackets on your wall using a level.
- Screw the brackets into the wall or the side of a cabinet.
- Slide all your tape rolls onto the dowel in the order you like.
- Place the dowel into the brackets and secure one end with a pin.
- Pull the end of the tape to ensure it spins freely on the rod.
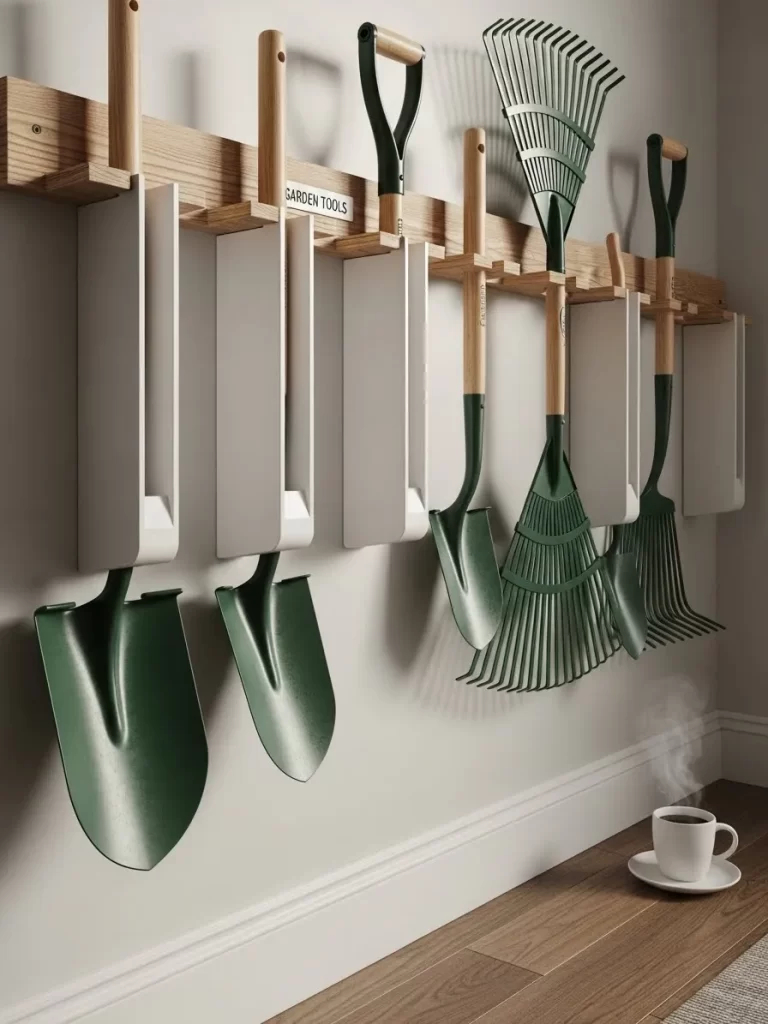
11 Vertical Garden Tool Lattice

Long handled tools like shovels and rakes often lean against the wall and fall over. This wooden lattice system keeps them upright and organized against the garage wall. It uses a grid pattern to create slots for various garden implements. You can easily see every tool at a glance without moving a heavy pile.
The natural wood frame adds a warm look to the utility area of your garage. High hooks on the lattice hold smaller items like hand pruners or gloves. This setup keeps the floor completely clear for walking or parking your mower. It turns a messy corner into an attractive display.
Building this rack helps protect the sharp edges of your gardening gear. The tools stay dry and away from the damp concrete floor. This project is a simple way to manage the chaos of outdoor maintenance supplies. You will feel more prepared for yard work with everything in its place.
Material Required List
- Wooden cedar lath strips
- Outdoor wood screws
- Wall mounting blocks
- Wood glue
- Weatherproof sealant
Equipment Required List
- Power drill
- Measuring tape
- Level
- Hand saw
- Pencil
DIY Instructions
- Cut your cedar strips to the desired height and width for your wall space.
- Lay the vertical strips on the ground with even gaps between them.
- Place the horizontal strips over the vertical ones to create a grid.
- Screw the pieces together at every intersection to make the lattice strong.
- Apply a coat of sealant to protect the wood from moisture.
- Mount small wooden blocks to the wall studs to act as spacers.
- Attach the lattice to the blocks so there is a gap behind the wood.
- Hang your garden tools by their handles or use hooks on the grid.
12 Recessed Power Tool Charging Station
Cordless tools need a home where batteries can charge safely. This recessed shelf keeps chargers off your main workbench surface. It features custom cutouts that hold the base of your drills and drivers. This design hides messy cords behind the wooden frame.
The upper shelf provides a flat area for the charging docks and spare batteries. Lower slots allow the tools to hang by their handles for quick access. This organization ensures you always have a fresh battery ready for a project. It transforms a tangled mess of wires into a sleek power hub.
Keeping chargers in one spot prevents you from losing them under scrap wood. The open design allows heat from the batteries to escape easily. This unit is a great addition to any serious DIY workshop. You will save time by never searching for a charged drill again.
Material Required List
- Three quarter inch plywood
- Power strip with surge protection
- Wood screws
- Finish nails
- Wood glue
Equipment Required List
- Jigsaw
- Power drill
- Tape measure
- Level
- Sandpaper
DIY Instructions
- Measure the width of your power drill handles to determine the slot size.
- Cut a piece of plywood to serve as the bottom hanging shelf.
- Use a jigsaw to cut U shaped slots into the front edge of the board.
- Build a rectangular box frame to hold the top and bottom shelves.
- Drill a large hole in the back of the frame for the power cord.
- Mount the power strip inside the box and thread the cord through the hole.
- Screw the entire unit into the wall studs at a comfortable height.
- Plug in your chargers and hang your drills in the custom slots.
13 Heavy Duty Mobile Project Cart
Moving heavy tools around a large garage can be tiring. This mobile cart features industrial casters that roll smoothly over concrete. It provides a portable workspace that you can take directly to your car or project. The bright blue finish makes it easy to spot in a busy room.
Deep trays prevent small parts and screws from rolling off while you move. A side handle allows for easy steering through tight spaces. This cart holds everything you need for a specific job in one organized place. It keeps your main workbench clear of temporary clutter.
Sturdy metal legs ensure the cart stays stable when you are working on top of it. Locking wheels keep it from rolling away on uneven floors. This is a must have for anyone who performs vehicle maintenance. Your tools will always be right where you need them.
Material Required List
- Steel utility cart kit
- Four heavy duty locking casters
- Rubber drawer liners
- Bolts and nuts
- Thread locking fluid
Equipment Required List
- Socket wrench set
- Adjustable wrench
- Screwdriver
- Pliers
- Hammer
DIY Instructions
- Lay out all the metal pieces from your cart kit on a flat floor.
- Attach the legs to the bottom tray using the provided bolts.
- Secure the middle and top trays to the legs at your preferred heights.
- Install the industrial casters into the bottom of each leg.
- Tighten all bolts firmly and use thread locker to prevent them from loosening.
- Place the rubber liners inside the trays to protect your tools.
- Attach the steering handle to the side of the top tray.
- Test the wheels and locks to ensure the cart moves and stays correctly.
14 Floor Mounted Multi Bike Rack
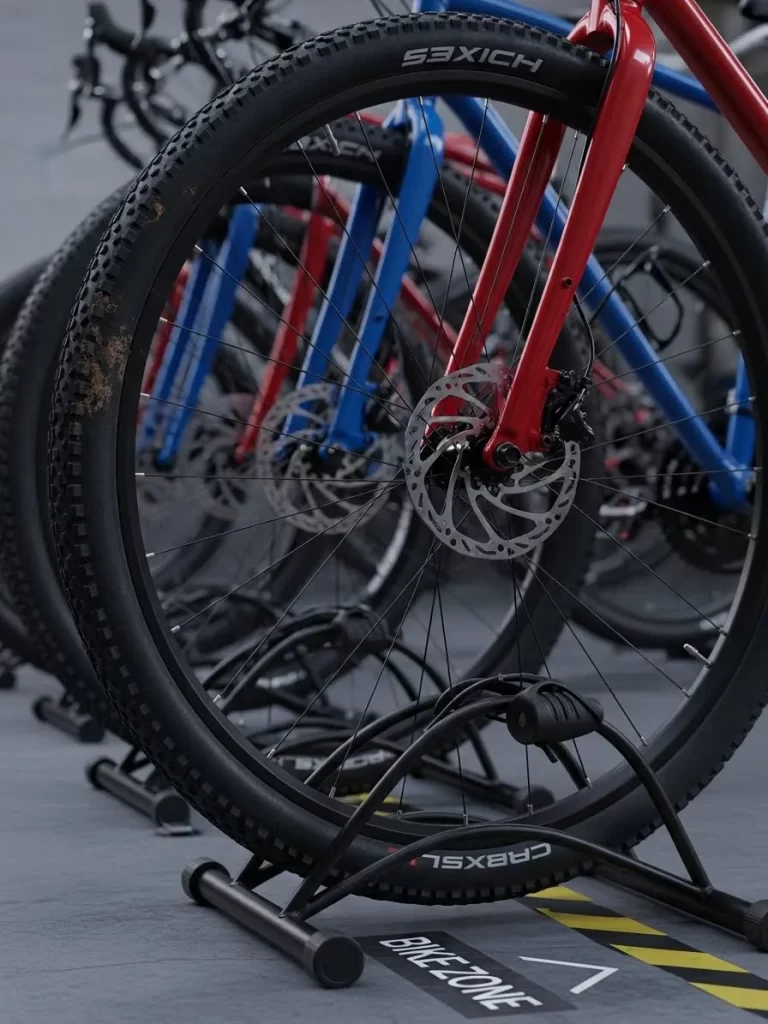
Bicycles often lean against walls and take up valuable floor space. This sturdy metal rack keeps multiple bikes upright and parallel. It prevents the handlebars from tangling and protects the frames from scratches. The black finish blends into the garage floor for a clean look.
Individual slots hold the front or rear wheel of each bicycle securely. This system is great for families with many riders. It encourages everyone to park their bikes in a designated spot. You can move the entire rack easily if you need to clean the floor.
Using a floor rack is much easier for children than hanging bikes on walls. It keeps the weight off the walls and prevents damage to your drywall. This setup makes your garage look like a professional bike shop. You will never trip over a fallen bicycle again.
Material Required List
- Pre fabricated metal bike rack
- Floor anchors for concrete
- Marking chalk
- Protective end caps
- Outdoor paint if needed
Equipment Required List
- Hammer drill
- Masonry drill bit
- Wrench
- Tape measure
- Vacuum to clean dust
DIY Instructions
- Place the bike rack on the floor where you want it to stay.
- Mark the mounting holes on the concrete using your chalk.
- Move the rack aside and drill holes into the floor with a hammer drill.
- Vacuum the dust out of the holes so the anchors fit properly.
- Tap the floor anchors into the holes using a hammer.
- Reposition the rack over the holes and insert the bolts.
- Tighten the bolts with a wrench until the rack is rock solid.
- Park your bikes in the slots to ensure they are spaced correctly.
15 Rotating Hardware Bin Carousel
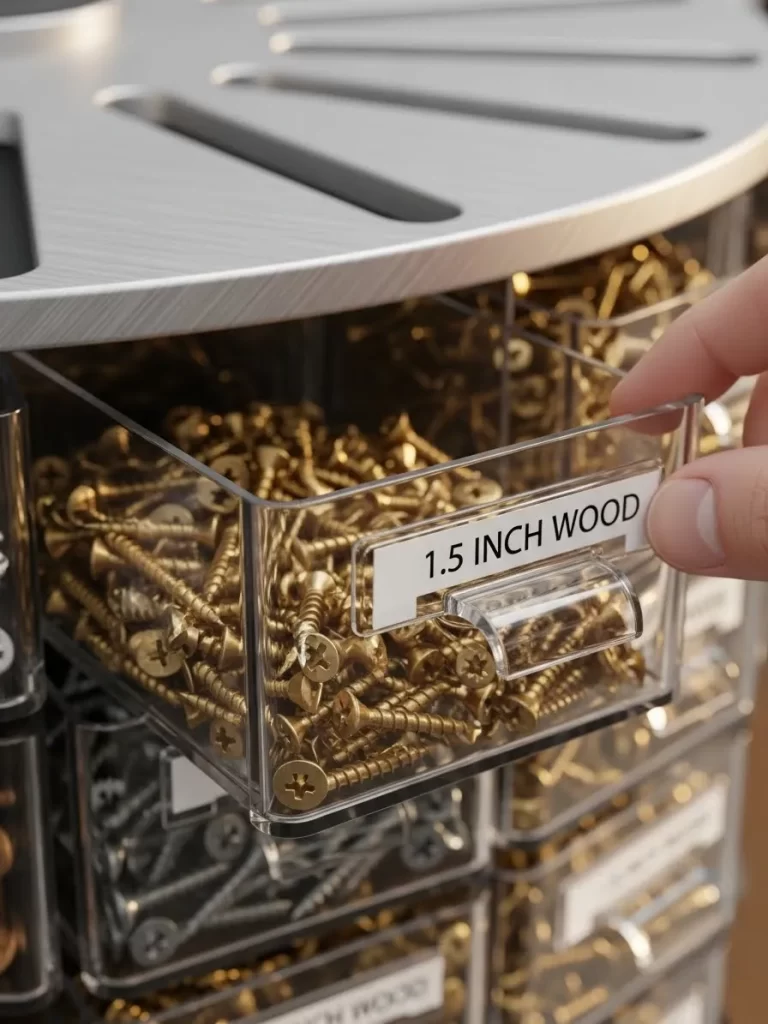
Small screws and nails are easy to lose in a cluttered garage. This rotating carousel features clear bins so you can see your hardware. It holds hundreds of small parts in a very compact circular space. You can find the exact size you need with a quick spin of the unit.
Each clear drawer has a label for easy identification. This system stops you from buying hardware you already own. The metal top provides a durable surface that resists scratches and spills. It is a great way to organize the tiny items that cause big messes.
The unit fits well on a workbench corner or a sturdy shelf. High quality bearings ensure the rotation remains smooth even when the bins are full. This project saves you time during every assembly task. Your hardware collection will look neat and professional.
Material Required List
- Circular metal or wood base
- Tiered carousel frame
- Set of clear plastic tilt bins
- Label maker tape
- Central bearing assembly
Equipment Required List
- Screwdriver
- Level
- Pliers
- Cleaning cloth
- Pencil
DIY Instructions
- Assemble the central support frame according to the manufacturer.
- Attach the rotating bearing to the base plate for a smooth spin.
- Slide each tier of bins onto the central support post.
- Secure the tiers so they do not wobble during rotation.
- Snap the clear plastic bins into their designated slots on the frame.
- Sort your screws and nails by size and place them into the bins.
- Use a label maker to mark the front of each drawer clearly.
- Spin the unit to make sure it is balanced and turns easily.
16 Interlocking Modular Floor Tiles
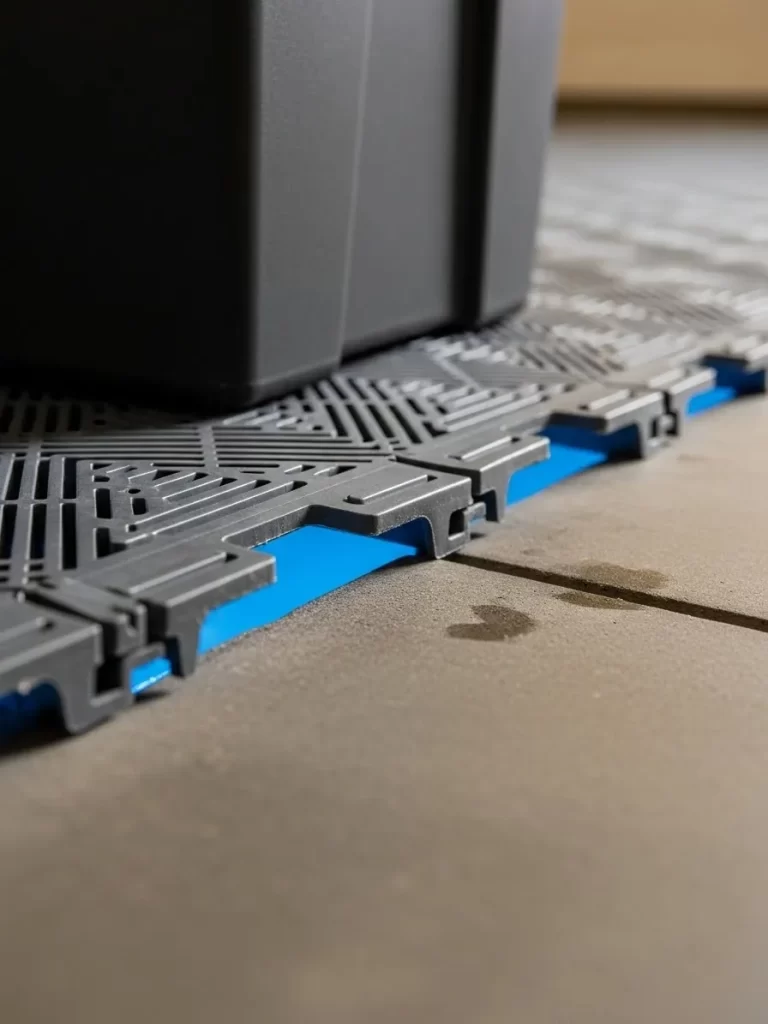
Garage floors often become stained with oil and dirt over time. These interlocking tiles provide a clean and durable surface for your workspace. They protect the concrete underneath and provide extra cushion for your feet. The textured pattern prevents slipping even when the floor is wet.
The blue and grey colors help define different zones in your garage. You can easily replace a single tile if it becomes damaged. This flooring system is easy to clean with a broom or a damp mop. It gives your garage a finished look that feels like a real room.
Installing these tiles requires no glue or special tools. They snap together like puzzle pieces and stay in place under heavy weight. This is a fast way to upgrade the look and feel of your garage. You will enjoy working in a space that looks this good.
Material Required List
- Modular garage floor tiles
- Edge trim pieces
- Landscape fabric for noise reduction
- Cleaning solution
- Duct tape
Equipment Required List
- Rubber mallet
- Utility knife
- Tape measure
- Chalk line
- Knee pads
DIY Instructions
- Sweep and mop your garage floor to remove all dust and oil.
- Lay down landscape fabric if you want to reduce clicking sounds.
- Start in the front corner and lay the first tile with the loops facing out.
- Snap the next tiles into place using a rubber mallet for a tight fit.
- Use a chalk line to keep your rows straight across the large floor.
- Cut the tiles near the walls using a sharp utility knife for a custom fit.
- Install the sloped edge pieces at the garage door entrance.
- Park your car on the new floor to help the tiles settle into place.
17 Pulley System for Holiday Decor

Bulky items like Christmas trees are hard to store without taking up floor space. This ceiling mounted pulley system lifts your decorations out of the way. It keeps artificial trees upright and protected from being crushed. A clear plastic cover keeps dust off your festive items all year long.
The mechanical advantage of the pulleys makes lifting heavy decor very easy. You can store your tree with the lights still attached to save time next year. This setup utilizes the high empty space near your garage ceiling. It leaves more room for your car and daily tools.
A locking cleat on the wall ensures the load stays safely in the air. This is a smart solution for items you only use once every twelve months. Your garage will stay organized even during the off season. You will love how easy it is to set up for the holidays.
Material Required List
- Ceiling pulley kit
- Heavy duty nylon rope
- Large plastic storage bag
- Wall mounted cleat
- Carabiner clips
Equipment Required List
- Power drill
- Stepladder
- Stud finder
- Tape measure
- Pencil
DIY Instructions
- Find a ceiling joist in a spot that will not block your garage door.
- Screw the main pulley bracket into the center of the wooden joist.
- Mount the secondary pulleys to guide the rope toward a wall.
- Attach the wall cleat at a height that is easy for you to reach.
- Place your artificial tree inside the large plastic storage bag.
- Secure the lifting straps around the center pole of the tree.
- Thread the rope through the pulleys and clip it to the tree straps.
- Pull the rope to lift the tree and wrap the excess around the cleat.
18 Slim Entryway Shoe Cabinet
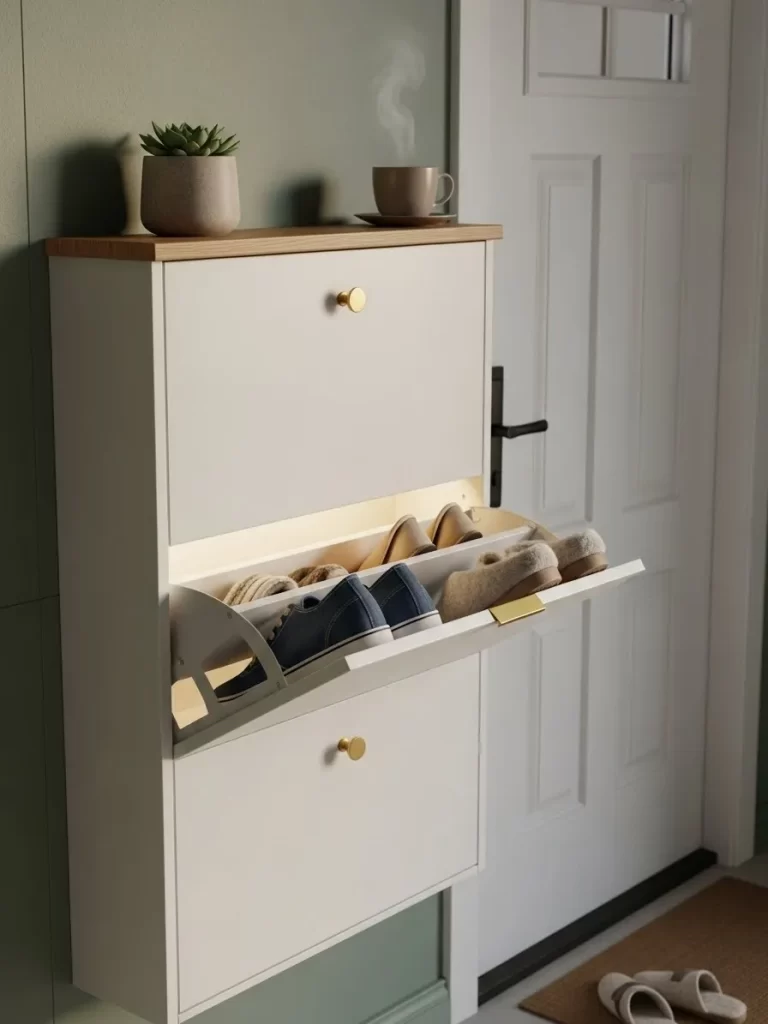
Shoes often pile up near the door and create a tripping hazard. This slim cabinet hides footwear behind a sleek white facade. The tilting drawers allow for deep storage in a very narrow piece of furniture. It fits perfectly against the wall without blocking the walkway.
The wooden top provides a handy spot for your keys or a small plant. Keeping shoes in a cabinet prevents dirt from being tracked into your home. This design makes the entrance to your house look tidy and welcoming. It is a great way to manage the daily clutter of a busy family.
The cabinet mounts to the wall for extra safety and stability. Its clean lines blend into modern garage interiors effortlessly. You can find your favorite pair of shoes instantly without digging through a pile. This simple piece of furniture changes your morning routine for the better.
Material Required List
- Slim shoe cabinet kit
- Wall mounting anchors
- Wood glue
- Decorative knobs
- Small felt pads
Equipment Required List
- Screwdriver
- Level
- Power drill
- Tape measure
- Hammer
DIY Instructions
- Assemble the outer frame of the cabinet using the provided screws.
- Attach the tilting drawer mechanisms to the inside of the frame.
- Slide the shoe dividers into the drawers according to your shoe size.
- Place the cabinet against the wall and check it with a level.
- Mark the mounting holes on the wall through the back of the cabinet.
- Drill holes and insert wall anchors to keep the cabinet from tipping.
- Secure the cabinet to the wall using long screws into the anchors.
- Attach the decorative knobs to the front of each tilting drawer.
19 Wall Mounted Small Parts Bin System

Small copper fittings and plumbing parts are difficult to keep organized. This wall mounted rail system holds dozens of beige plastic bins in neat rows. You can remove individual bins to take your parts directly to the workspace. Labels on each bin tell you exactly what is inside.
The open top design allows for quick grabbing of parts during a project. Mounting the rails on the wall saves valuable shelf and drawer space. This system is perfect for anyone who does their own home repairs. It keeps your hardware sorted by size and material.
Sturdy metal rails support the weight of heavy brass or copper fittings. You can expand the system easily by adding more rails and bins. This organization prevents the frustration of searching for a single small part. Your workshop will look like a professional supply store.
Material Required List
- Metal wall mounting rails
- Assorted plastic hanging bins
- Label stickers
- Heavy duty wall screws
- Cleaning alcohol
Equipment Required List
- Power drill
- Level
- Tape measure
- Screwdriver
- Permanent marker
DIY Instructions
- Decide on the wall area where you want to mount your parts bins.
- Use a level to mark straight horizontal lines for the metal rails.
- Screw the rails into the wall studs using heavy duty hardware.
- Wipe the front of each plastic bin with alcohol so labels stay on.
- Write the names of your parts on the stickers and apply them to the bins.
- Hook the bins onto the rails starting from the top row.
- Arrange the bins by category such as copper, PVC, or electrical.
- Fill each bin with the appropriate parts and enjoy the order.
20 Heavy Duty Wall Mounted Ladder Rack
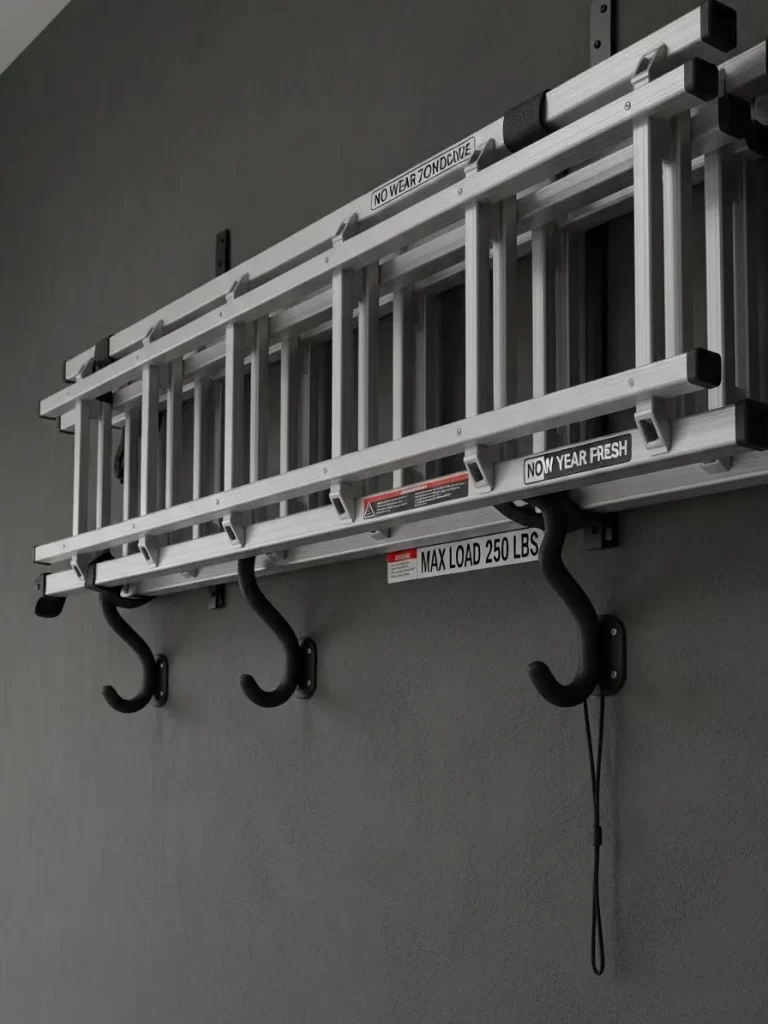
Long ladders are awkward to store and often take up too much floor space. These heavy duty wall hooks keep your ladder flat against the wall and out of the way. The black padded hooks protect the aluminum or fiberglass from scratches. This setup makes it easy to grab the ladder when you need it.
The hooks are rated to hold hundreds of pounds for maximum safety. Storing the ladder horizontally prevents it from tipping over and causing damage. This keeps your garage floor open for your car or other large equipment. It is a simple solution for one of the most difficult items to store.
A safety strap can be added to ensure the ladder stays put during an earthquake. The clean grey wall behind the ladder makes the garage feel organized. You will appreciate how much floor space you regain with this project. It is a permanent fix for garage clutter.
Material Required List
- Pair of heavy duty ladder hooks
- Lag bolts for wall studs
- Safety bungee cord
- Large flat washers
- Protective foam padding
Equipment Required List
- Power drill
- Stud finder
- Socket wrench
- Level
- Tape measure
DIY Instructions
- Use a stud finder to locate two wooden beams in your garage wall.
- Measure the length of your ladder to determine hook spacing.
- Mark the height for the hooks so the ladder is easy to reach.
- Drill pilot holes into the center of the wall studs.
- Attach the ladder hooks using heavy lag bolts and washers.
- Use a level to ensure the hooks are at the same height.
- Wrap extra foam padding around the hooks if they are not already soft.
- Lift the ladder onto the hooks and secure it with a bungee cord.
21 Folding Wall Mounted Workbench
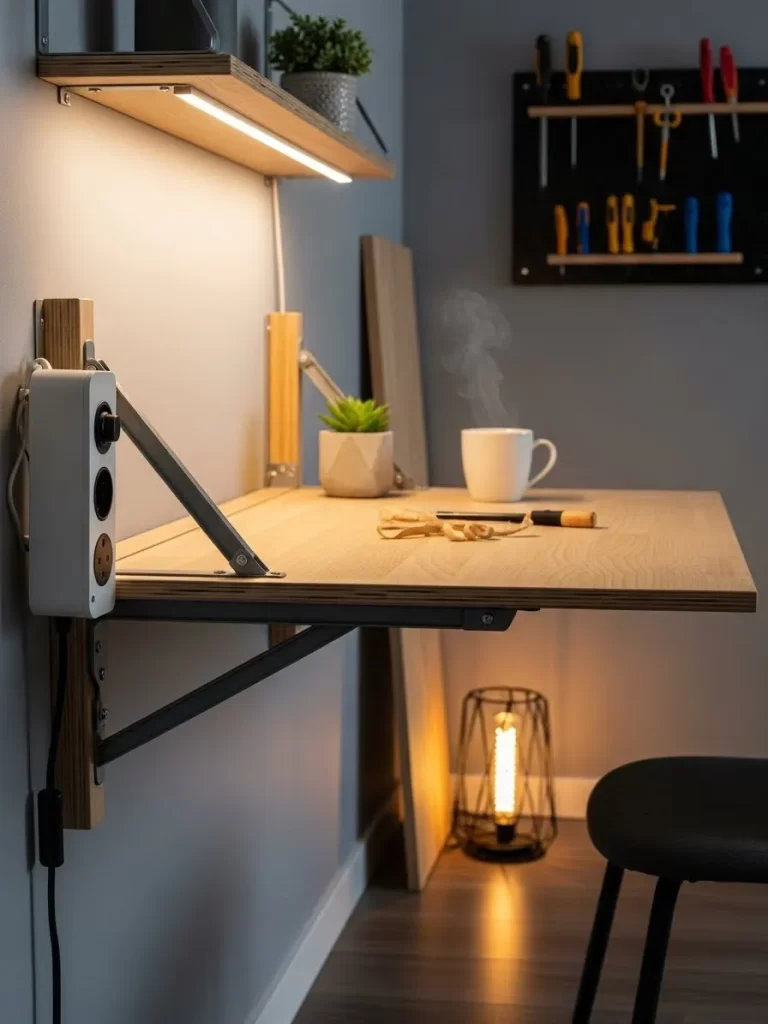
A folding bench is the best way to save floor space in a small garage. This wooden surface stays flat against the wall when you are not using it. Heavy metal brackets support the weight when you need to work. It creates a sturdy area for any repair job or hobby.
A power strip is mounted on the side for easy access to electricity. Small plants and a coffee mug sit on top to make the space feel cozy. This setup keeps your garage tidy while giving you a place to create. You can tuck it away in seconds once the work is finished.
The light wood grain adds a warm look to your workshop. It is much better than a heavy table that you cannot move. You will enjoy having a clear floor while still having a place to build things. This project is excellent for anyone with limited square footage.
Material Required List
- One large sheet of three quarter inch plywood
- Two heavy duty folding wall brackets
- One power strip with mounting holes
- Box of two inch wood screws
- Wall anchors for your specific wall type
Equipment Required List
- Electric drill
- Level tool
- Measuring tape
- Screwdriver
- Pencil
DIY Instructions
- Measure the height where you want your workbench to sit on the wall.
- Use a stud finder to locate the wooden beams inside your wall.
- Mark the holes for your folding brackets on the wall at the chosen height.
- Drill holes into the wall and secure the brackets using the wall anchors.
- Place your plywood sheet on top of the open brackets to check the fit.
- Screw the plywood to the brackets from underneath so the top stays smooth.
- Attach the power strip to the side of the wooden board for easy reach.
22 Ceiling Mounted Sports Ball Net

Large balls often bounce around the floor and cause clutter. This ceiling net keeps them high and out of the way. It utilizes the empty space near your skylight or roof rafters. You can see every ball clearly through the mesh holes.
Strong ropes hold the weight of basketballs and soccer balls easily. This system prevents tripping hazards and keeps your garage floor open. It is a very cheap solution for active families with lots of sports gear. Storing items vertically is a great trick for a clean home.
The net stretches to hold different sizes of equipment. You can pull a ball out in seconds when you are ready to play. This setup turns unused ceiling area into a functional storage zone. It keeps your garage looking organized and professional.
Material Required List
- Heavy duty cargo net or mesh netting
- Four large metal eye hooks
- Strong nylon rope
- Carabiner clips
- Wall anchors
Equipment Required List
- Stepladder
- Power drill
- Measuring tape
- Pencil
- Scissors
DIY Instructions
- Pick a spot on your ceiling that is away from the garage door track.
- Measure the size of your net when it is fully stretched out.
- Mark four points on the ceiling that match the corners of your net.
- Drill holes at each mark and screw in the large metal eye hooks.
- Clip the corners of the net to the hooks using the carabiners.
- Use the nylon rope to tighten the edges if the net hangs too low.
- Toss your sports balls into the net and check that it stays secure.
23 Modular Slatwall Hardware Bins
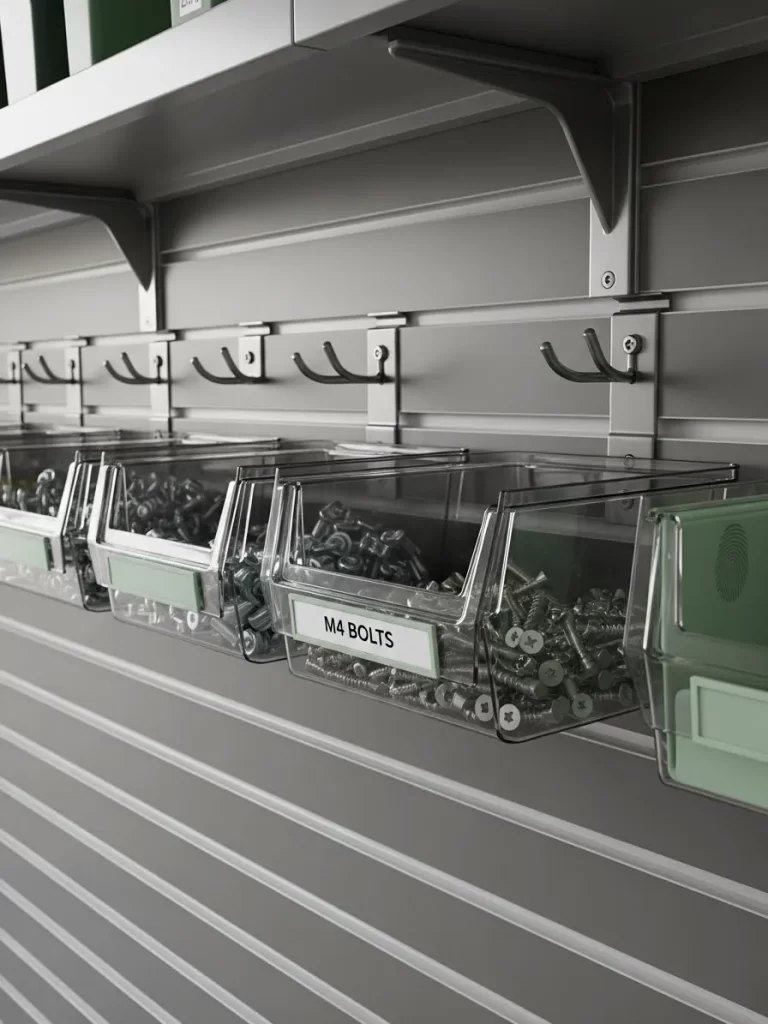
Small parts like bolts and screws need a home. This slatwall system uses clear plastic bins to keep hardware organized. Each container snaps onto the grey wall panel and stays secure. You can move the bins around to change your layout whenever you want.
Labels on the front of the bins tell you exactly what is inside. This prevents you from searching through messy drawers for a single fastener. The grey color looks professional and matches modern workshop styles. It is a durable way to manage hundreds of tiny items.
The open top design makes it easy to grab parts while you work. You can take an entire bin to your workbench and snap it back later. This system grows with your collection of tools and supplies. It is the ultimate solution for a messy hardware collection.
Material Required List
- PVC or metal slatwall panels
- Set of clear plastic hanging bins
- Adhesive label stickers
- Heavy duty panel screws
- Wall trim pieces
Equipment Required List
- Power drill
- Level
- Measuring tape
- Fine tip marker
- Circular saw
DIY Instructions
- Measure the wall area where you want to install the slatwall panels.
- Cut the panels to size if they are too long for your space.
- Use a level to draw a straight line on the wall for the first panel.
- Screw the panels into the wall studs starting from the bottom row.
- Snap the next panel into the groove of the one below it and screw it in.
- Write the names of your hardware on the labels and stick them to the bins.
- Hook each bin into the slatwall slots to organize your workspace.
24 Car Detail Product Cabinet
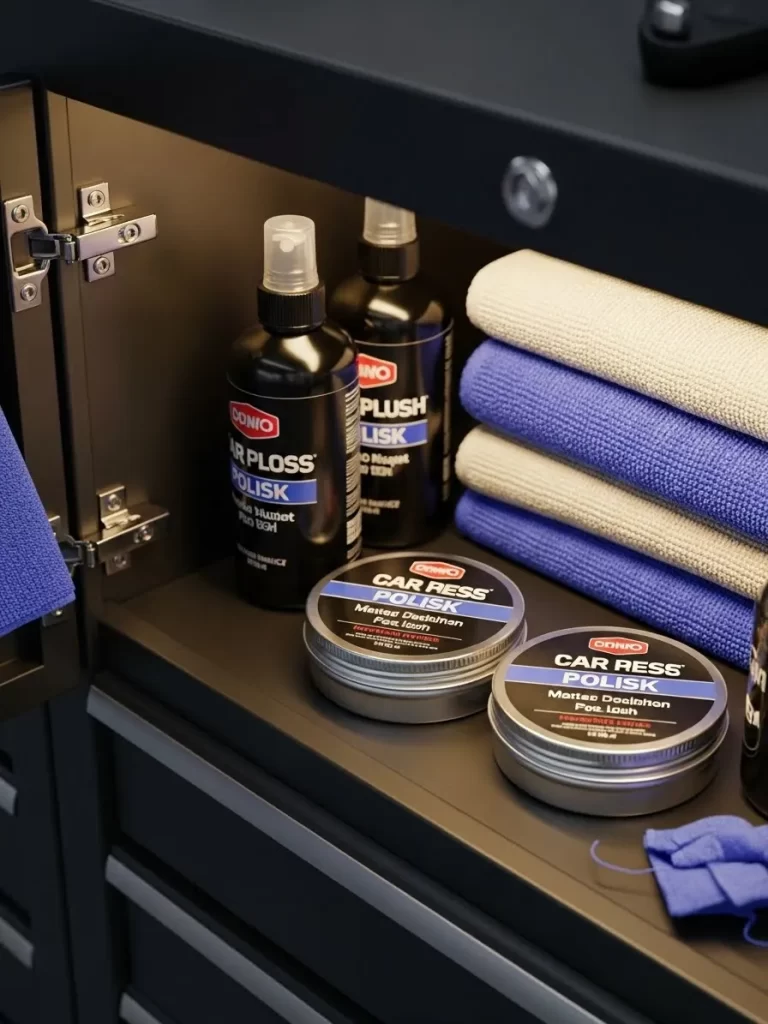
Keeping your car shiny requires many different sprays and waxes. This black metal cabinet stores all your detailing supplies in one spot. Padded shelves protect the bottles and prevent them from sliding around. Soft microfiber towels stay clean and folded inside the unit.
Magnetic latches keep the doors shut to prevent dust from entering. You can mount this cabinet at eye level near your parking spot. Having everything grouped together makes washing your car much faster. It creates a high end look for your automotive storage area.
The interior light helps you see every label clearly. You can organize your products by type like glass cleaner or tire shine. This cabinet protects your expensive chemicals from heat and light. It is a great addition for any car lover.
Material Required List
- Metal wall cabinet with adjustable shelves
- Rubber shelf liners
- Battery powered LED light strip
- Wall mounting bolts
- Cleaning cloth
Equipment Required List
- Power drill
- Level
- Socket wrench
- Measuring tape
- Pencil
DIY Instructions
- Find the best spot on your garage wall near where you park.
- Use a level to mark the height for the top of the cabinet.
- Hold the cabinet against the wall and mark the mounting holes inside.
- Drill holes into the wall studs and insert your mounting bolts.
- Lift the cabinet and tighten the bolts until it is very secure.
- Cut the rubber liners to fit each shelf and lay them down flat.
- Stick the LED light strip to the top inside edge of the cabinet.
- Arrange your car waxes and sprays on the shelves for easy reach.
25 Motorized Overhead Platform Lift
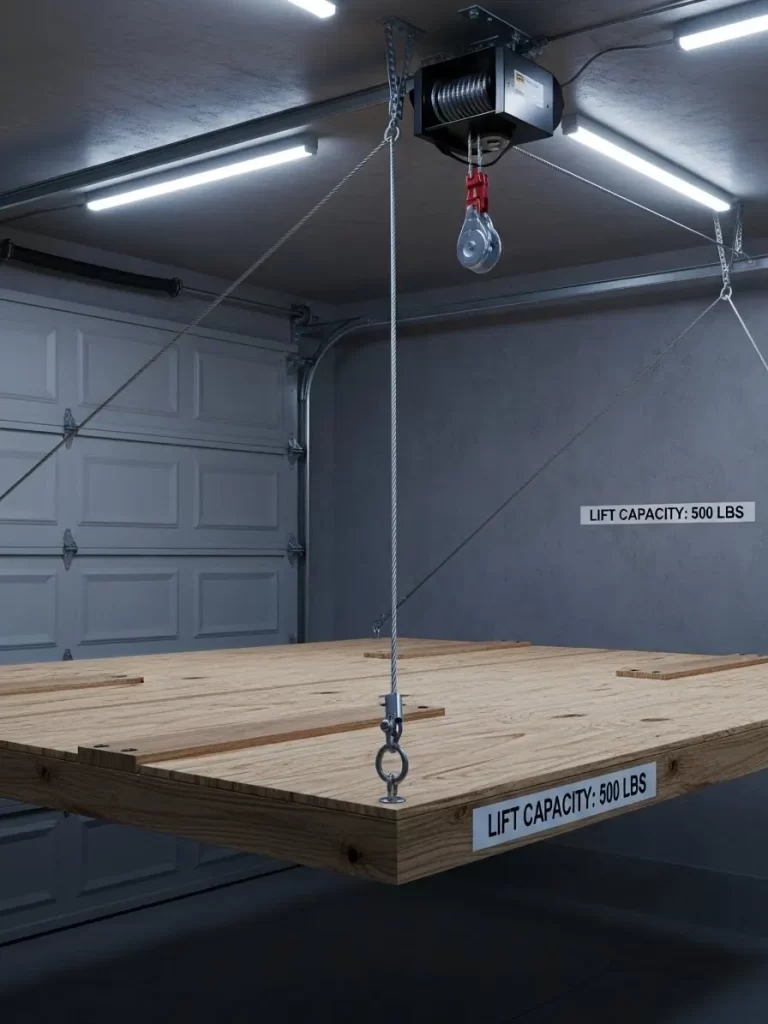
Heavy items are difficult to lift into high storage areas. This motorized platform does all the hard work for you. It uses strong steel cables to raise a large wooden deck to the ceiling. You can store heavy boxes or furniture without straining your back.
The platform has a high weight capacity and stays level during the move. Safety sensors ensure the lift stops if something is in the way. This project turns the highest part of your garage into a useful warehouse. It is a great investment for long term organization.
The control switch is mounted on the wall for easy operation. You can keep your seasonal items safe from floor floods and pests. This system maximizes every inch of vertical space in your home. It makes garage organization feel like a high tech hobby.
Material Required List
- Motorized hoist kit with remote
- Steel cables and pulleys
- Four foot by four foot wooden platform
- Steel eye bolts
- Heavy duty mounting brackets
Equipment Required List
- Power drill
- Stepladder
- Socket wrench set
- Measuring tape
- Level
DIY Instructions
- Install the motorized hoist to the ceiling joists according to the kit.
- Build a strong wooden platform using thick plywood and framing boards.
- Attach the steel eye bolts to the four corners of your platform.
- Mount the pulleys to the ceiling in a square pattern above the platform.
- Thread the steel cables through the pulleys and attach them to the lift.
- Connect the other end of the cables to the motorized hoist drum.
- Test the lift by raising the platform a few inches while it is empty.
- Use the remote to raise your storage boxes to the ceiling safely.
26 Sandpaper Grit Filing System
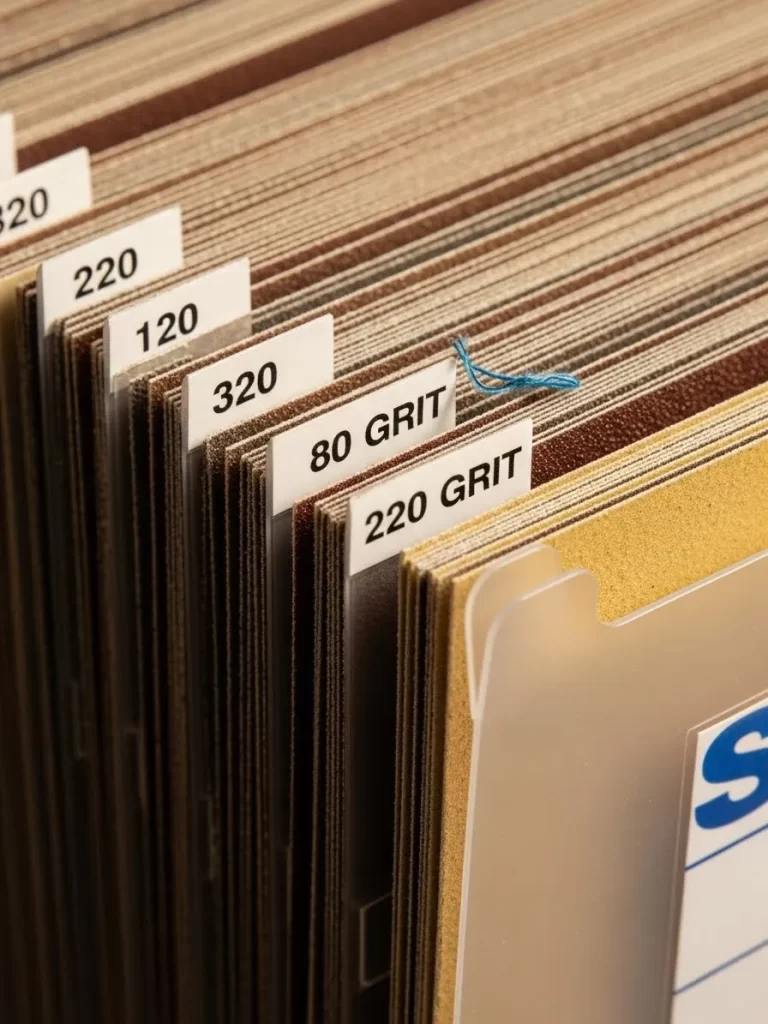
Sandpaper sheets often get curled or lost in messy toolboxes. This filing system organizes every sheet by its grit number. Small tabs allow you to flip through the different levels of coarseness quickly. It keeps the paper flat and ready for your next sanding project.
The clear plastic sleeves protect the abrasive surface from damage. You can store this organizer on a shelf or inside a deep drawer. Knowing exactly how much paper you have left saves you trips to the store. This simple tool keeps your woodworking supplies in order.
The labels range from rough eighty grit to smooth three hundred twenty grit. You will never grab the wrong paper by mistake again. It is a very cheap way to add professional order to your workshop. Your projects will look better with the right sanding steps.
Material Required List
- Plastic expanding file folder
- Clear sheet protectors
- Adhesive grit labels
- Cardboard dividers
- Permanent marker
Equipment Required List
- Scissors
- Ruler
- Label maker
- Pen
- Desktop or shelf space
DIY Instructions
- Group your sandpaper sheets by the grit number on the back.
- Place each grit type into a separate clear sheet protector.
- Insert cardboard dividers into the file folder to keep it stiff.
- Print or write labels for grit sizes like 80, 120, and 220.
- Stick the labels to the tabs of the expanding file folder.
- Slide the sheet protectors into the folder in numerical order.
- Store the folder on a shelf near your woodworking bench.
27 Parallel Bar Clamp Wall Rack
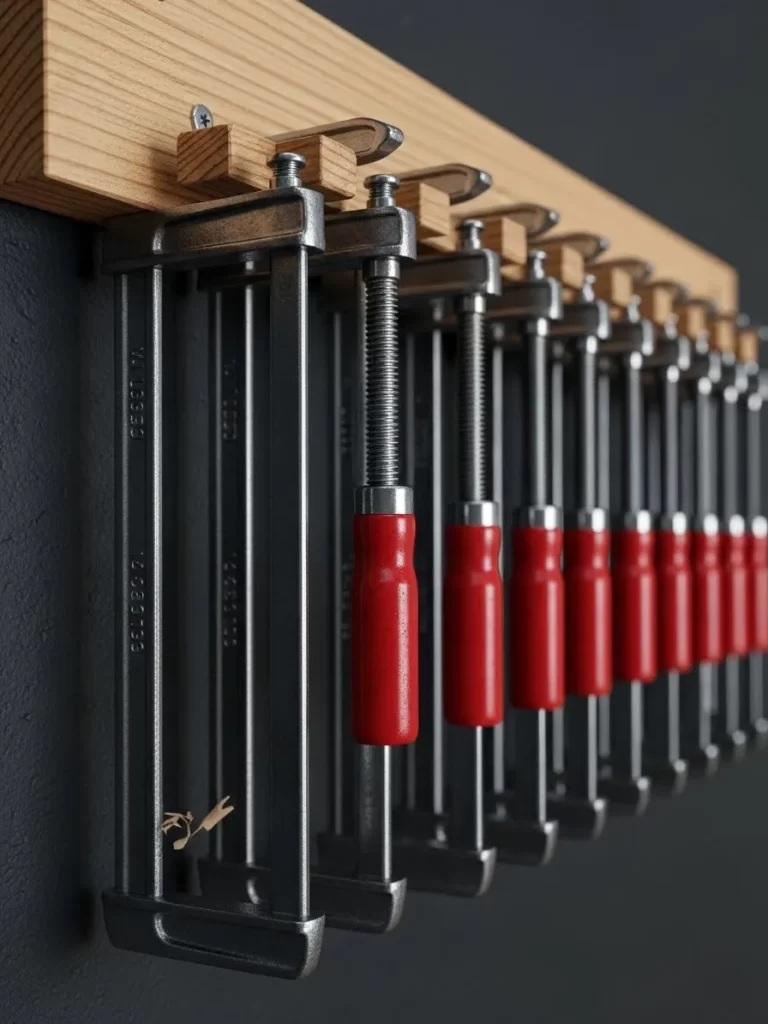
Long metal clamps are heavy and take up a lot of space. This wooden wall rack keeps them lined up and easy to grab. Each clamp hangs by its head in a custom slot. This prevents them from falling over or tangling with other tools.
The natural wood finish looks great against a dark garage wall. You can mount multiple racks to hold a large collection of clamps. Keeping them off the floor prevents rust and keeps the workshop safe. This is a must have for any furniture builder.
The red handles stand out so you can see your tools instantly. You can organize them by length so the right tool is always ready. This project is simple to build and lasts for a lifetime. It transforms a messy corner into an organized tool wall.
Material Required List
- One thick wooden board for the base
- Wooden strips for the dividers
- Box of long wood screws
- Wood glue
- Heavy duty wall lag bolts
Equipment Required List
- Table saw or miter saw
- Power drill
- Level
- Tape measure
- Sandpaper
DIY Instructions
- Cut your main wooden board to the length of your wall space.
- Cut small wooden blocks to act as dividers for the clamp heads.
- Space the blocks along the board so the metal bars fit between them.
- Glue and screw each block to the main board very securely.
- Sand all the edges so the clamps slide in and out smoothly.
- Use a level to mark a straight line on your garage wall studs.
- Bolt the entire rack to the wall studs using the heavy lag bolts.
- Slide your clamps into the slots with the handles facing down.
28 PVC Beach Chair Storage Rack
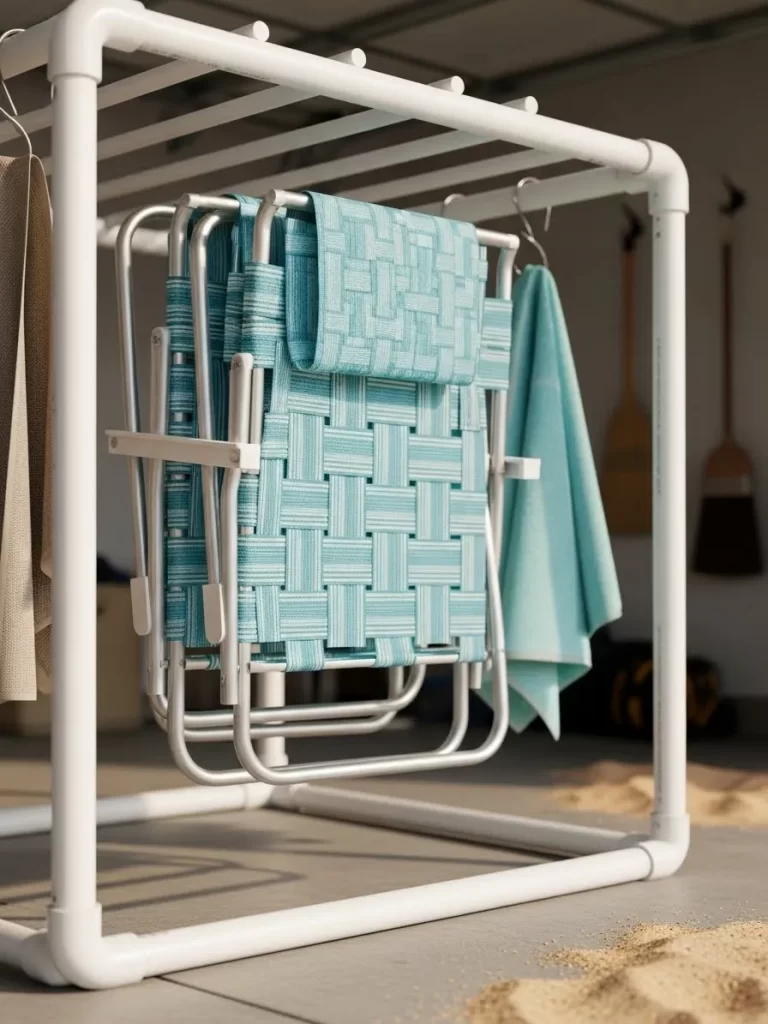
Folding chairs often fall over in corners and create a mess. This rack is made from white plastic pipes to hold chairs upright. It is very lightweight and easy to move around your garage. The design allows air to circulate so damp chairs dry out quickly.
You can hang beach towels on the side of the frame too. This keeps all your summer gear in one central location. Building with plastic pipes is affordable and requires no special skills. It is a smart way to manage bulky seasonal items.
The smooth plastic will not scratch your chair frames or fabric. You can build this rack in any size to fit your specific needs. It keeps your garage floor clean and your gear ready for the beach. This is a fun and easy weekend project.
Material Required List
- Several lengths of one inch PVC pipe
- PVC elbow connectors
- PVC T connectors
- PVC cement glue
- Sandpaper
Equipment Required List
- PVC pipe cutter or handsaw
- Measuring tape
- Rubber mallet
- Pencil
- Cleaning rag
DIY Instructions
- Measure the width and height of your folded beach chairs.
- Cut the PVC pipes into the pieces needed for your frame size.
- Sand the cut ends of the pipes to remove any rough edges.
- Lay the pieces on the floor to test the shape of the rack.
- Connect the pipes using the elbow and T fittings for a snug fit.
- Use the rubber mallet to tap the pieces together firmly.
- Apply PVC cement to the joints once you are happy with the design.
- Let the glue dry and then place your chairs into the slots.
29 Snow Clearing Tool Station
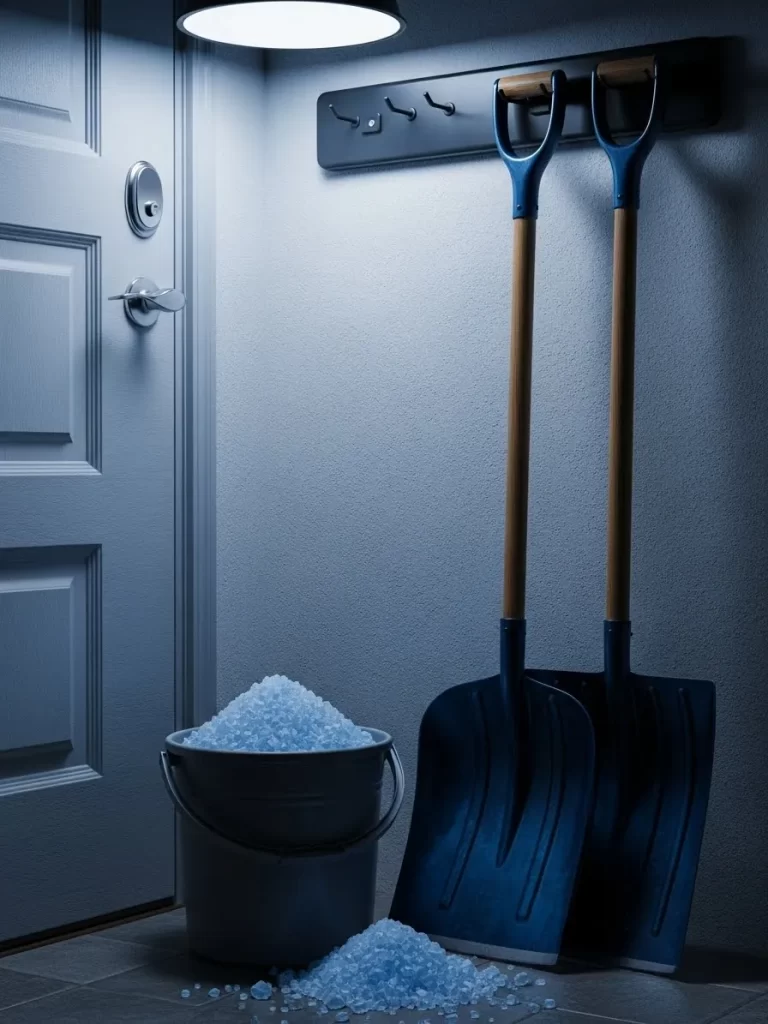
Winter tools need to be ready as soon as the snow starts falling. This wall mounted rack holds heavy shovels and ice scrapers. A bucket of blue salt sits on the floor nearby for easy access. Keeping these items near the door saves you time during a storm.
Strong hooks support the weight of wet and heavy equipment. The dark grey wall hides dirt and keeps the entryway looking tidy. This station ensures you are never searching for a shovel in the dark. It simplifies your winter chores and keeps the path clear.
Having a dedicated spot prevents tools from leaning against your car. You can hang a light above the area to see better at night. This organized corner makes the cold months much easier to handle. It is a practical addition to any snowy climate home.
Material Required List
- Heavy duty wall mounting rail
- Assorted large tool hooks
- Plastic bucket for salt
- Small hand scoop
- Wall anchors and screws
Equipment Required List
- Power drill
- Level
- Screwdriver
- Measuring tape
- Pencil
DIY Instructions
- Pick a spot near the door where you enter and exit the garage.
- Use a level to mark a straight line for the mounting rail.
- Drill holes into the wall studs and screw the rail into place.
- Snap the large hooks onto the rail and space them out.
- Hang your snow shovels and scrapers by their handles on the hooks.
- Fill your plastic bucket with ice melt salt and place it on the floor.
- Keep the hand scoop inside the bucket for quick spreading of salt.
30 Overhead Luggage Storage Shelf
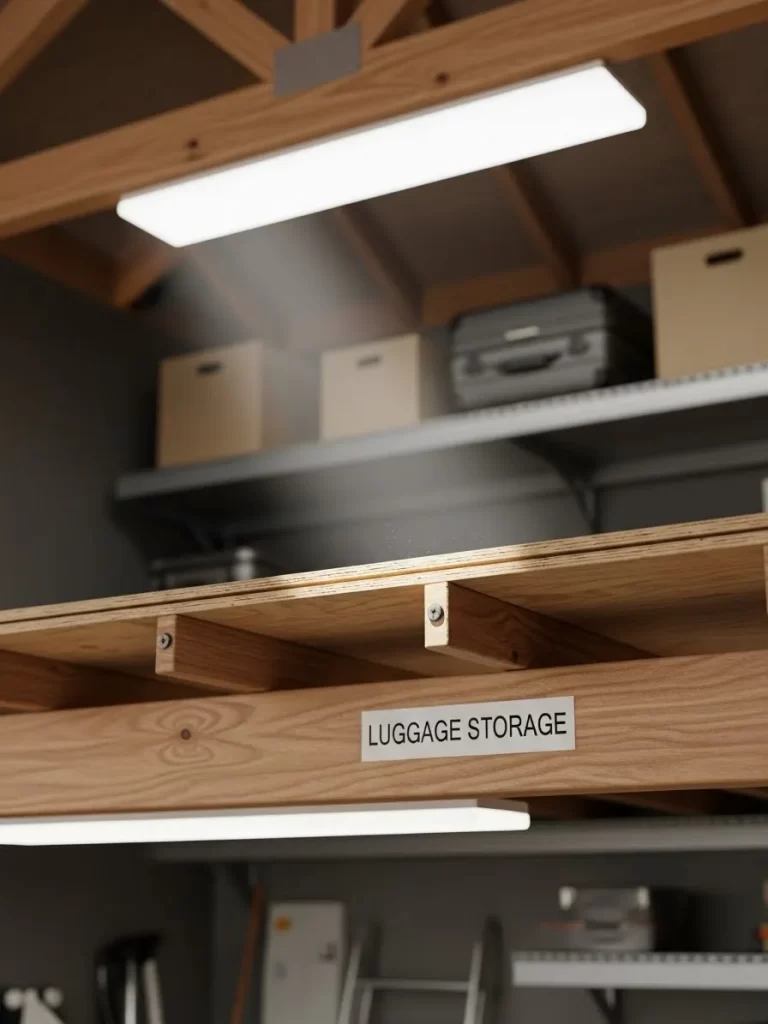
Suitcases take up a lot of room but are rarely used. This wooden ceiling shelf is designed specifically for heavy luggage. It keeps your bags away from floor moisture and pests. Bright LED lights underneath the shelf illuminate the workspace below.
The sturdy frame is bolted directly into the ceiling joists for safety. Large labels on the side help you find the right bag quickly. Utilizing this space leaves your closet and garage floor completely open. It is a brilliant way to hide bulky travel gear.
The open design allows the bags to breathe and prevents musty smells. You can store multiple suitcases in a single row along the ceiling. This project adds value to your home by creating more storage space. You will love how much cleaner your garage feels.
Material Required List
- Two by four wooden boards for the frame
- Thick plywood for the shelf surface
- Heavy duty ceiling bolts
- LED light fixtures
- Label stickers
Equipment Required List
- Power drill
- Stepladder
- Stud finder
- Circular saw
- Level
DIY Instructions
- Use a stud finder to locate the ceiling joists in your garage.
- Build a rectangular frame using your two by four wooden boards.
- Cut the plywood to match the size of the wooden frame.
- Screw the plywood to the frame to create the shelf floor.
- Attach vertical support legs to the corners of your frame.
- Bolt the legs directly into the ceiling joists with heavy bolts.
- Mount the LED lights to the underside of the shelf for visibility.
- Place your suitcases on the shelf and apply labels to the side.
31 Heavy Duty Magnetic Tool Strip
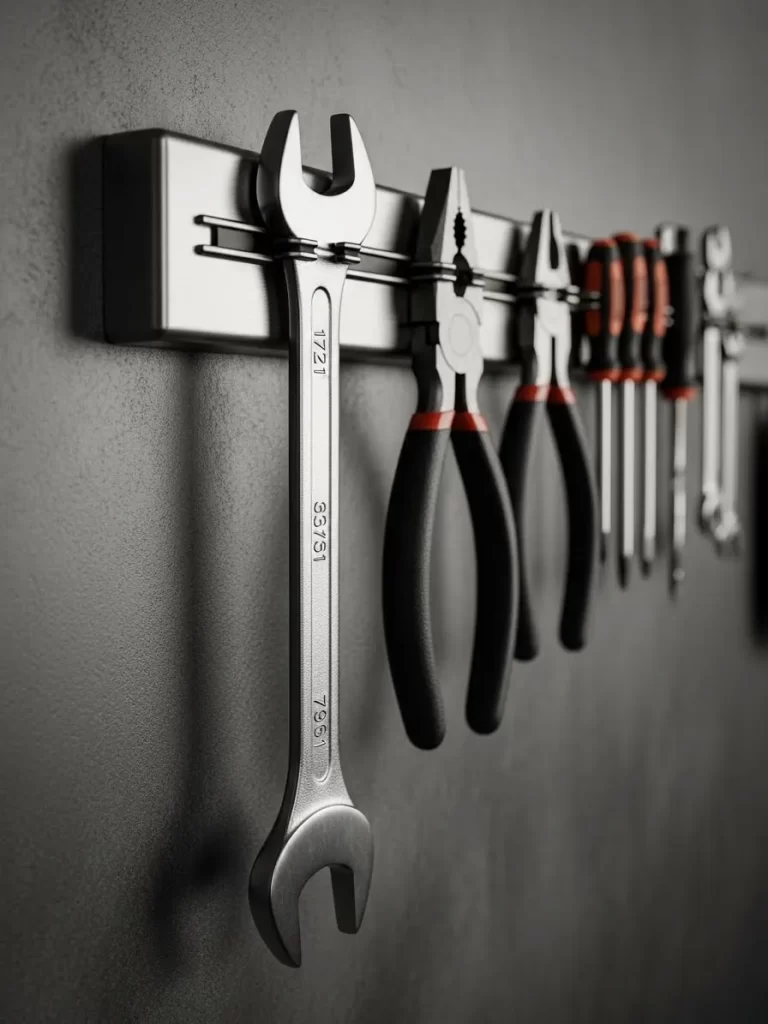
Metal tools often get buried at the bottom of a heavy drawer. This magnetic strip keeps your most used wrenches and pliers right in front of you. It uses a strong magnetic force to grip steel tools securely. You can mount it directly to your wall or the side of a cabinet.
The sleek metal finish looks great in any modern workshop. It allows you to see every tool size without digging through a pile. This setup also helps your tools dry faster if they get a little damp. Every item stays exactly where you put it until you need it again.
Installation is very fast and requires only basic skills. You can add multiple strips to create a long row of organized gear. This simple addition changes how you interact with your workspace daily. You will love having your favorite pliers within reach at all times.
Material Required List
- One heavy duty magnetic tool bar
- Two large wall screws
- Two plastic wall anchors
- Rubbing alcohol for cleaning
Equipment Required List
- Power drill with bits
- Bubble level
- Manual screwdriver
- Pencil for marking
DIY Instructions
- Select a flat spot on your wall near your main workbench.
- Hold the magnetic strip against the wall and use a level to keep it straight.
- Mark the two mounting holes on the wall with your pencil.
- Drill holes at your marks using a bit that matches your wall anchors.
- Push the plastic anchors into the holes until they are flush with the wall.
- Place the magnetic strip over the anchors and drive the screws in tight.
- Wipe the front of the strip with alcohol to remove any fingerprints.
- Snap your metal tools onto the strip and arrange them by size.
32 Vertical Garden Tool Wall Slots
Shovels and rakes take up a lot of room when they lean against a corner. This wooden slot system keeps them upright and very close to the wall. It uses a deep groove design to hold the handles firmly in place. Your garden gear will no longer fall over every time you walk past.
The white finish on the wooden blocks creates a clean and bright look. You can mount this rack at a height that keeps the heavy tool heads off the ground. This prevents moisture from the concrete from rusting the metal parts. It turns a messy pile of tools into a beautiful wall display.
Having a dedicated slot for each rake makes cleaning up much faster. You can see immediately if a tool is missing from your collection. This system is strong enough to hold even the heaviest steel spades. Your garage floor will feel much larger once these items are on the wall.
Material Required List
- One long wooden mounting board
- Pre cut wooden slot blocks
- Heavy duty wood screws
- White outdoor paint
- Wall lag bolts
Equipment Required List
- Power drill
- Spirit level
- Paintbrush
- Measuring tape
- Stud finder
DIY Instructions
- Use a stud finder to locate the wooden beams behind your garage wall.
- Mark the height for your mounting board so tools hang comfortably.
- Paint your wooden board and slot blocks white and let them dry completely.
- Screw the long mounting board into the wall studs using lag bolts.
- Attach the slot blocks to the board with even gaps between them.
- Check that each gap is wide enough for your specific tool handles.
- Secure each block with two screws to prevent them from twisting.
- Slide your shovels and rakes into the slots to finish the project.
33 Illuminated Shadow Pegboard

Finding a small tool on a crowded wall can be hard in a dark garage. This illuminated pegboard features a bright LED light at the very top. It casts a soft glow over all your hand tools for better visibility. The board also has painted silhouettes so you know exactly where each tool lives.
The wooden frame gives the pegboard a finished and professional appearance. Dark outlines of hammers and wrenches make it obvious when a tool is not put away. This encourages you to keep your workspace tidy after every single project. It is a great way to train family members to return items to their home.
The LED strip stays hidden behind the top frame to prevent glare. This setup makes your garage feel like a high end design studio. You can find the right wrench size in seconds without searching. It is a functional and attractive upgrade for any home workshop.
Material Required List
- One sheet of white pegboard
- Wooden trim for the frame
- LED light strip with power cord
- Black permanent marker or paint
- Wood glue
Equipment Required List
- Power drill
- Small hammer
- Measuring tape
- Level
- Paintbrush
DIY Instructions
- Cut your pegboard and wooden frame to the size you want for your wall.
- Lay your tools on the board in the exact spots you want them to hang.
- Trace the outline of each tool using a black marker or a small brush.
- Build the wooden frame and attach it to the edges of the pegboard.
- Mount the LED light strip to the inside of the top frame piece.
- Secure the entire pegboard unit to the wall studs using long screws.
- Plug the light into a nearby outlet and test the brightness.
- Place your tools onto the board so they match the painted shadows.
34 Ceiling Mounted Bike Pulley
Bicycles are bulky and often block the path to your car. This pulley system lifts your bike all the way to the garage ceiling. It uses a mechanical advantage to make lifting a heavy mountain bike very easy. Your floor stays clear while your bike remains safe and out of the way.
The hooks are covered in rubber to protect your bike frame and seat. A locking mechanism ensures the bike stays up even if you let go of the rope. This is an excellent solution for seasonal riders who need extra space in winter. It utilizes the empty area above your head where nothing else fits.
Lowering the bike is just as easy as lifting it for a quick ride. The rope system is smooth and does not require a lot of strength. You can install multiple lifts side by side for the whole family. It makes your garage look extremely organized and high tech.
Material Required List
- Bike hoist kit with rope and pulleys
- Two wooden mounting blocks
- Heavy duty ceiling screws
- Wall mounted rope cleat
Equipment Required List
- Power drill
- Stepladder
- Stud finder
- Measuring tape
- Wrench set
DIY Instructions
- Use a stud finder to locate the ceiling joists above your parking area.
- Measure the distance between the handlebars and the seat of your bike.
- Screw the wooden mounting blocks into the ceiling joists at that distance.
- Attach the pulley brackets to the wooden blocks using the kit hardware.
- Thread the rope through the pulleys as shown in the instruction manual.
- Mount the rope cleat to a nearby wall at a height you can reach.
- Hook the padded ends of the lift to your bike seat and handlebars.
- Pull the rope to raise the bike and tie it off on the wall cleat.
35 Metal Chemical Storage Shelf with Light
Storing spray cans and cleaners requires a safe and sturdy surface. This metal shelf is built to resist leaks and spills from harsh chemicals. A dedicated shop light is mounted above it to help you read small labels. It keeps your automotive fluids organized and away from the floor.
The brushed metal finish is very easy to wipe clean after a project. Multiple cans sit in neat rows so you can find what you need quickly. This setup prevents cans from rusting because they stay dry and elevated. It is a durable choice for a workspace that gets a lot of use.
The overhead light eliminates shadows that hide items in the back. You can group your sprays by type like lubricants or glass cleaners. This organization stops you from buying the same product twice by mistake. Your garage will feel much safer with chemicals stored properly.
Material Required List
- Stainless steel wall shelf
- Compact LED shop light
- Wall mounting hardware
- Cleaning wipes
- Label stickers
Equipment Required List
- Power drill
- Bubble level
- Screwdriver
- Measuring tape
- Pencil
DIY Instructions
- Select a wall location that is away from any open flames or heat.
- Use a level to mark a straight line for the metal shelf placement.
- Drill holes into the wall and insert your heavy duty anchors.
- Bolt the metal shelf to the wall so it is perfectly level.
- Mount the shop light directly above the shelf using the provided clips.
- Route the power cord safely to the nearest electrical outlet.
- Wipe the shelf surface to remove any dust or manufacturing oil.
- Arrange your spray cans on the shelf and add labels if you like.
36 Cantilevered Lumber Storage Rack
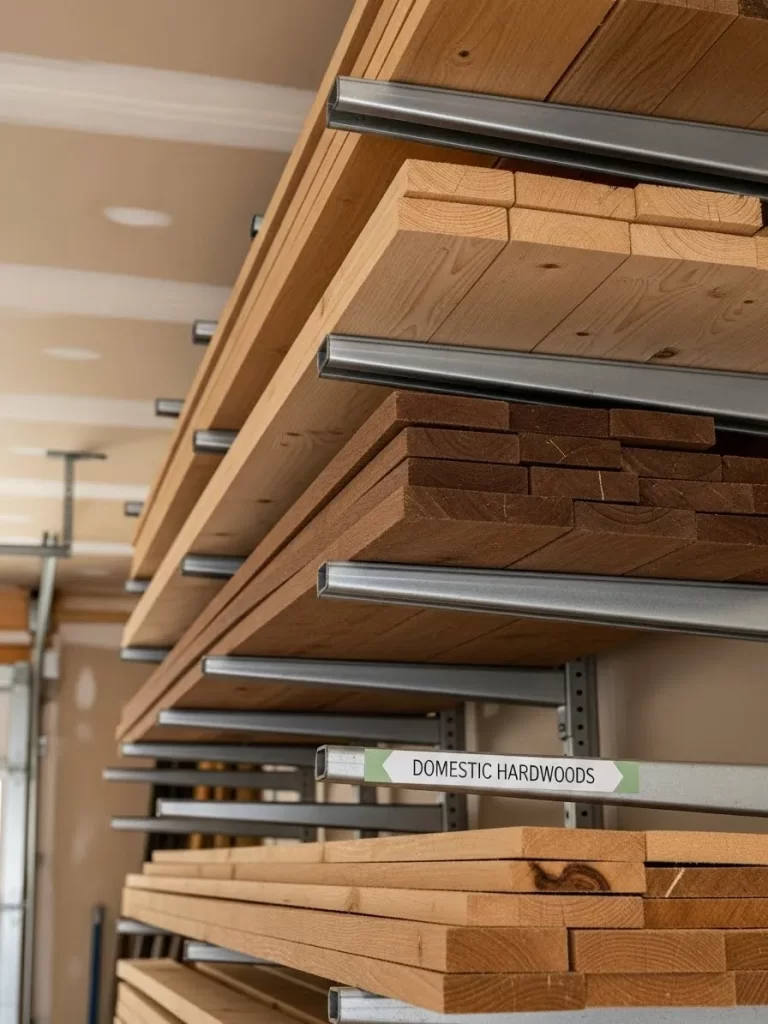
Wood scraps and long boards often create a tripping hazard on the floor. This heavy duty rack uses metal arms to hold lumber horizontally on the wall. It keeps your expensive wood dry and perfectly straight. You can store many different types of boards in a very small space.
The cantilever design allows you to grab any board without moving the whole pile. Labels on the metal arms help you identify different species of wood. This system is strong enough to hold hundreds of pounds of heavy hardwood. It turns a messy pile of timber into an organized library of materials.
Storing wood off the floor prevents it from soaking up moisture from the concrete. This helps your projects stay stable and prevents boards from warping over time. The grey metal finish blends in with the industrial look of a garage. You will love how much floor space you regain with this rack.
Material Required List
- Metal lumber rack kit with vertical rails
- Adjustable metal support arms
- Heavy duty lag bolts
- Large flat washers
- Adhesive labels
Equipment Required List
- Power drill
- Socket wrench
- Stud finder
- Level
- Tape measure
DIY Instructions
- Use a stud finder to locate at least three vertical wall beams.
- Mark the height for the vertical rails so you can reach the top shelf.
- Drill pilot holes into the center of the wall studs for the bolts.
- Secure the vertical metal rails to the wall using the lag bolts.
- Ensure the rails are perfectly vertical using your level tool.
- Snap the support arms into the rails at the heights you prefer.
- Place your longest boards on the bottom arms for the best stability.
- Apply labels to the front of the arms to categorize your wood types.
37 Padded Fishing Rod Wall Rack

Fishing rods are delicate and can break easily if they are left in a corner. This wall mounted rack uses soft foam to hold your rods securely. It keeps the lines from tangling and protects the expensive guides. Your gear stays ready for your next trip to the lake at any time.
The vertical orientation uses very little wall space in your garage. High quality cork handles stay clean and away from oil or grease. This setup makes your fishing collection look like a professional tackle shop. It is a great way to show off your favorite gear while keeping it safe.
The foam grips adapt to different rod thicknesses without scratching the finish. You can mount this rack high enough to keep the rods away from pets or kids. It simplifies your preparation time before a big fishing adventure. You will never have to untangle a mess of rods again.
Material Required List
- Two pre made fishing rod rack panels
- High density foam inserts
- Wall mounting screws
- Plastic anchors
- Small level
Equipment Required List
- Power drill
- Manual screwdriver
- Pencil
- Measuring tape
- Vacuum for dust
DIY Instructions
- Decide if you want to hang your rods vertically or horizontally.
- Measure the length of your longest rod to find the right spacing.
- Mark the mounting holes for the first panel on the wall.
- Use a level to ensure the second panel matches the first one.
- Drill holes and insert the plastic anchors into the wall.
- Screw both panels into place until they are firm and steady.
- Press the foam inserts into the slots if they are not pre installed.
- Gently push your fishing rods into the foam grips to store them.
38 Labeled Clear Camping Gear Bins
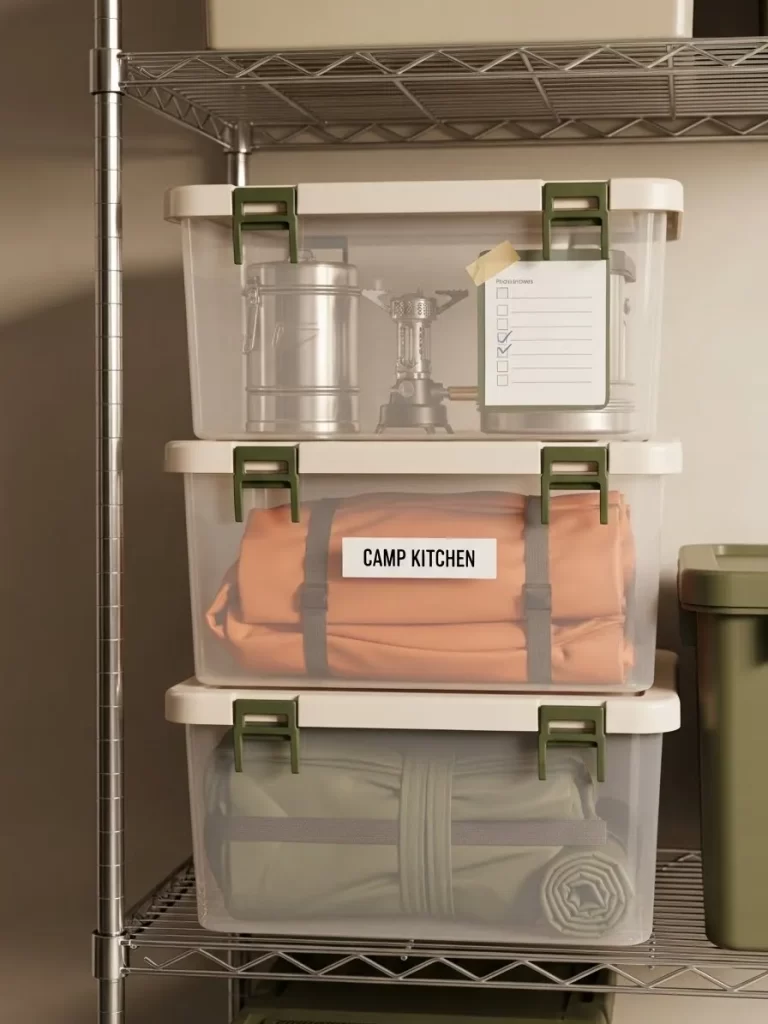
Camping equipment usually involves many small parts that are easy to lose. These clear plastic bins allow you to see your stoves and lanterns instantly. They feature green locking lids to keep dust and bugs away from your gear. Stacking them on a metal shelf maximizes your storage volume.
The clear sides mean you do not have to open every box to find a tent stake. Bold labels on the front identify categories like kitchen gear or bedding. This system makes packing for a weekend trip much faster and less stressful. Everything stays clean and organized during the long off season.
Rugged metal shelving provides a strong base for these heavy containers. You can adjust the shelf heights to fit different sizes of bins. This setup keeps your expensive outdoor equipment safe from garage floor spills. It is the best way to manage a large collection of hobby gear.
Material Required List
- Set of clear plastic bins with locking lids
- Heavy duty metal wire shelving unit
- Adhesive label pockets
- Printed category cards
- Packing list paper
Equipment Required List
- Rubber mallet for shelf assembly
- Level
- Measuring tape
- Permanent marker
- Scissors
DIY Instructions
- Assemble the metal wire shelving unit using a rubber mallet for the clips.
- Ensure the shelves are level so the bins do not slide or tilt.
- Sort all your camping gear into logical groups on the floor first.
- Place each group of items into its own clear plastic bin.
- Snap the lids on tight to create a seal against dust and moisture.
- Write the category names on the cards and slide them into the pockets.
- Stick the label pockets onto the front of each plastic container.
- Stack the bins onto the metal shelves with the labels facing out.
39 High Visibility Floor Safety Tape

Garages often become crowded with items that block the walking path. This yellow and black floor tape creates clear boundaries for different zones. It marks a zone where nothing should ever be parked or stored. This keeps the entrance to your home safe and free of tripping hazards.
The bright colors serve as a constant reminder to keep the area clear. It is a very cheap way to improve the safety and flow of your garage. The adhesive is strong enough to handle car tires rolling over it daily. This simple trick helps maintain the organization you worked hard to create.
Applying this tape defines where your car should stop every single time. It protects your walls and storage bins from accidental bumps. This visual guide is excellent for children to know where it is safe to walk. Your garage will look like a professional and well managed facility.
Material Required List
- Roll of yellow and black striped floor tape
- Heavy duty floor degreaser
- Cleaning rags
- Clear floor sealant
- Marking chalk
Equipment Required List
- Broom
- Scraper tool
- Measuring tape
- Scissors
- Long straight edge
DIY Instructions
- Sweep the garage floor thoroughly to remove all loose dirt and dust.
- Scrub the area where you want the tape with a strong degreaser.
- Use a scraper to remove any dried paint or oil spots from the concrete.
- Let the floor dry completely before you attempt to apply any tape.
- Mark the straight lines for your zone using chalk and a straight edge.
- Peel the backing off the tape and press it down firmly along the chalk line.
- Walk over the tape several times to ensure it has a very strong bond.
- Apply a thin layer of clear sealant over the edges for extra durability.
40 Modular Small Hardware Tilt Bins
Small washers and nuts are the hardest items to keep organized in a shop. These grey tilt bins feature clear fronts so you can see your inventory. They snap onto a wall panel to save space on your busy workbench. You can open them with one finger to grab exactly what you need.
Each bin has a white label area for writing specific sizes or types. This prevents you from mixing up different threads or materials. The bins are made of tough plastic that can handle heavy metal parts. It is a professional way to manage thousands of tiny pieces of hardware.
The modular design allows you to add more rows as your collection grows. You can take an entire bin to your project and snap it back later. This stops you from losing small parts on the floor while you work. It is a solution for anyone who does precision assembly tasks.
Material Required List
- Set of modular plastic tilt bins
- Wall mounting rails or panel
- Printed labels or a marker
- Heavy duty wall screws
- Plastic wall anchors
Equipment Required List
- Power drill
- Level
- Manual screwdriver
- Tape measure
- Pencil
DIY Instructions
- Choose a wall spot that is within easy reach of your main work area.
- Use a level to mark a straight horizontal line for the mounting rail.
- Drill holes into the wall and secure the rail with screws and anchors.
- Snap the individual tilt bin units onto the mounting rail one by one.
- Ensure the bins are clicked in firmly so they do not fall when full.
- Sort your washers and small hardware by size and material type.
- Fill each bin and write the specific size on the label area.
- Test the tilting motion to make sure everything moves smoothly.
41 Wooden Trash Bin Privacy Screen

Large plastic bins often look messy sitting in the corner of your garage. This wooden screen hides your trash and recycling cans behind an attractive cedar fence. It creates a clean boundary while keeping your bins easy to access. The natural wood grain adds a touch of warmth to the utility area of your home.
Open slats allow for plenty of air flow to prevent bad smells from building up inside the enclosure. You can easily pull the bins out when it is time for the weekly collection. This project turns a necessary eyesore into a neat part of your organization plan. It makes your garage feel like a finished room rather than a cluttered storage unit.
Utilizing a screen like this helps protect your bins from being knocked over by cars or pets. The sturdy frame ensures the structure stays upright and stable over time. You can even paint the wood to match the interior walls for a seamless look. It is a simple way to conquer the visual clutter that trash cans usually create.
Material Required List
- Eight foot long cedar wood slats
- One box of weather resistant wood screws
- Four metal corner brackets
- One can of exterior wood stain
- Sandpaper sheets
Equipment Required List
- Cordless power drill
- Metal measuring tape
- Hand saw or miter saw
- Wide paintbrush
- Wood pencil for marking
DIY Instructions
- Measure the width and depth of your trash bins to determine the screen size.
- Cut your cedar slats into equal lengths for the vertical fence pieces.
- Build two side frames by screwing vertical slats to horizontal support boards.
- Attach the front panel to the side frames using the metal corner brackets.
- Space the slats roughly one inch apart to allow for proper air circulation.
- Sand the entire wooden surface to remove any rough edges or splinters.
- Apply a coat of wood stain with your brush and let it dry for one day.
- Place the screen in the corner and slide your bins behind the new wooden wall.
42 Seasonal Travel Storage Rack
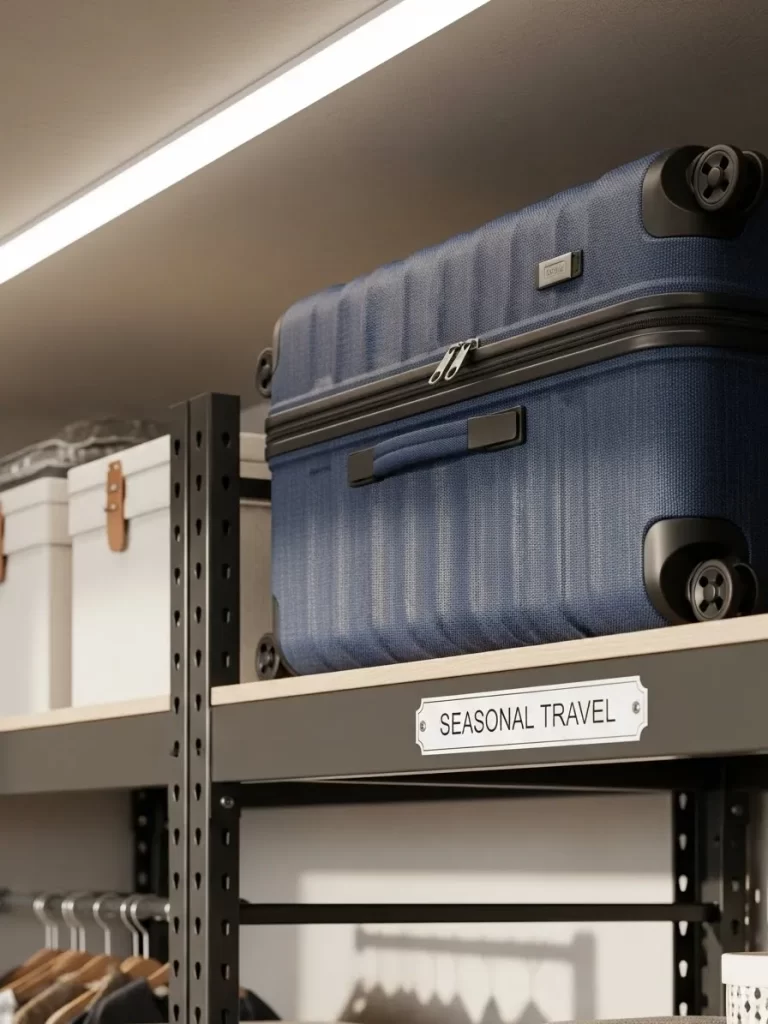
Suitcases take up a massive amount of room in your bedroom closets. This dedicated shelving unit keeps your heavy luggage high and out of the way. Sturdy metal frames support the weight of multiple bags without any bending. A clear label identifies the area specifically for your seasonal travel gear.
Keeping your bags on a high shelf prevents them from getting damaged or dusty on the floor. You can see exactly where your luggage is when it is time for a vacation. This setup utilizes the vertical space that usually goes to waste in a garage. It is a smart way to manage bulky items that you only use a few times each year.
The open design allows the suitcases to stay dry and prevents musty odors from forming. You can adjust the height of the shelves to fit larger trunks or small carry on bags. This system keeps your daily path clear for walking or parking your vehicle. It is a professional storage solution that adds value to your workshop area.
Material Required List
- Industrial metal wire shelving unit
- Adhesive label holders
- Printed category cards
- Heavy duty wall mounting anchors
- Large metal screws
Equipment Required List
- Socket wrench set
- Bubble level tool
- Electronic stud finder
- Steel measuring tape
- Rubber mallet
DIY Instructions
- Measure the height of your tallest suitcase to find the right shelf spacing.
- Assemble the metal shelving unit according to the provided guide.
- Use a rubber mallet to tap the shelf clips firmly into the corner posts.
- Locate the wooden studs in your wall using the electronic finder.
- Use wall anchors to secure the top of the shelf to the wall so it cannot tip.
- Check that the unit is level before you begin adding any heavy weight.
- Print a label that says Seasonal Travel and slide it into the plastic holder.
- Arrange your luggage on the shelves with the largest pieces on the bottom.
43 Shadow Outline Tool Pegboard
Knowing where a tool belongs saves a lot of time during a busy project. These black shadow outlines show exactly where each wrench and hammer should hang. You can see at a glance if something is missing from your collection. This system makes cleaning up your workspace much more efficient after a long day.
The light grey pegboard provides a neutral background that makes your metal tools stand out. Individual hooks hold each item securely so they do not fall onto the floor. This layout encourages you to put things back where they belong every time you use them. It is a visual way to maintain order in a high traffic garage workshop.
Adding silhouettes prevents other people from hanging items in the wrong spots. You can easily reorganize the board as you buy new equipment for your hobby. The clean look of the board gives your garage a professional and high tech feeling. It is the way to stay organized while working on complex repairs.
Material Required List
- Large sheet of grey pegboard
- Black permanent marker or paint pen
- Set of assorted metal pegboard hooks
- Wooden mounting spacers
- Wood screws
Equipment Required List
- Spirit level
- Manual screwdriver
- Steel measuring tape
- Pencil
- Cleaning rag
DIY Instructions
- Decide on the best arrangement for your tools by laying them on the board.
- Trace the outline of each tool carefully with your black marker pen.
- Fill in the center of the outlines to create a solid black shadow shape.
- Mount the wooden spacers to your wall studs at the corners of the board.
- Screw the pegboard onto the spacers to leave room for the metal hooks.
- Check the board with your level to ensure it sits straight on the wall.
- Insert the pegboard hooks into the holes matching your traced shapes.
- Hang each tool over its corresponding black shadow to complete the board.
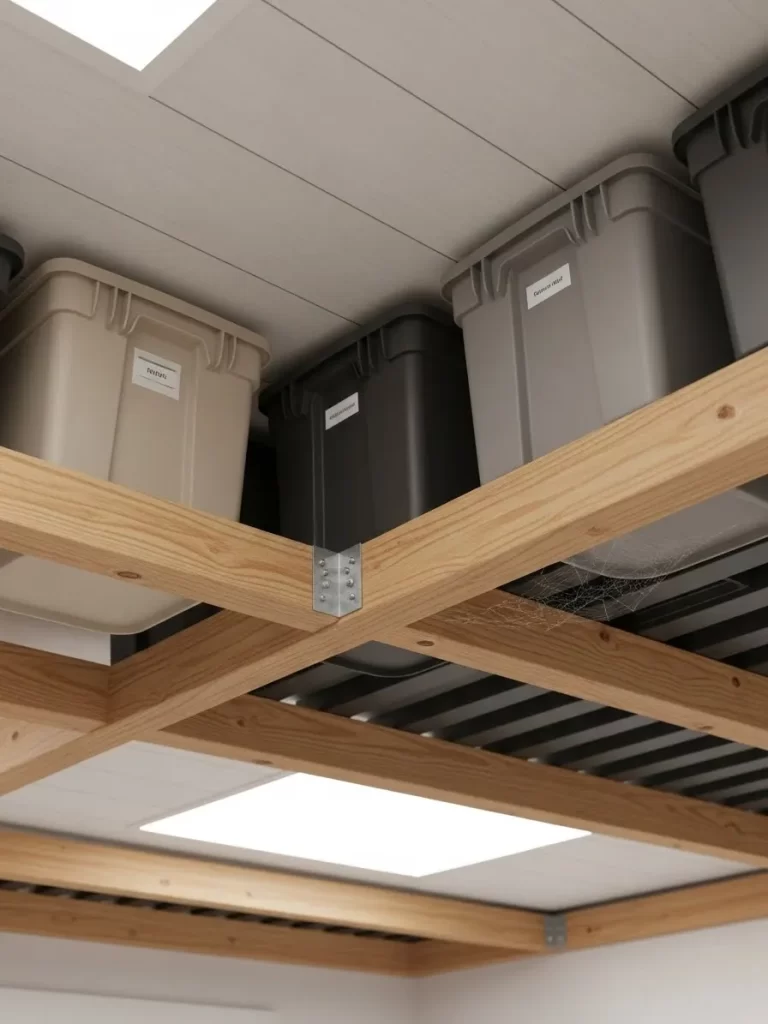
44 Ceiling Joist Bin Tracks
Your garage ceiling has a huge amount of hidden storage potential between the wooden beams. These wooden tracks allow you to slide plastic bins directly into the space between the joists. It keeps your belongings safe from the floor and maximizes your total square footage. This method is great for lightweight items and your holiday decor.
Clear labels on the front of the bins help you find what you need without pulling every box down. The bins stay snug and secure even when the heavy garage door moves. This setup looks very professional and keeps your garage floor open for your car. It is a clever storage hack for any home with exposed ceiling joists.
Utilizing the ceiling prevents items from getting wet if the floor ever floods. You can store things you only need once a year in the very back of the tracks. This project is affordable and uses basic lumber from your local hardware store. It transforms empty air into a functional storage vault for your family gear.
Material Required List
- Eight foot long wooden runners
- Large wood screws
- Heavy duty plastic bins with wide lips
- Label stickers
- Wood glue
Equipment Required List
- Cordless power drill
- Sturdy stepladder
- Electronic stud finder
- Steel measuring tape
- Pencil
DIY Instructions
- Measure the width of the lip on your storage bins before buying lumber.
- Locate the wooden ceiling joists and mark their center with a pencil.
- Cut your wooden runners to the length of your ceiling storage zone.
- Screw the first runner into the ceiling joists along the marked line.
- Use a bin as a guide to find the exact spot for the second runner.
- Mount the second rail so the bin lip slides into the track easily.
- Test the fit by sliding a bin back and forth to ensure it does not stick.
- Apply a label to the front of each bin so you know what is inside.
45 Multi Tiered Rotating Hardware Station
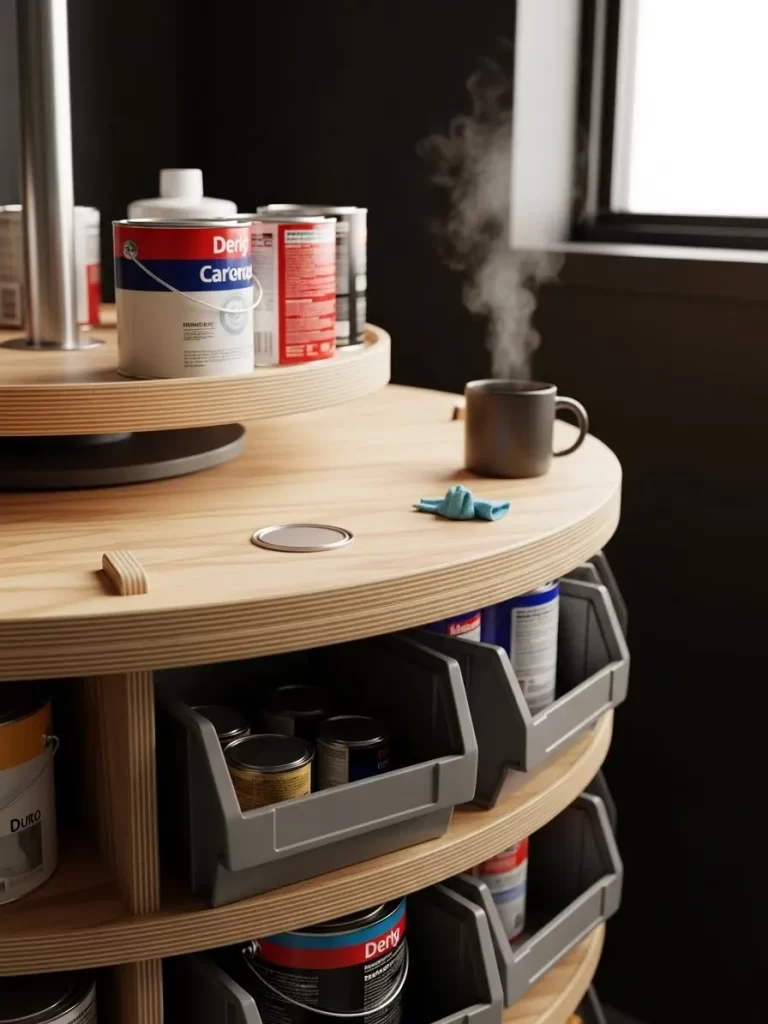
Small screws and nails are impossible to keep organized on a flat shelf. This rotating station features multiple tiers of clear bins for all your small hardware. You can find the right size by simply spinning the unit to the correct row. It holds hundreds of items in a tiny circular footprint on your workbench.
Clear plastic drawers make it easy to see exactly how many fasteners you have left. The wooden frame provides a strong and stable base for the rotating mechanism. This system is a dream for anyone who does a lot of assembly or repair work. You will never have to dig through a messy junk drawer again to find a screw.
Detailed labels on each bin tell you the exact length and thread of the hardware. This prevents you from using the wrong fastener on a delicate project. The station can sit on any flat surface or even be mounted to a corner shelf. It is a grade solution for the most common type of garage clutter.
Material Required List
- Circular plywood sheets
- One thick central wooden post
- Heavy duty metal swivel bearing
- Set of clear plastic tilt bins
- Wood glue
Equipment Required List
- Jigsaw to cut wood circles
- Power drill
- Manual screwdriver
- Sandpaper
- Tape measure
DIY Instructions
- Use a compass to draw circles on your plywood and cut them with a jigsaw.
- Sand the edges of the circles until they are smooth to the touch.
- Attach the metal swivel bearing to the bottom base circle.
- Secure the central wooden post to the center of the base.
- Glue and screw the upper circles to the post at even heights.
- Mount the clear plastic tilt bins around the edge of each wooden tier.
- Sort your screws and nails by size and place them into the bins.
- Write the size on a small label and stick it to the front of each drawer.
Key Takeaways
1 Utilizing the ceiling and wall areas is the fastest way to clear your floor.
2 Grouping similar items together helps you find what you need without searching.
3 Labeling every bin and shelf prevents clutter from returning in the future.
4 Creating specific zones for sports and tools keeps the room functional for everyone.
5 Regular maintenance of your storage systems ensures long term success and order.
Taking back control of your garage is a journey that starts with one single project. You now have a massive list of ways to handle every type of clutter from heavy kayaks to tiny screws. Implementing just a few of these ideas will make a noticeable difference in your daily life.
A tidy workspace invites more creativity and reduces the stress of home maintenance. You will save time and money by knowing exactly what you own and where it stays. This collection of hacks ensures that every square inch of your room works for you rather than against you.
Start today by choosing the project that solves your biggest frustration. Your future self will appreciate the effort when you can park your car easily or find your tools in seconds. Consistency is the secret to keeping your garage organized for the long haul.