Many homeowners struggle with walls that feel blank, cold, or simply uninspired. It is easy to settle for a single, lonely piece of art hung haphazardly in the center of the room. That approach often leaves a space feeling disconnected and fails to capture the unique energy of the people living there.

The truth is, your home deserves walls that speak volumes about your life and your style journey. A gallery wall is not just a collection of frames; it is a visual biography, a curated arrangement of memories, textures, and tastes. It provides the pulse and personality that elevates mere decor into purposeful design.
This expansive guide offers 45 distinct gallery wall layouts to solve the problem of boring art forever. We cover everything from Zen bathroom symmetry to dramatic staircase statements, providing step by step instructions for every project. Prepare to transform your walls from empty surfaces into compelling visual narratives.
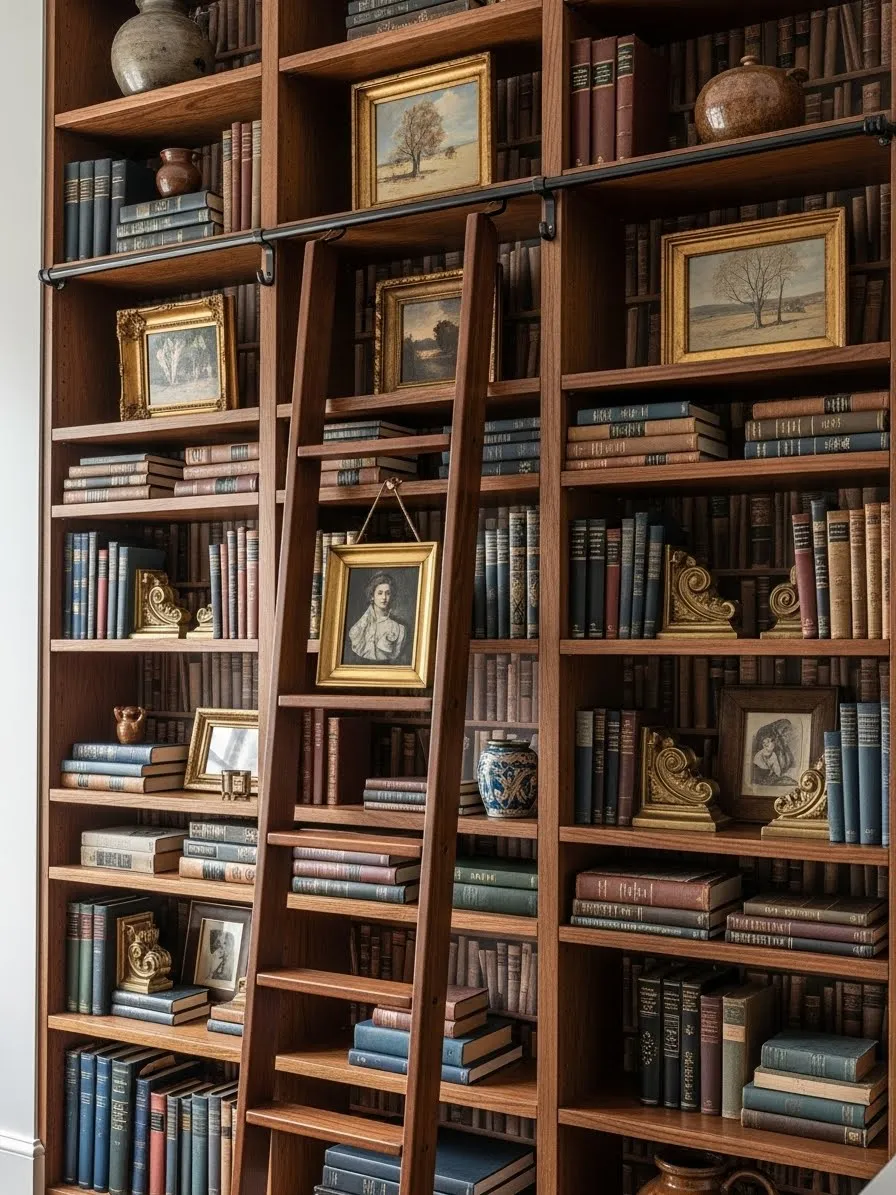
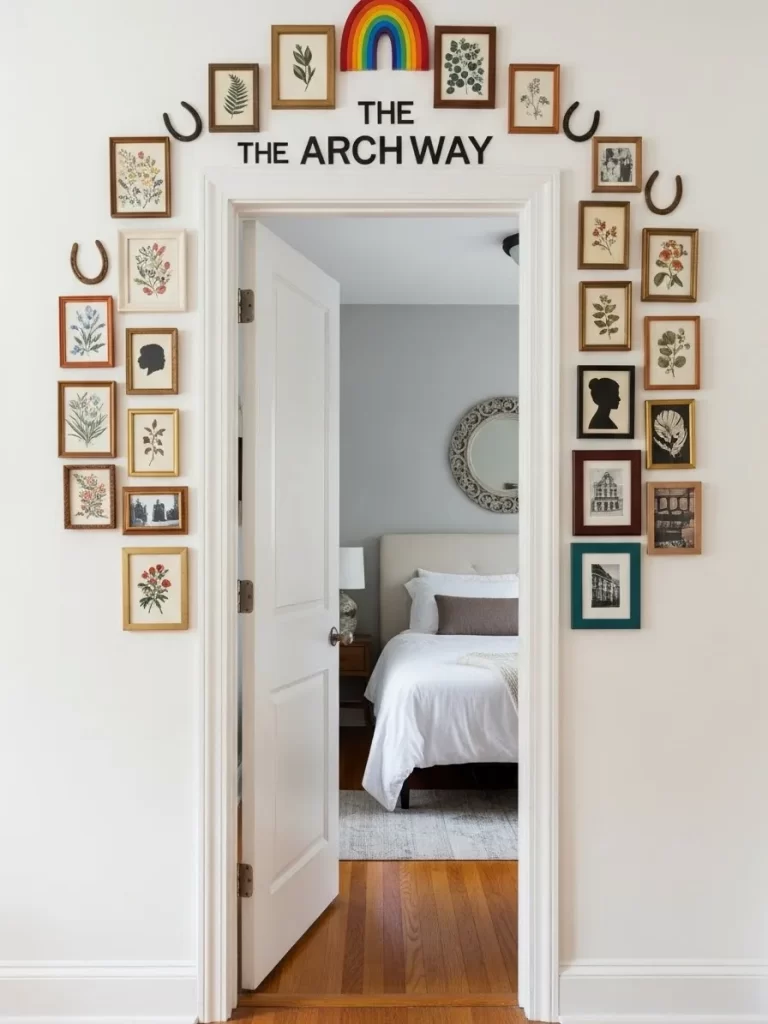
1 Vintage Staircase Heritage Wall
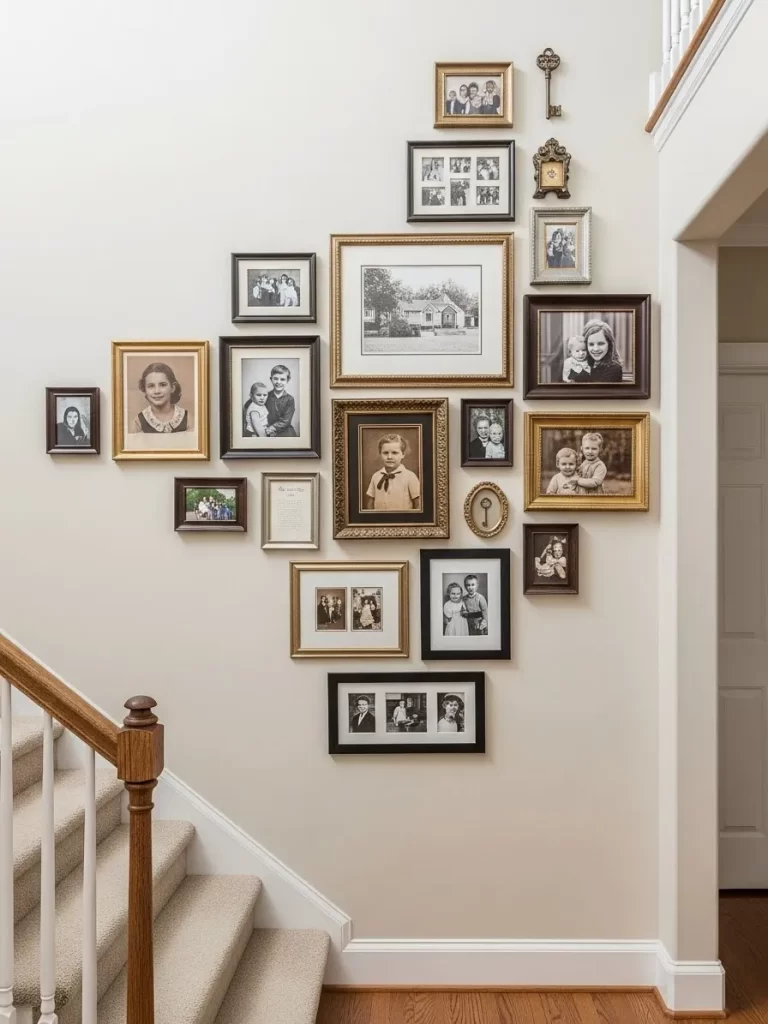
Transforming a blank staircase wall into a storied journey begins with choosing the right frames. This layout uses a mix of ornate gold, deep mahogany, and simple black frames to create a sense of history. Every portrait tells a unique chapter of a family legacy while the varied sizes keep the viewer’s eye moving upward.
Mixing textures and shapes prevents the display from feeling stiff or clinical. Tiny brass keys and oval trinkets nestle between larger rectangular pieces to add a touch of whimsy. This collection proves that personal memories serve as the most captivating decor when arranged with intention and heart.
The monochromatic sepia and black and white tones unify the diverse framing styles. By keeping the color palette of the photos consistent, you allow the craftsmanship of the frames to shine. It turns a functional transition space into a meaningful museum of your own life.
Material Required List
- Assorted vintage and modern picture frames in various finishes
- Black and white or sepia printed photographs
- Decorative wall accents like antique keys or small mirrors
- Kraft paper or old newspapers for templates
- Painter’s tape
- Acid-free photo corners or mounting tape
Equipment Required List
- Hammer
- Small finishing nails or picture hangers
- Level tool
- Pencil
- Measuring tape
- Scissors
DIY Instruction Step by Step
- Gather all the photos and objects you want to display on the floor to see how they fit together.
- Trace each frame and decorative object onto kraft paper and cut out these shapes.
- Mark the location of the hanging hardware on each paper template so you know exactly where the nail goes.
- Tape the paper templates onto your staircase wall using painter’s tape to experiment with the arrangement.
- Follow the natural upward angle of the stairs to ensure the bottom of the gallery mimics the slope of the steps.
- Check each template with a level to make sure your lines are straight and balanced.
- Drive your nails directly through the marks you made on the paper templates.
- Pull the paper off the wall, leaving the nails in place for a clean installation.
- Hang your frames and objects onto the nails and adjust them until they sit firmly against the wall.
- Step back frequently to view the wall from the bottom of the stairs to ensure the visual flow feels natural.
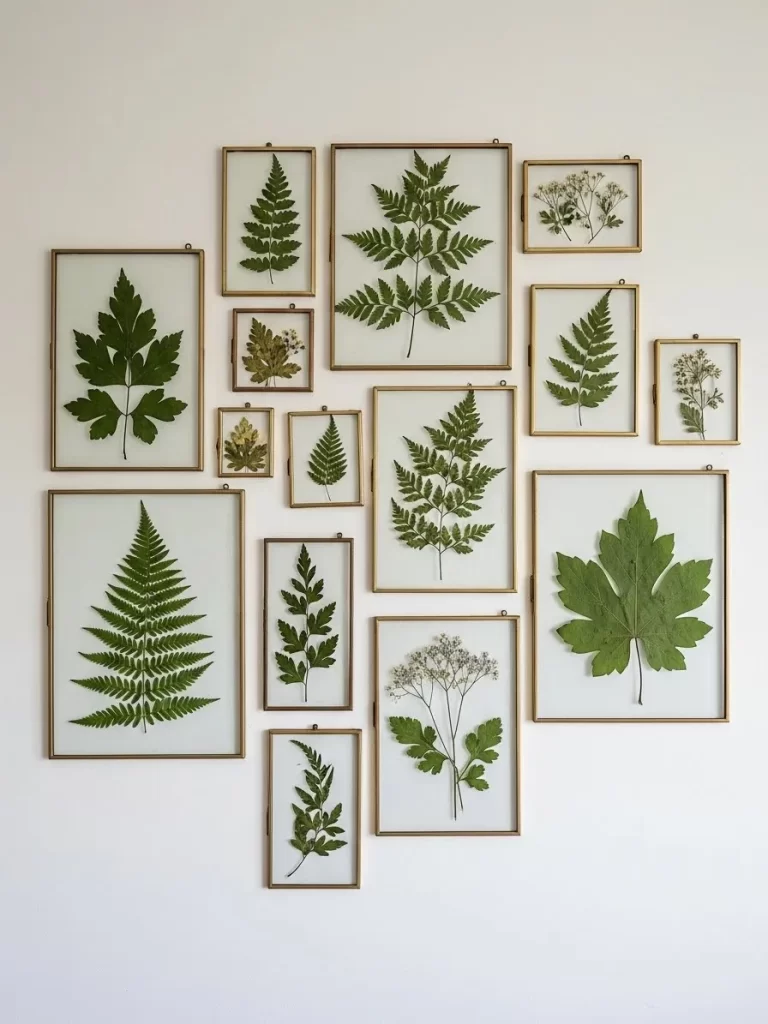
2 Botanical Grid Symphony
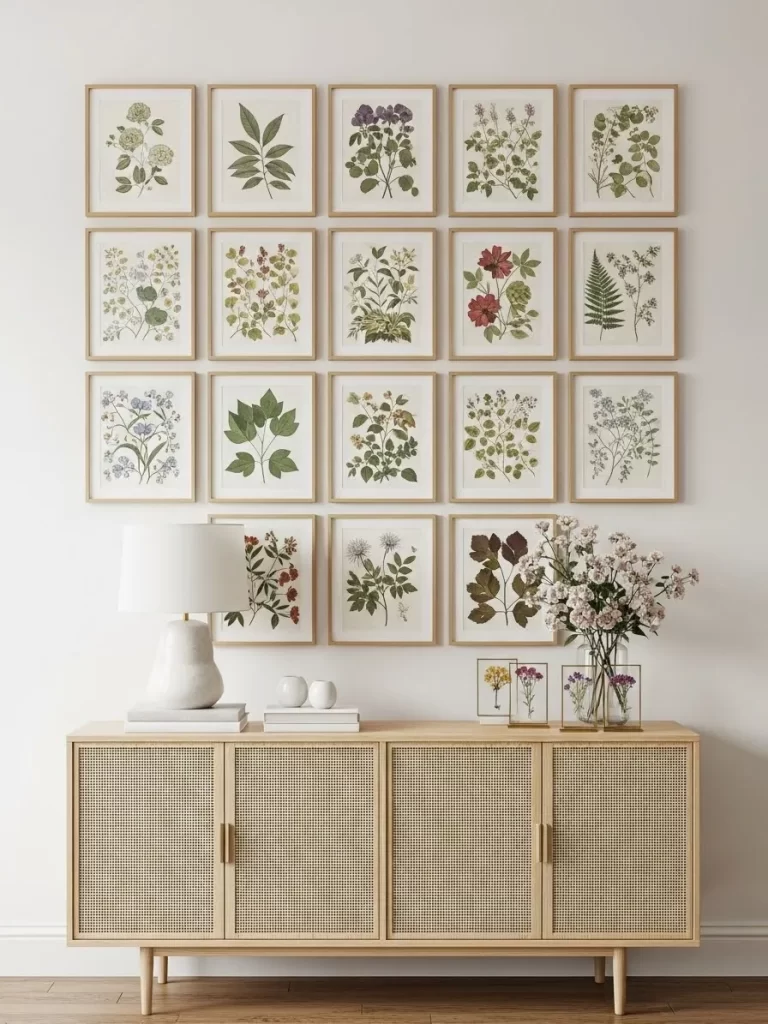
Natural beauty finds a structured home in this symmetrical botanical display. Each frame holds a delicate illustration of flora, bringing a soft organic touch to the room. Using a grid layout creates a sense of calm and order that anchors the space beautifully.
Light wood frames complement the muted tones of the plant sketches. This repetition of shape and color makes the collection feel like a singular, large-scale art piece rather than scattered items. It bridges the gap between traditional science prints and modern minimalist design.
Placing this arrangement above a woven sideboard adds texture to the visual story. The greenery in the frames mirrors the fresh flowers on the cabinet, blurring the line between art and life. It is a simple way to bring the outdoors inside without overwhelming the senses.
Material Required List
- 20 Matching light wood or oak frames
- Botanical art prints or pressed dried flowers
- High-quality white cardstock for mounting
- Large sheet of butcher paper
- Low-tack masking tape
Equipment Required List
- Spirit level
- Measuring tape
- Pencil
- Hammer
- Small wall nails
- Spacers (like a small block of wood or a thick ruler)
DIY Instruction Step by Step
- Measure the total width of your sideboard to determine the outer boundaries for your art grid.
- Select your prints and place them inside the frames, ensuring they are all oriented the same way.
- Lay the butcher paper on the floor and arrange the frames in five columns and four rows.
- Use a spacer tool to ensure the gap between every single frame is exactly the same, such as two inches.
- Trace around each frame onto the paper once you are happy with the spacing.
- Mark the center point for the hanging hardware on each traced rectangle on your paper map.
- Tape the large piece of paper onto the wall using your level to keep the top line horizontal.
- Drive a nail into every mark you made through the paper and into the wall.
- Carefully tear the paper away from the wall so only the nails remain.
- Hang each frame starting from the center and working your way out to keep the grid aligned.
3 Boho Terracotta Corner Nook
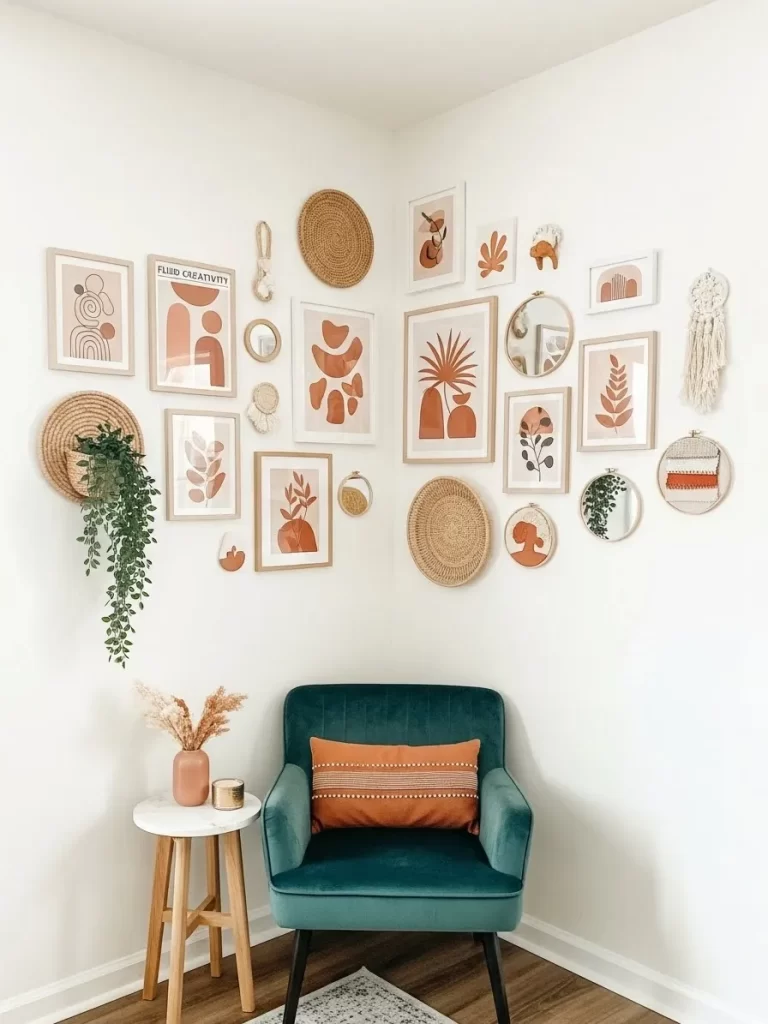
Corners often stay empty and neglected, but they offer a unique canvas for three-dimensional art. This layout wraps warm terracotta tones and organic shapes around the bend to create an inviting reading spot. It breaks away from flat surfaces by incorporating woven baskets, small mirrors, and soft macramé textures that pop against the white wall.
The color palette stays grounded in earthy oranges, soft creams, and hints of sage green. These shades provide a cozy warmth that makes the furniture feel like part of the art itself. Small embroidery hoops and trailing faux greenery add layers of depth that a standard frame simply cannot achieve on its own.
Arranging art across two meeting walls helps to define a specific zone in an open-concept room. It pulls the eye inward, turning a simple chair into a focal point of relaxation. This eclectic mix proves that your home’s story is best told through a variety of mediums and tactile materials.
Material Required List
- Assorted thin wood frames with abstract terracotta prints
- Woven seagrass baskets or flat wall trays
- Small round mirrors in gold or wood finishes
- Embroidery hoops with textured fabric or tassels
- Small macramé wall hanging
- Faux trailing ivy or eucalyptus plant
Equipment Required List
- Clear command hooks (for lightweight baskets and hoops)
- Small nails
- Hammer
- Pencil
- Measuring tape
- Blue painter’s tape
DIY Instruction Step by Step
- Clear the corner area and position your main furniture piece first so you know where the eye naturally rests.
- Start by placing your largest frames on the floor to find a balance between the left and right walls.
- Use painter’s tape to mark a vertical line in the very center of the corner to act as your guide.
- Begin hanging the largest framed pieces first, keeping them at roughly eye level for a seated person.
- Work outward from the corner crease, alternating between frames and circular objects like baskets or mirrors.
- Use clear adhesive hooks for the woven baskets and macramé to avoid making large holes in the drywall.
- Tuck the trailing greenery into a wall-mounted basket or behind a frame to let the leaves drape naturally.
- Space the smaller items like embroidery hoops in the gaps to ensure the wall looks full but not crowded.
- Step back frequently and sit in the chair to make sure the arrangement feels balanced from a seated perspective.
- Check that no heavy frames are hanging directly where a person’s head might bump them while relaxing.
4 Minimalist Picture Ledge Serenity
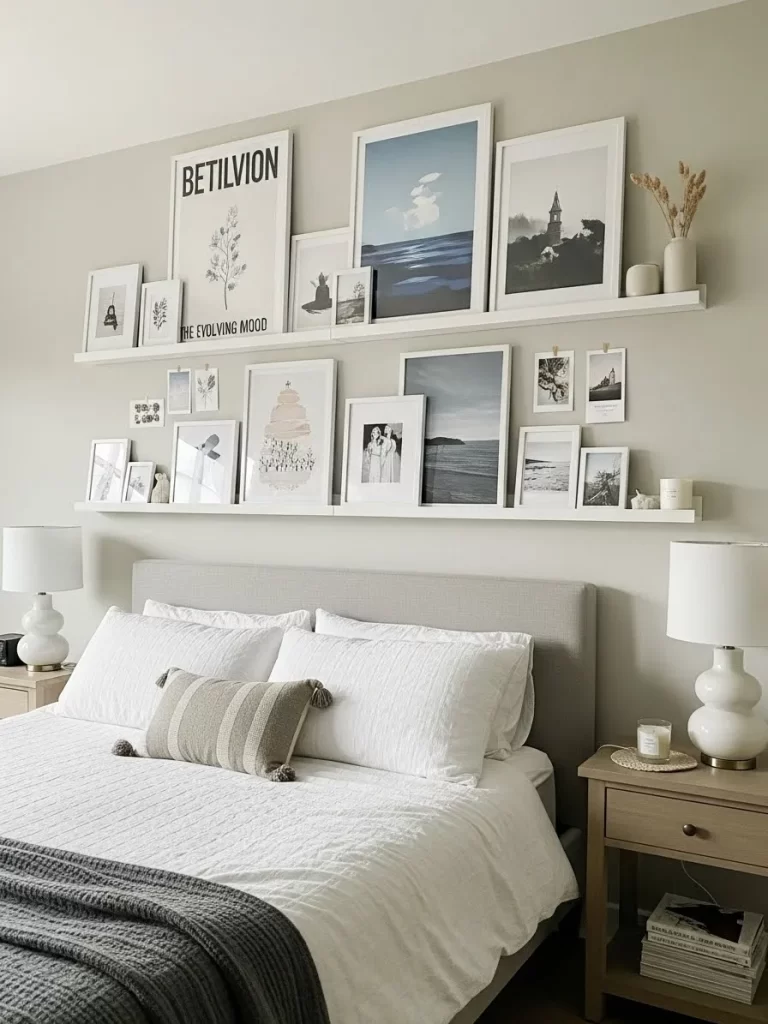
Floating ledges offer a sophisticated way to display art without committing to dozens of permanent wall holes. This bedroom arrangement uses two long white shelves to layer framed prints of varying heights and widths. Overlapping the frames creates a natural sense of depth and movement that feels curated rather than cluttered.
The cool blue and grey tones of the coastal photography promote a restful atmosphere above the headboard. Small polaroids and unframed sketches are tucked between larger pieces using simple gold clips or tape for a casual, studio-like vibe. This approach allows you to swap out seasonal art or new memories in seconds without needing a hammer.
Symmetry is maintained through the use of matching white frames and a neutral wall color. The clean lines of the ledges align with the bed frame, grounding the entire display within the room’s architecture. It is a versatile solution for anyone who loves to frequently refresh their decor.
Material Required List
- Two long white floating picture ledges
- Assorted white frames in various sizes
- Coastal or landscape art prints
- Small polaroids or postcards
- Decorative gold clips or washi tape
- Wall anchors and screws
Equipment Required List
- Power drill
- 1/4 inch drill bit
- Spirit level
- Phillips head screwdriver
- Pencil
- Measuring tape
DIY Instruction Step by Step
- Measure the width of your headboard and mark the center point on the wall with your pencil.
- Determine the height for the bottom ledge by ensuring you can sit up in bed without your head hitting the shelf.
- Hold the first ledge against the wall and use your spirit level to draw a perfectly straight horizontal line.
- Mark the pre-drilled holes of the ledge onto the wall while holding it steady.
- Drill holes into your pencil marks and tap the plastic wall anchors into place with a hammer.
- Align the ledge with the anchors and drive the screws in tightly with your screwdriver.
- Repeat these steps for the second ledge, leaving at least 15 to 18 inches of vertical space between them for tall frames.
- Place your largest frames on the ledges first, staggering them so they are not directly on top of each other.
- Layer smaller frames in front of the larger ones to create a “nested” look.
- Use small clips or tape to add tiny photos or notes in the gaps to finish the cozy, lived-in feel.
5 Ethnic Texture Noir Gallery
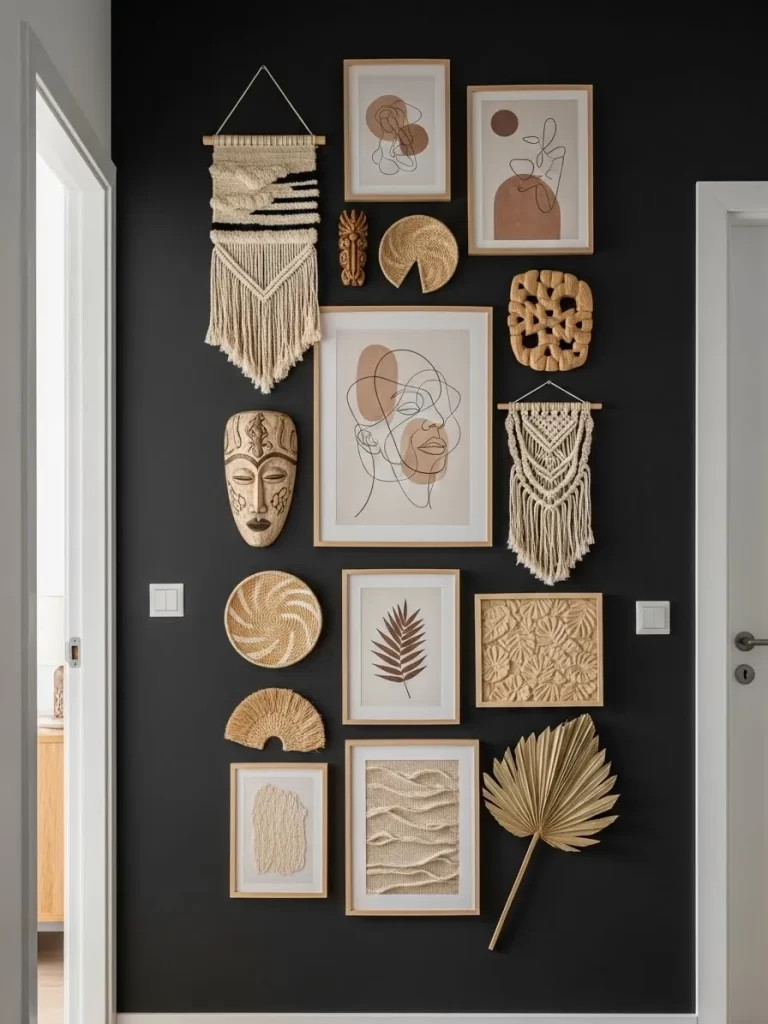
Bold contrast takes center stage in this vertical display set against a deep charcoal backdrop. The dark wall makes the sandy beiges and cream tones of the art pieces pop with dramatic intensity. This arrangement blends line-art portraits with physical artifacts like carved masks and woven palm fans to create a rich, tactile experience.
The collection uses a mix of natural materials to soften the modern, dark aesthetic of the room. Macramé hangings with thick fringes add a bohemian softness that balances the sharp edges of the wooden frames. Each piece feels like a souvenir from a distant travel journey, telling a story of global appreciation and craftsmanship.
Organizing these items in a tall, narrow column makes excellent use of high ceilings or narrow hallways. It draws the gaze upward, making the entire room feel more spacious and intentional. This style works because it treats textures as just as important as the images themselves.
Material Required List
- 4 to 6 light wood frames with abstract line art or botanical prints
- 2 Macramé wall hangings in different sizes
- 1 Traditional carved wooden mask
- 2 or 3 Woven grass baskets or fans
- 1 Dried palm spear or large leaf
- Heavy-duty mounting tape or sticky putty for odd-shaped items
Equipment Required List
- Hammer
- Small nails with wide heads
- Tape measure
- Level
- Chalk or light pencil
- Stepladder (if hanging near the ceiling)
DIY Instruction Step by Step
- Clear a space on the floor that matches the dimensions of your wall area to plan the vertical layout.
- Place your largest framed line-art piece in the center as the anchor for the entire collection.
- Position the macramé hangings and the carved mask on either side of the top frames to establish the upper boundaries.
- Fill the gaps between frames with smaller circular baskets or textural items like the woven fan.
- Use chalk to mark a light vertical line down the center of your dark wall so you stay centered during the hanging process.
- Start hanging from the top down, beginning with the items that require nails or hooks.
- Use the level on the top edges of the rectangular frames to ensure they are not tilted against the dark background.
- Apply strong mounting tape to the back of the palm leaf or flat baskets if they are too light for a traditional nail.
- Space each item roughly 2 to 3 inches apart to keep the column feeling connected rather than cluttered.
- Wipe away any remaining chalk marks with a damp cloth once every piece is securely in place.
6 Rustic Culinary Keepsake Wall
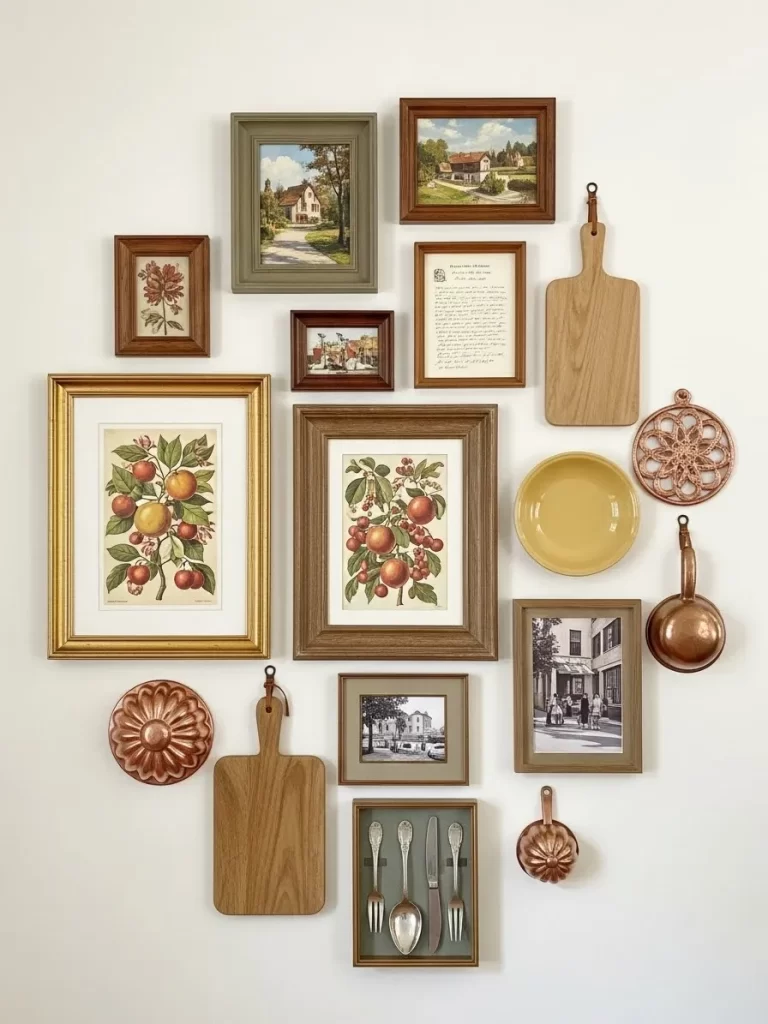
The kitchen deserves a touch of soul that goes beyond mere utility. This layout celebrates the heart of the home by mixing vintage fruit illustrations with actual kitchen artifacts. Warm copper molds and smooth wooden cutting boards break up the traditional framed art, adding a three-dimensional quality to the wall.
Rich wood tones and antique gold frames provide a grounded, timeless feel against the clean white backdrop. Small shadow boxes holding vintage silverware turn everyday tools into celebrated relics. It is a beautiful way to display family heirlooms that might otherwise gather dust in a drawer.
Each piece is placed with a relaxed sense of balance rather than rigid symmetry. The soft curves of a yellow ceramic plate contrast with the sharp lines of a handwritten recipe or a landscape print. This gallery tells a story of shared meals and generations of cooking, making the space feel lived-in and loved.
Material Required List
- Variety of wood and gold picture frames
- Vintage botanical fruit prints and landscape art
- Antique copper jelly molds or small pots
- Wooden cutting boards with leather hanging loops
- Shadow box frame for silverware
- Ceramic plate with a plate hanger
- Command adhesive strips for lightweight items
Equipment Required List
- Hammer
- Small finishing nails
- Measuring tape
- Pencil
- Level
- Kraft paper for planning
DIY Instruction Step by Step
- Clean your kitchen artifacts thoroughly to remove any grease or dust before hanging.
- Trace the outline of your cutting boards, molds, and frames onto kraft paper and cut them out.
- Arrange these paper shapes on the floor to find a composition that feels balanced and interesting.
- Tape the templates to your kitchen wall using painter’s tape to visualize the final look.
- Ensure the cutting boards are placed at a height where they won’t interfere with your countertop workspace.
- Mark the spot for the nail or hook on each paper template based on the hanging hardware.
- Tap your nails into the wall directly through the paper templates to maintain your planned spacing.
- Remove the paper scraps and start hanging your heavier framed items first to anchor the display.
- Use adhesive strips for lighter items like the copper molds to avoid unnecessary holes in the wall.
- Place the ceramic plate and shadow box last to fill in the remaining gaps and complete the story.
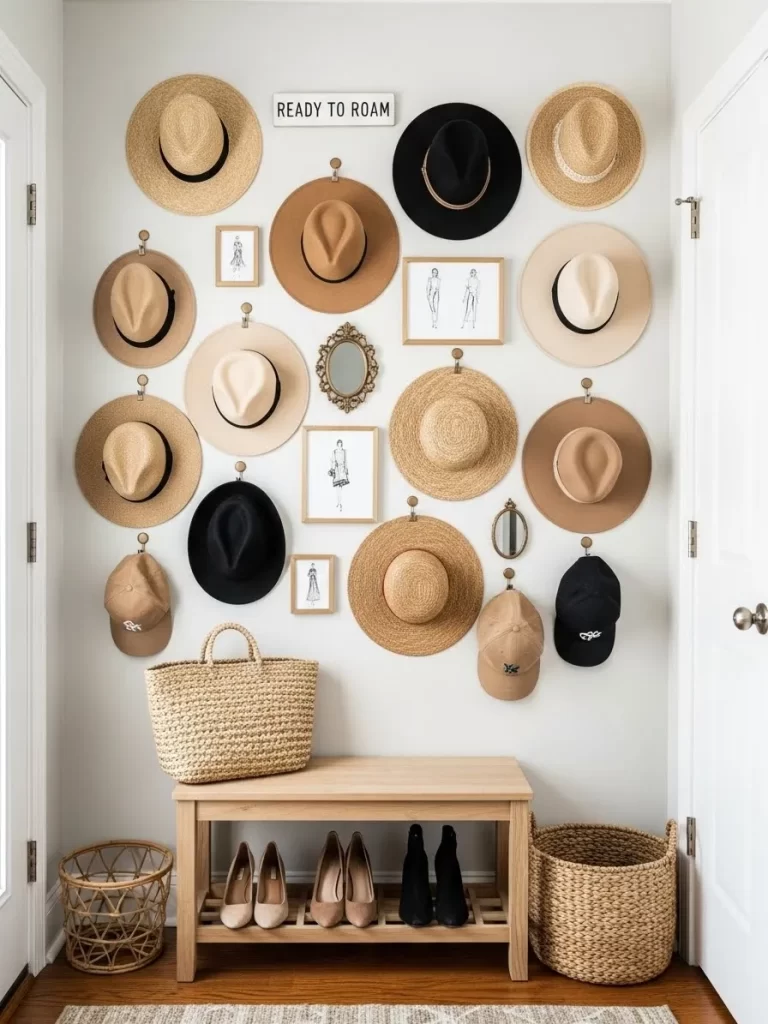
7 Zen Bathroom Symmetry
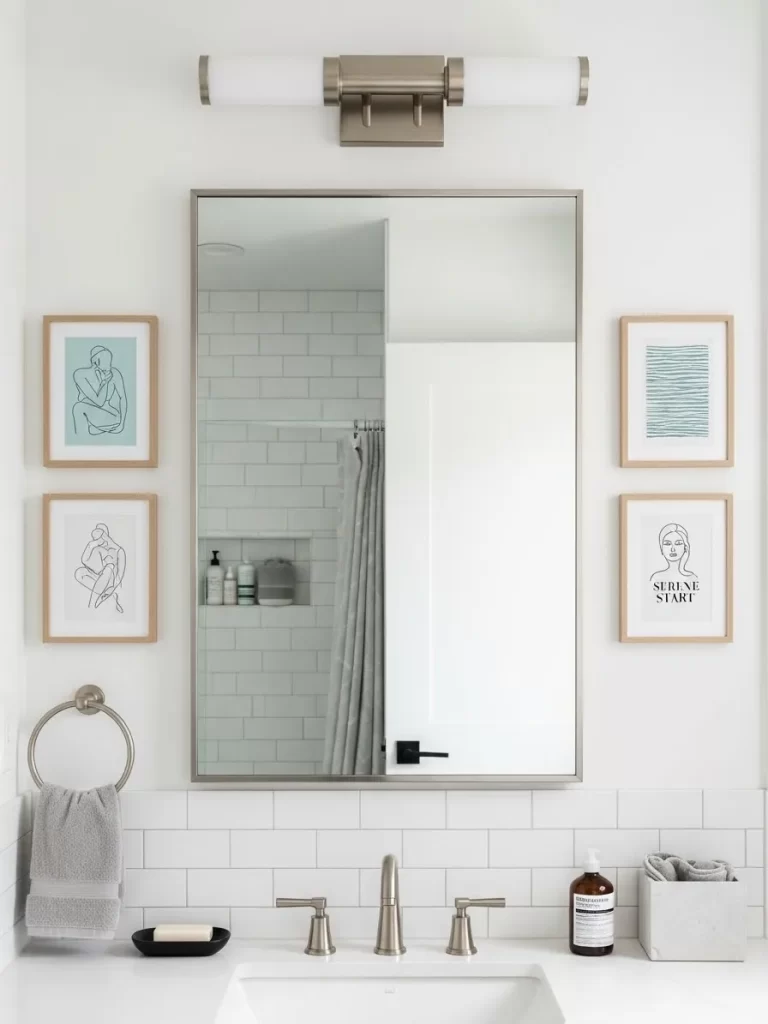
Elevate your morning routine by surrounding your vanity mirror with calming, minimalist art. This layout uses four identical light wood frames to flank a central mirror, creating a balanced and peaceful atmosphere. The simple line drawings in soft blue and monochrome tones provide a gentle start to your day without cluttering the visual field of the bathroom.
Consistency is key when working with small, functional spaces. By aligning the frames vertically on either side of the mirror, you draw the eye upward and make the ceiling feel higher. The natural wood finish of the frames warms up the white subway tile and cool nickel fixtures, adding a touch of organic texture to the sleek surfaces.
This arrangement works because it respects the utility of the room while injecting personal style. The artwork remains protected behind glass, ensuring humidity does not damage the delicate prints. It is a simple way to turn a standard bathroom into a boutique-style retreat that feels both clean and curated.
Material Required List
- 4 Matching slim wood frames
- 4 Minimalist line-art prints on moisture-resistant paper
- Acid-free mounting board
- Clear silicone bumpers (to prevent frames from touching damp walls)
- Pencil
Equipment Required List
- Spirit level
- Measuring tape
- Hammer
- Small galvanized nails (to resist rust)
- Painter’s tape
DIY Instruction Step by Step
- Measure the height of your bathroom mirror and the distance between the mirror and the side walls.
- Select art prints that feature a similar color palette to keep the small space looking unified.
- Place the prints in the frames and attach small clear bumpers to the bottom corners of each frame for airflow.
- Mark a vertical line on the wall exactly three inches away from each side of the mirror using your level.
- Decide on the vertical center point of the mirror to align your frames accordingly.
- Use painter’s tape to mark where the top and bottom of each frame will sit on your vertical lines.
- Ensure the gap between the top and bottom frames on each side is equal, such as four inches apart.
- Drive a small galvanized nail into the wall at the marked hanging point for the top frames first.
- Hang the top two frames and check them with your level before moving to the bottom set.
- Repeat the process for the bottom frames, ensuring they align perfectly with the ones above them for a crisp look.
8 Whimsical Playroom Clothesline Gallery
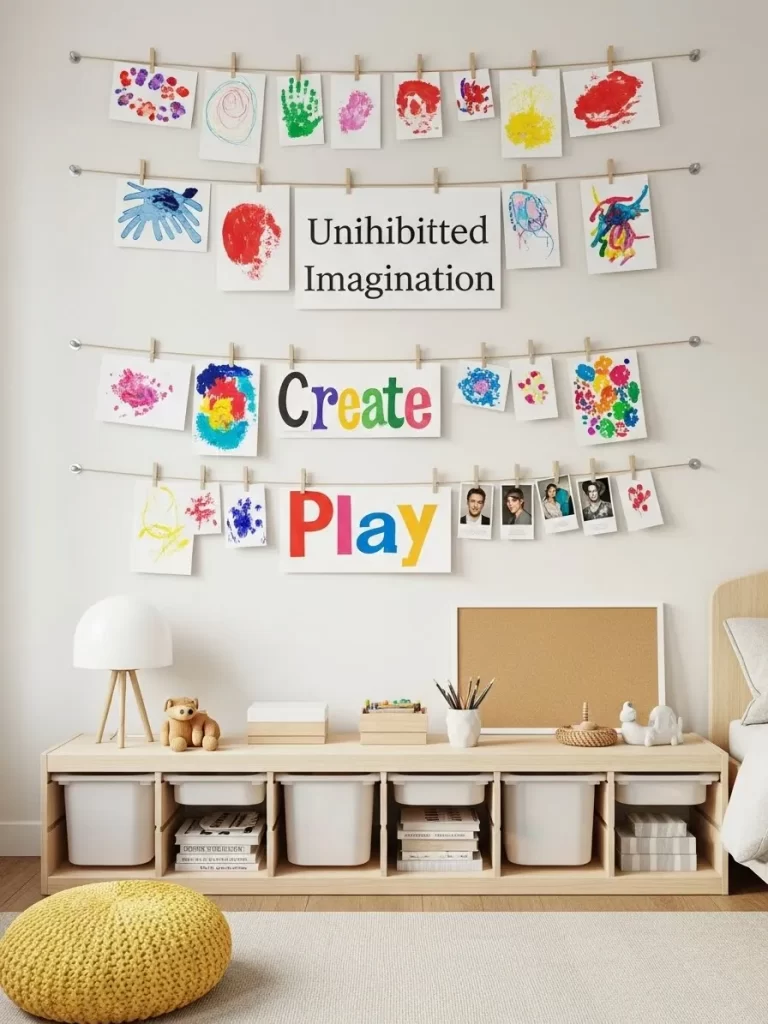
Celebrate the raw joy of childhood by turning messy finger paintings into a professional-looking rotating exhibit. This layout uses simple twine and wooden clothespins to hang a vibrant collection of drawings and family snapshots. It creates a dynamic wall that grows and changes as quickly as the little artists who live there.
Brightly colored handprints and abstract splashes of paint bring an energetic pulse to the neutral playroom walls. Large typography posters like “Play” or “Create” act as anchors for the smaller, more chaotic pieces of art. This system makes children feel like valued contributors to the home’s aesthetic while keeping clutter off the refrigerator door.
The beauty of this setup lies in its total flexibility. You can swap out a watercolor masterpiece for a new school photo in seconds without touching a single tool. It transforms a blank wall into an interactive zone that encourages curiosity and uninhibited imagination.
Material Required List
- Natural jute twine or colorful nylon cord
- Pack of mini wooden clothespins
- 8 to 10 metal eye-hook screws or small decorative wall knobs
- Assorted children’s artwork and colorful cardstock
- Large printed typography posters for focal points
Equipment Required List
- Measuring tape
- Pencil
- Drill with a small pilot bit
- Spirit level
- Scissors
DIY Instruction Step by Step
- Select a wide, open wall at a height where children can see their work but cannot easily pull on the strings.
- Measure the width of the wall and mark four horizontal rows, leaving about 12 inches of vertical space between each line.
- Use your spirit level to ensure the pencil marks for the eye-hooks are perfectly level across the wall.
- Drill small pilot holes at each mark to prevent the drywall or wood from cracking.
- Twist the eye-hook screws or decorative knobs into the pilot holes by hand until they are flush with the wall.
- Cut a length of twine for the first row, adding an extra six inches to ensure you have enough for secure knots.
- Tie the twine tightly to the first hook and stretch it across to the opposite hook, pulling it taut before knotting the end.
- Repeat the stringing process for all four rows to create a consistent “clothesline” effect.
- Clip the largest posters or cardstock signs in the center of the middle rows to provide a visual anchor.
- Use the clothespins to attach paintings, photos, and sketches around the central signs, staggering them for an organic look.
9 Cinematic Hallway Horizon
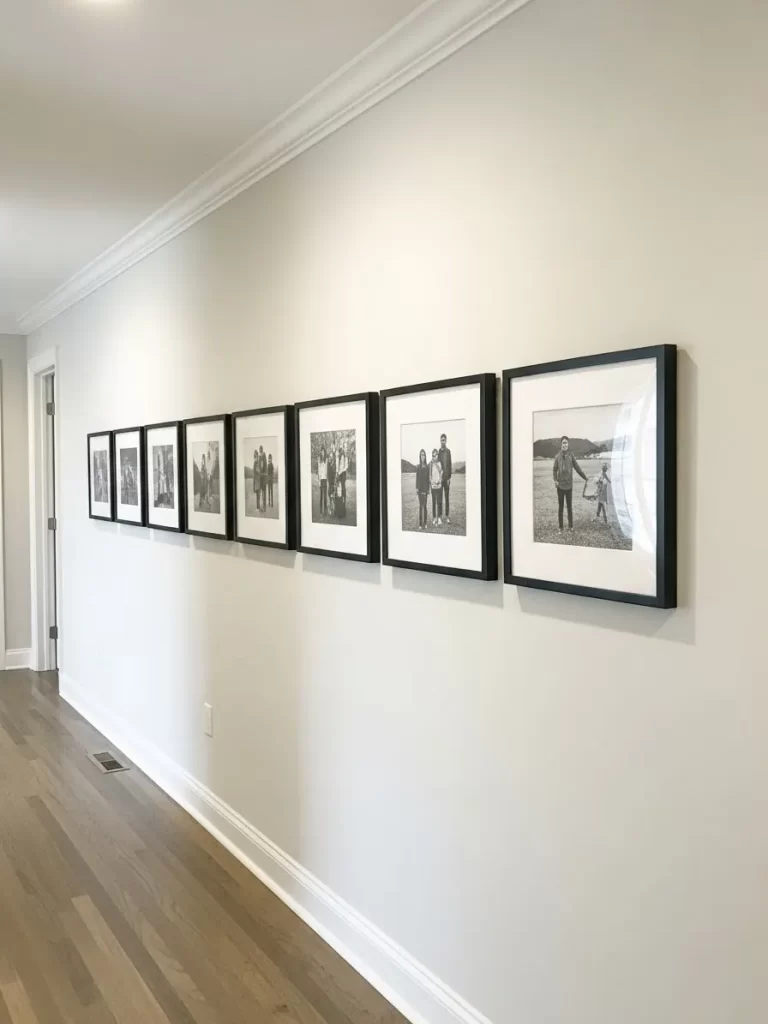
Long, empty corridors often feel like wasted space, but they provide the perfect stage for a continuous visual narrative. This layout utilizes a series of identical black frames to create a sleek, rhythmic line that guides the eye down the hallway. By using high-contrast black and white photography, the gallery achieves a timeless, cinematic quality that feels sophisticated and intentional.
Wide white matting inside the frames adds a breath of fresh air to each image, making the photos stand out against the neutral wall. This uniform approach eliminates visual noise, allowing the viewer to focus on the individual stories captured in each snapshot. It turns a simple walk from one room to another into a private gallery tour of your most cherished life moments.
The horizontal alignment creates a sense of stability and length, making even a narrow passage feel more expansive. Each frame is spaced with mathematical precision, reflecting a modern aesthetic that values order and clarity. This design is a testament to the idea that sometimes, keeping things simple is the most effective way to make a bold statement in your home.
Material Required List
- 8 to 10 Identical square black frames
- Black and white printed photographs
- Pre-cut white mats with a wide border
- Large roll of painter’s tape (delicate surface)
- Acid-free mounting tape
Equipment Required List
- Long spirit level (or a laser level)
- Measuring tape
- Pencil
- Hammer
- Small picture hanging nails
- Spacing block (a 2-inch wide piece of wood or cardboard)
DIY Instruction Step by Step
- Start by selecting a series of photos that share a similar lighting style or theme to ensure the hallway feels cohesive.
- Place your photos into the frames, ensuring they are perfectly centered within the white mats.
- Measure the total length of your hallway wall and find the horizontal centerline where the middle of the frames should sit.
- Apply a long, straight strip of painter’s tape across the wall at your desired height using a level to act as a placement guide.
- Determine the center of the wall and hang your first frame there to establish the anchor point of the gallery.
- Place your spacing block against the edge of the first frame to mark exactly where the next frame should begin.
- Mark the nail hole for the second frame, ensuring it stays perfectly aligned with the top edge of the painter’s tape.
- Repeat the spacing and marking process for each frame, moving outward from the center toward both ends of the hallway.
- Drive your nails into the marks and hang the frames, checking each one with the level to ensure they are plumb.
- Remove the painter’s tape carefully once all frames are secure to reveal your clean, professional-looking horizon line.
10 Dramatic Triptych Dining Statement
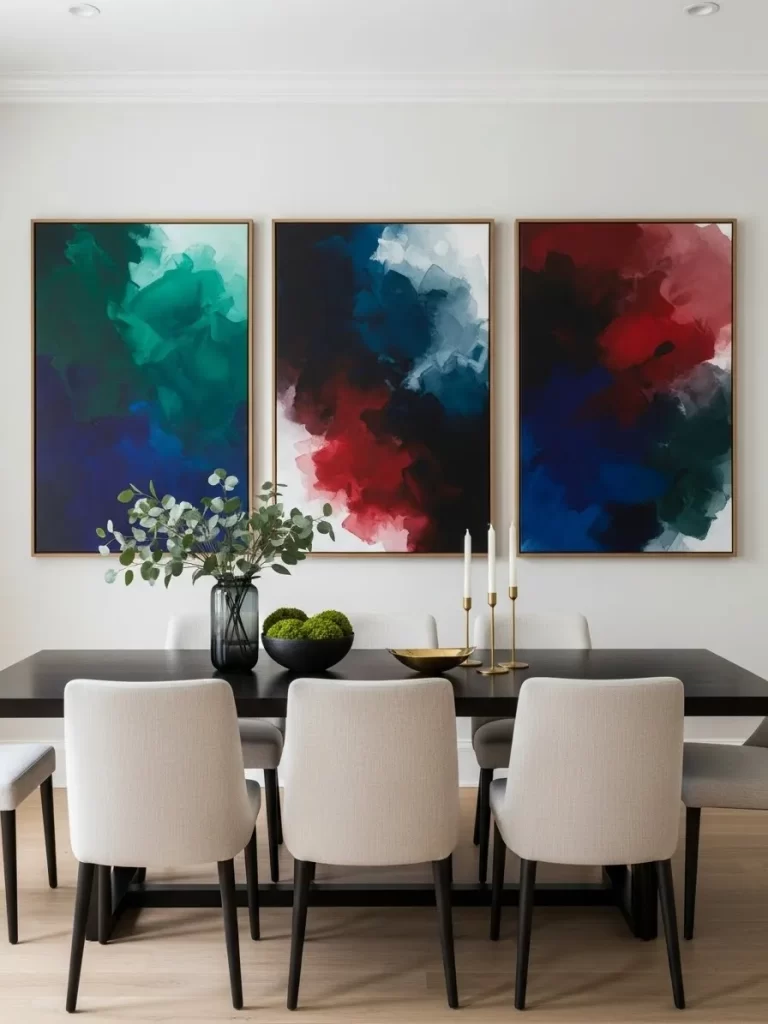
Large-scale art possesses the unique power to ground an open dining area with instant sophistication. This layout features three oversized canvases that share a moody, abstract theme of deep teals, crimsons, and midnight blues. By using a triptych format, you cover a vast wall space while maintaining a sense of rhythmic balance that single pieces often lack.
Slim oak frames provide a subtle boundary for the swirling colors without distracting from the emotional weight of the paint. The vertical orientation of these panels draws the eye upward, making the ceiling feel more lofty and grand. This specific arrangement acts as a vibrant backdrop for dinner conversations, turning a simple meal into a refined event.
Coordinating the tabletop decor with the art helps the room feel unified and intentional. Eucalyptus branches and dark ceramic bowls mirror the organic shapes found within the brushstrokes above. This approach creates a cohesive visual experience where the furniture and the wall decor speak the same elegant language.
Material Required List
- 3 Large matching canvases or framed abstract prints
- Heavy-duty picture hanging wire
- High-quality wall anchors designed for heavy weights
- Microfiber cloth for cleaning glass or canvas surfaces
- Brown paper for wall mapping
Equipment Required List
- Power drill and appropriate drill bits
- Level (long version preferred)
- Measuring tape
- Pencil
- Hammer
- Stud finder
DIY Instruction Step by Step
- Measure the total length of your dining table and find the center point on the wall directly behind it.
- Determine the height of the art by ensuring the bottom edge sits roughly 8 to 12 inches above the tabletop.
- Lay the three panels on the floor to decide the order that creates the most pleasing color flow.
- Cut three pieces of brown paper to the exact size of your frames to use as visual guides.
- Tape the center paper template to the wall first, aligning its middle with the center mark of your table.
- Place the remaining two paper templates on either side of the center one, leaving a 3-inch gap between them.
- Use the stud finder to see if you can mount the heavy art directly into wooden wall studs for maximum security.
- Mark the hanging points on the paper templates and drill your holes for the anchors or heavy-duty screws.
- Remove the paper and install the hardware, then carefully lift each large panel into place.
- Place a level across the top of all three frames to ensure the horizontal line is perfectly straight across the room.
11 Botanical Grid Symphony
Natural beauty finds a structured home in this symmetrical botanical display. Each thin wood frame holds a delicate illustration of flora, bringing a soft organic touch to the room. Using a grid layout creates a sense of calm and order that anchors the space without feeling heavy or overwhelming.
Light oak frames complement the muted tones of the plant sketches. This repetition of shape and color makes the collection feel like a single, large-scale art piece rather than scattered items. It bridges the gap between traditional science prints and modern minimalist design by focusing on clean lines and white space.
Placing this arrangement above a woven sideboard adds a rich layer of texture to the room’s story. The greenery in the frames mirrors the fresh flowers on the cabinet, blurring the line between art and life. This approach is a simple way to bring the outdoors inside for a refreshing look.
Material Required List
- 20 Matching light wood frames
- Botanical art prints or pressed dried flowers
- High-quality white cardstock for mounting
- Large sheet of kraft paper
- Painter’s tape
Equipment Required List
- Spirit level
- Measuring tape
- Pencil
- Hammer
- Small wall nails
- Wooden spacer block (2 inches wide)
DIY Instruction Step by Step
- Measure the total width of your furniture to determine the outer boundaries for your art grid.
- Place your prints inside the frames and ensure they are all oriented in the same direction.
- Lay the kraft paper on the floor and arrange the frames in five columns and four rows.
- Use a spacer tool to ensure the gap between every single frame is exactly the same width.
- Trace around each frame onto the paper once you are happy with the layout.
- Mark the center point for the hanging hardware on each traced rectangle on your paper map.
- Tape the large piece of paper onto the wall using your level to keep the top line straight.
- Drive a nail into every mark you made through the paper and into the wall surface.
- Carefully tear the paper away from the wall so only the nails remain in place.
- Hang each frame starting from the center and work your way out to keep the grid aligned.
12 Boho Terracotta Corner Nook

Corners often stay empty, but they offer a unique canvas for three-dimensional art. This layout wraps warm terracotta tones and organic shapes around the bend to create an inviting reading spot. It breaks away from flat surfaces by incorporating woven baskets, small mirrors, and soft macramé textures.
The color palette stays grounded in earthy oranges, soft creams, and hints of sage green. These shades provide a cozy warmth that makes the furniture feel like part of the art itself. Small embroidery hoops and trailing greenery add layers of depth that a standard frame cannot achieve.
Arranging art across two meeting walls helps to define a specific zone in an open-concept room. It pulls the eye inward, turning a simple chair into a focal point of relaxation. This eclectic mix proves that your home’s story is best told through a variety of tactile materials.
Material Required List
- Assorted thin wood frames with abstract prints
- Woven seagrass baskets or flat wall trays
- Small round mirrors in gold or wood finishes
- Embroidery hoops with textured fabric
- Small macramé wall hanging
- Faux trailing ivy plant
Equipment Required List
- Clear adhesive hooks
- Small finishing nails
- Hammer
- Pencil
- Measuring tape
- Blue painter’s tape
DIY Instruction Step by Step
- Position your main furniture piece first so you know where the eye naturally rests in the corner.
- Place your largest frames on the floor to find a balance between the left and right walls.
- Use painter’s tape to mark a vertical line in the very center of the corner as a guide.
- Begin hanging the largest framed pieces first at roughly eye level for a seated person.
- Work outward from the corner crease, alternating between frames and circular objects like baskets.
- Use clear adhesive hooks for the woven baskets to avoid making large holes in the wall.
- Tuck the trailing greenery into a wall-mounted basket to let the leaves drape naturally.
- Space the smaller items in the gaps to ensure the wall looks full but not crowded.
- Step back frequently to make sure the arrangement feels balanced from across the room.
- Check that no heavy frames are hanging where someone might bump them while sitting.
13 Minimalist Picture Ledge Serenity
Floating ledges offer a sophisticated way to display art without committing to dozens of permanent wall holes. This bedroom arrangement uses two long white shelves to layer framed prints of varying heights and widths. Overlapping the frames creates a natural sense of depth that feels curated rather than cluttered.
The cool blue and grey tones of the coastal photography promote a restful atmosphere above the headboard. Small polaroids and sketches are tucked between larger pieces using simple clips for a casual, studio-like vibe. This approach allows you to swap out new memories in seconds without needing a hammer.
Symmetry is maintained through the use of matching white frames and a neutral wall color. The clean lines of the ledges align with the bed frame, grounding the entire display within the room’s architecture. It is a versatile solution for anyone who loves to frequently refresh their decor.
Material Required List
- Two long white floating picture ledges
- Assorted white frames in various sizes
- Coastal or landscape art prints
- Small polaroids or postcards
- Decorative gold clips
- Wall anchors and screws
Equipment Required List
- Power drill
- Spirit level
- Phillips head screwdriver
- Pencil
- Measuring tape
DIY Instruction Step by Step
- Mark the center point of your headboard on the wall with your pencil.
- Determine the height for the bottom ledge so you can sit up without hitting the shelf.
- Hold the first ledge against the wall and use your level to draw a straight line.
- Mark the pre-drilled holes of the ledge onto the wall while holding it steady.
- Drill holes into your marks and tap the plastic wall anchors into place with a hammer.
- Align the ledge with the anchors and drive the screws in tightly with your screwdriver.
- Repeat these steps for the second ledge, leaving about 15 inches of vertical space between them.
- Place your largest frames on the ledges first and stagger them across the width.
- Layer smaller frames in front of the larger ones to create a nested look.
- Use small clips to add tiny photos in the gaps to finish the cozy feel.
14 Ethnic Texture Noir Gallery
Bold contrast takes center stage in this vertical display set against a deep charcoal backdrop. The dark wall makes the sandy beiges and cream tones of the art pieces pop with dramatic intensity. This arrangement blends line-art portraits with physical artifacts like carved masks and woven palm fans to create a rich, tactile experience.
The collection uses a mix of natural materials to soften the modern, dark aesthetic of the room. Macramé hangings with thick fringes add a bohemian softness that balances the sharp edges of the wooden frames. Each piece feels like a souvenir from a distant travel journey, telling a story of global appreciation and craftsmanship.
Organizing these items in a tall, narrow column makes excellent use of high ceilings or narrow hallways. It draws the gaze upward, making the entire room feel more spacious and intentional. This style works because it treats textures as just as important as the images themselves.
Material Required List
- 4 to 6 light wood frames with abstract line art
- 2 Macramé wall hangings in different sizes
- 1 Traditional carved wooden mask
- 3 Woven grass baskets or fans
- 1 Dried palm spear
- Heavy-duty mounting tape
Equipment Required List
- Hammer
- Small nails with wide heads
- Tape measure
- Level
- Chalk
- Stepladder
DIY Instruction Step by Step
- Clear a space on the floor that matches your wall dimensions to plan the vertical layout.
- Place your largest framed line-art piece in the center as the anchor for the collection.
- Position the macramé hangings and the carved mask on either side of the top frames.
- Fill the gaps between frames with smaller circular baskets or textural items like woven fans.
- Use chalk to mark a light vertical line down the center of your dark wall.
- Start hanging from the top down, beginning with the items that require nails or hooks.
- Use the level on the top edges of the rectangular frames to ensure they are straight.
- Apply strong mounting tape to the back of the palm leaf or flat baskets.
- Space each item roughly 2 to 3 inches apart to keep the column feeling connected.
- Wipe away any remaining chalk marks with a damp cloth once every piece is secure.
15 Rustic Culinary Keepsake Wall
The kitchen deserves a touch of soul that goes beyond mere utility. This layout celebrates the heart of the home by mixing vintage fruit illustrations with actual kitchen artifacts. Warm copper molds and smooth wooden cutting boards break up the traditional framed art, adding a three-dimensional quality to the wall.
Rich wood tones and antique gold frames provide a grounded, timeless feel against the clean white backdrop. Small shadow boxes holding vintage silverware turn everyday tools into celebrated relics. It is a beautiful way to display family heirlooms that might otherwise gather dust in a drawer.
Each piece is placed with a relaxed sense of balance rather than rigid symmetry. The soft curves of a yellow ceramic plate contrast with the sharp lines of a handwritten recipe or a landscape print. This gallery tells a story of shared meals and generations of cooking.
Material Required List
- Variety of wood and gold picture frames
- Vintage botanical fruit prints
- Antique copper jelly molds
- Wooden cutting boards with leather loops
- Shadow box frame for silverware
- Ceramic plate with a plate hanger
Equipment Required List
- Hammer
- Small finishing nails
- Measuring tape
- Pencil
- Level
- Kraft paper
DIY Instruction Step by Step
- Clean your kitchen artifacts thoroughly to remove any grease or dust before hanging them.
- Trace the outline of your cutting boards, molds, and frames onto kraft paper.
- Arrange these paper shapes on the floor to find a composition that feels balanced.
- Tape the templates to your kitchen wall using painter’s tape to visualize the look.
- Ensure the cutting boards are placed where they won’t interfere with your countertop workspace.
- Mark the spot for the nail or hook on each paper template.
- Tap your nails into the wall directly through the paper templates to maintain spacing.
- Remove the paper scraps and start hanging your heavier framed items first.
- Use adhesive strips for lighter items like the copper molds to avoid extra holes.
- Place the ceramic plate and shadow box last to fill in the remaining gaps.
16 Zen Bathroom Symmetry

Elevate your morning routine by surrounding your vanity mirror with calming, minimalist art. This layout uses four identical light wood frames to flank a central mirror, creating a balanced and peaceful atmosphere. The simple line drawings in soft blue tones provide a gentle start to your day.
Consistency is key when working with small, functional spaces. By aligning the frames vertically on either side of the mirror, you draw the eye upward and make the room feel taller. The natural wood finish of the frames warms up the white subway tile and cool nickel fixtures.
This arrangement works because it respects the utility of the room while injecting personal style. The artwork remains protected behind glass, ensuring humidity does not damage the delicate prints. It is a simple way to turn a standard bathroom into a boutique-style retreat.
Material Required List
- 4 Matching slim wood frames
- 4 Minimalist line-art prints
- Acid-free mounting board
- Clear silicone bumpers
- Pencil
Equipment Required List
- Spirit level
- Measuring tape
- Hammer
- Small galvanized nails
- Painter’s tape
DIY Instruction Step by Step
- Measure the height of your bathroom mirror and the distance to the side walls.
- Select art prints that feature a similar color palette to keep the space unified.
- Place the prints in the frames and attach small clear bumpers to the bottom corners.
- Mark a vertical line on the wall exactly three inches from each side of the mirror.
- Decide on the vertical center point of the mirror to align your frames.
- Use painter’s tape to mark where the top and bottom of each frame will sit.
- Ensure the gap between the top and bottom frames on each side is equal.
- Drive a small galvanized nail into the wall at the marked hanging point.
- Hang the top two frames and check them with your level before moving down.
- Repeat the process for the bottom frames, ensuring they align perfectly with the ones above.
17 The Vinyl Soundtrack Wall

Music lovers can turn their favorite albums into a dynamic piece of architecture with this sleek, rotating display. This layout uses minimalist wood ledges to showcase record sleeves as high-impact art. It creates a “now playing” vibe that changes whenever you decide to spin a new disc, making your wall as rhythmic as your playlist.
Black and white covers mixed with bold pops of red and orange establish a vintage yet modern aesthetic. By arranging the albums in a clean five-column grid, the wall feels organized despite the diverse cover designs. This approach celebrates the physical beauty of analog media while keeping your collection within arm’s reach.
Positioning the display above a mid-century sideboard anchors the listening station as a primary focal point. The natural wood grain of the ledges ties into the furniture below for a seamless, intentional look. It transforms a simple hobby into a curated interior statement that speaks volumes about your personality.
Material Required List
- 15 Thin wood picture ledges or vinyl wall shelves
- Your favorite 12-inch vinyl record albums
- Spirit level
- Wall anchors and screws
- Pencil
Equipment Required List
- Power drill
- Measuring tape
- Phillips head screwdriver
- Hammer
- Level tool
DIY Instruction Step by Step
- Measure the width of your sideboard and mark the center point on the wall with your pencil.
- Determine how many rows you want; three rows of five albums usually fill a standard wall space nicely.
- Space your rows about 14 inches apart vertically to ensure there is enough clearance to lift the albums out.
- Use your level to draw a perfectly straight horizontal line for the first row of ledges.
- Mark the screw holes for each ledge, ensuring there is about an inch of breathing room between the ledges horizontally.
- Drill pilot holes into the wall at each pencil mark and tap in your plastic wall anchors.
- Screw the ledges into the anchors until they are flush and firm against the wall.
- Check each ledge with your level again before moving to the next row to maintain a crisp grid.
- Repeat the installation for the remaining rows until your grid is complete.
- Slide your favorite record sleeves onto the ledges and enjoy your new interactive music gallery.
18 Moody Maximalist Jewel Box

Powder rooms provide a unique opportunity to experiment with bold, saturated themes that might feel too heavy for a living room. This layout uses a floral teal wallpaper as a lush backdrop for an eclectic mix of gold-framed portraits and mirrors. The high density of the art creates a “jewel box” effect that feels luxurious and deeply personal.
Ornate brass frames and vintage-style oil paintings add a sense of old-world mystery to the small space. Layering different shapes—like oval cameos next to large rectangular landscapes—prevents the wall from feeling too static. Small wall-mounted pedestals holding white porcelain figures add a surprising three-dimensional element.
Warm sconce lighting casts a soft glow over the gold leafing, making the entire room sparkle. This arrangement proves that even the smallest utilitarian spaces can become a gallery for your most treasured finds. It is a masterclass in how to use “more is more” to create an unforgettable interior experience.
Material Required List
- Assorted ornate gold and brass frames
- Small wall-mounted display shelves or pedestals
- Vintage-style oil portraits or botanical prints
- Small decorative mirrors
- Antique brass keys or tassels for extra detail
- Heavy-duty picture hangers
Equipment Required List
- Hammer
- Pencil
- Measuring tape
- Level
- Small nails
DIY Instruction Step by Step
- Start with your largest framed piece and place it at eye level directly above the toilet or next to the mirror.
- Work outward from this central anchor, adding pieces one by one rather than planning a strict grid.
- Mix your textures by placing a smooth porcelain bust on a shelf next to a highly textured gold frame.
- Use small nails to hang decorative accents like antique keys in the tiny gaps between larger frames.
- Ensure your frames are spaced closely—about one to two inches apart—to achieve that dense, maximalist look.
- Check that every piece is secure, as small rooms often have high traffic and vibration from closing doors.
- Use a level on the rectangular pieces, but feel free to tilt or stagger the oval frames for a more organic feel.
- Incorporate a small mirror to help bounce light around the dark wallpaper and add a sense of depth.
- Step back frequently to view the wall from the doorway to ensure the colors look balanced.
- Add a few hanging tassels or ribbons to the bottom of the frames for an extra touch of Victorian charm.
19 The Organized Chaos Command Center
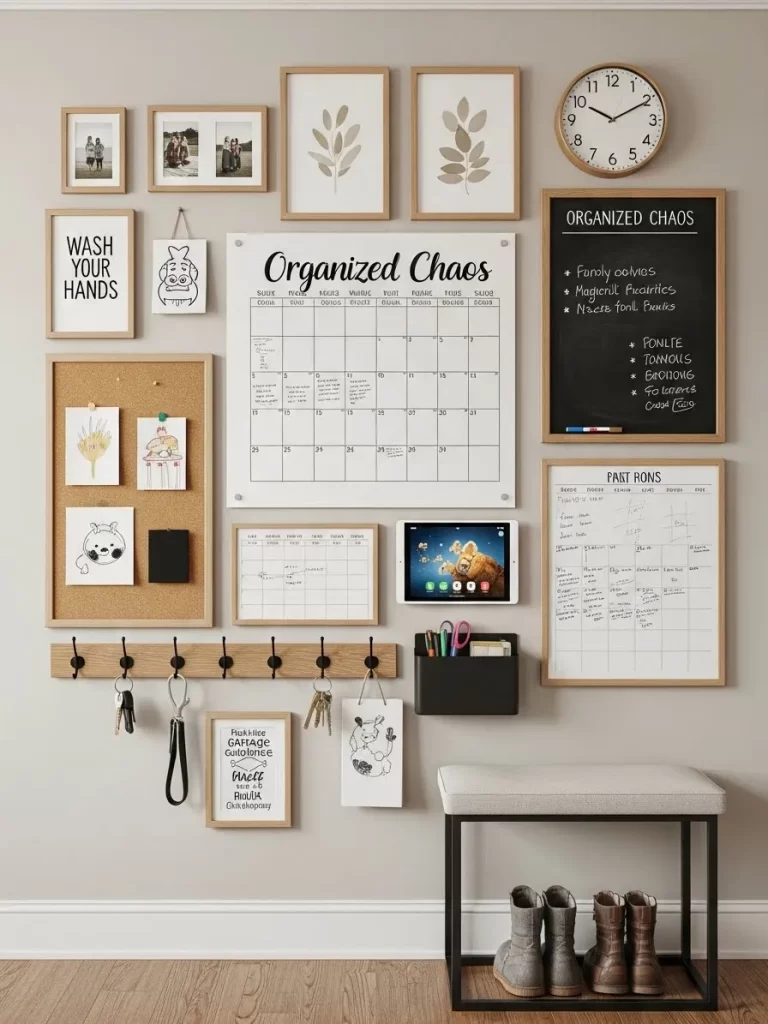
Managing a busy household requires a hub that is both functional and visually pleasing. This layout combines calendars, chalkboards, and corkboards into a unified “command center” that keeps everyone on track. By using matching light wood frames for every element, the diverse tools look like a cohesive art installation.
A central acrylic calendar allows for easy monthly planning without the mess of paper scraps. Surrounding it with smaller clipboards and “wash your hands” signage blends practical reminders with homey decor. The inclusion of a small tablet mount ensures technology has a dedicated home amidst the analog tools.
A row of sturdy black hooks at the bottom provides a place for keys and bags, keeping the floor clear of clutter. This system proves that organization doesn’t have to look clinical or boring. It turns daily chores into a beautiful part of your home’s story by framing the “chaos” of life with intention.
Material Required List
- Large acrylic wall calendar
- Framed chalkboard and corkboard
- Matching wood frames for family photos or lists
- Wall-mounted key rail with hooks
- Small black storage bin or mail sorter
- Tablet wall mount
Equipment Required List
- Power drill
- Level tool
- Measuring tape
- Pencil
- Screwdriver
DIY Instruction Step by Step
- Map out the largest items—the calendar and chalkboard—on the wall first to define the center of the display.
- Install the key rail at the very bottom, roughly three to four feet from the floor for easy access.
- Use a level to ensure the top edges of the calendar and chalkboard align for a clean horizontal look.
- Mount the acrylic calendar using the provided standoff hardware for a modern, floating effect.
- Place the corkboard and chalkboard on either side to keep the “writing zones” grouped together.
- Fix the tablet mount at eye level so it is easy to check digital schedules or play music.
- Fill the remaining gaps with smaller framed photos or inspirational quotes to soften the functional look.
- Attach the mail sorter or pen bin near the chalkboard so writing tools are always handy.
- Ensure all items are screwed into wall anchors, as this wall will be touched and used daily.
- Step back and test the flow to make sure you have enough room to write on the boards comfortably.
20 Symmetrical Botanical Window Flank
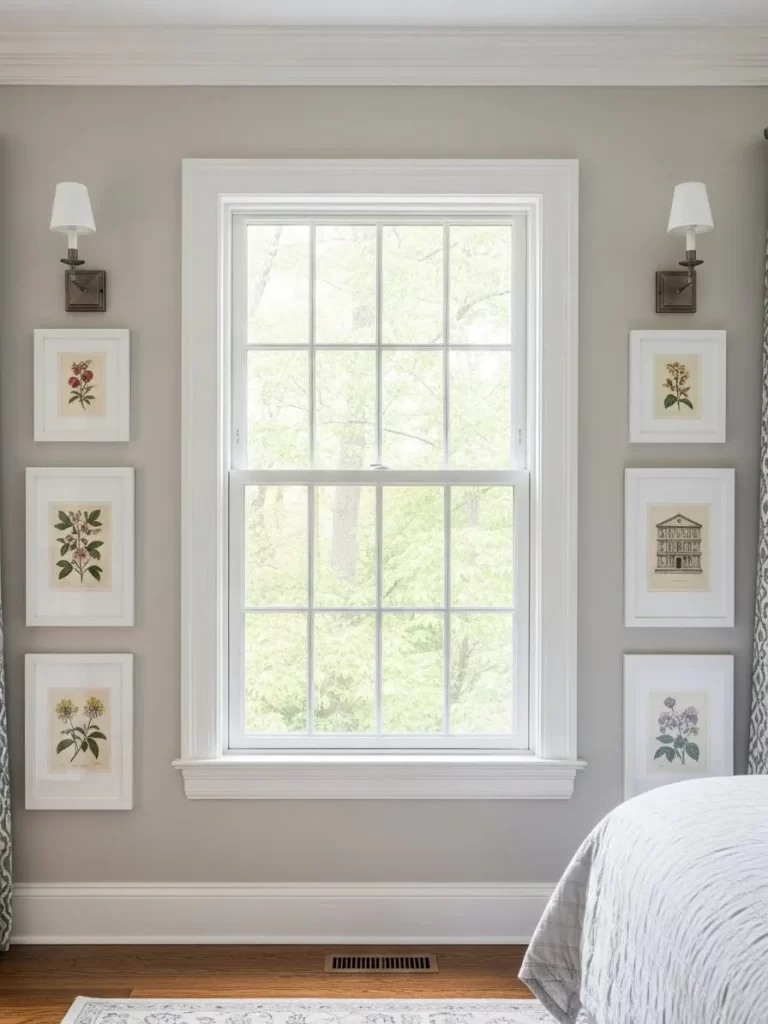
Framing a natural light source helps to pull the beauty of the outdoors into your interior design. This layout uses six matching white frames to flank a central window, creating a balanced and airy feel in a bedroom or sunroom. The delicate botanical prints mirror the trees visible through the glass, making the wall feel like an extension of the garden.
Using a vertical column on either side of the window frame adds a sense of height and architectural dignity to the space. Soft floral sketches in muted tones provide a touch of color without competing with the view. This arrangement works well in rooms with high ceilings where the space around windows often feels empty or neglected.
Matching the frames to the window trim creates a clean and seamless look that feels built into the home. Small wall sconces placed above the columns provide a soft glow that illuminates the art during the evening hours. It is a sophisticated way to turn a simple architectural feature into a stunning and intentional focal point.
Material Required List
- 6 Matching white gallery frames
- Set of 6 botanical or architectural art prints
- Acid-free white mats
- Low-tack painter’s tape
- Pencil
Equipment Required List
- Measuring tape
- Spirit level
- Hammer
- Small picture hanging nails
- Step stool
DIY Instruction Step by Step
- Measure the height of your window and the width of the wall space on both the left and right sides.
- Select art prints that feature a similar color palette to keep the small space looking unified.
- Place the prints in the frames and attach small clear bumpers to the bottom corners of each frame for airflow.
- Mark a vertical line on the wall exactly four inches away from the edge of the window trim on both sides.
- Decide on the vertical center point of the window to use as a horizontal guide for your middle frames.
- Place your first nail on the vertical line at the center height you determined in the previous step.
- Hang the middle frame and use your level to ensure the top edge is perfectly horizontal.
- Measure eight inches upward from the top of the middle frame to mark the spot for your top nail.
- Measure eight inches downward from the bottom of the middle frame to mark the spot for your bottom nail.
- Repeat this identical spacing process on the opposite side of the window to maintain perfect symmetry.
21 Romantic Bedroom Vignette

Softness and intimacy define this small-scale gallery placed directly above a bedside table. This layout uses a collection of thin, light wood frames to showcase wedding photography and delicate floral line art. By clustering the pieces together in an asymmetrical cloud, the arrangement feels organic and deeply personal.
The warm, muted tones of the photographs blend seamlessly with the beige walls and linen headboard. A small, framed Wi-Fi password sign adds a modern, hospitable touch for guests or a simplified daily routine. This collection proves that art does not need to be large to make a significant emotional impact on a room.
Matching the wood finish of the frames to the nightstand creates a unified furniture-to-wall story. It turns a functional corner of the bedroom into a curated sanctuary for memories. This approach is excellent for renters or those with limited wall space who still want to express their unique journey.
Material Required List
- 6 to 8 Small mismatched light wood frames
- Printed wedding or family photographs
- Floral sketches or calligraphy prints
- Small easel or frame stand for the tabletop
- Acid-free mounting tape
- Command adhesive strips
Equipment Required List
- Measuring tape
- Pencil
- Level
- Hammer
- Small finishing nails
DIY Instruction Step by Step
- Select your favorite small photos and art prints that share a soft, romantic color palette.
- Lay the frames on your nightstand to see how they will overlap with your lamp and other decor.
- Start by hanging the largest central frame about six inches above the top of the lamp shade.
- Add smaller frames around the central piece, keeping the gaps between them uneven for a relaxed vibe.
- Use a level on the rectangular frames to ensure they are straight, even in a casual arrangement.
- Place one framed photo on the nightstand itself to bridge the gap between the furniture and the wall.
- Use command strips for the smaller frames to avoid making numerous small holes in the drywall.
- Ensure the Wi-Fi password frame is placed at the bottom for easy visibility and access.
- Stagger the heights of the frames so the tallest point is in the center of the cluster.
- Step back and check that the arrangement does not feel too heavy on one side of the bed.
22 Neutral Nursery Heirloom Wall
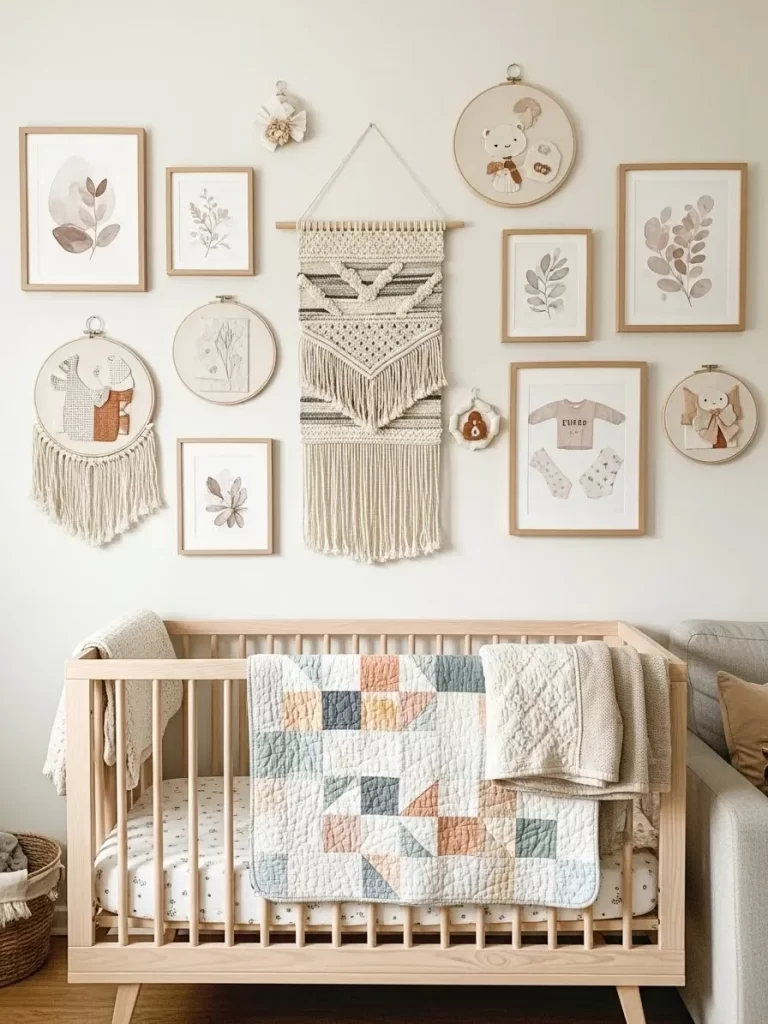
Creating a soothing environment for a newborn involves more than just picking a paint color. This nursery layout combines soft-toned botanical prints with handmade macramé and embroidery hoops to create a tactile wonderland. The earthy beiges and soft sage greens promote a sense of calm and natural beauty.
A large, fringed macramé hanging serves as the central anchor, adding warmth and texture to the hard wall surface. Surrounding it are small framed baby clothes and hand-stitched art that celebrate the arrival of a new family member. This mix of mediums makes the wall feel like a living scrapbook of love and anticipation.
Placing this gallery directly above the crib keeps the visual interest high while the colors remain quiet. It is a beautiful way to incorporate heirlooms and handmade gifts into the room’s permanent architecture. This storied wall will grow with the child, offering a soft and familiar backdrop to their early years.
Material Required List
- 5 Light wood frames with botanical prints
- 1 Large central macramé wall hanging
- 3 Embroidery hoops with neutral fabric art
- 1 Framed baby garment or keepsake
- Small decorative tassels or wall charms
- Kraft paper
Equipment Required List
- Hammer
- Small nails
- Measuring tape
- Pencil
- Level
- Painter’s tape
DIY Instruction Step by Step
- Position the crib against the wall first to determine your horizontal working area.
- Hang the large macramé piece in the exact center, roughly 18 inches above the top rail of the crib.
- Trace your frames and embroidery hoops onto kraft paper and cut out the templates.
- Tape the paper templates around the macramé hanging to find a balanced, floating arrangement.
- Keep the heavier framed items closer to the center and the lighter hoops on the outer edges.
- Use the level to ensure your rectangular frames are perfectly plumb and aligned.
- Mark the nail holes on the paper templates and drive your nails through the paper.
- Remove the paper and hang your items, starting with the framed keepsake for stability.
- Ensure all items are hung securely with extra-wide nail heads so they cannot be easily bumped.
- Add the small tassels or charms in the remaining tiny gaps to finish the whimsical look.
23 Traditional Lit Architecture Gallery

Lighting can transform a simple collection of drawings into a dramatic architectural statement. This layout features three large, classic frames showcasing detailed sketches of historic buildings and cityscapes. The use of dedicated brass picture lights and warm wall sconces creates a museum-like quality that feels prestigious and timeless.
The rich mahogany and gold-leaf frames provide a sturdy, formal boundary for the sepia-toned art. Placing a larger piece next to two smaller stacked frames creates a balanced asymmetry that feels more modern than a strict row. This specific arrangement is wonderful for formal dining rooms or entryways where you want to impress guests.
The warm glow from above highlights the texture of the paper and the fine lines of the ink. It proves that how you light your art is just as important as the art itself. This gallery tells a story of travel and appreciation for the craftsmanship of the past.
Material Required List
- 1 Large dark wood frame with gold detailing
- 2 Medium matching dark wood frames
- Architectural or cityscape sketches in sepia
- 1 Battery-operated brass picture light
- 2 Matching wall sconces with frosted shades
- Heavy-duty wall anchors
Equipment Required List
- Power drill
- Screwdriver
- Level
- Measuring tape
- Pencil
- Hammer
DIY Instruction Step by Step
- Measure your wall space and mark the center point for your primary large frame.
- Install the wall sconces first, placing them about five feet apart to frame the entire gallery area.
- Hang the largest architectural print in the center, slightly offset toward the right sconce.
- Stack the two smaller frames vertically on the left side to balance the visual weight.
- Ensure there is a consistent three-inch gap between the two stacked frames.
- Mount the brass picture light directly above the largest frame to act as the primary spotlight.
- Use the level to make sure all three frames and the light fixture are perfectly horizontal.
- Use heavy-duty anchors for the large frame, as traditional glass can be quite heavy.
- Adjust the sconce shades so the light is directed downward and toward the center of the art.
- Step back and dim the room lights to ensure the gallery lighting is even and inviting.
24 Personal Vision Door Gallery
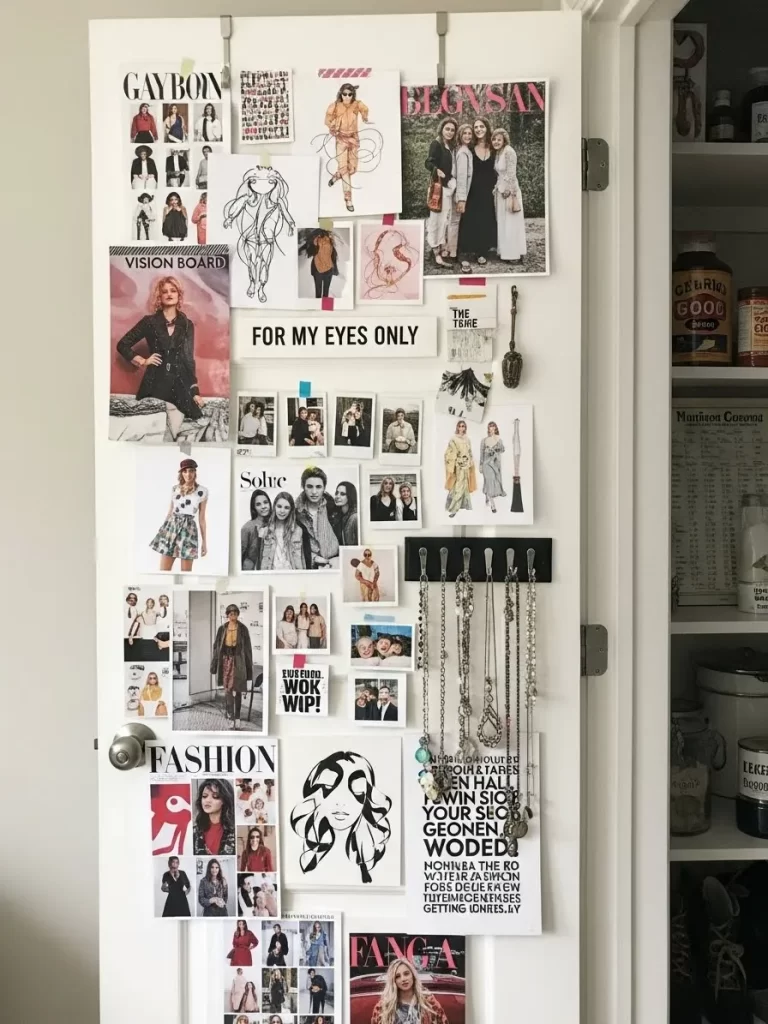
Doors often go unnoticed as design opportunities, but they provide a brilliant vertical stage for a private vision board. This layout utilizes the back of a door to mix fashion photography, sketches, and motivational quotes in an energetic collage. It turns a functional barrier into a source of inspiration that greets you every time you reach for the handle.
Black and white portraits contrast sharply with vibrant pink accents and lush green landscapes. Using a mix of small polaroids and large magazine clippings creates a layered, three-dimensional effect that feels alive. This approach is wonderful for bedrooms or home offices where you want to keep your goals and aesthetic dreams in plain sight.
A small black rack with hooks at the bottom adds a functional layer for jewelry or accessories. This bridges the gap between static art and daily utility, making the display feel integrated into your morning routine. It is a creative way to tell your style story without using up any valuable wall space.
Material Required List
- Assorted magazine clippings and fashion prints
- Personal polaroids and small sketches
- Low-tack washi tape in various colors
- Black wall-mounted jewelry hook rail
- Self-adhesive mounting squares
- Small decorative charms
Equipment Required List
- Measuring tape
- Level
- Scissors
- Pencil
- Small screwdriver (for the hook rail)
DIY Instruction Step by Step
- Clean the surface of your door with a dry cloth to ensure all adhesives stick firmly.
- Begin by placing your largest “anchor” images in the center of the door at eye level.
- Use washi tape on the corners of the prints to add a pop of color and a casual, studio-type vibe.
- Surround the large images with smaller polaroids, overlapping them slightly to create depth.
- Use the level to install the jewelry hook rail about waist-high on the door.
- Ensure the hook rail is screwed in securely if the door is solid wood, or use heavy-duty adhesive for hollow doors.
- Tuck small sketches or handwritten notes into the gaps between the larger fashion spreads.
- Hang your most-used necklaces or keys on the hooks to tie the art into your daily life.
- Step back frequently to ensure the collage feels balanced and covers most of the upper door panel.
- Update the images every few months to keep your vision board fresh and aligned with your current goals.
25 Industrial Stairwell Blueprint Statement
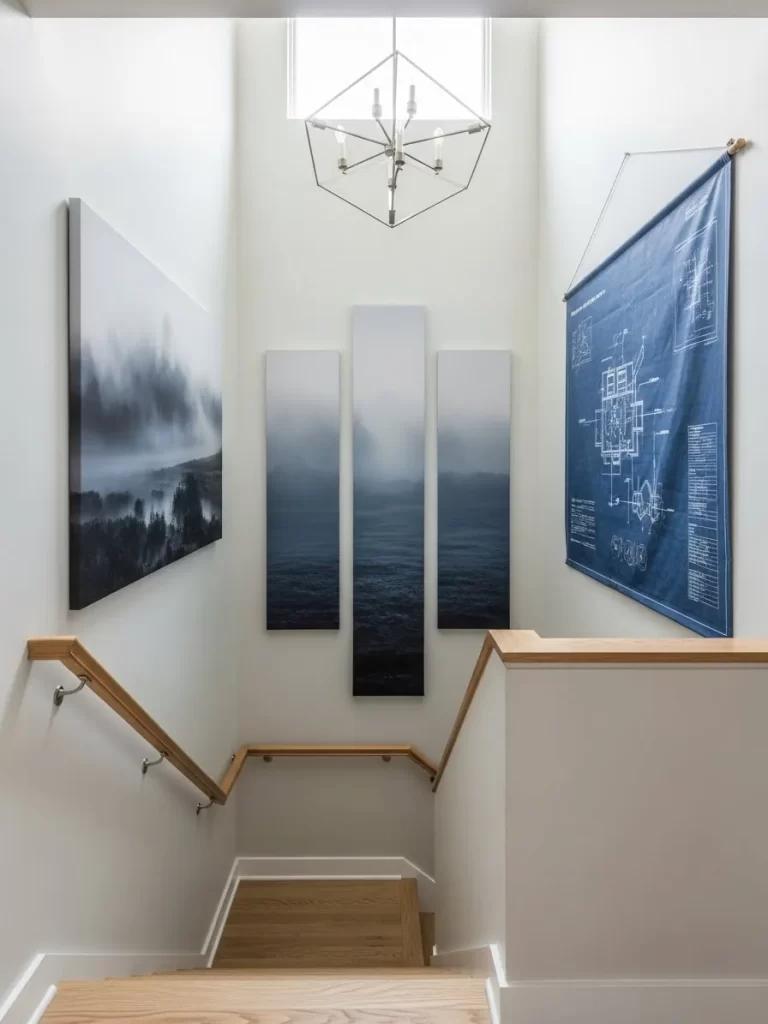
Scale and drama transform a transition space into a high-design experience in this modern stairwell. This layout features a large-scale landscape on the left and a vertical triptych in the center that draws the gaze toward the high ceiling. The deep blues and misty greys of the photography provide a cooling, sophisticated atmosphere that feels incredibly expansive.
A large blue architectural blueprint hangs on the right wall, adding a technical and intellectual layer to the gallery. The contrast between the organic nature scenes and the precise lines of the blueprint creates a compelling visual tension. This specific arrangement works because it respects the height of the stairwell while grounding the space with large, bold pieces.
The thin, dark frames keep the focus entirely on the art without adding unnecessary bulk to the walkway. A geometric chandelier overhead casts even light across all surfaces, ensuring no piece is lost in shadow. This is a masterclass in how to use large-format art to make a narrow space feel grand and intentional.
Material Required List
- 1 Oversized horizontal landscape canvas
- 3 Tall, narrow vertical canvases (matching set)
- 1 Large architectural blueprint or map
- 1 Slim wooden dowel and hanging cord for the blueprint
- Heavy-duty wall anchors and screws
- Laser level
Equipment Required List
- Power drill
- Measuring tape
- Pencil
- Stepladder
- Hammer
DIY Instruction Step by Step
- Use a sturdy stepladder and have a partner assist you when working in high stairwell areas.
- Determine the center point of the main wall facing the stairs for your vertical triptych.
- Mark the height for the center panel of the triptych so it is level with the upper landing.
- Use a laser level to ensure all three vertical panels are perfectly aligned at the top.
- Space the vertical panels exactly four inches apart to maintain a crisp, clean gap.
- Mount the large landscape canvas on the side wall, centering it between the handrail and the ceiling.
- Attach the blueprint to the wooden dowel and tie the hanging cord securely to both ends.
- Install a single sturdy hook on the opposite wall to hang the blueprint, allowing it to drape naturally.
- Ensure all hardware is rated for the weight of the large canvases to prevent any accidents in the walkway.
- Check the alignment from both the bottom and the top of the stairs to ensure the flow looks natural from every angle.
26 Cartographic Study Command Center

Precision and global curiosity define this impressive grid of vintage-style maps above a modern workspace. This layout uses eighteen identical black frames to create a massive, unified display that covers nearly the entire wall. It turns a standard home office into a sophisticated map room that feels both scholarly and incredibly stylish.
Each frame holds a different segment of a global or city map, creating a puzzle-like effect that rewards close inspection. The consistent black frames provide a sharp, professional boundary that grounds the complex detail of the cartography. This arrangement proves that repetition of a single theme can create a much larger impact than a mix of random items.
Placing this grid behind a simple wood desk and leather chair anchors the room as a place of focus and travel. The neutral tones of the maps blend with the warm leather and wood, creating a timeless and masculine aesthetic. It is a powerful way to fill a large wall while maintaining a clean and organized atmosphere.
Material Required List
- 18 Identical black gallery frames
- 18 Sections of a large map or individual vintage-style maps
- Acid-free white mats for each frame
- Large sheet of butcher paper for a wall template
- Painter’s tape
Equipment Required List
- Long spirit level
- Measuring tape
- Pencil
- Hammer
- Box of picture hanging nails
- 1-inch spacer block
DIY Instruction Step by Step
- Lay all eighteen frames on a large floor space to organize the map segments in the correct order.
- Measure the total dimensions of the grid and mark the center of your wall behind the desk.
- Start by hanging the bottom-center frame first, ensuring it is level and at a comfortable height above the desk.
- Use your 1-inch spacer block to mark the position for the frame directly to the left and right.
- Work your way across the bottom row, checking each frame with your level as you go.
- Begin the second row by placing the spacer block on top of the bottom-center frame.
- Continue this process for all three rows, always using the spacer to keep the gaps perfectly uniform.
- Ensure the vertical lines between the columns are perfectly straight from top to bottom.
- Use a pencil to lightly mark any adjustments needed before the final nail is driven in.
- Step back and view the grid from the doorway to ensure the entire “map” looks cohesive and aligned.
27 Mid-Century Minimalist Trio

Creating a focal point in a dining area requires a balance between scale and simplicity. This layout features three large, identical black frames that house minimalist abstract prints. The clean, black-and-white art provides a sophisticated contrast against the warm wood of a mid-century sideboard.
By using wide white matting, the artwork feels expansive and high-end, even if the prints themselves are simple. The horizontal alignment mimics the long line of the furniture below, which helps to ground the room and make it feel more spacious. This arrangement is a testament to the idea that a few large pieces often make a bigger statement than many small ones.
Pairing this gallery with a few sculptural vases and a green plant adds life to the structured display. The organic shapes of the decor soften the hard lines of the frames, creating a harmonious and curated environment. It turns a plain wall into a gallery-worthy scene that anchors the entire dining experience.
Material Required List
- 3 Large identical black frames
- 3 Minimalist abstract art prints
- Pre-cut wide white mats
- Heavy-duty picture hanging wire
- Wall anchors
Equipment Required List
- Measuring tape
- Spirit level
- Pencil
- Power drill
- Phillips head screwdriver
DIY Instruction Step by Step
- Measure the width of your sideboard and divide that number by three to find the general area for each frame.
- Insert your prints into the frames, ensuring they are centered perfectly within the wide mats.
- Determine the height by placing the bottom of the frames about 6 to 10 inches above the sideboard.
- Mark the center point of the sideboard on the wall to align the middle frame.
- Use your level to draw a light horizontal line across the wall where the top of the frames will sit.
- Install the wall anchor for the center frame first and hang it to establish your anchor point.
- Measure exactly 4 inches out from each side of the center frame to mark the spots for the remaining two frames.
- Drill holes for the side anchors, ensuring they stay perfectly on your horizontal pencil line.
- Attach the side frames and use your level to check that all three are perfectly flush with one another.
- Step back to ensure the spacing is even and the overall look feels balanced with the furniture below.
28 Symmetrical Window Botanical Flank
Framing a natural light source helps pull the beauty of the outdoors into your interior design. This layout uses six matching white frames to flank a central window, creating a balanced and airy feel in a bedroom or sunroom. The delicate botanical prints mirror the trees visible through the glass, making the wall feel like an extension of the garden.
Using a vertical column on either side of the window frame adds a sense of height and architectural dignity to the space. Soft floral sketches in muted tones provide a touch of color without competing with the view. This arrangement works well in rooms with high ceilings where the space around windows often feels empty.
Matching the frames to the window trim creates a clean and seamless look that feels built into the home. Small wall sconces placed above the columns provide a soft glow that illuminates the art during the evening. It is a sophisticated way to turn a simple architectural feature into a stunning and intentional focal point.
Material Required List
- 6 Matching white gallery frames
- Set of 6 botanical art prints
- Acid-free white mats
- Low-tack painter’s tape
- Pencil
Equipment Required List
- Measuring tape
- Spirit level
- Hammer
- Small picture hanging nails
- Step stool
DIY Instruction Step by Step
- Measure the height of your window and the width of the wall space on both the left and right sides.
- Center your prints within the white mats and secure them inside the white frames for a professional look.
- Determine the vertical center point of the window to use as a horizontal guide for your middle frames.
- Mark a vertical line on the wall exactly four inches away from the edge of the window trim on both sides.
- Place your first nail on the vertical line at the center height you determined for the middle frames.
- Hang the middle frames on each side first and use your level to ensure they are horizontal.
- Measure eight inches upward from the top of the middle frame to mark the spot for your top nail.
- Measure eight inches downward from the bottom of the middle frame to mark the spot for your bottom nail.
- Repeat this identical spacing process on the opposite side of the window to maintain perfect symmetry.
- Step back to the center of the room to ensure all frames align with each other and the window.
29 Eclectic Collector’s Living Room

This layout celebrates the beauty of an evolving collection by mixing various frame styles, sizes, and subjects. It creates a cozy, lived-in feel that tells a story of travel, family, and personal interests. By spreading the art across a large living room wall, the space feels warm and layered rather than stark.
The arrangement uses a mix of dark wood, gold, and black frames to keep the eye moving across the entire surface. Small sketches nestle next to large landscapes, while an oval mirror or a clock breaks up the rectangular grid. This style is forgiving and allows you to add new pieces as you find them over time.
Grouping the art around a central sofa or a large piece of furniture helps to anchor the room. The diverse colors in the prints provide a palette that you can pull from for your throw pillows and rugs. This gallery turns a standard living area into a rich, personal museum of your own life.
Material Required List
- 15 to 20 Mismatched frames in various finishes
- Diverse art collection (photos, sketches, postcards)
- Small decorative wall clock or mirror
- Kraft paper or old newspapers
- Blue painter’s tape
Equipment Required List
- Hammer
- Assorted picture hanging nails
- Pencil
- Measuring tape
- Level
DIY Instruction Step by Step
- Clear a large space on the floor that matches the dimensions of your living room wall.
- Arrange all your frames and objects on the floor, starting with the largest piece in the center.
- Move the smaller pieces around the central anchor until you find a balance that feels organic.
- Trace each item onto kraft paper and cut out the templates, noting where the hanger is on each.
- Use painter’s tape to stick the paper templates onto your wall, starting from the middle and working out.
- Stand back and adjust the paper templates until the arrangement feels right for the room.
- Hammer your nails directly through the paper templates at the marked hanging points.
- Tear the paper away from the wall, leaving the nails ready for your frames.
- Hang your art pieces one by one, using your level to ensure the rectangular frames are straight.
- Add any non-framed objects like the clock or mirror last to fill in the remaining gaps.
30 Woven Basket Mandala

Natural textures and circular patterns come together to turn a plain sofa wall into a rhythmic masterpiece. This layout uses a collection of hand-woven seagrass and palm baskets of varying sizes to create a sunburst effect. The earthy browns, blacks, and creams add organic warmth that balances the clean lines of modern furniture.
By arranging the largest tray in the center and spiraling outward with smaller bowls, you create a sense of movement and energy. This three-dimensional art style is much lighter than heavy frames, making it a safe and airy choice for high-traffic seating areas. The different weaving patterns tell a story of global craftsmanship and sustainable design.
Matching the toss pillows on the sofa to the dark accents in the baskets creates a unified look. This arrangement proves that you do not need traditional paper art to make a sophisticated statement in a living room. It is a tactile, budget-friendly way to fill a large space with soul and character.
Material Required List
- 20 to 25 Woven wall baskets in varying sizes and patterns
- Clear fishing line or thin floral wire
- Small adhesive wall hooks or thin finishing nails
- Large sheet of butcher paper (for the template)
- Pencil
Equipment Required List
- Hammer
- Measuring tape
- Scissors
- Step ladder
- Level (to ensure the center basket is perfectly aligned with the sofa)
DIY Instruction Step by Step
- Lay all your baskets on the floor in front of your sofa to plan the circular “mandala” shape.
- Place the largest, most detailed basket in the middle to serve as the visual heart of the display.
- Surround the center piece with medium baskets, rotating them to show off different weaving directions.
- Fill the outer edges with the smallest woven trays to create a soft, tapering boundary for the art.
- Trace the final arrangement onto a large sheet of butcher paper and mark the center of each basket.
- Tape the butcher paper template to the wall, ensuring it is centered over the back of the sofa.
- Tap a small finishing nail through each center mark on the paper template.
- Carefully tear the paper away from the wall, leaving the nails in their designated spots.
- Loop a small piece of fishing line through the back of the basket weave if it lacks a hanging loop.
- Hang each basket onto its nail, starting from the center and working outward to preserve the symmetry.
31 Midnight Noir Star Chart

Deep charcoal walls serve as a dramatic stage for this cosmic collection. This layout uses a cluster of black frames to highlight moon phases and celestial sketches, creating a moody and intellectual vibe. A single gold frame in the center breaks the monochromatic pattern, drawing the eye toward a bold abstract piece that anchors the entire display.
Low lighting from a small table lamp enhances the mysterious atmosphere of the room. The dark background allows the white details in the star charts to pop, making the wall feel like a window into the night sky. This arrangement is a beautiful choice for a quiet study or a cozy bedroom corner.
Organizing the frames in a loose, rectangular cluster keeps the look sophisticated and organized. By mixing vertical and horizontal orientations, you add a sense of movement to the wall without cluttering the space. It is a powerful way to use high contrast to tell a story of wonder and discovery.
Material Required List
- 10 Black frames in various sizes
- 1 Medium gold frame for the center
- Celestial and lunar art prints
- Black and white abstract sketch
- Heavy-duty hanging strips
Equipment Required List
- Level tool
- Measuring tape
- Pencil
- Small hammer
- Finishing nails
DIY Instruction Step by Step
- Lay out your frames on a flat surface to find the best arrangement for your wall size.
- Place the gold frame in the very center and surround it with the black frames.
- Start hanging the central gold frame first at eye level to establish your anchor.
- Position the largest black frames directly above and below the gold piece.
- Work outward to the left and right, placing smaller frames in the remaining gaps.
- Use your level tool to ensure every frame is perfectly straight against the dark paint.
- Maintain a consistent two-inch gap between every frame to keep the cluster looking tidy.
- Drive your nails into the wall at the measured points for each specific frame size.
- Mount your frames and check the alignment one last time from a distance.
- Dust the glass surfaces with a microfiber cloth to ensure the black art stays crisp.
32 Golden Botanical Specimen Wall
Elevate the classic plant print by using slim brass frames that allow the art to “float” against the wall. This layout features a variety of fern and leaf specimens, each captured in a delicate gold border. The thin frames create a sense of lightness and elegance that works beautifully in a bright dining room or hallway.
Arranging the frames in an asymmetrical cloud makes the collection feel like an organic growing vine. By mixing large statement leaves with tiny sprigs, you create a visual rhythm that mimics the diversity of nature. The metallic finish of the brass adds a touch of luxury to the simple green and white palette.
This display turns a blank wall into a serene indoor garden that requires zero maintenance. The glass-on-glass look of floating frames adds depth, as the wall color peeks through the edges of each piece. It is a refined way to bring the outdoors inside for a fresh and timeless home story.
Material Required List
- 15 Slim brass floating frames in assorted sizes
- Pressed botanical prints or high-quality leaf sketches
- Clear adhesive dots for securing art inside glass
- Brass picture hooks
Equipment Required List
- Level
- Measuring tape
- Pencil
- Small hammer
- Soft cloth
DIY Instruction Step by Step
- Select a variety of leaf shapes and sizes to ensure the gallery has enough visual interest.
- Open your floating frames and center each print between the two sheets of glass.
- Use a tiny clear adhesive dot to keep the paper from sliding once the frame is closed.
- Plan your layout on the floor, starting with the largest frames in the center-left area.
- Place smaller frames around the edges to create a “drifting” effect upward and to the right.
- Mark the top center of each frame’s position on the wall with a light pencil dot.
- Hammer the brass hooks into the wall at your marked points.
- Hang the frames and use the level to make sure they are not tilted.
- Space the frames about one to three inches apart to keep the arrangement feeling airy.
- Wipe away any fingerprints from the glass and brass to maintain the high-shine look.
33 The Hall of Fame Sports Gallery

Turn a basement or game room into a professional tribute with this structured sports memorabilia wall. This layout uses large black shadow boxes to showcase jerseys, signed baseballs, and stadium blueprints. The deep navy matting inside the frames adds a sense of prestige and coordinates with the team colors.
Using a symmetrical grid ensures that a large number of items can be displayed without looking like a cluttered locker room. Placing a large jersey in the center creates a focal point that anchors the smaller photos and balls. This system protects your most valuable keepsakes from dust while turning them into high-end decor.
Adding a wooden trunk and a vintage bat at the base of the wall bridges the gap between the art and the room. This makes the gallery feel like a complete installation rather than just hung pictures. It is the best way to celebrate your passion for the game while keeping your home looking sharp and intentional.
Material Required List
- 3 Large jersey shadow boxes
- 4 Medium frames for stadium blueprints
- 2 Small shadow boxes with ball mounts
- Printed sports photography
- Acid-free mounting pins
Equipment Required List
- Power drill
- Wall anchors and screws
- Long spirit level
- Measuring tape
- Pencil
DIY Instruction Step by Step
- Use a stud finder to locate the strongest points in your wall to support the weight of the instruments.
- Mark the positions for the guitar hangers first, as these are your largest and heaviest items.
- Install the guitar hangers using the power drill and heavy-duty anchors for maximum security.
- Arrange your framed sheet music and soundwave prints on the floor to fill the spaces between the instruments.
- Place the smaller violin and ukulele hooks in the remaining gaps, staggering their heights.
- Mount the frames using a level to ensure the vertical lines of the grid stay crisp.
- Ensure there is enough clearance around each instrument so they can be removed easily from the hooks.
- Hang the guitars by their headstocks and check that they sit straight against the wall.
- Place the smaller instruments on their hooks, ensuring the bows are tucked neatly behind them.
- Wipe down the instruments with a soft cloth to keep the wood and strings gleaming under the lights.
34 Washi Tape Studio Collage
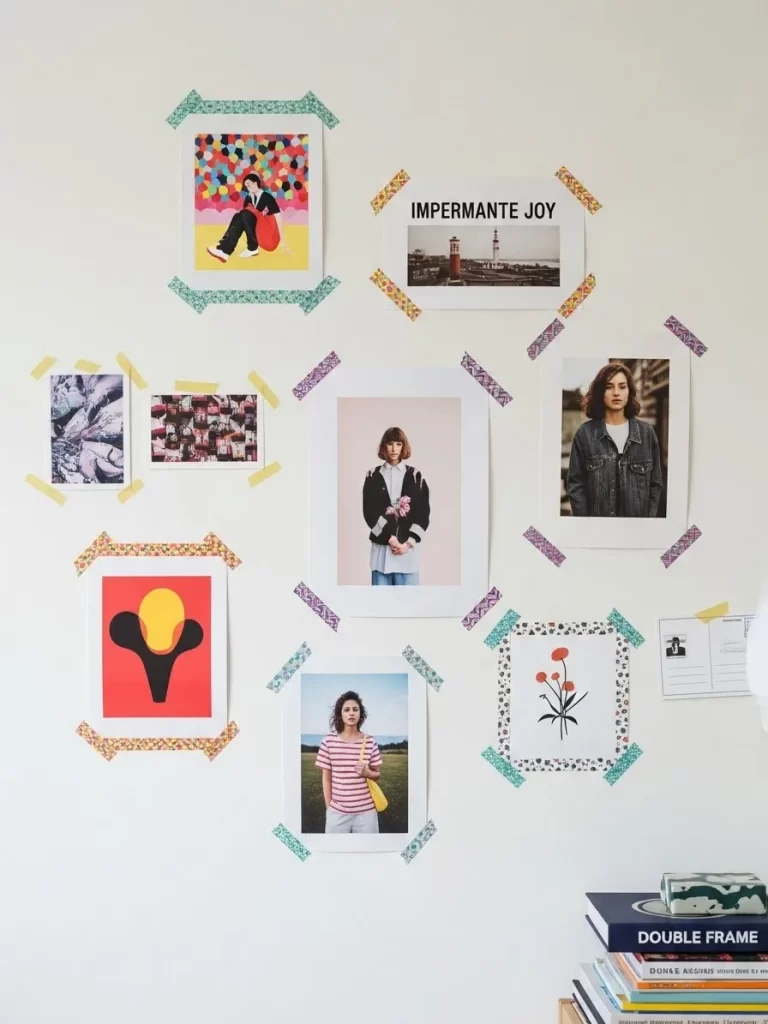
Renters and students will love this low-commitment way to display a vibrant mix of inspiration. This layout uses colorful washi tape instead of frames to secure photos and postcards directly to the wall. It creates a casual, “in-progress” look that is common in fashion and design studios.
Mixing bright pop-art prints with minimalist portraits gives the wall an energetic and creative pulse. By staggering the heights and angles of the images, you make the display feel personal and spontaneous. This method allows you to change your art as often as your mood without ever damaging the paint.
Using different patterns of tape adds an extra layer of color and texture to the wall story. You can coordinate the tape colors with the art to make each piece feel like it has its own “custom frame.” This is a fun and budget-friendly way to fill a large space with big personality and zero stress.
Material Required List
- Variety of art prints, photos, and postcards
- 5 to 6 Rolls of patterned washi tape
- Sticky putty (optional for heavier cardstock)
- Scissors
Equipment Required List
- Measuring tape (to find the general center)
- Pencil (to mark corners lightly)
- Level (only if you want a straight grid)
DIY Instruction Step by Step
- Pick a color theme for your art to help the collage look intentional rather than messy.
- Lay all your pieces on the floor to find a balanced mix of sizes and colors.
- Start with the largest print in the center of your wall at eye level.
- Cut four short strips of washi tape and place them diagonally across the corners of the print.
- Add your next image slightly to the side, overlapping it if you want a layered look.
- Use different colors of tape for each image to keep the eye moving across the display.
- Place smaller postcards and notes in the gaps to fill out the shape of the collage.
- Ensure you press the tape firmly onto the wall to prevent the images from curling over time.
- Step back to see if any areas look too empty or too crowded.
- Easily peel and move any piece if the arrangement feels off balance.
35 The Timeless Clock Gallery
Turn your home office into a sophisticated map of time with this unique collection of vintage and modern clocks. This layout uses over a dozen timepieces of various shapes—from round pocket-watch styles to ornate cuckoo clocks. The mix of dark wood and metallic finishes creates a rich, scholarly atmosphere that encourages productivity.
Placing two large circular mirrors in the center of the clock cluster adds light and depth to the wall. This prevents the wall from feeling too heavy with dark wood and helps reflect the light from your desk lamp. Each clock tells a story of a different era, making the room feel like a private museum of history and engineering.
Organizing the clocks in an organic cloud keeps the display from looking like a retail store shelf. By varying the heights and sizes, you create a sense of organized chaos that feels curated and smart. It is a brilliant way to fill a large office wall with items that are both functional and incredibly stylish.
Material Required List
- 12 to 15 Clocks in various styles and sizes
- 2 Large round framed mirrors
- Fresh batteries for all clocks
- Small wall hooks
Equipment Required List
- Hammer
- Measuring tape
- Pencil
- Level (for the mirrors)
- Soft dusting cloth
DIY Instruction Step by Step
- Gather a mix of battery-operated clocks so you don’t have to worry about winding them all.
- Place the two large mirrors in the center of your wall area about six inches apart.
- Use your level to ensure the mirrors are perfectly straight, as they are the anchors for the wall.
- Start hanging the largest clocks around the mirrors to establish the main shape of the gallery.
- Fill in the gaps with smaller pocket-style clocks and unique shapes like cuckoo clocks.
- Ensure the cuckoo clock has enough vertical space for its weights and pendulum to hang freely.
- Set each clock to a different time zone for a “world traveler” vibe, or keep them all in sync.
- Use a pencil to mark the nail points so you don’t make unnecessary holes.
- Step back frequently to ensure the variety of wood tones is spread evenly across the wall.
- Wipe down the glass faces and wood frames once everything is securely hung.
36 Shabby Chic Empty Frame Cluster

Vintage charm meets artistic minimalism in this airy arrangement of open frames. This layout uses a collection of weathered white and gold frames without any glass or artwork inside, allowing the wall’s texture to become part of the design. It creates a romantic, antique atmosphere that feels light and effortless on a patterned wallpaper background.
A small dried floral wreath placed inside one of the larger frames adds a touch of organic life to the wood. By mixing ornate, crown-molded frames with simpler rectangular shapes, you achieve a curated look that feels like a Parisian flea market find. This style is excellent for those who appreciate the craftsmanship of the frames themselves.
The monochromatic white and cream tones keep the display from feeling cluttered or heavy. It turns a blank wall into a storied architectural feature that whispers of history and grace. This approach proves that sometimes the boundary of the art is enough to tell a beautiful story.
Material Required List
- 10 to 12 Assorted vintage frames in white, cream, and gold
- 1 Small dried flower or grapevine wreath
- Fine-grit sandpaper (for distressing)
- White or cream chalk paint
- Floral wire
Equipment Required List
- Small hammer
- Finishing nails
- Measuring tape
- Pencil
- Soft brush
DIY Instruction Step by Step
- Hunt for mismatched frames at thrift stores or yard sales, focusing on interesting textures and carvings.
- Paint any dark frames with chalk paint and lightly sand the edges once dry to create a distressed look.
- Remove all glass, backings, and old staples from the frames so only the wood skeletons remain.
- Lay the frames on the floor to find a balanced arrangement where some edges overlap slightly.
- Place your largest, most ornate frame in the center-right position to anchor the cluster.
- Use floral wire to attach the small wreath to the top of a medium-sized frame.
- Mark the wall with a pencil where the top center of each frame will rest.
- Drive a small finishing nail into each mark, keeping the nail heads discreet.
- Hang the frames, ensuring they sit flush against the wall for a clean profile.
- Adjust the overlaps until the shapes feel connected and the floral accent is clearly visible.
37 The Virtuoso Music Room Gallery
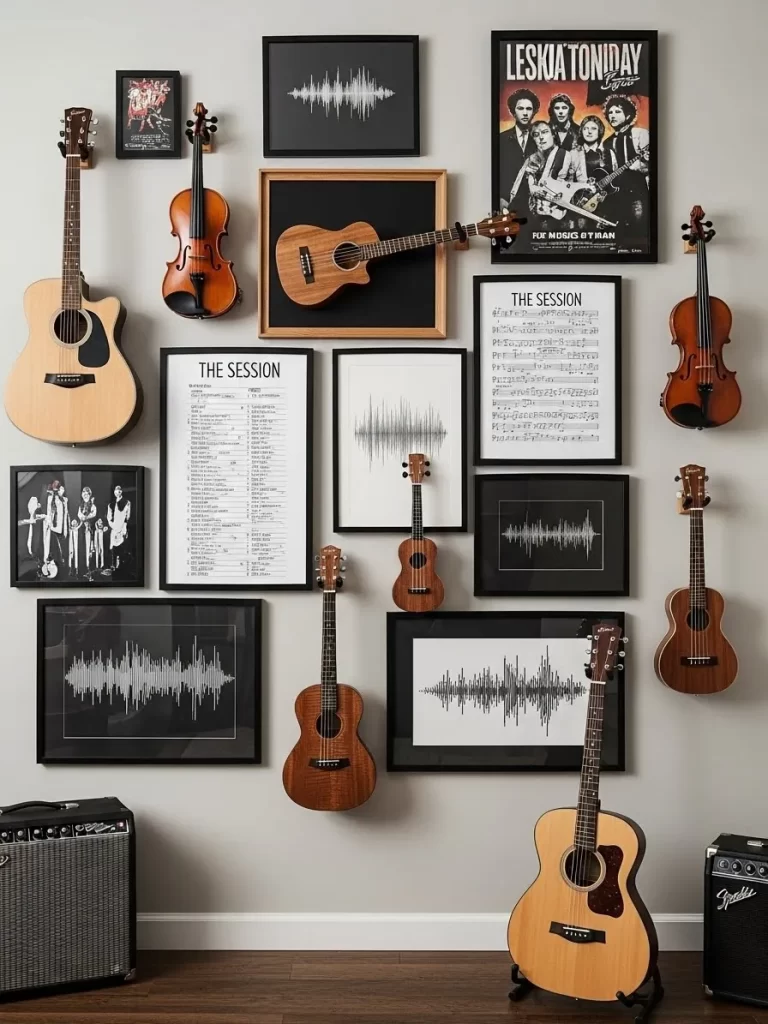
Harmonize your living space by turning your musical instruments into the main attraction. This layout mixes actual guitars, violins, and ukuleles with framed sheet music and soundwave art. It creates a rhythmic and soulful wall that celebrates the technical beauty of sound and the physical grace of wood.
Black and white posters of famous sessions provide a historical backdrop for the modern instruments. Using specialized wall mounts ensures that your guitars are safe while remaining ready for a spontaneous jam session. The contrast between the dark frames and the warm wood of the instruments makes the room feel like a professional recording studio.
Organizing the pieces in a dense, vertical grid makes the most of high ceilings. Small ukuleles and violins fill the gaps between larger acoustic guitars, creating a full and energetic visual melody. This gallery tells a story of a life lived through song and dedicated to the craft of music.
Material Required List
- 3 Acoustic or electric guitars
- 2 Violins or violas
- 3 Ukuleles
- Variety of black frames for sheet music and posters
- Heavy-duty guitar wall hangers
- Stringed instrument wall hooks
Equipment Required List
- Power drill
- Stud finder
- Wall anchors and screws
- Level
- Measuring tape
- Pencil
DIY Instruction Step by Step
- Use a stud finder to locate the strongest points in your wall to support the weight of the instruments.
- Mark the positions for the guitar hangers first, as these are your largest and heaviest items.
- Install the guitar hangers using the power drill and heavy-duty anchors for maximum security.
- Arrange your framed sheet music and soundwave prints on the floor to fill the spaces between the instruments.
- Place the smaller violin and ukulele hooks in the remaining gaps, staggering their heights.
- Mount the frames using a level to ensure the vertical lines of the grid stay crisp.
- Ensure there is enough clearance around each instrument so they can be removed easily from the hooks.
- Hang the guitars by their headstocks and check that they sit straight against the wall.
- Place the smaller instruments on their hooks, ensuring the bows are tucked neatly behind them.
- Wipe down the instruments with a soft cloth to keep the wood and strings gleaming under the lights.
38 The Heritage Cameo Column
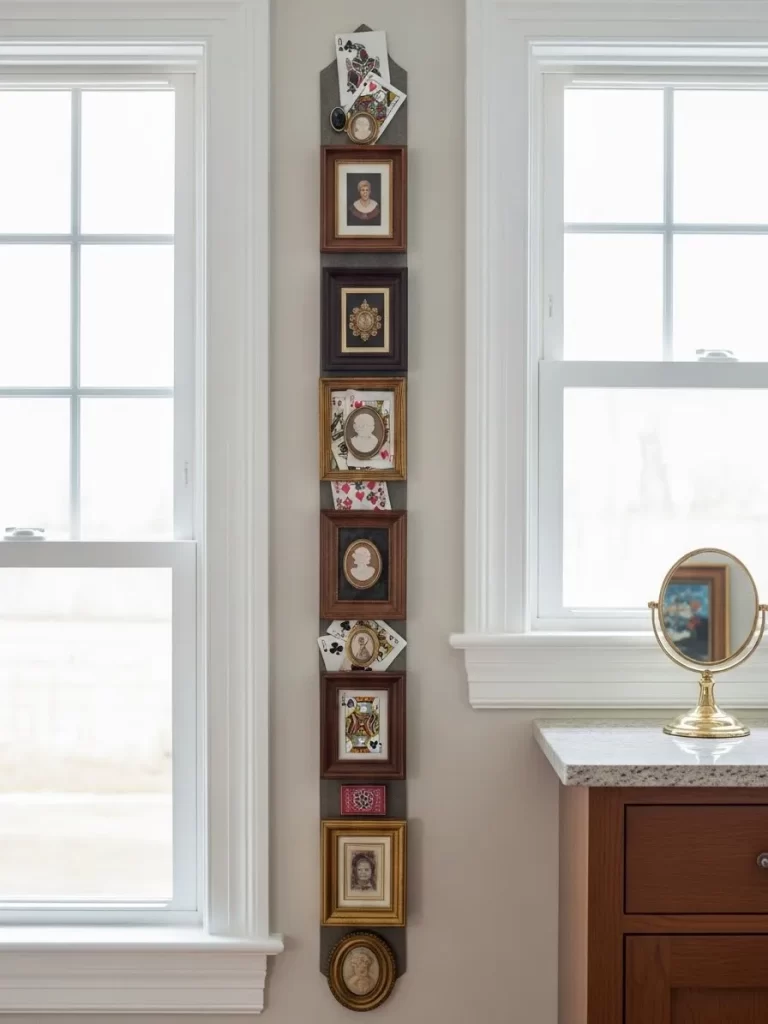
Narrow wall sections between windows provide a grand opportunity for a vertical story. This layout uses a series of small, dark wood frames to house classic silhouette cameos and vintage playing cards. The stacked orientation draws the eye upward, making the most of a slim architectural space while adding a sense of formal dignity.
Rich mahogany tones and gold inner borders give the collection a prestigious, heirloom quality. By tucking antique playing cards behind the frames, you add a layer of whimsy and personality to the traditional portraits. This arrangement works beautifully in a dressing room or a formal hallway where detail is appreciated up close.
A small gold-framed mirror on a nearby counter reflects the gallery, doubling its visual impact. The vertical line creates a sense of order and history that feels grounded and intentional. It proves that even the smallest spaces in your home can hold a powerful narrative when curated with care.
Material Required List
- 6 to 8 Small mismatched dark wood frames
- Silhouette cameo prints or hand-cut profiles
- Vintage playing cards (Kings and Queens)
- 1 Long wooden or felt mounting strip (optional for easy alignment)
- Small brass tacks
Equipment Required List
- Hammer
- Measuring tape
- Pencil
- Level
- Super glue (for card accents)
DIY Instruction Step by Step
- Select frames that are roughly the same width but vary slightly in height or decorative detail.
- Place your silhouette portraits inside the frames, ensuring they are centered and straight.
- Glue a vintage playing card to the top or side of a few frames so they peek out from behind the wood.
- Measure the total height of the wall space between your windows to find the center line.
- Mark a vertical line with your pencil using a level to keep the column perfectly straight.
- Start by hanging the top frame about six inches below the ceiling or window molding.
- Space each subsequent frame exactly two inches below the one above it to create a rhythmic flow.
- Use small brass tacks to secure the frames to the wall, keeping the hardware nearly invisible.
- Ensure each frame is centered on your vertical pencil line as you move down the wall.
- Step back and check that the column feels balanced between the two natural light sources.
39 Interactive Chalkboard Gallery

Turn your wall into a living workshop with this creative blend of art and handwritten notes. This layout features a large matte black chalkboard wall as the canvas for a mix of framed floral prints and white chalk sketches. It allows for a constant dialogue between permanent art and fleeting thoughts, making the space feel incredibly dynamic.
Frames are mounted directly onto the chalkboard, surrounded by hand-drawn borders and arrows that explain the “story” of each piece. This playful approach is fantastic for a family room or a creative home office where ideas are always flowing. The stark contrast of white chalk on a black background makes every colors in the art prints stand out.
You can update the text, draw new frames, or add guest notes whenever the mood strikes. This gallery doesn’t just sit on the wall; it invites everyone in the house to participate in the design. It is a brilliant way to keep your home decor feeling fresh, fun, and completely uninhibited.
Material Required List
- Black matte chalkboard paint
- 6 to 8 White wooden frames
- Vibrant floral or character art prints
- Dustless white chalk or chalk markers
- Small picture hanging strips (adhesive style works best on paint)
Equipment Required List
- Paint roller and tray
- Painter’s tape
- Level
- Pencil
- Eraser or damp cloth
DIY Instruction Step by Step
- Prep your wall by sanding it smooth and applying two even coats of matte black chalkboard paint.
- Allow the paint to cure fully for at least 48 hours before writing or hanging anything on it.
- Use adhesive hanging strips to mount your white frames in a scattered, energetic arrangement.
- Place your art prints inside the frames, choosing colors that will pop against the black backdrop.
- Use chalk to draw ornate, imaginary “frames” around the empty spaces on the wall.
- Add arrows and handwritten labels to describe the art or leave messages for family members.
- Use the level to make sure your text stays horizontal, or write at angles for a more casual vibe.
- Keep a damp cloth nearby to easily wipe away and change your chalk drawings whenever you like.
- Encourage guests to sign the wall or draw their own additions during gatherings.
- Season the chalkboard by rubbing a piece of chalk sideways over the whole surface and wiping it off for a classic look.
40 The Solitary Spotlight Portrait
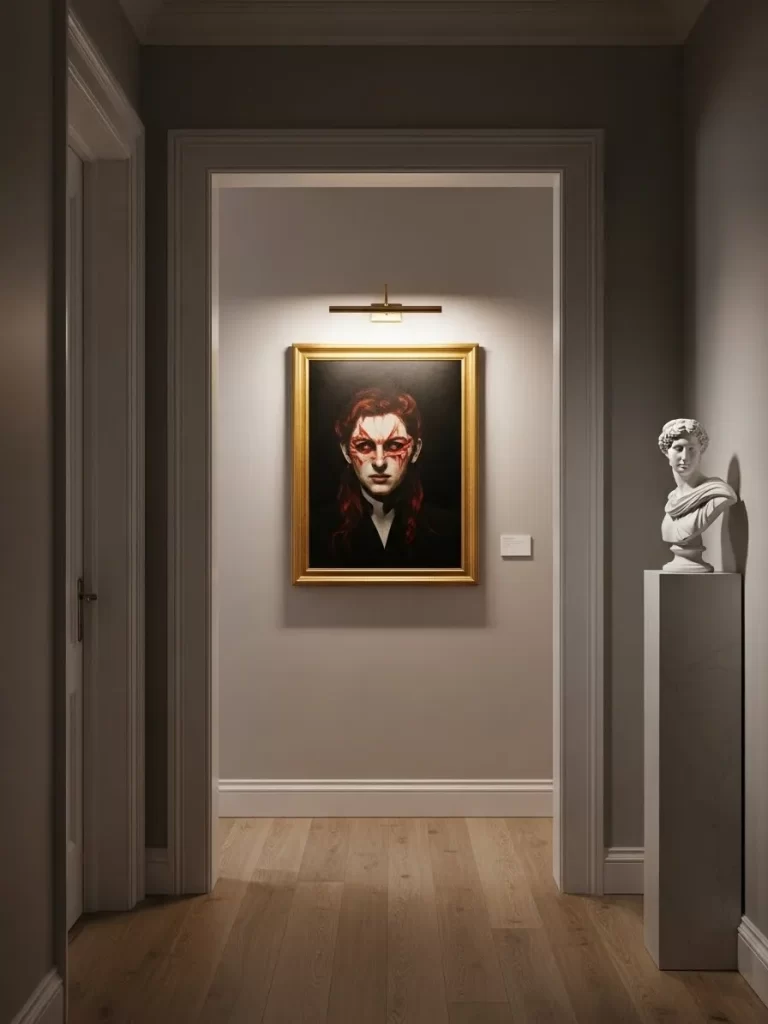
Sometimes a single, powerful image says more than a dozen smaller pieces. This layout features one oversized, dramatic portrait placed at the end of a long hallway or in a dedicated niche. The moody lighting and gold frame turn the art into a hauntingly beautiful focal point that commands immediate attention.
A dedicated brass picture light mounted above the frame ensures the portrait is the only thing glowing in the dim corridor. This museum-style approach creates an atmosphere of mystery and high drama as you move through the home. It treats the art as a true masterpiece, giving it the breathing room it needs to be fully appreciated.
Pairing the portrait with a simple white pedestal and a classical bust nearby adds to the gallery-like feel. This arrangement tells a story of refined taste and a love for the theatrical. It is a bold choice that transforms a functional hallway into a sophisticated and unforgettable journey.
Material Required List
- 1 Oversized gold leaf frame
- 1 Large-scale moody portrait (canvas or high-quality print)
- 1 Battery-operated or hardwired brass picture light
- 1 Slim white display pedestal
- 1 Classical plaster or marble bust
- Heavy-duty wall anchors
Equipment Required List
- Power drill
- Stud finder
- Level
- Measuring tape
- Screwdriver
- Pencil
DIY Instruction Step by Step
- Find the natural focal point at the end of a hallway or in the center of a large, blank wall.
- Use a stud finder to ensure you have a strong mounting point for the oversized frame.
- Install the heavy-duty wall anchors and mount the portrait so the eyes are at average eye level.
- Center the brass picture light directly above the frame, following the manufacturer’s instructions for height.
- Ensure the light is tilted to wash the entire surface of the art without creating a harsh glare.
- Place the white pedestal about two feet away from the wall to one side of the portrait.
- Center the classical bust on the pedestal to create a three-dimensional layer to the display.
- Use a level to ensure the frame is perfectly straight, as any tilt will be obvious in a simple layout.
- Keep the surrounding wall space completely clear to maintain the focus on the central image.
- Step to the other end of the hallway to check how the spotlighting looks from a distance.
41 Neon Typographic Bedroom Hub
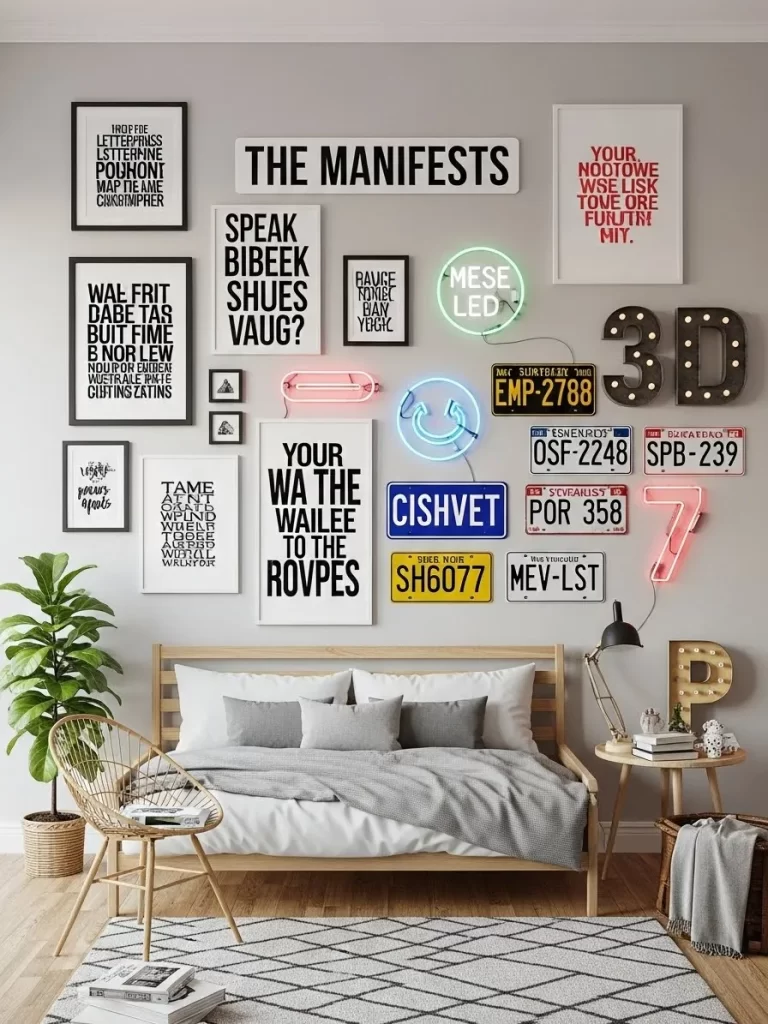
Electric energy meets modern minimalism in this bold bedroom statement. This layout features a vibrant collection of neon signs, vintage license plates, and oversized typography posters that turn the wall above the bed into a glowing story. By mixing glowing light with flat black-and-white prints, you create a sense of depth that feels urban and sophisticated.
Large marquee letters and license plates from different regions add a layer of travel-inspired nostalgia. The variety of fonts and sizes keeps the display from feeling static, mimicking the chaotic beauty of a city street. This arrangement works perfectly for those who want their bedroom to feel like a boutique hotel or a creative studio.
A light wood bed frame and neutral bedding provide a calm base that allows the wall to shine. The warm glow from the neon signs replaces traditional bedside lamps, casting a soft and colorful light across the room. It is a brilliant way to showcase your personality through light and language.
Material Required List
- 4 Typography posters in black frames
- 3 Neon wall signs (Mese, Cishvet, and a smiley face)
- 5 Vintage license plates
- Large marquee letters (3D and P)
- Red neon “7” sign
- Command heavy-duty mounting strips
Equipment Required List
- Level
- Measuring tape
- Pencil
- Small screwdriver (for neon mounts)
- Hammer
DIY Instruction Step by Step
- Measure the width of your headboard and center the largest typography poster directly above it.
- Mount the neon signs using their specific hardware, ensuring cords are tucked neatly behind the posters.
- Position the license plates in small clusters around the neon signs to ground the glowing elements.
- Place the marquee “3D” and “P” letters on the right side to balance the weight of the large left-side frames.
- Use a level to ensure the main text posters are perfectly straight, as they act as the wall’s grid.
- Install the red neon “7” near the marquee letters to add a final pop of warm light.
- Use adhesive mounting strips for the license plates to avoid making numerous small holes.
- Plug in all neon elements to a single power strip with a remote for easy on-and-off access.
- Step back to check that the colors are distributed evenly across the entire wall area.
- Dust the neon tubes gently with a soft cloth to keep the glow bright and clear.
42 The Grand Library Exhibition

High ceilings and architectural molding provide the perfect backdrop for a museum-style display. This layout utilizes two levels of a grand library to showcase a series of matching black-framed etchings. By following the horizontal lines of the balcony, the gallery emphasizes the impressive scale of the room while maintaining a sense of classic order.
The top row features larger, wider prints that align with the upper windows, while the middle row creates a continuous band of art above the seating area. Using identical frames and cream-colored mats gives the collection a prestigious and scholarly feel. This approach is excellent for large collections that share a similar medium or historical theme.
Placing smaller, nested frames on the lower wall near the desk creates a more intimate viewing experience. The contrast between the formal grid above and the casual furniture below makes the room feel lived-in yet refined. It is a masterclass in using repetition to fill a massive space with quiet elegance.
Material Required List
- 18 Matching black frames with cream mats
- Series of etchings or ink sketches
- Long-span picture hanging wire
- Heavy-duty wall anchors
- Laser level
Equipment Required List
- Power drill
- Step ladder
- Measuring tape
- Pencil
- Hammer
DIY Instruction Step by Step
- Measure the length of the balcony and divide the space to determine how many frames will fit in the band.
- Use a laser level to project a perfectly straight line across the entire width of the upper and middle walls.
- Start by hanging the center frame of the middle row to establish your primary anchor point.
- Measure a consistent four-inch gap between each frame as you work your way toward the corners.
- Install the top row of larger frames, aligning their vertical centers with the frames directly below them.
- Use heavy-duty anchors for every frame, as high-traffic library areas require extra security.
- For the lower wall, group four smaller frames in a two-by-two grid to fill the space above the desk.
- Ensure all frames are hung at the same depth so they look like a flat architectural feature from the floor.
- Step to the opposite side of the room to verify that the long horizontal lines look straight.
- Use a microfiber duster on an extension pole to keep the high-mounted frames clean.
43 Canine Companion Entryway
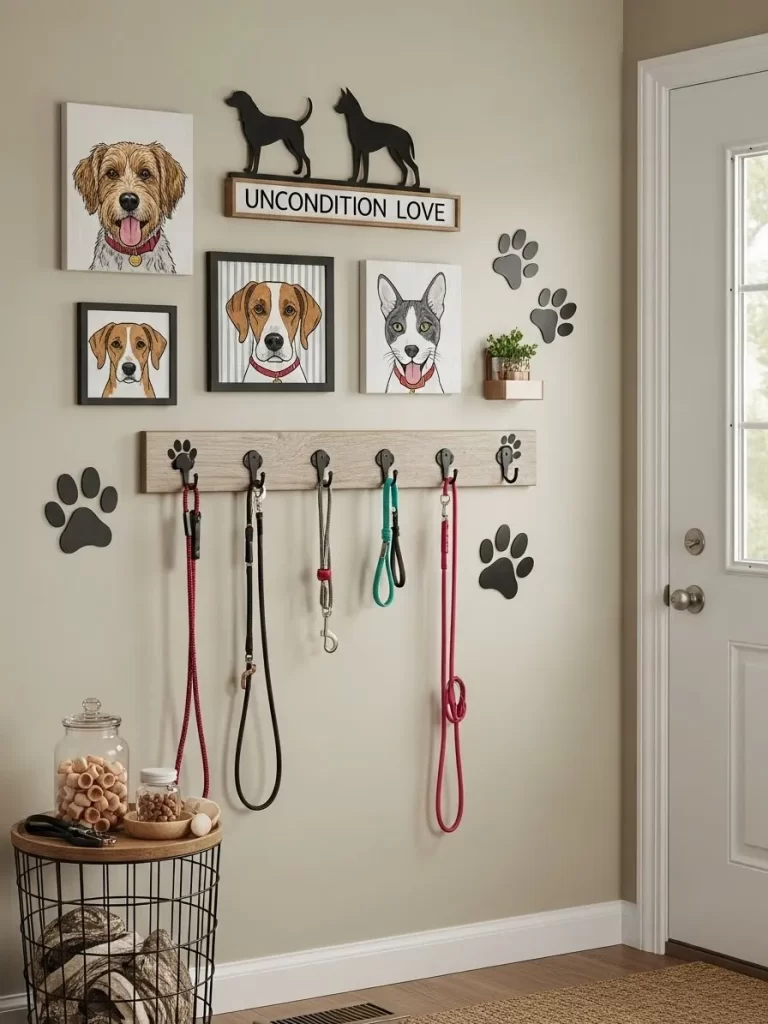
Celebrate your furry friends with a wall that is both adorable and highly functional. This layout combines colorful pet portraits with paw-print wall decals and a sturdy wooden lead rack. It turns a simple mudroom or entryway into a dedicated station that makes walking the dog a more organized and joyful routine.
Framed canvases of different breeds in a pop-art style provide a cheerful welcome to anyone entering the home. The inclusion of an “Unconditional Love” sign anchors the theme, while small wall-mounted planters add a touch of fresh greenery. This arrangement proves that functional zones can be just as stylish as formal living rooms.
A lower wooden rail with black hooks keeps leashes, harnesses, and bags tidy and off the floor. This bridges the gap between art and utility, making the wall a central hub for pet care. It is a heartwarming way to tell the story of the animals who make your house a home.
Material Required List
- 4 Square pet portraits (canvas or framed prints)
- “Unconditional Love” wooden sign
- Wooden hook rail with black metal hooks
- 5 Paw-print wall decals
- Small wall-mounted copper planter
- Dog treats in a glass jar (for the side table)
Equipment Required List
- Power drill and wall anchors
- Level
- Hammer
- Pencil
- Measuring tape
DIY Instruction Step by Step
- Install the wooden hook rail first, placing it about four feet from the floor for easy reach.
- Center the largest pet portrait directly above the middle of the hook rail.
- Position the “Unconditional Love” sign at the top center of the display to act as a header.
- Arrange the remaining three pet portraits around the central one in a loose, staggered pattern.
- Mount the copper planter next to the portraits to add a 3D element and a pop of metallic color.
- Peel and stick the paw-print decals in a “walking” pattern across the blank spaces of the wall.
- Use a level to ensure the hook rail and the main portrait are perfectly horizontal.
- Secure all hanging art with anchors, as this is a high-movement area where leashes will be grabbed.
- Place a small wire table below the rack to hold a jar of treats and other pet essentials.
- Hang your colorful leashes on the hooks to complete the functional part of the gallery.
44 Mid-Century Minimalist Silhouette
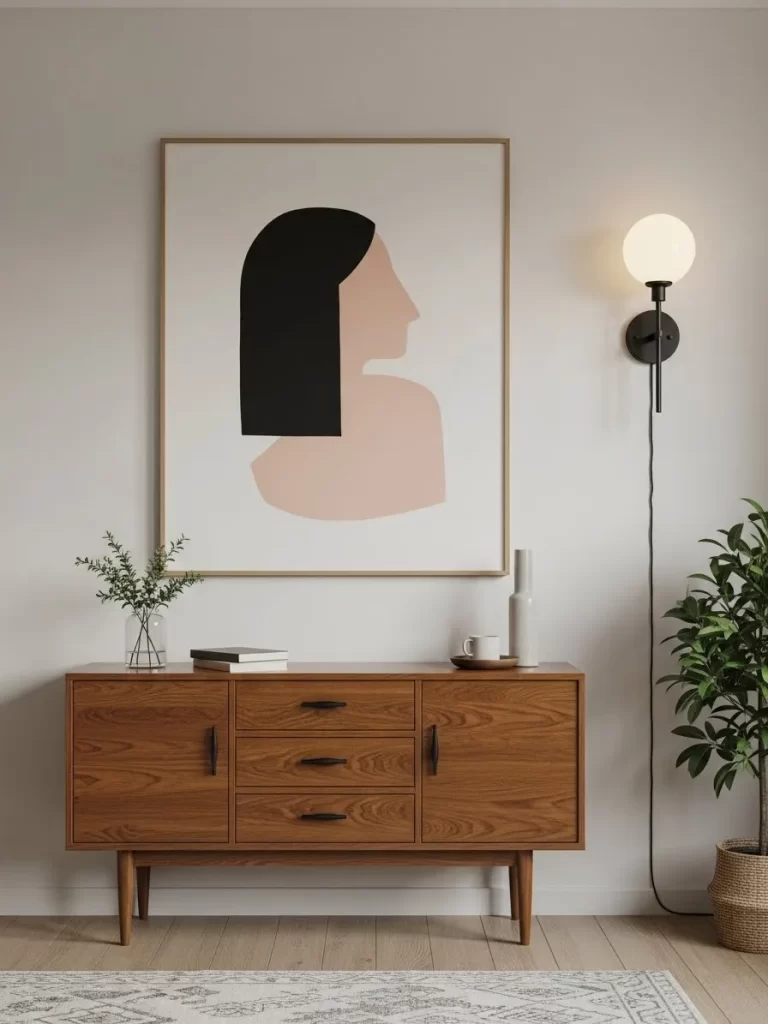
Large-scale simplicity can ground a room with a single, calm focal point. This layout features one oversized frame holding a minimalist silhouette of a female profile in soft peach and black tones. By placing this bold piece above a warm oak sideboard, you create a sophisticated mid-century look that feels modern and uncluttered.
A single globe wall sconce mounted to the side provides a soft, asymmetrical light that highlights the curves of the art. This off-center lighting choice adds a designer touch that feels more intentional than standard overhead lights. The clean lines of the art mirror the structured design of the furniture below.
Keeping the accessories on the sideboard minimal—a small plant and a few books—allows the art to remain the star. The neutral wall color acts as a blank canvas, making the black of the silhouette stand out with striking clarity. It is a perfect solution for those who want to achieve a “quiet luxury” aesthetic in their living space.
Material Required List
- 1 Oversized light wood frame
- Minimalist silhouette art print
- Hardwired or plug-in globe wall sconce
- White matboard (if needed for the frame)
- Heavy-duty picture hanging wire
Equipment Required List
- Power drill and masonry bits
- Level
- Stud finder
- Pencil
- Measuring tape
DIY Instruction Step by Step
- Find the horizontal center of your sideboard and mark it on the wall with a pencil.
- Determine the height by ensuring the bottom of the frame is roughly 8 inches above the furniture.
- Use a stud finder to locate a secure mounting point for the heavy oversized frame.
- Drill and install heavy-duty wall anchors, then hang the frame and check it with your level.
- Mark the position for the globe sconce about 12 inches to the right of the frame’s edge.
- Install the sconce at a height that aligns with the middle of the artwork for a balanced look.
- If using a plug-in sconce, use a cord cover that matches your wall color for a seamless finish.
- Ensure the artwork is perfectly centered within its frame to maintain the minimalist feel.
- Place a small vase with green sprigs on the left side of the sideboard to balance the sconce on the right.
- Step back and view the arrangement from the center of the room to ensure the scale feels right.
45 The Curated Shadow Box Collection
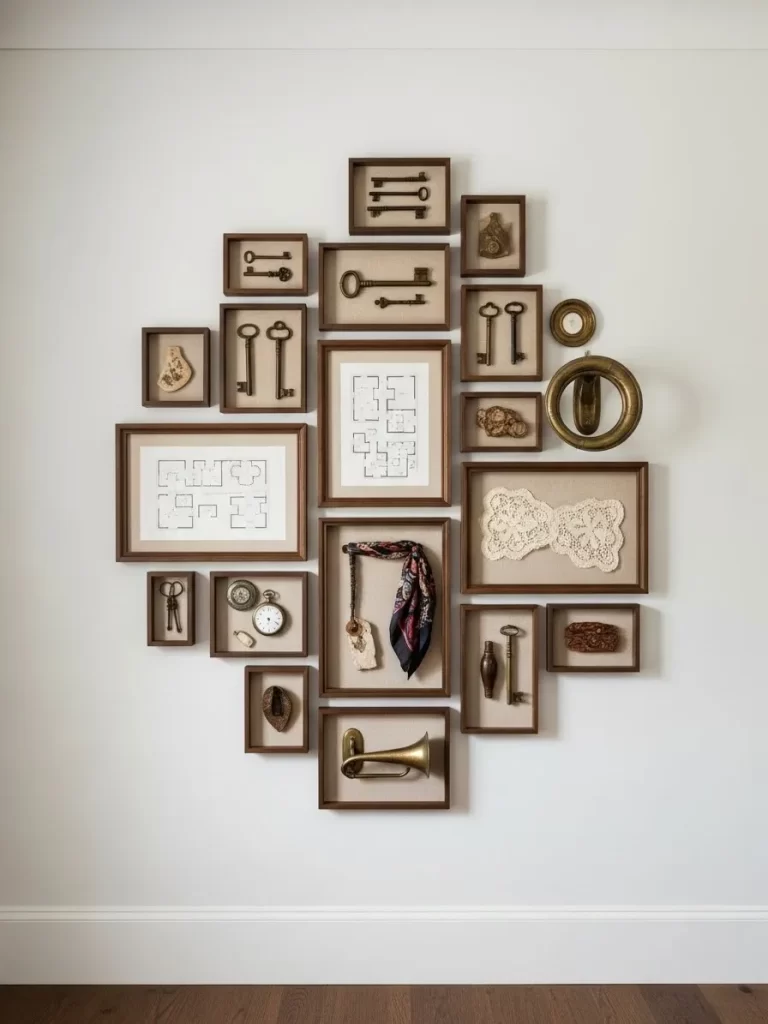
Transform your favorite heirlooms into a stunning 3D gallery with this dense shadow box arrangement. This layout uses over twenty deep wood frames to showcase antique keys, vintage scarves, and architectural blueprints. By clustering them in a large diamond shape, the wall feels like a treasure chest of personal history and discovery.
Varying the sizes of the shadow boxes allows you to display everything from a tiny pocket watch to a large ornate horn. The uniform dark wood frames provide a cohesive boundary that ties the diverse objects together. This method is the best way to protect fragile items while keeping them on display for everyone to enjoy.
Placing a large blueprint or floor plan in the center provides a flat visual anchor for the more textured items. The mix of metallic brass, soft fabrics, and paper creates a rich, tactile experience that rewards close inspection. It is a deeply personal and artistic way to tell the full story of your family’s heritage.
Material Required List
- 20 to 25 Shadow boxes in various sizes (dark wood finish)
- Collection of artifacts (keys, scarves, watches, instruments)
- 2 Framed architectural blueprints
- Acid-free mounting foam or pins
- Hot glue gun (for heavy objects)
Equipment Required List
- Hammer
- Small finishing nails
- Measuring tape
- Pencil
- Level
DIY Instruction Step by Step
- Lay all your shadow boxes on the floor to arrange the diamond-shaped cluster before hanging.
- Mount your artifacts inside the boxes using pins or small amounts of hot glue for heavier items.
- Place the two largest blueprint frames in the center to act as the primary vertical axis.
- Mark the wall at the very top and bottom of your intended diamond shape to set your boundaries.
- Start hanging from the center out, beginning with the blueprints and largest shadow boxes.
- Space the boxes closely—about one inch apart—to create the look of a single, massive installation.
- Use a level on every box to ensure the horizontal lines of the grid stay perfectly straight.
- Fill the outer edges of the diamond with the smallest boxes and unique shapes like round frames.
- Ensure the heavier items (like the brass horn) are in boxes with reinforced wall anchors.
- Step back frequently to make sure the overall diamond shape is symmetrical and full.
You have now explored 45 distinct paths toward turning a bland wall into a vibrant reflection of your passions and history. The solutions range from using simple floating shelves to creating complex, three dimensional basket clusters. Remember that every item, whether a child’s drawing or a vintage clock, is a valuable piece of your ongoing narrative.
The finished gallery is a testament to your own creative eye and personal journey. Your wall should feel authentic, layered, and completely unique to your dwelling. These diverse layouts offer the structural confidence you need to start hanging without fear.
Do not allow any wall space to remain a missed opportunity. Gather your favorite photos, artifacts, and prints, and begin building the compelling, storied backdrop your home has always needed.
Key Takeaways
Design Fundamentals
- Go Beyond the Frame: Incorporate three dimensional items like woven baskets, antique keys, mirrors, or small shelves to add crucial depth and texture.
- Embrace Intentional Contrast: Use dark frames on light walls for a modern feel, or mix ornate gold with simple black to achieve a rich, eclectic appearance.
- Balance is Key: Symmetrical grids create a sense of calm and order, while asymmetrical “cloud” clusters inject energy and organic flow into the room.
Practical Hanging Tips
- Template Everything: Always use kraft paper or painter’s tape to map out your entire display on the wall before driving the first nail. This prevents unnecessary holes.
- Layering Creates Depth: Place small polaroids or postcards on picture ledges and overlap frames slightly to achieve a professional, curated look.
- Consider Function: Use sturdy anchors for heavy items and use low tack tape or adhesive strips for easy-to-change displays in high volume areas like playrooms.
Telling Your Story
- Coordinate Art with Life: In the kitchen, hang copper molds next to botanical prints. In the nursery, frame baby clothes next to soft macramé.
- Light it Up: Dedicated brass picture lights or even neon signs can turn a simple piece into a dramatic focal point by adding specialized focus.
- Theme Consistency: Whether you choose neutral botanicals, moody noir, or high energy pop art, sticking to a consistent theme unifies a large collection.