A new year often brings a desire for a fresh start. This feeling extends to our homes, but the thought of buying new furniture can be daunting for your wallet. It often feels like you have to choose between the home you want and the budget you have.

What if you could completely refresh your space using the pieces you already own? You can breathe new life into that dated dresser or that plain bookshelf with just a little creativity and some simple supplies. A change of color, some new hardware, or an unexpected detail can make all the difference.
This collection of 36 furniture makeovers is your guide to doing just that. Each project is approachable and kind to your budget, proving that a beautiful home is within reach. Get ready to see the hidden potential in your old furniture and create a space that feels new again.
1. The Two-Tone Farmhouse Nightstand

Give an old nightstand a fresh, new look. This project mixes paint with natural wood for a beautiful result. The soft green color brings a sense of calm to any room. It feels both modern and comfortable.
The warm wood on top and the drawer front create a lovely contrast. This technique highlights the furniture’s best features. A simple black handle finishes the piece, adding a clean, updated touch. This makeover is a simple way to create a stylish and personal piece for your home.
DIY Instructions
Here is how you can make your own two-tone nightstand.
What You’ll Need:
- An old wooden nightstand
- Sandpaper (medium and fine grit)
- Painter’s tape
- Sage green paint (or your favorite color)
- Wood stain or a clear sealer
- A new drawer handle
- Paintbrushes
- Clean rags
- A screwdriver
Step-by-Step Guide:
- Get Ready: First, take out the drawer. Use your screwdriver to remove the old handle. Now, clean the entire nightstand and the drawer with a damp rag to get rid of any dust or dirt. Let it dry completely.
- Make it Smooth: Take your medium-grit sandpaper and gently rub all the surfaces you plan to paint. This step is important because it helps the new paint stick. You don’t have to sand off all the old paint, just make it feel a little rough. Wipe away the dust with a a clean rag.
- Tape it Up: You want to keep the top and the front of the drawer looking like natural wood. Use the painter’s tape to carefully cover the edges of these parts. Make sure the tape is pressed down firmly so no paint can sneak underneath.
- Time to Paint: Now for the fun part! Dip your brush in the green paint and apply a thin, even coat to the body of the nightstand. Don’t forget the sides of the drawer. Let the first coat dry, which might take an hour or two. Then, add a second coat for a really nice finish.
- Show Off the Wood: While the paint is drying, you can work on the wooden parts. If you want to change the color of the wood, rub on some wood stain with a clean rag. If you like the natural color, just brush on a clear sealer. This protects the wood and makes it look great.
- Add the New Handle: Once the paint on the drawer is totally dry, you can attach the new handle. Use your screwdriver to screw it into place.
- Put it all Together: Carefully peel off the painter’s tape. Slide the drawer back into the nightstand. Find a great spot for your newly transformed piece of furniture!
2. Emerald Green Bookshelf with a Pop of Pattern

Transform a basic cube organizer into a statement piece. A deep emerald green paint gives it a rich, sophisticated feel. The real surprise is the patterned wallpaper added to the back panels. This detail adds depth and a custom-made appearance.
Adding small, gold legs elevates the entire shelf, both literally and figuratively. It moves from a simple storage unit to a piece of elegant furniture. This project shows how a few simple changes can completely change the character of a common item.
DIY Instructions
Follow these steps to create your own designer-inspired bookshelf.
What You’ll Need:
- A cube bookshelf unit
- Emerald green paint
- Peel-and-stick wallpaper
- 4 furniture legs
- A screwdriver
- Measuring tape and scissors or a craft knife
Step-by-Step Guide:
- Prepare the Bookshelf: Start by cleaning the entire bookshelf. If it has old legs, remove them.
- Paint it Green: Apply a coat of emerald green paint to the entire unit. You will likely need two coats for a deep, even color. Let it dry completely between coats.
- Measure for Wallpaper: Measure the inside dimensions of the back panels of the cubes you want to decorate. Also, measure the front of any cube doors.
- Cut and Apply: Carefully cut the peel-and-stick wallpaper to your measurements. Peel off the backing and gently press the wallpaper into place on the back panels and doors. Smooth out any bubbles.
- Add the Legs: Turn the bookshelf upside down. Position the new legs at the corners and use a screwdriver to attach them securely.
- Final Assembly: Turn the bookshelf upright and admire your work! You can place the wallpapered doors in any configuration you like.
3. Industrial Coffee Table on Wheels

Give your living room a sturdy, industrial edge with this coffee table makeover. This project combines a warm wood top with a strong, black-painted base. The addition of metal corner brackets and caster wheels completes the factory-cart look.
This isn’t just about style; it’s also about function. The wheels make it easy to move the table around, whether for cleaning or rearranging your space. It’s a great way to turn a boring coffee table into a conversation starter.
DIY Instructions
Here’s how to build your own industrial-style table.
What You’ll Need:
- An old coffee table
- Black paint
- Wood stain for the top
- 4 caster wheels
- 8 metal corner brackets
- Sandpaper, screws, and a drill
Step-by-Step Guide:
- Sand Everything Down: Start by sanding the tabletop to remove the old finish. Then, lightly sand the base to help the paint stick.
- Stain the Top: Wipe the tabletop clean. Apply a coat of wood stain with a rag, and wipe off any excess. Let it dry and apply a clear protective coat.
- Paint the Base: While the top is drying, paint the legs and frame of the table black. Let it dry completely.
- Add Hardware: Attach the metal corner brackets to the four corners of the tabletop using screws. This gives it that industrial feel.
- Install the Wheels: Flip the table over and screw one caster wheel onto the bottom of each leg.
- Reassemble: If you took the table apart, now is the time to put it back together.
4. Rustic Farmhouse Dresser

Create a charming, rustic look with a distressed finish. This technique gives new life to an old dresser, making it feel like a treasured family heirloom. The combination of a clean white body and a rich, dark wood top is a classic farmhouse style.
Distressing the edges reveals hints of the wood underneath, adding character and a sense of history. Simple, dark cup-pull handles are the finishing touch, complementing the dark top and enhancing the rustic vibe.
DIY Instructions
You can achieve this beautiful, aged look with a few simple steps.
What You’ll Need:
- A wooden dresser
- White chalk paint
- Dark wood stain
- Sanding block or sandpaper
- Clear furniture wax
- New cup-pull handles
Step-by-Step Guide:
- Prep the Dresser: Clean the dresser thoroughly. Remove the drawers and all the old hardware. Sand the top of the dresser completely down to the bare wood. Lightly scuff-sand the rest of the dresser.
- Stain the Top: Apply the dark wood stain to the sanded tabletop. Let it dry, then protect it with a clear sealer.
- Paint the Body: Apply two coats of white chalk paint to the dresser frame and the drawer fronts. Let the paint dry fully.
- Distress the Paint: Take your sanding block and gently rub the edges and corners of the dresser and drawers. Focus on areas that would naturally show wear over time.
- Seal the Finish: To protect your work, apply a coat of clear furniture wax over all the painted surfaces with a clean cloth. Buff it to a soft shine.
- Add New Hardware: Install the new cup-pull handles on the drawers.
- Put it Back Together: Slide the drawers back into the dresser and enjoy your new piece!
5. Mid-Century Modern Credenza Glam-Up

Add a touch of glamour to a mid-century modern piece. This makeover uses a sophisticated dark grey paint as a backdrop for stunning wood and gold accents. The clean, tapered legs with gold caps are a hallmark of the style.
A geometric pattern made with thin gold lines adds a unique, artistic touch to the doors, making the piece feel truly special. This project is about enhancing the original beauty of the furniture with modern, elegant details.
DIY Instructions
Give your furniture a glamorous and modern update.
What You’ll Need:
- A credenza or sideboard
- Dark grey paint
- Painter’s tape
- Thin gold metallic tape or a gold paint pen
- New tapered furniture legs with gold caps
- New gold handles
Step-by-Step Guide:
- Prepare for Painting: Clean the piece and remove all hardware, doors, and drawers.
- Tape Off Wood Areas: Carefully apply painter’s tape to protect the wooden drawer fronts and any parts of the doors you want to keep as natural wood.
- Paint the Body: Paint the main frame of the credenza with the dark grey paint. Let it dry completely.
- Create the Gold Pattern: Use a ruler to help you apply the thin gold tape or draw with the gold paint pen. Create a geometric design on the doors.
- Update the Hardware: Install the new gold handles and screw on the new tapered legs.
- Reassemble Your Piece: Carefully put the doors and drawers back on the credenza.
6. Boho-Chic Cane Webbing Bookshelf

Bring a natural, bohemian texture to a simple bookshelf. Cane webbing is a popular way to add warmth and interest to furniture. Paired with an earthy terracotta paint color, it creates a relaxed and stylish vibe.
Instead of hiding the attachment, this project makes it a feature. The cane is laced onto the cabinet doors with a simple cord, adding a crafty, handmade detail that makes the piece unique. It’s a fresh take on a classic material.
DIY Instructions
It’s easy to add this trendy feature to your own furniture.
What You’ll Need:
- A bookshelf with cabinet doors
- Terracotta or dusty rose colored paint
- A roll of cane webbing
- A staple gun
- A drill and a small drill bit
- Cord or twine for lacing
Step-by-Step Guide:
- Paint the Bookshelf: First, clean the unit and then give it a couple of coats of your chosen paint color. Let it dry fully.
- Prepare the Cane: Cut a piece of cane webbing slightly larger than the front panel of each door. Soak the cane in warm water for about 30 minutes to make it soft and easy to work with.
- Attach the Cane: Lay the damp cane over the front of a door. Pull it tight and use a staple gun to attach it to the edges of the door.
- Drill Holes for Lacing: Once the cane is secure, use a drill to make small, evenly spaced holes around the border of the cane panel.
- Lace it Up: Thread your cord or twine through the holes, creating a decorative crisscross pattern that holds the edges of the cane down.
- Reattach Doors: Put the updated doors back on your bookshelf.
7. Elegant Marble and Gold Bar Cart

Create a high-end look for less with this simple bar cart update. A basic cart can be transformed into a chic and glamorous piece with just two materials. A coat of gold spray paint gives the frame a bright, metallic shine.
The real magic comes from the marble-patterned contact paper. Applied to the shelves, it mimics the look of real stone, adding a touch of luxury. This is a quick and affordable way to create a sophisticated spot for your drinks and glassware.
DIY Instructions
This is a fast project with a big impact.
What You’ll Need:
- A bar cart
- Gold spray paint
- Marble-patterned peel-and-stick contact paper
- A craft knife
- A smoother tool (a credit card works well)
Step-by-Step Guide:
- Paint the Frame: If your cart isn’t already gold, take it outside or to a well-ventilated area and give the frame a few light coats of gold spray paint. Let it dry.
- Clean the Shelves: Make sure the shelves are perfectly clean and dry. Remove them from the cart if you can.
- Apply the Contact Paper: Roll out the contact paper and cut a piece that is a little bigger than your shelf.
- Peel and Stick: Carefully peel back one edge of the paper’s backing. Line it up with the edge of the shelf and press it down. Slowly pull off the rest of the backing while using your smoother tool to press the paper onto the shelf, pushing out air bubbles as you go.
- Trim the Excess: Use a sharp craft knife to carefully trim the extra contact paper from around the edges of the shelf.
- Repeat and Reassemble: Do the same for any other shelves, then put your newly glamorous cart back together.
8. Coastal Rope-Trimmed Nightstand

Bring the relaxing feel of the beach into your bedroom. This makeover uses a soft, sky-blue paint to create a calm and airy base. The texture of the beadboard-style drawers adds to the coastal cottage charm.
The standout detail is the natural rope trim glued around the edges of the drawer fronts. This simple addition adds a nautical touch. Clear glass knobs finish the look, sparkling like sea glass and keeping the overall feel light and fresh.
DIY Instructions
Create your own piece of coastal-inspired furniture.
What You’ll Need:
- A nightstand
- Light blue paint
- Natural rope
- A hot glue gun
- New clear glass knobs
- A screwdriver
Step-by-Step Guide:
- Prep and Paint: Clean the nightstand, remove the old hardware, and then paint the entire piece with your light blue paint. Apply a second coat if needed.
- Measure and Cut Rope: Measure the distance around the front of one of your drawers. Cut a piece of rope to that length.
- Glue on the Rope: Working in small sections, apply a line of hot glue to the edge of the drawer front and carefully press the rope into place. Continue until the entire drawer is trimmed with rope. Repeat for any other drawers.
- Add New Knobs: Once the paint is dry, use your screwdriver to install the new glass knobs.
- Reassemble: Put the drawers back in the nightstand.
9. Minimalist Floating Wall Desk

Maximize your space with a sleek floating desk. This is a fantastic solution for small rooms or for creating a clean, uncluttered work area. The simple wooden plank offers a warm, natural surface, contrasting beautifully with the wall.
Supported by two matching wooden brackets, this desk has a light, airy appearance because it has no legs. This project is all about simplicity and function, proving that you don’t need a large piece of furniture to create a usable and stylish workspace.
DIY Instructions
This space-saving desk is easy to install.
What You’ll Need:
- A solid wood plank (cut to your desired desk size)
- 2 strong wooden brackets
- Sandpaper
- Wood stain or clear sealer
- A drill, screws, a level, and a stud finder
Step-by-Step Guide:
- Finish the Wood: Sand the wood plank and brackets until they are smooth. Wipe them clean. Apply your choice of stain or sealer to all the wood pieces and let them dry.
- Locate Wall Studs: Decide where you want your desk. Use the stud finder to find the strong support studs inside the wall. This is crucial for making your desk secure. Mark the stud locations with a pencil.
- Mount the Brackets: Hold one bracket on the wall at your desired height, making sure the screw holes are over a stud mark. Use the level to make sure it’s straight, then drill it securely to the wall. Repeat for the second bracket, using the level to ensure it’s perfectly even with the first.
- Attach the Desktop: Place your wooden plank on top of the mounted brackets. Check that it’s level one last time. From underneath, use your drill to drive screws up through the bracket holes and into the bottom of the plank to fix it in place.
10. The Adventurer’s Decoupage Dresser

Turn a plain dresser into a canvas for your personality. This creative project uses the technique of decoupage to cover drawer fronts with images, making it truly one-of-a-kind. A bright orange paint on the frame makes the whole piece pop.
The drawers tell a story, with a mix of world maps for the traveler and colorful comic book scenes for the hero within. This is more than just furniture; it’s a piece of art that reflects your passions and adventures.
DIY Instructions
Unleash your creativity with this fun decoupage project.
What You’ll Need:
- A dresser
- Bright orange paint
- Old maps, comic books, or any pictures you like
- Mod Podge (a type of craft glue)
- A foam brush or paintbrush
- Scissors
- New knobs
Step-by-Step Guide:
- Prep the Dresser: Clean the dresser, take out the drawers, and remove the old knobs.
- Paint the Frame: Paint the main body of the dresser with your orange paint.
- Plan Your Design: Cut up your maps and comics. Arrange them on the drawer fronts until you have a layout you love.
- Apply the Pictures: Using your foam brush, apply a thin layer of Mod Podge to a small section of a drawer. Place a piece of paper on it and smooth it down. Continue this process, overlapping the paper pieces slightly, until the drawer front is covered. Repeat for all drawers.
- Seal Your Work: Once all the paper is on, brush a smooth, even coat of Mod Podge over the entire papered surface of each drawer. This will seal and protect it. Let it dry, then add one more coat.
- Finishing Touches: When everything is completely dry, install your new knobs.
- Reassemble: Slide the decorated drawers back into your vibrant new dresser.
11. Geometric Graphic Desk

Add a modern, artistic flair to a plain white desk. This makeover uses thin tape to create a striking geometric pattern. It’s a simple way to add a lot of personality without picking up a paintbrush.
The sharp, clean lines give the desk a contemporary edge. The design is completely up to you, from a simple pattern to a complex web of lines. This project proves that even the smallest details can have a huge impact on a piece of furniture.
DIY Instructions
Here’s how to give your desk a modern edge.
What You’ll Need:
- A plain desk
- Thin black electrical tape or washi tape
- A ruler
- A craft knife or scissors
Step-by-Step Guide:
- Clean the Surface: Start with a clean, dry desk. Wipe down the areas where you plan to add the tape to ensure they are free of dust and oils.
- Plan Your Design: You can lightly sketch a design with a pencil or just start applying tape. It’s often best to start with the longest lines first.
- Apply the Tape: Use your ruler to guide you. Press the tape down firmly, starting at one end and smoothing it out as you go to avoid bubbles.
- Create Intersections: Let your lines cross over each other to create interesting shapes and angles.
- Trim the Edges: Use your craft knife to carefully trim the tape at the edges of the drawers and desk for a clean, professional finish.
12. Gilded Live-Edge Side Table

Combine rustic charm with a touch of glamour. This project turns a natural wood slice into a chic side table. The raw, live edge of the wood provides beautiful, organic texture.
Modern hairpin legs give the table a light, airy feel. A band of gold paint around the edge adds a surprising and sophisticated detail. It’s a wonderful way to bring a natural element into your home with a stylish, contemporary twist.
DIY Instructions
Create a high-end table with these simple steps.
What You’ll Need:
- A thick wood slice
- 3 or 4 hairpin legs
- Sandpaper
- Clear sealer or varnish
- Gold metallic paint
- Painter’s tape
- A drill and screws
Step-by-Step Guide:
- Smooth the Wood: Sand the top and sides of the wood slice until they are very smooth. Wipe away all the dust.
- Seal the Top: Apply a coat of clear sealer to the top of the wood slice to protect it and bring out the grain. Let it dry.
- Tape for Gold: Apply painter’s tape around the top edge of the wood slice to create a clean line for your gold accent.
- Add the Gilding: Paint the exposed side edge of the wood slice with the gold paint. You may need two coats. Let it dry completely.
- Attach the Legs: Peel off the tape. Flip the wood slice over and position the hairpin legs evenly. Use a drill to screw them securely into place.
13. Color-Block Accent Bookshelf

Breathe new life into a standard bookshelf with pops of color. This easy project involves painting the inside of some compartments with bright, cheerful hues. It instantly makes the piece more dynamic and fun.
This technique draws the eye and creates visual interest, turning a simple storage unit into a display piece. You can choose colors that match your room’s decor or go for a bold, rainbow effect. It’s a playful way to customize your furniture.
DIY Instructions
Here’s how to add a splash of color to your shelves.
What You’ll Need:
- A bookshelf
- Painter’s tape
- Small sample pots of paint in various colors
- A paintbrush
Step-by-Step Guide:
- Choose Your Cubes: Decide which of the bookshelf cubes you want to paint. You can create a pattern or make it random.
- Tape Off the Edges: Carefully apply painter’s tape along the inside front edges of the cubes you will be painting. This will give you a sharp, clean line.
- Start Painting: Paint the inside back and sides of your chosen cubes. A small brush is good for getting into the corners.
- Apply a Second Coat: Let the first coat dry, then apply a second coat to make the color really vibrant.
- Remove the Tape: Once the second coat is dry to the touch, carefully peel off the painter’s tape. Let the paint cure fully before placing items back on the shelf.
14. Industrial Pipe Shelving Unit

Build a sturdy and stylish shelving unit with an industrial vibe. This project uses common plumbing pipes and wood planks to create a functional piece with a lot of character. The dark metal and warm wood create a handsome contrast.
This type of open shelving is great for displaying books, plants, and decor in a living room, office, or kitchen. It’s a custom-built look that is surprisingly straightforward to assemble.
DIY Instructions
Follow these steps to build your own pipe shelves.
What You’ll Need:
- 2 wooden planks, stained and sealed
- Assorted black pipe pieces (flanges, pipes of different lengths, tees, elbows)
- A drill and screws
- A level
- A stud finder
Step-by-Step Guide:
- Plan Your Design: Lay out your pipe pieces on the floor to create the two side supports for your shelves. Make sure they are identical.
- Assemble the Supports: Twist the pipe pieces together tightly to build the side frames.
- Mount the First Support: Use a stud finder to locate the studs in your wall. Hold one of the assembled pipe supports against the wall and use a level to make sure it’s straight. Screw the flanges securely into the wall studs.
- Position the Shelves: Place your wood planks onto the arms of the mounted support.
- Mount the Second Support: Place the second pipe support under the other end of the shelves. Use your level on the shelves to make sure everything is straight before screwing the second support to the wall.
15. DIY Tufted Ottoman

Create a comfortable and elegant tufted ottoman from scratch. This project shows how to build a cushioned top for a small table or a custom-built frame. The button tufting creates a classic, high-end look.
Layering foam, batting, and fabric creates a plush and inviting surface. This is a rewarding project that allows you to choose the exact fabric and color to match your living space. It’s a great introduction to the basics of upholstery.
DIY Instructions
This project is more advanced but very rewarding.
What You’ll Need:
- A sturdy base (like a small coffee table or a simple wooden box)
- A piece of plywood cut to the size of the top
- Thick foam
- Fabric batting
- Your choice of upholstery fabric
- Fabric-covered buttons
- A drill, a long upholstery needle, and strong thread
- A staple gun
Step-by-Step Guide:
- Prepare the Base: Mark a grid pattern on your plywood where you want your buttons to be. Drill a small hole at each mark.
- Layer the Cushion: Use spray adhesive to glue the foam to the plywood. Lay the fabric batting over the foam, and then lay your main fabric on top.
- Start Tufting: Thread your long needle with strong thread and push it up from the bottom, through one of the holes in the plywood. Thread a button on top, then push the needle back down through the same hole.
- Create the Tuft: Pull the thread tight from the bottom to create the dimple effect. Secure the thread by stapling it in a zig-zag pattern to the plywood. Repeat for all buttons.
- Finish the Edges: Pull the fabric taut around the edges of the plywood and use the staple gun to secure it to the underside.
- Attach to Base: Secure your newly upholstered top to your table base with screws from underneath.
16. Playful Chalkboard Kids’ Table

Make a kids’ table that is both fun and functional. The top of this table is coated with chalkboard paint, turning it into an endless canvas for drawing and doodling. It’s a fantastic way to encourage creativity.
The legs are painted in bright, primary colors, making the table a cheerful addition to any playroom or bedroom. This simple makeover transforms a plain piece of furniture into an interactive and exciting play space.
DIY Instructions
Create a fun art station for your little one.
What You’ll Need:
- A small wooden kids’ table
- Chalkboard paint
- Paints in bright colors (e.g., red, yellow, blue)
- Painter’s tape
- Paintbrushes
- Sandpaper
Step-by-Step Guide:
- Prep the Table: Lightly sand all the surfaces of the table to help the paint stick. Wipe it clean.
- Paint the Legs: Turn the table upside down. Paint each leg a different bright color. You might need two coats. Let them dry.
- Tape the Top: Turn the table upright. Apply painter’s tape around the top edges of the legs to protect them from the black paint.
- Apply Chalkboard Paint: Paint the tabletop with the chalkboard paint. It’s important to apply several thin coats. Follow the directions on the can, letting it dry completely between each coat.
- Condition the Chalkboard: After the final coat has cured for a few days, you need to “season” it. Rub the side of a piece of chalk over the entire surface, then wipe it off with a dry cloth. Now it’s ready for drawing!
17. Faux Marble Console Table

Get the luxurious look of a marble table for a fraction of the price. This clever makeover uses marble-patterned contact paper to transform a simple console table. The result is a chic and elegant piece that looks incredibly realistic.
Whether you choose classic white marble or dramatic black, this technique instantly elevates your furniture. Paired with a simple metal frame, it creates a modern and sophisticated look for an entryway or living room.
DIY Instructions
This is an easy way to get a high-end look.
What You’ll Need:
- A console table with a flat top
- Marble-patterned peel-and-stick contact paper
- A craft knife or scissors
- A smoother tool or a credit card
Step-by-Step Guide:
- Prepare the Top: Make sure the tabletop is perfectly clean and dry. If you can, remove the top from the table’s frame.
- Cut the Paper: Roll out your contact paper and cut a piece that is larger than the tabletop on all sides.
- Apply Carefully: Peel back about 6 inches of the paper’s backing. Line up the edge of the paper with the edge of the table and press it down.
- Smooth it Out: Slowly continue to peel off the backing while using your smoother tool to press the paper onto the surface. Work from the center out to push away any air bubbles.
- Finish the Edges: For a seamless look, wrap the excess paper around the edges of the tabletop. Use your craft knife to make clean cuts at the corners.
- Reassemble: If you removed the top, put it back on the frame.
18. Cottage-Chic Fabric-Backed Bookshelf

Add a touch of hidden charm to an ordinary bookshelf. By lining the back panels with a pretty fabric or wallpaper, you can introduce color, pattern, and texture. This detail gives the furniture a custom, cottage-style feel.
It’s a wonderful way to brighten up a dark piece of furniture or to coordinate your shelving with your room’s decor. Every time you reach for a book, you’ll see the lovely pattern inside.
DIY Instructions
Here’s how to add this charming detail.
What You’ll Need:
- A bookshelf with a back panel
- Fabric or wallpaper of your choice
- Mod Podge or spray adhesive
- A foam brush
- A measuring tape and scissors
Step-by-Step Guide:
- Measure and Cut: Carefully measure the inside dimensions of each section of the bookshelf’s back panel. Cut your fabric or wallpaper to these exact sizes.
- Apply Adhesive: Working one section at a time, use your foam brush to apply an even coat of Mod Podge to the back panel of the bookshelf.
- Place the Fabric: Carefully lay your pre-cut piece of fabric onto the glued panel. Start from one edge and smooth it down with your hands to remove any wrinkles or bubbles.
- Seal It (Optional): If you used fabric, you can apply a top coat of Mod Podge over the fabric to seal and protect it. This will give it a wipeable surface.
- Let it Dry: Allow the adhesive to dry completely before you put your items back on the shelves.
19. Bold Campaign-Style Dresser

Create a dramatic and sophisticated statement piece. This makeover pairs a deep, moody navy blue paint with striking brass hardware. This combination is characteristic of classic campaign furniture, a style that is both timeless and bold.
The addition of the metal corner brackets and structured handles gives the dresser a strong, substantial presence. It’s a powerful look that can anchor a bedroom or living space and looks very high-end.
DIY Instructions
Achieve this classic, bold look for your dresser.
What You’ll Need:
- A dresser
- Navy blue or other dark-colored furniture paint
- A set of campaign-style hardware (corner pieces and handles)
- Sandpaper
- A drill and a screwdriver
Step-by-Step Guide:
- Prep the Dresser: Clean the dresser well. Remove all the drawers and the old hardware. Lightly sand all surfaces to be painted.
- Paint it Navy: Apply two to three coats of your navy paint to the dresser frame and the drawer fronts. Let it dry completely between coats for a smooth, rich finish.
- Position the Hardware: Once the paint is fully cured, it’s time for the new hardware. Carefully measure and mark where your corner brackets and handles will go. Use a level to make sure everything is straight.
- Install the Hardware: Drill pilot holes for your screws. Then, use your screwdriver to attach all the new brass hardware securely.
- Reassemble: Slide the drawers back into the dresser and admire your stunning transformation.
20. Color-Dipped Stool Legs

Give plain bar stools a quick and modern update. This simple technique involves painting just the bottom portion of the legs. The “dipped” effect adds a clean, graphic detail and a pop of color or metallic shine.
This is a subtle change that makes a big difference, giving the stools a custom-designed feel. You can choose any color to match your kitchen or bar area. Using a metallic paint like copper adds a bit of unexpected warmth and style.
DIY Instructions
This is one of the quickest furniture updates you can do.
What You’ll Need:
- Wooden stools
- Painter’s tape
- A measuring tape
- Paint (e.g., white and copper spray paint)
Step-by-Step Guide:
- Decide on the Height: Turn your stools upside down. Decide how high up the legs you want the paint to go. Use your measuring tape to measure that distance up from the bottom of each leg and make a small pencil mark.
- Create a Clean Line: Carefully wrap a piece of painter’s tape around each leg, using your pencil marks as a guide. Press the top edge of the tape down firmly to prevent any paint from bleeding under it.
- Paint the Legs: In a well-ventilated area, spray or brush your chosen paint color onto the section of the legs below the tape. Apply light coats to avoid drips.
- Let it Dry and Remove Tape: Once the paint is completely dry to the touch, carefully peel off the painter’s tape to reveal your crisp, clean line.
- Let it Cure: Let the paint cure for a day or two before putting the stools back into heavy use to prevent scuffs.
21. DIY Modern Slat Wall Organizer

Create a stylish and functional organization system with a custom slat wall. This project provides a clean, modern backdrop for hanging shelves, bins, and hooks. It is a very versatile storage solution for a garage, office, or craft room.
The contrast between the painted slats and the natural wood background adds visual depth. You can customize the size and layout to fit your exact needs, making it a truly personal and practical addition to your space.
DIY Instructions
Here’s how to build your own versatile slat wall.
What You’ll Need:
- A large piece of plywood for the back
- Several 1×3 inch wood boards for the slats
- White paint
- A saw, a drill, and screws
- A measuring tape and pencil
- Small, evenly sized wood blocks to use as spacers
Step-by-Step Guide:
- Cut Your Slats: Measure the width of your plywood backing and cut all of your 1×3 boards to that length. These will be your slats.
- Paint the Slats: Paint the front and side edges of your slats with white paint. Let them dry completely.
- Plan the Layout: Lay the first slat at the top of the plywood backing, flush with the edge. Screw it into place.
- Use Spacers: Place your small wood spacer blocks on top of the first slat. Push the next slat down against the spacers. This ensures your spacing is perfectly even.
- Attach the Slats: Screw the second slat into place. Remove the spacers and repeat the process, working your way down the plywood until the entire board is covered with evenly spaced slats.
- Mount the Wall: Securely mount your finished slat wall to the studs in your wall. Now you can add hooks and accessories.
22. The Ombre Blue Dresser

Give a plain dresser a beautiful and calming new look with an ombre paint effect. This technique involves painting each drawer a slightly different shade of the same color, creating a gentle gradient. The result is a unique and artistic piece.
Starting with a dark blue for the bottom drawer and adding a bit more white paint for each drawer above creates a smooth transition. This is a creative way to use a single paint color to achieve a multi-tonal, designer look.
DIY Instructions
Creating this beautiful gradient is easier than it looks.
What You’ll Need:
- A dresser with multiple drawers
- White furniture paint (for the frame)
- A can of dark blue paint
- A paint tray and roller
- Several disposable containers for mixing paint
- A paintbrush
Step-by-Step Guide:
- Prep the Dresser: Clean the dresser, remove the drawers, and take off any hardware.
- Paint the Frame: Paint the main body of the dresser white. Let it dry.
- Paint the Darkest Drawer: Pour some of your dark blue paint into the paint tray and use the roller to paint the front of the bottom drawer.
- Mix the Next Shade: Pour the remaining paint from the tray into one of your disposable containers. Add a small amount of white paint and mix it well. This will be the color for the next drawer up.
- Continue Painting and Mixing: Paint the next drawer. Then, pour the leftover paint into a new container, add a little more white paint, and mix. Repeat this process for each drawer until you reach the top.
- Reassemble: Once all the drawers are dry, put them back in the dresser.
23. The Modern Fluted Side Table

Add high-end texture to your space by creating a fluted side table. This project uses half-round wood dowels to cover a simple cylindrical base, resulting in a piece that looks modern and expensive. The clean lines and natural wood are very on-trend.
This technique can be used to upcycle an old round table or to build one from scratch using a concrete form tube. It’s a stunning way to add architectural detail and warmth to your living room or bedroom.
DIY Instructions
Here’s how to create this textured, high-end look.
What You’ll Need:
- A round base (like an old table or a large cardboard concrete tube)
- A round piece of wood for the tabletop
- Many half-round wooden dowels
- A saw
- Strong wood glue
- A measuring tape
Step-by-Step Guide:
- Prepare the Base: Make sure your round base is clean and sturdy.
- Measure and Cut Dowels: Measure the height of your base. Carefully cut all of your half-round dowels to this exact length. You will need a lot of them.
- Start Gluing: Apply a line of wood glue to the flat back of one dowel. Press it firmly onto the side of your round base, making sure it is perfectly straight up and down.
- Continue Gluing: Place the next dowel right beside the first one, making sure there are no gaps. Continue this process, working your way all the way around the base until it’s completely covered.
- Attach the Top: Apply wood glue to the top edge of your newly fluted base. Carefully center your round tabletop on it and press down. Let the glue dry completely.
24. Chic Leather Drawer Pulls

Upgrade your furniture with custom leather drawer pulls. This small change can have a huge impact, adding a touch of warmth, texture, and sophistication. It’s an inexpensive way to make a basic piece of furniture look more unique and high-end.
These handles are particularly good for a modern, Scandinavian, or rustic aesthetic. They are soft to the touch and simple to make, requiring only a few materials and basic tools.
DIY Instructions
You can make a whole set of these in under an hour.
What You’ll Need:
- A strip of leather
- Scissors or a craft knife
- A ruler
- A screw and bolt for each handle
- A drill or a leather punch
Step-by-Step Guide:
- Cut the Leather: Decide how large you want your pulls to be. Cut a rectangular strip of leather for your first handle.
- Punch the Holes: Fold the leather strip in half to create the pull shape. Use a leather punch or a drill to make a hole through both ends of the folded strip.
- Prepare the Drawer: If your drawer doesn’t already have a hole for a knob, you’ll need to drill one in the center.
- Attach the Pull: Push the screw from the inside of the drawer through the hole. On the front, place your new leather pull over the screw, then tighten the bolt on the front to hold it in place.
- Repeat: Use your first leather pull as a template to cut and punch the rest for a uniform look.
25. Faux Concrete Coffee Table

Achieve a modern, industrial look with a faux concrete finish. This project uses a special type of cement mixture to apply a thin, concrete-like layer over an existing tabletop. It gives you the heavy, textured appearance of concrete without the weight.
This is a great way to cover up a damaged or outdated tabletop. The cool gray of the concrete pairs well with wood tones and a minimalist black and white color scheme, adding an urban edge to your living space.
DIY Instructions
Get the industrial look with this simple technique.
What You’ll Need:
- An old coffee table
- Feather-finish cement mix
- A mixing bucket and a putty knife
- Sandpaper
- A clear, matte sealer
Step-by-Step Guide:
- Prep the Table: Clean your tabletop thoroughly. If it’s very glossy, give it a light sanding to help the concrete stick.
- Mix the Concrete: In your bucket, mix a small batch of the feather-finish cement with water. Follow the package directions. You want a consistency like pancake batter.
- Apply the First Coat: Use your putty knife to spread a thin, even layer of the concrete mix over the entire tabletop. Don’t worry about making it perfect. Let it dry completely.
- Sand and Re-coat: Once dry, sand the surface smooth. Wipe away the dust, then apply another thin coat. Repeat this process 3-4 times, until you are happy with the look.
- Final Sanding: After the final coat is dry, give it one last sanding with fine-grit sandpaper until it’s as smooth as you like.
- Seal the Surface: Wipe the table clean of all dust. Apply 2-3 coats of a matte sealer to protect the surface from stains and water.
26. Geometric Wood Marquetry Tabletop

Create an intricate, patterned tabletop using wood veneers. This project, known as marquetry, involves cutting thin pieces of wood and fitting them together to form a design. It gives the appearance of a very expensive, handcrafted piece of furniture.
Using veneers in different wood tones, like a dark walnut and a light maple, allows you to create a striking geometric pattern. While it requires patience, the stunning result is a one-of-a-kind work of art.
DIY Instructions
This advanced project requires precision but is very rewarding.
What You’ll Need:
- A table with a smooth, flat top
- Sheets of wood veneer in at least two different colors
- A very sharp craft knife and a metal ruler
- A cutting mat
- Wood glue and a small brush or roller
- Clear sealer or varnish
Step-by-Step Guide:
- Plan Your Design: Draw a grid on your tabletop. Then sketch out your geometric pattern. A simple checkerboard or a pattern of triangles is a good place to start.
- Cut Your Pieces: Using your craft knife and metal ruler, carefully cut your veneer sheets into the shapes needed for your design (e.g., squares or triangles). Be very precise with your cuts.
- Start Gluing: Start in the center of the table. Apply a thin, even layer of wood glue to the back of one of your veneer pieces and press it into place on the tabletop.
- Build the Pattern: Continue gluing down pieces one by one, fitting them tightly against each other like a puzzle. Wipe away any excess glue that squeezes out.
- Let it Dry: Once the entire tabletop is covered, place a flat board and some heavy books on top and let the glue dry for 24 hours.
- Finish the Surface: Lightly sand the entire veneer surface until it’s perfectly smooth. Wipe away the dust and apply several coats of a clear sealer to protect your beautiful work.
27. The Vintage Postcard Desk

Personalize a desk or table with cherished memories. This project uses decoupage to cover a tabletop with copies of old family photos, postcards, or letters. It turns a simple piece of furniture into a meaningful collage of personal history.
A distressed white paint on the legs gives the desk a soft, vintage feel that complements the sepia-toned images. This is a beautiful way to display your favorite memories in a functional and creative way.
DIY Instructions
Turn your desk into a scrapbook of memories.
What You’ll Need:
- A desk or table
- White paint
- Sandpaper
- Copies of your favorite photos or postcards (don’t use the originals!)
- Mod Podge
- A foam brush
Step-by-Step Guide:
- Prep the Desk: Clean the desk. Paint the legs and frame with white paint. Once dry, you can lightly sand the edges to give it a distressed, aged look.
- Arrange Your Photos: Lay out your photo copies on the tabletop. Trim them and arrange them in a collage that you like.
- Apply the First Photo: Remove the photos. Take one photo and apply a thin layer of Mod Podge to the back of it with your foam brush. Place it down on the desk and smooth out any bubbles.
- Complete the Collage: Continue gluing down your photos, slightly overlapping them, until the entire surface is covered.
- Seal the Top: Once all the photos are in place, apply a generous, even coat of Mod Podge over the entire tabletop. This will seal and protect the images. Let it dry, then apply at least two more coats for a durable finish.
28. Farmhouse Wire Mesh Cabinet Doors

Give your kitchen or storage cabinets a rustic, farmhouse-style update. This project involves replacing the center panels of your cabinet doors with wire mesh. It creates a semi-open look that is great for displaying dishes or pantry items.
This makeover can make a kitchen feel lighter and more open. You can paint the mesh or leave it as is for an industrial touch. It’s a popular look that adds a lot of character.
DIY Instructions
Here’s how to get this popular farmhouse look.
What You’ll Need:
- Cabinet doors with removable center panels
- A roll of wire mesh (also called hardware cloth)
- Tin snips or wire cutters
- A staple gun
- A screwdriver
Step-by-Step Guide:
- Remove the Doors and Panels: Take the cabinet doors off their hinges. On the back of the door, find the clips or wood strips holding the center panel in place and carefully remove them. Take out the wood or glass panel.
- Measure and Cut the Mesh: Measure the opening in the cabinet door. Using your wire cutters, cut a piece of the wire mesh that is about 1 inch larger than the opening on all sides.
- Staple the Mesh: Place the piece of mesh over the opening on the back of the door. Pull it tight and use your staple gun to secure it to the inside of the door frame. Place staples every few inches.
- Finish the Back: For a clean look, you can re-install the wood strips you removed in step 1. This will hide the cut edges of the mesh.
- Rehang the Door: Put the updated door back on the cabinet.
29. Upcycled Door Headboard

Create a unique and rustic headboard by upcycling an old door. This is a creative and resourceful project that adds a lot of character and history to a bedroom. The panels and details of the door provide instant architectural interest.
Adding foam padding and fabric to the door softens the look and makes it comfortable to lean against. The nailhead trim provides a classic, upholstered finish. It’s a fantastic way to give a discarded item a beautiful new purpose.
DIY Instructions
Turn an old door into a beautiful focal point.
What You’ll Need:
- An old wooden door
- Foam padding
- Fabric batting and your choice of upholstery fabric
- Decorative nailhead trim strips
- A staple gun
- A rubber mallet or hammer
Step-by-Step Guide:
- Prepare the Door: Clean the old door thoroughly. If needed, cut it to the right width for your bed.
- Add Padding: Cut your foam padding to fit the sections of the door you want to upholster. Use spray adhesive to glue the foam in place.
- Layer the Fabric: Drape the fabric batting over the foam, pulling it tight and stapling it to the back of the door. Then, do the same with your main upholstery fabric, making sure it is smooth and taut.
- Add Nailhead Trim: To create a clean, finished edge, use your mallet to gently tap the nailhead trim strips into the door frame, right along the edge of the fabric.
- Mount the Headboard: You can attach legs to the bottom of the door or mount it directly to the wall behind your bed using heavy-duty wall brackets.
30. DIY Agate Slice Knobs

Add a touch of natural beauty and bohemian glamour to any piece of furniture with custom agate knobs. These beautiful stone slices, with their unique colors and patterns, can be easily turned into one-of-a-kind hardware.
This is a very simple project that makes a huge statement. The gold-leafed edges of the agate slices add a bit of sparkle. It’s the perfect finishing touch for a dresser, nightstand, or cabinet.
DIY Instructions
This is a quick and easy way to add a lot of personality.
What You’ll Need:
- Agate slices (with one flat side)
- Plain, flat-topped knobs or knob bases
- Strong, permanent adhesive (like E6000)
- A gold leafing pen (optional)
Step-by-Step Guide:
- Add a Gold Edge (Optional): If your agate slices don’t already have a metallic edge, you can easily add one. Use your gold leafing pen to carefully trace around the raw outer edge of each slice. Let it dry completely.
- Prepare the Knobs: Make sure the tops of your plain knob bases are clean and dry.
- Apply Adhesive: Squeeze a generous amount of the strong adhesive onto the top of the knob base.
- Attach the Agate: Firmly press the flat side of an agate slice onto the adhesive-covered knob base. Make sure it’s centered.
- Let it Cure: Set the newly made knobs aside and let the adhesive cure for at least 24 hours before you handle them or screw them onto your furniture.
31. The Intricate Stenciled Console

Add an intricate, tile-like pattern to a plain piece of furniture using stencils. This technique gives a hand-painted look without needing advanced artistic skill. A deep blue base with a white pattern creates a classic and crisp contrast.
This method can transform a simple console table or dresser into a sophisticated statement piece. The repeating pattern adds a sense of rhythm and elegance, mimicking the look of expensive inlaid furniture.
DIY Instructions
Here’s how to master the art of stenciling.
What You’ll Need:
- A console table or dresser
- Dark blue and white furniture paint
- A furniture stencil
- Stencil brushes or a small foam roller
- Painter’s tape
- A paper plate
Step-by-Step Guide:
- Prep and Paint: Clean your furniture piece and give it a solid base coat of dark blue paint. Let it dry completely.
- Position Your Stencil: Place your stencil where you want to begin your pattern. Use painter’s tape to hold it firmly in place so it doesn’t move.
- Load Your Brush: Pour a small amount of white paint onto a paper plate. Dab your stencil brush or foam roller into the paint, then dab most of it off onto a clean part of the plate. This “off-loading” is key to preventing paint from bleeding under the stencil.
- Apply the Paint: Using a gentle dabbing or pouncing motion, apply the white paint over the stencil openings. Don’t use a brushing motion.
- Reveal and Repeat: Carefully lift the stencil to see your clean pattern. Let the paint dry for a minute, then reposition the stencil next to your first design and repeat the process until the surface is covered.
- Seal Your Work: Once everything is dry, apply a clear top coat to protect your beautiful stenciled design.
32. The Rustic Scrap Wood Bookshelf

Create a unique, textured bookshelf using leftover scrap wood. This project adds a rustic and dimensional backdrop to a simple bookcase. The varying colors and lengths of the wood pieces create a dynamic, skyline-like effect.
This is a wonderful way to use up wood scraps and add a custom, handcrafted feel to your furniture. The whitewashed frame provides a nice contrast that makes the reclaimed wood back panel stand out.
DIY Instructions
Turn your wood scraps into a beautiful feature.
What You’ll Need:
- A basic bookshelf
- Various scrap wood pieces and paint stir sticks
- Wood stain in a few different colors
- Wood glue
- A saw
- White paint and sandpaper (for the frame)
Step-by-Step Guide:
- Prep the Bookshelf: Clean the bookshelf. If you want a rustic look for the frame, paint it white and then gently sand the edges to distress it.
- Prepare the Scraps: Stain your various scrap wood pieces in different colors. This will give the final piece more depth.
- Measure and Cut: Measure the width of the inside of your bookshelf. Cut your scrap wood pieces and paint stir sticks into various lengths. You can even cut pointed or angled tops for a fence-post look.
- Create the Pattern: Start at the bottom. Apply wood glue to the back of your scrap wood pieces and press them onto the back panel of the bookshelf, creating a staggered, overlapping pattern.
- Fill the Space: Continue gluing pieces, fitting them together like a puzzle, until the entire back of the bookshelf is covered.
- Let it Dry: Let the glue dry completely before putting your shelves and books back in.
33. The Modern Acrylic Display Bench

Combine a simple bench with a custom acrylic cover to create a modern display case. This project turns a functional seating area into a stylish place to showcase collectibles, books, or art objects, all while keeping them dust-free.
The clear acrylic adds a sleek, minimalist touch that feels very contemporary. It allows the items inside to be the focus. This is a clever way to add storage and display space in a clean, uncluttered way.
DIY Instructions
Create a unique and modern display piece.
What You’ll Need:
- A simple bench
- A custom-cut acrylic box (you can order these online)
- Stand-off bolts or furniture feet (for the acrylic to rest on)
- A drill
Step-by-Step Guide:
- Prepare the Bench: If your bench isn’t already, paint it a clean, simple color like white. Let it dry.
- Position the Supports: Decide where you want the corners of your acrylic box to sit on the bench. Mark these spots.
- Install the Supports: Drill pilot holes at your marked spots. Screw in the stand-off bolts or other supports. These will elevate the acrylic slightly and hold it in place.
- Place the Display Box: Carefully place your custom acrylic box over the supports.
- Arrange Your Display: Lift the box and arrange your favorite items on the bench underneath. Place the cover back on and enjoy your new, modern display case.
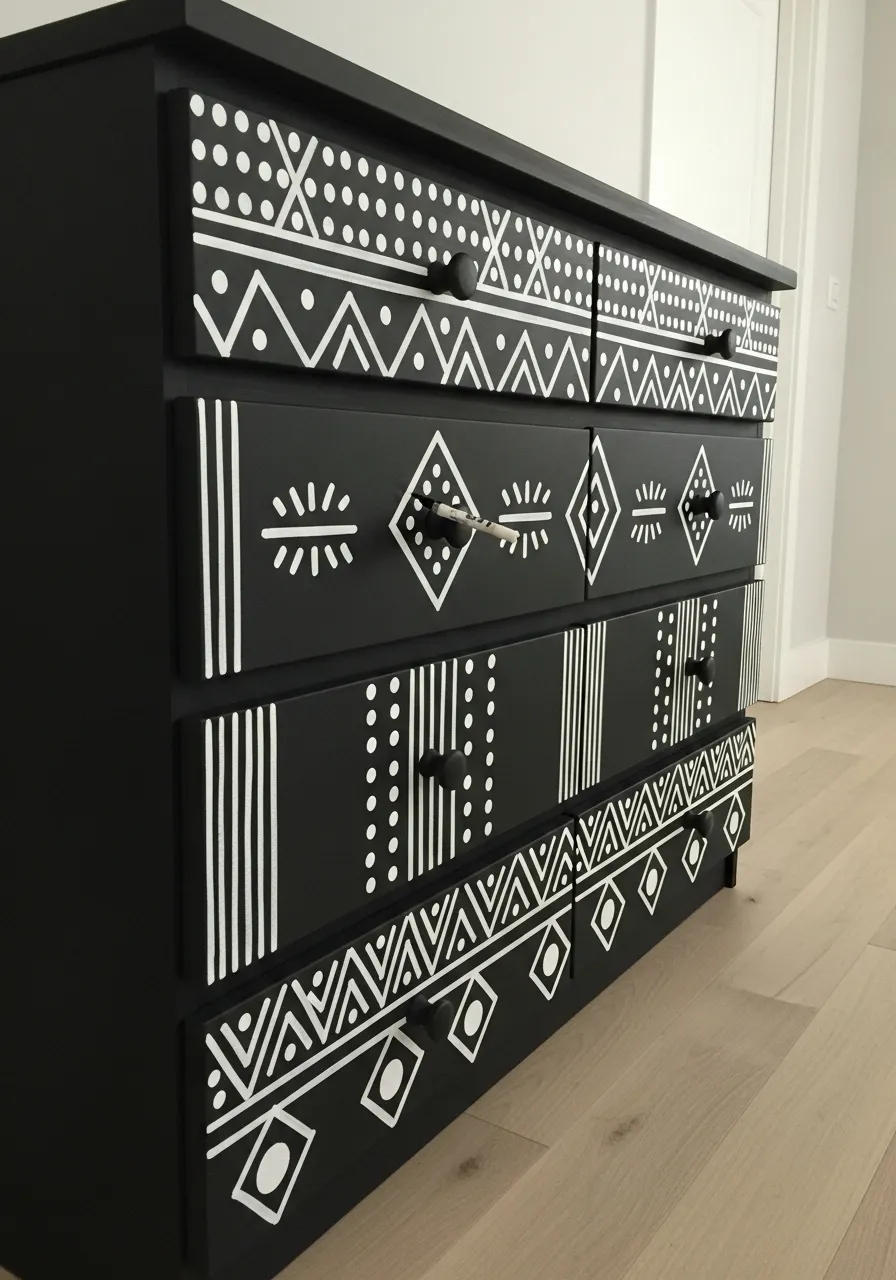
34. The Hand-Painted Tribal-Pattern Dresser

Turn a plain dresser into a bold piece of art with hand-painted patterns. This makeover uses a simple black-and-white color scheme to create high-impact, tribal-inspired designs. Each drawer can feature a different pattern for an eclectic, collected look.
You don’t need to be a professional artist for this project. Simple lines, dots, and geometric shapes are easy to paint and combine to create complex-looking designs. It’s a very personal way to add a graphic punch to your room.
DIY Instructions
Unleash your inner artist with this creative project.
What You’ll Need:
- A dresser
- Black and white furniture paint
- A white paint pen or a small, fine-tipped artist’s brush
- A ruler
- New knobs (optional)
Step-by-Step Guide:
- Create a Blank Canvas: Clean the dresser, remove the drawers and hardware, and paint the entire piece black. Let it dry fully.
- Plan Your Designs: Look for inspiration for simple tribal or mudcloth patterns online. You can practice your designs on a piece of paper first.
- Start Painting: Use your white paint pen or fine-tipped brush to start painting your patterns directly onto the drawer fronts. Use a ruler to help you keep your lines straight.
- Vary the Patterns: Create a different design for each drawer to make the piece more visually interesting.
- Finishing Touches: Once the paint is dry, install new knobs that complement your design.
- Seal and Reassemble: Apply a clear top coat to protect your hand-painted work. Once it’s dry, put the drawers back in.
35. The Aged Terra-Cotta Pot Side Table

Create a rustic and earthy side table using large terra-cotta pots. This is an inventive project that repurposes common garden items into a unique piece of furniture. An aged finish gives the pots a beautiful, weathered patina.
By gluing two pots together at their bases, you can create a sturdy hourglass shape. A simple wooden or glass top completes the table. It’s a charming and affordable way to add a touch of rustic, old-world style to a patio or living room.
DIY Instructions
Turn simple garden pots into a stylish table.
What You’ll Need:
- 2 large terra-cotta pots of the same size
- Strong, permanent construction adhesive
- White or beige paint
- A round wood or glass tabletop
- A paintbrush and a damp cloth
Step-by-Step Guide:
- Create the Aged Look: Water down your paint slightly. Brush some paint onto the pots, then immediately use a damp cloth to wipe most of it off. This will leave paint in the crevices and create a soft, aged look. Let it dry.
- Glue the Pots Together: Apply a thick bead of construction adhesive around the rim of the bottom of one of the pots.
- Form the Base: Carefully place the second pot upside down on top of the first, pressing the two bottoms together firmly. Wipe away any excess glue. Let it cure completely, which might take 24 hours.
- Attach the Top: Apply another bead of construction adhesive to the top rim of your new hourglass-shaped base.
- Place the Tabletop: Carefully center your wood or glass tabletop on the base and press down. Let the adhesive cure before placing any items on the table.
36. The Elegant Applied Molding Dresser

Add architectural detail and a high-end look to a flat-front dresser with applied molding. This simple technique creates the illusion of expensive inset paneling. The crisp white molding against the soft blue-gray paint creates a classic and elegant contrast.
This is a fantastic way to give a basic, inexpensive dresser a custom-built appearance. It adds dimension and character, elevating the entire piece with a simple, affordable material.
DIY Instructions
This is an easy way to get a custom look.
What You’ll Need:
- A dresser with flat-front drawers
- Lightweight decorative wood molding
- A miter box and saw (for cutting 45-degree angles)
- A measuring tape
- Strong wood glue or construction adhesive
- White paint for the molding
- Caulk and wood filler (optional)
Step-by-Step Guide:
- Prep and Paint: Clean your dresser and paint it your desired base color. Let it dry completely. Paint your strips of molding white before you cut them.
- Measure for Molding: Measure the height and width of your drawer fronts. Decide how large you want your decorative rectangles to be.
- Cut the Molding: Use your miter box to cut the ends of your molding pieces at 45-degree angles. You will need four pieces for each drawer to create a frame.
- Glue on the Molding: Apply a thin bead of wood glue to the back of each piece of molding and carefully press it onto the drawer front to form your rectangle. Use painter’s tape to hold the pieces in place while the glue dries.
- Finishing Touches (Optional): For a professional look, you can fill the corner joints with a tiny bit of wood filler and run a thin bead of caulk around the inside and outside edges of the molding.
- Touch up Paint: Touch up the paint on the molding and you are done!
Transforming your home doesn’t require a showroom budget or brand-new items. As these 36 examples show, a little creativity and effort can go a long way. You have the power to turn a tired, forgotten piece into the highlight of your room.
Each project is more than a simple update; it’s an opportunity to add your personal story to the furniture that fills your life. From a simple coat of paint to a complete structural change, every makeover makes your space uniquely yours.
So, choose a project that speaks to you, gather your supplies, and start the year by creating something beautiful. Your home, and your wallet, will thank you for it.
Key Takeaways
- Paint is Powerful: A new coat of paint is the single most effective way to change a piece’s entire mood. Techniques like ombre, distressing, and color-blocking can add a custom touch.
- Hardware Makes a Difference: Never underestimate the impact of new hardware. Swapping out old knobs, legs, or handles is a quick and often inexpensive update with huge visual impact.
- Texture Adds Character: Materials like rope, cane webbing, fabric, and even scrap wood can introduce warmth, dimension, and personality to a plain piece of furniture.
- Patterns Personalize: You don’t have to be an artist to create a unique design. Stencils, tape, contact paper, and decoupage are simple ways to add a custom, artistic touch.
- Think Outside the Box: Everyday items hold amazing potential. Old doors can become headboards, garden pots can become tables, and natural stones can become drawer knobs.