That wooden dresser you inherited or the plain side table you’ve had for years doesn’t have to be destined for the curb. We often look at outdated furniture and see a problem that requires a costly solution.

A trip to the furniture store can feel like the only option for a room refresh. But replacing every piece that feels tired is a quick way to empty your wallet.
What if you could create a fresh, updated look using the very pieces you already own? With a bit of imagination, some paint, and a free weekend, you can completely transform your furniture.
This guide is filled with 36 budget-friendly makeovers that prove you don’t need to be an expert to get stunning results. Get ready to see your old furniture in a whole new light.
1. Farmhouse Gingham Dresser Makeover

A classic dresser gets a charming farmhouse update. The body is painted a soft, light gray, providing a gentle contrast to the warm, stained wood top. This two-tone effect gives the piece a custom, thoughtful feel.
The top drawers feature a delightful surprise with a gray and white gingham pattern. This small detail adds a touch of country style without overwhelming the design. Simple, dark cup pulls and knobs complete the clean, rustic aesthetic, making it a handsome addition to any room.
DIY Instructions: Getting the Farmhouse Look
What You’ll Need:
- A wooden dresser
- Sandpaper and clean cloths
- Light gray paint
- Wood stain
- Painter’s tape
- Gingham-patterned scrapbook paper or fabric
- Mod Podge and a foam brush
- New dark-colored knobs and cup pulls
- A screwdriver
Step-by-Step Guide:
- Prep Your Dresser. Start by cleaning the entire dresser. Remove all the old drawer pulls with your screwdriver.
- Sand and Stain the Top. Use painter’s tape to create a clean line just below the top of the dresser. Sand the top until the old finish is gone. Wipe it clean and then apply your wood stain according to the directions on the can.
- Paint the Body. Lightly sand the rest of the dresser frame and the drawer fronts. Wipe away the dust and then paint them with your light gray paint. You might need two coats for a nice, even finish.
- Add the Gingham Detail. Cut your gingham paper or fabric to fit the front of the top drawers. Apply a thin, even layer of Mod Podge to the drawer front, then carefully smooth the paper or fabric on top. Push out any air bubbles.
- Seal and Finish. Once the Mod Podge is dry, you can paint another thin layer over the top of the paper to seal it. It will dry clear. Once everything is completely dry, install your new knobs and cup pulls.
2. Bohemian Rattan Bookshelf

This bookshelf makeover is a stunning example of bohemian design. The entire piece is painted a deep, rich teal, creating a bold and beautiful statement. This vibrant color serves as the perfect backdrop for the natural textures.
The back of the bookshelf is lined with a colorful, intricate mandala-patterned wallpaper, adding an element of surprise and visual interest. Natural rattan webbing on the bottom cabinet doors and jute rope wrapped around the edges of the shelves introduce warm, organic textures that complete this free-spirited and stylish look.
DIY Instructions: Your Bohemian Bookshelf
What You’ll Need:
- A wooden bookshelf
- Sandpaper and a clean cloth
- Deep teal paint
- A paintbrush or roller
- Fun, patterned wallpaper
- Mod Podge or wallpaper paste
- A sheet of rattan webbing
- A staple gun
- Jute rope
- A hot glue gun
Step-by-Step Guide:
- Paint it Bold. Clean your bookshelf and give it a light sanding. Apply two coats of your deep teal paint to the entire piece, letting it dry between coats.
- Line the Back. Measure the back panels of your bookshelf and cut your wallpaper to fit. Apply wallpaper paste or Mod Podge to the back panels and carefully smooth the wallpaper into place.
- Add Rattan to the Doors. Remove the doors from the bottom cabinet. If they have a solid center panel, you’ll need to cut it out, leaving the frame. Cut your rattan webbing to be slightly larger than the opening. Stretch it tight and use a staple gun to attach it to the inside of the door frame.
- Wrap the Shelves. Use a hot glue gun to add a decorative touch. Apply a thin line of glue to the edge of a shelf and press the jute rope into place. Continue until you’ve wrapped the edges of all your shelves.
- Put it Back Together. Once everything is dry, re-attach the doors to the cabinet.
3. Modern Two-Tone Nightstand

This nightstand is a sophisticated example of modern, color-blocked design. The piece is split right down the middle, with one half painted a crisp, clean white and the other half painted a deep, moody charcoal gray.
This split-color design creates a striking visual effect. The drawers also play with this contrast. One drawer is painted white, another is charcoal, and the bottom drawer is a beautiful, natural wood. Sleek, minimalist hardware in both brass and black adds to the clean, contemporary feel.
DIY Instructions: A Modern Makeover
What You’ll Need:
- A nightstand or small dresser
- Sandpaper and clean cloths
- High-quality painter’s tape
- White paint and charcoal gray paint
- A small paintbrush or roller
- A clear sealer for the wood drawer
- New, modern drawer pulls
- A screwdriver
Step-by-Step Guide:
- Prep the Piece. Clean the nightstand and remove the old hardware. If you are leaving one drawer as natural wood, remove it and set it aside.
- Create the Center Line. Find the exact center of the nightstand. Use a pencil and a long ruler to draw a straight line down the middle. Apply painter’s tape very carefully along this line.
- Paint One Side. On one side of the tape, paint the nightstand frame and the drawer fronts white.
- Paint the Other Side. On the other side of the tape, paint the frame and the remaining drawer front charcoal gray. For the sharpest line, it’s best to remove the painter’s tape while the paint is still a little bit wet.
- Finish the Wood Drawer. Sand the natural wood drawer until it’s very smooth. Wipe it clean and apply a clear sealer to protect it.
- Add the Hardware. Once everything is completely dry, install your new modern pulls.
4. Industrial Coffee Table on Casters

This coffee table is a great example of rugged, industrial style. The top is made of thick, sturdy wooden planks that have been stained to a warm, rich brown, highlighting the natural grain of the wood.
The base is what really defines the piece. It features hairpin legs, a popular mid-century modern element, but with a tough, industrial twist. Heavy-duty metal brackets are bolted to the corners, and the table is set on caster wheels, making it both stylish and easy to move.
DIY Instructions: Build an Industrial Table
What You’ll Need:
- Several thick wooden planks
- Sandpaper
- Wood stain
- A clean cloth
- A set of hairpin legs with caster wheels
- Heavy-duty metal corner brackets
- A drill and screws or bolts
Step-by-Step Guide:
- Create the Tabletop. Arrange your wooden planks side-by-side to form the tabletop. You can join them together from the underside with smaller pieces of wood or metal brackets.
- Sand and Stain. Sand the entire tabletop until it’s smooth. Wipe away the dust, and then use a clean cloth to apply the wood stain. Let it soak in, then wipe off any excess.
- Attach the Legs. Flip your tabletop upside down. Position the hairpin legs at the corners and use your drill and screws to attach them securely.
- Add the Brackets. For that extra industrial look, position the heavy-duty metal brackets on the corners of the tabletop. You may need to drill pilot holes before securing them with screws or bolts.
- Flip it Over. Once everything is secure, carefully turn your new coffee table upright.
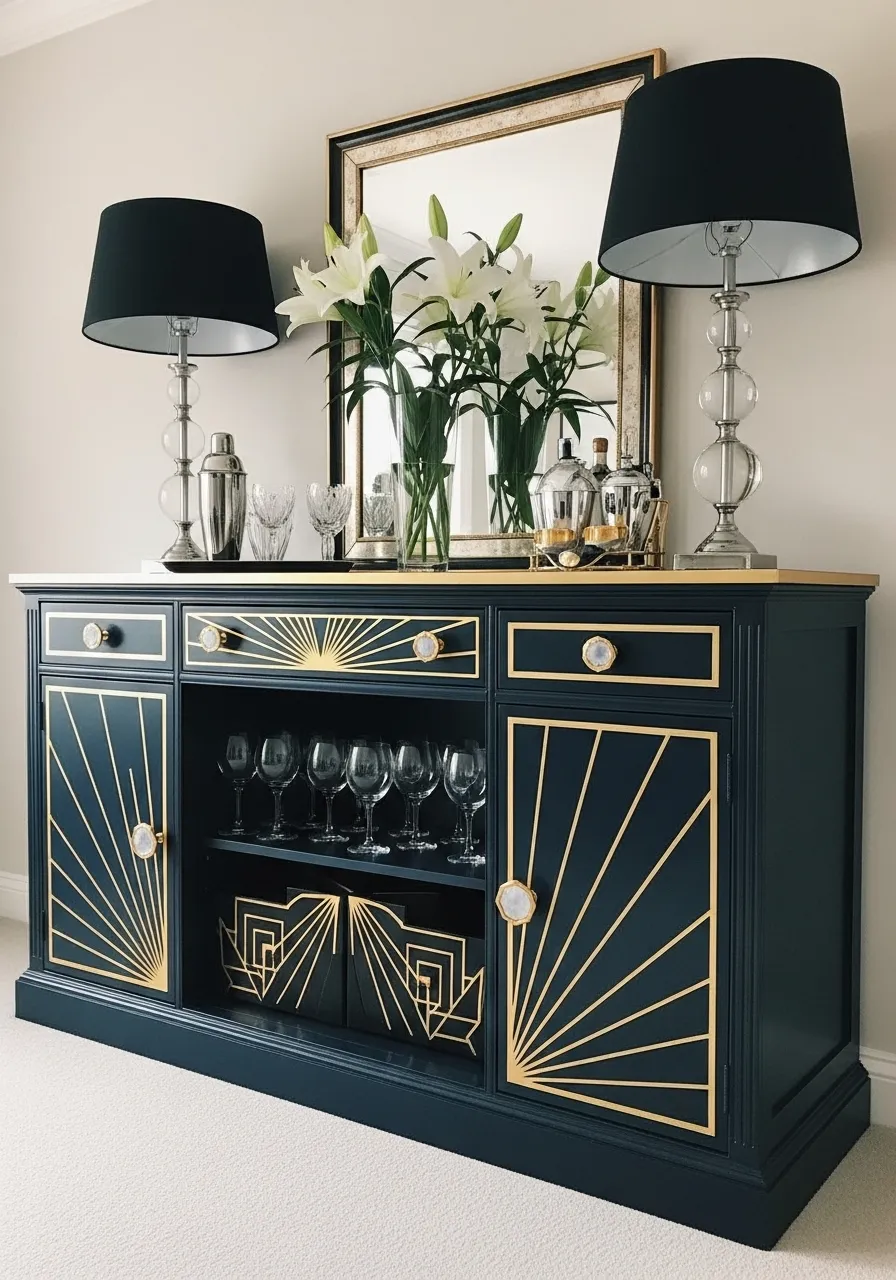
5. Art Deco Inspired Sideboard

This sideboard is a glamorous nod to the elegance of the Art Deco era. The body of the piece is painted a deep, dramatic navy blue, which serves as a rich canvas for the metallic details.
The standout feature is the gold sunburst pattern that fans out across the cabinet doors. This iconic Art Deco motif adds a sense of luxury and movement. A thin gold line frames the drawers, and beautiful knobs with a mother-of-pearl look complete the sophisticated and stylish transformation.
DIY Instructions: An Art Deco Dream
What You’ll Need:
- A sideboard or buffet
- Sandpaper and a clean cloth
- Navy blue paint
- A paintbrush or roller
- Gold paint or a gold paint pen
- A long ruler and a pencil
- Painter’s tape
- New, elegant knobs
- A screwdriver
Step-by-Step Guide:
- Paint it Navy. Clean the sideboard and remove the old hardware. Give the piece a light sanding and wipe it clean. Apply two coats of your navy blue paint for a rich, even finish.
- Draw the Sunburst. Once the paint is dry, it’s time to create the sunburst. Find the point where you want the rays to start (usually near the bottom corner of a door). Use your ruler and a pencil to lightly draw straight lines fanning out from that point.
- Paint the Gold Lines. You can carefully paint the lines with a small artist’s brush and gold paint. For an easier method, use a gold paint pen and a ruler to trace over your pencil lines. You can also use thin painter’s tape to create the lines.
- Frame the Drawers. Use painter’s tape to create a thin border around the drawer fronts. Paint this border with your gold paint.
- Add the Final Touch. Once all the paint is dry, install your new, beautiful knobs.
6. Coastal Style Dining Chairs

This set of dining chairs brings a fresh and breezy coastal feel to the dining room. The wooden frames are painted a clean, crisp white. Some of the paint has been lightly sanded off on the edges, giving them a slightly distressed, well-loved look.
A small, charming blue anchor is stenciled on the back of each chair, adding a subtle nautical touch. The seats have been reupholstered with a classic blue and white striped fabric, which is comfortable, durable, and perfectly fits the seaside theme.
DIY Instructions: Bring the Beach Home
What You’ll Need:
- Wooden dining chairs
- Sandpaper
- White paint
- A paintbrush
- A small anchor stencil
- Blue craft paint and a stencil brush
- Blue and white striped fabric
- A staple gun and scissors
- A screwdriver
Step-by-Step Guide:
- Prep and Paint. Clean your chairs. If they have upholstered seats, use a screwdriver to remove them. Lightly sand the chair frames and then apply two coats of white paint.
- Distress the Edges. Once the paint is dry, use a piece of sandpaper to gently rub away some of the paint on the corners and edges where they would naturally get worn.
- Add the Anchor. Place your anchor stencil on the back of the chair. Use a small amount of blue paint on your stencil brush to dab the color on. Carefully lift the stencil.
- Reupholster the Seats. Lay your striped fabric face down. Place the seat pad on top. Cut the fabric, leaving a few extra inches all around. Pull the fabric tight and use a staple gun to attach it to the underside of the seat.
- Put it Back Together. Once the stencils are dry, use your screwdriver to re-attach the newly covered seats to your chairs.
7. Mid-Century Modern Dresser

This dresser is a fantastic example of Mid-Century Modern design, known for its clean lines and mix of materials. The main frame and iconic tapered legs are a warm, beautiful wood, which is a hallmark of the style.
The fun comes from the drawer fronts, which have been painted in a classic mid-century color palette. The mix of orange, olive green, teal, and white adds a playful, graphic quality to the piece. Simple, original-style drawer pulls complete this authentic and stylish retro look.
DIY Instructions: A Mid-Century Makeover
What You’ll Need:
- A wooden dresser, preferably with mid-century lines
- Sandpaper and clean cloths
- Painter’s tape
- Paints in a retro color palette (orange, green, teal, white)
- Small paint rollers or brushes
- Wood oil or polish (for the frame)
Step-by-Step Guide:
- Prep the Drawers. Clean the entire dresser. Remove the drawers you plan to paint. Give the drawer fronts a light sanding and wipe them clean.
- Tape Them Off. Use high-quality painter’s tape to carefully tape off the edges of the drawer fronts so you don’t get paint on the sides.
- Paint the Colors. Apply your different retro colors to the drawer fronts. Using a small roller will give you a smooth, professional-looking finish. Apply two coats for the best color.
- Care for the Frame. While the drawers are drying, give the wooden frame of the dresser a good clean and polish with some wood oil to bring out its natural beauty.
- Reassemble. Once the drawer fronts are completely dry, carefully remove the painter’s tape. Put the drawers back into the dresser.
8. Colorful Kids’ Chalkboard Dresser

This dresser is a fun, colorful, and interactive piece for a child’s room. The frame is painted a clean white, and the legs are a dark gray, creating a nice, neutral base. The excitement is all in the drawer fronts.
Each drawer is painted a different bright, primary color: red, yellow, blue, and green. One small drawer front has been coated with chalkboard paint, offering a creative space for doodles and labels. A mix of fun, mismatched knobs adds to the playful and whimsical feel.
DIY Instructions: A Dresser for Playtime
What You’ll Need:
- A dresser
- Sandpaper and a clean cloth
- White paint for the frame
- Brightly colored paints for the drawers
- A small can of chalkboard paint
- A small paint roller or foam brush
- A variety of fun knobs
- A screwdriver
Step-by-Step Guide:
- Paint the Frame. Clean the dresser and remove all the drawers and old knobs. Give the frame a light sanding and paint it white.
- Paint the Drawers. Sand the drawer fronts lightly. Paint each drawer a different bright color. Using a small roller will help you get a smooth finish with no brush marks.
- Create the Chalkboard. For one of the drawer fronts, use your small roller to apply the chalkboard paint. It’s best to apply several thin coats, letting it dry between each one. Follow the directions on the can.
- Add the Fun Knobs. Once all the paint is completely dry and cured, it’s time for the fun part! Screw in all of your different, colorful knobs.
- Get it Ready for Art. Before you let your child draw on the chalkboard, you need to “season” it. Rub the side of a piece of chalk all over the entire surface, then wipe it clean with a dry cloth. Now it’s ready for masterpieces!
9. French Provincial Distressed Sideboard

This sideboard is a beautiful example of shabby chic style, inspired by elegant French Provincial furniture. The piece has been painted in a soft white or light gray, but the finish is what makes it special. The paint is “distressed,” meaning it’s been sanded off in places to reveal a darker color or the original wood underneath.
This technique gives the furniture an aged, romantic, and well-loved appearance. The original ornate hardware has been kept, adding to the authentic, vintage feel. It’s a soft and pretty style that is full of character.
DIY Instructions: A Touch of French Country
What You’ll Need:
- A vintage sideboard, preferably with some curves
- Sandpaper (medium and fine grit)
- Dark gray or brown paint (for the undercoat)
- A light-colored chalk paint (white or light gray)
- A paintbrush
- A block of wax or a wax candle
- Clean cloths
Step-by-Step Guide:
- Clean and Prep. Clean the sideboard well. You can remove the hardware if you want to clean it separately.
- Create the Undercoat. If you want a dark color to show through when you distress, paint the entire piece with your dark gray or brown paint and let it dry.
- The Wax Trick. This is the secret to easy distressing. Rub the block of wax or the candle along the edges and in the spots where you want the paint to chip off easily.
- Paint the Top Coat. Now, paint the entire piece with your light-colored chalk paint, right over the wax. Apply one or two coats and let it dry.
- Reveal the Age. Once the top coat is dry, take a piece of fine-grit sandpaper and gently rub it over the areas where you applied the wax. The top layer of paint will come off easily, revealing the dark color underneath and creating a beautiful, aged look.
- Seal It. Wipe away all the dust. To protect your work, you can apply a clear or dark furniture wax all over the piece with a clean cloth.
10. Vintage Traveler’s Trunk Coffee Table

This coffee table is a creative and imaginative piece that looks like a well-traveled antique steamer trunk. A simple trunk or storage box has been painted a dark, moody color, like a deep charcoal or navy.
The top and sides are decorated with vintage-style maps, giving it a sense of adventure and history. Faux leather straps with brass buckles are added around the trunk, and travel-themed “stamps” are stenciled on the sides. This project is all about adding layers of detail to tell a story.
DIY Instructions: A World Traveler’s Table
What You’ll Need:
- An old trunk, or a simple wooden box with a lid
- Sandpaper
- Dark-colored paint
- A paintbrush
- Vintage-style maps or scrapbook paper
- Mod Podge and a foam brush
- Faux leather straps or old belts
- A hot glue gun or strong adhesive
- Brass-colored buckles and tacks
- Travel-themed stencils and white craft paint
Step-by-Step Guide:
- Paint the Trunk. Clean your trunk and give it a light sanding. Paint it with your dark base color and let it dry.
- Add the Maps. Cut your maps to fit the top of the trunk. You can tear the edges for a more aged look. Use Mod Podge to apply the maps to the surface, and then seal them with another coat of Mod Podge on top.
- Attach the Straps. Cut your faux leather straps or old belts to fit around the trunk. Use a strong glue to attach them. Add the brass buckles for a realistic touch. You can also add brass tacks along the edges of the straps.
- Stencil the Stamps. Use your travel-themed stencils and a small amount of white paint to add the look of passport stamps or luggage labels to the sides of the trunk.
- Add Wheels. For a functional touch, you can add small caster wheels to the bottom of the trunk to make it easy to move around.
11. Scandinavian Style Dresser Update

This dresser is a beautiful blend of minimalism and warmth. A clean white frame provides a bright and airy foundation, making the piece feel fresh and modern. The mix of hardware adds a custom, thoughtful touch.
Some drawers are updated with simple, tan leather pulls that are both soft and stylish. Other drawer fronts are left in their natural, light wood state, showing off the beautiful grain. This combination of crisp white, warm wood, and soft leather is the heart of Scandinavian design.
DIY Instructions: A Touch of Scandi Style
What You’ll Need:
- A dresser
- Sandpaper and clean cloths
- White paint
- A paintbrush or roller
- Clear sealer or wax (for the wood drawers)
- A strip of tan leather
- A ruler and a sharp craft knife or scissors
- Screws and washers
- Simple round wood knobs
- A screwdriver
Step-by-Step Guide:
- Prep the Dresser. Start by cleaning the dresser well. Remove all the old knobs and handles with a screwdriver.
- Paint and Protect. Lightly sand the dresser frame and the drawers you want to paint. Wipe away the dust. Apply two coats of white paint, letting it dry between coats. For the drawers you want to keep natural, sand them smoothly and apply a clear sealer to protect the wood.
- Make the Leather Pulls. Cut your leather strip into equal pieces, about 5-6 inches long. Fold each piece in half to make a loop. Use a screw with a washer to attach each loop to the front of a white drawer from the inside.
- Add the Knobs. For the natural wood drawers, simply screw in the new round wood knobs.
- Put it Together. Once everything is dry, place the drawers back into the dresser. Your clean and simple new piece is complete.
12. Hollywood Glam Mirrored Vanity

This vanity makeover brings all the sparkle of a classic movie star’s dressing room. The entire piece has a bright white finish, but the real transformation comes from adding custom-cut mirrors to every drawer front.
These mirrored surfaces reflect light, making the whole room feel bigger and brighter. To complete the luxurious look, the old knobs have been replaced with beautiful, multi-faceted crystal knobs that glitter like jewels. It’s a truly glamorous update.
DIY Instructions: Add Some Sparkle
What You’ll Need:
- A vanity or desk
- White paint
- Sandpaper and a clean cloth
- A measuring tape
- Mirrors, custom cut to fit your drawer fronts
- Strong mirror adhesive
- New crystal knobs
- A drill (if new holes are needed)
- A screwdriver
Step-by-Step Guide:
- Get a Clean Slate. Clean the vanity from top to bottom. Remove the old drawer pulls. Give the vanity frame a light sanding, wipe it clean, and then paint it white. Apply a second coat if needed.
- Measure for Mirrors. Carefully measure the front of each drawer. Write down the measurements. Take these to a local glass and mirror shop and ask them to cut pieces of mirror to those exact sizes.
- Attach the Mirrors. Make sure your drawers are clean and dry. Apply the special mirror adhesive to the back of a mirror piece, following the directions on the tube. Carefully press the mirror onto the drawer front. Press firmly and let it dry completely. Repeat for all drawers.
- Add the Bling. Once the adhesive is fully cured and the mirrors are secure, it’s time for the knobs. You can attach your new crystal knobs by screwing them in through the existing holes.
13. Rustic Industrial Storage Bench

This storage bench is sturdy, handsome, and useful. The wood has a deep, dark finish that highlights its natural lines and knots, giving it an aged and rugged character. This look is created with a special technique of charring the wood or using layers of dark stain.
Strong black metal straps and handles add to the industrial, almost medieval, feel. A simple, tufted cushion in a durable, earthy fabric makes it a comfortable spot to sit. This piece is a great addition to an entryway for storage and seating.
DIY Instructions: Build a Rugged Bench
What You’ll Need:
- Thick wood planks to build a box
- A drill and wood screws
- A wood torch (for charring) OR dark wood stain
- Sandpaper
- Black metal straps and handles
- Black screws or bolts
- Fabric, foam, and a piece of plywood for the cushion
Step-by-Step Guide:
- Build the Box. Assemble your wood planks into a simple rectangular box with a hinged lid to create the bench.
- Get the Look. To get the dark, textured finish, you can carefully use a wood torch to lightly burn the surface of the wood. Or, you can layer different colors of dark stain, wiping them on and off. Once you have the look you want, sand it lightly to make it smooth.
- Add the Hardware. Attach the black metal straps around the bench using screws or bolts for a strong, industrial look. Add the handles to the sides.
- Make the Cushion. Cut a piece of plywood slightly smaller than the bench lid. Cut a piece of foam the same size. Lay your fabric down, place the foam on top, and then the plywood. Pull the fabric tightly around and staple it to the back of the plywood.
- Finish Up. Place your finished cushion on top of the bench. You can secure it with screws from underneath the lid if you like.
14. Tropical Punch Side Table

This side table is a burst of cheerful, tropical energy. It’s a great way to add a pop of color and fun to any room. The top and drawer front are covered in a vibrant wallpaper filled with lush green leaves and bright pink flowers.
The playful design continues with the legs, which are painted in two different fun colors: a bright coral and a leafy green. A shiny gold pineapple-shaped knob serves as the delightful finishing touch, completing this vacation-inspired makeover.
DIY Instructions: Make a Tropical Getaway
What You’ll Need:
- A small side table with a drawer
- Sandpaper and a clean cloth
- Tropical-themed wallpaper or thick wrapping paper
- Mod Podge and a foam brush
- Bright green and coral paint
- Painter’s tape
- A fun new knob (like a pineapple!)
- A screwdriver
Step-by-Step Guide:
- Prep the Table. Clean the table and remove the old knob. Give the whole piece a light sanding.
- Paint the Legs. Use painter’s tape to mask off the legs. Paint two of the legs bright green, and the other two coral. You may need two coats.
- Cover with Paper. Cut your tropical paper to fit the tabletop and the drawer front. Apply a thin, even coat of Mod Podge to the tabletop, then carefully smooth the paper on top. Use a credit card or your hands to push out any air bubbles. Do the same for the drawer front.
- Seal It. Once the paper is dry, paint a thin coat of Mod Podge over the top of the paper. This will protect it. It will look white at first but will dry clear.
- Add the Final Touch. Once everything is completely dry, screw in your fun new pineapple knob.
15. Vintage Industrial Filing Cabinet

An old metal filing cabinet has been given a new life as a stylish, industrial storage unit. Instead of covering up its history, this makeover celebrates it. The original gray paint, along with its scuffs and rust spots, gives it authentic character.
The update is simple and effective. Bright, stenciled numbers in yellow and red have been added to the drawer fronts. This gives it the look of an old-school locker or workshop cabinet, adding a touch of color and a cool, graphic element to the piece.
DIY Instructions: Industrial and Organized
What You’ll Need:
- An old metal filing cabinet
- A good cleaning spray and cloths
- Number stencils
- Brightly colored spray paint (like yellow and red)
- Painter’s tape
- A clear matte spray sealer (optional)
Step-by-Step Guide:
- Clean, Don’t Erase. Clean the filing cabinet well with a good degreasing cleaner. You want to remove dirt, but not the cool, aged look of the metal. Let it dry completely.
- Tape and Stencil. Decide which numbers you want on your drawers. Use painter’s tape to hold your number stencil firmly in place on the first drawer front. Use more tape and paper to cover the rest of the drawer so you don’t get paint where you don’t want it.
- Spray the Numbers. In a well-ventilated area (like outside), hold the spray paint can about 8-10 inches away and spray a light, even coat over the stencil. It’s better to do two light coats than one thick, drippy one.
- Reveal the Look. While the paint is still slightly wet, carefully lift the stencil straight off.
- Repeat and Seal. Repeat the process for the other drawers with different colors. If you want to protect the cabinet and stop any rust from getting worse, you can spray the whole piece with a clear matte sealer once the numbers are dry.
16. Art Nouveau Inspired Armoire

This armoire has been elevated from a simple piece of furniture to a work of art. The dark, moody paint on the body creates a dramatic backdrop for the stunning designs on the doors. Each door is a different rich, jewel-toned color, one deep purple and one olive green.
The real beauty is in the graceful, flowing floral patterns that sweep across the doors. Rendered in a shimmering copper or gold, these Art Nouveau-style irises and leaves make the piece look incredibly elegant and unique. Ornate brass handles complete the sophisticated, artistic look.
DIY Instructions: Paint a Masterpiece
What You’ll Need:
- An armoire or wardrobe
- Sandpaper and a clean cloth
- Dark paint for the frame
- Jewel-toned paints for the doors (e.g., purple, green)
- Metallic copper or gold craft paint
- A large, detailed Art Nouveau stencil
- Stencil adhesive spray or painter’s tape
- Small stencil brushes or sponges
- New ornate handles
Step-by-Step Guide:
- Prep Your Canvas. Clean the armoire and remove the old handles. Lightly sand all surfaces and wipe away the dust.
- Paint the Base Colors. Paint the main frame of the armoire with your dark base color. Then, paint each door a different jewel-toned color. Let everything dry completely, applying a second coat if needed.
- Apply the Stencil. Spray the back of your stencil with a light coat of stencil adhesive, or use painter’s tape to hold it very securely in place on one of the doors.
- Add the Metallic Design. Pour a small amount of your metallic paint onto a paper plate. Dip your stencil brush or sponge into the paint, then dab most of it off onto the plate. You want a “dry brush.” Gently dab or swirl the paint over the stencil openings. Build up the color slowly.
- The Big Reveal. Once you’ve filled in the design, carefully remove the stencil. Let the design dry completely before doing the other door.
- Finishing Touches. Once all the paint is dry, install your new ornate handles.
17. Southwestern Style Entryway Bench

This bench is filled with the warm, earthy colors and textures of the American Southwest. The wooden frame is painted in a lovely terracotta or clay color, which immediately sets a warm and inviting tone.
The seat has been reupholstered using a piece of a woven Kilim rug, featuring geometric patterns in turquoise, black, and coral. This adds amazing texture and visual interest. The final rustic touch is the jute rope that has been carefully wrapped around the legs.
DIY Instructions: A Touch of the Desert
What You’ll Need:
- A simple wooden bench
- Sandpaper and a clean cloth
- Terracotta or clay-colored paint
- A paintbrush
- A small, flat-weave rug or durable patterned fabric
- A staple gun
- Jute rope
- A hot glue gun
- Decorative upholstery tacks (optional)
Step-by-Step Guide:
- Paint the Bench. Clean the bench and give the frame a light sanding. Wipe it down, then paint it with your terracotta color. Let it dry and apply a second coat.
- Upholster the Seat. Lay your rug or fabric face down on the floor. Place the bench upside down on top of it. Pull the fabric up and over the seat, stapling it securely to the underside of the seat. Start by placing one staple in the middle of each of the four sides, pulling the fabric tight as you go. Then fill in the gaps.
- Wrap the Legs. Starting at the top or bottom of one leg, use a dot of hot glue to secure the end of your jute rope. Tightly wrap the rope around the leg, making sure each new wrap is snug against the last one. When you get to the end, cut the rope and secure it with another dot of hot glue. Repeat for all legs.
- Add a Detail. For a more finished look, you can use a hammer to gently tap in a line of decorative upholstery tacks along the edge of the fabric on the sides of the seat.
18. Minimalist Japanese-Style Coffee Table

This coffee table is a lesson in simplicity and quiet style. It is built low to the ground, encouraging a more relaxed and grounded way of gathering. The design is simple and chunky, with thick legs and a solid top.
The wood is stained in a deep, dark espresso or black finish. This dark color is very dramatic, yet it still allows the natural texture and grain of the wood to show through. Paired with simple floor cushions, it creates a calm, peaceful, and minimalist space for conversation or tea.
DIY Instructions: Simple and Grounded
What You’ll Need:
- Thick wood boards for the top and legs
- Wood glue and screws
- A drill
- Sandpaper (medium and fine grit)
- Dark wood stain (ebony or jacobean)
- Clean cloths
- A matte or satin polyurethane topcoat
Step-by-Step Guide:
- Build a Simple Table. Construct a simple, low table by creating a top and four thick, square legs. Attach the legs securely from the top with glue and screws before you attach the final top boards.
- Sand it Smooth. Once built, sand the entire table until it is very smooth. Start with medium grit sandpaper and finish with fine grit sandpaper. Wipe away all the dust.
- Apply the Stain. Using a clean cloth, rub the dark stain into the wood, going in the direction of the wood grain. Let it soak in for a few minutes, then use a new, clean cloth to wipe off any extra stain. The longer you leave it on, the darker it will be. Let it dry completely.
- Protect the Finish. To protect your table from spills, apply a thin coat of matte or satin polyurethane with a clean brush. Let it dry, then lightly sand it with fine sandpaper and apply a second coat.
19. Nature-Inspired Sideboard

This sideboard brings the calm and gentle beauty of the outdoors inside. The main frame of the piece is a light, natural wood. This is complemented by soft, muted paint colors on some of the drawer fronts and cabinet doors.
The most unique feature is the hardware. Some drawers have simple knobs, but others feature handles made from actual tree branches. These organic, one-of-a-kind pulls make the piece feel deeply connected to nature. It’s a wonderful way to add a rustic and personal touch to your furniture.
DIY Instructions: Bring the Outdoors In
What You’ll Need:
- A wooden sideboard
- Sandpaper and clean cloths
- Muted, earthy paint colors (like sage green and dusty blue)
- Painter’s tape
- A small paintbrush
- Sturdy, dry tree branches
- A handsaw
- A drill
- A clear sealer
Step-by-Step Guide:
- Prep and Paint. Clean the sideboard well. Use painter’s tape to carefully mask off the areas you want to paint. Lightly sand inside the taped areas, wipe them clean, and then apply your soft, earthy paint colors. Let dry, then remove the tape.
- Find Your Handles. Go on a walk and find some fallen tree branches that are about 1-2 inches thick and feel very dry and sturdy.
- Make the Handles. Use a saw to cut the branches to the lengths you need for your drawer pulls. Sand any rough spots to make them smooth and comfortable to touch.
- Seal the Branches. To make sure the branches last and stay clean, spray them with a few coats of clear sealer. Let them dry completely.
- Attach Your New Handles. Drill two holes from the inside of the drawer front out. Then, use long screws to attach the branch handles securely from the inside.
20. Moody Velvet Accent Chair

A traditional wooden chair is given a dramatic and luxurious new personality. The ornate, turned legs and classic frame have been painted in a sophisticated matte black. This modern finish instantly updates the chair’s old-fashioned shape.
The seat provides a rich pop of color and texture. It has been reupholstered in a deep, royal blue crushed velvet. The combination of the soft, shimmering velvet against the stark matte black frame creates a look that is both moody and incredibly chic.
DIY Instructions: A Touch of Drama
What You’ll Need:
- An old wooden chair with a removable seat
- Sandpaper and a clean cloth
- Matte black spray paint or chalk paint
- A screwdriver
- A staple gun
- Scissors
- A piece of rich velvet fabric
Step-by-Step Guide:
- Prep the Chair. Clean the chair frame. Use a screwdriver to unscrew the seat pad and set it aside. Give the entire chair frame a light sanding, then wipe it clean.
- Paint it Black. In a well-ventilated area, spray paint the chair frame with matte black paint. Or, use a brush to apply matte black chalk paint. Apply two light coats for the best coverage. Let it dry completely.
- Get the Seat Ready. While the frame is drying, place the seat pad on your new velvet fabric. Use the old fabric cover as a guide for how big to cut your new piece, leaving a few extra inches all around.
- Attach the New Fabric. Lay your velvet fabric nice-side-down. Place the seat pad on top of it. Starting in the middle of one side, pull the fabric up and over the edge and secure it with a staple gun. Do the same on the opposite side, pulling the fabric tight. Continue this all the way around the seat.
- Reassemble. Once the chair frame is completely dry, use your screwdriver to attach the newly-covered velvet seat.
21. Collegiate-Inspired Map Desk

This desk has a smart, scholarly feel, perfect for a home office or study area. The wooden top is kept classic, but the frame is painted a deep, collegiate blue. This adds a nice pop of color and gives the piece a more modern look.
The drawer fronts are the main feature. They have been decoupaged with old maps, giving the desk a sense of history and adventure. Vintage-style library card catalog pulls complete the look, making it feel like a treasured find from an old university library.
DIY Instructions: A Smart Study Spot
What You’ll Need:
- A wooden desk
- Sandpaper and clean cloths
- Painter’s tape
- Dark blue paint and red paint
- A paintbrush
- Old maps or map-themed paper
- Mod Podge and a foam brush
- New library-style drawer pulls
- A screwdriver
Step-by-Step Guide:
- Prep and Tape. Clean the desk well. Remove the old hardware. If you’re keeping the top natural wood, use painter’s tape to create a clean line where the top meets the frame.
- Paint the Frame. Lightly sand the desk frame and wipe it down. Paint the frame with your dark blue paint. Paint the bottom drawer red for a fun, contrasting detail. Let it all dry.
- Map the Drawers. Cut your map paper to fit the fronts of the other two drawers. Apply a thin layer of Mod Podge to a drawer front, then carefully smooth the map paper on top.
- Seal and Protect. Once the paper is in place, paint a thin layer of Mod Podge over the top of the map to seal it. It will dry clear.
- Add the Hardware. Once everything is fully dry, screw on the new library-style drawer pulls.
22. Abstract Desert-Modern Sideboard

This sideboard is a piece of functional art. The light wood frame provides a neutral canvas for the abstract, hand-painted design on the front. The design features geometric lines and shapes in a warm, desert-inspired color palette.
Curving lines in terracotta and tan connect across the different doors and drawers, creating one large, cohesive piece of art. Simple leather pulls add a soft, organic touch that complements the earthy colors and modern design. It’s a bold and creative statement piece.
DIY Instructions: Paint Your Own Art
What You’ll Need:
- A modern, flat-front sideboard
- Sandpaper
- Paints in desert colors (terracotta, beige, tan, white)
- Artist’s paintbrushes of various sizes
- A pencil
- Leather strips for pulls
- Screws and washers
Step-by-Step Guide:
- Create a Blank Canvas. Clean the sideboard and remove any old hardware. Give the front a very light sanding to help the paint stick.
- Sketch Your Design. Lightly sketch out your abstract design with a pencil across the front of the doors and drawers. Think about flowing lines and simple shapes like circles and arches.
- Paint in the Shapes. Carefully paint in your design using your different desert-colored paints. Use different-sized brushes for the lines and the filled-in shapes. Take your time.
- Make the Pulls. While the paint dries, create your leather pulls. Cut leather strips, fold them into loops, and punch a small hole through the ends for the screw.
- Finish the Piece. Once the paint is completely dry, attach your new leather pulls using screws and washers from the inside of the drawers and doors.
23. English Garden Potting Bench

This piece transforms a simple table or sideboard into a charming and practical potting bench, perfect for a patio or garden. The body is painted in soft, muted colors like dusty rose and slate blue, giving it a gentle, weathered look.
The wooden top is left natural, ready for work. A back piece with a small shelf and hooks has been added for extra storage. To complete the garden theme, delicate white floral designs have been stenciled onto the drawer fronts and the top shelf.
DIY Instructions: A Gardener’s Dream Bench
What You’ll Need:
- An old workbench, console table, or sideboard
- Sandpaper
- Softly colored paints (e.g., dusty rose, slate blue)
- Paintbrushes
- A small floral stencil
- White craft paint and a stencil brush
- A clear outdoor sealer
Step-by-Step Guide:
- Prep and Paint. Clean your table well. Lightly sand the parts you plan to paint. Apply your chosen colors to the different parts of the bench—for example, the legs in one color and the back in another.
- Keep the Top Natural. If your tabletop is wood, give it a good sanding to clean it up and make it smooth.
- Add the Stencil. Once the paint is dry, use your stencil and a small amount of white paint to add the floral details to the drawer fronts or other areas. Use a dabbing motion to prevent the paint from bleeding under the stencil.
- Protect Your Bench. Since this bench will likely be used outdoors or get wet, it’s very important to protect it. Apply two or three coats of a clear outdoor sealer over the entire piece—both the painted parts and the natural wood top.
- Add Hooks. If you added a back panel, screw in some simple hooks to hang your garden tools and gloves.
24. Classic Campaign Style Nightstands

These nightstands have a timeless and sophisticated look, inspired by antique campaign furniture that was designed to be moved. The simple, boxy shape is painted in a deep, masculine navy blue.
The classic campaign style comes from the hardware. Shiny brass corner brackets protect the edges, and recessed brass drawer pulls lie flat against the drawer fronts. This combination of the dark paint and the gleaming brass creates a look that is both handsome and elegant.
DIY Instructions: Get the Campaign Look
What You’ll Need:
- A pair of simple, boxy nightstands
- Sandpaper and a clean cloth
- Navy blue or dark green paint
- A paintbrush or roller
- Brass corner brackets
- Recessed brass campaign-style drawer pulls
- A drill and a screwdriver
Step-by-Step Guide:
- Prep for Paint. Clean the nightstands well. Remove any old hardware. If there are holes from the old knobs, you may need to fill them with wood filler and sand them smooth.
- Apply a Rich Color. Give the nightstands a light sanding all over. Wipe them clean, then apply two coats of your navy blue paint for a deep, even finish.
- Add the Corner Brackets. Once the paint is completely dry, carefully attach the brass corner brackets to all eight corners of each nightstand using the small screws that come with them.
- Install the Pulls. Installing recessed pulls might require you to cut a shallow area for them to sit in. Follow the directions that come with the hardware. If that seems too difficult, you can find non-recessed campaign pulls that are easier to install. Attach them securely.
25. Steampunk Inventor’s Cabinet

This cabinet is an incredible work of imagination, perfect for a fan of the steampunk genre. A simple wooden cabinet has been completely transformed into what looks like a mysterious, mechanical device from a Victorian inventor’s workshop.
The doors are covered with old maps and sheet music. On top of that, a complex arrangement of copper pipes, gears, gauges, and valves has been added. The hardware looks heavy and industrial. It’s a highly detailed and creative piece that tells a story.
DIY Instructions: A Steampunk Creation
What You’ll Need:
- A small cabinet
- Dark wood stain
- Old maps, sheet music, or scrapbook paper
- Mod Podge
- Lots of fun bits and pieces: old gears, clock parts, copper pipes and fittings, a small pressure gauge, old knobs and valves.
- A very strong glue (like E6000 or a two-part epoxy)
- Metallic copper and bronze craft paint
Step-by-Step Guide:
- Age the Cabinet. Clean your cabinet. Give it a light sanding and then apply a dark wood stain to make it look old.
- Create the Background. Decoupage the front and sides of your cabinet with your chosen papers using Mod Podge. Seal it with another coat of Mod Podge on top.
- Arrange Your Parts. Lay out all your steampunk pieces on the cabinet doors. Play with the arrangement until you have a design you love. Think about creating a network of pipes or a set of interesting-looking controls.
- Paint the Pieces. To make everything look like it belongs together, you can paint some of your plastic or newer-looking metal pieces with metallic copper and bronze paints. Let them dry.
- Glue Everything Down. One by one, use your strong glue to permanently attach all the gears, pipes, and gauges to the cabinet. This will take time and patience! Let the glue cure completely.
26. Color-Dipped Bar Stools

This is a simple, modern, and incredibly fun way to update a set of plain wooden bar stools. The top part of the stools, including the seat, is left in its natural light wood finish. This keeps the look clean and fresh.
The fun comes in on the legs. Using painter’s tape to create sharp, clean lines, the legs have been “dipped” in different bands of color. This set uses bold black, clean white, and then a final pop of hot pink and neon yellow, making each stool slightly different but part of a cohesive, playful set.
DIY Instructions: Dip Your Stools in Color
What You’ll Need:
- Plain wooden stools
- Sandpaper
- Painter’s tape
- A ruler or measuring tape
- Several colors of paint (e.g., white, black, and a bright neon color)
- Paintbrushes
- A clear sealer (optional)
Step-by-Step Guide:
- Prep the Stools. If the stools have a shiny finish, give the legs a light sanding to help the paint stick. Wipe them clean.
- Tape Off Your First Section. Decide where you want your first band of color to start. Use a ruler to make sure the line is the same height on all the legs. Apply painter’s tape carefully around each leg to create a very sharp line.
- Paint the First Color. Paint the section of the legs below the tape. For this look, the bottom section is black. Apply two coats. While the second coat is still a little wet, carefully peel off the painter’s tape. Let it dry completely.
- Tape and Paint Again. Once the first color is totally dry, tape off the next section above it. Make sure you tape a clean line on top of your first color. Paint the next section (in this case, white). Remove the tape and let it dry. Repeat for your final, brightest color.
- Protect Your Work. If you want to make your stools extra durable, you can apply a coat of clear sealer to the painted legs once everything is dry.
27. Moroccan Bone Inlay Style Dresser

This dresser is a stunning example of intricate, global-inspired design. It mimics the look of traditional Moroccan bone inlay furniture, which is very expensive. The entire piece has been covered in a detailed, black and white floral and geometric pattern.
This amazing transformation can be achieved with either precisely applied stencils or special furniture decals. The result is a high-impact, beautifully detailed piece that looks like it was sourced from a faraway market. It’s a testament to how a pattern can completely change a piece of furniture.
DIY Instructions: An Intricate Inlay Look
What You’ll Need:
- A dresser with flat surfaces
- Fine-grit sandpaper and a clean cloth
- Black or dark charcoal paint
- A paintbrush or roller
- A large, detailed Moroccan or bone inlay-style stencil
- White or off-white paint
- A dense foam roller or stencil brush
- A clear topcoat
Step-by-Step Guide:
- Create the Base. Clean your dresser and remove the hardware. Give it a light sanding and wipe it clean. Apply two coats of your black paint to the entire piece for a solid, dark base. Let it dry completely.
- Stenciling Time. This step requires patience. Start on one of the top corners of the dresser. Secure your stencil with painter’s tape or stencil adhesive.
- Apply the White Paint. Pour some of your white paint onto a paper plate. Load your foam roller or stencil brush with a small amount of paint, then roll or dab most of it off onto the plate. You want very little paint on your applicator.
- Fill in the Stencil. Carefully roll or dab the white paint over the stencil. Use light pressure. It’s better to build up the color with two thin coats than to use too much paint at once, which can cause bleeding.
- Move and Repeat. Carefully lift your stencil and move it to the next section, lining it up with the pattern you just painted. Repeat this process until the entire dresser is covered. Let it dry completely.
- Protect the Pattern. Apply two coats of a clear topcoat to protect your beautiful work.
28. Wabi-Sabi Inspired Rustic Bench

This bench celebrates the beauty of imperfection, a core idea in the Japanese philosophy of wabi-sabi. The piece is made from reclaimed, weathered wood that is full of knots, cracks, and uneven texture. Its history is its beauty.
The construction is simple and rustic. The most interesting detail is the visible joinery, where the pieces of wood are held together. Some of these joints have been wrapped with gold wire or cord. This is inspired by the Japanese art of Kintsugi, where broken pottery is repaired with gold, highlighting the break as a beautiful part of the object’s history.
DIY Instructions: Find Beauty in Imperfection
What You’ll Need:
- Old, weathered, or reclaimed wood beams
- A saw
- A drill and screws
- Sandpaper (just to remove splinters)
- Gold or brass craft wire
Step-by-Step Guide:
- Find Your Wood. Look for old pieces of wood that already have a lot of character. Don’t worry about cracks or knots—that’s what you want.
- Build Simply. Cut your wood and assemble a very simple, rustic-looking bench. The construction doesn’t have to be perfect. The goal is to make something that looks handmade and has been around for a long time.
- Clean, Don’t Perfect. Use sandpaper to knock off any sharp splinters, but don’t try to sand the bench smooth. You want to keep all of that rough, natural texture. Wipe it down to remove any dust.
- The Golden Repair. Identify a few of the joints or some of the natural cracks in the wood. Tightly and neatly wrap the gold wire around these areas. This small, shiny detail will stand out against the rough wood and make the “imperfections” look like special features.
29. Scandinavian Folk Art Painted Trunks

These storage trunks are decorated with a beautiful, traditional painting style known as Rosemaling, which comes from Norway. The trunks themselves are painted in bold, classic colors like deep red and blue.
The charm comes from the hand-painted floral designs that adorn the surfaces. These patterns feature flowing scrolls, leaves, and flowers, painted in a palette of bright, cheerful colors like yellow, green, and white. It’s a wonderful way to add a touch of handmade, folk-art history to your home.
DIY Instructions: Paint a Folk Art Treasure
What You’ll Need:
- A wooden trunk or chest
- Sandpaper and a clean cloth
- Base paint colors (like red and blue)
- Various acrylic craft paints for the design (yellow, green, white, etc.)
- A variety of small, round, and pointed artist’s paintbrushes
- A clear topcoat
Step-by-Step Guide:
- Paint the Base. Clean your trunk, give it a light sanding, and apply two coats of your main base color. Let it dry completely.
- Plan Your Design. Look up “Rosemaling” online for inspiration. The designs are usually symmetrical and feature “S” and “C” scrolls, leaves, and flowers. You can lightly sketch a design on your trunk with a pencil.
- Start with Scrolls. Using a medium-sized round brush, paint the main flowing scroll lines of your design.
- Add Flowers and Leaves. Use smaller brushes to add the flowers and leaves. Don’t be afraid to layer colors. Folk art is often bold and not perfectly blended. Have fun with the teardrop-shaped brushstrokes that are common in this style.
- Add Details. Use a very small, fine-tipped brush to add details like dots, outlines, and highlights in white or another light color.
- Protect Your Art. Once your beautiful painting is completely dry, apply two coats of a clear topcoat to protect it.
30. Glam Animal Print Ottoman

This ottoman is a bold and glamorous statement piece, perfect for someone who loves daring design. A traditional ottoman with curved wooden legs has been completely made over. The legs are painted a glossy black, and the very tips are dipped in gold for a touch of luxury.
The real drama is in the upholstery, which uses two different, clashing animal prints. The top cushion is a classic leopard print, while the base is covered in a striking zebra print. A line of shiny brass upholstery tacks separates the two patterns and adds a final, polished detail.
DIY Instructions: A Walk on the Wild Side
What You’ll Need:
- An old ottoman
- Sandpaper
- Glossy black paint and a small amount of gold paint
- Paintbrushes
- Painter’s tape
- Leopard print fabric and zebra print fabric
- A staple gun
- Scissors
- A decorative tack strip or individual brass tacks and a hammer
Step-by-Step Guide:
- Prep and Paint the Legs. Remove the old fabric from the ottoman. Give the wooden legs a light sanding and paint them with glossy black paint.
- Dip in Gold. Once the black paint is dry, use painter’s tape to tape off the very bottom of each leg. Carefully paint the tips with your gold paint. Remove the tape and let them dry.
- Upholster the Base. Cut your zebra fabric to fit around the sides of the ottoman base. Use your staple gun to attach it, pulling it tight as you go.
- Upholster the Top. Cut your leopard print fabric to fit the top cushion. Staple it securely, pulling it tight for a smooth finish.
- Add the Tacks. To cover the staples where the two fabrics meet and to add a designer detail, use a hammer to carefully tap in a line of brass upholstery tacks all the way around the ottoman.
31. Faux Marble Console Table

This project gives a simple console table an incredibly chic and expensive-looking upgrade. The frame of the table is painted a crisp, clean white, while the bottom shelf is painted a contrasting black, creating a modern, graphic look.
The real transformation is the top, which has been covered with a realistic marble-patterned contact paper. This simple technique completely changes the character of the piece, giving it the luxurious appearance of real stone without the cost or weight. Sleek, minimalist brass pulls add a final touch of elegance.
DIY Instructions: The Look of Marble for Less
What You’ll Need:
- A console table
- Sandpaper and clean cloths
- White paint and black paint
- Paintbrushes
- High-quality marble-patterned contact paper
- A measuring tape
- A craft knife or scissors
- A flat tool for smoothing (like a credit card)
Step-by-Step Guide:
- Prep and Paint. Clean the console table well and remove any hardware. Lightly sand the frame and shelf, then wipe away the dust. Paint the main frame and legs white, and paint the bottom shelf black. Let it dry completely.
- Measure and Cut. Carefully measure the top of your console table. Roll out your contact paper and use your measurements to cut a piece that is slightly larger than the tabletop on all sides.
- Apply the Contact Paper. This step is easier with two people. Peel back just a few inches of the paper backing from one end. Carefully line up the edge of the paper with the edge of the tabletop and press it down.
- Smooth it Out. Slowly continue to peel the backing off while using your flat tool to smooth the contact paper onto the surface. Work from the center out to push away any air bubbles.
- Trim the Edges. Once the top is covered, use a sharp craft knife to carefully trim the excess contact paper from the edges for a perfect fit.
32. Natural Cane Panel Headboard

This headboard brings a warm, natural, and airy feeling to the bedroom. A simple wooden frame is constructed and painted a clean white, which provides a fresh border. The inside of the frame is finished with a light, natural wood trim.
The main feature is the three large panels of woven cane webbing that fill the frame. The cane’s natural color and texture add a layer of softness and a touch of bohemian style to the room. It’s a beautiful way to create a high-end, custom look for a bed.
DIY Instructions: Weave a Dreamy Headboard
What You’ll Need:
- Wood boards to build a frame (like 1x3s)
- A saw, wood glue, and screws
- White paint and a paintbrush
- A roll of cane webbing
- A heavy-duty staple gun
- Thin wood trim or lattice strips to finish the edges
Step-by-Step Guide:
- Build the Frame. Construct a simple rectangular frame with vertical dividers to create three sections, sized to fit the width of your bed.
- Paint the Frame. Paint the main part of your new frame white. You can stain the inside edges with a light wood stain for a two-tone look if you like. Let it dry.
- Attach the Cane. Cut your cane webbing into three pieces, each one slightly larger than one of the openings in your frame. It helps to soak the cane in warm water for about 30 minutes to make it more flexible.
- Staple it in Place. While the cane is still damp, stretch it across the back of an opening and use a staple gun to attach it. Pull it very tight as you staple. As the cane dries, it will shrink and become even tighter.
- Add a Finishing Trim. To hide the staples and create a clean look, you can glue or nail a thin piece of wood trim over the stapled edges of the cane on the back of the headboard.
33. Metallic Ombré Filing Cabinet

This project turns a boring office staple into a stunning, glamorous piece of decor. A standard metal filing cabinet is given an amazing new look with a smooth, blended color gradient, known as an ombré effect.
Using three different metallic spray paints, the cabinet transitions seamlessly from a bright, shimmering gold at the top, down through a warm copper in the middle, to a rich, deep bronze at the bottom. This sophisticated finish makes the cabinet look like a high-end, decorative piece.
DIY Instructions: A Metallic Masterpiece
What You’ll Need:
- A metal filing cabinet
- A good cleaner to remove any grease
- Three cans of metallic spray paint in coordinating colors (e.g., gold, copper, bronze)
- A drop cloth or newspaper
Step-by-Step Guide:
- Prep the Cabinet. Clean the filing cabinet thoroughly to remove any dirt, dust, or oily residue. Make sure it’s completely dry. You don’t need to sand metal before spray painting.
- Spray the Base Colors. In a well-ventilated area, spray the top third of the cabinet with your lightest color (gold). Spray the middle third with your mid-tone color (copper), and the bottom third with your darkest color (bronze). Don’t worry about blending them yet.
- Create the Blend. This is the key step. While the paint is still wet, hold the can of your lightest color about 12-14 inches away and spray a light mist where it meets the middle color. This will help the colors blend.
- Blend the Other Seam. Now do the same thing with your middle color, spraying a light mist over the area where it meets the darkest color. You can go back and forth with light mists until you have a smooth transition.
- Let it Cure. Let the filing cabinet dry and cure completely according to the directions on the spray paint can before you handle it or put it back into use.
34. Bold Geometric Sideboard

This sideboard is a masterclass in using color and shape to create a dynamic, modern piece. The frame of the sideboard is kept simple, allowing the doors and drawers to be the star of the show.
Using painter’s tape to create sharp lines, a bold geometric design of intersecting triangles covers the entire front. The design is filled in with a strong color palette of forest green, navy blue, and bright yellow, with some sections left as natural wood. It’s a graphic, eye-catching update.
DIY Instructions: Get Graphic with Geometry
What You’ll Need:
- A sideboard with flat-front doors and drawers
- Sandpaper and a clean cloth
- High-quality painter’s tape (like FrogTape)
- Paints in your chosen colors (e.g., green, blue, yellow, white)
- Paintbrushes or small rollers
- A craft knife
Step-by-Step Guide:
- Prep Your Piece. Clean the sideboard and remove the hardware. If some sections will remain natural wood, tape them off. Lightly sand the areas you will be painting.
- Create Your Design with Tape. This is the most important step. Use your painter’s tape to lay out your geometric design across the entire front of the piece. Press the edges of the tape down firmly to prevent paint from bleeding underneath.
- Paint in the Colors. Carefully paint within the taped-off sections with your different colors. It’s like a coloring book for furniture! Apply a second coat if needed for vibrant color.
- The Big Reveal. For the sharpest lines, it’s best to remove the painter’s tape while the paint is still slightly wet. Pull it off slowly and at an angle.
- Let it Dry and Reassemble. Let the paint cure completely before you put the hardware back on and start using your amazing new piece of art.
35. Textured Plaster Coffee Table

This coffee table combines a sleek wooden top with a highly textured, sculptural base. This project gives a basic table a high-end, designer look by adding unique texture. The clean lines of the warm wood top provide a beautiful contrast to the rustic base.
The base of the table has been covered in a layer of joint compound or plaster, which has been applied with a putty knife to create a rough, stucco-like finish. Painted in a soft, neutral gray, the base has an organic, stone-like appearance that is both modern and earthy.
DIY Instructions: Add Some Texture
What You’ll Need:
- A basic coffee table with a solid base (like an old cube or parsons table)
- Sandpaper
- A tub of pre-mixed joint compound or plaster
- A putty knife or trowel
- Paint in a neutral color for the base
- A clear sealer for the top (if the wood is unfinished)
Step-by-Step Guide:
- Prep the Table. If your table has a separate top, it’s easiest to remove it. Clean the base of the table well and give it a light sanding to help the compound stick.
- Apply the Texture. Scoop some joint compound onto your putty knife. Spread it onto the base of the table, just like you are putting frosting on a cake. Don’t try to make it smooth! Create peaks and swirls with your knife to build up an interesting texture. Cover the entire base.
- Let it Dry. Let the joint compound dry completely. This might take 24 hours or more, depending on how thick you applied it. It will get lighter in color as it dries.
- Paint the Base. Once it’s bone dry, you can paint the textured base with your chosen neutral color. Use a brush to get into all the nooks and crannies.
- Finish the Top. Make sure your wood top is clean and smooth. You can apply a clear sealer to protect it. Once the base is dry, reattach the top.
36. Chinoiserie-Style Cabinet

This cabinet is a stunning example of Chinoiserie, a European interpretation of Chinese and East Asian artistic traditions. A classic black cabinet is framed with rich red and delicate gold trim, creating a sense of luxury.
The beauty of the piece comes from the decorative paper or wallpaper applied to the door and drawer fronts. It features a classic Chinoiserie scene with delicate cherry blossom branches, birds, and pagodas, set against a soft blue background. Ornate brass hardware and a single tassel complete this elegant and worldly transformation.
DIY Instructions: A Touch of the Orient
What You’ll Need:
- A cabinet or small armoire
- Sandpaper and clean cloths
- Black, red, and gold paint
- Painter’s tape
- Fine-tipped paintbrushes
- Beautiful Chinoiserie-style wallpaper or decoupage paper
- Mod Podge and a foam brush
- New ornate hardware
Step-by-Step Guide:
- Paint the Frame. Clean the cabinet and remove the old hardware. Sand it lightly. Paint the main body of the cabinet black.
- Add the Trim. Once the black paint is dry, use painter’s tape to mask off the trim areas. Carefully paint these sections with your red paint. When that is dry, use a very small artist’s brush to add a thin line of gold paint as a final detail.
- Apply the Paper. Cut your decorative paper to fit the panels on the doors and drawers. Apply a thin, even coat of Mod Podge to a panel, then carefully smooth the paper on top.
- Seal the Design. Once the paper is in place, apply another thin coat of Mod Podge over the top of the paper to seal and protect it.
- Add the Finishing Touches. When everything is completely dry, install your new ornate hardware. You can add a decorative tassel to a handle for a final, beautiful detail.
As you can see from these diverse projects, you don’t need a big budget to make a big impact. A simple change, whether it’s a bold coat of paint, new hardware, or a creative pattern, can redefine a piece of furniture.
The journey from a drab, overlooked item to a stunning focal point is easier than you think. You don’t need professional skills—just a willingness to try something new.
The most rewarding part of any DIY project is the result: a unique piece that reflects your personal style and tells a story of creative renewal.
So take another look at that outdated dresser or boring bench. Your next favorite piece of furniture isn’t in a store; it’s already in your home, waiting for its second chance.
Key Takeaways
- Paint is Powerful: A new color is the quickest and most effective way to change the entire mood of a piece of furniture.
- Hardware is Jewelry: Swapping old knobs and pulls for new ones is a simple, low-effort update that can make a piece look more modern, rustic, or glamorous.
- Texture Adds Interest: Using fabric, wallpaper, cane webbing, or even plaster adds a layer of depth and personality that paint alone cannot achieve.
- Don’t Fear the DIY: Most of these projects are beginner-friendly and require basic tools, proving that anyone can transform their furniture with a little guidance.