

Does the sight of your pantry fill you with dread rather than dinner inspiration? You are certainly not alone. Most home cooks struggle with food storage chaos, where expired spices hide next to crushed snack boxes. A messy pantry costs you time, money, and sanity every single day.
Overbuying duplicates or letting staples spoil are common problems caused by poor visibility and disorganization. Transforming this space does not require a costly renovation; it simply needs clever strategy and efficient storage tools. We gathered forty innovative solutions designed to maximize every inch of your kitchen cabinet.
We explore everything from easy decanting techniques to maximizing vertical space with stackable bins and rotating tiers. These solutions will help you manage bulk goods, keep snacks fresh, and ensure you always know exactly what is on hand. Get ready to reclaim control and turn your pantry into a beautifully organized culinary command center.
1 Uniform Airtight Canister System
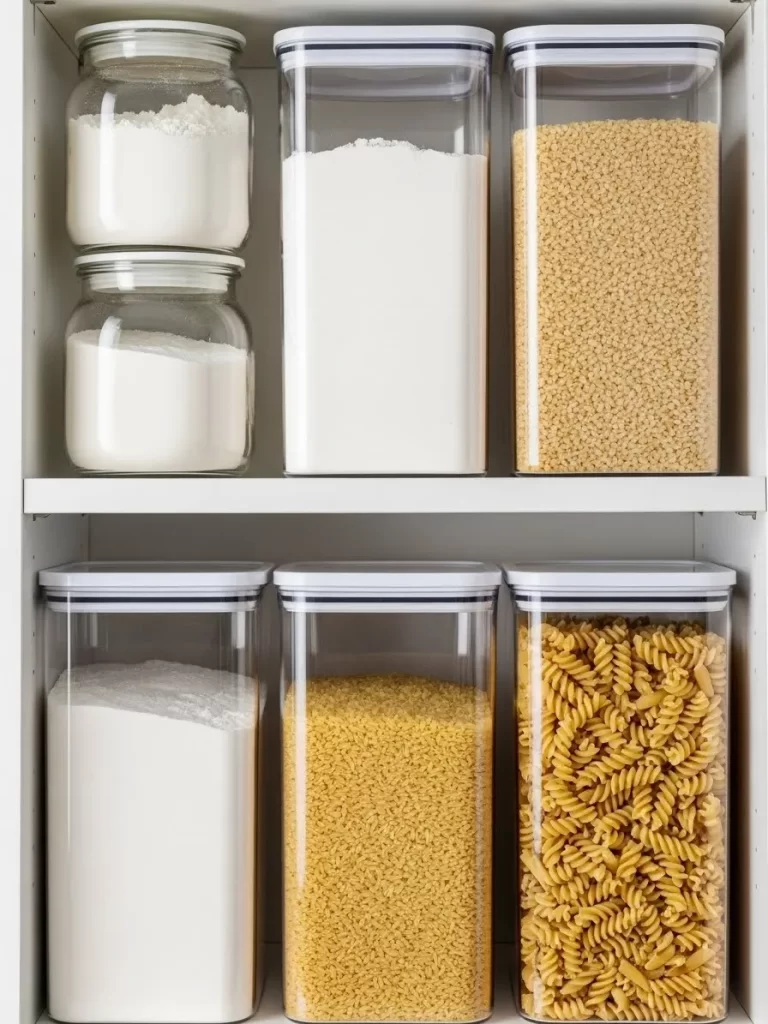
Keeping dry goods fresh often feels like a losing battle against humidity and stale air. These tall, transparent containers provide a clear view of your inventory so you never run out of pasta or flour unexpectedly. The matching white lids create a cohesive look that instantly calms the visual noise of a busy pantry.
By using vertical space effectively, you can fit more items on a single shelf. This setup eliminates bulky, half empty cardboard boxes that clutter your cabinets. You will find that cooking becomes much faster when every ingredient is visible and easy to reach.
Consistent shapes allow these bins to sit flush against one another. This arrangement maximizes every square inch of your storage area. Your pantry will transform from a chaotic mess into a streamlined station for meal preparation.
Materials Required
- Clear plastic or glass airtight canisters in various sizes
- Permanent chalk marker or vinyl labels
- Microfiber cloth
- Warm soapy water
Equipment Required
- Measuring tape
- Level for shelf alignment
- Small step stool
DIY Instructions
- Measure the height and depth of your pantry shelves to ensure the tall containers will fit comfortably.
- Remove all current food items and wipe down the empty shelves with a damp microfiber cloth.
- Wash each new canister and lid in warm soapy water then dry them completely to prevent mold.
- Pour your dry goods like pasta, rice, and flour into the corresponding bins using a funnel if necessary.
- Apply a label to the front of each jar at the same height for a uniform appearance.
- Group similar items together on the shelves with the tallest containers at the back.
- Check the seals on the lids to confirm they are pressed down firmly to keep air out.
2 Wall Mounted Cereal Dispenser Station
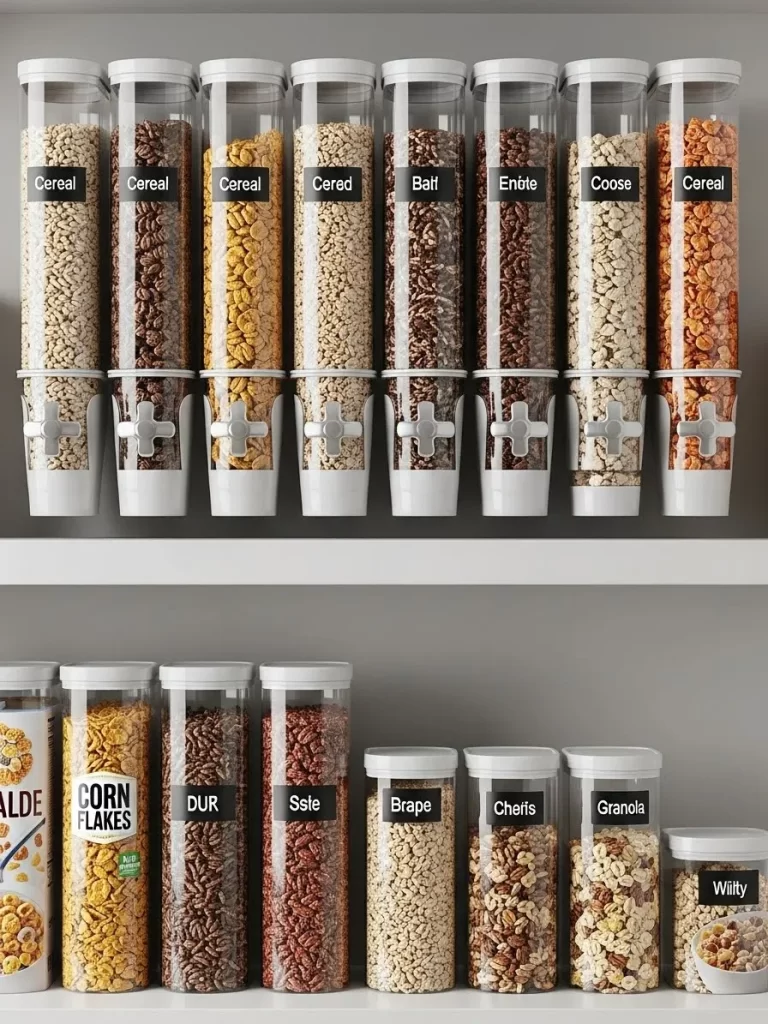
Breakfast time often feels rushed when you have to fumble with awkward cereal boxes and messy plastic bags. Installing a row of wall mounted dispensers keeps your favorite grains at eye level and ready for a quick pour. These clear tubes show exactly how much toasted oats or cornflakes you have left before the next grocery trip.
Each unit features a simple twist knob that controls the portion size with ease. This design helps reduce spills on the floor and keeps the contents fresher for a longer period than open cardboard. Your kitchen will look like a high end hotel buffet while saving valuable counter space for other tasks.
The sleek white brackets and transparent bodies provide a modern aesthetic that fits into any kitchen decor. You can easily remove the canisters for cleaning or refilling without needing heavy tools. This system makes it simple for children to serve themselves without creating a giant mess in the process.
Materials Required
- Wall mounted cereal dispenser set
- Wall anchors and screws
- Dry erase or vinyl labels
- Rubbing alcohol
Equipment Required
- Power drill with bits
- Phillips head screwdriver
- Bubble level
- Pencil
DIY Instructions
- Choose a flat section of wall in your pantry or kitchen that is within easy reach for all family members.
- Hold the mounting bracket against the wall and use a bubble level to ensure it is perfectly straight.
- Mark the screw holes with a pencil and then move the bracket aside to drill pilot holes into the drywall.
- Insert plastic wall anchors into the holes and tap them flush with the wall using a hammer if necessary.
- Align the bracket over the anchors and secure it tightly using the provided screws and a screwdriver.
- Clean the exterior of the clear canisters with rubbing alcohol to ensure your labels will stick properly.
- Fill the containers with your preferred dry cereals and snap the airtight lids onto the top.
- Slide the canisters into the wall bracket until they click into place and test the dispensing knob.
3 Glass Clamp Jar Collection
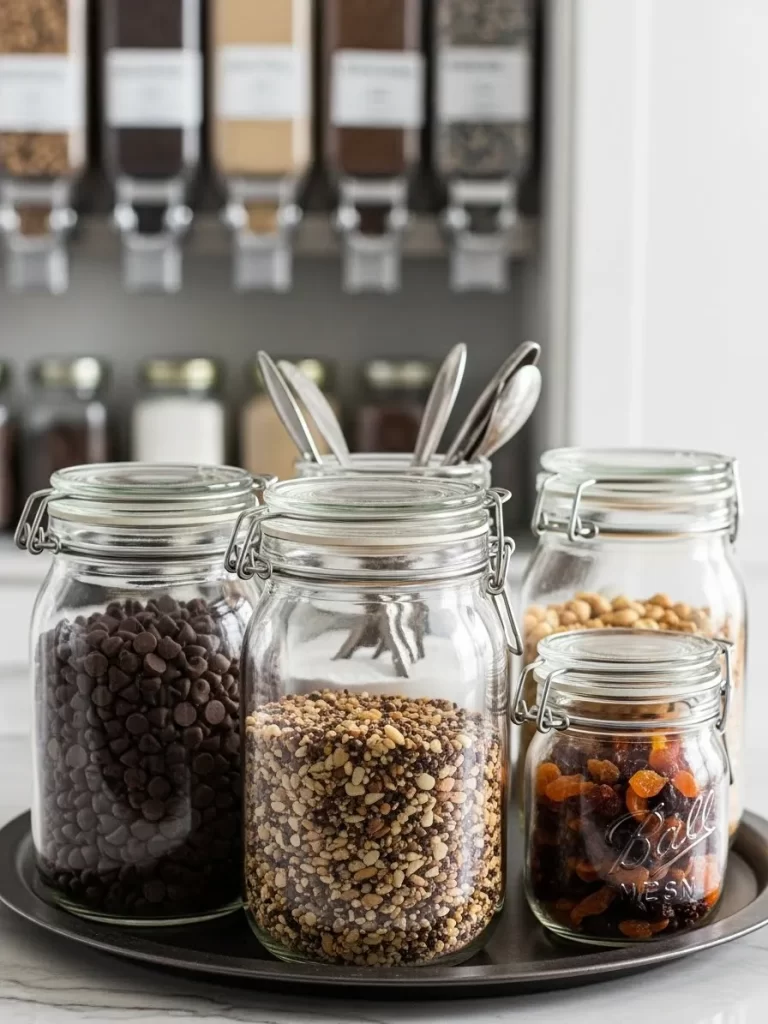
Storing baking essentials like chocolate chips and nuts in glass clamp jars adds a touch of classic charm to your shelving. These heavy duty glass containers feature a metal locking mechanism and a rubber gasket that creates a tight seal. You can see the rich textures of your snacks and ingredients which makes the pantry feel warm and inviting.
A large tray underneath the jars keeps them grouped together so they do not shift around on the shelf. This method prevents small items from getting lost in the dark corners of your cabinet. Since glass is non porous, it will not absorb smells or stains from the food stored inside.
Mixing different sizes of these jars creates a layered and interesting visual display. You can quickly grab the whole tray to bring your baking supplies to the counter in one trip. This approach combines beauty with high functionality for a busy home cook.
Materials Required
- Various sizes of glass jars with wire bale clamps
- Large circular or rectangular serving tray
- Replacement rubber gaskets
- Mild dish soap
Equipment Required
- Soft drying towel
- Measuring cup or funnel
- Small step ladder
DIY Instructions
- Inspect the rubber gaskets on your glass jars to make sure they are soft and free of cracks.
- Wash the jars and the tray in warm water with mild soap and let them air dry completely.
- Place the empty tray on a stable surface and decide on the arrangement of your jars based on height.
- Fill the largest jars with bulky items like chocolate morsels or flour and use the smaller ones for seeds or dried fruit.
- Close the wire bale clamps firmly to ensure the airtight seal is engaged for maximum freshness.
- Arrange the filled jars on the tray with the most frequently used items placed toward the front edge.
- Carry the loaded tray to your pantry shelf and slide it into place carefully to avoid clinking the glass.
4 Stackable Metal Wire Bins
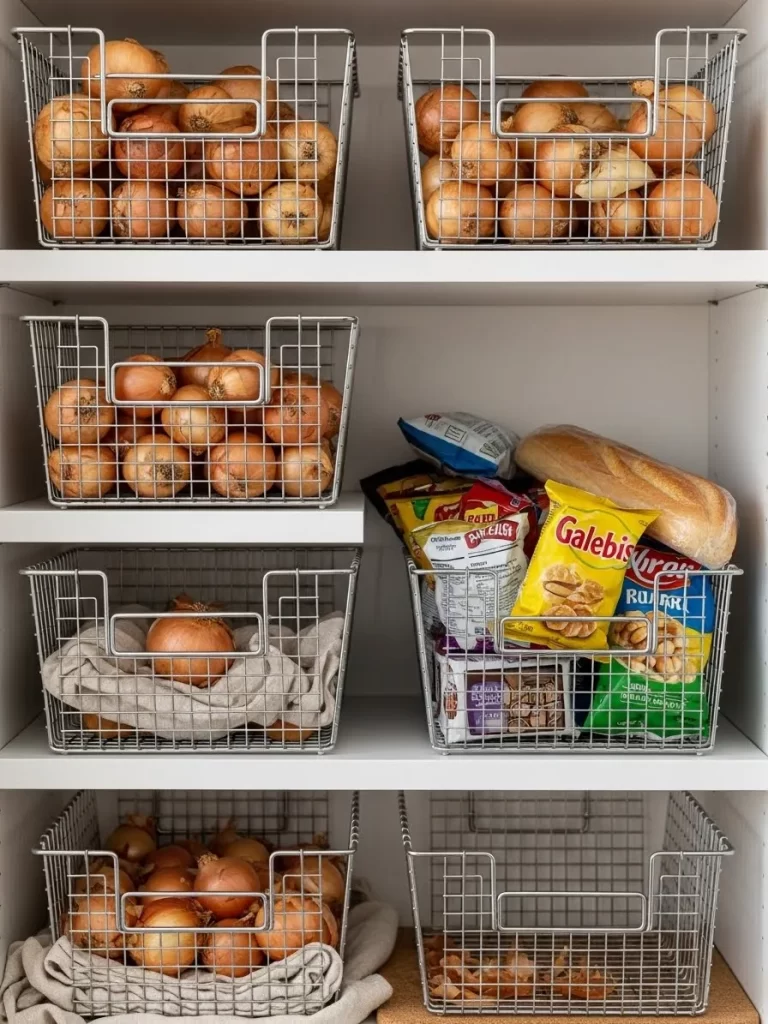
Bulk vegetables like onions and potatoes need proper airflow to stay fresh and prevent early sprouting. These sturdy metal wire bins allow air to circulate freely around your produce while keeping them contained in one spot. The open front design makes it incredibly easy to grab what you need without unstacking the entire pile.
You can use these versatile baskets for more than just produce, such as holding bags of chips or loaves of bread. The silver finish provides a clean and industrial look that works well on any white shelving unit. These bins are built to last and can handle the weight of heavy items without bending or sagging.
Stacking these units vertically turns an empty corner into a powerhouse of storage. You will no longer have onions rolling around the floor or bags of snacks crushed under heavier boxes. This setup brings a sense of order to the items that are usually the hardest to organize.
Materials Required
- Stackable metal wire storage baskets
- Cotton or linen liners (optional for base)
- Cardstock for hanging tags
- String or twine
Equipment Required
- Scissors
- Permanent marker
- Cleaning rag
DIY Instructions
- Sort your produce and snacks to determine how many bins you will need for each category.
- Wipe down the metal wires with a dry rag to remove any dust from the shipping process.
- Place a linen liner at the bottom of the bins meant for onions to catch any loose skins.
- Set the first bin on the bottom shelf and stack the next one on top by aligning the corner grooves.
- Load your onions and potatoes into the lower bins as they are typically heavier.
- Use the upper bins for lighter items like bagged snacks or bread to keep them from getting squashed.
- Write the contents on a small piece of cardstock and tie it to the front of the bin with twine for easy identification.
5 Clear Acrylic Snack Bins
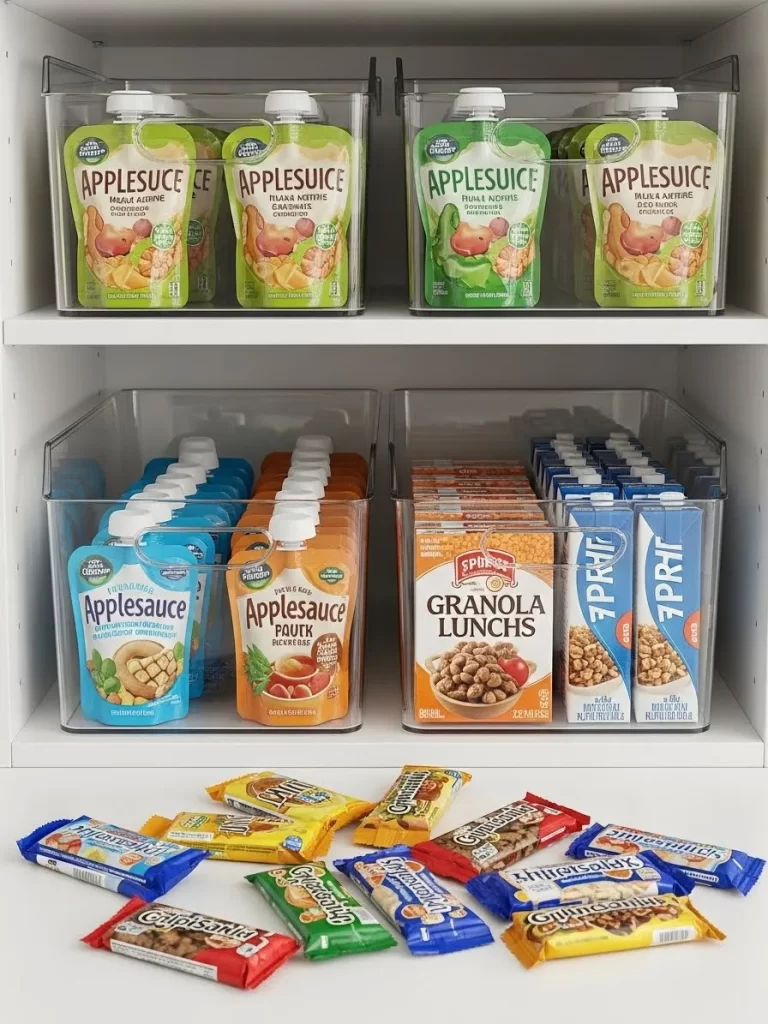
Finding a quick snack becomes much easier when everything is sorted into clear, accessible bins. These acrylic containers are excellent for holding juice pouches, applesauce, and granola bars in neat rows. Because they are transparent, you can see exactly when it is time to add items to your shopping list.
The high sides of these bins keep tall items from tipping over and creating a mess on the shelf. You can pull the entire bin out like a drawer to reach the snacks at the very back. This system prevents the common problem of forgotten food expiring in the shadows of the pantry.
Setting up a dedicated snack zone helps children find healthy options on their own. It also makes packing school lunches much faster when you can grab one item from each bin quickly. These bins are easy to wipe clean if a juice pouch happens to leak.
Materials Required
- Clear acrylic pantry bins in various widths
- Assorted snacks and drinks
- Adhesive labels
- Multipurpose cleaner
Equipment Required
- Microfiber cloth
- Ruler
DIY Instructions
- Measure the width of your snacks to choose bins that allow for two or three neat rows of items.
- Clean your pantry shelf thoroughly with a multipurpose cleaner to remove any sticky residue.
- Group your snacks by type, such as putting all fruit pouches together and all granola bars in another pile.
- Place the tallest items at the back of the acrylic bin and the shorter items toward the front.
- Slide the bins onto the shelf side by side to fill the available horizontal space.
- Apply a label to the front of the bin if you want to maintain a specific spot for each snack type.
- Refill the bins as soon as you come home from the grocery store to keep the system working.
6 Deep Pantry Back Stock Bins
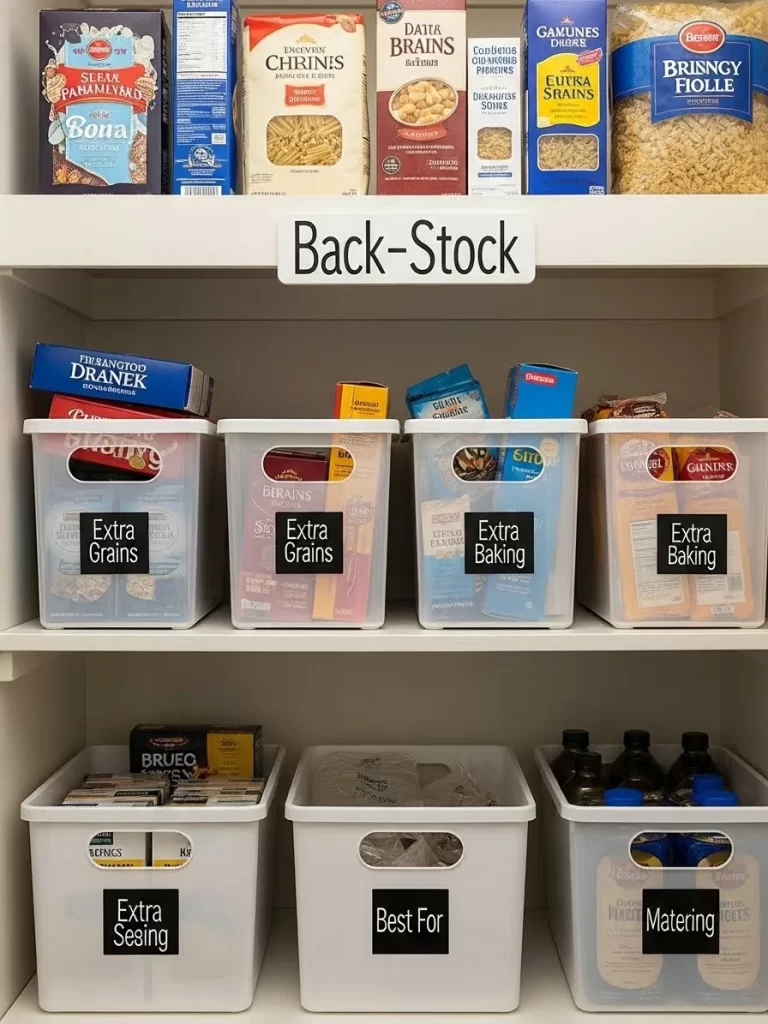
Large families often struggle with storing extra supplies that do not fit in primary containers. These deep plastic bins are specifically for back stock, holding surplus bags of grain and baking staples. Placing these on higher or lower shelves keeps your daily reach zone clear of unnecessary bulk.
Each bin features a large handle for easy retrieval from deep cabinets. The white opaque finish hides the visual clutter of mismatched packaging while maintaining a clean look. You can quickly see which category needs a restock by reading the bold labels on the front.
Organizing by category like “Extra Grains” or “Extra Baking” prevents you from buying duplicates. This method ensures you always have a backup of your most used ingredients. Your pantry will feel much larger once you move the overflow into these designated zones.
Materials Required
- Large white plastic bins with handles
- Blackboard adhesive labels
- White chalk marker
- Shelf liner
Equipment Required
- Measuring tape
- Damp cloth
- Step stool
DIY Instructions
- Sort through your pantry and gather all unopened duplicate items or bulk bags.
- Group these items into broad categories such as pasta, baking supplies, or snacks.
- Clean the front surface of your bins with a damp cloth and let them dry completely.
- Stick a blackboard label onto the center of each bin and write the category name clearly.
- Place the heavy bulk items at the bottom of the bin to keep it stable.
- Slide the bins onto the less accessible shelves of your pantry since you will reach for them less often.
- Check these bins before every grocery trip to see what you already have in stock.
7 Tiered Canned Food Organizer
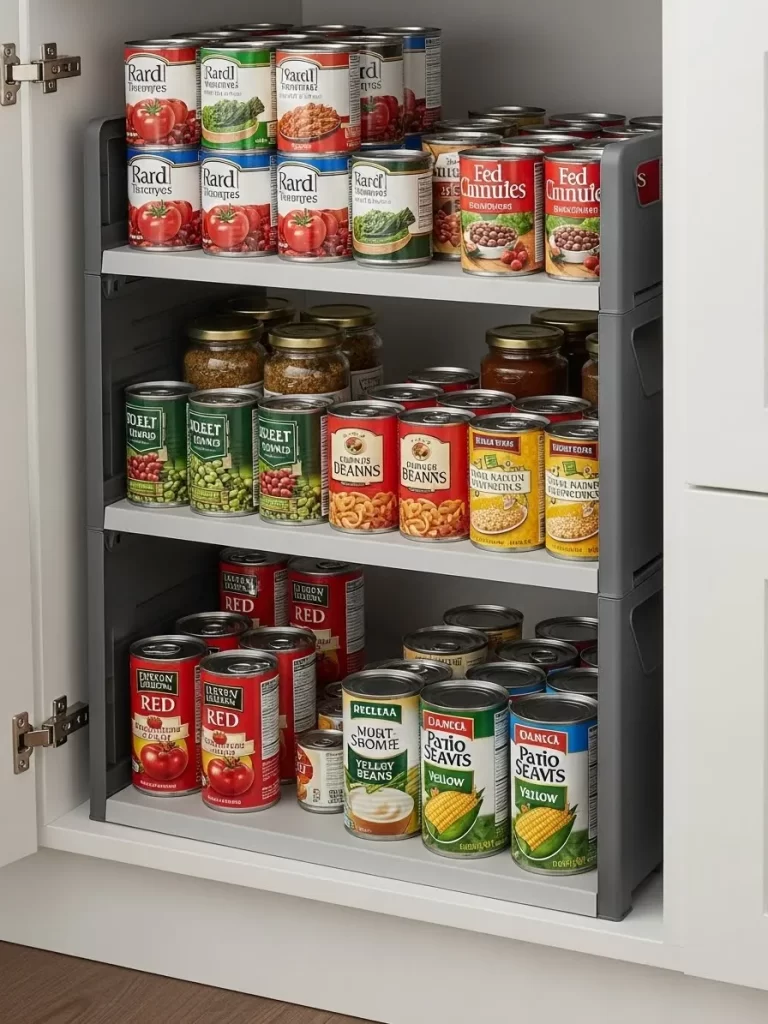
Searching for a specific can of beans often leads to a messy pile at the back of the shelf. This tiered shelving unit acts like a stadium for your canned goods, lifting the back rows higher than the front. You can read every label at a glance without having to move a single jar.
The sturdy gray frame provides a solid foundation for heavy tin cans and glass jars. This setup prevents the “hidden at the back” syndrome that leads to expired food. By utilizing the vertical height of your shelf, you effectively double your storage capacity.
You can organize your cans by type, such as tomatoes in one row and vegetables in another. This system makes meal planning simple because you can see your inventory instantly. It turns a dark cabinet into a professional looking display that stays organized long term.
Materials Required
- 3 tier expandable spice or can rack
- All purpose surface cleaner
- Small circular labels (optional for lids)
Equipment Required
- Paper towels
- Level
- Screwdriver (if assembly is required)
DIY Instructions
- Empty your cabinet of all cans and wipe the shelf clean to remove dust or rings.
- Place the tiered rack on the shelf and expand it to fit the full width of the space.
- Group your cans by size and food type so they look uniform when displayed.
- Set the items you use least frequently on the very top tier at the back.
- Arrange the everyday staples like canned tomatoes or beans on the middle and bottom tiers.
- Turn all the labels forward so you can read the brand and content names easily.
- Use the space underneath or to the side for any odd sized jars that do not fit the tiers.
8 Multi Tier Rotating Turntable
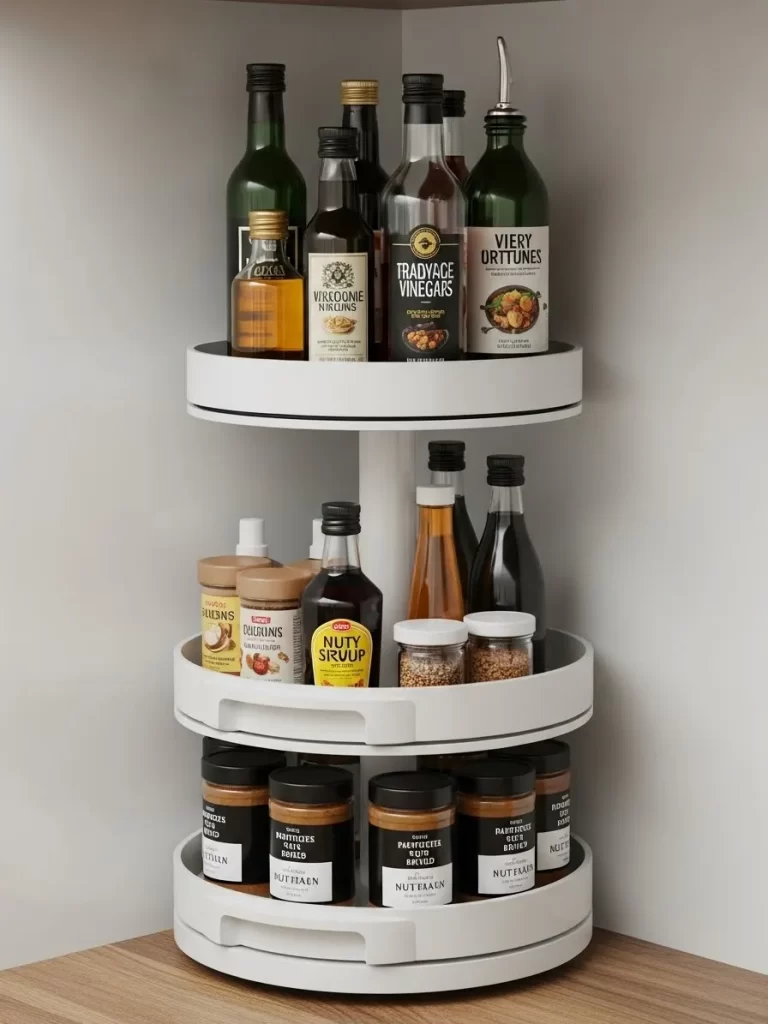
Corner cabinets are notorious for becoming “black holes” where bottles of vinegar and oil go to be forgotten. This three story rotating turntable brings everything hidden in the back right to your fingertips with a simple spin. The high outer rims ensure that tall glass bottles stay upright and secure during rotation.
Each level offers ample space for different heights of condiments and spice jars. You can keep your oils on top, sauces in the middle, and small spice jars on the bottom. This vertical approach saves a massive amount of shelf real estate while keeping your counters clear.
The clean white finish and smooth spinning mechanism make this a functional centerpiece for any pantry corner. You no longer have to knock over three bottles just to reach the soy sauce. It is a simple tool that provides an immediate solution to cluttered cooking liquids.
Materials Required
- 3 tier rotating Lazy Susan
- Non slip shelf liner (if not included)
- Warm water and soap
Equipment Required
- Screwdriver (if the center post needs tightening)
- Soft towel
DIY Instructions
- Wash the plastic trays with warm soapy water and dry them thoroughly before assembly.
- Assemble the center support post and snap the three tiers into place from bottom to top.
- Place the unit in a corner of your pantry or on a countertop where items tend to pile up.
- Put the heaviest and tallest bottles on the bottom tier to keep the center of gravity low.
- Fill the middle tier with medium sized jars like honey, peanut butter, or large spices.
- Use the top tier for small items like extracts or frequently used salt and pepper shakers.
- Give the unit a test spin to ensure nothing hits the walls or neighboring items on the shelf.
9 Under Shelf Pull Out Baskets
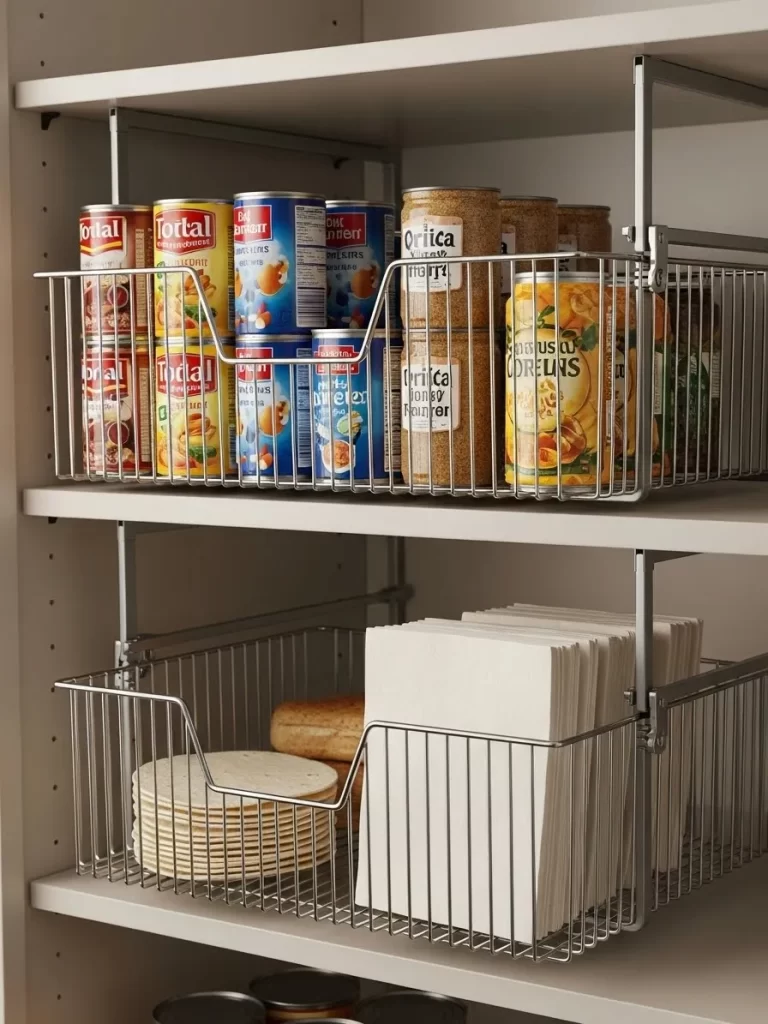
Wasted space often exists between the top of your food and the shelf above it. These metal wire baskets slide onto your existing shelves to create an extra drawer without any permanent drilling. They are the best way to store flat items like tortillas, napkins, or extra canned goods.
The open wire design lets you see exactly what is inside from any angle. Because they pull out, you can access the very back of the basket with one smooth motion. This is a brilliant fix for renters who cannot install permanent hardware but need more storage.
Using these baskets helps separate soft items like bread from heavier canned goods below. You can keep your lunch prep items in one spot so you can grab them quickly in the morning. These units are remarkably strong and stay firmly in place once weighted with items.
Materials Required
- Under shelf slide on wire baskets
- Thin cardboard or plastic sheets (optional for the base)
- Cleaning spray
Equipment Required
- Ruler to check shelf thickness
- Scissors
DIY Instructions
- Measure the thickness of your pantry shelf to make sure the basket arms will slide over it.
- Clean the top and bottom of the shelf where the basket will be mounted.
- Slide the arms of the wire basket onto the shelf until the front edge is flush.
- Place a thin plastic sheet at the bottom of the basket if you plan to store small items that might fall through the wire.
- Fill the basket with lightweight or flat items like packs of wraps, napkins, or small snack bags.
- Ensure the items inside are not so tall that they prevent the basket from sliding under the shelf.
- Use multiple baskets side by side to create a full row of “floating” drawers across your pantry.
10 Vertical Bakeware Organizer
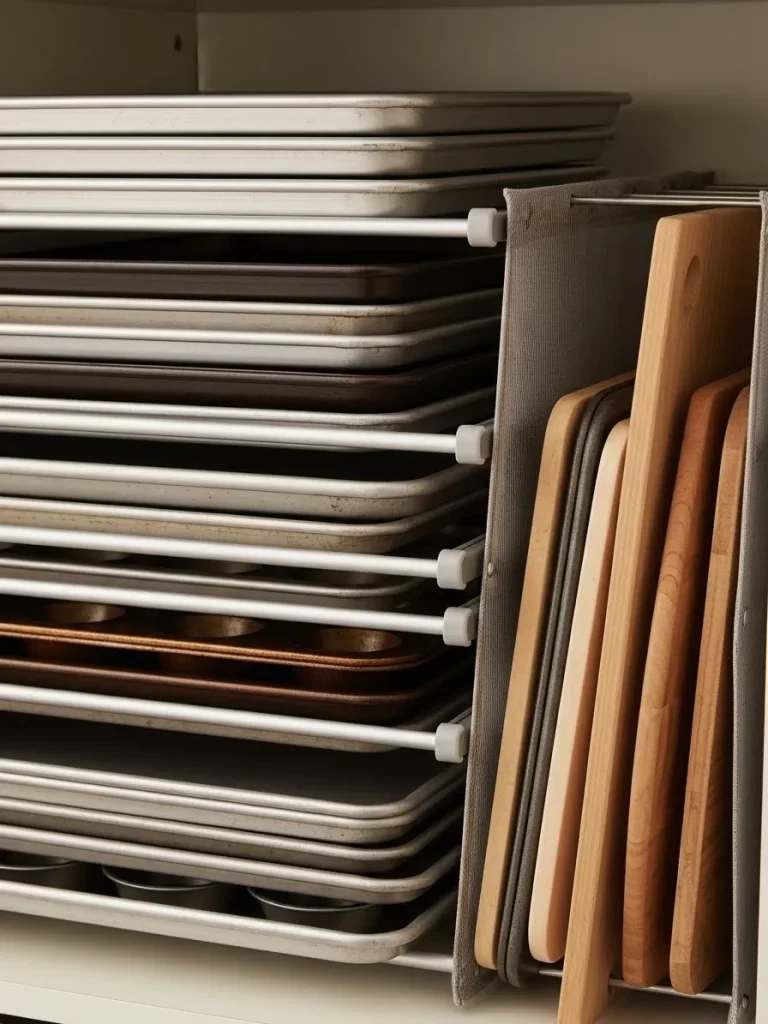
Stacking baking sheets and muffin tins in a horizontal pile makes it difficult to grab the one at the bottom. This vertical organizer uses dividers to stand your pans, cookie sheets, and cutting boards on their sides. You can slide out a single sheet without causing a noisy metal avalanche in your kitchen.
The fabric or metal slots protect your non stick surfaces from getting scratched by other pans. This system works well inside deep lower cabinets or on wide pantry shelves. It also helps your wood cutting boards stay dry by allowing air to flow between them.
Organizing by height and frequency of use makes your baking sessions much more efficient. You can keep your most used cookie sheets in the center slots for the easiest access. This simple rack turns a chaotic cabinet into an orderly library of kitchen tools.
Materials Required
- Vertical pan and lid rack
- Small adhesive rubber feet (to prevent sliding)
- Microfiber cloth
Equipment Required
- Tape measure
- Level
DIY Instructions
- Clear out your lower cabinet and measure the depth to ensure the rack will fit with the door closed.
- Wipe the cabinet base and the rack itself to remove any grease or dust.
- Attach small rubber feet to the bottom of the rack to keep it from sliding when you pull a pan out.
- Place the rack at the front of the cabinet so you do not have to lean in too far.
- Slide your heaviest items, like cast iron griddles or large cutting boards, into the widest slots.
- Place muffin tins and cooling racks into the narrower dividers.
- Arrange the items so the tallest pans are at the back or side to maintain visibility for smaller items.
11 Gravity Fed Can Roller
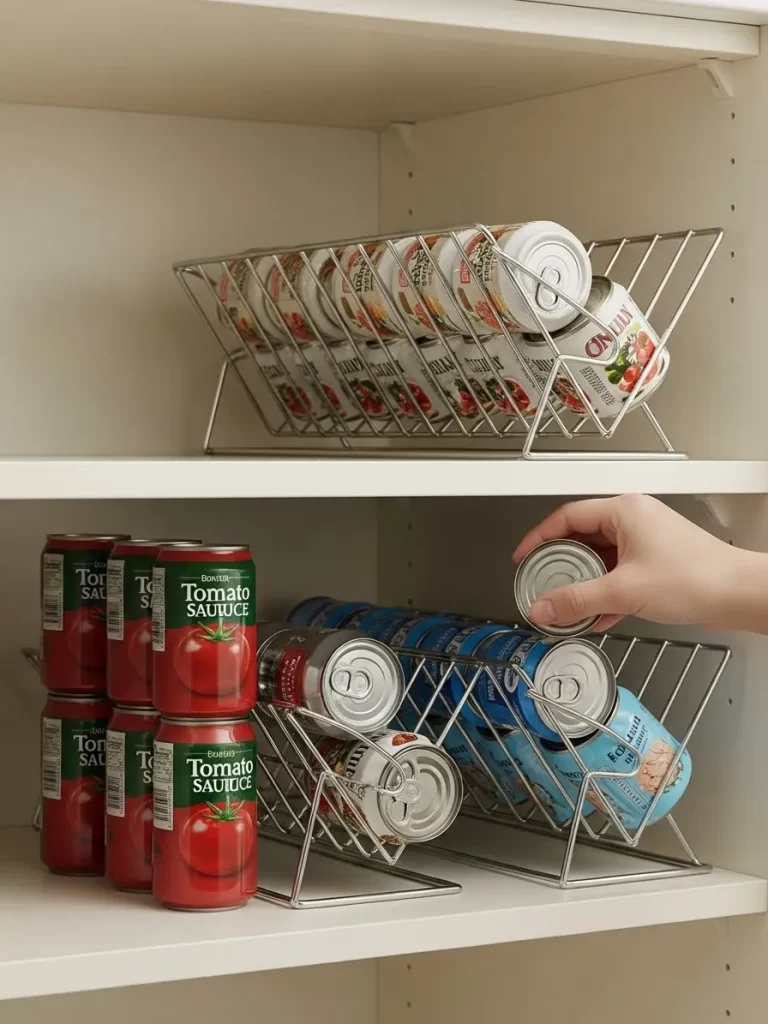
Canned goods often hide in the dark recesses of a pantry until they pass their expiration date. This chrome wire rack uses a slight slope to roll the next can forward every time you take one from the front. You will always use your oldest stock first without even thinking about it.
The two tier design doubles your storage density on a single shelf. You can fit dozen of standard cans in a very small footprint. Because the frame is open wire, you can see exactly when your soup or vegetable supply is running low.
This system is great for high volume households that go through staples quickly. It keeps your shelves looking like a professional grocery aisle rather than a cluttered cabinet. Your meal prep becomes much smoother when you can grab exactly what you need in seconds.
Materials Required
- Gravity fed metal can rack
- Shelf liner
- Microfiber cloth
- All purpose cleaner
Equipment Required
- Rubber mallet (if assembly is required)
- Level
- Tape measure
DIY Instructions
- Clear the target shelf and wipe it down with all purpose cleaner to ensure a dust free surface.
- Measure your shelf depth to confirm the rack has enough room for the cans to roll without hitting the door.
- Assemble the wire rack according to the manufacturer instructions using a rubber mallet to secure the joints.
- Place the rack on the shelf and check that it is level so the cans roll straight.
- Load the cans from the back of each row so the oldest ones move toward the front opening.
- Group similar items by row, such as placing all tomato sauces in the top section and beans in the bottom.
- Test the movement by removing the front can to see if the row behind it slides forward smoothly.
12 Over the Door Storage Rack
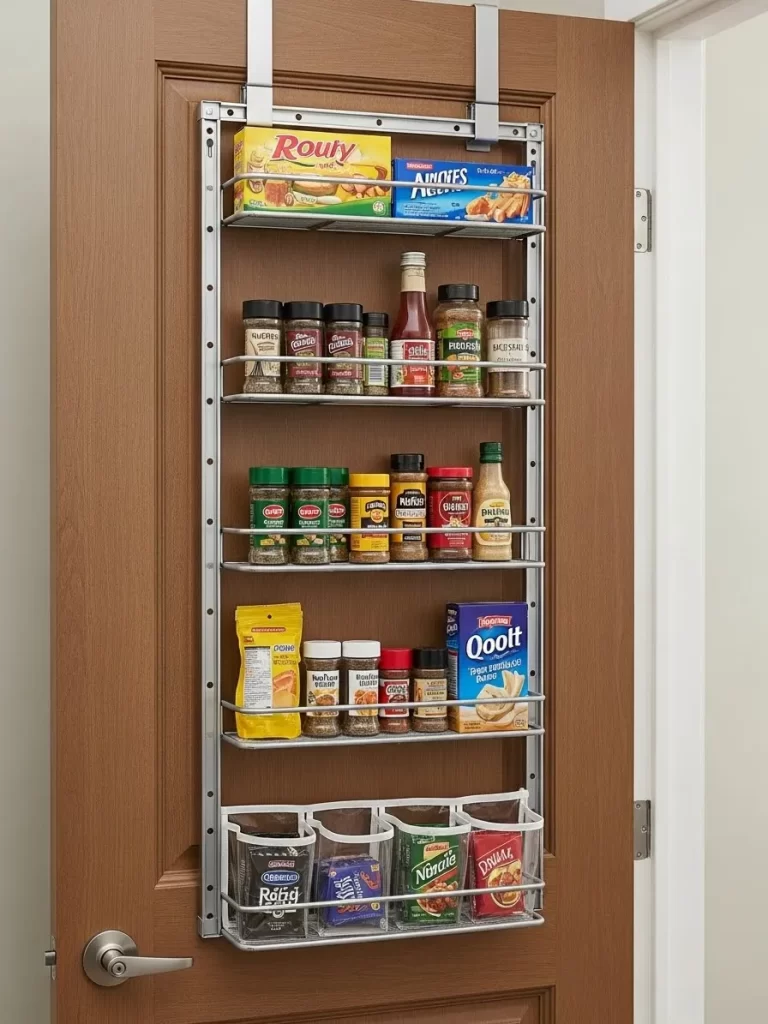
Small kitchens frequently suffer from a lack of cabinet space for spices and small bottles. An over the door rack utilizes the empty vertical space on the back of your pantry door. This sturdy metal frame features multiple tiers of baskets and hooks for ultimate organization.
You can adjust the height of the baskets to accommodate tall bottles of vinegar or short jars of spices. The clear dividers at the bottom are excellent for holding small packets of seasoning or snacks. This setup keeps your most used items at eye level for quick access during cooking.
Installing this rack frees up an entire shelf inside your pantry for larger bulk items. The gray finish blends seamlessly with most door colors for a tidy appearance. It is a smart way to expand your kitchen capacity without doing a full renovation.
Materials Required
- Over the door metal organizer kit
- Felt pads (to prevent door scratching)
- Rubbing alcohol
Equipment Required
- Power drill with bits
- Phillips head screwdriver
- Step stool
- Pencil
DIY Instructions
- Clean the top edge and face of your pantry door with rubbing alcohol to remove grease.
- Hook the main support brackets over the top of the door and ensure they are centered.
- Stick felt pads to the back of the metal frame where it touches the door to prevent noise and scratches.
- Attach the vertical side rails to the top brackets and secure them with the provided screws.
- Snap the wire baskets into the rails at your desired heights based on the items you plan to store.
- Place your heaviest bottles on the lower tiers to keep the door balanced when it opens.
- Organize smaller spice jars and packets in the upper baskets where they are easy to see.
- Double check that all screws are tight so the rack does not wobble when the door moves.
13 Slide Out Coffee and Breakfast Tray
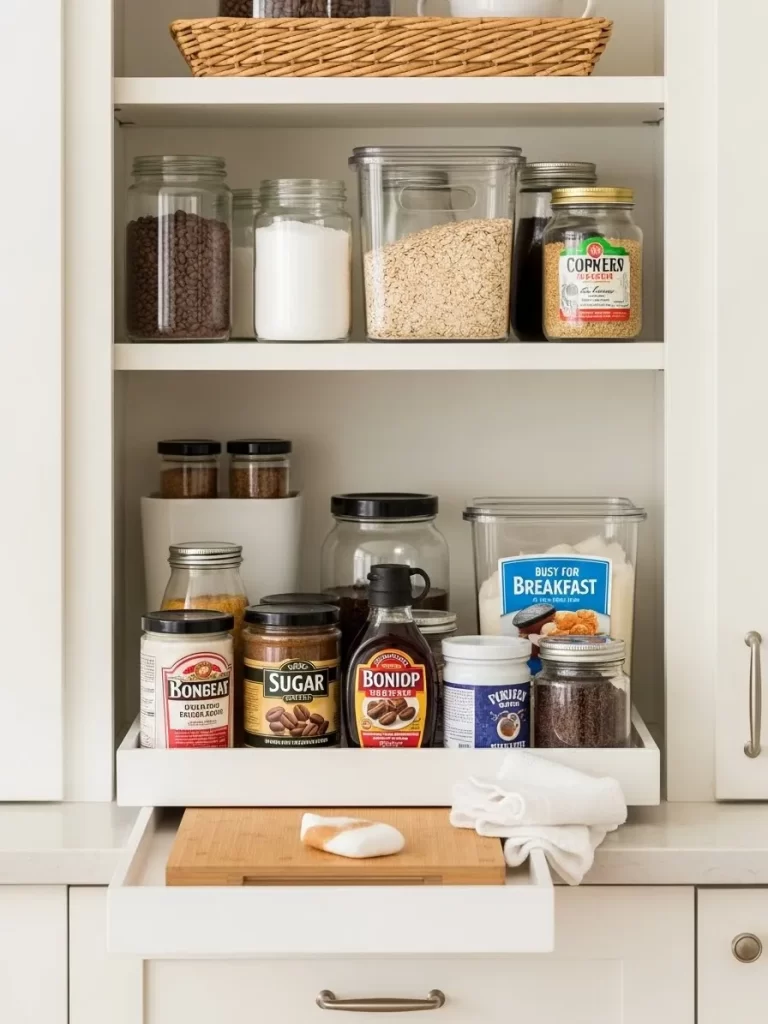
Morning routines are much simpler when all your coffee and breakfast needs are in one movable spot. A slide out wooden tray keeps your sugar, coffee grounds, and syrups organized and ready for use. This feature allows you to pull everything out into the light rather than digging in a dark cupboard.
The white wooden finish of the tray matches modern cabinetry for a built in look. You can keep a small cutting board underneath for quick tasks like slicing a bagel. This dedicated zone prevents coffee rings and sugar spills from staining your permanent shelves.
Grouping your morning essentials together saves time during the early hours. You can easily see when you are low on sweeteners or your favorite breakfast spreads. It turns a standard pantry shelf into a functional beverage station.
Materials Required
- Low profile wooden tray
- Small cutting board
- Non slip mat
- Wood polish
Equipment Required
- Measuring tape
- Level
DIY Instructions
- Measure your pantry shelf to find a tray that fits the width while leaving room for the cabinet door to close.
- Wipe the tray with wood polish to protect the surface from moisture and coffee stains.
- Place a non slip mat on the shelf to keep the tray from sliding too far when you pull it out.
- Arrange your coffee jars, sugar dispensers, and syrups neatly on the tray surface.
- Place a small cutting board in the space directly below the tray for easy access.
- Group your morning items by height so the taller bottles do not block the smaller jars.
- Test the “slide” by pulling the tray toward you to ensure it moves smoothly without tipping.
14 Weeknight Meal Prep Bins
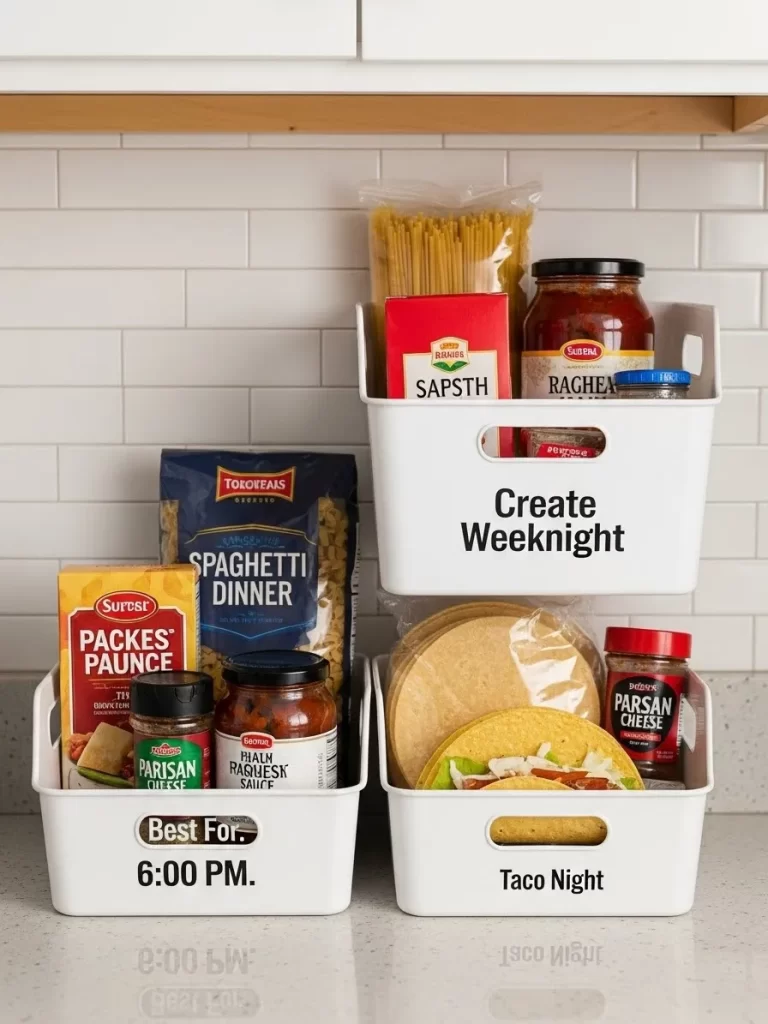
Deciding what to cook for dinner after a long day is often the hardest part of the evening. These “Meal Night” bins allow you to group all the ingredients for a specific recipe in one container. You can simply grab the “Taco Night” bin and have everything ready to go on the counter.
The white bins feature bold labels that help everyone in the family know what the plan is for dinner. This system reduces the time spent searching for that one specific jar of sauce or packet of seasoning. It also helps you spot missing ingredients long before you start cooking.
Stacking these bins vertically saves space and keeps your counters clear of clutter. You can prepare for the whole week on Sunday by pre filling these containers. This proactive approach makes healthy home cooking much more achievable for busy people.
Materials Required
- White plastic bins with integrated handles
- Adhesive vinyl labels or chalkboard stickers
- Permanent marker
Equipment Required
- Cleaning cloth
- Ruler
DIY Instructions
- Look at your meal plan for the week and identify which recipes have several dry ingredients.
- Clean the front of your bins and apply labels like “Taco Night” or “Pasta Dinner.”
- Gather all the non perishable items for each meal, such as tortillas, spice mixes, and canned sauces.
- Place these items into the designated bins so they are grouped by recipe.
- Stack the bins on your main pantry shelf at eye level for easy retrieval.
- When it is time to cook, bring the entire bin to your workspace to save trips back and forth.
- Refill the bins as soon as you finish your weekly grocery shopping to stay ahead.
15 Low Level Accessible Kid Zone
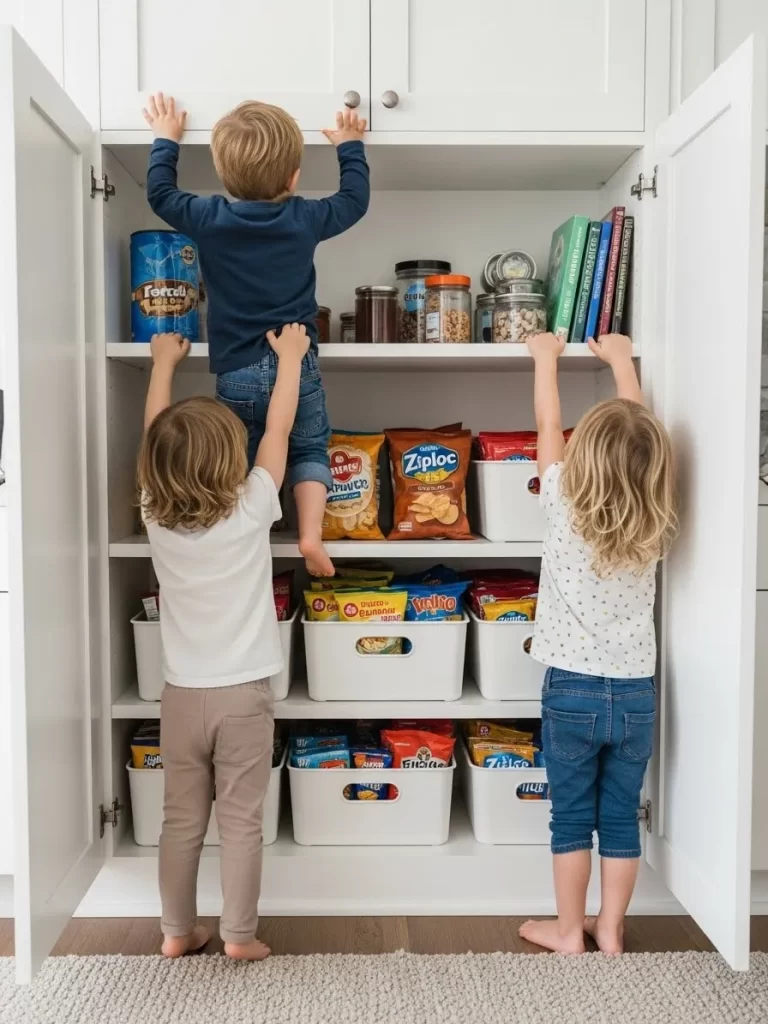
Encouraging independence in children is easier when their snacks and supplies are within reach. By dedicating the bottom shelves of a pantry to kid friendly items, you allow them to help themselves. These white bins keep individual snack bags and juice boxes organized and easy to see.
This setup prevents children from climbing on shelves or counters to reach treats. You can arrange the bins so that healthy options are the easiest to grab. The sturdy white containers are low to the ground and safe for little hands to pull out.
Having a designated area for kids also keeps the rest of your pantry organized. You will no longer find half eaten bags of crackers hidden behind your baking supplies. It creates a sense of order that the whole family can follow.
Materials Required
- Medium sized white plastic bins
- Durable labels with icons or simple text
- Child safe cleaning wipes
Equipment Required
- Step stool (for the adult)
- Measuring tape
DIY Instructions
- Clear off the lowest one or two shelves in your pantry to create the kid zone.
- Wipe the shelves clean with child safe wipes to remove any old crumbs or sticky spots.
- Choose bins that are light enough for a child to pull out but sturdy enough to hold weight.
- Fill the bins with pre portioned snacks like crackers, fruit leathers, and granola bars.
- Use labels with pictures if your children are not yet reading so they know what is inside.
- Arrange the bins side by side so there is no need to stack them, making access safer.
- Show your children their new “snack station” and explain that they can choose from these bins.
16 “Eat Me First” Transition Bin

Food waste often happens because we forget about the items that are nearing their expiration date. A bright blue “Eat Me First” bin acts as a visual reminder to use these products before they go bad. This simple system can save you a significant amount of money on your monthly grocery bill.
Placing this bin in a prominent spot ensures that everyone looks there before opening a brand new package. It is the best place for that half used bag of pretzels or the apples that are getting a bit soft. This container turns potential waste into a priority for the next meal or snack.
The high contrast between the blue bin and the orange bin below makes the labels easy to read. You can use this for produce, snacks, or even items you bought for a specific recipe you haven’t made yet. It is a highly effective tool for keeping your inventory fresh and moving.
Materials Required
- Brightly colored plastic bin (blue or teal)
- “Eat Me First” printed label or sticker
- Clear packing tape
Equipment Required
- Scissors
- Damp cloth
DIY Instructions
- Pick a brightly colored bin that stands out from your other neutral pantry containers.
- Print or write a bold “EAT ME FIRST” label and secure it to the front of the bin with tape.
- Search your pantry for any items that expire within the next week or two.
- Look for open packages that need to be finished to maintain their freshness.
- Place these items in the blue bin and set it on a shelf that is at eye level.
- Train your family to check this bin first whenever they are looking for a snack.
- Rotate items into this bin every time you organize your pantry or come home from the store.
17 Color Coded Shelf Zones

Visual cues are much faster for our brains to process than reading every single label. Using small strips of colored tape on the edge of your shelves helps you return items to their proper home instantly. This color coding system creates “zones” for different categories like snacks, baking, or dinner staples.
Matching the tape color to the bin or the items on that shelf provides a sense of harmony. For example, a blue strip can mark the zone for healthy snacks while an orange strip marks the sweets. This method is particularly helpful for guests or family members who do not know your organization system.
The clear canisters with handles make it easy to see your food while keeping it airtight. These bins are uniform in shape, which helps them line up perfectly with the colored markers on the shelf. Your pantry will look intentional and professionally curated with this simple addition.
Materials Required
- Multi colored washi tape or electrical tape
- Clear plastic bins with white lids
- Permanent marker
Equipment Required
- Scissors
- Ruler
- Cleaning rag
DIY Instructions
- Decide on a color for each of your pantry categories, such as green for vegetables and blue for grains.
- Clean the front edge of your pantry shelves with a dry rag to ensure the tape sticks well.
- Cut a small three inch strip of colored tape for each zone you want to create.
- Press the tape firmly onto the edge of the shelf directly in front of where those items live.
- Organize your clear bins behind the corresponding color markers.
- If you have a large white basket for “Dinner Crates,” mark its spot with a matching color strip.
- Explain the color system to your household so everyone knows where to put things away after use.
18 Pegboard Drawer Divider System

Deep kitchen drawers often become a jumbled mess of bowls and lids that are hard to separate. A pegboard base with movable wooden dowels allows you to customize the layout for your specific dishware. You can create a snug home for every bowl, plate, and container so they never shift when the drawer opens.
This system is excellent for preventing delicate ceramic bowls from clinking together and chipping. You can easily adjust the pegs as your collection of kitchenware changes over time. It makes unloading the dishwasher much faster since every item has a clearly defined boundaries.
The natural wood and cork aesthetic adds a high end feel to the inside of your cabinets. Because the dowels stand vertically, they utilize the full height of the drawer effectively. This is a brilliant way to turn a deep, dark drawer into an organized storage powerhouse.
Materials Required
- Pegboard drawer liner (wood or plastic)
- Wooden or plastic pegs/dowels
- Non slip adhesive backing
Equipment Required
- Handsaw or jigsaw (to trim the liner to size)
- Measuring tape
- Sandpaper
DIY Instructions
- Measure the internal width and depth of your kitchen drawer very accurately.
- Cut the pegboard liner to fit the bottom of the drawer using a saw, then sand any rough edges.
- Place the liner inside the drawer and secure it with a non slip backing if it feels loose.
- Set your largest bowls or plates on top of the liner to find the best arrangement.
- Insert the pegs into the holes surrounding each item to lock them into place.
- Leave a small amount of “wiggle room” so you can easily lift the items out without snagging.
- Group similar items together, like stacking small bowls in one section defined by four pegs.
19 Pull Out Deep Base Drawer
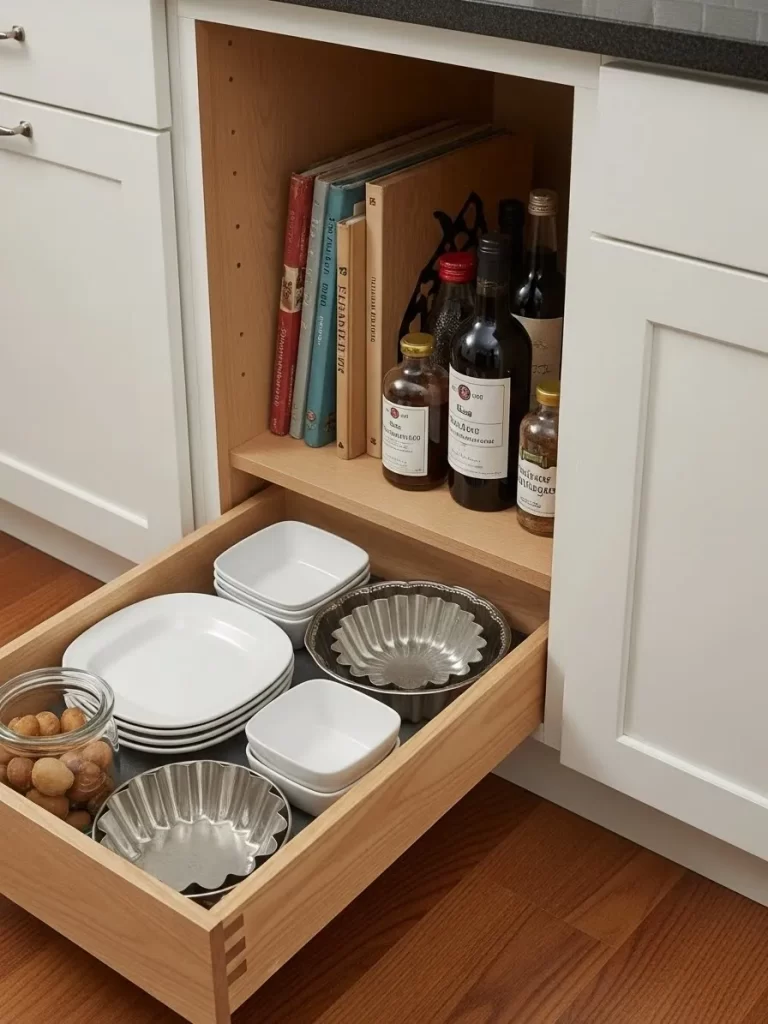
Reaching for items at the back of a deep lower cabinet usually requires getting down on your hands and knees. Installing a pull out wooden drawer turns that hard to reach space into a convenient sliding shelf. You can see everything from your mixing bowls to your baking tins in one smooth motion.
The sturdy wooden construction can handle the weight of heavy ceramic plates and glass jars. High sides on the drawer prevent items from falling off the back or sides during transit. This modification significantly increases the usability of your base cabinets.
Keeping frequently used baking dishes and bowls here makes meal prep much more ergonomic. You can even store cookbooks and bottles of oil in the stationary space above the drawer. This combination of fixed and sliding storage maximizes every inch of your kitchen.
Materials Required
- Pre assembled wooden pull out drawer kit
- Heavy duty drawer slides
- Wood screws
- Wood glue
Equipment Required
- Power drill
- Level
- Pencil
- Screwdriver
DIY Instructions
- Measure the interior of your cabinet and choose a drawer kit that allows for the width of the slides.
- Remove any existing stationary shelves that might block the path of the new drawer.
- Mark the position for the drawer slides on the cabinet walls using a level to ensure they are straight.
- Screw the slides into the cabinet walls securely, making sure they are flush with the front frame.
- Attach the matching tracks to the sides or bottom of the wooden drawer box.
- Slide the drawer into the cabinet tracks until it clicks into place and test the movement.
- Load your heaviest bowls and plates into the drawer, placing the most used items toward the front.
20 Adjustable Spice Drawer Insert
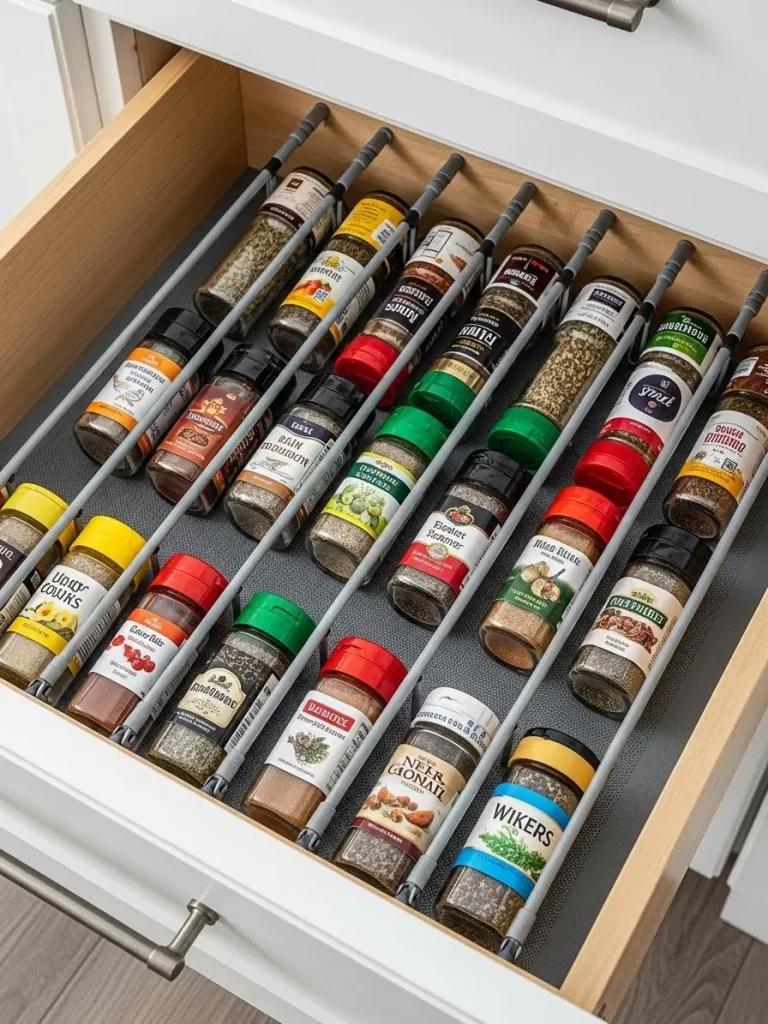
Searching through a cluttered spice rack can be frustrating when you are in the middle of a recipe. This drawer organizer uses angled rails to lay your spice jars flat so the labels are always facing up. You can fit dozens of spices in a single drawer while keeping them perfectly aligned and visible.
The gray adjustable dividers can move to accommodate different lengths of spice jars. This ensures that nothing rolls around when you open and close the drawer. It is a much more efficient use of space than keeping round jars on a traditional shelf.
Organizing your spices alphabetically or by cuisine type makes cooking much faster. The low profile design fits into standard kitchen drawers without hitting the top of the frame. It transforms a chaotic “junk drawer” into a professional spice station.
Materials Required
- Expandable spice drawer liner or tray
- Uniform spice jars (optional for a cleaner look)
- Label maker or pre printed spice labels
Equipment Required
- Measuring tape
- Scissors (if the liner is trim to fit)
- Cleaning cloth
DIY Instructions
- Empty your designated spice drawer and wipe it clean with a damp cloth to remove any spilled herbs.
- Measure the drawer width and expand the organizer to fill the space from wall to wall.
- If the liner is longer than your drawer, trim the back edge with scissors for a custom fit.
- Transfer your spices into uniform jars if you prefer a cohesive look, then apply labels to the sides.
- Lay the jars onto the angled tiers of the organizer with the labels facing toward the front of the drawer.
- Group your spices by how often you use them, putting salt, pepper, and garlic powder in the first row.
- Close the drawer slowly to make sure the tallest jars have enough clearance to move freely.
21 Cohesive Decanted Supply Wall

Transferring bulk goods into a single style of container removes the visual noise created by bright grocery store packaging. These square airtight canisters sit close together to eliminate gaps where dust might settle. You can instantly see your levels of sugar, grains, and nuts through the crystal clear walls.
White labels with clean black text make searching for ingredients effortless even during a busy dinner rush. This uniform look brings a sense of calm and luxury to a standard kitchen pantry. You will find it much more satisfying to bake when your supplies are displayed like a professional pastry shop.
The flat lids allow you to stack smaller jars on top of larger ones without them tipping over. This setup turns your shelf into a solid wall of organized food. It is a simple shift that makes a massive impact on the overall cleanliness of your storage space.
Materials Required
- Uniform square airtight canisters
- Waterproof vinyl labels
- Rubbing alcohol
- Funnel
Equipment Required
- Microfiber cloth
- Level for label alignment
- Measuring tape
DIY Instructions
- Select a set of canisters that match in height and lid style to create a seamless row.
- Clean the exterior of the containers with rubbing alcohol to remove any oils so the labels stick firmly.
- Pour your dry goods into the bins using a wide funnel to avoid spills on the counter.
- Place your labels at the exact same height on every jar for a professional finish.
- Arrange the bins on your shelf with the most frequently used items in the front row.
- Group similar categories together such as all baking powders in one cluster and grains in another.
- Wipe the lids with a dry cloth every time you refill to keep the airtight seals working correctly.
22 Fabric Snack Bins with Chalkboard Labels
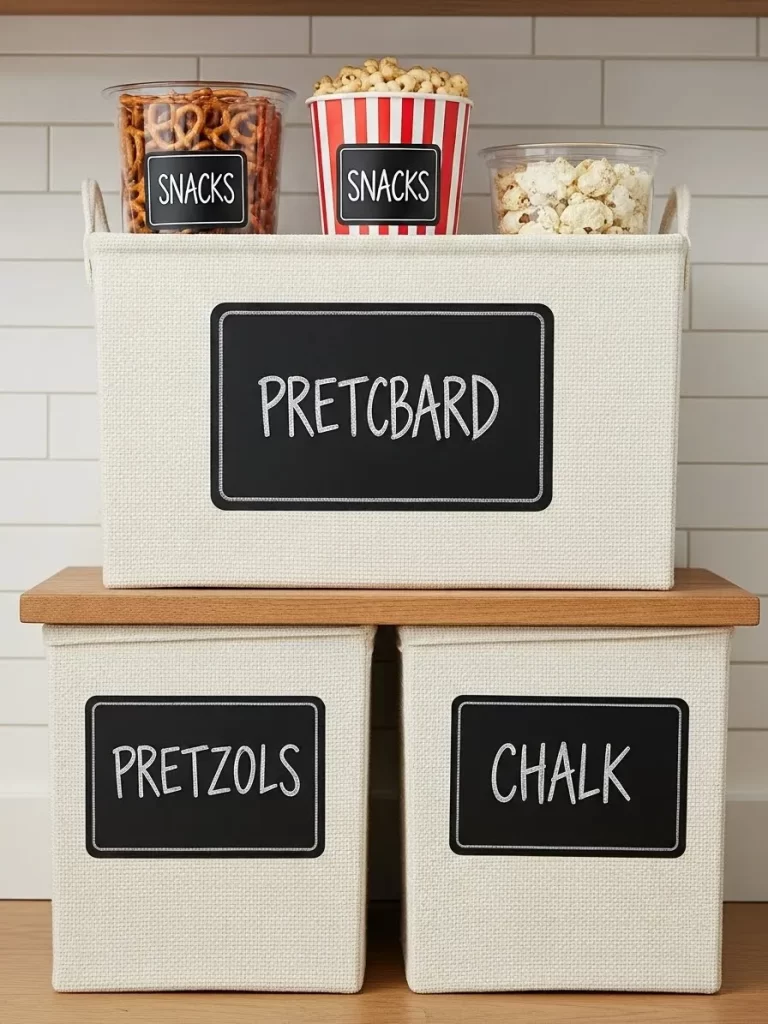
Small loose items like granola bars and pretzel bags often create a messy mountain on your shelves. These woven fabric bins provide a soft and attractive way to hide that clutter from view. The neutral cream color softens the look of your pantry while providing a sturdy home for lightweight snacks.
Each bin features a large blackboard style label that you can customize with a chalk marker. This allows you to change the contents of the bin without needing to peel off old stickers. You can keep your pretzels in one spot and your popcorn in another with zero confusion.
The handles on the sides make it easy for anyone to pull the entire bin down to the counter. These are particularly good for storing items that do not stand up well on their own. This storage solution adds a cozy and organized feel to any open shelving unit.
Materials Required
- Cream colored fabric storage bins
- Clip on or adhesive chalkboard labels
- White chalk marker
- Clear plastic inserts (optional for crumbs)
Equipment Required
- Measuring tape
- Cleaning rag
DIY Instructions
- Measure the depth of your pantry shelves to ensure the bins do not hang over the edge.
- Use a chalk marker to write clear category names like “Pretzels” or “Popcorn” on the labels.
- Attach the labels to the center of the fabric bins where they are most visible.
- Sort your snacks into the bins and avoid overfilling them so the fabric does not bulge.
- Place a clear plastic liner at the bottom if you are storing snacks that tend to leave crumbs.
- Line the bins up side by side to create a uniform row of textured storage.
- Teach family members to return snacks to the correctly labeled bin to maintain the system.
23 Bin Clip Labeling System
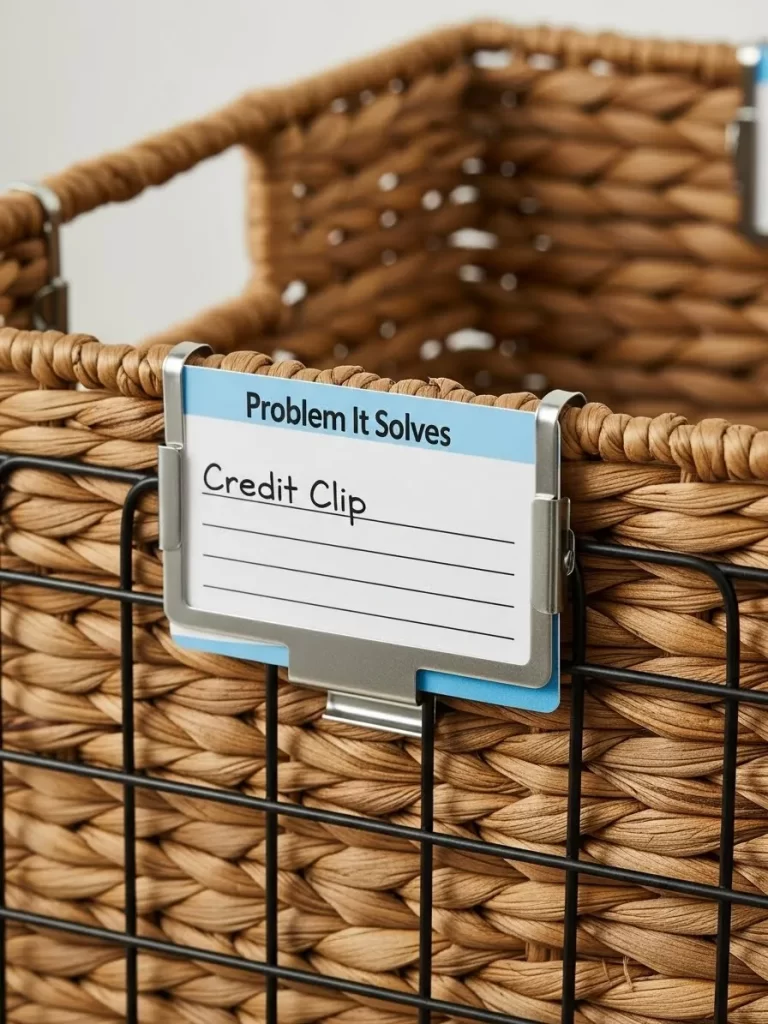
Labeling woven or wire baskets can be difficult because standard stickers do not adhere well to those surfaces. These metal bin clips provide a flat and secure surface for your category names. You can easily slide them onto the rim of almost any basket to identify the contents immediately.
The silver metal finish adds a professional touch to your rustic woven containers. You can switch the paper inserts whenever you decide to reorganize your pantry. This flexibility makes the system highly sustainable as your food preferences change over time.
Having clear labels at eye level stops the habit of digging through every bin to find one specific item. It also encourages guests to help themselves without having to ask where everything is located. These clips are a small detail that makes a huge difference in pantry navigation.
Materials Required
- Metal bin clips
- Cardstock paper inserts
- Permanent fine tip marker
- Clear tape
Equipment Required
- Scissors
- Ruler
DIY Instructions
- Cut your cardstock into small rectangles that fit perfectly inside the metal clip frame.
- Write the name of your pantry category on the paper in neat and bold lettering.
- Slide the paper into the clip and secure it with a tiny piece of clear tape if it feels loose.
- Open the back of the clip and slide it over the edge of your woven or wire basket.
- Position the clip in the center of the front face for the best visual balance.
- Repeat this process for all your storage containers to create a matching set across your pantry.
- Update the paper inserts whenever you change the purpose of a specific basket.
24 Date Tracking Label Method
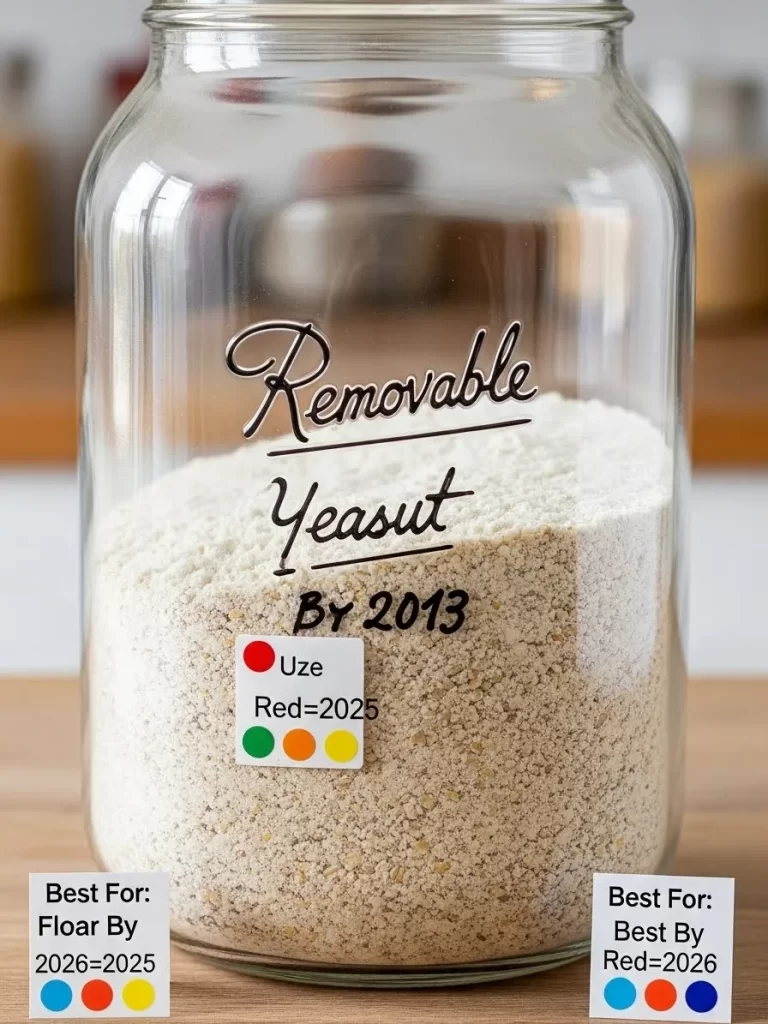
Knowing when your ingredients were purchased is the secret to maintaining a truly fresh kitchen. These specialized labels allow you to mark the month and year you opened a product. You will never have to guess if that flour or yeast is still active and safe to use.
The labels use a simple color coding system that you can read from across the room. Using different colors for different years helps you rotate your stock much faster. This method is essential for bulk items that do not come with a clear expiration date on the bag.
Applying these stickers to the front of your glass jars keeps the information front and center. It turns your pantry into a smart inventory system that saves you money by reducing food waste. You will feel much more confident in the quality of the meals you serve to your family.
Materials Required
- Date tracking stickers or color coded dots
- Permanent marker
- Glass storage jars
- Rubbing alcohol
Equipment Required
- Tweezers (for precise sticker placement)
- Microfiber cloth
DIY Instructions
- Wipe the surface of your glass jar with rubbing alcohol to ensure a clean bonding area.
- Write the month and year of purchase on the tracking sticker with a permanent marker.
- Peel the sticker and place it near the bottom of the jar so it does not block the view of the food.
- Use a specific color dot for each year to make visual rotation even easier.
- Every time you refill a jar, remove the old sticker and apply a new one with the current date.
- Check your pantry once a month and move jars with the oldest dates to the front of the shelf.
- Discard any items that have passed their recommended shelf life based on your date marks.
25 Magnetic Spice and Knife Display
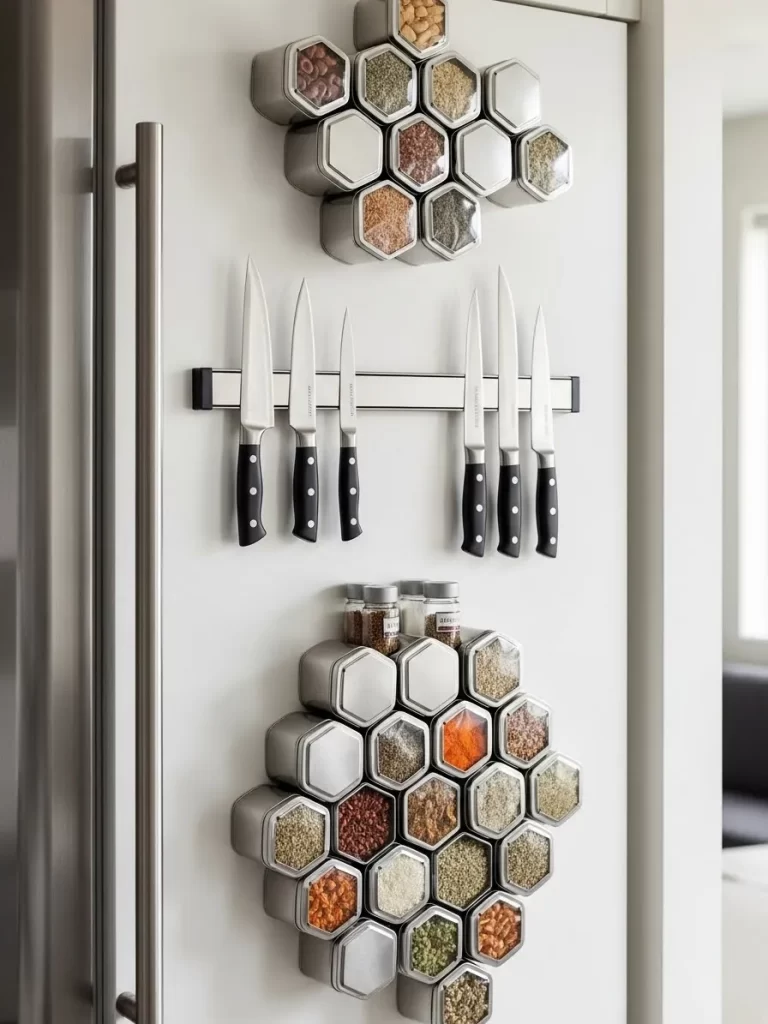
Traditional spice racks often take up valuable counter space and hide small jars in the back of a cabinet. This magnetic system uses the side of your refrigerator or a mounted metal plate to hold hexagonal tins. You can arrange your spices in a beautiful honeycomb pattern that doubles as kitchen art.
A magnetic knife strip keeps your most used blades within reach while keeping them away from the edges of the counter. This vertical storage method protects the sharpness of your knives by preventing them from clinking in a drawer. It also keeps dangerous edges out of the reach of small children.
This setup is a fantastic way to utilize “dead space” on the sides of appliances or cabinets. You can grab exactly the herb or tool you need with one hand while you are busy at the stove. It makes your cooking area feel more professional and highly efficient.
Materials Required
- Magnetic hexagonal spice tins
- Magnetic knife bar
- Wall anchors and screws (if mounting to a wall)
- Spice labels
Equipment Required
- Power drill
- Level
- Screwdriver
- Pencil
DIY Instructions
- Decide if you will use the side of your fridge or mount a metal strip to your backsplash.
- If mounting a knife bar, use a level to mark the screw holes with a pencil.
- Drill pilot holes and insert wall anchors to ensure the bar can support the weight of heavy knives.
- Screw the magnetic bar into place and test its strength with your largest chef knife.
- Fill your hexagonal tins with spices and apply small labels to the side or bottom of each one.
- Snap the tins onto the magnetic surface in a tight pattern to save the most space.
- Arrange your knives on the strip with the handles pointing down for the safest and easiest grip.
26 Multi Tier Rolling Pantry Cart
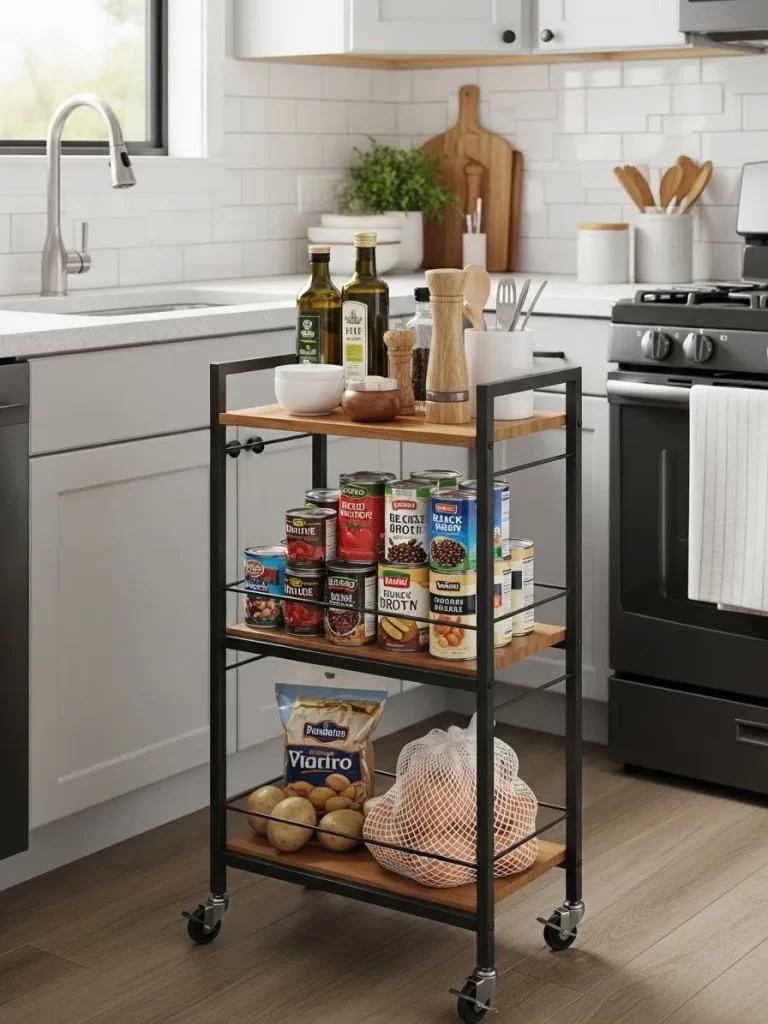
Some kitchens simply do not have enough built in storage to handle a full week of groceries. A slim rolling cart provides three tiers of extra space that you can tuck into a narrow gap between the fridge and the wall. You can move your entire inventory of oils, cans, and vegetables closer to your prep area when you start cooking.
The wood and metal construction provides a sturdy and stylish look that matches most modern decors. You can use the top shelf for frequently used items like olive oil and salt grinders. The lower shelves are great for heavy cans and bags of potatoes that need to stay off the floor.
Locking wheels ensure that the cart stays put once you have it in the right position. This is a mobile solution for renters or anyone who needs more flexibility in their kitchen layout. It allows you to expand your pantry without any permanent construction or heavy lifting.
Materials Required
- 3 tier rolling utility cart
- Non slip shelf liners
- Small wire baskets
- Wood oil (for the shelves)
Equipment Required
- Wrench or screwdriver (for assembly)
- Measuring tape
- Level
DIY Instructions
- Assemble the frame of the rolling cart according to the manual, ensuring all bolts are tight.
- Apply a thin coat of wood oil to the shelves to protect them from moisture and coffee stains.
- Cut non slip liners to fit each tier and lay them down to keep items from sliding during movement.
- Place the heaviest items, such as canned goods and sacks of onions, on the bottom shelf.
- Organize your medium items like pasta boxes or jars on the middle shelf using small baskets.
- Keep your daily essentials like oils, vinegars, and spices on the top shelf for quick access.
- Slide the cart into its designated storage spot and engage the wheel locks to keep it secure.
27 Vertical Paper Towel Cabinet Mount
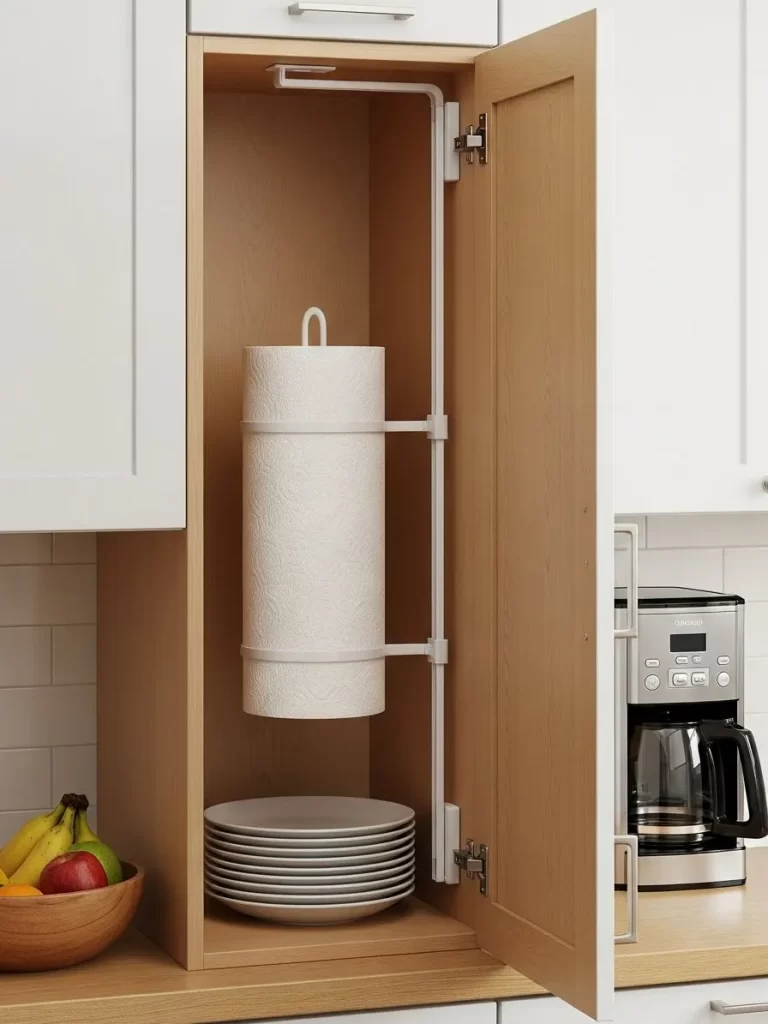
Standard paper towel holders often clutter your countertops or require drilling into the underside of upper cabinets. This vertical mounting system fits inside a tall, narrow cabinet to hide the roll from view. It keeps your paper towels clean and dry while making them easy to grab with one hand.
The white metal arm holds the roll securely and prevents it from unraveling too quickly. Placing the holder inside a cabinet near the sink or stove keeps your kitchen looking tidy and minimalist. You can use the shelf space below for plates or other flat items without any interference.
This solution is great for keeping your kitchen aesthetic clean and focused on your decor rather than cleaning supplies. It utilizes the vertical height of a cabinet that might otherwise go to waste. You will find that your counters feel much larger once the paper towel roll is moved.
Materials Required
- Vertical paper towel holder mount
- Wood screws
- Adhesive pads (optional)
Equipment Required
- Power drill
- Pencil
- Measuring tape
DIY Instructions
- Choose a cabinet near your main workspace that has enough vertical clearance for a full paper towel roll.
- Hold the mounting bracket against the internal side wall of the cabinet and mark the holes with a pencil.
- Drill small pilot holes into the wood, taking care not to go all the way through to the exterior.
- Screw the bracket into the wall of the cabinet until it is completely firm and does not wiggle.
- Slide the paper towel roll onto the vertical arm and pull the first sheet through the opening.
- Check that the cabinet door closes comfortably without hitting the paper towel roll.
- Place your everyday plates on the shelf below to maximize the use of the remaining space.
28 Hanging Bag Clip Organizer
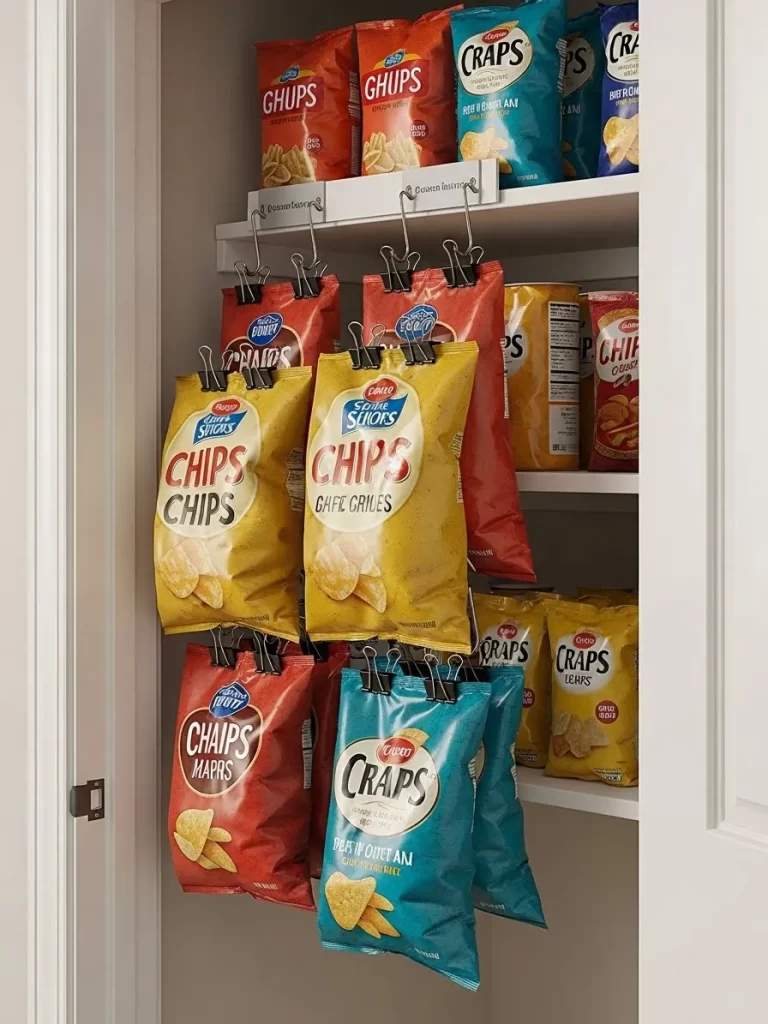
Bags of chips and pretzels are notorious for taking up too much shelf space and getting crushed. This clever system uses small tension rods and binder clips to hang your snacks vertically from the underside of a shelf. You can see every bag in your collection without having to move a single item.
The clips keep the bags tightly sealed to maintain freshness and prevent stale snacks. This method turns the “air space” at the top of your shelves into a functional storage zone. Your chips will stay whole and crispy because they are not being squeezed under other boxes.
You can easily unhook a single bag when you are ready for a snack and clip it back up when you are done. This setup is particularly helpful for kids who can see all their options at eye level. It is a low cost way to bring high end organization to a messy snack cabinet.
Materials Required
- Small tension rods
- Large binder clips or “S” hooks
- Adhesive command hooks (if rods won’t stay)
Equipment Required
- Level
- Measuring tape
DIY Instructions
- Measure the width of your pantry shelf and adjust the tension rod to fit snugly between the walls.
- Slide several binder clips onto the tension rod before you lock it into its final position.
- Place the rod about three inches from the top of the shelf to allow the bags to hang freely.
- Roll the top of your snack bags and attach a binder clip to the center of each one.
- Hang the clips onto the rod, spacing them out so you can read the labels on the bags.
- Group similar snacks together, such as putting all the spicy chips in one row.
- Ensure the rod is tight enough to handle the weight of several full bags without slipping down.
29 Transparent Water Bottle Rack
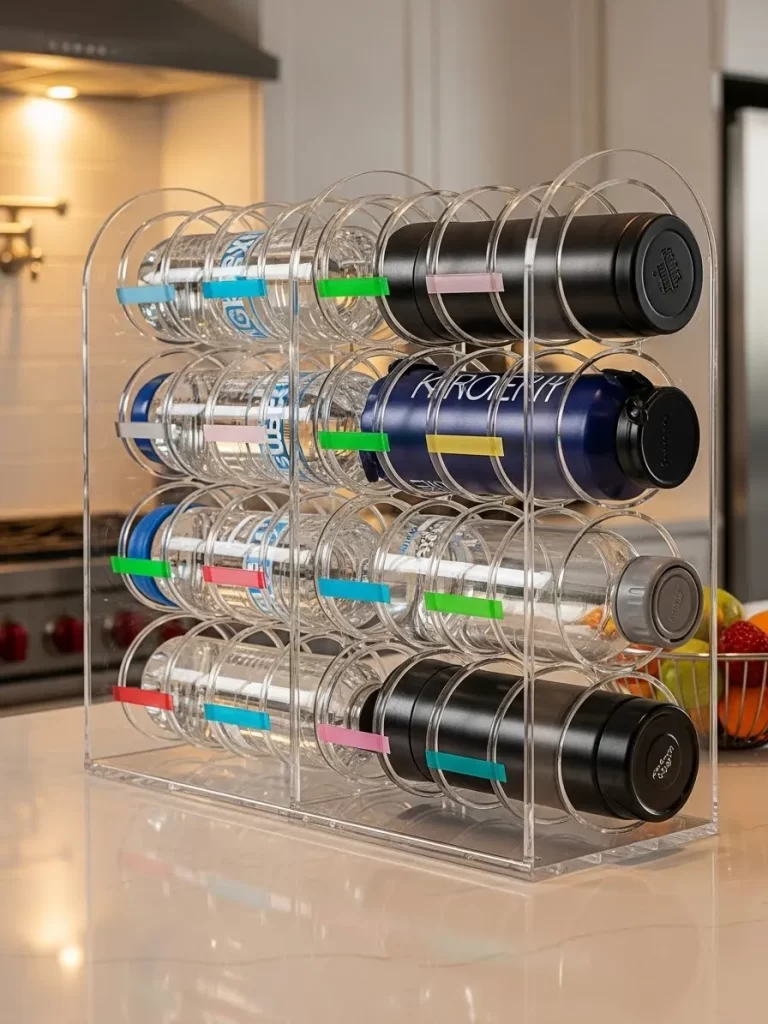
Water bottles and travel mugs are difficult to store because they tend to tip over like dominos on a flat shelf. These curved acrylic racks allow you to lay your bottles on their sides in a neat stack. You can pull out one bottle without disturbing the rest of your collection.
The clear plastic design makes the rack almost invisible, which keeps your pantry looking open and airy. You can stack these units as high as your shelf allows to make the most of your vertical space. This system works for everything from thin plastic bottles to wide insulated flasks.
Each bottle rests in its own designated cradle, which prevents them from rolling around. This setup is excellent for active families who use many different bottles throughout the day. Your cabinet will transform from a clinking mess into a streamlined hydration station.
Materials Required
- Stackable acrylic bottle racks
- Mild dish soap
- Microfiber cloth
Equipment Required
- Ruler
- Step stool
DIY Instructions
- Measure the height of your shelf to see how many tiers of bottle racks you can safely stack.
- Wash the acrylic racks in warm soapy water and dry them with a microfiber cloth to prevent water spots.
- Place the first rack on the shelf and line it up with the front edge for easy access.
- Stack the second rack on top of the first by aligning the built in grooves or feet.
- Lay your bottles into the curved slots with the lids facing forward so you can identify them.
- Place your heaviest or largest bottles on the bottom tier to keep the stack stable.
- Use the very top tier for smaller items like kids’ juice bottles or reusable straws.
30 Custom Tea Sachet Drawer
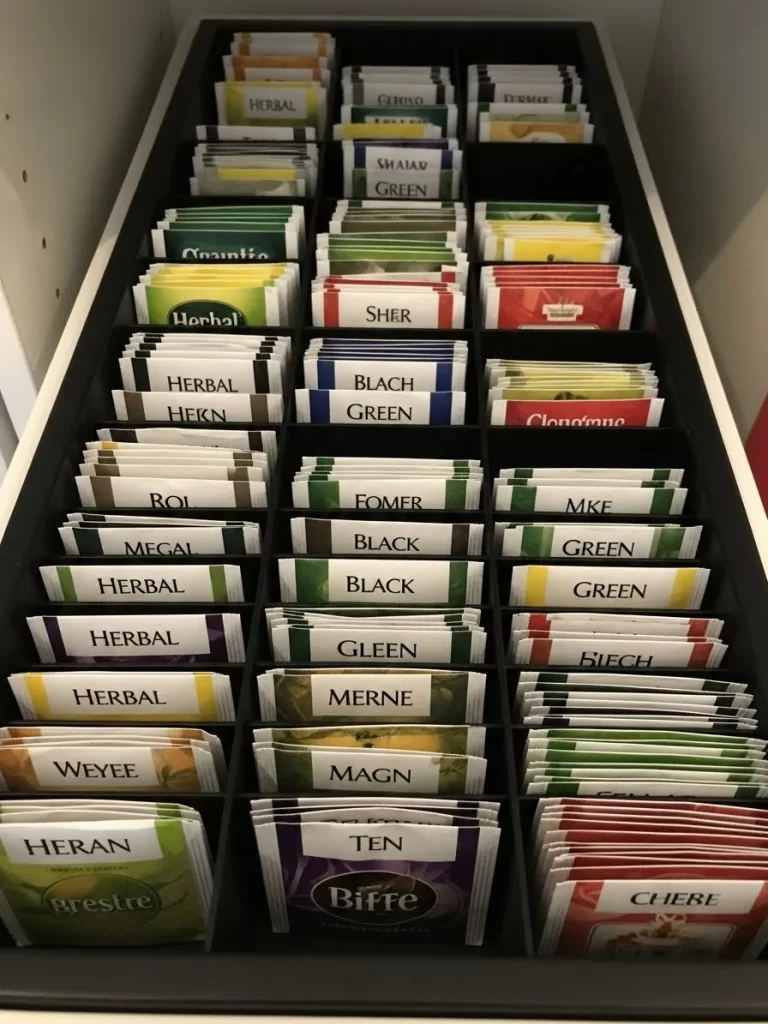
Tea drinkers often have dozens of different flavors that get lost in a sea of cardboard boxes. This drawer insert features multiple small compartments that keep each tea type separated and upright. You can browse your entire collection and choose your morning brew in just a few seconds.
The black finish of the organizer provides a sharp contrast that makes the colorful tea packets pop. This system prevents the bottom of your drawer from filling up with loose tea leaves and dust. It is a much more elegant way to serve guests than handing them a tattered box.
Organizing your tea by type, such as herbal, green, and black, makes it easy to find exactly what you need. You can see when you are running low on your favorite blend before you completely run out. This drawer turns a simple kitchen task into a calm and organized ritual.
Materials Required
- Multi compartment drawer organizer
- Assorted tea sachets
- Small labels (optional)
Equipment Required
- Measuring tape
- Hand vacuum (to clean the drawer first)
DIY Instructions
- Measure the internal dimensions of your kitchen drawer to find an organizer that fits snugly.
- Use a hand vacuum to remove any old crumbs or tea dust from the empty drawer.
- Place the organizer into the drawer, ensuring it does not slide around when the drawer opens.
- Sort your tea packets by category and place them into the individual slots.
- Face all the packets in the same direction so you can read the names easily.
- If the slots are large, you can fit two different flavors in one compartment using a divider.
- Place a small label on the edge of each slot if you want to maintain a permanent spot for specific flavors.
31 Specialized Seasoning Packet Bins
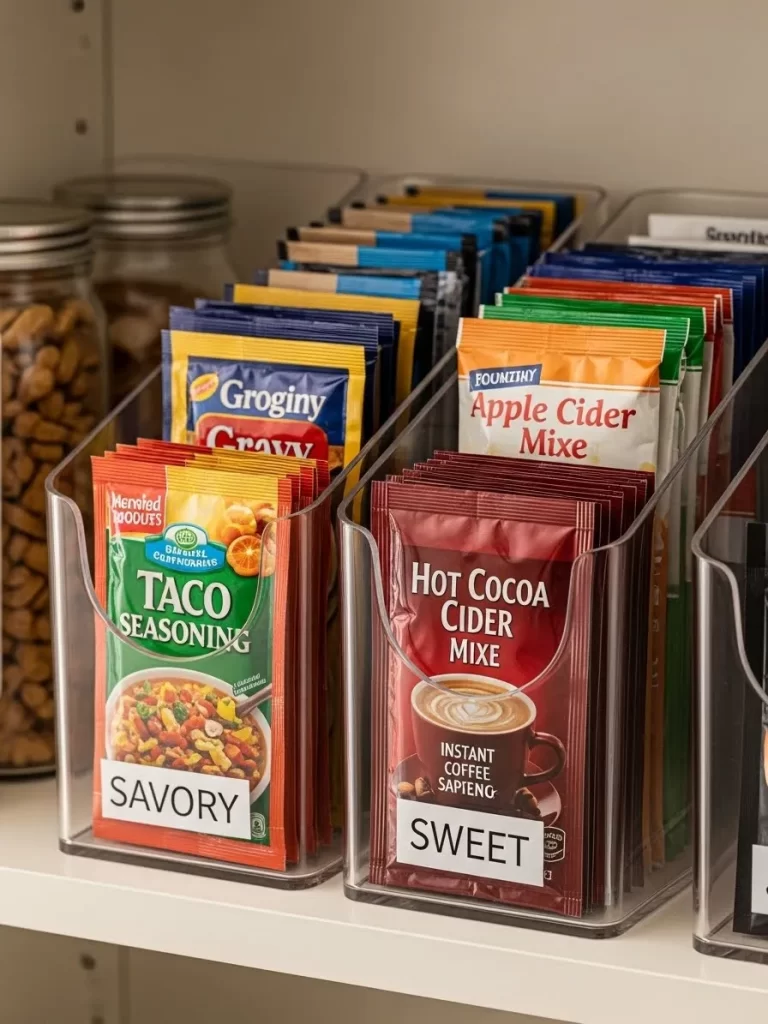
Small seasoning envelopes often get lost under larger boxes or create a messy pile in the back of your shelves. These clear acrylic bins feature high sides and a front opening that lets you flip through your packets like a filing cabinet. You can easily separate your savory taco mixes from your sweet hot cocoa powders.
The transparent material ensures you never buy duplicates because you can see every single packet in the row. This organization method keeps your powders dry and protects them from getting crushed by heavier items. It turns a chaotic corner into an efficient prep station for quick meals.
By placing labels on the front, everyone in the home knows exactly where to find the ranch dip or gravy mix. These bins slide easily onto standard shelves and maximize the depth of your cabinetry. You will find that your meal prep goes much faster when you aren’t hunting for that one specific spice blend.
Materials Required
- Narrow clear acrylic storage bins
- Adhesive bin labels
- Permanent marker
- All-purpose cleaner
Equipment Required
- Microfiber cloth
- Ruler for shelf depth check
DIY Instructions
- Measure the width of your seasoning packets to ensure they fit comfortably inside the narrow bins.
- Clean your pantry shelf and the exterior of the acrylic bins with a damp microfiber cloth to remove dust.
- Sort your seasoning envelopes into broad categories such as “Savory,” “Sweet,” or “Baking.”
- Place the packets into the bins with the labels facing forward for quick reading.
- Apply a label to the lower front of each bin so you can identify the category even when the bin is full.
- Slide the bins onto the shelf, keeping the most frequently used items at your eye level.
- Group the bins side-by-side to create a uniform and professional look in your cabinet.
32 Repurposed Pasta Storage Tubes

Large boxes of spaghetti or linguine are often awkward to store once they have been opened. You can create a unique and budget friendly solution by using tall glass cylinders or even cleaned snack tubes. This method keeps long noodles standing upright, which saves a massive amount of horizontal shelf space.
The clear glass allows you to appreciate the different shapes and colors of your pasta collection. For shorter noodles, a square airtight jar keeps them fresh and prevents them from breaking into small pieces. This variety of heights and shapes creates a dynamic and interesting look on your countertop.
Using a uniform labeling style across different containers ties the whole look together. You can even use a specific container for “broken pasta” to ensure nothing goes to waste. This storage style makes it easy to grab exactly the amount you need for dinner without dealing with flimsy cardboard.
Materials Required
- Tall glass cylinders or cleaned pringles tubes
- Decorative contact paper or wrapping paper
- Black vinyl labels
- White chalk marker
Equipment Required
- Scissors
- Soft drying towel
- Measuring tape
DIY Instructions
- Wash your glass cylinders or snack tubes thoroughly with warm soapy water and dry them completely.
- If using snack tubes, measure the height and wrap the exterior in decorative contact paper for a clean look.
- Carefully place your long spaghetti or fettuccine into the tall cylinders to avoid snapping the ends.
- Pour your smaller pasta shapes into shorter square jars to keep them airtight and fresh.
- Write the pasta type on your black vinyl labels using a white chalk marker for a high contrast finish.
- Align the labels at the same height on each container to create a sense of visual order.
- Place the tallest tubes at the back of your counter or shelf to maintain a clear line of sight.
33 Mobile Baking Station
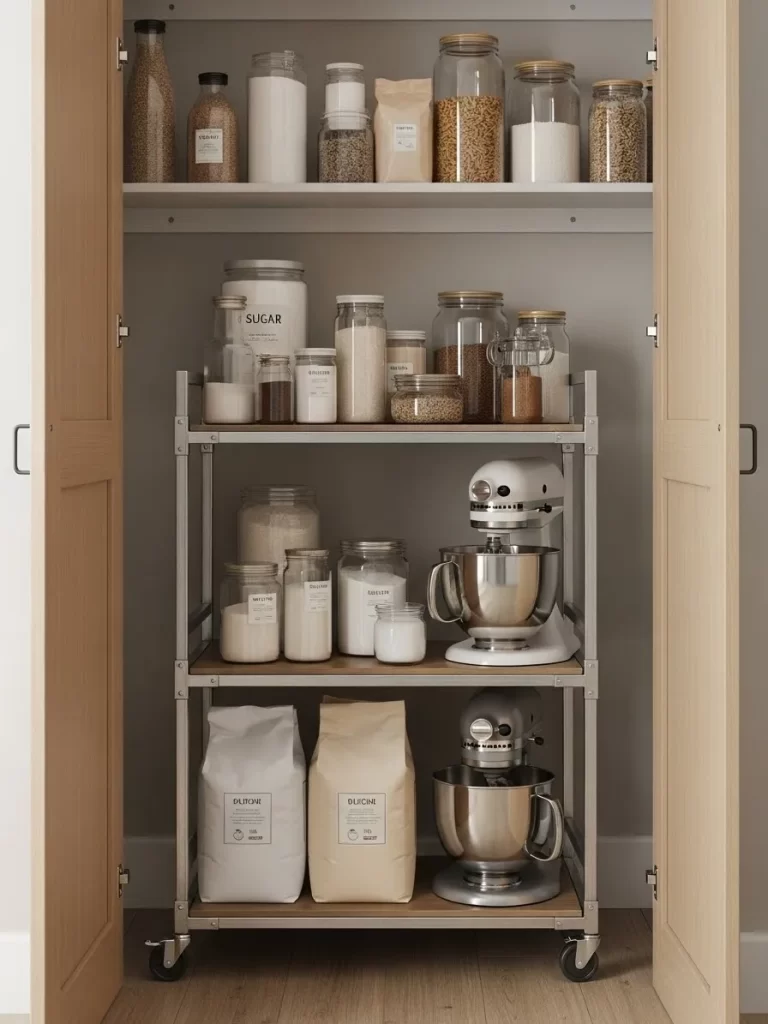
Heavy stand mixers and large bags of flour can be difficult to move around a small kitchen. A sturdy metal rolling cart with wooden shelves creates a dedicated space for all your baking essentials. You can store your mixer on the middle shelf and keep your bulk ingredients in large jars on top.
This station allows you to wheel your entire baking setup directly to your workspace when you are ready to create. The lower shelf is excellent for storing heavy bags of sugar or extra bowls that don’t fit in your cabinets. This mobility prevents you from having to lift heavy appliances across the room repeatedly.
Keeping your most used ingredients in clear jars on the cart makes it easy to see when you are running low. The natural wood and metal design adds a warm, industrial feel to your kitchen or pantry area. It is a smart way to add extra counter space without a permanent renovation.
Materials Required
- 3-tier metal and wood utility cart
- Large glass storage jars
- Stand mixer
- Wood wax or polish
Equipment Required
- Assembly wrench (usually included)
- Level
- Screwdriver
DIY Instructions
- Assemble the metal frame of the utility cart following the manufacturer’s guide, ensuring all bolts are tight.
- Attach the wooden shelves to the frame and check that they are level to prevent jars from sliding.
- Apply a light coat of wood wax to the shelves to protect the surface from flour and liquid spills.
- Place your stand mixer on the middle shelf where it is stable but easy to lift onto the counter.
- Fill large glass jars with flour, sugar, and oats and place them on the top shelf for quick access.
- Use the bottom shelf for your heaviest items, such as bulk bags of grain or extra mixing bowls.
- Test the locking wheels to ensure the cart stays firmly in place while you are measuring ingredients.
34 Budget-Friendly Patterned Bins
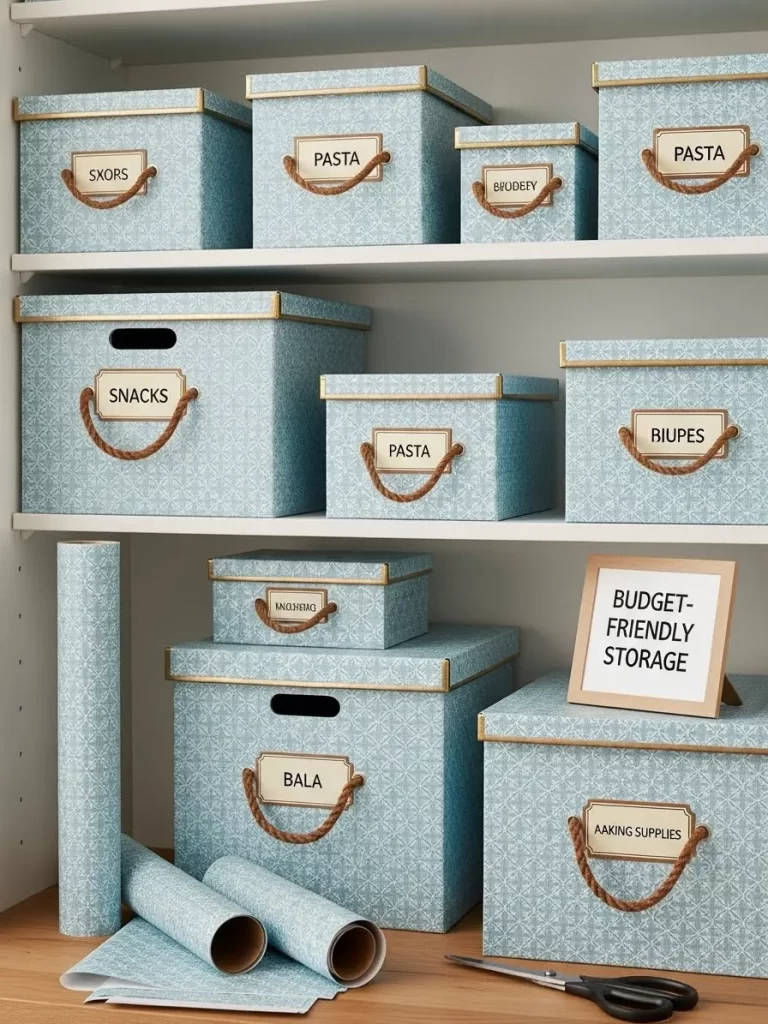
Organizing a large pantry does not have to be expensive if you use simple cardboard boxes and decorative paper. These blue patterned bins provide a coordinated look that hides mismatched packaging and bulky items. You can find boxes of various sizes to fit everything from small snack bars to large bags of pasta.
The rope handles add a rustic touch and make it easy to pull the bins off high shelves safely. Each bin features a framed label that clearly identifies the contents, such as “Pasta” or “Baking Supplies.” This system is easy to expand as your family’s needs change over time.
Using patterned paper or fabric allows you to customize the look of your pantry to match your home’s decor. It is a creative way to recycle sturdy delivery boxes into functional storage units. You will be amazed at how much cleaner your pantry looks when the visual noise of colorful packaging is gone.
Materials Required
- Sturdy cardboard boxes in various sizes
- Patterned contact paper or wrapping paper
- Rope for handles
- Metal label frames
Equipment Required
- Box cutter or scissors
- Hot glue gun
- Hole punch or drill
- Ruler
DIY Instructions
- Select a group of sturdy boxes that fit well together on your pantry shelves.
- Measure and cut your patterned paper to cover the exterior of each box, securing the edges with glue or tape.
- Punch two holes on the front side of each box and thread a short length of rope through them.
- Knot the rope on the inside of the box to create a sturdy handle for pulling the bin.
- Center a metal label frame on the front of the box and secure it with the provided hardware or hot glue.
- Slide a cardstock insert into the frame with the name of the pantry category written clearly.
- Arrange the boxes on your shelves, grouping similar sizes together for a neat and balanced appearance.
35 Vertical Wire Mesh Produce Towers
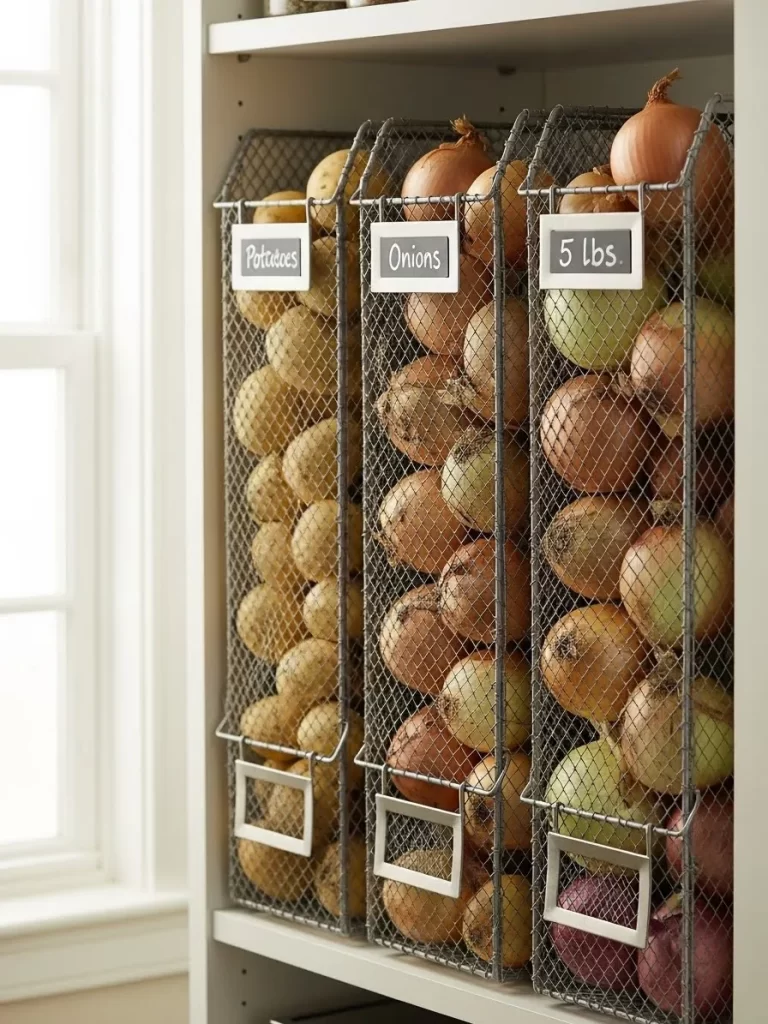
Onions and potatoes stay fresh much longer when they have constant airflow to prevent moisture buildup. These tall wire mesh towers allow you to store a large volume of produce in a very narrow vertical space. You can easily see your stock levels through the mesh so you never run out unexpectedly.
The open top design makes it simple to drop in new produce from the grocery store. Small blackboard labels on the front identify exactly what is inside each tower. This prevents you from accidentally mixing different types of onions or potatoes that have different shelf lives.
These towers sit flush against the side of a cabinet or wall, making use of space that is often wasted. The silver wire finish is durable and easy to spray clean if any dirt or skins accumulate at the bottom. It is a professional looking solution for a common kitchen storage problem.
Materials Required
- Vertical wire mesh storage bins
- Blackboard clip-on labels
- Chalk marker
- Plastic tray for the base (optional)
Equipment Required
- Level
- Cleaning brush
- Measuring tape
DIY Instructions
- Choose a cool, dark corner of your pantry for your produce to help it stay fresh longer.
- Place a small plastic tray on the floor or shelf to catch any loose skins that fall through the mesh.
- Set your wire mesh towers on the tray and ensure they are stable and not leaning.
- Use a chalk marker to write “Potatoes,” “Onions,” or “Garlic” on the blackboard labels.
- Clip the labels to the front of the mesh at a height that is easy for you to read.
- Fill each tower with your produce, placing the freshest items at the bottom if possible.
- Check the bottom of the towers once a week for any produce that needs to be used immediately.
36 Over the Door Lid Organizer
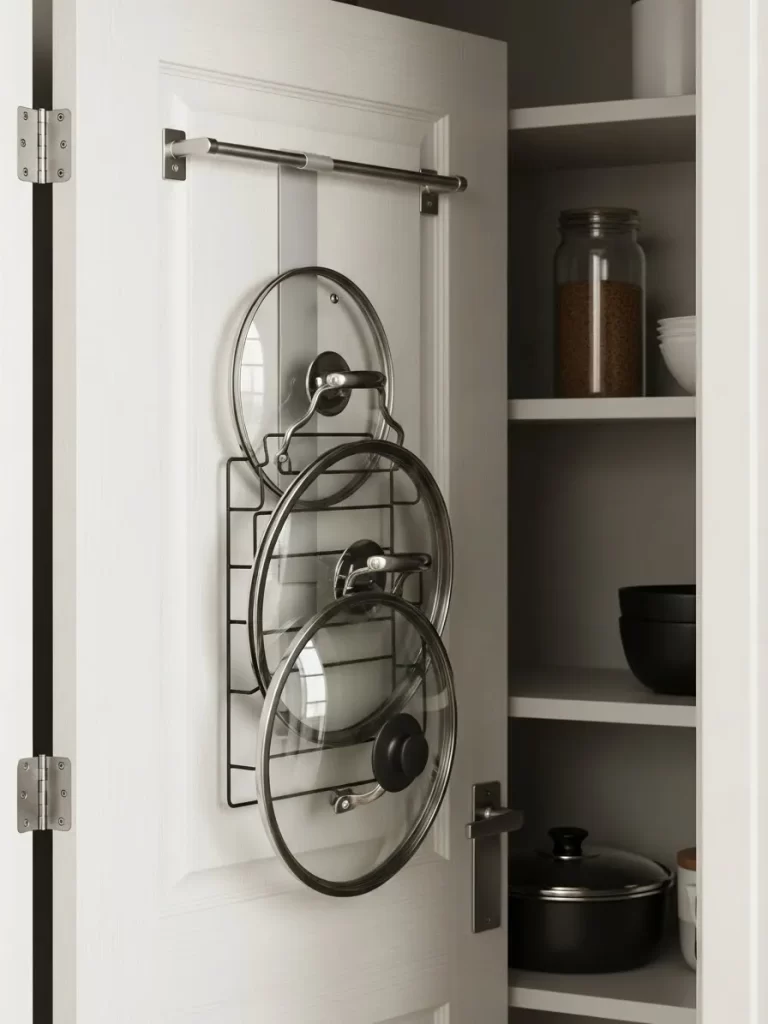
Pot lids are often the most frustrating items to store because they take up so much space in drawers. An over the door rack turns the back of your pantry door into a dedicated storage zone for various lid sizes. This keeps the glass and metal lids safe from scratching and makes them easy to grab.
The slim profile of the rack ensures that it doesn’t interfere with the items stored inside your pantry shelves. You can arrange the lids by size, with the largest ones at the bottom for better balance. This solution frees up an entire kitchen drawer for your pots and pans.
Having your lids visible and organized prevents the loud clatter of searching through a dark cabinet. The sturdy wire frame holds the lids securely so they don’t rattle when the door opens or closes. It is a simple addition that makes a huge impact on your kitchen’s daily functionality.
Materials Required
- Over the door pot lid rack
- Small adhesive felt pads
- Cleaning spray
Equipment Required
- Screwdriver (if assembly is needed)
- Level
- Pencil
DIY Instructions
- Clean the surface of your pantry door to ensure the rack sits flush against the wood.
- Hook the rack over the top of the door and check that the door still closes smoothly.
- Place small adhesive felt pads on the back of the metal frame to prevent it from scratching the door.
- If the rack has screw holes, mark them with a pencil and secure the bottom to the door for extra stability.
- Slide your pot lids into the designated slots, starting with the largest at the bottom.
- Ensure the handles of the lids are facing outward so you can grab them easily.
- Test the door by opening and closing it several times to make sure the lids stay securely in place.
37 Precision Pour Jars for Grains
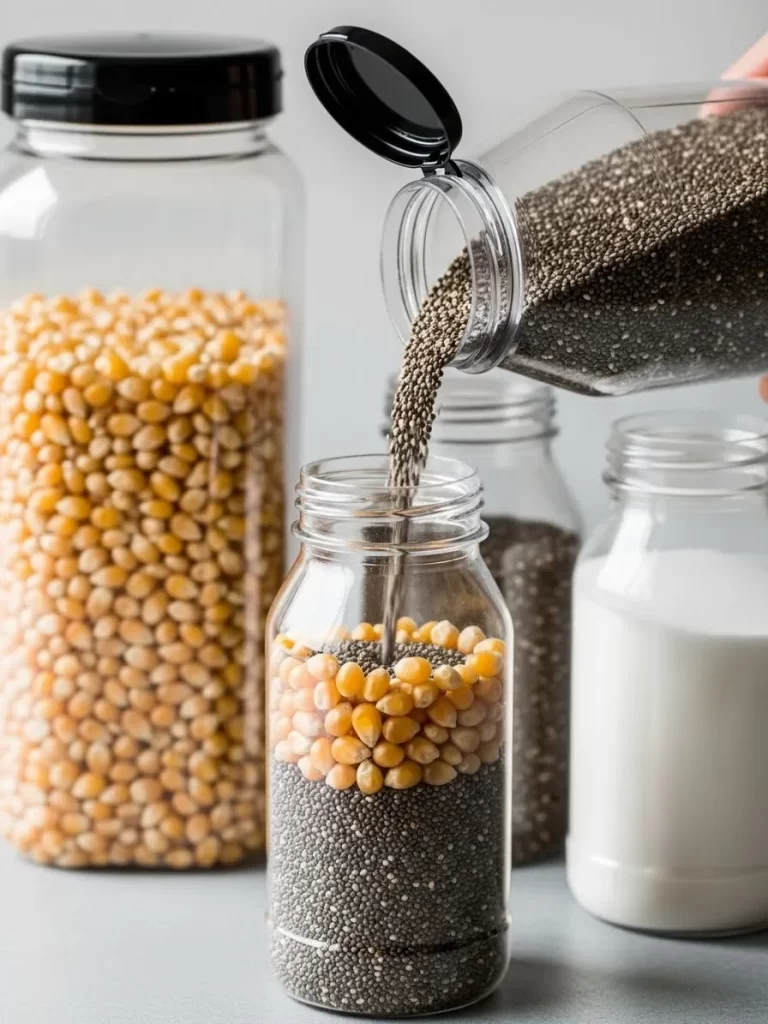
Small seeds and grains like chia or flax are much easier to handle when stored in jars with narrow openings. These clear jars allow you to pour exactly the amount you need into your smoothie or oatmeal without a mess. The flip top lids keep the contents airtight and fresh for a long time.
Storing popcorn kernels in a large jar nearby keeps all your healthy snacks in one convenient location. You can see the beautiful textures of the grains, which adds a decorative element to your pantry shelving. These jars are easy to hold and operate with one hand during a busy morning.
Using jars of different heights helps you organize your grains by how much you typically use. For example, use the largest jar for popcorn and the smaller ones for expensive superfoods. This system keeps your pantry looking modern and highly organized.
Materials Required
- Clear glass or plastic jars with pour spouts
- Airtight flip-top lids
- Small funnel
- Rubbing alcohol
Equipment Required
- Microfiber cloth
- Label maker (optional)
DIY Instructions
- Wash your jars and lids in warm soapy water and let them dry completely before filling.
- Wipe the exterior of the jars with rubbing alcohol to ensure your labels will stay in place.
- Use a small funnel to pour your grains and seeds into the jars to prevent spills.
- Snap the airtight lids on firmly and test the pour spout to make sure it opens smoothly.
- Apply a small label to the side of the jar identifying the contents and the date of purchase.
- Arrange the jars on your shelf from tallest to shortest to maintain visibility for every item.
- Refill the jars as soon as they reach the bottom quarter to ensure you never run out of your favorites.
38 Motion Activated Shelf Lighting
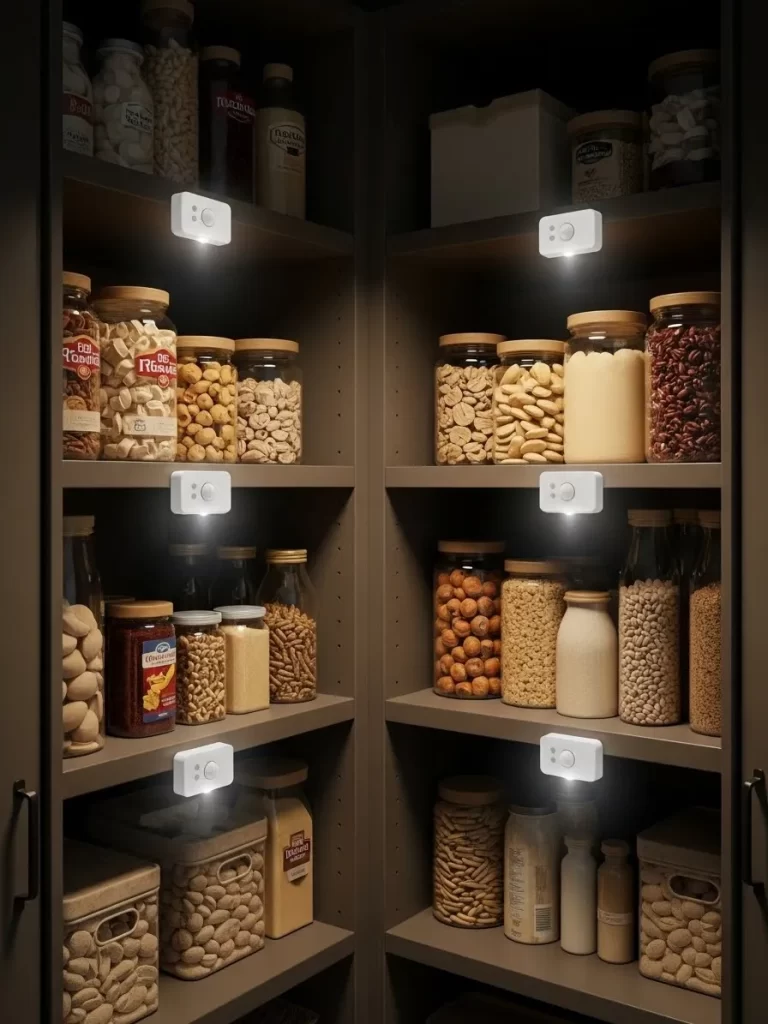
Finding ingredients in a deep, dark pantry is much easier when every shelf is brightly illuminated. These small motion activated LED lights turn on automatically as soon as you open the door or reach into a shelf. You can see the labels on your jars and cans even in the furthest corners of the cabinet.
The warm glow of the lights makes your pantry feel inviting and well maintained. Because they are battery operated, you can install them anywhere without needing a professional electrician. This simple upgrade prevents you from losing items in the shadows of your storage area.
You can place these lights under each shelf to provide a layered lighting effect throughout the pantry. This makes it easy to take a quick inventory of your food before you head to the grocery store. It is a low cost way to bring a high end, custom look to your home.
Materials Required
- Motion activated LED puck lights
- Extra batteries
- Double-sided mounting tape
- Rubbing alcohol
Equipment Required
- Measuring tape
- Pencil
- Step stool
DIY Instructions
- Identify the darkest areas of your pantry where you often struggle to see the labels on your food.
- Clean the underside of the shelf where you want to mount the light with rubbing alcohol.
- Insert the batteries into the LED light and test the motion sensor to make sure it works.
- Apply the double-sided mounting tape to the back of the light fixture.
- Press the light firmly onto the underside of the shelf and hold it for thirty seconds to ensure a strong bond.
- Repeat this process for every shelf, centering the lights for the most even distribution of brightness.
- Adjust the sensor angle if necessary so the lights turn on as soon as you approach the pantry.
39 Decorative Floral Backsplash
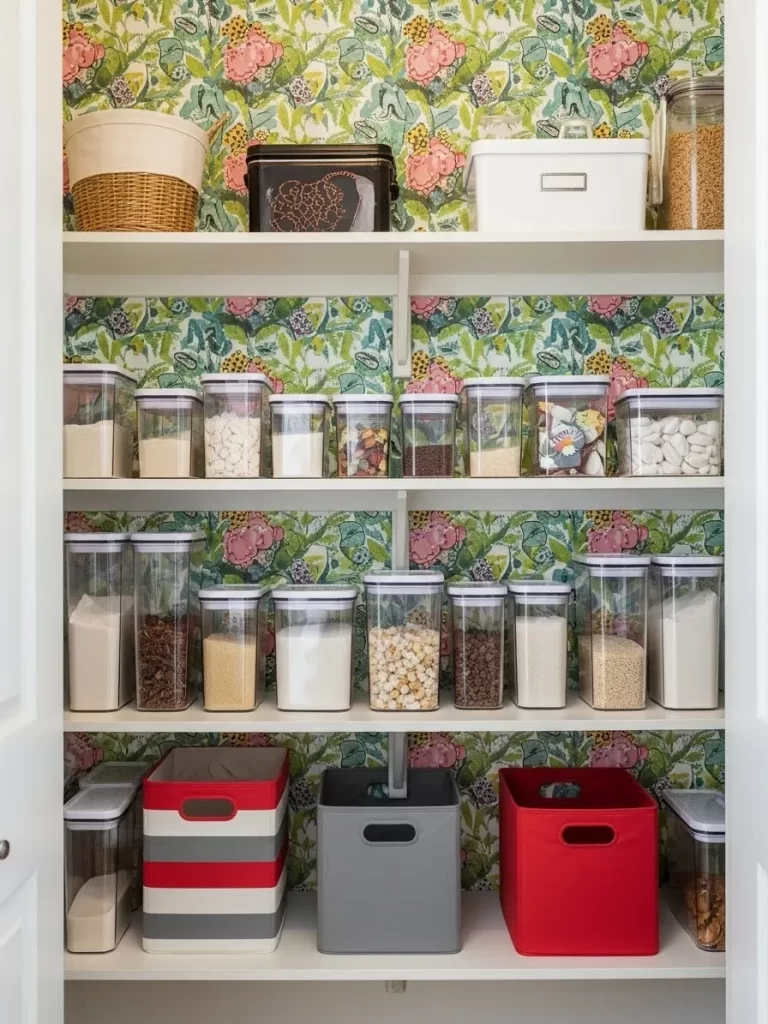
A beautiful pantry can motivate you to keep your food organized and your kitchen clean. You can transform the back wall of your shelves using a vibrant floral contact paper or wallpaper. This adds a pop of color and personality to a space that is usually very plain and functional.
The colorful background makes your clear canisters and white bins stand out and look more professional. You can coordinate the colors of your storage bins with the patterns in the wallpaper for a designer look. It is an easy way to hide old, stained cabinet walls without the mess of painting.
Using removable contact paper allows you to update the style of your pantry whenever you want a change. It is also easy to wipe clean if a jar of oil or sauce happens to leak on the shelf. This decorative touch turns your pantry from a storage closet into a beautiful feature of your home.
Materials Required
- Removable floral contact paper or wallpaper
- Clear storage bins in various sizes
- Smoothing tool or credit card
- Mild cleaning solution
Equipment Required
- Scissors or utility knife
- Measuring tape
- Pencil
DIY Instructions
- Remove all items and shelves from your pantry to have a completely clear workspace.
- Clean the back wall of the pantry with a mild solution to remove any grease or dust.
- Measure the height and width of the back wall and cut your contact paper to match.
- Peel a small section of the backing and align the top edge of the paper with the top of the wall.
- Slowly peel the rest of the backing while using a smoothing tool to push out any air bubbles.
- Trim any excess paper at the bottom or sides using a sharp utility knife for a clean edge.
- Reinstall your shelves and arrange your clear bins against the new colorful background.
40 Periodic Pantry Reset Routine
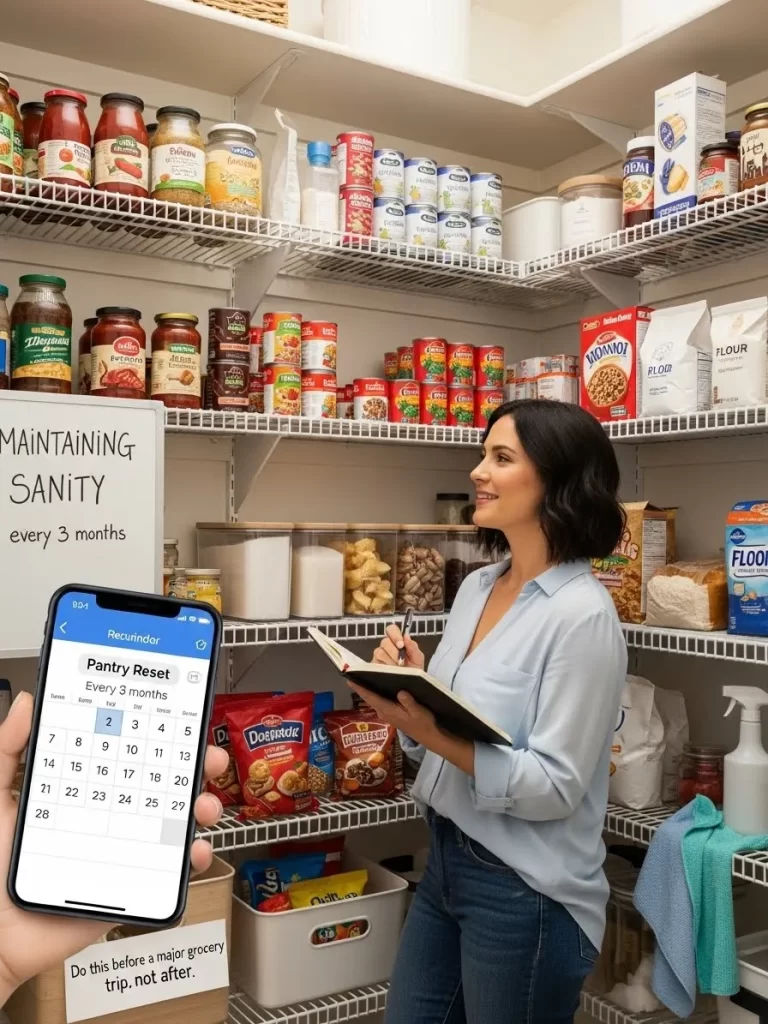
The key to a long term organized pantry is regular maintenance and a clear plan for restocking. You can use a digital calendar or a physical checklist to schedule a “Pantry Reset” every three months. This ensures that you rotate your stock and discard any items that have expired.
Using a smartphone app to track your inventory helps you avoid overbuying during your major grocery trips. You can take a quick photo of your shelves before you leave the house so you always know what you have. This habit saves you money and reduces the stress of meal planning.
Keeping a small notepad in the pantry allows you to write down items as soon as you use the last of them. This ensures your shopping list is always accurate and up to date. A well maintained pantry is the foundation of a happy and efficient home kitchen.
Materials Required
- Smartphone with an inventory or calendar app
- Physical notepad and pen
- Cleaning supplies
- Magnetic notepad holder
Equipment Required
- Step stool
- Trash bags for expired items
DIY Instructions
- Schedule a recurring “Pantry Reset” on your digital calendar for every ninety days.
- During the reset, remove everything from the shelves and wipe them down with a cleaning spray.
- Check the expiration dates on every can and jar, moving the oldest items to the front.
- Update your inventory app with the quantities of your staples like flour, rice, and pasta.
- Mount a magnetic notepad on the inside of the pantry door for an ongoing shopping list.
- Write down any items that are running low as soon as you notice them during your daily cooking.
- Review your list before every major grocery trip to ensure you only buy what you truly need.
Taking control of your pantry is more than just stacking cans neatly; it is about building a sustainable system that simplifies your life. By implementing smart organizational habits and leveraging tools like airtight canisters and gravity fed racks, you have created a foundation for efficiency. This transformation reduces food waste, saves you money, and takes the stress out of daily meal preparation.
Maintaining this organized space is an ongoing effort, not a one time project. Integrating simple routines like a quarterly reset or daily inventory checks ensures your pantry remains a functional and beautiful space. Your kitchen command center is now ready to support all your future culinary adventures with ease.
Key Takeaways
- Maximize Visibility: Use clear, labeled containers for all dry goods to prevent purchasing duplicates and reduce waste.
- Utilize Vertical Space: Employ tiered risers, stackable bins, and over the door racks to use the full height and depth of your cabinets.
- Establish Zones: Group items by category (e.g., Baking, Snacks, Grains) and use designated bins to ensure everything has a home.
- Prioritize Rotation: Implement a simple “Eat Me First” zone and date labels to ensure older items are used before they expire.
- Simplify Access: Use rotating turntables and pull out drawers to make reaching items in deep or corner cabinets effortless.