The fireplace mantel is often the heart of a room. It is the natural gathering spot. Yet, it can be a challenge to decorate. Many of us leave it empty or fill it with clutter.

This space is a chance to show your personality. It can tell a story about who you are and what you love. It can set the tone for your entire home. A well-styled mantel turns a simple wall into a true focal point.
If you are feeling uninspired, you are in the right place. We have gathered 40 creative approaches to redesign your mantel. Each one comes with a simple DIY project to help you get started. You will find a style here that speaks to you.
1. Earthy and Artistic Display

This mantel brings a sense of calm with its natural tones. A collection of terracotta and cream vases creates a warm, grounded look. Each vase has a unique shape, adding interest without clutter. A lively green plant spills over the side, offering a touch of life.
A bare, twisting branch stretches across the scene. It connects the different elements together. The backdrop is a simple canvas with a painted arch, which pulls all the earthy colors into one focal point. This design feels both simple and thoughtfully arranged.
DIY Instructions: Modern Arch Canvas
This simple art piece can be the foundation for your whole mantel design.
What You’ll Need:
- A blank canvas (any size you like)
- A pencil
- A piece of string
- A thumbtack or a small piece of strong tape
- Craft paint in a terracotta or light brown color
- A medium-sized paintbrush
- Painter’s tape
Step-by-Step Guide:
- Find the Center: First, lay your canvas flat. Find the middle of the bottom edge of your canvas and make a tiny, light pencil mark there. This spot will be the center of your arch.
- Make a Simple Compass: Tie one end of the string to your pencil, close to the tip. Hold the other end of the string firmly on the center mark you made. Use a thumbtack or tape to hold it down securely. The string should be just long enough to reach the left or right edge of the canvas.
- Draw the Curve: Keeping the string straight and tight (like a guitar string!), swing the pencil from one side of the canvas to the other. This will draw a nice, even curved line for the top of your arch.
- Tape the Straight Sides: Now, take the painter’s tape. Place a long piece of tape straight down from where the curve ends on the left side to the bottom of the canvas. Do the same thing on the right side. These tape lines will be your guides for a clean edge.
- Time to Paint: Dip your brush in the paint and carefully fill in the arch shape you created. Paint inside the taped lines and below your curved pencil line. Try to make your brush strokes go in the same direction for a smooth look.
- The Big Reveal: Let the paint dry completely. This is very important! It might take an hour. Once it is 100% dry, slowly and carefully peel off the painter’s tape. You should have a beautiful, crisp arch. Now it’s ready to place on your mantel!
2. Moody and Scholarly Charm

This fireplace creates a rich, academic atmosphere. The dark walls make the gold-framed mirror pop, reflecting the room’s light. Stacks of old books are used as pedestals for sculptures and portraits, telling a story of history and art. Brass candlesticks add a warm, metallic glow.
A garland of dried orange slices is draped across the mantel, adding a surprising touch of color. Greenery spills from a vase and climbs the wall, bringing life to the studious setting. This look is layered and full of character. It invites you to look closer.
DIY Instructions: Dried Orange Garland
This fragrant garland adds a beautiful, natural touch to your mantel.
What You’ll Need:
- 2-3 large oranges
- A sharp knife
- A cutting board
- Paper towels
- A baking sheet
- Twine or pretty ribbon
- A large needle or a skewer
Step-by-Step Guide:
- Slice the Oranges: First, ask an adult to help you cut the oranges. You want to slice them into thin, round pieces, about as thick as a coin. Try to make them all the same thickness so they dry evenly.
- Pat Them Dry: Lay the orange slices on a few paper towels. Gently press another paper towel on top to soak up some of the extra juice. This helps them dry faster in the oven.
- Time to Bake: Place the orange slices in a single layer on a baking sheet. You don’t need any oil or spray. Bake them in the oven at a very low temperature, around 200°F (95°C). This is a slow process. It will take about 2-3 hours. You’ll need to flip them over every 30 minutes. They are ready when they are dry and a little bit see-through.
- Cool Them Down: Once they’re done, take them out of the oven and let them cool completely on the baking sheet.
- String Them Up: Cut a piece of twine or ribbon as long as you want your garland to be. Use a big needle or a pointy skewer to carefully poke a hole through the top of each dried orange slice.
- Create Your Garland: Thread the twine through the holes in the orange slices. You can space them out or have them close together. Tie a knot at each end of the twine, and your beautiful garland is ready to hang!
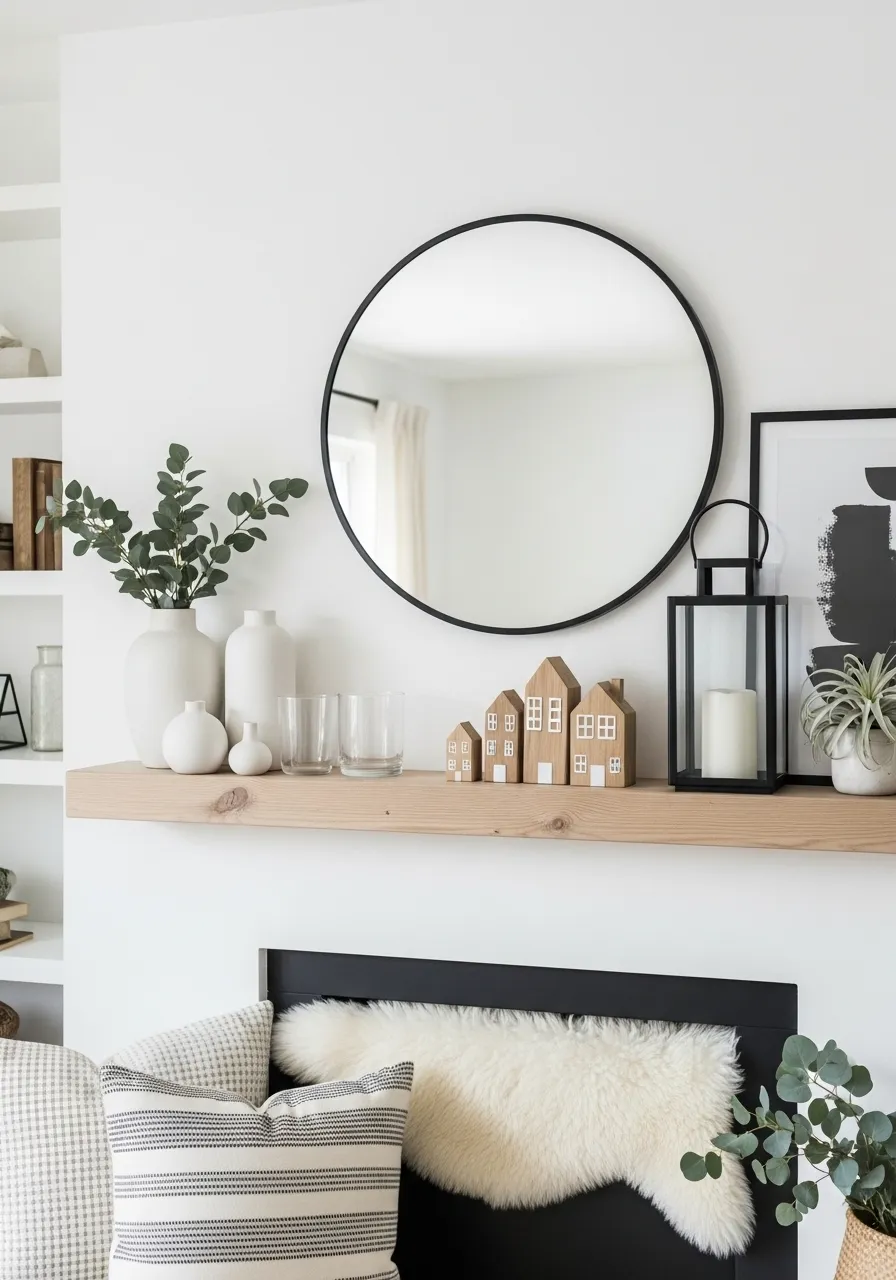
3. Clean and Simple Scandi

This mantel is all about clean lines and a peaceful feeling. A natural wood beam adds warmth against the crisp white wall. The large, round mirror with a simple black frame is the main attraction. It makes the room feel bigger and brighter.
White vases of different sizes hold simple green stems. A black lantern with a candle inside adds a cozy touch. The tiny wooden houses bring a bit of playful charm. Everything is balanced and uncluttered. This style proves that you don’t need a lot of stuff to make a big impact.
DIY Instructions: Little Wooden Houses
These cute little houses are fun to make and add a personal touch.
What You’ll Need:
- A block of soft wood (like pine, from a craft store)
- A pencil and a ruler
- A small handsaw (ask an adult for help!)
- Sandpaper
- White craft paint
- A small paintbrush
- A black fine-tip marker
Step-by-Step Guide:
- Draw Your House: Take your wood block and use a pencil and ruler to draw a simple house shape. It’s just a rectangle with a triangle on top for the roof. You can make them tall and skinny or short and wide.
- Cut It Out (With Help!): This is a job for a grown-up. Ask them to carefully cut along the lines you drew using the handsaw. Now you have a little wooden house! Make a few in different sizes to create a village.
- Smooth the Edges: Use the sandpaper to smooth all the sharp edges and corners of your house. Make it feel nice and soft. Wipe off any sawdust when you’re done.
- Leave Some Wood: Decide how much of the house you want to be natural wood and how much you want to paint. This design leaves the main body of the house natural.
- Paint the Roof: If you are painting the roof, you can use painter’s tape to make a straight line. Then, paint the roof part with your white paint. Let it dry.
- Draw the Windows: Once the paint is dry, use your black marker to draw little windows and doors. You can just draw small squares for windows. Be creative! You can give each house a different look. Your little village is now ready for your mantel.
4. Breezy Coastal Getaway

This display feels like a walk on the beach. The distressed white chest serves as a unique base, full of rustic texture. A collection of sea-glass-colored bottles creates a beautiful, watery palette of blues and greens. These are grouped together to catch the light.
Natural elements complete the scene. A thick, coiled rope adds a nautical touch. Starfish, coral, and smooth pebbles are scattered about, looking as if they just washed ashore. Dried pampas grass in a jug mimics sea oats swaying in the breeze. This mantel is a breath of fresh air.
DIY Instructions: Faux Sea Glass Bottles
Turn any clear glass bottle into a seaside treasure.
What You’ll Need:
- Clean, empty glass bottles or jars
- Craft paint in sea glass colors (light blue, light green, white)
- A small bowl
- A little bit of water
- A paintbrush
Step-by-Step Guide:
- Prepare Your Paint: Squeeze a good amount of your sea glass colored paint into a small bowl. Add just a tiny bit of water and mix it up. You want the paint to be a little thinner than normal, but not watery.
- Paint the Inside: Pour the thinned paint into your bottle. Now, start swirling and turning the bottle around. Your goal is to coat the entire inside surface with paint. Keep turning until you can’t see any clear spots.
- Drain the Extra: Once the inside is fully coated, turn the bottle upside down over your bowl or some paper towels to let all the extra paint drip out. This might take a few minutes.
- Let It Dry: Place the bottle upside down on paper towels and let it dry completely. This is the most important step and it can take a full day or two. Be patient! The paint needs to be totally dry on the inside.
- Display Your Treasure: Once dry, your bottle will have a soft, frosted look just like real sea glass found on the beach. Make a few in different colors and sizes to group on your mantel.
5. Timeless and Traditional Grace

This mantel exudes classic elegance. The dark, ornately carved wood is a statement in itself. A beautiful landscape painting in a heavy gold frame acts as the centerpiece. It draws your eye in and sets a formal tone for the room.
The arrangement is perfectly symmetrical. Matching blue and white ginger jars stand on either side, adding a touch of chinoiserie flair. Tall brass candlesticks hold slender tapers, ready to cast a warm glow. A vintage clock sits at the center, marking time with quiet dignity. This is a look of enduring style.
DIY Instructions: “Antique” Picture Frame
Give any simple picture frame a touch of old-world glamour.
What You’ll Need:
- A simple wooden picture frame (from a craft or dollar store)
- Gold spray paint
- Black or dark brown craft paint
- A small, stiff paintbrush or a crumpled paper towel
- Clear sealant spray (optional)
Step-by-Step Guide:
- Go for Gold: In a well-ventilated area (like outside), lay your frame down on some newspaper. Spray paint the entire frame with the gold paint. Make sure to get the sides too. Let it dry completely. You might need two coats for good coverage.
- Add the “Age”: Once the gold paint is totally dry, it’s time to make it look old. Dip the very tip of your stiff brush or a crumpled paper towel into a tiny bit of black or brown paint. Dab most of it off onto a scrap piece of paper. You want very little paint.
- Dry Brush the Details: Lightly brush or dab the dark paint over the gold frame. Focus on the corners and any carved details. This technique is called “dry brushing.” It creates shadows and makes the frame look like it has been around for a long time.
- Blend and Soften: If you add too much dark paint, you can wipe some of it off with a clean cloth while it’s still wet. The goal is to make it look subtle, not messy.
- Seal the Deal: Once you are happy with the look and the paint is dry, you can spray it with a clear sealant to protect it. This is optional. Now you have a fancy “antique” frame for your favorite picture!
6. Bold Art Deco Glamour

This mantel is all about drama and high style. The glossy black fireplace provides a striking contrast for the gold and white accents. A brilliant gold sunburst mirror explodes from the center, reflecting light and adding a touch of luxury. The entire look is confident and chic.
Symmetry rules this design. Tall, geometric black and white vases stand like sentinels on either side, holding dark flowers and fluffy white feathers. Crystal decanters and a gold fan-shaped sculpture complete the sophisticated, party-ready vibe. It’s a nod to a glamorous past, made modern.
DIY Instructions: Sunburst Mirror
Create your own stunning centerpiece with this simple project.
What You’ll Need:
- A small, round craft mirror
- Wooden dowels or bamboo skewers in various lengths
- A hot glue gun (with adult supervision!)
- Gold spray paint
- A piece of cardboard larger than your mirror
Step-by-Step Guide:
- Plan Your Rays: Lay your mirror face down on the center of the cardboard. Arrange your wooden dowels or skewers around the mirror like the rays of the sun. Mix up the lengths, with some long and some short, to make it interesting.
- Glue the Rays: Once you like your arrangement, it’s time to glue. One by one, pick up a dowel, put a dab of hot glue on the end, and press it firmly onto the back of the mirror. Ask a grown-up for help with the hot glue gun as it gets very hot.
- Build Your Sunburst: Continue gluing the dowels all the way around the mirror. You can make a second layer on top of the first for a fuller look. Let the glue cool and harden completely.
- Paint it Gold: Take your sunburst outside or to a well-ventilated space. Place it on some newspaper. Carefully spray paint the entire thing—dowel rays and the edge of the mirror—with your gold spray paint.
- Let It Dry: Let the paint dry fully. You might need to add a second coat to make sure you’ve covered everything. Once it’s dry, you can add a picture hanger to the back or simply lean your glamorous new mirror against the wall on your mantel.
7. Bohemian Fiber Arts

This mantel is a celebration of texture and handcrafted beauty. Natural wood provides a simple stage for a stunning display of fiber art. Woven and macrame wall hangings in warm, earthy colors create a soft and inviting focal point. A round mirror framed in rope adds to the natural, handmade feel.
Dried grasses and palm leaves in terracotta vases bring in elements from nature. A lush green plant cascades down one side, adding life and movement. The whole arrangement feels free-spirited and cozy. It’s a space that is personal and full of warmth.
DIY Instructions: Easy Yarn Wall Hanging
You don’t need to know how to weave to make this beautiful piece of art.
What You’ll Need:
- A stick or a wooden dowel
- Yarn in a few different colors and thicknesses
- Scissors
Step-by-Step Guide:
- Cut Your Yarn: Decide how long you want your wall hanging to be. Cut many pieces of yarn that are twice that length. For example, if you want it to be 1 foot long, cut your yarn pieces to be 2 feet long. Cut a bunch of pieces in all your different colors.
- The Magic Knot: Take one piece of yarn and fold it in half to make a loop at the top. This is called a Lark’s Head knot.
- Attach to the Stick: Place the looped end of the yarn over your stick. Then, pull the two loose ends of the yarn through the loop and pull it tight. You’ve just attached your first piece of yarn!
- Fill Up the Stick: Keep doing this with all your pieces of yarn. You can make patterns with your colors or just mix them up randomly. Push the knots close together so the stick is full.
- Give It a Haircut: Once all your yarn is on the stick, the bottom will probably be uneven. Use your scissors to trim the bottom. You can cut it straight across, in a V-shape, or at an angle.
- Add a Hanger: Cut one last piece of yarn and tie each end to the ends of the stick. Now you have a hanger to put it up on the wall above your mantel.
8. Sleek Industrial Edge

This setup combines raw materials with a clean, modern look. The floating reclaimed wood shelves provide a rustic foundation against a cool concrete wall. A large, framed blueprint of a building serves as the main artwork, adding a technical and graphic element.
Function meets form with the lighting. A pair of lamps made from industrial pipes and vintage-style Edison bulbs cast a warm, inviting light. A concrete planter with a snake plant adds a touch of green. Gears and old books finish the look, suggesting a workshop or a study. This is a smart and stylish space.
DIY Instructions: Faux Concrete Planter
Get the cool look of concrete without the heavy weight.
What You’ll Need:
- A plastic or terracotta pot
- Light gray craft paint
- Dark gray craft paint
- A small sponge or a crumpled paper towel
- A small plate or palette for your paint
Step-by-Step Guide:
- Base Coat: First, make sure your pot is clean and dry. Paint the entire outside of the pot with the light gray paint. Let it dry completely. You might need two coats to cover it well.
- Add Texture: Squeeze a little bit of the light gray paint and a little bit of the dark gray paint onto your plate, but don’t mix them.
- Sponge It On: Dip your damp sponge or crumpled paper towel into both colors at the same time. Then, start dabbing the paint all over the pot. This will create a mottled, textured look, just like real concrete.
- Cover It All: Keep dabbing until the whole pot is covered. There is no right or wrong way to do it! You just want a mix of light and dark gray spots.
- Let it Dry: Let the paint dry completely. Your planter will now have the cool, industrial look of concrete. You can put a plant directly inside (if it has drainage) or just place a smaller potted plant inside your new “concrete” planter.
9. Bountiful Autumn Harvest

This mantel is overflowing with the warmth and abundance of fall. A lush wreath made of magnolia leaves creates a rich, green centerpiece. An impressive garland, full of autumn leaves, pinecones, and berries, drapes gracefully across the entire length of the mantel.
Amber-colored glass bottles and vintage-style lanterns cast a cozy glow. Sheaves of dried wheat and a variety of pumpkins in different colors and textures are layered throughout. A simple “Grateful” banner adds a sweet, heartfelt message. This design is a true celebration of the season.
DIY Instructions: Easy Fall Leaf Garland
Bring the colors of autumn indoors with this simple craft.
What You’ll Need:
- A long piece of twine or ribbon
- A bag of fake autumn leaves from a craft store
- A hot glue gun (with adult supervision!)
- Optional: small fake berries or mini pinecones
Step-by-Step Guide:
- Lay Out Your Twine: Cut a piece of twine to the length you want your garland. Lay it out straight on a table or the floor. This will be the backbone of your garland.
- Start Gluing: Ask a grown-up to help with the hot glue gun. Take one leaf, put a small dot of hot glue at the base of its stem, and press it onto the twine.
- Layer the Leaves: Take another leaf and glue it so it slightly overlaps the first one. Keep doing this, layering the leaves on top of each other. Point them in slightly different directions to make it look full and natural, like they just fell from a tree.
- Keep Going: Continue gluing leaves along the entire length of the twine until your garland is as full as you like it.
- Add Some Extras (Optional): If you have them, you can glue on some little red berries or tiny pinecones in between the leaves. This will make your garland look even more special.
- Let it Cool: Let the glue cool down completely before you hang your beautiful new garland on the mantel.
10. Modern and Geometric Pop

This fireplace makes a bold statement with bright colors and sharp lines. The mantel itself is painted a vibrant turquoise, instantly grabbing your attention. The design uses a technique called color blocking, with solid panels of yellow, green, and royal blue creating a playful, artistic backdrop.
The objects on the mantel continue the modern theme. A bright blue vase and a yellow cylinder stand out against the colorful panels. A simple black and white line drawing adds a graphic touch. This look is energetic and fun. It shows how a fearless use of color can completely transform a space.
DIY Instructions: Colorful Art Panels
Create your own modern art with these easy-to-make panels.
What You’ll Need:
- 3-4 flat canvas boards or sturdy pieces of cardboard in different sizes
- Craft paint in bright, bold colors (like yellow, green, blue)
- A medium-sized paintbrush
- Painter’s tape (optional, for clean edges)
Step-by-Step Guide:
- Choose Your Colors: Pick a few bright colors that you love and that look good together.
- Prepare Your Canvas: Lay your canvas boards or cardboard pieces down on some newspaper to protect your work surface.
- Paint Your Panels: Take one color and completely paint one of your boards. Use smooth, even strokes. If you’re using cardboard, you might need two coats of paint.
- Paint the Others: Now, use your other colors to paint the rest of the boards. Each board should be one solid color. Let them all dry completely.
- Arrange Your Art: Once they are dry, you can arrange them on your mantel. Lean them against the wall. You can overlap them and place them at different heights to create a cool, layered look. Play around with the arrangement until you find a design that you like. It’s like building with colorful blocks!
11. Playful Postmodern Shapes

This mantel is a playground of color and form. A glossy black fireplace provides the perfect stage for the bright, sculptural objects. The pieces are arranged with a sense of fun, mixing primary colors like red, yellow, and blue. Each object has a simple, geometric shape—spheres, cones, and cubes.
The look is creative and unconventional. An asymmetric, cloud-like mirror hangs on the wall, breaking up the straight lines. A framed piece of pop art adds to the graphic, cartoonish feel. This is a bold choice for someone who loves art and isn’t afraid to play with design.
DIY Instructions: Colorful Wooden Sculptures
Make your own mini modern art sculptures to brighten up any shelf.
What You’ll Need:
- Small wooden blocks in different shapes (cubes, spheres, cones from a craft store)
- Craft paint in bright primary colors
- Paintbrushes
- Strong craft glue or wood glue
Step-by-Step Guide:
- Paint Your Shapes: Lay out some newspaper. Paint each of your wooden shapes a different solid color. You might need to paint one half, let it dry, and then paint the other half. Give them a second coat of paint if you need to.
- Let Them Dry: Make sure all your painted shapes are completely dry before you start building.
- Plan Your Sculpture: Before you glue, play around with stacking the shapes. Try putting a cone on a cube, or a sphere next to a block. See what combinations you think look cool.
- Start Gluing: Once you have a design you like, it’s time to glue. Put a small dab of glue on the bottom of one shape and press it firmly onto another.
- Build It Up: Keep gluing your pieces together to create your unique sculpture. Hold them in place for a minute to make sure the glue starts to stick.
- Let It Set: Let your finished sculpture sit for a few hours to make sure the glue is completely dry and strong. Now you have a fun piece of art for your mantel!
12. French Country Charm

This mantel has a soft, romantic feel, like a cottage in the French countryside. The distressed white finish on the mantel and the arched mirror gives it a gentle, aged look. Large white pitchers filled with bunches of lavender bring a touch of color and the feeling of a fresh garden indoors.
The arrangement is symmetrical and balanced. Small, framed botanical prints lean against the wall, adding to the nature-inspired theme. A vintage-style clock sits at the center. Simple greenery tied with white ribbons hangs from the corners, completing the charming, rustic look.
DIY Instructions: Simple Greenery Swags
These little bundles of green are easy to make and add a fresh touch.
What You’ll Need:
- A few sprigs of fresh greenery (like eucalyptus, cedar, or even cuttings from your yard)
- Thin floral wire or twine
- Scissors
- A pretty white ribbon
Step-by-Step Guide:
- Gather Your Greens: Take a few small branches of your greenery and arrange them into a little bundle. Have them all facing the same direction. You can make it as full or as simple as you like.
- Tie It Together: Cut a small piece of floral wire or twine. Wrap it tightly around the stems of your greenery bundle, near the top. Twist the wire or tie a tight knot to secure it.
- Trim the Ends: Use your scissors to snip the ends of the stems so they are all even. This makes it look neat and tidy.
- Add the Ribbon: Cut a long piece of your white ribbon. Tie it in a bow around the spot where you secured the stems with wire. The ribbon will hide the wire and add a decorative touch.
- Make a Hanger: Use the tails of the ribbon to create a loop for hanging, or simply tie it directly onto a small nail or hook on the corner of your mantel. Make two for a balanced look!
13. Minimalist Zen Retreat

This display is the definition of peace and simplicity. It uses a “less is more” approach to create a calming, meditative space. Each object is chosen carefully and has room to breathe. The color palette is neutral, with black, white, and natural tones.
A single branch with new green leaves reaches out from a simple round vase. A stack of smooth, dark stones brings a sense of balance. A miniature rake rests on a bed of white sand, inviting a moment of mindfulness. This design shows that you don’t need clutter to create a powerful focal point.
DIY Instructions: Mini Zen Garden
Create your own little spot of calm with a tiny Zen garden.
What You’ll Need:
- A shallow dish or a small tray with a lip
- Fine white sand (you can find this at a craft store)
- A few small, smooth stones
- A small stick or a tiny rake (you can even use a fork)
Step-by-Step Guide:
- Add the Sand: Pour the white sand into your shallow dish. Fill it up about halfway. Gently shake the dish to make the sand level and smooth.
- Place Your Stones: Carefully place your smooth stones on top of the sand. You can group them together in a corner or space them out. Think about what looks peaceful to you. There’s no wrong way to do it.
- Get Your Rake: Now, take your tiny rake, stick, or fork. This is the fun part!
- Create Patterns: Gently drag the rake through the sand to create lines and patterns. You can make straight lines, wavy lines, or circles around the stones.
- Find Your Zen: The idea of a Zen garden is to relax your mind as you focus on making the patterns in the sand. When you want a change, just shake the dish gently to smooth the sand out and start again. Place it on your mantel as a reminder to take a quiet moment.
14. Dramatic Gothic Romance

This mantel is dark, moody, and full of theatrical flair. The deep charcoal wall color creates a dramatic backdrop for the gothic-arched mirror. Ornate, silver candelabras are filled with black candles, with wax dripping down the sides for an ancient, mysterious effect.
A skull and classical busts rest on stacks of old books. Dark purple flowers and bare branches add to the spooky, romantic feeling. This look is perfect for someone who loves history, fantasy, and a touch of the macabre. It is bold and unforgettable.
DIY Instructions: Drippy Wax Candles
Get that spooky, old-castle look safely.
What You’ll Need:
- A black or dark-colored pillar candle (a thick candle)
- A red candle (like a taper or birthday candle)
- A candle holder or a plate to catch the wax
- A lighter or matches (ask an adult for help!)
Step-by-Step Guide:
- Safety First: This is a project for a grown-up to help with! Put your main black candle on a safe plate or in a sturdy holder that can catch wax drips. Make sure you are working away from anything that can catch fire.
- Light the Red Candle: Ask the adult to light the red candle. This will be your “drip” candle.
- Drip the Wax: Carefully, the adult should tilt the lit red candle over the top edge of the black candle. Let the red wax drip down the sides of the black candle.
- Create the Drips: Move the red candle around the top edge of the black candle to make drips all around it. You can let some drips be long and some be short. It should look like the candle has been burning for a very long time.
- Let It Cool: Once you are happy with how it looks, the adult can blow out the red candle. Let all the red wax drips cool and harden completely on the black candle. Now you have a spooky, drippy candle for your mantel! Never leave any burning candle unattended.
15. Warm Southwestern Spirit

This mantel captures the rustic beauty of the American Southwest. A heavy, rough-hewn wooden beam serves as the shelf, full of natural character. Earthenware pottery in warm terracotta tones is arranged across the mantel, complemented by a single pot in a vibrant turquoise glaze.
A round mirror with a hammered metal frame adds a rustic, handcrafted touch. Cacti in simple clay pots bring the desert landscape indoors. A hand-woven textile with a geometric pattern adds color and texture, while a string of wooden beads completes the relaxed, earthy vibe.
DIY Instructions: Tassel Bead Garland
This simple garland adds a touch of bohemian style to your mantel.
What You’ll Need:
- Plain wooden beads of various sizes
- Twine or string
- Yarn for the tassels
- A piece of cardboard (about 4 inches wide)
- Scissors
Step-by-Step Guide:
- Make the Tassels First: Wrap your yarn around the piece of cardboard many times (about 20-30 times is good). The more you wrap, the fluffier your tassel will be.
- Tie the Top: Cut a small piece of yarn and slide it under the wrapped yarn at the top of the cardboard. Tie a tight knot. This will hold your tassel together.
- Cut the Bottom: Slide the yarn off the cardboard. You’ll have a bundle of loops. Use your scissors to cut through the loops at the bottom.
- Finish the Tassel: Cut another piece of yarn and wrap it tightly a few times around the tassel, about an inch from the top knot, to create the tassel “head.” Tie a knot to secure it. Make a few tassels for your garland.
- String Your Beads: Cut a long piece of twine for your garland. Start threading your wooden beads onto it. You can make a pattern with different sized beads or just add them randomly.
- Add the Tassels: After you’ve strung a good number of beads, thread the twine through the top loop of a tassel. Then continue adding beads. Space your tassels out along the garland. Once you’re done, tie a loop at each end for hanging.
16. Charming Cottage Garden

This display is like a cheerful garden party on your mantel. An assortment of vintage floral plates is hung on the wall, creating a lovely, mismatched backdrop. Fresh flowers are everywhere, spilling out of pitchers, teacups, and small vases. The colors are soft and pretty, with lots of pinks, blues, and greens.
A bird’s nest resting on a bed of moss under a glass dome (a cloche) adds a sweet, natural touch. A framed piece of needlepoint and stacks of old books complete the cozy, handcrafted feeling. This look is full of charm and personality.
DIY Instructions: Bird’s Nest Display Cloche
Create a beautiful nature scene under glass.
What You’ll Need:
- A small, fake bird’s nest and fake eggs (from a craft store)
- A small plate or a wooden disc for the base
- A sheet of fake moss (from a craft store)
- A glass cloche or a clean, clear glass jar that fits over the base
- Craft glue
Step-by-Step Guide:
- Create Your Base: Take your plate or wooden disc. Cut a piece of the moss sheet to fit on top of it. Use a few dabs of craft glue to stick the moss down onto the base.
- Place the Nest: Put a little circle of glue in the middle of your mossy base. Gently press your little bird’s nest into the glue.
- Add the Eggs: If your eggs are not already in the nest, you can add a tiny drop of glue inside the nest to hold each little egg in place. This will keep them from rolling out.
- Let It Dry: Give the glue a few minutes to dry so everything is secure.
- Cover Your Scene: Carefully place your glass cloche or clean jar over the top of your little nature scene. Make sure it fits nicely onto the base. You now have a beautiful, tiny world to display on your mantel!
17. Serene and Sculptural Whites

This fireplace is an exploration of texture and form, all within a single color. The entire scene, from the wall to the mantel to the objects, is bathed in soft shades of white and light gray. This monochromatic palette creates a very calm and sophisticated feeling.
The interest comes from the different shapes and surfaces. Ribbed vases, a donut-shaped sculpture, and textured canvases are arranged together. Natural elements like white coral and sea fans add organic shapes to the clean lines. This design proves that a single color can be incredibly rich and interesting.
DIY Instructions: Textured Canvas Art
You don’t need to be a painter to create a piece of modern, textured art.
What You’ll Need:
- A blank canvas
- Thick acrylic paint (in white or a light color) OR a small tub of drywall joint compound
- A putty knife or an old gift card
- Optional: A comb or a fork for making patterns
Step-by-Step Guide:
- Protect Your Space: Lay down some newspaper. This project can get a little messy!
- Spread the Texture: Scoop up some of the thick paint or joint compound with your putty knife. Spread it onto the canvas like you are frosting a cake. Don’t make it smooth! You want it to be thick and have bumps and ridges.
- Create Patterns: This is the fun part. Use the edge of your putty knife to make lines and shapes in the thick paste. You can also drag a comb or a fork through it to create interesting patterns. Play around until you have a texture you like.
- Let It Dry (Really Dry!): This is the most important step. Joint compound can take a day or two to dry completely. It needs to be hard and white. Thick paint will also need a long time to dry.
- Display Your Art: Once it is completely dry, your textured masterpiece is ready. You can lean it against the wall on your mantel. It adds a cool, sculptural feel to your display.
18. The Curious Naturalist

This mantel looks like a collection from a Victorian-era scientist or explorer. The dark wall color makes the vintage-style chart of insects and ferns stand out as the centerpiece. A fascinating collection of natural specimens is displayed with care.
Butterflies, shells, and bird’s nests are preserved under glass cloche domes of various sizes. Old books are used to add height and a sense of history. Magnifying glasses and small vials filled with tiny treasures are scattered about, inviting you to take a closer look at the wonders of the natural world.
DIY Instructions: Specimen Display Jar
Create your own little museum display with a simple jar.
What You’ll Need:
- A clean glass jar with a lid (a mason jar or an old food jar works well)
- A small handful of pebbles or sand
- Some dried moss or a small twig
- A “specimen” – this could be a cool-looking rock, a large shell, or even a realistic-looking plastic bug or butterfly
- Optional: A label and a piece of twine
Step-by-Step Guide:
- Build Your Habitat: First, put a layer of pebbles or sand in the bottom of your clean, dry jar. This will be the ground for your specimen.
- Add Some Nature: Place a small piece of dried moss or a twig inside. You can lean it against the side of the jar.
- Place Your Specimen: Carefully place your special object—the rock, shell, or bug—inside the jar. Arrange it so it’s the star of the show. Use a pencil to help you nudge it into the right spot if you need to.
- Close It Up: Put the lid on your jar. You have now created your own little world!
- Label It (Optional): To make it look extra scientific, you can write a fancy name for your specimen on a small paper label. Punch a hole in the label, and use a piece of twine to tie it around the neck of the jar.
19. Mystical Celestial Night

This mantel is inspired by the magic of the night sky. The deep, dark wall color is like a midnight canvas for the celestial objects. A large, simple mirror reflects the room, while a golden crescent moon and a spray of stars seem to float in front of it.
A framed constellation chart adds to the astronomical theme. Tall, slender candlesticks provide a warm glow. Chunks of raw amethyst crystal bring a touch of earthy magic and beautiful purple color to the display. This design is dreamy, enchanting, and a little bit mysterious.
DIY Instructions: Golden Star Garland
Add a little sparkle to your mantel with this easy-to-make star garland.
What You’ll Need:
- Gold glittery craft paper or a piece of thin cardboard
- A star-shaped cookie cutter or a pencil to draw a star
- Scissors
- A hole punch
- String or gold thread
Step-by-Step Guide:
- Trace Your Stars: Place your star cookie cutter on the back of your gold paper and trace around it with a pencil. If you don’t have a cookie cutter, you can draw a simple star shape. Trace as many stars as you want for your garland.
- Cut Them Out: Carefully cut out all of your star shapes with scissors.
- Punch the Holes: Take your hole punch and make one hole at the top point of each star. This is where the string will go through.
- String Your Stars: Cut a long piece of string or gold thread. Thread it through the hole in your first star. You can tie a tiny knot to keep it in place, or just let it hang.
- Build Your Garland: Continue threading all of your stars onto the string. You can have them close together or far apart.
- Hang and Shine: Once all your stars are on the string, your garland is ready! You can drape it in front of a mirror like in the picture, or hang it across the front of your mantel.
20. Mid-Century Modern Graphics

This mantel is a throwback to the cool, graphic style of the 1950s and 60s. The look is defined by clean lines, organic shapes, and a distinctive color palette of orange, olive green, and black. A large abstract art print with bold shapes is the main focal point.
A classic starburst clock hangs on the wall, a true icon of the era. The objects on the mantel are sculptural and interesting, like the curved white bowl and brass candlesticks. This design is sophisticated yet fun. It is a great choice for a room with a retro-inspired feel.
DIY Instructions: Mid-Century Abstract Art
Create your own retro-style art print with simple shapes.
What You’ll Need:
- A piece of white paper or cardstock
- A frame
- Craft paint in retro colors (like orange, green, black, or teal)
- A pencil
- A few round objects to trace (like cups, bowls, or lids of different sizes)
- Paintbrushes
Step-by-Step Guide:
- Plan Your Shapes: Think about simple shapes from the 1950s. They used a lot of half-circles, ovals, and boomerangs.
- Trace Some Circles: Lightly trace a few circles and half-circles of different sizes onto your paper using your cups and bowls as guides. You can have them overlap.
- Paint Your Shapes: Now, fill in your traced shapes with your retro-colored paints. You can make some solid colors. For others, you can just paint the outline. Try to be neat, but it doesn’t have to be machine-made.
- Add Some Lines: Use black paint and a thin brush to add some straight or curvy lines that connect or go through your shapes. This will add to the graphic look.
- Let it Dry: Let your painting dry completely.
- Frame Your Masterpiece: Once it’s dry, you can erase any visible pencil marks. Put your new abstract painting in a simple frame and lean it against the wall on your mantel for an instant touch of retro cool.
21. Bold Tropical Glamour

This mantel makes a lush and dramatic statement. A black marble fireplace creates a luxurious base for the vibrant green and gold. Huge tropical leaves, like monstera and palm fronds, burst from tall emerald green vases. The arrangement is symmetrical and perfectly balanced.
Gold accents add a touch of glamour. Gleaming pineapple sculptures and figurines of big cats are placed thoughtfully among the leaves. A framed print of a single palm leaf ties the whole look together. This is a confident and stylish design that feels like a five-star tropical resort.
DIY Instructions: Gold Leaf Pineapple
Give a faux pineapple a glamorous makeover.
What You’ll Need:
- A fake pineapple (from a craft or home decor store)
- Gold spray paint
- Newspaper or a drop cloth
Step-by-Step Guide:
- Set Up Your Space: This is a job for outside or a very well-ventilated room. Lay down your newspaper to protect the area from paint.
- Make Sure It’s Clean: Wipe down your fake pineapple with a cloth to make sure it’s free of any dust.
- Time to Spray: Place the pineapple in the center of your newspaper. Hold the spray paint can about 6-8 inches away from it. Start spraying in short, even strokes.
- Get Full Coverage: Slowly turn the pineapple as you spray to make sure you cover it from all angles. Don’t forget the leafy top part!
- Let It Dry: Let the first coat of paint dry completely. This might take about an hour.
- Add a Second Coat: Once it’s dry, check for any spots you might have missed. Apply a second, light coat of paint for a really rich, solid gold finish. Let it dry completely before placing it on your mantel.
22. Cozy Lakeside Cabin

This hearth feels like a warm hug on a chilly day. The stone and wood fireplace is the heart of this cozy scene. A simple garland of pine and red berries drapes over the thick wooden mantel. A landscape painting of a lake and forest sits comfortably on the hearth, not on the mantel, which is a nice change.
Everything about this space says “relax.” Plaid wool blankets are folded and stacked, ready to be used. Old-fashioned lanterns and birch-bark candles add a rustic, flickering glow. A pair of canoe paddles leans casually, hinting at outdoor adventures.
DIY Instructions: Birch Bark Candles
Bring the look of the woods inside with these simple decorative candles.
What You’ll Need:
- Plain white or cream-colored pillar candles (the thick ones)
- Sheets of birch bark paper (from a craft store)
- Scissors
- A ruler or tape measure
- A hot glue gun (with adult supervision!)
Step-by-Step Guide:
- Measure Your Candle: Take your ruler and measure how tall your candle is. Then, measure all the way around it to see how big it is.
- Cut the Bark Paper: Roll out your birch bark paper. Cut a rectangle that is the same height as your candle, and just a little bit longer than the measurement around it, so it can overlap a little.
- Wrap the Candle: Carefully wrap the piece of birch bark paper around your candle. Make it snug and straight.
- Time to Glue (With Help!): Ask a grown-up to help with the hot glue gun. Run a thin line of hot glue down the seam where the paper overlaps. Press it down firmly for a few seconds until it holds.
- Make a Set: Now you have a beautiful birch bark candle! They look great in groups, so you can make a few more in different sizes to cluster together on your hearth. (Remember, these are for decoration. If you want to light them, never leave them unattended.)
23. Grandmillennial Blue and White

This room is a beautiful example of “grandmillennial” style—a fresh take on traditional decor. The classic white fireplace is the anchor for a stunning collection of blue and white porcelain. Ginger jars, vases, and plates are arranged symmetrically, creating a timeless and elegant look.
A bamboo-style mirror in a pagoda shape adds a touch of Chinoiserie chic. Matching lamps with pleated shades provide soft, warm light. The whole space feels layered and collected over time. Fresh pink and blue hydrangeas add a burst of garden color.
DIY Instructions: Faux Bamboo Mirror
Get the look of a chic bamboo mirror using a simple frame.
What You’ll Need:
- A simple wooden picture frame with a flat surface (any shape)
- Thin half-round wood dowels or bamboo skewers
- A hot glue gun (with adult supervision!)
- Gold or brown spray paint
- Wood glue
- Small clippers or strong scissors
Step-by-Step Guide:
- Measure and Cut: Measure the sides of your picture frame. Use your clippers to cut pieces of the dowels or skewers to fit along all the sides of the frame.
- Glue the “Bamboo”: Ask an adult to help with the hot glue. Glue the dowel pieces onto the front of the frame, right next to each other, to create the look of bamboo stalks.
- Create the Knots: To make the little “knots” you see on bamboo, you can use a different method. Squeeze a thick line of wood glue across your dowels every few inches. The wood glue will dry raised, looking like the joints in a bamboo stalk. Let this dry completely.
- Paint Your Frame: Once all the glue is dry, take your frame outside. Spray paint the entire thing—frame and dowels—with your chosen color. Gold or a natural brown looks great.
- Let It Dry: Give it a couple of coats for a nice, even finish, and let it dry completely. Now you have a high-end-looking mirror for a fraction of the price!
24. A Walk in the Woods

This mantel brings the forest floor right into your home. A thick, rustic wooden beam is covered in a lush bed of green moss. It’s a living landscape. A gnarled piece of driftwood and a lichen-covered branch create a beautiful, natural sculpture.
The details are all foraged from nature. Smooth river stones, pinecones, and interesting seed pods are scattered among the moss. Earthy, handmade pottery and beeswax candles complete the organic, peaceful scene. This display is a tribute to the quiet beauty of the woods.
DIY Instructions: Mossy Branch Centerpiece
Create a long-lasting piece of natural art for your mantel.
What You’ll Need:
- An interesting-looking dry branch from your yard
- Fake moss (you can buy this in sheets or bags at a craft store)
- A hot glue gun (with adult supervision!)
Step-by-Step Guide:
- Clean Your Branch: Make sure your branch is clean and dry. Brush off any loose dirt.
- Find the Mossy Spots: Look at your branch and decide where moss would naturally grow—in the little nooks and crannies and on the tops of the branches.
- Get the Glue Gun: Ask an adult to help you with the hot glue gun. It gets very hot!
- Glue the Moss: Squeeze a small patch of hot glue onto a spot on the branch. Quickly, before the glue cools, press a small clump of the fake moss onto the glue. Hold it for a few seconds until it sticks.
- Keep Going: Continue adding patches of moss to your branch. You don’t need to cover the whole thing. Just adding it in a few spots will make it look realistic and beautiful.
- Let it Cool: Once you are happy with how it looks, let the glue cool down completely. Now you have a beautiful, mossy branch that will last forever. You can lay it across your mantel as a centerpiece.
25. Soft and Modern Neutral

This hearth and mantel have a calm, gallery-like quality. The color palette is very soft and muted, with shades of beige, cream, and natural wood. A large piece of abstract art with simple, blocky shapes leans against the wall, creating a subtle focal point.
The objects are chosen for their form and texture. A large, rustic white vase is filled with silvery-green olive branches. Stacks of light-colored books add height. A simple wooden bead garland with tassels adds a soft, handcrafted touch. This is a very serene and sophisticated look.
DIY Instructions: Abstract Neutral Painting
You can create a beautiful piece of modern art, even if you don’t know how to draw.
What You’ll Need:
- A blank canvas
- Craft paint in 2-3 soft, neutral colors that are similar (like beige, cream, and taupe)
- A medium-sized, flat paintbrush
- A pencil (optional)
Step-by-Step Guide:
- Choose Your Main Color: Pick one of your paint colors to be the background. Paint your entire canvas with this color and let it dry completely.
- Plan Your Shapes: Look at the example. The shapes are very simple and organic, like big, soft rectangles with rounded corners. You can lightly sketch out a few big shapes on your canvas with a pencil if you want.
- Paint the First Shape: Take your second color. Use your flat brush to paint in one of the big shapes. Don’t worry about making the edges straight. A slightly wavy, imperfect edge looks more artistic.
- Add Another Shape: Let the first shape dry a little bit. Then, use your third color to paint another shape. You can have it slightly overlap the first one.
- Let it Dry: Let your finished painting dry completely. That’s it! You have created a piece of calm, modern art. Place it on your hearth or mantel to set a peaceful tone.
26. Sculptural and Minimalist

This fireplace makes a powerful statement with its bold shapes and simple materials. The concrete-finish fireplace is a piece of art in itself. The decor is minimal but has a strong presence. There are no small, fussy objects here.
Each piece is chosen for its sculptural quality. A rough, stone-like statue stands tall. A simple black arch and other geometric objects add to the modern, artistic feel. A snake plant in a simple pot provides the only touch of living green. This look is about appreciating form, texture, and space.
DIY Instructions: Faux Stone Sculpture
Make a modern sculpture using air-dry clay.
What You’ll Need:
- A block of air-dry clay (look for one with a stone or concrete effect, or use plain white)
- A small cup of water
- Your hands!
- Optional: A plastic knife or modeling tools
Step-by-Step Guide:
- Work the Clay: Take a big piece of your air-dry clay and knead it with your hands for a few minutes. This makes it soft and easy to work with.
- Form Your Shape: Start shaping the clay into a simple, blocky form. You can make a tall rectangle, a cube, or an interesting abstract shape. Don’t try to make it look like something specific. Just focus on creating a cool form.
- Add Texture: Once you have a basic shape you like, you can add texture. You can use your fingers to pinch parts of it, or use a plastic knife to carve lines into it. Dipping your fingers in a little water can help you smooth out parts you want to be smooth.
- Let It Dry: This is the most important part. Place your sculpture on a flat surface and let it dry. Air-dry clay can take 2-3 days to dry completely. You’ll know it’s ready when it feels hard and is light in color all the way through.
- Display Your Sculpture: Once it’s fully dry, your new stone-like sculpture is ready to be displayed on your mantel.
27. Global Bazaar Vibrancy

This mantel is a joyful explosion of color, pattern, and texture from around the world. A brightly colored sequin textile is draped over the mantel, full of energy and sparkle. Another textile with a patchwork design adds even more color and a handcrafted feel.
The collection feels like treasures gathered from travels. An intricately carved wooden mirror frame adds a beautiful, architectural element. A group of brass candlesticks shines warmly. A hand-carved wooden mask and colorful painted bowls complete the eclectic, well-traveled look.
DIY Instructions: No-Sew Sequin Runner
Add some sparkle to your mantel without any sewing.
What You’ll Need:
- A piece of sequin fabric (you can find this at a fabric store) long enough to drape over your mantel
- Fabric glue or a hot glue gun (with adult supervision!)
- Scissors
- Optional: Tassel trim
Step-by-Step Guide:
- Measure Your Mantel: Decide how long and wide you want your runner to be. Remember to add some extra length if you want it to hang down the sides.
- Cut Your Fabric: Lay your sequin fabric flat. Carefully cut it to the size you measured. Sequin fabric can be a little tricky to cut, so take your time.
- Finish the Edges: To stop the fabric from fraying and to give it a clean look, you need to hem the edges. You don’t need to sew! Simply fold over about half an inch of fabric along each edge and press it flat.
- Glue the Hem: Run a thin line of fabric glue (or have an adult use a hot glue gun) under the folded edge and press it down firmly. Do this for all four sides.
- Add Trim (Optional): If you want to add tassels, run a line of glue along the two short ends of your runner and press the tassel trim onto it. Let all the glue dry completely before you display your sparkly new runner on your mantel.
28. Classic Equestrian Style

This mantel has a handsome, classic feel, like the study or trophy room of a country estate. The dark wood mantel and deep navy walls create a rich and masculine backdrop. A large, stately painting of a horse in a gold frame is the clear focal point.
The accessories all fit the theme. Silver trophies and candlesticks gleam against the dark wood. A plaid wool throw adds a touch of cozy pattern and color. Even the small details, like a framed collection of horse bits, contribute to the sophisticated, equestrian story.
DIY Instructions: Framed Hardware Art
Turn everyday objects into a piece of custom art.
What You’ll Need:
- A shadow box frame (a frame that is deep)
- A piece of fabric like linen or burlap to fit inside the frame
- A few interesting small objects (like old keys, vintage hardware, or even fishing lures)
- A hot glue gun (with adult supervision!)
Step-by-Step Guide:
- Prepare Your Background: Open up your shadow box frame. Take out the backing board. Cut your piece of fabric so it is the same size as the board. Use a few dots of glue to attach the fabric smoothly to the front of the board.
- Arrange Your Objects: Place your backing board on a table. Arrange your small hardware objects on top of the fabric. Move them around until you find a layout that you like. You can line them up neatly or arrange them in a pattern.
- Glue Them Down: This part needs an adult’s help. One by one, pick up an object. The adult will put a dab of hot glue on the back of it, and then you can press it firmly onto the fabric-covered board.
- Let it Set: Continue until all your objects are glued down. Let the glue cool and harden for a few minutes.
- Assemble the Frame: Carefully place the board back into the shadow box frame and close it up. You now have a unique piece of art that tells a story.
29. Wabi-Sabi and Imperfect Beauty

This design celebrates the Japanese idea of wabi-sabi—finding beauty in imperfection. The rustic, weathered wood of the fireplace itself has a quiet strength. The objects on display are simple, handmade, and show the marks of their creation.
The pieces are arranged sparingly, allowing each one to be appreciated. A delicate, bare branch sits in a rough, handmade vase. Pottery bowls and cups, some with visible, golden repairs (a technique called Kintsugi), are placed on the hearth and mantel. This is a very peaceful and soulful look.
DIY Instructions: Kintsugi-Style Bowl
Create the look of a beautifully repaired bowl without breaking anything.
What You’ll Need:
- A simple ceramic bowl (light color works best)
- A gold paint pen with a fine tip
- A pencil
Step-by-Step Guide:
- Plan Your “Cracks”: Before you use the paint pen, take your pencil and lightly draw a few lines on your bowl where you want the “cracks” to be. Think about how a real bowl might break. The lines should look a bit like lightning bolts or tree branches.
- Start Drawing: Uncap your gold paint pen and shake it well. Carefully trace over your pencil lines with the gold pen.
- Take Your Time: Use a slow, steady hand. If you make a mistake, you can sometimes wipe it off quickly with a paper towel before it dries.
- Make it Look Real: Real Kintsugi often has thicker areas of gold where pieces would join. You can make some parts of your lines a little thicker to look more authentic.
- Let It Dry: Let the paint from the pen dry completely according to the instructions on the pen. It might take an hour or more. Once dry, you will have a beautiful bowl that celebrates the idea of imperfection. (This is for decoration only, not for eating out of!)
30. Breezy Mediterranean Blue

This fireplace feels like a sunny villa on a Greek island. The crisp white of the fireplace is the perfect backdrop for the vibrant cobalt blue accents. The inside of the fireplace is lined with beautiful blue and white patterned tiles, creating a delightful surprise.
The decor is simple and fresh. A collection of blue glass bottles and blue and white pottery is arranged on the mantel. A small, potted olive tree and another vase with olive branches bring a touch of green. A string of blue beads adds a final pop of color. It is a clean, happy, and inviting look.
DIY Instructions: Faux Tile Panel
Get the look of beautiful tiles without the messy installation.
What You’ll Need:
- A thin board of wood or a sturdy piece of foam core, cut to the size you want
- Tile-patterned scrapbook paper or peel-and-stick wallpaper
- Mod Podge or craft glue
- A foam brush or paintbrush
- Scissors or a craft knife
Step-by-Step Guide:
- Cut Your Board: First, decide how big you want your tile panel to be. Measure and cut your wood or foam core board to that size.
- Prepare Your “Tiles”: If you are using scrapbook paper, cut it to the same size as your board.
- Apply the Glue: Using your foam brush, apply a thin, even coat of Mod Podge or glue all over the front of your board.
- Attach the Paper: Carefully lay your patterned paper onto the glued board. Start from one edge and smooth it down as you go to get rid of any air bubbles. If you’re using peel-and-stick wallpaper, you can just peel off the backing and carefully apply it to the board.
- Seal the Top: Once the paper is smooth, paint a thin coat of Mod Podge over the entire top of the paper. This will seal it and give it a slight sheen, just like real tiles. Don’t worry, it will look white at first but will dry clear.
- Let it Dry: Let your panel dry completely. Now you have a beautiful piece of “tile” art that you can lean on your mantel to add a pop of pattern and color.
31. Natural Winter Glow

This mantel has a cozy and elegant holiday feel without being overly festive. A thick, lush garland of fresh cedar and pine drapes beautifully over the floating wood shelf. The deep green of the foliage provides a natural, fragrant base for the entire display.
A collection of white and beeswax pillar candles adds a warm, flickering light. They are arranged in a casual cluster, creating an inviting glow. Simple wooden stars and natural pinecones are tucked into the greenery, adding a touch of rustic charm. A simple mirror in the background reflects the candlelight.
DIY Instructions: Simple Wooden Star Ornaments
These rustic stars are easy to make and look lovely on a mantel or tree.
What You’ll Need:
- 5 small, straight sticks of similar size for each star
- A hot glue gun (with adult supervision!)
- Twine or string for hanging (optional)
Step-by-Step Guide:
- Gather Your Sticks: Go on a nature walk and find some small, straight twigs. Try to find ones that are about the same thickness. Break them so you have five pieces of the same length (about 4-5 inches is a good size).
- Build Your Star: Lay your five sticks out on a flat surface in the shape of a star. You will need to overlap the ends to make the points. Play around with them until you have a shape you like.
- Time to Glue (With Help!): Ask a grown-up to help with the hot glue gun. At each point where two sticks cross, the adult should add a small dot of hot glue to hold them together.
- Make it Strong: Make sure you glue all five points where the sticks overlap. You might want to flip the star over and add a dot of glue on the back of each point as well to make it extra sturdy.
- Let it Cool: Let the glue cool and harden completely. You can make a few of these stars and tuck them into your mantel garland, or tie a loop of twine to the top of one point to hang it.
32. Earthy Bohemian Layers

This mantel arrangement is warm, textural, and full of earthy charm. The foundation is a beautiful stone fireplace and a rich wood mantel. A large macrame wall hanging with burnt orange accents is the stunning centerpiece. It adds softness and a handmade feel.
A collection of pottery in shades of terracotta, amber, and brown is arranged artfully. The different shapes and glazes create a lot of visual interest. Dried pampas grass adds a feathery texture. A trailing green plant in a macrame hanger balances the composition and brings a touch of life.
DIY Instructions: Simple Macrame Plant Hanger
You only need to know one simple knot to make this beautiful plant hanger.
What You’ll Need:
- Macrame cord or thick cotton rope
- A metal or wooden ring
- Scissors
- A small potted plant
Step-by-Step Guide:
- Cut Your Cords: Cut four long pieces of your macrame cord. A good length to start with is about 6 feet for each piece.
- Attach to the Ring: Take all four pieces of cord and fold them in half. Push the looped middle part through your ring. Then, pull the loose ends through the loop and pull tight. You now have eight strands of cord hanging from your ring.
- Start Knotting: Split your eight cords into four groups of two. About halfway down the cords, tie a simple overhand knot in each pair. Try to make sure all four knots are at the same level.
- The Second Row of Knots: Now for the trick! Take one cord from one pair, and one cord from the pair next to it. A few inches below your first row of knots, tie these two cords together in another simple knot. Do this all the way around until you have created a new row of four knots. This will create the basket shape.
- Finishing Knot: Gather all eight cords together a few inches below your second row of knots. Tie them all together in one big knot.
- Trim and Hang: Trim the ends below the big knot so they are even. Place your potted plant inside the basket you created, and it’s ready to hang!
33. The Alchemist’s Study

This mantel looks like it was taken from the laboratory of a curious old-world scientist. The backdrop of vintage maps and celestial charts sets a scholarly and mysterious tone. A collection of antique-style laboratory glass, including beakers and flasks, is filled with colored liquids and botanicals.
The display is full of fascinating objects. A brass telescope is pointed towards the heavens. An old set of scales suggests careful measurement and experimentation. The entire scene is lit by a single candle, casting long shadows and adding to the mysterious, intellectual atmosphere.
DIY Instructions: Aged Paper Scroll
Turn any piece of paper into an ancient-looking document.
What You’ll Need:
- A piece of regular white paper
- A shallow dish or baking tray
- Cold coffee or black tea
- A lighter or matches (for adult use only!)
- Twine or a ribbon
Step-by-Step Guide:
- Write or Draw: First, write a message or draw a map on your piece of paper. You can use a fancy pen to make it look old.
- Crumple It Up: Tightly crumple your paper into a ball. Then, carefully open it up and flatten it out. This will give it instant wrinkles and make it look old.
- Give it a Bath: Pour your cold coffee or tea into the shallow dish. Submerge your wrinkled paper in the liquid. Let it soak for a few minutes. The longer it soaks, the darker it will get.
- Let it Dry: Very carefully take the wet paper out of the liquid and lay it flat on some paper towels to dry completely. It will be very fragile when it’s wet.
- Age the Edges (Adults Only!): This is a step for a grown-up. They can very carefully and safely singe the edges of the dry paper with a lighter to give it a burnt, ancient look.
- Roll It Up: Once your paper is dry and the edges are aged, roll it up into a scroll. Tie it with a piece of twine, and you have a mysterious document for your mantel.
34. Classic Nautical Display

This mantel is crisp, clean, and has a timeless maritime feel. The classic white mantel provides a bright base for the nautical treasures. A round porthole-style mirror with a wood and brass frame is a fitting centerpiece. A beautifully detailed model sailboat with full sails stands proudly to one side.
The details are thoughtful and authentic. A pair of silver lanterns looks ready for a night at sea. A rolled-up nautical chart is tied with thick rope. On the hearth below, another model ship and a framed print of nautical flags continue the theme.
DIY Instructions: Rope-Wrapped Decor
Give a simple glass vase or bottle a nautical makeover.
What You’ll Need:
- A simple glass bottle or a cylindrical vase
- Jute or sisal rope
- A hot glue gun (with adult supervision!)
- Scissors
Step-by-Step Guide:
- Start at the Bottom: Ask a grown-up to help with the hot glue gun. Put a small dot of hot glue on the very bottom edge of your bottle. Press the end of your rope into the glue to secure it.
- Start Wrapping: Add another thin line of glue right next to where you started. Begin to wrap the rope tightly around the base of the bottle.
- Keep it Tight and Tidy: Continue adding a little bit of glue and then wrapping the rope around the bottle. Keep the rows of rope very tight against each other so there are no gaps.
- Wrap as High as You Like: You can wrap the entire bottle, or just stop partway up. It’s up to you!
- Finish it Off: When you have wrapped as much as you want, cut the rope. Have the adult add one last dot of glue to secure the end of the rope neatly.
- Let it Cool: Let the glue cool completely. You now have a rustic, rope-wrapped vase that is perfect for a coastal-themed mantel.
35. Symmetrical Topiary Garden

This mantel brings the formal elegance of a structured garden indoors. The look is built on balance and symmetry. A grid of six framed botanical prints hangs above the mantel, creating a beautiful, natural gallery wall. This sets a sophisticated and orderly tone.
On the mantel, four small topiary trees of varying heights are arranged perfectly symmetrically. Plants under glass cloches and in a miniature greenhouse add to the horticultural theme. The hearth is just as lush, with ferns, orchids, and other potted plants creating a green oasis.
DIY Instructions: Pressed Flower Art
Preserve the beauty of small flowers and leaves to create your own art.
What You’ll Need:
- A few small flowers or interesting leaves
- A heavy book
- Two pieces of paper towel or parchment paper
- A simple picture frame
Step-by-Step Guide:
- Collect Your Plants: Go outside and find some small, flat flowers (like pansies or violets) or interesting leaves and ferns.
- Prepare for Pressing: Open your heavy book to somewhere in the middle. Lay one piece of paper towel on the right-hand page.
- Arrange Your Flowers: Carefully arrange your flowers and leaves on top of the paper towel. Make sure they are not overlapping. Lay the second piece of paper towel on top of them.
- Close the Book: Gently close the book. The weight of the book will press the flowers flat and dry them out. You can even stack more heavy books on top.
- Be Patient: This is the hard part! You need to leave the flowers in the book for at least one to two weeks. Don’t peek! They need time to dry out completely.
- Create Your Art: After two weeks, carefully open the book. Your flowers will be flat and dry. You can now arrange them on a nice piece of paper, and use tiny dots of glue to hold them in place. Put your creation in a frame for a beautiful piece of botanical art.
36. Rose Gold and Blush Tones

This mantel has a soft, modern, and feminine feel. The color palette is a gentle mix of blush pink, soft gray, and warm rose gold. An abstract painting with simple blocks of these colors leans against the wall, setting the color scheme for the entire display.
The objects are a beautiful collection of shapes and finishes. Frosted pink vases sit next to shiny, metallic rose gold vessels. The look is cohesive and calming. A few sprigs of dried pink flowers add a delicate, natural touch. This is a very chic and romantic design.
DIY Instructions: Color Block Canvas Art
This is one of the easiest ways to make your own modern art.
What You’ll Need:
- A blank canvas
- Craft paint in 2-3 colors that you like together
- A wide, flat paintbrush
- Painter’s tape
Step-by-Step Guide:
- Tape Your Design: Use the painter’s tape to tape off a section of your canvas. For this design, you could tape a large rectangle across the top half of the canvas. Press the edges of the tape down firmly.
- Paint Your First Block: Choose one of your colors. Use your wide brush to paint inside the taped-off area. You can make your brushstrokes look a little rough and painterly; they don’t have to be perfectly smooth.
- The Big Reveal (Part 1): Carefully peel off the painter’s tape while the paint is still a little wet. This will give you a nice, clean edge. Let this first block of color dry completely.
- Tape the Second Block: Once the first block is dry, use painter’s tape to create another shape below it.
- Paint the Second Block: Use a different color to paint in this second section.
- Reveal and Dry: Peel off the tape and let the whole canvas dry. You now have a simple, beautiful piece of abstract art that perfectly matches your decor.
37. The Artist’s Loft

This display feels like a creative corner in an artist’s studio. It’s a celebration of the tools of art-making. Blank and in-progress canvases are layered against the wall, suggesting works yet to be created. The look is informal, industrial, and full of creative energy.
Jars and pitchers are repurposed to hold a huge collection of paintbrushes. Tubes of paint are clipped to the canvas, ready for use. A flexible silver desk lamp provides focused light for the artist at work. This is a very personal and inspiring setup for any creative person.
DIY Instructions: Paint Brush Holder Jars
Give your art supplies a cool, artsy home.
What You’ll Need:
- A few clean, empty glass jars (like jam jars or pickle jars)
- Leftover craft paint in various colors
- A small paintbrush
Step-by-Step Guide:
- Make Sure Jars are Clean: Wash and dry your glass jars thoroughly. Make sure there is no sticky residue from the labels.
- Get Your Paint: You can use any leftover craft paint you have. This project is about using what you’ve got!
- Create the Drips: This is the fun part. Open a bottle of paint. Tip it over the rim of the jar and give it a little squeeze so the paint starts to drip down the side.
- Add More Colors: Do this with a few different colors. Let the drips run into each other and create cool patterns. Turn the jar as you go to make drips all the way around.
- Let it Dry: Place your jar upside down on some newspaper and let the paint dry completely. This might take a day or two because the drips are thick.
- Fill Them Up: Once dry, your new artsy holders are ready! You can fill them with paintbrushes, pens, pencils, or markers. They will look great on your shelf or mantel.
38. Cheerful Spring Welcome

This mantel is bursting with the fresh, happy energy of springtime. A large round mirror with a simple wood frame makes the whole scene feel bright and open. Pots of cheerful yellow daffodils and tulips, with their bulbs still visible, line the mantel.
The color scheme is a classic combination of yellow, blue, and white. Pretty blue and white patterned bowls and cups hold some of the flowers. A bird’s nest with little blue eggs sits safely under a glass cloche. It is a beautiful and optimistic celebration of the new season.
DIY Instructions: Speckled Robin’s Eggs
Create beautiful, realistic-looking decorative eggs.
What You’ll Need:
- Fake craft eggs (in plastic or wood)
- Light blue craft paint
- A small amount of dark brown craft paint
- A small, stiff paintbrush (an old toothbrush works great!)
- A small bowl with a little water
Step-by-Step Guide:
- Paint the Base Coat: First, paint all of your craft eggs with the light blue paint. You might need to paint one side, let it dry, and then paint the other. Give them two coats for a nice, solid color. Let them dry completely.
- Prepare for Speckling: Put a tiny bit of the dark brown paint on a paper plate. Add just a few drops of water and mix it to create a thin, watery paint.
- Get Your Brush Ready: Dip the very tips of your stiff brush or toothbrush into the brown paint mixture.
- The Flicking Technique: This is the fun part! Hold the brush a few inches away from one of your blue eggs. Use your thumb to flick the bristles of the brush. This will create a fine spray of tiny brown dots on the egg.
- Speckle All Over: Turn the egg and keep flicking the brush until the egg is covered in little speckles. You can add as many or as few as you like.
- Let Them Dry: Let your speckled eggs dry completely. They will look just like real robin’s eggs! You can place them in a small bowl or a nest on your mantel.
39. Opulent Cabinet of Curiosities

This mantel is a maximalist’s dream, filled with opulent and curious treasures. An enormous, ornately carved gold mirror creates a dramatic and luxurious backdrop. The entire display is a feast for the eyes, with layers of interesting objects.
The collection has a dark and romantic feel. A taxidermy raven and a deer head add a touch of gothic nature. Brilliant blue and green peacock feathers burst from vases. Silver candlesticks, old framed silhouettes, and a glass dome filled with butterflies complete the fascinating and eclectic look.
DIY Instructions: Gilded Frame Silhouettes
Create classic, custom portraits with a modern twist.
What You’ll Need:
- Small, ornate picture frames (from a craft or thrift store)
- A piece of black paper
- A piece of white paper
- A pencil
- Small, sharp scissors
- A glue stick
Step-by-Step Guide:
- Find a Profile: You can find profile (side view) pictures online, or take a picture of a family member or pet from the side. Print it out so it is small enough to fit in your frame.
- Trace the Shape: Carefully cut out the profile from the printed picture. Place it on your piece of black paper and trace around it with a pencil.
- Cut Out the Silhouette: Use your small, sharp scissors to carefully cut out the silhouette shape from the black paper. This is the hardest part, so take your time!
- Prepare the Background: Take the backing out of your picture frame. Use it as a template to cut your white paper to the exact same size.
- Glue it Down: Use your glue stick to put a small amount of glue on the back of your black silhouette. Center it on your white paper background and press it down firmly.
- Frame Your Art: Put the background with your silhouette on it back into the frame. You can make a whole collection of different family members and group them together on your mantel for a classic, personal touch.
40. Serene Coastal Retreat

This mantel has a calm and airy feel, like a peaceful day at the beach. A large painting of a serene ocean and sky sets the tranquil mood. The color palette is soft and light, with lots of white, sandy beige, and gentle blues and greens.
The decor is simple and elegant. Large white ginger jars are filled with beautiful blue and white hydrangeas. A white lamp provides soft light. Natural, textural elements like a woven basket plate and large seashells connect the space to the coast. A framed family photo adds a personal, heartwarming touch.
DIY Instructions: Seashell Photo Holder
Turn a beautiful shell into a unique way to display a favorite photo.
What You’ll Need:
- A medium-sized seashell with a flat, stable base (like a conch shell)
- A small piece of craft wire (about 6 inches long)
- A pencil
- Your favorite photo
Step-by-Step Guide:
- Find the Right Shell: Choose a shell that can sit flat on a table without wobbling. Make sure it’s clean and dry.
- Create the Coil: Take your piece of craft wire. Wrap one end of the wire tightly around a pencil three or four times. This will create a small, circular coil.
- Slide it Off: Carefully slide the coil off the end of the pencil. This little spiral is what will hold your photo.
- Attach to the Shell: The other end of the wire is still straight. Find a natural nook or crevice in your seashell where you can securely tuck the straight end of the wire. If you can’t find a good spot, you can use a tiny dot of hot glue or super glue (with an adult’s help) to hold it in place.
- Position the Holder: Bend the wire so that the coil at the top is standing up straight, ready to hold a picture.
- Add Your Photo: Gently slide the corner of your favorite photo into the wire coil. The coil will hold it upright. You now have a beautiful and personal piece of decor for your coastal-themed mantel.
You have seen 40 different worlds, all contained on one small shelf. Your fireplace mantel is more than just a piece of architecture. It is a stage for your creativity. It is a place to celebrate the seasons, display your passions, and make your house feel like a home.
Do not be afraid to experiment. Start with a single object you love and build from there. Swap things out, play with different arrangements, and have fun with the process.
Your home should be a reflection of you. With these ideas, your mantel can become the most personal and interesting spot in the room. Now it is your turn to create.
Key Takeaways
- Start Fresh. Before you begin, clear everything off your mantel. A blank canvas is the best place to start.
- Play with Layers and Height. Create visual interest by using objects of different sizes. Place taller items in the back and shorter ones in the front.
- Choose a Theme. Whether it is a color, a season, or a style like “coastal” or “industrial,” a theme helps unify your decor.
- Make It Personal. A handmade item or a framed family photo makes your mantel unique. Our DIY projects are a great starting point.
- Think Symmetrically and Asymmetrically. A balanced, symmetrical look is classic and calm. An asymmetrical arrangement can feel more modern and dynamic. Both work well.