Small homes often feel crowded when friends visit. You want to host people but the floor space is limited. Finding a balance between comfort and room to move is a common struggle for apartment dwellers.

You can solve this problem with smart furniture and creative thinking. This list of 41 solutions shows you how to add seats without ruining your layout. Many of these ideas serve two purposes to help you get the most out of every inch.
Focusing on vertical space and hidden storage will change how you use your home. You do not need a massive budget to make these upgrades. These DIY projects are simple enough for anyone to finish in a weekend.
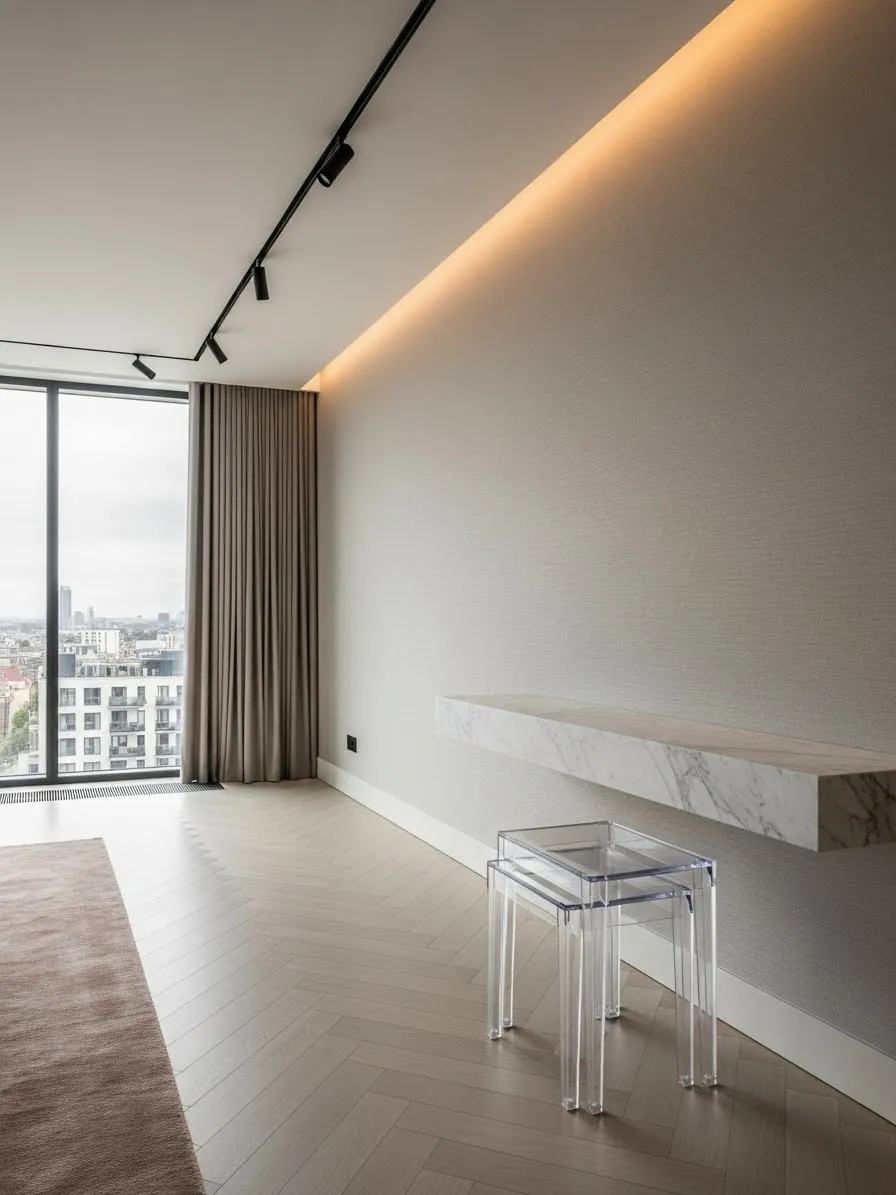
1 Clear Acrylic Nesting Stools

Clear acrylic nesting stools offer a clever way to add seating without cluttering your view. Their transparent design makes them appear nearly invisible in a small room. This helps keep the space feeling open and airy.
You can pull these stools out whenever guests arrive for a quick seating fix. They are lightweight and easy to move around the house. They serve as great side tables for drinks when they are not being used as seats.
Once your visitors leave, simply stack them back together. Slide the set under a console table or into a corner. This nesting feature ensures you maximize every square inch of your floor.
Material required list
- Two sheets of 0.5 inch thick clear acrylic
- Specialized acrylic solvent cement
- Microfiber cleaning cloth
- Fine grit sandpaper 400 and 600 grit
- Blue painter tape
Equipment required list
- Table saw with a fine tooth blade for plastics
- Applicator bottle for solvent
- Clamps with soft rubber pads
- Measuring tape
- Work gloves and safety goggles
DIY instruction step by step
- Measure and mark your acrylic sheets for two different sizes so one stool can slide inside the larger one.
- Use the table saw to cut the top and two side pieces for each stool while going slowly to avoid cracking the material.
- Sand the cut edges of each piece with 400 grit sandpaper and follow up with 600 grit for a smooth finish.
- Arrange the pieces in a U shape with the top resting on the two sides and use blue painter tape to hold them together temporarily.
- Apply the acrylic solvent cement to the joints using the applicator bottle and the liquid will pull into the seam by itself.
- Place clamps on the joints and let the stools sit for 24 hours without moving them until the bond is fully set.
- Remove the tape and wipe the stools down with a microfiber cloth to remove any dust.
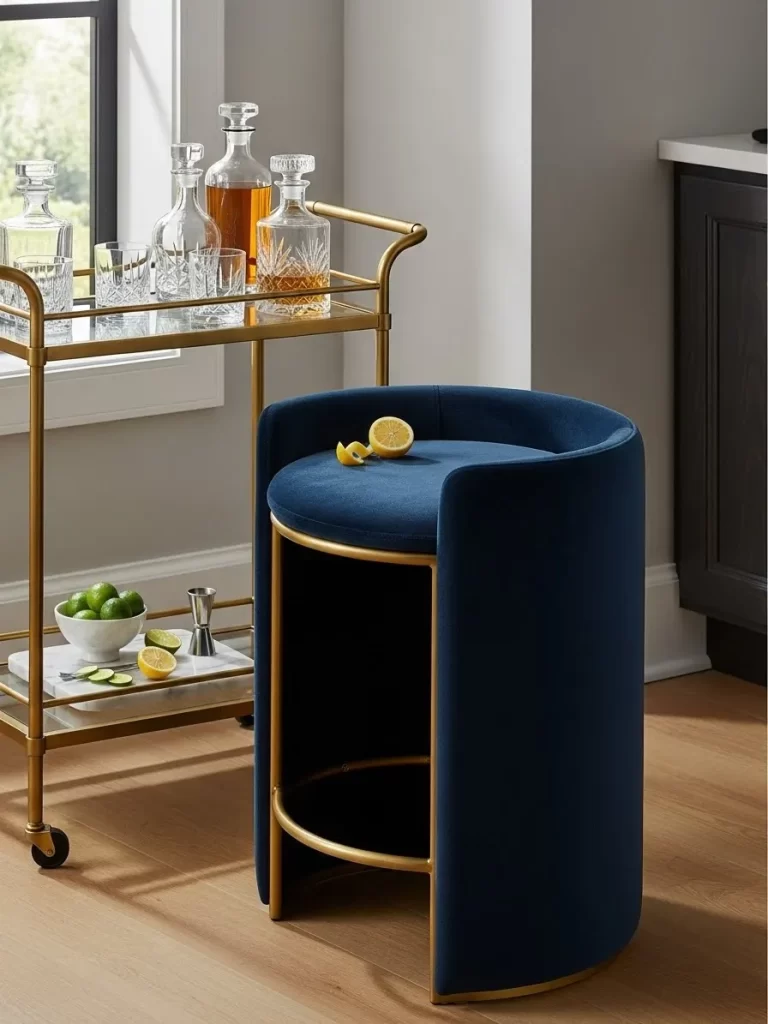
2 Navy Round Storage Ottoman

A large round storage ottoman provides a soft place for guests to sit. Its circular shape helps traffic flow easily in a tight living room. The navy velvet fabric adds a touch of luxury and comfort to the center of your seating area.
The lid lifts up to show a hidden compartment. You can store extra pillows or bulky blankets inside to keep your home tidy. This piece replaces a traditional coffee table while adding extra seating capacity.
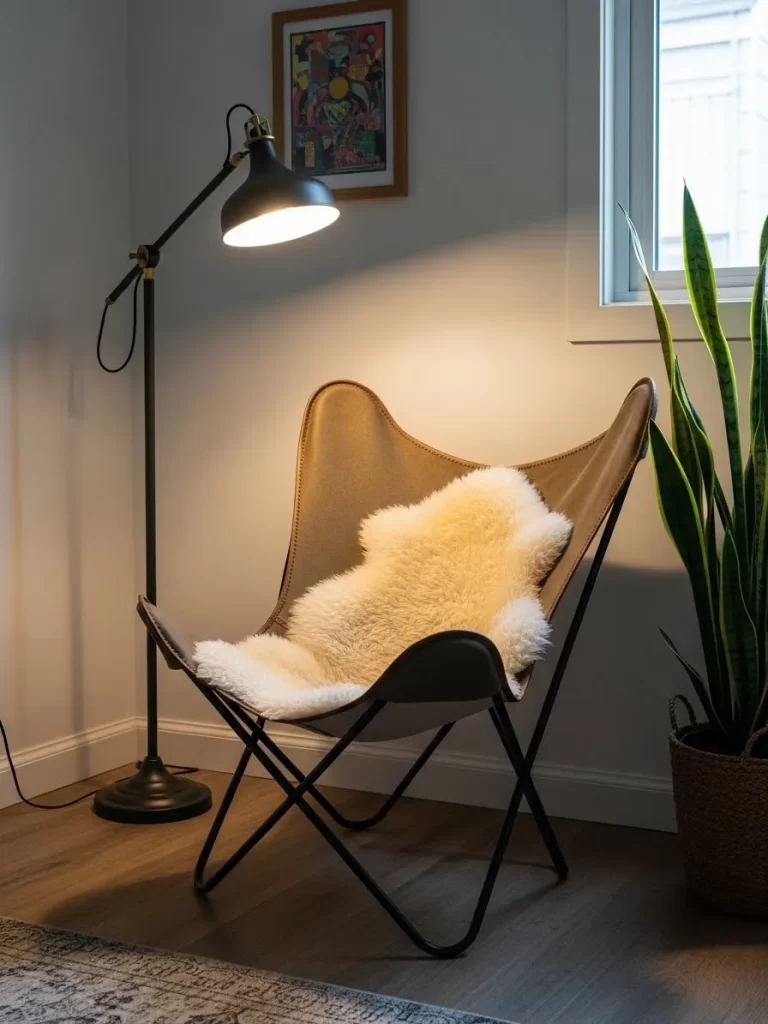
This furniture item is sturdy enough to hold heavy items or multiple people. It acts as a focal point that ties the room together. You get two functions in one single footprint.
Material required list
- One large wooden cable spool or circular plywood base
- High density foam 3 inches thick
- 4 yards of velvet fabric
- 2 yards of batting
- Heavy duty staples
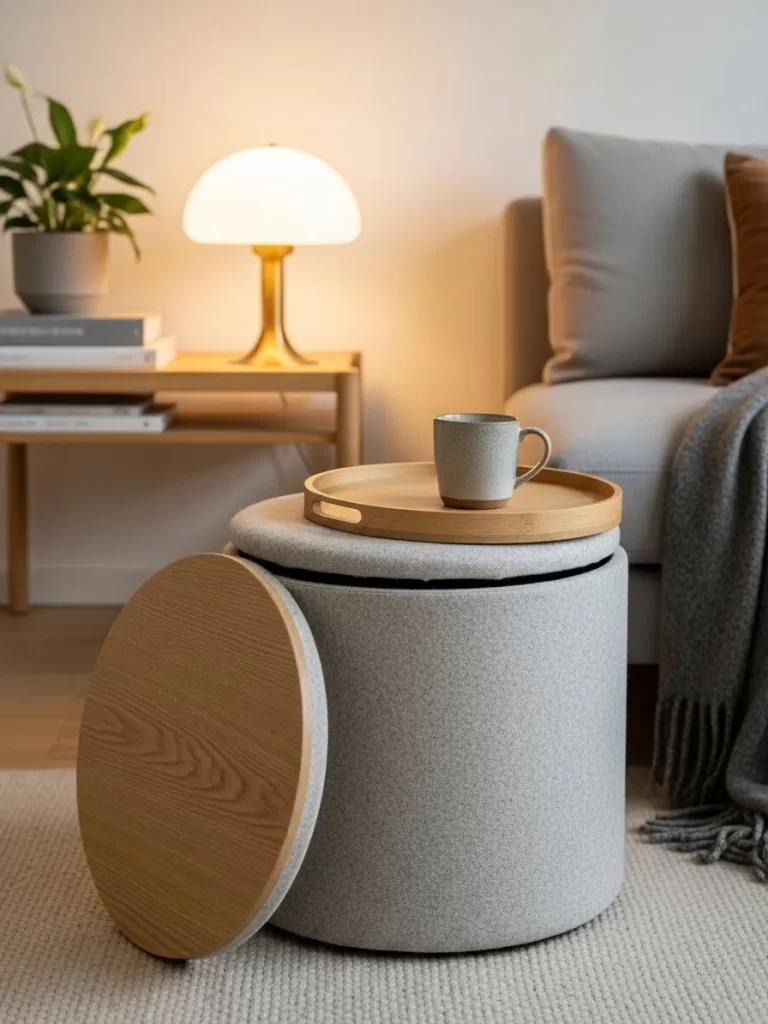
- Spray adhesive
- Piano hinge
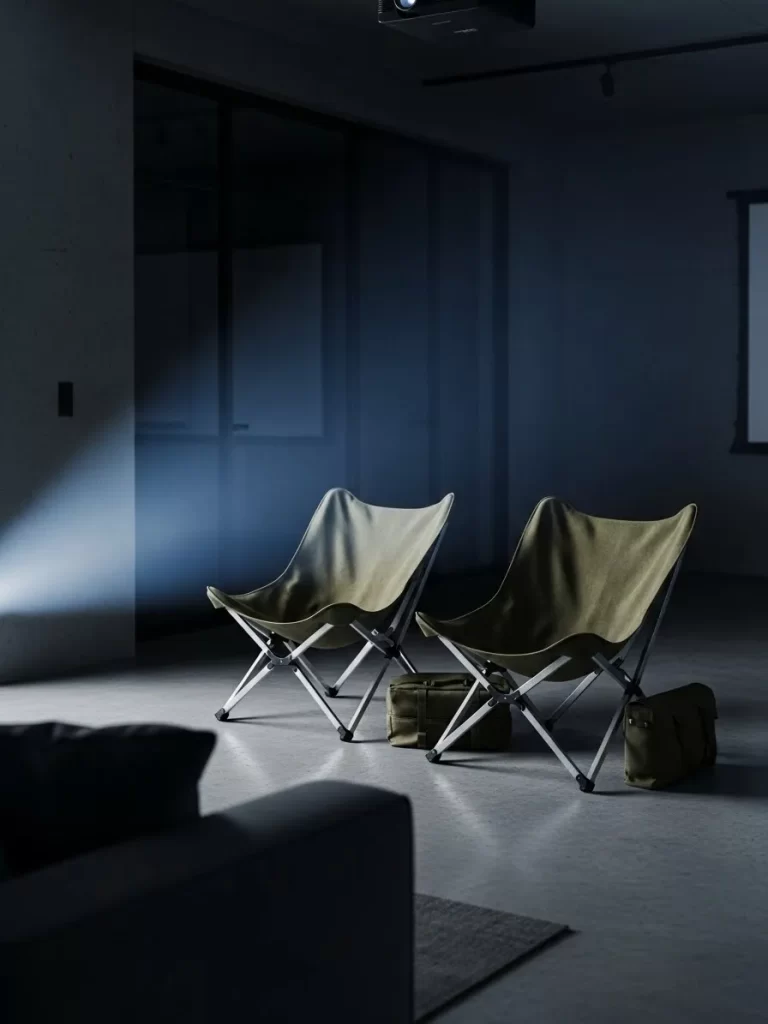
Equipment required list
- Staple gun
- Electric carving knife or heavy scissors
- Screwdriver
- Measuring tape
- Marker
DIY instruction step by step
- Cut your plywood into two large circles for the top and bottom or use a spool.
- Screw a side strip of thin plywood around the bottom circle to create a drum shape and add internal support blocks for strength.
- Spray adhesive onto the top circle and press the foam onto it before trimming the foam to match the circle using an electric knife.
- Wrap the top piece in batting and then your velvet fabric while pulling the fabric tight and stapling it to the underside of the wood.
- Cover the drum base with fabric by wrapping it around and stapling it at the top and bottom edges for a clean look.
- Attach the upholstered top to the base using a piano hinge so the lid can open and close smoothly.
- Add small furniture feet to the bottom to protect your floor.
3 Wall Mounted Folding Bench
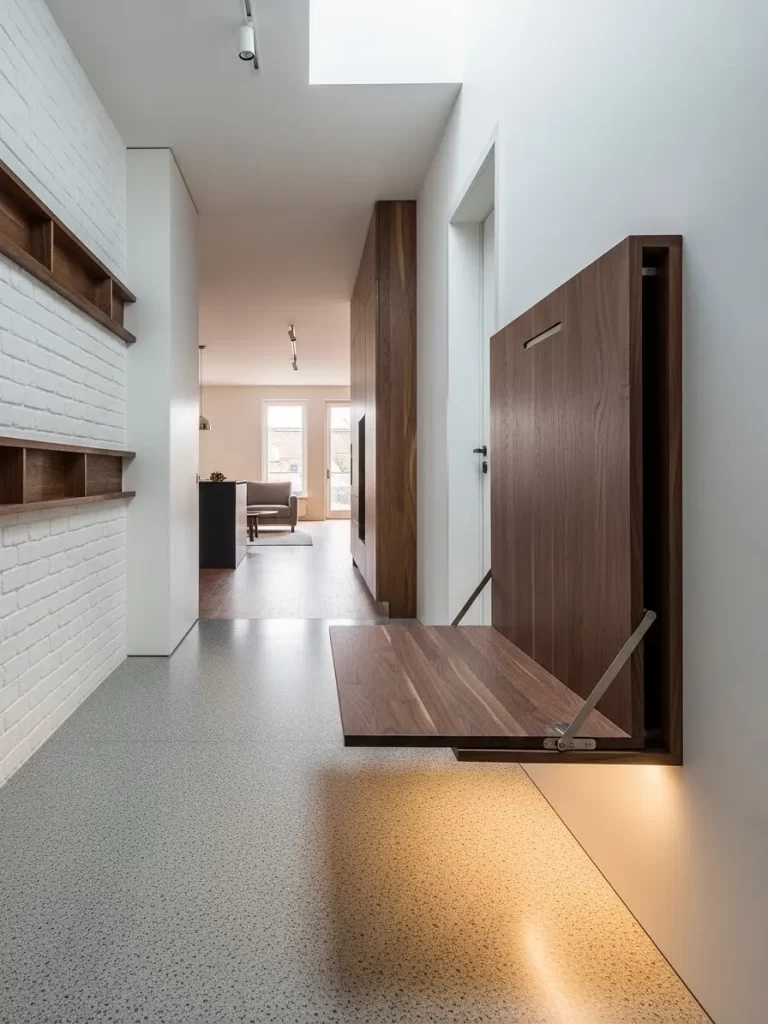
This wooden bench attaches directly to your wall to save floor space. It stays folded up flat when you do not need it. This design is excellent for narrow entryways or small living rooms.
Pull the seat down to create a sturdy place for someone to sit. It provides a clean and modern look that blends with your wall. The wood grain brings a natural element to the interior design.
The bench uses strong brackets to ensure safety and stability. It can hold a significant amount of weight despite its slim profile. This is a great solution for temporary seating needs.
Material required list
- One solid wood board 15 inches wide and 30 inches long
- Two heavy duty folding shelf brackets
- Wall anchors for masonry or wood studs
- Wood stain or clear sealant
- 2 inch wood screws
Equipment required list
- Power drill
- Level
- Stud finder
- Sandpaper
- Paintbrush
DIY instruction step by step
- Sand your wood board until it is very smooth and apply a coat of stain or sealant before letting it dry completely.
- Use a stud finder to locate the vertical wooden beams inside your wall because you must mount this bench to studs for safety.
- Hold one bracket against the wall at the height you want for your seat and use a level to make sure it is perfectly straight.
- Drill pilot holes into the wall studs and screw the bracket into place.
- Repeat this for the second bracket.
- Place the wood board on top of the brackets and ensure it is centered and level.
- Drive screws through the bracket holes into the bottom of the wood board without going through the top.
4 Wooden Crate Storage Wall
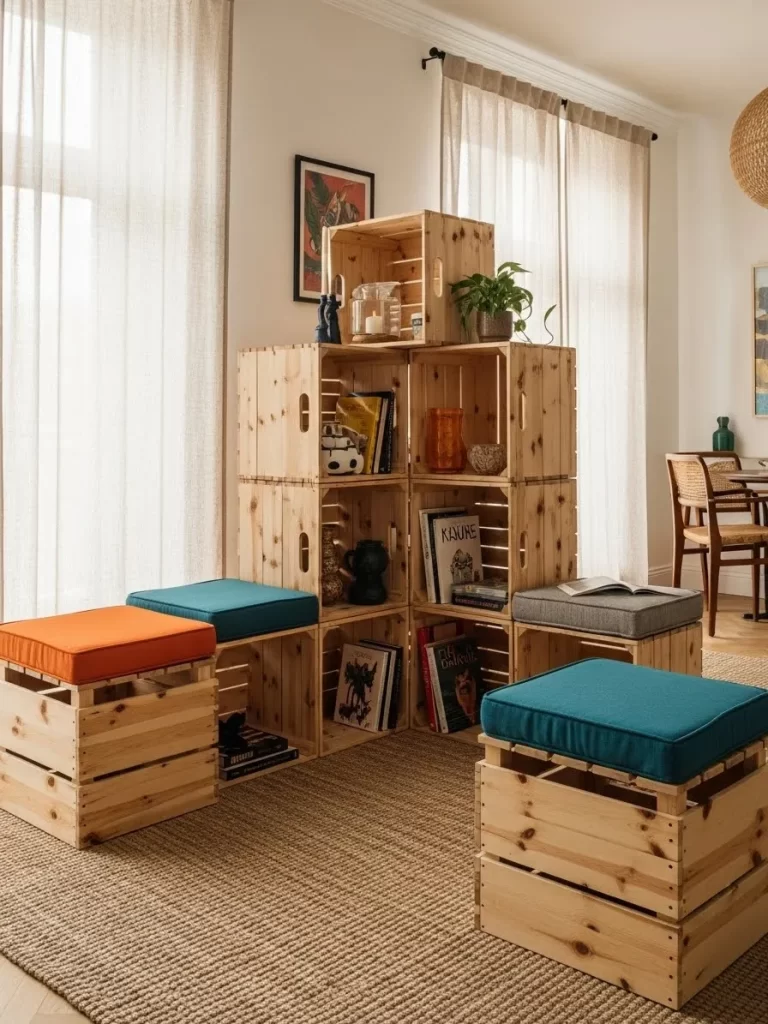
Wooden crates offer a rustic and flexible way to create extra seating. You can stack them in various patterns to fit your specific room layout. They provide both storage for books and a place to rest.
Add colorful cushions to the tops of the lower crates. This turns simple storage boxes into comfortable stools. The bright fabric colors bring energy and style to the living room.
You can move these crates around easily if you change your mind. They work well as individual seats or grouped together as a bench. This setup is very affordable for anyone on a budget.
Material required list
- 6 to 8 sturdy wooden shipping crates
- Large binder clips or small bolts
- 2 inch thick foam pads
- Fabric remnants
- Sandpaper
Equipment required list
- Power drill if using bolts
- Measuring tape
- Scissors
- Staple gun
DIY instruction step by step
- Sand every surface of the wooden crates to prevent splinters while paying close attention to the corners and handle holes.
- Stack the crates against a wall in your desired shape and keep the open sides facing out for storage.
- Secure the crates together using binder clips for a temporary setup or use bolts and nuts for a more permanent and safer wall.
- Measure the top surface of the crates you want to use as seats and cut your foam pads to match these measurements.
- Wrap each foam pad in fabric and pull the fabric tight around the foam before stapling it to a thin piece of plywood cut to the same size.
- Place the upholstered pads on top of the crates and use adhesive strips to keep them from sliding.
- Fill the remaining crates with books or decorative items to add weight and stability.
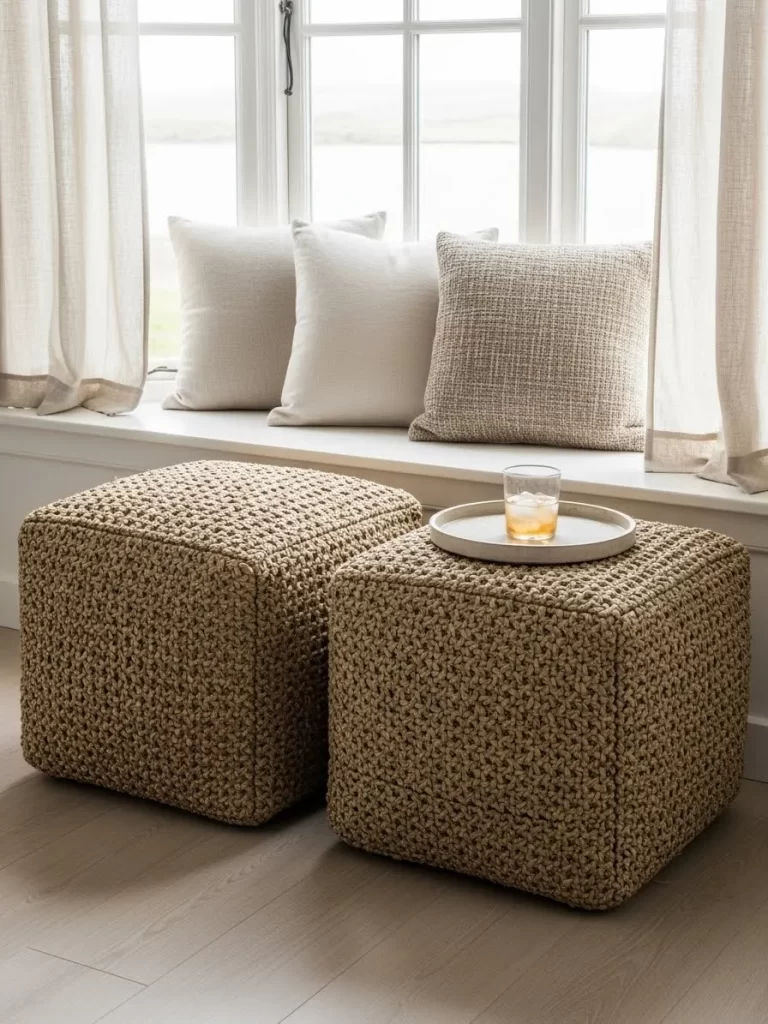
5 Pink Velvet Cube Poufs
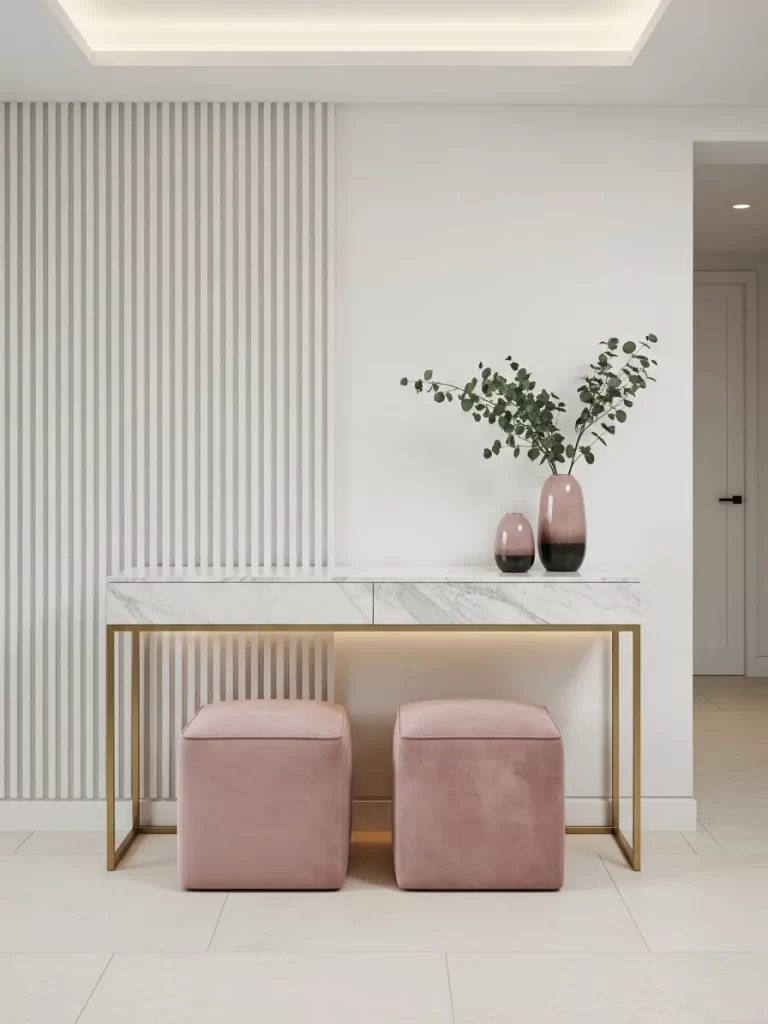
Small velvet cube poufs are versatile pieces for any tiny home. They fit neatly under a console table to stay out of the way. Their soft texture adds a cozy feel to the room.
These cubes are light enough for children or adults to move easily. You can use them as footrests when you are relaxing on the sofa. They provide a quick seat when you have more people than chairs.
The pink velvet color provides a soft pop of style against white walls. These items are small but offer high value for seating needs. They keep your floor plan flexible and open.
Material required list
- High density upholstery foam cube 18 inches square
- 2 yards of velvet fabric
- Spray adhesive
- Long upholstery needle
- Heavy duty thread
Equipment required list
- Measuring tape
- Fabric scissors
- Sewing machine or needle and thread
- Straight pins
DIY instruction step by step
- Buy a pre cut foam cube to save time and ensure a square shape and apply a light layer of spray adhesive to the foam.
- Measure each side of the cube and cut six squares of velvet fabric that are one inch larger than the foam sides.
- Pin the fabric squares together with the soft sides facing each other and sew five of the sides together to create a box shape.
- Turn the fabric cover right side out so the velvet is on the exterior.
- Slide the foam cube into the fabric cover.
- Fold the edges of the final open side inward and use a hidden stitch to sew the last side shut by hand.
- Pull the thread tight to ensure the seams are crisp and professional.
6 Slat Wood Window Seat
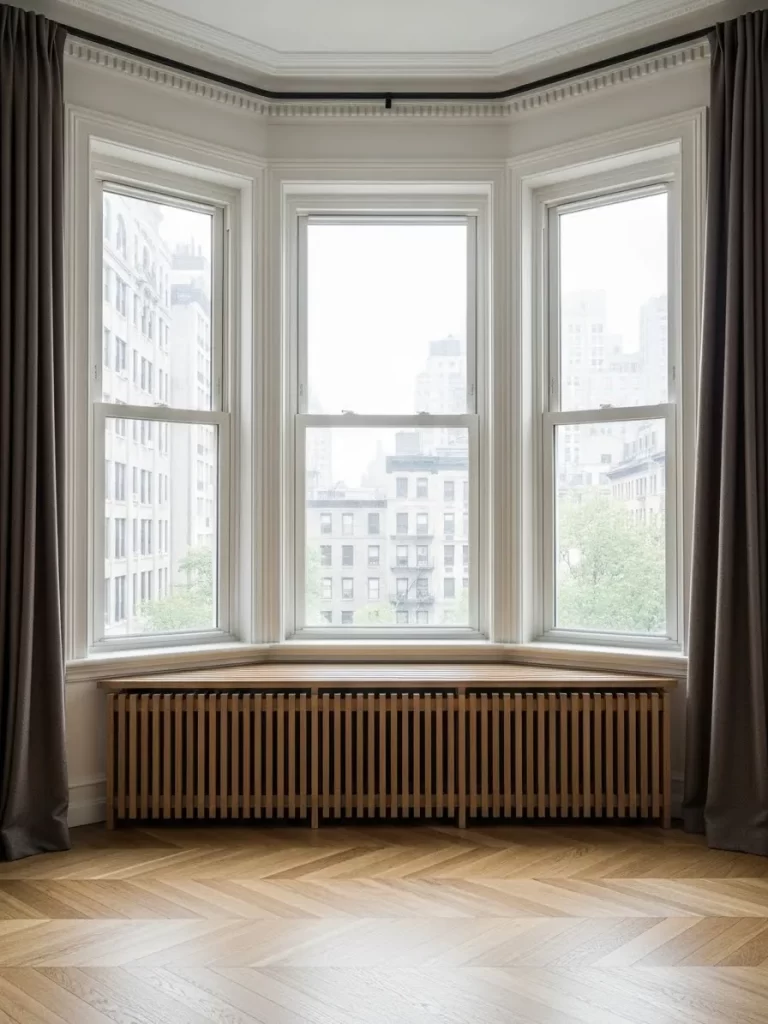
A custom window seat makes use of the space under your windows. The vertical wood slats create a modern look while hiding unsightly radiators. This long bench provides plenty of room for several people to sit.
The flat top offers a great spot to enjoy the view or read a book. Natural light from the window makes this the best seat in the house. It turns an awkward architectural feature into a functional asset.
This built in design feels like a permanent part of the architecture. It keeps the floor area clear because it sits flush against the wall. The warm wood tones make the room feel inviting.
Material required list
- 1 by 2 inch pine or oak boards
- 3/4 inch plywood for the top
- Wood glue
- Finish nails
- Wood stain
Equipment required list
- Miter saw
- Hammer or nail gun
- Level
- Measuring tape
- Paintbrush
DIY instruction step by step
- Measure the width of your window area and the height from the floor before building a basic rectangular frame using scrap wood.
- Cut your plywood to fit the top of the frame and screw it down to create the seat surface.
- Cut many 1 by 2 boards to the height of your frame to serve as your vertical slats.
- Apply wood glue to the back of a slat and nail it to the front of the frame starting at one corner.
- Use a small scrap of wood as a spacer between each slat to ensure the gaps are all the same width.
- Continue nailing slats across the entire front and sides of the bench.
- Sand the top seat and the slats before applying your wood stain and letting it dry completely.
7 Thick Stacked Floor Cushions
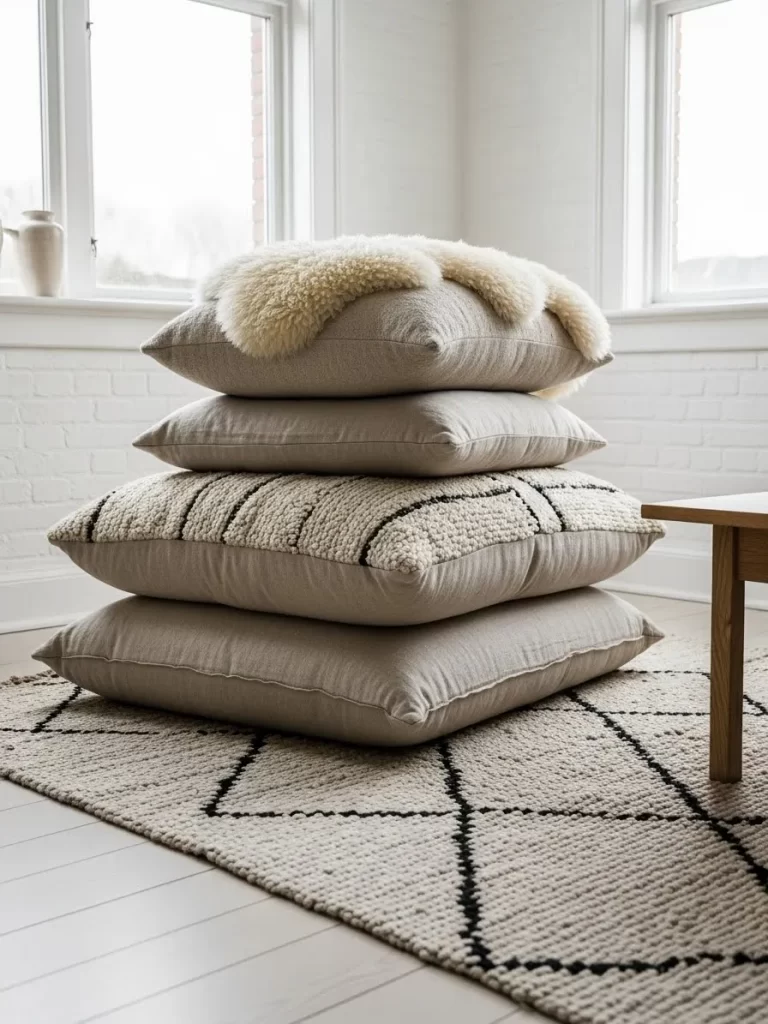
Floor cushions are a casual and comfortable seating option. Stacking them creates a high seat that looks like a unique piece of furniture. You can unstack them to provide individual spots on the rug.
These cushions are easy to store in a closet or under a bed. They add a soft and relaxed vibe to your living room decor. Different textures and patterns can be mixed to show your personal style.
This solution is great for low coffee tables or movie nights. The thick padding protects you from the hard floor. It is a very flexible way to handle large groups of friends.
Material required list
- 4 large pillow inserts or foam slabs
- 5 yards of heavy duty upholstery fabric
- Long zippers
- Sewing thread
Equipment required list
- Sewing machine
- Fabric scissors
- Pins
- Measuring tape
DIY instruction step by step
- Measure your pillow inserts and cut two squares of fabric for each cushion that are two inches wider than the insert.
- Cut a long strip of fabric for the side of the cushion that is as long as the perimeter of the square.
- Sew the side strip to the first square of fabric while making sure the pretty sides of the fabric are facing each other.
- Sew a zipper onto the second square of fabric and the remaining edge of the side strip to allow for easy washing.
- Finish sewing the rest of the seams to complete the box shape.
- Turn the cover right side out and stuff the pillow insert inside.
- Repeat this for all cushions and stack them in a corner or near the sofa.
8 Integrated Leather Bench Station
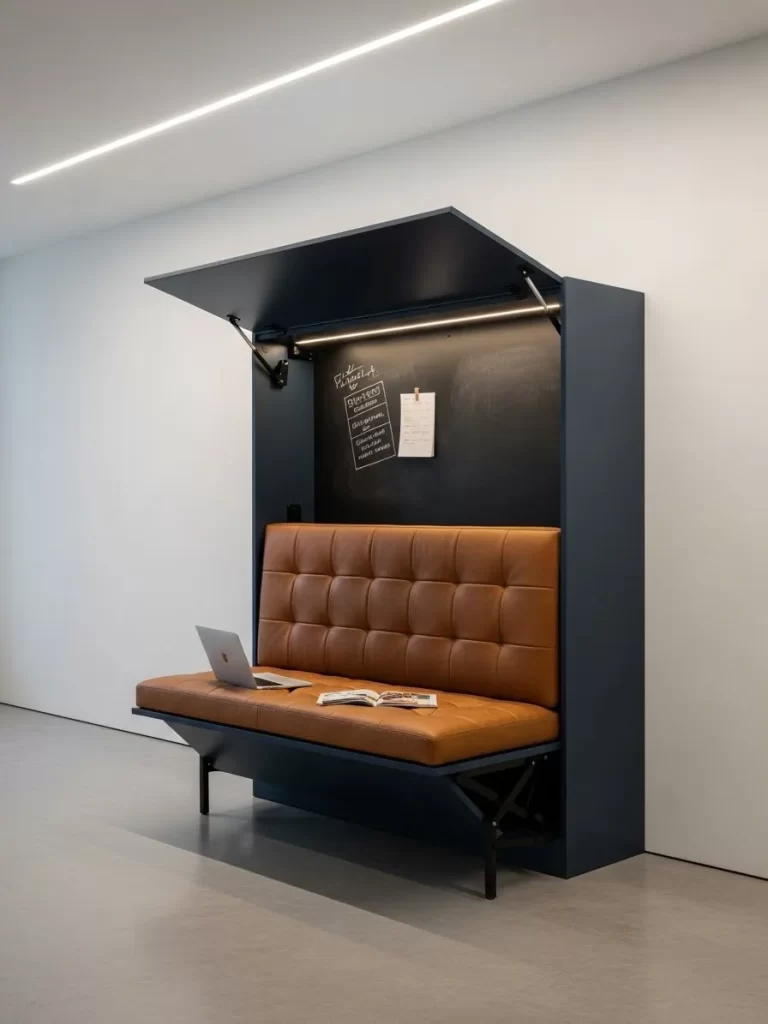
A flip down bench is a high tech solution for tiny spaces. It features a leather seat that drops down from a wall cabinet. This provides a comfortable place to work or sit without taking up permanent room.
The cabinet above can hold a small desk or storage area. The leather material is durable and easy to wipe clean. It looks very sophisticated and professional in a modern home.
When the bench is closed, it looks like a simple wall panel. This hides the seating and keeps the room looking organized. It is a masterpiece of space saving engineering.
Material required list
- Plywood for the cabinet box
- Foam padding
- Faux leather fabric
- Gas struts or heavy duty hinges
- Wall mounting hardware
Equipment required list
- Circular saw
- Drill
- Staple gun
- Screwdriver
- Level
DIY instruction step by step
- Build a shallow wooden box to mount on the wall to act as the frame for your folding seat.
- Cut a piece of plywood that fits inside the box to serve as the seat.
- Glue foam to the plywood seat and wrap it in faux leather before stapling the leather to the back of the wood.
- Attach the seat to the bottom of the wall box using strong hinges.
- Install gas struts on the sides to help the seat stay open and prevent it from falling too fast.
- Use a stud finder to locate the wall studs and screw the entire box into the wall at seat height.
- Add a latch at the top to keep the seat tucked away when you do not need it.
9 Rolling Library Ladder
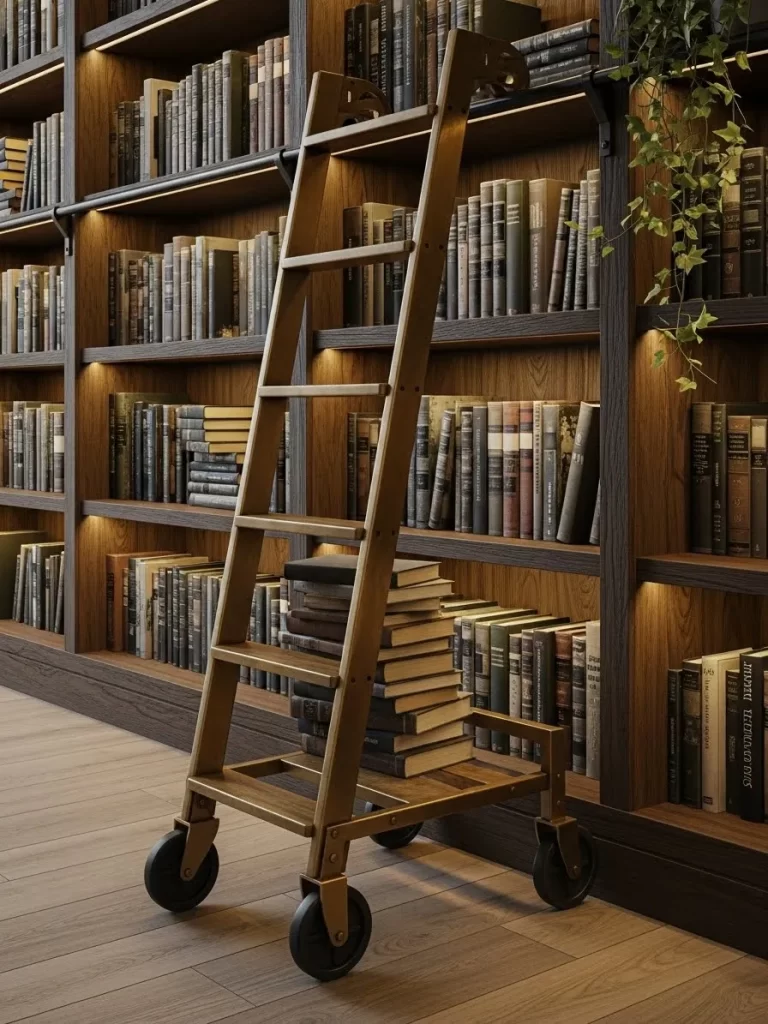
A library ladder with a built in shelf provides a unique place to sit. It allows you to reach high shelves while offering a perch for reading. The wheels make it easy to glide across the room.
The wooden steps are wide enough to act as small stools. It adds a classic and scholarly feel to your living room. This piece uses vertical space which is often wasted in small homes.
You can lock the wheels for safety when you want to sit. It is a functional tool that doubles as furniture. The dark wood finish looks elegant against a wall of books.
Material required list
- Pre made wooden ladder
- Two large rubber wheels
- Two locking casters
- 1 by 12 inch wood board for the seat
- Metal brackets
Equipment required list
- Drill
- Wrench
- Saw
- Sandpaper
DIY instruction step by step
- Buy a sturdy wooden ladder that reaches your highest shelf and sand any rough spots on the wood.
- Cut a piece of 1 by 12 inch board to fit across two rungs of the ladder to serve as your seat.
- Secure the seat board to the ladder rungs using metal brackets and screws while ensuring it is very stable.
- Drill holes into the bottom of the ladder legs and bolt the wheels and locking casters into place.
- Ensure the locking casters are on the front so you can reach them easily.
- Apply a coat of wood polish to make the ladder shine.
- Test the ladder by rolling it and then locking the wheels before you sit down.
10 Backless Sofa Bench

A backless bench placed behind a sofa adds seating without blocking the view. It provides a spot for people to sit and talk to those in the kitchen or dining area. The slim design fits into narrow gaps easily.
The textured fabric adds visual interest to the back of your couch. It makes the living room feel more finished and layered. This is a smart way to bridge two different areas of an open floor plan.
You can also use this bench as a table for drinks or books. It is versatile and does not require much space. The dark color hides stains and wear over time.
Material required list
- 2 by 4 inch lumber for the frame
- Plywood for the top
- Foam and batting
- Upholstery fabric
- 4 wooden furniture legs
Equipment required list
- Drill
- Staple gun
- Saw
- Measuring tape
DIY instruction step by step
- Build a long and narrow rectangular frame using the 2 by 4 lumber and use screws at the corners for strength.
- Screw the plywood to the top of the frame.
- Glue the foam to the plywood and cover it with batting for softness.
- Wrap your upholstery fabric over the top and staple it to the bottom of the wooden frame.
- Cover the bottom of the bench with a scrap piece of fabric to hide the staples and wood.
- Screw the wooden furniture legs into the four corners of the frame.
- Place the bench directly behind your sofa to create a new seating zone.
11 Nested Blue Velvet Stools
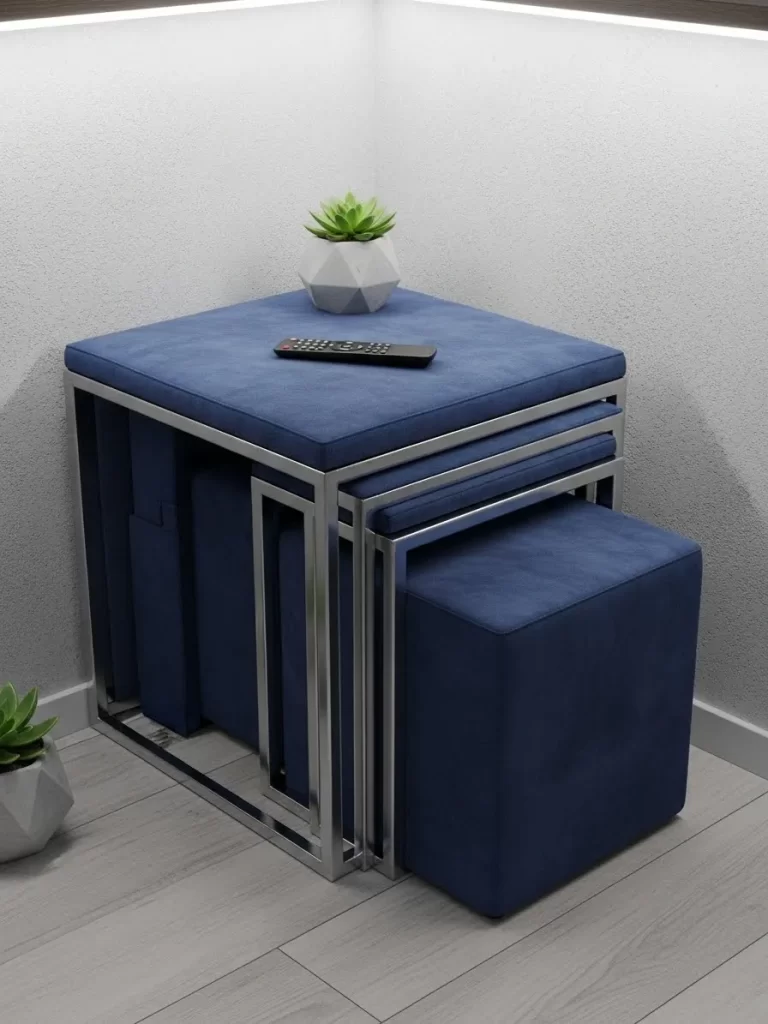
Nested stools with metal frames provide a modern look for small corners. These items come in three different heights so they can tuck inside each other. The deep blue fabric offers a comfortable and soft surface for sitting.
Shiny chrome frames add a touch of industrial style to your room. You can use the smallest stool as a side table for your remote or coffee. These stools are easy to grab when you have an extra guest at your door.
They take up the footprint of only one stool when you put them away. This keeps your floor space open for walking during the day. The simple design is easy to clean and maintain.
Material required list
- Square metal or wood tubing for frames
- Pre cut plywood squares for seat bases
- High density upholstery foam
- Blue velvet fabric
- Heavy duty staples
- Metallic silver spray paint
Equipment required list
- Saw
- Power drill and screws
- Staple gun
- Measuring tape
- Scissors
DIY instruction step by step
- Construct three square frames in three sizes so each one fits under the larger one.
- Paint the frames with metallic silver spray paint to give them a modern look.
- Cut plywood squares to match the top dimensions of each frame.
- Glue thick foam to the top of the plywood and trim it to match the edges.
- Wrap the blue velvet fabric over the foam and staple it to the bottom of the plywood.
- Screw the upholstered seat bases onto the frames.
- Slide the stools together to check that they nest without rubbing.
12 Minimalist White Window Nook
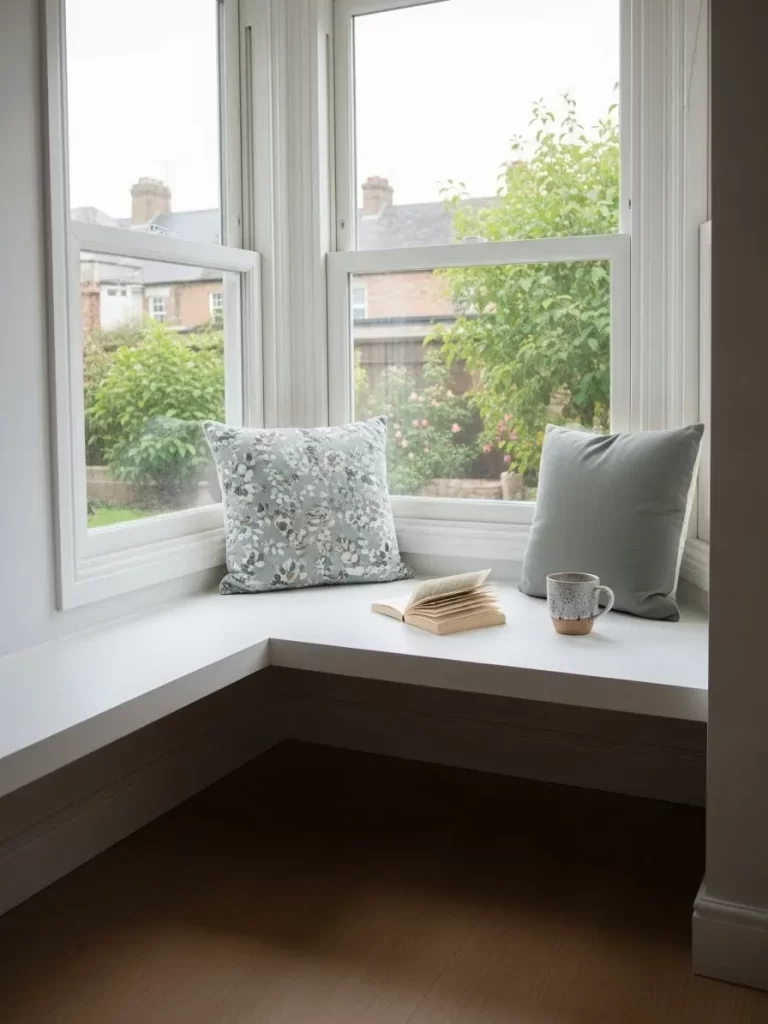
A minimalist window nook turns a simple corner into a peaceful retreat. This L shaped bench is painted white to blend with the walls and trim. It creates a seamless look that does not overwhelm a tiny room.
You can add decorative pillows to make the hard surface comfortable for reading. The space underneath is suited for storing bins or shoes. Natural light makes this area feel bright and much larger than it is.
It is a great spot for morning coffee or afternoon relaxation. This built in furniture adds value and character to your home design. You can easily build this using standard lumber.
Material required list
- 2 by 4 lumber for the support frame
- 3/4 inch plywood for the seat top
- White paint and primer
- Wood screws
- Caulk for gaps
Equipment required list
- Circular saw
- Power drill
- Paint roller
- Level
- Stud finder
DIY instruction step by step
- Measure the corner area and use a stud finder to mark the wall studs.
- Build a sturdy rectangular frame using the 2 by 4 lumber and screw it into the studs.
- Construct a second frame to create the L shape and join it to the first one.
- Cut your plywood to fit the top of the frames and sand the edges until smooth.
- Screw the plywood down into the frames and fill the screw holes.
- Apply a coat of primer followed by two coats of white paint.
- Apply caulk to the edges where the wood meets the wall for a professional finish.
13 Wall Hanging Bamboo Chairs
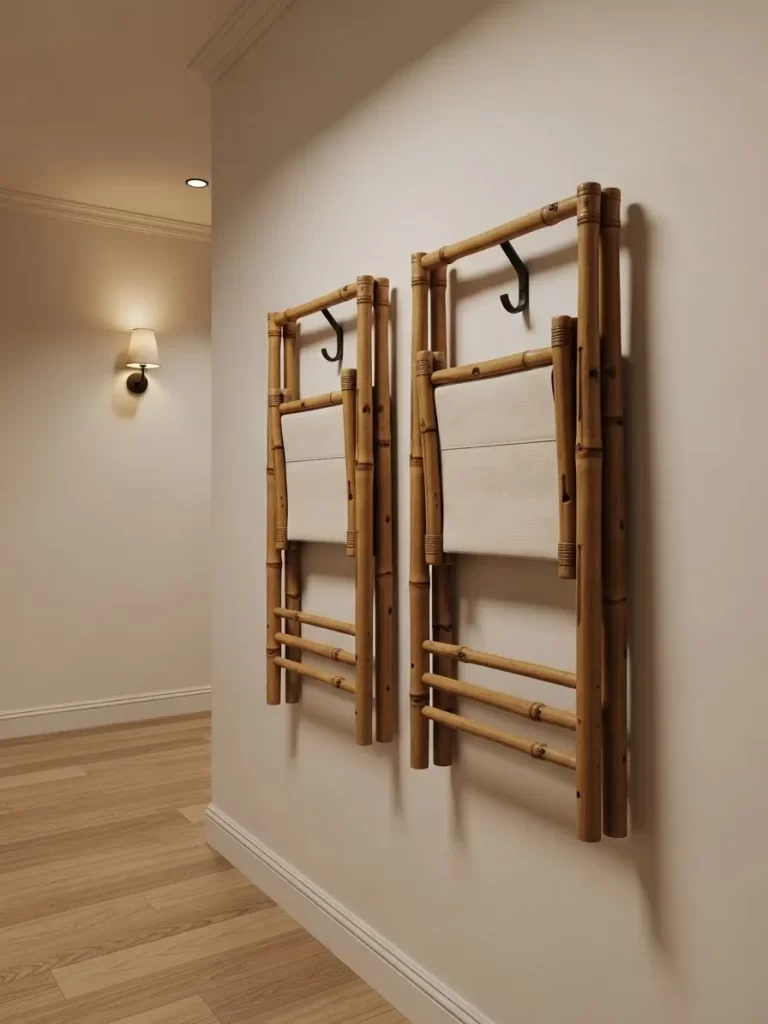
Bamboo folding chairs hanging on wall hooks stay completely out of your way. This is a smart space saving trick that works well in modern homes. You can take them down instantly when you need extra seats for dinner.
The bamboo material is lightweight but very strong for supporting adults. It adds a natural and boho vibe to your interior wall decor. These chairs look like art when you display them in a row on the wall.
They are much better than bulky chairs that take up floor space all day. You can use them indoors or move them to a balcony. This setup is easy to install with just a few hooks.
Material required list
- Two bamboo folding chairs
- Two heavy duty wall hooks
- Heavy duty wall anchors
- Leveling tool
Equipment required list
- Power drill
- Measuring tape
- Pencil
DIY instruction step by step
- Select a section of wall that stays clear of walking paths.
- Measure the height of the folded chairs to decide where the hooks should go.
- Use a level to mark two spots on the wall for the hooks.
- Drill holes into the wall and insert the heavy duty anchors.
- Screw the hooks into the anchors until they are tight and secure.
- Fold the bamboo chairs and hang them securely onto the hooks.
- Test the hooks by pulling down slightly to ensure they can hold the chair weight.
14 Green Ceramic Garden Stool
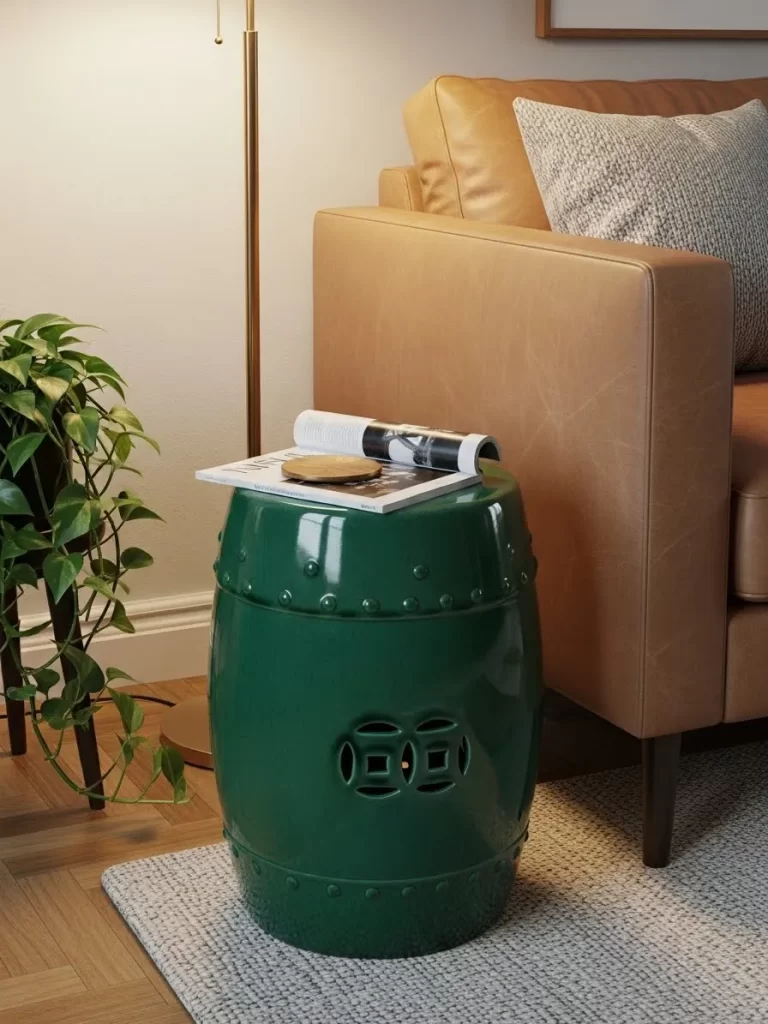
A green ceramic garden stool is a durable and stylish addition to any room. Its bright color and glossy finish catch the light and add visual interest. This piece works as a seat or a sturdy side table for a lamp.
Ceramic is easy to clean and can handle spills without any damage. The drum shape is classic and fits into tight corners easily. You can move it around the room to wherever extra seating is needed.
It adds a touch of garden charm to an indoor living space. These stools are heavy enough to stay in place but small enough to move. They look great next to a leather chair.
Material required list
- Large plastic bucket for a mold
- High strength concrete mix
- Green glossy outdoor paint
- Clear gloss sealant
- Sandpaper
Equipment required list
- Mixing bucket
- Trowel
- Large sponge
- Paintbrush
DIY instruction step by step
- Mix the concrete in a bucket until it reaches a thick consistency.
- Pour the concrete into your plastic bucket mold and tap the sides to release air.
- Let the concrete dry for two days before pulling it out of the mold.
- Sand the surface of the stool until it feels very smooth.
- Wipe the stool with a damp sponge to remove any dust.
- Apply three coats of green glossy paint and let it dry between coats.
- Add a clear gloss sealant to give it the look of a ceramic finish.
15 Round Meditation Cushion Stack
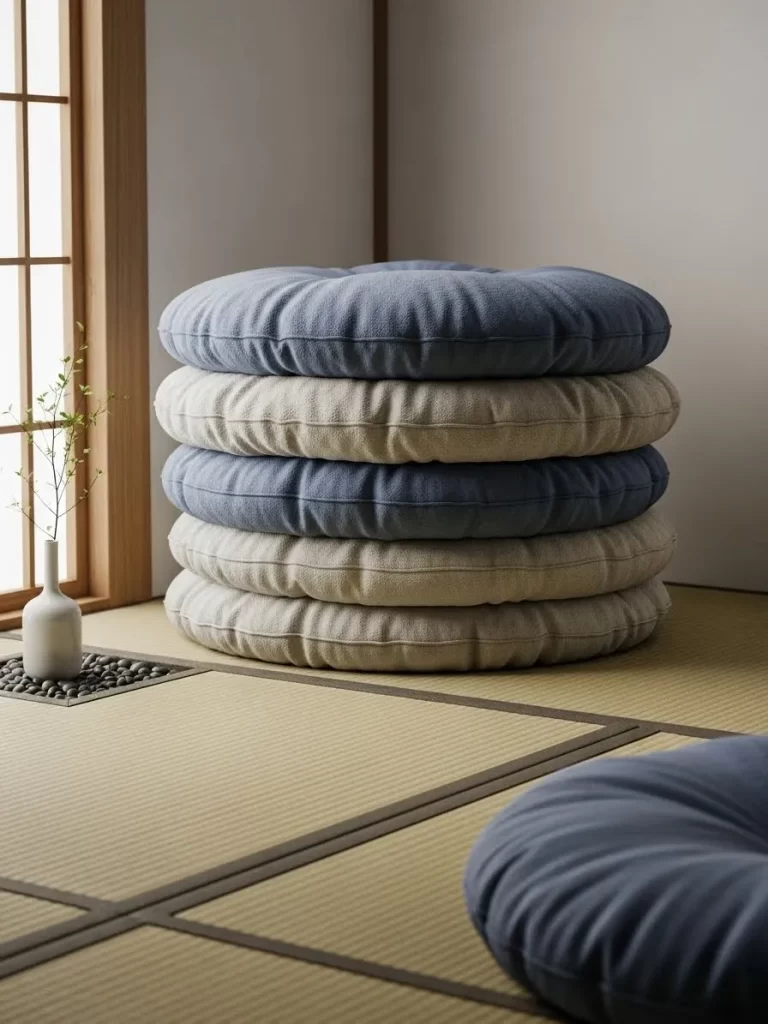
Stacked round meditation cushions provide a soft and flexible seating solution. They are suited for sitting on the floor while playing games or relaxing. The light blue and gray colors create a calming atmosphere in the room.
You can move them around the floor to create different seating groups. When you are done, stack them back up in a corner to save space. These cushions are much more comfortable than sitting directly on a hard floor.
They add a touch of zen and comfort to your living room decor. The fabric is soft and inviting for guests. Different heights can be achieved by stacking more or fewer pillows.
Material required list
- Durable cotton or linen fabric
- Large bag of polyester fiberfill
- Heavy duty thread
- Large decorative buttons
Equipment required list
- Sewing machine
- Fabric scissors
- Long needle
- Pins
DIY instruction step by step
- Cut two large circles of fabric for each cushion using a large bowl as a guide.
- Cut a long strip of fabric that matches the length around the circle.
- Sew the strip to the first circle with the pretty sides facing inward.
- Attach the second circle to the strip but leave a small gap for the stuffing.
- Turn the cover right side out and stuff it firmly with fiberfill.
- Sew the gap shut by hand using a hidden stitch.
- Use a long needle to sew a button through the center to create a tufted look.
16 Wall Swivel Industrial Stool
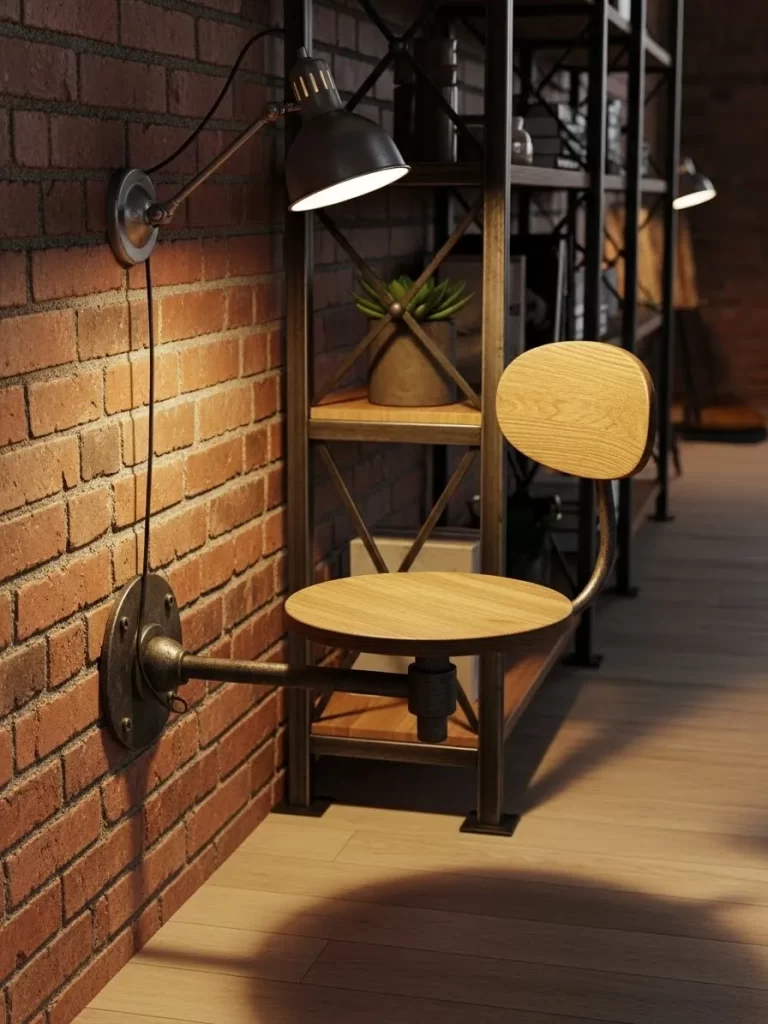
An industrial wall swivel stool saves floor space by attaching to the wall. The metal arm allows the seat to swing out when you need it. This design is inspired by old factory stools and adds a vintage feel.
The wooden seat is warm and balances the cold metal of the arm. It is a great choice for a kitchen island or a small home bar. You can tuck it against the wall when it is not in use.
The height is often adjustable which makes it very versatile for different guests. It turns a wall into a functional seating area. It is rugged enough for daily use.
Material required list
- One round wooden seat
- 1 inch iron pipe fittings
- Floor flange for wall mounting
- Swivel joint fitting
- Heavy duty lag bolts
Equipment required list
- Pipe wrench
- Power drill
- Level
- Wood stain
DIY instruction step by step
- Assemble the iron pipes to form an L shaped arm that can swivel.
- Screw the floor flange onto the end of the pipe arm.
- Attach the swivel joint to the other end of the arm.
- Sand the wooden seat and apply your favorite wood stain.
- Bolt the wooden seat onto the swivel joint assembly.
- Use a level to mark the wall where the stool will be mounted.
- Drill holes into the wall studs and use lag bolts to secure the flange.
17 Leather Moroccan Pouf

A leather Moroccan pouf brings global style to your home. The rich brown leather and white stitching add a handcrafted feel. This round seat is suited for putting your feet up or as a low stool.
It gets softer and more comfortable as the leather ages over time. The compact size makes it easy to tuck under a table. You can fill it with old clothes or towels to save money on stuffing.
This item adds a warm and cozy element to a modern living room. Guests will love the relaxed vibe it brings to the space. It is lightweight and easy to carry to any room.
Material required list
- Large pieces of faux or real leather
- Thick waxed upholstery thread
- Shredded foam or old fabric for stuffing
- Chalk for marking
Equipment required list
- Heavy duty leather scissors
- Large upholstery needle
- Straight pins
DIY instruction step by step
- Cut two large circles and several rectangular side panels from your leather.
- Sew the side panels together to form a long ring that fits the circles.
- Use a decorative cross stitch to sew the top circle to the side ring.
- Repeat the process for the bottom circle but leave an opening for stuffing.
- Turn the pouf right side out through the opening.
- Stuff the pouf as tightly as possible with foam or fabric scraps.
- Close the opening using the same decorative stitch and pull the thread tight.
18 Macrame Hanging Chair
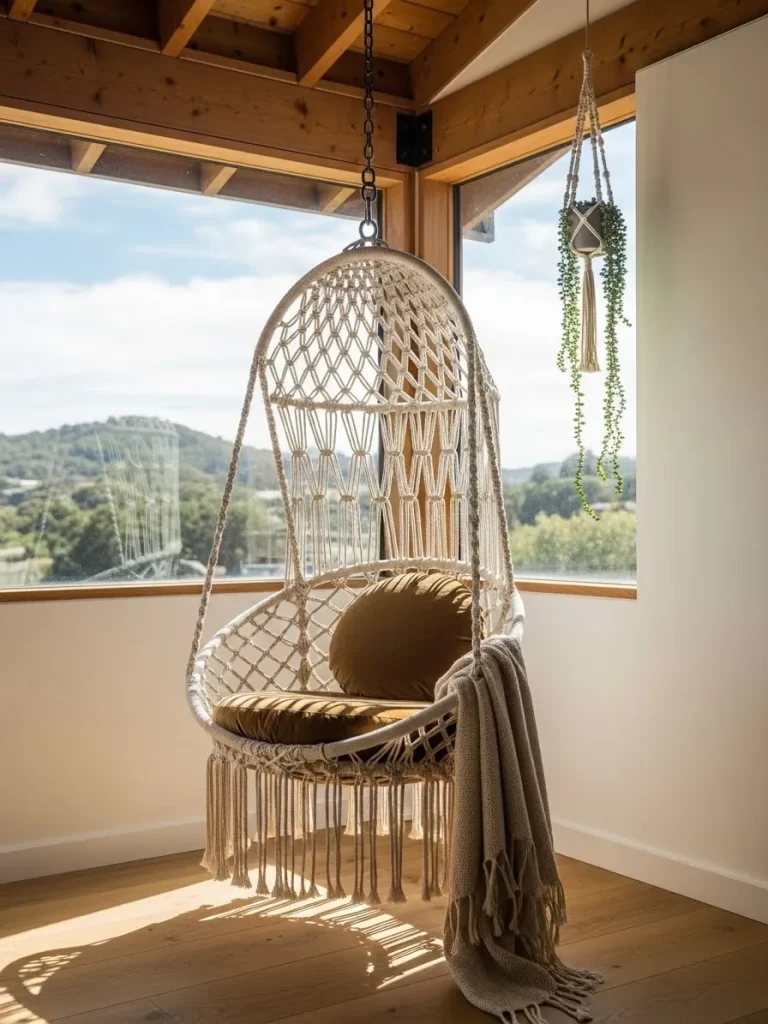
A macrame hanging chair adds a whimsical and airy feel to a sunny window. The woven rope design allows light to pass through so it does not feel heavy. You can sway gently while reading a book or enjoying the view.
It saves floor space by hanging from a ceiling beam. The soft white color makes the room feel bright and relaxed. You can add a colorful pillow and a throw blanket for extra comfort.
This chair is a beautiful focal point that guests will always want to sit in. The boho style is very popular and inviting. It makes any corner feel like a private getaway.
Material required list
- Two large metal rings in different sizes
- 400 yards of cotton macrame cord
- Heavy duty ceiling hook
- Metal chain for hanging
Equipment required list
- Sharp scissors
- Measuring tape
- Power drill
DIY instruction step by step
- Tie the two metal rings together at the back using a strong double knot.
- Wrap the cord around both rings until the metal is completely covered.
- Create a net for the seat by tying square knots in a grid pattern.
- Attach long cords to the top of the larger ring to form the backrest.
- Weave the backrest cords down into the smaller seat ring and knot them.
- Drill a hole into a solid ceiling beam and install the heavy duty hook.
- Use the chain to hang the chair at a comfortable height from the floor.
19 Wooden Storage Daybed
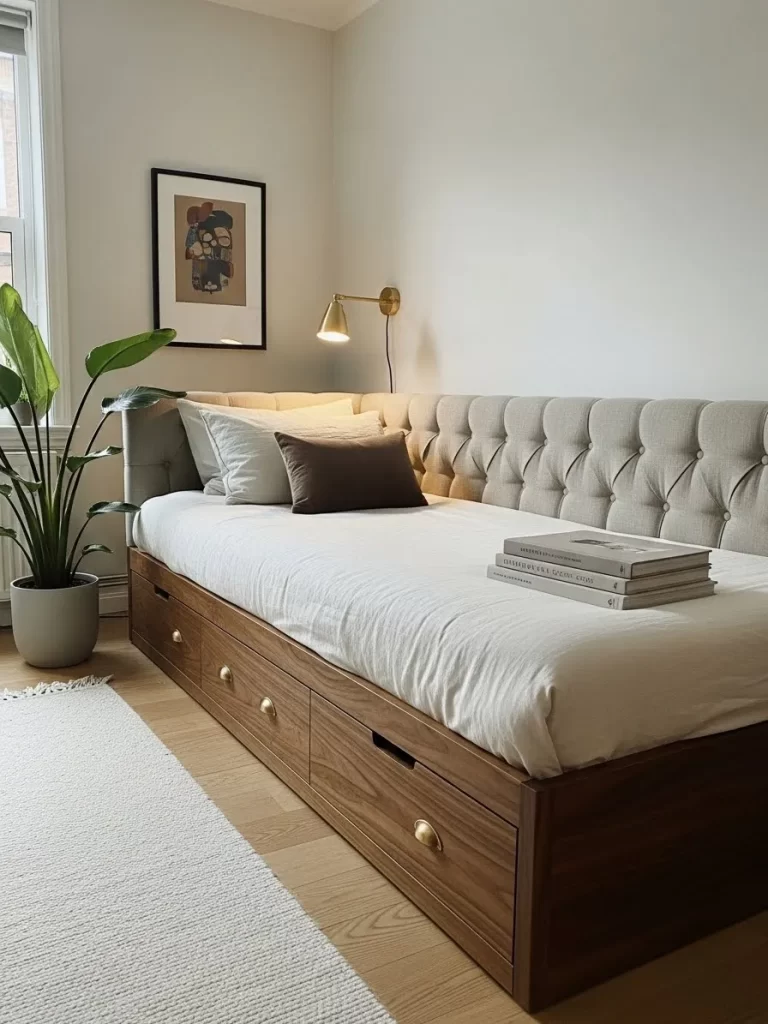
A storage daybed is a multi functional piece for a tiny living room. It works as a comfortable sofa during the day and a bed for guests at night. The built in wooden drawers provide plenty of space for extra linens.
The tufted backrest adds a touch of elegance and comfort for lounging. Natural wood tones keep the room feeling warm and grounded. You can style it with many pillows to make it feel like a couch.
It fits perfectly against a long wall to maximize your floor space. This is a smart investment for any small apartment owner. You get storage and extra sleeping space in one.
Material required list
- 2 by 4 lumber for the frame
- 3/4 inch plywood for the platform
- Wooden drawer slides and handles
- Twin size mattress
- Tufted headboard panel
Equipment required list
- Circular saw
- Power drill
- Measuring tape
- Level
DIY instruction step by step
- Build a rectangular frame using 2 by 4 lumber that fits a twin mattress.
- Create three drawer openings on the front side of the frame.
- Install the platform plywood on top of the frame and screw it down.
- Build three wooden boxes to serve as drawers and attach the slides.
- Slide the drawers into the frame and attach the front panels and handles.
- Attach the upholstered backrest panel against the wall behind the frame.
- Put the mattress on top and decorate with pillows to finish the look.
20 Honeycomb Kraft Paper Stool
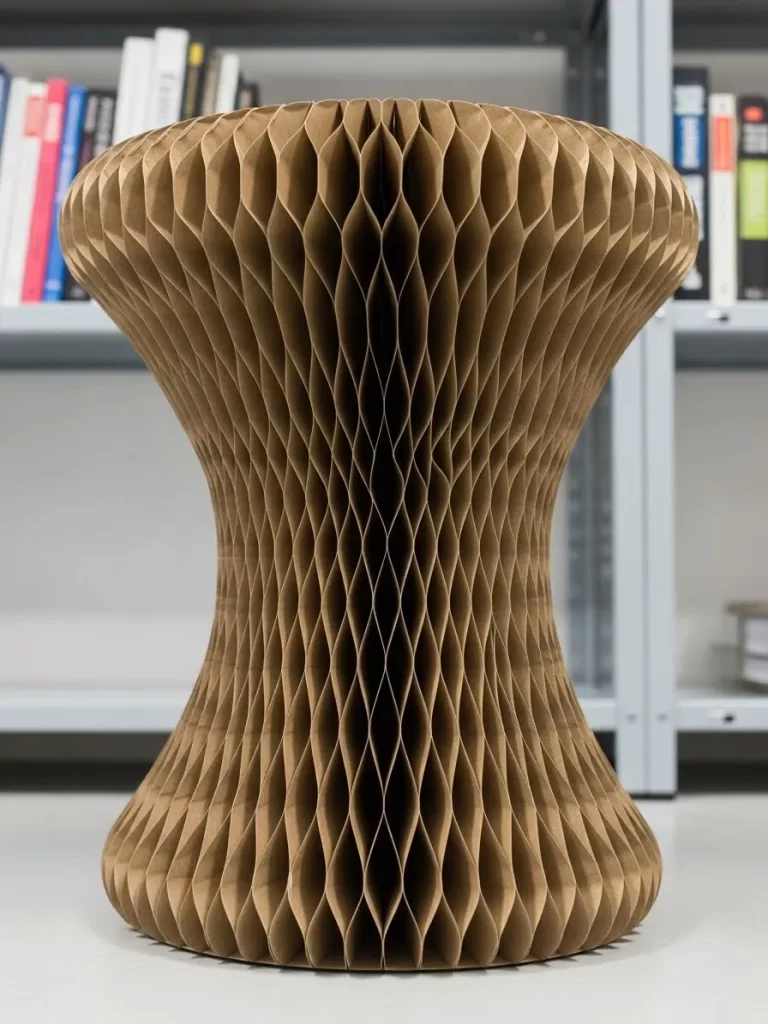
A honeycomb paper stool is a fascinating piece of modern engineering. It can fold flat like a book when you do not need to use it. When you open it, the paper layers create a strong structure that can hold an adult.
The brown kraft paper look is unique and eco friendly. It is very lightweight and easy to carry from room to room. You can store several of these on a bookshelf.
This is a great solution for people who host large parties occasionally. It adds a conversation piece to your living room while being very practical. It is truly surprising how strong paper can be.
Material required list
- 50 sheets of heavy weight kraft paper
- Strong wood glue
- Two pieces of thick cardboard for the ends
- Strong magnets
Equipment required list
- Paper cutter or sharp blade
- Glue brush
- Clamps
DIY instruction step by step
- Cut all paper sheets into a uniform shape using a sturdy template.
- Apply thin glue lines in a staggered pattern on the first sheet of paper.
- Place the next sheet on top and repeat the glue pattern but shifted over.
- Continue stacking the sheets until you have a thick block of paper.
- Glue the cardboard covers to the front and back of the stack.
- Embed magnets into the cardboard covers so they stick together when open.
- Fan out the stack and connect the covers to form the round stool shape.
21 Vintage Suitcase Side Table

A vintage suitcase turns into a charming side table and extra seat with just a few steps. The tan leather and old travel stickers add a sense of adventure to your home. This piece provides a flat surface for a plant.
Wooden legs raise the suitcase to a comfortable height for sitting. You can move it easily to a corner when you need more space. This upcycled project is both stylish and useful for a small room.
It gives a second life to an old object while adding character to your decor. You can store secrets or blankets inside. It is a one of a kind furniture piece.
Material required list
- One vintage hard shell suitcase
- Four tapered wooden furniture legs
- Four metal mounting plates for legs
- 1/2 inch thick plywood
- Wood glue
Equipment required list
- Power drill
- Screwdriver
- Measuring tape
- Saw
DIY instruction step by step
- Measure the inside bottom of the suitcase and cut a plywood board to fit.
- Glue the plywood to the inside bottom to create a solid base for the legs.
- Turn the suitcase over and mark four spots for the leg positions.
- Drill holes through the suitcase and the internal plywood at your marks.
- Screw the metal mounting plates onto the bottom of the suitcase.
- Twist the wooden legs into the mounting plates until they are tight.
- Open the suitcase and place your storage items inside.
22 Hearth Side Tufted Bench
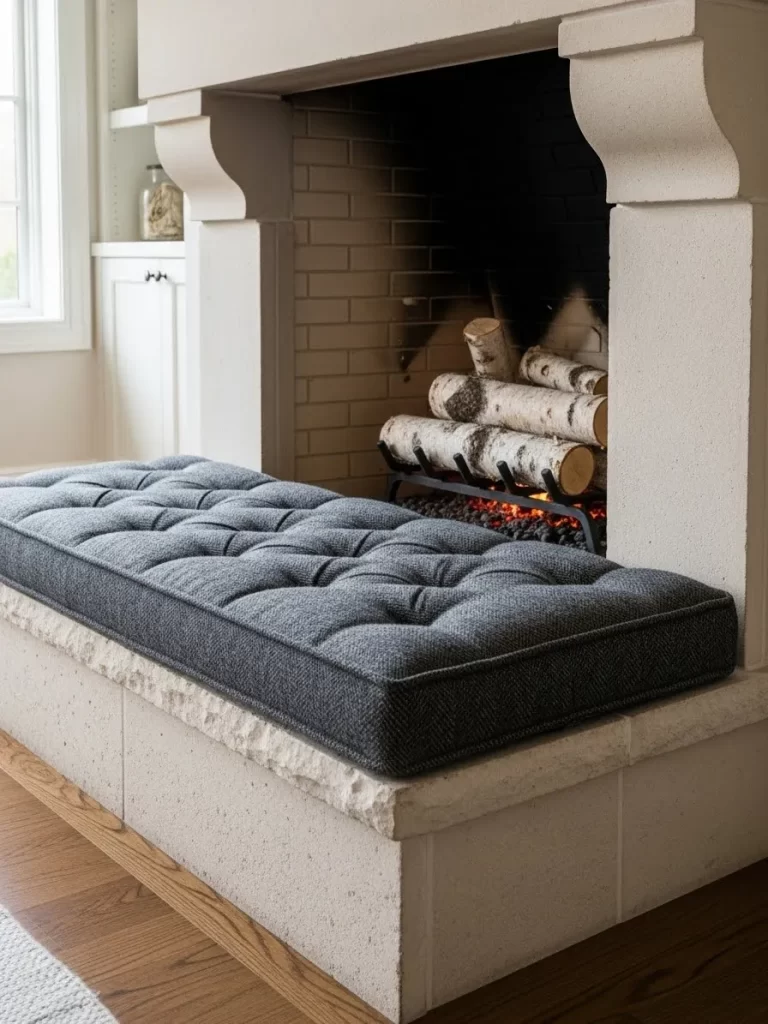
A long tufted cushion turns a cold fireplace hearth into a warm seating area. The dark gray fabric contrasts beautifully with the white stone of the fireplace. This bench provides a cozy spot for guests to relax near the fire.
It uses the existing structure of your home to add more seats without taking up floor space. The thick padding makes the hard stone comfortable for long periods. You can easily remove the cushion when needed.
This design keeps your living room looking elegant and organized. It is a simple way to maximize every square inch of your seating area. It makes winter nights much more enjoyable.
Material required list
- 3 inch thick high density foam
- Gray upholstery fabric
- 1/2 inch thick plywood base
- Spray adhesive
- Batting for extra softness
Equipment required list
- Staple gun
- Electric carving knife for foam
- Measuring tape
- Scissors
DIY instruction step by step
- Measure the width and depth of your fireplace hearth carefully.
- Cut the plywood base to match the hearth dimensions minus one inch.
- Cut the foam to the same size as the plywood using the electric knife.
- Spray adhesive on the plywood and press the foam onto the surface.
- Wrap a layer of batting over the foam and staple it to the bottom of the wood.
- Lay your fabric flat and place the cushion on top of the fabric.
- Pull the fabric tight and staple it to the underside of the plywood base.
23 Slat Wall Floating Benches
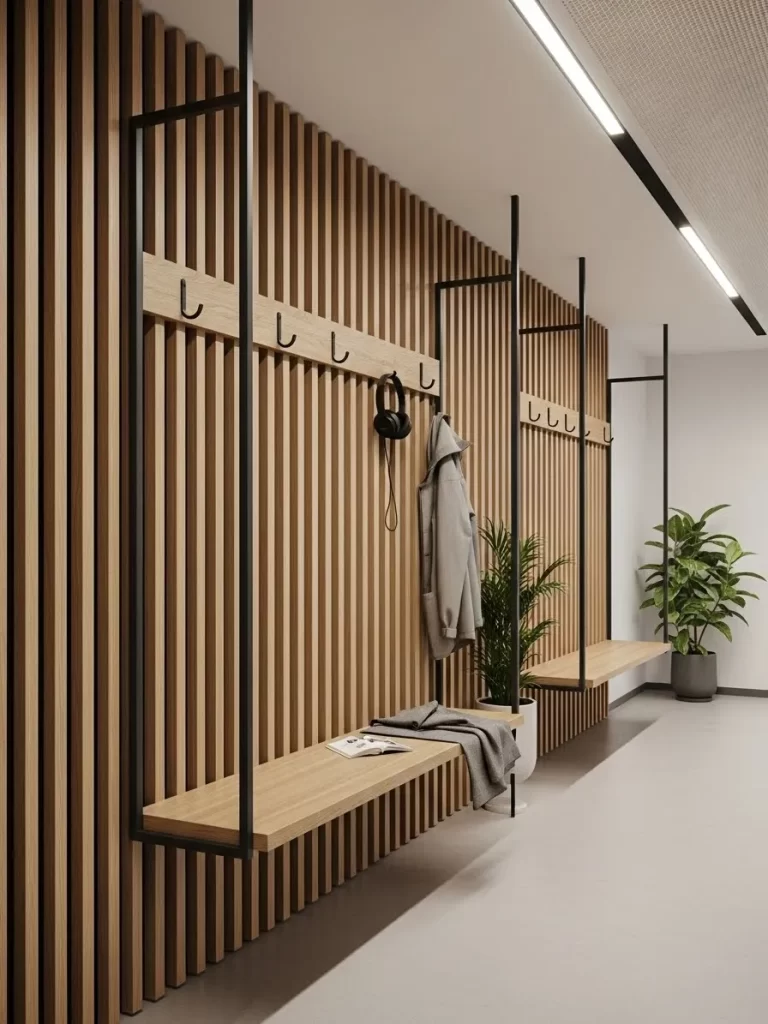
Floating benches attached to a slat wall create a modern and airy seating area. The vertical wood slats draw the eye upward and make the room feel taller. These benches do not have legs which keeps the floor clear.
This design is suited for narrow hallways or minimalist living rooms. The black metal frames add a touch of industrial style to the warm wood. You can use the area under the benches for storing shoes.
This setup looks like a custom piece of architecture built into the room. It provides plenty of seating for several people at once. It is a sleek way to handle a crowd.
Material required list
- 1 by 2 inch wood slats for the wall
- 2 by 12 inch wood boards for the seats
- Heavy duty wall brackets
- Wood stain and sealant
- Long wood screws
Equipment required list
- Power drill
- Level
- Stud finder
- Saw
DIY instruction step by step
- Use a stud finder to locate the vertical wall studs across the entire wall.
- Screw the wood slats vertically into the studs with small gaps between them.
- Sand the seat boards until they are very smooth and apply a clear stain.
- Mark the wall at the desired height for the benches using a level.
- Screw the heavy duty brackets into the wall studs through the slats.
- Place the seat boards on the brackets and secure them from underneath.
- Check the benches for stability and add extra screws to the slats if needed.
24 Mid Century Storage Trunk
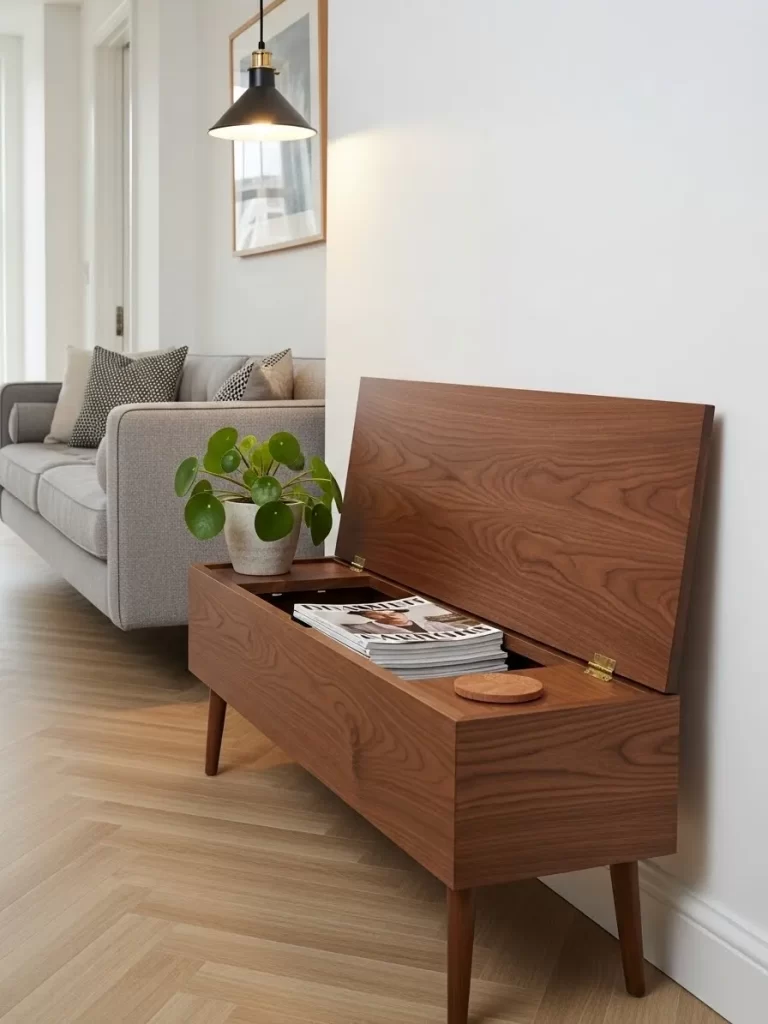
This mid century style trunk features a walnut finish and a hidden storage area. The lid flips open to hold books or extra pillows for your guests. Tapered legs give it a classic look that fits well with modern furniture.
It provides a sturdy surface for sitting or as a low coffee table. The rich wood grain adds a touch of natural beauty to the room. This piece is small but offers two functions in a single footprint.
You can place it behind a sofa or along a wall to save space. It is a timeless solution for any tiny living room layout. It looks expensive but is easy to build.
Material required list
- 3/4 inch walnut plywood sheets
- Four tapered wooden legs
- Brass hinges
- Wood glue and finish
- Sandpaper
Equipment required list
- Table saw
- Power drill
- Screwdriver
- Clamps
DIY instruction step by step
- Cut your plywood into pieces for the four sides and the bottom of the trunk.
- Glue and screw the sides together to form a sturdy rectangular box.
- Attach the bottom piece to the box and let the glue dry overnight.
- Cut a piece for the lid and sand all the edges until they are smooth.
- Attach the lid to the back of the trunk using the brass hinges.
- Flip the trunk over and screw the tapered legs into the four corners.
- Apply a clear wood finish to bring out the natural grain of the walnut.
25 Modern Floor Rocker

A modern floor rocker offers a low profile seating option for gaming or watching TV. The black fabric and geometric stitching give it a cool and contemporary look. It sits directly on the rug and rocks gently.
This chair is lightweight and easy to move around the room. It is suited for kids or adults who enjoy sitting close to the floor. The curved frame provides great support for your back.
This piece takes up very little visual space in a tiny room. You can tuck it away under a table when you are finished. It is the best seat for long gaming sessions.
Material required list
- Curved plywood strips for the rocking frame
- High density foam padding
- Black upholstery fabric
- Wood glue and bolts
- Batting
Equipment required list
- Jigsaw
- Power drill
- Staple gun
- Measuring tape
DIY instruction step by step
- Cut two identical curved rocking rails out of thick plywood using a jigsaw.
- Connect the rails together using three cross boards to create the frame.
- Cut a piece of plywood for the seat and backrest and screw it to the frame.
- Glue foam to the seat and backrest surfaces and cover with batting.
- Wrap the black fabric over the padding and staple it to the back of the wood.
- Ensure the fabric is pulled tight to avoid any wrinkles or lumps.
- Test the rocking motion on a rug to make sure it moves smoothly.
26 Curved Navy Bar Stool
This curved bar stool features a navy velvet seat and a gold metal frame. The high back provides extra comfort for long conversations at the bar. Its slim profile allows you to tuck several under a counter.
The gold finish adds a touch of glam and luxury to the room. The open frame design keeps the room feeling light and airy. You can use this stool as an extra seat when guests are over.
The velvet material is soft and easy to clean with a damp cloth. This piece is both a functional seat and a stylish decorative item. It makes any kitchen counter look like a high end lounge.
Material required list
- Round metal or wood base
- Curved backrest frame
- Navy velvet fabric
- Gold metallic spray paint
- Foam padding
Equipment required list
- Power drill
- Staple gun
- Paintbrush
- Measuring tape
DIY instruction step by step
- Construct a simple stool frame with a tall backrest using wood or metal.
- Paint the entire frame with gold metallic spray paint and let it dry.
- Cut a circle of plywood for the seat and a curved piece for the backrest.
- Glue foam to both pieces and wrap them in navy velvet fabric.
- Staple the fabric securely to the back of the wood pieces.
- Screw the upholstered seat and backrest onto the gold frame.
- Add rubber pads to the bottom of the legs to protect your floors.
27 Braided Jute Cube Poufs
Braided jute poufs offer a natural and textured seating option for a cozy home. The tan color and woven pattern add a rustic touch to your decor. These cubes are sturdy enough to act as stools.
The natural material is durable and brings a sense of the outdoors inside. You can use them to create a relaxed and casual seating area on a rug. They are light enough for children to move.
This solution is both eco friendly and very stylish. They fit under most coffee tables when not in use. They provide a nice contrast to smooth leather or velvet furniture.
Material required list
- Large amount of jute rope
- Thick cardboard or wood cube base
- Hot glue sticks
- Clear sealant spray
Equipment required list
- Hot glue gun
- Scissors
- Measuring tape
DIY instruction step by step
- Find or build a sturdy box to serve as the core of your pouf.
- Start at the bottom of the box and apply a line of hot glue.
- Press the jute rope into the glue and wrap it tightly around the box.
- Continue wrapping the rope upward until the entire side is covered.
- Coil the rope on the top of the box in a circular pattern to finish the surface.
- Use plenty of glue at the end of the rope to ensure it stays in place.
- Spray the finished pouf with a clear sealant to prevent the jute from fraying.
28 Hidden Drawer Ottoman
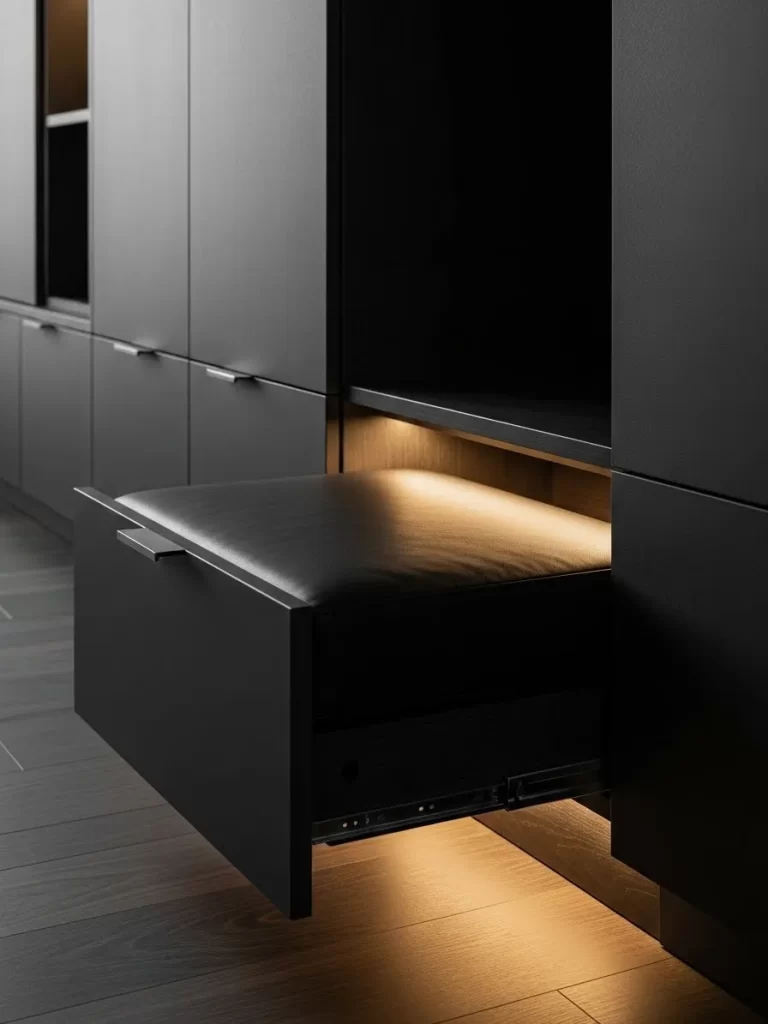
A hidden drawer ottoman is a clever way to add seating and secret storage. The black leather seat pulls out from a cabinet like a regular drawer. This design is suited for bedrooms or hallways.
When you are done, the seat slides back into the cabinet and disappears. This keeps your floor area clear and the room looking organized. The built in lighting adds a high tech touch.
It is a masterpiece of space saving furniture design. You can hide your shoes or electronics inside. It provides a comfortable place to sit while getting ready for the day.
Material required list
- Large wooden cabinet frame
- Heavy duty drawer slides
- Plywood for the seat base
- Black leather fabric
- Foam padding
Equipment required list
- Power drill
- Staple gun
- Saw
- Level
DIY instruction step by step
- Build a sturdy wooden cabinet with a large opening at the bottom.
- Install heavy duty drawer slides inside the bottom opening of the cabinet.
- Build a thick wooden drawer box that fits into the slides.
- Cut a plywood top for the drawer and glue foam to the surface.
- Wrap the foam in black leather and staple it to the bottom of the plywood.
- Screw the upholstered seat onto the top of the drawer box.
- Install a handle on the front of the drawer so you can pull it out easily.
29 Built In Breakfast Nook
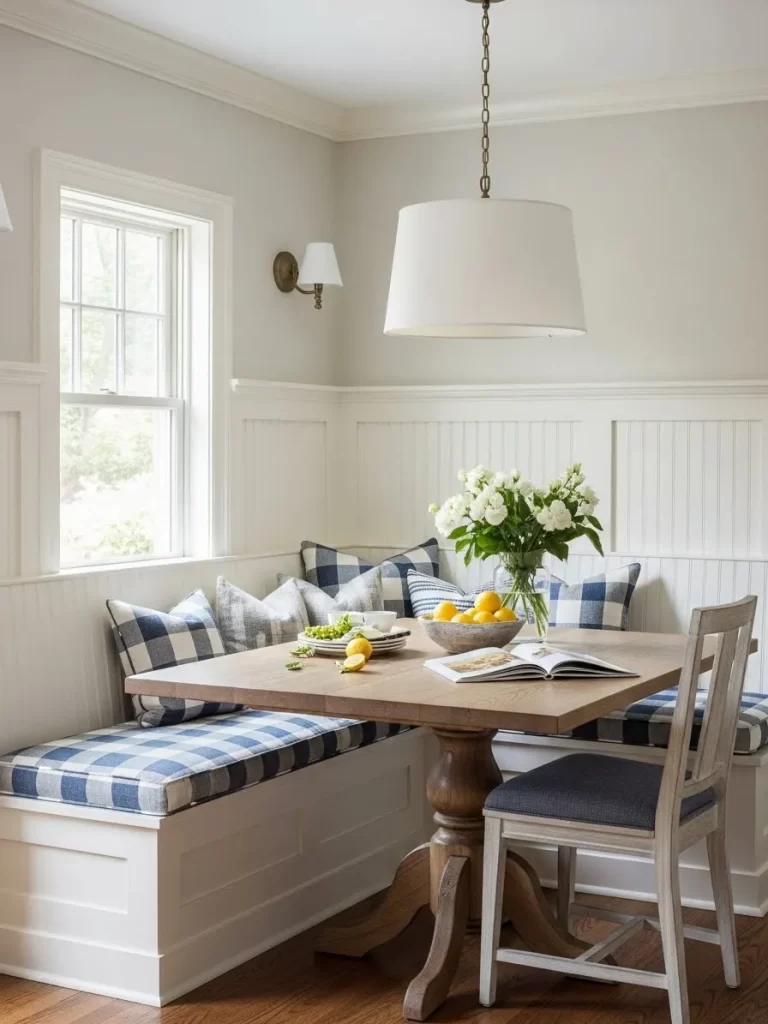
A built in breakfast nook maximizes seating in a small kitchen corner. The white wooden bench fits perfectly against the walls to save floor space. Blue and white checkered cushions add a cozy feel.
The area under the seats can be used for extra storage bins. Natural light from the window makes this the most inviting spot in the house. This design turns an unused corner into a dining zone.
It is a smart way to add value and character to your home. You can fit more people around a table with a bench than with chairs. It feels like a private cafe in your house.
Material required list
- 2 by 4 lumber for the frame
- 3/4 inch plywood for the seat and sides
- White paint and primer
- Checkered fabric for cushions
- Foam padding
Equipment required list
- Circular saw
- Power drill
- Paint roller
- Staple gun
DIY instruction step by step
- Measure the corner area where the bench will be built.
- Build a rectangular frame using 2 by 4 lumber and screw it into the wall studs.
- Cut plywood pieces for the front and sides of the bench and nail them to the frame.
- Cut a plywood top for the seat and sand all the edges until smooth.
- Apply a coat of primer and two coats of white paint to the wood.
- Cut foam to fit the seat and wrap it in the checkered fabric.
- Staple the fabric to the bottom of the foam to create the cushions.
30 Butterfly Chair with Fur
A butterfly chair offers a relaxed and stylish seating option for any room. The black metal frame and tan leather seat give it a modern and airy look. Adding a faux fur throw makes it extra cozy.
The curved design provides great support for your back while you relax. This chair takes up very little visual space because of its open frame. It is suited for reading a book or talking.
It adds a touch of boho charm to your living room. You can fold it up and put it away if you need more space. It is light enough to move to any room easily.
Material required list
- Butterfly chair metal frame
- Tan leather seat cover
- Faux fur throw blanket
- Metal clips for the cover
Equipment required list
- No special equipment required for assembly
DIY instruction step by step
- Purchase a pre made butterfly chair frame and a leather seat cover.
- Unfold the metal frame and ensure all the joints are secure and tight.
- Slide the corners of the leather seat cover onto the four points of the frame.
- Push down on the seat to make sure the cover is fully seated on the frame.
- Drape the faux fur throw over the back of the chair for added comfort.
- Arrange the fur so it looks natural and covers the top edge of the leather.
- Place the chair in a sunny corner near a plant to complete the look.
31 X Frame Folding Stools

X frame folding stools are a classic space saving solution for tiny homes. The metal legs fold flat so you can store them in a closet or under a bed. The wooden seats add warmth.
The slim profile allows you to fit several in a narrow hallway. They are lightweight and easy to carry to wherever you need a quick seat. This design is durable and will last for years.
It is a practical and stylish addition to your furniture collection. They work well for outdoor parties as well as indoor use. You can stack them against a wall when folded.
Material required list
- Square metal tubing for the legs
- Round wooden seats
- Pivot bolts and nuts
- Metal paint
Equipment required list
- Power drill
- Wrench
- Saw
- Sandpaper
DIY instruction step by step
- Cut four pieces of metal tubing to the same length for each stool.
- Drill a hole in the center of each piece for the pivot bolt.
- Connect two pieces together using a bolt and nut to create an X shape.
- Repeat this for the second set of legs and connect the two X frames with cross bars.
- Sand the wooden seat and apply a clear coat or stain.
- Screw the wooden seat onto the top of the X frame legs.
- Test the folding motion to make sure the stool opens and closes smoothly.
32 Height Adjustable Scissor Table
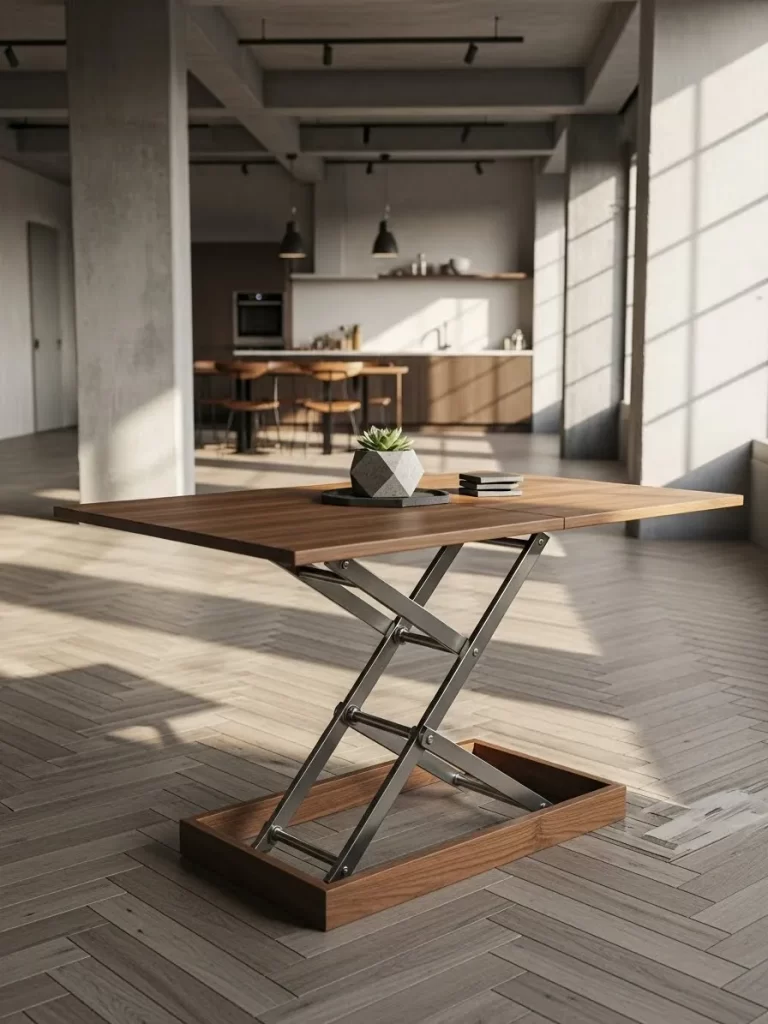
A height adjustable coffee table is a multi functional masterpiece for small rooms. It features a wooden top and a metal X frame base that can be raised or lowered. Use it as a desk or dining table.
The industrial look fits well with modern and minimalist decor styles. It is sturdy enough to hold heavy items or act as a temporary desk. This table uses its footprint effectively.
It is a smart choice for anyone living in a tiny apartment. You can change the height in seconds without any tools. It replaces two pieces of furniture with just one.
Material required list
- One large wooden table top
- Metal X frame lifting mechanism
- Wood stain and sealant
- Metal screws
Equipment required list
- Power drill
- Screwdriver
- Measuring tape
- Sandpaper
DIY instruction step by step
- Purchase a pre made metal lifting mechanism for a height adjustable table.
- Sand your wooden table top until it is very smooth and even.
- Apply a coat of wood stain to match your other living room furniture.
- Flip the table top over and mark the positions for the lifting mechanism.
- Screw the metal base onto the bottom of the wood top using strong screws.
- Ensure the mechanism is centered so the table remains stable when raised.
- Test the lifting function to make sure it moves easily and locks into place.
33 Cork Stool Side Table
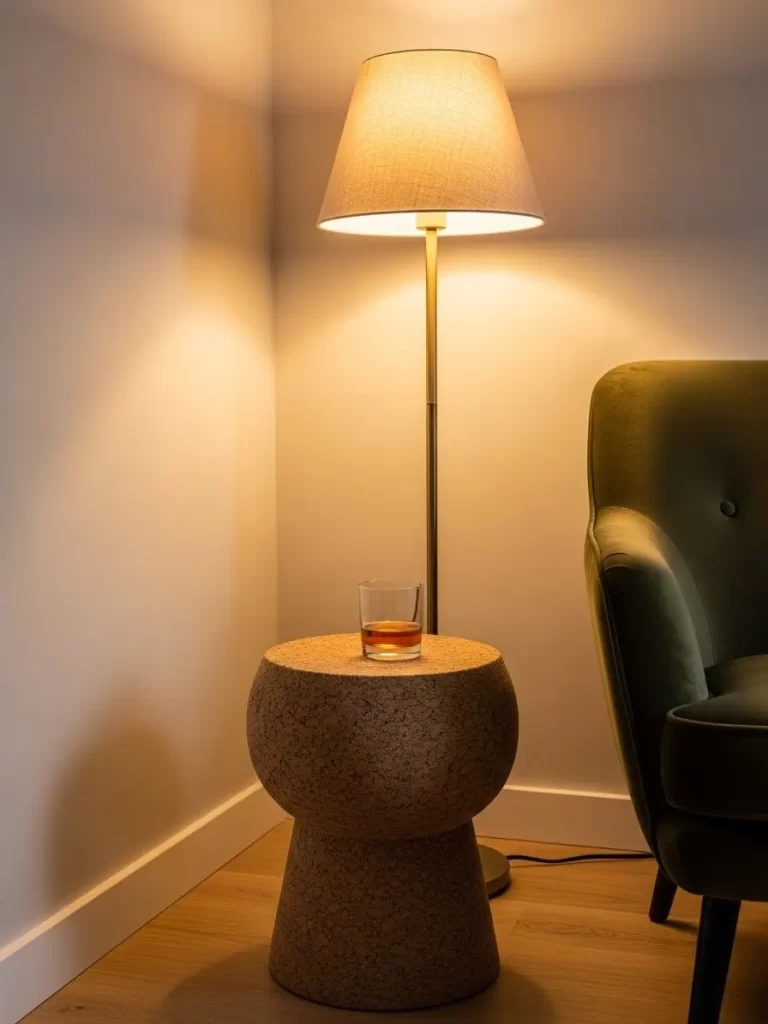
A cork stool is a unique and eco friendly piece for your living room. The natural material is soft to the touch and adds a warm texture. This item works as a seat or a side table.
Cork is naturally water resistant and easy to clean with a damp cloth. This stool is lightweight and easy to move to where it is needed. It adds a touch of modern style to your home.
You will love the natural look and feel of this versatile piece. It is very quiet when moved across hard floors. The material is sustainable and looks great in any environment.
Material required list
- Large block of compressed cork
- Fine grit sandpaper
- Clear protective sealant spray
Equipment required list
- Wood lathe or sharp carving tools
- Sanding block
- Measuring tape
DIY instruction step by step
- Start with a large rectangular block of compressed cork material.
- Use a wood lathe to turn the block into a smooth drum or hourglass shape.
- If you do not have a lathe, use carving tools to shape the cork by hand.
- Sand the entire surface of the stool until it is very smooth and even.
- Wipe away any cork dust with a clean and dry cloth.
- Spray the stool with a clear protective sealant to prevent stains and wear.
- Let the sealant dry completely before using the stool as a seat.
34 Floating Minimalist Wall Bench
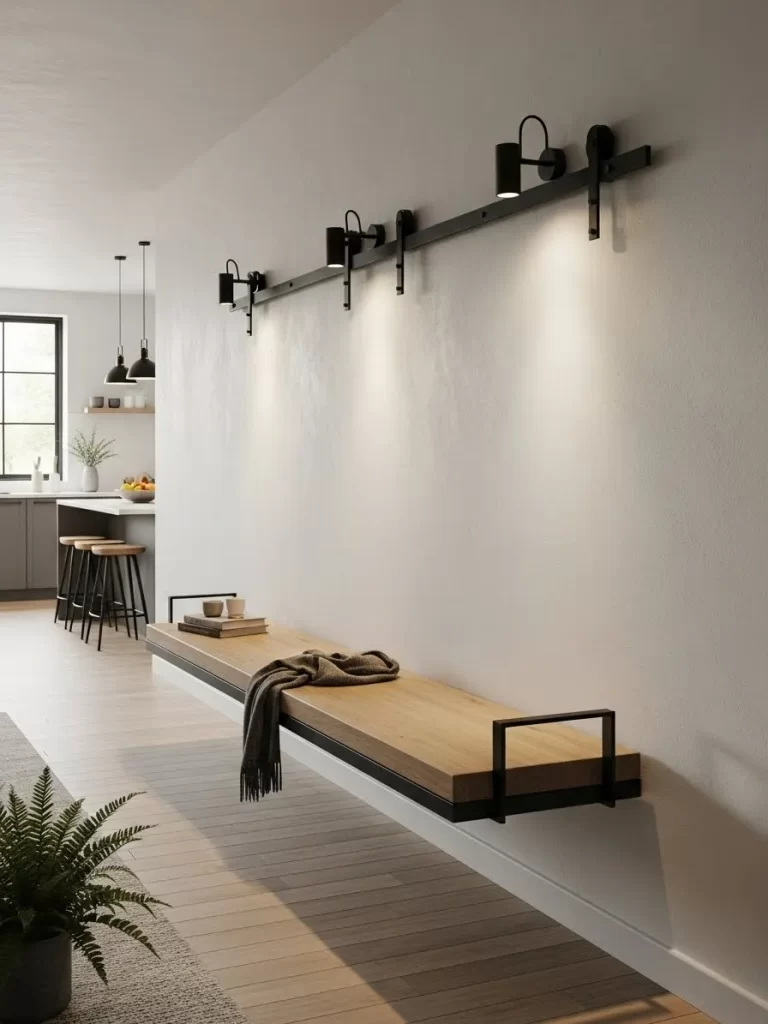
A floating minimalist wall bench provides seating without taking up any floor space. The long wooden seat is attached to the wall using hidden metal brackets. This keeps the room open.
The simple wood grain adds a touch of natural beauty to a plain wall. It is suited for entryways or as extra seating along a living room wall. This bench is sturdy enough for adults.
It is a custom looking piece that is easy to build and install. You can mount it at any height to suit your needs. It makes cleaning the floors much easier since there are no legs.
Material required list
- One long and thick wooden board
- Heavy duty floating shelf brackets
- Heavy duty wall anchors for masonry or studs
- Wood stain and sealant
Equipment required list
- Power drill
- Level
- Stud finder
- Saw
DIY instruction step by step
- Measure the length of the wall where the bench will be installed.
- Cut your wooden board to the desired length and sand all surfaces.
- Apply a coat of wood stain and let it dry completely.
- Use a stud finder to locate the vertical wall studs for a secure mount.
- Mark the wall at seat height and use a level to keep the line straight.
- Screw the floating shelf brackets into the wall studs using heavy duty anchors.
- Slide the wooden board onto the brackets and secure it according to the instructions.
35 Tufted White Boucle Sofa
A tufted boucle sofa offers a luxurious and comfortable primary seating option. The soft white fabric and tufted design add a touch of elegance. It provides enough space for several people.
Boucle fabric is durable and adds a unique texture to your decor. You can style the sofa with colorful pillows to show your style. It fits against a wall to maximize floor space.
This piece is a classic and inviting focal point for any living room. The nubby texture is very trendy and feels soft against the skin. It makes the room feel high end and cozy.
Material required list
- Wooden sofa frame
- High density upholstery foam
- White boucle fabric
- Upholstery buttons
- Wood legs
Equipment required list
- Staple gun
- Long upholstery needle
- Measuring tape
- Scissors
DIY instruction step by step
- Build or buy a sturdy wooden sofa frame with a high back.
- Glue thick foam to the seat and backrest surfaces and cover with batting.
- Lay the boucle fabric over the backrest and mark the spots for the buttons.
- Use a long needle to pull the buttons through the fabric and foam to the back.
- Tie the button threads tight on the back of the frame to create the tufted look.
- Wrap the fabric over the seat and staple it securely to the bottom of the wood.
- Screw the wooden legs into the four corners of the sofa base.
36 Terracotta Block Stools
Large terracotta velvet poufs provide a soft and colorful seating option. These square cushions sit directly on the floor and add a cozy feel. You can move them around easily for guests.
Velvet fabric is soft and comfortable for sitting for long periods. You can use these poufs as extra seats or as large footrests. They are suited for casual gatherings or relaxing on a rug.
This solution is both practical and very trendy for a modern home. The warm color adds life to a neutral room. They are easy to stack in a corner when the party is over.
Material required list
- 4 yards of terracotta velvet fabric
- Large bag of shredded foam or beans
- Heavy duty thread
- Long zipper
Equipment required list
- Sewing machine
- Fabric scissors
- Pins
- Measuring tape
DIY instruction step by step
- Cut six large squares of terracotta velvet fabric for each pouf.
- Pin four of the squares together to form the sides of a box.
- Sew the side seams together with the pretty side of the fabric facing in.
- Attach the top square to the sides and sew the seams.
- Sew a long zipper into one edge of the final bottom square.
- Attach the bottom square to the sides but leave the zipper open.
- Turn the cover right side out and fill it tightly with foam or beans.
37 Storage Drum Stool
A storage drum stool is a multi functional piece with a hidden secret. The gray fabric body provides a soft seat while the wood lid hides a storage area. You can flip the lid over.
The round shape fits easily into tight corners or next to a sofa. It is lightweight and easy to move to wherever you need a seat. The neutral colors blend well with most modern styles.
This stool is a smart and stylish solution for a small home. You can hide your remotes or chargers inside. It looks great as a pair in front of a fireplace.
Material required list
- Large cardboard or plastic drum
- Gray upholstery fabric
- Round wooden board for the lid
- Foam padding
- Spray adhesive
Equipment required list
- Staple gun
- Saw
- Measuring tape
- Scissors
DIY instruction step by step
- Find a sturdy drum or bucket to serve as the base for your stool.
- Cut a round piece of plywood to fit perfectly on the top of the drum.
- Glue a layer of foam to the top of the plywood lid and wrap it in fabric.
- Staple the fabric to the bottom of the lid for a clean and soft finish.
- Wrap the gray fabric around the body of the drum and staple the edges.
- Ensure the fabric is pulled tight and covers the entire drum surface.
- Place the lid on top and flip it over when you need a flat tray surface.
38 Wood Library Step Chair

A wood library step chair is a classic piece that transforms into a ladder. The dark wood and brass hinges add a touch of antique style. You can use it as a chair or reach high shelves.
It is a functional and beautiful piece of furniture that guests will admire. The solid wood construction ensures it will last for many years. This chair uses its footprint effectively for two functions.
It is a timeless and practical addition to any library or living room. It is a great conversation starter. The mechanism is very clever and easy to operate with one hand.
Material required list
- Solid wood boards
- Heavy duty brass hinges
- Wood glue and screws
- Dark wood stain and sealant
Equipment required list
- Table saw
- Power drill
- Screwdriver
- Sandpaper
DIY instruction step by step
- Cut your wood boards into pieces for the seat, back, and ladder steps.
- Build the chair frame and attach the seat using glue and screws.
- Cut the backrest in half and attach the two pieces using the brass hinges.
- This hinge allows the backrest to flip down and become the top step of the ladder.
- Attach the additional ladder steps to the bottom of the chair frame.
- Sand every surface until smooth and apply a dark wood stain.
- Test the flipping motion several times to ensure the chair is stable in both positions.
39 Canvas Director Chairs
Canvas director chairs offer a casual and portable seating option for any home. The black metal frames and olive green fabric give them a modern look. These chairs fold flat for storage.
The lightweight design makes them easy to carry to different rooms or outdoors. The canvas material is durable and comfortable for long periods. These chairs take up very little visual space.
This is a practical and stylish solution for any small apartment. They look great in a corner with a floor lamp. You can buy replacement covers in many different colors to change the look.
Material required list
- Folding metal director chair frame
- Heavy duty canvas fabric
- Wood dowels for the fabric loops
- Fabric paint or dye
Equipment required list
- Sewing machine
- Fabric scissors
- Measuring tape
DIY instruction step by step
- Purchase a basic metal folding chair frame from a furniture store.
- Measure the seat and backrest areas and cut your canvas fabric to fit.
- Sew large loops on the ends of the fabric pieces for the chair rails.
- Slide the fabric loops onto the metal rails of the chair frame.
- Insert wood dowels into the loops if needed to keep the fabric secure.
- Ensure the fabric is pulled tight when the chair is fully opened.
- Paint or dye the canvas in your favorite color to match your living room decor.
40 Vintage Cushion Trunk

A vintage leather trunk with a top cushion turns an old object into a functional seat. The rich brown leather and gold hardware add history. This piece provides a sturdy surface for sitting.
The soft gray cushion makes the hard trunk comfortable for your guests. You can easily remove the cushion to access your items. This project gives a second life to a beautiful old trunk.
It is a stylish and practical addition to any small room. It fits well in an entryway or at the foot of a bed. You can store your winter coats inside to save closet space.
Material required list
- One vintage leather trunk
- 2 inch thick foam padding
- Gray upholstery fabric
- Wood board for the cushion base
- Spray adhesive
Equipment required list
- Staple gun
- Saw
- Measuring tape
- Scissors
DIY instruction step by step
- Measure the top of the vintage trunk carefully.
- Cut a wood board to match the dimensions of the trunk lid.
- Glue the foam to the top of the wood board using spray adhesive.
- Wrap the gray fabric over the foam and staple it to the bottom of the wood.
- Ensure the fabric is pulled tight and the corners are folded neatly.
- Place the finished cushion on top of the trunk lid.
- Use small pieces of hook and loop tape to keep the cushion from sliding off.
41 Floating Shadow Cabinet Bench
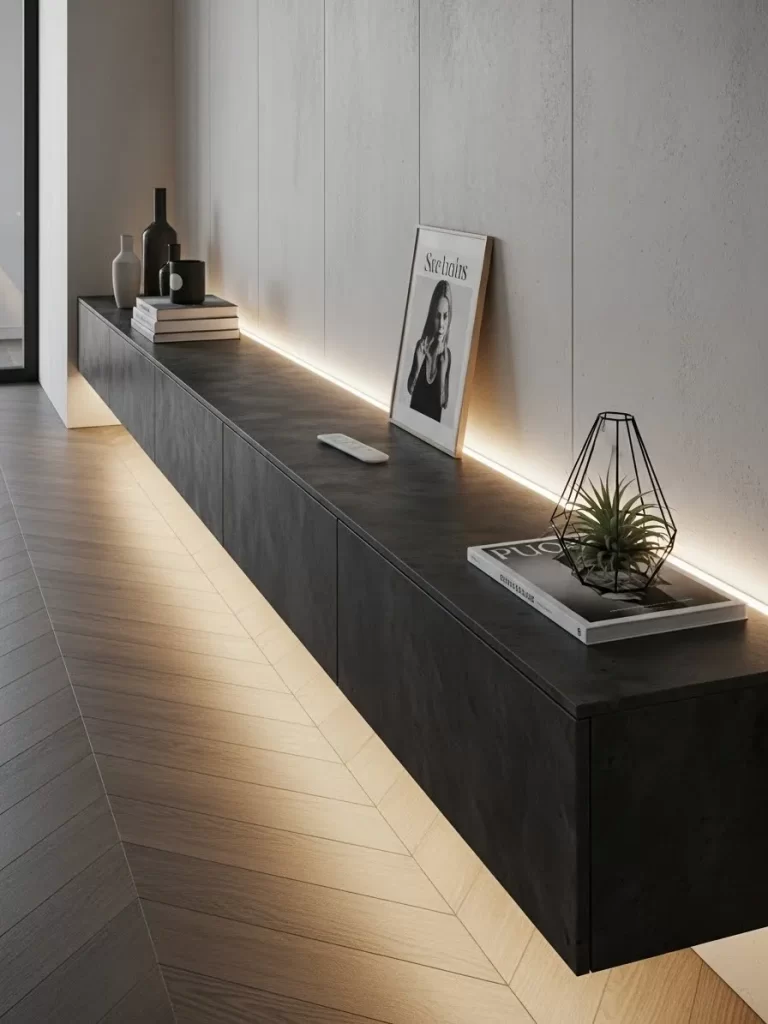
This long charcoal cabinet floats above the floor to provide a sleek seating and storage solution. It features a dark matte finish that looks modern and sophisticated against a light wall. The top surface is long enough to hold books or act as a wide bench for several guests.
A soft glow from an integrated light strip beneath the cabinet adds depth to the room. This lighting makes the heavy piece appear weightless and helps illuminate the walkway. It is a smart way to add massive functionality to a hallway or living room wall without using a single inch of floor space.
Material required list
- Three 3/4 inch thick plywood sheets
- Heavy duty French cleat mounting system
- LED light strip with adhesive backing
- Dark charcoal matte furniture paint
- Wood glue and 1.5 inch screws
Equipment required list
- Circular saw or table saw
- Power drill and driver bits
- Level tool
- Stud finder
- Paint roller and tray
DIY instruction step by step
- Measure the length of your wall and decide how long you want the cabinet to be.
- Cut the plywood into top, bottom, and side panels to form a long rectangular box.
- Apply wood glue to the edges and screw the panels together to build the main cabinet frame.
- Build internal dividers every 24 inches to ensure the top can support the weight of people sitting.
- Sand the entire cabinet until smooth and apply a coat of primer followed by the charcoal paint.
- Use a stud finder to locate the wall studs and screw the female half of the French cleat into them.
- Attach the male half of the cleat to the back of the cabinet and lift it onto the wall cleat.
- Stick the LED light strip to the bottom back edge of the cabinet and plug it into a nearby outlet.
Living in a tiny space does not mean you have to stop hosting parties. Choosing pieces that fold or nest makes a massive difference in your daily life. You can transform your home into a welcoming place for everyone you love.
Try starting with one or two small projects to see what works best for your routine. Most of these seating options are easy to build or find on a budget. Your living room will feel much larger once the visual clutter is gone.
Confidence comes from having a plan for every guest who enters your home. You now have 41 creative ways to ensure nobody has to sit on the floor. Take pride in your small home and make it work for your lifestyle.
Key Takeaways
Look for furniture that nests or folds to keep your walking paths clear during the day. This simple change allows you to expand your seating only when you need it.
Use your vertical space by mounting benches or stools directly to the wall. This keeps the floor open and makes a small room feel much more airy.
Hidden storage inside ottomans and trunks helps reduce the mess that often builds up in tiny homes. You get a comfortable seat and a place to hide blankets at the same time.
Soft items like floor cushions or poufs are very easy to hide in a closet. Pull them out for casual movie nights and tuck them away when the guests leave.