
A cozy living room can feel cramped the moment you invite guests over. Adding seating often means sacrificing precious space, instantly turning your home into a cluttered puzzle. This challenge is a common concern for apartment dwellers and homeowners alike who want to entertain comfortably.

Fortunately, brilliant design exists for maximizing every square inch of your home. Smart solutions let you multiply seating options while maintaining a beautiful, clutter-free environment. You must look beyond bulky sofas and traditional armchairs when optimizing your small space.
We have compiled forty-one genius solutions designed to tackle this common problem head-on. These ideas integrate seating, storage, and style seamlessly into small areas. Get ready to transform your tiny living room into an inviting haven, ready for any impromptu gathering.
1. Wall-Mounted Folding Bench
Retractable Slat Bench: Seating That Disappears
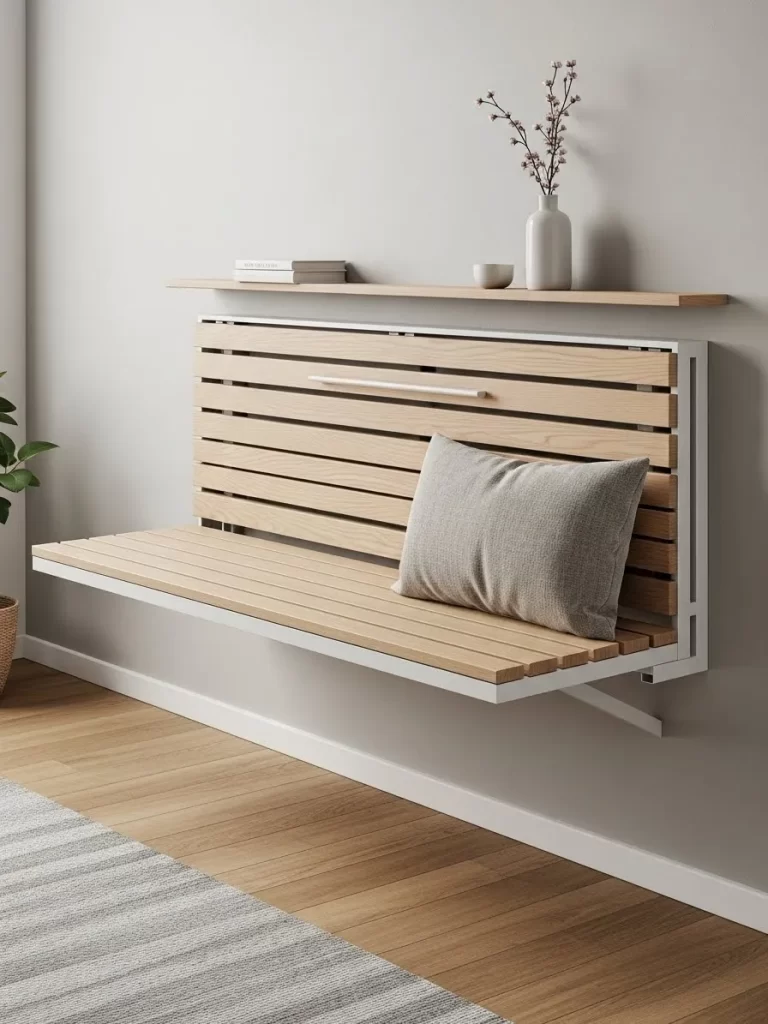
Living in a small apartment requires clever furnishing choices. This wall-mounted slat bench offers a streamlined, simple solution for adding extra seating without permanently taking up floor space. It folds neatly against the wall when not needed, resembling a decorative panel or a slim console table. When guests arrive, the bench easily folds down, providing a sturdy, comfortable spot for two or three people.
The light wood finish and clean white metal frame lend a modern, airy feel to the room, preventing the small area from feeling cluttered. Placing a simple shelf just above it creates an appealing focal point while adding display space for small items like books or vases. This design truly maximizes vertical space, proving that even the tiniest living room can accommodate company.
DIY Instruction: Creating a Basic Folding Bench
Item Name: Retractable Slat Bench
Materials Required
- Two sturdy plywood or solid wood boards (for the top and back)
- Wooden slats (enough to cover the surface of your bench)
- Two heavy-duty folding shelf brackets (or specialized folding bench hardware)
- Screws appropriate for your wall type (e.g., toggle bolts for drywall, masonry screws for brick)
- Wood glue
- Wood finish, stain, or paint (optional)
Equipment Required
- Measuring tape
- Power drill and various bits
- Stud finder
- Level
- Screwdriver
- Clamps
- Safety glasses and gloves
Step-by-Step Instructions
- Prepare the Slats and Base: Cut your wooden slats and the main seat board to the desired length of your bench. If you are using a base board, ensure it is smooth. Sand all wood pieces thoroughly to remove rough edges, which gives a professional look.
- Assemble the Seat Top: Apply wood glue to the long edges of the slats. Clamp them together securely on top of the main seat board (or simply align and attach them if using individual slats for the seat). Allow the glue to dry completely according to the manufacturer’s directions.
- Attach Folding Hardware: Following the instructions for your folding brackets, position and attach them to the underside of your assembled seat bench using appropriate screws. Make sure the brackets are positioned symmetrically and are squared to the edges.
- Locate Wall Studs: Use a stud finder to locate the wall studs where you plan to install the bench. Marking the stud locations ensures you secure the weight-bearing components directly into the structure for maximum support. If studs are unavailable, you must use heavy-duty wall anchors, such as toggle bolts.
- Mount the Bench Frame: Hold the assembled bench against the wall at the desired seating height. Use a level to ensure the entire unit is straight. Once leveled, mark the mounting points for the folding brackets onto the wall.
- Secure to the Wall: Drill pilot holes into the wall studs or prepared anchor locations. Screw the folding brackets securely into the wall structure, making certain the screws are seated tightly.
- Test the Bench: Slowly fold the bench down to the seating position. Apply gentle downward pressure to test stability. Once satisfied, fully test the bench for weight capacity before use. You can apply a wood stain or protective clear coat at this stage, if you wish.
2. Ottoman with Nested Poufs
Multifunctional Ottoman Set: Seating in Layers
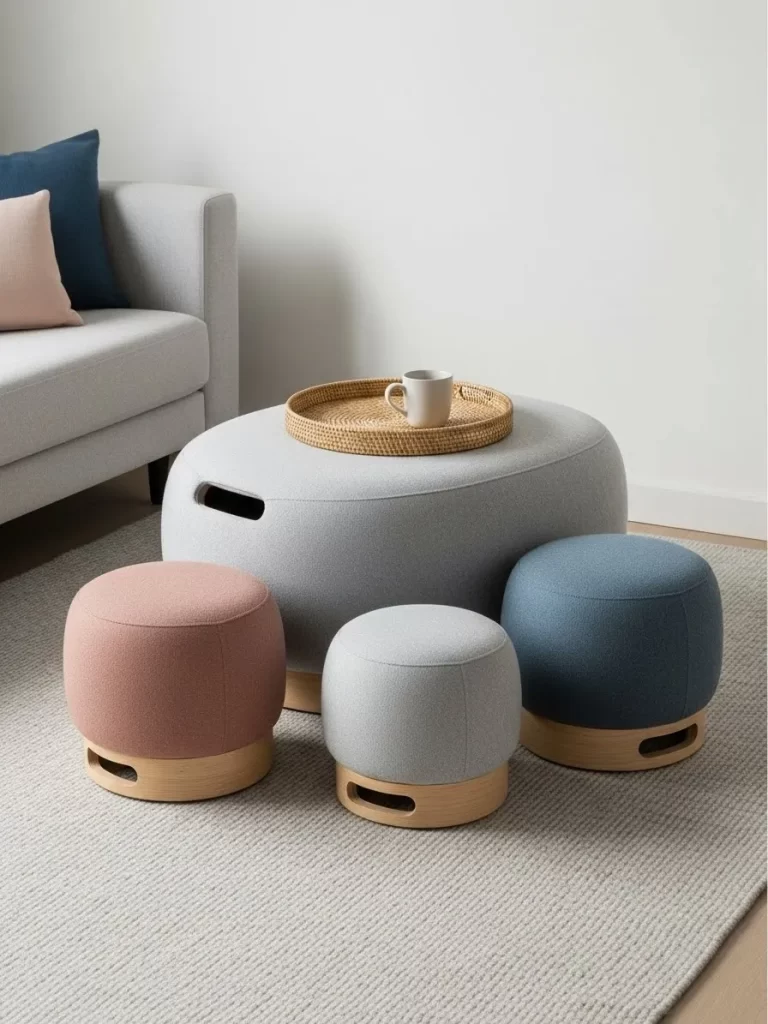
This clever set demonstrates how a central piece can multiply seating options instantly. A large, oval ottoman, upholstered in soft grey fabric, serves as a coffee table when topped with a sturdy serving tray. The smart design incorporates cutouts at the base, hinting at the smaller seating options nested within. This helps keep the living area clear during daily use.
When extra seating becomes necessary, three smaller, round poufs are easily retrieved from beneath the main ottoman. Finished in complementary colors like dusty pink, cool blue, and light gray, they introduce texture and a pop of color to the neutral space. These versatile pieces function as footrests, casual seats, or even small side tables, making them an asset in a compact room.
DIY Instruction: Creating a Set of Nested Ottoman Poufs
Item Name: Multifunctional Ottoman Set
Materials Required
- Large, sturdy wooden storage box or pre-made ottoman frame (for the outer piece)
- Three medium-density foam discs (for the nested pouf tops)
- Fabric for upholstery (a total of about 4-6 yards, depending on size)
- Plywood or MDF bases for the nested poufs
- Upholstery batting or wadding
- Small furniture feet for all pieces
- Wood glue and staples
Equipment Required
- Staple gun
- Utility knife or electric carving knife (for cutting foam)
- Sewing machine (or needle and thread for hand stitching)
- Power drill and screws
- Measuring tape
Step-by-Step Instructions
- Construct the Pouf Bases: Cut the plywood or MDF into three circles (or squares) slightly larger than your foam discs. Attach the small furniture feet to the underside of each base using screws.
- Upholster the Pouf Tops: Place one foam disc on a base. Wrap the foam and base completely in upholstery batting, pulling it taut. Secure the batting to the underside of the base with staples.
- Cover the Poufs: Cut your chosen fabric, leaving enough overhang to pull around the base. Center the fabric over the batting and foam. Begin stapling the fabric to the underside of the base, pulling firmly to eliminate wrinkles. Neatly fold the corners or edges as you go, ensuring a smooth, finished edge.
- Create the Outer Ottoman: If building the outer piece, assemble your wooden box. If it is an open frame, ensure its internal height and width can accommodate the three smaller poufs. Attach furniture feet to the base of this large ottoman.
- Upholster the Outer Ottoman: Using the same fabric, cut large panels to cover the sides and top of the main ottoman. Staple the fabric tightly to the frame. If the top is removable, ensure the fabric edges are neatly finished and hemmed for a clean look.
- Nest and Use: Once all pieces are upholstered, arrange the three smaller poufs inside the large ottoman. The height should be carefully calculated so the lid or top of the main ottoman fits snugly over the nested pieces.
3. Pull-Out Ottoman Sleeper

Sectional with Integrated Sleeper Ottoman
Maximize the functionality of a small sectional by choosing a design that includes a pull-out sleeper ottoman. This configuration provides a plush footrest or a casual side table, using a tray, for everyday use. The neutral, textured upholstery keeps the living space feeling calm and expansive. It blends seamlessly with a variety of decor styles.
The true genius lies in its dual purpose as a guest bed. By lifting the handle on the ottoman’s front panel, the top cushion flips open. A hidden metal frame and mattress stored inside smoothly pull out and extend, transforming the piece into a comfortable twin-sized bed. This solution eliminates the need for bulky sofa beds, conserving valuable floor space while still providing overnight accommodations.
DIY Instruction: Converting an Ottoman into a Storage Unit
Item Name: Sleeper Storage Ottoman
Note: Due to the complexity of the integrated sleeper mechanism, this DIY focuses on converting a standard ottoman into deep storage, a common feature that still saves space.
Materials Required
- Large, sturdy ottoman frame with a removable lid
- Wood screws
- Two heavy-duty lift-up hinges (or piston hinges for assisted opening)
- Plywood or MDF boards (to line the interior, if needed)
- Wood glue
Equipment Required
- Power drill and various bits
- Measuring tape
- Level
- Screwdriver
Step-by-Step Instructions
- Assess the Ottoman: Remove the lid and inspect the frame. Ensure the internal structure is solid and provides deep, clear storage space. If the bottom is open, cut a piece of plywood to fit and secure it with screws to create a floor for the storage area.
- Mark Hinge Placement: Place the lid back onto the ottoman frame. Determine which side you want the lid to open from. Position the two lift-up hinges symmetrically on the back edge of the ottoman frame and the corresponding edge of the lid.
- Attach Hinges to Frame: Following the hinge manufacturer’s instructions, use the power drill and screws to firmly attach the base of the hinges to the back edge of the main ottoman box. Ensure they are straight and aligned.
- Attach Hinges to Lid: Lift the lid and align the other side of the hinges with the marked locations on the underside of the lid. Screw the hinges securely into the lid. If using assisted piston hinges, confirm they are installed correctly to bear the weight of the lid.
- Test and Adjust: Slowly lift and lower the lid, checking that the hinges operate smoothly and the lid opens fully without binding. The new storage space is immediately ready for blankets, pillows, or folding chairs.
4. Acrylic Console Bench
See-Through Lucite Console Bench
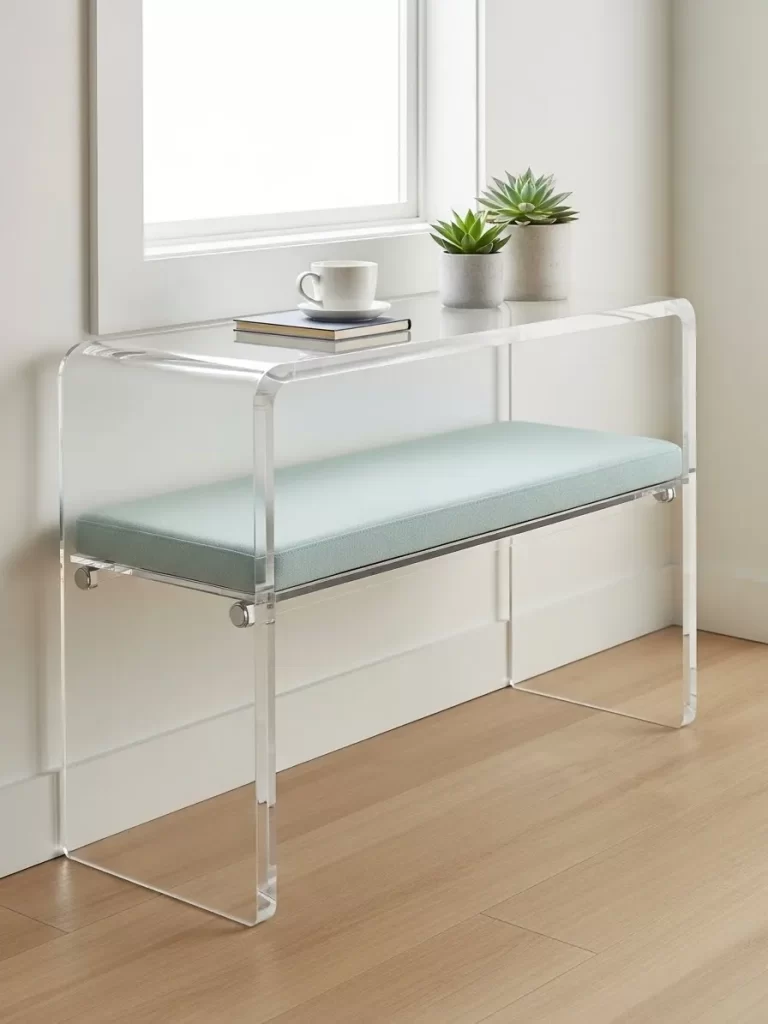
The use of clear materials, such as acrylic or Lucite, is a brilliant trick for minimizing the visual weight of furniture in a small room. This elegant console table, featuring a waterfall edge, provides a functional surface for drinks or decorative items. Its transparent structure allows light to flow right through it, making the room feel larger and less occupied.
Beneath the clear top, a simple, thin cushion in a light mint hue is suspended on metal supports, creating a practical bench. The bench offers subtle, comfortable seating without introducing bulk. Because the piece is almost invisible, it can be tucked against a wall or window without obstructing the view or the floor plan. It serves as both a chic entryway bench and a backup living room seat.
DIY Instruction: Creating a Bench with Clear Legs
Item Name: Acrylic-Style Bench
Note: Working with large sheets of acrylic requires specialized tools for cutting and bonding. This DIY outlines how to achieve a similar ‘floating’ look using sturdy wooden supports painted white or mirrored, and a simple upholstered top.
Materials Required
- One wooden board (for the bench top)
- Two sturdy acrylic furniture panels (or two smooth, finished wooden planks painted gloss white)
- Upholstery foam and batting
- Fabric (to cover the foam top)
- Screws and strong adhesive (like epoxy)
- Metal brackets (optional, for extra support)
Equipment Required
- Power drill and screws
- Measuring tape
- Utility knife (for cutting foam)
- Staple gun
- Sandpaper
Step-by-Step Instructions
- Prepare the Top: Cut the wooden bench top to the desired length and width. Lightly sand all edges. Cut the upholstery foam and batting to the exact size of the top board.
- Upholster the Top: Glue the foam to the top of the wooden board. Wrap the foam and board completely in upholstery batting, stapling it underneath. Finally, wrap the chosen fabric tightly over the batting, stapling the edges to the underside of the board. Ensure the edges are smooth and neat.
- Prepare the Legs (Acrylic Method): If using acrylic panels, you must secure the bench top using high-strength acrylic adhesive (epoxy). Apply adhesive sparingly to the top edges of the acrylic legs and press them firmly against the underside of the upholstered top board. Clamp the assembly securely and allow the adhesive to cure fully.
- Prepare the Legs (Painted Wood Alternative): If using painted wooden planks, you can use L-brackets and screws to attach the top board to the legs for a stronger connection. Attach the brackets to the legs first, then screw the brackets to the underside of the bench top.
- Reinforce and Finish: If the acrylic legs feel unstable, consider adding a thin, clear acrylic brace connecting the two legs near the floor. Place the finished bench against the wall in your living room for a stunning, visually light seating option.
5. Built-In Storage Banquette
Corner Seating Banquette with Lift-Top Storage
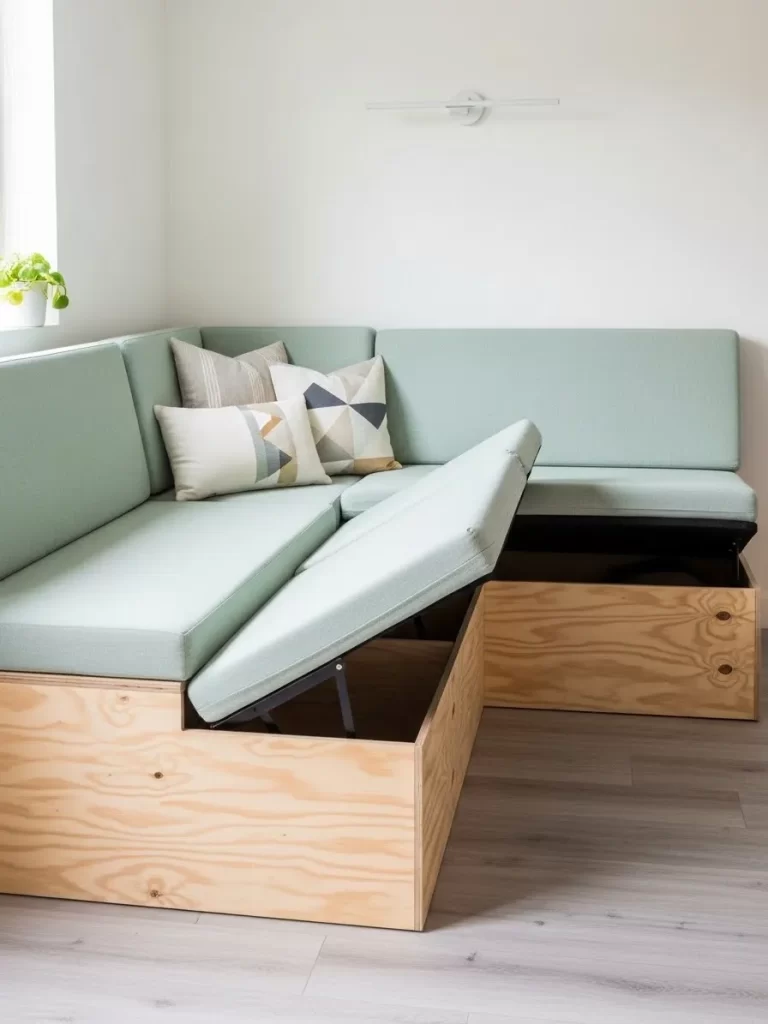
Utilizing a corner is a brilliant way to incorporate extensive seating and storage into a small living room. This U-shaped or L-shaped banquette is constructed from simple, attractive plywood boxes, creating a custom, comfortable area along the walls. The natural wood grain adds a warm, contemporary feel.
The top cushions, upholstered in a refreshing mint green fabric, lift effortlessly. This reveals deep, hidden storage compartments within the plywood boxes, making it an excellent place to stow away board games, blankets, or overflow items. This design eliminates clutter while maximizing the room’s seating capacity, proving that bespoke solutions often offer the most efficient use of space.
DIY Instruction: Constructing a Simple Corner Banquette
Item Name: Corner Storage Banquette
Materials Required
- Plywood sheets (or MDF, for the box frames)
- Wood screws and wood glue
- Heavy-duty lift-up hinges (two per storage box lid)
- Wood stain or paint
- High-density foam for cushions
- Upholstery fabric and batting
Equipment Required
- Circular saw or handsaw (for cutting wood)
- Power drill and various bits
- Measuring tape and level
- Staple gun and heavy-duty staples
- Clamps
Step-by-Step Instructions
- Design and Measure: Decide on the length and height of the banquette boxes. Measure the corner space precisely. Sketch out the cut list for the plywood to create the front, side, and bottom panels for each box segment.
- Cut and Assemble the Boxes: Cut the plywood pieces. Apply wood glue to the edges and screw the pieces together to form sturdy rectangular boxes. Use clamps while the glue dries. Build individual boxes that fit together to form the ‘L’ shape.
- Finish the Wood: Sand down any rough edges and apply your chosen stain or paint to the assembled box frames. Allow time for the finish to fully cure.
- Create and Upholster Lids: Cut plywood pieces to serve as the lids for the boxes. These must fit perfectly. Using lift-up hinges, attach the lids to the back edge of the box frames, ensuring they open upward easily.
- Make the Cushions: Cut the high-density foam to the size of each lid. Wrap the foam pieces in upholstery batting and then cover them tightly with the upholstery fabric, securing the fabric to the underside of the plywood lid using a staple gun.
- Place the Banquette: Position the assembled banquette boxes firmly against the wall in the chosen corner. The finished cushions rest on the lids, completing the seamless, dual-purpose seating arrangement.
6. Stacked Seating Stools

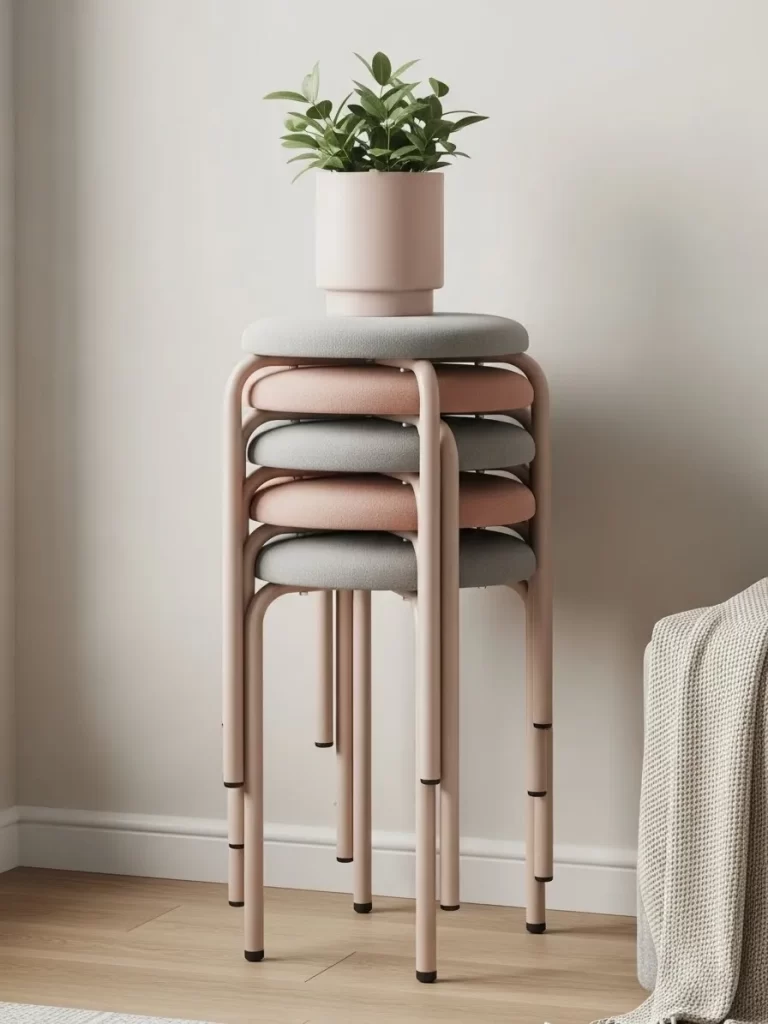
Minimalist Stacking Stools
For ultimate flexibility and space conservation, a set of stacking stools is hard to surpass. These four simple stools, featuring round, cushioned seats in soft gray and blush pink, are designed to nest neatly together when not needed. They take up the footprint of just one small item, making them incredibly practical for narrow spaces.
When stacked, the stools double as a creative side table, perfect for displaying a potted plant or a small stack of books. Their light construction and compact shape mean they can be effortlessly separated and distributed around the room the moment extra guests arrive. The curved metal legs add a contemporary touch while maximizing stability.
DIY Instruction: Upgrading Basic Stacking Stools
Item Name: Minimalist Stacking Stools
Note: Building a metal-legged stacking stool from scratch is complex. This DIY focuses on customizing and upholstering affordable, existing stacking stools for a refreshed, high-end look.
Materials Required
- Four basic stacking stools (with flat seats, typically wood or plastic)
- High-density foam (thin sheets, about 1-inch thick)
- Upholstery fabric (about 2 yards total)
- Upholstery batting
- Spray paint (for the metal or plastic legs, if desired)
- Strong adhesive spray or glue
Equipment Required
- Sandpaper (fine-grit)
- Staple gun and staples
- Utility knife
- Screwdriver
Step-by-Step Instructions
- Disassemble and Prep: Unscrew the seat tops from the stool legs. If painting the legs, lightly sand them and clean them thoroughly. Apply a thin, even coat of spray paint (using a primer first, if necessary) in your desired color, allowing ample time to dry.
- Cut and Attach Foam: Use the original seat as a template to cut the foam and batting. Use adhesive spray to glue the foam firmly onto the top of the original seat.
- Wrap with Batting: Cover the foam and seat with a layer of batting, pulling it around the edges and stapling it securely to the underside of the seat. The batting ensures a smooth, rounded cushion.
- Upholster the Seat: Cut your chosen fabric, leaving enough overhang to pull around the base. Center the fabric over the batting. Begin stapling the fabric to the underside of the base, pulling firmly to eliminate wrinkles. Neatly fold the corners or edges as you go, ensuring a smooth, finished edge.
- Reassemble: Once all four seats are upholstered and dry, use the screwdriver to re-attach the newly cushioned seats to the painted stool legs.
- Stack and Display: Stack the finished stools when not in use, using the top one as a side table for plants or decorative items.
7. Cube Modular Seating

Stacked Cube Pouf and Tray Seating
This innovative approach uses modular cubes that function as seating, storage, and side tables simultaneously. Each lightweight cube is upholstered in a durable, textured fabric, making them easy to move and rearrange. When stacked, they utilize vertical space efficiently, becoming a tall, sculptural element in the corner of the room.
The flexibility of the cubes allows them to be separated instantly: two can serve as comfortable footrests or extra seating, while another, topped with a simple wooden tray, transforms into a temporary side table for drinks or snacks. The clever design, including small handles on the sides, emphasizes their portability and multi-use function, offering numerous seating arrangements from a single collection.
DIY Instruction: Creating a Upholstered Storage Cube
Item Name: Modular Storage Cube Pouf
Materials Required
- Six square pieces of sturdy plywood or MDF (for the box sides, top, and bottom)
- Wood glue and screws
- Upholstery foam (for the top)
- Upholstery fabric (about 2 yards per cube)
- Two handles (optional, for portability)
- Small plastic furniture glides (optional, for the bottom)
Equipment Required
- Power drill and various bits
- Handsaw or circular saw
- Measuring tape
- Staple gun and staples
- Clamps
Step-by-Step Instructions
- Cut and Assemble the Box: Cut five of the plywood pieces to the exact same size to form the bottom and four sides of a cube. Apply wood glue to the joining edges and screw the pieces together securely to form a sturdy, open-top box. Clamp and let the glue dry.
- Prepare the Lid: The sixth piece of plywood will be the lid. Cut the foam to the exact size of the lid. Glue the foam to the top of the lid board.
- Upholster the Cube Sides: Cut fabric panels for the four sides and bottom of the cube. Staple the fabric tightly to the exterior of the box. Ensure the top edge is clean and neat. If adding handles, cut small slits in the fabric and attach the handles to the sides of the box before stapling the fabric in place.
- Upholster the Lid: Wrap the foam-topped lid in fabric, pulling the edges taut and stapling them firmly to the underside of the lid board.
- Finish and Assemble: Place the upholstered lid on top of the upholstered box. If you wish to prevent the lid from sliding, you can glue a small wooden lip to the underside of the lid that fits inside the box opening. Add furniture glides to the bottom if the cube will be moved frequently.
- Repeat and Stack: Create as many cubes as needed. When not in use, stack them neatly for streamlined storage and a sculptural look.
8. Window Seat Storage Bench

Window Nook Seating with Cube Storage
Transforming an underutilized window area into a comfortable seating nook is an exceptional way to add permanent extra seating. This custom bench, running the length of the window, features a thick, soft cushion and pillows, creating an inviting reading spot. It draws natural light and takes advantage of a wall that might otherwise be bare.
The wooden base is cleverly designed with open shelving, which breaks up the visual weight and offers built-in storage. Storage bins, baskets, and decorative boxes can be tucked into the cubbies to hide clutter, keeping the living room organized and tidy. This solution provides both practical seating for multiple people and necessary storage without claiming valuable central floor space.
DIY Instruction: Building a Basic Window Seat
Item Name: Window Nook Storage Bench
Materials Required
- Plywood or MDF sheets (for the frame and cubbies)
- Wood screws and wood glue
- Wood trim (optional, for a finished look)
- Paint or stain
- High-density foam (for the cushion)
- Upholstery fabric and batting
Equipment Required
- Circular saw or handsaw (for cutting wood)
- Power drill and various bits
- Measuring tape and level
- Staple gun
- Clamps
Step-by-Step Instructions
- Measure and Design: Decide on the length and height of the banquette boxes. Measure the corner space precisely. Sketch out the cut list for the plywood to create the front, side, and bottom panels for each box segment.
- Cut and Assemble the Boxes: Cut the plywood pieces. Apply wood glue to the edges and screw the pieces together to form sturdy rectangular boxes. Use clamps while the glue dries. Build individual boxes that fit together to form the ‘L’ shape.
- Finish the Wood: Sand down any rough edges and apply your chosen stain or paint to the assembled box frames. Allow time for the finish to fully cure.
- Create and Upholster Lids: Cut plywood pieces to serve as the lids for the boxes. These must fit perfectly. Using lift-up hinges, attach the lids to the back edge of the box frames, ensuring they open upward easily.
- Make the Cushions: Cut the high-density foam to the size of each lid. Wrap the foam pieces in upholstery batting and then cover them tightly with the upholstery fabric, securing the fabric to the underside of the plywood lid using a staple gun.
- Place the Banquette: Position the assembled banquette boxes firmly against the wall in the chosen corner. The finished cushions rest on the lids, completing the seamless, dual-purpose seating arrangement.
9. Rattan Hanging Chair
Woven Rattan Hanging Pod Chair
When floor space is severely limited, look up! A hanging chair provides a comfortable, stylish, and entirely space-saving seating option because it uses zero floor area. This beautiful, egg-shaped pod chair, woven from natural rattan, introduces texture and a light, airy feel to the corner of the room.
The chair hangs from the ceiling, allowing it to gently swing, offering a cozy and relaxing retreat. Layering the seat with a soft, fuzzy sheepskin cushion and a large pillow ensures maximum comfort. Hanging chairs serve as an eye-catching focal point and can be easily tucked into a corner that might otherwise go unused.
DIY Instruction: Safely Hanging a Chair
Item Name: Rattan Hanging Pod Chair
Note: This DIY focuses on the safe installation of a pre-made hanging chair, as fabricating a structurally sound rattan chair is highly specialized.
Materials Required
- Pre-made hanging chair
- Heavy-duty ceiling anchor kit (must be rated for significantly more than the sitter’s weight)
- Chain or rope (rated for heavy loads)
- S-hooks or carabiners
- Washers and nuts
Equipment Required
- Stud finder (essential)
- Power drill and large wood boring bit
- Ladder
- Measuring tape
- Wrench
Step-by-Step Instructions
- Locate the Ceiling Joist: This step is critically important. Use a stud finder to locate a solid wooden ceiling joist in the desired location. A joist is the only safe structural component strong enough to support the dynamic, shifting weight of a person in a swinging chair. Mark the center point clearly.
- Drill the Pilot Hole: Climb the ladder and use the power drill with an appropriate wood boring bit to drill a pilot hole up into the center of the joist. The depth and diameter should match your heavy-duty anchor kit’s specifications.
- Install the Anchor: Screw the heavy-duty anchor (typically an eye bolt or hook) deep into the joist. Use the wrench to ensure it is tightened until the hook base is flush with the ceiling, checking that it is completely secure and cannot be pulled out by hand.
- Hang the Chair: Attach one end of the chain or rope to the installed ceiling anchor using an S-hook or carabiner. Attach the other end of the chain or rope to the hanging point on your chair.
- Adjust and Test: Adjust the chain length to ensure the chair hangs at a comfortable height off the floor. Before sitting down, pull down on the chair with your full body weight to test the security of the anchor and chain.
- Decorate: Add your cushions and pillows. This corner seating spot is now ready to use, providing a floating oasis.
10. Console Desk with Nested Stools
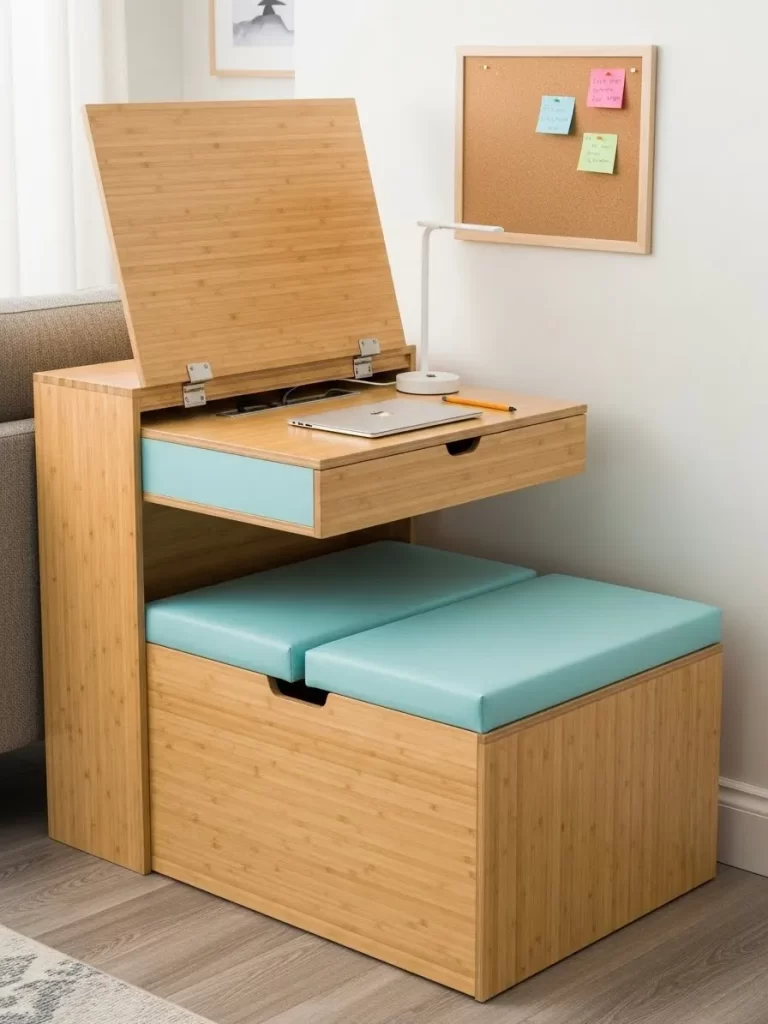
Bamboo Multi-Task Console and Seating
This piece of furniture is the ultimate master of disguise for a small apartment, brilliantly combining three functions into one compact footprint. The tall, slim unit is crafted from warm bamboo, giving it a natural, clean aesthetic. The upper section features a flip-up lid, which reveals a small, functional desktop for working on a laptop or writing.
The lower half of the unit conceals the extra seating. Two square, upholstered stools, featuring a bright pop of teal-blue cushion, are neatly nestled beneath the desk surface. They slide out easily when guests arrive. When not in use, the stools are completely hidden, maintaining the console’s streamlined appearance, making it a perfect workspace, entry table, and two-person seating solution.
DIY Instruction: Building a Nested Ottoman/Desk Unit
Item Name: Bamboo Multi-Task Console
Note: Due to the complexity of the pull-out desk drawer, this DIY focuses on the construction of the nesting stool base and a simple storage top.
Materials Required
- Plywood or MDF sheets (for the console and stool frames)
- Wood glue and screws
- Piano hinge (for the flip-up lid)
- Two upholstered storage boxes or two small cube ottomans (for the nested seating)
- Wood veneer or stain (to achieve a bamboo look, optional)
Equipment Required
- Power drill and various bits
- Circular saw or handsaw
- Measuring tape and level
- Screwdriver
Step-by-Step Instructions
- Design the Console Box: Determine the size of your two nesting stools. The console box must be wide enough to allow the two stools to slide in side-by-side, with a little clearance. Cut the plywood to create the back, sides, and floor of the main console box.
- Assemble the Console Frame: Screw and glue the pieces together to form a sturdy, open-front box. Ensure the dimensions leave enough vertical space for the stools to slide in comfortably.
- Construct the Top Storage/Desk: Cut a plywood piece for the top of the console. This will be the flip-up lid. Attach the piano hinge along the back edge of the top piece and the top back edge of the main console box, allowing the lid to open completely.
- Finishing: Sand and apply your chosen finish (stain or veneer) to all exposed surfaces of the console box.
- Insert the Seating: Slide your two upholstered ottomans or cubes into the opening at the base of the console.
- Ready to Use: When the top is closed, the unit serves as a console. When the top is lifted, it is a desk. When the ottomans are pulled out, it is instant seating.
11. Stackable Floor Cushions

Oversized Floor Pillows for Casual Seating
Floor seating offers a wonderfully casual and flexible solution, especially in living rooms too tiny for conventional chairs. These large, square cushions, finished in a warm, textured terracotta fabric, provide comfortable, low-to-the-ground seating. They stack neatly when not in use, creating an appealing, textured accent in the room’s corner.
The cushions are thoughtfully designed with sturdy carrying handles, emphasizing their portability. This makes them easy to grab and distribute throughout the room instantly for movie night or a casual get-together. They can be used individually for seating or stacked two high to create a comfortable pouf, demonstrating true versatility.
DIY Instruction: Sewing Simple Floor Cushions
Item Name: Oversized Floor Pillows
Materials Required
- Heavy-duty upholstery fabric (around 2 yards per cushion, depending on size)
- Pre-cut high-density foam (or poly-fil/batting for a softer cushion)
- Heavy-duty thread
- Webbing or sturdy fabric scraps (for the handles)
- Zipper (optional, for removable covers)
Equipment Required
- Sewing machine
- Measuring tape and fabric scissors
- Pins
- Iron and ironing board
Step-by-Step Instructions
- Measure and Cut Fabric: Determine the size of your square cushion (e.g., 28×28 inches). Cut two large squares for the top and bottom panels. Cut four long, rectangular strips for the side panels, ensuring the width matches the desired foam thickness.
- Prepare the Handle: Cut two smaller pieces of webbing or fabric for each handle. Fold the handle material neatly and sew it along the edges to create a strong, flat strap.
- Assemble the Sides: Pin and sew the four side strips together to create a continuous fabric loop. Press the seams open with an iron for a crisp finish.
- Attach the Handle and Top Panel: Pin the handle securely onto the edge of the top square piece, about one-third of the way in from the corner. Then, pin the side-panel loop to the top square piece, right sides facing, and sew them together, leaving a 1/2 inch seam allowance.
- Insert Foam and Close: Pin and sew the remaining bottom square to the side-panel loop, again with right sides facing. Leave an opening wide enough to slide the foam or stuffing inside. Turn the cover right-side out. Insert the foam carefully. Hand-stitch the opening closed using a slip stitch for an invisible seam.
- Repeat and Stack: Repeat the steps for all cushions. When not in use, stack them neatly against a wall to conserve space.
12. Bookcase Pull-Out Stool

Integrated Bookcase Stool
Merging two distinct pieces of furniture into one is a highly effective way to save space in compact living areas. This tall, light oak bookcase features deep shelving for maximum storage of books and decor. The clever addition is the discreet pull-out seat, which is stored entirely within the structure.
A small section of one shelf, complete with a round green felt mat for comfort, smoothly slides out on drawer glides. This innovative element provides a quick, convenient spot to perch while selecting a book, tying a shoe, or enjoying a quick moment of rest. The functionality is maximized by the small wall-mounted lamp placed nearby, providing focused lighting for reading.
DIY Instruction: Adding a Pull-Out Step/Stool to Shelving
Item Name: Integrated Bookcase Stool
Materials Required
- Plywood or solid wood board (for the stool platform)
- Heavy-duty drawer slides (rated for person weight)
- Small metal brackets or wood blocks (for mounting the slides)
- Screws and wood glue
- Felt or non-slip mat (for the top)
Equipment Required
- Power drill and various bits
- Measuring tape and level
- Saw (if cutting the platform)
- Screwdriver
Step-by-Step Instructions
- Measure and Cut the Platform: Measure the width and depth of the shelf cavity where the stool will be placed. Cut the plywood platform to fit exactly, ensuring it is flush with the shelf front when pushed in.
- Mount Drawer Slides (Bookcase Side): Attach one half of the heavy-duty drawer slides horizontally inside the shelf cavity. You may need to screw the slides into small wooden mounting blocks or metal brackets if the bookcase sides are thin, to ensure the slide is flush and firmly attached. Use a level to confirm the slides are perfectly parallel.
- Mount Drawer Slides (Platform Side): Attach the corresponding halves of the drawer slides to the bottom edge of your wooden stool platform. The platform should sit flush with the bottom edge of the slides when fully assembled.
- Assemble and Test: Carefully insert the platform, now attached to its slide halves, into the bookcase slides. The platform should slide smoothly in and out without tilting. Fully extend the platform and ensure the slides lock firmly into the open position.
- Add the Seat Top: Cut the felt or non-slip mat to fit the top of the stool platform and secure it with strong adhesive. This adds comfort and prevents items from slipping.
- Secure the Bookcase: Ensure the entire bookcase unit is securely anchored to the wall using wall straps or brackets, as pulling out the stool shifts the unit’s center of gravity.
13. Foldable Accordion Stool
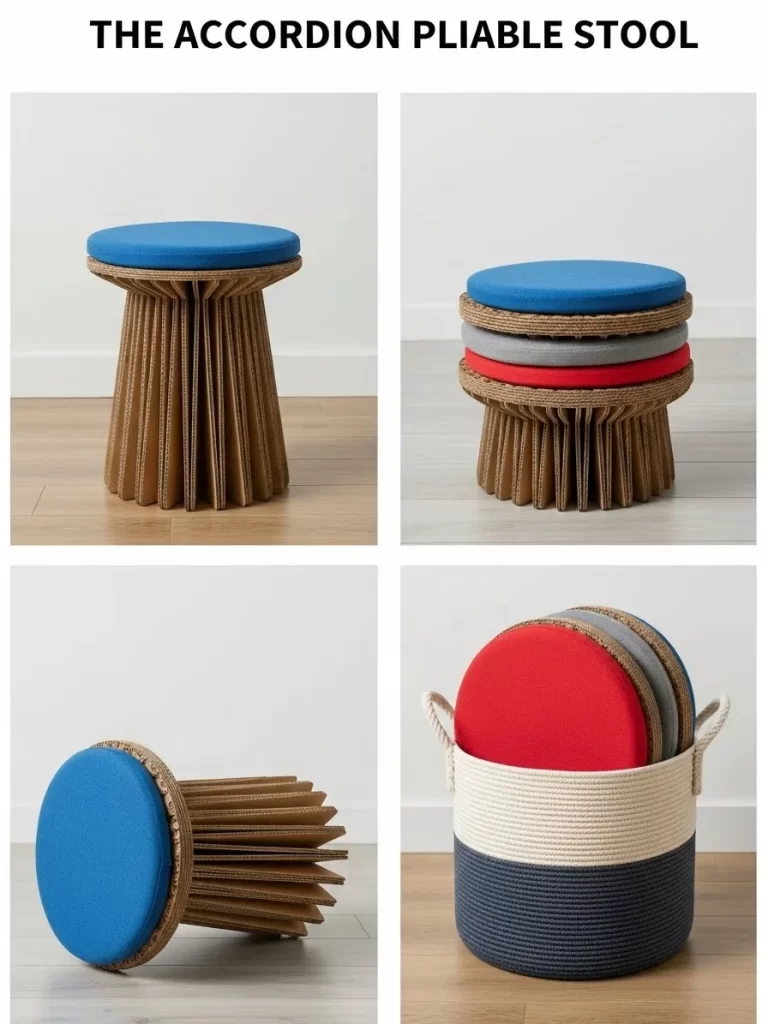
Pliable Cardboard Accordion Stool
This highly collapsible seating option is genius for tiny spaces, offering portability and remarkable space-saving capability. The stool is constructed from dense, pleated cardboard that opens like an accordion to form a surprisingly sturdy cylindrical seat. The honeycomb structure makes it incredibly strong yet lightweight.
When fully expanded, it provides a stable perch with a comfortable, round cushion top. The real utility lies in its folded state: it shrinks down to a slim disk, easily tucked away. The cushions, featuring bright colors like red, blue, and grey, can be conveniently stored together in a basket or drawer, completely freeing up the floor space.
DIY Instruction: Creating Accordion-Inspired Storage for Cushions
Item Name: Accordion Pliable Stool
Note: The actual accordion stool requires specialized folding machinery. This DIY focuses on creating a designated storage container for its cushions, maximizing floor space.
Materials Required
- Large, sturdy rope basket (or a decorative hamper)
- Fabric strips or rope (to create dividers, optional)
- Needle and heavy-duty thread
- Round cushions (pre-made or from other seating)
Equipment Required
- Scissors
- Measuring tape
Step-by-Step Instructions
- Select Storage Container: Choose a durable rope basket or hamper that is tall enough to accommodate several folded cushions stacked on their sides. This vertical storage method minimizes the required floor footprint.
- Measure Cushions: Measure the diameter and thickness of your stackable cushions. Ensure the basket’s internal width is slightly larger than the cushion diameter for easy insertion and removal.
- Prepare the Basket: If using rope or fabric strips to create dividers (to keep different-colored cushions separated), measure and cut the material. Hand-stitch the strips into the basket walls to create vertical compartments, if desired.
- Organize Cushions: Place the round cushions inside the basket, stacking them vertically on their side edges. This arrangement allows you to see the color of each cushion for quick selection.
- Position the Container: Place the filled basket near the sofa or in a corner. The basket itself is attractive decor, and the cushions are stored vertically and compactly until they are needed for seating.
14. Slim Bar Height Console

Wall-Mounted Narrow Console Bar
When conventional dining or counter-height tables consume too much area, a slim console bar against a wall provides an excellent alternative. This piece features a shallow desktop finished in light wood, supported by a thin, black metal frame. Its narrow profile allows it to fit neatly behind a sofa or along a wall, using minimal depth.
The surface is deep enough for two people to work or dine casually. The addition of power outlets built into the side is a modern convenience, making it a functional workstation. Paired with a slender, upholstered bar stool that tucks completely underneath, this console bar serves as a dining area, office desk, and backup seating spot.
DIY Instruction: Building a Slim Wall Console Bar
Item Name: Narrow Console Bar
Materials Required
- One wooden plank (for the tabletop, shallow depth)
- Metal square tubing or sturdy wooden planks (for the frame and legs)
- Screws and wood glue
- Mounting brackets (L-brackets)
- Black spray paint (for the metal look, optional)
Equipment Required
- Power drill and various bits
- Measuring tape and level
- Saw (or a lumberyard to cut wood to size)
- Sandpaper
Step-by-Step Instructions
- Cut the Wood Top: Cut the wooden plank to the desired length (e.g., 4 to 5 feet) and a narrow depth (e.g., 14 inches) for the tabletop. Sand and stain or paint the top.
- Build the Leg Frame (Optional Metal Look): Cut your wooden planks to create a simple, rectangular frame and four legs. Assemble the rectangular frame that will sit just under the tabletop. Spray paint the wooden frame and legs black to mimic a metal industrial look.
- Assemble the Console: Attach the painted legs firmly to the rectangular frame base using screws and glue. Once the base is sturdy, secure the finished wooden tabletop onto the frame.
- Wall Mounting (Highly Recommended): If the console is very narrow, attach L-brackets to the underside of the tabletop and screw the other side of the brackets securely into wall studs. Use a level throughout to ensure it is straight. This prevents tipping and adds stability.
- Pair with Seating: Place the console against the wall. Purchase a single, slim bar stool that can slide completely underneath the console when not in use.
15. Modular Tetris Seating
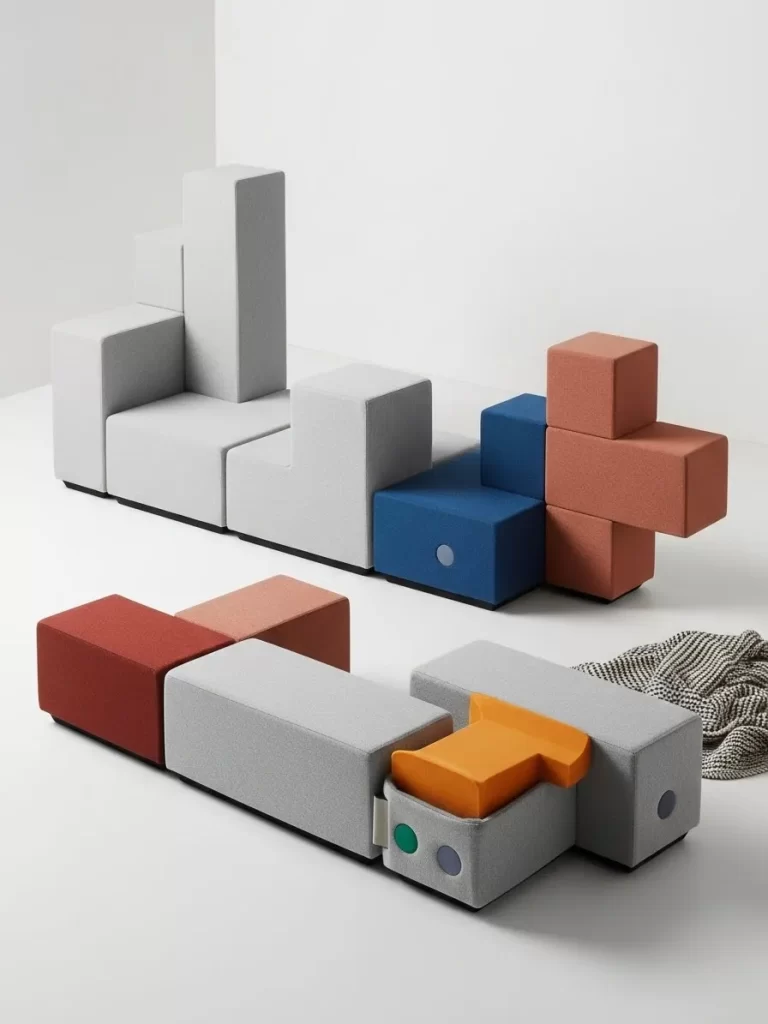
Interlocking Modular Blocks
Unleash your inner designer with this fully modular seating system, which offers infinite rearrangement possibilities for small rooms. The pieces are geometric blocks, upholstered in contrasting, textural fabrics, allowing them to interlock like puzzle pieces. This design makes the furniture fun and entirely customizable based on the space or occasion.
The blocks can be arranged as a small sofa, separated into individual seats, or stacked artistically against a wall to clear the floor. The different colors, from muted gray to vibrant blue and terracotta, allow homeowners to inject personality while maintaining flexibility. This system adapts to both seating and sculptural decor needs effortlessly.
DIY Instruction: Creating Simple Modular Blocks
Item Name: Interlocking Modular Blocks
Materials Required
- Six square or rectangular plywood/MDF box frames (no top or bottom)
- Plywood squares (to serve as tops and bottoms)
- High-density foam (for the upholstery)
- Upholstery fabric in various colors
- Velcro strips (industrial strength, for interlocking)
- Screws and wood glue
Equipment Required
- Power drill and various bits
- Handsaw or circular saw
- Staple gun and heavy-duty staples
- Utility knife (for cutting foam)
Step-by-Step Instructions
- Build the Cube Frames: Cut and assemble your plywood pieces into uniform, open-top box frames (cubes or rectangles). Use wood glue and screws for durability.
- Upholster the Sides: Cut fabric panels for the sides and bottom of each box. Wrap the fabric tightly around the sides and staple it neatly to the bottom edge of the frame.
- Create the Cushion Lids: Cut the foam and plywood tops to size. Glue the foam to the plywood tops. Wrap the foam and lid tightly in the chosen colored fabric, stapling underneath.
- Attach Cushion Lids: Place the cushion lids directly onto the upholstered cube frames. You can lightly secure them with non-slip pads or small Velcro dots if needed.
- Add Interlocking Mechanism: Attach industrial-strength, sticky-back Velcro strips to the sides of each block (top half on one side, bottom half on the adjacent side). This allows the pieces to connect securely in various configurations.
- Arrange and Play: Arrange the blocks into a sofa, separate them into individual seats, or stack them to resemble a modern sculpture when maximum floor space is needed.
16. Pull-Out Seating Drawer

Integrated Drawer Seating Unit
Hiding seating inside existing cabinetry is one of the most ingenious space-saving strategies. This flush, modular unit, finished in a minimalist grey and white palette, features a counter surface above deep storage. The eye-catching element is the full-sized seating pouf that slides out on heavy-duty drawer glides.
The cushioned seat, complete with a bright red accent trim, is always ready but completely invisible when not needed. It pulls out easily from beneath the counter surface, offering a comfortable place to sit or put on shoes. This furniture piece demonstrates excellent function, using the vertical space while keeping the main room floor entirely clear.
DIY Instruction: Creating a Drawer Seat from Cabinetry
Item Name: Integrated Drawer Seating Unit
Materials Required
- Large, existing drawer cabinet (or build one with deep drawers)
- Plywood or sturdy board (for the drawer base)
- Heavy-duty, full-extension drawer slides (rated for person weight)
- High-density foam and upholstery fabric (for the seat)
- Casters or wheels (optional, for easier movement)
- Drawer pull or handle
Equipment Required
- Power drill and various bits
- Measuring tape
- Screwdriver
- Staple gun
Step-by-Step Instructions
- Prepare the Cabinet Opening: Remove an existing drawer from your base cabinet. The opening must be clear and sturdy. If building a new cabinet, ensure the opening is appropriately sized.
- Build the Seating Box: Construct a simple, shallow box frame using plywood that is designed to fit the width and height of the cabinet opening. Secure the four sides and the bottom with screws and glue.
- Install Drawer Slides: Attach the heavy-duty, full-extension drawer slides to the inside walls of the cabinet opening. Attach the corresponding slide halves to the sides of the newly built seating box.
- Upholster the Seat: Cut the foam to the exact size of the box top. Glue the foam onto the top surface. Wrap the foam and the box top tightly with upholstery fabric, securing the fabric to the underside of the box with staples.
- Add Handle and Wheels (Optional): Attach a drawer pull or handle to the front of the seating box. If desired, screw small casters to the bottom for smooth rolling once fully extended.
- Insert and Test: Slide the completed seating box into the cabinet. The unit should glide smoothly and lock into place when fully pushed in.
17. Knit Beanbag and Pouf
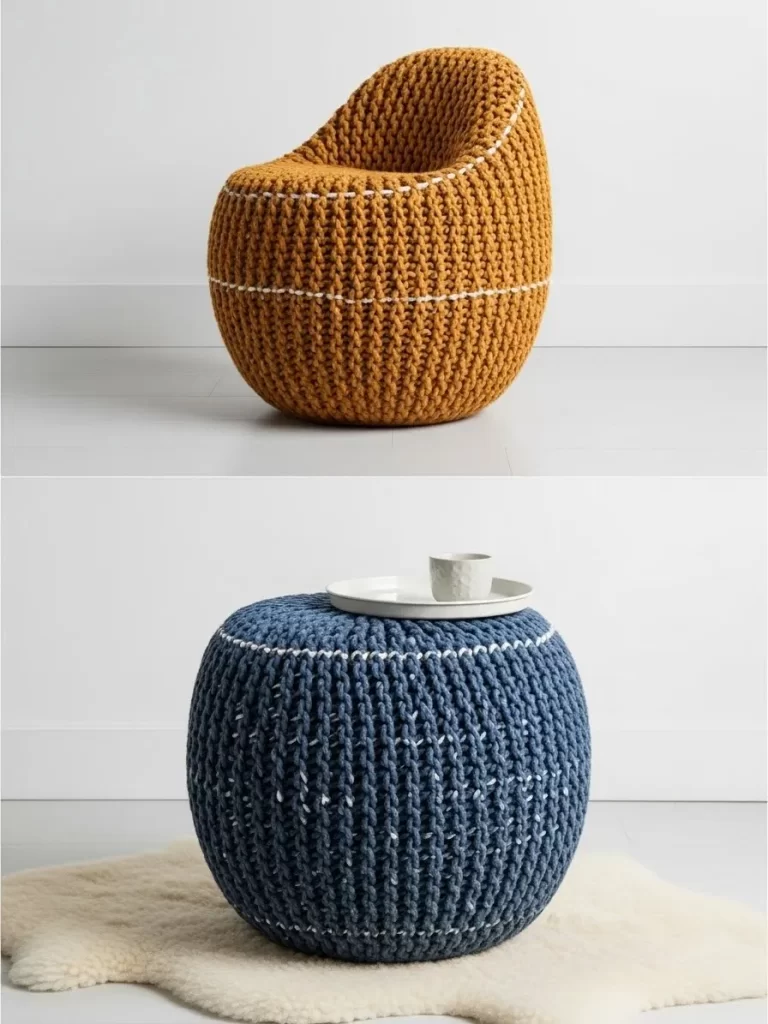
Chunky Knit Poufs and Beanbag
Textured, soft furnishings provide comfortable seating that is easy to move and store. The image displays a large, chunky-knit beanbag chair in a warm, mustard yellow, offering a deep, relaxed spot to sit. Alongside it is a matching round pouf in deep navy blue, which serves as a footrest or a low side table when topped with a tray.
The large, woven texture and striking colors add visual interest and warmth to the room. The lack of rigid structure makes these pieces highly versatile; they mold to the body for seating or serve as flexible floor cushions. They are effortlessly shifted from the center of the room to a corner when not actively being used.
DIY Instruction: Creating a Simple Knit Pouf Cover
Item Name: Chunky Knit Pouf
Materials Required
- Chunky-weight yarn (or thick T-shirt yarn)
- Large circular knitting needles or large crochet hook (size will depend on yarn weight)
- Fabric (to create an inner lining bag)
- Polystyrene beads or shredded foam filling
Equipment Required
- Needle and thread (for lining)
- Scissors
Step-by-Step Instructions
- Knit or Crochet the Panels: Using your chunky yarn and large needles, knit or crochet two round panels for the top and bottom, and one large rectangular panel for the side. The size should match the desired pouf dimensions. Keep the tension loose for the characteristic chunky look.
- Sew the Cover: Hand-stitch the side panel into a loop. Sew the top and bottom panels onto the side loop, leaving an opening for stuffing.
- Sew the Inner Lining: Use the fabric to sew an inner bag identical in size to the pouf cover. This holds the filling and makes the cover removable for cleaning.
- Fill the Liner: Fill the inner lining bag with polystyrene beads or shredded foam until the desired firmness is reached. Sew the opening of the inner lining closed securely.
- Insert and Close: Insert the filled liner into the knit pouf cover. Hand-stitch the remaining opening in the knit cover closed neatly.
- Finished Pouf: The resulting chunky knit pouf is lightweight, movable, and provides excellent overflow seating or a flexible side table.
18. Fold-Down Wall Chair
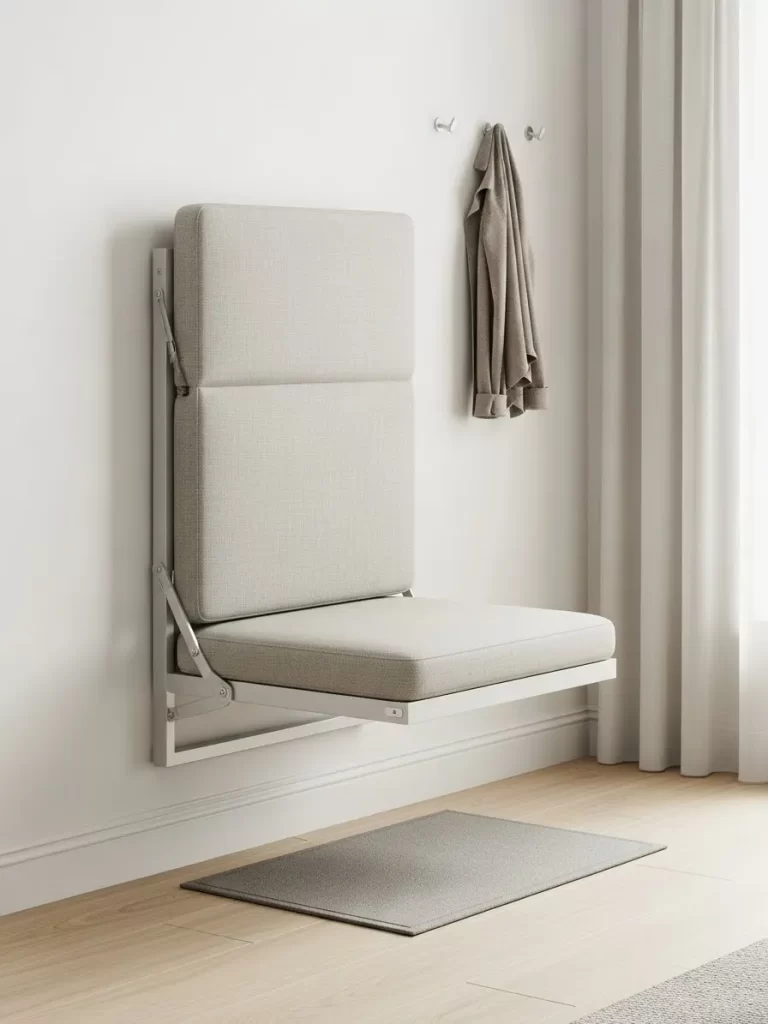
Discreet Wall-Mounted Folding Chair
This is the ultimate solution for truly minimal seating when space is extremely tight. The design is a full-sized chair, complete with a cushioned seat and high back, yet it folds completely flat against the wall. The neutral, light grey upholstery ensures it blends seamlessly into the decor, maintaining an uncluttered appearance.
The sturdy metal frame and folding mechanism mean it offers robust, comfortable support when deployed. When folded up, the piece looks like a subtle upholstered wall panel. The chair provides excellent temporary seating, particularly useful near an entry for putting on shoes or in a living space when one extra seat is required.
DIY Instruction: Installing a Wall-Mounted Folding Chair
Item Name: Wall-Mounted Folding Chair
Note: Building a safe, load-bearing folding chair mechanism requires engineering. This DIY focuses on the crucial, safe installation of a pre-made wall chair.
Materials Required
- Pre-made wall-mounted folding chair unit
- Heavy-duty screws (appropriate length for studs/wall anchors)
- Wall anchors (if studs are unavailable)
Equipment Required
- Stud finder (essential)
- Power drill and bits
- Level
- Measuring tape
- Pencil
Step-by-Step Instructions
- Determine Height and Location: Decide on the comfortable seating height. Use a stud finder to locate at least two strong vertical wall studs in the desired area. Mark the center points of the studs clearly.
- Position the Chair Frame: Hold the folding chair unit against the wall. Use a level to ensure the frame is perfectly straight, both horizontally and vertically. Mark the mounting holes onto the wall using the pre-drilled holes in the chair frame as a guide.
- Drill Pilot Holes: Drill pilot holes through your markings, ensuring the holes go directly into the center of the wall studs. This ensures maximum weight bearing capability. If using heavy-duty wall anchors, follow their specific installation instructions.
- Secure the Frame: Hold the chair frame back up and use the heavy-duty screws to firmly attach the frame to the wall studs. Tighten the screws until the unit is flush against the wall and absolutely secure.
- Test the Chair: Slowly fold the chair down into the seating position. Apply strong downward pressure with your hands, and then sit on the chair gently to fully test its stability and weight-bearing capability.
19. Rolling Storage Pouf with Table
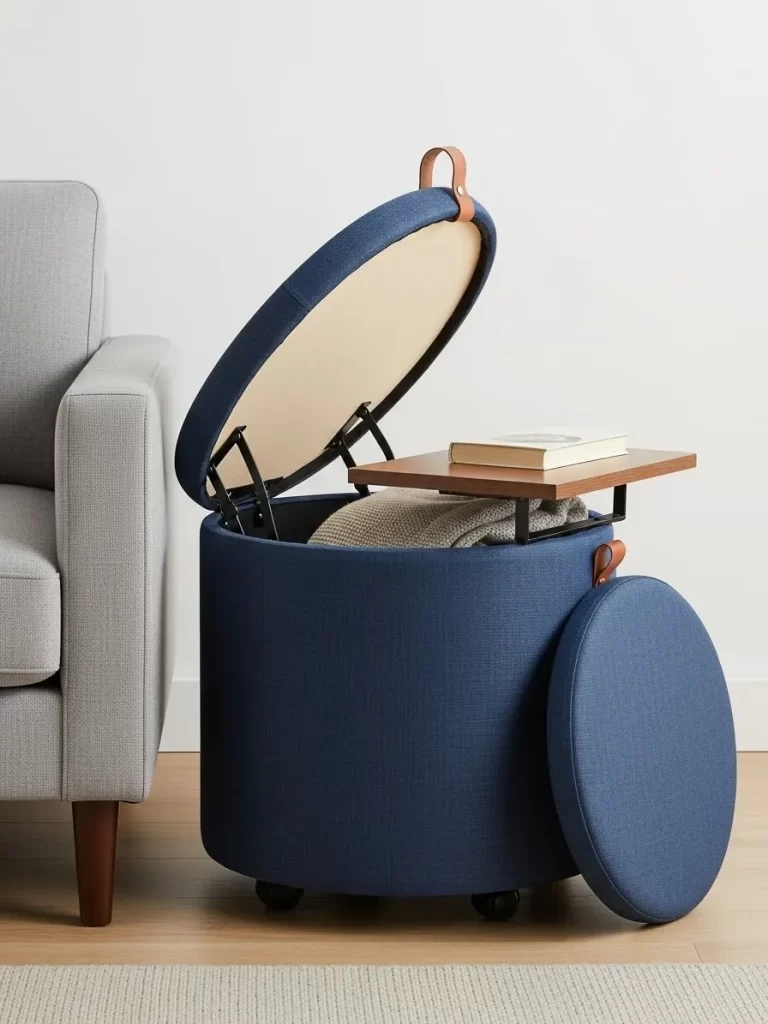
Round Storage Ottoman on Casters
Combining deep storage, a comfortable pouf, and a serving tray is a trifecta of space-saving function. This cylindrical ottoman, upholstered in a rich navy fabric, features integrated casters, allowing it to be effortlessly rolled into place wherever extra seating is required. The durable leather handle adds portability and a refined accent.
The top lid lifts open smoothly with a hinge mechanism, revealing deep storage perfect for blankets, remote controls, or toys. The clever design includes a wooden insert that rests on the edge of the storage area, transforming half of the lid into a sturdy, temporary side table. The piece easily serves as a footrest, seat, and organized storage container.
DIY Instruction: Adding Casters and a Tray to a Storage Ottoman
Item Name: Rolling Storage Ottoman
Materials Required
- Pre-made cylindrical storage ottoman
- Four swiveling casters (wheels)
- Wood screws (short enough not to pierce the bottom of the ottoman)
- Circular piece of plywood or thick wood (for the tray)
- Stain or paint (for the tray)
Equipment Required
- Power drill and various bits
- Screwdriver
- Measuring tape
Step-by-Step Instructions
- Prepare the Ottoman Base: Turn the storage ottoman upside down. Ensure the bottom is a sturdy material (plywood or MDF). If the bottom is fabric, you may need to insert an internal wooden base before proceeding.
- Mount the Casters: Measure and mark the four locations for the casters, placing them near the outer edge for maximum stability. Use the power drill and wood screws to firmly attach all four swiveling casters to the bottom of the ottoman.
- Finish the Tray: Cut the circular plywood piece to the desired size for a serving tray. Sand the edges smooth and apply a protective stain or clear coat.
- Test the Mobility: Turn the ottoman right-side up. Roll it around the floor to confirm the casters move smoothly.
- Use the Tray: When the lid is closed, simply place the finished wooden tray on top of the upholstered lid to convert it into a small coffee or side table.
20. Cylindrical Storage Stool

Minimalist Concrete-Style Stool
A tall, cylindrical stool offers a modern, minimalist way to add seating without cluttering the floor visually. This stool features a clean, simple silhouette finished in a neutral, light beige, giving it the appearance of smooth concrete or plaster. The small, round cushion top in muted rose adds comfort and a touch of warmth.
The cylinder is designed to be hollow, providing essential vertical storage for items like umbrellas, yoga mats, or small blankets. The simple handle cutout near the top emphasizes its lightweight nature and portability, allowing it to be easily moved from a corner to the center of the room as needed. It functions equally well as a display pedestal, side table, or quick seat.
DIY Instruction: Upgrading a Storage Bin to a Stool
Item Name: Cylindrical Storage Stool
Materials Required
- Large, sturdy cardboard tube (e.g., concrete forming tube) or a round storage bin
- Textured paint (e.g., plaster effect or stone finish) or contact paper
- High-density foam (for the seat)
- Fabric (for the seat cover)
- Plywood circle (for the seat base)
- Strong adhesive
Equipment Required
- Utility knife
- Sandpaper (for the wood top)
- Paintbrush or roller
- Staple gun
Step-by-Step Instructions
- Prepare the Stool Body: If using a cardboard tube, cut it to the desired height (around 18 inches). If using a storage bin, ensure the lid is removable. Cut out a small notch near the top for a handle if one does not exist.
- Apply Finish: Apply the textured paint or contact paper to the exterior of the cylinder to achieve the smooth, minimalist concrete look. Allow the paint to dry completely.
- Create the Seat: Cut the plywood circle slightly larger than the top opening of the cylinder. Cut the foam to the exact size of the plywood. Glue the foam to the plywood circle.
- Upholster the Seat: Wrap the foam and plywood top tightly in your chosen fabric, stapling the excess fabric to the underside of the plywood.
- Assemble and Use: Apply strong adhesive (like construction adhesive) around the top rim of the finished cylinder and press the upholstered seat firmly onto the rim. Let the adhesive cure. The result is a dual-purpose storage stool.
21. Foldable Floor Mattress

Tufted Folding Floor Pad
When you need seating or a temporary bed, a high-quality folding mattress is a brilliant solution for small homes. This square, tufted floor pad, featuring dark gray upholstery and contrasting yellow foam layers, stacks compactly when not in use. The different layers are held together by a convenient zipper system, allowing for quick assembly and disassembly.
The thickness of the mattress provides comfortable support for sitting directly on the floor during casual entertaining or movie nights. When unfolded fully, the piece transforms into a substantial sleep surface for overnight visitors. The zippered cover and robust construction ensure this item is both functional and durable for regular use.
DIY Instruction: Creating a Tufted Folding Floor Pad
Item Name: Tufted Folding Floor Pad
Note: Due to the complexity of multi-layered, zippered folding pads, this DIY focuses on making a simple, large, tufted floor cushion.
Materials Required
- Large piece of high-density foam (e.g., 4 inches thick)
- Durable upholstery fabric (enough to cover the foam completely, plus side panels)
- Heavy-duty thread
- Long upholstery needle
- Buttons or strong twine (for tufting)
Equipment Required
- Sewing machine
- Fabric scissors
- Measuring tape
- Utility knife (for cutting foam)
Step-by-Step Instructions
- Measure and Cut Fabric: Determine the size of your square cushion (e.g., 28×28 inches). Cut two large squares for the top and bottom panels. Cut four long, rectangular strips for the side panels, ensuring the width matches the foam thickness plus seam allowance.
- Sew the Cover: Sew the side panels together to form a loop. Sew the top and bottom panels onto the side loop, leaving one entire side open for inserting the foam. Turn the cover right-side out.
- Insert the Foam: Carefully slide the large foam pad into the sewn fabric cover. Smooth out the cover so the foam fits snugly into the corners.
- Tuft the Cushion: Decide on a pattern for the tufting (e.g., a grid of nine points). Thread the long upholstery needle with strong twine or thread. Push the needle completely through the cushion (front to back) at the first marked point.
- Secure the Tuft: On the back side, thread a button onto the needle and pass the needle back through the cushion, coming out the front. Pull the twine tightly to create the dimple, and securely tie off the thread with a button on the front side. Repeat this process for all tufting points.
- Close the Seam: Hand-stitch the open side closed using a slip stitch, which gives a clean, professional finish.
22. Compact Semi-Circle Side Table

Half-Round Side Table
Sometimes, the best solution is a piece of furniture that subtly takes up less space than its traditional counterpart. This small, half-round side table, pushed flush against the sofa back, provides a sturdy surface for drinks and decor without requiring a large circular footprint. The sleek design makes it visually appealing.
The tabletop features a modern split design: half light wood and half smooth gray. The slim, angled legs, finished in a matte sage green, introduce a playful color and modern silhouette. It is just the right size for holding a small potted plant and a cup, offering function without obstructing the flow of a narrow living area.
DIY Instruction: Creating a Half-Round Table
Item Name: Half-Round Side Table
Note: This DIY focuses on modifying a small, round table to sit flush against a wall or sofa.
Materials Required
- Small, pre-made round side table (with detachable top)
- Saw (handsaw or jigsaw)
- Sandpaper
- Paint or stain (for the legs and top)
- Screws
- Metal brackets (optional, for wall mounting)
Equipment Required
- Measuring tape and pencil
- Power drill
Step-to-Step Instructions
- Remove and Mark the Top: Unscrew the tabletop from the legs. Measure and mark a straight line directly across the center of the round top. This line will divide the circle exactly in half.
- Cut the Top: Carefully use a handsaw or jigsaw to cut the tabletop precisely along the marked center line. Sand the newly cut straight edge until it is completely smooth.
- Finish the Wood: If you want a split-color effect like the image, tape off half of the cut tabletop and paint it the desired color (e.g., gray). Paint the other half with a clear coat or wood stain. Paint the table legs a contrasting color (e.g., green).
- Reassemble: Once all pieces are dry, align the straight cut edge of the tabletop with the back of the legs and re-attach the top securely with screws.
- Position: Place the straight edge of the finished table directly against the wall or the back of your sofa. The half-circle design visually saves floor area.
23. Window Bench with Open Storage
Cube Storage Window Bench
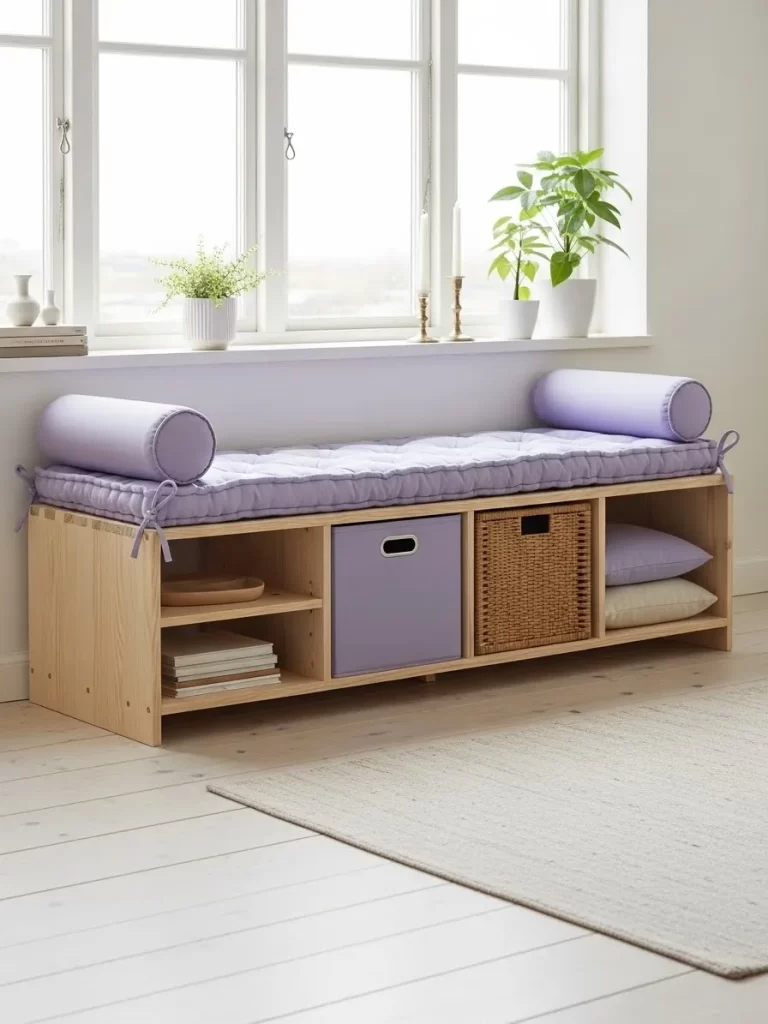
This brightly decorated wooden bench converts a plain window area into a delightful, multi-functional seating and storage zone. The structure consists of simple, natural pine cubbies, which provides a custom-built appearance. The natural wood grain introduces a casual, Scandinavian feel.
A long, comfortable cushion with tufting in a beautiful lavender shade creates the seat, complete with matching bolster pillows for back support. The open cubbies beneath are used efficiently: some hold decorative items, while others neatly contain woven baskets and purple storage bins. This solution maximizes seating capacity while fighting clutter effectively.
DIY Instruction: Building a Window Bench with Open Cubbies
Item Name: Cube Storage Window Bench
Materials Required
- Plywood or MDF sheets (for the frame and internal dividers)
- Wood glue and screws
- Paint or clear polyurethane finish
- High-density foam (for the cushion)
- Fabric and batting (for the cushion)
- Rope or ribbon (for cushion ties)
Equipment Required
- Circular saw or handsaw
- Power drill and various bits
- Level and measuring tape
- Staple gun
Step-to-Step Instructions
- Measure and Cut: Measure the window space precisely. Cut the plywood into the four main frame pieces (top, bottom, and two sides). Cut internal divider pieces to create the vertical cubbies.
- Assemble the Box: Apply wood glue to the edges and assemble the basic rectangular box frame using screws. Then, glue and screw the internal divider panels into place. Use a measuring tape to ensure all cubbies are evenly spaced.
- Finish the Frame: Sand all surfaces smooth. Apply your chosen stain or clear finish to the wooden bench structure. Allow it to dry completely.
- Create the Cushion: Cut the high-density foam to the size of the bench top. Wrap the foam in batting. Cut the fabric panels and sew a simple cover, leaving an opening for the foam. Insert the foam and hand-stitch the opening closed.
- Add Ties (Optional): Attach loops of rope or ribbon to the underside of the cushion and corresponding points on the bench frame. This allows you to tie the cushion down, preventing it from sliding.
- Position and Decorate: Place the finished bench snugly beneath the window. Slide storage bins and baskets into the cubbies.
24. Giant Round Floor Cushion
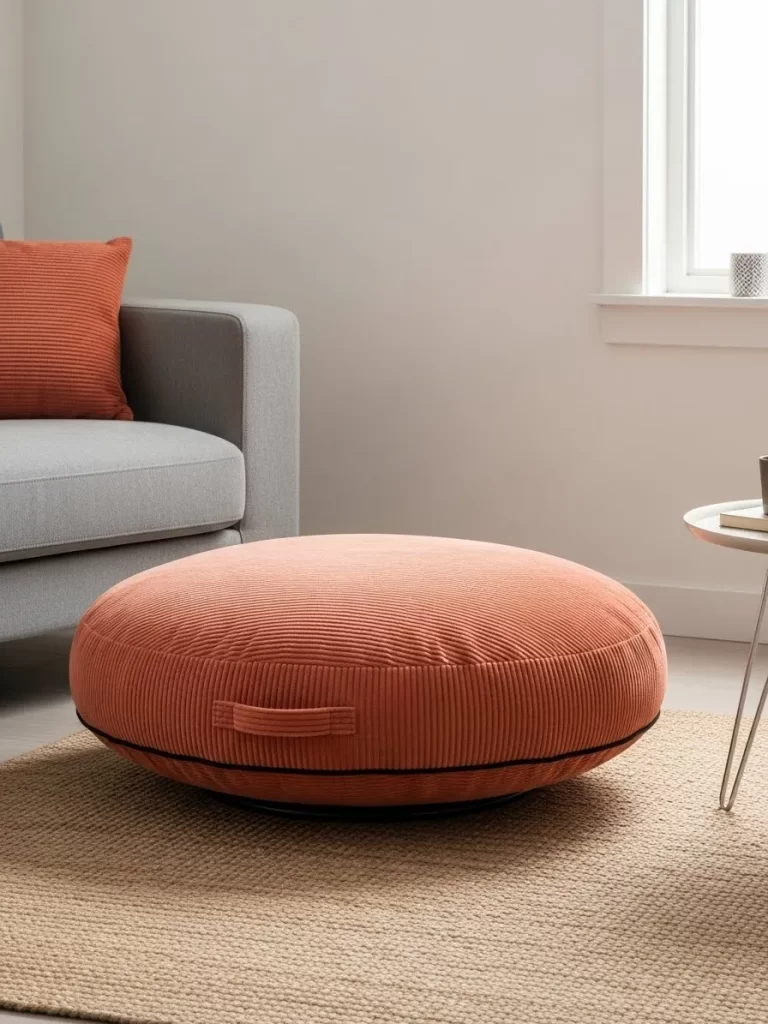
Corduroy Floor Pad
Introducing a giant floor cushion is one of the easiest ways to add comfortable, casual seating without committing to large furniture. This oversized, round pad is upholstered in a soft, ribbed corduroy fabric in a warm, rusty orange color. The corduroy texture adds a comforting, tactile quality to the room.
The large floor pad, featuring a small handle on its side for portability, sits directly on the area rug, taking up minimal vertical space. It serves as a large, low pouf for stretching out, a meditation cushion, or an extra seat for children or casual guests. Its low profile helps keep sight lines open in a restricted area.
DIY Instruction: Sewing a Giant Round Floor Cushion Cover
Item Name: Corduroy Floor Pad
Materials Required
- Large amount of durable, wide-wale corduroy fabric (or other upholstery fabric)
- Heavy-duty thread
- Poly-fil stuffing or beanbag filling
- Zipper (optional, for removable cover)
- Webbing or strong fabric (for the handle)
Equipment Required
- Sewing machine
- Fabric scissors
- Measuring tape
- Pins
Step-to-Step Instructions
- Cut the Panels: Determine the desired diameter and height. Cut two large circles for the top and bottom panels. Cut one long, rectangular strip for the side panel (the gusset), ensuring its length matches the circumference of the circles and its width matches the desired cushion height plus seam allowance.
- Prepare the Handle: Cut a piece of webbing for the handle. Pin and sew the handle securely onto the side strip, near the edge.
- Assemble the Cover: Sew the long edges of the side strip together to form a ring. Pin and sew the top and bottom circles to the side ring, right sides facing. Leave a large opening in the side strip for filling.
- Fill the Cushion: Turn the cover right-side out. Stuff the cover tightly with poly-fil or beanbag filling until the cushion achieves a firm shape.
- Close the Seam: Pin the edges of the opening together. Hand-stitch the opening closed securely. If using a zipper, install the zipper before assembly.
- Place on Floor: Position the large cushion directly on the floor or an area rug for comfortable, flexible seating.
25. Floating Wood Shelf Bench
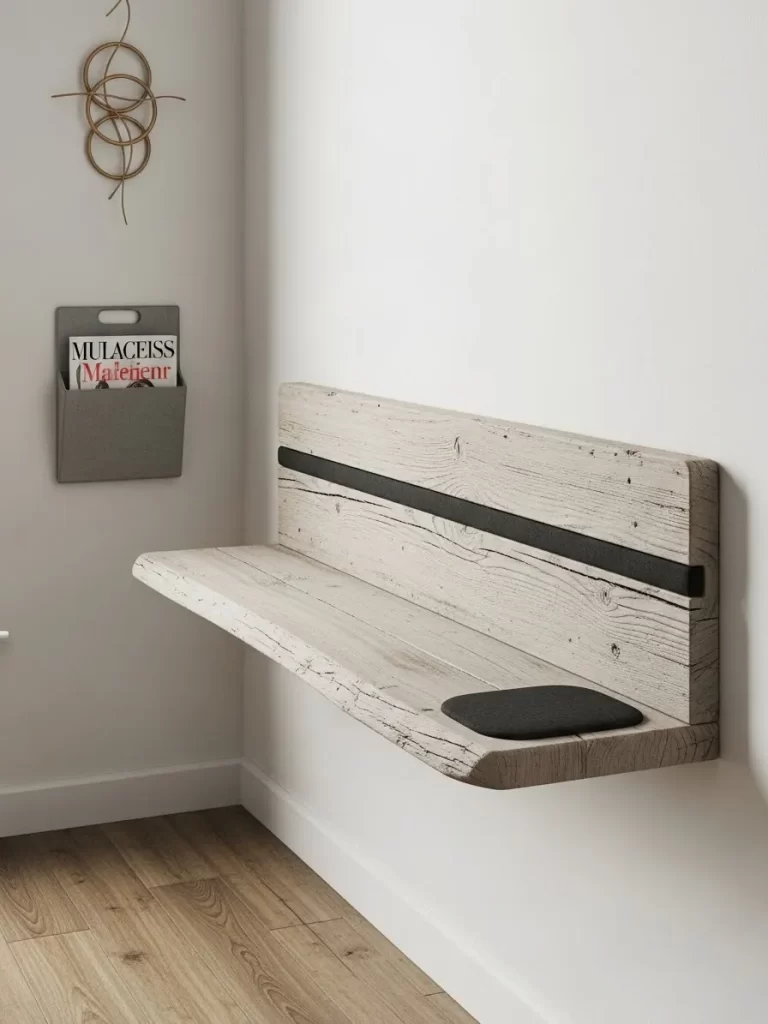
Reclaimed Wood Wall Bench
A floating bench design achieves a unique, rustic look while maximizing floor clearance. This piece, crafted from distressed, whitewashed wood, is securely mounted to the wall, with no visible supports. The thick wood creates a sturdy, cantilevered seat that doubles as a decorative shelf.
A contrasting black leather strap or metal inlay runs across the back wall panel, adding a modern, industrial touch. A small, dark cushion is placed on one end to define a seating spot. The design provides occasional seating and a display area, and the open space beneath helps the room feel significantly larger.
DIY Instruction: Installing a Heavy-Duty Floating Bench
Item Name: Reclaimed Wood Wall Bench
Note: This DIY requires advanced carpentry skill and strict adherence to structural safety.
Materials Required
- Very thick, solid wood plank (for the seat)
- Heavy-duty concealed floating shelf brackets (must be rated for person weight)
- Long lag screws (for mounting brackets into studs)
- Wood stain or paint (to achieve the reclaimed look)
- Small cushion or pad
Equipment Required
- Stud finder (critical)
- Power drill and impact driver
- Level and measuring tape
- Planer or router (optional, for flush fit)
Step-to-Step Instructions
- Prepare the Wood: Cut the wood plank to the desired length. Sand the plank and apply your chosen finish (e.g., light stain and whitewash). Allow it to dry completely.
- Locate Wall Studs: Use the stud finder to locate and mark the exact center of at least three vertical wall studs where the bench will be mounted. The brackets must be anchored into studs.
- Install the Brackets: Following the bracket instructions, drill pilot holes into the wall studs and use the long lag screws to firmly secure the heavy-duty floating shelf brackets to the wall. Use the level frequently to ensure they are perfectly straight.
- Prepare the Seat: Turn the finished wood plank upside down. Carefully measure and drill holes into the back edge of the plank that precisely align with the support rods sticking out from the wall brackets. The depth of the holes must match the length of the rods.
- Mount the Bench: Slide the wooden bench plank onto the bracket rods firmly. Use a rubber mallet to gently tap the bench into place until it is flush with the wall.
- Test for Safety: The bench should be completely stable. Perform a rigorous weight test before using it for seating.
26. Ergonomic Saddle Stool
Sculpted Saddle Stool
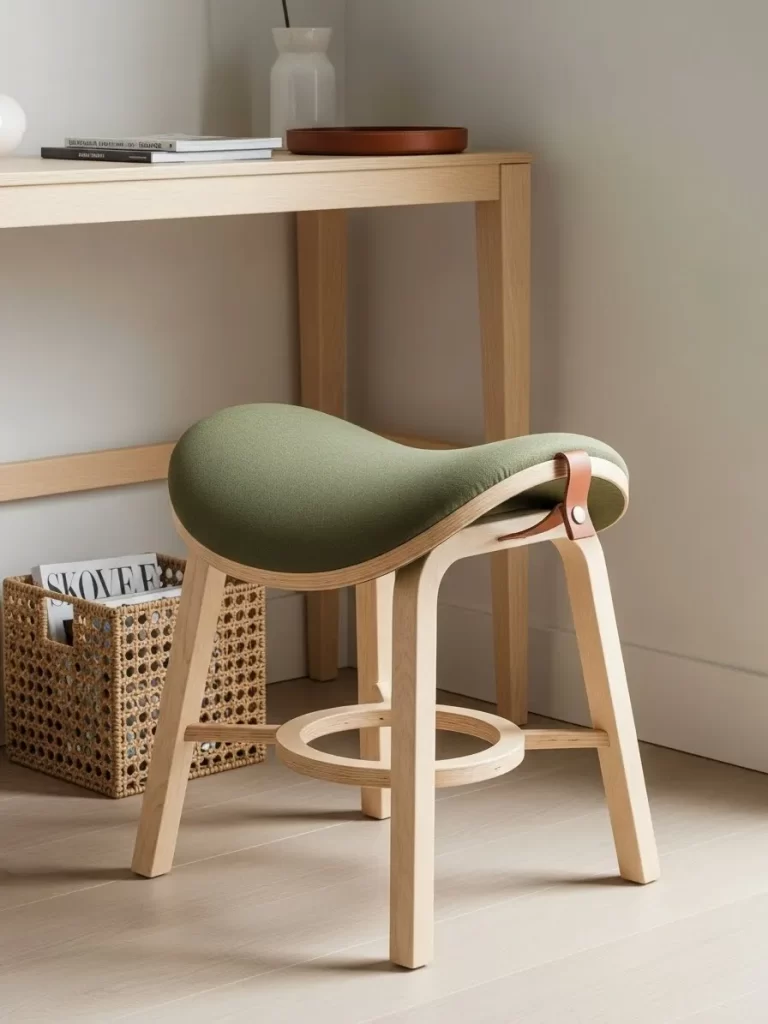
A compact, specialized stool is an effective solution for spaces that require occasional, task-oriented seating. This saddle-style stool features a uniquely sculpted seat upholstered in a soft, olive green fabric. The ergonomic shape provides comfortable posture support for short periods.
The stool base is constructed from light, curved plywood, giving it a warm, modern feel. A small leather strap is integrated into the side of the seat, serving as a subtle handle to emphasize its portability. Its small footprint allows it to be tucked under a desk or console, ready to be pulled out for extra seating when needed.
DIY Instruction: Upgrading a Simple Bar Stool
Item Name: Sculpted Saddle Stool
Note: The sculpted shape and bent plywood base are complex. This DIY focuses on creating a comfortable, padded, and portable stool from a basic bar stool.
Materials Required
- Basic wooden bar or counter stool
- High-density foam (for padding)
- Wood scraps (to create a slightly larger top, optional)
- Upholstery fabric and batting
- Leather strap or webbing (for the handle)
- Screws and wood glue
Equipment Required
- Staple gun
- Sandpaper
- Power drill
Step-to-Step Instructions
- Prepare the Base: Disassemble the stool if necessary. Sand and paint or stain the wooden base and legs.
- Create the Seat Pad: If the existing seat is too small, cut a piece of plywood or wood scrap to the desired saddle shape and attach it to the stool frame. Cut the foam to match this shape. Glue the foam onto the wooden seat.
- Upholster the Seat: Wrap the foam and wooden seat tightly in batting and then the upholstery fabric. Secure the fabric to the underside of the seat using a staple gun.
- Attach the Handle: Cut a short length of leather strap or webbing. Drill pilot holes on the side of the seat where you want the handle. Screw the handle securely into the side of the upholstered seat.
- Reassemble: Re-attach the newly upholstered seat to the finished stool base.
- Tuck Away: Place the finished stool neatly beneath a desk or in a corner for easy access.
27. Jute Basket Beanbag
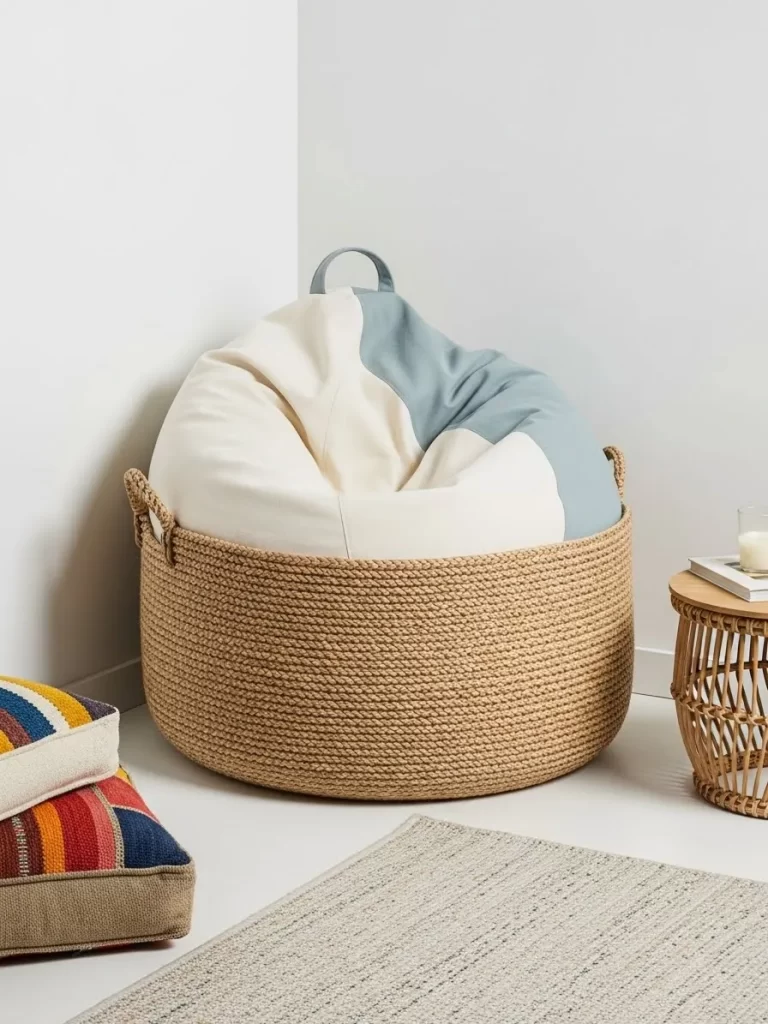
Rope Basket Beanbag Cover
Maximizing the appeal of flexible seating, this large beanbag is contained within a stylish, natural-fiber rope basket. The basket, woven from thick jute or cotton rope, features sturdy handles, adding visual texture and containment for the beanbag itself. This prevents the beanbag from spreading out too much, saving space.
The beanbag insert has a playful, two-toned cover in white and light blue, providing contrast against the natural basket. This combination offers a deeply comfortable, low-slung lounge seat that can be easily pulled out for extra guests or pushed back into a corner for a neat appearance. The aesthetic is casual and inviting.
DIY Instruction: Creating a Beanbag Liner for a Basket
Item Name: Rope Basket Beanbag Cover
Materials Required
- Large, sturdy, decorative rope basket
- Durable, non-stretch fabric (e.g., canvas or duck cloth) for the liner
- Polystyrene beads or shredded foam filling
- Heavy-duty thread
- Zipper (optional, for filling)
Equipment Required
- Sewing machine
- Fabric scissors
- Measuring tape
- Pins
Step-to-Step Instructions
- Measure the Basket: Measure the diameter of the basket bottom and its internal height. The beanbag liner must be slightly smaller than the basket dimensions to fit inside and allow for the slumping effect of the fill.
- Cut the Liner Panels: Cut a circular piece of fabric for the bottom and one long rectangular strip for the side. If you want a handle like the image, cut two handles from the fabric.
- Sew the Liner: Sew the side strip into a ring. Pin and sew the bottom circle to the ring. Sew on the handles, if included. Leave a small, strong opening for filling.
- Fill the Liner: Use a funnel to fill the fabric liner with the polystyrene beads or shredded foam. Fill it slightly less than full; the beanbag needs room to mold when someone sits on it.
- Close the Liner: Hand-stitch the opening closed using a strong, double seam. You may want to sew an outer cover from a decorative fabric (like the image) and then insert the filled liner into that cover.
- Place in Basket: Tuck the finished beanbag liner (or the outer cover) neatly into the rope basket. The basket will contain the beanbag, making it a compact, attractive seat.
28. Entryway Bench with Shoe Rack
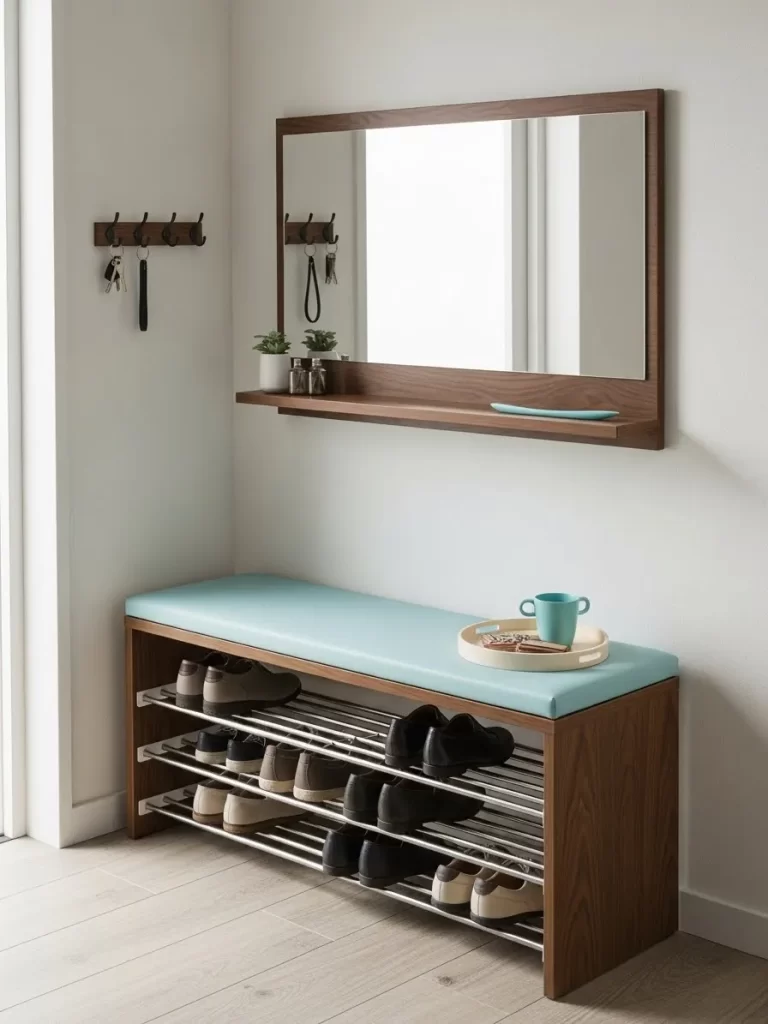
Slim Entryway Storage Bench
A functional entryway bench can easily be repurposed as backup living room seating. This model features a slim profile and beautiful walnut-stained wood frame. The cushioned top, upholstered in a light turquoise material, provides a comfortable spot for sitting while transitioning between inside and outside.
The space beneath the seat is cleverly utilized with multiple chrome rods creating open, ventilated shelving for shoes. This multi-purpose piece acts as an organization zone, a display area with a mirror shelf above, and a sturdy bench for extra guests. Its narrow depth is a key feature for saving floor space.
DIY Instruction: Adding a Cushion to a Shoe Rack Bench
Item Name: Slim Entryway Storage Bench
Note: This DIY focuses on upholstering and adding a cushion to an existing shoe rack bench for comfort.
Materials Required
- Basic wooden shoe rack or low bench with open shelving
- High-density foam (for the cushion)
- Durable upholstery fabric
- Upholstery batting
- Non-slip shelf liner or Velcro dots
- Wood stain or paint (optional)
Equipment Required
- Staple gun and staples
- Utility knife
- Measuring tape
Step-to-Step Instructions
- Prepare the Bench: If the bench is unfinished, sand it and apply a wood stain or paint color. Ensure the top surface is clean and level.
- Cut the Foam: Measure the exact length and width of the bench top. Cut the high-density foam to these dimensions using a utility knife.
- Upholster the Cushion: Center the foam on the piece of plywood or wood base. Wrap the foam and base completely in upholstery batting, securing it underneath with a few staples.
- Cover with Fabric: Cut the fabric, ensuring enough material to wrap around the foam and secure it underneath the bench base. Pull the fabric tightly and staple it neatly to the underside of the base, maintaining tension for a smooth top finish.
- Secure to Bench: Place a non-slip shelf liner or a few Velcro dots on the top surface of the wooden bench. Place the finished cushion on top. The cushion is now secured, providing comfortable, durable overflow seating.
29. Pedestal Stool and Lamp Set
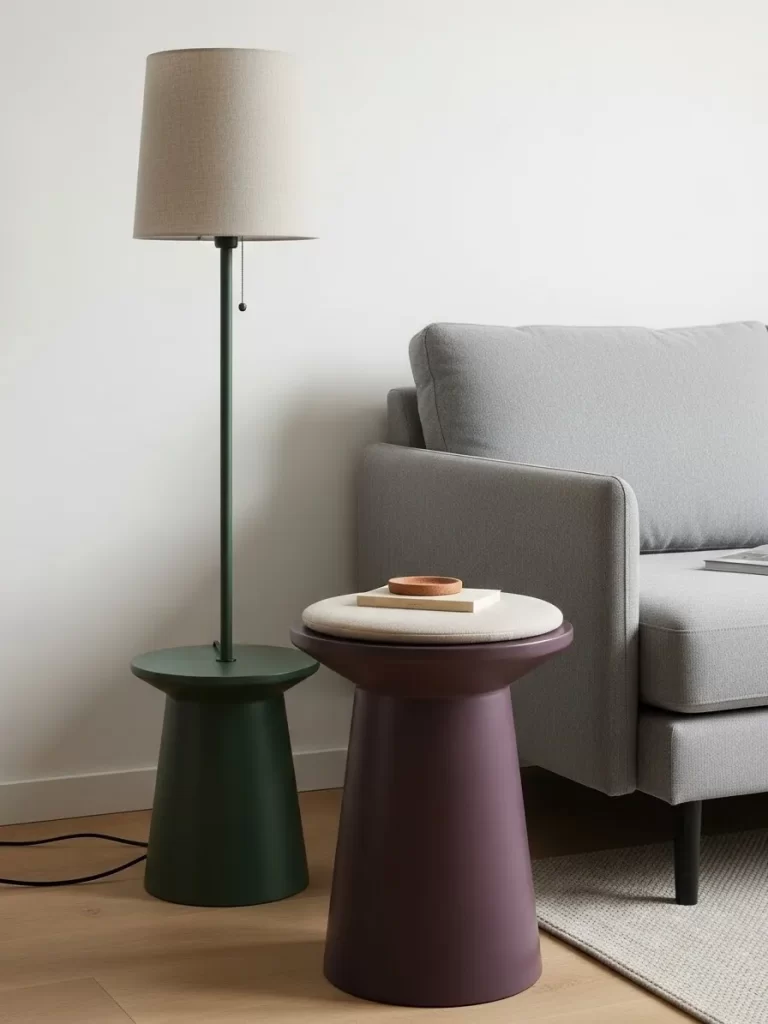
Colorful Pedestal Stool and Lamp
When a room can only handle a single accessory piece, making it multi-functional is the smart move. This set features two matching pedestal pieces, one serving as a floor lamp base and the other as a portable stool. The contrasting, matte colors—deep plum for the stool and forest green for the lamp—add a modern flair.
The stool features a flat top where a small round cushion is placed, perfect for a quick perch or as a side table to hold a book or cup. The lamp base is substantial, providing ambient lighting. By keeping the bases slim and vertical, the pairing offers seating, lighting, and a surface without consuming much floor area.
DIY Instruction: Creating a Cushion for a Pedestal Stool
Item Name: Colorful Pedestal Stool
Materials Required
- Pre-made sturdy pedestal side table or stool
- High-density foam (round shape)
- Upholstery fabric
- Wood glue or strong adhesive
- Non-slip material (optional)
Equipment Required
- Fabric scissors
- Staple gun (optional, if using a thin plywood base for the cushion)
Step-to-Step Instructions
- Measure the Top: Measure the diameter of the pedestal stool’s flat top surface.
- Cut and Shape the Foam: Cut the foam into a circle slightly smaller than the top diameter. This allows the cushion to sit neatly on the surface without overhang.
- Upholster the Foam: Cut the fabric into a circle large enough to wrap around the foam and tuck underneath. Place the foam in the center of the fabric. Gently pull the edges of the fabric up over the foam and gather the fabric neatly underneath, gluing or hand-stitching the gathered material closed.
- Secure the Cushion: Place the upholstered cushion on top of the pedestal stool. Use a small amount of adhesive or strategically placed non-slip material on the bottom of the cushion to prevent it from sliding off during use.
- Style: The pedestal stool is now an attractive, comfortable seat. It can be easily moved to the side of the sofa for extra seating or used as a functional side table.
30. Cork Divider Bench
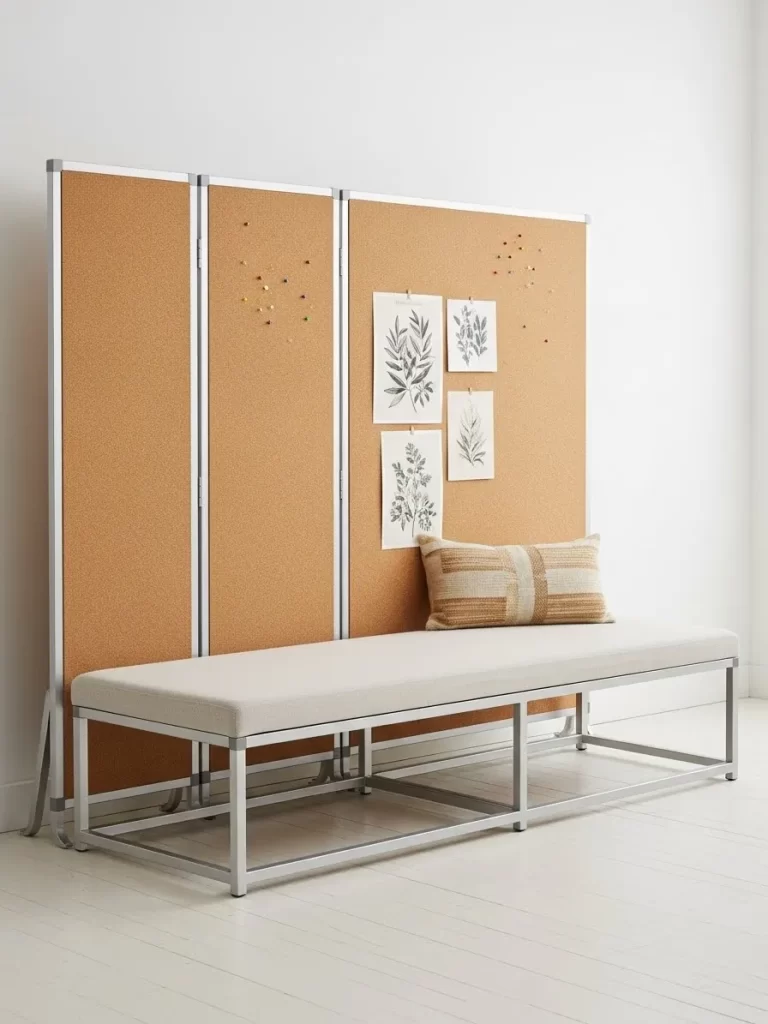
Three-Panel Cork Board Bench
This flexible piece serves as a room divider, a creative display area, and overflow seating, maximizing utility in a small room. The long, slim bench features a light, neutral fabric cushion and a simple, boxy metal frame, offering a clean, minimalist aesthetic. The neutral tone ensures it blends easily.
The back of the bench is an integrated, three-panel cork board divider, which is ideal for pinning up art, notes, or mood boards. This vertical element defines a space without building a permanent wall. The bench uses its area efficiently, providing seating and a functional privacy screen simultaneously.
DIY Instruction: Creating a Bench with an Integrated Display Back
Item Name: Cork Board Divider Bench
Note: This DIY focuses on creating a bench and then attaching a simple, existing screen or cork board to its back.
Materials Required
- Pre-made slim bench or long console table frame
- Upholstery foam and fabric (for the cushion)
- Pre-made tri-fold cork board divider (or a wooden screen)
- Metal L-brackets
- Screws and nuts/bolts (to connect the bench and divider)
Equipment Required
- Power drill and bits
- Measuring tape and level
- Staple gun
Step-to-Step Instructions
- Prepare the Bench: Ensure the bench frame is sturdy. Upholster the top with foam and fabric, securing the cushion to the bench top.
- Position the Divider: Place the cork board divider or screen directly behind the center of the bench. Use a level to ensure the divider stands perfectly straight.
- Mark Connection Points: Mark the locations where the L-brackets will connect the back of the bench frame to the base of the divider panel. Aim for at least two connection points for stability.
- Attach the Brackets: Secure the L-brackets to the back frame of the bench using screws. Then, attach the other side of the L-brackets to the wooden or metal base frame of the divider. Use bolts for a stronger connection if the divider base is metal.
- Test Stability: The combined unit should be able to stand freely and stably. Place a few pillows on the bench for comfort and use the cork back for pinning your display items.
- Use as a Divider: Position the finished piece to subtly separate a seating area from an entryway or dining area.
31. Built-In Recessed Nook
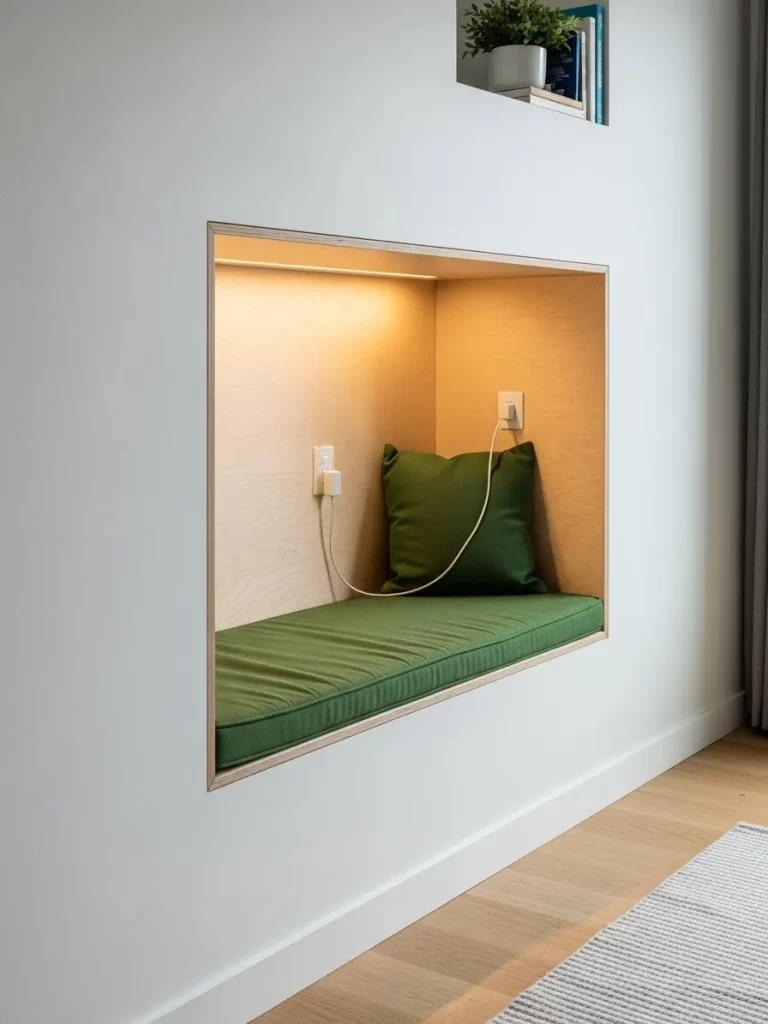
Wall Niche Reading Seat with Charger
When space is extremely limited, using the depth of the wall cavity itself is a brilliant, space-saving maneuver. This recessed niche provides a custom-made reading nook that requires zero floor space. The surrounding white walls and light wood trim create a clean, contemporary appearance.
The nook features a comfortable olive green cushion and a plush accent pillow, making it an inviting spot for a quick rest. Practicality is enhanced by the built-in lighting and integrated power outlets, allowing visitors to relax and charge their devices easily. This solution demonstrates how thoughtful construction can transform otherwise wasted wall space into functional seating.
DIY Instruction: Creating a Shallow Wall Niche Seat
Item Name: Wall Niche Reading Seat
Note: This DIY assumes you are working with a non-load-bearing wall or have access to a skilled contractor to frame out the opening safely.
Materials Required
- Plywood or MDF sheets (for lining the niche interior)
- Trim pieces (for the finished edge)
- Wood glue and finishing nails
- Small LED strip light kit
- Outlet box and wiring (requires an electrician)
- Foam and fabric (for the cushion)
- Paint
Equipment Required
- Saw (jigsaw or circular saw)
- Stud finder and measuring tape
- Power drill and bits
- Level
- Nail gun or hammer
Step-by-Step Instructions
- Mark and Frame the Opening: Use a stud finder to locate studs. If possible, choose an area between studs. Carefully cut the drywall to create the niche opening. Frame the interior with thin lumber to create a neat, sturdy cavity.
- Line the Interior: Measure the interior dimensions of the framed niche. Cut plywood panels to line the back, sides, top, and bottom of the cavity. Glue and nail the lining panels securely into the frame.
- Install Electrical (Professional Step): Have a qualified electrician run wiring to install the power outlets inside the niche and install the switch for the lighting.
- Add Lighting and Trim: Install the LED strip light along the top interior edge of the niche, concealing the wiring. Nail the decorative trim pieces around the exterior edge of the niche opening for a finished look. Paint the entire niche structure.
- Create the Cushion: Measure the exact dimensions of the niche bottom. Cut the high-density foam to fit. Upholster the foam neatly with your chosen fabric.
- Final Setup: Place the finished cushion in the niche. Plug in the lighting and test the outlets. The cozy built-in seating area is now ready.
32. Foldable Corner Floor Chair
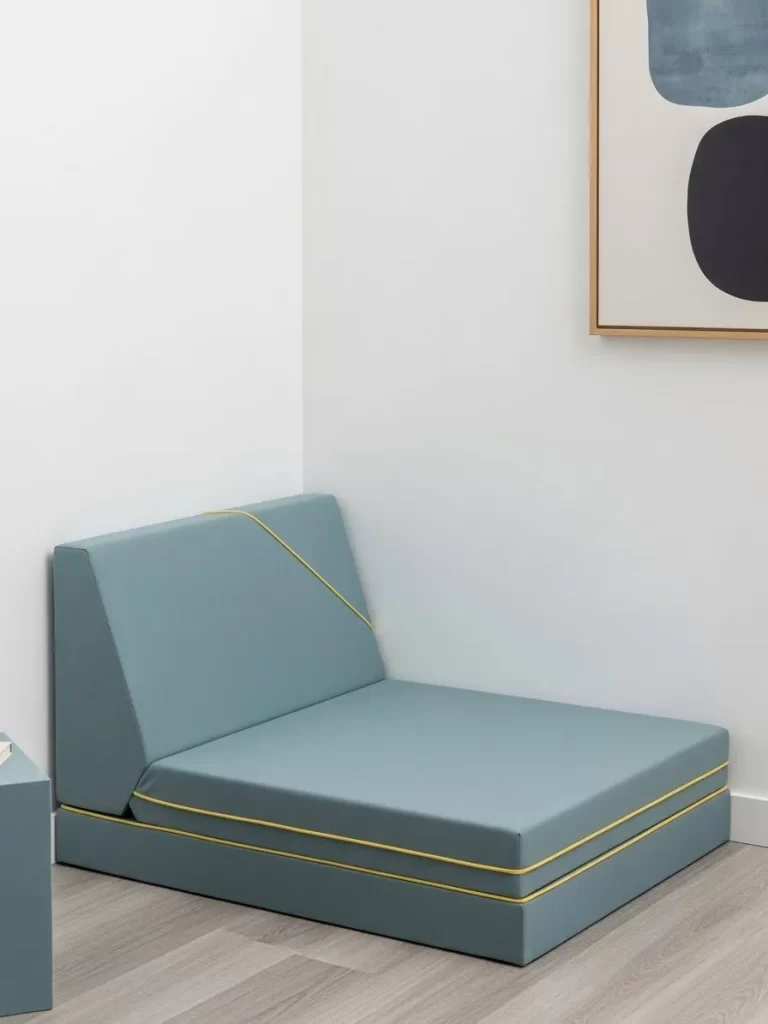
Minimalist Folding Corner Lounger
Achieving a comfortable corner seat without the bulk of a full armchair is easy with this hinged floor cushion. The piece is constructed from thick foam blocks covered in a calming slate-blue fabric with a modern yellow contrast stripe. When not needed, the piece folds completely flat for easy sliding under a bed or cabinet.
The simple design allows the backrest to be angled against the wall, creating a comfortable, low-slung chair for gaming or reading. The cushion provides generous surface area, making it a flexible lounge spot. It is an excellent solution for maximizing the seating potential of unused corners.
DIY Instruction: Creating a Hinged Floor Cushion
Item Name: Minimalist Folding Corner Lounger
Materials Required
- Two identical foam pads (thick, high-density)
- Durable upholstery fabric
- Heavy-duty thread
- Large, sturdy continuous hinge (or two strong fabric strips)
- Zipper (optional, for removable cover)
Equipment Required
- Sewing machine
- Fabric scissors
- Utility knife (for foam)
- Measuring tape
Step-by-Step Instructions
- Prepare the Foam: Ensure the two foam pieces are the exact same size.
- Sew the Cover: Cut fabric to create a single, continuous cover that will envelop both foam pieces. The cover must have a central channel or seam where the hinge or fabric connector will be placed. Sew the cover, leaving one edge open for foam insertion.
- Attach the Hinge (Fabric Method): If using a strong fabric hinge, cut a piece of durable fabric and sew it securely to the interior of the cover’s central seam, joining the two sides. This allows the back to fold up but prevents the pieces from separating.
- Insert Foam and Close: Slide the two foam pieces into the cover. Hand-stitch the final seam closed.
- Alternative (External Hinge): If using a physical metal hinge, install the hinge onto the wood bases of the foam (if applicable) and then sew the fabric cover over the entire assembly, ensuring the fabric does not obstruct the hinge’s movement.
- Use Against the Wall: Place the cushion against a corner. Fold one end up against the wall to form the supportive backrest.
33. Sofa with Hidden Trundle Ottoman
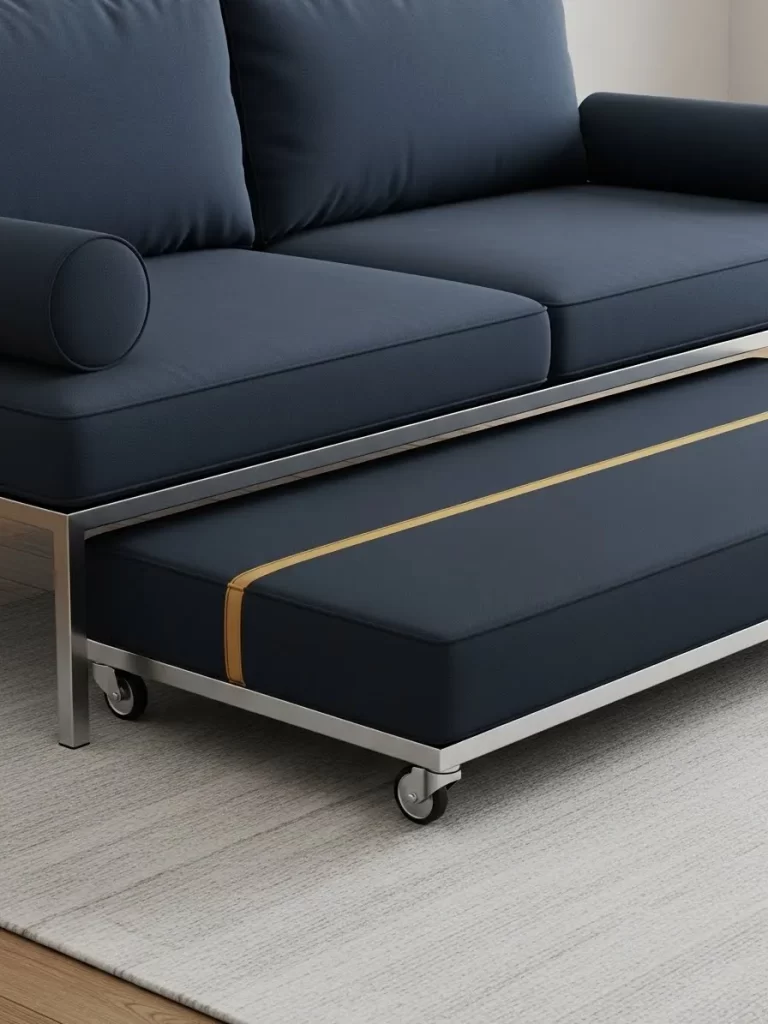
Pull-Out Sofa Seating Cart
This sleek, modern sofa conceals an incredibly functional extra seating unit within its frame. The main sofa features a simple, deep-blue upholstery and a slim, polished metal frame, keeping the visual footprint light. The design incorporates a hidden trundle that is nearly invisible when pushed in.
The cushioned trundle unit, featuring a contrasting gold stripe, rolls out smoothly on small casters, transforming the sectional into an extended chaise or offering an entirely separate seat. It is perfect for impromptu lounging or overflow seating without moving any heavy furniture. This piece highlights that major furniture can still incorporate clever space-saving functions.
DIY Instruction: Adding Casters to an Existing Ottoman
Item Name: Pull-Out Sofa Seating Cart
Note: Building a fully integrated sofa trundle is very complex. This DIY focuses on making a standard ottoman function as a smooth-rolling extra seat.
Materials Required
- Sturdy, flat-bottomed ottoman or storage box
- Four swiveling, low-profile casters (wheels)
- Wood screws (ensure they are the right length)
- Power drill
- Measuring tape
Equipment Required
- Power drill and bits
- Screwdriver
Step-to-Step Instructions
- Examine the Base: Turn the ottoman upside down. Ensure the bottom material is sturdy wood or thick plywood to support the screws and the weight.
- Mark Caster Placement: Measure and mark the four locations for the casters. They should be placed near the corners but slightly inward to prevent them from hitting the sofa frame when rolled under.
- Attach the Casters: Use the power drill and wood screws to firmly attach the swiveling casters to the marked locations on the bottom of the ottoman. The casters must be secure to prevent wobbling during movement.
- Test Mobility: Turn the ottoman right-side up. Roll it around to check that all four wheels move smoothly and do not snag on the rug or floor.
- Storage: The ottoman can now be easily rolled out from under a side table or console for use and quickly pushed back into a discreet spot.
34. Folding Magazine Sling Chair
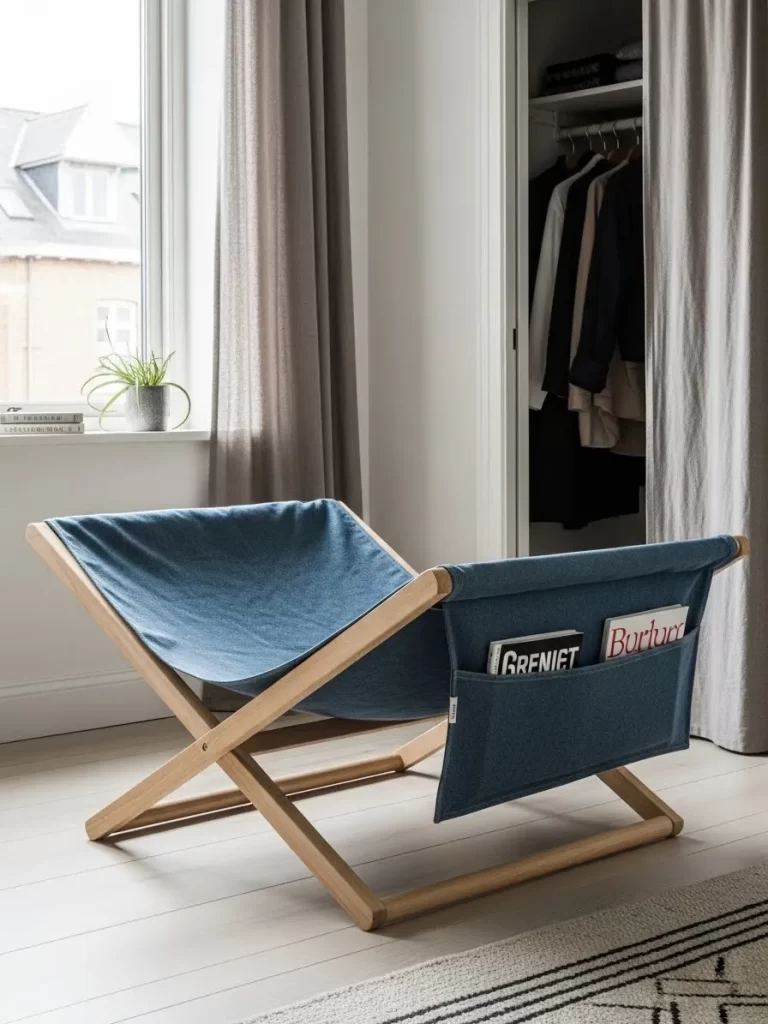
Portable Fabric Sling Chair with Storage
Achieving maximum seating comfort with a minimal footprint is accomplished with this collapsible chair. The entire structure is made from a lightweight wooden frame that folds completely flat for storage behind a door or in a closet. The deep blue fabric seat creates a comfortable sling shape, perfect for relaxed lounging.
The most resourceful feature is the storage integrated into the back of the chair. Deep fabric pockets are sewn directly into the back panel, providing organized storage for magazines, books, or tablets. This design ensures that essential reading material is always within reach, eliminating the need for a separate side table.
DIY Instruction: Adding Storage Pockets to a Folding Chair
Item Name: Portable Fabric Sling Chair with Storage
Note: This DIY assumes you have a basic folding wooden chair that needs an upgrade.
Materials Required
- Basic folding wooden or canvas chair
- Durable fabric (e.g., denim or canvas)
- Heavy-duty thread
- Scissors
- Measuring tape
- Pins
Equipment Required
- Sewing machine
- Iron
Step-to-Step Instructions
- Measure the Back Panel: Measure the width and height of the chair’s backrest area where you want the pockets to be.
- Cut the Fabric: Cut a rectangular piece of durable fabric for the main pocket panel. Cut a slightly smaller piece of fabric for the front panel, ensuring it is tall enough to create two or three deep pockets when folded.
- Create the Pockets: Fold the smaller front panel fabric up to create two or three pockets. Pin the layers in place and use the sewing machine to sew vertical lines to create the individual pocket compartments.
- Sew the Panel: Place the pocket panel onto the main back panel fabric. Sew them together along the bottom edge and the vertical pocket dividers. Hem the top edge of the pocket panel for a clean finish.
- Attach to Chair: Wrap the entire storage panel around the backrest of the chair. Hand-stitch the panel securely to the existing chair fabric or frame at the top, sides, and bottom using heavy-duty thread.
- Fold Away: The chair folds flat even with the storage attached, offering easy organization and extra seating.
35. Wall-Art Folding Seat
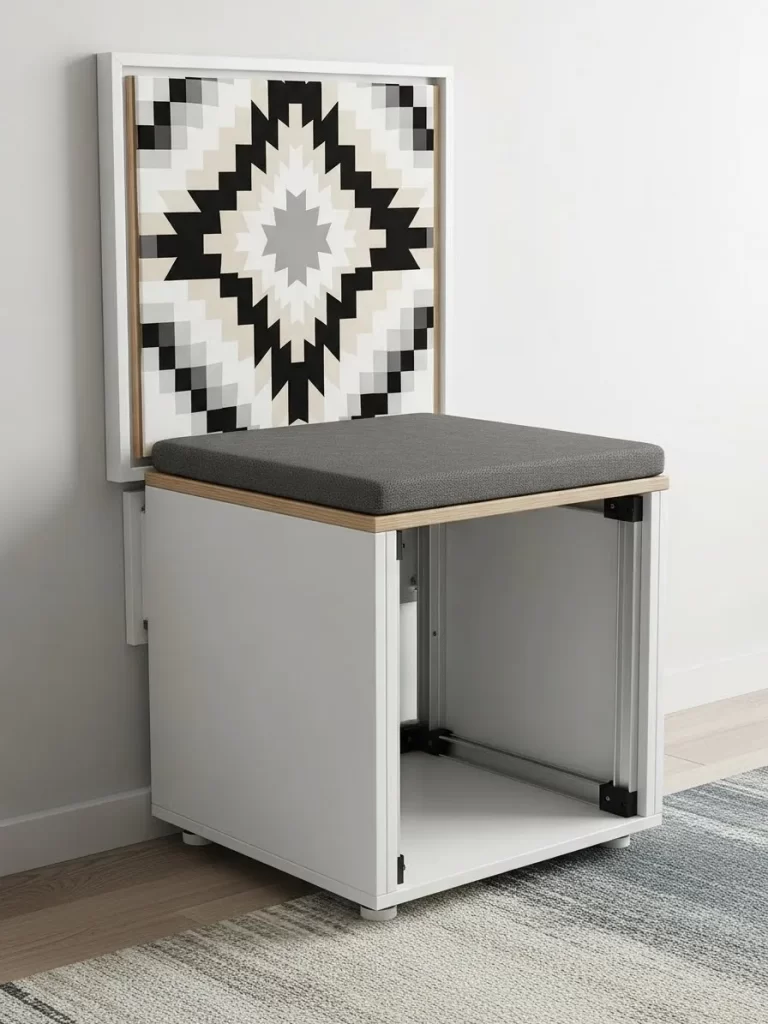
Geometric Wall Art Console Chair
This piece epitomizes hidden functionality, transforming from a sleek piece of wall art into a usable seat in seconds. When folded up, the seat back displays a striking geometric pattern in black, white, and grey, serving as a contemporary decorative element. The lower white cube acts as a slim console or side table.
The top of the cube serves as the comfortable seat cushion, upholstered in a coordinating gray fabric. The back panel folds down and locks into place, creating a supportive backrest. This innovative design offers a robust, full-back chair that completely disappears when vertical, making it a masterpiece of space economy.
DIY Instruction: Creating a Decorative Panel for a Chair Back
Item Name: Geometric Wall Art Console Chair
Note: This DIY focuses on creating the decorative panel for a pre-made folding chair that has a flat back.
Materials Required
- Thin, lightweight plywood or MDF board (sized for the chair back)
- Paint in various colors (black, white, grey, etc.)
- Masking tape (low tack)
- Sealer/Varnish
- Screws or strong adhesive (to attach to chair)
Equipment Required
- Ruler and pencil
- Paintbrushes
- Power drill (if screwing to chair)
Step-to-Step Instructions
- Prepare the Panel: Cut the plywood or MDF to the exact size of the chair back. Lightly sand the surface.
- Design the Pattern: Use a ruler and pencil to lightly draw your geometric design (e.g., diagonal lines, squares, diamonds) onto the panel surface.
- Paint the Design: Use low-tack masking tape to carefully mask off the areas you want to remain white or one color. Paint the exposed areas. Once dry, remove the tape, re-mask for the next color, and paint again. Repeat until the entire pattern is complete.
- Seal the Art: Apply a clear sealer or varnish over the painted panel to protect the finish.
- Attach to Chair: Once the panel is completely dry, use a strong construction adhesive to glue the panel directly onto the flat back of the folding chair, or secure it with small, counter-sunk screws if the chair frame is wood.
- Display: When folded up, the striking panel becomes an engaging piece of wall art.
36. Stackable Wood Plank Seat
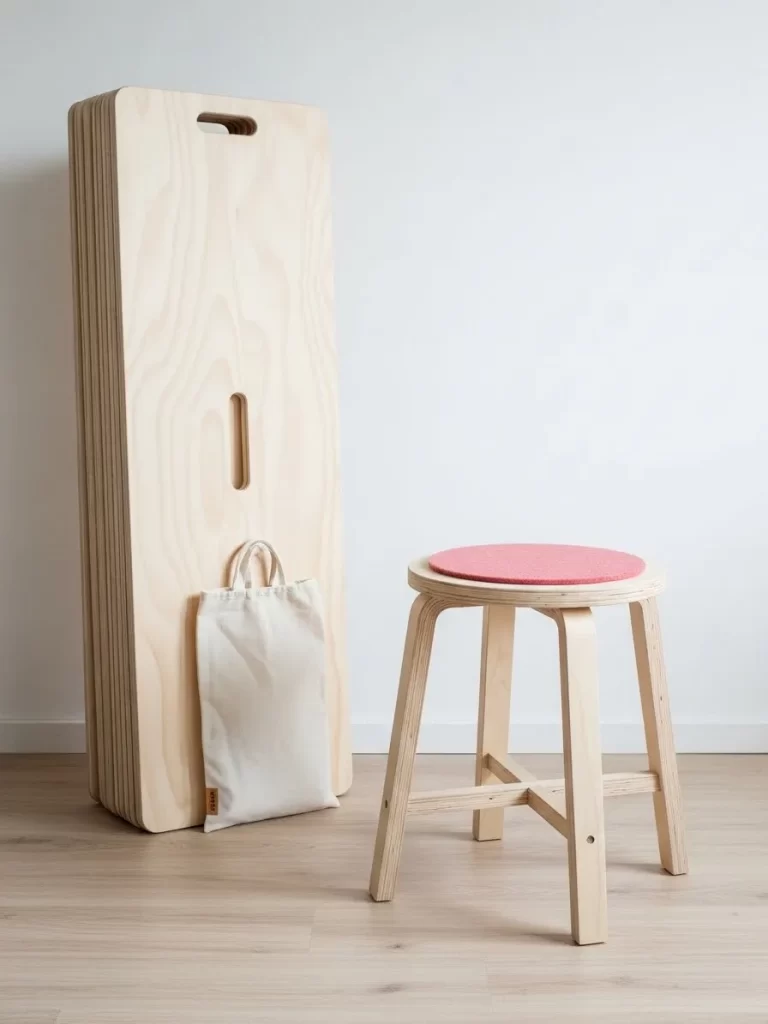
Multi-Use Layered Wood Stools
This simple, Scandinavian-inspired design provides versatile seating and surfaces that store vertically to reclaim floor area. The set includes multiple flat wooden planks with handle cutouts, which stack neatly against the wall when not in use. A simple round stool with a pink felt cushion stands ready for immediate use.
The planks can be separated and used as individual trays, low floor seats, or even as short side tables by resting them horizontally. The thin profile of the stacked planks allows them to be tucked into extremely narrow spaces, demonstrating flexibility and minimalist style. The single cushion suggests quick, comfortable access to one piece of the set.
DIY Instruction: Creating Simple Stacking Wood Planks
Item Name: Multi-Use Layered Wood Stools
Materials Required
- Plywood sheets (or solid wood boards)
- Wood glue and screws (optional)
- Wood stain or clear coat
- Sandpaper
Equipment Required
- Circular saw or handsaw
- Router or drill with a large bit (for the handle cutout)
- Measuring tape
Step-to-Step Instructions
- Cut the Planks: Determine the desired size (long and wide, but thin). Cut multiple rectangular planks from the plywood.
- Cut the Handle: For each plank, measure and mark a central location for the handle. Use a router or drill to cut out a simple, elongated oval shape for the handle cutout. Sand the edges of the handle thoroughly to prevent splinters.
- Finish the Planks: Sand all surfaces and edges of the planks smooth. Apply a clear coat or light stain to protect the wood and enhance its natural grain.
- Stack and Store: Once dry, stack the finished planks vertically in a corner against the wall. They are now ready to be used individually as low seats, trays, or decorative risers.
37. Wave Chaise Lounger
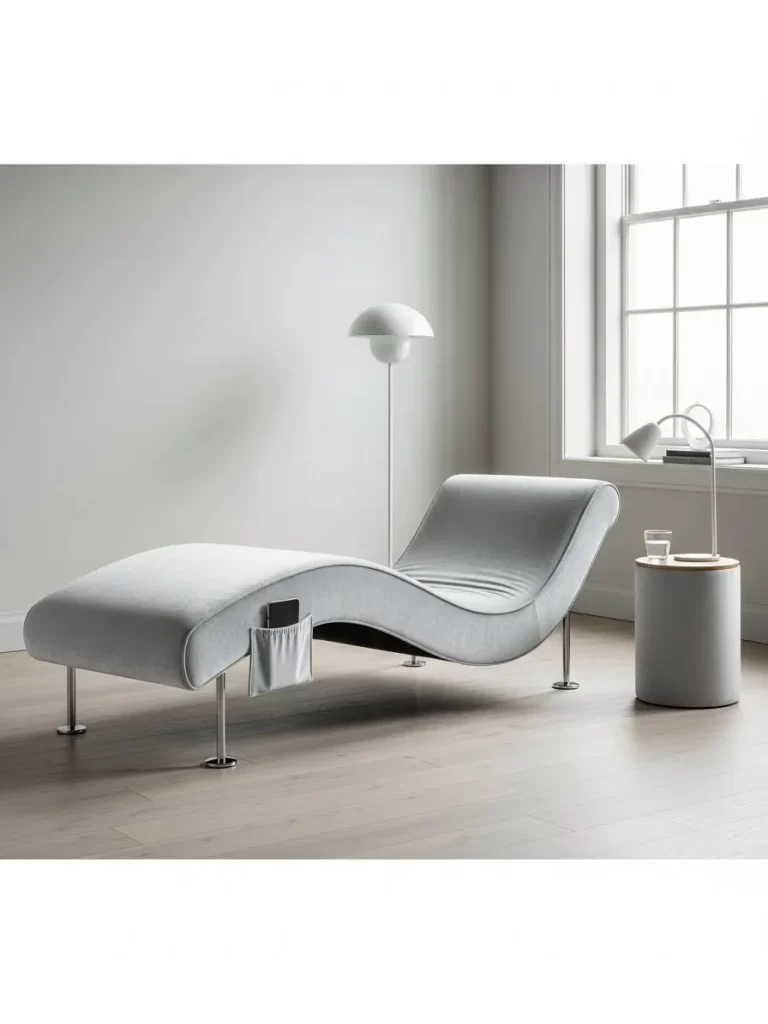
Sculpted Chaise with Magazine Pocket
While a chaise lounge seems large, its streamlined, wave-like shape maximizes comfort along a wall, using less width than a sofa. This stylish lounger features a smoothly curved frame upholstered in soft, light gray fabric, giving it an airy, contemporary appearance. The polished metal legs lift the piece, creating more visual floor space.
The addition of a fabric storage pocket sewn onto the side of the chair is a resourceful element. This pocket is sized to hold a phone, remote, or book, eliminating the need for a separate side table. The chaise offers maximum relaxation in a relatively narrow footprint.
DIY Instruction: Adding a Storage Pocket to Upholstery
Item Name: Sculpted Chaise with Magazine Pocket
Note: This DIY focuses on adding a simple, sewn-on storage pocket to an existing upholstered chair.
Materials Required
- Durable upholstery fabric (to match the chaise)
- Heavy-duty thread and needle
- Pins
- Scissors
Equipment Required
- Sewing machine (optional, for neat seams)
Step-to-Step Instructions
- Measure and Cut Fabric: Determine the size of the desired pocket (wide enough for magazines, deep enough to hold items securely). Cut two pieces of fabric: one for the front of the pocket and one for the back (which will be sewn to the chaise).
- Prepare the Pocket: Sew the two pieces together along the bottom and side edges. Hem the top edge neatly. If desired, sew a small pleat at the bottom to allow the pocket to expand.
- Pin to Chaise: Pin the completed pocket securely to the side of the chaise, ensuring the pocket is level and positioned at a comfortable height for access.
- Hand-Stitch Securely: Using a heavy-duty needle and strong thread, hand-stitch the pocket firmly onto the chaise upholstery. Stitch along the bottom edge and the two vertical sides. Use small, invisible stitches for a professional look.
- Test: Place a few magazines or a remote control in the pocket to test the strength and accessibility.
38. Lifting Table Banquette
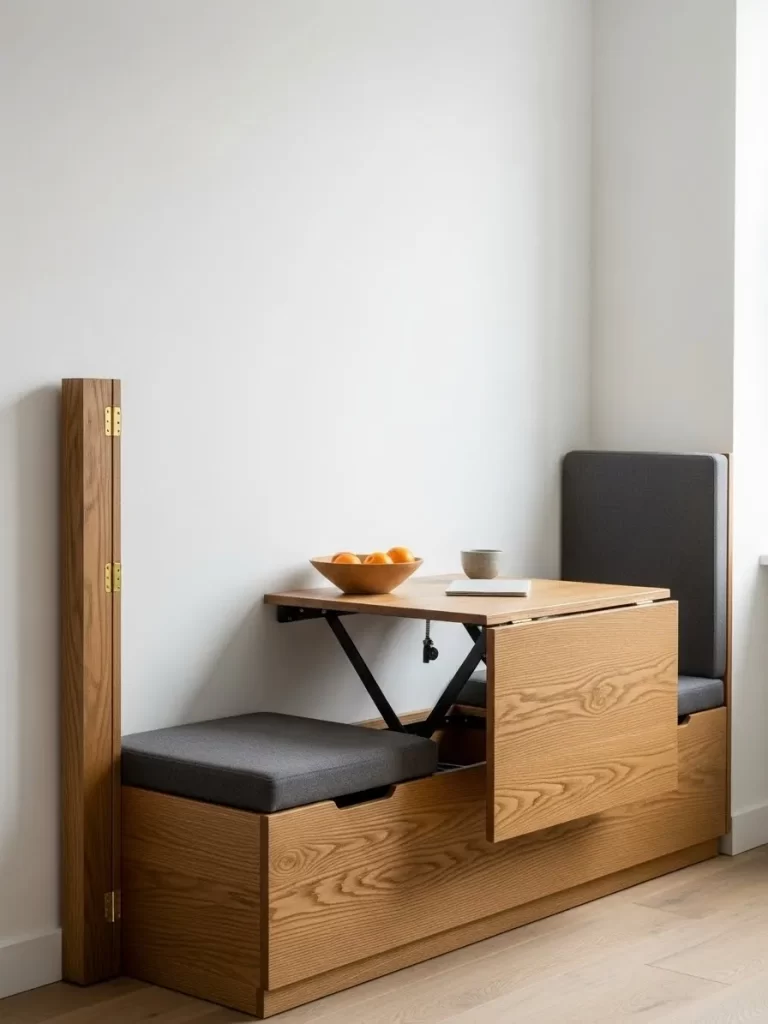
Corner Storage Bench with Pop-Up Table
This custom corner banquette not only provides ample seating and storage but also features a revolutionary pop-up table. The structure is built from rich, natural oak-stained boxes with comfortable gray cushions. The cushions can be lifted to reveal deep storage underneath.
The genius innovation is the central section: a simple pull on the cushion reveals a hidden, mechanical lifting mechanism. This mechanism smoothly raises and folds out a wooden tabletop, transforming the seating area into a functional dining or workspace instantly. This is the ultimate multi-tasking furniture piece for a small kitchen or living area.
DIY Instruction: Creating a Lifting Table Insert for a Bench
Item Name: Corner Storage Bench with Pop-Up Table
Note: The mechanical lift system is highly specialized and must be purchased pre-made. This DIY focuses on integrating the mechanism into a custom bench.
Materials Required
- Storage bench structure (must have a center cavity)
- Pop-up coffee table lift mechanism (hardware kit)
- Wood piece (for the tabletop)
- Screws and bolts (appropriate for the mechanism)
- Measuring tape and level
Equipment Required
- Power drill and various bits
- Screwdriver
Step-to-Step Instructions
- Prepare the Cavity: In the center section of your storage bench, ensure the top cushion is removable and the cavity beneath is clear. The internal dimensions must match the size requirements of the purchased lift mechanism.
- Install the Mechanism Base: Following the manufacturer’s directions, use screws to firmly attach the base of the lift mechanism inside the bench cavity. Ensure it is centered and level.
- Prepare the Tabletop: Cut the tabletop wood piece to the size required by the mechanism. Apply stain or finish.
- Attach the Tabletop: Attach the tabletop to the upper arms of the lift mechanism using screws.
- Test the Lift: Slowly test the mechanism, ensuring it raises and lowers smoothly and locks securely into the raised position. The cushion that covers this section when closed must be completely removed before lifting the table.
39. Felt Storage Ottoman with Cutout

Minimalist Felt Storage Cylinder
This chic, modern cylinder offers storage and seating while maintaining a clean, minimalist aesthetic. The tall, round ottoman is covered in a soft, textured cream felt, giving it a cozy, yet structured feel. Small leather handles on the side add a subtle, high-quality detail.
The piece functions as a side table for small items when the lid is on, or as an occasional seat. Its most creative feature is the front cutout, revealing internal storage space for items like blankets or yoga mats, which are often difficult to hide. The removable lid on the front also provides easy access to the contents.
DIY Instruction: Creating a Felt Covered Storage Cylinder
Item Name: Minimalist Felt Storage Cylinder
Materials Required
- Large, sturdy cardboard tube or rigid plastic cylinder (for the base)
- Thick, durable felt fabric (cream color)
- Leather straps (for handles)
- Plywood circles (for the top and bottom)
- Strong adhesive spray or wood glue
- Screws
Equipment Required
- Utility knife
- Power drill
- Fabric scissors
- Measuring tape
Step-to-Step Instructions
- Prepare the Base: Cut the cardboard tube or plastic cylinder to the desired height. Cut plywood circles for the top and bottom, fitting them snugly. Glue and screw the bottom plywood piece to the cylinder for a stable base.
- Create the Cutout (Optional): If creating the front cutout, measure and carefully use a utility knife to cut the desired opening shape into the front of the cylinder.
- Cover with Felt: Apply strong adhesive spray to the exterior of the cylinder. Carefully wrap and smooth the felt fabric tightly around the entire cylinder, neatly tucking and gluing the edges at the seams and edges of the cutout.
- Add Handles: Drill pilot holes on the sides where you want the leather handles. Secure the leather straps with screws.
- Create the Lid: Cover the top plywood circle with felt and attach a small leather strap handle to the center. The lid simply rests on top, or it can be hinged if desired.
40. Bolster Bench with Under-Storage

Modular Daybed Bench with Hidden Bolsters
This low-profile daybed bench offers stylish extra seating and features ingenious integrated storage for its cushions. The main bench has a slatted, striped cushion top with cylindrical bolsters at either end, all secured with attractive leather straps. The wood base includes a central shelf for books.
The true cleverness lies beneath the shelf. Four additional matching cylindrical bolsters are stored perfectly along the base, acting as structural elements while remaining completely hidden. These extra bolsters can be pulled out and used as flexible floor cushions or footrests, adding extra seating instantly.
DIY Instruction: Creating a Low Modular Daybed Bench
Item Name: Modular Daybed Bench with Hidden Bolsters
Materials Required
- Plywood or solid wood planks (for the bench frame and shelf)
- Screws and wood glue
- Foam cylinders (for bolsters)
- Upholstery fabric (for bolsters and main cushion)
- Leather strapping (for cushion holders)
Equipment Required
- Power drill and bits
- Circular saw
- Measuring tape and level
- Staple gun
Step-to-Step Instructions
- Build the Frame: Assemble a simple, sturdy rectangular bench frame using wood and screws. Ensure it is long enough for lounging.
- Add the Shelf: Cut the middle shelf piece. Measure and attach it between the legs or sides of the bench frame, ensuring enough space above and below for the cushions/bolsters.
- Create the Bolsters: Cut the foam cylinders to the desired length. Sew covers for the bolsters and slip them on. Create extra bolsters that will be stored underneath the shelf.
- Create the Cushion: Upholster the main top cushion in the striped fabric.
- Add Straps: Drill small holes into the bench frame at the ends. Attach leather straps to the top surface to secure the end bolsters and the main cushion.
- Store and Display: Place the main cushion and end bolsters on top. Arrange the extra bolsters on the bottom shelf, effectively storing them in a usable, organized way.
41. Pull-Out Step Seating
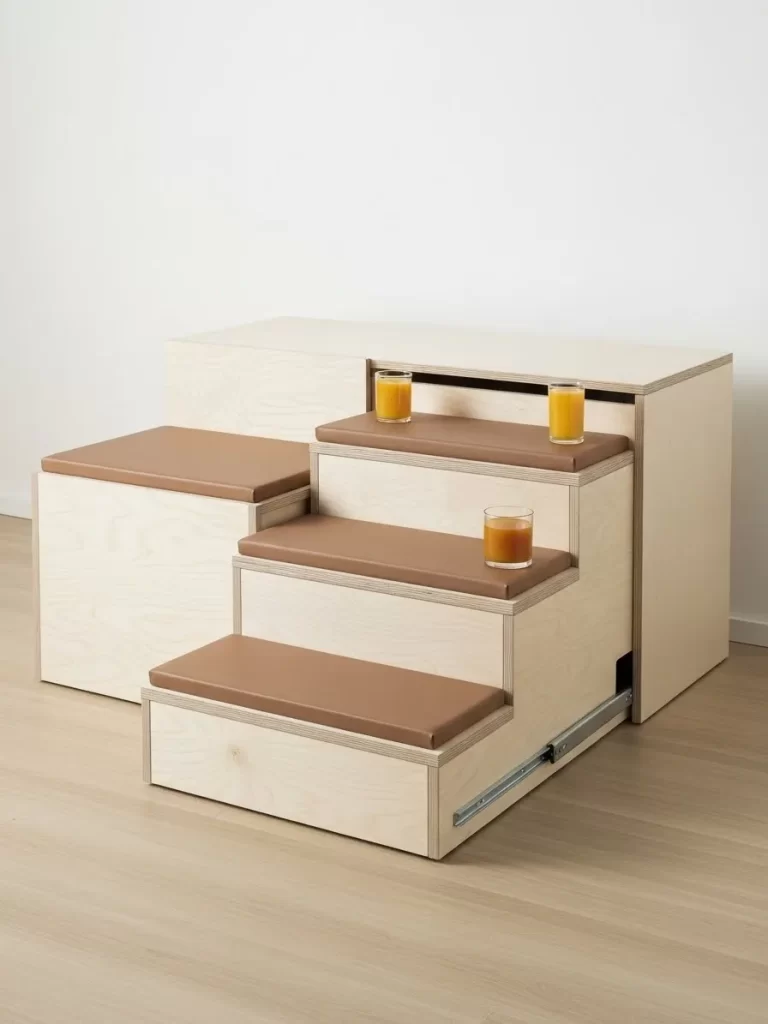
Step Ladder with Storage and Seating
This unique modular piece turns necessary vertical access into versatile extra seating and hidden storage. Constructed from light-colored plywood, the unit features three steps with padded tops in a warm brown faux leather, providing comfortable, durable seating surfaces. The entire step unit smoothly slides out on heavy-duty glides from a larger wooden block.
Each step actually functions as a deep storage drawer, offering a resourceful way to tuck away items like linens or toys. When fully extended, the steps can be used as seating, display surfaces, or a small tiered serving area for snacks and drinks. When pushed back in, the unit is a simple, neat block of furniture, saving considerable floor area.
DIY Instruction: Creating a Step Seating Unit (Storage Focus)
Item Name: Pull-Out Step Seating
Note: This DIY focuses on creating a stationary, three-step storage unit that functions as seating.
Materials Required
- Plywood sheets (for step frames and drawer boxes)
- Wood glue and screws
- Three sets of full-extension drawer slides
- Drawer pulls/handles
- High-density foam and faux leather/upholstery fabric
- Stain or clear coat
Equipment Required
- Circular saw or handsaw
- Power drill and various bits
- Measuring tape and level
- Staple gun
Step-by-Step Instructions
- Design the Frame: Determine the height and depth of your three steps. Cut the plywood to create a sturdy, three-tiered frame structure that provides the necessary space for the drawer boxes.
- Build the Drawers: Construct three separate, open-top plywood boxes that are sized to fit the respective step openings. Attach the full-extension drawer slides to the sides of each drawer box.
- Install the Drawers: Mount the corresponding slide pieces inside the frame structure. Insert the drawers, ensuring they slide smoothly and lock when closed.
- Create the Upholstered Tops: Cut three pieces of plywood to serve as the drawer faces/step tops. Cut foam pads to match the tops. Upholster the foam and wood tops with the faux leather, securing the fabric underneath with staples.
- Attach the Tops and Handles: Screw the upholstered step tops directly onto the front of the corresponding drawer boxes. Attach the drawer handles.
- Finishing: Sand and apply a clear coat or stain to the exposed plywood surfaces. The unit is now a stylish, multi-level seating and storage system.
We have journeyed through forty-one exceptional ways to solve the small space seating dilemma. Every creative solution, from rolling storage poufs to wall-mounted folding benches, proves that function and style can easily coexist. Remember, your home’s size should never limit your ability to entertain guests or lounge comfortably.
The core lesson here involves viewing all furniture pieces as multi-tasking resources. Look intentionally for vertical storage, hidden compartments, and lightweight designs that disappear when not actively in use. Custom DIY projects can often yield the most space-efficient results, tailored exactly to your unique layout.
Use these forty-one ideas to inspire your next home transformation project. Choose the solutions that best reflect your style and social calendar requirements. Creating a dynamic, welcoming living room is entirely achievable, regardless of its current footprint.
Key Takeaways
Maximize Vertical Space
Look up when seeking space-saving furniture for your apartment. Solutions that fold down, mount to the wall, or stack neatly upward are the most efficient choices available.
Prioritize Dual Functionality
Every item in a small room should serve at least two useful purposes in its current location. Ottomans should store blankets and pillows, while window benches should double as convenient display shelves.
Choose Low-Profile Designs
Furniture that sits low to the ground or uses transparent materials helps keep visual sight lines completely open. This visual trick immediately makes the whole room feel larger and more expansive than it actually is.
Embrace Portability
Always choose lightweight items that are placed on casters or equipped with sturdy carrying handles. This smart feature allows you to quickly rearrange seating for a crowd and effortlessly clear the floor area afterward.