
The entryway is the hardest working space in any home. It handles everything: coats, keys, mail, school bags, and dirt. This high-traffic zone quickly devolves into a stressful mess, leaving you starting and ending your day feeling disorganized.

Chaos near the door stops your home from feeling truly welcoming. It also creates friction when you are rushing out the door. However, organizing this area does not require a full renovation or expensive furniture purchases.
Instead, small, intentional habits and simple DIY installations make the biggest difference. We have gathered 42 quick tidy hacks designed to transform your entryway from a chaotic drop zone into a calm, organized greeting space. Get ready to create a welcoming first impression that lasts.
1. Stylish Ceramic Catchall Tray
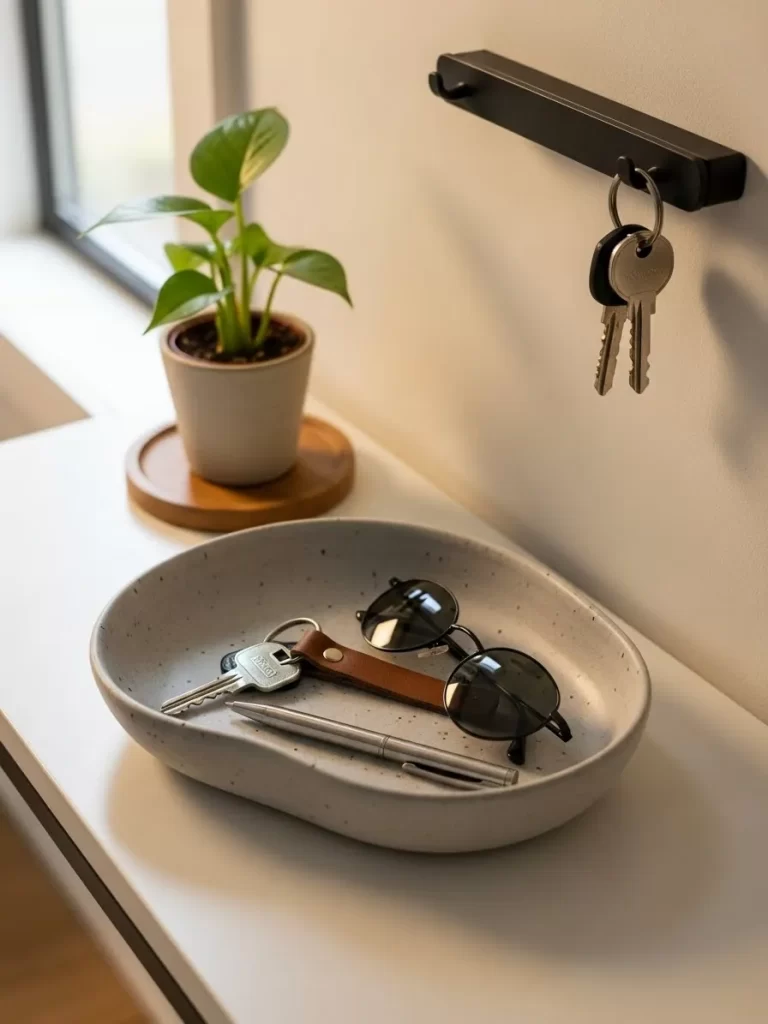
This tiny section of your entryway already shows how smart organization helps eliminate chaos. A designated spot for small items stops them from migrating across flat surfaces. Notice how this speckled ceramic tray holds essentials like keys, sunglasses, and a pen right where you need them.
Adding a small magnetic strip above the console table provides vertical storage for additional keys. Using vertical space is a wonderful strategy for maximizing storage in tight entry areas. Everything has a home, making grab-and-go routines smooth and simple when heading out the door.
A small potted plant brings a lovely touch of life and warmth to the scene. These thoughtful additions create a welcoming atmosphere instantly, ensuring your first impression is one of calm order. Keeping these small items contained prevents clutter from spreading throughout the rest of your home.
Material Required (For DIY Entryway Key Tray)
- One shallow, oblong ceramic dish or bowl (at least 8 inches long).
- Fine-grit sandpaper (120-220 grit).
- All-purpose cleaning spray and cloth.
- Four small adhesive rubber feet or felt pads (to protect the furniture surface).
- Optional: Acrylic sealant spray (matte or satin finish).
Equipment Required
- Drill with a small bit (if creating a drainage hole for a plant, though not necessary for a simple catchall tray).
- Safety glasses and gloves (if sanding or spraying sealant).
DIY Instruction: Creating Your Own Entryway Catchall
Step 1: Choose Your Dish
Select a ceramic dish or bowl that is shallow enough to grab items easily, but deep enough to contain small accessories like coins or keys. The oblong shape shown here works well for accommodating items like sunglasses. Make certain the dish is clean and free of cracks.
Step 2: Smooth Any Rough Edges
Carefully inspect the rim and base of your dish for any rough spots that might scratch your console table. If you find rough areas, gently rub them with the fine-grit sandpaper until they feel smooth to the touch. It is very important to remove all ceramic dust with a damp cloth afterward.
Step 3: Clean and Dry Thoroughly
Wash the ceramic dish with warm, soapy water to remove any manufacturing residue or dust. A clean surface is essential for the next steps. Rinse the dish thoroughly and let it air dry completely before proceeding.
Step 4: Apply Surface Protectors
Take the small adhesive rubber feet or felt pads. Peel the backing off of four of these pads. Position them evenly on the very bottom surface of your dish. These tiny protectors prevent the ceramic from scratching your wooden or painted furniture surface.
Step 5 (Optional): Seal the Finish
If you chose a porous or unglazed ceramic dish, you might want to apply a layer of acrylic sealant spray. Lay the dish upside down in a well-ventilated area. Hold the can about 8 to 12 inches away and apply a thin, even layer of spray. Let this coat dry completely, following the product instructions, before bringing the dish indoors.
Step 6: Place and Organize
Once the dish is completely dry and the feet are attached, place the tray near your entryway door. Start simple: add your most frequently misplaced items, like house keys, car keys, and sunglasses. You have now created a dedicated station that instantly stops entryway clutter.
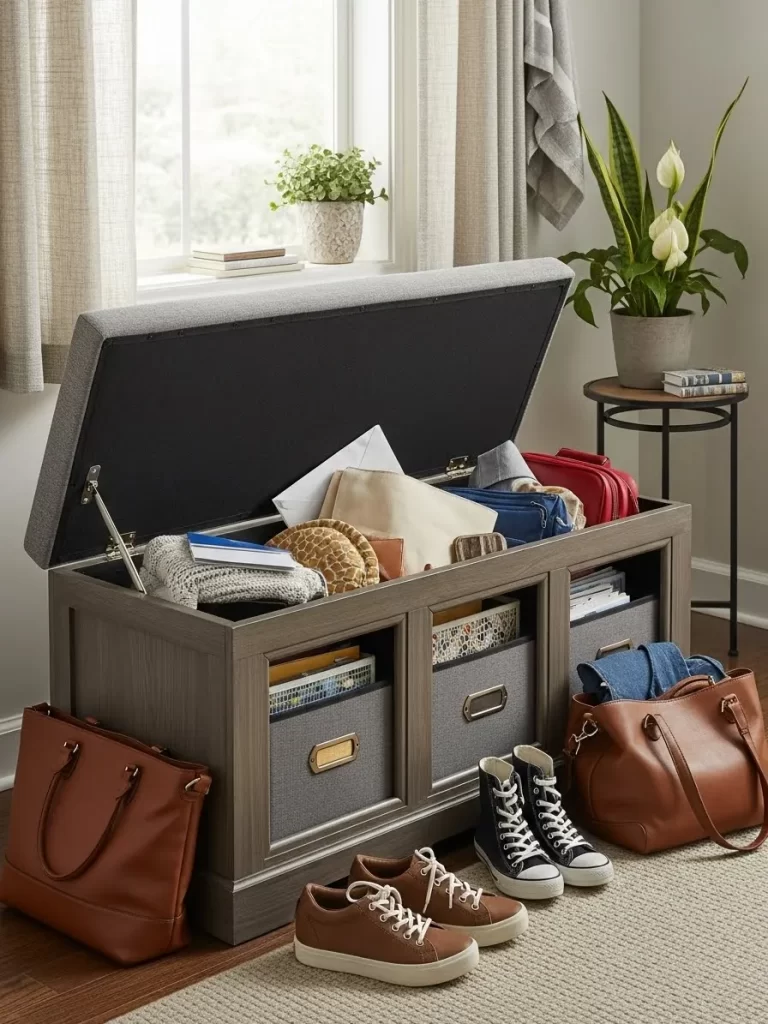
2. Organized Entryway Shoe Bench
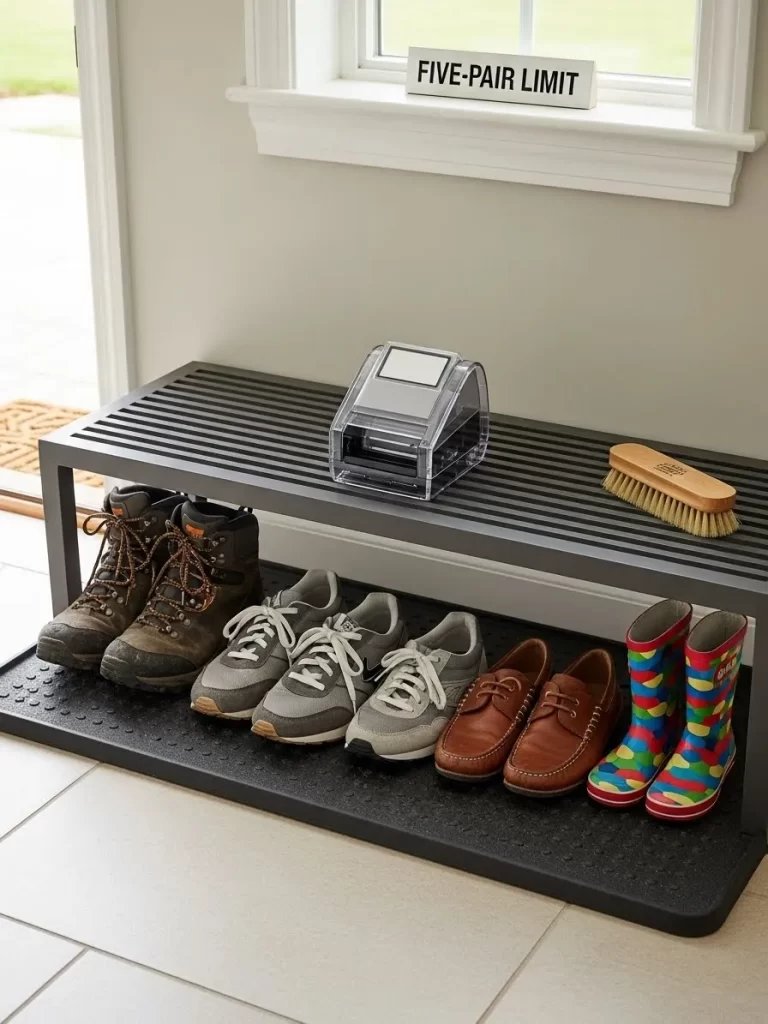
Keeping a shoe storage station near the door is a simple, effective solution for minimizing hallway mess. This sleek, slat-style bench offers a great spot to sit down while simultaneously organizing footwear beneath. The open design allows air to circulate, which is helpful for airing out damp or worn items.
Notice the separate rubber mat placed directly beneath the bench. This essential addition catches dirt, mud, and water, protecting the surrounding flooring. Including a shoe brush nearby encourages everyone to clean their footwear before placing them back on the rack, maintaining cleanliness.
The small sign on the windowsill, reading “FIVE-PAIR LIMIT,” establishes a clear boundary for shoe clutter. Setting a simple, visible rule like this ensures the space remains tidy and prevents an accumulation of excessive footwear. This method provides functional storage while keeping the area streamlined and welcoming.
Material Required (For DIY Entryway Shoe Mat)
- One heavy-duty rubber or silicone utility mat (size to fit beneath the bench or storage rack).
- Two pounds of clean, smooth river stones or pebbles.
- Strong, clear adhesive or sealant rated for rubber/plastic (such as silicone sealant or construction adhesive).
- Optional: Fine-tipped permanent marker or paint pen.
Equipment Required
- Caulk gun (if using construction adhesive).
- Trowel or spreader (or old putty knife).
- Safety gloves.
DIY Instruction: Creating a Stone Shoe-Drying Mat
Step 1: Prepare the Surface
Start by thoroughly cleaning the rubber utility mat with soap and water; allow it to dry completely. A clean, dry surface ensures the adhesive bonds correctly. Work in a well-ventilated area, preferably outdoors or in a garage, especially when using strong adhesives.
Step 2: Plan the Stone Placement
Pour the river stones onto the mat and arrange them to see how they fit and look. You want a dense, even layer that completely covers the center area where shoes will sit. The stones should not be piled up but should sit side by side.
Step 3: Apply the Adhesive
Remove the stones temporarily and apply the adhesive liberally across the mat surface, focusing on the area you plan to cover with stones. Use the trowel or putty knife to spread the adhesive into a thin, even layer across the entire surface. Be certain to follow the specific open time recommended on the adhesive packaging.
Step 4: Place the Stones
Gently press the stones into the layer of adhesive, fitting them together as tightly as possible. Try to achieve a relatively flat surface to support the shoes evenly. Press firmly to ensure good contact between the stone, the adhesive, and the mat.
Step 5: Allow for Curing
Leave the completed stone mat undisturbed for the full curing time specified by the adhesive manufacturer. This curing process can take anywhere from 24 to 72 hours, depending on the product and humidity. Do not place any shoes on the mat until it is completely dry and cured.
Step 6 (Optional): Mark a Limit Line
If you want to implement a visual rule like the five-pair limit, use a permanent marker or paint pen to draw a subtle line on the windowsill or the bench itself. This small, visual cue reinforces the boundary and helps keep the area neat without appearing cluttered.
3. Slim Wall-Mounted Mail Sorter

Managing incoming paper is one of the biggest challenges to maintaining an organized entryway. This sleek, modern metal organizer addresses that issue immediately by providing designated slots for mail and other documents. The three labels, “ACTION,” “SHRED,” and “FILE,” offer clear guidance for immediate sorting.
Installing a vertical organizer like this uses often-wasted wall space near the door. Keeping the sorting process right at the point of entry ensures that paper never makes it onto the console table or floor. This systematic approach tackles paper clutter before it can spread into the main living areas.
Its narrow profile means it takes up very little physical space, making it a great solution for small apartments or narrow hallways. The simple, metallic finish also blends easily with most contemporary decor styles. Using a labeled system for incoming mail is a powerful habit for maintaining long-term order.
Material Required (For DIY Wall-Mounted Mail Sorter)
- One three-slot, wall-mounted file folder or letter sorter (stainless steel or heavy plastic).
- Wall anchors and screws (often included, as shown).
- Small sheet of white paper or cardstock.
- Label maker or permanent marker.
- Double-sided mounting tape (heavy-duty strength).
Equipment Required
- Drill and drill bits (appropriate size for anchors).
- Screwdriver (Phillips or flathead, as required).
- Tape measure or ruler.
- Pencil.
- Small level.
DIY Instruction: Installing the Mail Sorter
Step 1: Determine the Placement Height
Select an accessible wall location near your main entryway or coat rack. Hold the sorter up to the wall and mark the desired height with a pencil. Make certain the top edge is easy for all adults in the household to reach comfortably.
Step 2: Mark the Drilling Holes
Use a level to ensure the sorter is straight, or use the mounting template if one was provided. Mark the exact locations of the screw holes onto the wall using your pencil. Double-check the alignment using the level before drilling.
Step 3: Drill Pilot Holes and Insert Anchors
Using the appropriate drill bit size (usually indicated on the wall anchor package), drill pilot holes into the marked spots. Gently tap the wall anchors into the pilot holes until they sit flush with the wall surface. Wall anchors are necessary for supporting weight, especially in drywall.
Step 4: Secure the Sorter
Line up the sorter’s mounting holes with the installed anchors. Insert the screws through the sorter and into the anchors. Use a screwdriver to tighten the screws firmly, but avoid overtightening, which can damage the wall or the sorter.
Step 5: Apply the Labels
If the sorter does not have permanent labels, create labels for “ACTION,” “SHRED,” and “FILE” using a label maker or neatly written cardstock pieces. Use a small piece of double-sided mounting tape to attach these labels clearly above the corresponding slots.
Step 6: Start the Routine
Immediately begin using the sorter as soon as you bring mail inside. Train yourself to deposit every piece of paper into one of the three labeled slots. Establishing this routine is critical for keeping paper chaos contained right from the start.
4. Assorted Entryway Hooks Installation Kit
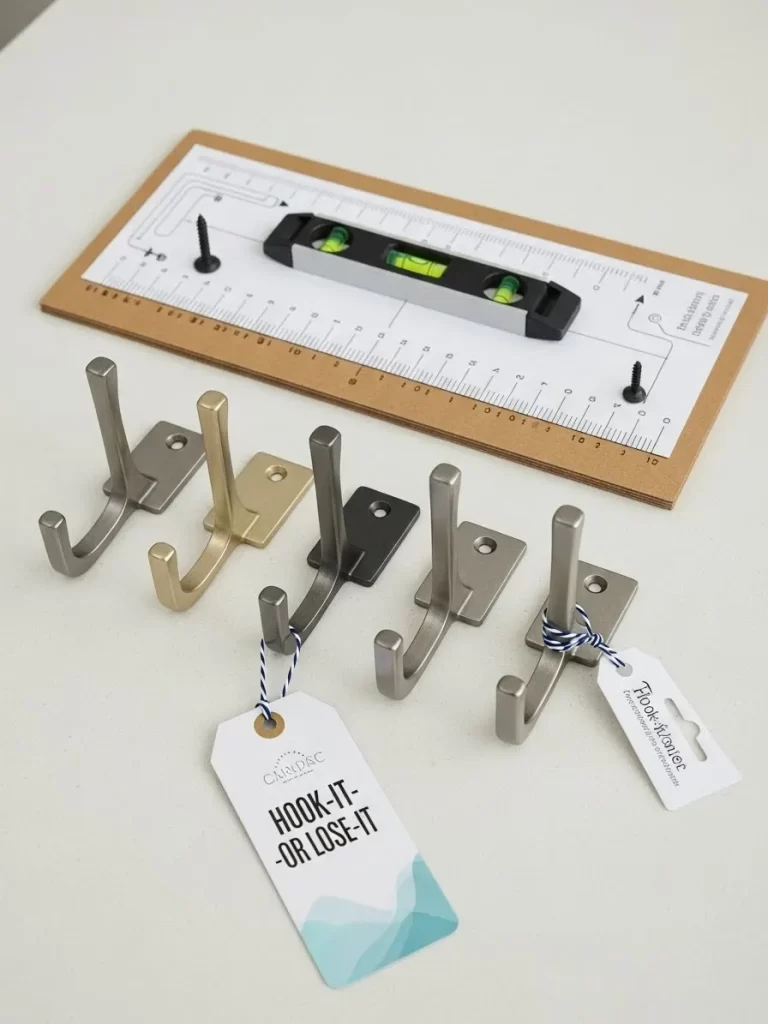
Proper installation is essential for ensuring wall hooks can handle heavy winter coats and full backpacks. This collection of sturdy metal hooks highlights the importance of having the right hardware and tools for the job. The different finishes allow you to match the hardware to your home’s existing style.
The inclusion of the small level and ruler template shows the value of precise mounting. Hooks that are installed level and evenly spaced look much more professional and contribute to a feeling of calm order. Using a template simplifies the process, eliminating guesswork when marking drill points.
These single hooks are surprisingly strong and offer a much tidier look than overcrowding a single coat rack. Installing hooks at various heights can also accommodate different family members, making it easy for everyone, including children, to hang their own items. Remember: “Hook-It-or-Lose-It” is a great motto for an organized entryway!
Material Required (For DIY Sturdy Wall Hooks)
- Four to six sturdy single metal coat hooks (in your desired finish).
- Wood mounting board (if not mounting directly to a wall stud).
- Wall anchors and screws (heavy-duty, appropriate for your wall type).
- Wood glue (if mounting hooks onto a separate board).
- Optional: Touch-up paint to match the wall.
Equipment Required
- Electric drill and appropriate drill bits.
- Level (at least 12 inches long).
- Tape measure.
- Pencil or chalk for marking.
- Screwdriver (or drill bit attachment).
DIY Instruction: Installing Sturdy Entryway Hooks
Step 1: Locate the Mounting Spots
Decide on the height and spacing for your hooks. Hooks should be spaced at least 6 to 8 inches apart to allow items to hang without overlapping. Use a stud finder to locate wall studs; mounting directly into studs provides the most secure hold for heavy items.
Step 2: Create a Level Line
Use your level and a pencil to draw a faint, straight, horizontal line across the wall where the base of the hooks will sit. This guideline ensures all hooks are mounted at the same height. If you are using a mounting board, hold it up and mark the board’s top and bottom edges.
Step 3: Mark the Screw Holes
Hold the first hook up to the wall, lining it up with your level line. Use the pencil to mark the exact locations for the screw holes. Repeat this process for all remaining hooks, checking the horizontal spacing as you go.
Step 4: Drill and Install Anchors
If you cannot hit a stud, use your drill to create pilot holes for the wall anchors at each marked point. Gently tap the wall anchors into the pilot holes until they sit flush with the wall surface. Wall anchors are necessary for supporting weight, especially in drywall.
Step 5: Attach the Hooks
Hold the first hook in place, lining up its holes with the installed anchors or stud holes. Insert the screws and use your screwdriver to tighten the screws firmly, but avoid overtightening, which can damage the wall or the hook. Repeat this process for every hook.
Step 6: Wipe and Test
Erase any stray pencil marks. Gently tug on each hook to confirm it is securely attached and can bear weight. Once you are confident in the installation, immediately begin using them for coats, bags, and scarves to maintain an orderly entryway.
5. Labeled Seasonal Storage Baskets
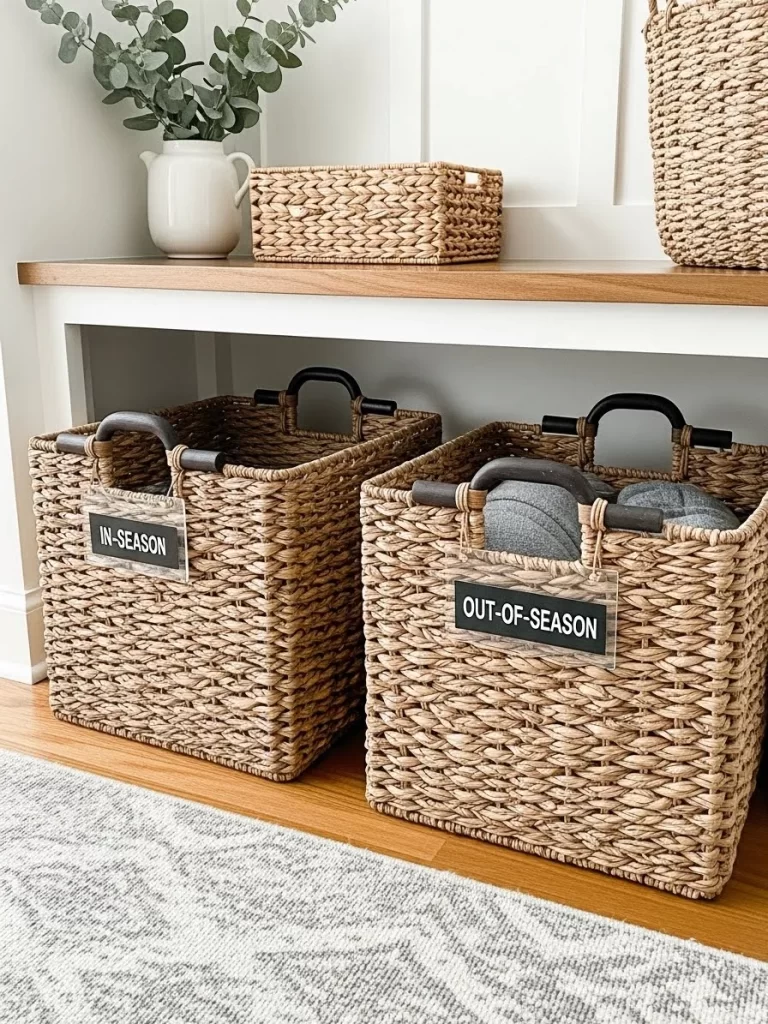
Organizing items by season is a clever way to keep the entryway clutter-free year-round. These lovely woven baskets offer a stylish storage option that doesn’t sacrifice aesthetics for functionality. Placing them neatly below a bench or console table keeps them contained and accessible.
The simple, clear labels, reading “IN-SEASON” and “OUT-OF-SEASON,” make sorting incredibly easy. This labeling strategy quickly communicates the purpose of each container, which is essential for busy households. Guests or family members know exactly where to put or find items like hats, gloves, or scarves.
Using large, sturdy baskets with handles makes them simple to pull out and access the contents. Woven textures also add a natural, warm element to the space, elevating the look beyond just utility. Keeping seasonal essentials sorted and out of sight is a powerful step toward a welcoming first impression.
Material Required (For DIY Labeled Woven Baskets)
- Two to three sturdy, rectangular woven baskets with handles (seagrass, rattan, or water hyacinth).
- Pre-cut, clear acrylic or plastic luggage tags (with a hole for attachment).
- Black or white cardstock or heavy paper.
- Fine-tip permanent marker or label maker.
- Twine or thin leather cord (for attaching the labels).
Equipment Required
- Paper trimmer or sharp scissors.
- Ruler.
DIY Instruction: Creating Seasonal Storage Labels
Step 1: Prepare the Inserts
Cut the cardstock or heavy paper into strips that fit neatly inside the acrylic tag holders. You will need one insert for each basket. Use a ruler and scissors to ensure the edges are straight and fit snugly inside the tag.
Step 2: Create the Labels
Using a label maker or a neat permanent marker, create the text for your labels. Start with high-level categories like “IN-SEASON,” “OUT-OF-SEASON,” or specific names like “SHOES,” “SCARVES,” or “SPORTS GEAR.” Ensure the writing is dark and clear for easy reading.
Step 3: Assemble the Tags
Place the finished paper insert inside the clear acrylic tag holder. The holder protects the label from moisture and wear. Close the tag holder securely, making certain the paper does not shift inside.
Step 4: Attach the Tags
Thread a piece of twine or leather cord through the hole in the tag holder. Loop the twine around the basket’s handle and tie a simple, secure knot (a double knot works well) to keep the label firmly in place. Position the label so it faces straight forward for the best visibility.
Step 5: Load and Organize
Place the now-labeled baskets beneath your entryway bench or console. Fill the “IN-SEASON” basket with current essentials (e.g., winter hats in December) and the “OUT-OF-SEASON” basket with items you won’t need for a few months (e.g., swim goggles). The consistent labeling makes tidiness easy to maintain.
6. Exit Zone Prep Station Mat
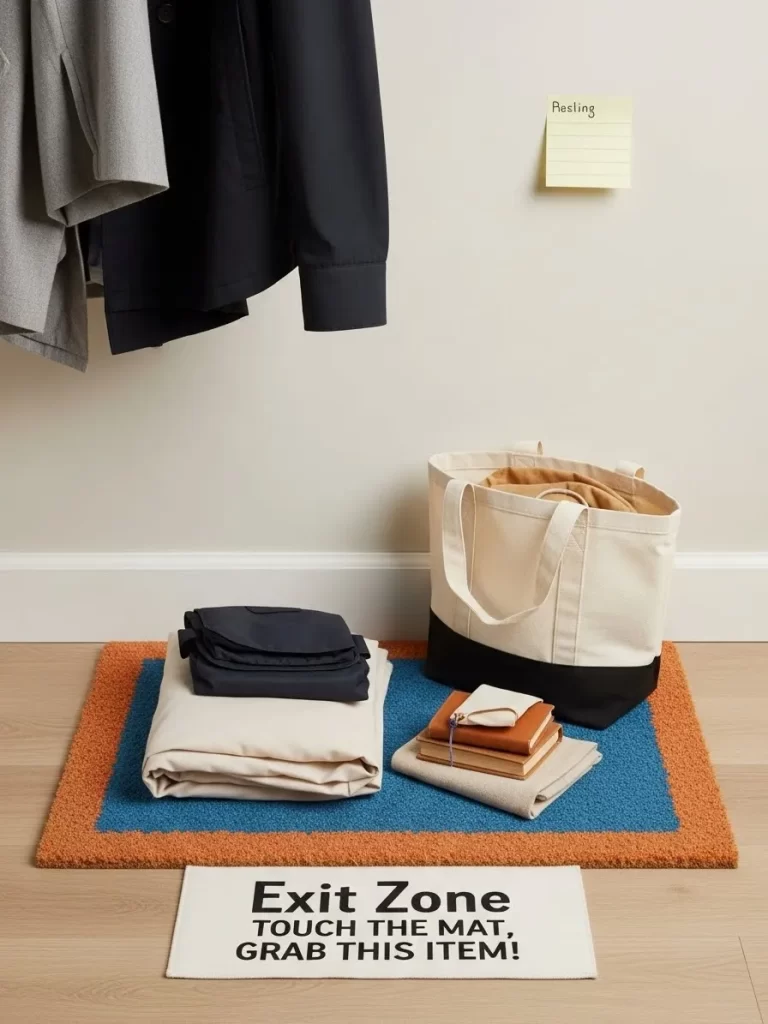
Implementing a staging area by the door is a simple but highly effective organization strategy. This colorful, dual-layered mat clearly defines an “Exit Zone” where you place items that absolutely must leave the house the next day. This routine ensures essential errands are never forgotten.
Placing items like folded laundry, library books, or a work bag right on the mat makes them impossible to overlook. The presence of a cheerful yellow sticky note reinforces a key reminder, showing how different organization methods can work together. Making a habit of using this zone eliminates the last-minute scramble.
Using a designated floor mat for this purpose prevents the necessary items from getting mixed up with regular entryway clutter like keys or mail. This visible system works especially well for busy mornings or when juggling multiple tasks. A highly organized person knows the value of making tasks automatic.
Material Required (For DIY Entryway Prep Mat)
- One medium-sized, low-profile rubber-backed doormat (the base).
- One contrasting small, rectangular welcome mat or rubber runner (the text layer).
- Heavy-duty fabric glue or permanent adhesive spray.
- White exterior-grade paint or stencil paint.
- Letter stencils (at least 3 inches high).
Equipment Required
- Paintbrush or stencil brush.
- Gloves (to protect hands from paint/adhesive).
- Measuring tape or ruler.
- Painter’s tape.
DIY Instruction: Creating a Stenciled Exit Zone Mat
Step 1: Prepare the Text Mat
Take the smaller mat (the one you plan to stencil) and make certain it is clean and completely dry. Use painter’s tape to mark off a crisp rectangular area on the mat where you want the “Exit Zone” phrase to appear. This helps keep the paint contained.
Step 2: Position and Secure the Stencils
Carefully lay out your letter stencils to spell out your desired message, such as “EXIT ZONE” or “GRAB THIS ITEM.” Secure the stencils firmly to the mat using small pieces of painter’s tape around the edges so they do not shift while painting.
Step 3: Apply the Paint
Dip your stencil brush lightly into the white exterior paint. Dab the brush straight up and down over the stencils, applying the paint in thin, even coats. Avoid pushing paint under the stencil edges. Apply two or three light coats until the text is opaque, allowing a few minutes of drying time between each coat.
Step 4: Remove Stencils and Cure
Carefully peel off the stencils and painter’s tape immediately after applying the final coat. Let the painted mat dry and cure completely, which may take 24 hours, according to the paint instructions.
Step 5: Assemble the Zone
Once fully dry, place the smaller stenciled mat neatly on top of the larger, contrasting base mat, or simply use the stenciled mat by itself. Place it directly in front of the door. The visual boundary is now ready to receive your priority items for the following day.
7. Simple, Overflow Coat Rack
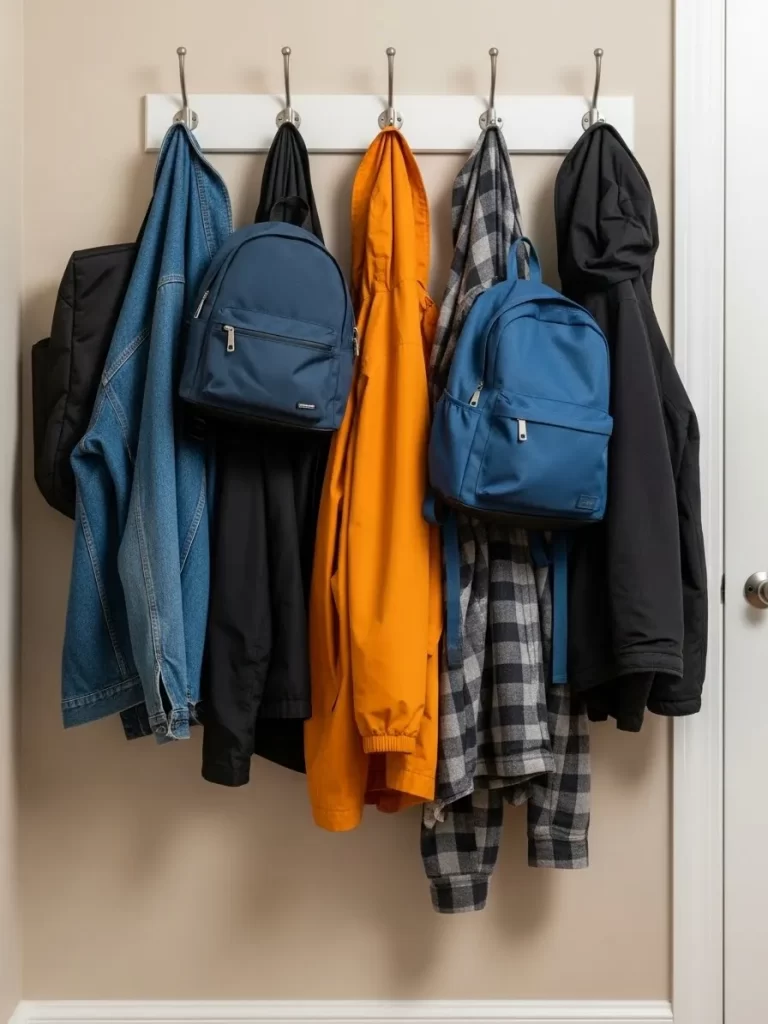
When a closet is already full, adding an overflow coat rack near the door is a smart organizational maneuver. This sturdy, white-painted wood rack with five double hooks provides immediate, accessible storage for jackets, backpacks, and outerwear. Maximizing storage here keeps the rest of the house clear.
The arrangement shows a mix of items—jackets of different colors and a couple of blue backpacks. By keeping these everyday items contained, you maintain the main entryway’s tidy appearance. Simple utility hooks offer a great way to handle the constant rotation of family items that need to be within reach.
Using a single-bar rack creates a clean, linear look that contributes to visual order. It is crucial to limit the number of items per hook, preventing a messy pileup that defeats the purpose. This setup is all about quick access and easy tidiness—a powerful combination for a busy entry.
Material Required (For DIY Standard Hook Rail)
- One pre-made wooden hook rail with four to six hooks attached.
- Wall anchors and screws (appropriate for the weight and wall material).
- Level.
- Pencil.
Equipment Required
- Electric drill and drill bits.
- Screwdriver.
- Tape measure or ruler.
- Stud finder.
DIY Instruction: Mounting a Pre-Made Hook Rail
Step 1: Select the Mounting Height
Decide on the appropriate height for the hook rail. A standard height for most adults is about 5 to 5.5 feet from the floor. Use your tape measure to find the center point of the rail’s length and mark this on the wall with a faint pencil line.
Step 2: Locate Wall Studs
Use a stud finder along the marked line. If you can align the mounting holes of the hook rail with one or more wall studs, the installation will be significantly stronger. Mark the stud locations clearly with your pencil.
Step 3: Mark and Level the Holes
Hold the hook rail against the wall, lining it up with your center and stud marks. Use the level placed along the top edge of the rail to ensure it is perfectly straight. Mark the precise locations of the pre-drilled screw holes onto the wall surface.
Step 4: Drill and Anchor
If you are not hitting a stud, drill pilot holes and install wall anchors at the marked spots. If you are drilling into a stud, simply drill a pilot hole slightly smaller than the width of your screw to prevent the wood from splitting.
Step 5: Secure the Rail
Position the hook rail against the wall, aligning the holes. Insert the screws into the holes and use your screwdriver to firmly fasten the rail to the wall. Do not overtighten, which can cause the wood to crack.
Step 6: Clear the Clutter
Erase any visible pencil lines. Start using the rail immediately for jackets, bags, and backpacks. The designated spots make it easy for everyone to hang up their items instead of dropping them on the floor or the nearest flat surface.
8. Essential Items Grab-and-Go Basket
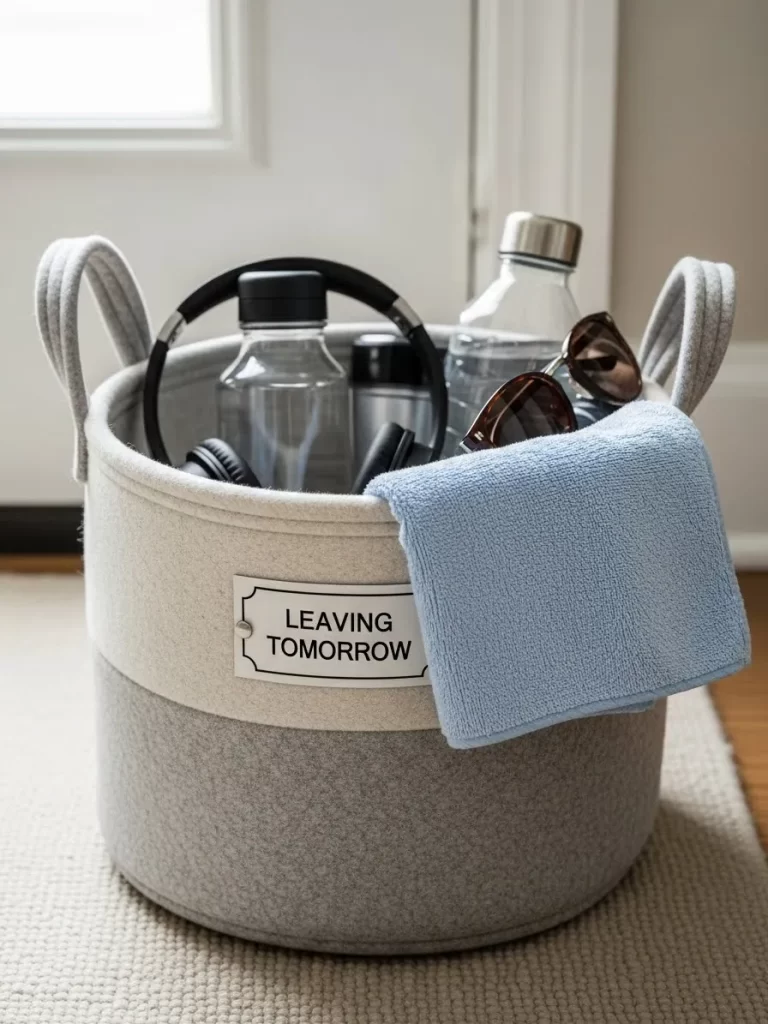
This soft-sided felt basket acts as a helpful “last minute” catch-all, ensuring essential items leave the house with you. The simple label, “LEAVING TOMORROW,” clearly communicates its purpose as a staging area. Placing the basket right by the door makes it an easy part of the evening routine.
Inside, the basket holds a mix of things that are easily forgotten, like water bottles, headphones, and sunglasses. Containing these disparate items in one place eliminates the morning frantic search. Everything you need is collected and ready for a smooth start to the day.
The soft felt material is gentle on hardwood floors and provides a warm, modern aesthetic. Unlike a closed box, the open top provides a visual reminder of what needs to be taken. This simple system ensures a chaotic morning doesn’t ruin an otherwise well-organized home entrance.
Material Required (For DIY Labeled Felt Basket)
- One sturdy, two-toned felt or woven fabric basket with handles.
- One small, ornamental frame or clear plastic label holder (with a hole for attachment).
- White cardstock or a small piece of decorative paper.
- Fine-tip black permanent marker or label maker.
- Twine, ribbon, or small wire hook (for attaching the label).
Equipment Required
- Ruler.
- Scissors.
DIY Instruction: Creating a Tomorrow’s Gear Basket
Step 1: Prepare the Label Insert
Cut the cardstock or paper to fit neatly inside the chosen ornamental frame or label holder. A standard size like $3 \times 1.5$ inches usually works well for visibility. Ensure the paper strip is completely straight.
Step 2: Create the Essential Label
Using the permanent marker or a label maker, write the key phrase clearly on the insert. Simple, action-oriented phrases work best, such as “LEAVING TOMORROW,” “WORK BAG CONTENTS,” or “RETURN ITEMS.” Keep the text centered and legible.
Step 3: Secure the Label
Place the finished paper insert inside the frame or label holder. Thread the twine, ribbon, or wire hook through the attachment hole. Tie the material firmly to one of the basket’s handles, ensuring the label faces outward.
Step 4: Assign Its Purpose
Place the now-labeled basket right next to the door or at the foot of the entryway console table. Assign the basket a simple, single purpose: to hold items that must be taken out of the house the following day.
Step 5: Implement the Routine
Make it a nightly habit to walk through the house and collect any items that need to leave, placing them directly into the basket. This ensures no last-minute trips searching for library books, dry cleaning, or workout gear. You have created an effortless staging area.
10. Dedicated Guest Coat Hooks
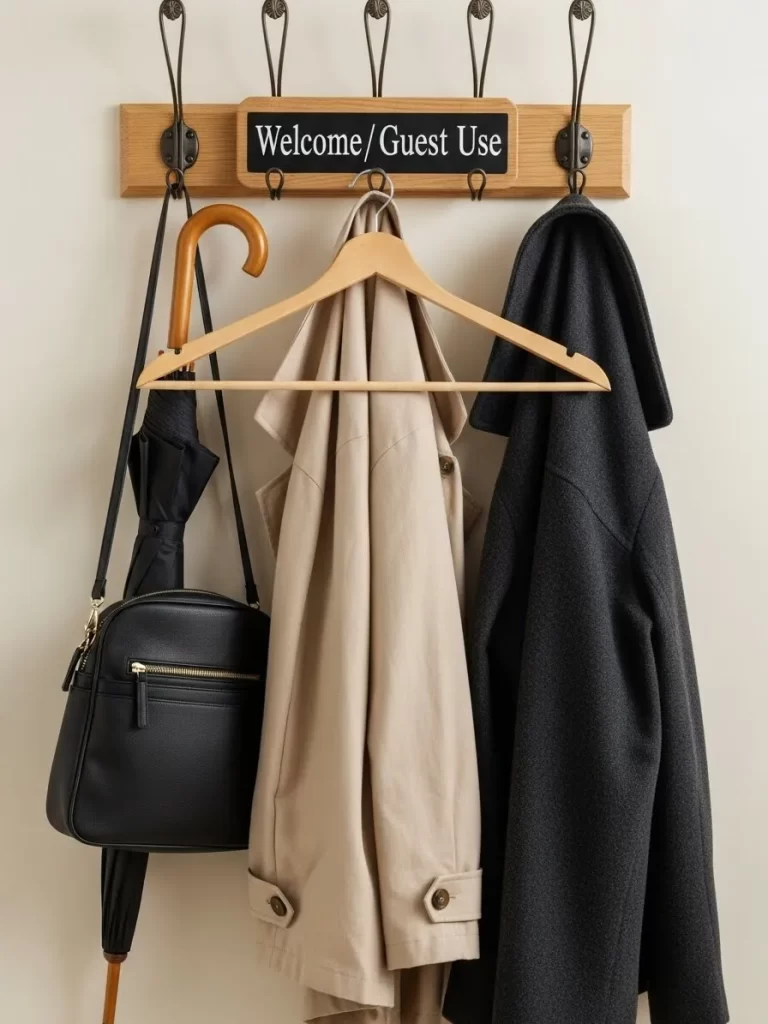
Offering a dedicated spot for visitors to hang their things is a thoughtful way to maintain order during gatherings. This attractive wooden rail features four elegant hooks and a clear sign reading, “Welcome/Guest Use.” Designating specific storage areas like this prevents visitor items from cluttering main furniture pieces.
Providing a sturdy, good-quality wooden hanger, as shown, ensures coats maintain their shape while hanging. Note the inclusion of accessories like an umbrella and a purse; giving these items a temporary, easy-to-access home keeps them off the floor or counters. This small detail shows care and consideration for your guests.
Having a separate area for guests means family items can remain in the closet or on their designated hooks. This prevents the primary storage system from being overwhelmed and keeps your daily routine undisturbed. It is a simple, effective hack for keeping the entire entry area tidy and organized during high-traffic times.
Material Required (For DIY Guest Hook Sign)
- One small, wooden plaque or sign blank (approx. 8-10 inches wide).
- White exterior-grade craft paint.
- Black paint or black permanent vinyl.
- Small wooden coat hooks (optional, if making the entire rack).
Equipment Required
- Small paintbrush or sponge roller.
- Letter stencils (small, clean font).
- Sandpaper (fine grit).
- Screws and drill (for attaching the sign/hooks to the wall).
DIY Instruction: Creating a Guest Hook Sign
Step 1: Prepare the Wooden Sign
Gently sand the wooden plaque or sign blank to ensure a smooth surface, then wipe away any dust with a clean cloth. Apply one or two thin, even coats of the white craft paint to the entire surface, allowing each coat to dry completely before applying the next.
Step 2: Position the Stencils
Once the white paint is fully dry, position your letter stencils to spell out “WELCOME / GUEST USE” or a similar phrase. Use a ruler to ensure the words are centered and perfectly straight before securing the stencils with small pieces of tape.
Step 3: Apply the Lettering
Using the black paint or vinyl, carefully apply the lettering. If painting, dab the brush straight down onto the stencil to prevent paint bleed. If using vinyl, carefully peel and transfer the letters onto the sign. Remove stencils/transfer tape once the paint is dry or the vinyl is secured.
Step 4: Attach the Sign to the Wall/Rack
If you are only creating the sign, drill a small pilot hole at the top two corners. Attach the finished sign directly to the wall above your existing hooks or mount it to the wooden rack itself using small decorative screws.
Step 5: Designate the Area
Place two or three good-quality wooden hangers on the hooks beneath the sign. This visual setup immediately signals to guests that this area is reserved for their use, helping them keep your entryway neat without having to ask.
11. Slim Console Table Charging Station
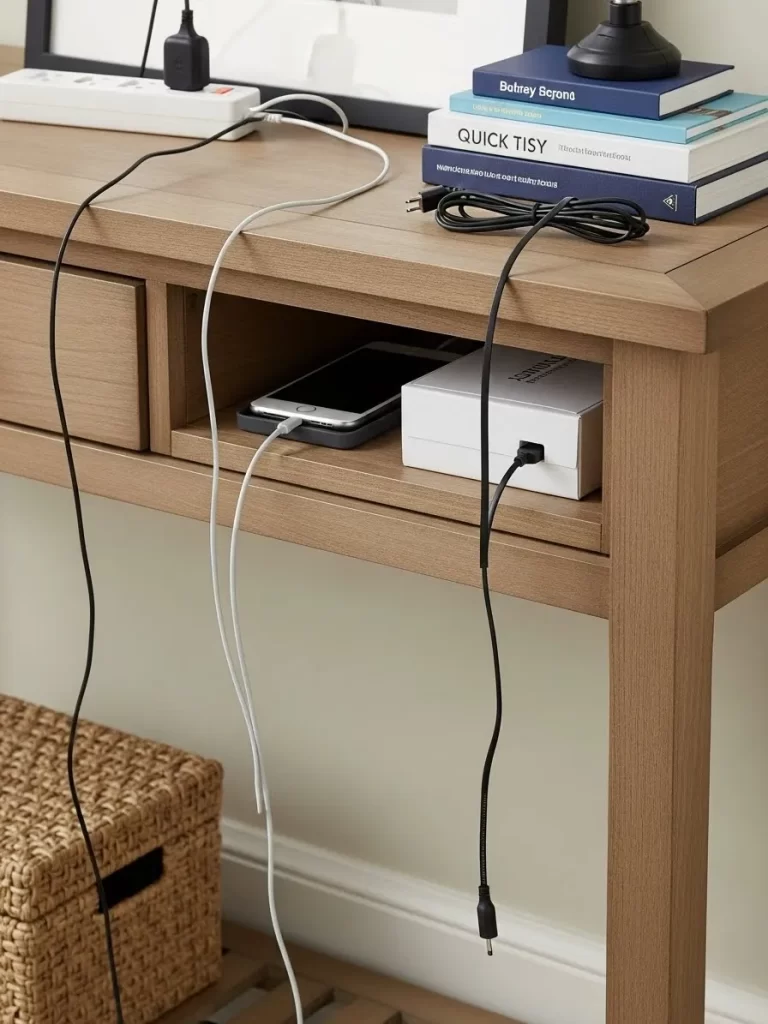
Managing the tangle of charging cables is a constant challenge in any modern entry space. This cleverly organized setup uses a console table’s open shelf to create a hidden charging station. A white power box is neatly tucked away, keeping the bulk of the wires out of sight.
The open cubby offers just enough room for a phone and the small charging hub, keeping the entryway surface uncluttered. Only the necessary cables hang over the front, making it easy to plug and unplug devices. Keeping this technology contained helps the entrance maintain a much calmer appearance.
Notice how the charging station sits beside a stack of books, showing that organization and decorative items can coexist beautifully. The entire assembly keeps messy electronics from dominating this important first impression area. Creating this dedicated spot ensures devices charge quickly without adding to the visual chaos.
Material Required (For DIY Concealed Charging Station)
- One small surge protector or charging hub (with multiple USB ports).
- One small decorative box or plastic cable management box (to hold the surge protector).
- Velcro strips or double-sided mounting tape.
- Cord clips or ties.
- Small hole saw or drill bit (if modifying the console for hidden cables).
Equipment Required
- Electric drill (if modifying the furniture).
- Safety glasses.
DIY Instruction: Building a Console Charging Cubby
Step 1: Choose and Prepare the Cubby
Select an open shelf or cubby area on your entryway furniture that is close to a wall outlet. Clean the area thoroughly. If the console table back is solid wood, consider drilling a small hole (about 1 inch in diameter) in an inconspicuous corner to run the main power cord straight through, hiding it better.
Step 2: Secure the Power Source
Place the surge protector or charging hub inside the decorative or cable management box. Feed the main power cord out of the box through a pre-cut or drilled hole. Use Velcro strips or mounting tape to secure the cable management box firmly inside the chosen cubby so it does not slide around.
Step 3: Connect and Mount the Main Power Cord
Plug the main power cord into the wall outlet. Use adhesive cord clips to run the cable discreetly down the console leg or along the baseboard to minimize its visibility.
Step 4: Organize the Charging Cables
Take the individual charging cables (for phones, tablets, etc.) and plug them into the hub inside the box. Leave just enough cable slack to reach the cubby opening or the top of the console. Use cord ties or Velcro wraps to bundle up any excess length of cable neatly inside the box.
Step 5: Test and Contain
Test all the ports to ensure everything charges correctly. Place the phone or device inside the cubby for charging. The entryway now features a contained and functional charging station, stopping power cords from becoming messy, sprawling eyesores.
12. Clear Labeled Car Essentials Box
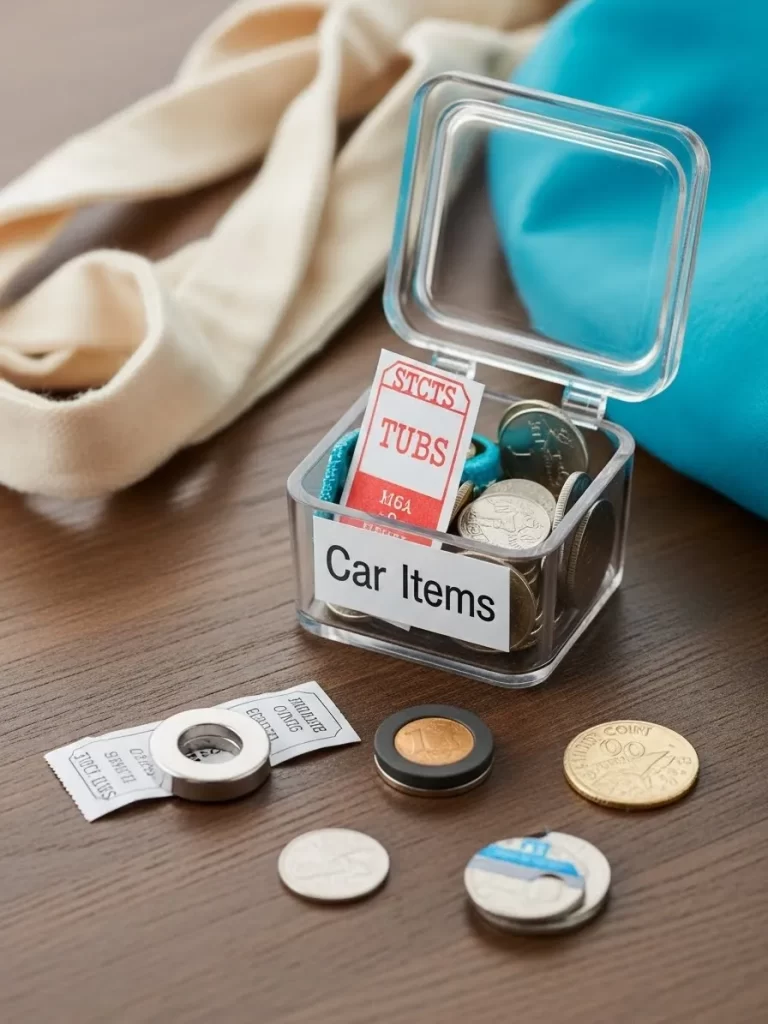
Small, miscellaneous items like loose change, parking stubs, and garage openers often contribute to tabletop clutter. This small, clear acrylic box provides a specific, labeled home for these tiny but essential “Car Items.” Having a designated spot prevents these bits from ending up scattered around the entryway.
The clear material means you can quickly see the contents, which is helpful for grabbing a quarter for a parking meter at a moment’s notice. The red and white tag inside the box adds another visual cue for key tags or other small, important documents. Tidy organization is often about containing the smallest things effectively.
Keeping this box on the console table encourages family members to empty their pockets immediately upon arriving home. This simple routine prevents this “pocket overflow” from migrating to other surfaces in the house. A tidy entryway starts with an honest plan for tiny items.
Material Required (For DIY Car Item Container)
- One small, clear acrylic or plastic box with a secure lid (approx. $3 \times 3 \times 3$ inches).
- Waterproof vinyl label (pre-printed or from a label maker).
- Assortment of spare keys, coins, and small essential car items.
Equipment Required
- None.
DIY Instruction: Setting Up the Car Item Container
Step 1: Prepare the Container
Thoroughly clean the inside and outside of the acrylic box with a gentle cleaner and dry it completely. A clean container looks fresh and inviting.
Step 2: Create the Label
Using a label maker or pre-printed waterproof vinyl, create a clear, simple label reading “Car Items” or “Pocket Dump.” Make certain the text is centered and clearly legible.
Step 3: Apply the Label
Carefully peel the backing off the label. Apply the label to the front, lower half of the clear box, ensuring it is straight and free of air bubbles. The label’s position should not obstruct the view of the contents too much.
Step 4: Gather the Contents
Collect all those small, easily misplaced car essentials: spare car keys, key tags, tokens, change for tolls or parking, and small notes. Empty the contents of various jars and drawers into this central spot.
Step 5: Place and Use
Place the labeled box on your entryway console table or shelf, right next to where you hang your keys. Establish the routine that all small car-related items go directly into this box immediately upon entering the house.
13. Over-the-Door Emergency Storage Pouch
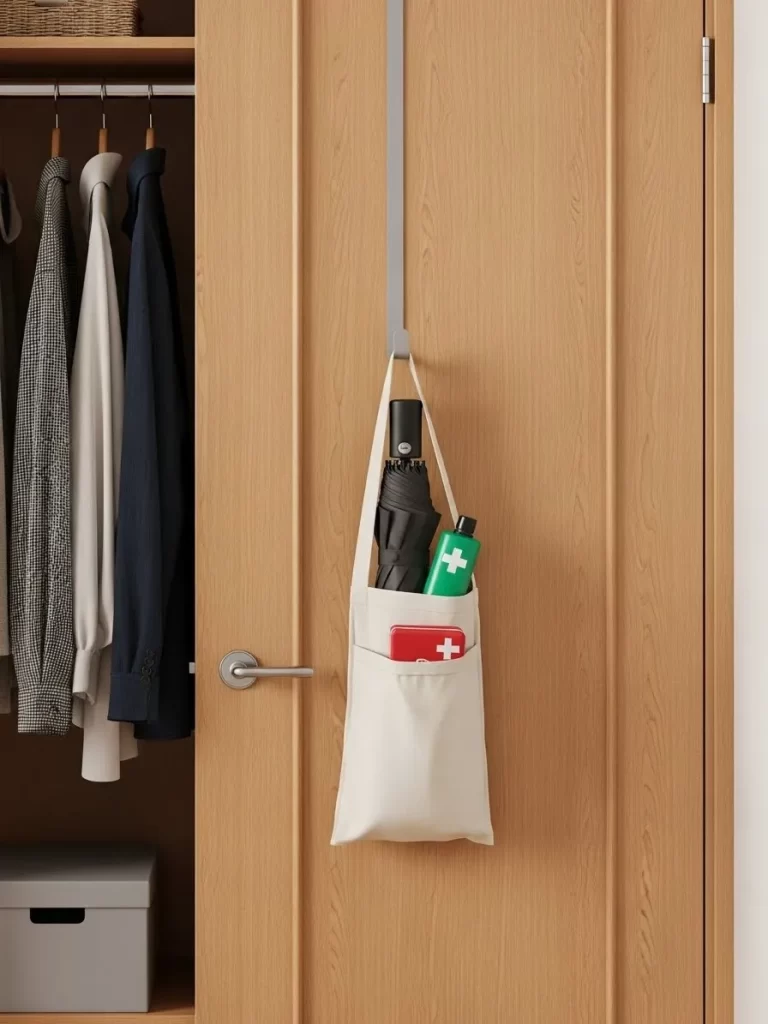
Vertical storage is a wonderful hack for utilizing the back of a closet or entry door, spaces often overlooked. This canvas pocket, hung with a simple over-the-door strap, offers an immediate home for essential grab-and-go items. It keeps necessary gear accessible without taking up floor space.
The pouch contains items like an umbrella and a basic first aid kit, things you need in a hurry but do not want cluttering the main area. The soft fabric ensures it does not scratch the wooden door surface. Hanging items behind the door means they are literally out of sight but still completely convenient.
The sleek design of the pouch complements the closet’s organized interior, suggesting a generally tidy approach to the entire home. This simple installation is a fantastic solution for small apartments or entryways lacking space for furniture. Having emergency items readily available is both functional and smart.
Material Required (For DIY Over-the-Door Pouch)
- One canvas or heavy cotton fabric storage pouch with a loop handle.
- One over-the-door metal hook or strap (ensure it is thin enough for the door to close).
- First aid supplies, umbrella, hand sanitizer, or other grab-and-go essentials.
Equipment Required
- None.
DIY Instruction: Setting Up the Door Pouch
Step 1: Select the Hanging Mechanism
Choose an over-the-door hook that is low-profile. Hold the hook over the top edge of your entryway closet door or main door and gently close the door to ensure it latches properly without resistance.
Step 2: Attach the Pouch
Hang the loop handle of the canvas storage pouch directly onto the over-the-door hook. Make certain the pouch hangs at a height that is easy for everyone to access without straining.
Step 3: Load the Essentials
Fill the pouch with those items that always seem to be missing when you need them most. This might include a compact umbrella, a small travel first aid kit, spare dog bags, or extra keys.
Step 4: Establish the Routine
Always return the items to the pouch as soon as you enter the house. This consistent action keeps your emergency and rain-day items exactly where they belong, ready for the next use.
14. Pet Supply Hanging Organizer
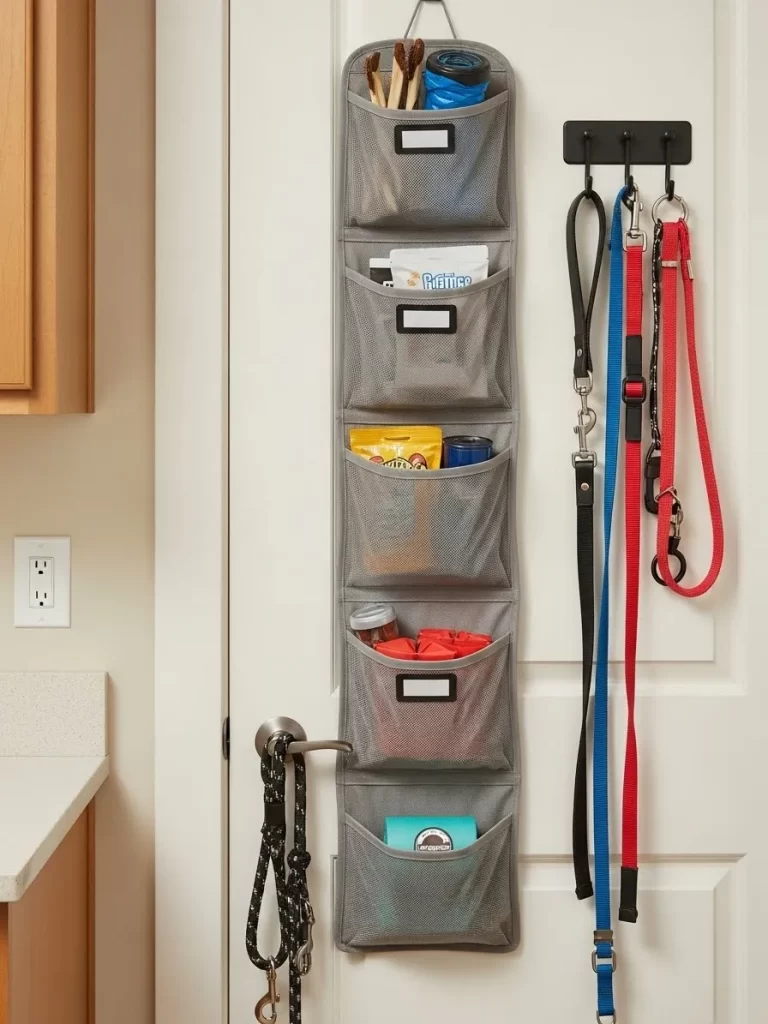
Pet supplies, like leashes and treats, quickly become messy when left loose near the door. This multi-pocket mesh organizer provides five vertical storage spots for different pet accessories. The transparent mesh allows quick visual confirmation of the contents in each pocket.
Right next to the organizer, four hooks hold different colored leashes and collars neatly. Keeping the leashes hung vertically prevents them from tangling into an unsightly knot on the floor or hook rack. This entire wall section is now a dedicated, organized pet zone.
The organizer cleverly utilizes wall space near the exit, where the supplies are most needed. The simple metal hooks are also useful for hanging keys or even a small scoop. Creating a highly focused vertical storage solution like this is essential for minimizing entry chaos when you have pets.
Material Required (For DIY Pet Zone)
- One five-pocket mesh or canvas over-the-door organizer (ensure it fits your door).
- One four-hook wall-mounted rack (black or coordinating color).
- Wall anchors and screws for the hook rack.
- Small labels for the organizer pockets.
Equipment Required
- Drill and drill bits.
- Screwdriver.
- Level.
- Pencil.
DIY Instruction: Installing the Pet Supply Center
Step 1: Hang the Pocket Organizer
Place the over-the-door hooks for the mesh organizer over the top edge of your chosen door. Test the door to ensure it closes easily. This item typically does not require drilling. Fill the pockets with items like treats, toys, poop bags, and grooming wipes.
Step 2: Choose the Hook Rack Location
Select a wall area right next to the door or organizer to mount the four-hook rack. Hold the rack up to the wall and use a level to ensure it is perfectly straight. Mark the screw holes with a pencil.
Step 3: Drill and Anchor the Hooks
Drill pilot holes into the marked spots. Insert wall anchors if you are drilling into drywall. If hitting a stud, use the appropriate screws. Anchors are especially important here, as pet leashes can sometimes be pulled sharply.
Step 4: Mount the Hook Rack
Line up the hook rack with the drilled holes. Secure the rack firmly to the wall with the screws using a screwdriver. Make certain the rack is stable and secure before hanging any items.
Step 5: Organize the Leashes
Hang the leashes, collars, and harnesses neatly from the new wall hooks. The weight distribution helps prevent tangles. You have now created a single, tidy, and functional grab-and-go station for all pet-related excursions.
15. Tufted Storage Bench with Cubbies
This entryway storage bench offers a triple-duty solution: comfortable seating, large concealed storage, and open cubby space. The tufted, hinged lid lifts to reveal a deep cavity, excellent for stashing away bulkier items like blankets, large bags, or seasonal footwear. Keeping items hidden dramatically reduces visual clutter.
The open shelving below features two fabric cubby drawers that offer easy access to items like gloves, scarves, or small folders. Using soft bins prevents items from spilling out while still keeping them organized. The mix of open and closed storage gives flexibility for different needs.
A sturdy bench also encourages family members to sit down while putting on or taking off shoes, rather than balancing awkwardly. This small, comfortable element contributes greatly to a welcoming and organized atmosphere. This central piece of furniture creates a true mudroom feeling, even in a small entryway.
Material Required (For DIY Console Bin Labels)
- Two fabric storage bins (with front handles).
- Pre-cut label holders or metal luggage tags.
- Cardstock or thick paper inserts.
- Label maker or permanent marker.
- Thin wire or twine (for attaching tags to bins).
Equipment Required
- Scissors.
- Ruler.
DIY Instruction: Labeling the Storage Cubbies
Step 1: Prepare the Inserts
Measure the space inside your label holders or metal tags. Cut the cardstock or heavy paper inserts to match the required size precisely. They should fit snugly inside the holder to prevent slipping.
Step 2: Create Clear Labels
Choose simple, clear category names like “HATS/GLOVES,” “REUSABLE BAGS,” “SPORTS GEAR,” or “EXTRA KEYS.” Use a label maker or write neatly and clearly with a permanent marker on the cardstock inserts.
Step 3: Assemble the Labels
Place the finished paper inserts into the label holders or tags. Thread the wire or twine through the attachment hole.
Step 4: Attach to the Bins
Securely tie or wire the label holder onto the front handle of each fabric storage bin. Position the labels so they face straight out for immediate identification.
Step 5: Load and Place
Load the bins with their corresponding items. Slide the labeled bins neatly into the open cubby spaces of the storage bench. This system ensures items are returned to the correct location every time, maintaining the tidiness of the entryway bench.
16. Floating Shelf with Visual Reminders
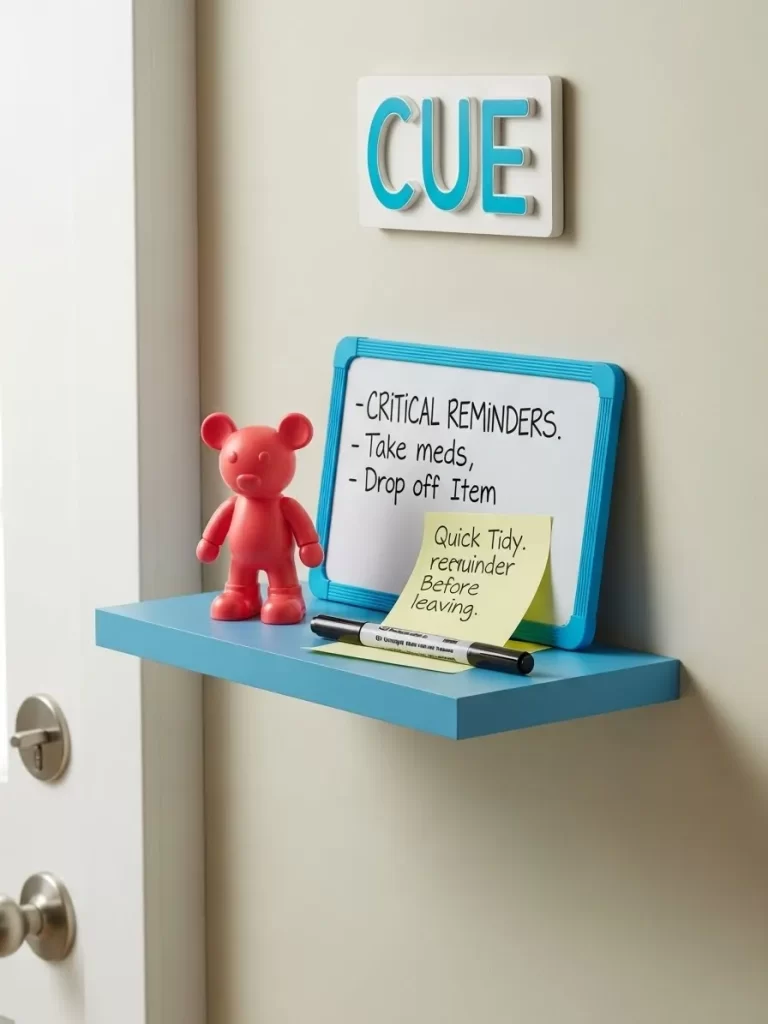
A shallow floating shelf is a clever way to add functionality to a small wall space without sacrificing floor area. This blue shelf provides a temporary holding area for items that require immediate attention. The vibrant color adds a bit of cheer to the space.
The small, leaning whiteboard is used for “Critical Reminders,” showing items that must be addressed right before leaving the house. The bright yellow sticky note reinforces the rule: check the board before exiting. Using a small shelf for active tasks keeps the main furniture surfaces clear.
A playful statue and a large wall sign, which reads “CUE,” add visual interest and reinforce the idea of a mental prompt. This little reminder station is essentially a second line of defense against forgotten items, ensuring smooth departures and a clutter-free return.
Material Required (For DIY Floating Reminder Shelf)
- One pre-cut wooden shelf (approx. 12-16 inches long, 4-6 inches deep).
- Wall mounting brackets and screws (hidden or decorative).
- Small decorative whiteboard or chalkboard.
- Dry-erase markers or chalk.
- Optional: Small decorative item (like the red statue).
Equipment Required
- Drill and drill bits.
- Level.
- Pencil.
- Tape measure.
- Stud finder.
DIY Instruction: Mounting the Reminder Shelf
Step 1: Determine Placement
Select an accessible wall location near your main entryway or coat rack. Hold the sorter up to the wall and mark the desired height with a pencil. Make certain the top edge is easy for all adults in the household to reach comfortably.
Step 2: Mark and Drill Holes
Use a level to ensure the shelf is straight. Hold the shelf brackets against the wall, align them with the line, and mark the screw holes. Use a stud finder if possible to mount directly into wall studs for the sturdiest support. Drill pilot holes and insert wall anchors where studs are not available.
Step 3: Mount the Brackets
Secure the shelf brackets firmly to the wall with screws. If using a shelf with hidden hardware, attach the hardware according to the manufacturer’s instructions.
Step 4: Secure the Shelf
Place the wooden shelf onto the mounted brackets or hardware. Screw the shelf down to the brackets from below to prevent it from slipping (if required by the hardware type).
Step 5: Set Up Reminders
Place the small whiteboard/chalkboard on the shelf. Write down a few common “exit” reminders, like “Keys,” “Meds,” or “Drop Off Item.” Use a dry-erase marker (secured nearby with a loop or tape) to make updating the list simple.
17. Decorative Umbrella Stand
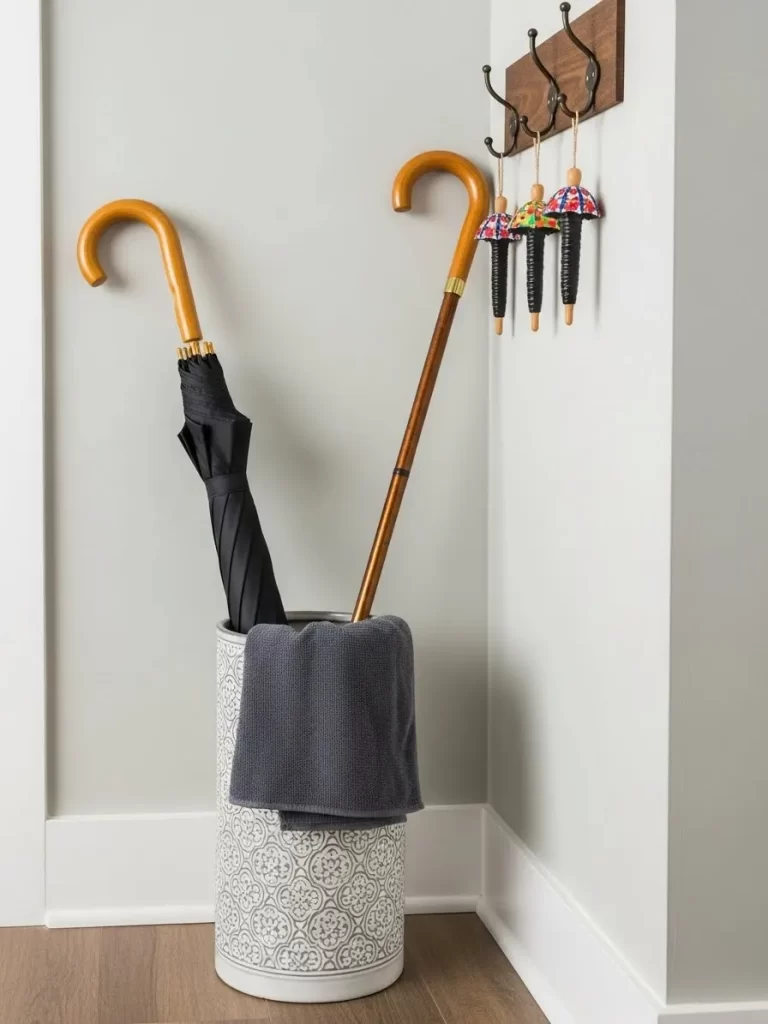
Wet umbrellas leaning against the wall or dripping onto the floor are a source of entryway mess. This tall, decorative umbrella stand offers a stylish and contained solution for rain gear. The patterned ceramic finish adds an attractive, upscale touch to the space.
The stand is conveniently placed right near the door, allowing family members to store wet umbrellas immediately upon entry. A towel placed near the top helps catch any residual moisture, preventing it from pooling at the bottom. The stand itself becomes a beautiful decorative piece.
Note the dark wooden coat rack above, which holds small decorative umbrella keychains, showing a playful organization theme. Containing the bulkier rain gear in a vertical stand keeps the coat hooks free for coats and bags. This simple piece solves a common clutter and wet mess problem quickly.
Material Required (For DIY Umbrella Stand)
- One tall, sturdy decorative vase, ceramic planter, or galvanized metal bucket (at least 18 inches high).
- River rocks or pebbles (for weight and water drainage).
- Small absorbent cloth or towel.
- Optional: Waterproof spray sealant (if using a porous planter).
Equipment Required
- None.
DIY Instruction: Preparing an Umbrella Stand
Step 1: Select the Container
Choose a container that is heavy enough not to tip over when full of umbrellas. Ensure it has a closed bottom or will be fully waterproofed to prevent water damage to your floor. Clean the container thoroughly.
Step 2 (Optional): Waterproof the Container
If your container is ceramic or porous, spray the entire interior surface with a waterproof sealant. Allow the sealant to cure completely according to the product directions, which may take 24 to 48 hours.
Step 3: Add Weight and Drainage
Place a layer of river rocks or heavy pebbles at the bottom of the container. This adds weight to improve stability and keeps the umbrella tips from sitting in any water that collects.
Step 4: Add the Absorbent Layer
Fold the small absorbent towel neatly and place it just inside the top of the container. This towel can be used to quickly wipe down the umbrellas before placing them inside, minimizing the water collecting in the base.
Step 5: Place and Use
Position the completed stand near the entry door. Instruct everyone to place their closed umbrellas directly into the stand upon arrival. This single piece immediately organizes rain gear and protects your floors.
18. Family Color-Coded Cubbies
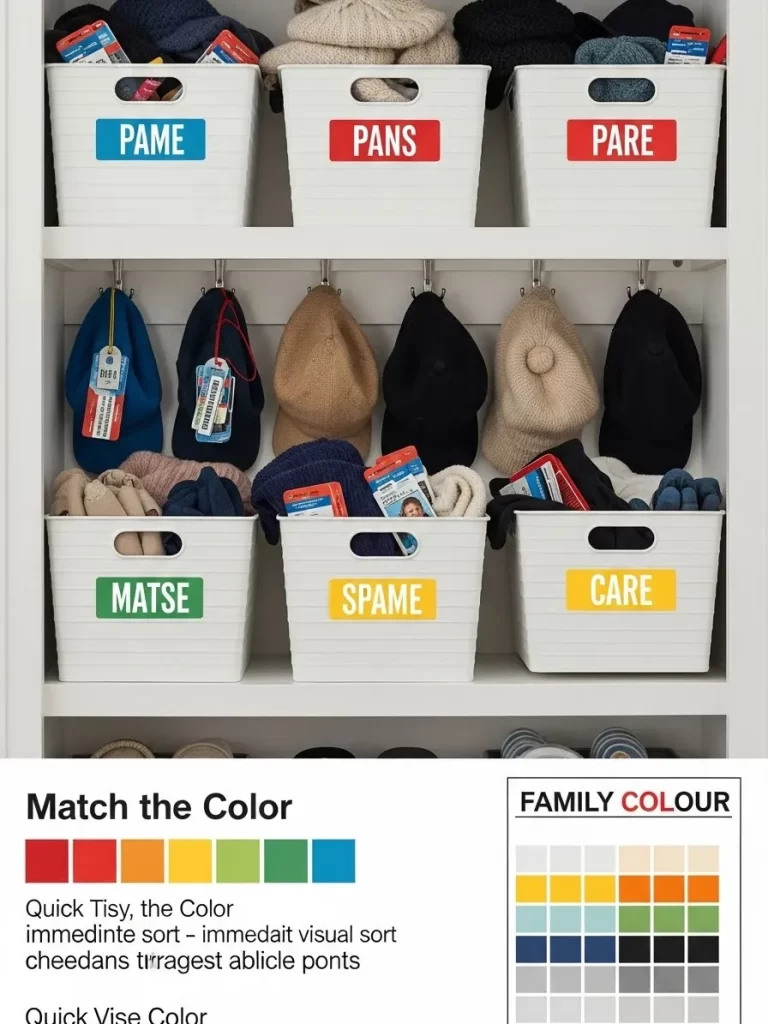
Color-coding is a highly effective visual organization strategy, especially in busy family entryways. This closet uses different colored labels on hooks and storage bins to assign a dedicated spot to each person. This eliminates confusion about whose hat or glove belongs where.
The upper and lower shelves contain matching white storage bins, each clearly marked with a different colored label. The hooks below the top shelf also feature tags corresponding to the family color scheme. Consistency in color-coding makes sorting and cleanup automatic.
This system encourages everyone, including children, to place items in their correct, assigned spot. The entire cabinet is organized by item type (hats, gloves, etc.) and then by person using the color cues. This level of visual organization ensures the entryway closet remains tidy and functional.
Material Required (For DIY Color-Coded Labels)
- White plastic storage baskets (six shown, with cut-out handles).
- Red, yellow, green, and blue permanent vinyl sheets or thick colored cardstock.
- Label maker or white permanent marker.
- Small safety pins or wire for attaching tags to hooks.
Equipment Required
- Scissors or rotary cutter.
- Ruler.
DIY Instruction: Implementing Color-Coded Cubbies
Step 1: Choose Family Colors
Assign a unique color to each family member (or couple/group) that will use the entryway storage. You might choose red for Mom, blue for Dad, yellow for Child A, and green for Child B.
Step 2: Create Bin Labels
Cut the colored vinyl or cardstock into large, rectangular label shapes (approx. $4 \times 2$ inches). Using the label maker, print the category name (like “MATSE,” “CARE,” etc., or simply the person’s name) onto a white strip, then stick it onto the colored rectangle.
Step 3: Attach Labels to Bins
Use strong adhesive or clear packing tape to attach the colored labels neatly to the front center of the plastic storage bins. Ensure the labels are smooth and will not peel off easily. Load the bins with the appropriate person’s items.
Step 4: Create Hook Tags
Cut smaller squares or circles from the colored material. Write the person’s name or initial on the tag. Use a small safety pin or piece of wire to attach the colored tag securely to the hook itself.
Step 5: Organize the Items
Place each person’s seasonal coat and backpack on their corresponding color-coded hook. Slide the labeled storage bins into the cubby slots. The visual appeal of the organized colors makes cleanup a simple matching game for everyone.
19. The Entryway “Item Limit” Rule

Setting explicit rules for entryway organization is surprisingly effective. This console table features two small, framed signs that clearly state limits for items allowed on the surface. One sign mentions a “5 Item Rule,” and the other refers to a “Hard Limit.”
The visual signs prevent the common habit of using the console table as a dumping ground for everything coming through the door. Placing a framed rule next to a lovely lamp and a small decorative catchall tray shows that beauty and discipline can coexist. The signs themselves add a modern, intentional decorative element.
By limiting the number of items—keys, a coaster, a lamp—the surface immediately looks cleaner and more intentional. Training the household to respect a visual boundary like this is a fundamental hack for eliminating daily entry clutter. This simple hack ensures the area provides a warm welcome.
Material Required (For DIY Framed Rule Signs)
- Two small, wooden photo frames (approx. $5 \times 7$ inches).
- Black or dark-colored cardstock.
- White permanent marker or letter stencils.
- White paint (optional, if using stencils).
- Optional: Small desktop easels for displaying the signs.
Equipment Required
- Ruler.
- Scissors.
DIY Instruction: Creating the Item Limit Signs
Step 1: Prepare the Background
Remove the glass and backing from the two photo frames. Cut the black or dark cardstock to fit perfectly inside the frame openings. The dark background makes the white lettering stand out clearly.
Step 2: Create the Rule Text
Decide on your simple, clear rules, such as “3 ITEM LIMIT” or “KEYS & MAIL ONLY.” Either use a stencil and white paint, or carefully write the rule onto the black cardstock using a white permanent marker. Keep the text large, centered, and easy to read from a distance.
Step 3: Assemble the Signs
Place the finished rule cardstock inside the frame and replace the backing securely. Ensure the glass is clean to maximize visibility.
Step 4: Position the Signs
Place the two framed signs prominently on your entryway console table, right near where clutter tends to accumulate. Use a small desktop easel to prop them up if they do not stand on their own.
Step 5: Enforce the Rule
Use the signs as a non-verbal cue to remind family members to keep the table surface clear. Any time the number of items exceeds the “limit,” prompt the person responsible to remove the extra items immediately.
20. Two-Tier Entryway Shoe Rack
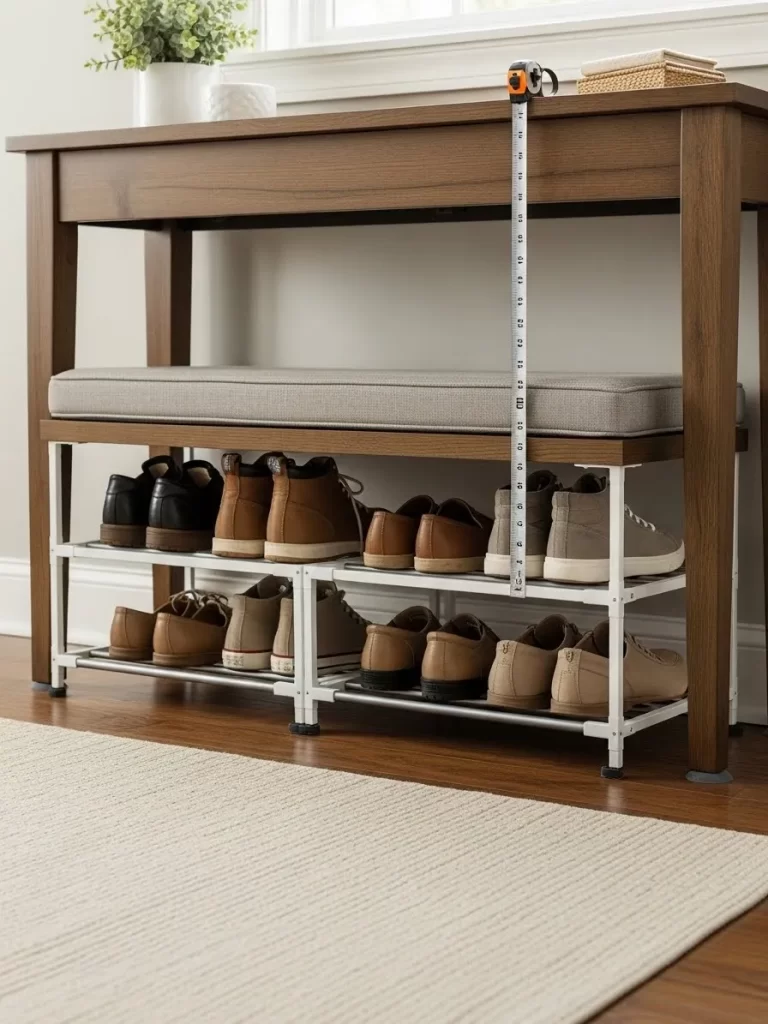
For entryways with limited floor space, a compact, two-tier shoe rack offers excellent vertical organization. This narrow white rack is neatly tucked under a small entryway bench, maximizing storage without visual bulk. The simple metal design fits seamlessly into the area.
A small measurement from the top of the bench to the rack shows the intentionality of the fit, ensuring every inch of vertical space is used. The two tiers hold multiple pairs of shoes, keeping them off the floor where they create a mess and a tripping hazard. Keeping shoes off the rug maintains cleanliness.
This solution works well because it clearly separates the shoes while allowing air circulation to prevent odors. By storing two levels of shoes in the same footprint as one, you achieve double the organization. Consistent use of a shoe rack is essential for maintaining a clean entry.
Material Required (For DIY Under-Bench Shoe Storage)
- One two-tier metal or wire shoe rack (narrow width to fit under the bench).
- Small rubber furniture feet (optional, to prevent rack from scratching the floor).
Equipment Required
- Screwdriver (if assembly of the rack is required).
DIY Instruction: Assembling the Shoe Storage Rack
Step 1: Measure the Space
Measure the height, width, and depth of the space beneath your entryway bench or console table. This ensures the shoe rack you purchase will fit without protruding or looking too bulky.
Step 2: Assemble the Rack
If your two-tier rack came disassembled, follow the manufacturer’s instructions to put it together using a screwdriver or the provided tool. Ensure all connections are tight and secure so the rack is stable.
Step 3: Add Floor Protection (Optional)
If the shoe rack has metal feet, stick a small rubber furniture foot pad onto the bottom of each leg. This simple step protects your entryway floor or rug from scratches and scuffs when the rack is moved.
Step 4: Slide into Position
Slide the assembled rack neatly into the measured space beneath the bench or console table. Center it visually in the space.
Step 5: Load and Maintain
Place shoes neatly onto the two tiers, grouping them by type or frequency of use. Train everyone to place their shoes on the rack immediately upon entering. This routine ensures shoes never pile up on the floor.
21. Hygiene Station Wall Dispenser
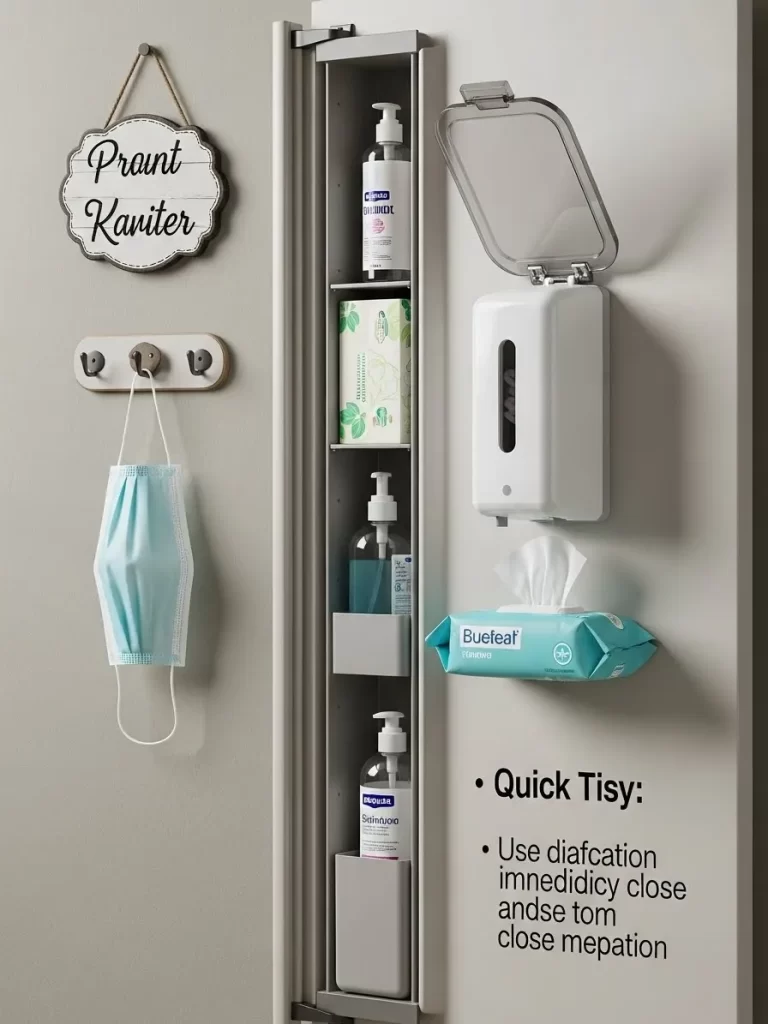
Keeping cleanliness supplies near the door is a modern organization essential for maintaining a tidy home. This slim, vertical organizer uses unused wall space to store frequently used hygiene items like hand sanitizer and tissues. Everything needed for quick sanitation is immediately accessible.
The narrow profile of this organizer keeps it from jutting out into the entryway, making it a functional yet discreet solution. Placing a wall-mounted tissue dispenser next to it ensures spills, dust, or runny noses are addressed right away. This quick tidy setup reinforces a habit of cleanliness upon entering the home.
Notice the simple hook rack nearby, dedicated to masks or keys. Using a vertical system like this keeps bottles and boxes from cluttering flat surfaces like console tables. A designated “Hygiene Hub” helps keep germs outside and minimizes the mess that often accumulates on the way in.
Material Required (For DIY Entryway Hygiene Station)
- One narrow, wall-mounted storage cabinet or spice rack (plastic or metal).
- Wall anchors and screws.
- Hand sanitizer dispenser bottles.
- Travel-size tissue packs or sanitizing wipe container.
- Small hook rack (optional).
Equipment Required
- Drill and drill bits.
- Screwdriver.
- Level.
- Pencil.
DIY Instruction: Mounting the Hygiene Organizer
Step 1: Select the Wall Spot
Choose a convenient wall area near the entry door, ideally where people naturally pause. Use a pencil to mark the desired height for the top of the organizer; ensure all adults can reach the top shelf comfortably.
Step 2: Mark and Drill Holes
Hold the organizer or its mounting template up to the wall. Use the level to make certain it is straight before marking the screw locations with a pencil. Drill pilot holes and insert the wall anchors appropriate for your wall material (drywall usually requires anchors).
Step 3: Secure the Organizer
Line up the organizer with the drilled holes. Insert the screws and use a screwdriver to fasten the unit securely to the wall. Give it a gentle tug to confirm stability.
Step 4: Load and Arrange
Place the hand sanitizer bottles and tissue packs neatly onto the shelves. Decant bulky containers into slimmer, more attractive pump bottles if necessary to maximize space.
Step 5: Install Accessories (Optional)
If using the separate hook rack, follow the same steps to mount it next to the organizer. Use these hooks to hang masks, key chains, or small hand towels. This compact station makes entry a clean, automatic process.
22. Entryway Bench with Statement Mirror

Anchoring the entryway with a functional furniture piece, like a bench, provides several organizational advantages. This simple bench offers a cushioned seat for shoe-changing and an open lower shelf to keep footwear contained. Black metal and gray fabric create a sharp, streamlined look.
The large framed mirror hung above the bench adds significant visual interest while serving a practical purpose. A quick check of your outfit before leaving the house eliminates the need to run back to a bedroom mirror. Hanging the mirror vertically helps make the hallway feel taller and more open.
The simple shoe shelf beneath the bench ensures footwear is organized immediately upon removal. An attractive bag resting on the seat suggests this is a designated drop-off zone upon entry. This combination of seating, storage, and visual appeal creates a cohesive and welcoming first impression.
Material Required (For DIY Mirror Mounting)
- One large, framed mirror (must have secure wire or D-ring hardware attached to the back).
- Heavy-duty picture hanging wire or two heavy-duty wall hooks.
- Wall anchors (toggle bolts or appropriate heavy-duty anchor for the mirror’s weight).
- Ruler or tape measure.
Equipment Required
- Stud finder.
- Drill and drill bits.
- Level (at least 24 inches long).
- Safety gloves and glasses.
- Pencil.
DIY Instruction: Hanging a Heavy Entryway Mirror
Step 1: Assess and Measure Weight
Determine the weight of the mirror and confirm the hardware on the back is secure and rated for that weight. Always use hardware and wall anchors rated for at least double the mirror’s actual weight for safety.
Step 2: Locate Studs
Use a stud finder to locate wall studs above the bench area. Mounting into a stud is always the safest option for heavy items. Mark the stud locations lightly with a pencil.
Step 3: Determine Height and Level Line
Hold the mirror up to the wall to confirm the desired height (usually centered visually above the bench). Use a long level to draw a faint, horizontal line where the top of the hanging hardware should sit. This line ensures the mirror will hang straight.
Step 4: Install the Hardware
If hanging on one central wire, measure the spot for the hook along the level line. If using two D-rings, measure the exact distance between the rings and mark the two corresponding spots on the wall. Drill pilot holes, install the heavy-duty wall anchors, and secure the wall hooks or mounting hardware firmly.
Step 5: Hang the Mirror
With the help of another person, carefully lift the mirror and secure the hanging wire or D-rings onto the installed wall hooks. Step back to confirm the mirror is level and securely seated before removing your hands.
23. Load-Out Basket for Returns
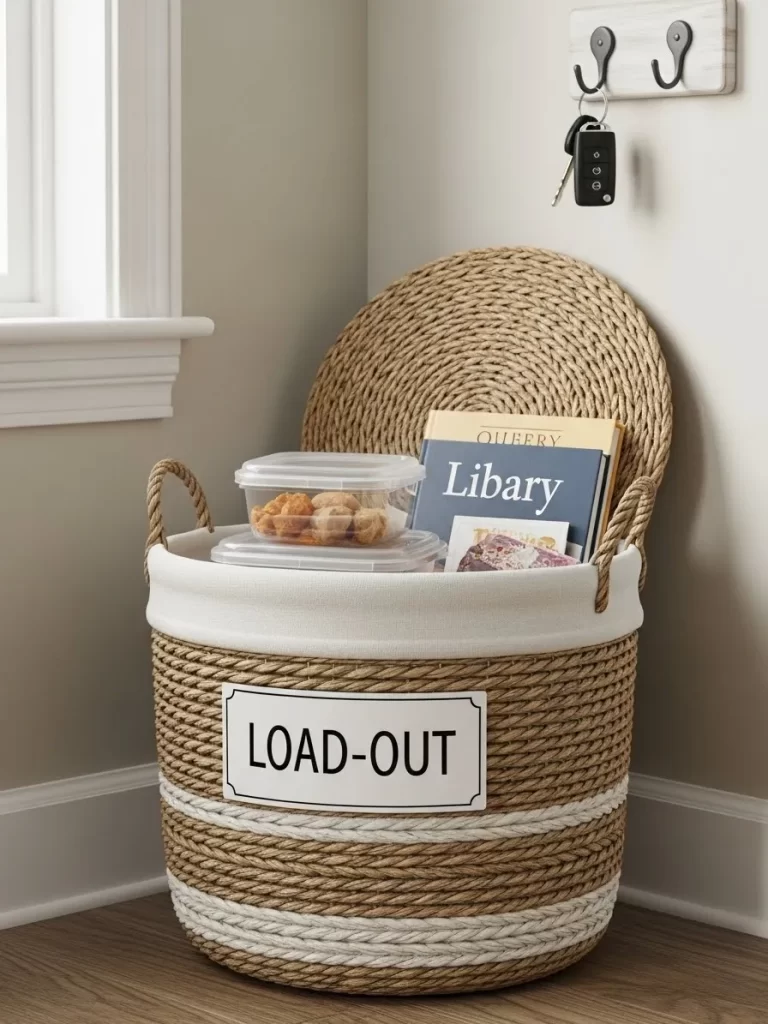
A designated “Load-Out” spot is a critical organization hack for preventing returns, library books, and items to be dropped off from cluttering the living space. This large, woven round basket with rope handles provides a stylish and functional container for those temporary items.
The bold label, “LOAD-OUT,” clearly communicates the basket’s purpose, preventing it from turning into just another storage bin. The items inside—library books, a container of food—are visible reminders of tasks that need to be completed when exiting the home.
The woven texture of the basket adds warmth to the corner, turning a functional object into a decorative piece. Positioning it near the door, with a small key hook above, ensures the critical items are seen right before you grab your keys. This system prevents forgotten errands and maintains a clean entryway.
Material Required (For DIY Load-Out Basket)
- One large, round woven basket with a removable liner (rope or seagrass).
- One plastic or rigid label plaque (approx. $8 \times 4$ inches).
- White vinyl lettering or white acrylic paint.
- Small piece of twine or wire (for attachment).
- Glue (if securing the label permanently).
Equipment Required
- Ruler.
- Scissors.
DIY Instruction: Labeling the Load-Out Basket
Step 1: Prepare the Label Plaque
Take the plastic or rigid label plaque and clean its surface thoroughly. This plaque provides a stable, flat surface for the lettering.
Step 2: Create the Lettering
Using white vinyl lettering or carefully painted white acrylic, clearly spell out the phrase “LOAD-OUT” across the center of the plaque. Ensure the letters are straight, evenly spaced, and fully adhered or dry.
Step 3: Attach the Plaque to the Basket
Use a strong, flexible glue (rated for fabric or plastic) to affix the labeled plaque to the center front of the basket’s removable liner or directly onto the woven material. Alternatively, if the plaque has holes, use a piece of twine or thin wire to securely tie the label to the basket’s handle or edge.
Step 4: Position and Fill
Place the basket in the entryway corner, easily visible from the door. Immediately start using it for all items that need to leave the house later that day or the next: returns, dry cleaning, rental movies, or food containers.
Step 5: Establish the Exit Habit
Make it a habit to check the “LOAD-OUT” basket every time you walk out the door. The prominent position and clear label make it an automatic part of your exit routine, ensuring nothing important gets left behind.
24. Coin Toss Jar for Pocket Clutter

Loose coins, small receipts, and stray bills are classic sources of entryway mess. This large, clear glass jar provides a dedicated, attractive containment system for the contents of pockets and wallets. The fun, vintage-style label reads “Coin Toss.”
The clear glass allows you to quickly gauge how full the jar is and offers a visual reminder of the money saved. Stashing the receipts and coins immediately upon arrival stops them from ending up in a messy pile on the console table. This simple piece of glassware becomes a decorative and functional feature.
Placing the jar on a small, contained tray ensures that any stray coins or receipts that miss the jar are still contained. Creating this simple, visually appealing system encourages everyone in the house to participate in pocket tidiness. It is a smart way to turn clutter into savings.
Material Required (For DIY Coin Toss Jar)
- One large, clear glass jar with a wide mouth and a secure lid.
- One self-adhesive, vintage-style label (or printable label paper).
- Black fine-tip permanent marker or printed text.
- Small, shallow decorative tray (to place the jar on).
Equipment Required
- None.
DIY Instruction: Setting Up the Coin Toss Jar
Step 1: Clean the Jar
Thoroughly wash and dry the glass jar. A crystal-clear jar looks much more appealing and allows you to see the contents easily.
Step 2: Create the Label
Print or neatly handwrite the phrase “Coin Toss” onto the self-adhesive label using the permanent marker. Choose an elegant or playful font to enhance the decorative look of the jar.
Step 3: Apply the Label
Peel the backing off the label and carefully adhere it to the center of the glass jar. Smooth out any wrinkles or air bubbles gently.
Step 4: Place on the Tray
Set the labeled jar onto the small decorative tray. This tray defines the boundaries of the “toss zone” on your table, keeping items confined even if they spill slightly.
Step 5: Establish the Pocket Dump Routine
Place the finished jar and tray on the entryway console table. Instruct everyone to empty all coins, receipts, and small pocket contents directly into the jar every time they come through the door. This simple routine is the key to preventing pocket clutter.
25. Large Freestanding Hall Tree
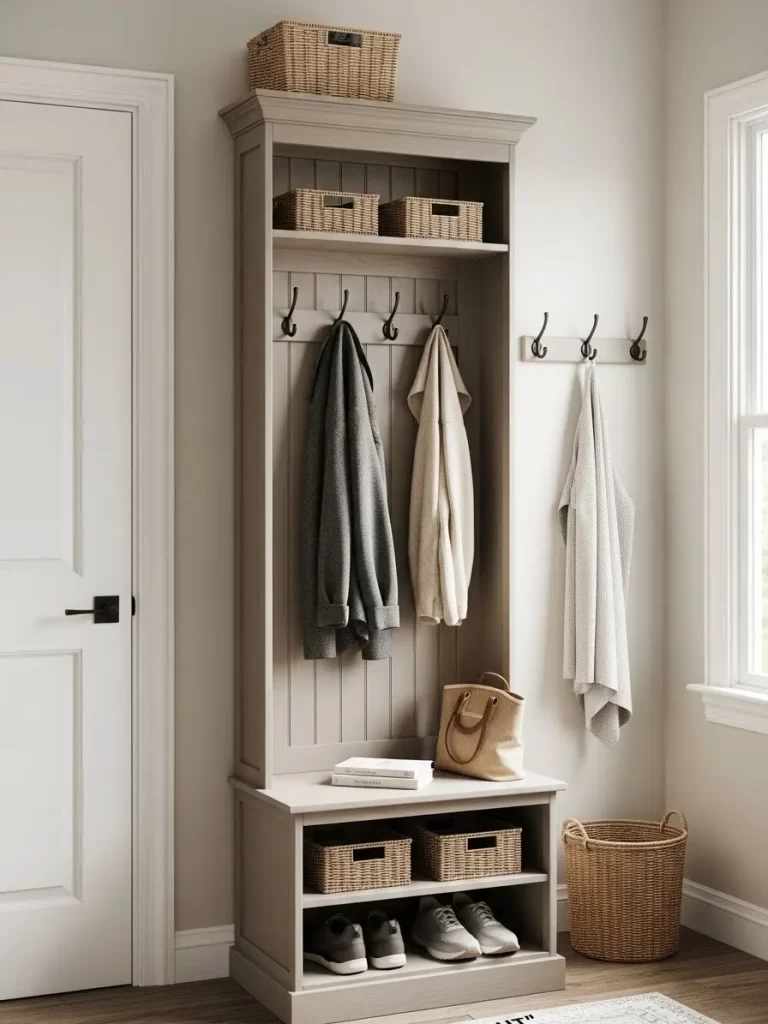
A traditional hall tree is a robust, all-in-one solution for entryway organization, providing multiple functions in a single footprint. This tall, stately piece features hooks for hanging outerwear, open shelves for baskets, a bench for seating, and lower shelves for shoe storage.
The open upper shelves neatly hold three woven baskets, keeping accessories like keys and mail out of sight. Four large coat hooks provide ample hanging space, ensuring jackets are off the floor and hanging properly. The bench is great for sitting while putting on or taking off shoes.
Below the bench, two open shelves are dedicated to organizing daily footwear. This single piece of furniture addresses coats, accessories, seating, and shoes, effectively creating a mudroom feeling where one didn’t exist before. Its height and design provide visual balance and order to the entire entrance.
Material Required (For Organizing the Hall Tree)
- Six small to medium woven storage baskets (for the upper and lower shelves).
- Label tags and twine (optional, for labeling the baskets).
- Decorative pillow or cushion (for the seating area).
Equipment Required
- None (assuming the hall tree is already assembled).
DIY Instruction: Organizing the Hall Tree
Step 1: Assign Shelf Purposes
Mentally assign a purpose to each area of the hall tree. Dedicate the upper baskets for seasonal items or hats, the hooks for coats and bags, the bench for seating, and the lowest shelves for current footwear.
Step 2: Label and Place Upper Baskets
Label the upper baskets with clear categories like “KEYS/MAIL,” “HATS,” or “SCARVES.” Place only the assigned items into these baskets. Slide the baskets neatly onto the top shelves, ensuring the labels face forward.
Step 3: Organize the Hooks
Utilize the coat hooks for jackets and frequently used items. Limit items per hook to one jacket and one small bag to maintain the tidy look. Avoid overcrowding, as this immediately creates visual chaos.
Step 4: Tidy the Seating Area
Place a comfortable cushion or small decorative pillow on the bench. Keep this area mostly clear, perhaps allowing only a single book or handbag to rest there temporarily.
Step 5: Arrange the Footwear
Place shoes neatly on the lower open shelves. Implement a rule that only the shoes currently being worn should be stored here; other shoes should be stored in a closet elsewhere. This prevents the lower area from becoming a cluttered mess of footwear.
26. Unpack Now Post-Shopping Station
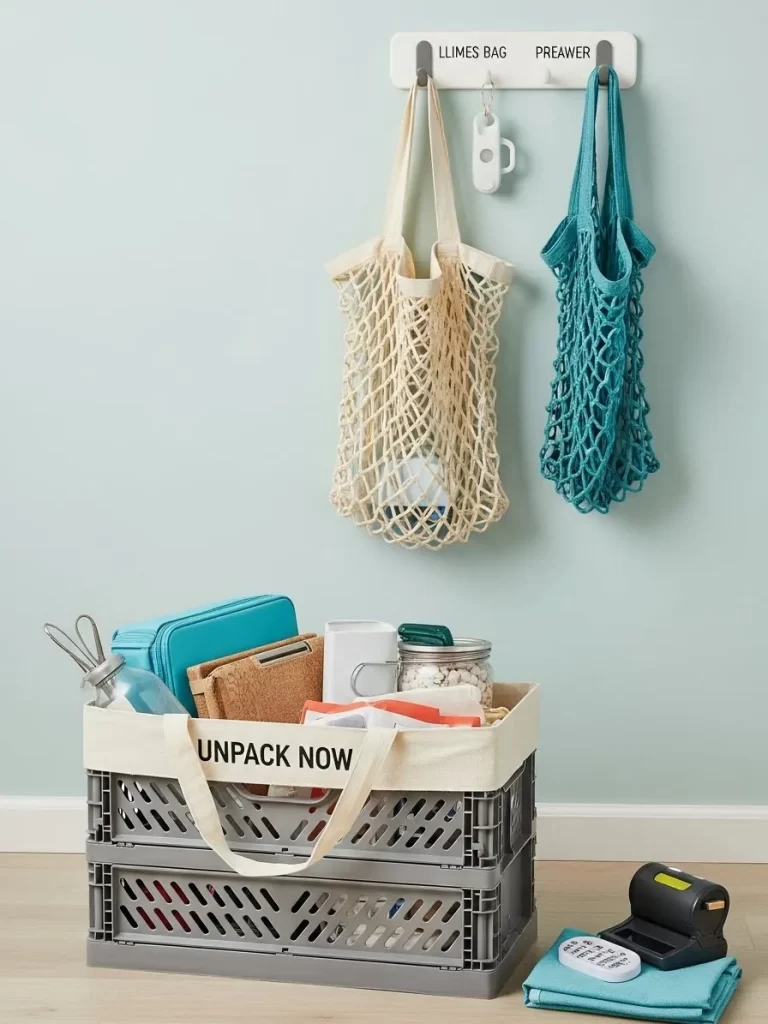
Preventing shopping bags and reusable totes from sitting unpacked for days is key to an organized entry. This clever setup features a sturdy, collapsible crate labeled “UNPACK NOW,” creating an immediate staging area for new items. The explicit label prompts instant action.
Above the crate, a sleek, wall-mounted hook rack holds reusable shopping bags, keeping them contained and ready for the next trip. Hanging the bags vertically saves space and prevents them from falling into a messy pile.
The collapsible crate is smart for small entryways, as it can be folded flat when not in use. Items inside, like personal care products and containers, await immediate sorting. This system transforms the entryway from a drop zone into a dedicated, active processing station.
Material Required (For DIY Unpack Station)
- One collapsible plastic storage crate or large wire basket.
- One wide, thick piece of ribbon or cotton webbing (for the “UNPACK NOW” label).
- Permanent black marker or vinyl letters.
- Safety pins or flexible glue.
Equipment Required
- None.
DIY Instruction: Creating the Unpack Now Label
Step 1: Prepare the Strap
Cut the wide ribbon or cotton webbing to a length that allows it to wrap across the front opening of the crate or basket and attach neatly.
Step 2: Create the Bold Text
Using a stencil and permanent marker or applying vinyl letters, clearly write the phrase “UNPACK NOW” onto the center of the ribbon or webbing. Ensure the lettering is bold and stands out prominently.
Step 3: Attach the Label to the Crate
Drape the finished ribbon across the front of the collapsible crate. Use safety pins, small binder clips, or a flexible fabric glue to secure the ribbon to the fabric lining or handle area of the crate. The label should be easily visible.
Step 4: Designate the Spot
Place the labeled crate directly in the entryway, near the door or under the coat hooks. Place all incoming shopping bags or return items immediately into this crate when you arrive home.
Step 5: Complete the Cycle
Establish the rule that nothing can leave the “UNPACK NOW” crate until it is put away in its permanent home. Once emptied, the crate can be used again or folded flat and stored discreetly until the next shopping trip.
27. Motion Sensor Lighting Hack
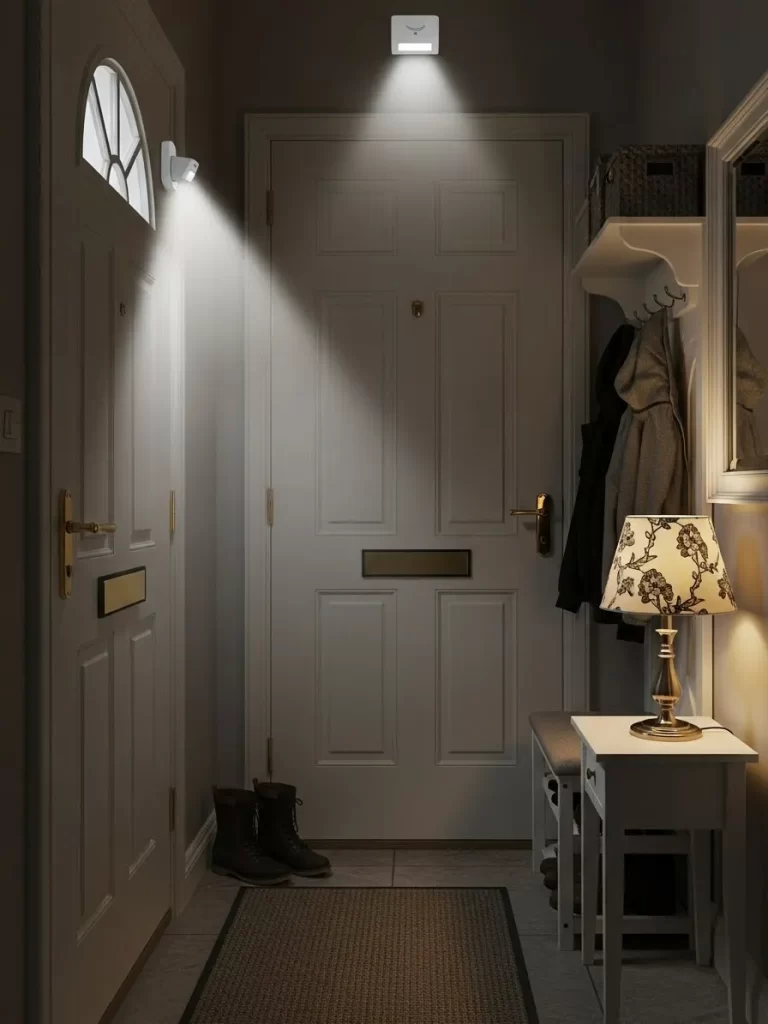
A dark entryway immediately feels messy and unwelcoming, even if it is tidy. Installing motion sensor lighting is a brilliant hack for making the space safer and more inviting instantly. These small, battery-operated lights provide bright, directional illumination without the need for complex wiring.
One light is positioned on the wall, shining down onto the shoe area, and another on the ceiling illuminates the path. Good lighting ensures you can clearly see where to put your keys or shoes, encouraging tidiness. It also removes the frustration of fumbling for a light switch with full hands.
The small, discreet fixtures blend into the decor, focusing attention on the light itself, not the source. This inexpensive upgrade instantly elevates the safety and feel of the entryway. An illuminated space naturally looks less chaotic and much more welcoming.
Material Required (For DIY Motion Sensor Lighting)
- Two battery-operated LED motion sensor lights (one wall-mount, one ceiling-mount).
- Small wall screws or heavy-duty adhesive strips (usually included with the light).
- AA or AAA batteries (as required by the light).
Equipment Required
- Small screwdriver.
- Level (optional, for wall placement).
DIY Instruction: Installing Motion Sensor Lights
Step 1: Choose Placement
Identify two spots: one above the door or on the ceiling to illuminate the general area, and one lower down on the wall, aimed at the shoe area or console table. Ensure the lights are placed to maximize sensor coverage as people enter.
Step 2: Prepare the Lights
Open the battery compartment of each light and insert the required AA or AAA batteries. Set the light function to the “motion sensor” or “auto” setting.
Step 3: Mount the Ceiling/Wall Light
For the ceiling light, use the adhesive backing or the small provided screws to secure the base plate firmly to the ceiling. For the wall light, use adhesive strips or screws to attach the light base plate to the desired wall spot.
Step 4: Attach the Fixtures
Twist or snap the light fixtures onto their mounted base plates. The adhesive should be firmly pressed against the wall/ceiling for at least 30 seconds to ensure a secure bond.
Step 5: Test the Sensor
Step out of the sensor’s range and then walk back into the entryway. The light should turn on instantly when it detects motion. Good lighting helps eliminate the appearance of chaos and makes organization easier.
28. Grid Organizer for Small Tools
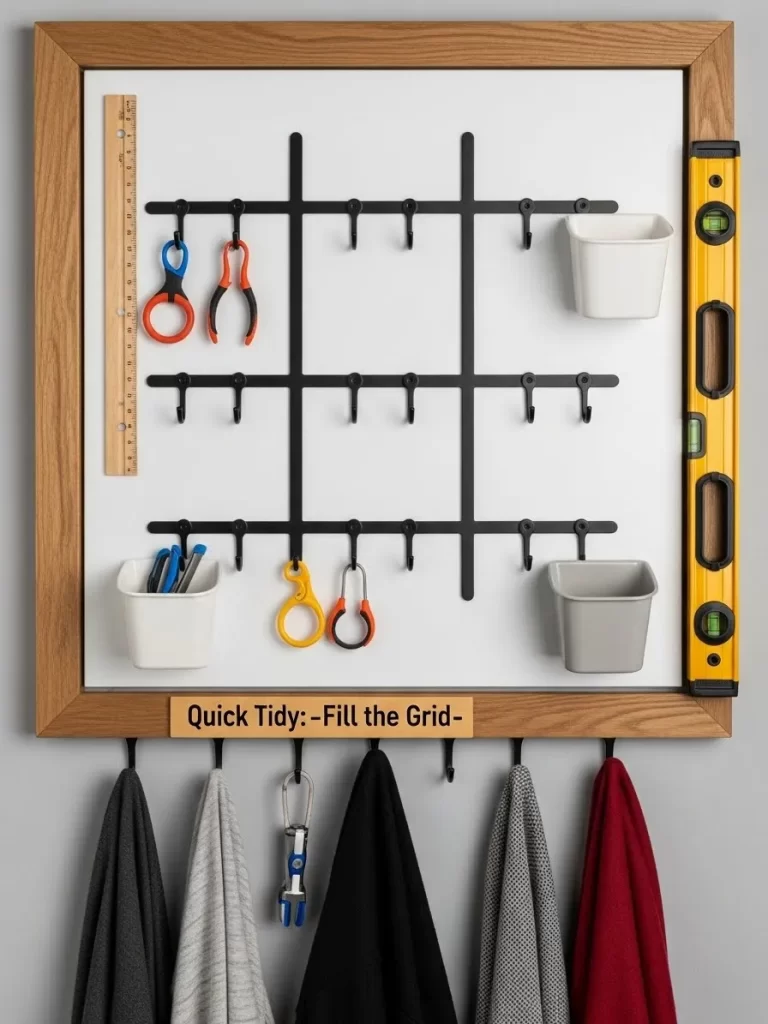
Small household tools, rulers, and scissors often end up lost in a junk drawer, making them inaccessible when needed near the door. This framed, black metal grid organizer provides a designated home for these small essentials. The grid system offers flexible placement for hooks and bins.
The modular design allows for customization, featuring open bins for pens and pencils and multiple hooks for keyrings and small gadgets. The included ruler and level reinforce the emphasis on structured, orderly organization. The simple wooden frame adds a decorative touch.
Hanging this organizer in the entryway ensures that often-needed tools are within reach for quick tasks like opening packages or measuring a return item. The linear structure and dedicated spots for every item transform clutter into visual harmony.
Material Required (For DIY Grid Organizer)
- One pre-framed metal grid panel (with hooks and mounting hardware).
- Small plastic or metal hanging storage cups (to attach to the grid).
- Adhesive labels (for the storage cups).
Equipment Required
- Drill and drill bits.
- Screwdriver.
- Level.
- Pencil.
DIY Instruction: Mounting the Grid Organizer
Step 1: Determine Wall Placement
Choose an empty wall space that is visible and accessible. Hold the framed grid organizer up to the wall and use a pencil to mark the desired height.
Step 2: Level and Mark Holes
Use the level against the top edge of the frame to ensure it is perfectly straight. Mark the precise locations of the frame’s mounting holes.
Step 3: Drill and Secure
Drill pilot holes and install wall anchors if you are not mounting into wall studs. Secure the frame firmly to the wall with the provided screws. Ensure the frame is stable and securely attached before loading any weight onto it.
Step 4: Customize the Grid
Attach the small storage cups and hooks onto the grid system, distributing them evenly. Place items like scissors, small screwdrivers, pens, and pencils into the bins. Hang keychains and utility items from the hooks.
Step 5: Create a Tidy Zone
Use the area below the grid to hang coats or scarves, ensuring the items on the grid are kept tidy and accessible. The visual organization of the grid helps eliminate the messy clutter of small tools.
29. One-Touch Donation Closet System

A cluttered entryway often means you are simply holding onto too many things. This closet system includes a dedicated “One-Touch Donation” box, making the process of letting go of items simple and automatic. The decorative, patterned box sits neatly on a shelf.
Having a clear donation drop-off box right in the entryway closet ensures that items are collected the moment you decide you no longer need them. This prevents unwanted clothing or household goods from creating temporary clutter elsewhere.
The rest of the closet shows smart use of vertical space, with hooks for coats, folded blankets, and vertical shoe storage below. The donation box adds a final layer of organization, helping to manage inventory creep. Keeping the entryway closet tidy is the ultimate hack for eliminating all outside chaos.
Material Required (For DIY Donation Box)
- One large, attractive, sturdy storage box with a removable lid (patterned cardboard or fabric).
- White cardstock or a label plaque.
- Black permanent marker or printed text.
- Flexible glue or double-sided tape.
Equipment Required
- Ruler.
- Scissors.
DIY Instruction: Setting Up the Donation Box
Step 1: Prepare the Box
Select a large, sturdy box that fits easily on a closet shelf or floor. Clean the box exterior.
Step 2: Create the Label
Cut the white cardstock to a clear, legible size. Using the permanent marker or printed text, write the phrase “ONE-TOUCH DONATION” clearly across the center. Keep the message simple and direct.
Step 3: Attach the Label
Use flexible glue or strong double-sided tape to firmly attach the labeled cardstock to the front of the donation box. Ensure the label is centered and easily read when the closet door is open.
Step 4: Load and Place
Place the box on an easily accessible shelf or on the floor of the entryway closet. Immediately begin using it: the moment you decide an item of clothing or a household good is no longer needed, place it directly into this box.
Step 5: Schedule the Drop-Off
Once the box is full, immediately schedule a donation drop-off. Do not let the box sit there for weeks. This “one-touch” system ensures items are removed from the home quickly, maintaining a clutter-free environment.
30. Quick Clean-Up Station
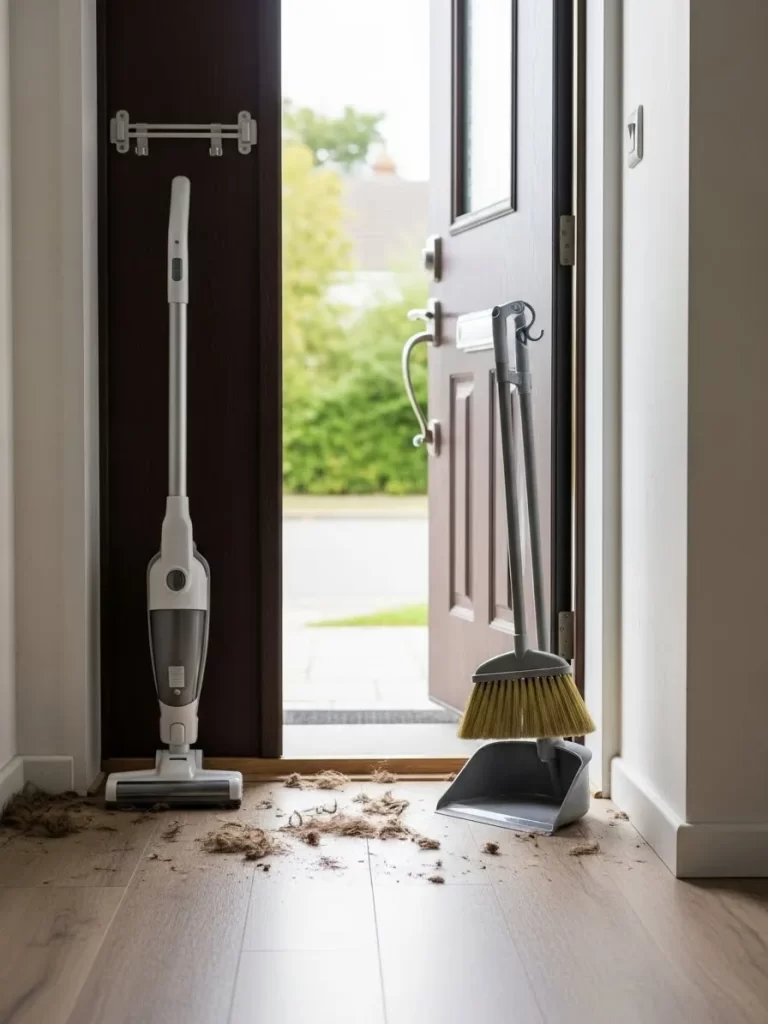
Dirt, leaves, and outdoor debris are common culprits that quickly create chaos in the entryway. Designating a small area for quick cleaning tools is an essential tidy hack. A cordless stick vacuum and a neat broom-and-dustpan set are ready for immediate use.
Keeping a lightweight vacuum close to the door encourages family members to perform a quick clean the moment dirt is tracked in. This instant action prevents the mess from migrating into the rest of the house. The tools are easily stored behind the door or in a corner.
The image shows a pile of actual dirt, emphasizing the need for this quick response system. By having the right tools right where the mess happens, you eliminate the excuse of having to fetch the vacuum from a distant closet. A clean floor is the foundation of a welcoming entrance.
Material Required (For DIY Quick Sweep Station)
- One compact cordless stick vacuum with a wall mount.
- One modern-style broom and standing dustpan set.
- Small wall anchors and screws (for the vacuum mount).
Equipment Required
- Drill and drill bits.
- Screwdriver.
- Level.
- Pencil.
DIY Instruction: Installing the Vacuum Charging Mount
Step 1: Choose a Discreet Spot
Select a wall area near the entry door that is also close to a power outlet for charging. This spot is often behind the door or in a shallow closet. Hold the vacuum mount up to the wall and mark the screw holes.
Step 2: Level and Drill
Use a level to ensure the charging mount will be installed straight. Drill pilot holes and install wall anchors if necessary. Secure the charging mount firmly to the wall with screws.
Step 3: Charge the Vacuum
Plug the charging cord into the wall outlet and connect it to the mount. Place the vacuum onto the mount to begin charging.
Step 4: Position the Broom Set
Place the broom and dustpan set neatly next to the vacuum or in the corner. Ensure the dustpan sits upright to contain any collected dirt.
Step 5: Enforce the Routine
Make it clear to everyone that the small vacuum and broom are exclusively for quick entryway cleanups. Encouraging immediate cleanup of tracked-in dirt is the best way to maintain a perpetually tidy floor.
31. Backpack Landing Mat

Wet or dirty backpacks and lunch bags dropped on the floor can quickly create a mess and damage wood surfaces. This bright blue, rubber-edged landing mat provides a designated, easy-to-clean spot for kids to drop their gear right upon entering. The mat has a fun, encouraging phrase to guide placement.
Two sturdy wall hooks hold the small lunch tote and water bottle, utilizing vertical space efficiently. Keeping these small items off the floor prevents tripping hazards and ensures they are ready for the next day. The main backpack rests on the mat, keeping dirt and moisture contained.
This system reinforces a consistent routine: drop the large item on the mat and hang the smaller ones on the hooks. This simple, visual boundary helps contain the chaos of children’s school gear. It is an excellent way to maintain a clean floor and a tidy, welcoming entry.
Material Required (For DIY Backpack Mat Station)
- One medium-sized, flexible rubber or silicone utility mat (approx. $18 \times 24$ inches).
- Two sturdy wall hooks (decorative or utility).
- Wall anchors and screws for the hooks.
- Optional: Vinyl lettering or paint for a mat phrase.
Equipment Required
- Drill and drill bits.
- Screwdriver.
- Pencil.
- Level.
DIY Instruction: Setting Up the Backpack Station
Step 1: Choose Hook Placement
Select a wall area near the door, high enough for the hooks to accommodate a child’s hanging lunch bag but low enough for the child to reach easily. Use a level to mark the height for the hooks and mark the screw holes.
Step 2: Install the Hooks
Drill pilot holes, insert wall anchors if needed, and secure the two hooks firmly to the wall with screws. Ensure they are strong enough to hold a full lunch bag and water bottle.
Step 3: Position the Landing Mat
Place the utility mat directly on the floor below the hooks. This mat serves as the designated “landing spot” for the main backpack.
Step 4 (Optional): Add Encouragement
If using vinyl lettering, apply a positive, action-oriented phrase like “DROP AND HUG THE WALL” onto the mat’s surface to make the routine fun and clear for children.
Step 5: Implement the Routine
Instruct the child to immediately hang their lunch bag and water bottle on the hooks and place their backpack neatly onto the mat when they arrive home. This keeps school-related clutter confined to one easy-to-clean space.
32. Scent and Ambiance Tray

A welcoming entryway appeals to all the senses, and a delightful scent can dramatically change the feeling of the space. This simple arrangement uses a decorative tray to contain fragrance elements, preventing them from looking messy or overwhelming the console table.
The tray holds a vase of white flowers, a lit candle, and a reed diffuser, creating a layered, inviting fragrance. Using a clear or marbled tray protects the furniture surface from wax or oil spills. This arrangement turns a functional item into a focal point.
Positioning the setup next to a large mirror helps bounce light and aroma throughout the hallway, enhancing the ambiance. The entire scene, including a small bench in the background, suggests calm and intentional organization. Adding soft lighting and a pleasant smell is a quick, low-effort hack for a better first impression.
Material Required (For DIY Scent Tray)
- One decorative tray (marble, wood, or metallic, large enough for three items).
- One reed diffuser (with your favorite essential oils).
- One decorative candle in a glass holder.
- One small vase and fresh or faux flowers.
- Felt or rubber feet (optional, to place under the tray).
Equipment Required
- None.
DIY Instruction: Creating the Ambiance Tray
Step 1: Prepare the Tray
Ensure the decorative tray is clean and free of dust. If you plan to place it on a delicate surface, attach small felt or rubber feet to the underside of the tray to prevent scratching.
Step 2: Position the Core Scent
Place the reed diffuser on the tray first, positioning it towards the back or a corner. Insert the reeds and allow the oil to begin permeating the air. Reed diffusers provide a continuous, stable fragrance.
Step 3: Add the Candle
Place the decorative candle near the center or opposite corner of the tray. A candle adds both a lovely scent and a warm glow in the evening. Important: Never leave a lit candle unattended.
Step 4: Incorporate Visual Beauty
Place the vase of flowers (fresh or high-quality faux) on the tray to introduce a natural element and a pop of color. Arrange the items to look balanced and appealing.
Step 5: Maintain and Refresh
Set the completed ambiance tray on your entryway console table. Remember to flip the reeds in the diffuser periodically to refresh the scent. This simple step creates an instantly welcoming and sensory experience for everyone entering your home.
33. Clip-and-Go Key Organizer

Small, critical paper items, like return labels, tickets, and appointment cards, often get lost or forgotten. This vertical key organizer combines hooks for keys with a small clipboard and pen holder to manage these essential papers. Everything you need for an outing is in one small spot.
The organizer features dedicated space for “Quick Tidy” notes and a pen cup, encouraging immediate action and reducing table clutter. Clipping event tickets right next to the corresponding keys makes forgetting them nearly impossible. The key hooks are large enough for multiple keyrings.
Installing a compact, multi-functional piece like this uses minimal wall space but offers maximum utility. It stops the common entryway mess of scattered keys, loose notes, and roaming pens. This simple, wall-mounted solution is a powerful organization tool.
Material Required (For DIY Wall Organizer)
- One wall-mounted key hook and pen cup organizer (or clipboard/shelf system).
- Wall anchors and screws.
- Small notepad or index cards.
- Pens and fine-tip markers.
Equipment Required
- Drill and drill bits.
- Screwdriver.
- Level.
- Pencil.
DIY Instruction: Installing the Clip-and-Go Organizer
Step 1: Choose the Location
Select a convenient, eye-level spot right next to the door. Hold the organizer up and use a level to mark the screw holes with a pencil.
Step 2: Drill and Anchor
Drill pilot holes and insert the appropriate wall anchors. Secure the organizer firmly to the wall using the provided screws and your screwdriver.
Step 3: Load the Supplies
Place pens and markers into the integrated cup or shelf. Clip a small notepad or index card to the clipboard section for quick notes.
Step 4: Establish the Routine
Hang all daily-use keys immediately onto the hooks. When you have an important paper item—a ticket, a dry-cleaning receipt, or a library due-date slip—clip it onto the clipboard. This visual reminder ensures you grab the paper and the keys together.
Step 5: Clear and Reset
Make a habit of removing the paper from the clipboard immediately after the task is completed. Keeping the clipboard clear ensures it is ready for the next important “grab-and-go” item.
34. Vertical Mail Sorting File

The “No Horizontal Mail Rule” is one of the most effective ways to tame paper clutter. This wall-mounted file organizer provides a central location for sorting mail immediately, preventing it from piling up on any flat surface. The vertical orientation prevents mail from spreading out.
The files are color-coded and labeled clearly with “ACTION,” “READ,” and “SHRED,” encouraging quick, decisive handling of every piece of paper. The simple, solid frame adds to the organized aesthetic. This hack is specifically designed to stop the “paper sprawl” problem.
Hanging this file near the door ensures that the paper sorting happens at the point of entry, before it ever enters the main living space. Using this system keeps kitchen counters and console tables clear, instantly improving the first impression of your home.
Material Required (For DIY Vertical File System)
- One wall-mounted file holder or magazine rack (metal or sturdy plastic).
- Wall anchors and screws.
- Five to seven hanging file folders (various colors).
- Label maker or adhesive tab labels.
Equipment Required
- Drill and drill bits.
- Screwdriver.
- Level.
- Pencil.
DIY Instruction: Setting Up the Vertical File Sorter
Step 1: Choose and Mark Placement
Select a wall area that is easy to reach near the door or coat rack. Hold the file holder up, use the level to ensure it is straight, and mark the screw holes with a pencil.
Step 2: Mount the Holder
Drill pilot holes and install wall anchors. Secure the file holder firmly to the wall with screws.
Step 3: Label the Folders
Use the label maker to create clear, action-oriented labels on the hanging file folder tabs. Essential categories include: “ACTION” (bills, forms), “READ” (magazines, important notices), “SHRED” (junk mail with sensitive info), and “FILE” (items to save).
Step 4: Load and Implement the Rule
Insert the labeled file folders into the wall holder. Place a small, framed reminder of the “No Horizontal Mail Rule” nearby.
Step 5: Enforce Sorting at the Door
Establish the habit that all mail and paper must be placed immediately into one of the vertical files upon entry. Nothing is allowed to sit horizontally on any table or counter in the entryway.
35. Divided Drawer Utility Organizer
A small console or cabinet in the entryway often collects random household “junk.” Using modular drawer dividers transforms that cluttered space into a highly organized utility hub. These matching gray trays categorize small, easy-to-lose items.
The dividers keep disparate items, like batteries, pens, rubber bands, matches, and small tools, separated and easily found. Labeling each tray, even with simple names like “ROSS,” “MATES,” and “TOSS,” maintains order. This system utilizes the cabinet’s depth efficiently.
Organizing these tiny essentials here prevents trips to the garage or basement for a spare AA battery or a screwdriver. Keeping frequently needed household items contained but out of sight is a powerful way to eliminate small-scale chaos in the entrance area.
Material Required (For DIY Drawer Organizer)
- Set of modular, interlocking drawer dividers or small plastic bins (various sizes).
- Small adhesive labels or clear tape.
- Fine-tip permanent marker.
- Assorted small items (batteries, pens, matches, etc.).
Equipment Required
- Ruler or tape measure.
DIY Instruction: Organizing the Entryway Drawer
Step 1: Empty and Measure
Completely empty the entryway drawer and wipe it clean. Measure the inner dimensions (length, width, and depth) of the drawer.
Step 2: Plan the Layout
Arrange the modular dividers inside the empty drawer. Mix large bins for bulkier items (like batteries) and small, narrow bins for linear items (like pens or markers). Maximize the space by fitting the bins snugly together.
Step 3: Label the Bins
Use adhesive labels or clear tape and a permanent marker to create a simple label for each bin based on its intended contents (e.g., “PENS,” “BATTERIES,” “TOOLS,” “BANDS”). Place the label on the inner side wall of the bin for visibility.
Step 4: Sort and Load
Gather all the small, miscellaneous items currently cluttering your entryway. Sort them into the corresponding labeled bins. Be ruthless: if an item does not fit the category or hasn’t been used in a year, relocate it.
Step 5: Maintain the System
Slide the completed drawer back into the console. Make a rule that anything placed in that drawer must go into one of the designated, labeled bins. This simple structure prevents future clutter accumulation.
36. Hydration and Reading Corner
Creating a dedicated, aesthetic zone for items that often roam the house—like magazines and reusable water bottles—helps contain them. This woven basket, nestled in a corner, provides a beautiful containment solution for these items near the door. The removable liner adds a soft, tidy touch.
The basket holds current reading material and two brightly colored water bottles. Placing these near the exit encourages everyone to grab a filled bottle before leaving the house, promoting healthy habits. The basket itself brings a calming, natural texture to the space.
The proximity of the basket to the door makes it an automatic staging area. This hack prevents magazines from cluttering coffee tables and ensures water bottles are not forgotten in the morning rush. It turns a chaotic corner into a clean, functional zone.
Material Required (For DIY Hydration Basket)
- One rectangular woven basket with a removable cloth liner.
- Two to three reusable water bottles.
- Current magazines or light reading material.
- Optional: Small decorative throw blanket or towel.
Equipment Required
- None.
DIY Instruction: Setting Up the Hydration Hub
Step 1: Prepare the Basket
Select a woven basket that is sturdy enough to hold several full water bottles. Ensure the cloth liner is clean and fits neatly inside the basket.
Step 2: Gather the Essentials
Collect your family’s favorite reusable water bottles and two or three current magazines or books. Fill the water bottles and place them near the back of the basket.
Step 3: Arrange the Contents
Stand the magazines up along one side of the basket. Place the water bottles next to them. If using a small throw blanket or towel, drape it over the side of the basket for a decorative look and to catch any condensation.
Step 4: Position the Basket
Place the basket neatly in a corner near the entry door or console table. Its position should be visually accessible but not obstructive.
Step 5: Establish the Routine
Encourage family members to return their empty water bottles to the basket when they arrive home so they can be cleaned and refilled for the next day. This keeps them from being abandoned randomly throughout the house.
37. Locker Unit Top Tray Catchall

Entryway lockers offer incredible, personalized vertical storage, but their flat tops can easily become cluttered. This rubberized tray placed on top of the locker unit defines a specific area for temporary items, preventing sprawl. The textured mat adds a modern, industrial look.
The geometric wooden lamp adds warm lighting, which is crucial for a welcoming entrance. A bright yellow sticky note, reading “QUICK! THE TOP!” reinforces the immediate action required in this zone. The tray serves as a quick drop zone for keys or glasses upon entry.
Lockers provide personal, closed storage, which is fantastic for minimizing visual chaos. Using the top surface only for temporary, contained items ensures the entire unit maintains a tidy look. The combination of closed storage and a defined catchall zone is highly effective.
Material Required (For DIY Locker Top Organizer)
- One rubber or metallic utility tray (sized to fit the locker top).
- One small, decorative lamp (or a wireless charging pad).
- Small notepad and pen.
- Optional: Lock and keys for the locker doors.
Equipment Required
- None.
DIY Instruction: Creating the Locker Top Zone
Step 1: Choose and Place the Mat
Select a tray or mat made of rubber, metal, or another sturdy material that can contain small spills or dust. Wipe the top of the locker unit clean. Center the tray neatly on the locker top.
Step 2: Introduce Lighting
Place the small decorative lamp (or charging pad) on the tray or right next to it. Ensure the lamp’s cord is managed neatly and tucked away behind the unit.
Step 3: Add Reminders
Place a small notepad and pen (or sticky notes) on the mat for quick, immediate reminders. A visually bright sticky note is often the best trigger for instant action.
Step 4: Establish Purpose
The area on the tray is designated for temporary drop-off only—keys, wallets, or outgoing notes. Everything else must go immediately into the closed lockers below.
Step 5: Lock Down Storage
Use the keys to lock the individual locker doors. This forces family members to use the defined spaces inside and prevents them from simply piling items on the floor or the catchall tray.
38. Shared Essentials Wire Basket
A single, central basket for shared outdoor essentials—like bug spray, sunscreen, lip balm, and small first aid items—simplifies preparation for family outings. This rustic wire basket with wooden handles provides a contained, attractive holder for these items. The label “Shared Hub” clearly communicates its communal purpose.
Including small scissors and a roll of tape shows this hub is also ready for minor household tasks like opening packages or small repairs. The small zipped pouch inside is perfect for containing tiny items like loose change or hair ties. Containing these small tubes and containers in one spot eliminates medicine cabinet and drawer clutter.
Placing this basket on the entryway console table makes it an easy grab-and-go zone for outdoor activities. This small, stylish organization solution prevents the messy sprawl of tubes and tools that often plagues flat surfaces.
Material Required (For DIY Shared Essentials Hub)
- One decorative wire basket with handles (approx. $8 \times 6$ inches).
- One small, rigid label holder and tag.
- Sunscreen, bug spray, lip balm, small scissors, and tape.
- One small, zippered pouch (to contain tiny items).
Equipment Required
- None.
DIY Instruction: Assembling the Shared Hub
Step 1: Prepare the Basket and Label
Clean the wire basket and attach the label holder and tag to the front, writing “Shared Hub” or “Outdoor Essentials” clearly on the tag.
Step 2: Collect and Sort Items
Gather all small tubes and containers that your family frequently needs when going outside (sunscreen, chapstick, hand lotion, etc.).
Step 3: Contain Tiny Items
Place all tiny, loose items (like hair ties, single batteries, or small keys) into the small zippered pouch. Place the pouch inside the wire basket.
Step 4: Arrange the Essentials
Place the larger tubes and small tools (scissors, tape) neatly around the pouch inside the basket. Arrange them vertically to maximize space and visibility.
Step 5: Position for Quick Access
Place the finished “Shared Hub” basket prominently on your entryway console table or shelf. The shared nature of the basket means that everyone knows exactly where to look for these common necessities, eliminating search time and mess.
39. Next-Day Outfit Planning Hook
Reducing morning chaos starts with planning the night before. This closet hack uses an accordion-style extendable hook rack to hang the “Next Day Outfit,” setting it aside from the rest of the clothing. A simple tag clearly identifies the purpose of the hanger.
The accordion design is practical because it can be pushed flat against the wall when not in use, maximizing closet space. Hanging the outfit on a simple wooden hanger maintains the garment’s shape. The visual setup right inside the door makes it easy to grab and go in the morning.
Using a tape measure to show the available space emphasizes the clever use of this often-empty vertical area inside the closet door. Pre-selecting clothes eliminates decision fatigue and ensures that getting ready is a smooth, orderly process.
Material Required (For DIY Outfit Hanger)
- One accordion-style extendable hook rack or a single sturdy wall hook.
- Wall anchors and screws.
- One wooden hanger.
- Small cardstock tag and marker.
Equipment Required
- Drill and drill bits.
- Screwdriver.
- Level.
- Pencil.
DIY Instruction: Installing the Outfit Prep Rack
Step 1: Choose the Location
Select a wall space inside your entryway closet where the clothes will not interfere with the door closing. Mark the height for the hook rack, aiming for a spot that keeps the clothes hanging freely.
Step 2: Mount the Rack
Hold the accordion rack up to the wall, use the level to mark the screw holes, and drill pilot holes. Secure the rack firmly to the wall with screws. If using a single hook, ensure it is installed into a wall stud for maximum stability.
Step 3: Create the Tag
Cut a piece of cardstock and write “NEXT DAY OUTFIT” clearly on it. Punch a small hole in the cardstock and thread it onto the hook of the wooden hanger.
Step 4: Implement the Routine
Every evening, select the complete outfit you plan to wear the following day (including accessories if desired) and hang it on the tagged wooden hanger. Place the hanger on the newly installed hook.
Step 5: Enjoy the Smooth Morning
The outfit is now ready and waiting. This simple act of planning transforms morning chaos into an orderly, efficient start to the day.
40. Potted Plant with Drip Tray
Bringing life and natural warmth into the entryway is a quick way to make the space feel welcoming. This large, patterned potted plant adds vibrant color and a calming presence. A well-chosen plant instantly softens hard lines and elevates the overall look.
Crucially, the plant sits on a square drip tray. This essential addition catches any excess water and prevents soil or moisture from staining or damaging the wooden floor. An organized entryway is protected from unexpected messes.
Positioning the plant near a window takes advantage of natural light and creates a focal point when entering the home. Combining a beautiful natural element with a simple, functional protection item (the tray) is a clever organization hack that blends form and function.
Material Required (For DIY Potted Plant Station)
- One large, decorative ceramic planter.
- One plastic or metal square drip tray (must be larger than the planter’s base).
- Indoor potting soil and drainage pebbles.
- One suitable indoor plant (like a peace lily or snake plant).
Equipment Required
- None.
DIY Instruction: Setting Up the Plant Station
Step 1: Choose the Plant and Pot
Select a large, healthy indoor plant and a heavy, decorative planter that complements your entryway style. Ensure the planter has a drainage hole at the bottom.
Step 2: Prepare the Drainage
Place a layer of drainage pebbles or broken terracotta pieces at the bottom of the planter. This helps prevent the soil from becoming waterlogged.
Step 3: Plant the Specimen
Fill the planter with fresh indoor potting soil. Carefully transfer the plant from its nursery pot into the large planter, filling soil around the root ball. Water the plant thoroughly.
Step 4: Position the Drip Tray
Place the square drip tray directly on the floor in the desired entryway location. Ensure the tray is completely centered where the planter will sit.
Step 5: Final Placement
Carefully lift the heavy planter and place it directly onto the center of the drip tray. The tray will catch any overflow water after watering, protecting your floor and completing this tidy decorative hack.
41. Wood Console with Tiered Storage
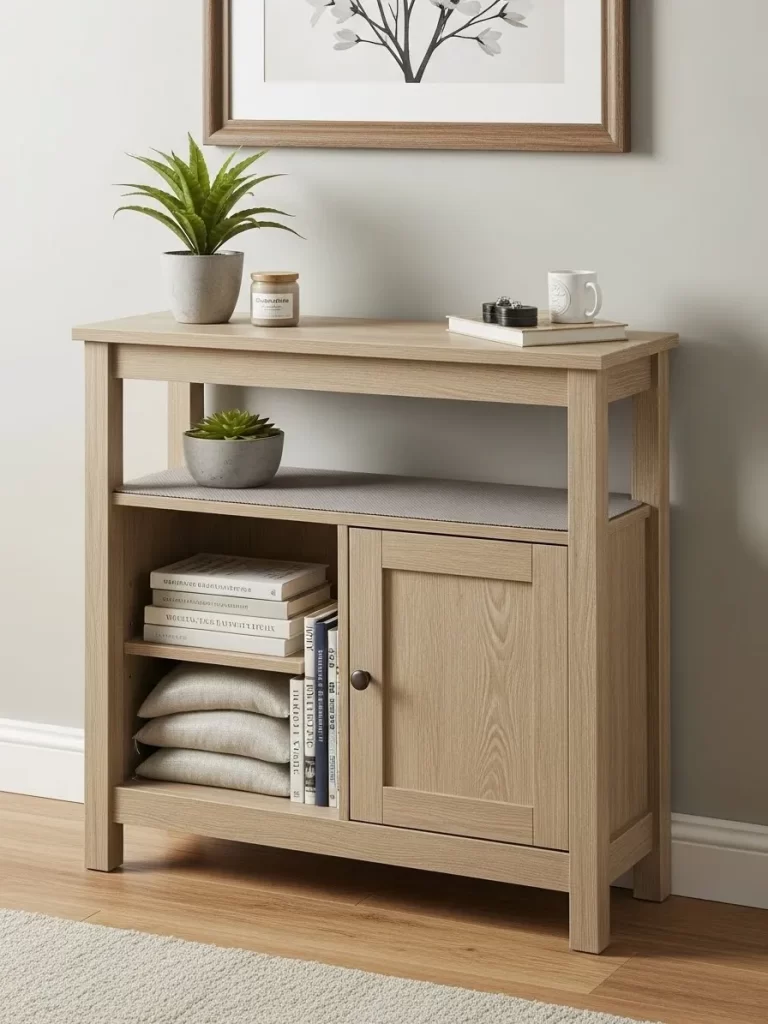
This light wood console provides essential storage while maintaining a clean, open aesthetic. It features three levels: a top surface for decorative items, an open shelf for soft goods, and a closed cabinet for hidden items. This mix of open and closed storage is key to balancing organization and style.
The upper shelf provides space for books and neatly stacked linen pillows, keeping them off the floor and contained. Closed storage in the cabinet offers a place to hide less attractive or more cluttered items, like cleaning supplies or small electronics.
Adding a small plant and decorative items to the top surface keeps the entrance feeling welcoming and intentional. The cabinet is the silent workhorse, holding chaos out of view. Using a unit like this minimizes floor clutter while maximizing vertical utility.
Material Required (For DIY Shelf Liner & Bookends)
- One roll of non-adhesive, textured shelf liner (to protect the wood shelves).
- One set of small, decorative metal bookends.
- Assortment of neatly bound books and folded linens.
Equipment Required
- Ruler.
- Scissors or utility knife.
DIY Instruction: Organizing the Open Console Shelf
Step 1: Measure and Cut the Liner
Measure the dimensions of the open shelves on your console unit. Use the ruler and scissors or utility knife to cut the shelf liner precisely to fit the surface of the shelves. The liner protects the wood from scuffs, scratches, and dust.
Step 2: Place the Liner
Place the cut liner neatly onto the console shelves, ensuring it lays flat without any bumps or wrinkles.
Step 3: Stack the Linens
Fold linens or small blankets (if storing them here) into neat, uniform rectangles. Stack them in an organized pile on one side of the shelf. Uniform folding is essential for tidiness.
Step 4: Arrange the Books
Stand books vertically on the opposite side of the shelf. Use the decorative metal bookends to keep them standing straight and contained. Do not lean books against the console wall; the bookends ensure vertical organization.
Step 5: Utilize the Cabinet
Fill the closed cabinet with any items you want completely out of sight. Keep this space organized with smaller bins inside. The hidden space is crucial for eliminating visual clutter.
42. Divided Catchall Tray

Small, easily misplaced items—lip balm, keychains, coins, and receipts—require extreme containment to prevent chaos. This segmented white tray provides dedicated compartments for each tiny category. The multiple sections immediately force organization.
A small pouch in one section holds lip balms and tissues, while another section is reserved entirely for coins. This compartmentalization eliminates the “junk drawer” effect on the console table. The separate round container holds tissues for immediate use.
This tray’s shallow depth and multiple dividers turn small clutter into a clean, segmented visual arrangement. Placing a receipt ready for filing or disposal next to the tray reinforces the “Touch Once” paper rule. A highly organized entryway starts with perfect containment for the smallest of items.
Material Required (For DIY Divided Catchall Tray)
- One segmented white plastic or wooden tray (at least two to three compartments).
- One small, decorative ceramic bowl (to hold key rings/pouch).
- Small containers of lip balm, breath mints, tissues, and loose change.
Equipment Required
- None.
DIY Instruction: Setting Up the Compartmentalized Tray
Step 1: Clean and Dry the Tray
Thoroughly wipe down the segmented tray to ensure it is clean and dry. A clean base is essential for organizing small items.
Step 2: Assign Compartment Categories
Assign a single category to each compartment. For example: Coins in Section 1, Lip Balms/Mints in Section 2, and Small Tools/Keys in Section 3.
Step 3: Utilize the Small Bowl
Place the small, decorative ceramic bowl inside one of the larger tray compartments. Use this bowl to hold key rings, a small key pouch, or anything that needs to be lifted easily.
Step 4: Load the Compartments
Place loose coins directly into their designated section. Neatly group lip balms and mints into their area. Place any small tools or items into the remaining space.
Step 5: Maintain Order
Place the completed tray on the entryway console table. When you arrive home, immediately sort your pocket contents into the appropriate section of the tray. The visually separated sections ensure the arrangement remains tidy.
Tackling entryway chaos can feel overwhelming, but these 42 quick hacks show that small, intentional systems create big results. Remember that organization is not about achieving temporary cleanliness. It is about creating easy, repeatable routines for everyone in the home.
The right organization system is one that requires minimal effort and maximum habit. Whether you implement the “Touch Once” mail rule, install a clever vertical organizer, or simply enforce a strict “Item Limit,” consistency is the true key to maintaining order. A welcoming entrance sets a positive tone for your entire home.
Key Takeaways
Visual Boundaries Are Essential
Define specific zones for everything—shoes, keys, and mail. Use trays, mats, and baskets to clearly mark where items belong. The simple act of defining a boundary instantly contains clutter.
Go Vertical for Maximum Impact
Utilize unused wall space behind doors or above console tables with hooks, floating shelves, and slim organizers. Vertical storage is a powerhouse solution in narrow hallways.
Master the “Touch Once” Rule
Handle mail, receipts, and pocket contents immediately upon entry. This simple, disciplined routine prevents temporary piles from becoming permanent messes.
Prioritize Quick Clean-Up Tools
Keep a small broom or a cordless vacuum hidden near the door. Immediate cleanup of dirt and debris stops mess from migrating into the rest of the house.