Do you ever feel a rush of stress the moment you step through your own front door? The entryway, the critical transition zone between the outside world and your personal sanctuary, often becomes a chaotic dumping ground.

Shoes pile up like mountainous obstacles, keys hide in the shadows, and misplaced coats create a constant visual mess. This high traffic area is often undersized and overworked, leading to frustration for everyone who uses it.
The good news is that banishing this door side disaster is entirely possible. We have curated 39 ingenious and stylish solutions to help you reclaim this space. Whether you prefer minimalist designs or need heavy duty industrial storage, these ideas will guide you toward a functional, welcoming entryway.
Inside, you will find detailed DIY instructions and material lists to transform your entryway into a streamlined command center. Prepare to turn your zone of chaos into a place of calm.
1. Minimalist Maple Entryway Command Center

This inviting entryway instantly makes coming home feel orderly and calm. The use of light wood cabinetry and a soothing sage green accent wall creates a truly harmonious welcome. Clever vertical storage maximizes every inch, keeping bulky outerwear neatly hidden away in tall cabinets.
The design incorporates dedicated spots for all essential items, eliminating countertop clutter. Below the comfortable seating area, open cubbies provide easy access storage for daily footwear, making quick transitions simple. Above the bench, sturdy hooks are lit by concealed lighting, providing illumination and style while keeping coats handy.
A sleek, round mirror adds a touch of organic shape and gives you one last check before heading out the door. The low floating drawer near the mirror serves as a convenient drop zone for keys and wallets. This cohesive system proves that even small spaces can handle substantial organization without feeling cramped.
Materials Required List
- Plywood sheets (Maple veneer recommended)
- Wood screws and joining hardware
- Edge banding material
- Bench cushion foam and fabric
- Coat hooks (five to six metal hooks)
- LED strip lighting and power supply
- Round framed mirror
- Paint in a soft sage green color
Equipment Required List
- Miter saw or circular saw for cutting wood
- Drill and various drill bits
- Stud finder and level
- Sanding block or electric sander
- Iron for applying edge banding (if using heat activated banding)
- Clamps
- Tape measure
- Paintbrush and roller
- Screwdriver set
Step by Step DIY Instructions
Step 1: Plan and Prepare the Wall
Measure your entryway meticulously, sketching out where the tall cabinet, bench seating, and floating drawer will be positioned. Once measurements are confirmed, mark the accent wall area. Apply two coats of the sage green paint to this central area, allowing the first coat to dry completely before starting the second. Use the stud finder to locate and mark studs where the heavy cabinetry will be secured.
Step 2: Construct the Cabinet Boxes
Cut the plywood sheets into the necessary pieces for the tall storage cabinet, the overhead storage units, the shoe cubby base, and the floating drawer unit. Pre drill all holes for screws and connecting hardware. Assemble the boxes using wood glue and screws, ensuring all corners are square. Apply edge banding to all visible raw plywood edges for a refined look.
Step 3: Install the Main Units
Begin by securing the tall vertical cabinet to the wall, making sure it is anchored directly into the wall studs for maximum stability. Use a level throughout this process. Next, mount the overhead cabinets and the shoe cubby base. The shoe cubby base should be robustly built to support the weight of the bench cushion and people sitting on it.
Step 4: Create the Accent Wall Panel and Lighting
Cut a large piece of plywood or MDF to fit the recessed area behind the bench. Paint this panel the same sage green color. Before installing it, mount your coat hooks onto the panel, spacing them evenly. Mount this finished panel into the recessed area. Install the LED strip lighting underneath the upper cabinets, running the wiring neatly behind the panels or cabinets to conceal it.
Step 5: Finishing Touches
Install the floating drawer unit, again using wall anchors or securing it to studs if possible. Hang the round mirror above this unit. Finally, create or purchase the custom bench cushions and place them on the seating area. Slide storage bins into the open upper shelves.
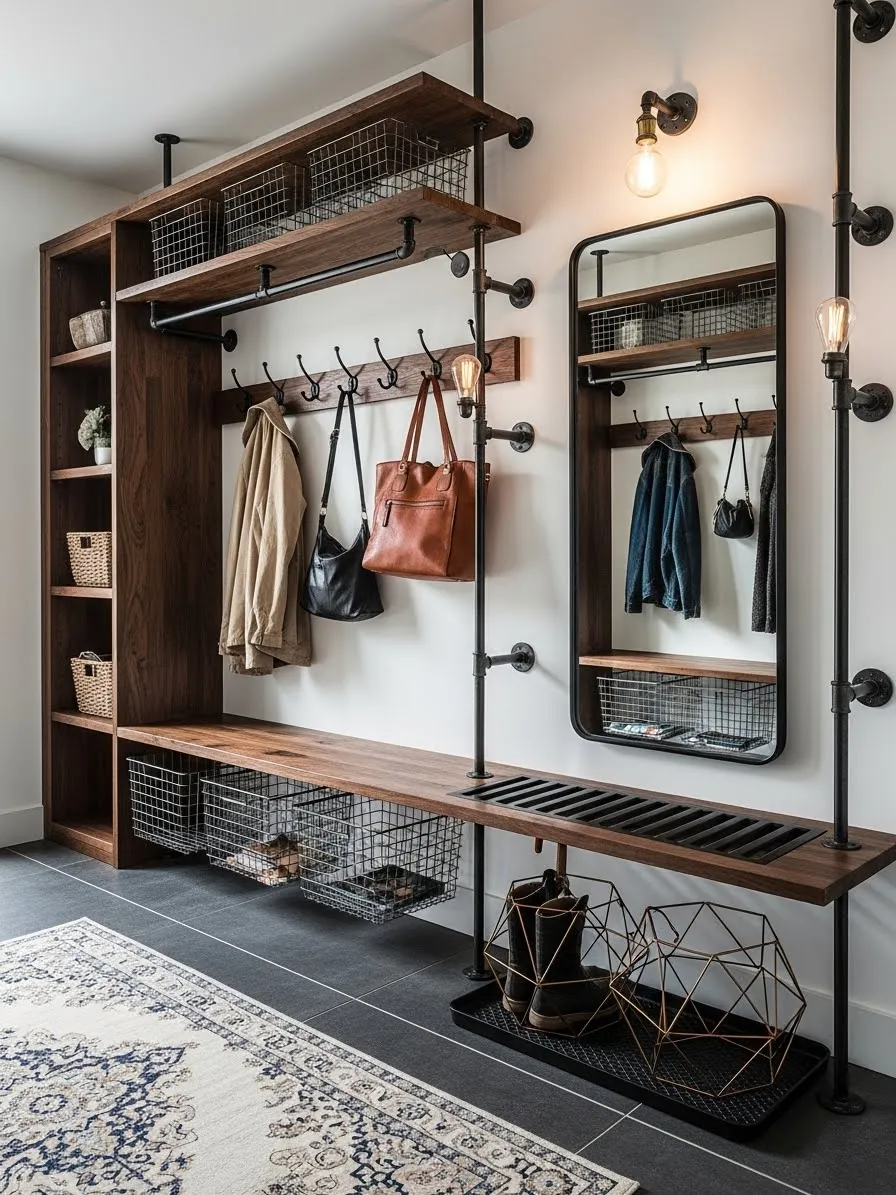
2. Industrial Pipe and Dark Wood Mudroom

This robust design brings an edgy, urban feel right into the home’s transition space. Rich, dark wood shelving contrasts beautifully with the stark white walls and the utilitarian aesthetic of the black metal piping. The industrial pipe framework supports the entire structure, creating an open, airy yet incredibly strong organization system.
Multiple storage zones address various clutter challenges. A built in slatted boot tray allows wet footwear to drain neatly, protecting the floor beneath. Open shelves on the left provide space for decorative touches alongside functional woven baskets.
Above the comfortable bench, a rack and multiple hooks offer ample hanging space for jackets and bags. Wire storage baskets on the upper shelves and beneath the bench keep accessories and shoes visible but contained. The inclusion of a large mirror ensures quick readiness checks, while exposed bulb sconces enhance the vintage, factory inspired atmosphere.
Materials Required List
- Dark stained wood planks (for shelving and bench)
- Black metal pipe and fittings (flanges, elbows, T junctions)
- Metal wire storage baskets (various sizes)
- Heavy duty coat hooks
- Pipe for the hanging garment rod
- Slatted metal or wood grate for the shoe drain area
- Wall sconces with exposed bulbs
Equipment Required List
- Pipe wrench for tightening fittings
- Drill and long screws
- Level and tape measure
- Stud finder
- Wood saw (if not pre cutting wood)
- Screwdriver
- Safety glasses and gloves
Step by Step DIY Instructions
Step 1: Map the Layout and Assemble the Framework
Carefully measure the wall area and plan the placement of the vertical pipe supports, ensuring they align with wall studs where possible for maximum load bearing. Attach the pipe flanges to the wall using heavy duty screws and a level. Begin assembling the vertical pipe segments, securing them to the flanges and connecting them with T junctions where shelves will rest.
Step 2: Install the Wood Shelving
Cut the dark wood planks to the required lengths for the bench, upper shelves, and side shelves. Place the shelves onto the pipe structure. Where the bench meets the wall, secure it with L brackets or additional flanges underneath for extra support. For the slatted shoe area, create a framed opening in the bench and drop the metal or wood grate into place.
Step 3: Add Hanging Storage and Accessories
Mount the central wood plank for the coat hooks securely to the wall. Attach the heavy duty coat hooks to this plank, spacing them evenly. Install the metal garment rod underneath the top shelf using pipe fittings designed for hanging rods.
Step 4: Mount the Mirror and Lighting
Secure the large framed mirror directly to the wall at a comfortable viewing height. Install the wall sconces next to the mirror and shelving unit, connecting them safely to the electrical wiring. Always consult an electrician or ensure power is turned off before handling electrical components.
Step 5: Organize and Finish
Place the wire baskets on the shelves and underneath the bench for shoes and smaller items. Finally, step back and admire your sturdy, new organizational hub.
3. Coastal Farmhouse Shiplap Entry Bench

This breezy, bright entryway immediately communicates a sense of relaxed comfort. The white shiplap style wall treatment provides striking texture and a casual, coastal feel, serving as the stunning backdrop for organization. A light, distressed wooden bench offers essential seating for putting on or taking off shoes.
Above the hooks, built in cubbies deliver crucial vertical storage, transforming unused wall space into a tidy holding area. The upper area uses woven baskets and neatly stacked linens to maintain an organized appearance while adding warmth. The use of natural materials, such as the chunky rope wrapped mirror and woven floor mat, enhances the organic atmosphere.
Under the bench, large woven containers slide in and out, swallowing shoes and miscellaneous clutter out of sight. A colorful, abstract painting adds a pop of vibrant color, keeping the overall look fresh and inviting. This design balances open hanging storage with discreet container storage, proving highly functional for a busy family.
Materials Required List
- Thin MDF strips or shiplap panels (for the wall treatment)
- Light colored wood planks (for the bench construction)
- Wood screws and nails
- White paint and primer
- Heavy duty single coat hooks (six to eight hooks)
- Woven storage baskets (for cubbies and under the bench)
- Large round mirror with a natural rope frame
Equipment Required List
- Nail gun or hammer
- Level and stud finder
- Miter saw or circular saw
- Paint roller and brushes
- Drill and screwdriver
- Tape measure and pencil
Step by Step DIY Instructions
Step 1: Build and Install the Upper Cubbies
Cut the wood planks for the cubby unit, assembling a long, rectangular box with internal dividers. Secure the frame using wood glue and screws. Prime and paint the entire cubby unit white, allowing it to dry thoroughly. Find the wall studs and securely mount the finished cubby unit high on the wall, using long screws that anchor directly into the studs.
Step 2: Install the Wall Treatment
Begin installing the shiplap or MDF strips onto the wall beneath the cubbies. Start at the top, using a level to ensure the first strip is straight. Continue downwards, ensuring the spacing between the strips is consistent. Use a finish nailer for a clean installation. Paint the entire wall treatment white once installed.
Step 3: Construct and Place the Bench
Cut the wood planks for the bench seat and the supporting legs/dividers. The bench should be constructed to allow clearance for the large woven baskets to slide underneath. Assemble the bench robustly and paint or lightly white wash the wood to achieve the distressed look. Place the bench snugly against the finished wall. It does not need to be secured to the wall if it is resting on the floor and against the baseboard.
Step 4: Mount Hooks and Decor
Measure and mark the placement for the coat hooks. Attach the heavy duty single hooks directly into the shiplap wall, ensuring they hit studs where possible, or use appropriate wall anchors for stability. Hang the rope framed mirror centrally between the hooks.
Step 5: Final Organization
Place the smaller woven baskets into the upper cubbies. Slide the large woven storage containers into the space beneath the bench. Hang the artwork to complete the farmhouse aesthetic.
4. Cascading Modular Storage Cubes

This light wood, stackable unit offers a refreshingly versatile approach to entryway organization. Its stepped, staggered configuration naturally draws the eye, transforming storage into a visual feature. The open cube design keeps items readily accessible while promoting airy simplicity.
Different sized baskets and containers slide into the open cubbies, hiding various items from shoes to gloves. Using a mix of woven straw and plain canvas bins adds pleasing textural variety. Some cubbies are reserved for displaying small pieces of art, colorful pottery, and lively houseplants, making the space feel personal and inviting.
A simple wooden rail with metal hooks is mounted separately on the wall, providing essential space for jackets and scarves. This method demonstrates how readily available storage boxes can be combined to create a unique, built in appearance without complex installation.
Materials Required List
- Square or rectangular wooden cube modules (pre fabricated or custom made)
- Heavy duty wood glue
- Small L brackets (optional, for securing modules)
- Wall anchors and screws (for securing the unit to the wall)
- Solid wood plank (for the coat rack)
- Metal coat hooks (five to six hooks)
Equipment Required List
- Level and measuring tape
- Drill and various drill bits
- Screwdriver
- Clamps (if gluing modules together)
Step by Step DIY Instructions
Step 1: Plan the Stacked Configuration
Decide on the exact stepped layout you want. Start by placing the bottom layer of cube modules directly onto the floor, using a level to ensure they are straight and aligned. Determine which cubes will require glue or brackets to stabilize the structure.
Step 2: Assemble the Base and Middle Layers
Apply wood glue between the modules where their sides touch, starting with the base layer. Clamp them together while the glue sets. For added security, discreetly place small L brackets inside the top corners of the bottom modules and attach the next layer of cubes to them. Continue stacking, ensuring the structure remains stable and level as you build upwards.
Step 3: Secure the Structure to the Wall
Once the glue is dry and the cubes are assembled, anchor the upper modules to the wall using heavy duty screws and wall anchors. This step is crucial for safety and stability, especially for cubes that stand higher than two feet off the ground.
Step 4: Install the Coat Rack
Cut a simple wood plank for the coat rack. Mark and pre drill the spots for the coat hooks and secure them to the plank. Mount the finished coat rack horizontally on the wall next to the cube unit, ensuring it is anchored securely into studs.
Step 5: Organize and Decorate
Place your chosen baskets into the designated cubbies. Fill the remaining open shelves with decorative items, plants, and smaller containers for a stylish, personalized finish.
5. Sleek Multifunctional Command Tower

This modern, custom designed unit provides total entryway organization in one striking vertical structure. Utilizing a refreshing mix of light wood, warm gray, and bold pops of sunny yellow, the tower maximizes storage capacity without sacrificing contemporary style. Its narrow profile is a clever solution for tight corridors.
The design incorporates a full length mirror, allowing for quick outfit checks before leaving the home. A built in bench with a brightly colored, comfortable cushion offers a designated resting spot. Below the seat, a deep drawer conceals items.
One side features vertical cubbies, specially shaped to hold tall objects like umbrellas and long handled brushes. The central section uses a textured pegboard back panel, allowing hooks, notes, and small shelves to be arranged and rearranged easily. The entire system is built to handle the daily demands of a busy household efficiently.
Materials Required List
- Plywood or MDF boards (various thicknesses for structure)
- Laminates or paint in white, gray, and bright yellow
- Bench cushion foam and vinyl or fabric covering
- Pegboard panel
- Assorted pegboard hooks and small accessories
- Door hardware and drawer slides
- Full length mirror (with simple frame)
- Garment hanging rod and brackets
Equipment Required List
- Table saw or panel saw
- Drill and router
- Brad nailer or finish nailer
- Hinges and drawer slides installation jigs
- Staple gun (for cushion upholstery)
- Level and tape measure
Step by Step DIY Instructions
Step 1: Construct the Outer Cabinet Boxes
Cut the structural wood (plywood/MDF) to create the three main vertical sections: the side cubby unit, the central bench/hanging unit, and the mirror side panel. Assemble the boxes using screws and wood glue. Apply the chosen laminates or paint to the exterior surfaces, ensuring the wood accents remain exposed where needed.
Step 2: Build the Internal Features
Install the internal shelving for the side cubby unit. Construct the deep drawer box for the bench base and install the drawer slides into the appropriate opening. Cut the pegboard to size and install it as the back panel for the central section using small spacers to keep it off the wall.
Step 3: Assemble and Finish the Central Unit
Install the bright yellow seat cushion foam onto the bench base using glue and cover it with the chosen fabric, securing the fabric underneath with a staple gun. Attach the hanging rod brackets and the rod itself. Secure the full length mirror onto the side panel.
Step 4: Combine the Units and Place
Stand the three assembled sections upright and secure them together using internal screws. Since this is a tall, heavy structure, secure the entire combined unit to the wall using anchors or screws driven into wall studs to prevent tipping.
Step 5: Accessorize
Place the specialized pegboard hooks and shelves onto the pegboard. Add a rubber floor mat for wet items and a standalone umbrella stand next to the unit.
6. Opulent Dark Wood Wardrobe

This custom built, floor to ceiling storage system showcases a dramatic blend of high function and high style. The deep, inky black cabinetry features vertical reeding, adding subtle texture and visual interest to the expansive surfaces. Bold, elongated brass handles provide a striking contrast against the dark wood.
This is not just storage; it is a concealed command center. The cabinets open to reveal hidden organization, including a dedicated charging station drawer for phones and devices, eliminating cord clutter. Another secret compartment with a push latch is reserved for securing valuable items.
The luxurious feel is enhanced by the surrounding elements: a plush, emerald green velvet bench with a gold frame and a grand, rectangular mirror. This sophisticated entryway proves that utility does not need to compromise on glamour or upscale appeal, offering vast, tidy storage behind closed doors.
Materials Required List
- MDF or solid wood panels (for cabinetry structure)
- Reeded trim or panels (for door fronts)
- Black high gloss or matte paint
- Brass handles (long bar pulls)
- Hinges and magnetic catches
- Soft close drawer slides
- Drawer organizing inserts (including one with a cutout for charging cords)
- Push latch mechanism (for the secret compartment)
Equipment Required List
- Table saw or miter saw
- Router (to create dadoes for shelves)
- Drill and drill bits (for hardware)
- Screwdriver
- Paint sprayer or high quality paint brushes and foam rollers
- Clamps
Step 1: Construct the Cabinet Boxes**
Cut the wood panels to create multiple tall cabinet box frames. Ensure each box is sized to fit together seamlessly when installed. Assemble the boxes using wood glue and screws. Create the interior shelving and drawer openings as needed, especially the specific sections for the charging station and secret vault.
Step 2: Build and Detail the Doors and Drawers
Cut the cabinet doors and drawer fronts. Apply the reeded trim or panels to the door faces using glue and small brad nails for a decorative look. Construct the drawer boxes and install the soft close drawer slides into the appropriate openings. Paint all exterior and visible interior parts of the cabinet black, applying several thin, even coats for a smooth finish.
Step 3: Install Hardware and Internal Features
Attach the handles to the drawer fronts and doors. Install the hinges onto the doors. Install the specialized push latch mechanism for the secret compartment door. Create the charging drawer insert by cutting a notch or hole in the back to thread power cords through.
Step 4: Installation and Final Securing
Move the assembled cabinet boxes into the entryway. Anchor each vertical unit to the wall and to each other using long screws, ensuring they are securely fastened to wall studs. This large piece must be secured to the wall to prevent tipping.
Step 5: Accessorize the Space
Place the velvet bench and hang the large mirror adjacent to the cabinetry, continuing the dramatic, upscale theme.
7. Mid Century Modern Credenza

This inviting entryway uses a classic credenza as its primary organization station, providing a warm, retro aesthetic. The rich, warm toned wood, combined with the signature tapered legs, defines the popular mid century style. This piece offers both enclosed storage behind sleek cabinet doors and open shelf space in the center.
The central open shelf is helpful for quickly dropping off keys or small accessories. Beneath the main unit, a row of simple black wooden crates provides additional hidden shoe storage, keeping the floor area tidy. The adjacent small seating area includes a simple cushion, creating a useful spot for quick stops.
Above the unit, a narrow wooden coat rack with polished brass hooks provides essential hanging space. The composition is balanced by colorful, geometric artwork and a sculptural table lamp, proving that furniture designed for living areas can easily be repurposed for effective entryway use.
Materials Required List
- Medium to dark stained wood panels (for the credenza body)
- Tapered wooden legs with mounting plates
- Door hinges and simple drawer slides
- Solid wood plank (for the coat rack)
- Brass coat hooks
- Rectangular framed mirror
- Wood glue and screws
- Black wooden crates (pre fabricated or custom made)
Equipment Required List
- Table saw or circular saw
- Drill and various drill bits
- Screwdriver
- Level and tape measure
- Clamps
Step by Step DIY Instructions
Step 1: Build the Credenza Body
Cut the wood panels to size for the top, bottom, and side panels of the credenza. Assemble the main box structure using wood glue and screws. Create internal dividers for the cabinet compartments and the central drawer/shelf opening. Install the drawer slides and hinges.
Step 2: Apply Doors, Drawer, and Legs
Attach the cabinet doors and drawer front, ensuring they open and close smoothly. Secure the tapered wooden legs to the bottom of the credenza using leg mounting plates, ensuring the legs are stable and evenly spaced.
Step 3: Create and Install the Coat Rack
Cut the solid wood plank for the coat rack. Affix the brass hooks to the plank, spacing them appropriately. Mount the finished coat rack horizontally on the wall above the credenza, anchoring it securely into wall studs.
Step 4: Configure the Seating Nook
Place a small bench or build a simple, low box structure for the seating area next to the credenza. Add a cushion for comfort. This area can also serve as low level storage.
Step 5: Final Touches and Organization
Position the black wooden crates neatly beneath the credenza for shoe storage. Hang the mirror and artwork. Style the top of the credenza with the lamp, vase, and any personal items.
8. High Tech Digital Command Hub

This cutting edge entryway cabinet transforms the mundane act of leaving and arriving into a streamlined, automated experience. The sleek, monochromatic structure, framed in crisp white, houses an array of smart features. Integrated ambient lighting strips add a futuristic glow to the recess.
A central touchscreen panel displays essential information, such as the weather forecast and calendar reminders, minimizing the chance of forgetting necessary items. Below the screen, dedicated cutouts offer convenient spots for keys and accessories. The suspended, dark gray desk area provides a station for quick tasks.
The surface of the desk features wireless charging capabilities, keeping phones and laptops powered up and ready for the next outing. This highly focused unit eliminates visible clutter, demonstrating that technology can be expertly integrated into home organization for ultimate efficiency.
Materials Required List
- MDF or Plywood (for the main cabinet frame)
- High gloss white and matte black laminate or paint
- Integrated LED strip lighting and power supply
- Wall mounted touch screen display and hardware
- Wireless charging pad module
- Custom wood or plastic tray inserts
- Wire grommets and power strips
Equipment Required List
- Table saw or circular saw
- Router (to create neat edges and cable channels)
- Drill and various drill bits
- Screwdriver
- Electronic wiring tools (or consult an electrician)
- Level and tape measure
Step by Step DIY Instructions
Step 1: Construct the Outer Shell
Cut and assemble the main vertical box frame using the MDF or plywood. This structure serves as the white exterior shell. Ensure the frame is square and stable. Apply the white finish to all exterior surfaces.
Step 2: Build and Install the Interior Cubby
Construct the smaller, inset black cubby unit. This contains the floating desk surface, the screen mounting area, and the side panels. Before securing it, cut the necessary holes for the touchscreen mounting, cable management, and the key hooks. Apply the matte black finish to this inner unit. Securely fasten the inner black cubby unit inside the white outer shell.
Step 3: Integrate the Technology and Lighting
Install the touch screen display into its cutout, managing the wires neatly behind the panel. Install the wireless charging pad into the surface of the floating desk. Run the power cords for the screen, charging pad, and any internal power strips through the cable channels. Install the LED strip lighting along the top and sides of the white frame recess and connect it to a power source.
Step 4: Mount the Structure
Since this is a heavy, freestanding unit, secure the entire structure to the back wall using anchors or screws into wall studs for stability.
Step 5: Finish the Details
Install the small accessory hooks below the screen. Place a piece of framed artwork in the remaining open area to soften the technological appearance.
9. Traditional Farmhouse Locker Bench

This expansive entryway system offers family friendly organization with a rustic farmhouse charm. Light oak wood is utilized for both the upper cubbies and the substantial storage bench below, providing warmth and durability. The backdrop features classic beadboard paneling in a soft gray, framed by white shiplap walls.
The upper unit consists of individual cubbies, each ready to house a wire basket labeled for a different family member or category. This personalized approach makes it simple for everyone to keep track of their gear. Below, a long row of mesh wire baskets sits in open cubbies, allowing air circulation for shoes and eliminating clutter.
The long wooden bench features a lift up lid, providing even more concealed storage for out of season items or sports equipment. The contrast of the natural wood tones against the white and gray walls creates a timeless, tidy look.
Materials Required List
- Light oak wood panels (for bench and cubbies)
- Beadboard paneling
- Wood trim (for framing the cubbies)
- White and light gray paint
- Hooks (five to six black metal hooks)
- Mesh wire storage baskets with label tags
Equipment Required List
- Miter saw
- Drill and screws
- Brad nailer or finish nailer
- Level and stud finder
- Sandpaper
- Paint brushes and rollers
- Bench lid hinges
Step by Step DIY Instructions
Step 1: Install the Wall Treatment
Measure the area where the bench and cubbies will be placed. Install the beadboard paneling vertically up to the desired height (just above the hooks). Frame the beadboard section with simple wood trim. Paint the beadboard area light gray, and ensure the surrounding walls are painted white.
Step 2: Build the Bench Base
Cut and assemble the sturdy bench box, ensuring the front is divided into cubby openings for the wire baskets. Construct the lift up lid section and attach it using strong hinges, making sure it opens smoothly. Apply the stain or clear finish to the oak bench. Securely position the bench against the beadboard wall.
Step 3: Construct and Mount the Cubby Shelf
Cut and assemble the upper cubby unit, installing vertical dividers to create the four or five open sections. Apply the stain or finish to match the bench. Mount the cubby unit to the wall directly above the beadboard, ensuring it is anchored into wall studs.
Step 4: Install the Hooks
Measure the space between the bench and the cubbies. Attach the black metal hooks directly to the beadboard paneling, spacing them evenly. Use heavy duty screws for maximum weight bearing capacity.
Step 5: Accessorize
Place the wire mesh baskets into the bench cubbies and the smaller baskets into the upper shelves. Label each basket clearly. Hang a large decorative sign above the cubbies to complete the farmhouse aesthetic.
10. Vibrant Playful Floating Storage

This joyful, colorful entryway is a celebration of utility and cheerfulness, especially well suited for families with children. The foundation is a crisp white wall, allowing the vibrant pops of color from the storage elements to truly shine. The open concept relies on floating shelves and baskets to maximize vertical space.
The wall features glass shelving interspersed with playful, brightly colored wooden shelves (hot pink, lime green, turquoise, and orange). This creates ample room for displaying small treasures, pictures, and quick grab accessories. Small, brightly colored hooks are mounted directly beneath the shelves for keys and light items.
A white bench with a bold turquoise cushion provides a comfortable seating spot. Below the bench, organized cubbies hold baskets in matching neon colors, easily hiding toys, shoes, and gear. This design keeps essential items at eye level and readily accessible, encouraging tidiness through sheer visual appeal.
Materials Required List
- Tempered glass shelves and mounting hardware
- Wood planks (for the colorful shelves and bench)
- Spray paint or paint in bright neon colors (pink, green, blue, orange)
- Small plastic or metal hooks (key hooks)
- Bench cushion foam and turquoise fabric
- Colorful storage baskets (pink, green, blue)
Equipment Required List
- Drill and screwdriver
- Level and tape measure
- Stud finder
- Safety glasses (especially when drilling near glass)
- Sandpaper
- Staple gun (for cushion upholstery)
Step by Step DIY Instructions
Step 1: Paint the Colorful Shelves
Cut the wooden shelves to the desired lengths. Sand them smooth. Prime them, then apply two coats of the vibrant, neon colored paint (pink, orange, etc.), allowing each coat to dry completely.
Step 2: Install the Floating Shelves
Determine the placement of the shelves, alternating between the glass and wooden units for balance. Install the mounting hardware for the glass shelves first. Anchor the hardware securely to the wall. Next, mount the colorful wooden shelves, ensuring they are level.
Step 3: Install the Hooks
Measure and mark the placement for the small, colored hooks directly beneath the wooden shelves. Secure the hooks using appropriate small screws or adhesive.
Step 4: Construct the Bench
Cut and assemble the simple bench structure from white painted wood, ensuring it has open cubbies beneath for the baskets. Construct the seat cushion and cover it in the turquoise fabric using a staple gun. Place the bench against the wall.
Step 5: Final Placement
Slide the brightly colored storage baskets into the bench cubbies. Arrange framed photos, vases, and small decorative items on the upper shelves, ensuring they are balanced across the colorful scheme.
11. Traditional Revolving Shoe Wardrobe

This luxurious entryway demonstrates that massive storage can be achieved with sophisticated elegance. The design features tall, custom cabinetry painted in a soft, stately gray with classic paneling and trim. This looks like a beautiful armoire but conceals an incredible organizational secret.
The centerpiece is a full height cabinet that opens to reveal a rotating shoe rack system. The revolving mechanism allows owners to store dozens of pairs of shoes neatly on stacked trays, making access surprisingly simple and keeping footwear entirely out of sight.
The surrounding elements maintain the upscale atmosphere, including a substantial bench with drawers and a plush, emerald green cushion. A magnificent, ornate gold framed mirror adds a touch of regal glamour to the space. Subtle wall hooks are included for light coats, completing this highly functional and beautiful ensemble.
Materials Required List
- Plywood or MDF panels (for wardrobe structure)
- Custom trim and molding (for paneling details)
- Soft gray paint and primer
- Revolving shoe rack hardware (central spindle, adjustable tiers)
- Bench seat wood panels and drawer slides
- Drawer pulls (knobs or small handles)
- Heavy duty hinges (for the tall door)
Equipment Required List
- Table saw or miter saw
- Router (to create paneling details)
- Drill and various bits
- Screwdriver
- Level and stud finder
- Specialized tools for the revolving mechanism installation
Step by Step DIY Instructions
Step 1: Construct the Tall Wardrobe Frame
Cut and assemble the tall cabinet box where the revolving rack will sit. Ensure the dimensions accommodate the vertical spindle and the circular trays. Reinforce the top and bottom plates to support the rotational hardware. Apply the soft gray paint and install the decorative paneling/molding onto the exterior of the cabinet.
Step 2: Install the Revolving Mechanism
Follow the manufacturer instructions precisely to install the revolving shoe rack system. This typically involves securing the central spindle at the base and top of the cabinet and attaching the tiered shoe trays to the spindle. Test the mechanism to ensure it rotates smoothly and silently.
Step 3: Build the Bench Unit
Cut and assemble the low bench unit, including the frame for the storage drawers beneath the seat. Install the drawer slides. Construct the drawer boxes and attach the fronts and pulls. Apply the matching gray paint and molding details. Secure the bench cushion on top.
Step 4: Install and Finalize
Install the heavy duty hinges and hang the tall cabinet door onto the wardrobe frame. Anchor both the wardrobe and the bench securely to the wall studs to prevent movement.
Step 5: Decorate
Hang the ornate gold framed mirror above the bench. Place an umbrella stand nearby and install simple wall hooks for coats.
12. Zen Inspired Tatami Entryway

This design offers a peaceful, beautifully illuminated transition space inspired by traditional Japanese aesthetics. The use of light bamboo or maple wood throughout creates an immediately calming atmosphere. The functional design seamlessly blends storage with thoughtful display areas.
The lower section features low bench seating with open cubbies, specifically designed for footwear and storage baskets. A tatami style mat covers the floor, naturally signaling a shift in atmosphere and providing a clean zone. The use of river stones or dark gravel around the mat adds a grounding, natural texture.
Above the benches, a custom arrangement of floating wooden boxes and shelves provides display space for art and natural elements like moss balls. Concealed LED strip lighting is integrated into the shelves, casting a warm glow that highlights the contents and creates a dramatic effect in the evening. This organized space emphasizes simplicity and tranquility.
Materials Required List
- Light bamboo or maple wood panels (for benches and shelves)
- Tatami mat
- Smooth river stones or dark gravel
- LED strip lighting and power supply
- Small round mirror
- Natural fiber storage baskets (four to six)
- Small wooden coat rack
Equipment Required List
- Miter saw or table saw
- Drill and screws
- Stud finder and level
- Wood glue
- Lighting wire connectors
Step by Step DIY Instructions
Step 1: Construct the Bench Cubbies
Cut and assemble the low bench units, creating the open cubbies for shoe storage and baskets. Use wood glue and screws for strong assembly. Apply a clear sealant or light finish to the wood.
Step 2: Prepare the Floor Area
Define the perimeter where the tatami mat will sit. Lay down a thin barrier (like landscape fabric) to contain the stones. Pour the river stones or gravel into the border area, ensuring the center space remains level for the mat. Place the tatami mat in the center.
Step 3: Construct the Floating Shelves
Cut and assemble the wooden floating box shelves. Before securing them to the wall, plan the route for the LED lighting strips. Route the wires discreetly through channels or holes drilled in the back of the shelves.
Step 4: Install Shelves and Lighting
Securely mount the floating shelves to the wall, anchoring them into studs. Install the LED strip lighting into the underside or back lip of the shelves so the light is directed down or forward. Connect the lighting to the power source.
Step 5: Final Touches
Mount the small wooden coat rack and the round mirror. Place the woven baskets into the bench cubbies. Arrange decorative items like vases, candles, and plants on the illuminated shelves for a peaceful welcome.
13. High Performance Adventure Gear Wall

This specialized entryway is clearly designed for active, outdoor lifestyles, transforming clutter into an organized display of readiness. The charcoal gray slatted wall panels are crucial, providing endless flexibility for hook placement to accommodate large, awkward items like skis and climbing ropes. The bold “WET ZONE” markers clearly define the functional space.
Open shelving, crafted from warm wood, contrasts nicely with the dark gray and offers storage for small bins and necessary supplies. Heavy duty hooks hang tools and protective gear, keeping them accessible yet tidy. Large, clear plastic bins with labels sit on a simple wooden bench, ensuring seasonal items are protected and easy to identify.
A metal rolling cart adds valuable mobile storage, useful for bringing gear in and out of the space. The inclusion of decorative maps and nature photography prevents the space from feeling purely utilitarian. This system proves highly effective for maximizing storage in a compact area.
Materials Required List
- Slatwall panels (or grooved panels) and mounting hardware
- Dark gray paint or finish
- Wood planks (for shelves and bench)
- Heavy duty single and double hooks (assorted sizes)
- Large, clear plastic storage bins with lids
- Metal utility cart on wheels
- Rubber mats (for the wet zone)
Equipment Required List
- Drill and screws
- Stud finder and level
- Circular saw or table saw
- Measuring tape
- Paint roller and brush
Step by Step DIY Instructions
Step 1: Prepare and Install the Slatwall
Measure the walls and cut the slatted panels to fit the area. Paint the panels a dark gray color. Securely mount the panels to the wall, making sure they are anchored into wall studs where possible for maximum load bearing.
Step 2: Build and Mount the Shelving and Bench
Cut the wood planks for the floating shelves and the low bench structure. Apply a sealant to protect the wood. Mount the floating shelves to the slatwall using compatible brackets, arranging them for balance. Assemble the simple bench structure and place it firmly on the floor.
Step 3: Organize the Hooks and Accessories
Determine the location for different types of gear (skis, ropes, bags). Insert the appropriate hooks into the slatwall grooves and test their stability. Organize small accessories and maps onto the main wall.
Step 4: Configure Mobile and Bench Storage
Place the metal utility cart in a convenient spot. Fill the large, clear plastic bins with labeled items and place them on or near the bench. Lay down the heavy rubber mats in the designated wet zone for easy cleaning.
14. Bohemian Textured Sanctuary

This entryway immediately offers a warm, globally inspired welcome, rich with texture and vibrant color. The organization relies on open shelving and unique, decorative hooks that double as visual art. A simple, light toned wooden bench grounds the space.
A large, woven textile hangs on the wall, serving as a striking backdrop for smaller, artistic hooks and hanging baskets. The woven macramé mirror, accented with tassels, is a standout piece that enhances the handcrafted aesthetic. The top shelf displays an array of pottery, plants, and natural artifacts.
Under the bench, large, round leather poufs provide soft extra seating and a cozy, informal feel. Additionally, a woven basket offers simple, concealed storage. This setup prioritizes beauty and personality while still offering dedicated spots for hanging bags and accessories.
Materials Required List
- Simple, light wood plank (for the bench)
- Wood plank (for the upper floating shelf)
- Assorted decorative hooks (wood or brass)
- Large woven textile or rug (for the wall)
- Leather poufs and woven baskets
- Macramé or woven mirror
- Various plants and terracotta pots
Equipment Required List
- Drill and screws
- Stud finder
- Level
- Sandpaper (for bench/shelf)
Step by Step DIY Instructions
Step 1: Install the Bench
Cut and assemble the simple wooden bench. Sand it smooth and apply a clear, natural finish. Position the bench against the wall.
Step 2: Hang the Wall Textile
Find the wall studs where the shelf and textile will be located. Hang the large, colorful woven textile centrally above the bench, ensuring it is straight and secure.
Step 3: Mount the Shelf and Hooks
Install the floating wood shelf high above the textile backdrop, using strong mounting brackets secured into wall studs. Next, install the collection of decorative hooks directly onto the wall (some may overlap the textile), arranging them artistically for visual interest. Ensure the hooks are sturdy enough to hold bags.
Step 4: Decorate and Accessorize
Hang the macramé mirror near the hooks. Arrange the collection of plants, vases, and pottery on the floating shelf. Place the leather poufs and large woven baskets beneath the bench for a layered, textured finish.
15. Minimalist Floating Acrylic Storage

This clean, contemporary entryway uses transparent materials to create an illusion of lightness and space. The structure is composed of thick, clear acrylic shelving, which appears to float against the soft blue gray wall. This method maximizes vertical organization while keeping the visual impact minimal.
Integrated LED strip lighting runs along the bottom of each shelf, providing bright task lighting and highlighting the stored items. The shelving system includes built in hooks and wire baskets, offering dedicated spots for hanging coats, scarves, and holding small accessories. This design proves that organization can be sleek and virtually invisible.
Below the main unit, a floating white bench with an acrylic base maintains the airy aesthetic. Wire storage baskets beneath the bench continue the light, open feel, providing easily viewable space for shoes and larger items. A sunburst mirror adds a decorative touch that complements the sharp, modern lines.
Materials Required List
- Thick acrylic sheets (for shelves and bench legs)
- White wood or MDF (for the floating shelf/drawer and bench top)
- LED strip lighting and power supply
- Stainless steel coat hooks
- Chrome or silver wire storage baskets
- Acrylic adhesive or strong bolts
Equipment Required List
- Specialized tools for working with acrylic (cutting, polishing)
- Drill and appropriate fasteners for acrylic/wall mounting
- Level and stud finder
- Lighting wire connectors
Step by Step DIY Instructions
Step 1: Construct the Acrylic Shelving
Cut and polish the acrylic sheets for the vertical supports and horizontal shelves. Use a strong acrylic adhesive to join the pieces into the tiered shelving unit. Allow sufficient time for the adhesive to cure completely.
Step 2: Integrate Lighting and Hooks
Install the LED strip lighting along the underside of the main shelves, concealing the wiring neatly within the structure or wall. Pre drill and attach the stainless steel coat hooks to the underside of the appropriate shelves.
Step 3: Install the Floating Bench and Shelf
Mount the white wood floating shelf/drawer unit securely to the wall using hidden brackets. This unit will support the main acrylic shelving structure. Next, construct the bench: create the white cushioned top and attach the clear acrylic legs. Place the bench on the floor.
Step 4: Mount the Main Unit
Carefully secure the large acrylic shelving unit onto the floating white shelf, also anchoring the top and sides of the acrylic structure into the wall studs for maximum stability.
Step 5: Accessorize
Place the wire baskets under the bench. Hang the decorative sunburst mirror adjacent to the shelving unit, ensuring it reflects the light and enhances the airy feeling.
16. Ultra Minimalist Floating Bench

This stark, concrete toned entryway champions the less is more philosophy, focusing on strong architectural lines and texture. The centerpiece is a substantial, cantilevered bench that appears to float effortlessly from the textured gray wall. This design offers essential seating and a clear visual foundation.
The storage is kept intentionally spare to avoid visual clutter. Above the bench, two thick, dark wood shelves provide a deep contrast against the pale wall. A simple wood plank with large black hooks is mounted below the lower shelf, offering functional hanging space without distraction.
The look is grounded by a large, full length mirror that leans against the wall, reflecting the light and amplifying the sense of space. The only visible items are a few sculptural vases and a pair of leather boots, demonstrating how edited organization can create a sense of dramatic calm.
Materials Required List
- Thick plywood or MDF (for the floating bench structure)
- Concrete finish veneer or specialized paint/plaster
- Dark stained wood planks (for the floating shelves)
- Wood plank (for the coat hook rail)
- Black metal hooks
- Large full length framed mirror
Equipment Required List
- Heavy duty structural support brackets (cantilever style)
- Drill, long lag screws, and stud finder
- Level and tape measure
- Concrete finishing trowel or specialty paint applicators
- Circular saw
Step by Step DIY Instructions
Step 1: Build and Secure the Floating Bench Frame
Construct a sturdy, internal frame for the floating bench using heavy plywood. This frame must be anchored directly into multiple wall studs using long, heavy duty lag screws and structural brackets. This is the most crucial step for stability.
Step 2: Apply the Finish
Wrap the external faces of the installed frame with plywood or MDF. Apply the concrete finish (specialized plaster or paint) evenly over the entire bench surface, creating a seamless, textured look. Allow to dry and cure according to product instructions.
Step 3: Install the Floating Shelves
Cut and stain the dark wood planks for the shelves. Install hidden floating shelf brackets into the wall above the bench. Mount the stained wood shelves onto the brackets.
Step 4: Mount the Coat Hook Rail
Cut the wood plank for the hook rail and stain it to match the shelves. Attach the black metal hooks to the rail. Mount the finished rail directly below the lowest shelf, securing it into wall studs.
Step 5: Final Placement
Lean the large, full length mirror against the wall adjacent to the bench. Place a textured rug on the floor. Maintain the minimalist look by using the shelves for only a few simple, well chosen decorative objects.
17. Multi Colored Industrial Lockers

This highly personalized entryway uses rows of tall metal lockers to deliver family friendly, heavy duty storage with a playful schoolhouse flair. The lockers are painted in a mix of deep navy, olive green, and cream, creating visual interest. The use of large, bold numbers on each locker aids in personal assignment and organization.
A continuous wooden bench runs along the front of the lockers, offering a warm contrast to the metal and providing essential seating. Beneath the bench, open cubbies are used for shoe storage, with large numbers on pull out dividers further defining each person’s territory.
The front of the doors features small chalkboard squares, allowing for quick notes, reminders, or messages. Heavy duty industrial sconces above the lockers cast a utilitarian light. This setup is incredibly durable and capable of swallowing vast amounts of seasonal clothing, sports equipment, and miscellaneous gear.
Materials Required List
- Metal lockers (assorted sizes/colors or uniform size for custom painting)
- Custom paint in navy, olive green, and cream
- Wood plank (for the bench top)
- Large numbers (stencils or vinyl decals)
- Small chalkboard panels and adhesive
- Industrial metal wall sconces
Equipment Required List
- Drill and screws
- Level and tape measure
- Paint sprayer (optional, for even locker coating)
- Wood saw (for bench)
- Pipe wrench (if sconces require pipe mounting)
Step by Step DIY Instructions
Step 1: Prepare and Install the Lockers
If needed, sand and custom paint the metal lockers. Once dry, position the lockers side by side. Securely attach the lockers to the back wall and to each other for stability, using screws driven into wall studs.
Step 2: Install the Bench
Cut the wood plank to the correct length for the bench top. Apply a protective finish. Secure the bench top across the front of the locker bases, creating a seamless, sturdy seating area.
Step 3: Organize Under Bench Storage
Create simple vertical dividers for the shoe storage cubbies beneath the bench. Attach large, numbered signs to the front of these dividers, assigning a space for each family member’s footwear.
Step 4: Add Lighting and Personalization
Install the industrial wall sconces above the lockers, connecting them safely to the electrical system. Attach the large numbered decals or stencils to the top of each locker door. Glue the small chalkboard panels onto the interior or exterior of the locker doors for notes.
Step 5: Final Use
Add internal hooks to the lockers for coats and bags. Place a long rubber mat on the floor beneath the shoe cubbies to catch dirt and moisture.
18. Heirloom Card Catalog Storage

This deeply rich and handsome entryway utilizes a custom built cabinet reminiscent of an antique library card catalog, delivering maximum small item organization. The continuous dark wood surface features dozens of small drawers, each detailed with classic brass label holders and pulls.
The design creates a long, continuous drop zone, perfect for setting down mail, books, or decorative items. The small size of the drawers makes this piece a master of containment, assigning a specific spot for keys, spare change, batteries, small tools, and other miscellaneous clutter that often collects near the door.
Above the unit, a gallery of framed botanical prints adds a classic, refined touch. A traditional lamp and a simple wooden stool complete the academic, traditional aesthetic. This solution offers visual uniformity despite the vast quantity of hidden storage.
Materials Required List
- Dark stained wood panels (Cherry or Walnut finish)
- Thin wood strips (for drawer fronts and dividers)
- Brass label holders and drawer pulls
- Drawer slides or runners (for multiple small drawers)
- Wood glue and screws
Equipment Required List
- Table saw or miter saw (essential for precision cuts)
- Router (optional, for decorative edging)
- Drill and various drill bits
- Clamps
- Sandpaper
Step by Step DIY Instructions
Step 1: Construct the Cabinet Boxes
Cut and assemble the main cabinet boxes. This unit should be built in sections due to its length. Create the interior framework of dividers and runners for the multiple rows of small drawers.
Step 2: Build and Finish the Drawers
Cut and assemble the numerous small drawer boxes. Cut the drawer fronts. Apply the dark stain or finish to all components. When dry, attach the drawer fronts to the boxes.
Step 3: Install Hardware
Attach the brass label holders and drawer pulls to the center of each drawer front. Install the finished drawers into the corresponding cabinet runners.
Step 4: Final Assembly and Installation
Place the assembled cabinet sections side by side, ensuring they look continuous. Secure the entire unit to the wall using screws, preventing tipping. Place a continuous wood top piece over the entire structure for a finished surface.
Step 5: Decorate
Create the gallery wall of botanical prints above the cabinet. Add a small lamp and a stool nearby.
19. Kid Friendly Primary Color Cubbies

This robust entryway system is specifically designed to handle the high volume of a busy home or classroom, offering personalized, brightly colored storage for multiple users. The structure is built from durable white cabinetry with warm wood accents, ensuring longevity and easy cleaning. The use of vibrant primary and secondary colors makes the space cheerful and engaging.
Each personal cubby features an upper box for backpack or lunch bag storage, along with a coat hanging area below. The hooks are color coordinated to match the storage bins, simplifying ownership for younger users. The base of the unit includes large, open cubbies that house brightly colored plastic baskets, a handy solution for shoes, toys, and sports equipment.
The entire unit is slightly elevated, offering a comfortable height for seating while providing a clear sense of order. Fun wall decals above the cubbies complete the lively, youth focused atmosphere.
Materials Required List
- Plywood or MDF boards (white laminate finish recommended)
- Plastic storage bins (in red, blue, green, yellow, orange)
- Colorful plastic coat hooks (matching bin colors)
- Wood screws and joining hardware
- Baseboard trim
- Optional: Fun wall decals
Equipment Required List
- Table saw or circular saw
- Drill and various drill bits
- Screwdriver
- Level and tape measure
- Clamps
Step by Step DIY Instructions
Step 1: Construct the Base and Frame
Cut and assemble the sturdy base box for the cubby unit, ensuring it is slightly recessed to provide a kick plate effect. Construct the outer box frame of the entire unit. Using screws and glue, secure the frame to the base.
Step 2: Install Vertical and Horizontal Dividers
Cut and install the vertical dividers to create the individual locker sections. Next, install the horizontal dividers for the seating area and the upper box storage area. Ensure all joints are strong and square.
Step 3: Install the Hooks
Measure and mark the height for the coat hooks in each cubby. Drill pilot holes and install the colorful plastic hooks in the designated areas.
Step 4: Secure the Unit
Because this is a tall, heavy piece, secure the entire unit to the back wall using screws anchored directly into wall studs to prevent any possibility of tipping. Install baseboard trim around the bottom of the unit for a finished look.
Step 5: Organize and Decorate
Place the bright plastic bins into the upper and lower cubbies. Apply fun, colorful decals to the wall space above the unit to complete the playful theme.
20. Sleek Monochromatic Grid System

This hyper organized entryway uses a minimalist, grid based shelving unit to achieve a modern, graphic look. Thin black metal uprights and shelves create a striking contrast against the crisp white wall and luxurious marble bench. The open framework ensures the space feels light and uncluttered.
The organization is highly structured, relying on dedicated rows of simple black hooks mounted beneath the shelves for quick, accessible hanging storage. This eliminates the need for bulky coat closets. The system incorporates open display areas for a pop of color, such as a stack of books or a striking clock with red accents.
The focal point is the solid, floating marble slab that acts as both a seating area and a sturdy drop zone. This element adds a touch of sophistication to the utilitarian structure. Discreet overhead lighting is recessed into the ceiling, illuminating the entire wall evenly.
Materials Required List
- Black metal uprights and shelf supports (modular system recommended)
- Black metal shelves
- White marble slab (for the bench)
- Heavy duty brackets (for mounting the marble)
- Black coat hooks (small, simple design)
- Thin wire lighting system (for overhead)
- Rectangular framed mirror
Equipment Required List
- Drill and specialized masonry bits (for marble mounting)
- Stud finder and level
- Screwdriver
- Metal cutting saw (if custom sizing the metal frame)
Step by Step DIY Instructions
Step 1: Install the Metal Framework
Begin by installing the thin black metal uprights, ensuring they are perfectly level and anchored into the wall and ceiling. Next, install the horizontal shelf supports according to the desired grid layout.
Step 2: Mount the Shelves and Hooks
Place the black metal shelves onto the supports. Install the row of black coat hooks directly beneath the shelves. The systematic arrangement of hooks enhances the linear, orderly design.
Step 3: Install the Marble Bench
Mount the heavy duty structural brackets to the wall at the desired bench height, ensuring they are secured into wall studs. Carefully position the marble slab onto the brackets. Check the weight bearing stability and levelness.
Step 4: Finish with Lighting and Accessories
Install the recessed or track lighting system directly above the unit to wash the entire area in light. Hang the simple, rectangular mirror on the lower right section of the grid. Place a small, graphic clock centrally and add a few carefully chosen decorative objects.
21. Dark Wood and Velvet Luxe Bench

This tailored entryway features a deep, sophisticated color palette, perfect for a high end, executive atmosphere. The wall paneling and bench are crafted from a rich, dark stained wood, providing a sense of masculine strength. A large, plush cushion in a deep red velvet covers the bench, offering a luxurious seating experience.
The bench design is exceptionally thoughtful, featuring a suspended shelf beneath the seat with leather and metal strapping, explicitly designed for storing shoes or luggage. This high end detail elevates the simple act of storage. A floating side drawer, faced with leather, provides a handy spot for keys, wallets, and small items.
Above the bench, a high back panel features a contrasting light colored accent, creating a visual frame for the antique brass coat hooks. A vintage map print completes the old world, scholarly look.
Materials Required List
- Dark stained wood panels (Walnut or dark Cherry finish)
- Bench cushion foam and deep red velvet fabric
- Leather strapping and metal hardware (for the shoe shelf)
- Brass coat hooks
- Small drawer slides
- Leather veneer (for the drawer face)
- Wood glue and screws
Equipment Required List
- Table saw or miter saw
- Drill and screwdriver
- Staple gun (for cushion upholstery)
- Level and tape measure
Step by Step DIY Instructions
Step 1: Construct the Bench and Back Panel
Cut and assemble the dark wood bench box. Construct the tall back panel, ensuring the light colored accent piece is securely recessed into the frame.
Step 2: Install the Shoe Shelf
Install the internal supports for the shoe shelf. Run the leather straps horizontally between the supports and secure them using metal hardware, creating a durable, luggage rack inspired sling.
Step 3: Build and Install the Floating Drawer
Construct the small drawer box and apply the leather veneer to the drawer face. Install the drawer slides onto the side of the back panel structure, creating the illusion that the drawer is floating.
Step 4: Upholster and Attach Hooks
Upholster the bench cushion using the red velvet fabric and secure it to the bench top with the staple gun or adhesive. Attach the antique brass hooks to the light colored accent panel on the backboard.
Step 5: Final Placement
Mount the entire assembled bench and back panel unit securely to the wall. Hang the framed map print above the back panel.
22. Modular Light Wood Peg Rail System

This highly adaptable organization system uses a light toned wood paneling with a distinct peg hole pattern, allowing shelves, mirrors, and hooks to be rearranged endlessly. The structure avoids being built into the wall, instead using wooden uprights and dowel rods for a flexible, architectural presence.
The design utilizes narrow, floating shelves that provide simple display space for small items and plants. The main organization relies on adjustable dowel rods that hold the shelves, and a variety of small, rectangular mirrors and hooks. This visual flexibility is maintained by utilizing large, natural woven baskets for upper storage.
Beneath the hanging area, a wide, simple plank acts as a continuous low shelf for shoes and boots. The lower portion of the wall features a contrasting blue paint color, adding depth to the light wood structure. This system is genuinely dynamic and can evolve with the family’s changing storage needs.
Materials Required List
- Large plywood or MDF panels (for the peg boards)
- Wooden dowel rods (various lengths, for pegs and shelf supports)
- Light wood shelves (pre cut)
- Hooks (small metal or wooden pegs)
- Rectangular framed mirrors
- Natural woven storage baskets
Equipment Required List
- Drill and drill bits (for creating the peg holes)
- Level and stud finder
- Sandpaper
- Paint brushes (for the lower wall color)
Step by Step DIY Instructions
Step 1: Create the Pegboard Panels
Cut the large wood panels to size. Using a template or precision measuring, drill rows of holes evenly across the entire surface of the panels. Ensure the holes are slightly larger than the dowel rods to allow for easy movement. Apply a clear finish to the panels.
Step 2: Mount the Panels
Anchor the finished pegboard panels securely to the wall, making sure they are perfectly aligned. Leave a small gap behind the panels using spacers to allow the wooden pegs to be fully inserted.
Step 3: Paint the Accent Wall
Paint the lower half of the wall behind the pegboard structure the accent blue color.
Step 4: Configure the Organization
Insert the wooden dowel rods into the holes to create shelf supports. Place the small shelves onto the supports. Insert pegs for hanging coats, bags, and mirrors. Use the additional dowel rods and brackets to support the upper storage baskets.
Step 5: Place the Shoe Shelf
Place the wide, simple wood plank along the base of the unit to serve as the continuous shoe shelf.
23. Dog and Pet Dedicated Entry Station

This ingenious corner unit is designed specifically to manage the chaos associated with pet ownership, seamlessly integrating organization with animal care. The natural light wood construction creates a clean, durable surface. The area is clearly defined as the “Paw Zone” with a decorative gate.
The low bench serves as a comfortable spot for owners to manage leashes and towels. It features an integrated, pull out drawer that discreetly holds pet food bowls, eliminating spills and clutter when not in use. Adjacent to the bowls, a cabinet provides storage for food, treats, and cleaning supplies.
Above the bench, a simple floating shelf holds decorative items, while a wooden rail features large metal rings and hooks for hanging leashes, harnesses, and waste bag dispensers. The overall design is highly practical, keeping all pet related items consolidated and ready for use.
Materials Required List
- Plywood or natural light wood panels (for bench and shelves)
- Drawer slides
- Pet food bowls (stainless steel recommended)
- Cabinet hinges and door pulls
- Wood plank (for the hook rail)
- Large metal rings or hooks
- Optional: Small decorative gate/divider
Equipment Required List
- Table saw or circular saw
- Drill and hole saw (for food bowl cutouts)
- Screwdriver
- Level and tape measure
- Sandpaper
Step by Step DIY Instructions
Step 1: Construct the Bench Unit
Cut and assemble the main bench box, creating an opening for the pet bowl drawer and an opening for the storage cabinet. Construct the pet bowl drawer box, ensuring the front panel is slightly thicker.
Step 2: Integrate the Pet Bowls
Use the hole saw to cut two circular openings in the top of the pet bowl drawer front, matching the diameter of the stainless steel bowls. Install the drawer slides and place the finished drawer into the opening. Insert the bowls into the cutouts.
Step 3: Install Cabinet Door and Shelves
Install the cabinet door onto the storage opening using hinges. Install small internal shelves within the cabinet for storing supplies.
Step 4: Mount Shelves and Hook Rail
Securely mount the upper floating shelf to the wall. Construct the hook rail, attach the metal rings or hooks, and mount the rail horizontally below the shelf.
Step 5: Final Touches
If desired, construct the small, decorative gate and position it to define the “Paw Zone.” Place towels, storage baskets, and accessories neatly onto the bench and shelf.
24. Slatted Wood Screen Divider

This dynamic organization method utilizes a vertical wood screen to subtly define the entryway space while providing a concealed hanging area. The screen is composed of multiple vertical wood slats, creating striking shadows and allowing light to filter through, maintaining an open feel.
The wood used is a rich, warm tone, standing in elegant contrast to the deep gray walls. The utility is cleverly hidden: a horizontal strip with modern coat hooks is mounted directly onto the screen, providing hanging space without the hooks being visible from certain angles.
In the foreground, a simple, low bench with a black metal frame offers a minimalist spot for seating and temporary item placement. The entire design is highly architectural and serves as both a stylish room partition and a discreet cloakroom.
Materials Required List
- Wood slats (uniform width and thickness)
- Black coat hooks
- Wood plank (for the hook rail)
- Wood glue
- Metal frame bench (or materials to build a simple bench)
- Screws and structural supports
Equipment Required List
- Miter saw (essential for precise, uniform slat cutting)
- Drill
- Level and tape measure
- Brad nailer or finish nailer
Step 1: Construct the Screen Frame
Build a simple, sturdy frame (top and bottom rails) for the wood screen. This frame must be securely anchored to the floor and ceiling.
Step 2: Attach the Vertical Slats
Cut the wood slats to the exact height of the frame. Begin attaching the slats vertically to the top and bottom rails, ensuring the spacing between each slat is uniform. Use wood glue and a brad nailer for clean attachment.
Step 3: Install the Hidden Hook Rail
Cut the wood plank for the hook rail. Attach the metal coat hooks to the rail. Securely fasten the finished hook rail horizontally across the slats at a suitable height. Since the rail is mounted behind the slats, visibility is minimized.
Step 4: Place the Bench
Place the simple, contemporary bench with the metal frame in front of the screen.
Step 5: Final Styling
Add a small stack of books and a glass for simple, sophisticated decoration.
25. Library Inspired Cabinetry with Rolling Ladder

This magnificent, custom built entryway unit maximizes vertical space while exuding the elegance of a classic library. The cabinetry is painted in a sophisticated charcoal gray and extends from floor to ceiling, providing enormous hidden storage capacity. Architectural molding adds dimension and refinement.
The unit features a mix of closed cabinets, drawers, and open shelving. The large, closed cabinets on the lower level are great for stowing away bulky items. The open shelves are reserved for displaying collections of books and leather storage boxes, adding texture and warmth.
The standout feature is the dark wood ladder on brass rails, providing access to the highest shelves. A comfortable, centrally located bench with drawers and a map backdrop creates a dedicated seating and planning area. This entire system offers a grand, highly organized, and aesthetically rich welcome.
Materials Required List
- Plywood or MDF (for all cabinet boxes)
- Wood molding and trim (for paneling details)
- Charcoal gray paint
- Brass hardware (drawer pulls, rails, ladder hardware)
- Custom wooden ladder
- Bench cushion foam and fabric
- Leather storage boxes
- Wall sconces
Equipment Required List
- Table saw or miter saw
- Router (for trim work)
- Drill and screws
- Finish nailer
- Level and stud finder
- Specialized hardware installation tools (for ladder rail)
Step 1: Construct the Cabinet Boxes
Cut and assemble the multiple cabinet boxes for the base drawers, the tall upper units, and the central recess. Ensure all dimensions allow for the installation of the rolling ladder rail. Anchor the boxes securely to the wall and to each other.
Step 2: Add Architectural Detail
Install the wood trim and molding to create the paneled door fronts and the decorative cornice around the top. Apply the charcoal gray paint to the entire unit.
Step 3: Install Drawers, Doors, and Hardware
Install the drawer slides and build the drawer boxes for the bench base. Install the large cabinet doors on the outer vertical units. Attach all the brass drawer pulls and handles. Install the wall sconces within the central recess.
Step 4: Mount the Ladder Rail
Following instructions, securely mount the brass rail horizontally across the top section of the cabinet face. Attach the ladder hardware to the custom wooden ladder and place it on the rail.
Step 5: Finishing Touches
Install the bench cushion on the central seat. Hang the map print on the back wall of the recess. Fill the upper open shelves with books and leather storage boxes.
26. Recessed Illuminated Shiplap Nook

This stunning entryway provides a seamless, built in look through its use of a recessed wall niche. The all white finish on the walls and cabinetry ensures a clean, spacious feeling, while the horizontal shiplap style paneling in the back adds subtle texture. The entire area is beautifully defined by soft, concealed LED strip lighting.
Above the hooks, three small cubbies provide valuable display space for minimalist decor, illuminated by the continuous light source. A long, sturdy bench offers comfortable seating. Notably, the bench incorporates a mixed material top: white on the seating side and a contrasting black marble accent on the far end, creating a dedicated drop zone for keys and coins.
The simple brushed metal hooks are highly functional for daily coats and bags. This design elevates a simple seating area into a sophisticated, highly organized welcome point.
Materials Required List
- Plywood or MDF boards (for cabinet frame and cubbies)
- White paint or laminate
- Horizontal shiplap or wood strips
- LED strip lighting and power supply
- White wood or laminate for the bench
- Black marble slab (for the accent section)
- Brushed nickel coat hooks (five to six)
Equipment Required List
- Drill and screws
- Stud finder and level
- Circular saw or table saw
- Lighting wire connectors
- Paint roller and brush
Step by Step DIY Instructions
Step 1: Frame the Recess and Install Shiplap
If a recess does not exist, build a frame that projects from the wall to create the niche effect. Install the horizontal shiplap or wood strips onto the back wall of the recess. Paint the shiplap and the entire interior of the niche white.
Step 2: Install the Cubby Shelf
Build the upper cubby unit with internal dividers. Before installing, mount the LED strip lighting underneath the front lip of the cubby unit and run the wiring neatly out of sight. Secure the cubby unit into the top of the recess.
Step 3: Construct the Bench
Build the bench structure from white wood or laminate. Cut the black marble slab to size. Affix the marble slab onto one end of the bench surface, and cover the remaining seating area with the white surface material. Place the bench into the lower section of the recess.
Step 4: Add Hooks
Install the brushed nickel coat hooks directly onto the shiplap wall, spacing them evenly beneath the overhead lighting. Ensure they are secured into wall studs where possible.
Step 5: Finishing
Add decorative accessories to the upper cubbies and the marble accent surface.
27. Graphic Pop Art Color Block System

This vibrant entryway utilizes bold color blocking and clean geometry to create a lively and unforgettable welcome. The wall is divided into large sections of deep teal and soft coral, providing a strong, eye catching background for the simple white storage units. This design is highly graphic and modern.
Two symmetrical white floating shelves—one above, one below—contain the color field, offering essential organization. The upper shelf features two cubbies for baskets, while the lower shelf provides open cubbies for shoes. The floating design maintains an open, airy feeling despite the intense color.
A row of black metal hooks is mounted beneath the top shelf, positioned entirely within the teal zone. The centerpiece is a striking round mirror with thin black quadrant lines, echoing the sharp, modern aesthetic. This organization system successfully blends visual art with practical utility.
Materials Required List
- White wood or MDF (for the upper and lower floating shelves)
- Paint in deep teal and soft coral (for the wall sections)
- Black metal coat hooks (five to six hooks)
- Black framed round mirror with quadrant detail
- Woven storage baskets
- Invisible shelf support brackets
Equipment Required List
- Drill and screws
- Level and tape measure
- Paint rollers and brushes (essential for clean lines)
- Painter’s tape (high quality for crisp edges)
- Stud finder
Step by Step DIY Instructions
Step 1: Execute the Color Blocking
Measure and tape the wall meticulously to define the color blocks (teal and coral). Apply two coats of the teal paint and two coats of the coral paint, ensuring crisp, clean lines between the colors. Remove the tape only when the paint is fully dry.
Step 2: Install Floating Shelves
Secure the invisible support brackets for the upper and lower white shelves into the wall studs. Slide the pre finished white shelves onto the brackets. Ensure the shelves are level and securely mounted.
Step 3: Install Hooks and Mirror
Install the black metal hooks directly beneath the upper shelf, ensuring they are centered within the teal color block. Hang the round, graphic mirror so it sits partly on the teal and partly on the coral section for visual balance.
Step 4: Final Organization
Place woven baskets into the upper cubbies for concealed storage. Use the lower cubbies for neat shoe placement.
28. Robust Copper Pipe and Slate Mudroom

This durable, industrial inspired entryway is constructed to withstand heavy use, using a rugged combination of copper piping and dark slate surfaces. The copper framework, while industrial, offers a touch of warm metallic patina. The slate used for the shelves and benches is non porous and easy to clean.
The unit includes two low benches for seating, separated by a unique sloped boot tray covered in a coarse mat, guiding water and mud away from the floor. The open design allows wet items to dry quickly. The top shelving unit, also framed in copper pipe, provides high level storage and a long hanging rod.
A large, copper framed mirror hangs nearby, offering visual symmetry and adding functionality. This entire system is built with durability in mind, proving highly useful for areas exposed to weather and outdoor activities.
Materials Required List
- Copper pipe and fittings (elbows, flanges, T connections)
- Dark slate tiles or slabs (for bench tops and shelves)
- High strength adhesive (for attaching slate to frame)
- Dark wood plank (for the hook rail)
- Copper colored coat hooks
- Sloped tray and coarse rubber matting (for the boot area)
Equipment Required List
- Pipe cutter and deburring tool
- Soldering equipment (optional, if permanently joining pipe) or pipe wrench (if using threaded fittings)
- Drill and screws
- Level and stud finder
Step by Step DIY Instructions
Step 1: Construct the Pipe Frames
Measure and cut the copper pipes for the bench legs, shelf supports, and mirror frame. Assemble the frames using T and elbow fittings. Secure the wall mounting flanges to the wall studs where the shelves and mirror will be installed.
Step 2: Create and Place the Slate Surfaces
Cut the slate slabs to fit the bench tops and shelf frames. Use a strong industrial adhesive to secure the slate slabs onto the copper frames. Allow the adhesive to cure completely.
Step 3: Build the Boot Tray
Construct the sloped tray using wood or metal, ensuring it sits between the two benches. Line the tray with the coarse rubber matting to catch dirt and moisture.
Step 4: Install Shelves and Hooks
Mount the top copper shelf unit securely to the wall flanges. Attach the copper colored coat hooks to the dark wood plank and mount the plank beneath the upper shelf. Install the large, copper framed mirror.
Step 5: Final Touches
Place simple rubber mats on the floor near the benches for additional protection.
29. Retro Diner Inspired Corner Unit

This high energy entryway corner maximizes style and storage using bold, contrasting colors and a retro flair. The design features glossy red and vivid turquoise cabinets and accents, reminiscent of a classic 1950s diner. The floor is covered in a matching black and white checkered tile.
The unit utilizes corner bench seating with comfortable blue cushions. This seating area conceals storage underneath, including a cabinet and an open area for storing vinyl records, enhancing the retro theme. Above the bench, an open cubby is painted turquoise and provides shelving for books and a vintage radio.
Glossy red cabinets above the cubbies offer crucial closed storage. The inclusion of a bright red rotary telephone and a tall, turquoise shelf for more vinyl records solidifies the playful, nostalgic atmosphere.
Materials Required List
- Plywood or MDF boards
- High gloss red and turquoise paint or laminate
- Bench cushion foam and tufted blue fabric
- Cabinet hinges and simple metal pulls
- Black coat hooks
- Checkered black and white floor tiles or laminate
Equipment Required List
- Table saw or circular saw
- Drill and screws
- Staple gun (for cushion upholstery)
- Level and tape measure
- Router (optional, for cabinet door edging)
Step by Step DIY Instructions
Step 1: Prepare the Walls and Floor
Install the black and white checkered floor. Paint the accent wall area surrounding the unit in the bold turquoise color.
Step 2: Construct and Paint the Corner Unit
Cut and assemble the L shaped corner bench and the upper cabinetry (open and closed). Apply the high gloss red finish to the bench base and the upper closed cabinets. Apply the turquoise paint to the open shelving cubby.
Step 3: Install the Bench and Upholstery
Secure the bench base to the wall. Upholster the bench cushion in the tufted blue fabric and place it on the seat. Install the cabinet door on the bench base using hinges.
Step 4: Mount Upper Cabinets
Securely mount the turquoise open cubby shelf above the bench. Mount the glossy red closed cabinets above that.
Step 5: Install Accessories
Mount the bright red coat hooks near the bench. Place the tall, turquoise vinyl record shelf adjacent to the unit. Add retro decor like the telephone, clock, and poster to complete the look.
30. Contemporary Black Wood Storage Wall

This sophisticated entryway is defined by a massive, built in storage unit finished in a striking matte black wood grain. The design provides maximum organization while maintaining a unified, modern aesthetic. The floor to ceiling cabinets flank a deep, open central recess.
The central recess features warm, light wood at the base, providing a comfortable visual contrast and acting as a long shelf for shoes. The shoe shelf is divided into small, individual cubbies, ensuring footwear is perfectly lined up and contained. Above the shoe area, deep hanging recesses provide space for coats and bags.
A crucial feature is the integrated security safe, discreetly recessed into the central vertical cabinet, offering a secure spot for valuables near the exit. The entire unit is handle free, using push latches to maintain the sleek, modern appearance.
Materials Required List
- Plywood or MDF boards (for cabinet construction)
- Matte black wood grain laminate or paint
- Light wood panels (for the shoe shelf base)
- Heavy duty hinges and push to open cabinet hardware
- Built in security safe
- Internal hooks and garment rods
Equipment Required List
- Table saw or circular saw
- Drill and screws
- Router (for creating recessed areas)
- Level and stud finder
Step by Step DIY Instructions
Step 1: Construct the Cabinet Framework
Cut and assemble the large vertical cabinet boxes. This unit is built in sections (flanking tall cabinets and the central section) and then assembled together. Create the large open recesses for coats and the subdivided area for shoes.
Step 2: Install Doors and Shoe Cubbies
Cut and install the cabinet doors, fitting them with push to open hardware to eliminate exterior pulls. Construct the light wood shoe shelf base and install the small internal dividers to create the shoe cubbies.
Step 3: Integrate the Safe
Route the opening for the security safe into the central vertical divider cabinet. Install the safe, ensuring it is securely fastened to the structure.
Step 4: Assemble and Secure
Join the individual cabinet sections together. Anchor the entire massive unit securely to the back wall and floor for stability.
Step 5: Internal Organization
Install internal hooks or small garment rods inside the deep coat recesses. Place small decorative items or a simple bench near the unit to complete the look.
31. Cozy Corner Bench with Built in Storage

This charming entryway makes brilliant use of a challenging corner space, transforming it into a highly functional and comfortable mudroom. The entire unit is built in a soft, light gray color, creating a unified and calming atmosphere. The design features an L shaped cushioned bench that offers generous seating.
The vertical back panel uses vertical grooves or shiplap style paneling, adding subtle traditional texture. The storage is maximized through open cubbies beneath the bench for baskets and shoes. A round, tiered rotating shoe organizer sits at the end, providing accessible, dedicated storage for multiple pairs of footwear.
The corner itself features a built in mirror, visually expanding the space. Open shelves above the coat hooks provide display space for books and decorative objects. This corner unit is a master class in maximizing small square footage.
Materials Required List
- Plywood or MDF boards (for all cabinet work)
- Soft gray paint
- Bench cushion foam and gray fabric
- Vertical groove paneling (or shiplap strips)
- Metal coat hooks
- Corner mirror
- Tiered revolving shoe organizer hardware
- Woven storage baskets
Equipment Required List
- Table saw or miter saw
- Drill and screws
- Staple gun (for cushion upholstery)
- Level and stud finder
Step by Step DIY Instructions
Step 1: Construct the Bench and Back Panels
Cut and assemble the L shaped bench unit. Construct the vertical back panels, applying the groove or shiplap paneling detail. Assemble the circular shelving unit for the revolving shoe organizer.
Step 2: Paint and Install
Paint all wooden components in the soft gray color. Install the back panels securely to the wall studs. Place the bench unit firmly in the corner.
Step 3: Install Mirrors and Shelves
Install the mirror securely into the corner junction of the back panels. Mount the upper floating shelf above the coat hook area. Build and secure the curved open shelving unit next to the bench.
Step 4: Install Hooks and Upholstery
Install the metal coat hooks onto the back panels. Upholster the bench cushions and place them onto the bench seats. Install the tiered hardware for the revolving shoe organizer inside its curved cabinet.
Step 5: Final Touches
Place woven baskets into the open cubbies beneath the bench. Organize books and decorative items on the open shelves.
32. Sleek Modern Hook and Bench Display

This entryway utilizes a minimalist approach, focusing on clean lines, light colors, and natural texture. The entire wall is covered in a woven, neutral toned wallpaper, adding subtle warmth and depth. The organization is kept deliberately simple to highlight the quality of the hanging items.
A long, simple white floating bench is mounted low on the wall, providing seating and a clean base for the display. The storage is entirely vertical, relying on a scatter of small, minimalist wooden pegs placed at various heights, which is highly artistic and adaptable.
The arrangement of pegs accommodates coats, scarves, and handbags, treating them as part of the decor. A large, framed piece of modern typography art and a tall floor lamp complete the sophisticated, gallery inspired atmosphere.
Materials Required List
- Neutral toned textured wallpaper
- White wood or MDF (for the floating bench)
- Invisible shelf support brackets
- Small wooden pegs or knobs (dozens for scattered placement)
- Framed artwork
- Floor lamp
Equipment Required List
- Wallpaper paste and tools
- Drill and screws
- Level and stud finder
- Measuring tape
Step 1: Install Wallpaper**
Prepare the wall surface and meticulously install the textured wallpaper, ensuring seams are invisible. Allow the wallpaper to dry completely.
Step 2: Install the Floating Bench
Secure the invisible support brackets for the long white bench deep into the wall studs. Slide the finished white bench onto the brackets, ensuring it is perfectly level.
Step 3: Install the Pegs
Determine the scattered, artful pattern for the wooden pegs. Mark the locations on the wall. Carefully drill pilot holes and install the wooden pegs, varying the height to accommodate different items like bags and scarves. Ensure each peg is firmly secured.
Step 4: Final Styling
Lean the large mirror against the wall. Place the tall floor lamp next to the bench. Hang the framed artwork and utilize the pegs for a curated display of outerwear and accessories.
33. Hexagonal Mesh Industrial Cabinetry

This robust entryway storage system features a striking, heavy duty industrial design, utilizing black metal frames and hexagonal mesh panels for an edgy, see through look. The mesh allows contents to be partially visible, encouraging neatness while still offering secured containment.
The unit includes a substantial wood bench top, providing a natural warmth that contrasts with the black metal. Beneath the bench, three large mesh cabinet doors conceal shoe storage. Above the bench, the unit offers open shelving and upper cabinets, all protected by the heavy gauge mesh.
A separate, tall mesh cabinet provides additional, narrow vertical storage for small items, organizing the area into distinct zones. Industrial caged light sconces mounted on the wall enhance the factory inspired aesthetic.
Materials Required List
- Square and rectangular metal tubing (for frame construction)
- Hexagonal metal mesh sheets
- Solid wood plank (for the bench top)
- Metal hinges, latches, and pulls
- Industrial caged light sconces
Equipment Required List
- Welding equipment (or specialized metal joinery hardware)
- Metal cutting saw
- Drill and screws
- Wood saw (for bench)
- Level
Step by Step DIY Instructions
Step 1: Weld the Metal Frames
Cut and weld or join the metal tubing to create the robust frames for the main unit (bench, upper shelving, and cabinets) and the separate tall vertical cabinet.
Step 2: Attach Mesh Panels
Cut the hexagonal metal mesh to size. Weld or securely fasten the mesh panels to the back and sides of the frames. For the cabinet doors, attach the mesh to the door frames, then install the hinges and latches.
Step 3: Install the Bench Top
Cut the wood plank for the bench top. Apply a protective sealant. Place the wood plank securely onto the metal base frame.
Step 4: Assemble and Install
Assemble the main unit and secure it to the wall for stability. Place the separate tall cabinet beside it.
Step 5: Finish the Area
Install the industrial caged light sconces on the wall. Add labeled storage boxes and internal hooks to complete the highly functional, transparent organization.
34. Vertical Plant Wall and Wood Bench

This entryway brings the refreshing feel of nature indoors with a vibrant, living green wall. The vertical planter system, complete with its own irrigation base, creates a lush, natural partition that cleans the air and provides a stunning focal point. Track lighting is aimed at the plants, ensuring they thrive and enhancing their visual appeal.
Opposite the plant wall, a simple, slatted wood bench offers a sturdy seating area. The lower shelf of the bench is utilized for neatly storing shoes and a fresh towel. A simple wooden hook rack is mounted above the bench, providing essential hanging space for outerwear.
The color scheme is clean and organic, combining the white paneling and green plants with the natural wood tones. This design is highly functional, offering seating and organization while dramatically improving the aesthetic and air quality of the space.
Materials Required List
- Vertical garden planter system with reservoir (often modular)
- Moisture tolerant plants (Pothos, ferns, etc.)
- Slatted wood bench with lower shelf
- Wood plank (for the hook rail)
- Metal coat hooks (four to five)
- Track lighting system
Equipment Required List
- Drill and screws
- Stud finder and level
- Gardening tools (for planting)
- Electrical wiring tools (or consult an electrician for track lighting)
Step by Step DIY Instructions
Step 1: Install the Plant Wall
Install the vertical garden system, ensuring the bottom reservoir is stable. Plant the wall with the selected moisture tolerant plants. Install the track lighting on the ceiling, aiming the lights downward to illuminate the plants and hooks.
Step 2: Build and Place the Bench
Cut and assemble the slatted wood bench, including the lower shelf for shoe storage. Apply a waterproof finish to the wood. Place the bench on the floor.
Step 3: Mount the Hook Rail
Cut the wood plank for the hook rail and attach the metal coat hooks. Mount the finished rail securely to the wall above the bench.
Step 4: Final Touches
Place a glass bowl on the bench for keys and coins. Neatly arrange shoes and a towel on the lower shelf.
35. Custom Plywood Pod Seating

This striking entryway installation features fluid, organic curves that feel like a piece of modern art. Crafted entirely from light plywood sheets layered and shaped into smooth, rounded forms, the unit is truly custom. The seamless design incorporates a curved bench for seating and a dramatic tall back panel.
The inside of the curved bench is painted in soft pastels (pink and yellow), adding a whimsical, unexpected detail. The back panel features simple wooden hooks and a whimsical circle shaped hanging apparatus for coats and bags. A large, oval framed mirror completes the natural, handcrafted aesthetic.
A small niche in the curve provides a little shelf for placing keys or a vase. This unique system avoids sharp angles entirely, creating a soft, welcoming, and memorable transition space.
Materials Required List
- Thin plywood sheets (many layers required for curvature)
- Wood glue
- Paint in soft pink and yellow (for the niche interior)
- Simple wooden coat hooks
- Custom wood circle shapes (for coat hangers)
- Oval framed mirror
- Bench cushion foam and gray fabric
Equipment Required List
- Band saw or flexible saw blade (essential for curves)
- Orbital sander (for smoothing edges)
- Drill and screws
- Clamps (many, for gluing layers)
- Level
Step by Step DIY Instructions
Step 1: Create the Curved Forms
Cut multiple layers of thin plywood into the curved shapes required for the bench and the tall back panel. Apply wood glue between the layers and stack them to achieve the desired thickness and curve. Clamp the pieces tightly and allow the glue to dry completely.
Step 2: Sand and Finish
Once dry, use the orbital sander to meticulously smooth all the curves and edges. Apply a clear, natural finish to the plywood to protect it while maintaining the raw look.
Step 3: Integrate Color and Hooks
Paint the internal niche area of the bench in the soft pastel colors. Construct the simple wooden coat hooks and the decorative circle hangers. Securely mount the hooks and the circle shapes onto the tall back panel.
Step 4: Upholster and Install
Upholster the bench cushion and the small stool cushion. Secure the entire custom unit to the wall and floor where necessary for stability. Hang the oval framed mirror.
36. Deep Navy Hidden Organization Drawers

This highly organized system focuses on maximizing concealed storage within deep, stylish drawers. The cabinetry is painted in a rich, dark navy blue and features classic paneling, accented by elegant brass hardware. The entire unit is topped with a light colored marble countertop, offering a luxurious and durable surface for dropping mail or keys.
The genius lies inside the drawers: custom, removable wooden dividers create cubbies for everything from neatly rolled scarves and gloves to shoes and umbrellas. This layered approach ensures that small items are contained and easy to locate, preventing the common issue of drawers becoming disorganized junk piles.
The large mirror above the countertop adds light and space, while providing a clear view. This elegant design proves that high capacity organization can be seamlessly integrated into refined, traditional decor.
Materials Required List
- Plywood or MDF boards (for cabinet structure and drawer boxes)
- Deep navy blue paint
- Marble countertop
- Full extension drawer slides
- Brass bar pulls and knobs
- Thin wood strips (for internal drawer dividers)
- Wood glue and finish
Equipment Required List
- Table saw (essential for precise drawer and divider construction)
- Drill and screwdriver
- Level
- Paint sprayer or high quality foam roller
Step 1: Build the Cabinet Frame**
Construct the main cabinet frame. Create the drawer openings, ensuring they are perfectly square. Paint the cabinet structure the deep navy blue color.
Step 2: Construct and Fit Drawers
Build the deep drawer boxes. Install the full extension drawer slides into the cabinet openings. Apply the navy paint to the drawer fronts and attach the brass hardware. Insert the completed drawers into the slides.
Step 3: Create Internal Dividers
Cut the thin wood strips to create custom divider grids that fit snugly inside the drawer boxes. Assemble the grids using wood glue. Apply a clear sealant to the wooden dividers. Place the finished grids into the drawers.
Step 4: Install the Countertop
Securely place the marble countertop onto the cabinet base. Anchor the cabinet to the wall studs.
Step 5: Final Touches
Place the large mirror above the countertop. Organize the contents using the new dividers.
37. Backlit Architectural Grid

This breathtaking entryway is a statement in modern design, utilizing dramatic LED strip lighting to create a glowing, three dimensional grid effect on the wall and floor. The organization elements are simple and white, serving as the canvas for the striking light lines.
The functional pieces include a large, vertical mirror and a floating white console table that serves as a streamlined drop zone. Two narrow glass shelves with embedded hooks provide easy access storage for coats and umbrellas, maintaining the system’s light visual weight. The light is the main feature, highlighting the clean, empty space around the furniture.
The lines of light delineate zones on the wall, floor, and furniture edges, creating a truly futuristic and highly controlled environment. Clutter would ruin this effect, reinforcing the need for minimalist, contained organization.
Materials Required List
- LED strip lighting (flexible, high density)
- Diffuser channels (for sharp light lines)
- White wood or MDF (for the console table)
- Large framed mirror
- Glass shelves and mounting hardware
- Metal coat hooks (simple design)
Equipment Required List
- Router (for creating precise channels for lights/wiring)
- Drill and screws
- Level and stud finder
- Lighting wire connectors and power supply (needs professional installation)
Step 1: Route the Lighting Channels
Meticulously plan the layout of the light grid on the wall and floor. Use a router to create shallow, precise channels into the drywall and the wood floor (if applicable) to house the LED strips and diffuser channels. Run the necessary wiring discreetly to a power source.
Step 2: Install the Floating Console
Build the white floating console table. Install the internal support brackets onto the wall and mount the table. Install LED strips into the routed channels on the table’s edges.
Step 3: Install Shelves and Mirror
Mount the large mirror vertically. Install the glass shelves using hidden brackets or minimal mounting hardware. Attach the metal coat hooks beneath the glass shelves.
Step 4: Install and Test Lighting
Install the LED strip lighting into all the wall, floor, and furniture channels. Install the diffusers over the strips. Connect all wiring to the main power supply and test the entire system.
Step 5: Final Styling
Keep decor to a minimum, using only a few dark, sculptural items to contrast with the bright light.
38. Expansive Travel and Cork Organization

This inspiring entryway is a tribute to wanderlust and adventure, utilizing a huge, custom world map to create a truly memorable focal point. The map is mounted over a cork board panel, turning the wall into a functional display and planning board.
The cork backing allows users to pin travel photos, notes, and local maps. The wall is also used for organization, with globe shaped thumbtacks serving as creative, functional hooks for hanging keys and small items. This highly personalized approach makes the act of leaving and arriving feel significant.
Beneath the map, a long, floating console offers ample surface area for travel related items like passports, currency, and journals. The open shelving below holds large woven baskets for extra storage, maintaining a clean yet adventurous aesthetic.
Materials Required List
- Large world map printed on durable material
- Cork board sheets
- Long console table with drawers
- Globe shaped pushpins or decorative hooks
- Woven storage baskets
- Small display globe
Equipment Required List
- Drill and screws
- Level and tape measure
- Adhesive (for securing cork and map)
Step by Step DIY Instructions
Step 1: Mount the Cork and Map
Affix the cork board sheets to the lower portion of the wall. Carefully mount the large world map over the cork, ensuring it is centered and smooth.
Step 2: Install the Console
Install the floating console table beneath the map, securing it to the wall studs. Ensure the console is level and sturdy.
Step 3: Organize the Hanging Area
Use the globe shaped thumbtacks or small hooks to mark important locations on the map and serve as key hooks. Pin a smaller map or important notes onto the cork area.
Step 4: Final Organization
Fill the console drawers with travel documents and currency. Place the large woven baskets beneath the console for shoe or blanket storage. Add a decorative globe and a small compass to the top surface.
39. Natural Wood Peg Rail and Bench

This lengthy entryway prioritizes simple, natural materials to create a welcoming, organized space that feels open and airy. The organization relies on a continuous, shaker style peg rail system running the length of the wall, providing flexible hanging spots for coats, bags, and small woven baskets.
Beneath the pegs, a long, heavy wood bench serves as both a seating area and a low shelf. The bench is built with simple, robust wooden supports, giving it a timeless, durable quality. The wood grain is prominent, adding warmth to the otherwise white walls and light floor.
The hanging baskets provide lightweight, open storage for gloves or accessories. A tall, wood framed mirror hangs at the end, offering a full view. A small wooden stool provides an extra seating option that can be easily moved.
Materials Required List
- Long wood plank (for the peg rail)
- Wooden dowel rods (for the pegs)
- Heavy wood planks (for the bench)
- Wood glue and screws
- Wood stain or clear finish
- Woven storage baskets (with handles)
- Full length framed mirror
Equipment Required List
- Drill and various drill bits (for creating peg holes)
- Miter saw
- Level and stud finder
- Clamps
Step by Step DIY Instructions
Step 1: Build the Peg Rail
Cut the long wood plank for the peg rail. Mark the evenly spaced spots for the pegs. Drill holes (at a slight upward angle) for the wooden dowel rods. Insert the dowels (pegs) into the holes using wood glue. Apply the stain or clear finish.
Step 2: Construct and Install the Bench
Cut and assemble the heavy wooden bench using thick planks for the top and sides. Apply the matching stain or finish. Place the bench along the wall beneath the peg rail. Since the bench is heavy, it needs minimal anchoring, but securing it to the wall is optional for added stability.
Step 3: Mount the Rail and Mirror
Securely mount the finished peg rail to the wall above the bench, anchoring it into wall studs. Hang the full length framed mirror adjacent to the bench.
Step 4: Organize
Hang small woven baskets onto the pegs for storage. Use the bench surface and the open area beneath for resting items and storing shoes.
We have explored 39 unique and effective solutions for transforming your entryway from a chaotic clutter zone into a model of organized calm. From the sleek lines of minimalist design to the rustic charm of farmhouse lockers, a solution exists for every style and space constraint.
The key takeaway from these diverse approaches is the need for dedicated structure. By installing permanent, compartmentalized systems—be they revolving shoe racks, custom drawer dividers, or vertically stacked cubbies—you eliminate the opportunity for items to collect randomly.
Remember, a tidy entryway is not just about looks. It sets the tone for your entire home and contributes significantly to your daily sense of peace and efficiency. Start small by tackling footwear, then expand to outerwear and small accessories using the DIY plans provided.
Key Takeaways
- Form Follows Function: The most successful entryways feature built in, permanent storage systems tailored to the household’s actual needs (pets, sports gear, etc.).
- Go Vertical: Maximize unused wall space with shelving, hooks, and floor to ceiling cabinets to keep items off the floor.
- Contain Small Clutter: Utilize specialized storage, like divided drawers or labeled cubbies, for keys, mail, and accessories to stop them from scattering on surfaces.