This is the season of shadows and whispers. Halloween often brings to mind bright orange plastic and cartoon ghosts. But it can be something more. It can be a time for elegance, mystery, and stunning design. This is an invitation to rethink your holiday decorations.

Forget the garish and embrace the gorgeous. This collection of 40 ideas will guide you. We explore sophisticated color palettes, rich textures, and the power of candlelight. You will see how natural elements, from bare branches to mossy pumpkins, can create a hauntingly beautiful atmosphere.
Each idea is a starting point for your own creativity. With simple DIY projects, you can craft a home that feels both festive for the season and uniquely you. Prepare to welcome a more refined and enchanting kind of haunting into your home.
1. Mystical Midnight Dinner Party

A tablescape set for a sophisticated haunting. The scene uses a deep black tablecloth as a canvas for mystery. Gold cutlery provides a glint of luxury against the darkness, catching the soft candlelight. The centerpieces are lush arrangements of deep purple and blood-orange flowers, spilling out from dark vases.
Velvet and metallic pumpkins are scattered artfully down the table’s length. They add texture and a sense of autumnal richness. Tall, black taper candles in ornate brass holders complete the look, casting long shadows that dance as guests gather. This is Halloween dining transformed into an elegant, memorable experience.
DIY Instructions: Gilded Velvet Pumpkins
What You’ll Need:
- Small and medium-sized craft pumpkins (the fake kind from a craft store).
- Black and gold acrylic craft paint.
- A few soft paintbrushes (one medium, one small for details).
- Gold spray paint.
- Newspaper or a plastic tablecloth to protect your workspace.
Step-by-Step Guide:
- Set Up Your Space: Lay down your newspaper or plastic cover on a table. This will keep everything clean. Make sure you are in a place with fresh air, especially for the spray painting part.
- Paint the Pumpkins Black: Take your medium paintbrush and the black acrylic paint. Paint a few of your craft pumpkins completely black. You might need to do two coats of paint. Let the first coat dry for about 20 minutes before you add the second one.
- Make Some Pumpkins Gold: Now for the shiny ones! Take a few other pumpkins outside or to a well-ventilated area. Place them on the newspaper. Hold the gold spray paint can about 6-8 inches away from a pumpkin and spray in a steady, even motion. Turn the pumpkin to make sure you cover all sides. Let them dry completely.
- Add Gold Details: Once your black pumpkins are dry, it’s time to add a special touch. Use your small paintbrush and the gold acrylic paint to paint the stems of the black pumpkins gold. This makes them look extra fancy.
- Arrange Your Table: After all your pumpkins are dry, you can place them on your table. Mix the black and gold pumpkins together down the center of your table to create a beautiful and spooky centerpiece.
2. Ethereal Phantom Fireplace

Transform your fireplace into a ghostly gathering place. This design uses a clean, all-white palette to create a scene that is more magical than monstrous. Billowing white cheesecloth drapes over the mantel, resembling ancient cobwebs or spectral mist.
White pumpkins of various sizes are nestled among the fabric, adding a touch of the harvest season. The stars of the show are the floating ghosts, crafted from the same simple cloth. Their simplicity is their charm. This look proves that spooky decor can be bright, airy, and stunningly beautiful.
DIY Instructions: Floating Cheesecloth Ghosts
What You’ll Need:
- A roll of cheesecloth.
- A bottle of liquid starch.
- A small balloon and a bottle (like a soda bottle).
- A bowl.
- Black felt or paper and scissors.
- A little bit of glue.
Step-by-Step Guide:
- Create Your Ghost Form: Blow up the balloon just a little bit, so it’s the size of a ghost head. Place the balloon on top of an empty soda bottle to hold it up. This will be the mold for your ghost.
- Soak the Cloth: Cut a square piece of cheesecloth, big enough to drape over your balloon and bottle form. Pour some liquid starch into a bowl. Dip your cheesecloth into the starch until it’s completely soaked.
- Drape and Dry: Gently squeeze out the extra starch from the cloth, but don’t wring it out completely. Drape the wet cheesecloth over the balloon and bottle. Arrange the folds and ripples in a spooky, flowing way. Now, you have to be patient and let it dry completely. This might take a whole day.
- Give It a Face: Once the cheesecloth is stiff and dry, carefully remove the balloon and bottle from underneath. Your ghost will now stand on its own! Cut out two small ovals from the black felt or paper for eyes. Glue them onto the ghost’s head.
- Make Them Fly: You can set your ghosts on a shelf or hang them from the ceiling with a piece of clear string to make them look like they are floating in the air.
3. Apothecary’s Cabinet of Curiosities

Create a corner of mysterious marvels with a well-stocked apothecary shelf. This look is about storytelling, suggesting a room where potions are brewed and secrets are kept. The shelves are filled with old books, their spines hinting at ancient knowledge.
Glass bottles of different shapes and sizes hold colored liquids, turning simple water into elixirs. Golden skulls serve as dramatic bookends, while framed botanical prints of strange plants line the back. The warm glow of candlelight makes the glass and gold shimmer, inviting guests to look closer at the fascinating collection.
DIY Instructions: Aged Potion Bottles
What You’ll Need:
- Empty glass bottles or jars with corks or lids.
- Water.
- Food coloring (green, blue, red).
- Twine or string.
- Paper and a pen.
- A tea bag and a little warm water.
Step-by-Step Guide:
- Make the Potion: Fill your glass bottles with water. Add a few drops of food coloring to each bottle to make different colored “potions.” Put the corks or lids on tightly.
- Create an Old Label: Cut a small rectangle out of your paper. Think of a spooky potion name like “Wolfsbane” or “Dragon’s Breath” and write it on the paper.
- Age the Label: To make the label look old, dip the tea bag in warm water and gently dab it all over the paper label. This will stain it and make it look like it’s from a long time ago. Let it dry.
- Attach the Label: Once the label is dry, wrap a piece of twine around the neck of the bottle a few times. Tuck the label under the twine or use a little glue to stick it to the bottle.
- Display Your Potions: Line up your finished potion bottles on a shelf. They look great when you have a few different colors and sizes together.
4. Enchanted Forest Fireplace

Bring the haunting beauty of a deep, dark forest into your home. This decor uses natural elements to build a scene that feels both rustic and magical. Gnarled branches reach up and around a mirror, creating a wild, untamed frame.
Black crows perch on birch logs, watching over the room with an intelligent gaze. The hearth is overflowing with pumpkins covered in green moss, making them look as if they were just pulled from the forest floor. Lanterns filled with candles cast a warm, flickering light, completing this cozy and captivating woodland scene.
DIY Instructions: Mossy Forest Pumpkins
What You’ll Need:
- Craft pumpkins (any size).
- A bag of craft moss (you can find this at a craft store).
- A hot glue gun and glue sticks (ask an adult for help with this part!).
- Newspaper to keep your area clean.
Step-by-Step Guide:
- Prepare Your Workspace: Lay down some newspaper. Working with moss can be a little messy, so this helps make cleanup easy.
- Heat Up the Glue Gun: With an adult’s help, plug in the hot glue gun and let it get warm.
- Start Gluing: Work in small sections. Squeeze a small patch of hot glue onto the pumpkin. Be careful, the glue is very hot.
- Add the Moss: Quickly press a small handful of moss onto the hot glue. Hold it for a few seconds until it sticks.
- Cover the Pumpkin: Keep adding glue and moss in small patches until you have covered as much of the pumpkin as you like. You can cover the whole thing, or just a few spots to make it look like moss is growing on it. Let it cool down, and your forest pumpkin is ready!
5. Gothic Vampire’s Soirée

Set a scene of dramatic, gothic romance. This style is rich with luxurious textures and deep, bold colors. A foundation of black and crimson fabrics creates an immediate sense of opulence and danger.
A magnificent silver candelabra stands as the centerpiece, its tall white candles waiting to be lit. Crystal decanters hold dark red liquids, hinting at fine wine or something more sinister. The final touch is the placement of plush, red velvet pumpkins and a bouquet of black roses. It’s a beautifully dark arrangement fit for a vampire’s castle.
DIY Instructions: No-Sew Velvet Pumpkins
What You’ll Need:
- A roll of toilet paper (a new, full one).
- A square piece of velvet fabric (about 20×20 inches).
- A cinnamon stick or a small twig from outside.
- Some pretty ribbon or twine (optional).
Step-by-Step Guide:
- Unroll a Little: Unroll the toilet paper just a few times, then roll it back up loosely. This makes the roll a little softer and less stiff.
- Wrap It Up: Lay your velvet fabric flat with the soft, fuzzy side facing down. Place the toilet paper roll in the center of the square.
- Tuck It In: One at a time, pick up the corners of the fabric and tuck them into the hole in the center of the toilet paper roll. Keep tucking the fabric in all the way around until the whole roll is covered and the fabric is tight.
- Add the Stem: Poke the cinnamon stick or twig into the center hole where you tucked the fabric. This is your pumpkin’s stem!
- Finishing Touches: You can tie a ribbon around the base of the stem if you want to add a little extra decoration. Now you have a beautiful, soft velvet pumpkin.
6. Modern Witch’s Altar

For a more subtle and spiritual approach to the season, create a modern witch’s altar. This decor is less about scares and more about serene, mystical energy. The focus is on natural and celestial elements.
Bundles of dried herbs like rosemary and lavender hang on the wall, releasing a gentle fragrance. A brass mobile of the moon’s phases adds a touch of celestial magic. Below, framed tarot cards sit beside a collection of healing crystals like amethyst and clear quartz. It is a peaceful and personal space that celebrates the magic of the season.
DIY Instructions: Dried Herb Bundles
What You’ll Need:
- Fresh herbs like rosemary, lavender, or sage.
- Natural twine or string.
- Scissors.
Step-by-Step Guide:
- Gather Your Herbs: Take a handful of your fresh herbs. You can use just one kind or mix a few together. Arrange them into a nice little bundle or bouquet.
- Trim the Stems: Use your scissors to trim the bottom of the stems so they are all the same length. This makes the bundle look neat.
- Tie It Tight: Cut a long piece of twine. Starting at the bottom of the stems, wrap the twine tightly around the bundle, working your way up an inch or two.
- Secure It: Once the bundle feels secure, wrap the twine back down to the bottom. Tie a tight knot to keep it all together. Leave a long tail of twine if you want to hang it up.
- Hang to Dry: Find a cool, dry place to hang your herb bundle upside down. It will dry in a week or two, and you’ll have a beautiful, fragrant decoration.
7. The Raven’s Perch Mantel

This mantelpiece is a nod to classic gothic literature and mysterious birds of the night. Against a dark, moody wall, bare branches create a striking silhouette, adorned with the iridescent shimmer of peacock feathers.
The unexpected color from the feathers adds a layer of sophisticated beauty. Black crows are perched throughout the scene, some on the branches and others on stacks of old books. Below, vintage birdcages sit empty, adding to the feeling of beautiful melancholy. It’s a smart and poetic take on Halloween decor.
DIY Instructions: Spooky Feathered Branches
What You’ll Need:
- A few bare branches from your yard.
- A vase or jar to hold them.
- Craft feathers (like black feathers or peacock feathers).
- A hot glue gun or craft glue.
- Ribbon (optional).
Step-by-Step Guide:
- Find Your Branches: Go on a nature walk and find some interesting-looking bare branches. Make sure they are clean and dry.
- Arrange the Branches: Place your branches in a vase or jar. Arrange them so they stand up nicely and spread out in a way you like.
- Add Feathers: Take your craft feathers and decide where you want to place them. You can add just a few for a subtle look or many for a bolder look.
- Glue Them On: Put a tiny dot of hot glue or craft glue on the end of a feather’s quill. Carefully press it onto one of the small twigs on your branch. Hold it for a few seconds to make sure it sticks. Do this with all your feathers.
- Final Touches: You can tie a dark, velvety ribbon around the vase to complete the look. Your feathered branches are now ready to be the centerpiece of your mantel.
8. Monochrome Modern Macabre

Halloween decor can be incredibly chic and simple. This look uses a strict black and white color scheme to create a high-impact, modern display. The clean lines and lack of color allow the spooky shapes to truly stand out.
Black skulls are placed with purpose on a light wooden shelf. The most clever elements are the skeleton hands, which double as unique holders for tall black candles. A single bare branch in a simple vase adds an organic, sculptural touch. This minimalist approach is for those who appreciate a clean aesthetic with a dark twist.
DIY Instructions: Skeleton Hand Candle Holder
What You’ll Need:
- A plastic skeleton hand (from a party or craft store).
- A small, square block of wood or a flat stone for the base.
- Strong glue, like E-6000 or a hot glue gun (get an adult’s help).
- White or black spray paint.
Step-by-Step Guide:
- Prepare the Hand: Many plastic skeleton hands can be bent. Gently bend the fingers of the hand so that they could form a circle to hold a candle.
- Glue to the Base: Put a good amount of strong glue on the wrist part of the skeleton hand. Press it firmly onto your wood block or stone base. Let the glue dry completely so the hand is standing up securely.
- Paint It: In a well-ventilated area (like outside), spray paint the entire piece—the hand and the base—one solid color. White or black looks very modern. You may need a couple of coats. Let it dry fully.
- Add a Candle: Once it’s completely dry, you can carefully place a taper candle inside the grasp of the skeleton fingers. Make sure it’s secure. This is best used for decoration, or with a battery-operated candle for safety.
9. Gilded Noir Bar Cart

Celebrate Halloween with a touch of roaring twenties glamour. A simple bar cart becomes a show-stopping service station for spooky spirits. The theme is pure elegance, mixing black and gold to create a luxurious and festive feel.
Pumpkins are transformed into art pieces with painted gold geometric patterns. Gilded skulls sit beside fancy cocktail glasses and decanters. Black and gold feathers add texture and height to the display. This is a grown-up way to do Halloween, proving that the holiday can be both fun and incredibly stylish.
DIY Instructions: Art Deco Pumpkins
What You’ll Need:
- A black craft pumpkin.
- A gold paint pen (the metallic, permanent kind).
- A ruler.
- A pencil.
Step-by-Step Guide:
- Plan Your Design: Art Deco style uses a lot of straight lines and sunburst patterns. You can look up “Art Deco patterns” online for ideas.
- Sketch with Pencil: Lightly sketch your design onto the black pumpkin with a pencil. Using a ruler will help you get your lines perfectly straight. A simple sunburst coming from the stem is a great place to start.
- Trace with the Paint Pen: Carefully trace over your pencil lines with the gold paint pen. Take your time to make your lines clean and sharp. The gold will pop against the black pumpkin.
- Let It Dry: Let the paint from the pen dry completely before you handle the pumpkin too much.
- Display with Pride: Place your stylish Art Deco pumpkin on your bar cart, shelf, or table. It will look like a piece of art!
10. Charming Farmhouse Witch’s Kitchen

Even the kitchen can get a touch of subtle Halloween spirit. This charming farmhouse look mixes everyday decor with sweet and spooky accents. A wooden tiered tray becomes the main stage for this festive display.
Small white pumpkins are tucked next to potted herbs and amber glass bottles. Little black cauldrons hold candy or cinnamon sticks, adding a playful witchy element. A letterboard with a fun phrase like “Witch, Please” brings a bit of humor. This approach is warm, inviting, and shows how easily you can add holiday fun to any room.
DIY Instructions: Spooky Tiered Tray
What You’ll Need:
- A two or three-tiered tray.
- Small white craft pumpkins.
- Little plant pots or mugs.
- Amber-colored glass bottles.
- A few small black bowls (to look like cauldrons).
- Fall items like cinnamon sticks, small pinecones, or faux leaves.
Step-by-Step Guide:
- Start with the Big Stuff: Place your largest items on the tray first. Put a small plant on the bottom tier and maybe a larger amber bottle on the top tier.
- Add the Pumpkins: Scatter your small white pumpkins on all the levels of the tray. Tuck them in next to the bigger items.
- Fill the “Cauldrons”: Take your small black bowls and fill them with fun things. You can use candy corn, cinnamon sticks, or even little decorative spooky items. Place them on the tray.
- Fill in the Gaps: Use your smallest items, like the pinecones or leaves, to fill in any empty spaces. The goal is to make the tray look full and abundant.
- Arrange and Rearrange: Step back and look at your tray. Move things around until you think it looks just right. There is no wrong way to do it, so just have fun creating your own spooky farmhouse display!
11. Starry Night Celestial Corner

Embrace the magic of the cosmos with this celestial-themed vignette. A deep, dark backdrop makes the stellar details shine. The scene is dominated by framed star charts and a delicate golden moon phase mobile that seems to float in mid-air.
Plush, navy-blue velvet pumpkins, adorned with tiny stars, sit below, grounding the display. Dark blue candles and crystal balls add to the mystical atmosphere. This decor is perfect for anyone who loves stargazing and wants to bring a little piece of the night sky indoors for Halloween.
DIY Instructions: Starry Velvet Pumpkins
What You’ll Need:
- A dark blue or black craft pumpkin (velvet ones work great!).
- Small, silver or gold star stickers (the kind for scrapbooking).
- Craft glue (optional, if the stickers aren’t very sticky).
- A silver or gold paint pen.
Step-by-Step Guide:
- Map Out Your Constellation: Decide if you want to place the stars randomly or create a real constellation like the Big Dipper. You can look up pictures of constellations to copy.
- Stick on the Stars: Carefully peel your star stickers and press them firmly onto the pumpkin. Scatter them all around the surface.
- Add a Dusted Look: To create a “milky way” effect, take your paint pen and make lots of tiny dots in clusters between the bigger star stickers.
- Paint the Stem: For a final touch of magic, use your gold or silver paint pen to color the pumpkin’s stem. Let it dry.
- Display Your Cosmos: Place your starry pumpkin on a shelf or table to create your own little galaxy.
12. Edgar Allan Poe’s Study

Pay homage to the master of macabre with a scene straight from a gothic poem. This look is all about dark, literary drama. A portrait of Edgar Allan Poe sets the stage, surrounded by framed calligraphy of his most famous quotes.
Black crows perch ominously on stacks of leather-bound books and even a skull. Dripping black candles in tarnished silver holders cast a gloomy light over an old-fashioned inkwell and quill. It’s a sophisticated and moody setup that is both intelligent and intensely atmospheric.
DIY Instructions: “Aged” Quote Calligraphy
What You’ll Need:
- A piece of thick paper or cardstock.
- A black marker or calligraphy pen.
- A wet tea bag.
- A simple black frame.
Step-by-Step Guide:
- Write the Quote: Choose a short, spooky quote from a writer like Edgar Allan Poe. Carefully write it out on the paper with your black marker. Try to make your handwriting look a little old-fashioned and swirly.
- Age the Paper: Once the ink is completely dry, take your wet tea bag and gently dab it all over the paper. This will give it a brown, aged look. Be careful not to rub too hard or the paper might tear.
- Let It Dry: Let the paper dry completely. It might curl up a little, but that just makes it look older.
- Frame Your Art: Once dry, place your aged quote into a simple black frame.
- Create a Gallery: Make a few of these with different quotes and hang them together on a wall for a spooky, literary display.
13. Phantom’s Masquerade Ball

Bring the drama and romance of the opera to your home. This opulent display is inspired by a grand masquerade ball. Rich red velvet drapes over a table, piled with elegant clutter. Gilded, ornate mirrors and candelabras create endless reflections of flickering candlelight.
Deep red roses are arranged in lavish bouquets. The key elements, of course, are the white and gold masks, placed artfully amongst scattered sheets of music. It’s a scene of mystery, passion, and high drama, turning any corner into a stage.
DIY Instructions: Simple Phantom Mask
What You’ll Need:
- A plain white craft mask (you can find these at a craft store).
- A hot glue gun (with an adult’s help).
- One or two pretty feathers.
- Gold glitter glue or a gold paint pen.
- A piece of ribbon.
Step-by-Step Guide:
- Decorate the Mask: Use your gold glitter glue or paint pen to draw elegant swirls and designs on the mask. You can outline the eyes or add dots and lines along the edges. Let it dry completely.
- Add Feathers: Decide where you want to place your feathers. Usually, they look nice on one side of the mask, near the temple. Ask an adult to help you put a small dot of hot glue on the end of a feather and press it onto the mask.
- Attach the Ribbon: Most craft masks come with an elastic band, but a ribbon looks much fancier. Cut the elastic off and glue a long piece of ribbon to each side of the mask so you can tie it on.
- Display or Wear: You can wear your mask for fun, or place it on a table as part of your dramatic Halloween decorations.
14. Sleepy Hollow Harvest

Capture the feel of a classic American ghost story with this rustic harvest scene. This decor celebrates the cozy and creepy sides of autumn. A bale of hay and dried corn stalks create a charmingly rustic base.
A spooky silhouette of the Headless Horseman on the wall immediately sets the spooky tone. Classic orange pumpkins and gourds are mixed with weathered lanterns holding flameless candles. A grapevine wreath on the door, adorned with black horses, completes this tribute to the legend of Sleepy Hollow.
DIY Instructions: Headless Horseman Silhouette
What You’ll Need:
- A sheet of black construction paper.
- A pencil.
- Scissors.
- A printout of a spooky tree and horseman shape (you can find these online).
- Tape or sticky tack.
Step-by-Step Guide:
- Find a Template: Search online for a “headless horseman silhouette” or “spooky tree silhouette” and print out a simple one you like.
- Trace the Shape: Place your printed template on top of the black construction paper. Carefully trace the outline of the shape with a pencil.
- Cut It Out: Carefully cut along the lines you traced. Take your time, especially on the tricky parts.
- Stick It to the Wall: Use a few small pieces of tape or some sticky tack to attach your black paper silhouette to a light-colored wall.
- Create a Scene: It looks especially spooky when you place it behind a table with some pumpkins and lanterns in front of it.
15. Little Shop of Horrors Terrariums

This unique decor idea is for plant lovers who enjoy a touch of the bizarre. It turns a collection of houseplants into a creepy display of strange specimens. The key is using glass cloches, or bell jars, to make the plants look like they are part of a scientific collection.
Carnivorous plants, like pitcher plants, are especially effective. Even regular houseplants look more mysterious when displayed this way. Add in some thorny branches and a vase of blood-red roses to enhance the feeling that these plants might just have a mind of their own.
DIY Instructions: Spooky Specimen Cloche
What You’ll Need:
- A glass cloche (bell jar) with a base.
- A small plastic toy skeleton, spider, or skull.
- A small handful of craft moss.
- A hot glue gun or strong craft glue.
Step-by-Step Guide:
- Create a Mossy Base: Put some glue on the base of your cloche. Press the craft moss onto the glue to create a little patch of spooky ground.
- Position Your Specimen: Decide how you want your spooky item to sit. You can have a skeleton lying down or a spider crawling on the moss.
- Glue It in Place: Put a bit of glue on the bottom of your plastic toy and press it firmly into the moss. Let it dry so it’s secure.
- Cover It Up: Carefully place the glass part of the cloche over your creation.
- Display Your Discovery: Put your finished cloche on a shelf. It will look like a strange and mysterious specimen you discovered on a spooky adventure.
16. The Fortune Teller’s Table

Create a mysterious corner where the future can be told and spirits can be contacted. This setup is draped in dark, luxurious fabrics and filled with mystical objects. A collection of old, framed photographs hints at ancestors or spirits from the past.
A crystal ball, a spirit board, and tarot cards are laid out, ready for a séance. A single preserved rose under a glass cloche adds a touch of timeless, melancholic beauty. The whole scene is lit by the soft, flickering glow of candlelight, making it a space full of secrets and supernatural possibilities.
DIY Instructions: Aged Spirit Photos
What You’ll Need:
- A printout of an old-fashioned, black and white portrait (you can find these online).
- A wet tea bag.
- Scissors.
- A small, vintage-looking photo frame.
Step-by-Step Guide:
- Print Your Photo: Find a picture of a person from a long time ago online. The older the style, the better. Print it out on regular paper.
- Age the Photo: Gently dab the wet tea bag all over the printed picture. This will give it a brownish, old-fashioned tint. Don’t make it too wet, or the ink might run.
- Let It Dry: Let the paper dry completely.
- Trim to Fit: Use your scissors to cut the photo to the right size to fit inside your frame.
- Frame Your “Ancestor”: Place the aged photo in your vintage frame. It will look like a real photograph of a spirit from the past. You can make a few and group them together on a table.
17. Scandinavian Ghost Village

Halloween decor can be cozy, cute, and modern. This minimalist Scandinavian-inspired look is simple and charming. A floating shelf holds a village of little white ceramic houses, their windows glowing warmly from within.
Simple black cutouts of pine trees add a touch of a spooky forest vibe. Below, a chunky knit blanket creates a soft, inviting texture. A few white pumpkins and black taper candles complete this clean and serene scene. It’s a gentle and stylish way to celebrate the season.
DIY Instructions: Simple Clay Ghost House
What You’ll Need:
- A block of white air-dry clay.
- A small craft knife or a plastic knife (ask an adult for help).
- A small cup of water.
- A battery-operated tealight candle.
Step-by-Step Guide:
- Roll Out the Clay: Take a piece of clay and roll it into a flat slab, about as thick as a cookie.
- Cut the Walls: With an adult’s help, use the knife to cut out four rectangles for the walls of your house. Make two of them slightly taller and cut them into a pointy house shape at the top.
- Cut Windows: Carefully cut out little squares for windows in the wall pieces.
- Assemble the House: Stand the wall pieces up and press the edges together. Use a tiny bit of water on your finger to smooth the seams where the walls meet. Leave the bottom open.
- Let It Dry: Let your clay house dry completely. This could take a day or two.
- Light It Up: Once it’s dry and hard, you can place your little house over a battery-operated tealight. The light will shine through the windows, making it look like a cozy ghost lives inside.
18. Naturalist’s Cabinet of Curiosities

For a look that is more scientific than supernatural, create a naturalist’s collection. This sophisticated decor feels like it belongs in a vintage museum. The shelves are filled with fascinating objects from the natural world, all displayed under glass cloches.
Bird’s nests, interesting bones, skulls, and insect specimens are all treated like precious artifacts. Framed charts of bugs and plants line the back of the shelves. This is an elegant and educational take on Halloween, celebrating the beautiful and sometimes strange side of nature.
DIY Instructions: Faux Framed Insect
What You’ll Need:
- A small shadow box frame.
- A plastic insect toy (like a beetle or butterfly).
- A hot glue gun.
- A small piece of paper and a pen.
Step-by-Step Guide:
- Prepare the Frame: Open up your shadow box frame and make sure the inside is clean.
- Glue the Insect: Put a dab of hot glue on the belly of your plastic insect toy. Carefully press it into the center of the back of the shadow box. Hold it for a few seconds until it sticks.
- Make a Label: On your small piece of paper, write a fancy, scientific-sounding name for your insect. You can just make one up!
- Attach the Label: Put a tiny bit of glue on the back of your label and stick it in the shadow box, right below your insect.
- Close and Display: Close up the shadow box frame. You now have your very own “rare” insect specimen to hang on the wall or place on a shelf.
19. Gilded Insect Menagerie

Turn creepy crawlies into chic works of art. This surprising theme uses insects as a motif but makes them glamorous with a coat of gold paint. A gallery wall of framed golden beetles and spiders creates a stunning and modern focal point.
The theme continues with pumpkins, both black and white, that serve as a perch for more gilded creatures. The simple color palette of black, white, and gold keeps the look sophisticated and cohesive. It proves that even the most unlikely subjects can be made beautiful and elegant.
DIY Instructions: Gilded Pumpkin Bugs
What You’ll Need:
- Plastic insect toys (spiders, beetles, flies).
- Gold spray paint.
- A craft pumpkin.
- A hot glue gun.
Step-by-Step Guide:
- Make the Bugs Gold: Take your plastic insect toys outside or to a well-ventilated area. Place them on some newspaper. Spray them with the gold spray paint, making sure to cover all sides. Let them dry completely.
- Heat the Glue Gun: With an adult’s help, get your hot glue gun ready.
- Attach the Bugs: Decide where you want your golden bugs to crawl on your pumpkin. Put a dab of hot glue on the underside of a dried, painted bug.
- Press It On: Quickly and carefully press the bug onto the pumpkin. Hold it in place for a few seconds until the glue sets.
- Create a Swarm: Add a few more bugs, making it look like they are crawling up the side of the pumpkin. Your creepy-crawly creation is now chic and ready to display!
20. Desert Ghost Vignette

For a unique and unexpected Halloween theme, look to the desert for inspiration. This style swaps traditional autumn elements for the earthy tones and textures of the Southwest. A large cow skull serves as a dramatic centerpiece on the wall.
Cacti in terracotta pots are mixed with white and pale green pumpkins. Small skulls are tucked amongst the plants, and a wooden bowl holds dried chilis and gourds. The overall look is rustic, natural, and just a little bit haunted, like a ghost town in the desert.
DIY Instructions: Mini Faux Cactus Pot
What You’ll Need:
- A mini terracotta pot.
- Green air-dry clay.
- A few toothpicks.
- A small handful of sand or tiny rocks.
Step-by-Step Guide:
- Fill the Pot: Put the sand or tiny rocks into your mini terracotta pot, filling it almost to the top. This will be the “soil.”
- Shape the Cactus: Take a piece of green air-dry clay and roll it into a cactus shape. You can make it tall and skinny, or round.
- Add Spines: Break your toothpicks in half. Gently poke the pointy ends of the toothpick halves all over your clay cactus to make it look like it has spines.
- “Plant” Your Cactus: Gently press the bottom of your finished clay cactus into the sand in your pot so it stands up.
- Let It Dry: Let the clay dry completely. Now you have a tiny, spooky desert plant to add to your Halloween decor.
21. The Witch’s Herb Garden

Create a corner that looks and smells like a real witch’s conservatory. This idea is for those with a green thumb who want to brew up some botanical magic. A simple baker’s rack is filled with potted herbs, both real and faux.
The secret to the spooky look is in the details. Bundles of herbs are hung to dry, and dark purple pumpkins are nestled among the pots. Handwritten labels with the names of magical plants like “Belladonna” and “Wormwood” complete the enchanting scene. It is a fresh and fragrant take on witchy decor.
DIY Instructions: Spooky Plant Markers
What You’ll Need:
- Wide craft sticks (like popsicle sticks).
- A black permanent marker.
- A wet tea bag.
Step-by-Step Guide:
- Write the Names: Take your black marker and write the name of a spooky or magical plant on each craft stick. You can use names like “Mandrake,” “Wolfsbane,” or “Nightshade.” Try to use a spooky, scratchy handwriting.
- Age the Wood: To make the markers look old, gently rub the wet tea bag all over the craft sticks, front and back. This will stain the wood a light brown color.
- Let Them Dry: Set the sticks aside and let them dry completely.
- Stake Your Plants: Once dry, your spooky plant markers are ready. You can stick them in the soil of your favorite houseplants to instantly give them a magical, witchy vibe for Halloween.
22. Haunted Ancestors Gallery Wall

Turn your hallway into a haunted mansion with a gallery of ghostly family portraits. This decor tells a story and creates a wonderfully chilling atmosphere. The key is to gather many ornate, vintage-style frames, preferably in gold or black.
Fill the frames with old-fashioned portraits, but add a spooky twist to a few. One might be covered by a black veil, another might have glowing eyes, and one might be a terrifying ghost. Wall-mounted candelabras add to the eerie, flickering light, making it feel like the eyes in the portraits are watching you.
DIY Instructions: Blacked-Out Ghost Portrait
What You’ll Need:
- An old picture frame with the glass removed.
- A piece of black fabric or felt, cut to the size of the frame opening.
- A piece of cardboard, also cut to the same size.
- Two small, white circle stickers (or white paint and a small brush).
- Glue.
Step-by-Step Guide:
- Prepare the Backing: Put a layer of glue on your piece of cardboard. Press the black fabric smoothly on top of the cardboard and let it dry. This will be your “portrait.”
- Add the Eyes: Take your two white circle stickers and place them on the black fabric where the eyes should be. If you don’t have stickers, you can use a small brush and a dot of white paint to make two glowing eyes.
- Frame Your Ghost: Once the eyes are in place, put the fabric-covered cardboard into the frame, just like you would a normal picture.
- Hang with Others: Your ghost portrait is ready! It looks extra spooky when you hang it on a wall surrounded by other normal-looking old portraits.
23. The Headless Horseman’s Mantel

This striking mantelpiece is a tribute to the ultimate Halloween ghost story. It combines rustic, equestrian elements with spooky touches to create a sophisticated and slightly scary scene. A leather saddle and riding helmet instantly bring the horseman to mind.
The addition of a long, black wig flowing from the helmet is a clever and creepy detail. Bare branches in a silver trophy vase add a touch of the haunted forest, while a glowing jack-o’-lantern sits on the hearth, waiting for the rider’s return. It’s a powerful and imaginative display.
DIY Instructions: Headless Rider’s Helmet
What You’ll Need:
- A black plastic toy riding helmet or any simple black hat.
- A cheap, long black wig from a costume shop.
- A hot glue gun or strong craft glue.
- A styrofoam head form (optional, but helpful).
Step-by-Step Guide:
- Set Up Your Helmet: Place the toy helmet on a table or on a styrofoam head form to keep it steady.
- Prepare the Wig: Look at the inside of the wig. You will be gluing the mesh part of the wig to the inside rim of the helmet.
- Glue the Wig: With an adult’s help, apply a line of hot glue along the back inside edge of the helmet.
- Press the Wig in Place: Quickly press the mesh part of the wig onto the glue. Hold it for a few seconds until it sticks. Add more glue along the sides if needed to make it secure.
- Display Your Creation: Let the glue dry completely. You can then place your headless horseman’s helmet on a mantel or a shelf, letting the long black hair hang down for a spooky effect.
24. Día de los Muertos Ofrenda

Celebrate with a vibrant and beautiful Day of the Dead altar. This display is not about being scary, but about honoring and remembering loved ones. The scene is bursting with color, from the bright paper banners (papel picado) to the rich orange of the marigold flowers.
An ofrenda, or altar, is built with multiple levels and covered with a colorful serape blanket. It is decorated with photos of ancestors, and offerings of their favorite things. The most iconic elements are the colorfully decorated sugar skulls that are placed all around the altar.
DIY Instructions: Simple Painted Sugar Skull
What You’ll Need:
- A white ceramic or plastic skull (from a craft store).
- Different colors of acrylic craft paint.
- A few small paintbrushes.
Step-by-Step Guide:
- Start with the Eyes: Sugar skulls often have flowers around the eyes. Pick a bright color and paint a circle around each eye socket. Then, using another color, paint little half-circles or “scallops” around the circle to look like petals.
- Decorate the Forehead: Paint a flower, a sun, or a pretty design on the forehead of the skull.
- Add Details to the Face: Use your small brushes to paint colorful swirls, dots, and lines on the cheeks and chin of the skull.
- Paint the Teeth: You can leave the teeth white, or you can paint a line across them and add little vertical lines to make them stand out.
- Let It Dry: Let your painted skull dry completely. You can make a few with different colors and designs and place them on a shelf to celebrate.
25. Siren’s Sunken Treasure

Lure your guests in with a mystical underwater scene. This decor imagines the treasure trove of a beautiful and dangerous siren. The display is built around shades of deep sea blue and the sparkle of lost treasure.
A fishing net is draped artfully, tangled with fairy lights and shells. A skull encrusted with pearls and jewels is the main attraction, looking like it has been at the bottom of the ocean for centuries. Glass vases filled with water and faux seaweed sit beside silver octopus figures and scattered coins.
DIY Instructions: Jeweled Pirate Skull
What You’ll Need:
- A plastic skull.
- A bag of craft jewels, flat-backed pearls, and small beads.
- Strong craft glue or a hot glue gun.
Step-by-Step Guide:
- Plan Your Design: Decide where you want to put your biggest jewels. It’s a good idea to put one big jewel in an eye socket or on the forehead to start.
- Start Gluing: With an adult’s help, put a dot of hot glue or craft glue on the back of your biggest jewel and press it onto the skull.
- Add More Jewels: Keep gluing on the bigger gems and pearls, spreading them out over the skull.
- Fill in the Gaps: Once your big jewels are in place, use smaller beads and pearls to fill in the empty spaces. Put a small amount of glue on the skull and sprinkle the tiny beads on top.
- Let It Dry: Let the glue dry completely. Your skull will now look like a piece of treasure recovered from a pirate shipwreck.
26. Midnight Bat Swarm

Create a dramatic and modern art installation with a swarm of bats. This simple idea has a huge visual impact. Using just black paper, a colony of bats appears to be flying out from behind a piece of furniture and up the wall towards the moon.
The key to this look is the sheer number of bats and their dynamic arrangement, which creates a sense of movement. A few bats on pumpkins or in a nearby picture frame tie the whole look together. It is a wonderfully simple and affordable way to make a big statement.
DIY Instructions: 3D Paper Bats
What You’ll Need:
- Black construction paper or cardstock.
- A pencil.
- Scissors.
- A bat-shaped stencil or cookie cutter (or you can draw one freehand).
- Sticky tack or double-sided tape.
Step-by-Step Guide:
- Trace Your Bats: Place your bat stencil on the black paper and trace around it with a pencil. Trace as many bats as you can fit on the paper. It’s good to have different sizes.
- Cut Them Out: Carefully cut out all of your bat shapes.
- Make Them 3D: Take one of your paper bats and fold the wings up on each side of the body. Don’t make a sharp crease, just a soft fold. This will make the bat’s wings pop out from the wall.
- Stick Them Up: Put a small piece of sticky tack or double-sided tape on the back of the bat’s body.
- Create Your Swarm: Start sticking the bats on the wall. Place them close together at the beginning to look like they are coming from one spot, then have them spread out as they fly up the wall.
27. Ghostly Silver Feast

Set a table for a glamorous gathering of ghosts. This elegant tablescape uses a monochrome palette of white, grey, and silver. The result is a shimmering, ethereal scene that feels both fancy and haunted.
The table is filled with tarnished silver trays, goblets, and candlesticks. Using old or thrifted silver is great for this look because the imperfections add character. White and silver-painted pumpkins are mixed in, along with silver acorns, creating a beautiful and cohesive display. A simple bouquet of white roses adds a touch of life to the ghostly feast.
DIY Instructions: Faux Tarnished Silver Pumpkin
What You’ll Need:
- A craft pumpkin.
- Silver metallic spray paint.
- Black acrylic craft paint.
- A paper towel.
- Newspaper.
Step-by-Step Guide:
- Paint It Silver: On a newspaper-covered surface, spray paint your pumpkin with the silver metallic paint. Cover the whole thing and let it dry completely.
- Add the “Tarnish”: Squeeze a little bit of black paint onto a plate. Dab your paper towel into the black paint, then dab most of it off onto the newspaper. You want very little paint on your paper towel.
- Wipe It On: Lightly wipe the paper towel with the black paint over the silver pumpkin. Focus on the grooves and the area around the stem. This will make the pumpkin look old and tarnished.
- Blend It: If you add too much black paint, you can wipe it off with a clean part of the paper towel. Keep dabbing and wiping until it looks like old silver.
- Let It Dry: Let the black paint dry. Your elegant, tarnished pumpkin is now ready for your ghostly table.
28. Glamorous Spider’s Lair

Who knew spiders could be so chic? This decor takes a classic creepy creature and gives it a glamorous makeover. A corner is transformed with dramatic black spiderwebs, but these are draped with shimmering gold chains.
The spiders themselves are the stars of the show. Large, glittery black and gold spiders crawl across the web and the wall. Even the pumpkins get the glam treatment, draped in gold chains. It’s a stylish and unexpected take on a Halloween staple.
DIY Instructions: Jeweled Spider
What You’ll Need:
- A plastic spider toy.
- Black or gold spray paint.
- A large, flat-backed rhinestone or jewel.
- Strong craft glue or a hot glue gun.
Step-by-Step Guide:
- Paint the Spider: Take your plastic spider outside and spray paint it one solid color, either black or gold. Let it dry completely.
- Choose Your Jewel: Pick out a big, sparkly rhinestone for the spider’s body.
- Glue the Jewel: With an adult’s help, put a good amount of hot glue or craft glue on the back of the jewel.
- Stick It On: Press the jewel firmly onto the main body part (the abdomen) of the painted spider.
- Let It Dry: Let the glue dry completely. You now have a fancy, jeweled spider that you can place on a web, a pumpkin, or a wall.
29. Bountiful Harvest Table

Celebrate the beauty and abundance of the autumn season. This look is less about spooky and more about creating a warm and inviting harvest atmosphere. It uses natural textures and a warm, neutral color palette.
A large wreath made of wheat is the main feature, hanging on the wall. The table is filled with cornucopias spilling out mini pumpkins and nuts. White pumpkins are mixed with gourds and arranged around large glass hurricane lamps with candles. The whole scene feels cozy, generous, and is a beautiful way to decorate for the entire fall season.
DIY Instructions: Mini Cornucopia
What You’ll Need:
- An ice cream cone (the pointy sugar cone kind).
- A wet tea bag.
- A small bowl or plate.
- Mini decorative items like tiny pumpkins, beads for “berries”, or nuts.
Step-by-Step Guide:
- Age the Cone: To make the ice cream cone look more like a woven cornucopia, gently rub the wet tea bag all over it. This will give it a light brown, rustic color.
- Let It Dry: Place the cone on a plate and let it dry completely.
- Fill It Up: Once it’s dry, it’s time to fill your mini cornucopia.
- Arrange Your Harvest: Carefully place your tiny pumpkins, nuts, and berries inside the opening of the cone, letting them spill out onto the plate.
- Display Your Bounty: You can place your mini cornucopia on a dinner plate as a decoration for a special fall meal, or group a few together on a shelf.
30. Spooky Greenhouse Terrariums

Combine a love of plants with a hint of Halloween spookiness. This display creates the feeling of a mad botanist’s greenhouse. A collection of glass terrariums and cloches are filled with beautiful green plants, moss, and rocks.
The spooky surprise is found nestled inside some of the jars. A black skull or a black pumpkin sits amongst the greenery, looking like a strange and exotic new specimen. This is a subtle, elegant, and clever way to add a touch of Halloween to your indoor garden.
DIY Instructions: Mini Spooky Terrarium
What You’ll Need:
- A small glass jar with a lid, or a small glass vase.
- A handful of small pebbles or gravel.
- A spoonful of potting soil.
- A small piece of moss.
- A tiny plastic skull or a mini black pumpkin.
Step-by-Step Guide:
- Add a Drainage Layer: Put a thin layer of pebbles at the bottom of your glass jar. This helps with water for real plants, but for a fake one, it just looks nice.
- Add Soil: Put a small layer of soil on top of the pebbles.
- Place Your Spooky Item: Nest your tiny skull or mini pumpkin in the center of the jar, pressing it into the soil a little bit.
- Add Moss: Gently place pieces of moss on the soil around your spooky item. This makes it look like a little spooky world.
- Finishing Touches: If you have a lid, you can place it on top. Your mini spooky terrarium is now complete and ready to be displayed on a bookshelf.
31. Art Deco Glamour

Channel the glitz and sophistication of the 1920s with this Art Deco-inspired Halloween decor. The look is defined by bold geometric patterns, a strict black and gold color palette, and luxurious details. A gallery wall of stylized Art Deco prints sets a glamorous tone.
Large black feathers in tall vases add height and drama. Below, pumpkins are painted with metallic gold stripes and sunbursts. This entire setup feels like a lavish party from a bygone era, proving Halloween can be exceptionally chic and polished.
DIY Instructions: Simple Art Deco Wall Art
What You’ll Need:
- A sheet of black cardstock paper.
- A gold metallic paint pen.
- A ruler.
- A simple black frame.
Step-by-Step Guide:
- Find Inspiration: Look up “simple Art Deco patterns” online. You’ll see lots of straight lines, sunbursts, and geometric shapes.
- Draw Your Design: Use your ruler and the gold paint pen to draw a design on the black paper. Start in the middle and draw straight lines coming out like rays of sunshine. Add some triangles or stepped shapes.
- Keep It Simple: The key to this style is clean, sharp lines. Don’t make it too complicated. The gold lines on the black paper will look very striking.
- Let it Dry: Make sure the paint from the pen is completely dry before you touch it.
- Frame Your Masterpiece: Place your finished drawing into the black frame. You can make a few different designs and hang them together for a beautiful gallery wall.
32. Mad Scientist’s Laboratory

Cook up some spooky fun with a mad scientist’s lab theme. This playful decor uses laboratory glassware to create a colorful and quirky scene. Beakers and flasks are filled with brightly colored water, suggesting strange and bubbling concoctions.
Toy syringes are placed in the beakers and test tube racks, adding to the laboratory feel. A whiteboard in the background with complicated formulas scribbled on it completes the look. Even the pumpkins get in on the experiment, with colorful paint dripping down their sides.
DIY Instructions: Colorful Lab Beakers
What You’ll Need:
- Some clear glass jars or vases in different shapes and sizes.
- Water.
- Food coloring (green, blue, red, yellow).
- Dry ice chips (ask an adult for help, and be very careful!).
Step-by-Step Guide:
- Set up your Lab: Arrange your different glass jars on a tray or table.
- Mix Your Potions: Fill each jar about three-quarters full with water. Add a few drops of a different food coloring to each jar and stir.
- Make it Bubble (Adults Only!): This part needs a grown-up. Have an adult put on gloves and use tongs to drop one or two small chips of dry ice into each jar of colored water.
- Watch the Magic: The dry ice will start to bubble and create a thick, spooky fog that spills over the sides of the jars.
- Enjoy the Show: The fog effect will last for a few minutes. Never touch the dry ice with your bare hands, as it is very cold and can hurt you.
33. The Sorcerer’s Secret Library

This decor creates the feeling of stepping into a hidden library filled with ancient spellbooks and magical secrets. The look is built around old, leather-bound books, skulls, and the mysterious glow of floating candles.
Books are stacked high on dark wooden shelves, some with wax seals or strange titles. Skulls are used as bookends, watching over the forbidden knowledge. The floating candles, which are battery-operated, are the most magical element, hovering mysteriously among the bookshelves. It is a dark, academic, and enchanting scene.
DIY Instructions: Faux Spellbook
What You’ll Need:
- An old hardcover book you don’t need anymore.
- Brown or black acrylic paint.
- A paper towel.
- A plastic spider or a skeleton key.
- A hot glue gun.
Step-by-Step Guide:
- Paint the Book: Paint the entire cover of the book, front, back, and spine, with your brown or black paint. Let it dry.
- Make it Look Old: Squeeze a little paint onto a plate. Dab your paper towel in it, then wipe most of it off. Lightly rub the paper towel over the book cover to give it an old, worn look.
- Add a Title (Optional): You can use a gold paint pen to write a spooky title like “Spells” or “Potions” on the spine or the front cover.
- Attach a Spooky Object: With an adult’s help, use the hot glue gun to attach a plastic spider or a cool-looking old key to the front of the book.
- Display Your Grimoire: Place your finished spellbook on a shelf with some candles or a skull.
34. Friendly Garden Ghosts

Who says a garden has to be scary for Halloween? This charming decor turns a porch or patio into a sweet and spooky floral display. The look uses a soft, all-white color palette that feels gentle and pretty.
White pumpkins are hollowed out and used as beautiful vases for bouquets of white roses, baby’s breath, and dusty miller. Little cheesecloth ghosts with cute, simple faces are tucked among the flowers and pots, looking more friendly than frightening. It is a lovely and unexpected way to decorate an outdoor space.
DIY Instructions: White Pumpkin Flower Vase
What You’ll Need:
- A medium-sized white pumpkin (real or fake).
- A knife for carving (an adult’s job).
- A spoon or scoop.
- A small glass or plastic cup that fits inside the pumpkin.
- Fresh flowers.
Step-by-Step Guide:
- Carve the Pumpkin (Adults Only!): Ask an adult to carefully cut a circle around the stem of the pumpkin, just like when you carve a jack-o’-lantern.
- Hollow It Out: If you are using a real pumpkin, use a spoon to scoop out all the seeds and stringy parts from the inside.
- Insert the Cup: Place your small plastic or glass cup inside the hollowed-out pumpkin. This will hold the water for your flowers and keep the pumpkin from getting soggy.
- Add Water and Flowers: Fill the cup with water. Trim the stems of your fresh flowers and arrange them in the cup.
- Display Your Bouquet: Your beautiful pumpkin vase is complete! It will look lovely as a centerpiece on a table or sitting on your front steps.
35. Vintage Midnight Circus

Step right up to the spookiest show on earth! This decor creates the feeling of a haunted circus from a black and white movie. The entire scene is done in black, white, and grey, which makes it incredibly striking and dramatic.
A black and white striped tablecloth sets the stage. Pumpkins are painted with harlequin and striped patterns to match. The display is filled with vintage circus items, like a small Ferris wheel and old photos of circus performers. Tall black and white feathers add a final touch of eerie elegance.
DIY Instructions: Harlequin Pattern Pumpkin
What You’ll Need:
- A white or black craft pumpkin.
- Painter’s tape.
- Black and white acrylic paint.
- A paintbrush.
Step-by-Step Guide:
- Start with a Base Coat: Make sure your pumpkin is one solid color to start, either white or black.
- Tape Your Design: Carefully place strips of painter’s tape on the pumpkin to create a diamond (harlequin) pattern. Press the edges of the tape down firmly to prevent paint from leaking underneath.
- Paint the Second Color: If you have a white pumpkin, paint the open spaces black. If you have a black pumpkin, paint them white. Paint right over the tape.
- Let it Dry (Almost!): Wait until the paint is almost dry, but still a tiny bit tacky.
- Peel the Tape: Carefully and slowly peel off the painter’s tape. This should leave you with clean, sharp lines. Let the pumpkin dry completely before displaying it with your other circus items.
36. The Raven’s Nest
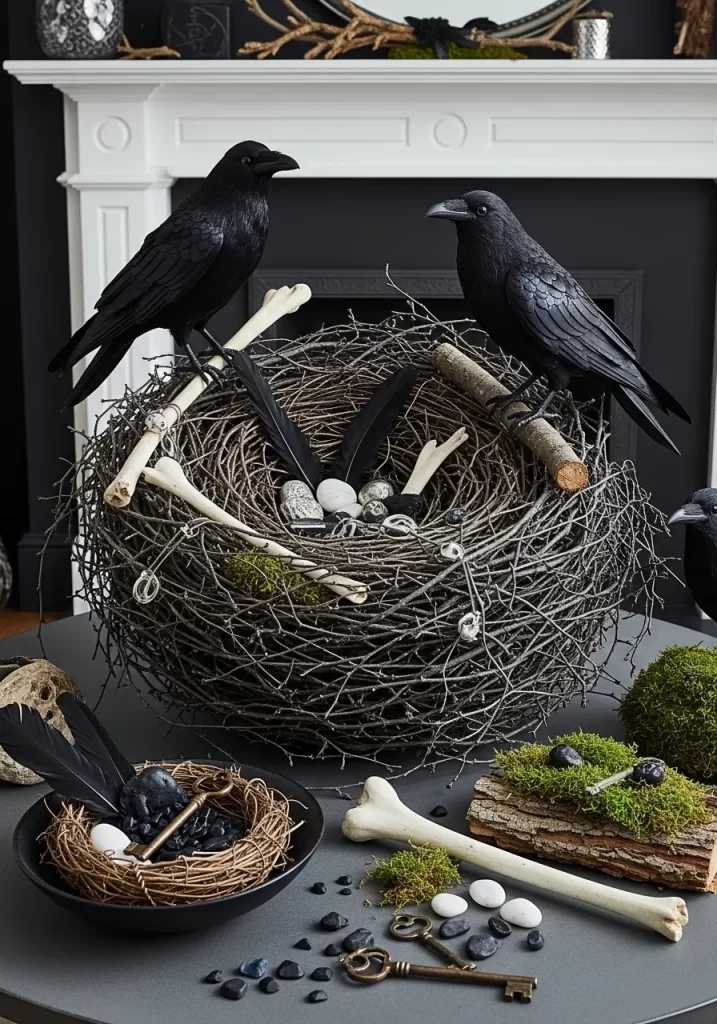
This decor creates a fascinating and slightly unsettling natural scene. It imagines the nest of a clever raven who collects strange and mysterious treasures. A large, gnarled grapevine nest is the centerpiece of the display.
Inside the nest, instead of just eggs, there are raven feathers, small animal bones, and old, tarnished keys. Two large black ravens are perched on the edge, guarding their hoard. The whole scene is placed on a simple grey surface, making the dark, complex textures of the nest stand out.
DIY Instructions: Mini Treasure Nest
What You’ll Need:
- A small grapevine wreath (from a craft store).
- A handful of craft moss.
- A few black craft feathers.
- An old key.
- A few small, white pebbles or beads.
- A hot glue gun.
Step-by-Step Guide:
- Shape the Nest: A grapevine wreath already looks a lot like a nest. You can gently pull at some of the twigs to make it look a little messier and more natural.
- Add Moss: Use a hot glue gun to add bits of moss to the inside and outside of the wreath to make it look softer.
- Place Your Treasures: Arrange your treasures inside the nest. Place the old key in the center.
- Add the Details: Glue a few black feathers so they are sticking up out of the moss. Scatter the white pebbles or beads around to look like eggs or collected stones.
- Let It Cool: Let the glue cool down. Your mysterious raven’s nest is now ready to be put on display.
37. Modern Apothecary’s Poison Shelf
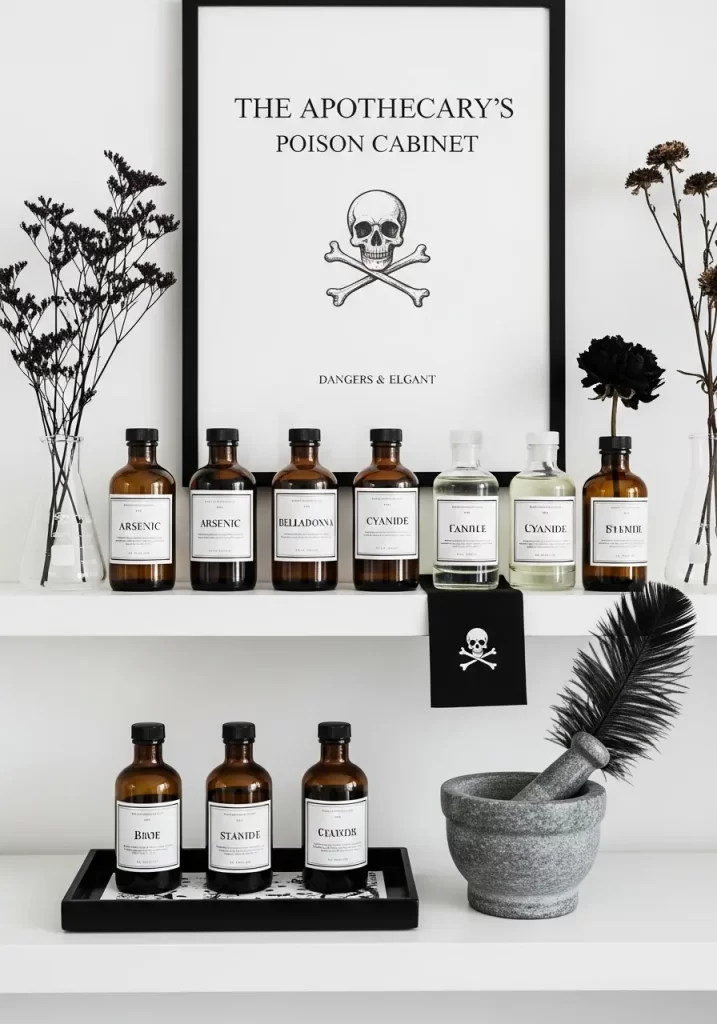
This is a clean, minimalist, and modern take on the classic apothecary theme. The look is more like a dangerous chemistry lab than a dusty old shop. The stark black and white color scheme creates a very crisp and slightly sinister feel.
A framed print of “The Apothecary’s Poison Cabinet” sets the scene. Below, two shelves are lined with amber and clear glass bottles. Each bottle has a simple, clean label with the name of a deadly poison, like “Arsenic” or “Cyanide.” A few dried black flowers and a mortar and pestle complete this deadly but elegant display.
DIY Instructions: Poison Bottle Labels
What You’ll Need:
- A sheet of white sticker paper (or plain paper and glue).
- A computer and printer.
- Scissors.
- Empty glass bottles.
Step-by-Step Guide:
- Design Your Labels: On a computer, use a simple word processor. Choose a clean, simple font. Type the names of different poisons, like “BELLADONNA” or “CYANIDE.” Make a simple rectangle around each name.
- Print the Labels: Print your designs onto the sheet of sticker paper. If you are using plain paper, just print it normally.
- Cut Them Out: Carefully cut out each rectangular label.
- Stick Them On: Peel the backing off your sticker labels and carefully stick them onto the front of your empty glass bottles. If you used plain paper, just use a glue stick to attach them.
- Line Them Up: Arrange your finished poison bottles in a neat row on a shelf for a display that is both clean and creepy.
38. Ghost of the Samurai

This unique Halloween theme blends Japanese minimalism with a ghostly aesthetic. The decor is very clean, calm, and deliberate. It uses a simple color palette of white, black, and red with natural textures.
A white pumpkin is beautifully hand-painted with a Japanese kanji character for “ghost.” Bare branches are set in a smooth black stone, resembling a piece of ikebana art. A samurai helmet, a painted fan, and a small bamboo fountain complete this serene and spooky scene.
DIY Instructions: Kanji Calligraphy Pumpkin
What You’ll Need:
- A white craft pumpkin.
- A printout of a Japanese kanji character you like (like the one for “oni” which means demon or ogre).
- A pencil.
- A black paint pen or a small brush and black paint.
Step-by-Step Guide:
- Choose Your Character: Look online and find a simple kanji character that you think looks cool. Print it out.
- Transfer the Design: This is a cool trick. Scribble all over the back of the printed paper with your pencil, covering the area behind the character.
- Trace It: Flip the paper over and place it on your pumpkin. Carefully trace the outline of the kanji character with your pencil. When you lift the paper, a faint pencil outline of the character will be left on the pumpkin.
- Paint It In: Carefully fill in the outline with your black paint pen or brush. Try to make your strokes look like they were done with a calligraphy brush.
- Let it Dry: Let the paint dry completely. You now have a beautiful and unique pumpkin for your display.
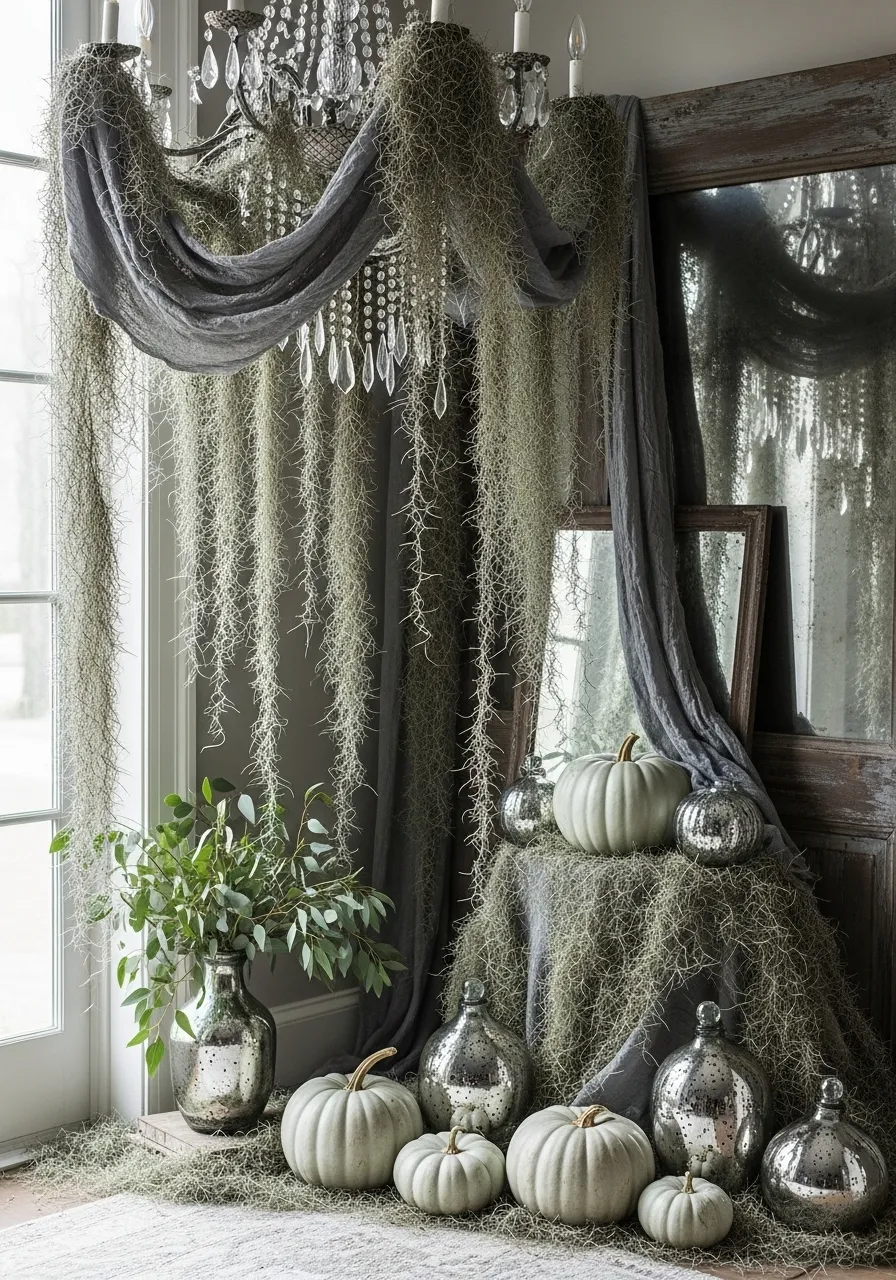
39. Southern Gothic Swamp

This decor is dripping with moody, southern gothic atmosphere. The scene feels like a beautiful, decaying mansion being overtaken by a haunted swamp. The main feature is the abundance of Spanish moss, which hangs from a chandelier and drapes over everything.
A color palette of soft grey-green and tarnished silver adds to the ethereal, aged look. Pale green and white pumpkins are mixed with mercury glass gourds and vases. This style is incredibly romantic, mysterious, and a little bit spooky.
DIY Instructions: Faux Mercury Glass Pumpkin
What You’ll Need:
- A craft pumpkin (a plastic or glass one works best).
- Krylon Looking Glass spray paint.
- A spray bottle with a mixture of half vinegar, half water.
- A paper towel.
Step-by-Step Guide:
- Prepare your Station: This can be a bit messy, so do it outside on some newspaper.
- Mist the Pumpkin: Lightly spritz the outside of your pumpkin with the vinegar and water mixture. You want little droplets, not a solid sheet of water.
- Spray with Looking Glass Paint: Immediately spray a light coat of the Looking Glass paint all over the wet pumpkin. The paint will react with the water droplets.
- Blot and Repeat: Gently blot the pumpkin with a paper towel. This will lift some of the paint where the water drops were, creating the spotty, aged look of mercury glass.
- Build Layers: Repeat the process of misting, spraying, and blotting a few more times until you are happy with how it looks. Let it dry completely.
40. Gothic Gargoyle Guardian
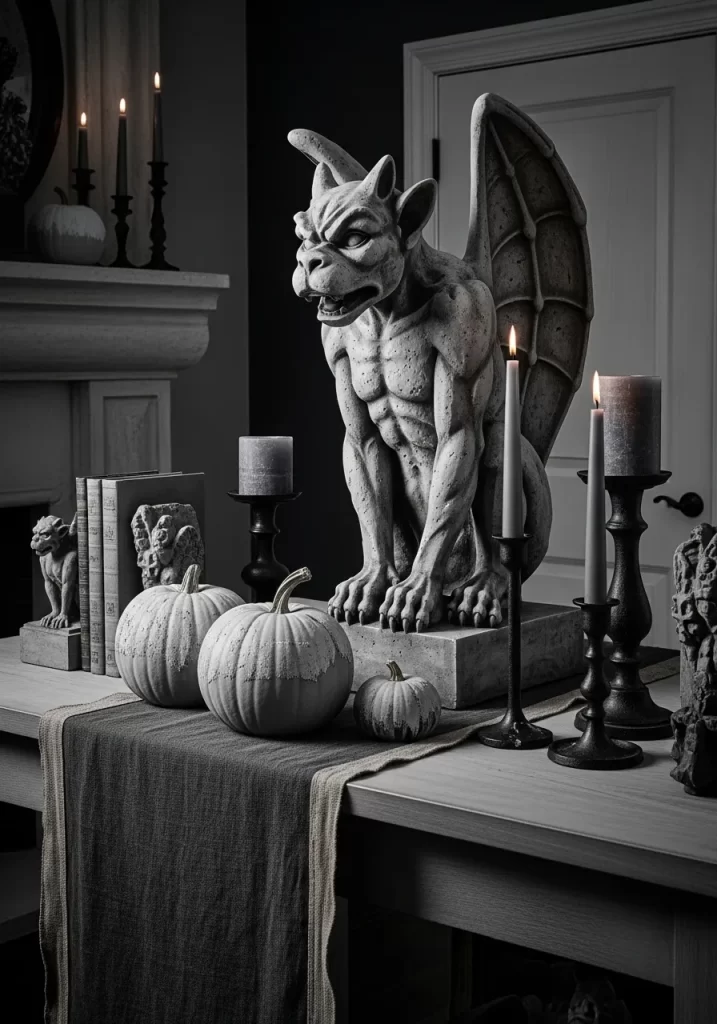
Give your home the ancient, imposing feel of a gothic cathedral. This decor uses strong, architectural elements to create a powerful and moody scene. The undisputed star is a large, stone-like gargoyle statue, who sits as a guardian over the space.
The color palette is a simple and dramatic monochrome of grey and black. The gargoyle is surrounded by pumpkins with a rough, stone-like texture and tall black candlesticks. This look is bold, dramatic, and for those who appreciate classic gothic horror.
DIY Instructions: Faux Stone Pumpkin
What You’ll Need:
- A craft pumpkin.
- Grey stone-textured spray paint.
- Black and white acrylic craft paint.
- A sponge or a crumpled paper towel.
Step-by-Step Guide:
- Apply the Stone Texture: In a well-ventilated area, spray your pumpkin all over with the stone-textured spray paint. This special paint has little flecks in it that will make the pumpkin look and feel like real stone. Let it dry completely.
- Add Shadows: Squeeze a little black paint onto a plate. Dip your sponge into the paint, then dab most of it off. Lightly dab the black paint into the grooves and around the stem of the pumpkin to create shadows.
- Add Highlights: Now do the same thing with the white paint. Lightly dab the white paint on the raised parts of the pumpkin to make them stand out.
- Blend and Dry: Keep dabbing with black and white until your pumpkin looks like an old, weathered stone carving. Let it dry completely before displaying it with your gargoyle.
Halloween decor does not have to be loud or childish. It can be a reflection of your own style. It can be sophisticated, dramatic, and deeply atmospheric. Through these 40 ideas, we have explored the many ways to elevate the season. From a simple velvet pumpkin to a dramatic haunted gallery wall, elegance is always within reach.
Let these concepts inspire you to play with texture, light, and story. Take the DIY guides and make them your own. This year, create a home that doesn’t just scream Halloween, but elegantly whispers it.
Key Takeaways
- Embrace a Limited Palette: Many striking looks rely on simple color schemes like black and white, monochrome metallics, or deep jewel tones.
- Texture is Everything: Velvet, tarnished silver, rough moss, and smooth glass add depth and interest to your decor.
- Lighting Creates the Mood: The soft, flickering light from candles or the sparkle of fairy lights is essential for an eerie and elegant atmosphere.
- Nature is Your Ally: Bare branches, dried herbs, gourds, and flowers are powerful tools for creating a sophisticated, organic feel.
- Tell a Story: The most memorable decor creates a scene, whether it’s a witch’s herb garden, a vampire’s feast, or a mad scientist’s lab.