Opening a beautiful gift is exciting. However, the first impression is often the wrapping. Dull paper and sloppy bows simply do not cut it anymore. Your thoughtful present deserves an equally elegant presentation.

We collected 42 stunning ways to elevate your gift giving immediately. These concepts use texture, striking color, and unique materials to look utterly luxurious. Transform your next gift from ordinary to unforgettable.
1. Sophisticated Monochrome Banding
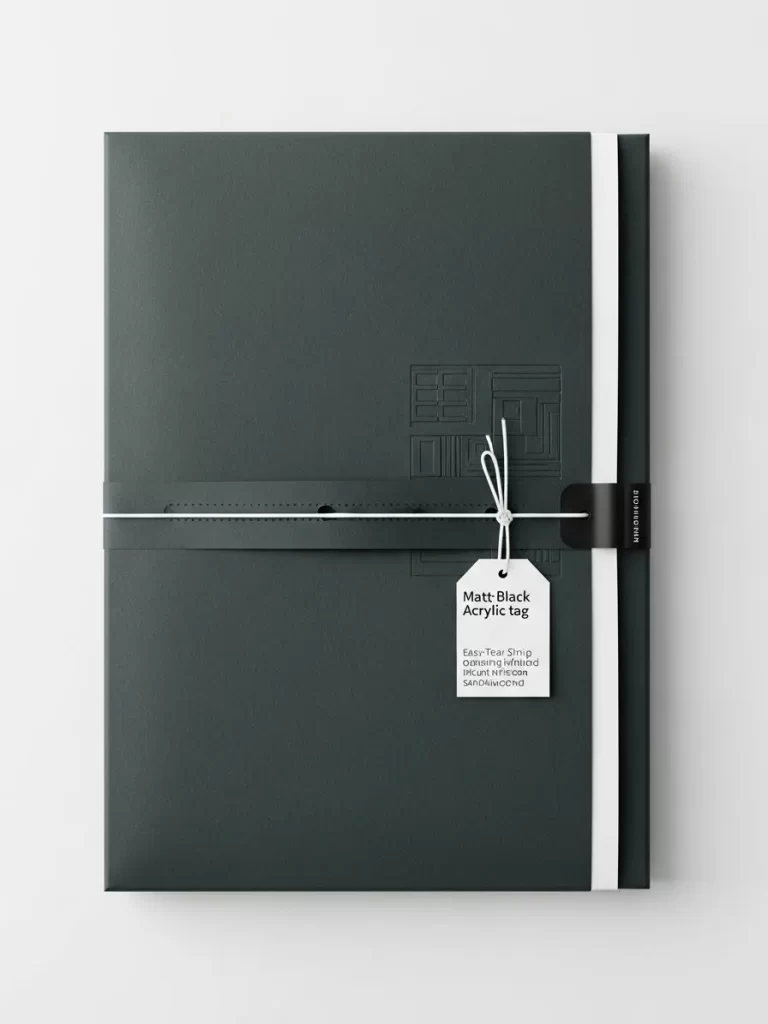
This presentation relies on high contrast and textural subtlety to create a luxurious, understated look. The main wrapping is a deep matte charcoal or nearly black paper. This dark surface instantly gives the package a serious, expensive feel.
A single, crisp white vertical strip runs along one edge, providing a sharp break from the darkness. Further defining the edge is a narrow black paper strip that contains an embossed or debossed pattern, adding a hidden textural detail.
The package is secured with a thin white twine, tied simply across the center. A rectangular white tag hangs from the twine, featuring bold, minimalist typography. This design proves that elegance comes from clean lines and thoughtful use of negative space.
Material Required
- Heavy matte black or charcoal wrapping paper
- Thick, smooth white paper strip
- Narrow matte black paper strip (stamped with a subtle pattern, optional)
- Plain white cardstock tag
- Thin white cotton twine
- Black paper or thin ribbon (for the horizontal band detail)
Equipment Required
- Sharp scissors
- Double sided tape or strong clear adhesive
- Embossing tool or stamp (optional)
- Single hole punch
DIY Instruction
- Wrap the Base: Carefully wrap your gift box using the matte black paper. Ensure all edges are crisp for a professional appearance. Use double sided tape underneath the flaps to keep the surface perfectly seamless.
- Add the White Stripe: Cut the thick white paper strip so it is long enough to wrap completely around the box, vertically. Center this white strip along one edge of the wrapped gift. Secure the ends underneath the box with adhesive.
- Create the Horizontal Detail: Wrap a narrow black ribbon or paper strip horizontally around the entire package. Position it about two thirds of the way down. Secure the ends neatly underneath the box.
- Add the Patterned Band (Optional): If using, adhere the subtly embossed narrow black strip vertically next to the main white stripe, securing its ends underneath.
- Tie and Tag: Wrap the thin white cotton twine around the package, horizontally, crossing the white and black vertical elements. Loop the twine around the middle of the box.
- Secure the Tag: Thread the twine through the hole in the white cardstock tag. Tie the twine securely in a simple knot on the front to anchor the tag in place.
2. Furoshiki Silk Elegance
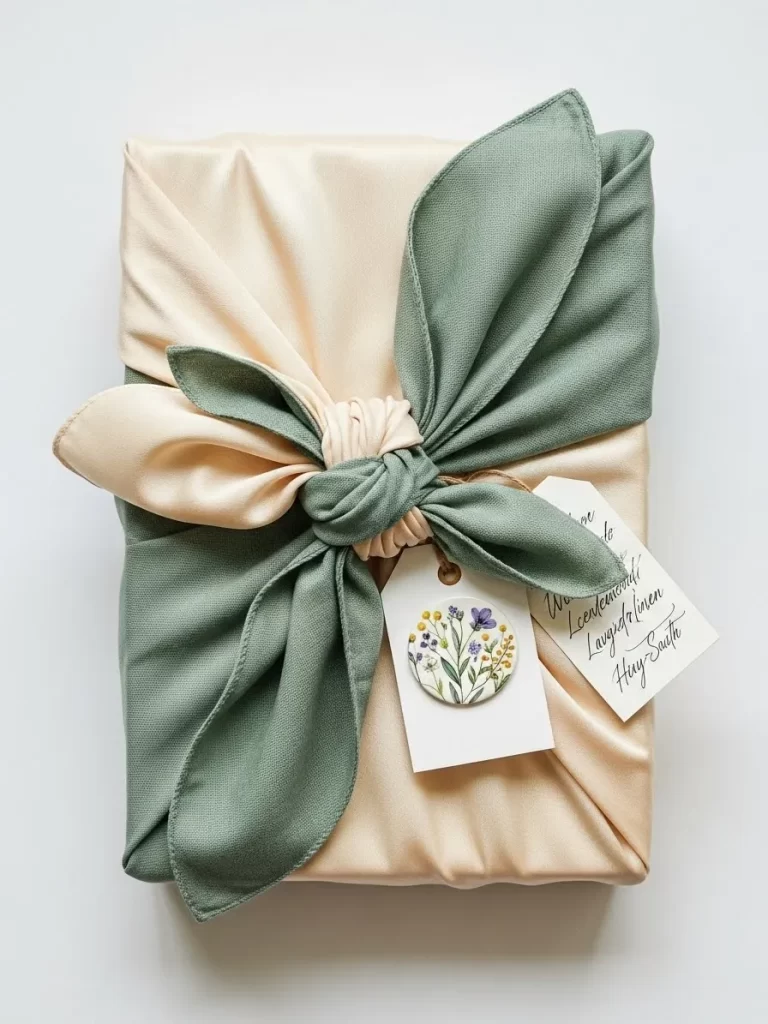
This beautiful presentation utilizes the ancient Japanese art of Furoshiki, using cloth instead of disposable paper. The technique creates a lovely soft texture and a much more luxurious feel than standard wrapping. Here, a light peach or cream satin provides the base layer.
The accent piece is a sage green fabric, creating a pleasing contrast against the silky background. The fabric is carefully knotted at the top, forming large, flowing loops that resemble a sophisticated bow. This method is incredibly environmentally conscious, as the fabrics can be reused repeatedly.
Dainty tags attached with natural twine finish the package beautifully. One tag features a hand painted botanical design, adding a thoughtful, artisanal touch. The overall look is soft, airy, and truly high end, proving that wrapping itself can be part of the gift.
Material Required
- One large square piece of light cream or peach satin or silk fabric (for the main wrap)
- One slightly smaller square piece of sage green linen or cotton fabric (for the knot detail)
- Two plain white cardstock tags
- Thin natural jute twine
- Small round decorative element with a botanical design
Equipment Required
- Sharp scissors (for cutting twine)
- Fine tipped pen (for writing on tags)
DIY Instruction
- Lay the Main Fabric: Place the cream colored fabric flat on a table, oriented like a diamond. Center the gift box diagonally in the middle of the fabric.
- Initial Folds: Take the top and bottom corners of the fabric. Bring them up over the gift box and tie them together in a loose, single knot directly on top of the box.
- Tie the Accent Fabric: Place the smaller, sage green fabric flat, also like a diamond. Center the wrapped box on top of this green fabric.
- Create the Ears: Take the two remaining corners (the ones pointing left and right) of the sage green fabric. Pull them up and tie them together in a secure, tight knot over the box. The resulting ends should look like flowing, broad loops or “bunny ears.”
- Secure the Knot: Adjust the knots so the cream fabric and the green fabric are blended neatly. The green knot should sit right over the cream knot. Ensure the flowing green fabric loops are artfully arranged.
- Attach the Tags: Thread the jute twine through the holes in the two cardstock tags. Tie the decorative round element to the twine near the tags for extra flair. Secure the entire tag assembly by tying the twine around the base of the fabric knots.
3. Sculptural Accordion Ring
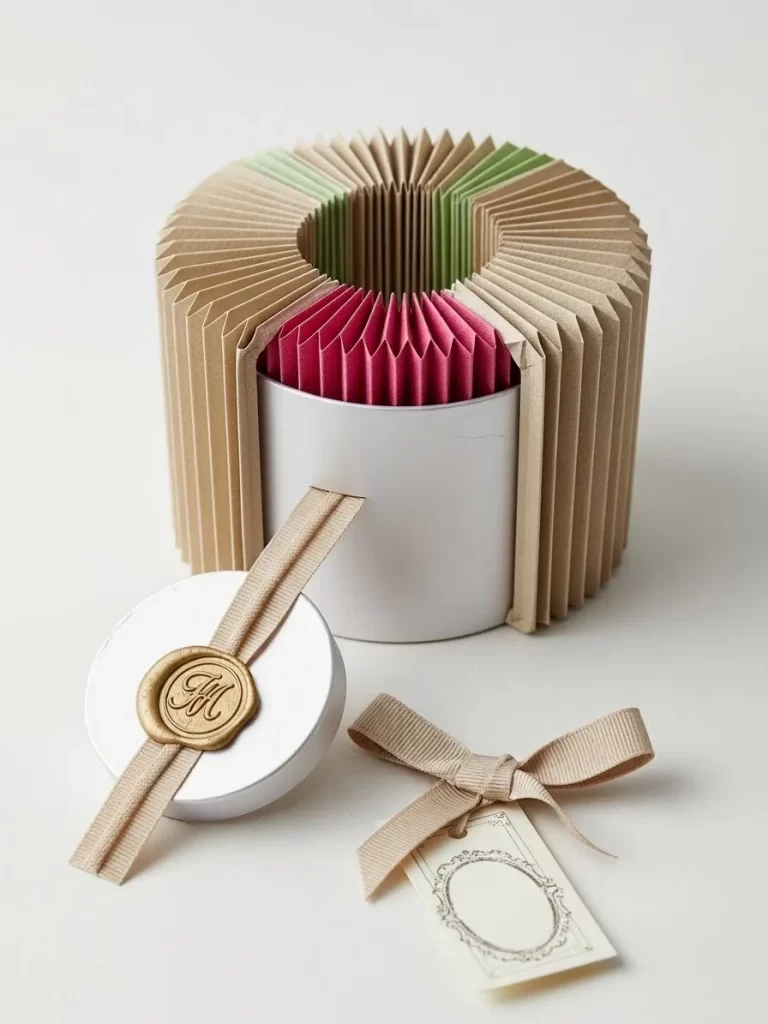
This inventive technique transforms a simple cylindrical box into a dramatic, sculptural centerpiece. The design relies on the stunning texture created by finely pleated kraft paper. The accordion folds give the wrapping incredible dimension and visual weight.
The main wrapping is natural, earthy kraft paper, providing a beautiful neutral texture. Hidden layers of bright color peek out from the interior of the accordion folds. Bright magenta and light spring green segments add a surprising and delightful pop of color when viewed from above.
A round white lid, adorned with a simple, flat gold wax seal, finishes the piece. The seal features a decorative initial, lending a regal, customized feeling. This is a marvelous way to make a smaller gift feel substantial and exceptionally artistic.
Material Required
- Plain white cylindrical gift box with a separate lid
- Long strips of sturdy kraft paper
- Small strips of bright magenta and lime green colored paper
- Thin taupe or champagne colored woven ribbon
- Gold wax seal stamp and gold sealing wax
- Plain white cardstock tag with decorative border
Equipment Required
- Ruler and pencil
- Scoring tool or bone folder
- Hot glue gun and glue sticks
- Scissors
DIY Instruction
- Measure and Score the Paper: Measure the height of your cylindrical box. Cut long strips of kraft paper to this exact height. Using the scoring tool, score the entire length of the paper strip at very narrow, consistent intervals (e.g., every half inch or less).
- Create the Pleats: Fold the scored kraft paper strip back and forth along the lines, creating a crisp accordion fold. Repeat this process until you have enough pleated paper to wrap around the entire box.
- Add Color Detail: Glue small strips of the magenta and green paper onto the inside valley of a few of the accordion folds. Distribute these colors evenly around the strip.
- Form the Ring: Apply a line of hot glue along the side of the plain white box. Press the base of the pleated kraft paper strip against the glue, wrapping it tightly and evenly around the cylinder to form the external ring. Secure the ends of the strip with glue.
- Seal the Lid: Melt the gold sealing wax according to the manufacturer’s directions. Drip the wax onto the center of the white box lid. Press the initialed wax seal stamp firmly into the melted wax and allow it to cool.
- Finish with Ribbon: Wrap the thin woven ribbon vertically around the box lid and tie it into a small, neat bow on top of the sealed wax. Attach the tag to the bow with a small piece of twine.
4. Celestial Star Chart Folder
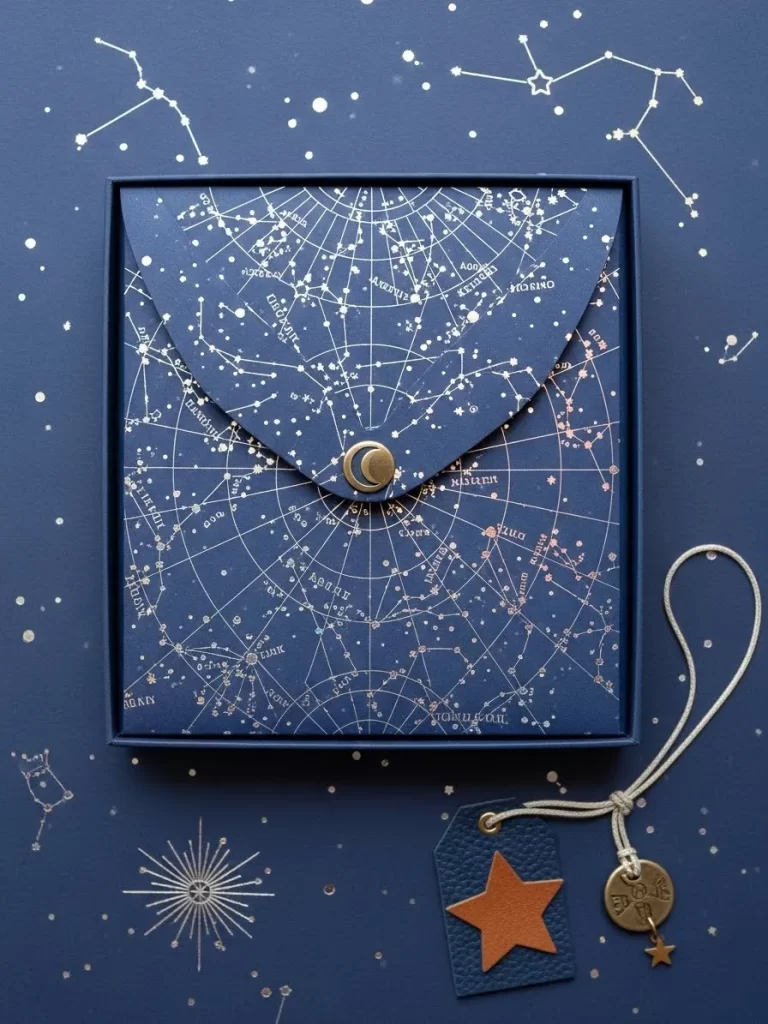
This wrapping style is much more than simple paper; it is a beautifully constructed envelope or folder. The deep indigo color immediately evokes the mystery and grandeur of the night sky. Fine gold and rose gold foil tracing a star chart covers the entire surface.
The folder is created from heavy cardstock, giving the presentation a structural, expensive feel. Instead of tape, the closure features a small brass or gold toned fastener with a tiny crescent moon detail. This simple hardware provides a sturdy and luxurious seal.
Adding to the theme are two layered tags: one is a deep blue leather star shape, and the other a small brass charm. The contrasting textures of the paper, metal, and leather make this an incredibly tactile and memorable presentation. This concept is exceptionally thoughtful for anyone interested in astronomy.
Material Required
- Heavy indigo cardstock printed with a gold celestial map design
- Small decorative brass or gold toned button closure (with crescent moon detail)
- Small piece of contrasting color leather or heavy cardstock (to cut star shape)
- Metallic gold coin charm or disc
- Thin ivory or cream cord
- Leather hole punch
Equipment Required
- Sharp scissors or craft knife
- Ruler
- Adhesive (for securing envelope flaps)
- Hammer (if required for button closure installation)
DIY Instruction
- Construct the Folder: Cut the celestial cardstock into the required shape to create a square envelope or folder. Fold the sides in neatly over the gift, ensuring a clean edge where the top flap meets the body of the folder. Secure the bottom and side seams with strong adhesive.
- Install the Fastener: Following the hardware instructions, install the decorative button closure on the top flap. Make sure the corresponding catch or mechanism is firmly secured on the body of the folder so the flap closes cleanly in the center.
- Prepare the Tags: Cut the contrasting leather or cardstock into a neat star shape. Use the leather hole punch to create a hole in one point of the star and one in the gold coin charm.
- Assemble the Cord: Cut a long piece of the ivory cord. Thread one end through the star and the other end through the gold coin charm.
- Attach the Tags: Loop the remaining portion of the cord around the base of the button closure. Tie the cord in a simple knot, letting the tags dangle freely near the corner of the package.
5. Minimalist Botanical Wrap
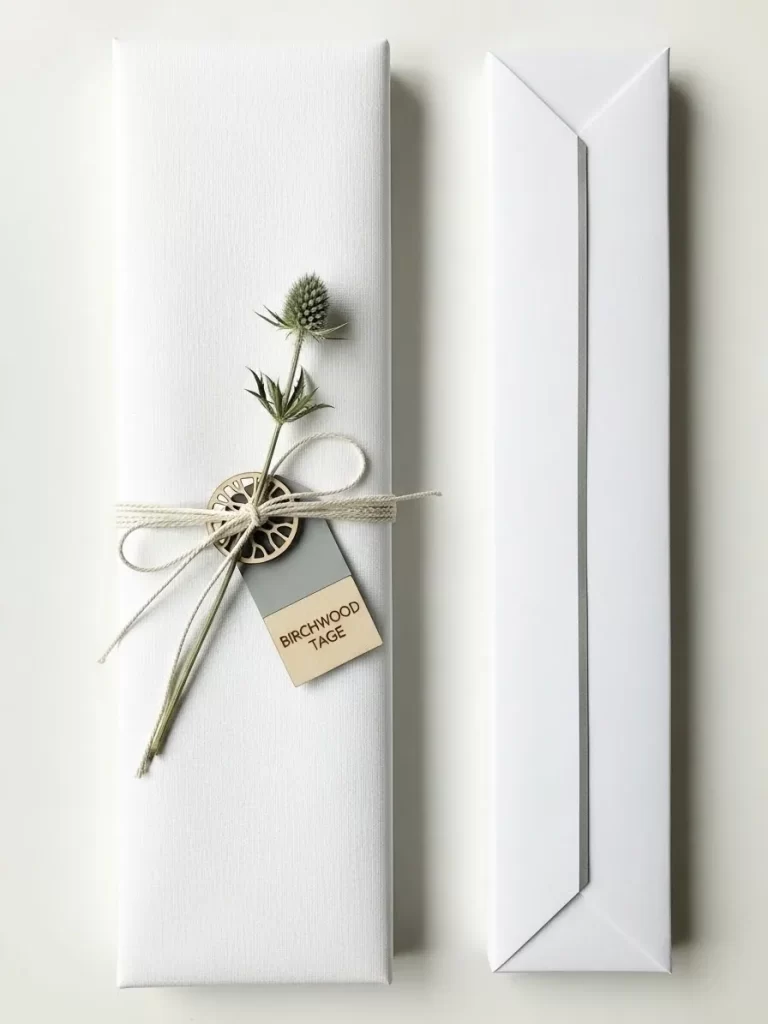
Clean, crisp white wrapping paper provides an elegant backdrop for a naturally inspired embellishment. The simplicity of the all white wrap ensures the focus remains on the single, carefully chosen floral element. This technique relies on beautiful texture and understated adornment.
The wrapping paper has a subtle linen or canvas texture, giving it a heavier, more artisanal quality than cheap paper. A double layer of natural twine is used to secure the tag and the decoration. The twine adds a wonderful homespun texture that contrasts with the smooth white paper.
A single dried thistle or small spiky flower stem is tucked under the twine, providing a sophisticated touch of color and form. The tags are also natural: a small wooden one layered over a neutral cardstock tag. This arrangement demonstrates how monochromatic schemes can be immensely luxurious.
Material Required
- Heavy, textured matte white wrapping paper (linen or canvas texture preferred)
- Natural colored thick jute twine or cotton string
- One small dried thistle or other interesting dried flower/seed pod
- Small gray cardstock tag
- Small wooden tag (birch or similar light wood)
Equipment Required
- Sharp scissors
- Double sided tape (for clean wrapping)
DIY Instruction
- Wrap the Gift: Neatly wrap your rectangular gift box using the white textured paper. Use double sided tape along all seams and folds for the cleanest possible finish.
- Measure the Twine: Cut a long length of jute twine, enough to wrap around the package twice and leave tails for a bow.
- Create the Bundle: Lay the dried thistle stem horizontally across the front center of the wrapped gift. Place the wooden tag and the gray cardstock tag near the stem.
- Wrap and Secure: Begin wrapping the twine around the gift horizontally, making two passes side by side. Ensure the twine holds the stem and tags in place.
- Tie the Bow: Bring the ends of the twine together on the front of the package. Tie them into a neat, secure knot directly over the stem and tags. Finish with a simple, small bow. Trim the excess twine neatly.
6. Regal Velvet Envelope
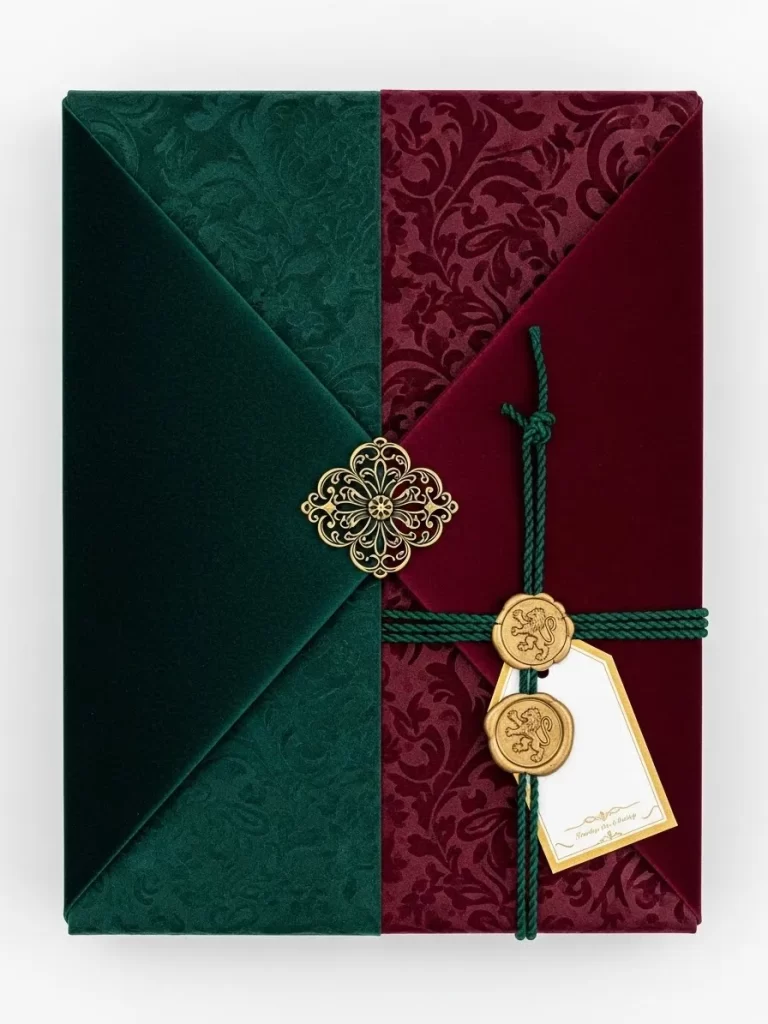
This design features a sumptuous, rich material palette reminiscent of royal court attire. The main wrapping is a deep, velvety fabric, split dramatically into two contrasting jewel tones: emerald green and burgundy red. This creates a luxurious tactile experience.
The fabric is folded in an envelope style, with the seams creating sharp, geometric points where the colors meet. An elaborate, vintage style gold filigree brooch acts as the central closure. The metal detailing provides a wonderful, ornate focal point.
Further ornamentation is provided by deep green braided cord wrapped around the package. Two matching gold wax seals, bearing a lion or crest, secure a simple gold edged tag. The combination of velvet, gold, and deep color feels extremely formal and expensive.
Material Required
- Deep emerald green velvet fabric square
- Rich burgundy patterned velvet or textured fabric square
- Small gold filigree brooch or ornate charm
- Deep green braided cord or thick twine
- Gold sealing wax and seal with an elaborate crest or initial
- Gold edged ivory cardstock tag
Equipment Required
- Hot glue gun and glue sticks
- Sharp scissors
- Lighter or melting spoon (for wax seal)
DIY Instruction
- Prepare the Fabric: Place the gift box diagonally on the center of the emerald velvet square. Do the same with the burgundy fabric. You will essentially use two overlapping fabric squares to create the dual color look.
- Create the Envelope Folds: Bring the opposite corners of the fabric up and fold them neatly over the center of the package, creating four sharp, pointed flaps that meet in the middle. Use a minimal amount of hot glue beneath the fabric corners to hold the folds firmly in place. Ensure the green covers one half and the red covers the other.
- Attach the Brooch: Apply a dot of hot glue to the exact center where the four points meet. Carefully press the back of the gold filigree brooch onto the glue to secure it as the closure point.
- Wrap the Cord: Cut a generous length of the green braided cord. Wrap it around the entire box, both horizontally and vertically, crossing neatly at the center. Secure the cord with a knot on the front, near the right seam.
- Seal the Tag: Attach the gold edged tag to the cord using a short piece of twine. Create the two gold wax seals on the cord near the tag, allowing the gold to melt slightly onto the cord for a secure, impressive finish.
7. Earth Toned Layered Texture
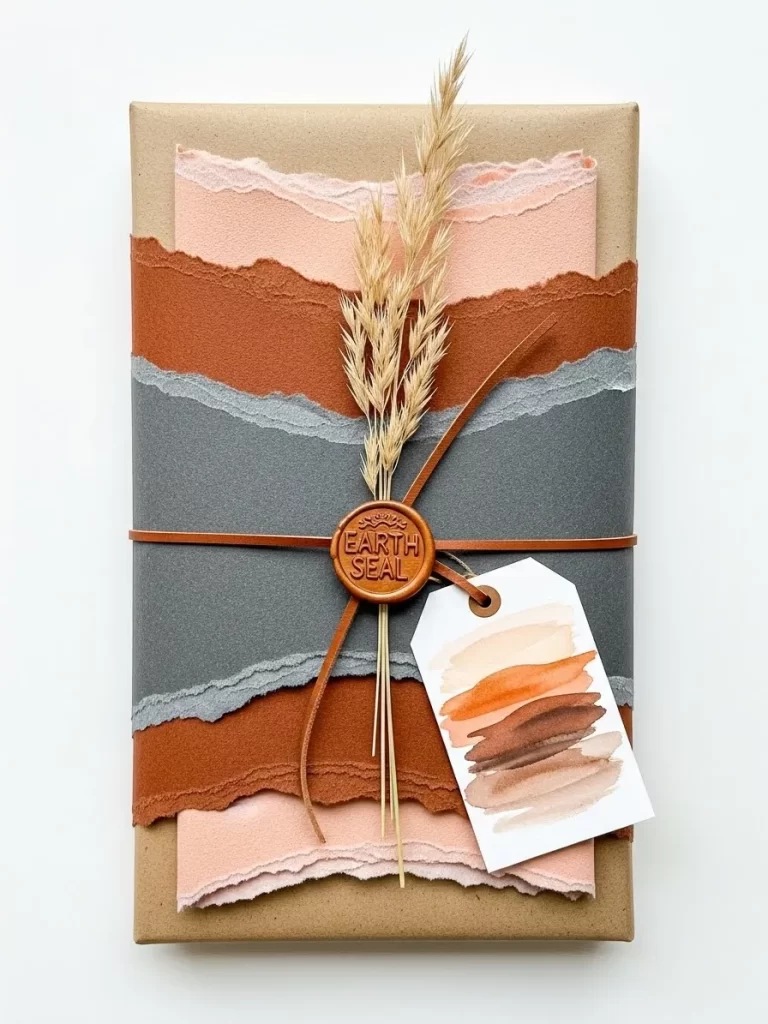
This beautifully textured wrap relies on a sophisticated mix of raw, natural materials and torn edges. The base is a simple kraft paper, offering an organic and grounding feel. Layered on top are strips of paper in warm, earthy shades: rust, terracotta, soft pink, and deep charcoal.
The torn edges of the layered papers create a rough, sculptural effect, making the flat surface come alive with shadow and depth. The colors work together harmoniously, evoking a desert or canyon landscape. This design is wonderfully tactile and sophisticated.
A simple leather cord wraps around the layers, providing a smooth textural counterpoint. A single sprig of dried pampas grass is tucked under the cord, giving height and softness. The wax seal, colored to match the rich leather, anchors a watercolor painted tag.
Material Required
- Standard brown kraft paper (for the base wrap)
- Various papers with texture (e.g., handmade paper, cardstock) in rust, charcoal gray, terracotta, and dusty rose
- Thin brown faux leather cord or strip
- Neutral dried pampas grass or similar botanical sprig
- Brown sealing wax and seal stamp with a simple text
- White cardstock tag pre painted with watercolor swatches
Equipment Required
- Scissors (for rough tearing)
- Strong liquid adhesive or double sided tape
- Melting spoon and lighter (for wax seal)
DIY Instruction
- Wrap the Base: Wrap the gift box cleanly in the brown kraft paper. Use tape discreetly underneath the edges.
- Tear the Layers: Using only your hands, gently tear the colored papers into strips. The tearing should be uneven and rough, giving a natural, rugged edge.
- Layer and Stack: Arrange the torn strips in alternating colors and lengths horizontally across the center of the package. Stack them so that the colors overlap slightly.
- Secure the Layers: Apply a small amount of adhesive to the back of each strip and carefully press them onto the kraft paper base.
- Wrap the Cord: Take the faux leather cord and wrap it once horizontally around the entire package, covering the center of the layered strips. Tie it in a knot on the front.
- Add Botanicals and Seal: Tuck the dried grass sprig under the cord on the front. Prepare the brown wax seal and affix it directly over the knot, securing the cord and the stem in place.
- Attach the Tag: Loop the painted cardstock tag onto the cord near the wax seal before trimming the cord ends.
8. Duo Tone Clear Casing
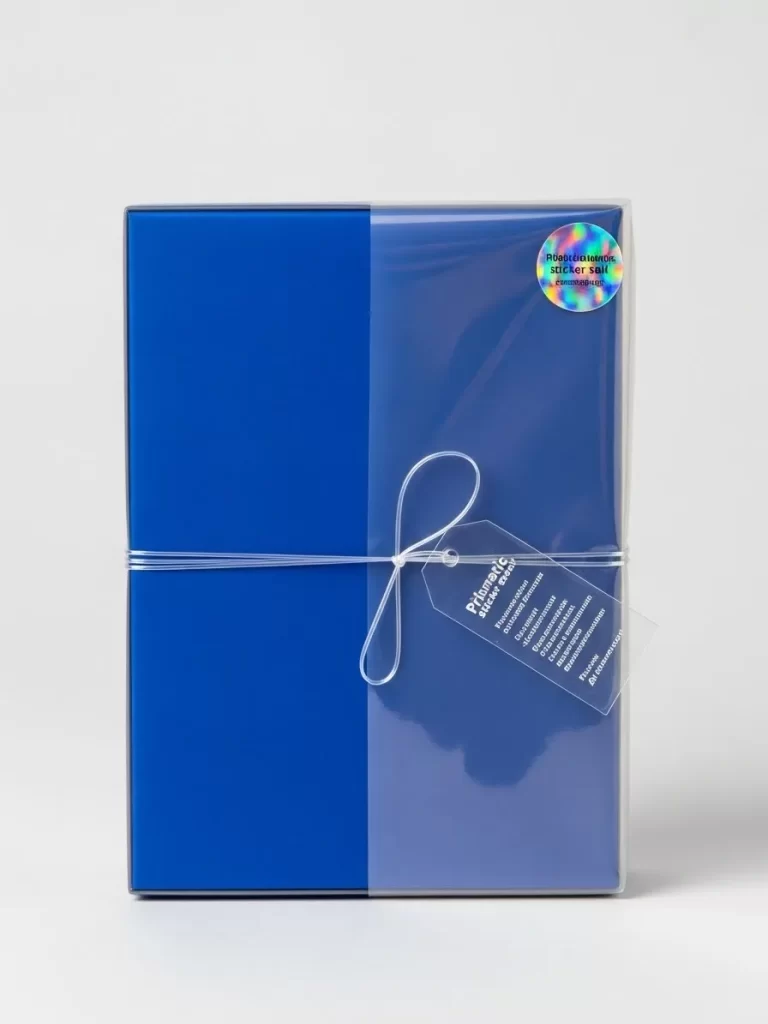
This high gloss, modern presentation uses stark color blocking and a clear layer to achieve a contemporary luxury look. The package is wrapped in two vibrant shades of blue: a bright cobalt and a deeper navy. The two colors meet precisely in the center, creating a sharp graphic division.
The entire wrapped box is then encased in a clear acrylic or cellophane box or sleeve. This clear layer adds immense shine and protects the sharp color boundary underneath. The final effect is a sleek, polished, and very structural appearance.
Instead of thick ribbon, a thin white string is used sparingly, tied only once across the center. A simple, clear acrylic tag is attached to the string. A small holographic sticker, placed in the corner, provides a subtle, unexpected rainbow flash. This is luxury defined by simplicity and materials.
Material Required
- Two shades of smooth, high gloss paper: bright cobalt blue and deep navy blue
- Clear acrylic presentation box or thick, clear cellophane sleeve
- Thin white cotton cord or plastic string
- Clear acrylic tag
- Small holographic sticker or decal
Equipment Required
- Sharp scissors
- Strong adhesive or tape (for joining the two papers)
DIY Instruction
- Prepare the Duo Tone Wrap: Cut a sheet of the cobalt blue paper and a sheet of the navy blue paper. Adhere the two sheets together along one long edge using a very thin, clean line of adhesive. This seam should run perfectly straight.
- Wrap the Box: Use the joined paper to wrap your gift box. Position the seam so it runs vertically down the exact center of the front of the box, creating the striking color block effect. Wrap the sides and back cleanly.
- Encapsulate the Gift: Carefully slide the wrapped box into the clear acrylic case or sleeve. Ensure the front seam remains perfectly straight inside the case.
- Wrap the Cord: Cut a length of the thin white cord. Wrap it once horizontally around the exterior of the clear case. Tie a simple knot in the center front.
- Attach the Tag: Loop the clear acrylic tag onto the cord before securing the knot.
- Apply the Sticker: Gently peel and adhere the small holographic sticker to the upper right corner of the clear case for a final, modern accent.
9. Woven Paper Texture
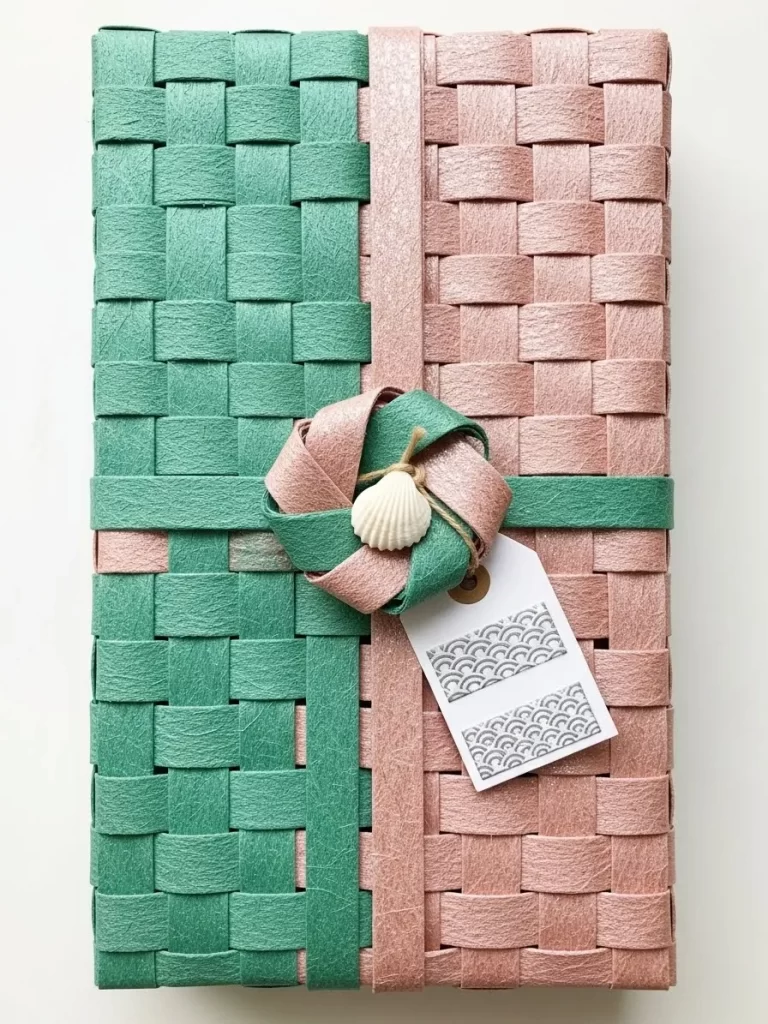
This gift wrapping transforms paper into a basket weave, resulting in a rich, textural surface that is truly unique. The box is completely covered by strips of paper woven together in two alternating, sophisticated colors: shimmering seafoam green and dusky rose pink.
The weaving is tight and uniform, giving the presentation a sturdy, handcrafted feel. This labor intensive technique immediately signifies the thoughtful care put into the presentation. The slight shimmer on the paper strips elevates the colors from playful to elegant.
A contrasting band of the seafoam green strip is wrapped vertically and horizontally across the center, securing the weave and creating a framing effect. The center is adorned with a decorative bow made of the same woven strips, and a small, delicate seashell charm is attached.
Material Required
- Sheets of shimmering paper or sturdy ribbon in seafoam green
- Sheets of shimmering paper or sturdy ribbon in dusky rose pink
- Small white seashell charm or bead
- Thin natural twine
- Small patterned cardstock tag
Equipment Required
- Ruler
- Craft knife or paper cutter
- Double sided tape or strong adhesive
DIY Instruction
- Cut the Strips: Use the paper cutter or craft knife to cut both the green and pink papers into strips of equal width (e.g., one inch wide). You need enough strips to cover the entire box when woven.
- Begin the Weave: Secure the ends of one set of strips (e.g., the pink ones) to the top or back of the box using adhesive. These will be your vertical warp threads.
- Weave the Horizontal Strips: Begin weaving the horizontal strips (the green ones) through the vertical strips in an over and under pattern. Keep the weaving tight and push the strips together so no base paper shows through. Alternate colors as you weave, ensuring the weave covers the entire front and sides of the box. Secure the ends underneath the box.
- Create the Securing Bands: Cut one long strip of the seafoam green paper. Wrap it vertically around the center of the box. Secure the ends underneath. Repeat the process horizontally.
- Make the Woven Bow: Take a few small strips of both colors. Loop and fold them artfully to create a small, dimensional bow shape. Secure the folds with adhesive on the back.
- Attach Embellishments: Glue the woven bow directly onto the center where the green bands cross. Tie the seashell charm and the patterned tag onto a short length of twine and secure the twine around the base of the bow.
10. Neon Pop Art Reveal
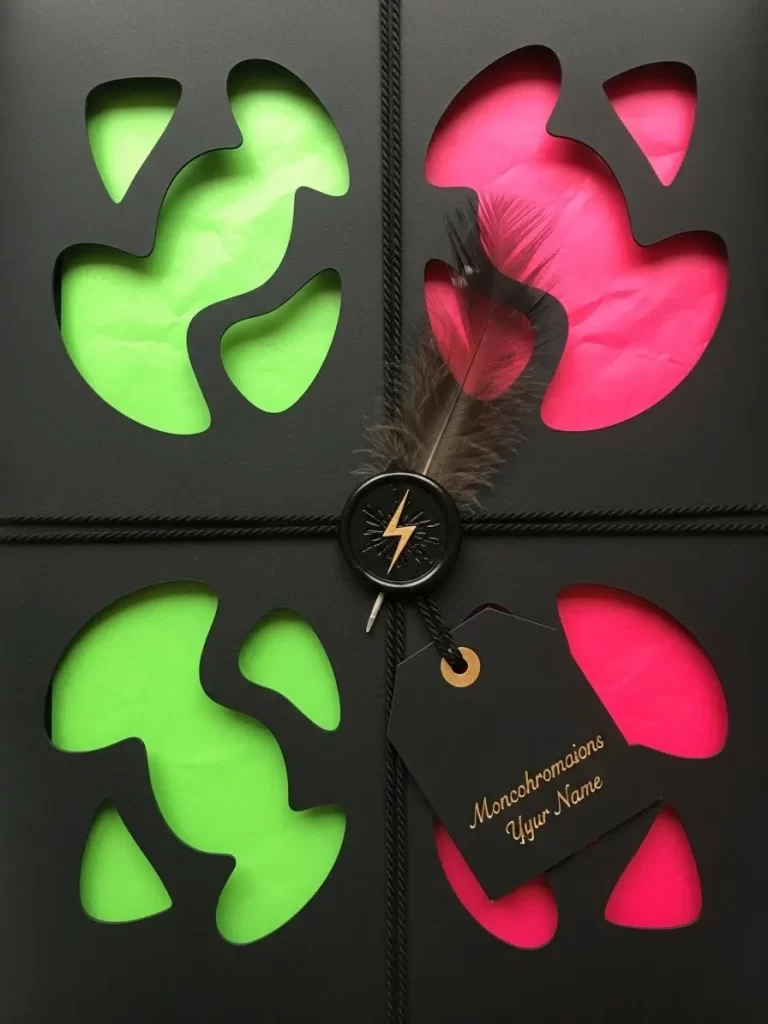
This design uses stark black paper as a frame to showcase vibrant, unexpected color underneath. The wrapping features four large, quadrant cutouts in a graphic, abstract shape. These cutouts reveal layers of neon tissue paper beneath.
The color contrast is highly dramatic: deep matte black against electric lime green and intense magenta. This combination gives the wrapping a bold, contemporary feel, reminiscent of pop art or high end street style. This sophisticated use of shocking color is very impactful.
The finishing touches are kept simple but dramatic. Black cord is wrapped around the box and anchored by a matte black wax seal featuring a lightning bolt symbol. A single, dark, iridescent feather is tucked under the seal, adding a final gothic edge.
Material Required
- Heavy matte black cardstock or wrapping paper
- Electric lime green tissue paper
- Intense magenta or hot pink tissue paper
- Black thin cord or twine
- Matte black sealing wax and lightning bolt seal stamp
- One dark feather (e.g., dark brown, iridescent black)
- Black cardstock tag with gold foil lettering
Equipment Required
- Craft knife and cutting mat
- Ruler and template (for the abstract cutouts)
- Double sided tape
- Melting spoon and lighter (for wax seal)
DIY Instruction
- Wrap the Box: Neatly wrap the gift box in the lime green tissue paper. Then, wrap the box again in the magenta tissue paper. The colors should be visible through the cutouts you will create next.
- Create the Black Overlay: Wrap the box one final time with the matte black cardstock or paper. Do not secure the ends yet.
- Cut the Shapes: Use the craft knife and template to carefully cut the four abstract, curved shapes in the black paper on the front of the box. Ensure you cut through the black paper only, revealing the neon colors underneath.
- Secure the Wrap: Carefully fold the edges of the black paper under the box and secure them with tape.
- Wrap the Cord: Take the black cord and wrap it horizontally and vertically around the box, ensuring the cord divides the four cutouts neatly. Knot the cord in the center.
- Seal and Attach Feather: Prepare the matte black sealing wax. Drip the wax directly over the knot and press the lightning bolt seal into it. Before the wax completely sets, gently tuck the stem of the dark feather underneath the edge of the seal.
- Attach the Tag: Loop the black cardstock tag onto the cord near the wax seal.
11. Japanese Scrolls of Riches
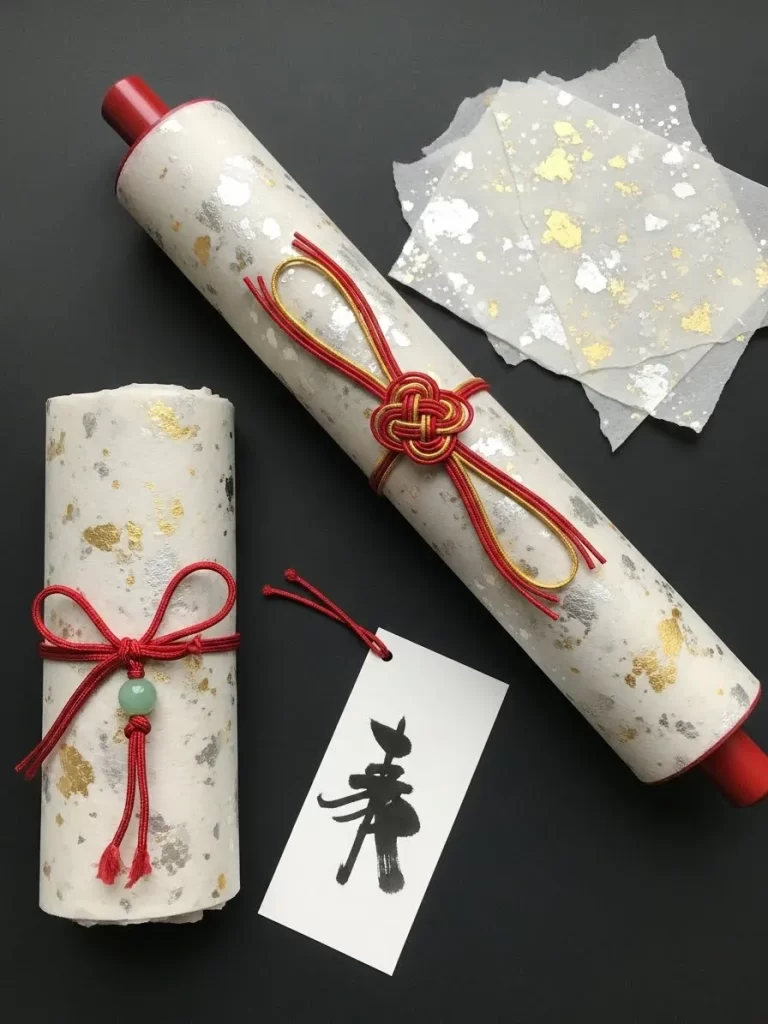
This wrapping style transforms a gift into an elegant, time honored scroll. The paper features a textured, milky white finish heavily embedded with shimmering gold and silver leaf. This instantly suggests luxury and high value.
The scroll is secured with vibrant Mizuhiki cord, a traditional Japanese art form using stiffened paper string. The red and gold cords are tied into an intricate, highly structured knot known as the Plum Blossom knot. This knot symbolizes good fortune and strong bonds.
Further elevating the presentation is a smooth red dowel at the ends, mimicking an ancient manuscript. The smaller scroll features a knot adorned with a beautiful jade green bead. A simple white tag bearing a hand brushed calligraphic character finishes this beautiful, culturally rich presentation.
Material Required
- Heavy white paper embedded with gold and silver foil flakes
- Red wooden dowels or cylinders (optional, for ends)
- Red and thin gold Mizuhiki cord (premade or DIY)
- Small jade green decorative bead or stone
- Heavy white cardstock tag
- Black ink (for calligraphy)
Equipment Required
- Strong adhesive or hot glue gun
- Fine tipped calligraphy brush (optional)
- Scissors
DIY Instruction
- Prepare the Scroll Paper: Neatly wrap your gift in the foil embedded paper. If the gift is long or cylindrical, simply wrap the paper around it several times. If using dowels, secure the paper edges around the dowels at both ends with strong adhesive to form a rigid scroll.
- Make the Mizuhiki Knot: Construct or purchase a complex Mizuhiki knot, such as the Plum Blossom knot, using the red and gold cords. Alternatively, simply tie the cords in an intricate looping design.
- Attach the Large Knot: Wrap the main red and gold Mizuhiki cord around the center of the large scroll. Secure the central knot firmly to the scroll with a small dot of adhesive on the back so it does not slip.
- Create the Small Bow: For the smaller scroll, use the red cord to create a simple, stylized bow knot. Thread the jade green bead onto the central loop of the knot before tightening.
- Secure the Small Bow: Wrap the cord around the small scroll and secure the bead and knot assembly on the front with a tight knot. Let the cord ends dangle neatly.
- Add the Tag: Write your calligraphic character or personal message on the white cardstock tag. Thread the remaining red cord through the tag hole and secure it around the main scroll’s cord near the knot.
12. Brushed Metal Industrial Chic
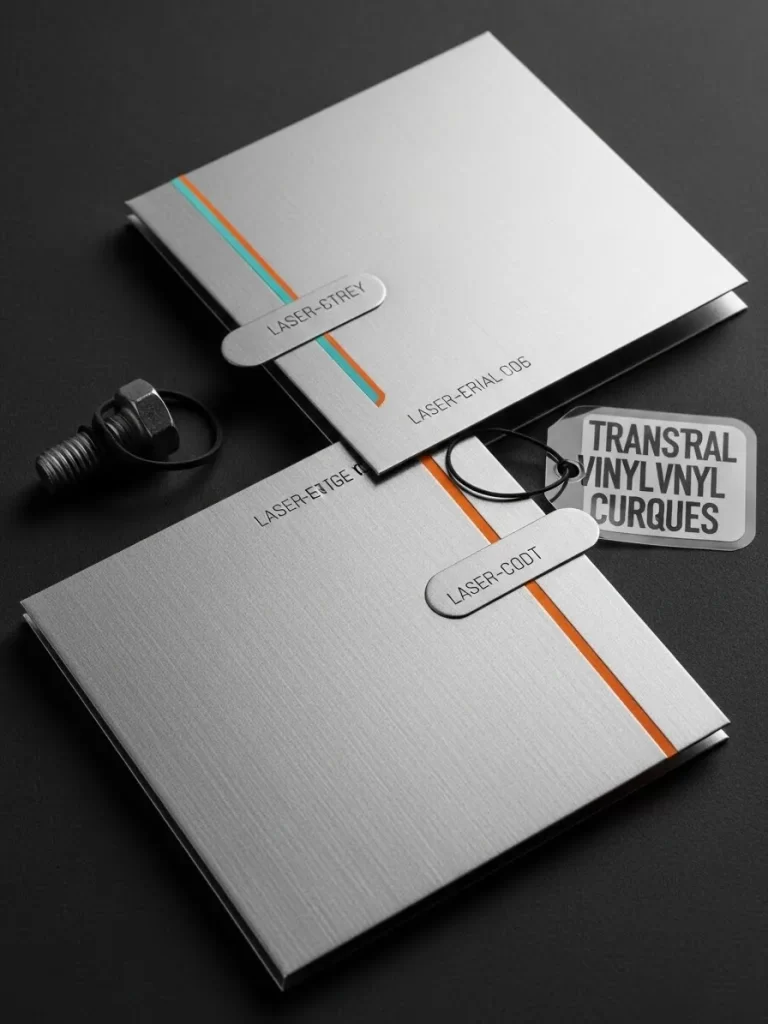
This wrapping style is incredibly modern, using a sleek, brushed aluminum look that resembles high end architectural materials. The paper has a subtle horizontal texture, giving the silver surface a matte, sophisticated finish. This approach is highly minimalist and clean.
The design features two distinct vertical lines of color: a thin strip of vibrant teal next to a bold strip of burnt orange. This unexpected color combination provides an artistic, eye catching pop against the neutral metal background.
A matte silver metal plaque is secured horizontally, engraved with cryptic text. The fastening is a simple nut and bolt detail lying nearby, adding a distinctly industrial, deconstructed feel. This is wrapping as graphic design, embracing texture and precision.
Material Required
- Heavy cardstock or paper with a brushed silver or aluminum texture
- Thin strips of teal colored paper or vinyl
- Thin strips of burnt orange colored paper or vinyl
- Two small, rounded rectangular silver metal tags (ready for engraving or stamping)
- Small metal bolt and matching nut
- Thin black wire or ring (for attaching tags)
Equipment Required
- Ruler and craft knife (for precise cutting of color strips)
- Strong adhesive
- Engraving tool (optional, for custom tags)
DIY Instruction
- Wrap the Folder: This look works best for a flat, folder style gift. Wrap the base cardstock or object neatly in the brushed silver paper.
- Apply Color Stripes: Measure and adhere the teal strip vertically to the left side of the front panel. Immediately next to it, adhere the burnt orange strip. Ensure the lines are perfectly straight and parallel.
- Prepare the Metal Tags: If possible, engrave or stamp your desired text onto the silver metal tags.
- Attach the Tags: Secure the metal tags horizontally across the colored strips using a small dot of strong adhesive on the back of each tag. The tags should slightly cover the color strips.
- Add Industrial Details: Thread the black wire through the hole of one metal tag and loop it around the bolt. Tie the wire securely. Place the assembled bolt and nut near the package for decorative effect, suggesting the wrapping is held together by hardware.
13. Art Deco Feather Fan
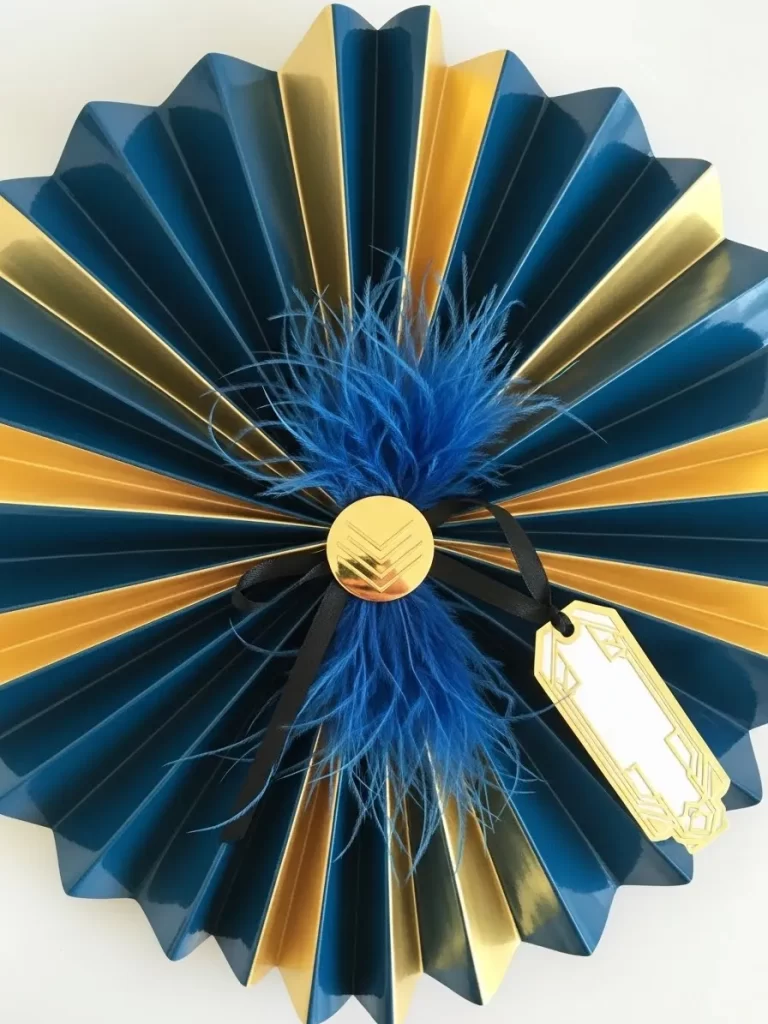
This is a remarkably dramatic and theatrical wrapping concept, using accordion folded paper to create a striking decorative fan. Alternating sections of deep, reflective midnight blue and shimmering metallic gold make a powerful visual statement.
The fan design suggests a luxury accessory or an elaborate stage prop, fully embracing the opulence of the Art Deco era. The two colors contrast beautifully, with the shiny gold catching the light against the deep blue gloss.
The center of the fan is adorned with a poof of electric blue marabou feathers, adding textural drama. A circular gold tag, embossed with a geometric pattern, anchors the feathers. A tiny black satin ribbon holds an elongated gold tag with a classic Art Deco border.
Material Required
- Sturdy paper in deep metallic blue and shiny gold
- Electric blue marabou or down feathers
- Small circular gold metallic disc or medallion with geometric pattern
- Thin black satin ribbon
- Elongated gold foil cardstock tag with Art Deco design
Equipment Required
- Ruler and pencil
- Scoring tool or bone folder
- Strong adhesive or hot glue gun
- Single hole punch
- Sharp scissors
DIY Instruction
- Cut and Score: Cut long, equal strips of both the blue and gold paper. Score the entire length of both colors at narrow, consistent intervals (e.g., half inch) along the short side.
- Form the Pleats: Fold the scored paper strips back and forth along the lines to create crisp accordion pleats for both colors.
- Assemble the Fan: Glue the ends of the blue and gold strips together, alternating colors. Continue joining the strips until you have a long, pleated ribbon. Carefully bring the two ends of the ribbon together and secure them with strong adhesive to form a complete, closed circular fan shape.
- Add Feathers: Secure the small bunch of blue feathers to the center point of the fan using hot glue.
- Anchor the Medallion: Glue the circular gold medallion directly over the base of the feathers to secure them.
- Attach the Tag: Loop the black satin ribbon through the hole of the gold Art Deco tag. Thread the other end of the ribbon through the base of the medallion and tie it into a small, neat bow just beneath the medallion.
14. Zen Garden Sand Texture
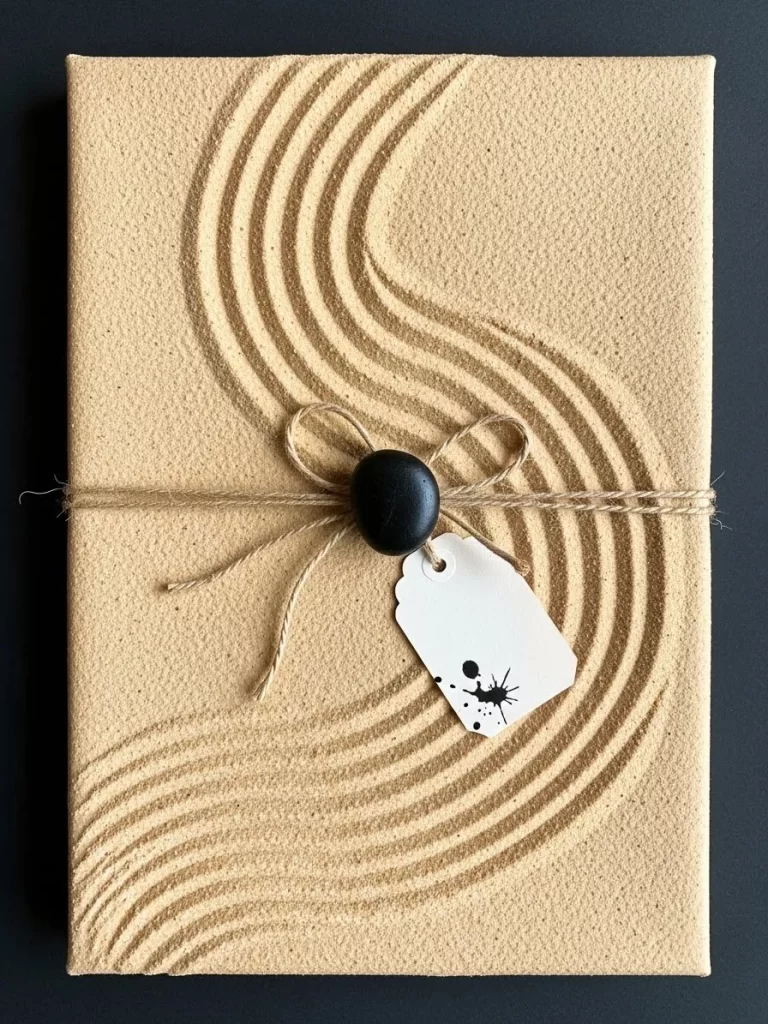
This wrapping features an astonishing textural element, mimicking the raked sand of a Japanese Zen garden. The paper is coated in a fine layer of light beige sand, giving it a wonderfully rough, tactile surface. This makes the presentation truly unique.
Curving, rhythmic lines are drawn into the sand coating, suggesting calm and contemplation. The sweeping, wave like pattern adds visual movement and depth to the flat box surface. This attention to detail elevates the simple paper into a conceptual art piece.
The package is secured with a natural jute twine, tied in a simple, rustic bow. A smooth, black river stone serves as the decorative anchor, providing a beautiful textural contrast to the sand. A simple white tag featuring a small, dramatic ink splat adds a final abstract flourish.
Material Required
- Wrapping paper coated with fine beige sand (or DIY sand application)
- Natural jute twine
- One smooth black river stone or sea glass pebble
- Plain white cardstock tag
- Black ink
Equipment Required
- Small rake or pointed wooden skewer (for creating the sand pattern)
- Hot glue gun and glue sticks (or strong fabric adhesive)
- Hole punch
- Fine tipped pen (for the ink splat)
DIY Instruction
- Wrap the Box: Neatly wrap your gift box in the sand textured paper. If you are creating the textured paper yourself, apply adhesive to the paper, sprinkle it evenly with fine sand, and let it dry completely before wrapping.
- Rake the Pattern: Use the pointed skewer or small rake to gently draw the curving, wave like lines into the sand coating on the front of the wrapped box. Be gentle to avoid tearing the paper.
- Wrap and Knot: Cut a length of jute twine long enough to wrap around the package horizontally. Wrap it around and tie a simple, small bow in the center of the front.
- Prepare the Tag: Use the hole punch on the white cardstock tag. Dip the pen tip into black ink and lightly flick it onto the tag to create a delicate splat pattern.
- Attach the Stone: Apply a small dot of hot glue to the underside of the black stone. Carefully press the stone onto the center of the bow knot, anchoring the twine securely in place.
- Secure the Tag: Loop the tag onto one of the twine ends before trimming the excess cord.
15. Iridescent Holographic Band
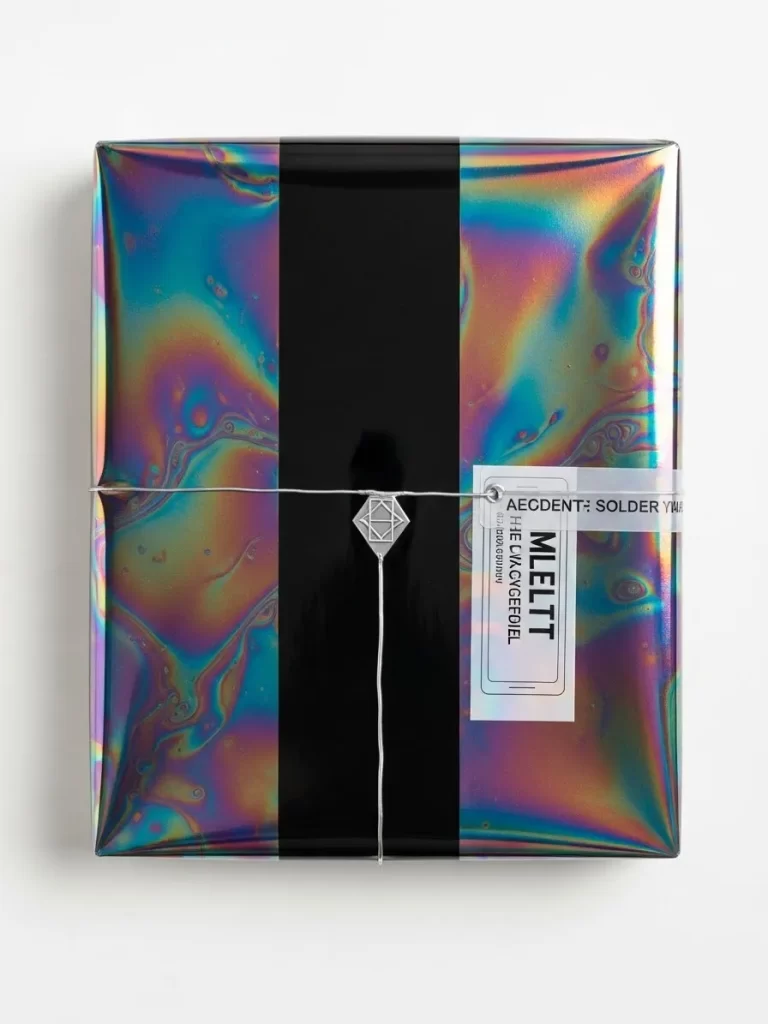
This is an extremely contemporary, almost futuristic wrapping style. The main paper is covered in an iridescent, oil slick holographic finish that catches every color of the rainbow. The colors shift and swirl, giving the surface perpetual movement.
A bold, vertical band of deep matte black paper contrasts sharply with the reflective background. The black strip grounds the bright holographic effect, giving the package a serious, modern edge. This contrast of texture and sheen is very striking.
Thin silver twine is wrapped horizontally around the package, crossing the black strip. The center is secured with a small, flat silver geometric charm resembling a diamond cut. A simple rectangular white tag, featuring minimalist typography, finishes the high tech look.
Material Required
- Holographic or iridescent foil wrapping paper
- Heavy matte black cardstock strip
- Thin silver metallic twine or string
- Small flat silver geometric charm (diamond or prism shape)
- White cardstock tag with clean, minimalist font
Equipment Required
- Ruler
- Strong adhesive or double sided tape
- Scissors
DIY Instruction
- Wrap the Box: Neatly wrap the gift box using the holographic foil paper. Secure all seams with tape underneath the edges for a clean finish.
- Apply the Black Band: Cut the matte black cardstock strip to the width you desire and wrap it vertically around the center of the wrapped box. Secure the ends underneath the box with strong adhesive.
- Wrap the Twine: Cut a length of silver twine. Wrap it horizontally around the box, crossing the vertical black strip. Bring the ends together in the center front.
- Attach the Charm: Thread the silver twine through the hole in the geometric silver charm.
- Knot and Secure: Tie the silver twine in a tight, secure knot directly over the center of the black band. The charm should rest perfectly centered on the black strip. Trim the twine ends.
- Attach the Tag: Loop the rectangular white tag onto the twine near the knot before trimming the twine ends.
16. Geometric Folded Envelope
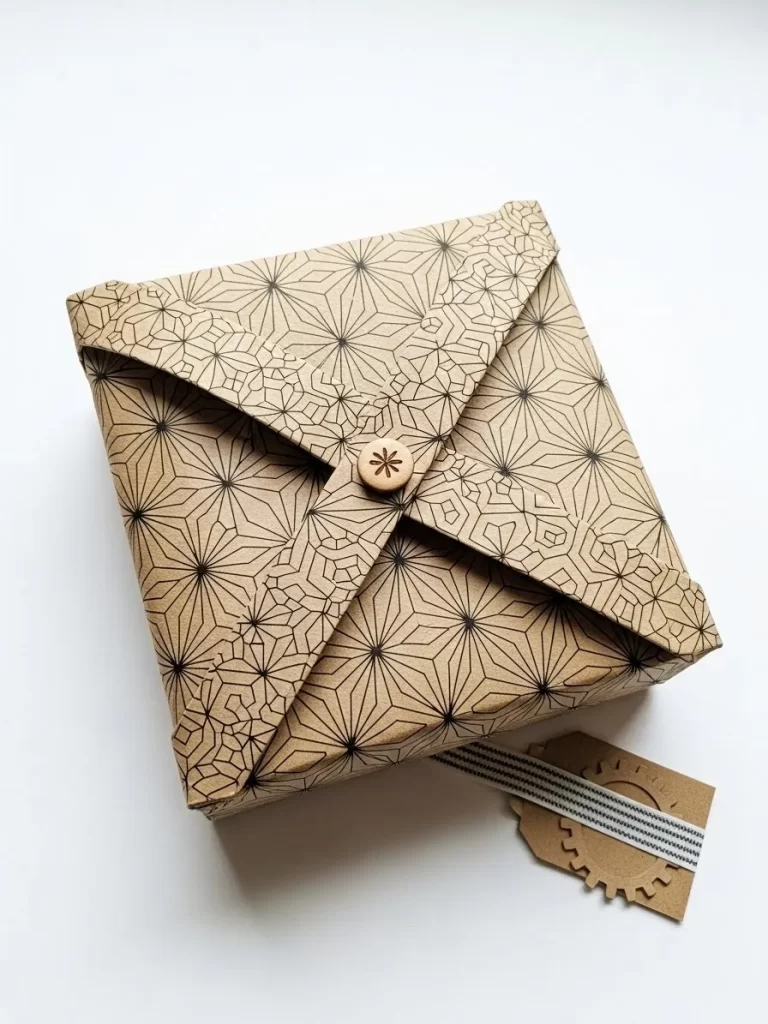
This wrapping creates an elaborate, folded paper enclosure, eliminating the need for any tape or ribbon. The paper is natural kraft cardstock printed with a complex, fine lined geometric pattern that resembles a starburst or kaleidoscope. The pattern provides depth and detail.
The folding technique results in four sharp, neat flaps meeting precisely in the center top. This method is structurally interesting and elevates the humble paper material. The clean lines give the presentation an architectural precision.
A small, simple wooden button with a star engraved in its center acts as the sole closure. The button is secured to the bottom flap and holds the top flap closed. A small kraft tag, edged with a black and white striped ribbon, hangs from the bottom corner, continuing the clean, rustic theme.
Material Required
- Sturdy kraft paper or thin cardstock printed with a repeating geometric pattern
- One small wooden button with a decorative center (or simple wood grain)
- Thin black and white patterned ribbon or printed strip
- Small piece of kraft cardstock (for tag)
- Thin string or elastic cord
Equipment Required
- Ruler and pencil
- Scoring tool
- Craft knife
- Adhesive (to secure the button)
DIY Instruction
- Measure and Cut: Cut the patterned paper into a square large enough to completely wrap the gift box. Mark the center point and the corners of the box on the paper.
- Score the Folds: Using the scoring tool, score lines from the corners of the paper to the marked center points of the sides of the box. This helps create the four sharp flaps.
- Pre Fold: Fold the paper along all the scored lines to pre crease the shape.
- Wrap and Fold: Place the gift box in the center. Bring the four corners of the paper up over the box. Carefully fold the resulting four flaps inwards, so they overlap and meet precisely in the center top, forming a neat square or diamond.
- Attach the Button: Secure the wooden button to the bottom layer flap in the center using strong adhesive. Attach a tiny loop of elastic or string to the button’s loop hole.
- Close the Envelope: Cut a small slit or hole in the top layer flap. Loop the string or elastic from the button through the slit to secure the closure.
- Create the Tag: Cut the small piece of kraft cardstock into a tag shape. Adhere the black and white striped ribbon horizontally onto the tag. Loop a small piece of twine through the tag hole.
- Attach the Tag: Tie the tag’s twine around the corner of the wrapped package.
17. Duotone Velvet Clutch

This is a magnificent example of fabric wrapping, using two complementary shades of luxurious velvet for dramatic effect. The main body is a deep, shimmering teal velvet. The underside of the folds, however, reveals a rich, contrasting purple velvet.
The contrast between the two colors, accented by a subtle copper colored piping or edge, gives the folding a multi dimensional quality. The folds are gathered tightly at the top center, creating an elegant, upward sweeping ear shape.
A beautiful, rectangular brass clasp, engraved with an intricate repeating floral pattern, holds the fabric tightly in the middle. The smooth, engraved metal contrasts beautifully with the soft texture of the gathered velvet. This approach creates a high fashion, couture presentation.
Material Required
- Square piece of rich teal velvet fabric
- Square piece of deep purple velvet fabric
- Copper colored piping cord or metallic ribbon
- Rectangular brass buckle or clasp with engraved detail
Equipment Required
- Sewing machine or needle and thread (optional, for piping)
- Strong fabric adhesive or hot glue gun
DIY Instruction
- Prepare the Fabric: If adding piping, sew the copper piping along the edges of the teal fabric square. Lay the teal velvet square flat with the purple velvet square on top, slightly offset.
- Wrap the Base: Place the gift box diagonally in the center of the fabrics. Bring two opposite corners of the fabric up and tie them together in a secure knot right on top of the box. Adjust the fabric so the copper edge is visible.
- Form the Ears: Gather the remaining two corners of the fabric. Bring them up together and twist them tightly at the knot point, creating the two upright, ear like loops. The purple fabric should now be visible on the interior of the teal loops.
- Secure the Clasp: Carefully arrange the fabric where it gathers in the center. Slide the fabric into the brass clasp, ensuring the clasp holds the fabric securely and sits horizontally across the front of the package.
- Adjust the Folds: Gently pull and adjust the folds around the sides of the box to ensure they are even and the fabric is taut and smooth everywhere except for the dramatic central knot and loops.
18. Geode Reveal Envelope
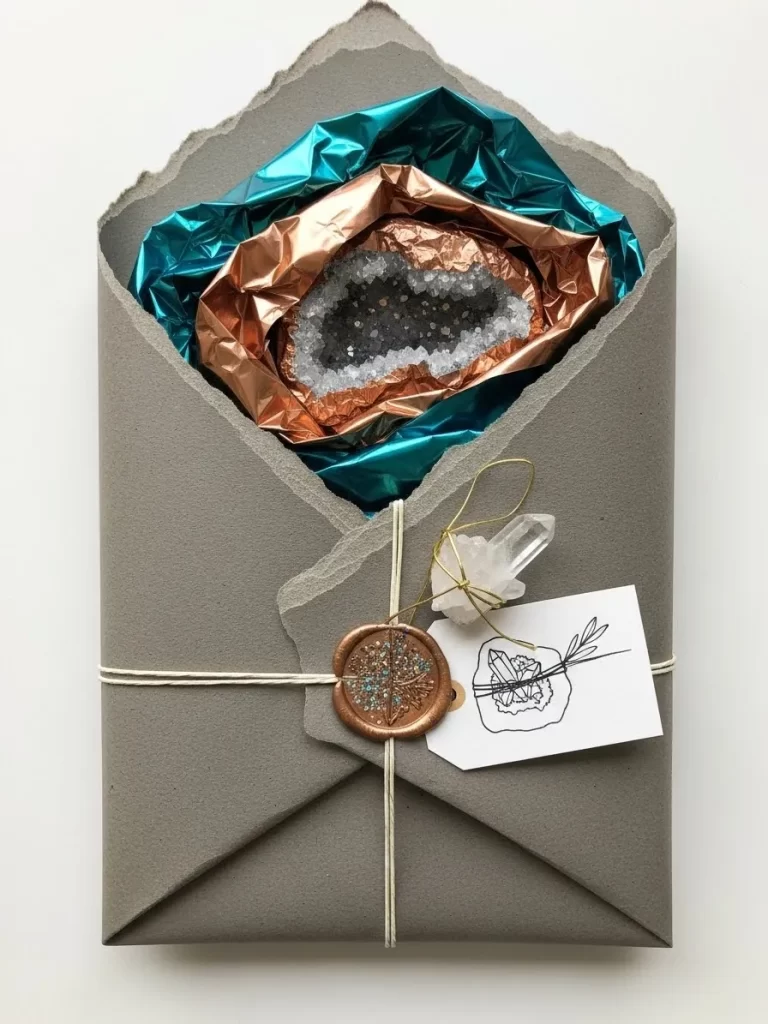
This wrapping concept involves folding the paper into an envelope shape that intentionally reveals a dazzling secret within. The outer paper is heavy, matte, dusty gray cardstock, giving a sober, earthen texture. The edges are roughly torn for an organic feel.
The flap opens to reveal nested layers of shimmering metallic foil in copper and brilliant teal. These foils surround the actual gift, which appears to be a dazzling, crystal filled geode. The colorful, bright interior contrasts dramatically with the dull, matte exterior.
The closure is secured by a copper colored wax seal stamped with an intricate tree motif dotted with tiny blue gems. A simple white cardstock tag, bearing a sketch of a crystal, is tied on with pale gold thread, to which a small quartz point is attached.
Material Required
- Heavy, matte dusty gray or taupe cardstock
- Metallic copper foil wrapping paper
- Metallic teal foil wrapping paper
- Pale gold thin thread or wire
- Copper colored sealing wax and tree motif seal stamp with tiny faux gems
- Small clear quartz crystal point
- White cardstock tag with a line art sketch
Equipment Required
- Scissors (for rough tearing)
- Hot glue gun or strong adhesive
- Melting spoon and lighter (for wax seal)
DIY Instruction
- Tear the Cardstock: Roughly tear the edges of the gray cardstock so the paper is large enough to fold into an envelope around the gift.
- Inner Foil Layer: Wrap the gift loosely first in the copper foil, then in the teal foil. The foil should not be neatly wrapped, but gathered and layered to create texture. Place this bundle on the center of the torn gray cardstock.
- Fold the Envelope: Fold the sides of the gray cardstock up and over the foil wrapped gift, creating a messy, rustic envelope shape. Secure the seams underneath with adhesive.
- Close the Flap: Fold the top flap down. Wrap the pale gold thread around the width of the envelope, tying a knot where the flap meets the body.
- Seal and Attach Crystal: Prepare the copper wax seal. Place the quartz crystal point near the thread knot. Drip the wax directly onto the knot and the thread. Press the tree motif seal firmly into the wax, securing the thread and the crystal’s wire in place.
- Attach the Tag: Loop the white cardstock tag onto the pale gold thread before securing the seal.
19. Botanical Blueprint Layers

This wrapping is a masterful layering of translucent and opaque materials, achieving a deeply textural, vintage, and scientific aesthetic. The base layer is a simple, calming slate blue paper. Several printed layers are stacked on top of this base.
The first layer is a sheet of translucent vellum printed with a blueprint style image. Over this rests a white card printed with a simple botanical sketch. The layering creates an airy depth that suggests archival documents.
A fresh fern frond is placed at the center, providing a vibrant pop of natural green. The layers are secured with an ivory woven ribbon, crossing vertically and horizontally. The ribbon is anchored by two overlapping wax seals: one gold with an initial, one teal with a simple circle.
Material Required
- Matte slate blue wrapping paper
- Translucent vellum sheet printed with a blueprint design
- White paper or card printed with a simple botanical sketch
- Fresh fern frond or similar pressed botanical element
- Ivory woven ribbon (or linen tape)
- Gold sealing wax with an initial stamp
- Teal sealing wax with a simple circular stamp
- Small leather or felt circle in teal or light blue
Equipment Required
- Strong adhesive or double sided tape
- Scissors
- Melting spoon and lighter (for wax seals)
DIY Instruction
- Wrap the Base: Wrap the gift box neatly in the matte slate blue paper.
- Layer the Prints: Center the translucent vellum sheet on the front of the gift. Center the white botanical print on top of the vellum, creating a layered effect. Secure the corners of the vellum and the print to the base paper with a small dot of adhesive.
- Add the Botanical: Place the fern frond vertically down the center of the package.
- Wrap the Ribbon: Cut a long piece of the ivory woven ribbon. Wrap it around the gift horizontally and then vertically, ensuring the ribbons cross directly over the center of the fern frond. Tie the ribbons in a knot at the intersection.
- Seal and Layer: Prepare the gold wax seal first. Place the small teal felt circle slightly off center from where the ribbons cross. Drip the gold wax onto the ribbon knot and press the initialed stamp.
- Second Seal: Prepare the teal wax seal. Drip it onto the teal felt circle, slightly overlapping the gold seal. Press the circular stamp into the teal wax. The seals should anchor the ribbon and the fern.
20. High Gloss Digital Tag
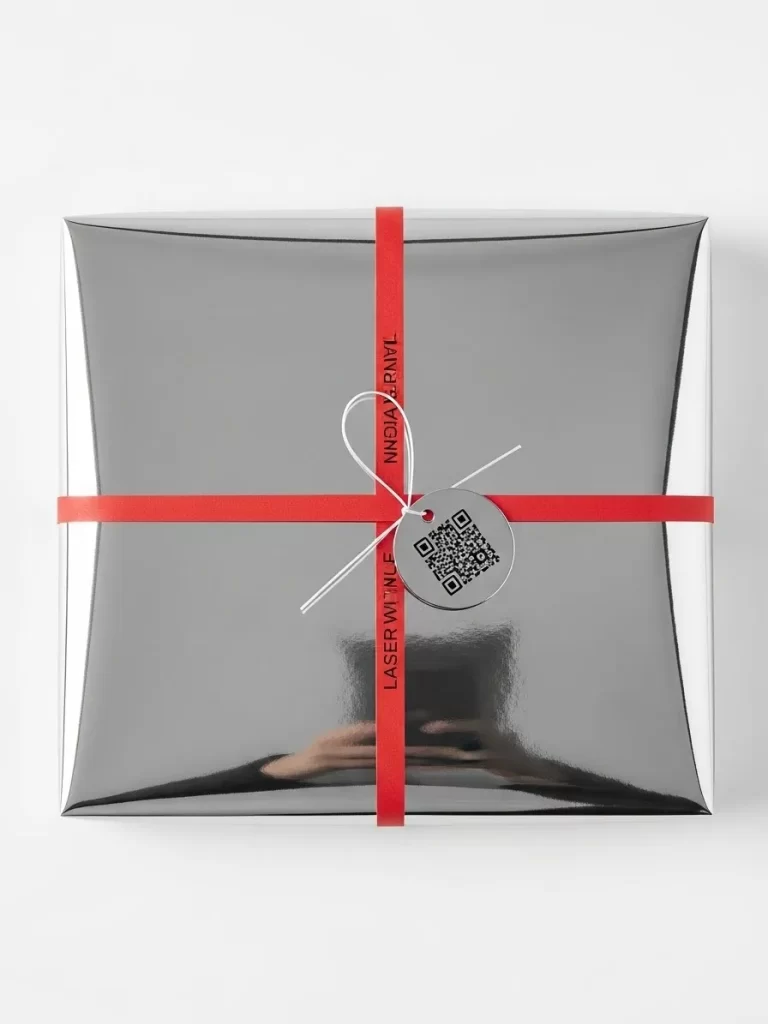
This wrapping is the definition of minimalist high tech luxury, using extreme shine and bold digital accents. The package is encased in a highly reflective, chrome like silver material that acts almost like a mirror. The surface is sleek and perfectly polished.
A single, vibrant red ribbon wraps around the package, providing a dramatic focal point against the reflective silver. The red color is intense and eye catching. The color choice suggests high energy and modern design sensibility.
Instead of a typical bow, the red ribbon is simply knotted in the center and secured with a thin white twine. The tag is the most innovative part: a metallic silver disc featuring a large, readable QR code. This gives the presentation a truly cutting edge, digital flair.
Material Required
- High gloss metallic silver or chrome wrapping paper
- Wide, satin red ribbon
- Thin white cotton twine
- Round silver metallic tag with a QR code design
- Silver jump ring or key ring
Equipment Required
- Sharp scissors
- Double sided tape (for clean wrapping)
DIY Instruction
- Wrap the Box: Carefully wrap the gift box in the high gloss silver paper. Work slowly to avoid wrinkles. Use double sided tape for all seams to maintain the flawless, mirrored finish.
- Wrap the Red Ribbon: Take the red ribbon and wrap it around the box, horizontally and vertically, crossing neatly in the center. Secure the ends underneath the box with adhesive.
- Prepare the Tag: Thread the silver jump ring through the hole in the QR code tag.
- Attach the Tag: Cut a length of white twine. Loop the twine through the silver jump ring attached to the tag.
- Knot and Secure: Bring the white twine ends up and tie them in a tight, neat knot right where the red ribbons cross in the center front. The tag should dangle freely. Trim the ends of the white twine neatly.
21. Concrete Minimalism Plate
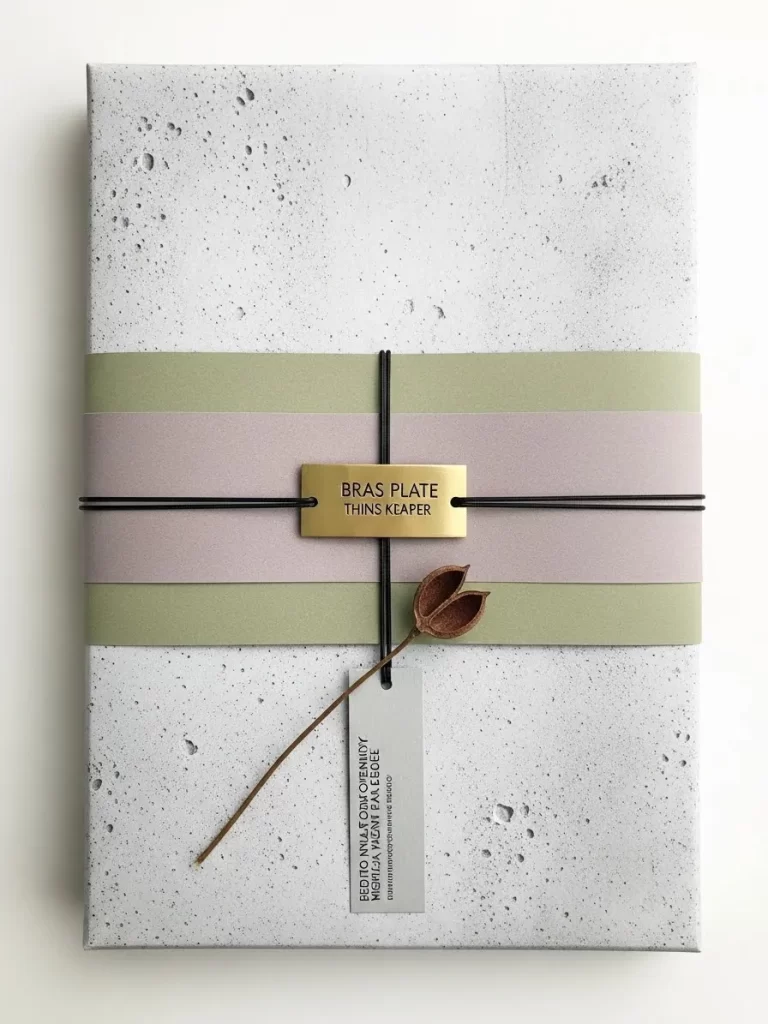
This design uses a remarkable paper that mimics the rough, textured appearance of concrete. The gray surface is slightly mottled with lighter specks, giving it a raw, industrial foundation. This contrast is key to the sophisticated appeal.
Layered across the center are two horizontal bands of colored paper: a muted sage green and a soft dusty rose. This unexpected, gentle color palette softens the harshness of the concrete texture. The strips are simple and clean.
The package is secured with a thin black cord, crossing vertically and horizontally. At the center intersection is a small, polished brass plate engraved with simple text. A dried seed pod hangs from the cord, providing an organic, natural touch against the manmade aesthetic.
Material Required
- Heavy paper or cardstock printed with a concrete or stone texture
- Strip of muted sage green paper
- Strip of dusty rose paper
- Thin black cord or sturdy thread
- Small polished brass plate (engraved or stamped)
- Dried seed pod or simple brown botanical stem
- White cardstock tag (for long text)
Equipment Required
- Ruler
- Strong liquid adhesive or double sided tape
- Scissors
DIY Instruction
- Wrap the Base: Wrap the gift box neatly in the concrete textured paper.
- Apply Color Bands: Adhere the dusty rose paper strip horizontally across the center of the package. Place the wider sage green strip directly above it, allowing the rose color to peek out just below. Ensure the strips are perfectly level.
- Wrap the Cord: Cut a length of black cord. Wrap it tightly around the package both vertically and horizontally, crossing in the center. Knot the cord on the front.
- Attach the Brass Plate: Place the brass plate directly over the cord knot. Secure it using a small dab of strong adhesive or hot glue, ensuring it sits perfectly straight.
- Secure the Botanical: Tie the stem of the dried seed pod and the white cardstock tag onto the vertical black cord beneath the brass plate. Trim the cord ends neatly.
22. Vintage Map Treasure
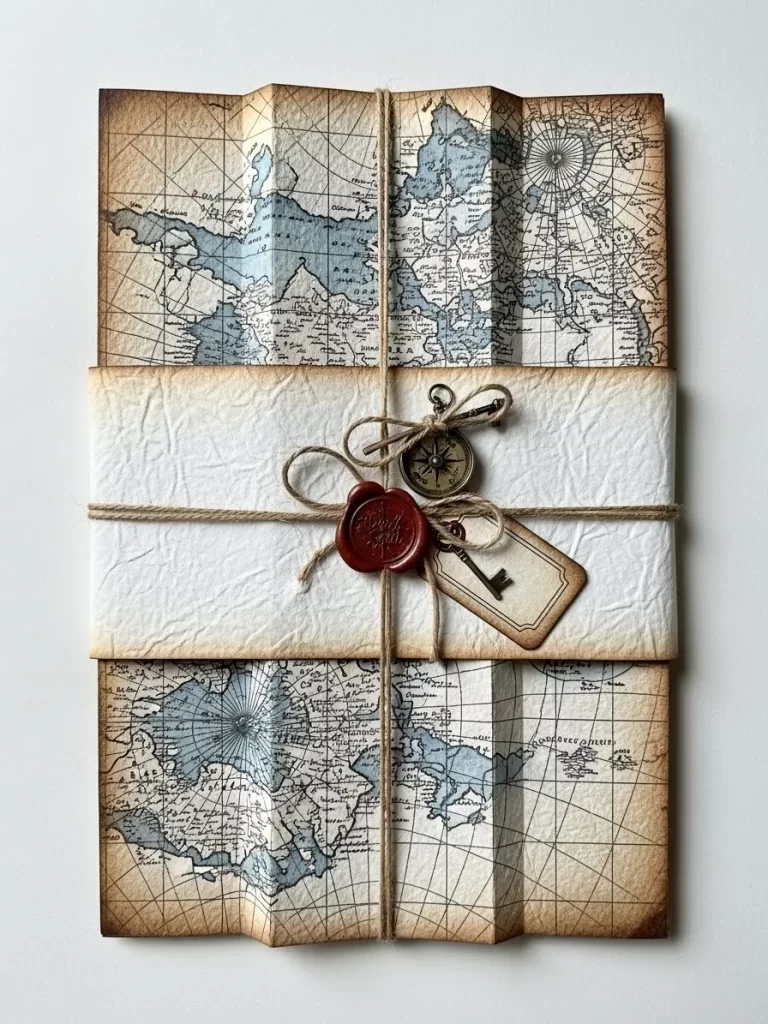
This presentation evokes the spirit of a grand adventure or a hidden discovery. The wrapping paper is a vintage style map, folded and creased to look like an ancient artifact. The aged texture and faded colors immediately suggest history and importance.
A strip of crinkled, fibrous white paper is wrapped horizontally across the middle, mimicking a manuscript or note scroll. This white band provides a clean, neutral break between the detailed map sections.
The package is tied securely with rustic brown twine. A deep red wax seal, stamped with a simple script or flourish, anchors the twine at the center. Accompanying the seal is a miniature brass compass charm and a tiny decorative antique key, truly elevating the theme of hidden treasure.
Material Required
- Wrapping paper with a vintage map design (pre folded for authenticity)
- Strip of crinkled white handmade paper or fibrous paper
- Rustic brown jute twine
- Deep red sealing wax and seal stamp
- Miniature brass compass charm
- Miniature decorative metal key
- Aged cardstock tag
Equipment Required
- Scissors
- Strong adhesive
- Melting spoon and lighter (for wax seal)
DIY Instruction
- Wrap the Map: Wrap the gift box using the map paper. When wrapping, make intentional creases or folds in the paper to enhance the aged, cartographic look.
- Add the Center Band: Wrap the crinkled white paper strip horizontally around the center of the package. Secure it on the back with adhesive.
- Wrap the Twine: Cut a long piece of the rustic twine. Wrap it horizontally around the white band several times, crossing the center point. Knot the twine securely on the front.
- Attach Charms and Seal: Thread the compass charm and the small key onto the twine near the knot.
- Apply the Seal: Prepare the deep red wax seal. Drip the melted wax directly onto the knot, securing the twine and the base of the key. Press the seal stamp firmly into the wax and allow it to cool.
- Attach the Tag: Loop the aged cardstock tag onto the twine just below the seal before trimming the twine ends.
23. Dripping Gold Luxury
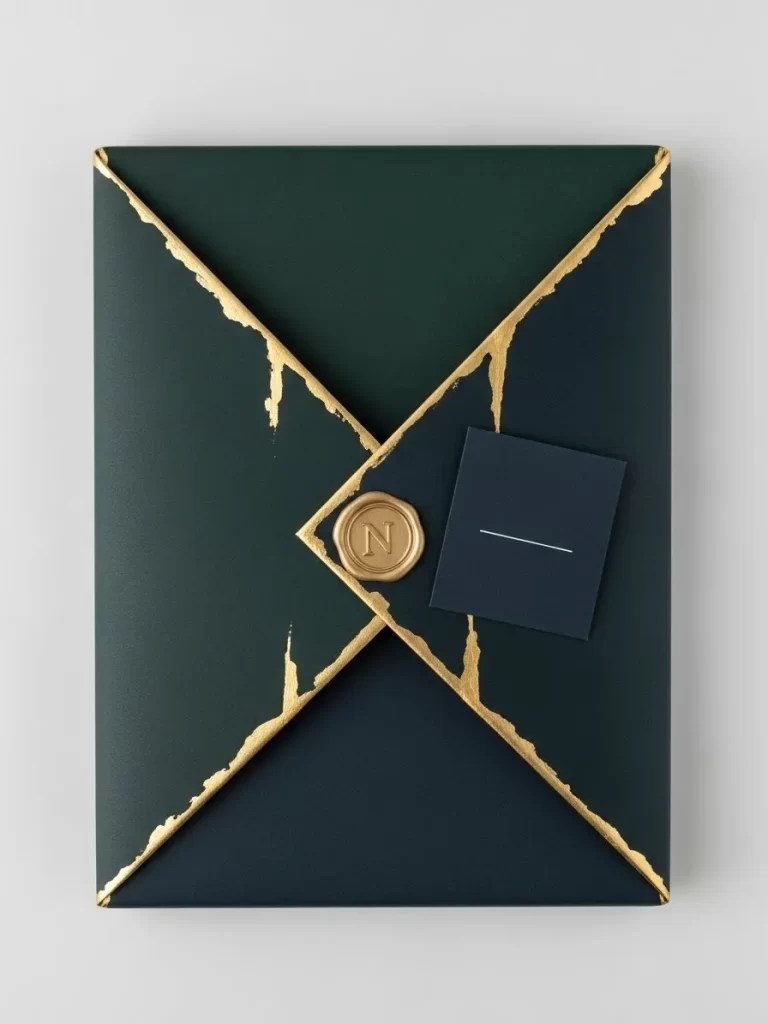
This wrapping utilizes a simple, dramatic contrast between matte dark color and striking metallic texture. The paper is a deep, rich hunter green or forest green with a completely smooth, matte finish.
The elegance comes from the intentional, artistic application of gold. The paper is folded into four envelope flaps that meet in the center. Along the edges of these folds, thick metallic gold paint is applied unevenly, creating a look of molten, dripping gold.
A polished gold wax seal, featuring a single prominent letter, anchors the four flaps together in the center. A small, dark navy square card, perhaps for a brief note, is tucked under one flap. This design is highly stylized and visually opulent.
Material Required
- Heavy matte dark green or navy blue cardstock or paper
- Thick metallic gold acrylic paint
- Small paintbrush (for paint application)
- Gold sealing wax and seal stamp with a prominent initial
- Small square of dark navy cardstock
Equipment Required
- Strong adhesive or hot glue gun
- Melting spoon and lighter (for wax seal)
DIY Instruction
- Wrap and Fold: Wrap the gift box in the dark matte paper. Fold the paper edges to create four distinct, sharp flaps that meet in the center of the box top, forming an envelope closure. Secure the seams underneath the box.
- Apply the Gold: Dip the paintbrush into the metallic gold paint. Carefully paint a thick, uneven line of gold along the torn or cut edges of the four top flaps. Let the paint drip slightly down the paper to achieve the molten look. Allow the paint to dry completely.
- Attach the Insert: Tuck the dark navy square cardstock piece slightly under one of the painted flaps.
- Seal the Center: Prepare the gold wax seal. Drip the melted wax onto the exact center where the four flaps meet, ensuring it covers the intersecting points. Press the initialed seal stamp firmly into the wax to secure the envelope closure.
24. Fractured Ice Geometry
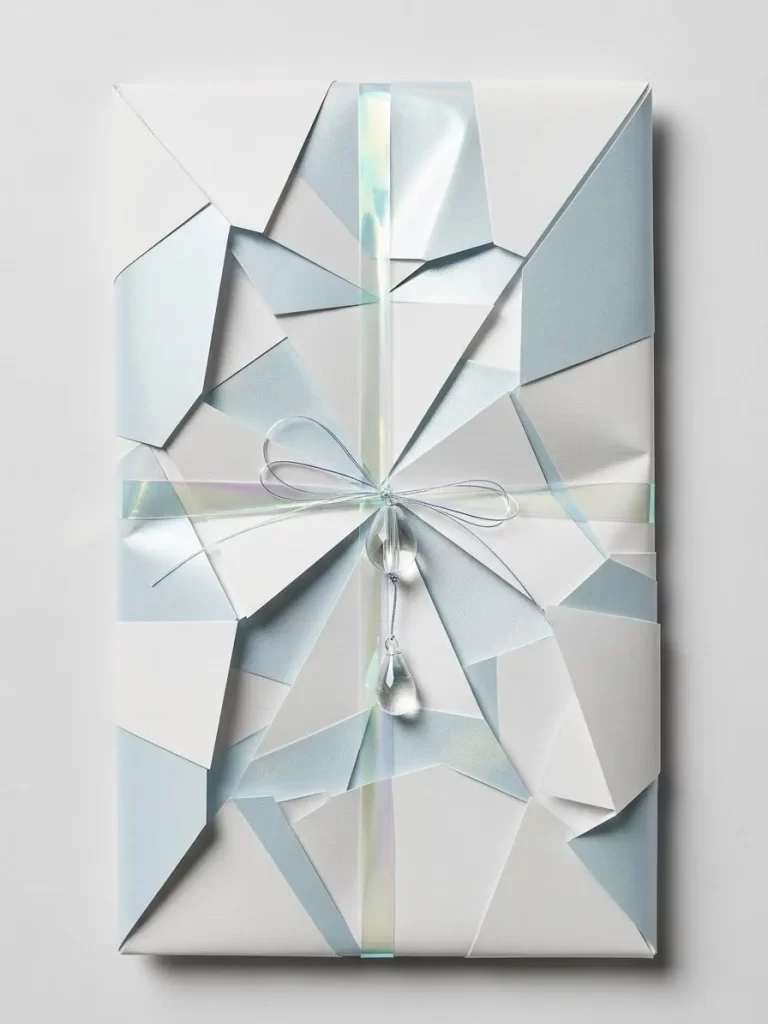
This wrapping is defined by a cool, clean, and highly dimensional aesthetic, resembling fractured ice or crystal formations. The paper is cut and layered with geometric precision, using shades of white, light blue, and a reflective silver.
The layered triangular and angular pieces create texture and depth, catching the light in various ways. The overall effect is sharp, modern, and visually striking. Subtle shimmering paper strips are incorporated throughout the design.
A sheer, opalescent ribbon wraps around the package, catching the rainbow hues of the layered paper underneath. The ribbon is secured with a simple bow in the center, from which hangs a stunning clear acrylic crystal tear drop or prism charm, enhancing the ice theme.
Material Required
- Matte white wrapping paper (for the base)
- Cardstock in varying shades of light blue, white, and metallic silver
- Thin strips of iridescent or holographic paper
- Sheer opalescent ribbon
- Clear acrylic crystal tear drop charm or prism
- Thin white cord
Equipment Required
- Craft knife and cutting mat
- Ruler (for precise cutting of shapes)
- Strong adhesive or glue stick
- Scissors
DIY Instruction
- Wrap the Base: Neatly wrap the gift box using the matte white paper.
- Cut the Fragments: Using the craft knife and ruler, cut the blue, silver, and iridescent cardstock into many irregular triangular and geometric fragments.
- Layer the Fragments: Begin adhering the fragments onto the front of the wrapped box. Overlap the pieces strategically to create a sense of dimension and depth. Ensure the white base paper is visible in the gaps between the colored fragments.
- Wrap the Ribbon: Wrap the opalescent ribbon around the package, both horizontally and vertically. Tie the ribbon securely into a neat bow in the center.
- Attach the Charm: Thread a short piece of thin white cord through the loop of the crystal charm. Tie the other end of the cord onto the center knot of the ribbon, allowing the charm to dangle vertically.
25. High End Leather Strapping
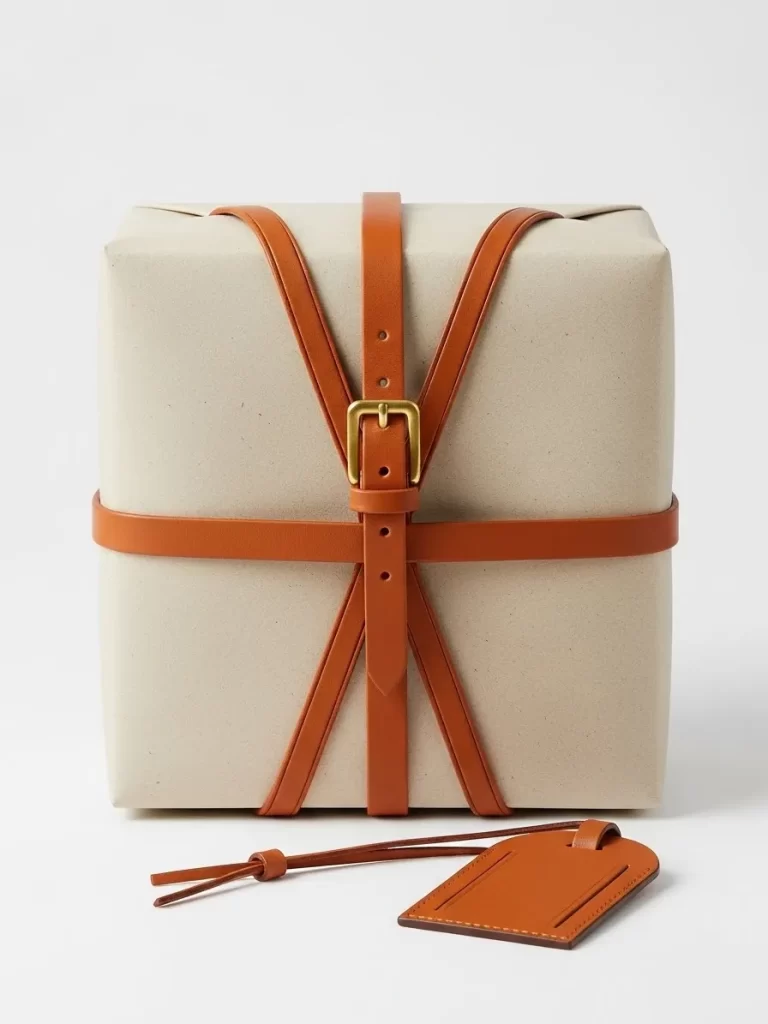
This wrapping is exceptionally stylish and evokes the elegance of bespoke leather goods or luggage. The base paper is a neutral, warm cream or beige, providing a sophisticated blank canvas.
The entire package is wrapped in thin leather or high quality faux leather strapping in a rich, warm cognac brown. The strapping is arranged in a classic X shape on the front, similar to a luggage belt. This gives the gift a structural, tailored feel.
The straps are secured with a simple, functional square brass buckle in the center. The package remains clean and minimalist, allowing the leather and brass to speak for themselves. An accompanying leather luggage tag hangs neatly below, ready for personalization.
Material Required
- Heavy cream or beige textured wrapping paper
- Long strips of thin cognac brown faux leather or leather strapping
- Small square brass buckle
- Matching cognac brown faux leather luggage tag
- Small leather cord (to attach tag)
Equipment Required
- Leather hole punch (for strap holes)
- Strong leather adhesive or hot glue gun
- Sharp scissors
DIY Instruction
- Wrap the Base: Wrap the gift box neatly in the cream or beige paper.
- Form the X Strap: Cut two long lengths of the faux leather strapping. Wrap one length horizontally around the middle of the box. Secure the ends underneath with adhesive.
- Add the Vertical Straps: Place the second length of strapping vertically over the horizontal strap. Fold and arrange the top half of this strap into a neat X pattern. The four ends of the X should meet in the center.
- Attach the Buckle: Thread the remaining vertical strap end through the brass buckle. Secure the buckle to the center where the four straps meet using adhesive on the underside of the buckle. Trim and secure the strap end under the horizontal strap. Use the hole punch to create belt holes on the vertical strap if needed to adjust the look.
- Attach the Tag: Loop the small leather cord through the luggage tag’s loop. Tie the tag onto one of the horizontal strap corners or simply lay it beside the gift for a coordinated look.
26. Japanese Paper Zen Cube
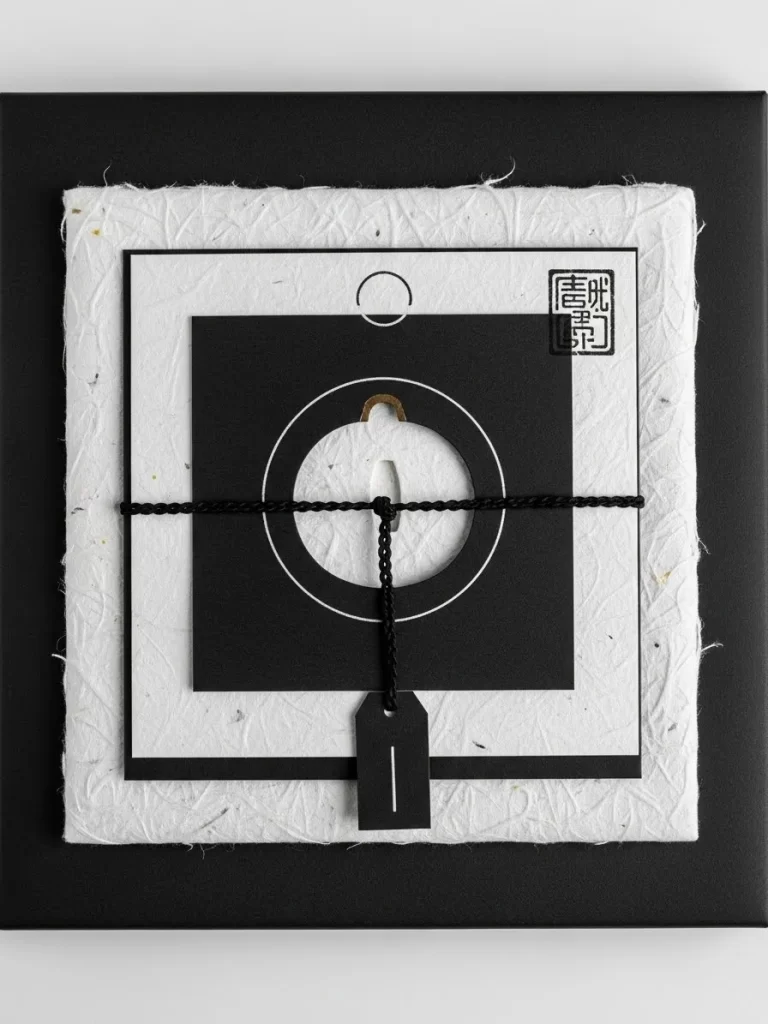
This design is a study in monochromatic texture and minimalist composition, drawing heavily on Japanese artistic principles. The base is a square box wrapped in deep matte black paper.
Layered on the front is a large square of thick, fibrous, crinkled white paper, giving a wonderful, raw texture. Centered on the white paper is a smaller square of matte black cardstock, which features a precise circular cutout revealing a small, subtle gold detail underneath.
The package is secured by a thin black braided cord, wrapped horizontally and vertically. The cord knot is secured over the central white circle. A small black tag hangs from the cord, completing the clean, structural composition.
Material Required
- Heavy matte black wrapping paper
- Large square of thick, fibrous white handmade paper
- Small square of matte black cardstock
- Piece of gold paper or small gold foil element
- Thin black braided cord or thread
- Small black cardstock tag
Equipment Required
- Craft knife (for cutting the circle)
- Ruler
- Strong adhesive or double sided tape
- Single hole punch
DIY Instruction
- Wrap the Base: Wrap the box in the matte black paper.
- Layer the White: Center and secure the fibrous white paper square onto the front of the wrapped box using adhesive.
- Prepare the Black Layer: Cut the small black cardstock square. Use the craft knife to cut a neat circle out of the center of this square. Glue a small piece of gold paper underneath the circular cutout.
- Attach the Black Layer: Center and secure the circular cutout black cardstock square onto the middle of the white paper.
- Wrap the Cord: Take the black braided cord and wrap it around the entire box, horizontally and vertically, crossing in the center. Knot the cord over the center circular element.
- Attach the Tag: Loop the small black cardstock tag onto the cord near the knot before trimming the excess cord.
27. Reptile Texture with Foil Edge
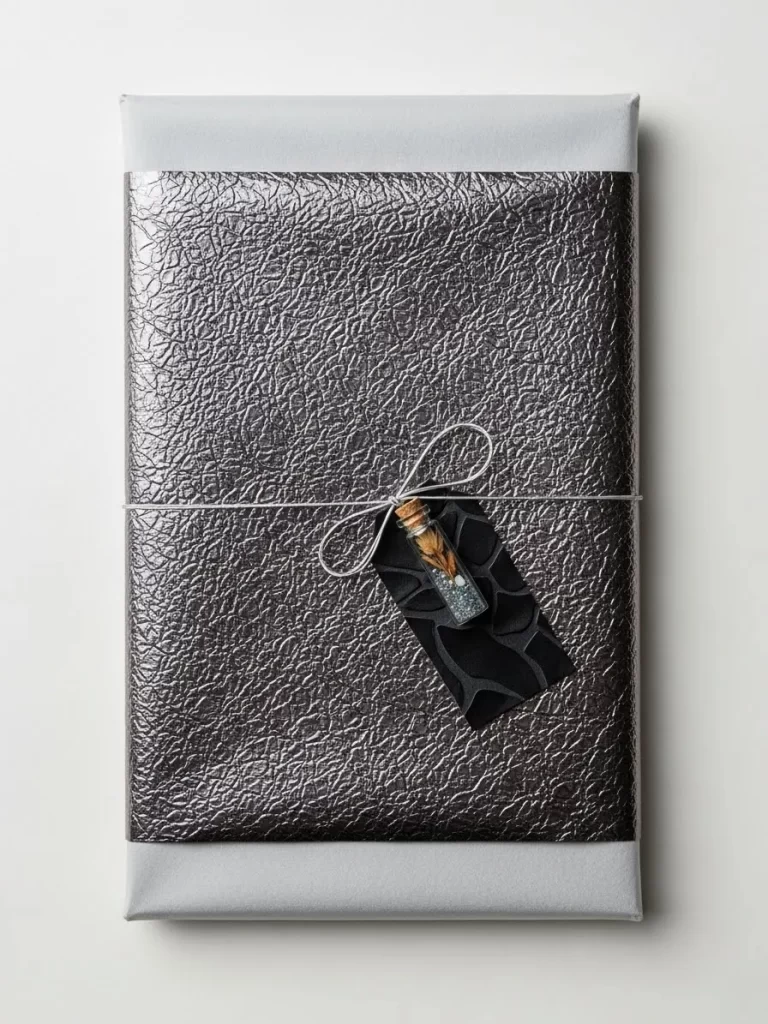
This wrapping features a dramatic, highly textured metallic paper that resembles reptile skin or crinkled metallic leather. The deep, charcoal silver color provides a strong, sophisticated foundation.
The metallic paper covers the entire body of the gift. The ends of the package are wrapped in a contrasting smooth, light gray paper, creating a clean border effect at the top and bottom. This simple color block adds refinement to the intense texture.
The package is secured with thin white twine, tied simply across the center. A small black tag with a subtle pattern hangs from the twine, along with a miniature glass vial containing dried herbs or seeds. This unique accessory adds a touch of bohemian curiosity.
Material Required
- Heavy metallic charcoal paper with a reptilian or textured pattern
- Smooth light gray wrapping paper (for end caps)
- Thin white cotton twine
- Small black tag with subtle pattern
- Miniature glass vial with cork stopper and filler (e.g., small pine needles, seeds)
Equipment Required
- Sharp scissors
- Double sided tape
- Hot glue gun (optional, for securing vial)
DIY Instruction
- Wrap the Base: Wrap the gift box using the metallic textured paper.
- Add the End Caps: Cut two strips of the smooth light gray paper. These strips should be the exact height of the box ends. Secure the strips around the ends of the box, covering the edges of the metallic paper neatly.
- Wrap the Twine: Cut a length of white twine. Wrap it once horizontally around the center of the box. Tie the twine in a small, neat bow on the front.
- Attach the Embellishments: Thread the twine through the hole in the black tag. Secure the loop of the miniature glass vial to the twine near the tag.
- Secure the Knot: Tighten the bow knot to secure all the elements in place.
28. Paper Flower Bloom
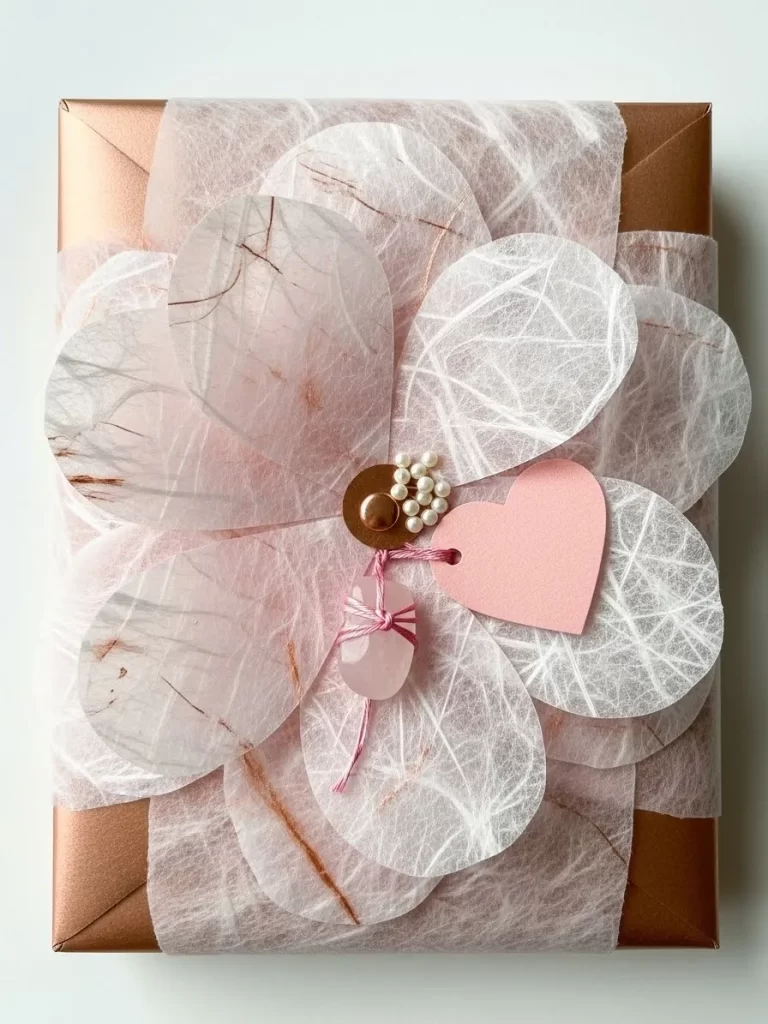
This design is soft, romantic, and highly textural, transforming the flat gift into a three dimensional flower. The base is a smooth, reflective rose gold foil paper, giving a beautiful, warm shimmer.
Layered over the front is a large, overlapping flower created from sheer, fibrous white paper, perhaps mulberry paper. The transparent, textured petals allow the rose gold base to peek through, creating depth and a soft, glowing color.
The flower is anchored in the center by a small copper colored metallic button adorned with tiny white beads. A matching pink heart shaped tag hangs from the center, tied on with a pink string and secured with a small, pink crystal charm. This is an exquisitely delicate presentation.
Material Required
- Smooth, reflective rose gold foil wrapping paper
- Sheer, fibrous white paper (e.g., mulberry paper or tissue)
- Small copper colored button or disc
- Tiny white faux pearl beads
- Pink cardstock (to cut heart shape)
- Thin pink string
- Small pink rose quartz or crystal charm
Equipment Required
- Scissors (for cutting petal shapes)
- Hot glue gun and glue sticks
- Single hole punch
DIY Instruction
- Wrap the Base: Neatly wrap the gift box in the rose gold foil paper.
- Cut the Petals: Cut the sheer white fibrous paper into many large, circular or oval petal shapes.
- Assemble the Flower: Starting from the outer edge, use small dots of hot glue to secure the petals onto the front of the wrapped gift, overlapping them to create the shape of a large, open flower. Layer them until the entire surface is covered.
- Center Detail: Glue the small copper button to the exact center of the flower. Use the hot glue gun to attach the tiny white pearl beads around the edge of the button for extra detail.
- Create the Heart Tag: Cut the pink cardstock into a neat heart shape. Punch a hole in one side of the heart.
- Attach the Tags: Thread the pink string through the heart tag and the pink crystal charm. Tie the string in a small knot around the base of the copper button, letting the heart and crystal dangle neatly.
29. Carbon Fiber Racing Box
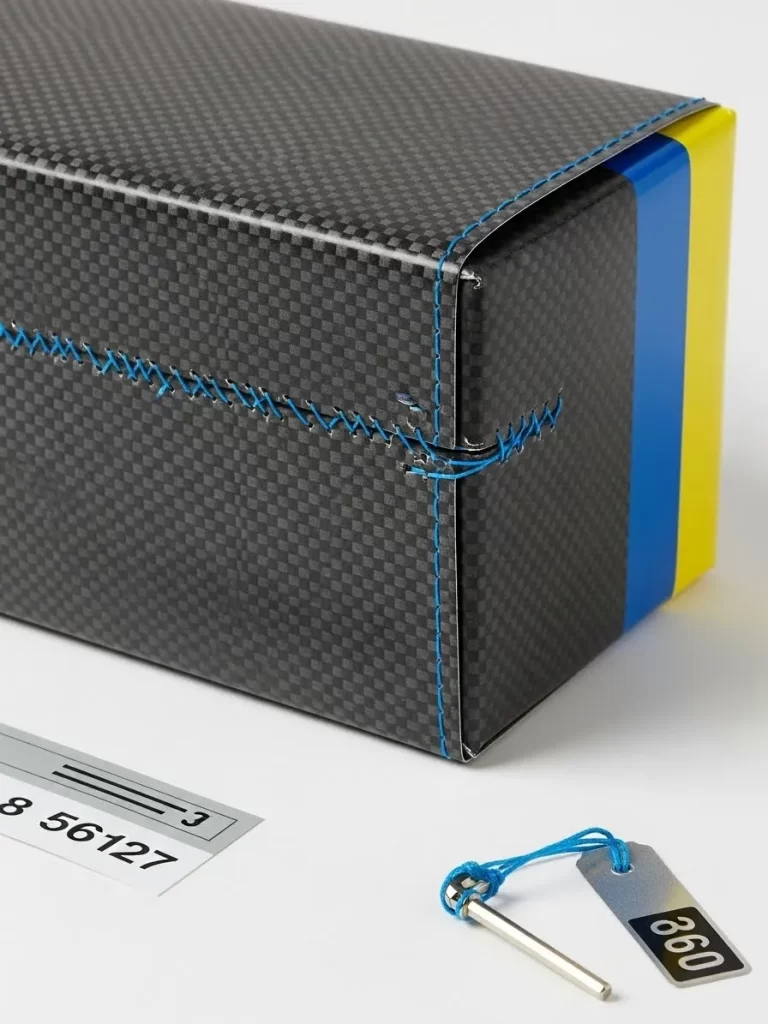
This wrapping uses a material design inspired by high performance engineering, giving the gift a distinctly modern, hyper masculine feel. The main body of the box is covered in paper that mimics the textured weave of carbon fiber.
The two ends of the box feature a striking color block of vibrant blue and yellow, reminiscent of motorsport livery. This bold, graphic contrast keeps the dark carbon texture dynamic and energized.
The design is enhanced by thick, bright blue stitching along the corners and seams, mimicking custom upholstery. A small, industrial silver tag with bold numbering hangs nearby, secured by a matching blue thread looped through a metal pin.
Material Required
- Sturdy paper or cardstock printed with a carbon fiber pattern
- Solid bright blue paper
- Solid vibrant yellow paper
- Thick, contrasting bright blue thread or embroidery floss
- Industrial style small metal tag with printed numbers
- Small silver metal pin or fastener
- Thin blue thread (for attaching tag)
Equipment Required
- Craft knife and ruler
- Strong adhesive
- Large needle (for stitching holes)
- Scissors
DIY Instruction
- Wrap the Base: Wrap the main body of the gift box in the carbon fiber paper.
- Add Color Blocks: Measure and cut the blue and yellow paper to fit the ends of the box exactly. Secure them to the sides with adhesive, ensuring the blue and yellow strips sit flush against the carbon fiber paper.
- Pre Drill Stitch Holes: Use the large needle to poke small, evenly spaced holes along the main seams and corners of the carbon fiber paper where you want the stitching to appear.
- Stitch the Seams: Thread the thick blue floss onto the needle. Hand stitch along the pre poked holes, creating a prominent, decorative running stitch along the corners and top edge of the carbon fiber paper. Secure the thread ends neatly inside the flaps.
- Attach the Tag: Loop the thin blue thread through the hole in the metal tag and around the silver metal pin. Tie the thread securely and place the tag assembly next to the package.
30. Nautical Rope Tassel Glamour
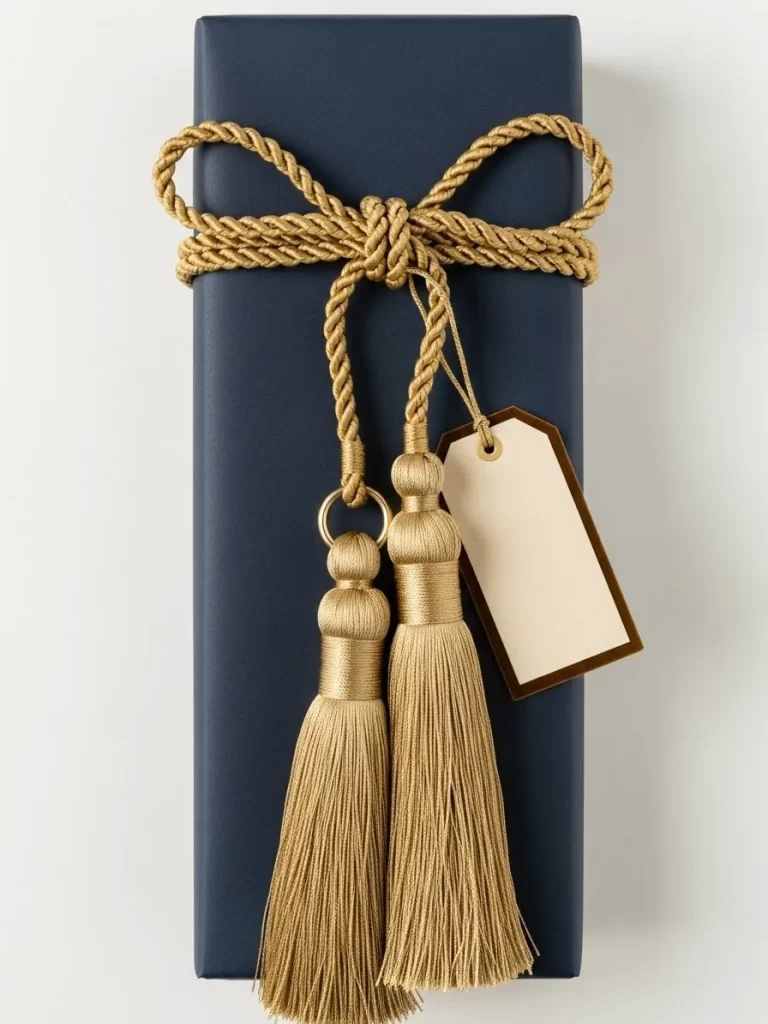
This is a beautiful example of using heavy cordage to create a sophisticated, dramatic accent. The base wrapping is a deep, rich navy blue matte paper. This dark color provides a wonderful canvas for the gold embellishments.
The package is secured with thick, braided gold rope, wrapped vertically and tied into a large, prominent bow at the top. The substantial nature of the rope elevates the look far beyond standard ribbon.
Two magnificent, plush gold tassels hang from the bow knot, adding considerable length and movement. The tassels are anchored by small gold rings. A plain cream colored tag, edged in gold foil, hangs from the tassels, completing this luxurious and refined presentation.
Material Required
- Heavy matte navy blue wrapping paper
- Thick gold braided cord or rope
- Two plush gold decorative tassels with gold ring loops
- Plain cream cardstock tag with gold foil border
- Thin gold thread (for attaching tag)
Equipment Required
- Sharp scissors
- Double sided tape (for clean wrapping)
DIY Instruction
- Wrap the Base: Neatly wrap the long gift box in the navy blue matte paper.
- Wrap the Gold Rope: Cut a very generous length of the gold rope. Wrap it vertically around the box, leaving ample length for the bow and tassels at the top.
- Tie the Bow: Tie the rope ends into a large, structured bow at the top center of the box. Ensure the loops are even and the knot is tight.
- Attach the Tassels: Loop the gold rings of the two tassels directly onto the knot of the gold rope, allowing them to hang down the front of the package.
- Attach the Tag: Use a small length of the thin gold thread to loop through the hole in the gold edged tag. Tie the tag onto the gold ring of one of the tassels.
31. Pleated Cloudscape Volume
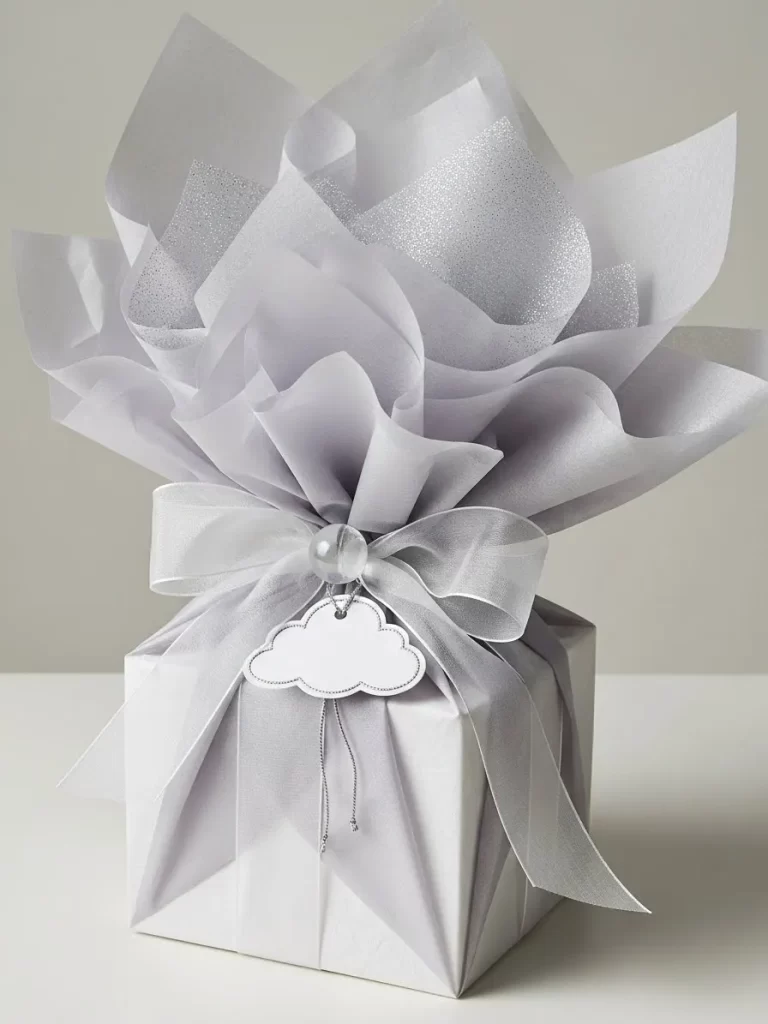
This wrapping transforms a conventional box into a soft, ethereal sculpture using light colored papers and organza. The bottom half is covered in white or pale lavender paper, which has been meticulously folded and pleated at a diagonal. This technique creates amazing volume and shadows.
Above the pleated base, layers of sheer, silver dusted white and pale gray tissue paper are gathered dramatically, creating a soft, cloud like puff. This contrast between the precise folding below and the airy volume above is captivating.
The entire package is cinched in the middle with a wide, sheer organza ribbon, tied into a large, elegant bow. The center knot is anchored by a large, smooth pearl bead. A simple cloud shaped tag hangs from the bead, completing the heavenly aesthetic.
Material Required
- Smooth white or pale lavender wrapping paper (for base)
- Sheer white and pale gray tissue paper (some with silver glitter or dusting)
- Wide, sheer silver or pale gray organza ribbon
- Large, smooth round pearl bead
- White cardstock (for the cloud tag)
- Thin silver metallic cord (for attaching tag)
Equipment Required
- Ruler and scoring tool (for pleating)
- Double sided tape
- Hot glue gun and glue sticks
- Scissors
- Small hole punch
DIY Instruction
- Wrap the Base: Neatly wrap the gift box in the white or pale lavender paper.
- Create the Pleats: Cut the paper into squares slightly larger than the sides of the box. Use the ruler and scoring tool to score diagonal lines across the square sections. Fold the paper along these lines, gathering the pleats at the center point where the ribbon will sit. Secure the folded paper onto the box sides using small dots of adhesive.
- Create the Puff: Layer several sheets of the different gray and silver tissue papers. Gather the center of the papers tightly. Secure this gathered puff onto the top surface of the box with a dot of hot glue. Arrange the outer edges of the paper to look voluminous and cloud like.
- Wrap the Ribbon: Take the sheer organza ribbon and wrap it horizontally around the cinched area of the box, covering the raw edges of the tissue paper. Tie the ribbon into a large, full bow at the front.
- Add Center Detail: Thread the silver metallic cord through the pearl bead. Secure the pearl bead to the center knot of the ribbon using the cord.
- Attach the Tag: Punch a hole in the cloud shaped tag. Loop the remaining silver metallic cord through the tag and tie it securely to the pearl bead.
32. Modern Wood Slat Screen
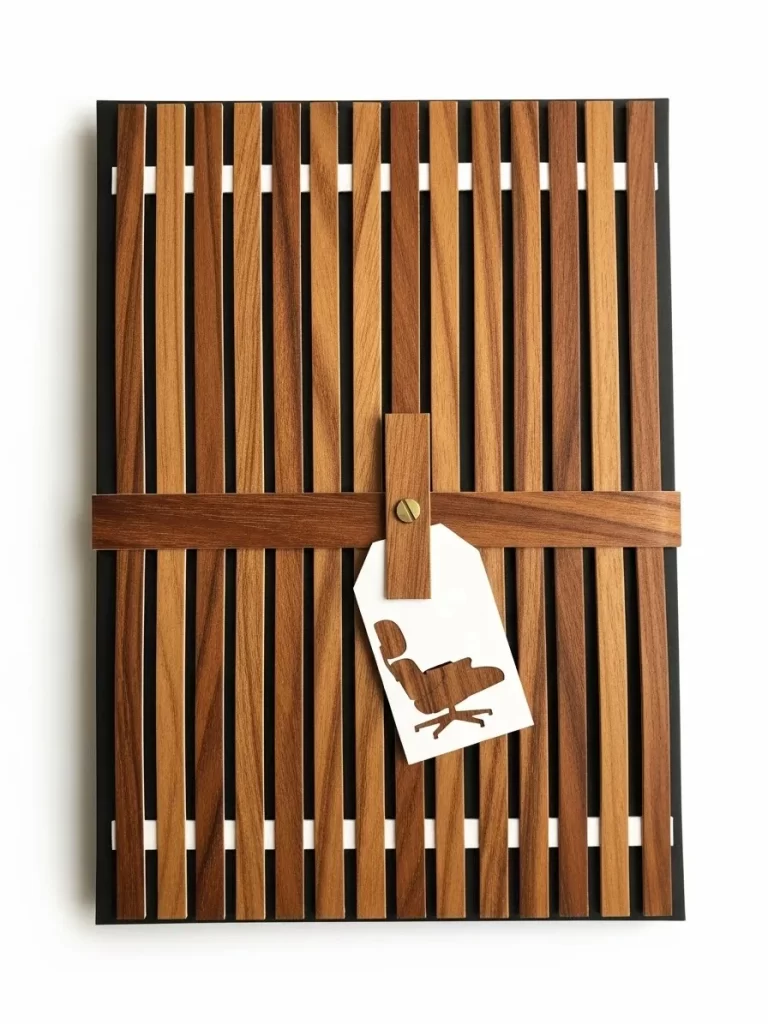
This wrapping concept uses natural wood strips to create a modernist, architectural screen effect. The base is a dark black box, providing a deep shadow background. Thin strips of alternating light and dark wood veneer are arranged vertically across the front.
The thin vertical wood pieces are spaced evenly, allowing glimpses of the dark background and creating a wonderful visual rhythm. This design evokes the clean lines of midcentury furniture or Japanese screens.
A thicker, dark wood strap wraps horizontally across the center. It is secured with a small brass rivet, adding an authentic hardware detail. A crisp white tag hangs from the strap, featuring a die cut image of a classic desk chair, lending a sophisticated, minimalist flair.
Material Required
- Matte black gift box or heavy black cardstock
- Thin strips of light wood veneer (e.g., maple)
- Thin strips of dark wood veneer (e.g., walnut)
- Thicker dark wood strip or faux leather strap
- Small brass rivet or antique brass fastener
- White cardstock tag
- Thin black cord
Equipment Required
- Craft knife and cutting mat
- Strong wood adhesive or hot glue gun
- Ruler (for precise spacing)
- Rivet setter or small hammer (for fastener)
- Hole punch
DIY Instruction
- Prepare the Base: Ensure your gift box is wrapped in or made of matte black material.
- Apply Vertical Slats: Measure and cut the light and dark wood veneer strips to the exact height of the box. Apply strong adhesive to the backs of the strips. Alternating colors, adhere the strips vertically onto the front of the box, ensuring the spacing between each slat is equal and uniform.
- Apply Horizontal Strap: Wrap the thick dark wood strap horizontally around the center of the box, covering the vertical strips. Secure the ends underneath the box with adhesive.
- Install the Fastener: Where the strap crosses the center, use the hole punch or drill to create a small hole. Install the brass rivet or fastener to secure the strap, giving it a permanent hardware look.
- Attach the Tag: Punch a hole in the white cardstock tag. Loop the black cord through the tag and secure it tightly around the wood strap near the brass fastener.
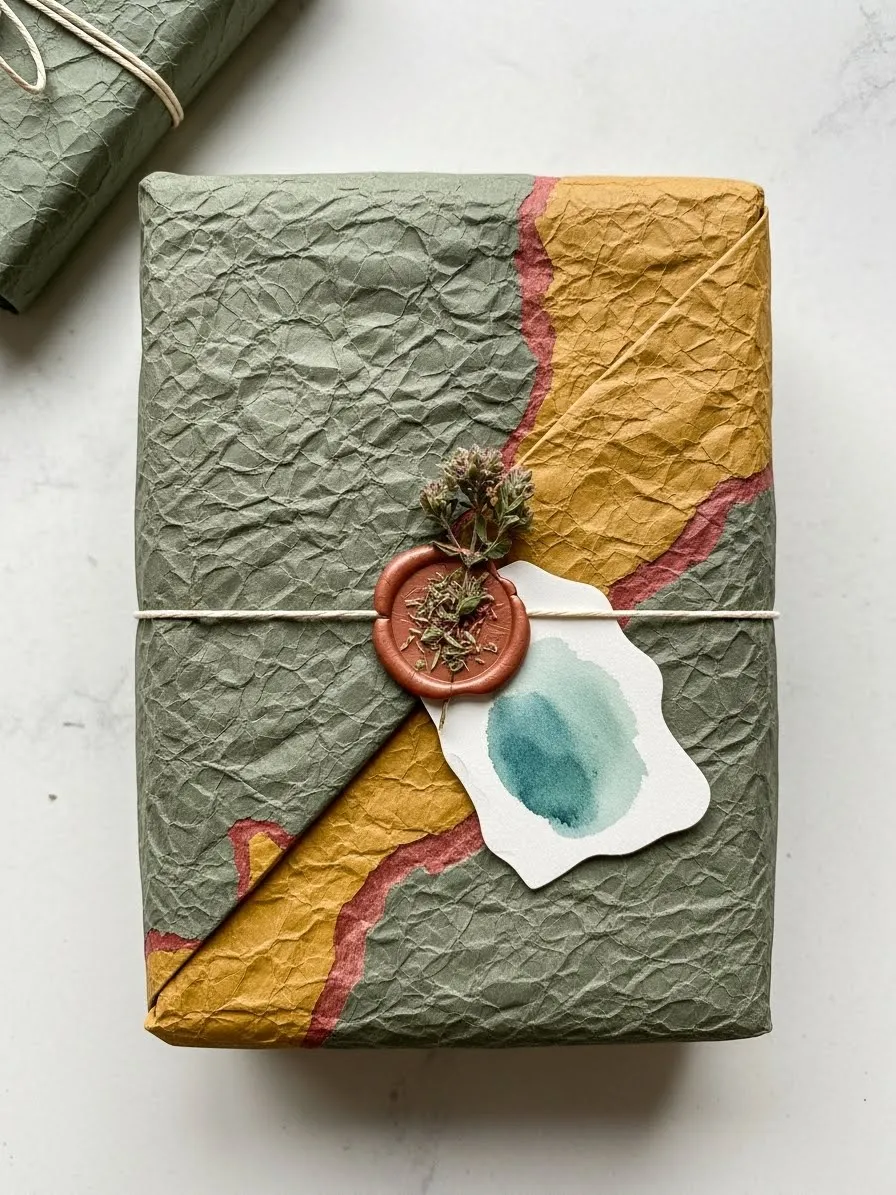
33. Crumpled Topography Wax Seal

This wrapping features a complex, layered paper application that mimics a topographical map or geological strata. The paper itself is heavily crinkled and textured, enhancing the earthy color palette.
One large section of the box is covered in muted sage green paper. The other section is covered in a deep mustard yellow. A thin, curving line of reddish brown separates the two colors, suggesting a natural boundary or winding river.
A simple white twine secures the package horizontally. The centerpiece is a smooth, copper colored wax seal applied directly over the twine knot. A small sprig of dried moss or tiny flowers is pressed into the warm wax before it sets. A hand painted tag, featuring a teal watercolor blot, hangs nearby.
Material Required
- Heavy paper in muted sage green, mustard yellow, and reddish brown
- Thin white cotton twine
- Copper colored sealing wax and seal stamp
- Small sprig of dried moss or tiny flowers
- White cardstock tag (for watercolor effect)
- Teal and dark green watercolor paint
Equipment Required
- Strong adhesive or glue stick
- Melting spoon and lighter (for wax seal)
- Paintbrush (for watercolor tag)
- Scissors
DIY Instruction
- Crumple the Paper: Take the green and yellow paper and intentionally crumple it into a tight ball. Smooth it back out, leaving deep creases and texture.
- Wrap the Colors: Wrap the box diagonally, using the sage green paper for one half and the mustard yellow for the other. The two colors should meet diagonally across the box front.
- Add the Boundary: Cut a thin, curving strip of the reddish brown paper. Glue it neatly along the seam where the green and yellow papers meet.
- Wrap the Twine: Wrap the thin white twine horizontally around the package. Tie the twine in a simple knot in the center of the color boundary.
- Seal and Adorn: Prepare the copper colored wax seal. Drip the wax directly over the twine knot. Gently place the small sprig of dried moss onto the melted wax. Press the seal stamp firmly over the moss and allow it to cool.
- Create and Attach the Tag: Paint the white cardstock tag with a simple teal and green watercolor blot. Punch a hole in the tag and loop it onto the white twine before trimming the ends.
34. Neon Iridescent Reveal
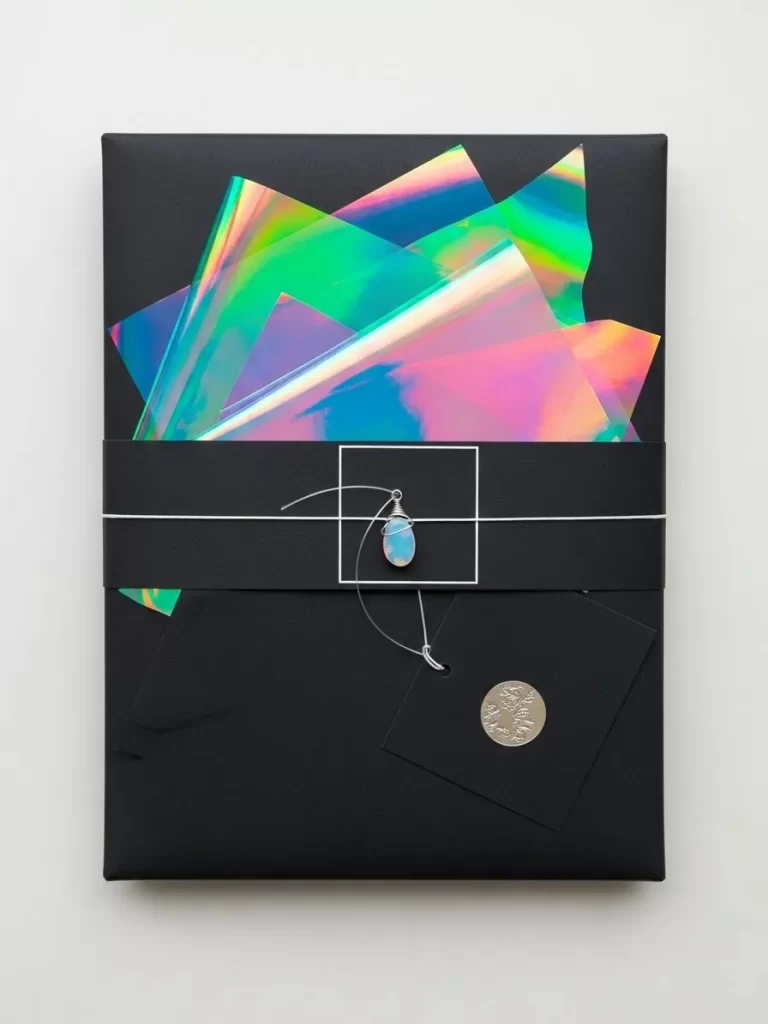
This is a stark, graphic, and highly contemporary design, relying on the dramatic contrast between matte black and dazzling, futuristic color. The box is wrapped entirely in deep matte black paper.
The front of the package features a vertical slice cut out of the black paper, which reveals layers of iridescent or holographic foil paper underneath. The rainbow sheen of the foil shimmers brightly against the dark background.
A wide black band wraps horizontally across the cutout section. This band is secured with a thin white cord, looped to hold a small, opalescent moonstone charm. A metallic silver seal, etched with a crest, is adhered to the bottom corner, enhancing the sophisticated edge.
Material Required
- Heavy matte black wrapping paper
- Iridescent or holographic foil paper (in pinks, greens, and blues)
- Wide matte black cardstock strip (for the horizontal band)
- Thin white cotton cord or string
- Small opalescent moonstone or quartz charm
- Metallic silver wax seal or sticker with a crest design
Equipment Required
- Craft knife and cutting mat
- Ruler (for precise cutting of the slit)
- Strong adhesive or double sided tape
- Scissors
DIY Instruction
- Wrap the Base: Neatly wrap the gift box in the matte black paper.
- Create the Inner Layer: Cut a piece of the iridescent foil paper slightly larger than the cutout you plan to make. Secure this piece to the center of the wrapped box.
- Cut the Reveal: Use the craft knife and ruler to cut a precise vertical rectangle or slit in the black paper on the front, revealing the colorful foil beneath.
- Apply the Band: Wrap the wide matte black cardstock strip horizontally around the center of the box, covering the ends of the slit. Secure the ends underneath the box with adhesive.
- Attach the Charm: Wrap the thin white cord horizontally around the center of the black strip. Thread the cord through the loop of the moonstone charm. Tie the cord in a small, neat knot over the center of the strip.
- Final Accent: Adhere the metallic silver crest seal or sticker to the bottom right corner of the package.
35. Classic Book Binding Case
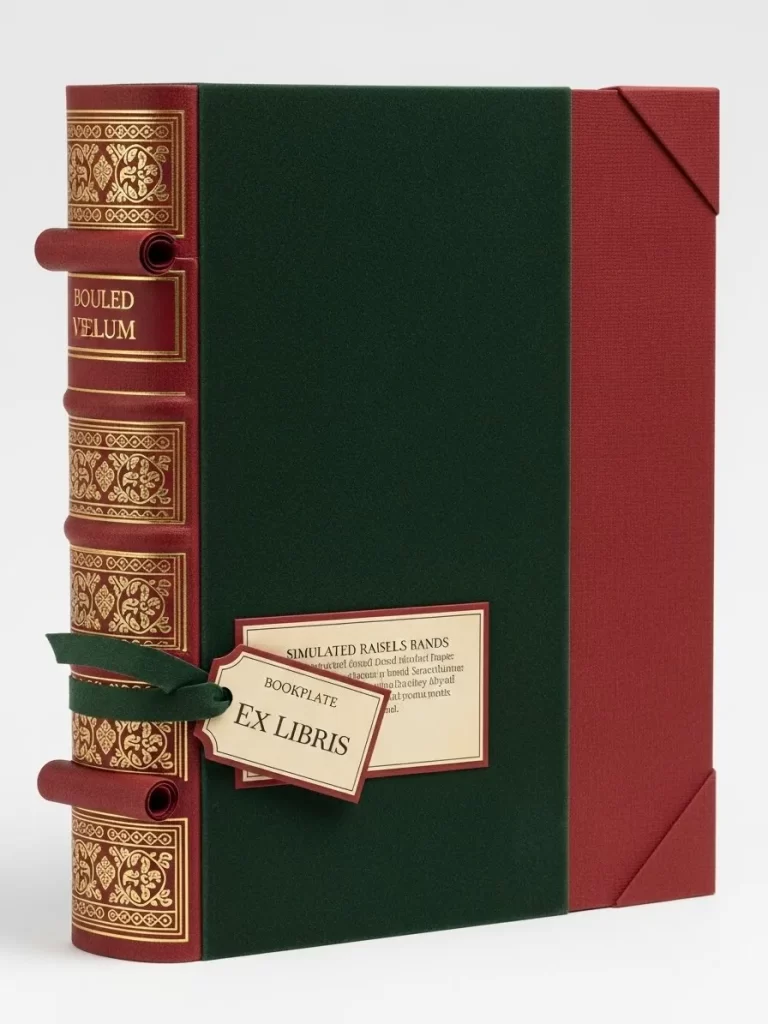
This design transforms a rectangular gift into the appearance of a handsome, leather bound volume, suggesting an item of antiquity and importance. The wrapping uses three main colors: deep forest green, rich maroon, and gold.
The front cover is a deep green fabric. The spine section is wrapped in maroon paper embossed with elaborate gold vine and leaf patterns, giving it the look of expensive tooling. Faux raised bands are incorporated into the spine for authentic book binding detail.
Red fabric covers the sides, held in place by green ribbon corner wraps. The package is secured by a green satin ribbon tied around one of the raised bands. Two layered tags, one labeled ‘Bookplate’ and the other ‘Ex Libris,’ complete this highly detailed, literary presentation.
Material Required
- Heavy cardstock or fabric in deep forest green (for the cover)
- Heavy cardstock in rich maroon, embossed with gold patterns (for the spine)
- Red paper or fabric (for the side pieces)
- Cardboard tubing or thick paper strips (to create the raised spine bands)
- Green satin ribbon
- Two different sized cream cardstock tags (for bookplate labels)
Equipment Required
- Ruler and craft knife
- Strong adhesive or glue gun
- Scissors
DIY Instruction
- Build the Spine: Cut the gold embossed maroon paper to the width of the spine. Glue the cardboard tubing or paper strips horizontally across the maroon paper to create the raised bands.
- Wrap the Body: Wrap the main front section of the box in the deep green material.
- Assemble the Book: Adhere the decorated maroon spine piece to the side of the box, covering the raw edge of the green wrap. Wrap the ends of the box with the red paper.
- Create Corner Details: Cut four triangles of the red paper. Glue them neatly to the top and bottom corners of the green cover to mimic the protective corners of a book jacket.
- Wrap the Ribbon: Wrap a length of the green satin ribbon around the box, securing it around one of the middle raised spine bands. Tie the ribbon into a small, neat bow on the spine.
- Attach the Tags: Loop the two layered tags onto the green ribbon near the bow.
36. Copper Filigree Gatefold
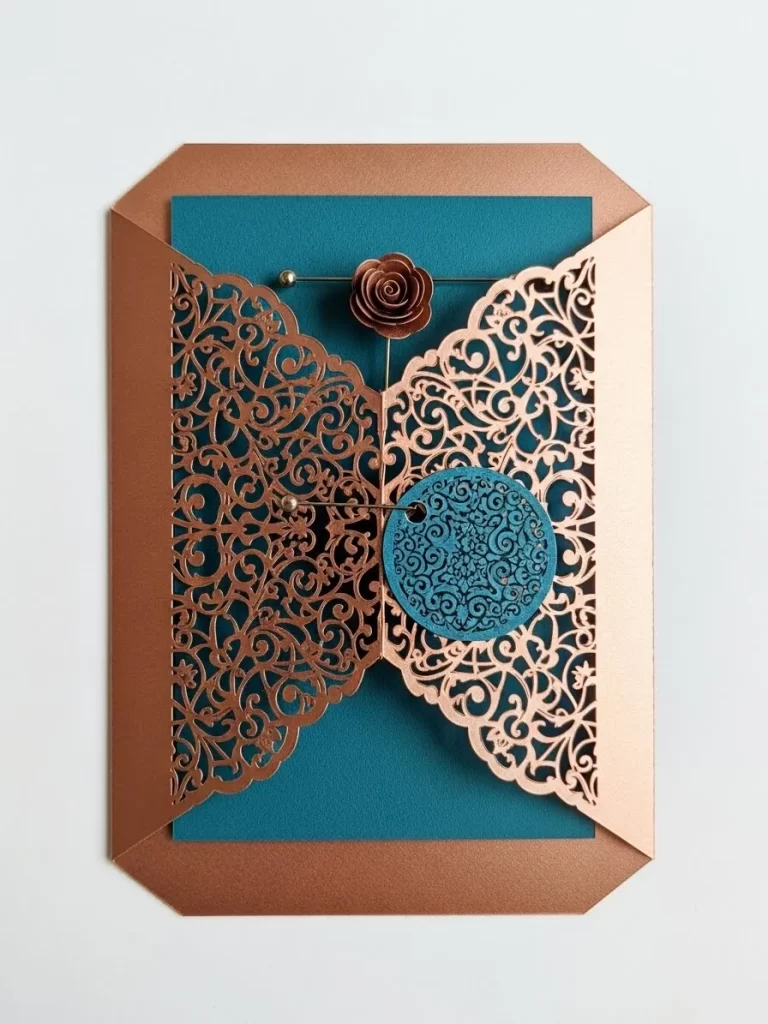
This is an exceptionally ornate and sophisticated presentation, using highly decorative laser cut paper to create a shimmering gatefold enclosure. The base layer is a rich, matte teal or peacock blue paper.
The outer layer is copper colored metallic cardstock, laser cut with an intricate, swirling filigree pattern. This pattern suggests lace or wrought ironwork. The copper gatefold panels meet in the center, revealing the vivid blue underneath.
A small copper paper flower is secured near the top seam. The package is cinched by a thin, iridescent bead wire. A circular blue tag, etched with a matching pattern, is secured in the center with a small metal pin, providing a layered focal point.
Material Required
- Heavy matte teal or peacock blue cardstock
- Large sheet of copper colored metallic cardstock (laser cut with filigree pattern)
- Small copper paper flower or rosette
- Thin bead wire or copper colored wire
- Small circular tag in matching teal color, etched with a pattern
- Small metal pin or bead
- Strong adhesive
Equipment Required
- Craft knife (if laser cut paper is not available)
- Ruler
- Hot glue gun and glue sticks
- Wire cutters
DIY Instruction
- Wrap the Base: Wrap the gift box cleanly in the matte teal cardstock.
- Prepare the Gatefold: Cut the copper filigree paper into two matching panels, sized to cover the front of the box. Score a crease down one edge of each panel so they can fold inward easily.
- Attach the Gatefold: Adhere the non folding edge of each copper panel to the side of the wrapped box. The filigree panels should meet neatly in the center front.
- Add Flower Detail: Use a small dot of hot glue to secure the copper paper flower near the top edge where the two panels meet.
- Cinch the Wire: Wrap the thin bead wire horizontally around the center of the box, over the copper panels. Twist the wire at the back to secure it.
- Attach the Tag: Loop the patterned teal tag onto the wire on the front. Use a small metal pin to pierce the tag and the paper beneath, securing the tag and keeping the two gatefold panels closed in the center.
37. Linen Fabric Cross Stitch Window
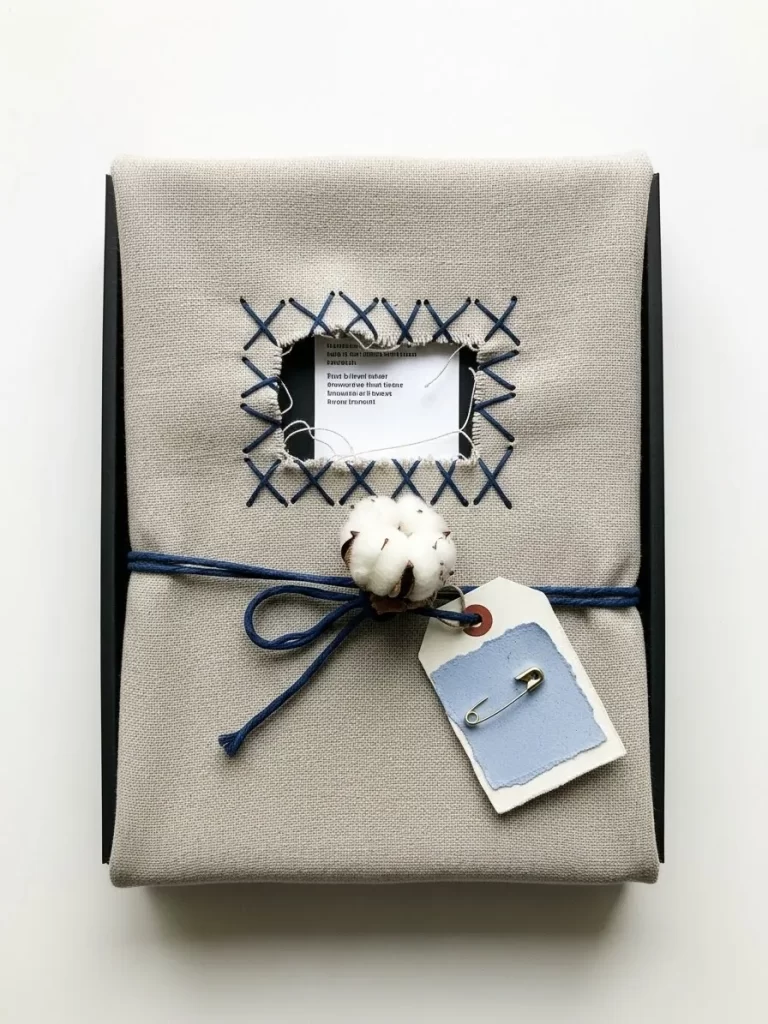
This creative wrapping uses fabric to add texture and warmth, presenting the gift as a handcrafted sampler. The base is a dark black box. A layer of coarse, oatmeal colored linen fabric wraps over the top.
A square cutout in the center of the linen reveals the dark surface beneath. Around the edges of this window, bold, navy blue embroidery thread is stitched in a prominent cross stitch pattern. This homespun detail contrasts strongly with the sleek black box.
The package is secured with thick navy blue twine, tied into a large, simple loop knot on the front. A small, dry cotton boll is tucked into the knot, adding a soft, natural element. A simple tag, layered with ripped blue paper and secured with a small safety pin, hangs from the knot.
Material Required
- Matte black gift box
- Square of coarse linen or burlap fabric in an oatmeal color
- Thick navy blue embroidery floss or yarn
- Thick navy blue twine
- Dry cotton boll
- White cardstock tag
- Small square of ripped blue paper
- Small metal safety pin
Equipment Required
- Craft knife (for cutting the window)
- Large embroidery needle
- Strong fabric adhesive
- Hole punch
DIY Instruction
- Wrap the Fabric: Lay the linen fabric over the top and sides of the black box. Secure the edges underneath with strong fabric adhesive.
- Cut the Window: Use the craft knife to cut a neat square window in the center of the linen fabric, revealing the black box underneath.
- Stitch the Border: Thread the large needle with the thick navy blue floss. Stitch a decorative cross stitch border around the entire perimeter of the window cutout. Secure the thread ends neatly on the inside of the window.
- Wrap and Knot: Wrap the navy blue twine horizontally around the box. Tie it into a large, prominent loop knot over the bottom edge of the linen fabric.
- Add the Cotton: Tuck the stem of the cotton boll into the center of the twine knot.
- Layer and Pin the Tag: Glue the small piece of ripped blue paper onto the bottom of the white cardstock tag. Secure the small safety pin through the blue paper layer.
- Attach the Tag: Loop the tag onto the navy blue twine loop before trimming the cord ends.
38. Rainbow Ribbon Burst
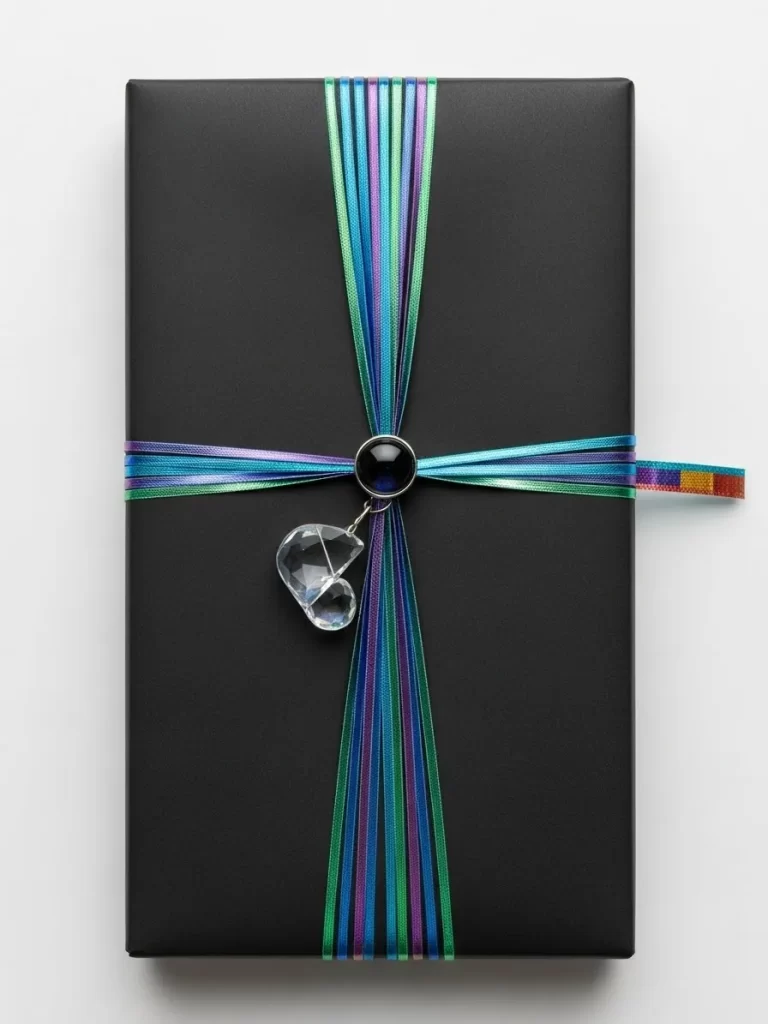
This wrapping is a fun, celebratory take on high end design, using a collection of shimmering, multi colored ribbons. The base is a completely stark, matte black paper, allowing the ribbons to be the star attraction.
Multiple thin, metallic ribbons in shades of blue, teal, green, and purple are layered vertically and horizontally across the box, fanning out from the center point. The overlapping ribbons create a burst of color and a wonderful iridescent shimmer.
The center intersection is secured by a round, polished black glass bead, which draws the eye. Hanging from the bead is a large, faceted clear crystal charm, shaped like a heart or tear drop. This design is clean, graphic, and strikingly vibrant.
Material Required
- Heavy matte black wrapping paper
- Multiple thin ribbons in various shades of metallic blue, teal, green, and purple
- One wider ribbon with a rainbow gradient pattern
- Round polished black glass or stone bead
- Large faceted clear crystal charm
- Thin silver wire or jump ring
Equipment Required
- Strong adhesive or double sided tape
- Scissors
- Wire cutters
DIY Instruction
- Wrap the Base: Neatly wrap the gift box in the matte black paper.
- Apply Ribbons: Cut many lengths of the thin metallic ribbons, slightly longer than the box. Adhere the ribbons vertically down the box, spacing them closely and alternating colors to create the fanned out effect. Repeat the process horizontally.
- Center the Bead: Apply a strong adhesive to the back of the black glass bead. Carefully press the bead onto the exact center where all the ribbons cross, securing them in place.
- Add the Charm: Use a short piece of silver wire or a jump ring to attach the faceted clear crystal charm to the black bead. The charm should hang vertically down the front of the package.
- Final Ribbon Accent: Wrap the single rainbow gradient ribbon around the waist of the package, securing the ends underneath. Let a small piece of the rainbow end hang loose at the side for extra flair.
39. Vintage Leather Trunk Case
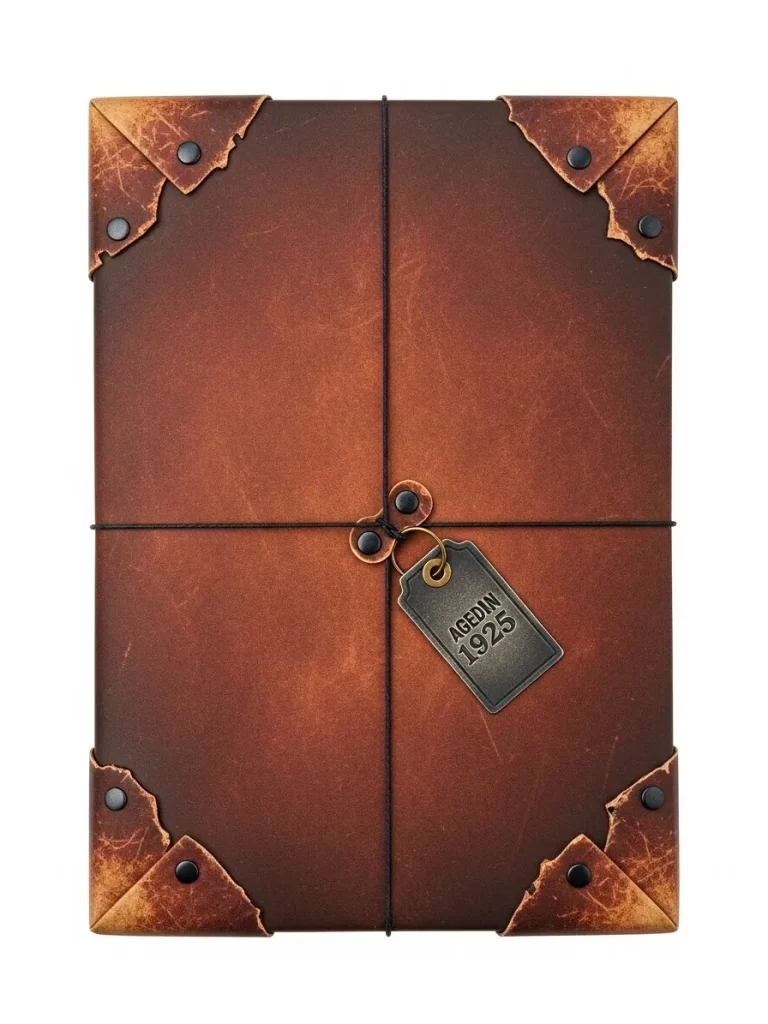
This presentation transforms the gift into a distinguished, antique piece of luggage. The paper is printed to mimic rich, worn cognac brown leather, complete with natural creases and patina.
The aesthetic is further enhanced by decorative paper corner protectors, which are secured with small black rivets or brads. These elements give the flat box structural depth and authenticity, making it look like a well traveled trunk.
Black cord wraps around the package, creating four quadrants. The cord is secured in the center with a rustic metal fastener. A vintage style black metal tag hangs from the center, stamped with the year “1925,” adding a final nostalgic touch.
Material Required
- Heavy paper or cardstock printed with a worn brown leather texture
- Paper strips printed to look like dark brown corner protectors
- Small black paper brads or rivets (for corner detail)
- Thin black cotton or synthetic cord
- Small metal fastener (for cord closure)
- Vintage style metal tag stamped with “Aged in 1925”
Equipment Required
- Strong adhesive or glue stick
- Scissors
- Small hole punch or awl
DIY Instruction
- Wrap the Box: Neatly wrap the gift box using the faux leather paper.
- Attach the Corners: Cut the corner protector strips into triangles. Secure these dark strips onto the four corners of the box with adhesive. Use the hole punch to pierce holes in the corners of the protectors and insert the black paper brads or rivets for a secured look.
- Wrap the Cord: Cut a long piece of black cord. Wrap it both vertically and horizontally around the box, ensuring the cord crosses neatly in the center. Knot the cord tightly at the center front.
- Attach the Fastener: Glue the small metal fastener directly over the cord knot.
- Attach the Tag: Loop the metal tag onto a short piece of cord. Tie the tag’s cord onto the main wrapping cord near the fastener.
40. Marbled Ink Feather Accents
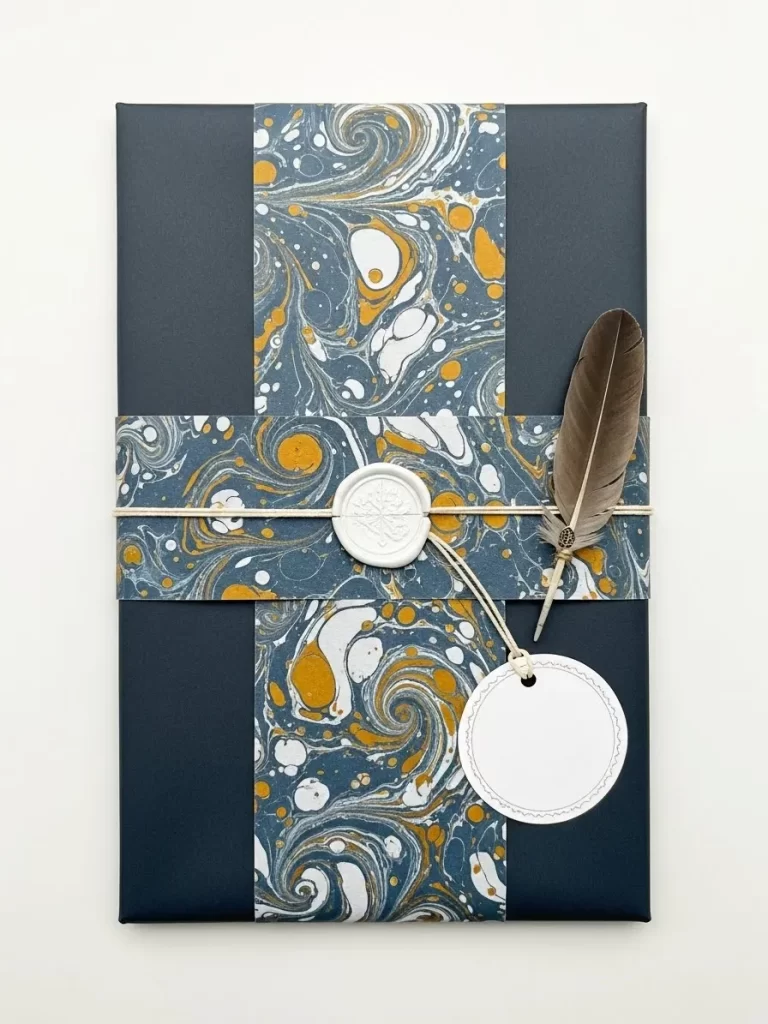
This wrapping relies on a classic, textural paper pattern for its elegance. The base is a deep, smooth navy blue matte paper. A vertical and horizontal band of beautifully hand marbled paper is layered over the top.
The marbled paper features organic swirls of deep blue, white, and intense gold, giving the pattern depth and movement. This technique evokes old world craftsmanship and sophisticated interior design.
The marbled bands are secured by white twine, wrapped horizontally around the box. A prominent white wax seal, featuring a simple motif, is placed over the center knot. A large, natural colored feather is tucked under the seal, adding a final rustic but elegant detail.
Material Required
- Heavy matte navy blue wrapping paper
- Hand marbled paper strips (navy, white, and gold pattern)
- Thin white cotton twine
- White sealing wax and seal stamp with a simple motif
- Large natural colored feather (e.g., turkey or pheasant feather)
- White circular cardstock tag
Equipment Required
- Ruler
- Strong adhesive or double sided tape
- Melting spoon and lighter (for wax seal)
- Scissors
DIY Instruction
- Wrap the Base: Wrap the gift box neatly in the matte navy blue paper.
- Apply Marbled Bands: Cut two strips of the marbled paper. Wrap one strip vertically down the center of the package and the other horizontally. Secure the ends underneath the box with adhesive, ensuring they cross perfectly in the center.
- Wrap the Twine: Wrap the thin white twine horizontally around the package, crossing the vertical marbled strip. Knot the twine in the center.
- Seal and Adorn: Prepare the white wax seal. Tuck the stem of the feather underneath the twine near the knot. Drip the wax directly onto the knot and feather stem. Press the seal stamp firmly into the wax and allow it to cool.
- Attach the Tag: Loop the white circular cardstock tag onto the twine just below the seal before trimming the twine ends.
41. Hyper Precision Neon Grid
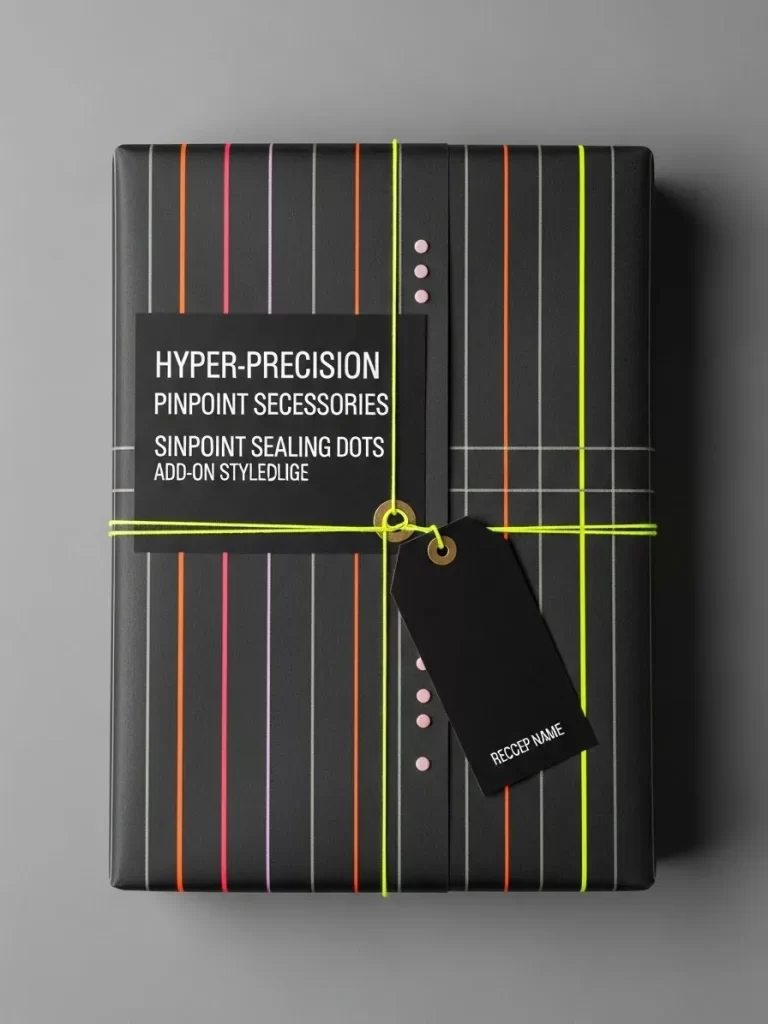
This design takes a sleek, modern approach, utilizing a dark background to make bright, fluorescent lines pop. The paper is deep matte black, overlaid with a subtle, fine lined grid pattern in light gray or black gloss.
The main decoration is a series of vertical neon colored lines that appear hand drawn in highlighter pink, orange, and lime green. These vibrant, thin stripes create a dynamic, energetic contrast against the severe black background.
Thin neon yellow cord wraps horizontally and vertically, crossing neatly in the center. The center is secured by a bold, black square tag overlaid with minimalist white typography. Small, neon pink sealing dots are placed along the edges, adding a playful, high tech touch.
Material Required
- Heavy matte black wrapping paper with a subtle grid pattern
- Fluorescent fine liner pens or thin neon tape strips (pink, orange, green)
- Thin neon yellow cord or string
- Matte black cardstock for large center tag
- White transfer lettering or vinyl (for tag text)
- Small round neon pink sealing stickers or paint dots
- Black rectangular tag with brass grommet (for recipient name)
Equipment Required
- Ruler (for drawing straight lines)
- Craft knife
- Double sided tape
- Single hole punch
DIY Instruction
- Wrap the Base: Neatly wrap the gift box in the matte black grid paper.
- Apply Neon Stripes: Using the ruler, draw or apply the thin neon colored stripes vertically across the front of the box. Vary the colors and spacing for a dynamic look.
- Add Dots: Carefully place the small neon pink sealing dots along the edges or on the corners of the box.
- Wrap the Cord: Cut a length of neon yellow cord. Wrap it horizontally and vertically around the box, securing the ends underneath with tape.
- Prepare the Tags: Create the large black center tag with the white typographic text. Punch a hole in the name tag (the smaller black rectangle).
- Attach the Tags: Secure the large black typographic tag horizontally across the center of the box with strong adhesive, covering the cord intersection. Loop the name tag onto the neon yellow cord just beneath the large tag’s corner and knot the cord ends neatly.
42. Emerald Petal Beetle
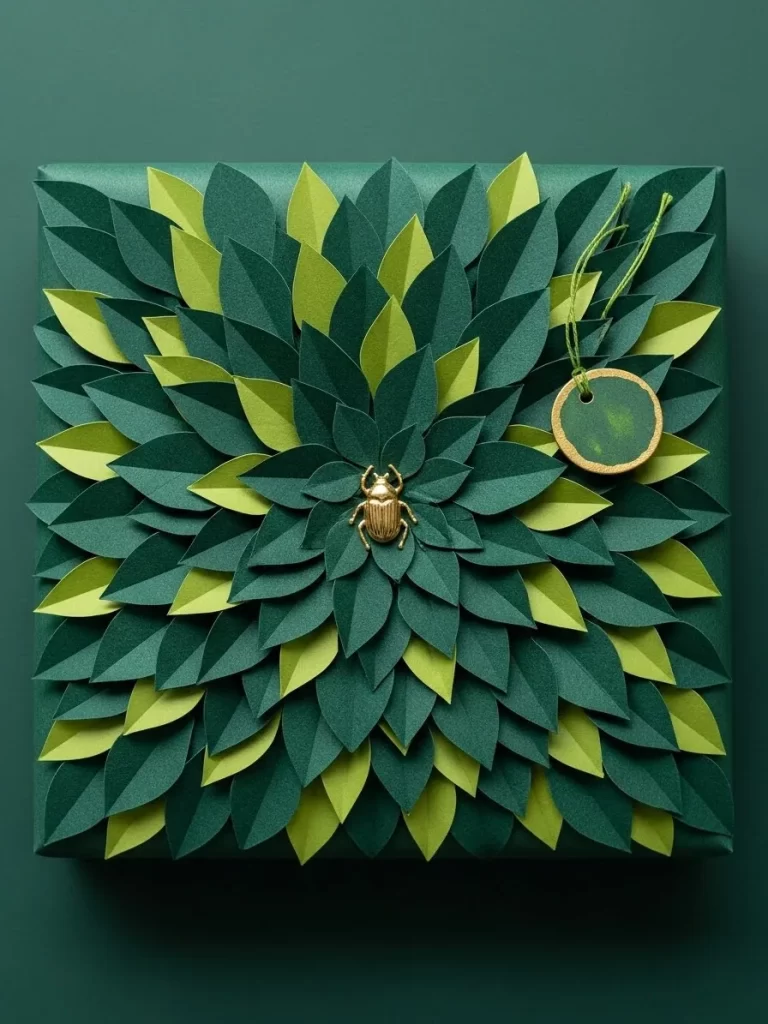
This wrapping is a striking, dramatic floral sculpture created entirely from layered paper. The base is a deep, smooth emerald green paper, providing a rich, monochromatic background.
The entire surface is covered by an elaborate, three dimensional flower bloom composed of layered, dark green and bright lime green paper petals. The overlapping petals create an intense, lush textural effect, giving the package a lifelike, botanical feel.
The center of the bloom is adorned with a polished, gold toned scarab beetle charm. This focal point suggests an ancient treasure or a treasured curiosity. A small, circular wood slice tag, painted green, hangs from the corner with green twine, completing the beautiful natural theme.
Material Required
- Heavy matte emerald green wrapping paper
- Cardstock in deep forest green and bright lime green (for petals)
- Small polished gold toned beetle or scarab charm
- Small circular wood slice tag
- Deep green paint or stain (for the wood tag)
- Thin green cotton twine
Equipment Required
- Scissors (for cutting petal shapes)
- Hot glue gun and glue sticks
- Single hole punch
- Small paintbrush (for painting tag)
DIY Instruction
- Wrap the Base: Wrap the gift box neatly in the deep emerald green paper.
- Cut the Petals: Cut many leaf or petal shapes from both the deep green and lime green cardstock. The petals should vary slightly in size.
- Assemble the Bloom: Starting from the center and working outwards, use hot glue to secure the petals onto the front of the box. Overlap the petals, alternating the colors and layers to build a dense, dimensional flower shape that covers most of the surface.
- Attach the Beetle: Once the central layer of petals is complete, apply a small dot of hot glue to the underside of the gold beetle charm. Carefully press the beetle onto the very center of the paper flower.
- Prepare the Tag: Paint the wood slice tag with the deep green paint. Let it dry. Punch a hole in the tag.
- Attach the Tag: Loop the thin green twine through the tag’s hole. Secure the twine around the corner of the wrapped package with a small knot.
Gift wrapping is truly an extension of your thoughtful gesture. Moving beyond flimsy paper and sticky tape immediately elevates the experience. You now possess a wealth of creative strategies to make every gift appear expensive and refined.
Start using unique textures like velvet or faux leather. Embrace striking monochrome palettes. Adding a custom wax seal or a dried botanical element takes minimal effort but delivers maximum impact.
Key Takeaways
- Texture is Vital: Always choose materials like fabric, textured paper, or wood. This adds tactile luxury to any package.
- Monochrome is Elegant: Using high contrast black and white or deep jewel tones creates a sophisticated look easily.
- Hardware Matters: Trade plastic bows for elements like leather straps, brass buckles, or custom wax seals.
- Layers Add Depth: Combine translucent vellum with opaque cardstock. This creates an artistic, dimensional appearance.
- Go Custom: Hand drawn details, custom tags, and unique knots signify effort and immense care.