Giving a gift is a special moment. The anticipation before the paper comes off is part of the fun. But often, we focus so much on the gift inside that we forget how important the wrapping is. A thoughtfully wrapped present shows you care. It turns a simple item into an exciting experience.

Dull, generic wrapping paper can make even the most amazing gift feel a little less special. You don’t need to spend a lot of money to make your presents look stunning. With a little creativity, you can transform your gifts from ordinary to extraordinary.
This guide is here to help. We have gathered 45 elegant ideas that are simple to create. Each one comes with easy-to-follow instructions. Get ready to make every gift you give a memorable work of art.
1. Gilded Forest Charm

Bring the quiet beauty of a winter forest to your gift giving. This style uses deep, earthy tones as its foundation. The dark green paper creates a rich canvas, suggesting something special is inside. Natural jute twine wraps the present, adding a rustic and sincere touch that feels personal.
A small branch from a pine tree introduces a piece of the outdoors. What makes this design stand out are the hints of gold. Gilded tips on the pine needles and delicate gold-leaf feathers on the paper catch the light beautifully. This small detail transforms the simple wrapping into a sophisticated and memorable presentation.
DIY Instructions: Gilded Forest Charm
What You’ll Need:
- Dark green wrapping paper
- A roll of natural jute twine
- A small pine or fir sprig from your yard or a craft store
- Gold craft paint and a small paintbrush
- A brown paper gift tag
- A gold marker or pen
- Scissors and tape
- (Optional) Gold feather stickers
Step-by-Step Guide:
- Wrap Your Gift: First, carefully wrap your box with the dark green paper. Make sure your corners are crisp and your tape is hidden for a neat look.
- Add a Touch of Gold: If you have gold feather stickers, place a couple on the front of the gift. Press them down firmly so they stick well. This adds a little surprise.
- Paint the Pine Sprig: Take your small pine branch. Dip the very tips of the needles into a little bit of gold paint. You don’t need a lot! Just enough to make them sparkle. Set the branch aside on a piece of scrap paper to dry completely.
- Tie it with Twine: Cut a long piece of twine. Wrap it around your gift a few times, crisscrossing it in the middle. Pull it snug but not so tight that it dents the box.
- Attach Your Decorations: Once your painted pine sprig is dry, gently tuck it underneath the twine in the center of the gift.
- Write the Name Tag: Use your gold pen to write the person’s name on the brown paper tag.
- Final Touch: Tie the twine into a simple, neat bow over the pine sprig, and slide the name tag onto one of the twine ends before you finish the knot. Your beautiful, nature-inspired gift is ready!
2. Rustic Furoshiki Spice

This wrapping method offers a gift within a gift. Using a simple piece of cloth, known as Furoshiki, creates a sustainable and beautiful package. The soft, neutral fabric provides a gentle backdrop for the decorations. This style feels warm and thoughtful, showing care for both the recipient and the environment.
The charm comes from the natural additions tied on top. A dried orange slice, a cinnamon stick, and a custom wooden tag create a bundle of textures and scents. It’s a simple technique that results in an incredibly heartfelt and memorable presentation. The leather tie holds everything together with a rustic finish.
DIY Instructions: Rustic Furoshiki Spice
What You’ll Need:
- A square piece of fabric (like linen or cotton, big enough to wrap your gift)
- A thin leather or suede cord
- A dried orange slice
- A cinnamon stick
- A wooden gift tag
- A pen to write on the tag
Step-by-Step Guide:
- Place Your Gift: Lay your fabric flat on a table in a diamond shape. Place your gift box in the very center.
- Make the First Folds: Take the bottom corner of the fabric and fold it up and over the box, tucking any extra fabric neatly underneath. Do the same with the top corner, bringing it down over the box.
- Tie the Knot: Now you have two corners left on the sides. Bring both of them up to the middle, above the box. Tie them together once, like you’re starting to tie your shoes.
- Make a Second Knot: Tie those same two corners again to make a secure and pretty knot on top. Adjust the fabric “ears” so they look nice.
- Add the Decorations: Take your leather cord and slide the wooden tag onto it. Lay the cinnamon stick and dried orange slice on top of the knot.
- Secure Everything: Wrap the leather cord around the base of the fabric knot, making sure to catch the orange and cinnamon stick. Tie a small, tight bow to hold everything in place. Write the person’s name on the tag. Your eco-friendly gift is ready!
3. Orchard Harvest Wrap

This design feels like a crisp autumn day. The base is simple brown kraft paper, a classic choice that always looks good. A wide band of burlap is wrapped around the middle, giving the gift a wonderful, rustic texture that you can feel. It’s a look that is both humble and stylish.
The decoration is a small collection of nature’s treasures. Dried apple slices, bright red berries, and tiny pinecones are gathered together. Red and white baker’s twine holds it all in place, adding a pop of color that reminds you of a country fair. The birch-patterned tag completes the woodland theme.
DIY Instructions: Orchard Harvest Wrap
What You’ll Need:
- Brown kraft wrapping paper
- A wide strip of burlap ribbon
- Red and white baker’s twine
- A few dried apple slices (from a craft store or homemade)
- Some small faux berries and tiny pinecones
- A gift tag
- A hot glue gun (and a grown-up to help)
- Scissors and tape
Step-by-Step Guide:
- Wrap the Box: Start by wrapping your present neatly in the brown kraft paper.
- Add the B burlap Band: Cut a piece of burlap ribbon that is long enough to wrap around the middle of the box. Secure it on the back with a little bit of tape or a dot of hot glue.
- Tie the Twine: Cut a long piece of baker’s twine. Wrap it around the box a couple of times, right over the center of the burlap. Criss-cross it in the middle and pull it snug.
- Create Your Harvest Bundle: Ask a grown-up to help you with the hot glue gun. Glue the dried apple slices together in a little stack. Then, glue the pinecones and berries on top to make a small, pretty cluster.
- Attach the Bundle: Put a dot of hot glue on the back of your harvest bundle and press it firmly onto the spot where the twine crosses in the middle.
- Add the Finishing Touches: Write on your gift tag. Tie the twine into a bow around your nature bundle, and attach the tag as you tie the final knot.
4. Seaside Serenity Collage

This gift wrap captures the calm feeling of a day at the beach. The base layer is a soft gray paper, like a misty morning sky. On top, different shades of blue and tan paper are layered. Their edges are torn, not cut, which makes them look soft and natural, like paper washed by the waves.
A delicate, white mesh ribbon is tied around the package, resembling a fishing net. The real treasures are the small, natural decorations. A tiny starfish, a piece of smooth driftwood, and a beautiful oyster shell are gathered in the center. This design is all about mixing textures to create a peaceful, coastal scene.
DIY Instructions: Seaside Serenity Collage
What You’ll Need:
- Light gray wrapping paper
- A few sheets of colored paper in shades of blue, navy, and sandy tan
- White mesh or gauze ribbon
- A small starfish, a piece of driftwood, and a clean oyster shell
- A gift tag
- A glue stick
- Scissors and tape
Step-by-Step Guide:
- Wrap Your Present: First, wrap the box in the light gray paper for your base.
- Tear Your Paper Layers: Take your colored paper sheets. Instead of cutting them, carefully tear them into different rectangular shapes. This will give you soft, fuzzy edges. Make them different sizes.
- Create the Collage: Use a glue stick to attach the torn paper pieces to the front of the gift. Layer them on top of each other to create a nice effect. There’s no right or wrong way, just do what looks good to you!
- Tie the Ribbon: Once the glue is dry, wrap the mesh ribbon around the box and over your paper collage. Tie it into a simple, loose bow.
- Add Your Beach Treasures: Gently tuck the piece of driftwood under the knot of the bow. You can use a small dot of glue to secure the starfish and the oyster shell right on top of the bow’s center.
- Attach the Tag: Write a name on your gift tag and tie it to the ribbon. Your seaside gift is complete!
5. Pressed Botanical Elegance

This wrapping style is delicate and timeless. It uses the beauty of real flowers and leaves to create a very personal touch. The main feature is a pressed pansy and a fern leaf, preserved in all their natural detail. Their colors look stunning against the simple cream-colored card.
A sheet of vellum paper is folded over the front. This see-through paper softens the look and protects the fragile botanicals, while still letting you see them. It feels like looking at a page from a classic storybook. A simple cream ribbon ties it all together, keeping the focus on the natural elegance of the flowers.
DIY Instructions: Pressed Botanical Elegance
What You’ll Need:
- A gift wrapped in plain cream or white paper (or a plain gift bag)
- Pressed flowers and leaves (you can buy these at a craft store or press your own)
- A sheet of vellum paper (tracing paper works too)
- A thin, cream-colored satin ribbon
- A glue stick
- Scissors
Step-by-Step Guide:
- Start with a Plain Gift: Make sure your gift is wrapped in a simple, light-colored paper.
- Arrange Your Flowers: Decide where you want to place your pressed fern and flower. Gently place them on the front of the gift to see how they look.
- Add a Tiny Bit of Glue: Once you like the arrangement, carefully pick up each flower and leaf. Put a very small dot of glue from the glue stick on the back and gently press it onto the gift. Be careful, they are delicate!
- Create the Vellum Cover: Cut a piece of vellum paper that is a little smaller than the front of your gift. Fold it in half like a a card.
- Place the Cover: Open the vellum “card” and place it over your flowers, so the fold is on one side. This creates a soft, protective layer.
- Tie the Ribbon: Cut a long piece of ribbon. Wrap it around the entire gift, holding the vellum paper in place. Tie a simple, elegant bow on the front.
6. Modern Terrazzo Pattern

This gift wrap is playful and modern. The paper is covered in a terrazzo pattern, which is made of colorful, scattered shapes, just like the popular flooring. The design is fun and artistic, with bits of black, blue, pink, and gold against a white background. It has a lot of energy and style.
To keep the focus on the busy pattern, the ribbon is very simple. A plain canvas or cotton ribbon is wrapped around the gift. It adds a nice, natural texture without competing with the paper. The gift tag is designed to match, pulling the whole look together for a chic and contemporary feel.
DIY Instructions: Modern Terrazzo Pattern
What You’ll Need:
- A large sheet of plain white paper
- Craft paints in 3-4 different colors (like black, blue, pink) and one metallic color (like gold)
- A paintbrush
- A paper plate for your paint
- A simple, plain-colored ribbon
- A gift tag
- Scissors and tape
Step-by-Step Guide:
- Set Up Your Art Station: Lay down some newspaper to protect your table. Squeeze a little bit of each paint color onto your paper plate.
- Paint Your Shapes: Dip your paintbrush in one color. Paint small, blob-like shapes all over the white paper. They don’t need to be perfect circles; different shapes are better!
- Add More Colors: Clean your brush or use a new one for each color. Keep adding more colorful shapes, scattering them around. Leave some white space between them.
- Add Some Shine: For the last step, use your metallic gold paint. Add a few small gold shapes here and there to make your paper look extra special.
- Let it Dry: Leave your custom-made paper to dry completely. This might take an hour or so.
- Wrap Your Gift: Once it’s dry, use your beautiful terrazzo paper to wrap your present.
- Add the Final Touch: Tie a simple ribbon around the middle and add your gift tag.
7. Hand-Sketched Birch Bark

This gift wrap is wonderfully creative and personal. It turns a simple white paper into a piece of art that looks just like the bark of a birch tree. The design is hand-drawn with a black marker, giving it a unique, rustic charm. No two gifts wrapped this way will ever look exactly the same.
A band of the illustrated paper is wrapped around a plain white box, creating a strong visual contrast. The gift is tied with simple black-and-white baker’s twine, which complements the drawing. A silver, leaf-shaped tag adds a metallic touch that elevates the simple, homespun design.
DIY Instructions: Hand-Sketched Birch Bark
What You’ll Need:
- A gift wrapped in plain white paper
- A separate strip of white paper
- A black marker (a fine tip and a regular tip are helpful)
- Black and white baker’s twine
- A leaf-shaped gift tag (or any tag you like)
- Scissors and tape
Step-by-Step Guide:
- Wrap the Box: First, make sure your gift is neatly wrapped in plain white paper.
- Prepare Your “Bark”: Cut a strip of white paper that is wide enough to make a nice band around your gift.
- Draw the Birch Lines: Using your black marker, draw a few wavy vertical lines down the paper strip. These will be the main outlines of your birch bark.
- Add the Details: Look at a picture of a birch tree. You’ll see little horizontal dashes and knotty eye-shapes. Use your marker to add these details to your drawing. Don’t worry about making it look exactly right; the imperfections are what make it look real.
- Create the Band: Once you’re happy with your drawing, wrap the paper strip around the middle of your gift and tape it in the back.
- Tie it Up: Wrap the baker’s twine around the gift, right over the middle of your drawing. Tie a simple bow.
- Add the Tag: Write the name on your tag and attach it to the twine.
8. Aromatic Spice Bundle

This gift wrap is a treat for the senses. It starts with natural brown kraft paper, made more interesting with a clean, white paper band wrapped around it. This layering of paper adds a touch of simple elegance. The entire package is tied together with rustic twine.
The main attraction is the fragrant bundle tied to the front. A bright slice of dried orange, warm cinnamon sticks, star anise, and sprigs of lavender and rosemary are gathered together. The combination of scents is incredible, offering a preview of the thoughtful gift inside. It’s a design that feels cozy, natural, and full of care.
DIY Instructions: Aromatic Spice Bundle
What You’ll Need:
- Brown kraft wrapping paper
- A strip of plain white paper
- Natural twine
- A collection of fragrant items: a dried orange slice, cinnamon sticks, star anise, a sprig of rosemary, and a sprig of lavender.
- A brown paper gift tag
- Scissors and tape
Step-by-Step Guide:
- Wrap with Kraft Paper: First, wrap your gift box neatly using the brown kraft paper.
- Add the White Band: Cut a wide strip of white paper. Wrap it around the center of the box like a belly band and tape it securely on the back.
- Tie the Twine: Cut a long piece of twine. Wrap it around the box, first from top to bottom, then from side to side, so it crosses in the middle right over the white band.
- Create Your Scent Bundle: Gather your aromatic items. Lay the rosemary and lavender sprigs down first. Place the cinnamon sticks on top, and then the dried orange slice and star anise.
- Attach the Bundle: Gently tuck your entire spice bundle under the spot where the twine crosses.
- Secure and Finish: Tie a tight knot with the twine to hold your bundle in place. Then, tie it into a bow. Write on your gift tag and slide it under the knot before you pull it tight.
9. Celestial Chalkboard Art

This wrapping paper turns your gift into a magical night sky. It uses matte black paper to create a dramatic, chalkboard-like effect. The entire surface becomes a canvas for your own creativity. You can personalize it with any design you can imagine, making the wrapping as special as the gift itself.
Here, a white chalk marker has been used to draw beautiful star constellations and delicate floral patterns. A clean line divides the space, and the recipient’s name is written in elegant script. This style is sophisticated, artistic, and completely unique. It shows that a lot of thought went into the presentation.
DIY Instructions: Celestial Chalkboard Art
What You’ll Need:
- Matte black wrapping paper
- A white chalk marker (you can find these at a craft store)
- A ruler
- Scissors and tape
Step-by-Step Guide:
- Wrap in Black: Carefully wrap your gift with the black paper. Matte paper works best for a true chalkboard look.
- Plan Your Design: Think about what you want to draw. You can look up pictures of simple star constellations (like the Big Dipper) or practice drawing some simple flowers or leaves on a piece of scrap paper first.
- Draw Your Lines: Use your ruler to help you draw a straight white line across the middle of the box. This gives your design a clean, organized look.
- Add Your Drawings: Start drawing your designs with the chalk marker. Add a constellation on the top half and some pretty leaves or flowers on the bottom half. Take your time!
- Write the Name: In the space you left, carefully write the name of the person who will receive the gift. You can write it in fancy cursive or simple block letters.
- Let it Dry: Let the chalk marker ink dry for a few minutes so it doesn’t smudge. Your personalized work of art is ready!
10. Midnight Velvet & Wax Seal

This gift wrap is the definition of luxury. It begins with a deep, matte navy or black paper that creates a feeling of elegance and mystery. The presentation is simple but makes a powerful statement. This style is reserved for a truly special gift for a very special person.
The star of the show is a wide, lush velvet ribbon in a deep teal or blue. It adds a rich texture that begs to be touched. In the center of the beautiful bow, a classic wax seal with a monogram adds an old-world, personal touch. A tiny sprig of baby’s breath tucked in provides a delicate and soft contrast to the dark, dramatic colors.
DIY Instructions: Midnight Velvet & Wax Seal
What You’ll Need:
- Matte navy or black wrapping paper
- Wide, high-quality velvet ribbon
- A small sprig of baby’s breath (real or fake)
- A wax seal kit (with wax and a stamp) OR a peel-and-stick wax seal sticker for an easier option.
- A gift tag with a matching initial
- Scissors and tape
- (If using a real wax seal) A grown-up to help with melting the wax.
Step-by-Step Guide:
- Wrap the Gift: Neatly wrap your box in the dark, matte paper. Make your folds as sharp as possible.
- Tie the Velvet Ribbon: Cut a long piece of velvet ribbon. Wrap it around the box both ways, so it crosses in the center. Tie a big, beautiful, floppy bow. Adjust the loops so they are even.
- Add the Wax Seal:
- Easy Way: Peel the back off a wax seal sticker and press it firmly right in the middle of the bow’s knot.
- Fancy Way: Ask a grown-up for help. Carefully melt the sealing wax and drip a small puddle onto the center of the bow’s knot. Before it cools, press the stamp into the wax and hold for a few seconds. Lift it straight up.
- Tuck in the Flowers: Gently tuck the small sprig of baby’s breath behind the knot of the bow.
- Attach the Tag: Write the person’s initial on the tag and tie it to one of the ribbon tails with a thin piece of string.
11. Art Deco Elegance

Step back into an era of glamour and sophistication with this design. The striking combination of glossy black paper and a bold, gold geometric pattern creates a look of pure luxury. This style is all about sharp lines, high contrast, and a touch of dramatic flair.
A wide, black satin ribbon is tied in a classic bow, adding a soft texture against the sleek paper. Tucked into the ribbon, a single black feather provides a final, extravagant touch reminiscent of the Roaring Twenties. This wrapping makes any gift feel like a special occasion.
DIY Instructions: Art Deco Elegance
What You’ll Need:
- Glossy black wrapping paper
- A sheet of gold-patterned Art Deco style scrapbook paper
- A wide black satin ribbon
- One black craft feather
- A gift tag
- Glue stick, scissors, and tape
Step-by-Step Guide:
- Wrap in Black: Start by wrapping your gift in the glossy black paper.
- Create a Patterned Band: Cut a wide strip from your gold-patterned paper. Wrap this band around one end of the gift box and secure it on the back with tape. This creates a stylish, asymmetrical look.
- Tie the Ribbon: Cut a long piece of your black satin ribbon. Wrap it around the box, right over the seam where the black and patterned papers meet. Tie a large, luscious bow.
- Add the Feather: Gently slide the bottom of the black feather underneath the knot of the bow. You can angle it however you think looks best.
- Attach the Tag: Write the name on your tag and attach it to the center of the bow with a small piece of string.
12. Adventurer’s Treasure Map

This gift wrap is for the explorer at heart. The paper looks like an ancient, weathered map, sparking curiosity about what treasure lies within. The details of old-world coastlines and calligraphy invite a closer look. This design tells a story before the gift is even opened.
Natural twine holds everything together, adding to the rustic, seafaring feel. A miniature rolled scroll serves as a unique place for a name, while a red wax seal adds a stamp of authenticity and importance. It’s a creative presentation that promises an adventure.
DIY Instructions: Adventurer’s Treasure Map
What You’ll Need:
- Vintage map wrapping paper
- Natural twine
- A small strip of parchment-like paper for the tag
- A red wax seal kit or a red peel-and-stick wax seal
- A red ribbon
- Scissors and tape
Step-by-Step Guide:
- Wrap the Gift: Neatly wrap your box with the map-themed paper.
- Add a Ribbon: Wrap a thin red ribbon around the box from top to bottom.
- Tie with Twine: Wrap the twine around the box multiple times, crisscrossing over the red ribbon for a layered look.
- Make the Scroll Tag: Write the recipient’s name on your small strip of paper. Tightly roll it up to look like a tiny scroll.
- Create a Bundle: Tie another small piece of twine around your scroll. Lay the scroll on the front of the gift.
- Secure with a Seal: Use your wax seal to secure the scroll and the main twine together. Drip the wax where the twines cross and press your seal. Or, simply use a sticker seal for an easier finish.
13. Emerald Damask Key

This design is rich with a sense of history and mystery. The wrapping paper features a deep emerald green color with a velvety, flocked damask pattern. This texture gives the gift a luxurious, antique feel. It suggests elegance and old-world opulence.
A thin, sheer gold ribbon is tied crisply around the package, its shimmer contrasting beautifully with the matte, velvety paper. The finishing touch is an ornate, vintage-style key tied to the center. It adds a touch of romance and leaves you wondering what secrets the gift holds.
DIY Instructions: Emerald Damask Key
What You’ll Need:
- Green damask or flocked wrapping paper
- Thin, sheer gold ribbon
- An antique-style key charm
- A dark paper gift tag
- A gold pen
- Scissors and tape
Step-by-Step Guide:
- Wrap with Patterned Paper: Carefully wrap your gift box in the beautiful damask paper. Pay extra attention to the corners to keep them neat.
- Tie the Gold Ribbon: Cut a long piece of the gold ribbon. Wrap it around the box from top to bottom, and then again from side to side, crossing it in the exact center.
- Create a Simple Bow: Tie the ribbon into a small, neat bow right in the middle.
- Attach the Key: Before you pull the final loops of the bow tight, slide the key charm onto one of the ribbon strands so it dangles right below the knot.
- Add the Tag: Use your gold pen to write a name on the dark gift tag. Tie the tag next to the key.
14. Classic Monochrome Stripes

This gift wrap is the essence of chic simplicity. It uses a deep, matte black paper that is both bold and understated. The look is clean, modern, and incredibly stylish. It proves that you don’t need a lot of color to make a big impression.
The focus of this design is the ribbon. A high-quality grosgrain ribbon with striking black and white stripes is tied into a full, beautiful bow. The sharp contrast of the stripes against the solid black paper creates a dynamic and sophisticated look. This timeless combination is always in style.
DIY Instructions: Classic Monochrome Stripes
What You’ll Need:
- Matte black wrapping paper
- A wide, striped black and white ribbon
- A simple white gift tag
- Scissors and tape
Step-by-Step Guide:
- Wrap in Matte Black: Get a crisp, clean wrap on your gift using the matte black paper. Hide your tape on the bottom for the neatest look.
- Cut a Long Ribbon: To make a big, full bow, you’ll need a very long piece of ribbon. It’s better to have too much than not enough!
- Tie the Bow: Wrap the ribbon around the box both ways, crossing in the center. Tie a classic, multi-looped bow. Take your time to shape the loops so they are full and even.
- Trim the Tails: Cut the ends of the ribbon tails at a sharp angle to prevent them from fraying and to give them a professional finish.
- Add the Tag: Write on your simple white tag and attach it with a small piece of string to the center of the bow.
15. Ethereal Marble & Geode

This wrapping style blends natural beauty with modern luxury. The paper has a classic white and gray marble pattern, giving it a cool, stone-like appearance that is both timeless and trendy. The look is clean, bright, and very elegant.
A sheer gray ribbon with a thin gold edge is tied around the gift, adding a soft and shimmery layer. The true centerpiece is a slice of polished blue agate, edged in gold. This beautiful, natural stone adds a pop of vibrant color and a unique, organic texture, transforming the gift into a work of art.
DIY Instructions: Ethereal Marble & Geode
What You’ll Need:
- Marble-patterned wrapping paper
- Sheer gray ribbon with a gold edge
- A polished agate slice (available at craft stores)
- A hot glue gun (and a grown-up’s help)
- A white gift tag and a gold pen
- Scissors and tape
Step-by-Step Guide:
- Wrap in Marble: First, wrap your gift box in the marble-patterned paper.
- Tie the Ribbon: Wrap the sheer ribbon around the box from top to bottom and side to side, so it crosses in the middle. Instead of a bow, tie a simple, flat knot.
- Attach the Agate Slice: Ask a grown-up to help you with the hot glue gun. Put a generous dot of hot glue on the back of the agate slice and press it firmly onto the ribbon’s knot. Hold it for a few seconds until the glue sets.
- Add the Tag: Write the recipient’s name on the tag with a gold pen. Gently tuck the tag under one of the ribbon strands next to the beautiful stone.
16. Opulent Brocade Fold

This wrapping uses luxurious fabric for a truly regal presentation. Inspired by the Japanese Furoshiki technique, this gift is wrapped in a piece of rich brocade fabric with an intricate, woven pattern in shades of navy, burgundy, and gold. This method is sustainable and makes the wrapping a reusable part of the gift.
Instead of a ribbon, a thick, decorative gold cord is tied around the folded fabric. The cord ends in two beautiful tassels, which adds a final touch of grandeur and elegance. A simple, round gold tag with a monogram completes this incredibly opulent look.
DIY Instructions: Opulent Brocade Fold
What You’ll Need:
- A square piece of ornate fabric, like brocade or jacquard
- A decorative cord with tassels
- A small, round metallic tag
- A permanent marker
Step-by-Step Guide:
- Place the Gift: Lay your fabric on a flat surface, wrong side up, in a diamond shape. Place your gift in the center.
- Make the Folds: Take the bottom corner and fold it up over the gift. Then take the top corner and fold it down.
- Fold the Sides: Now, take the left corner and fold it neatly over the top of the gift. Do the same with the right corner, folding it over the left one.
- Tie the Cord: Take your tasseled cord and wrap it around the gift to hold the fabric folds in place.
- Make a Knot: Tie the cord in a simple, secure knot on top. Let the beautiful tassels hang down.
- Add the Tag: Write an initial on your metallic tag and attach it to the cord.
17. A Night at the Opera

This gift wrap is full of romance and drama. A crisp white box provides a clean canvas for the story it tells. The stark simplicity of the background makes the decorations stand out with theatrical flair.
A wide, luxurious black satin ribbon is tied across the center. Tucked into the bow are a single red rose and a single white rose, symbolizing passion and purity. A silver masquerade mask charm, a custom “Admit One” ticket, and a scrap of sheet music complete the theme, suggesting a magical, mysterious evening event.
DIY Instructions: A Night at the Opera
What You’ll Need:
- A gift in a plain white box, or wrapped in plain white paper
- A wide black satin ribbon
- One high-quality fake red rose and one white rose
- A small masquerade mask charm
- A custom-printed “ticket” gift tag
- Scissors
Step-by-Step Guide:
- Start with White: Make sure your gift box is plain white.
- Tie the Ribbon: Wrap the black satin ribbon around the middle of the box and tie a large, elegant bow.
- Arrange the Roses: Trim the stems of your roses so they are not too long. Gently slide the stems of both roses underneath the knot of the bow. Arrange them so they look beautiful together.
- Add the Charm: Use a thin piece of string or wire to tie the masquerade mask charm to the center of the bow.
- Attach the Ticket: Punch a small hole in your ticket-style gift tag and tie it near the mask charm. Your dramatic gift is ready for its debut!
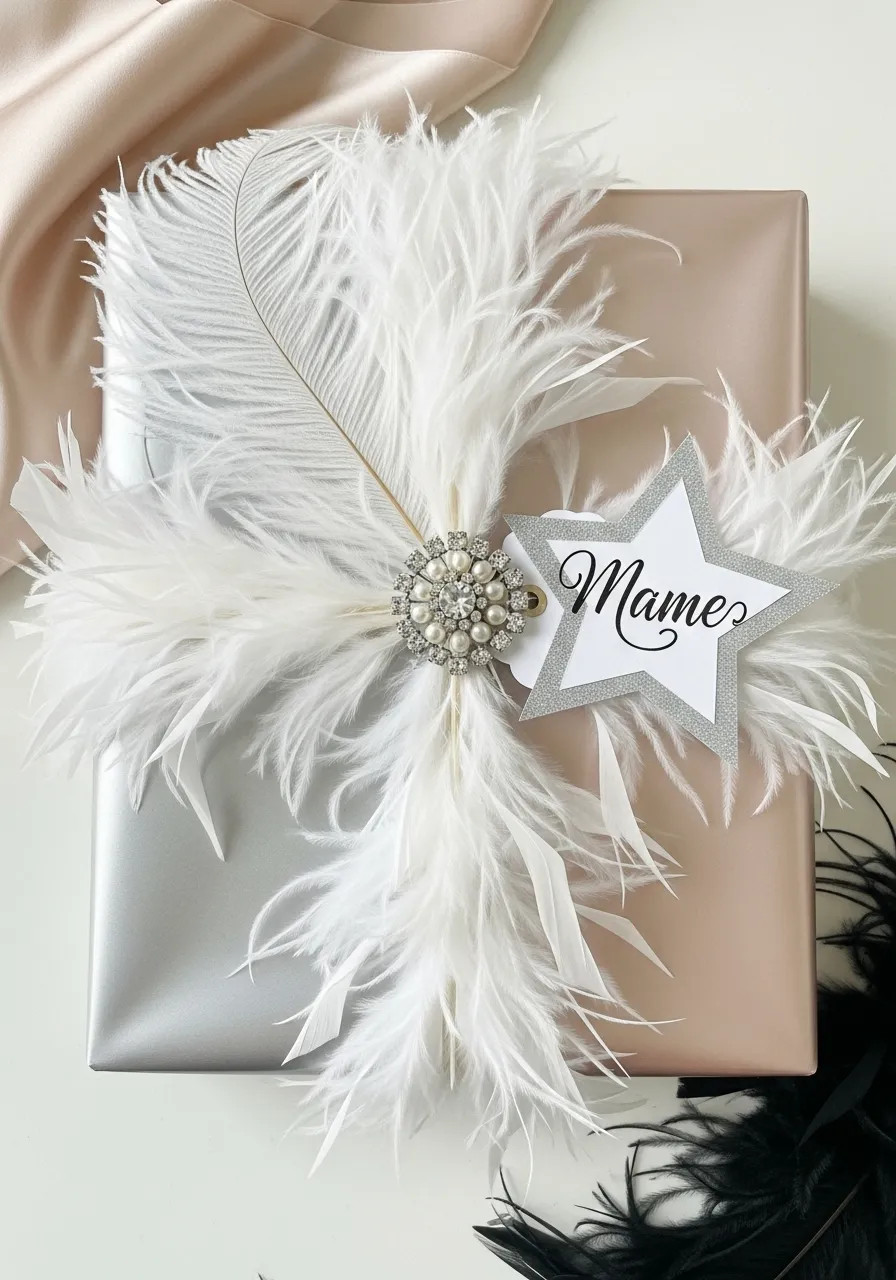
18. Feather & Pearl Glamour

This gift wrap exudes the glamour of Old Hollywood. The paper itself is a two-toned metallic sheen of silver and rose gold, creating a soft and luxurious base that shimmers in the light. This is a style meant to be over-the-top and fabulous.
The decoration is a starburst of soft, white ostrich feathers, creating incredible texture and drama. In the very center, where the feathers meet, a stunning vintage-style brooch covered in pearls and rhinestones adds a dose of sparkle. It’s a presentation that is pure, unapologetic elegance.
DIY Instructions: Feather & Pearl Glamour
What You’ll Need:
- Metallic wrapping paper (silver or rose gold)
- Several fluffy white craft feathers (like ostrich feathers)
- A vintage-style brooch with a pin on the back
- A star-shaped gift tag
- A hot glue gun (and a grown-up’s help)
- Scissors and tape
Step-by-Step Guide:
- Wrap in Shine: Carefully wrap your gift in the metallic paper.
- Arrange the Feathers: Plan how you want your feathers to look. Lay them out on the gift in a circle or starburst shape, with the pointy ends all meeting in the middle.
- Glue the Feathers: Ask a grown-up to help. Put a dot of hot glue on the very bottom of one feather’s stem and press it onto the gift. Do this one by one until all your feathers are in place.
- Add the Brooch: Take your sparkly brooch and pin it right through the center of all the feather stems. This will hide the glued parts and be your beautiful centerpiece.
- Attach the Tag: Write a name on your star-shaped tag and tuck it in among the soft feathers.
19. The Architect’s Draft
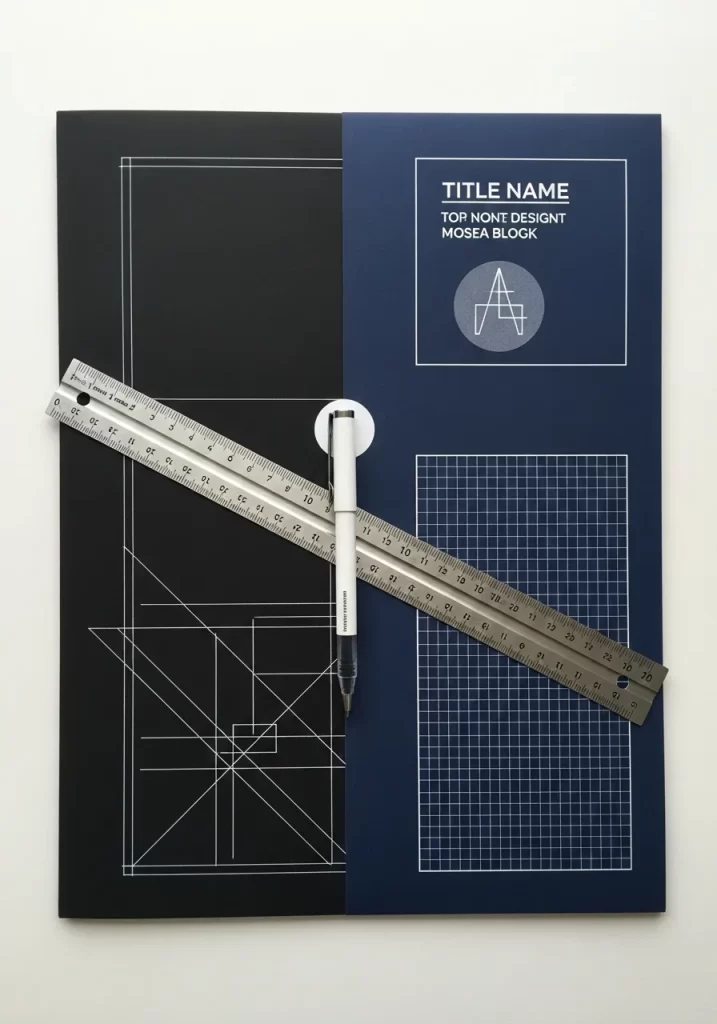
This wrapping is clean, clever, and creative. It uses solid-colored paper, like black or navy, as a base, turning the gift into a blueprint or a designer’s sketch. The decoration is not ribbon or bows, but precise, hand-drawn technical illustrations.
Using a white pen and a ruler, the surface is decorated with grids, geometric shapes, and even diagrams like the golden ratio. The look is intelligent, minimalist, and uniquely personal. It’s a thoughtful choice for anyone who appreciates design, art, or engineering.
DIY Instructions: The Architect’s Draft
What You’ll Need:
- Matte black or navy blue wrapping paper
- A white gel pen or fine-tipped paint marker
- A ruler
- Scissors and tape
Step-by-Step Guide:
- Wrap the Box: Neatly wrap your gift in the dark, solid-colored paper.
- Plan Your Design: Decide what kind of technical drawing you want to create. You could draw a simple grid, a cool geometric pattern, or even the initial of the person’s name in a blocky, architectural style.
- Start Drawing: Use your ruler and white pen to carefully draw your design directly onto the paper. Take your time to make your lines as straight and clean as possible.
- Add Details: You can add smaller details like measurements, little circles, or a title block in one corner, just like a real blueprint.
- No Ribbon Needed: For this style, you don’t need a ribbon. The clean, graphic design is the main feature. The gift is ready!
20. Modernist Color Play

This gift wrap is a bold and joyful celebration of color. Inspired by modern art movements like Bauhaus, this style uses blocks of solid, bright colors to create a graphic and eye-catching design. It is playful, energetic, and full of confidence.
Here, a base of bright yellow is overlaid with a large block of vibrant blue and a smaller accent of metallic silver. A very thin red ribbon cuts across the design, adding another layer of sharp, geometric contrast. This style is less about decoration and more about the powerful interplay of pure color and shape.
DIY Instructions: Modernist Color Play
What You’ll Need:
- Two or three different rolls of solid-colored wrapping paper (e.g., yellow, blue, silver)
- A very thin ribbon in a contrasting color (e.g., red)
- A simple, modern gift tag
- A glue stick or double-sided tape
- Scissors and tape
Step-by-Step Guide:
- Wrap in Your Base Color: First, wrap the entire gift in your main color, like the bright yellow.
- Cut Your Color Blocks: From your other colored papers, cut out clean, rectangular shapes. You can make one large block and one smaller one.
- Attach the Blocks: Use a glue stick or double-sided tape to neatly attach your colored blocks onto the front of the gift. You can overlap them for a layered look.
- Add the Thin Ribbon: Cut a piece of your thin ribbon. Wrap it around the gift so it makes a cross or lines up with the edges of your paper blocks. Secure it tightly on the back with tape. This is for looks, not for holding the gift shut.
- Attach the Tag: Write on your simple tag and attach it to the ribbon.
21. Tailored Stripes & Earth Tones

This wrapping style is sophisticated and refined. It uses layers of high-quality paper and ribbon in a muted, masculine color palette of gray, olive green, and cream. The look is structured and intentional, like a well-tailored suit.
The design is built with carefully placed bands of color and texture. A wide, gray grosgrain ribbon sits atop vertical strips of paper, creating a pleasing grid. The final touch of rustic twine adds a hint of relaxed warmth to the otherwise formal presentation.
DIY Instructions: Tailored Stripes & Earth Tones
What You’ll Need:
- Matte gray wrapping paper
- Strips of olive green and cream-colored paper
- Wide, gray grosgrain ribbon
- Natural twine
- A gray gift tag
- A glue stick, scissors, and tape
Step-by-Step Guide:
- Wrap in Gray: Start by wrapping your gift in the matte gray paper.
- Add Paper Bands: Cut two strips of olive green paper and one strip of cream paper. Use a glue stick to attach them vertically onto the front of the gift, leaving some space between them.
- Add the Ribbon: Wrap the wide gray ribbon horizontally around the box, right over the middle of the paper strips. Secure it in the back.
- Tie the Twine: Wrap the natural twine around the box a few times, directly over the gray ribbon. Tie a simple, neat bow in the center.
- Attach the Tag: Write an initial on the gray tag and attach it to the twine.
22. Sleek Diagonal Reveal

This gift wrap is sharp, modern, and intriguing. It plays with angles and layers to create a dynamic look. The main colors are a stark matte black and a brushed metallic silver, which gives it a futuristic and high-end feel.
The design’s cleverness comes from a diagonal fold that reveals a surprise pop of vibrant red underneath. A thin, metallic gold band acts as a clasp, adding another touch of luxury. This minimalist approach is all about precision and clean lines.
DIY Instructions: Sleek Diagonal Reveal
What You’ll Need:
- Matte black wrapping paper
- A sheet of metallic silver paper and a small piece of red paper
- A thin strip of metallic gold paper
- A glue stick, scissors, and tape
Step-by-Step Guide:
- Wrap in Black: First, wrap your gift completely in the matte black paper.
- Create the Reveal: Glue the small piece of red paper onto the black paper where you want your “reveal” to be.
- Prepare the Silver Layer: Cut a piece of silver paper that is the same size as the top of your box. Make one clean, diagonal cut across it.
- Attach the Silver: Take the larger of your two silver pieces. Line it up with the corners of your box and carefully fold back the diagonal edge to show the red underneath. Use a glue stick to secure the silver paper in place.
- Add the Gold Band: Wrap the thin gold strip around the box like a band, securing it in the back. You can write a name on it with a permanent marker.
23. Luminous Leaf Silhouette

This design is artistic and layered, creating a beautiful sense of depth. It starts with a bold, graphic background of black and white stripes. This provides a modern frame for the softer elements on top.
A smaller gift, wrapped in a soft, translucent vellum, sits at the center, framed by a pop of red. The vellum wrap is adorned with a simple cream ribbon and the ghostly silhouette of a single leaf, which appears soft and ethereal. It’s a masterful mix of bold patterns and delicate details.
DIY Instructions: Luminous Leaf Silhouette
What You’ll Need:
- Black and white striped wrapping paper
- A sheet of red paper
- A smaller box
- Vellum or tracing paper
- A single, nicely shaped leaf (real or fake)
- A thin cream-colored ribbon
- A white pen
- Glue stick, scissors, and tape
Step-by-Step Guide:
- Wrap the Main Gift: Wrap your larger gift or a flat board in the striped paper.
- Create the Frame: Cut a piece of red paper slightly smaller than your main gift and glue it to the center.
- Prepare the Top Gift: Place your leaf on the smaller box. Carefully wrap the box and leaf with vellum paper, so you can see the leaf’s shadow through it.
- Tie the Ribbon: Tie the cream ribbon in a simple bow around the vellum-wrapped box.
- Write the Name: Use a white pen to write a name directly onto the vellum.
- Assemble: Use double-sided tape or a glue stick to mount the smaller box onto the red frame.
24. Graphic Statement Wrap

This gift wrap is bold, modern, and makes a statement. The design uses high-contrast black and a pop of electric neon green to grab your attention. This isn’t about hiding the gift; it’s about celebrating the occasion with loud, proud typography.
A simple black box is the canvas. The main feature is a large, custom-cut initial in a vibrant, unmissable color. Simple, rustic twine is used to tie the gift, its natural texture providing a cool contrast to the sharp, clean lines of the letter.
DIY Instructions: Graphic Statement Wrap
What You’ll Need:
- A gift in a plain black box or wrapped in matte black paper
- A sheet of brightly colored paper (like neon green)
- Natural twine
- A pencil and scissors
- A glue stick
Step-by-Step Guide:
- Start with Black: Make sure your gift is in a plain black box.
- Create Your Initial: On the back of your colored paper, lightly draw the outline of the first letter of the recipient’s name. Make it big and blocky!
- Cut it Out: Carefully cut out the letter.
- Attach the Letter: Use a glue stick to apply an even layer of glue to the back of your letter and press it firmly onto the center of the box.
- Tie with Twine: Cut a long piece of twine and wrap it around the box several times, crisscrossing over the letter. Finish with a simple bow.
25. Industrial Copper Coil

This wrapping style is uniquely modern and minimalist. It finds beauty in industrial materials. The paper has the rough, speckled texture of concrete, creating a cool, gray, and surprisingly chic base for the gift.
The “ribbon” is the most striking feature. Instead of fabric, a long piece of copper wire is tightly and repeatedly wrapped around the box. The warm, metallic shine of the copper is a stunning contrast against the cool, matte gray of the paper. This design is all about texture and unexpected materials.
DIY Instructions: Industrial Copper Coil
What You’ll Need:
- Concrete-textured or gray speckled wrapping paper
- A roll of thin, flexible copper wire
- A gray gift tag
- Wire cutters
Step-by-Step Guide:
- Wrap in “Concrete”: Wrap your gift neatly in the textured gray paper.
- Start Coiling: Hold one end of the copper wire at the back of the box. Start wrapping the wire around and around the box. Keep the strands close together to create a neat, coiled band.
- Wrap Both Ways: After you have a nice wide band going one way, twist the wire 90 degrees and wrap it a few times in the other direction.
- Secure the Wire: When you’re done, twist the end of the wire securely around another strand at the back to hold it in place. Use wire cutters to snip any excess.
- Attach the Tag: Write a name on your tag and attach it by looping the tag’s string around one of the copper strands.
26. Festive Peekaboo Windows

This is a clever and delightful way to wrap a gift, creating a fun reveal. The design uses two layers of paper. The bottom layer is a festive, patterned paper, in this case, a beautiful black and gold snowflake design.
The top layer is a crisp, clean sheet of plain white paper. Using a craft knife, festive shapes like a heart, a deer, and a Christmas tree are carefully cut out. These “windows” reveal the pretty pattern underneath, creating a charming and personalized look. An initial in the center adds a final custom touch.
DIY Instructions: Festive Peekaboo Windows
What You’ll Need:
- Two sheets of wrapping paper: one patterned, one plain white
- A pencil
- A craft knife (and a grown-up’s help)
- A cutting mat or thick cardboard
- Scissors and tape
Step-by-Step Guide:
- First Wrap: Wrap your gift using the patterned paper. This will be the design that shows through.
- Prepare the Top Layer: Cut a piece of plain white paper to the same size as the top of your box.
- Draw Your Shapes: On the white paper, lightly draw the outlines of the shapes you want to cut out (stars, hearts, etc.).
- Cut the Windows: Place the white paper on a cutting mat. Ask a grown-up to carefully use the craft knife to cut out the shapes you drew.
- Create the Cover: Attach the white paper with the cutouts to the top of your wrapped gift using double-sided tape. The pretty pattern will now peek through the windows!
27. Wanderlust Collage Wrap

This gift wrap tells the story of a traveler and an artist. It uses a clean white base to build a collage of memories and interests. This highly personal style shows a deep level of thought has gone into the presentation.
Bands of different papers are layered horizontally: a black strip, a floral pattern, sheet music, and a piece of a map. Each element can be chosen to represent something the recipient loves. The whole collage is tied together with simple white twine and finished with an elegant wax seal.
DIY Instructions: Wanderlust Collage Wrap
What You’ll Need:
- Plain white wrapping paper
- Strips of different kinds of paper (e.g., scrapbook paper, old maps, sheet music, black paper)
- White twine
- A wax seal sticker
- A gift tag
- A glue stick, scissors, and tape
Step-by-Step Guide:
- Wrap in White: Start with a neatly wrapped gift in plain white paper.
- Cut Your Strips: Cut several strips of your different papers. Make them varying widths.
- Create the Collage: Use a glue stick to attach the strips horizontally across your gift. Overlap them and arrange them in a way that looks interesting to you.
- Tie with Twine: Wrap the white twine vertically around the gift, right over the center of your collage. Tie a simple knot.
- Add the Seal and Tag: Press the wax seal sticker onto the knot. Write a name on your tag and tuck it underneath the twine.
28. Sakura Bloom Furoshiki

This is a beautiful example of the Japanese art of fabric wrapping, Furoshiki. The chosen fabric is vibrant and tells a story, with a pattern of delicate pink cherry blossoms (sakura) mixed with a classic blue and gray gingham. It is a gift that is both sustainable and full of cultural beauty.
The fabric is tied in an elegant knot on top, with the corners creating two “ears” that look like a bow. Tucked into the knot is a single, delicate sprig of cherry blossoms, bringing the pattern to life. A simple wooden tag and a dark button add a final, rustic touch.
DIY Instructions: Sakura Bloom Furoshiki
What You’ll Need:
- A square piece of patterned fabric
- A small sprig of fake flowers (like cherry blossoms)
- A large button
- A small wooden gift tag
- A small piece of twine
Step-by-Step Guide:
- Place Your Gift: Lay your fabric flat in a diamond shape and place your gift in the middle.
- Tie the First Knot: Bring the bottom and top corners up to the middle and tie them in a simple, secure knot.
- Create the Bow: Now take the left and right corners. Bring them up to the middle and cross them over each other.
- Tie the Final Knot: Tie these two corners into a beautiful knot on top of the first one. Arrange the “ears” so they look like a nice bow.
- Add the Decorations: Use a small piece of twine to tie the button and the wooden tag together. Then, tie this bundle around the center of the fabric knot. Gently tuck the flower sprig into the knot.
29. Artful Watercolor Greeting

This wrapping turns the gift itself into a piece of watercolor art. Instead of using store-bought paper, the design is painted directly onto high-quality paper or a card. Soft washes of pink, yellow, and blue blend together to create a dreamy, ethereal background.
A delicate, sheer blue ribbon is tied in a simple bow, complementing the colors in the painting without overwhelming it. A few splatters of gold paint add a touch of sparkle and magic. The name is written in elegant gold calligraphy, making the entire package feel like a personal, handcrafted card.
DIY Instructions: Artful Watercolor Greeting
What You’ll Need:
- A sheet of thick watercolor paper
- Watercolor paints and a brush
- A cup of water
- Gold craft paint
- A thin, sheer ribbon
- A gold pen
Step-by-Step Guide:
- Create Your Painting: On your watercolor paper, get your brush wet and paint swatches of different colors. Let the colors touch and bleed into each other to create a soft, blended look.
- Add Gold Splatters: While the paint is still a little damp, dip a clean brush in a tiny bit of gold paint. Gently flick the brush over your paper to create little gold specks. Let everything dry completely.
- Make it the Wrap (or Card): You can either use your painting to wrap a small gift, or fold it in half to make a beautiful card to attach to a larger gift.
- Tie the Ribbon: Tie the sheer ribbon in a simple, delicate bow around your painted paper or card.
- Write the Name: Use your gold pen to write the recipient’s name in beautiful script right on the front.
30. Psychedelic Marble Swirl

This gift wrap is vibrant and mesmerizing. The paper is covered in a traditional marbling pattern, full of energetic swirls of black, blue, pink, and green. The effect is organic and psychedelic, like looking at oil on water. Each twist and turn of the pattern is unique, making the paper a piece of art in itself.
With such a busy and beautiful pattern, the rest of the wrapping is kept very simple. A soft, gray-green velvet ribbon is tied in a classic knot and bow. The ribbon’s soft, matte texture provides a calming contrast to the wild energy of the paper, and its color is perfectly picked to match one of the hues in the swirl.
DIY Instructions: Psychedelic Marble Swirl
What You’ll Need:
- A sheet of beautiful marbled paper
- A high-quality velvet ribbon in a color that matches the paper
- A simple gift tag
- Scissors and tape
Step-by-Step Guide:
- Find the Paper: The most important part of this style is the paper. Look for a really special, high-quality marbled paper at an art supply or specialty paper store.
- Wrap with Care: Wrap your gift, paying close attention to lining up the pattern at the seams if you can.
- Choose Your Ribbon: Pick a velvet ribbon in one of the colors from the paper. This will make the whole look feel very coordinated and professional.
- Tie a Simple Bow: Wrap the ribbon around the box both ways and tie a simple, elegant bow in the center.
- Add the Tag: Write on your gift tag and attach it to the ribbon. Let the beautiful paper be the star of the show.
31. Personalized Calligraphy Script

This is one of the most personal ways to wrap a gift. The paper itself is the message. Instead of a simple pattern, it is covered in beautiful, flowing calligraphy. It could be a favorite poem, a song lyric, or a heartfelt letter written just for the recipient.
The gift is wrapped in this custom, hand-lettered paper, making the outside as meaningful as the inside. Simple twine is used to tie it all together, ensuring that the beautiful words remain the star of the show. This style shows incredible thought and effort.
DIY Instructions: Personalized Calligraphy Script
What You’ll Need:
- A large sheet of black or white paper
- A calligraphy pen or a metallic marker
- Natural twine
- A computer and printer (for the easier version)
- Scissors and tape
Step-by-Step Guide:
- Create Your Paper (The Easy Way): Type out a poem or a nice message on your computer. Choose a beautiful calligraphy font. Print it out on a large sheet of paper.
- Create Your Paper (The Artistic Way): If you’re good at handwriting, use your calligraphy pen or marker to write your message directly onto the paper. Don’t worry if it’s not perfect!
- Wrap Your Gift: Once your paper is ready, use it to wrap your gift. Be mindful of where the words are, so the prettiest parts are on top.
- Tie with Twine: Wrap the simple twine around the box a few times and tie a small, neat bow.
32. Indigo Shibori Knot

This wrapping style is inspired by the Japanese art of Shibori tie-dye. It uses a cloth napkin or bandana with a striking indigo and white pattern. This method is not only beautiful and bohemian but also sustainable, as the cloth wrap can be reused by the recipient.
The fabric is neatly folded around the gift. Instead of a ribbon, a simple white rope is tied around the package, giving it a slightly nautical feel. A matching white tassel and a fabric knot add a final, charming touch.
DIY Instructions: Indigo Shibori Knot
What You’ll Need:
- A square tie-dyed napkin or bandana
- A length of white rope
- A white tassel
- A gift tag
- Scissors
Step-by-Step Guide:
- Fold the Fabric: Place your gift in the center of the napkin. Fold the napkin neatly around it, like you’re wrapping a present with paper, tucking the ends in.
- Tie the Rope: Wrap the white rope around the middle of the folded napkin to hold it all together. Tie a simple, tight knot.
- Add the Tassel: Before you finish the knot, slide the loop of the tassel and the gift tag onto one end of the rope.
- Finish the Knot: Tie the final knot to secure everything in place. You can even tie a small knot in one of the fabric ends for extra decoration.
33. Global Explorer’s Map

This gift wrap is an invitation to adventure. The paper is a colorful, detailed map of a faraway land, sparking a sense of wanderlust. The intricate lines and names of cities and seas make the paper itself an interesting discovery.
The package is tied with red and black baker’s twine, the colors providing a nice graphic contrast to the map. At the center, a brass compass charm is the focal point, reinforcing the theme of travel and exploration. This wrapping is for the dreamer and the world traveler.
DIY Instructions: Global Explorer’s Map
What You’ll Need:
- Wrapping paper with a vintage map design
- Red and black baker’s twine
- A brass compass charm or sticker
- A gift tag
- Scissors and tape
Step-by-Step Guide:
- Wrap with the Map: Carefully wrap your gift using the map paper.
- Twist Your Twine: Cut a long piece of both the red and the black twine. Hold them together and wrap them around the box as if they were one string.
- Tie a Bow: Crisscross the twine in the center and tie a simple bow.
- Add the Compass: Attach the compass charm to the center of the bow. If you’re using a sticker, press it firmly onto the knot.
- Attach the Tag: Write on your gift tag and tie it to the bow.
34. Symphony in Velvet

This gift is wrapped for a true music aficionado. The paper is covered in beautiful, classic sheet music, creating a sense of rhythm and elegance. It’s a thoughtful choice that reflects the recipient’s passion.
A luxurious, wide black velvet ribbon with a striking red reverse is tied in an elaborate bow. The rich texture and deep color of the velvet provide a dramatic, almost theatrical, contrast to the black and white of the musical score. A single, silver treble clef charm sits in the center as the perfect finishing touch.
DIY Instructions: Symphony in Velvet
What You’ll Need:
- Sheet music wrapping paper
- Wide, two-toned velvet ribbon
- A silver treble clef charm
- Scissors and tape
Step-by-Step Guide:
- Wrap in Music: Neatly wrap your gift in the sheet music paper.
- Tie the Velvet Ribbon: Cut a very long piece of the velvet ribbon. Wrap it around the box both ways, crossing in the center.
- Make a Beautiful Bow: Tie a large, luscious bow. Take your time to shape the loops so they look full and elegant. The two-toned ribbon will create a lovely effect.
- Add the Charm: Use a small piece of string or thin wire to attach the treble clef charm to the very center of the bow’s knot.
35. Mediterranean Tile Mosaic

This gift wrap is bursting with the sunny, vibrant energy of a seaside villa. The paper is covered in an intricate pattern that looks like beautiful, hand-painted Mediterranean ceramic tiles. The mix of blues, yellows, and oranges is joyful and eye-catching.
To complement the busy pattern, the wrapping is finished simply. A thin cord is tied around the gift. The main decoration is a large, handmade tassel with two bold colors—royal blue and sunny yellow—pulled directly from the tile design.
DIY Instructions: Mediterranean Tile Mosaic
What You’ll Need:
- Wrapping paper with a tile pattern
- A large, two-colored tassel (or yarn to make your own)
- Thin string or cord
- A simple gift tag
- Scissors and tape
Step-by-Step Guide:
- Wrap with Tile Paper: Wrap your gift in the colorful, patterned paper.
- Tie the Cord: Wrap the thin cord around your gift a few times and tie a simple knot on top, leaving the ends long.
- Attach the Tassel and Tag: Slide the loop of your large tassel onto one of the long ends of the cord. Do the same with your gift tag.
- Tie a Final Knot: Tie the ends of the cord together in another knot to secure the tassel and tag. Let them dangle beautifully on the front of the gift.
36. Urban Newsprint Pop
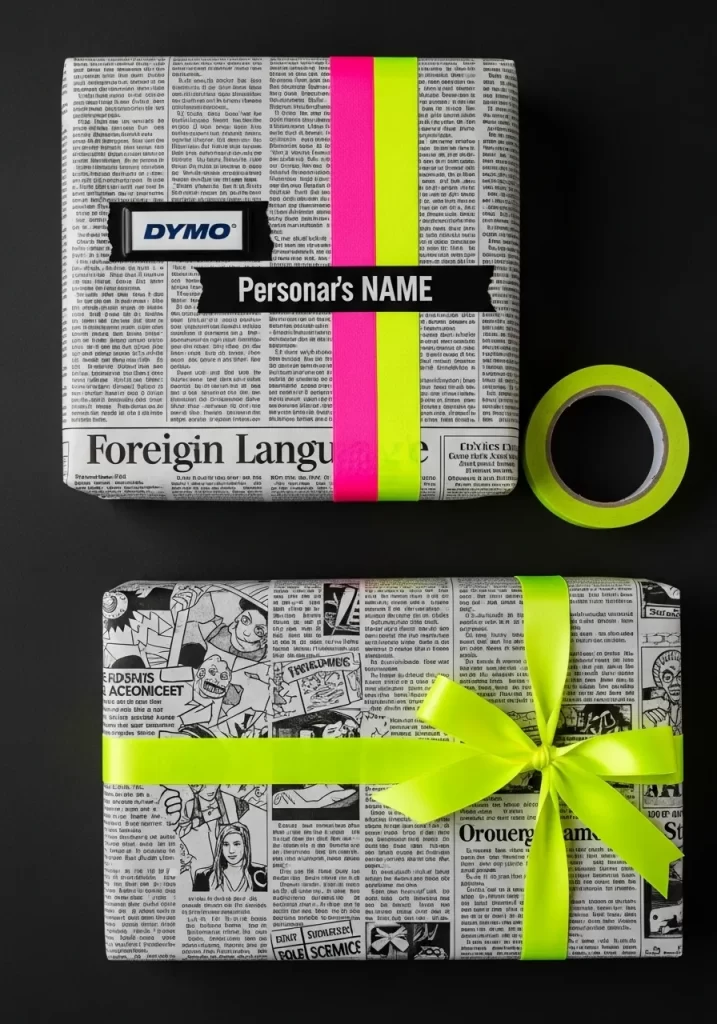
This gift wrap style is edgy, graphic, and has a cool, urban vibe. It uses something ordinary—like newspaper, comic strips, or the classifieds—as a creative and sustainable wrapping paper. The black and white text or drawings create a busy, monochrome background.
The magic comes from the jolt of unexpected color. A band of fluorescent neon tape or a shockingly bright ribbon is added to the package. This creates a brilliant contrast and a modern, pop-art feel. A label from a retro label maker is the perfect finishing touch.
DIY Instructions: Urban Newsprint Pop
What You’ll Need:
- Newspaper (the comic section or a foreign language paper works great!)
- A roll of brightly colored neon tape or a neon ribbon
- A retro Dymo label maker (optional)
- Scissors and tape
Step-by-Step Guide:
- Wrap in Newsprint: Find an interesting page of the newspaper and use it to wrap your gift.
- Add the Neon (Tape Method): If using tape, wrap a few strips of the neon tape around the box to create a clean, colorful band.
- Add the Neon (Ribbon Method): If using a ribbon, tie a big, fluffy bow around the middle of the box.
- Add a Name: For a really cool touch, use a Dymo label maker to punch out the person’s name and stick it on the neon band. Or, you can just use a simple tag.
37. Stargazer’s Dream

This gift wrap is for anyone who loves the magic of the night sky. The paper is a deep, dark navy blue, covered with beautifully illustrated star charts, zodiac signs, and constellations. It turns the gift into a small piece of the cosmos.
To add to the celestial feel, a shimmering, see-through silver ribbon is tied in a big, airy bow. The ribbon has tiny stars on it, adding an extra layer of sparkle. The gift tag is dark to match the paper and features a silver star and a hand-drawn constellation.
DIY Instructions: Stargazer’s Dream
What You’ll Need:
- Navy blue constellation wrapping paper
- A wide, sheer silver ribbon (bonus if it has stars)
- A dark-colored gift tag
- A silver marker and a star sticker
- Scissors and tape
Step-by-Step Guide:
- Wrap in the Cosmos: Neatly wrap your gift in the beautiful constellation paper.
- Tie the Starry Ribbon: Cut a long piece of your sheer ribbon and tie it into a big, beautiful bow on top of the gift.
- Create a Cosmic Tag: On your dark gift tag, add a silver star sticker. Use your silver marker to draw a simple constellation, like the Big Dipper, and write the person’s name.
- Attach the Tag: Tie the tag to the center of the bow.
38. Cozy Pom-Pom Cluster

This wrapping is as fun and cozy as a favorite sweater. It starts with simple, plain brown kraft paper, which provides a nice, neutral background. The simple paper lets the colorful decorations really stand out.
The main feature is a happy bundle of fluffy yarn pom-poms. Using different colors like pink, cream, and olive green makes the cluster look extra cheerful. The gift is tied with matching pink yarn instead of a traditional ribbon, which completes the soft, handmade, and heartwarming feel.
DIY Instructions: Cozy Pom-Pom Cluster
What You’ll Need:
- Brown kraft wrapping paper
- Yarn in a few different colors
- A pom-pom maker (or a fork and scissors)
- A simple gift tag
- Scissors and tape
Step-by-Step Guide:
- Wrap in Kraft Paper: First, wrap your gift in the plain brown paper.
- Make Your Pom-Poms: Make three or four small pom-poms in your different yarn colors. You can use a special pom-pom making tool, or just wrap yarn around a fork many times, tie a string tightly around the middle, and then cut the loops. Fluff them up!
- Tie the Gift: Use a piece of yarn to wrap around the gift a few times and tie a simple knot.
- Attach the Pom-Poms: Before you tie a bow, string your pom-poms and your gift tag onto the yarn.
- Finish with a Bow: Tie a final bow to hold your pom-pom cluster in place.
39. Pocketful of Memories

This gift wrap is incredibly thoughtful and serves as a card and gift wrap all in one. The base is a soft, simply patterned paper. The special part is a handmade pocket attached to the front, which can hold extra little treasures.
A wide band of kraft paper is wrapped around the gift to create a base for the pocket. The pocket itself is made from a cute, coordinating patterned paper. It’s the perfect place to tuck in a personal photo, a handwritten note, a gift tag, and maybe even a small piece of candy.
DIY Instructions: Pocketful of Memories
What You’ll Need:
- Patterned wrapping paper
- A strip of brown kraft paper
- A piece of cute scrapbook paper for the pocket
- A photo, gift tag, and other small notes
- Glue stick, scissors, and tape
Step-by-Step Guide:
- Wrap the Gift: First, wrap your box in your main patterned paper.
- Create the Band: Wrap the strip of brown kraft paper around the middle of the box and tape it in the back.
- Make the Pocket: Cut a square or rectangle from your scrapbook paper. Put a thin line of glue along the left, right, and bottom edges.
- Attach the Pocket: Press the glued paper onto the center of the brown paper band to create your pocket. Let the glue dry.
- Fill the Pocket: Now for the fun part! Fill your pocket with a photo, a name tag, a little note, and any other special flat items you want to include.
40. The Naturalist’s Specimen Box

This gift wrap is for the curious and nature-loving. It turns the present into a naturalist’s specimen box, ready for study. A plain, off-white paper provides the clean, scientific background.
The package is tied with simple twine, as if it were a parcel sent from an expedition. The decorations are the “specimens” themselves: incredibly realistic and beautiful 3D butterflies and beetles, along with a single striped feather. A tag that looks like a museum collection label completes the wonderfully unique and intellectual theme.
DIY Instructions: The Naturalist’s Specimen Box
What You’ll Need:
- Plain cream or white wrapping paper
- Natural twine
- A few realistic 3D butterfly and beetle embellishments (from a craft store)
- A small craft feather
- A gift tag designed like a specimen label
- A hot glue gun (and a grown-up’s help)
- Scissors and tape
Step-by-Step Guide:
- Wrap the Box: Wrap your gift neatly in the plain, light-colored paper.
- Tie the Twine: Wrap the twine around the box from top to bottom and side to side, tying a simple knot where they cross.
- Create a Specimen Tag: On your gift tag, write “Specimen,” “Date,” and “Collected By” to make it look like a real scientific label. Fill it out and attach it to the twine.
- Arrange Your Insects: Decide where you want to place your butterflies and beetles on the box.
- Attach the Specimens: Ask a grown-up to help you. Put a tiny dot of hot glue on the back of each insect and the feather and carefully press them onto the box.
41. Delicate Paper-Cut Feather

This gift wrap is a study in elegant simplicity. It uses a base of muted, solid-colored paper, like this soft gray, which creates a calm and sophisticated canvas. The style feels modern, clean, and very artistic.
The centerpiece is a stunning, intricately cut paper feather. This delicate piece of paper art is layered over a strip of contrasting green and a flash of metallic silver. A simple piece of twine is tied around the layers, holding them together without distracting from the beautiful craftsmanship of the feather.
DIY Instructions: Delicate Paper-Cut Feather
What You’ll Need:
- Matte gray wrapping paper
- Strips of sage green and metallic silver paper
- A pre-made laser-cut paper feather (from a craft store) OR a craft knife and a feather template to make your own (with a grown-up’s help).
- Thin, natural twine
- Scissors and tape
- A glue stick
Step-by-Step Guide:
- Wrap in Gray: First, wrap your gift in the solid gray paper.
- Create Your Layers: Cut a wide strip of silver paper and a slightly narrower strip of green paper. Use a glue stick to layer them on top of each other and then glue them onto the front of the gift.
- Attach the Feather: Carefully glue your paper-cut feather onto the center of the green strip.
- Add the Twine: Cut a piece of twine and tie it in a simple knot around the middle of the paper feather and the layers underneath.
42. Charming Button Monogram

This gift wrap is full of homespun charm and creativity. It starts with a base of ribbed brown kraft paper, which provides a lovely texture. This simple, rustic background is the perfect stage for a very personal touch.
The decorations are made from an assortment of everyday buttons. A small cluster of neutral-toned buttons is gathered where the twine crosses. The most special detail is the recipient’s initial, carefully formed by arranging smaller buttons into the shape of the letter. It’s a wonderfully thoughtful and unique design.
DIY Instructions: Charming Button Monogram
What You’ll Need:
- Ribbed brown kraft paper
- An assortment of buttons in different sizes and neutral colors (black, cream, brown)
- Thin, natural twine
- A hot glue gun (and a grown-up to help)
- A pencil
- Scissors and tape
Step-by-Step Guide:
- Wrap in Kraft Paper: Neatly wrap your gift in the ribbed brown paper.
- Tie the Twine: Wrap the twine around the box both ways, so it crosses in the middle. Tie a simple knot.
- Create the Button Cluster: Ask a grown-up for help with the hot glue. Glue a small pile of your bigger buttons right on top of the knot. Layer them for a nice effect.
- Draw Your Letter: Lightly, with a pencil, draw the outline of the initial you want to make on the front of the box.
- Fill in the Letter: Use the hot glue to carefully attach your smaller buttons inside the lines you drew until you have formed the letter.
43. Geometric Paper Sculpture

This is not just gift wrap; it’s a piece of sculpture. The gift itself is encased in a custom-made, geometric box. The box is constructed from folded paper in sharp, angular facets, like a cut gemstone. The color palette is a sophisticated mix of white, black, gold, and silver.
The beauty of this style is in its structure and form. It doesn’t require any ribbon. A few small, matching paper sculptures might sit on top for extra decoration. The name or initial is written on one of the facets, becoming part of the overall design.
DIY Instructions: Geometric Paper Sculpture
What You’ll Need:
- Heavy cardstock in white, black, gold, and silver
- A template for a geometric box (you can find these online by searching “geometric box template”)
- A ruler
- A scoring tool or a dull butter knife
- Strong craft glue
- Scissors
Step-by-Step Guide:
- Print Your Template: Find and print a template for a geometric box that is the right size for your gift.
- Cut Out the Pieces: The template might have many small triangle and diamond shapes. Carefully cut these shapes out of your different colored cardstock papers.
- Score the Folds: Using a ruler and a scoring tool, score along all the lines that need to be folded. This will make your folds super crisp and clean.
- Start Assembling: Carefully fold along all your scored lines. Begin gluing the tabs of the paper shapes together, following the template’s instructions. This part takes patience!
- Enclose the Gift: Before you glue the final pieces, place your gift inside. Then, finish gluing the box shut.
44. Woven Ribbon Plaid

This gift wrapping technique is creative and textural. It starts with a plain white paper base. The decoration is created by weaving together ribbons of different colors and textures to create a custom plaid or basket-weave pattern.
Here, strips of grosgrain ribbon in white, black, cream, and tan are woven over and under each other. The different widths of the ribbon add to the visual interest. The result is a beautifully tactile and sophisticated design. A single, elegant monogrammed charm is the only other embellishment needed.
DIY Instructions: Woven Ribbon Plaid
What You’ll Need:
- Plain white wrapping paper
- Several rolls of ribbon in different colors and widths
- A monogram charm
- Double-sided tape
- Scissors and tape
Step-by-Step Guide:
- Wrap in White: Start with a gift neatly wrapped in white paper.
- Lay the First Layer: Cut several strips of ribbon long enough to wrap around your box. Use double-sided tape to attach them to the back, laying them vertically across the front of the gift. Space them out a little.
- Start Weaving: Now cut your horizontal ribbons. Take one ribbon and weave it over and under the vertical ribbons. Secure the ends on the back with double-sided tape.
- Continue Weaving: Take your next horizontal ribbon. This time, weave it the opposite way: under and over. Continue this process until you have created a beautiful woven pattern.
- Add the Charm: Attach the monogrammed charm to one of the spots where the ribbons cross.
45. Minimalist Mobile Topper

This gift wrap is an exercise in modern, minimalist elegance. The wrapping itself is very simple: a rich, matte forest green paper tied with a simple gold and white string. The simplicity of the wrap provides the perfect foundation for its unique topper.
Instead of a bow, the gift is topped with a delicate, artistic mobile. Made from thin wire and featuring balanced geometric and organic shapes in gold and white, the mobile is a gift in itself. It is a sophisticated and unexpected embellishment that is sure to be kept long after the gift is opened.
DIY Instructions: Minimalist Mobile Topper
What You’ll Need:
- Matte green wrapping paper
- Gold and white baker’s twine or thin string
- Thin craft wire (gold and silver)
- A few small, flat metal or cardstock shapes (circles, leaves, etc.)
- A gift tag
- Wire cutters and small pliers
Step-by-Step Guide:
- Wrap the Gift: Neatly wrap your gift in the dark green paper.
- Tie the String: Wrap the gold and white string around the box both ways and tie a simple knot and bow.
- Build Your Mobile: This is the creative part! Cut a few pieces of wire. Use pliers to create small loops at the ends. Attach your metal or paper shapes to some ends. Connect the pieces of wire together so they balance and move freely.
- Attach the Mobile: Tie the top of your finished mobile to the center of the bow on your gift.
- Add the Tags: This gift has two tags: one tied to the box and one hanging from the mobile itself for a layered look.
The way you present a gift says so much. It is the first impression, a preview of the thought and care you’ve put inside. As we’ve seen, creating a beautiful package doesn’t require expensive supplies or expert skills. It only takes a little imagination and a willingness to try something new.
From natural elements and rustic twine to modern patterns and luxurious ribbons, there is a style for every occasion and every person. The next time you have a gift to give, think beyond the basic roll of paper. Choose an idea that speaks to you and have fun with it.
Your friends and family will notice the extra effort. The beautiful wrapping becomes a part of the gift itself, a gesture that shows how much you truly value them. That extra touch is what turns a simple exchange into a cherished memory.
Key Takeaways
- Presentation Matters: Thoughtful gift wrapping elevates the entire gift-giving experience and shows extra care.
- Use Everyday Materials: You can create stunning results using simple items like kraft paper, twine, buttons, or elements from nature.
- Personalization is Key: Adding a unique touch, like a monogram, a photo, or a hand-drawn design, makes a gift feel incredibly special.
- Texture Adds Depth: Mixing materials like velvet, burlap, vellum, or yarn creates a rich, tactile experience that looks and feels expensive.
- Simple Can Be Elegant: A minimalist design with high-quality materials often makes a stronger statement than an overly busy one.