
Winter blues often make a home feel cold and uninviting. The lack of sunlight leaves rooms looking flat and gray. You deserve a space that feels like a warm embrace during these chilly months. Earthy pink is the secret to transforming a sterile bedroom into a cozy sanctuary.

This color palette goes beyond basic pastel tones. It draws inspiration from clay, terracotta, and soft sunsets. These shades provide a grounded feeling that promotes rest and recovery. You can easily introduce these hues through paint, textiles, or handmade furniture.
Refreshing your decor does not require a massive budget. Small changes often yield the most significant results. This guide explores thirty five creative ways to use earthy pink for a total room makeover. Get ready to turn your sleeping area into a sun drenched retreat.
1 Raw Wood Headboard Ledge
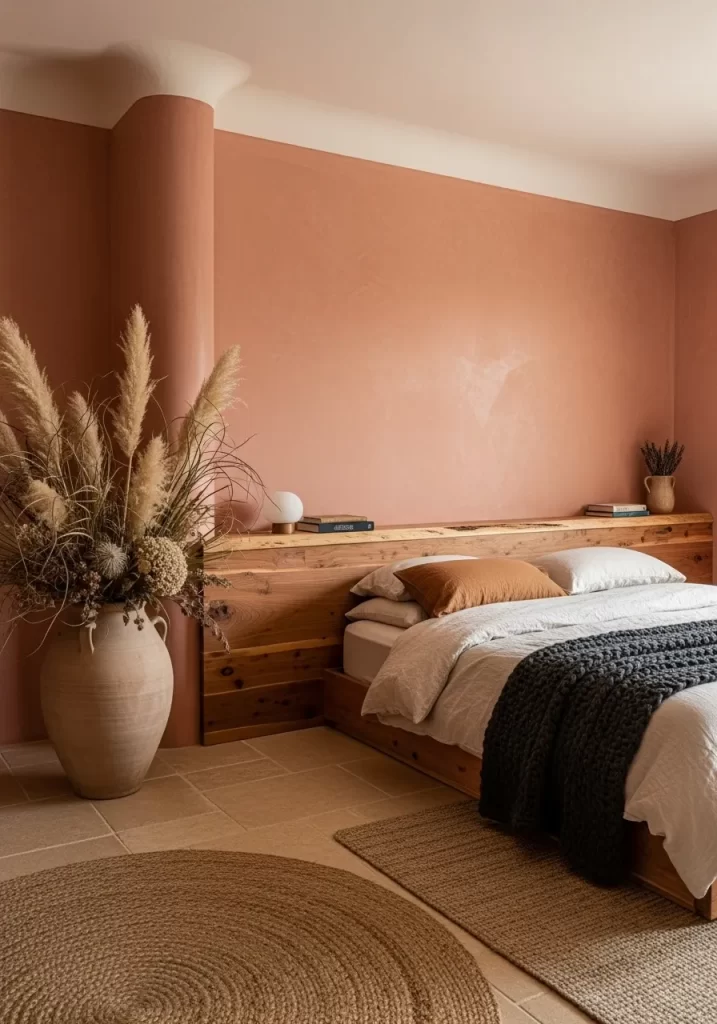
Warm pink walls provide a soft glow against the rough timber. A thick wooden plank rests behind the bed to serve as a functional shelf. Natural light hits the textured clay vase filled with tall pampas grass. This setup feels grounded and very rustic. It uses organic materials to bring life to the space.
You can feel the warmth radiating from the earthy tones. Jute rugs and linen sheets complete the tactile experience. Banish the cold with these layered textures. Every element works together to create a cozy sanctuary. It feels like a hug for your senses.
Material Required List
- Solid wood timber plank
- Wall brackets
- Screws
- Wall anchors
- Sandpaper
- Clear wax finish
Equipment Required List
- Power drill
- Level
- Measuring tape
- Stud finder
- Pencil
- Safety glasses
DIY Instructions
- Measure the width of your bed to find the length for the wood.
- Buy a thick piece of raw timber from a local lumber yard.
- Sand the wood with fine sandpaper until it feels smooth.
- Rub a clear wax finish over the grain to protect the surface.
- Locate the wooden studs in your wall using a stud finder.
- Mark the desired height of the ledge with a pencil.
- Use a level to ensure your marks are straight across the wall.
- Drill pilot holes into the wall studs at your marks.
- Secure the brackets to the wall using anchors and screws.
- Place the timber plank on the brackets and screw it from below.
2 Mauve Velvet Tufted Grandeur
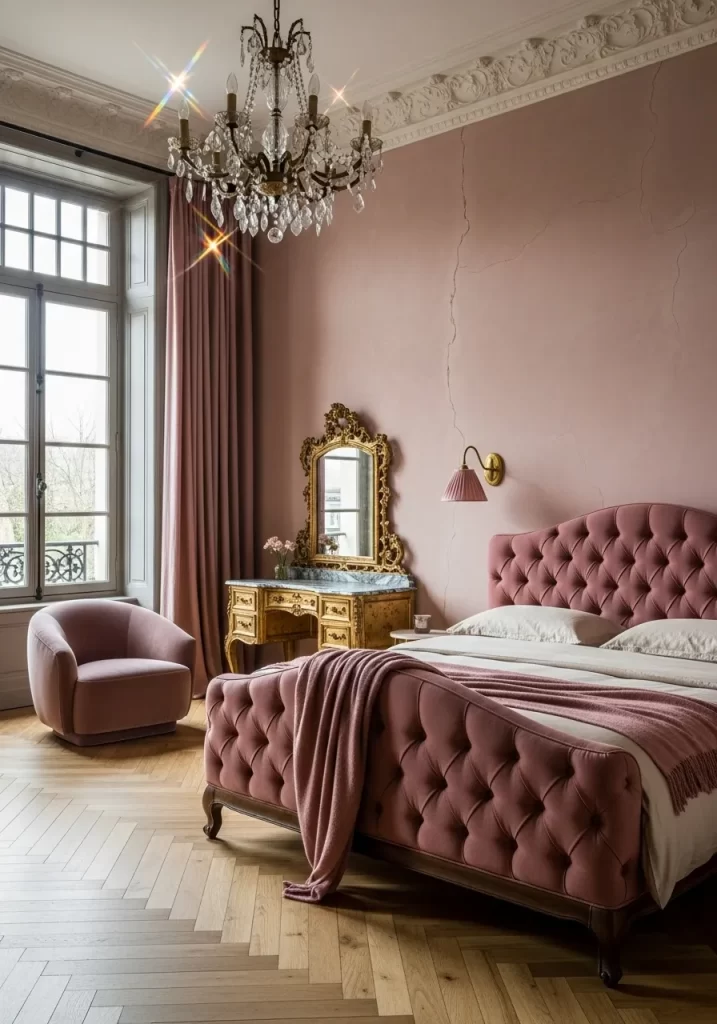
Luxury meets comfort in this stunning vintage setup. A deep mauve tufted headboard anchors the room against soft pink walls. Crystal chandeliers add a touch of sparkle that reflects off the gold vanity. Light wood floors in a chevron pattern keep the space feeling open. Heavy drapes in a matching rose tone block out the cold winter light.
Plush textiles invite you to relax after a long day. This design balances opulence with a lived in feel. You can almost feel the softness of the velvet just by looking at it. Adding a gold framed mirror completes the regal atmosphere. Every detail helps to banish the winter gloom.
Material Required List
- Velvet upholstery fabric
- Foam padding
- Plywood board
- Upholstery buttons
- Strong thread
- Spray glue
Equipment Required List
- Staple gun
- Power drill
- Measuring tape
- Long needle
- Scissors
DIY Instructions
- Cut your plywood board to the size of your bed width.
- Drill holes through the wood in a diamond grid pattern.
- Spray glue on the board and press the foam on top.
- Lay your velvet fabric over the foam and center it.
- Thread the long needle and push it through a hole from the back.
- Pass the needle through the foam and the fabric.
- Slide a button onto the thread and push the needle back.
- Pull the thread very tight to create a deep dimple.
- Knot the thread securely at the back of the board.
- Wrap the fabric edges over the board and staple them down.
3 Japandi Slat Wall Sanctuary
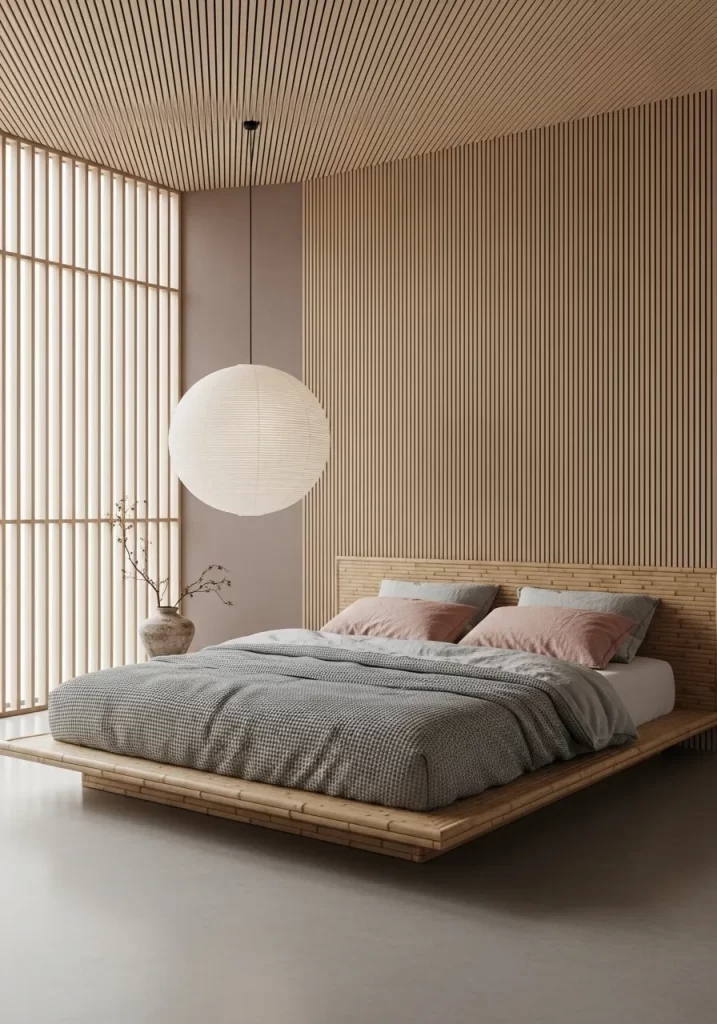
Clean lines and light wood create a peaceful retreat. Vertical slats run from the floor to the ceiling for a tall look. A large paper globe light hangs in the center of the room. This diffused glow softens the sharp edges of the platform bed. Pink pillows add a tiny pop of color to the gray linens.
The room feels very open and airy. Japanese design meets Scandinavian warmth in this setup. It removes all distractions so you can focus on sleep. Natural materials bring the outdoors inside. This style works well for those who love order. You feel calm the moment you walk inside.
Material Required List
- Pine wood strips
- Wood glue
- Finish nails
- Clear sealant
- Wood spacers
Equipment Required List
- Miter saw
- Spirit level
- Brad nailer
- Measuring tape
- Sandpaper
DIY Instructions
- Measure the height of your wall from floor to ceiling.
- Cut your pine wood strips to match that exact length.
- Sand the front and sides of every strip until smooth.
- Apply a line of wood glue to the back of a strip.
- Place the strip against the wall and check it with a level.
- Nail the strip into the wall at the top and bottom.
- Put a spacer block next to the strip to keep gaps even.
- Glue and nail the next strip right against that spacer.
- Continue this process across the entire width of the wall.
- Brush on a clear sealant to protect the wood from dust.
4 Terracotta Mediterranean Escape
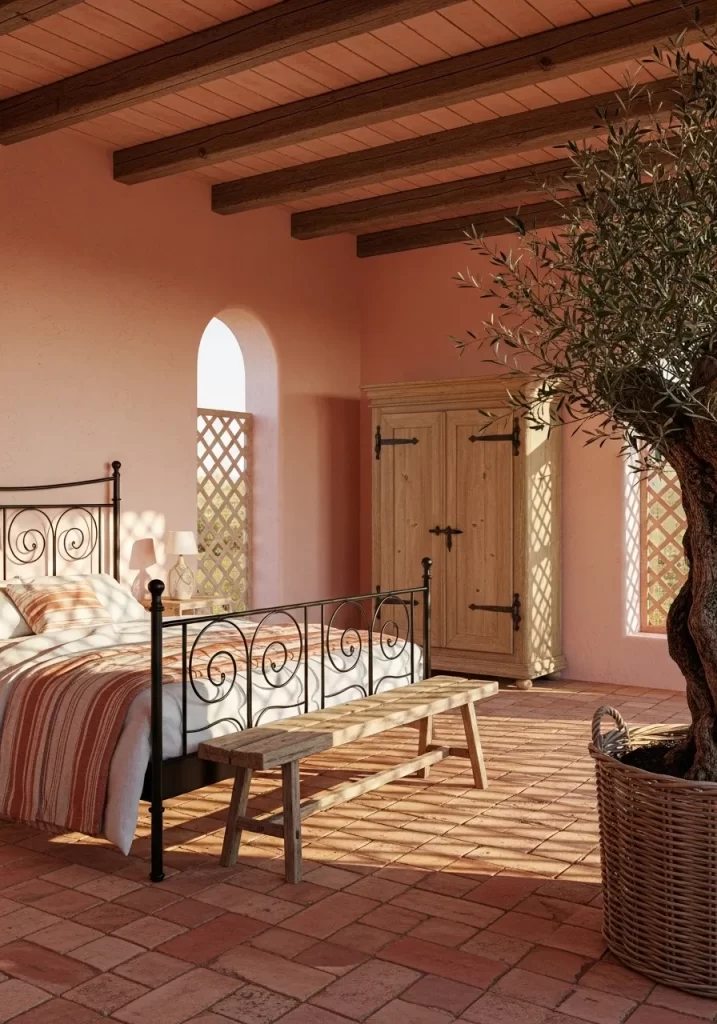
Warm terracotta tiles ground this sun drenched room. An elegant black iron bed frame stands out against peach walls. Sunlight pours through arched windows and casts long shadows. A rustic wooden bench sits at the foot of the bed. Olive trees in woven baskets bring life to the corners.
This style feels like a summer escape in the middle of winter. Heavy ceiling beams add architectural interest and a sense of history. It is a rugged yet gentle space that celebrates natural light. The lack of clutter allows the textures of stone and wood to speak. You feel connected to the earth in this environment.
Material Required List
- Old metal bed frame
- Black matte spray paint
- Metal primer
- Tack cloth
- Sandpaper
Equipment Required List
- Drop cloth
- Screwdriver
- Safety mask
- Cleaning rag
- Wire brush
DIY Instructions
- Take the bed frame apart to work on each piece.
- Scrub the metal with a wire brush to remove rust.
- Sand the entire surface with fine sandpaper for a smooth base.
- Wipe away all the dust using a damp cleaning rag.
- Lay down a drop cloth in a spot with fresh air.
- Apply one thin coat of metal primer to every part.
- Wait for the primer to dry according to the label.
- Shake the black spray paint well before using it.
- Apply a light coat of paint using steady side motions.
- Put the bed back together once the paint has fully cured.
5 Maximalist Boho Peacock Nook
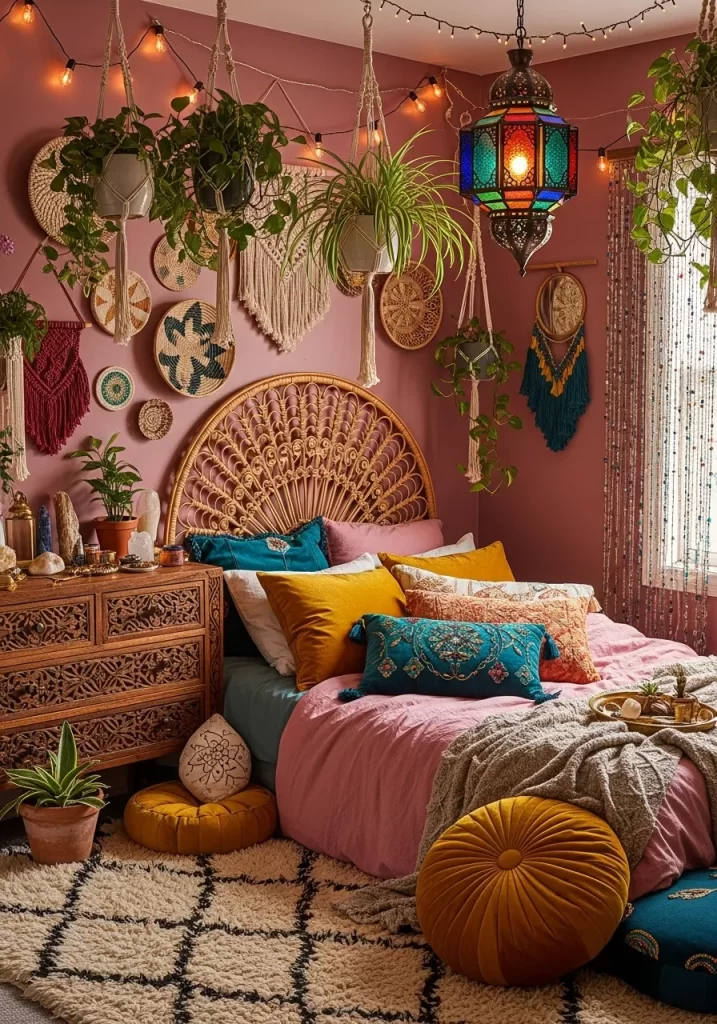
Bohemian energy fills every inch of this vibrant bedroom. A large rattan headboard acts as a focal point with intricate patterns. Macrame hangers hold lush green plants at various heights. Multiple woven baskets decorate the walls like organic pieces of art. Deep mustard and teal pillows contrast with the pink walls.
String lights add a whimsical sparkle during the evening hours. This room celebrates texture and personal style over strict rules. It feels warm and full of life. Every corner offers something interesting to look at. You can relax easily in such a creative and textured space.
Material Required List
- Natural rattan reeds
- Plywood base
- Wood glue
- Brass nails
- Clear varnish
Equipment Required List
- Hammer
- Large bucket for water
- Clamps
- Pencil
- Measuring tape
DIY Instructions
- Draw a large half circle on your plywood and cut it.
- Soak your rattan reeds in water for two hours.
- Bend the wet reeds into loops that look like feathers.
- Nail the base of each loop to the plywood edge.
- Use wood glue where the reeds overlap for strength.
- Clamp the pieces together while the glue dries completely.
- Create smaller loops to fill in the gaps for detail.
- Allow the entire headboard to dry in the sun.
- Apply a thin layer of clear varnish for a shine.
- Mount the headboard to the wall with heavy duty strips.
6 Urban Canopy Loft
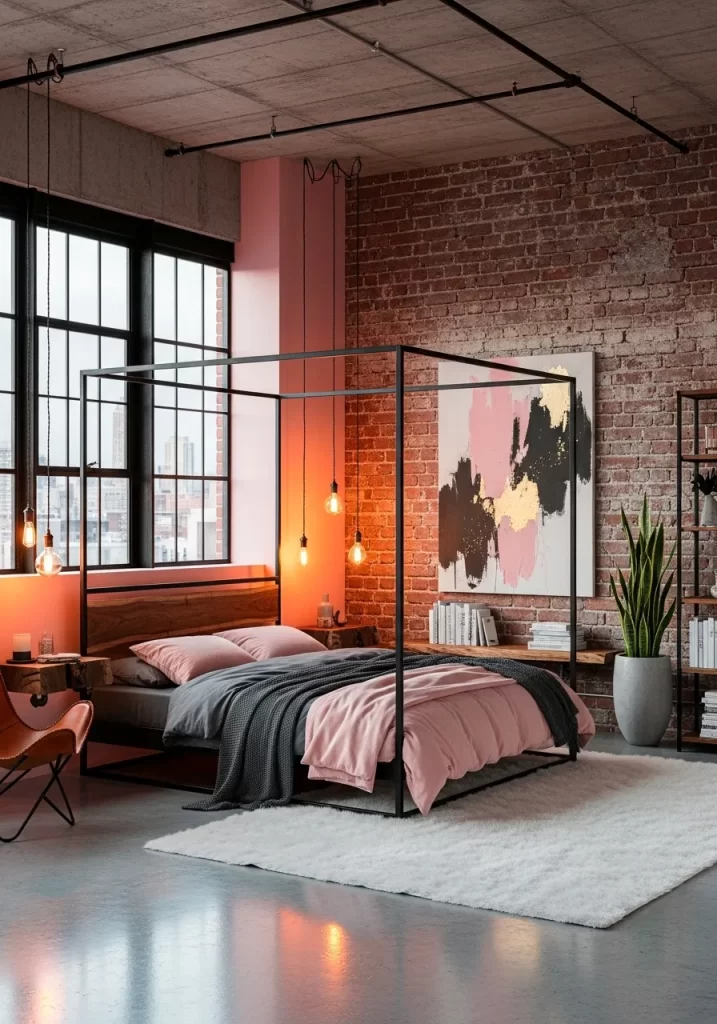
Raw brick and smooth concrete meet soft rose accents here. A black metal canopy bed provides structure without feeling heavy. Large windows let in views of the city skyline. Hanging bulb lights replace traditional lamps for a modern touch. Abstract art with splashes of pink and gold ties the palette together.
A thick white rug softens the hard floors under your feet. This design proves that industrial spaces can feel cozy. It is a bold look for a confident decorator. High ceilings allow the tall bed frame to shine as a centerpiece. Rest comes easy in this structured and stylish retreat.
Material Required List
- Square metal tubing
- Corner connectors
- Black metal paint
- Set screws
- Metal end caps
Equipment Required List
- Allen wrench
- Measuring tape
- Spirit level
- Step ladder
- Paint brush
DIY Instructions
- Measure your mattress and add two inches for the frame.
- Buy pre cut metal tubes that match those measurements.
- Lay the four bottom rails on the floor for assembly.
- Join the bottom rails together with corner pieces.
- Insert the four tall vertical posts into the corners.
- Tighten the set screws firmly using an Allen wrench.
- Use a ladder to place the top rails onto the posts.
- Secure the top corners with the remaining connectors.
- Check every side with a spirit level for straightness.
- Push plastic end caps into any open tube holes.
7 Scalloped Curtain Cottage
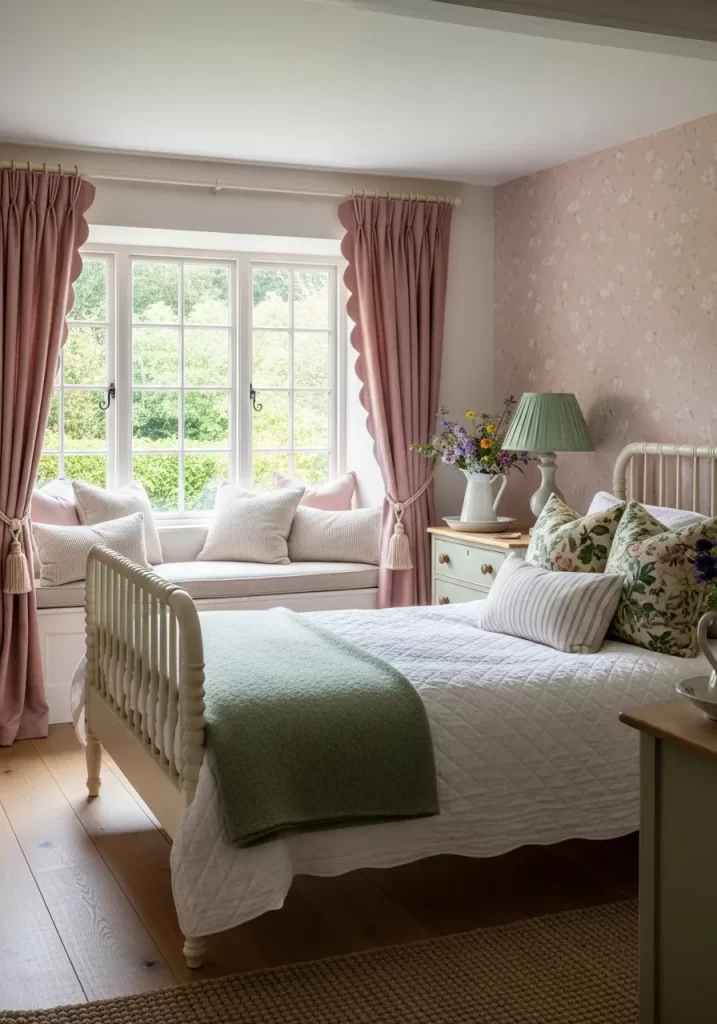
Cottage charm defines this sweet and airy space. Soft pink curtains with unique wavy edges frame the window seat. A white spindle bed looks classic against the floral wallpaper. Green accents in the lamp and blanket provide a fresh feel. Piles of cushions make the window nook a spot for reading.
Natural light fills the room and highlights the wooden floors. This style feels nostalgic and very comforting for guests. It is a gentle way to use color without stress. You can enjoy the view of trees while staying warm. Cozy vibes make this room a favorite for winter mornings.
Material Required List
- Heavy pink fabric
- Matching pink thread
- Curtain rod
- Clip on rings
- Cardboard
Equipment Required List
- Sewing machine
- Fabric shears
- Tailors chalk
- Iron
- Measuring tape
DIY Instructions
- Measure your window and cut fabric to double that width.
- Draw a semi circle on cardboard to use as a template.
- Trace the wavy line along the bottom of your fabric.
- Cut carefully along the chalk line with sharp shears.
- Fold the wavy edge over by half an inch.
- Sew slowly along the curve to create a neat hem.
- Fold and sew the top edge for a straight header.
- Press the entire curtain with an iron to remove folds.
- Attach clip on rings at equal distances along the top.
- Slide the rings onto the rod and hang the curtains.
8 Futuristic Boucle Arch
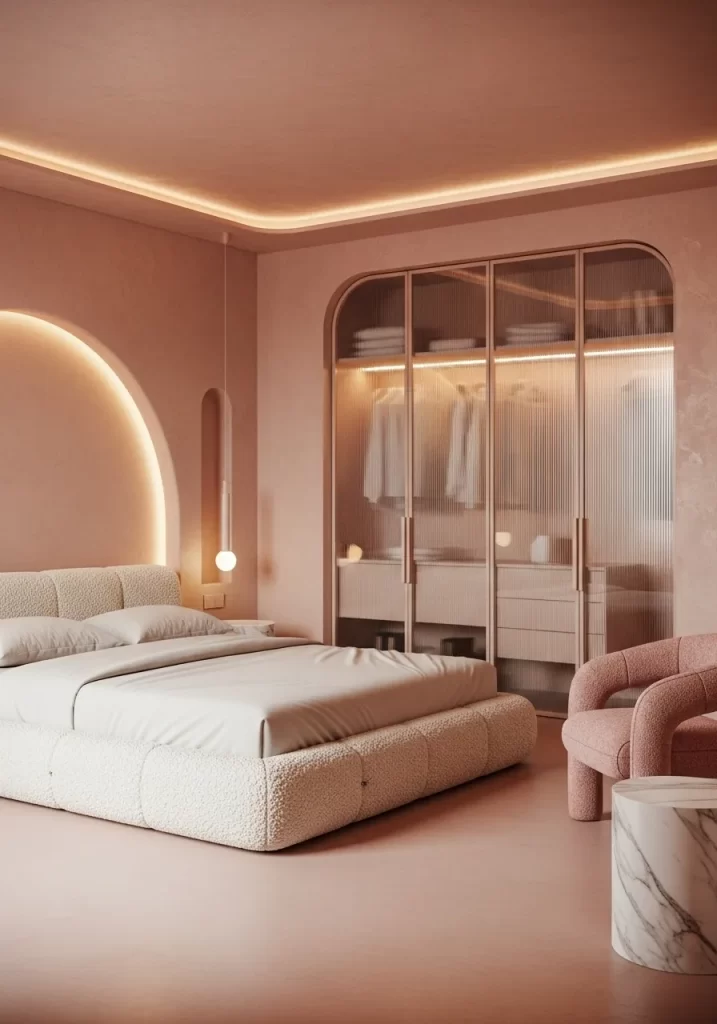
Curved lines create a soothing atmosphere in this pink paradise. A glowing arch behind the bed provides a soft night light. Smooth pink surfaces cover the walls for a seamless look. The bed features textured boucle fabric that feels modern and soft. A fluted glass wardrobe keeps clothes hidden but lets light pass.
Everything in this space feels intentional and high tech. It is a sleek retreat from the busy world outside. Hidden lighting eliminates harsh shadows and makes the room feel large. You get a sense of luxury from the custom details. This room is a dream for modern design lovers.
Material Required List
- LED strip lights
- Thin drywall sheets
- Joint compound
- Pink matte paint
- Corner beads
Equipment Required List
- Utility knife
- Spackle blade
- Paint roller
- Measuring tape
- Power screwdriver
DIY Instructions
- Build a wooden frame in the shape of a large arch.
- Cut thin drywall into strips that can bend easily.
- Screw the drywall to the curved wooden frame carefully.
- Apply corner beads to the edges to keep them crisp.
- Cover all screws and seams with joint compound.
- Sand the arch until it is smooth and matches the wall.
- Paint the arch with your chosen shade of pink.
- Peel the backing off the LED strip and stick it inside.
- Hide the power cord behind the baseboard or wall.
- Plug in the lights and set the brightness with a remote.
9 Tropical Carved Canopy
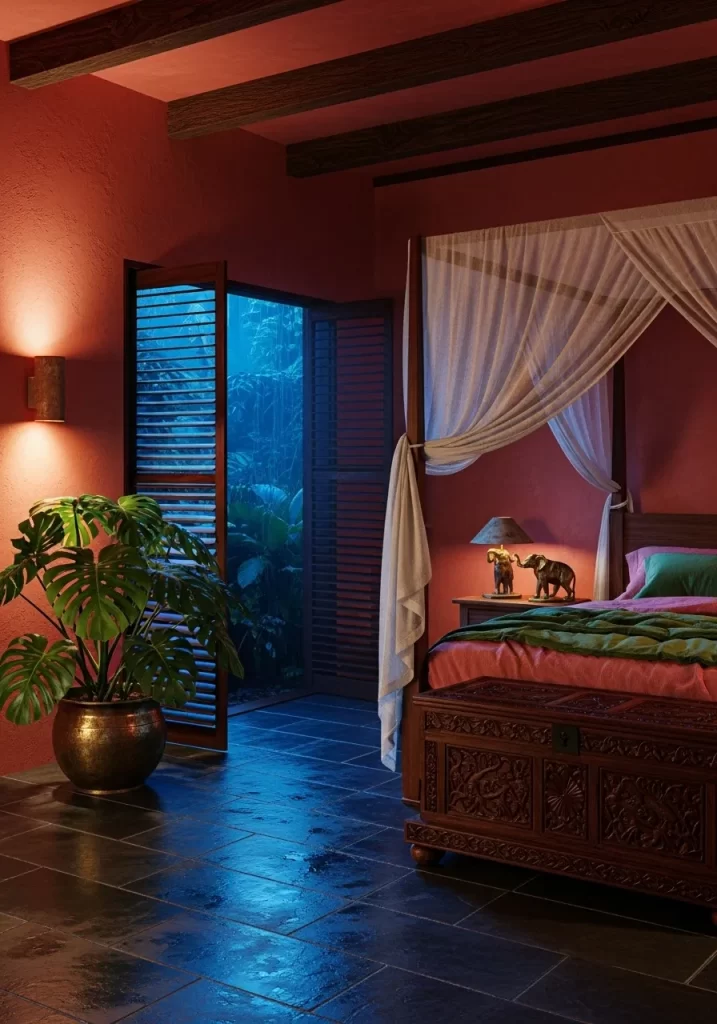
Rich woods and deep pink tones create a moody sanctuary. A heavily carved chest sits at the foot of the bed. Light fabric drapes over the canopy for a romantic touch. A large monstera plant adds a tropical vibe next to the shutters. The dark tiled floor keeps the room cool and grounded.
Warm wall lights glow against the textured plaster. This room feels like a hidden getaway in a far away land. It is mysterious and very cozy for winter nights. You can store extra blankets inside the beautiful chest. Every piece of furniture tells a story of craftsmanship. Escape the cold in this exotic and layered room.
Material Required List
- Plain wooden chest
- Dark wood stain
- Metal hinges
- Wood wax
- Tack cloth
Equipment Required List
- Wood chisels
- Rubber mallet
- Sandpaper
- Paint brush
- Pencil
DIY Instructions
- Find a solid wood chest that has no existing paint.
- Use a pencil to draw a floral pattern on the front.
- Hold the chisel at an angle against your pencil line.
- Tap the chisel with the mallet to cut the wood.
- Carve away small pieces to create depth in the design.
- Sand the carved area until the wood feels smooth.
- Wipe the wood clean with a tack cloth for staining.
- Brush on a dark wood stain and let it sit.
- Wipe away extra stain to show the wood grain.
- Screw on the metal hinges to complete the look.
10 Sage and Rose Wainscoting
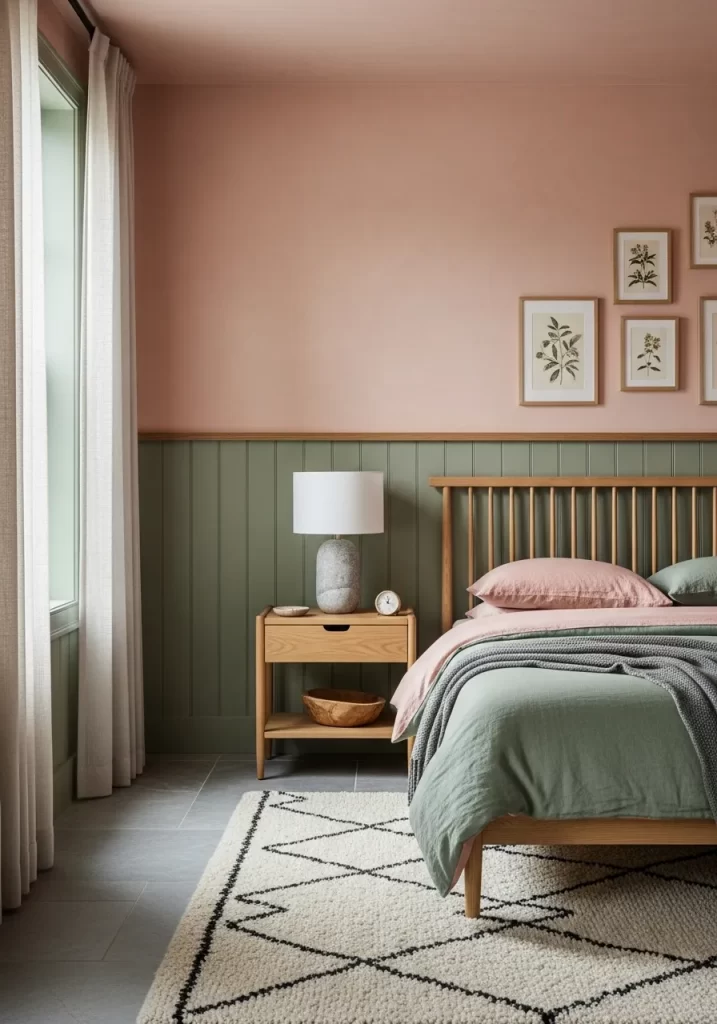
Sage green meets dusty rose in this balanced and calm room. Vertical wood panels cover the lower half of the wall. This adds depth and a sense of tradition to the space. Botanical prints in simple frames sit right above the wood line. A light oak bed frame keeps the look natural.
Pink bedding ties back into the upper wall color for a cohesive feel. The cream rug with a black pattern adds modern flair. This space feels grounded and very quiet. It is a great way to use two colors without stress. You find peace in the simple and natural decor choices.
Material Required List
- Plywood sheets
- Trim molding
- Sage green paint
- Pink wall paint
- Construction adhesive
Equipment Required List
- Circular saw
- Spirit level
- Caulking gun
- Paint brush
- Hammer
DIY Instructions
- Paint the top half of your wall with pink paint.
- Cut your plywood sheets into panels for the lower wall.
- Apply adhesive to the back of each wood panel.
- Press the panels against the wall and check with a level.
- Nail the panels at the corners to secure them tightly.
- Cut the trim molding to fit along the top edge.
- Glue and nail the trim to hide the raw wood edge.
- Fill any small gaps between panels with paintable caulk.
- Paint the entire lower section with the sage green paint.
- Use a small brush to get paint into every corner.
11 Mid Century Modern Record Nook
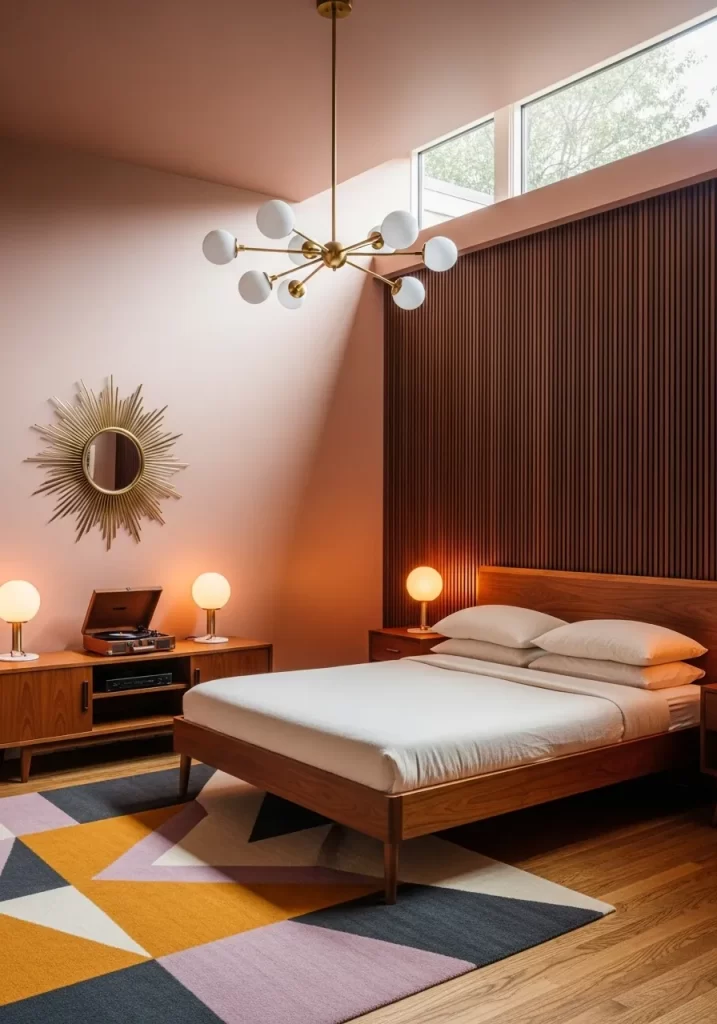
Retro vibes and warm pink walls make this bedroom feel very cool. A dark wood slat wall behind the headboard adds incredible texture. The brass globe chandelier acts as a stunning piece of jewelry for the ceiling. Low profile furniture keeps the sight lines clear and open.
A geometric rug adds playfulness with its yellow and purple triangles. You can play your favorite vinyl on the wooden credenza. This room is for those who love a mix of old school style and fresh colors. It feels like a high end apartment in the heart of the city.
Material Required List
- Wood slats
- Black paint
- Brass furniture legs
- Velvet bedding
- Abstract geometric rug
Equipment Required List
- Level
- Power drill
- Staple gun
- Paint roller
- Tape measure
DIY Instructions
- Choose a wall behind your bed to become the texture focal point.
- Paint the wall black to provide a dark shadow behind the slats.
- Attach thin wood slats vertically with a one inch gap between them.
- Use a level to ensure every piece of wood is perfectly straight.
- Find a low vintage dresser and clean it with a damp cloth.
- Remove the old legs and screw on new brass tapered legs for a modern look.
- Hang a sunburst mirror on the pink wall to balance the dark wood.
- Layer your bed with a crisp white duvet and pink velvet pillows.
- Place a geometric rug under the bottom half of the bed.
- Set up your record player on the dresser and enjoy the music.
12 Southwestern Plaster Alcove Bed
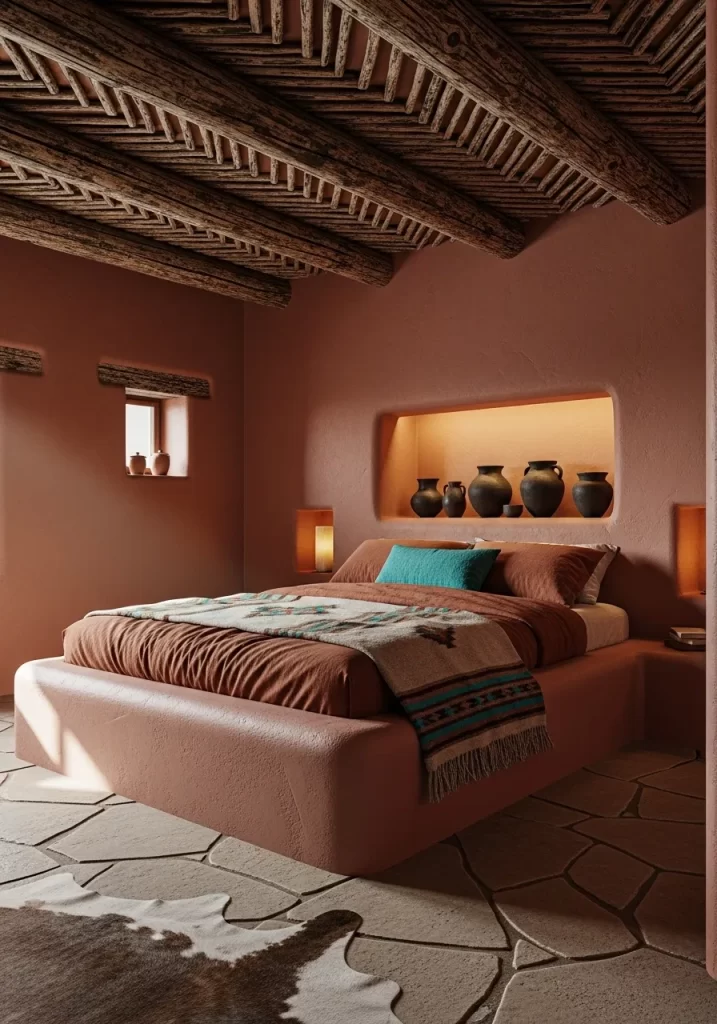
Textured walls in a deep terracotta pink define this earthy retreat. The ceiling features heavy wooden logs that add a rustic and historic feel. A large built in niche above the bed acts as a gallery for dark clay pottery. Soft ambient light glows from within the alcoves to highlight the organic shapes.
The bed sits low to the ground on a matching plaster base. Natural stone tiles underfoot stay cool during the day. A woven blanket with tribal patterns adds a layer of cultural history to the room. This design feels grounded and ancient.
Material Required List
- Wooden logs for ceiling beams
- Ready mix plaster or joint compound
- Terracotta matte paint
- Drywall sheets
- Wood studs for framing
Equipment Required List
- Power drill
- Level tool
- Trowel
- Paint roller
- Saw for wood beams
DIY Instructions
- Build a wooden frame against your existing wall using studs to create the depth for the niches.
- Cut out the shapes for your alcoves in the drywall sheets before mounting them.
- Screw the drywall to the frame and ensure the edges are aligned.
- Apply a thick layer of joint compound over the drywall to create a rough plaster texture.
- Use a wet trowel to smooth the inside of the alcoves for a clean look.
- Let the plaster dry for at least twenty four hours until it is hard.
- Paint the entire wall and the inside of the niches with your terracotta paint.
- Measure and cut your wooden logs to fit the width of the ceiling.
- Secure the logs to the ceiling joists using long heavy duty screws.
- Place your pottery inside the alcoves and add small battery lights for a soft glow.
13 Moroccan Draped Canopy Oasis

Fabric drapes from the center of the ceiling to create a tent like atmosphere. This bedroom uses deep pinks and rich patterns to transport you to North Africa. Ornate carved wood headboards stand tall against the warm walls. Copper lanterns hang at different heights and cast intricate shadows.
Multiple leather poufs provide casual seating on the large patterned rug. The space feels intimate and very cozy. Soft white light filters through the draped fabric for a dreamy effect. It is a bold choice for anyone who loves global style.
Material Required List
- Lightweight sheer fabric
- Large brass eye hooks
- Decorative tassels
- Strong nylon string
- Patterned area rug
Equipment Required List
- Step ladder
- Power drill
- Measuring tape
- Sewing kit or fabric glue
- Pliers
DIY Instructions
- Locate the center point of your ceiling and mark it with a pencil.
- Drill a pilot hole and screw in a large brass eye hook at the center.
- Measure the distance from the center hook to the four corners of the room.
- Cut four long pieces of fabric that are slightly longer than those measurements.
- Gather the ends of all four fabric pieces and tie them to the center hook.
- Install four more eye hooks in the corners of the ceiling.
- Pull each piece of fabric toward a corner hook so it drapes gently.
- Tie the outer ends of the fabric to the corner hooks using nylon string.
- Hide the knots by wrapping decorative tassels around the hook areas.
- Steam the fabric to remove wrinkles so it hangs smoothly over the bed.
14 Deep Emerald Botanical Sanctuary
Forest green velvet takes center stage in this moody and sophisticated room. The headboard features a classic winged shape for a sense of privacy. Dark botanical art hangs on the soft pink wall to connect the colors. Glass cloches on the nightstand house miniature moss gardens.
Heavy green curtains block out the gray winter sky. This color combination feels high end and very lush. Dark wood floors ground the space and add a touch of nature. The room balances dark tones with light walls for a dramatic effect.
Material Required List
- Glass display cloches
- Dried or live moss
- Small river stones
- Charcoal bits
- Potting soil
Equipment Required List
- Long tweezers
- Small spray bottle
- Cleaning rag
- Pencil
- Spoon
DIY Instructions
- Clean the glass cloche inside and out with a soft rag.
- Place a thin layer of charcoal at the bottom of the glass base to keep it fresh.
- Add a layer of small river stones on top of the charcoal for drainage.
- Spoon in an inch of potting soil and press it down gently to level it.
- Use the tweezers to place pieces of moss onto the soil.
- Create a small landscape by varying the heights of the moss.
- Add tiny stones or twigs to make the scene look like a forest floor.
- Spray the moss lightly with water using the spray bottle.
- Place the glass lid over the base to create a sealed environment.
- Set the cloche on your nightstand where it can get indirect sunlight.
15 Minimalist Floating Zen Suite
Simple beauty defines this Japanese inspired bedroom. A floating wooden bed frame seems to hover over the tatami mat floor. Soft pink walls glow from a hidden light strip behind a low headboard. A sliding shoji screen allows natural light to enter while maintaining privacy.
The room contains very few items to promote a clear mind. Neutral tones work with the light wood to create a serene environment. This design focuses on quality over quantity. It feels incredibly spacious and very modern.
Material Required List
- Heavy duty wood beams
- Plywood sheets
- LED light strips
- Wood glue
- Long lag bolts
Equipment Required List
- Circular saw
- Impact driver
- Spirit level
- Measuring tape
- Sandpaper
DIY Instructions
- Build a small rectangular frame out of thick wood beams.
- Screw this frame firmly into the floor studs in the center of the room.
- Build a larger frame for the mattress that will sit on top of the small one.
- Attach the large frame to the small base using long lag bolts.
- Cover the top of the large frame with smooth plywood sheets.
- Sand all the edges of the wood to prevent any splinters.
- Ensure the bed is level by checking all four sides with your tool.
- Stick an LED light strip to the underside of the large frame.
- Hide the power cord by running it through the hollow center of the base.
- Place your mattress on top and enjoy the look of your floating bed.
16 Old World Tuscan Villa Retreat
Rustic plaster walls in a warm rose hue provide a beautiful backdrop. An ornate black iron bed frame adds a touch of weight and history. Thick wooden beams across the ceiling make the room feel secure and aged. A large wooden chest at the foot of the bed offers plenty of storage.
Sunlight streams through an arched window to warm the stone floor. Dried olive branches in a clay pot bring a bit of the countryside inside. This style celebrates the beauty of aged materials and simple living. It feels like a room in a quiet Italian villa.
Material Required List
- Unfinished wooden chest
- Steel wool
- White vinegar
- Black tea bags
- Clear furniture wax
Equipment Required List
- Glass jar
- Paint brush
- Lint free rag
- Sandpaper
- Bucket
DIY Instructions
- Drop a piece of steel wool into a jar of vinegar and let it sit for two days.
- Steep three black tea bags in a cup of boiling water until it is very dark.
- Sand your wooden chest to remove any old finish or rough spots.
- Brush the dark tea over the entire chest and let it dry completely.
- Apply the vinegar and steel wool mixture over the tea layer.
- Watch as the wood turns a dark weathered gray or brown color instantly.
- Let the chest dry for a full day in a well ventilated area.
- Lightly sand the edges to create a naturally worn look.
- Rub clear furniture wax over the surface with a lint free rag.
- Buff the wax to a soft shine to protect your new vintage chest.
17 Regal Shell Pink Glamour
Luxury reaches new heights in this stunning art deco space. A massive scalloped headboard in shimmering pink velvet mimics a seashell. Gold trim lines the wall panels for a truly royal appearance. The ceiling features a recessed gold panel that reflects crystal light.
Black and white marble tiles create a bold pattern on the floor. Glossy black nightstands add a modern contrast to the soft pink tones. This bedroom is for those who want to feel like royalty every day. It is grand and very exciting to look at.
Material Required List
- Gold leaf sheets
- Gilding size adhesive
- Soft squirrel hair brush
- Painter’s tape
- Clear topcoat sealer
Equipment Required List
- Cotton gloves
- Stepladder
- Small mixing bowl
- Soft polishing cloth
- Drop cloth
DIY Instructions
- Use painter’s tape to mark the area on the ceiling you want to turn gold.
- Apply a thin and even layer of gilding size adhesive to the marked area.
- Wait about fifteen minutes until the adhesive feels tacky but not wet.
- Put on cotton gloves to avoid getting oils on the delicate gold sheets.
- Lift a gold leaf sheet carefully and press it onto the sticky surface.
- Use the soft brush to flatten the leaf and remove any air bubbles.
- Overlap the sheets slightly to ensure there are no gaps in the gold.
- Brush away any loose gold flakes once the entire area is covered.
- Apply a clear topcoat sealer to protect the gold from dust or peeling.
- Remove the tape slowly to reveal a crisp and royal gold ceiling panel.
18 Modern Industrial Copper Loft
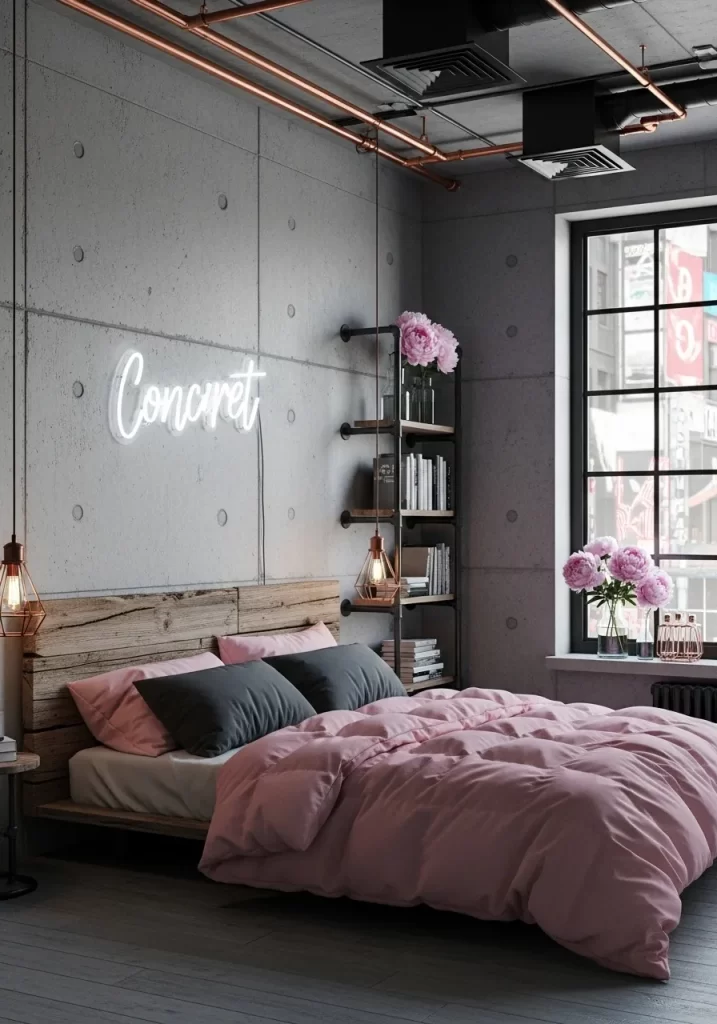
Raw concrete walls meet glowing copper pipes in this urban hideaway. A neon sign on the wall adds a modern and personal touch to the space. The headboard is made from rough reclaimed wood to balance the concrete. Pink bedding provides a soft and inviting contrast.
Large windows look out onto the city and bring in plenty of light. Open shelving made from metal pipes keeps the room feeling airy. This design works well for a loft or a city apartment. It feels young and very creative.
Material Required List
- Copper pipes
- Copper elbow joints
- Pipe wall flanges
- Wood planks for shelves
- Industrial strength glue
Equipment Required List
- Pipe cutter
- Power drill
- Spirit level
- Measuring tape
- Screwdriver
DIY Instructions
- Measure the wall where you want your shelves to sit.
- Cut your copper pipes into equal lengths for the vertical supports.
- Screw the wall flanges into the wall using a drill and wall anchors.
- Insert a short piece of pipe into each flange and add an elbow joint.
- Connect the vertical pipes to the elbow joints to create the frame.
- Slide your wood planks across the copper pipes to form the shelves.
- Use a spirit level to make sure the planks are not tilted.
- Apply a small drop of glue where the pipes meet the joints for stability.
- Clean the copper with a rag to make it shine against the concrete.
- Place your favorite books or small plants on the new industrial shelves.
19 Modern Farmhouse Rose Accent
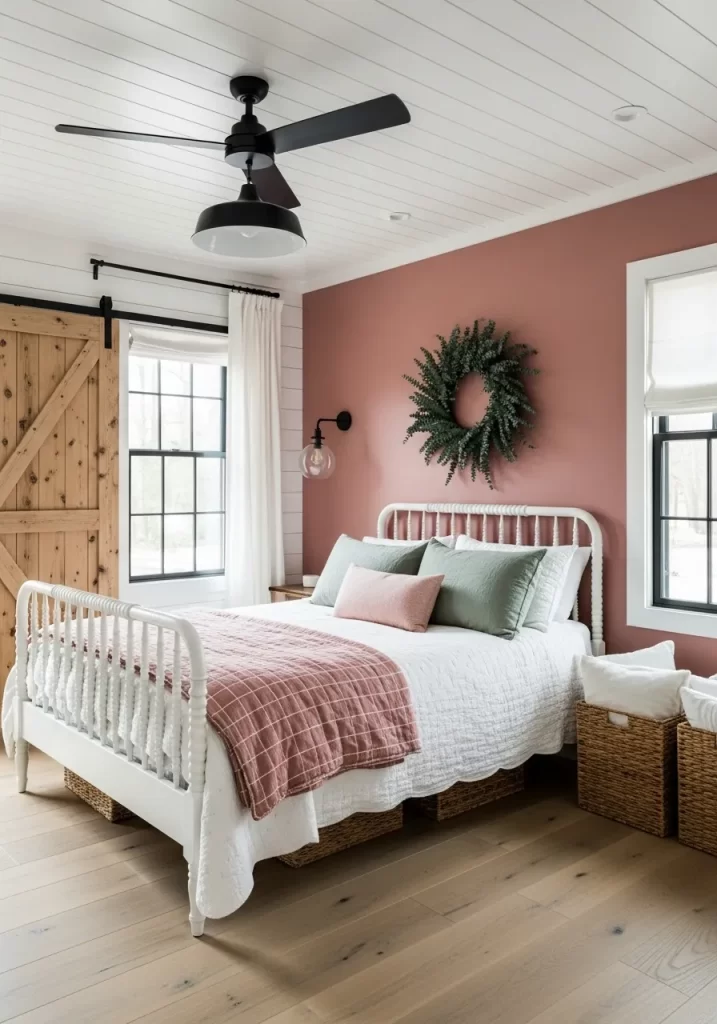
Cottage style gets a fresh update with a beautiful rose pink wall. A white spindle bed frame looks bright and clean against the warm backdrop. A sliding barn door adds a rustic touch and saves space in the room. A green eucalyptus wreath provides a natural pop of color.
Woven baskets under the bed offer smart storage solutions. The white paneled ceiling makes the room feel light and very tall. This space is cheerful and welcoming for guests or family. It combines classic farmhouse elements with a modern color palette.
Material Required List
- Dried eucalyptus branches
- Large metal hoop
- Floral wire
- Silk ribbon
- Command hook
Equipment Required List
- Wire cutters
- Scissors
- Measuring tape
- Gloves
- Pencil
DIY Instructions
- Lay your metal hoop on a flat surface to plan your design.
- Cut the eucalyptus branches into smaller pieces about six inches long.
- Place a bunch of branches against the hoop and wrap floral wire around them.
- Add the next bunch so it overlaps and hides the wire of the first one.
- Continue moving around the hoop until it is completely covered in green.
- Trim any wild branches with your cutters to keep the circular shape.
- Tie a large silk ribbon into a bow at the top or bottom of the wreath.
- Wrap a small piece of wire around the back of the hoop to make a loop.
- Mark the center of the wall above your bed with a pencil.
- Stick a command hook on the mark and hang your fresh wreath.
20 Futuristic Plaster Wave Bed
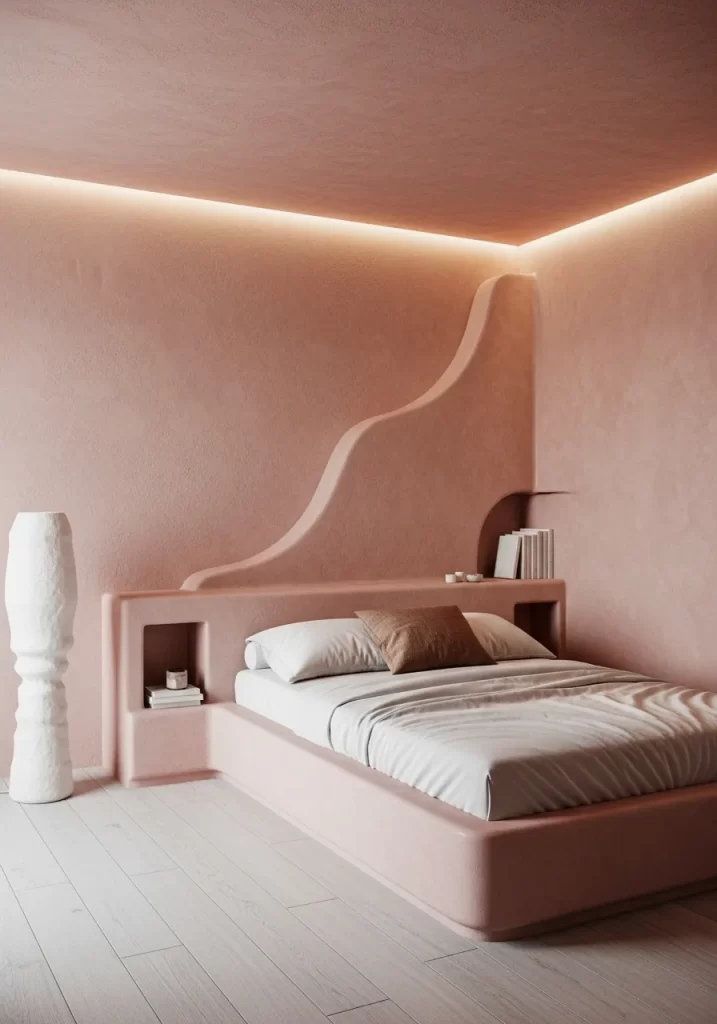
Fluid shapes and soft pink tones create a dreamlike bedroom. A custom plaster headboard flows directly into a wavy wall shelf. This seamless design removes all sharp corners for a soothing effect. Built in alcoves provide space for books and small candles.
A glowing light strip along the ceiling edge adds a soft halo to the room. The white wooden floor keeps the space feeling light and very clean. This room looks like it belongs in a modern art gallery. It is a bold statement that focuses on form and light.
Material Required List
- Flexible plywood
- Structural foam blocks
- Fine grit sandpaper
- White plaster finish
- Pink wall paint
Equipment Required List
- Jigsaw
- Utility knife
- Spackle trowel
- Paint sprayer
- Measuring tape
DIY Instructions
- Draw a wavy silhouette on your wall to act as a guide for the shelf.
- Cut the flexible plywood into the shape of your wave using a jigsaw.
- Attach the plywood to the wall using hidden wooden brackets.
- Use structural foam to build up the thickness of the wave for a 3D look.
- Carve the foam with a utility knife to create smooth and rounded edges.
- Apply a thin layer of plaster over the entire plywood and foam structure.
- Sand the plaster once it dries until the surface is incredibly smooth.
- Add a second coat of plaster to fill in any tiny holes or cracks.
- Paint the wave and the wall with the same shade of pink paint.
- Use a paint sprayer for a flawless finish with no brush marks.
21 Romantic Floral Garden Suite
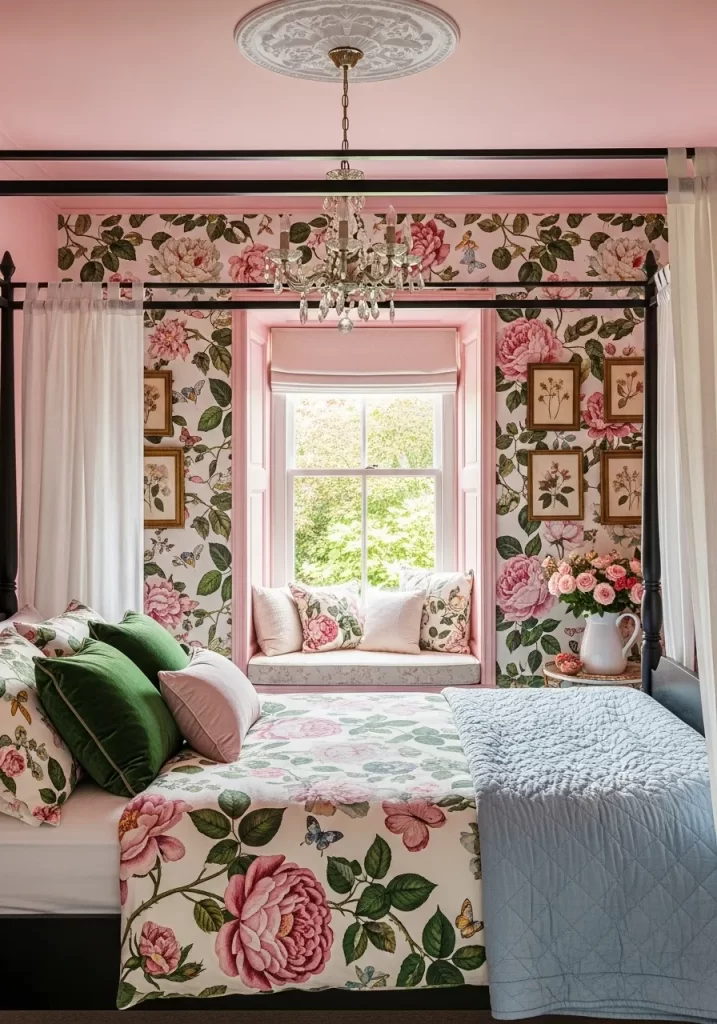
Pink peonies dance across the walls in this garden inspired bedroom. A black four poster bed adds a bold frame to the delicate patterns. Large green velvet pillows bring a touch of the outdoors inside. This look celebrates spring even when the ground is frozen.
The white curtains keep the window seat feeling airy and light. You can enjoy the view while surrounded by soft colors and floral art. This room turns a simple sleep space into a romantic escape. It balances heavy metal lines with soft fabric textures effortlessly.
Material Required List
- Floral wallpaper rolls
- Wallpaper paste
- Smoothing tool
- Measuring tape
- Utility knife
Equipment Required List
- Ladder
- Large sponge
- Bucket
- Level
- Pencil
DIY Instructions
- Measure the height and width of your wall to calculate wallpaper rolls.
- Clear the wall of any nails or dirt so the surface is flat and clean.
- Draw a straight vertical line on the wall using a level as a guide.
- Apply wallpaper paste to the back of the paper or directly to the wall.
- Line up the first strip with your vertical mark and press it firmly.
- Smooth out air bubbles using the smoothing tool from center to edges.
- Trim the extra paper at the ceiling and floor with a utility knife.
- Match the pattern on the second strip with the first one before sticking.
- Wipe away extra glue from the front of the paper with a damp sponge.
- Repeat these steps across the entire wall until complete.
22 Coastal Shell Rattan Escape
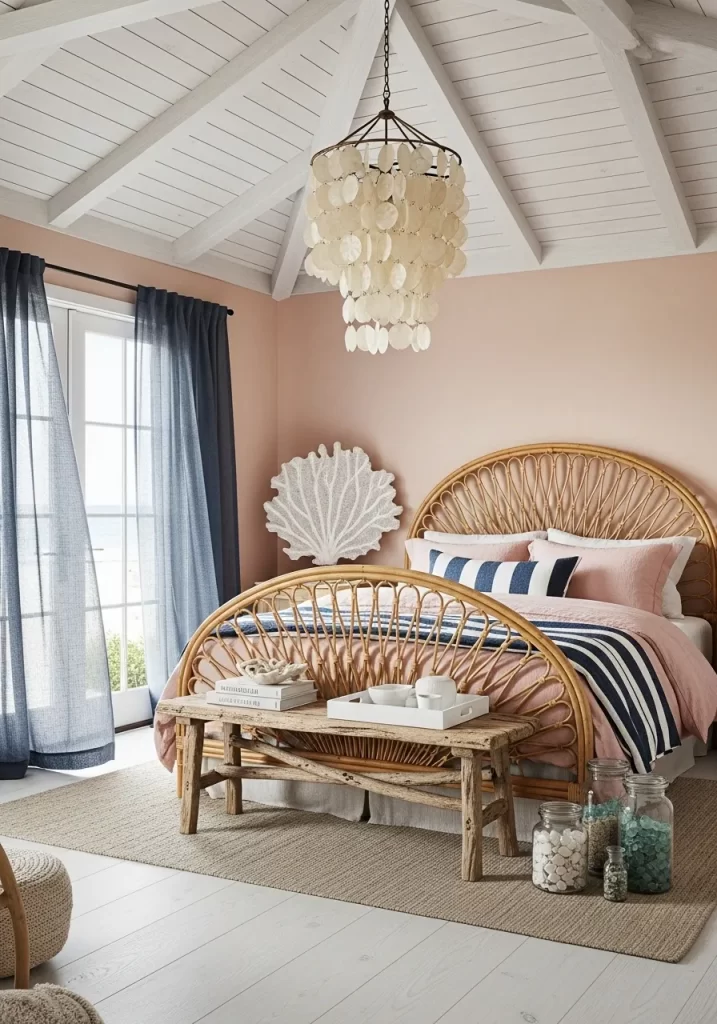
Breezy vibes fill this light filled room. A stunning shell chandelier hangs from the white paneled ceiling. The rattan headboard and footboard bring natural textures to the forefront. Navy blue stripes on the bedding add a classic nautical touch.
Soft pink walls keep the space feeling warm and sunny. A rustic wooden bench at the end of the bed provides a spot for books. Glass jars filled with sea glass sit on the floor for personalized detail. This bedroom feels like a permanent vacation by the shore.
Material Required List
- Large metal hoop
- Clear fishing line
- Flat shells or capiz discs
- Drill bit for shells
- Strong glue
Equipment Required List
- Power drill
- Scissors
- Measuring tape
- Pencil
- Marker
DIY Instructions
- Purchase a large bag of flat shells and a circular metal hoop.
- Use a very small drill bit to make a tiny hole at the top of every shell.
- Cut long pieces of fishing line in various lengths for a tiered look.
- Tie one end of the line through the shell hole and secure with a knot.
- String multiple shells on one line by tying knots at equal intervals.
- Tie the top end of each shell string to the metal hoop.
- Ensure strings are evenly distributed around the hoop to hang straight.
- Add extra shells to the center of the hoop for a fuller look.
- Use strong glue on the knots to prevent shells from slipping off.
- Hang your new chandelier from a ceiling hook and enjoy the sound.
23 Space Age Crimson Sphere
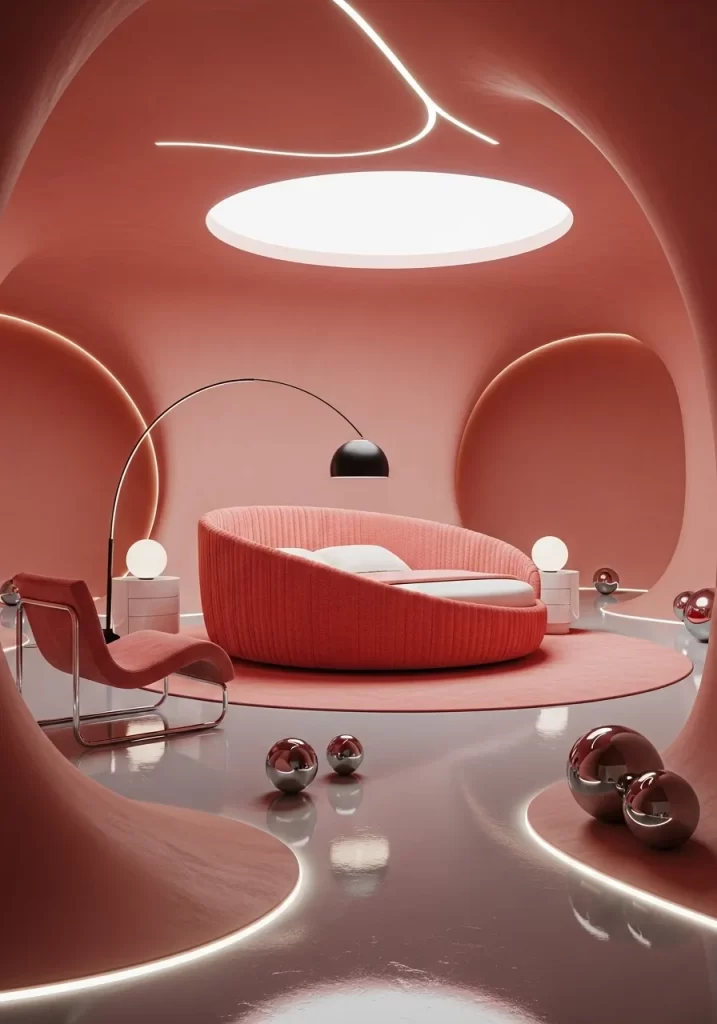
Curves take over in this ultra modern bedroom. A round red bed sits in the center of a glossy white floor. Recessed lighting in the walls and ceiling creates a futuristic glow. Polished silver spheres reflect the pink and red tones of the room.
A sleek black floor lamp arches over the sleeping area for a focused light. This design feels like a set from a high tech movie. It is bold and very minimal in its execution. The lack of sharp corners makes the space feel fluid and calm.
Material Required List
- High gloss white floor paint
- Clear epoxy resin
- Painter’s tape
- Floor cleaner
- Sandpaper
Equipment Required List
- Paint roller
- Squeegee
- Masking tape
- Bucket
- Safety gloves
DIY Instructions
- Remove all furniture and clean the floor thoroughly to remove dust.
- Sand the floor surface lightly to help the new paint bond better.
- Apply painter’s tape along the bottom of the walls for protection.
- Roll on a thick coat of high gloss white paint and let it dry for a day.
- Mix the two parts of the epoxy resin in a bucket per directions.
- Pour the clear resin onto the floor starting from the furthest corner.
- Use a squeegee to spread the resin evenly across the entire surface.
- Pop any small air bubbles that appear using a heat gun.
- Let the resin cure for at least forty eight hours before walking.
- Remove the tape and enjoy your new mirror like futuristic floor.
24 Cozy Twilight Plywood Bed
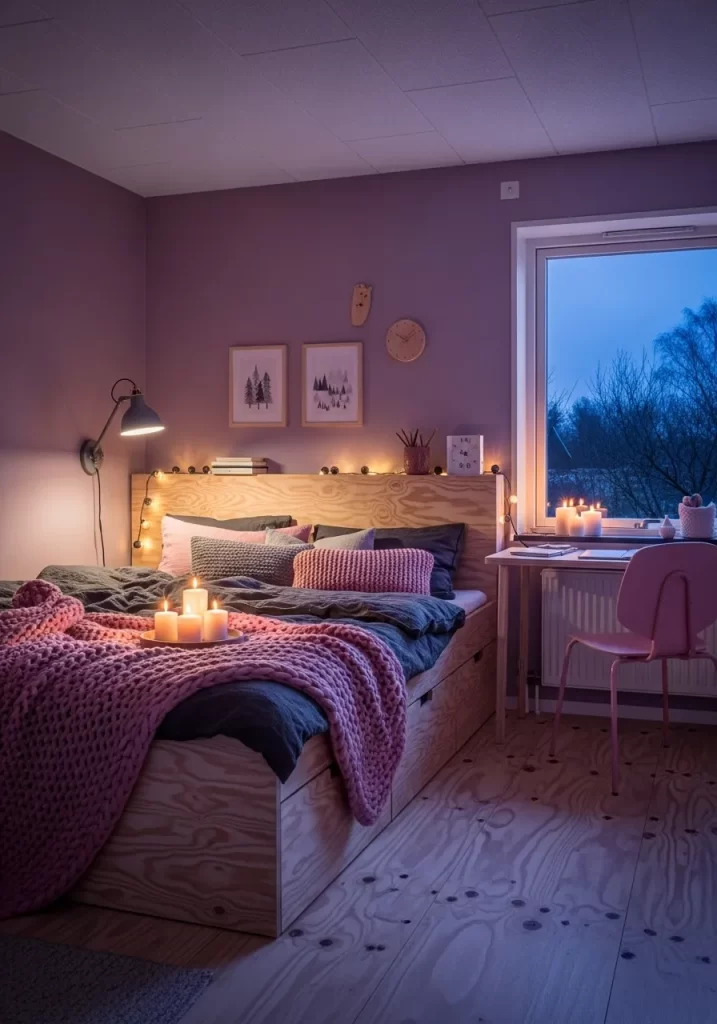
Warmth and function meet in this smart bedroom design. A light wood platform bed features built in drawers for extra storage. Soft purple and pink light washes over the room from string lights. A thick pink knit blanket adds a cozy layer to the dark bedding.
The window provides a view of the quiet blue evening outside. Simple line art on the walls keeps the decor minimal yet personal. This space feels like a safe haven for cold nights. It uses simple materials to create a very rich atmosphere.
Material Required List
- Birch plywood sheets
- Wood glue
- Wood screws
- Drawer slides
- Sandpaper
Equipment Required List
- Circular saw
- Power drill
- Measuring tape
- Level
- Pencil
DIY Instructions
- Build a large rectangular box out of plywood to act as the bed base.
- Cut out rectangular openings on the sides for the drawers.
- Build smaller wooden boxes that fit inside these openings for the slides.
- Screw metal drawer slides into the openings and onto the boxes.
- Test the drawers to make sure they open and close smoothly.
- Attach a flat plywood sheet on top of the base to support the mattress.
- Sand every edge and corner of the wood until they are soft.
- Apply a clear coat of wood sealant to protect from stains.
- Screw the drawer fronts onto the boxes for a seamless look.
- Push the bed into place and fill the drawers with extra blankets.
25 Urban Brick Industrial Loft
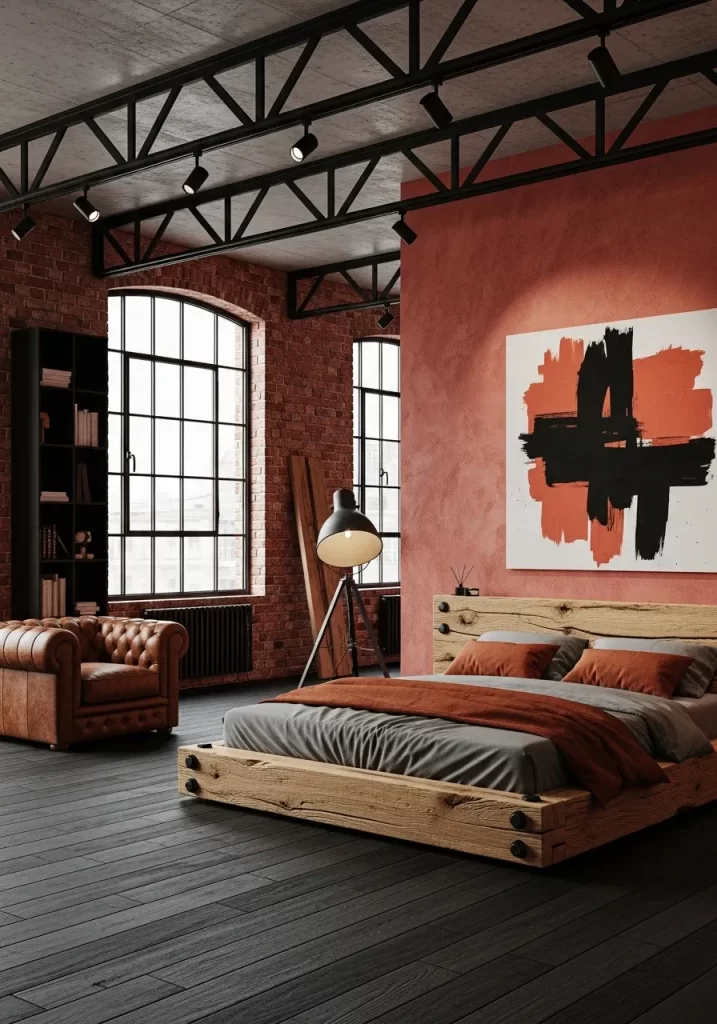
Raw materials define this edgy and warm bedroom. Exposed red brick walls contrast with the soft terracotta pink accent wall. A chunky wood platform bed grounds the space with its natural grain. Large industrial windows let in plenty of daylight.
Abstract art with bold black and orange strokes adds a modern focal point. A leather armchair provides a comfortable spot to sit and relax. The black metal rafters overhead emphasize the loft aesthetic. This room feels strong and very grounded.
Material Required List
- Large blank canvas
- Black acrylic paint
- Orange acrylic paint
- White acrylic paint
- Painter’s tape
Equipment Required List
- Large flat paint brush
- Paint tray
- Plastic drop cloth
- Small palette knife
- Mixing stick
DIY Instructions
- Lay a plastic drop cloth on the floor to keep the area clean.
- Place your large blank canvas on top of the cloth.
- Pour white and orange paint into a tray and mix slightly for a marbled look.
- Use the large brush to sweep colors across the canvas in wide motions.
- Let the first layer dry for one hour before adding the next color.
- Dip a palette knife into black paint and scrape across for sharp lines.
- Flick small drops of black paint onto the canvas for a splatter effect.
- Use painter’s tape to create crisp edges if you want a geometric look.
- Allow the painting to dry for a full day in a dust free spot.
- Hang the art over your bed to tie the industrial and pink tones together.
26 Victorian Plum Velvet Manor
Opulence shines in every corner of this historic bedroom. Deep plum wallpaper with a damask pattern covers the walls. An ornate tufted bed frame acts as the centerpiece under a crystal chandelier. The intricate white ceiling molding adds a sense of grandeur.
A large gold framed mirror reflects the rich colors of the room. Traditional portraits in vintage frames hang along the walls. This space feels like a room in a royal palace. It is sophisticated and very luxurious.
Material Required List
- Vintage wooden frame
- Gold spray paint
- Fine sandpaper
- Tack cloth
- Clear wax
Equipment Required List
- Screwdriver
- Cleaning rag
- Safety mask
- Drop cloth
- Soft brush
DIY Instructions
- Find an old wooden frame at a thrift store or attic.
- Remove the glass and the back of the frame using a screwdriver.
- Sand the wood lightly to remove any old flakes of paint.
- Wipe the frame clean with a tack cloth to get rid of dust.
- Place the frame on a drop cloth in a well ventilated area.
- Spray a light coat of gold paint over the entire surface.
- Wait for the first coat to dry and then add a second for a solid shine.
- Use a soft brush to rub dark wax into carved details for an aged look.
- Buff the wax with a clean rag to give it a soft and expensive glow.
- Put the mirror or art back into the frame and hang it.
27 Scandi Pink Small Space
Efficiency meets style in this compact and bright bedroom. A built in wooden bed frame maximizes every inch of the small room. Drawers underneath provide hidden storage for clothes and linens. Soft pink walls and ceiling create a cohesive and warm environment.
A large round mirror helps to make the narrow space feel wider. White floor to ceiling cabinets offer plenty of room for storage. The simple light fixture on the wall keeps the nightstand area clear. This design shows small rooms look beautiful and functional.
Material Required List
- Birch plywood
- Wood glue
- Screws
- Drawer handles
- Sandpaper
Equipment Required List
- Measuring tape
- Saw
- Power drill
- Level
- Pencil
DIY Instructions
- Measure the width of your room from wall to wall to fit the bed exactly.
- Cut plywood pieces to build a sturdy frame that sits on the floor.
- Create internal dividers inside the frame to separate drawer spaces.
- Build drawers out of thinner plywood and attach them to slides.
- Screw the frame into the wall studs so it does not shift.
- Place a large sheet of plywood on top to act as mattress base.
- Sand all the edges until they are perfectly smooth and safe.
- Drill holes in the front of drawers to attach chosen handles.
- Paint the drawer fronts white to match the cabinets.
- Slide drawers into place and put your mattress on top.
28 Southwest Terracotta Cactus Room
Desert heat inspires this vibrant and earthy bedroom. Terracotta floor tiles and bright orange walls create a sun drenched feel. A turquoise wooden cabinet adds a splash of cool color. Tall cacti in patterned pots bring life to the corners.
Moroccan star lanterns hang from the wooden ceiling beams. The bed features a colorful woven blanket with geometric designs. Arched doorways add a touch of traditional architecture. This room feels energetic and very full of life.
Material Required List
- Plain terracotta pots
- Acrylic paint in turquoise and white
- Painter’s tape
- Sealer spray
Equipment Required List
- Paint brushes
- Small sponge
- Water jar
- Pencil
- Rags
DIY Instructions
- Clean your terracotta pots with a damp rag to remove dust.
- Draw a simple geometric pattern on the pot using a pencil.
- Use painter’s tape to mark off straight lines for a crisp look.
- Paint the turquoise color into the sections you marked.
- Let first color dry and add white accents or dots with small brush.
- Use a sponge to dab paint for a weathered and rustic texture.
- Remove the tape carefully once the paint is dry to the touch.
- Spray a clear sealer over the entire pot to protect the paint.
- Wait for the sealer to dry for at least four hours.
- Place a tall cactus inside the pot and set it in a sunny corner.
29 Rustic Log Cabin Hearth
Natural wood walls create a cozy cocoon in this rustic retreat. A stone fireplace provides a warm glow and a focal point. An antler chandelier hangs from the vaulted ceiling for mountain style. The log bed frame looks sturdy and very traditional.
A sheepskin rug on the floor adds softness under your feet. A rocking chair by the window offers a quiet place to watch snow fall. This room feels like a mountain getaway far from the city. It is grounded and very comforting.
Material Required List
- Faux antlers
- Strong wire
- Brown spray paint
- Small light bulbs
- Electrical tape
Equipment Required List
- Wire cutters
- Pliers
- Glue gun
- Measuring tape
- Screwdriver
DIY Instructions
- Arrange faux antlers on a table in a circular natural pattern.
- Use strong wire to wrap antlers together where they overlap.
- Tighten the wire with pliers to ensure the structure is solid.
- Apply hot glue to joints to hide wire and add extra strength.
- Spray the entire structure with brown paint to look real.
- Wrap a string of small light bulbs around the antlers.
- Hide the wires along the back of antlers using electrical tape.
- Attach a metal chain to three points on the antler ring for hanging.
- Connect the chain to a ceiling hook and plug in the lights.
- Adjust antlers as needed to ensure the chandelier hangs level.
30 Charcoal Slat Modern Suite
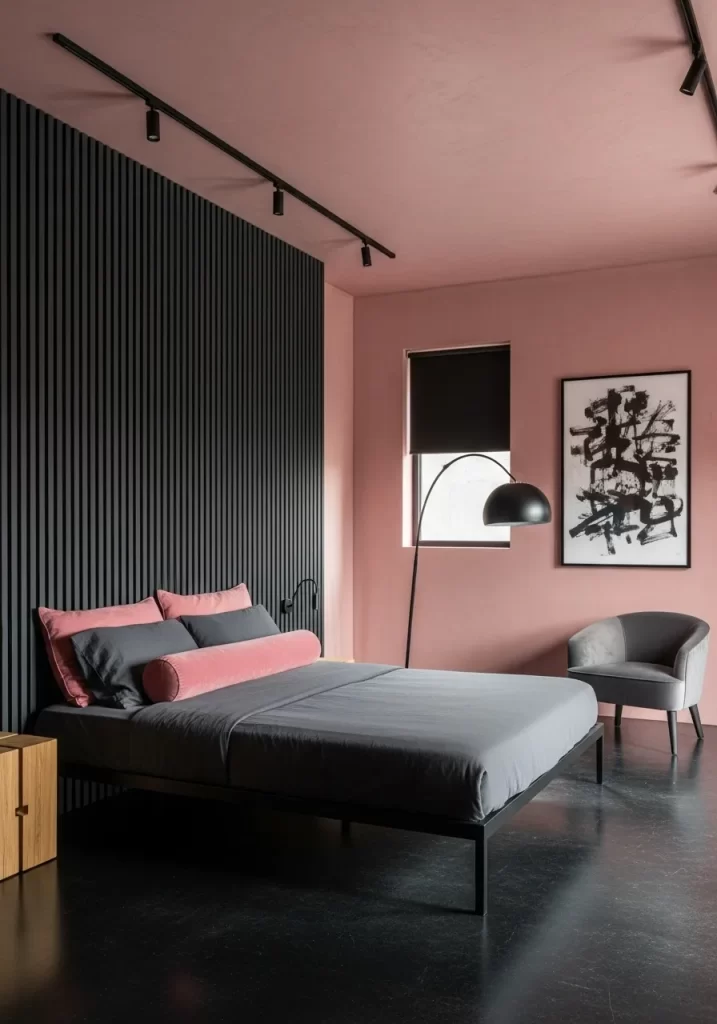
Contrast is the key to this sleek and contemporary bedroom. A vertical black slat wall provides a dark backdrop for the bed. Soft pink walls and ceiling soften the look and add warmth. A gray upholstered bed frame keeps the lines clean and modern.
A large black and white abstract painting adds drama to the wall. The arched floor lamp provides targeted light for reading. Dark floors reflect light and make the room feel sophisticated. This design is excellent for a moody and modern aesthetic.
Material Required List
- Wood slats
- Black matte paint
- Construction adhesive
- Small nails
- Spacers
Equipment Required List
- Level
- Circular saw
- Hammer
- Paint roller
- Measuring tape
DIY Instructions
- Measure the height of the wall from the floor to the ceiling.
- Cut your wood slats to this exact height using a circular saw.
- Paint all slats with black matte paint and let dry completely.
- Paint the wall behind the slats black to hide any gaps.
- Apply construction adhesive to the back of the first slat.
- Place the slat on the wall and use a level to ensure it is straight.
- Hammer a small nail into the top and bottom of the slat.
- Place a small wooden spacer next to the slat to keep gap even.
- Glue and nail the next slat right against that spacer.
- Continue across entire wall and remove spacers when finished.
31 Sunlit Terracotta Patio Room
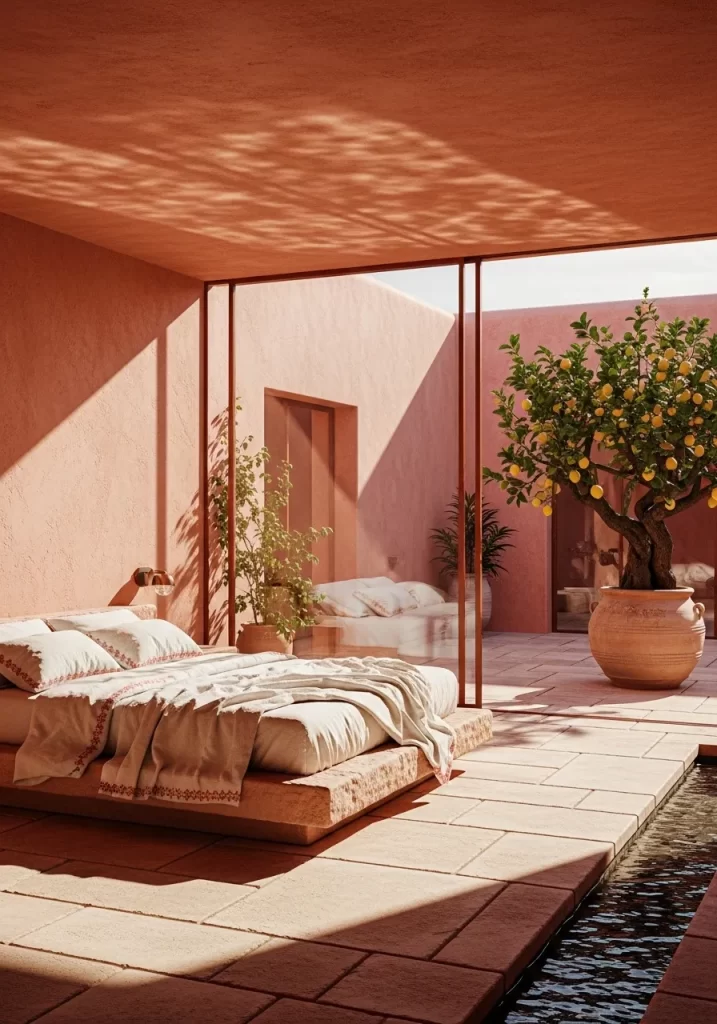
Sunlight drenches this beautiful room through floor to ceiling glass. Terracotta pink walls glow warmly against the stone tiled floor. A low platform bed features embroidered linens for a touch of detail. A large potted lemon tree brings a fresh citrus scent to the space.
The outdoor patio feels like an extension of the bedroom itself. A small pool outside reflects the warm colors of the walls. This room celebrates indoor outdoor living and natural warmth. It is a serene spot for morning coffee and quiet reflection.
Material Required List
- Low platform bed
- Embroidered linens
- Large terracotta pot
- Lemon tree
- Stone floor tiles
Equipment Required List
- Measuring tape
- Trowel for tiling
- Large watering can
- Soft cleaning cloth
- Glass cleaner
DIY Instructions
- Choose a room with large windows to maximize natural sunlight.
- Paint the walls in a soft terracotta pink to reflect light.
- Install stone floor tiles for a natural and grounded feel.
- Place a low wooden platform bed in the center of the room.
- Layer the bed with high quality embroidered white linens.
- Find a sunny corner for your large terracotta lemon tree pot.
- Keep the glass windows spotless to ensure a clear view outside.
- Use minimal furniture to keep the space feeling open and airy.
- Add a small bedside lamp for soft lighting in the evening.
- Open the patio doors during the day for fresh air circulation.
32 Cloud Like All White Suite
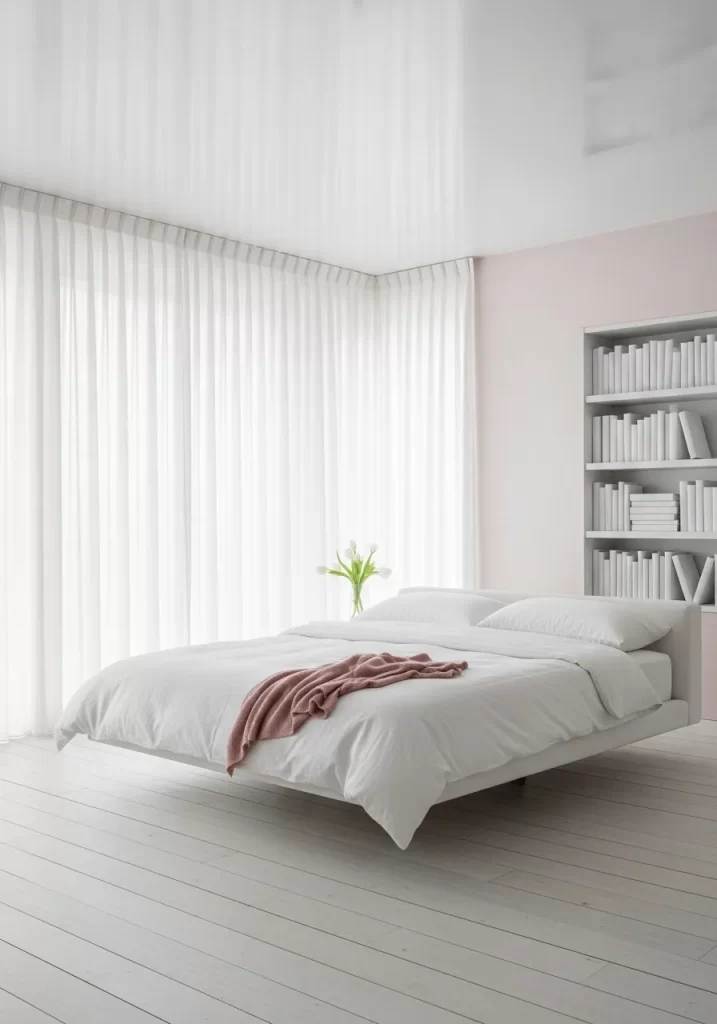
Purity and softness define this ethereal and light filled bedroom. Softest pink walls are almost white to create a subtle warmth. A floating white bed frame looks like it is made of clouds. Floor to ceiling white curtains soften the light from the large windows.
A tall white bookshelf is filled with white covered books for a clean look. A single pink throw blanket adds a tiny touch of color. This room feels incredibly quiet and very calm for sleeping. It is a masterclass in monochromatic and minimal design.
Material Required List
- White floating bed frame
- Sheer white curtains
- White bookshelves
- White book covers
- Pink wool throw
Equipment Required List
- Spirit level
- Power drill
- Measuring tape
- Ladder
- Steamer for curtains
DIY Instructions
- Paint your walls in a very pale, almost white pink shade.
- Install a floating bed frame securely to the wall studs.
- Hang sheer white curtains from the ceiling to the floor.
- Use a steamer to remove all wrinkles from the curtain fabric.
- Assemble white bookshelves and secure them to the wall for safety.
- Wrap all your books in white paper for a uniform clean look.
- Arrange the books neatly by height on the tall shelves.
- Dress the bed in all white linens for a cloud like effect.
- Drape a single soft pink throw blanket over the corner of the bed.
- Keep the room free of any unnecessary colored items for calm.
33 Boho Attic Macrame Hideaway
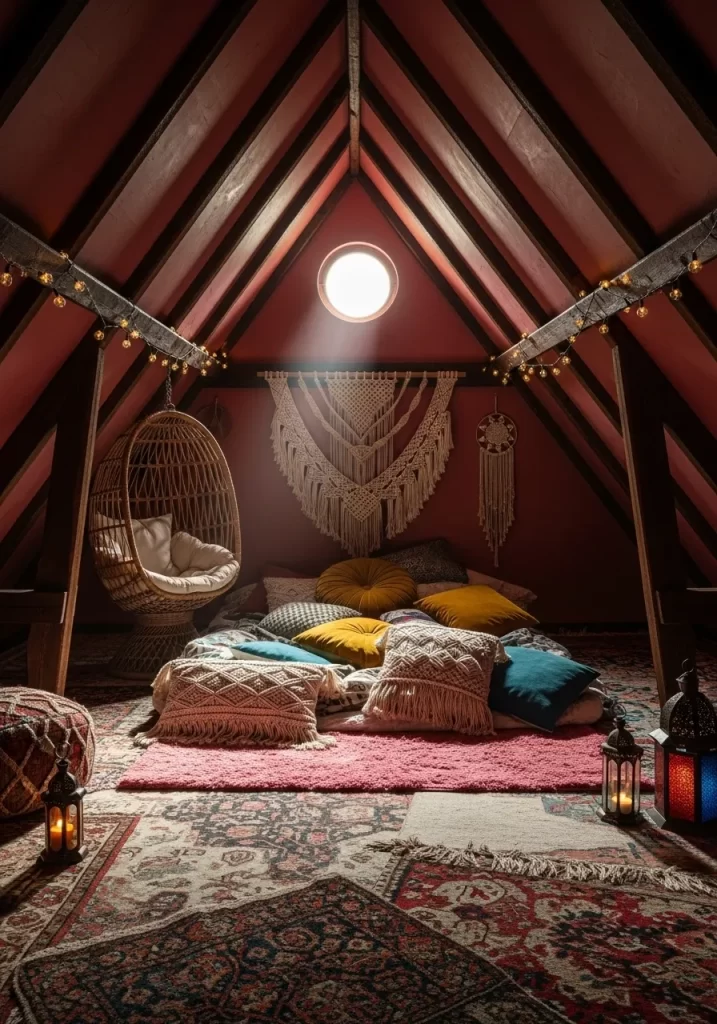
Cozy sloped ceilings make this attic bedroom feel like a secret fort. A large macrame wall hanging acts as a soft and textured headboard. A wicker hanging chair provides a fun spot for reading by the skylight. Patterned rugs and floor pillows create a casual sleeping area.
String lights and Moroccan lanterns add a magical evening glow. Deep pink walls keep the small space feeling warm and intimate. This room is for those who love a relaxed and creative lifestyle. It feels very personal and full of interesting textures.
Material Required List
- Large macrame hanging
- Wicker hanging chair
- Ceiling hook
- Patterned area rugs
- Floor cushions
Equipment Required List
- Power drill
- Heavy duty ceiling mount
- Measuring tape
- Ladder
- Hammer
DIY Instructions
- Paint the attic walls in a deep earthy pink for warmth.
- Hang a large macrame piece on the center of the main wall.
- Locate a solid ceiling beam to hang your wicker chair safely.
- Drill a pilot hole and screw in a heavy duty ceiling hook.
- Attach the hanging chair using the provided chain and clip.
- Layer multiple patterned rugs on the floor for maximum comfort.
- Place a mattress directly on the rugs for a casual boho bed.
- Scatter various floor cushions around the room for extra seating.
- String warm fairy lights along the sloped ceiling beams.
- Add a few green plants to bring life to the attic space.
34 Navy and Blush Executive Suite

Sophistication and power meet in this high end modern bedroom. A massive navy blue velvet headboard reaches toward the ceiling. Soft blush pink walls provide a gentle contrast to the dark colors. Polished silver accents on the furniture add a touch of shine.
White linens with navy trim keep the bed looking crisp and clean. Two navy velvet benches sit at the foot of the bed for utility. This room feels very professional and very well organized. It is a bold look for someone who loves modern luxury.
Material Required List
- Navy velvet fabric
- High density foam
- Large plywood board
- Silver furniture trim
- White and navy bedding
Equipment Required List
- Staple gun
- Power drill
- Level
- Measuring tape
- Fabric scissors
DIY Instructions
- Cut a large plywood board to be much taller than a standard bed.
- Glue high density foam to the board and let it set.
- Wrap the board in navy velvet fabric and pull it tight.
- Staple the fabric securely to the back of the board.
- Mount the massive headboard to the wall using heavy duty brackets.
- Add silver trim strips to the edges for a polished look.
- Paint the surrounding walls in a soft blush pink shade.
- Dress the bed with white sheets that have navy blue edges.
- Place two matching navy velvet benches at the end of the bed.
- Use silver bedside lamps to complete the executive aesthetic.
35 Natural Slate and Moss Room
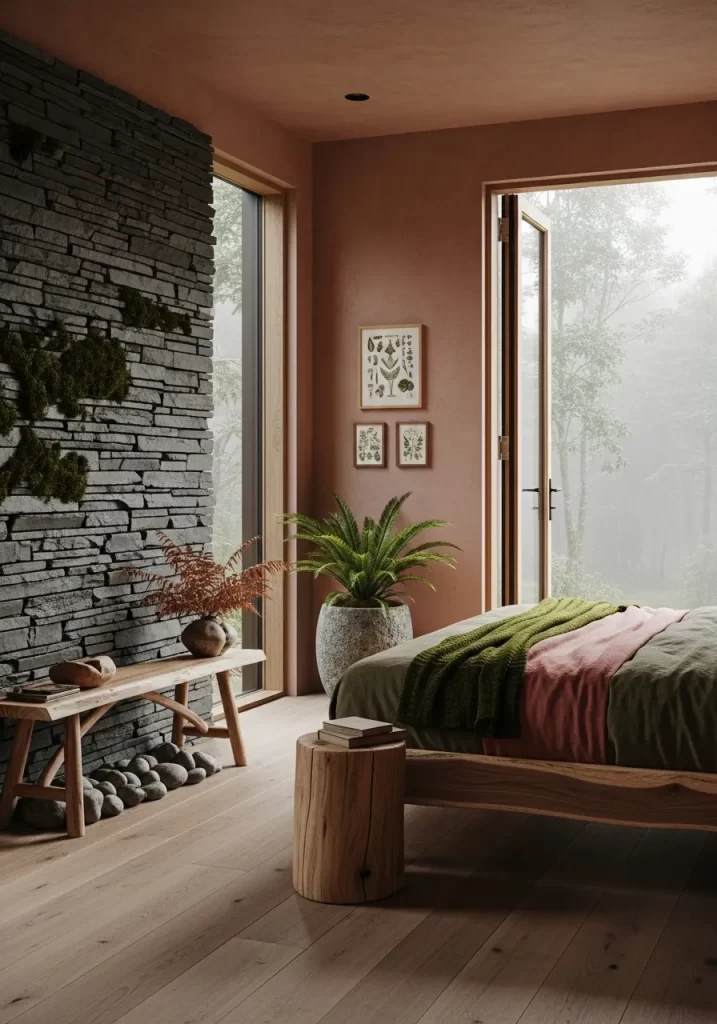
Texture and nature define this earthy and very quiet bedroom. A wall of dark gray slate stones provides a rugged and natural feel. Real green moss grows in the cracks of the stone for an organic touch. Soft terracotta walls glow against the cool gray of the stone.
A simple wooden bed frame and log nightstand keep the look raw. Large windows open to a misty forest view for a serene vibe. This room feels like a luxurious cabin in the middle of nature. It is a very grounding and peaceful space for rest.
Material Required List
- Thin slate stone veneers
- Stone adhesive
- Preserved green moss
- Solid wood log stool
- Sage green throw
Equipment Required List
- Notched trowel
- Tile saw
- Level
- Spatula for moss
- Measuring tape
DIY Instructions
- Choose a feature wall and ensure it is clean and flat.
- Apply stone adhesive to the wall using a notched trowel.
- Press slate stone veneers into the adhesive starting from the bottom.
- Use a tile saw to cut the stones for the edges of the wall.
- Leave small gaps between some stones for the moss to live.
- Use a spatula to press preserved moss into the stone gaps.
- Paint the other walls in a warm terracotta pink for contrast.
- Place a solid wood log stool next to the bed as a nightstand.
- Add a sage green wool throw to the bed for a forest touch.
- Keep window treatments minimal to enjoy the natural forest view.
Transforming your bedroom is a journey toward better rest and personal expression. Every idea in this list offers a unique way to bring warmth into your life. You have the power to create a sanctuary that defies the winter season. Start with one small project and watch your space evolve.
Earthy pink remains a timeless choice for those who value comfort. It bridges the gap between modern style and natural beauty. Your home should reflect the peace you want to feel every day. Take these steps to ensure your bedroom remains a favorite place to hide away.
Key Takeaways
- Texture adds depth and visual interest to flat walls.
- Natural materials like wood and rattan pair beautifully with pink tones.
- Lighting choices significantly change the mood of the entire room.
- Small DIY projects make luxury styles accessible to everyone.
- Color has a direct impact on your mental well being and sleep quality.