
Blank walls often leave a home feeling unfinished and sterile. You walk into a room and notice the silence of empty spaces. High price tags at galleries usually stop people from decorating. This guide changes that reality.

Creating your own art brings a sense of pride that store bought items cannot match. You get to control the colors and textures of your surroundings. These projects prove that style is about creativity rather than a large bank account.
Prepare to transform your living space with these thirty nine unique concepts. Each project uses accessible materials to achieve high quality results. Your journey toward a more personal home begins right here.
1 Sophisticated Framed Vintage Scarf
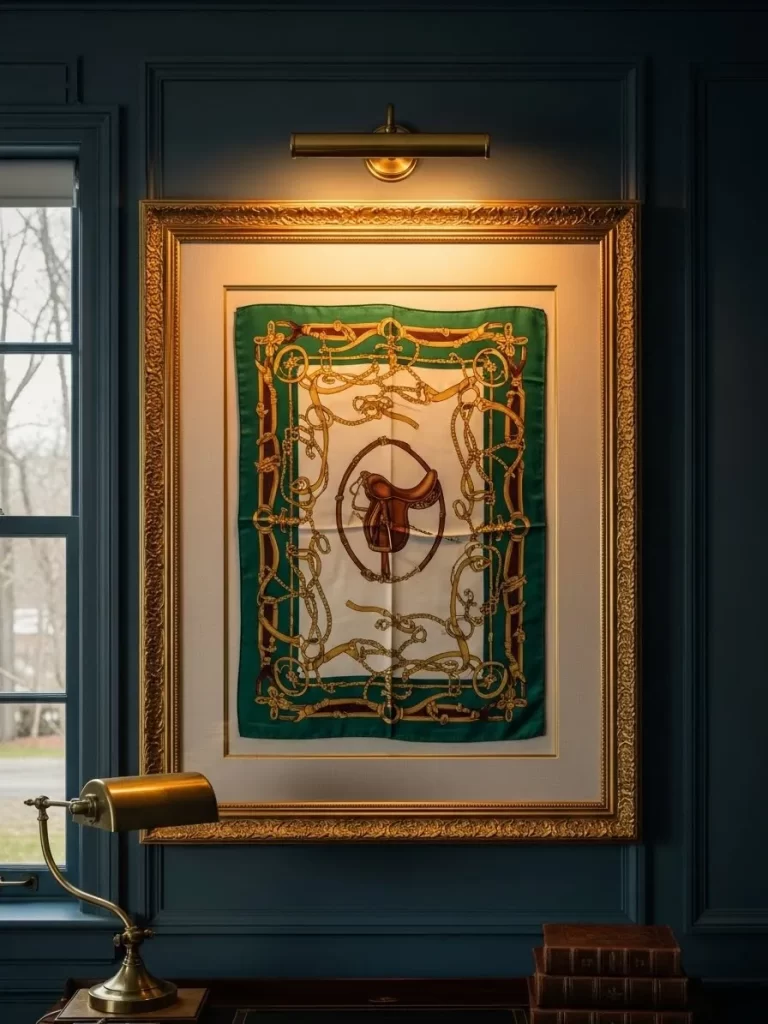
Transform a forgotten silk accessory into a striking centerpiece for your study or living room. This project uses the rich textures and intricate patterns of a vintage scarf to add a layer of history and elegance to your walls. Darker paint colors behind the gold frame help the vibrant greens and golds of the fabric pop with intensity.
Choosing a textile with a classic equestrian or geometric print creates a high end look without the massive price tag. Large frames provide a sense of scale that commands attention in any room. Lighting plays a huge role here as a simple picture light above the frame brings out the subtle sheen of the silk.
You can easily swap the scarf whenever the seasons change or if you find a new pattern that speaks to you. This method preserves the delicate fabric while showcasing it as fine art. It is a brilliant way to recycle family heirlooms or thrift store finds into a focal point.
Materials Required
- One vintage silk or polyester scarf
- A large ornate gold picture frame
- Acid free foam core board or heavy cardstock
- Double sided fabric tape
- Neutral colored fabric or paper for the background mat
Equipment Required
- Handheld garment steamer or iron
- Measuring tape
- Scissors
- Level
- Hammer and nails
DIY Instructions
- Iron or steam your scarf thoroughly to remove all creases and fold lines.
- Lay the back of the frame on a flat surface and place your background material over the foam board.
- Center the scarf on top of the background material to find the best placement.
- Apply small strips of double sided fabric tape to the top corners of the foam board.
- Press the top edge of the scarf onto the tape carefully so it hangs straight.
- Check that the fabric is taut but not stretched or distorted.
- Place the glass and frame over the assembly and secure the back clips.
- Measure the center of your wall space to determine where the nail should go.
- Drive the nail into the wall and hang your new masterpiece.
- Install a battery operated picture light above the frame to complete the sophisticated look.
2 Textured Minimalist Plaster Canvas
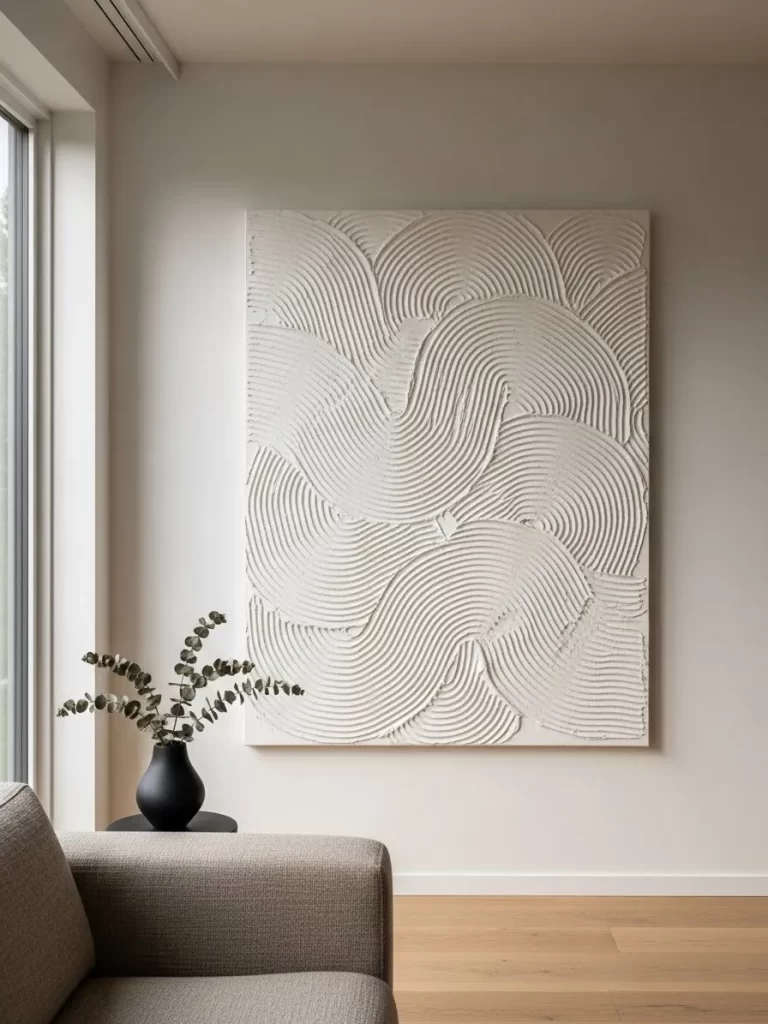
Breathe life into a flat room with a monochromatic masterpiece that relies on shadows rather than colors. This project uses joint compound to create sweeping, rhythmic grooves that catch the light beautifully throughout the day. The stark white finish maintains a clean look while the heavy texture adds a sophisticated, tactile element to your wall.
Large scale art often costs a small fortune, but this DIY version allows you to achieve a gallery look for very little money. You can customize the patterns to be as chaotic or as organized as you like. It serves as a calm focal point that works incredibly well in modern or minimalist interiors.
Materials Required
- One large pre stretched canvas
- All purpose joint compound or heavy structure paste
- White interior acrylic paint
- Fine grit sandpaper
Equipment Required
- Wide putty knife or spreader
- Notched trowel (found in the tiling aisle)
- Large drop cloth
- Paint roller or large brush
DIY Instructions
- Lay your canvas flat on a protected surface using the drop cloth to catch any spills.
- Scoop a generous amount of joint compound onto the center of the canvas with your putty knife.
- Spread the compound evenly across the entire surface until the canvas is hidden.
- Drag your notched trowel in large, overlapping semi circles to create the arched patterns.
- Wipe the trowel clean after every few strokes to keep the lines sharp and defined.
- Allow the compound to dry completely for at least twenty four hours until it turns bright white.
- Sand any sharp peaks gently with fine grit sandpaper to smooth out the finish.
- Apply a coat of white acrylic paint over the dry plaster to seal it and prevent cracking.
- Let the paint dry before mounting the canvas on your wall with heavy duty hangers.
3 Floating Pressed Botanical Frames
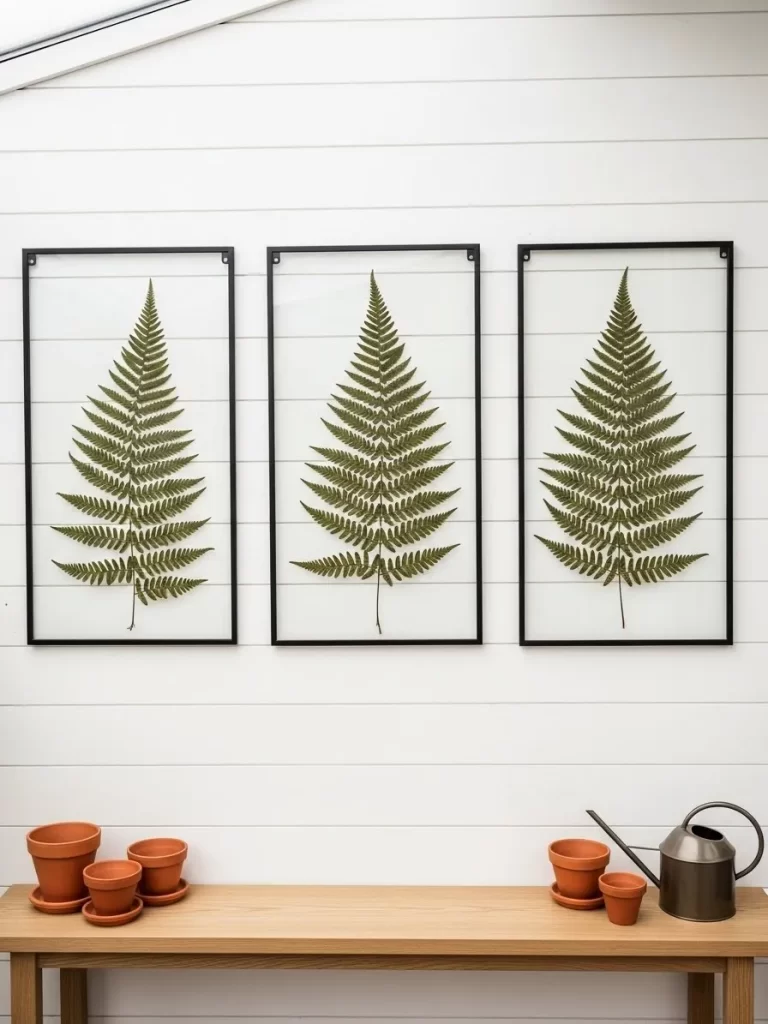
Capture the delicate beauty of nature by displaying oversized fern fronds in sleek, transparent frames. This botanical triptych brings an organic feel to white paneled walls or sunrooms. The transparent background creates a floating effect that makes the greenery appear as if it is part of the wall itself.
Using a set of three identical frames creates a sense of balance and professional design. The deep green of the preserved leaves provides a cooling contrast against warm wood furniture or terracotta pots. It is a timeless way to celebrate the outdoors while keeping your decor fresh and airy.
Materials Required
- Three large black floating frames (glass on both sides)
- Three large dried fern fronds or flat leaves
- Clear adhesive dots or a tiny bit of glue
- Glass cleaner
Equipment Required
- Microfiber cloth
- Measuring tape
- Pencil
- Hammer and nails
DIY Instructions
- Clean both sides of every glass pane thoroughly to ensure there are no fingerprints or dust.
- Place your dried fern in the center of the bottom glass sheet for each frame.
- Apply a tiny dot of clear adhesive to the back of the stem to keep the leaf from sliding.
- Lay the top glass sheet over the leaf carefully to sandwich it in place.
- Slide the glass sheets back into the frame and secure the locking mechanism.
- Measure your wall space and mark three spots with equal gaps between them.
- Use a level to ensure your marks are perfectly horizontal across the wall.
- Drive your nails into the marks and hang each frame slowly.
- Step back to check the alignment and adjust the frames until they look uniform.
4 Sun and Moon Celestial Tapestry
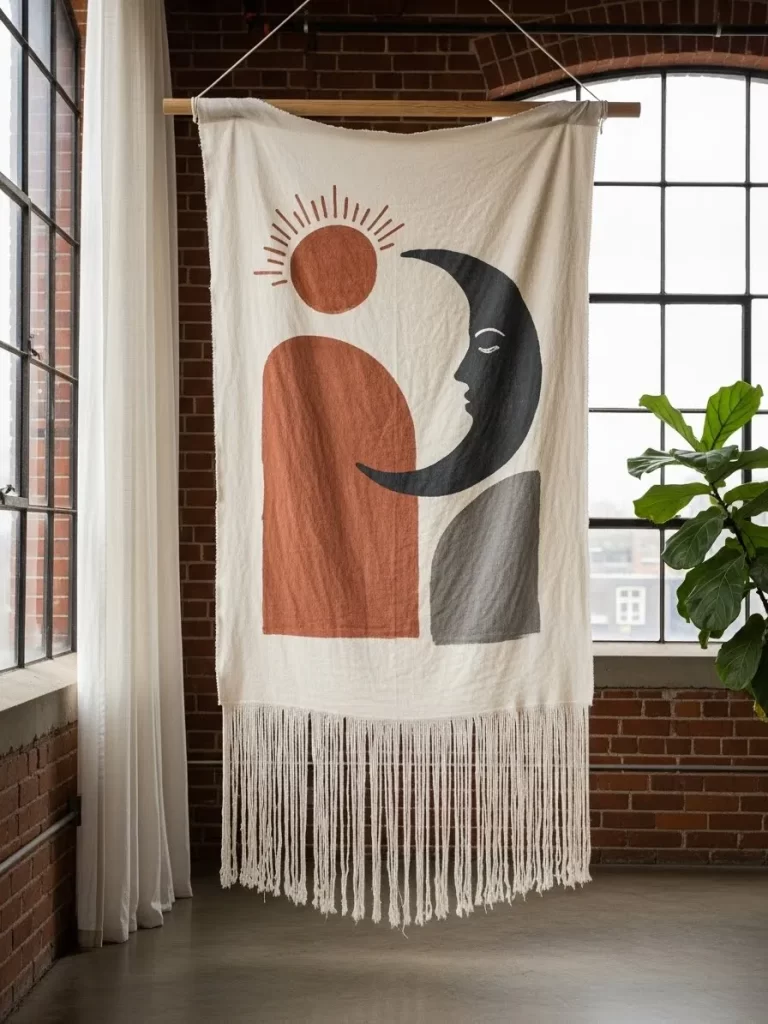
Invite a sense of cosmic wonder into your home with a hand painted textile wall hanging. This piece features bold, earthy tones and a fringed bottom that adds movement and softness to any industrial or brick wall. The simple graphic shapes of the sun and moon offer a modern take on traditional celestial art.
Hanging fabric is a clever way to dampen echoes in large rooms while adding a layer of warmth. A simple wooden dowel keeps the top crisp and straight, allowing the fabric to drape naturally. This project is a great way to practice fabric painting without needing complex artistic skills.
Materials Required
- Large rectangular piece of heavy cream canvas or linen
- Fabric paint in terracotta, charcoal, and mustard yellow
- Wooden dowel (slightly wider than the fabric)
- Cotton twine or rope
- Iron on hem tape
Equipment Required
- Large paint brushes
- Fabric markers for fine lines
- Iron
- Scissors
DIY Instructions
- Fold the top edge of your fabric over the wooden dowel to measure the sleeve size.
- Use iron on hem tape to secure the sleeve so the dowel can slide through easily.
- Sketch your sun and moon shapes lightly with a pencil onto the fabric.
- Fill in the large shapes with your fabric paint using steady, even strokes.
- Draw the sun rays and facial details with a fabric marker once the paint is dry.
- Pull individual threads from the bottom edge of the fabric to create a long, shaggy fringe.
- Slide the wooden dowel through the top sleeve of the tapestry.
- Tie the cotton twine to both ends of the dowel to create a hanging loop.
- Find a sturdy hook or nail on your wall and hang the fabric at eye level.
5 Geometric Herringbone Wood Art
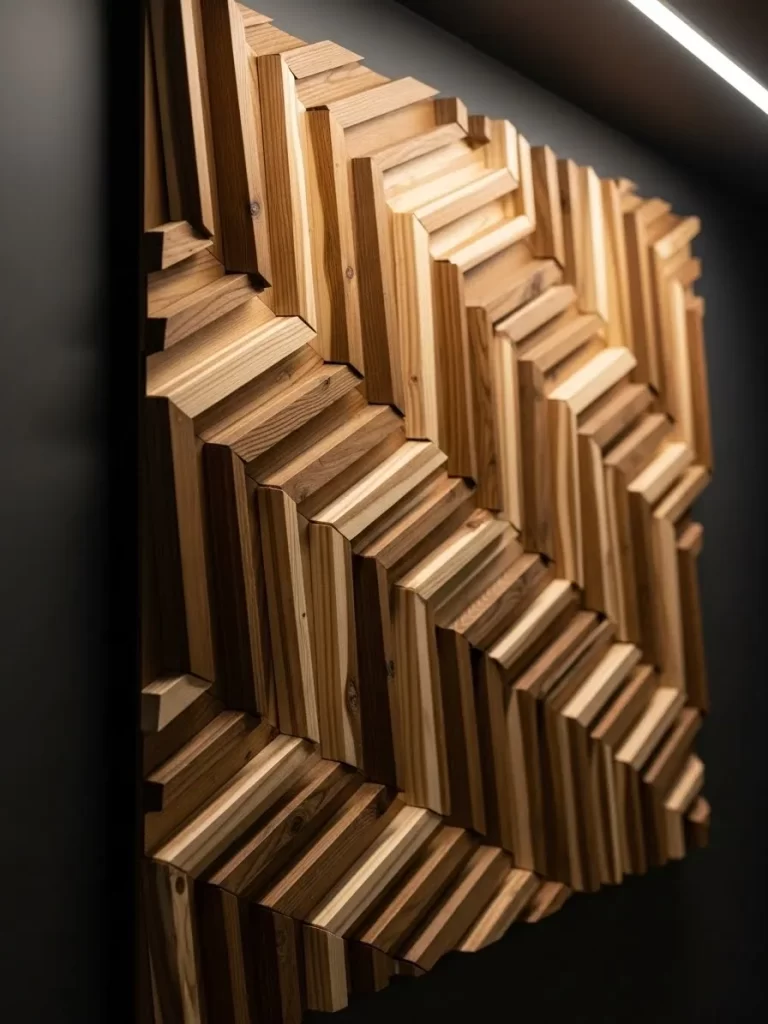
Add architectural interest and depth with a multi dimensional wood sculpture made from reclaimed timber. The alternating angles of the wood pieces create a dynamic herringbone pattern that changes appearance as the light shifts. This dark, moody backdrop allows the natural wood grains and warm tones to take center stage.
This type of art works wonders for adding texture to a hallway or a home office. It feels substantial and expensive, yet it can be made from scrap wood or inexpensive trim. The varying thickness of the wood strips provides a 3D effect that flat paintings simply cannot match.
Materials Required
- Plywood backing board (cut to your desired size)
- Multiple wood strips or trim pieces of varying thicknesses
- Wood glue
- Dark wood stain or black paint for the background
- Clear matte sealer
Equipment Required
- Miter saw or miter box
- Measuring tape
- Sandpaper
- Clamps
- Paint brushes
DIY Instructions
- Paint your plywood backing board a dark color and let it dry completely.
- Cut your wood strips into equal lengths with 45 degree angles on both ends.
- Sand the edges of every wood piece to remove splinters and rough spots.
- Arrange the wood pieces in a herringbone pattern on the board without glue first.
- Start from the center line and work your way outward to ensure the pattern is symmetrical.
- Apply a thin layer of wood glue to the back of each piece and press it onto the board.
- Use clamps or heavy books to hold the pieces down until the glue sets firmly.
- Apply a clear matte sealer over the wood to protect the grain and add a soft finish.
- Attach heavy duty French cleats to the back of the plywood to hang the heavy sculpture safely.
6 Textured Boho Macrame Hanging
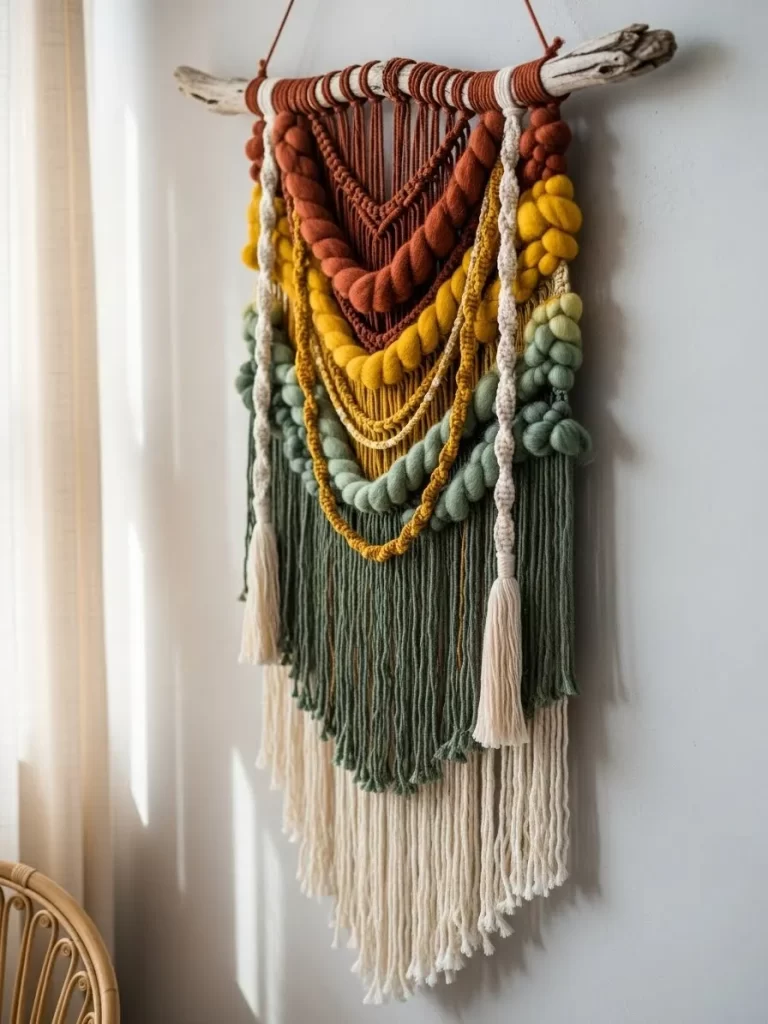
Bring a cozy, handcrafted vibe to your bedroom with a layered fiber art piece. This design combines thick wool roving with traditional macrame knots in a palette of forest green, ochre, and rust. A natural driftwood branch serves as the anchor, giving the piece an effortless, rustic feel.
Fiber art is an excellent way to introduce soft textures that counteract the hard lines of furniture. The long tassels at the bottom create a sense of height and elegance. This project is very forgiving for beginners because variations in the yarn only add to its unique character.
Materials Required
- A sturdy piece of driftwood or a thick fallen branch
- Cotton macrame cord in various colors
- Chunky wool roving for thick textures
- S hooks for hanging while you work
Equipment Required
- Sharp scissors
- Fine tooth comb or brush for tassels
- Measuring tape
DIY Instructions
- Clean your driftwood branch and dry it thoroughly before starting.
- Cut several long lengths of your base macrame cord and attach them to the branch using lark’s head knots.
- Tie simple square knots in a V shape to create the central structure of the hanging.
- Thread the thick wool roving through the knots to create those chunky, raised textures.
- Switch colors of cord as you move down the piece to create a layered, sunset effect.
- Continue adding rows of knots and roving until the branch is mostly covered.
- Trim the bottom of the cords into a pointed or curved shape with your scissors.
- Use a comb to brush out the ends of the tassels for a soft, fluffy look.
- Tie a piece of cord to both ends of the branch and hang it on a decorative wall hook.
7 Modern Gold Hoop Air Plant Display
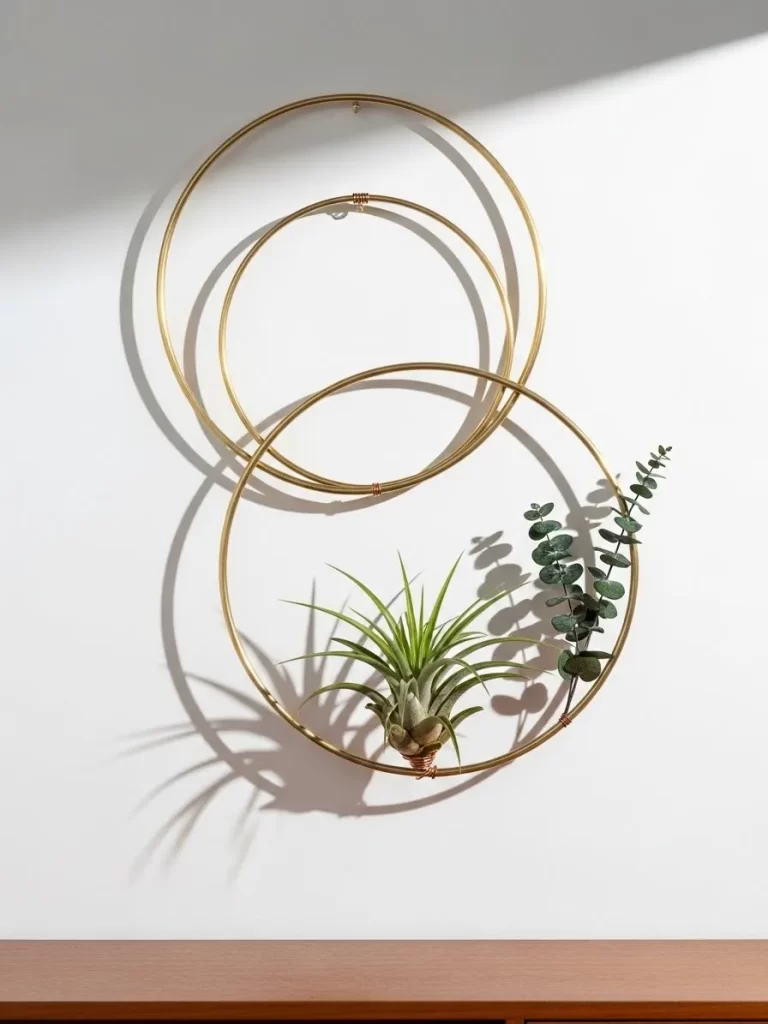
Elevate your indoor garden with a minimalist wall installation featuring metallic hoops and living air plants. These interlocking circles create a geometric shadow play against your wall that looks like high end sculpture. It is an incredibly lightweight project that adds a touch of greenery without taking up shelf space.
Air plants are hardy and require very little maintenance, making them great for busy homeowners. The gold finish of the hoops adds a hint of luxury and reflects light into darker corners. You can arrange the hoops in various configurations to fit the specific dimensions of your wall.
Materials Required
- Three gold metal craft hoops in different sizes
- Live air plants (Tillandsia)
- Thin copper or gold craft wire
- Dried eucalyptus or greenery stems
Equipment Required
- Wire cutters
- Small needle nose pliers
- Clear wall adhesive hooks or small nails
DIY Instructions
- Arrange your three gold hoops on a table to find an overlapping pattern you enjoy.
- Use small pieces of craft wire to wrap the hoops together at the points where they touch.
- Snip any excess wire with your cutters and tuck the sharp ends inward with pliers.
- Wrap a few coils of wire around the bottom of the largest hoop to create a small cradle.
- Gently nestle your air plant into the wire cradle so it is secure but not crushed.
- Tuck a few stems of dried eucalyptus into the wire for added height and texture.
- Hold the assembly against the wall to find the best hanging point.
- Place a small nail or clear hook at the top of the highest hoop.
- Hang your hoop art and mist the air plants with water once a week to keep them healthy.
8 Vintage Shadow Box Memory Keeper
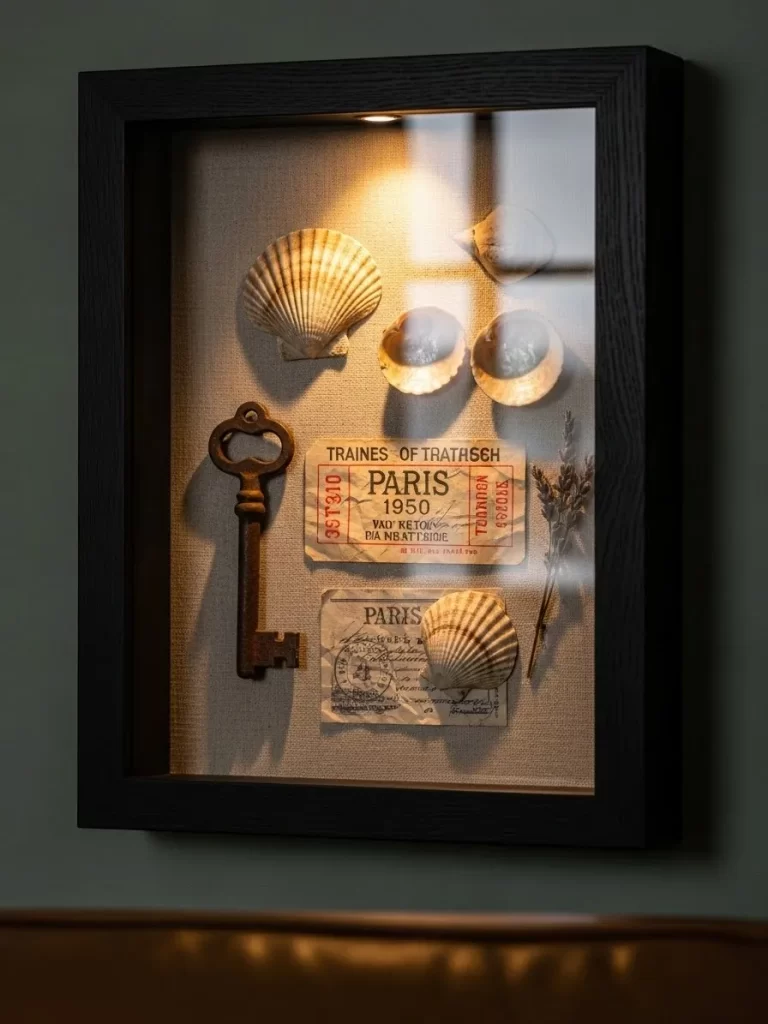
Preserve your most cherished travel memories in a sophisticated shadow box that tells a story. This display uses a dark wooden frame to highlight a collection of antique keys, sea shells, and vintage tickets. The built in spotlight at the top adds a dramatic museum quality feel to your personal artifacts.
Shadow boxes allow you to display three dimensional objects that would otherwise stay hidden in a drawer. Mixing textures like rusted metal and delicate paper creates a visually rich composition. This is a meaningful way to turn a trip to Paris or a day at the beach into a permanent work of art.
Materials Required
- Deep shadow box frame with a glass front
- Neutral linen or burlap for the backboard
- Vintage ephemera like tickets, postcards, or old keys
- Small shells or dried flowers
- Strong clear adhesive or tiny pins
Equipment Required
- Battery operated micro LED puck light
- Tweezers for precise placement
- Glue gun
- Glass cleaner
DIY Instructions
- Remove the backboard of the shadow box and cover it with your linen or burlap fabric.
- Lay out your items on the backboard to create a balanced arrangement before gluing.
- Use a glue gun or small pins to secure each item firmly to the fabric.
- Clean the inside of the glass to ensure the view of your treasures is perfectly clear.
- Mount a small battery operated LED light to the top inside edge of the frame.
- Place the backboard back into the frame and secure the tabs.
- Turn on the light to see how the shadows fall across your objects.
- Hang the box in a hallway or entryway where guests can admire the details up close.
- Replace the batteries or use the remote to illuminate your memories in the evening.
9 Painted Arch Shelf Accent
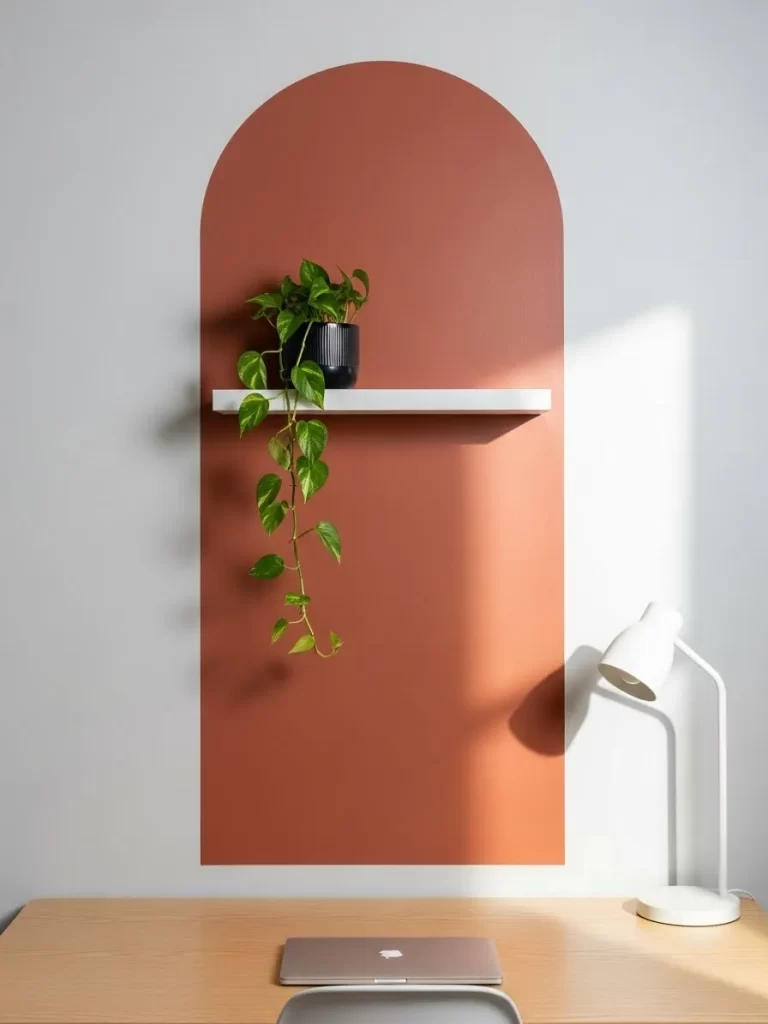
Create a bold architectural statement by painting a simple terracotta arch directly onto your wall. This technique defines a specific zone for a floating shelf, making the plant and decor feel more intentional and framed. It is a fantastic way to add a room within a room feeling to a small workspace or desk area.
The contrast between the warm clay color and a neutral wall provides instant depth without the need for expensive wallpaper. Pairing the arch with a trailing vine plant like a Pothos adds a sense of life and vertical movement. This DIY is quick, affordable, and easy to paint over if you ever decide to change your style.
Materials Required
- One quart of interior paint in an earthy terracotta or sage green
- White floating shelf with mounting hardware
- Painter’s tape
- One small trailing indoor plant
Equipment Required
- Long piece of string and a pencil (for the compass method)
- Small paint roller and a trim brush
- Level
- Power drill and wall anchors
DIY Instructions
- Determine the height and width of your arch based on the size of your floating shelf.
- Pin one end of a string to the center point of the arch’s base and tie a pencil to the other end.
- Swing the pencil in a half circle to draw a perfect arch top on the wall.
- Use a level and a straight edge to draw the vertical lines down from the ends of the arch.
- Apply painter’s tape along the straight vertical lines to ensure a crisp edge.
- Paint the edges of the arch carefully with a small brush before filling the center with a roller.
- Remove the tape while the paint is still slightly damp to prevent peeling.
- Wait for the paint to dry completely before drilling holes for your shelf brackets.
- Mount the white floating shelf in the center of the arch and place your plant on top.
10 Eclectic Blue and White Plate Gallery
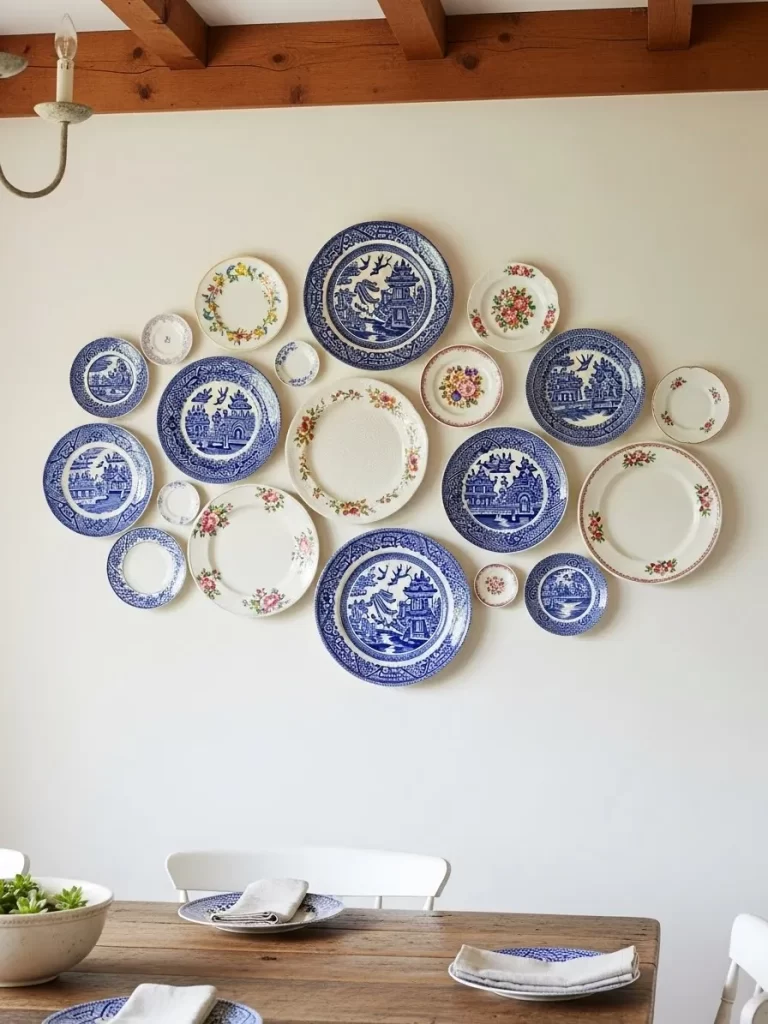
Turn your dining room wall into a vibrant display of history with a curated collection of porcelain plates. This arrangement mixes classic blue willow patterns with floral designs to create a layered and cozy atmosphere. The varying sizes of the plates break up the monotony of a large blank wall and add a touch of farmhouse charm.
Gathering pieces from thrift stores or antique shops makes this project a fun ongoing hunt. The circular shapes of the plates provide a nice contrast to the sharp corners of dining tables and chairs. It is a flexible design that you can expand over time as you find new pieces you love.
Materials Required
- A collection of 15 to 20 plates in varying sizes and patterns
- Adhesive disk plate hangers or wire hangers
- Large sheet of kraft paper or newspaper
Equipment Required
- Hammer and small nails
- Pencil and painter’s tape
- Level
- Scissors
DIY Instructions
- Lay all your plates out on the floor to find a layout that looks balanced and organic.
- Trace each plate onto kraft paper and cut out the circles to create templates.
- Tape the paper templates onto the wall using painter’s tape to visualize the final look.
- Adjust the spacing between the paper circles until the gallery feels cohesive.
- Clean the back of each plate thoroughly before applying the adhesive disk hangers.
- Allow the adhesive on the hangers to dry for 24 hours to ensure a strong bond.
- Mark the nail position on each paper template and drive a nail through the paper into the wall.
- Tear the paper templates away and hang the corresponding plates on the nails.
- Step back and use a level to make sure the plates are straight and secure.
11 Ombre Dip Dyed Fiber Art
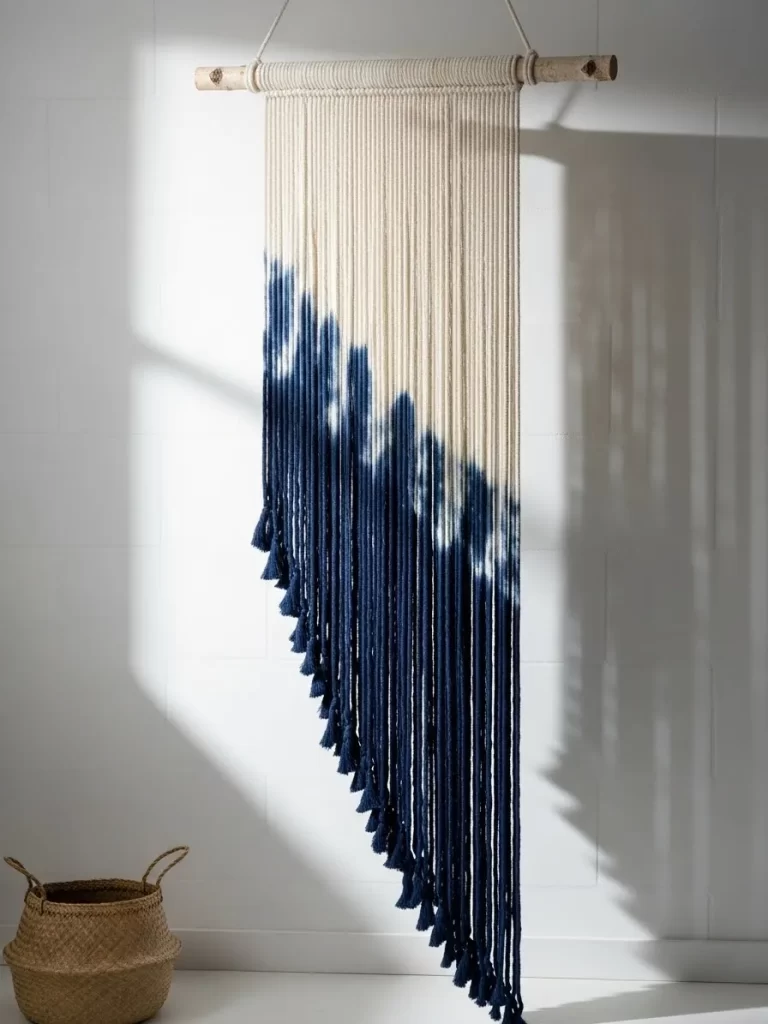
Introduce a splash of deep ocean blue to a stark white wall with this elegant dip dyed hanging. The natural cream cotton cords provide a beautiful contrast to the saturated indigo base. This piece features a dramatic diagonal color split that adds a sense of movement and modern flair to a hallway or bedroom.
Fiber art is an excellent way to soften the echoes in a room with hard surfaces. The long, straight fringe creates a clean silhouette that fits well in minimalist or coastal interiors. This project is surprisingly simple to execute and allows you to play with different color gradients.
Large scale textiles like this one act as a soft headboard or a focal point above a console table. The organic texture of the cotton combined with the rich dye creates a piece that feels both handcrafted and high end. You can customize the length and the angle of the dye to fit your specific wall space.
Materials Required
- Natural cotton macrame cord (3mm or 4mm thickness)
- Fabric dye in Navy or Indigo
- Large wooden dowel or natural branch
- Salt or dye fixative
- Masking tape
Equipment Required
- Large plastic bucket or tub
- Rubber gloves
- Measuring tape
- Sharp scissors
- Plastic drop cloth
DIY Instructions
- Cut your macrame cord into dozens of equal lengths that are twice your desired hanging height.
- Fold each cord in half and attach it to the wooden dowel using a simple lark’s head knot.
- Continue adding cords until the dowel is densely covered from end to end.
- Prepare your dye bath in the plastic bucket following the package instructions for a concentrated color.
- Lay your hanging on a flat surface and use masking tape to mark a diagonal line across the bottom half.
- Dip the bottom of the cords into the dye bath up to the tape line.
- Hold the cords in the dye for several minutes to achieve a deep, dark saturation.
- Lift the cords out slowly and rinse the bottom under cool water until it runs clear.
- Hang the piece over a protected area to air dry completely for twenty four hours.
- Comb through the dry fringe and trim the bottom edge into a sharp, clean curve.
12 Floating Invisible Bookshelf
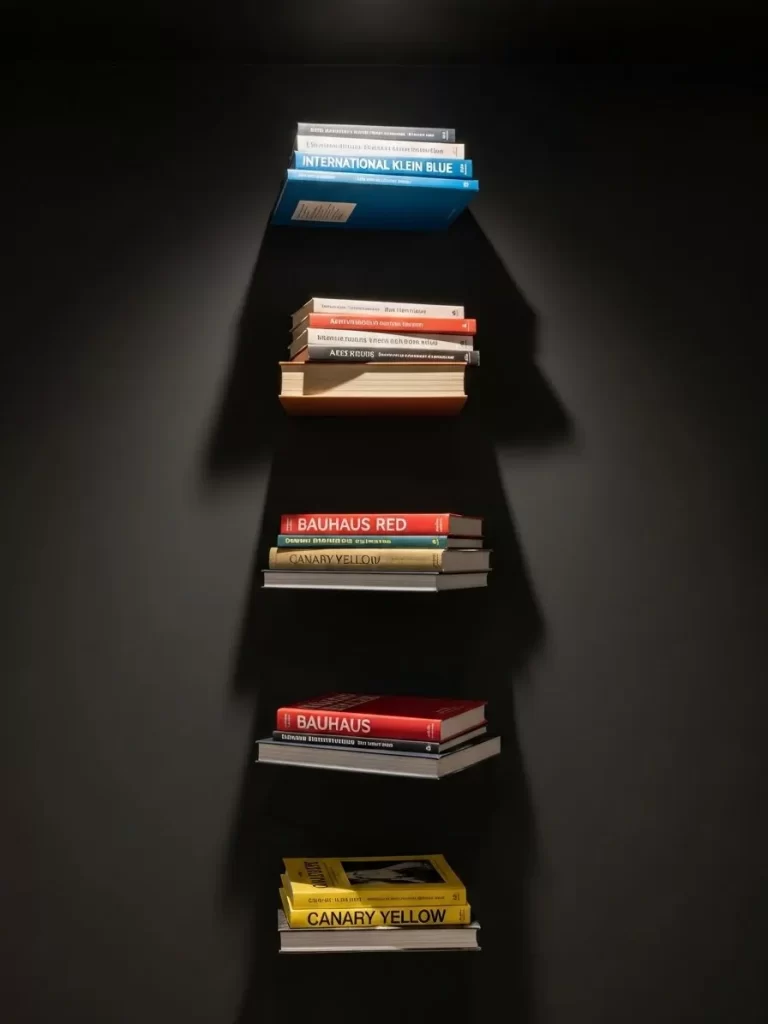
Turn your favorite literature into a gravity defying work of art that doubles as functional storage. These invisible shelves make your book collection appear as if it is hovering directly against a dark, moody wall. The vertical stack creates a strong architectural line that draws the eye upward and saves valuable floor space.
Using books as decor is a brilliant way to showcase your personality and interests. The colorful spines stand out vividly against a black or charcoal background, especially under a focused spotlight. It is a clever solution for small apartments or narrow hallways where a traditional bookcase would feel too bulky.
Mixing different genres and sizes adds to the eclectic feel of the display. This project proves that everyday items can become extraordinary wall art with the right mounting technique. It is a minimalist’s dream for keeping a room tidy while celebrating the written word.
Materials Required
- 5 to 7 sturdy hardcover books
- Small L shaped metal brackets
- Heavy duty wall anchors
- Wood screws
- Small pieces of Velcro or double sided tape
Equipment Required
- Power drill
- Level
- Screwdriver
- Pencil
- Measuring tape
DIY Instructions
- Choose a large, sturdy hardcover book to serve as the base for each shelf.
- Open the back cover of the book and place the L bracket against the inside center.
- Mark the holes of the bracket on the inside of the back cover and the wall.
- Drill holes into the wall and insert your heavy duty wall anchors.
- Screw the bracket firmly into the wall using the wood screws.
- Slide the back cover of the book between the bracket and the wall so the bracket is hidden inside.
- Use a small piece of Velcro or tape to keep the back cover closed against the bracket.
- Stack three or four more books on top of the base book to hide the vertical arm of the bracket.
- Repeat the process for each shelf, spacing them evenly in a vertical line using your level.
- Install a small spotlight at the top of the wall to cast dramatic shadows over your floating library.
13 Washi Tape Cityscape Mural
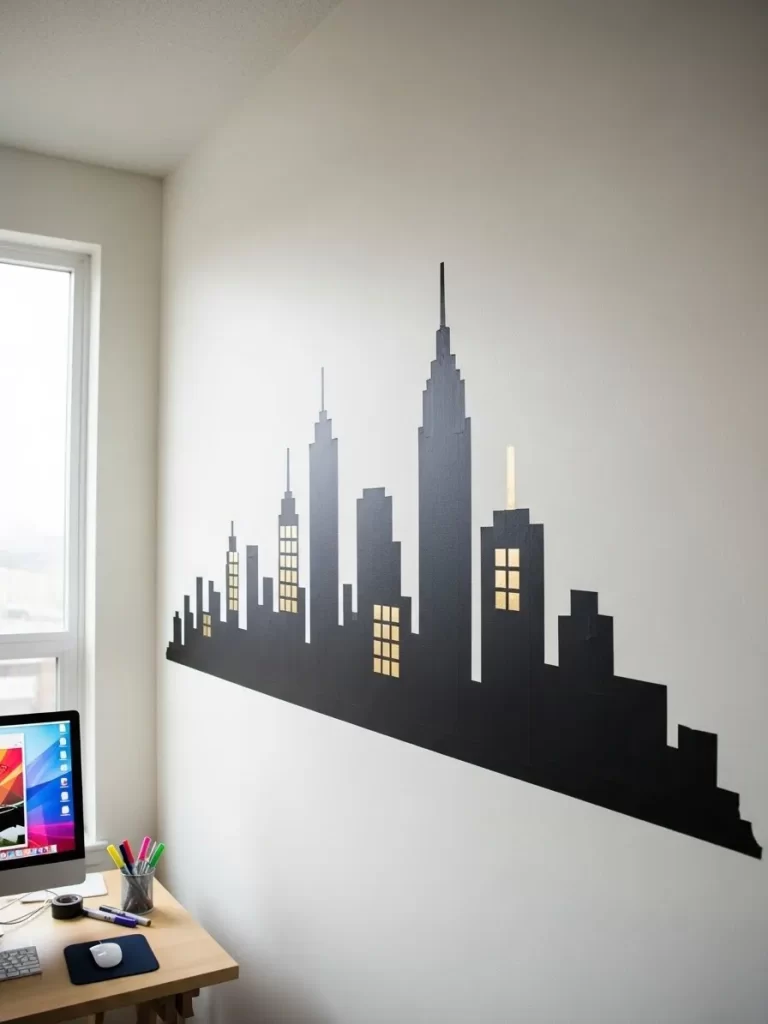
Create a stunning urban silhouette on a large office wall without the mess of permanent paint. This cityscape mural uses black washi tape or painter’s tape to build a graphic representation of a sprawling metropolis. The sharp angles and varied building heights provide a dynamic background for a modern workspace.
This temporary art solution is a gift for renters who want to personalize their space without losing their security deposit. You can easily peel the tape off and start over if you want to change the skyline. Adding small squares of yellow tape mimics glowing windows, bringing the city to life at night.
The black tape creates a high contrast look that feels professional and creative. It fills a large void on a white wall without feeling heavy or overwhelming. This project requires patience but very little artistic skill to achieve a high impact result.
Materials Required
- 2 to 3 rolls of black washi tape or black electrical tape
- 1 roll of thin yellow washi tape (for windows)
- Painter’s tape (for sketching)
Equipment Required
- X Acto knife or sharp scissors
- Metal ruler or straight edge
- Step ladder
- Level
DIY Instructions
- Clean the wall surface thoroughly with a damp cloth to ensure the tape sticks properly.
- Use a level and a long strip of painter’s tape to create a straight baseline for your city.
- Start in the center with your tallest building, using the ruler to keep your vertical lines straight.
- Press the black tape firmly onto the wall to form the outline of various skyscrapers.
- Fill in the bodies of the buildings with parallel strips of black tape until the shapes are solid.
- Vary the heights and roof shapes to include pointed towers and flat topped blocks.
- Use the X Acto knife to trim any overlapping edges for a clean, sharp finish.
- Cut small squares of yellow tape and place them randomly on the buildings to represent lit windows.
- Step back frequently to check the balance of the skyline and add smaller structures to the sides.
- Peel away your baseline painter’s tape to reveal a crisp, floating city.
14 Minimalist Continuous Line Face Art
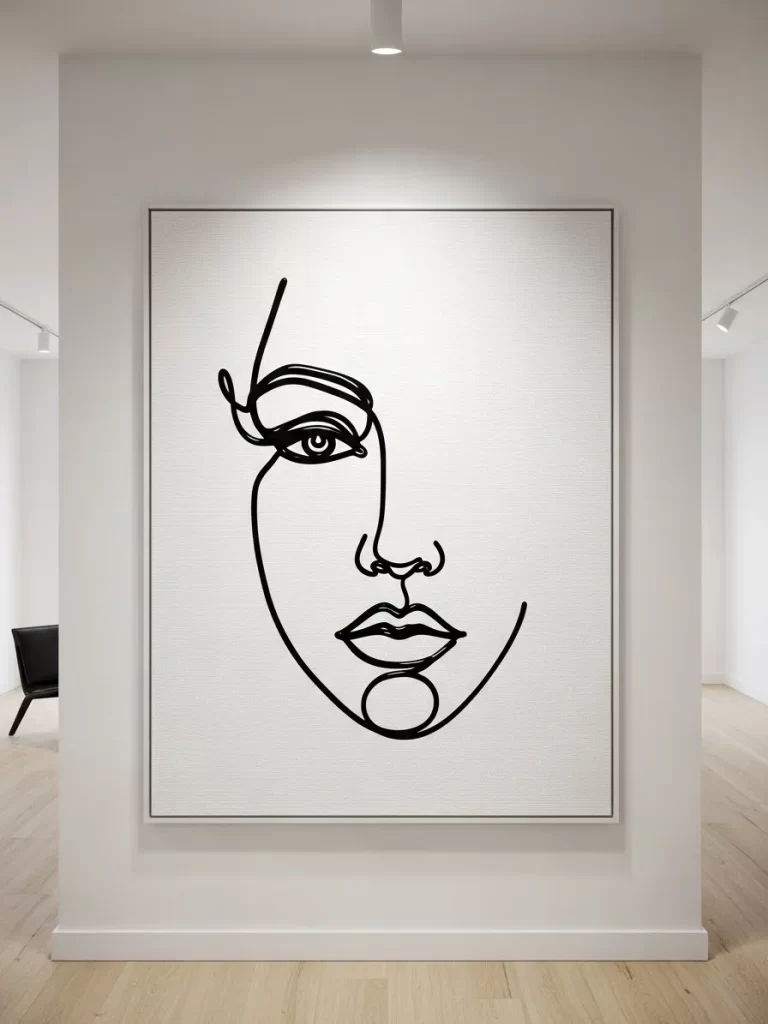
Make a bold statement with a large scale canvas that celebrates the beauty of simplicity. This project features a continuous line drawing of a woman’s face, a style that is both modern and timeless. The single black line against a textured white background creates a sophisticated gallery feel in a hallway or entry.
Continuous line art relies on the flow of the stroke rather than intricate details. It offers a sense of mystery and elegance that complements a minimalist home. This type of art works best on a massive scale where the simplicity of the subject can truly command the room.
The subtle texture of the canvas adds depth to the piece when viewed up close. This is an approachable project for anyone who enjoys sketching or wants to try their hand at contemporary art. It proves that you do not need a lot of color to create a powerful visual impact.
Materials Required
- One extra large pre stretched canvas
- Black acrylic paint or a thick black paint marker
- Matte white primer (if the canvas needs more texture)
- Pencil and eraser
Equipment Required
- Wide paint brush (for the background)
- Fine tip detail brush
- Projector (optional, for tracing)
- Large drop cloth
DIY Instructions
- Apply a coat of matte white primer to your canvas to create a slightly textured, non reflective base.
- Practice drawing your continuous face shape on a piece of paper without lifting your pen.
- Lightly sketch your favorite version onto the canvas with a pencil.
- Use a projector if you want to scale up a small drawing precisely onto the large canvas.
- Dip your detail brush into the black paint and start at one end of your pencil line.
- Trace over the pencil line with a steady, confident hand and a consistent flow of paint.
- Maintain the same thickness for the line throughout the entire drawing for a professional look.
- Allow the paint to dry completely before erasing any visible pencil marks.
- Mount the canvas in a prominent spot where the overhead lighting can highlight the clean lines.
- Keep the surrounding decor simple to let this graphic masterpiece shine.
15 Radial Reclaimed Wood Sunburst
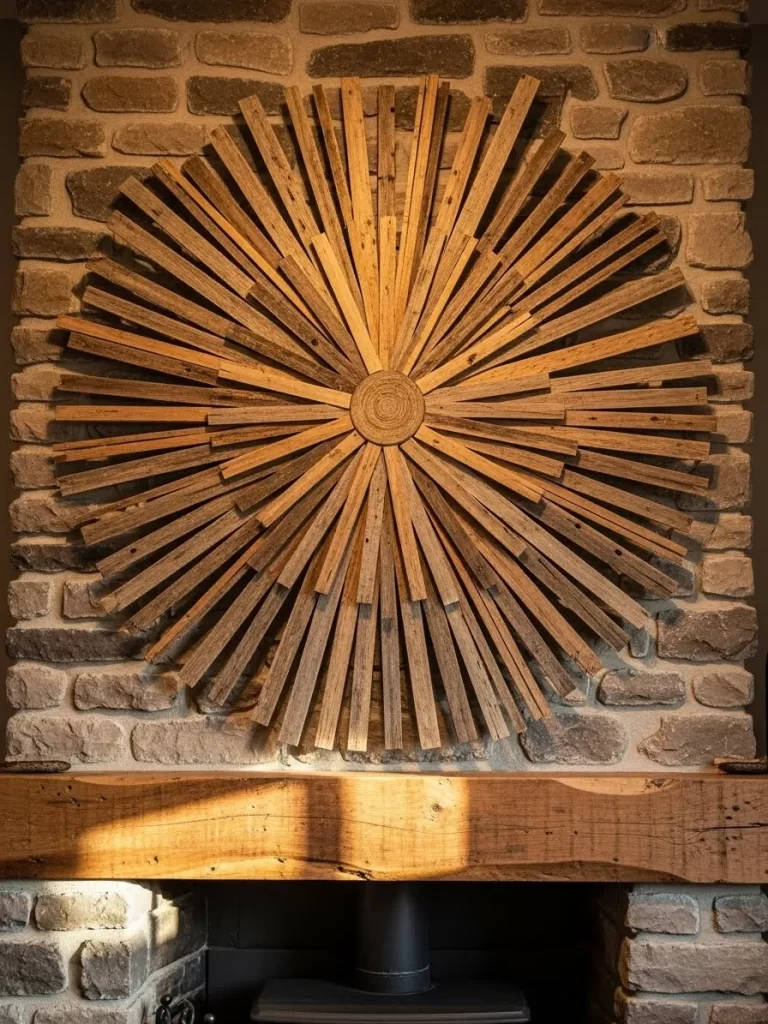
Bring the warmth of a mountain lodge to your fireplace with a magnificent sunburst sculpture. This piece is crafted from dozens of reclaimed wood laths arranged in a perfect circle around a central hub. The varying lengths and natural weathered textures create a sense of radiant energy and rustic charm.
Centering this art above a stone mantel adds a professional, finished look to the living room. The natural grains and knots of the wood provide an organic pattern that feels grounded and cozy. It is a brilliant way to recycle old fencing or barn wood into a high end architectural feature.
The radial design naturally draws the eye toward the center of the room. Because each piece of wood is unique, no two sunbursts will ever look exactly the same. It is a substantial piece of art that feels like a permanent part of the home’s structure.
Materials Required
- 40 to 60 strips of reclaimed wood or laths (cut to various lengths)
- One circular wooden base (the “hub”)
- Wood glue
- Small finishing nails
- Heavy duty hanging wire
Equipment Required
- Miter saw
- Hammer
- Measuring tape
- Sandpaper
- Power drill
DIY Instructions
- Sort your wood strips by color and texture to ensure a balanced look around the circle.
- Sand the ends of each strip to prevent splinters while keeping the weathered face untouched.
- Place your circular wooden hub in the center of your workspace.
- Arrange the longest strips in a cross pattern (north, south, east, west) and glue them to the hub.
- Fill in the gaps with medium and short strips, overlapping them slightly to create depth.
- Secure each strip with wood glue and a single finishing nail driven into the hub.
- Ensure the strips radiate out evenly like rays of the sun.
- Flip the entire assembly over carefully once the glue is dry.
- Drill two small holes into the back of the hub and attach the heavy duty hanging wire.
- Use a sturdy wall anchor to hang the sunburst safely above your mantel or bed.
16 Botanical Triptych Fabric Panels
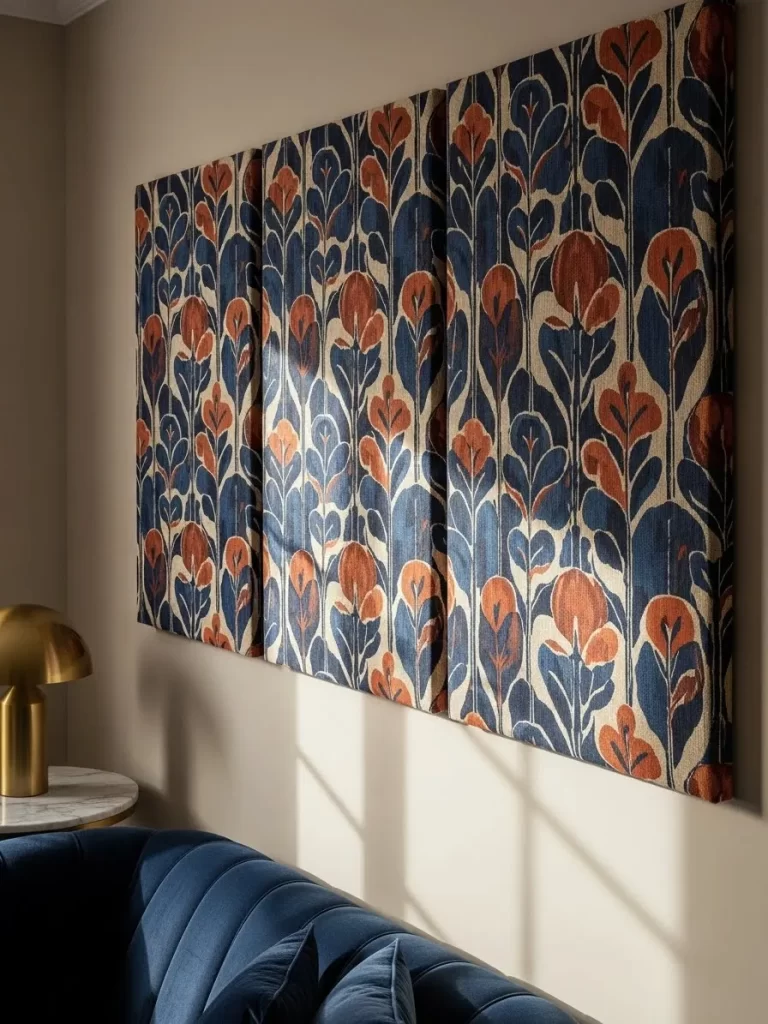
Infuse your lounge with a sense of rhythm and pattern using oversized fabric wrapped panels. This triptych features a deep navy blue background adorned with stylized orange and pink floral motifs. The repeating vertical design stretches the height of the room, making your ceilings feel much taller than they actually are.
Textile art is a brilliant way to introduce complex patterns without the commitment of wallpaper. These panels act as a soft backdrop that absorbs sound and adds a layer of comfort to modern spaces. You can select fabrics that coordinate with your existing cushions or rugs to tie the whole room together.
The three panel configuration allows you to cover a large wall area while maintaining a light and airy feel. It creates a gallery look that is both sophisticated and approachable. This project is a fantastic way to display high quality designer fabrics that might be too expensive for full curtains.
Materials Required
- Three large rectangular wooden frames or artist canvases
- 3 to 4 yards of heavy decorative upholstery fabric
- Heavy duty staples
- Picture hanging wire
Equipment Required
- Staple gun
- Fabric scissors
- Measuring tape
- Iron
- Level
DIY Instructions
- Iron your fabric thoroughly to remove any wrinkles or fold lines that might show once stretched.
- Lay your first frame flat on the back side of the fabric.
- Cut the fabric so it is four inches wider and longer than the frame on all sides.
- Fold the fabric over the top edge of the frame and secure it with a staple in the center.
- Pull the fabric taut to the bottom edge and place a staple in the center there as well.
- Repeat this process for the left and right sides, ensuring the pattern remains straight.
- Work your way from the center staples out toward the corners, pulling the fabric firmly as you go.
- Fold the corners neatly like a gift box and staple them down flat to avoid bulk.
- Repeat these steps for the remaining two panels to create a matching set.
- Mount the panels on the wall with two inch gaps between them for a professional finish.
17 Golden Flight Paper Butterfly Installation
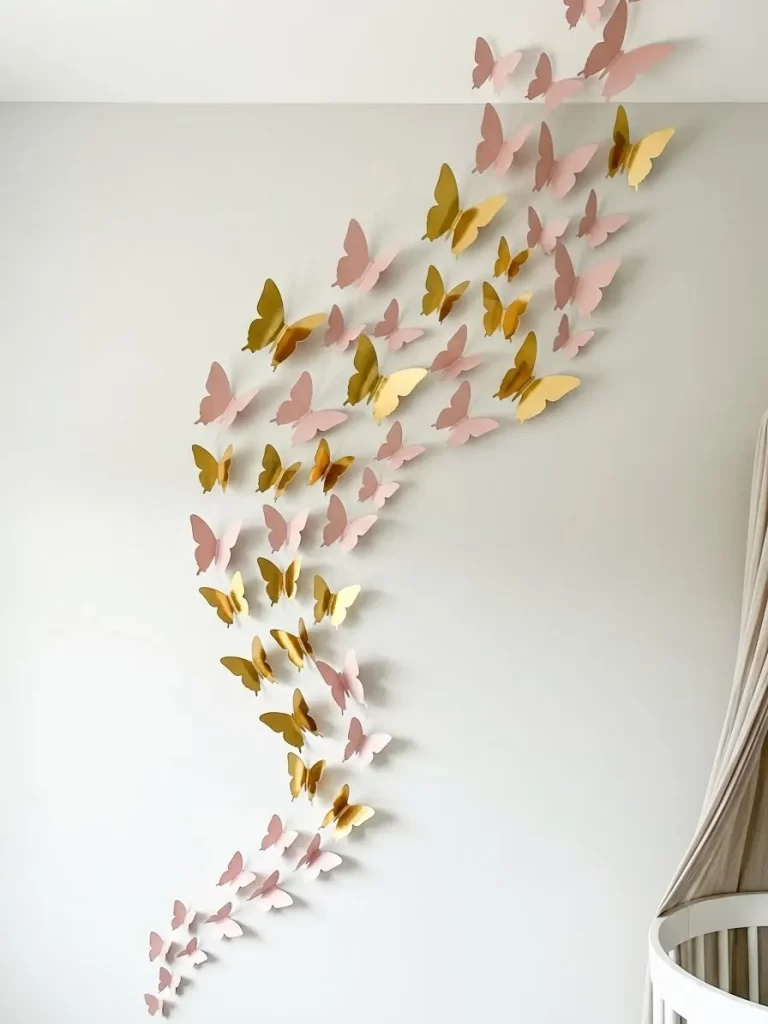
Add a whimsical and energetic touch to a nursery or bedroom with a swirling trail of paper butterflies. This 3D installation uses a mix of soft pink and metallic gold cardstock to create a sense of depth and movement. The butterflies appear to take flight from the corner of the room, dancing across the wall in a graceful arc.
Paper art is an incredibly budget friendly way to fill a large space with color and texture. The metallic gold pieces catch the sunlight beautifully, casting soft shadows that change throughout the day. This project allows for complete creative freedom in how you arrange the flock on your wall.
Each butterfly is folded slightly in the center to mimic the look of real wings in motion. This simple detail transforms flat paper into a dynamic sculpture that breathes life into the room. It is a wonderful way to add a personalized, handcrafted element to your home decor.
Materials Required
- Heavy cardstock in matte pink and metallic gold
- Double sided foam adhesive dots
- Butterfly shaped templates or a craft punch
Equipment Required
- Sharp scissors
- Pencil
- Ruler
- Clean cloth
DIY Instructions
- Trace your butterfly templates onto the back of your colored cardstock.
- Cut out at least 40 to 50 butterflies in varying sizes to create a diverse look.
- Fold each butterfly gently down the center of the body so the wings tilt upward.
- Wipe the wall surface with a clean cloth to ensure the adhesive sticks well.
- Apply a small double sided foam dot to the underside of each butterfly’s body.
- Start at the bottom of the wall and place your largest butterflies first to anchor the design.
- Create a curving path upward, gradually using smaller butterflies as you go.
- Mix the gold and pink colors randomly to keep the arrangement looking natural.
- Vary the angles of the butterflies so some appear to be flying sideways or upward.
- Press each one firmly against the wall for five seconds to ensure a long lasting bond.
18 Framed Silver Leaf Chinoiserie
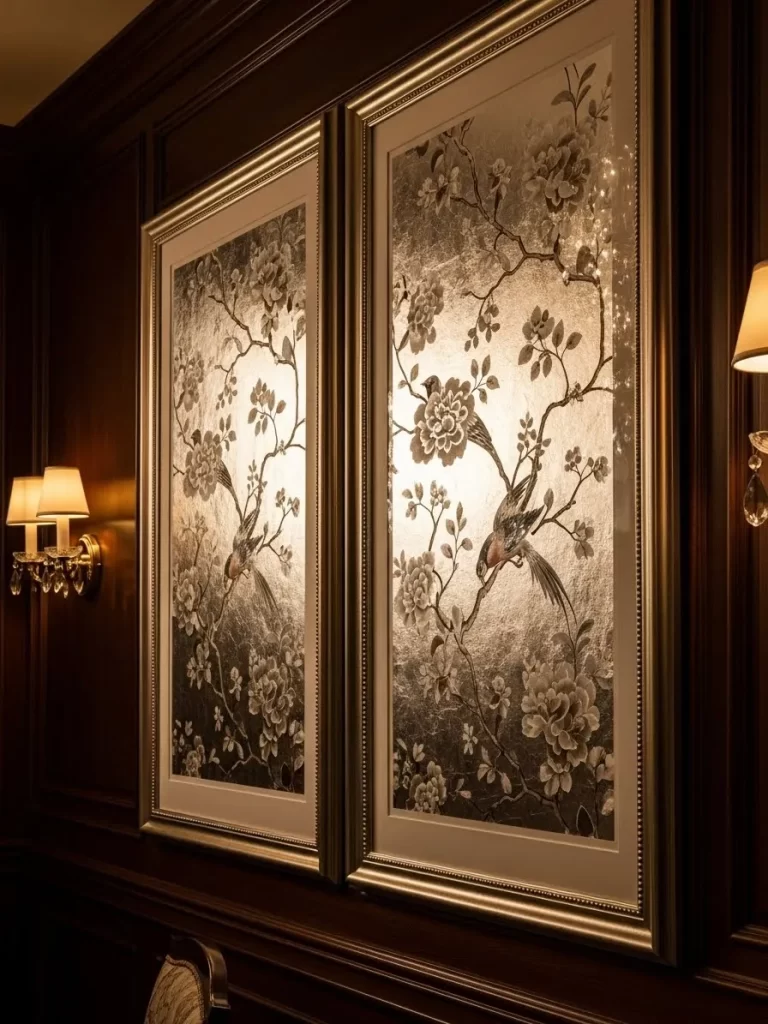
Bring a touch of old world glamour to your dining room with these stunning silver leaf panels. The delicate hand painted birds and floral branches stand out against a shimmering metallic background. These twin frames offer a high end look that mimics expensive traditional hand painted wallpaper at a fraction of the cost.
Metallic art is excellent for dark rooms as it reflects light from lamps and candles, creating a warm glow. The champagne gold frames add an extra layer of luxury that complements the silver tones within the art. It is a classic design choice that never goes out of style and works beautifully with formal furniture.
The symmetry of two large panels creates a balanced focal point that anchors the entire room. This project allows you to showcase artistic details like fine brushwork and shimmering textures. It is an investment in style that makes a powerful first impression on any guest.
Materials Required
- Two large matching picture frames in champagne gold
- Two sheets of heavy watercolor paper or mat board
- Silver leaf sheets and adhesive size
- Black and grey acrylic paint for the botanical details
Equipment Required
- Soft gilding brush
- Fine detail paint brushes
- Painter’s tape
- Glass cleaner
DIY Instructions
- Tape the edges of your paper or board to your work surface to keep it flat.
- Apply a thin, even layer of silver leaf adhesive size to the entire surface.
- Wait for the adhesive to become tacky before carefully laying the silver leaf sheets over it.
- Use a soft brush to smooth the leaf and brush away any excess flakes.
- Sketch a delicate branch and bird design lightly over the silver surface with a pencil.
- Paint the design using thin layers of black and grey paint to create a shadowed, etched look.
- Allow the paint to dry completely for several hours to avoid smearing.
- Clean the frame glass thoroughly on both sides before assembly.
- Place the silver panels into the frames and secure the backings tightly.
- Hang the frames side by side with a small gap between them on a dark, moody wall.
19 Hexagonal Cork Memo Board
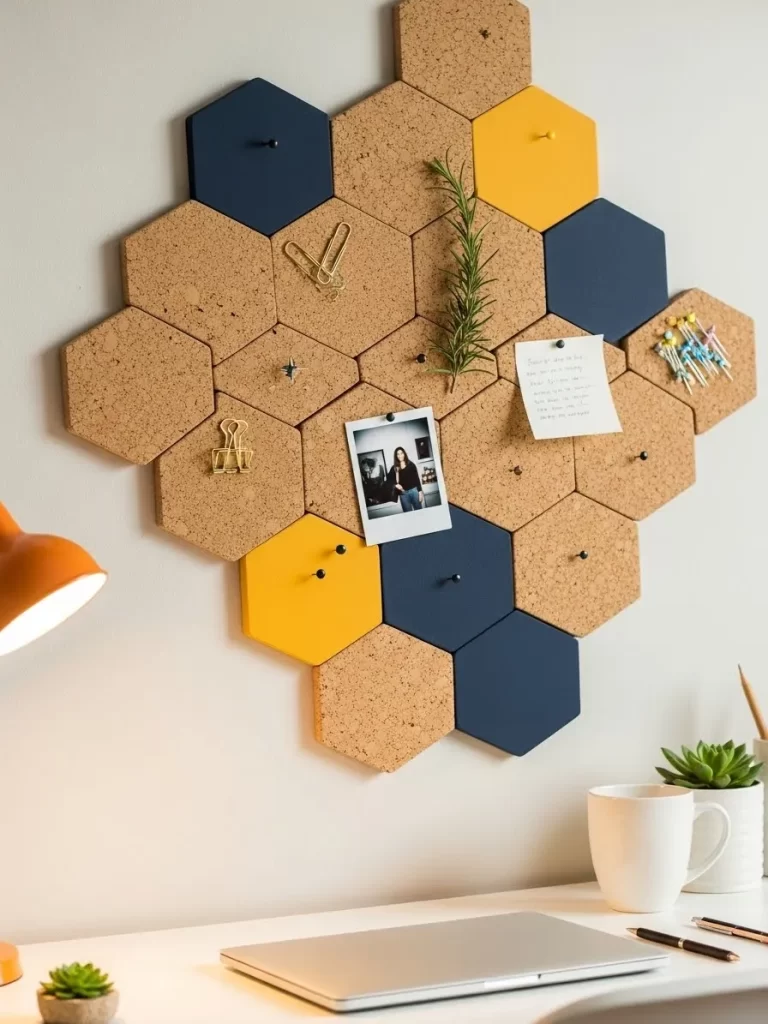
Organize your thoughts and display your favorite photos with a stylish honeycomb wall installation. This project uses hexagonal cork tiles mixed with painted accents in navy and yellow to create a functional piece of art. It is the perfect addition to a home office or a creative workspace where inspiration is always flowing.
The geometric shapes allow you to expand the display in any direction as your needs grow. Cork is a natural material that adds warmth and texture to a flat white wall. Painting a few of the tiles in bold colors breaks up the brown tones and makes the board look like a modern mural.
You can use this space for everything from pinning important reminders to displaying small sprigs of dried herbs. The modular nature of the hexagons means you can fit the board around furniture or into tight corners. It is a practical solution that keeps your desk clear while adding visual interest.
Materials Required
- 12 to 15 adhesive backed cork hexagons
- Acrylic paint in navy blue and bright yellow
- Push pins or decorative clips
- Personal photos and notes
Equipment Required
- Small paint roller or foam brush
- Painter’s tape
- Level
- Pencil
DIY Instructions
- Select three or four cork tiles to be your accent pieces and set them aside.
- Paint these select tiles in your chosen colors, applying two coats for an even finish.
- Allow the painted tiles to dry completely before you attempt to hang them.
- Lay all the hexagons out on a table to decide on a layout that looks balanced.
- Use a level and a pencil to mark a straight starting line on your wall.
- Peel the adhesive backing off the first center tile and press it firmly to the wall.
- Fit the next tiles tightly against the edges of the first one to build the honeycomb pattern.
- Distribute the painted navy and yellow tiles throughout the arrangement for a pop of color.
- Press each tile for thirty seconds to ensure the adhesive bonds with the wall.
- Use your favorite pins to attach photos, rosemary sprigs, and notes to your new command center.
20 Industrial Copper Pipe Magazine Rack
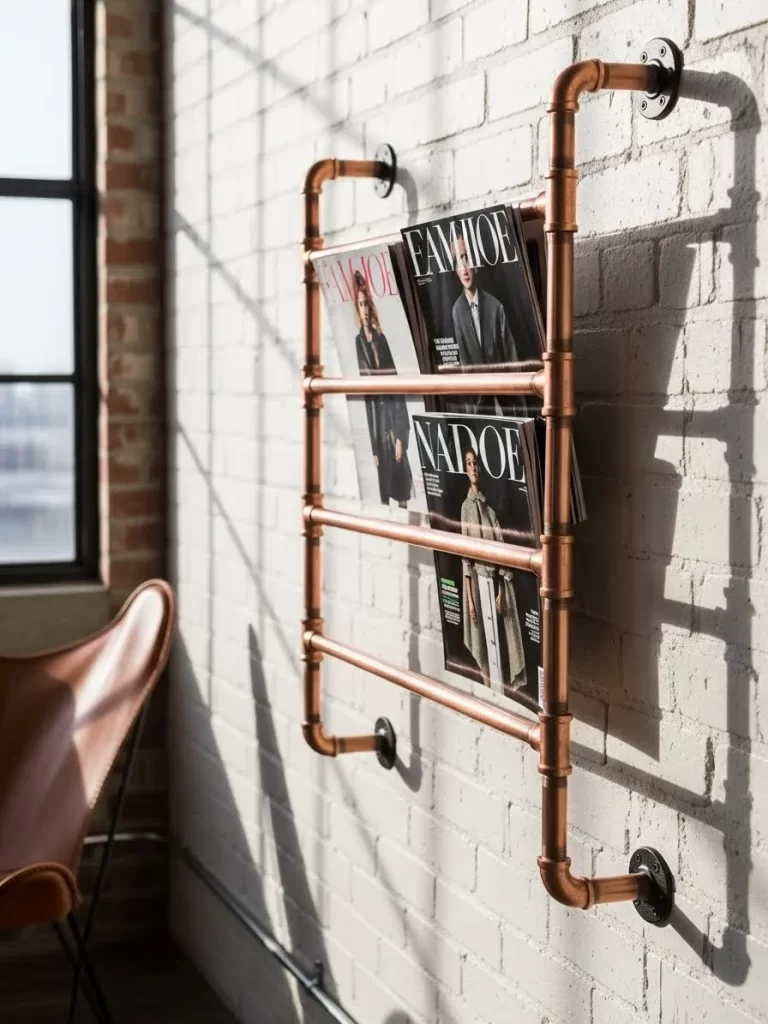
Give your reading materials a home that looks like a piece of industrial sculpture. This wall mounted rack is built from copper pipes and fittings, offering a sleek and sturdy way to display your favorite magazines. The warm metallic tones of the copper look incredible against a white brick wall or a rustic interior.
This design keeps your tabletops clear while turning colorful magazine covers into changing wall art. The horizontal bars provide plenty of space for multiple publications, making them easy to grab as you relax. It is a durable and functional piece that adds a touch of modern loft style to any room.
Copper naturally develops a beautiful patina over time, but you can also keep it polished for a high shine look. The exposed hardware and black wall mounts add to the rugged, architectural feel of the project. It is a great way to introduce metal elements into your home without it feeling cold or clinical.
Materials Required
- 1/2 inch copper pipes (cut to your desired width)
- 90 degree copper elbows and T junctions
- Four black floor flanges for wall mounting
- Copper epoxy or glue
Equipment Required
- Pipe cutter
- Power drill and wall anchors
- Screwdriver
- Level
- Steel wool (for polishing)
DIY Instructions
- Use your pipe cutter to slice the copper pipes into the specific lengths for your horizontal bars and vertical supports.
- Polish the cut pieces with steel wool to remove any marks and give the metal a bright shine.
- Dry fit the pipes and elbows together to create a ladder like frame on a flat surface.
- Apply a small amount of copper epoxy to the inside of each fitting once you are happy with the layout.
- Press the pipes firmly into the fittings and let the glue cure according to the package instructions.
- Screw the floor flanges onto the four ends of the rack where it will meet the wall.
- Hold the rack against the wall and use a level to ensure it is perfectly straight.
- Mark the holes for the flanges on the wall with a pencil.
- Drill the holes, insert your wall anchors, and screw the rack securely into place.
- Slide your favorite magazines over the horizontal bars to complete the industrial look.
21 Radiant Alcohol Ink Glass Art
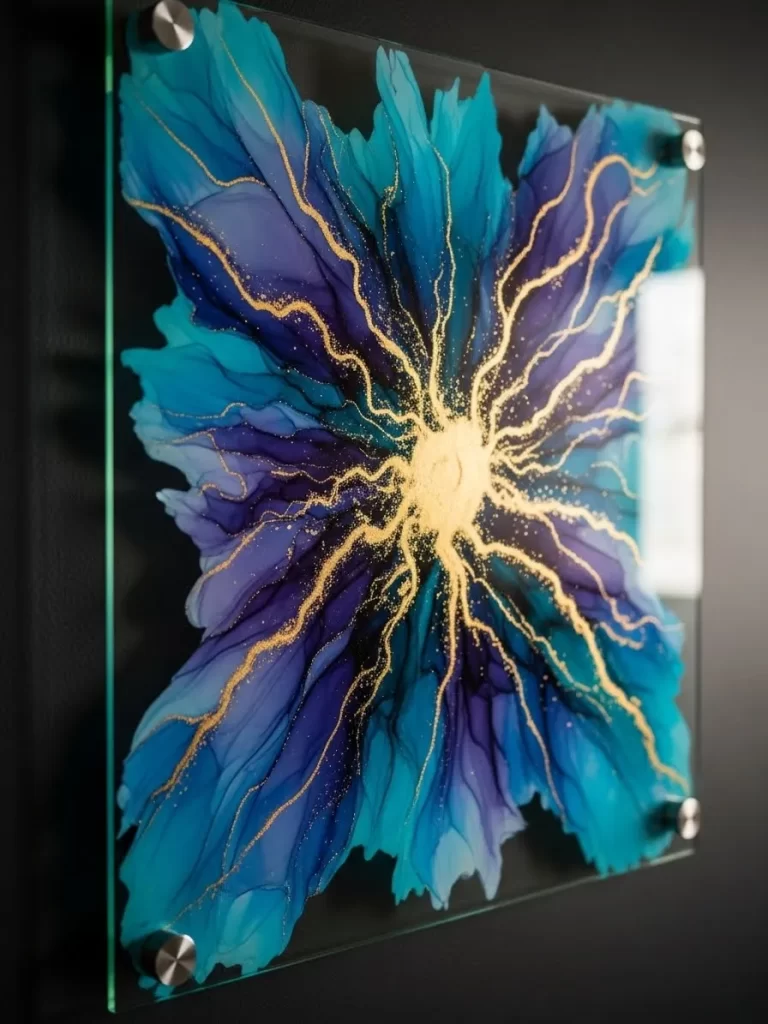
Infuse your hallway with a burst of energy using a custom alcohol ink masterpiece. This project uses translucent inks on a clear acrylic or glass pane to create a vibrant, floral explosion of blues and purples. The gold leaf accents at the center mimic a glowing sun, adding a touch of luxury that catches every ray of light.
Displaying the art in a frameless format with metallic standoffs gives it a sleek, modern edge. The way the colors bleed and blend creates an organic movement that feels both wild and controlled. It is a stunning way to add high gloss, gallery quality color to a dark or neutral wall.
Materials Required
- One thick square acrylic or glass sheet
- Alcohol inks in various shades of blue and purple
- Gold metallic ink or gold leaf flakes
- 99 percent isopropyl alcohol
- Clear UV resistant sealer spray
- Four metallic wall standoffs
Equipment Required
- Handheld hair dryer or air blower tool
- Power drill (with glass/tile bit if using glass)
- Protective gloves and mask
- Level
DIY Instructions
- Clean your acrylic or glass sheet thoroughly to remove any oils or dust particles.
- Pour a small amount of isopropyl alcohol onto the center of the sheet to help the ink flow.
- Drop your darkest blue and purple inks into the alcohol pool.
- Use a hair dryer on the lowest, coolest setting to push the ink toward the edges in petal shapes.
- Add lighter shades of ink and more alcohol to create layers and depth within the petals.
- Drop gold metallic ink into the very center while the other inks are still slightly tacky.
- Let the ink dry completely for several hours until the surface is no longer sticky.
- Spray a thin coat of UV resistant sealer over the art to prevent the colors from fading.
- Drill holes in the four corners of the sheet if they are not already present.
- Mount the standoffs to your wall and secure the glass sheet to create a floating effect.
22 Handwoven Tribal Basket Gallery
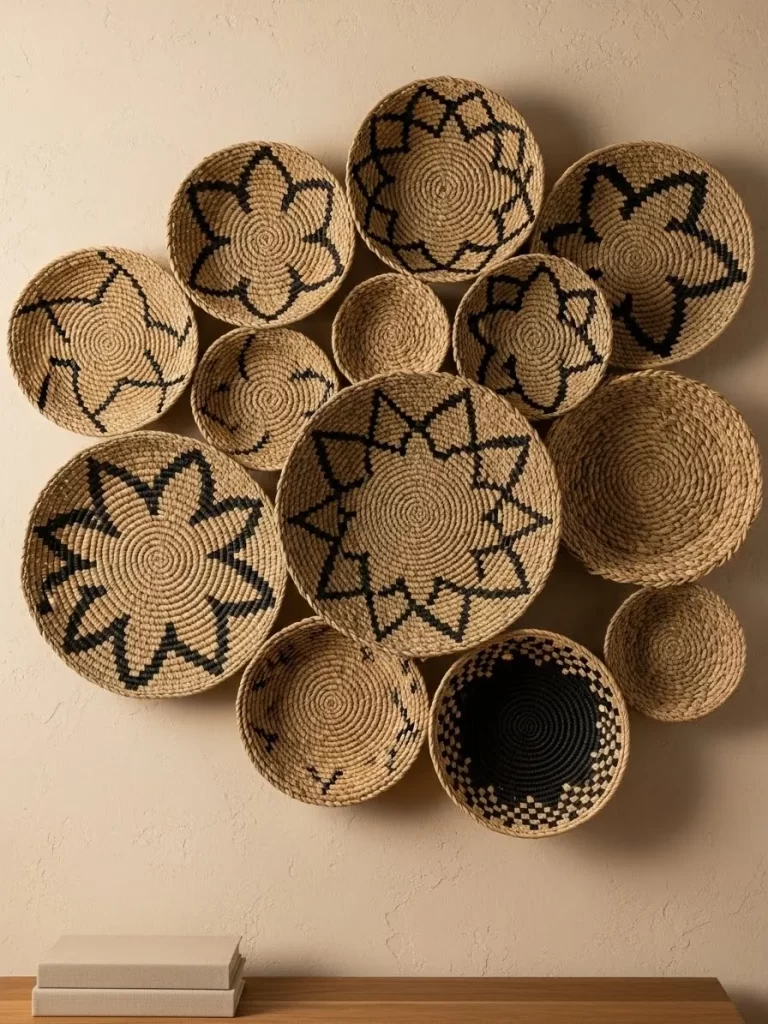
Bring the warmth of natural fibers and global patterns to your living room with a curated collection of woven baskets. This arrangement uses varying sizes and geometric designs to create a three dimensional mural that feels grounded and cozy. The black and tan contrast adds a modern tribal aesthetic that works beautifully against a warm beige wall.
Collecting these pieces from different artisans or thrift shops gives your wall a storied, traveled feel. Because they are lightweight, you can easily rearrange the cluster until it feels balanced. The circular shapes break up the straight lines of traditional furniture and add a soft, organic texture to the room.
Materials Required
- 10 to 15 woven seagrass or raffia baskets in different sizes
- Small finishing nails or clear command hooks
- Large sheet of floor paper (for planning)
Equipment Required
- Hammer
- Pencil
- Tape measure
- Step ladder
DIY Instructions
- Gather your baskets and group them by color and pattern to see which ones complement each other.
- Lay all the baskets on the floor in a circular cluster to find a layout you love.
- Trace the outline of the arrangement onto a large sheet of paper to use as a guide.
- Mark the center point of each basket on the paper guide with a pencil.
- Tape the paper guide to your wall at eye level to visualize the scale.
- Hammer a small finishing nail through each pencil mark on the paper and into the wall.
- Tear the paper away carefully so only the nails remain.
- Hang each basket onto its corresponding nail by hooking the weave over the nail head.
- Adjust the baskets so they overlap slightly for a more layered and professional look.
- Step back and rotate individual baskets to ensure the geometric patterns flow together.
23 Distressed Blue Mediterranean Tile Art
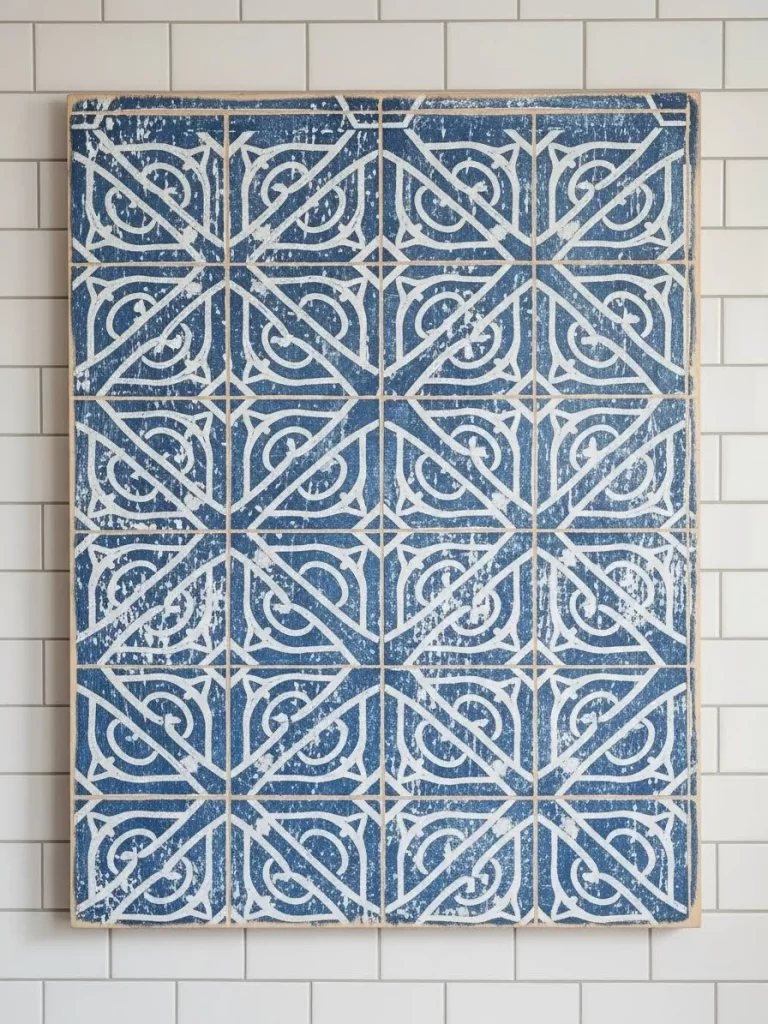
Capture the timeless beauty of a coastal villa with a large scale faux tile installation. This piece features a repeating geometric pattern in a classic cobalt blue and white palette. The distressed, weathered finish gives it the appearance of an ancient architectural find, adding history and character to your bathroom or kitchen.
Using a single large panel instead of individual tiles makes this a much faster and cleaner project. The blue tones provide a refreshing splash of color that pairs perfectly with white subway tiles. It is a clever way to achieve the look of expensive cement tiles without the weight or the permanent grout.
Materials Required
- One large rectangular plywood board
- White chalk paint (for the base)
- Blue acrylic paint
- Large geometric tile stencil
- Clear matte wax or sealer
Equipment Required
- Foam paint roller
- Stencil brush or sponge
- Sandpaper (medium grit)
- Measuring tape
- Level
DIY Instructions
- Sand the plywood board until it is smooth and wipe away any sawdust.
- Apply two coats of white chalk paint to the board and let it dry completely.
- Position your tile stencil at the top corner of the board and secure it with tape.
- Dab the blue paint onto the stencil using a nearly dry sponge to prevent bleeding.
- Lift the stencil and move it to the next section, aligning the pattern carefully.
- Continue stenciling until the entire board is covered in the repeating blue design.
- Rub the edges and surface of the pattern with sandpaper once the paint is dry to create a distressed look.
- Wipe away the dust and apply a layer of clear matte wax to protect the finish.
- Use a level to mark the wall where the board will be mounted.
- Secure the panel to the wall using heavy duty adhesive strips or hidden brackets.
24 Giant Plywood Designer Pegboard
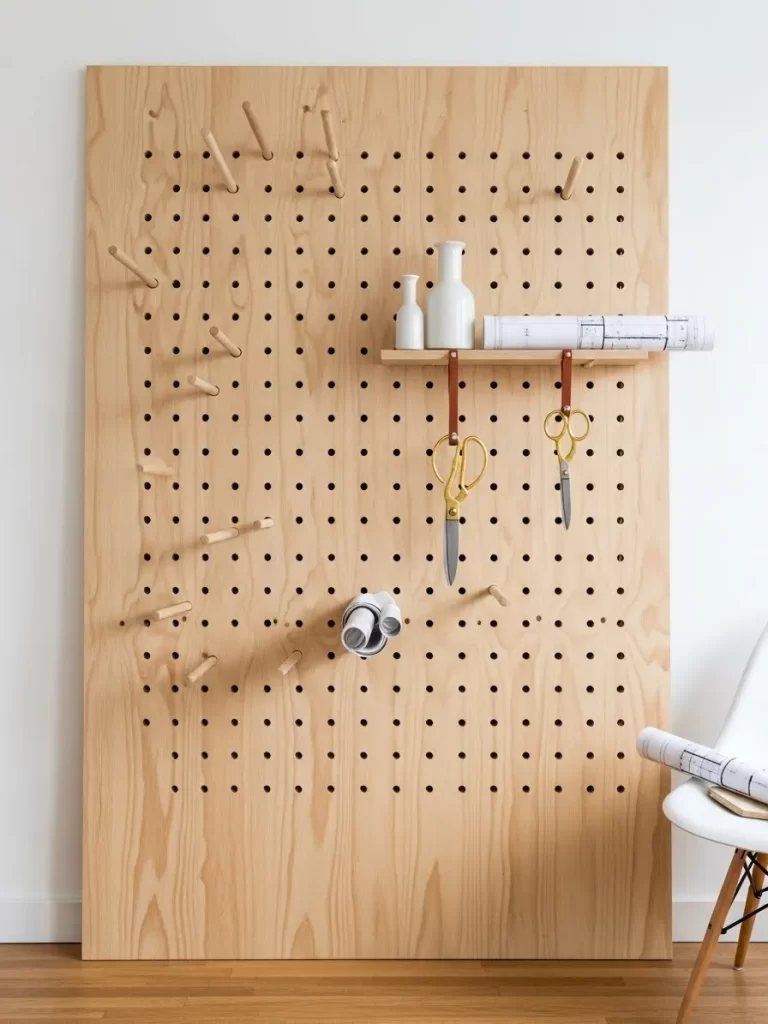
Combine organization and art with a massive floor to ceiling pegboard that serves as a functional focal point. This light wood installation features oversized pegs and movable shelves that allow you to customize your display daily. It is a brilliant solution for a creative studio or entryway where you need to store tools, rolls, and accessories in style.
The clean lines of the natural plywood offer a minimalist, Scandinavian vibe that feels fresh and airy. Leather straps holding brass scissors add a touch of high end detail to the utilitarian design. This project proves that storage can be just as beautiful as traditional paintings when executed with a designer’s eye.
Materials Required
- One large sheet of 3/4 inch birch plywood
- 1 inch thick wooden dowels (cut into 6 inch pegs)
- Small pieces of plywood (for shelves)
- Leather strips and brass hardware
- Wood glue
Equipment Required
- Power drill with a 1 inch spade bit
- Measuring tape and pencil
- Saw (for cutting dowels)
- Sandpaper
- Wall mounting cleats
DIY Instructions
- Measure and mark a perfect grid of dots on your plywood sheet, spacing them 4 inches apart.
- Use a power drill with a spade bit to create clean holes at every marked dot.
- Sand the entire board and the inside of the holes to ensure there are no splinters.
- Cut your wooden dowels into 6 inch lengths to create your custom pegs.
- Sand the ends of each peg until they are smooth and rounded.
- Insert the pegs into the holes; they should fit snugly but remain removable.
- Place your plywood shelves on top of two or three pegs to create custom display areas.
- Screw leather loops onto the board to hold frequently used tools like scissors.
- Install a French cleat system on the back of the board for a secure, flush wall mount.
- Arrange your vases, blueprints, and tools to create an ever changing wall of inspiration.
25 Monochrome Monstera Botanical Scroll
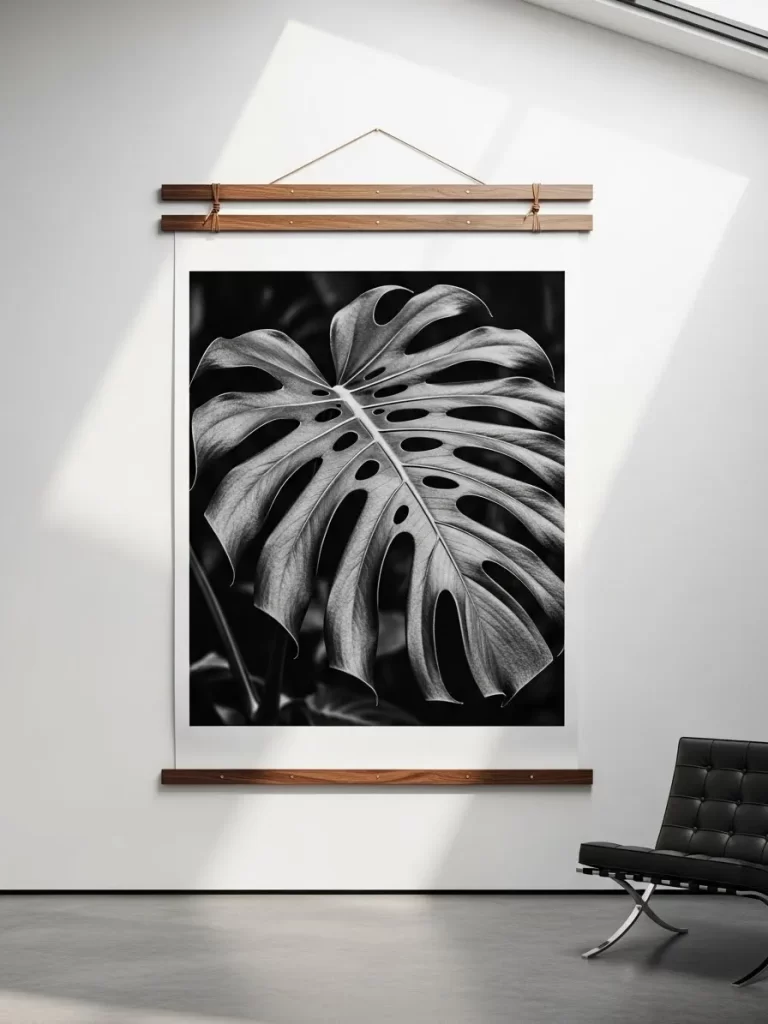
Celebrate the dramatic shapes of nature with a large scale black and white botanical print. This oversized Monstera leaf image is held between two dark wooden magnetic bars, creating a sophisticated scroll look. The high contrast photography brings a modern, edgy feel to a minimalist living room or office.
Scroll framing is a great alternative to heavy glass frames because it is lightweight and easy to swap out. The stark white background of the print makes the intricate holes and veins of the leaf stand out as a graphic masterpiece. It is a timeless piece that adds a touch of organic elegance without overwhelming the room with color.
Materials Required
- One large format black and white Monstera leaf print
- Four lengths of dark walnut wood trim (matching the width of the print)
- Strong neodymium magnets
- Leather cord for hanging
Equipment Required
- Super glue
- Scissors
- Measuring tape
- Level
DIY Instructions
- Lay your wooden trim pieces in pairs; you will need two for the top and two for the bottom.
- Glue small magnets at equal intervals along the inside of each wood piece.
- Ensure the magnets are aligned so the pairs of wood snap together firmly.
- Sandwich the top edge of your print between the first pair of magnetized wood bars.
- Repeat the process for the bottom edge of the print to give it weight and keep it flat.
- Drill two tiny holes in the top wood bar or attach the leather cord to the back.
- Tie a secure knot in the leather cord to create a hanging loop.
- Clean the wall area and find the center point for your new art.
- Hang the scroll on a simple nail or a decorative wall hook.
- Adjust the bottom bar if necessary to make sure the paper hangs perfectly straight.
26 Abstract Canvas Floor Scroll
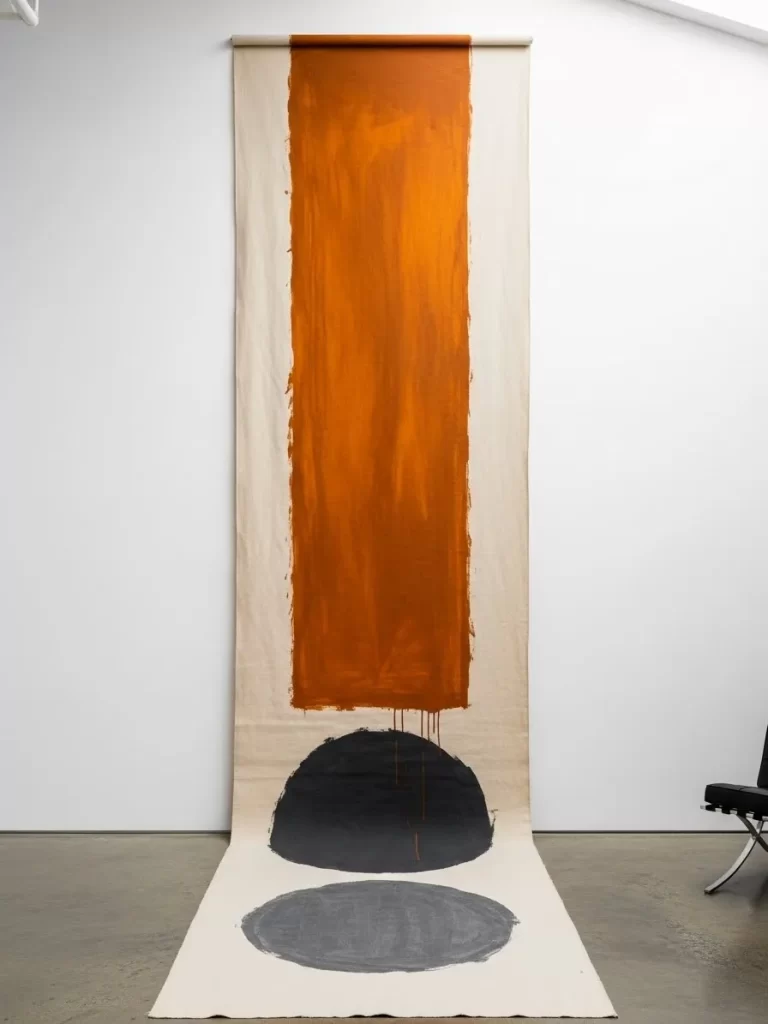
Make a massive impact with a towering floor to ceiling art piece that blurs the line between a painting and a room divider. This project features a long strip of raw canvas adorned with a giant burnt orange rectangle and moody charcoal circles. The way the fabric spills onto the floor adds a relaxed, gallery style atmosphere to any modern loft or open space.
Using a vertical scroll allows you to fill awkward tall gaps on your walls without needing expensive custom framing. The hand painted shapes feel intentional and bold, providing a focal point that grounds the entire room. This is a brilliant way to experiment with large scale color blocking while keeping your decor feeling light and movable.
Materials Required
- One extra long roll of heavy weight primed canvas
- Interior house paint in burnt orange and charcoal grey
- One large wooden dowel for the top
- Heavy duty adhesive or staples
Equipment Required
- Wide house painting brush
- Large round sponge for the circles
- Measuring tape
- Level
- Power drill
DIY Instructions
- Measure the height of your wall and cut the canvas so it is two feet longer than the wall height.
- Lay the canvas flat on a long drop cloth to protect your flooring.
- Paint a large orange rectangle starting from the top, leaving a few inches of white border on the sides.
- Use a large sponge dipped in charcoal paint to stamp the solid circles at the bottom.
- Allow the paint to dry for a full day before moving the fabric.
- Create a loop at the top of the canvas by folding it over and securing it with staples or glue.
- Slide the wooden dowel through the loop.
- Attach two mounting brackets to the very top of your wall near the ceiling.
- Place the dowel onto the brackets so the canvas hangs flush against the wall.
- Let the excess canvas pool naturally on the floor for that effortless designer look.
27 Textured Denim Star Quilt Art
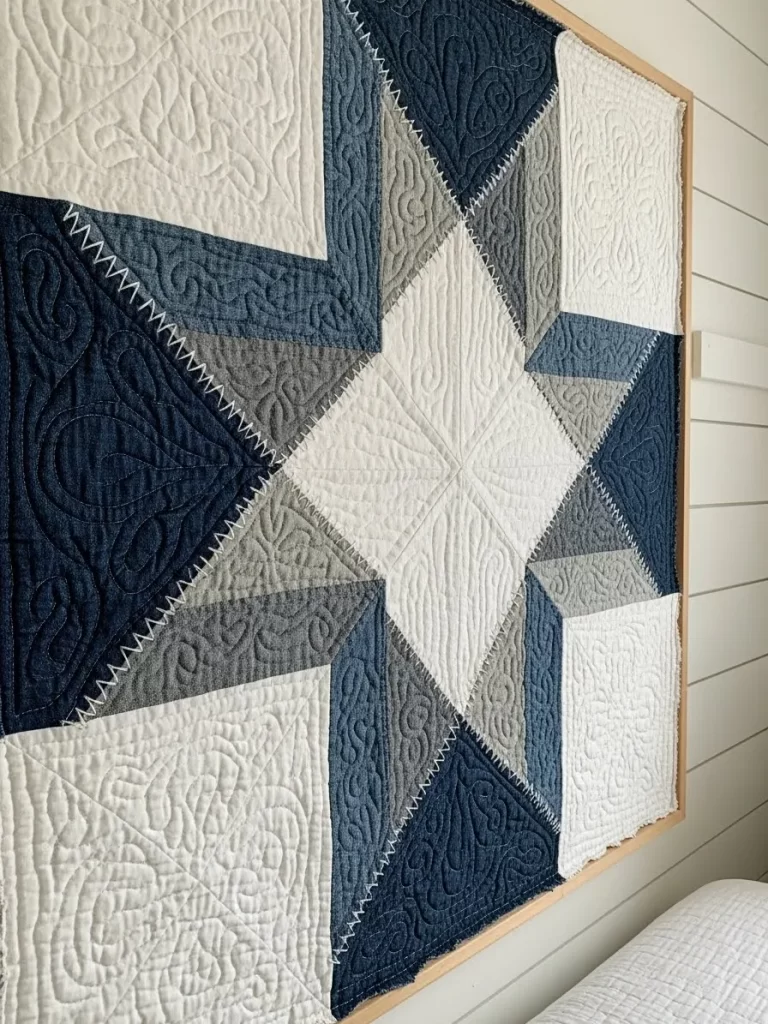
Celebrate traditional craftsmanship with a modern twist by framing a quilted star made from recycled denim. This piece combines various shades of indigo and grey to create a geometric pattern that feels both rugged and sophisticated. The intricate stitching adds a tactile layer that makes the wall feel warmer and more inviting.
Recycling old jeans into art is a sustainable way to preserve memories and reduce waste. The contrast between the soft fabric and a clean wooden frame creates a balanced look that suits farmhouse or industrial interiors. It is a stunning example of how textile art can provide more depth than a standard flat print.
Materials Required
- Assorted denim scraps in light, medium, and dark washes
- White cotton fabric for the background squares
- Quilt batting
- Large square wooden frame
Equipment Required
- Sewing machine
- Fabric scissors
- Rotary cutter and mat
- Iron
- Staple gun
DIY Instructions
- Cut your denim and white fabric into equal sized triangles using a rotary cutter.
- Arrange the triangles on a table to form a classic eight pointed star pattern.
- Sew the triangles together in rows to create the central star design.
- Press all your seams flat with an iron to ensure the quilt top stays crisp.
- Layer the star top over a piece of batting and a back fabric.
- Use your sewing machine to quilt a decorative pattern through all three layers.
- Trim the edges of the finished quilt square to fit your frame exactly.
- Remove the glass from your frame to let the texture of the denim shine.
- Stretch the quilt over a piece of foam board and staple it to the back.
- Place the board into the frame and hang it in a cozy reading nook or bedroom.
28 Stenciled Monstera Leaf Pop Art
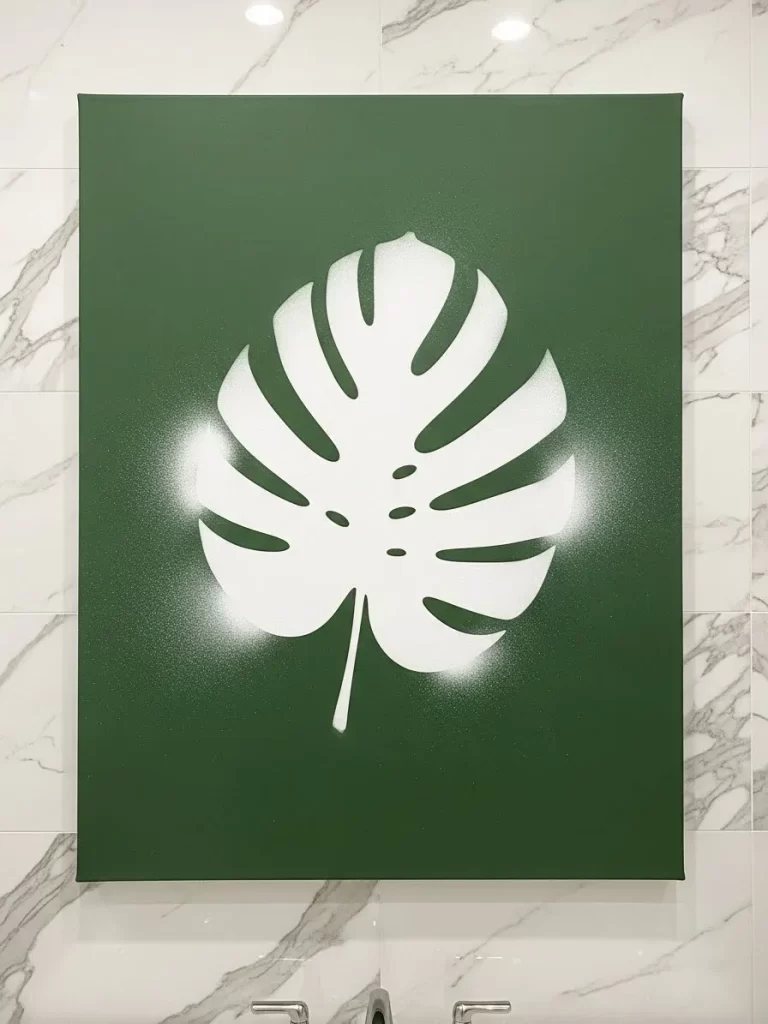
Bring a vibrant tropical energy to your bathroom or laundry room with a bold stenciled canvas. This project uses a bright forest green background and a crisp white leaf silhouette to create a clean, modern look. The subtle spray paint effect around the edges adds a layer of depth that makes the leaf appear to glow.
Using a stencil allows you to achieve professional results even if you do not have steady painting skills. This style of art works wonders for brightening up tiled spaces where traditional decor might feel out of place. It is a quick and affordable way to refresh your walls with a high contrast botanical theme.
Materials Required
- One medium sized pre stretched canvas
- Forest green acrylic paint
- White spray paint
- Large Monstera leaf stencil or a real dried leaf
- Low tack painter’s tape
Equipment Required
- Paint roller
- Protective mask
- Newspaper or drop cloth
- Level
DIY Instructions
- Roll two even coats of forest green paint onto the canvas and let it dry completely.
- Position your leaf stencil in the center of the green canvas.
- Secure the edges of the stencil with painter’s tape to prevent it from shifting.
- Cover the exposed green parts of the canvas with newspaper to protect them from overspray.
- Shake the white spray paint well and hold it about ten inches away from the stencil.
- Lightly spray over the stencil using short, even bursts to avoid drips.
- Wait a few minutes for the paint to set before carefully lifting the stencil.
- Allow the white paint to dry for at least four hours.
- Check the edges for any blurred lines and touch them up with a small brush if needed.
- Mount the canvas on your wall to add an instant splash of jungle inspired style.
29 Nautical Woven Rope Frame
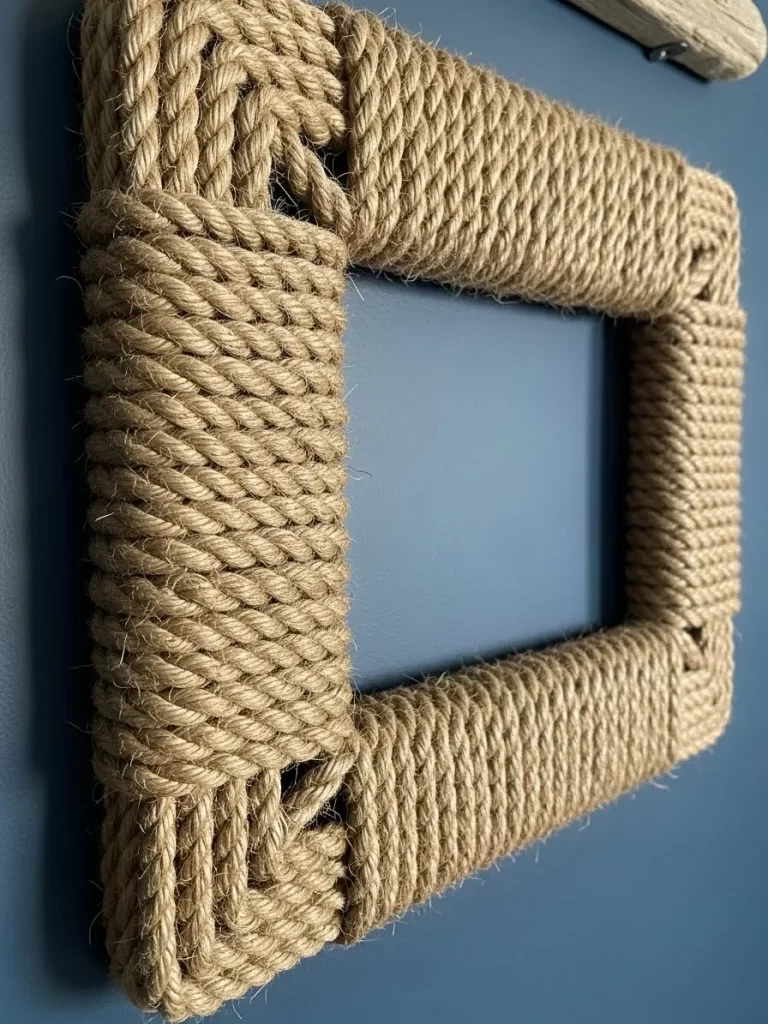
Give your mirrors or photos a rugged coastal upgrade with a hand wrapped rope frame. This project uses thick manila rope woven in a textured pattern to create a chunky, three dimensional border. It is a fantastic way to add a masculine, nautical touch to a bathroom or entry way with dark navy walls.
The natural tan color of the rope provides a beautiful organic contrast to smooth surfaces and metallic accents. This DIY project is incredibly durable and adds a lot of visual weight to a room without feeling cluttered. It turns a basic hardware store mirror into a custom designer piece that looks like it belongs in a high end beach house.
Materials Required
- One plain square or rectangular mirror with a flat frame
- 50 feet of thick manila or sisal rope
- High strength hot glue sticks
- Clear wood sealer spray
Equipment Required
- Glue gun
- Sharp utility knife or heavy scissors
- Measuring tape
- Painter’s tape
DIY Instructions
- Clean the surface of your existing mirror frame to ensure the glue bonds tightly.
- Protect the glass part of the mirror by covering it with paper and painter’s tape.
- Start at one corner and apply a thick line of hot glue along the outer edge.
- Press the end of the rope into the glue and hold it firmly until it sets.
- Begin wrapping the rope around the frame, applying glue as you go to keep it secure.
- Create a woven look by doubling back and layering the rope in a cross pattern at the corners.
- Ensure there are no gaps between the rows of rope so the original frame is hidden.
- Trim the end of the rope with a utility knife and tuck it neatly behind a previous layer.
- Spray the rope with a clear sealer to prevent fraying and make it easier to dust.
- Hang the mirror using heavy duty wall anchors to support the added weight of the rope.
30 Framed Vintage Sheet Music Triptych
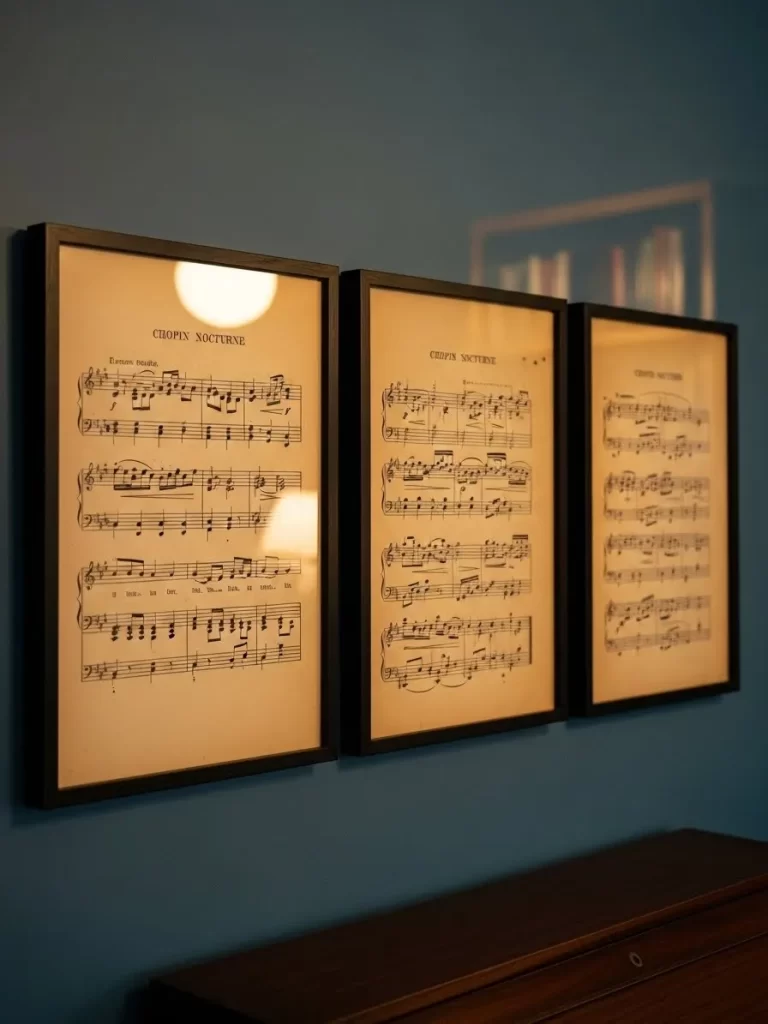
Celebrate your love for music with a sophisticated trio of framed vintage scores. This project uses aged, yellowed paper to bring a sense of history and quiet elegance to a piano room or study. The simple black frames provide a modern border that makes the classic notation look like fine art.
Arranging three identical frames in a horizontal line creates a sense of order and balance on a large wall. The warm tones of the old paper look stunning against deep blue or charcoal backgrounds. It is a meaningful way to display your favorite compositions while adding a cultured touch to your home.
Materials Required
- Three vintage sheet music pages (preferably from the same book)
- Three matching black picture frames
- Acid free white mat boards
- Archival tape
Equipment Required
- Glass cleaner
- Microfiber cloth
- Measuring tape
- Level
- Hammer and nails
DIY Instructions
- Carefully remove the chosen pages from your music book to avoid tearing the edges.
- Clean the glass on both sides for all three frames to ensure a streak free finish.
- Center the sheet music on the mat board and secure the top edge with archival tape.
- Place the mat and music into the frame, ensuring the paper is perfectly straight.
- Close the back of the frames and check for any dust trapped inside.
- Measure the width of your wall and mark the center point for the middle frame.
- Mark the positions for the outer two frames, leaving a consistent three inch gap between each one.
- Use a level to make sure all three nail marks are at exactly the same height.
- Drive the nails into the wall and hang your triptych slowly.
- Adjust the frames until they are perfectly aligned and enjoy your new musical gallery.
31 Modern Pantone Color Swatch Mural
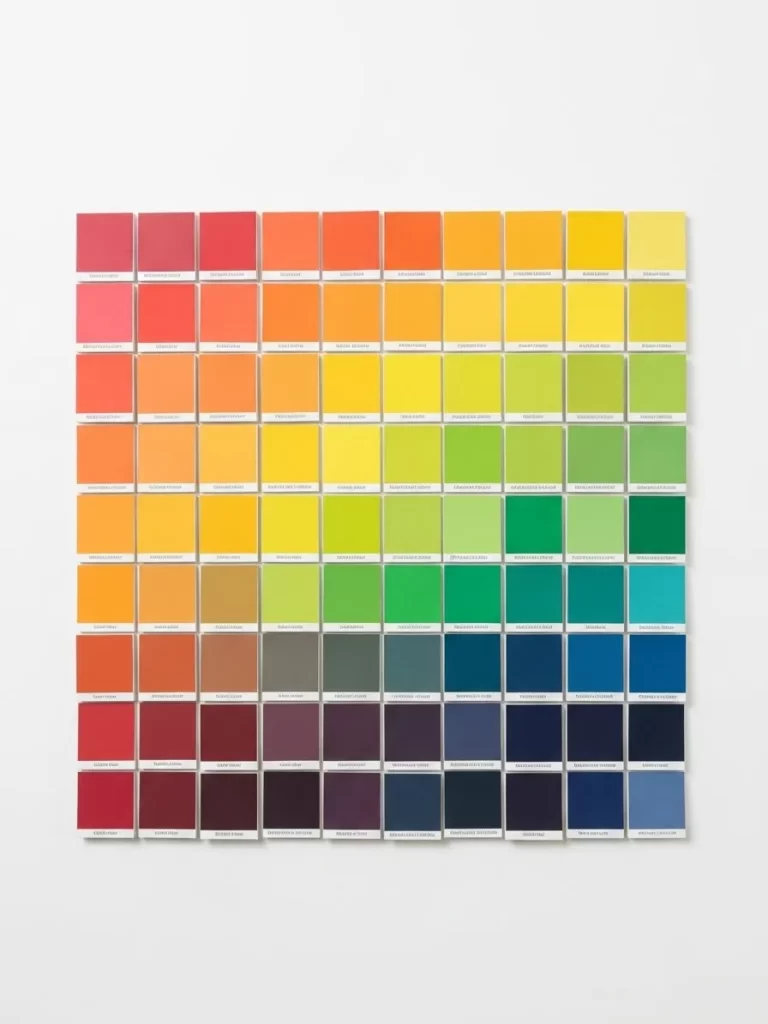
Inject a spectrum of joy into your workspace with a massive grid of colorful paint chips. This installation uses dozens of individual color swatches arranged in a precise gradient from deep reds to cooling blues. The clean white border around each square makes the colors vibrate with intensity against the wall.
This project is a dream for graphic designers or anyone who finds peace in color theory. It fills a large wall area with a high end look for virtually no cost using free samples from your local hardware store. The grid layout provides an architectural feel that remains playful and ever changing.
You can organize the colors by season or mood to keep your environment feeling fresh and inspired. Because the swatches are lightweight, they pose no risk to your walls and are incredibly easy to update. It is the ultimate customizable art piece for a modern, creative home.
Materials Required
- 80 to 100 paint sample swatches in a full rainbow spectrum
- Large white foam board or a clean white wall
- Double sided mounting tape or adhesive putty
Equipment Required
- Measuring tape
- Level
- Pencil
- Long metal ruler
DIY Instructions
- Collect a wide variety of paint swatches from a home improvement store, focusing on smooth gradients.
- Lay all the swatches out on a large table to organize them by hue and saturation.
- Determine the size of your grid and use a level to mark the top horizontal line on your wall.
- Measure the width of each swatch and calculate the exact spacing needed for a uniform look.
- Apply a small piece of double sided tape to the back of the first swatch in the top left corner.
- Press the swatch to the wall, ensuring it aligns perfectly with your pencil marks.
- Use your ruler to maintain a consistent half inch gap between every square.
- Work your way across the top row before starting the second row to keep the lines straight.
- Continue placing rows until your color gradient is complete and fills the designated space.
- Step back frequently to ensure the color transitions are smooth and the grid remains level.
32 Charred Wood 3D Acoustic Panel
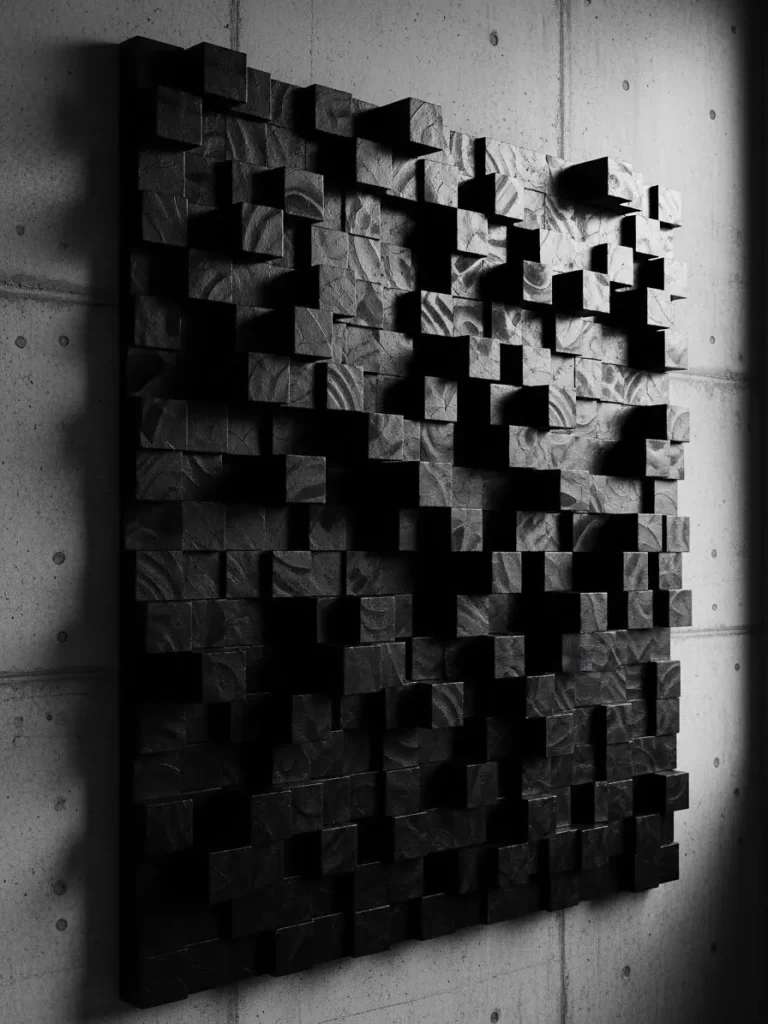
Bring a dramatic, sculptural element to your home theater or music room with a dark textured wood installation. This piece consists of hundreds of hand cut wood blocks of varying heights that create a mountain like topography. The deep black finish highlights the natural grain while the 3D surface helps to diffuse sound waves beautifully.
Using charred or stained wood adds a sense of luxury and mystery to an industrial or modern space. The play of light and shadow across the blocks changes throughout the day, making the wall feel like a living entity. It is a substantial project that serves as both high end art and functional acoustic treatment.
Materials Required
- 200 to 300 square wood blocks (cut from 2×2 or 4×4 timber)
- Large plywood backing board
- Black wood stain or a propane torch (for Shou Sugi Ban finish)
- Heavy duty construction adhesive
Equipment Required
- Miter saw
- Sandpaper
- Paint brush or torch
- Level
- French cleat hanging system
DIY Instructions
- Cut your wood timber into blocks ranging from one inch to four inches in height.
- Sand the top and sides of every block to ensure a clean finish after staining.
- Stain all the blocks a deep black or use a torch to safely char the surface for a matte look.
- Paint your plywood backing board black so no light wood shows through the gaps.
- Lay the board flat and arrange your blocks in a random pattern of varying heights.
- Apply a generous amount of construction adhesive to the bottom of each block.
- Press the blocks firmly onto the plywood, keeping them tightly packed together.
- Allow the adhesive to cure for at least forty eight hours before moving the panel.
- Attach the French cleat system to the back of the plywood and the wall.
- Lift the heavy panel into place and enjoy the dramatic new texture of your room.
33 Driftwood and Sea Glass Mobile
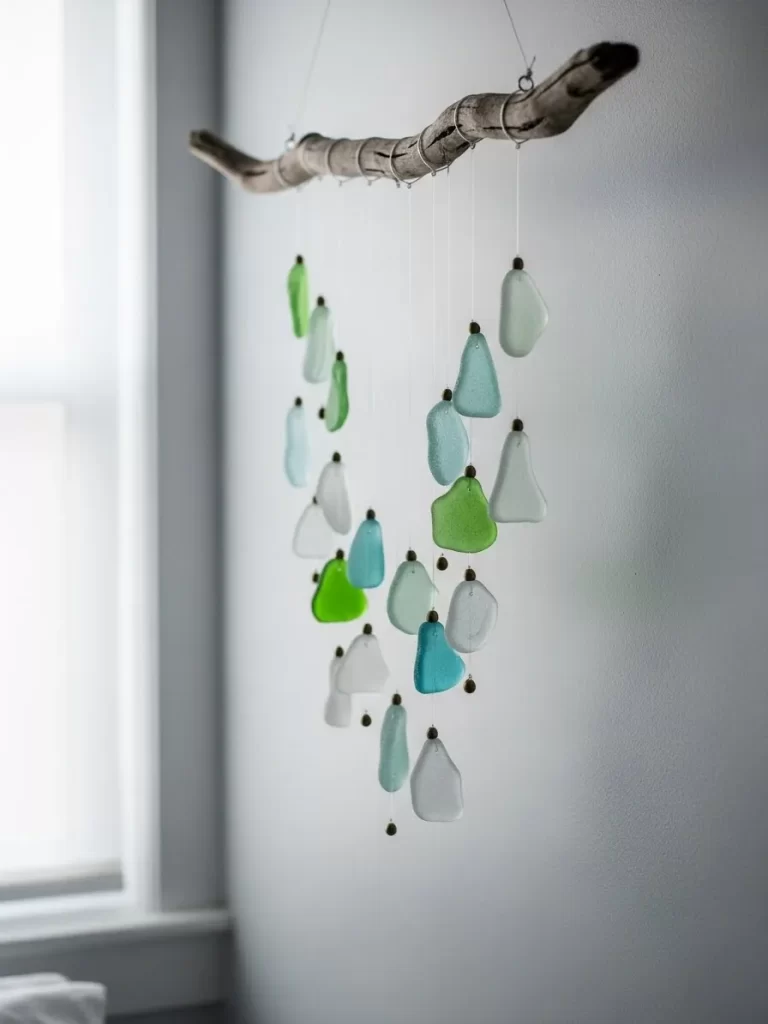
Capture the serene essence of the coast with a delicate hanging sculpture made from beach treasures. This piece features a weathered driftwood branch as the anchor for dozens of frosted sea glass shards. The soft greens, blues, and whites of the glass dangle at varying lengths, creating a sense of underwater movement.
This mobile is a perfect addition to a sunroom or a bathroom where light can pass through the translucent glass. The natural textures of the wood and the smooth edges of the sea glass provide an organic, calming focal point. It is a wonderful way to display a collection gathered over years of seaside walks.
Materials Required
- One curved piece of driftwood
- 20 to 30 pieces of sea glass in various colors
- Fine transparent jewelry wire or fishing line
- Small glass beads (for weight)
Equipment Required
- Small jewelry drill with a diamond bit
- Scissors
- Needle nose pliers
- Clear waterproof glue
DIY Instructions
- Sort your sea glass by color and size to plan a balanced visual flow.
- Use a jewelry drill to carefully create a tiny hole near the top of each piece of glass.
- Cut various lengths of transparent wire ranging from six inches to two feet.
- Thread a piece of wire through a glass shard and secure it with a small knot or bead.
- Tie the other end of the wire to the driftwood branch, spacing the strands evenly.
- Vary the heights of the glass shards to create a V shape or a random wave pattern.
- Add a small drop of clear glue to the knots on the branch to prevent them from sliding.
- Attach a sturdy hanging wire to the center and ends of the driftwood for balance.
- Hang the mobile near a window where the sunlight can illuminate the sea glass.
- Adjust the placement of the strands until the branch hangs perfectly level.
34 Minimalist Herbarium Kitchen Gallery
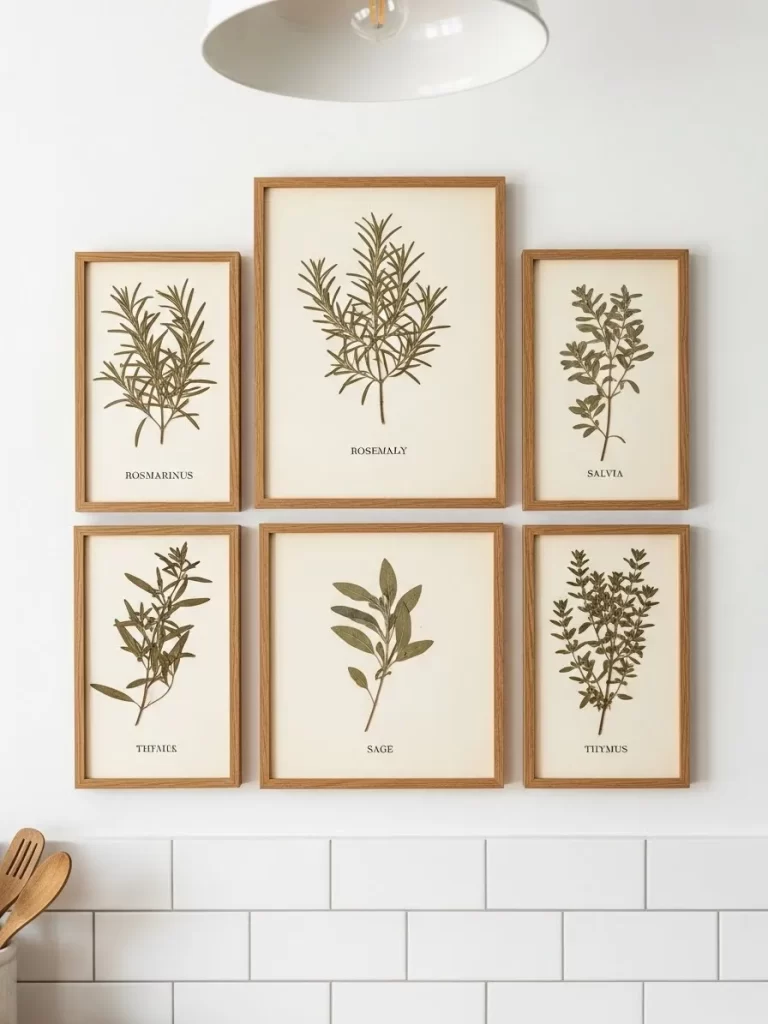
Transform your kitchen wall into a fresh botanical display with a series of framed herb specimens. These six matching frames feature classic kitchen herbs like rosemary, sage, and thyme printed on aged cream paper. The light oak frames and clean typography create a look that is both vintage and modern.
This gallery wall adds a layer of organic charm to a white tiled kitchen without adding clutter. The vertical arrangement makes the most of narrow wall spaces and brings a sense of life to the cooking area. It is a timeless design choice that celebrates the simple beauty of the ingredients we use every day.
Materials Required
- Six botanical herb prints on high quality cardstock
- Six matching light oak or natural wood frames
- White mat boards (if not included with frames)
Equipment Required
- Level
- Measuring tape
- Hammer and small nails
- Pencil
DIY Instructions
- Choose six different herb designs that have a consistent artistic style and color palette.
- Clean the frame glass thoroughly to remove any dust or fingerprints.
- Center each print within its frame and secure the back clips tightly.
- Measure the total width of your wall to find the exact center for the middle frames.
- Use a level and pencil to mark two horizontal lines for the top and bottom rows.
- Mark the nail spots for the center frames first, keeping them four inches apart vertically.
- Move outward and mark the spots for the remaining four frames with equal horizontal spacing.
- Drive your nails into the marks and hang the frames starting from the center.
- Check the alignment with your level to ensure every frame is perfectly straight.
- Step back and enjoy how the greenery softens the hard lines of your kitchen cabinets.
35 Neon CREATE Inspiration Sign

Light up your creative studio or home office with a vibrant pink neon sign that sets a bold mood. This modern light feature uses flexible LED neon to spell out a motivating word in a flowing, handwritten font. The glow reflects off dark walls to create a high energy atmosphere that is perfect for late night brainstorming sessions.
LED neon is a safe and energy efficient alternative to traditional glass neon tubes. It stays cool to the touch and is lightweight enough to hang on almost any wall surface. This piece acts as both a functional light source and a powerful piece of contemporary pop art.
Materials Required
- One custom LED neon sign (CREATE)
- Clear acrylic backing (usually comes with the sign)
- Wall mounting hardware or decorative chains
- Clear adhesive clips (to hide the power cord)
Equipment Required
- Power drill
- Screwdriver
- Level
- Tape measure
DIY Instructions
- Decide on a height that allows the sign to be seen clearly without being blocked by furniture.
- Hold the acrylic backing against the wall and use a level to make sure the text is straight.
- Mark the mounting holes on the wall through the pre drilled holes in the acrylic.
- Drill the holes and insert wall anchors if you are mounting directly into drywall.
- Screw the standoffs or mounting brackets into the wall securely.
- Align the sign with the brackets and tighten the decorative caps to hold it in place.
- Run the power cord down the wall in a straight line toward the nearest outlet.
- Use clear adhesive clips to pin the cord to the wall so it remains nearly invisible.
- Plug in the transformer and use the remote to adjust the brightness to your liking.
- Turn off the main overhead lights to see the full dramatic effect of the neon glow.
36 Abstract Bleached Indigo Tapestry
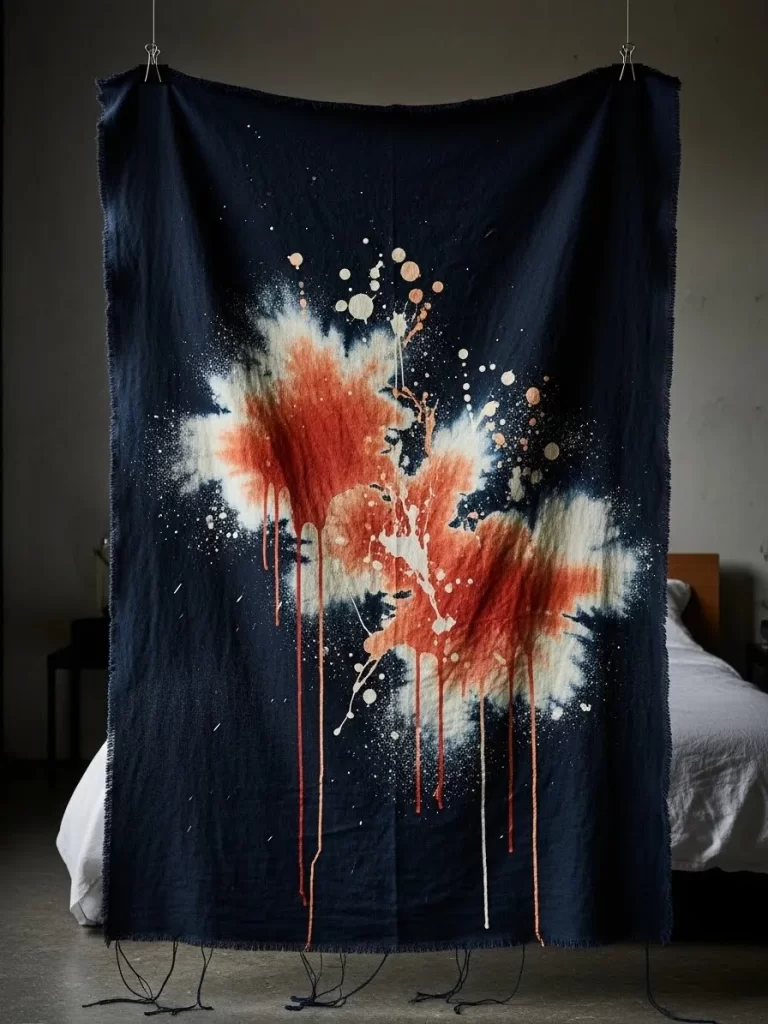
Create a dramatic focal point in your bedroom with a hand dyed textile hanging that feels like a work of modern art. This deep navy linen sheet features bold splashes of orange and white created through a specialized bleaching and dyeing process. The raw, frayed edges give the piece an effortless and organic feel.
Hanging a large fabric piece behind a bed acts as a soft, textured alternative to a traditional headboard. The chaotic, explosive patterns provide a sense of energy and movement that contrasts with clean white bedding. It is an affordable way to bring massive scale and high end style to a room.
Materials Required
- One large navy blue linen or heavy cotton sheet
- Household bleach in a spray bottle
- Fabric dye in terracotta or burnt orange
- Two large binder clips or a wooden magnetic hanger
Equipment Required
- Rubber gloves
- Plastic drop cloth
- Large bucket
- Protective mask
DIY Instructions
- Lay your navy sheet flat on a plastic drop cloth in a well ventilated outdoor area.
- Spray bleach randomly across the fabric to create large, irregular white spots.
- Watch the color change carefully and rinse the fabric with water once you reach a bright white.
- Scrunch the bleached sections of the damp fabric and dip them into a concentrated orange dye bath.
- Let the dye sit for twenty minutes before rinsing the entire sheet in cold water.
- Hang the fabric to air dry completely, allowing the natural wrinkles to remain for texture.
- Use two large metal binder clips to grab the top corners of the tapestry.
- Measure the center of your wall and drive two nails at the appropriate width for the clips.
- Hang the clips onto the nails so the fabric drapes naturally against the wall.
- Pull a few threads from the bottom edge to create a soft, distressed fringe.
37 Triptych Vintage Library Maps
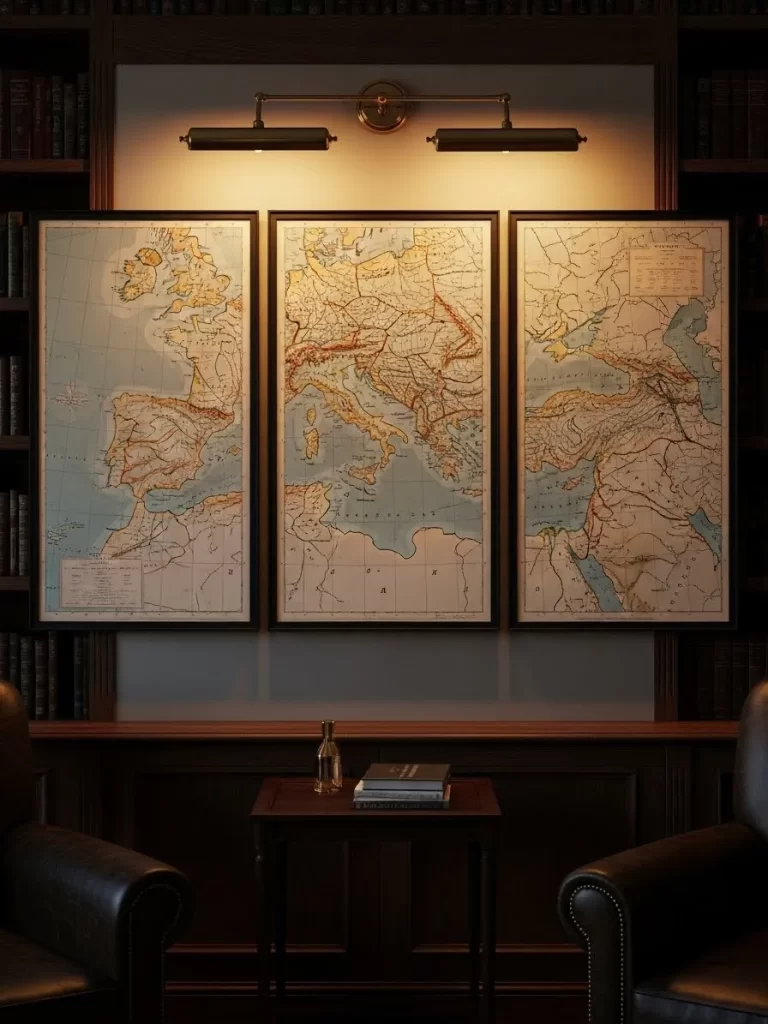
Evoke a sense of adventure and worldliness in your study with three oversized vintage maps. These detailed charts of Europe and the Mediterranean are displayed in thin black frames, creating a classic library aesthetic. The sepia tones and intricate topography add a layer of intellectual charm to a dark, moody room.
Using a triptych allows you to cover a vast wall area while keeping the individual pieces easy to handle. The maps serve as a great conversation starter and provide a timeless look that never goes out of style. This arrangement works perfectly above a low bookshelf or a leather sofa.
Materials Required
- Three large format vintage map prints
- Three identical thin black poster frames
- Double sided archival tape
Equipment Required
- Measuring tape
- Level
- Pencil
- Hammer and nails
DIY Instructions
- Lay your maps on a flat surface to ensure the borders and colors match across all three.
- Clean the frame glass with a microfiber cloth to remove any smudges.
- Place the maps into the frames, using archival tape to keep them from sliding if needed.
- Close the frame backs and ensure the hanging wire is at the same height on each one.
- Find the center of your wall and mark the spot for the middle map first.
- Mark the spots for the left and right maps, leaving a consistent three inch gap between them.
- Use a long level to make sure all three marks are perfectly horizontal.
- Drive your nails into the wall and hang the frames starting with the center piece.
- Adjust the outer frames until the gaps are perfectly uniform and the edges align.
- Install a long picture light above the center map to illuminate the fine details in the evening.
38 Hand Painted Tribal Pattern Canvas
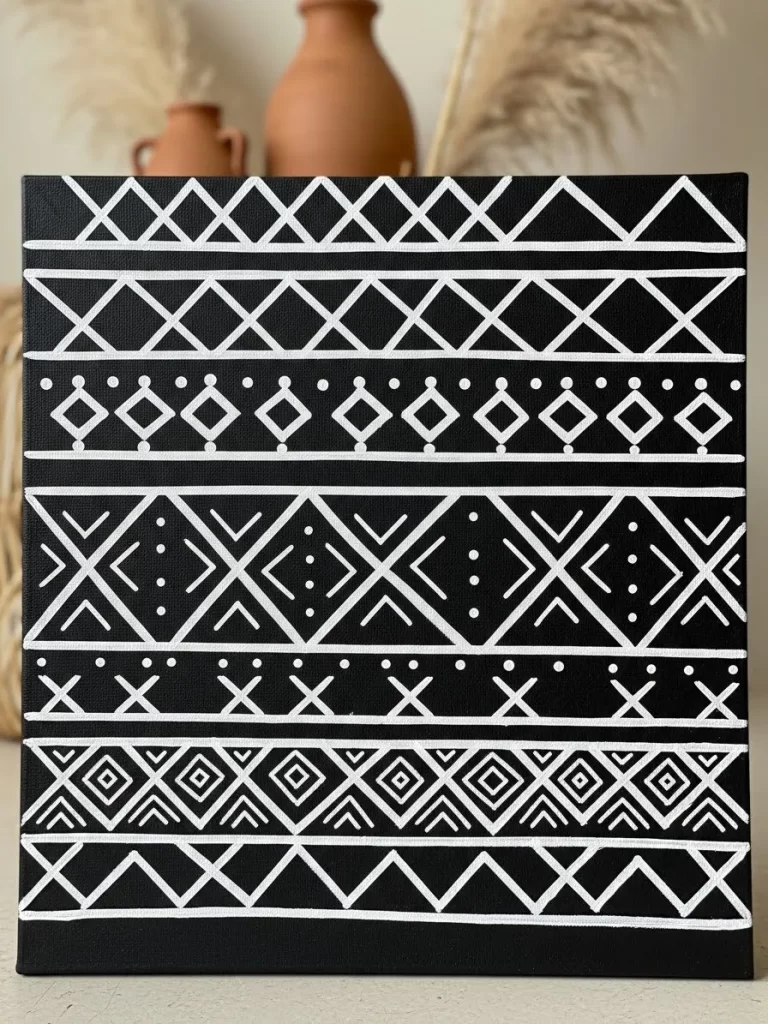
Add a graphic, boho touch to your decor with a monochromatic canvas featuring traditional tribal motifs. This project uses a black background and crisp white paint to create a series of geometric borders, triangles, and dots. The high contrast design feels modern while paying homage to ancient textile patterns.
This type of art is very forgiving for beginners because the hand drawn imperfections add to the authentic feel. It is a fantastic way to introduce pattern into a room without using too much color. This piece looks incredible when paired with natural elements like clay vases and pampas grass.
Materials Required
- One medium square pre stretched canvas
- Black acrylic paint (for the base)
- White paint marker or fine tip brush with white paint
- Pencil and ruler
Equipment Required
- Wide paint brush
- Small jar of water
- Paper towels
DIY Instructions
- Paint the entire canvas with two coats of solid black acrylic paint and let it dry.
- Use a ruler and pencil to lightly draw horizontal guide lines across the canvas.
- Plan your patterns within the rows, such as zig zags, diamonds, and dashed lines.
- Start from the top and use your white paint marker to draw the first geometric border.
- Move to the next row and fill it with a different repeating pattern for variety.
- Use dots and small circles to fill in the larger gaps between the geometric shapes.
- Keep your hand steady and apply even pressure to the marker for consistent line work.
- Allow the white paint to dry for at least one hour before touching the surface.
- Erase any visible pencil marks gently once the paint is fully cured.
- Hang the canvas in a spot with good lighting to highlight the intricate white details.
39 Oversized Scrabble Tile Word Art
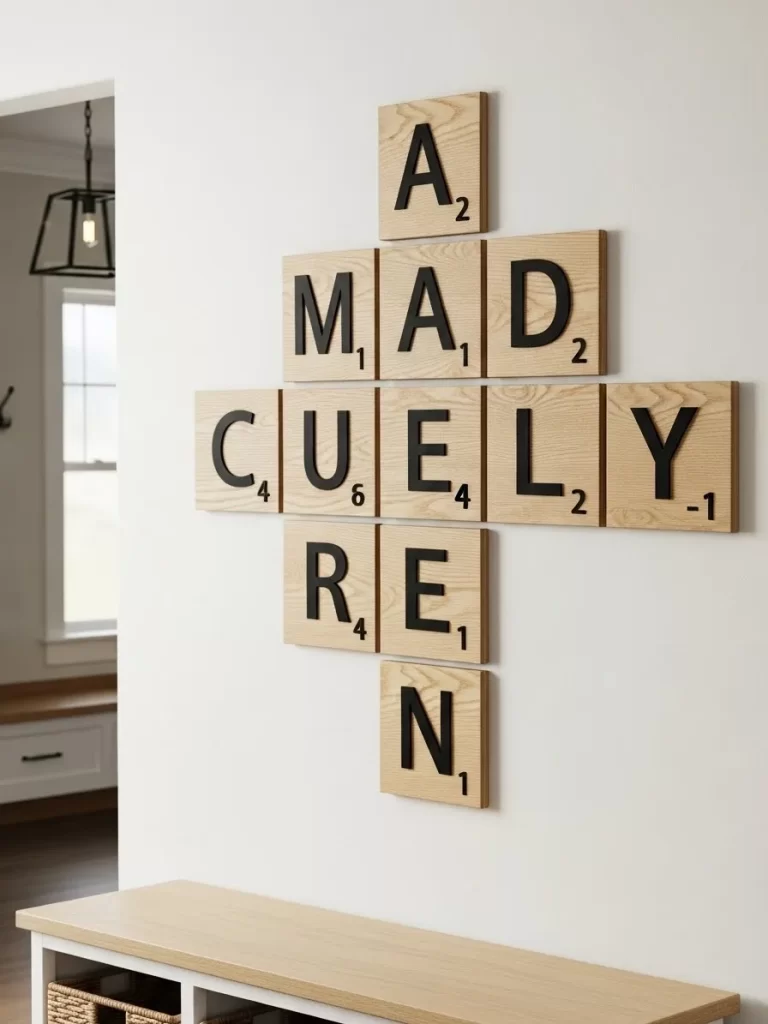
Personalize your entryway with a playful installation of giant wooden Scrabble tiles. This project uses large square boards to spell out the names of family members or meaningful words in a crossword layout. The natural wood grain and bold black letters create a warm, inviting feel that welcomes guests into your home.
This art piece is modular, meaning you can add more tiles as your family grows or as you find new words to include. It is a creative way to fill a large vertical wall space and adds a unique, custom element to your decor. The oversized scale turns a familiar game into a sophisticated design feature.
Materials Required
- 12 to 15 square wooden boards (10×10 inches)
- Black vinyl letter decals or black paint
- Wood stain in a light oak or pine finish
- Small Command strips for hanging
Equipment Required
- Sandpaper
- Paint brush or foam roller
- Measuring tape
- Level
DIY Instructions
- Sand the edges and surfaces of every wooden board until they are smooth to the touch.
- Apply a thin coat of wood stain to each board to bring out the natural grain.
- Allow the stain to dry completely for twenty four hours before applying the letters.
- Position your black vinyl letters in the center of each board to spell out your words.
- Add a small number in the bottom right corner of each tile to represent the Scrabble point value.
- Lay the tiles out on the floor to plan your crossword layout and ensure the names intersect correctly.
- Use a level and pencil to mark the position of the very top tile on your wall.
- Apply Command strips to the back of the tiles for a damage free hanging solution.
- Press the tiles onto the wall one by one, using the level to keep them perfectly square.
- Ensure the gaps between the tiles are consistent to maintain the look of a real game board.
Decorating your home is a continuous process of self expression. These ideas show that anyone can build a beautiful environment with a little effort. You now have the tools and steps to refresh every corner of your house.
Start with the project that speaks to your current mood or needs. Small changes often lead to a massive shift in how you feel about your space. Your walls are ready for their new look.
Creating beauty should be a joyful experience for you and your family. Take your time with each step. The final result will be a home that truly feels like your own.
Key Takeaways
Custom art adds character without requiring professional skills. Using your hands to build decor creates a deep connection to your living space.
Repurposed materials help save money while protecting the environment. Thrift stores and nature provide endless supplies for your next masterpiece.
Varying textures like wood and fabric creates visual depth. A mix of different art styles makes a room feel curated and professional.