Do you stare at your blank walls? It can make a room feel unfinished. Your home should show who you are.
Many people feel stuck. They think decorating is too expensive. Custom art costs a lot of money.

You do not need to be a professional artist. You also do not need a huge budget.
These 40 creative DIY wall art ideas will change your space. Get ready to personalize your home and make your walls interesting.
1. Minimalist Line Art Canvas

This style brings a clean, modern feel to any room. It uses a single continuous line to create a striking image, often a face or figure. The simplicity is its strength.
Adding simple blocks of color behind the line art gives it depth. This abstract touch makes the piece unique. You can match these colors to your room’s decor for a cohesive look. It’s a personal piece of art without complex techniques.
DIY Instructions:
Materials:
- Blank canvas (any size)
- Pencil and eraser
- Acrylic paint (black, plus 1-2 background colors like tan or rust)
- Fine-tip paintbrush (for lines)
- Medium flat paintbrush (for color blocks)
- A cup of water (for rinsing brushes)
- Paper towels
- A reference image for your line art (search “minimalist face line art”)
Steps:
- Find Your Design: Search online for a simple line art design you like. A face, flower, or animal works well.
- Sketch the Color Blocks: Look at your reference. Decide where you want your simple color shapes to go. Lightly sketch these shapes onto the canvas with your pencil.
- Paint the Blocks: Use your medium flat brush to paint inside the shapes you just sketched. Use your chosen background colors. Don’t worry about staying perfectly in the lines. Let this paint dry completely (about 20-30 minutes).
- Sketch the Main Art: Once the blocks are dry, lightly sketch your main line-art design over the canvas with your pencil. Draw lightly so you can erase if needed.
- Paint the Lines: Take your fine-tip brush and the black paint. Dip the very tip of the brush in the paint. Slowly and carefully trace over your pencil lines. Try to make the line flow smoothly.
- Add Details: Use the same black paint and fine-tip brush to add details, like the flowers in the image.
- Dry and Display: Let the entire canvas dry for at least an hour. Once dry, it’s ready to hang.
2. Textured Woven Wall Hanging

This is a “macra-weave,” a style that mixes thick, soft yarns with weaving techniques. It brings warmth and dimension to a wall. The piece in the image uses earthy colors like rust, gold, and olive green.
Different textures make it interesting. You see chunky, unspun wool for clouds, tight braids, and loose tassels. It all hangs from a single natural branch. This kind of art softens a room and adds a handmade feel.
DIY Instructions:
Materials:
- A sturdy branch or wooden dowel
- Thin, strong cotton string (this is your “warp” string)
- A simple weaving loom or a sturdy piece of cardboard (about 12×16 inches)
- Scissors
- A variety of yarns: chunky wool, medium-weight in different colors, and thin string
- A wide-tooth comb
Steps:
- Make a Loom (if needed): If using cardboard, cut 1/2-inch deep slits every 1/2-inch along the top and bottom edges.
- Warp Your Loom: Tie your thin cotton string to the top left slit. Pull it down to the bottom left slit. Wrap it up, over, and back down to the next slit. Repeat this across the entire loom. Keep the strings tight. Tie it off at the end.
- Start Weaving: Cut a long piece of your first yarn color. Start at the bottom. Weave the yarn “over, under, over, under” across the warp strings.
- Weave Back: On the way back, do the opposite. If you went over a string, go under it this time.
- Pack it Down: After every few rows, use your comb to push the woven yarn down. This keeps it tight.
- Add Texture: To make the puffy “clouds,” lay a thick piece of chunky yarn across the warp strings. Weave 3-4 rows of regular yarn above it to lock it in place. Then, gently pull the chunky yarn up to create loops.
- Add Fringe: To make the hanging tassels, cut ten 1-foot-long pieces of yarn. Fold the bunch in half. Push the folded loop under two of your bottom warp strings. Pull the loose ends through the loop and pull tight. This is a “Rya knot.” Repeat as desired.
- Finish: When your weaving is done, carefully cut the warp strings from the back of your loom. Tie the top loops onto your branch. Tie the bottom strings together in pairs to secure the weaving.
3. Rustic Crate Shelf Collage

Wooden crates become functional art. This design uses many crates in different sizes and finishes. Some are painted white, some are stained dark, and others are left natural.
They are arranged in a playful, overlapping cluster. This creates a geometric, 3D effect on the wall. It is a smart way to get storage and a statement piece at the same time. You can display books, plants, or small treasures.
DIY Instructions:
Materials:
- Several wooden crates (3-6, in different sizes)
- Sandpaper (medium grit)
- Paint or wood stain (in your chosen colors)
- Paintbrushes or old rags (for staining)
- Power drill
- Long wood screws (at least 2 inches long)
- Wall anchors
- A stud finder
- A level
Steps:
- Prep the Crates: Sand any rough edges or splinters off the crates. Wipe them clean with a dry cloth.
- Paint or Stain: In a well-ventilated area, paint or stain your crates. Let them dry completely, for at least 3-4 hours.
- Plan Your Layout: Arrange the crates on the floor. Move them around until you find a design you like. Take a photo of it with your phone.
- Find Wall Studs: Use your stud finder to locate the studs in your wall. Mark them lightly with a pencil. Your shelves will be most secure if you screw them into studs.
- Hang the First Crate: Start with the main, or lowest, crate in your design. Hold it against the wall. Use your level to make sure it is straight.
- Drill and Secure: Drill a hole through the inside back of the crate and into the wall stud. If there is no stud, drill a hole and tap in a wall anchor.
- Attach Crate: Use your drill to drive a screw through the crate and into the wall anchor or stud. Use two screws for each crate.
- Build the Cluster: Add the next crate. As you attach it to the wall, you can also drill a screw through its side to connect it to the first crate. This makes the whole structure stronger.
- Check Level: Use your level on every crate before you attach it. Continue until your full design is on the wall.
4. Watercolor Galaxy Painting

You can create a vibrant galaxy on paper. This piece uses watercolor paints. Deep blues, bright pinks, and purples blend together on the paper.
The colors bleed into each other to form cosmic clouds. White paint, splattered with a toothbrush, creates a field of stars. It is a simple technique that gives you a stunning result. Each one will be unique.
DIY Instructions:
Materials:
- Watercolor paper (this is important, it is thick and won’t curl)
- Watercolor paints (blue, purple, pink, black)
- A medium-sized paintbrush
- Two jars of clean water
- Masking tape
- A hard board (like a clipboard or a piece of cardboard)
- An old toothbrush
- White acrylic paint (or white gouache)
Steps:
- Tape Your Paper: Tape all four edges of the watercolor paper to your hard board. This stops it from curling when it gets wet.
- Wet the Paper: Use your paintbrush to apply a clean, even coat of water to the entire paper inside the tape. It should be shiny but not have puddles.
- Add Color: Dip your brush in water, then into your blue paint. Tap the brush onto the wet paper. Watch the color spread.
- Blend: Clean your brush. Add pink and purple in other areas. Let the colors touch and bleed into each other.
- Add Depth: While the paper is still wet, add a few small touches of black paint. This creates the deep space effect.
- Dry Completely: Let the painting air dry. This can take an hour.
- Make the Stars: Put a small dab of white acrylic paint on a plate. Dip the tips of the toothbrush bristles in the white paint.
- Splatter: Hold the toothbrush over your painting. Use your thumb to flick the bristles. This will create a fine spray of stars.
- Finish: Let the white paint dry. Slowly peel off the masking tape to reveal a clean, sharp border.
5. Pressed Flower Floating Frames

This project brings nature indoors. Real flowers and leaves are pressed flat and preserved. They are then arranged inside glass “floating” frames.
These frames have two panes of glass, which makes the plants look suspended. The thin metal borders, often gold or brass, add an elegant touch. Grouping several frames of different sizes creates a beautiful, delicate gallery wall.
DIY Instructions:
Materials:
- Fresh flowers and leaves (choose thinner ones, as bulky flowers are hard to press)
- A heavy book (like a textbook or phone book)
- Parchment paper
- Floating glass frames (with metal or wood edges)
- Tweezers (optional, but helpful)
Steps:
- Collect Your Plants: Pick flowers and leaves on a dry day. Moisture can cause mold.
- Arrange for Pressing: Open your heavy book to the middle. Lay down a sheet of parchment paper.
- Place Flowers: Arrange your flowers and leaves on the parchment paper. Make sure none of them are overlapping.
- Press: Place another sheet of parchment paper on top of the flowers. Carefully close the book.
- Add Weight: Stack several more heavy books on top of the first one.
- Wait: Be patient. Leave the flowers to press for 2 to 4 weeks. They must be completely dry and paper-thin.
- Open the Frame: Carefully open your floating frame and clean both panes of glass.
- Arrange Your Art: Use tweezers to gently arrange your dried flowers on one of the glass panes.
- Close the Frame: Place the second pane of glass on top. Carefully secure the frame’s latch or clips. It is ready to hang.
6. Minimalist Plaster Art

Texture is the main focus of this art. It uses joint compound, or plaster, on a canvas. The material is spread thickly.
Tools like putty knives and combs are used to create patterns. You can see wide scrapes, thin ridges, and smooth patches. The piece might be all white for a subtle look, or have blocks of muted color. It is a very modern and sophisticated project.
DIY Instructions:
Materials:
- A blank canvas
- Pre-mixed joint compound (from a hardware store)
- Putty knives (a wide one and a small one)
- A notched trowel (for tile) or a wide-tooth plastic comb
- Acrylic paint (optional, in neutral colors like tan or gray)
- A disposable cup and stir stick
Steps:
- Tint Your Plaster (Optional): If you want color, scoop some joint compound into your disposable cup. Add a small squirt of acrylic paint and stir it until the color is fully mixed.
- Apply to Canvas: Scoop a large amount of the plain or tinted compound onto your canvas.
- Spread It: Use your wide putty knife to spread the compound over the canvas. It is like frosting a cake. You can make it thick.
- Create Texture: While the compound is wet, use your tools. Drag the notched trowel across it to make lines.
- Add More Shapes: Use your small putty knife to add shapes. Press it flat and lift it up to create peaks.
- Layer: You can add a different colored section next to your first one. Spread it and create a different texture.
- Dry Completely: This is the most important step. Lay the canvas flat in a safe place. It needs to dry for 24 to 48 hours. It must be completely hard before you hang it.
- Hang: Once fully dry, hang your new textured art.
7. Paint Chip Pixel Art

This project turns free paint samples into graphic art. Small squares are cut from paint chips. These squares become “pixels.”
They are arranged on a white grid. You can create any shape: a heart, a monogram, or an old-school video game character. The colors blending together give it a “gradient” effect. This is a low-cost but high-impact project.
DIY Instructions:
Materials:
- A large white poster board or foam core board
- A pencil and a long ruler
- Many paint chips in a gradient of colors (e.g., from light red to dark red)
- A 1-inch square paper punch (or scissors and a 1-inch template)
- A glue stick
Steps:
- Create Your Grid: Use your pencil and ruler to draw a light grid on your poster board. Make each square 1 inch by 1 inch.
- Punch Your Pixels: Use the square paper punch to cut out dozens of colored squares from your paint chips. This is faster than using scissors.
- Group Your Colors: Sort your cut squares into piles by color, from lightest to darkest.
- Plan Your Design: Lightly sketch your shape (like the heart) onto the grid.
- Start Gluing: Start with one color. Apply glue to the back of a paint chip square using the glue stick.
- Place the Pixel: Press the square down onto one of the grid squares, following your design.
- Create the Gradient: Fill in your shape, arranging the colors from light to dark. For example, start with light red on the left side of the heart and finish with dark red on the right.
- Fill It In: Continue gluing squares until your design is complete. Let the glue dry before framing or hanging.
8. Vinyl Record Display Ledges

Show off your music collection as wall art. This idea uses very narrow, shallow shelves. These are “picture ledges,” and they are just deep enough to hold a record cover.
The record covers themselves are often works of art. Arranging them in neat rows creates a clean, graphic display. It is also easy to swap out the records to change the room’s mood.
DIY Instructions:
Materials:
- Several “picture ledges” (available at stores like IKEA or Target)
- A level
- A power drill
- Screws
- Wall anchors
- A stud finder
- A pencil
Steps:
- Plan the Layout: Decide where you want your rows of shelves. Hold the first ledge against the wall. Use your level to make sure it is straight.
- Mark Your Line: When it is level, lightly trace under it with a pencil.
- Find Studs: Use your stud finder to locate the studs along your pencil line. Mark these spots. It is best to anchor shelves to studs.
- Mark Drill Holes: Hold the shelf back on the line. Mark the wall through the screw holes on the shelf. Try to hit the studs you marked.
- Drill and Anchor: Set the shelf down. Drill your holes. If a hole is not on a stud, gently tap a wall anchor into that hole with a hammer.
- Attach Shelf: Hold the shelf back up, aligning the holes. Use your drill to drive the screws through the shelf and into the wall (or the anchors).
- Repeat: Measure the distance you want between your rows (about 14-16 inches). Repeat the process for the other shelves. Use your level every time.
- Display: Once all shelves are secure, set your favorite records on them.
9. Alcohol Ink Art Tiles

This project creates vibrant, swirling designs that look like watercolor. It uses alcohol inks, which are very bright, concentrated dyes.
When dropped onto a non-porous surface like a ceramic tile, the inks spread. Using an air puffer or a straw to blow the ink creates new patterns. Gold ink is often added for a rich, metallic accent. These can be coasters or grouped as a larger wall piece.
DIY Instructions:
Materials:
- White, glossy ceramic tiles (4×4 inch)
- Alcohol inks (2-3 colors you like, plus one metallic gold)
- Rubbing alcohol (90% or higher)
- An air puffer (for keyboards) or a simple drinking straw
- Disposable gloves
- A plastic sheet to protect your table
Steps:
- Protect Your Space: Put on your gloves. Alcohol inks stain. Cover your work surface with the plastic sheet.
- Clean Tile: Wipe your ceramic tile with a paper towel and rubbing alcohol. This removes any dust or oils.
- Drop Inks: Squeeze 1-2 drops of your first ink color onto the tile. Add a drop of a second color next to it.
- Add Alcohol: Squeeze a few drops of the plain rubbing alcohol onto the inks. This makes them spread and blend.
- Move the Ink: Use your air puffer (or blow gently through a straw) to move the inks around. Blow from the center out to the edges.
- Add Gold: Add a single drop of the metallic gold ink. Use the air to blow it through the other colors.
- Dry: Stop when you like the design. The alcohol evaporates very quickly. The tile will be dry to the touch in just a few minutes.
- Seal: If you want to use these as coasters, you must spray them with a clear acrylic sealer. This protects the art from water.
10. Wine Cork Mosaic Box

This project recycles wine corks into a personal piece of art. The corks are arranged inside a deep shadow box frame.
Most corks are set standing up, showing the plain tan cork. To create a design, the wine-stained ends of red wine corks are used. In this image, they form a wine glass shape. It is a wonderful way to save memories from special occasions.
DIY Instructions:
Materials:
- A deep shadow box frame (at least 1.5 inches deep)
- A large collection of wine corks (you will need many)
- A hot glue gun and plenty of glue sticks
- A pencil
- A piece of paper or cardstock cut to fit the back of the frame
Steps:
- Prepare the Frame: Open the back of the shadow box. Take out the backing panel.
- Draw Your Design: On your piece of paper, lightly sketch a simple design. A wine glass, a heart, or a single letter works well.
- Sort Your Corks: Separate your corks. You need regular tan corks for the background and red-stained corks for your design.
- Glue the Design: Place your paper template onto the backing panel. Use your hot glue gun to put a dab of glue on the stained end of a cork. Press it down onto your sketched design. Repeat until your shape is filled.
- Fill the Background: Now, glue the regular corks. Put glue on the side of a cork and place it standing up on the backing panel.
- Pack Them In: Pack the background corks in tightly around your design. You may need to cut some corks in half with a utility knife (be careful!) to fill small gaps.
- Reassemble: Once the entire panel is full and the glue is cool, place it back into the shadow box frame. Secure the back, and it is ready to hang.
11. Geometric Color Block Mural

This project turns a plain wall into a modern mural. It uses painter’s tape to create sharp, geometric shapes. Triangles, circles, and rectangles overlap in a dynamic design.
The color palette is key. This one uses deep teal, rust, gold, and pale pink. The blocks of color are painted in. When the tape is removed, it reveals clean white lines between the shapes. This creates a bold, graphic focal point in the room.
DIY Instructions:
Materials:
- Painter’s tape (high quality, like FrogTape)
- A level
- A pencil and a long ruler or yardstick
- Paint in your chosen colors (small sample pots are often enough)
- Paintbrushes (a 2-inch angled brush and a small artist’s brush)
- A paint tray
- Tools for circles: a round object to trace (like a large bowl) or a pin and string to make a compass.
Steps:
- Plan Your Design: Lightly sketch your geometric design on the wall with a pencil. Use your ruler and level to get straight, sharp lines.
- Tape the Lines: This is the most important step. Apply painter’s tape on the outside of the lines you drew. Press the edges down firmly to prevent paint from bleeding underneath.
- Tape Circles: To tape a circle, trace it with a pencil. Then, carefully apply small, overlapping pieces of tape along the inside of the circle line.
- Paint Your First Color: Pour your first color into the paint tray. Use your angled brush to paint inside one of your taped-off shapes. Paint from the tape’s edge inward to help seal it.
- Paint Other Shapes: Continue painting your different shapes with their chosen colors.
- Wait for it to Dry: Let the paint become almost dry, but not fully cured (about 1-2 hours). If you wait too long, the paint might peel off with the tape.
- The Reveal: Slowly and carefully pull the painter’s tape off at a 45-degree angle. This should leave you with crisp, clean shapes.
- Touch-ups: If any paint bled, use your small artist’s brush and your wall’s original paint color to clean up the edges.
12. Framed Fabric Swatches

This is a simple way to create custom art from textiles. The project uses scraps of beautiful fabric. These can be velvet, a patterned rug, or a colorful print.
Each piece of fabric is cut to size and placed in a simple picture frame. The texture and color of the fabric become the art. Grouping four different frames with coordinating textiles creates a rich, layered gallery wall.
DIY Instructions:
Materials:
- Picture frames (all matching, or a mix of styles)
- Fabric scraps (velvet, old scarves, rug remnants, patterned cloth)
- The paper insert that comes inside the frame
- Scissors
- Tape (double-sided tape works well)
Steps:
- Disassemble Frames: Open the back of your picture frames. Take out the paper insert or mat.
- Use as a Template: Lay your paper insert on top of your fabric scrap.
- Cut Your Fabric: Carefully cut the fabric, using the paper as your guide. Make it the exact same size as the paper.
- Secure the Fabric: Place the cut fabric on top of the frame’s backing board (the hard piece of cardboard).
- Add Tape: To stop the fabric from slipping, use a small piece of double-sided tape on the back of the fabric to stick it to the backing board.
- Reassemble: Place the fabric-covered backing back into the frame. If your frame has a glass front, you can choose to keep it in (for a sleek look) or leave it out (to show off the fabric’s texture).
- Secure and Hang: Close up the back of the frame and hang it on the wall. Repeat with your other fabric pieces.
13. Punch Needle Wall Art

This art has a unique, hooked-rug texture. It is made using a “punch needle.” This tool pushes loops of yarn through a special backing cloth.
The image shows abstract rainbows and shapes. The tightly packed loops create a soft, 3D effect. The piece hangs from a simple wooden dowel. It adds a cozy, handmade element to the wall.
DIY Instructions:
Materials:
- A punch needle tool
- A “no-slip” embroidery hoop or a wooden stretcher frame
- Monk’s cloth or weaver’s cloth (this is the special backing fabric)
- Yarn in various colors
- A marker
- Scissors
- A wooden dowel
- Twine for hanging
Steps:
- Stretch Your Fabric: Stretch the monk’s cloth as tightly as possible in your hoop or frame. It should be “tight as a drum.”
- Draw Your Design: Use your marker to draw your design (like the rainbows) directly onto the back of the fabric. Remember, your design will be mirrored on the front.
- Thread Your Needle: Follow your punch needle’s instructions to thread the yarn through it.
- Start Punching: Hold the needle like a pen, with the open, sharp side facing the direction you are moving. Push the needle all the way down through the fabric, until the handle touches it.
- Pull Up and Slide: Pull the needle just back up to the surface of the fabric. Do not lift it high. Slide it over about 1/8 of an inch along your line.
- Punch Again: Push the needle all the way down again. This creates a loop on the other side.
- Fill the Shape: Repeat this “punch, slide, punch” motion. Fill the outlines of your design first, then fill in the centers.
- Finish: When done, snip the yarn tails on the back. You can trim the loops on the front for a different texture, or leave them looped.
- Hang: Remove the fabric from the hoop. Sew a simple pocket along the top edge, slide your dowel through, and tie on a piece of twine.
14. Wood Bead Wall Garland

This is a simple, rustic decoration. It is a long garland made of natural wooden beads in various sizes. The beads are strung on a piece of twine or leather cord.
To add interest, some beads are painted. This one has beads with polka dots and simple patterns. Large yarn tassels at the ends complete the look. It can be draped over a shelf, a frame, or hung on its own.
DIY Instructions:
Materials:
- Wooden beads (in several sizes, from small to large)
- Twine, jute cord, or leather lacing
- Yarn (for the tassels)
- Acrylic paint (optional, for custom beads)
- A small paintbrush (optional)
- Scissors
Steps:
- Make Tassels: Cut a 6-inch piece of yarn and lay it down. Cut 30-40 more pieces of yarn, each 12 inches long. Lay this bunch in the middle of your single 6-inch piece.
- Tie Tassel: Fold the bunch in half. Tie the 6-inch piece tightly at the fold, creating a loop.
- Wrap Tassel Head: Cut another 12-inch piece of yarn. Wrap it tightly around the “neck” of the tassel, about 1 inch down from the fold. Tie it off.
- Trim: Trim the bottom loops of the tassel so all the ends are even. Make two tassels.
- Paint Beads (Optional): Paint designs (dots, stripes, or solid colors) on some of your wooden beads. Let them dry completely.
- String Beads: Cut a piece of twine to your desired length (e.g., 3-4 feet). Tie one of your tassels to one end.
- Create a Pattern: Start stringing your beads onto the twine. Create a pattern with the different sizes and painted beads.
- Finish: When your garland is long enough, string the other tassel on. Tie a secure knot. Your garland is ready to hang.
15. Geometric Wooden Mobile

This is a hanging mobile made from simple wooden shapes. It features circles, half-circles, and other cutouts. The pieces are painted in a modern, earthy color palette.
The shapes are connected with string and balanced on a wooden dowel. Wooden beads act as colorful spacers. This mobile moves gently with the air, adding a calm, artistic touch.
DIY Instructions:
Materials:
- Thin craft wood sheets or basswood
- A pencil
- A craft saw or utility knife (if cutting by hand)
- A drill with a very small drill bit
- Sandpaper (fine grit)
- Acrylic paint (3-4 colors)
- Paintbrushes
- A thin wooden dowel
- String or twine
- Wooden beads
Steps:
- Draw Your Shapes: Draw simple geometric shapes (circles, semi-circles) on your craft wood. You can trace cups and bowls.
- Cut the Shapes: Carefully cut out the shapes with your craft saw. (This step requires patience. You can also buy pre-cut wooden shapes online).
- Sand: Lightly sand the edges of all your shapes until they are smooth.
- Drill Holes: Drill small holes where you want the shapes to connect. You will need one hole at the top and one at the bottom of most shapes.
- Paint: Paint your wooden shapes and beads in your chosen colors. You can paint them solid or add simple color-block designs. Let them dry.
- Assemble the Strands: Cut several pieces of string, each about 2 feet long. Tie a bead or a small shape to the bottom of one string.
- String the Shapes: Thread the string up through your shapes and beads, tying a knot under each piece to hold it in place.
- Hang from Dowel: Once you have 3-5 strands, tie them to your wooden dowel. Space them out.
- Add Hanger: Tie one long piece of twine to both ends of the dowel. This creates the triangle hanger. Adjust the strands on the dowel until it hangs balanced.
16. Moroccan Stencil Art

This project mimics the look of intricate tilework. It uses a large, detailed wall stencil. The stencil in the image has a complex geometric Moroccan pattern.
The stencil is taped to the wall. Paint is then applied over it with a roller. This one uses dark blue and beige. When the stencil is lifted, it leaves a sharp, beautiful design. This creates a high-end, wallpaper-like effect.
DIY Instructions:
Materials:
- A large wall stencil (in a pattern you like)
- Painter’s tape
- A small foam paint roller and paint tray
- Paint (in your chosen colors)
- A level
- Paper towels
Steps:
- Position Your Stencil: Decide where you want your design. Hold the stencil against the wall. Use your level to make sure it is straight.
- Tape it Securely: Use painter’s tape to tape all four edges of the stencil flat against the wall. Make sure no edges are lifting.
- Load Your Roller: Pour a small amount of paint into your tray. Roll the foam roller in the paint.
- Off-Load Excess Paint: This is key. Roll the roller several times on a stack of paper towels. The roller should be almost dry. Too much paint will bleed under the stencil.
- Roll the Paint: Use light, even pressure to roll the paint over the stencil. Cover the entire design. You may need two light coats.
- Wait and Peel: Wait just a minute or two for the paint to be tacky. Do not let it dry fully.
- Remove: Carefully peel the stencil off the wall.
- Repeat (if needed): If you are creating a larger pattern, line up the stencil’s registration marks next to the area you just painted. Tape it down and repeat the process.
17. Distressed Antique Mirrors

This project gives new mirrors an aged, antique look. A set of simple mirror tiles is used. The reflective backing of the mirror is partially removed.
Paint stripper and acids (like bleach or muriatic acid, with great care) are used to distress the back. This creates spots and splotches. The tiles are then painted, and text is added. Grouping them creates a grid of unique, gothic-style art.
DIY Instructions: (Simplified, Safer Version)
Materials:
- Simple mirror tiles (like from a hardware store)
- Spray bottle
- A 1:1 mixture of water and white vinegar
- Paper towels
- Coarse steel wool
- Flat black spray paint
- Disposable gloves
- Safety glasses
Steps:
- Protect Yourself: Put on your gloves and safety glasses. Work in a well-ventilated area.
- Work on the Back: This entire process happens on the back of the mirror. There is usually a layer of gray paint protecting the silver reflective layer.
- Scrub the Backing: Use the coarse steel wool to scrub off the gray paint backing in random areas. You want to expose the shiny silver layer underneath.
- Spray the Acid: Lightly mist the exposed silver areas with your vinegar-water solution.
- Wait and Blot: Let the vinegar sit for 5-10 minutes. You may see the silver layer start to dissolve or change color. Blot it dry with a paper towel.
- Repeat: You can repeat the scrubbing and spraying steps until you like the distressed look.
- Paint the Back: Once the mirror is dry, spray the entire back of the mirror with the flat black paint. This black paint will show through where you removed the silvering.
- Dry and Hang: Let the paint dry completely. When you turn the mirror over, you will have a “foxed,” antique look. Hang the tiles in a grid.
18. Geometric String Art

This art uses nails and colorful string. A shape is outlined with small nails. Then, string is wrapped around them in a geometric pattern.
This piece uses a custom shape (the state of Vermont) on a white painted board. The inside is painted black for contrast. Multi-colored string is wrapped in random, crossing lines. This creates a web of color and texture.
DIY Instructions:
Materials:
- A piece of wood (painted or stained)
- A paper printout of your design
- Tape
- Small nails with a head (about 1-inch long)
- A hammer
- Embroidery floss or thin string in many colors
Steps:
- Paint Your Board: Paint or stain your wood board and let it dry. You can paint a contrasting shape in the middle, as shown.
- Tape Your Pattern: Tape your paper printout onto the board.
- Nail the Outline: Hammer the small nails along the outline of your paper shape. Space them about 1/2 inch apart. Keep them at an even height.
- Remove Paper: Once all nails are in, tear the paper template away.
- Start Stringing: Tie the end of your first color of string to one of the nails with a tight knot.
- Wrap the String: Wrap the string to any other nail on the board. Loop it around the nail head to secure it, then move to another nail.
- Create Your Pattern: You can go back and forth, create ‘X’ shapes, or wrap randomly. There is no wrong way.
- Change Colors: When you want to change colors, snip the string, tie it off on a nail, and start a new color the same way.
- Finish: Continue until the design is as full as you like. Tie off the final string and trim any loose ends.
19. Washi Tape Wall Drawing

This is a temporary and easy way to draw on your walls. It uses thin washi tape or pinstripe tape. The tape becomes the “lines” of your drawing.
This wall has a mountain range with a herringbone pattern inside. Above it, a simple grid creates a wall calendar. Because the tape is low-tack, it is simple to apply. It is also easy to remove without damaging the paint.
DIY Instructions:
Materials:
- Thin black washi tape (or electrical tape, or vinyl pinstripe tape)
- A level
- A ruler or yardstick
- A pencil
- Scissors or a craft knife
Steps:
- Sketch Your Design: Lightly sketch your design on the wall with a pencil. Use your level and ruler to get the lines for the calendar grid perfectly straight.
- Start with Straight Lines: For the calendar, stick the end of your tape to the wall. Unroll it slowly, using your level as a guide to keep it straight.
- Press it Down: Once the line is straight, press it down firmly with your fingers.
- Cut the End: Use your craft knife to get a clean, sharp cut at the end of the line.
- Create Your Shapes: For the mountains, apply the tape over your pencil lines. You may need to cut the tape at each “peak” and start a new piece.
- Add Details: Create the herringbone pattern inside the mountains by adding short, diagonal strips of tape.
- Remove: When you are ready for a change, the tape should peel off cleanly.
20. Hat Wall Peg Display

This idea turns your hat collection into a functional display. It uses simple, round wooden pegs. The pegs are mounted on the wall in a neat, symmetrical grid.
Each peg holds one hat. The different colors, textures, and shapes of the hats create the art. This design is organized and stylish. It also keeps your hats in good shape and easy to grab.
DIY Instructions:
Materials:
- Wooden “Shaker” pegs or simple round drawer knobs
- A power drill
- A pencil
- A ruler or measuring tape
- A level
- Wall anchors and screws (some pegs come with screws)
Steps:
- Plan Your Grid: Decide how many hats you want to hang. Use your ruler and pencil to plan your grid on the wall.
- Mark the Pegs: Mark a small ‘X’ with your pencil where each peg will go. Use your level to make sure your horizontal and vertical rows are straight. (A common spacing is 12-16 inches apart).
- Drill Holes: Drill a hole at each ‘X’ you marked. The drill bit should be slightly smaller than your screw.
- Insert Anchors: Gently tap a wall anchor into each hole. This is important for making sure the pegs are strong enough to hold the hats.
- Attach Pegs: Most pegs have a screw that goes through the back, or a screw built-in.
- Screw them In: Drive the screw through the peg and into the wall anchor. If it’s a knob, screw the knob onto the screw you placed in the anchor. Keep turning until it is snug against the wall.
- Check Level: As you go, use your level to double-check that your rows are still straight.
- Hang Your Hats: Once all the pegs are secure, hang your hats.
21. Wooden Poster Hanger

This is a clean, modern way to hang large prints. It uses thin wooden bars to clamp the top and bottom of the poster. This replaces a traditional, heavy glass frame.
The wood bars are held together by magnets or small screws. A simple string or leather cord is attached to the top bar for hanging. This design is minimal. It makes the art the main focus and is great for oversized prints.
DIY Instructions:
Materials:
- Four thin wooden strips (e.g., 1×2 inch pine), cut to be 1 inch wider than your poster
- Strong craft magnets (at least 8) or small wood screws
- A drill with a small drill bit (if using screws)
- Twine or leather cord
- Hot glue gun or super glue
- Sandpaper (fine grit)
Steps:
- Prep the Wood: Cut your four wood strips. Make sure they are all the same length. Sand any rough edges until they are smooth.
- For a Magnet Hanger:
- Take two wood strips for the top. Lay them flat. Mark spots for your magnets (one near each end, and 1-2 in the middle).
- Carefully drill shallow holes just big enough and deep enough for your magnets to sit flush.
- Glue the magnets into the holes. Important: Make sure the magnets you glue into the second wood strip are facing the correct way so they attract, not repel, the first strip.
- Repeat this entire process for the bottom two wood strips.
- For a Screw Hanger:
- Take two wood strips for the top. Clamp them together. Drill 3-4 holes all the way through both strips (one near each end, 1-2 in the middle).
- Repeat for the bottom two strips.
- Attach Hanger: Take the top back strip. Drill two small, shallow holes on the back of it, near the ends. Knot your twine, push it through the holes, and add a dab of glue to secure the knot.
- Assemble:
- Magnet: Lay your poster on the bottom-front strip. Place the bottom-back strip on top. The magnets should snap together, clamping the poster. Repeat for the top.
- Screw: Lay your poster on the bottom-front strip. Place the bottom-back strip on top, align the holes, and insert the screws. Repeat for the top.
- Hang: Your print is now ready to hang from the twine.
22. Wood Shim Herringbone Art

This piece uses inexpensive wood shims to create a striking pattern. Wood shims are thin, tapered pieces of wood used for leveling.
Here, they are cut at an angle and stained in different shades. The pieces are arranged in a “herringbone” or arrow pattern. This creates a rustic, textured piece of art. It highlights the natural grain of the wood.
DIY Instructions:
Materials:
- A sturdy backing board (like plywood or MDF)
- A bundle of wood shims
- Wood stain in 3-4 different colors (e.g., light oak, dark walnut, gray)
- Old rags or foam brushes
- A miter saw (or a hand saw and miter box)
- Wood glue
- A pencil and a ruler
Steps:
- Stain Your Shims: In a ventilated area, apply your different stains to groups of shims. You want a good variety of colors. Wipe off the excess stain with a rag. Let them dry completely.
- Find Your Centerline: Draw a straight vertical line down the center of your plywood backing board.
- Cut the Angles: Set your miter saw to a 45-degree angle.
- Start in the Middle: Take your first shim. Cut the end at a 45-degree angle. Apply wood glue to the back.
- Place the First Piece: Press the shim onto the board. The angled cut should be right against the center pencil line.
- Create the ‘V’: Take a second shim (maybe a different color). Cut its end at the opposite 45-degree angle. Apply glue. Place it on the other side of the pencil line, so its angled end meets the first piece. This forms your first “V” shape.
- Continue: Keep cutting and gluing shims. Work your way up or down the board. Alternate colors to create a random, rustic pattern.
- Trim Edges: The ends of the shims will hang off the sides of the board. Once the glue is dry, use a hand saw to carefully trim these ends flush with the edge of the plywood.
- Frame (Optional): You can add a simple border with 1×2 wood strips to give it a finished look.
23. Vintage Map Monogram

This project personalizes your wall with a custom map letter. It uses a large cardboard or wood letter as a base.
A vintage map is used to cover the letter. You can choose a map of a meaningful place. The map is cut out and glued to the letter. This one is mounted on a canvas, which is also covered in a map. It is a thoughtful piece with a personal story.
DIY Instructions:
Materials:
- A large craft letter (cardboard or thin wood)
- An old map
- Mod Podge (a glue and sealer)
- A foam brush
- A pencil
- Scissors or a craft knife
Steps:
- Trace Your Letter: Lay your letter face down on the back of your map. Use a pencil to trace around it.
- Cut the Map: Carefully cut out the letter shape from the map.
- Apply Glue: Use your foam brush to apply a thin, even coat of Mod Podge to the front of your craft letter.
- Place the Map: Carefully lay your map cutout onto the glued letter. Start from one side and smooth it down with your fingers as you go. This prevents air bubbles.
- Smooth It Out: Press firmly all over. Push any air bubbles out toward the edges. Let this dry for 20-30 minutes.
- Seal the Top: Once it is dry, apply a thin layer of Mod Podge over the top of the map. It will look milky white but will dry clear. This seals and protects the map.
- Dry: Let the entire project dry for at least an hour. Once dry, it is ready to display.
24. Dot Sticker Gradient Art

This is a modern art piece made from simple office supplies. It uses colorful dot stickers. The stickers are placed in a precise grid.
The colors are arranged to create a gradient. This one shows a block of red fading to pink, and a block of blue fading to black. The grid is drawn lightly on the paper first. The result is a clean, graphic, and colorful design.
DIY Instructions:
Materials:
- A large piece of white poster board or cardstock
- A picture frame
- Colorful dot stickers (in 3-4 colors that blend well)
- A pencil
- A long ruler
- A good eraser
Steps:
- Cut to Size: Cut your poster board to fit your picture frame.
- Draw Your Grid: Use your pencil and ruler to draw a light grid on your poster board. The spacing of the lines should be just a little wider than your dot stickers.
- Plan Your Design: Decide where your blocks of color will go.
- Start Sticking: Take your first color (e.g., dark blue). Place one sticker at each intersection of your grid lines.
- Create the Gradient: As you move up your grid, start mixing in your next color (e.g., medium blue). At first, it might be 3 dark blue, 1 medium blue. Then 2 and 2. Then 1 and 3.
- Fade: Continue this process with your other colors (e.g., light blue, then white) until you have a smooth-looking fade.
- Fill Your Shapes: Repeat this for any other color blocks in your design.
- Erase: Once all stickers are in place, use your eraser to gently remove any visible pencil grid lines.
- Frame: Place your finished art in the frame.
25. Framed Book Page Art

This design turns old book pages into a 3D wall display. It uses a set of matching frames, arranged in a grid.
Some frames hold single, flat pages from a book. Others are “shadow box” frames. These hold a whole book, opened to a favorite page. This mix of 2D and 3D elements is very striking. You can also add custom text over a page.
DIY Instructions:
Materials:
- Several picture frames (a mix of standard frames and deep “shadow box” frames)
- An old book you are willing to cut
- A craft knife
- A metal ruler
- A cutting mat
- Double-sided tape
Steps:
- For the Flat Pages:
- Carefully use your craft knife and ruler to cut a page out of your book.
- Open your standard picture frame. Mount the page just like you would a photo. You can place it on a black background for contrast.
- You can also use a computer to print a word or phrase (like “Find love.”) onto a transparent sheet, then lay that over the book page.
- For the 3D Books:
- Open your shadow box frame.
- Take your old book. Use your craft knife to cut the back cover off the book.
- Apply strong double-sided tape to the inside of the front cover.
- Press the front cover firmly against the back panel of the shadow box.
- Arrange the pages of the book so they are fanned open in a natural way.
- Arrange Your Wall: Hang your flat frames and shadow boxes in a grid pattern on your wall.
26. Dip-Dyed Canvas Art

This project creates a soft, watercolor “ombre” effect. It uses small, blank canvases. The canvases are dipped into a bath of fabric dye.
The dye soaks into the canvas, bleeding upwards. This creates a natural, faded edge. The image shows canvases dipped in different colors. One canvas has string wrapped around it, which resists the dye and adds another layer of design.
DIY Instructions:
Materials:
- Small, blank white canvases (e.g., 6×6 inches)
- Liquid fabric dye (like RIT dye)
- A large bucket or plastic tub
- Hot water
- Salt (helps the dye stick)
- A spoon or stir stick
- Disposable gloves
- Paper towels or an old towel
Steps:
- Protect Your Space: Put on your gloves. Dye will stain.
- Prepare the Dye Bath: Fill your bucket with hot water. Add about 1/2 cup of salt. Shake your dye bottle well and pour some into the water. Stir until it is all mixed. The more dye, the darker the color.
- Dip the Canvas: Hold your canvas by the top edge. Slowly dip the bottom 1-2 inches into the dye bath.
- Hold and Wait: Hold the canvas in the dye. The dye will start to creep up the canvas fabric. For a light color, hold it for 30-60 seconds. For a darker, higher fade, hold it for 2-5 minutes.
- Remove and Rinse: Slowly lift the canvas out. Tilt it so the dye drips back into the bucket.
- Let it Bleed: Set the canvas upright on a paper towel. The dye will continue to bleed up a little as it dries, creating the soft edge.
- Dry: Let the canvases dry completely, for at least 3-4 hours.
- Arrange: Hang your set of dried canvases in a group.
27. Woven Basket Wall Collage

This decor uses shallow, woven baskets as wall art. A collection of different baskets is arranged in a cluster.
The baskets have various sizes, textures, and patterns. Some are simple, natural rattan. Others have black geometric designs. The mix of textures creates a warm, bohemian look. The large, central basket acts as an anchor for the whole arrangement.
DIY Instructions:
Materials:
- A collection of shallow, lightweight woven baskets (look at thrift stores)
- Small nails or tacks
- A hammer
- A pencil
Steps:
- Plan Your Layout: Lay your baskets on the floor. Arrange them in a pattern you like. Start with your largest basket in the center.
- Cluster: Tuck smaller baskets around the edges of the large one. Overlap some of them. Move them around until the cluster looks balanced.
- Take a Photo: Once you like the layout, take a quick photo with your phone.
- Hang the First Basket: Start with the large, central basket. Hold it on the wall where you want it to go.
- Nail It: Hammer a small nail through the center of the basket, directly into the wall. The weave will hide the nail head.
- Add the Next Baskets: Use your phone photo as a guide. Add the next basket. Hold it in place. Hammer a nail through its center.
- Secure Overlaps: If one basket overlaps another, you may need a longer nail to go through both baskets and into the wall.
- Finish: Continue adding baskets until your whole design is on the wall.
28. Layered Ledge Gallery Wall

This is a modern, flexible way to display art. It uses shallow “picture ledges” instead of hanging frames one by one.
The ledges are mounted on the wall. Frames of different sizes and finishes are then leaned on them. This allows you to overlap frames. Small plants and objects are mixed in. It is easy to change this wall by simply moving the frames around.
DIY Instructions:
Materials:
- 2-3 picture ledge shelves
- A power drill
- A level
- A stud finder
- Wall anchors and screws
- A pencil
- A collection of framed art and small plants
Steps:
- Plan Your Ledges: Decide where you want your ledges. A common placement is one above the other, spaced 18-24 inches apart.
- Hold the First Ledge: Hold your first ledge against the wall. Place your level on top of it. Adjust until it is straight.
- Mark Your Holes: While it is level, use a pencil to mark the wall through the pre-drilled holes in the ledge.
- Find Studs: Use your stud finder to see if any of your marks line up with a wall stud.
- Drill and Anchor: Set the ledge down. Drill holes on your pencil marks. If a hole is not on a stud, tap a wall anchor into that hole.
- Attach the Ledge: Hold the ledge back up. Use your drill to drive screws through the ledge and into the wall anchors (or studs).
- Repeat: Measure up from your first ledge and repeat the process for the other ledges. Use your level every time.
- Arrange Your Art: Once the ledges are secure, lean your framed art on them. Overlap smaller frames in front of larger ones. Add your small plants.
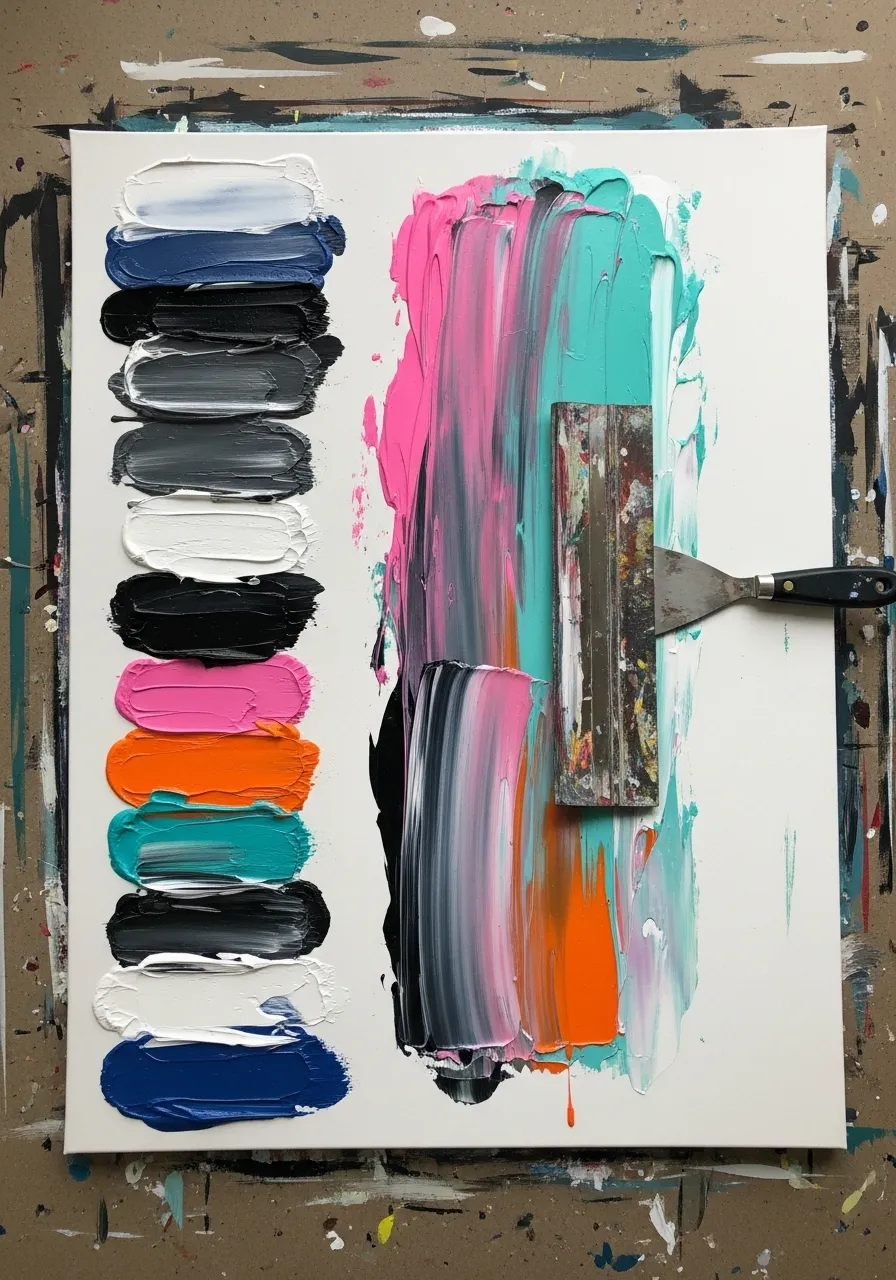
29. Abstract Paint Scrape Art

This is a fast and fun way to make abstract art. It uses thick-bodied acrylic paint. Several colors are scraped across the canvas at once.
In this image, bright pink, teal, and black are scraped with a wide putty knife. This action blends the colors in a dynamic, streaked way. The swatches on the side show the color palette. It is an expressive technique where no two pieces are the same.
DIY Instructions:
Materials:
- A blank canvas
- Heavy body acrylic paints (3-5 colors)
- A wide putty knife or a plastering trowel
- A paint palette or a paper plate
Steps:
- Plan Your Colors: Squeeze out your paint colors onto your palette.
- Load the Tool: You can either:
- A) Squeeze your paints in a line directly onto the canvas.
- B) Scoop up 2-3 colors at once onto the edge of your putty knife.
- Scrape the Paint: Place the edge of your putty knife on the canvas, just above the paint.
- Pull: Press down firmly and pull the knife across the canvas in one smooth motion. The colors will streak and blend together.
- Repeat: You can scrape again in a different spot. You can scrape over a previous scrape with a new color.
- Add Swatches (Optional): You can use a smaller knife to add simple swatches of each color to the side, as seen in the photo.
- Stop: The key is to not over-work it. Stop when you like the effect.
- Dry: This uses thick paint, so it needs to dry for a long time. Lay the canvas flat for 24-48 hours.
30. Framed Pegboard Organizer

This turns a simple pegboard into a stylish, functional wall piece. A standard white pegboard is framed with natural wood.
The frame gives the board a finished, intentional look. It is then customized with shelves, hooks, and baskets. This one has painted black circles for decoration. It is a smart way to organize tools, craft supplies, or kitchen items.
DIY Instructions:
Materials:
- A piece of pegboard, cut to your desired size
- Four 1×2 wood strips for the frame
- A miter saw (or hand saw and miter box)
- Wood glue
- A nail gun (or small finishing nails and a hammer)
- Pegboard accessories (hooks, shelves, baskets)
- Paint (optional, for decoration)
Steps:
- Measure Your Pegboard: Measure the exact height and width of your pegboard.
- Cut the Frame: You need to cut your 1×2 wood strips to create a frame. Set your miter saw to a 45-degree angle.
- Cut the Angles:
- Cut a 45-degree angle on the end of a wood strip.
- Measure along the short side of the strip to match the length of your pegboard.
- Cut an opposite 45-degree angle at that mark.
- Repeat this to create two strips for the height and two for the width.
- Assemble the Frame: Lay your four mitered frame pieces on the floor. Apply wood glue to each 45-degree cut.
- Join: Press the corners together to form a rectangle. Use your nail gun or hammer to drive a small nail through the side of each corner to hold it.
- Attach to Pegboard: Lay the frame on the floor. Apply a bead of wood glue all along the top edge of the frame.
- Place Board: Carefully lay your pegboard on top of the glue, making sure the edges are flush.
- Secure: You can add a few small nails through the back of the pegboard into the frame for extra strength.
- Dry and Hang: Let the glue dry completely. Hang the entire unit on the wall (you may need to screw it into studs).
- Organize: Add your hooks and shelves.
31. Neon Grid Wall Display

This project combines an industrial grid panel with colorful LED neon signs. It transforms a simple mesh grid into a vibrant focal point.
Custom neon words like “Plan” and “Sing” glow brightly. Other shapes, like a carton, add playful touches. The signs plug into a power box. You can also hang other items, like notes or drawings, on the grid. This creates a fun, modern, and very personal display.
DIY Instructions:
Materials:
- A metal grid panel (often sold for offices or shops)
- Small zip ties or clear command hooks
- LED neon signs (custom words, shapes, etc.)
- A power strip or wall outlet
- Optional: paper notes, photos, small clips
Steps:
- Mount the Grid: Attach your metal grid panel securely to the wall. You may need screws or strong wall anchors, depending on its weight. Use a level to ensure it is straight.
- Unpack Neon Signs: Carefully unbox your LED neon signs. Most come with wires and a power adapter.
- Arrange: Hold your neon signs up to the grid. Decide where you want each word or shape to go.
- Attach Signs: Use small zip ties or clear command hooks to attach the neon signs to the grid. Thread the zip ties through the grid squares and around the clear tubing of the sign. Pull them tight.
- Manage Wires: Guide the power cords from each sign down to the bottom of the grid. Use more zip ties to keep the cords tidy and close to the grid.
- Plug In: Gather all the power cords and plug them into a power strip or directly into a wall outlet.
- Add Extras: Use small clips to hang notes, drawings, or photos on the grid around your neon art.
32. Repurposed Window Frame Display

This project uses an old window frame to create a unique display board. The frame has distressed, peeling white paint. This adds rustic charm.
Each pane of glass is removed. The openings are then filled with different materials. Some hold vintage botanical prints. Others are backed with cardboard or covered with a chalkboard panel. It is a creative way to showcase memories and art.
DIY Instructions:
Materials:
- An old window frame (with multiple panes)
- A utility knife or glass cutter (use caution!)
- Plywood or cardboard cut to fit each pane opening
- Hot glue gun
- Art prints, photos, fabric scraps, or corkboard pieces
- Chalkboard paint and a small foam roller (optional)
Steps:
- Safety First: Put on heavy gloves and safety glasses.
- Remove Glass: Carefully use a utility knife to remove the old glazing putty or wood strips holding the glass in place. Then, remove each pane of glass. Discard the glass safely.
- Clean the Frame: Scrape off any loose paint or debris from the frame. Wipe it clean. You can paint it, or leave it distressed.
- Cut Backing Pieces: For each window pane opening, cut a piece of plywood or sturdy cardboard to fit snugly.
- Decorate Backing:
- Prints: Glue your art prints or photos directly onto the cardboard pieces.
- Chalkboard: Paint one of your plywood pieces with chalkboard paint. Let it dry completely.
- Fabric/Cork: Cover a piece with fabric or corkboard using hot glue.
- Insert Backing: Apply a bead of hot glue to the inside edge of each window pane opening on the back of the frame.
- Secure Panels: Press your decorated backing pieces into the openings. Hold until the glue cools.
- Hang: Once all panels are secure, hang your repurposed window frame on the wall.
33. Yarn Pom-Pom Rainbow Hanger

This is a cheerful and textural wall hanging. It uses many yarn pom-poms in a rainbow of colors. The pom-poms are clustered around a metal hoop and a wooden dowel.
A small, woven rainbow adds another pop of color. Long strands of yarn hang down. Different shades of blue and gray pom-poms form a “V” shape below. It is a playful piece that brings a lot of softness to a room.
DIY Instructions:
Materials:
- Yarn in many colors (rainbow colors, whites, grays, blues)
- A pom-pom maker (various sizes)
- A metal craft hoop
- A wooden dowel
- Strong string or fishing line
- Scissors
- Optional: a small woven rainbow (can be bought or made separately)
Steps:
- Make Pom-Poms: Follow the instructions for your pom-pom maker. Make many pom-poms in all your chosen colors. Make sure to leave a long tail of yarn when you tie them off.
- Attach to Hoop: Use the long yarn tails to tie the pom-poms securely to the metal hoop. Cluster them together. Create a layered effect like clouds.
- Attach Rainbow (Optional): If you have a small woven rainbow, use string to tie it to the bottom of the hoop.
- Attach to Dowel: Tie several long strands of white or cream yarn to your wooden dowel. These will be the “rain” or fringe.
- Connect Hoop to Dowel: Use string to tie the metal hoop (with the pom-poms) to the wooden dowel.
- Create Bottom V-Shape: Cut many long pieces of yarn in shades of blue and gray.
- Attach Bottom Pom-Poms: Tie more pom-poms (in the blue/gray colors) to these long yarn strands. Create two hanging sections that form a “V” shape.
- Hang: Tie a loop of string to each end of the wooden dowel to hang the entire piece.
34. Abstract Coastal Triptych

This art uses three canvases hung together to form a single image. This is called a “triptych.” The painting has an abstract, explosive look.
Bold brushstrokes of black, gold, and blue burst from the center. A horizontal band of calm blue and sand colors grounds the piece, suggesting a beach horizon. The contrast of the calm background with the dynamic foreground makes it very engaging.
DIY Instructions:
Materials:
- Three blank canvases of the same size
- Acrylic paints (black, metallic gold, sky blue, deep blue, sandy beige, white)
- Large flat paintbrushes
- Masking tape (optional)
- A paint palette or paper plates
- Water for cleaning brushes
Steps:
- Prepare Canvases: Line up your three canvases. Decide which way they will hang.
- Paint the Horizon (Optional): If you want a straight horizon line, use masking tape across the middle of all three canvases.
- Paint the Ocean/Sand: Paint the top part of the horizon with your deep blue and sky blue. Paint the bottom part with sandy beige. Blend them where they meet. Let it dry completely. Remove tape if used.
- Load Your Brush: Squeeze large amounts of black, gold, and blue paint onto your palette.
- Make the Burst: Take a large, flat brush. Load it with multiple colors.
- Strike Outward: Start from the very center canvas. Make short, sharp strokes that radiate outwards from the middle. Do not overthink it.
- Overlap: Use different colors and overlap your strokes. Continue across all three canvases, making sure the “burst” appears to flow from one to the next.
- Add White: Add some white paint to the burst for extra lightness and movement.
- Dry and Hang: Let the paintings dry completely. Hang the three canvases side-by-side, leaving a small gap between each.
35. Macrame Plant Hangers

This project brings greenery to your walls with handmade macrame hangers. Macrame is a craft using knots to create patterns.
These hangers use natural cotton cord and a simple wooden ring at the top. Each one holds a small terracotta pot with a plant. Hanging a line of these at different heights creates a living wall display. They add a soft, bohemian touch.
DIY Instructions:
Materials:
- Natural cotton macrame cord (3-4mm thickness)
- Wooden rings (one for each hanger)
- Terracotta pots with plants
- Scissors
- A measuring tape
- A place to hang your work while knotting (like a hook)
Steps:
- Cut Cords: For one hanger, cut four long pieces of macrame cord. Each piece should be about 8-10 feet long.
- Attach to Ring: Fold all four cords in half. Loop the folded end through your wooden ring. Pull the loose ends through the loop and tighten. You now have eight working cords hanging from the ring.
- First Knot Section (Square Knots):
- Divide your eight cords into four groups of two.
- Take two outer cords and two inner cords (so, four cords total).
- Make a square knot: Make a “4” shape with the far-left cord over the two middle cords. Take the far-right cord, go over the end of the “4,” under the middle cords, and up through the loop of the “4.” Pull tight.
- Reverse it: Make a backward “4” with the far-right cord. Take the far-left cord, go over the end, under the middle, and up through the loop. Pull tight.
- Make 5-10 square knots in a row with this group of four cords.
- Repeat: Make the same section of square knots with the other groups of four cords.
- Second Knot Section (Connecting):
- Leave a space (about 2-3 inches).
- Take two cords from the left knot section and two cords from the right knot section.
- Make another set of 5-10 square knots with these four cords. This creates a diamond shape.
- Repeat this across the row, joining the sections.
- Create the Basket: Continue making alternating rows of square knots. As you get closer to where the pot will sit, you will need fewer knots per row to form the “basket” shape.
- Gather and Finish: When the hanger is long enough for your pot, gather all the loose cords at the bottom. Tie a large, tight knot with all eight cords together. You can add a decorative tassel if you wish.
- Insert Pot: Place your potted plant into the macrame hanger.
36. Fluid Art Canvas Pour

This project creates abstract, swirling patterns using liquid acrylic paint. It is often called “pour painting” or “fluid art.”
Different colors of paint are mixed with a pouring medium. They are layered in a cup, then poured onto the canvas. As the paint flows, it creates cells and ribbons of color. This one uses blues, golds, and blacks for a rich, dynamic effect.
DIY Instructions:
Materials:
- Blank canvas
- Acrylic paints (liquid or heavy body mixed with pouring medium)
- Pouring medium (like Floetrol or Liquitex Pouring Medium)
- Silicone oil (optional, creates more “cells”)
- Small plastic cups (one for each color, plus one large “pour cup”)
- Stir sticks
- Plastic sheet or newspaper to protect your work surface
- Push pins or small blocks to elevate your canvas
- Disposable gloves
Steps:
- Prepare Your Space: Cover your work surface thoroughly with plastic or newspaper. Elevate your canvas on push pins or small blocks so the paint can drip off.
- Mix Your Paints: In separate small cups, mix each color of acrylic paint with pouring medium. The consistency should be like warm honey or cream. If using silicone oil, add 2-3 drops to each color cup and stir gently.
- Layer the Pour Cup: Take your large “pour cup.” Slowly pour each color, one by one, into the cup. Try not to stir the colors together.
- The Flip (Optional, for “dirty pour”): Place your canvas upside down on top of the pour cup. Quickly flip the canvas and cup over together. Let the cup sit on the canvas for a minute.
- The Pour: Lift the cup and let the paint flow out. Or, simply pour the paint directly from the cup onto the canvas.
- Tilt the Canvas: Gently tilt the canvas in all directions. Let the paint flow and cover the edges. This creates the patterns.
- Let it Drip: Continue tilting until you like the design and the canvas is fully covered. Let the excess paint drip off the edges.
- Dry: Leave the canvas flat to dry for at least 24-48 hours. It may take longer as the paint is thick.
37. Curated Shadow Box Display

This project creates a “cabinet of curiosities” inside a shadow box. A deep frame holds a collection of small, meaningful objects.
This one has old keys, buttons, spools of thread, seashells, and driftwood. The items are arranged artfully and glued down. A vintage map or old paper provides a background. It tells a story and is a very personal display.
DIY Instructions:
Materials:
- A deep shadow box frame (with a removable back)
- A collection of small, flat objects (old keys, buttons, shells, coins, small twigs, dried flowers)
- A piece of decorative paper (vintage map, old book page, scrapbook paper)
- Hot glue gun or strong craft glue
- Tweezers (helpful for small items)
- A pencil and ruler
Steps:
- Remove Backing: Open the shadow box and take out the back panel.
- Prepare Background: Cut your decorative paper to fit the back panel. Glue it down smoothly.
- Arrange Your Objects: Lay your collected objects on the paper-covered backing panel. Move them around until you like the arrangement. Aim for a balanced look.
- Take a Photo: Take a picture with your phone. This will help you remember the layout.
- Start Gluing: Using your photo as a guide, apply a small dab of hot glue (or craft glue) to the back of each object.
- Place Carefully: Press the object onto the background. Hold it for a few seconds until the glue sets. Use tweezers for small items.
- Fill Gaps (Optional): If there are small empty spots, add very tiny items like beads or small buttons.
- Dry: Let the glue dry completely.
- Reassemble: Carefully place the decorated backing panel back into the shadow box. Secure it, and your display is ready to hang.
38. Bold Floral Wall Mural

This turns a wall into a vibrant garden. It uses large, stylized flower and leaf shapes. The design has a mix of colors and textures.
Some shapes are solid blocks of color, like mustard yellow or soft pink. Others are simple outlines in white or black. A curving black shape divides the wall, creating a dynamic background. It is a striking, energetic mural.
DIY Instructions:
Materials:
- Pencil and eraser
- A long ruler or flexible measuring tape
- Masking tape (optional, for wavy lines)
- Paint in your chosen colors (e.g., black, white, pink, yellow, green)
- Paintbrushes (small artist’s brush, 1-inch flat brush, 2-inch angled brush)
- Small paint rollers (optional, for large areas)
- Reference images of simple floral designs
Steps:
- Plan Your Design: Look at your wall. Decide where your large shapes will go. Start with the big, flowing lines.
- Draw the Main Outline: Lightly sketch the main elements, like the large curved shape, with your pencil.
- Tape the Curve (Optional): For a very clean curve, apply painter’s tape along one side of your pencil line.
- Paint the Large Shapes: Use your chosen colors to paint in the large, solid shapes. Use a roller for big areas and an angled brush for edges.
- Paint the Flowers: Lightly sketch your flowers and leaves onto the wall.
- Fill with Color: Use your brushes to paint in the colors for the solid flowers. Paint from the edges inwards.
- Add Outline Flowers: For the outline flowers (like the white ones), just paint a thin line. You can freehand these or lightly sketch them first.
- Add Details: Paint small dots or clusters of tiny leaves.
- Allow to Dry: Let all the paint dry completely.
- Erase: Gently erase any visible pencil lines.
39. Clay Arch & Circle Mobile

This mobile is made from air-dry clay. It features circles, half-circles, and arch shapes. The pieces are decorated with subtle patterns.
Some shapes have carved rainbows, others have small polka dots. The clay pieces are painted in earthy colors like rust, white, and natural clay. Small wooden beads are mixed in. It creates a simple, calming, and textural art piece.
DIY Instructions:
Materials:
- Air-dry clay (white or terracotta colored)
- A rolling pin
- Cookie cutters (circle, half-circle, or make templates)
- Small tools for making patterns (toothpick, small stamp, skewer)
- Sandpaper (fine grit)
- Acrylic paint (rust, white, black, tan)
- Paintbrushes
- Small wooden beads
- Twine or string
- A wooden dowel or branch
- A drill with a very small drill bit
Steps:
- Roll the Clay: On a clean surface, roll out your air-dry clay to about 1/4 inch thickness.
- Cut Shapes: Use cookie cutters or a craft knife and templates to cut out your shapes. Make circles, half-circles, and arches.
- Add Texture: Use your small tools to gently press patterns into some of the wet clay shapes (like rainbows or dots).
- Drill Holes: Use a toothpick or small drill bit to make small holes in each clay piece. These are for stringing them together. Make one hole at the top and one at the bottom of most pieces.
- Dry Completely: Lay your clay shapes flat on parchment paper. Let them air dry for 24-48 hours, flipping them once to ensure even drying. They must be completely hard.
- Sand: Once dry, lightly sand any rough edges.
- Paint: Paint your clay shapes and beads in your chosen colors. Let them dry.
- Assemble Strands: Cut several pieces of twine. Start by tying a bead or a shape to the bottom of each string.
- String Shapes: Thread the string through your painted shapes and beads. Tie a knot under each piece to hold it in place.
- Hang from Dowel: Once you have 3-5 hanging strands, tie them to your wooden dowel or branch.
- Add Hanger: Tie a long piece of twine to both ends of the dowel to hang the mobile. Adjust strands for balance.
40. CD Mosaic Mirror Frame

This project gives old CDs a new life as sparkly mosaic tiles. It uses broken CD pieces to create a shimmering frame for a mirror.
CDs are cut into small, irregular shards. These pieces are then glued onto a mirror frame or other flat surface. The iridescent bits catch the light and create a kaleidoscope effect. Safety glasses are a must for this one.
DIY Instructions:
Materials:
- Old CDs or DVDs
- Strong scissors (or dedicated craft scissors)
- Safety glasses
- A mirror or picture frame
- Strong craft glue (like E6000)
- Black acrylic paint and a brush (optional)
Steps:
- Safety First: Put on your safety glasses. This is very important to protect your eyes from flying plastic bits.
- Cut the CDs: Take one CD. Use strong scissors to cut it into small, irregular pieces. Do not try to make them all the same. The jagged edges create sparkle.
- Prep the Frame: If your mirror or frame is not black, you can paint it black first. This will make the CD pieces stand out more. Let the paint dry.
- Start Gluing: Apply a small dab of strong craft glue to the back of one CD piece.
- Place the Piece: Press the CD piece onto your mirror frame.
- Continue Mosaicing: Continue gluing pieces, working in small sections. Try to place them close together, but do not worry if there are small gaps. The black background helps hide them.
- Fill the Area: Cover the entire frame with the CD pieces.
- Dry: Let the glue dry completely. This can take several hours, or even overnight.
- Clean (Optional): If there is any visible glue haze, you can gently wipe it with a cloth when dry.
- Hang: Your disco-ball-inspired frame is ready to hang.
Your walls do not have to be boring. You now have 40 creative ways to fill them.
Art is about personality. It is not about spending a lot of money.
You saw how simple materials can become beautiful decor. Wine corks, string, and old CDs can all be art.
Choose one project from this list. Gather your supplies this weekend. You can transform your home one wall at a time.
Key Takeaways
- You can personalize your home without a large budget.
- Creating your own wall art is achievable for any skill level.
- Simple materials like wood shims, string, and fabric scraps can become stunning decor.
- DIY projects let you match your art to your home’s exact style and colors.
- The goal is to create a space that feels personal to you.