Finding the right look for your home during the season of love often leads to boring store aisles. Generic plastic hearts and mass produced banners fail to capture the warmth you want to share. Crafting your own pieces allows you to put a personal touch on every corner.

This collection offers plenty of creative ideas that use simple supplies from your craft bin. You can transform basic paper or wood into stunning art in just one afternoon. Everyone in your family will enjoy the cozy feeling these handmade items bring.
Personal style shines when you avoid the typical store options. These projects prove that beautiful homes do not require a massive budget. Small efforts lead to big results that will impress every guest who enters.
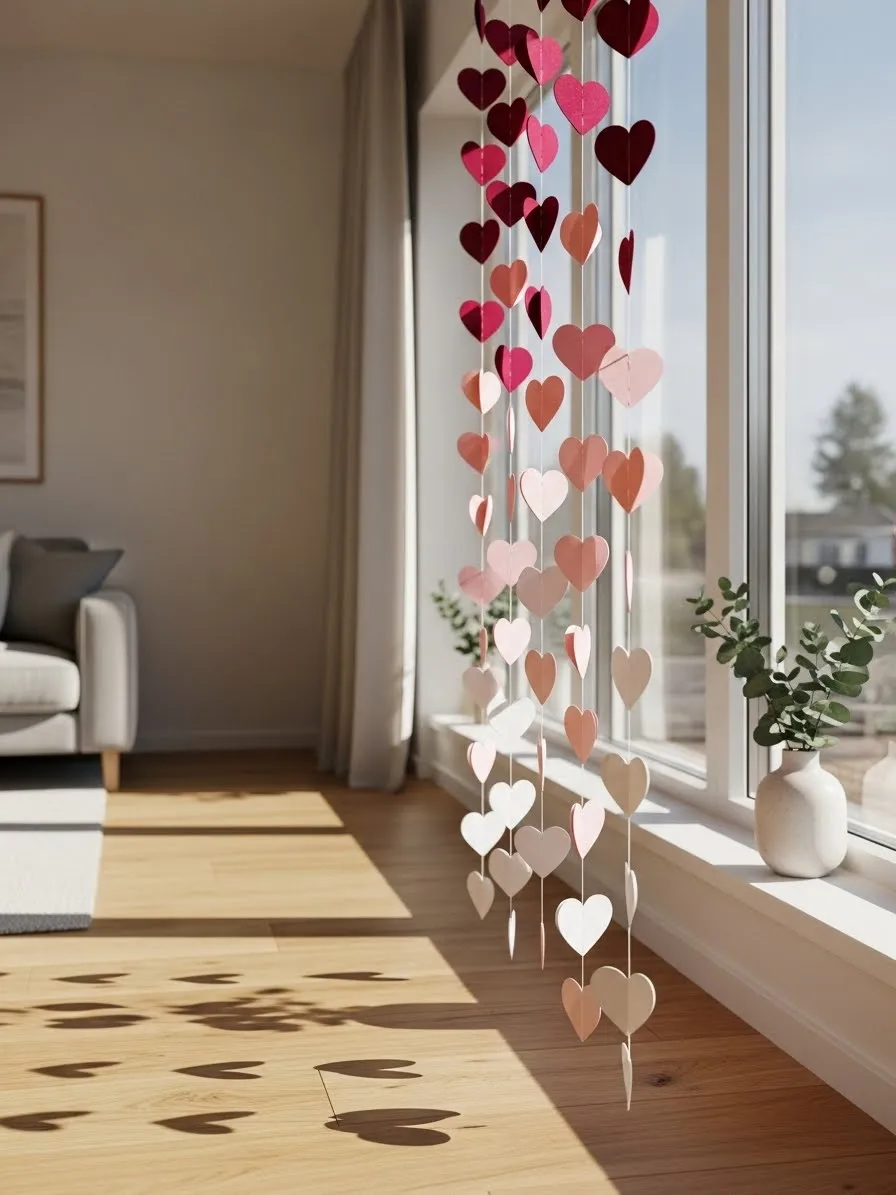
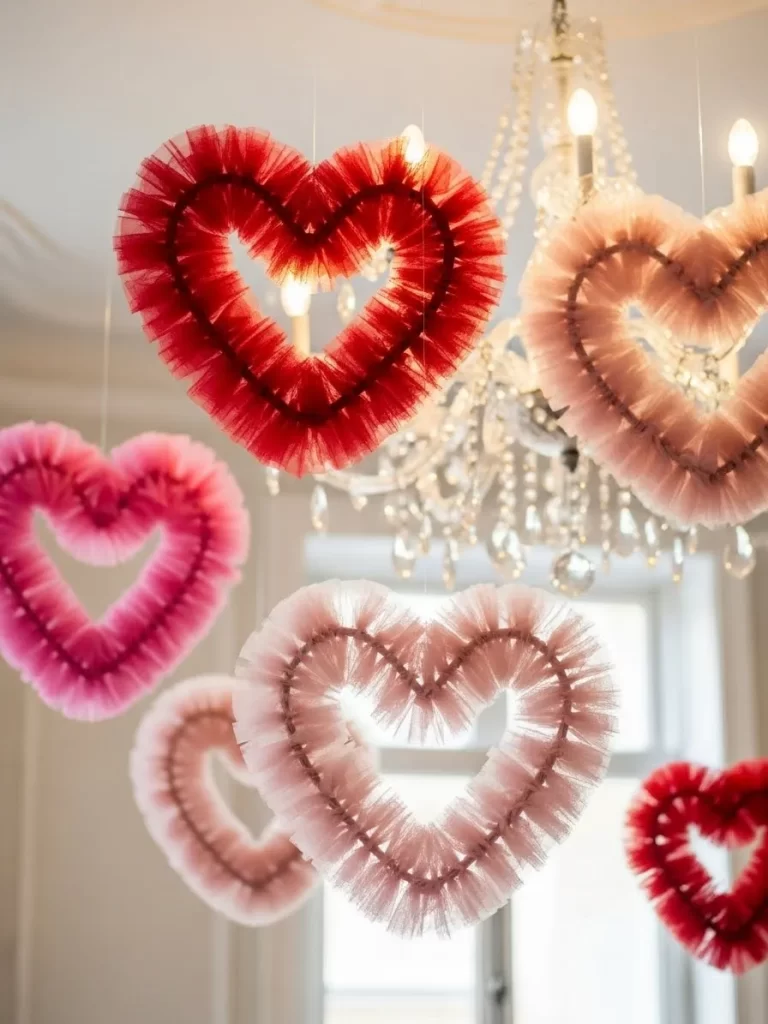
1 Ombre Heart Window Garland

Transform your living space with this stunning ombre heart curtain that catches the afternoon sunlight beautifully. It adds a soft romantic glow to any room while keeping the atmosphere light and airy. Guests will notice the delicate movement of the paper shapes as they sway in the breeze.
Creating this piece allows you to customize the color transition from deep burgundy to soft cream. You can hang it in a doorway or across a large window to greet your loved ones with festive charm. Each strand creates a playful shadow on your floor that changes throughout the day. This simple project brings a high end look to your home without spending a lot of money. Small details like the varying shades make the craft look professionally made.
Materials Required
- Cardstock paper in various shades of red and pink
- Clear fishing line or white thread
- Adhesive glue dots or a glue stick
Equipment Required
- Heart shaped paper punch or scissors
- Ruler
- Pencil
DIY Instructions
- Pick out several sheets of cardstock in a gradient of colors ranging from dark red to white.
- Cut out dozens of hearts from each color of paper using your heart punch.
- Measure the height of your window and cut several long pieces of clear fishing line to that length.
- Lay one piece of string flat on a table and arrange the hearts in your preferred color order.
- Put a small dot of glue on the back of a heart and press the string into the center.
- Press a second heart of the same color on top to sandwich the string in the middle.
- Keep going down the string while leaving two inches of space between each heart.
- Repeat these steps for all your strings until you have a full set of heart strands.
- Attach the top of each string to the upper frame of your window with tape.
2 Rustic Twig Heart Wall Art
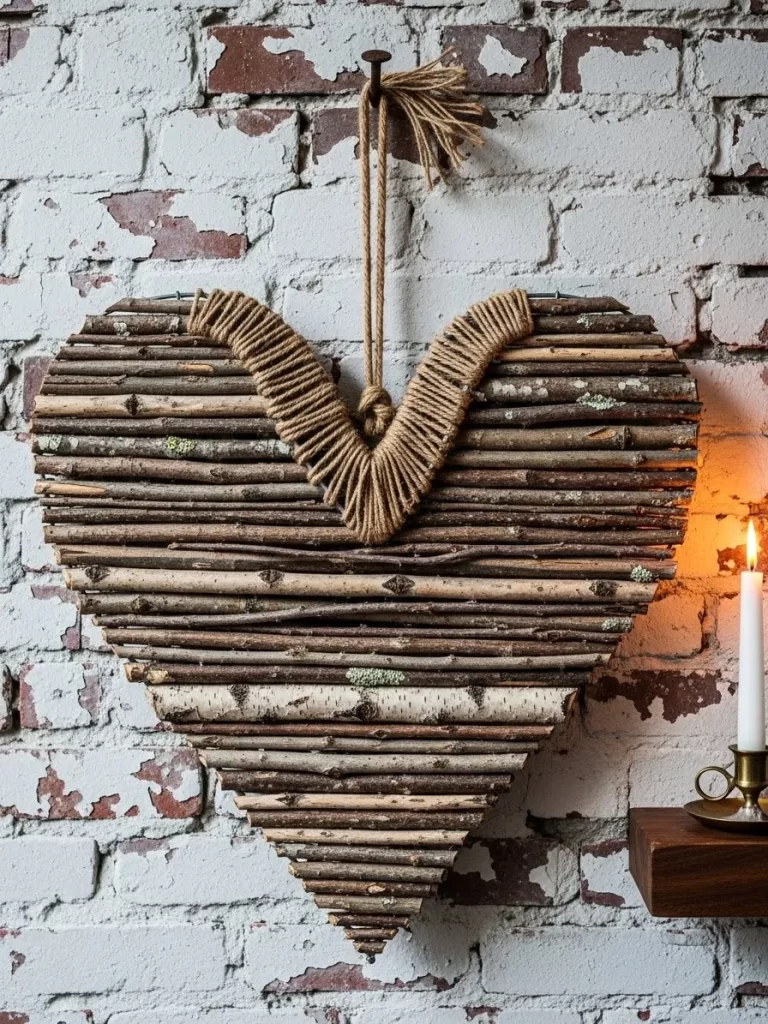
Natural textures bring a cozy feeling to any room during the winter months. This wall hanging uses simple wooden sticks to form a large romantic symbol. It looks wonderful against a brick wall or above a fireplace.
You can find these materials while walking in your local park. The organic look provides a nice contrast to modern furniture. Friends will admire the handmade charm this piece adds to your home. Every twig contributes a unique shape to the overall design.
Materials Required
- Dry wooden twigs of similar thickness
- Cardboard for the base
- Strong brown twine for hanging
- Wood glue
Equipment Required
- Pruning shears or heavy scissors
- Hot glue gun
- Pencil
DIY Instructions
- Draw a large heart shape on a piece of cardboard using your pencil.
- Cut out the heart shape carefully to create your sturdy base.
- Gather many small sticks and clean off any dirt or loose bark.
- Use the pruning shears to trim the twigs so they fit within the heart outline.
- Apply hot glue to the cardboard and press the twigs down horizontally.
- Layer the sticks until you cover the entire cardboard surface.
- Wrap twine around the top center of the heart to create a loop.
- Tie a knot in the twine and hang it on a sturdy nail.
3 Crepe Paper Rose Bouquet
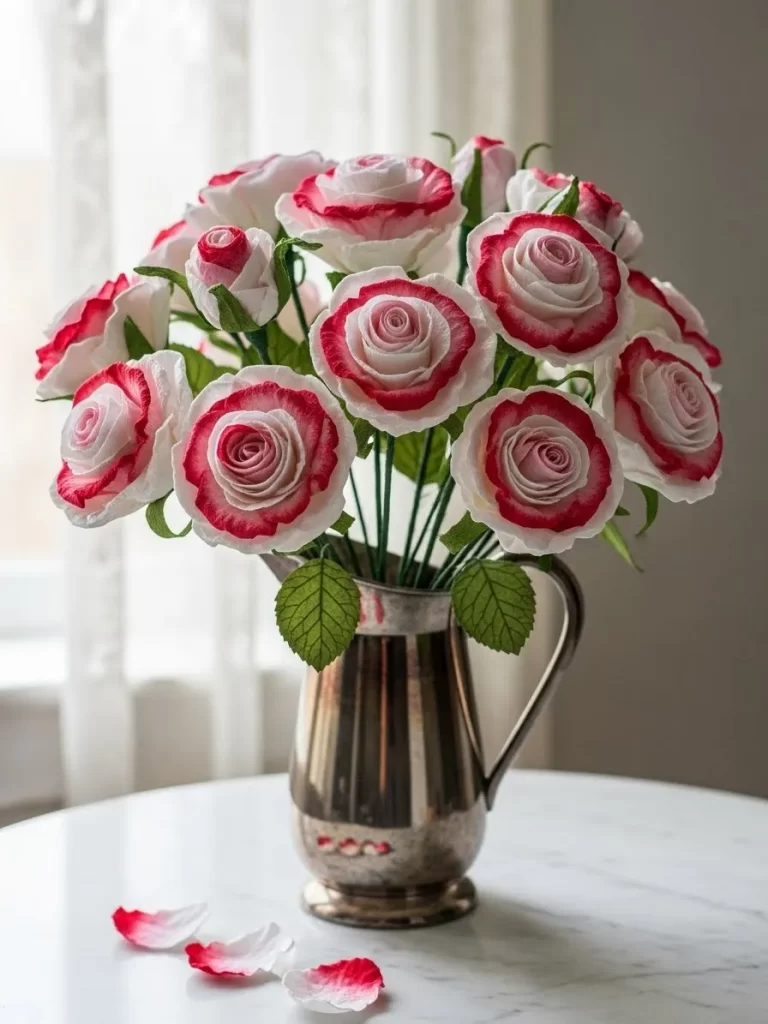
Elegant paper flowers stay beautiful forever and make a wonderful centerpiece. These handmade roses feature white petals with a delicate red edge. They look very realistic when placed in a vintage silver pitcher.
Creating these blooms is a relaxing way to spend a quiet afternoon. You can adjust the size of each flower to make the bouquet look natural. This craft adds a touch of sophistication to your dining table. Your guests will be surprised to learn they are made of paper.
Materials Required
- White crepe paper rolls
- Green floral tape
- Thick floral wire for stems
- Red ink marker
Equipment Required
- Sharp scissors
- Hot glue gun
DIY Instructions
- Cut the crepe paper into small petal shapes with rounded tops.
- Run the red marker along the top edge of every petal to add color.
- Stretch the center of each petal gently with your thumbs to create a curve.
- Apply a small dot of glue to the bottom of one petal.
- Wrap that petal around the top of a floral wire.
- Continue adding petals around the wire in a circular pattern.
- Cover the base of the flower and the entire wire with green floral tape.
- Group several finished roses together and place them in a vase.
4 Glowing Heart Mason Jar

Soft candlelight creates a warm atmosphere for a romantic evening at home. This jar features small red hearts that glow when you light a candle inside. It serves as a beautiful accent piece for a bedside table or mantel.
The light shines through the paper to cast a red tint on the surroundings. You can use different sizes of hearts to add visual interest. This project is very affordable and uses items you likely have in your kitchen. It provides a subtle way to celebrate the holiday.
Materials Required
- Glass mason jar with a lid
- Red tissue paper or thin construction paper
- Clear decoupage glue
Equipment Required
- Small heart shaped hole punch
- Sponge brush
- Battery operated tea light candle
DIY Instructions
- Clean the glass jar thoroughly to remove any oils or dust.
- Punch out dozens of small hearts from your red paper.
- Spread a thin layer of glue over a section of the jar using the brush.
- Press the paper hearts onto the wet glue in a random pattern.
- Apply another layer of glue over the top of the hearts to seal them.
- Let the jar dry completely until the glue becomes clear and hard.
- Place the tea light candle inside the jar.
- Screw the lid on loosely or leave it off to let the light shine.
5 Large Love Table Sign
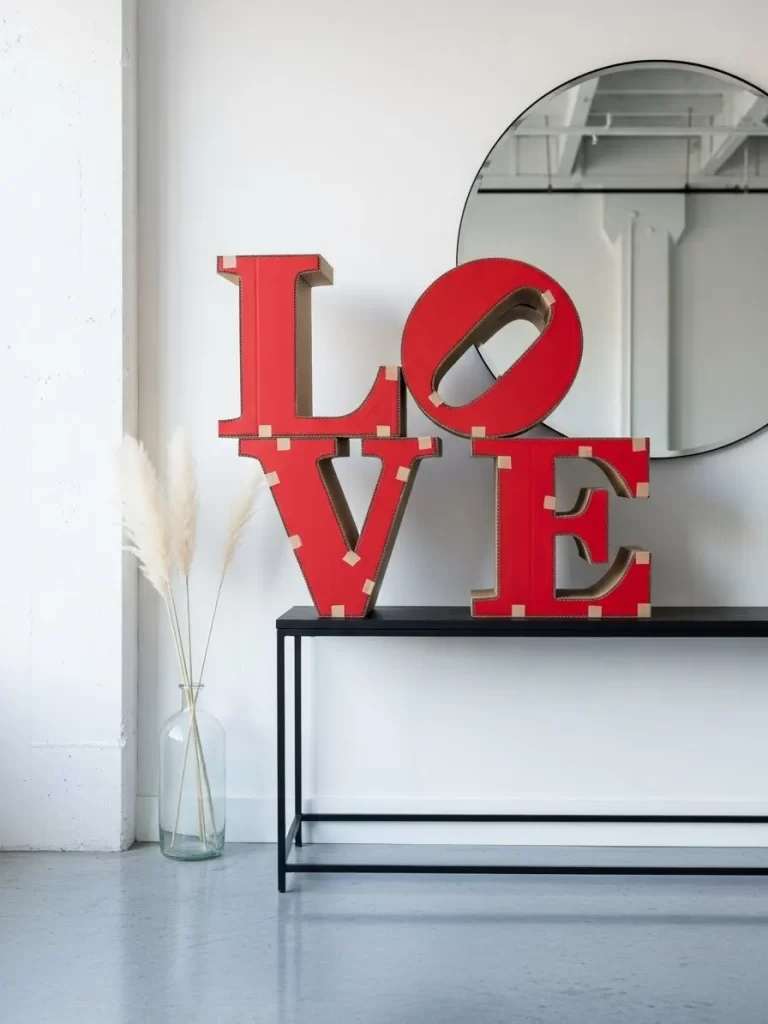
Bold red letters make a statement in a modern living space. This oversized sign is made from cardboard and sits proudly on a console table. It adds a festive pop of color to a white or neutral room.
The thick letters have a 3D effect that looks professional and stylish. You can place decorative dried grass nearby to soften the look. This decoration is lightweight and easy to move around your house. It serves as a great backdrop for holiday photos.
Materials Required
- Large sheets of thick corrugated cardboard
- Bright red acrylic paint
- Strong packing tape
Equipment Required
- Utility knife or box cutter
- Large paintbrush
- Ruler and pencil
DIY Instructions
- Sketch the letters L, O, V, and E onto your cardboard sheets.
- Cut out two identical copies of each letter using the utility knife.
- Cut long strips of cardboard that are three inches wide for the sides.
- Tape the side strips around the edge of one letter copy.
- Place the second letter copy on top and tape it to the strips.
- Cover all the tape seams with small pieces of cardboard or paper.
- Paint the entire surface of each letter with two coats of red paint.
- Set the letters on a flat surface once they are fully dry.
6 DIY Conversation Heart Stones

Colorful clay hearts bring a nostalgic feel to your holiday decor. These pieces look like the classic candies everyone remembers from childhood. You can stamp them with sweet words like MINE or XOXO.
Scatter these hearts on a tray or use them as unique place cards. The pastel colors look soft and inviting on a dark stone surface. This activity is fun for people of all ages to try. You can customize the messages to fit your family and friends.
Materials Required
- Air dry clay or salt dough
- Pastel acrylic paints in pink, green, and purple
- Clear sealant spray
Equipment Required
- Heart shaped cookie cutter
- Small letter stamps
- Rolling pin
DIY Instructions
- Roll out the clay on a flat surface until it is half an inch thick.
- Use the heart cutter to make many individual clay shapes.
- Press the letter stamps into the wet clay to spell out short words.
- Allow the clay hearts to dry for twenty four hours until they are hard.
- Paint each heart with a light coat of pastel paint.
- Wipe the top of the letters quickly so the natural clay color shows through.
- Spray a clear sealant over the hearts to protect the paint.
- Arrange the finished hearts in a decorative bowl or on a table.
7 Burlap and Fabric Heart Banner
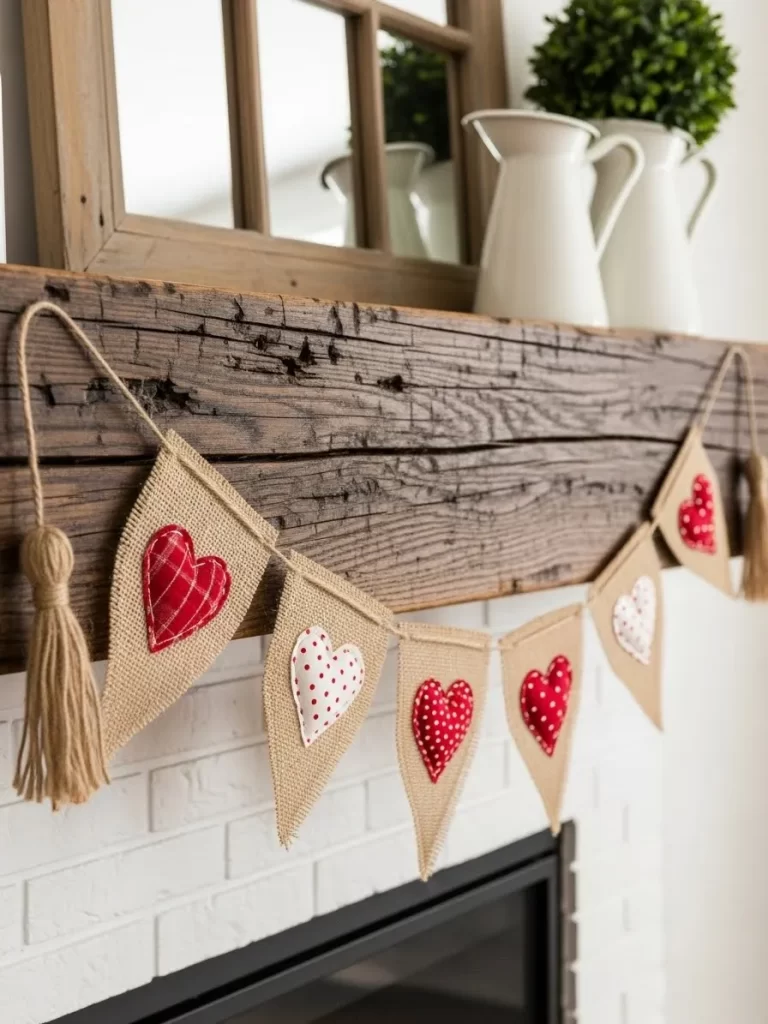
Rustic materials give this fireplace mantel a charming farmhouse appearance. The banner features simple burlap triangles decorated with patterned fabric hearts. It hangs gracefully with large tassels on each end.
Mixed patterns like polka dots and plaid add a playful energy to the room. You can match the fabric to your existing pillows or curtains. This craft is easy to assemble without any difficult sewing. It brings a handmade warmth to your living area.
Materials Required
- Natural burlap fabric
- Scraps of red and white patterned fabric
- Thick twine or jute rope
- Cotton yarn for tassels
Equipment Required
- Sharp fabric scissors
- Hot glue gun
DIY Instructions
- Cut the burlap into several triangles of the same size.
- Cut heart shapes out of your patterned fabric scraps.
- Glue one fabric heart onto the center of each burlap triangle.
- Fold the top edge of the burlap over the twine and glue it down.
- Space the triangles evenly along the length of the rope.
- Make two large tassels by wrapping yarn around your hand and tying the top.
- Attach one tassel to each end of the twine banner.
- Hang the finished bunting across your mantel or a doorway.
8 Vintage Book Page Cone Wreath
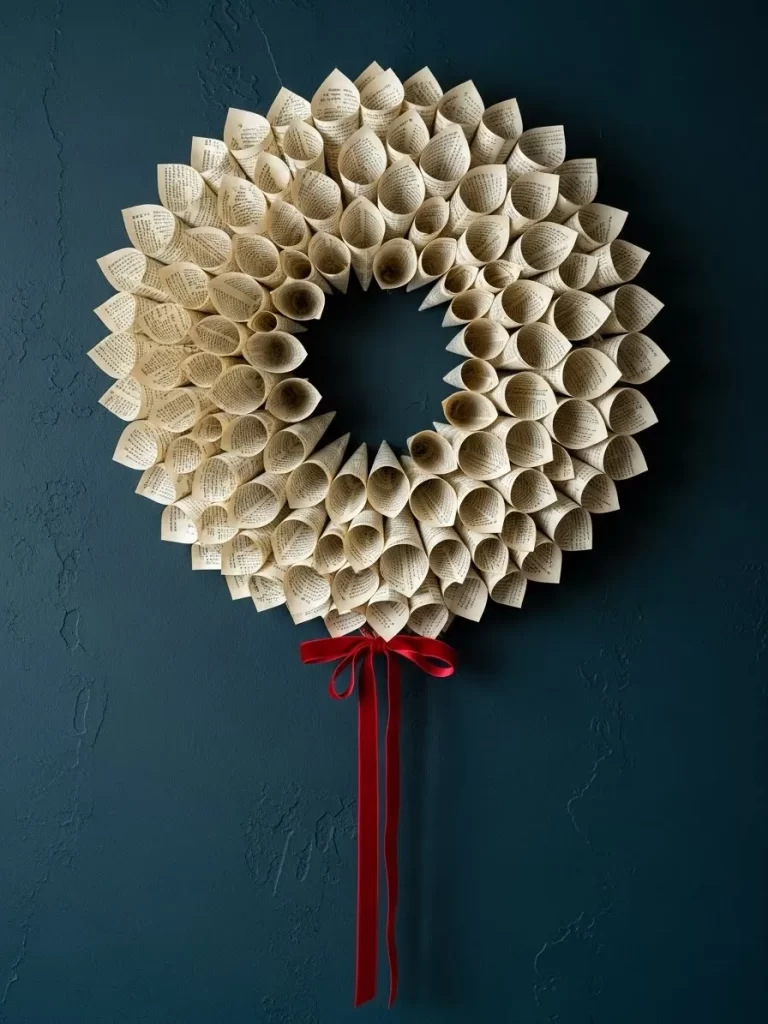
Old books find a second life as a sophisticated piece of wall art. This wreath uses dozens of paper cones to create a textured sunburst design. A simple red ribbon adds just the right amount of holiday color.
The neutral tones of the paper fit well with any interior design style. It looks particularly striking against a dark or moody wall color. This project takes some time but the result is very impressive. You can use pages from a favorite story to make it more meaningful.
Materials Required
- Pages from an old book or newspaper
- A round cardboard ring for the base
- Red velvet ribbon
Equipment Required
- Hot glue gun
- Stapler
DIY Instructions
- Tear several dozen pages out of an old book carefully.
- Roll each page into a tight cone shape with a pointed end.
- Secure the edge of the cone with a staple or a dot of glue.
- Glue the first layer of cones around the outer edge of the cardboard ring.
- Add a second layer of cones closer to the center of the ring.
- Continue adding layers until the entire cardboard base is hidden.
- Tie a large bow using the red velvet ribbon.
- Glue the bow to the bottom of the wreath and hang it up.
9 Framed Pressed Flower Heart
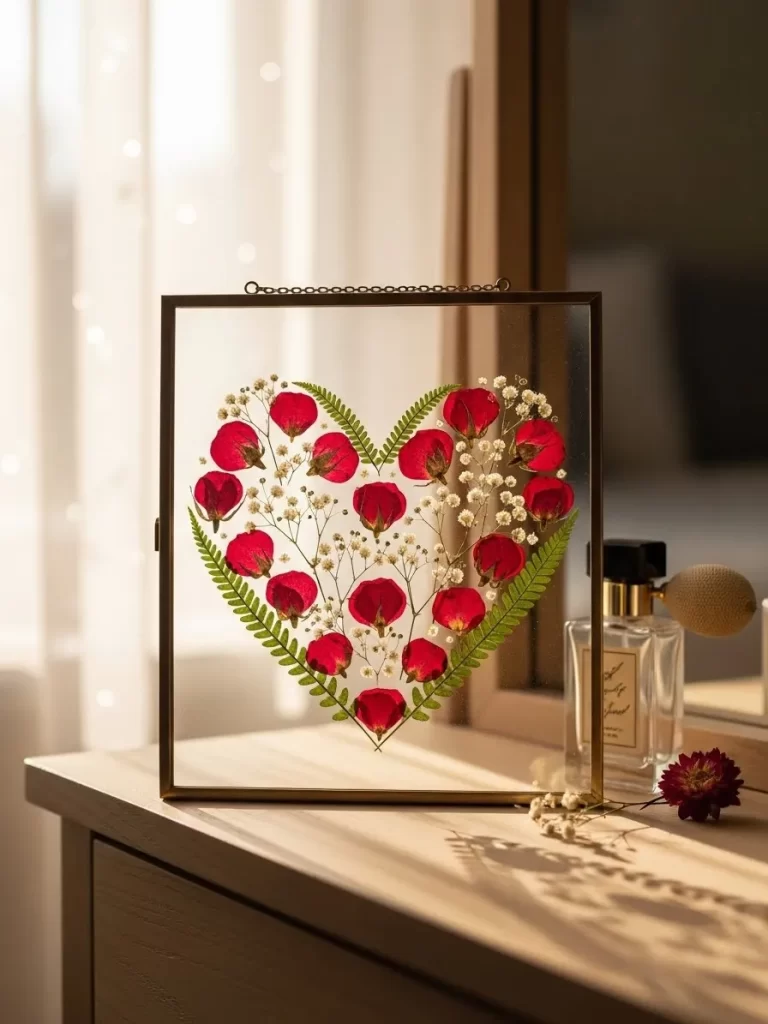
Natural botanical elements create a delicate and romantic piece of art. This project involves arranging dried red petals and green leaves into a heart. The glass frame makes the flowers look like they are floating in the air.
This decoration adds a soft touch to a vanity or a bookshelf. It captures the beauty of nature in a permanent display. You can use flowers from a special bouquet to keep those memories alive. Sunlight passing through the glass highlights the fine details of the plants.
Materials Required
- Dried red rose petals
- Pressed fern leaves or small green foliage
- Dried babys breath flowers
- Double pane glass floating frame
Equipment Required
- Tweezers for placement
- Small glue pen
DIY Instructions
- Open the glass frame and clean both sides of the glass panes.
- Lay the first pane flat on a clean table.
- Use tweezers to arrange the green leaves into a large heart outline.
- Fill the center of the heart with the red rose petals.
- Add tiny sprigs of babys breath around the edges for extra detail.
- Place a tiny dot of glue on the back of each piece to hold it in place.
- Set the second pane of glass carefully on top of the flowers.
- Close the frame and display it where it can light up the room.
10 Stuffed Felt Heart Bowl Fillers
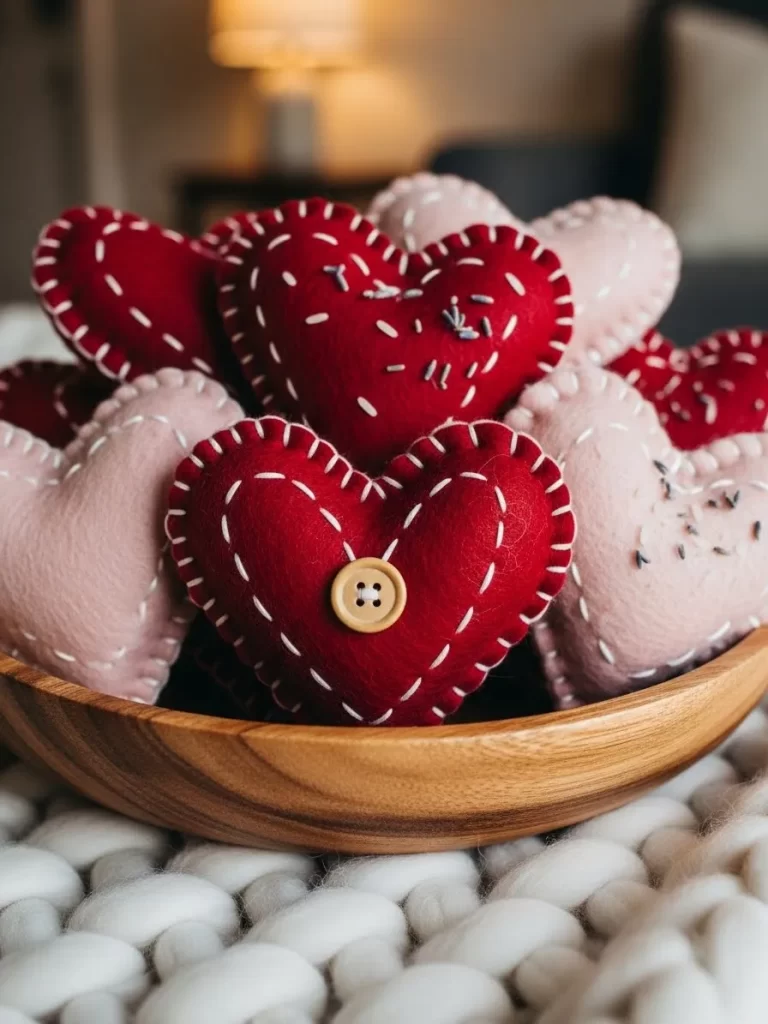
Soft felt decorations make your home feel extra cozy and inviting. These hand sewn hearts feature decorative white stitching and cute button details. They look beautiful when piled high in a rustic wooden bowl.
You can mix different shades of red and pink felt for a varied look. Adding dried lavender inside the stuffing creates a pleasant scent for your room. These hearts are small enough to be used as ornaments or gift toppers. They are durable and will last for many years.
Materials Required
- Red and pink felt fabric
- White embroidery floss
- Polyester fiberfill or cotton balls for stuffing
- Small wooden buttons
Equipment Required
- Sewing needle
- Fabric scissors
- Straight pins
DIY Instructions
- Cut out two identical heart shapes from the felt fabric.
- Sew a small wooden button onto the front of one heart piece.
- Place the two heart pieces together and pin them so they do not move.
- Use a needle and white thread to sew around the edge with a blanket stitch.
- Leave a small one inch opening at the side of the heart.
- Push the stuffing through the hole until the heart is plump.
- Sew the opening closed with the same stitching pattern.
- Place several finished hearts into a bowl for a simple display.
11 Butterfly Heart Wall Collage
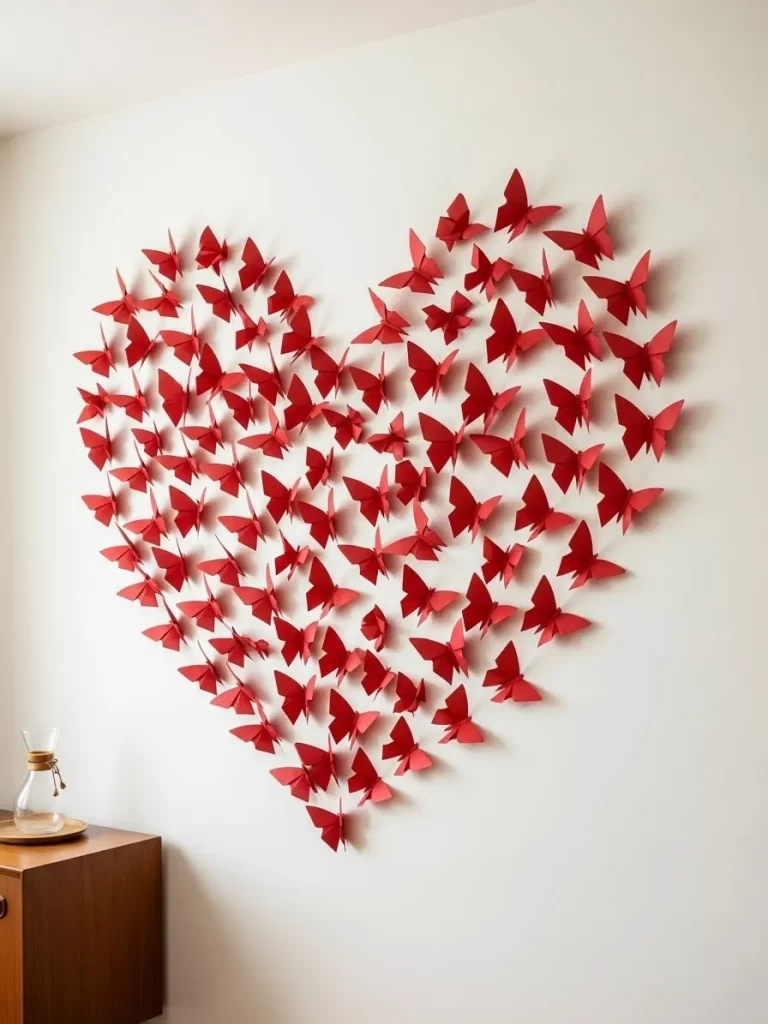
Simple paper cutouts can turn a plain wall into a dramatic focal point. This heart consists of dozens of red butterflies that look like they are taking flight. It creates a sense of movement and energy in a minimalist room. Every single piece is folded to stand out from the surface.
You can arrange them in a large heart shape above your bed or sofa. The bright red color provides a bold contrast against white walls. This project is very quick to finish once the pieces are cut. It adds a whimsical and romantic touch to your living space. Kids will love helping you stick these lightweight decorations to the wall.
Materials Required
- Red cardstock paper
- Double sided adhesive foam squares
Equipment Required
- Butterfly stencil or paper punch
- Sharp scissors
- Pencil
DIY Instructions
- Trace or punch out fifty butterfly shapes from your red cardstock.
- Fold each butterfly in half along the center body to lift the wings.
- Lightly draw a large heart outline on your wall with a pencil.
- Place a small adhesive square on the back of the butterfly body.
- Stick the butterflies onto the wall inside your heart outline.
- Angle them in different directions to make them look more natural.
- Erase any visible pencil marks once the collage is complete.
- Step back and adjust any pieces that look out of place.
12 Recycled Wine Cork Heart
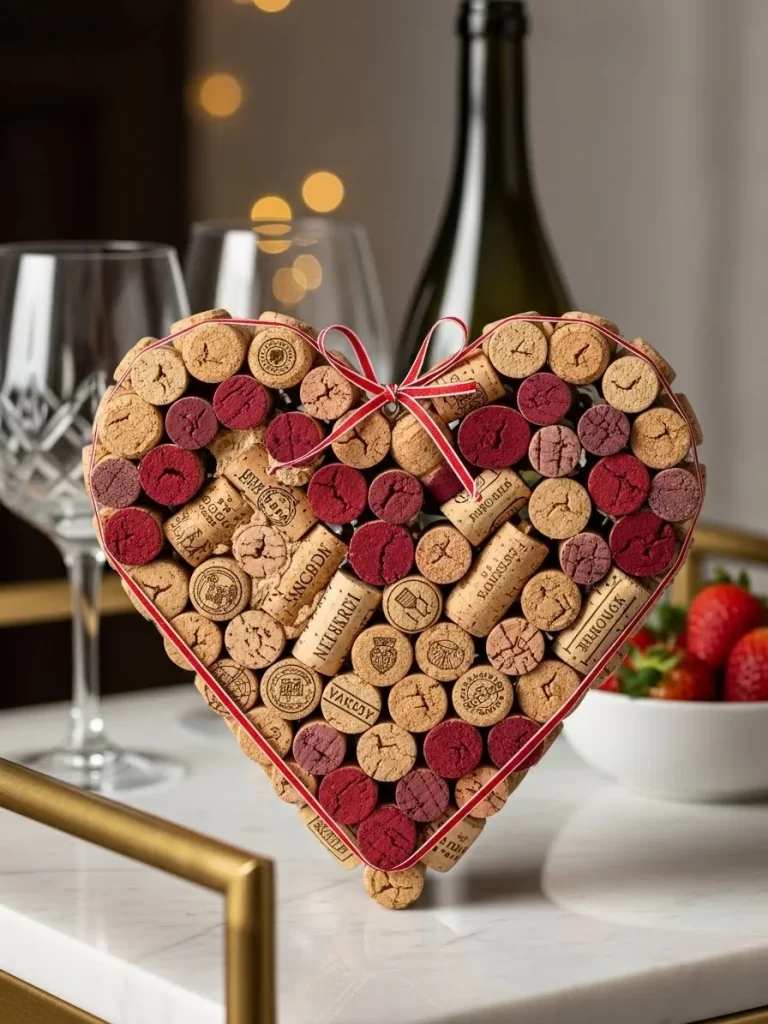
Repurpose your collection of wine corks into a meaningful piece of art. This heart combines natural wood tones with deep red stains for a rich texture. It stands upright on a table or tray as a sturdy centerpiece. A thin red ribbon provides a finishing touch that ties the look together.
This project is an excellent way to remember special celebrations. The varied heights of the corks add a unique 3D dimension to the craft. You can paint the ends of some corks to add more color. It fits well in a kitchen or a home bar area. Friends will love the creative use of common household items.
Materials Required
- At least forty used wine corks
- Red acrylic paint or ink
- Thin red ribbon
- Cardboard for a small base
Equipment Required
- Hot glue gun
- Paintbrush
- Utility knife
DIY Instructions
- Sort your corks by size and color to plan your design.
- Dip the ends of several corks into red paint and let them dry.
- Cut a small heart out of cardboard to act as your layout guide.
- Glue the corks together in a heart shape starting from the center.
- Stack the corks vertically so they stand on their flat ends.
- Add layers until you reach the desired size and shape.
- Wrap a red ribbon around the outside edge of the heart.
- Secure the ribbon with a tiny dot of glue and tie a small bow.
13 Paper Roll Heart Stamps
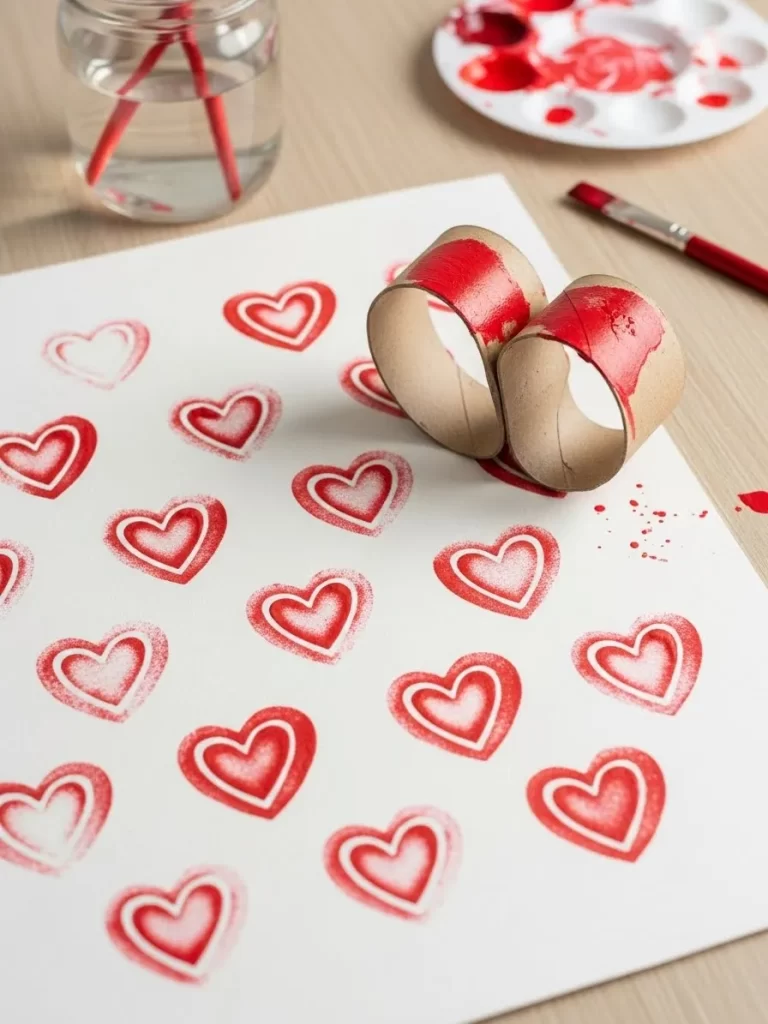
Household items offer endless possibilities for creative holiday projects. You can easily shape cardboard rolls to make your own heart stamps. This technique produces a fun pattern on paper or fabric with very little effort. Children will enjoy helping with this mess free activity during the afternoon.
Creating custom wrapping paper or cards becomes very simple with this tool. The double lines of the heart stamp create a modern and graphic look. You can use different shades of red and pink paint for variety. It is a fantastic way to reuse paper towel rolls before recycling them. This craft proves that you do not need expensive supplies to be creative.
Materials Required
- Empty toilet paper or paper towel rolls
- Red and pink craft paint
- Large sheets of white paper
Equipment Required
- Rubber bands
- Shallow plate or paint tray
DIY Instructions
- Press the center of one end of the tube inward to form a V shape.
- Pinch the opposite side of the tube to create a point.
- Wrap a rubber band around the tube to hold this heart shape in place.
- Pour a small amount of paint onto your shallow plate.
- Dip the shaped end of the tube into the wet paint.
- Press the stamp firmly onto your paper and lift it straight up.
- Repeat the pattern across the entire sheet of paper.
- Let the paint dry completely before using the paper for gifts.
14 Knitted Heart Pillow
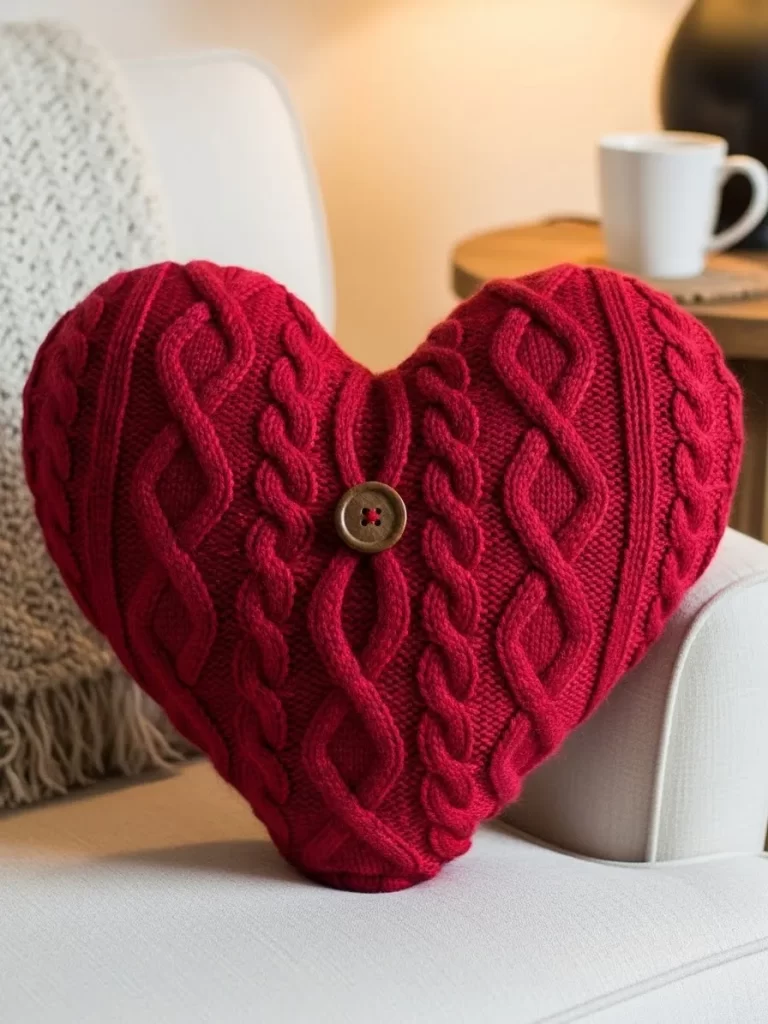
Textures like wool and yarn add a layer of warmth to your sofa. This large heart pillow features a classic cable knit pattern in a vibrant red shade. A single wooden button in the center adds a rustic and charming detail. It makes your living room feel like a cozy retreat during cold evenings.
You can reuse an old sweater to make this project even easier. The soft filling makes it comfortable for lounging while watching a movie. This decoration adds a pop of color to a grey or white armchair. It feels much more personal than a store bought cushion. Your family will appreciate the extra comfort this handmade item provides.
Materials Required
- An old red cable knit sweater or knit fabric
- Polyester fiberfill stuffing
- Large wooden button
- Matching red thread
Equipment Required
- Sharp fabric scissors
- Sewing needle or sewing machine
- Straight pins
DIY Instructions
- Turn your sweater inside out and lay it flat on a table.
- Draw a large heart shape on the fabric using a piece of chalk.
- Pin the two layers of the sweater together inside the lines.
- Cut out the heart shape while leaving an extra inch for the seam.
- Sew around the edges but leave a four inch opening at the bottom.
- Turn the fabric right side out so the knit pattern shows.
- Stuff the pillow firmly with the polyester fiberfill.
- Sew the opening closed by hand and attach the button to the center.
15 Clothespin Memory Photo Wreath
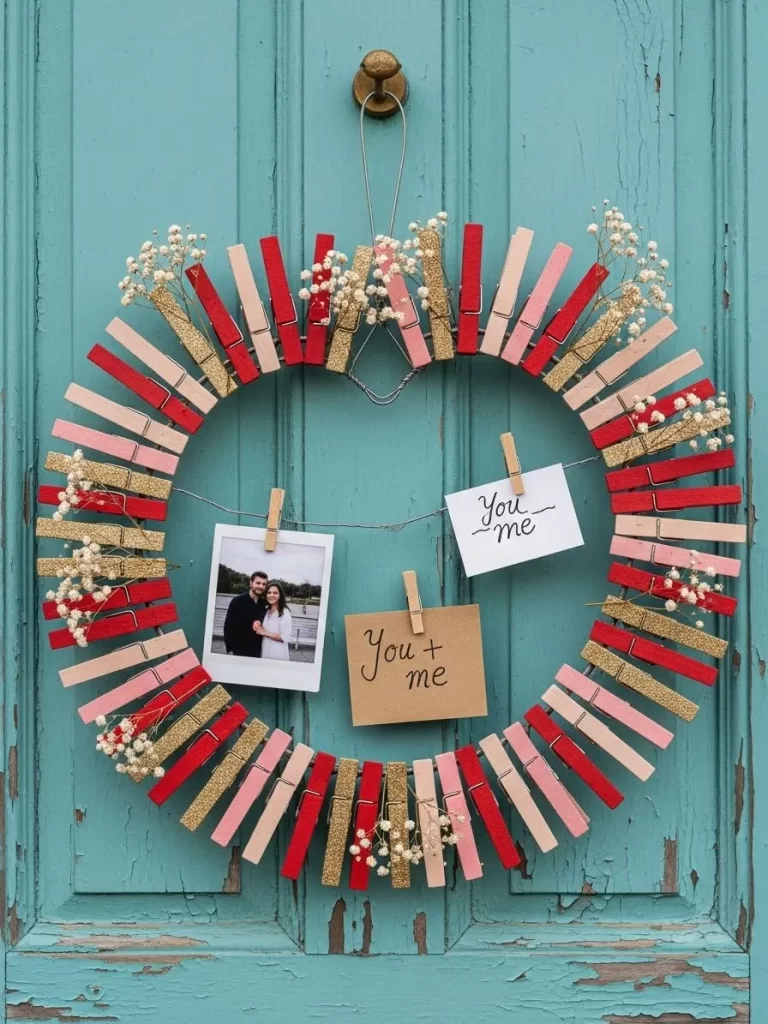
Display your favorite moments with a personalized photo wreath this year. This wire frame holds painted clothespins in shades of pink, red, and gold. You can clip photos and sweet notes to the center for a nostalgic touch. Tiny white flowers add a soft organic feel to the outer edges.
This decoration serves as a wonderful conversation starter for your guests. You can update the pictures easily whenever you want a fresh look. It hangs beautifully on a front door or in a hallway. The gold glitter pins add a touch of sparkle to the design. This project celebrates your relationships in a very visual and creative way.
Materials Required
- Wire heart shaped wreath frame
- Wooden clothespins
- Pink, red, and gold acrylic paint
- Small printed photos
Equipment Required
- Paintbrush
- Gold glitter glue
- Small clips or twine
DIY Instructions
- Paint your wooden clothespins in a variety of holiday colors.
- Add gold glitter to a few pins to give them some extra shine.
- Let the pins dry completely before you touch them again.
- Clip the painted pins around the entire wire frame.
- Arrange the colors in a repeating pattern for a neat look.
- Use twine to hang several photos in the open center of the wreath.
- Attach the photos to the twine using the extra clothespins.
- Hang the finished wreath on a hook or a nail.
16 Watercolor Heart Art
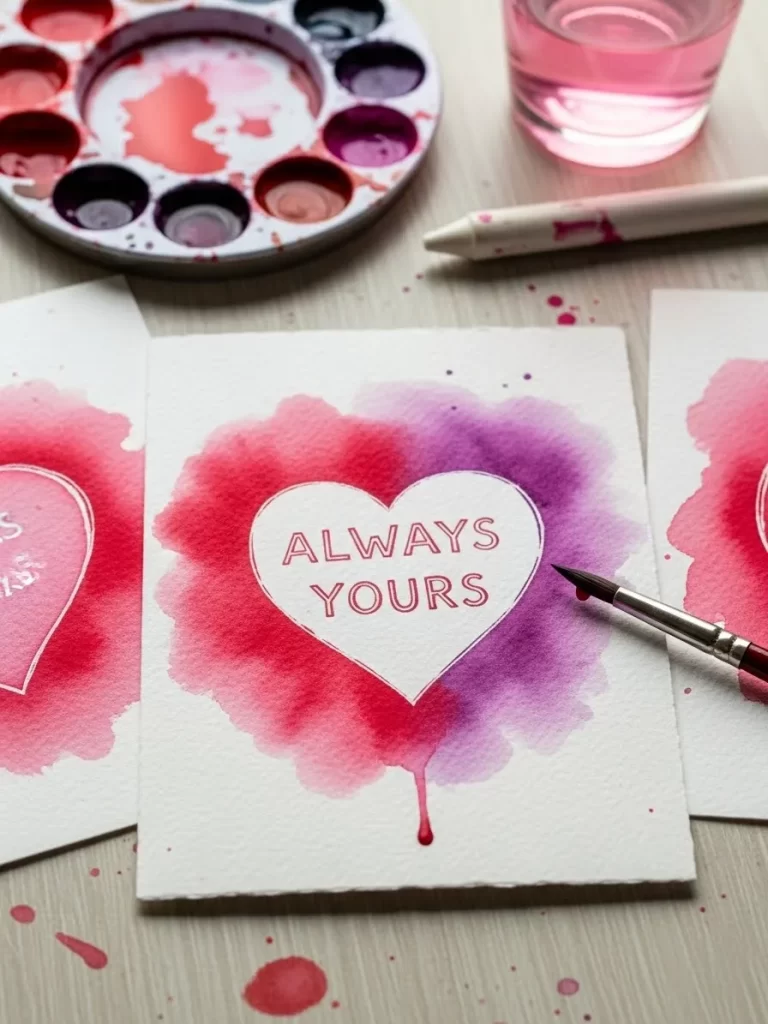
Soft bleeding edges give watercolor art a dreamy and romantic appearance. This simple project focuses on a white heart surrounded by vibrant pink and purple washes. You can write your own message in the center for a personal touch. Frame it to create a lovely gift for someone special in your life.
The unpredictable nature of the paint makes every piece of art unique. It is a relaxing way to explore your creativity without any pressure. This art looks elegant on a desk or a small gallery wall. The bright colors will lift your mood every time you see them. You only need a few supplies to start this beautiful project.
Materials Required
- Thick watercolor paper
- Pink and purple watercolor paints
- Masking tape or a white crayon
Equipment Required
- Round paintbrush
- Jar of clean water
- Paper towels
DIY Instructions
- Tape the edges of your paper to a flat surface to keep it still.
- Draw a heart in the center using a white crayon to keep that area white.
- Wet your paintbrush and mix it with a small amount of pink paint.
- Apply the paint in circles around the outside of the heart.
- Add purple paint while the paper is still wet to let the colors blend.
- Dab away any extra water with a paper towel if it gets too messy.
- Let the painting dry completely before you remove the tape.
- Write a sweet note inside the white heart with a fine pen.
17 Textured Yarn Heart Bowl
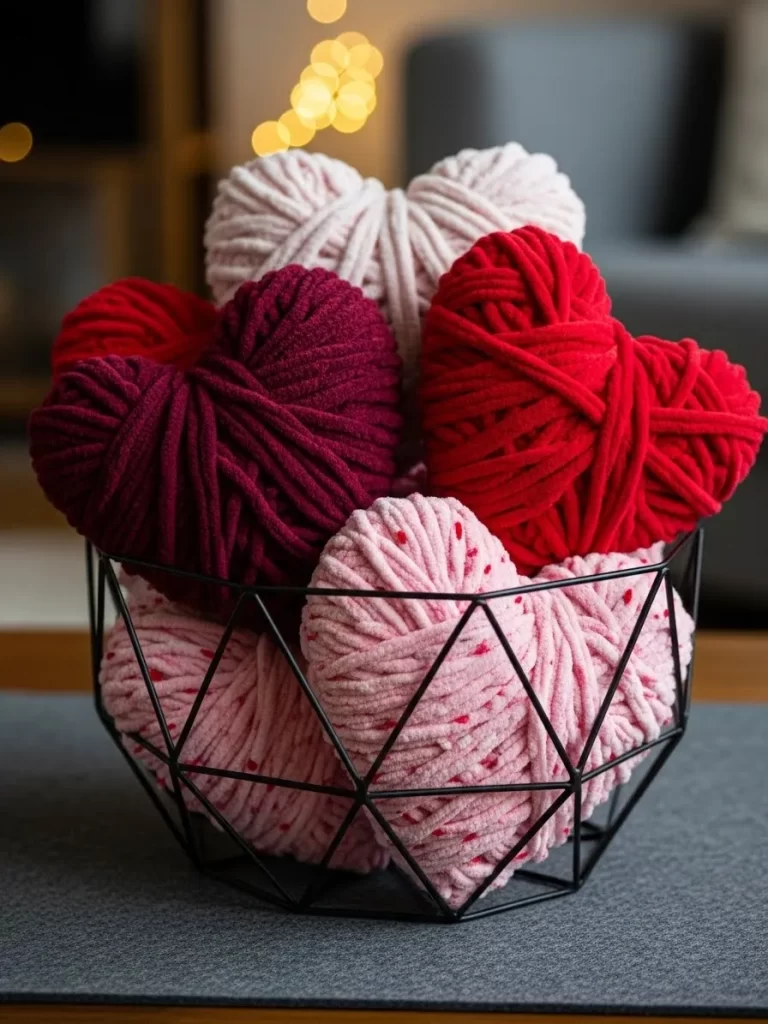
Oversized yarn brings a modern and tactile element to your home decor. These hearts are wrapped in thick velvet or wool to create a plush look. They sit beautifully in a black geometric bowl for a striking visual contrast. Choose different shades of pink and burgundy to match your personal style.
This decoration adds a soft feel to a hard coffee table surface. You can make these while watching your favorite show in the evening. They are very lightweight and safe to have around pets or children. The chunky texture makes them look professional and high end. These hearts provide a simple way to fill empty spaces on your shelves.
Materials Required
- Chunky velvet or wool yarn
- Styrofoam hearts or balls of crumpled paper
- Low temp hot glue
Equipment Required
- Sharp scissors
- Glue gun
DIY Instructions
- Apply a small dot of glue to the top of your heart base.
- Press the end of the yarn into the glue and hold it for a second.
- Wrap the yarn tightly around the base in different directions.
- Continue wrapping until you can no longer see the base underneath.
- Tuck the end of the yarn under a previous loop to hide it.
- Add another small dot of glue to secure the final tail of yarn.
- Repeat this process with different colors of yarn for a full set.
- Place the finished hearts into a decorative metal or wooden bowl.
18 Twine Wrapped Glass Vases
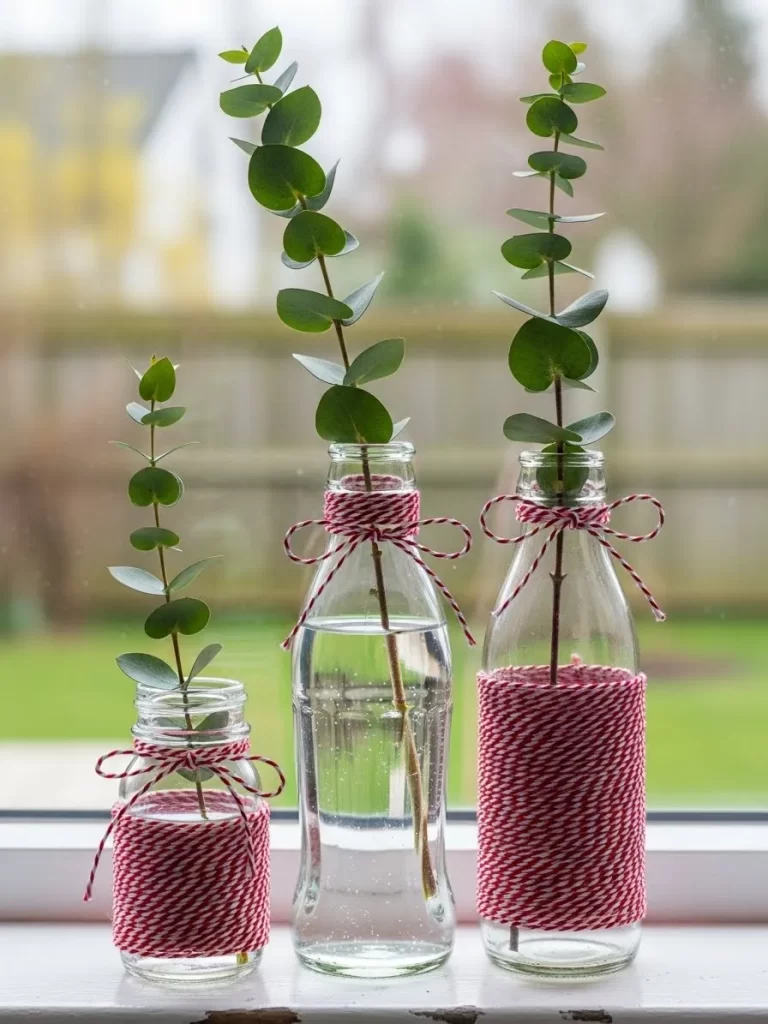
Minimalism often creates the most impact with very little effort or cost. These clear glass bottles are wrapped in red and white twine for a festive touch. Fresh eucalyptus stems provide a pop of green and a fresh scent to the room. Line them up on a windowsill to enjoy their simple beauty.
You can use bottles of different heights to create a more interesting display. This craft is an excellent way to recycle glass milk or soda bottles. The red and white pattern reminds everyone of classic candy canes. It adds a bit of texture to a sunny kitchen or dining area. These vases stay beautiful long after the holiday is over.
Materials Required
- Empty glass bottles or jars
- Red and white baker’s twine
- Fresh or dried greenery stems
Equipment Required
- Scissors
- Clear drying craft glue
- Small brush
DIY Instructions
- Clean your glass bottles thoroughly and remove any sticky labels.
- Apply a thin line of glue around the bottom of the bottle.
- Press the end of the twine into the glue and let it set.
- Wrap the twine tightly around the bottle while moving upward.
- Cover the middle section or the entire bottle according to your taste.
- Brush a little more glue at the top to secure the end of the twine.
- Tie a small bow around the neck of the bottle for extra detail.
- Fill the bottles with water and add your favorite green branches.
19 Musical Heart Ornaments
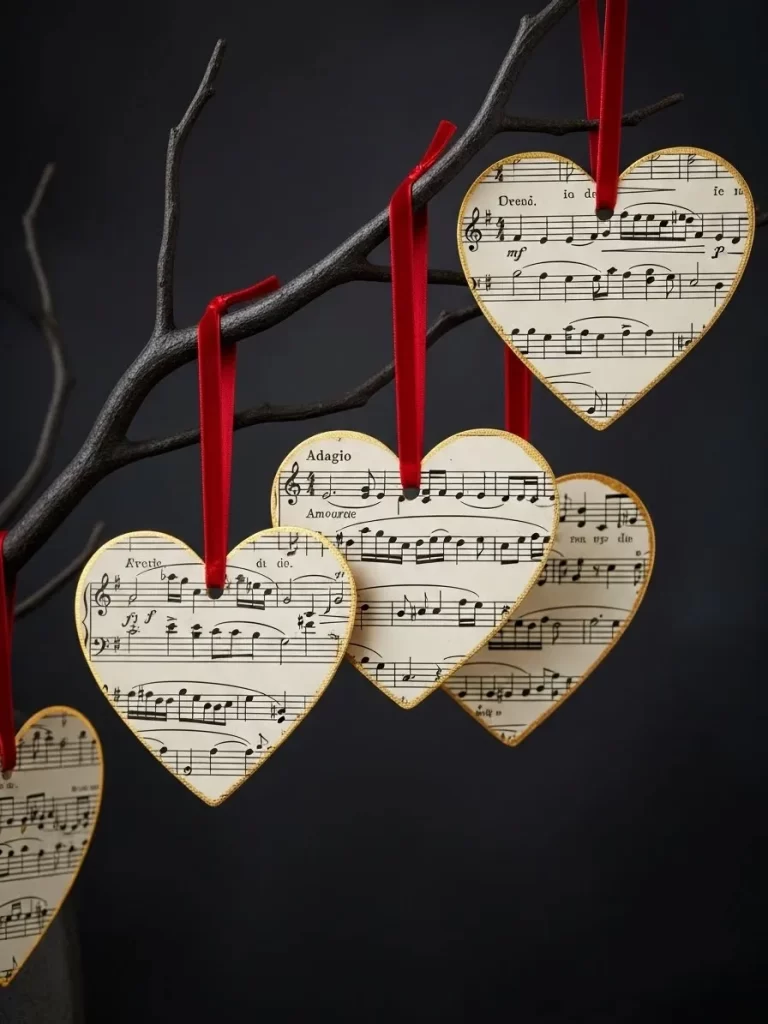
Music adds a poetic and vintage layer to your Valentine decorations this year. These hearts are cut from old sheet music and finished with a shimmering gold edge. They hang from dark branches with thin red velvet ribbons for a classy look. This project is a wonderful way to celebrate a love for the arts.
The aged yellow paper looks beautiful against the deep red of the ribbon. You can use pages from a favorite song to make it extra special. These ornaments are very lightweight and move gently with the air. They bring a sense of history and romance to any corner of your home. It is a very affordable craft that looks quite expensive once finished.
Materials Required
- Old sheet music or printed song lyrics
- Gold acrylic paint or a gold leaf pen
- Red velvet ribbon
- Thin cardstock for backing
Equipment Required
- Sharp scissors
- Small hole punch
- Glue stick
DIY Instructions
- Glue your sheet music onto a piece of thin cardstock to make it stiff.
- Cut out several heart shapes in the size you prefer.
- Run the gold paint along the very edge of each paper heart.
- Let the gold paint dry completely before you touch the ornaments.
- Punch a small hole in the top center of every heart.
- Thread a piece of red velvet ribbon through the hole.
- Tie the ends of the ribbon into a loop for hanging.
- Display the hearts on a decorative branch or a jewelry stand.
20 Wood Stick Floating Heart Frame
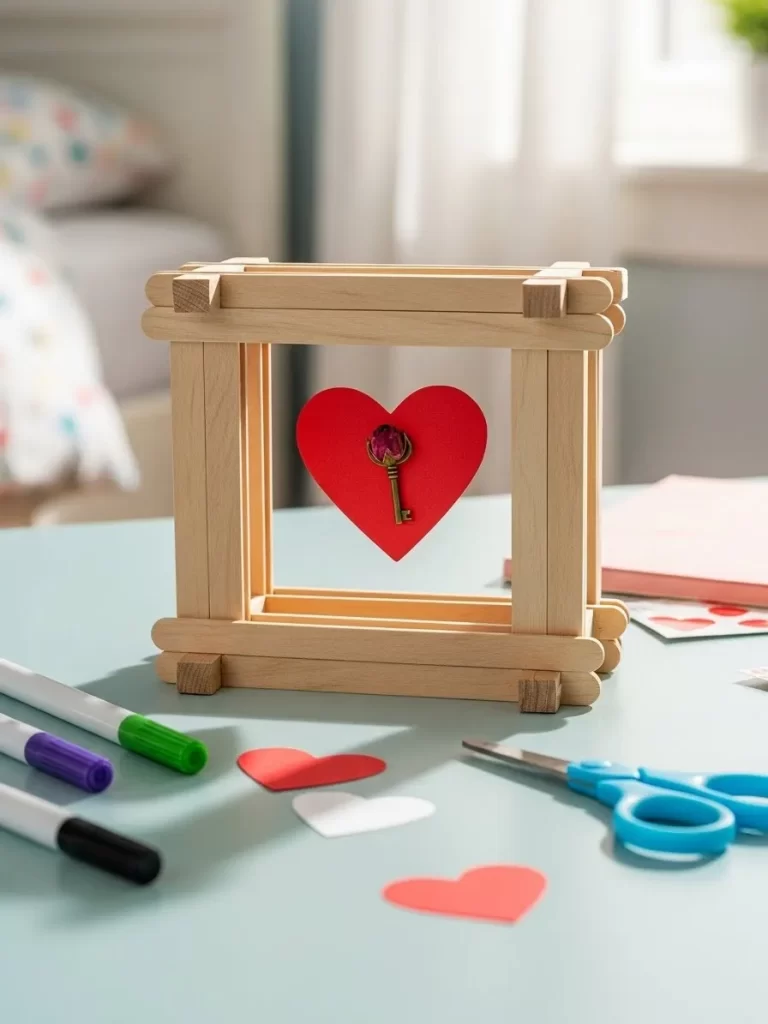
Basic craft sticks can build a unique architectural frame for your holiday art. This 3D structure holds a suspended red heart with a tiny vintage key in the center. It looks like a miniature gallery piece that you can place on a desk. The natural wood keeps the design feeling light and modern.
This project is a great way to use up extra supplies from your craft bin. The floating effect creates a sense of wonder and curiosity for anyone who sees it. You can paint the frame or leave it natural for a rustic look. It serves as a symbolic reminder of love and trust in your home. This display is sturdy enough to stand on its own without a hook.
Materials Required
- Wooden craft sticks
- Red cardstock paper
- Tiny metal key or a small charm
- Clear fishing line or thin thread
Equipment Required
- Hot glue gun
- Scissors
- Needle
DIY Instructions
- Glue four sticks together to form a square for the front of the frame.
- Build a second square and connect them with four more sticks at the corners.
- Continue adding sticks until you have a thick and sturdy wooden cube.
- Cut a small heart out of the red cardstock paper.
- Use a needle to pull a piece of clear thread through the top of the heart.
- Tie the tiny metal key to the center of the paper heart.
- Glue the ends of the thread to the top inside edge of your wooden frame.
- Make sure the heart hangs right in the center of the structure.
21 Red Glitter Candle Jars
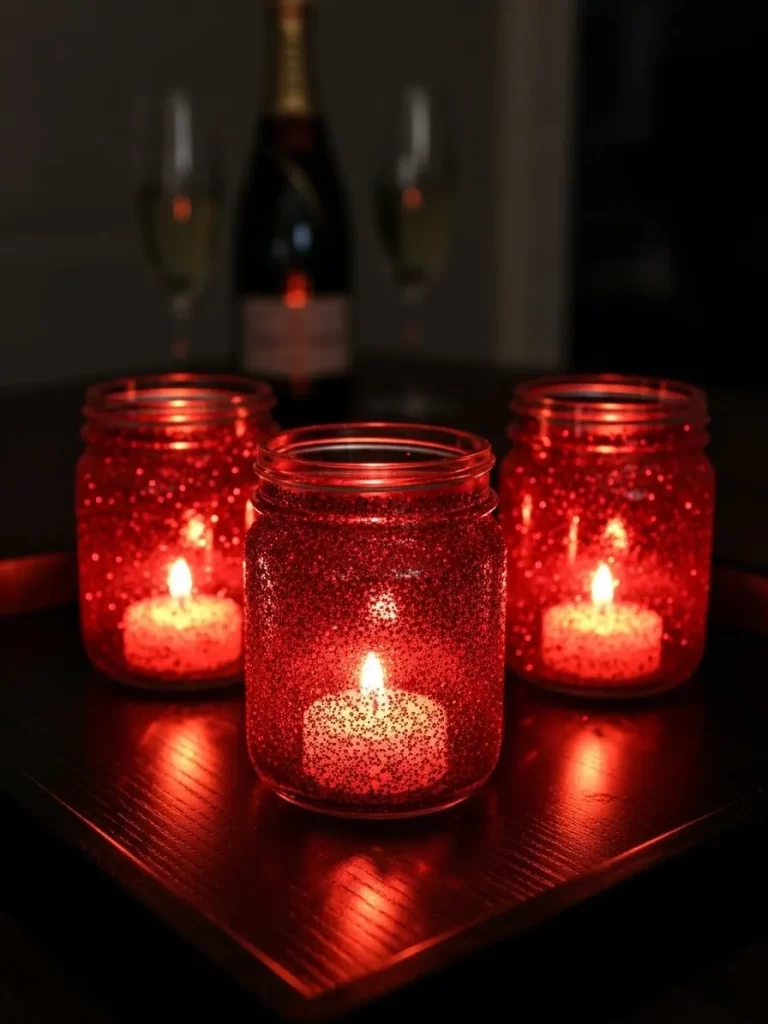
Lighting up your room is easy with these sparkling glass containers. They cast a warm red glow when you place a small candle inside. You can put them on a dining table to set a cozy mood for a dinner. Glitter covers the outside to create a rich and festive texture.
Every jar looks unique because of the way the light hits the red flakes. You can group three together on a tray for a bigger visual impact. These decorations stay beautiful even when the candles are not lit during the day. Small flickers of light will bounce off the walls to create a magical atmosphere. This project is very cheap to make using old kitchen jars.
Materials Required
- Glass jars in different sizes
- Red glitter
- Clear liquid glue
Equipment Required
- Foam brush
- Tea light candles
- Paper plate to catch extra glitter
DIY Instructions
- Wash your glass jars with warm water and soap to remove any dust.
- Dry the jars completely with a towel so the glue sticks well.
- Pour some clear glue onto a plate or into a small bowl.
- Use the foam brush to spread a thick layer of glue over the outside of the jar.
- Shake the red glitter over the wet glue until you cannot see the glass anymore.
- Tap the jar gently to let the extra glitter fall onto a paper plate.
- Let the jars sit for two hours until the glue feels hard and dry.
- Place a tea light candle in the bottom of each jar and light it.
22 Embroidered Heart Hoop Art
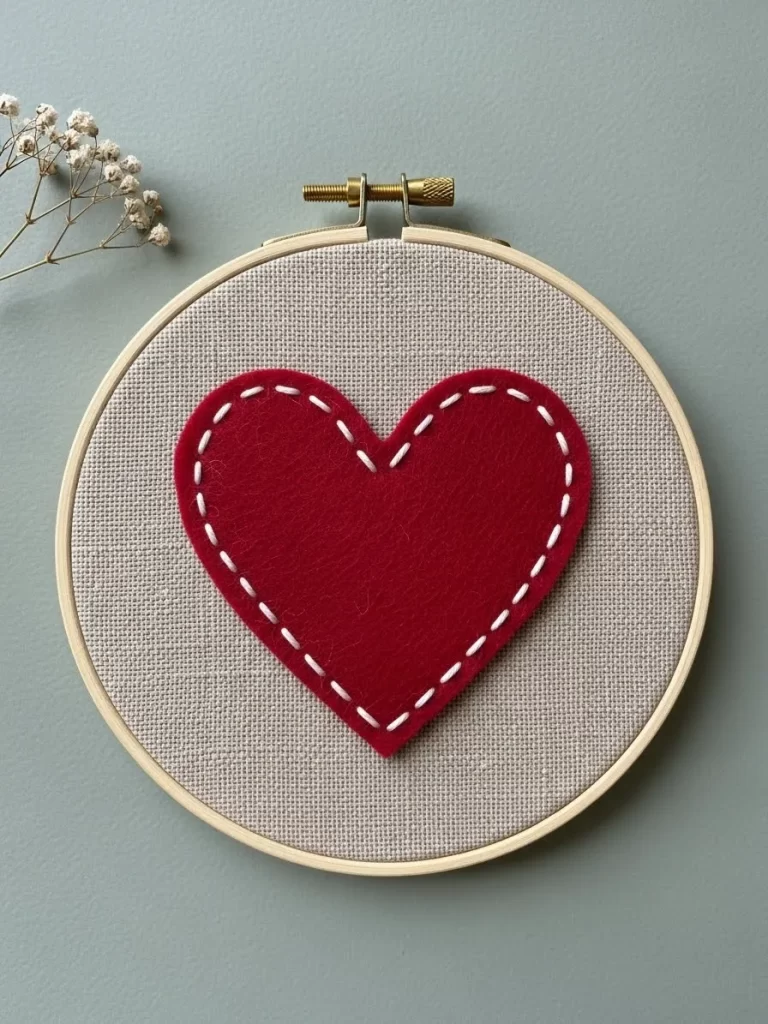
Simple sewing projects bring a sense of peace to your busy afternoon. This piece uses a wooden hoop to frame a bright red heart on soft fabric. It adds a handmade touch to a gallery wall or a bedroom shelf. The white stitching stands out against the neutral background to create a clean look.
You can make this gift for a friend or keep it to decorate your own space. It feels very cozy and traditional in a modern home. You do not need to be an expert at sewing to finish this craft. It serves as a sweet reminder of the love you put into your home decor. The round shape of the hoop provides a nice contrast to square picture frames.
Materials Required
- Wooden embroidery hoop
- Gray or tan linen fabric
- Red felt fabric
- White embroidery thread
Equipment Required
- Sewing needle
- Fabric scissors
- Pencil
DIY Instructions
- Loosen the screw on the wooden hoop and separate the two rings.
- Place your fabric over the smaller ring and press the larger ring on top.
- Tighten the screw so the fabric is tight like a drum.
- Draw a heart shape on your red felt using a pencil.
- Cut out the felt heart carefully with your fabric scissors.
- Center the heart on the fabric inside the hoop.
- Thread your needle with white string and tie a knot at the end.
- Sew around the edge of the heart using long and even stitches.
- Trim the extra fabric from the back of the hoop once you are finished.
23 Dried Orange and Heart Mobile
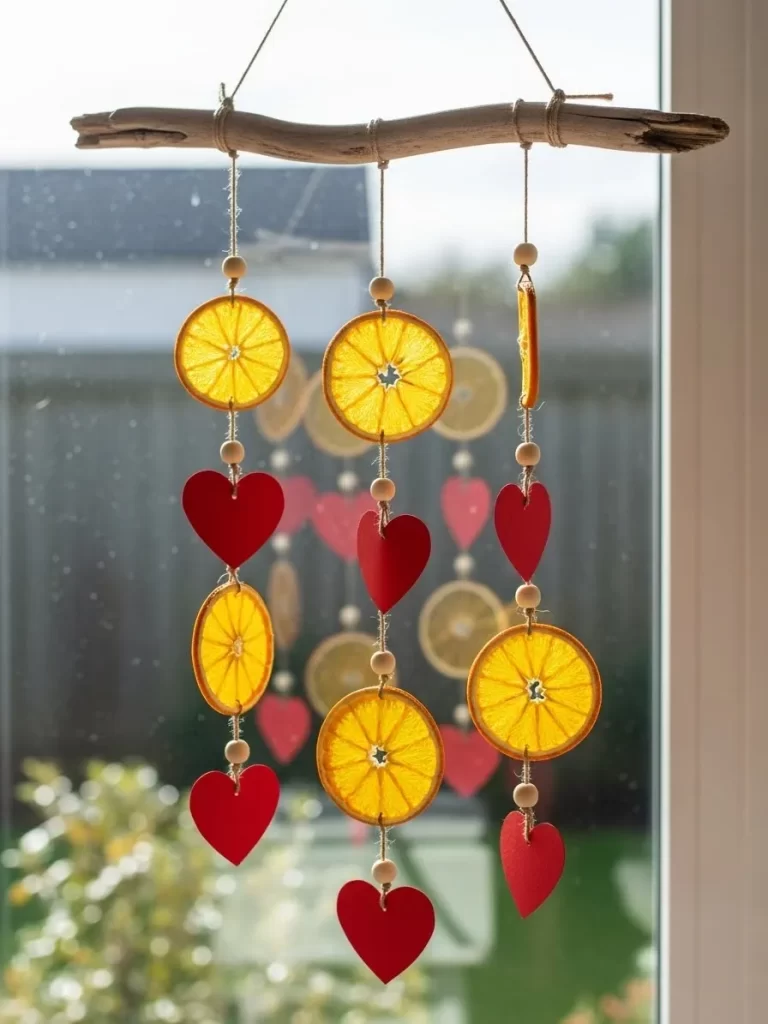
Natural scents and bright colors combine in this rustic window hanging. Slices of dried oranges look like stained glass when the sun hits them. Paper hearts add a romantic touch to the driftwood base. This mobile moves gently in the breeze to create a relaxing environment.
You can hang it in a kitchen or a sunroom to bring the outdoors inside. The orange color looks vibrant next to the deep red of the paper. Every piece is unique because nature provides different shapes and sizes. It is a fantastic way to use fruit that might otherwise go to waste. Your guests will love the fresh and organic feel of this decoration.
Materials Required
- Dried orange slices
- Red cardstock paper
- Wooden beads
- Driftwood branch
- Thin twine
Equipment Required
- Scissors
- Small hole punch
- Large sewing needle
DIY Instructions
- Cut three long pieces of twine and tie them to a sturdy piece of driftwood.
- Use a needle to thread a wooden bead onto the first string.
- Push the needle through the center of a dried orange slice.
- Cut several hearts out of the red paper and punch a hole in the top.
- Tie a paper heart below the orange slice to keep it in place.
- Keep adding beads and oranges until the string is the length you want.
- Repeat these steps for the other two strings on the branch.
- Tie a loop of twine to the center of the driftwood for hanging.
- Display the mobile in a sunny window to see the colors glow.
24 Ribbon and Lace Scrap Tree
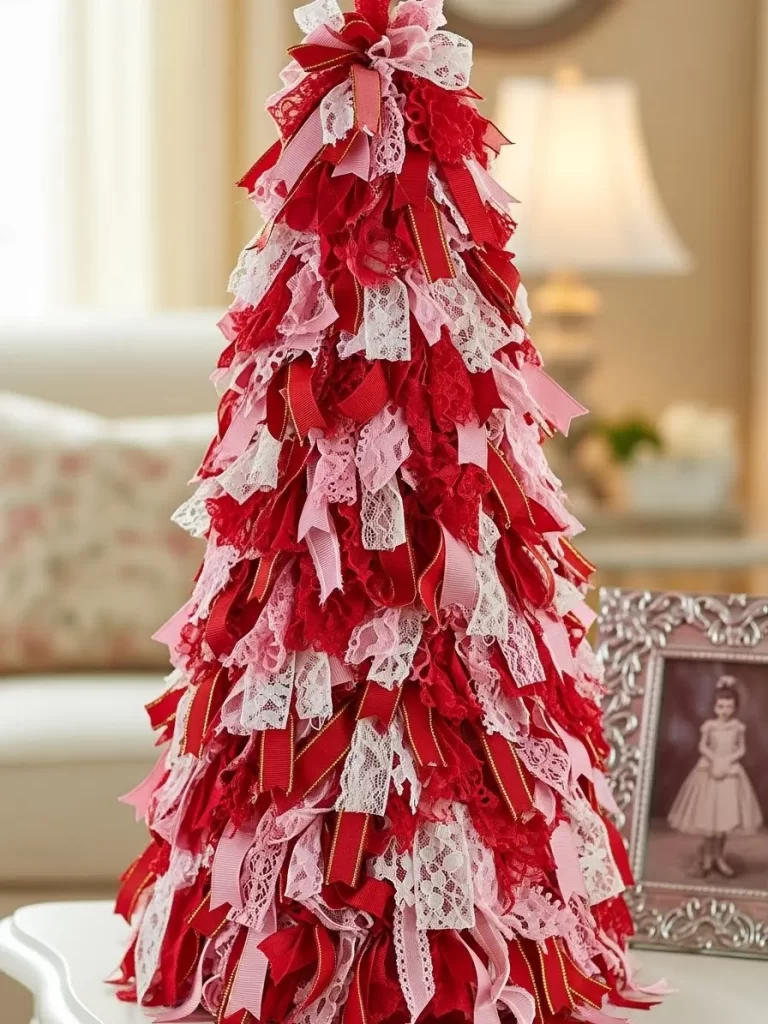
Shabby chic style comes alive with this textured holiday tree. It uses scraps of lace and ribbon to create a soft and feminine look. The layers of red and pink fabric build a beautiful conical shape that stands tall. You can use it as a centerpiece for your holiday brunch or a vanity.
The mix of patterns and textures makes it look very professional. This project is an excellent way to use up small pieces of fabric from previous crafts. It adds a pop of color to a white or neutral room. Every layer tells a story with its unique ribbon choice. You can make several trees in different sizes for a full display.
Materials Required
- Foam cone base
- Scraps of red ribbon
- Pink lace strips
- White fabric pieces
Equipment Required
- Hot glue gun
- Fabric scissors
DIY Instructions
- Cut your fabric and ribbon into dozens of small strips about three inches long.
- Plug in your glue gun and wait for it to get warm.
- Start at the bottom of the foam cone and apply a line of glue.
- Press the center of a ribbon strip into the glue to hold it down.
- Repeat this step around the entire base until the first layer is full.
- Move up one inch and start the next layer using the lace strips.
- Continue layering ribbons and lace until you reach the very top of the cone.
- Glue a small red bow on the peak to hide any visible foam.
25 Newspaper Heart Poster
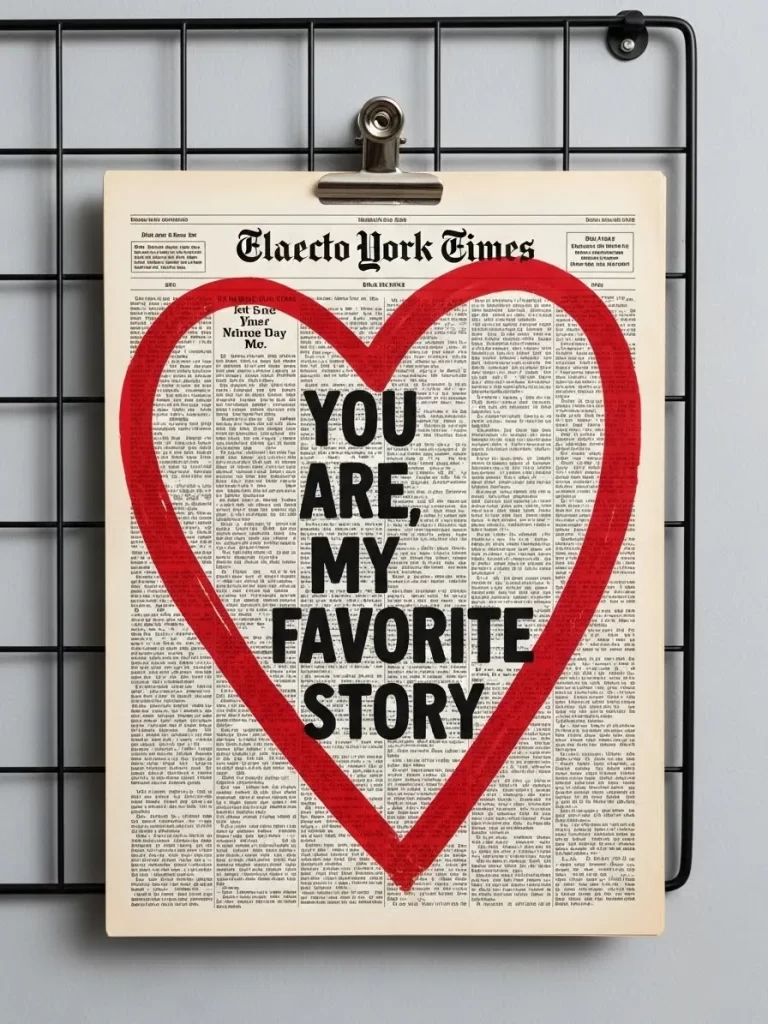
Vintage charm meets modern art in this simple wall hanging. It features a bold red heart painted over an old news article. The black text provides a busy background that makes the red color pop. You can frame this or hang it with a simple metal clip for a raw look.
This project is very quick and uses items you likely have in your recycling bin. It looks wonderful in an office or a creative studio. The contrast between the old paper and new paint is very striking. You can pick a page with a date that is special to you. It proves that simple materials can create very high end art.
Materials Required
- A page from an old newspaper
- Red acrylic paint
- Cardboard for a backing board
Equipment Required
- Large paintbrush
- Pencil
- Metal clipboard or frame
DIY Instructions
- Pick a newspaper page that has interesting stories or a nice font.
- Glue the newspaper page onto a piece of cardboard to make it flat.
- Sketch a large heart outline in the center with a light pencil.
- Fill in the heart shape with a bright red paint using your brush.
- Let the paint dry completely so the paper does not wrinkle or tear.
- Write a short message in black marker inside the heart if you like.
- Place the finished page in a frame or clip it to a wire wall grid.
26 Mandala Heart Painted Rocks
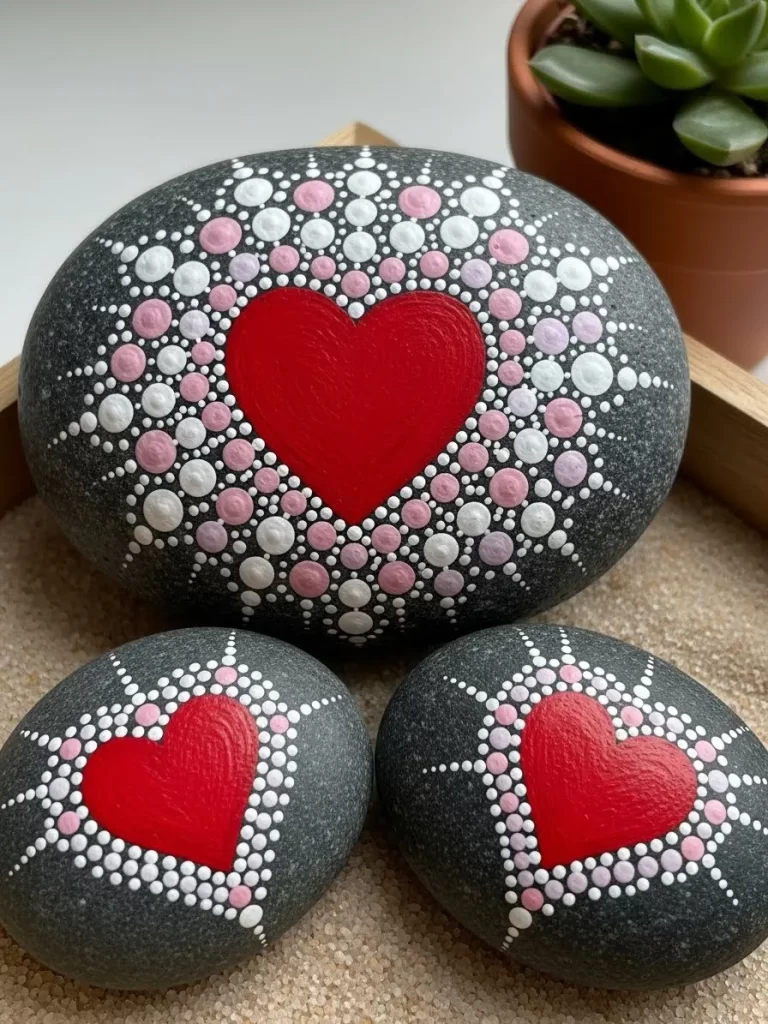
Dot painting is a meditative way to create intricate holiday decorations. These smooth stones feature a red heart surrounded by white and pink dots. The pattern looks like a blooming flower or a sunburst from a distance. These stones work well as paperweights or garden accents during the spring.
The weight of the rock feels solid and satisfying in your hand. You can make a whole set to give away as party favors. Every stone has a different shape that changes the look of the mandala. The bright colors will lift your mood every time you look at them. This craft is a great way to practice patience and focus.
Materials Required
- Smooth dark river rocks
- Red paint
- White paint
- Pink paint
Equipment Required
- Small paintbrushes
- Wooden dowels or dotting tools
- Paper towel
DIY Instructions
- Paint a solid red heart in the center of your smooth stone.
- Dip a small wooden tool into the white paint and wipe off any extra.
- Make a row of tiny dots around the edge of the red heart.
- Use the pink paint to create a second row of larger dots.
- Continue adding circles of dots until you reach the edge of the rock.
- Allow the paint to dry for several hours before you touch the stone.
- Apply a clear coat of spray if you want the rock to be shiny.
27 Pinecone Rose Centerpiece
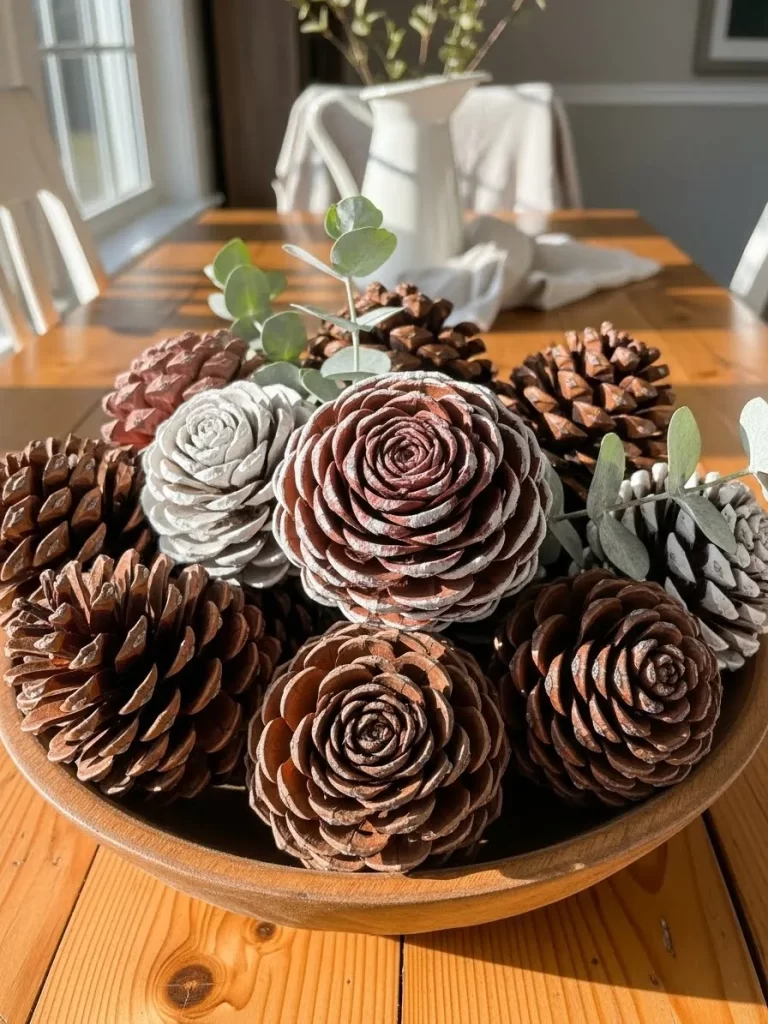
Bringing nature inside makes your home feel grounded and cozy. These pinecones are turned upside down to look like blooming wooden roses. A few white tips add the appearance of frost or winter snow. They look beautiful sitting in a simple wooden bowl on your dining table.
This decoration is very sturdy and will last for many years. You can find pinecones in your yard for a free crafting material. The brown wood tones look very warm and inviting in any light. It is an excellent way to bridge the gap between winter and spring. Your family will enjoy the rustic charm this project brings to the house.
Materials Required
- Large pinecones
- White acrylic paint
- Fresh eucalyptus stems
- Round wooden bowl
Equipment Required
- Small paintbrush
- Dry cloth
DIY Instructions
- Clean any dirt or needles off your pinecones with a dry cloth.
- Turn the pinecone over so the bottom part faces upward.
- Paint the very tips of the wooden scales with a bit of white paint.
- Let the paint dry so it does not smudge on your table.
- Arrange the pinecones inside a round wooden bowl in a tight group.
- Tuck a few green eucalyptus leaves between the pinecones for extra color.
- Place the bowl in the center of your coffee table for everyone to see.
28 Pink Pom Pom Heart

Fluffy textures add a sense of playfulness to your wall decor. This large heart is made from dozens of handmade yarn pom poms. The mix of light and dark pink colors creates a soft visual depth. A long tassel at the bottom adds a bit of bohemian style to the piece.
This decoration is very lightweight and easy to hang on any wall. It makes a nursery or a bedroom feel much softer and warmer. You can choose different yarn colors to match your own room style. The process of making the pom poms is very relaxing and fun. Your home will feel extra cozy with this tactile piece of art.
Materials Required
- Pink yarn in two different shades
- Thick cardboard
- Gold beads
Equipment Required
- Sharp scissors
- Hot glue gun
- Pencil
DIY Instructions
- Cut a large heart shape out of a sturdy piece of cardboard.
- Make forty small pom poms by wrapping yarn around your fingers many times.
- Tie the center of the yarn bundles and cut the loops to make them fluffy.
- Glue the pom poms onto the cardboard base until it is fully covered.
- Create a large tassel by wrapping yarn around a book and tying one end.
- Thread a few gold beads onto the string at the top of the tassel.
- Glue the tassel to the bottom point of your heart.
- Attach a small loop of yarn to the back for hanging on the wall.
29 Heart Shaped Fringe Pinata
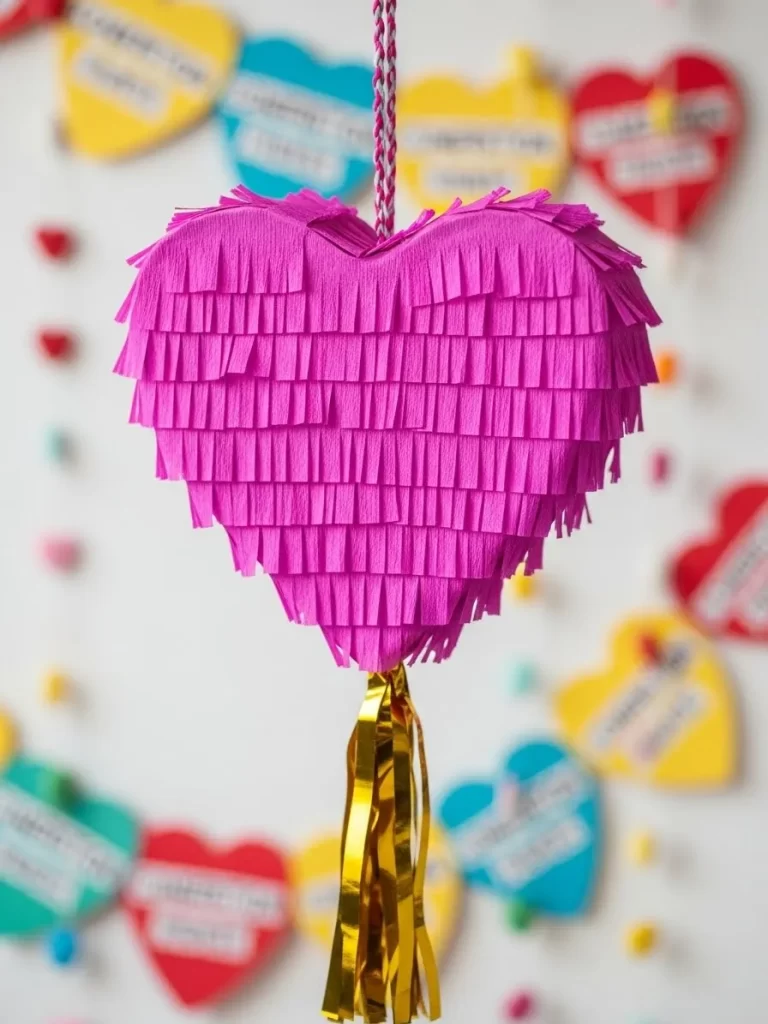
Party decorations should be bright and full of energy. This magenta piñata features layers of crinkled paper fringe for a fun look. It hangs from a colorful rope and can be used as a centerpiece. The gold streamers at the bottom catch the light when the heart moves.
You can fill it with small treats or use it purely for decoration. It adds a festive and celebratory feel to any room. This project is very popular for holiday parties with friends. The bright pink color is very eye catching and cheerful. You will enjoy seeing it sway and sparkle in your living space.
Materials Required
- Corrugated cardboard
- Magenta crepe paper
- Gold foil strips
- Strong packing tape
Equipment Required
- Scissors
- Glue stick
- String for hanging
DIY Instructions
- Cut two large hearts and a long three inch strip from your cardboard.
- Tape the long strip between the two hearts to create a hollow box.
- Close the edges with tape but leave a small hole if you want to add candy.
- Cut the crepe paper into long strips and snip the edges to make fringe.
- Glue the fringe strips onto the cardboard starting from the very bottom.
- Overlap each layer of paper so you cannot see the cardboard underneath.
- Attach a gold foil tassel to the bottom tip with a bit of tape.
- Punch a hole in the top and pull a string through for hanging.
30 Paper Plate Love Birds
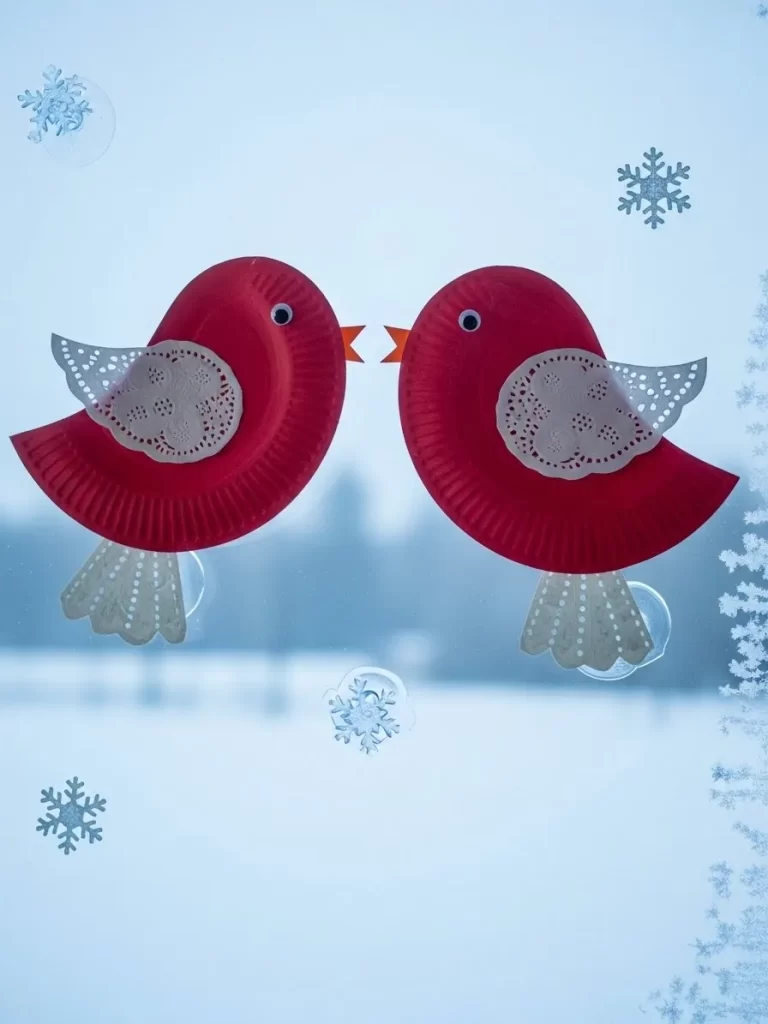
Simple crafts are a great way to decorate your windows for the holiday. These bright red birds are made from common kitchen supplies. They feature delicate lace wings and cute googly eyes for personality. You can stick them to the glass to brighten up a snowy winter day.
They look like they are talking to each other when placed in a pair. This activity is very easy and quick to finish in one afternoon. Children will love choosing where to put the birds around the house. It adds a whimsical and romantic touch to your interior design. Using paper plates makes this an affordable way to decorate.
Materials Required
- Red paper plates
- White paper doilies
- Orange construction paper
- Googly eyes
Equipment Required
- Scissors
- Glue stick
- Clear tape
DIY Instructions
- Cut a red paper plate in half to create the curved body of the bird.
- Glue a googly eye near the rounded edge of the plate half.
- Cut a small triangle from orange paper for the beak and glue it on.
- Take a white paper doily and cut it into a small wing shape.
- Glue the lace wing to the center of the red paper plate.
- Cut a tail shape from another piece of doily and attach it to the back.
- Repeat these steps to make a second bird facing the opposite way.
- Use a small piece of clear tape to fix the birds to your window glass.
31 Paper Doily Heart Bunting
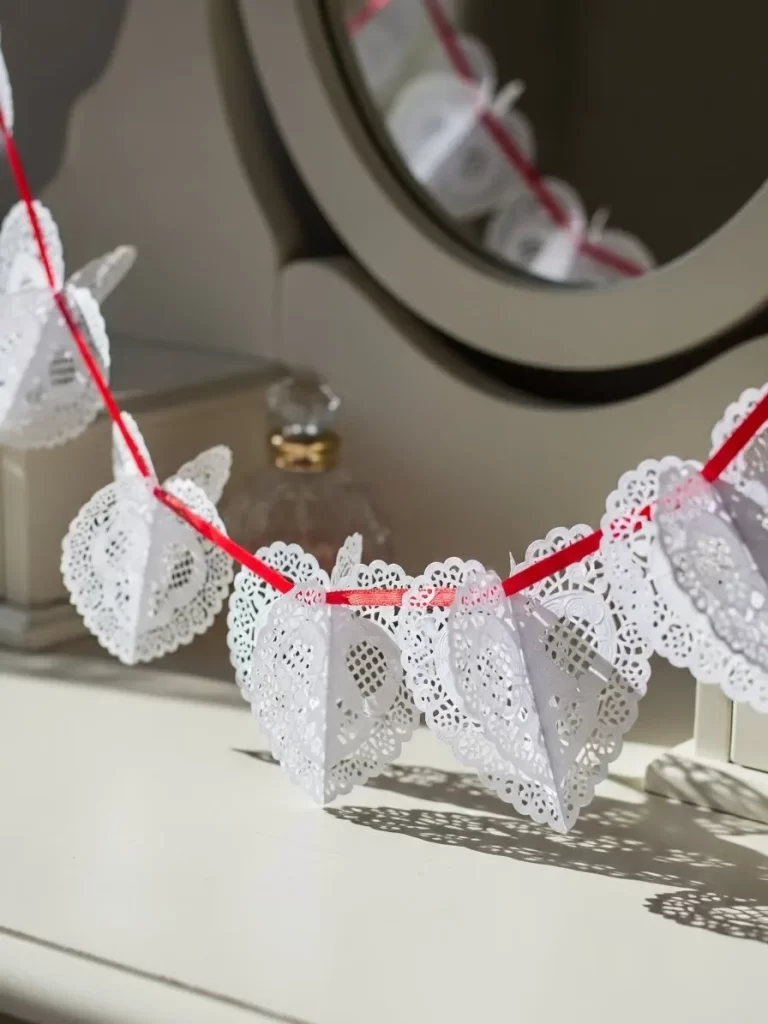
Delicate lace patterns bring a soft and vintage elegance to your home. This bunting uses white paper doilies folded into hearts and hung on a red ribbon. It adds a classic romantic touch to a vanity mirror or a bedroom wall. The intricate cutouts look beautiful when the light shines through them.
You can hang this garland in long loops to create a graceful movement. This project is very budget friendly and uses simple party supplies. It brings a clean and bright feeling to any dark corner of your room. Your guests will admire the handmade charm of these delicate shapes. It is a wonderful way to decorate without adding heavy textures.
Materials Required
- Large white paper doilies
- Bright red satin ribbon
- Double sided tape
Equipment Required
- Scissors
- Ruler
DIY Instructions
- Fold a large paper doily in half carefully.
- Cut a heart shape out of the folded paper with your scissors.
- Make sure the lace pattern is visible on both sides of the heart.
- Repeat this process until you have twelve identical hearts.
- Measure out five feet of red satin ribbon for your garland.
- Place a small piece of tape on the top back of each heart.
- Press the heart onto the ribbon and space them four inches apart.
- Continue until all the paper hearts are attached to the string.
- Hang the bunting across your wall or along a shelf.
32 Geometric Gem Door Heart
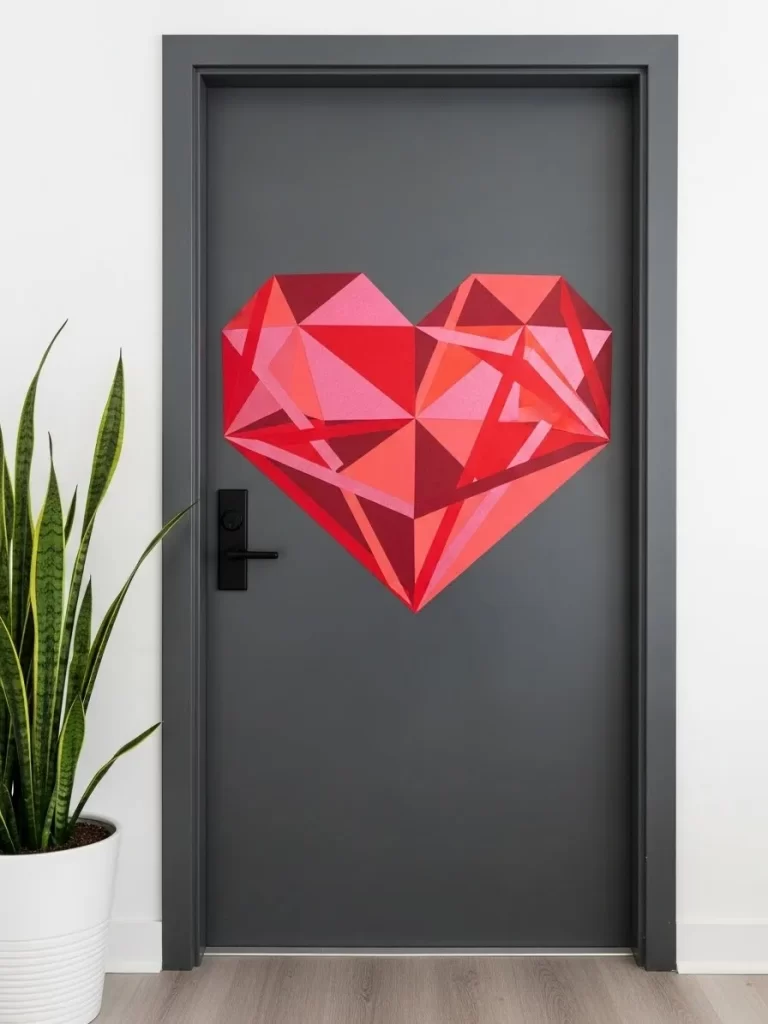
Modern art meets festive decor with this striking geometric design. This heart consists of many triangles in different shades of red and pink. It is applied directly to a door to create a bold and artistic entrance. The sharp lines give it a contemporary look that fits any sleek home.
You can customize the colors to match your existing door paint. This decoration is very easy to remove once the holiday is over. It serves as a great first impression for everyone who visits your house. The 3D effect makes the heart look like a giant gemstone. Your entryway will feel much more vibrant with this geometric art.
Materials Required
- Red and pink vinyl sheets or cardstock
- Removable wall adhesive squares
Equipment Required
- Ruler
- Pencil
- Scissors
DIY Instructions
- Draw several triangles of different sizes on your paper sheets.
- Use three different colors of red to create a shaded effect.
- Cut out all the triangles carefully with your sharp scissors.
- Lay them out on a flat table to form a large heart shape.
- Make sure the points of the triangles fit together like a puzzle.
- Put an adhesive square on the back of each paper piece.
- Start from the center and stick the triangles onto your door.
- Keep adding pieces until the full heart shape is finished.
33 Egg Carton Flower Wreath
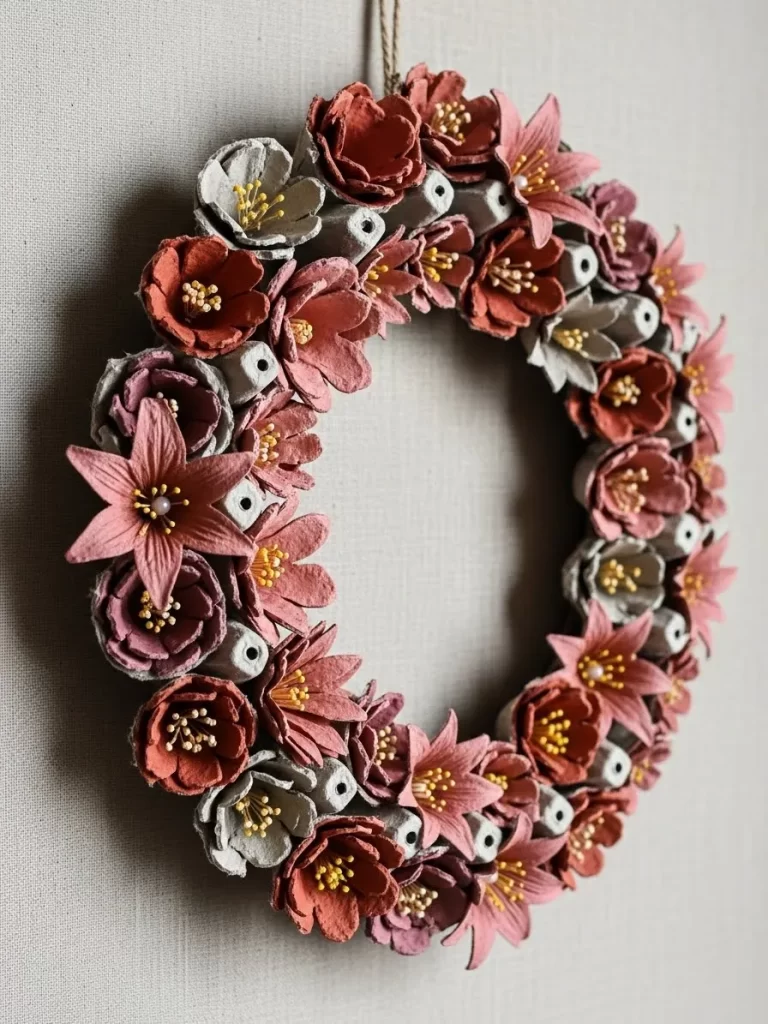
Upcycling common items can lead to very impressive and beautiful results. This wreath features many small flowers made from recycled egg cartons. The soft shades of dusty rose and peach create a gentle floral display. It looks lovely hanging on a neutral wall or a front door.
Every flower is unique because of the way the cardboard is cut and folded. This project is a fantastic way to reduce waste while being creative. The texture of the egg carton makes the flowers look very sturdy and thick. It brings a touch of spring into your home during the winter months. Your friends will be amazed that this is made from trash.
Materials Required
- Cardboard egg cartons
- Pink and peach acrylic paints
- Round wire wreath frame
- Thin floral wire
Equipment Required
- Sharp scissors
- Paintbrush
- Hot glue gun
DIY Instructions
- Cut the individual cups out of your cardboard egg cartons.
- Snip four petals into the sides of each cup with your scissors.
- Bend the petals outward and round the edges to look like a flower.
- Paint every flower with your favorite shades of pink and rose.
- Let the paint dry completely before you move to the next step.
- Glue a small wooden bead or some yellow paint in the center.
- Attach the flowers to the wire frame using the thin floral wire.
- Fill the entire circle until the wreath looks lush and full.
34 Key to My Heart Shadow Box
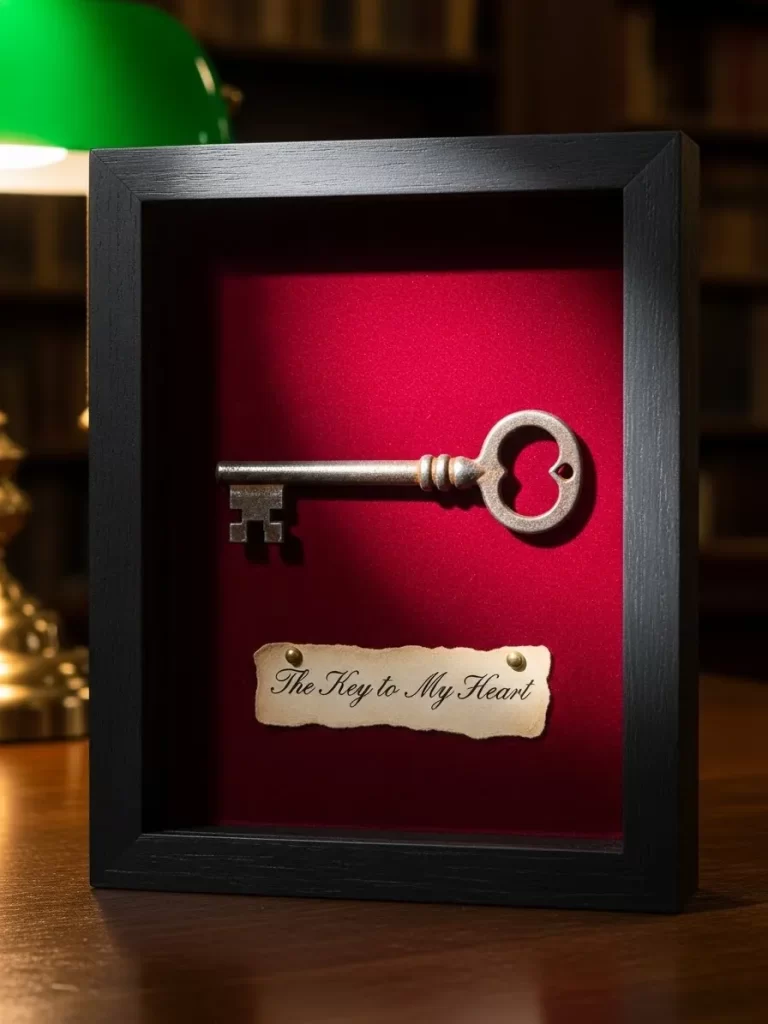
Symbolic decorations add a layer of meaning and romance to your space. This shadow box features a vintage metal key against a deep red background. A small aged paper tag with a sweet message hangs right below the key. It looks like a precious treasure kept inside a sleek black frame.
Display this piece on a nightstand or a library shelf for a classic look. The rich velvet texture of the background adds a sense of luxury. It is a thoughtful gift that tells a story of love and trust. This project uses very simple items to create a high end appearance. Your home will feel more intimate with this meaningful art.
Materials Required
- Deep black shadow box frame
- Red velvet fabric
- Large vintage metal key
- Piece of aged paper or parchment
Equipment Required
- Hot glue gun
- Fine black pen
- Scissors
DIY Instructions
- Open the back of your shadow box and remove the insert.
- Wrap a piece of red velvet fabric tightly around the insert.
- Glue the edges of the fabric to the back so the front is smooth.
- Put a generous amount of glue on the back of your metal key.
- Press the key into the center of the red velvet background.
- Write a short message on your small piece of aged paper.
- Glue the paper tag just below the key so it stays in place.
- Close the frame and hang it on a wall in your bedroom.
35 Fingerprint Heart Canvas
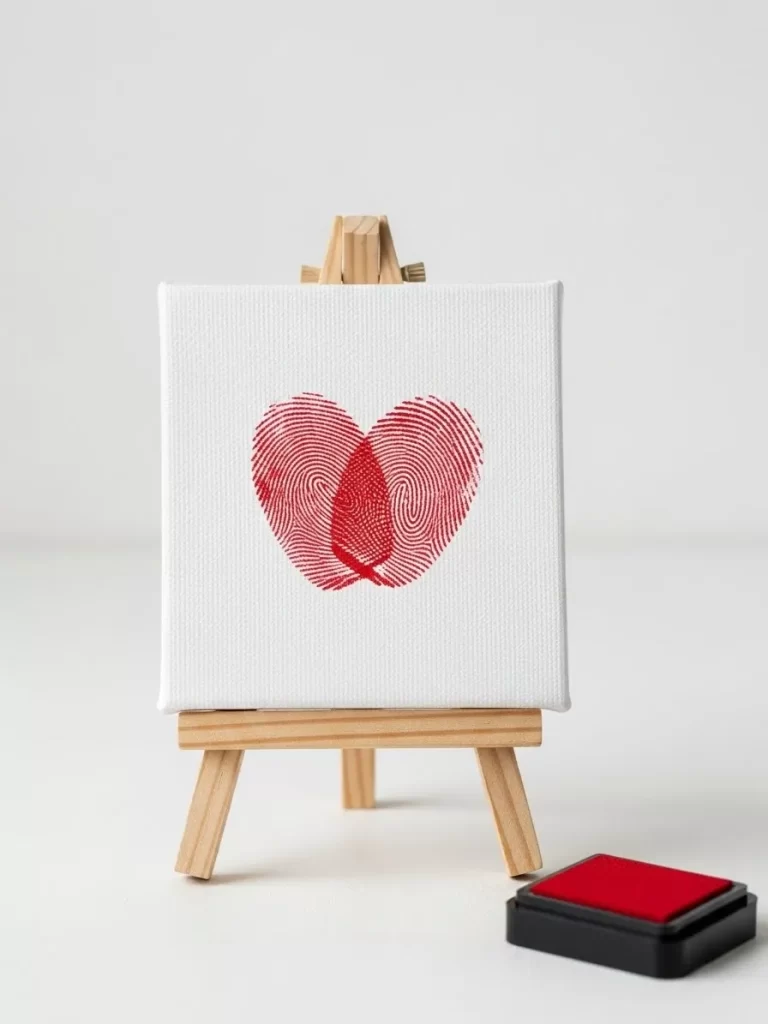
Personal touches make the best decorations for a family home. This mini canvas features a heart made from two red fingerprints. It is a very simple and sweet way to capture a moment in time. The white background makes the red ink stand out with great clarity.
You can place this tiny easel on a desk or a kitchen windowsill. It serves as a constant reminder of a special bond between two people. This project is very quick and requires almost no cleanup afterward. It is a wonderful activity for couples or parents and children. Your living space will feel more personal with this unique art.
Materials Required
- Small white primed canvas
- Red ink pad or acrylic paint
- Small wooden easel
Equipment Required
- Damp cloth for cleaning fingers
DIY Instructions
- Set your mini canvas on a flat and stable work surface.
- Press your thumb firmly into the red ink pad until it is covered.
- Press your thumb onto the center of the canvas at a slight angle.
- Let another person press their thumb next to yours in the other direction.
- Make sure the two prints overlap at the bottom to form a heart.
- Wipe your fingers immediately with a damp cloth to remove the ink.
- Let the ink on the canvas dry for at least twenty minutes.
- Place the finished heart canvas onto the small wooden easel.
36 Tulle Heart Hanging Mobile
Soft and airy materials create a very dreamy atmosphere in any room. These hanging hearts are made from layers of ruffled tulle in shades of pink and red. They float gracefully from the ceiling and move with every small breeze. This mobile adds a whimsical and romantic touch to a nursery or a party.
The different sizes of hearts provide a lot of visual interest and depth. You can hang them near a light fixture to see the fabric glow. This project is very lightweight and easy to install with just a bit of string. It brings a sense of softness and grace to your interior design. Your guests will love the playful movement of these ruffled hearts.
Materials Required
- Pink and red tulle fabric
- Thin wire or cardboard rings
- Clear fishing line
Equipment Required
- Sharp scissors
- Hot glue gun
DIY Instructions
- Bend a piece of wire into a heart shape to make the frame.
- Cut long strips of tulle that are four inches wide.
- Wrap the tulle around the wire heart many times to make it thick.
- Bunch the fabric together as you wrap to create ruffles.
- Glue the end of the tulle to the back of the wire frame.
- Repeat this process to make five hearts of different colors.
- Tie a long piece of fishing line to the top of each heart.
- Tape the other end of the lines to your ceiling at different heights.
37 Heart Confetti Balloons
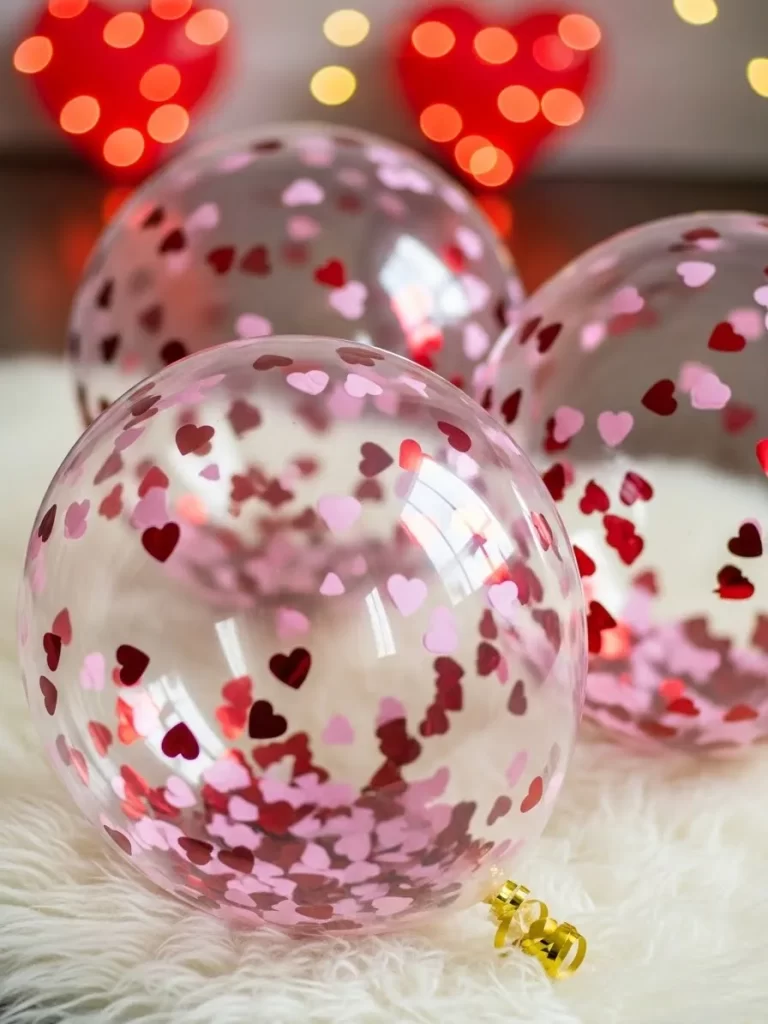
Balloons are an excellent way to add instant energy and joy to a space. These clear balloons are filled with many tiny red and pink paper hearts. They look very festive when gathered in a group or scattered on the floor. The hearts dance inside the balloons whenever they are moved or shaken.
Use these for a holiday brunch or a surprise celebration at home. They add a pop of color and a playful vibe to your living room. This project is very cheap and takes very little time to prepare. It is a fantastic way to make a simple balloon look much more professional. Your family will enjoy the fun and festive look of these floating hearts.
Materials Required
- Clear latex balloons
- Red and pink paper confetti hearts
- Shiny gold curling ribbon
Equipment Required
- Small funnel
- Balloon pump
- Scissors
DIY Instructions
- Stretch the neck of a clear balloon so it is easy to fill.
- Place a small funnel into the opening of the balloon.
- Pour a handful of paper hearts through the funnel into the balloon.
- Use a pump to fill the balloon with air until it is large and round.
- Tie a knot in the neck of the balloon to keep the air inside.
- Rub the balloon on a piece of fabric to create static electricity.
- Shake the balloon so the hearts stick to the inside walls.
- Tie a long gold ribbon to the bottom of the balloon.
38 Chalkboard Label Candy Jars
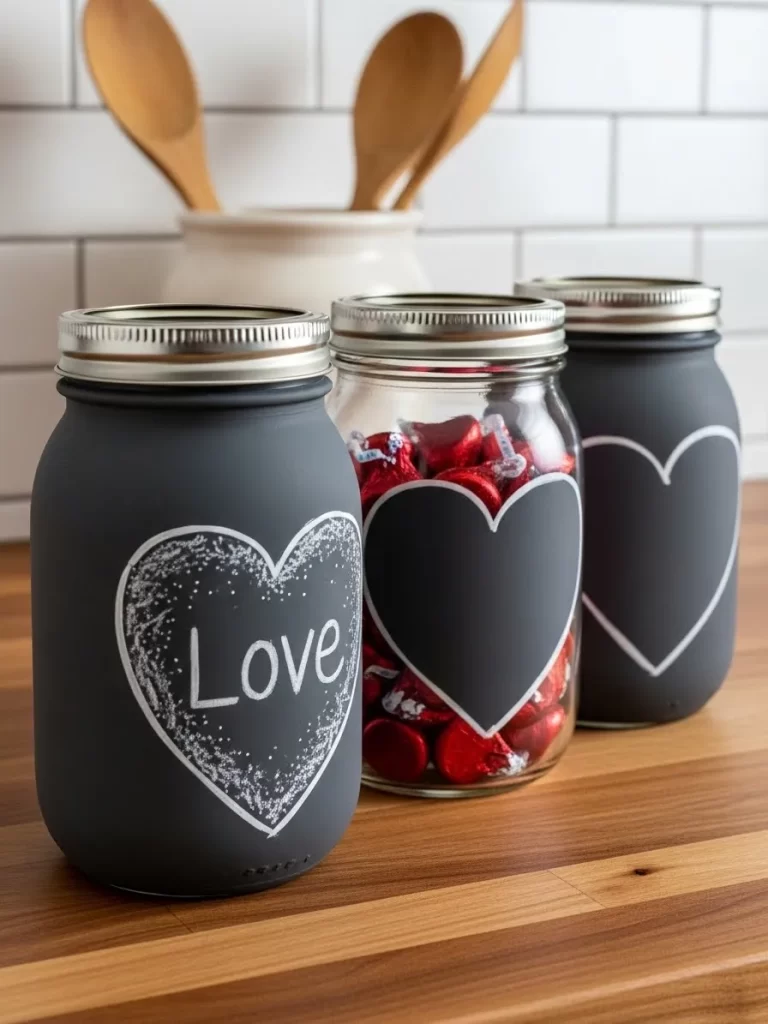
Practical storage can also be a beautiful part of your holiday decor. These grey painted jars feature a chalkboard heart for custom messages. You can fill them with red candies or chocolate kisses for a sweet display. They look great sitting on a kitchen counter or a coffee station.
The matte finish gives the jars a modern and sophisticated appearance. You can change the words on the labels whenever you feel like it. It is a wonderful way to keep your treats organized and accessible. This project reuses glass jars to save money and the environment. Your home will feel more organized and festive with these jars.
Materials Required
- Glass storage jars with lids
- Grey matte spray paint
- Black chalkboard paint
- White chalk
Equipment Required
- Painters tape
- Newspaper
- Small paintbrush
DIY Instructions
- Clean your jars and let them dry completely before you start.
- Cut a heart shape out of some tape and stick it to the center of the jar.
- Place the jars on some newspaper in a well ventilated area.
- Spray the entire jar with grey paint and let it dry for one hour.
- Carefully pull the tape heart off the jar to reveal the clear glass.
- Paint inside that clear heart shape with the black chalkboard paint.
- Wait for the black paint to harden for at least four hours.
- Use white chalk to write a sweet word inside the heart.
39 Rustic Rope Wrapped Wine Bottles
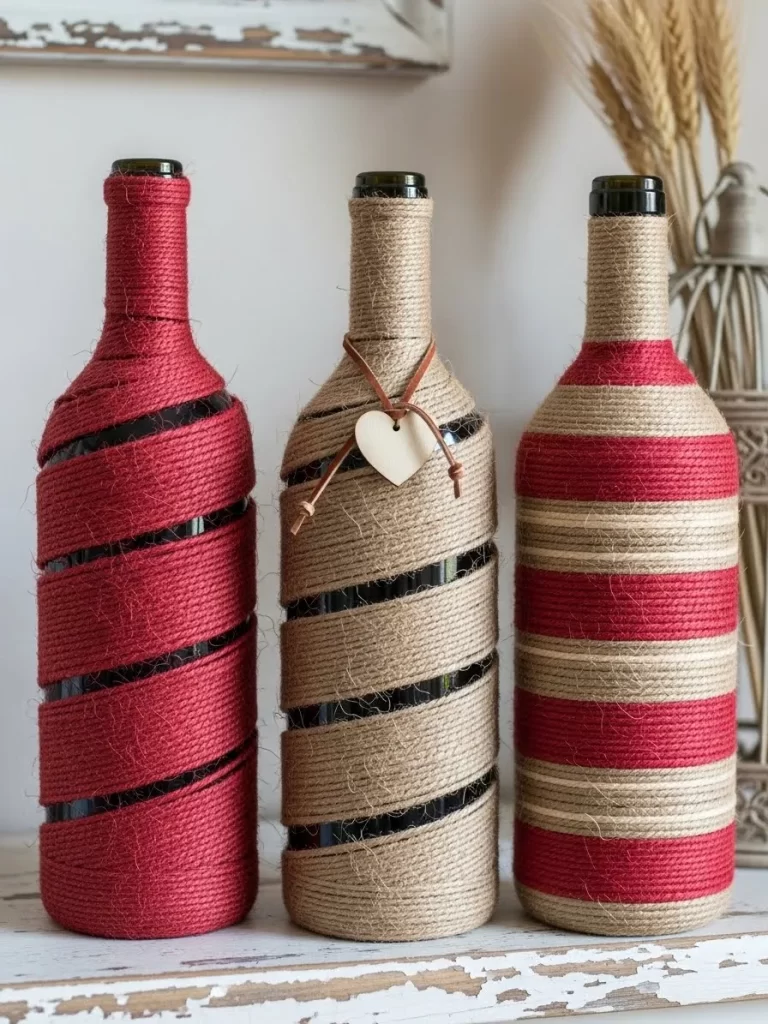
Textured materials bring a warm and grounded feeling to a dining table. These wine bottles are wrapped in thick jute rope in alternating colors. A small wooden heart charm adds a delicate and romantic detail to the center bottle. They work perfectly as a rustic centerpiece for a holiday meal.
You can use bottles of different shapes to add variety to your display. This craft is an excellent way to give new life to empty glass containers. The natural tones of the rope fit well with wood and brick surfaces. It is a very sturdy decoration that will last for many years. Your guests will admire the handmade and organic look of these bottles.
Materials Required
- Three empty wine bottles
- Natural brown jute rope
- Dark red twine
- Small wooden heart charm
Equipment Required
- Hot glue gun
- Scissors
- Small brush
DIY Instructions
- Clean the bottles and make sure all the labels are removed.
- Put a dot of glue at the very bottom of the first bottle.
- Press the end of the brown rope into the glue to start.
- Wrap the rope tightly around the bottle while moving upward.
- Use red twine for some sections to create a striped pattern.
- Keep wrapping until the entire glass surface is covered in rope.
- Glue the end of the rope to the neck of the bottle and trim it.
- Tie a wooden heart charm around the middle bottle with a bit of twine.
40 Heart Dreamcatcher Wall Hanging
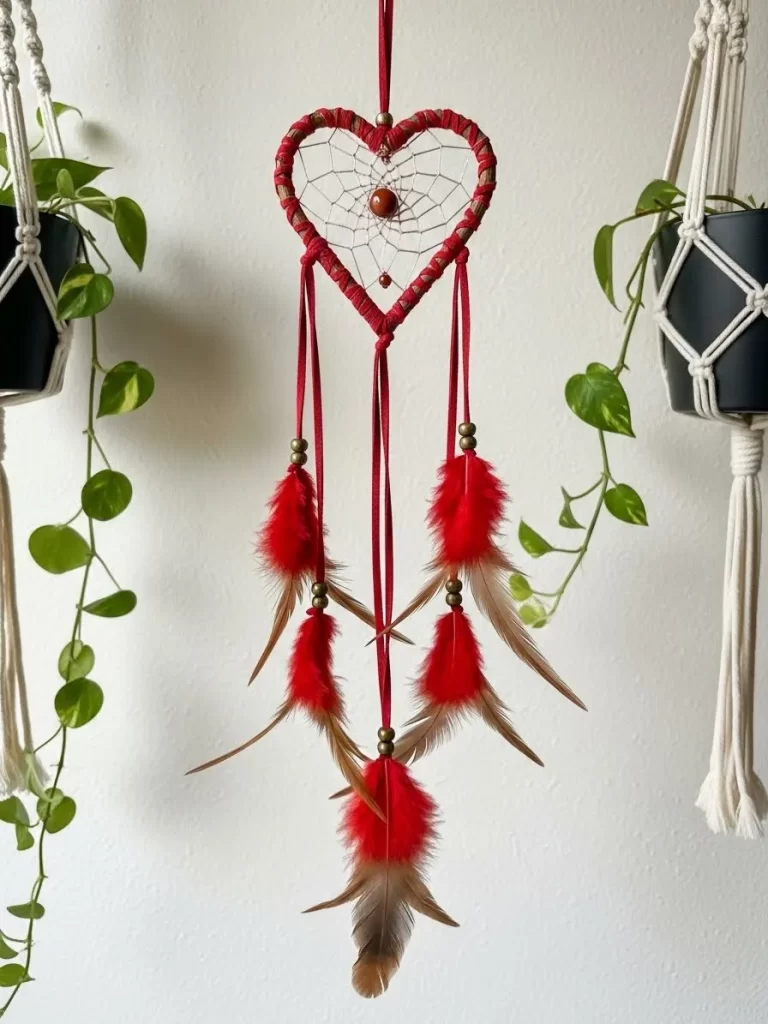
Dreamy and bohemian styles add a sense of peace to your bedroom. This heart shaped frame features an intricate web with a red stone in the center. Long red feathers and beads hang from the bottom to create movement. It is a beautiful piece of art that brings a soft romantic energy to your wall.
Hang this above your bed or near a window to catch the light. The vibrant red color provides a bold contrast against a plain white wall. This project is a wonderful way to practice your weaving and knotting skills. It feels very personal and unique compared to store bought items. Your room will feel much more serene with this handmade dreamcatcher.
Materials Required
- Thick wire for the heart frame
- Red suede cord
- Thin white string
- Red feathers and wooden beads
Equipment Required
- Scissors
- Small jewelry pliers
- Glue
DIY Instructions
- Bend your wire into a large heart shape and twist the ends together.
- Wrap the red suede cord around the entire wire frame until it is hidden.
- Tie a piece of white string to the top notch of the heart.
- Loop the string around the frame every two inches to start the web.
- Keep weaving the string into the previous loops to move toward the center.
- Thread a red stone onto the string when you reach the middle and tie it.
- Tie three long pieces of cord to the bottom point of the heart.
- Slide some beads onto the cords and glue a few red feathers to the ends.
41 Glittering Heart Circle Garland
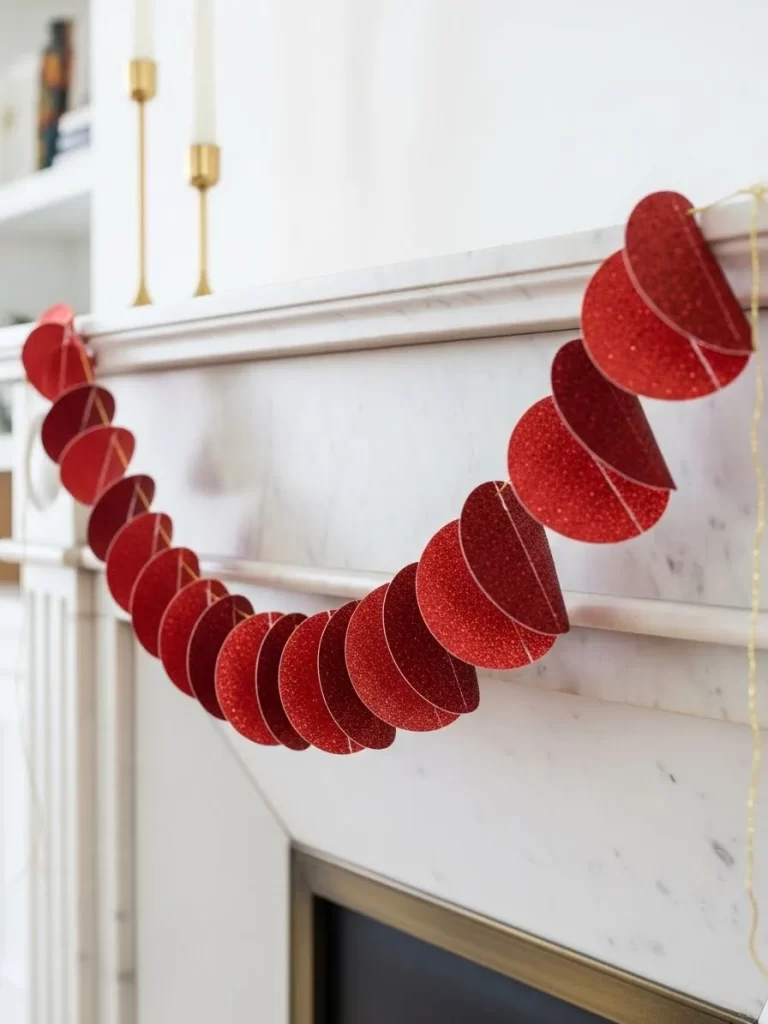
Glittering red circles drape across a white marble fireplace to create a festive focal point in your home. Every disc catches the light and adds a bit of sparkle to your living space during the holiday. This simple project brings a high end look to your room without spending a lot of money. You can hang this garland in long loops to create a sense of movement.
Small details like the shiny texture make the room feel much more celebratory. Guests will admire how the light bounces off the red surfaces. It provides a modern and clean style that fits any house. This craft is very quick to finish in one morning. Your mantel will look much more inviting with this bright display.
Materials Required
- Red glitter cardstock paper
- Thin gold string or thread
- Clear craft glue
Equipment Required
- Large circle paper punch
- Ruler
- Scissors
DIY Instructions
- Punch out forty circles from your red glitter cardstock using the paper punch.
- Measure a piece of gold string that is six feet long.
- Lay the string flat on a table and space out your paper circles.
- Put a small dot of glue on the back of one glitter circle.
- Press the string into the glue and put another circle on top to hide the string.
- Leave three inches of space between each pair of circles.
- Repeat this process until you reach the end of the gold string.
- Let the glue dry for one hour before you move the garland.
- Drape the finished string across your fireplace mantel or a window.
42 Puzzle Piece Memory Frame
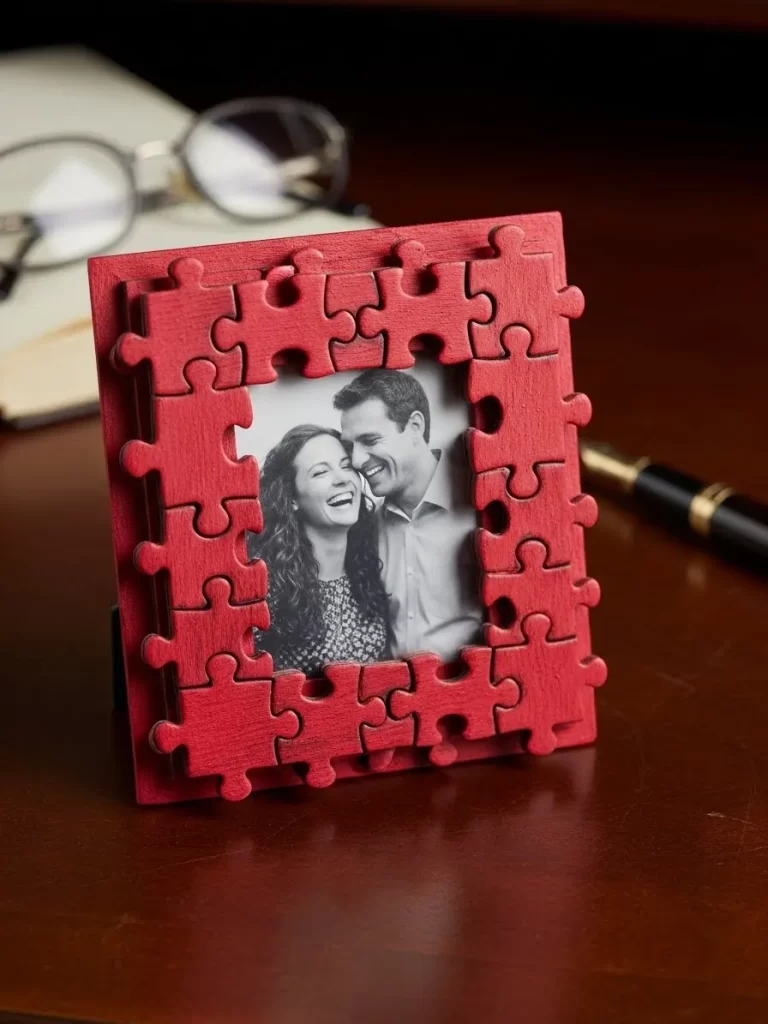
Red puzzle pieces come together to frame a black and white photo of a happy couple. This unique craft symbolizes how two people fit together in a meaningful way. The wooden texture of the frame makes the bold red color look even more vibrant. It sits proudly on a desk or a shelf as a sweet reminder of a special bond.
Your friends will love the creative thought behind this handmade gift. The layered pieces add a 3D effect that looks professional and artistic. You can use an old puzzle to make this an eco friendly project. This decoration brings a touch of warmth and personality to your office. It serves as a great conversation starter for visitors.
Materials Required
- Plain wooden picture frame
- Red acrylic paint
- Old puzzle pieces
- Black and white photograph
Equipment Required
- Small paintbrush
- Glue gun
- Newspaper
DIY Instructions
- Remove the glass and the back from your wooden picture frame.
- Spread out your puzzle pieces on a sheet of newspaper.
- Paint the front and sides of every puzzle piece with bright red paint.
- Paint the wooden frame red as well so the colors match.
- Let the paint dry completely before you start gluing.
- Glue the puzzle pieces around the edge of the frame in two layers.
- Overlap the pieces so they look like they are fitting together.
- Place your black and white photo inside the frame and put the back on.
- Display the frame on a table or hang it on a wall.
43 Matchbox Secret Note Gift
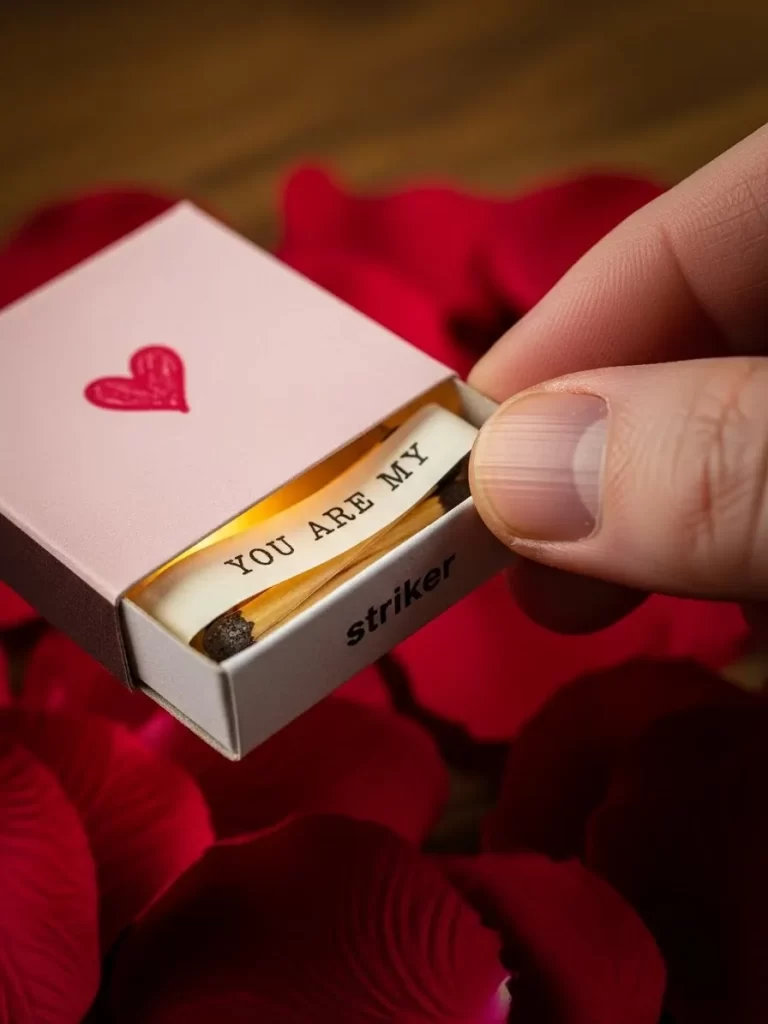
A small pink matchbox hides a secret message that says YOU ARE MY STRIKER. This tiny surprise is a playful and romantic way to share a note with a loved one. The hand drawn heart on the top adds a personal touch to the gift. It fits easily in a pocket or a purse for a quick surprise during the day.
Creating this small treasure is a fun way to express your feelings. You can change the message to fit any inside joke or sweet memory. The light pink color looks soft and inviting on a bedside table. It is a very cheap project that produces a very big smile. Your partner will appreciate the effort you put into such a small detail.
Materials Required
- Empty cardboard matchbox
- Light pink construction paper
- Thin white paper strip
- Red marker
Equipment Required
- Glue stick
- Scissors
- Fine black pen
DIY Instructions
- Measure the outside of your matchbox and cut a piece of pink paper to fit.
- Glue the pink paper around the outer cover of the box.
- Draw a small red heart on the top of the pink paper using your marker.
- Cut a strip of white paper that fits inside the sliding drawer.
- Write your secret message on the white paper with the black pen.
- Fold the paper strip so it fits neatly inside the matchbox.
- Glue one end of the strip to the bottom of the drawer.
- Close the matchbox and give it to your favorite person.
44 Macrame Braided Heart Charm
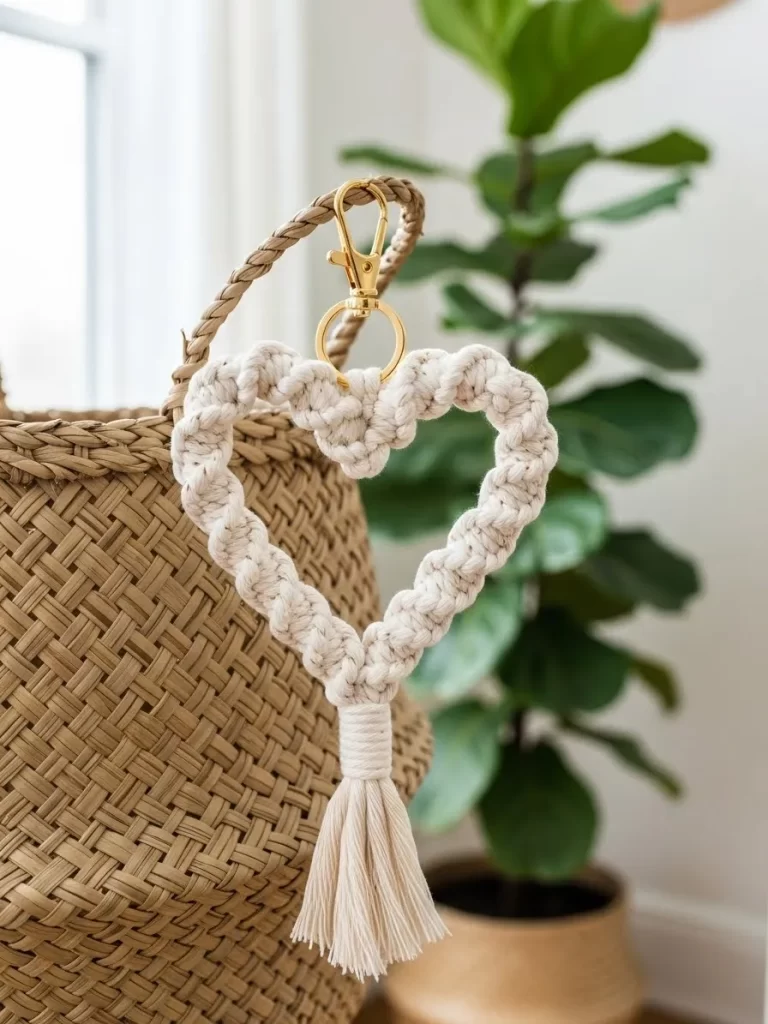
Braided cream rope forms a beautiful heart shape that you can hang on a bag or a key ring. This macrame project adds a bohemian and soft feel to your accessories. The long tassel at the bottom gives it a stylish and modern appearance. Every knot shows the care and time you spent on the craft.
This decoration is very sturdy and will last through daily use. You can use different colors of rope to match your personal style. It makes a wonderful gift for a friend who loves handmade jewelry. The natural texture of the cotton looks great against a woven basket. Your home will feel a bit more relaxed with these soft accents.
Materials Required
- Thick cotton macrame rope
- Gold metal lobster clasp
- Cream colored thread
Equipment Required
- Sharp scissors
- Measuring tape
- Comb
DIY Instructions
- Cut two pieces of cotton rope that are each twelve inches long.
- Thread the ropes through the metal ring of the lobster clasp.
- Tie a square knot right at the base of the metal ring.
- Bend the two ropes outward and then back together to form a heart.
- Tie the ropes together at the bottom with a small piece of thread.
- Leave the ends of the rope long to create a tassel.
- Brush the ends of the rope with a comb to make them look fluffy.
- Trim the bottom of the tassel so the edges are straight and neat.
45 Coffee Bean Scented Candle Tray
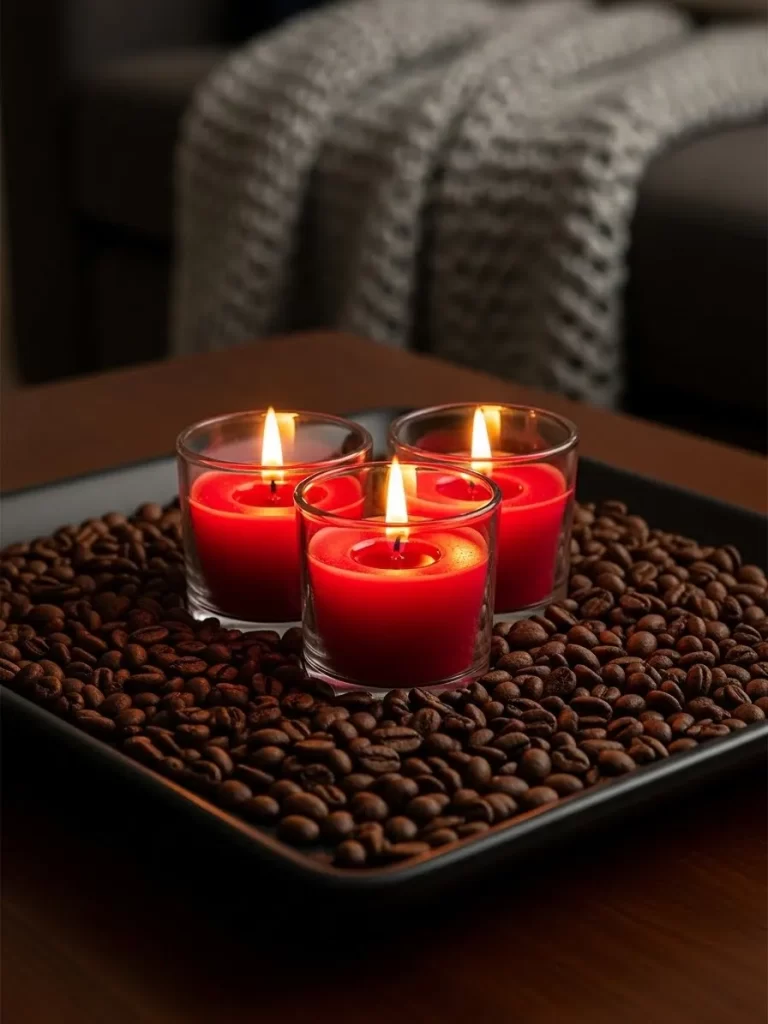
Three red candles sit on a bed of dark roasted coffee beans in a sleek black tray. The heat from the flames releases a wonderful aroma into your room during the evening. This centerpiece adds a warm and grounded feeling to your coffee table or dining area. It is a very simple way to create a sensory experience for a romantic night.
The dark brown beans provide a rich contrast to the bright red glass. You can use this decoration to make your kitchen smell like a fresh cafe. This project is very quick to assemble when you have guests coming over. It adds a touch of luxury to your home with very little effort. Your family will enjoy the cozy glow and the pleasant scent.
Materials Required
- Bag of dark roasted whole coffee beans
- Three red glass votive candles
- Rectangular black tray
Equipment Required
- Level surface
DIY Instructions
- Clean your black tray with a cloth to remove any dust.
- Pour the entire bag of coffee beans into the tray.
- Spread the beans out until they form a flat and even layer.
- Nest the three red candles into the beans in a straight line.
- Push the candles down slightly so they are stable and do not tip.
- Make sure there is space between each candle for the air to move.
- Place the tray in the center of your table.
- Light the candles and wait a few minutes for the coffee scent to rise.
Key Takeaways
Simple materials like cardboard and twigs can look very high end with a bit of paint. Choosing to build your own art saves a lot of money during the holidays. Personalization is the biggest benefit of making your own festive decor.
Recycling household items like jars and corks saves money while helping the planet. Gifts made by hand often mean much more than anything bought from a shop. Creating these projects serves as a relaxing way to spend your weekend.
Every room in your house can benefit from a tiny touch of romance. Natural elements like stones and wood provide a grounded and rustic feeling. You only need basic tools to start your crafting journey today.
Sharing your love through handmade art makes the holiday feel truly special. Small changes to your living space create a big impact on your mood. We hope these forty five projects inspire you to pick up your glue gun today.
Your home will shine with a unique glow that reflects your own style. Enjoy the process of building a romantic retreat for your favorite people. Handmade decorations turn a house into a place full of memories.
Start with one small project and watch your creativity grow. Every piece you make adds to the festive spirit of the season. Love is in the details of the things you create with your own hands.