As the air grows crisp and shadows lengthen, it is time to transform your home into a place of delightful fright. Your front yard holds immense potential. It can become a final resting place for restless spirits and forgotten souls. This is your chance to create a scene that stops trick-or-treaters in their tracks.

Forget expensive store-bought decorations. The most memorable haunts are born from creativity and a little bit of handiwork. This guide offers you 39 unique ideas to build your own spooky graveyard. Each project comes with simple steps, turning everyday materials into figures of your worst nightmares.
Prepare to dig into these projects. You will learn to craft everything from classic tombstones to elaborate, story-driven scenes. Your lawn is a blank canvas. Let’s paint it with terror.
1. Skeleton Family Dollhouse

This creation offers a peek into the afterlife. A multi-level house reveals skeleton figures in detailed, everyday scenes. On one floor, a family shares a meal, their bony fingers frozen in conversation. Above, others relax in a sitting room, a permanent state of repose.
The lowest level shows a skeleton lounging in a coffin, reading a book for eternity. A tiny skeleton plays by a warm, glowing fireplace. This miniature world tells a story, turning a simple decoration into a fascinating, macabre display for visitors to discover.
DIY Instructions:
What You’ll Need:
- An old bookshelf or a few wooden crates you can stack.
- Gray, black, and brown craft paint.
- Paintbrushes.
- Small, posable skeleton figures (like the ones from a craft store).
- Dollhouse furniture (chairs, tables, beds).
- Hot glue gun and glue sticks.
- Scraps of dark-colored fabric (like red or black).
- Small battery-powered LED tea lights.
- Fake cobwebs.
Step-by-Step Guide:
- Build Your Haunted House: Take your bookshelf or stack a few wooden crates to make the rooms. Paint the inside and outside with gray paint to look like old stone or concrete. You can dab on some black and brown paint with a sponge to make it look dirty and ancient.
- Furnish the Rooms: Place the little tables, chairs, and other furniture inside each “room” or shelf. If the furniture is too bright, paint it black or dark brown to make it look spookier.
- Pose Your Skeleton Family: Decide what you want each skeleton to be doing. Use the hot glue gun to carefully put a dot of glue on a chair and press a skeleton down to make it sit. You can bend their arms and legs. Maybe one is sitting at the dinner table and another is lying on a sofa.
- Add Cozy, Creepy Details: Cut your fabric scraps into small rectangles to make curtains for the windows or blankets for the beds. Use a tiny bit of glue to hang them. For a spooky fireplace, put one or two of the LED tea lights in the fireplace area.
- Final Touches: Gently stretch out some fake cobwebs and drape them in the corners of the rooms and over the furniture. This will make your skeleton dollhouse look like it has been sitting in a graveyard for a very long time!
2. Trapped Giant’s Hand

Something massive is trying to escape from beneath your lawn. This giant, stone-like hand erupts from the earth, its fingers curled in a desperate grasp. Thick chains wrap around the knuckles and wrist, suggesting a powerful beast is imprisoned just below the surface.
The cracked texture gives it an ancient look, as if it has been there for centuries. Add a few spotlights from below to cast long, eerie shadows at night. This decoration tells a chilling story without a single word.
DIY Instructions:
What You’ll Need:
- Chicken wire.
- Work gloves.
- Several cans of expanding foam sealant.
- A wooden stake or sturdy stick.
- Gray, black, and brown spray paint.
- Plastic chains (from a hardware or party store).
- Wire cutters.
Step-by-Step Guide:
- Shape the Hand: Put on your gloves. Bend and shape the chicken wire into the form of three large fingers and the back of a hand. Don’t worry about making it smooth; lumpy is good. Attach the hand shape to the wooden stake.
- Create the Skin: Push the stake into the ground where you want the hand to be. Following the instructions on the can, spray the expanding foam all over the chicken wire frame. The foam will puff up. Let it dry completely. It will be hard but lightweight.
- Paint the Stone: Once the foam is totally dry, spray paint the entire hand with gray paint. While it’s still a little wet, lightly spray some black and brown paint in the cracks and low spots to make it look old and dirty.
- Chain it Up: Drape the plastic chains over and around the fingers and wrist. This makes it look like someone tried to keep the giant from escaping.
- Final Touches: Place a few small tombstones around the base of the hand to complete the graveyard scene.
3. Cyberpunk Cemetery

Give your graveyard a futuristic, spooky twist. These tombstones glow with eerie neon light, displaying messages like “CONNECTION LOST” and “404 NOT FOUND.” Intricate circuit board designs pulse with energy from below.
This setup imagines a graveyard for forgotten technology or lost digital souls. The bright, colorful glow against the dark night creates a striking and unusual haunted scene. It is a modern nightmare for a digital age.
DIY Instructions:
What You’ll Need:
- Clear acrylic or plexiglass sheets.
- A permanent marker.
- An engraving tool or a Dremel with a fine tip.
- Safety glasses.
- Small wood blocks for the bases.
- LED light strips (battery-powered).
- Hot glue gun or strong adhesive.
Step-by-Step Guide:
- Design the Tombstones: Draw the shape of a tombstone on the acrylic sheet with a permanent marker. Add words like “404 Error” or draw computer-chip lines.
- Carve the Design: Put on your safety glasses. Carefully use the engraving tool to trace over all the lines you drew. The tool will scratch the design into the acrylic. When you’re done, wipe off the marker with a paper towel.
- Build the Light Base: Cut a thin slot into the top of each wood block, just wide enough for the acrylic sheet to stand in. Attach a small LED light strip to the block right in front of the slot.
- Assemble: Place the bottom edge of your carved tombstone into the slot in the wood base. Use glue to make sure it’s secure.
- Light it Up: Turn on the LED lights. The light will travel through the acrylic and make the lines you carved glow brightly in the dark.
4. Witch’s Brew Fountain

This display creates a bubbling, glowing potion scene. A witch’s cauldron, placed before a weathered tombstone, seems to overflow with a magical brew. The eerie purple and green lights give the impression of a powerful spell being cast.
Surrounding the cauldron, glass jars hold the witch’s ingredients, like spiders and eyeballs, each glowing with its own strange light. A crooked broomstick leans against the tombstone, a sign that the witch might return at any moment.
DIY Instructions:
What You’ll Need:
- A large black plastic cauldron.
- A small pond pump or fountain kit.
- Clear vinyl tubing.
- Submersible, color-changing LED pond lights.
- A few glass jars.
- Gummy eyeballs, plastic spiders, and other creepy toys.
- Water and food coloring (optional).
- Small, waterproof LED lights or glow sticks.
Step-by-Step Guide:
- Set Up the Cauldron: Place the cauldron on level ground. Put the pond pump at the bottom and the submersible LED lights around it.
- Create the Fountain: Attach one end of the clear tubing to the pump. Run the other end up and point it towards the middle of the cauldron. You might need to prop it up on something. Fill the cauldron with water.
- Make Glowing Ingredients: Fill the glass jars with water. Add plastic spiders or gummy eyeballs. For extra color, add a drop of food coloring. Drop a small waterproof LED or a cracked glow stick into each jar and seal the lid.
- Arrange the Scene: Place the glowing jars around the base of the cauldron. Lean a broom against a nearby tombstone or wall.
- Turn it On: Plug in the pump and the lights. The water will bubble up and the lights will make it glow like a magic potion.
5. Phantom Projector Ghosts

Bring your ghouls to life with this high-tech haunting. This method uses a simple projector to display floating, transparent ghosts onto a screen or even the side of your house. The spirits appear to drift through the air, wailing and moaning.
One of the easiest and most effective decorations, this creates a dynamic, movie-like experience. The ghosts can appear in windows or float over tombstones, making your graveyard feel truly occupied by spirits from another world.
DIY Instructions:
What You’ll Need:
- A video projector.
- A laptop or media player.
- A spooky ghost animation video (you can find these on YouTube).
- A thin, light-colored fabric sheet, a white shower curtain, or a piece of mesh.
- String or zip ties.
- A clear plastic storage bin with a lid.
Step-by-Step Guide:
- Find Your Ghost Video: Search online for “ghost projection video” or “Halloween hologram loop” and download one you like. Load it onto your laptop or media player.
- Set Up Your Screen: Hang your fabric sheet between two trees, from your garage door, or in a large window. The fabric should be pulled tight.
- Protect the Projector: Place your projector inside the clear plastic storage bin. This will protect it from rain or morning dew. Cut a small hole in the side for the power cord.
- Project the Ghosts: Place the bin in your yard and aim the projector at your screen. Connect it to your media player and turn it on. You may need to adjust the focus and position to get the image just right.
- Start the Haunting: Play the video on a loop. When it gets dark, the ghosts will appear to be floating in your yard for everyone to see.
6. Vengeful Forest Spirit

This creature looks as though it has risen from the graveyard’s soil. Made of twisted vines and gnarled branches, this forest spirit stands guard over the tombstones. Its body is covered in moss, and skeletal hands reach out to grab anyone who comes too close.
The most terrifying feature is its glowing green eyes, which seem to pierce through the darkness. It is a monster born of nature and nightmare, a powerful protector of the dead that will frighten anyone who dares to cross its path.
DIY Instructions:
What You’ll Need:
- A simple frame for the body (PVC pipes connected in a humanoid shape work well).
- Chicken wire and zip ties.
- Lots of twigs, branches, and vines (real or fake).
- Fake moss sheets.
- A pair of large plastic skeleton hands.
- Two green battery-powered LEDs or glow sticks for the eyes.
- Hot glue gun.
Step-by-Step Guide:
- Build the Skeleton: Assemble your PVC pipe frame so it looks like a stick person. This will be the monster’s skeleton.
- Flesh it Out: Wrap chicken wire around the PVC frame to give the body and head a thicker shape. Use zip ties to hold it in place.
- Add the Nature: Use the hot glue gun and more zip ties to attach branches, twigs, and vines all over the chicken wire body. Overlap them so you can’t see the frame underneath.
- Give it Skin and Hands: Drape and glue sheets of fake moss over the shoulders and chest to make it look ancient. Attach the plastic skeleton hands to the ends of the arms.
- Create Glowing Eyes: Find a spot for the eyes in the head area. Secure the two green LEDs or glow sticks so they shine out from between the branches.
7. Professor Crowley’s Bug Infestation

This display tells the story of a science experiment gone horribly wrong. The tombstone of “Professor Crowley” is the center of a terrifying bug outbreak. The entire grave site is crawling with giant insects.
A massive centipede snakes its way through the dirt, while huge caterpillars climb the house and giant beetles stand guard. The scene is lit with a sickly green glow, making the creepy crawlies look even more unnatural and scary. It is a bug lover’s worst nightmare.
DIY Instructions:
What You’ll Need:
- Several black plastic bowls (for the centipede).
- A few green plastic bowls (for the caterpillar).
- White pipe cleaners or thick wire for legs.
- Black and green craft foam sheets.
- Hot glue gun.
- A drill.
- Googly eyes or yellow paint.
- A green spotlight.
Step-by-Step Guide:
- Make the Giant Centipede: Drill two holes on opposite sides of each black plastic bowl. String them together with wire to create a long, flexible body. Use the hot glue gun to attach bent pipe cleaners along the sides for legs.
- Create the Caterpillar: Glue the green bowls together in a line. Cut out circles from craft foam for spots and glue them on. Add large googly eyes or paint eyes on the front bowl.
- Make Other Bugs: You can make simple beetles by turning a bowl upside down and adding pipe cleaner legs.
- Set the Scene: Place a tombstone in your yard. Arrange the giant centipede around it. Place the caterpillar so it looks like it’s crawling up your house or a bush.
- Add Eerie Lighting: Aim a green spotlight at the tombstone and the bugs to make the whole area glow.
8. Gates of the Underworld

This grand entrance sets a terrifying tone for your entire graveyard display. Two tall, crumbling stone pillars stand on either side of a rickety gate. A skeleton, wrapped in chains, is bound to the entrance as a grim warning to all who enter.
On top of the pillars, gargoyles watch over the scene, their eyes lit by the flicker of candles. A weathered “KEEP OUT” sign makes the message clear: this is a place for the dead, and mortals are not welcome.
DIY Instructions:
What You’ll Need:
- Two tall cardboard boxes (like for appliances) or a wooden frame for the pillars.
- Gray stone-textured spray paint.
- Black and green craft paint and a sponge.
- A full-size plastic skeleton.
- A long section of plastic chain.
- A wooden plank and black marker for the sign.
- Two small plastic gargoyles.
- A few battery-operated candles.
Step-by-Step Guide:
- Build the Pillars: Stand the two cardboard boxes up to be your pillars. Spray paint them completely with the gray stone-textured paint. Once dry, use a sponge to dab black and green paint on them to make them look old and mossy.
- Create the Gate: If you don’t have a real gate, you can make a simple one from wood or PVC pipes painted black.
- Warn Your Visitors: Write “KEEP OUT” on the wooden plank with a black marker and hang it across the top of the gate entrance.
- Add the Guard: Wrap the plastic skeleton in chains and attach him to the gate. Drape more chains across the entrance.
- Final Touches: Place the gargoyles on top of the pillars. Put the battery-operated candles next to them to create a spooky, flickering light.
9. The Grieving Reaper

This statue combines beauty and fear. At first glance, it looks like a stone angel weeping over a grave. But a closer look reveals the chilling scythe in its hand, marking it as the Grim Reaper in disguise.
Its face is hidden in its hands, as if it is crying. Is it sad, or is it just hiding its terrifying face? An uplight placed at the base throws deep shadows across its wings and ragged robes, making it a truly haunting figure for your graveyard.
DIY Instructions:
What You’ll Need:
- A basic angel or religious garden statue.
- Gray and black spray paint.
- Cheesecloth or old, thin white fabric.
- White school glue and a bowl of water.
- A wooden dowel and gray cardboard for the scythe.
- A small, outdoor spotlight.
Step-by-Step Guide:
- Create the Stone Look: Spray paint the entire angel statue with gray paint. Lightly spray some black paint in the folds of the robe and wings to create shadows and make it look older.
- Make the Robes Tattered: Mix some white glue with water in a bowl. Dip strips of cheesecloth into the mixture, squeeze out the extra, and drape them over the statue’s existing robes to make them look old and torn. The glue will make them stiff when they dry.
- Craft the Scythe: Cut a long, curved blade shape from the cardboard. Paint it gray and black to look like old metal. Attach it to the top of the wooden dowel. Place the scythe in the statue’s hands, using strong glue if needed.
- Set the Mood: Place the finished statue in your yard among other tombstones. Aim the spotlight up at it from the ground to create dramatic shadows at night.
10. Gothic Family Mausoleum

This elegant tomb is a centerpiece for any serious graveyard. The detailed, gothic design with its arches, crosses, and angel statues creates a feeling of timeless sorrow. This isn’t just a grave; it’s a final resting place for a whole family.
Two black urns hold dead, white branches, and a simple black fence with a red velvet rope keeps visitors at a respectful distance. A soft glow from candles within the tomb’s alcove suggests that the spirits inside are still present.
DIY Instructions:
What You’ll Need:
- Large sheets of foam insulation board.
- A utility knife or foam cutter.
- Strong construction adhesive or hot glue.
- White or light gray exterior paint.
- Black craft paint for details.
- Small plastic angel figures (from a craft store).
- Two plastic garden urns and black spray paint.
- White spray-painted tree branches.
- Battery-operated pillar candles.
- A short section of black garden fencing.
Step-by-Step Guide:
- Build the Mausoleum: Cut the foam boards into the shapes for the walls and roof of your tomb. Think of it like building a simple box with a pointed roof. Use the adhesive to glue the pieces together. Cut out an arched opening in the front.
- Paint and Detail: Paint the entire structure with the white or gray paint. Once dry, use black paint and a small brush to add details like cracks or outlines to make it look like stone blocks.
- Add Statues: Glue the small angel figures near the roofline to make it look more ornate. You can paint them to match the stone color.
- Prepare the Urns: Spray paint the two garden urns black. Once dry, place them on either side of the mausoleum’s entrance and arrange the white-painted branches inside.
- Final Assembly: Place the mausoleum in your yard. Set up the black garden fence in front of it. Place the battery-operated candles inside the arched opening for a safe, flickering glow.
11. Pumpkin Patch Overlord

The pumpkin patch has risen up and taken over. A monstrous jack-o’-lantern with a terrifying grin and glowing eyes dominates the scene. Its thorny vines, alive with an evil green light, have captured a helpless scarecrow.
An army of smaller pumpkins, all with their own carved faces, surrounds the tombstones. They seem to be waiting for their master’s command. This is not a harvest festival; it is a hostile takeover.
DIY Instructions:
What You’ll Need:
- One very large pumpkin (real or craft).
- Many small to medium pumpkins.
- A scarecrow.
- Green pool noodles or thick green rope.
- Green LED light string.
- Orange string lights or battery-powered tea lights.
- Pumpkin carving tools.
Step-by-Step Guide:
- Carve Your Army: Carve menacing faces into all your pumpkins. Make the large one look the most frightening.
- Set the Scene: Place your tombstones and the giant pumpkin in the yard. Lay the scarecrow on the ground in front of them as if it has been defeated.
- Unleash the Vines: Weave the green pool noodles or rope around the scarecrow, tombstones, and pumpkins. Make it look like the vines are growing everywhere and trapping everything.
- Add a Sinister Glow: Wrap the green LED lights around the pool noodle vines. Place the orange lights or tea lights inside all the carved pumpkins.
- Arrange the Horde: Scatter the smaller pumpkins around the yard to look like the giant pumpkin’s army.
12. The Spectral Sculptor

A grieving spirit kneels forever at a tombstone, draped in flowing white robes. Her ghostly form is frozen in a moment of sorrow. Her hands, made of wire mesh, seem to reach out for the gravestone, perhaps trying to connect with the one she lost.
White roses are scattered at the base of the tomb and draped over the top, a symbol of a love that has not died. The scene is quiet, sad, and deeply unsettling, especially under a soft blue light.
DIY Instructions:
What You’ll Need:
- A simple mannequin or a PVC pipe frame built in a kneeling position.
- Chicken wire.
- Work gloves.
- Lots of white cheesecloth or thin white fabric.
- Liquid starch or a 50/50 mix of white glue and water.
- A foam tombstone.
- Fake white roses.
Step-by-Step Guide:
- Build the Ghost’s Body: Create your kneeling frame. This will be the skeleton for your ghost.
- Shape the Hands: Wearing gloves, shape the chicken wire into two cupped, skeletal hands. Attach them to the arms of your frame.
- Drape the Fabric: Dip large pieces of cheesecloth into the liquid starch or glue mixture. Squeeze out the excess and carefully drape it over the frame, head, and hands to form a ghostly shape. Allow it to dry completely until it’s stiff.
- Create the Scene: Place your ghost and the tombstone in your yard.
- Add Final Touches: Drape a piece of lacy fabric and some white roses over the tombstone. Scatter more rose petals on the ground around the kneeling ghost.
13. Zombie Pool Party

The dead are rising from their graves, but something is a bit off. Mounds of fresh dirt signal the escape of the undead all over your lawn. Gory, decaying hands reach up from the soil, surrounded by scattered bones.
In a strange, funny twist, some of these zombies have emerged holding brightly colored pool noodles. Were they buried under a swimming pool, or are they just ready for a party? It adds a touch of weird humor to the otherwise terrifying scene.
DIY Instructions:
What You’ll Need:
- Several pairs of fake zombie hands or monster gloves.
- Old, long-sleeved shirts.
- Stuffing (like newspaper or plastic bags).
- Brightly colored pool noodles.
- Several bags of topsoil or mulch.
- Plastic bones.
Step-by-Step Guide:
- Create the Arms: Stuff the sleeves of the old shirts to create arms. Attach a zombie hand to the end of each sleeve.
- Make the Graves: Pour several mounds of dirt onto your lawn where you want the zombies to appear.
- Raise the Dead: Push the bottom of a stuffed arm deep into each dirt mound so that the hand is sticking out.
- Add the Details: Scatter plastic bones on and around the dirt mounds.
- Get the Party Started: Cut the pool noodles into smaller pieces and stick them into some of the zombie hands.
14. The Midnight Ghost Train

A ghostly locomotive materializes from the night fog, its single headlight cutting a bright path through your graveyard. This isn’t a normal train; it’s a phantom express, perhaps carrying souls to the other side.
The stark black silhouette against the thick smoke and bright light creates a powerful and frightening image. Tombstones and railroad crossing signs in the foreground make it clear this train has gone off its tracks and into the world of the dead.
DIY Instructions:
What You’ll Need:
- Large sheets of black-painted plywood or thick black foam board.
- A jigsaw or utility knife.
- White paint for details (like wheels).
- Wooden stakes and screws to hold it up.
- A very bright, battery-powered outdoor spotlight.
- A fog machine.
Step-by-Step Guide:
- Design the Train: Draw the side-view silhouette of an old-fashioned steam train onto your plywood or foam board.
- Cut it Out: Carefully use your jigsaw or knife to cut out the train shape. Paint a few white details on the wheels if you like.
- Set it Up: Attach the wooden stakes to the back of the train cutout so you can stand it up firmly in your yard. Make a few simple railroad crossing signs as well.
- Add the Light: Place the spotlight on the ground behind the cutout, aimed forward from where the train’s headlight should be.
- Bring the Fog: Set up the fog machine near the train. In the dark, turn on the spotlight and the fog machine. The train will appear as a terrifying silhouette in the mist.
15. The Flaming Pumpkin Ghoul

This is not your friendly neighborhood jack-o’-lantern. Perched atop a gnarled, blackened tree trunk, a pumpkin-headed creature surveys your yard. A ragged black cape hangs from its non-existent shoulders.
The creature’s head is a carved pumpkin with an evil face, but instead of a candle, it burns with an unholy fire. The flickering flames give it a terrifying sense of life. Another pumpkin at its base seems to serve it, glowing with the same inner heat.
DIY Instructions:
What You’ll Need:
- A tomato cage or a fake tree stump for the body.
- A black cloak or piece of black fabric.
- A carvable craft pumpkin.
- Orange and yellow silk “flame” fabric (from a craft store).
- A small, battery-powered fan.
- An orange or red battery-powered LED light.
Step-by-Step Guide:
- Build the Body: Set up the tomato cage (pointy side down) or the tree stump. Drape the black fabric over it to create the body.
- Carve the Head: Carve a scary face into your craft pumpkin. Make the mouth and eye holes large.
- Create the Fire Effect: Place the LED light and the small fan inside the pumpkin. Cut the silk flame fabric into strips and glue them around the inside of the stem hole, so they stand up.
- Assemble the Ghoul: Place the pumpkin head on top of the body.
- Turn it On: Switch on the fan and the light. The fan will cause the silk fabric to dance and flicker, looking like real flames coming out of the pumpkin’s head.
16. The Cursed Pirate Cove

Your lawn has been transformed into a ghostly shore where a cursed pirate crew is eternally stranded. Their skeletal forms, still wearing red bandanas, emerge from the sand to guard their treasure and their ship.
One pirate lunges from a treasure chest overflowing with gold and jewels, while others man their beached vessel. The scene is a complete story, turning your yard into a swashbuckler’s nightmare under the moonlight.
DIY Instructions:
What You’ll Need:
- Lots of sand to create a beach area.
- A wooden rowboat, or the front half of one built from plywood.
- Several full-size posable skeletons.
- Pirate accessories: red bandanas, eye patches, plastic swords.
- A wooden treasure chest.
- Plastic gold coins and beaded necklaces.
- Wooden signs painted to look like pirate tombstones.
Step-by-Step Guide:
- Make Your Beach: Pour and spread the sand over a large area of your yard.
- Beach the Ship: Place your boat or boat facade so it looks like it has run aground on the sand.
- Assemble Your Crew: Dress the skeletons in bandanas and give them swords. Position them around the scene. Place one halfway inside the treasure chest, and others half-buried in the sand.
- Add the Loot: Fill the treasure chest with the plastic coins and jewelry, letting it spill out onto the sand.
- Mark the Graves: Create simple wooden tombstones with pirate names on them and place them around the cove.
17. The Forsaken Toy Box

Childhood memories turn into nightmares with this display. A collection of old, forgotten toys has taken over a corner of the graveyard. A sinister clown emerges from a jack-in-the-box, its smile promising no fun at all.
A teddy bear with missing button eyes sits silently, while skeletal soldiers on rocking horses stand guard. Wooden blocks are arranged on the dirt to spell out a disturbing message to anyone who gets too close: “PLAY WITH US.” A single, dim bulb overhead lights the creepy scene.
DIY Instructions:
What You’ll Need:
- Old toys like a teddy bear, rocking horse, jack-in-the-box. (Thrift stores are great for this).
- Brown and black craft paint and water.
- A set of children’s wooden blocks.
- A safe, outdoor-rated light cord with a single Edison bulb.
- A small foam tombstone.
Step-by-Step Guide:
- Age the Toys: Make the toys look old and dirty. Mix a little paint with a lot of water and brush it over them, then wipe some off. Let them dry.
- Spell a Message: Use a marker or paint to put one letter on each wooden block. Spell out a scary phrase like “GET OUT” or “PLAY WITH US.”
- Create the Scene: In a dark corner of your yard, place a tombstone. Arrange the creepy toys and the message blocks in the dirt in front of it.
- Set the Mood: Hang the single lightbulb from a tree branch or a stake so it hangs directly over the toy scene. This creates a focused, eerie spotlight.
18. Afterlife Tea Time

Even the dead enjoy a bit of social grace. This charming yet creepy scene features two skeletons enjoying a tea party in the middle of your cemetery. One wears a fancy top hat, while the other sports a lovely sun hat, forever frozen mid-sip.
Watching them from the background is a glowing blue ghost, a silent observer of their eternal party. String lights overhead give the gathering a festive, bizarre atmosphere, making you wonder what they might be gossiping about.
DIY Instructions:
What You’ll Need:
- Two posable, full-size skeletons.
- A small bistro-style table and two chairs.
- An old tea set.
- A top hat and a wide-brimmed hat.
- A ghost prop (you can buy one or make a simple one with a sheet and a balloon).
- A blue light or glow stick to put inside the ghost.
- Outdoor string lights.
Step-by-Step Guide:
- Set the Table: Place your table and chairs in the yard.
- Seat Your Guests: Carefully position the skeletons in the chairs. Use hot glue or wire to fix their hands in place, holding the teacups and teapot. Place the hats on their heads.
- Place the Spectator: Put your ghost prop in the background behind the tea party. Place a blue light inside it to make it glow.
- Add Ambiance: Hang the string lights over the scene.
- Final Touches: You can add other small details, like a plastic crow on a chair or a fake rat on the table.
19. Graveyard Crash Site

A close encounter of the spooky kind has occurred in your yard. A silver flying saucer has crash-landed right in the middle of the cemetery, spilling green, glowing alien ooze all over the ground.
The pilot, a skeleton alien, can be seen in the cockpit, perhaps the victim of the crash. Another, human skeleton lies on the ground, a casualty of the invasion. Strange, colorful alien plants have already started sprouting from the contaminated soil.
DIY Instructions:
What You’ll Need:
- Two large plastic snow sled saucers.
- Silver spray paint.
- A large, clear plastic bowl for the cockpit.
- Two skeletons.
- Green and blue battery-powered lights.
- Green glow-in-the-dark slime or puffy paint.
- Colorful foam (like cut-up pool noodles).
Step-by-Step Guide:
- Build the UFO: Glue or screw the two plastic saucers together, rim to rim, to create the classic UFO shape. Spray paint the whole thing silver.
- Make the Cockpit: Cut a hole in the top saucer and glue the clear plastic bowl over it. Place one skeleton inside the cockpit with some green lights.
- Stage the Crash: Prop the UFO at an angle on a mound of dirt to make it look like it crashed.
- Add Alien Ooze: Drizzle the green slime all over the UFO and the ground. Lay the second skeleton on the ground nearby.
- Grow Alien Plants: Stick the colorful foam pieces into the dirt around the crash site to look like strange alien flora. Add the blue lights for extra effect.
20. The Safety Bell Grave

This decoration plays on a terrifying old fear: being buried alive. The tombstone for “Mr. Abernathy” has a chillingly simple instruction: “WAIT FOR THE BELL.”
Next to the grave, a small bell is mounted on a post. A rope is tied to the bell and leads down, disappearing into the fresh mound of dirt. It leaves visitors with a frightening question: Is Mr. Abernathy still down there, and what happens if that bell rings?
DIY Instructions:
What You’ll Need:
- A foam tombstone.
- A black permanent marker.
- A wooden stake or post.
- A small bracket or hook.
- A brass or metal bell.
- A long piece of thick, natural-looking rope.
- A bag of topsoil or mulch.
Step-by-Step Guide:
- Inscribe the Tombstone: Use the black marker to write a name and the phrase “WAIT FOR THE BELL” on the tombstone.
- Set up the Grave: Create a fresh-looking mound of dirt in your yard and place the tombstone at the head of it.
- Install the Bell: Hammer the wooden post into the ground next to the dirt mound. Attach the bracket or hook near the top and hang the bell from it.
- Connect the Rope: Tie one end of the rope to the clapper (the inside part that rings) of the bell.
- Bury the Evidence: Lay the rest of the rope across the dirt mound and bury the other end in the middle, making it look like it goes down into the coffin below.
21. Plague Quarantine Zone

This scene transforms your yard into a historical nightmare. A makeshift mass grave is roped off, marked by crude wooden crosses with biohazard symbols. The area is littered with burlap-wrapped bodies, hastily buried during a terrible plague.
A lone wheelbarrow holds another victim, waiting to be discarded. A stark sign warns everyone: “PLAGUE QUARANTINE – DO NOT ENTER.” The harsh overhead light makes the scene feel like a grim, official containment zone.
DIY Instructions:
What You’ll Need:
- Several large burlap sacks.
- Old clothes, newspaper, or leaves for stuffing.
- Twine or rope.
- Scrap wood to make simple crosses.
- White paper and a red marker for biohazard signs.
- A wooden stake and a small board for the quarantine sign.
Step-by-Step Guide:
- Create the Bodies: Stuff the burlap sacks firmly with your stuffing material to create body shapes. Use twine to tie off the “neck” and “ankle” areas to make them look more human-like.
- Mark the Graves: Nail two pieces of scrap wood together to form a cross. Make several of these.
- Make Warning Signs: Draw a biohazard symbol on white paper with a red marker and attach one to each cross. Write “PLAGUE QUARANTINE” on the small board and nail it to a stake.
- Set the Scene: Pile up some dirt in your yard. Arrange the burlap bodies on and around the dirt pile. Stick the crosses into the mound.
- Final Touches: Place your quarantine sign at the edge of the scene. You can add a wheelbarrow with another body in it for extra effect.
22. Captured Spirit Lanterns

This idea fills your graveyard with a gentle, eerie glow. The whole yard is dotted with mason jars that shine with a brilliant, supernatural blue light. Floating just above each jar is a tiny, cute ghost, as if its spirit is the source of the light.
The graves are covered with moss and draped in gauzy fabric, creating a soft, ethereal atmosphere. It is a beautiful but haunted scene, turning your lawn into a home for lost and lonely souls.
DIY Instructions:
What You’ll Need:
- Several glass mason jars.
- Blue, battery-powered fairy light strings.
- Small foam or plastic balls.
- White cheesecloth or gauze fabric.
- Black permanent marker.
- Shepherd’s hooks or wire to hang them.
Step-by-Step Guide:
- Light the Jars: Bunch up a string of blue fairy lights and place it inside a mason jar. Screw the lid on, leaving the small battery pack outside. Do this for all your jars.
- Make the Ghosts: Drape a small square of cheesecloth over a foam ball to make a head. Tie it with a small piece of string at the “neck.”
- Give Them a Face: Use the black marker to draw two simple oval eyes on the head of each ghost.
- Assemble the Lantern: Attach the little ghost to the lid of the jar. You can use hot glue or tie it to the handle.
- Display Your Spirits: Place the jars around your graveyard. You can also use shepherd’s hooks to hang them from different heights.
23. The Catacombs Wall

This decoration creates the illusion of a deep, dark crypt right in your yard. A crumbling stone wall has a large hole broken in the center, revealing a space packed to the ceiling with human skulls.
Inside the dark opening, a string of orange lights casts a hellish glow on the dozens of skulls, making their empty eyes seem to watch you. An open grave in front of the wall shows that the bone collection is still growing.
DIY Instructions:
What You’ll Need:
- A large sheet of foam insulation board.
- Gray, stone-patterned spray paint.
- A utility knife.
- Lots of plastic skulls.
- Black fabric.
- Orange string lights.
- A wooden frame for support.
Step-by-Step Guide:
- Build the Wall: Attach the foam board to a simple wooden frame to make it stand up. Spray paint the front with the stone-pattern paint.
- Break it Open: Use the utility knife to carefully cut a large, jagged hole in the middle of the foam wall.
- Fill the Crypt: Behind the wall, hang a piece of black fabric to create a dark background. Stack and glue the plastic skulls in the opening so they look tightly packed.
- Add Eerie Lighting: Weave the orange string lights in and among the skulls inside the opening.
- Dig a Grave: For an extra touch, you can create a small, stone-lined pit in front of the wall and place a few more skulls and lights inside.
24. The Dead Fairy Garden

This setup is a strange mix of magical and macabre. A charming miniature garden has been built around a tree, complete with tiny tombstones, mossy paths, and colorful toadstools. But the garden’s inhabitants are not what you would expect.
Instead of cheerful fairies, tiny skeletons with delicate, insect-like wings are perched on top of the graves. It’s a final resting place for the Fae, a whimsical and creepy scene that gets more unsettling the closer you look.
DIY Instructions:
What You’ll Need:
- Several small, posable skeletons (like for a dollhouse).
- Craft fairy wings (you can find these in the doll-making section of a craft store).
- Small foam tombstones.
- Fake moss.
- Miniature mushrooms and other fairy garden accessories.
- Small pebbles or stones.
- Hot glue.
Step-by-Step Guide:
- Create Your Skele-Fairies: Use a small dot of hot glue to attach a pair of fairy wings to the back of each tiny skeleton.
- Build the Garden: Choose a spot, like the base of a tree. Lay down fake moss to be your grass.
- Arrange the Graves: Place the miniature tombstones around the garden.
- Pose the Fairies: Sit your skeleton fairies on top of the tombstones. You can bend them into different poses.
- Add Details: Use the small pebbles to make a little path. Scatter the miniature mushrooms around the garden to complete the magical, spooky scene.
25. Bone Collector’s Yard

This is not a normal cemetery; it’s a gruesome construction site. The entire area is filled with strange structures and mounds made entirely of skulls and bones. The ground is covered in black mulch, making the white bones stand out.
A towering skeleton, the bone collector himself, stands watch over his grim work. A shovel left in a pile suggests the digging is not yet finished. This display shows a story of a creature building a terrifying kingdom from its victims.
DIY Instructions:
What You’ll Need:
- Many plastic skulls and assorted plastic bones.
- Hot glue gun.
- Twine.
- Several bags of black mulch or dirt.
- A few wooden stakes.
- A full-size skeleton prop.
Step-by-Step Guide:
- Lay the Groundwork: Spread the black mulch over the area you want to decorate. This will be your construction zone.
- Build the Bone Piles: Create several mounds of mulch. Carefully stack skulls on top to create pyramids. Use hot glue to hold them together if needed.
- Create Bone Structures: Make small teepee shapes by tying three long bones together at the top with twine. Place these around your yard.
- Post the Collector: Assemble your full-size skeleton and have him stand over the bone piles like a foreman.
- Add the Details: Stick a shovel into one of the mounds of dirt. Scatter loose bones all around the scene.
26. Midnight Coven Ritual

You have stumbled upon a secret and terrifying ceremony. A group of mysterious figures in black, hooded robes stand in a circle in the dead of night. They are gathered around a crackling bonfire, performing some unknowable ritual.
Each figure holds a glowing staff, raised towards the sky. The only light comes from the fire and their strange weapons. The scene feels dangerous and ancient, as if you are interrupting something you were not meant to see.
DIY Instructions:
What You’ll Need:
- Several simple frames (PVC pipe stick figures work well).
- Black sheets or robes to drape over the frames.
- A pile of rocks for the fire pit.
- Red and orange string lights.
- Pool noodles.
- Orange or red duct tape.
Step-by-Step Guide:
- Assemble the Coven: Build your PVC pipe figures and arrange them in a circle. Drape a black sheet over each one to create a hooded figure.
- Build the Fire Pit: Make a small circle on the ground with your rocks.
- Create the Fire: Bunch up the red and orange string lights and place them in the middle of the rock circle. This creates a safe, glowing fire effect.
- Craft the Staffs: Give each figure a pool noodle to hold. Wrap the top third of each pool noodle with the bright orange or red duct tape to make it look like it’s glowing.
- Begin the Ritual: Pose the figures so they are holding their staffs and facing the fire to start the ceremony.
27. A Mournful Duet

The music never truly dies in this graveyard. From a freshly dug grave, two skeleton arms emerge, still clutching their beloved instruments: a cello and a violin. It is as if the musicians were buried but refused to stop playing.
The instruments are tangled in cobwebs and covered with fallen leaves, showing they have been there for some time. This display is strangely beautiful and sad, a tribute to a passion that even death could not stop.
DIY Instructions:
What You’ll Need:
- An old or toy cello and violin.
- Two pairs of plastic skeleton arms.
- A mound of dirt or mulch.
- Fake cobwebs.
- A small Bluetooth speaker (optional).
Step-by-Step Guide:
- Create the Grave: Make a fresh-looking mound of dirt in your yard.
- Position the Instruments: Lean the cello against a small tombstone or prop it up on the mound. Lay the violin nearby.
- Raise the Musicians: Stick the skeleton arms into the dirt so they look like they are coming out of the ground.
- Set the Pose: Arrange the arms so that their bony fingers are holding the instruments and their bows, as if they are in the middle of a song.
- Add Final Touches: Drape fake cobwebs over the instruments and the arms. For a great effect, hide a small Bluetooth speaker in the grave and play slow, sad classical music.
28. The Cyclops Crypt

This is no ordinary mausoleum; it is a prison for a monster. The massive stone tomb is heavily fortified. But instead of a door, there is a single, giant green eye that stares out from the darkness, scanning the graveyard.
The entrance has been sealed with a wooden pallet and wrapped in heavy chains, as if the builders were desperate to keep whatever is inside from ever getting out. A sickly green smoke pours from the crypt, a sign of the evil within.
DIY Instructions:
What You’ll Need:
- Large foam insulation boards.
- Gray stone-textured spray paint.
- A large green plastic bowl or exercise ball for the eye.
- Black craft paint.
- A wooden pallet.
- Thick plastic chains.
- A green spotlight and a fog machine.
Step-by-Step Guide:
- Build the Crypt: Cut and glue the foam boards to create the front of a large, tall tomb. Spray paint it to look like old, cracked stone. Cut a large doorway opening.
- Create the Monster: Paint a black pupil on the green bowl or ball to make an eyeball. Mount it inside the doorway so it seems to be looking out.
- Seal the Entrance: Place the wooden pallet in front of the doorway. Drape the plastic chains across the pallet and the front of the crypt.
- Add the Atmosphere: Place the green spotlight inside the crypt, shining out. Put the fog machine nearby so the smoke drifts out from the entrance.
29. The Last Laugh

The circus has come to the cemetery. This grave belongs to a clown, and the joke seems to be on anyone who visits. The tombstone, which reads “THE SHOW IS OVER,” is draped in red and white circus stripes.
Creepy clown masks are mounted on sticks like warnings. Playing cards are scattered all over the grave, and a single white-gloved hand reaches up from the dirt. The whole scene feels like a prank that has gone horribly, horribly wrong.
DIY Instructions:
What You’ll Need:
- A foam tombstone.
- Red and white striped fabric.
- Several scary clown masks.
- A deck of playing cards.
- A mannequin hand with a white glove.
- A few red and white balloons.
- Small wooden stakes.
Step-by-Step Guide:
- Decorate the Tombstone: Drape the striped fabric over the tombstone. Use a marker to write “THE SHOW IS OVER” on the front.
- Set the Grave: Place the tombstone in your yard. Create a small mound of dirt in front of it to be the grave.
- Add the Performer: Stick the mannequin hand into the center of the dirt mound so it looks like it is reaching up.
- Surround it with Scares: Attach the clown masks to the wooden stakes and stick them in the ground around the grave.
- Final Touches: Scatter the playing cards all over the ground. Inflate the balloons and tie them to the tombstone.
30. Vampire’s Unrest

Even in death, this vampire is a gentleman. A skeleton, dressed in a sharp tuxedo with a high-collared red cape, lies in a simple wooden coffin. He is not resting peacefully, however. The coffin lid is pushed partly open.
The vampire waves a bony hand to the world outside, as if greeting a visitor or signaling his imminent return. Red roses are scattered around the grave, a touch of eternal romance for this creature of the night.
DIY Instructions:
What You’ll Need:
- A large cardboard box or simple wooden crate to be the coffin.
- A full-size, posable skeleton.
- Black fabric for a tuxedo and red fabric for the lining and cape.
- A white paper dickey with a bow tie.
- Fake red roses.
- A red spotlight.
Step-by-Step Guide:
- Prepare the Coffin: If using a cardboard box, you can paint it to look like wood. Line the inside of the coffin with the red fabric.
- Dress the Vampire: Drape the black fabric around the skeleton to look like a suit. Attach the white dickey and bow tie at its neck. Fashion a simple cape from the red fabric and attach it at the shoulders.
- Place the Body: Lay the dressed-up skeleton inside the coffin. Bend one of its arms so it is waving.
- Set the Scene: Dig a shallow hole in your yard to place the coffin in, so it looks like it’s in the ground. Lean the lid against the side.
- Add the Finishing Touches: Scatter the red roses inside and around the coffin. At night, aim a red spotlight at the vampire to give him a sinister glow.
31. Toxic Waste Spill

A terrible accident has contaminated this cemetery. Rusty old barrels marked with biohazard symbols are piled high, leaking a glowing, green substance all over the ground. The toxic goo bubbles and smokes, melting everything it touches.
A poor skeleton has been caught in the spill, its bones being dissolved by the hazardous material. The entire scene glows with an unnatural green light, a clear warning of the deadly chemicals that have poisoned this final resting place.
DIY Instructions:
What You’ll Need:
- Several plastic barrels or large buckets.
- Brown and orange paint for rust effect.
- Biohazard symbol stencils or printouts.
- Cans of expanding foam.
- Bright green spray paint.
- Green LED string lights.
- A plastic skeleton.
Step-by-Step Guide:
- Age the Barrels: Paint the barrels to look old and rusty. You can use a sponge to dab on the brown and orange paint for a realistic rust texture.
- Add Warnings: Stencil or glue the biohazard symbols onto the sides of the barrels.
- Create the Spill: Arrange the barrels in a pile. Spray the expanding foam so it looks like it’s pouring out of the barrels and onto the ground. Let it dry and harden.
- Make it Glow: Spray paint the hardened foam with the bright green paint. Weave the green LED lights through the foam to make it glow from within.
- Add a Victim: Place the plastic skeleton so it looks like it’s half-submerged in the toxic spill.
32. Unlucky Grave Robber

This scene tells the story of a grave robber who met a grim fate. An open grave reveals a skeleton lying on its back, surrounded by the treasure it was trying to steal. Gold coins and jewels are scattered around its bony frame.
The robber’s tools—shovels and a pickaxe—are left behind, and an old lantern still burns, its light casting a lonely glow on the failed heist. It seems the grave’s occupant did not appreciate being disturbed.
DIY Instructions:
What You’ll Need:
- A rectangular section of black plastic liner or tarp for the grave.
- A posable skeleton.
- Shovels and a pickaxe.
- Plastic gold coins and beaded necklaces.
- A battery-operated lantern.
- A pile of dirt.
Step-by-Step Guide:
- Dig the Grave: You don’t need to dig a real hole. Simply lay the black plastic liner on your lawn and pile dirt all around its edges to create the illusion of an open grave.
- Place the Robber: Lay the skeleton inside the grave area.
- Scatter the Loot: Sprinkle the plastic gold coins and jewels in and around the skeleton.
- Leave the Tools: Stick the shovels and pickaxe into the dirt pile next to the grave.
- Light the Scene: Place the battery-operated lantern on the edge of the grave to illuminate the scene at night.
33. Doomsday Sundial

Time is up for the souls in this graveyard. A massive, cracked stone sundial stands as a monument to the end of days. Instead of all numbers, some of the hours are marked by grinning skulls, counting down to a final, unknown hour.
The sundial is set in a stone base, and a nearby tombstone simply reads, “TIME’S UP.” This is a quiet but deeply ominous decoration, suggesting that some cosmic clock has finally struck midnight for the dead.
DIY Instructions:
What You’ll Need:
- A large, round piece of foam board or plywood.
- Gray stone-textured spray paint.
- Black craft paint.
- A long, triangular piece of wood or foam for the gnomon (the part that casts the shadow).
- A square piece of foam for the base.
Step-by-Step Guide:
- Create the Sundial Face: Paint the round piece of foam or wood with the gray stone paint. Use black paint to add cracks.
- Mark the Hours: Paint Roman numerals around the edge of the circle. For some of the numbers (like 3, 6, 9, and 12), paint a small skull instead.
- Attach the Gnomon: Glue the long, triangular piece into the center of the sundial so that it stands up straight.
- Make the Base: Paint the square piece of foam to match the sundial. Attach the sundial to the base.
- Set the Scene: Place your sundial in the yard. You can add a small, simple tombstone next to it with “TIME’S UP” written on it.
34. The Endless Cemetery

This decoration creates a chilling optical illusion. Your entire lawn is filled with a dense forest of identical, weathered tombstones. They are packed so tightly together that it looks like a maze with no way out.
Here and there, a pair of skeleton hands can be seen gripping the top of a tombstone, as if the dead are trying to pull themselves out. A few of the graves glow with a faint, red light, hinting at the evil that lies beneath.
DIY Instructions:
What You’ll Need:
- Many large sheets of corrugated cardboard.
- A utility knife.
- Gray and black spray paint.
- Small wooden stakes.
- Hot glue or a staple gun.
- A few pairs of plastic skeleton hands.
- A few red LED lights.
Step-by-Step Guide:
- Mass-Produce Tombstones: Draw a simple tombstone shape on a piece of cardboard and cut it out. Use this as a template to trace and cut out as many tombstones as you can.
- Paint Them: Spray paint all the cardboard cutouts with gray paint. Lightly spray some black paint on them to add shadows and cracks.
- Make them Stand: Attach a small wooden stake to the bottom of the back of each tombstone.
- Plant Your Cemetery: Stick the tombstones into your lawn, placing them very close together to create a crowded, maze-like effect.
- Add the Undead: Glue a pair of skeleton hands to the top of a few of the tombstones. Place a red LED light at the base of a few others for a spooky glow.
35. A Murder of Crows

This graveyard is under the watchful eyes of hundreds of silent sentinels. Every surface is covered with black crows. They perch on tombstones, line the bare branches of a dead tree, and stand silently on the ground.
The sheer number of birds is what makes this scene so unnerving. It creates a dark, oppressive atmosphere, as if the crows are waiting for something to happen. A single bird hangs from a noose, a grim warning to any who might disturb this place.
DIY Instructions:
What You’ll Need:
- Many fake crows (you can find these at craft or dollar stores).
- Bare tree branches (real or fake).
- A few foam tombstones.
- Hot glue and wire.
- A blue or dark purple spotlight.
Step-by-Step Guide:
- Build Your Trees: Stick several bare branches into the ground to create one or more dead-looking trees.
- Set the Graves: Place your tombstones around the base of the trees.
- Unleash the Crows: Use hot glue and thin wire to attach the fake crows everywhere. Put them on the tree branches, on top of the tombstones, and scatter them all over the ground.
- Create a Focal Point: For an extra creepy touch, you can hang one crow from a branch with a small loop of twine.
- Add Spooky Lighting: Aim the blue or purple spotlight at the scene. This will cast long, eerie shadows and make the black crows stand out in the dark.
36. Pet Sematary

Sometimes, dead is better. This corner of your graveyard is a tribute to beloved pets who have passed on. A weathered, hand-painted sign points the way to the “Pet Sematary,” where small graves are marked with simple wooden headstones.
Each grave has a crude drawing of the pet and its name, like “Fluffy” or “Goldie.” The tiny skeletons of cats, dogs, and birds lie on the dirt, a sad and creepy reminder that not just humans are buried here.
DIY Instructions:
What You’ll Need:
- A weathered wooden sign and a post.
- Black paint.
- Several small, flat pieces of wood for headstones.
- Small animal skeletons (cat, dog, fish, bird).
- Small rocks or pebbles.
- A bag of black mulch.
Step-by-Step Guide:
- Make the Sign: Paint “PET SEMATARY” on the weathered wooden sign and attach it to the post. Stick it in the ground.
- Create the Graves: Spread the black mulch on the ground below the sign.
- Personalize the Headstones: On each small piece of wood, paint the name of a pet and a simple picture of what it was (like a cat silhouette).
- Lay the Pets to Rest: For each pet, make a small grave by placing a headstone and arranging a small circle of rocks on the mulch. Lay one of the animal skeletons in the middle of the rock circle.
- Add Final Touches: You can add other details like small, crude wooden crosses or solar-powered path lights.
37. Greenhouse of Horrors

This is no ordinary garden. A small greenhouse stands in the cemetery, but a sign warns visitors: “PLEASE DON’T FEED THE PLANTS.” Inside, a collection of monstrous, carnivorous plants with gaping mouths and sharp teeth are on display.
Long, green tentacles snake their way out of broken panes of glass, reaching for unsuspecting passersby. The greenhouse glows with an eerie red and green light, a sign that these are no ordinary flowers.
DIY Instructions:
What You’ll Need:
- A small, cheap plastic greenhouse kit.
- Several terracotta pots.
- Green and red felt.
- Styrofoam balls or cones for the plant heads.
- Hot glue.
- Green pool noodles for tentacles.
- Red and green string lights.
- Plastic skulls.
Step-by-Step Guide:
- Assemble the Greenhouse: Build your greenhouse according to the instructions. You can make it look old by smearing some dirt on the plastic walls.
- Create the Killer Plants: Glue red felt inside a folded piece of green felt to make a mouth. Wrap this around a foam ball to create a head. Add white felt triangles for teeth. Attach this to a sturdy stick or dowel.
- Pot Your Plants: Fill the pots with dirt and “plant” your monster flowers. Place some of them inside the greenhouse and a few outside the door. Place a plastic skull in some of the pots.
- Add Tentacles: Weave the green pool noodles through the greenhouse frame and out any openings.
- Light it Up: String the red and green lights inside the greenhouse to make it glow.
38. The Spider’s Lair

Arachnophobes beware. This tombstone has become the nest for a monstrous spider and her countless offspring. A giant black spider with glowing red eyes sits atop the grave, guarding her home.
The entire area is covered in thick, sticky webbing, stretching from the tombstone to the surrounding bushes and ground. Dozens of smaller spiders crawl all over the webs, and several large, web-wrapped egg sacs lie at the base of the grave, ready to hatch.
DIY Instructions:
What You’ll Need:
- One giant spider decoration.
- Lots of stretchy “spider web” material.
- Many small plastic spiders.
- Several white foam balls (for egg sacs).
- A foam tombstone.
- Green and purple spotlights.
Step-by-Step Guide:
- Set the Scene: Place your tombstone in the desired location.
- Spin the Web: Stretch the spider web material all over the tombstone and attach it to nearby trees, bushes, or stakes in the ground. The more you stretch it, the better it looks.
- Place the Queen: Position the giant spider on top of the tombstone or high up in the web.
- Create Egg Sacs: Wrap the foam balls in the stretchy web material until they are completely covered. Place these at the base of the tombstone.
- Add the Horde: Scatter the small plastic spiders all over the webs, the tombstone, and the egg sacs. At night, use green and purple lights to illuminate the scene.
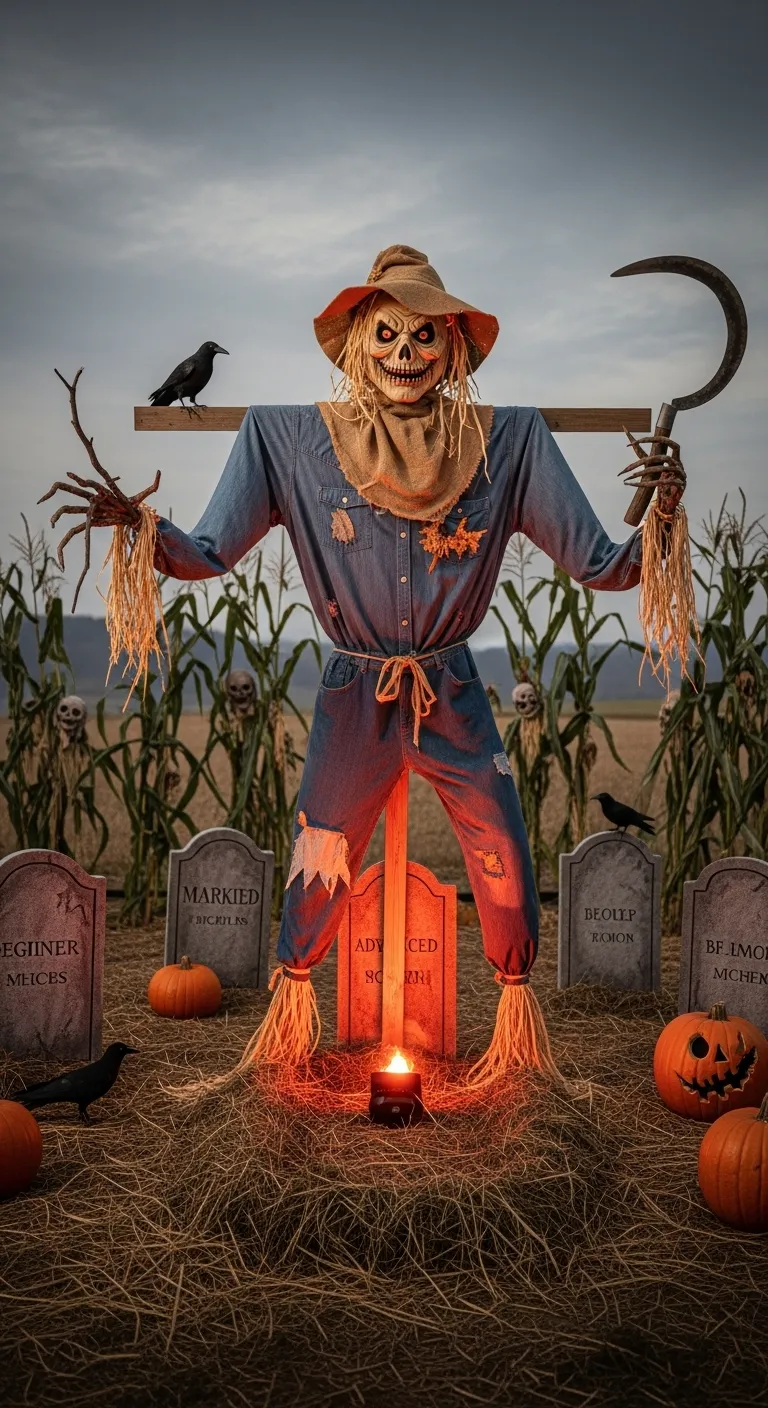
39. The Harvest Reaper

This is the scarecrow that farmers have nightmares about. Standing tall in a haunted cornfield, this creature is more than just a bird-scarer. It has a terrifying skull face with glowing eyes and wears old, tattered denim.
Its arms are made of jagged branches, and in one hand it holds a rusty, curved scythe. It seems to be the guardian of this dead field, a reaper of a very different sort. A candle at its feet lights it from below, giving it a truly demonic appearance.
DIY Instructions:
What You’ll Need:
- Two sturdy wooden posts to make a cross shape.
- An old pair of jeans and a denim or flannel shirt.
- Straw or hay for stuffing.
- A scary skull mask.
- An old straw hat.
- A plastic scythe toy.
- Twine or rope.
- A battery-operated candle.
Step-by-Step Guide:
- Build the Frame: Nail the two wooden posts together to form a classic scarecrow cross. Secure it firmly in the ground.
- Dress the Reaper: Put the shirt and jeans on the frame. Use twine to tie off the cuffs of the pants and sleeves.
- Stuff It: Stuff the clothes with lots of straw to fill out the body.
- Add the Head and Hands: Place the skull mask over the top of the post. Put the hat on top of the mask. For hands, you can stick jagged branches or plastic skeleton hands into the ends of the sleeves.
- Arm Your Scarecrow: Use twine to securely tie the plastic scythe into one of its hands. Place the battery-operated candle at its base for a safe, spooky uplight.
Your journey through the graveyard is now complete. You have seen how foam, paint, and a bit of imagination can create a truly frightening front yard. The power to build a memorable Halloween display is in your hands. There is no need to spend a fortune to create a scene that will be the talk of the neighborhood.
Choose the ideas that sparked your dark creativity. Combine different elements to tell your own spooky story. Whether you start with a single, unsettling tombstone or a full-blown zombie outbreak, the most important part is to have fun creating your personal haunt. Now go forth and bring your terrifying visions to life.
Key Takeaways
- Creativity Over Cost: You can create high-impact decorations using simple, affordable materials like cardboard, foam, and paint.
- Storytelling is Key: The best graveyard displays tell a story. Combine elements like a grave robber, a weeping angel, or a crashed UFO to build a narrative.
- Lighting Creates Mood: Simple additions like spotlights, colored LEDs, and fog machines can turn a good display into a great one by creating shadows and a spooky atmosphere.
- Start Small and Grow: You do not have to build everything at once. Start with a few key pieces this year and add to your collection over time to create an even more elaborate display next Halloween.