When you think of Halloween decorations, your mind might jump to plastic skeletons and bright orange pumpkins. The season often brings a wave of decor that can feel a bit loud. But what if your autumn aesthetic is more subtle, more modern, or just a little more grown-up?

This year, you can embrace the spirit of the season without compromising on style. Ghosts, the classic Halloween icon, can be surprisingly chic. With a little creativity and some simple materials, you can craft ghostly decor that is elegant, artistic, and full of personality.
We have gathered 38 do-it-yourself ghost decor ideas that prove spooky can also be sophisticated. From rustic farmhouse charm to minimalist modern art, there is a project here for every home and every skill level. Get ready to create some beautiful haunts.
1. Rustic Ghost Chandelier

This beautiful ghost chandelier adds a touch of simple elegance to your autumn decor. A natural birch branch provides a rustic foundation for the piece. Little ghosts, crafted from soft gauze, float gracefully below. Their simple forms and wide eyes create a playful, not frightening, look.
The decoration hangs beautifully, complementing a neutral color scheme of grays and whites. This piece feels handmade and special. It brings a whimsical spirit to the room without being overwhelming. This is a subtle and charming nod to the Halloween season.
DIY Instructions
Materials You’ll Need:
- A sturdy tree branch (birch looks very nice)
- Small foam craft balls (about 1-2 inches wide)
- White, lightweight fabric like cheesecloth or gauze
- Small black beads or googly eyes
- A hot glue gun with glue sticks
- Clear fishing line (or thin white thread)
- Scissors
- Twine or a stronger string for hanging the branch
Step-by-Step Guide:
- Prepare Your Branch: First, go outside and find a branch that you think looks nice. Clean off any dirt or loose bark. An adult can help you trim any small twigs to make it smooth.
- Create the Hanger: Cut a long piece of twine. Tie one end of the twine securely to one side of the branch. Tie the other end of the twine to the other side of the branch. This creates a triangle shape for hanging it up later.
- Start Your First Ghost: Take one foam ball. This will be the ghost’s head. Cut a long piece of clear fishing line, about two feet long so you have extra. Carefully push the line through the center of the foam ball. A needle can help with this. Tie a large knot at the bottom of the ball so it won’t slip off.
- Give the Ghost a Body: Cut a square of your white fabric. A good size is about 10×10 inches. Place the foam ball in the very center of the fabric square and drape the fabric down over it.
- Shape the Ghost: Gently pinch the fabric just underneath the foam ball to form a “neck.” Cut a small piece of your fishing line and tie it tightly around the neck to hold the fabric in place. Let the rest of the fabric hang down.
- Add the Eyes: This part is fun! Ask an adult to help you use the hot glue gun. Put two tiny dots of glue on the ghost’s head and press the black beads or googly eyes on.
- Build Your Ghost Family: Now, just repeat steps 3 through 6. You can make as many ghosts as you like to fill up your branch. Try making the fishing lines different lengths for a more interesting look.
- Hang the Ghosts on the Branch: Tie the top end of each ghost’s fishing line to the branch. You can space them out evenly or group them together. Once you are happy with where they are, an adult can trim the extra line.
- Display Your Creation: Find a great spot to hang your new ghost chandelier. It looks wonderful in a doorway, over a table, or against a plain wall.
2. Serene Spirit Incense Holder

This ceramic ghost offers a calm, modern take on Halloween decor. The piece is split into a speckled white top and a solid black bottom, creating a striking contrast. It is not just a decoration; it’s a functional incense burner. Smoke gently rises from the top, adding a mysterious and calming atmosphere to any room.
This small, artistic ghost brings a peaceful feeling, making it a unique addition to your seasonal display. It fits well on a desk or a small tray with decorative stones.
DIY Instructions
Materials You’ll Need:
- White air-dry clay
- Black acrylic paint and a small paintbrush
- A small bowl of water
- A rolling pin and a plastic knife
- Fine-grit sandpaper
- Clear, matte sealant spray
- An incense cone
Step-by-Step Guide:
- Form the Body: Take a piece of clay and roll it into a thick cone shape. Hollow out the inside from the bottom so it can sit flat. Use your knife to cut a mouth-shaped hole in the front.
- Create the Head: Roll another, smaller piece of clay into a ball. Then, gently pinch and shape it into a small bowl. This will be the top of the ghost’s head, where the incense rests. Cut two small eye holes in it.
- Join the Pieces: Score (scratch) the top edge of the body and the bottom edge of the head piece. Dab a little water on the scratched parts. Gently press the head onto the body, smoothing the seam with your finger.
- Let It Dry: Let your clay ghost dry for 24-48 hours, or until it is completely hard.
- Smooth It Out: Once dry, use the sandpaper to gently smooth any rough spots.
- Time to Paint: Paint the bottom half of your ghost with the black acrylic paint. Let it dry completely.
- Seal Your Work: To protect it, take your ghost outside and spray it with a clear sealant. Let that dry.
- Light It Up: Place a lit incense cone on the top dish and enjoy the gentle smoke.
3. Modern Wire Ghost Art

These wire ghosts provide a clean and artistic touch to Halloween decorations. Crafted from simple black and white wire, their forms are light and airy. Some hang on the wall like line drawings, while others stand on small blocks of wood or marble.
The design is minimal, using the wire to outline a classic ghost shape with simple loops for eyes. This style is sophisticated and modern. It proves that holiday decor can be both playful and very chic.
DIY Instructions
Materials You’ll Need:
- 16-gauge craft wire (black or white)
- Wire cutters and round-nose pliers
- A printed picture of a simple ghost shape
- For a standing ghost: a small wood block and strong glue
Step-by-Step Guide:
- Print Your Guide: Find a simple ghost outline online and print it out. This will be your map.
- Cut the Wire: Cut a long piece of wire, about 2-3 feet long. It’s better to have too much than too little.
- Start Bending: Place your wire over the printed outline. Using your pliers and fingers, start bending the wire to match the ghost’s shape.
- Make the Eyes: When you get to the eyes, use your round-nose pliers to bend the wire into two small circles.
- Finish the Shape: Continue bending the wire until you’ve traced the entire ghost. Twist the two ends of the wire together at the bottom to secure it. Snip any extra wire.
- For a Wall Ghost: Your ghost is ready! You can hang it on the wall with a small nail.
- For a Standing Ghost: Don’t twist the ends together. Instead, bend both ends downward to create two “legs.” Put a dab of strong glue on the bottom of each leg and stand your ghost up on the wooden block. Hold it for a minute until the glue sets.
4. Ethereal Ghost Luminaries

These lanterns cast a soft, welcoming glow. Each one is a simple glass jar wrapped in frosted paper. A friendly ghost silhouette is cut out, allowing the light from a candle inside to shine through. Copper-colored rims and wire handles add a warm, metallic accent.
These luminaries are gentle and sweet. They create a cozy ambiance on a cool autumn evening. They are lovely grouped together on a porch step or a mantel.
DIY Instructions
Materials You’ll Need:
- Clean glass jars
- Frosted vellum paper
- A pencil and scissors
- Double-sided tape
- Copper-colored craft tape
- Thin craft wire
- LED tea lights (these are safest!)
Step-by-Step Guide:
- Measure Your Jar: Cut a piece of the vellum paper so it’s tall enough to cover the side of your jar and long enough to wrap all the way around.
- Draw Your Ghost: On the back of the vellum paper, lightly draw a simple ghost shape in the middle.
- Cut It Out: Carefully cut the ghost shape out of the paper.
- Wrap the Jar: Use double-sided tape to attach one end of the paper to the jar. Wrap the paper tightly around and secure the other end with more tape.
- Add Copper Details: Stick the copper tape around the top rim and bottom edge of the jar for a nice finish.
- Make a Handle: Cut a long piece of wire. Wrap it securely around the neck of the jar, just under the rim. Take the two long ends, bring them together at the top, and twist them to form a handle.
- Add Light: Drop an LED tea light inside your finished lantern and watch it glow.
5. Floating Garden Ghosts

These little ghosts bring life to any planter or garden bed. Made from white clay, each one has a unique, wind-swept shape as if they are flying through the air. Their simple black eyes and open mouths give them a surprised and cheerful expression.
They are mounted on thin stakes, some with springy coils that let them bob and dance in the breeze. These charming figures add a playful touch to your outdoor or indoor plants.
DIY Instructions
Materials You’ll Need:
- White oven-bake clay
- A rolling pin and a plastic knife
- Thin wooden skewers or stiff wire
- A black permanent marker
- An oven (and an adult to help)
- Optional: Waterproof sealant for outdoor use
Step-by-Step Guide:
- Warm Up the Clay: Knead a small piece of clay in your hands until it’s soft and easy to work with.
- Roll It Out: On a clean, flat surface, roll the clay out until it’s about a quarter-inch thick.
- Cut Your Ghost: Use the plastic knife to cut out a ghost shape. Make the tail long and wavy, like it’s flying.
- Make the Face: Use the tip of your skewer or a pencil to poke two holes for eyes and a bigger one for a mouth.
- Add the Stake: Gently push the non-pointy end of a skewer or wire into the bottom of the ghost.
- Time to Bake: Place your clay ghosts on a baking sheet and have an adult help you bake them according to the directions on the clay package.
- Let Them Cool: Once they are done baking, let them cool down completely.
- Draw the Face: Use your black permanent marker to color in the eye and mouth holes.
- Plant Your Ghosts: Stick your finished ghosts into the soil of your favorite potted plant or in your garden. If they’ll be outside in the rain, ask an adult to spray them with a waterproof sealant.
6. Ghostly Window Apparitions

A collection of ghosts appears to float across these window panes. The decals, in bold black and stark white, create a dynamic scene against the glass. Some ghosts are classic sheet-style figures, while others have wispy, trailing tails that suggest movement.
A haunted house silhouette at the bottom grounds the spooky display. This decoration is simple yet highly effective. It turns your windows into a ghostly gallery for all to see.
DIY Instructions
Materials You’ll Need:
- Black and white removable vinyl (or contact paper)
- A pencil and scissors
- Ghost silhouette pictures printed from a computer
Step-by-Step Guide:
- Find Your Ghosts: Search online for “ghost silhouettes” and print out a few different shapes that you like.
- Trace the Shapes: Place your printed picture on top of the vinyl (on the smooth, colorful side) and trace around it. You might need to press hard with your pencil to see the line. Or, you can cut out the paper ghost and trace it onto the back (paper side) of the vinyl.
- Cut Them Out: Carefully cut along the lines you traced to get your ghost shapes. Make some from white vinyl and some from black.
- Clean Your Window: Make sure your window is clean and dry so the vinyl will stick well.
- Peel and Stick: Carefully peel the paper backing off of a vinyl ghost.
- Place on the Window: Gently place the sticky side of the ghost onto the glass. Smooth it down with your fingers from the center out to push out any air bubbles.
- Create a Scene: Stick all your ghosts on the window. You can make them look like they are chasing each other or flying around a haunted house you also cut out.
7. Peek-a-Boo Corner Ghosts

These clever ghosts seem to be passing right through the walls. Positioned in the corner of a room, their forms are made from draped, semi-transparent fabric. The larger ghost appears to be emerging from a wooden plaque, its long body trailing down the wall.
A smaller, curious ghost peeks over a shelf. The grid-like texture of the fabric gives them a unique, almost digital look. This is a creative and surprising way to use an often-overlooked space for decorating.
DIY Instructions
Materials You’ll Need:
- A styrofoam ball
- A disposable cup or bottle to use as a stand
- Cheesecloth or gauze
- Liquid fabric stiffener
- A bowl
- Black felt and scissors
- Glue
Step-by-Step Guide:
- Set Up Your Ghost Form: Place the styrofoam ball on top of the upside-down cup or bottle. This will be the mold for your ghost’s head and body.
- Prepare the Fabric: Cut a piece of cheesecloth big enough to drape over the ball and hang down as long as you want your ghost to be.
- Soak the Cloth: Pour some fabric stiffener into a bowl. Put your cheesecloth in the bowl and squish it around until it’s completely soaked.
- Drape and Shape: Squeeze out the extra liquid, but don’t wring it out completely. Carefully drape the wet cloth over the styrofoam ball. Arrange the folds and ripples to look like a floating ghost.
- Let It Dry: Leave your ghost to dry for a full day. When it’s done, it will be stiff and hold its shape.
- Reveal Your Ghost: Once it’s completely dry, you can lift the hardened cheesecloth ghost off of the form.
- Give It Eyes: Cut two oval shapes from the black felt and glue them onto the ghost’s head.
- Find a Spooky Spot: You can set your ghost on the corner of a bookshelf, a doorframe, or anywhere it looks like it’s peeking out.
8. Bohemian Spirit Chandelier

This is not your typical Halloween decoration. It’s a stunning macrame mobile featuring a host of tassel ghosts. The intricate knots of the dusty rose and natural cotton cord create a beautiful, textured look. Wooden beads add to the earthy, bohemian feel.
Each ghost is a simple tassel with two black dots for eyes, hanging at different lengths to create a cascading effect. This piece is a work of art. It blends seasonal fun with sophisticated, handcrafted style.
DIY Instructions
Materials You’ll Need:
- Thick off-white yarn
- A small hardcover book
- Scissors
- Small black beads
- A hot glue gun (with an adult’s help)
- A metal or wood embroidery hoop
Step-by-Step Guide:
- Wrap the Yarn: Hold the end of the yarn against the book and wrap the yarn around it over and over again (about 50 times for a puffy ghost).
- Tie the Top: Cut a separate 10-inch piece of yarn. Slide it under all the wrapped yarn at one end of the book and tie a tight knot. This string will be the hanger.
- Make the Head: Carefully slide the bundle of yarn off the book. Cut another piece of yarn and tie it tightly around the whole bundle, about an inch from your top knot. This makes the ghost’s head.
- Create the Tassel: Snip through all the loops of yarn at the bottom. Trim the ends to make them even.
- Add the Eyes: Ask an adult to help you use the hot glue gun to put two tiny dots of glue on the ghost’s head and stick on the black beads.
- Make a Ghost Family: Repeat the steps to make as many tassel ghosts as you want.
- Assemble the Chandelier: Tie the top strings of your ghosts to the embroidery hoop. Hang them at different heights to make it look interesting.
9. Haunted Heirlooms Mobile

This clever mobile mixes family history with a bit of Halloween fun. Old black-and-white photographs are paired with ghost-shaped paper cutouts. Some photos are clipped directly to the ghosts, making it seem like the figures in the portraits have become friendly spirits.
The entire display hangs from a rustic tree branch. This is a very personal and creative decoration. It’s a bit spooky, a bit sentimental, and completely unique.
DIY Instructions
Materials You’ll Need:
- A nice-looking stick from outside
- Copies of old family photos (don’t use the real ones!)
- White and black construction paper
- Mini clothespins
- Twine or string
- Scissors and a pencil
- A ghost-shaped cookie cutter or template
Step-by-Step Guide:
- Get Your Photos Ready: Ask a grown-up to help you print black-and-white copies of some old family pictures.
- Make Paper Ghosts: Use the cookie cutter or template to trace ghost shapes onto the black and white paper. Cut them out.
- Cut the Hangers: Cut a few pieces of twine, each about two feet long.
- Assemble a String: Take one piece of twine. Use a mini clothespin to clip a paper ghost to it. A little farther down, use another clothespin to add a photo. You can mix and match however you like.
- Fill Your Mobile: Keep adding photos and ghosts to your different strings.
- Attach to the Branch: Tie the top of each completed string to your stick. Spread them out so they don’t get tangled.
- Make it Hangable: Tie a long piece of twine to both ends of the stick. Now you can hang your family ghost mobile for everyone to see.
10. Phantom Light Projector

This simple box creates a big effect. A small, square light projector casts a large, spooky ghost silhouette onto the wall. The design is a classic, wavy ghost with a surprised expression. On the front of the box, a smaller version of the ghost is lit up.
This decoration turns a dark corner into a feature. It is a modern and minimal way to create a haunted atmosphere without any clutter. The changeable slides mean you can have a whole gallery of ghouls.
DIY Instructions
Materials You’ll Need:
- An empty shoebox with its lid
- A small, bright flashlight
- Black construction paper
- A craft knife (for an adult to use)
- Scissors, tape, and a pencil
Step-by-Step Guide:
- Make the Flashlight Hole: On one of the short ends of the shoebox, have an adult help you trace and cut a hole that’s the same size as the front of your flashlight.
- Create the Projector Screen: On the opposite short end, cut out a large rectangle. This is where the shadow will shine out.
- Make the Slide Holder: Put the lid on the box. In the center of the lid, have an adult cut a thin, long slot. This is where you will drop your slides in.
- Design a Slide: Cut a square of black construction paper that’s a little bigger than the slot you just made. In the very center of that square, draw a ghost shape.
- Cut Out the Ghost: Ask an adult to use the craft knife to carefully cut the ghost shape out of the black paper. This hole is what the light will shine through.
- Set It Up: Push your flashlight into the round hole you made in the back of the box.
- Project! Drop your ghost slide into the slot on top. Go into a dark room, turn on the flashlight, and point the box at a plain wall. You should see a giant ghost shadow!
11. Elegant Drapery Ghost Centerpiece

A dramatic spirit makes a grand entrance at this dinner party. This ghost serves as a stunning centerpiece, with its off-white fabric body cascading down from the head of the table. The fabric has a beautiful weight, creating deep folds that pool onto the floor with a grey ombre effect.
Two simple black felt ovals for eyes give it a classic ghost look. This is a show-stopping piece that sets a sophisticated and moody tone for an elegant Halloween gathering.
DIY Instructions
Materials You’ll Need:
- A tall, sturdy base, like a mannequin head on a stand or a large ball on top of a lamp base.
- A very large piece of light, flowing fabric (like jersey knit or cheesecloth). At least 4-5 yards.
- Black felt
- Scissors
- Safety pins or a hot glue gun
Step-by-Step Guide:
- Set Up Your Form: Place your mannequin head or ball form at the end of your dining table where you want the ghost to sit.
- Drape the Fabric: Drape your large piece of fabric over the top of the form. Make sure it’s centered. Let the fabric hang down naturally on all sides.
- Arrange the Folds: Spend some time arranging the fabric to create nice-looking folds and drapes. You want it to look like it’s flowing.
- Create the Eyes: Cut two large, spooky oval shapes out of the black felt.
- Attach the Eyes: Decide where you want the eyes to be on the ghost’s “head.” You can use safety pins to attach them from the inside for a no-sew option, or an adult can help you hot glue them on.
- Final Touches: Let the bottom of the fabric trail onto the floor. If you want the ombre look, you can use fabric dye on the bottom few feet of the cloth before you start (let it dry completely!).
12. Rustic Stitched Ghost Garland

This charming garland has a warm, handmade feel. Black and white felt ghosts are strung along a piece of natural twine. The ghosts have a cute, cartoonish shape, and their edges are detailed with simple stitching marks.
Wooden beads and small tassels separate the ghosts, adding texture and a touch of rustic style. It’s a friendly and welcoming decoration, great for hanging on a mantel or a wall.
DIY Instructions
Materials You’ll Need:
- Black and white craft felt
- A ghost-shaped template or cookie cutter
- Scissors
- A white paint pen or a black marker
- Twine
- Wooden beads
- Jute or thin yarn for tassels
Step-by-Step Guide:
- Cut the Ghosts: Use your template to trace ghost shapes onto the black and white felt and cut them out.
- Add the Details: On the black ghosts, use the white paint pen to draw eyes and a mouth, plus little stitch marks around the edge. Do the same on the white ghosts using the black marker.
- Make Tassels (Optional): Wrap the jute or yarn around three of your fingers about 10 times. Slide it off, and tie a small piece of string tightly around the top of the loop. Cut the bottom loops to create the tassel.
- String Your Garland: Cut a long piece of twine. Thread it through a needle (a plastic one works well).
- Assemble: Poke the needle through the top of a ghost. Then, thread on a wooden bead, then a tassel, then another bead. Then add another ghost. Keep repeating this pattern until your garland is the length you want.
- Hang It Up: Tie loops at both ends of the twine for easy hanging.
13. Digital Ghost Welcome Screen

For a truly modern and simple decoration, let your computer do the work. A cheerful ghost appears on this laptop screen, offering a friendly “HELLO.” The image is set against a black background, making the white ghost pop.
This is a fun and unexpected way to add a bit of seasonal spirit to your office or workspace. It’s a zero-clutter option that is sure to make anyone who sees it smile.
DIY Instructions
Materials You’ll Need:
- A computer (laptop or desktop)
- Access to the internet
- A simple image editing program (like Paint or Canva)
Step-by-Step Guide:
- Find Your Ghost: Search online for a “simple ghost icon” or “cute ghost graphic.” Find one you like with a transparent background and save it to your computer.
- Open Your Editor: Open your image editing program. Create a new file that is the same size as your computer’s screen resolution (you can find this in your display settings).
- Make a Black Background: Fill the entire background of your new file with the color black.
- Add Your Ghost: Import or paste your saved ghost image into the middle of the black background.
- Add a Message: Use the text tool to type a message like “HELLO” or “BOO!” under your ghost. Choose a fun font and make the text white.
- Save Your Image: Save the finished picture as a JPEG or PNG file.
- Set as Background: Go to your computer’s desktop settings and choose your new picture to be your wallpaper or screensaver.
14. Spooky Concrete Garden Ghost

This ghost is solid and built to last. Made from concrete and an old towel, it has a wonderfully rough texture. Its shape is formed by draping the fabric over a mold, resulting in natural, heavy-looking folds.
The color variation from the striped towel adds visual interest. This is a substantial piece of outdoor decor that will guard your garden or porch step through the autumn season.
DIY Instructions
Materials You’ll Need:
- An old towel
- A bag of quick-mix concrete
- A bucket for mixing
- Water
- A plastic bottle or can to use as a mold
- A styrofoam ball for the head
- Cooking spray or petroleum jelly
- Gloves and a mask
Step-by-Step Guide:
- Build Your Form: Place the styrofoam ball on top of the plastic bottle. This will be the shape of your ghost. You can tape it in place.
- Prepare the Form: Cover your ghost form with plastic wrap and then coat it with cooking spray. This will stop the concrete from sticking.
- Mix the Concrete: Put on your gloves and mask. In the bucket, mix the concrete powder with water according to the package directions. It should be like a thick pancake batter.
- Soak the Towel: Push the towel into the concrete mix. Squish it around until the whole towel is completely covered in the mixture.
- Drape and Shape: Lift the heavy, wet towel out of the bucket and carefully drape it over your ghost form. Arrange the folds how you want them to look.
- Let It Cure: Leave the ghost to dry and harden for at least two days. Don’t move it!
- The Reveal: Once it is rock solid, you can carefully lift the concrete ghost off of the form. It’s ready for your garden!
15. Gilded Ceramic Ghost Congregation

A gathering of elegant ghosts creates a beautiful centerpiece. These figures are made of smooth, white ceramic with a glossy finish. Their shapes are simple and varied, from tall and slender to short and stout.
A thin, shiny gold line trims the bottom of each ghost, adding a touch of luxury. One special ghost even wears a tiny gold crown. This is a very chic and modern take on Halloween figures.
DIY Instructions
Materials You’ll Need:
- White oven-bake or air-dry clay
- A rolling pin and plastic knife
- Glossy white craft paint
- A gold leafing pen or gold metallic paint
- A small paintbrush
Step-by-Step Guide:
- Shape Your Ghosts: Take a piece of clay and roll and pinch it into a ghost shape. Make a flat bottom so it can stand up. Make a whole family of them in different sizes.
- Add Faces: Use the end of a paintbrush or a toothpick to poke two small holes for eyes.
- Dry or Bake: If using air-dry clay, let them dry for a day or two. If using oven-bake clay, have an adult help you bake them according to the package directions.
- Paint Them White: Once they are hard and cool, paint them all over with the glossy white paint. You might need two coats.
- Add the Gold: When the white paint is dry, carefully use your gold pen or a tiny brush with gold paint to draw a neat line around the bottom edge of each ghost.
- Display Your Ghosts: Arrange your new shiny ghost family on a tray or your mantel.
16. Secret Spirit Locket

This tiny treasure holds a delightful secret. Inside a vintage-style brass locket, a miniature ghost floats in a starry night sky. The background sparkles with dark glitter, creating a sense of depth and magic.
The little ghost itself is simple and sweet. This is a beautiful and unexpected piece that combines a love for jewelry with a touch of seasonal charm. It’s a subtle way to carry the Halloween spirit with you.
DIY Instructions
Materials You’ll Need:
- An empty locket
- White and black polymer clay
- Dark blue or black fine glitter
- Clear-drying craft glue
- A toothpick
Step-by-Step Guide:
- Create the Night Sky: Open the locket. Squeeze a small amount of glue into one side of the locket and spread it around. Sprinkle the glitter over the glue until it’s all covered. Tap out the extra glitter and let it dry.
- Make a Tiny Ghost: Take a very small piece of white polymer clay and roll it into a teardrop shape. Flatten it slightly.
- Give It Eyes: Roll two tiny specks of black clay and press them onto the ghost’s head for eyes.
- Bake Your Ghost: Have an adult help you bake the tiny ghost according to the clay package’s directions (it will only need a few minutes). Let it cool.
- Place the Ghost: Put a small dot of glue on the back of your cooled ghost and carefully place it inside the locket on top of the glittery background.
- Let it Set: Leave the locket open for a few hours to make sure the glue is completely dry before you close it.
17. Ghostly Glassware Decals

A simple way to haunt your happy hour. These clear glasses are decorated with tiny, friendly ghost decals. The little white ghosts are simple in shape, with minimalist black dot eyes, adding a touch of playful spirit to any beverage.
This is an incredibly easy and non-permanent way to make your bar cart or party table ready for Halloween. The ghosts seem to float on the surface of the wine and cocktail glasses.
DIY Instructions
Materials You’ll Need:
- Clean, dry glasses
- White removable window cling vinyl or a white chalk marker
Step-by-Step Guide:
- Choose Your Method: Decide if you want to use vinyl for a very clean look, or a chalk marker for a more hand-drawn feel.
- For Vinyl: Draw several small, simple ghost shapes on the paper side of the white vinyl. Cut them out carefully. Peel off the backing and stick them onto your glasses. Smooth out any bubbles.
- For Chalk Marker: Make sure the marker is well-shaken. Carefully draw your little ghost shapes directly onto the outside of the glasses. Let the marker ink dry completely before you touch it.
- Party Time: Fill your glasses and enjoy! The vinyl will peel off easily after the party, and the chalk marker will wash off with soap and water.
18. Cozy Felt Ghost Mobile

Soft, gentle ghosts float together in this lovely mobile. Made from a creamy off-white felt, these plush ghosts have a comforting, cushiony look. Each one is topped with a single natural wood bead, adding a simple, organic touch.
They hang at different levels from a wooden embroidery hoop, creating a sense of gentle movement. This is a sweet and calming decoration, a far cry from spooky, and brings a handmade warmth to a room.
DIY Instructions
Materials You’ll Need:
- Thick off-white or cream-colored craft felt
- A pencil and scissors
- Cotton balls or pillow stuffing
- A needle and thread (in a matching color)
- Small black beads for eyes
- Large wooden beads
- An embroidery hoop
- String
Step-by-Step Guide:
- Cut the Shapes: Fold a piece of felt in half. Draw half of a bell-like ghost shape along the fold. Cut it out, so when you unfold it, you have a symmetrical ghost shape. You will need two of these shapes for each ghost.
- Start Sewing: Place two ghost shapes together. Start sewing around the edge with small stitches, leaving the top open.
- Add the Eyes: Before you sew all the way around, sew two small black beads onto the front piece for eyes.
- Stuff Your Ghost: Gently push a few cotton balls or a bit of stuffing inside your ghost through the top opening to make it puffy.
- Finish Sewing: Sew the rest of the ghost closed.
- Add the Hanger: Thread a long piece of string through your needle. Push the needle up through the bottom center of the ghost and out the very top. Thread on a large wooden bead.
- Assemble the Mobile: Make several ghosts. Tie the top of their strings to the embroidery hoop, making them hang at different lengths.
- Hang Your Mobile: Tie three or four strings to the hoop to hang the entire mobile.
19. Watercolor Ghost Gallery Wall

This collection of framed prints turns ghost art into sophisticated decor. Each piece features a ghost painted with black watercolor, creating a beautiful, translucent effect. The paint bleeds and splatters in different ways, making every ghost unique.
The simple black, white, and natural wood frames complement the art. Grouping them together creates an impressive gallery wall that is both artistic and seasonally appropriate.
DIY Instructions
Materials You’ll Need:
- Thick watercolor paper
- Black watercolor paint
- A paintbrush and a cup of water
- Picture frames in various sizes
Step-by-Step Guide:
- Prepare Your Paper: Cut your watercolor paper to fit inside your frames.
- Wet the Paper: Use your paintbrush to paint a ghost shape on the paper using only clean water.
- Add the Paint: While the paper is still wet, dip your brush in the black watercolor paint. Gently touch the brush to the wet area on the paper.
- Watch the Magic: The black paint will spread out and bleed through the water, creating a cool, ghostly effect. You can add more paint or more water to change the look.
- Let It Dry: Set your paintings aside to dry completely. This is very important.
- Add Eyes: Once dry, you can use a more concentrated bit of black paint or a black marker to add two simple dots for eyes.
- Frame Your Art: Place your finished ghost paintings into their frames.
- Create Your Gallery: Hang your new ghost art on the wall in a group.
20. Glamorous Gold-Trimmed Ghost

This is a ghost that loves glamour. A large, flowing sheet of cream-colored fabric creates the body, but the edges are what make it special—they are trimmed in brilliant, shiny gold foil.
Splashes of gold paint dust the ghost’s body, and large black ovals serve as eyes. Hanging from a rustic wooden beam, this decoration is a fantastic mix of rustic and chic. It’s a true statement piece.
DIY Instructions
Materials You’ll Need:
- A large piece of off-white or cream fabric (at least 2 yards)
- Wide gold foil ribbon or gold lamé fabric
- A hot glue gun or fabric glue
- A large styrofoam ball or an inflated balloon
- Black felt
- Gold craft paint and a stiff paintbrush
- Fishing line
Step-by-Step Guide:
- Add the Gold Trim: Lay your cream fabric flat. Carefully glue the gold ribbon or a strip of gold fabric all the way around the edges. Let it dry.
- Create the Head Form: Use fishing line to hang your styrofoam ball or balloon from the ceiling or a doorway where you have room to work.
- Drape Your Ghost: Drape the gold-trimmed fabric over the ball or balloon, making sure the gold edges hang down nicely.
- Add the Eyes: Cut two large oval shapes from the black felt and glue them onto the ghost’s head.
- Splatter the Paint: Dip the tip of your stiff paintbrush in the gold paint. Flick your wrist to splatter the paint onto the ghost’s body. Do this as much or as little as you like.
- Let It Dry: Allow the paint and glue to dry completely.
- Hang Your Masterpiece: If you used a balloon, you can now pop it. Use fishing line to hang your glamorous ghost from a curtain rod, a decorative branch, or a hook on the wall.
21. Playful Clay Ghost Trinkets

This setup shows how a simple ghost shape can be used in many fun ways. Tiny white and black clay ghosts are scattered across decorative trays and coasters. A rolling pin embossed with the ghost pattern suggests these could be used for baking, too.
The modern coasters and trays in white, black, and pale pink provide a stylish backdrop. This is a versatile and playful idea for adding small, ghostly touches all around your home.
DIY Instructions
Materials You’ll Need:
- White, black, and pink polymer clay
- A small ghost-shaped cookie cutter
- A small rolling pin
- An oven (and an adult to help)
Step-by-Step Guide:
- Condition the Clay: Knead a piece of clay in your hands until it is soft and easy to roll.
- Roll It Out: On a clean, flat surface, roll the clay out evenly until it’s about a quarter-inch thick.
- Cut Out Ghosts: Press your ghost cookie cutter firmly into the clay. Make as many ghosts as you can.
- Add Eyes: For the white and pink ghosts, take tiny specks of black clay and roll them into balls. Gently press them onto the ghosts for eyes. Do the same for the black ghosts using white clay.
- Bake Them: Place all your little clay ghosts on a baking sheet. Ask an adult to help you bake them according to the directions on the clay package.
- Let Them Cool: Once baked, let them cool down completely.
- Decorate: Now you can use your tiny ghosts! Scatter them on a decorative tray, glue them to magnets, or use them as game pieces.
22. Industrial Chain Ghost Sculpture

This is a ghost with a tough, edgy style. The entire sculpture is made of draped chains in black, silver, and gold. The chains are hung from a wire frame, creating a ghost-like silhouette that is both spooky and artistic.
The mix of metal finishes adds texture and an industrial feel. This unique piece hangs from the ceiling, making it a dramatic and unexpected focal point in a modern room.
DIY Instructions
Materials You’ll Need:
- A wire hanger
- Pliers
- Lots of craft chains in different colors (black, silver, gold) and sizes
- A small styrofoam ball
Step-by-Step Guide:
- Shape the Frame: Use pliers to bend the wire hanger into the shape of a ghost’s head and shoulders. You can wrap the wire around the styrofoam ball to get a good head shape. Leave the hook at the top for hanging.
- Start Draping: Take a long piece of chain. Hook one end onto one “shoulder” of your wire frame. Drape it across the “head” and hook the other end to the other shoulder.
- Keep Adding Chains: Continue draping chains over the frame. Use different colors and let them hang down at different lengths. You want to build up layers to create the ghost’s body.
- Fill It In: Make sure you cover most of the wire frame. The more chains you use, the more solid your ghost will look.
- Create a Face (Optional): You can use a couple of short, circular chains to create the look of eyes on the front.
- Hang Your Sculpture: Use the hook from the hanger to display your industrial ghost in a corner or from the ceiling.
23. Cozy Sweater Ghosts

These adorable figures look like they are ready for a chilly autumn day. Made from old knit sweaters, they have a wonderfully soft and textured appearance. The cable-knit pattern on the fabric adds a cozy, handmade charm.
Their simple, round heads and stitched-on black eyes give them a friendly, doll-like quality. A simple twine bow at the neck finishes the look. These are perfect for a rustic or farmhouse-style Halloween display.
DIY Instructions
Materials You’ll Need:
- An old knit sweater (cream, grey, or beige work well)
- Scissors
- A needle and thread
- Pillow stuffing or cotton balls
- Black embroidery floss
- Twine
Step-by-Step Guide:
- Cut the Sweater: Cut a rectangle from the body of the sweater. Then, cut a long, thinner rectangle from one of the sleeves for the arms.
- Make the Body: Fold the larger rectangle in half. Sew up the side and the top, but leave the bottom open. This creates a little bag.
- Stuff the Head: Turn the bag right-side out. Stuff the top part firmly with stuffing to create a round head.
- Form the Neck: Tie a piece of twine tightly under the stuffed head to form the neck.
- Stuff the Body: Fill the rest of the body with stuffing, but not as tightly as the head. Sew the bottom closed.
- Make the Arms: Fold the long sleeve piece in half lengthwise and sew it into a tube. Stuff it lightly.
- Attach the Arms: Wrap the arm tube around the back of the ghost, just under the neck, and stitch it in place.
- Add the Face: Use the black embroidery floss to stitch two simple eyes onto the head.
- Finishing Touch: Tie a small bow with the twine around the ghost’s neck.
24. Botanical Ghost Suncatcher

This ghost is a celebration of nature. The classic ghost shape is made from clear resin, and inside, a beautiful arrangement of pressed flowers and ferns is preserved forever. Pansies, baby’s breath, and other colorful flowers create a stunning stained-glass effect.
Framed by a geometric brass hanger, it’s designed to be hung in a window. When the sun shines through, the ghost comes alive with color. This is a truly unique and artistic piece.
DIY Instructions
Materials You’ll Need:
- A ghost-shaped silicone mold
- Clear casting resin and hardener
- Pressed and dried flowers
- A disposable mixing cup and stir stick
- Gloves and safety glasses
- A drill with a tiny bit (for an adult to use)
Step-by-Step Guide:
- Arrange Your Flowers: Place your pressed flowers face-down inside the ghost mold. Arrange them in a pretty pattern.
- Mix the Resin: Put on your gloves and glasses. In your disposable cup, carefully measure and mix the resin and hardener according to the package directions. Stir slowly to avoid creating too many bubbles.
- Pour the Resin: Slowly and carefully pour the mixed resin into the mold over the flowers. Pour just enough to cover them.
- Let It Cure: Let the resin sit for about 20-30 minutes. You can use a toothpick to pop any bubbles that rise to the surface. Let it cure for at least 24 hours, or as long as the directions say.
- De-mold: Once it’s fully hardened, you can gently pop your resin ghost out of the silicone mold.
- Add a Hanger: Ask an adult to help you drill a small hole near the top of the ghost. Thread a string or a pretty chain through the hole to hang it in your window.
25. Grecian Goddess Ghost

This is Halloween decor at its most elegant. A wire mannequin is draped in flowing white fabric, creating the illusion of a ghostly figure in a beautiful Grecian gown. The fabric is artfully pinned and folded to create a sense of movement and grace.
A crown of dried baby’s breath and a string of pearls add to the ethereal, goddess-like appearance. This is a sophisticated and artistic installation that transforms a simple room into a haunted ballroom.
DIY Instructions
Materials You’ll Need:
- A dress form or wire mannequin
- Several yards of flowing white fabric (like chiffon or jersey)
- Safety pins
- A faux pearl necklace
- A simple wreath or circlet of faux flowers
Step-by-Step Guide:
- Cover the Head: If your mannequin has a distinct head, wrap a piece of fabric smoothly around it to hide the features.
- Drape the Body: Start draping the fabric over one shoulder of the mannequin. Let it hang down in the front and back.
- Create the Gown: Use your safety pins to pleat and gather the fabric around the mannequin’s form. Think about how a real dress would hang. You can wrap it around the waist or let it flow freely. There’s no wrong way to do it!
- Add a Sleeve: Let a long piece of fabric hang down from one of the arms to create a dramatic, flowing sleeve.
- Accessorize: Gently place the flower crown on the mannequin’s head. Drape the pearl necklace from the shoulder across the chest.
- Final Touches: Step back and look at your creation. Adjust the drapes and folds until you are happy with how your ghostly goddess looks.
26. Ghostly Resin Coasters

These coasters capture tiny spirits under glass. Each one is made from clear resin, with a ghostly figure seemingly trapped inside. In one, the ghost is surrounded by a swirl of white and gold, like a magical mist.
These are functional pieces of art that add a subtle, spooky touch to your coffee table. The clear resin gives them a modern and clean look.
DIY Instructions
Materials You’ll Need:
- Coaster-shaped silicone molds (round or hexagon)
- Clear casting resin and hardener
- White alcohol ink
- Gold glitter or mica powder
- Printed ghost images on clear acetate or transparency film
- A disposable mixing cup and stir stick
- Gloves and safety glasses
Step-by-Step Guide:
- Mix Your Resin: Put on your gloves and glasses. Mix a small batch of resin according to the package directions.
- Pour the First Layer: Pour a thin layer of clear resin into the bottom of your molds. Let this cure for a few hours until it’s tacky, but not fully hard.
- Add the Ghost: Gently place your clear ghost image onto the tacky layer of resin.
- Mix the Second Batch: Mix another, larger batch of resin. This time, add a few drops of white alcohol ink and a pinch of gold glitter. Stir it in.
- Pour the Top Layer: Pour the white and gold resin mixture over the ghost image, filling the mold to the top.
- Let It Cure: Let the coasters cure completely, which usually takes 24-48 hours.
- De-mold: Once they are totally hard, pop your new coasters out of the molds.
27. Retro Ghost Marquee Sign

Light up your Halloween party with this fantastic ghost sign. A large, friendly ghost shape is outlined with a string of glowing marquee bulbs. The classic cartoon ghost has a fun, retro vibe that feels like an old movie theater sign.
This is a bold and cheerful piece of decor. It would be a great centerpiece for a snack table or a photo booth backdrop.
DIY Instructions
Materials You’ll Need:
- A large piece of thick foam board or thin plywood
- A pencil
- A craft knife or jigsaw (for an adult to use)
- White paint
- A string of round, globe-style party lights (LED is best)
- A drill
Step-by-Step Guide:
- Draw Your Ghost: On your foam board or wood, draw a large, simple ghost shape.
- Cut It Out: Ask an adult to help you cut out the ghost shape using the craft knife or jigsaw.
- Paint It: Paint the entire ghost shape white. You may need a couple of coats. Let it dry completely.
- Mark the Light Spots: Place your string of lights on top of the ghost and arrange them where you want them to go. Use a pencil to mark a spot for each bulb.
- Drill the Holes: Have an adult drill a hole at each spot you marked. The hole should be just big enough for the base of the light bulb to push through from the back.
- Insert the Lights: From the back of the sign, push one light bulb through each hole so the round globe is sticking out the front.
- Light It Up: Plug in your sign and watch your friendly ghost glow!
28. Personalized Ghost Napkin Rings

Set a chic and spooky table with these personalized napkin rings. Each ring features a small, white clay ghost that seems to be flying around it. The ghosts are simple and modern in their design.
A tiny initial is stamped onto each ghost’s tail, making them a thoughtful place card for a Halloween dinner party. The contrast between the white ghost and the dark napkin is striking.
DIY Instructions
Materials You’ll Need:
- White oven-bake polymer clay
- A small ghost-shaped cookie cutter
- Simple wooden or metal napkin rings
- Strong craft glue (like E6000)
- A set of small letter stamps
Step-by-Step Guide:
- Roll the Clay: Knead and roll out your white clay until it’s about a quarter-inch thick.
- Cut Out the Ghosts: Use your cookie cutter to cut out one ghost for each napkin ring.
- Personalize Them: Gently press a letter stamp into the tail of each ghost to add an initial for each of your guests.
- Add Eyes: Use a toothpick to poke two small holes for eyes.
- Bake the Ghosts: Place your clay ghosts on a baking sheet and have an adult bake them according to the package directions. Let them cool completely.
- Glue Them On: Put a line of strong glue on the back of a cooled ghost. Press it firmly onto a napkin ring and hold it for a minute.
- Let Them Dry: Let the glue dry completely for several hours before you use them.
29. Literary Ghost from Folded Book Pages

This clever ghost is born from the pages of a book. The pages of an old hardcover book have been carefully folded to create the three-dimensional, cone-like shape of a ghost’s body.
The text on the folded pages adds a wonderful texture and pattern to the sculpture. Two simple black paper circles for eyes complete the look. This is a brilliant piece for a library, office, or any book lover’s home.
DIY Instructions
Materials You’ll Need:
- An old paperback book you don’t mind using (at least 150 pages)
- A ruler
- A pencil
- Black paper
- Glue
Step-by-Step Guide:
- Mark Your Guide: Open the book to the first page. At the top corner of the page, measure two inches down from the top and make a small pencil mark.
- The First Fold: Take the top right corner of the page and fold it down so the top edge of the page lines up with the inside crease of the book (the gutter).
- The Second Fold: Now you will have a folded triangle shape. Fold that shape over again towards the gutter, making a sharp crease.
- The Third Fold: You’ll have a small triangle of paper sticking out at the bottom. Fold that little piece up and tuck it inside the other folds.
- Repeat, Repeat, Repeat: Go to the next page and do the exact same three folds. Continue doing this for every single page in the book.
- Stand It Up: Once all the pages are folded, you can stand the book up and fan out the pages to create your ghost shape.
- Add Eyes: Cut two circles out of black paper and glue them on for eyes.
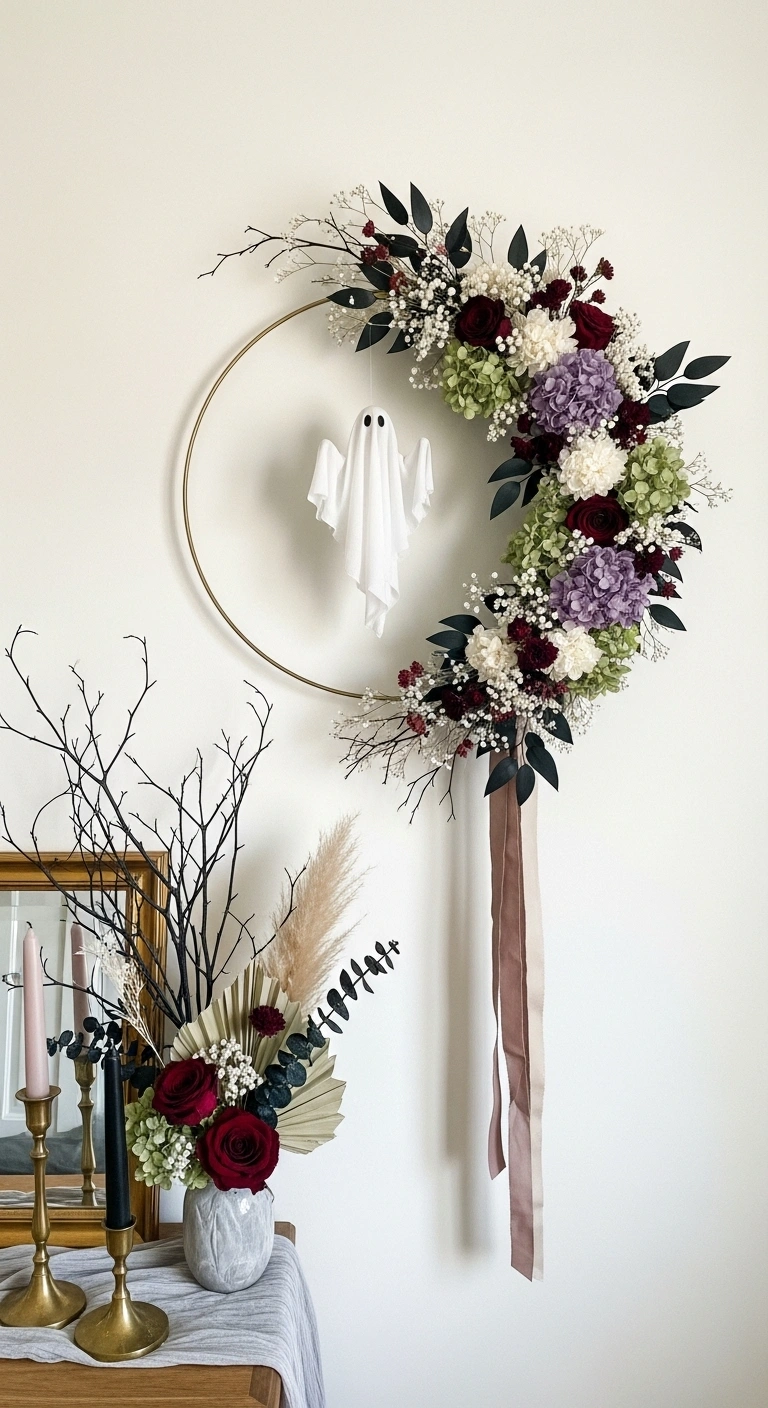
30. Floral Ghost Hoop Wreath

This wreath is a beautiful blend of spooky and sweet. A simple gold hoop is adorned with a stunning arrangement of flowers in deep reds, purples, and whites. Greenery and baby’s breath add texture and fullness.
Floating in the center of the hoop is a simple, white cloth ghost. A long, dusty rose ribbon trails down from the bottom. This is a very romantic and elegant take on a Halloween wreath.
DIY Instructions
Materials You’ll Need:
- A metal craft hoop
- Bunches of faux flowers and greenery (in autumn colors)
- Floral wire
- A small piece of white cloth
- A cotton ball
- Black thread
- Clear fishing line
- A long, pretty ribbon
Step-by-Step Guide:
- Make a Mini Ghost: Place the cotton ball in the center of the white cloth. Gather the cloth around the cotton ball to form a head and tie it off with the black thread. Use the thread to stitch on two simple eyes.
- Hang the Ghost: Tie a piece of fishing line to the top of the ghost’s head. Tie the other end to the top of the metal hoop so the ghost hangs in the middle.
- Start the Flowers: Take a small bunch of your faux flowers and greenery. Use the floral wire to wrap the stems tightly to the metal hoop.
- Build Your Arrangement: Keep adding more bunches of flowers, overlapping the stems of the previous bunch. Work your way around one side of the hoop.
- Fill It In: Add smaller flowers and baby’s breath to fill in any gaps.
- Add the Ribbon: Tie your long, pretty ribbon to the bottom of the hoop and let it hang down.
- Display Your Wreath: Hang your beautiful floral ghost wreath on a door or a wall.
31. Interactive Sequin Ghost Pillow

This pillow adds a touch of interactive fun to your sofa. A friendly ghost is revealed on a field of reversible sequins. One side is a clean, sparkling white, while the other is a deep, shimmering black.
You can “draw” on the pillow with your finger, changing the ghost’s expression or making it disappear and reappear. It’s a playful and modern piece that invites you to touch and transform it.
DIY Instructions
Materials You’ll Need:
- A blank, two-color reversible sequin pillowcase (like black and white)
- A pencil and paper
- Scissors
- Fabric paint in a contrasting color OR iron-on vinyl
- If using paint: a small paintbrush
- If using vinyl: a cutting machine (like a Cricut) and an iron
Step-by-Step Guide:
- Create Your Stencil: Draw a simple ghost shape on your paper and cut it out to create a stencil.
- Prepare the Pillow: Make sure all the sequins are flipped to one color (for example, all black). Place the pillowcase on a flat surface.
- For the Paint Method: Place your stencil on the pillow. Use your small brush to carefully dab fabric paint onto the sequins inside the stencil. Apply a thin, even coat. Let it dry completely, then carefully remove the stencil.
- For the Vinyl Method: Create your ghost design in your cutting machine’s software. Cut the shape from the iron-on vinyl. Following the vinyl’s instructions, carefully iron the ghost shape onto the sequins.
- Let It Set: Allow the paint or vinyl to fully cure according to the product directions before you start playing with your new interactive pillow.
32. Origami Ghost Garland

This delicate garland brings a touch of geometric charm. A flock of tiny ghosts, folded from black and white paper, are strung together on a thin line. Their crisp folds and simple forms give them a clean, modern look.
The alternating colors create a pleasing pattern. This is a lightweight and airy decoration, great for draping across a mirror, a window, or a bookshelf.
DIY Instructions
Materials You’ll Need:
- Square sheets of thin paper in black and white (origami paper is best)
- A needle and thin thread or fishing line
- A black marker
Step-by-Step Guide:
- Start with a Square: Place your square paper on the table. Fold it in half diagonally to make a triangle, then unfold it. Fold it in half diagonally the other way, and unfold. You should have an “X” crease.
- Fold to the Center: Fold the top point down to meet the center of the “X”.
- Fold the Sides: Fold the left and right sides in so their edges meet at the center line. It will look like a kite.
- Create the Arms: Fold the two small side flaps outward to create the ghost’s arms.
- Flip and Fold: Flip the whole thing over. Fold the bottom point up just a little bit. Then fold the top point down to create the ghost’s head.
- Add a Face: Use your black marker to draw two simple dots for eyes.
- String Them Up: Make a bunch of black and white ghosts. Use a needle to carefully poke the thread through the top of each ghost’s head and string them into a garland.
33. Ghostly Bottle Topper Centerpieces

These charming ghosts appear to float above a stylish dinner table. Their forms are simple: a round head draped with semi-sheer, grid-patterned fabric. They stand at attention on long wooden dowels, placed inside elegant clear glass bottles.
This creates a beautiful, multi-level centerpiece that is airy and doesn’t block the view across the table. It is a simple yet very effective way to create a sophisticated tablescape.
DIY Instructions
Materials You’ll Need:
- Small styrofoam balls
- Thin wooden dowels
- Square pieces of white, lightweight fabric (like cheesecloth or gauze)
- Black felt or paper
- A hot glue gun or craft glue
- Empty, clean glass bottles
Step-by-Step Guide:
- Make the Ghost Form: Carefully push one end of a wooden dowel into a styrofoam ball. This will be the ghost’s head on a stick.
- Drape the Fabric: Place a square of fabric over the top of the styrofoam ball, making sure it hangs down evenly on all sides.
- Secure the Fabric: You can put a little bit of glue on top of the ball before draping to hold the fabric in place.
- Cut the Eyes: Cut two small circles or ovals from the black felt or paper.
- Add the Face: Glue the eyes onto the front of the ghost’s head.
- Assemble Your Centerpiece: Make a few more ghosts. Place the end of each dowel into an empty glass bottle.
- Arrange Your Ghosts: Group the bottles in the center of your table. You can use dowels of different lengths to create a more dynamic look.
34. “Beware” Mirror Ghost

A spooky specter appears on the surface of this elegant mirror. The ghost’s form is semi-transparent, created with a specialty spray paint that gives it a misty, ethereal quality. The word “BEWARE” is stenciled across its middle, giving a clear warning.
This is a clever and surprising decoration that plays with reflections and light. It’s a great way to add a touch of spookiness to a hallway or entryway.
DIY Instructions
Materials You’ll Need:
- A mirror
- A large piece of contact paper or stencil vinyl
- A pencil and scissors
- Krylon Looking Glass spray paint (or a similar mirror-effect spray)
- Letter stencils (optional)
Step-by-Step Guide:
- Create the Stencil: On the paper side of your contact paper, draw a large ghost shape. This will be your stencil. Carefully cut it out, leaving the outline intact.
- Clean the Mirror: Make sure your mirror is perfectly clean and dry.
- Apply the Stencil: Peel the backing off your contact paper stencil and press it firmly onto the mirror where you want your ghost to be. Make sure all the edges are sealed.
- Spray the Ghost: In a well-ventilated area (preferably outside), shake the can of looking glass spray paint very well. Apply a few light, even coats over the ghost-shaped hole in your stencil.
- Add a Word (Optional): While the paint is still wet, you can place letter stencils on top of the painted area and spray another light coat to add a word like “BEWARE” or “BOO”.
- The Reveal: Let the paint dry for about 10-15 minutes. Carefully peel off the contact paper stencil. Your ghostly image will remain on the mirror.
35. Layered Tulle Floating Ghosts

A group of ethereal ghosts floats down from the ceiling. Their bodies are made from layers of white tulle and tattered strips of fabric, giving them a wonderful sense of volume and texture. One ghost in the center has a string of fairy lights inside, making it glow from within.
These are beautiful and dramatic decorations. Hanging them at different heights from a rustic branch creates a stunning visual effect that feels both spooky and magical.
DIY Instructions
Materials You’ll Need:
- Inflated white balloons
- Lots of white tulle fabric
- Strips of old white cotton fabric or cheesecloth
- Liquid fabric stiffener
- A large bowl
- Fishing line
- Black felt and glue
- Optional: Battery-powered fairy lights
Step-by-Step Guide:
- Set Up Your Form: Hang your inflated balloons from the ceiling with fishing line, with the tied end facing up.
- Prepare the Fabric: Cut your tulle and fabric into various strips and squares.
- Soak and Drape: Pour fabric stiffener into the bowl. Dip a piece of fabric in, squeeze out the extra, and drape it over a balloon.
- Build Up Layers: Continue dipping and draping pieces of tulle and fabric strips over the balloon. The more layers you add, the more solid your ghost will be. Let the strips hang down to create a tattered look.
- Add Lights (Optional): Before you add the final layers, wrap a string of fairy lights around the middle of the ghost. Then cover them with more fabric.
- Let It Dry: Let the ghosts hang and dry completely for at least 24 hours. They should be stiff.
- Pop the Balloon: Once dry, pop the balloon inside and remove it. The fabric will hold its shape.
- Add a Face: Glue two black felt ovals onto the head for eyes. Re-hang your finished ghosts with fishing line.
36. Ghostly Cheese Board Markers

These little ghosts are a charming and useful addition to any Halloween party platter. Cut from thin, white material, they are designed to be used as labels for a cheese or charcuterie board. The chalkboard-like surface allows you to write on them with a special pen.
This is a fun way to combine festive decor with practical party hosting. The cute, flying ghost shapes are much more interesting than standard place cards.
DIY Instructions
Materials You’ll Need:
- White polymer clay
- A small ghost-shaped cookie cutter
- A rolling pin
- White chalkboard paint
- A small paintbrush
- An oven (and an adult’s help)
- A chalkboard marker
Step-by-Step Guide:
- Roll the Clay: Knead and roll out the white clay until it’s quite thin, about 1/8 of an inch.
- Cut the Shapes: Use your cookie cutter to cut out as many ghost shapes as you need. For the pick, you can either cut a pointed tail on the ghost or make a separate pointy stake to attach later.
- Bake Them: Place the clay ghosts on a baking sheet and have an adult bake them according to the package directions. Let them cool completely.
- Paint the Surface: Carefully paint the front surface of each ghost with the chalkboard paint. Let it dry, then apply a second coat.
- Condition the Surface: Once the paint is fully dry, take a piece of chalk and rub it all over the painted surface, then wipe it clean. This prepares it for writing.
- Label Your Cheeses: Use your chalkboard marker to write the names of your cheeses or other foods on your new ghostly markers.
37. Captured Spirits Bell Jar Decor

These elegant decorations look like tiny spirits have been collected for observation. Small, white clay ghosts are suspended inside glass bell jars, or cloches. Each display is a miniature world, with the ghost floating above a base of moss, crystals, or black sand.
This is a sophisticated and slightly moody way to decorate. The glass jars create a feeling of a Victorian curiosity cabinet, making the simple ghosts feel precious and mysterious.
DIY Instructions
Materials You’ll Need:
- Small glass bell jars with bases
- White polymer clay
- Clear fishing line
- A hot glue gun or strong craft glue
- A needle
- Decorative elements for the base (like moss, small rocks, crystals, or sand)
Step-by-Step Guide:
- Make a Tiny Ghost: Roll a small piece of white polymer clay into a simple ghost shape. Use a needle to poke two small eye holes.
- Create a Hanger: Before baking, use the needle to poke a hole all the way through the top of the ghost’s head, from side to side.
- Bake and Cool: Have an adult help you bake the ghost according to the clay’s instructions. Let it cool down.
- Thread the Hanger: Cut a piece of fishing line. Thread it through the hole in the ghost’s head and tie it in a small, tight knot to make a loop.
- Suspend the Ghost: Put a small dot of hot glue on the very top, inside center of the glass jar. Press the fishing line loop into the glue and hold until it sets. The ghost should now be hanging inside.
- Decorate the Base: Arrange your moss, sand, or crystals on the wooden or metal base of the bell jar.
- Enclose Your Spirit: Carefully place the glass cloche over the base, making sure the ghost hangs freely.
38. Glowing Ghost Yard Stakes

A family of friendly ghosts lights up this cozy backyard scene. The ghosts are cut from wood and have a simple, classic silhouette. They are painted with a special paint that gives them a soft, greenish glow, making them visible even after the sun goes down.
Mounted on simple wooden stakes, they can be arranged in a group to welcome guests along a path or around a fire pit. They provide a gentle, welcoming light, not a spooky fright.
DIY Instructions
Materials You’ll Need:
- A thin sheet of plywood
- A jigsaw (for an adult to use)
- Sandpaper
- White or off-white paint
- Glow-in-the-dark paint
- Black craft paint
- Wooden garden stakes
- A drill and wood screws or strong wood glue
Step-by-Step Guide:
- Draw Your Ghosts: On the plywood, draw a few simple ghost shapes in different sizes.
- Cut Them Out: Ask an adult to carefully cut out the ghost shapes using a jigsaw.
- Sand the Edges: Use sandpaper to smooth down any rough edges on your wooden ghosts.
- Paint a Base Coat: Paint the front and back of your ghosts with the white paint. Let it dry.
- Make Them Glow: Paint a few coats of the glow-in-the-dark paint over the white paint. The more coats you use, the brighter they will glow. Let it dry completely.
- Add Faces: Use a small brush and the black paint to add simple oval eyes and mouths to your ghosts.
- Attach the Stakes: Have an adult help you attach a wooden stake to the back of each ghost. You can do this with a drill and screws or by using strong wood glue.
- Plant Your Ghosts: Push the stakes into the ground in your yard or garden to create a friendly, glowing ghost family.
Decorating for Halloween is a chance to be creative and have fun. As these 38 ideas show, you don’t have to choose between festive and fashionable. By using a little imagination and some basic craft supplies, you can fill your home with a spirit of chic celebration.
Whether you prefer a simple, modern look or something more rustic and cozy, there is a handmade ghost waiting to haunt your home in the most stylish way possible. So pick a project, put on some autumn tunes, and enjoy the process of making your space uniquely yours this season.
Key Takeaways
- Personalize Your Decor: Making your own decorations ensures your home has a unique and personal touch that you can’t buy in a store.
- Style is Not Sacrificed: Halloween decor can be elegant, modern, and beautiful. You can match your seasonal items to your home’s existing aesthetic.
- Simple Can Be Stunning: Many of these projects use inexpensive and common craft materials to create high-impact, beautiful decorations.
- Crafting for Everyone: With a range from simple paper folding to more involved projects with clay or resin, there is a DIY idea suitable for any confidence level.