Living in a home with small closets can feel like a constant battle against clutter. You might find yourself shoving clothes into corners or searching for shoes under the bed. A lack of space often makes mornings stressful and messy.

You do not need a massive renovation to fix your storage problems. Many creative methods allow you to utilize every inch of your wardrobe. These simple changes can turn a cramped area into a tidy sanctuary for your belongings.
We have gathered a list of forty two ways to expand your storage space using basic tools. These projects are simple enough for anyone to try at home. Your tiny closet will soon feel much larger than it actually is.
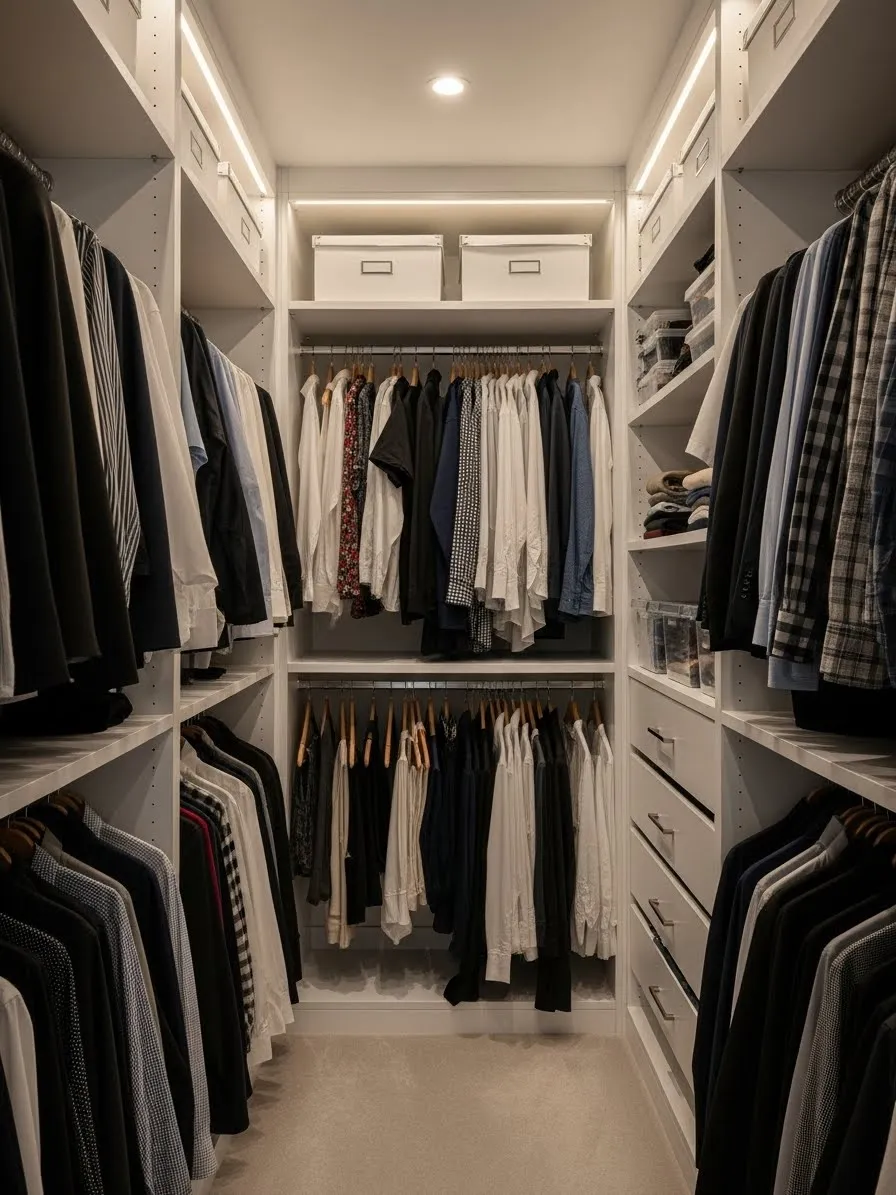
1 Adjustable Double Hanging Rod
Maximize your vertical space by installing a second rail below your existing one. This simple addition instantly creates room for twice as many shirts or jackets. You can keep your shorter items like blouses and folded pants in this middle section while leaving floor space for bins.
Small closets often feel cramped because we leave the bottom half empty. Adding a secondary rod makes use of that wasted area. It keeps your clothes organized and prevents them from wrinkling in a crowded space. Your wardrobe will look much more tidy.
Many homeowners struggle with limited square footage in their bedrooms. A double hanging solution is a brilliant way to fix this issue without a full renovation. It allows you to categorize your outfits by season or style efficiently. You will find that getting ready in the morning becomes much faster when everything has a specific spot.
Material Required List
- Metal closet rod
- Two wall brackets
- Center support hook
- Screws and wall anchors
- Plastic end caps
Equipment Required List
- Power drill
- Measuring tape
- Level tool
- Pencil
- Hammer
DIY Instruction Step By Step
- Measure the height of your longest shirts hanging on the top rod to see where the second rod should go without touching the floor.
- Mark the wall on both sides with a pencil at the specific height you want the new rail to sit.
- Use a level tool to make sure your pencil marks are straight across from each other so the rod does not slant.
- Hold the wall brackets up to your marks and use the pencil to dot the exact spots for the screw holes.
- Drill small pilot holes into the wall where you made your dots using a drill bit slightly smaller than your anchors.
- Tap the plastic wall anchors into the holes using a hammer until they are flush with the wall surface.
- Screw the brackets firmly into the anchors using your power drill and the provided screws.
- Attach the center support hook to the top rod or the ceiling if your new rod is very long to prevent it from sagging.
- Slide the metal rod into the brackets and secure it by tightening any small set screws if your kit includes them.
- Hang your clothes on the new lower level and enjoy the extra room.
2 Glowing Shoe Shelves
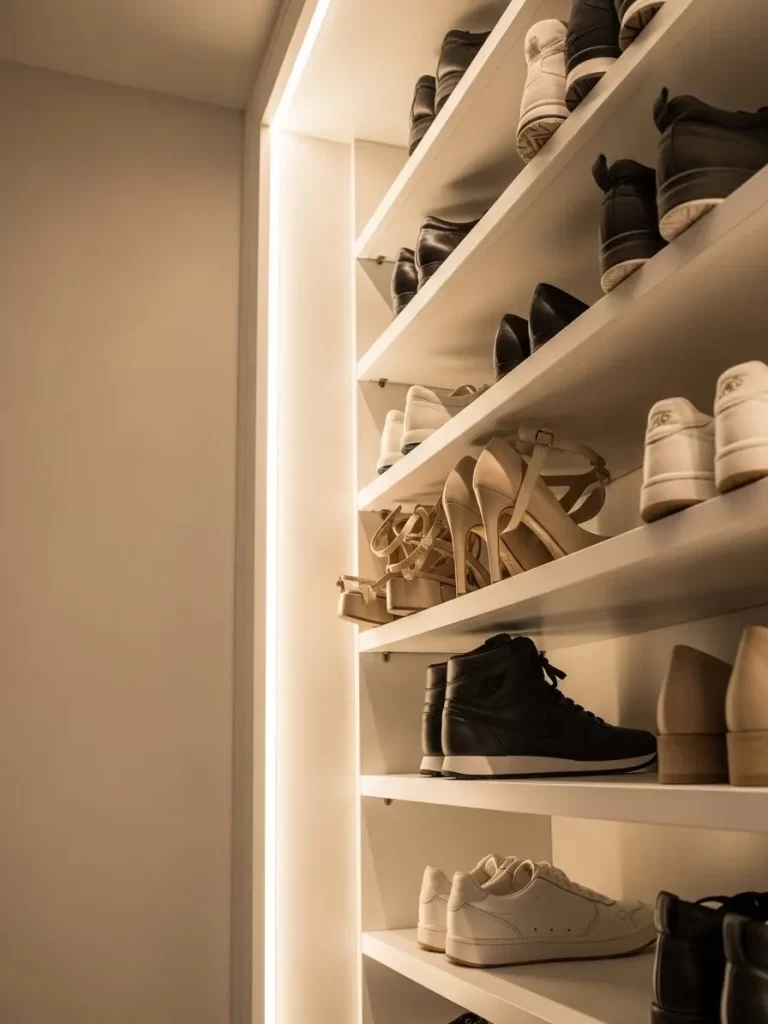
Illuminate your footwear collection with simple LED light strips. This setup turns a dark closet corner into a high end display while making it easier to find your favorite sneakers. You will no longer struggle to distinguish black shoes from navy ones in the shadows.
The soft glow adds a clean look to your shelving unit. It also helps you stay organized because you will want to show off your tidy arrangement. This project works well for anyone who owns a lot of heels or boots.
Material Required List
- Adhesive LED light strips
- Power adapter
- Extension cord
- Clear plastic clips
- Alcohol wipes
Equipment Required List
- Scissors
- Measuring tape
- Ladder
DIY Instruction Step By Step
- Clean the underside of each shelf with alcohol wipes to remove dust so the lights stick well.
- Measure the length of the shelf edge where you want the light to shine.
- Cut the LED strip at the designated cut marks provided by the manufacturer.
- Peel the backing off the adhesive strip slowly as you press it against the shelf.
- Apply firm pressure along the entire length of the strip to ensure it stays in place.
- Connect the strip to the power adapter and plug it into the nearest outlet.
- Use clear plastic clips to hide the power cord along the side of the closet wall.
- Turn on the lights and check if the placement provides even coverage for all your shoes.
3 Rolled Clothing PVC Tubes

Tidy up your messy drawers by using circular dividers for smaller garments. This method keeps your rolled leggings, scarves, or t shirts visible and easy to grab. You can say goodbye to digging through a mountain of fabric every morning.
This system creates a structured grid that prevents items from unrolling or getting lost. It maximizes every inch of your drawer or shelf space. Your clothes will stay wrinkle free and look like they belong in a boutique.
Material Required List
- PVC pipes or sturdy cardboard tubes
- Sandpaper
- Non toxic paint
- Wood glue
Equipment Required List
- Hand saw
- Measuring tape
- Pencil
- Paint brush
DIY Instruction Step By Step
- Measure the depth of your closet drawer or shelf from front to back.
- Mark the PVC pipe with a pencil using those measurements so every tube is the same length.
- Cut the pipe into several sections with your hand saw carefully.
- Rub the edges of the cut tubes with sandpaper to make them smooth so they do not snag your clothes.
- Wipe the dust off the tubes and paint them a color that matches your closet.
- Let the paint dry completely for a few hours before moving them.
- Arrange the tubes inside your drawer in a tight grid pattern.
- Apply a small amount of glue between the tubes if you want them to stay permanently connected.
- Roll your clothes tightly and slide one item into each tube.
4 Accessory Pegboard Station
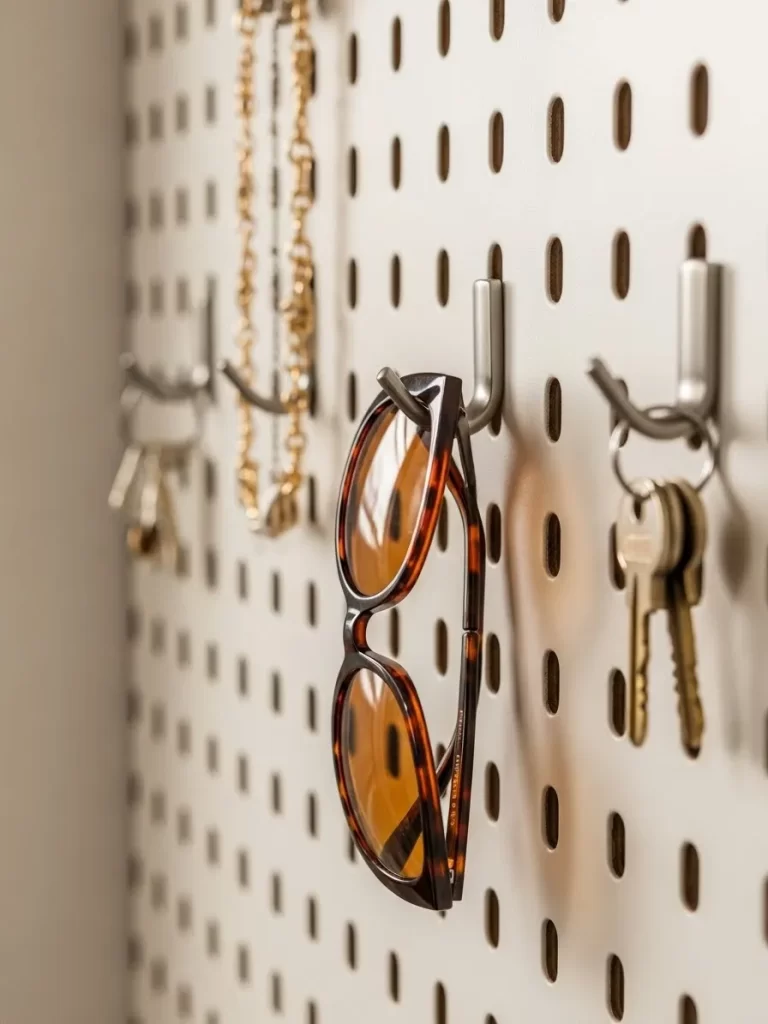
Transform a bare wall into a functional storage station for your daily accessories. A pegboard allows you to hang sunglasses, keys, and jewelry in plain sight. This solution clears up clutter from your dresser tops and keeps small items safe.
The beauty of this project is its flexibility. You can move the hooks around whenever you buy new items. It turns your accessories into a piece of art while keeping your morning routine very efficient.
Material Required List
- Large pegboard sheet
- Assorted pegboard hooks
- Spacers
- Screws
- Wall anchors
Equipment Required List
- Power drill
- Level tool
- Pencil
- Screwdriver
DIY Instruction Step By Step
- Hold the pegboard against the wall and use a level to make sure it is straight.
- Mark the four corners through the pre drilled holes onto your wall with a pencil.
- Drill holes into the wall at your marks and tap in the plastic wall anchors.
- Place spacers behind the pegboard so there is a small gap between the board and the wall.
- Drive the screws through the board and the spacers into the wall anchors until tight.
- Insert the metal hooks into the small holes in any pattern you like.
- Hang your sunglasses by their frames and place your keys on the smaller hooks.
- Group similar items together to make them easier to find when you are in a rush.
5 Bungee Corner Shoe Storage
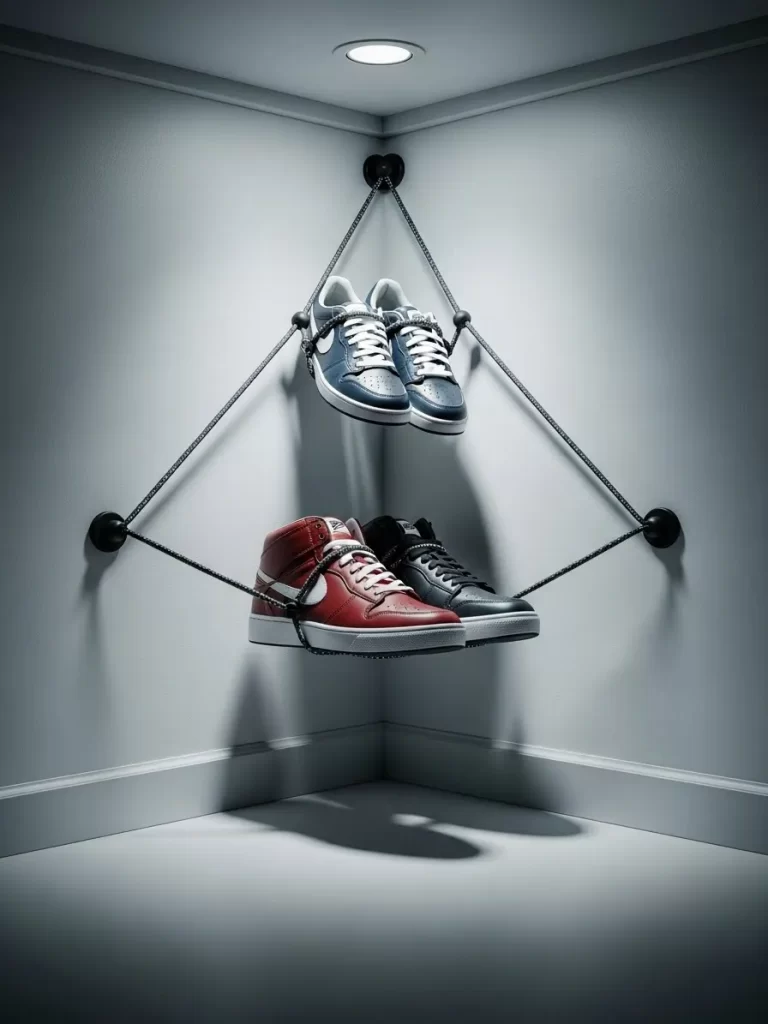
Utilize the empty corners of your closet with a clever cord storage system. This design uses tension to hold sneakers and athletic shoes against the wall. It is a fantastic way to free up floor space for boxes or larger items.
This project is especially helpful for small apartments or narrow closets. It keeps your shoes off the ground where they usually pile up. The vertical arrangement also allows for better air circulation around your footwear.
Material Required List
- Bungee cords or thick elastic rope
- Sturdy wall hooks or eye bolts
- Wall anchors
- Screws
Equipment Required List
- Power drill
- Measuring tape
- Pencil
- Pliers
DIY Instruction Step By Step
- Pick a corner in your closet that is currently unused.
- Mark two spots on one wall and one spot on the adjacent wall to form a triangle.
- Drill holes into your marks and insert the wall anchors firmly.
- Screw the eye bolts or hooks into the anchors until they are secure.
- Thread the bungee cord through the hooks to create a tight web or sling.
- Knot the ends of the cord and trim any excess length with your pliers.
- Test the tension by placing a pair of shoes onto the cords.
- Adjust the hooks if the shoes seem to slide or if the cord is too loose.
6 Vintage Suitcase Tower
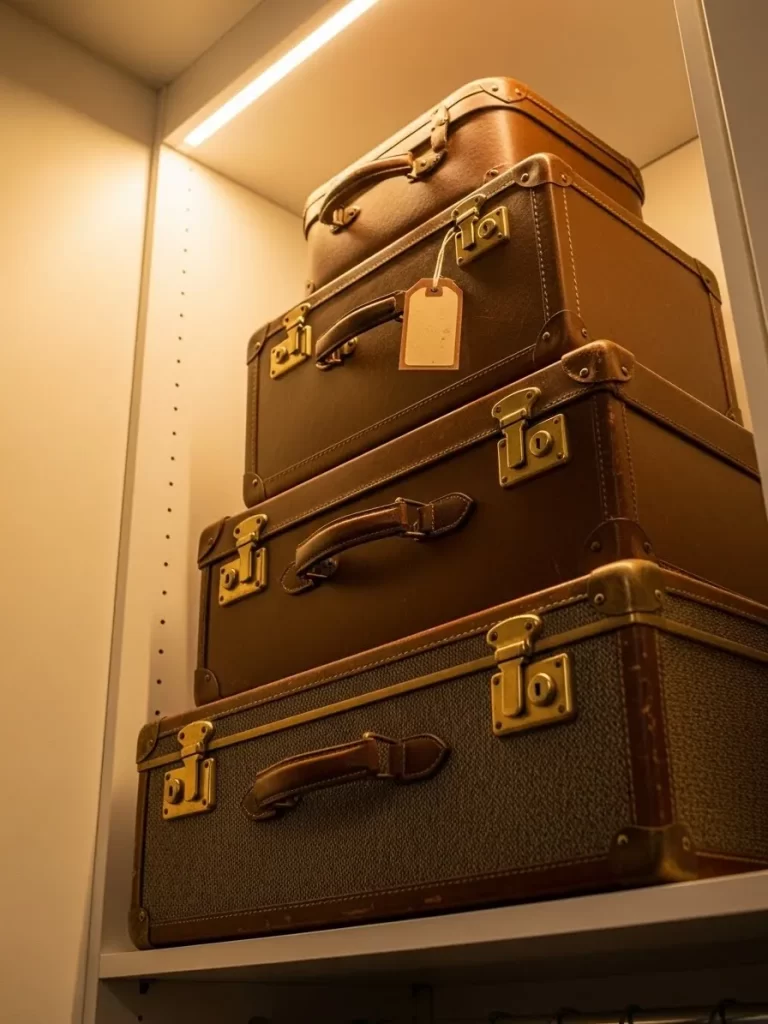
Give your old luggage a second life by using it as hidden storage. Stacking vintage suitcases creates a charming look while holding items you do not use daily. You can store heavy blankets, winter coats, or holiday decorations inside these sturdy boxes.
Small apartments often lack storage for bulky seasonal items. This method adds a nostalgic touch to your bedroom decor while clearing up your closet floor. The flat surfaces also provide a handy place to set a lamp or a book.
Material Required List
- Multiple vintage suitcases in different sizes
- Fabric freshener spray
- Cedar blocks
- Small felt pads
Equipment Required List
- Cleaning cloth
- No heavy tools needed
DIY Instruction Step By Step
- Wipe down the outside of each suitcase with a damp cloth to remove old dust.
- Spray the interior with fabric freshener to get rid of any musty smells.
- Place a cedar block inside each suitcase to protect your fabrics from moths.
- Fill the largest suitcase with your heaviest items like quilts or boots.
- Stick felt pads on the bottom corners of the smaller suitcases to prevent scratching.
- Stack the suitcases on top of each other from largest to smallest.
- Ensure the tower is stable and does not wobble when you touch it.
- Label the handles with small tags so you know what is hidden inside each one.
7 Under Shelf Shoe Bars
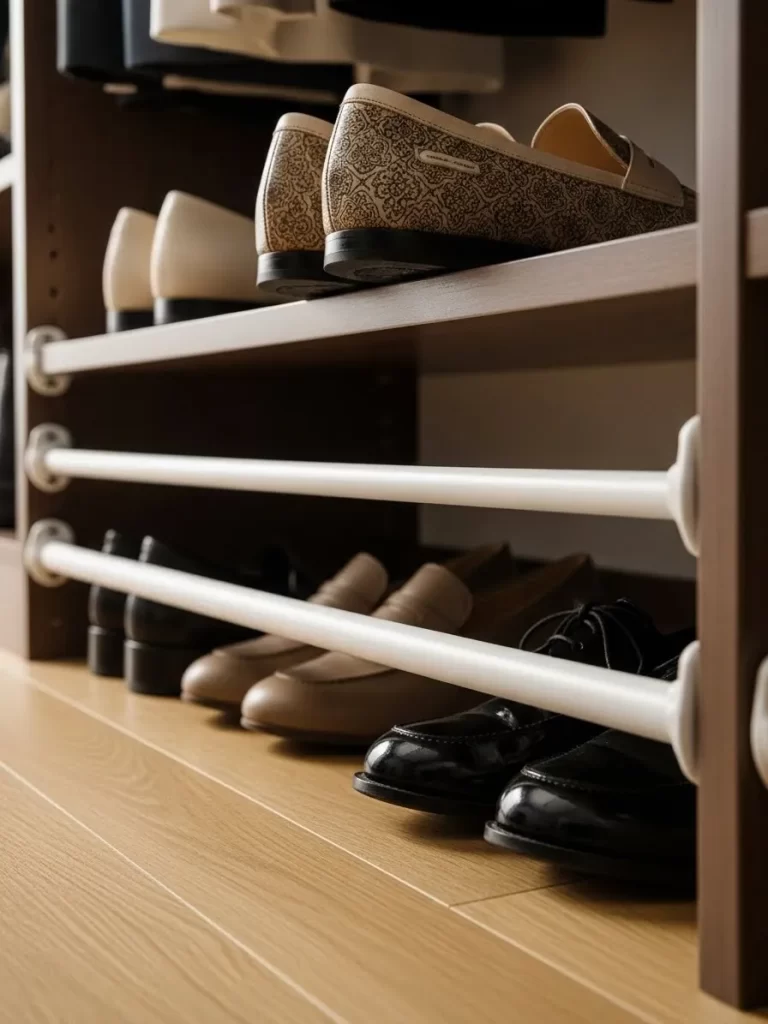
Install thin rails underneath your existing shelves to hold your formal shoes. This trick uses the empty space that sits right above your floor or between existing shelves. It keeps your loafers and flats neatly lined up and prevents them from getting crushed.
You can see every pair at a glance without having to move anything else. This setup works excellently in the bottom of a wardrobe where shoes usually pile up. It makes your closet look like a custom built system for a fraction of the cost.
Material Required List
- Small tension rods or thin wooden dowels
- Rod sockets
- Short screws
- Sandpaper
Equipment Required List
- Measuring tape
- Screwdriver
- Pencil
DIY Instruction Step By Step
- Measure the width inside your closet frame or under a specific shelf.
- Mark the side walls with a pencil about three inches above the floor.
- Screw the rod sockets into the marks on both the left and right sides.
- Slide your tension rod or dowel into the sockets so it sits horizontally.
- Place a second rod about four inches behind the first one if you have deep shelves.
- Angle your shoes so the heels hook over the back rod while the toes rest on the front rod.
- Adjust the height if your shoes have high heels to ensure they fit comfortably.
- Tighten the screws one last time to make sure the bars can hold the weight.
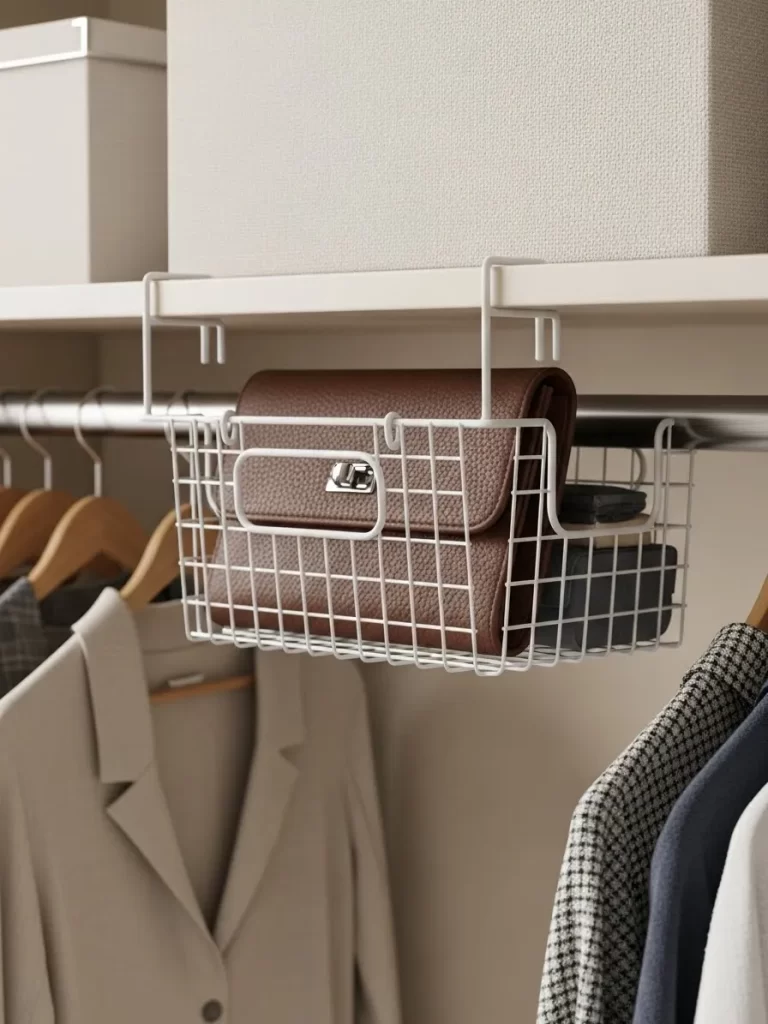
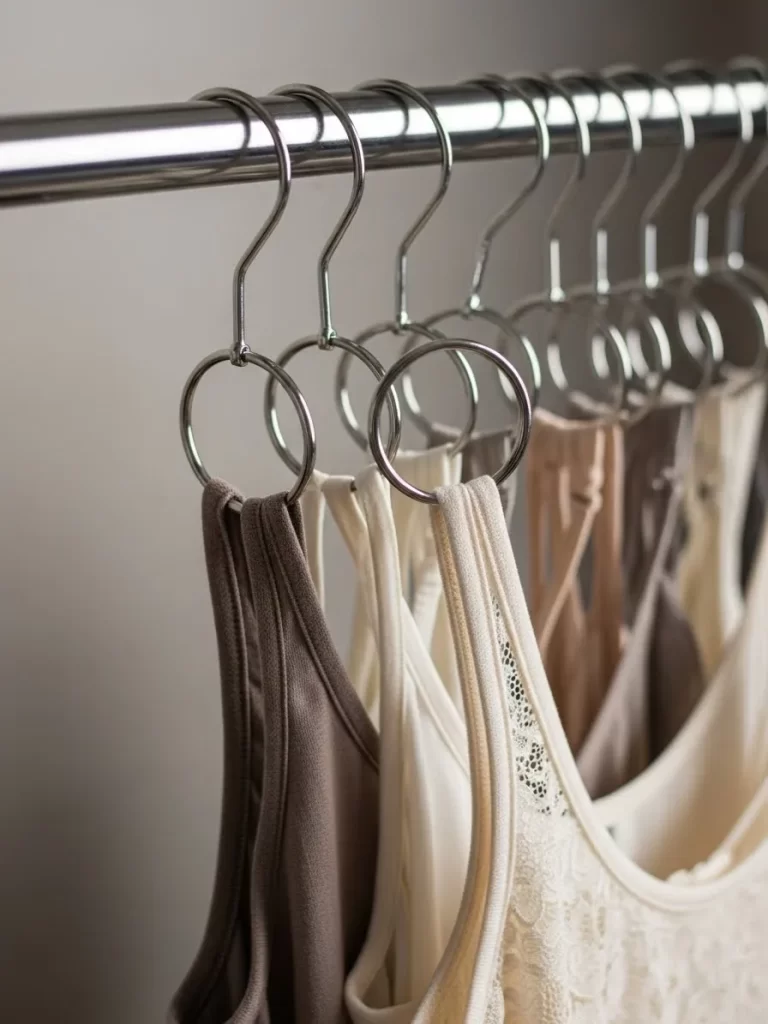
8 Circular Handbag Organizers
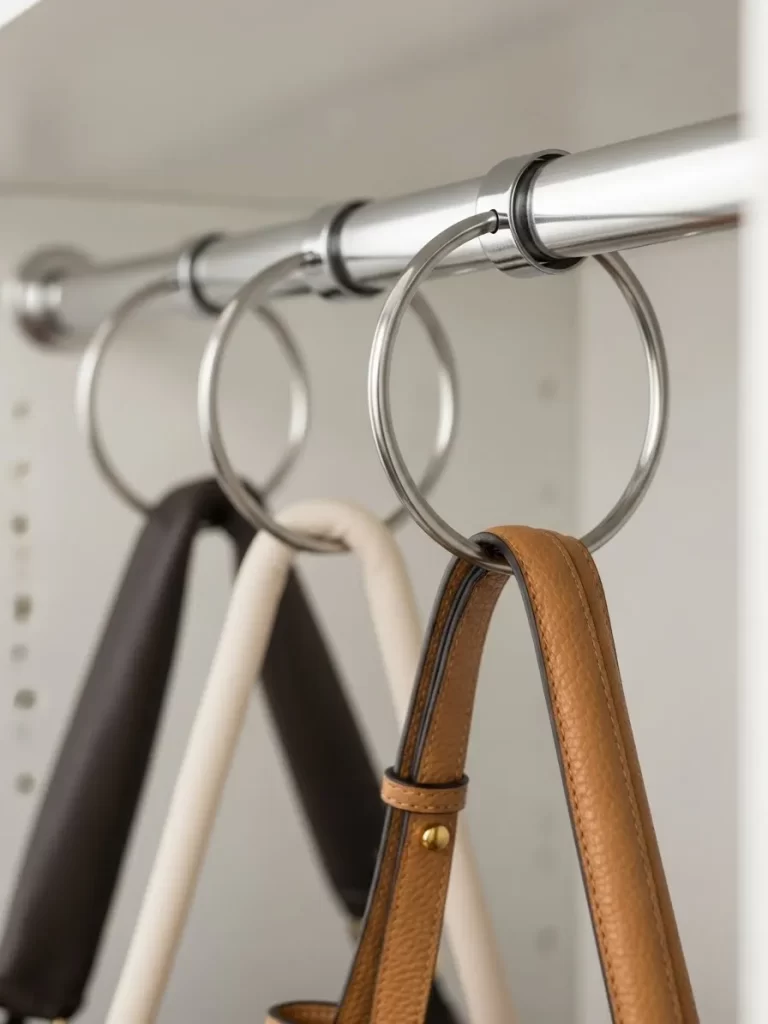
Organize your purse collection by hanging them from your main closet rod. Using simple metal rings allows you to store bags vertically instead of stacking them on a shelf. This prevents the straps from getting tangled and keeps the bags from losing their shape.
This solution is very affordable and takes only seconds to set up. You can slide the rings along the rod to make room for new additions as your collection grows. Your bags will stay clean, visible, and ready for use at any time.
Material Required List
- Large metal shower curtain rings
- S hooks
- Fabric scraps
Equipment Required List
- No tools required
DIY Instruction Step By Step
- Clear a section of your closet rod where you want to hang your bags.
- Snap the metal rings onto the rod one by one.
- Wrap a small piece of fabric around the ring if the metal feels sharp to protect your straps.
- Open the ring and slide the handle of your purse through it.
- Close the ring securely so the bag does not fall.
- Face all the bags in the same direction to keep the look consistent and tidy.
- Sort your bags by size or color to make choosing an outfit easier.
- Slide the bags closer together to save even more space along the rod.
9 Geometric Purse Grid
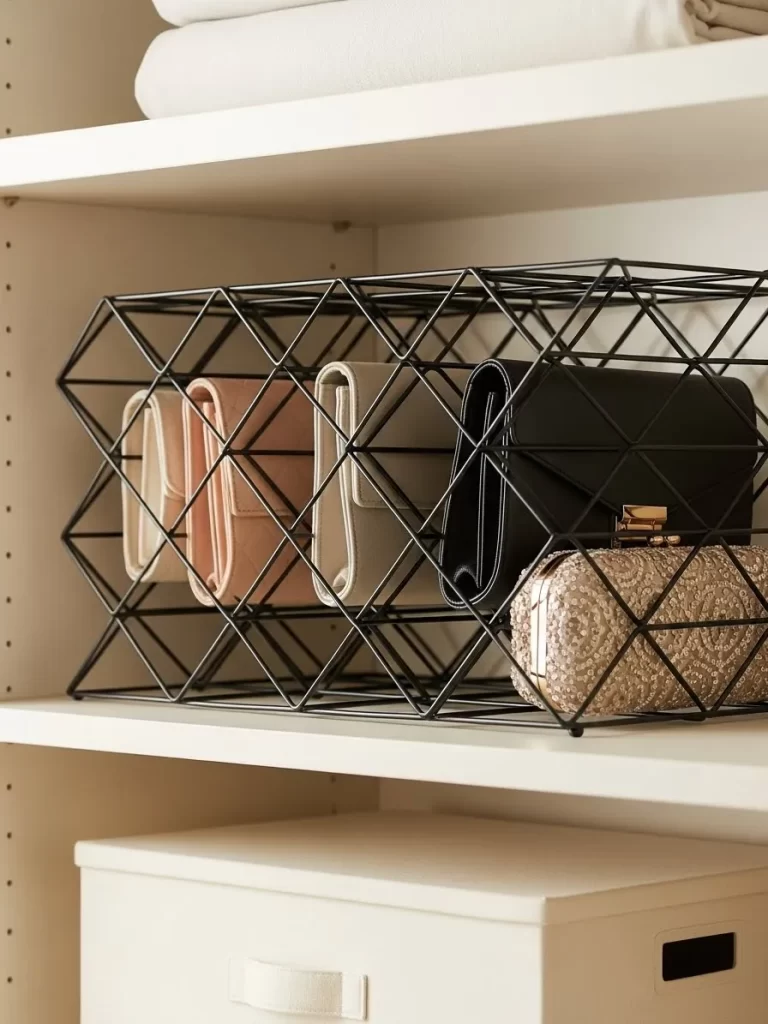
Keep your clutches and small evening bags upright with a wire grid organizer. This system prevents your delicate bags from flopping over and getting creased. It provides a dedicated slot for every item so you can see your entire collection easily.
The wire design is lightweight and fits onto almost any standard closet shelf. It adds a modern and organized feel to your dressing area. You will find that your bags last much longer when they are stored properly without pressure.
Material Required List
- Wire wine rack or garden grid
- Small zip ties
- Non slip adhesive pads
Equipment Required List
- Wire cutters
- Measuring tape
DIY Instruction Step By Step
- Measure your closet shelf to make sure the wire rack fits inside comfortably.
- Place the wire rack on the shelf with the openings facing forward.
- Stick non slip pads on the bottom of the rack so it does not slide.
- Use zip ties to connect two racks together if you have a very large collection.
- Trim the long ends of the zip ties with your wire cutters.
- Slide one clutch or wallet into each diamond shaped opening.
- Arrange them by color to create a beautiful visual display.
- Ensure the bags are pushed all the way back so they do not fall forward.
10 Magazine Boot Supporters
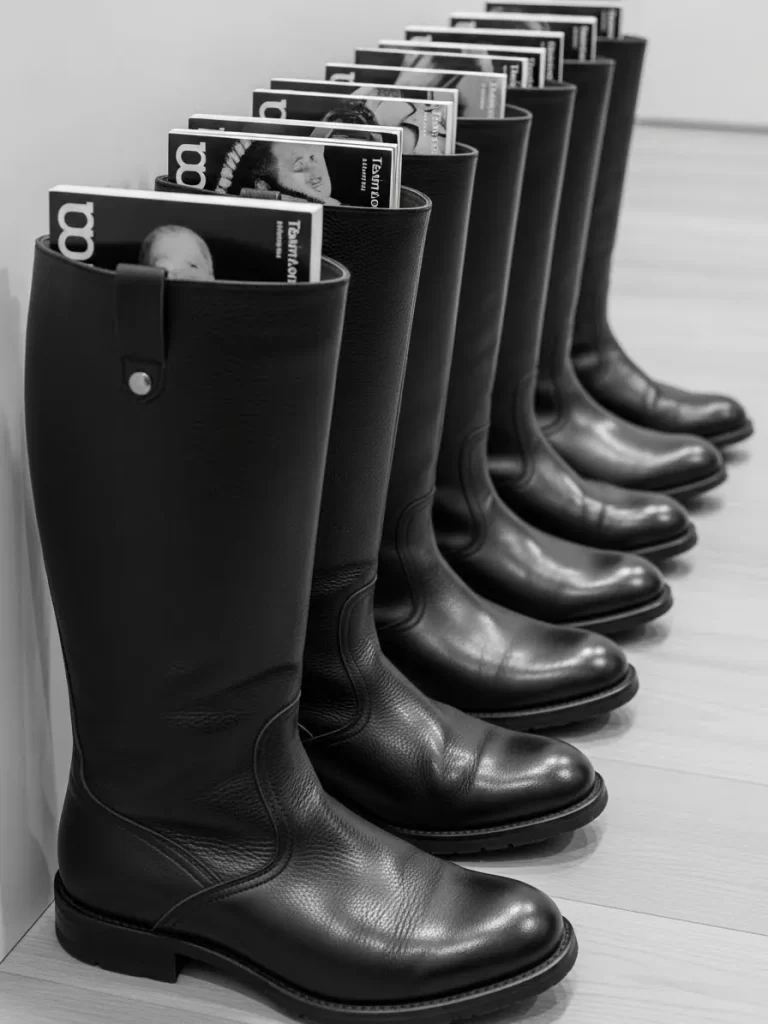
Prevent your tall boots from falling over and developing ugly cracks in the leather. Using old magazines as inserts keeps the boot shafts upright and sturdy. This simple hack saves you from buying expensive plastic boot trees.
This method keeps your closet floor looking neat and organized. It also allows for better airflow inside the boots which helps prevent odors. You can easily swap the magazines if they ever get damp or worn out.
Material Required List
- Old magazines or catalogs
- Clear packing tape
- Decorative paper
- Scented dryer sheets
Equipment Required List
- No heavy tools needed
DIY Instruction Step By Step
- Select two magazines of the same thickness for each pair of boots.
- Roll the magazine into a tight cylinder shape that matches the width of your boot.
- Wrap a piece of clear tape around the middle of the roll to keep it from unfurling.
- Cover the magazine with decorative paper if you want a more polished look.
- Place a scented dryer sheet inside the boot before inserting the magazine.
- Slide the rolled magazine deep into the boot until it reaches the ankle.
- Stand the boots up side by side on your closet floor or shelf.
- Check that the boots are standing straight and not leaning to one side.
11 Hat Shelf Illumination
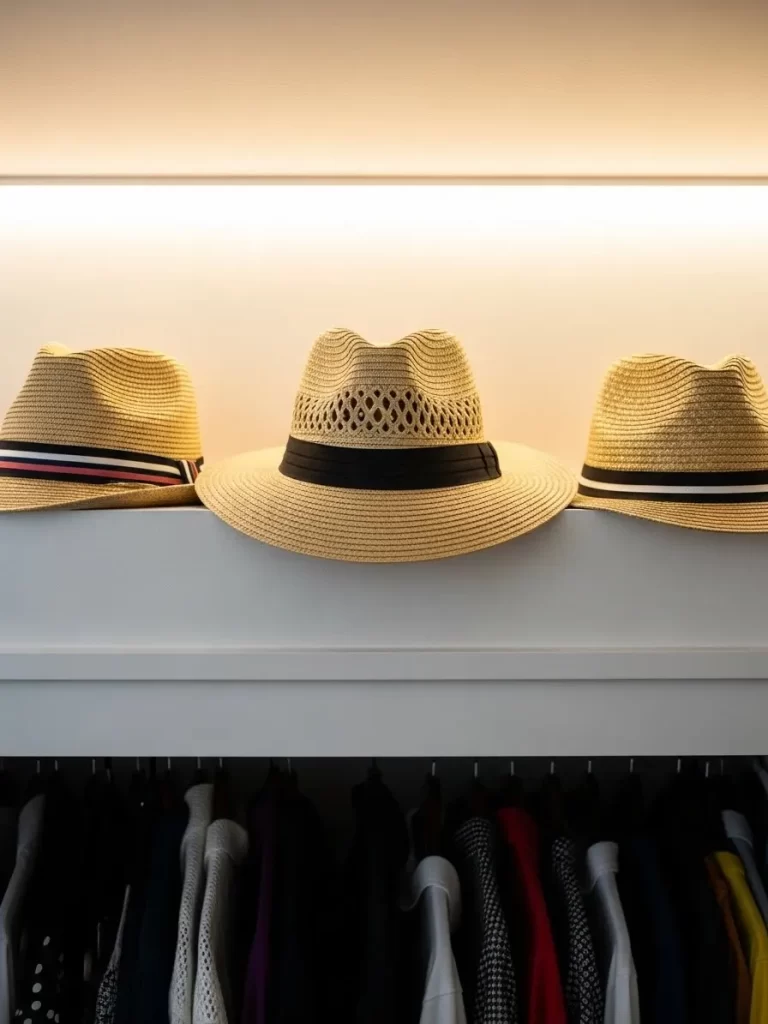
Hats often get crushed or forgotten when they are tucked away on high shelves. You can display them in a single row with a soft light to keep them safe and visible. This makes your accessories look like a curated collection while brightening the top of your closet.
Adding a light strip above the hats makes the entire space feel taller. You will be able to see colors and textures clearly even in a dark room. This setup works well for sun hats, fedoras, and caps alike.
Material Required List
- LED battery powered light strip
- Adhesive tape
- Small bowls or hat stands
- Fabric freshener
Equipment Required List
- Measuring tape
- Step ladder
- Cleaning cloth
DIY Instruction Step By Step
- Use a step ladder to reach the highest shelf in your closet safely.
- Wipe the shelf and the wall behind it with a cloth to remove dust.
- Measure the length of the shelf to see where the light should go.
- Peel the back off the LED strip and press it against the underside of the shelf above.
- Place your hats in a single row along the shelf.
- Use small bowls turned upside down as hat stands to keep them elevated.
- Space the hats evenly so they do not overlap each other.
- Turn on the light and adjust the hats so they are in the center of the glow.
12 Secret Mirror Jewelry Cabinet
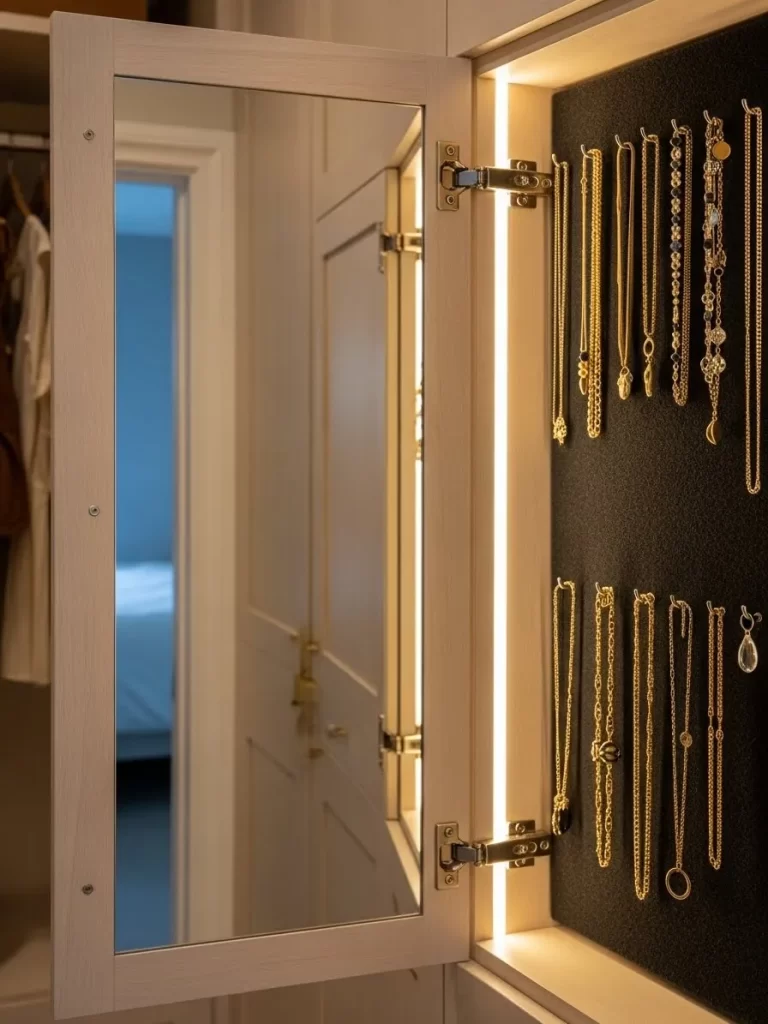
Necklaces often get tangled in small jewelry boxes on your dresser. You can build a hidden cabinet behind a full length mirror to store your accessories. This keeps your chains straight and your earrings organized while hiding your valuables.
The cabinet uses the space inside the wall or sits flat against it. You can add many small hooks to hold every piece of jewelry you own in plain sight. This prevents items from getting lost or scratched in a messy drawer.
Material Required List
- Full length mirror with a frame
- Small metal hooks
- Piano hinge
- Magnetic latch
- Felt fabric
Equipment Required List
- Power drill
- Level tool
- Screwdriver
- Pencil
DIY Instruction Step By Step
- Pick a spot on your closet wall that has enough room for the mirror to swing open.
- Build a shallow wooden frame that is the same size as your mirror.
- Glue felt fabric inside the frame to protect your jewelry from scratches.
- Screw many small hooks into the wood in several rows.
- Attach the piano hinge to one side of the wooden frame and the mirror.
- Mount the frame to the wall using anchors and long screws.
- Install a magnetic latch on the opposite side to keep the mirror closed.
- Hang your necklaces on the hooks and place your rings on smaller pins.
- Close the mirror and check that it looks like a normal wall mirror.
13 Industrial Copper Rods
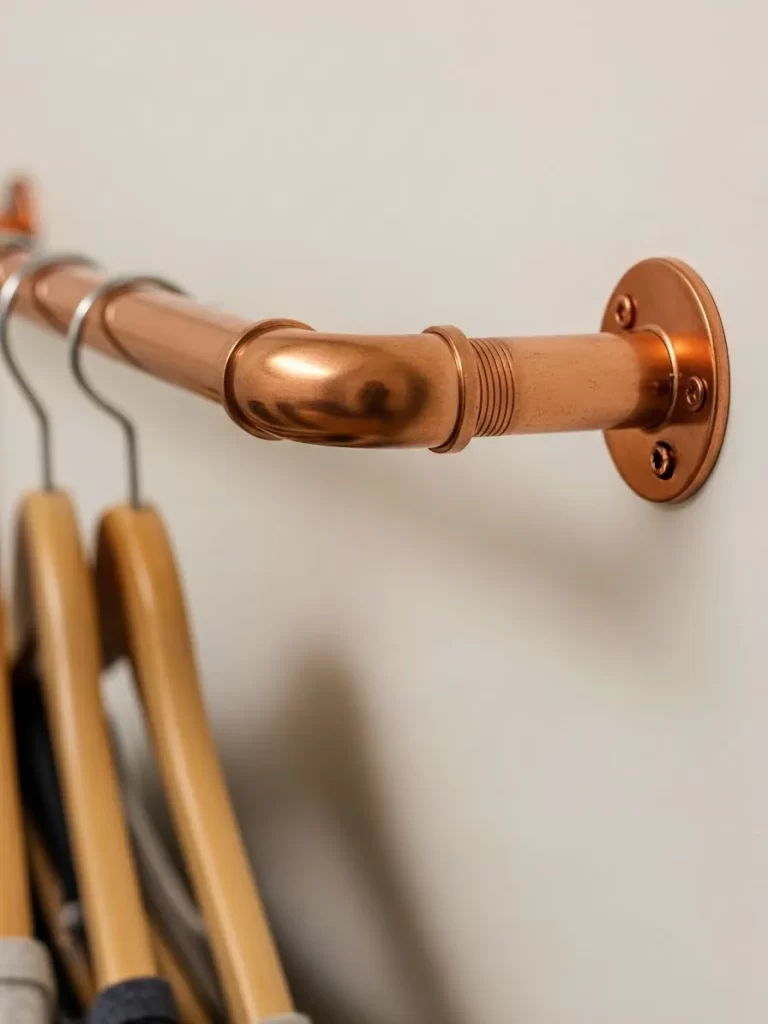
Standard closet rods can sometimes bend or break under the weight of heavy coats. You can use copper pipes to create a very strong and stylish hanging rail. The warm metal color adds a modern industrial look to your storage space.
The pipes can be cut to any length to fit your specific closet size perfectly. You can mount them directly to the wall or from the ceiling. This provides a custom solution for odd shaped rooms or tiny closets.
Material Required List
- Copper pipe
- Copper elbows and joints
- Floor flanges for mounting
- Metal screws
- Wall anchors
Equipment Required List
- Pipe cutter
- Power drill
- Screwdriver
- Measuring tape
DIY Instruction Step By Step
- Measure the distance between your closet walls where the rod will go.
- Use a pipe cutter to trim the copper pipe to the correct length.
- Sand the ends of the pipe so they are not sharp and slide into joints easily.
- Mark the wall with a pencil where the floor flanges will be mounted.
- Drill holes into the wall and push in your sturdy wall anchors.
- Screw the floor flanges into the anchors until they are very tight.
- Connect the pipe to the elbows and screw them into the flanges.
- Check that the rod is level before you tighten the final screws.
- Wipe the copper with a clean cloth to remove any fingerprints.
14 Tall Closet Sliding Ladder
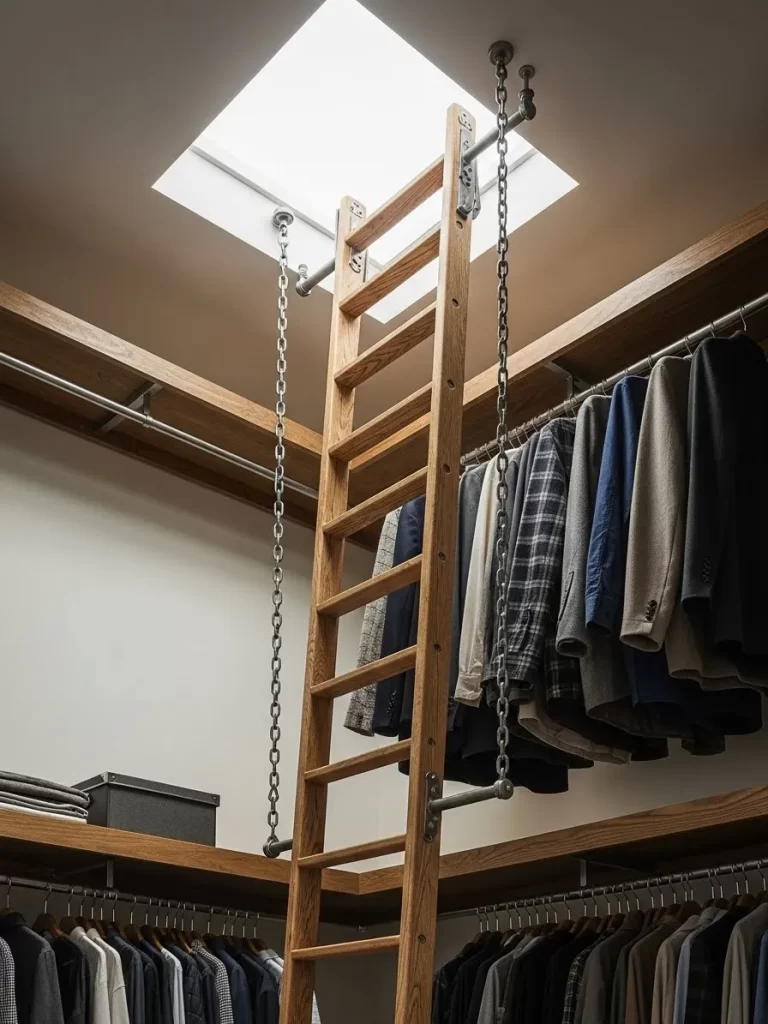
Many closets have high shelves that are very hard to reach without a chair. You can install a sliding ladder to make use of that vertical space near the ceiling. This allows you to store seasonal items or extra suitcases high up safely.
The ladder slides smoothly along a metal rail fixed to the shelving unit. You can push it out of the way when you are not using it. It adds a sophisticated library feel to your walk in closet immediately.
Material Required List
- Wooden ladder
- Metal sliding rail kit
- Wheels and brackets
- Safety stops
- Wood finish or paint
Equipment Required List
- Power drill
- Level tool
- Screwdriver
- Wrench
DIY Instruction Step By Step
- Measure the height of your top shelf and the length of the wall for the rail.
- Install the metal rail along the top of your shelving unit using long screws.
- Use a level to ensure the rail is perfectly straight so the ladder does not roll.
- Attach the brackets and wheels to the top and bottom of the wooden ladder.
- Lift the ladder and hook the top wheels onto the metal rail.
- Test the sliding motion to make sure it moves without catching on anything.
- Install safety stops at both ends of the rail so the ladder cannot slide off.
- Apply a coat of paint or wood finish to match your closet decor.
- Climb up and start filling those high shelves with your extra belongings.
15 Wall Mounted Woven Baskets

You can add texture and extra storage to your closet by mounting woven baskets on the wall. This uses vertical space for items like belts, scarves, or rolled t shirts. The baskets look natural and beautiful against a plain white wall.
The open tops make it very easy to drop items inside as you tidy up your room. You can see what is in each basket without having to open a drawer. This system works well for small accessories that usually get lost in big bins.
Material Required List
- Woven wicker or seagrass baskets
- Large washers
- Long screws
- Wall anchors
- Decorative tags
Equipment Required List
- Power drill
- Pencil
- Level tool
DIY Instruction Step By Step
- Choose baskets that are sturdy and have a flat back for mounting.
- Decide on a pattern for the baskets on your closet wall.
- Mark the wall with a pencil where the top of each basket will sit.
- Drill holes for the wall anchors and push them in until flush.
- Place a large washer on your screw so it does not pull through the wicker.
- Drive the screw through the back of the basket into the wall anchor.
- Use two screws per basket to make sure they do not tilt or wobble.
- Check that the baskets are level and secure enough to hold weight.
- Attach a decorative tag to each handle to show what is stored inside.
16 Low Level Boot Hanger
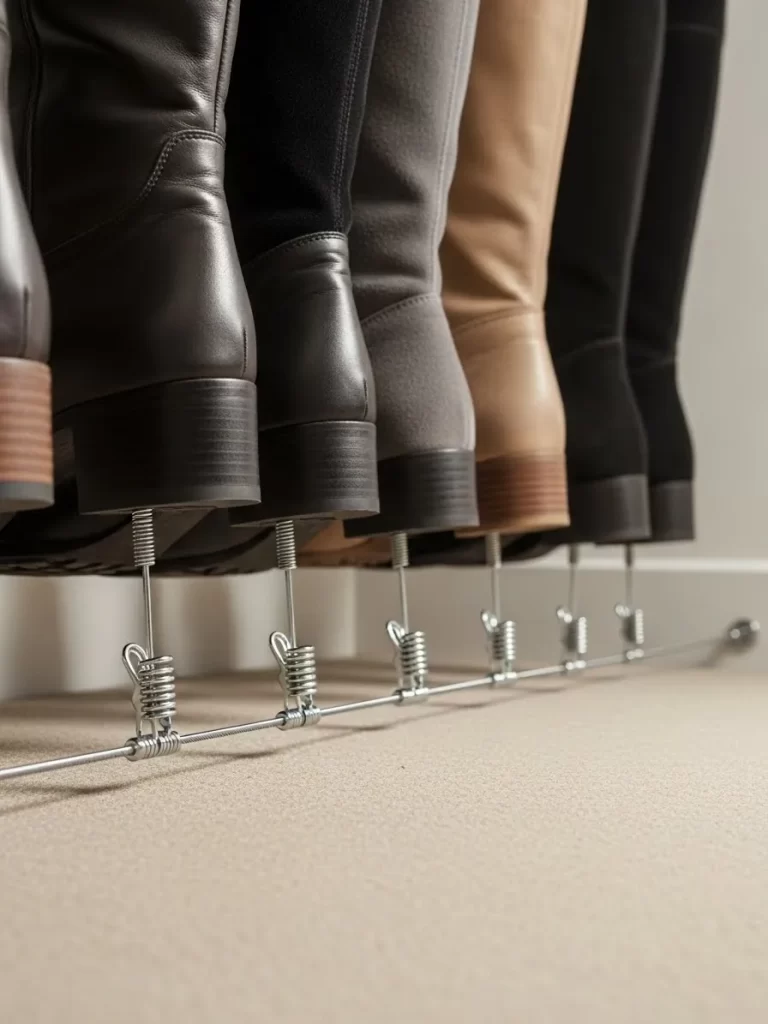
Storing tall boots on the floor takes up a lot of room and looks messy. You can use clips to hang your boots from a low hanging rod instead. This keeps the boots off the ground and prevents the leather from folding.
The clips hold the boots securely without leaving any marks on the material. You can line them up by color or style for a very tidy look. This also helps the boots air out after you wear them throughout the day.
Material Required List
- Metal boot clips with rubber grips
- Small tension rod
- Rod brackets
- Screws
Equipment Required List
- Power drill
- Screwdriver
- Measuring tape
DIY Instruction Step By Step
- Measure the height of your tallest boots to see where the rod should go.
- Mark the side walls of your closet about twenty inches above the floor.
- Screw the brackets into the wall at your pencil marks.
- Place the tension rod into the brackets and make sure it is tight.
- Attach a metal clip to the top edge of each boot.
- Make sure the rubber grips are placed correctly so they do not slip.
- Hook the clips onto the new rod so the boots hang freely.
- Space the boots out so they have room to breathe and do not touch.
- Enjoy the extra floor space for your storage bins or sneakers.
17 Fabric Curtain Closet Door
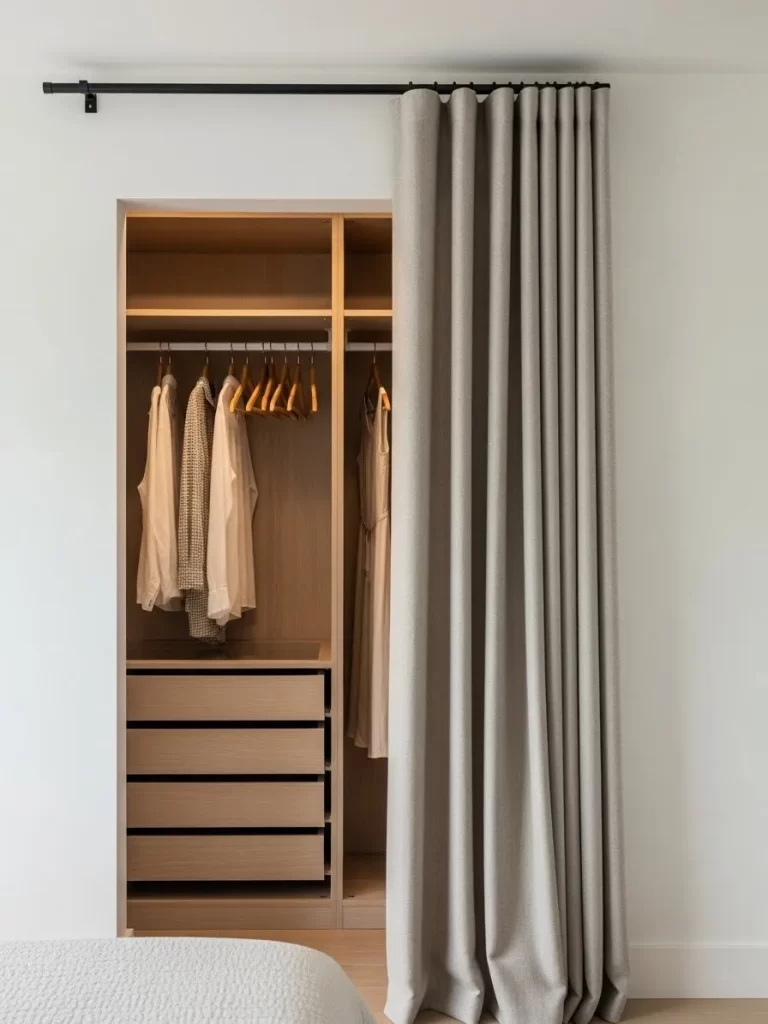
Heavy closet doors can take up a lot of space when you open them in a small room. You can replace them with a soft fabric curtain to make the space feel bigger. This allows you to access your clothes easily even in a tight corner.
The curtain hides your clothes and creates a clean look in the room instantly. You can choose a fabric that matches your bedding or rugs for a custom look. This is a very affordable alternative to buying expensive new doors.
Material Required List
- Thick curtain panel
- Drapery rod
- Rod brackets
- Wall anchors
- Screws
Equipment Required List
- Power drill
- Level tool
- Screwdriver
- Measuring tape
DIY Instruction Step By Step
- Remove your old closet doors and the hinges from the frame.
- Fill any old screw holes with wood putty and paint over them.
- Measure the width of the closet opening to find the right rod size.
- Mark the wall above the closet frame where the brackets will go.
- Use a level to ensure the marks are straight on both sides.
- Drill holes and install the wall anchors for the rod brackets.
- Screw the brackets into place and slide the curtain onto the rod.
- Place the rod into the brackets and secure it according to the kit.
- Hem the curtain if it is too long so it just touches the floor.
18 Vertical Denim Clip Rail
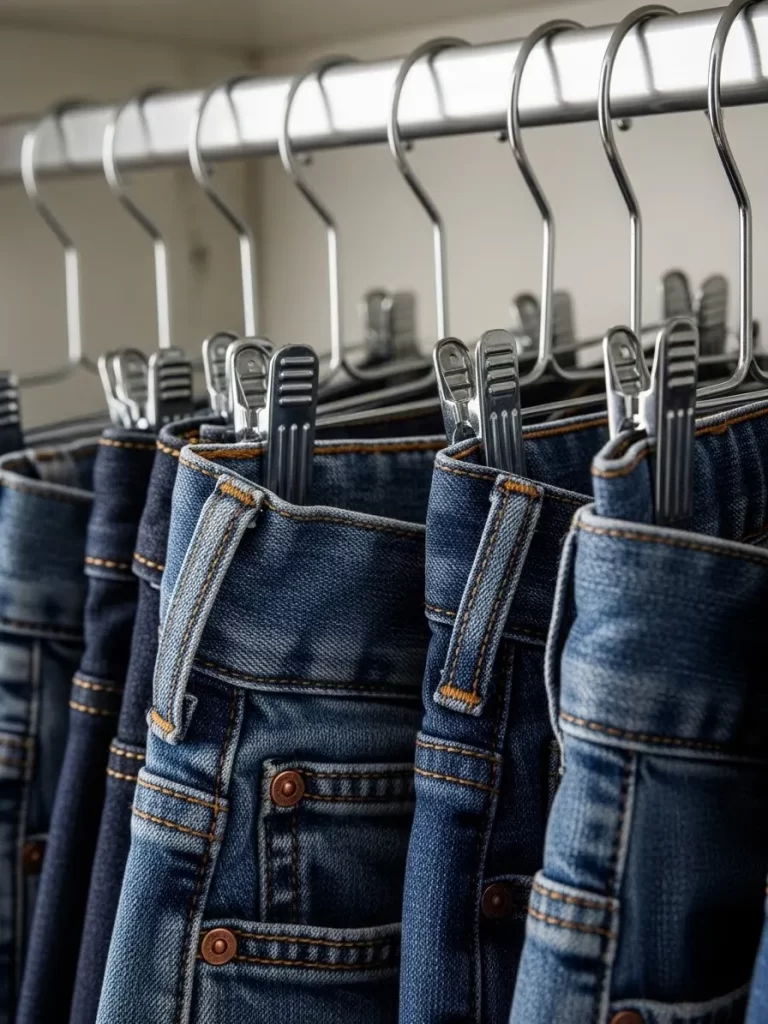
Jeans are bulky and take up a lot of shelf space when you fold them. You can use hangers with metal clips to store your denim vertically on a rod. This keeps the waistbands flat and prevents deep creases in the legs.
The clips make it very easy to find the pair you want to wear. You can see the wash and style of every jean at a single glance. This setup also helps your jeans stay fresh between washes by allowing airflow.
Material Required List
- Strong hangers with metal clips
- Non slip rubber pads
- S hooks
Equipment Required List
- No tools required
DIY Instruction Step By Step
- Clear a section of your closet rod for your denim collection.
- Place a small non slip pad inside the metal clips if they feel sharp.
- Fold your jeans in half vertically so the legs are lined up.
- Open the clips on the hanger and attach them to the waistband.
- Make sure the jeans are centered on the hanger so they do not tilt.
- Hang the jeans on the rod with the front of the waistband facing forward.
- Group your jeans by color from lightest to darkest for a clean look.
- Slide the hangers close together to maximize every inch of the rail.
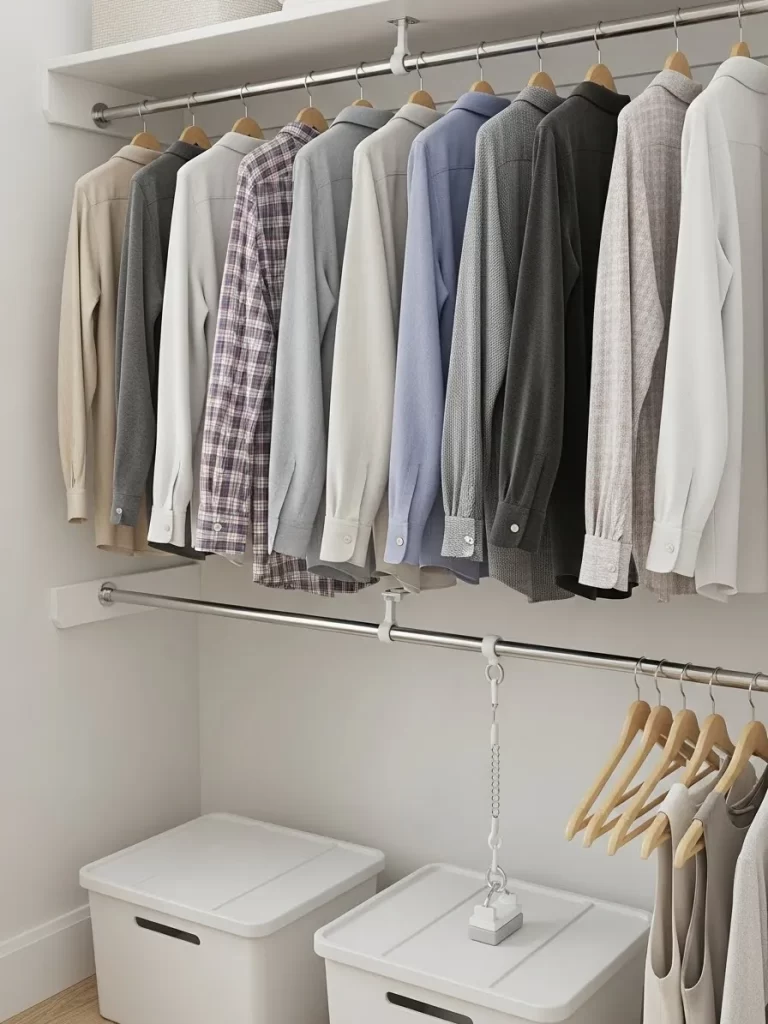
19 Ultimate Double Rod System

A single rod often leaves a lot of empty space at the bottom of the closet. You can install a second rod below the first one to double your hanging capacity. This allows you to separate your tops from your bottoms easily.
The organized layout makes it much easier to build outfits every single morning. You can keep your shirts on the top level and your skirts or pants on the bottom. This system keeps your clothes from getting crowded and wrinkled.
Material Required List
- Two metal closet rods
- Four wall brackets
- Center support brackets
- Wall anchors
- Long screws
Equipment Required List
- Power drill
- Level tool
- Pencil
- Screwdriver
- Measuring tape
DIY Instruction Step By Step
- Measure the total height of your closet from the floor to the ceiling.
- Mark a spot for the top rod about eighty inches from the floor.
- Mark a spot for the bottom rod about forty inches from the floor.
- Use a level to make sure all your marks are straight across the walls.
- Drill holes at your marks and install the wall anchors firmly.
- Screw the brackets into the anchors on both sides of the closet.
- Slide the rods into the brackets and secure them with provided screws.
- Add a center support bracket for each rod if they are longer than four feet.
- Hang your shirts on the top rod and your pants on the bottom rod.
20 Door Mounted Outfit Hook
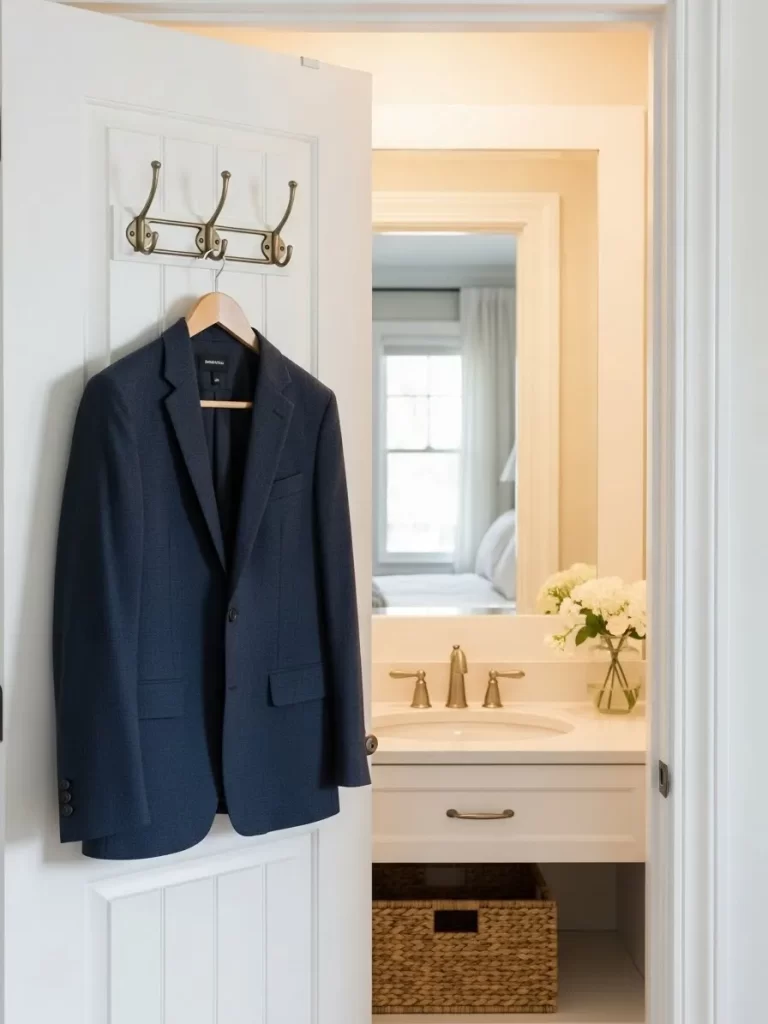
You can gain extra storage by using the back of your closet door effectively. Installing a sturdy hook allows you to hang your outfit for the next day. This keeps your blazer or dress wrinkle free and ready for your morning routine.
The hook can also hold heavy items like robes or winter coats when not in use. This frees up space inside the main closet for other clothes. The door stays functional while providing a dedicated spot for your daily gear.
Material Required List
- Over the door metal hook rack
- Felt padding
- Decorative ribbon
Equipment Required List
- No tools required
DIY Instruction Step By Step
- Open your closet door to make sure there is a gap at the top.
- Slide the metal hook over the top edge of the door carefully.
- Place a small piece of felt padding behind the hook to protect paint.
- Check that the door still closes easily with the hook in place.
- Hang your blazer or coat on a hanger and place it on the hook.
- Use the smaller hooks for items like scarves or your work bag.
- Make sure the weight is balanced so the hook does not tilt.
- Enjoy having your morning outfit ready and visible in one spot.
21 Interior Sidewall Tie Hooks
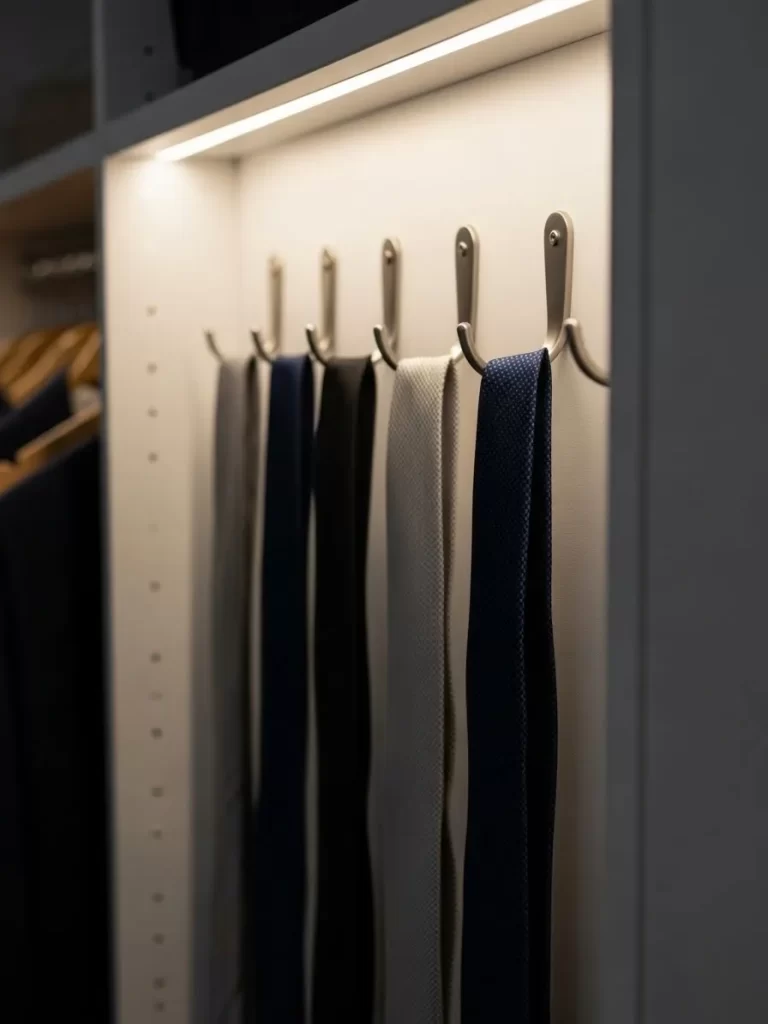
Ties often get lost when they are draped over a standard clothes hanger. You can use small metal hooks on the inside of your closet wall to hang them. This keeps your ties straight and prevents them from getting caught on other clothes.
You can see every color and pattern when they are lined up this way. It makes choosing the right tie for your suit much faster and easier. The wall hooks use space that would otherwise stay empty and wasted.
Material Required List
- Small metal hooks
- Thin screws
- Wall anchors
- Wood glue
Equipment Required List
- Power drill
- Pencil
- Level tool
- Screwdriver
DIY Instruction Step By Step
- Find a narrow side wall inside your closet for the tie rack.
- Mark a horizontal line with your pencil where the hooks will go.
- Space the marks about two inches apart for each tie hook.
- Use a level to make sure your row of hooks is straight across.
- Drill small holes into the wall at each of your pencil marks.
- Tap the wall anchors into the holes until they are flush.
- Screw the metal hooks into the anchors until they feel tight.
- Hang your favorite ties on the hooks to keep them organized.
22 Soda Tab Hanger Extenders
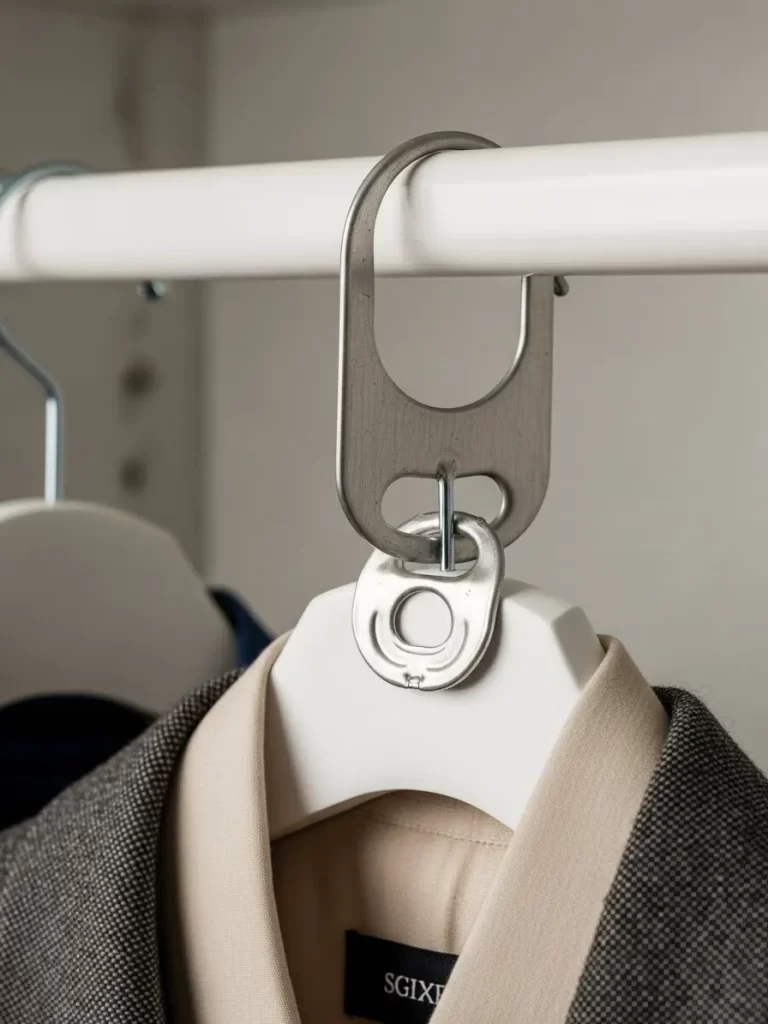
Double your hanging space without buying expensive gadgets for your wardrobe. You can use a simple metal tab from a soda can to connect two hangers. This vertical stacking method allows you to store more clothes in a narrow closet.
This trick is very helpful for grouping outfits like a shirt and matching blazer. It keeps your clothes organized and prevents them from bunching up on the rod. You will find that you have much more room for new items.
Material Required List
- Metal soda tabs
- Standard hangers
- Sanding paper
Equipment Required List
- No tools needed
DIY Instruction Step By Step
- Save several metal tabs from your soda cans and wash them well.
- Use sandpaper to smooth any sharp edges on the metal tabs.
- Slide the top hole of the tab over the hook of a hanger.
- Let the tab rest at the base of the hanger hook.
- Slide the hook of a second hanger through the bottom hole of the tab.
- Check that the hangers are stable and not too heavy for the tab.
- Hang the top hanger on your closet rod as you normally would.
- Use this method to stack your outfits vertically and save room.
23 Under Shelf Wire Basket
Use the empty area under your shelves for small handbags and clutches. A wire basket that slides onto the shelf provides a hidden storage spot. This keeps your accessories safe and off the main rod where they take up room.
The open design allows you to see exactly what is inside the basket. You can grab your purse and go without searching through a big pile. It is a very smart way to use every inch of your storage area.
Material Required List
- Slide on wire basket
- Rubber bumpers
- Small zip ties
Equipment Required List
- Measuring tape
DIY Instruction Step By Step
- Measure the thickness of your closet shelf to find a basket that fits.
- Slide the arms of the wire basket onto the edge of the shelf.
- Push the basket all the way back until it sits flush with the wall.
- Place rubber bumpers on the basket arms to protect your shelf.
- Use a zip tie to secure the arms if they feel a bit loose.
- Place your small bags and wallets inside the basket neatly.
- Arrange them by color so you can find them in a hurry.
- Enjoy the extra space you just created for your other items.
24 Velvet Non Slip Hangers
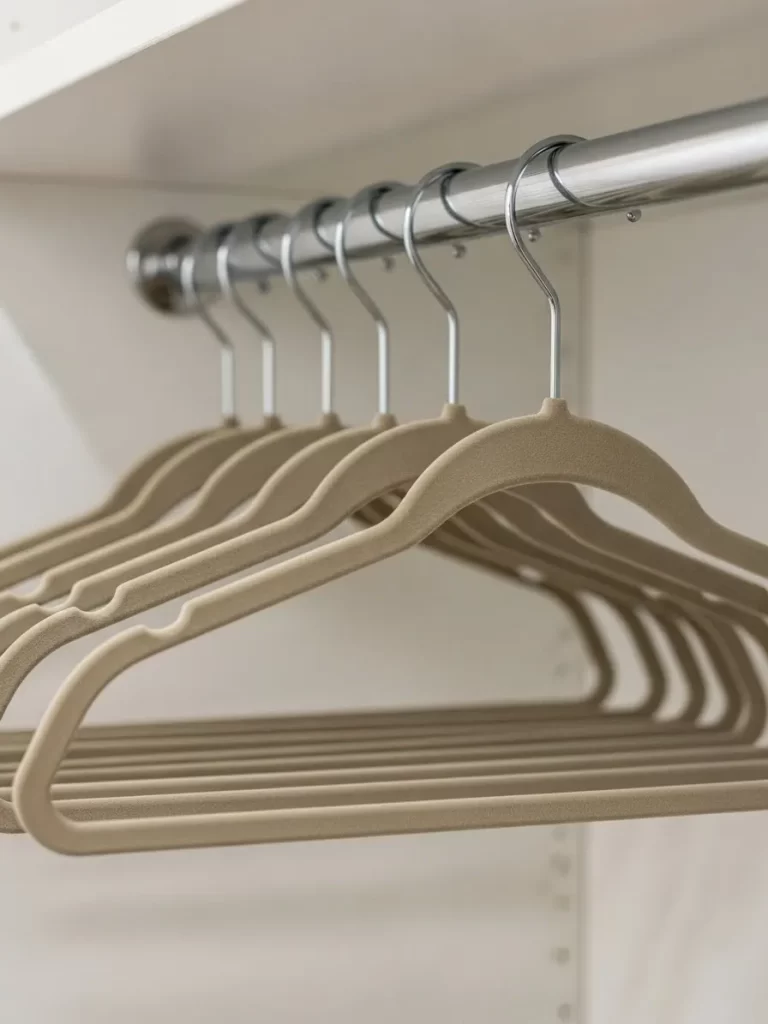
Bulky plastic hangers can take up a lot of room on your closet rod. You can swap them for slim velvet hangers to save space and keep clothes from sliding. The soft texture holds delicate fabrics like silk and satin in place safely.
These hangers are much thinner than standard ones which allows for more clothes. They give your wardrobe a very uniform and professional look instantly. Your storage will feel much more organized and easy to manage every day.
Material Required List
- Slim velvet hangers
- Shoulder shapers
- Small hooks
Equipment Required List
- No tools required
DIY Instruction Step By Step
- Empty a section of your closet and remove all the old hangers.
- Group your clothes by type such as shirts or dresses.
- Slide a velvet hanger into each garment carefully to avoid stretching.
- Face all the hanger hooks in the same direction on the rod.
- Push the clothes close together to see how much space you save.
- Use the shoulder shapers for heavy coats to keep their form.
- Hang the most delicate items on the velvet to prevent them from falling.
- Enjoy the clean look of your new organized hanging system.
25 Floating Corner Perfume Shelves
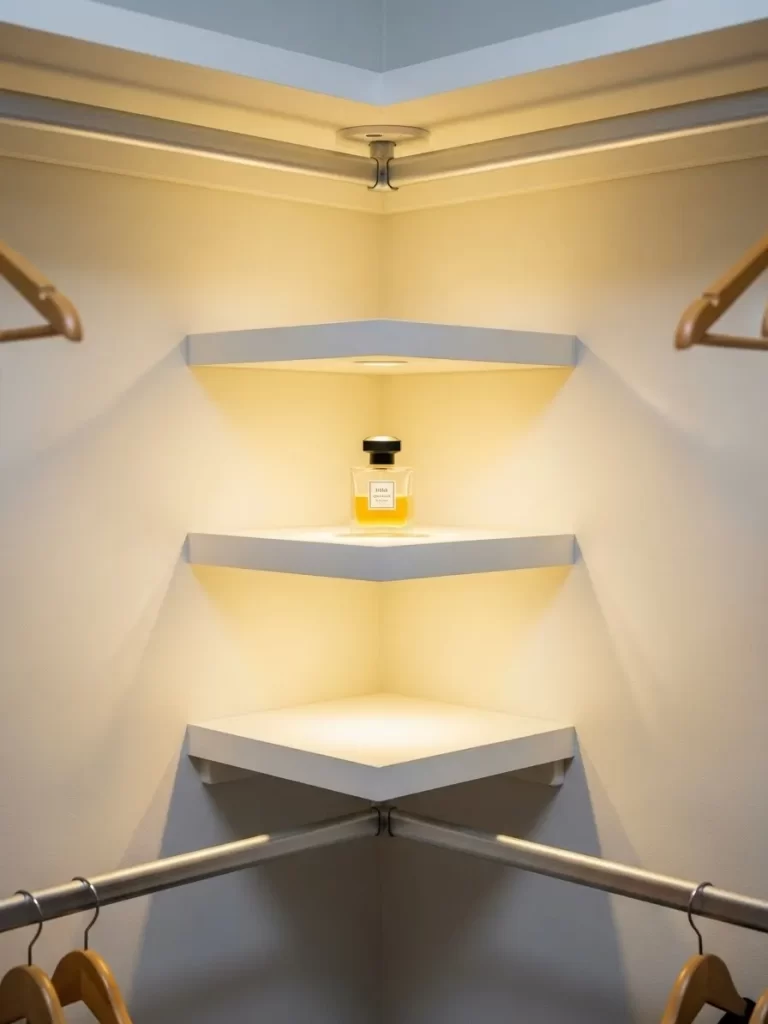
Utilize the empty corners of your closet with small floating shelves for perfumes. This keeps your glass bottles safe and away from your hanging clothes. The elevated design turns your scents into a beautiful and organized display.
The shelves use space that is usually empty and hard to reach effectively. You can add a small light to highlight your collection at night. It makes your storage area feel like a high end boutique in your own home.
Material Required List
- Corner shelf units
- Wall anchors
- Long screws
- Wood finish
Equipment Required List
- Power drill
- Level tool
- Pencil
- Measuring tape
DIY Instruction Step By Step
- Pick a corner in your closet that has enough room for small shelves.
- Mark the height for each shelf using a pencil and a level tool.
- Space the marks about ten inches apart for a balanced look.
- Drill pilot holes into the wall at each of your marks carefully.
- Push the plastic wall anchors into the holes until they sit flush.
- Screw the shelf brackets into the wall anchors until they are tight.
- Place the shelf boards onto the brackets and secure them with screws.
- Arrange your perfume bottles on the shelves to finish the display.
26 Binder Clip Basket Labels
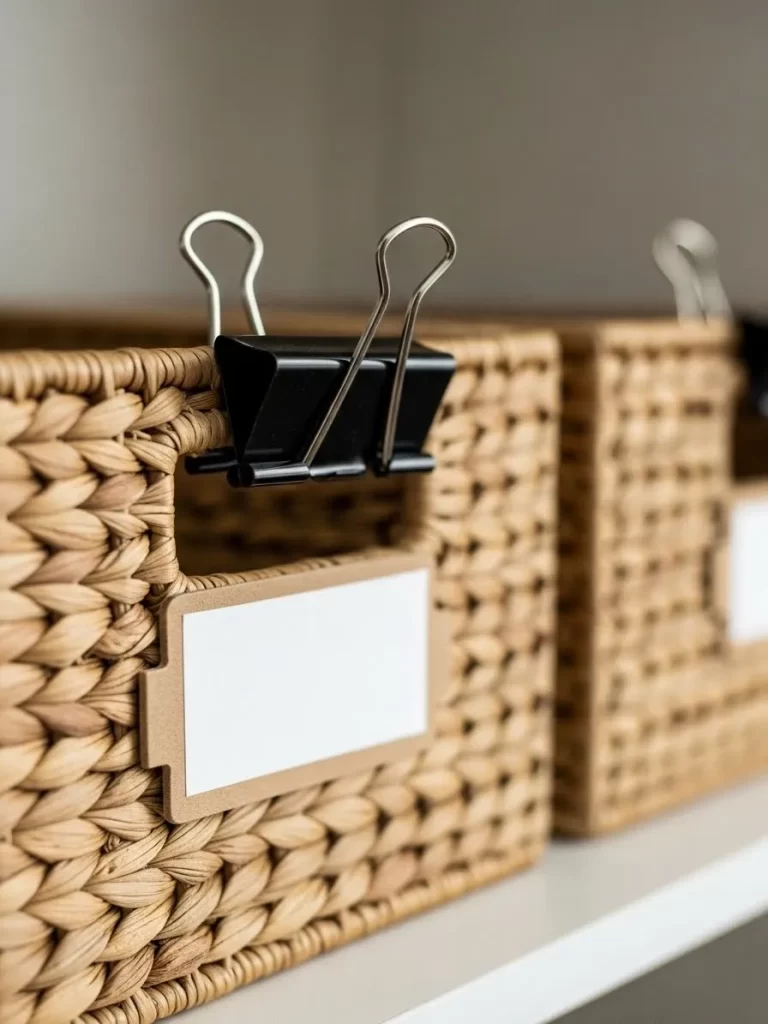
Knowing where everything is can be hard in a very large and full closet. You can use metal clips to hold labels on your woven storage baskets. This keeps your scarves and socks organized and easy to find every single morning.
The labels are easy to change whenever you move your items around. They give your storage a very tidy and structured look that anyone can maintain. You will find that you spend much less time searching for small accessories.
Material Required List
- Metal binder clips
- Paper labels
- Clear tape
- Thin cardstock
Equipment Required List
- Scissors
- Pen
DIY Instruction Step By Step
- Cut the cardstock into small rectangles that fit on your clips.
- Write the name of the items on each piece of cardstock clearly.
- Cover the labels with clear tape to protect them from dirt.
- Open the metal binder clip and slide the label into the handle.
- Attach the clip to the top edge of your storage basket firmly.
- Ensure the label faces outward so you can read it from a distance.
- Repeat this for all your baskets to create a full labeling system.
- Move the clips around as needed when you reorganize your closet.
27 Chalkboard Label Storage Bins
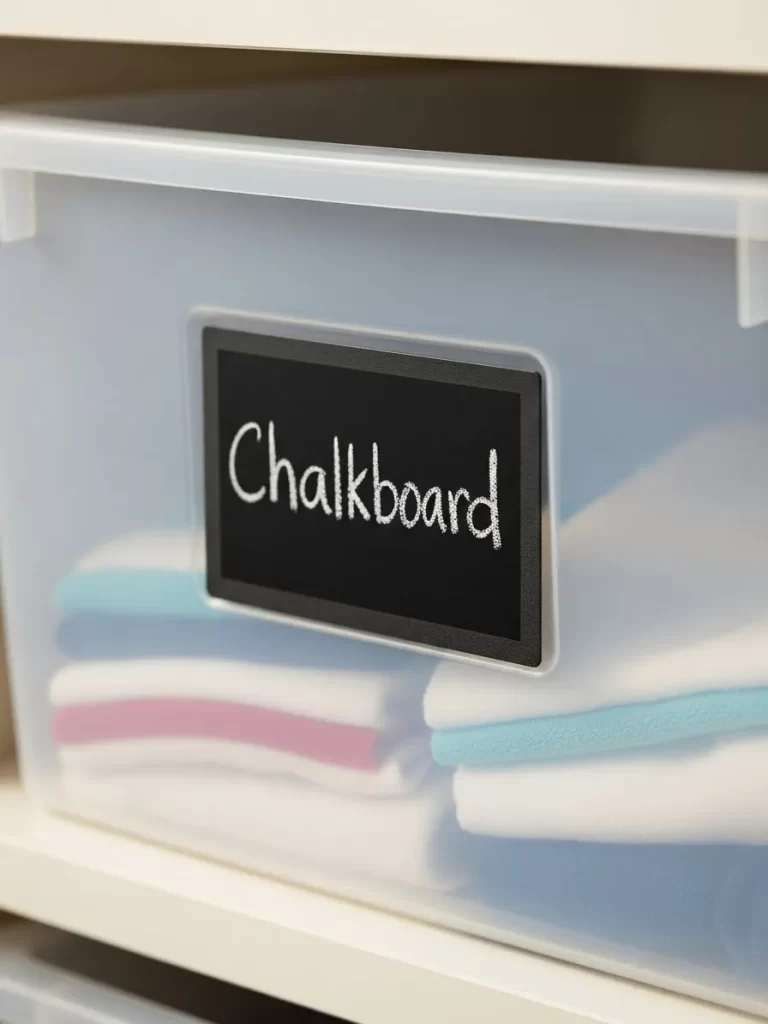
Plastic bins are great for storage but it is hard to see what is inside them. You can use chalkboard paint to create a label on the front of each box. This allows you to write the contents with a pen that can be erased later.
The bins look modern and keep your seasonal clothes organized for many months. You can easily update the label when you swap winter gear for summer outfits. It is a very clever way to keep your storage area looking professional.
Material Required List
- Plastic storage bins
- Chalkboard paint
- Painter tape
- White chalk pen
Equipment Required List
- Paint brush
- Measuring tape
DIY Instruction Step By Step
- Clean the front surface of your plastic bins to remove any dust.
- Use painter tape to mark a small rectangle on the center of the bin.
- Apply a thin layer of chalkboard paint inside the taped area carefully.
- Let the paint dry for several hours before adding a second coat.
- Remove the painter tape once the paint is fully dry to the touch.
- Use the white chalk pen to write the contents of the bin clearly.
- Place your folded clothes inside and slide the bin onto a shelf.
- Erase the label and write a new one whenever you change items.
28 Nested Suitcase Storage Hack
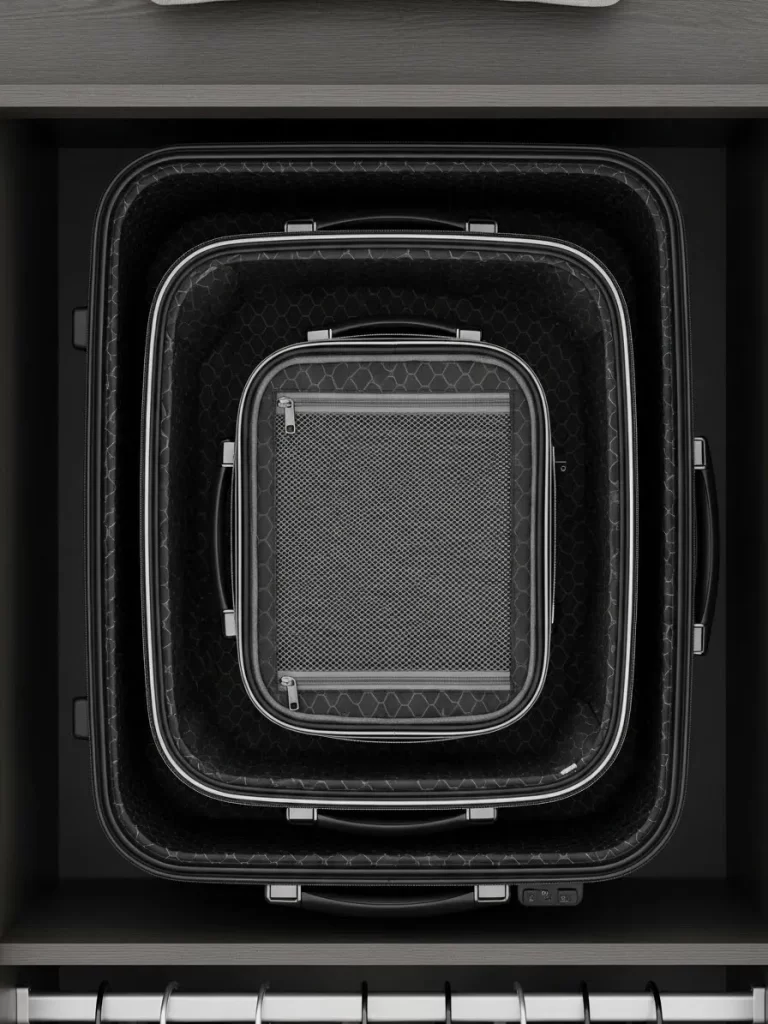
Empty suitcases can take up a lot of valuable room on your closet floor. Store them inside each other to save a huge amount of space in your wardrobe. This nested method keeps your luggage organized and out of the way.
The largest case protects the smaller ones from dust and accidental scratches. You can keep your travel accessories inside the smallest bag to stay organized. It is a very simple way to clear up a cluttered storage area.
Material Required List
- Suitcase set
- Dust covers
- Dryer sheets
Equipment Required List
- No tools needed
DIY Instruction Step By Step
- Open your largest suitcase and lay it flat on the floor or bed.
- Place a scented dryer sheet inside to keep the interior fresh.
- Take the next smaller suitcase and slide it inside the large one.
- Continue this process until all your bags are stacked together.
- Keep small travel items like neck pillows in the very center bag.
- Close the largest suitcase and zip it up to keep everything safe.
- Place the nested luggage set on a high shelf or under your bed.
- Enjoy the extra floor space you gained by stacking your suitcases.
29 Herringbone Fabric Storage Bins
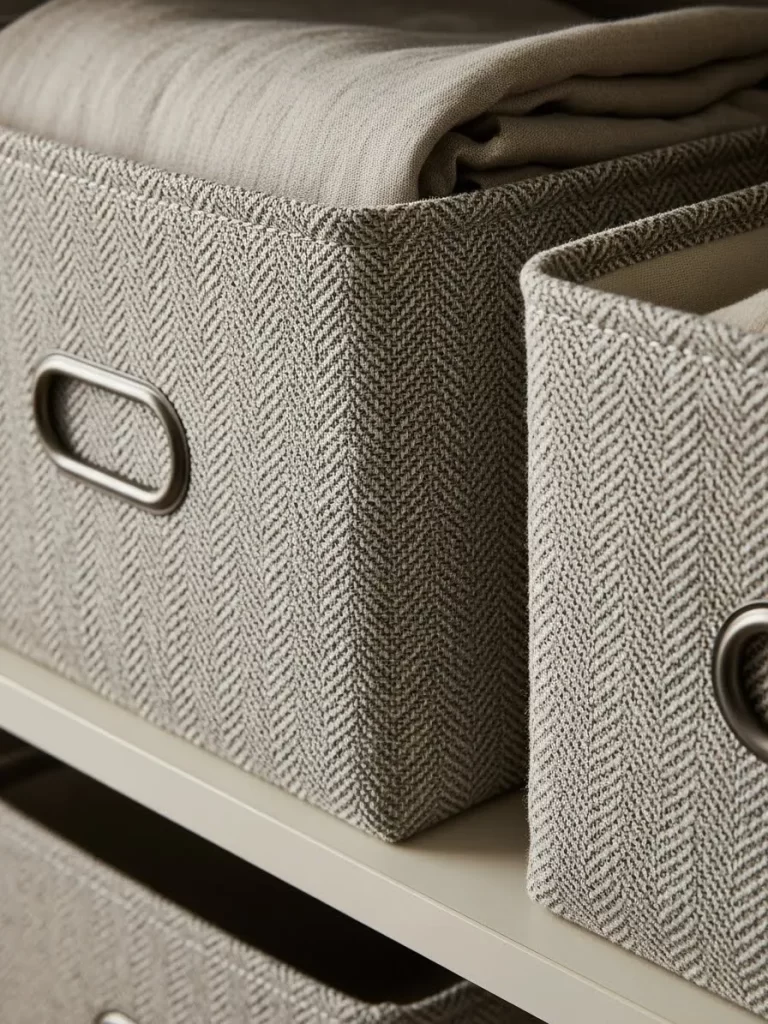
Add a touch of style to your shelves with soft fabric storage bins. The herringbone pattern looks beautiful and keeps your bulky blankets organized. These baskets are lightweight and easy to pull down from high closet shelves.
The fabric is soft so it will not scratch your delicate clothes or shelves. You can use them to hold anything from winter sweaters to extra linens. Your closet will look much more cozy and tidy with these stylish bins.
Material Required List
- Fabric storage bins
- Metal grommets
- Felt liners
Equipment Required List
- No tools needed
DIY Instruction Step By Step
- Choose bins that fit the depth and height of your closet shelves.
- Wipe the shelf with a cloth to remove any dust before placing them.
- Fold your heavy blankets or towels into neat squares to fit inside.
- Place the folded items into the bin until it is full but not bursting.
- Slide the bin onto the shelf with the handle facing toward you.
- Group similar colors together for a very organized and clean look.
- Use the metal grommet as a handle to pull the bin out easily.
- Enjoy having your linens stored in a soft and beautiful container.
30 Adhesive Wall Belt Hooks
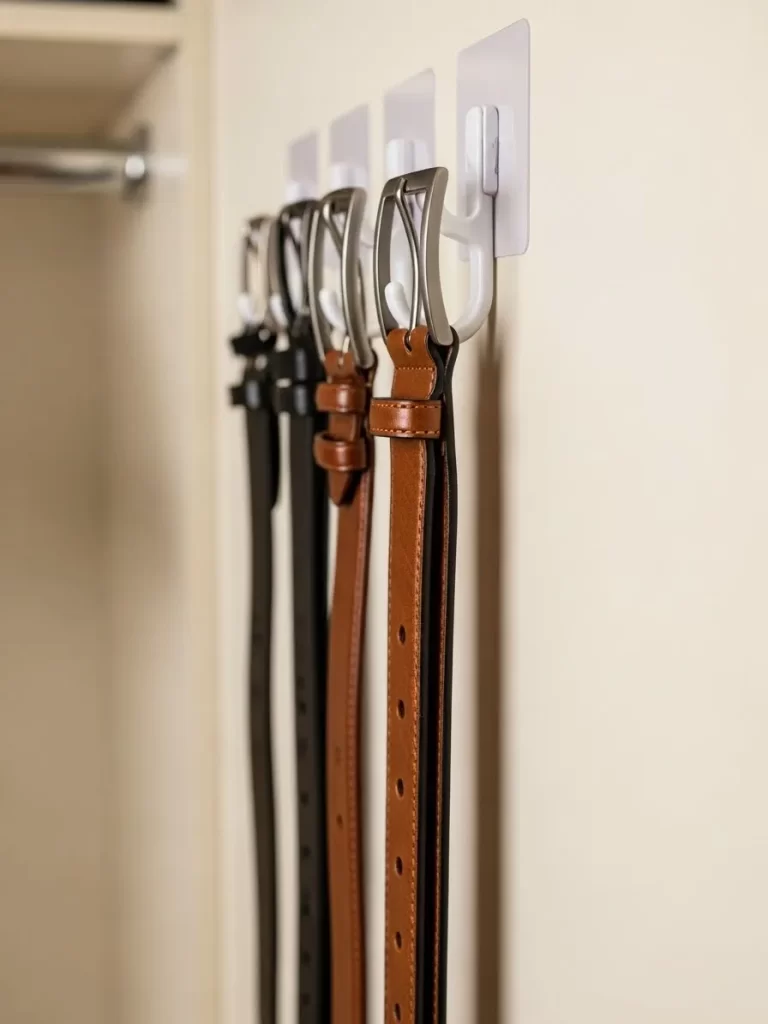
Belts often end up in a messy pile at the bottom of a drawer or shelf. You can use adhesive hooks on the inside of your closet wall to hang them. This keeps the leather straight and prevents the buckles from getting scratched.
You can see every belt at once which makes getting dressed much faster. The hooks take up no room and keep your accessories organized in a small space. It is a very affordable fix for a cluttered wardrobe area.
Material Required List
- Adhesive wall hooks
- Cleaning alcohol
- Small labels
Equipment Required List
- Measuring tape
- Pencil
DIY Instruction Step By Step
- Find a vertical spot on your closet wall or door for the belt rack.
- Wipe the area with alcohol to make sure the hooks stick well.
- Mark a horizontal line with your pencil to keep the hooks level.
- Space the marks about three inches apart for each of your belts.
- Peel the backing off the adhesive hook and press it to the wall.
- Hold the hook in place for thirty seconds to ensure it stays put.
- Wait one hour before hanging any weight on the new hooks.
- Hang your belts by the buckles to keep them organized and visible.
31 Foam Ring Boot Shapers
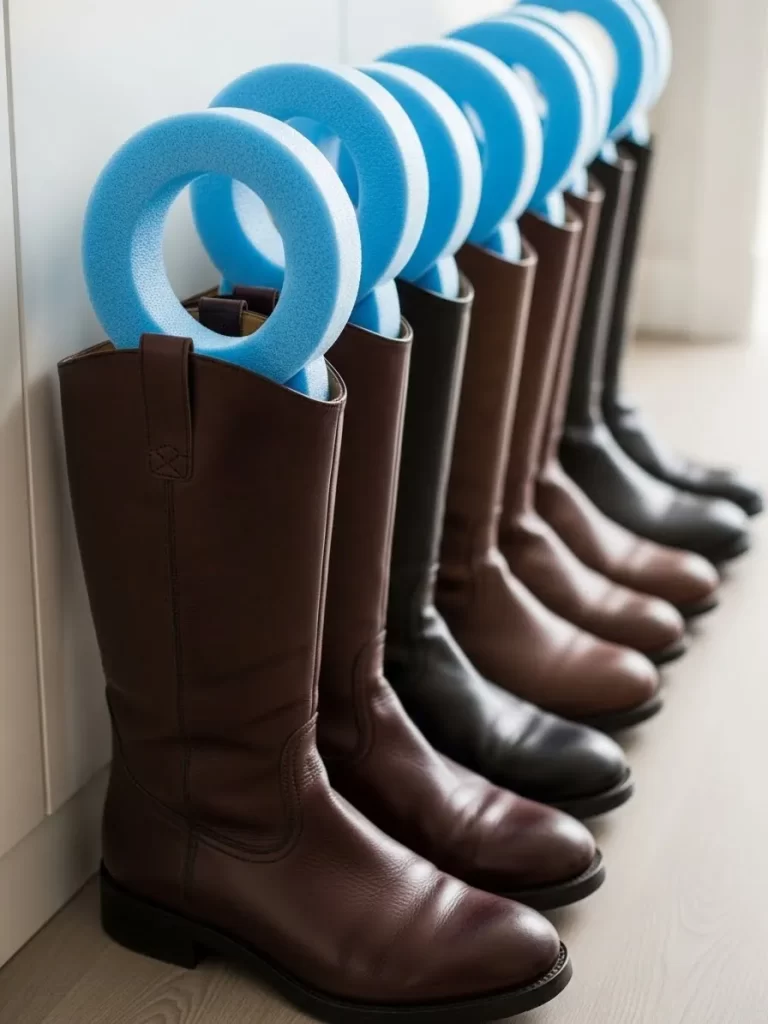
Keep your long boots standing tall with lightweight foam inserts. These circular supporters prevent the leather from bending and cracking at the ankles. You will find that your boots last many more seasons when they are stored this way.
The bright blue foam is easy to handle and fits into almost any boot size. It provides firm support while allowing air to reach the bottom of the footwear. Your closet floor will look professional and tidy with every pair lined up.
Material Required List
- Foam pool noodles or pre cut foam rings
- Scented sachets
- Decorative fabric
Equipment Required List
- Utility knife
- Measuring tape
DIY Instruction Step By Step
- Measure the height of your boot shaft from the heel to the top edge.
- Mark your foam material with a pencil at that specific length.
- Cut the foam into sections using a sharp utility knife carefully.
- Slice a small slit down the center if you need to bend the foam.
- Place a scented sachet inside the boot to keep the interior fresh.
- Slide the foam supporter deep into the boot until it reaches the ankle.
- Ensure the top of the foam sits just below or at the top of the boot.
- Stand your boots in a single row along the wall or on a low shelf.
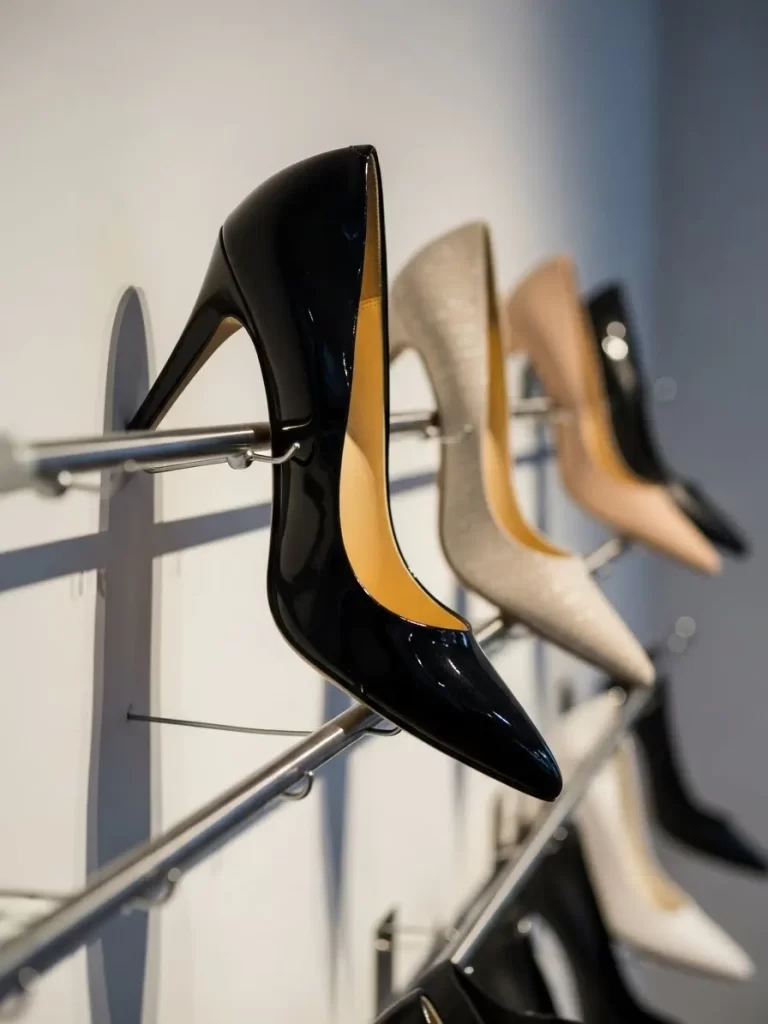
32 Vertical Wall Heel Bars
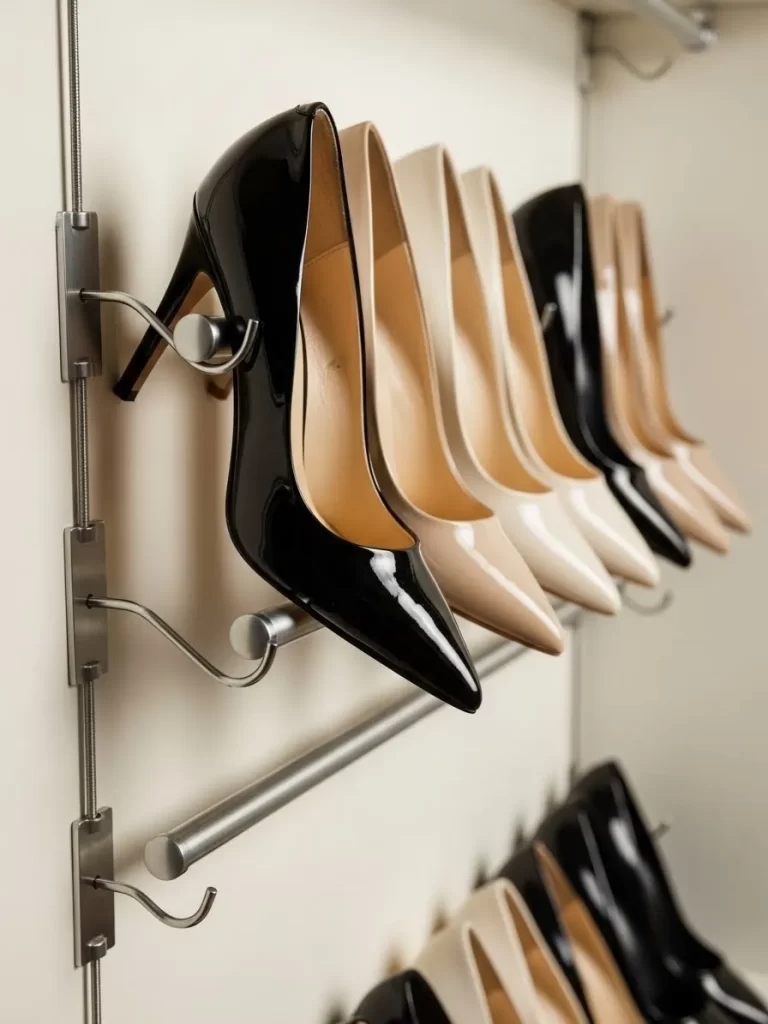
Show off your high heels by hanging them on wall mounted metal bars. This solution turns your footwear into a piece of art while saving a lot of floor space. You can easily find the right pair for your outfit in seconds.
The bars hold the heels securely and prevent the shoes from falling over. This setup works well on narrow walls that are usually left empty in closets. It gives your dressing area a modern and stylish look immediately.
Material Required List
- Thin metal rods
- Wall mounting clips
- Screws
- Wall anchors
Equipment Required List
- Power drill
- Level tool
- Pencil
- Screwdriver
DIY Instruction Step By Step
- Pick a section of your closet wall that is clear of hanging clothes.
- Mark the spots for the mounting clips using a pencil and a level tool.
- Space the bars about twelve inches apart so shoes have enough room.
- Drill holes at your marks and insert the plastic wall anchors.
- Screw the mounting clips into the anchors until they are very tight.
- Slide the metal rod into the clips and secure it in place.
- Repeat this for as many levels as you need for your collection.
- Hook the heels of your shoes over the bar so the toes point down.
33 Dedicated S Hook Purse Rail

Organize your handbags by hanging them from a dedicated rail with metal S hooks. This keeps the straps straight and prevents the bags from getting dusty on the floor. You can see every purse you own without having to move a single box.
The hooks slide easily along the bar so you can adjust spacing for different sizes. It is a very quick way to tidy up a messy shelf or corner. Your accessories will stay in great condition and remain easy to reach.
Material Required List
- Metal rod
- Large S hooks
- End brackets
- Screws
Equipment Required List
- Power drill
- Measuring tape
- Level tool
DIY Instruction Step By Step
- Measure a spot on your closet wall or under a shelf for the rail.
- Mark the positions for the end brackets with your pencil clearly.
- Drill holes and tap in the wall anchors if you are mounting to wall.
- Screw the brackets into place and make sure they are level.
- Slide the metal rod into the brackets and secure it tightly.
- Place the metal S hooks onto the rod one by one.
- Loop the handle of your handbag over the bottom of the S hook.
- Space the bags out so they do not touch and lose their shape.
34 Brass Hanging Jewelry Bar
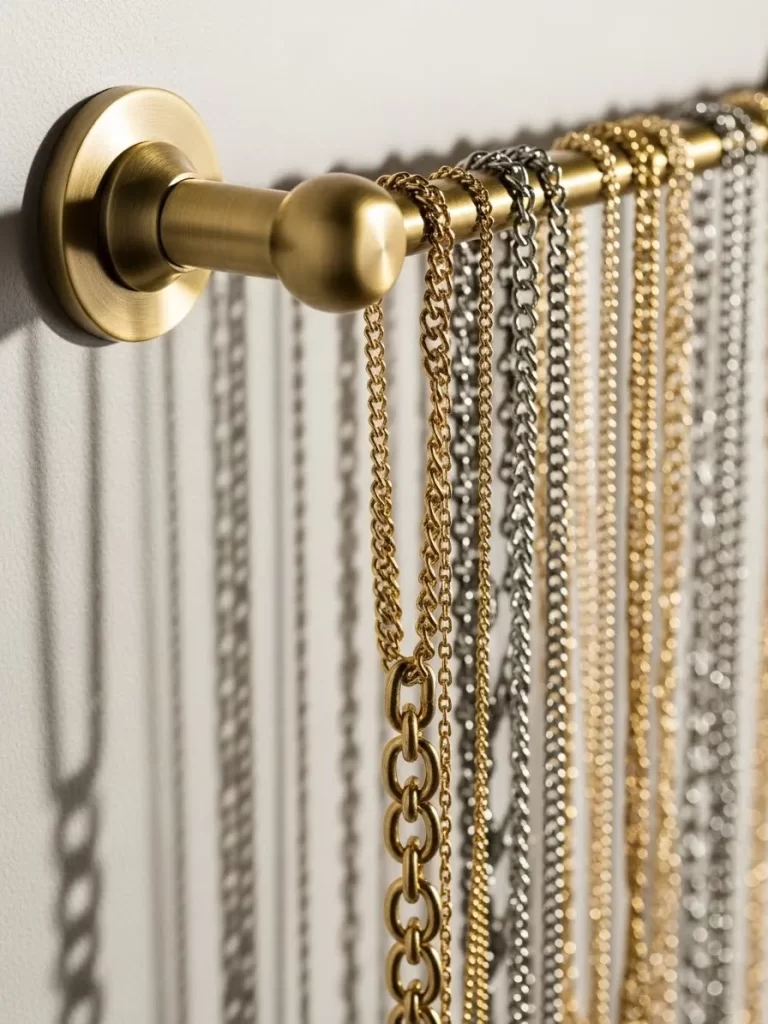
Keep your necklaces from tangling by hanging them on a stylish brass rod. This simple wall mount allows you to see every chain and pendant clearly. It adds a touch of elegance to your dressing area while keeping your jewelry safe.
The rod is thin enough to hold many items without looking crowded on the wall. You can mount it at eye level so you can quickly grab what you need. This project is much better than keeping pieces in a messy box.
Material Required List
- Solid brass rod
- Two wall flanges
- Small screws
- Wall anchors
Equipment Required List
- Power drill
- Level tool
- Pencil
- Fine cloth
DIY Instruction Step By Step
- Choose a flat wall area near your mirror or dressing table.
- Hold one flange against the wall and mark the screw holes.
- Use a level to mark the second flange spot so the rod stays straight.
- Drill small pilot holes at your marks and push in the anchors.
- Screw the first flange onto the wall until it is firm.
- Slide the brass rod into the first flange and then the second one.
- Screw the second flange into the wall to lock the rod in place.
- Wipe the brass with a fine cloth to remove any fingerprints.
- Drape your necklaces over the rod and arrange them by length.
35 Tennis Ball Accessory Slits
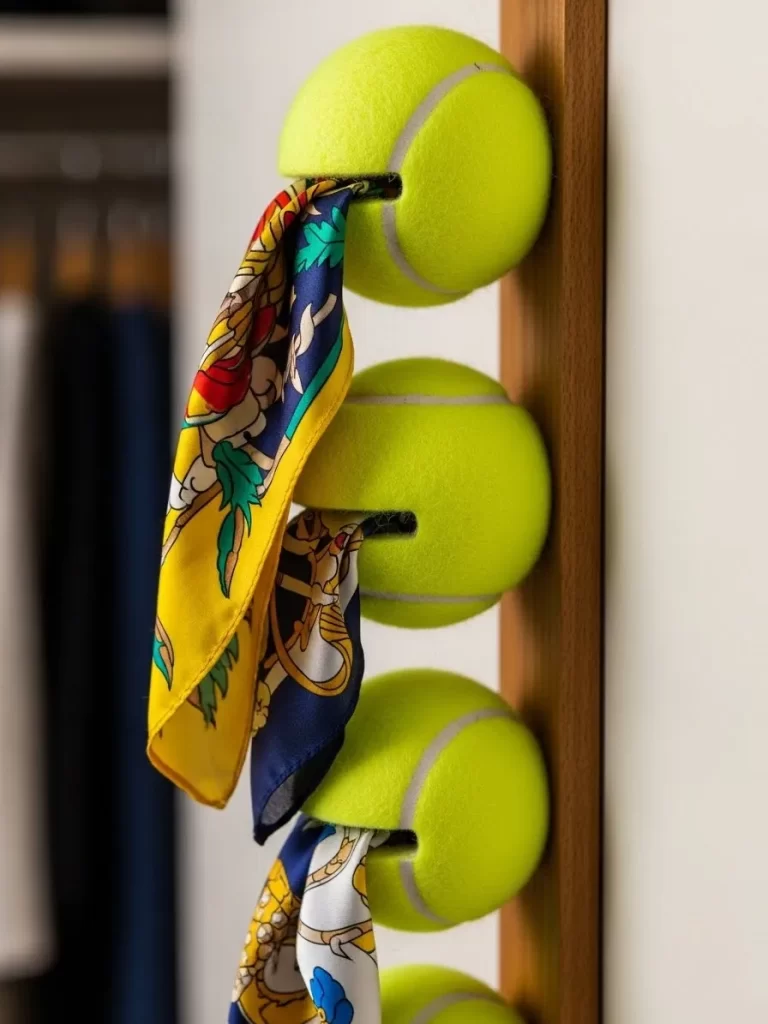
Create a unique storage spot for your scarves and small items using tennis balls. By making a small cut in the ball, you create a natural grip that holds fabric securely. This is a very creative way to reuse old sports equipment.
The balls are soft and will not damage your delicate silk or wool scarves. You can mount several of them in a row for a playful look on the wall. This project is a great conversation piece and keeps items organized.
Material Required List
- Used tennis balls
- Wood screws
- Large washers
- Wooden board
Equipment Required List
- Utility knife
- Power drill
- Screwdriver
DIY Instruction Step By Step
- Use a sharp utility knife to cut a straight horizontal slit across each ball.
- Make sure the cut is deep enough to reach the hollow center easily.
- Drill a small hole in the back of the ball opposite the slit.
- Place a large washer on a screw and insert it through the front.
- Drive the screw through the back hole and into a board or wall.
- Repeat this for all your tennis balls until they are in a line.
- Slide the end of a scarf into the slit of the ball.
- Pull on the fabric slightly to make sure the ball holds it tight.
36 Clear Acrylic Sweater Dividers
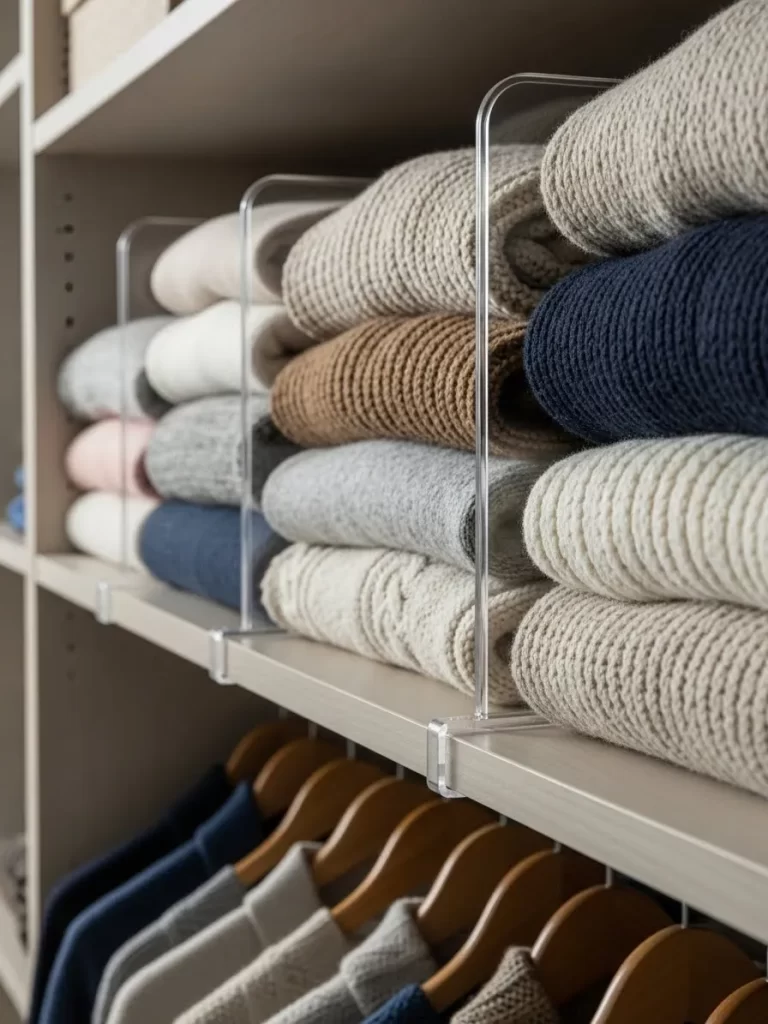
Stop your stacks of sweaters from falling over with clear acrylic shelf dividers. These simple vertical boards create separate columns for your folded clothes. You can see every item in the stack without worrying about a mess.
The clear material makes your closet look much larger and more modern. The dividers slide easily onto most standard wooden shelves without any tools or screws. It is a very smart way to keep your knits organized and tidy.
Material Required List
- Acrylic shelf dividers
- Non slip adhesive pads
- Labels
Equipment Required List
- Measuring tape
- Cleaning cloth
DIY Instruction Step By Step
- Clean your closet shelf thoroughly to remove any dust or lint.
- Measure the height of your shelf to make sure the dividers fit inside.
- Peel the backing off the non slip pads and stick them to the divider.
- Slide the divider onto the edge of the shelf for a new stack.
- Space the dividers about ten inches apart for sweaters or knits.
- Push the divider all the way back until it touches the wall.
- Fold your clothes into neat rectangles that match the column width.
- Stack your items between the dividers and enjoy the organized look.
37 Vertical Drawer File Folding
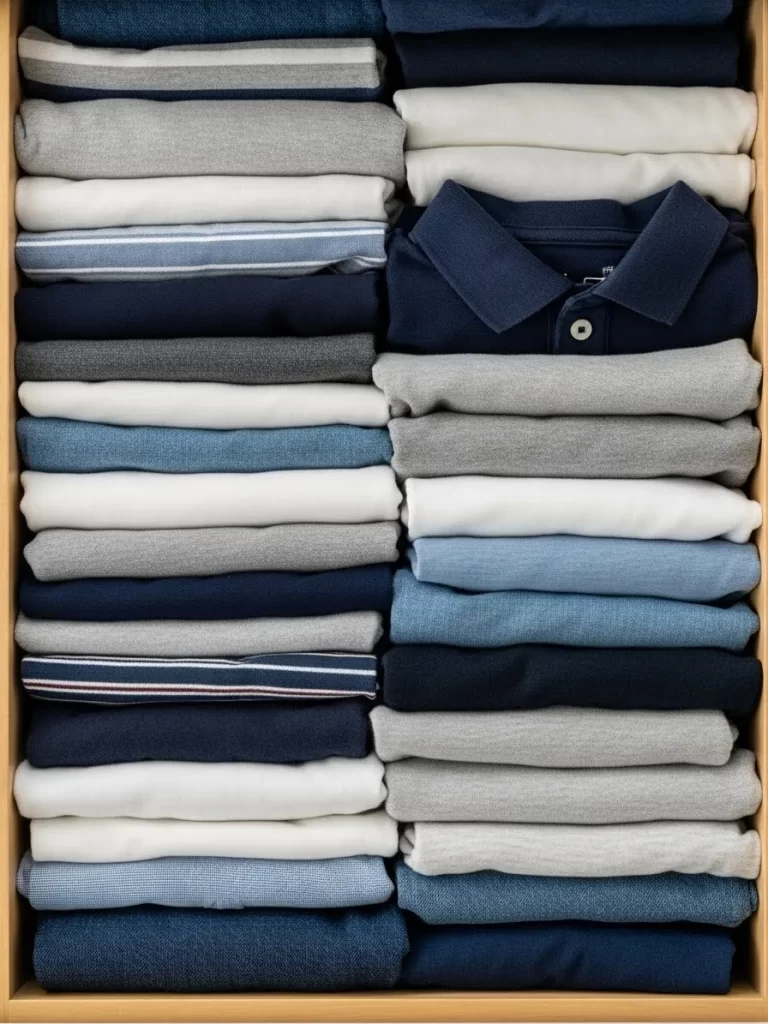
Maximize the space in your drawers by folding your clothes vertically like files. This method allows you to see every shirt or pair of pants at a glance. You will never have to dig to the bottom of a stack again.
This system keeps your clothes looking neat and prevents deep wrinkles from forming. It also allows you to fit many more items into a single drawer space. Your morning routine will become much faster when you pick outfits instantly.
Material Required List
- Cardboard strips
- Double sided tape
- Scented liners
Equipment Required List
- Scissors
- Measuring tape
DIY Instruction Step By Step
- Empty your drawer and place a scented liner at the bottom for freshness.
- Measure the height of your drawer and cut cardboard strips slightly shorter.
- Use double sided tape to stick the strips to the sides for sections.
- Lay a shirt flat and fold the sides into the center for a rectangle.
- Fold the rectangle in half and then into thirds until it stands on edge.
- Place the folded shirt into the drawer with the folded edge upward.
- Line up your clothes in rows from the front of the drawer to back.
- Group them by color to make the drawer look beautiful and tidy.
38 Zip Up Mesh Packing Cubes
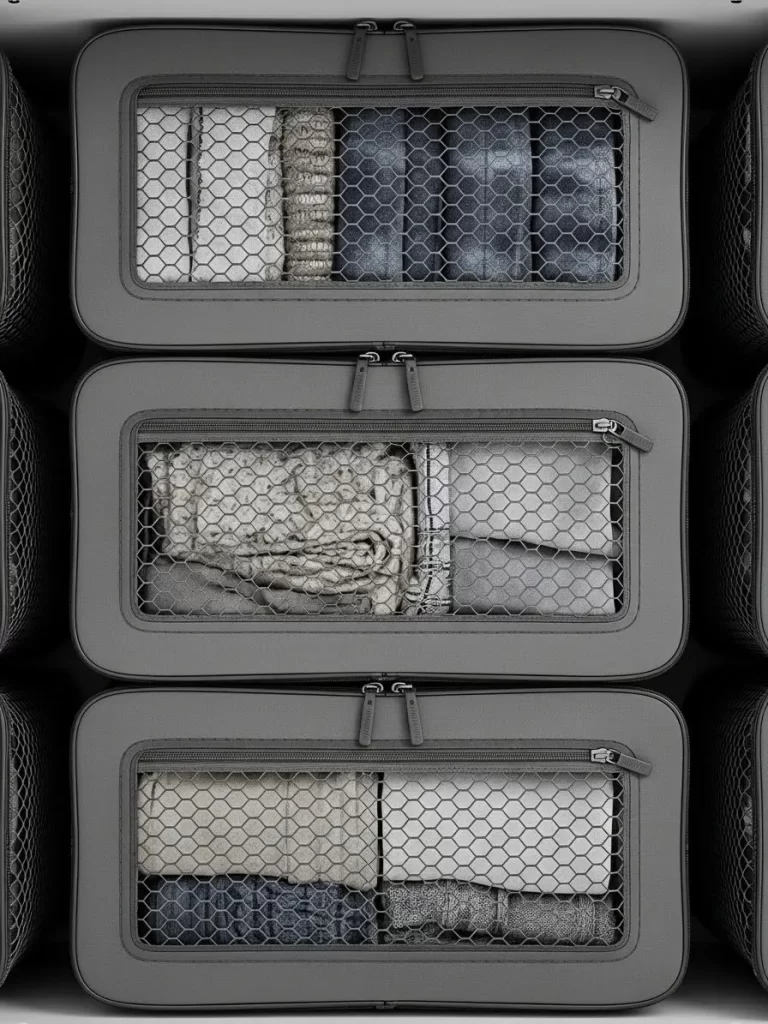
Keep your small accessories organized inside your closet using mesh packing cubes. These zip up bags are great for holding socks, underwear, or swimwear on shelves. The mesh front allows you to see what is inside without opening it.
The cubes protect your delicate fabrics from dust and accidental snagging. They are easy to stack and can be moved around as your needs change. This project is a very affordable way to add structure to large shelves.
Material Required List
- Mesh packing cubes in various sizes
- Dryer sheets
- Small labels
Equipment Required List
- No tools needed
DIY Instruction Step By Step
- Sort your small items into groups like socks or belts.
- Fold each item neatly and place it inside a packing cube carefully.
- Add a dryer sheet to the cube to keep everything smelling fresh.
- Zip the cube closed and check that it is not overstuffed.
- Write the contents of the bag on a label and attach to handle.
- Stack the cubes on your closet shelf from largest to smallest.
- Place the items you use daily in the most reachable spot.
- Swap the cubes around when the seasons change for relevant items.
39 Vertical Canvas Shoe Cubby

Add a vertical shoe station to your closet rod with a hanging canvas organizer. This solution provides ten or more cubbies for your sneakers and flats. It uses vertical space that is usually wasted and keeps your floor clear.
The soft fabric is gentle on your shoes and prevents them from getting scuffed. You can also use the cubbies for rolled towels or bulky sweaters if needed. It is a very versatile tool for any small storage area.
Material Required List
- Hanging canvas organizer with velcro strap
- Cardboard inserts
- Fabric spray
Equipment Required List
- Step ladder
DIY Instruction Step By Step
- Use a step ladder to reach your main closet rod safely.
- Wrap the velcro strap of the organizer around the rod and press.
- Make sure the organizer hangs straight and has room to swing.
- Slide a cardboard insert into the bottom of each cubby for strength.
- Spray the canvas with a light fabric protector to keep it clean.
- Place one pair of shoes into each cubby with toes facing out.
- Group your shoes by style so all your sneakers are together.
- Check the weight every few weeks to make sure the rod is secure.
40 Leather Tag Bin Labels
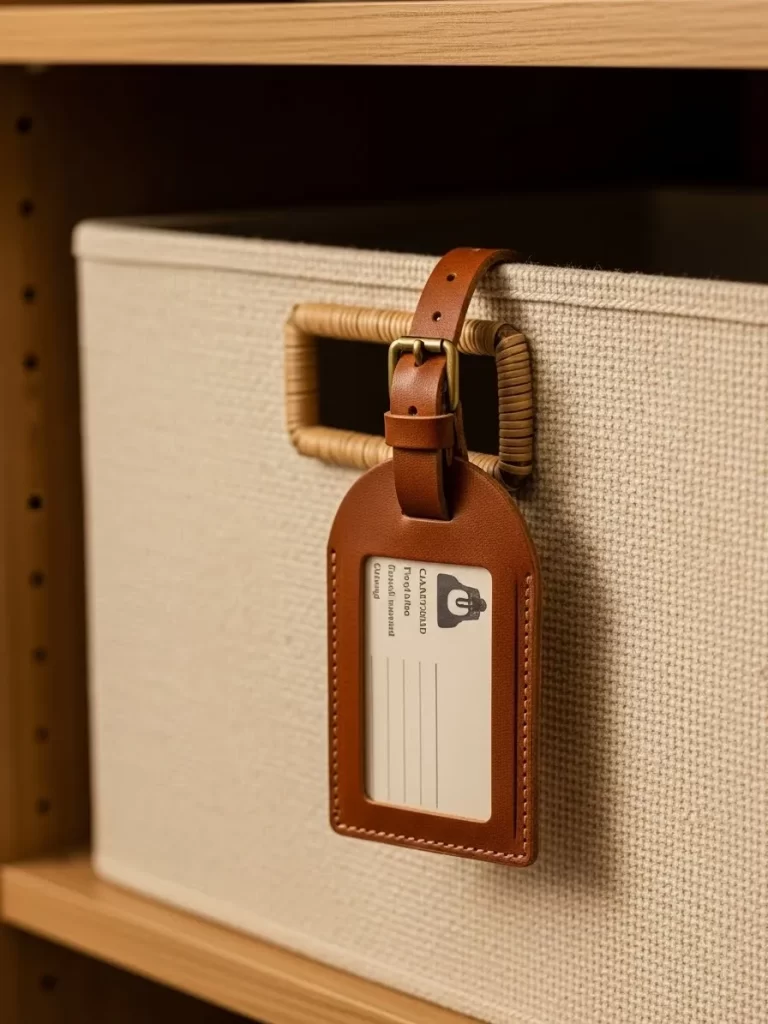
Give your storage bins a luxury look by adding high quality leather labels. These tags make it easy to identify the contents of your boxes from a distance. You can use them on woven baskets, plastic bins, or fabric cubes.
The leather adds a warm and natural touch to your closet decor. It is a very durable material that will last for years without fading. Your storage system will look like it was designed by a professional organizer.
Material Required List
- Leather luggage tags or scraps
- Metal rivets or string
- Permanent marker
- Cardstock inserts
Equipment Required List
- Leather punch
- Hammer
- Scissors
DIY Instruction Step By Step
- Cut your leather into small rectangular shapes if using scraps.
- Use a leather punch to make a small hole at the top of the tag.
- Write the category name on a piece of cardstock and slide into tag.
- Loop a piece of sturdy string or a metal rivet through the hole.
- Attach the tag to the handle or the front of your storage bin.
- Make sure the label is facing forward so you can read it easily.
- Repeat this for every bin in your closet for a consistent look.
- Update the cardstock inserts whenever you change the items in bin.
41 Multi Ring Tank Top Hanger
Store many tank tops on a single hanger using metal rings to save hanging space. This method keeps your tops straight and prevents them from getting buried in drawers. You can see every color and style without having to pull items out.
This solution is very affordable and uses basic supplies found in any store. It is a great way to manage a large collection of summer clothes in a small closet. Your clothes will stay wrinkle free and ready for any outfit.
Material Required List
- Sturdy metal hanger
- Metal shower rings
- Small zip ties
Equipment Required List
- No tools required
DIY Instruction Step By Step
- Snap several metal shower rings onto the bottom bar of a hanger.
- Space the rings about two inches apart so the tops do not touch.
- Use a small zip tie to secure each ring in place if they slide around.
- Slide one strap of your tank top through each metal ring.
- Let the tops hang vertically below the hanger for a clean look.
- Group your tops by color to make choosing an outfit faster.
- Hang the main hanger on your closet rod as you normally would.
- Enjoy the extra space you created on your hanging rail.
42 High Heel Wall Rods
Utilize empty wall space to display your high heels on thin metal rods. This project keeps your expensive shoes off the floor and away from dust. It turns your footwear into a beautiful and organized part of your closet decor.
The rods hold the heels securely and prevent the shoes from losing shape. This setup is great for narrow walls that cannot fit traditional shelving. You will love how easy it is to pick the right pair for any event.
Material Required List
- Thin metal rods or curtain rods
- Wall brackets
- Screws
- Wall anchors
Equipment Required List
- Power drill
- Level tool
- Pencil
- Measuring tape
DIY Instruction Step By Step
- Pick a flat section of your closet wall that is easy to reach.
- Mark the spots for the wall brackets using a pencil and level.
- Space the rods about ten inches apart vertically for shoe height.
- Drill holes into the wall and insert the plastic wall anchors.
- Screw the brackets into the anchors until they are very tight.
- Slide the metal rod into the brackets and secure it in place.
- Repeat this for all the levels you need for your collection.
- Hook the heels of your shoes over the rod so they hang safely.
Managing a small closet does not have to be a daily struggle. You can reclaim your space by trying a few of these smart storage tricks. Every small improvement makes your daily routine much more pleasant.
Start with one project and see how it changes your morning. You will likely find the motivation to tackle even more areas of your home. A tidy space leads to a much clearer mind and a happier lifestyle.
Key Takeaways
Vertical space is often wasted but offers the most room for growth. You can easily double your capacity by adding lower rods or wall hooks.
Lighting can change how you perceive and use a dark storage area. Adding simple LED strips makes finding items much faster and reduces clutter.
Repurposing household items saves money while solving organization issues. Common things like soda tabs or magazines can become powerful storage tools.
Grouping items by category or color keeps the space looking neat. Consistent hangers and labeled bins create a professional look in any wardrobe.