
Christmas is about tradition, but your decor does not have to be dull! Every year, those mass produced ornaments seem to offer the same tired look, lacking any real soul or memory. This holiday season, why not craft a truly personal tree?
Creating your own DIY Christmas ornaments is the answer. It’s an amazing way to save money, engage the family in a fun activity, and most importantly, build a collection of cherished keepsakes that tell your unique story.

Handmade decorations naturally bring a cozy, bespoke warmth to your home that no store bought item can rival. They are wonderful for commemorating big family milestones—a new home, a wedding, or the arrival of a baby.
Plus, decorating your tree with personal ornaments gives it instant visual appeal. We have gathered 39 incredible DIY ideas, covering everything from rustic wood slices to dazzling mirror mosaics, all broken down into easy steps for anyone to follow. Get ready to transform your tree from basic to breathtaking!
1. Handpainted Year Slice

This gorgeous, rustic wood slice offers the chance to capture a moment in time. The large painted year stands out beautifully against the natural bark, making it a wonderful keepsake for family memories. Fine pine branch details and tiny white dots surround the center, giving the piece a cozy, snowy border.
Using a wood slice is an easy way to bring natural texture to your Christmas tree decor. This durable decoration is lightweight and keeps the focus entirely on the hand-lettered message. It serves as a beautiful reminder of the current year’s holidays and travels. You can use different colors or themes each year to build a collected set of annual ornaments. This craft is simple enough for anyone to try, regardless of their painting skill level.
DIY Instructions: The Handpainted Wood Slice
You need just a few basic craft supplies to create this charming ornament. Remember to ask a grown up for help with any cutting or sanding.
Supplies:
- One pre-sanded wood slice with bark attached (about 4 to 5 inches wide)
- Acrylic paint in white and black (or colors you love)
- A thin paint brush and a medium flat brush
- A pencil
- Jute twine or ribbon for hanging
Step 1: Preparing the Background First, take your medium brush and the white acrylic paint. You will paint a circle right in the middle of the wood slice. Make sure this circle is big enough to hold your large numbers easily. Let this white circle dry completely. It might need two coats of white paint to make the numbers stand out later.
Step 2: Planning Your Year Once the white paint feels dry and chalky, grab your pencil. Gently draw the four numbers of the current year right onto the white circle. You want them big and bold. Since pencil marks are easy to erase, you can adjust them until they look just right.
Step 3: Painting the Numbers Now, switch to the black paint and your medium brush. Carefully paint over the pencil lines for the year. Take your time to fill in the numbers neatly. If you want the numbers to look really solid, let the first layer dry and then paint a second layer.
Step 4: Adding the Evergreen Border Use your thin paint brush and the black paint. Now you will draw the pine branches around the edge of the white circle. The branches are simple: paint a curved line, then add tiny, short, angled lines coming off of it to look like pine needles. Keep practicing until you have a full wreath shape around the numbers.
Step 5: Creating the Snowy Look Switch back to your white paint and use the very tip of your thin brush or the end of a pencil eraser. Gently dab little white dots all over the wood slice, especially near the pine branches. These tiny dots will look like snowflakes or falling snow. Let all the paint dry.
Step 6: Attaching the Hanger Finally, loop a piece of the jute twine through the pre-drilled hole at the top of the wood slice. Tie the ends in a strong knot. Your personalized annual memory ornament is now ready to hang on the tree!
2. Woven Nordic Star

This beautiful woven decoration provides an elegant, earthy texture to your holiday setup. Thin strips of paper or woven material in soft, natural colors crisscross to form a striking, symmetrical star shape. A small wooden bead at the center and a simple tag add a finished touch.
Woven ornaments are a wonderful way to bring a Nordic or minimalist feel to your decorating. The intricate yet straightforward weaving creates a visually complex pattern that looks stunning against the green pine needles. Try experimenting with different color combinations, such as bright red and green or metallics like silver and gold. This flat, sturdy design makes it a long lasting piece you can use for many seasons.
DIY Instructions: The Woven Nordic Star
Woven paper stars are easier to make than they look. You will need some thin, flat strips of material, like scrapbook paper or thin wood veneer strips.
Supplies:
- Thin craft strips (paper or veneer), about 1/2 inch wide, in two different colors (you will need 8 strips total)
- Craft glue that dries clear
- A pair of scissors
- Two small wooden beads
- Twine for hanging
Step 1: Preparing the Weaving Strips Lay out four strips of one color going up and down on your work table. Place four strips of the second color going side to side. You want to weave them together just like you would start a checkered picnic blanket. Put a little drop of glue where the strips cross in the center to hold them steady.
Step 2: Starting the Corner Weaves Now you have a big square in the middle with strips coming out in eight different directions. You need to create little pointed shapes at the ends of these strips. Take two strips next to each other and fold them diagonally, weaving them over and under each other until you create a pointy star arm. Glue the ends together at the point.
Step 3: Completing the Arms Keep working your way around the center. You will weave the strips together in pairs until you have four woven points for your star. You may need to trim any extra length when you glue the points together. Make sure the points all look about the same size and shape.
Step 4: Adding the Details Once the glue is completely dry and the star is firm, thread a long piece of twine through the top arm of the star. Tie the ends together to make a loop. Before tying, you can thread one of the wooden beads onto the twine for extra charm. You can also glue a bead onto the center point for decoration.
3. Light Up Gingerbread Home

This tiny, charming house captures the cozy feeling of a home for the holidays. Modeled after classic gingerbread houses, this design uses durable clay materials to create a long lasting piece. The details, including the tiny white frosting windows and brick texture, look incredibly sweet. A small light placed inside gives the house a soft, welcoming glow on the tree.
Personalize this unique decoration with a special phrase or date written on the base. It makes a memorable gift for a new couple or a way to celebrate moving into a new space. The star shaped cutouts on the front wall add a fun holiday touch, making this piece truly stand out. This lovely home reminds everyone of warmth and tradition.
DIY Instructions: The Clay Gingerbread Home
You will need a type of clay that air dries or needs baking, like polymer clay. Always follow the clay instructions for baking times, and ask a grown up for help with the oven.
Supplies:
- Clay or modeling material in brown (for the house) and white (for the frosting)
- Rolling pin
- Plastic butter knife or clay shaping tools
- Small cookie cutters (house or square/star shapes)
- A small battery operated LED tea light
- Thin wire and an ornament hook
Step 1: Making the House Pieces First, roll out the brown clay until it is about as thick as two stacked nickels. Use your knife or a ruler to cut out five shapes: two rectangles for the side walls, one large rectangle for the back, one piece for the floor, and one piece with a triangle top for the front wall.
Step 2: Building the Walls Use a little bit of water or special clay glue to stick the walls together, making a box shape. Gently smooth the edges where the walls meet so they look neat. Make sure the front wall is facing forward. Do not put the roof on yet.
Step 3: Creating Details Use a tiny piece of white clay rolled thin to make the “frosting.” Cut out tiny squares and arches to make the windows and doors. Gently press them onto the brown walls. You can use mini cookie cutters to make the star shapes or chimney details.
Step 4: Adding the Roof and Hanger Now, cut two matching roof rectangles out of the brown clay and attach them to the top. When the house is built, gently poke a small hole in the very top of the chimney or roof to insert a thin wire loop for hanging later.
Step 5: Baking and Lighting Ask a grown up to bake your house following the clay package directions. Once cool, paint any words you like onto the base. Push the wire loop through the roof hole. The LED tea light goes inside the house’s base. You can carefully secure it with a tiny bit of glue so it does not fall out when you hang it.
4. Spiced Citrus Sparkle

These sun kissed dried orange slices provide a beautiful, natural color to your tree. The simple yet sophisticated look features a natural cinnamon stick tied across the center, giving the whole piece a beautiful, warm holiday aroma. A touch of gold glitter dust makes the fruit segments shine like tiny stained glass windows.
Natural ornaments are highly popular because they bring an organic, festive scent right into your home. The copper wire hanger gives it a refined, handcrafted feel. You can easily make a dozen of these decorations at once to fill your tree with color and amazing fragrance. Use different citrus fruits like limes or grapefruit for a varied look and scent.
DIY Instructions: The Spiced Citrus Sparkle
The trickiest part is preparing the oranges, so be sure to get a grown up to help with the oven.
Supplies:
- Thinly sliced oranges (dried completely in an oven or dehydrator)
- Whole cinnamon sticks
- Craft glue
- Gold glitter or gold paint
- Copper jewelry wire (thin gauge)
- Wire cutters and a small round object (like a pencil)
Step 1: Drying the Orange Slices Ask a grown up to slice whole oranges very thin, about 1/4 inch thick. Lay the slices on a baking sheet and bake them in a very low oven for several hours, flipping them often, until they are totally dry and hard. This must be done correctly so they last.
Step 2: Adding Sparkle Once the slices are cool and dry, you can add glitter. Brush a small amount of craft glue onto the inner edges of the orange segments. Sprinkle the gold glitter onto the wet glue, then shake off the extra. Let the sparkle dry completely.
Step 3: Attaching the Cinnamon Put a drop of strong craft glue on the back of the orange slice. Press one or two cinnamon sticks across the center to hold them in place. Wait for the glue to set firmly before moving on.
Step 4: Creating the Hanger Take the copper wire and cut about 6 inches of it. Gently use the round pencil to help you bend one end of the wire into a small loop for hanging. Thread the other, straight end of the wire through the top edge of the orange slice. Twist the wire end around the loop to secure the ornament.
5. Miniature Forest Snow Globe

Step into a tiny, magical woodland with this clear glass orb ornament. Inside, a detailed scene of mossy ground, tiny evergreen trees, and bright red toadstools creates a wonderful, enchanting world. Small stones and a hint of blue sparkle for water complete the miniature landscape.
This DIY terrarium brings a touch of whimsy and fantasy to your Christmas decor. The clear globe allows the beautiful scene to be viewed from all sides, making it a captivating piece. You can hide a special message written on a tiny scroll inside for a surprise element. Use different miniature elements, like tiny woodland animals or snowmen, to change the theme. It’s a memorable, customized decoration that showcases your creativity.
DIY Instructions: The Miniature Forest Globe
This project requires careful gluing and tiny materials.
Supplies:
- Clear plastic or glass ornament globe (with a removable top)
- Fake moss and small craft greenery (like tiny bottle brush trees)
- Small decorative toadstools or mushrooms
- Tiny pebbles and sand
- Blue glitter or fake snow
- Strong craft glue (that dries clear)
Step 1: Building the Ground Remove the metal top from your globe. Pour a very thin layer of sand into the bottom. Mix a little bit of blue glitter or fine blue sand with the regular sand to create a tiny “pond” area.
Step 2: Creating the Scene Base Take a cotton swab or a stick and push a dollop of strong craft glue onto the sand where you want your main elements to sit. Press the fake moss onto the glue to create the ground cover.
Step 3: Planting the Forest Now, use the glue to carefully attach your miniature greenery and trees into the mossy ground. Use tweezers if the pieces are very small. Place the red toadstools around the “pond” area to make it look like a little clearing. Remember to put elements near the front so they are easy to see.
Step 4: Securing the Scene Make sure all your pieces are firmly glued and nothing will shake loose. Let the glue dry completely. This might take several hours.
Step 5: Closing the Globe Once everything is dry and stable, gently put the metal top back onto the globe. Loop a thin string or clear fishing line through the metal hook at the top for hanging. Your tiny forest is now ready for the tree!
6. Cozy Knit Memory Pillow

These adorable, plush decorations resemble cozy handknitted sweaters. Featuring bold red and white patterns, these soft shapes add warmth and a rustic cabin feel to your tree. The embroidered number on the star and the mittens makes this a wonderful piece to mark a special year or a family date.
This textile ornament design provides a welcome softness and texture among the hard glass and ceramic decorations. Using stuffed shapes like stars or mittens is a charming way to celebrate the holiday season. They are very safe for homes with little ones or pets since they will not shatter if they fall. This craft is also a great way to use leftover pieces of old sweaters or knit fabric scraps.
DIY Instructions: The Cozy Knit Memory Pillow
You will need some knit fabric or the sleeves of an old sweater. Ask a grown up to help you with the sewing machine if you use one.
Supplies:
- Knit fabric (wool or acrylic) in your chosen colors
- Scissors
- Needle and embroidery floss or yarn
- Polyester stuffing
- Paper for templates
Step 1: Making the Template First, draw the shape you want your ornament to be—a star, a mitten, or a small square—onto the paper. Cut out this paper template. Make sure it is the size you want the finished ornament to be.
Step 2: Cutting the Fabric Pin the template onto your knit fabric. Cut out two identical shapes for each ornament you plan to make. Be careful not to cut your fabric too small.
Step 3: Adding the Numbers Now is the time to add any personalized numbers or designs to one side of the fabric. You can cut out numbers from felt and glue them on, or use embroidery floss and a needle to sew them directly onto the fabric. If you sew, make sure your stitches are neat.
Step 4: Sewing the Ornament Place the two matching fabric shapes exactly on top of each other. Using a needle and floss (or a sewing machine), sew all the way around the edge. Make sure you leave a small opening, about 1 inch wide, so you can push the stuffing inside.
Step 5: Stuffing and Closing Gently push the soft polyester stuffing into the small opening. Push it in until the ornament looks plump and feels firm, like a small pillow. Once it is full, use the needle and floss to sew the opening shut with tiny, neat stitches.
Step 6: Adding the Loop Finally, sew a small loop of matching yarn or ribbon to the top of the ornament. You now have a soft, personalized keepsake.
7. Monogrammed Gourd Basket

This beautifully crafted mini basket uses natural materials to achieve a rustic, folk art charm. The body of the basket is made from a small gourd or half coconut shell, giving it a unique curve. Woven raffia or jute creates a neat handle and decorative rim. Small red and green craft berries add a splash of holiday color.
The little monogram charm hanging from the handle makes this ornament feel truly special and gift worthy. It is a fantastic option for incorporating earth friendly or cabin style elements into your Christmas display. This small basket is strong and looks great when filled with tiny items like a mini pinecone or a small sprig of greenery. It provides a unique, three dimensional shape to contrast with flat decorations on your tree.
DIY Instructions: The Monogrammed Gourd Basket
This project is great for using strong craft glue and natural fibers like jute or raffia.
Supplies:
- A small, sturdy base (like a half walnut shell, a tiny craft cup, or a dried gourd piece)
- Jute twine, raffia, or thin craft rope
- Small plastic or craft berries (red and green)
- A small initial letter charm or tag
- Strong craft glue (hot glue is best, but a grown up must help)
Step 1: Wrapping the Rim Take your strong glue and spread a thin line along the top edge of your small basket base. Carefully wrap the jute twine around the top edge several times to create a woven looking rim. Trim the excess string and secure the end with more glue.
Step 2: Creating the Handle Cut a short, curved piece of sturdy wire or a thin piece of twig for the handle. Wrap the jute twine tightly around this piece of wire or twig until it is completely covered. Use tiny drops of glue to keep the wrapping neat.
Step 3: Attaching the Handle Put a drop of strong glue on the inside rim of the basket on two opposite sides. Firmly press the ends of your wrapped handle into the glue spots. Hold them still until the glue is completely set and the handle feels strong.
Step 4: Decorating with Berries Glue the small craft berries onto the handle, spacing them evenly. You can use two or three colors for a rich, festive look. Make sure the colors are placed nicely so they balance each other.
Step 5: Final Touches Tie your initial monogram charm onto the center of the handle using a small piece of thin string. Your lovely basket is ready to fill with tiny treasures and hang on the tree.
8. Lacy Quilled Snowflake

This large, intricate snowflake shows off the delicate art of paper quilling. Hundreds of tiny paper coils, curled and shaped into teardrops and eye shapes, connect to form a striking, beautiful design. The light blue and white paper strips make the decoration look icy and ethereal.
Paper quilling is a wonderful skill to learn and results in stunning, lightweight decorations. The design is completely three dimensional, casting interesting shadows on the tree lights. You can easily adjust the size and complexity of the pattern to fit your skill level. These decorations look amazing when hung near a window, catching the winter sunlight. It offers a totally unique and handmade look that factory made ornaments cannot match.
DIY Instructions: The Lacy Quilled Snowflake
Quilling requires patience and a specialized tool to roll the paper strips.
Supplies:
- Thin paper quilling strips in white, light blue, or silver
- A quilling tool (a slotted pen or needle tool)
- Craft glue that dries clear
- Waxed paper or a clear plastic sheet
- Tweezers (helpful for placing tiny shapes)
- Clear fishing line or thread for hanging
Step 1: Rolling the Basic Shapes Take a paper strip and insert one end into the slot of the quilling tool. Carefully and tightly roll the strip all the way up. Slide the coil off the tool and let it gently expand into a looser circle. Glue the end closed. Make at least 50 of these coils.
Step 2: Shaping the Coils Now, pinch each coil into different shapes. Pinch one end to make a teardrop shape. Pinch both ends to make an eye shape. You will need many of both shapes.
Step 3: Making the Center Glue a small, tight circle of paper in your main color to start the center of the snowflake. Around this center, glue six teardrop shapes pointed outwards like spokes on a wheel. Let this central piece dry completely.
Step 4: Building the Arms Now, you will build the six arms of the snowflake using the eye shapes and more teardrops. Glue two or three eye shapes together, side by side, and attach them to the tips of the central teardrops. Continue to build outwards, using glue to connect the pieces firmly at their edges. Always let the glue dry between building sections so the snowflake does not fall apart.
Step 5: Finishing the Snowflake Once the snowflake is completely built and dry, carefully glue a piece of clear fishing line to the top arm. Use a generous dot of glue for a strong hold. This intricate paper creation is ready to hang.
9. Galaxy Resin Photo Sphere

This extraordinary ornament uses clear resin to capture a beautiful memory inside a geometric sphere. The deep blue and black colors create a stunning “galaxy” effect, highlighted by shimmering gold foil and iridescent flakes. A cherished photo floats right in the middle, turning the decoration into a miniature memory capsule.
Using resin allows you to create incredibly three dimensional and shiny keepsakes. The faceted shape catches the light beautifully, making it an attention grabbing piece on any tree. The embedded photograph ensures this decoration is deeply meaningful and personal. This ornament shows that you can move beyond flat paper and glass to craft truly unique, high quality pieces for your family.
DIY Instructions: The Galaxy Resin Photo Sphere
Working with resin requires special care and safety. You must have a grown up help you with this project because resin and hardener can be messy.
Supplies:
- Clear casting resin and hardener (follow package directions for mixing)
- Silicone mold in a geometric or sphere shape
- Resin color pigments in blue and black
- Gold foil flakes and iridescent glitter
- A photo printed on transparent paper (cut to fit)
- Small mixing cups and stir sticks
- A drill (or a strong grown up) to make the hanging hole
Step 1: Mixing and Coloring the Resin Measure and mix the resin and hardener exactly as the package tells you. This step is super important. Pour a small amount into a separate cup and add a few drops of the blue and black pigment to create a dark, galaxy color.
Step 2: Pouring the First Layer Pour a thin layer of the clear, uncolored resin into the bottom of your mold. Let it sit for about 20 minutes until it feels slightly tacky. Sprinkle in some iridescent glitter and gold foil flakes to make it look like stars.
Step 3: Embedding the Photo Take your small, cut out photo. Gently push it down into the tacky resin layer, making sure it is flat. Pour a tiny layer of the dark, colored resin around the sides of the photo to create the galaxy frame.
Step 4: Finishing the Pour Pour the rest of the clear or slightly tinted resin over the photo until the mold is full. Use a stir stick to make sure there are no air bubbles trapped near the photo. Let the mold sit undisturbed for at least 24 to 48 hours until the resin is completely hard.
Step 5: Finishing Touches Carefully pop the ornament out of the mold. Ask a grown up to drill a small, clean hole near the top. Insert an ornament hook or a piece of thin wire for hanging.
10. Concrete Gilded Disk

This modern, sophisticated ornament offers an exciting contrast of industrial and elegant styles. The decoration is made from a thin disk of dark gray concrete, giving it a unique, earthy weight. A diagonal sweep of bright copper or gold leaf covers part of the surface, creating a stunning visual sparkle.
Concrete is a surprisingly versatile craft material that adds a unique, contemporary touch to Christmas decor. The simple circle shape keeps the focus on the striking textural contrast between the rough matte concrete and the brilliant, shimmering metal foil. This ornament is very durable and appeals to those who enjoy a modern, non traditional holiday look. This piece proves that high style decorations can easily be crafted right at home.
DIY Instructions: The Concrete Gilded Disk
You will need to mix and pour concrete for this project. Always have a grown up help you with the mixing and handling of concrete materials.
Supplies:
- Quick set concrete or cement mix
- Water
- A round mold (like a small plastic container or a large cookie cutter)
- Copper or gold leaf sheets
- Metal leaf adhesive (a special type of glue)
- A small sponge or soft brush
- Drill and wire for hanging
Step 1: Pouring the Concrete Follow the package directions to mix the concrete with water until it is the texture of thick oatmeal. Pour the mix into your round mold. As soon as you pour it, place a straw or stick where you want the hanging hole to be. Let the concrete dry completely; this might take a full day.
Step 2: Removing and Sanding Once the concrete is hard, gently push it out of the mold. Ask a grown up to carefully sand the edges so they feel smooth and neat. If you used a straw for a hole, remove the straw now.
Step 3: Applying the Adhesive Take your metal leaf adhesive and a small paintbrush. Paint a diagonal line across the surface of the disk. Cover about one third of the surface with this glue, making sure the edge is jagged and irregular. Let the glue sit for a few minutes until it feels tacky, like the back of a sticky note.
Step 4: Laying the Foil Carefully lay the copper or gold leaf sheet onto the tacky glue section. Press it down gently using the soft brush. Once the foil is stuck, gently brush away the excess pieces to reveal the beautiful, sparkling gilded pattern.
Step 5: Sealing and Hanging You can spray the ornament with a clear sealant to protect the foil. Once it is fully dry, put a piece of wire or strong string through the hole for hanging.
11. Modern Monogram Maze

This strikingly modern ornament features a large, layered initial with clean, geometric lines. The contrasting black and natural wood layers create a mesmerizing optical illusion, adding depth and visual interest. Hanging from a simple jute string, this piece brings a contemporary, almost architectural element to your Christmas tree decor.
Personalized letters are a fantastic way to honor family names or create thoughtful gifts. Using multiple layers of wood makes the design strong and gives it a high quality, three dimensional look. Smaller versions of the monogram can be hung in groups or attached to gift wrapping for extra flair. This sleek, non traditional design is great for people who prefer a minimalist or graphic style.
DIY Instructions: The Modern Monogram Maze
You will need some thin craft wood or very thick cardstock and paint for this layered look.
Supplies:
- Thin craft wood or foam board (three layers needed)
- Paint in black or a deep color
- Craft knife or laser cutter (ask a grown up for help with sharp tools)
- Strong wood glue
- Jute twine or ribbon
- A printed template of your chosen letter
Step 1: Cutting the Layers Print out your large initial letter in a bold, block font. This is your template. Carefully cut out three identical layers of the letter from your wood or foam board using the template.
Step 2: Painting the Layers Paint the top layer and the bottom layer of the letter using the black paint. Leave the middle layer the natural wood color. Let all the paint dry completely.
Step 3: Creating the Maze Effect Take the middle layer (the natural wood one). Now, use your craft knife to carefully cut out the inner parts of the letter, following the lines. You want to leave a thin wood border that looks like the lines on the example. This step creates the “maze” or line art.
Step 4: Stacking and Gluing Stack the layers carefully in this order: black (bottom), natural wood (middle), and black (top). Make sure the edges line up perfectly. Use strong glue to secure all three layers together. Press them down firmly until the glue dries.
Step 5: Adding the Hanger Loop a piece of the jute twine through the top curve of the letter. Tie a strong knot at the end. Your unique, layered initial is ready to display.
12. Geometric Wired Star

This dazzling star is constructed using thin brass wire woven into a striking, three dimensional geometric shape. Small, clear glass beads are threaded onto the frame, catching the light and creating a beautiful, subtle shimmer. The golden wire is twisted to spell out a word like “Peace” right in the center.
Wire wrapped decorations add an antique, artisanal feel to your holiday decor. This star shape is complex and draws the eye, making it a wonderful statement piece for the tree. The added beads make it sparkle even when the tree lights are off. You can personalize the inner word to match your family’s favorite saying or theme for the year. This piece is strong and will become a cherished heirloom.
DIY Instructions: The Geometric Wired Star
Wire working can be a little tricky, so be careful and ask a grown up to help with the tools.
Supplies:
- Thin craft wire (brass or gold color)
- Small clear glass or acrylic beads
- Wire cutters and jewelry pliers (round and flat nose)
- A small piece of paper with the word you want to spell
Step 1: Bending the Frame Cut about eight pieces of wire, each around 6 inches long. Use the round nose pliers to bend a small loop at both ends of each wire piece. These loops will be the connection points for the star.
Step 2: Connecting the Star Points Using the flat nose pliers, start connecting the wire pieces together by hooking the loops. You want to form a four pointed star shape first, with two wire pieces making up each point. You are making a sturdy, flat frame.
Step 3: Creating the 3D Shape Now, take more wire pieces and connect the existing points in a crisscross pattern, adding height and depth. This is where the geometric shape comes together. You are essentially creating a structure that looks like two pyramids connected at their bases. Make sure all the loops are twisted tightly closed.
Step 4: Adding the Beads Thread a new, thin piece of wire with the clear beads. Wrap this beaded wire around the connection points of the frame. You want the beads to look like they are decorating the star’s edges. Secure the ends by twisting them around the main frame.
Step 5: Writing the Word Take a separate, very thin piece of wire. Carefully bend the wire to spell out the word “Peace” or another short word. Make sure the ends are bent into tiny loops. Use two small pieces of thin wire to attach the word securely to the center of the star frame.
13. Engraved Winter Scene Globe

This elegant clear glass ball features a stunning winter scene etched or painted onto its surface. A majestic stag stands within a snowy landscape of frosted evergreen trees and rolling hills. The decoration includes a subtle initial below the scene and is topped with a beautiful white ribbon bow.
Etched ornaments offer a sophisticated and lasting way to capture holiday images. The clear glass lets the tree lights shine through, creating a magical, frosted effect that is reminiscent of a cold winter night. This style is quite versatile; you can choose different scenes like Santa’s sleigh, or a classic star design. The crisp white detailing makes this a classic and timeless addition to any tree.
DIY Instructions: The Engraved Winter Scene Globe
For an etched look, you can use vinyl stickers or special frosting spray. If you want to paint, you will need glass paint. We will use white paint for a frosty look.
Supplies:
- Clear glass or plastic ornament ball
- White glass paint
- Thin detail brush
- A printed template of a deer or tree scene (small enough to fit)
- Wide white ribbon for the bow
- Thin piece of string
Step 1: Creating the Scene Template Print out the outline of a simple deer and evergreen trees. Cut the images out carefully to create stencils. Tape the stencils gently onto the outside of the clear ornament where you want the design to be.
Step 2: Painting the Base Mix your white paint with a little water so it is thin but still solid. This makes it look frosted. First, use your medium brush to paint a snowy bank across the very bottom of the ornament. Let this strip of white paint dry a bit.
Step 3: Painting the Details Now, use the thin brush and paint carefully inside the stencils to create the white outlines of the deer and the trees. Use tiny dabs of paint for the trees to make them look like soft pine needles. Once the paint is dry, carefully peel off the stencils.
Step 4: Adding the Monogram Use the thin brush to paint your initial or a small word onto the clear area of the ornament. Let all the paint dry completely.
Step 5: Tying the Bow Remove the metal top of the ornament and attach a thin string for hanging. Now, take the wide white ribbon. Tie a large, beautiful bow around the metal top. Place the ornament back onto the tree.
14. Color Block Modern Tag

This contemporary ornament uses bold, graphic shapes and a clean color palette. The tag shape is split into blocks of white, gray, and black using geometric lines. A small metal label attached to the center adds a customizable message or year.
This design is highly fashionable and suits a modern or Scandinavian style of decorating. The combination of painted geometric blocks and the leather hanger gives it a strong, balanced look. It is an excellent way to incorporate trending colors like charcoal and light gray into your seasonal setup. This simple shape makes it a quick and easy afternoon craft project.
DIY Instructions: The Color Block Modern Tag
You will need a thin, rectangular piece of wood or clay for the base of this tag.
Supplies:
- A pre cut, tag shaped piece of wood or clay (about 2 inches wide and 6 inches long)
- Acrylic paints in black, white, and gray
- Painter’s tape or masking tape
- Small paintbrush
- A small metal tag or piece of wood for the word/year
- Leather cord or ribbon for hanging
Step 1: Preparing the Base If your tag has a pointed end, start by painting that pointed tip completely white. Let this paint dry completely.
Step 2: Masking for the Color Blocks Once the white is dry, use the painter’s tape to mask off a clean, straight line above the white section. Now, tape off a diagonal line that runs up toward the top corners. You are creating the shapes where the gray and black colors will go.
Step 3: Painting the Colors Paint one of the unmasked sections a solid gray. Paint the other unmasked section a solid black. Let both colors dry completely.
Step 4: Removing the Tape When all the paint is completely dry, very carefully peel off all the painter’s tape. You should see clean, crisp lines separating the three color blocks.
Step 5: Adding the Detail Use a strong glue to attach your small metal tag or painted piece of wood to the center of the ornament. Make sure the message is straight.
Step 6: Hanging the Tag Thread a piece of leather cord through the pre drilled hole at the top of the tag. Tie the cord in a simple knot to create a hanger.
15. Upcycled Disco Ball

This unique, striking ornament is made by covering a sphere with tiny mirror pieces and old CDs. The reflective surfaces create a dazzling, multi colored effect as the lights hit them, transforming the decoration into a miniature disco ball. The addition of a personal charm on a beaded chain makes it completely one of a kind.
Using recycled CDs is a creative way to make your holiday decorating earth friendly and fun. This ornament captures the joy and brightness of the holiday season, casting rainbows and sparkles all around your room. It is a fantastic option for someone who loves music, dancing, or non traditional, high energy decorations. This fun design provides a great texture contrast among softer, matte ornaments.
DIY Instructions: The Upcycled Disco Ball
You will need to break the CDs, so ask a grown up for help with this step to stay safe.
Supplies:
- A plain foam or plastic sphere (about 4 to 6 inches wide)
- Old CDs or DVDs
- Small craft mirror tiles (optional, but helpful for filling gaps)
- Strong craft glue (hot glue is recommended, with adult help)
- Wire or a heavy ornament hook
- Safety glasses and gloves (for breaking the CDs)
Step 1: Preparing the Mirrors Put on your safety glasses and gloves. Ask a grown up to carefully cut or break the old CDs into many small, square or triangular pieces. The pieces do not need to be uniform in size, but they should be small enough to cover the ball.
Step 2: Attaching the CD Pieces Start at the top of the foam sphere. Put a small dot of strong glue onto the back of a CD piece. Press the piece firmly onto the ball. Continue gluing the CD pieces and mirror tiles onto the sphere, working in small sections. Try to leave only tiny gaps between the pieces.
Step 3: Creating an Accent For a fun look, you can glue one or two whole CDs (or large halves) onto the sides of the sphere as a decorative accent before filling in the rest of the space with the small tiles.
Step 4: Finishing and Hanging Continue gluing until the entire sphere is covered. Let all the glue dry completely. Push a sturdy ornament hook or wire deep into the top of the foam ball. You can also hang a personalized charm from a small chain attached to the hook.
16. Acrylic Pour Art Disk

This stylish, abstract ornament uses a fluid acrylic pour technique to create a stunning wave of color. Deep jewel tones like emerald green, sapphire blue, and gold swirl together beautifully across the surface of a clear acrylic disk. A small initial and the year are painted onto the clean white area.
Acrylic pouring creates a striking, marbled effect that looks truly unique every time. The intense colors and metallic accents give the ornament a luxurious, high end feel. Since no two pours are ever the same, each piece is a completely original work of art. This flat disk shape makes it lightweight while maximizing the visual impact of the vibrant, flowing colors.
DIY Instructions: The Acrylic Pour Art Disk
Acrylic pouring can be messy, so cover your work area completely with newspaper or plastic.
Supplies:
- Flat, clear round acrylic disk (with a hanging hole)
- Fluid acrylic paints in 3 to 5 colors (blue, green, white, gold)
- Pouring medium (needed to make the paint flow easily)
- Small plastic cups and stir sticks
- Vinyl for the lettering (or gold marker)
- Clear ribbon for hanging
Step 1: Mixing the Paint In separate small cups, mix each of your acrylic colors with the pouring medium. Follow the instructions on the pouring medium bottle to get the right consistency. It should flow easily off the stick, like thin syrup.
Step 2: Creating the Pour Take a larger, empty cup. Pour the different colors into this single cup, layering them one on top of the other without mixing. Start and end with white or clear paint.
Step 3: Pouring the Disk Quickly turn the cup upside down onto the corner of the acrylic disk. Lift the cup slightly and let the paint flow out. Gently tilt the disk until the paint covers about two thirds of the surface, creating a beautiful marbled pattern. Let the excess paint drip off the edges.
Step 4: Drying and Lettering Lay the disk flat to dry completely. This can take up to 48 hours. Once dry, use a gold paint marker or a vinyl sticker to carefully add the initial and the year to the clean white section of the disk.
Step 5: Finishing the Ornament Thread a piece of clear ribbon through the hole at the top. Tie the ends together to make a hanger.
17. Vintage Postcard Collage

This charming ornament features a collage of old fashioned Christmas postcards attached to a natural wood slice. The images show classic holiday scenes and beautiful women in Victorian clothing. A lovely green velvet ribbon bow adds a final touch of vintage elegance.
Collage ornaments are an easy way to achieve a nostalgic, antique look for your tree. The combination of the smooth, printed paper and the rough wood bark creates an appealing contrast in texture. This is a wonderful craft for showcasing family history by using copies of real old photographs or holiday cards. The use of a simple adhesive sealant helps protect the images for many seasons.
DIY Instructions: The Vintage Postcard Collage
You will need printed images that look old or actual postcard images.
Supplies:
- Oval or round wood slice with bark
- Printed images of vintage postcards (cut to fit the wood slice)
- Craft glue
- A small sponge brush
- Mod Podge (or a similar clear sealing glue)
- Wide velvet ribbon (green or red)
Step 1: Arranging the Images Lay your postcard images onto the wood slice until you find an arrangement you like. You can layer them slightly over each other for a collage effect.
Step 2: Gluing the Images Use the craft glue to attach the images firmly to the wood slice. Press down smoothly, making sure there are no air bubbles trapped underneath the paper. Let the glue dry completely.
Step 3: Sealing the Ornament Use the sponge brush to paint a thin, even layer of Mod Podge right over the top of the entire wood slice and the images. This seals and protects the paper. Let the first layer dry, then apply one or two more layers for a strong, shiny finish.
Step 4: Adding the Hanger Once the sealant is dry, take a piece of the velvet ribbon. Fold the ribbon in half and push the loop through the hole at the top of the wood slice. Pull the ends through the loop and tighten the ribbon to secure it. Tie the two ends into a beautiful bow.
18. Pressed Flower Resin Charms

These small, clear resin shapes contain beautiful pressed flowers and greenery. Delicate yellow, pink, and white blooms are perfectly preserved inside the glossy resin. Some designs include sparkling gold foil flakes for extra detail. Different molds create varied shapes like squares, teardrops, and small circles.
These botanical decorations capture the memory of a beautiful garden, bringing a touch of nature to the winter holidays. Using resin and dried flowers is a fantastic technique to create unique jewelry or small gifts. The clear, jewel like quality makes them look expensive and luxurious. You can even use flowers from a special event, like a wedding or birthday bouquet, to make the ornament deeply personal.
DIY Instructions: The Pressed Flower Resin Charms
This requires resin work, so a grown up must help with the mixing and pouring to ensure safety.
Supplies:
- Clear casting resin and hardener
- Silicone molds in small charm shapes
- Dried and pressed flowers and ferns (make sure they are completely flat and dry)
- Tweezers
- Gold foil flakes (optional)
- Thin wire or charm eyelets
Step 1: Preparing the Flowers Make sure your flowers are perfectly flat and completely dry before you start. Use tweezers to plan out how the flowers will look inside the mold.
Step 2: Mixing the Resin Measure and mix the resin and hardener carefully according to the package directions.
Step 3: Layering the Resin Pour a very thin layer of the clear, mixed resin into the bottom of your mold. Let it sit for about 10 minutes until it is slightly thick and sticky. This layer helps secure the bottom of the flowers.
Step 4: Placing the Flowers Using the tweezers, gently place the pressed flowers onto the sticky resin layer. Place them face down if your mold is upside down. Add a few gold foil flakes around the edges if desired.
Step 5: Final Pour and Curing Slowly pour the rest of the resin over the flowers until the mold is full. Use a stir stick to check for any bubbles. Let the resin cure (harden) completely, which takes 24 hours or more.
Step 6: Finishing the Charm Once hard, gently remove the charms from the mold. Ask a grown up to carefully screw a small charm eyelet or wire loop into the top of the piece for hanging.
19. Embroidered Felt Photo Frame

This adorable ornament is a soft, cushioned picture frame crafted from dark green felt. The frame is heavily decorated with hand sewn embroidery details that look like festive holly leaves and bright red berries. A small, oval cutout is the size of a favorite family photograph.
Felt crafts offer a beautiful, handmade texture and a cozy, traditional feel to your tree. The embroidery work elevates the simple felt into a stunning heirloom piece. You can easily switch out the photo each year to feature the most recent family picture. These personalized frames make heartfelt, meaningful gifts for relatives or friends during the holidays. The small size makes them perfect for any branch.
DIY Instructions: The Embroidered Felt Photo Frame
Felt is easy to cut and sew. You will be using a simple running stitch or blanket stitch.
Supplies:
- Felt sheets in green and cream (or colors you like)
- Embroidery floss in red and gold/yellow
- Sharp scissors
- Needle
- Polyester stuffing
- Small, clear plastic sheet (for the photo cover)
- A small printed photograph
Step 1: Cutting the Felt Pieces Cut out two identical rectangles from the green felt. Cut a small oval or circle shape from the center of only one of the green rectangles. Cut one rectangle from the cream felt to go on the front (this is where you will write names). Cut a piece of clear plastic slightly bigger than the photo hole.
Step 2: Decorating the Front Use the gold and red embroidery floss to hand sew the holly leaves and berries onto the green felt piece with the hole. This takes time, so be patient and make your stitches neat. Sew the small cream felt pieces above and below the photo hole.
Step 3: Assembling the Layers On the back of the decorated front piece, glue or tape your clear plastic sheet over the photo hole. Place your printed photograph behind the plastic.
Step 4: Sewing and Stuffing Place the decorated front piece onto the solid back piece of felt. Use the needle and green floss to sew around the outside edges. Remember to leave a small opening for stuffing. Gently push small amounts of the polyester stuffing inside to make the frame plump and soft. Sew the opening shut.
Step 5: Finishing the Frame Sew a small loop of red ribbon to the top edge for hanging. You can use a fine point marker to write names or dates on the cream felt sections.
20. Stamped Clay Cookie Ornaments

These sweet ornaments look exactly like classic gingerbread cookies but are made from durable clay or salt dough. They feature recognizable holiday shapes like the bell, the star, and the gingerbread man. The clay is decorated with painted “icing” details and stamped with names, dates, or tiny handprints.
Using salt dough or clay is an easy, fun, and kid friendly craft for creating custom decorations. Stamping names and pressing small handprints onto the surface makes these pieces priceless family mementos. They capture the cozy, familiar look of traditional holiday baking without worrying about them going stale. This is a lovely tradition for celebrating children and new family members.
DIY Instructions: The Stamped Clay Cookie Ornaments
You will need a batch of simple salt dough or air dry clay for this project.
Supplies:
- Salt dough or air dry clay
- Rolling pin
- Cookie cutters (star, bell, gingerbread man)
- Alphabet stamps or small stamps for handprints
- Small round object (like a pencil or straw)
- Acrylic paints in red, white, and green
- Thin detail brush
- Ribbon or twine for hanging
Step 1: Making the Shapes Roll out your salt dough or clay until it is about 1/4 inch thick. Use your cookie cutters to cut out the shapes you want.
Step 2: Stamping the Details Before the clay dries, use a stamp to press names, dates, or handprints gently onto the surface of the “cookies.” Be careful not to press too hard or you will warp the shape.
Step 3: Creating the Hole Use the end of a straw or pencil to carefully poke a small hole near the top of each ornament. This hole is for hanging, so make sure it is big enough for your ribbon.
Step 4: Drying and Baking Follow your recipe’s instructions for drying or baking the ornaments until they are completely hard. They must be very dry to last for years.
Step 5: Painting the Icing Once cool and dry, use the thin detail brush and the bright colored paints to paint details that look like icing. Use red to outline the edges and green for little squiggles or stripes. Let the paint dry completely.
Step 6: Finishing the Cookie Thread a piece of ribbon or twine through the hole. Tie the ends in a knot. Your adorable, long lasting “cookies” are ready to hang!
21. Embroidered Hoop String Lights

This delicate decoration features cross stitch work inside a small wooden hoop frame. The white fabric provides a clean background for an embroidered wreath and a string of tiny colorful lights. A small set of initials and a date personalizes the piece.
Hoop ornaments are simple to make and bring a cozy, handcrafted feel to the Christmas tree. The contrast between the simple wood and the colorful, woven thread is very appealing. They are lightweight and make excellent, thoughtful gifts for anyone who appreciates fiber art. You can easily change the embroidered design each year, perhaps using snowflakes, reindeer, or a favorite holiday quote.
DIY Instructions: The Embroidered Hoop String Lights
Cross stitch requires some precision, so patience is key. Ask a grown up to help you with the needle.
Supplies:
- Small round wooden embroidery hoop (about 3 to 4 inches wide)
- White Aida cloth or linen fabric
- Embroidery floss in green, red, yellow, and various colors for lights
- Small sharp needle
- Jute twine or ribbon for hanging
Step 1: Preparing the Fabric Stretch the white fabric tightly inside the embroidery hoop and tighten the screw at the top. Trim the excess fabric around the back, leaving about half an inch of border.
Step 2: Stitching the Wreath Start by stitching the miniature green wreath in the center of the fabric using green floss. Use small X shapes for cross stitch, or small loops for a different texture. Add a tiny red bow to the top of the wreath.
Step 3: Stitching the Lights Next, stitch a thin, black or brown curved line above the wreath for the string. Using bright colors like red, yellow, green, and blue, stitch small, bright light bulbs along the string. Keep the stitches uniform so the lights look neat.
Step 4: Adding Personalization Use red or dark green floss to stitch your initials and a significant year below the wreath. Use a simple, block letter font for easy stitching.
Step 5: Finishing the Ornament Cut a circle of felt and glue it neatly onto the back of the hoop to cover the messy stitches. Loop the jute twine through the metal screw at the top of the hoop.
22. Vintage Sheet Music Scrolls

These unique ornaments are made from rolled up vintage sheet music or old printed paper. The scroll is secured with a touch of gold paint at the top and bottom edges. A decorative wax seal with a letter initial, held in place by a small wooden dowel, provides a charming, antique feel.
These musical scrolls are a wonderful decoration for anyone who loves music or appreciates a nostalgic, literary aesthetic. They look especially beautiful when grouped together on a tree, creating a uniform, elegant style. You can personalize them with different initials, making them thoughtful gifts for teachers or musicians. The simple twine hanger gives them a nice rustic touch.
DIY Instructions: The Vintage Sheet Music Scrolls
You can find old sheet music at craft stores or print a copy online to use.
Supplies:
- Printed sheet music paper (aged or stained coffee to look old)
- Thin wooden dowels or craft sticks (cut small, about 1 inch)
- Gold acrylic paint
- Hot glue gun (ask a grown up for help)
- Faux wax seal or decorative sticker with a letter initial
- Jute twine for hanging
Step 1: Rolling the Scroll Take a piece of sheet music and cut it into a small rectangle (about 3 inches wide). Roll the paper tightly around a pencil to create a neat scroll shape. Slide the pencil out and use a tiny drop of craft glue to secure the end of the paper.
Step 2: Adding the Gold Detail Use the gold acrylic paint and a small brush to paint a thin band of gold around the top and bottom edge of the paper scroll. Let the paint dry completely.
Step 3: Attaching the Seal Place a small dot of hot glue onto the back of your wooden dowel or craft stick. Quickly press the dowel horizontally across the middle of the scroll. Press the wax seal or sticker directly onto the center of the wooden dowel to hide the glue.
Step 4: Adding the Hanger Fold a piece of jute twine in half and push the ends into the top opening of the paper scroll. Use a drop of glue inside the scroll to hold the twine firmly in place.
23. Sparkling Snowman Family

This cheerful snowman is built from three shiny, silver tinsel pom poms. He wears a classic scarf and hat, and his body is made of simple felt pieces and pipe cleaners. He holds a tiny reindeer friend and wears a personalized banner with a date and family name.
Pom pom crafts are a fun, three dimensional way to create whimsical and playful Christmas characters. They are soft, lightweight, and completely child safe. This snowman is a memorable piece that can celebrate a family milestone or a new baby. The tinsel material catches the light beautifully, making him stand out on the tree.
DIY Instructions: The Sparkling Snowman Family
You can buy silver tinsel pom poms or make them yourself using tinsel yarn.
Supplies:
- Three different sizes of silver tinsel pom poms (small, medium, large)
- Pipe cleaners (white, brown, and red/green)
- Felt pieces (orange for nose, black for eyes/buttons)
- Small cotton ball or pom pom for the hat
- Craft glue (hot glue is best, with adult help)
- A small strip of white paper for the banner
Step 1: Building the Snowman Body Use hot glue to carefully stack the three pom poms on top of each other, with the largest one on the bottom and the smallest on top. Let the glue set firmly.
Step 2: Adding the Accessories Cut a small rectangle of red and green striped felt for the scarf and glue it around the snowman’s neck. Glue a small white pom pom onto the top of the smallest pom pom for the hat. Use black felt pieces for the eyes and buttons, and an orange felt triangle for the nose.
Step 3: Making the Arms Twist a white pipe cleaner into a slightly wavy shape for the arms. Poke and glue the ends into the middle pom pom to create arms that stick out sideways.
Step 4: Creating the Banner Write the year and family name on the strip of white paper. Fold the ends of the paper inward like a scroll. Glue the ends of the paper banner gently onto the snowman’s middle.
Step 5: The Hanger and Friend Attach a piece of twine or a bent pipe cleaner loop to the very top of the hat for hanging. You can create a tiny reindeer or penguin using brown pipe cleaners and small pom poms, and hang it from the snowman’s arm using a piece of thread.
24. Macrame Angel Ornament

This beautiful, bohemian style angel is made using natural cotton macrame cord in a creamy white color. The body is formed by a simple wooden bead head and a knotted, textured dress. Fluffy knots create the appearance of detailed wings, and a tiny metal halo finishes the graceful design.
Macrame decorations add an earthy, rustic texture to your holiday collection. This angel is elegant and brings a sense of serenity to the tree. The personalized wooden tag hanging from her neck makes this piece an excellent memorial or gift for a special friend. This craft involves learning just a few simple knots, making it a calming and rewarding DIY project.
DIY Instructions: The Macrame Angel Ornament
Macrame is done by using simple knots. You need to use a soft cotton cord.
Supplies:
- Natural cotton macrame cord (about 3mm thick)
- One large wooden ring (about 1 inch wide)
- One round wooden bead (for the head)
- Small wooden tag or charm
- Sharp scissors
Step 1: Making the Dress and Body Cut many pieces of macrame cord all the same length (about 12 inches long). Take one piece of cord and knot it tightly around the wooden ring. This cord will serve as the center spine.
Step 2: Attaching the Cords Now, fold all the other cut cords in half. Use the Lark’s Head knot (looping the folded end over the ring and pulling the ends through) to attach all the cords neatly onto the wooden ring, right next to the spine cord. These cords form the angel’s dress.
Step 3: Shaping the Head and Neck Gently pull the top few cords on each side away from the main bunch. Gather the remaining long cords tightly together under the wooden ring. Wrap a small piece of cord around this gathered section two or three times to form the angel’s neck, and knot it securely. Slide the wooden bead onto the cords to form the head.
Step 4: Creating the Wings Take the cords you pulled away earlier (two small bunches). Use the Square Knot pattern to create a textured section on both the left and right sides. These sections will form the angel’s wings. Trim the ends of these wing cords and the long dress cords to be neat and feathery.
Step 5: Adding the Halo and Tag Place a small gold wire circle or a bent pipe cleaner above the wooden bead for the halo. Tie the wooden tag around the neck cord. Loop a piece of cord through the wooden ring for hanging.
25. Newspaper Woodland Animals

These whimsical ornaments feature the charming shapes of an owl and a fox, made using the art of paper mache. The surface is covered in pages from a newspaper or vintage book, giving them a unique sepia tone and printed texture. Bright, cheerful colors accent the eyes and ears.
Paper mache is a fantastic way to create lightweight, three dimensional shapes that are totally unbreakable. Using newspaper print adds a subtle, sophisticated pattern that elevates the simple craft. They are a great choice for decorating a rustic or woodland themed Christmas tree. The friendly faces and bold outlines make them appealing to all ages.
DIY Instructions: The Newspaper Woodland Animals
This craft takes a while to dry, so you will need to be patient for a few days.
Supplies:
- Balloons, cardboard, or foam shapes (to create the base form)
- Strips of newspaper or book pages
- Paper mache paste (flour and water mixture, or glue and water)
- Acrylic paint in white, light blue, and black
- Thin detail brush
- Craft fur for the fox’s head (optional)
Step 1: Making the Base Shape Draw the outline of your fox or owl shape onto cardboard and cut it out. Tape crumpled newspaper balls onto the cardboard to make the shape puffy and three dimensional.
Step 2: Applying the Paper Mache Dip the newspaper strips one by one into the paper mache paste. Smooth the wet strips carefully over the entire base shape. Overlap the strips until you have at least three layers. Make sure the final layer uses only the printed book pages for the clean look.
Step 3: Drying the Shapes Let the paper mache shapes dry completely for one or two full days. They must be hard before you start painting.
Step 4: Painting the Faces Use the white paint to create the large eye patches on the fox and the owl’s belly. Use the light blue and black paint to carefully add the eyes, nose, and tiny eyelashes. Add color to the fox’s inner ears.
Step 5: Adding Details Glue a small tuft of craft fur to the fox’s head. You can paint a name or date onto a small piece of cardstock and glue it onto the ornament like a banner. Attach a piece of twine to the back for hanging.
26. Neon Yarn Spheres

These vibrant, abstract ornaments are created by wrapping brightly colored yarn around a clear base. The thin thread creates a translucent, web like effect that allows the tree lights to shine through beautifully. Using neon colors like hot pink, lime green, and turquoise makes these pieces pop against the evergreen branches.
Yarn globes are simple to make and provide a wonderful opportunity to use bold, cheerful colors in your holiday decorating. They are extremely lightweight and shatterproof, making them safe for homes with small children. You can easily tuck a small note or piece of glitter inside before sealing the globe for a special surprise. These modern, textured pieces add an exciting burst of color.
DIY Instructions: The Neon Yarn Spheres
This requires dipping the yarn in glue, so protect your work surface well.
Supplies:
- Small balloons (blown up to the size you want the ornament)
- Cotton or acrylic yarn in neon colors
- Craft glue (PVA glue is best)
- Water
- Glitter (optional)
- Bowl for mixing the glue
Step 1: Preparing the Glue Mix In the bowl, mix the craft glue with a little bit of water until it is the consistency of thin cream or milk.
Step 2: Wrapping the Yarn Dip your finger into the glue mix and spread a tiny bit onto the balloon to make it sticky. Now, slowly unroll the neon yarn and start wrapping it randomly all over the balloon. You want to cover the balloon completely, but leave enough space so you can still see the balloon underneath.
Step 3: Soaking the Yarn Once you have wrapped the yarn to your liking, cut the end of the yarn. Submerge the entire yarn covered balloon into the bowl of glue mixture. Make sure the yarn is completely soaked. Pull the balloon out, letting the excess glue drip back into the bowl.
Step 4: Drying and Hardening Hang the glue soaked balloon up to dry completely for at least 24 hours. The yarn must be completely hard and stiff. You can sprinkle glitter onto the wet yarn if you like.
Step 5: Finishing the Ornament Once the yarn sphere is hard, use a pin to pop the balloon inside. Carefully pull out the deflated balloon pieces through one of the holes in the yarn. Loop a piece of matching yarn through the top for hanging.
27. Miniature Building Block Diorama

This amazing ornament uses small plastic building blocks to create a tiny, detailed winter scene. Miniature figures stand in a snow covered landscape surrounded by evergreen trees and brightly colored, striped buildings. The scene rests on a small, round platform.
Building block creations are a wonderfully geek chic or nostalgic way to personalize your tree. They are easy to customize with your family’s favorite colors and figures, celebrating hobbies or shared memories. The solid base makes it a great standalone display piece as well. This unique decoration proves that ornaments can be playful and completely unique.
DIY Instructions: The Miniature Building Block Diorama
This project requires many small pieces of building blocks, so gather your supplies carefully.
Supplies:
- A large, round white building block plate (for the base)
- Assorted small building blocks (white, red, blue, green, etc.)
- Small miniature pine trees or bushes
- Tiny building block figures (like people or animals)
- Small eyelet screw or wire hook
- Optional: strong plastic glue
Step 1: Planning the Scene Start by arranging your scene on the large round base plate. You want a sense of a snowy landscape. Place your tiny figures in the center.
Step 2: Building the Landscape Use the white building blocks to create a low, uneven layer of “snow” around the figures. Use the brightly colored blocks to build small, geometric structures like a colorful tower or houses around the edges.
Step 3: Planting the Trees Place the miniature plastic pine trees in between the buildings to create a small forest effect. Make sure the trees look scattered naturally around the scene.
Step 4: Securing the Pieces For a long lasting ornament, you may want to use a tiny bit of plastic glue to secure the small pieces, especially the figures, to the base plate so they do not fall off. This is important since the ornament will be hanging.
Step 5: Adding the Hanger Find a tall, sturdy piece of the structure you built. Gently screw a small eyelet screw or wire hook into the top of this tall piece. This will be the hanging point. Loop a piece of twine or wire through the eyelet to hang the ornament.
28. Vibrant Pom Pom Creature

This fun, fluffy creature is made from colorful, textured yarn pom poms. A large, multi colored body pom pom is topped with a smaller head pom pom that features large, expressive eyes and a wide, friendly smile. Felt ears and a small bow tie complete the cheerful design.
Pom pom animals are a charming and unconventional way to decorate for the holidays. The bright, clashing colors give it a modern, playful feel. This ornament is soft, lightweight, and perfect for families who enjoy whimsical, non traditional decor. Making these creatures is a relaxing activity that results in a huge visual impact.
DIY Instructions: The Vibrant Pom Pom Creature
You will need a pom pom maker tool or two pieces of cardboard cut into circles.
Supplies:
- Acrylic or wool yarn in bright colors (pink, blue, lime green, white)
- Pom pom maker tools (or cardboard circles)
- Felt scraps in green and black (for ears and bow tie)
- Plastic craft eyes
- Small piece of pink felt for the tongue
- Craft glue (hot glue is best, with adult help)
Step 1: Making the Pom Poms First, make a large, multi colored pom pom for the body using pink, red, and blue yarn together. Next, make a small pom pom for the head, primarily using white yarn. When you cut the threads, leave a long loop on the head pom pom for hanging later.
Step 2: Shaping the Face Take the white pom pom and use white felt circles for the eye areas, gluing them onto the head to give it structure. Glue the plastic craft eyes onto the felt circles.
Step 3: Adding the Features Cut a small pink oval for the tongue and a little light blue pom pom for the nose. Glue the tongue and nose onto the face, creating a smile shape underneath. Cut two small green and black circles for the ears and glue them to the top of the head.
Step 4: Assembling the Creature Carefully use hot glue to attach the small head pom pom onto the large body pom pom. Make sure it is secure.
Step 5: Final Touches Cut a piece of green felt and fashion a small bow tie. Glue the bow tie onto the creature’s neck area. Use the existing yarn loop at the top of the head for hanging.
29. Repurposed Puzzle Piece Wreath

This ingenious decoration uses recycled puzzle pieces to create a textural, stylized wreath shape. The pieces are arranged and painted in shades of gold and deep green, making them look like stylized evergreen branches. A small photo window at the bottom personalizes the center opening.
Using puzzle pieces is a brilliant, earth friendly way to repurpose old games, creating a unique texture that looks like layered scales or leaves. The metallic gold paint contrasts beautifully with the deep forest green. This craft is easy to do in batches and is a fun way to include a treasured photograph on your tree. This wreath is a truly memorable and customized centerpiece.
DIY Instructions: The Repurposed Puzzle Piece Wreath
You need puzzle pieces that are all the same shape for this project.
Supplies:
- Approximately 50 to 75 puzzle pieces (of the same size and shape)
- Acrylic paints in bright green and gold
- Two pieces of cardboard (one ring shaped, one square)
- Hot glue gun (with adult help)
- Jute twine or ribbon for hanging
- A small printed photograph
Step 1: Painting the Pieces Sort your puzzle pieces into two piles. Paint the pieces in the first pile a solid bright green. Paint the pieces in the second pile a shimmering gold. Let the paint dry completely.
Step 2: Creating the Wreath Base Cut a round, ring shape out of one piece of cardboard. This will be the sturdy base for your wreath.
Step 3: Gluing the Green Layer Start on the outside edge of the cardboard ring. Use hot glue to attach the green puzzle pieces around the outside rim, making sure they all face the same direction, like they are overlapping leaves. Continue gluing in rings, moving inward toward the center hole, until you have covered about half the cardboard.
Step 4: Gluing the Gold Layer Now, use the gold puzzle pieces to cover the rest of the cardboard base, creating the second half of the wreath. Again, make sure the pieces overlap neatly and point in the same direction as the green pieces.
Step 5: Adding the Photo Cut a small piece of cardboard and glue your photograph onto it. Glue this photo piece onto the very bottom of the wreath base, so the photo sits neatly in the center of the ring.
Step 6: Finishing the Wreath Loop a long, wide ribbon through the top of the wreath and tie a knot for hanging.
30. Holiday Plaid Gnome

This wonderfully whimsical ornament is a large, soft textile gnome. His body is made of gray knitted fabric, and he wears a festive red and green plaid hat. He sports a fluffy white beard, a simple wooden bead nose, and a small, personalized wooden sign tucked into his hat.
Gnome ornaments are incredibly popular and bring a sweet, folksy charm to any tree. Using cozy materials like plaid and knit fabric gives him a warm, inviting texture. The personalized sign makes him a fantastic, customized gift to celebrate a family’s holiday traditions. This fun, three dimensional character is a fantastic way to celebrate the magic of Christmas.
DIY Instructions: The Holiday Plaid Gnome
You will need to sew the body and hat, so ask a grown up for help with the needle or sewing machine.
Supplies:
- Knit or textured fabric (gray or white) for the body
- Plaid fabric (red/green) for the hat
- Craft fur (white or gray) for the beard
- Polyester stuffing
- One small wooden bead (for the nose)
- Needle, thread, and scissors
- Small piece of wood or cardstock for the sign
Step 1: Sewing the Body Cut two matching, rounded teardrop shapes from the knit fabric. Sew them together, leaving the wide top open for stuffing. Push the polyester stuffing inside until the body is firm. Sew the top closed.
Step 2: Sewing the Hat Cut the plaid fabric into a tall, cone shape. Sew the long sides together to create the hat. Place the hat over the top of the body and sew or glue it gently in place.
Step 3: Attaching the Beard Cut a triangle shape from the craft fur. Gently glue the flat top edge of the fur right underneath the front edge of the hat.
Step 4: Adding the Nose Place the small wooden bead right above the beard, where a nose should sit. Use a strong glue or thread to secure the bead to the fabric body and hat.
Step 5: Creating the Sign Write the name or message onto your small piece of wood or cardstock. Attach a tiny piece of twine to the top of the sign. Gently push or glue the sign into the fold of the gnome’s hat so it stands up straight.
Step 6: Finishing the Ornament Sew a loop of twine onto the very top point of the hat for hanging.
31. Shrinky Dink Doodle Charms

These charming, doodled charms are made using specialized plastic that shrinks and thickens when baked. The original drawings, featuring bright colors and simple designs, become tiny, durable pieces perfect for hanging. They are great for showcasing children’s artwork or creating funny character portraits.
Shrinky Dinks offer a nostalgic and simple way to turn flat drawings into three dimensional keepsakes. They are fun and easy for the whole family to make, resulting in strong, glossy ornaments. Use chain links to attach multiple small charms together, creating a unique cluster. This craft is a quick project that delivers a big, colorful impact.
DIY Instructions: The Shrinky Dink Doodle Charms
You must have a grown up help you with the oven and baking part of this craft.
Supplies:
- Sheets of Shrinky Dink plastic (or similar shrinking plastic)
- Permanent colored markers or colored pencils
- Scissors
- Hole punch
- Baking sheet lined with parchment paper
- Ornament hooks or small charm chains
Step 1: Drawing the Design Draw your design directly onto the rough side of the Shrinky Dink plastic. Remember, the finished charm will shrink to about one third of its original size. Use big, bold designs and vibrant colors.
Step 2: Cutting and Punching Carefully cut around the edges of your finished design. Use the hole punch to put a hole where you want the charm to hang. You must punch the hole before baking, as the plastic becomes too hard afterwards.
Step 3: Baking the Charm Place the cut out plastic pieces onto the parchment lined baking sheet. Ask a grown up to bake them in a preheated oven (check the package for the exact temperature). Watch the charms closely; they will curl up and then flatten back out. Once they are flat and thicker, they are done.
Step 4: Cooling and Shaping Ask the grown up to quickly remove the tray and use a spatula to press the charm completely flat if needed. Let the charm cool for a minute.
Step 5: Adding the Hanger Attach a piece of small chain or simply thread an ornament hook through the baked hole.
32. Beaded Tribal Shield
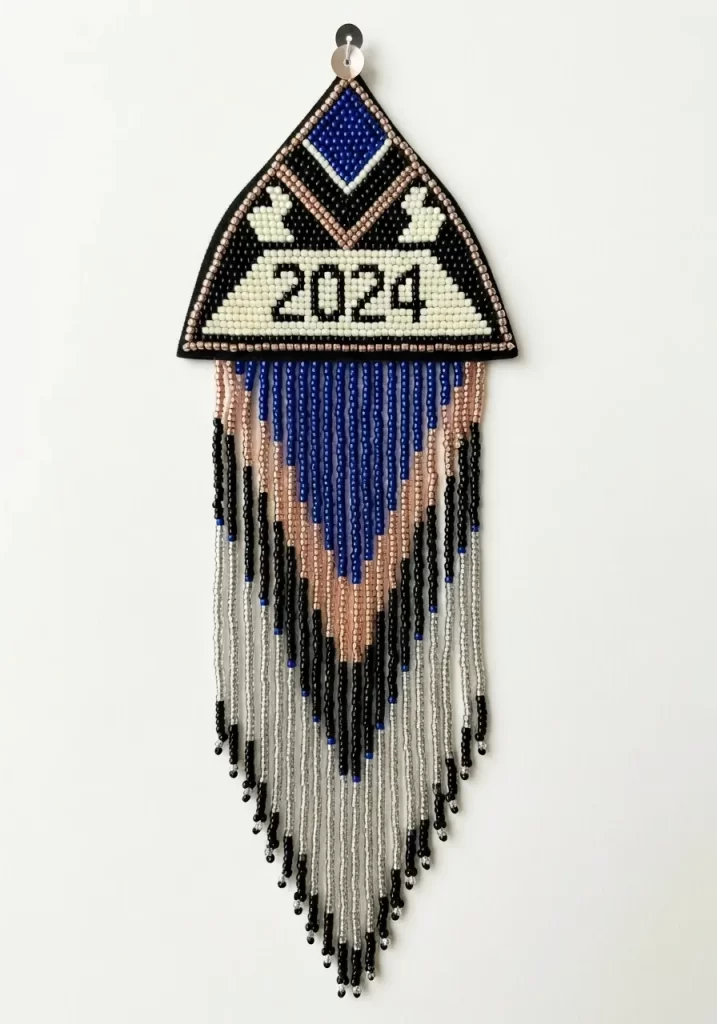
This striking, geometric ornament is crafted using hundreds of tiny seed beads sewn onto a fabric backing. The design features bold, layered V shapes in shades of royal blue, white, tan, and silver, creating a shield or arrow pattern. The long, cascading beaded fringe provides beautiful movement and sparkle.
Beadwork creates an incredibly rich texture and a truly artisanal look that is unlike any store bought item. The bold geometric patterns bring a strong, modern aesthetic to your Christmas decor. This hanging piece is lightweight but requires patience for the detailed stitching. The combination of the different colored beads makes this ornament a shimmering statement piece.
DIY Instructions: The Beaded Tribal Shield
Beadwork requires patience and very small needles. Ask a grown up to help you thread the needle.
Supplies:
- Small, flat piece of stiff felt (black or dark color)
- Tiny seed beads in multiple colors (blue, white, black, silver)
- Beading needle and strong thread
- Scissors
- Small sequins or ribbon for the edge
- Hook or sequin for hanging
Step 1: Planning the Pattern Draw the outline of your shield shape onto the felt. Now, use a pencil to lightly draw the geometric V pattern you want for the design.
Step 2: Beading the Main Shape Thread your needle with the beading thread. Start sewing the rows of beads onto the felt, following your pencil lines. You will sew one bead at a time, or use the lazy stitch technique to sew several beads at once. Use the different bead colors to fill in the geometric shapes completely.
Step 3: Adding the Fringe Once the main body is beaded, you can add the fringe along the bottom edge. Thread a long piece of thread with beads, using the different colors to create the layered V shape. Tie the thread firmly into the bottom edge of the felt and hang a final bead at the very end of the thread. Repeat this step many times to create a full, flowing fringe.
Step 4: Finishing the Edges Sew tiny sequins or use a piece of thin ribbon to cover the edges of the felt for a neat, finished look. Sew a small sequin onto the top center point for hanging.
33. Velvet Monogram Knot

This luxurious, spherical ornament is wrapped entirely in plush velvet fabric. Stripes of deep green, holiday red, and sunny gold velvet twist around each other to form a tight, elegant knot. A gold braid cord wraps around the middle, providing extra richness. A hand embroidered monogram is featured prominently on the green section.
Velvet fabric offers a beautiful, rich texture and deep jewel tones that scream luxury and tradition. This unique twisted knot technique creates a soft, dimensional shape that is completely different from a standard glass ball. The hand embroidered initial makes this piece a personalized heirloom. This is a lovely ornament for anyone who loves classic, traditional Christmas colors and tactile decorations.
DIY Instructions: The Velvet Monogram Knot
You will need a foam ball and several strips of velvet fabric for this elegant knot.
Supplies:
- A foam sphere (about 3 to 4 inches wide)
- Velvet fabric strips in three colors (red, green, gold)
- Embroidery floss in white or gold
- Needle, scissors, and tailor’s pins
- Gold ribbon or cord
- Strong craft glue
Step 1: Prepping the Strips Cut long strips of the velvet fabric, about 1 inch wide. If you are adding a monogram, use the needle and embroidery floss to carefully stitch the initials onto one of the green strips before you start assembling.
Step 2: Pinning the Strips Start by placing the end of the green, monogrammed strip onto the foam ball and securing it with a small dab of glue and a pin. Then, take the red strip and secure it right next to the green one.
Step 3: Creating the Knot Carefully wrap the strips around the foam ball, letting them twist and overlap naturally to create the knotted look. Secure the strips as you wrap by pushing pins into the ball at various points.
Step 4: Finishing the Knot Once the entire ball is covered, trim the ends of the velvet strips and tuck them neatly underneath the surrounding strips. Secure them with glue and small pins.
Step 5: Adding the Trim and Hanger Glue the gold braid cord around the entire ball, following a natural line where the colors meet, to create a final decorative band. Use a piece of gold ribbon or cord attached to the top knot for hanging.
34. Mirrored Mosaic Star

This dramatic star is a true statement piece, made by covering a large star shape with tiny square mirror tiles. The tiles catch the light from every direction, creating an intense, shimmering sparkle. Small copper colored tiles are mixed in with the silver mirror pieces for depth. A personalized metal plaque sits in the center.
Mirror mosaics provide incredible glitter and reflection, making this ornament look like a shining star on the tree. The size and sharp geometric shape give it a powerful visual presence. The central metal tag allows you to engrave the year or a special family motto, making it a wonderful yearly tradition. This stunning design is perfect for those who want their tree to truly dazzle.
DIY Instructions: The Mirrored Mosaic Star
You can purchase pre cut star shapes or cut them from stiff wood or foam board.
Supplies:
- Large star shaped wood or foam base (pre painted black)
- Small mirror mosaic tiles (silver and copper color)
- Tile adhesive or strong craft glue
- Tweezers (helpful for placing tiles)
- Engraved metal plaque (optional)
- Wire or hook for hanging
Step 1: Preparing the Star If your star base is not black, paint it black and let it dry. This helps hide any small gaps between the tiles.
Step 2: Gluing the Mosaic Start at the very point of one star arm. Put a small dot of glue onto the back of a mirror tile. Press the tile firmly onto the star. Continue gluing the tiles onto the star, working in small sections. Try to keep the rows and lines straight while covering the entire surface.
Step 3: Adding the Accent Color Scatter the copper colored tiles randomly across the star, concentrating them near the center or in the inner V shapes for depth and contrast.
Step 4: Securing the Plaque Once the entire star is covered with the mosaic pieces and the glue is dry, glue the personalized metal plaque right onto the center of the star.
Step 5: Hanging the Star Screw a sturdy wire hook into the back of the star point that faces up. This piece is heavier, so make sure the wire is strong.
35. Glittering Feather Burst

This lavish, three dimensional ornament is built around a central white foam sphere. The sphere is surrounded by delicate white feathers, small clusters of faux pearls, and glittery gold accents. Two elegant ribbons, personalized with names, hang from the top and bottom.
Feather and pearl arrangements create an ethereal, angelic look perfect for a beautiful, classic Christmas tree theme. The pale pink and champagne gold pearls add a soft color and texture against the crisp white feathers. This piece is lightweight yet has great visual volume, filling space without weighing down branches. It makes a beautiful gift for a new baby or a milestone celebration.
DIY Instructions: The Glittering Feather Burst
This project requires careful layering and gluing to create the clustered look.
Supplies:
- Small white foam sphere
- Small faux pearls and pearl beads (white, pink, gold)
- White craft feathers
- Glittery gold or white sprays and accents
- Ribbon for the personalized name tags
- Strong craft glue (hot glue is best, with adult help)
Step 1: Gluing the Pearls Start by gluing the pearl beads around the edge of the foam sphere. Use different sizes and colors of pearls, creating a thick, layered cluster around the center.
Step 2: Adding the Feathers Push or glue the ends of the white craft feathers into the base, arranging them so they stick out like rays around the pearl cluster. Use smaller feathers closer to the center and larger feathers for the outside edges.
Step 3: Adding Sparkle Tuck the small glittery gold or white sprays in between the feathers and pearls for extra shimmer and texture.
Step 4: Making the Tags Write the name or message onto the ribbon using a permanent gold marker. Cut the ends of the ribbon into a V shape. Glue the ribbon tag near the top and bottom of the pearl cluster.
Step 5: Finishing the Ornament Loop a piece of thin wire through the top center of the foam sphere to create a hanger.
36. Jeweled Gold Pinecone

This natural pinecone is transformed into a sparkling gem using metallic gold paint and small craft rhinestones. The tips of the pinecone scales are highlighted with gold, and a tiny, clear rhinestone is carefully glued to the center of each scale. It hangs from a simple satin ribbon.
Natural elements like pinecones bring an earthy, warm feeling to your tree, and adding glitter makes them truly festive. The small rhinestone details catch the light from the tree bulbs beautifully, creating a jeweled effect. This decoration is a fun project to make with pinecones you collect outside, turning a simple natural item into a glittering treasure. You can add a small personalized tag for an extra touch.
DIY Instructions: The Jeweled Gold Pinecone
Ensure the pinecone is clean and completely dry before painting.
Supplies:
- One clean, dry pinecone
- Metallic gold acrylic paint and a small brush
- Small, clear craft rhinestones (flat back)
- Strong craft glue or rhinestone glue
- Satin ribbon (gold or cream color)
- Small eyelet screw or wire hook
Step 1: Painting the Scales Dip your small paintbrush lightly into the gold paint. Gently brush the paint only onto the tips and edges of the pinecone scales. You want the deep brown color of the pinecone to still show through, creating a contrasted look. Let the paint dry completely.
Step 2: Adding the Jewels Put a tiny dot of strong craft glue onto the center of each gold painted scale. Use tweezers or the end of a pencil to gently pick up a clear rhinestone and press it onto the glue dot. Work your way all around the pinecone until every scale has a jewel.
Step 3: Attaching the Hanger Carefully screw a small eyelet screw or wire hook into the top center of the pinecone base.
Step 4: Finishing the Ornament Thread a piece of satin ribbon through the eyelet hook. Tie the ribbon ends into a neat bow for hanging.
37. Patchwork Memory Star

This soft, plush star ornament is stitched together using pieces of brocade and velvet fabric in shades of blue, white, and silver. The star is dimensional and padded, resembling a small pillow. The center of the star features a small pocket, holding a tiny, personal written note.
Patchwork is a lovely way to create heirloom decorations by utilizing meaningful fabric scraps or pieces from old clothing. The mix of textured materials like velvet and brocade gives the piece incredible depth. Including a pocket for a personal note, a memory, or a wish makes this a truly sentimental annual tradition. The elegant twisted cord around the edge gives it a refined, classic touch.
DIY Instructions: The Patchwork Memory Star
You will need to sew the fabric pieces together. This is a great project for sewing by hand.
Supplies:
- Small fabric scraps (velvet, brocade, or patterned cotton) in desired colors
- Polyester stuffing
- Sewing needle and matching thread
- Twisted metallic cord (for the edge)
- A small strip of paper for the note
- Small piece of ribbon or cord for hanging
Step 1: Cutting the Fabric Cut out five diamond shaped pieces of the patterned fabric. Sew these five pieces together to form the front half of the star. Cut a large, five pointed star shape from the backing fabric.
Step 2: Creating the Pocket Cut a small square of fabric for the pocket. Sew the pocket piece onto the front of the patchwork star, leaving the top edge open. Fold a small piece of paper and write your message on it. Tuck the note into the pocket.
Step 3: Sewing and Stuffing Place the patchwork front piece onto the solid back piece. Sew them together around the edge, leaving a small opening for stuffing. Gently push the polyester stuffing inside until the star feels soft and plump. Sew the opening shut.
Step 4: Adding the Edge Cord Use strong craft glue or tiny stitches to carefully sew the twisted metallic cord all around the outside edge of the star. This gives it a professional, finished look.
Step 5: Adding the Hanger Sew a small loop of the metallic cord or ribbon to the top point of the star.
38. Faux Fur Heart Pillow

This charming heart shaped pillow is made from strips of soft, long haired faux fur. The three horizontal color blocks—white, gray, and light pink—create a modern, cozy effect. The soft, fluffy texture makes it a delightful, warm addition to your holiday decorations. A small, personalized wooden tag hangs from a ribbon loop.
Faux fur brings an undeniable feeling of warmth and softness to the often rigid nature of Christmas decorations. The large heart shape is perfect for celebrating love and friendship during the holiday season. It is a fantastic option for creating a cozy, Scandinavian inspired tree. The layered colors make this simple shape look sophisticated and expensive.
DIY Instructions: The Faux Fur Heart Pillow
You will need to use a sharp box cutter or rotary blade to cut the fur cleanly.
Supplies:
- Faux fur fabric in three colors (white, gray, pink)
- Needle and thread
- Polyester stuffing
- Sharp scissors or craft knife
- Ribbon (red or color of your choice)
- Small wooden tag
Step 1: Cutting the Heart Pieces Cut two heart shapes from your backing fabric (like felt or plain cotton). This will be the template. Cut three strips of the different colored faux fur wide enough to cover the heart when laid on top of each other.
Step 2: Sewing the Fur Front Carefully sew the three strips of fur together along the horizontal lines to create one large piece of tri colored fabric. Use your heart template to cut the final heart shape from this tri colored fur piece. This is the front of the pillow.
Step 3: Sewing and Stuffing Place the fur front onto the plain backing heart. Sew them together around the outside edge, leaving a small opening. Push the polyester stuffing inside until the heart is soft and plump. Sew the opening shut.
Step 4: Attaching the Hanger Fold the red ribbon in half and sew or glue the loop onto the top curve of the heart.
Step 5: Adding the Tag Tie the personalized wooden tag onto the red ribbon loop for a finishing touch.
39. Mini Wreath String Lights

This delightful ornament is a miniature, evergreen wreath wrapped with a string of tiny LED fairy lights. The light source is a small battery pack cleverly tucked inside the base of the wreath. The simple addition of red berries and a personalized wooden tag makes it a cozy, self illuminating piece.
Illuminated ornaments are essential for adding a warm, welcoming glow to the darker parts of the tree. This wreath is a bright, charming decoration that provides great lighting without needing to plug into the main tree lights. The rustic greenery paired with the modern battery powered lighting creates a beautiful juxtaposition. This piece is easy to hang and creates an immediate focal point on any branch.
DIY Instructions: The Mini Wreath String Lights
You will need a small, flexible base for the wreath shape.
Supplies:
- Small, flexible wire or plastic wreath base (about 6 inches wide)
- Faux evergreen garland or small sprigs
- Small LED fairy lights (battery operated)
- Faux red craft berries or plastic sprigs
- Personalized wooden tag
- Thin wire or twine for wrapping
Step 1: Building the Base Wrap a flexible piece of wire or thin garland around itself to create the round wreath base. If you are using sprigs, use thin green wire to attach the small evergreen sprigs onto the base until it looks full and bushy. Add the small faux red berries by twisting their stems into the wreath.
Step 2: Adding the Lights Take the LED fairy lights and start wrapping them gently around the wreath base. The wires are thin, so they should blend in with the greenery. The small battery pack should sit neatly at the bottom center of the wreath. Secure the battery pack with a small piece of wire or twine.
Step 3: Finishing the Wreath Use thin wire to attach the personalized wooden tag to the top center of the wreath, making sure the message is clearly visible above the lights.
Step 4: Hanging the Wreath Thread a piece of thin wire or ribbon through the top of the wreath for hanging. Make sure the battery pack is easily accessible in case you need to turn the lights on or off.
You now have 39 unique, creative DIY ornament ideas to completely transform your Christmas tree. Throw out those factory made decorations and replace them with pieces that actually mean something to you and your family. Creating these heirlooms is more than just crafting; it’s about making memories and establishing new holiday traditions that will last for years to come.
Whether you choose the elegant Velvet Monogram Knot or the playful Vibrant Pom Pom Creature, each piece will add character and charm to your holiday display. Many of these projects use recycled materials, making this an earth friendly approach to decorating. This massive collection offers something for every skill level, from simple cookie shapes to intricate wire designs. Get started today and watch your Christmas tree become the star of your holiday season.
Key Takeaways
Making Christmas Personal
Your holiday decorations should tell your family’s story. Handmade ornaments allow you to mark milestones and special years, giving your tree depth and meaning. Skip the generic department store items and focus on custom keepsakes.
Crafting for Every Skill Level
This guide offers projects ranging from easy-to-use Shrinky Dink charms and Stamped Clay Cookies for kids, to advanced techniques like Resin Photo Globes and intricate Beaded Shields. There is a DIY option here for absolutely everyone.
Benefits Beyond Decor
DIY ornaments are a fantastic way to stretch your holiday budget while producing high quality gifts and decorations. They are often lightweight, shatterproof, and durable, ensuring they last for many seasons. These crafts offer fun, focused time with family, creating memories as you create beauty.