Are you tired of staring at the same dull, empty walls in your home? Sometimes the most expensive framed print still feels boring. You might feel a canvas needs to be complicated or expensive to look good. That is simply not true.

If your current decor feels lifeless, it is time to try something new. Custom art is the answer to bringing personality back into your space. Making your own wall hangings means you control the color, the texture, and the size. You can create pieces that genuinely match your furniture and your style.
We have gathered 35 easy DIY canvas projects you can tackle this weekend. This list requires no fancy training or professional skill. Simple supplies like yarn, tape, paint, and even old corks are all you need. Prepare to say goodbye to boring art forever.
1. Gold Accent Color Block Geometric Art

Bold colors bring immediate life to a plain room. This canvas project uses simple squares to create a massive visual impact. You do not need professional skills to get straight lines here because tape does the heavy lifting for you. Each square features a vibrant hue like teal, magenta, or classic navy to grab attention.
Small touches of gold leaf add a surprising shine when the light hits the surface. It looks expensive but costs very little to make at home. Customize the palette to match your existing furniture or rugs. This piece proves that simple geometry acts as a powerful design element. Your walls will look curated and intentional rather than random.
Material Required
- Large stretched canvas (white)
- Acrylic craft paints (orange, teal, red, green, pink, navy, black, blue)
- Painter’s tape or masking tape (1 inch width)
- Gold leaf sheets
- Gold leaf adhesive size (special glue for foil)
- White acrylic paint
Equipment Required
- Flat paintbrushes (medium size)
- Ruler or measuring tape
- Pencil
- Two small bowls for water
- Paper towels
- Soft dry brush (for gold leaf)
DIY Instructions
Step 1
Paint your entire canvas with a coat of white acrylic paint. This ensures the background lines remain crisp and bright later on. Allow this base coat to dry completely for at least one hour.
Step 2
Measure the canvas to divide it into nine equal sections. Use your ruler and a pencil to make light marks on the edges. Run strips of painter’s tape horizontally and vertically across the canvas to form a grid. Press the edges of the tape down firmly to prevent color bleeding.
Step 3
Select a specific color for the first square. Use a flat brush to paint the inside of the square carefully. Repeat this process with different colors for the remaining squares. You may need two coats for darker colors like navy or black to get full coverage.
Step 4
Decide which corners or edges will feature gold accents. Apply a thin layer of gold leaf adhesive to these specific spots before removing the tape. Wait about fifteen minutes for the glue to become tacky and clear.
Step 5
Gently press a sheet of gold leaf onto the sticky areas. Use a soft, dry brush to smooth it down and brush away any excess flakes.
Step 6
Slowly peel off the painter’s tape while the paint is still slightly tacky to avoid chipping. Reveal the crisp white lines between your colorful blocks. Let the entire piece cure for twenty four hours before hanging it up.
2. Ombre Sunset Skyline Silhouette

City sunsets have a calming effect that many people love. This project captures that urban beauty using a smooth color gradient. You blend acrylic paints directly on the canvas to create a fading twilight sky. The colors shift from deep blue at the top to a warm red at the horizon.
A solid black skyline anchors the bottom of the piece to create contrast. You do not need to copy a real city. Random rectangles and needle shapes work well to suggest buildings. This artwork brings a modern and colorful vibe to any bedroom or office. It serves as a great reminder of evening walks in the city.
Material Required
- Stretched canvas
- Acrylic paints (dark blue, purple, pink, red, orange, black)
- Carbon paper (optional for tracing)
- Painter’s tape
Equipment Required
- Large flat blending brush
- Small detail brush (round tip)
- Palette or paper plate
- Cup of water
- Rags
DIY Instructions
Step 1
Squeeze lines of blue, purple, pink, and red paint directly onto the canvas in horizontal rows. Place the darkest blue at the very top and the warmest red near the bottom third.
Step 2
Take a damp flat brush and sweep it back and forth horizontally. Work from the top down to blend the colors where they meet. Smooth out the transition so there are no harsh lines between the hues. Let this background dry for about two hours.
Step 3
Sketch a city skyline lightly with a pencil along the bottom edge. Vary the heights of your buildings to make the composition interesting. Include details like antennas or sloped roofs.
Step 4
Fill in the building shapes using black acrylic paint. Use a flat brush for the large blocks and a small detail brush for the antennas and fine edges.
Step 5
Add a second coat of black paint if the background colors show through. Allow the artwork to dry overnight before displaying it.
3. Woven Wood Veneer Texture Art

Texture often adds more interest to a room than flat color does. This woven piece uses strips of wood veneer or sturdy paper to create a 3D basket effect. The interlocking pattern creates depth and shadows that change throughout the day. Muted tones like teal, brown, and cream give it an earthy and organic feel.
It mimics the look of expensive fiber art but costs much less. You can customize the strip width to change the scale of the weave. This project requires patience but yields a high end result. It works exceptionally well in spaces with a boho or rustic design style.
Material Required
- Rectangular canvas or wood board
- Wood veneer strips (or heavy cardstock)
- Acrylic paints (teal, brown, beige, dark blue)
- Wood glue or strong craft glue
- Masking tape
Equipment Required
- Scissors or craft knife
- Ruler
- Paintbrushes
- Heavy books (for pressing)
DIY Instructions
Step 1
Cut your wood veneer or cardstock into long strips of equal width. Ensure the strips are longer than the width and height of your canvas so they can wrap around the edges.
Step 2
Paint the strips in your chosen color palette. Leave some strips as natural wood for contrast. Let the paint dry completely.
Step 3
Lay the vertical strips side by side on the canvas and tape them temporarily at the top edge.
Step 4
Weave the horizontal strips through the vertical ones using an “over under” pattern. Push each horizontal strip up snugly against the previous one to minimize gaps.
Step 5
Adjust the tightness of the weave to ensure the pattern looks even. Glue the ends of each strip to the back or side of the canvas frame.
Step 6
Trim any excess material from the back. Place heavy books on the surface while the glue sets to ensure the weave stays flat.
4. Metallic Geometric Mandala on Black

Sacred geometry designs look striking against a dark background. This project uses a black canvas to make metallic gold, silver, and rose gold pop. The circular mandala pattern radiates outward to create a sense of balance. You use simple dots and lines to build complex looking shapes.
Precision is key here but the tools make it easy. A compass helps guide your circles while paint markers give you control. The final result looks like an intricate metal inlay. It acts as a sophisticated focal point for a living room or meditation space.
Material Required
- Black stretched canvas (or white canvas painted black)
- Metallic paint markers (gold, silver, rose gold)
- White chalk or slate pencil
Equipment Required
- Compass (for drawing circles)
- Ruler
- Protractor (optional)
- Eraser
DIY Instructions
Step 1
Paint your canvas black if it is not already dark. Wait for it to dry fully to prevent the metallic markers from clogging.
Step 2
Find the exact center of the canvas using a ruler. Mark it with a small dot. Use a compass to draw several concentric circles lightly in chalk radiating from that center point.
Step 3
Draw straight lines intersecting the center like a pizza pie to create even sections. These guidelines help you keep the pattern symmetrical.
Step 4
Begin drawing your design from the center outward using metallic markers. Use the chalk lines as guides to place petals, dots, and triangles. Alternate between gold, silver, and rose gold for visual depth.
Step 5
Fill in larger shapes with color to add weight to the design. Allow the ink to dry for a few minutes before your hand touches it to avoid smudging.
Step 6
Wait twenty four hours for the ink to cure. Gently wipe away the visible chalk guidelines with a damp cloth.
5. Upcycled Denim Patchwork Collage

Old jeans often end up in the trash but they make excellent art material. This collage uses various shades of blue denim to create a textured tactile surface. Frayed edges and seams add character that paint cannot replicate. You can arrange the scraps in neat grids or abstract swirls.
The indigo tones work as a neutral that fits many decor styles. This is a great way to preserve a favorite pair of jeans that no longer fits. It adds a cozy and casual atmosphere to a room. The heavy fabric also provides sound dampening benefits.
Material Required
- Sturdy canvas or wooden board
- Old denim jeans (various washes)
- Fabric glue or hot glue sticks
- White lace trim (optional)
Equipment Required
- Fabric scissors
- Hot glue gun
- Ruler
DIY Instructions
Step 1
Gather denim in different shades ranging from light acid wash to dark indigo. Cut the jeans into strips, squares, and circles. Keep the thick seams and hems as they add interesting texture.
Step 2
Fray the edges of some fabric strips by pulling at the loose threads. This creates a soft and rugged look.
Step 3
Lay out your design on the canvas before gluing anything. Organize the pieces into sections like horizontal stripes, vertical lines, or concentric circles.
Step 4
Apply hot glue to the back of each denim piece. Press them firmly onto the canvas. Overlap the edges slightly to cover the background completely.
Step 5
Incorporate lace or other fabric scraps for contrast if desired. Glue the thickest seams down last to create raised borders between sections.
Step 6
Check for any loose edges and secure them with extra glue. Trim any stray threads hanging off the sides of the canvas.
6. Watercolor Drip Effect Canvas

Controlled chaos makes this drip painting exciting to create. You allow gravity to pull the paint down the canvas to form organic lines. Water helps thin the acrylics to create translucent watercolor effects. The teal, blue, and pink colors blend softly where they meet.
It looks fluid and dreamy rather than rigid. This technique requires zero drawing skills. The white negative space in the center keeps the art from feeling heavy. It brings a fresh and playful energy to a space.
Material Required
- White stretched canvas
- Fluid acrylic paints (teal, blue, pink, violet)
- Water
Equipment Required
- Spray bottle with water
- Wide paintbrush
- Plastic drop cloth or garbage bags (for mess protection)
- Easel or prop to hold canvas upright
DIY Instructions
Step 1
Set up your workspace with plastic sheets because this project gets messy. Prop the canvas up vertically so it stands straight.
Step 2
Mix acrylic paint with a little water if it is too thick. You want a consistency that flows easily but holds its color.
Step 3
Apply a generous amount of paint to the top edge of the canvas using a brush. Do the same for the bottom corners if you want upward splashes.
Step 4
Spray water directly onto the wet paint at the top. Watch as the paint begins to run down the canvas.
Step 5
Guide the drips by tilting the canvas slightly if needed. Add more water for longer drips or stop spraying for shorter ones. Let colors bleed into each other naturally.
Step 6
Lay the canvas flat once you are happy with the look to stop the dripping. Allow it to dry completely for twenty four hours.
7. Minimalist Textured Plaster Waves

White on white art relies on shadow and depth to stand out. This project uses modeling paste to build actual physical texture on the surface. A notched tool creates rhythmic waves that look like Zen sand gardens. A bold block of black at the bottom grounds the airy design.
The high contrast between the smooth paint and the rough ridges is visually stimulating. It brings a sophisticated gallery look to your home. This style fits superbly in modern or industrial interiors. The materials are durable and hard drying.
Material Required
- Stretched canvas
- Modeling paste, joint compound, or thick gesso
- Black acrylic paint
- Masking tape (optional)
Equipment Required
- Notched trowel or adhesive spreader
- Palette knife
- Paintbrush
DIY Instructions
Step 1
Scoop a large amount of modeling paste onto the top two thirds of the canvas. Spread it out roughly with a palette knife to get an even thickness of about a quarter inch.
Step 2
Drag a notched trowel through the wet paste in a wavy motion. Keep your hand steady to create continuous parallel lines.
Step 3
Wipe the trowel clean and repeat the motion if you make a mistake. The paste stays wet for a while so you have time to adjust. Let the texture dry until it is hard to the touch.
Step 4
Paint the bottom third of the canvas with solid black acrylic paint. You can curve the black line to match the waves or keep it straight.
Step 5
Use a small brush to carefully paint up to the edge of the textured plaster. Ensure the black paint fills the grooves at the transition line.
Step 6
Let the paint dry. The plaster creates its own shadows so no further shading is required.
8. Hot Glue Relief & Gradient Art

Hot glue is usually a fastener but here it acts as a drawing tool. You create raised 3D designs directly on the canvas surface. A soft pastel gradient background makes the white glue lines pop. The shapes can be abstract doodles, snowflakes, or floral patterns.
This method adds a tactile element that tempts people to touch the art. It is playful and works well in kids’ rooms or creative studios. The glue dries quickly which speeds up the process. You get a relief sculpture effect without using clay or carving tools.
Material Required
- Canvas panel
- Hot glue sticks
- Acrylic paints (pastel pink, blue, grey)
- White paint (optional)
Equipment Required
- Hot glue gun
- Sponge brush or soft blending brush
- Pencil
DIY Instructions
Step 1
Paint your canvas with a gradient background. Start with pink at the top and blend into blue or grey at the bottom. Use a sponge brush for a smooth transition. Let this dry fully.
Step 2
Plug in your hot glue gun and let it heat up. Sketch your design lightly with a pencil if you want a guide.
Step 3
Squeeze the trigger gently to draw lines with the hot glue over your background. Keep the nozzle slightly above the canvas to get smooth rounded lines.
Step 4
Draw abstract loops, circles, or specific shapes like snowflakes. Vary the pressure to create thick and thin lines.
Step 5
Allow the glue to cool and harden completely. This usually takes only a few minutes.
Step 6
Leave the glue translucent or paint over the raised lines with white acrylic to make them stand out more against the pastel background.
9. Cork Mosaic State Map

This artwork doubles as a functional pinboard. You cut wine corks or cork sheets to fill the shape of a state or country. The natural texture of the cork contrasts sharply with a black background. It is a great way to document travels or show hometown pride.
The geometric arrangement of the square corks gives it a pixelated look. You can use colored pins to mark places you visited. It is sturdy and holds up well to repeated use. This project requires precision cutting but is very rewarding.
Material Required
- Black canvas or painted wood board
- Wine corks or cork tiles
- Strong craft glue or construction adhesive
- Paper template of your chosen map
Equipment Required
- Sharp craft knife or box cutter
- Cutting mat
- White pencil or chalk
DIY Instructions
Step 1
Print out a map outline of your desired state or country. Cut out the paper shape to use as a stencil.
Step 2
Place the stencil on the black canvas and trace the outline with a white pencil.
Step 3
Cut your corks into small squares or consistent rectangular shapes. Using square cork tiles is easier than slicing round wine corks.
Step 4
Apply glue to the back of each cork piece. Start filling the map shape from the center and work your way out to the edges.
Step 5
Trim the cork pieces that touch the border to fit the curve of the outline. This ensures the map shape remains recognizable.
Step 6
Let the glue cure for twenty four hours. Add a small legend or key in the corner using string or paint if desired. Use push pins to mark special locations.
10. Chunky Yarn Braided Rainbow

Fiber art brings warmth and softness to hard walls. This rainbow is made by wrapping or braiding chunky yarn. The colors are muted and earthy like rust, mustard, and sage. It creates a cozy nursery or living room decoration.
The texture is thick and substantial. You do not need to know how to knit or crochet to make this. It essentially involves gluing yarn onto a backing. The arch shape is a classic symbol of hope and happiness.
Material Required
- Thick cotton rope (for the core)
- Chunky yarn skeins (rust, mustard, cream, blue, sage)
- Felt sheet or canvas (for backing)
- Hot glue sticks
- Masking tape
Equipment Required
- Hot glue gun
- Scissors
- Comb (to fringe the ends)
DIY Instructions
Step 1
Cut four or five lengths of thick cotton rope. Make each piece slightly shorter than the next to form an arch stack.
Step 2
Wrap the first rope entirely with the rust colored yarn. Knot the start and end to secure it. Alternatively, braid the yarn strands and glue them onto the rope for a different texture.
Step 3
Repeat the wrapping process for each rope piece using a different color for each layer.
Step 4
Glue the wrapped ropes together side by side to form the rainbow arch. Apply hot glue between the ropes and press them firmly.
Step 5
Glue the entire rainbow onto a piece of felt or canvas for stability. Trim the backing so it is not visible from the front.
Step 6
Unravel the exposed rope ends at the bottom. Use a comb to brush them out into a soft fringe.
11. Rainbow Tissue Paper Collage

Bright colors can change the entire mood of a room. This project uses translucent tissue paper to create a stained glass effect. You layer squares of different colors over each other. The spots where they overlap create new and deeper shades.
It is a very forgiving process that does not require precise cutting. The torn edges give it a textured and organic look. This art piece works well in playrooms or creative studios. Sunlight hits the colors and makes them glow if you hang it near a window. It is a joyful explosion of hues on a white background.
Material Required
- White stretched canvas
- Tissue paper (various rainbow colors)
- Decoupage glue or Mod Podge
- Water
Equipment Required
- Foam brush or soft paintbrush
- Scissors (optional)
- Cup for glue mixture
DIY Instructions
Step 1
Tear or cut the tissue paper into squares and rectangles of various sizes. Rough edges look better for this style so you do not need a ruler.
Step 2
Mix a small amount of water into your decoupage glue to thin it out slightly. This helps the delicate paper stick flat without tearing.
Step 3
Brush a thin layer of the glue mixture onto a section of the canvas. Place a piece of tissue paper on the wet spot.
Step 4
Apply another thin layer of glue gently over the top of the tissue paper. Smooth out any large air bubbles with your brush.
Step 5
Repeat this process and overlap the edges of the tissue paper pieces. Notice how blue over yellow creates green. Cover as much of the white canvas as you like.
Step 6
Let the entire canvas dry overnight. The glue will turn clear and leave a glossy finish.
12. Geometric Mirror Mosaic Starburst

Reflective surfaces add glamour and make small spaces feel larger. This artwork uses small craft mirrors to form a striking starburst pattern. The dark navy background makes the glass shapes pop.
The design looks like an exploding firework or a stylized snowflake. You arrange hexagons, squares, and triangles in lines radiating from the center. It feels modern and high end but is very affordable to make. This piece catches the light beautifully at night.
Material Required
- Stretched canvas
- Navy blue acrylic paint
- Small craft mirrors (hexagons, squares, triangles)
- Strong craft adhesive or jewelry glue
Equipment Required
- Paintbrush
- Ruler
- White chalk or pencil
- Tweezers (for placing small mirrors)
DIY Instructions
Step 1
Paint your canvas with two coats of navy blue paint. Allow it to dry completely so the surface is not tacky.
Step 2
Find the center of the canvas with a ruler and mark it with a small dot of chalk.
Step 3
Draw faint lines radiating outward from the center like the spokes of a wheel. These will guide your mirror placement.
Step 4
Arrange the mirrors on the canvas without glue first. Start from the center and work your way out. Mix different shapes to create interesting rays.
Step 5
Lift one mirror at a time and apply a dab of glue to the back. Press it firmly back into place.
Step 6
Wipe away any chalk marks with a damp cloth once the glue is fully cured. Clean the mirrors with glass cleaner to remove fingerprints.
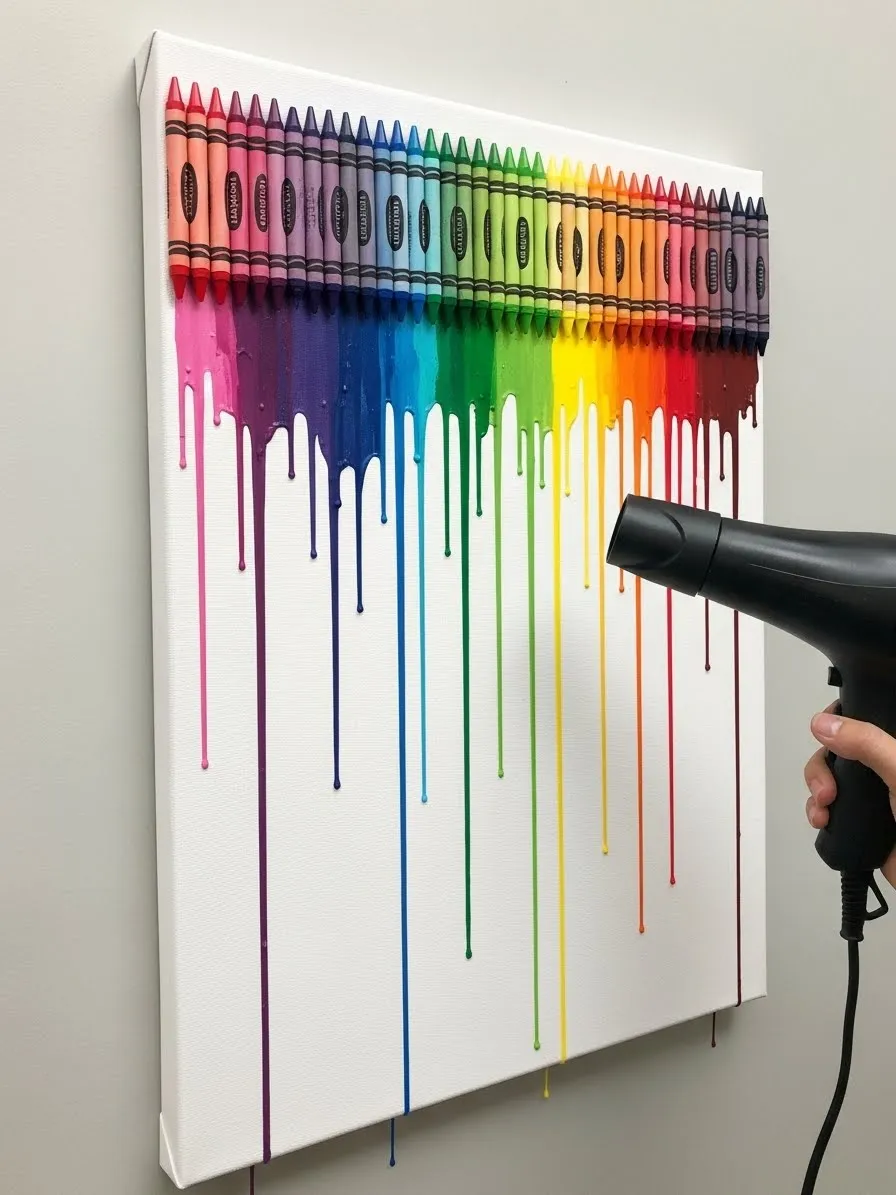
13. Rainbow Crayon Melt Rain

Melting crayons is a classic craft that creates a vibrant cascade of color. You line up a spectrum of crayons at the top of the canvas. Heat causes the wax to liquify and run down in straight lines.
The result looks like colorful rain. It introduces a fun and nostalgic element to your decor. You can control the flow to keep the drips short or let them reach the bottom. The texture is thick and waxy which adds depth to the piece.
Material Required
- White stretched canvas
- Box of wax crayons (64 count or more)
- Hot glue sticks
Equipment Required
- Hot glue gun
- Hair dryer or heat gun
- Drop cloth or old newspapers
- Easel or prop (to tilt canvas)
DIY Instructions
Step 1
Peel the paper wrappers off the crayons if you prefer a clean look or leave them on for branding. Arrange them in rainbow order at the top edge of the canvas.
Step 2
Hot glue each crayon securely to the canvas with the tip pointing down. Ensure they are touching each other to create a solid line of color.
Step 3
Prop the canvas up vertically against a wall covered in newspaper. The wax will splash so protect your floor.
Step 4
Turn your hair dryer to the high heat setting. Aim the air at the center of the crayons.
Step 5
Move the heat back and forth as the wax begins to melt. Gravity will pull the colored wax down the canvas. Direct the air to guide the drips.
Step 6
Turn off the dryer once you are happy with the length of the drips. Let the wax cool and harden for about ten minutes.
14. Monochrome Cardboard Texture Art

Cardboard scraps can transform into sophisticated textured art. This project involves cutting cardboard into strips and geometric shapes. You arrange them in patterns like chevrons or checkerboards.
A coat of grey paint unifies the different materials. Shadows created by the raised layers define the design. It has an industrial and architectural feel. This is an excellent way to recycle shipping boxes into something beautiful.
Material Required
- Stretched canvas
- Corrugated cardboard scraps
- Craft glue or wood glue
- Grey acrylic paint (or spray paint)
Equipment Required
- Box cutter or craft knife
- Metal ruler
- Cutting mat
- Paintbrush
DIY Instructions
Step 1
Cut your cardboard into many thin strips of even width. Also cut some squares if you want a checkerboard section.
Step 2
Plan your layout on the canvas. Try a herringbone pattern on one side and squares on the other.
Step 3
Glue the cardboard pieces onto the canvas. Leave small gaps between them to emphasize the texture.
Step 4
Press the cardboard down with a heavy book while the glue dries to ensure it stays flat.
Step 5
Apply a coat of grey paint over the entire surface. Paint from different angles to get into the crevices of the corrugated edges.
Step 6
Add a second coat if the cardboard color is still showing through. Let it dry fully before hanging.
15. Industrial Typography on Stripes

Bright colors mixed with industrial lettering create a bold urban look. This background features vertical stripes of paint in primary colors. Stenciled letters on brown kraft paper or cardboard are glued on top.
The contrast between the messy painted stripes and the crisp text is visually appealing. It looks like a street poster or a piece of modern pop art. You can choose meaningful words or random numbers for an abstract vibe.
Material Required
- Canvas
- Acrylic paints (yellow, blue, red, pink, grey)
- Brown kraft paper or thin cardboard
- Black spray paint or acrylic paint
- Spray adhesive or glue stick
Equipment Required
- Wide paintbrush
- Letter stencils
- Scissors
DIY Instructions
Step 1
Paint vertical stripes of different colors on your canvas. Do not worry about straight lines. Let the brush strokes overlap and look rough. Allow this to dry.
Step 2
Cut rectangular strips of brown kraft paper or cardboard. Make them slightly smaller than the width of your canvas.
Step 3
Place letter stencils on the brown paper strips. Use black paint to fill in the letters. You can spell out a quote or use random codes.
Step 4
Lift the stencils carefully and let the black paint dry.
Step 5
Apply glue to the back of the paper strips.
Step 6
Position the strips horizontally across the colorful background. Press them down firmly to secure them.
16. Vintage Book Page Quote Collage

Old books provide a beautiful creamy background for text art. You cover the canvas with pages from a damaged or thrifted book. Bold black words are layered on top to create an inspirational message.
This style feels intellectual and cozy. It fits well in libraries or reading nooks. The text “Wanderlust Dream Grow” suggests adventure and personal development. The layout balances the busy background with clear white space.
Material Required
- Canvas
- Old book pages
- Mod Podge or white glue
- White cardstock or heavy paper
- Black paint or printed letters
Equipment Required
- Paintbrush
- Scissors
- Computer and printer (optional)
DIY Instructions
Step 1
Tear pages out of an old book. Apply glue to the canvas and stick the pages down. Overlap them slightly to cover the entire surface.
Step 2
Brush a layer of glue over the top of the pages to seal them. Let this dry completely.
Step 3
Print your chosen words on white cardstock using a large bold font. Alternatively you can paint the words on white paper.
Step 4
Cut out the paper with the words in rectangular blocks.
Step 5
Arrange the words in the center of the canvas. Play with the spacing until it looks balanced.
Step 6
Glue the white word blocks onto the book page background.
17. Button and Trinket Monogram

Small items like buttons and beads can form a lovely mosaic. This project features a large monogram letter on a bright pink background. The letter is filled with an assortment of textures including corks and dried moss.
It acts as a personalized nameplate for a bedroom or dorm. The 3D elements invite you to look closer. It is a great way to use up leftover craft supplies. The white outline makes the letter shape distinct and readable.
Material Required
- Canvas
- Pink acrylic paint
- Assorted buttons, beads, wine corks, sequins
- Dried craft moss
- White paint pen or thin brush
- Tacky glue
Equipment Required
- Pencil
- Paintbrush
- Printed large letter (for template)
DIY Instructions
Step 1
Paint the entire canvas with pink acrylic paint and let it dry.
Step 2
Cut out a large paper letter to use as a template. Trace the letter shape onto the center of the canvas with a pencil.
Step 3
Outline the pencil mark with a white paint pen to create a crisp border.
Step 4
Apply a thick layer of tacky glue inside the letter outline. Work in small sections so the glue does not dry too fast.
Step 5
Press buttons, corks, and beads into the glue. Fill small gaps with sequins or tiny beads. Add tufts of moss for texture.
Step 6
Allow the glue to cure flat for twenty four hours to ensure heavy items do not slide off.
18. Gold Framed Brushstrokes

Minimalism relies on the power of simple shapes. This piece uses two heavy black brushstrokes on a white background. A thin gold rectangle frames the paint to add a touch of elegance.
The contrast between the rough paint texture and the precise gold line is striking. It looks very modern and chic. This art takes only minutes to paint but looks high fashion. It is perfect for a clean and contemporary living space.
Material Required
- White canvas
- Black heavy body acrylic paint
- Gold paint pen or gold leaf pen
Equipment Required
- Wide flat paintbrush
- Ruler
DIY Instructions
Step 1
Ensure your canvas is clean. Paint it white if you want a brighter background.
Step 2
Load a wide brush with a lot of black paint. Swipe it across the canvas horizontally in one confident motion.
Step 3
Repeat the motion to create a second parallel stroke below the first one. Leave the edges rough and textured. Allow the black paint to dry.
Step 4
Use a ruler to guide your gold paint pen. Draw a rectangle that overlaps the black strokes.
Step 5
Go over the gold lines a second time to ensure they are opaque and shiny.
Step 6
Let the gold ink dry completely before touching it.
19. Geometric Tape Resist Art

Sharp lines define this bold black and white artwork. You use masking tape and stencils to block off shapes before painting. When you peel the tape away the white canvas is revealed underneath.
The design combines triangles, circles, and waves. It explores positive and negative space. The result is crisp and graphic. It looks like a professional print but is done entirely by hand.
Material Required
- White canvas
- Black acrylic paint
- Painter’s tape or masking tape
- Adhesive vinyl or contact paper (for curves)
Equipment Required
- Scissors
- Paintbrush
- Compass (for drawing the circle on vinyl)
DIY Instructions
Step 1
Start with a white canvas. If your canvas is not bright white paint a base coat first and let it dry.
Step 2
Apply strips of tape to form the triangle and straight lines. Press the edges of the tape down firmly to prevent leaks.
Step 3
Cut a circle and a wave shape out of adhesive vinyl or contact paper. Stick these onto the canvas in your desired composition.
Step 4
Paint the entire canvas black. Cover the tape and stencils completely.
Step 5
Wait until the paint is tacky but not fully dry. Slowly peel off the tape and vinyl stickers.
Step 6
Touch up any bleeding edges with a small brush and white paint if necessary.
20. Minimalist One Line Drawing

One line drawings are a trendy artistic style where the pen never lifts from the paper. This canvas features a simple portrait of a woman and a dog. The continuous line connects the figures in a fluid motion.
It is elegant and understated. The lack of shading makes it feel light and airy. You do not need to be a master artist to trace a design. It adds a sophisticated artistic touch to any wall.
Material Required
- White canvas
- Black permanent marker or paint pen
- Pencil
- Eraser
Equipment Required
- Printed image (for reference or tracing)
- Graphite paper (optional for transfer)
DIY Instructions
Step 1
Find a line drawing image you like online and print it out to size.
Step 2
Place graphite transfer paper on the canvas and lay your print on top. Trace the lines with a pencil to transfer the design.
Step 3
Alternatively sketch the design lightly with a pencil freehand. Focus on flowing lines rather than perfect anatomy.
Step 4
Take your black marker and trace over the pencil lines. Try to move your hand smoothly to avoid shaky lines.
Step 5
Vary the line weight slightly by pressing harder in some areas if using a paint pen.
Step 6
Wait for the ink to dry and gently erase any visible pencil marks.
21. Hand Carved Eraser Stamp Pattern

Simple patterns can have a calming effect on a space. This project uses a common eraser to create a custom stamp. You carve a feather design and repeat it across the white canvas.
The earthy tones of rust, sage, and grey look very organic. It creates a wallpaper effect without the hassle of hanging paper. You do not need to buy expensive rubber stamps. This method gives you total control over the shape and spacing.
Material Required
- White stretched canvas
- Large rubber eraser (rectangular)
- Acrylic paints (rust, sage green, grey)
- Paper plate or palette
Equipment Required
- X-Acto knife or craft carving tool
- Pencil
- Paintbrush (for applying paint to stamp)
DIY Instructions
Step 1
Draw a simple feather shape on the flat side of your eraser with a pencil. Keep the design simple so it is easy to carve.
Step 2
Use your craft knife to carefully cut away the rubber around your drawing. The feather shape should be raised while the background is cut low.
Step 3
Squeeze small amounts of paint onto your palette. Use a brush to apply a thin layer of paint to the raised stamp surface.
Step 4
Press the stamp firmly onto the canvas. Lift it straight up to avoid smearing the design.
Step 5
Repeat this process to fill the canvas. Rotate the stamp slightly or change colors to create a random pattern.
Step 6
Let the paint dry completely. Clean your stamp with water if you want to use it again later.
22. Pressed Flower Initial Art

Nature offers the most beautiful art supplies for free. This piece features a large letter “E” made entirely from pressed flowers and leaves. The colorful petals create a delicate and vibrant monogram.
It preserves the beauty of spring for the whole year. This makes a thoughtful gift for a friend or a new baby. The white background ensures the colors of the flowers stand out clearly. It feels personal and handcrafted.
Material Required
- Canvas panel
- Dried pressed flowers (various colors and sizes)
- Dried fern leaves
- Mod Podge or clear craft glue
Equipment Required
- Tweezers
- Small paintbrush
- Printed letter template (optional)
- Pencil
DIY Instructions
Step 1
Lightly trace a large letter onto your canvas using a pencil. You can print a letter from your computer to use as a guide.
Step 2
Arrange your dried flowers and leaves inside the letter shape without glue first. Place larger flowers like daisies in the main areas and use small buds to fill gaps.
Step 3
Pick up one flower at a time using tweezers. Apply a small dot of glue to the back of the flower.
Step 4
Press the flower gently onto the canvas. Be careful not to crush the delicate petals.
Step 5
Continue gluing until the entire letter shape is filled. Overlap the leaves slightly to hide the white canvas underneath.
Step 6
Allow the glue to dry. You can brush a thin layer of Mod Podge over the top to seal the flowers if you want extra protection.
23. Coastal Seashell and Sand Gradient

Bring the beach home with this textured seascape. The background features a smooth ombre fade from white to blue. A diagonal sweep of real sand and seashells cuts across the canvas.
The contrast between the smooth paint and the rough sand is visually interesting. It captures the feeling of a shoreline walk. You can use shells collected from your own vacations. This piece adds a relaxed coastal vibe to any bathroom or living area.
Material Required
- Canvas
- Acrylic paints (white, light blue, dark blue)
- Real beach sand
- Assorted seashells and small driftwood
- Strong craft glue (white glue usually works well for sand)
Equipment Required
- Sponge brush (for blending)
- Old spoon (for sprinkling sand)
DIY Instructions
Step 1
Paint the canvas with a gradient effect. Put white paint at the top and blue at the bottom. Blend them in the middle with a damp sponge brush. Let this dry.
Step 2
Mix some sand with white glue in a cup until it forms a thick paste.
Step 3
Spread the sand mixture diagonally across the bottom corners of the canvas. You can also brush plain glue on the canvas and sprinkle dry sand over it.
Step 4
Arrange your seashells and driftwood pieces along the edge of the sand line. Place larger shells in the middle and smaller pebbles near the ends.
Step 5
Glue each shell down securely. Use a generous amount of glue for heavier items.
Step 6
Shake off any loose sand once the glue is fully dry.
24. Impasto Forest Sunset

Texture gives a painting life and energy. This landscape uses the impasto technique where paint is applied very thickly. Palette knives create rugged mountain shapes and tall pine trees.
The sunset colors of orange and purple glow behind the dark green forest. You do not need to be precise with this style. The raised ridges of paint catch the light. It looks like an oil painting from a gallery.
Material Required
- Canvas
- Heavy body acrylic paints or oil paints (orange, purple, dark green, white, black, brown)
- Modeling paste (optional to thicken paint)
Equipment Required
- Set of palette knives (various shapes)
- Paper towels (to wipe knives)
DIY Instructions
Step 1
Mix your acrylic colors with modeling paste if they are not thick enough. You want a consistency like soft butter.
Step 2
Spread orange and purple paint across the upper middle of the canvas for the sky. Use a palette knife to blend them loosely.
Step 3
Use the edge of a palette knife to scrape dark green paint vertically. This creates the trunks and branches of the pine trees.
Step 4
Apply grey and white paint at the bottom to suggest rocky ground or a stream. Do not smooth it out. Leave the strokes rough.
Step 5
Layer more dark green paint on top of the trees to add dimension.
Step 6
Let the painting dry flat for at least two days. Thick paint takes much longer to cure than thin layers.
25. DIY Chalkboard Menu

Functional art makes your kitchen more useful. This project turns a canvas into a framed chalkboard menu. A bright yellow painted border gives it a pop of color.
You can write your weekly meals or grocery list on the black surface. It helps keep the household organized. The text “Today’s Menu” at the top gives it a cafe feel. It is reusable and easy to wipe clean.
Material Required
- Stretched canvas
- Black chalkboard paint
- Yellow acrylic paint (or colored tape)
- White chalk
- Painter’s tape
Equipment Required
- Foam roller or wide brush
- Ruler
- Letter stencils (optional)
DIY Instructions
Step 1
Apply painter’s tape around the edges of the canvas to create a border. Mask off the center rectangle.
Step 2
Paint the outer border with bright yellow paint. You might need two coats for solid coverage. Remove the tape and let it dry.
Step 3
Apply fresh tape over the inner edge of the yellow border to protect it.
Step 4
Paint the center rectangle with black chalkboard paint. Apply one coat horizontally and let it dry. Apply a second coat vertically.
Step 5
Wait twenty four hours for the chalkboard paint to cure completely. Rub the side of a piece of chalk over the entire black surface to “season” it. Wipe it clean.
Step 6
Use stencils or your own handwriting to paint “Today’s Menu” at the top in white. Use the board to write your daily specials.
26. Magnetic Organizer Board

This canvas acts as a command center for your office. It combines a magnetic board with a painted calendar grid. The background features abstract blocks of blue and pink.
You can pin photos, notes, and receipts directly to the surface. It gets clutter off your desk and onto the wall. Magnetic primer is the secret ingredient here. It turns fabric into a metal attracting surface.
Material Required
- Canvas
- Magnetic primer or magnetic paint
- Acrylic paints (blue, pink, white)
- Permanent black marker
- Small magnets
Equipment Required
- Paint roller
- Ruler
- Paintbrushes
DIY Instructions
Step 1
Paint the areas where you want to stick magnets with magnetic primer. You need at least three or four coats for the magnets to stick well. Let each coat dry in between.
Step 2
Paint your colored design over the magnetic primer. Use blue for the main background and pink for accents.
Step 3
Paint a white rectangle in the lower section for the calendar.
Step 4
Use a ruler and black marker to draw the grid lines for the calendar on the white patch. Write the days of the week at the top.
Step 5
Add clips or push pins to the non magnetic areas if you want to hang papers that way.
Step 6
Test the magnetic strength with light magnets. Hang your photos and notes.
27. Abstract Splatter Toothbrush Art

Abstract art allows you to be totally free. This piece is created by flicking paint onto the canvas with a toothbrush. The chaotic web of blue, red, and green lines looks energetic.
There is no wrong way to do this. It is about the motion and the colors. The result resembles the famous works of Jackson Pollock. It adds a modern and edgy touch to a plain room.
Material Required
- White canvas
- Fluid acrylic paints (blue, red, green, grey, yellow)
- Water (to thin paint)
Equipment Required
- Old toothbrushes
- Drop cloth or cardboard box (to catch mess)
- Gloves
DIY Instructions
Step 1
Place your canvas inside a large cardboard box or on a protected floor. This process sprays paint everywhere.
Step 2
Mix your acrylic paints with a little water. The consistency should be like heavy cream so it flicks easily.
Step 3
Dip an old toothbrush into the first color. Hold it over the canvas.
Step 4
Run your thumb along the bristles to spray the paint downward. You can also swing the brush aggressively to create long lines.
Step 5
Repeat with different colors. Layer the lines over each other. Let some drops be big and others be fine mist.
Step 6
Allow the paint to dry completely. Do not tilt the canvas while wet unless you want the drips to run.
28. Translucent Geometric Shapes

Geometry creates order and balance. This artwork features overlapping triangles and circles. The colors appear translucent where the shapes intersect.
It creates a cool mid-century modern look. The lines are sharp and clean. Use colors like teal, red, and ochre for a retro vibe. This design looks complex but is built one shape at a time.
Material Required
- Canvas
- Acrylic paints
- Painter’s tape (for triangles)
- Contact paper or circular stencils
Equipment Required
- Paintbrush
- Scissors
DIY Instructions
Step 1
Mask off a large triangle shape using painter’s tape. Paint the inside a solid color like black or teal. Let it dry and remove the tape.
Step 2
Create a circle stencil using contact paper. Stick it onto the canvas so it overlaps part of the first triangle.
Step 3
Paint the circle with a different color. If you want a translucent effect mix the paint with a glazing medium or a lot of water.
Step 4
Mask off another triangle that overlaps the previous shapes. Paint it a contrasting color like red.
Step 5
Continue adding shapes until the composition feels balanced. Ensure each layer is dry before adding tape on top of it.
Step 6
Peel off all tape and stencils carefully to reveal the crisp intersections.
29. Vintage Photo Transfer

Displaying family photos on canvas gives them a classic art feel. This project transfers a black and white image directly onto the fabric. The edges are rough and distressed for a vintage look.
A painted blue border frames the image nicely. This technique embeds the ink into the canvas texture. It looks more authentic than just gluing a photo down. It is a wonderful way to honor special memories.
Material Required
- Canvas
- Laser printed photo (on regular paper, not photo paper)
- Gel medium or photo transfer medium
- Acrylic paint (for border)
Equipment Required
- Sponge brush
- Spray bottle with water
- Soft cloth or sponge
DIY Instructions
Step 1
Print your photo using a laser printer. Remember to mirror the image if it has text.
Step 2
Apply a thick layer of gel medium to the printed side of the paper.
Step 3
Place the paper face down onto the center of the canvas. Press it down firmly and smooth out any air bubbles. Let it dry overnight.
Step 4
Wet the back of the paper with water using a spray bottle. The paper will become soggy.
Step 5
Gently rub the paper with your fingers or a soft sponge. The paper pulp will roll off but the ink will stay on the canvas. Be patient and gentle.
Step 6
Paint a border around the transferred image with acrylic paint to frame it. Apply a final coat of gel medium to seal the photo.
30. Green Color Block Grid

Monochromatic color schemes are sophisticated and easy to match. This art uses various shades of green separated by white lines. The geometric grid is created simply with tape.
It adds a fresh and organized look to a room. The different greens create depth without being overwhelming. This project is beginner friendly because the tape ensures straight lines.
Material Required
- Canvas
- Acrylic paints (dark green, lime green, olive, white)
- Painter’s tape (narrow width works best)
Equipment Required
- Ruler
- Paintbrush
- Scissors
DIY Instructions
Step 1
Paint the entire canvas white and let it dry. This becomes the color of the lines between the blocks.
Step 2
Apply strips of tape across the canvas in a random geometric pattern. Create triangles, trapezoids, and rectangles.
Step 3
Press the edges of the tape down firmly to seal them.
Step 4
Select a specific green for each section. Paint the inside of the shapes. Try not to put two shapes of the same color next to each other.
Step 5
Apply a second coat of paint to ensure the colors are solid and bold.
Step 6
Peel the tape off slowly while the paint is still slightly damp. This reveals the crisp white grid lines. Let it cure fully.
31. Pop Art Wood Circle Assemblage

Three dimensional art adds immediate depth to flat walls. This project uses wooden craft rounds or thick cardboard circles to build a sculptural piece. You paint them in bright primary colors like yellow, red, and blue.
Layering smaller circles on top of larger ones creates interesting shadows. It looks playful and modern. This style works exceptionally well in a children’s playroom or a retro living area. You can arrange the pieces randomly or in a strict grid. The resulting artwork pops off the canvas literally and visually.
Material Required
- White canvas
- Wooden craft circles (various sizes)
- Acrylic paints (yellow, green, blue, purple, red, orange)
- Strong wood glue or heavy duty craft glue
Equipment Required
- Paintbrushes
- Palette
- Heavy book (for weight during gluing)
DIY Instructions
Step 1
Lay out your wooden circles on a protected surface. Group them by size so you can plan your colors.
Step 2
Paint the face and edges of each wooden circle. Use bright, saturated colors for a pop art look. You might need two coats to cover the wood grain.
Step 3
Allow the paint to dry completely.
Step 4
Arrange the painted circles on the white canvas. Try stacking a small blue circle on top of a larger red one to create depth. Play with the composition until it feels balanced.
Step 5
Lift one piece at a time and apply glue to the back. Press it firmly onto the canvas. If you are stacking circles, glue the bottom one first.
Step 6
Place a heavy book on top of the circles gently to hold them flat while the glue sets. Leave it for several hours.
32. Color Block Knit Sampler

Knitting usually results in scarves or blankets but here it becomes wall decor. This piece displays six knitted squares arranged in a neat grid. Each square features a diagonal color split using earthy tones like rust, blue, and black.
It brings a cozy and homespun texture to a room. You do not need to knit a whole sweater to finish this project. Small swatches work best and are quick to make. This is a fantastic way to use up leftover yarn scraps. The contrast between the soft yarn and the rigid canvas is lovely.
Material Required
- Canvas
- Yarn (various colors like blue, rust, cream, black)
- Fabric glue or needle and thread
Equipment Required
- Knitting needles
- Scissors
- Darning needle
DIY Instructions
Step 1
Knit six separate squares using a simple garter stitch. To create the diagonal effect, switch yarn colors in the middle of the row or knit two triangles and sew them together.
Step 2
Weave in any loose yarn ends on the back of your knitted squares.
Step 3
Block your squares by pinning them to a flat surface and steaming them. This ensures they are perfectly square and lay flat.
Step 4
Arrange the six squares on the canvas. Leave equal spacing between them to show the white background.
Step 5
Apply a generous amount of fabric glue to the back of each knit square. Press it onto the canvas.
Step 6
Alternatively, sew the corners of the squares directly into the canvas using a sharp needle and thread for a secure hold.
33. Acrylic Flip Cup Pour

Fluid art yields results that look like galaxies or marble. This technique involves layering paint in a cup and flipping it onto the canvas. Gravity and chemical reactions do the work for you.
The colors mix organically to create cells and lacing patterns. No two pours are ever the same. High contrast colors like black, blue, and gold look stunning together. It is a messy process but very freeing. This art style becomes an instant conversation starter.
Material Required
- Canvas
- Fluid acrylic paints or pouring medium mixture
- Silicone oil (optional for cells)
- Plastic cup
Equipment Required
- Popsicle sticks (for stirring)
- Drop cloth or large bin (to catch runoff)
- Gloves
DIY Instructions
Step 1
Mix each acrylic color with pouring medium until it flows like warm honey. Add two drops of silicone oil to the colors if you want cell effects.
Step 2
Take one empty plastic cup. Pour small amounts of each color into the cup, layering them one on top of the other. Do not stir.
Step 3
Place your canvas face down on top of the cup. Hold the cup and canvas together tightly and flip them over so the cup is upside down on the canvas.
Step 4
Lift the cup straight up quickly. The paint will flood out onto the surface.
Step 5
Tilt the canvas gently in different directions. Guide the paint to cover the corners and edges. Watch the patterns stretch and warp.
Step 6
Set the canvas on raised cups to dry. Ensure it is level so the paint does not slide off while drying.
34. Textured White Stencil Art

White on white art is timeless and elegant. This project uses modeling paste to create a raised pattern on the canvas. A detailed damask stencil provides the intricate background design.
Large, smooth swooshes of paste on top add a modern contrast to the vintage pattern. Shadows define the artwork rather than color. It looks very high end and sophisticated. This piece fits beautifully in minimal or shabby chic interiors.
Material Required
- Canvas or sturdy board
- Modeling paste or joint compound
- White acrylic paint (optional)
- Masking tape
Equipment Required
- Decorative stencil (damask or geometric)
- Palette knife or scraper
- Spreader
DIY Instructions
Step 1
Place your stencil over the canvas. Secure the edges with masking tape so it does not shift.
Step 2
Scoop modeling paste onto a spreader. Drag it over the stencil to fill the holes. Ensure the layer is even.
Step 3
Lift the stencil straight up carefully to reveal the raised pattern. Let this layer dry until it is firm.
Step 4
Apply fresh modeling paste to your palette knife. Create large, sweeping strokes over parts of the dried stencil pattern.
Step 5
Vary the pressure to make the strokes thick in the middle and thin at the ends. This creates a layered, dynamic look.
Step 6
Allow the entire piece to dry for twenty four hours. You can leave it matte or seal it with a gloss varnish.
35. Impasto Ocean Waves

Capturing the movement of the sea requires heavy texture. This painting uses the impasto technique to build 3D waves. You mix thick paste with blue and turquoise paint to sculpt the water.
The whitecaps rise off the canvas to catch the light. It feels energetic and refreshing. You can almost hear the crashing waves when looking at it. This style does not require fine brushes, just bold knife strokes.
Material Required
- Canvas
- Heavy body acrylic paints (dark blue, turquoise, teal, white, sand/beige)
- Modeling paste or gel medium
Equipment Required
- Set of palette knives
- Paper towels
DIY Instructions
Step 1
Paint the bottom inch of the canvas with a sandy beige color. This represents the shore.
Step 2
Mix your blue paints with modeling paste to thicken them. You want the paint to hold its shape when scooped.
Step 3
Apply the dark blue mixture to the top of the canvas using a palette knife. Spread it in horizontal, wavy motions.
Step 4
Layer lighter turquoise and teal colors below the dark blue. Blend them partially but leave distinct streaks.
Step 5
Use pure white paste to create the crashing foam. Apply it thickly on the crests of the waves. Use the tip of the knife to pull the white paint upward for splashes.
Step 6
Let the painting dry flat. The thick peaks will take a long time to harden completely.
Creating custom canvas art is one of the quickest ways to personalize your home. You have seen how basic materials transform into high-end decorative pieces. The options range from sophisticated geometric patterns to playful textured collages. You no longer need to settle for mass produced items.
Remember that boring walls are usually a missed opportunity for self expression. The key to great decor is texture, color, and personal relevance. Grab the supplies for your favorite project from this list. Start hanging meaningful, engaging art on your walls today.
Key Takeaways
- Complexity Is Optional: Simple techniques like tape resist and stamping yield stunning results. You do not need professional drawing skills to make great wall art.
- Embrace Texture: Materials like modeling paste, yarn, cork, and buttons add depth that paint alone cannot achieve. Textured art catches light and creates interest.
- Customize Everything: Use these projects as starting points. Change the colors, swap the materials, and resize the pieces to fit your specific room decor.
- Source Your Supplies: Repurpose old items like denim, wine corks, and book pages. DIY art is often budget friendly and environmentally conscious.
- Focus on Personality: The best wall art reflects your own story. Choose themes like travel, nature, or favorite colors that make you happy.