Your dining room often waits quietly. It’s a space reserved for just a few special days a year. The rest of the time, it might feel forgotten or underused. But it holds so much potential for warmth and gathering.
The holiday season is the perfect reason to bring this room back to life. It’s a time for connection, for shared meals, and for creating a magical atmosphere. A few thoughtful changes can transform your dining area into the true heart of your home.

This guide is here to inspire you. We’ve gathered 39 stunning ideas for every taste and style. You will find everything from quiet, minimalist looks to grand, glamorous feasts.
Best of all, you can create these beautiful scenes yourself. Each idea comes with simple, step-by-step instructions. Get ready to turn your underused dining room into a space your family will love and remember.
1. Gilded Evergreen Runner

A dark table provides a stunning backdrop for this holiday setting. The design creates a feeling of modern elegance. A lush garland of fresh pine stretches across the length of the table, creating a natural and fragrant runner. This greenery brings the outdoors inside for a festive touch.
Pops of rich red, from pomegranates nestled within the branches, offer a classic holiday contrast. The scene is illuminated by the soft glow of tall, slender white candles. They stand in simple gold holders, matching the fine legs of the grey velvet chairs and the striking chandelier above. This tablescape feels both luxurious and welcoming.
DIY Instructions: Gilded Evergreen Runner
Here is how you can make this beautiful centerpiece at home. It’s super easy!
What You’ll Need:
- A long piece of evergreen garland (you can find fake ones at a craft store, or use real branches from a tree).
- Floral wire (it’s like thin, green wire for plants).
- 3-4 pomegranates or large red Christmas ornaments.
- 5-6 tall, thin white candles.
- 5-6 simple gold candle holders.
- A gold or mustard-colored fabric table runner.
Step-by-Step Guide:
- Set the Stage: First, lay your fabric runner down the middle of your dining table. Make sure it’s straight and smooth.
- Place the Greenery: Lay your evergreen garland right on top of the fabric runner. Stretch it out from one end of the table to the other.
- Add Red Jewels: Now for the fun part! Gently place your pomegranates or red ornaments among the evergreen branches. Space them out so it looks balanced. To keep them from rolling, wrap a small piece of floral wire around them and twist the end onto a sturdy branch in the garland.
- Bring in the Light: Carefully place your gold candle holders within the garland. Make a nice pattern, maybe putting one in the center and a few on each side. Once you like where they are, put the tall white candles inside them.
- Final Fluff: Gently fluff the branches of the garland around the fruit and candles. This makes it look fuller and more natural. Make sure no leaves or branches are touching the part of the candle that will be lit.
2. Scandinavian Winter Calm

This dining space feels peaceful and bright. It uses a simple color palette of white, light grey, and natural wood to create a serene holiday mood. The clean lines of the wooden chairs and round table are soft and inviting. A simple wreath made of eucalyptus hangs on the wall, adding a touch of nature without overwhelming the room.
The centerpiece is a collection of bare branches, lightly frosted, reaching up from the table. A few delicate silver ornaments hang from them, catching the light. The warm glow from the candles on the shelf adds to the cozy atmosphere. This style shows that holiday decor can be quiet and beautiful.
DIY Instructions: Frosted Branch Centerpiece
You can make this simple and elegant centerpiece in just a few minutes.
What You’ll Need:
- A few interesting-looking bare branches from your yard.
- A can of white or silver spray paint (or fake snow spray).
- A low, simple vase or dish.
- A handful of small pebbles or sand.
- 4-5 small, lightweight silver or clear ornaments with hooks.
- Old newspaper.
Step-by-Step Guide:
- Prepare Your Branches: Take your branches outside and shake them to get rid of any dirt or leaves. Lay them down on some old newspaper.
- Add a Touch of Frost: Lightly spray the branches with your white or silver paint. You don’t need to cover them completely. Just a light dusting will make them look frosted. Let them dry completely.
- Set Up Your Base: Fill your vase or dish with the small pebbles or sand. This will hold your branches in place.
- Arrange the Branches: Gently push the bottom ends of the dry, painted branches into the pebbles. Arrange them so they stand up and look like a small tree.
- Hang the Ornaments: Carefully hang your ornaments on a few of the stronger twigs. Spread them out so the branches don’t look too crowded.
Your beautiful, wintery centerpiece is now ready for the table!
3. Cozy Farmhouse Holiday

This dining room is full of rustic charm and holiday warmth. The bold, black-and-white buffalo check curtains immediately catch your eye and set a cozy tone. The large wooden trestle table and matching bench feel sturdy and welcoming, ready for a big family meal.
A festive centerpiece of fresh greenery and bright red berries runs down the center of the table, bringing vibrant color to the room. Red candles and a simple red table runner continue the classic holiday theme. The combination of natural wood, classic patterns, and festive red creates a space that feels both stylish and comfortable.
DIY Instructions: Rustic Evergreen Box Centerpiece
This long-lasting centerpiece will look great on your table all season long.
What You’ll Need:
- A long, narrow wooden box (you can find these at craft stores).
- A few blocks of floral foam (the kind you can use for fake plants).
- Lots of faux evergreen sprigs and branches.
- Several picks of fake red berries.
- Wire cutters.
Step-by-Step Guide:
- Prepare Your Box: Place the blocks of floral foam inside your wooden box. Cut them with a knife if you need to, so they fit snugly.
- Build Your Base: Start sticking the larger evergreen branches into the foam. Begin at the ends and in the middle to create the main shape.
- Fill it In: Use the smaller evergreen sprigs to fill in all the gaps. Keep adding pieces until you can’t see the foam anymore and the box looks full and lush.
- Add a Pop of Color: Now, use your wire cutters to snip the berry picks into smaller pieces. Stick these berry pieces throughout the greenery. Spread them out evenly to add color everywhere.
- Fluff and Finish: Gently fluff up the branches and berries to make it look natural and full.
You’ve just created a beautiful farmhouse centerpiece that looks like it came from a magazine!
4. Gatsby Holiday Glamour

This dining room is all about drama and luxury. The deep navy blue walls and rich pink curtains create a bold and sophisticated backdrop. The entire room sparkles with gold accents, from the unique base of the glass table to the stunning light fixtures.
The centerpiece is an explosion of white and gold-tipped feathers, creating a sense of 1920s glamour. Velvet chairs in a deep blue invite guests to sit, while a gold bar cart stands ready for celebration. This decor turns any meal into a special occasion, filled with sparkle and style.
DIY Instructions: Glamorous Feather Centerpiece
Get ready to create a show-stopping centerpiece that will wow your guests.
What You’ll Need:
- A tall, slender gold vase.
- A styrofoam ball that fits snugly into the opening of the vase.
- A pack of large white ostrich feathers.
- A pack of peacock feathers (optional).
- Gold craft paint and a small paintbrush.
Step-by-Step Guide:
- Prepare the Base: Place the styrofoam ball securely into the top of your gold vase.
- Add a Touch of Gold: Take about half of your white feathers and gently paint just the very tips with the gold paint. Let them dry completely.
- Start Building: Begin by pushing the stems of the plain white feathers into the top of the styrofoam ball. Point them straight up to create height.
- Create the Shape: Now, start adding more feathers around the sides of the ball. Angle them outwards to create a big, round, fanned-out shape. Mix in your gold-tipped feathers as you go.
- Add Extra Flair: If you’re using them, add a few peacock feathers here and there for another layer of texture and glamour. Keep adding feathers until the styrofoam ball is completely hidden.
Your fabulous and flashy feather centerpiece is complete!
5. Coastal Holiday Breeze

This dining room brings a breath of fresh, seaside air to the holidays. The space is bright and airy, with white slipcovered chairs and sheer white curtains. The decor uses natural textures like the woven sea-grass rug and a simple burlap table runner to create a relaxed, beachy feel.
Instead of pinecones, the centerpiece features starfish and driftwood. A large glass hurricane lamp with a single white candle sits in the middle, surrounded by a wreath of delicate twigs and shells. The soft blue napkin adds a hint of ocean color. This is a calm and beautiful way to celebrate the season.
DIY Instructions: Seaside Wreath Centerpiece
Bring the beach to your holiday table with this easy-to-make decoration.
What You’ll Need:
- A large glass hurricane vase.
- One large white pillar candle.
- A small grapevine wreath that is wider than the base of your vase.
- A hot glue gun and glue sticks.
- A collection of small seashells, starfish, and small pieces of driftwood.
Step-by-Step Guide:
- Set the Center: Place the large white candle inside the glass hurricane vase and put it in the center of your table.
- Prepare Your Wreath: Place the grapevine wreath on the table around the hurricane vase.
- Start Decorating: Use your hot glue gun to start attaching the beach treasures to the wreath. Put a dab of hot glue on a shell or piece of driftwood and press it onto the grapevine. (Ask a grown-up for help with the hot glue gun!)
- Create a Pattern: Arrange the larger pieces, like the starfish, first. Then fill in the gaps with the smaller shells and driftwood pieces. Keep adding things until your wreath looks full and beautiful.
- Final Check: Make sure everything is glued on securely.
Now your table has a beautiful, beach-inspired centerpiece for the holidays!
6. Bohemian Holiday Feast

This dining room is a warm and inviting space, full of texture and personality. A rich, patterned red tapestry on the wall sets a cozy, eclectic mood. Layers of rugs and floor cushions invite guests to relax and stay awhile. The glow of string lights and lanterns makes the whole room feel magical.
The table itself is a beautiful piece of natural wood, which provides a rustic base for the setting. A huge bouquet of flowers and dried pampas grass creates a stunning, wild centerpiece. This dining room is a free-spirited and joyful place for a holiday gathering.
DIY Instructions: Wildflower and Pampas Grass Bouquet
Create a beautiful, bohemian centerpiece that feels both rustic and romantic.
What You’ll Need:
- A large, low bowl or pot for your vase.
- A block of wet floral foam (for fresh flowers) or dry floral foam (for fake flowers).
- A variety of flowers in colors you like (roses, carnations, etc.).
- Some greenery, like eucalyptus or fern sprigs.
- Several tall stalks of dried pampas grass.
- Scissors.
Step-by-Step Guide:
- Set Up Your Base: If using fresh flowers, soak the wet floral foam in water. Then, place your foam block inside your bowl.
- Add Greenery First: Cut the stems of your greenery and start sticking them into the foam. Create a loose, round shape as your base.
- Place Your Big Flowers: Next, add your largest flowers. These are the stars of the show! Space them out in the greenery.
- Fill In with Smaller Flowers: Now, fill in the gaps with your smaller flowers. Turn the bowl as you work to make sure it looks good from all sides.
- Add the Drama: Finally, take your tall pampas grass stalks and stick them right in the middle of the arrangement. This will give your bouquet amazing height and texture.
You’ve made a stunning, bohemian centerpiece that is full of life!
7. Mid-Century Merrymaking

This dining room is a blast from the past, in the best way possible. It’s full of the fun shapes and bright colors of mid-century modern design. The starburst chandelier is a showstopper, and the colorful abstract art adds a playful touch. Chairs in teal and white add pops of cheerful color.
The holiday decor is simple yet effective. A collection of colorful bottle brush trees marches down the center of an orange table runner, creating a fun and festive focal point. It’s a happy and vibrant space that proves holiday decorating doesn’t have to be just red and green.
DIY Instructions: Colorful Bottle Brush Tree Forest
This is one of the easiest and most fun centerpieces to make!
What You’ll Need:
- A bright orange or red table runner.
- A collection of bottle brush trees in different sizes and holiday colors (like green, teal, red, and white). You can find these at most craft stores during the holidays.
- Optional: A flat tray to put the trees on.
Step-by-Step Guide:
- Lay the Foundation: Place your colorful table runner down the center of your dining table.
- Start Planting Your Forest: Begin arranging your bottle brush trees on the runner. Start with the tallest tree in the middle.
- Create a Landscape: Place the other trees on either side of the center one. Mix up the colors and sizes to make it look like a real, whimsical forest. Create little groups of trees.
- Check Your View: Make sure the trees aren’t too tall, so guests sitting across from each other can still see each other.
- Optional Tray: If you want, you can arrange your forest on a simple white or silver tray first, and then place the tray on the runner. This can make it easier to move.
That’s it! You now have a cheerful, retro-inspired centerpiece.
8. Classic Christmas Elegance

This dining room is the picture of traditional holiday style. The deep wood of the furniture, the ornate chandelier, and the classic floral curtains create a feeling of timeless elegance. Everything feels formal and special, ready for a grand holiday dinner.
A beautiful plaid runner in red, green, and gold sets the festive stage on the table. In the center, a silver candelabra holds tall white candles, surrounded by a ring of fresh roses and greenery. A lush garland with big red bows drapes across the sideboard, completing the classic Christmas look.
DIY Instructions: Candelabra and Rose Centerpiece
Make your table look extra fancy with this traditional and beautiful decoration.
What You’ll Need:
- A silver candelabra.
- Tall white taper candles.
- A small foam or grapevine wreath that fits around the base of the candelabra.
- Floral wire.
- A few sprigs of fresh or faux greenery (like boxwood or pine).
- 3-4 fresh or very realistic fake red roses.
- Wire cutters.
Step-by-Step Guide:
- Prepare the Candelabra: Place your candelabra in the center of the table and put the tall white candles in the holders.
- Build the Wreath Base: Take your wreath and start attaching the greenery. Cut small pieces of greenery and use short pieces of floral wire to wrap them tightly onto the wreath frame. Keep going until the whole wreath is covered in green.
- Add the Roses: Cut the stems of your roses so they are very short, about 2 inches long. Carefully push the stems into the wreath, hiding the stem in the greenery. Space the roses out evenly around the wreath.
- Put it Together: Gently lower your finished wreath over the top of the candelabra so it sits at the base.
- Final Touches: Fluff the greenery around the roses to make it look full.
Your elegant, classic centerpiece is ready to light up your holiday dinner.
9. Urban Industrial Holiday

This dining room combines a cool, city loft vibe with cozy holiday touches. The exposed brick wall and dark metal light fixture give the space an industrial feel. Sleek, gunmetal chairs and a live-edge wood table continue this modern, urban theme.
To soften the look for the holidays, simple decorations are added. A string of warm fairy lights is draped near the window. A fresh, unadorned evergreen wreath with a simple white ribbon hangs on the brick wall, adding a touch of natural green. The centerpiece, a unique candelabra made of copper pipes, adds to the industrial charm.
DIY Instructions: Simple and Modern Holiday Wreath
This wreath is very easy to make and looks great in a modern or industrial-style home.
What You’ll Need:
- A simple wire wreath frame (you can get these at any craft store).
- A bundle of fresh or high-quality fake evergreen branches (like cedar or fir).
- Green floral wire.
- Wire cutters.
- A long piece of thick, white satin or cotton ribbon.
Step-by-Step Guide:
- Make Small Bundles: Cut your evergreen branches into smaller pieces, about 6-8 inches long. Take 2-3 pieces and hold them together to make a small bundle.
- Attach the First Bundle: Place your first bundle onto the wire frame. Use a piece of floral wire to wrap tightly around the stems and the frame 3-4 times. Don’t cut the wire yet!
- Keep Going: Make another small bundle. Place it on the frame so the leafy part covers the stems of the first bundle. Use the same long piece of floral wire to wrap it tightly onto the frame.
- Cover the Frame: Keep making bundles and attaching them, always overlapping the last one, until you’ve gone all the way around the frame. When you get to the end, tuck the stems of the last bundle under the leaves of the first one. Now cut the wire and twist it in the back to secure it.
- Add the Ribbon: Tie your white ribbon into a simple knot or bow at the bottom of the wreath, letting the ends hang down long.
You’ve created a beautiful and simple wreath that adds a perfect touch of holiday cheer.
10. Zen Holiday Calm

This dining space is an exercise in peaceful simplicity. It draws on Japanese design principles, featuring a low table and comfortable floor cushions for seating. The color palette is neutral and calming, with natural materials like wood and woven seagrass. The focus is on creating a tranquil and uncluttered atmosphere.
The holiday decor is minimal and thoughtful. The centerpiece is a striking example of Ikebana, the Japanese art of flower arranging. It uses a few bare branches, a sprig of pine, and a single red camellia to create a beautiful, natural sculpture. This room shows that a holiday setting can be serene and deeply calming.
DIY Instructions: Simple Ikebana-Inspired Centerpiece
Create a piece of living art for your table with this mindful and simple arrangement.
What You’ll Need:
- A low, shallow bowl or dish.
- A floral frog (a small, heavy base with spikes, also called a kenzan).
- A few interesting bare branches from outside.
- One or two small sprigs of pine.
- One single, beautiful flower (like a camellia, a small chrysanthemum, or a rose).
- Pruning shears or strong scissors.
Step-by-Step Guide:
- Set Your Foundation: Place the floral frog in your bowl, slightly off-center. Add a little water to the bowl.
- Create Height: Take your longest branch. This is your “heaven” branch. Trim it so it’s about one and a half times the width of your bowl. Press the bottom of the stem firmly onto the spikes of the floral frog so it stands up tall.
- Add Your Second Branch: Take a shorter branch. This is your “man” branch. It should be about two-thirds the height of your first branch. Place it in the frog, tilting it slightly to one side.
- Place Your Flower: Take your single flower. This is your “earth” flower. Cut the stem very short and place it low in the arrangement, near the base, tilting forward.
- Fill in with Green: Use the small pine sprigs to hide the floral frog. Stick them in around the base of the other stems. Take your time and enjoy creating a simple, beautiful shape.
Your peaceful, Zen-inspired centerpiece is finished.
11. Parisian Holiday Charm

This sweet and elegant dining corner feels like a Parisian café during the holidays. The soft, tufted banquette and classic bistro chairs are chic and comfortable. A beautiful Christmas tree sparkles with fairy lights and pastel ornaments, setting a magical tone. The entire space is light, airy, and romantic.
The table decorations are delightfully sweet. A stunning macaron tower creates a unique and delicious centerpiece, surrounded by smaller stands of treats. Fresh pink roses in simple glasses add a touch of natural beauty. This setup is a charming way to celebrate the season.
DIY Instructions: Faux Macaron Tower Centerpiece
You can get this beautiful look without baking, and you can reuse it every year!
What You’ll Need:
- A cone-shaped styrofoam form (about 12-15 inches tall).
- About 50-60 fake macarons in pastel colors (you can find these at craft stores or online).
- A hot glue gun and plenty of glue sticks.
- A pretty cake stand to use as a base.
Step-by-Step Guide:
- Set Your Base: Place your styrofoam cone in the center of your cake stand. You can add a dab of hot glue to the bottom to secure it if you like.
- Start at the Bottom: Take your first fake macaron and put a generous amount of hot glue on the back. Press it firmly onto the cone, right at the bottom edge.
- Create Your First Row: Continue gluing macarons right next to each other, creating a full circle around the base of the cone.
- Build Your Way Up: Start your second row, placing the macarons in the gaps of the first row, like you’re building with bricks. Keep gluing rows of macarons, working your way up the cone.
- Finish the Top: When you get to the very top, you might have a small space left. You can glue one final macaron right on the point to finish it off.
Voila! You have a gorgeous and reusable macaron tower centerpiece.
12. Winter Wonderland Glow

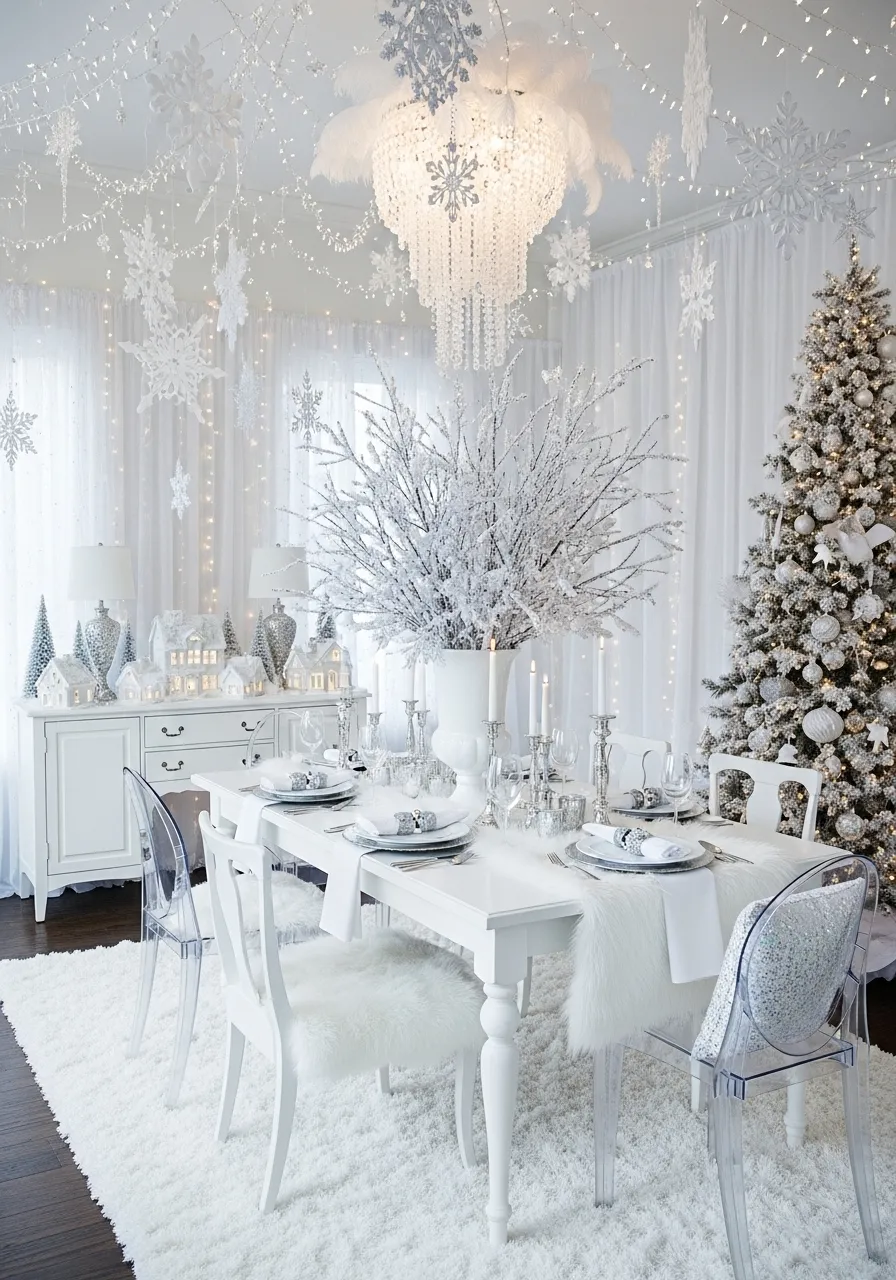
This dining room is a sparkling winter dream. The entire room is decorated in shades of white, silver, and frosted green, creating a cohesive and magical look. A stunning crystal chandelier hangs above the table, looking like icicles. The sideboard is decorated with a miniature snowy village and frosted trees.
The table itself is a vision of elegance. A lush garland, heavily flocked with fake snow and woven with fairy lights, runs down the center. Silver ornaments are tucked into the branches. The centerpiece is a large, beautiful bouquet of white roses and baby’s breath, completing the snowy, romantic scene.
DIY Instructions: Snowy, Light-Up Garland
It’s easy to create this magical, snow-covered table runner.
What You’ll Need:
- A simple faux pine garland.
- A can of fake snow spray.
- A string of battery-powered fairy lights with thin, silver wire.
- A few silver Christmas ball ornaments in different sizes.
- Old newspaper or a drop cloth.
Step-by-Step Guide:
- Let it Snow: Take your garland outside or to a well-ventilated area. Lay it down on the newspaper. Shake the can of snow spray well and spray the garland until it has a nice, even coating of “snow.” Let it dry completely.
- Add the Sparkle: Once the garland is dry, take your string of fairy lights. Start at one end and gently wrap the lights around the garland, weaving in and out of the branches.
- Tuck in the Ornaments: Place your silver ornaments deep within the branches of the garland. The branches will help hold them in place. You can also use the wire hooks to secure them.
- Arrange on the Table: Lay your finished garland down the center of your table. Hide the small battery pack under some of the branches at one end. Fluff the branches to make it look full and beautiful.
Turn on the lights and watch your winter wonderland table glow!
13. Whimsical Nutcracker Suite

This dining room is a playful and magical escape. The deep purple walls create a dramatic, starry-night backdrop for a whimsical holiday theme. A black chandelier adds a touch of gothic elegance, while fairy lights twinkle all around. The room is filled with color and fantasy.
The decorations are all inspired by the Nutcracker ballet. A collection of colorful nutcracker soldiers stands at attention on a side table. The main centerpiece is a bowl of shiny ornaments, flanked by nutcrackers and colorful candles. This is a fun and imaginative theme for a holiday celebration.
DIY Instructions: Nutcracker and Ornament Centerpiece
Create a fun and festive centerpiece that tells a story.
What You’ll Need:
- A large, decorative bowl (blue or gold would be great).
- A collection of shiny ball ornaments in jewel tones (like blue, red, gold).
- 2-3 medium-sized nutcracker figures.
- A few colorful taper candles and holders.
Step-by-Step Guide:
- Create the Center: Place your decorative bowl in the middle of the table. Carefully fill it with the shiny ornaments. Mix up the colors to make it vibrant.
- Stand Guard: Place one nutcracker figure on one side of the bowl. Place another nutcracker on the other side. They will look like they are guarding the treasure of ornaments.
- Add Some Height: Place your candle holders on either side of the nutcrackers. Put the colorful candles in them.
- Final Arrangement: Adjust everything so it looks balanced and festive. You can even place a smaller nutcracker right in front of the bowl.
Your playful nutcracker centerpiece is now ready for a magical holiday meal.
14. Southwestern Holiday Fiesta

This dining room celebrates the holidays with the warm, earthy tones of the American Southwest. The furniture is made of natural wood and woven leather, creating a rustic and inviting feel. A colorful geometric rug adds pattern and energy to the space. The decor is a mix of textures and natural elements.
Instead of pine trees, potted cacti serve as the main greenery. A simple eucalyptus wreath and a string of dried chili peppers hang on the wall. The table is set with a vibrant, striped runner and terracotta-colored accents. This is a unique and warm way to celebrate the season.
DIY Instructions: Holiday Cactus Garden
This centerpiece is unexpected, easy to care for, and full of personality.
What You’ll Need:
- A long, shallow terracotta planter or a few individual small terracotta pots.
- 2-3 small- to medium-sized cacti of different shapes.
- Cactus potting soil.
- A few shiny, copper-colored Christmas ball ornaments.
- Gardening gloves.
Step-by-Step Guide:
- Plant Your Cacti: Put on your gardening gloves to protect your hands! If using one long planter, fill it with cactus soil. Gently remove the cacti from their plastic pots and plant them in the new planter, spacing them out. If using individual pots, just make sure they are ready to go.
- Arrange Your Garden: Place your long planter in the center of the table. If using individual pots, arrange them in a nice cluster in the middle of the table.
- Add Holiday Shine: Carefully place the copper-colored ornaments on the soil in between the cacti. The shiny metal looks beautiful against the green cacti and orange terracotta.
- Be Careful: Make sure the ornaments are just resting on the soil and not leaning against the spiky parts of the cacti.
You’ve created a unique and festive centerpiece that brings a touch of the desert to your holiday table.
15. Rustic Mountain Lodge Holiday

This dining room feels like a cozy cabin retreat in the mountains. The space is filled with warm wood tones, from the large hutch to the sturdy farmhouse table. A buffalo plaid runner and napkins bring a classic rustic pattern to the tablescape. Sheepskin throws on the chairs and bench add a layer of cozy texture.
The decor has a charming, outdoorsy feel. An antler chandelier hangs above, and vintage-looking skis lean in the corner. The centerpiece is a long wooden box filled with greenery and large red candles inside lanterns, creating a safe and warm glow.
DIY Instructions: Rustic Lantern Centerpiece
This centerpiece is rustic, charming, and will make your table feel extra cozy.
What You’ll Need:
- A long, shallow wooden box or tray.
- 2-3 black metal or wood lanterns that are small enough to fit inside the box.
- 2-3 red pillar candles that fit inside the lanterns.
- Faux evergreen sprigs and pinecones.
- Wire cutters.
Step-by-Step Guide:
- Place Your Lanterns: Arrange the lanterns inside your wooden box. Don’t put them too close together; leave some space between them.
- Add the Candles: Open the doors on the lanterns and place the red pillar candles inside.
- Fill with Greenery: Take your evergreen sprigs and start filling the empty space in the box around the lanterns. Make it look full and lush.
- Add Natural Accents: Tuck the pinecones in among the greenery. Place them in small groups to look more natural.
- Final Fluff: Fluff up the branches around the lanterns and pinecones. Make sure no greenery is touching where the candle flame will be if you decide to light them.
Your cozy and rustic lantern centerpiece is ready to bring a warm glow to your dinner.
16. Modern Monochrome Green

This dining room is a sophisticated and modern take on holiday decor. The entire space is designed around various shades of olive and forest green. This creates a look that is both dramatic and soothing. The clean lines of the black furniture and the modern brass light fixture keep the room feeling fresh and contemporary.
The table setting is a celebration of the color green. A collection of green glass bottles and vases of different shapes and sizes runs down the center of the table. A few white calla lilies and large monstera leaves add a touch of organic shape. This is a chic and stylish way to decorate for the holidays.
DIY Instructions: Green Bottle Collection Centerpiece
This modern centerpiece is easy to put together and has a big impact.
What You’ll Need:
- A collection of 7-9 empty glass bottles in various shades of green. Wine bottles work great!
- A few faux or real monstera leaves.
- 3-4 stems of faux or real white calla lilies.
- A green patterned table runner.
Step-by-Step Guide:
- Clean Your Bottles: Make sure all your bottles are clean and that you have removed the labels. Soaking them in warm, soapy water usually works.
- Lay the Runner: Place your green table runner down the center of the table.
- Group Your Bottles: Start arranging your bottles on the runner. Create a cluster in the center of the table. Mix up the different shapes, heights, and shades of green.
- Add the Flora: Place one monstera leaf in a few of the bottles with wider openings. Then, place a single calla lily stem in a few of the skinnier bottles. You don’t need to put something in every single bottle.
- Create Balance: Step back and look at your arrangement. Move the bottles around until it feels balanced and looks like a small glass forest.
You have now created a sleek, modern centerpiece that is effortlessly cool.
17. Pastel Candyland Dream

This dining room is a sweet and sugary holiday fantasy. The color palette is full of soft pastels like pink, mint green, and lavender. Sheer curtains and lots of light make the room feel bright and cheerful. The entire space looks like it’s straight out of a candy store.
The decor is playful and sweet. A pastel beaded chandelier hangs like rock candy from the ceiling. A bar cart is filled with colorful candies and treats. The centerpiece is a collection of pink and mint green bottle brush trees mixed with large glass apothecary jars filled to the brim with colorful gumballs and candies.
DIY Instructions: Holiday Candy Jar Display
This is a fun and easy decoration that your guests will love.
What You’ll Need:
- 2-3 clear glass apothecary jars with lids, in different sizes.
- Several large bags of colorful, round candies (like gumballs, sixlets, or other coated chocolates).
- A scoop.
Step-by-Step Guide:
- Clean Your Jars: Make sure your glass jars are clean and completely dry on the inside.
- Pick Your First Candy: Choose one type of candy for your first jar. Open the bag and use a scoop or a cup to carefully pour the candy into the jar. Fill it all the way to the top.
- Fill the Others: Repeat the process with your other jars and different colored candies. You can create layers of different colors in one jar, or fill each jar with just one color.
- Arrange Your Display: Place the lids on your jars. Arrange them in a group in the center of your table. You can mix in some bottle brush trees or candles to complete the look.
This sweet and simple centerpiece is ready to bring a touch of fun to your holiday table!
18. Moody Nordic Glow

This dining room creates a cozy and intimate atmosphere, inspired by Nordic winters. The room is dark and moody, which makes the candlelight feel even warmer and more inviting. The simple wooden furniture and natural textures are hallmarks of Scandinavian design. Sheepskin throws on the chairs add warmth and comfort.
The main source of decor and light is an abundance of candles. A long wooden trough filled with moss and a row of tall white taper candles creates a stunning centerpiece. More clusters of white pillar candles are grouped together on the sideboard, filling the entire room with a soft, flickering glow.
DIY Instructions: Long Candlelight Trough Centerpiece
This dramatic centerpiece will bring a warm and magical glow to your dining room.
What You’ll Need:
- A long, narrow wooden trough or planter box.
- A block of dry floral foam.
- About 10-12 tall, white taper candles.
- Sheets of dried or preserved moss (from a craft store).
- A knife to cut the foam.
Step-by-Step Guide:
- Prepare the Foam: Cut the floral foam so it fits snugly into the bottom of your wooden trough.
- Secure the Candles: Carefully and firmly press the bottom of each taper candle into the foam. Create a straight line of candles down the center of the trough. Make sure they are standing up straight and are secure.
- Add the Moss: Take your sheets of moss and gently lay them over the foam, tucking it in around the bases of the candles. Cover all of the foam so it looks like the candles are growing out of a bed of moss.
- Check for Safety: Make sure the moss is pressed down and not loose or fluffy near where the candle flames will be. This centerpiece is beautiful, but always be careful when lighting candles.
Your stunning and cozy Nordic centerpiece is ready to light up the night.
19. Glamorous Art Deco Party

This dining room is ready for a glamorous celebration. The design is inspired by the bold style of the Art Deco era, with a strong black, white, and gold color scheme. A dramatic geometric rug sets the stage. Gold and crystal light fixtures add a luxurious sparkle to the room.
The centerpiece is a lavish explosion of white feathers and orchids in a tall gold vase, commanding attention. The table is set with black chargers and gold cutlery. Tufted white chairs with gold ring details complete the opulent look. This is a dining room designed to impress.
DIY Instructions: Opulent White Feather Arrangement
Create a centerpiece that is full of drama and high style.
What You’ll Need:
- A tall, slender gold vase.
- A styrofoam ball or half-dome that fits in the top of the vase.
- A pack of large white ostrich feathers.
- A few faux stems of white phalaenopsis orchids.
- A few faux gold palm leaf stems.
- A hot glue gun.
Step-by-Step Guide:
- Set the Foundation: Securely place your styrofoam piece in the top of the vase.
- Add the Feathers: Start pushing the stems of the white ostrich feathers into the styrofoam. Create a large, fanned-out shape. Make some feathers stand up tall in the middle and others drape down gracefully on the sides.
- Place the Orchids: Cut the orchid stems so they are shorter. Place them near the center of the arrangement, so the flowers cascade down the front.
- Add Gold Accents: Tuck the gold palm leaf stems into the arrangement. Place them behind the orchids and among the feathers to add a layer of texture and shine.
- Fill it Out: Keep adding feathers until your arrangement is full and the styrofoam is completely hidden. Use a dab of hot glue on the stems for extra security if needed.
Your incredibly glamorous and stylish centerpiece is ready for a grand event.
20. Swedish Folk Art Christmas

This dining room is cheerful and full of traditional charm. It has a Swedish or Scandinavian folk art theme, using a classic color palette of red, white, and natural wood. Simple decorations, many of which look handmade, give the room a heartfelt and personal feel.
The decor features classic folk art motifs. A red and white printed tablecloth sets a festive mood. A wooden Dala horse, a famous symbol of Sweden, sits on the table. The hutch is decorated with small cross-stitch art pieces and simple red heart garlands. This is a celebration of tradition and handcrafted beauty.
DIY Instructions: Simple Swedish Candle Wreath
This traditional centerpiece is simple to make and full of rustic charm.
What You’ll Need:
- A simple, flat pine or boxwood wreath (real or fake).
- Four white pillar candles of the same size.
- A red-and-white patterned table runner or tablecloth.
- Optional: A small wooden folk art figure, like a Dala horse or a goat.
Step-by-Step Guide:
- Set the Table: Lay your festive tablecloth or runner on your table first.
- Place the Wreath: Put the simple evergreen wreath right in the center of the table.
- Arrange the Candles: Place your four white pillar candles inside the wreath. Imagine the wreath is a clock face, and place the candles at the 12, 3, 6, and 9 o’clock positions. This is a traditional Advent wreath setup.
- Add a Folk Art Touch: If you have a small wooden figure, you can place it in the center of the wreath or just next to it on the table for an extra touch of Swedish charm.
- Keep it Simple: This look is all about simplicity. Resist the urge to add too much more. The beauty is in the clean, traditional look.
Your charming and simple Swedish-inspired centerpiece is ready to bring holiday cheer to your home.
21. Shabby Chic Holiday Charm

This romantic dining room is overflowing with shabby chic charm. The distressed white furniture and soft linen tablecloth create a light and airy base. A beautiful crystal chandelier hangs above, dripping with glass ornaments for an extra festive touch. The whole space feels gentle and nostalgic.
The color palette is soft, with pale pinks and greens. A simple eucalyptus garland runs down the table, dotted with cranberries and an old-fashioned popcorn strand. Pink candles add a warm glow, reflecting in the vintage silver. This look is delicate and full of vintage-inspired beauty.
DIY Instructions: Old-Fashioned Popcorn Garland
This is a classic, fun, and inexpensive decoration to make with the whole family.
What You’ll Need:
- A bag of plain popcorn, already popped (day-old popcorn is actually stronger!).
- A bag of fresh cranberries.
- A sewing needle.
- Strong thread or fishing line.
- A thimble (to protect your finger!).
Step-by-Step Guide:
- Thread Your Needle: Cut a very long piece of thread and thread it through your needle. Don’t make a knot at the end yet.
- Start Stringing: Carefully push the needle through the center of a piece of popcorn. Be gentle so it doesn’t break! Slide it down the thread.
- Create a Pattern: Now, string a few cranberries. You can make any pattern you like! Maybe three popcorn pieces, then two cranberries. Keep repeating your pattern.
- Make it Long: Continue stringing until your garland is as long as you want it to be.
- Finish it Off: Once you’re done, tie a big knot at both ends of the thread so your popcorn and cranberries don’t slide off. You can lay it on your table or hang it on a tree.
You’ve just made a classic holiday decoration that looks and smells wonderful!
22. Moroccan Holiday Oasis

Step into a warm and exotic holiday celebration with this Moroccan-inspired dining space. The room is a feast for the senses, filled with rich colors, intricate patterns, and luxurious textures. Guests sit on comfortable floor cushions around a large brass tray table, creating an intimate and relaxed atmosphere.
The main feature is the stunning collection of perforated metal lanterns hanging from the ceiling, which cast beautiful, complex shadows. A terracotta tagine serves as an unconventional centerpiece, surrounded by small bowls of spices and nuts. This is a vibrant and unforgettable way to gather for the holidays.
DIY Instructions: Moroccan Lantern Cluster
You can create this magical glow without any complicated wiring.
What You’ll Need:
- 3-5 Moroccan-style lanterns of different shapes and sizes (you can find these at home goods stores or online).
- 3-5 battery-operated LED fairy lights or flameless candles.
- A spot to hang them, like from a ceiling hook or a curtain rod.
- Twine or clear fishing line.
Step-by-Step Guide:
- Prepare the Lights: Open each of your lanterns. Place one set of fairy lights or one flameless candle inside each one. Turn them on.
- Cut Your Hangers: Cut different lengths of twine or fishing line for each lantern. This will make them hang at different heights, which looks more interesting.
- Attach the Hangers: Securely tie one end of a piece of twine to the handle or loop on top of a lantern.
- Hang Your Cluster: Tie the other ends of the twine to your ceiling hook or rod. Hang the largest lantern first, then add the others around it at different heights.
- Adjust and Enjoy: Step back and adjust the lengths so they look like a beautiful, glowing cluster.
Your room will now be filled with the warm and magical light of a Moroccan night.
23. Enchanted Woodland Feast

This dining room looks like a magical scene taken directly from a forest floor. The entire design is built around natural, earthy elements, creating a peaceful and organic atmosphere. A stunning live-edge wood table provides the perfect rustic foundation for the tablescape.
A runner made of real moss creates a lush, green path down the center of the table. Potted ferns, faux mushrooms, pinecones, and acorns are nestled into the moss. Wood slice chargers and simple green napkins continue the natural theme. This is a wonderfully imaginative and grounded way to decorate for a holiday meal.
DIY Instructions: Living Moss Table Runner
Bring the forest indoors with this easy and enchanting table decoration.
What You’ll Need:
- A few rolls or sheets of preserved moss (from a craft store).
- A hot glue gun and glue sticks.
- A collection of natural items: pinecones, acorns, small twigs, and faux mushrooms.
- A roll of brown craft paper.
Step-by-Step Guide:
- Create Your Base: Cut a long strip of brown craft paper to the length and width you want for your runner. This will protect your table.
- Lay the Moss: Place your sheets of moss on top of the craft paper. You can cut the moss to fit. Use a few dabs of hot glue to attach the moss to the paper so it doesn’t slide around.
- Go Foraging (for decorations!): Start arranging your pinecones, acorns, and mushrooms on top of the moss. Create little clusters and spread them out down the entire length of the runner.
- Secure Your Treasures: Once you like where everything is placed, use your hot glue gun to add a small dab of glue to the bottom of each item to hold it in place.
- Final Touches: Gently fluff the moss around your decorations to make it look like they are naturally growing there.
You have created a magical forest floor centerpiece for your guests to enjoy!
24. Hollywood Glamour Holiday

This dining room is the definition of high-glamour. The dramatic black-and-white color scheme is bold and sophisticated. A massive crystal chandelier and multiple silver candelabras fill the room with sparkling light, reflecting in the large mirror. The look is formal, luxurious, and ready for a black-tie event.
The table is overflowing with extravagant bouquets of white flowers, including hydrangeas, roses, and orchids. The pure white of the flowers stands out beautifully against the black chairs and accents. This is a timeless and incredibly elegant way to celebrate a special occasion.
DIY Instructions: Lavish White Floral Arrangement
You don’t need to be a florist to create this stunning, high-impact centerpiece.
What You’ll Need:
- A fancy silver bowl or urn-shaped vase.
- A large block of wet floral foam (for real flowers) or dry floral foam (for fake flowers).
- Lots of faux white flowers: 5-7 large hydrangea heads, 10-12 roses, and 3-4 stems of orchids.
- Wire cutters.
Step-by-Step Guide:
- Prepare Your Base: Soak the foam if you’re using real flowers. Cut the foam to fit tightly inside your silver bowl.
- Start with the Biggest Flowers: Cut the stems of your hydrangeas short. These are your base flowers. Push them into the foam around the edges and in the center to create a full, mounded shape.
- Add the Roses: Next, cut the stems of the roses a little longer than the hydrangeas. Fill in the gaps between the hydrangeas with the roses.
- Add the Orchids: The orchids are for drama. Leave their stems long. Place them so they arc gracefully out of one side of the arrangement, like a waterfall.
- Fill Any Gaps: Keep turning your arrangement and looking at it from all sides. If you see any empty spots or can see the foam, tuck in another flower until it is completely full and lush.
You now have a centerpiece that looks like it belongs in a palace!
25. Cozy Highland Holiday

This dining room has the warm and welcoming feel of a Scottish Highland lodge. The decor features rustic wood, cozy textiles, and nods to the great outdoors. Plaid blankets and a matching table runner add color and classic pattern. A stag’s head on the wall completes the lodge-inspired aesthetic.
The centerpiece is a large, rustic bowl overflowing with a mix of fresh pine branches, holly, and other winter greenery. The arrangement is simple and natural, looking as if it were just gathered from the surrounding forest. This dining room is a handsome and comfortable setting for a hearty holiday meal.
DIY Instructions: Foraged Pine Centerpiece Bowl
Create a large, natural-looking centerpiece that brings the scent of winter indoors.
What You’ll Need:
- A large, wide bowl (silver, wood, or ceramic would work).
- A block of wet floral foam.
- A variety of faux or real evergreen branches (pine, fir, cedar).
- A few sprigs of faux or real red berries (like holly or winterberry).
- Pruning shears or wire cutters.
Step-by-Step Guide:
- Set Your Foundation: Soak the floral foam in water and place it in your bowl.
- Create Your Shape: Start by inserting the longest evergreen branches into the sides of the foam, so they drape down slightly. Then add some taller branches in the middle to create height.
- Fill it In: Keep adding smaller branches to fill in all the gaps. Mix the different types of evergreens to create lots of texture. Keep turning the bowl to make sure it looks good from every angle.
- Add a Pop of Red: Once your bowl is full of greenery, tuck the berry sprigs in here and there. The red will stand out beautifully against the green.
- Final Check: Make sure the foam is completely hidden and the arrangement looks full and wild.
Your beautiful, rustic centerpiece is now ready for the table.
26. Grand Victorian Christmas

This dining room is a trip back in time to a grand Victorian Christmas celebration. The room is filled with dark, ornate wood, rich fabrics, and the warm glow of candlelight. A magnificent crystal chandelier and heavy, patterned drapes add to the feeling of opulence and tradition.
A fully decorated Christmas tree stands proudly in the corner, part of the dining experience itself. The table is adorned with a lace runner and a long, lush garland. The garland is studded with fresh fruit, flowers, and dozens of candles, creating a bountiful and festive scene. This is classic holiday decorating at its most lavish.
DIY Instructions: Classic Fruit and Greenery Garland
This traditional decoration makes your table look bountiful and smell amazing.
What You’ll Need:
- A simple faux pine garland.
- Floral wire.
- A selection of faux fruit, such as apples, small pomegranates, and pears.
- A few small clusters of faux red flowers or berries.
- Wire cutters.
Step-by-Step Guide:
- Lay Out Your Garland: Place your garland on a flat surface.
- Prepare the Fruit: Cut a 6-inch piece of floral wire. Push it straight through the bottom third of a piece of faux fruit until it comes out the other side. Bend both ends of the wire down so they are together.
- Attach the Fruit: Place the fruit where you want it on the garland. Use the wire ends you created to wrap tightly around a sturdy branch of the garland, securing the fruit in place.
- Create a Pattern: Continue attaching fruit down the length of the garland. Space it out evenly. In between the larger fruits, attach your smaller clusters of flowers or berries using the same method.
- Place on the Table: Once all your fruit is attached, lay your beautiful, bountiful garland down the center of your table.
Your classic and elegant Victorian-style garland is complete!
27. Futuristic Winter Solstice

This dining room is ultra-modern and minimalist. The design uses a stark palette of pure white and cool grey, creating a clean and almost futuristic atmosphere. The lighting is a key feature, with glowing vertical panels and a sculptural LED chandelier that looks like a swirl of light.
Holiday decor here is extremely restrained and conceptual. There is no traditional greenery or color. Instead, a sculptural arrangement of bare branches, painted silver, sits in a clear glass vase. The effect is artistic and serene, like a quiet celebration of the winter solstice. This is holiday decorating for the true minimalist.
DIY Instructions: Silvered Branch Sculpture
This is a very simple DIY that creates a big, artistic statement.
What You’ll Need:
- An interesting, sculptural branch (Manzanita branches, sold at craft stores, are great for this).
- A can of metallic silver spray paint.
- A simple, tall, clear glass vase.
- Old newspaper or a drop cloth.
Step-by-Step Guide:
- Prepare Your Branch: Take your branch outside or to a well-ventilated area and place it on the newspaper. Make sure it’s clean and dry.
- Paint it Silver: Shake the can of spray paint well. Apply a light, even coat of silver paint all over the branch. Let it dry, then turn it over and spray any spots you missed. Let it dry completely.
- Arrange in Vase: Once the branch is fully dry, simply place it in your tall glass vase.
- Find the Best Angle: Rotate the branch in the vase until you find its most interesting side to display.
That’s it! You’ve created a piece of modern art for your holiday table.
28. Tuscan Harvest Gathering

This dining room is warm, rustic, and inviting, with the feel of an Italian country kitchen. The room is filled with the golden tones of aged wood and warm walls. A large wooden hutch displays a collection of beautiful, hand-painted pottery. An iron pot rack with copper pans adds to the charming, rustic kitchen atmosphere.
The tablescape is less about Christmas and more about a bountiful harvest celebration. A simple green runner is the base for a garland of olive branches, fresh grapes, pomegranates, and pears. A large vase of sunflowers adds a cheerful burst of yellow. This is a warm and welcoming table, ready for good food and conversation.
DIY Instructions: Bountiful Harvest Runner
This beautiful centerpiece celebrates the bounty of the season.
What You’ll Need:
- A few long, faux olive branch garlands.
- Floral wire.
- 2-3 small bunches of faux grapes (in red or green).
- 3-4 faux pomegranates or pears.
- Wire cutters.
Step-by-Step Guide:
- Create the Base: Lay your olive branch garlands down the center of your table to create a lush, green base.
- Attach the Grapes: Use small pieces of floral wire to attach the bunches of grapes to the garland. Tuck them in so they look like they are nestled naturally among the leaves.
- Add the Fruit: Use the same wire method from the Victorian garland project to attach your pomegranates and pears. Push wire through the bottom of the fruit, then twist the wire onto the garland.
- Create Clusters: Don’t space everything out evenly. Create a few fuller “moments” along the runner where you cluster a bunch of grapes and a piece of fruit together. It will look more natural.
- Fluff and Finish: Fluff the olive leaves around the fruit to make it look full and abundant.
Your beautiful and delicious-looking harvest runner is ready to welcome your guests.
29. Mystic Winter’s Eve

This dining setting is cozy, intimate, and a little bit magical. The room is dimly lit, with the warm glow of candles creating most of the light. This creates a mysterious and comforting atmosphere. Natural textures like wood, wool, and evergreen branches make the space feel grounded and connected to nature.
The decor is simple and rustic. A large, wild wreath of foraged greenery hangs on the door. The centerpiece is a simple ring of evergreens with red and white candles in the middle. Sheepskin throws on the chairs invite you to get comfortable and stay for a while. This is a perfect setting for a quiet, soulful winter celebration.
DIY Instructions: Simple Advent Candle Wreath
This traditional centerpiece is easy to make and brings a warm, peaceful glow.
What You’ll Need:
- A simple, round evergreen wreath (real or fake).
- 4-5 pillar candles of slightly different heights (red and white look great).
- A heat-proof tray or plate that is larger than your wreath.
- Optional: A few pinecones.
Step-by-Step Guide:
- Safety First: Place your heat-proof tray in the center of your table. This will protect your table from any dripping wax.
- Place the Wreath: Lay your evergreen wreath on top of the tray.
- Arrange the Candles: Cluster your pillar candles in the open center of the wreath. Put the tallest one in the middle and the shorter ones around it.
- Add a Natural Touch: If you have pinecones, you can tuck a few into the wreath’s branches for extra texture.
- Light and Enjoy: Light the candles and enjoy the peaceful, warm glow it brings to your room.
You have created a simple, beautiful, and traditional centerpiece for the holiday season.
30. Preppy Blue and White Holiday

This dining room is a fresh and sophisticated take on holiday decorating. It uses a classic and preppy color scheme of navy blue, white, and gold. The look is crisp, clean, and elegant. A modern sputnik-style chandelier adds a contemporary touch, while a gold sunburst mirror brings a bit of sparkle.
The holiday elements are subtle and chic. Instead of traditional red and green, the decor relies on fresh flowers and simple greenery. Beautiful blue and white chinoiserie ginger jars are used as vases for white tulips and flowering branches. A simple pine garland with a few candles weaves between them, adding a touch of classic holiday green.
DIY Instructions: Ginger Jar Floral Arrangement
This is a classic and elegant arrangement that you can use long after the holidays are over.
What You’ll Need:
- A blue and white ceramic ginger jar.
- A bundle of high-quality faux white tulips (about 10-12 stems).
- Wire cutters.
- Optional: A little bit of water in the jar to make it look more realistic.
Step-by-Step Guide:
- Prepare Your Jar: Make sure your ginger jar is clean. You can remove the lid and set it aside.
- Measure Your Tulips: Hold the tulip stems up against the jar to see how tall you want them to be. They should be about one and a half times the height of the jar.
- Cut the Stems: Use your wire cutters to cut the bottoms of the faux tulip stems to the desired length. It’s a good idea to cut them at slightly different lengths to make the arrangement look more natural.
- Arrange the Flowers: Place the tulips in the jar one by one. Let them fall naturally to the sides. Create a loose, casual arrangement rather than a tight, perfect ball.
- Final Touches: If you want, you can add a few inches of water to the jar. No one will know the flowers are fake!
You’ve created a timeless and beautiful centerpiece that is full of grace and style.
31. Tropical Holiday Getaway

Who says the holidays have to be cold? This bright and breezy dining room is a tropical escape. Natural textures like rattan and bamboo create a relaxed, vacation-like vibe. A string of pineapple lights adds a playful and festive touch. The room is sunny, fun, and totally unexpected.
The table is set for a warm-weather celebration. A centerpiece made of large tropical leaves, like monstera and palm, is overflowing with fresh fruit and vibrant hibiscus flowers. Even the small palm tree in the corner is decorated with colorful ornaments. This is a joyful and creative way to celebrate the season.
DIY Instructions: Tropical Fruit and Flower Centerpiece
This fresh and vibrant centerpiece is surprisingly easy to assemble.
What You’ll Need:
- A large, low bowl.
- 3-4 large tropical leaves (faux or real).
- A whole pineapple.
- A mix of other tropical fruits like mangoes, star fruit, and limes.
- A few brightly colored flowers like hibiscus (faux ones will last longer).
Step-by-Step Guide:
- Create a Leafy Base: Place your large tropical leaves in the bowl first. Let them drape over the sides.
- Add the Star: Place the whole pineapple in the center of the bowl, on top of the leaves.
- Fill it In: Arrange the other fruits around the base of the pineapple. Fill in all the empty spaces in the bowl.
- Add a Pop of Color: Tuck your bright flowers in between the fruits. The vibrant pink or red will look amazing against the green leaves and colorful fruit.
- Final Touches: Make sure everything is secure and looks balanced.
Your sunny, tropical centerpiece is now ready for your holiday luau!
32. Ice Queen’s Palace

This dining room is a breathtaking, all-white winter wonderland. The space is completely transformed into a magical, frozen palace. A canopy of fairy lights and hanging snowflakes creates a sparkling ceiling. A flocked Christmas tree and a menagerie of white decorations add to the frosty, ethereal atmosphere.
The table setting is pure icy elegance. A massive centerpiece of glittery, frosted white branches explodes from a white urn. The table is set with silver chargers and crystal glasses. It’s a truly immersive and enchanting holiday experience.
DIY Instructions: Hanging Snowflake Canopy
Create a magical, snowy sky inside your home with this simple project.
What You’ll Need:
- A variety of plastic or paper snowflakes in different shapes and sizes.
- Clear fishing line.
- Clear tape or small, clear removable ceiling hooks.
- A pair of scissors.
Step-by-Step Guide:
- Prepare Your Snowflakes: Unpack all your snowflakes and lay them out.
- Cut the Line: Cut many pieces of fishing line in different lengths. Some can be short (1 foot) and some can be long (3 feet). This will make your snowflakes hang at different levels, like real snow.
- Attach the Line: Tie one end of a piece of fishing line through the small hole on each snowflake.
- Start Hanging: Take your first snowflake and attach the other end of the line to the ceiling using a small piece of clear tape or a clear hook.
- Create Your Blizzard: Continue hanging snowflakes all over the ceiling above your dining table. Mix up the different sizes and hang them at different heights to create a beautiful, layered look.
Now you can dine under your very own magical flurry of snowflakes!
33. Bountiful Autumn Harvest

This dining room is filled with the warm, cozy feeling of a fall harvest festival. The decor uses a rich palette of autumn colors like orange, gold, and deep red. A plaid rug and simple wooden furniture create a comfortable, rustic foundation. The room feels abundant and ready for Thanksgiving.
The table is overflowing with the bounty of the season. A centerpiece of small pumpkins, gourds, apples, and wheat stalks runs down the center of the table. A garland of dried orange slices is draped in the window, catching the light beautifully. This is a classic and heartwarming way to celebrate the harvest season.
DIY Instructions: Dried Orange Slice Garland
This beautiful, natural garland smells amazing and is easy to make.
What You’ll Need:
- 2-3 large oranges.
- A sharp knife.
- A baking sheet.
- Parchment paper.
- Twine or string.
- A needle or a small skewer.
Step-by-Step Guide:
- Slice Your Oranges: Carefully cut the oranges into thin, even slices, about 1/4 inch thick.
- Pat Them Dry: Lay the orange slices on a paper towel and gently pat them to remove as much extra juice as you can.
- Bake Them Low and Slow: Place the slices on a baking sheet lined with parchment paper. Bake them in the oven at a very low temperature (around 200°F or 95°C) for 2-3 hours. Flip them over halfway through. They are done when they are dry and slightly translucent. Let them cool completely.
- String Them Up: Use a needle or a skewer to poke two small holes near the top of each orange slice.
- Create Your Garland: Thread your twine through the holes in the orange slices, leaving a little space between each one. Make the garland as long as you want.
You can hang your beautiful, fragrant garland in a window, on a wall, or even on a Christmas tree.
34. Silver and Shine Soiree

This dining room is all about high-shine and glamour. The color scheme is a cool and sophisticated mix of silver, grey, and periwinkle blue. Mirrored furniture and a large, rectangular crystal chandelier make the whole room sparkle and reflect light. The look is polished, luxurious, and very chic.
The table is covered in glittering decorations. A silver, sequined table runner provides a sparkling base. The centerpiece is a large, ornate silver bowl overflowing with shiny silver Christmas ornaments. Mercury glass candle holders and silver candelabras add even more reflective shine.
DIY Instructions: Bowl of Silver Ornaments
This is one of the quickest and easiest centerpieces you can make, and it has a huge impact.
What You’ll Need:
- A large, beautiful bowl. A silver or mercury glass bowl is a great choice.
- A lot of Christmas ball ornaments in shades of silver. Get a mix of shiny, matte, and glittery finishes, and a variety of sizes.
Step-by-Step Guide:
- Place Your Bowl: Put your empty bowl in the center of your dining table.
- Add the Largest Ornaments First: Take your biggest ornaments and place them in the bottom of the bowl.
- Fill it Up: Now, start adding the rest of your ornaments. Pour them in and arrange them so the different sizes and finishes are all mixed up.
- Create a Mound: Keep adding ornaments until the bowl is overflowing and you have a beautiful, high mound of silver baubles.
- Final Touches: Make sure the hooks on the ornaments are tucked down and hidden as much as possible.
In just two minutes, you have created a stunningly simple and glamorous centerpiece.
35. Gingerbread Village Jubilee

This dining room is a sweet and cheerful scene straight from a storybook. The entire theme revolves around adorable gingerbread houses and gingerbread men. A classic red and white color scheme, featuring lots of gingham, keeps the look festive and coordinated. The room is playful, nostalgic, and fun for all ages.
The tablescape is a village of treats. Several decorated gingerbread houses serve as the main centerpieces. Gingerbread trees and cookies are scattered around, creating a delicious-looking landscape. Even the chandelier is decorated with hanging gingerbread man cookies.
DIY Instructions: Gingerbread Man Garland
This is a fun craft that will make your whole house smell like Christmas!
What You’ll Need:
- Your favorite gingerbread cookie dough (store-bought is fine!).
- A gingerbread man cookie cutter.
- A straw or a small skewer.
- Icing and sprinkles for decorating.
- Red and white baker’s twine.
Step-by-Step Guide:
- Make Your Cookies: Roll out your dough and cut out your gingerbread men. Place them on a baking sheet.
- Make a Hole: Before you bake them, use a straw to poke a hole through the top of each gingerbread man’s head. This is where the string will go.
- Bake and Cool: Bake the cookies according to your recipe and let them cool completely.
- Decorate!: This is the fun part! Use your icing and sprinkles to give your gingerbread men faces and buttons. Let the icing dry completely.
- String Them Up: Cut a long piece of twine. Carefully thread it through the holes you made in the cookies. Leave some space between each gingerbread man.
Hang your adorable and tasty garland on a wall, a doorway, or even a small Christmas tree.
36. Celestial New Year’s Eve

This dining room is set for a magical midnight celebration. The theme is celestial, with deep midnight blue and sparkling silver accents creating a starry night sky effect. A breathtaking canopy of twinkling fairy lights covers the entire ceiling, making you feel like you’re dining under the stars.
The decor is sophisticated and enchanting. A futuristic, atom-shaped chandelier hangs down, surrounded by silver star and moon ornaments. The table is draped in rich blue velvet, and the place settings are marked with starry details. This is a dramatic and unforgettable setting for ringing in the new year.
DIY Instructions: Hanging Celestial Ornaments
Create a dreamy, starry sky effect with these simple hanging decorations.
What You’ll Need:
- Cardboard or stiff silver cardstock.
- Star and crescent moon shapes to trace (you can print these from the internet).
- A pencil.
- Scissors.
- Silver glitter and glue, or silver craft paint.
- Clear fishing line.
Step-by-Step Guide:
- Trace Your Shapes: Trace your star and moon shapes onto your cardboard or cardstock. Make a bunch of them in different sizes.
- Cut Them Out: Carefully cut out all your star and moon shapes.
- Make Them Sparkle: If you used plain cardboard, now it’s time to decorate! Cover your shapes with glue and sprinkle on silver glitter, or just paint them with silver paint. Let them dry completely.
- Attach the Hangers: Poke a small hole in the top of each ornament. Cut different lengths of fishing line and tie one to each shape.
- Hang Your Stars: Use clear tape or small hooks to hang your celestial ornaments from the ceiling at different heights.
Your dining room will now be filled with a galaxy of shimmering stars and moons.
37. Earthy and Modern Minimalism

This dining room is a study in warm minimalism. The space is calm and uncluttered, with a focus on natural materials and sculptural shapes. The color palette is a soothing mix of beige, brown, and black. The lighting is soft and moody, creating an intimate and sophisticated atmosphere.
The tablescape is an artistic arrangement of shapes and textures. Instead of one centerpiece, a collection of matte ceramic vases in various organic shapes is grouped together. A few bare, sculptural branches add height and interest. This is a refined and understated approach to holiday decorating that values form and texture over bright colors.
DIY Instructions: Modern Ceramic Vase Grouping
You can create this stylish, artistic look with just a few simple pieces.
What You’ll Need:
- 3-5 ceramic vases in neutral colors (like white, beige, or grey). Choose vases with interesting, different shapes and sizes.
- 1-2 interesting, bare branches from your yard.
- Pruning shears.
Step-by-Step Guide:
- Clean Your Vases: Make sure your vases are clean and ready to be displayed.
- Start Grouping: Begin arranging your vases in the center of your table. Don’t put them in a straight line. Create a cluster, putting the tallest vase in the back and the shorter ones in front. Overlap them slightly.
- Trim Your Branches: Hold your branches up to your tallest vase. Use your pruning shears to trim the branch so it’s a good height for the vase.
- Add the Branches: Place one or two simple branches in one or two of the vases. Leave the other vases empty. The beauty of this look is in the mix of empty and filled shapes.
- Adjust and Admire: Step back and adjust the placement of your vases until the whole grouping feels balanced and looks like a small sculpture.
You have created a very chic and modern centerpiece that is all about beautiful shapes.
38. Retro Diner Holiday Party

This dining room is a blast of nostalgic fun. The entire room is decorated like a vintage 1950s diner, with a chrome-edged table and colorful vinyl chairs. A bright red pendant light and a cheerful red-and-white checkered rug complete the retro vibe. The room is bright, happy, and full of playful energy.
The holiday decorations are just as fun and colorful. Wreaths made of shiny Christmas candies hang on the walls. A string of classic, colorful C9 Christmas lights is draped across the room. The centerpiece is a collection of vintage-inspired holiday figurines, candy canes, and colorful dishes.
DIY Instructions: Colorful Candy Wreath
This sweet wreath is fun to make and looks good enough to eat!
What You’ll Need:
- A simple styrofoam wreath form.
- A hot glue gun and lots of glue sticks.
- Several bags of wrapped, colorful hard candies (like peppermints, fruit candies, and lollipops).
- A wide, colorful ribbon for hanging.
Step-by-Step Guide:
- Prepare Your Wreath: Lay your styrofoam wreath on a flat, protected surface.
- Start Gluing: Start gluing your wrapped candies onto the wreath form. Put a generous dab of hot glue on the back of a candy and press it firmly onto the foam.
- Cover the Wreath: Keep gluing candies onto the wreath. Place them close together to cover all the white foam. Mix up the colors and types of candy. You can even stick some lollipops in at fun angles.
- Check for Gaps: Once you think you’re done, lift the wreath and look at it from all sides to make sure you’ve covered all the spots.
- Add a Hanger: Take your wide ribbon and loop it around the top of the wreath. Tie it in a big bow.
Now you have a super fun and colorful candy wreath to hang on your wall!
39. Wabi-Sabi Winter Stillness

This dining room embodies the principles of Wabi-Sabi, a Japanese worldview centered on accepting imperfection and appreciating natural simplicity. The room is spare and uncluttered, with a focus on rustic, handmade objects. The color palette is muted and calming. The space feels peaceful, humble, and deeply tranquil.
The decor is minimal and thoughtful. The rustic wooden table and stools are left bare to show their natural texture. The centerpiece is a single, stark branch in a rough, handmade pottery vase. A few simple candles provide a soft, warm light. This is a quiet, contemplative approach to the season.
DIY Instructions: Simple Wabi-Sabi Branch
This centerpiece is about finding the beauty in a single, simple object from nature.
What You’ll Need:
- A rustic, handmade-looking ceramic or pottery vase. It should not be perfect or shiny.
- One single, beautiful branch. Go for a walk and look for one that has an interesting shape, maybe with a few twists or some moss on it.
Step-by-Step Guide:
- Find Your Branch: The most important part of this DIY is finding the right branch. Look for one that has character. It doesn’t need to be perfectly straight.
- Clean Your Branch: Gently wipe any dirt off your branch. You can trim a few small twigs if you want, but don’t make it look too perfect.
- Place it in the Vase: Put the branch in your rustic vase.
- Find the Right Angle: Turn the branch and the vase on your table until you find the most beautiful and simple view. The goal is to appreciate the branch’s natural shape.
That’s it. You have created a centerpiece that is also a piece of simple, natural art.
The holidays are about more than just a single meal. They are about creating a space that feels warm and full of joy. Your dining room can be the center of that festive energy, not just for one day, but for the entire season.
We have journeyed through dozens of styles, from rustic farmhouse charm to sleek modern minimalism. Each look shows that a little creativity can make a huge impact. You don’t need a massive budget to create a stunning tablescape.
The most beautiful decorations are often the ones you make yourself. A handcrafted centerpiece or a simple, natural garland brings a personal touch that makes the space truly yours.
We hope these ideas have sparked your imagination. Now you can refresh your dining room and turn it into a cherished backdrop for all your holiday memories.
Key Takeaways
- Embrace Your Unique Style. Holiday decor is not limited to red and green. Whether you love coastal calm, bohemian warmth, or retro fun, there is a festive style that fits your personality. Don’t be afraid to try something unexpected.
- Use Natural Elements. Some of the most beautiful decorations are the simplest. Bare branches, fresh greenery, seasonal fruits, and pinecones can create a stunning and inexpensive tablescape that feels connected to the season.
- Lighting Creates the Magic. The right lighting can change everything. An abundance of candles, twinkling fairy lights, or a dramatic chandelier instantly adds a warm and festive glow, making any meal feel like a special occasion.
- A Personal Touch is Best. A DIY project makes your decor meaningful. Creating your own centerpiece or garland not only saves money but also infuses your dining room with a personal story and a sense of pride.