
Walking into a room that feels slightly off can be frustrating. You might spend a lot of money on furniture and yet the space still feels unpolished. Small errors often stack up to create a look that feels accidental rather than intentional.

Many homeowners struggle with scale and lighting. These are the two biggest factors that influence how expensive a room feels. You do not need a massive budget to fix these issues. Most of the time the solution involves simple adjustments and a keen eye for detail.
This guide highlights thirty seven common decorating errors that can lower the value of your home aesthetic. We will show you how to identify these traps. You will also find practical steps to turn every corner into a refined sanctuary.
1 Oversized Traditional Area Rug
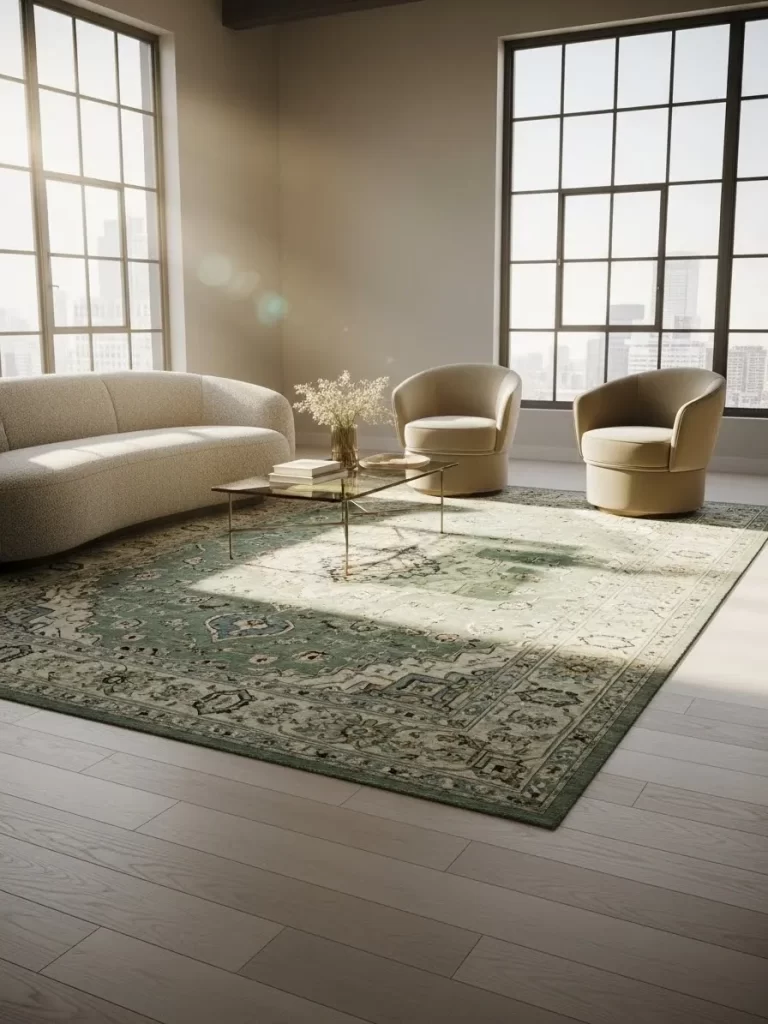
Choosing a rug that is too small for your living room often makes the space feel cramped and disjointed. This image showcases a large, sage green traditional rug that stretches well beyond the edges of the furniture. By placing all chair legs on the carpet, you create a cohesive zone that anchors the seating area beautifully.
A spacious rug provides a high end look while protecting your flooring from scratches. The intricate patterns add a layer of texture that balances the minimalist curved sofa and armchairs. It acts as a visual foundation that pulls various design elements together into a single, polished story.
Selecting a piece with muted tones ensures the room remains bright and airy. You should avoid tiny accent rugs in large rooms as they can look like floating islands. Instead, aim for a size that allows your furniture to breathe while still feeling connected to the ground.
Material Required
- Large area rug (8×10 or larger depending on room size)
- Non slip rug pad
- Double sided carpet tape
Equipment Required
- Measuring tape
- Vacuum cleaner
- A second person for heavy lifting
DIY Instructions
- Clear all furniture from the center of your living room to create a blank workspace.
- Clean the floor thoroughly using a vacuum or mop to ensure no dust remains trapped under the rug.
- Measure the floor space to ensure your new rug will sit at least six inches away from the walls.
- Unroll the non slip rug pad over the area where you want the rug to lie.
- Trim any excess rug pad using scissors so it stays hidden under the edges of the carpet.
- Lay the rolled rug at one end of the room and slowly unroll it across the pad with help from a friend.
- Smooth out any wrinkles or air bubbles by pushing from the center toward the outer edges.
- Apply carpet tape to the corners if the edges seem to curl upward.
- Lift your sofa and chairs back into place, ensuring at least the front legs of every piece sit firmly on the rug.
2 Large Abstract Impasto Wall Art
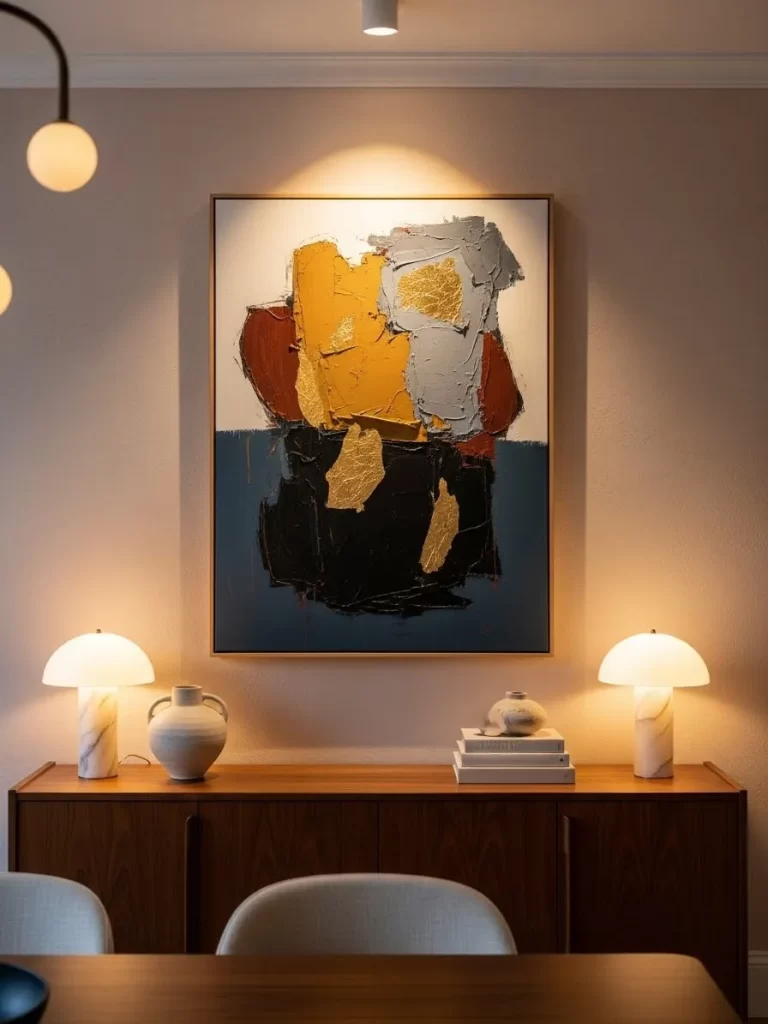
Small artwork on a large wall often makes a room look unfinished or cheap. This oversized canvas features bold impasto strokes in gold, black, and blue, filling the visual field above the sideboard. Choosing a scale that commands attention creates a sophisticated focal point and anchors the entire dining or living area.
The thick texture of the paint adds a luxury feel that flat prints simply cannot replicate. Using warm spotlights above the frame enhances the golden highlights and deep shadows. This lighting choice makes the piece feel like a curated gallery find rather than a mass produced item.
Centering the art over your furniture creates balance and symmetry. Ensure the piece is wide enough to cover at least two thirds of the width of the sideboard beneath it. This proportion keeps the arrangement from looking top heavy or disconnected from the rest of the decor.
Material Required
- Large primed canvas (36×48 inches or larger)
- Heavy body acrylic paints (black, white, blue, ochre)
- Gold leaf sheets and gilding adhesive
- Clear gloss varnish
Equipment Required
- Set of metal palette knives
- Large flat paintbrushes
- Level
- Picture hanging kit (heavy duty)
DIY Instructions
- Lay your canvas flat on a protected surface to prevent paint from dripping down the sides.
- Sketch a rough horizontal line across the middle to divide your color zones.
- Use a palette knife to scoop thick mounds of black and blue paint onto the bottom half of the canvas.
- Spread the paint in rough, upward strokes to create a jagged, textured ridge in the center.
- Apply ochre and white paint to the top half, blending them slightly to create a soft, neutral background.
- Wait for the paint to become tacky, then press gold leaf sheets onto the thickest ridges of the center section.
- Brush away excess gold leaf gently with a dry, soft brush once the adhesive is set.
- Apply a coat of gloss varnish over the entire piece to protect the texture and add a high end shine.
- Locate the wall studs and mount the heavy duty hanging hardware to ensure the large frame stays secure.
3 Modern Branch Sputnik Chandelier
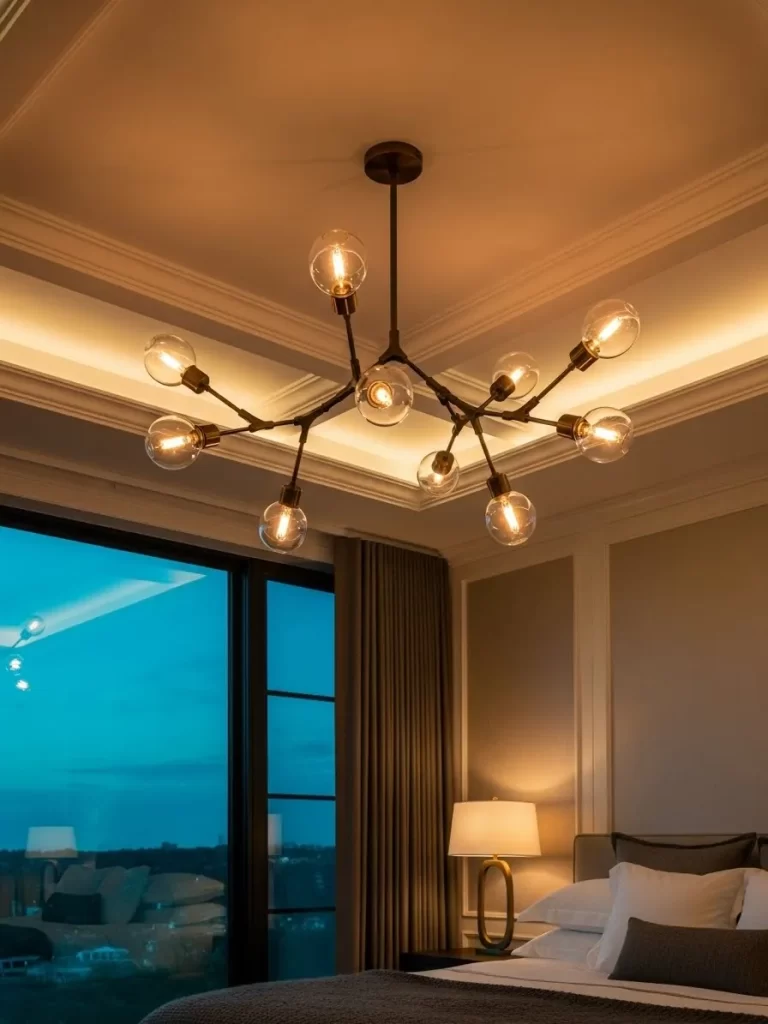
Outdated, basic light fixtures are a common mistake that brings down the value of a bedroom. This branch style chandelier features thin black arms and exposed glass globes that spread light evenly across the ceiling. It serves as a functional sculpture that draws the eye upward and makes the room feel taller.
The warm glow from the clear bulbs creates an inviting atmosphere for relaxation. By replacing a standard flush mount with a statement piece, you instantly upgrade the architectural feel of the space. It coordinates well with the recessed tray ceiling and adds a contemporary edge to traditional crown molding.
Proper height is key when hanging a large fixture over a bed. You want it low enough to be a feature but high enough so you never feel closed in. This specific design uses clean lines to provide a lot of light without appearing bulky or heavy in a soft sleeping area.
Material Required
- Modern branch chandelier kit
- LED Edison style globe bulbs
- Wire nuts and electrical tape
- Ceiling medallion (optional for a classic look)
Equipment Required
- Step ladder
- Screwdriver set
- Wire strippers
- Non contact voltage tester
DIY Instructions
- Turn off the power to the light circuit at the main breaker box to ensure total safety.
- Use a voltage tester on the old fixture to confirm no electricity is running to the wires.
- Unscrew the mounting bracket of the existing light and carefully lower it to disconnect the wires.
- Attach the new mounting crossbar to the electrical box in the ceiling using the provided screws.
- Thread the chandelier wires through the downrod and attach them to the house wires (black to black, white to white).
- Twist the wire ends together and secure them tightly with plastic wire nuts and electrical tape.
- Tuck the wires into the junction box and slide the canopy cover up against the ceiling.
- Tighten the decorative nuts on the canopy to hold the fixture firmly in place.
- Screw in the glass globes and bulbs, then restore the power at the breaker to test your work.
4 Integrated Bookshelf Accent Lighting
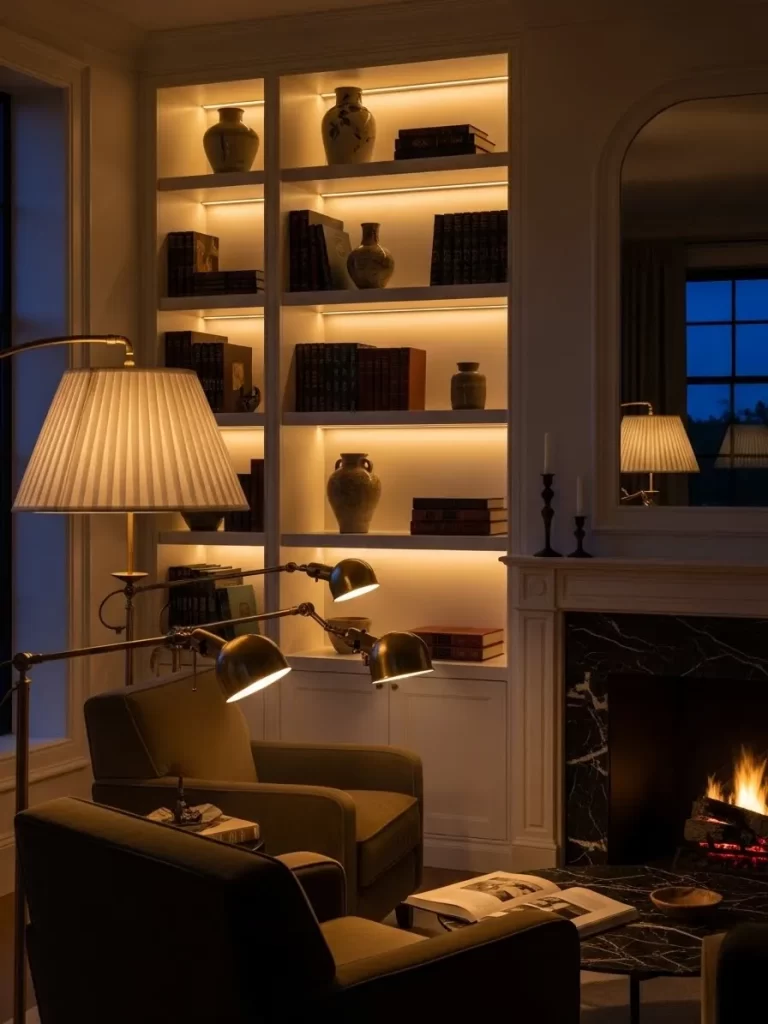
Dark, shadowy bookshelves often look cluttered and unappealing. This built in unit features warm LED light strips tucked under each shelf, illuminating the books and decorative vases. This simple addition transforms a basic storage wall into a glowing architectural feature that feels expensive and custom.
The light highlights the textures of the pottery and the spines of the books. It creates depth within the shelves, making the wall appear to recede and opening up the room. Using a warm color temperature ensures the glow mimics the flickering fire in the hearth nearby.
Layering your light sources is a hallmark of high end design. By combining the shelf lights with a pleated floor lamp and a glowing fireplace, the room feels cozy and rich. It eliminates the need for harsh overhead lighting that can wash out your decor.
Material Required
- Adhesive LED light strips (warm white)
- Low voltage power adapter
- Wire hiding channels or clips
- Smart plug or dimmer switch
Equipment Required
- Measuring tape
- Scissors (for cutting LED strips)
- Clean cloth and rubbing alcohol
- Drill with a small bit (if hiding wires through shelves)
DIY Instructions
- Measure the length of each shelf and cut your LED strips at the designated cut marks on the tape.
- Wipe the underside of each shelf with rubbing alcohol to remove dust so the adhesive sticks properly.
- Peel the backing off the LED strip and press it firmly against the front underside of the shelf.
- Drill a tiny hole in the back corner of each shelf if you want to run the wires behind the books.
- Connect each shelf strip to the main power bus wire using the snap connectors provided in the kit.
- Run the main power cord down the side of the bookshelf, hiding it behind the frame or using a wire channel.
- Plug the adapter into a wall outlet and connect it to a smart plug for easy voice control.
- Arrange your books and vases so they sit slightly back from the light source to avoid harsh glares.
- Adjust the brightness using a dimmer to find a level that glows softly without being too bright.
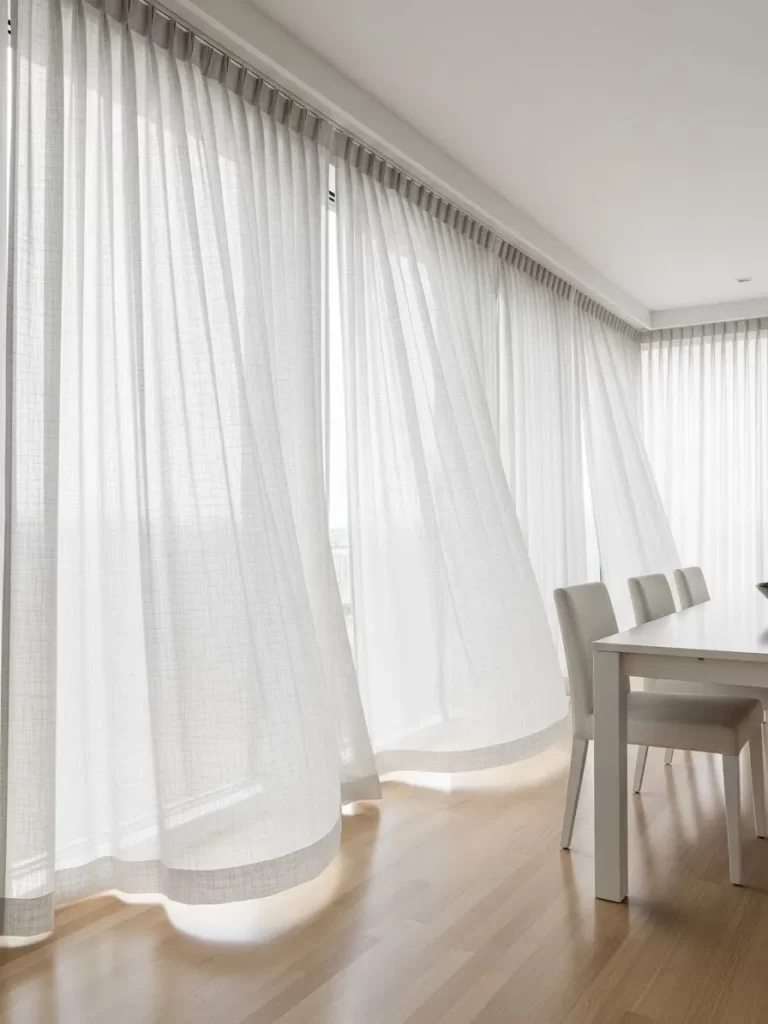
5 Minimalist Symmetrical Living Lounge
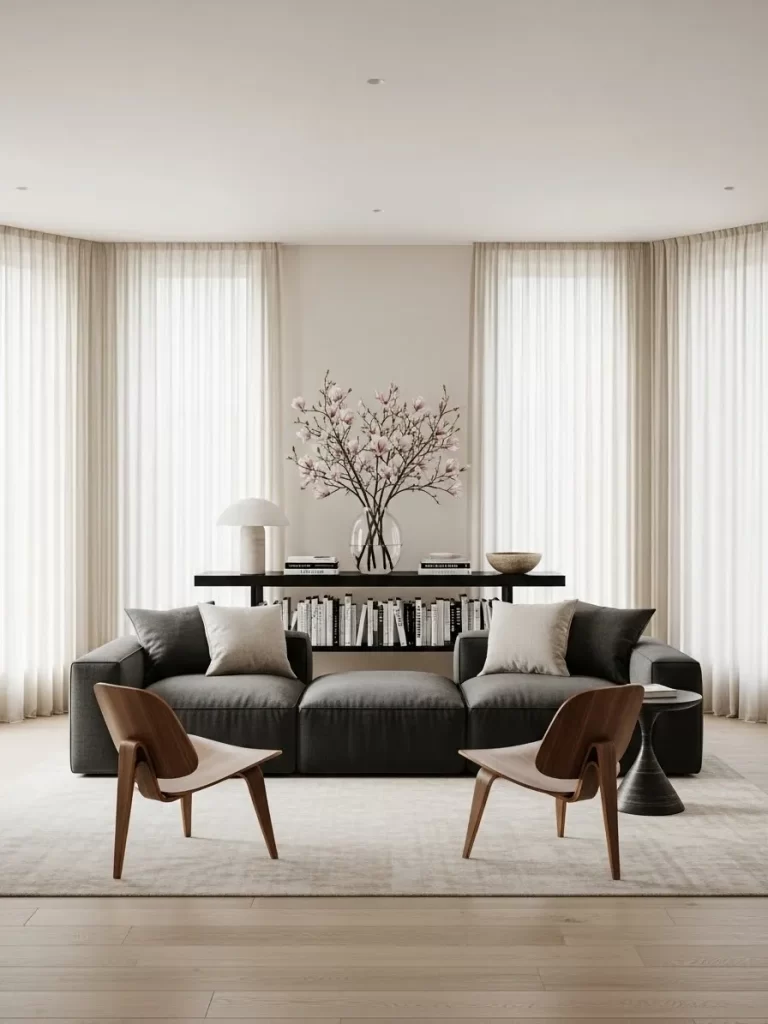
A common decorating blunder is pushing all furniture against the walls, leaving a cold void in the center. This layout uses a low profile charcoal sofa and twin wooden accent chairs to create an intimate conversation circle. Placing a console table behind the sofa adds a layer of depth and provides a home for books and tall floral arrangements.
The sheer floor to ceiling curtains soften the natural light and provide a high end, hotel like backdrop. By centering the rug and furniture, the room feels balanced and intentional rather than scattered. The neutral color palette keeps the large furniture pieces from feeling heavy or overwhelming the space.
Using a long console table also helps define different zones in an open floor plan. It offers a surface for a lamp and decorative bowls, which helps the room look lived in and curated. This arrangement proves that you do not need a lot of color to create a striking and expensive looking environment.
Material Required
- Low profile modular sofa
- Two wooden frame lounge chairs
- Slim black console table
- Large neutral area rug
Equipment Required
- Furniture sliders (for easy positioning)
- Measuring tape
- Steam cleaner (for curtains)
DIY Instructions
- Measure the center of your room and place the area rug down as your primary anchor point.
- Position the main sofa in the center of the rug, leaving a wide walkway behind it.
- Place the console table directly against the back of the sofa to act as a functional divider.
- Set the two accent chairs opposite the sofa at a slight inward angle to encourage conversation.
- Install curtain rods near the ceiling and hang sheer panels that kiss the floor for a custom look.
- Stack books horizontally on the console table to create different heights for your decor.
- Add a tall glass vase with flowering branches to the center of the console for a vertical focal point.
- Place a small round side table between the chairs to hold drinks or small items.
- Adjust the furniture slightly until the gaps between pieces feel even and the room feels balanced.
6 Travertine Fireplace with Textured Accents
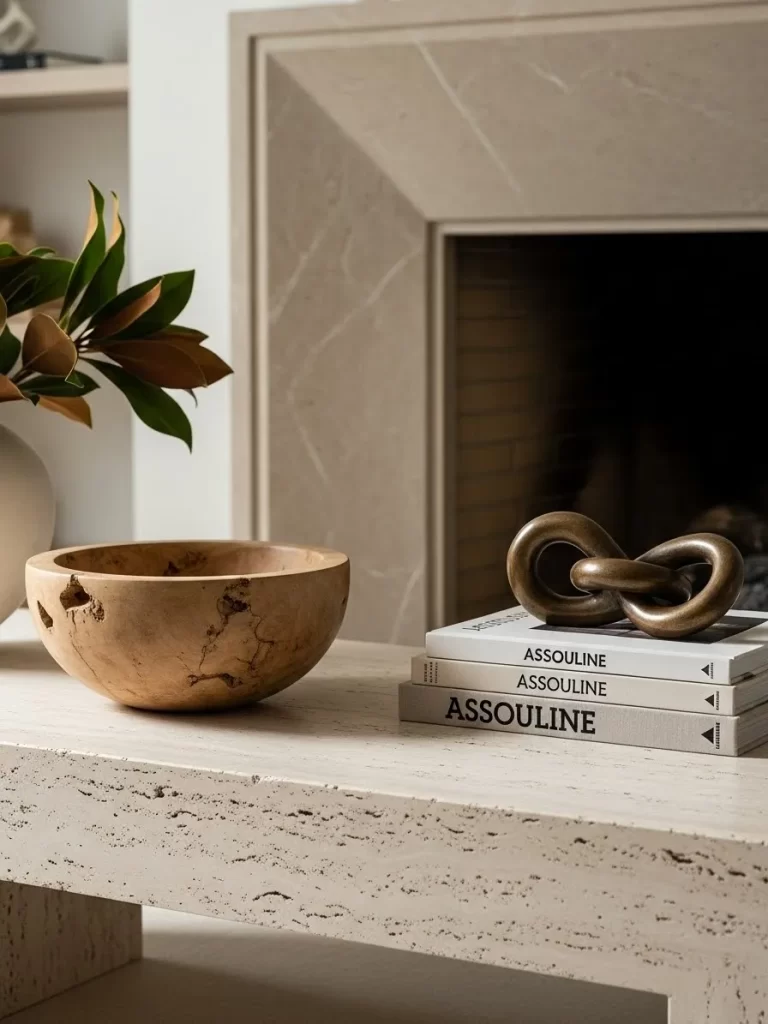
Ignoring the texture of your accessories can make even a beautiful fireplace look flat and cheap. This scene features a smooth travertine mantel topped with a raw, hand carved wooden bowl and a bronze chain link sculpture. Mixing stone, wood, and metal creates a sensory experience that feels deeply sophisticated and expensive.
The organic shape of the bowl contrasts beautifully with the sharp, clean lines of the stone fireplace. Using a small stack of high quality coffee table books provides a pedestal for the metal sculpture, giving it more presence. These small details show that the space was designed with care and an eye for artistic contrast.
Limiting the number of items on a mantel prevents a cluttered, messy appearance. Choose a few substantial pieces rather than many small trinkets that can look like dust collectors. This minimalist approach allows the natural beauty of the travertine to shine while still feeling decorated.
Material Required
- Hand carved wooden bowl
- Heavy metal chain link sculpture
- Three large hardcover art books
- Neutral ceramic vase with greenery
Equipment Required
- Microfiber cloth
- Stone sealer (for the mantel)
- Soft felt pads (to prevent scratches)
DIY Instructions
- Clean your fireplace mantel thoroughly with a microfiber cloth and apply a stone sealer if the surface is porous.
- Apply small felt pads to the bottom of your heavy metal sculpture and wooden bowl to protect the stone.
- Select three books with neutral spines and stack them from largest to smallest on one side of the mantel.
- Place the bronze chain link sculpture on top of the book stack to give it extra height and importance.
- Position the wooden bowl on the opposite side to balance the weight of the book stack.
- Leave a generous amount of empty space in the middle to keep the look clean and modern.
- Place a large vase with fresh green leaves just off to the side to add a natural element.
- Step back and view the mantel from across the room to ensure the heights of the objects vary.
- Rotate the bowl or books slightly until the arrangement looks effortless and not overly staged.
7 Mid Century Modern Bedroom Suite

Mismatched or cheap looking nightstands often ruin the flow of a serene bedroom. This room features a warm wood nightstand paired with a matching leather bench at the foot of the bed. The rich tones of the wood and leather add warmth to the cream upholstered headboard and light walls.
A floating marble shelf above the nightstand provides extra storage without taking up floor space. This clever use of vertical space keeps the bedside area from looking cramped or messy. The soft glow of the pendant light creates a peaceful mood that is much more refined than a standard ceiling light.
Layering bedding with different textures, like a heavy throw over crisp sheets, adds a luxury hotel feel. Keeping the color palette within the same family of beiges and browns creates a cohesive and calm environment. It ensures the room looks like a professionally designed suite rather than a collection of random furniture.
Material Required
- Upholstered wingback bed frame
- Mid century wooden nightstand
- Leather and metal end of bed bench
- Marble wall shelf with brackets
Equipment Required
- Power drill and wall anchors
- Level
- Screwdriver
- Stud finder
DIY Instructions
- Center your bed frame against the main wall, leaving equal space on both sides for nightstands.
- Assemble the wooden nightstand and place it close to the bed for easy access to the drawers.
- Use a stud finder to locate the wall studs above the nightstand for the floating shelf.
- Mark the wall where the marble shelf brackets will go, using a level to ensure they are straight.
- Drill pilot holes and secure the brackets into the studs or use heavy duty wall anchors.
- Slide the marble shelf onto the brackets and check again with the level before tightening.
- Place the leather bench at the foot of the bed, ensuring it is perfectly centered with the mattress.
- Layer your mattress with a thick duvet and a contrasting throw blanket folded neatly at the bottom.
- Add a few books and a small decorative bowl to the shelf to complete the lived in look.
8 Deep Forest Velvet Window Treatments
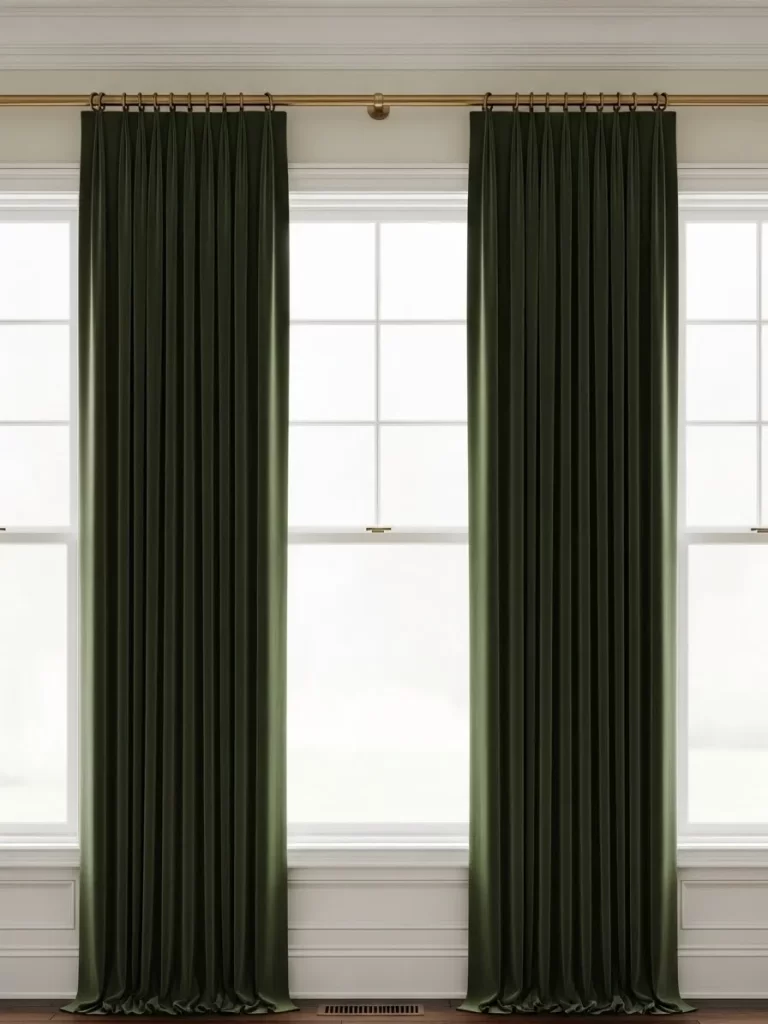
Hanging curtains too low or choosing thin, flimsy fabric is a mistake that makes windows look small. These floor to ceiling emerald green velvet drapes are hung on a brass rod positioned just below the crown molding. The heavy fabric pools slightly on the floor, adding a sense of grandeur and luxury to the tall windows.
The dark green color provides a bold contrast against the white walls and traditional trim work. Using rings on a thin rod allows the fabric to hang in deep, uniform pleats that look expensive and tailored. This setup not only looks beautiful but also provides excellent light blocking and sound insulation.
Extending the rod beyond the width of the window makes the glass appear much wider than it actually is. This trick allows the fabric to sit mostly on the wall, letting in maximum light when the curtains are open. It is a simple way to make a standard room feel like a high end estate.
Material Required
- Heavyweight velvet curtain panels (extra long)
- Solid brass curtain rod and brackets
- Brass curtain rings with clips
- Heavy duty wall anchors
Equipment Required
- Step ladder
- Power drill
- Measuring tape
- Hand steamer
DIY Instructions
- Measure the height from the floor to just below your ceiling molding to determine the curtain length.
- Mark the wall four to six inches outside the window frame for the rod brackets.
- Drill holes and install the brass brackets using heavy duty anchors to support the weight of the velvet.
- Slide the brass rings onto the rod before lifting the rod onto the brackets.
- Clip the velvet panels to the rings, spacing them evenly to create consistent pleats.
- Adjust the panels so they cover the edges of the window frame but do not block the glass.
- Use a hand steamer to remove any fold lines or wrinkles from the velvet fabric while it hangs.
- Arrange the bottom of the curtains so they puddle slightly or just touch the floor surface.
- Open and close the curtains several times to ensure the rings glide smoothly over the rod.
9 Chic Transitional Entryway Nook
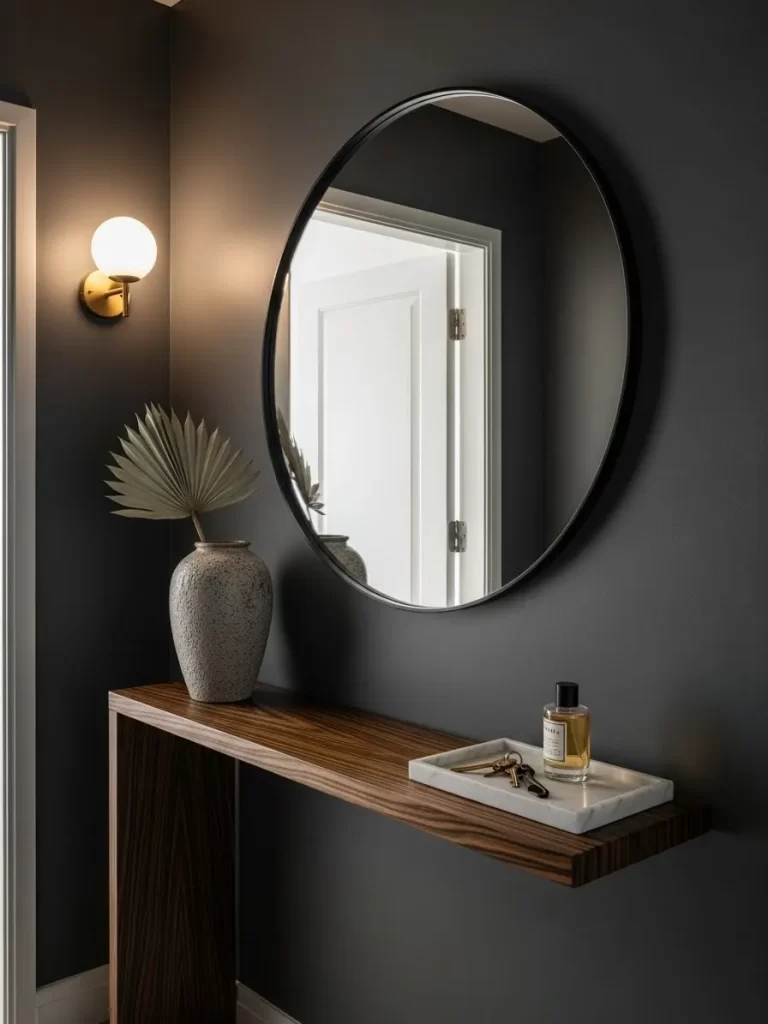
A cluttered or empty entryway creates a poor first impression of your home. This design features a slim, dark wood console table paired with a large circular mirror with a thin black frame. The round shape of the mirror breaks up the straight lines of the hallway and reflects light into the dark corner.
The dark charcoal paint on the walls makes the wood grain of the table and the white door trim pop. A simple marble tray on the table holds keys and a bottle of perfume, keeping daily essentials organized. The single tall vase with a palm leaf adds a splash of greenery without taking up too much space.
Proper lighting is vital in a small nook to keep it from feeling like a cave. The globe wall sconce provides a soft, warm light that makes the entryway feel welcoming and bright. This combination of functional furniture and artistic lighting creates an expensive, designed look the moment you walk in.
Material Required
- Slim wood console table
- Large round black framed mirror
- Marble vanity tray
- Modern globe wall sconce
Equipment Required
- Drill and wall mounting hardware
- Level
- Wire strippers (if hardwiring the light)
- Pencil for marking
DIY Instructions
- Paint the accent wall a deep charcoal or navy to create a sophisticated backdrop for your furniture.
- Place the console table against the wall and ensure it does not block the path of the door.
- Measure the center of the table and mark the wall at eye level for the mirror.
- Install a heavy duty wall hook and hang the round mirror, checking that it is perfectly level.
- Mark the spot for the wall sconce about six inches to the side of the mirror.
- Connect the light fixture to the wall wires or use a battery powered puck light for an easy no wire fix.
- Place a marble tray on the console to create a designated spot for keys and small items.
- Add a textured ceramic vase with a single large dried leaf for an organic touch.
- Hide any visible lamp cords behind the leg of the console table using adhesive clips.
10 Rope and Wool Fiber Wall Sculpture

Mass produced, flat wall prints can often look cheap and lack character. This large scale fiber art piece is made from woven rope and thick tufts of white wool, adding incredible texture to a dining nook. It acts as a soft, acoustic panel that absorbs sound while providing a unique visual focal point.
The neutral beige tones of the rope complement the white marble tulip table and built in bench seating. Using a piece that fills a large portion of the wall makes the ceiling feel higher and the room more finished. This type of handmade art brings a warmth and soul to the room that plastic frames cannot offer.
Pairing a highly textured wall piece with smooth surfaces like marble creates a sophisticated balance. The contrast between the rough rope and the polished table makes both items stand out more. This design choice shows a high level of confidence in mixing different materials and styles.
Material Required
- Thick manila or cotton rope (50-100 feet)
- Raw white wool roving
- Large wooden dowel or hidden mounting bar
- Strong upholstery thread
Equipment Required
- Heavy duty scissors
- Hot glue gun (optional for securing knots)
- Wall hooks
- Large needle
DIY Instructions
- Cut a sturdy wooden dowel to the desired width of your wall hanging to serve as the frame.
- Loop long strands of rope over the dowel using a simple lark’s head knot until the dowel is covered.
- Weave horizontal rows of rope through the hanging strands to create a solid, mat like background.
- Tie large, decorative knots in thick pieces of rope and sew them onto the surface for 3D texture.
- Take clumps of white wool roving and weave them through the rope to create cloud like shapes.
- Secure the wool by tucking the ends behind the rope or using a small dab of hot glue.
- Trim the bottom of the hanging rope to create a clean or intentionally shaggy edge.
- Install two sturdy hooks on the wall and rest the wooden dowel onto them.
- Fluff the wool sections by hand once the piece is hanging to give it maximum volume and softness.
11 Lush Fiddle Leaf Fig in Concrete Planter
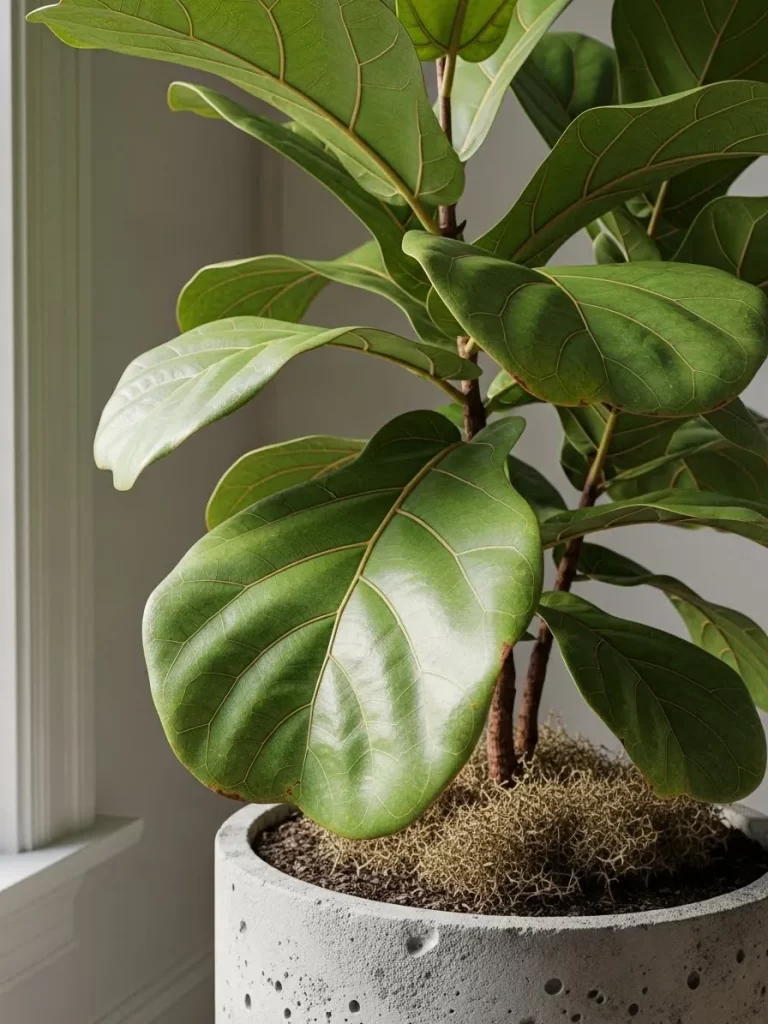
Bringing life into a corner often requires more than just a small desk plant. This large fiddle leaf fig stands tall in a minimalist concrete pot, offering a vibrant burst of organic green against neutral walls. The broad, waxy leaves catch the light and create a natural sculpture that feels fresh and expensive.
Using a substantial tree instead of multiple tiny pots prevents a cluttered look. Large scale greenery anchors a room and adds a layer of sophistication that fills empty vertical space. It softens sharp architectural lines and makes the transition between indoors and outdoors feel seamless.
To keep the look high end, choose a planter with a clean silhouette and a matte finish. Covering the soil with dried moss or river stones hides the dirt and adds a professional touch. This simple upgrade ensures your indoor garden looks like a curated design element rather than a basic hobby.
Material Required
- Live or high quality faux Fiddle Leaf Fig tree
- Large concrete or ceramic cylinder planter
- Potting soil or heavy floral foam (for faux)
- Decorative dried Spanish moss or river rocks
Equipment Required
- Hand trowel
- Watering can
- Soft microfiber cloth
DIY Instructions
- Select a planter that is at least two inches wider than the current nursery pot of your tree.
- Fill the bottom third of the concrete pot with fresh soil or drainage pebbles to allow air circulation.
- Remove the tree from its plastic container and gently loosen the outer roots with your fingers.
- Place the tree in the center of the new pot and fill the remaining space with soil, pressing down firmly.
- Water the plant immediately to settle the soil and remove any air pockets around the root ball.
- Spread a thick layer of dried moss over the top of the soil to create a clean, uniform surface.
- Wipe each individual leaf with a damp cloth to remove dust and bring out the natural shine.
- Position the plant near a window with bright, indirect light to help it thrive and stay vibrant.
- Rotate the pot every few weeks so the leaves grow evenly and the tree does not lean toward the light.
12 Textural Cream Living Room Layering
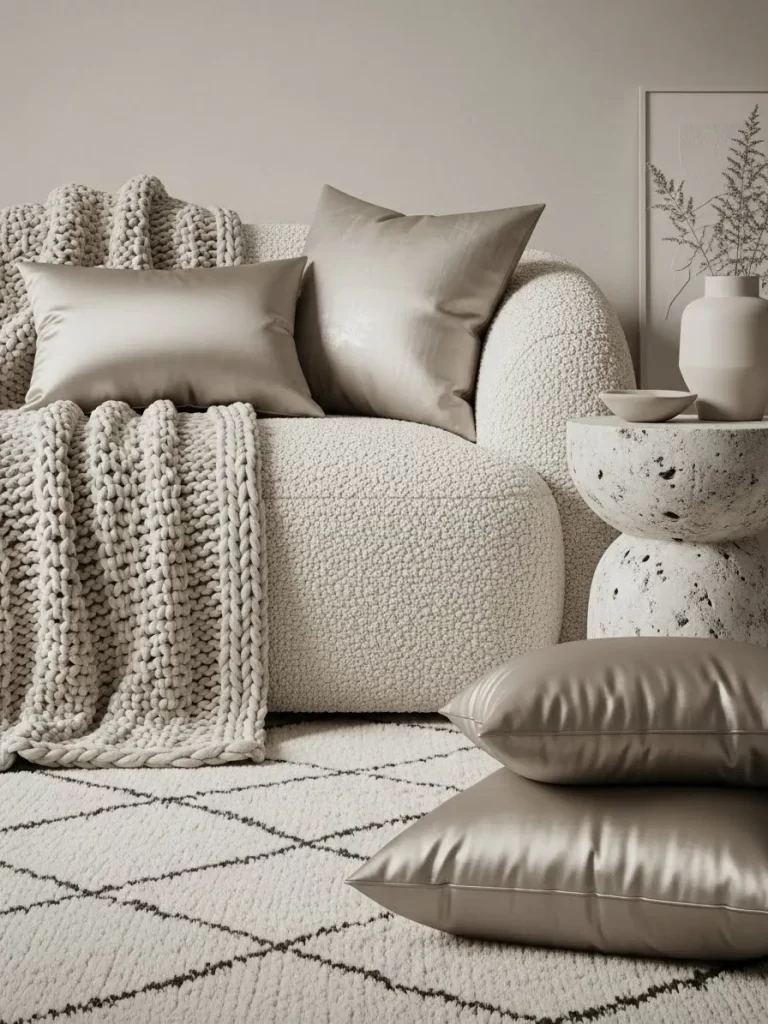
Failing to mix textures in a neutral room can leave the space feeling flat and boring. This lounge area uses a heavy, chunky knit throw blanket alongside smooth satin pillows to create a rich sensory experience. The varying fabrics add depth to the cream boucle sofa, making the monochromatic palette feel cozy and intentional.
The contrast between the soft wool and the shimmering silk catches the light differently throughout the day. Using a round, textured stone side table adds a rugged element that balances the softness of the fabrics. This layering technique is a secret to making a simple room look like it belongs in a luxury catalog.
Avoid using only one type of material for all your accessories. Instead, combine rough, smooth, matte, and shiny finishes to build a complex visual story. This approach makes the room feel warm and lived in while maintaining a high end, sophisticated aesthetic.
Material Required
- Oversized chunky knit wool throw
- Set of champagne satin lumbar pillows
- Boucle or nubby fabric sofa
- Stacked stone or plaster side table
Equipment Required
- Fabric shaver (for maintenance)
- Lint roller
- Soft brush for stone surfaces
DIY Instructions
- Start with a clean, neutral sofa as your base and clear away any old or mismatched cushions.
- Drape the chunky knit blanket over one corner of the sofa, letting it hang naturally toward the floor.
- Place two large square pillows at the back corners to provide structure and a comfortable backrest.
- Add the satin lumbar pillows in front of the larger ones to introduce a different shape and texture.
- Tuck the edges of the blanket into the seat cushions slightly so it looks styled but not messy.
- Position the stone side table within arm’s reach of the sofa to create a functional and visual anchor.
- Place a small ceramic bowl or a single branch on the table to keep the styling minimalist.
- Chop the top of your pillows with your hand to create a v shape, giving them a professional, plump look.
- Step back and adjust the folds of the blanket until the arrangement looks balanced and inviting.
13 Grand Tiered Glass Chandelier
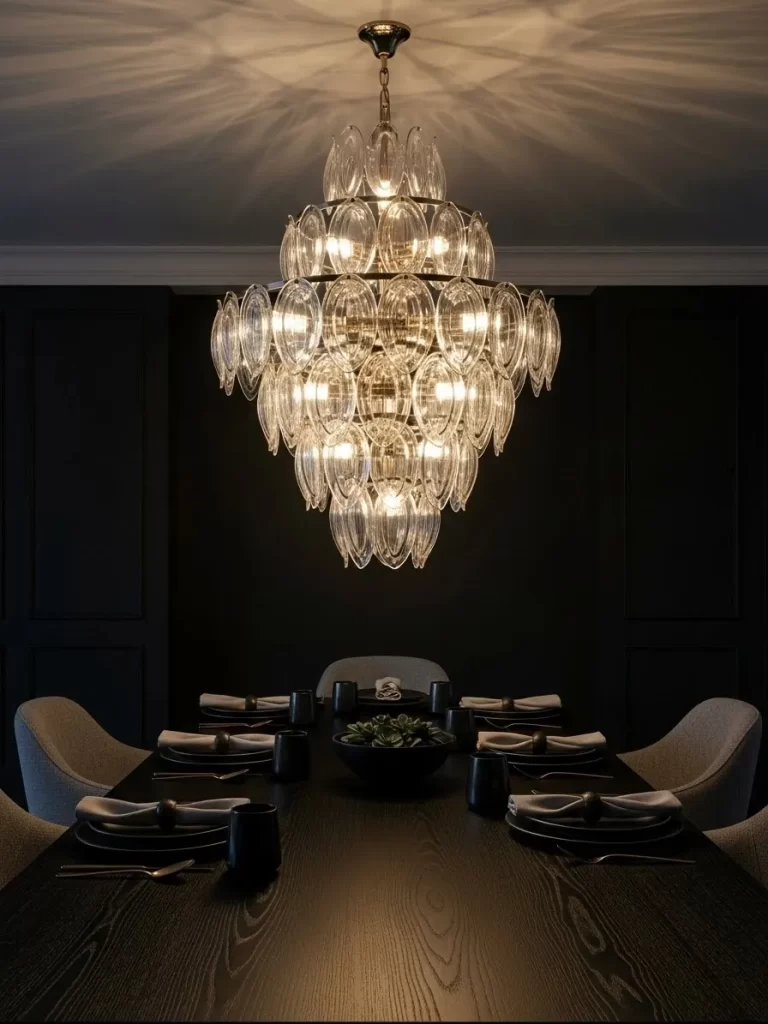
Lighting that is too small for a dining table is a common mistake that diminishes the room’s impact. This magnificent tiered chandelier features dozens of oval glass petals that catch and refract the light beautifully. It fills the void above the dark wood table, acting as a sparkling crown for the entire dining room.
The dark walls and black furniture allow the glass and light to become the primary focus of the space. This dramatic contrast creates a moody, upscale atmosphere that feels like a private boutique restaurant. The shadows cast on the ceiling add another layer of architectural interest that makes the room feel taller.
When choosing a large fixture, ensure it hangs at the correct height to avoid blocking views across the table. A grand piece like this should be the main event, so keep the table decor simple and understated. This balance prevents the room from feeling over decorated or cluttered.
Material Required
- Multi tiered glass petal chandelier
- Dimmable LED candelabra bulbs
- Heavy duty ceiling brace
- Cotton gloves (for handling glass)
Equipment Required
- Tall ladder
- Wire strippers and voltage tester
- Screwdriver set
- Cleaning spray for glass
DIY Instructions
- Verify that your ceiling electrical box is rated for a heavy fixture and install a support brace if needed.
- Shut off the main power and test the wires to ensure no electricity is flowing through the circuit.
- Connect the chandelier mounting plate to the ceiling box using the provided long screws.
- Lift the main frame of the fixture and connect the wiring, securing them with wire nuts and electrical tape.
- Slide the canopy up to the ceiling and tighten the decorative collar to hide the wires.
- Put on clean cotton gloves to prevent fingerprints while you handle the delicate glass petals.
- Hook each glass piece onto the frame starting from the bottom tier and moving upward to the top.
- Install dimmable bulbs so you can adjust the mood of the room from bright to a soft glow.
- Restore the power and use a soft cloth to give the glass a final polish once everything is in place.
14 Framed Landscape Above the Mantel
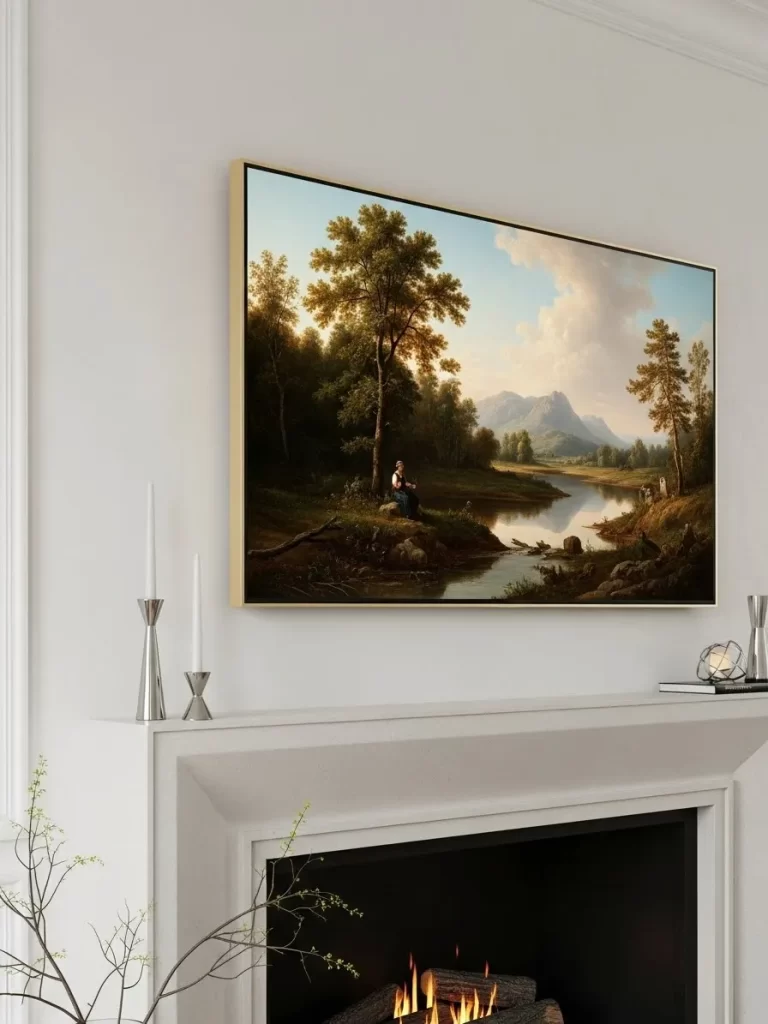
Leaning a small or unframed print against a wall often looks like an afterthought rather than a design choice. This large, gold framed landscape painting is mounted securely above a white marble fireplace, creating a classic and timeless look. The deep greens and warm sunlight in the art bring a sense of calm and nature into the living room.
The thin gold frame adds a touch of metallic shine that coordinates with the silver candlesticks on the mantel. By choosing art that spans most of the fireplace width, the entire wall feels cohesive and grand. It draws the eye upward, highlighting the height of the room and the beauty of the molding.
Pairing traditional art with a modern, clean lined fireplace creates a beautiful transitional style. This mix of old and new prevents the room from feeling too stiff or outdated. It shows a thoughtful approach to blending different eras into a single, elegant home.
Material Required
- Large scale landscape art print or canvas
- Slim gold or brass picture frame
- Heavy duty wall mounting kit
- Two silver taper candle holders
Equipment Required
- Power drill
- Spirit level
- Measuring tape
- Pencil
DIY Instructions
- Measure the width of your mantel and select a frame that is roughly two thirds of that size.
- Center the art piece on the wall, ensuring the bottom of the frame sits six to ten inches above the mantel.
- Mark the hanging points on the wall with a pencil while using a level to keep everything straight.
- Drill holes into the wall and tap in the plastic anchors to support the weight of the large frame.
- Screw the hanging hooks into the anchors and carefully lift the art into position.
- Check the level one last time and adjust the frame until it is perfectly horizontal.
- Place the silver candlesticks on one side of the mantel to create an asymmetrical, modern balance.
- Add a small, low profile object like a decorative knot on the other side to complete the look.
- Wipe the glass of the frame with a lint free cloth to ensure the colors of the landscape remain crisp.
15 High Gloss Navy Cabinet with Gold Hardware
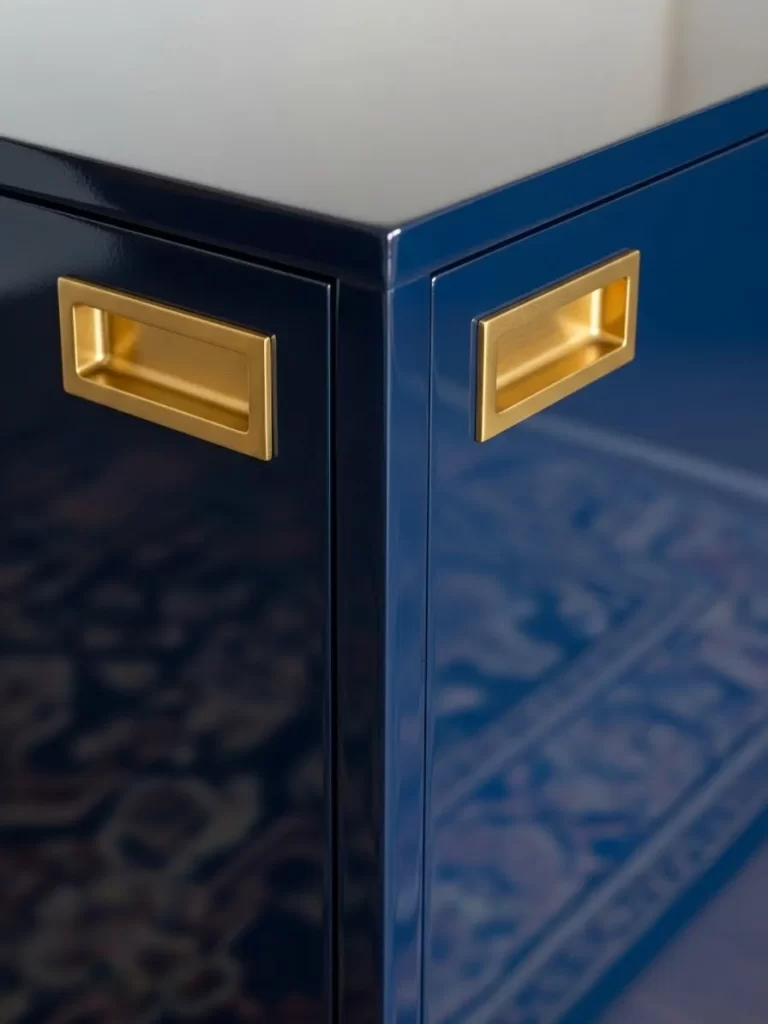
Dated or boring storage units can quickly make a room look cheap and uninspiring. This cabinet features a stunning deep navy blue finish with a mirror like high gloss sheen. The recessed gold handles add a pop of luxury and a modern architectural detail that transforms a simple box into a piece of art.
The reflective surface of the cabinet bounces light around the room, making the dark color feel bright and energetic. This bold choice works well in both modern and traditional settings because of its clean lines and rich pigment. It serves as a sophisticated anchor for the room while providing hidden storage for clutter.
Pairing a glossy finish with a matte rug or wooden floor creates a beautiful contrast in textures. This prevents the room from feeling too shiny or overwhelming. It is a simple way to introduce a designer touch into your home without a full renovation.
Material Required
- Wood or MDF cabinet unit
- High gloss navy blue enamel paint
- Two gold recessed pull handles
- Fine grit sandpaper
Equipment Required
- High quality foam roller
- Power drill and spade bit (for handles)
- Painter’s tape
- Screwdriver
DIY Instructions
- Sand the entire surface of the cabinet with fine grit sandpaper to create a smooth base for the paint.
- Wipe away all dust with a tack cloth and use painter’s tape to protect any areas you do not want blue.
- Apply a thin coat of high gloss primer and let it dry completely before sanding lightly again.
- Use a foam roller to apply the navy enamel paint in long, even strokes to avoid leaving any bubbles.
- Wait for the first coat to dry, then apply a second and third coat until the color is deep and the shine is uniform.
- Measure and mark the exact spots for your new gold handles on the front of the cabinet doors.
- Carefully drill the holes for the recessed handles, being careful not to splinter the fresh paint.
- Insert the gold hardware and secure it from the inside with the provided screws.
- Allow the paint to cure for at least forty eight hours before placing any objects on the surface.
16 Mixed Texture Sofa Pillows
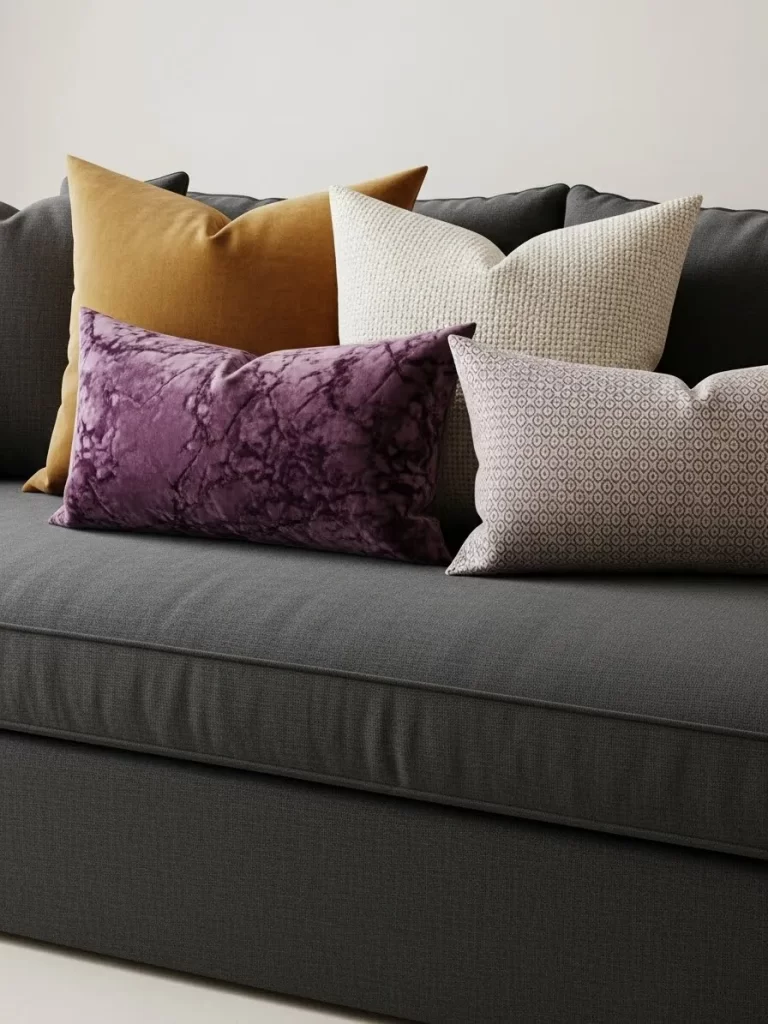
A common mistake is using matching pillow sets that come with the sofa, which often looks generic and uninspired. This arrangement features a rich mix of mustard velvet, cream knit, and deep purple marbled fabrics. By varying the sizes and textures, you create a layered look that feels high end and personally curated.
The deep plum lumbar pillow adds a bold pop of color against the charcoal gray upholstery. Mixing a geometric pattern with solid, textured fabrics provides visual interest without the space feeling chaotic. This approach ensures your seating area looks like a professional designer styled it rather than a furniture showroom.
When arranging your pillows, place the largest, sturdiest squares at the back for support. Layer smaller or uniquely shaped pieces in the front to draw the eye and provide variety. This simple change adds a luxurious feel to any standard sofa and makes the room feel much more inviting.
Material Required
- Two 22×22 inch velvet pillow covers
- One 20×20 inch chunky knit pillow cover
- Two textured or patterned lumbar pillow covers
- High quality down or faux down inserts
Equipment Required
- Fabric steamer
- Measuring tape
- Soft lint brush
DIY Instructions
- Select a color palette that includes one neutral, one bold accent, and one complementary shade.
- Purchase pillow inserts that are two inches larger than your covers to ensure a plump, high end look.
- Stuff the inserts into the covers, making sure to push the corners of the insert deep into the cover corners.
- Zip the covers closed and shake the pillows vigorously to distribute the filling evenly.
- Place the large velvet pillows at each end of the sofa against the armrests.
- Lean the textured knit pillow against one of the velvet squares to create a layered effect.
- Position the patterned lumbar pillows in the center or slightly off center for a modern touch.
- Steam any wrinkles out of the covers while they are on the sofa for a crisp finish.
- Perform a karate chop to the top center of each pillow to create a professional indentation.
17 Sleek Emerald Green Kitchen Cabinetry
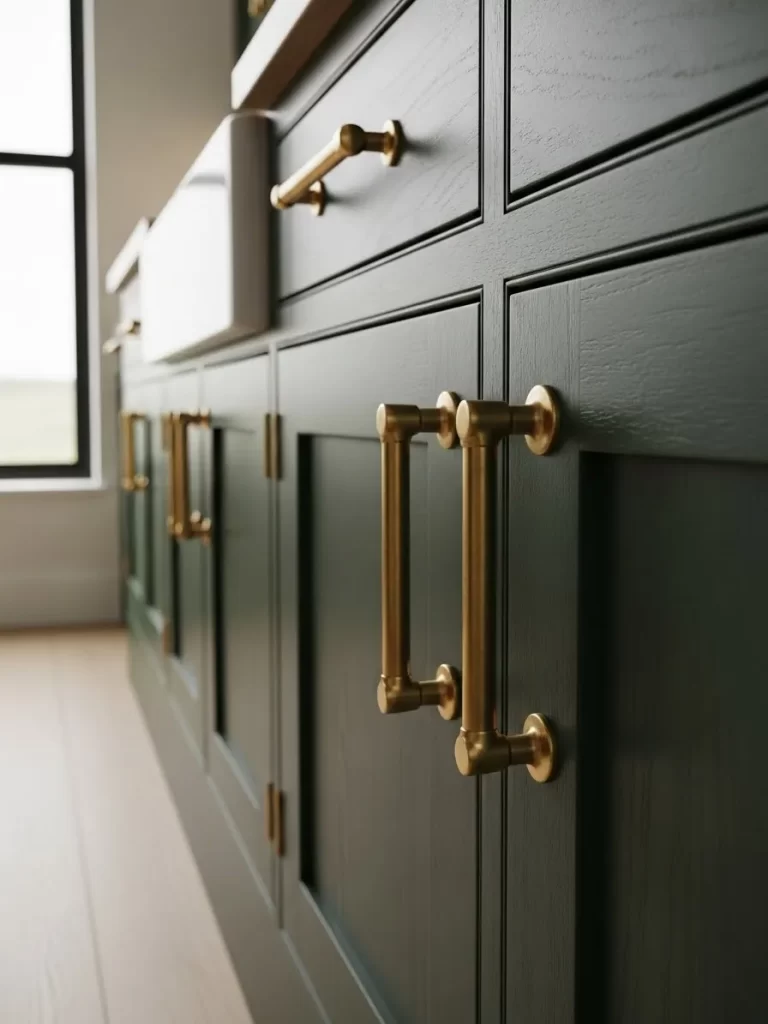
Plain white or builder grade wood cabinets can make a kitchen feel dated and lacking in personality. These stunning emerald green cabinets feature a subtle wood grain that adds warmth and depth to the bold color choice. The long, cylindrical brass handles provide a modern contrast that looks incredibly expensive and custom.
The dark green hue acts as a sophisticated neutral when paired with light flooring and white countertops. Using oversized hardware instead of small knobs gives the cabinetry a more architectural and intentional appearance. This design choice proves that bold colors can still feel timeless when executed with high quality finishes.
Focusing on the details of your hardware is one of the easiest ways to upgrade a kitchen. Replacing old pulls with heavy, solid metal handles instantly increases the perceived value of the entire room. It creates a tactile experience that feels sturdy and luxurious every time you open a drawer.
Material Required
- High quality cabinet paint or stain (Emerald Green)
- Modern brass T bar handles
- Painter’s tape
- Deglosser or liquid sandpaper
Equipment Required
- Power drill
- Cabinet hardware jig (for precise hole placement)
- Screwdriver
- High density foam roller
DIY Instructions
- Remove all cabinet doors and drawers and take off the old hardware before starting.
- Clean the surfaces with a degreaser and use a liquid sandpaper to scuff the old finish.
- Tape off the edges of the cabinet frames to prevent paint from getting on the walls or floor.
- Apply a thin, even coat of primer and allow it to dry completely according to the label.
- Roll on the green cabinet paint using a foam roller to ensure a smooth, brush stroke free finish.
- Apply a second coat of paint after the first is dry to achieve a deep, uniform color.
- Use a hardware jig to mark the exact locations for your new, longer brass handles.
- Drill the holes carefully using a bit that matches the size of your handle screws.
- Attach the new handles firmly and rehang the doors, checking the alignment of the hinges.
18 Coastal Driftwood Living Room Console
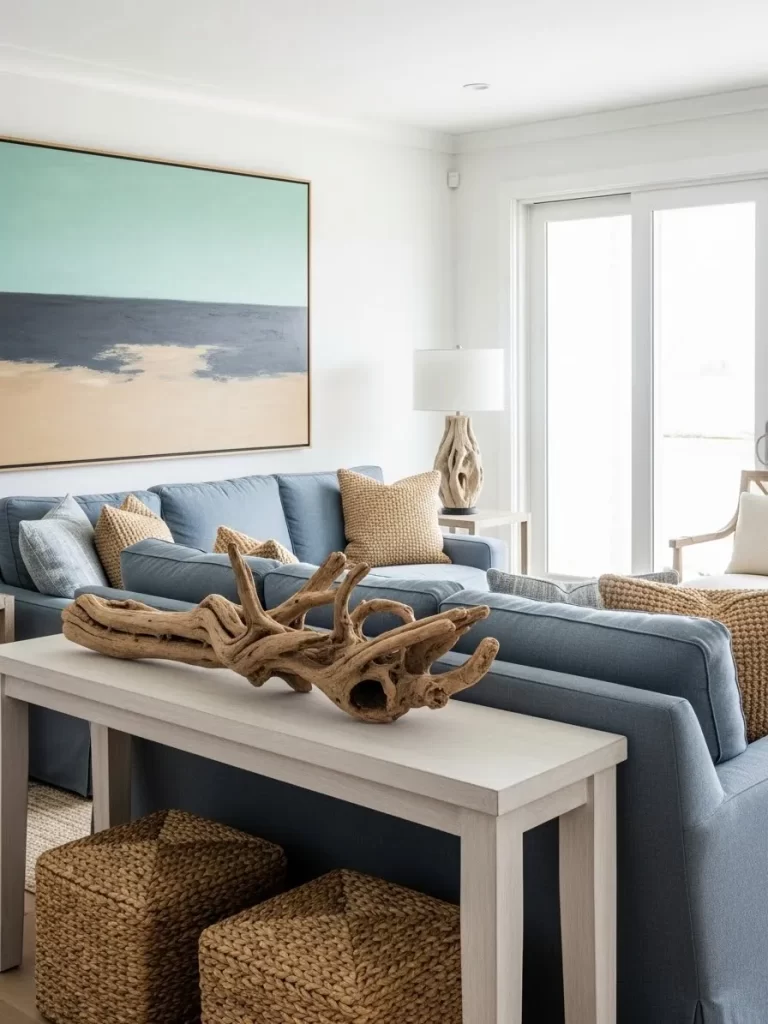
Empty spaces behind a floating sofa can make a living room feel incomplete or hollow. This white console table provides a perfect surface for a large, organic driftwood sculpture and woven storage baskets. The natural wood tones against the light furniture create a breezy, coastal atmosphere that feels calm and expensive.
The large abstract painting on the wall coordinates with the blue tones of the sofa, tying the whole room together. By placing woven ottomans underneath the table, you add texture and extra seating without taking up more floor space. This layered approach makes the room feel functional and thoughtfully planned.
Choose a few large scale items for the table surface rather than many small trinkets to maintain a clean look. The driftwood serves as a conversation piece that brings the beauty of nature indoors. This balance of clean lines and raw, organic shapes is a hallmark of sophisticated coastal design.
Material Required
- Long, slim wooden console table (White or light oak)
- Large piece of natural driftwood or a faux wood sculpture
- Two large woven storage baskets or poufs
- Textured ceramic table lamp
Equipment Required
- Level
- Soft cloth for dusting
- Furniture pads (to protect the floor)
DIY Instructions
- Place the console table directly against the back of your sofa, ensuring it is centered.
- Check that the table is level and add felt pads to the legs if the floor is uneven.
- Position the large driftwood sculpture in the center of the table as your primary focal point.
- Place a textured lamp on one end of the table to add height and warm lighting.
- Stack a couple of large coffee table books on the other side to balance the lamp’s visual weight.
- Slide the woven baskets or poufs under the table to fill the empty space near the floor.
- Adjust the spacing so that no area of the table feels overcrowded or too empty.
- Dust the driftwood regularly with a soft brush to keep the natural crevices clean.
- Run any lamp cords down the back of the table leg and secure them with clips to keep them hidden.
19 Floating Sheer Dining Room Drapery
Heavy, dark curtains can often make a dining room feel small, closed in, and somewhat dated. These floor to ceiling white sheer panels allow soft, diffused light to fill the space while providing a layer of privacy. The way the fabric catches the breeze adds a sense of movement and airy luxury to the modern dining area.
The curtains are hung high on a hidden track, which makes the ceiling appear much taller than it is. This minimalist window treatment complements the clean lines of the white dining chairs and table perfectly. It creates a serene, ethereal backdrop that allows the architecture of the home to take center stage.
Using a continuous run of fabric across a large window or glass door creates a high end, hotel like feel. The sheer material softens the hard angles of the room and creates a gentle transition to the view outside. This is an excellent way to make a modern space feel warmer and more inviting without adding clutter.
Material Required
- Extra long white sheer curtain panels
- Ceiling mounted curtain track or slim rod
- Drapery hooks or clips
- Iron on hem tape (if adjustment is needed)
Equipment Required
- Power drill and ladder
- Measuring tape
- Handheld steamer
- Pencil for marking the ceiling
DIY Instructions
- Measure the entire width of your window wall and the height from the ceiling to the floor.
- Mark the ceiling every twelve inches to indicate where the curtain track will be installed.
- Drill pilot holes and secure the track to the ceiling using heavy duty anchors.
- Slide the curtain gliders into the track before attaching the end caps to keep them in place.
- Attach the sheer panels to the gliders using drapery hooks, ensuring even spacing between pleats.
- Pull the curtains across the track to ensure they glide smoothly without catching.
- Check the length and use iron on hem tape to adjust the bottom so it barely touches the floor.
- Steam the fabric thoroughly from top to bottom to remove all fold lines and wrinkles.
- Arrange the folds by hand while the fabric is damp so they hang in neat, uniform columns.
20 Modern Drum Pendant with Brass Details
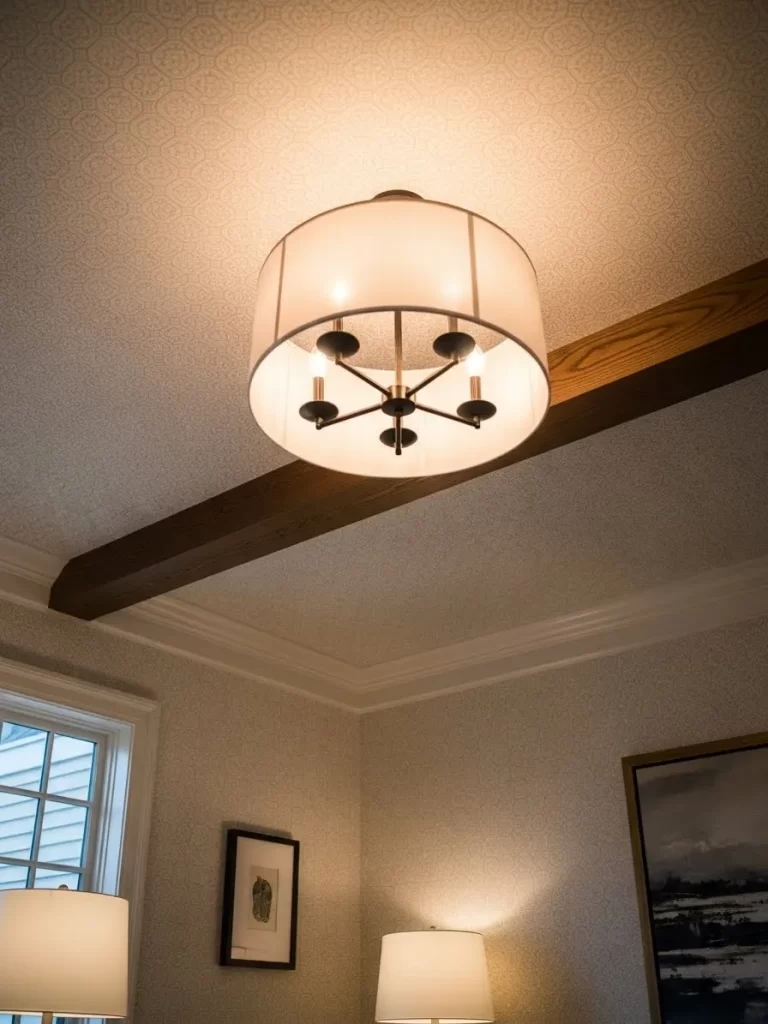
Basic, flush mount boob lights are a major design mistake that instantly makes a home look cheap. This stylish drum pendant features a clean white shade and a sophisticated internal brass frame with multiple bulbs. It provides a soft, even glow that illuminates the room without the harsh glare of exposed bulbs.
The brass accents on the light fixture coordinate with the warm wood tones of the ceiling beams. By choosing a fixture with a wide diameter, you create a sense of scale and importance in the room. This type of lighting acts as a piece of ceiling jewelry that draws the eye upward and completes the decor.
Layering your light is key to a high end feel, so pair a central pendant with smaller table lamps. This allows you to control the mood and highlight different areas of the room as needed. A drum pendant is a versatile choice that works well in bedrooms, offices, or living spaces.
Material Required
- Large drum pendant light fixture
- LED warm white bulbs
- Wire nuts and electrical tape
- Ceiling mounting bracket
Equipment Required
- Step ladder
- Non contact voltage tester
- Screwdriver set
- Wire strippers
DIY Instructions
- Turn off the power to the room at the main breaker panel for your safety.
- Remove the old light fixture and use a voltage tester to ensure the wires are not live.
- Screw the new mounting bracket into the existing electrical box in the ceiling.
- Connect the light’s wires to the house wires (black to black, white to white, and green to ground).
- Secure each connection with a plastic wire nut and wrap it with a bit of electrical tape.
- Lift the fixture base to the ceiling and tighten the screws to hold it firmly in place.
- Install the LED bulbs and attach the drum shade to the central rod or frame.
- Adjust the shade so it sits perfectly level and does not tilt to one side.
- Turn the power back on and test the light to ensure it glows evenly through the fabric shade.
21 Travertine Coffee Table with Sculptural Accents
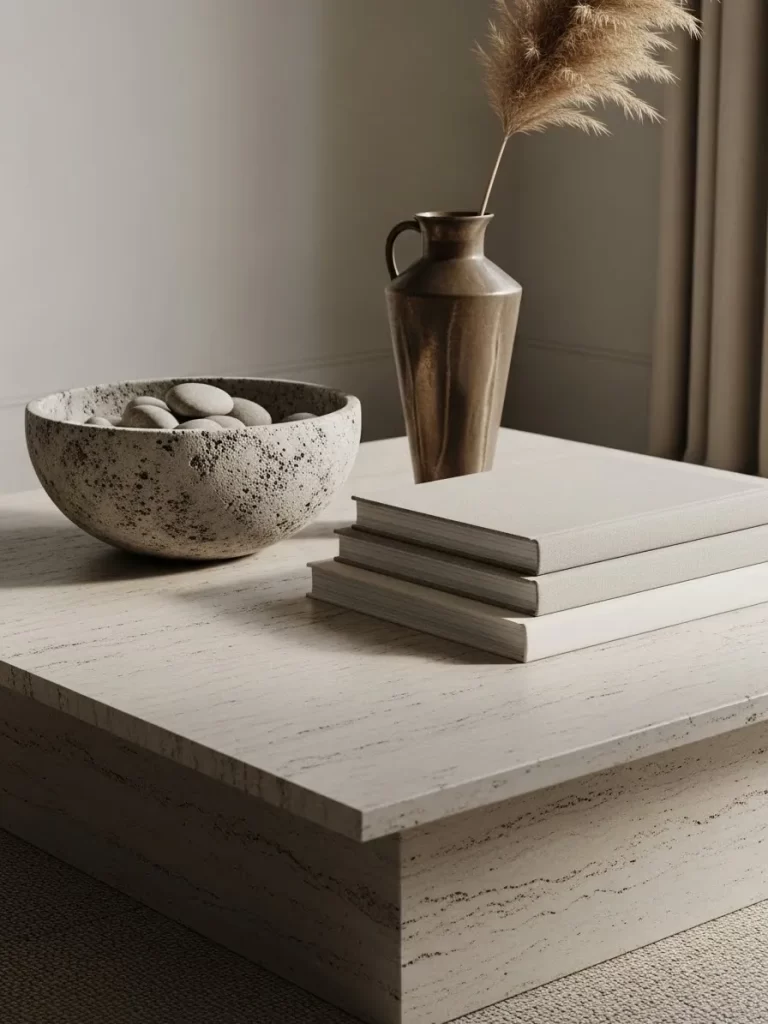
Using a small, flimsy coffee table often makes a large living room feel cheap and disjointed. This solid travertine square table provides a heavy, grounded presence that anchors the seating area. The natural stone texture offers a high end, architectural feel that serves as a canvas for a curated collection of objects.
The arrangement uses a tall bronze vase with dried pampas grass to add vertical interest and a soft, organic touch. A stack of three linen bound books creates a pedestal for smaller items, while a textured stone bowl filled with smooth river rocks adds a sensory element. This mix of hard stone, soft grass, and metallic finishes creates a rich, designer look.
To keep the styling sophisticated, stick to a monochromatic palette that highlights the natural beauty of the materials. Avoid overcrowding the surface with too many small trinkets that can look like clutter. This minimalist approach allows each piece to breathe and maintains an expensive, gallery like atmosphere in your home.
Material Required
- Solid travertine or limestone coffee table
- Tall bronze or brass tapered vase
- Dried pampas grass stems
- Three neutral hardcover coffee table books
- Porous stone bowl and smooth decorative river stones
Equipment Required
- Microfiber cloth
- Stone sealer
- Soft felt pads (for the base of heavy objects)
DIY Instructions
- Clean the surface of your travertine table with a dry microfiber cloth to remove any fine stone dust.
- Apply a thin coat of stone sealer to prevent stains from drinks or oils, allowing it to dry for 24 hours.
- Place the large stone table in the center of your rug, leaving at least 18 inches of walking space on all sides.
- Apply felt pads to the bottom of the bronze vase and the stone bowl to prevent them from scratching the table.
- Position the tall vase with pampas grass in a back corner of the table to create a high visual point.
- Stack your three books from largest to smallest near the opposite corner to create a stable, flat surface.
- Place the stone bowl on the table and fill it with smooth river rocks until they are slightly mounded.
- Step back and ensure the items form a triangular shape, which is more pleasing to the eye than a straight line.
- Rotate the books or vase slightly until the arrangement looks natural and balanced from every seat in the room.
22 Layered Bamboo Blinds and Sheer Drapes
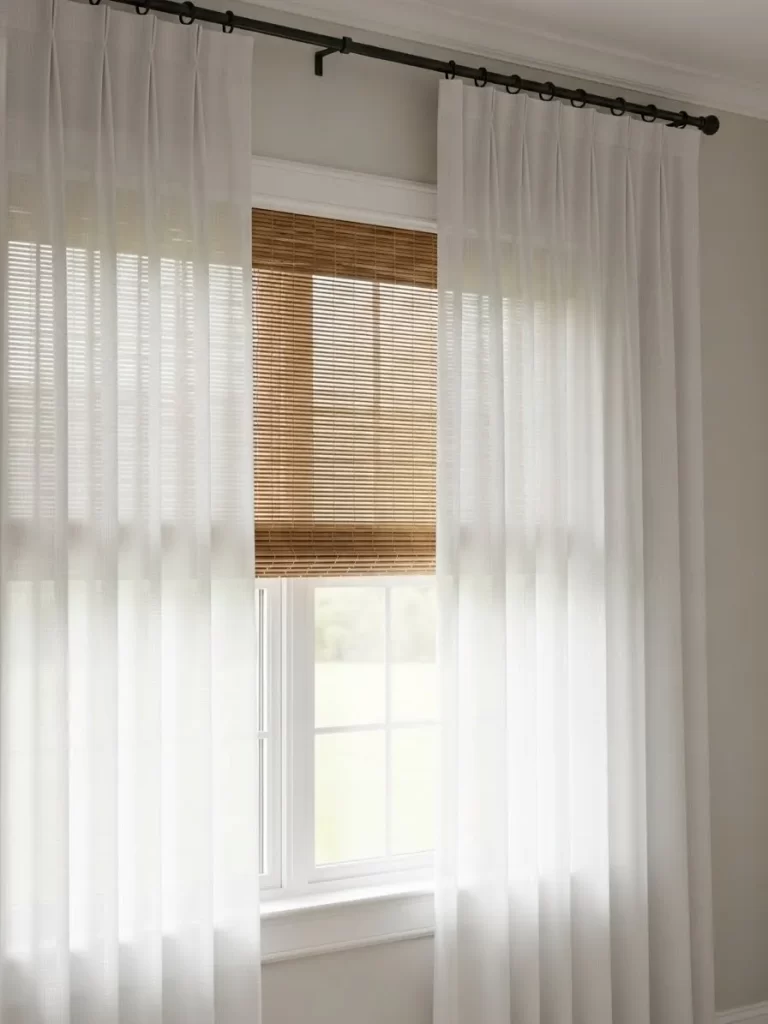
Standard plastic mini blinds are one of the fastest ways to make a beautiful room look cheap. This window features a warm bamboo roman shade layered under crisp, white pleated sheer curtains. This combination provides excellent light control and privacy while adding a rich, layered texture to the walls.
The natural wood tones of the bamboo break up the white surfaces and add a cozy, organic feel. Hanging the curtain rod several inches above the window frame makes the glass appear much taller and more grand. The sheer fabric softens the harsh edges of the window and allows a gentle, diffused glow to enter the room.
Mixing different window treatments is a secret trick used by professional designers to create a custom look. It adds a level of complexity and detail that a single blind or curtain simply cannot achieve. This setup works perfectly in bedrooms or living areas where you want a balance of warmth and brightness.
Material Required
- Cordless bamboo or woven wood roman shade
- High quality white sheer pleated curtain panels
- Black or bronze metal curtain rod and rings
- Heavy duty wall anchors and screws
Equipment Required
- Power drill
- Measuring tape
- Level
- Screwdriver
DIY Instructions
- Measure the inside width of your window frame and install the bamboo blind mounting brackets at the top corners.
- Snap the bamboo shade into the brackets and test the cordless lift mechanism to ensure it moves smoothly.
- Measure six inches above the window frame and four inches outside the frame on each side for your curtain rod brackets.
- Use a level to ensure your marks are even, then drill the holes and insert the wall anchors.
- Screw the metal brackets into the wall and slide your sheer panels onto the curtain rod.
- Place the rod onto the brackets and secure it with the small tension screws provided in the kit.
- Adjust the bamboo shade so it sits halfway down the window to showcase the layered look.
- Spread the sheer curtains to the edges of the rod so they frame the window without blocking the bamboo.
- Use a hand steamer on the sheer fabric to remove any fold lines for a polished, professional finish.
23 Tufted Leather Chesterfield Sofa Detail
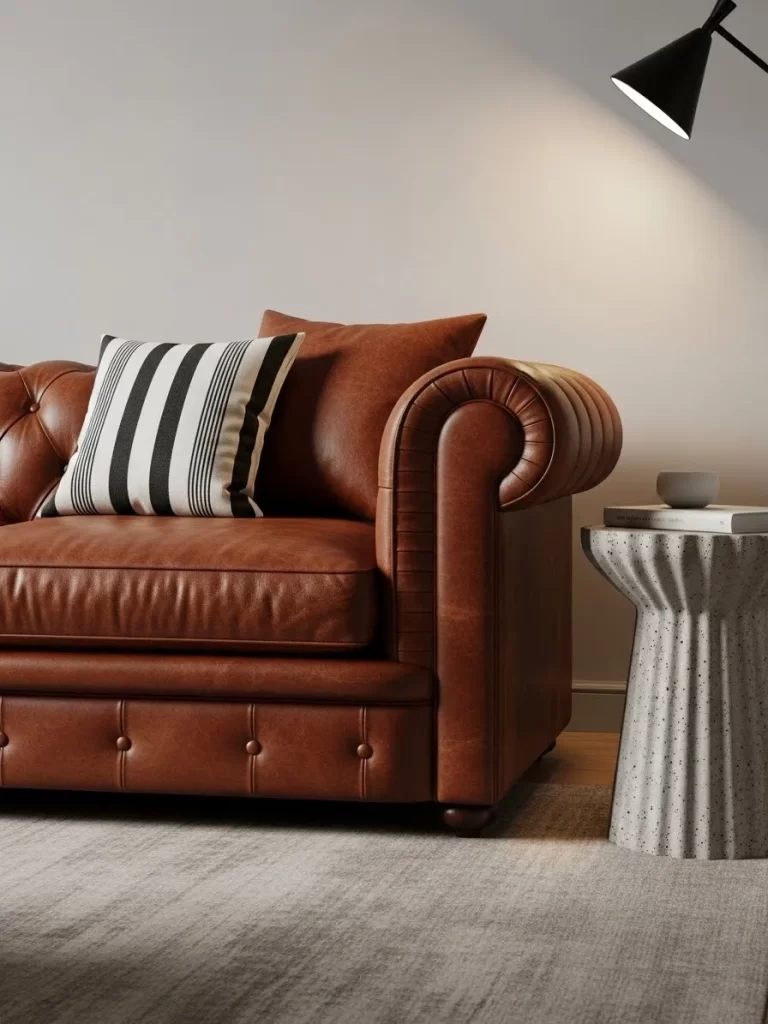
Choosing a low quality faux leather sofa often leads to peeling and a cheap appearance over time. This classic Chesterfield features deep button tufting and rich, cognac colored top grain leather that will only look better as it ages. The rolled arm and brass nailhead trim add a level of craftsmanship that makes a bold statement in any room.
Pairing the heavy, masculine leather with a simple black and white striped pillow adds a modern, graphic touch. The contrast between the warm brown leather and the cool gray rug prevents the room from feeling too dark or traditional. This balance of styles creates a transitional look that feels both timeless and trendy.
A fluted concrete side table placed next to the sofa adds another layer of modern texture. It provides a sturdy surface for books and a drink without competing with the sofa for attention. This combination of leather, stone, and fabric creates a high end environment that feels incredibly sturdy and well made.
Material Required
- Top grain leather Chesterfield sofa
- Black and white striped cotton pillow
- Fluted concrete or plaster side table
- Neutral wool area rug
Equipment Required
- Leather conditioner
- Soft lint free cloth
- Furniture sliders
DIY Instructions
- Position your leather sofa on the area rug, ensuring it is at least a few inches away from any direct heat sources.
- Wipe down the leather with a soft cloth to remove any dust from shipping or assembly.
- Apply a small amount of leather conditioner to a cloth and rub it into the hide to keep it supple and prevent cracking.
- Place the striped pillow in the corner of the sofa, leaning it against the rolled arm for a crisp contrast.
- Set the concrete side table about two inches away from the sofa arm to provide a functional surface.
- Add a single white hardcover book to the side table to create a clean, minimalist accent.
- Check that the nailhead trim on the sofa is clean and polished to catch the light.
- Adjust the lighting in the room to highlight the deep tufting and shadows of the leather.
- Fluff the seat cushions regularly to maintain the structured, high end silhouette of the Chesterfield.
24 Marble Kitchen Island with Natural Accents
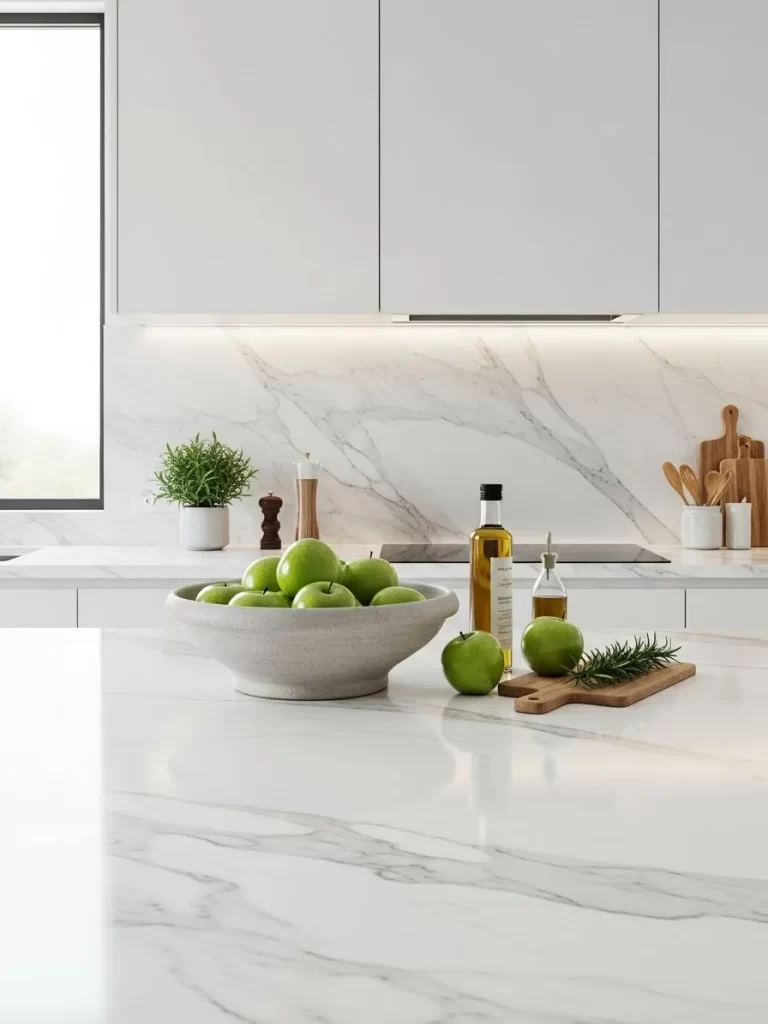
Cluttered countertops with mismatched appliances can make an expensive kitchen look cheap and messy. This island features a seamless white marble slab with soft gray veining that creates a bright, luxurious workspace. By keeping the surface mostly clear, the focus remains on the beautiful stone and the high quality cabinetry.
A large stone bowl filled with bright green apples provides a simple, inexpensive pop of color that feels fresh. Using wooden cutting boards of different sizes adds warmth and a practical, lived in feel to the cold marble. Small bottles of high quality olive oil and fresh rosemary in a white ceramic pot add to the culinary atmosphere.
The integrated under cabinet lighting casts a warm glow over the backsplash, eliminating dark shadows. This layer of light makes the kitchen feel larger and highlights the texture of the marble. This minimalist approach to styling ensures your kitchen looks like a professional chef’s space rather than a cluttered family room.
Material Required
- White marble or quartz countertop
- Large shallow stone or concrete fruit bowl
- Set of three wooden cutting boards (various shapes)
- Fresh green apples and a small potted rosemary plant
Equipment Required
- Marble safe stone cleaner
- Soft microfiber cloth
- Wood oil (for the cutting boards)
DIY Instructions
- Clean the marble surface thoroughly with a specialized stone cleaner to remove all streaks and crumbs.
- Apply a food safe wood oil to your cutting boards to darken the grain and protect them from moisture.
- Place the largest cutting board against the backsplash and lean the smaller ones in front of it at a slight angle.
- Position the stone bowl in the center of the island or near a corner to act as the main focal point.
- Fill the bowl with fresh green apples, piling them high so they are visible from across the room.
- Place the rosemary plant near the stove or sink to add a natural scent and a touch of green.
- Arrange your olive oil and vinegar bottles on a small tray to keep any drips off the marble surface.
- Ensure the under cabinet LED lights are turned on to highlight the veining in the stone backsplash.
- Clear away any small appliances or mail to maintain the clean, expansive look of the countertop.
25 Soft Wall Wash Lighting

Harsh, direct overhead lights can make even the most beautiful room feel cold and uninviting. This wall features a recessed ceiling light that washes the surface with a soft, warm glow. This technique highlights the subtle texture of the paint and creates a moody, sophisticated atmosphere that feels like a luxury hotel.
By directing light downward along the wall, you eliminate the dark corners that can make a room feel small. This type of lighting is perfect for highlighting artwork or simply creating a serene background for a living area. It provides enough light to see without the blinding intensity of a standard center room fixture.
Using a dimmer switch with these lights allows you to adjust the mood from bright and energetic to soft and relaxing. This flexibility is a key element of high end lighting design that makes your home feel more custom. It is a simple architectural detail that adds a massive amount of value to your interior design.
Material Required
- Recessed gimbal ceiling light fixture (adjustable)
- Warm white LED bulb (2700K to 3000K)
- Smart dimmer switch
- Fine grit sandpaper and matching wall paint
Equipment Required
- Drywall saw (if installing new)
- Power drill
- Screwdriver
- Voltage tester
DIY Instructions
- Turn off the power at the breaker and use a voltage tester to ensure the wires are safe to handle.
- Identify the spot in the ceiling about 12 to 18 inches away from the wall you want to illuminate.
- Cut a hole in the drywall using a template and a drywall saw, being careful to avoid any studs.
- Connect the light fixture wires to the house wiring using wire nuts and secure them with electrical tape.
- Push the recessed housing into the ceiling and snap the spring clips into place to hold it firm.
- Insert the warm LED bulb and adjust the gimbal head so it tilts toward the wall at a 30 degree angle.
- Replace your standard wall switch with a dimmer switch to give you full control over the light’s intensity.
- Patch any small scuffs around the ceiling hole with spackle, sand it smooth, and touch up with paint.
- Turn the power back on and adjust the light at night to find the perfect angle that hides any wall imperfections.
26 Seamless Light Oak Flooring

Installing cheap, shiny laminate flooring is a common mistake that instantly lowers the value of a home. This room features wide plank light oak floors with a matte finish that highlights the natural grain and knots. The soft, honey toned wood creates a warm and expansive foundation that makes the entire open plan space feel cohesive and bright.
The lack of transitions between the dining and living areas provides a high end, custom look. Choosing a light wood helps bounce natural light throughout the interior, making even smaller rooms feel airy. This flooring choice serves as a timeless canvas that works perfectly with both modern furniture and traditional architecture.
To keep the floor looking expensive, avoid using high gloss sealants that can look like plastic. A matte or satin finish feels more organic underfoot and hides small scratches or dust much better. This simple material choice ensures your home looks like a professionally designed sanctuary rather than a temporary rental.
Material Required
- Engineered or solid white oak wide planks
- High quality underlayment or moisture barrier
- Low VOC matte polyurethane finish
- Color matched wood filler
Equipment Required
- Flooring nailer or mallet
- Miter saw for precise end cuts
- Spacers
- Floor roller
DIY Instructions
- Remove all old flooring and baseboards to ensure you have a perfectly flat and clean subfloor.
- Lay down a high quality underlayment across the entire surface to provide sound insulation and a moisture barrier.
- Place spacers against the walls to allow for natural wood expansion as the seasons change.
- Start laying your first row of oak planks with the tongue side facing the wall for stability.
- Use a flooring nailer to secure the planks to the subfloor, ensuring each piece is tapped tightly against the next.
- Stagger the end joints of the planks by at least six inches to create a natural and strong pattern.
- Cut the final planks in each row using a miter saw to fit the specific dimensions of your walls.
- Fill any small nail holes or gaps with a color matched wood filler to create a seamless surface.
- Install your baseboards over the expansion gaps and sweep the floor to remove all debris before moving in furniture.
27 Integrated Media Wall Art Mode
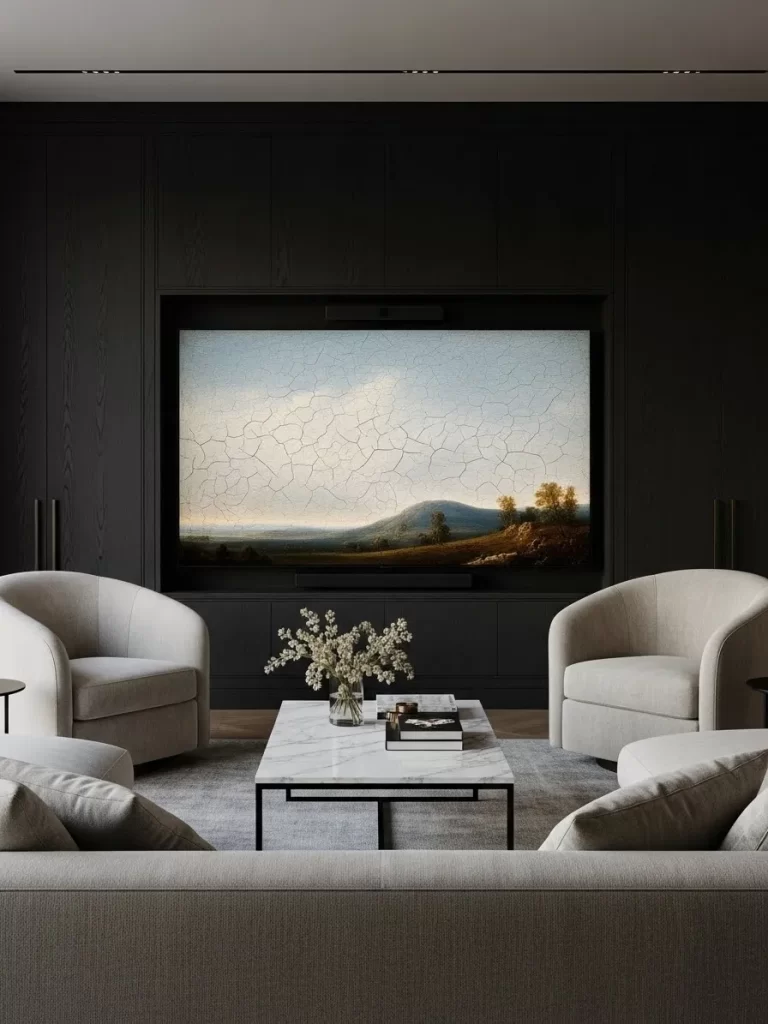
A giant black television screen often acts as a visual void that ruins the aesthetic of a sophisticated living room. This design features a television mounted flush into a dark charcoal accent wall, displaying a classical landscape painting. This clever trick transforms an appliance into a piece of fine art that complements the room when the power is off.
The dark cabinetry surrounding the screen allows the frame to disappear, creating a clean and intentional focal point. Pairing the screen with light colored lounge chairs and a marble table provides a beautiful contrast that feels balanced. This setup ensures your technology serves your design goals rather than distracting from them.
Using a cracked or textured art filter on the digital display adds a layer of realism that mimics an old canvas. It eliminates the cheap look of a glowing glass box and replaces it with the warmth of a curated gallery. This is one of the most effective ways to upgrade a modern home into a luxury living space.
Material Required
- Slim mount smart television with Art Mode
- Custom thin picture frame for TV edges
- Recessed wall mounting bracket
- High definition digital art files
Equipment Required
- Power drill
- Stud finder
- Level
- Wire snake (to hide cables behind the wall)
DIY Instructions
- Choose a wall location where the television can be centered with your seating arrangement or fireplace.
- Use a stud finder to locate the vertical supports and mark the height for your recessed mounting bracket.
- Install the bracket into the studs, ensuring it is perfectly level so the art does not look crooked.
- Drill a small hole behind the bracket and a second hole near the floor to run your power and HDMI cables through the wall.
- Connect the wires to the TV and lift the screen onto the bracket, pressing it firmly until it sits flush with the wall.
- Snap the custom magnetic picture frame onto the edges of the TV to hide the plastic bezel.
- Upload your favorite high resolution landscape paintings to the TV’s internal storage or app.
- Adjust the brightness and color temperature settings so the image looks like a real painting rather than a screen.
- Set the TV to turn on the art mode whenever motion is detected in the room to keep the gallery look consistent.
28 Sculptural Mid Century Wooden Dresser

Mismatched or cheap particle board dressers can make a bedroom feel temporary and unpolished. This walnut dresser features hand carved horizontal pulls that add a unique, sculptural quality to the functional piece. The rich wood grain and dovetail joints signify a level of craftsmanship that makes the furniture feel like a long term investment.
The surface is kept minimalist with a crystal whiskey decanter and a classic bust sculpture. These high end accessories add a touch of old world charm to the mid century modern silhouette. This mix of materials creates a masculine and refined atmosphere that feels deeply personal and curated.
To maintain the expensive look, avoid overcrowding the top with daily clutter like keys or loose change. Use a small tray for essentials and let the sculptural elements of the dresser be the primary focus. This approach ensures your bedroom remains a calm and stylish retreat.
Material Required
- Solid walnut or teak mid century dresser
- Plaster or marble bust sculpture
- Crystal glass decanter
- Microfiber dusting cloth
Equipment Required
- Furniture wax or lemon oil
- Soft cloth for application
- Level
DIY Instructions
- Place the dresser against a neutral or dark painted wall to make the wood tones pop.
- Use a level to check the top surface and adjust the feet of the dresser if your floor is uneven.
- Apply a small amount of furniture wax to a soft cloth and rub it into the wood to enhance the natural shine.
- Buff the wood in the direction of the grain until the surface feels smooth and looks vibrant.
- Position the bust sculpture on one end of the dresser to create a tall, artistic focal point.
- Place the crystal decanter and a single glass on the opposite side to balance the visual weight.
- Leave the center of the dresser empty to showcase the beautiful wood grain and clean lines.
- Hide any power cords from nearby lamps behind the back of the dresser using adhesive cable clips.
- Organize the drawers using felt dividers to keep your clothes tidy and the exterior looking streamlined.
29 Atmospheric Scent and Texture Tray
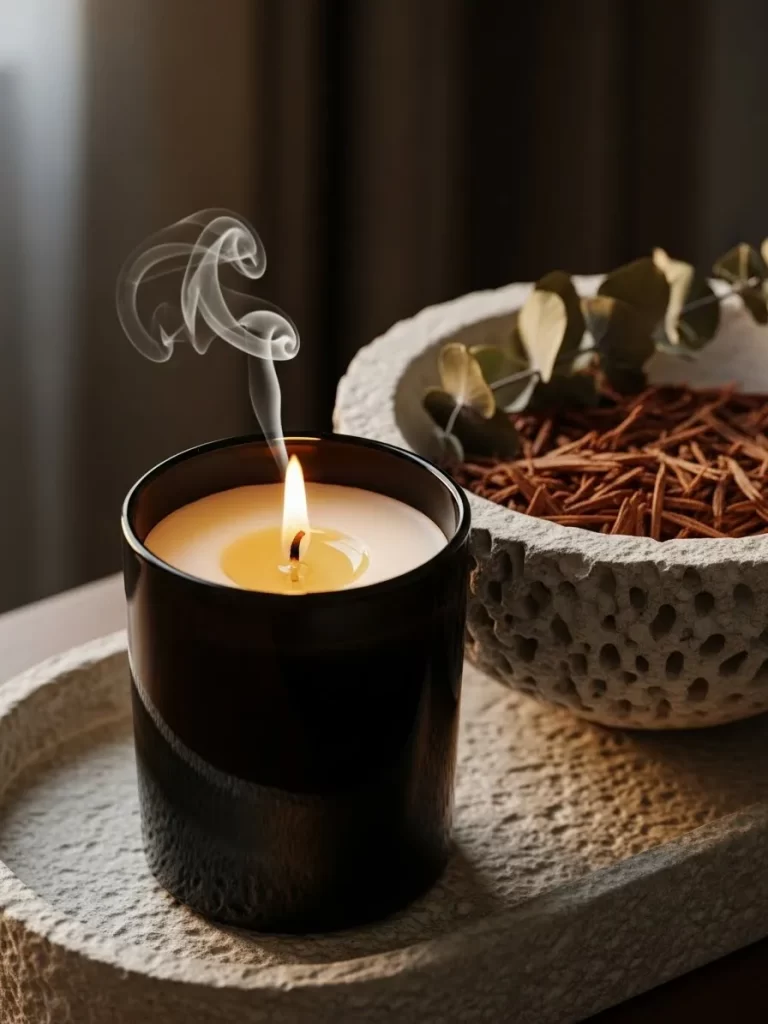
Ignoring the sensory experience of a room is a mistake that can leave a space feeling cold and plastic. This scene features a matte black candle jar sitting on a rough, hand carved stone tray alongside a textured ceramic bowl. The rising smoke and the flickering flame add a dynamic element that makes the room feel cozy and expensive.
The contrast between the smooth candle and the porous, crater like texture of the bowl creates a striking visual interest. Filling the bowl with dried cedar or sandalwood shavings provides a natural scent even when the candle is not lit. This layering of textures and aromas shows a high level of attention to detail in your decorating.
Using a tray to group these items prevents them from looking like random clutter on a table. It creates a moment of design that pulls the eye and invites relaxation. This small addition is an easy and affordable way to make your living area feel like a high end spa.
Material Required
- Hand carved stone or travertine tray
- Matte black scented soy candle
- Textured ceramic or lava rock bowl
- Dried botanical shavings or potpourri
Equipment Required
- Long reach lighter or matches
- Soft brush (for cleaning stone textures)
- Wick trimmer
DIY Instructions
- Clean your stone tray with a soft brush to remove any loose particles or dust from the carving.
- Place the tray in the center of your coffee table or on a side table near your favorite chair.
- Set the matte black candle on one side of the tray, ensuring the wick is trimmed to a quarter inch.
- Position the textured bowl next to the candle and fill it with dried wood shavings or aromatic herbs.
- Light the candle and let it burn until the wax melts across the entire top to prevent tunneling.
- Blow out the candle and use a lid or snuffer to keep the smoke from filling the room.
- Rearrange the items occasionally to keep the display looking fresh and intentional.
- Dust the tray and bowl weekly with a soft brush to maintain the crisp, high end look of the materials.
- Replace the botanicals every few months to ensure the scent remains vibrant and inviting.
30 Modern Reading Nook with Olive Tree
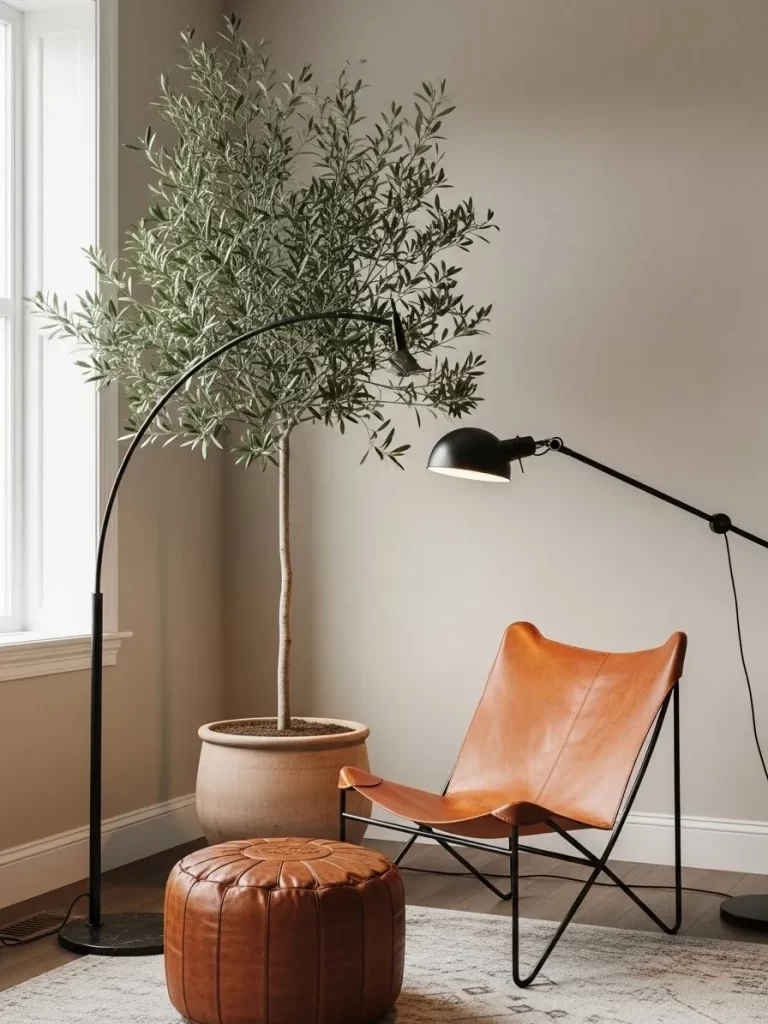
Leaving a corner empty or filling it with a cheap plastic chair can make a room feel unfinished. This nook features a tall, slender olive tree in a large terracotta pot, providing a soft vertical element. The cognac leather butterfly chair and matching Moroccan pouf create a stylish and comfortable spot for relaxation.
The black arched floor lamp reaches over the chair, providing perfect task lighting without the need for a bulky table. This combination of natural greenery, rich leather, and matte black metal creates a sophisticated, modern aesthetic. It turns a forgotten corner into a functional and beautiful destination within your home.
Choosing a large scale plant like an olive tree adds a Mediterranean flair that feels very upscale. The muted green leaves work well with the neutral wall color and the warm tones of the leather. This design proves that a few well chosen pieces can create a more impactful space than a room full of small decorations.
Material Required
- Potted olive tree (live or high quality silk)
- Large terracotta or clay planter
- Cognac leather butterfly chair
- Leather Moroccan pouf
- Arched black floor lamp
Equipment Required
- Furniture pads (for the chair legs)
- Measuring tape
- Light bulb (warm white LED)
DIY Instructions
- Place the large planter in the corner of the room, ensuring it has a saucer underneath if the tree is live.
- Position the olive tree in the pot and fluff the branches so they fill the vertical space evenly.
- Set the butterfly chair at a slight angle toward the center of the room to create an inviting look.
- Apply small felt pads to the bottom of the metal chair frame to protect your flooring from scratches.
- Place the Moroccan pouf in front of the chair to act as a footrest or an extra seat for guests.
- Assemble the arched floor lamp and place the base behind or beside the chair.
- Adjust the arm of the lamp so the light hangs directly over the center of the seating area.
- Tuck any visible power cords along the baseboard to keep the nook looking clean and professional.
- Add a small neutral rug under the entire arrangement to define the space as a separate zone in the room.
31 Trio of Tapered Glass Vases

Relying on small, plastic accessories often makes a mantel or shelf look cheap and cluttered. This image features three hand-blown glass vases in varying heights and muted jewel tones. The amber and teal colors catch the light beautifully, adding a sophisticated glow to the room without overwhelming the palette.
Pairing these translucent pieces with a bold, textured abstract painting creates a balanced visual story. The heights of the vases are staggered to draw the eye upward, making the ceiling feel higher. This simple arrangement proves that investing in a few quality glass pieces is better than a dozen trinkets.
Using a minimalist stone ledge as a base allows the colors of the glass to pop against the neutral wall. It creates a serene and curated environment that feels like a boutique art gallery. This approach to styling ensures your home looks polished and intentionally designed.
Material Required
- Three tapered glass vases (various heights)
- High-quality abstract canvas art
- Distilled water (if using for fresh stems)
Equipment Required
- Microfiber cloth
- Level (for mounting art)
- Measuring tape
DIY Instructions
- Clean the surface of your mantel or shelf thoroughly to remove any dust or debris.
- Center your large abstract painting on the wall, leaving about four inches of space above the ledge.
- Place the tallest glass vase on the right side of the art to create a strong vertical anchor.
- Position the medium and small vases next to the tallest one, overlapping them slightly for depth.
- Check the balance from across the room to ensure the colors do not clash with the painting.
- Polish each vase with a microfiber cloth to remove fingerprints and ensure maximum shine.
- Add a single dried branch or fresh flower to the tallest vase if you want an organic touch.
- Ensure the vases are far enough apart to breathe but close enough to feel like a cohesive group.
- Use clear museum gel on the bottom of the vases if you live in an area prone to vibrations.
32 Curated Woven Pantry Organization
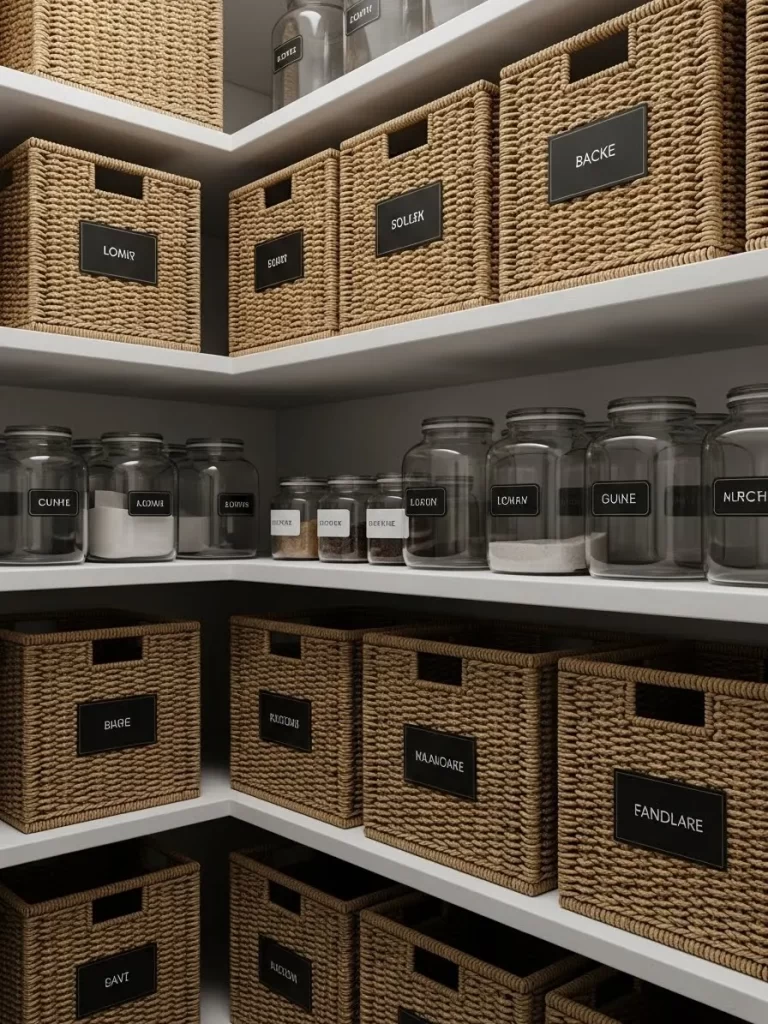
Mismatched plastic containers and cardboard boxes make a pantry feel chaotic and inexpensive. This image shows a custom storage solution using uniform woven baskets and glass jars with black labels. The consistent use of materials creates a sense of order that feels like a luxury kitchen feature.
The natural texture of the rope baskets adds warmth to the clean white shelving. By labeling every container, you create a functional system that is as beautiful as it is practical. This organized look suggests a high level of care and attention to the details of the home.
Grouping similar items together helps maintain the visual flow of the shelves. Using glass for dry goods like flour and sugar allows you to see the contents while keeping them fresh. This simple organizational upgrade transforms a utility space into a stunning design element.
Material Required
- Set of uniform woven rope baskets
- Large glass apothecary jars
- Custom black adhesive labels
- Chalk marker or white paint pen
Equipment Required
- Measuring tape
- Cleaning wipes
- Step stool
DIY Instructions
- Empty your entire pantry and wipe down every shelf to create a fresh, clean workspace.
- Measure the height and depth of your shelves to ensure your new baskets will fit comfortably.
- Categorize your food items into groups like baking, snacks, and grains to determine how many baskets you need.
- Write your categories on the black labels using a white paint pen for a crisp, high-contrast look.
- Apply the labels to the center of each basket and glass jar, ensuring they are all at the same height.
- Transfer dry goods from their original cardboard packaging into the glass jars to eliminate visual clutter.
- Place the heaviest items in baskets on the lower shelves for easy access and safety.
- Arrange the baskets and jars in neat rows, leaving small gaps between them for a balanced look.
- Rotate the labels forward so the text is easy to read at a glance when you open the pantry.
33 Dramatic Portrait and Terracotta Seating
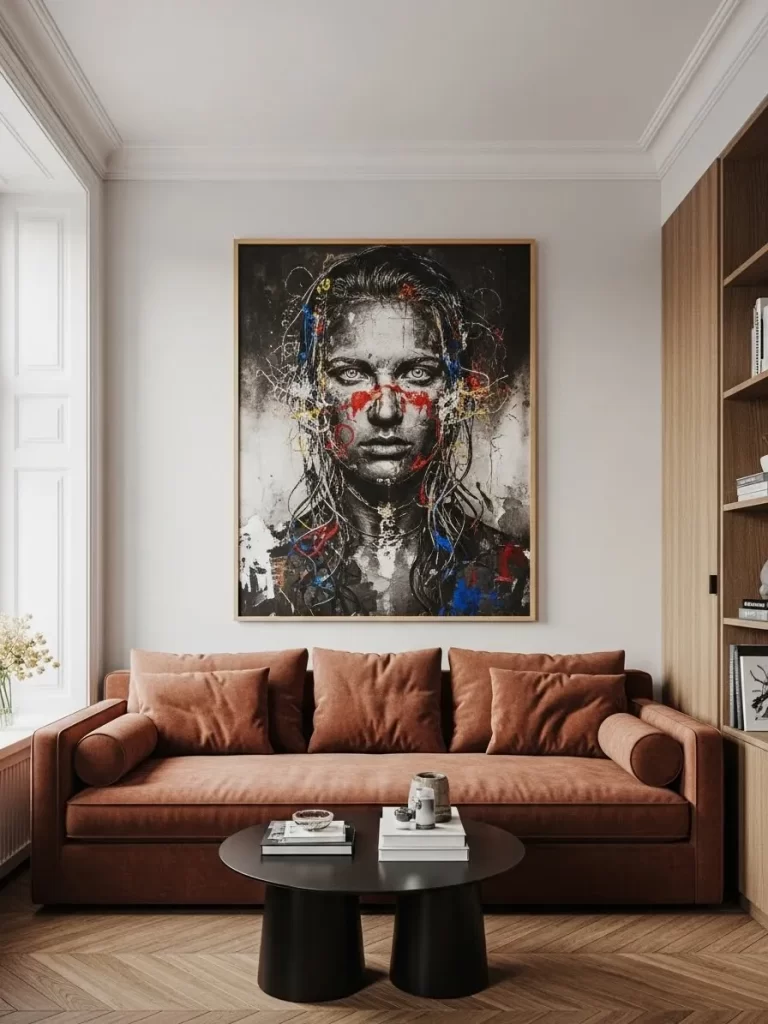
Small, uninspired wall art can make a large living room feel empty and cheap. This image showcases a massive, high-contrast portrait that commands the entire wall above the sofa. The bold splashes of red and yellow in the art tie perfectly into the warm terracotta tones of the velvet seating.
The symmetry of the three back cushions creates a structured and tailored look that feels expensive. Using a low-profile black coffee table keeps the focus on the vibrant furniture and the striking artwork. This combination of bold colors and large-scale elements creates a sophisticated and moody atmosphere.
Incorporating natural wood grain on the side cabinets adds a layer of organic warmth to the modern space. The herringbone flooring provides a subtle pattern that enhances the overall luxury of the room. This design demonstrates how a few powerful pieces can define the character of an entire home.
Material Required
- Oversized framed portrait or canvas
- Terracotta velvet three-seater sofa
- Low-profile black circular coffee table
- Set of neutral-colored art books
Equipment Required
- Heavy-duty wall anchors
- Power drill
- Level
- Furniture sliders
DIY Instructions
- Measure your main wall to find the exact center point for your oversized artwork.
- Mark the hanging height so the center of the portrait is at eye level (roughly 57 inches from the floor).
- Install heavy-duty wall anchors to ensure the large frame stays securely in place.
- Position the terracotta sofa directly underneath the art, leaving a few inches of space from the wall.
- Place the black coffee table in front of the sofa, centered with the middle cushion.
- Stack two or three art books on the table to create a simple and polished display.
- Add a small decorative bowl on top of the books for a touch of texture.
- Adjust the lighting in the room to highlight the face in the portrait and the velvet of the sofa.
- Ensure the walkway around the coffee table is clear to maintain a feeling of spaciousness.
34 Minimalist Black Marble Hearth
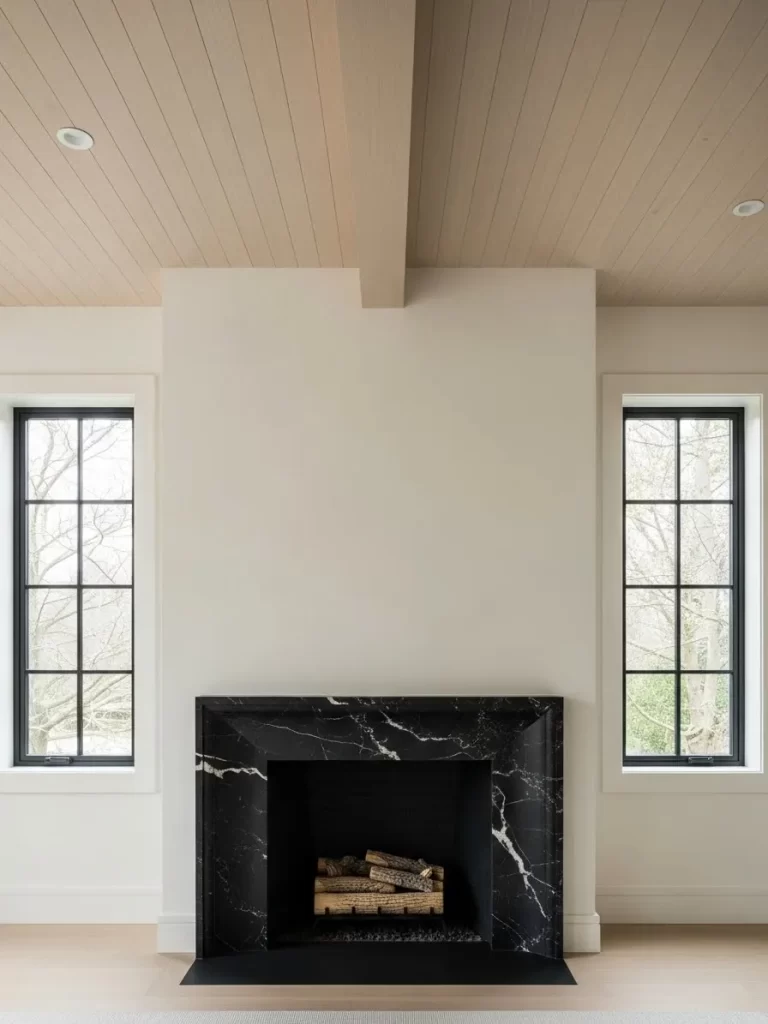
A cluttered or dated fireplace surround can bring down the entire aesthetic of a living room. This image features a sleek, floor-to-ceiling fireplace clad in black marble with white veining. The contrast against the cream-colored walls creates a stunning architectural focal point that feels incredibly high-end.
The natural wood ceiling with exposed beams adds a rustic touch that balances the coldness of the marble. Large windows on either side allow natural light to flood the space, highlighting the beautiful patterns in the stone. This clean and minimalist approach ensures the fireplace remains the star of the room.
Keeping the mantel free of decor allows the focus to stay on the craftsmanship of the stone. The logs placed inside the hearth add an organic and cozy element to the sharp, modern lines. This design proves that simplicity and high-quality materials are the keys to a luxurious home.
Material Required
- Large marble or quartz slabs (Black with white veining)
- High-heat mortar or adhesive
- Stone sealer
- Natural wood logs for display
Equipment Required
- Tile saw with a diamond blade
- Notched trowel
- Level
- Suction cup lifters (for large slabs)
DIY Instructions
- Clear the existing fireplace surround and ensure the wall is flat, clean, and structurally sound.
- Measure the dimensions of the fireplace and plan your marble layout to minimize visible seams.
- Apply a layer of high-heat mortar to the wall using a notched trowel for a strong bond.
- Carefully lift the marble slabs into place, using suction cup lifters to help with the weight.
- Use a level at every step to ensure the slabs are perfectly vertical and horizontal.
- Wipe away any excess mortar from the seams before it dries to keep the finish clean.
- Allow the mortar to cure for at least 24 hours before applying a high-quality stone sealer.
- Polish the marble with a soft cloth to bring out the natural shine and depth of the stone.
- Stack a few natural wood logs inside the hearth to add a warm and inviting touch to the design.
35 Mood Drenched Floral Powder Room
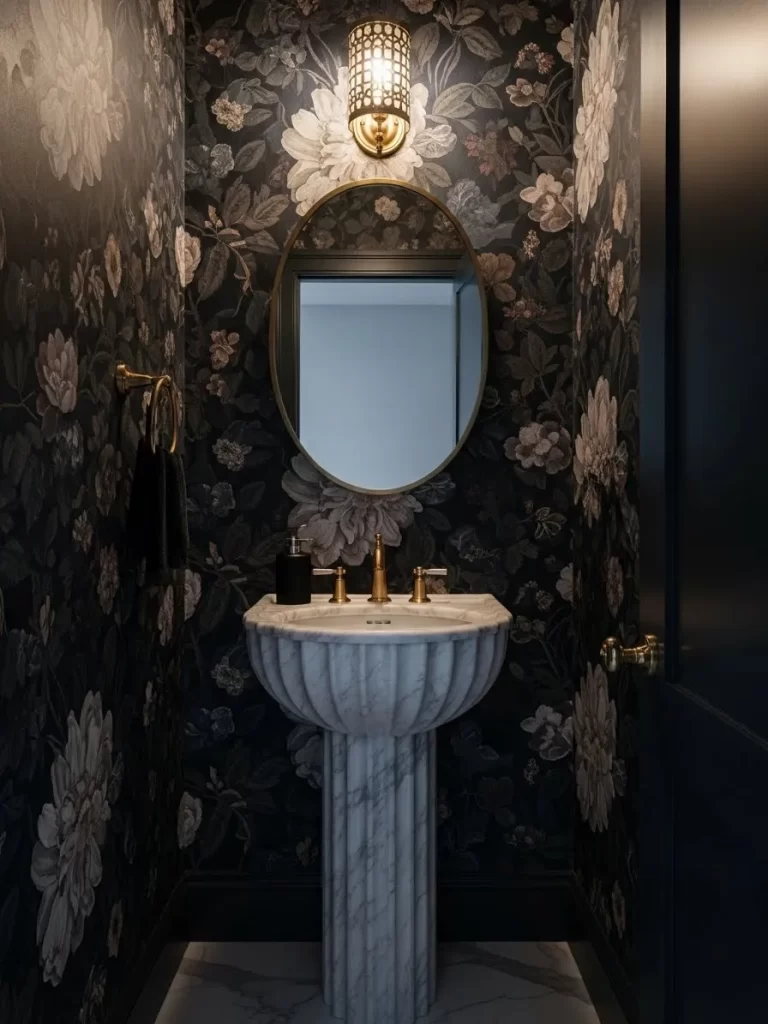
Plain white walls in a small bathroom can feel clinical and cheap. This powder room features a dramatic, dark floral wallpaper that wraps the space in a luxurious and moody embrace. The intricate patterns of large roses create a sense of depth and mystery that transforms a tiny room into a destination.
The white marble pedestal sink and gold fixtures add a bright, high-end contrast to the dark walls. An oval gold-framed mirror reflects the soft light from the ornate wall sconce, making the space feel larger. This bold use of pattern and metallic accents creates a sophisticated and curated look.
Dark colors in small spaces actually help the corners disappear, making the room feel more expansive. Using a single, powerful light source creates beautiful shadows that enhance the texture of the wallpaper. This design is a perfect example of how to use bold choices to create a memorable and expensive-looking interior.
Material Required
- Dark floral peel-and-stick or traditional wallpaper
- White marble pedestal sink
- Gold-finished faucet and towel ring
- Oval gold-framed mirror
Equipment Required
- Wallpaper smoothing tool
- Utility knife
- Power drill
- Plumbing wrench
DIY Instructions
- Remove all existing fixtures, including the sink and mirror, to create a blank canvas.
- Clean the walls thoroughly and repair any holes or bumps for a smooth wallpaper application.
- Apply the dark floral wallpaper starting from one corner, ensuring the pattern aligns perfectly between strips.
- Use a smoothing tool to remove air bubbles and a sharp utility knife to trim the edges at the ceiling and floor.
- Install the white marble pedestal sink and connect the gold-finished faucet following the manufacturer’s steps.
- Mount the gold-framed mirror at eye level, centered above the sink for a balanced look.
- Secure the gold towel ring to the wall within easy reach of the sink.
- Add a warm-toned LED bulb to your wall sconce to enhance the moody atmosphere of the room.
- Place a small, high-quality hand towel on the ring to complete the luxury hotel feel.
36 Elegant Spa Like Shower Curtain
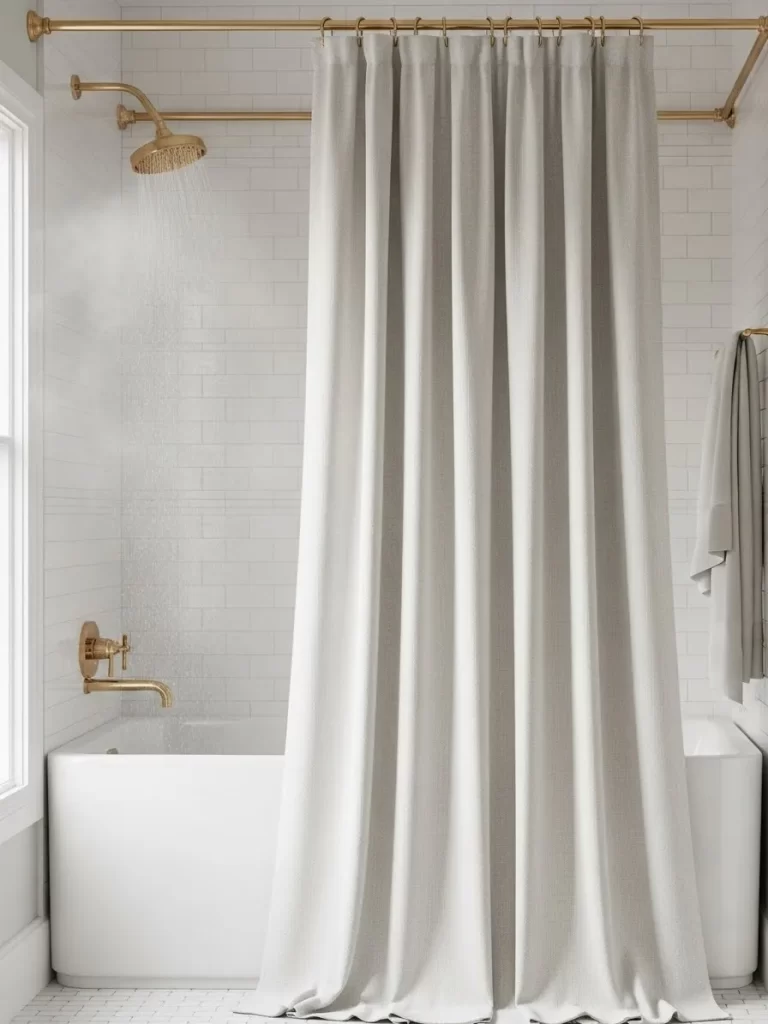
Flimsy, patterned plastic shower curtains are a common mistake that makes a bathroom look cheap. This image shows a heavy, textured fabric curtain in a soft cream tone that reaches from the ceiling to the floor. The extra length and thick material create a spa-like atmosphere that feels luxurious and tailored.
The gold-finished curtain rod and shower head add a touch of metallic warmth to the clean white subway tiles. This combination of soft fabric and shiny hardware creates a sophisticated balance that feels expensive. The vertical pleats of the curtain add height to the room and a sense of order.
Using a ceiling-mounted rod makes the shower area feel like a private cabana. The neutral color palette keeps the space feeling bright, airy, and clean. This simple upgrade is one of the most effective ways to give a standard bathroom a high-end, designer makeover.
Material Required
- Extra-long textured fabric shower curtain (Cream or white)
- Weighted fabric liner
- Gold-finished curtain rod and rings
- Gold-finished rainfall shower head
Equipment Required
- Power drill
- Level
- Screwdriver
- Step ladder
DIY Instructions
- Measure the distance from your ceiling to the floor to determine the correct curtain length.
- Mark the ceiling where the gold curtain rod brackets will be installed, ensuring they are level.
- Drill pilot holes and secure the brackets using heavy-duty anchors for extra support.
- Slide the gold rings onto the rod and lift the rod into the brackets.
- Attach the heavy fabric curtain and the weighted liner to the rings, alternating them for a clean look.
- Replace your old shower head with the new gold-finished rainfall model for a luxury upgrade.
- Check that the curtain touches the floor slightly to create a high-end puddle effect.
- Use a hand steamer on the fabric to remove any wrinkles and ensure the pleats hang straight.
- Arrange the curtain to one side when not in use to showcase the clean white tiling behind it.
37 Earthy Textures and Muted Tones
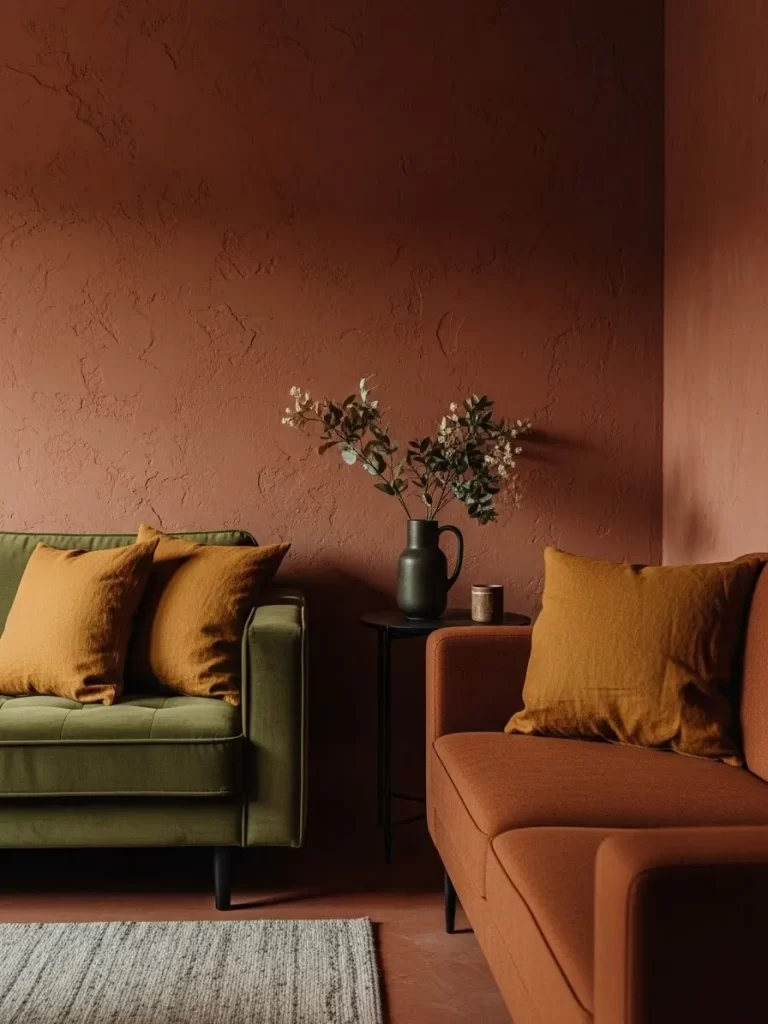
Mismatched furniture styles can often make a living room look cluttered and cheap. This image features a harmonious blend of an olive green velvet sofa and an earthy terracotta-toned armchair. The textured, clay-colored walls provide a warm and organic backdrop that ties the different furniture pieces together.
A small black side table holds a dark vase with delicate white flowers, adding a touch of life to the corner. The neutral-toned rug with a subtle pattern provides a soft foundation that anchors the seating area. This use of muted, nature-inspired colors creates a serene and sophisticated environment.
The play of light and shadow on the textured walls adds a layer of visual interest without the need for busy decor. Keeping the accessories minimal allows the rich colors of the velvet to be the main focus. This approach to design shows how a thoughtful color palette can create a high-end, cohesive look.
Material Required
- Olive green velvet sofa
- Terracotta-toned fabric armchair
- Small black circular side table
- Dark ceramic pitcher vase with fresh flowers
Equipment Required
- Microfiber cloth (for velvet maintenance)
- Measuring tape
- Furniture pads
DIY Instructions
- Paint your walls with a textured clay or terracotta-toned paint to create an earthy foundation.
- Position the olive green sofa against the main wall, leaving a small gap for airflow.
- Place the terracotta armchair at a slight angle to the sofa to create a cozy conversation area.
- Set the black side table between the two seating pieces for easy access to drinks or books.
- Add a dark ceramic vase with a few stems of fresh white flowers to the side table.
- Lay down a neutral-toned area rug, ensuring it sits under the front legs of both the sofa and the chair.
- Adjust the lighting to create soft shadows that highlight the texture of the walls.
- Use a soft brush or microfiber cloth to keep the velvet sofa looking plush and clean.
- Ensure the room remains free of unnecessary clutter to maintain the calm and sophisticated aesthetic.
Elevating your home does not require a total renovation. It often comes down to the small choices you make every day. By focusing on scale, texture, and lighting, you can transform a basic room into a high end retreat.
Keep your spaces uncluttered and purposeful. Choose quality over quantity whenever you can. Remember that a home should feel like a reflection of your personality while maintaining a sense of order and balance.
Your home is a work in progress. Do not feel pressured to fix everything at once. Pick one area and apply these rules to see an immediate difference in how your space feels.
Key Takeaways
1 Always prioritize the correct scale for rugs and artwork to avoid a disjointed look.
2 Layer your lighting with different sources rather than relying on harsh overhead fixtures.
3 Mix diverse textures like velvet stone and wood to add depth and interest.
4 Replace generic builder grade hardware with unique high quality pieces for an instant upgrade.
5 Use large scale greenery to fill vertical space and bring life into your corners.