
A new year often brings a strong desire for a clean slate. You might look around your living space and feel overwhelmed by the growing piles of stuff. Every corner seems full yet you still cannot find a place for your daily essentials.

Clutter does not just take up physical room. It weighs on your mind and makes relaxing at home difficult. Reclaiming your square footage is about more than just cleaning. It is about working smarter with the walls and doors you already have.
This guide offers forty two smart ways to boost your storage capacity. We focus on simple projects that any homeowner or renter can handle. You can transform your home into a structured sanctuary without spending a fortune.
1 Multifunctional Nesting Storage Ottomans
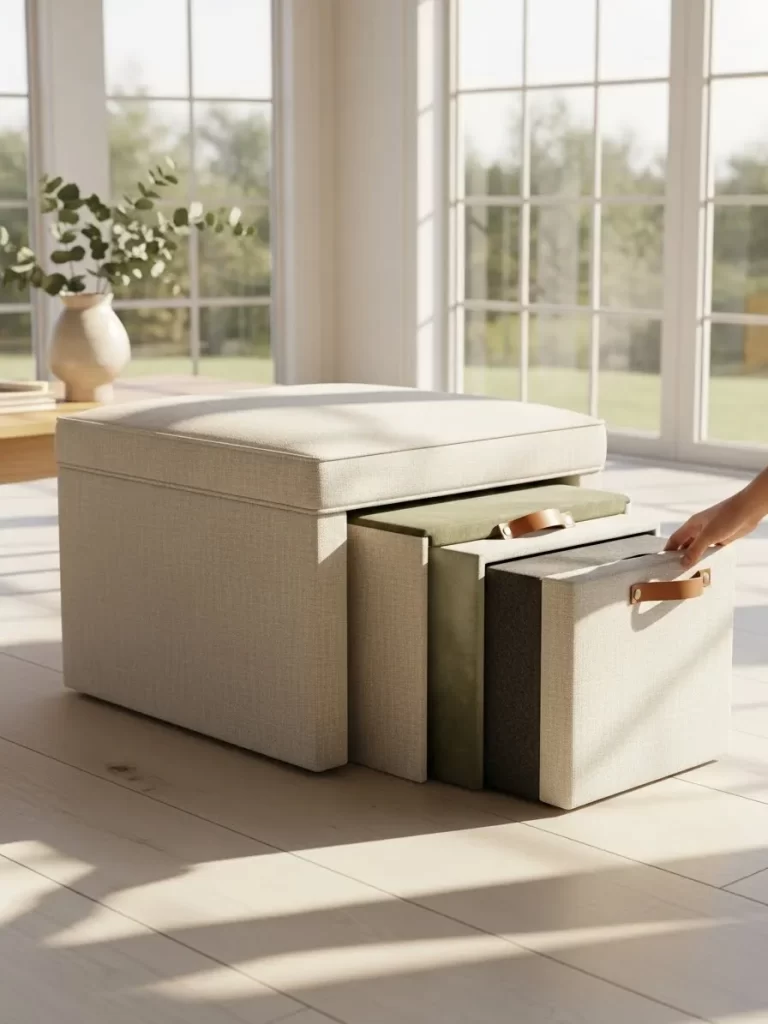
Cluttered living rooms often feel small and chaotic. This smart nesting ottoman set solves that problem by hiding extra seating and storage right in plain sight. Each smaller cube tucks neatly inside the larger frame to save floor space when you are alone.
Leather handles make it easy to slide each piece out for guests or a footrest. The neutral fabric blends into any decor style while keeping blankets or toys tucked away. It is a brilliant way to reclaim your square footage for the new year.
Using vertical and internal space transforms a single furniture item into a triple threat. You get a coffee table, a footstool, and hidden bins all at once. This setup keeps your home organized without sacrificing comfort or aesthetics.
Materials Required
- Three wooden storage crates in graduated sizes
- High density upholstery foam
- Neutral linen or canvas fabric
- Faux leather strips for handles
- Upholstery glue or heavy duty spray adhesive
- Brass upholstery tacks or screws
Equipment Required
- Staple gun with heavy duty staples
- Fabric scissors
- Measuring tape
- Power drill or screwdriver
DIY Instructions
- Measure the top lids of your three wooden crates to ensure they fit inside each other with enough clearance for fabric.
- Cut the upholstery foam to match the exact dimensions of each crate lid for a comfortable seat.
- Apply adhesive to the top of the wooden lid and press the foam firmly onto the surface.
- Lay your fabric flat on the floor and place the foam side of the lid face down onto it.
- Pull the fabric tight over the edges and secure it to the underside of the wood using the staple gun.
- Trim any excess fabric from the corners to ensure the lid still fits snugly on the crate base.
- Cut your faux leather strips into six inch lengths to create the pull handles.
- Fold the leather strips into loops and screw them into the front center of each crate.
- Paint or wrap the sides of the crates in matching fabric to create a uniform look.
- Slide the smaller crates into the largest one to complete your nesting set.
2 Live Edge Wall Mounted Folding Desk
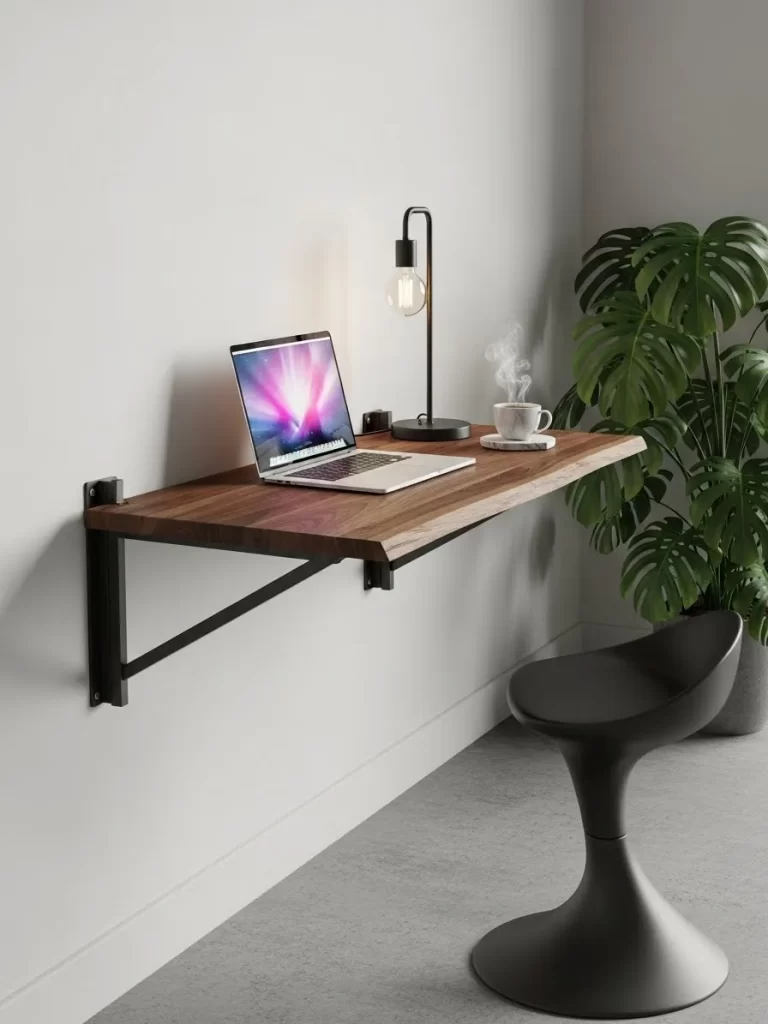
Small apartments often struggle to fit a dedicated workspace without feeling cramped. This folding desk offers a sturdy wooden surface that disappears when your workday ends. It uses heavy-duty brackets to stay secure while holding your laptop and morning coffee.
Natural wood grain adds warmth to any room, making the office area feel like a piece of art. You can mount it at any height to create either a sitting or standing station. This flexibility ensures your home remains a place of relaxation once the chores are finished.
Keeping the floor clear is a secret trick for making rooms look larger. Since this desk has no legs, you can slide a chair underneath or leave the area open for better foot traffic. It is a smart way to stay productive without sacrificing your living area.
Materials Required
- One live edge wood slab (36 inches wide)
- Two heavy-duty folding shelf brackets
- High-quality wood stain or clear sealant
- Large wall anchors and 2-inch wood screws
- Sandpaper (various grits from 80 to 220)
Equipment Required
- Power drill with drill bits
- Level tool
- Hand sander
- Paintbrush or rag for staining
- Stud finder
DIY Instructions
- Sand the wood slab starting with coarse grit and finishing with fine grit until the surface is smooth to the touch.
- Wipe away all dust and apply your chosen sealant or stain, then let it dry completely for 24 hours.
- Use a stud finder to locate the vertical supports inside your wall for the strongest mount.
- Mark the desired height of your desk on the wall, ensuring the marks are level with one another.
- Align the folding brackets with the wall marks and drill pilot holes into the wall studs.
- Screw the brackets into the wall securely using the heavy-duty screws and anchors if needed.
- Place the wood slab on top of the extended brackets and center it carefully.
- Drill small pilot holes through the bracket holes into the bottom of the wood slab, being careful not to go through the top.
- Drive screws through the brackets into the wood to lock the tabletop in place.
- Test the folding mechanism to ensure the desk locks and releases smoothly.
3 Vertical Over the Door Pantry Rack

Kitchen cabinets fill up quickly, leaving little room for spices and snacks. An over-the-door rack utilizes the forgotten space behind your pantry or cellar door. Six tiered wire baskets provide a clear view of your entire inventory at a single glance.
Clear acrylic bins and glass jars fit neatly into these rows to keep everything organized. You can store tall pasta containers or small spice bottles without them tipping over. This system prevents you from buying duplicates because you can see exactly what you have.
Installation is incredibly simple and requires no permanent changes to your cabinetry. It is a fantastic option for renters who need more storage but cannot drill into the walls. You will love how much counter space this simple addition frees up.
Materials Required
- Adjustable metal over-the-door frame
- Six wire or mesh storage baskets
- Clear airtight food containers
- Label stickers and a marker
- Small felt pads to prevent door scratching
Equipment Required
- No power tools needed
- Small wrench (usually included with the kit)
- Step stool
DIY Instructions
- Open the packaging and lay out all the metal frame segments on a flat surface.
- Connect the vertical rails together according to the height of your specific door.
- Hook the top brackets over the top edge of the door and let the rails hang down.
- Stick small felt pads on the back of the metal rails where they touch the door to prevent paint damage.
- Snap the wire baskets into the pre-drilled slots at your preferred heights.
- Ensure the heaviest items, like oils and large jars, are placed in the bottom baskets for stability.
- Fill your clear containers with dry goods and apply labels for easy identification.
- Place the containers into the baskets, grouping similar items like baking supplies together.
- Tighten any locking screws at the top or bottom of the frame to keep the rack from swinging.
- Close the door slowly to ensure the rack clears the door frame without hitting the molding.
4 Live Edge Floating Corner Shelves
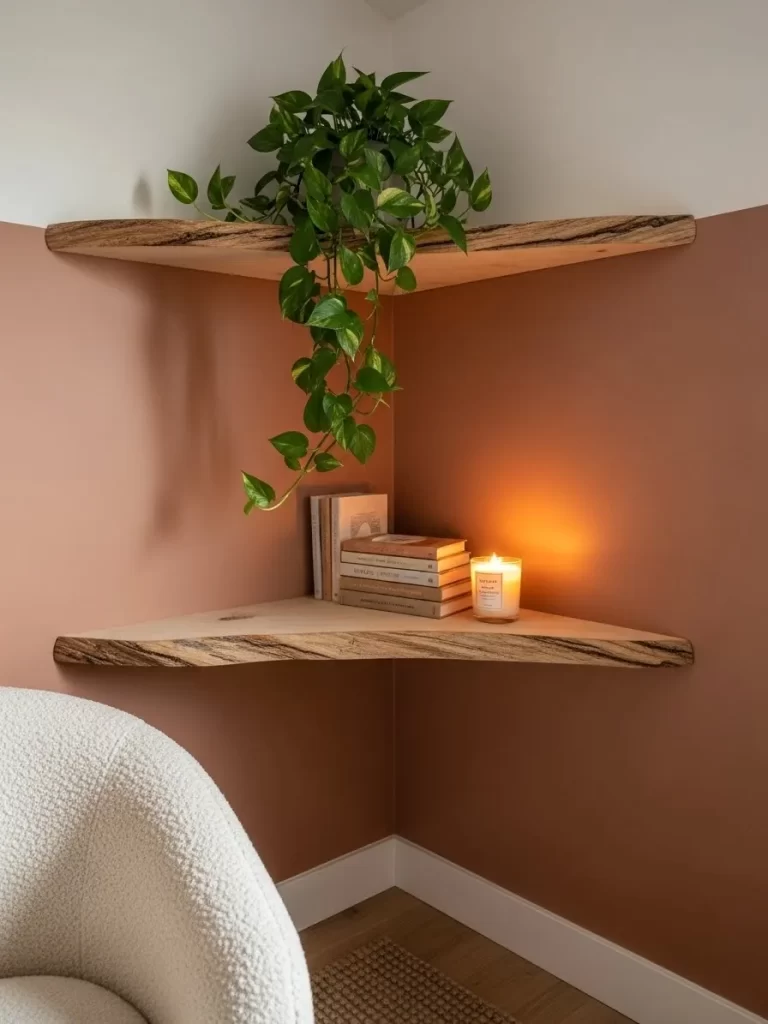
Corners are frequently the most underused areas in a standard room layout. These floating shelves turn those awkward gaps into a beautiful display for plants and books. The raw wood edges bring a touch of nature indoors while providing extra surfaces.
Mounting shelves at different heights creates a dynamic visual flow on your wall. This design choice draws the eye upward, which helps a small room feel much taller. It provides a dedicated spot for candles and decor that would otherwise clutter your tables.
The lack of visible brackets gives these shelves a clean and modern appearance. They look as though they are growing directly out of the walls. It is a stylish way to add character to a bedroom or a cozy reading nook.
Materials Required
- Two triangular live edge wood pieces
- Internal floating shelf mounting hardware
- Wood glue
- Polyurethane finish
- Wall anchors
Equipment Required
- Power drill
- Long masonry or wood drill bit
- Level
- Mallet
- Measuring tape
DIY Instructions
- Measure your corner to ensure the wood pieces are cut at a true 90-degree angle for a tight fit.
- Sand the wood thoroughly and apply a thin coat of polyurethane to protect it from moisture.
- Mark the wall where the internal support rods will enter the wood.
- Drill deep holes into the back edges of the wood blocks that match the diameter of your mounting rods.
- Hold the mounting bracket against the wall and use a level to make sure it is straight.
- Drill holes into the wall and secure the metal brackets using heavy-duty wall anchors.
- Apply a small amount of wood glue inside the holes of your wooden shelf.
- Slide the wood piece onto the metal rods protruding from the wall.
- Tap the edge of the shelf gently with a mallet to push it flush against the wall surface.
- Wipe away any seeping glue and let the shelf sit for an hour before placing items on it.
5 Hidden Kitchen Toe Kick Drawers
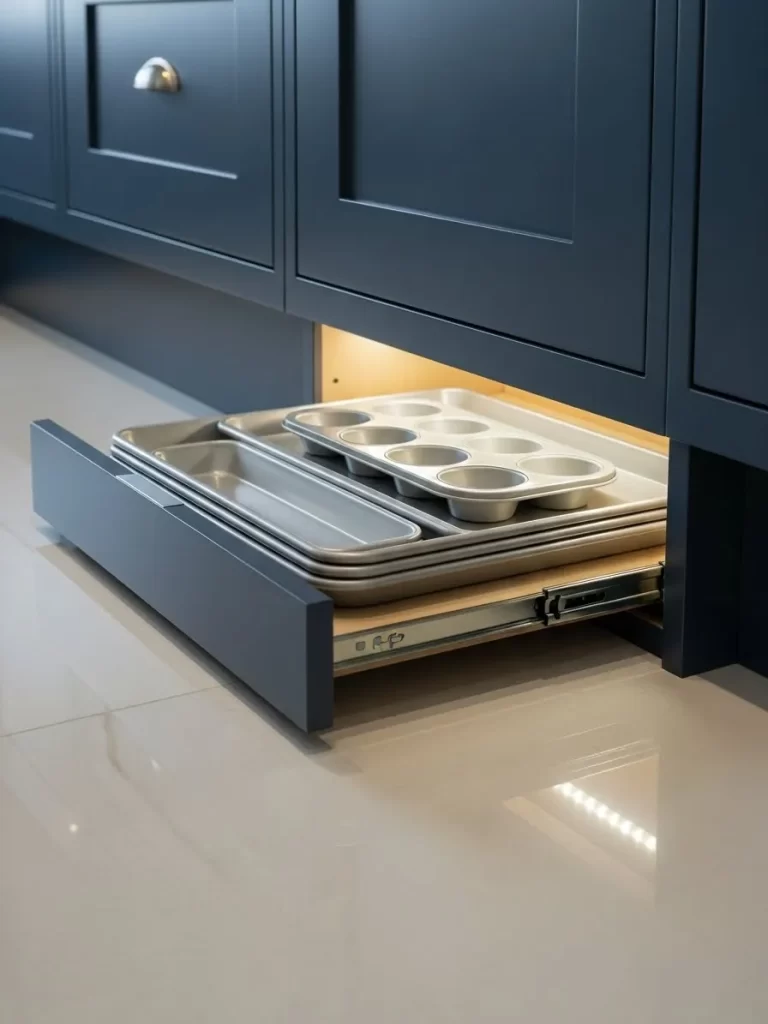
Standard kitchen cabinets usually leave a few inches of wasted space at the very bottom. These clever toe kick drawers transform that empty void into a secret storage spot for flat items. You can finally find a home for baking sheets and muffin tins without stacking them in a high cabinet.
Modern hardware allows these drawers to open with a simple tap of your foot. This hands-free design is incredibly helpful when your palms are covered in flour or cookie dough. It keeps your most used pans accessible while keeping the main kitchen area looking sleek.
Installing these drawers makes the room feel much more organized and professional. It utilizes every available inch of the floor plan for maximum efficiency. You will be surprised by how much extra room you find once the base of your cabinets is put to work.
Materials Required
- Premade drawer box or plywood for custom build
- Ultra low profile drawer slides
- Matching cabinet face board
- Wood glue
- Small furniture casters (optional for extra weight)
- Magnetic latches
Equipment Required
- Circular saw or table saw
- Power drill
- Measuring tape
- Carpenter square
- Screwdriver
DIY Instructions
- Measure the height and width of the recess under your bottom cabinets carefully.
- Cut your plywood to create a shallow box that is at least one inch shorter than the height of the kick space.
- Assemble the drawer box using wood glue and screws to ensure it remains sturdy under pressure.
- Attach the low profile slides to the sides of the drawer and the inner walls of the cabinet base.
- Slide the drawer into place to check for a smooth movement and even gaps.
- Cut a piece of trim that matches your existing cabinet base to act as the drawer front.
- Screw the trim piece onto the front of the drawer box so it sits flush with the rest of the cabinets.
- Install a touch-release magnetic latch so the drawer pops open when nudged.
- Place your heavy baking sheets or pizza stones inside the new compartment.
- Check the clearance between the bottom of the drawer and your kitchen floor to prevent scratching.
6 Floating Marble Radiator Console

Old fashioned radiators often take up valuable wall space and look out of place in modern rooms. This floating marble shelf sits just above the heating unit to create a sophisticated entryway table. It provides a spot for keys and mail without blocking the warmth coming from the metal fins.
The stone surface reflects light and adds a high-end feel to a functional utility area. Since it attaches to the wall, you do not have to worry about legs getting in the way of the pipes. It is a smart way to turn a bulky eyesore into an elegant furniture piece.
Using stone ensures the shelf can handle the rising heat without warping or cracking like wood might. This setup keeps your daily essentials organized right by the front door. You get a beautiful display area while maintaining the comfort of your home.
Materials Required
- One marble or granite remnant slab
- Two heavy duty floating shelf brackets (heat resistant)
- Masonry wall anchors
- Heat resistant silicone adhesive
- Stone sealer
Equipment Required
- Power drill
- Level
- Stud finder
- Caulking gun
- Measuring tape
DIY Instructions
- Measure the width of your radiator and add four inches to ensure the shelf hangs over the edges.
- Clean the stone slab and apply a professional sealer to prevent stains from keys or water.
- Locate the wall studs behind the radiator using a stud finder for a secure hold.
- Mark the wall at least two inches above the top of the radiator to allow for air circulation.
- Drill pilot holes and mount the heavy duty brackets into the wall studs.
- Use a level to ensure the brackets are perfectly horizontal before tightening the screws.
- Apply a few beads of heat resistant silicone adhesive to the top of the metal brackets.
- Carefully place the marble slab onto the brackets and center it over the radiator.
- Press down firmly and let the adhesive cure for a full 24 hours before placing items on top.
- Test the stability by placing a small lamp or bowl on the surface once the glue is dry.
7 Built-In Staircase Storage Drawers
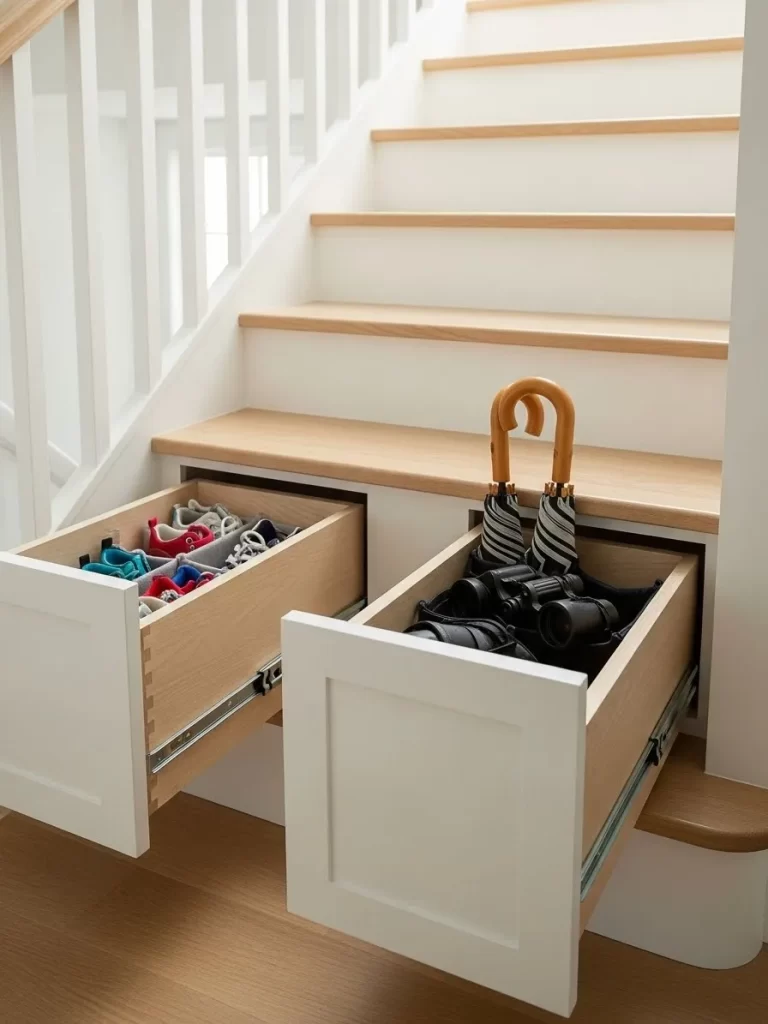
The space underneath a staircase is one of the most neglected areas in any multi-level house. These deep pull-out drawers turn that hollow cavity into a massive organization center for shoes and gear. It keeps the hallway clear of tripping hazards while making use of every cubic inch.
Custom drawer faces blend seamlessly with the trim of the stairs for a hidden look. You can store umbrellas, binoculars, or seasonal footwear right where you need them most. This solution is especially helpful for families who need a mudroom but lack the extra room.
Heavy duty glides allow even the deepest drawers to slide out with almost no effort. This makes it easy for children to reach their own shoes and put them away. It is a total game changer for maintaining a tidy entryway during the busy winter months.
Materials Required
- High quality 3/4 inch plywood
- Extra long heavy duty drawer slides (30 inch or more)
- Modern drawer pulls or handles
- Wood screws and finishing nails
- Paint or stain to match your staircase
Equipment Required
- Miter saw or circular saw
- Power drill and bits
- Level
- Pocket hole jig
- Hammer
DIY Instructions
- Remove the existing drywall or trim from the side of your staircase to expose the stringers.
- Measure the triangular openings between the floor and the stair supports.
- Build a sturdy rectangular frame inside the staircase cavity to hold the drawer tracks.
- Construct drawer boxes from plywood that fit the specific depth of your under-stair space.
- Install the heavy duty slides onto the inner frame and the sides of the drawer boxes.
- Slide the drawers in to ensure they move freely without hitting the stair structure.
- Cut plywood faces that match the angle and style of your staircase trim.
- Attach the faces to the drawer boxes, ensuring the gaps between drawers are even.
- Sand the faces and apply paint or a finish that matches the rest of the wood.
- Install your handles or pulls to finish the look and start organizing your gear.
8 Industrial Overhead Garage Storage Racks

Garages often become a graveyard for plastic bins that eat up valuable parking space. These overhead steel racks reclaim the ceiling area for items you only need once a year. It is the perfect spot for holiday decorations, camping gear, or bulky sports equipment.
Strong wire mesh shelves allow you to see what is stored from below without climbing a ladder. The height is adjustable, so you can clear the top of your SUV or garage door opener with ease. This setup keeps your floor clear for a workshop or a clean place to park your car.
Professional-grade racks can hold hundreds of pounds when bolted directly into the ceiling joists. This creates a safe and permanent storage solution that moves clutter out of your line of sight. You will finally have a garage that feels open and functional again.
Materials Required
- Heavy-duty steel overhead rack kit
- High-strength lag bolts
- Large plastic storage bins with lids
- Label maker or permanent marker
- Masking tape
Equipment Required
- Power drill with masonry or wood bits
- Stud finder (deep scan model)
- Socket wrench set
- Sturdy A-frame ladder
- Chalk line or laser level
DIY Instructions
- Use a stud finder to locate the ceiling joists and mark their direction with a pencil.
- Determine the distance between the joists to ensure the rack brackets will align with the wood.
- Hold the ceiling brackets against your marks and drill pilot holes into the center of the joists.
- Drive the lag bolts through the brackets using a socket wrench until they are tight against the ceiling.
- Attach the vertical down-posts to the ceiling brackets at your desired height.
- Connect the horizontal side beams to the down-posts to form the outer frame.
- Slide the wire mesh decking panels into the frame and secure them with the provided clips.
- Shake the rack firmly to test for any movement or looseness before loading it.
- Place your heaviest bins toward the center of the rack and lighter items on the edges.
- Ensure the rack does not interfere with the operation of your garage door or its tracks.
9 Hydraulic Lift-Up Storage Bed
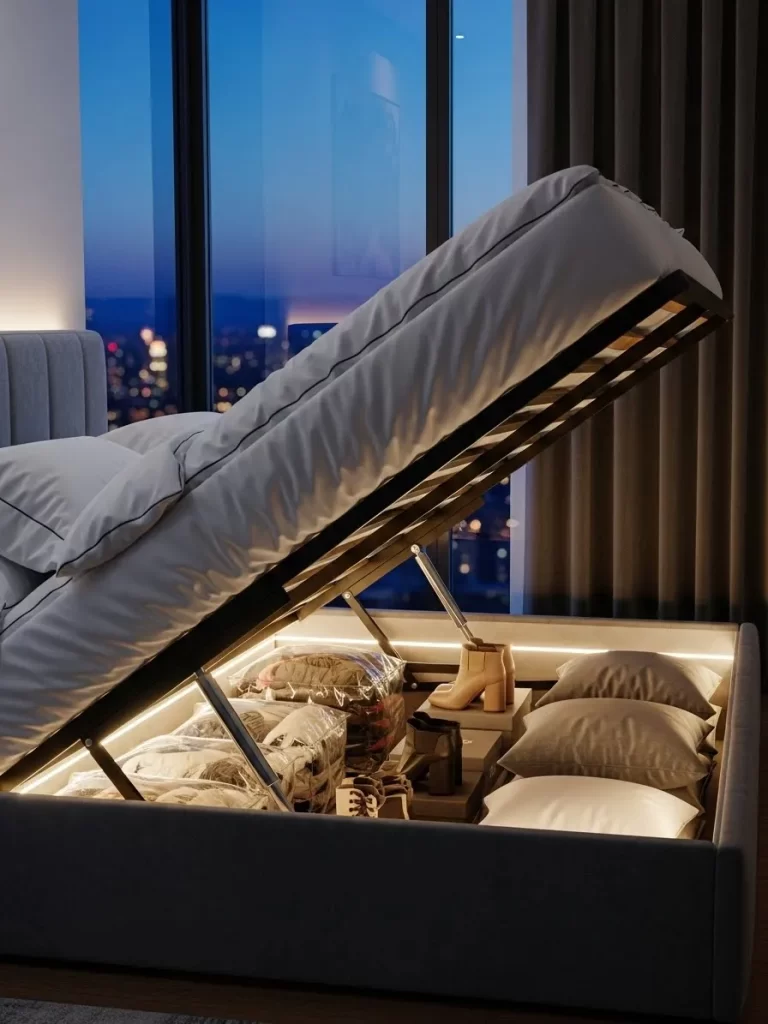
Standard beds leave a massive footprint in a bedroom while providing almost zero storage. A hydraulic lift-up frame turns the entire area under your mattress into a giant, dust-free closet. It is a fantastic place to hide away bulky winter coats, extra pillows, or luggage.
Powerful gas struts do all the heavy lifting for you, allowing easy access with just one hand. You no longer have to crawl on the floor to reach bins tucked under a traditional bed frame. The internal LED lighting makes finding your items quick and painless, even in a dark room.
The clean, upholstered exterior hides the fact that you have a secret warehouse underneath your mattress. It is a brilliant way to maintain a minimalist look in a small bedroom. You gain the storage capacity of a second dresser without taking up any extra floor space.
Materials Required
- Storage bed frame with hydraulic lift kit
- LED light strips with motion sensor
- Vacuum storage bags for bedding
- Fabric protector spray
- Cable ties for light wires
Equipment Required
- Allen wrench (usually provided)
- Screwdriver
- Measuring tape
- Scissors for LED strips
DIY Instructions
- Assemble the outer perimeter of the bed frame according to the manufacturer guidelines.
- Attach the lower metal brackets for the hydraulic pistons to the side rails of the bed.
- Bolt the upper lifting frame together and ensure it is square and level.
- Mount the gas struts to the brackets, ensuring the pressure rating matches your mattress weight.
- Secure the mattress slats to the lifting frame using the provided plastic caps or screws.
- Peel the adhesive backing off the LED light strips and run them along the inner base of the frame.
- Connect the light sensor near the opening of the bed so the lights turn on automatically when lifted.
- Place your mattress on top of the frame to provide the weight needed for the pistons to function.
- Organize your seasonal items in clear bins or vacuum bags inside the base.
- Slowly pull the handle to test the lift mechanism and ensure it stays open safely while you work.
10 Pop-Up Lift Top Coffee Table
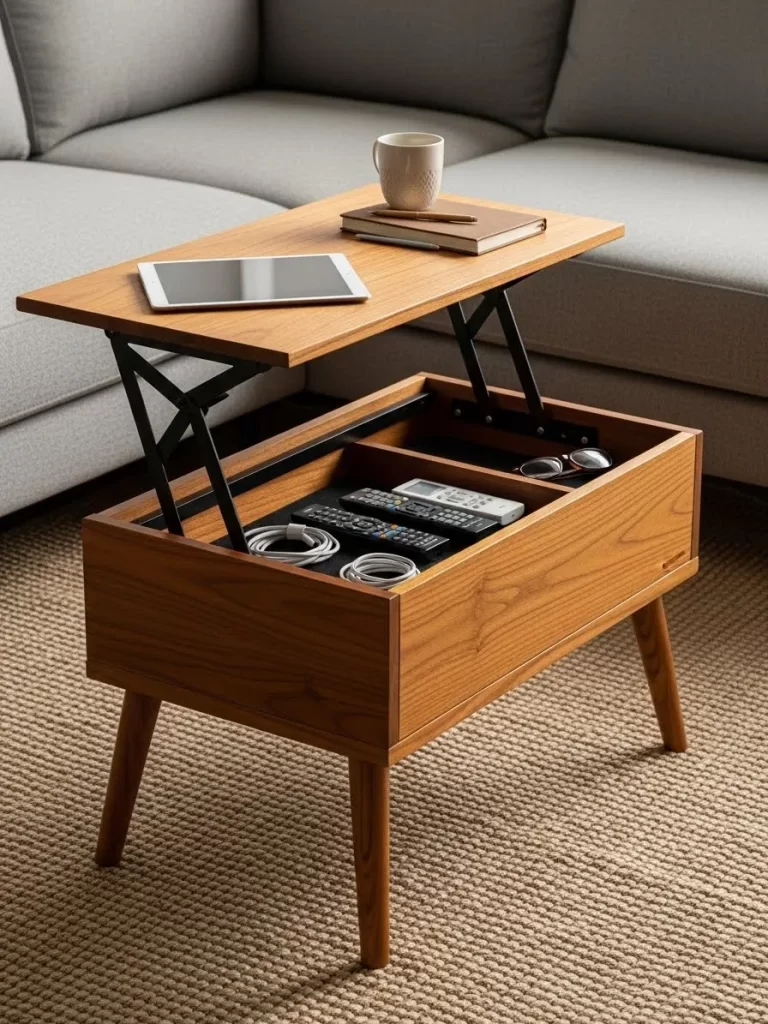
Living rooms often lack a comfortable place to eat or work while watching television. This lift-top coffee table features a mechanical hinge that brings the surface up to your height. Hidden beneath the tabletop is a deep compartment for remotes, tablets, and charging cables.
The mid-century design fits beautifully into a modern home while offering hidden functionality. You can keep your coasters and books on top but hide the clutter of electronics inside. It is a great way to maintain a tidy living area for guests while keeping your essentials close.
Sturdy metal supports ensure the table remains stable even when the top is fully extended. You can use it as a temporary desk or a dining surface without the table tipping over. This dual-purpose furniture is a must-have for maximizing space in small apartments.
Materials Required
- Coffee table with built-in lift mechanism
- Adhesive felt pads for the legs
- Small storage dividers for the internal bin
- Wood polish or wax
- USB charging hub
Equipment Required
- Screwdriver
- Level
- Rubber mallet
DIY Instructions
- Lay all the wooden panels on a soft rug to prevent any scratches during assembly.
- Screw the legs into the base plate and ensure they are tightened completely.
- Attach the heavy-duty spring hinges to the inside of the main table box.
- Align the tabletop panel with the top of the hinges and secure them with the provided screws.
- Check that the top lifts and lowers evenly without rubbing against the sides of the table.
- Place felt pads on the bottom of the legs to protect your flooring from scuffs.
- Install the internal dividers to keep your remotes and cables from sliding around.
- Apply a coat of wood polish to the exterior to give it a fresh, clean shine.
- Route a charging cable through the back of the table if you want to charge devices inside.
- Test the closing speed to make sure the tabletop lands softly on the frame.
11 Deep Drawer Window Seat
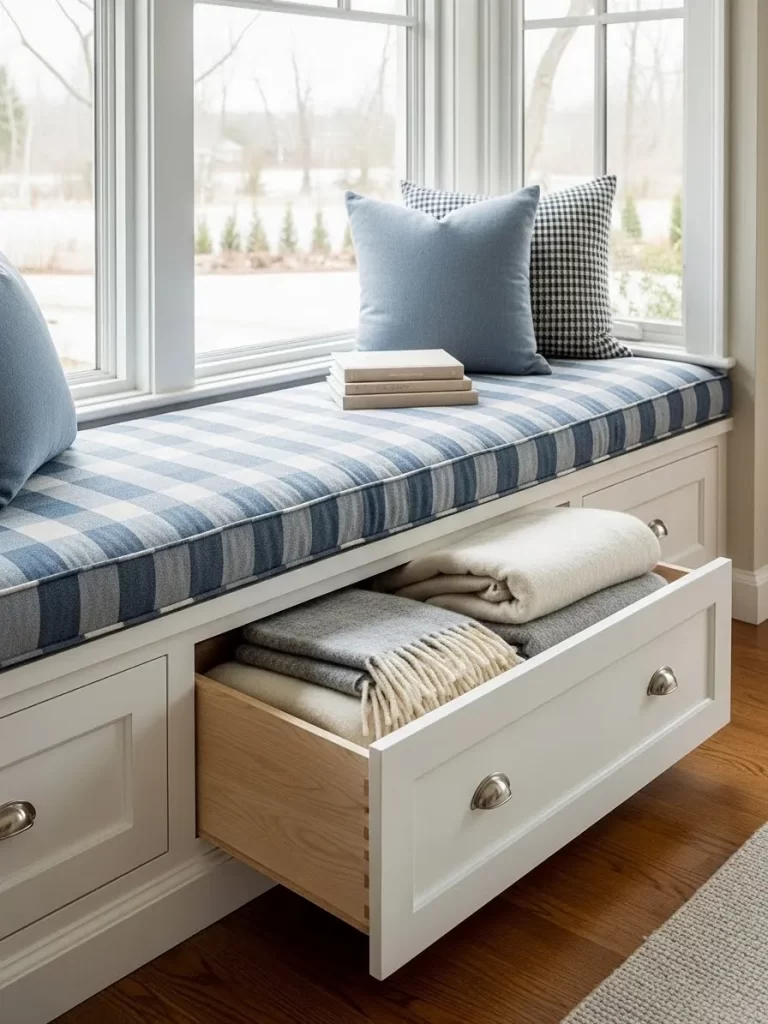
Bay windows often have empty cavities underneath that serve no purpose. This custom window seat changes that by adding massive storage drawers for bulky linens and blankets. It creates a cozy reading nook while hiding seasonal items right where you need them.
Soft blue checkered upholstery provides a comfortable spot to enjoy the morning sun. The white cabinetry and classic silver pulls ensure the unit looks like a built-in part of your home architecture. It is a smart way to add seating and organization to a bedroom or living area.
Having your extra duvets and pillows nearby makes guest prep much faster. Since the drawers slide all the way out, you never have to dig into dark corners to find what you need. This design makes every square inch of your window area work harder for you.
Materials Required
- Premade kitchen base cabinets or plywood for a custom frame
- High density seat foam
- Plaid or checkered upholstery fabric
- Heavy duty full extension drawer slides
- Decorative metal drawer pulls
- Wood trim and molding
Equipment Required
- Power drill
- Staple gun
- Miter saw
- Level
- Measuring tape
DIY Instructions
- Measure the width of your window alcove to determine how many cabinet units will fit.
- Secure the cabinet frames to the floor and wall studs to prevent any shifting when you sit down.
- Install the drawer slides inside the frames, making sure they are perfectly level with one another.
- Build or assemble the drawer boxes and attach the front decorative panels.
- Screw your metal pulls into the center of each drawer face for a finished look.
- Cut a thick piece of plywood to act as the bench top and secure it to the top of the cabinets.
- Wrap your foam in fabric and staple it to the underside of the bench top for a permanent cushion.
- Add decorative baseboard molding along the bottom to hide the gap between the cabinets and the floor.
- Caulk any gaps between the unit and the wall for a professional built-in appearance.
- Fill the drawers with your heaviest blankets and test the sliding mechanism.
12 Integrated Headboard Bookshelf
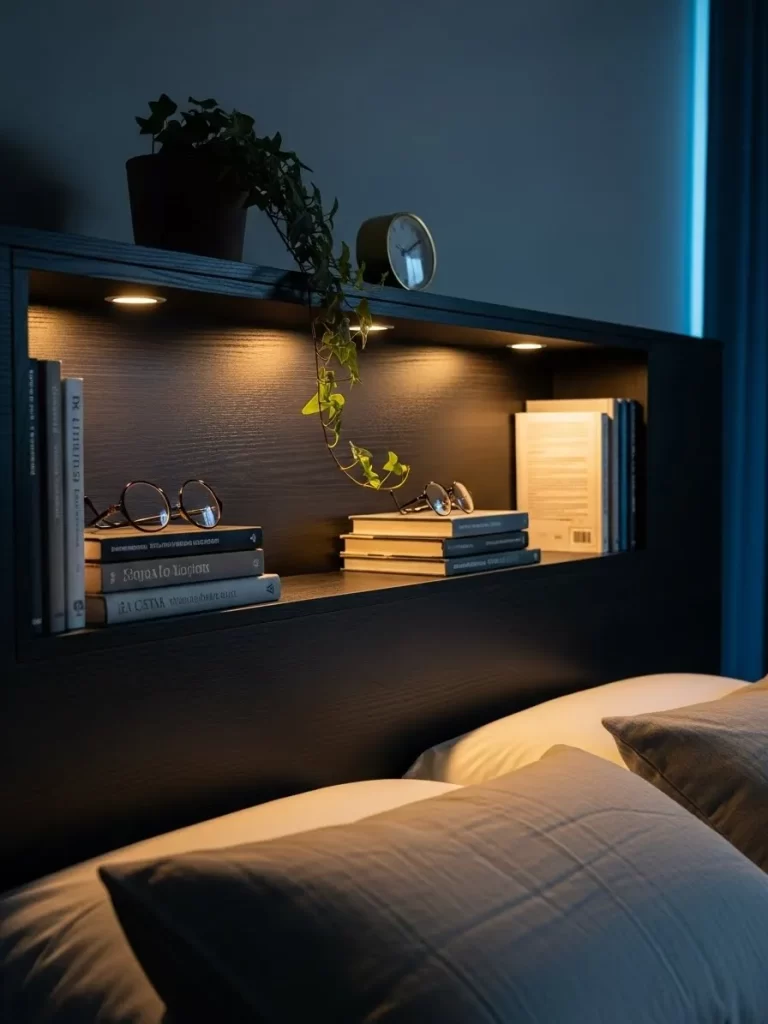
Small bedrooms rarely have enough room for both a headboard and separate nightstands. This integrated shelving unit solves that by building storage directly into the wall behind your pillows. It provides a sleek ledge for your glasses, books, and even small potted plants.
Built-in warm LED lighting eliminates the need for bulky bedside lamps that take up surface space. The dark wood finish adds a sophisticated, moody vibe to the room that feels modern and intentional. You can keep your nighttime essentials within arm’s reach without the clutter.
This setup keeps the floor area around your bed completely clear for better movement. It is an excellent solution for anyone living in a studio or a home with narrow rooms. You get a high-end custom look that maximizes vertical wall space effectively.
Materials Required
- Dark wood finish plywood or MDF panels
- Recessed LED puck lights or light strips
- Wood glue and finishing nails
- Edge banding to match the wood finish
- Hidden wall mounting brackets
Equipment Required
- Circular saw
- Hole saw bit for the lights
- Power drill
- Level
- Wire strippers for the lighting
DIY Instructions
- Determine the height of your mattress so the bottom shelf sits comfortably above your pillows.
- Cut your main back panel and side pieces to create a shallow box frame.
- Use a hole saw bit to cut openings in the top shelf where the recessed lights will sit.
- Assemble the frame using wood glue and pocket hole screws for a strong, invisible joint.
- Apply edge banding to all visible raw edges of the plywood to create a solid wood look.
- Feed the LED light wires through the holes and secure the fixtures in place.
- Mount the heavy-duty brackets to the wall studs at the correct height for the headboard.
- Slide the headboard unit onto the brackets and check that it is perfectly level.
- Connect the light wires to a power source or a simple plug-in transformer.
- Place your favorite books and decor on the shelves to complete your new bedside sanctuary.
13 Customizable Office Pegboard System
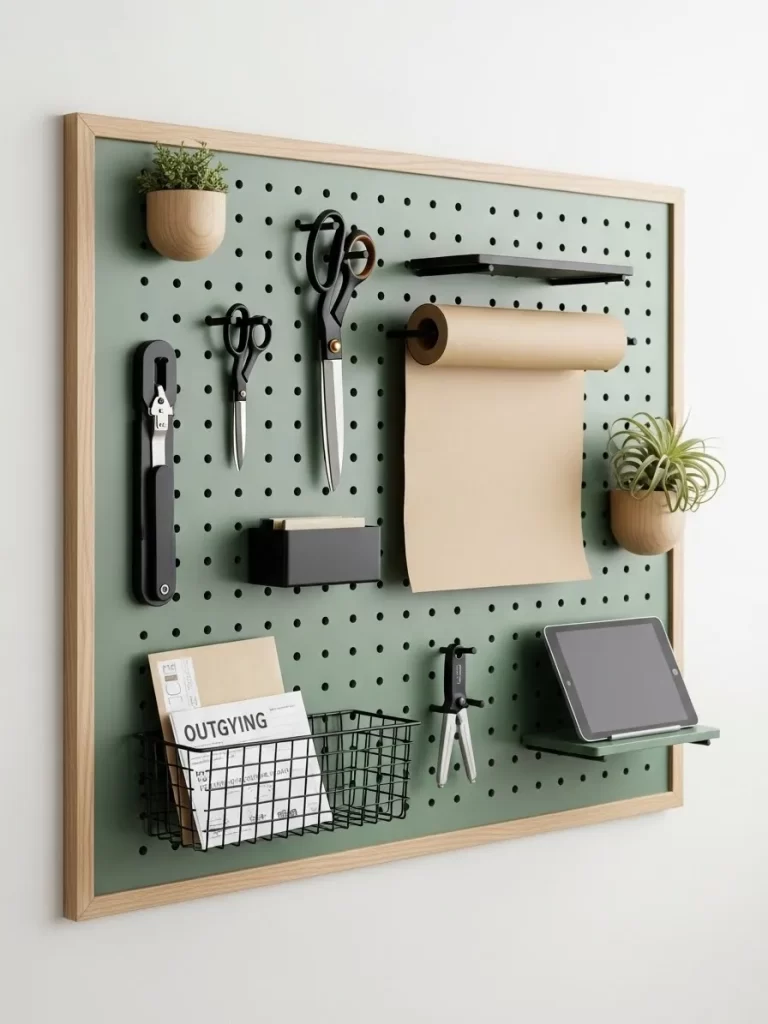
Desktops quickly become overwhelmed with pens, tablets, and loose papers. This sage green pegboard offers a vertical home for every tool in your workspace. You can move the hooks and baskets around whenever your needs change throughout the year.
The wooden frame gives the board a polished appearance that looks like a piece of wall art. Small wooden planters and wire baskets add texture and life to a functional organizing tool. It is a great way to keep your tablet and mail visible so you never miss an important date.
Using a pegboard frees up your entire desk surface for actual work. You no longer have to push aside piles of supplies just to find your keyboard or notepad. This system keeps your brain organized by keeping your environment visually clean and structured.
Materials Required
- Large pegboard sheet
- 1×2 wood strips for the frame
- Various pegboard accessories like hooks and baskets
- Paint in a soft matte finish (like sage green)
- Small wooden cups or pots
Equipment Required
- Paint roller and tray
- Power drill
- Miter saw
- Level
- Screwdriver
DIY Instructions
- Cut the pegboard to your desired size and sand the edges until they are smooth.
- Apply two coats of matte paint to the board and let it dry for at least four hours.
- Build a simple rectangular frame using the 1×2 wood strips to go around the edges.
- Attach the frame to the back of the board to create a gap between the board and the wall.
- Drill pilot holes through the frame and into the wall studs for a secure mount.
- Screw the pegboard onto the wall, making sure it is level and sturdy.
- Arrange your hooks and shelves on the board to fit your specific office supplies.
- Place small plants in the wooden cups to add a natural element to your workspace.
- Hang your most-used tools, like scissors or tablets, in the most accessible spots.
- Rearrange the layout as often as you like to find the most efficient workflow.
14 Magnetic Cabinet Vanity Bar

Small bathroom items like tweezers and bobby pins always seem to disappear in deep drawers. This brushed metal magnetic strip provides a dedicated home for all your grooming tools inside the cabinet. It keeps everything visible and upright so you can find what you need in seconds.
The sleek finish of the bar matches modern bathroom hardware and looks incredibly clean. Since it mounts to the inner wall, it uses space that is usually left empty. You will love how much faster your morning routine becomes when your tools are ready for you.
Installing this strip prevents the “junk drawer” effect where small metal items get tangled together. It is a low-cost upgrade that provides a massive boost to your bathroom organization. You can even use it for nail clippers, scissors, and small metal combs.
Materials Required
- Heavy duty magnetic tool strip
- Strong adhesive mounting tape or small screws
- Rubbing alcohol for surface cleaning
- Stainless steel grooming tools
Equipment Required
- Measuring tape
- Level
- Screwdriver (if using screws)
DIY Instructions
- Choose a flat surface inside your medicine cabinet or on the back of a cabinet door.
- Clean the area thoroughly with rubbing alcohol to remove any oils or dust.
- Measure the length of your magnetic bar to ensure it fits the space without hitting the shelves.
- Peel the backing off the adhesive tape or mark the screw holes with a pencil.
- Press the bar firmly onto the surface or drill small pilot holes for the screws.
- Secure the bar in place and hold it for thirty seconds if using adhesive.
- Let the adhesive cure for several hours before adding any heavy tools.
- Arrange your tweezers, clippers, and pins across the magnetic surface.
- Ensure there is enough clearance to close the cabinet door completely.
- Group similar items together so you can grab them without looking.
15 Horizontal Wall Mounted Book Ledges
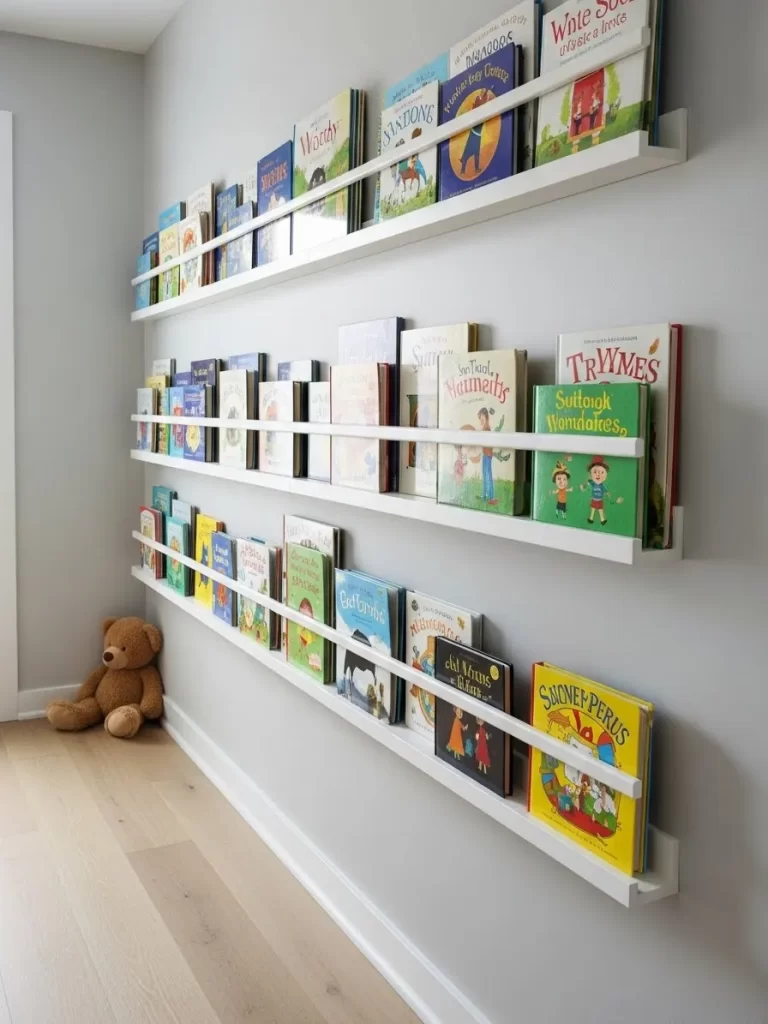
Traditional bookshelves take up a lot of floor space and can feel heavy in a child’s room. These slim white ledges display books with the covers facing out, making them look like a vibrant gallery. It encourages kids to read more because they can easily see their favorite characters.
The low-profile design ensures that the walkway stays open and clear for play. You can mount these at any height, allowing even the smallest toddlers to reach their own bedtime stories. It is a fantastic way to add color to a neutral room using the items you already own.
By stacking multiple ledges vertically, you turn an empty wall into a massive library. The thin front rail keeps the books from sliding off while remaining almost invisible. This setup is much safer than tall bookcases that could tip over during playtime.
Materials Required
- Prefabricated picture ledges or narrow U-shaped molding
- Wall anchors and matching screws
- White paint or finish
- Level
Equipment Required
- Power drill
- Measuring tape
- Pencil
- Stud finder
DIY Instructions
- Determine how many rows of books you want and mark the wall at equal intervals.
- Use a stud finder to locate the strongest mounting points for each ledge.
- Hold the first ledge against the wall and use a level to ensure it is perfectly straight.
- Drill pilot holes through the back of the ledge and into the wall or studs.
- Insert your wall anchors if you are not hitting a wooden stud directly.
- Screw the ledge into the wall until it is tight and does not wobble.
- Repeat this process for the remaining ledges, keeping the spacing consistent.
- Fill any visible screw heads with white wood filler for a seamless look.
- Wipe the ledges down with a damp cloth to remove any construction dust.
- Arrange your books by color or size to create a beautiful and organized display.
16 Vertical Wall Bike Hanger

Bicycles are notoriously difficult to store indoors without blocking hallways or taking up floor space. This vertical mount lifts the front wheel and holds the bike flat against the wall like a piece of sculpture. The wooden base and metal hook provide a stylish and secure anchor for heavy frames.
The design features a clear backing plate that protects your white walls from tire marks and grease. It is an ideal solution for city dwellers who need to keep their expensive road bikes safe inside. You get a clean look that turns your hobby into a focal point of the room.
Lifting the bike off the ground makes cleaning your floors much easier and prevents tripping. You can install this in an entryway or even a living room because it looks so intentional. It is a durable way to reclaim your hallway for better foot traffic.
Materials Required
- Vertical bike hook kit
- Clear acrylic or plastic wall guard
- Heavy duty lag bolts
- Solid wood mounting block
Equipment Required
- Power drill with large bits
- Stud finder
- Level
- Socket wrench
DIY Instructions
- Find a wall stud that has enough clearance on both sides for the width of your handlebars.
- Mark the height of your bike by holding it vertically against the wall with the back tire touching the floor.
- Center your clear wall guard over the stud and mark the mounting holes.
- Drill pilot holes through the guard and deep into the wooden wall stud.
- Screw the wooden mounting block and the metal hook into the wall using the lag bolts.
- Ensure the hook is angled correctly to catch the front rim of your bicycle securely.
- Use a socket wrench to tighten the bolts until the mount feels completely immovable.
- Lift your bike and hang the front wheel to test the weight distribution.
- Adjust the position of the clear guard if the tires are still touching the painted wall.
- Check the bolts once a month to ensure they remain tight under the weight of the bike.
17 S-Hook Denim Organization Bar
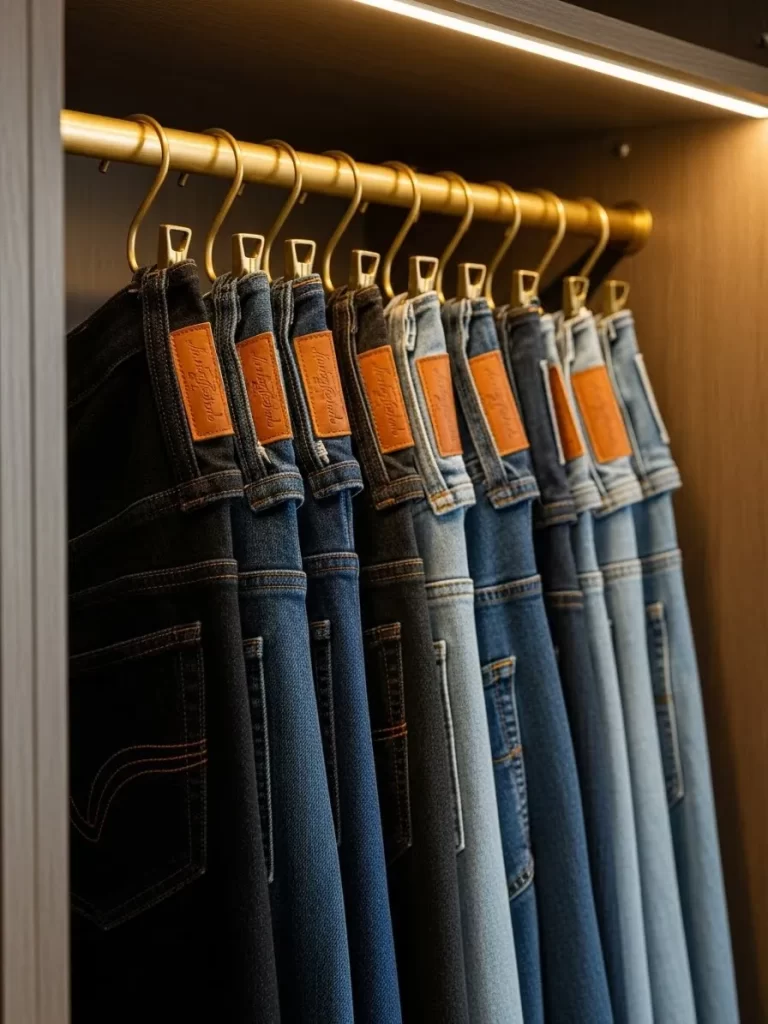
Folding jeans often results in messy piles that tip over in your closet. This clever organization bar uses sturdy S-hooks to hang denim by the belt loops instead. It keeps your pants perfectly vertical and prevents those annoying fold lines from forming on the legs.
Brass hardware adds a touch of luxury to your storage space while remaining incredibly durable. You can see every wash and style at a glance without digging through a dark shelf. This method also saves a massive amount of horizontal rod space compared to traditional hangers.
Sliding a pair of jeans off the hook is faster than wrestling with a standard clothes hanger. The uniform look makes your closet feel like a high-end boutique. You will love how much easier it is to stay organized when every pair has its own dedicated spot.
Materials Required
- Solid brass or heavy-duty metal closet rod
- Large metal S-hooks with flat ends
- Rod mounting brackets
- Leveling shims
Equipment Required
- Power drill
- Measuring tape
- Screwdriver
- Level
DIY Instructions
- Measure the width of your closet section to determine the length of the new rod.
- Mark the height on both side walls, ensuring there is enough vertical space for the full length of your jeans.
- Use a level to make sure your marks are even across the closet.
- Drill pilot holes into the wall studs or use heavy-duty anchors to secure the mounting brackets.
- Slide the rod into the brackets and tighten any locking screws to keep it from rotating.
- Place your S-hooks onto the rod, spacing them about three inches apart for easy access.
- Grab your jeans and hook the rear center belt loop onto the bottom of the S-hook.
- Arrange the denim by color from light to dark to create a visually pleasing display.
- Ensure the rod is sturdy enough to handle the weight of multiple heavy denim pairs.
- Check that you have enough clearance from the floor so the hems do not drag.
18 Double Hanging Closet Rod System
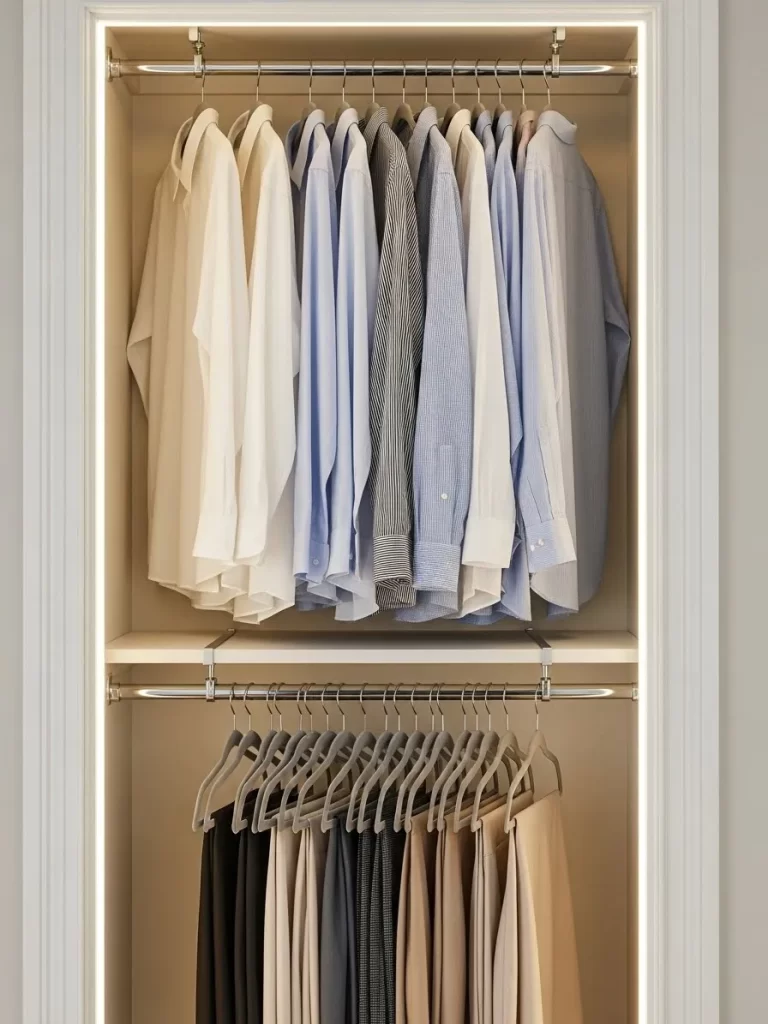
Single rod closets leave half of your wall space completely empty and wasted. This double hanging system adds a second level of storage for shirts and trousers in the same footprint. It effectively doubles your wardrobe capacity without needing a larger room.
The clean white finish and slim velvet hangers keep the look minimal and modern. Integrated LED strips along the frame ensure you can distinguish between navy and black fabrics even in the early morning. It is a simple architectural change that makes a huge impact on your daily routine.
Organizing by garment length allows you to fit more items into a smaller area. Keep your shorter button-downs on the top rack and slacks on the bottom for a tidy appearance. This setup turns a cramped closet into a highly efficient dressing station.
Materials Required
- Two adjustable closet rods
- Center support brackets for long spans
- Velvet non-slip hangers
- Adhesive LED light strips
- White shelving board for the middle divider
Equipment Required
- Power drill
- Stud finder
- Level
- Hacksaw (if rods need custom cutting)
DIY Instructions
- Remove all existing shelving to start with a completely blank wall surface.
- Measure and mark the wall at 80 inches for the top rod and 40 inches for the bottom rod.
- Use a stud finder to locate the best points for the mounting hardware to ensure safety.
- Screw the top brackets into the wall and seat the first rod firmly in place.
- Install a horizontal shelf between the two rod levels to provide a landing spot for folded items.
- Mount the second set of brackets underneath the shelf and install the lower rod.
- Wipe down the rods to remove any metal shavings or dust from the installation.
- Apply the LED strips to the underside of the shelf to illuminate the bottom rack.
- Use velvet hangers to maximize the number of items that can fit on each rod.
- Pull on the rods firmly to test the weight capacity before hanging your entire wardrobe.
19 Acrylic Shelf Dividers for Sweaters

Stacked sweaters and hoodies always seem to lean and fall over onto each other. These crystal-clear acrylic dividers create invisible walls that keep your stacks straight and tall. They provide a high-end retail look that makes your closet feel much more expensive.
Since the dividers are transparent, they do not block your view of the clothing or create visual clutter. They simply slide onto existing shelves without the need for glue or tools. This allows you to adjust the width of each section as your wardrobe changes through the seasons.
Keeping clothes separated prevents the “domino effect” when you pull one item from the bottom of the stack. Your knitwear stays neat and the edges remain crisp and aligned. It is a small investment that provides a massive improvement in closet aesthetics.
Materials Required
- Set of clear acrylic shelf dividers
- Microfiber cloth
- Mild plastic cleaner
- Small adhesive rubber dots (optional)
Equipment Required
- No tools required
- Measuring tape
DIY Instructions
- Empty your closet shelves and wipe them down to remove any lint or dust.
- Measure the thickness of your shelves to ensure the divider clips will fit snugly.
- Clean the acrylic panels with a microfiber cloth to remove fingerprints and smudges.
- Slide the first divider onto the shelf to create a starting boundary for your stacks.
- Place a stack of folded sweaters against the divider to determine the necessary width.
- Slide the next divider into place, leaving about half an inch of wiggle room for the clothes.
- Repeat this process across the length of the shelf for all your different garment types.
- Apply small rubber dots to the bottom of the dividers if they feel loose on the shelf.
- Group your items by material or color to enhance the organized appearance.
- Step back and check the alignment to ensure all dividers are parallel for a clean look.
20 Geometric Sculptural Coat Hook
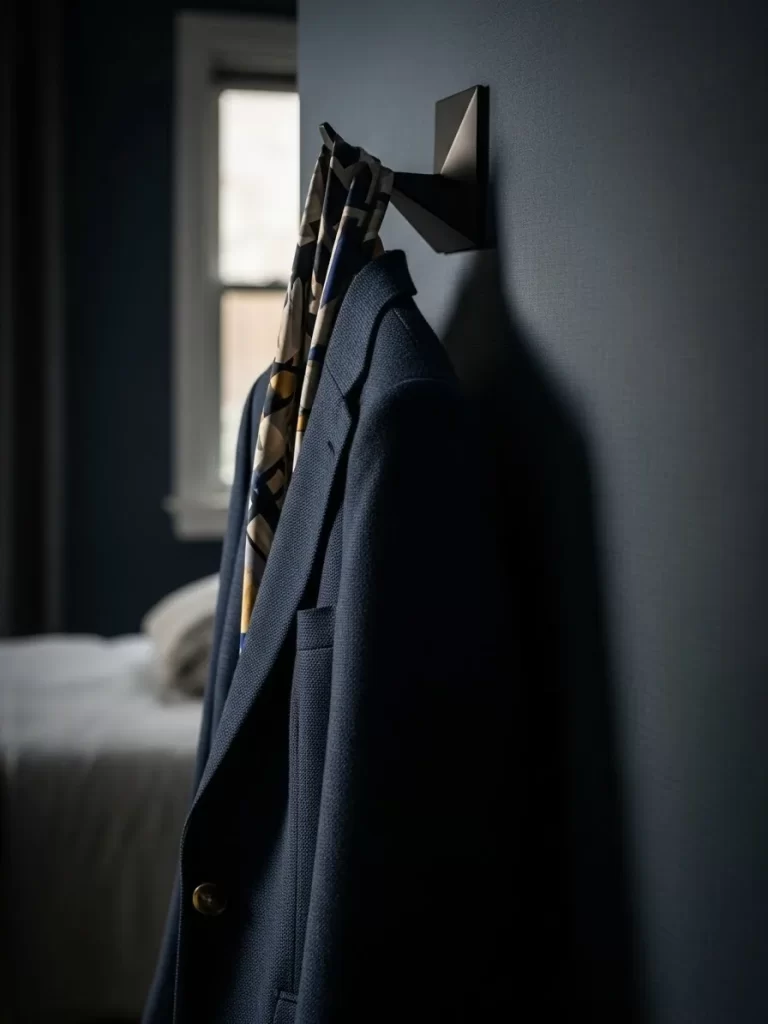
Standard coat racks often look messy and take up too much floor space in a narrow hallway. This wall-mounted geometric hook acts as a piece of modern art when it is not in use. Its sharp angles and matte finish provide a sophisticated way to hang your daily essentials.
The sturdy construction easily supports the weight of heavy wool overcoats and silk scarves. Mounting several of these at different heights creates a unique wall installation that is also functional. It is a great way to add character to an entryway while keeping your outerwear organized.
Keeping coats off the back of chairs makes your home feel instantly more put-together. This hook is small enough to fit behind a door or in a tight corner where a traditional rack would not work. You get a durable storage solution that elevates the design of your entire home.
Materials Required
- Geometric metal coat hooks
- Heavy-duty wall anchors
- Matching black screws
- Painter’s tape
Equipment Required
- Power drill
- Level
- Pencil
- Hammer
DIY Instructions
- Decide on a layout for your hooks, whether in a straight line or a staggered pattern.
- Place pieces of painter’s tape on the wall to visualize where each hook will sit.
- Hold the hook against the wall and mark the screw holes clearly with a pencil.
- Use a level to ensure the hook is not tilted before you start drilling.
- Drill pilot holes into the wall at your marks, using a bit that matches your anchors.
- Tap the plastic anchors into the holes gently with a hammer until they are flush with the wall.
- Align the hook over the anchors and drive the screws in until the unit is immovable.
- Remove the painter’s tape and wipe away any pencil marks from the wall surface.
- Give the hook a firm tug to make sure it is solid enough for heavy winter gear.
- Drape your favorite coat or scarf over the angled point to complete the look.
21 Two-Tiered Corner Rotating Organizer
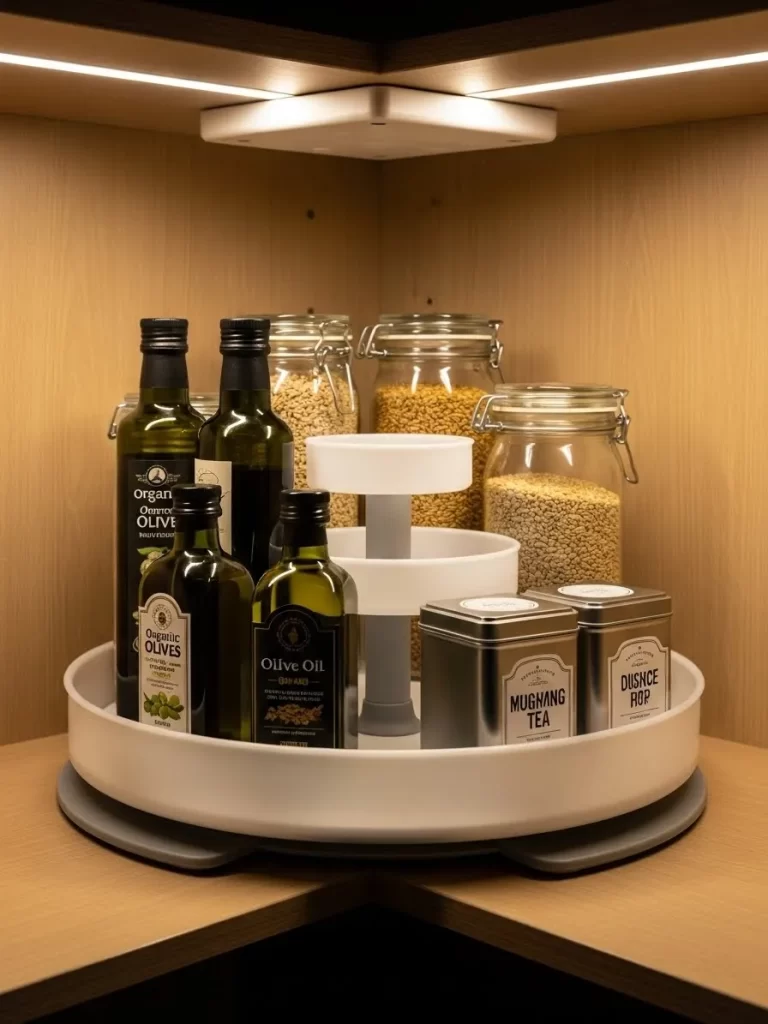
Corner cabinets often turn into a dark abyss where jars and bottles go to be forgotten. This sleek rotating turntable, commonly known as a lazy Susan, brings everything to the front with a simple flick of your finger. It features two levels of storage to double your usable surface area in tight spots.
Soft white plastic construction ensures the unit is easy to wipe clean if a bottle leaks or spills. The gray non-slip base keeps the organizer from sliding around while you spin it to find your favorite olive oil. It is a fantastic way to keep your pantry staples organized and visible at all times.
Integrated lighting above the unit makes reading small labels a breeze during late-night cooking sessions. You will love how much more functional your kitchen feels once you stop digging through deep shelves. This small upgrade turns an awkward corner into the most efficient part of your kitchen.
Materials Required
- Two-tier rotating turntable kit
- Clear glass jars with airtight lids
- Uniform metal tea tins
- Adhesive LED light strip
- Label stickers and a fine-tip marker
Equipment Required
- No heavy machinery needed
- Damp microfiber cloth
- Level (to ensure the cabinet shelf is flat)
DIY Instructions
- Clear everything out of your corner cabinet and wipe the shelf down to remove dust and crumbs.
- Assemble the rotating turntable by snapping the center support column into the base plate.
- Place the second tray on top of the column and ensure it spins smoothly without wobbling.
- Stick the LED light strip to the underside of the shelf above the turntable to illuminate the area.
- Transfer bulk grains and spices into clear glass jars so you can monitor your supply levels.
- Apply neat labels to each jar and tin for a professional, organized appearance.
- Place taller items like oil and vinegar bottles on the bottom tray for better stability.
- Set smaller tins and spice jars on the top tier where they are easier to reach.
- Spin the unit fully to check that nothing hits the cabinet walls or the door hinge.
- Group items by usage, such as baking supplies on one side and oils on the other.
22 Under-Sink Tension Rod Spray Station

The area beneath a kitchen or bathroom sink is notorious for being a disorganized mess of cleaning bottles. This clever hack uses a simple tension rod to hang spray bottles by their triggers, freeing up the entire floor of the cabinet. It creates a secondary level of storage that would otherwise go completely unused.
Brushed metal hardware gives the installation a clean and modern look that matches your plumbing fixtures. Glass bottles with uniform labels replace the chaotic mix of plastic packaging for a more serene environment. This setup makes it incredibly easy to grab exactly what you need without moving five other items.
By lifting the bottles, you create plenty of room for baskets or bins underneath to hold sponges and cloths. You can see your entire inventory at a glance, which prevents you from buying duplicate supplies. It is a low-cost solution that makes a massive difference in your daily chores.
Materials Required
- One heavy-duty adjustable tension rod
- Five glass spray bottles with silicone bases
- S-hooks (optional for hanging brushes)
- Waterproof labels
- All-purpose cleaning concentrates
Equipment Required
- Measuring tape
- Level
- Glass cleaner
DIY Instructions
- Measure the width of your under-sink cabinet to ensure your tension rod is the correct size.
- Clean the side walls of the cabinet thoroughly so the rubber ends of the rod can grip tightly.
- Hold the rod at the desired height, making sure it clears the sink basin and any plumbing pipes.
- Twist the rod to extend it until it fits snugly against both sides of the cabinet.
- Use a level to make sure the rod is perfectly horizontal before doing the final tightening.
- Fill your glass bottles with cleaning solutions and apply your waterproof labels to the front.
- Hang each bottle by the trigger mechanism over the rod, spacing them out evenly.
- Ensure the weight is distributed properly so the rod does not slip or bow in the center.
- Place a small basket underneath the rod to hold extra scrub brushes or microfiber towels.
- Check the tension of the rod once a month to ensure it remains secure under the weight of the bottles.
23 Magnetic Refrigerator Spice Tins

Countertop spice racks take up precious prep space and often look cluttered. These magnetic tins attach directly to the side of your refrigerator, turning a flat surface into a vibrant and functional spice wall. The clear lids allow you to see the beautiful colors and textures of your seasonings instantly.
Polished steel finishes blend seamlessly with modern appliances for a high-end look. This system keeps your most-used flavors right at your fingertips while you are standing at the stove. It is a brilliant way to reclaim drawer or cabinet space for larger kitchen gadgets.
The airtight seals on these tins keep your herbs and spices fresher for much longer than standard plastic jars. Since they are magnetic, you can rearrange them into patterns or group them by cuisine type. You will find yourself reaching for new flavors more often when they are this accessible.
Materials Required
- Set of 6 to 12 magnetic spice tins with clear lids
- High-quality dried spices and herbs
- Small funnel for mess-free filling
- Circular chalkboard labels
- White paint pen
Equipment Required
- Microfiber cloth
- Stainless steel cleaner
DIY Instructions
- Clean the side of your refrigerator with stainless steel cleaner to remove any fingerprints or grease.
- Wash the new spice tins in warm soapy water and let them dry completely before use.
- Use a small funnel to fill each tin with your favorite spices, leaving a little room at the top.
- Press the clear lids onto the tins firmly to ensure an airtight seal is formed.
- Write the name of each spice on a chalkboard label using a white paint pen.
- Apply the labels to the side or the top of the tins so they are easy to read.
- Test the magnetic strength by placing an empty tin on the fridge to ensure it does not slide.
- Arrange the filled tins in neat rows or a grid pattern on the side of the appliance.
- Keep spices away from direct heat or sunlight to preserve their potency and color.
- Wipe the clear lids occasionally with a damp cloth to keep your view of the spices crystal clear.
24 Pull-Out Cutting Board with Trash Hole
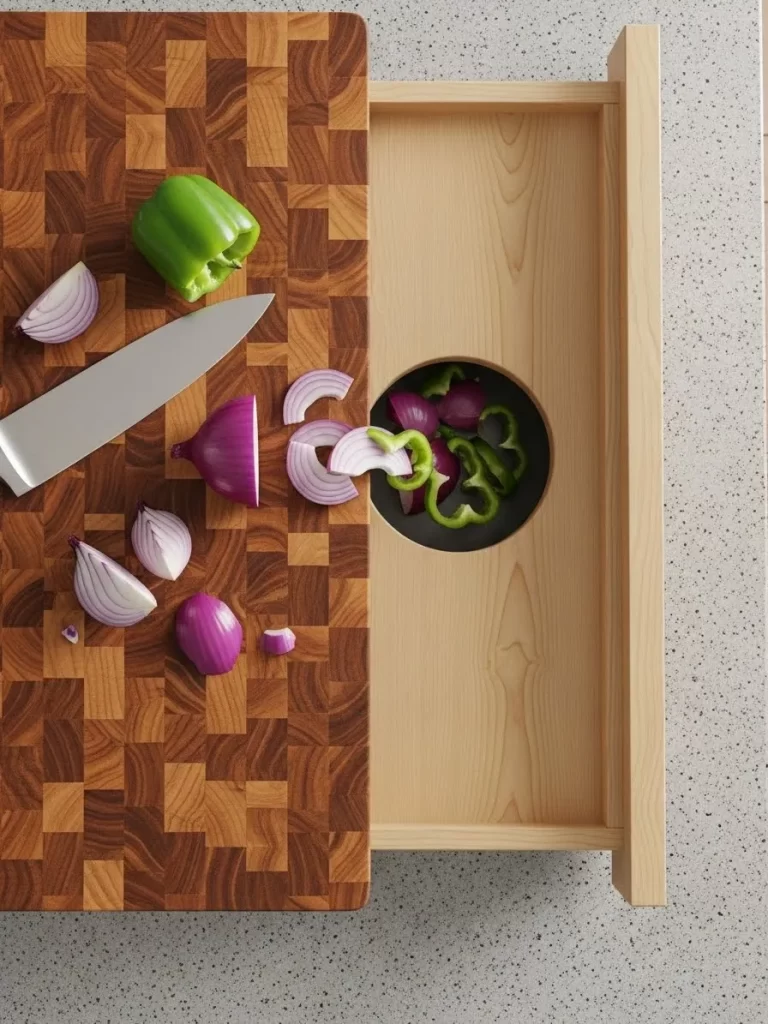
Preparing meals often involves a constant back-and-forth between the counter and the trash can. This integrated pull-out cutting board features a strategic circular cutout that leads directly to a waste bin below. It allows you to sweep vegetable peels and scraps away in one smooth motion without making a mess.
Natural wood grain provides a durable and beautiful surface for all your chopping needs. The board slides hidden into the cabinetry when not in use, keeping your kitchen looking tidy and professional. This design is a total game changer for anyone who loves to cook but hates the cleanup.
Installing this feature maximizes the efficiency of your workspace by combining two steps into one. It prevents juices and scraps from falling onto the floor or staining your countertops. You get more prep area and a cleaner kitchen all in one smart furniture piece.
Materials Required
- One thick maple or walnut butcher block slab
- Heavy-duty undermount drawer slides
- Plastic or metal trash receptacle
- Food-grade mineral oil
- Wood screws
Equipment Required
- Jigsaw with a fine-tooth blade
- Power drill
- Hole saw attachment
- Sandpaper (120 and 220 grit)
- Measuring tape
DIY Instructions
- Measure the opening in your cabinet to determine the exact size for your new pull-out board.
- Cut your butcher block to fit the opening, leaving a small gap on the sides for the slides.
- Use a hole saw or jigsaw to cut a six-inch circle near one end of the wooden board.
- Sand the edges of the hole and the entire surface of the board until they are perfectly smooth.
- Apply several coats of food-grade mineral oil to protect the wood and bring out the grain.
- Install the drawer slides inside the cabinet frame at the correct height for the board.
- Attach the corresponding slide members to the sides of the wooden butcher block.
- Slide the board into the cabinet and ensure it moves smoothly and locks when fully extended.
- Place your trash bin inside the cabinet directly underneath the circular hole in the board.
- Test the setup by chopping a few vegetables and sweeping the scraps directly into the bin.
25 Bamboo Bathroom Leaning Ladder
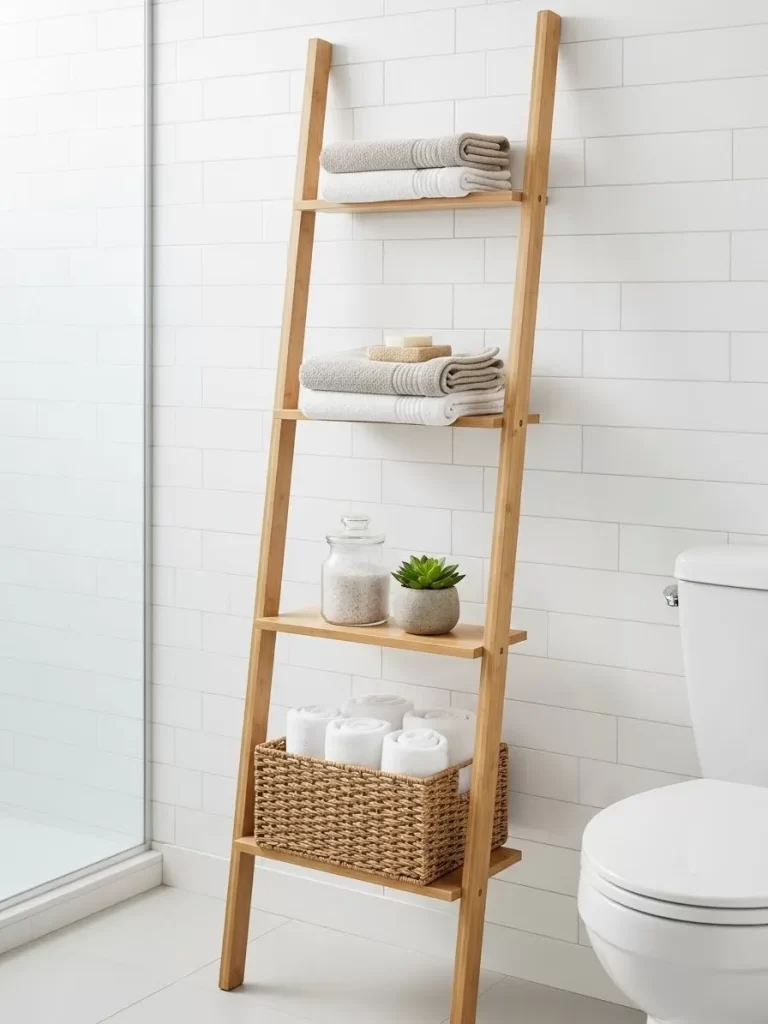
Bathrooms often lack enough wall space for multiple towel bars, leading to damp piles on the floor. This elegant bamboo ladder leans against the wall, providing four tiers of storage without taking up much floor area. It offers a spa-like feel while keeping your towels, soaps, and plants neatly organized.
The warm wood tones contrast beautifully against white subway tiles for a modern, clean aesthetic. You can use the bottom rungs for baskets filled with toilet paper or extra guest linens. It is a versatile piece that can be moved easily whenever you want to refresh your room layout.
Since it does not require drilling into the walls, it is an excellent choice for renters or those with tiled surfaces. The open design allows air to circulate around damp towels so they dry much faster. You will love how this simple addition turns a functional room into a relaxing retreat.
Materials Required
- One 5-foot bamboo or light wood ladder
- Small woven seagrass basket
- Glass apothecary jars
- Small potted succulent
- Non-slip rubber pads
Equipment Required
- Level
- Scissors (to trim pads)
DIY Instructions
- Wipe down the ladder with a damp cloth to remove any dust from the warehouse.
- Apply non-slip rubber pads to the top ends of the ladder where they touch the wall.
- Place similar rubber pads on the feet of the ladder to prevent it from sliding on wet tile.
- Lean the ladder against the wall at a slight angle, ensuring it feels stable and secure.
- Drape your cleanest, fluffiest towels over the top two rungs for a decorative look.
- Place a small woven basket on the third rung to hold washcloths or spare hand towels.
- Set a glass jar filled with bath salts or cotton balls on the widest part of a middle rung.
- Add a small potted plant to one of the tiers to bring a touch of greenery into the space.
- Ensure the weight is distributed evenly so the ladder does not tilt to one side.
- Check that the ladder does not block the path to the shower or the toilet for safety.
26 Recessed Hexagonal Shower Niche

Cluttered shower floors and hanging wire caddies can make a bathroom feel small and unkept. This recessed niche is built directly into the wall, providing a permanent home for your shampoos and body washes. The black hexagonal tile backdrop adds a sophisticated, modern touch to the shower stall.
Integrated LED lighting at the top of the niche makes your bottles glow and helps you see in the steam. This design keeps your products at eye level and prevents the buildup of soap scum on the shower floor. It is a high-end architectural detail that adds significant value to your home.
Matching amber glass bottles with minimalist labels create a cohesive and calm look. You no longer have to worry about knocking over tall bottles while you are washing your hair. This built-in solution is the ultimate way to achieve a clean and organized shower environment.
Materials Required
- Prefabricated shower niche box
- Black hexagonal mosaic tiles
- Amber glass pump bottles
- Waterproof LED light strip
- Thin-set mortar and waterproof grout
Equipment Required
- Tile saw or nippers
- Notched trowel
- Grout float
- Level
- Utility knife
DIY Instructions
- Cut an opening in your shower wall between the studs that matches the size of your niche box.
- Insert the prefabricated niche box into the hole and secure it to the studs with screws.
- Apply a waterproof membrane over the edges of the box and the surrounding wall to prevent leaks.
- Use a notched trowel to spread thin-set mortar onto the back and sides of the niche interior.
- Press your hexagonal tiles into the mortar, using a level to keep the rows perfectly straight.
- Allow the mortar to dry for 24 hours before applying the waterproof grout over the tiles.
- Wipe away excess grout with a damp sponge and let the niche cure completely.
- Install the waterproof LED strip along the top inner edge of the niche for a hidden glow.
- Transfer your favorite soaps into the amber glass bottles and place them inside the niche.
- Seal the grout lines with a professional-grade sealer to keep the black tiles looking sharp.
27 Clear Acrylic Under-Sink Drawers
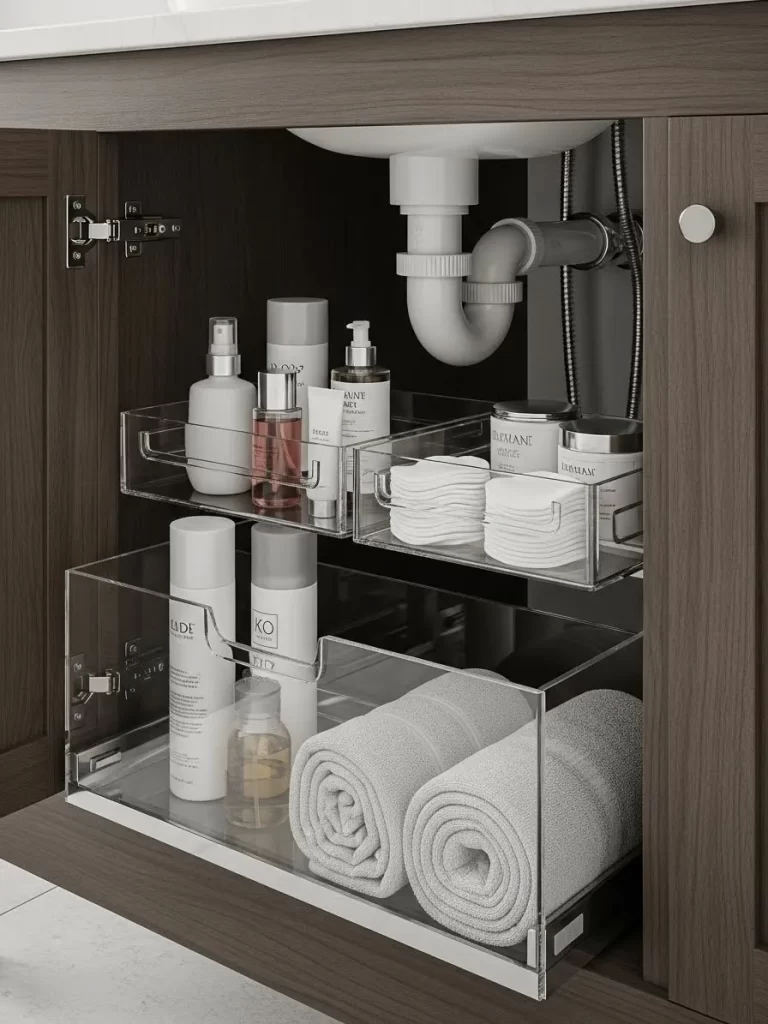
Deep bathroom cabinets are often where beauty products go to be lost and forgotten. These clear acrylic pull-out drawers allow you to see exactly what is stored in the very back of the cupboard. The tiered design makes use of the vertical space around the sink’s plumbing pipes.
The transparent material keeps the area looking bright and organized rather than dark and cluttered. You can group your items by category, such as skincare on the bottom and cotton pads on the top. This system makes your morning routine much faster because you never have to hunt for a specific bottle.
Acrylic is moisture-resistant and incredibly easy to clean, making it perfect for the bathroom. The drawers slide out fully, so you can grab a fresh towel or a new bottle of lotion without reaching into dark corners. It is a simple and effective way to master bathroom organization.
Materials Required
- Two-tier clear acrylic drawer set
- Small acrylic dividers
- White hand towels
- Assorted skincare and hair products
Equipment Required
- Measuring tape
- Cleaning wipes
DIY Instructions
- Remove everything from your bathroom cabinet and wipe the base clean with a disinfectant.
- Measure the space on both sides of the center plumbing pipe to see which drawer sizes will fit.
- Place the acrylic drawer units into the cabinet, ensuring they don’t hit the door when it closes.
- Use small dividers inside the top drawers to keep hair ties and clips from getting jumbled.
- Roll your hand towels neatly and place them in the larger bottom drawers for easy access.
- Arrange your tall bottles in the bottom tier and smaller jars or tins in the top tier.
- Group your items by how often you use them, putting daily essentials in the front.
- Ensure the drawers slide smoothly and don’t catch on the cabinet frame.
- Use the clear view to keep track of your inventory so you know when you’re running low on supplies.
- Wipe the outside of the acrylic occasionally to keep the drawers looking clear and new.
28 Sculptural Gold Rolled Towel Rack
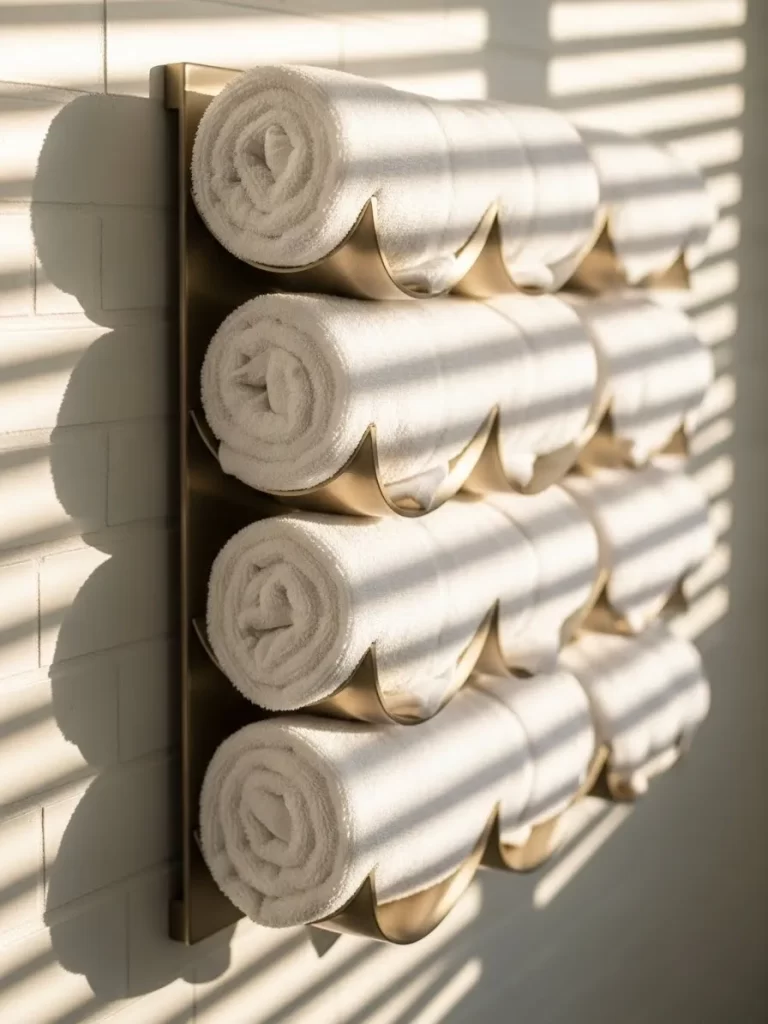
Storing towels can often feel like a utilitarian task that lacks any style. This wall-mounted rack features elegant gold waves that hold rolled towels like pieces of art. It turns your daily linens into a decorative focal point while saving valuable cabinet space.
The brushed gold finish adds a touch of warmth and luxury to a neutral bathroom. By rolling the towels instead of folding them, you save space and prevent the stack from tipping over. This setup is perfect for guest bathrooms where you want the essentials to be clearly visible and inviting.
Mounting the rack vertically uses empty wall space and keeps the floor area open. It creates a spa-like atmosphere where everything feels intentional and curated. You will love the convenience of grabbing a fresh towel right as you step out of the shower.
Materials Required
- Gold-finished wave towel rack
- Matching gold mounting screws
- Heavy-duty wall anchors
- Six to eight fluffy white bath towels
Equipment Required
- Power drill
- Level
- Pencil
- Measuring tape
DIY Instructions
- Choose a visible wall area near the shower or bathtub that has enough room for the rack.
- Hold the rack against the wall and use a level to make sure it is perfectly vertical.
- Mark the screw holes with a pencil so you know exactly where to drill.
- Drill pilot holes into the wall and tap in your heavy-duty anchors for a secure hold.
- Align the rack with the holes and drive the gold screws in until the unit is immovable.
- Lay your bath towels flat on a clean surface and fold them in half lengthwise.
- Roll the towels tightly starting from one end to create a uniform cylindrical shape.
- Slide each rolled towel into one of the gold waves, starting from the bottom and working up.
- Ensure the towels are centered in the rack so the display looks balanced and neat.
- Check the rack periodically to make sure the weight of the damp towels hasn’t loosened the screws.
29 Floating Crown Molding Shoe Ledges

High heels are notoriously difficult to store in a way that doesn’t damage the shoes or take up too much room. This creative hack uses classic crown molding mounted to the wall as a display ledge for your footwear. The heels of the shoes hook over the top edge, keeping them upright and organized.
White molding against a soft gray wall creates a sophisticated boutique look in your bedroom or closet. You can see every pair at a glance, making it much easier to coordinate your outfit for the day. It turns your shoe collection into a vibrant wall installation that saves floor space.
Installing multiple rows of molding allows you to store dozens of pairs on a single wall. It keeps your shoes away from dust and prevents them from getting scuffed in a crowded closet floor. This solution is as beautiful as it is functional for any fashion enthusiast.
Materials Required
- 8-foot lengths of classic crown molding
- White semi-gloss paint
- Long wood screws
- Wall anchors
- Wood filler
Equipment Required
- Miter saw
- Power drill
- Level
- Measuring tape
- Paintbrush
DIY Instructions
- Measure the width of your wall to determine how many sections of molding you need to cut.
- Use a miter saw to cut the ends of the molding at a 45-degree angle for a finished look.
- Paint the molding with a semi-gloss white finish and let it dry completely for 24 hours.
- Mark the wall at 12-inch intervals to ensure enough vertical clearance between the shoe rows.
- Use a level to draw straight lines across the wall where the molding will be mounted.
- Drill pilot holes through the molding and into the wall studs for maximum strength.
- Secure the molding to the wall using long screws and anchors where studs aren’t available.
- Cover the screw heads with wood filler and touch up the paint for a seamless appearance.
- Hook the heels of your shoes over the top edge of the molding, spacing them out evenly.
- Arrange the shoes by color or style to create a stunning and organized visual display.
30 Minimalist Oak Hallway Hook Rail
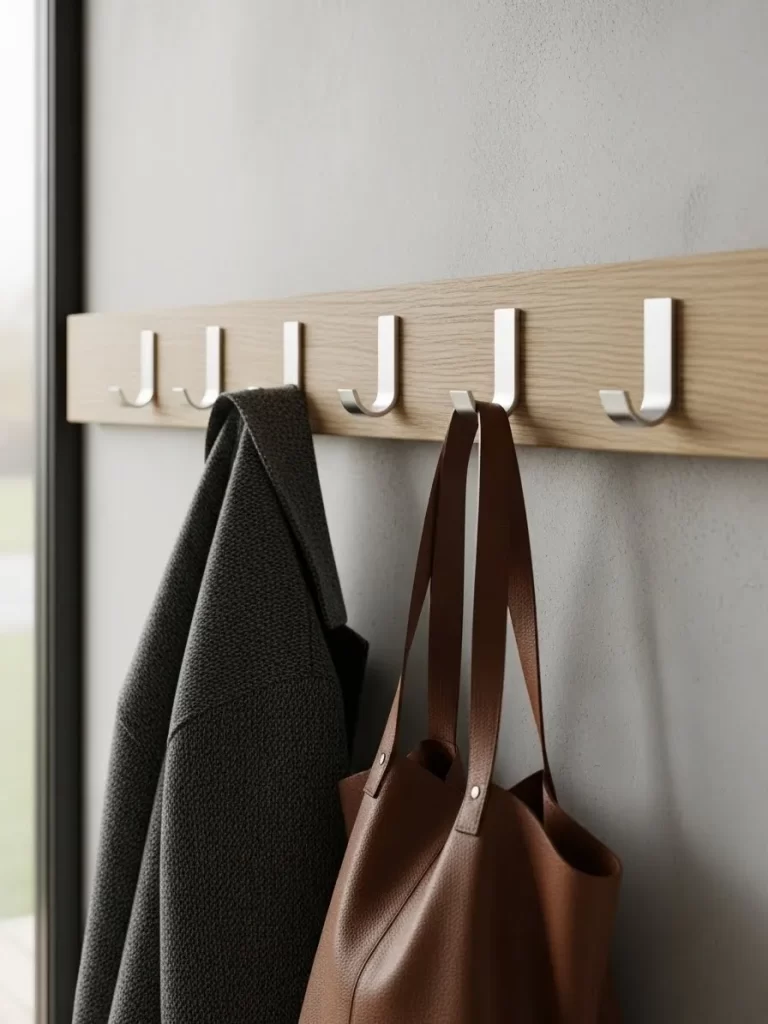
Entryways often become a dumping ground for bags and coats, making the whole house feel disorganized. This simple oak rail features sleek silver J-hooks that provide a dedicated spot for every family member’s gear. The natural wood grain and matte metal finish create a modern, understated look.
Mounting the rail at chest height makes it easy for everyone to hang up their items as soon as they walk in. It keeps the floor clear of tripping hazards and makes the hallway feel much wider. This setup is perfect for small homes that lack a dedicated mudroom or large closet.
The durable hooks can handle the weight of heavy leather bags and winter overcoats without bending. Using a single long rail instead of individual hooks ensures everything stays perfectly aligned. You get a clean, organized entryway that welcomes you home every day.
Materials Required
- One 4-foot solid oak board (1×4)
- Six brushed aluminum J-hooks
- Wood sealant or clear wax
- Heavy-duty mounting brackets
- Wood screws
Equipment Required
- Power drill
- Sandpaper (220 grit)
- Level
- Measuring tape
- Pencil
DIY Instructions
- Sand the oak board thoroughly until the surface is soft and free of any splinters.
- Apply a clear wax or sealant to the wood to protect it from moisture and highlight the grain.
- Mark the positions for your six hooks on the board, spacing them exactly 8 inches apart.
- Drill small pilot holes at your marks to prevent the wood from splitting when you add the hooks.
- Screw the J-hooks onto the board, ensuring they are all straight and tightly secured.
- Find the wall studs in your hallway and mark their positions at the desired mounting height.
- Use a level to make sure your marks are even so the rail doesn’t sit at an angle.
- Drill through the board and into the wall studs, securing the rail with long wood screws.
- Cover the mounting screws with matching wood plugs or leave them visible for an industrial look.
- Test the strength of the hooks by hanging your heaviest bag and checking for any movement.
31 Seagrass Entryway Bench Baskets
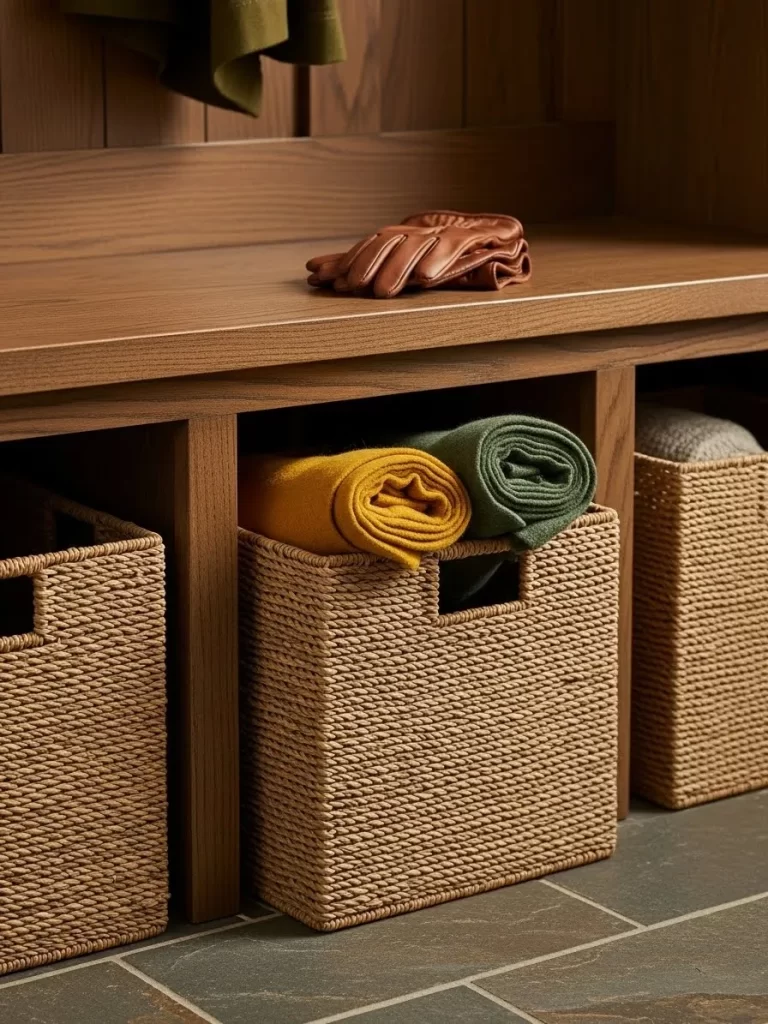
Mudrooms often turn into a chaotic pile of outdoor gear and stray gloves. These woven seagrass baskets slide perfectly into bench cubbies to hide the mess. They bring a natural texture to your entryway while keeping seasonal accessories like hats or scarves within easy reach.
Rolling your larger textiles into these bins prevents deep creases and makes finding your favorite wrap a simple task. The sturdy handles allow you to pull the entire basket out to sort through your items under better light. It is a fantastic way to maintain a clean, organized look in the busiest part of your home.
Matching the basket size to your furniture creates a high-end, custom appearance for a fraction of the cost. Using natural materials helps the space feel grounded and warm. You will love how much faster your morning routine becomes when every accessory has a dedicated home.
Materials Required
- Rectangular seagrass or wicker baskets
- Heavy-duty clear furniture wax
- Leather scraps for custom tags
- Permanent marker or label stamps
- Soft microfiber cloth
Equipment Required
- Measuring tape
- Hole puncher
- Twine or zip ties
DIY Instructions
- Measure the height, width, and depth of your bench cubbies to ensure a snug fit for the baskets.
- Wipe down the new baskets with a microfiber cloth to remove any loose natural fibers.
- Apply a light coat of clear furniture wax to the bottom of the baskets to help them slide smoothly on wood.
- Cut small rectangles from leather scraps to serve as durable, stylish identification tags.
- Use a hole puncher to create a small opening at the top of each leather tag.
- Write the names of family members or categories like “Gloves” on the tags with a marker.
- Attach the tags to the front handles of the baskets using twine or hidden zip ties.
- Roll your scarves and winter gear tightly to maximize the internal capacity of each bin.
- Slide the baskets into the cubbies, ensuring the labeled handles face outward for easy access.
- Check the bottom of the baskets every few months to ensure the wax is still providing a smooth glide.
32 Wall-Mounted Entryway Key and Mail Hub

Lose the habit of tossing your mail and keys onto the kitchen counter where they get buried. This sleek, matte gray wall organizer provides a dedicated slot for incoming letters and three sturdy hooks for your essentials. It turns a small patch of empty wall space into a high-functioning command center.
The deep pocket safely holds long envelopes and sunglasses without them falling out or getting scratched. Since it mounts directly to the wall, your surfaces remain clear for decor or food prep. It is a smart, minimalist solution for anyone living in a smaller apartment or home.
Installation is quick and provides an immediate boost to your home organization. The industrial finish fits seamlessly into modern decor styles while remaining incredibly durable. You will never have to hunt for your car keys again once they have this permanent landing spot.
Materials Required
- Metal wall-mounted mail organizer
- Heavy-duty drywall anchors
- Two-inch black screws
- Small level
- Masking tape
Equipment Required
- Power drill
- Drill bit (matching anchor size)
- Phillips head screwdriver
- Pencil
DIY Instructions
- Choose a spot near your main entrance that is at eye level for easy viewing of mail.
- Hold the organizer against the wall and use a level to ensure it is perfectly straight.
- Mark the mounting holes with a pencil through the pre-drilled slots in the metal frame.
- Place a small piece of masking tape over your marks to prevent the drywall from cracking while drilling.
- Drill pilot holes into the wall at each marked location.
- Tap the plastic drywall anchors into the holes until they sit flush against the surface.
- Align the organizer with the anchors and drive the screws in with a screwdriver.
- Tighten the screws until the unit is immovable and does not wobble when you pull on the hooks.
- Drop your daily mail into the top slot and hang your heaviest key set on a hook to test.
- Wipe the unit with a damp cloth to remove any fingerprints from the installation process.
33 Felt Bedside Tech Caddy
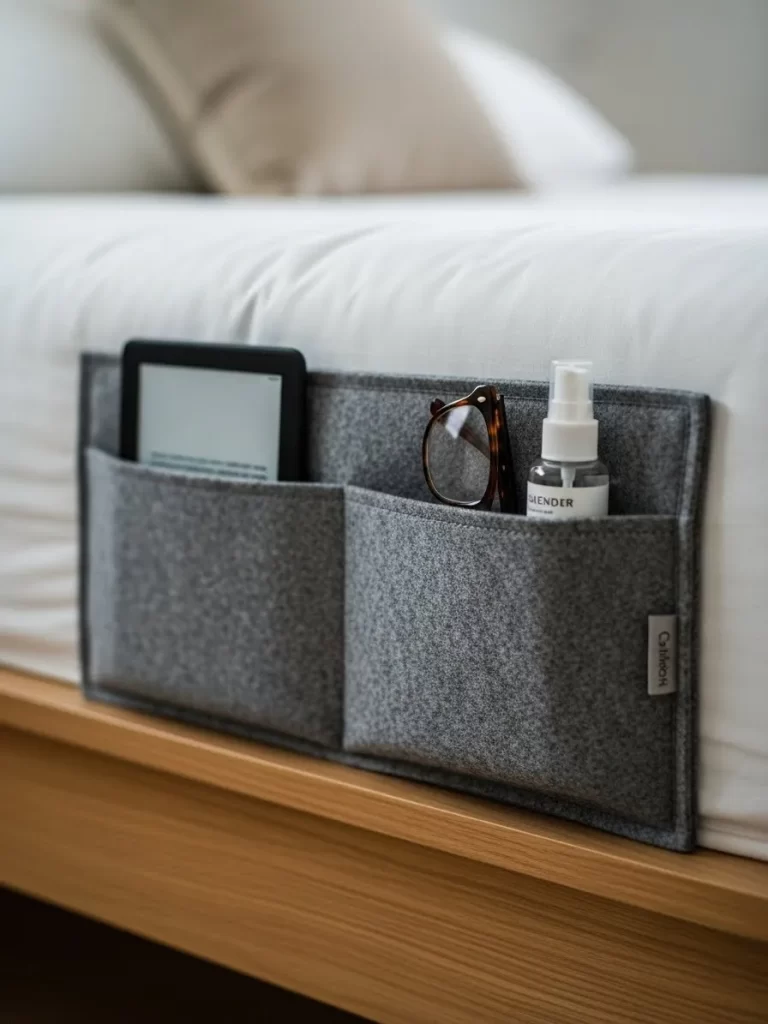
Modern nightstands often lack the room for bulky tablets and multiple pairs of glasses. This soft felt caddy slides between your mattress and bed frame to keep your devices safe and accessible. It protects your expensive screens from scratches while keeping them off the floor.
The neutral gray fabric blends into your bedding for a subtle, integrated appearance. Two deep pockets allow you to separate your e-reader from smaller items like hand lotion or glasses. It is a brilliant way to declutter your sleep space without adding a second piece of furniture.
Having your essentials right at your side makes late-night reading much more comfortable. The flexible material expands to fit your items but snaps back to keep a slim profile. You will appreciate the extra surface area you gain on your nightstand for a glass of water or a lamp.
Materials Required
- Thick industrial felt sheet (1/4 inch thickness)
- Heavy-duty fabric glue or a sewing kit
- Non-slip shelf liner scraps
- Measuring tape
Equipment Required
- Fabric scissors
- Chalk or fabric marker
- Large binder clips
- Iron (for crisp folds)
DIY Instructions
- Cut a long rectangle of felt approximately 12 inches wide and 30 inches long.
- Fold one end up about 10 inches to create the main pocket area.
- Use an iron on a low setting to press a sharp crease into the bottom of the fold.
- Apply heavy-duty fabric glue along the side edges of the folded section.
- Secure the edges with binder clips while the glue dries to ensure a permanent bond.
- Sew a vertical line down the center of the pocket if you want two smaller compartments instead of one large one.
- Cut a piece of non-slip liner and glue it to the long “tail” section that slides under the mattress.
- Let the glue cure for 24 hours to ensure it can handle the weight of your tablet.
- Slide the flat tail section deeply between the mattress and the box spring or frame.
- Place your tablet and glasses into the pockets to check the height and accessibility from your bed.
34 Hidden Wall Art Jewelry Cabinet
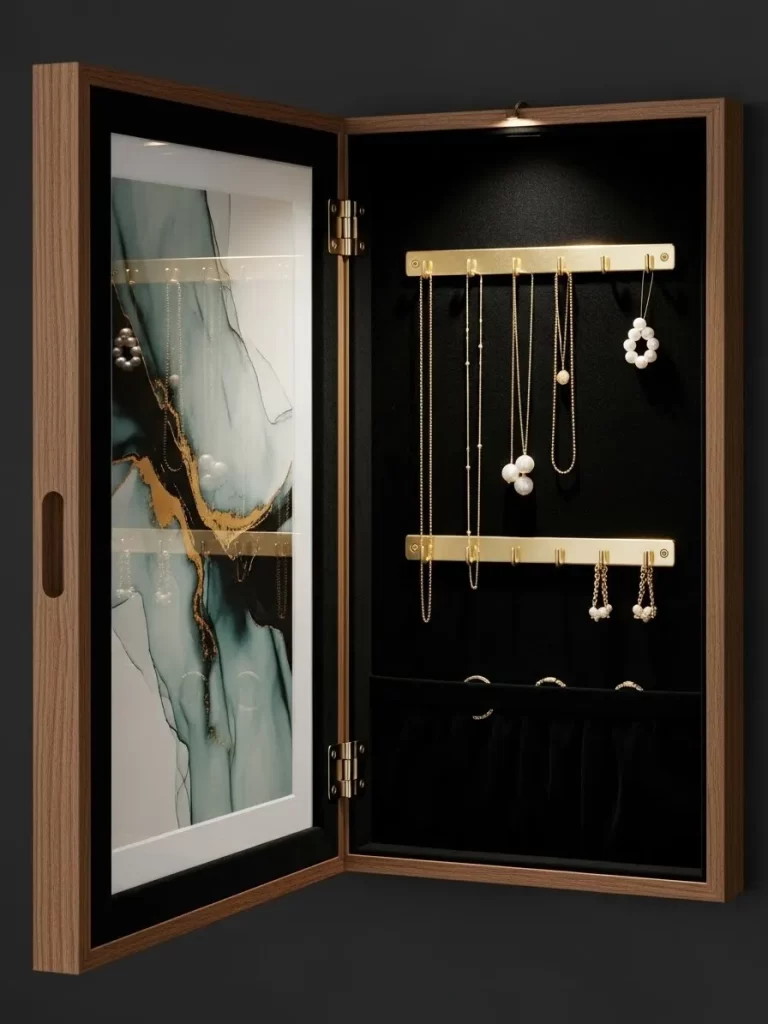
Keeping your jewelry organized often means dealing with tangled necklaces and missing earrings in a messy drawer. This clever cabinet features a beautiful abstract art panel that swings open to reveal a massive organization station. It uses vertical wall space to store dozens of pieces without cluttering your vanity.
The interior is lined with soft black velvet and features specialized hooks for necklaces and slots for rings. Gold-finished hardware adds a touch of luxury every time you open the door to choose your accessories. It is a sophisticated way to keep your valuables safe while adding a custom art piece to your bedroom.
Integrated LED lighting at the top of the cabinet ensures you can see every sparkle, even in a dim room. The slim wooden frame keeps the unit looking like a standard picture frame when closed. This dual-purpose hack is the ultimate way to maximize every inch of your wall space.
Materials Required
- Wall-mounted jewelry armoire with art front
- Internal LED puck light
- Matching wood touch-up marker
- Heavy-duty French cleat mount
- Level
Equipment Required
- Power drill
- Stud finder
- Screwdriver
- Measuring tape
DIY Instructions
- Use a stud finder to locate two wall studs in the area where you want to hang the art.
- Mark the height for the French cleat, ensuring the cabinet will be centered at eye level.
- Screw the wall half of the French cleat into the studs using a level to keep it perfectly straight.
- Attach the corresponding bracket to the back of the jewelry cabinet if it is not already installed.
- Lift the cabinet and slide it onto the wall bracket until it locks into place.
- Open the cabinet door and stick the battery-operated LED light to the top interior ceiling.
- Arrange your necklaces on the gold hooks, starting with the longest pieces to prevent tangling.
- Slide your rings into the velvet-lined slots and place your earrings on the designated mesh or bar.
- Use a wood marker to hide any small scuffs on the frame from the installation process.
- Swing the art door closed and check that it stays shut via the magnetic or latch mechanism.
35 Rustic Wood Blanket Ladder
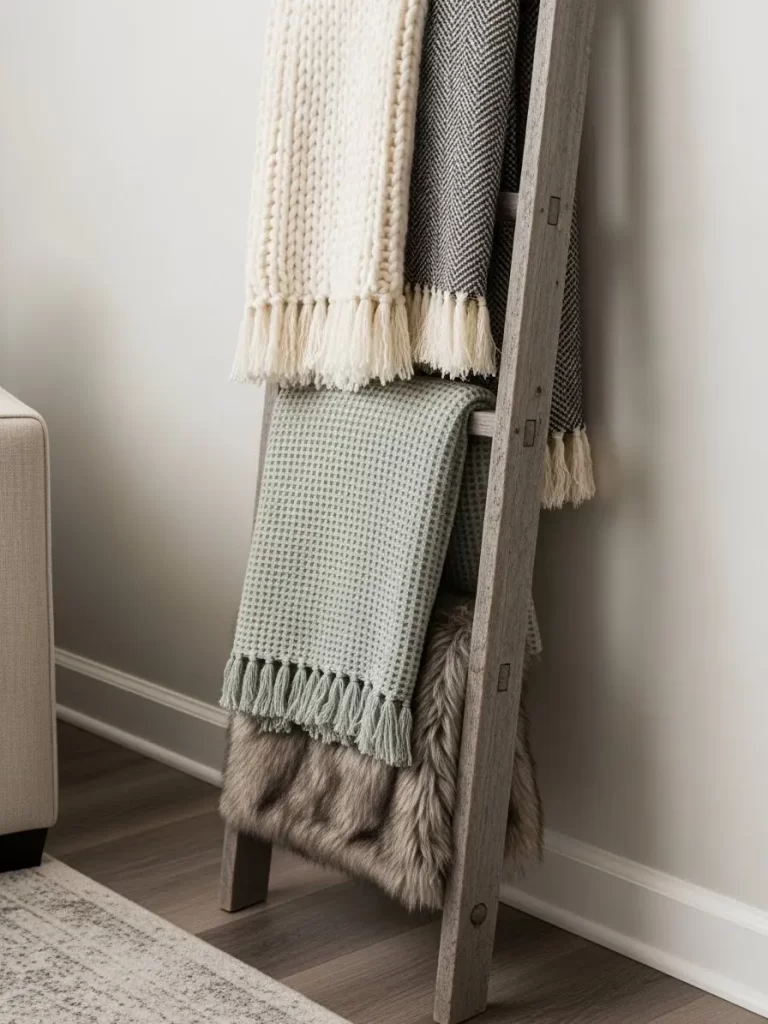
Living rooms often end up covered in throw blankets that make the sofa look unkept. This leaning wood ladder provides multiple rungs to display your favorite knits while keeping them off the floor. It adds a rustic, farmhouse aesthetic that fills an empty corner with warmth and purpose.
The vertical design allows you to stack different textures, from chunky wool to sleek faux fur, for a cozy visual display. Since it leans against the wall, it requires no permanent installation or heavy hardware. It is an easy way to move your storage around the room whenever you feel like redecorating.
Using a ladder prevents blankets from getting buried in deep baskets where they might develop musty odors. Each textile stays aired out and ready for a movie night. You will love how this simple piece of wood transforms your room into a more inviting and organized space.
Materials Required
- Reclaimed wood or 2×4 lumber
- Coarse and fine-grit sandpaper
- Wood stain or matte sealant
- Rubber floor protectors
- Wood glue
Equipment Required
- Power drill
- Wood screws
- Miter saw (or hand saw)
- Paintbrush
- Measuring tape
DIY Instructions
- Cut two long boards to 6 feet for the side rails and four shorter boards to 18 inches for the rungs.
- Sand all pieces thoroughly with coarse grit to remove splinters, then finish with fine grit for a smooth touch.
- Mark the side rails every 12 inches to indicate where the rungs will be attached.
- Drill pilot holes into the side rails at your marks to prevent the wood from splitting.
- Apply wood glue to the ends of the rungs and align them with the pilot holes.
- Drive wood screws through the rails and into the rungs to create a sturdy ladder frame.
- Apply your chosen stain or sealant with a brush and let it dry for at least 12 hours.
- Attach rubber pads to the top ends of the rails where they will touch the wall.
- Place rubber protectors on the feet of the ladder to prevent it from sliding on hard floors.
- Lean the ladder against the wall and drape your fluffiest blankets over the rungs for a cozy finish.
36 Under-Bed Rolling Clear Storage Bins
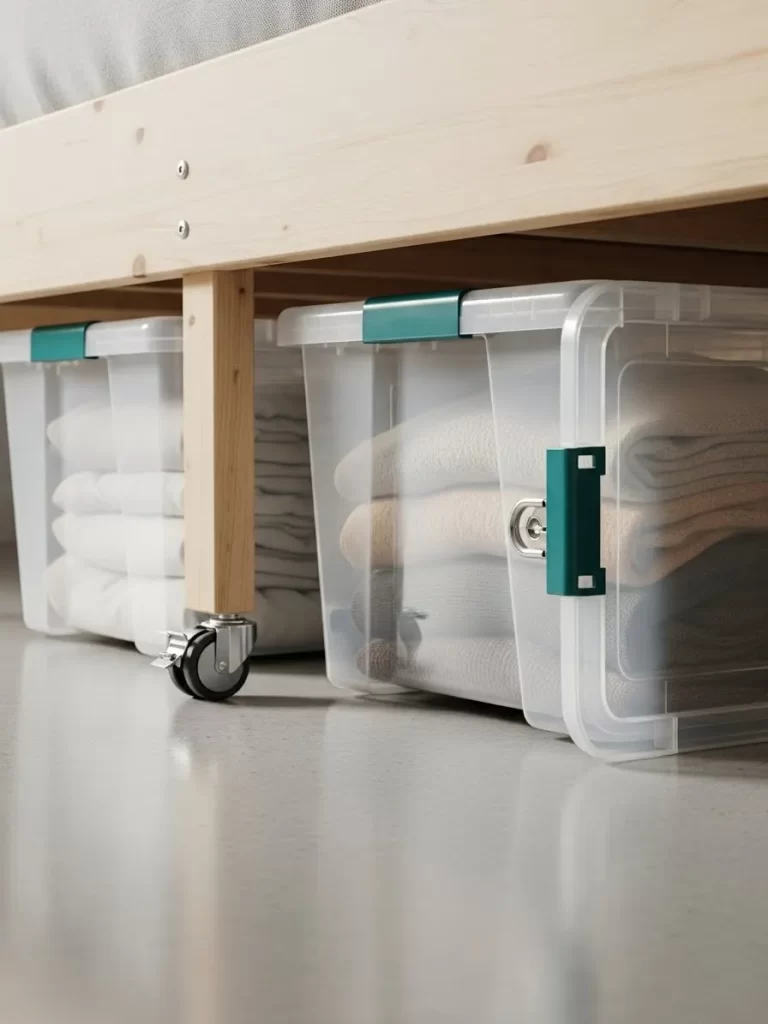
The space under your bed is a prime real estate area that often collects nothing but dust. These clear rolling bins turn that void into a high-capacity closet for seasonal clothes and extra linens. The transparent plastic allows you to see exactly what is inside without having to slide every bin out.
Durable casters on the bottom ensure the bins glide smoothly over carpet or hardwood with minimal effort. Integrated latches keep the lids secure and protect your textiles from dust and pests. It is a fantastic way to store bulky items like winter sweaters while keeping your main closet clear for daily wear.
Using rolling bins makes cleaning under the bed much faster since you can move everything in seconds. The low-profile design fits under almost any standard bed frame. You will be amazed by how much extra floor space you find once your off-season gear is tucked away.
Materials Required
- Low-profile clear plastic bins with lids
- Four 1-inch swivel casters per bin
- Industrial-strength double-sided mounting tape
- Cardstock for labels
- Large binder clips
Equipment Required
- Measuring tape
- Rubbing alcohol
- Scissors
DIY Instructions
- Measure the height of the gap under your bed to ensure your chosen bins will clear the frame.
- Clean the bottom four corners of the bins with rubbing alcohol to remove any manufacturing oils.
- Cut squares of the heavy-duty mounting tape and apply them firmly to the caster plates.
- Press the casters onto the bottom corners of the bin and hold for 60 seconds to ensure a strong bond.
- Let the tape cure for several hours before loading the bin with heavy clothing.
- Fold your clothes using a vertical method so you can see every item through the clear sides.
- Place the lid on the bin and snap the latches shut to create a dust-proof seal.
- Create a bold label on cardstock and tape it to the end of the bin that faces outward.
- Slide the bin under the bed, ensuring the wheels move freely and do not catch on the rug.
- Pull the bin out once a month to rotate your items and check for any dust buildup on the lid.
37 Magnetic Workshop Tool Rail

Workbenches often become a graveyard for loose wrenches and pliers that slow down your projects. This heavy-duty magnetic rail offers a powerful solution by gripping your metal tools firmly against the wall. It keeps every wrench and screwdriver visible and ready for action in a single row.
Black industrial coating ensures the bar looks professional while resisting scratches from heavy steel equipment. You can mount it at eye level to free up every square inch of your table for actual building. This setup prevents the frustration of digging through a deep, messy toolbox for a specific size.
Having your tools organized vertically makes it much easier to spot if something is missing at the end of the day. The magnets are strong enough to hold heavy pliers and even small hammers without slipping. It is a simple upgrade that turns a chaotic garage into a high-efficiency workshop.
Materials Required
- One 24-inch high-power magnetic tool bar
- Heavy-duty wall anchors
- Two-inch steel screws
- Level
- Pencil
Equipment Required
- Power drill
- Drill bit set
- Phillips head screwdriver
- Measuring tape
DIY Instructions
- Select a wall area directly above your workbench that is easy to reach while standing.
- Hold the magnetic rail against the wall and use a level to ensure it is perfectly horizontal.
- Mark the mounting holes on the wall with a pencil through the end brackets of the rail.
- Drill pilot holes into the wall at your marks, ensuring they are deep enough for the anchors.
- Tap the plastic wall anchors into the holes until they are flush with the drywall or wood.
- Place the magnetic bar over the anchors and drive the screws in tightly with your screwdriver.
- Test the strength of the mount by pulling on the bar to ensure it does not move.
- Arrange your wrenches by size from largest to smallest for a clean, organized appearance.
- Attach your pliers and screwdrivers with the handles facing upward for a better grip.
- Wipe the magnetic surface once a week to remove any metal shavings or oil buildup.
38 Garage Garden Tool Pegboard
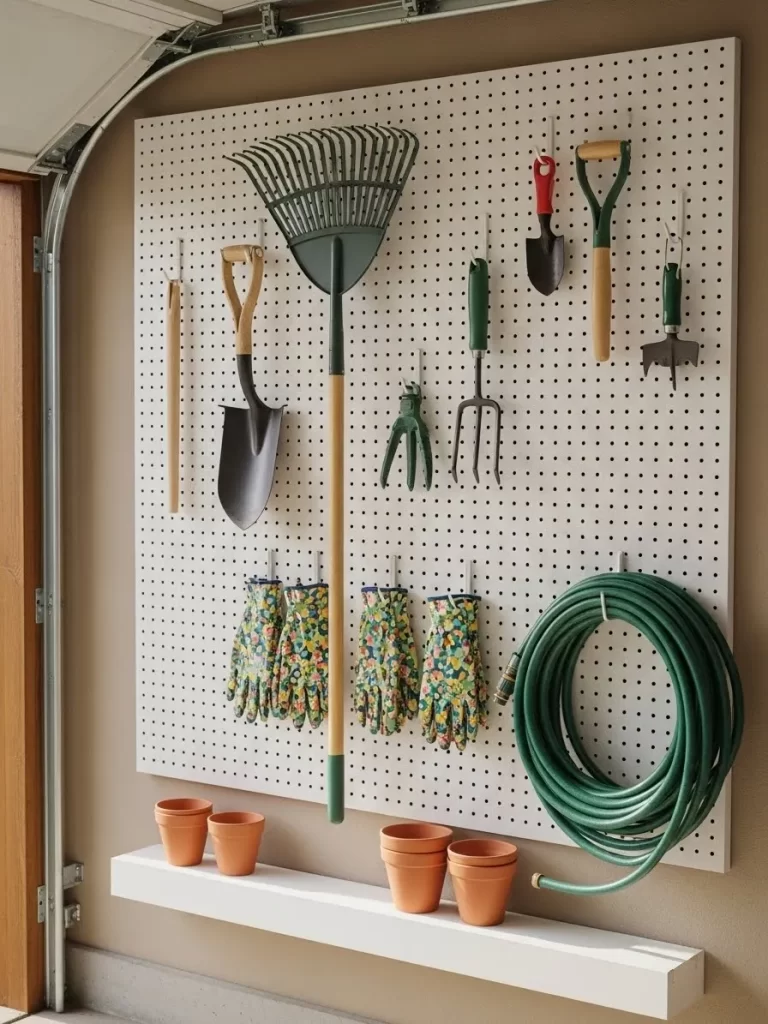
Garden rakes and shovels are notorious for falling over and creating a tripping hazard in the garage. This large white pegboard system provides a custom hanging spot for every outdoor tool you own. It utilizes vertical wall space to keep your floor clear for your car or lawnmower.
Hooks of various sizes allow you to hang everything from heavy shovels to delicate gardening gloves. The clean white background makes it easy to see exactly where each item belongs. It is a fantastic way to organize your landscaping gear for the busy spring season.
Adding a small shelf at the bottom provides a home for terracotta pots and watering cans. You will love how much more spacious your garage feels when your tools are neatly displayed on the wall. This system is durable enough to last through years of heavy use.
Materials Required
- Large 4×8 foot white pegboard sheet
- Assorted pegboard hook kit
- 1×2 wood furring strips for the frame
- Wood screws and wall anchors
- White wood trim for the outer edge
Equipment Required
- Power drill
- Circular saw or hand saw
- Level
- Stud finder
- Measuring tape
DIY Instructions
- Measure the wall area in your garage and cut the pegboard to fit the space using a saw.
- Cut the 1×2 wood strips to create a rectangular frame that will sit behind the pegboard.
- Screw the wood frame into the wall studs to create a gap for the hooks to enter the holes.
- Lift the pegboard and screw it into the wood frame, ensuring it is level and secure.
- Attach the white wood trim around the edges of the board for a finished, professional look.
- Insert long straight hooks for rakes and shovels, spacing them out to prevent overlapping.
- Use smaller J-hooks for hand trowels, shears, and your favorite pair of work gloves.
- Secure a small wire shelf to the bottom of the board for your empty garden pots.
- Coil your garden hose and hang it on a large heavy-duty hook to keep it from kinking.
- Group your tools by season or function to make finding them even faster during yard work.
39 Labeled Industrial Storage Bins

Basements and storage rooms often become a sea of identical gray bins that make finding items impossible. These heavy-duty plastic totes feature bold, oversized labels that tell you exactly what is inside from across the room. It is the ultimate system for managing holiday lights, camping gear, and winter decor.
The uniform gray color keeps the room looking tidy and cohesive even when stacked to the ceiling. Each bin features a reinforced lid that allows for safe, stable stacking to maximize your vertical space. You can easily find your “Winter Decor” without opening ten different boxes first.
Using professional-grade bins protects your belongings from moisture and dust over long periods. The recessed handles make it easy to lift and move the containers when you need to access items in the back. This organization method turns a cluttered basement into a structured and manageable archive.
Materials Required
- Set of 10 matching gray industrial storage totes
- Large white adhesive label sheets
- Permanent black marker
- Clear packing tape (for extra label protection)
- Rubbing alcohol
Equipment Required
- Measuring tape
- Scissors
- Step ladder
DIY Instructions
- Group all your loose items into categories like “Holiday Lights” or “Camping Gear.”
- Clean the front surface of each bin with rubbing alcohol to ensure the labels stick permanently.
- Cut the adhesive label sheets into large rectangles that are at least six inches wide.
- Write the category names in bold, block letters using a permanent black marker for high visibility.
- Apply the labels to the center of the bins, making sure they are straight and free of air bubbles.
- Place a piece of clear packing tape over each label to prevent the ink from smudging over time.
- Pack your items into the bins, placing the heaviest objects at the bottom for better stability.
- Snap the lids on firmly and check that the latches are fully engaged to keep out dust.
- Stack the bins against the wall, placing the most frequently used categories on the middle shelf.
- Ensure the labels are all facing outward so you can read them easily from the doorway.
40 PVC Drill and Power Tool Rack

Power drills are some of the most used tools in a workshop, yet they often clutter up valuable bench space. This creative DIY rack uses short sections of PVC pipe mounted under a shelf to create individual holsters for your drills. It keeps your most-used tools at your fingertips while keeping the cords and batteries organized.
The white PVC contrast against the wood shelf provides a clean, modern look for your garage or shop. Each holster is custom-fit to the handle of your drill, preventing them from falling or getting knocked over. It is a brilliant way to use the empty space underneath your existing shelving units.
Storing drills upside down protects the chuck and bits from collecting dust or getting damaged on the counter. You can add as many holsters as you need to accommodate your entire collection of cordless tools. This project is affordable, easy to build, and provides a massive boost to your workshop efficiency.
Materials Required
- 3-inch diameter PVC pipe
- One-inch wood screws
- Large flat washers
- PVC primer and cement (optional for end caps)
- Sandpaper
Equipment Required
- Power drill with screwdriver bit
- Miter saw or hacksaw
- Measuring tape
- Pencil
DIY Instructions
- Measure the length of your drill handles to determine how long each PVC section should be.
- Cut the 3-inch PVC pipe into 6-inch segments using a miter saw or a hacksaw for clean edges.
- Sand the cut ends of the PVC segments until they are smooth and free of any plastic burrs.
- Cut a 1.5-inch wide slot down the length of each pipe segment to allow the drill handle to slide in.
- Drill two pilot holes through the top of the PVC pipe opposite the slot you just cut.
- Hold the PVC segment against the underside of your wooden workbench or shelf.
- Use wood screws and large washers to secure the pipe to the wood through your pilot holes.
- Repeat this process for each drill, spacing the holsters about 5 inches apart for eas
y access.
- Slide your drills into the holsters with the battery facing outward for a secure and tidy fit.
- Check the screws periodically to ensure the weight of the drills hasn’t loosened the mount.
41 Heavy Duty Overhead Garage Bin Tracks

Standard ceiling racks sometimes make it difficult to pull just one specific container without disturbing the others. This track system allows individual plastic totes to slide independently along heavy steel rails. It turns the empty peak of your garage roof into a high-capacity warehouse that stays completely out of your way.
Each rail is spaced to catch the sturdy lip of a standard storage bin for a secure, floating fit. This design prevents the “tower of bins” problem where the item you need is always at the very bottom. You can simply slide the correct category toward your ladder and leave the rest of the ceiling undisturbed.
The industrial-strength steel can support hundreds of pounds when bolted into the structural rafters of your home. It is a fantastic long-term solution for heavy seasonal gear like camping equipment or snow tires. You will appreciate how much floor space you reclaim for your vehicles and hobbies.
Materials Required
- Heavy-duty steel C-channel rails
- Industrial lag bolts and washers
- Matching heavy-duty plastic storage totes
- High-visibility adhesive labels
- Steel spacers for rail alignment
Equipment Required
- Power drill with high-torque settings
- Impact driver or socket wrench
- Stud finder with deep-scan capability
- Sturdy A-frame ladder
- Chalk line for straight installation
DIY Instructions
- Determine the width of the top lip on your storage bins to know exactly how far apart to space the rails.
- Use a stud finder to locate the ceiling joists and mark their center points clearly with a pencil.
- Snap a chalk line across the ceiling to ensure your rails will be perfectly parallel for a smooth slide.
- Hold the first steel rail against the ceiling and drill pilot holes directly into the wooden joists.
- Secure the rail using lag bolts and washers, ensuring it is tightened until it is completely flush with the ceiling.
- Use a spacer block to position the second rail at the precise distance required to hold your bin lips.
- Bolt the second rail into the joists, checking frequently with a level to ensure the tracks remain even.
- Slide an empty bin into the track to test the clearance and make sure it moves without catching.
- Label the bottom of each bin in large letters so you can read the contents from the garage floor.
- Load your bins with gear and slide them into place, starting from the back of the garage and working forward.
42 Grid Wall Sports Equipment Center
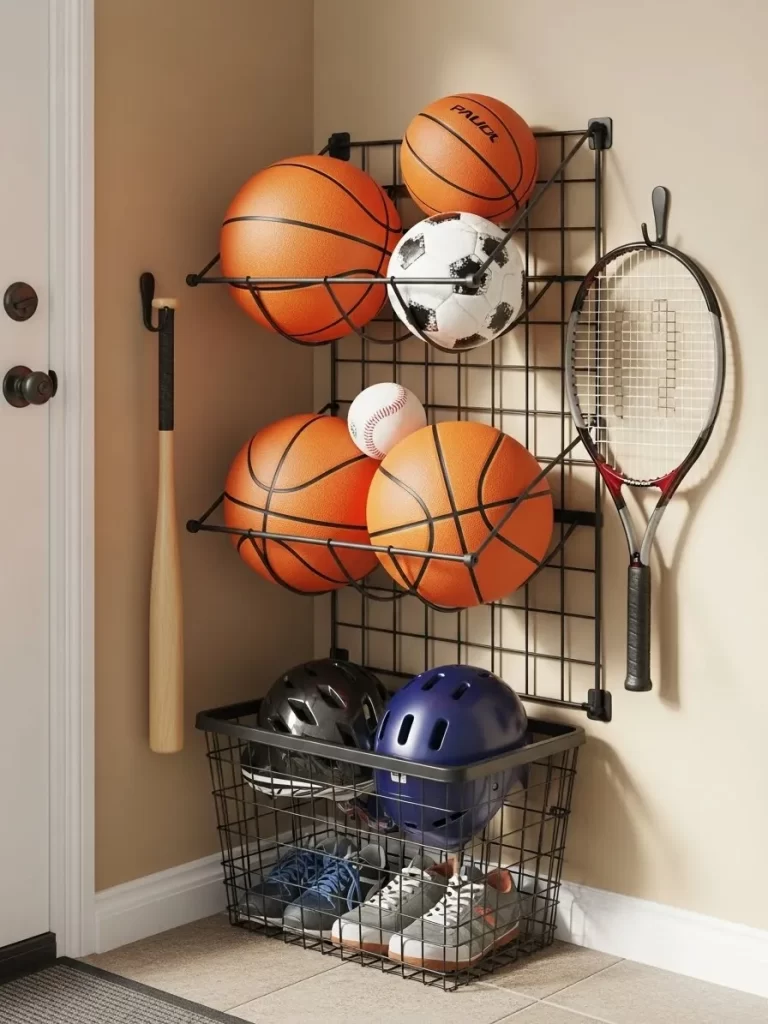
Sports gear often ends up in a messy pile near the door, creating a constant tripping hazard. This black wire grid wall provides a versatile vertical surface for basketballs, rackets, and helmets. It allows you to customize the layout with various hooks and baskets to fit your family’s specific hobbies.
Slanted wire shelves are designed to cradle balls so they stay put instead of rolling across the floor. Individual hooks on the side are great for hanging baseball bats and tennis rackets at an easy-to-reach height. It turns a chaotic corner into a structured display that looks organized and professional.
A large wire bin at the base provides the perfect spot for shoes and bulky items like knee pads. Since the entire system is open, your gear can air out properly after a long practice or game. You will love how much easier it is to get out the door when everything is exactly where it belongs.
Materials Required
- Two large black wire grid wall panels
- Grid wall wall-mounting clips
- Specialized ball cradles and slanted shelves
- Utility hooks for bats and rackets
- Heavy-duty wire floor basket
Equipment Required
- Power drill
- Level
- Wall anchors for masonry or drywall
- Measuring tape
- Pencil
DIY Instructions
- Measure the corner area where you want to install the center and mark the height of the first panel.
- Use a level to ensure your mounting clips are aligned horizontally before you begin drilling.
- Drill pilot holes and insert heavy-duty anchors to support the weight of the metal grid and sports gear.
- Screw the mounting clips into the wall and snap the first wire grid panel into place.
- Attach the second panel directly below or beside the first, depending on your available wall space.
- Clip the slanted ball cradles onto the grid at chest height for easy access to basketballs and soccer balls.
- Install the utility hooks on the outer edges of the grid to hold bats, rackets, and umbrellas.
- Place the large wire basket at the very bottom to catch shoes, cleats, and smaller items like baseballs.
- Arrange your helmets on the top rungs where they stay protected and out of the way of foot traffic.
- Test the stability of the entire grid by hanging your heaviest items and checking for any loose clips.
Organizing a home takes time and effort. You do not need to finish every project in a single weekend. Start with one small area and build momentum as you see the results of your labor.
A tidy house allows you to focus on what truly matters. You will save hours every week once you stop searching for lost keys or missing tools. These habits create a peaceful environment for you and your family to enjoy.
Key Takeaways
- Utilize every vertical surface including walls and the back of doors.
- Search for hidden gaps under furniture or inside staircases.
- Group similar items in clear bins to make your inventory visible.
- Label everything so every family member knows where items belong.
- Use multiuse furniture to serve more than one purpose in small rooms.