
Waking up to a chilly living room can make even the happiest morning feel unwelcome. If your sanctuary feels more like a refrigerator, you are not alone. The solution often involves much more than just cranking up the thermostat. Cold air seeps in through subtle weak points like windows, floors, and sparse decor.
Combatting this cold requires a deliberate, multi-layered strategy that addresses both heat retention and psychological warmth. We are moving beyond simple blankets to explore 36 transformative layering secrets. These techniques use textiles, color, texture, and light to create a dense, insulated envelope of comfort around your seating area.
Ready to reclaim your space? These practical, detailed secrets will turn your cold living room into an undeniably cozy retreat, ensuring warmth radiates from every surface and corner. Prepare to build a truly warm and inviting sanctuary right in the heart of your home.
1. Textured Floor Layering (The Heat Trap)

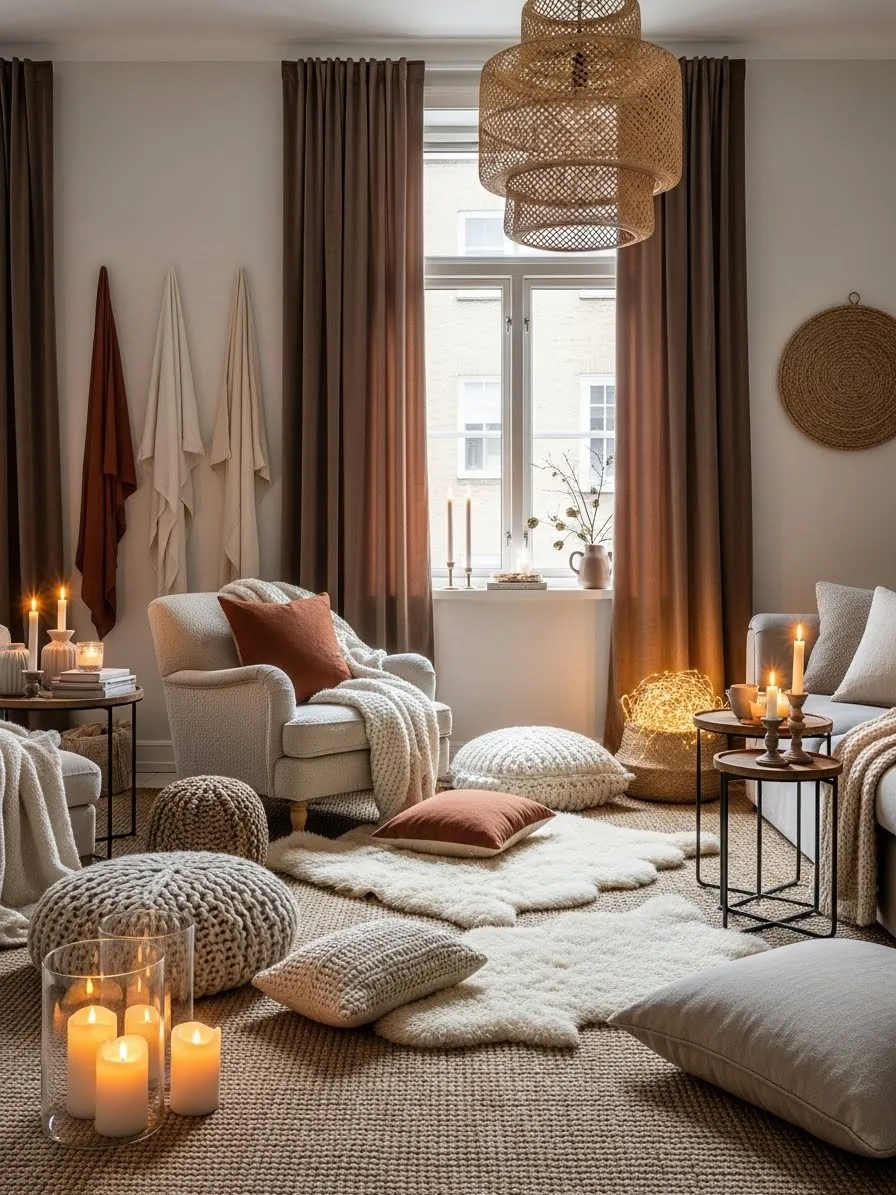
Adding textiles to your floor is perhaps the fastest way to combat that bone-chilling cold that rises from the foundation. This living room instantly feels more inviting when you soften the hard surfaces beneath your feet. The method shown here uses a combination of materials to insulate and appeal to the senses.
A large, foundational rug, like one made of braided jute or sisal, grounds the seating area beautifully. On top of this, placing smaller, plush rugs introduces luxurious texture. Soft sheepskins and thick woven cushions work together to seal in warmth, preventing cold air from seeping up through the floorboards.
Warm lighting from the rattan pendant and multiple candle groupings reinforces the cozy theme, highlighting the rich, earthy tones in the layered throws and floor accessories. This dense application of varied textures ensures that every cold, hard surface is covered, making the room visually and physically warm.
DIY: Creating a Layered Rug and Cushion Zone
This focuses on thoughtful textile placement to maximize warmth and visual appeal at floor level.
Material Required
- Large Area Rug (e.g., 8×10 or 9×12) in a neutral color or durable natural fiber (jute, wool blend).
- One to three smaller, high-pile accent rugs (e.g., sheepskin or faux fur) that contrast in texture.
- Two to four large, soft floor cushions or poufs in varying woven textures (knitted, woven cotton).
- Non-slip rug pads for both large and accent rugs.
Equipment Required
- Measuring tape (to ensure the large rug fits the space correctly).
- Utility knife or sturdy scissors (to trim non-slip pads if necessary).
DIY Instruction Step by Step
- Lay the Foundation: Begin by clearing the central seating area. Vacuum the floor thoroughly. Lay the largest non-slip rug pad, followed by the large area rug, ensuring it is centered beneath your main furniture pieces.
- Introduce the Accent Layers: Carefully place the smaller, contrasting accent rugs (like the sheepskins) on top of the foundation rug. Position them near primary seating areas or where feet will rest, such as near the armchair or sofa edge.
- Place Floor Seating: Now, distribute the large floor cushions and poufs across the layered rug surface. Cluster them naturally—do not line them up neatly. The poufs should be slightly overlapped by the accent rugs or throws to create visual continuity.
- Add Light and Warmth: Arrange large glass hurricanes containing warm-toned candles (or battery lights) near the floor-level textiles. The flickering light highlights the layers, enhancing the cozy feeling.
- Drape the Seating: Finish by draping heavy, soft throws over the back of the armchairs or sofas, allowing them to pool slightly onto the layered floor below, physically and visually linking the elevated seating with the warm floor nest.
2. Structural Wood Paneling (Natural Insulation)
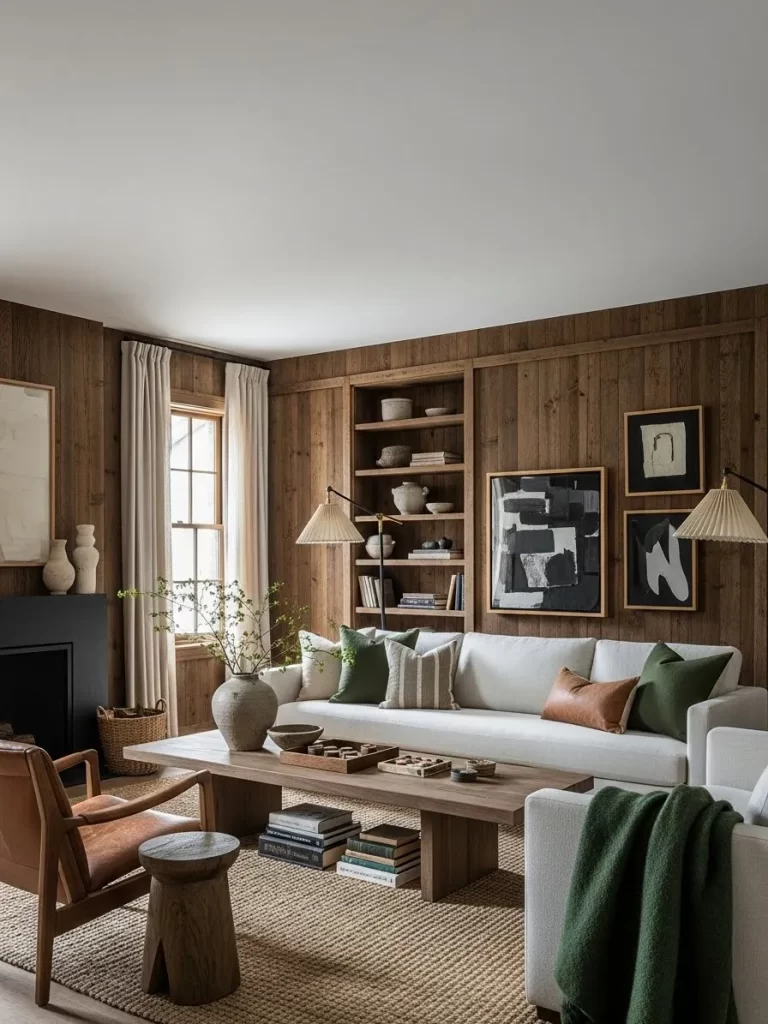
The use of continuous wood paneling across walls offers a textural and visually dense layer that instantly warms a space both aesthetically and structurally. This approach successfully blends the rustic comfort of a cabin with modern, minimalist design.
Full wood paneling not only visually suggests warmth but also acts as an additional layer of insulation, helping to stop cold from penetrating the drywall. The rich, medium tone of the wood creates an immediate sense of enclosure and security, which is the antithesis of a cold, cavernous room.
Layered textiles are thoughtfully introduced to complement the wood. A thick, woven jute rug grounds the main seating area, and pillows in deep earth tones, like forest green and warm rust leather, provide soft contrast. The simplicity of the furnishings allows the natural wood texture to be the dominant, warming feature.
DIY: Accent Wood Paneled Wall
Creating one feature wall is a manageable weekend project that delivers massive thermal and aesthetic benefits.
Material Required
- Tongue-and-groove wood boards (shiplap, pine, or similar) to cover the desired wall area.
- Finishing nails or brad nails.
- Wood glue (optional, for extra security).
- Wood stain or paint (in your desired finish, matching the image tone).
- Construction adhesive (for bonding to the wall).
Equipment Required
- Miter saw or circular saw (for cutting boards to length).
- Level (essential for straight installation).
- Stud finder.
- Pneumatic nail gun or hammer and finish nail set.
- Tape measure and pencil.
- Safety glasses.
DIY Instruction Step by Step
- Prep the Foundation: Clear the wall and remove any trim or baseboards you do not plan to use. Locate and mark the wall studs using a stud finder. Draw a light vertical line at each stud location; this is where you will secure the paneling.
- Prepare the Wood: Measure and cut the first batch of boards to the exact length needed for your wall. If you are staining, apply the stain now and allow it to dry according to the product instructions.
- Install the Base Row: Start the installation in a corner at the bottom of the wall. Apply a bead of construction adhesive to the back of the first board. Place the board on the wall, ensuring the tongue is facing up or out. Use your level to ensure this first piece is perfectly straight, as it dictates the alignment of all subsequent pieces.
- Secure the First Board: Nail the board into the wall studs using finishing nails. If using tongue-and-groove, you can “blind nail” by driving the nail at an angle through the tongue, where the next board will hide the nail head.
- Continue Laying Boards: Apply glue to the back of the second board. Fit the groove of the second board tightly over the tongue of the first. Gently tap it into place using a scrap piece of wood and a hammer (this prevents damaging the tongue). Nail the second board into the studs, repeating the process.
- Finish the Wall: Continue until the wall is covered. If the last board needs trimming to fit, rip it lengthwise with the saw. Reinstall any trim you removed, then stand back and enjoy the new depth and warmth of your paneled sanctuary.
3. Copper and Warm Lighting Accents (Ambient Glow)
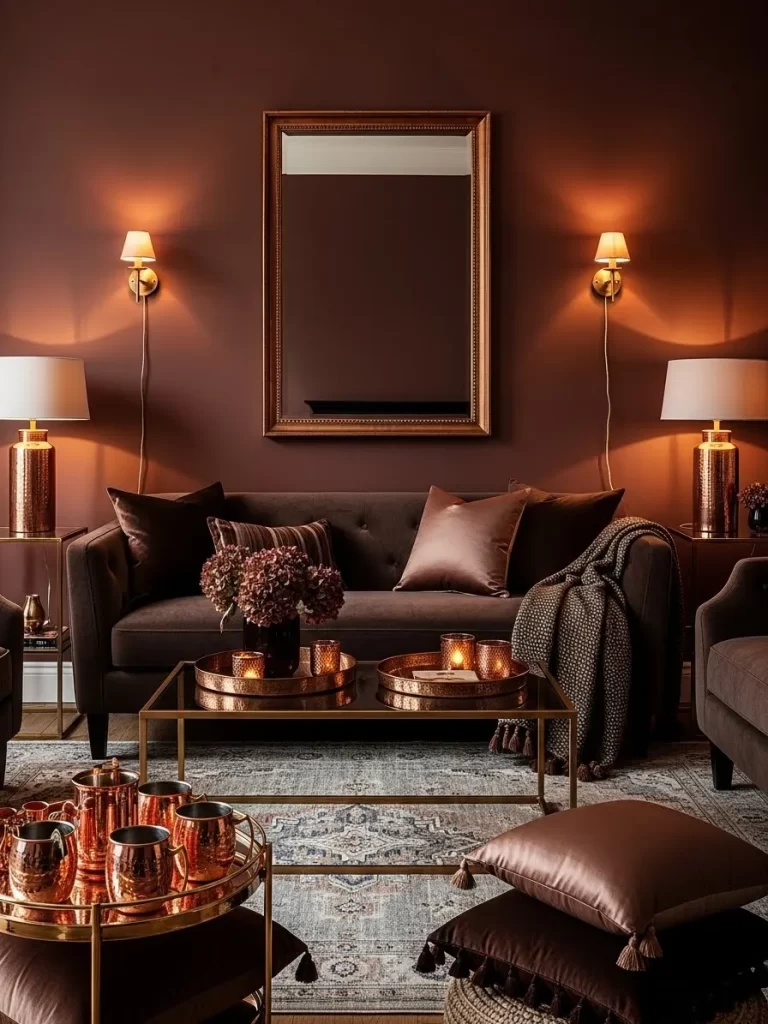
Using saturated wall color and specific warm-toned metallic accessories is an easy way to manipulate the room’s perceived temperature. The deep, rich terracotta brown on the walls creates an enveloping, cave-like atmosphere, which instantly feels protected from outside chill.
The lighting is the key layering element here. Warm-toned bulbs in the sconces and table lamps cast a low, inviting glow. This warm light is amplified by the numerous copper accessories—lamps, trays, mugs, and serving vessels—which reflect the light with a soft, reddish hue, mimicking the warmth of a fire.
Textiles layered on the dark sofa, such as the silky cushion and the dark, textured throw, offer tactile depth. By combining deep color, reflective metal, and low-level lighting, the room is transformed into a rich, decadent, and physically comforting space.
DIY: Creating a Copper-Toned Candle Display
This is a simple styling project to enhance the room’s warm glow and reflect light beautifully.
Material Required
- Two to three large decorative trays, preferably in a copper or brass finish.
- Pillar candles or votive candles (choose unscented or subtly spiced scents for winter).
- Copper or bronze-toned candle holders (votives, lanterns, or small bowls).
Equipment Required
- None, this is purely an arrangement exercise.
- Safety lighter or long matchsticks.
DIY Instruction Step by Step
- Select the Trays: Use the largest copper-toned tray as the centerpiece on your coffee table. Use a smaller tray for a side table or another surface. The metallic reflection from the tray is vital for spreading the warm light.
- Cluster the Candles: Group the candles onto the large centerpiece tray. Arrange them in clusters of odd numbers (three or five). Mix different heights of candles and candle holders for visual interest.
- Layer the Texture: Place some candles directly on the tray, and others inside copper-toned glass votives or small metallic bowls. This layers the texture and reflectivity.
- Distribute the Light: Place the secondary, smaller tray with a couple of candles on a side table. This distributes the warm glow across the seating area, preventing shadows and cold spots.
- Final Test: Turn off the overhead light and switch on only the lamps and light the candles. The warm illumination bouncing off the copper will instantly make the room feel deeply inviting and warm. Always ensure candles are placed safely away from drapes and throws.
4. Curvy Shapes and Plush Poufs (Organic Comfort)
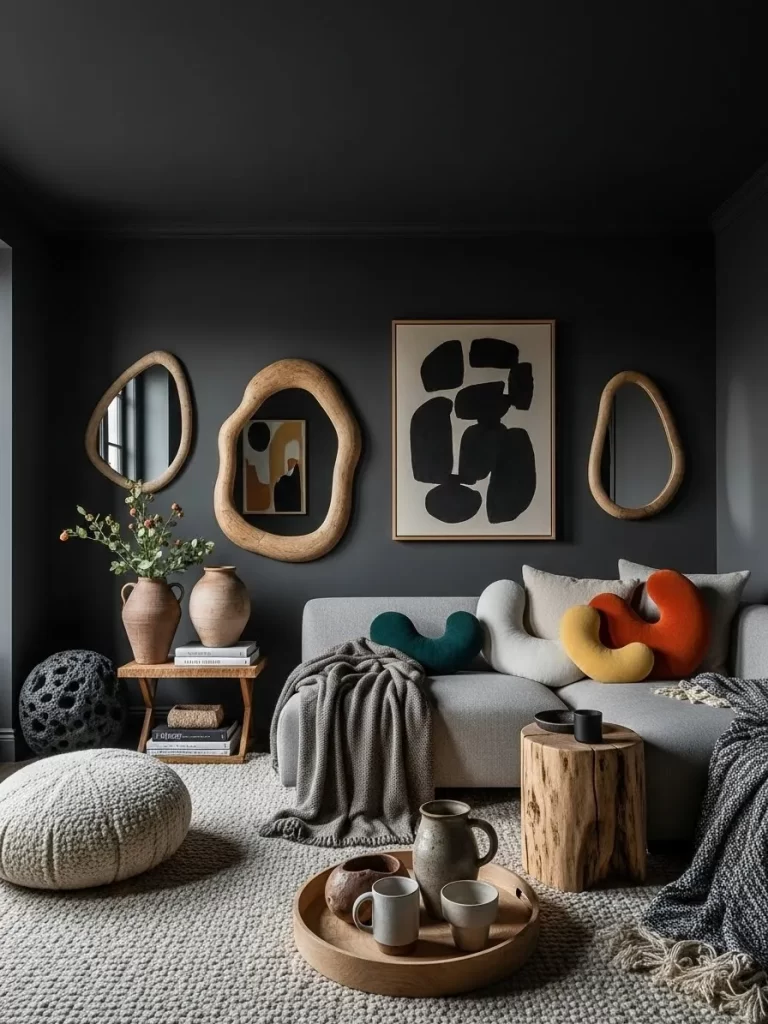
Introducing soft, rounded, and highly textured pieces is an effective layering secret to counteract the harshness of a cold, angular room. This design uses shape, material, and softness to build a sanctuary that feels protected and organic.
The walls are a dark charcoal, creating an encompassing feel, but the cold potential is negated by the use of organic, free-form wooden mirrors and the curvy, upholstered sofa. Key layers are the oversized, chunky knit pouf and the voluminous gray throw, which offer immediate, sinkable comfort.
The layering extends to the floor, where a thick, high-pile rug provides a soft foundation. By replacing straight lines with curved shapes and rounded textiles, the room shifts away from rigidity and focuses entirely on embracing natural, comforting warmth.
DIY: Creating a Cozy Wood Slice Side Table
Using natural, chunky wood as furniture adds immediate, rustic warmth and texture to contrast soft layers.
Material Required
- One large, thick wood slice or tree stump (ensure the wood is dry and sealed).
- Furniture felt pads (to protect floors).
- Clear polyurethane or wood wax (optional, for final seal).
Equipment Required
- Sandpaper (various grits, 80 to 220).
- Electric sander (optional, but recommended).
- Clean rags.
DIY Instruction Step by Step
- Source the Wood: Obtain a thick wood slice or stump. The ideal size is 12 to 18 inches in diameter. Crucially, the wood must be fully seasoned or kiln-dried to prevent cracking and insect issues indoors.
- Prepare the Surface: Use an electric sander, starting with coarse 80-grit sandpaper, to smooth the top, bottom, and side bark. Move to finer grits (120, then 220) to achieve a beautifully smooth, touchable surface. Wipe away all sawdust.
- Seal and Finish (Optional): Apply a coat of clear polyurethane or wood wax to the entire piece. This protects the wood and gives it a slight sheen that enhances the natural grain. Allow it to dry completely according to product instructions.
- Attach Floor Protection: Apply large furniture felt pads to the bottom surface of the wood slice. This ensures the heavy wood does not scratch your floor or snag the rug.
- Place and Layer: Position the wood slice next to the sofa or chair. Drape a corner of a soft, chunky throw over the side table and place a heavy, rustic ceramic mug or candle on top. The natural, warm wood immediately counters the cool tones of the wall and provides a beautiful textural contrast to the soft knits.
5. Monochromatic Textile Overload (The Snow Drift)
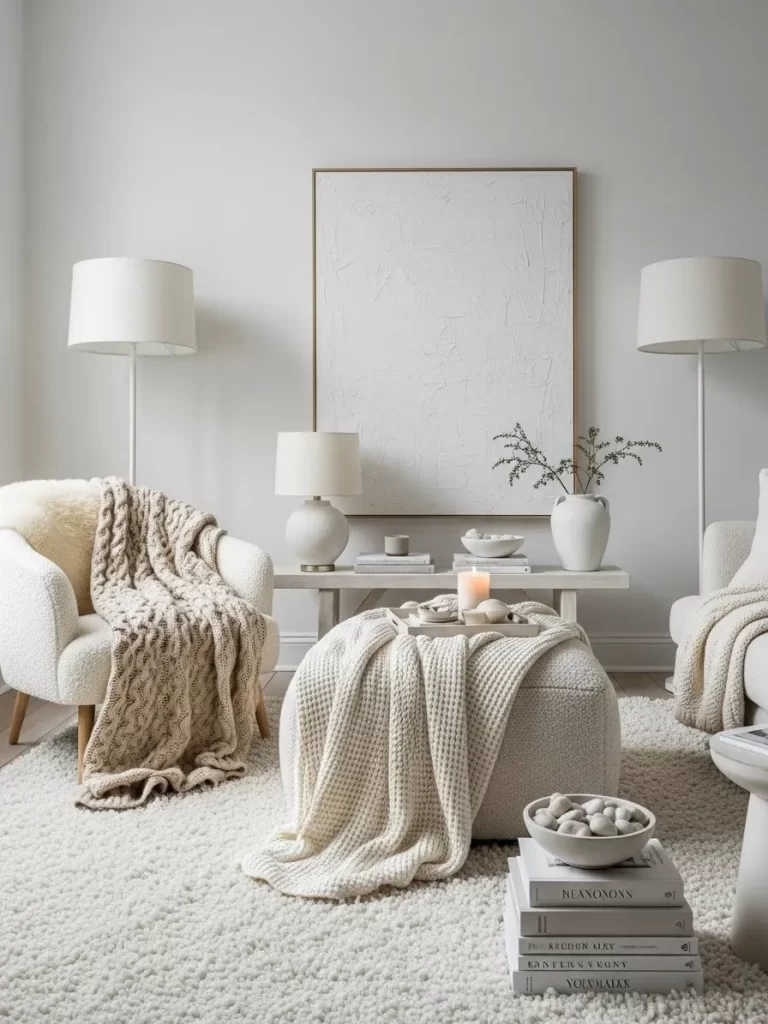
A monochromatic palette might seem cold, but when heavy textiles are layered densely, it creates a visual effect of being enveloped in a snowdrift, which is inherently cozy. This room uses cream and white to emphasize texture over color.
The main layering secret here is the volume of soft material. A deep-pile shag rug provides the foundational softness. On the chair, a cable-knit throw is draped heavily over a sheepskin cover, creating a triple layer of texture that is physically and visually inviting.
The furniture itself is upholstered in bouclé or soft woven fabric, ensuring every seating surface is plush. The repetition of soft shapes—the rounded ottoman, the circular lamp bases—makes the room feel quiet, safe, and deeply cushioned, transforming potential coldness into tranquil luxury.
DIY: The Oversized Knit Throw
An oversized, hand-knitted throw is the cornerstone of layering for visual warmth. It adds immediate weight and texture.
Material Required
- Super bulky or “jumbo” acrylic or wool-blend yarn (8-10 skeins, depending on the desired size and weight).
- T-pins (optional, for blocking).
Equipment Required
- Large circular knitting needles (US size 50 or larger) OR just your arms/hands (for arm knitting).
- Measuring tape.
- Scissors.
DIY Instruction Step by Step
- Measure and Cast On (Needle Method): Decide on the desired width of your throw (a good sofa throw is about 50 inches). Estimate the number of stitches required based on the size of your yarn and needles. Cast the stitches onto the circular needles.
- Knit the Body: Use a simple, dense stitch like the garter stitch (knit every row) to create maximum volume and texture. Continue knitting, keeping the tension loose to maintain the chunky look, until the throw reaches your desired length (usually 60 to 70 inches).
- Cast Off and Weave: Cast off all stitches securely. Cut the yarn, leaving a long tail, and weave in the ends carefully using your fingers or a very large tapestry needle.
- The Fluff and Drape: The finished throw is meant to be dramatically draped. Toss it casually over the back of the sofa or the arm of a chair, ensuring one corner puddles attractively onto the ottoman or floor. The sheer mass and texture of the giant knit will instantly make the room feel deeply warm and protected.
6. Fire and Faux Fire Warmth (Visual and Real Heat)
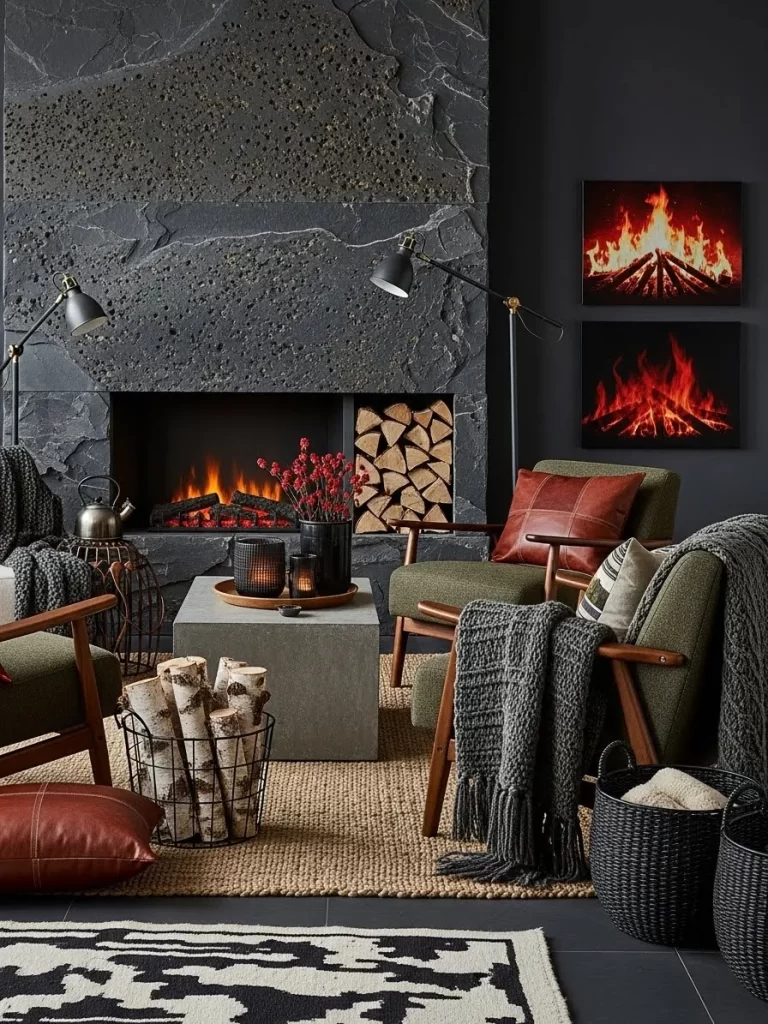
Nothing cures a cold room quite like the visual and physical presence of fire. This scene demonstrates the ultimate layering secret: combining real or faux heat sources with dark, dense textures to maximize the cozy effect.
The central electric fireplace or gas insert offers a physical heat source, crucial for actually raising the air temperature. Surrounding this with rough, dark slate and stacked firewood logs immediately tells the brain, “This is the source of warmth.” The dark wall color and stone mantel absorb the light rather than reflecting it, creating a deep, enveloping atmosphere.
Layering heavy, dark gray throws over the chairs and adding rich leather pillows introduces soft, insulating materials. This triple layer—physical heat, dark materials, and visual suggestion—creates an undeniably warm and grounded living room sanctuary.
DIY: Creating a Faux Log Basket Display
If you have a fireplace, keeping logs neatly stacked and accessible is both practical and decorative. If you do not have a working fireplace, you can create a charming, rustic illusion of warmth by displaying logs near an electric heater or in an unused hearth.
Material Required
- A wire basket, sturdy galvanized tub, or large, decorative woven basket.
- Clean, cut logs or birch wood pieces (ensure they are completely dry and free of insects).
- Battery-operated string lights (optional, for a subtle glow).
Equipment Required
- Gloves (for handling wood).
- Wire brush (if cleaning old wood or basket).
DIY Instruction Step by Step
- Select Your Container: Choose a basket that complements the room’s style. Ensure it is stable and strong enough to hold the weight of the wood.
- Prepare the Logs: If using real wood, ensure the pieces are cut to a similar, manageable length and are clean. Birch logs, with their white bark, are particularly striking for decorative purposes. For an authentic look, vary the diameter slightly.
- Arrange the Base Layer: Begin placing the logs vertically or horizontally in the basket. Start with the largest or most awkwardly shaped pieces at the bottom to create a stable foundation.
- Create Visual Appeal: As you stack, arrange the logs so the most attractive ends (e.g., the clean, cut ends or the bark) are visible from the front and top. The goal is to distribute light and create a full, invitingly functional look.
- Add the Glow (Optional): If using lights, weave the small, battery-operated string lights throughout the gaps between the logs. Hide the small battery pack discreetly beneath the logs or on the back side of the basket. When turned on, the subtle light will create a flickering, warm ambiance, enhancing the illusion of a nearby fire.
- Place Strategically: Position the log basket near a primary seating area or next to your existing fireplace or electric heater to maximize the visual impact of warmth.
7. Jewel Tones and Sumptuous Fabrics (Velvet Warmth)
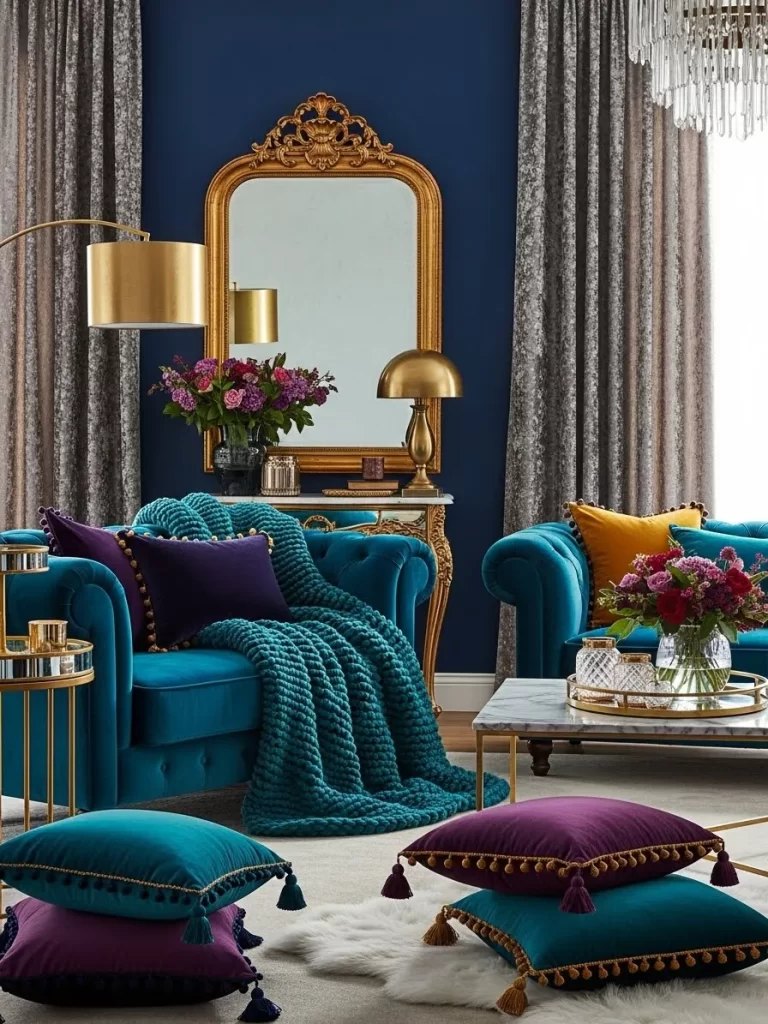
Colors and textures often associated with luxury and depth are powerful tools in combating a cold living room. This design uses rich, saturated jewel tones and high-sheen fabrics to create a sense of opulent warmth that feels deeply insulating.
The core secret is the use of velvet upholstery. The plush, densely woven pile of the turquoise velvet sofa absorbs and reflects light in a soft, non-stark way, making the surface look incredibly tactile and warm. Velvet fabric is known for its heavy drape and thickness, which contributes to a room’s insulation both physically and visually.
Layering is achieved through color and texture: a chunky, thick-knit throw in a contrasting teal is draped over the sofa. Pillows in vibrant purple and gold add depth and saturation, ensuring the eye always lands on rich color, completely eliminating the presence of anything cold or sterile.
DIY: Creating Layered Jewel-Tone Cushion Stacks
Layering cushions on the floor and furniture is an effortless way to introduce warmth, color, and flexible seating.
Material Required
- A mix of cushion covers in jewel tones (teal, sapphire, emerald, amethyst, gold) made from sumptuous fabrics like velvet, satin, or thick woven tapestry.
- Cushion inserts (feather or down alternatives provide the best, squishiest feel).
- Tassels, trim, or decorative ribbon (optional, for custom upgrades).
Equipment Required
- Sewing needle and thread (if adding trim or making covers).
- Scissors.
DIY Instruction Step by Step
- Select a Color Palette: Choose three to five rich jewel tones that work well together (like the teal, purple, and gold in the image). Ensure all the chosen fabrics have a deep color saturation and a soft, luxurious feel.
- Mix Sizes and Shapes: Gather cushion inserts in various sizes—large squares, rectangular lumbar shapes, and perhaps even small, round accent cushions. The variety of sizes adds visual layering complexity.
- Dress the Furniture: Place the largest, foundational cushions on the sofa and chairs. Layer medium-sized cushions in front of them, using one color to accent another (e.g., a gold cushion on a teal sofa). Use odd numbers (three or five) on a large sofa for the most appealing arrangement.
- Create Floor Stacks: This is the key layering step for coziness. Take two to three large cushions and stack them directly on the floor near the seating area. A common technique is placing the largest, darkest cushion on the bottom and the lightest or most textured one on top.
- Add Embellishment (Optional): If your cushions are plain, use a needle and strong thread to quickly stitch colorful tassels or contrasting trim around the edges of the covers. This detail adds depth and visual interest, making the cushions appear even more luxurious and substantial.
- The Fluff Test: Give every cushion a good “chop” in the center to plump it up and create a soft dent. This invites a person to immediately sink into the layered seating, reinforcing the sanctuary feel.
8. Layering Faux Fur and Sheepskin (Luxurious Cushioning)
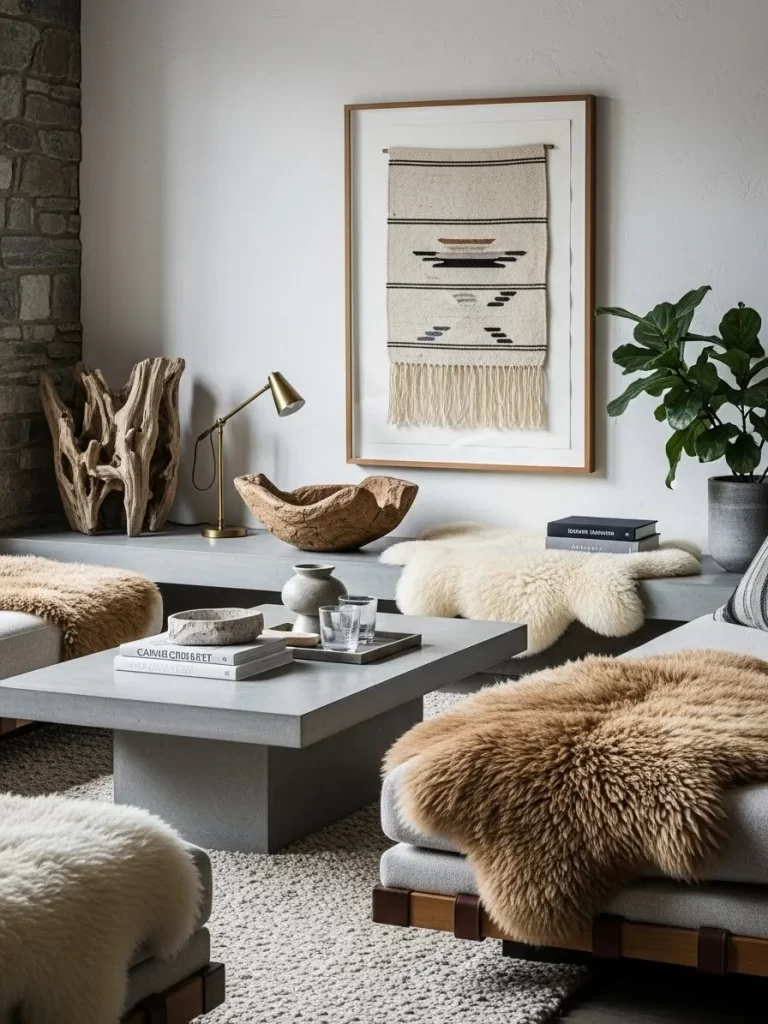
Introducing soft, deep-pile textures directly onto furniture is one of the most effective and luxurious ways to immediately combat cold leather or stiff upholstery. This design uses natural textures to transform minimalist, modern furniture into an inviting, tactile retreat.
The core secret is placing small, individual sheepskin and faux fur throws directly onto the seating surfaces. This provides an instant barrier of deep, insulating pile between the sitter and the cold cushion underneath. The varying colors—from creamy white to warm amber—add visual depth to the overall neutral palette.
These layers are not merely decorative; they serve a practical purpose by capturing body heat and providing an unparalleled level of sensory comfort. When combined with the rough stone wall and natural wood elements, the fur pieces soften the room’s angular surfaces. This technique is simple, reversible, and delivers immediate, intense warmth.
DIY: Creating Faux Sheepskin Seat Pads
This is an easy, no-sew project to add individual patches of faux fur coziness to hard seating or sectional pieces.
Material Required
- Large piece of high-quality faux sheepskin or faux fur fabric (measure the size of your seat cushions and purchase enough fabric to create individual pads).
- Non-slip shelf liner or gripping fabric tape (to keep the pads from sliding).
- Sharp utility knife or rotary cutter.
Equipment Required
- Cardboard or butcher paper (for creating a template).
- Permanent marker.
- Tape measure.
DIY Instruction Step by Step
- Create a Template: Measure the surface of the chair or cushion you wish to cover. Draw the desired shape (e.g., a 20-inch square, or a rectangle with slightly rounded edges) onto the cardboard template.
- Mark the Fabric: Turn the faux fur fabric over so the backing is facing up. Place your template onto the backing. Using the permanent marker, trace the shape onto the fabric backing. Ensure you trace the exact number of pads you need.
- Cut the Pads: Crucially, do not use scissors on the fur pile. Use the utility knife or rotary cutter to carefully cut only the fabric backing along the traced line. Cutting the backing only preserves the full length of the fur fibers, preventing a choppy, unnatural look.
- Secure the Pads: Cut pieces of non-slip shelf liner slightly smaller than the cut pads. Use fabric glue to secure the shelf liner to the center of the backing of each faux fur pad. This prevents the pad from sliding off leather or smooth fabric surfaces.
- Place and Fluff: Place the new faux fur pads directly onto your seating surfaces. Fluff the fibers gently with your hands. The dense, soft material instantly provides a luxurious, warm layer that beckons you to sit down.
9. Boho Textile Overload (Maximalist Coziness)

When combating a cold space, sometimes the solution is simply to add more, more, more! This aesthetic uses a maximalist approach, layering textiles from the floor right up to the ceiling to build a visual and physical wall of warmth.
The ultimate layering secret here is the use of tapestries and rugs as wall decor. Hanging large, heavy rugs or macramé pieces on the wall not only adds incredible color and texture but also provides genuine acoustic and thermal insulation, stopping drafts and cold transfer through the vertical surfaces.
On the floor, rugs are deliberately stacked, creating a soft, multi-textured landscape. This is complemented by an abundance of floor seating—poufs, ottomans, and floor cushions—each covered in warm-toned, richly patterned fabrics. The sheer quantity of soft, textured material eliminates any cold, bare surface, making the room feel like a cozy, textile-lined tent.
DIY: Creating a Layered Wall Tapestry Panel
Instead of buying one massive tapestry, you can layer smaller, affordable pieces to create a large, textured focal point that insulates the wall.
Material Required
- One large, lightweight curtain or fabric panel (this is the base layer).
- Two to four smaller, heavily textured textile pieces (e.g., macramé hanging, small woven rug, embroidered cloth).
- Dowel rod or wooden plank (to hang the tapestry).
- Picture hanging wire or sturdy rope.
- Wall hooks or heavy-duty mounting hardware.
Equipment Required
- Sewing machine or strong fabric glue (for simple hems and joining).
- Scissors.
- Tape measure and pencil.
- Level.
- Drill (for mounting hardware).
DIY Instruction Step by Step
- Prepare the Base: Hem the edges of the largest fabric panel if necessary. This piece will cover the largest section of the wall and provide the initial block of color.
- Mount the Hanging Mechanism: Secure the dowel rod or wooden plank to the top edge of the base fabric using glue or a sewing machine. Attach a loop of hanging wire or rope to the back of the rod/plank for mounting. Drill the wall hooks into the desired location on the wall (ensure they are level and secure for the weight).
- Arrange the Layers: Lay the base panel flat. Experiment with arranging the smaller, textured macramé pieces and rugs on top of the base. Overlap them slightly and vary the heights to create a dynamic, layered look.
- Secure the Layers: Using a needle and strong thread (or fabric glue), stitch or glue the smaller accent pieces directly onto the base fabric, making sure they are securely attached so they don’t droop when hung.
- Mount the Tapestry: Carefully lift the assembled tapestry and hang the rod onto the wall hooks.
- Add Final Touches: Once hung, adjust the layers slightly. You can pin or stitch the bottom corners of the tapestry to the wall to keep it taut and flat against the surface, maximizing its insulating power and creating a dramatic, warm backdrop for your sanctuary.
10. Plants and Organic Greenery (Layering Life)
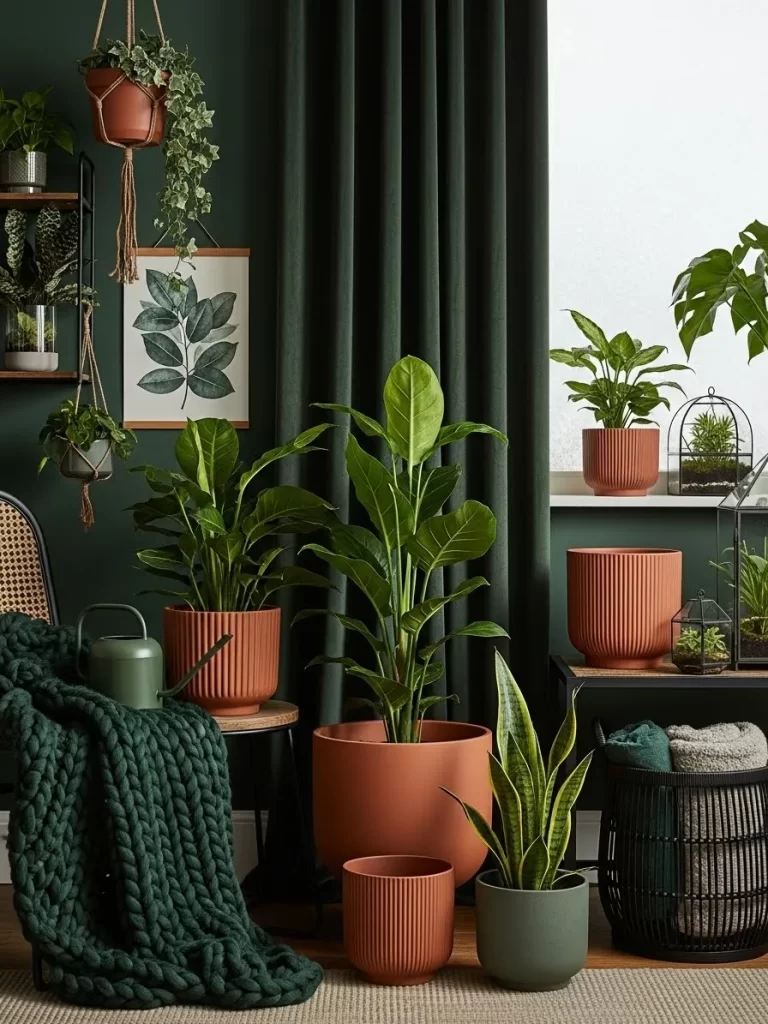
While plants don’t physically produce warmth, incorporating vibrant life and organic textures into a cold room dramatically improves its psychological temperature. This layering secret uses rich, deep greens and warm terracotta to create a feeling of life, growth, and natural warmth.
The deep emerald wall color and heavy velvet curtains provide a dark, dense backdrop that absorbs light and makes the space feel cloistered and cozy. Against this dark setting, the layering of various houseplants in warm-toned terracotta pots introduces a powerful, vibrant contrast that feels instantly rejuvenating and protective.
Layering different plant heights and species—from floor planters to hanging baskets—creates an immersive, jungle-like effect that feels sheltered and humid, countering the dry, sterile feeling of cold air. The chunky, dark green knit throw reinforces the theme of natural, homespun comfort.
DIY: Creating a Layered Indoor Plant Cluster
This project focuses on grouping various plants and textures together to create a single, impactful “green warmth” zone.
Material Required
- A variety of indoor plants (low-light tolerance is recommended if near a window in winter, such as Snake Plants, ZZ Plants, or Philodendrons).
- Terracotta or warm-toned ceramic planters in various heights and diameters.
- One small wooden stool or stack of books (for elevating one plant).
- Pea gravel or small decorative stones (for topping the soil).
Equipment Required
- Watering can.
- Trowel (for repotting).
- Potting soil.
DIY Instruction Step by Step
- Select a Location: Choose a corner or area in your living room that needs an infusion of warmth and life. If near a window, ensure the plants are not touching the cold glass.
- Vary the Heights: Use one tall plant (on the floor), one medium-sized plant (on a low stool or box), and one or two smaller plants (on a nearby shelf or table). This creates the layered visual depth that makes the cluster feel lush.
- Repot for Cohesion: If your plants are in mismatched plastic pots, repot them into warm, cohesive planters (like the terracotta in the image). This simple step instantly elevates the look and reinforces the color theme. Ensure the new planters have drainage holes.
- Add Surface Texture: After repotting, cover the visible soil in each pot with a thin layer of pea gravel or small decorative stones. This adds a clean, finished texture and helps the soil retain moisture.
- Group and Arrange: Place the plants close together. The leaves should lightly touch or overlap. This grouping (or layering of plants) mimics a dense natural environment, which increases localized humidity (a feeling of warmth) and makes the arrangement look fuller.
- Layer a Nearby Textile: Complete the zone by placing a thick, woven throw or blanket (ideally in a deep green or earthy color) on the closest chair or basket. This connects the soft human element to the organic, living warmth of the plant cluster.
11. Silver and White Layering (Visual Softness)
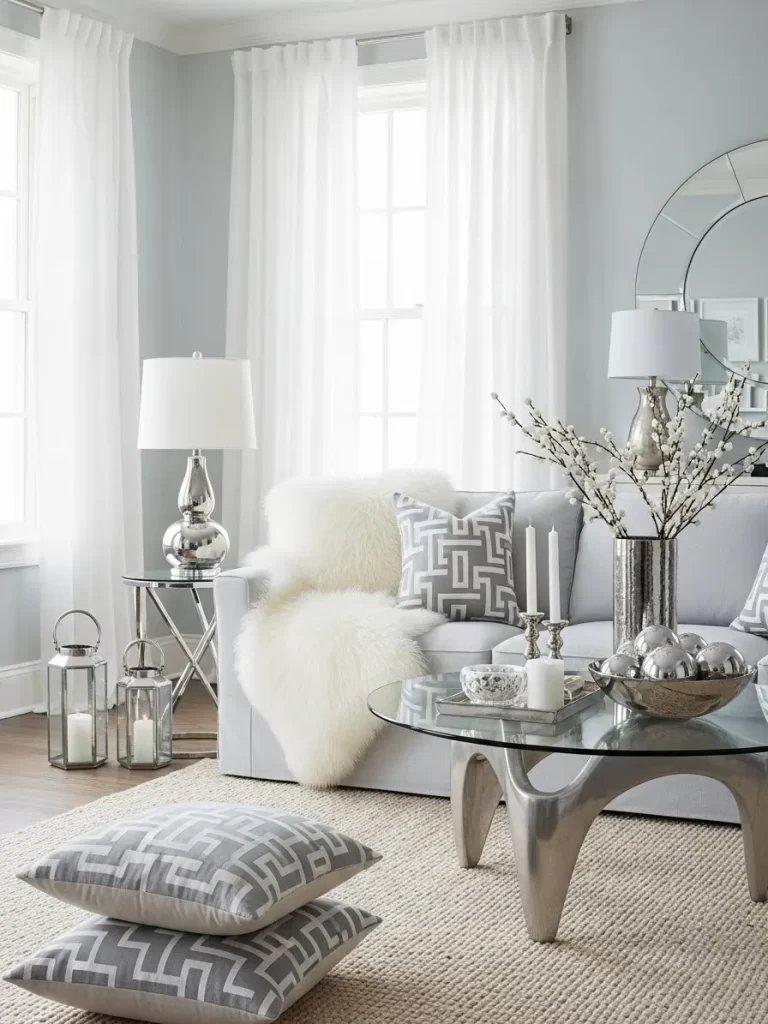
Although this color scheme typically leans toward coolness, the extensive layering of textiles and reflective surfaces creates a sense of tranquil, soft warmth. The key is the saturation of white and gray textures.
The foundational layer is a large, woven, natural-fiber rug, which immediately provides a warmth-trapping base beneath the hard floor. The sofa is then draped with an oversized, fluffy faux fur throw, offering an intense spot of plush comfort.
Metallic silver accessories, such as the mirrored table and lanterns, are used deliberately. Instead of feeling cold, they reflect the surrounding white and the warm lamp light, scattering a diffused, gentle glow. Layering the floor with large, patterned cushions invites sitting lower to the ground, increasing the perceived coziness within the light-filled, soft space.
DIY: Creating Layered Silver and Candle Lanterns
Lanterns provide a beautiful, contained way to introduce the soft glow of candlelight and the reflectivity of silver.
Material Required
- Two to three silver-toned lanterns of varying heights (ensure they are large enough for pillar candles).
- White pillar candles or warm-toned LED candles.
- Small mirrored or glass tray (to place the lanterns on).
Equipment Required
- None, this is purely an arrangement exercise.
DIY Instruction Step by Step
- Prep the Lanterns: Ensure the glass panels of the lanterns are clean. Place the white pillar candles inside the lanterns. If using LED candles, ensure the batteries are fresh for a steady, warm glow.
- Create a Cluster: Place the lanterns in a cluster of two or three on the floor next to a piece of furniture, such as the side table or the end of the sofa. Grouping them enhances the light output and visual impact.
- Enhance Reflection: Place the mirrored or glass tray underneath the lantern cluster. The tray will reflect the candle light and the silver frames, intensifying the gentle glow and visual warmth.
- Add Nearby Texture: Ensure there is a soft element nearby, like a faux fur throw on the sofa or a large floor cushion right next to the lantern cluster. This contrast highlights the soft warmth of the textiles against the cool, reflective light.
- Safety Check: If using real candles, make absolutely certain the lanterns are stable, away from flowing curtains or easily flammable materials, and never left unattended.
12. Leather, Books, and Tweed (The Gentlemen’s Hearth)

A classic library feel offers a specific, deep kind of psychological warmth, achieved through layering rich leather, dense books, and traditional masculine textures. The dark, navy blue walls create a feeling of being snugly enclosed, while the floor-to-ceiling bookshelves act as excellent sound and thermal insulation.
The leather furniture—a classic chesterfield sofa and armchair—has a deep, lived-in patina that is inherently warm. This is immediately softened by layering thick, wool throws, particularly one with a tweed or herringbone pattern, which suggests heritage and homespun comfort.
The layering continues with the arrangement of books, which add textural depth and a sense of history. Warm-toned lighting and rich amber liquids on the marble table add a final layer of luxurious, sensory warmth, creating a den that feels impenetrable to the cold.
DIY: Creating a Stacked Library Tabletop Display
Books are an often-overlooked layering secret that adds weight, history, and texture to a cold room.
Material Required
- A collection of 6-10 antique or classic hardback books (focus on warm leather bindings or rich colors).
- One or two heavy stone or marble coasters.
- A leather-bound journal or small box.
- A small, soft wool or tweed coaster/mat.
Equipment Required
- None, this is purely an arrangement exercise.
DIY Instruction Step by Step
- Build the Foundation: On the coffee table, start by creating a stack of 3-5 of the largest, oldest-looking books. Place them off-center to leave space on the table.
- Add Structure: On top of this stack, place a decorative, heavy object, like the marble cube shown, or a leather-bound box. This acts as a pedestal for smaller items.
- Layer a Soft Base: On the corner of the table near the armchair, lay down the small tweed or wool mat. This is where you will place items you want to keep close.
- Introduce Sensory Warmth: Place a warm-scented candle (like clove or amber) and a decanter or mug onto the table. The deep, amber liquids and the candle’s glow reinforce the room’s psychological warmth.
- Final Drape: Ensure a corner of the wool throw drapes casually over the arm of the chair, perhaps touching the corner of the coffee table. This visually connects the soft, physical layer with the dark, intellectual layer of the books and wood.
13. Terracotta and Dried Grass Textures (Desert Warmth)
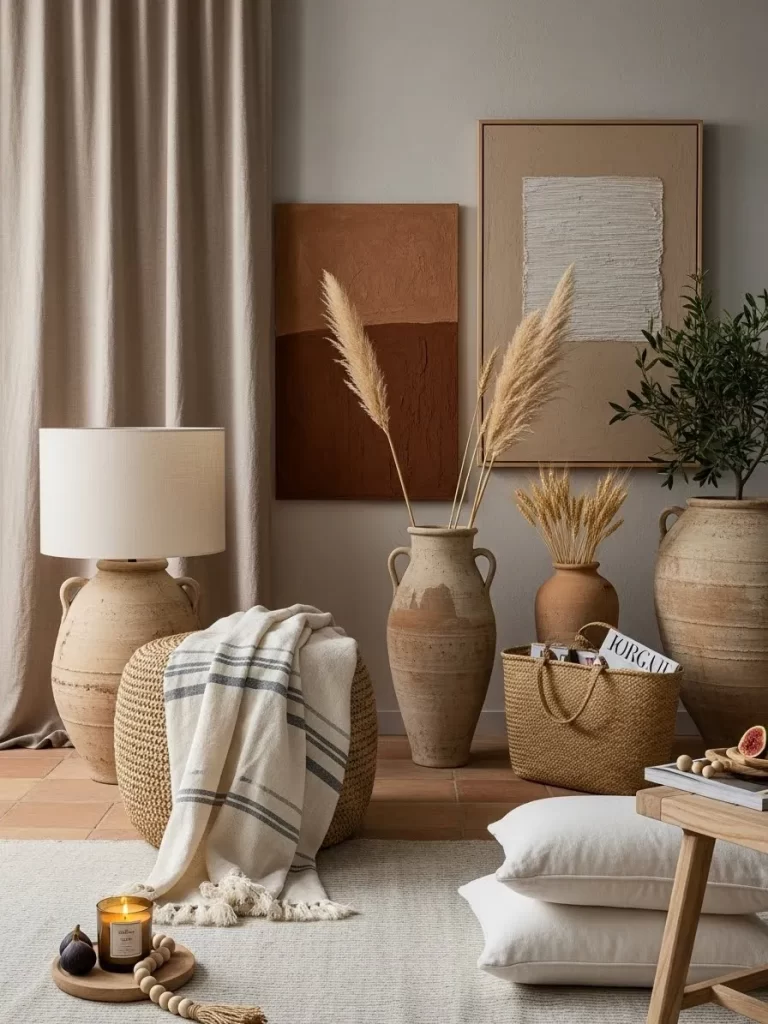
Natural materials like rough terracotta, woven fibers, and dried grasses suggest the heat of the sun-drenched earth, creating an immediate psychological warmth. This scheme uses layering to transport the room far away from cold, damp climates.
The layering begins with large, oversized earthenware vessels, which provide rough, earthy texture and a grounding presence. These are juxtaposed with fine, pale textures like the pampas grass and wispy wheat stalks, which create vertical height and softness.
The neutral, low-profile rug and the long, flowing curtains are all in creamy, natural tones. The single, dark scented candle visually concentrates the warmth, highlighting the combination of rough pottery and soft textiles for a deeply relaxed, Mediterranean-inspired sanctuary.
DIY: Creating a Dried Grass and Pottery Display
This is an elegant, non-flammable way to add height, texture, and natural warmth to a cold corner.
Material Required
- Two to three large earthenware or terracotta vases (varying heights).
- Dried pampas grass stalks (approximately 5-7 pieces).
- Dried wheat stalks or other similar fine, dried grasses.
- Decorative elements like wooden beads or raffia.
Equipment Required
- None, this is purely an arrangement exercise.
- Scissors (for trimming stalks).
DIY Instruction Step by Step
- Select the Vases: Choose one large, hero vase and one or two smaller, complementary vases. Ensure the material is rough, matte, and earthy, like terracotta. Place the largest vase on the floor and the smaller ones on a low stool or bench.
- Arrange the Pampas Grass: Place the pampas grass (the tallest texture) into the largest vase. Arrange the stalks so they fan out naturally, creating a wide, soft plume.
- Layer the Texture: In the smaller vase, place the wheat stalks. These have a finer, tighter texture that contrasts beautifully with the pampas grass and the rough pottery.
- Add Low-Level Detail: Drape a strand of wooden beads or raffia around the base of one of the smaller vases. This adds a subtle, handmade layer of texture at the lowest level.
- Connect with Textiles: Position the arrangement next to the woven pouf and the soft throw. The throw should be textured and pale-colored to reflect the lightness of the dried grasses. The combination of the two textures creates a complete, warm zone.
14. Industrial Knits and Color Pops (Urban Warmth)
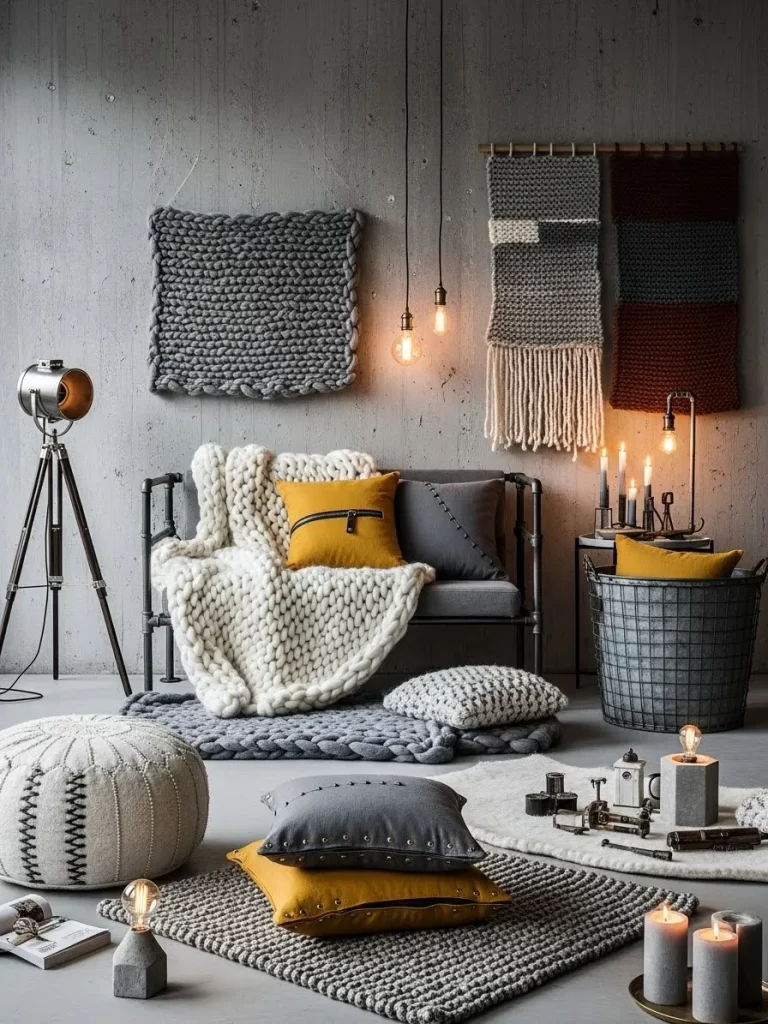
This style proves that rough, industrial materials can be made cozy through the strategic layering of super-chunky textiles and warm colors. The exposed concrete wall and pipe-frame furniture, which are inherently cold, are completely softened by the dense application of knits.
The layering is aggressive: a chunky knit rug sits on the floor, topped by a giant, cream-colored cable-knit throw that drapes dramatically over the metal sofa. The walls themselves are layered with hanging knit and macramé panels, which provide vertical texture and acoustic/thermal dampening.
Pops of mustard yellow contrast sharply with the charcoal gray, injecting a crucial element of visual warmth. The low, exposed warm-filament bulbs and scattered candles complete the scene, ensuring the warmth feels tactile, colorful, and highly atmospheric.
DIY: Creating a Giant Wall-Mounted Knit Square
Using super-chunky knitting to create wall art is a quick, textural way to insulate and decorate a cold wall.
Material Required
- Two to three skeins of super-bulky yarn (chunky wool blend or acrylic).
- One wooden dowel rod or thin strip of wood, cut to the width of the finished knit square.
- Heavy-duty hanging wire and wall hook.
Equipment Required
- Large circular knitting needles (US size 50 or larger) OR just hands (for arm knitting).
- Scissors.
- Measuring tape.
DIY Instruction Step by Step
- Measure and Knit: Determine the size of your square (e.g., 30 inches by 30 inches). Using the jumbo yarn, cast on the appropriate number of stitches for the width. Use the garter stitch (knit every row) for a dense, thick texture.
- Finish the Square: Continue knitting until the piece is square. Cast off securely. Weave in the yarn ends so the edges are clean.
- Attach the Dowel: Lay the knit piece flat. Place the dowel rod along the top edge of the square. Use strong thread or extra yarn to stitch the top row of the knit piece securely to the dowel rod. This creates a sturdy hanging mechanism.
- Prepare for Hanging: Attach the picture hanging wire or rope to the ends of the dowel rod. Ensure the hanging mechanism is secure and balanced.
- Mount on the Wall: Install the wall hook. Hang the knit square on the desired wall. The three-dimensional, deep texture instantly absorbs sound and heat, providing a striking visual contrast to the flat wall, making the whole area feel softer and warmer.
15. Velvet Drapes and Contrasting Color (Theater of Warmth)
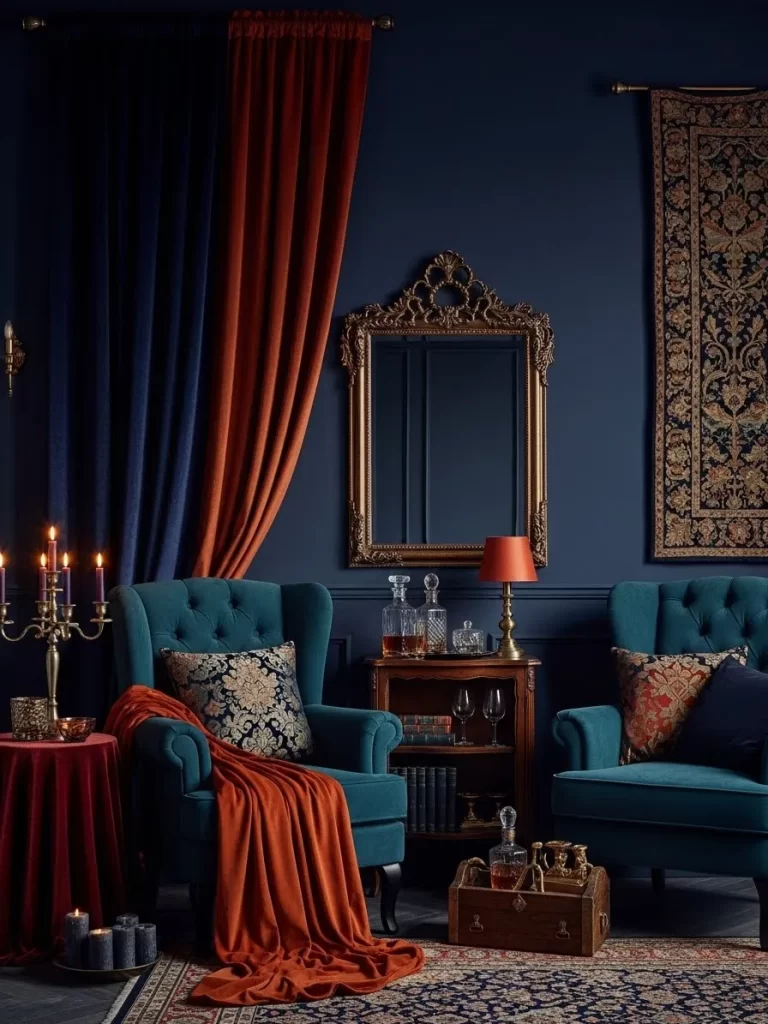
Bold color blocking with velvet textiles creates a highly theatrical, deeply warm, and luxurious atmosphere. The dark, moody midnight blue walls provide the perfect dense backdrop for layering rich, jewel-toned colors.
The core layering secret here is the heavy double curtain. A thick, dark navy curtain is layered with a vibrant, flowing terracotta velvet drape. This combination offers maximum thermal blocking at the cold window surface and introduces a dramatic pop of fire-like color that visually radiates heat.
The blue velvet armchairs are softened with an intense orange throw that spills dramatically to the floor. The combination of heavy velvet (in both the furniture and drapes) with the rich, deep colors creates an immediate, opulent, and sheltered atmosphere, transforming the room into a true sanctuary.
DIY: Creating a Color-Blocked Curtain Accent
This project focuses on adding a secondary, highly pigmented curtain panel to an existing window treatment for a luxurious, warm layer.
Material Required
- Two long panels of heavy, high-pigment fabric (like velvet or dark linen) in a bold, warm color (terracotta, burgundy, or burnt orange).
- Decorative curtain rings (if your existing rod doesn’t use hooks).
- Curtain holdbacks or tie-backs (optional).
Equipment Required
- Iron and ironing board (for pressing new curtains).
- Step stool or ladder.
DIY Instruction Step by Step
- Prep the New Panels: Lay out the new, warm-toned curtain panels. Ensure they are ironed neatly and completely wrinkle-free for the best presentation.
- Install the Rings: Attach the curtain rings to the top of the new panels.
- Layer the Rod: If you have an existing single curtain rod holding the primary curtains, you will simply slide the new, bold panels onto the same rod, positioning them toward the center of the window. If you have a double rod, place the bold panels on the inner rod.
- Arrange the Drape: Push the primary (navy blue) curtains out towards the edges of the window. Pull the new, terracotta-colored curtains inward so they overlap the primary drapes. The goal is to create a prominent vertical stripe of the warm color next to the dark color.
- The Final Flow: Ensure the bottom of the drapes just touches the floor. Use tie-backs to hold the terracotta drapes slightly open, creating a flowing, soft column of color that visually heats the entire vertical space.
16. Plaid and Log Stacks (Lumberjack Layering)
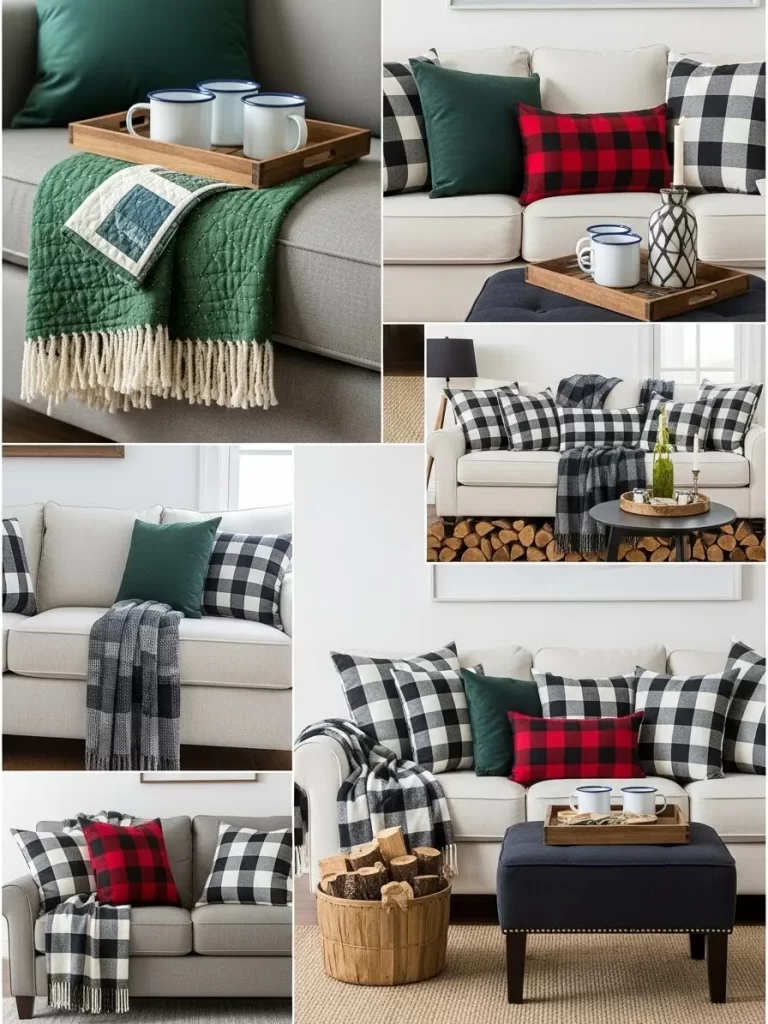
Embracing cabin-inspired textiles and natural elements like stacked firewood immediately invokes the idea of a warm, protected retreat. This scheme layers high-contrast buffalo plaid with deep, solid colors to create a cozy, graphic punch.
The foundational sofa is neutral, which allows the textile layers to do the heavy warming work. Throw pillows in red-and-black and black-and-white buffalo check are mixed with deep forest green solids. This combination of classic, insulating patterns and dense color makes the seating zone feel immediately robust and warm.
The layering extends to the display of stacked firewood. Whether real or faux, logs stacked in a tidy, visible basket or beneath a mantelpiece provide a strong visual reference to a heat source, instantly boosting the room’s cozy appeal. A thick throw in matching plaid completes the visual story of a snug cabin interior.
DIY: Building a Decorative Log Stack
This simple, powerful trick uses stacked wood to add natural, warming texture to a cold living space.
Material Required
- A collection of clean, dry, cut logs (birch or similar).
- A sturdy, decorative basket (wicker, wire, or canvas log carrier).
- A piece of wood or cardboard (to line the bottom of the basket).
Equipment Required
- Gloves (optional).
- Saw (if logs need trimming).
DIY Instruction Step by Step
- Clean the Logs: Ensure all logs are dry, clean, and bug-free. If necessary, lightly brush them to remove loose bark or dirt. All pieces should be roughly the same length for neat stacking.
- Prep the Basket: Line the bottom of the basket with a piece of scrap wood or heavy cardboard to create a flat, sturdy base.
- The Base Layer: Begin stacking the logs inside the basket. Place the first few pieces vertically and tightly against the back edge of the basket.
- Stack for Impact: Continue stacking, alternating between vertical and horizontal placements, or stack them all horizontally if your basket is long. The goal is to stack them tightly so the interesting cut ends are prominently displayed, creating a beautiful, warm-toned texture.
- Place Strategically: Position the log basket near the sofa, or if you have a non-working fireplace, place it inside the hearth opening. The sight of the stacked wood instantly provides a psychological layer of warmth, referencing fire and shelter.
17. Amber Glass and Ribbed Texture (Candlelight Glow)
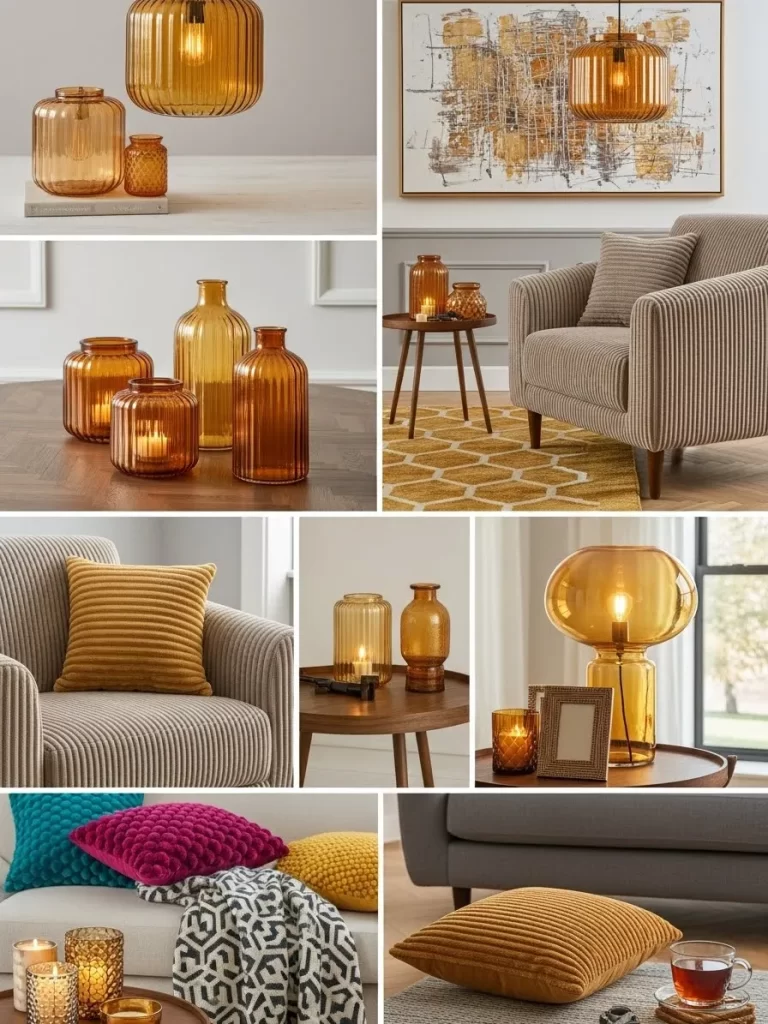
Layering accessories using warm-toned, translucent materials is a sophisticated way to amplify the effect of warm lighting. This scheme demonstrates how amber glass, especially when ribbed or textured, creates a diffused, gentle warmth that feels luxurious.
The secret is the material and color: all the glass pieces—vases, lanterns, and lamp bases—are a deep amber hue. This color filters the light from within, casting a honeyed, soft glow that feels immensely comforting compared to stark white light. The ribbed texture of the glass further scatters the light, softening harsh lines.
Textiles are layered in supporting warm tones, such as mustard yellow corduroy cushions and chunky patterned throws, enhancing the amber glow. This focused use of warm, translucent materials transforms simple lamps and candles into powerful sources of visual warmth.
DIY: Creating Amber Glass Diffusers
This is an easy styling change to maximize the warmth of your existing lighting.
Material Required
- Amber-colored glass vases, jars, or hurricane lanterns in varying sizes.
- Warm-toned LED string lights or battery-operated LED pillar candles.
- Small wooden discs or trays.
Equipment Required
- None, this is purely an arrangement exercise.
DIY Instruction Step by Step
- Gather the Glass: Collect two to five amber-colored glass pieces. Mix tall, thin shapes with wide, short shapes for an appealing cluster. Ribbed or textured surfaces are highly recommended for the best light diffusion.
- Insert the Light Source: Place the battery-operated LED pillar candles or wrap the LED string lights inside the glass vessels. The amber glass will filter the light into a soft, glowing warmth.
- Group and Elevate: Place the largest glass piece on a side table. Group the smaller pieces together, setting them on a small wooden disc or tray next to the large piece. This layers the accessories and contains the cluster.
- Connect to Textiles: Place a yellow or deep gold cushion on the adjacent chair. The cushion’s color will connect with the amber glow of the glass, completing a cohesive zone of warmth and texture.
- Enjoy the Diffused Glow: Turn on the lights in the evening. The amber color will visually hug the light, making the entire area feel soft, secure, and protected from the cold.
18. High-Contrast Monochromatic Layers (Structured Coziness)
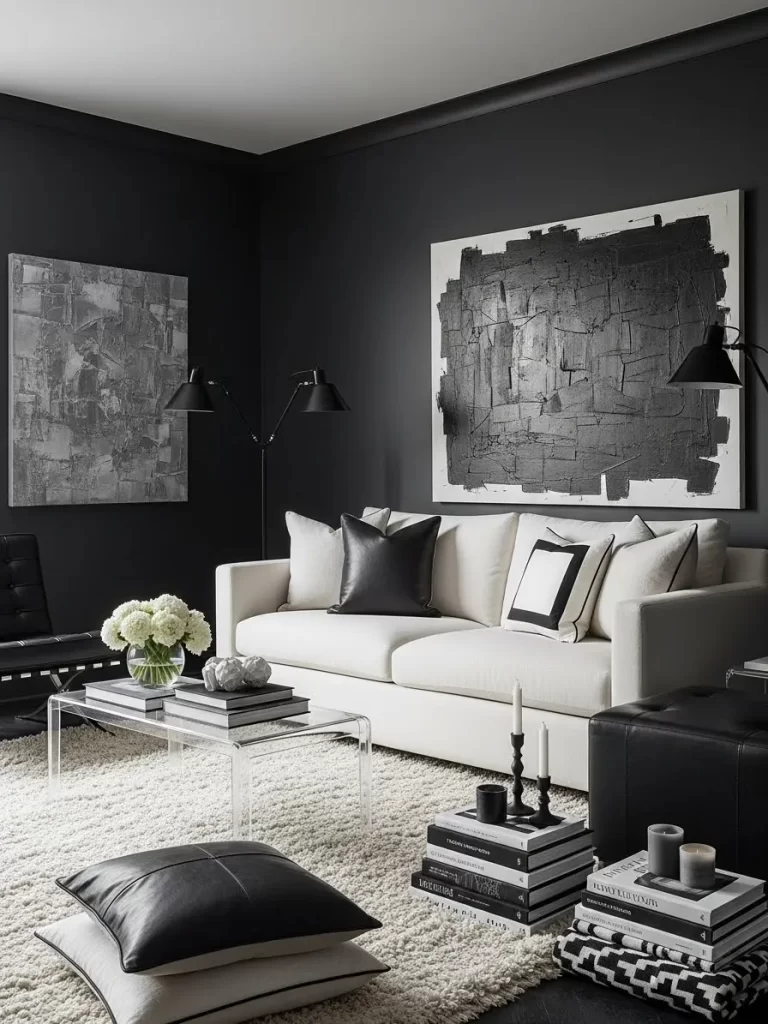
Monochromatic color schemes, especially black and white, can feel stark, but by layering rich, dark walls with high-pile rugs and deep-pile fabrics, the starkness is converted to sophisticated coziness. The layering here is achieved entirely through texture and depth.
The deep charcoal or black walls create an embracing backdrop, while the large, white, high-pile shag rug provides the foundational softness. This rug instantly absorbs noise and insulates the floor, acting as a cloud-like barrier.
The sofa is layered with different textures of black and white: soft linen for the sofa, thick leather for the accent pillows, and heavy cotton for the patterned accents. The three-dimensional quality of the black abstract art on the wall adds another layer of rugged texture, ensuring every surface, even the walls, offers visual depth and interest, eliminating cold flatness.
DIY: Creating a Layered Floor Pillow Stack
This technique introduces flexible, soft seating right at floor level, drawing the eye down to the warmest zone.
Material Required
- Two to four large (24 inches or larger) floor pillows or cushion inserts.
- Covers in deep black leather, thick linen, or heavy textured fabric (matching your monochrome scheme).
- A few coffee table books (black or white bindings).
Equipment Required
- None, this is purely an arrangement exercise.
DIY Instruction Step by Step
- Gather the Pillows: Select your largest, plushest pillows. If using monochrome, choose different textures—one leather, one linen, one patterned.
- The Floor Stack: Place the pillow stack directly on the high-pile rug near the coffee table or sofa. Stack them slightly unevenly or angle them to look ready for use. Two is sufficient, but three or four creates maximum impact.
- Integrate with Accessories: Place a tidy stack of 3-4 coffee table books next to the floor pillows. This grounds the soft pillows and adds a vertical, rigid contrast that enhances the softness. A small, simple candle or metallic object on top of the books completes the arrangement.
- Connect the Layers: Ensure the couch throw (if you have one) lightly drapes near the floor pillow stack. The eye travels from the soft couch, down the throw, to the layered pillows, reinforcing the theme of relaxation and warmth throughout the seating area.
19. Floor Cushions and Metallic Trays (Nomadic Layering)
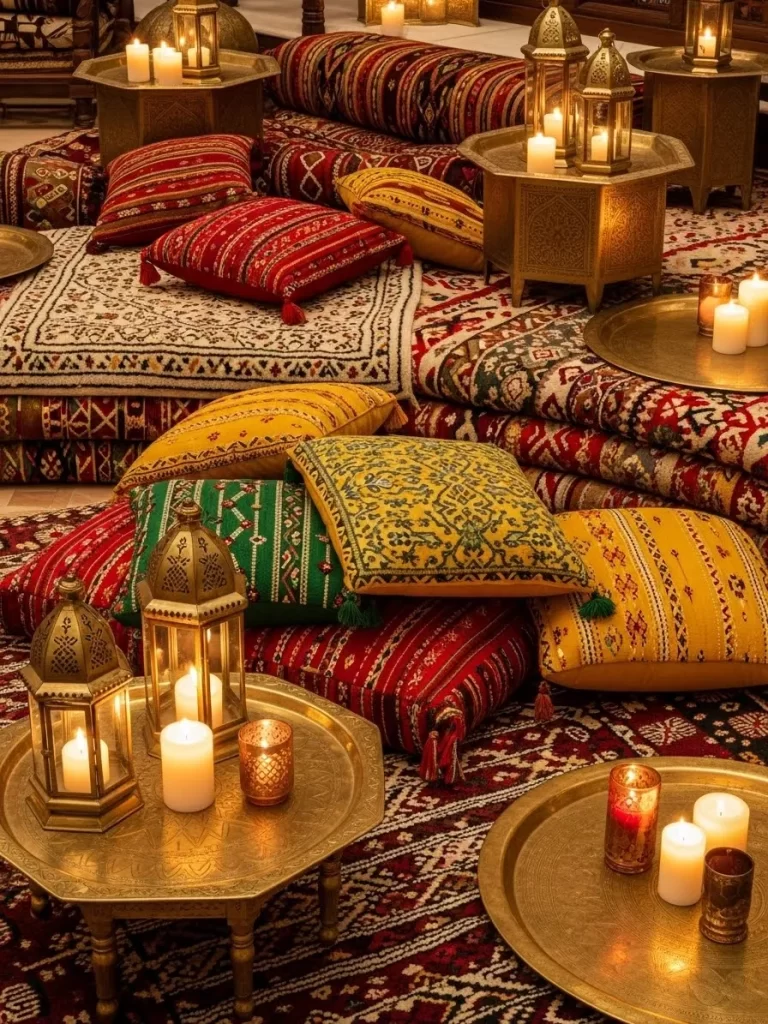
This style relies on an extreme density of warm-toned, patterned textiles and low, ambient lighting to create a rich, sheltering atmosphere. The layering is maximalist, using fabrics not just as decoration but as the primary architectural element of the space.
The secret is the sheer quantity of layered, thick rugs and floor cushions, stacked high to create a warm, inviting platform. Rich, deep colors like burgundy, gold, and red are used exclusively, which psychologically suggest heat and luxury. Every surface, including the furniture base, is cushioned.
Brass and gold metallic trays and lanterns are used low to the ground. These metallic layers reflect the abundant candlelight, scattering a flickering, intense warmth throughout the dense textile sanctuary. This style prioritizes flexible, low-level lounging, naturally trapping heat near the floor.
DIY: Creating a Tiered Candle Lantern Display
Using varying heights of metallic lanterns and trays creates a powerful, multi-level source of warm light near the floor.
Material Required
- Two to three brass or gold-toned metal lanterns (various heights).
- Two to three gold-toned, simple metal trays (various diameters).
- White pillar candles or warm-toned LED candles.
Equipment Required
- None, this is purely an arrangement exercise.
- Safety lighter or long matchsticks.
DIY Instruction Step by Step
- Select the Foundation: Place the largest, simplest metal tray on the floor or the lowest cushion stack. This is the base layer for one of your light clusters.
- Build the Tier: Place a second, smaller tray slightly elevated on a low stool or stacked books nearby. This creates a vertical layer.
- Place the Lanterns: Place the tallest lantern on the floor next to the base tray. Place the smallest lantern on the second, elevated tray. Using varying heights makes the display more dynamic.
- Cluster the Candles: Place pillar candles or votives directly onto the trays and inside the lanterns. Cluster them in odd numbers for a natural, rich look.
- Final Polish: The brass and gold will reflect the flickering candlelight brilliantly. Ensure the whole arrangement is tucked safely amongst the floor cushions, transforming the dark corner into a bright, warm focal point. Always supervise real candles.
20. Rust Walls and Natural Texture (Desert Minimalist)
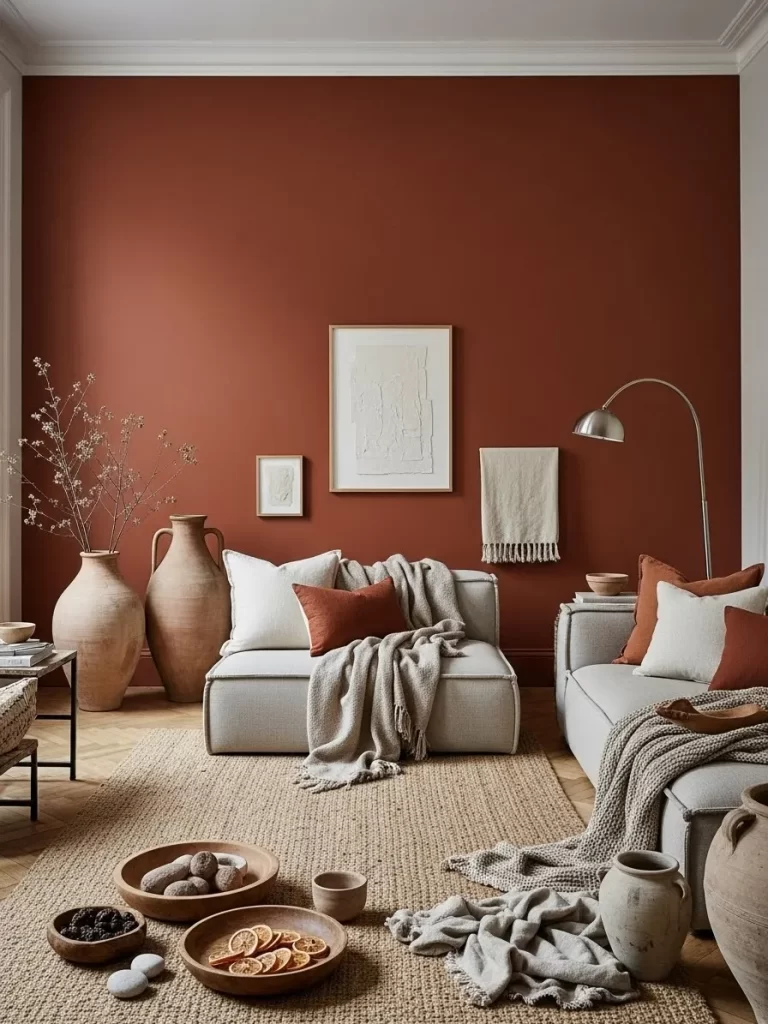
A large block of warm color combined with oversized, rustic vessels creates a simple yet powerful layered sanctuary. The striking terracotta or rust-colored wall immediately provides intense visual warmth, eliminating the feeling of a pale, cold box.
The layering is achieved through size and texture variation: huge, porous earthenware jugs flank the seating area, providing a rough, earthy counterpoint to the soft textiles. These vessels are juxtaposed with the low, squishy profile of the modern sofa, creating a grounding effect.
The neutral, low-profile sofa is piled with textural, soft layers. A heavy, natural-fiber rug serves as the foundation, topped with a thick, soft gray throw and rust-colored linen accent pillows. The combination of intense wall color, rough pottery, and soft, pliable fabrics makes the room feel grounded, simple, and deeply comfortable.
DIY: Oversized Rustic Floor Vases
Using oversized, natural-looking vases is a fantastic way to anchor a room and add rugged, earthy texture.
Material Required
- Two to three extra-large terracotta or matte ceramic vases (30 inches or taller).
- Dry, curly willow, manzanita branches, or tall pampas grass (to fill the vases).
- Sand or foam block (for stabilizing the branches).
Equipment Required
- None, this is purely an arrangement exercise.
DIY Instruction Step by Step
- Select the Vases: Choose vases with a matte, unglazed, or rough finish that closely mimics natural clay. Their size is key, so don’t be afraid to go very large (as shown).
- Stabilize the Vases: Place the vases in their final position. Pour some sand or place a foam block inside the vase bottoms to ensure they are stable and won’t tip over.
- Insert the Branches: Arrange the tall, dry branches inside the vase. Use a sparse arrangement, allowing the individual branches to stand out. Curly willow or manzanita adds a beautiful, sculptural layer that draws the eye upward.
- Connect to Textiles: Drape a corner of a soft, woven throw onto the closest seat. The rough, monumental scale of the vases provides a dense layer of texture, while the light, soft throw and the airy branches soften the overall look, creating a balanced, warm zone.
- Add a Sensory Layer: Place a simple wooden bowl filled with dried items, such as cinnamon sticks or orange slices, on a nearby low table to introduce a final sensory layer of comforting warmth.
21. Nautical Layers and Heavy Drape (Seaside Shelter)
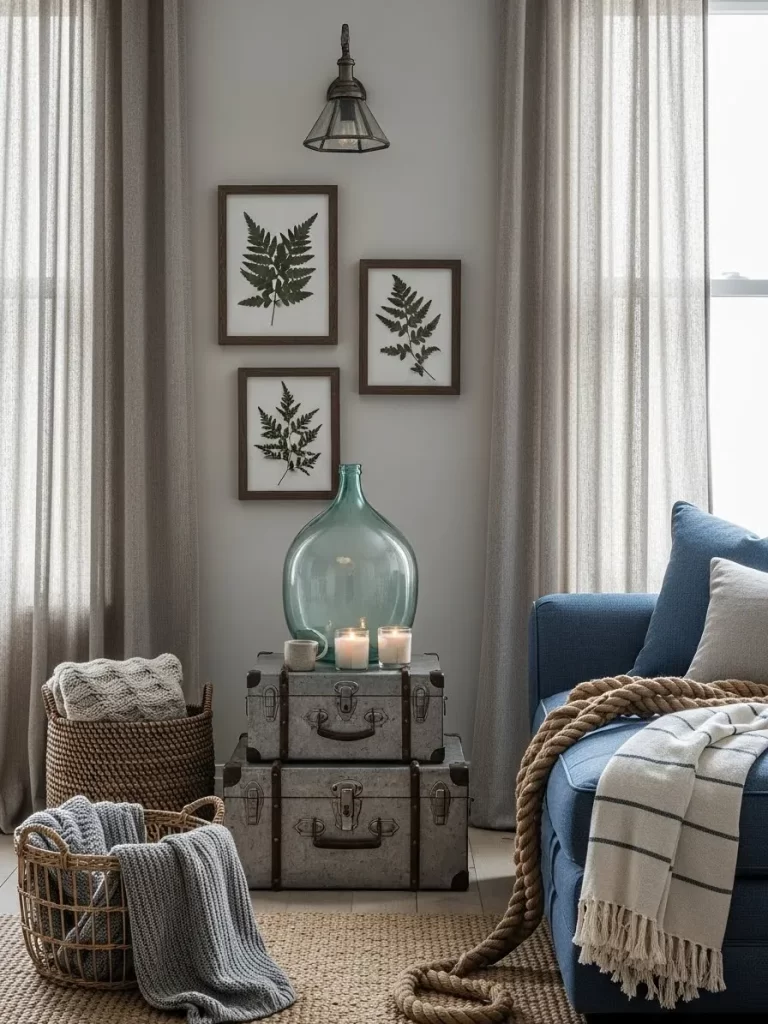
Even a cool color palette can feel warm when grounded by heavy texture, deep color, and suggestive layering. This room achieves a sense of cozy shelter using materials that feel robust against a cold climate.
The core layering secret is the use of heavy, long curtains and a nautical jute rug. The curtains, made of thick, textural linen, block the cold air from the window and frame the space with a soft, thermal boundary. The jute rug provides essential, heat-trapping texture underfoot.
Layering accessories like the stacked vintage trunks introduce weight and history. The oversized, blue glass vessel acts as a visual anchor, its color connecting to the deep blue sofa, which is itself layered with a chunky knit throw and a thick, striped blanket. The addition of a thick, coarse rope adds a final, rugged, tactile layer.
DIY: Creating a Rope-Wrapped Throw
Adding a unique, weighty texture like thick rope to a blanket or cushion provides an unexpected layer of nautical-inspired warmth.
Material Required
- One throw blanket (striped cotton or light wool works well).
- A length of thick, natural jute or manila rope (1-2 inches in diameter).
- Strong cotton thread or embroidery floss in a matching color.
Equipment Required
- Large, sturdy sewing needle.
- Scissors.
DIY Instruction Step by Step
- Measure and Cut Rope: Decide how much rope you want to display on the blanket. In the image, the rope is laid across the corner. Cut the rope to the desired length (it should look substantial, 5-7 feet).
- Prep the Blanket: Lay the throw blanket flat. Position the rope across the corner or edge of the blanket where it will rest on the sofa.
- Stitch the Rope: Using the large needle and strong thread, carefully stitch the rope to the blanket at intermittent points. Use small, strong stitches that penetrate the rope and secure it firmly to the blanket fabric. Stitching only a few spots allows the rope to mostly lie loose, preserving the layered look.
- Drape the Anchor: Drape the blanket over the arm of the sofa. The heavy, coarse rope adds a tactile, substantial layer that contrasts with the soft knit beneath it, making the entire piece feel robust and warm.
22. Mid-Century Texture and Saturated Color (The Jewel Box)
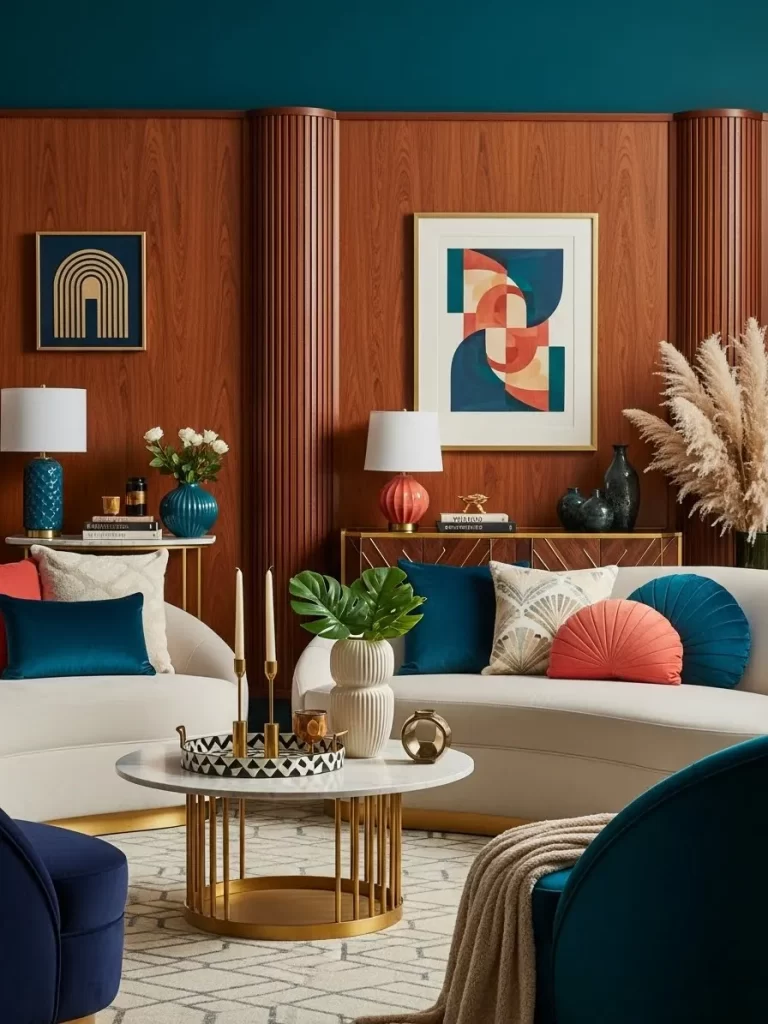
Rich wood paneling, saturated color blocking, and soft, curved furniture create a sophisticated, mid-century sanctuary. The entire wall is layered with warm, reddish-brown wood paneling, creating an immediate visual oven effect.
The secret here is the density of contrasting textures: the smooth, curved lines of the white sofas are immediately warmed by the intense velvet of the surrounding blue chairs and the jewel-toned cushions. Layered cushions feature soft velvet, ribbed corduroy, and patterned fabrics.
The warm-toned wood and gold accents (table legs, light fixtures) reflect the light with a soft glow. The addition of oversized pampas grass adds a final, tall, and soft layer of texture, ensuring the space feels both protected by the hard wood and cushioned by the textiles.
DIY: Creating a Ribbed Velvet Cushion
Adding ribbed, textured cushions in warm colors is a quick way to layer luxury and tactility onto smooth sofas.
Material Required
- Ribbed corduroy or pleated velvet fabric in a warm jewel tone (e.g., coral, mustard, or deep teal).
- Cushion insert (round or square).
- Zipper or Velcro closure.
Equipment Required
- Sewing machine.
- Scissors, pins, and thread.
- Measuring tape.
DIY Instruction Step by Step
- Cut the Fabric: Cut two pieces of fabric to the size needed for your cushion cover, adding a seam allowance around all edges. Ensure that the corduroy ribs or velvet pleats run vertically or horizontally as desired.
- Sew the Edges: Sew the two pieces together, leaving an opening for the zipper or for stuffing the insert. If using a zipper, install it neatly along the edge.
- Stuff and Finish: Turn the cover right-side out. Insert the cushion form tightly to ensure the cover is plump and smooth. Sew the opening closed (if not using a zipper).
- The Fluff and Placement: Place the new textured cushion prominently on the sofa, contrasting it with a smooth velvet pillow. The tactile ribbed surface invites touching and sinking into the seat, reinforcing the cozy feeling.
23. Woven Neutrals and Pine Cones (Harvest Hearth)

Layering natural, light-toned woven materials with seasonal textures creates a light, yet deeply grounded and warm living space. This look utilizes texture and natural color to generate warmth without relying on dark shades.
The floor is anchored by a large, square-patterned jute rug, which provides a heavy, insulating texture. The furniture, including the rattan chairs and wood cabinet, reinforces the natural theme. The key layering secret is the use of large, textured accessories like woven wall hangings and a huge bowl of pine cones.
Pine cones and dried wheat stalks instantly evoke autumn and winter gathering, associating the space with warmth and harvest. The many soft, cream-colored throws, draped casually over the rattan chairs, counteract the coolness of the woven cane, adding a crucial layer of plush comfort.
DIY: Creating a Bowl of Scented Pine Cones
This is an effortless way to add texture and a warm, comforting scent to the room.
Material Required
- A decorative wooden or ceramic bowl (wide and shallow is best).
- Clean, dry pine cones (gather your own or purchase them).
- Essential oil blend (cinnamon, clove, nutmeg, or cedarwood) for scent.
- Small spray bottle.
Equipment Required
- Large Ziploc bag or airtight container.
DIY Instruction Step by Step
- Prepare the Cones: Ensure the pine cones are completely dry. If gathering your own, bake them at $200^\circ\text{F}$ for about an hour to kill any insects and dry out sap.
- Scent the Cones: Fill the spray bottle with water and add about 20-30 drops of your chosen essential oil blend (cinnamon is highly recommended for warmth). Mist the pine cones lightly while they are inside the Ziploc bag.
- Seal and Infuse: Seal the Ziploc bag or place the cones in an airtight container for 24-48 hours. This allows the scent to fully infuse the cones, creating a long-lasting, natural fragrance.
- Display the Texture: Arrange the scented pine cones neatly in the decorative bowl. Place the bowl on a low table, like the nesting tables shown, or directly on the jute rug. The rough, natural texture combined with the warm aroma adds a double layer of sensory comfort to the cozy zone.
24. Deep Blue and High-Texture Rugs (Oceanic Calm)
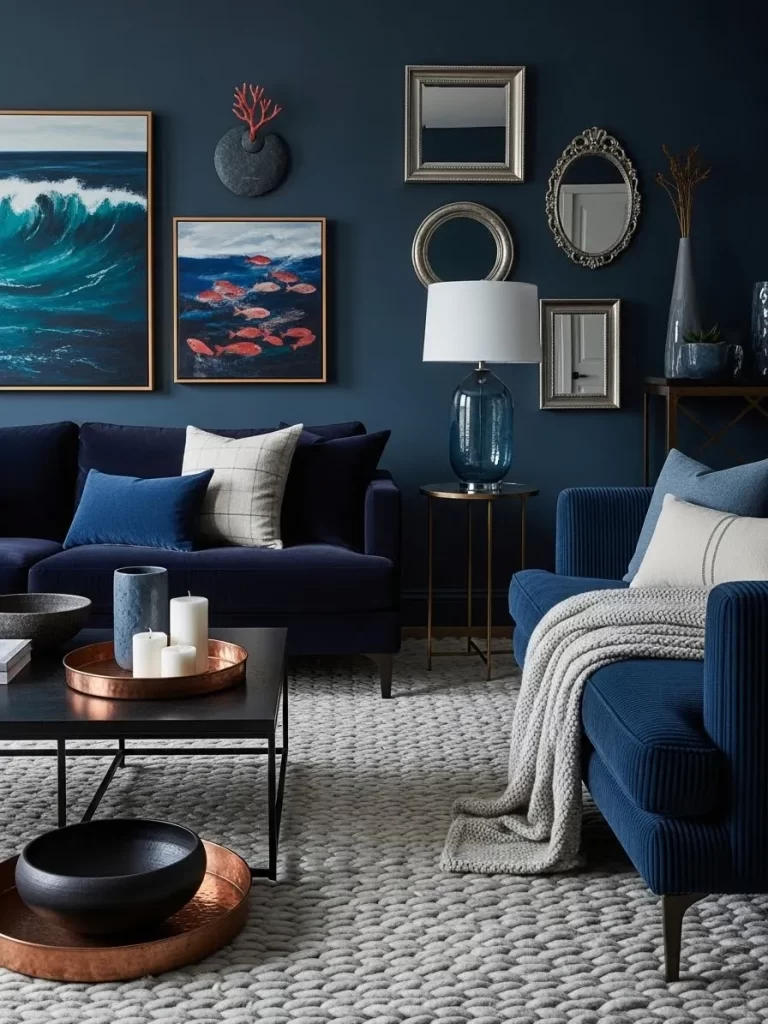
Deep, rich colors combined with intense texture create a calming yet deeply protected environment, even when the color palette is cool. The midnight blue walls and velvet sofa instantly create a dense, cave-like enclosure, stopping the eye from traveling to cold corners.
The most important layering element is the high-pile, thick-woven rug in a light neutral shade. This rug acts as a fluffy cloud, isolating the feet from the cold floor and providing a massive visual mass of softness. The contrast between the hard, dark walls and the soft, light rug is key to the coziness.
The metallic copper trays, placed on the black coffee table, add a flash of fire-like warmth. The deep blue sofa is topped with soft knit throws and lighter, checkered cushions, layering different shades of blue and complementary neutrals to build a complex, comfortable nest.
DIY: Creating a Tiered Copper Candle Display
Using copper trays near the floor level adds a crucial layer of fire-like warmth that counters the cool blue tones.
Material Required
- One large, flat copper serving tray.
- Three to five white or cream pillar candles (varying sizes).
- One or two ceramic bowls in a matte finish (dark blue or black).
- One small vase.
Equipment Required
- Safety lighter or long matchsticks.
DIY Instruction Step by Step
- Anchor the Table: Place the large, flat copper tray prominently on the coffee table. The reflectivity of the copper is essential for this layered warmth trick.
- Create the Candle Cluster: Arrange the white pillar candles in a cluster on the tray. Use odd numbers for a more natural look. Group the candles in one section of the tray.
- Layer the Texture and Color: Place the matte ceramic bowls on the tray near the candles. Their dark, flat color provides a grounding contrast to the bright, reflective copper. A small vase with a single light-colored flower can be added for height.
- Final Polish: The candlelight and ambient room light will reflect off the copper surface, casting a soft, warm glow that visually heats the entire zone. This element is the fire-like layer that balances the cool blue tones of the room.
25. Bouclé and Rounded Forms (Cushioned Minimalism)
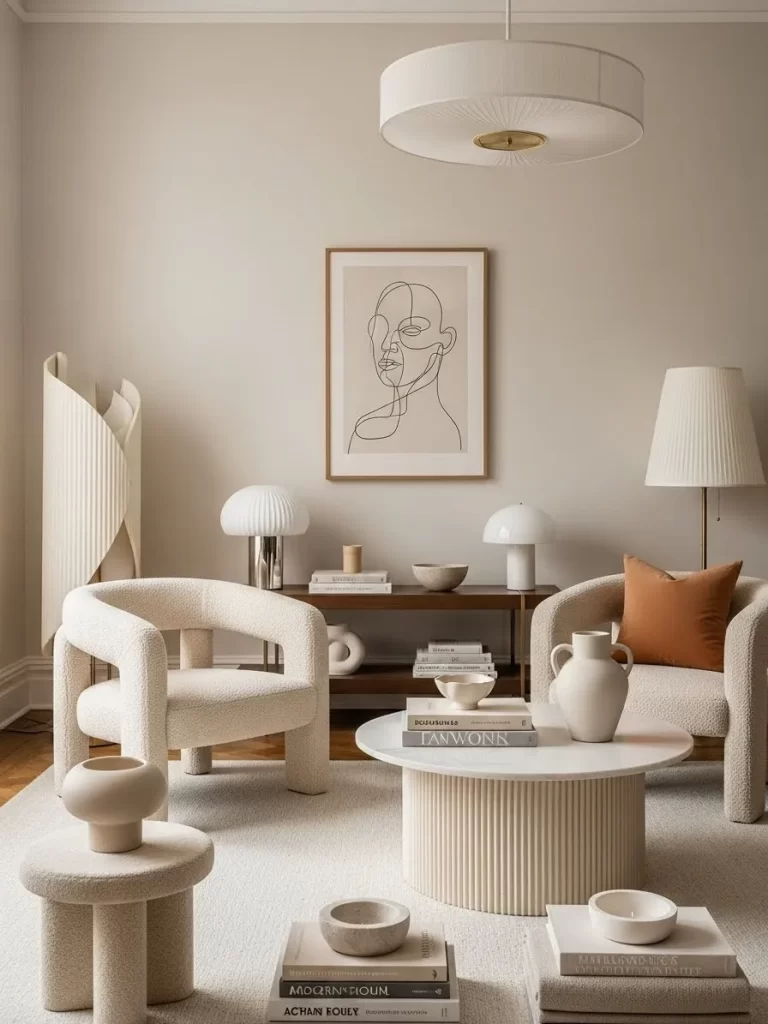
Creating warmth in a minimalist setting requires extreme focus on soft, inviting textures and gentle shapes. The monochromatic cream and white palette is made cozy through the extensive use of bouclé fabric and rounded forms.
The key secret is the texture of the bouclé chairs—a soft, looped weave that feels instantly warm and tactile. The curved arms and low profile of the seating offer an enveloping, protective shape. This soft architecture is layered with a deep, yet subtle, low-pile rug.
Accessories are also layered in soft, organic shapes: the fluted coffee table, the ceramic vases, and the rounded lamp shades. A single, small pop of terracotta color in the throw pillow adds a tiny element of visual heat that is necessary to complete the cozy feel in an otherwise light space.
DIY: Fluting a Simple Coffee Table
Fluted or ribbed textures add visual softness and sophistication, mimicking the warm texture of corduroy or bouclé.
Material Required
- A simple, round coffee table with a smooth edge (wood or composite).
- Half-round wooden dowels (approximately 1/4 inch diameter), enough to cover the circumference of the table edge.
- Strong wood glue.
- Wood primer and matte paint in a cream or off-white color.
Equipment Required
- Hand saw or miter box (for cutting dowels).
- Sandpaper.
- Measuring tape.
- Clamps or strong rubber bands.
DIY Instruction Step by Step
- Measure and Cut: Measure the circumference and height of the coffee table edge. Cut the half-round dowels to the exact height of the table edge. You will need many small pieces.
- Prep the Dowels: Lightly sand the dowels. Apply a coat of primer and two coats of matte cream paint to the dowels, allowing them to dry completely.
- Attach the Fluting: Starting at an inconspicuous point, apply a thin line of wood glue to the back of the first dowel piece. Press it firmly onto the edge of the coffee table. Continue placing the dowels side-by-side, pressing them close together to hide the seam.
- Secure and Dry: Use clamps or heavy rubber bands wrapped around the table’s circumference to hold the dowels tightly in place while the glue dries completely (allow 24 hours).
- Final Layering: Once dry, place the finished fluted table between the bouclé chairs. The ribbed texture of the table will echo the soft texture of the seating, layering a warm, decorative detail that contrasts with the hard, flat floor.
26. Blush Pink and Velvet Luxury (Gentle Warmth)
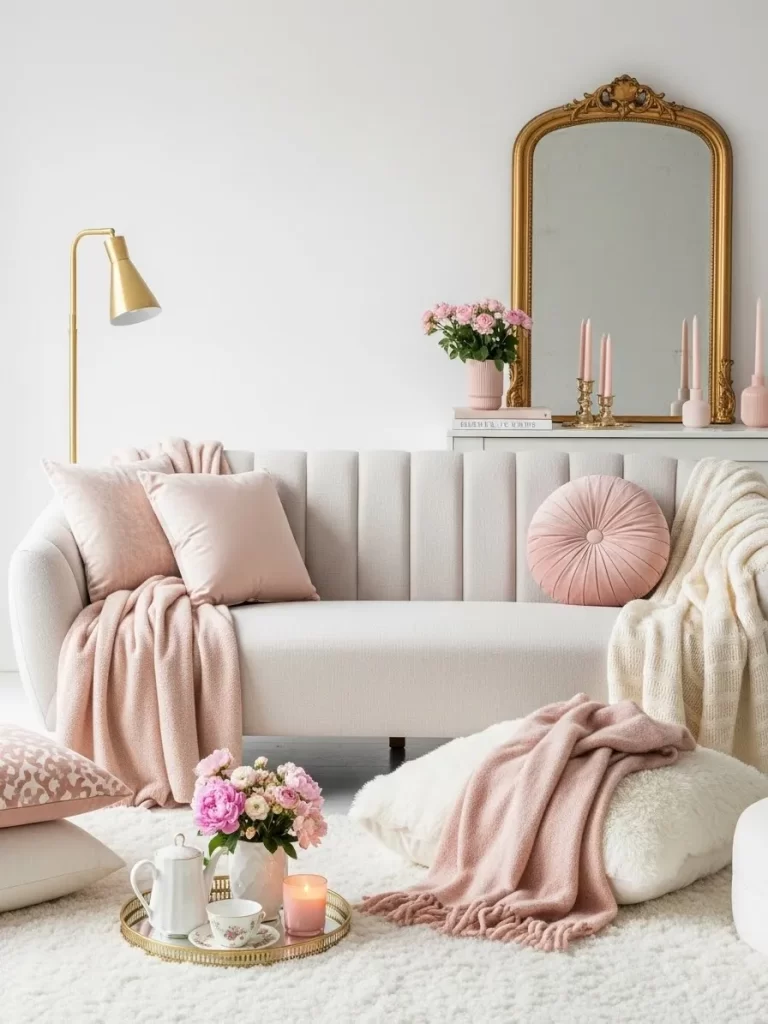
A soft, feminine palette can achieve deep coziness by relying heavily on luxurious textures and gentle color gradients. This living room uses blush pink and cream to create a tranquil, warm sanctuary.
The core secret is the massive application of velvet and faux fur. The velvet sofa is layered with multiple shades of pink throws and cushions—a soft fringe blanket, a pink velvet blanket, and a fluffy white throw. This triple layering of plush fabric makes the seating area incredibly inviting.
The gold mirror and accessories, combined with the multiple candlesticks, reflect the warm light with a gentle, soft glow. Grounding the space is a deep-pile white rug, which absorbs cold and provides a soft foundation, preventing the light colors from feeling airy or cold.
DIY: Creating a Layered Floor Stack with Plush Elements
This focuses on adding floor-level comfort and visual softness using stacked pillows and plush throws.
Material Required
- Two large, plain white floor cushions (square or rectangular).
- One soft, blush-pink fringed throw blanket.
- One small, soft white faux fur or sheepskin rug.
- A decorative tray (gold or white).
Equipment Required
- None, this is purely an arrangement exercise.
DIY Instruction Step by Step
- Build the Base: On the rug in front of the sofa, place the two large white floor cushions, stacking them slightly off-center. These create the softest, lowest seating layer.
- Add the Plush Layer: Lay the small white faux fur or sheepskin rug over the top cushion, allowing it to spill onto the main rug. This introduces a specific, intense softness.
- Layer the Color: Take the blush-pink fringed throw blanket and drape it artfully over the floor stack. The fringes should spill onto the floor. This provides the crucial color layer.
- Integrate Accessories: Place the small decorative tray nearby on the rug, perhaps holding a tea set and a small, flickering candle. The low placement of the light source will illuminate the plush textures, completing the gentle, warm sanctuary.
- Final Drape: Ensure the primary throw is draped over the sofa arm, pooling onto the floor cushions, physically connecting the two zones of warmth.
27. Jewel Tones and Geometric Patterns (Vibrant Coziness)
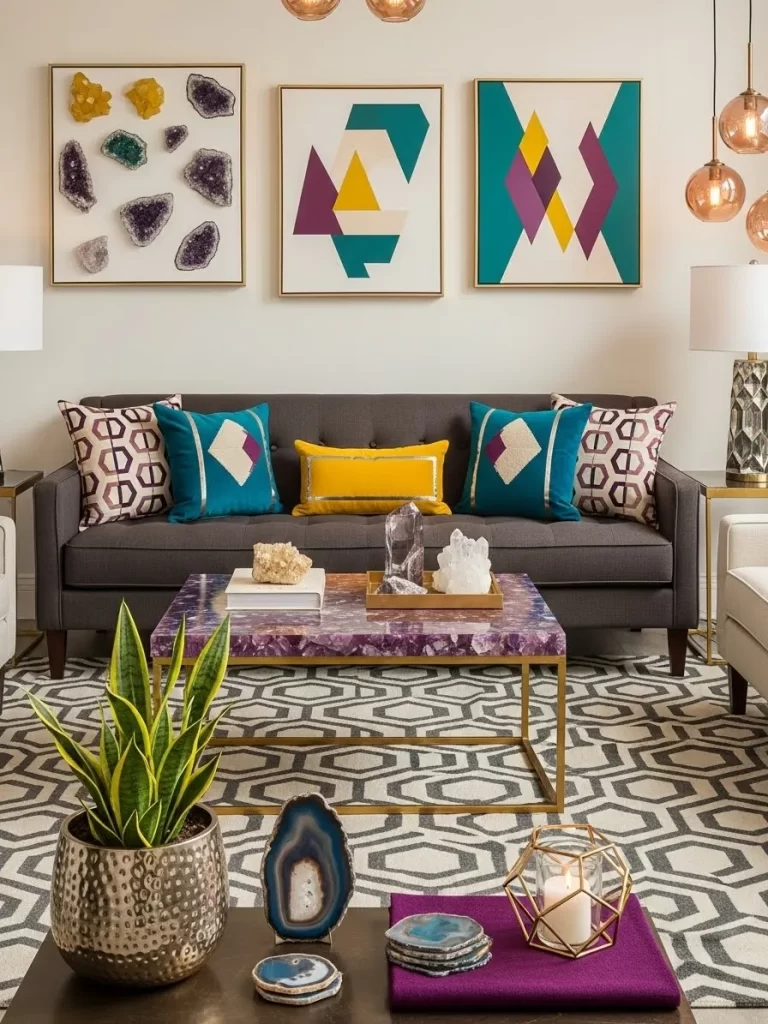
Bold, geometric patterns and intense jewel tones, when layered with textural elements, create a surprisingly warm and energetic space. This room uses color and pattern density to overcome the white walls and modern furniture.
The layered color palette is the secret: deep purples, teals, and intense yellows are distributed in pillows and the coffee table. These saturated colors create immediate visual heat, contrasting with the neutral sofa and rug.
The rug features a strong geometric pattern, which is repeated in the throw pillows and the wall art. This repetition creates a sense of enveloping energy and focus. The coffee table, made of purple agate or amethyst, provides a dense, jewel-like texture that visually grounds the space in rich color.
DIY: Creating a Geometric Patterned Pillow Layer
Introducing structured patterns in rich colors adds visual density and depth to a simple sofa.
Material Required
- Plain cushion inserts.
- Fabric with a bold geometric pattern (in your chosen jewel tones).
- Fabric with a solid, contrasting jewel tone (like teal or yellow velvet).
- Tassel or trim for edges (optional).
Equipment Required
- Sewing machine.
- Scissors, pins, and thread.
DIY Instruction Step by Step
- Cut and Sew Covers: Cut and sew cushion covers. Create an equal number of patterned covers and solid-color covers (like the image’s teal solids and geometric prints).
- The Base Layer: Place the solid-colored, largest cushions against the back of the sofa.
- The Pattern Layer: Layer the patterned cushions in front of the solid colors. Placing a patterned pillow next to a solid one highlights both the texture of the solid and the complexity of the pattern.
- The Accent Layer: Add a single, small lumbar pillow in a contrasting, intense color (like the yellow one shown). This final, bright layer acts as a visual anchor and draws the eye to the rich palette.
- Final Alignment: The stacked geometric and color layers create a visual barrier that feels plush and inviting, ensuring the cool gray sofa is overwhelmed by textural warmth.
28. Dark Wood Paneling and Oriental Rugs (Classic Den)
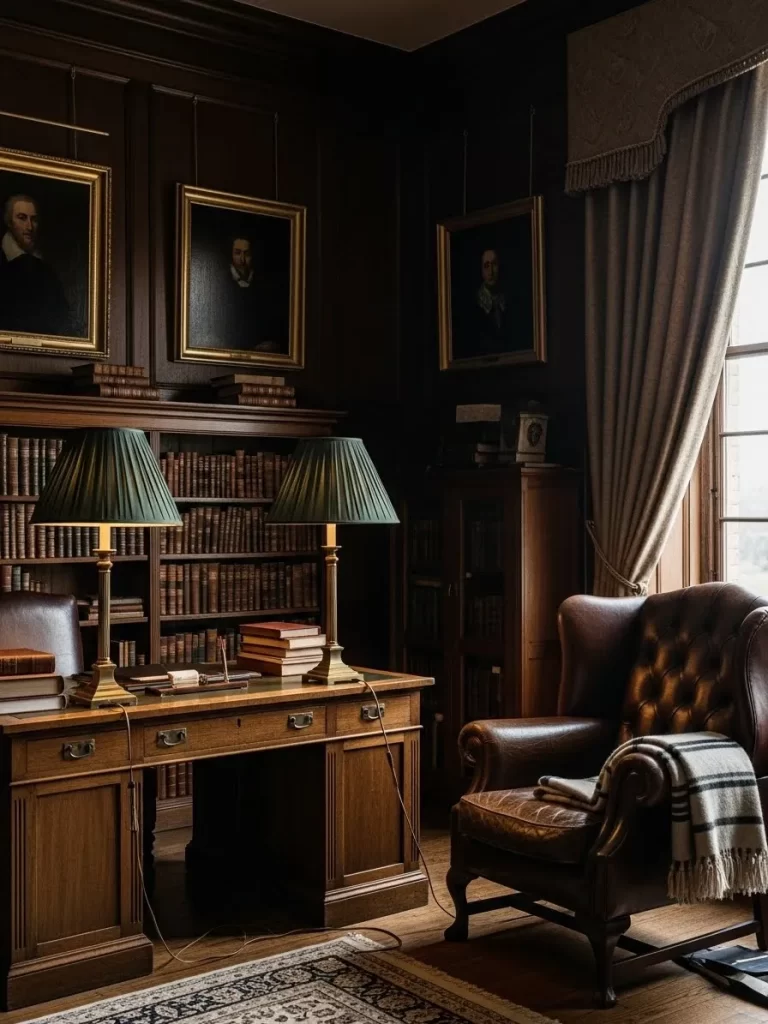
The ultimate in traditional warmth, this style uses layers of dark, rich wood and classic textiles to create a mood of deep security and history. The dark brown wood paneling across all walls and the exposed trim creates an unparalleled thermal barrier and visual enclosure.
The core secret is the Oriental rug and rich leather. The patterned rug adds a dense, complex layer of color and insulation beneath the wood floor. The tufted leather chair and desk top absorb and radiate a sense of established warmth.
Every accessory is layered: the lamps have heavy brass bases and pleated green shades, casting a concentrated, warm light onto the reading surface. A thick, fringed throw is draped over the leather chair, offering a final, necessary layer of soft, ready-to-use comfort that balances the room’s formal structure.
DIY: Upgrading a Lamp with a Pleated Shade
Changing a simple lamp shade to a pleated, dark fabric one instantly softens the light and adds a formal, classic layer of texture.
Material Required
- Existing table lamp base.
- New pleated lamp shade (deep green, burgundy, or gold fabric).
- Light bulb (2700K warm white).
Equipment Required
- None, this is purely an upgrade and styling exercise.
DIY Instruction Step by Step
- Select the Shade: Choose a shade made of pleated fabric, preferably silk or heavy linen, in a rich, dark color like the forest green shown. Ensure the harp or fitting on your lamp base matches the shade’s required attachment.
- Replace the Bulb: Replace the old bulb with a warm-toned LED bulb (around 2700 Kelvin). The light must be soft to create the den atmosphere.
- Install the Shade: Carefully remove the old shade and install the new pleated shade. The dark, dense fabric will prevent harsh light from spilling out, focusing the light downward onto the desk or table.
- Layer the Surface: Place the lamp on a desk or side table that is also layered with books and a small, leather accessory. The pleated shade adds a crucial layer of visual texture and directs a warm, intimate pool of light, instantly making the zone feel cozy for reading.
29. Alpine Wood and Wool Blanket (Ski Lodge Retreat)

When the view outside is snow, the inside must be the epitome of layered, raw, comforting warmth. This room uses rough-hewn wood, heavy textiles, and traditional patterns to create an enclosed alpine sanctuary.
The core layering secret is the structural wood. The ceiling beams, walls, and trim are all exposed, rustic wood, which provides a natural, thick layer of insulation. This structural warmth is complemented by a thick, natural fiber rug covering the entire floor.
The neutral sofas are heavily layered with thick throws and patterned cushions featuring snowflakes and geometric wool prints. A classic plaid wool blanket is used as a cover for the footstool, adding a heavy, authentic layer of insulating wool, perfect for resting feet after a day in the cold.
DIY: Covering a Footstool with a Wool Blanket
Using a heavy, patterned wool blanket to cover a footstool or ottoman is a quick, layered way to introduce thick texture and insulation.
Material Required
- Heavy, patterned wool blanket (plaid or traditional geometric pattern).
- Existing ottoman or footstool.
- Large upholstery tacks or decorative furniture nails.
Equipment Required
- Hammer.
- Measuring tape.
- Scissors.
DIY Instruction Step by Step
- Center the Blanket: Lay the wool blanket over the top and sides of the ottoman, ensuring the pattern is centered and straight on the top surface. The blanket should hang evenly on all sides.
- Smooth and Fold: Smooth out the fabric on the top surface. Neatly fold the corners under the edge of the ottoman to create clean, crisp lines, tucking the bulk of the fabric underneath.
- Secure the Fabric: Using the upholstery tacks or decorative nails, secure the blanket to the wooden base of the ottoman. Place the tacks evenly around the bottom edge of the stool, ensuring the fabric is held taut.
- Final Touch: The heavy wool blanket now provides an insulating, soft, and rugged texture layer. Place a woven basket or a small faux fur pillow next to it to reinforce the layered, rustic warmth of the retreat.
30. Modern Graphics and Warm Copper (Structured Comfort)
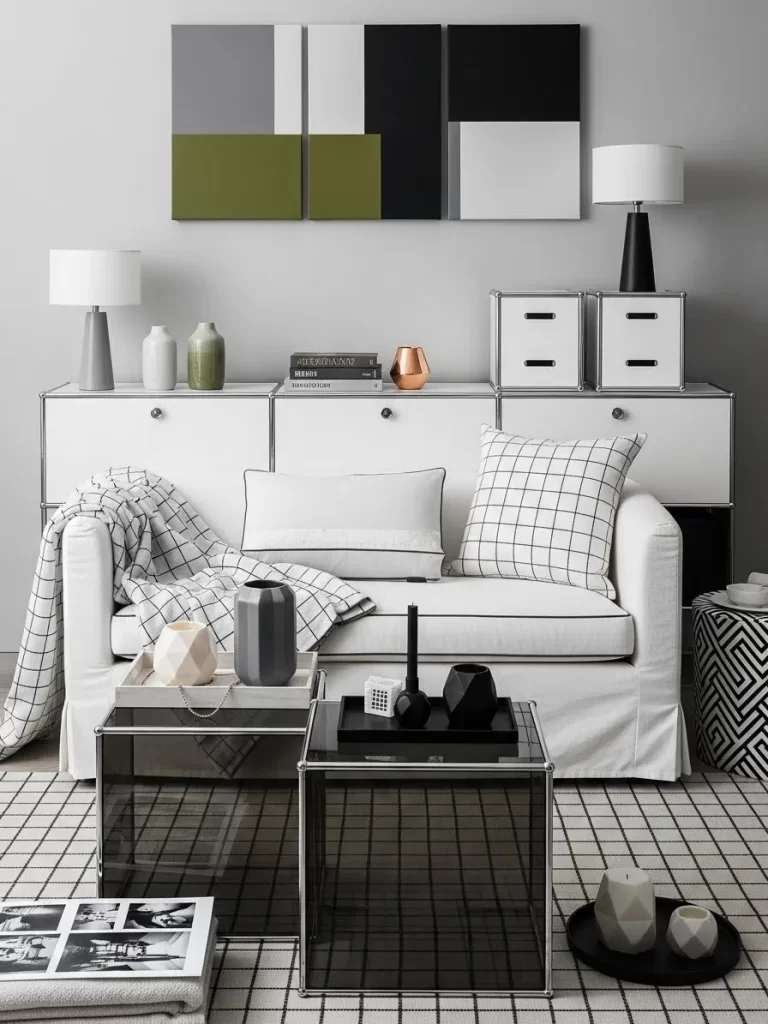
Even a minimalist, high-contrast black-and-white room can feel warm when specific textures and metallic accents are introduced. This scheme relies on layering graphic patterns and small, intense pops of warm metal.
The core secret is the graphic textile layering. A checkered rug is topped by a checkered throw and a grid-patterned pillow. This layered pattern density creates visual interest and depth, preventing the white furniture from feeling cold or flat.
Crucially, the warmth is introduced through tiny copper accessories. The small copper vase and a coppery hue in a geometric light fixture reflect the ambient light, adding a necessary, contrasting warmth to the stark monochrome. The matte gray vases and soft, geometric pillows add the final layers of tactile comfort.
DIY: Integrating Copper Pop Accessories
Adding a small, intentional layer of copper or brass is vital for psychological warmth in a cool, modern space.
Material Required
- One small copper or brass vase, dish, or geometric accessory.
- One solid-colored book (deep green or gray recommended).
- A matte ceramic vase (white or gray).
Equipment Required
- None, this is purely an arrangement exercise.
DIY Instruction Step by Step
- Prep the Surface: Clear a small space on a sideboard or side table near the sofa.
- Build the Base: Place the solid-colored book flat on the surface. This grounds the arrangement.
- Layer the Texture: Place the matte ceramic vase next to the book. Its non-reflective surface contrasts with the metallic piece to come.
- Introduce the Warmth: Place the small copper accessory directly in front of or next to the ceramic vase. The copper should be positioned to catch any ambient lamplight.
- Final Polish: The tiny metallic surface acts as a visual reflector, providing a concentrated flash of warm color that convinces the eye the room is not entirely cold, balancing the heavy use of black and white.
31. Patina Leather and Wood Paneling (The Heirloom Study)
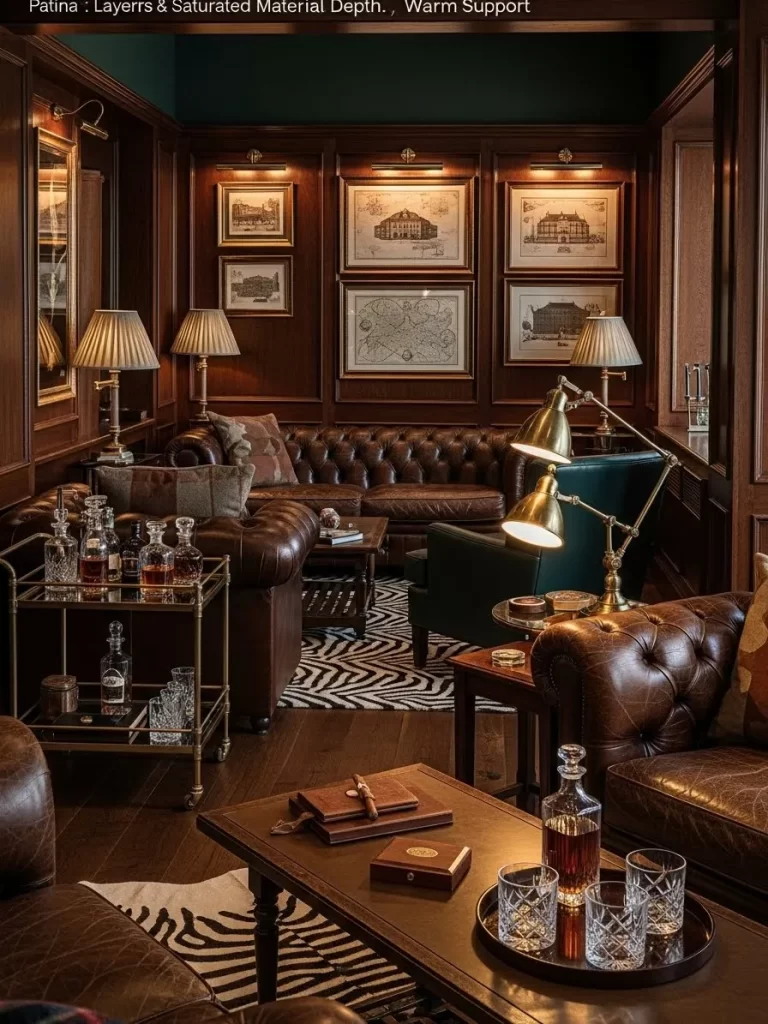
This space achieves an exceptionally high level of warmth through layers of deep, historical materials that feel heavily insulated and luxurious. The core secret is the combination of deep wood paneling and the rich patina of old leather furniture.
The heavy, tufted leather armchairs and sofa, with their aged finish, absorb light and instantly convey a sense of density and enduring warmth. Surrounding these pieces are wood-paneled walls and ceilings, creating a protective envelope that eliminates any chance of feeling cold.
Layering is achieved through the brass lighting and the textured rugs. Brass lamps provide a warm, directed glow, highlighting the rich wood. A subtle pattern in the area rug adds a floor layer of softness beneath the furniture, ensuring the room feels welcoming despite its dark, formal aesthetic.
DIY: Maintaining Patina on Leather Furniture
Keeping leather soft and supple is vital for comfort and preserving the warm, aged look. This is a maintenance secret, not a decoration.
Material Required
- Quality leather conditioner or balm (containing natural oils and waxes).
- Two soft, clean microfiber cloths (one for application, one for buffing).
- Leather cleaner (optional, for removing heavy dirt).
Equipment Required
- None.
DIY Instruction Step by Step
- Dust the Surface: Use a dry microfiber cloth to gently dust the entire surface of the leather furniture. If there are heavy spills, use a specialized leather cleaner as directed and allow it to dry.
- Apply Conditioner: Take a small amount of leather conditioner on a clean microfiber cloth. Start in an inconspicuous area to test the product.
- Rub in Gently: Using circular motions, rub the conditioner into the entire surface of the leather. Pay special attention to high-wear areas like arms and seating cushions. Do not saturate the leather; a little goes a long way.
- Allow Absorption: Allow the conditioner to sit and fully absorb into the leather for at least 15-20 minutes, or as directed by the product label. This step keeps the leather soft, preventing cracks that look and feel cold.
- Buff to a Sheen: Use the second clean, dry microfiber cloth to lightly buff the leather. This removes any excess product and brings out the rich sheen and color depth (the patina), completing the warm, luxurious look.
32. Faux Fur and Textured Gray (Cloud Nine Coziness)
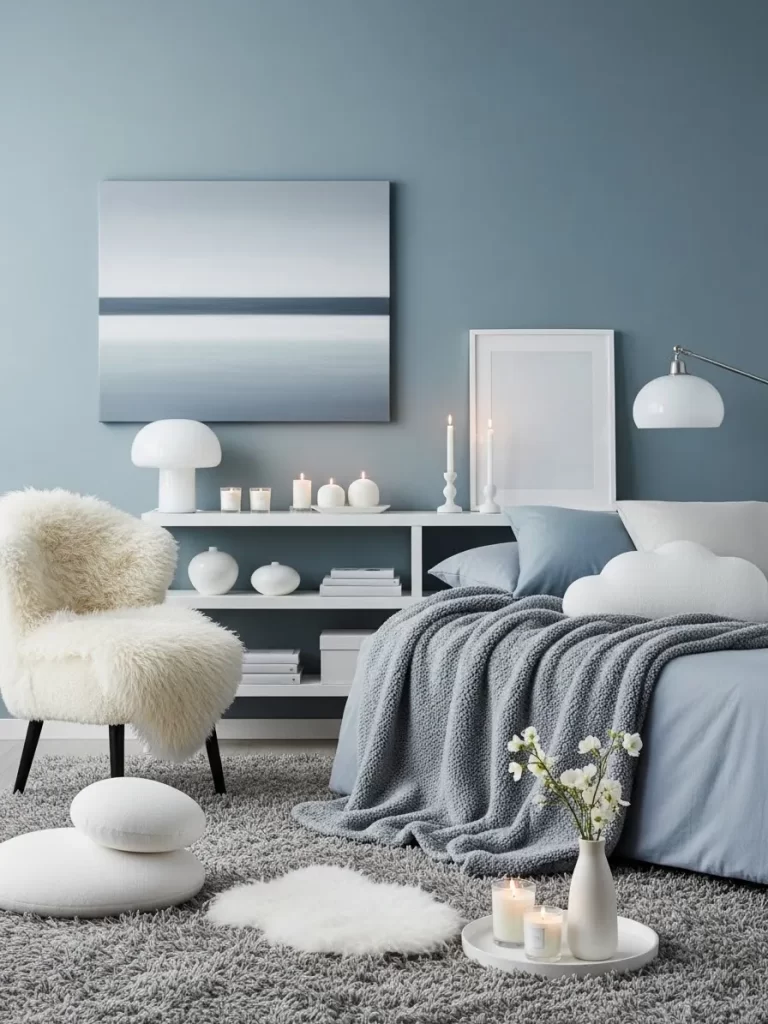
This living area proves that blue and gray can be profoundly cozy when textures are maximized and cold light is avoided. The layering secret here is the combination of ultra-soft, deep-pile textiles in a gentle, monochromatic cool palette.
The foundational layer is the ultra-plush, deep gray shag rug, which creates a massive field of softness that traps heat. On top of this, the fluffy white faux fur chair provides a tactile focal point that looks incredibly warm and inviting.
The bed (or large daybed) is layered with a super-chunky, soft gray throw, which contrasts with the smooth blue linen. Small, white round cushions echo the shape of the mushroom lamp, and multiple flickering candles add crucial firelight, warming the cool color scheme into a tranquil, cushioned sanctuary.
DIY: Creating a Textured Layered Tray Display
Creating a cluster of soft, flickering candlelight on a tray focuses the visual warmth in a cool-toned room.
Material Required
- One simple white or light gray serving tray (round or rectangular).
- Five to seven white or cream candles (a mix of pillar, votive, and tea light sizes).
- Small decorative vase with white flowers or simple greenery.
- Small white stones or sand (optional, to fill the tray).
Equipment Required
- Safety lighter or long matchsticks.
DIY Instruction Step by Step
- Place the Tray: Place the white tray on the rug or a low coffee table near the seating. Ensure it is stable.
- Arrange the Candles: Cluster the candles tightly together on the tray. Use different sizes and heights to create a dynamic light layer. The tight grouping maximizes the visual effect of the warm light.
- Add a Soft Element: Place the small vase of white flowers next to the candles. The softness of the flowers contrasts with the hardness of the wax.
- Create a Base (Optional): If the tray is large, you can scatter white decorative stones or a thin layer of sand on the tray surface beneath the candles. This adds an extra, subtle layer of texture.
- Ignite the Warmth: Light the candles. The focused, flickering glow contained within the clean white tray will provide the necessary visual warmth to balance the cool blues and grays, making the whole area feel protected and cozy.
33. Patchwork and Homespun Quilts (Heritage Comfort)
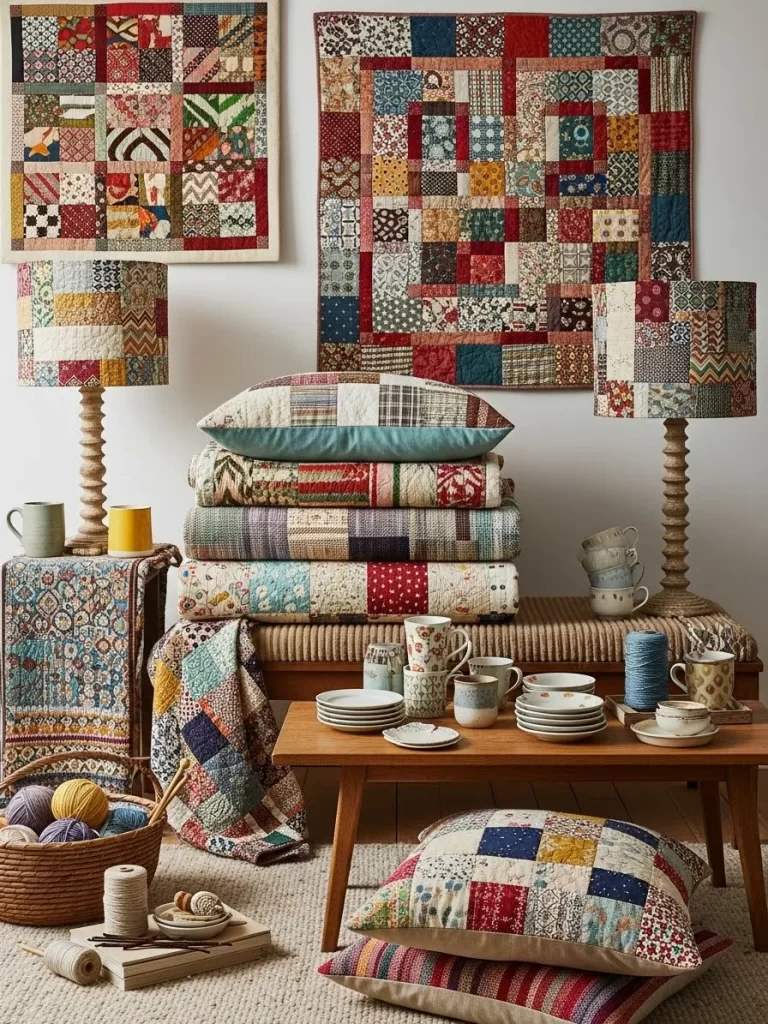
The most personal and historically warm layering technique uses handmade textiles like patchwork quilts, which carry a sense of history and dedicated labor. This room uses an abundance of patterned quilts to create a dense, colorful sanctuary.
The core secret is the use of stacked quilts and soft fiber art. Quilts stacked high on a bench provide both functional warmth and a massive, colorful focal point of texture. The mixture of checks, plaids, and tiny floral prints feels deeply homespun and protective.
Wall hangings made of similar patchwork add a vertical layer of insulating textile. The addition of yarn and knitting supplies in a woven basket reinforces the DIY, hand-made warmth of the space. Every surface is softened by patterned cushions and textile lampshades, eliminating any cold line.
DIY: Creating a Stacked Quilt Display
This is an organizational and styling secret that transforms stored blankets into a cozy piece of decor.
Material Required
- Three to five patterned quilts, throw blankets, or heavy coverlets.
- A bench or ottoman for stacking.
- One or two large decorative safety pins (optional, for holding the stack).
Equipment Required
- None, this is purely an arrangement exercise.
DIY Instruction Step by Step
- Select the Quilts: Choose quilts with varying patterns and colors, but ensure they share a similar warm or rustic aesthetic (like the patchwork shown). Include one extra-large, oversized throw to spill over the edge.
- Fold Evenly: Fold the quilts neatly into uniform rectangles. They should be just slightly narrower than the bench or stacking surface you are using.
- Stack for Height: Stack the folded quilts vertically on the bench, placing the neatest fold on top and varying the colors to create visual interest. The height of the stack is key for visual impact.
- The Casual Drape: Take the largest, thickest throw blanket and drape it casually over the top corner of the stack, allowing one end to spill dramatically onto the floor. This final, loose layer softens the rigid stack and invites someone to grab the throw.
- Accessorize: Place a large cushion on top of the stack and position a basket of yarn or knitting supplies nearby. This reinforces the theme of hand-made warmth and creative activity.
34. Smokey Glass and Dark Curtains (Shadowed Calm)
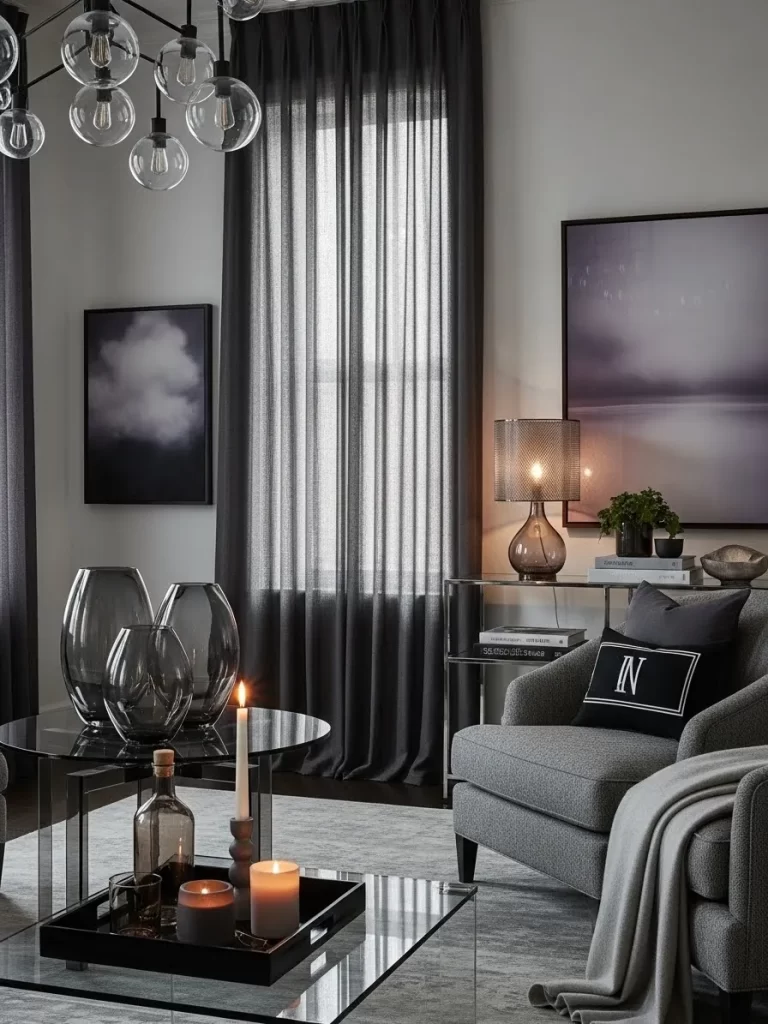
Using dark, sheer textiles and smokey, opaque glass creates a layered sense of calm and enclosure, making the room feel protected from the harsh light and cold outside. This cool-toned room achieves warmth through controlled light and dense material concentration.
The primary secret is the dark, floor-to-ceiling sheer curtain. This textile blocks harsh glare and diffuses light into a soft, gentle wash, instantly warming the light temperature. The dark gray color adds a heavy visual element that anchors the window area.
Accessories are layered in smokey gray and black glass. These translucent vessels, placed on glass tables, reflect the low, single candlelight with a diffused, dark glow. This subtle, shadowed warmth feels deeply sophisticated. The soft, monochromatic gray throw on the chair provides the necessary tactile layer.
DIY: Creating a Smokey Glass Light Cluster
This involves grouping dark-toned glass and warm light sources to create a mood of shadowed comfort.
Material Required
- Three to five glass vases/vessels in smokey gray, black, or dark amber (varying sizes).
- One black tray or dark wood platter.
- Two to three large pillar candles (white or dark gray).
- Small decorative items (like matte geometric shapes).
Equipment Required
- Safety lighter or long matchsticks.
DIY Instruction Step by Step
- Select the Base: Place the black or dark wood tray on the glass coffee table. This non-reflective base is necessary to ground the light cluster.
- Group the Glass: Arrange the dark glass vessels on the table surface next to the tray. Use the tallest piece for height and group the others around it. The dark transparency adds a layer of depth.
- Place the Candles: Place the pillar candles on the tray. If using candles outside the vessels, ensure they are stable. The warm light from the candles will contrast softly with the dark glass.
- Add Final Detail: Place a matte, small decorative shape or a book in front of the glass cluster. The dark elements absorb and concentrate the light.
- Drape a Throw: Ensure a soft, thick gray throw is draped over the arm of the nearby armchair, inviting the user to sit within this tranquil, shadowed zone of warmth.
35. Earth Tones and Macramé Art (Woven Sanctuary)
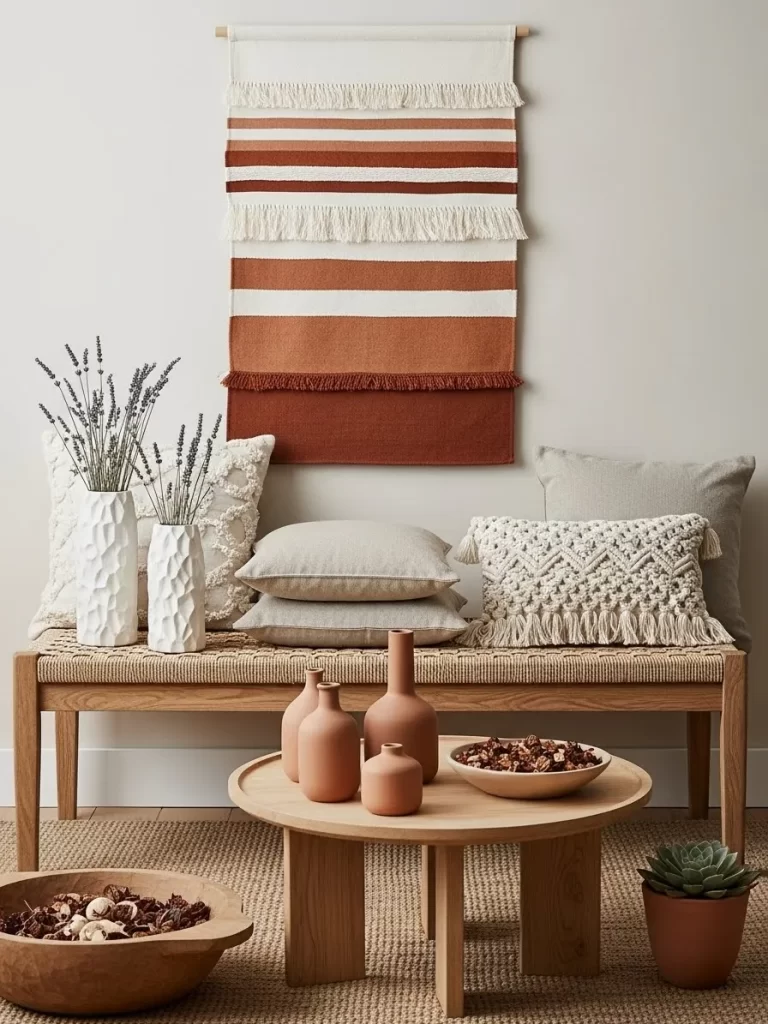
This entryway or seating area relies on layered, neutral, woven textures and natural wood to create a sense of sun-drenched, rustic warmth. The simple color palette of white, beige, and terracotta is entirely reliant on texture for its cozy feeling.
The core layering secret is the woven wall tapestry and macramé cushions. The tapestry adds a dense, vertical layer of texture in warm rust and cream colors, providing acoustic insulation and height. This is mirrored by the heavily textured macramé and embroidered pillows on the bench.
The light wood bench is layered with stacked linen pillows, creating multiple levels of seating softness. Small terracotta vases on the round table provide a necessary earthy contrast to the pale textiles. The entire floor is covered in a coarse jute rug, cementing the feeling of an enclosed, natural sanctuary.
DIY: Creating a Layered Macramé Pillow
Adding thick, fringed macramé cushions instantly brings coarse, insulating texture to seating.
Material Required
- Plain cushion insert and cover (thick linen or canvas).
- Natural cotton or jute cording (medium thickness) for macramé.
- Tassels (optional, pre-made or DIY).
Equipment Required
- Scissors.
- Fabric glue or strong thread/needle.
DIY Instruction Step by Step
- Prepare the Macramé: Using the cotton cording, create a small, simple section of macramé (like a fringe or diamond pattern) large enough to cover the front center of the pillow cover. Alternatively, purchase a simple macramé panel.
- Attach to Pillow: Center the finished macramé piece onto the front of the plain cushion cover. Use strong fabric glue around the edges or a needle and thread to securely stitch the macramé onto the pillow cover.
- Add Tassels: If desired, stitch tassels onto the four corners of the cushion cover to enhance the layered, bohemian texture.
- Place the Pillow: Place the finished macramé cushion in front of two solid linen pillows on the bench. The heavy, three-dimensional texture of the cording is a substantial, visible layer that instantly softens the hard lines of the bench, inviting deep comfort.
36. Retro Shapes and Ribbed Textures (Playful Warmth)
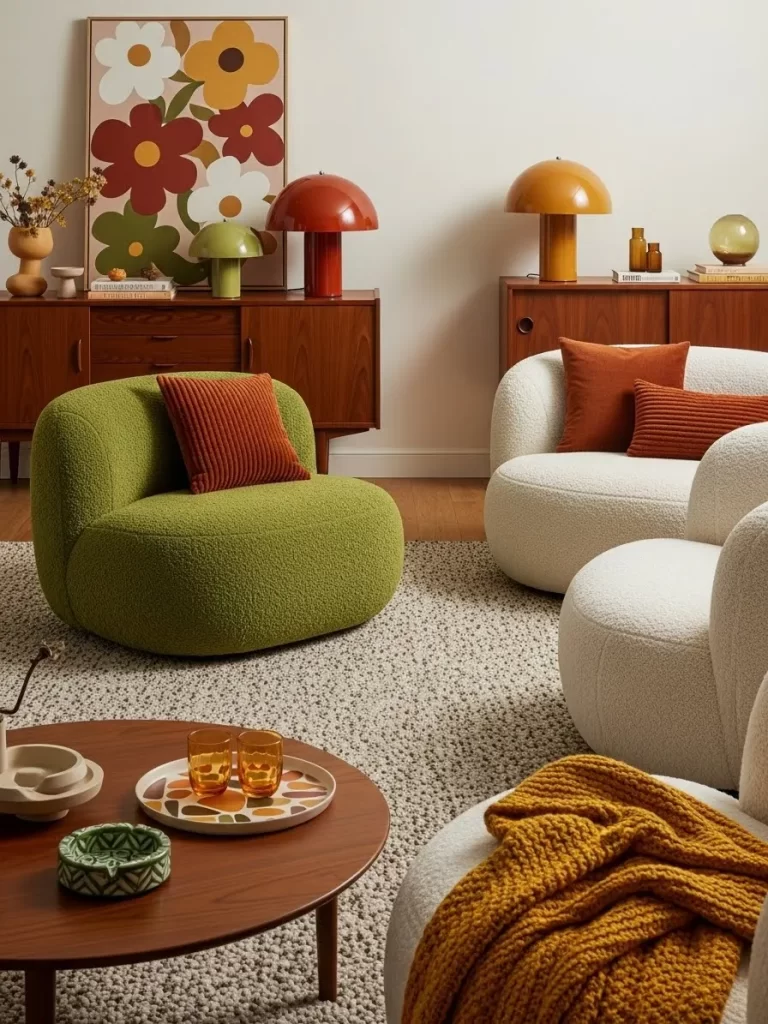
This room uses bold, retro-inspired colors and soft, organic furniture shapes to create a sanctuary that is both playful and deeply cushioned. The warmth is achieved by layering curved forms with high-pile textures and warm, saturated colors.
The core secret is the use of bouclé and ribbed corduroy. The seating, with its rounded, enveloping shape, is covered in soft, tactile bouclé (white and olive green). This is immediately layered with burnt orange ribbed corduroy pillows, which provide a linear texture contrast and a massive pop of visual heat.
The mushroom lamps and the graphic wall art introduce saturated reds and oranges, connecting the color scheme to fire and earth. The high-pile area rug provides a soft, warm foundation, ensuring that despite the smooth, mid-century wood cabinets, the room feels deeply padded and secure.
DIY: Creating a Retro-Inspired Tray Display
Using vintage-style glassware and patterned trays adds a layer of fun, colorful, and warm sophistication to the coffee table.
Material Required
- One round wooden tray with a slightly raised edge.
- Two glasses or mugs in warm, colored glass (amber or burnt orange).
- A small ceramic dish with a subtle geometric pattern (like the olive green one shown).
- A small, soft woolen napkin or coaster (mustard yellow recommended).
Equipment Required
- None, this is purely an arrangement exercise.
DIY Instruction Step by Step
- Place the Tray: Center the wooden tray on the coffee table. The wood provides a warm, natural base layer.
- Cluster the Glass: Place the two colored glasses on one side of the tray. The colored glass intensifies the ambient light, adding a warm glow.
- Layer with Ceramics: Place the patterned ceramic dish on the other side of the tray. Fill it with a small snack or a potpourri of orange peel.
- Add Softness: Place the woolen napkin underneath the colored glasses or drape it slightly over the edge of the tray. This provides the crucial soft texture layer.
- Connect to Seating: Ensure the chunky knit throw is draped over the nearest chair, its color connecting to the accessories on the tray. This entire cluster provides a focal point of color, texture, and inviting warmth.
Transforming a cold living room is a mission accomplished not with one grand gesture, but with 36 careful layers. We have covered everything from dense foundation rugs to textural wall art, showing how each addition acts as a thermal or visual insulator. These secrets shift your space from an empty box to a protective haven.
Remember that the goal is to trap heat, block drafts, and convince your senses that you are completely sheltered. Focus on materials like wool, velvet, and deep knits, and prioritize low, warm light sources like amber glass and candlelight. By stacking, draping, and arranging these elements, you build an inescapable cocoon of comfort.
Take these layering secrets and apply them to your home, starting from the floor and working your way up. You will soon discover that your living room is no longer just warm, but a welcoming, cozy sanctuary ready for the cold seasons ahead.
Key Takeaways
Thermal Barriers are Essential: Address drafts first by layering heavy curtains over windows and ensuring rugs cover at least 70% of the floor area. Dense fabrics like velvet and thick wool are vital for insulation.
Texture and Volume Equal Warmth: Use a high quantity of soft, three-dimensional textures—chunky knits, faux furs, and plush poufs. These elements absorb sound and light, making the space feel smaller and safer.
Manipulate Light and Color: Employ deep, saturated colors (rust, emerald, navy) to create a sense of enclosure. Always use warm-toned light bulbs (2700 Kelvin or lower) and reflective metals like copper and brass to mimic firelight.
Layering is Stacking: Use accessories to build vertical layers on tables, mantels, and the floor. Stacks of books, trays of candles, and tiered floor cushions physically raise the perceived temperature of the seating zone.