Need an Escape? 35 Cozy Reading Nook Ideas to Start Your Year Right
Establishing a cozy reading nook is one of the most rewarding ways to refresh your living space. As the year begins, many of us seek quieter habits and intentional moments of rest. A dedicated sanctuary for reading offers the perfect solution.

A reading space is more than just a chair; it is a personalized haven designed to encourage deep focus and ultimate relaxation. Whether your home is large or small, incorporating a special corner allows you to step away from screens and truly immerse yourself in a book.
We have curated a collection of 35 inspirational reading nooks, spanning every aesthetic from minimalist modern to rustic cabin. Explore these ideas and discover how clever lighting, luxurious texture, and smart built-in solutions can transform an unused corner into your favorite getaway. Every concept comes complete with a simple DIY project to help you begin crafting your own peaceful space today.
1. The Corner Banquette Retreat

This corner nook embodies quiet function and natural warmth, making it a stellar spot to settle in with a good book. This custom-built banquette cleverly utilizes every inch of corner space, turning a neglected area into a beautiful haven. The light oak wood provides a grounding, earthy base, complemented by soft, neutral cushions and throw pillows. Observe how the storage is integrated beneath the seating; the open shelf allows for easy access to reading materials, while the pull-out drawer is clever for stashing snacks or a warm beverage.
Above, simple wall-mounted shelving frames the space, keeping books and decorative ceramics neatly organized and within reach. Ambient lighting is key here. A large, softly glowing paper lantern offers a pleasant overhead wash, balanced by an adjustable swing-arm lamp mounted on the wall. This layered lighting ensures you always have the illumination needed for reading without harsh glare. A textured, knitted throw blanket adds an inviting layer of warmth, completing the feeling of total relaxation. It’s a truly restorative corner designed for slow, mindful moments.
DIY: Creating a Simple Floating Corner Shelf
This project helps replicate the functional wall storage seen above the reading nook.
Material Required List
- Two wooden planks (pre-cut to desired length, approximately 1 inch thick)
- Two small, decorative corner shelf brackets or simple L-brackets
- Wood screws (appropriate length for brackets and plank thickness)
- Wall anchors (if mounting into drywall)
- Wood stain or paint (optional, for finishing)
Equipment Required List
- Measuring tape
- Pencil
- Level
- Electric drill with appropriate drill bits
- Screwdriver or screw gun
- Stud finder (recommended)
DIY Instruction Step by Step
- Plan the Placement: Use your measuring tape and pencil to determine the exact height and placement for your shelves. Mark where the shelf should meet the adjacent wall. The shelves should be placed high enough to avoid hitting your head when seated, but low enough to reach comfortably.
- Locate Wall Studs: Use a stud finder to locate the wall studs in the corner area. Attaching directly to a stud provides the most secure hold. If studs aren’t present where you want the bracket, you must use wall anchors. Mark these locations.
- Install the First Bracket: Place your first bracket on the wall at your marked height. Use your drill to create pilot holes. If you are not hitting a stud, insert the wall anchors into the pilot holes. Then, use the wood screws to firmly attach the bracket to the wall. Use the level to make sure the bracket is perfectly straight.
- Install the Second Bracket: Repeat the process for the second bracket on the adjacent wall, ensuring the tops of both brackets align perfectly. Use the level across the tops of both installed brackets to confirm they are even.
- Finish the Wood (Optional): If you plan to stain or paint your wooden planks, do this now before mounting them. Allow the finish to dry completely according to the product instructions.
- Mount the Shelves: Place the first wooden plank on top of the first installed bracket. Secure the plank to the bracket from underneath using shorter wood screws. Repeat this with the second plank and the second bracket. The two shelf ends should meet neatly in the corner.
- Test the Stability: Gently place a few books or lightweight items on the newly installed shelves to ensure they are secure and stable before loading them up completely.
2. The Arched Alcove Sanctuary

This reading nook transports you to a bygone era of sophisticated comfort and quiet contemplation. Stepping into this arched alcove feels like entering a private world, secluded from daily distractions. The rich, dark teal walls create a deeply calming and enveloping atmosphere, truly setting the mood for introspection. A luxurious tufted velvet banquette in a matching deep green invites you to sink in, providing ample cushioning for long hours of reading.
Notice the built-in wooden archway, which adds architectural grandeur and serves as a frame for this personal library. It also cleverly incorporates open shelving on either side, displaying a curated collection of books and decorative objects. Subtle lighting from a small, shaded table lamp casts a warm glow, illuminating the pages of a book. A patterned curtain at the back adds a touch of classic elegance and can be drawn for extra privacy. A plaid throw blanket draped over the armrest suggests cozy warmth, while a small, portable reading table on the seat holds a drink and reading material. This space is a true testament to timeless design and dedicated comfort.
DIY: Creating a Decorative Faux Archway Frame
This project aims to recreate the visual impact of an arched frame around an existing nook or wall recess, enhancing its cozy feel.
Material Required List
- Flexible wood molding strip or trim (e.g., bendable MDF or pine, roughly 2-3 inches wide and 1/2 inch thick)
- Two straight wood molding strips or trim (same width and thickness, for the vertical sides)
- Wood glue
- Small finishing nails (1.5 inches long)
- Wood filler
- Sandpaper (medium and fine grit)
- Paint or stain (to match your room or desired finish)
- Painter’s tape (optional)
Equipment Required List
- Measuring tape
- Pencil
- Level
- Miter saw or hand saw with miter box
- Nail gun or hammer
- Putty knife
- Caulking gun (if using caulk for gaps)
DIY Instruction Step by Step
- Measure and Plan: First, decide on the width of your faux archway. Measure the width of your desired nook or wall space. You will also need to decide on the height of the arch’s curve.
- Cut the Vertical Pieces: Measure and cut your two straight wood molding strips to the desired height for the sides of your archway. Use a miter saw to ensure clean, straight cuts.
- Create the Arch Curve: Gently bend the flexible wood molding to form the arch. You might need to temporarily hold it against the wall to get a feel for the curve. Once satisfied with the curve, measure its length. If the molding is too long, trim it down.
- Attach Vertical Pieces: Apply wood glue to the back of one straight vertical molding piece and press it firmly against the wall, ensuring it is plumb with a level. Secure it with finishing nails using a nail gun or hammer, spacing nails every 12-18 inches. Repeat for the second vertical piece, making sure both are parallel.
- Attach the Arch: Apply wood glue along the back of the flexible arch molding. Carefully position it on top of the two vertical pieces, forming your arch. Press it firmly into place. Use painter’s tape to hold it while the glue sets if needed.
- Secure the Arch: Once positioned, use small finishing nails to secure the arch molding, spacing them every 6-8 inches along the curve. Be careful not to split the wood.
- Fill and Sand: Use wood filler to fill all nail holes and any small gaps where the molding pieces meet. Allow the filler to dry completely. Once dry, sand the filled areas smooth with medium-grit sandpaper, then follow with fine-grit sandpaper for a seamless finish.
- Paint or Stain: Clean off any dust. Now, you can paint or stain the entire faux archway frame to match your room’s trim or the specific aesthetic of your reading nook. Apply multiple thin coats for the best finish, allowing each coat to dry completely.
3. The Desert Minimalist Lounge

This setup offers a bright, minimalist take on the reading nook, focusing on natural textures and global patterns. This grounded reading area celebrates simplicity, featuring natural textures and earthy tones. A low-profile wooden frame supports a thick, comfortable mattress-style cushion, creating an inviting spot perfect for stretching out with a good novel. The aesthetic is strongly influenced by Southwestern or global design elements, evident in the throw pillows and floor cushions featuring geometric patterns in rust, terracotta, and soft lilac.
The surrounding decor maintains a clean, uncluttered feeling. A hand-woven wall hanging with thick fringe and rich color blocking adds a warm, tactile element above the seating. Next to the lounge, a simple, square travertine side table holds refreshments, its porous texture beautifully complementing the woven jute rug underneath. A sleek, black modern floor lamp provides directed light for reading. The towering, sculptural cactus adds a living element, infusing the space with a quiet desert vibe. This is a wonderfully airy and calm space for escaping the everyday.
DIY: Creating a Simple Geometric Patterned Floor Cushion
This project allows you to replicate the patterned floor cushions that add comfort and visual interest to the nook.
Material Required List
- Heavy cotton or linen fabric (for the cushion cover – 1 yard, depending on desired size)
- Two contrasting fabric colors (e.g., rust and lilac cotton scraps for appliques)
- Pillow stuffing or polyfill (enough for a large cushion)
- Coordinating thread
- Fusible webbing or fabric glue (optional, for attaching shapes before sewing)
Equipment Required List
- Sewing machine
- Fabric scissors
- Measuring tape
- Pins
- Iron and ironing board
- Pencil or fabric marker
DIY Instruction Step by Step
- Cut the Cushion Fabric: Measure and cut two identical squares of your main cushion fabric (e.g., 24 inches by 24 inches) for the front and back of the cushion cover. Also, cut four strips for the sides (e.g., four strips, 24 inches long and 4 inches wide) to create a box shape.
- Cut the Geometric Shapes: Sketch simple geometric shapes (squares, crosses, blocks, etc.) onto your contrasting accent fabrics. Carefully cut these shapes out using fabric scissors.
- Position the Appliques: Arrange the cut geometric shapes onto the center of one of the large main fabric squares (this will be the top of the cushion). Once satisfied with the layout, use pins to hold them in place. For a neater look, you can place pieces of fusible webbing underneath the shapes and iron them down before sewing.
- Sew the Appliques: Using your sewing machine and matching thread, stitch around the edges of every geometric shape to securely attach them to the main cushion fabric. A simple straight stitch or a tight zigzag stitch works well.
- Assemble the Cushion Cover: Take the two long side strips and sew them together at the ends to create one long strip. Pin and sew this strip (the boxing) to the perimeter of the front piece of the cushion (the one with the pattern). Use a 1/2-inch seam allowance.
- Attach the Back: Take the remaining cushion square (the back) and pin it to the open edge of the side strip, leaving a 10-12 inch opening along one side. This opening is for turning and stuffing. Sew around the perimeter, again using a 1/2-inch seam allowance.
- Turn and Stuff: Turn the completed cushion cover right-side out through the opening. Use the pillow stuffing to firmly fill the cushion to your desired firmness. Push the stuffing into the corners to ensure a full, plump shape.
- Close the Opening: Hand-stitch the opening closed using a slip stitch or ladder stitch. This stitch hides the thread, giving the cushion a professional, clean finish.
4. The Nautical Window Seat

This charming nook channels a coastal, cottage aesthetic, offering a bright and airy place for relaxation. This built-in window seat evokes the peaceful feeling of a seaside retreat, bathed in natural light. The soft, grey-washed cabinetry surrounding the window adds subtle texture and ample storage, keeping the space tidy and serene. Notice the delightful nautical touches, like the small porthole mirrors integrated into the upper cabinet doors. This detail immediately establishes a ship-inspired theme.
The seat cushion features a cheerful grey gingham pattern, offering a cozy spot to perch. Throw pillows in complementary stripes and a vibrant coral color featuring anchor motifs reinforce the coastal theme without overwhelming the design. Sheer white curtains softly filter the daylight, creating a gentle, diffused glow perfect for reading. Discreet open shelving on the right provides quick access to books and beach-found treasures like seashells. Wall sconces mounted on either side offer focused reading light after sunset. The woven rattan pendant fixture overhead finishes the space, adding an organic, beachy texture.
DIY: Adding Porthole Mirror Accents to Cabinetry
This project helps you replicate the fun, maritime look of the porthole mirrors on the cabinet doors.
Material Required List
- Two circular craft mirrors (around 6-8 inches in diameter)
- Thin brass or dark metal picture frame wire (or thin rope for a softer look)
- Strong adhesive (e.g., construction adhesive or heavy-duty mounting tape)
- Round wood trim pieces (optional, for framing the mirror if needed)
- Brass-colored furniture tacks or upholstery nails (optional, for decorative detail)
Equipment Required List
- Measuring tape
- Pencil
- Level
- Utility knife (if using mounting tape)
DIY Instruction Step by Step
- Plan the Placement: Measure the height and width of your cabinet doors. Use your measuring tape and pencil to find the center point where the mirror should sit. Use the level to ensure your marked center points on both doors are exactly the same height.
- Prepare the Mirror: Clean the back of the circular mirror thoroughly. If your mirror is not already framed, you may want to glue a thin round wood trim piece to the edge for a more substantial look, letting the glue dry completely.
- Attach the Mirror: Apply the strong adhesive or cut strips of heavy-duty mounting tape to the back of the mirror. Place the adhesive or tape evenly around the back perimeter to ensure good contact with the cabinet surface.
- Mount the Mirror: Carefully align the center of the mirror with your marked center point on the cabinet door. Gently but firmly press the mirror onto the cabinet door, holding it in place for the time specified by the adhesive instructions. Repeat for the second door.
- Add Decorative Wire/Rope (Optional): If you want to simulate the bolted look of a porthole, wrap the thin brass wire or rope neatly around the edge of the mounted mirror. Secure the ends of the wire/rope at the bottom using a tiny drop of super glue, making the seam inconspicuous.
- Simulate Bolts (Optional): For extra detail, place small brass furniture tacks or upholstery nails strategically around the outer perimeter of the mirror (directly into the cabinet door) to simulate the look of bolts holding the porthole in place.
5. The Emerald Velvet Drama

This reading nook is dramatically styled, combining luxurious fabrics with intense color for a glamorous, cocoon-like feel. This striking curved sofa, upholstered in plush emerald green velvet, immediately draws the eye, providing rich, comfortable seating. The depth of the color is further enhanced by the surrounding walls painted in a near-black, forest green tone. This design choice establishes a sense of complete enclosure and intimacy.
The area is beautifully framed by heavy, oatmeal-colored drapery suspended from a curved ceiling track, mimicking a canopy. These curtains can be drawn closed to heighten the sense of privacy or pulled back with elegant tassels to reveal the room. A vibrant purple throw blanket with decorative tassels draped over the sofa adds a welcome pop of jewel-toned contrast. The lighting fixture is a statement piece: a large, gold-hued spot lamp on a tripod stand provides a bright, localized source of illumination and cinematic flair. A small, dark wood side table and a classic patterned rug anchor this sophisticated and restorative retreat.
DIY: Creating a Simple Canopy Reading Nook Frame
This project helps you recreate the dramatic, enveloping feel of the curved curtain canopy using a flexible track system.
Material Required List
- Flexible curtain track (plastic or bendable aluminum, long enough to create a half-circle curve)
- Ceiling mounting hardware (screws, anchors) specific to the track
- Curtain hooks or gliders (to attach drapes to the track)
- Two sets of floor-length curtains (choose a heavy, luxurious fabric)
- Measuring tape
- Pencil
- Stud finder (recommended)
Equipment Required List
- Electric drill with appropriate bits (for pilot holes)
- Screwdriver or screw gun
- Level
- Stepladder
- Wire cutters (if track needs trimming)
DIY Instruction Step by Step
- Determine the Curve: First, decide how wide and how deep you want your curved canopy to be. Use the pencil to lightly mark the half-circle shape on the ceiling above your sofa or reading chair. Ensure the track ends will sit a little wider than your seating area.
- Plan Mounting Points: Identify where the track brackets or mounting points need to be placed along your marked curve. Use the stud finder to locate any ceiling joists for extra secure mounting. If you are drilling into drywall, you must use strong ceiling anchors. Mark all drilling locations.
- Install Mounting Hardware: Using the electric drill, create pilot holes at your marked spots. Insert the anchors if necessary. Secure the track brackets or mounting clips firmly to the ceiling, following the curve you drew. Use the level to make sure the track is flat against the ceiling.
- Attach the Flexible Track: Snap or screw the flexible curtain track into the installed mounting hardware, carefully bending it to match the half-circle shape. If the track is too long, use wire cutters to carefully trim the end before installation.
- Insert Curtain Gliders: Before hanging the track, or immediately after, slide the curtain hooks or gliders into the track channel. Ensure you have enough gliders for your curtains (usually one every 4-6 inches).
- Hang the Curtains: Attach the curtains to the gliders, starting from one end of the track. Gather the curtains evenly around the curve. The weight of heavy drapes helps hold the track shape.
- Final Adjustments: Test the curtains to ensure they glide smoothly. You can use decorative tie-backs or tassels to hold the curtains open on either side of the seating area, framing your luxurious nook.
6. The Mid-Century Modern Chair

This nook celebrates the iconic style of the mid-20th century, bringing together form and function in a bright, inviting space. This reading spot offers a stylish, sophisticated place to enjoy a book, leaning heavily into a classic mid-century modern aesthetic. The focal point is the beautifully sculpted lounge chair and matching ottoman, upholstered in a striking olive green fabric. Its ergonomic design and coordinating footrest promise hours of comfortable reading. The wooden legs and frame are sleek, adding natural warmth against the white walls.
The surrounding elements complement the chair flawlessly. An adjustable floor lamp with a matte black shade provides directed illumination, making it simple to focus the light exactly where needed. A small, round side table with a polished metal base and wooden top holds a cup of tea or reading accessories. The vibrant, abstract art and the iconic starburst clock on the wall inject personality and retro charm. A small wooden cabinet holding a record player and vinyl collection suggests listening to music while reading. The light-colored rug with bold, geometric color blocks ties the whole arrangement together with playful energy.
DIY: Creating a Starburst Wall Clock (A Simplified Version)
This project helps you replicate the iconic mid-century starburst clock using basic craft supplies.
Material Required List
- Small battery-operated clock mechanism (with hands)
- Circular piece of wood or sturdy cardboard (for the clock face)
- Thin wooden dowels (approximately 1/8 to 1/4 inch thickness, 12-16 pieces)
- Wood stain or dark paint (to color the dowels)
- Strong wood glue or hot glue gun and glue sticks
- Small wall hook or mounting hardware
Equipment Required List
- Measuring tape or ruler
- Hand saw or utility knife (for cutting dowels)
- Sandpaper (fine grit)
- Paintbrush
- Pencil
DIY Instruction Step by Step
- Prepare the Clock Face: If your circular wood piece isn’t pre-drilled, find the exact center and drill a small hole large enough for the shaft of your clock mechanism to fit through. Sand the edges smooth.
- Prepare the Starburst Spokes: Measure and cut your wooden dowels into varying lengths to create the “starburst” effect. A common pattern uses four long dowels (for 12, 3, 6, and 9 o’clock) and eight shorter dowels in between. You can also vary the length randomly for a more dynamic look.
- Stain or Paint the Spokes: Use the wood stain or dark paint to color all the dowel pieces. Ensure they are covered evenly and let them dry completely, following the product instructions.
- Mark the Attachment Points: Turn your clock face piece over (the back side). Use a ruler and pencil to mark the positions where the dowels will be attached around the perimeter. Try to space them evenly.
- Attach the Spokes: Apply a strong wood glue or hot glue to the end of one dowel and press it firmly onto the marked position on the back of the clock face. Hold it in place until the glue sets. Repeat this process, working your way around the circle until all the dowels are securely attached.
- Install the Clock Mechanism: Once the glue is completely dry, insert the clock mechanism through the center hole from the back. Attach the clock hands on the front according to the mechanism’s instructions.
- Mount the Clock: Attach a wall hook or mounting hardware to the back of the clock face, ensuring it is secure. Hang the finished starburst clock on the wall to add that signature mid-century touch to your reading nook.
7. The Serene Shoji Screen Chamber

This reading space offers an immediate escape into tranquility, embodying the principles of Japanese design with its focus on nature and calm simplicity. This reading nook transcends ordinary seating, becoming a dedicated sanctuary for quiet contemplation. The room is enclosed by beautiful, traditional shoji screens made of light wood gridwork and translucent paper. This creates a soft, diffused glow that washes the entire area in gentle, ambient light, promoting immediate relaxation. The elevated wooden platform clearly defines the space, suggesting a special area set apart from the rest of the home.
The seating is low to the ground, utilizing thick, comfortable floor cushions and bolsters rather than conventional furniture, encouraging a more grounded posture. A low wooden table serves as a central point for tea ceremonies or holding reading materials. Beneath the platform, subtle LED strip lighting adds a warm layer of illumination, highlighting the natural wood grain. Elements of nature are seamlessly integrated, including a small bonsai tree, smooth river stones, and a slender bamboo plant, connecting the inner space with the outside world. This design prioritizes peace, balance, and mindful relaxation, making it an exceptional place for slow reading.
DIY: Adding Under-Platform LED Strip Lighting
This project helps replicate the warm, subtle glow beneath the raised wooden platform, enhancing the serene atmosphere.
Material Required List
- LED strip lighting kit (warm white recommended, with self-adhesive backing)
- Power supply/adapter (usually included with the kit)
- Small plastic clips or cable ties (optional, for securing wires)
- Electrical tape (optional)
Equipment Required List
- Measuring tape
- Rubbing alcohol and clean cloth
- Scissors (to cut the LED strip, only at designated points)
DIY Instruction Step by Step
- Measure and Plan: Measure the total length of the platform’s perimeter where you want the light to shine underneath. This will help you determine how long your LED strip needs to be.
- Clean the Surface: Use the rubbing alcohol and a clean cloth to thoroughly clean the underside lip or edge of the wooden platform where the LED strip will be attached. This step is essential for ensuring the adhesive backing sticks firmly. Allow the surface to dry completely.
- Cut the Strip (If Necessary): If your LED strip is too long, find the designated cut marks (usually indicated by a copper line or scissor icon) and cut the strip to the required length using scissors. Never cut the strip anywhere else, or it may damage the circuit.
- Peel and Stick: Carefully peel off a few inches of the protective backing from the LED strip. Begin sticking the strip to the underside edge of the platform. Work slowly, pressing the strip firmly onto the wood as you go. Ensure the strip is concealed and faces slightly downward or outward to cast light onto the floor or wall.
- Connect and Conceal Wiring: Once the strip is fully adhered, connect the end of the strip to the power supply or adapter. Neatly tuck any excess wires underneath the platform, possibly using plastic clips or cable ties to secure them and keep them out of sight.
- Test the Lights: Plug in the adapter to an outlet. Check that the entire strip illuminates evenly and that the light is casting a pleasant, soft glow beneath the platform, just like in the picture.
8. The Celestial Constellation Chamber

This reading nook is an immersive, dramatic space designed to feel like a private observatory or a spaceship lounge. This reading environment is truly unique, transporting the reader to a deep, dark night sky. The ceiling is the showstopper, featuring glowing fiber-optic lights arranged to map out constellations against the midnight blue paint. This creates an incredibly intimate and atmospheric setting, perfect for getting lost in fantasy or science fiction. The built-in banquette seating, upholstered in rich navy velvet, follows the curved shape of the room, maximizing comfortable lounging space.
The room is furnished with high-end, contemporary details. A sleek, adjustable task lamp provides a bright, focused spot for reading on the small, oval marble table. Practical amenities like a mini-fridge discreetly tucked under the bench and a nearby fireplace (suggested by the chrome elements) make this space fully self-sufficient. Plush beanbag chairs offer alternative, informal seating options. Large mirrors on one wall add depth and dramatically reflect the starry ceiling. This chamber offers an unforgettable, dark, and utterly cozy escape.
DIY: Creating a Simple Glow-in-the-Dark Constellation Ceiling
This project helps replicate the stunning starry ceiling using glow-in-the-dark paint, offering a less complex alternative to fiber optics.
Material Required List
- Glow-in-the-dark ceiling paint (non-toxic, specialized for ceilings)
- Small artist brushes (various fine tips)
- Stencils or printed constellation maps (optional, for accuracy)
- Black or very dark blue ceiling paint (if you need to repaint the ceiling first)
- Drop cloth
- Ladder or sturdy step stool
Equipment Required List
- Measuring tape
- Pencil or chalk
- UV flashlight (to “charge” and check the paint glow)
DIY Instruction Step by Step
- Prepare the Ceiling: If your ceiling is not already a very dark blue or black, apply two coats of dark paint and allow it to dry completely. Lay down a drop cloth to protect the floor.
- Plan the Constellations (Optional): If you want accurate constellations, print out some simple star maps. Use a pencil or chalk to lightly mark the position of the main stars on your ceiling, referring to your maps. Alternatively, simply mark dots randomly for a natural star field effect.
- Apply the Glow Paint: Dip your fine-tipped artist brush into the glow-in-the-dark paint. Start painting small dots where you marked your stars. Use slightly larger dots for brighter, primary stars and smaller dots for background stars to add depth. Do not over-saturate the brush; thin layers dry best.
- Create Connecting Lines (Optional): Use your finest brush to paint thin, faint lines between the major stars to form the constellation shapes. These lines should be very subtle and should only become visible when the glow paint is activated.
- Let the Paint Cure: Allow the glow paint to dry completely. This might take several hours, depending on the paint brand. Do not expose it to bright light during the initial drying phase.
- Test the Glow: Once the room is completely dark, use a UV flashlight to quickly “charge” the glow paint. Turn off the UV light and admire your starry ceiling. Apply a second layer of glow paint to any stars that do not shine brightly enough, then repeat the charging process.
9. The Country Cottage Bench

This cheerful reading spot combines classic cottage charm with smart, functional design, creating an uplifting retreat. This bright window seat exudes a welcoming country feel, anchored by a charming floral wallpaper and crisp white woodwork. The built-in bench seating features a sturdy base painted in white, contrasting beautifully with the light, neutral cushion that spans the length of the seat. The back of the bench is finished with vertical beadboard paneling, adding texture and reinforcing the rustic, farmhouse aesthetic.
Above the seating, deep, white floating shelves offer generous space for display, holding everything from reading material to quaint pottery and decorative jars. Below the bench, open cubbies are sized perfectly for woven baskets, which provide clever storage for blankets or children’s toys, keeping the area neat. The decorative pillows are a delightful mix; checkered prints pair nicely with embroidered cushions featuring floral and berry motifs, adding handmade warmth. Adjustable wall sconces mounted over the top shelf provide focused, directional lighting for reading, making this a comfortable and stylish place for a quiet afternoon.
DIY: Installing Beadboard Paneling on the Backrest
This project helps you replicate the charming vertical wood paneling that adds texture and a cottage feel to the bench back.
Material Required List
- Beadboard paneling sheets (or individual planks, enough to cover the backrest area)
- Liquid construction adhesive (e.g., in a caulking tube)
- Small finishing nails (1 inch long)
- Wood filler
- Paint (to match your trim or bench color, likely white)
- Sandpaper (fine grit)
Equipment Required List
- Measuring tape
- Pencil
- Level
- Utility knife or circular saw (for cutting the panels to size)
- Caulking gun (for the adhesive)
- Nail gun or hammer
DIY Instruction Step by Step
- Measure the Backrest: Measure the height and width of the wall area behind your bench where the beadboard will be installed. If you are using pre-cut sheets, determine how many pieces you will need and plan your cuts.
- Cut the Panel: Using a circular saw or utility knife, cut the beadboard paneling to fit the measured backrest area. If you are cutting around existing obstacles like outlets, use your pencil to mark and cut those openings carefully.
- Prepare the Wall: Ensure the wall surface is clean and dry. Lightly mark the center position and the edges where the paneling will sit using your pencil and level, ensuring the paneling will be straight.
- Apply Adhesive: Apply a strong liquid construction adhesive to the back of the beadboard paneling in a zig-zag pattern around the edges and center. Apply adhesive generously, but keep it about an inch away from the edges.
- Mount the Panel: Carefully lift the paneling and align it with your markings on the wall. Press the panel firmly into place. Use the level to check that the panel is straight before proceeding.
- Secure with Nails: For extra security, drive small finishing nails into the beadboard, particularly around the perimeter and along the grooves where they will be less noticeable. Set the nails slightly below the surface using a nail set or the back of a hammer.
- Fill and Paint: Use wood filler to patch all the nail holes and any minor gaps along the edges. Let the filler dry completely, then sand the filled areas smooth with fine-grit sandpaper. Once dust-free, paint the new beadboard paneling with your desired color. Apply two thin coats for a clean, professional finish.
10. The Industrial Loft Lounger

This reading nook delivers a bold, industrial-chic statement, blending raw textures with sophisticated materials. Perfectly suited for an urban loft, this reading space combines function with a strong, minimalist aesthetic. The seating itself is a sleek, low-profile bench featuring a distressed, warm cognac leather cushion that rests on a dark, steel frame. This frame is cleverly mounted to the wall, creating a floating effect and maximizing floor space. Exposed brick walls provide a rugged, textured backdrop, contrasting nicely with the dark metal and smooth leather.
Functionality is built directly into the design; the floating bench frame incorporates open storage underneath, offering shelves for books and a convenient power strip for charging devices. An adjustable desk lamp placed on the bench edge provides direct task lighting for reading. A striking, large abstract artwork in black and white hangs above, mirroring the clean lines and limited color palette of the room. Separating the reading area from the adjacent workspace is a divider made of black wire mesh, a defining industrial element that also features small, built-in shelving. This design is sharp, adult, and highly efficient.
DIY: Creating a Wire Mesh Room Divider/Shelf
This project helps you replicate the industrial-style divider that offers separation and lightweight storage space.
Material Required List
- Square sheet of black welded wire mesh (or similar decorative metal screening)
- Four pieces of square metal tubing or sturdy wood (for the frame)
- Metal corner brackets or sturdy L-brackets (if creating a rectangular frame)
- Metal screws (appropriate length for connecting tubing/wood)
- Primer and matte black metal paint (if material isn’t pre-finished)
- Small metal clamps or zip ties (for attaching the mesh to the frame)
- Hardware for floor/ceiling attachment (screws, floor flanges, or ceiling mount plates)
Equipment Required List
- Measuring tape
- Pencil
- Safety gloves and glasses
- Miter saw (for wood frame) or metal cutting tools (for metal frame)
- Electric drill with appropriate bits
- Wrench or screwdriver
DIY Instruction Step by Step
- Measure and Cut Frame: Determine the desired height and width of your divider. Cut your metal tubing or wood pieces to create the vertical and horizontal sides of the rectangular frame.
- Assemble the Frame: Use the metal corner brackets and screws to securely join the four pieces of the frame into a sturdy rectangle. If using wood, wood glue and screws will work. Ensure the frame is square using a measuring tape.
- Cut and Attach Mesh: Carefully measure the inner dimensions of your newly built frame. Cut the wire mesh sheet to fit exactly inside the frame (wear heavy gloves). Lay the frame on the floor and place the mesh inside. Use small metal clamps, zip ties, or short screws to securely fasten the wire mesh to the inside perimeter of the frame.
- Paint the Divider (If Needed): If your materials are not already black, apply a metal primer followed by a matte black metal paint to the entire assembled frame and mesh. Let it dry completely.
- Install the Divider: Position the divider where you want it to sit. The easiest method is to secure the bottom to the floor and the top to the ceiling joists or wall studs for stability. Use appropriate mounting hardware (like floor flanges attached to the tubing) at the base and the top to bolt the frame firmly in place, ensuring it is perfectly straight with a level.
- Add Shelving (Optional): For a simple shelf effect, you can rest thin wooden planks on the horizontal wire supports of the mesh, or use thin metal brackets to attach small shelves directly to the wire mesh on one side.
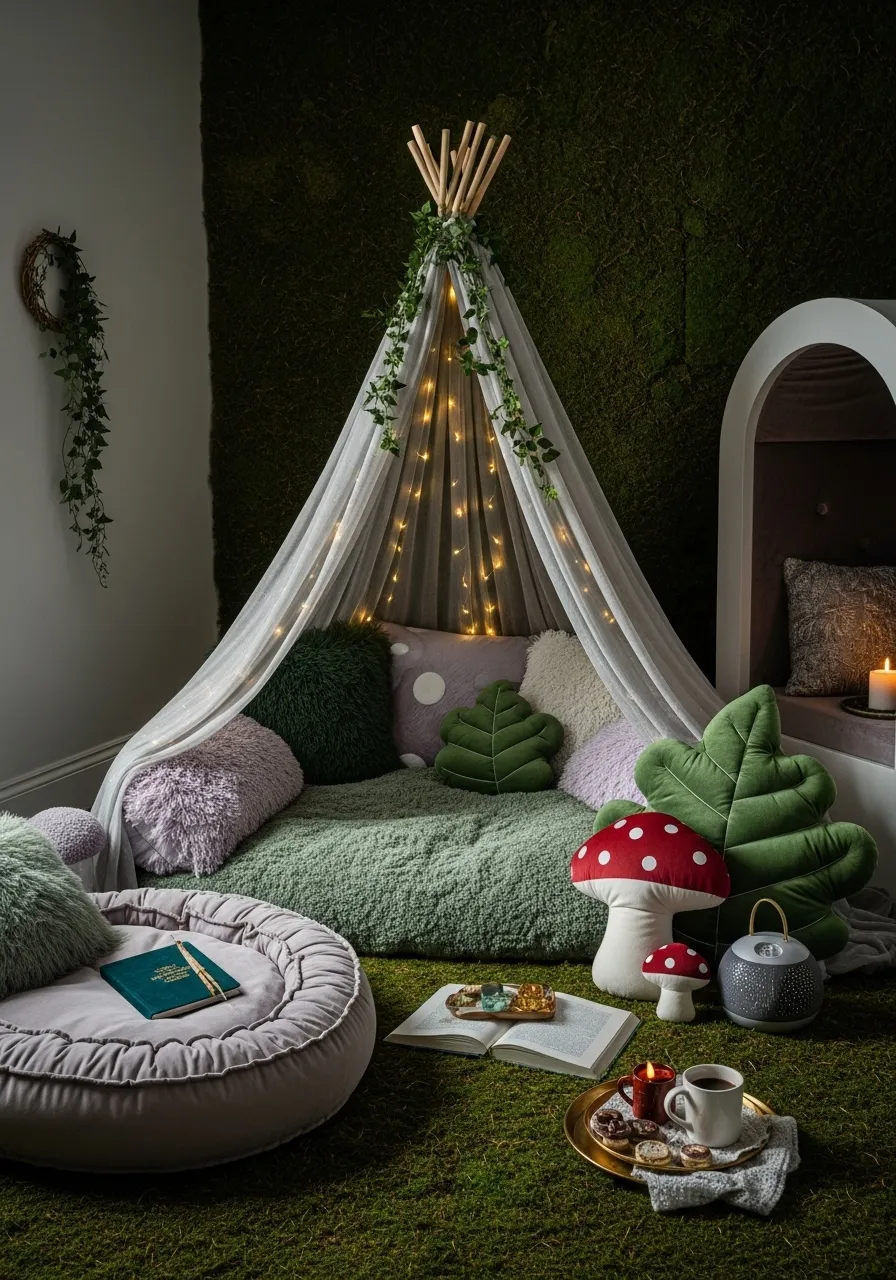
11. The Enchanted Forest Teepee

This magical reading nook creates an immersive, fairy-tale environment, making it a wonderful space for imaginative escapes. The focal point is the simple teepee structure, draped in sheer, flowing fabric and adorned with delicate fairy lights and trailing faux ivy. This canopy effect defines the space beautifully, giving it a cozy, contained feel. The floor is covered with a soft, deep green shag rug that mimics moss, enhancing the forest theme.
Comfort is key, provided by a large floor cushion covered in a fuzzy, pale green material and piled high with diverse pillows—some plush and others shaped like leaves. Whimsical accents like large, spotted toadstool plush toys add playful charm. A second round floor cushion offers another comfortable spot or a place to set down a drink tray. The wall behind the teepee features a stunning preserved moss installation, solidifying the woodland atmosphere. This spot is truly an imaginative, low-level haven for curling up with a fantasy story.
DIY: Assembling a Simple Reading Teepee Frame
This project focuses on creating the basic structure for the canopy using wooden dowels.
Material Required List
- Six wooden dowels (1 inch thick, 6-7 feet long)
- Sturdy rope or thick twine (approximately 10 feet)
- Sheer fabric (enough to wrap around the frame, about 4-5 yards depending on height)
- Optional: Battery-operated LED string lights and faux ivy garland
Equipment Required List
- Measuring tape
- Hand saw (if dowels need trimming)
DIY Instruction Step by Step
- Prepare the Dowels: Ensure all six dowels are the same length. If necessary, trim them using a hand saw. Sand the tops of the dowels lightly to prevent splintering.
- Gather the Top: Hold five of the six dowels together at the top, roughly 6 inches down from the ends. Spread the bases of these five dowels into a circle on the floor to form the teepee shape. Adjust the spread until the structure feels stable.
- Secure the Peak: Keeping the dowels together at the top, tightly wrap the rope or twine around the gathered area several times. Tie a secure, strong knot to bind the five dowels together permanently. The knot should be tight enough that the dowels cannot slip down when the bases are spread.
- Add the Sixth Dowel (Tension): The sixth dowel acts as a supporting crossbeam. Place this dowel horizontally across two opposite dowels inside the structure, positioning it about 3 feet up from the floor. Tie it securely to both vertical dowels with twine. This adds stability and provides a place to hang lights later.
- Drape the Fabric: Take your sheer fabric and start draping it over the secured peak, letting the material fall down the sides. Adjust the fabric so it hangs evenly on all sides, leaving the front open for entry. You can secure the fabric to the top knot using small pieces of twine or safety pins.
- Decorate and Light: Weave the battery-operated fairy lights and faux ivy garland around the wooden poles and inside the canopy fabric to create the magical, glowing effect. Place your soft rug and cushions inside to complete your cozy hideaway.
12. The Slatted Sunroom Nook

This stunning reading nook is a contemporary masterpiece, maximizing light and integrating natural materials with greenery. Positioned directly beneath a large skylight and adjacent to tall windows, this space is completely flooded with natural light. The structure features a custom-built frame made entirely of light, vertical wooden slats, creating a beautiful architectural enclosure that lets light filter through while providing visual texture.
The seating is a built-in bench, painted in a neutral tone, and topped with a deep emerald green cushion for a bold color contrast. This natural color scheme—wood tones and deep greens—is reminiscent of a modern garden setting. Potted hanging plants are suspended from the slatted roof, their trailing vines softening the clean lines of the wood and enhancing the tranquil atmosphere. A small, carved wooden side table and a stack of books and a blanket complete this refreshing, light-filled haven, making it a rejuvenating spot for reading and enjoying nature, regardless of the weather outside.
DIY: Creating Simple Hanging Planters
This project helps replicate the beautiful trailing plants suspended from the wooden canopy structure, adding vibrant greenery to the nook.
Material Required List
- Three small terracotta pots or planters
- Twine or thin rope (approx. 15-20 feet, depending on desired drop)
- Three healthy, trailing houseplants (e.g., Pothos or Philodendron)
- Potting soil
Equipment Required List
- Scissors
DIY Instruction Step by Step
- Prepare the Planters: Ensure your terracotta pots have drainage holes at the bottom. Fill each pot with fresh potting soil and gently transfer your chosen trailing plants into them. Water them lightly.
- Cut the Hanging Ropes: For each planter, cut three pieces of rope or twine, all equal in length. The length should be the distance from your hanging point to the desired height of the pot, plus about 2 feet for securing and tying the knots.
- Tie the Cradle: Take the three cut ropes for one pot. Gather the ends and tie them together in a secure knot. This knot will sit beneath the base of the pot.
- Form the Suspension: Take the three ropes and arrange them evenly around the outside of the pot. Carefully lift the pot. Bring the three ropes up along the sides. About 3 to 4 inches above the rim of the pot, tie a separate knot on each of the three ropes to create a small collar. This knot should be tight enough to prevent the pot from slipping through the cradle.
- Create the Hanging Loop: Bring all three ropes together again at the top (the point you want to hang from). Tie a single, strong knot here, leaving a small loop of rope at the very top. This loop is what you will use to hang the planter.
- Install and Hang: Using hooks or existing supports on your slatted canopy (ensure the structure is strong enough to bear the weight), carefully hang the loop of the prepared planter. Adjust the height of the three hanging planters to vary their visual interest.
13. The Boho Swing Retreat

This reading nook offers a weightless, bohemian escape, centered around a comfortable hanging chair. The macramé swing, with its fringe and intricate weaving, immediately sets a relaxed, textural mood. It’s paired with a sheer white canopy draped overhead, which adds a sense of enclosure and lightness, truly making the chair feel like a private cloud. The setting is bright and monochromatic, utilizing white walls, light wood flooring, and layered rugs.
The seating is enhanced with soft, neutral cushions, including a playful cloud-shaped pillow, ensuring maximum comfort for lengthy reading sessions. A chunky knit gray blanket is essential for staying cozy. Multiple pendant lights with exposed copper fittings hang nearby, providing modern vertical interest and soft illumination. The presence of two other hanging chairs suggests this is a social, yet deeply comfortable, reading space for multiple people. A plush, white faux fur rug completes the look, adding an extra layer of softness underfoot.
DIY: Creating a Hanging Canopy for a Chair
This project shows how to add a sheer canopy to a hanging chair or reading corner to create that sense of soft enclosure.
Material Required List
- One round canopy ring or large embroidery hoop (approx. 24-30 inches diameter)
- Sheer netting or tulle fabric (about 4-5 yards, pre-hemmed if possible)
- Sturdy ribbon or thin twine (to attach fabric to the ring)
- Small screw hooks or eye bolts (to attach the ring to the ceiling or chair frame)
Equipment Required List
- Measuring tape
- Scissors
DIY Instruction Step by Step
- Prepare the Fabric: If your sheer fabric is not already cut into a large, circular piece, you will need to cut it. It should be wide enough to wrap around the ring and long enough to drape to the floor. A simple alternative is to use four rectangular panels.
- Attach Fabric to the Ring (Panel Method): If using panels, gather the top edge of one panel and secure it to the canopy ring using small, evenly spaced knots of ribbon or twine. Repeat with the remaining three panels, ensuring they are spaced evenly around the ring. The gathered fabric will hang down from the ring.
- Attach Fabric to the Ring (Sheet Method): If using a single, large circular piece of fabric, fold the fabric in half several times to find the center point. Cut a small hole or slit in the very center. Slide the fabric over the canopy ring so the ring rests on the outside edge of the hole. Secure the fabric to the ring every few inches with ribbon or twine, leaving a small opening for entry.
- Determine Hanging Point: Decide whether the canopy will hang directly from the ceiling or attach to the hanging chains/ropes of your chair. If hanging from the ceiling, ensure you are drilling into a ceiling joist for security.
- Install the Hook: Screw a sturdy hook or eye bolt securely into the ceiling at the desired center point, or attach the hooks to the chair’s suspension point.
- Hang the Canopy: Attach the top of the canopy ring (or the ribbon/twine loop) to the installed hook. Adjust the fabric drapes so they fall gracefully around the chair, adding that soft, ethereal quality to your nook.
14. The Steampunk Scholar’s Library

This sophisticated nook is a haven for the intellectually curious, embracing the fantastical aesthetics of the Steampunk genre. The reading chair is a classic, deep button-tufted leather armchair in a rich, warm brown, promising old-world comfort. It’s nestled between towering, dark wood bookshelves, creating a fully immersive library feel. The dark wood and leather are contrasted dramatically by polished copper piping that frames the central reading chair, acting as an architectural embellishment.
The detailing is extraordinary, featuring decorative, exposed brass gears of varying sizes attached to the shelving unit, strongly reinforcing the mechanized, Victorian industrial theme. Cleverly, the copper structure also supports an adjustable task lamp and a small, pull-out writing shelf for taking notes. Lighting is provided by exposed filament bulbs and a heavy, adjustable bronze desk lamp, casting a warm, atmospheric glow perfect for examining old maps or dense texts. This setting is dramatic, unique, and deeply personal.
DIY: Creating Decorative Steampunk Gears
This project helps replicate the iconic gear decorations that give the bookshelf its signature Steampunk style.
Material Required List
- Thin MDF or plywood sheets (about 1/4 inch thick)
- Gold, bronze, or copper metallic spray paint
- Black craft paint (for distressing)
- Strong wood glue or construction adhesive
- Sandpaper (medium grit)
Equipment Required List
- Pencil
- Compass or round templates (various sizes like plates or bowls)
- Jigsaw or utility knife (for cutting wood)
- Drill (to cut the center hole)
DIY Instruction Step by Step
- Draw the Gear Shapes: Use a compass or various circular templates (bowls, plates) to draw different sized circles onto the MDF or plywood. Within each circle, draw the spoke-like gear teeth around the perimeter. Draw a center circle that will be removed later.
- Cut the Gears: Carefully cut out the drawn gear shapes using a jigsaw or a steady hand with a utility knife. Use a drill bit large enough to cut out the center hole of each gear cleanly. Sand all the edges smooth with medium-grit sandpaper.
- Paint the Gears: Lay the gears out in a well-ventilated area. Apply several light coats of the metallic spray paint (copper or bronze) to both sides, allowing each coat to dry completely.
- Distress and Age: Once the metallic paint is dry, lightly apply black craft paint, especially into the recesses and around the edges. Before the black paint dries, wipe most of it away with a damp rag. This process, known as “antiquing” or distressing, leaves subtle shadows, making the gears look aged and used.
- Mount the Gears: Apply a strong wood glue or construction adhesive to the back of the finished gears. Press them firmly onto the sides of your existing bookshelf or wall. Arrange them strategically, overlapping slightly or connecting visually, to mimic a complex mechanical system.
15. The Mediterranean Daybed

This inviting reading space captures the sun-drenched, rustic charm of a Mediterranean villa, prioritizing simple comfort and natural materials. A handsome daybed with an elegant wrought iron frame serves as the main seating, its scrolling metal details adding a touch of classic, European artistry. The neutral, thick mattress cushion and matching bolsters provide a comfortable, supportive place to recline.
The color palette is warm and earthy, featuring pale apricot walls and terra-cotta tiled floors, creating a cohesive, old-world atmosphere. Throws and pillows in complimentary shades of rust and checked patterns add texture and warmth. A built-in niche or recess in the wall acts as smart, unobtrusive shelving, styled with cookbooks, fresh herbs, and bottles of wine, suggesting a relaxed, culinary lifestyle. Natural light streams in through a window draped with loosely woven linen curtains. Simple accents, like a basket of citrus fruit and a lit lantern on the floor, complete this peaceful, restorative escape.
DIY: Creating a Rustic Herb Drying Bundle
This simple project helps replicate the organic, aromatic touch of the hanging dried herbs seen next to the niche shelving.
Material Required List
- Fresh bundles of hardier herbs (e.g., Rosemary, Thyme, Bay Leaves, or Lavender)
- Natural twine or rustic ribbon (jute or cotton)
- Scissors
Equipment Required List
- None
DIY Instruction Step by Step
- Gather the Herbs: Select fresh, healthy herb sprigs. Gently rinse them and pat them lightly with a paper towel to remove any excess moisture. Do not over-wash them.
- Bundle the Sprigs: Gather a modest collection of sprigs, holding them firmly together at the base of the stems. Ensure the bundle is not too thick; a looser bundle dries better and prevents mold.
- Tie the Stems: Use the natural twine or ribbon to wrap tightly around the base of the stems several times, starting about an inch from the bottom cut. Tie a secure double knot, leaving a generous loop of twine at the end for hanging.
- Find a Spot to Hang: Hang the bundle upside down from a small hook or nail near your reading nook, perhaps on the wall next to the shelving. Hanging them upside down is crucial for the drying process.
- Enjoy the Aroma: As the herbs dry, they will release a subtle, pleasant, natural aroma that enhances the relaxing, rustic atmosphere of the Mediterranean nook. Replace the bundle with fresh herbs every few months or as desired.
16. The Altitude Net Lounge

This adventurous reading nook is certainly unusual, turning open space in a pitched-roof loft into a fun, suspended hangout. A strong, rope cargo net is stretched tautly across the exposed ceiling beams, creating a buoyant, comfortable floor. This design transforms what would typically be a void above a stairwell or room below into usable, elevated lounging space. The exposed wood beams and white walls contribute to a rustic, cabin atmosphere.
To maximize comfort on the net, a large, plush faux fur rug is laid down, offering a soft barrier and a cozier surface. A thick, knitted throw blanket in deep green provides warmth. A small sign declaring the area the “Reading Zone” adds a whimsical touch. Nearby, a wall-mounted swing-arm lamp provides easy, focused light for reading. This elevated space feels like a fun, secure treehouse retreat, offering a unique perspective and a truly memorable way to relax.
DIY: Creating a Reading Zone Sign
This project helps you replicate the cute, personalized sign that labels the unique reading spot.
Material Required List
- Small piece of finished wood or painted MDF (shaped like a plaque or chalkboard)
- White or light-colored craft paint
- Dark-colored permanent marker or vinyl lettering (for the text)
- Small metal chain or thick twine
- Two small screw hooks
Equipment Required List
- Jigsaw (if cutting a custom shape)
- Paintbrush
- Drill (with small bit)
DIY Instruction Step by Step
- Cut and Shape the Wood: If you are creating a custom shape, like the plaque shown, use a jigsaw to cut the wood. Sand the edges smooth.
- Paint the Plaque: Apply two thin coats of the light-colored craft paint to the wood, ensuring full coverage. Allow the paint to dry completely between coats.
- Add the Text: Use a pencil to lightly sketch your chosen phrase, such as “READING ZONE,” on the dry plaque. Once satisfied with the layout, trace over the pencil lines with the dark permanent marker or adhere vinyl lettering.
- Install Hanging Hardware: Drill two small holes near the top edge of the sign, spaced a few inches apart. Thread the metal chain or thick twine through the holes and secure the ends with tight knots on the back of the sign, creating a hanging loop.
- Mount the Sign: Determine the location where you want to hang the sign (like the exposed beam). Screw two small screw hooks into the wood beam. Hang the sign’s loop from the hooks, ensuring it hangs straight.
17. The Modern Office Pod

This structure demonstrates how to create a highly focused and comfortable reading space even within an open or busy environment. This is a self-contained reading pod, built from light-colored wood framing and sound-dampening panels in charcoal gray. The stark contrast between the natural wood and the dark acoustic material creates a contemporary, architectural statement.
The seating consists of thick, upholstered cushions in matching dark gray, configured for both sitting and comfortable lounging. Functionality is integrated with a narrow floating shelf that serves as a writing or tablet surface. The most striking element is the diffused lighting: LED strips are concealed within the wooden frame, washing the dark back wall in a soft, bright glow and defining the space beautifully. Open cubbies underneath the seating provide easy access to books and decorative items. The design is sleek, private, and highly conducive to concentration, making it a stellar solution for a shared office or student space.
DIY: Adding Concealed LED Accent Lighting
This project replicates the diffused, ambient light source that outlines and brightens the interior of the reading cubby.
Material Required List
- LED light strip (with adhesive backing, preferably a high-density strip for continuous light)
- Aluminum LED channel (or diffuser channel, to hide the strip and diffuse the light)
- Power supply/adapter
- Wood screws (very small, for mounting the channel)
- Measuring tape
Equipment Required List
- Pencil
- Electric drill and screwdriver
- Hand saw or miter box (for cutting the aluminum channel)
DIY Instruction Step by Step
- Measure and Cut the Channel: Measure the length of the wooden frame where you want the light to be placed (e.g., along the vertical edges). Use a hand saw or miter box to cut the aluminum LED channel pieces to the exact required lengths.
- Mount the Channel: Using small wood screws, attach the aluminum channels to the inside edges of the wooden frame. Position the channel so it faces inward and the light source will be slightly concealed, maximizing the glowing effect.
- Install the LED Strip: Peel the adhesive backing from the LED strip and firmly press the strip into the aluminum channel. Ensure it is fully seated and runs the entire length of the channel.
- Connect and Conceal Wiring: Connect the LED strip to its power adapter. Run the wiring neatly along the back or base of the structure so it is completely hidden from view.
- Snap on the Diffuser Cover: Snap the plastic diffuser cover onto the aluminum channel. This piece hides the individual LED dots and creates the continuous, professional-looking line of soft light.
- Test the Lights: Plug in the adapter and verify that the light is evenly diffused and casts a pleasant, defining glow, enhancing the architectural features of the nook.
18. The Baroque Maximalist Chaise

This extravagant reading nook embraces maximalism with dramatic flair, creating a luxurious and theatrical space. The seating is a stunning, asymmetrical chaise lounge featuring heavily carved, ebonized wood and contrasting upholstery. The piece is divided between a rich, deep blue velvet and an intense lime green velvet, both tufted and detailed with tassels, providing unmatched visual impact and comfort.
The backdrop is just as bold: deep, dark blue walls and heavy, patterned drapery set a brooding, sophisticated scene. Above the seating, an enormous, ornate gold-framed mirror leans against the wall, reflecting the room and adding incredible depth and grandeur. The lighting is provided by a glittering crystal chandelier and classic wall sconces, which cast a warm, opulent glow. Embroidered cushions and a decorative rug soften the floor area, inviting the reader to settle in. This is a space dedicated to high drama and indulgent relaxation.
DIY: Creating a Decorative Tassel Throw
This project helps you replicate the fringed blanket that adds texture and a handmade element to the chaise lounge.
Material Required List
- Finished throw blanket (preferably one with solid or patterned edges)
- Yarn or embroidery floss in a coordinating color
- Small wooden beads (optional, for decorative detail)
- Ruler or small piece of cardboard (for tassel template)
Equipment Required List
- Sharp scissors
- Darning needle (with a large eye)
DIY Instruction Step by Step
- Make the Tassel Template: Wrap the yarn or floss tightly and repeatedly around the width of the ruler or cardboard piece. The width determines the length of your finished tassels. Wrap it about 40-60 times for a full tassel.
- Tie the Tassel: Carefully slide the looped yarn off the ruler. Take an 8-inch piece of yarn and slide it under the loops, pulling it up, and tying a tight knot at the very top of the loops. This will secure the top of the tassel.
- Shape the Tassel Head: Take another piece of yarn and wrap it tightly around the loops about a half-inch down from the top knot, securing the “head” of the tassel. Tie a knot and trim the excess yarn.
- Trim the Loops: Cut through all the bottom yarn loops with scissors to create the fringe of the tassel. Trim the ends so they are all the same length. Repeat this process until you have enough tassels for the blanket edge.
- Attach to the Blanket: Thread the darning needle with a length of yarn. Use the top strands of the tassel (where you tied the first knot) to sew the tassel securely onto the edge of the blanket. Space the tassels evenly along the edge—usually 3 to 4 inches apart. Tie the thread securely and trim excess.
19. The White Corner Minimalist

This reading nook represents the ultimate in pared-down, quiet simplicity, perfect for readers who seek zero visual distraction. The space is entirely white, from the walls to the floor to the singular, block-style armless chair, creating an almost monastic atmosphere. This monochromatic scheme instantly eliminates visual clutter and promotes mental clarity.
The functionality is subtle and integrated. A low, floating shelf spans the corner, serving as a landing space for a mug and a couple of books. The shelf is defined by a thin, brightly colored blue line running along its edge, the only splash of color in the entire room. Hidden LED lighting is mounted beneath the shelf, casting a warm, gentle wash down the wall that contrasts beautifully with the stark white. A discreet black electrical outlet is mounted below the shelf, providing convenient charging access. This design proves that cozy comfort can be achieved through pure form and light rather than excessive softness.
DIY: Installing a Simple Floating Shelf with Undermount Lighting
This project helps you install a clean, minimal floating shelf and add hidden lighting beneath it.
Material Required List
- Prefabricated floating shelf (choose one with a cavity large enough for LED strip)
- LED light strip (with adhesive backing, warm white)
- Power supply/adapter
- Mounting hardware (usually included with the shelf, e.g., wall bracket/rod)
- Wall anchors (if necessary)
Equipment Required List
- Measuring tape
- Pencil
- Level
- Electric drill with various bits
- Screwdriver
DIY Instruction Step by Step
- Mark the Shelf Placement: Decide on the height for your shelf. Use the measuring tape and pencil to mark the position on the wall. Use the level to ensure your marks are perfectly straight.
- Install the Wall Bracket: Following the manufacturer’s instructions for your specific shelf, screw the mounting bracket or rods securely to the wall. Use wall anchors if you are not drilling directly into a wall stud.
- Install the LED Strip: Before sliding the shelf onto the bracket, turn the shelf upside down. Peel the adhesive backing and firmly stick the LED strip along the underside length of the shelf, ensuring it is positioned toward the back edge so the light will shine down the wall.
- Slide and Secure the Shelf: Carefully slide the shelf onto the installed wall bracket or rods. Ensure it fits snugly and is secure. Conceal the power cord by running it discreetly along the baseboard or through a small hole (if the wiring is behind the wall).
- Test the Lighting: Plug in the adapter and check that the light casts an even, warm glow down the wall, subtly highlighting the area beneath the shelf.
20. The Zen Mat Reading Area

This reading space is the epitome of Japanese design, focusing on light, texture, and quiet ritual. The entire area is defined by a raised platform covered in traditional tatami mats, indicating a space dedicated to mindful rest. Large windows are covered with shoji screens—translucent panels of paper and light wood gridwork—which diffuse the bright outdoor light, creating an incredibly soft, uniform glow throughout the room. The lower half of the windows remains open, allowing a glimpse of the lush green foliage outside.
Seating is minimalist and low, featuring small floor cushions placed around an equally low, light wood table. This arrangement is conducive to tea ceremonies, writing, or quiet reading. Decorations are simple yet intentional: a slender bamboo plant, a minimalist vase holding delicate spring blossoms, and framed calligraphy or ink drawings. The overall feeling is one of peace, clarity, and deep connection to natural light and the changing seasons.
DIY: Creating a Simple Calligraphy Art Piece
This project helps you replicate the simple, framed artwork that adds cultural authenticity and a meditative focus to the space.
Material Required List
- Plain white, thick textured paper (e.g., watercolor paper or rice paper)
- Black ink (Indian ink or sumi ink)
- Calligraphy brush (medium tip)
- Simple wooden picture frame (light wood recommended)
Equipment Required List
- Small dish or palette for ink
- Pencil (optional, for light practice sketch)
DIY Instruction Step by Step
- Prepare the Surface: Lay the thick paper flat on a clean surface. Ensure your ink is ready in a small dish.
- Practice the Strokes: If you are a beginner, practice simple lines or characters on scrap paper until you feel comfortable with the brush flow and ink consistency. Simplicity is key to this aesthetic. Consider choosing a single, meaningful Japanese kanji character (like peace, or ‘heiwa’) or a simple, abstract nature design.
- Create the Art: Holding the brush vertically, apply the ink to your final paper. Focus on intentional, swift strokes rather than hesitant ones. Allow the natural texture of the brush and the slight imperfections in the ink to be part of the design.
- Dry and Frame: Allow the ink to dry completely. Once dry, place the finished calligraphy art into the light wood frame. If the paper is smaller than the frame, use a simple matting technique to center the artwork. Display the framed piece leaning against the wall on your reading platform for an authentic, serene touch.
21. The Bohemian Floor Feast

This colorful, texture-rich nook is an explosion of global textiles and patterns, creating an irresistibly inviting lounging spot. The central seating is a daybed or bench piled high with an overwhelming amount of patterned pillows. These cushions feature vibrant colors like fuchsia, turquoise, indigo, and burnt orange, showcasing intricate embroidery, tassels, and geometric prints. The base of the seating is draped in a woven textile, adding even more pattern and texture.
The floor space is equally important, covered in an elaborate patterned rug and scattered with large floor cushions and a striking leather Moroccan pouf. This low-level arrangement encourages a relaxed, informal style of reading. Overhead, ornate brass lanterns hang down, casting a warm, atmospheric light. Small details, like a dreamcatcher, a small Buddha statue, and woven side tables, reinforce the global, free-spirited aesthetic. This space is cozy because of its abundance, inviting readers to sink into the softness.
DIY: Making Tassel-Embellished Floor Pillows
This project focuses on adding decorative, oversized tassels to a purchased or existing floor cushion for a rich, bohemian look.
Material Required List
- Pre-made floor cushion cover (square or rectangular)
- Thick yarn or macramé cord in contrasting colors (e.g., turquoise, deep pink)
- Heavy-duty thread and needle
- Ruler or small piece of cardboard (for tassel template)
Equipment Required List
- Scissors
DIY Instruction Step by Step
- Determine Tassel Placement: The traditional look places one large, prominent tassel on each of the four corners of the floor cushion.
- Make the Tassels: Using the ruler or cardboard piece, wrap your yarn or cord tightly to create the loops. This time, wrap more yarn than usual to make a very thick, substantial tassel. Follow the procedure from DIY #18 (tie the top knot, wrap the head, and cut the bottom loops).
- Prepare for Attachment: Cut a long, thick piece of yarn and thread the heavy-duty needle.
- Attach to the Cushion: Position the top knot of the tassel right at the corner seam of the cushion cover. Carefully stitch the tassel onto the cushion cover by running the needle and thread repeatedly through the top knot and into the seam of the cushion. Stitch firmly to ensure the weight of the tassel doesn’t tear the seam.
- Secure the Tassels: Repeat the process for the remaining three corners. Make sure all knots and stitching are secure so the tassels can handle regular floor use. These substantial tassels instantly elevate the cushion’s bohemian charm.
22. The Art Deco Glamour Spot

This reading nook is an essay in high-contrast luxury, blending classic Art Deco drama with contemporary comfort. The central piece is a plush, white, channel-tufted wingback armchair, suggesting traditional elegance. Paired with a matching ottoman, it provides full, supportive seating for lengthy reading sessions. The light, creamy upholstery stands out vividly against the deep, matte black walls, creating an undeniable visual impact.
The accessories are intentionally glamorous. A mirrored nightstand acts as a side table, its reflective surface catching the light and adding sparkle. A large, ornate sunburst mirror with a gold finish hangs over the chair, serving as a dynamic, focal piece. Lighting is provided by a silver table lamp with a simple white shade, its sculpted metal base adding another Art Deco touch. A decorative carved screen stands nearby, providing a touch of vintage texture and privacy. The black and white rug with a geometric Greek key pattern anchors the space, tying the high-contrast elements together with clean lines.
DIY: Creating a Mirrored Side Table Top
This project helps you replicate the glamorous, reflective surface of the side table, or add a mirrored element to an existing small table.
Material Required List
- Small, square or rectangular piece of thin mirror tile (sized to fit your existing side table top)
- Strong adhesive (e.g., liquid nails or heavy-duty construction adhesive)
- Protective gloves and glasses
- Rubbing alcohol and a clean cloth
Equipment Required List
- Measuring tape
- Pencil or marker
DIY Instruction Step by Step
- Measure the Table Top: Measure the exact dimensions of the top of your existing side table. You need a mirror piece that fits perfectly flush or slightly overhangs the edge for a clean look.
- Prepare the Surface: Ensure the side table top is clean, dry, and free of dust. Use rubbing alcohol to clean the area where the mirror will be adhered.
- Apply Adhesive: Working in a well-ventilated area and wearing gloves, apply the strong adhesive to the back of the mirror tile. Apply it in a consistent zig-zag pattern, keeping it about one inch away from the edges.
- Mount the Mirror: Carefully center the mirror tile onto the table top. Press down firmly and evenly across the surface. Immediately wipe away any adhesive that squeezes out from the edges with a clean cloth.
- Cure Time: Do not use or move the table for the time specified by the adhesive manufacturer (usually 24-48 hours). Once cured, the mirrored surface will dramatically reflect light and add instant glamour to your reading nook.
23. The Sculptural Gray Cocoon

This reading nook embraces a raw, monastic aesthetic using concrete textures and a limited, subdued color palette. The entire space—walls, ceiling, and built-in bench—is coated in a matte, textured gray finish, giving the illusion of being carved from a single piece of stone. This creates an immediate feeling of protection and enclosure, like a private cave.
The seating is a thick, tufted mattress cushion in matching gray, providing a soft contrast to the hard surfaces. The deep recess of the nook encourages sinking in and disconnecting. The only color break comes from a single mustard-yellow lumbar pillow, adding a welcome, subtle pop of warmth. A simple, exposed filament bulb hangs from a cord, acting as a minimalist reading lamp and adding a vintage industrial touch. Accessories are few: a large, sculptural ceramic jug and a mug on the cushion. This style is about quiet contemplation and the beauty of texture.
DIY: Creating a Tufted Mattress Cushion
This project helps replicate the thick, button-tufted mattress that is central to the comfort and texture of this nook.
Material Required List
- Thick foam rubber (cut to fit the bench size, minimum 4 inches thick)
- Heavy-duty fabric (durable cotton, linen, or velvet, enough to cover the foam)
- Long upholstery needle
- Strong nylon thread or tufting twine
- Upholstery buttons (about 15-20, depending on size of bench)
Equipment Required List
- Scissors
- Ruler or measuring tape
- Permanent marker
DIY Instruction Step by Step
- Cover the Foam: Cut and sew your fabric to create a basic slipcover for the foam cushion. Leave one end open so you can insert the foam. Slide the foam into the cover and pin the open end closed. You will hand-stitch this closed later.
- Mark the Tufting Points: Use the ruler to mark a grid pattern on the top surface of the cushion (e.g., marks every 8-10 inches). These marks indicate where the buttons will be placed. Transfer the exact position of these marks to the bottom of the cushion.
- Start Tufting: Thread your long upholstery needle with the strong tufting twine. Start on the bottom of the cushion at a marked point, pushing the needle straight up through the foam to the corresponding top mark.
- Attach the Top Button: At the top, thread the twine through the shank of an upholstery button. Push the needle back down through the foam, close to the original exit point (about 1/4 inch away).
- Secure the Bottom: Pull the twine tight to create the desired dimple (the tuft). On the bottom side, tie the twine tightly around a small piece of button or a small washer to secure the tension. Knot the twine multiple times and trim the excess.
- Repeat and Finish: Repeat this process for all marked points. Once all tufts are complete, hand-stitch the remaining opening of the slipcover closed.
24. The Grand Corner Library

This reading nook is the ultimate statement of classical scholarship and warmth, nestled entirely within a custom-built, floor-to-ceiling library. The rich, mahogany-toned wood paneling and extensive shelving create an enveloping, classic atmosphere. The shelves are filled with books, organized by color and height, contributing to the sense of an old, established collection.
The seating is a built-in corner bench seamlessly integrated into the lower shelving unit, providing practical storage below and a comfortable rest above. The cushions are upholstered in a classic plaid fabric featuring deep reds and greens, which immediately evokes a cozy, academic feel. The practicality is high-end: a rolling wooden ladder with brass rails provides access to the upper shelves, and the brass accents continue in the subtle railing along the mid-shelf line. A small leather footstool offers a place to prop up feet, and a warm-toned, traditional rug defines the space.
DIY: Installing Brass Accent Rails on Shelving
This project helps replicate the decorative and functional brass rail seen along the front edge of the bookshelves.
Material Required List
- Brass tubing (thin diameter, cut to the length of your shelf fronts)
- Two to three small brass flange fittings (used to mount the tubing to the wood)
- Small wood screws (appropriate size for the flange fittings)
- Measuring tape
- Pencil
Equipment Required List
- Electric drill with small drill bit
- Screwdriver
DIY Instruction Step by Step
- Measure and Cut the Rail: Measure the exact length of the front edge of the shelves where you want the rail to run. Have the brass tubing cut to this length (often a metal supplier can do this for you).
- Mark Flange Placement: Determine the placement of your brass flange fittings—one at each end and one in the middle for longer shelves. Use a pencil to mark the exact screw holes for the flanges on the shelf front. The rail should be positioned high enough to be decorative but low enough to not impede access to the books.
- Drill Pilot Holes: Use the electric drill to carefully create small pilot holes at your marked screw locations. This prevents the wood from splitting.
- Attach the Flanges: Align the brass flange fittings over the pilot holes and secure them tightly to the front of the shelf using the wood screws and the screwdriver.
- Insert the Rail: Slide or snap the cut brass tubing into the openings of the installed flange fittings. The fittings should hold the tubing securely in place, creating a neat, elegant railing across the shelf front. Repeat this process for all desired shelf sections.
25. The Autumn Cabin Corner

This inviting nook captures the rich, warm mood of a cozy cabin nestled deep in the woods during autumn. The setting is dominated by deep forest green walls and a substantial, rustic wooden frame that provides an immediate sense of shelter and enclosure. The wood is deliberately left rough, enhancing the rustic feel. A large corner banquette, upholstered in olive green corduroy, offers a comfortable, textured surface for lounging.
The color palette is derived directly from nature; pillows in muted gold, rust, and deep terracotta are layered generously, adding warmth and visual depth. A thick, chunky knit brown throw blanket is draped over the seat, inviting immediate relaxation. The walls are minimally decorated with framed pressed leaves, reinforcing the natural, seasonal theme. Warm lighting is crucial here, provided by hidden spotlights and multiple pillar candles placed around the bench. A woven jute rug grounds the space, adding another layer of organic texture.
DIY: Creating Framed Pressed Leaf Art
This project helps replicate the simple, natural art pieces that enhance the autumnal, cabin atmosphere.
Material Required List
- Several large, well-preserved, dry leaves (e.g., maple or oak)
- Two sheets of acid-free cardstock or watercolor paper (one for the backing, one for the mat)
- Small or medium glass picture frames (with removable backs)
- Craft glue or archival tape
Equipment Required List
- Heavy books (for pressing leaves)
- Tweezers (optional, for handling delicate leaves)
DIY Instruction Step by Step
- Press the Leaves (Preparation): If your leaves are not already dry and flat, place them carefully between two sheets of plain paper and press them inside heavy books for at least one week until they are completely flat and dry.
- Prepare the Backing: Cut the backing cardstock to fit perfectly inside your chosen frame.
- Position the Leaf: Use tweezers to gently position the dried leaf onto the center of the cardstock backing. Once satisfied with the placement, secure the leaf with a very small dot of craft glue under the thickest part of the leaf, or use tiny pieces of archival tape if the leaf is extremely fragile.
- Assemble the Frame: Place the leaf and its backing into the frame. If desired, cut a simple paper mat to go over the backing, framing the leaf further. Replace the frame back securely.
- Display: Hang or lean the finished framed leaves onto the shelf or wall of your reading nook to add a simple, rustic touch of nature.
26. The Mondrian Art Cube

This architecturally striking reading nook is a bold homage to the De Stijl art movement, exemplified by Piet Mondrian. The entire structure is built as a contained cube, defined by a rigid grid of thick black lines. The panels within the grid are painted primarily in white, with strategic blocks of primary colors—red, blue, and yellow—creating a dynamic, abstract composition. This strong visual theme makes the nook a piece of functional art.
The seating is an integrated corner bench set low within the cube, featuring simple, neutral cushions in a calm off-white color. The monochrome cushions provide a necessary visual break from the surrounding vibrant energy. The design is minimalist when it comes to accessories; a stack of books and a small coffee tray are placed on the cube’s horizontal surfaces, which also double as small shelves. Small, adjustable swing-arm lamps are mounted inside the cube, ensuring that the necessary task lighting does not interrupt the clean, linear aesthetic. This space is stimulating and highly structured, a great choice for focused reading.
DIY: Painting a Mondrian-Inspired Storage Bench
This project helps you replicate the distinctive black-grid and color-block pattern on a simple, square bench or storage unit.
Material Required List
- Plain white storage bench or cube unit (MDF or painted wood)
- Painter’s tape (various widths, including very thin tape)
- Acrylic or interior latex paints (Red, Blue, Yellow, and Black)
- Paintbrushes (small for detail, roller for large areas)
Equipment Required List
- Measuring tape
- Pencil
- Ruler
DIY Instruction Step by Step
- Map the Grid: Use the pencil and ruler to lightly sketch the desired layout of the black grid lines on the white bench surface. The lines should be vertical and horizontal, mimicking the composition of the artwork.
- Tape the Grid Lines: Carefully apply the narrow painter’s tape exactly where the black lines will go. The width of the tape determines the final width of the black lines. Press the tape down firmly along all edges.
- Mark Color Blocks: Identify the large rectangular and square sections that will be painted in Red, Blue, or Yellow. Leave the majority of the panels white.
- Tape and Paint Color Blocks: Using wider painter’s tape, carefully mask off any white areas adjacent to a block you intend to color. Paint the chosen sections with Red, Blue, and Yellow, using small brushes for precision near the tape edges. Apply two coats if needed. Allow the paint to dry completely.
- Remove Tape and Paint Black: Slowly and carefully peel off all the painter’s tape. Now, use the black paint and a steady hand with a fine brush to carefully paint the previously masked white lines (where the narrow tape was).
- Cure: Allow the black paint to dry completely. The bold contrast of the primary colors against the white, framed by the stark black grid, creates the unmistakable artistic effect.
27. The Cloud of Comfort Lounge

This reading space is all about enveloping the reader in maximum softness, using plush materials and a soothing, monochromatic palette. The focal point is the large, low-profile lounge cushion, structured from thick, quilted or channeled gray fabric. This piece encourages sprawling out for long, lazy reading sessions. The entire setup is grounded on a soft, light-colored carpet, emphasizing the sense of sinking into luxury.
The texture is elevated by generous use of faux fur. Large, ivory-colored sheepskin throws are draped over the backrests, creating a dramatic, luxurious texture contrast with the quilted gray linen. Small, round fur poufs serve as secondary seating or footrests. A thick, cable-knit throw blanket adds another layer of cozy texture. The decor is kept minimal to maintain focus on comfort: a small floor lamp with a paper lantern shade provides soft, diffused light, and a wooden tray holds a candle and mug. This area is a true sanctuary of tactile comfort.
DIY: Layering Faux Fur for Texture
This simple styling technique helps replicate the luxurious, fluffy texture that defines this lounge space.
Material Required List
- Large sheets or small area rugs of high-quality faux fur or sheepskin (Ivory or white recommended)
- Non-slip rug pad material (optional, if using under a rug)
Equipment Required List
- Sharp scissors (if cutting fur to size)
- Stiff brush or pet brush (for fluffing)
DIY Instruction Step by Step
- Choose the Placement: Identify key areas where the fur will add impact—the backrest of the lounge, as a small ottoman cover, or as a rug layer.
- Layer on the Seating: Drape one of the faux fur pieces directly over the top of the quilted lounge, allowing the edges to fall naturally. Ensure enough is positioned to touch the reader’s back or shoulders.
- Create Fur Poufs (If Applicable): If you have a small, plain ottoman or cushion, you can cover it with a piece of the faux fur, simply draping it over to mimic the look of a fur pouf.
- Brush for Volume: Use a stiff brush or a clean pet brush to gently brush the fibers of the faux fur. This helps fluff up the material, making it look thicker and more luxurious.
- Adjust and Anchor: Tuck any loose corners or edges discreetly. Because the faux fur is light, ensure it is anchored securely under the weight of the cushions or other seating materials so it doesn’t slip when in use.
28. The Retro Future Pods

This reading nook setup is striking, featuring a collection of individual, futuristic pods that offer a high-tech, semi-private retreat. The main body of the chair is a smooth, glossy white shell, contrasted by vibrant, cushioned interiors in bright lime green, orange, or blue. These distinct colors add energy and personality to the functional design. The rounded, cocoon shape is highly effective at muffling external sound, making it conducive to focus.
The pods are designed for the modern reader, incorporating built-in tech features such as touchscreens and small tablet trays. Overhead, a small interior light is integrated for targeted illumination. The playful, retro-inspired aesthetic is reinforced by a decorative red robot placed on a curved side table. This side table, in white and orange, also provides low-level storage for books. Placed in a library setting, these pods demonstrate a modern approach to creating quiet, personalized space within a busy environment.
DIY: Creating a Curved Side Table (Using Shelves)
This project offers an easier way to replicate the C-shaped, curved side table using prefabricated shelf units.
Material Required List
- Two identical, small, rectangular floating shelves (white finish)
- One small, rectangular shelf piece (for the top)
- L-brackets or metal corner braces
- Screws and wood glue
- Brightly colored paint (e.g., orange or lime green)
Equipment Required List
- Measuring tape
- Pencil
- Screwdriver
- Paintbrush
DIY Instruction Step by Step
- Prepare the Shelves: Paint the undersides of the two identical side shelves and the underside of the top shelf with the bright accent color (orange or green). Allow them to dry completely.
- Form the C-Shape: Stand the two identical shelves vertically, parallel to each other. These will be the vertical sides of the “C” shape. Ensure the painted sides face inward.
- Attach the Top: Apply wood glue to the top edge of the two vertical shelves. Place the third, top shelf horizontally across them, aligning the edges to form the table top.
- Secure the Structure: Use L-brackets or corner braces on the inside corners (where the vertical pieces meet the top piece) to reinforce the structure. Screw the pieces together tightly.
- Add a Base (Optional): You can optionally add a fourth, bottom shelf to close the “C” and create a storage opening, attaching it with glue and L-brackets as well.
- Display: Place the finished table next to the reading chair. The structure creates built-in cubbies for holding books and provides a smooth surface for beverages or technology.
29. The High-Tech Sensory Booth

This is the ultimate modern solution for finding quiet, offering a completely self-contained, customizable escape pod. The structure is a transparent soundproof booth with a clean, light aluminum frame. The walls are opaque, providing visual privacy, and the entire unit is designed to block out environmental noise, making it perfect for focused work or reading.
The interior is minimalist and comfortable, featuring a simple white bench seat and a single textured pillow. The most innovative feature is the integrated colored lighting system; the walls glow with customizable LED light, here showing a gradient of cool blue and warm red. This chromotherapy aspect allows the user to set a mood for concentration or relaxation. A small side table and a minimal ventilation system complete the design. This space is a high-tech, contemporary approach to creating immediate quiet and personal atmosphere.
DIY: Adding Color-Changing Light to a Nook
This project helps replicate the mood-setting, customizable colored lighting effect using readily available RGB LED strips.
Material Required List
- RGB LED strip kit (with remote control and power supply)
- Double-sided mounting tape (optional, for extra security)
Equipment Required List
- Measuring tape
- Rubbing alcohol and clean cloth
DIY Instruction Step by Step
- Measure and Clean: Measure the interior perimeter of the ceiling or the inner frame of your nook where the light will be hidden. Clean the surfaces thoroughly with rubbing alcohol.
- Install the Strip: Peel the backing from the adhesive strip and press the RGB LED strip firmly into the frame or ceiling edge. Ensure the strip is mounted where it is concealed, allowing the light to bounce off the walls rather than shining directly into the user’s eyes.
- Connect the Controller: Connect the LED strip to its controller and power supply. Hide the controller and wiring behind the frame or inside a shelf.
- Test the Colors: Plug in the unit and use the remote control to test the various colors (red, blue, purple, etc.) and lighting modes. This allows the reader to instantly customize the ambiance of their nook, mimicking the advanced capabilities of the sensory booth.
30. The Underwater Grotto

This imaginative reading nook creates a highly immersive environment, designed to feel like a submerged cave or a deep-sea grotto. The walls are covered in a heavily textured, rough material, mimicking uneven rock or coral, and are painted in an intense, deep turquoise-blue. The entrance is a striking, irregular archway, reinforcing the cave aesthetic.
The atmosphere is dominated by a lighting effect; concealed lights project rippling, wave-like patterns onto the textured walls, giving the illusion of being underwater. Built-in, curved benches provide ample seating and are covered in soft, dark blue velvet. Small shelves integrated into the wall display treasures like large seashells. The accessories, including plush pillows, a cozy dark blue throw, and a small, functional humidifier, emphasize comfort and sensory relaxation. This nook is a truly unique, dramatic, and escapist spot for reading.
DIY: Creating a Textured Grotto Wall Finish
This project helps replicate the rough, uneven, rock-like texture of the walls using joint compound or plaster.
Material Required List
- Drywall joint compound (pre-mixed bucket) or artistic plaster
- Deep turquoise or midnight blue paint
- Water
- Protective sheets and painter’s tape
Equipment Required List
- Trowel or large putty knife
- Large, stiff brush (e.g., a scrub brush or wide paintbrush)
- Large bucket (for mixing)
DIY Instruction Step by Step
- Prepare the Room: Tape off the floor and surrounding trim with painter’s tape and lay down protective sheets, as this process can be messy.
- Apply the Compound: Using the trowel or large putty knife, apply the joint compound directly to the walls in thin to medium layers. Do not try to make it smooth; the goal is to create random peaks, valleys, and swirls to mimic rock or rough plaster.
- Create Texture: Before the compound sets, use the edge of the trowel, the stiff brush, or even your fingers (wearing gloves) to drag, stipple, and swirl the compound, enhancing the rough, grotto-like texture. Let the entire surface dry completely (this may take 24-48 hours, depending on thickness).
- Paint the Walls: Once the texture is bone-dry, apply the deep blue or turquoise paint. To highlight the texture, use a damp cloth or a dry brush technique to wipe away some of the paint from the highest peaks, or apply a slightly darker shade in the valleys.
- Cure: Allow the paint to fully cure. The rough texture will dramatically catch any light, giving the illusion of depth and creating your underwater environment.
31. The Terrazzo Corner Banquette

This sophisticated reading nook is a testament to the comeback of terrazzo, using the aggregate material to create a sculptural, contemporary lounge. The banquette is a custom, continuous piece that wraps around the corner, featuring a high backrest with rounded edges. The entire structure, including the matching side table and the floor, is covered in terrazzo with a light, warm base and speckled chips of black, terracotta, and brown. This bold application creates an immersive, highly textured environment.
The warmth of the wall paint in a muted terracotta shade prevents the stone texture from feeling cold. Simple, neutral cushions provide a soft, welcoming contrast against the busy pattern of the seating. The decor is minimal, featuring framed abstract art that echoes the seating colors and simple, unglazed terracotta pottery, reinforcing the earthy palette. A single, delicate globe pendant light hangs above, adding a touch of mid-century elegance. This space is highly stylized and focused on the beauty of materials.
DIY: Creating a Terrazzo Patterned Side Table Top
This project helps replicate the iconic terrazzo look on a simple side table surface using paint and grout.
Material Required List
- Small wooden or MDF side table (or a pre-cut square piece for the top)
- White, cream, or light gray paint (for the base coat)
- Small acrylic craft paints in various colors (e.g., black, brown, terracotta, blue)
- Fine-tip artist brushes
- Clear sealant (e.g., polyurethane or epoxy resin for a glossy finish)
Equipment Required List
- Sponge or rough piece of paper
- Paintbrushes
- Pencil
DIY Instruction Step by Step
- Paint the Base: Apply two coats of the light-colored base paint (white or cream) to the entire surface of the side table top. Allow it to dry completely.
- Sponge or Dot the Shapes: Using a small, stiff brush or tearing a small piece of sponge, dab random, unevenly sized shapes onto the painted surface with your darkest color (black or dark brown). These do not need to be dots; irregular, jagged shapes are better.
- Layer the Colors: Once the first color is dry, repeat the process with the remaining accent colors (terracotta, blue, etc.). Overlap the shapes slightly and ensure the pieces look scattered and random, resembling rock chips.
- Seal the Surface: Once all the paint is completely dry, apply several coats of a clear sealant (polyurethane or epoxy resin) to the surface. This protects the paint and gives the glossy, polished look typical of genuine terrazzo stone.
32. The Retro Diner Booth

This reading nook offers a fun, nostalgic escape, modeled after a classic mid-century diner booth. The structure features high-backed banquettes that create complete separation and privacy. The color scheme is deliberately bold and retro: deep teal, maroon, and sunny yellow upholstery contrast against backrests lined in cork. This combination is visually striking and instantly transports the reader to another time.
The table, set low between the benches, is sturdy and functional, offering ample space for writing or holding reading materials. The built-in shelf unit mounted on the partition holds a vintage-style radio, a stack of books, and a green gooseneck lamp, which provides focused, flexible illumination. A single, round wall sconce adds a warm ambient glow. This setup is highly practical, providing a workspace, a cozy seat, and a fun, thematic atmosphere for focused reading or writing.
DIY: Adding a Gooseneck Task Lamp to a Booth
This project focuses on securing a small, flexible reading lamp to the booth wall or shelf unit for targeted lighting.
Material Required List
- Small metal gooseneck lamp (clip-on or screw-base style)
- Small wood block (if the lamp needs a mounting base)
- Wood screws
- Pencil
Equipment Required List
- Measuring tape
- Electric drill with small drill bit
- Screwdriver
DIY Instruction Step by Step
- Choose Placement: Determine the best location on the shelf or booth divider for the lamp. It should be positioned where the light can be easily directed onto the table or book. Mark the screw points with a pencil.
- Prepare the Base (if screw-base): If your gooseneck lamp uses a screw-down base, mark the screw holes. If your lamp is a clamp style but you want it permanently fixed, you can screw the lamp’s base directly into a small, painted wood block, and then screw the block onto the back of the shelf.
- Drill Pilot Holes: Use the electric drill to carefully drill pilot holes at the marked positions.
- Secure the Lamp: Position the lamp base over the pilot holes and secure it firmly with wood screws. If the lamp is a clamp-on style, simply clamp it onto the shelf edge, ensuring the clamp is tight and stable.
- Test the Light: Plug in the lamp and adjust the flexible neck to ensure the light beam covers your reading area effectively.
33. The Sheer Canopy Dream

This reading nook is all about softness, light, and a romantic, ethereal feeling, achieved through generous use of sheer fabric. The central structure is a simple wooden frame, acting as a four-poster canopy bed base. The light wood provides a grounded, natural element. It is completely draped in multiple layers of flowing, white sheer curtains, creating an incredibly soft, cloud-like enclosure. The curtains are tied back with simple satin ribbons, allowing easy entry.
The seating is a thick, tufted mattress on a low wooden platform, piled high with simple, textured pillows in cream and beige. This setup encourages reclining and daydreaming. The floor is covered in a woven jute rug, adding an organic texture that contrasts with the silkiness of the curtains. A hanging mobile with delicate shell or leaf shapes adds subtle movement. Scattered journals, a quill, and a basket of magazines suggest a focus on slow, reflective activities.
DIY: Creating a Simple Fabric-Draped Canopy Frame
This project focuses on building a simple, open frame to support the sheer curtains for a romantic, enclosed feel.
Material Required List
- Four wooden posts (2×2 or 4×4, cut to ceiling height minus 4 inches)
- Four wooden beams (1×4, cut to the desired length/width of the bed)
- L-brackets or metal joint plates
- Wood screws
- Wood glue
- Sheer curtains or voile fabric (6-8 panels for maximum drape)
- Ribbon or twine (for tie-backs)
Equipment Required List
- Measuring tape
- Pencil
- Electric drill with bit
- Saw (if cutting wood)
DIY Instruction Step by Step
- Cut and Finish Wood: Cut all your wood pieces to the necessary lengths. Sand the edges smooth. You may optionally stain or paint the wood now.
- Assemble the Top Frame: Take the four wooden beams and join them at the corners to create a square or rectangular top frame. Use wood glue and reinforce the corners with L-brackets or joint plates and wood screws for maximum stability.
- Attach the Posts: Stand the four posts vertically. Apply wood glue to the top of each post and position one corner of the assembled top frame onto the post. Secure the frame to the post by driving screws through the frame and into the post. Repeat for all four corners.
- Drape the Curtains: Once the frame is assembled and standing, drape the sheer curtain panels over the top beams. Allow them to fall gracefully down the sides.
- Secure the Curtains: Tie the curtains back to the vertical posts using ribbon or twine, achieving the elegant, gathered look seen in the image. You can also loosely attach the panels to the top frame with safety pins to prevent slipping.
34. The Upcycled Barrel Pod

This reading nook is a stunning example of creative repurposing, transforming a large, industrial barrel into a cozy, contained sanctuary. The steel drum is mounted horizontally on wooden supports, and the interior is lined with light, curved wooden slats, creating a rustic, cabin-like feel within the metal shell. The metal rings and rivets are left exposed, celebrating the object’s industrial origins.
Comfort is provided by a thick, tufted mattress cushion in a neutral fabric, shaped to fit the curved base. A quilted backrest enhances the cozy, enveloping feeling of the pod. A small, adjustable wall-mounted task light illuminates the interior perfectly for reading. Cleverly, a thin, curved shelf runs along one side, acting as a desk for books and a mug. This innovative nook offers a dark, secure, and very unique personal escape for focused reading.
DIY: Building a Small Curved Shelf for the Interior
This project helps you add a small, functional shelf inside the barrel or curved space for books and small items.
Material Required List
- Thin plywood or hardboard (wide enough for the shelf depth)
- Small metal L-brackets (two per shelf)
- Screws (short screws for the shelf, longer screws for the wall/barrel)
- Pencil
- Paint or metallic spray paint (for the shelf/brackets, e.g., silver)
Equipment Required List
- Jigsaw (essential for cutting the curve)
- Measuring tape
- Screwdriver
- Sandpaper (medium grit)
DIY Instruction Step by Step
- Measure and Design: Determine the depth and length of the shelf you want. You need to design the back edge of the shelf to match the inner curve of the barrel or curved wall. Use the barrel itself to trace the needed curve onto your plywood.
- Cut the Curve: Use a jigsaw to carefully cut along the traced line, creating the shelf with the appropriate concave curve. Sand the edges thoroughly.
- Paint the Shelf and Brackets: Paint the shelf and the L-brackets. A metallic silver paint, as shown, enhances the industrial theme. Allow the paint to dry completely.
- Install Brackets: Hold the shelf in the desired position inside the barrel. Mark where the brackets need to go underneath the shelf and onto the wall/slats. Secure the L-brackets to the inner wall or slats first, ensuring they are level.
- Mount the Shelf: Place the shelf onto the brackets. Using shorter screws, drive them up from underneath the brackets into the shelf, securing it firmly in place. This provides a functional, curved surface that perfectly integrates with the unique space.
35. The Ice Palace Greenhouse

This reading nook is a stunning, high-fashion creation that suggests a sparkling, futuristic greenhouse or a crystal ice palace. The structure is a custom-built, hexagonal frame outlined entirely in brilliant LED light strips, giving it a strong, glowing architectural presence. The glass panels are covered with intricate, laser-cut white vinyl decals featuring snowflake and crystalline patterns. This results in a complex, beautiful enclosure that filters light dramatically.
The interior is monochromatic, dominated by shades of silver, white, and sharp turquoise. Seating is provided by a translucent plastic chair and large, floor-level cushions covered in metallic silver fabric. Accessories include highly geometric glass side tables, stack of books, and abstract blue geometric sculptures. The overall effect is one of cold, sharp glamour and dramatic light, offering a brilliant, unique space that feels completely removed from the everyday.
DIY: Applying Window Film or Decals for Pattern
This project helps replicate the intricate, privacy-adding crystalline patterns on the clear panels of a window or enclosure.
Material Required List
- Decorative window film or vinyl decals (choose a repeating crystalline or geometric pattern)
- Squeegee or credit card (for smoothing)
- Utility knife or scissors
- Spray bottle with water and a tiny drop of dish soap
Equipment Required List
- Measuring tape
- Pencil
DIY Instruction Step by Step
- Measure the Panels: Measure the exact height and width of the window or clear panel where the decal will be applied.
- Cut the Film: Carefully cut the window film or decal to the measured size.
- Clean and Wet: Thoroughly clean the glass surface. Fill the spray bottle with water and a small drop of dish soap. Lightly spray the glass panel until it is uniformly wet. The soapy water prevents the film from sticking immediately, allowing for positioning.
- Apply the Film: Peel the backing from the film/decal. Carefully place the wet, sticky side of the film onto the wet glass. Slide it into the correct position.
- Smooth and Seal: Starting from the center and working outward, use the squeegee or credit card to gently smooth the film, pushing all the water and air bubbles out from under the film and toward the edges.
- Trim Edges: Use the utility knife to carefully trim any excess film around the frame edges for a perfect fit. Once the water dries, the film will adhere strongly, providing the beautiful, patterned screen effect.
Creating a dedicated reading space is an investment in your personal well-being and a great way to start the year with renewed focus. We hope this extensive collection of 35 diverse nook ideas has sparked your imagination. Whether you gravitate toward the calming minimalism of the Japanese chamber or the bold statement of the Steampunk library, remember that your cozy corner should reflect your unique taste.
Every detail, from the light source to the texture of a throw, contributes to the overall feeling of sanctuary. Use these examples as inspiration for combining comfort, style, and practicality in your home. By tackling one of the simple DIY projects, you can begin designing your own restful escape today.
Key Takeaways
- Layered Lighting is Essential: Combine soft ambient lighting (like a paper lantern or hidden LEDs) with a directed task lamp (like a gooseneck or swing-arm) to ensure reading comfort without eye strain.
- Texture Equals Warmth: Rely on mixing materials—velvet, chunky knits, faux fur, and raw wood—to create a sense of deep comfort, especially in monochromatic or minimalist spaces.
- Built-ins Maximize Function: Utilize wall recesses, corners, and under-seat storage to incorporate shelving or seating, turning small, awkward spaces into efficient, customized reading havens.
- Define Your Atmosphere: Use strong, enveloping color palettes (like deep blues or greens) or architectural frames (canopies, arches, pods) to physically and visually separate the nook from the rest of the room, enhancing the sense of escape.