
Winter often brings a chill that seeps into your most private space. You might look at your bed and feel a sense of coldness instead of warmth. A bedroom should feel like a safe hug during the dark months.

Transforming your room does not require a total renovation. Small changes in light and fabric can make a massive difference. You can turn a plain sleeping area into a warm sanctuary with just a few clever choices.
This guide looks at thirty six ways to boost your winter comfort levels. Every element focuses on tactile heat and visual softness. You will find simple steps to make your bedroom the most welcoming spot in your home.
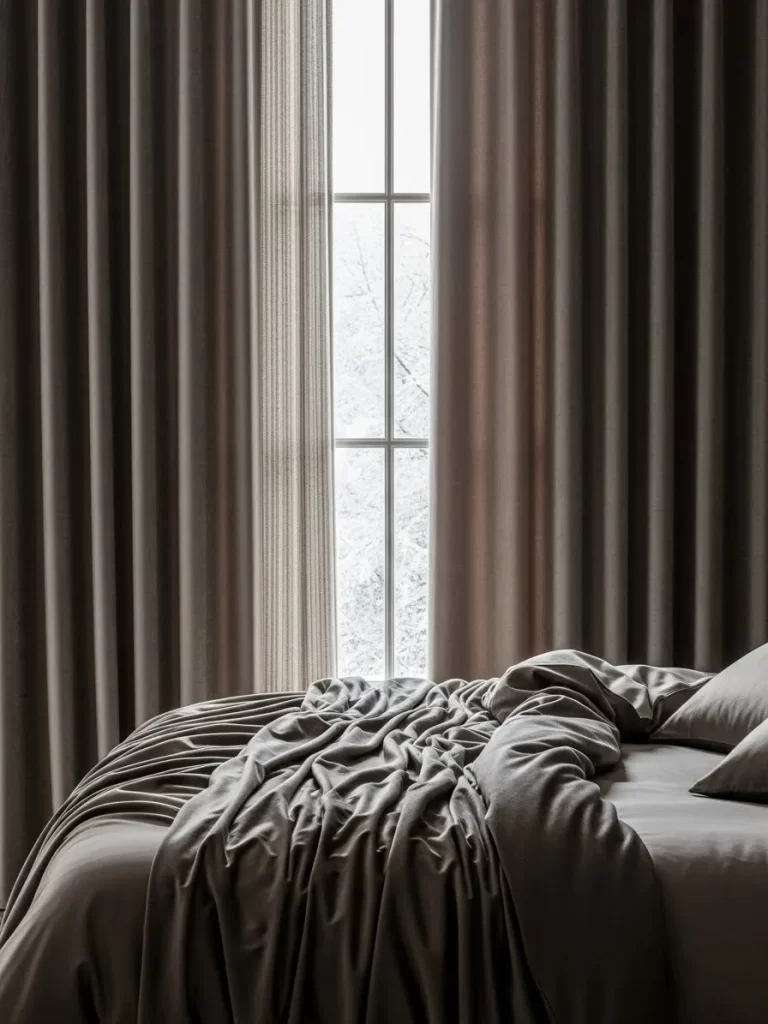
1 Chunky Arm Knit Throw Blanket
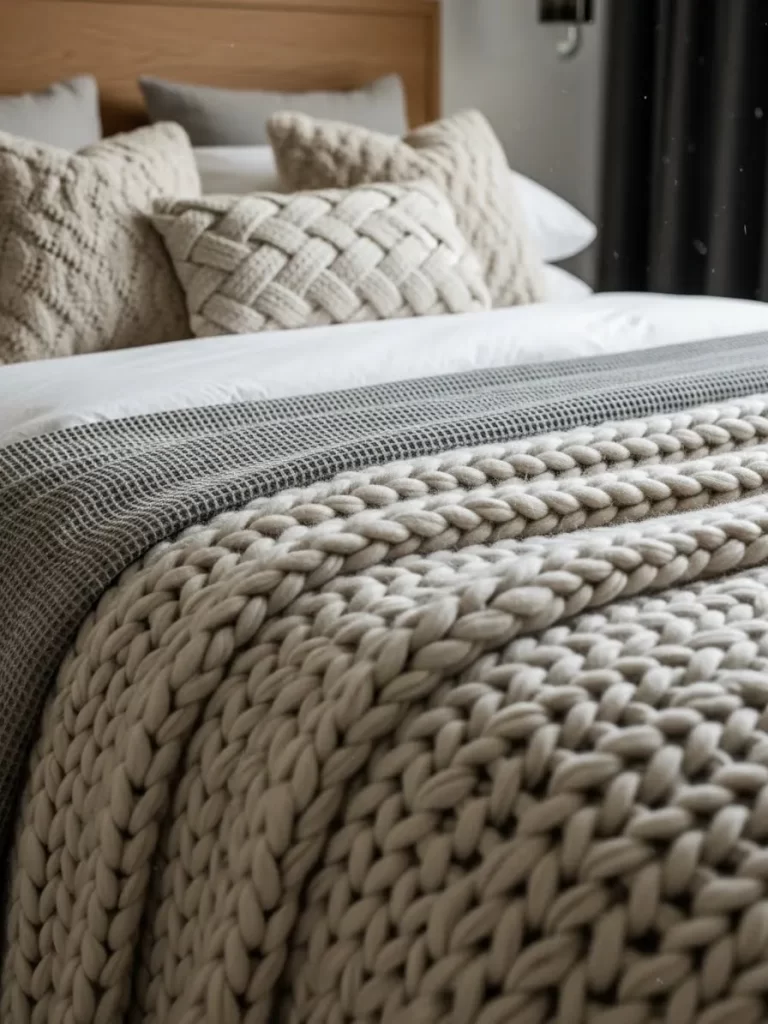
Adding a thick, oversized knit blanket instantly transforms a cold room into a sanctuary. This specific texture brings a tactile warmth that thin fabrics simply cannot match. The neutral cream tones blend seamlessly with various bedding styles while providing a sophisticated focal point.
Layering these heavy loops over your bed creates a sense of weight and security. It invites you to curl up during snowy evenings with a hot drink. Natural wool or soft acrylic blends work best to trap heat effectively without feeling scratchy against your skin.
Choosing a hand-knitted piece adds a rustic, artisanal touch to your decor. This element bridges the gap between modern minimalism and traditional winter comfort. It serves as both a functional heater and a visual masterpiece for your sleep space.
Material Required List
- 6 to 8 pounds of giant unspun wool roving or chunky chenille yarn
- Large flat surface like a dining table or clean floor
- Measuring tape
- Scissors
Equipment Required List
- Your own arms (no knitting needles needed)
- A sturdy chair for comfort while working
DIY Instruction Step by Step
Step 1: Create the Starting Loop Pull the end of your yarn and make a small circle about the size of a grapefruit. Pull a small piece of the working yarn through that circle to create your first slip knot. Place this loop over your right arm.
Step 2: Cast on Your First Row Reach through the loop on your arm to grab the working yarn. Pull it through to form a second loop and slide it onto the same arm. Repeat this until you have about 16 to 20 loops on your arm, depending on how wide you want the blanket.
Step 3: Transfer Loops to the Other Arm Take the working yarn and hold it in your right hand. Pull the first loop off your right wrist and over the yarn in your hand to create a new loop. Place this new loop onto your left arm. Move all stitches across one by one until your right arm is empty.
Step 4: Knit Back and Forth Continue moving the loops from arm to arm. Keep the stitches loose enough so they move easily but tight enough to stay uniform. This rhythm builds the body of the blanket quickly.
Step 5: Bind Off the Edges Knit two stitches onto your arm as usual. Take the first stitch and pull it over the second stitch and off your hand. Knit one more stitch so you have two again, then repeat the overlap process until only one loop remains.
Step 6: Finish the Tail Cut the yarn, leaving a tail of about 10 inches. Pull this tail through the final loop and knot it securely. Weave the loose ends back into the thick braids of the blanket to hide them.
2 Warm Ambient Layered Lighting
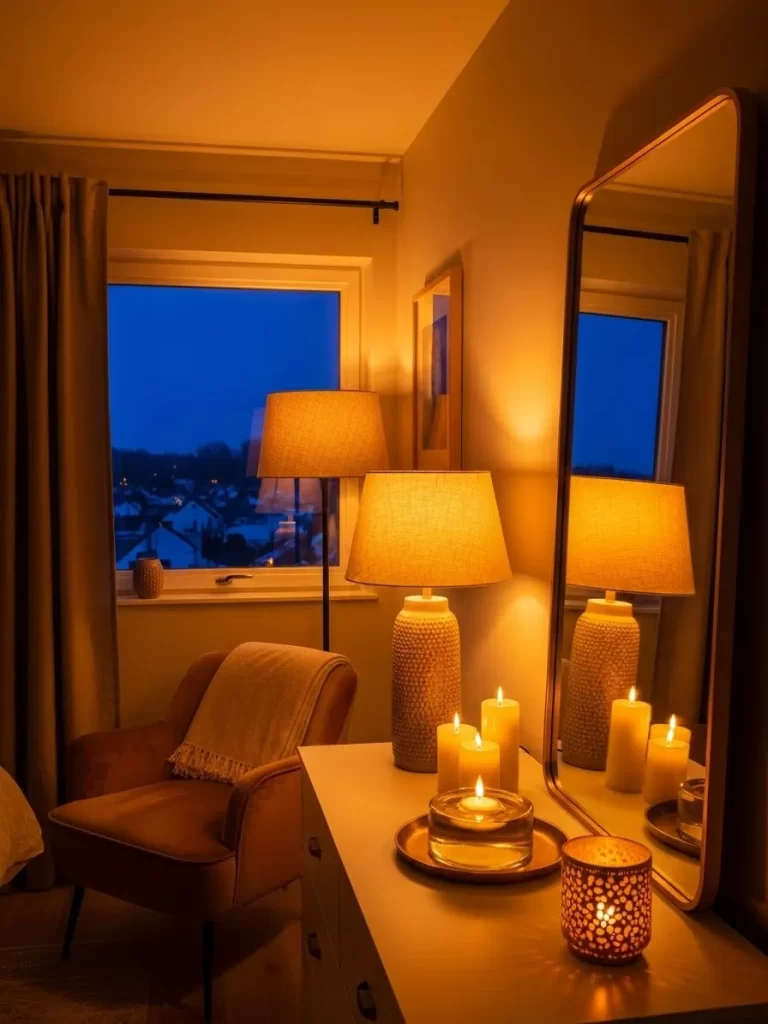
Creating a soft glow is essential for surviving long winter nights. This room uses a mix of floor lamps and table lamps with fabric shades to diffuse harsh light. The golden hue mimics a sunset, making the space feel safe and tucked away from the blue twilight visible through the window.
Candles add a flickering, living element to the furniture surfaces. Placing a large mirror behind these light sources doubles the warmth by reflecting the flames back into the room. This technique expands the visual space while intensifying the snug atmosphere.
Textured lamp bases and simple metal accents keep the look grounded and organic. Small tea lights in decorative holders provide tiny pockets of brilliance. These layers work together to eliminate dark corners, ensuring every inch of your bedroom feels welcoming.
Material Required List
- Selection of unscented pillar candles
- Glass or metal candle holders
- Warm-toned LED bulbs (2700K or lower)
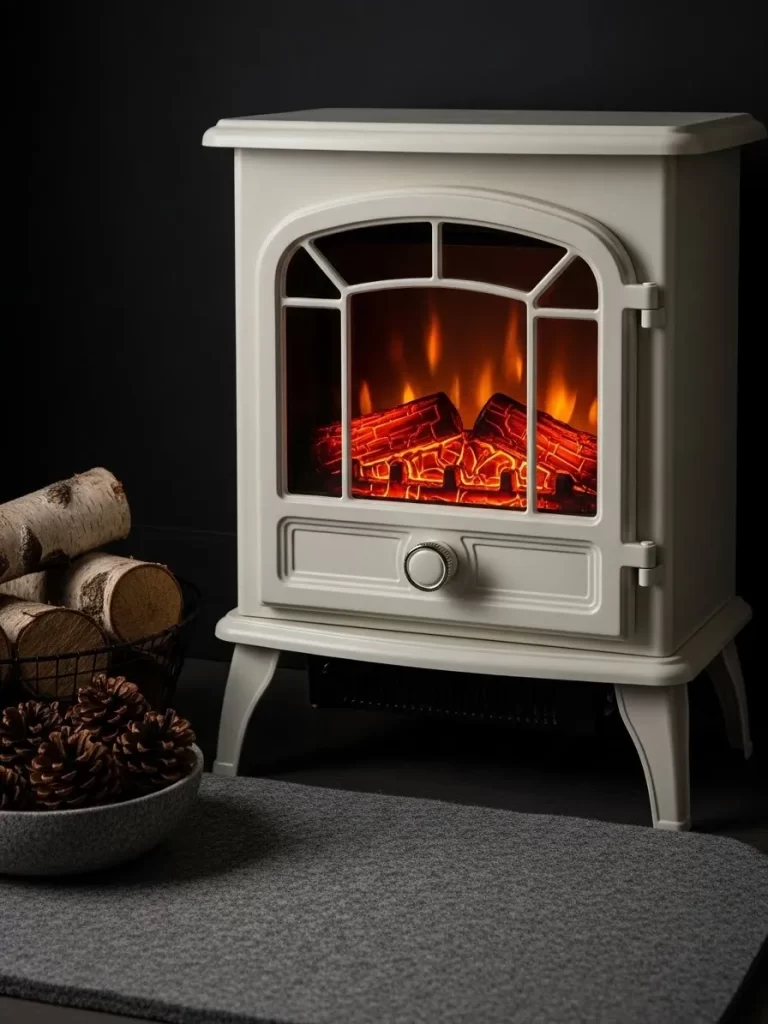
- Mirror with a thin frame
Equipment Required List
- Long-reach lighter or matches
- Soft microfiber cloth for cleaning glass
DIY Instruction Step by Step
Step 1: Swap Your Bulbs Remove any cool white or daylight bulbs from your existing bedside lamps. Replace them with warm-toned LED bulbs to create an instant amber glow that relaxes the eyes.
Step 2: Position the Mirror Leaning a tall mirror against the wall or mounting it on a dresser near your light sources. Ensure it catches the reflection of at least one lamp or candle set to maximize the light output.
Step 3: Cluster Your Candles Gather three pillar candles of varying heights on a heat-safe tray. Grouping them in odd numbers creates a more natural and visually pleasing arrangement than a single candle.
Step 4: Safe Lighting Placement Set your candle tray on a stable surface away from curtains or flowing fabrics. Always maintain a clear space around the flames to prevent any safety hazards during your relaxation time.
Step 5: Test the Atmosphere Turn off the main overhead light and switch on your lamps. Adjust the candle positions until the reflections in the mirror create a soft, even light across the entire seating area.
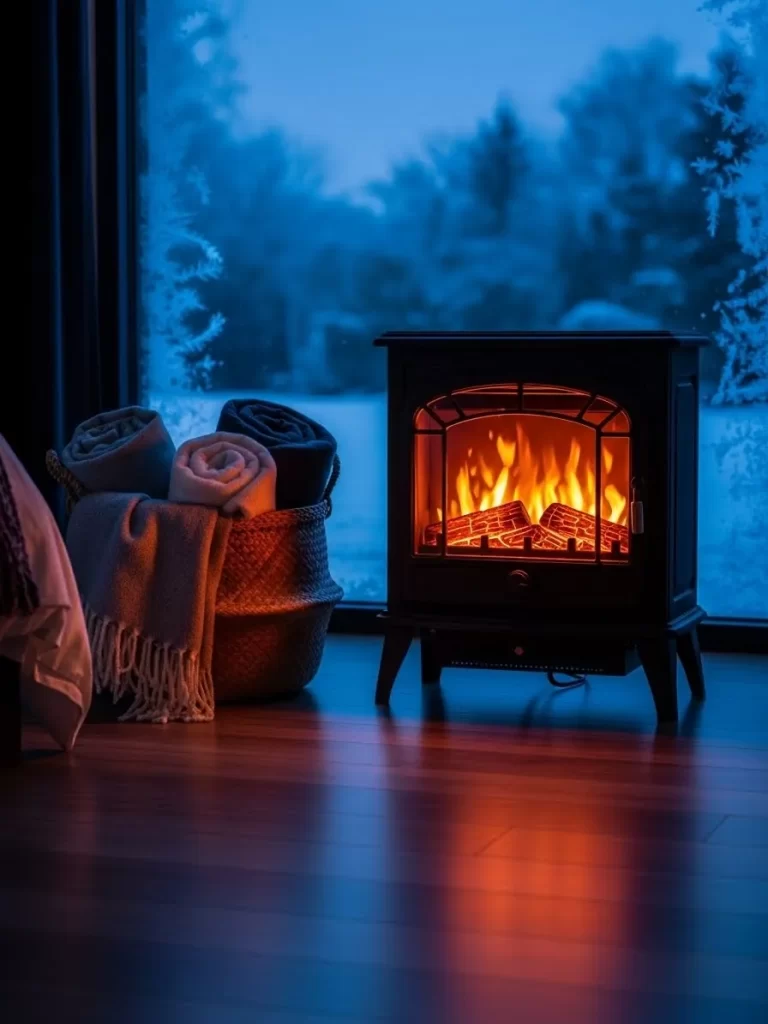
3 Electric Faux Fireplace Heater
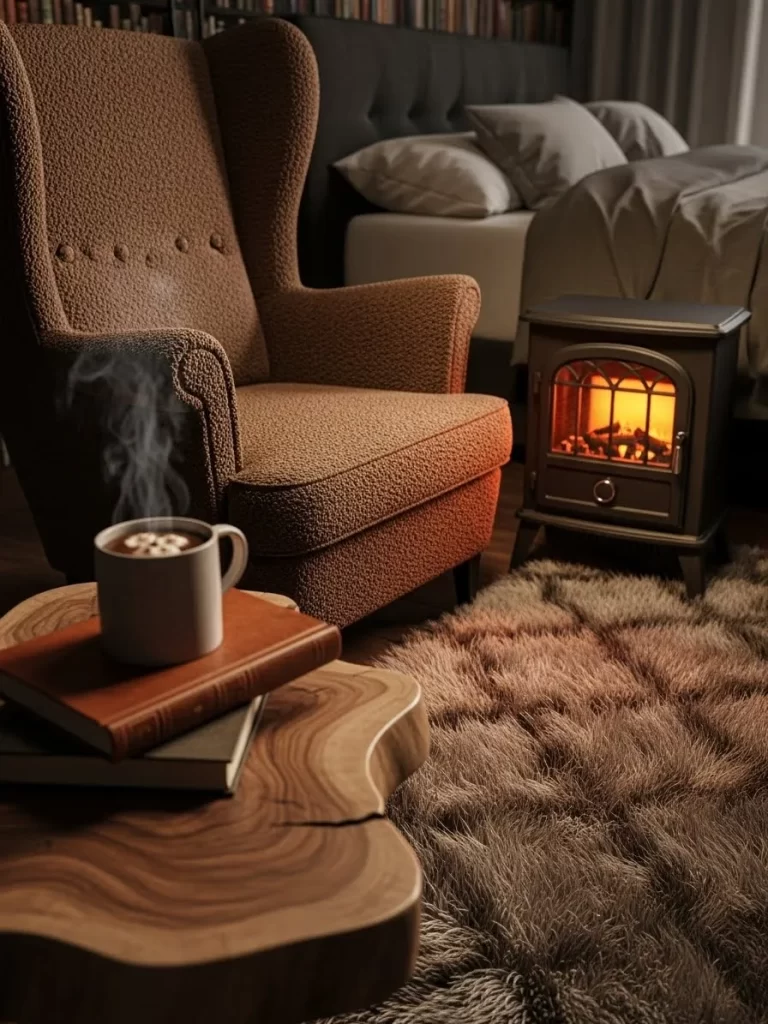
A portable electric stove brings the nostalgic charm of a wood-burning fire without the need for a chimney. The glowing embers and dancing flame effects provide a visual heat that psychologically warms the room. Its compact design allows it to fit neatly into a corner or next to a reading chair.
This unit acts as a secondary heat source, allowing you to lower the main thermostat while staying toasty in your immediate area. The matte black finish adds a classic touch to a modern bedroom layout. It serves as a beautiful focal point that draws the eye and anchors the room design.
Pairing the heater with a basket of rolled blankets ensures comfort is always within reach. The contrast between the orange internal glow and the cool winter shadows outside creates a stunning visual balance. It is a simple way to add luxury to a standard sleep space.
Material Required List
- Electric stove-style space heater
- Woven seagrass or wicker basket
- Spare cotton or wool blankets
- Nearby grounded electrical outlet
Equipment Required List
- Level (to ensure the heater sits flat)
- Damp cloth for dusting
DIY Instruction Step by Step
Step 1: Choose a Safe Spot Identify a flat, hard floor surface at least three feet away from your bed or curtains. Avoid placing the heater on thick carpets if the unit vents from the bottom.
Step 2: Set Up the Visual Anchor Place the heater at a slight angle toward your favorite sitting spot or the bed. This positioning ensures you can see the flames clearly, which enhances the cozy feeling of the room.
Step 3: Prepare the Blanket Basket Roll three or four blankets into tight cylinders rather than folding them. Stand them upright in a large woven basket and place it directly next to the heater for easy access.
Step 4: Power and Settings Plug the unit directly into a wall outlet rather than using an extension cord. Set the flame brightness to a medium level to mimic a real wood fire.
Step 5: Finishing Touches Wipe down the glass front of the heater to remove fingerprints or dust. This keeps the flame effect looking sharp and realistic as the light flickers through the room.
4 Air Purifying Greenery and Aromatherapy
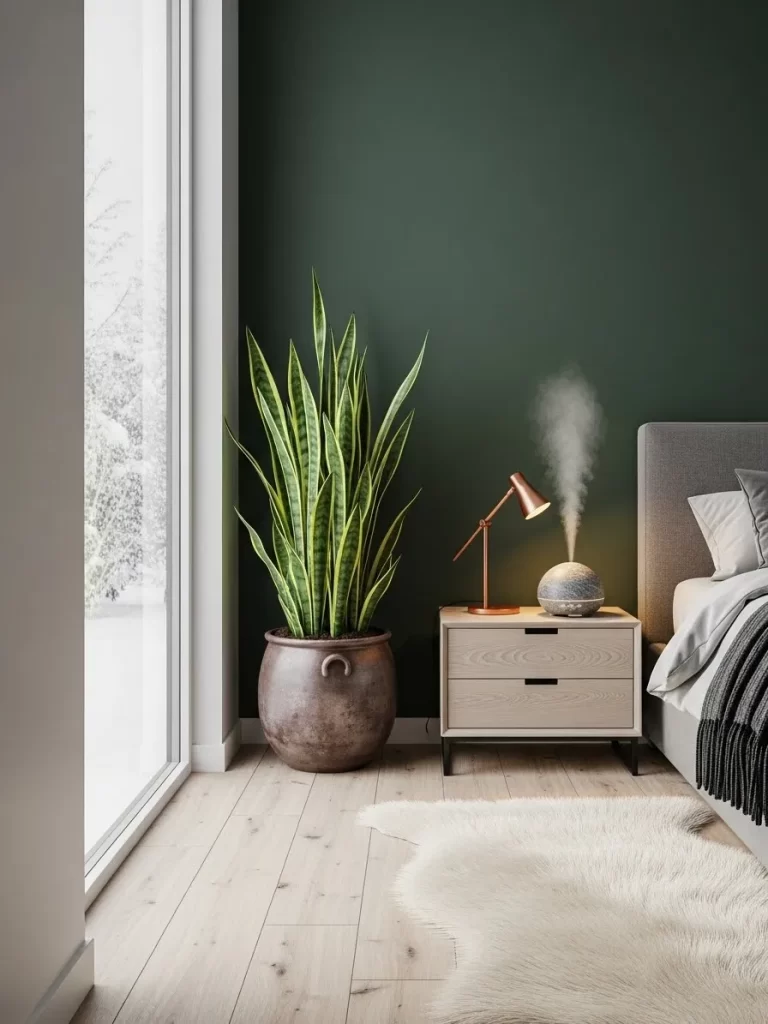
Bringing a tall Snake Plant into the bedroom adds life and oxygen to the indoor air during months when windows stay shut. The deep green leaves offer a refreshing contrast to the muted winter palette. Its upright growth habit makes it a great choice for narrow corners or bedside areas.
A stone-textured essential oil diffuser sits nearby, sending a gentle mist into the dry winter air. This helps maintain humidity levels, which is better for your skin and breathing. Using scents like cedarwood or lavender can help signal to your brain that it is time to rest.
The combination of organic life and soothing mist creates a spa-like environment. Small details, like the copper lamp, add a metallic warmth that catches the light beautifully. This setup focuses on wellness as much as it does on style.
Material Required List
- Large potted Snake Plant (Sansevieria)
- Ultrasonic cool mist diffuser
- Essential oils (Pine, Eucalyptus, or Lavender)
- Distilled water
Equipment Required List
- Watering can
- Small measuring cup for the diffuser
DIY Instruction Step by Step
Step 1: Pot the Plant Select a heavy ceramic or stone pot with drainage holes. Place your Snake Plant inside with fresh potting soil, ensuring the roots are well-covered but the leaves remain above the dirt line.
Step 2: Position for Growth Place the plant near a window where it can receive indirect sunlight. These plants are hardy and can survive lower light levels, which is helpful during the shorter days of winter.
Step 3: Fill the Diffuser Remove the outer stone cover of your diffuser. Fill the internal reservoir with water up to the marked fill line, taking care not to overfill it.
Step 4: Add Your Scent Drip 5 to 8 drops of your chosen essential oil into the water. For a winter forest feel, try mixing three drops of fir needle oil with two drops of orange oil.
Step 5: Activate the Mist Replace the cover and turn on the device. Choose a continuous mist setting for a quick scent boost, or an intermittent setting to keep the air fresh all night long.
5 Textured Bedside Essentials Tray
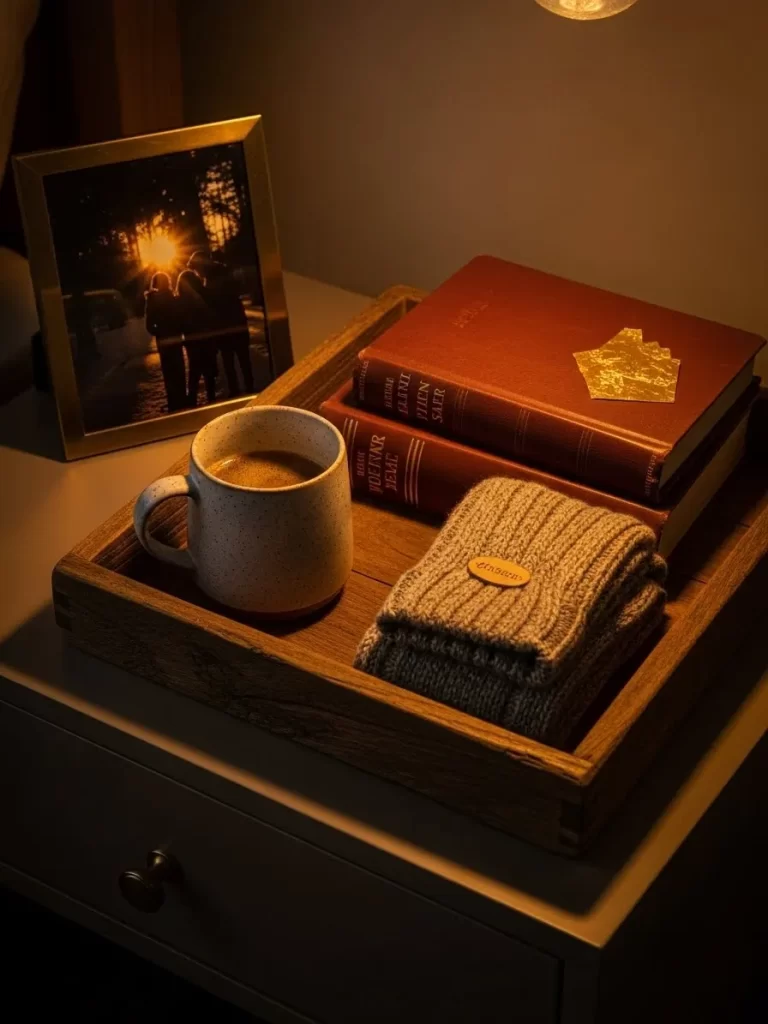
A wooden tray on the nightstand keeps your winter necessities organized and within arm’s reach. This simple addition prevents clutter from ruining the calm energy of your sleeping area. Natural wood grain adds a warm, organic texture that feels much cozier than plastic or glass surfaces.
Keeping a ceramic mug of warm coffee or tea here invites a slow start to your morning. Soft knit socks are ready to be pulled on before your feet even touch the cold floor. These small comforts make the transition from sleep to the day much more pleasant.
A framed photo of a favorite memory adds a personal touch that brings a smile to your face. Deep burgundy books provide both a pop of color and an easy way to unwind before bed. This corner is a tiny gallery of things that make you feel happy and relaxed.
Material Required List
- Low-profile wooden tray
- Ceramic speckled mug
- Pair of thick wool or cable-knit socks
- Hardcover books with colorful spines
- Small framed photograph
Equipment Required List
- Soft cloth for dusting
DIY Instruction Step by Step
Step 1: Select Your Tray Find a tray that takes up about half of your nightstand surface. A tray with raised edges is best because it defines the space and prevents items from sliding off.
Step 2: Layer the Tall Items Place your books at the back of the tray. Stacking them horizontally creates a stable platform for other small items or just keeps the heights varied and interesting.
Step 3: Add the Personal Element Position your framed photo next to the books. Tilt it slightly toward the bed so it is the first thing you see when you wake up.
Step 4: Prep the Comfort Items Fold your knit socks neatly and place them in the front corner of the tray. Set your favorite mug nearby, leaving enough space so it is easy to pick up without bumping other items.
Step 5: Arrange for Function Ensure there is still room for your phone or a pair of glasses. The goal is to make the tray look full and inviting without being crowded or messy.
6 Portable Flame Lantern and Soft Textiles
A small electric lantern provides a safe way to enjoy the look of a flame anywhere in the room. This piece mimics an old-fashioned oil lamp but uses modern technology for a flicker-free, worry-free glow. It sits perfectly on a nightstand to create a focal point of warm light.
Next to the light, a folded knit garment or blanket adds a layer of softness to the hard surface of the furniture. The ribbed texture of the fabric creates shadows that make the scene look more three-dimensional. It reminds you that warmth is always an arm’s length away.
Using a tray to group these items makes the decor look intentional rather than accidental. The dark wooden tones of the tray contrast beautifully with the lighter colors of the walls and bedding. This setup is a masterclass in using simple objects to build a hygge lifestyle.
Material Required List
- Battery-operated LED flame lantern
- Small wooden serving tray
- Thick ribbed knit sweater or scarf
- AA or AAA batteries (depending on the lamp)
Equipment Required List
- Screwdriver (if the battery compartment is secured)
DIY Instruction Step by Step
Step 1: Power the Lantern Open the bottom of your LED lantern and insert fresh batteries. Test the switch to ensure the flame has a warm, flickering glow rather than a steady, cold light.
Step 2: Base Placement Place your wooden tray on the center of the nightstand. If the tray has handles, align them parallel to the edge of the furniture for a clean, symmetrical look.
Step 3: Soften the Texture Take a thick knit item, like a sweater or a winter scarf, and fold it into a neat square. Place it on one side of the tray to act as a soft cushion for the visual weight of the lamp.
Step 4: Set the Light Place the lantern on the tray next to the folded knit. Ensure it is stable and not wobbly, as the light should be the main star of this small arrangement.
Step 5: Nightly Routine Turn the lantern on about thirty minutes before you plan to go to sleep. The soft light will help your brain produce melatonin, making it easier to drift off in a cozy environment.
7 Natural Textures and Dried Botanicals
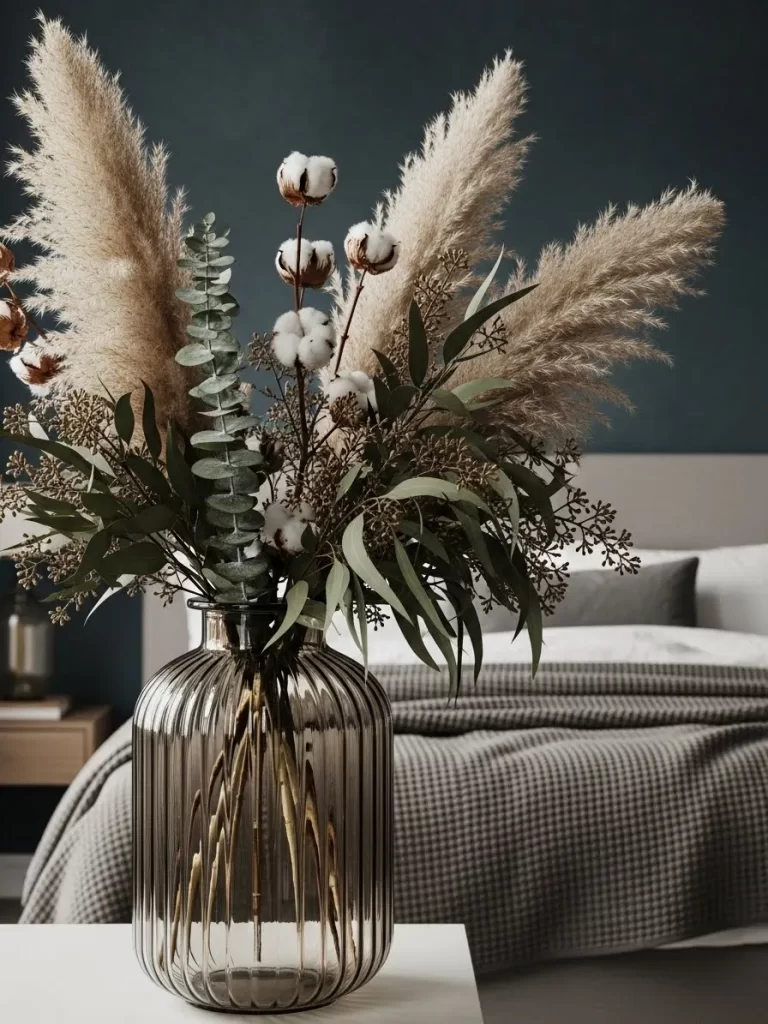
A large glass vase filled with dried pampas grass and cotton stems brings a piece of the outdoors inside. These neutral, earthy tones provide a soft visual break from the dark walls of the bedroom. The fluffy textures of the botanicals mimic the softness of your blankets and pillows.
Dried eucalyptus adds a subtle, refreshing scent that lingers in the air without being overpowering. Unlike fresh flowers, these arrangements require no water and will look great all winter long. The vertical lines of the stems draw the eye upward, making the ceilings feel higher.
The fluted glass of the vase catches the light and adds a touch of elegance to the room. This arrangement bridges the gap between a rustic cabin feel and a modern, polished bedroom. It is a simple way to add volume to your decor without adding clutter.
Material Required List
- Large fluted or ribbed glass vase
- 3-5 stems of dried pampas grass
- 2-3 cotton boll stems
- A few sprigs of dried eucalyptus
Equipment Required List
- Garden shears or heavy scissors
- Hairspray (optional, for the pampas)
DIY Instruction Step by Step
Step 1: Prepare the Pampas Take the pampas grass outside and give it a gentle shake to remove loose fluff. Lightly mist the plumes with hairspray to prevent them from shedding inside your house.
Step 2: Measure the Height Hold the stems against the side of the vase. You want the tallest stem to be about twice the height of the vase itself for a balanced, dramatic look.
Step 3: Trim the Stems Use your shears to cut the bottom of the stems at an angle. Start long, as you can always cut more off, but you cannot add length back once it is gone.
Step 4: Build the Base Place the heaviest or thickest stems in the vase first. These will act as the anchor for the smaller, more delicate cotton and eucalyptus sprigs.
Step 5: Arrange for Fullness Stagger the heights of the remaining stems. Criss-cross the bottoms inside the vase to make the top of the arrangement spread out wide and look lush and full.
8 Crystal Clear Hydration Station

Keeping a glass carafe and matching tumblers on your nightstand ensures you stay hydrated during dry winter nights. The ribbed glass texture adds a sophisticated sparkle that catches any ambient light in the room. This setup feels like a luxury hotel amenity right in your own home.
A small vase of dried lavender nearby releases a calming scent as you prepare for bed. The presence of water and flowers creates a peaceful well-being corner. It encourages a healthy routine of drinking water first thing in the morning.
Clean lines and transparent materials prevent the nightstand from feeling crowded. The reflections in the glass add a sense of movement and life to the room. It is a functional piece of decor that serves your health while looking beautiful.
Material Required List
- Ribbed glass water carafe
- Two matching ribbed glass tumblers
- Small ceramic bud vase
- Dried lavender sprigs
Equipment Required List
- Bottle brush for cleaning
- Fresh filtered water
DIY Instruction Step by Step
Step 1: Clean the Glass Wash your carafe and glasses thoroughly with warm soapy water. Use a bottle brush to reach the bottom of the carafe to ensure the glass stays crystal clear and free of spots.
Step 2: Fill the Carafe Pour fresh, filtered water into the carafe, leaving about an inch of space at the top. This prevents spills when you are reaching for it in the dark.
Step 3: Set the Tray If you have a marble or stone nightstand, place the glasses directly on the surface. If your table is wood, use a small coaster or tray to protect the finish from moisture.
Step 4: Arrange the Lavender Place three or four sprigs of dried lavender into your bud vase. Position this behind the water glasses so the purple color peeks through the clear glass.
Step 5: Position for Access Place the tumblers on either side of the carafe. Ensure the setup is close enough to the bed so you don’t have to sit up fully to reach your water during the night.
9 Tufted Bouclé End-of-Bed Bench

A long, tufted bench at the foot of the bed adds a layer of high-end comfort and utility. The bouclé fabric features a looped texture that feels incredibly soft and warm to the touch. It provides the perfect spot to sit while putting on socks or planning your outfit.
Dark blankets folded on top offer a sharp contrast to the creamy white fabric of the bench. This visual layering makes the bed area look complete and professionally styled. It also provides extra storage for pillows that you remove before sleeping.
The sturdy wooden legs keep the piece grounded and tie in with the flooring. This furniture item bridges the gap between the soft bed and the rest of the room. It creates a defined zone for relaxation that feels separate from the actual sleeping surface.
Material Required List
- Tufted bouclé bench or ottoman
- Dark grey or charcoal wool throw blanket
- Decorative wooden tray
- Small brass or gold accents
Equipment Required List
- Measuring tape (to match bed width)
- Vacuum with a brush attachment
DIY Instruction Step by Step
Step 1: Measure Your Bed Measure the width of your mattress. Your bench should be about 6 to 10 inches shorter than the width of the bed to ensure it doesn’t look overwhelming or block walking paths.
Step 2: Position the Bench Center the bench at the foot of the bed. Leave a small gap of about two inches between the bed frame and the bench so the blankets can hang naturally without getting bunched up.
Step 3: Layer the Textiles Fold a heavy dark blanket into a long, narrow rectangle. Drape it over one side of the bench, allowing a small portion of it to hang off the front edge for a casual look.
Step 4: Add Functional Decor Place a wooden tray on the opposite side of the blanket. This gives you a flat surface to set a book or a cup of tea without it tipping over on the soft tufted fabric.
Step 5: Maintain the Texture Use a vacuum brush once a week to gently lift the loops of the bouclé fabric. This prevents it from looking matted and keeps the cloud-like texture looking fresh all winter.
10 Earthy Tones and Plaster Wall Finishes
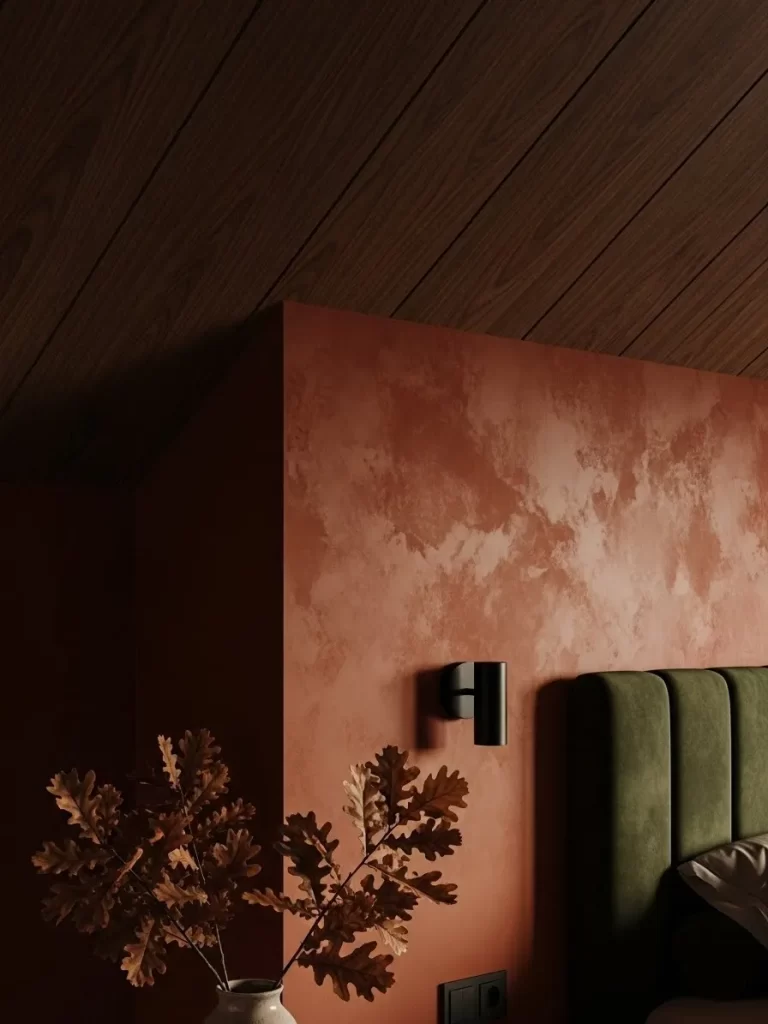
A textured plaster wall in a warm terracotta or clay hue adds depth and visual heat to the bedroom. This finish reflects light in a soft, irregular way that flat paint cannot achieve. It creates a cozy, cave-like feel that is incredibly comforting during the winter.
Deep green velvet headboards provide a rich, jewel-tone contrast against the warm walls. This color combination feels organic and grounded, like a forest in late autumn. Small black accents, like a modern reading lamp, add a touch of contemporary sharpness to the soft textures.
Dried oak leaves in a simple vase bring a bit of nature architecture into the space. Their golden-brown color ties the whole palette together. This room focuses on the beauty of imperfection and the warmth of natural materials.
Material Required List
- Venetian plaster or textured wall paint
- Wide putty knife or trowel
- Painter’s tape
- Drop cloths
Equipment Required List
- Paint roller (for base coat)
- Sandpaper (fine grit)
- Sturdy ladder
DIY Instruction Step by Step
Step 1: Protect the Space Remove all furniture from the wall area. Use painter’s tape to mask off the ceiling, baseboards, and any outlets. Lay down drop cloths to catch any falling plaster or paint.
Step 2: Apply the Base Color Roll on a standard flat paint in a color similar to your final plaster. This ensures no white wall peeks through the texture and gives the plaster a better surface to grip.
Step 3: Trowel the Plaster Scoop a small amount of plaster onto your trowel. Apply it to the wall using X motions, keeping the layer thin. Leave some areas slightly thicker than others to create natural-looking shadows.
Step 4: Layer for Depth Once the first layer is dry, apply a second thin coat. This fills in any large gaps and allows you to build up the mottled look that gives the wall its character.
Step 5: Smooth the Surface After the wall is completely dry, use fine-grit sandpaper to lightly buff away any sharp or jagged peaks. Wipe the wall down with a damp cloth to reveal a soft, sueded texture.
11 Under-Shelf Ambient LED Glow

Illuminating your storage spaces creates a sophisticated look that standard overhead bulbs cannot achieve. These floating shelves feature hidden LED strips that cast a soft downward radiance. This lighting style eliminates harsh shadows and highlights your books and ceramic vases with a museum-like quality.
The cool white light from the window balances with the warm amber radiance of the shelves. This mix of temperatures makes the bedroom feel modern yet deeply peaceful during the winter months. It is an excellent way to add visual depth to a flat wall without using bulky furniture.
Minimalist decor shines when highlighted by such precise light. Each shelf becomes a small stage for your morning clock or a simple white pitcher. This setup encourages a clutter-free environment which is essential for a restful night of sleep.
Material Required List
- Battery-operated or plug-in LED light strips
- Floating wooden shelves
- Double-sided mounting adhesive
- Cable clips for wire management
Equipment Required List
- Level to ensure shelves are straight
- Measuring tape
- Scissors to trim LED strips
DIY Instruction Step by Step
Step 1: Clean Your Surfaces Wipe the underside of each shelf with a dry cloth to remove any dust. This ensures the adhesive on the light strips will stick firmly and stay in place for a long time.
Step 2: Measure and Cut Measure the length of your shelf and cut the LED strip to match. Most strips have small markings where it is safe to snip them with regular scissors.
Step 3: Apply the Strips Peel the backing off the adhesive on the back of the LED strip. Press it firmly along the center of the underside of the shelf, working from one end to the other.
Step 4: Hide the Wires Run the power cord down the side of the shelf or along the corner of the wall. Use small cable clips to keep the wire tight and hidden from view.
Step 5: Test the Glow Turn on the lights in the evening to check for any uneven spots. Adjust the position slightly if the light is hitting the wall too harshly or casting unwanted shadows.
12 Floor-to-Ceiling Thermal Drapes
Heavy curtains are a must for blocking out the biting winter chill that leaks through glass panes. These taupe drapes feature deep folds that trap air, acting as a natural insulator for your sleep space. The rich fabric puddles slightly on the floor to create a tailored look.
The neutral tone matches with the rumpled linen bedding, creating a monochromatic sanctuary. This color palette is very soothing for the eyes and helps the brain prepare for rest. Watching the snow fall through a small gap in the fabric makes the warmth inside feel even more precious.
Using a sheer inner layer allows natural light to filter in during the day while maintaining your privacy. This layered window treatment gives you total control over the atmosphere of the room. It turns a simple window into a soft, textured feature wall.
Material Required List
- Pair of blackout or thermal-lined curtain panels
- Sturdy curtain rod with wall anchors
- Decorative curtain rings or clips
- Sheer inner curtain panels
Equipment Required List
- Power drill for mounting hardware
- Stepladder
- Handheld steamer for removing wrinkles
DIY Instruction Step by Step
Step 1: Mount the Rod High Install your curtain rod about 4 to 6 inches above the window frame. Hanging them high makes your ceiling look taller and prevents heat from escaping through the top of the window.
Step 2: Layer Your Fabrics Slide the sheer panels onto the inner rod and the heavy thermal panels onto the outer rod. This dual-layer system is the secret to a professional and functional window setup.
Step 3: Create Even Folds Adjust the fabric so the folds are evenly spaced across the rod. If you use rings, space them every 4 inches to ensure the curtain hangs with a natural, heavy wave.
Step 4: Steam the Fabric Use a handheld steamer to smooth out any creases from the packaging. Starting at the top and moving down allows the weight of the fabric to help pull the wrinkles out.
Step 5: Style the Puddle Arrange the bottom of the curtains so they touch the floor or fold slightly over it. This puddle effect blocks drafts from coming in under the window and looks very luxurious.
13 Cloud-Like Quilted Duvet

A high-loft duvet is the centerpiece of winter comfort. The square quilting keeps the filling evenly distributed, preventing cold spots while you sleep. This thick layer mimics the feel of a heavy cloud and provides the right amount of pressure for deep relaxation.
Crisp white bedding creates a clean aesthetic that brightens up dark winter mornings. The volume of the duvet adds a sense of luxury that makes the bed the most inviting place in the house. It is a foundation for layering smaller knit blankets and textured pillows.
Selecting a breathable cotton cover ensures that you stay warm without overheating. The soft texture is gentle on the skin and stays cool to the touch at first. Tucking yourself under this substantial weight is a great way to end a long, cold day.
Material Required List
- High-fill power down or microfiber duvet insert
- 100% cotton duvet cover
- Four matching pillowcases
- Bed sheet set
Equipment Required List
- Large capacity dryer
- Wool dryer balls
DIY Instruction Step by Step
Step 1: Fluff the Insert Place your duvet insert in a dryer on a low heat setting with a couple of wool dryer balls. This breaks up any clumps in the filling and maximizes the loft.
Step 2: Use the Burrito Method Turn your duvet cover inside out and lay it flat on the bed. Place the insert on top. Roll both together like a burrito, then pull the cover over the ends and unroll it.
Step 3: Secure the Corners Reach inside the cover and tie the internal strings to the loops on the corners of the duvet. This prevents the insert from sliding around or bunching up.
Step 4: Shake it Out Hold the duvet by the top corners and give it a vigorous shake. This helps the filling settle into place and gives the bed that signature puffy look.
Step 5: Fold the Top Fold the top 12 inches of the duvet back toward the foot of the bed. This shows off the pillows and makes the bed look professionally styled and ready for sleep.
14 Smart Speaker and Salt Lamp Duo

Combining technology with natural elements creates a balanced bedside environment. A sleek, grey fabric-covered smart speaker sits next to a glowing Himalayan salt lamp. This duo provides both a soothing auditory experience and a warm visual glow.
The salt lamp emits a soft light that is much better for your sleep cycle than blue light from a phone. It creates a pocket of warmth on your nightstand that feels organic and calming. The fabric texture of the speaker adds a touch of modern softness to the furniture surface.
This setup is great for playing white noise to drown out winter storms. The tiny orange light on the device acts as a subtle nightlight without being distracting. It is a functional way to upgrade your nightly routine.
Material Required List
- Himalayan salt lamp with a dimmer switch
- Fabric-covered smart speaker
- Small felt or cork coaster
- Low-wattage amber bulb
Equipment Required List
- Soft brush for cleaning salt crystals
DIY Instruction Step by Step
Step 1: Prepare the Salt Lamp Screw an amber bulb into the base of the salt lamp. Use a low-wattage bulb to ensure the light is soft enough for a bedroom setting.
Step 2: Protect Your Furniture Place a small felt or cork coaster under the salt lamp. Natural salt can sometimes sweat in humid air, and the coaster protects your wood surfaces from moisture.
Step 3: Position the Devices Set the speaker and the lamp side by side on your nightstand. Keep the lamp toward the back to act as a light source and the speaker toward the front for clear sound.
Step 4: Manage the Power Tuck the electrical cords behind the nightstand. Use a small piece of tape or a cord organizer to keep them from tangling or falling onto the floor.
Step 5: Set the Mood Dim the salt lamp to its lowest setting and ask your speaker to play rain sounds. This creates a sensory bubble that is for reading before bed.
15 Three-Layer Texture Palette

Mastering winter decor requires mixing different fabric weaves to create a rich environment. This palette features a smooth charcoal linen, a deep mustard waffle-knit, and a creamy white faux shearling. Each layer offers a different level of warmth and a unique feeling.
The waffle-knit fabric is excellent for trapping body heat while remaining lightweight. Pairing it with the heavy shearling creates a visual contrast that makes the bed look professionally designed. These colors bring a sophisticated earthiness to the room.
Touching these different textures throughout the day provides a grounding sensory experience. This variety prevents the room from feeling flat during the long months indoors. It is a simple way to add interest to your bedroom without using busy patterns.
Material Required List
- Charcoal grey linen flat sheet
- Mustard yellow waffle-knit throw blanket
- Cream-colored faux shearling pillow
- Fabric storage basket
Equipment Required List
- Lint roller for the dark fabrics
DIY Instruction Step by Step
Step 1: Start with the Base Lay your smooth charcoal linen sheet over the bed as the first layer. This provides a clean, dark backdrop that makes the other colors and textures pop.
Step 2: Add the Middle Layer Fold the mustard waffle-knit blanket into a long rectangle and drape it across the middle of the bed. The honeycomb texture adds visual interest.
Step 3: Top with Softness Place your creamy shearling pillows at the head of the bed or in a nearby chair. The high-pile texture provides the ultimate snuggle factor for the room.
Step 4: Coordinate the Colors Ensure the gold tones of the blanket are visible against the dark grey sheet. This high-contrast look is very modern and feels intentional.
Step 5: Store Extra Layers Keep a fabric basket at the foot of the bed to hold any layers you do not need every night. This keeps the room tidy while keeping the comfort close.
16 Midnight Blue and Steam Mist

Deep, dark wall colors like midnight blue create a sense of infinite space and mystery in a bedroom. This moody backdrop makes the white mist from a black teardrop diffuser look like a magical element. The contrast between the dark paint and the glowing lamp creates a cozy, nocturnal vibe.
The diffuser adds much-needed humidity to the room, preventing dry skin and scratchy throats. Its sleek matte finish disappears into the shadows, letting the moving steam be the star of the show. This setup turns your dresser into a quiet, meditative corner.
The warm glow from a nearby Edison bulb lamp adds a vintage touch to the modern scene. This amber light cuts through the cool blue of the walls, providing a balanced and comfortable glow. It is a masterclass in using light and shadow to build an atmosphere.
Material Required List
- Matte black ultrasonic water diffuser
- Warm white or amber Edison bulb lamp
- Distilled water
- Forest-scented essential oils (Cedar or Pine)
Equipment Required List
- Measuring cup for the diffuser
- Cleaning cloth for the lamp base
DIY Instruction Step by Step
Step 1: Setup the Diffuser Place your black diffuser on a level wooden surface. Ensure it is at least six inches away from the wall to allow the mist to circulate freely.
Step 2: Add the Essential Oils Fill the tank with water and add 6 drops of a woody essential oil. Cedarwood or sandalwood scents work with the deep blue color of the room.
Step 3: Position the Light Source Set your Edison bulb lamp next to the diffuser. The warm filament of the bulb will illuminate the rising mist, making it look like glowing smoke.
Step 4: Adjust the Output Set the diffuser to a pulsing or intermittent mode. This saves water and provides a gentle, ongoing scent that doesn’t become too strong in a small room.
Step 5: Enjoy the Contrast Turn off all other lights to see how the amber lamp interacts with the dark blue walls. The combination of moving mist and soft light is incredibly hypnotic.
17 Enchanted Fairy Light Canopy
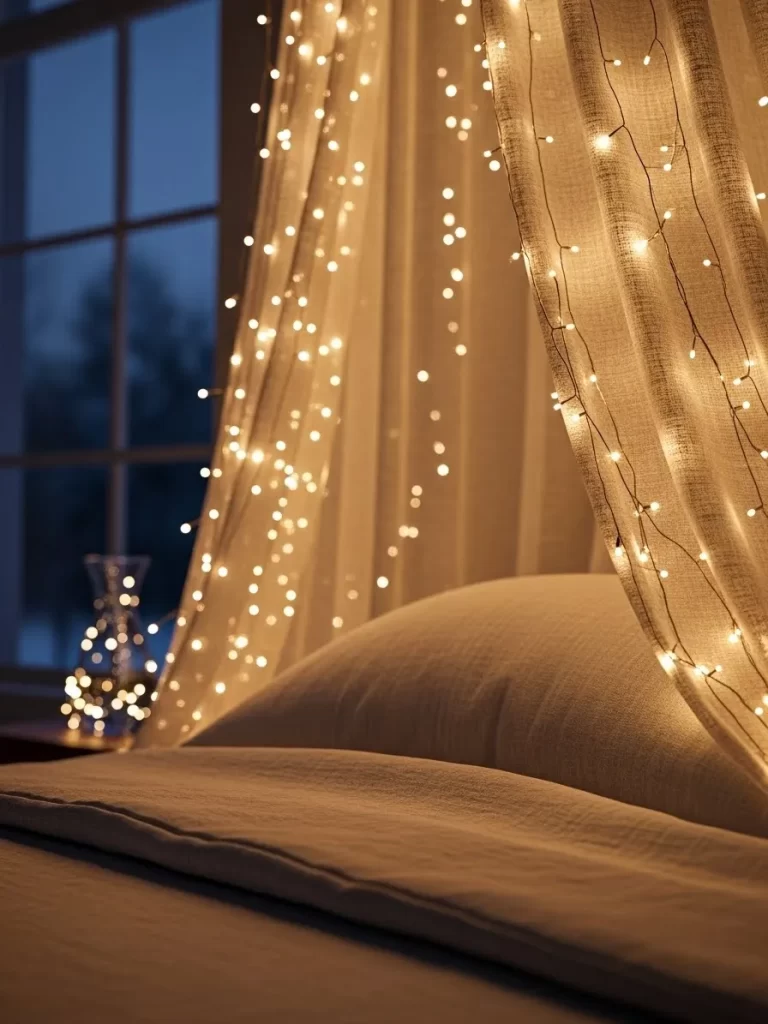
Draping delicate strings of warm white lights behind a sheer bed canopy creates a magical, starlit effect. These tiny fairy lights provide a soft glow that feels like a warm hug. The way the light filters through the thin fabric softens the entire room and hides any harsh edges.
This setup is a fantastic alternative to traditional lamps, as it fills the space with hundreds of tiny points of brilliance. It makes the bed feel like a separate, protected world away from the rest of the house. The blue twilight outside the window provides a beautiful contrast to the golden interior.
The lights remain cool to the touch, making them safe to use near lightweight fabrics. They use very little power and can be left on for hours to create a consistent, welcoming atmosphere. It is an affordable way to add a lot of personality to a plain bedroom.
Material Required List
- 2-3 strands of warm white LED fairy lights
- Sheer white fabric or pre-made bed canopy
- Small clear adhesive hooks
- Remote-controlled plug
Equipment Required List
- Stepladder
- Measuring tape
DIY Instruction Step by Step
Step 1: Plan the Layout Decide where you want the lights to hang. Behind the headboard or draped over the top of the bed frame are the most popular choices.
Step 2: Install the Hooks Place small clear adhesive hooks on the wall or ceiling in a zigzag pattern. Let the adhesive cure for an hour before hanging any weight on them.
Step 3: String the Lights Lace the fairy lights back and forth between the hooks. Let the wire hang slightly loose to create a more natural, draped appearance.
Step 4: Layer the Fabric Hang your sheer canopy fabric over the lights. The fabric should be thin enough for the light to shine through but thick enough to hide the actual wires.
Step 5: Conceal the Battery Pack Tuck the battery pack or power cord behind the pillow or under the bed frame. Use a remote-controlled plug so you can turn the stars on without getting out of bed.
18 Woven Slipper Storage Basket
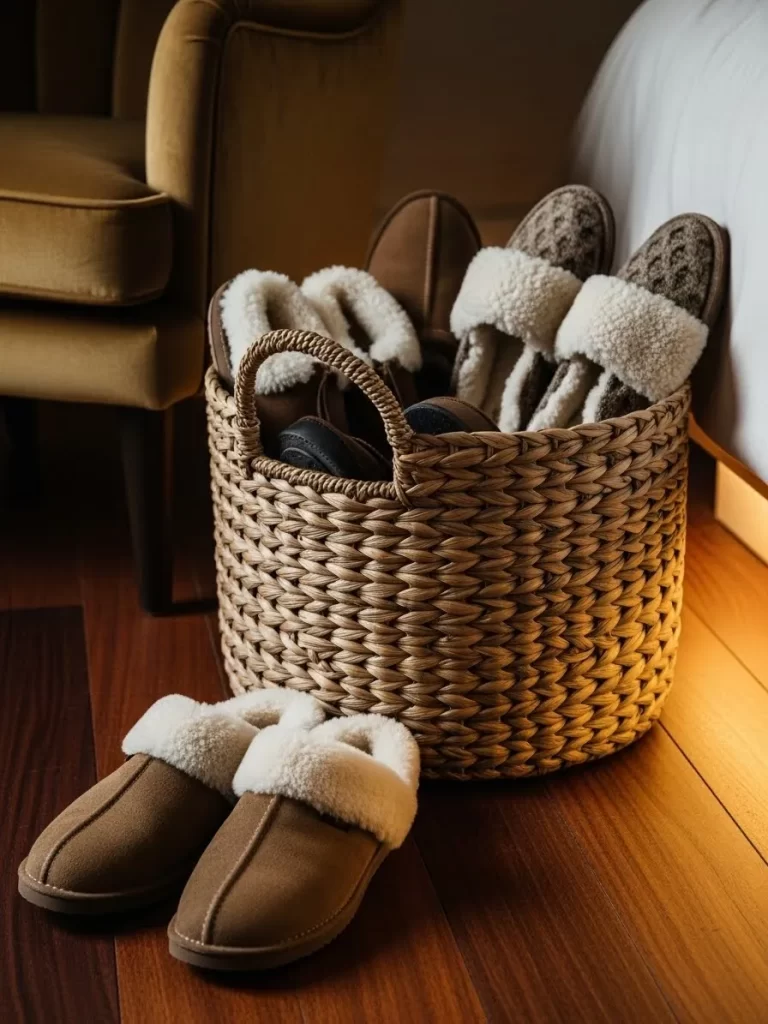
Keeping your feet warm is a priority during the cold season, and a dedicated slipper basket makes it easy. This woven seagrass container sits at the foot of the bed, filled with various plush, shearling-lined slippers. It keeps the floor clear of clutter while ensuring a cozy pair is always ready.
The natural texture of the basket adds a rustic, earthy feel to the room. The soft brown tones of the slippers match the warm wood flooring, creating a cohesive and grounded look. It is a small detail that makes everyone feel instantly cared for.
Having a slipper station encourages a no-shoes policy in the bedroom, which keeps your carpets clean and hygienic. The warm glow from the under-bed lighting makes the basket look like a treasure chest of comfort. It is a simple, functional addition to any winter bedroom layout.
Material Required List
- Large woven seagrass or wicker basket
- 3-4 pairs of shearling or faux-fur lined slippers
- Cedar balls or scented sachets
Equipment Required List
- No special equipment needed
DIY Instruction Step by Step
Step 1: Choose Your Basket Select a basket that is wide enough to hold several pairs of slippers. Handles make it easy to move during cleaning.
Step 2: Organize the Contents Stand the slippers upright in the basket with the toes pointing down. This allows you to see all the pairs at once and makes them easy to grab.
Step 3: Add a Fresh Scent Toss a couple of cedar balls or a lavender sachet at the bottom of the basket. This keeps the slippers smelling fresh and clean all season long.
Step 4: Position the Station Place the basket on the floor right where your feet hit the ground when you get out of bed. This ensures you never have to step onto a cold floor.
Step 5: Maintain the Collection Check the slippers once a week for any dirt or lint. A quick shake of the basket outside will keep it looking neat and inviting.
19 Targeted Bedside Reading Glow
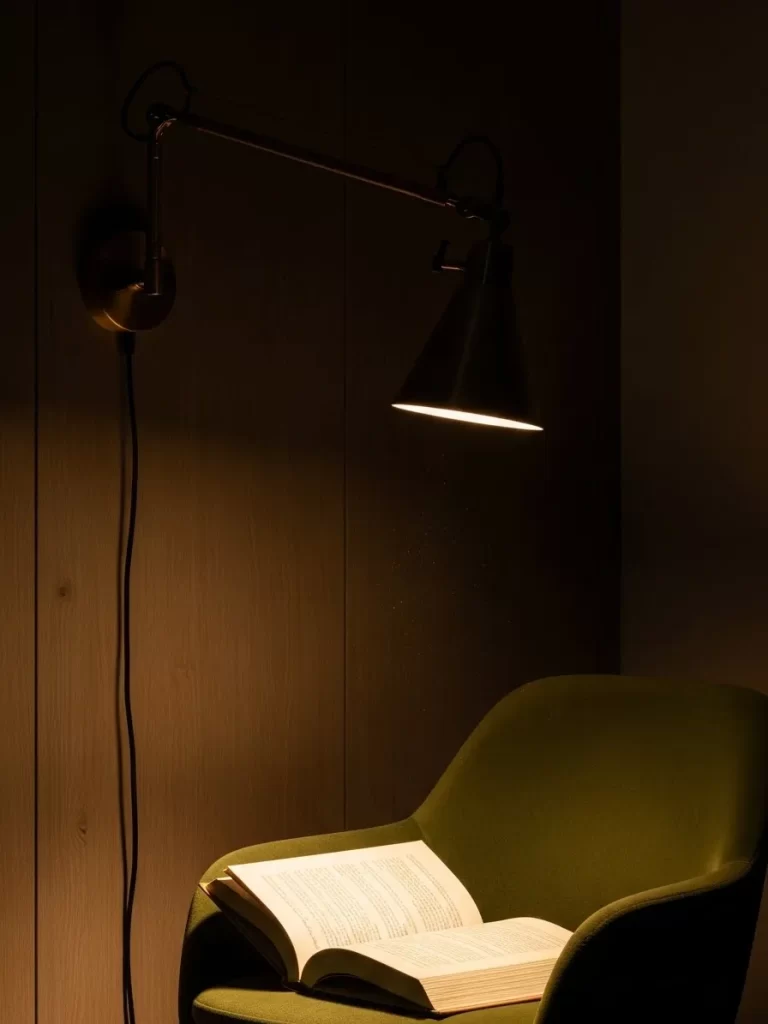
A dedicated reading light is essential for those who love to get lost in a book on a winter night. This matte black arm lamp is mounted to the wall, allowing you to position the light exactly over your page. It keeps the nightstand clear for other items like water or a clock.
The targeted beam of light creates a cozy spotlight effect, leaving the rest of the room in a restful darkness. The warm green fabric of the armchair provides a rich contrast to the black metal. This setup encourages a healthy screen-free hour before you go to sleep.
The adjustable arm means you can push the light away when it is not in use, maintaining a clean and minimalist look. It is a professional-grade lighting solution that adds a touch of industrial style to a soft bedroom. It is both a functional tool and a piece of modern art.
Material Required List
- Wall-mounted swing arm lamp
- Warm-toned LED bulb
- Wall anchors and screws
- Cord cover
Equipment Required List
- Power drill and bits
- Screwdriver
- Level
DIY Instruction Step by Step
Step 1: Find the Best Height Sit in your reading chair and mark the spot on the wall where the lamp base should go. It should be about 10 inches above your shoulder.
Step 2: Check for Studs Use a stud finder to see if you are mounting into a solid wood beam. If not, you must use heavy-duty wall anchors to keep the lamp secure.
Step 3: Mount the Base Drill your pilot holes and screw the mounting plate into the wall. Ensure it is perfectly level so the arm doesn’t swing open on its own.
Step 4: Attach the Lamp Secure the lamp body to the mounting plate. Tighten the screws until there is no wobble when you move the adjustable arm.
Step 5: Manage the Cord If your lamp has a cord, use a matching metal cord cover to hide it. This gives the lamp a built-in, hardwired look that is much cleaner.
20 Frosted Window Candle Array
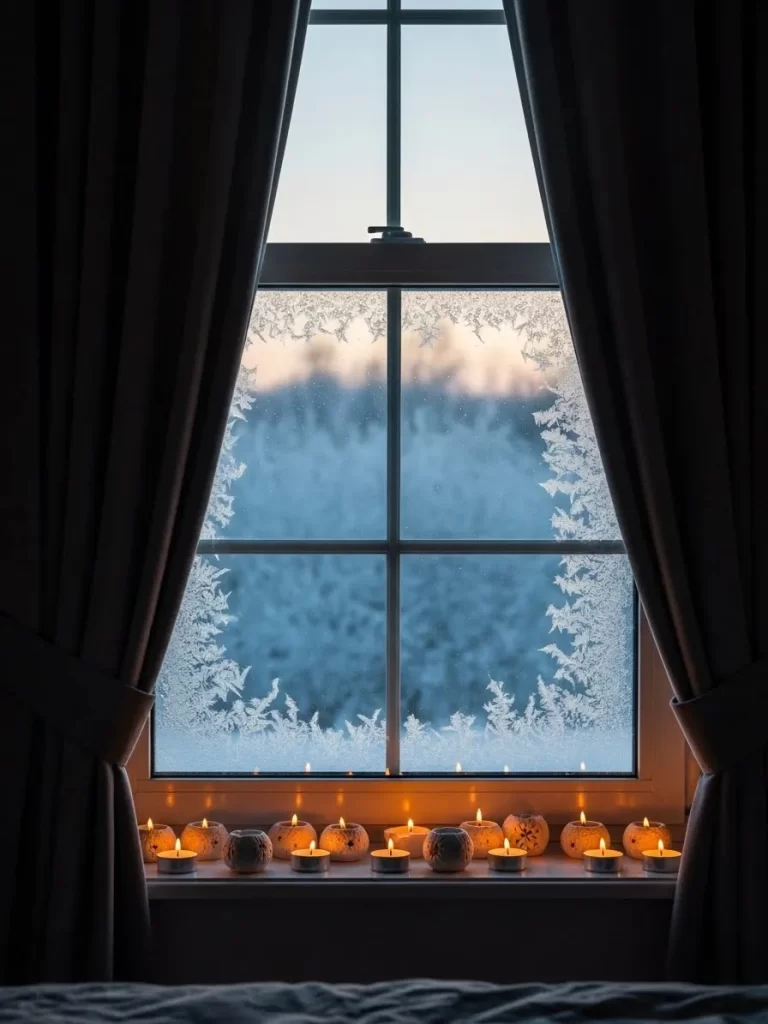
Placing a long row of tea light candles on the windowsill creates a stunning barrier against the cold outside world. The flickering flames reflect off the frost-covered glass, making the ice look like sparkling diamonds. This arrangement provides a natural warmth visible both inside and out.
The dark, heavy curtains frame the scene and help hold the heat from the candles near the glass. This simple act of lighting candles every evening becomes a beautiful winter ritual that signals the end of the day. The variety of ceramic holders adds a handmade, artisanal touch.
This setup is particularly effective during the blue hour when the sky turns a deep indigo. The orange glow of the candles provides the perfect color complement to the cold winter light. It turns a plain window into a dynamic and living piece of decor.
Material Required List
- 10-15 tea light candles or LED flameless tea lights
- Assorted small ceramic and glass candle holders
- Long-reach lighter
Equipment Required List
- Microfiber cloth
- Level
DIY Instruction Step by Step
Step 1: Clean the Glass Wipe down your window and the sill with a cleaning spray. Removing dust ensures the candle light will reflect perfectly and look its best.
Step 2: Mix Your Holders Gather a variety of small holders in different materials. Mixing white ceramic with clear glass adds visual layers and makes the arrangement look interesting.
Step 3: Space Them Out Place the candles in a straight line along the windowsill, spacing them about 3 inches apart. This creates a consistent curtain of light.
Step 4: Safety First Ensure no curtains or fabrics are hanging within 12 inches of the open flames. If you have pets, use high-quality LED tea lights instead.
Step 5: Light the Row Start at one end and light each candle quickly using a long-reach lighter. Watch as the frost on the glass begins to glow with a warm radiance.
21 Grand Tufted Comfort Base

A grand, tufted headboard in a neutral taupe or mushroom tone anchors the bedroom with a sense of stability. The deep buttoning creates shadows that add a rich texture to the wall behind the pillows. This substantial piece of furniture provides a soft surface for propping yourself up while reading in bed.
The tall wingback sides of the headboard wrap around the bed, making you feel tucked away and secure. This design acts as an extra layer of insulation against cold walls during freezing winter nights. It serves as the primary focal point that defines the entire room’s luxurious aesthetic.
Pairing this classic style with modern hanging pendant lights creates a balanced and timeless look. The soft glow from the bulbs highlights the velvet sheen of the fabric, making the bed look even more inviting. It is a piece that combines old-world charm with contemporary comfort.
Material Required List
- Large tufted wingback headboard
- Heavy-duty wall mounting brackets
- Pair of glass orb pendant lights
- Warm-toned dimmable bulbs
Equipment Required List
- Power drill
- Measuring tape
- Stud finder
DIY Instruction Step by Step
Step 1: Measure Your Space Measure the width of your mattress and ensure the headboard is slightly wider to create that grand, oversized look. Mark the center point of the wall.
Step 2: Locate Wall Studs Use a stud finder to locate the solid wood beams behind your drywall. Mounting a heavy headboard into studs is crucial for safety and stability.
Step 3: Install Mounting Brackets Screw the heavy-duty brackets into the wall studs at the correct height. Ensure they are perfectly level so the headboard doesn’t sit at an awkward angle.
Step 4: Hang the Headboard Lift the headboard and slide it onto the brackets. Check that it is firmly locked into place and doesn’t wobble when you lean back against it.
Step 5: Position the Pendants Hang your pendant lights on either side of the headboard, about 20 inches above the nightstand. This provides symmetric light that perfectly frames the tufted fabric.
22 Golden Arc Reading Zone
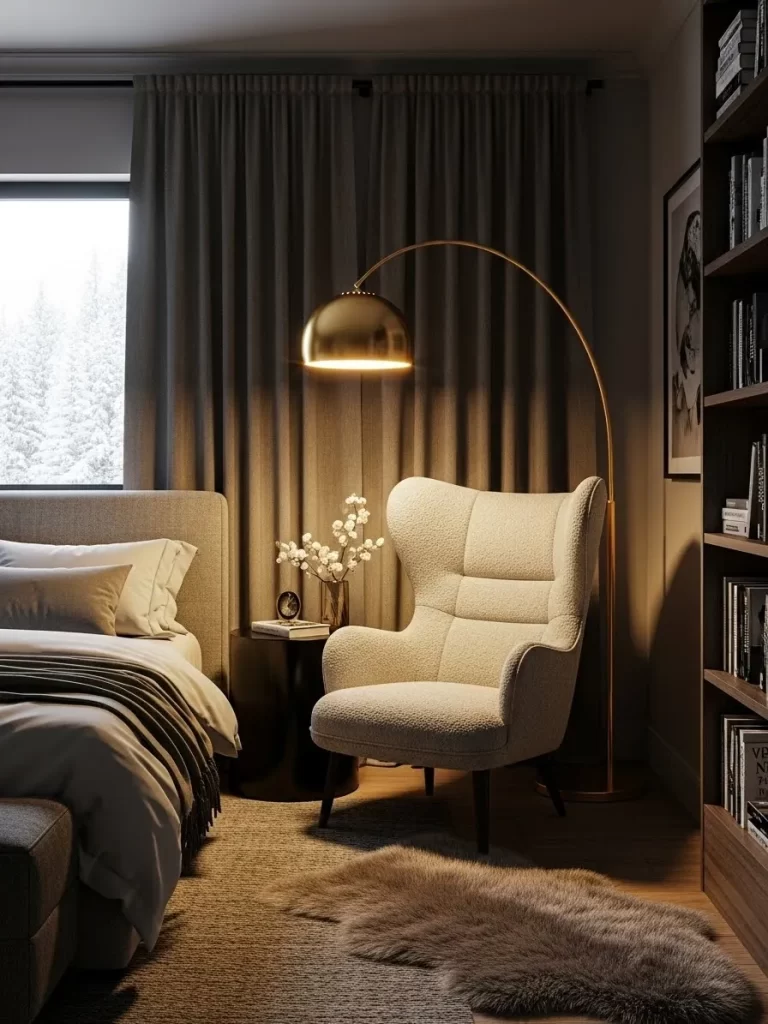
An oversized golden arc floor lamp transforms a simple corner into a high-end reading nook. The sweeping curve of the lamp brings light directly over your chair without the need for an end table. Its brass finish adds a metallic warmth that catches the glow from the lightbulb beautifully.
The plush bouclé armchair provides a nubby, tactile surface that is incredibly soft to the touch. Pairing this with a thick sheepskin rug ensures that your feet stay warm while you relax with a book. This corner becomes a private island of comfort within the larger bedroom space.
The combination of the tall lamp and the high-back chair creates a cozy vertical element in the room. This setup is great for making large bedrooms feel more intimate and filled with purpose. It is a stylish way to add functional lighting while maintaining a minimalist floor plan.
Material Required List
- Brass arc floor lamp
- Bouclé wingback armchair
- Large faux sheepskin rug
- Small black ceramic side table
Equipment Required List
- Philips head screwdriver (for lamp assembly)
- Scissors for trimming the rug pad
DIY Instruction Step by Step
Step 1: Assemble the Base The base of an arc lamp is very heavy for stability. Assemble the bottom sections first and ensure the main vertical pole is tightened securely into the base plate.
Step 2: Connect the Arc Slide the curved sections together and tighten the locking screws. Run the electrical wire through the internal channel to keep the look clean and professional.
Step 3: Position the Rug Lay down your sheepskin rug in the corner of the room. Place a non-slip pad underneath to prevent it from sliding on wood or laminate flooring.
Step 4: Place the Chair Set your bouclé armchair on top of the rug, facing toward the center of the room. Angle it slightly toward the lamp for the best light coverage.
Step 5: Adjust the Lamp Head Position the lamp so the shade hangs directly over the center of the chair seat. This ensures you have clear, direct light on your page while you read.
23 Arched Mirror and Herringbone Wood

A massive arched mirror leaning against the wall is a secret weapon for expanding a winter-dimmed room. The gold frame matches the bedroom’s warm accents and adds a touch of architectural elegance. It reflects the soft textures of the bed, doubling the cozy visual weight of the space.
The herringbone wood floors provide a classic pattern that adds movement and warmth to the ground level. This rich, dark wood contrasts beautifully with the light grey walls and cream-colored furniture. The reflections in the mirror highlight the craftsmanship of the flooring and the height of the ceilings.
This setup is particularly effective when placed opposite a window to catch the afternoon sun. Even on cloudy days, the mirror bounces whatever light is available deep into the room. It turns a simple wall into a dynamic window that brightens every corner.
Material Required List
- Oversized gold-framed arched mirror
- Anti-tip furniture wall strap
- Clear rubber bumper pads
- Glass cleaning solution
Equipment Required List
- Level
- Microfiber cloth
- Drill (for the safety strap)
DIY Instruction Step by Step
Step 1: Clean the Mirror Thoroughly clean both sides of the glass before moving it into position. Removing dust and fingerprints is much easier while the mirror is flat on the ground.
Step 2: Apply Bumper Pads Stick clear rubber pads to the bottom of the mirror frame. This prevents the heavy frame from scratching your wood floors and adds a bit of grip.
Step 3: Find the Angle Lean the mirror against the wall at a slight angle. Ensure the top is about 6 to 10 inches away from the wall for a stable and aesthetically pleasing tilt.
Step 4: Install the Safety Strap Screw the anti-tip strap into a wall stud behind the mirror and attach it to the back of the frame. This is a crucial safety step to prevent accidents.
Step 5: Check the Reflection Stand across the room and ensure the mirror is reflecting something pleasant, like the bed or a piece of art. Adjust the tilt until you are happy with the view.
24 Symmetry and Forest Views
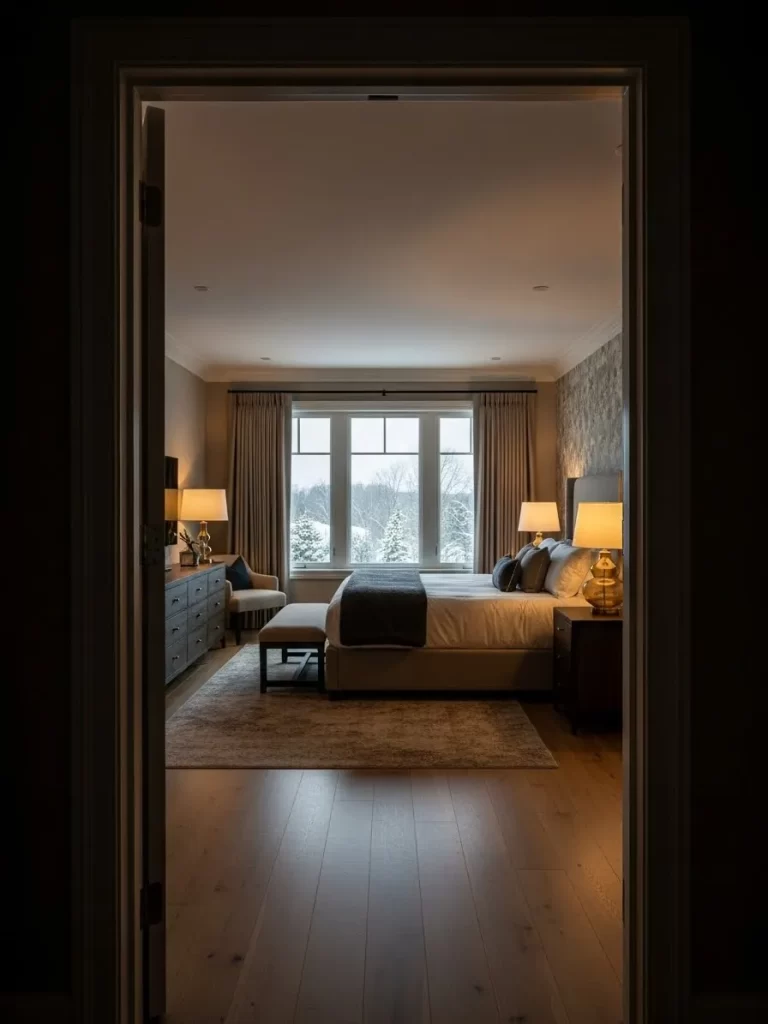
A perfectly symmetrical bedroom layout creates a sense of order and calm that is very restorative. Large windows frame the winter forest outside, acting as a living piece of art that changes with the weather. The heavy drapes can be closed to seal in the warmth or opened to invite the morning light.
Tall, amber-colored glass lamps on the nightstands add a touch of vintage luxury. Their golden glow is reflected in the dresser mirror across the room, creating a loop of warm light. This balanced design ensures that both sides of the bed are equally comfortable and functional.
The neutral color palette of the room allows the green of the trees and the blue of the snow to stand out. It feels like a high-end mountain lodge that is both modern and timeless. This room is a sanctuary where you can watch the seasons change from the comfort of your duvet.
Material Required List
- Matching pair of amber glass table lamps
- Symmetrical set of dark wood nightstands
- Floor-to-ceiling thermal curtain panels
- Large area rug (neutral tone)
Equipment Required List
- Measuring tape (for exact placement)
- Stepladder (for curtain hanging)
DIY Instruction Step by Step
Step 1: Center the Bed Use your measuring tape to ensure the bed is exactly centered between the two windows. This is the foundation for the entire room’s symmetry.
Step 2: Align the Nightstands Place your nightstands on either side of the bed. Leave about 3 inches of space between the bed frame and the furniture so the blankets can hang freely.
Step 3: Position the Lamps Set your amber glass lamps on the center of each nightstand. Use a level or tape measure to make sure they are exactly the same distance from the wall.
Step 4: Hang the Drapes Install your curtain rods at the same height above each window. Ensure the panels are wide enough to cover the entire window frame when closed.
Step 5: Check the Balance Stand at the foot of the bed and look toward the headboard. Everything should feel mirrored and balanced, which creates a peaceful energy in the room.
25 Textured Stone Diffuser and Woody Scents

A stone-textured diffuser brings an organic, earthy element to your bedside table. Its dark, charcoal finish contrasts with the warm wood of the furniture, creating a modern and grounding look. The white mist rising from the top adds a sense of movement and life to the room.
Using Cedarwood and Vanilla essential oils provides a scent that is both masculine and comforting. It mimics the smell of a luxury cabin or a quiet forest trail. This aromatherapy setup is a great way to signal to your brain that it is time to wind down for the night.
The small brown glass bottles of oil look beautiful sitting on the dresser. They add a touch of artisanal charm to the functional setup. This corner is all about the senses, combining touch, smell, and sight to create a peaceful environment.
Material Required List
- Stone-textured ultrasonic diffuser
- Cedarwood and Vanilla essential oils
- Small wooden tray or coaster
- Distilled water
Equipment Required List
- Measuring cup
- Soft cloth for cleaning the stone surface
DIY Instruction Step by Step
Step 1: Prepare the Surface Place a small wooden tray or coaster on your nightstand. This protects your furniture from any water droplets or oil spills that might happen during use.
Step 2: Fill the Reservoir Remove the stone cover and fill the internal tank with distilled water. Be careful not to exceed the fill line, as this can stop the mist from forming.
Step 3: Add the Scent Drip 4 drops of Cedarwood oil and 3 drops of Vanilla oil into the water. This combination creates a deep, warm scent that is perfect for winter evenings.
Step 4: Replace the Cover Carefully put the stone top back onto the diffuser. Ensure it is seated correctly so the mist flows straight up through the opening.
Step 5: Choose Your Mist Mode Turn on the device and select a continuous mist for a quick scent boost. Switch to intermittent mode before you go to sleep for a gentle, all-night fragrance.
26 Monochromatic Midnight Sanctuary
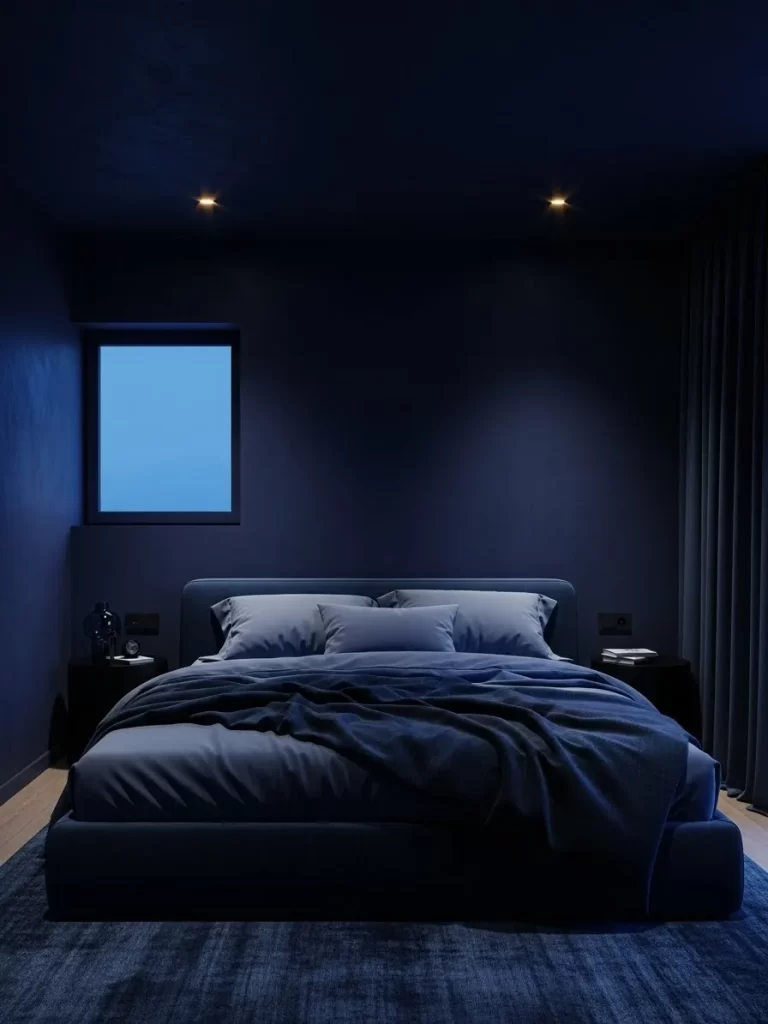
A fully monochromatic bedroom in deep blue or charcoal creates a cozy, cave-like environment. The walls, bedding, and even the ceiling are finished in the same dark hue to eliminate visual distractions. This design choice makes the small points of light from the ceiling lamps look like stars in a night sky.
The velvet headboard and plush rug add layers of texture within the same color family. This prevents the room from feeling flat while maintaining a very unified and calm look. It is a bold design that focuses on the feeling of being protected and tucked away from the world.
A single window provides a view of the blue twilight, which matches the room’s color scheme perfectly. This setup is great for light sleepers, as the dark environment naturally encourages deeper rest. It is a sophisticated way to embrace the quiet energy of the winter season.
Material Required List
- Midnight blue wall and ceiling paint
- Matching velvet upholstered bed frame
- Navy blue linen duvet set
- Deep blue high-pile area rug
Equipment Required List
- Paint roller and extension pole
- Painter’s tape
- High-intensity work light (for painting dark rooms)
DIY Instruction Step by Step
Step 1: Prep the Entire Room Remove all furniture and cover the floor with drop cloths. Mask off the windows and any outlets using high-quality painter’s tape to ensure clean lines.
Step 2: Paint the Ceiling First Use a long extension pole to paint the ceiling in the same dark blue as your walls. This wraps the room in color and creates that signature sanctuary feel.
Step 3: Apply Wall Color Roll on two coats of midnight blue paint. Dark colors often require a second coat to ensure the finish is perfectly even and deep.
Step 4: Layer the Textiles Once the paint is dry, move your navy velvet bed into place. Layer it with linen sheets and a duvet in the same blue family to maintain the look.
Step 5: Install Recessed Lighting Use warm-toned LED bulbs in your ceiling fixtures. The contrast between the dark ceiling and the tiny points of light will create a beautiful, starry effect.
27 Quilted Velvet and Wool Socks

Layering a heavy quilted velvet blanket over your bed provides both weight and incredible warmth. The diamond pattern of the quilting adds a classic texture that feels very high-end and luxurious. This blanket acts as a secondary heat layer that is for those extra-chilly nights.
Keeping a pair of thick, cream-colored wool socks on the bed is a simple winter comfort. It reminds you to take care of the small details that keep you warm and happy. The contrast between the dark velvet and the light wool is a beautiful visual of winter comfort.
The soft, sueded texture of the velvet is very comforting to touch as you drift off to sleep. It stays warm against the skin and adds a sense of opulence to any bedding set. This is a functional piece of decor that you will look forward to using every single year.
Material Required List
- Oversized quilted velvet coverlet (charcoal or navy)
- Pair of high-quality Merino wool socks
- Decorative fabric storage bin
- Scented linen spray
Equipment Required List
- Steam iron (to smooth velvet after shipping)
DIY Instruction Step by Step
Step 1: Prep the Blanket Unpack your quilted velvet blanket and give it a gentle steam to remove any fold lines. Velvet looks its best when the pile is smooth and free of creases.
Step 2: Layer Over the Duvet Lay the quilted blanket over your main duvet. Fold the top 12 inches down to show the textures of the layers underneath for a professionally styled look.
Step 3: Organize Your Socks Keep your clean wool socks in a dedicated fabric bin near the bed. This makes them easy to find in the dark when your feet get cold.
Step 4: Refresh the Fabric Lightly mist the velvet with a lavender linen spray. This adds a subtle scent that enhances the relaxing feeling of the heavy fabric.
Step 5: Fold for Style During the day, fold the blanket at the foot of the bed in a thick band. This adds visual weight to the bottom of the bed and looks very inviting.
28 Sunkissed Terracotta and Natural Fibers

A terracotta-colored accent wall brings the warmth of a Mediterranean sunset into your winter bedroom. This earthy hue is energized by the natural sunlight coming through sheer curtains. It creates a vibrant yet grounded atmosphere that is very refreshing during the dark months.
A woven seagrass ottoman and a nubby wool rug add natural textures that tie the room together. The cream-colored sofa and orange pillows create a comfortable spot for morning coffee in the sun. This room focuses on light, warmth, and organic materials to fight the winter blues.
The orange tones are balanced by fresh green plants in clay pots. This combination of fire and earth colors makes the room feel alive and welcoming. It is a space that encourages you to soak up every bit of natural light available during the day.
Material Required List
- Terracotta or Burnt Orange matte paint
- Woven seagrass ottoman
- Cream-colored small sofa or bench
- Sheer linen curtain panels
Equipment Required List
- Paint roller and tray
- Stepladder
- Vacuum with brush attachment
DIY Instruction Step by Step
Step 1: Choose Your Wall Select the wall that receives the most direct sunlight to be your terracotta accent. The sun will make the orange tone look warm and glowing rather than flat.
Step 2: Paint the Accent Apply two coats of terracotta paint. Use a matte finish to give the color a soft, sueded look that mimics natural clay.
Step 3: Hang Sheer Drapes Install sheer linen curtains over the window. These allow the maximum amount of light to enter while providing privacy and softening the sun’s rays.
Step 4: Position the Seating Place your cream sofa or bench directly in front of the window. Add the seagrass ottoman nearby to serve as a footrest or a place for a tray.
Step 5: Layer with Color Add a few orange throw pillows to the sofa. This pulls the color of the wall into the center of the room and makes the design feel cohesive.
29 Vintage Brass and Golden Heirlooms

A vintage brass alarm clock on the nightstand adds a touch of nostalgia and metallic warmth. Its classic bell design and aged finish tell a story of timeless style. This piece serves as a beautiful mechanical counterpoint to the soft fabrics and modern tech in the room.
A small wooden bowl nearby holds your favorite gold jewelry and pearl earrings. This keeps your treasures organized and adds a personal, delicate touch to the decor. The warm wood of the bowl and the golden shine of the metal work together to create a rich palette.
The soft light from a nearby lamp reflects off the glass of the clock and the polished surfaces of the jewelry. It turns a simple dresser top into a tiny gallery of precious things. This setup is about celebrating the small, beautiful details that make your house a home.
Material Required List
- Vintage-style brass twin-bell alarm clock
- Small hand-carved wooden bowl
- Set of gold and pearl jewelry
- Soft velvet jewelry cloth
Equipment Required List
- Microfiber cloth for polishing metal
DIY Instruction Step by Step
Step 1: Polish the Clock Use a soft microfiber cloth to wipe down the brass clock. Removing fingerprints makes the metal shine and look much more high-end and clean.
Step 2: Set the Time Wind the mechanical gears or insert a battery and set the clock to the correct time. The ticking sound can be very therapeutic for some people at night.
Step 3: Position the Bowl Place the wooden bowl on the nightstand next to the clock. Ensure it is close enough to the edge to be reached easily but far enough back to be safe.
Step 4: Arrange Your Items Lay your gold chains and earrings in the bowl. Staggering them makes it easy to pick them out in the morning without them getting tangled.
Step 5: Style the Duo Place the clock slightly behind the bowl to create a layered look. This small arrangement adds a lot of character and history to your bedside area.
30 Ivory Stove and Pinecone Harvest
A classic ivory electric stove heater brings a bright, clean look to a dark-walled bedroom. The dancing orange flames behind the glass provide a warm focal point that pops against the black background. Its traditional design adds a touch of cottage-core charm to any space.
A basket of birch logs and a bowl of large pinecones nearby bring the textures of the winter forest inside. These natural elements are free to collect and add a wonderful, rustic scent to the room. They serve as a visual reminder of the beauty of the season.
The soft grey rug underneath provide a comfortable base for the heater and the decorative items. This setup is all about creating a hearth feeling where there is no real fireplace. It is the best spot to warm your hands and enjoy the quiet of a snowy evening.
Material Required List
- Ivory-colored electric stove heater
- Large ceramic or stone bowl
- Collection of natural pinecones
- Small bundle of birch logs
Equipment Required List
- Vacuum (for any bits of pinecone or bark)
- Glass cleaner
DIY Instruction Step by Step
Step 1: Position the Stove Set your ivory heater against a dark wall for maximum visual impact. Leave enough space between the unit and the wall as recommended by the maker.
Step 2: Prep the Pinecones Bake your collected pinecones in a 200-degree oven for 30 minutes. This kills any tiny bugs and melts the sap, giving them a beautiful glossy finish.
Step 3: Arrange the Bowl Fill your large bowl with the treated pinecones. You can add a few drops of cinnamon or pine oil to them to act as a natural room freshener.
Step 4: Stack the Wood Place a small bundle of birch logs in a wire basket or simply stack them neatly next to the heater. The white bark of the birch matches the ivory stove.
Step 5: Final Clean Wipe down the glass door of the heater to ensure the flame effect is clear. Turn on the unit and enjoy the instant warmth and beautiful rustic scene.
31 Personal Memory Gallery Wall
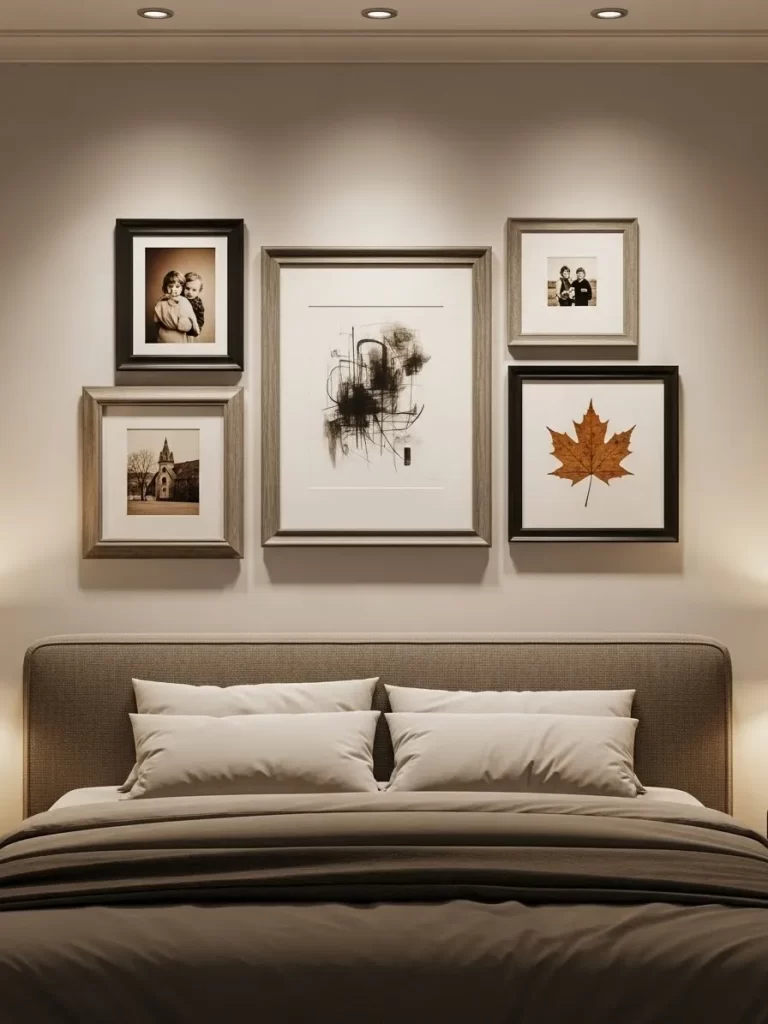
Displaying a collection of framed photos and art adds a layer of emotional warmth to your bedroom. This arrangement features various frame sizes in black, wood, and silver to create a curated, lived-in feel. A single dried leaf in a frame brings a bit of nature seasonal change inside, anchoring the display in the present moment.
The neutral wall color serves as a quiet backdrop that lets the memories take center stage. Placing this gallery directly above the headboard turns the bed into the room most personal focal point. It provides a beautiful view to look at while relaxing, making the space feel uniquely yours.
Lighting the wall with small recessed ceiling lights highlights the textures of the frames and the details of the art. This setup avoids clutter while filling the vertical space with visual interest. It is a simple way to surround yourself with people and places that make you feel safe and loved.
Material Required List
- Assorted picture frames in various finishes
- Printed personal photos or sketches
- One large dried maple or oak leaf
- Acid-free mounting tape or photo corners
Equipment Required List
- Measuring tape
- Level
- Hammer and small finishing nails
- Pencil for marking the wall
DIY Instruction Step by Step
Step 1: Curate Your Collection Select five to seven items that share a common theme or color palette. Include one natural element, like a large dried leaf, to add a unique organic texture to the group.
Step 2: Plan the Layout on the Floor Lay your frames out on the floor in front of the wall. Move them around until you find a balanced arrangement where the spacing between the frames is consistent.
Step 3: Create a Paper Template Trace each frame onto a sheet of paper and cut it out. Tape these paper templates to the wall using painter tape to visualize the final look without making holes.
Step 4: Mark Your Nail Spots Measure the distance from the top of each frame to its hanging wire or hook. Mark this exact spot on your paper templates with a pencil so your nails end up in the right place.
Step 5: Hang the Frames Hammer your nails through the marks on the paper, then pull the paper away. Hang your frames and use a level to ensure every piece is perfectly straight for a professional finish.
32 Reflective Evergreen Altar
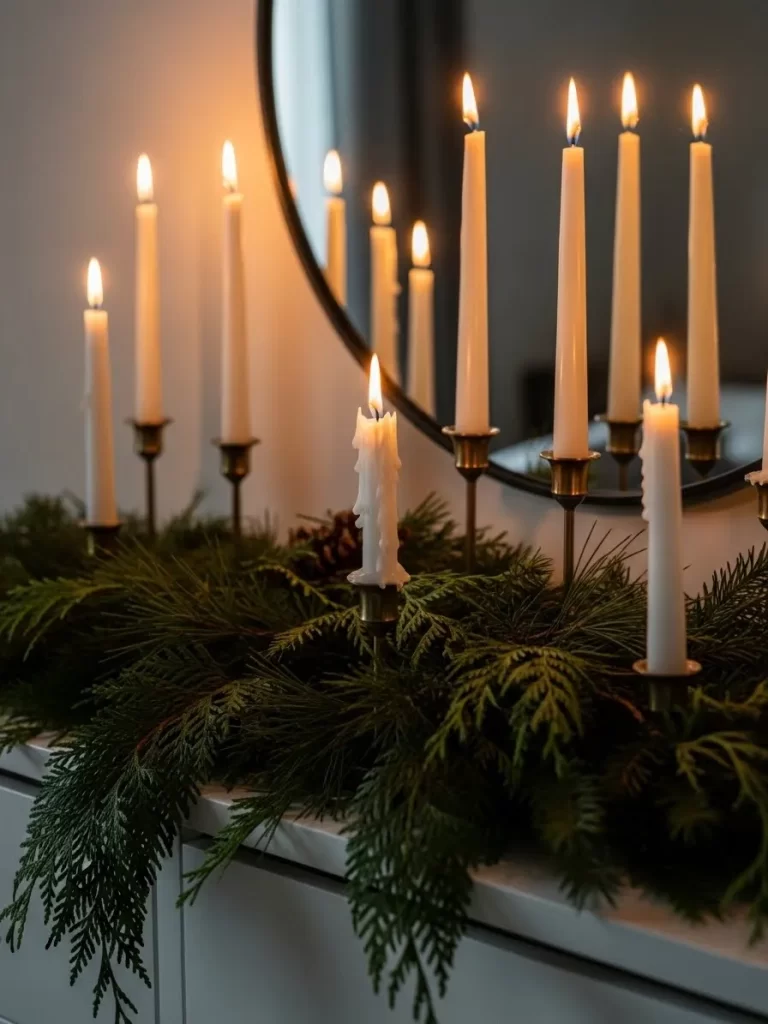
Grouping tall taper candles in front of a mirror creates a stunning display of light that warms the entire room. The mirror reflects the flickering flames, doubling the glow and making the space feel much brighter. Nestling the candle holders into a bed of fresh cedar and pine branches adds a wonderful winter scent.
The wax dripping down the sides of the white tapers gives the arrangement a rustic, old-world charm. This setup sits beautifully on a dresser or a mantel, acting as a living piece of decor. The dark green needles provide a rich contrast to the bright white wax and the golden light.
This arrangement is particularly effective during the late afternoon when the sun begins to set. It bridges the gap between natural daylight and cozy evening ambiance. It turns a simple surface into a celebratory corner that honors the quiet beauty of the winter season.
Material Required List
- 5 to 7 white taper candles of varying heights
- Assorted brass or glass candle holders
- Fresh cedar, pine, or fir branches
- Round or arched wall mirror
Equipment Required List
- Pruning shears for the greenery
- Long-reach lighter or matches
DIY Instruction Step by Step
Step 1: Clean the Mirror Wipe down your mirror until it is streak-free. A clean surface is essential for getting the most out of the light reflections from your candles.
Step 2: Position the Holders Place your candle holders in a staggered line in front of the mirror. Vary the heights to create a more dynamic and interesting silhouette in the reflection.
Step 3: Lay the Greenery Base Take your fresh evergreen branches and weave them around the bases of the candle holders. Ensure the needles are flat and secure so they do not touch the flames.
Step 4: Set the Tapers Place your white taper candles into the holders. If a candle is wobbly, melt a little wax into the bottom of the holder first to act as a glue.
Step 5: Light and Monitor Light the candles starting from the back to avoid burning your sleeves. Always stay in the room when these are lit, as the dry greenery requires careful attention.
33 Plush Bouclé Nest Chair
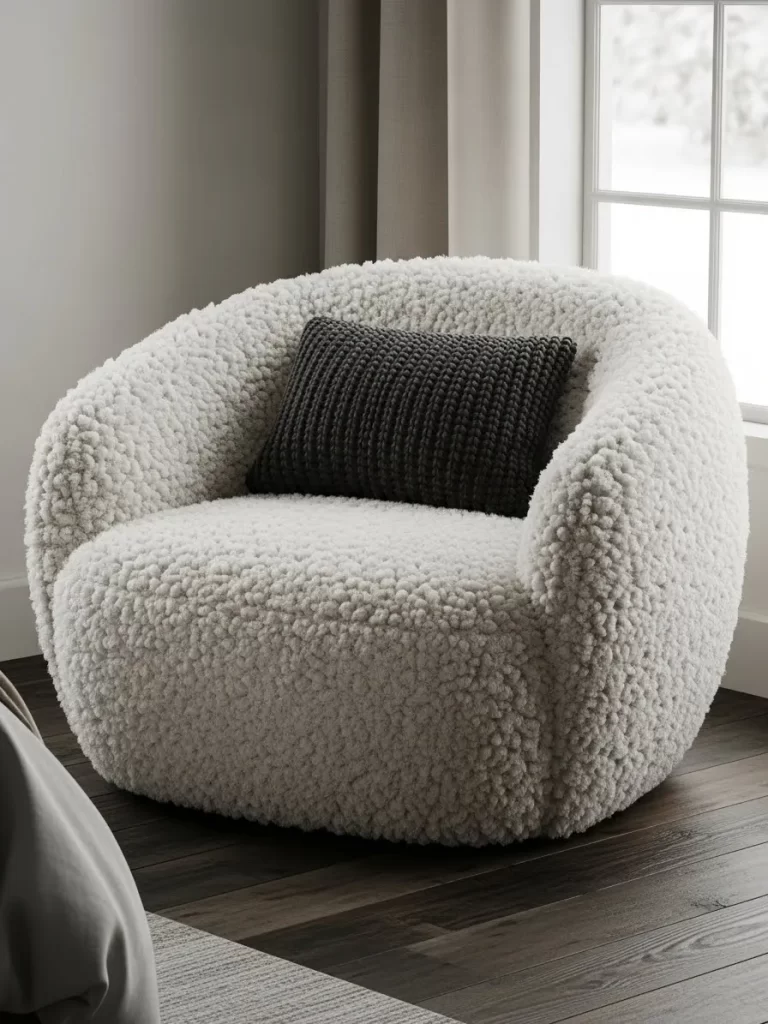
A round, oversized bouclé chair provides the ultimate spot for curling up with a book on a snowy day. The nubby, sheepskin-like texture is incredibly soft and holds heat, making it much warmer than leather or smooth fabric. Its curved back wraps around you, creating a private sense of security.
A dark, chunky knit pillow provides a sharp visual contrast to the ivory fabric. This duo sits near a window, allowing you to enjoy the view of the winter trees while staying perfectly toasty. The chair’s low profile keeps the room feeling open and airy while adding significant comfort.
The neutral tones of the chair blend seamlessly with any bedroom color scheme. It serves as a functional piece of art that invites you to slow down and take a break. This corner becomes a destination for relaxation that feels separate from the act of sleeping.
Material Required List
- Round bouclé swivel or accent chair
- Dark charcoal or black chunky knit throw pillow
- Small round area rug for underneath
- Soft-bristle fabric brush
Equipment Required List
- Measuring tape
- Vacuum with upholstery attachment
DIY Instruction Step by Step
Step 1: Measure Your Corner Ensure you have enough clearance for the chair to sit comfortably without blocking walkways. A round chair needs about three feet of space in every direction to look its best.
Step 2: Prepare the Floor Place a small round rug in your chosen corner. This anchors the chair and protects your flooring from any movement or scuffs from the chair’s base.
Step 3: Position the Seating Set the chair on the rug, angling it slightly toward the bed or a window. This makes the nook feel integrated into the room rather than tucked away in a corner.
Step 4: Add the Support Place the dark knit pillow in the center of the seat. This provides lumbar support and adds a necessary pop of dark color to the light ivory fabric.
Step 5: Groom the Fabric Gently brush the bouclé loops with a soft-bristle brush to keep them from matting. This simple maintenance keeps the chair looking new and feeling soft all winter long.
34 Stacked Shimmering Velvet Pillows

Layering pillows in different shades of silver and champagne velvet adds a touch of luxury to your winter bedding. The crushed texture of the fabric catches the light from your bedside lamps, creating a soft, shimmering effect. This stack provides a range of softness that makes the head of the bed look lush.
The cool tones of the velvet mimic the colors of winter frost and moonlight. Despite the cold colors, the heavy fabric is exceptionally warm and feels like a soft caress against the skin. These pillows bridge the gap between high-end fashion and bedroom comfort.
Using pillows with piped edges gives the stack a tailored, professional appearance. This arrangement is for those who love a bed that looks like it belongs in a boutique hotel. It is a simple way to upgrade your room style without changing your main furniture.
Material Required List
- 4 to 6 velvet pillow covers in varying metallic tones
- High-quality feather or down-alternative inserts
- Scented fabric refresher spray
Equipment Required List
- Iron or steamer for the covers
DIY Instruction Step by Step
Step 1: Prep the Covers Turn your velvet covers inside out and give them a light steam to remove any fold lines. Smooth fabric is key to getting that high-end, reflective shimmer.
Step 2: Stuff the Inserts Fold your pillow inserts in half to slide them easily into the covers. Once inside, reach into the corners to ensure the filling is evenly distributed for a plump look.
Step 3: The Karate Chop Stand your pillows upright against the headboard. Use the side of your hand to give the top edge a light chop, creating a small indent that shows off the fabric sheen.
Step 4: Layer by Size Place the largest pillows at the back and stagger the smaller ones in front. This creates a mountain of comfort that draws the eye and looks incredibly inviting.
Step 5: Finish with Scent Lightly mist the velvet with a vanilla or sandalwood fabric spray. The scent will linger in the heavy fibers, greeting you with a calming aroma when you lay down.
35 Forest Green Bubble Rug

A high-pile, textured rug in a deep forest green provides a soft, warm landing for your feet every morning. The bubble pattern creates tiny pockets of air that act as insulation against a cold floor. This rich color brings the feeling of an evergreen forest right into your walking path.
The rug sits next to a smart thermostat, highlighting the balance between modern technology and organic comfort. Its dark hue hides any winter debris and provides a grounded foundation for the lighter colors in the room. Walking barefoot on this surface is a tactile treat that starts your day on a cozy note.
This specific texture adds a lot of visual weight to the bottom of the room. It makes the space feel more substantial and anchored during the months when everything outside feels sparse. It is a functional piece that serves as a massage for your feet with every step.
Material Required List
- Textured bubble or pebble pile rug in forest green
- Non-slip rug pad
- Smart home thermostat (wall-mounted)
Equipment Required List
- Heavy-duty scissors
- Vacuum with a high-pile setting
DIY Instruction Step by Step
Step 1: Size the Rug Pad Lay your rug pad on the floor and place the rug on top. Use your scissors to trim the pad so it is exactly one inch smaller than the rug on all sides.
Step 2: Clean the Floor Surface Sweep or vacuum the floor area thoroughly. Any dust or grit under the rug pad can cause it to slide or damage your flooring over time.
Step 3: Position the Base Lay the rug pad down and smooth out any wrinkles. Place the forest green rug on top, starting from one edge and unrolling it slowly to keep it straight.
Step 4: Align with the Wall Ensure the rug is parallel to the baseboards. Position it so it sits directly under the area where you usually stand to adjust your thermostat or get out of bed.
Step 5: Revive the Pile Run your vacuum over the rug using the highest pile setting. This lifts the bubbles and makes the texture look full and vibrant immediately after unrolling.
36 Antique Leather Trunk and Plaid
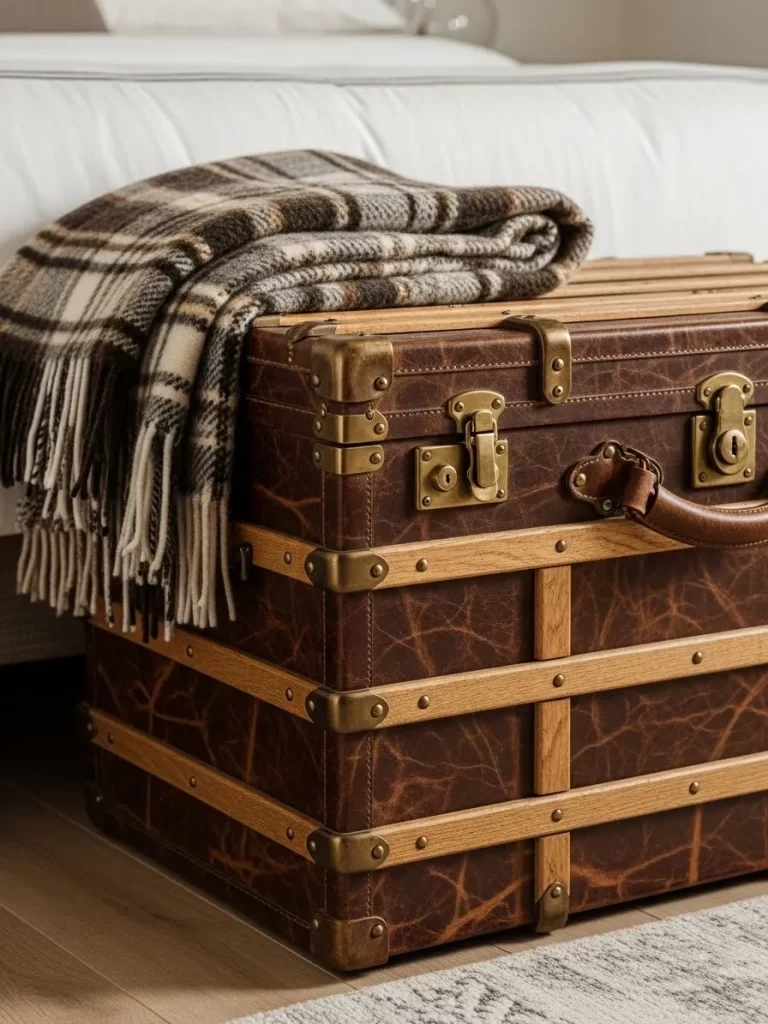
An aged leather trunk at the foot of the bed serves as a beautiful storage solution for your heavy winter blankets. The brass latches and wood-slat accents add a sense of history and rugged charm to the room. Draping a classic wool plaid throw over the corner gives it a cozy, cabin-like feel.
The deep brown leather has a natural patina that feels warm and inviting. It provides a sturdy surface for setting down a tray or a suitcase while you pack for a winter trip. This piece of furniture is as functional as it is decorative, hiding clutter while adding character.
The fringed edges of the plaid blanket add a soft, moving element to the heavy trunk. This combination of hard leather and soft wool is a classic winter design staple. It makes the entire bed area look complete and ready for the coldest nights of the year.
Material Required List
- Vintage or antique-style leather storage trunk
- 100% wool plaid throw blanket with fringe
- Cedar blocks for internal storage
Equipment Required List
- Leather conditioner and soft cloth
- Vacuum for the trunk interior
DIY Instruction Step by Step
Step 1: Clean and Condition Vacuum the inside of the trunk to remove any old dust. Use a soft cloth to apply a small amount of leather conditioner to the exterior to keep it supple and glowing.
Step 2: Protect Your Linens Place a few cedar blocks inside the trunk. This keeps your stored blankets smelling fresh and protects them from moths or dampness during the winter.
Step 3: Load the Storage Fold your extra-heavy winter quilts and place them inside. The weight of the blankets will help stabilize the trunk and prevent it from shifting on the floor.
Step 4: Style the Exterior Fold your plaid wool throw into thirds. Drape it over one corner of the trunk at an angle, letting the fringe hang down toward the floor for a casual, lived-in look.
Step 5: Final Placement Center the trunk at the foot of the bed. Ensure there is enough space to open the lid fully without hitting the bed frame or the wall.
Key Takeaways
Layer different textures like wool and velvet for maximum warmth. This combination traps heat and looks beautiful.
Use amber lighting to mimic a natural sunset. Soft light helps your brain relax and prepare for a deep sleep.
Incorporate living or dried plants to keep the air fresh. Nature provides a sense of peace when the world outside is frozen.
Personalize your space with photos and heirlooms. Surrounding yourself with memories builds a sense of emotional security.
Try simple DIY projects to add superior style on a small budget. Many of these elements are easy to create at home.
Creating a snug winter bedroom is a journey of sensory details. You do not need to apply every single tip to see a change. Pick the elements that speak to your personal sense of peace.
Start with one small project like a blanket or a candle tray. These layers of warmth build upon each other over time. You deserve a space that protects you from the freezing wind outside.
Your home should be your best refuge. Winter is much more enjoyable when you have a toasty place to rest your head. May your evenings be long and your blankets be heavy.