

Does your dwelling feel disjointed, almost like a collection of separate boxes? Many homeowners face this exact challenge when rooms transition abruptly from one style to the next. Achieving true flow is about much more than simply matching a few paint colors across a threshold.
It involves implementing subtle, sophisticated designer tricks that effectively connect sightlines, textures, and architectural details across your entire floor plan. When done correctly, this technique transforms individual spaces into one cohesive environment.
We have gathered 36 expert strategies to help you weave a unified, thoughtful narrative throughout your whole house. These ideas will transform your space from a series of individual, closed-off rooms into one harmonious, flowing environment you will love spending time in.
1. Creating Visual Harmony with Continuous Flooring
Relevant Name: Consistent Core Surface
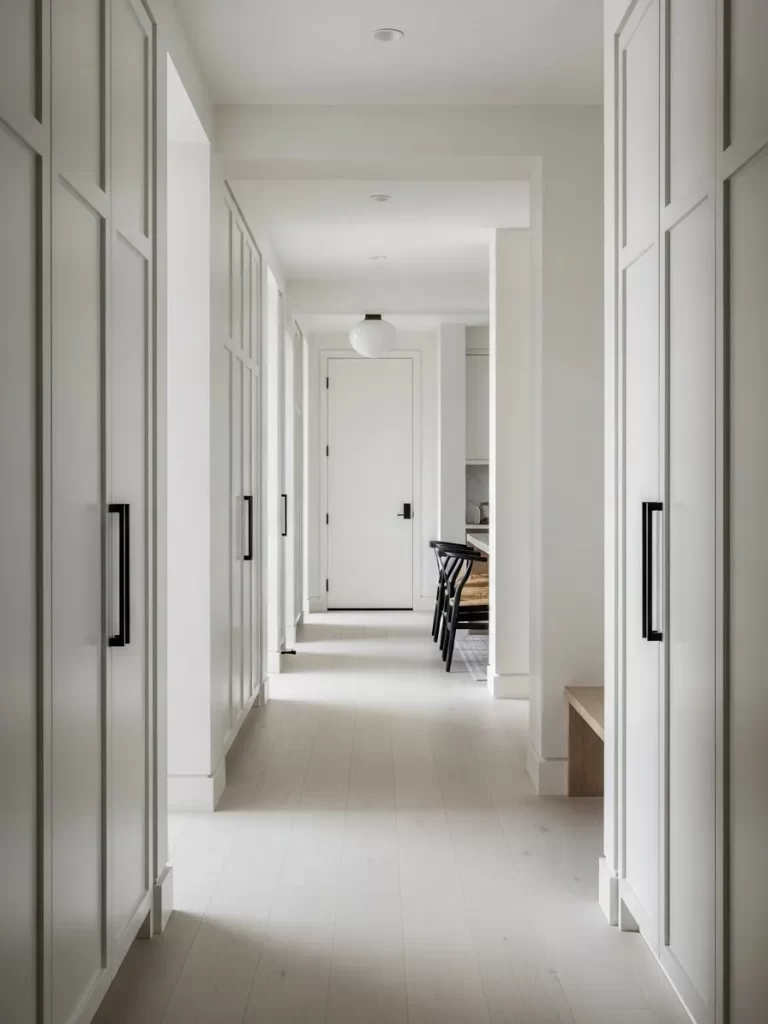
This long hallway effortlessly connects different areas of the home, primarily because the flooring runs uninterrupted from one space into the next. A light wood floor with minimal grain keeps the space feeling bright and expansive, successfully drawing the eye forward toward the adjoining room. This visual trick encourages a sense of continuity and prevents the hallway from feeling like a disconnected tunnel.
The pale tone of the floor reflects the ample light, both natural and artificial, enhancing the feeling of openness. This consistent surface treatment provides a neutral foundation, allowing architectural features like the tall white cabinetry and black hardware to stand out without competing for attention. Using the same material throughout shared common areas is an easy way to establish instant flow.
The uniformity of the cabinetry and the door color also contributes to the cohesive atmosphere. The simple material choice ensures a calm transition, making the journey from one room to the other feel like a thoughtful, integrated part of the home’s design story.
Material Required List
- Light-colored engineered wood or laminate flooring (enough to cover the continuous area).
- Underlayment appropriate for your subfloor (vapor barrier, sound dampening foam).
- Transition strips or quarter-round trim (to finish edges against walls, cabinets, and doorways).
- Wood filler (color matched to the flooring).
Equipment Required List
- Measuring tape.
- Pencil.
- Table saw or miter saw (for straight, clean cuts).
- Jigsaw (for tricky cuts around door frames or corners).
- Pry bar (for removing existing baseboards).
- Hammer and finish nails (for securing trim).
- Tapping block and pull bar (essential for click-lock flooring installation).
- Level.
- Safety glasses and ear protection.
DIY Instruction Step by Step
- Preparation is Key: Start by clearing the space completely, removing all furniture and décor. Use the pry bar to carefully remove the existing baseboards; set them aside if you plan to reuse them.
- Inspect the Subfloor: Ensure the subfloor (concrete or plywood) is clean, dry, and level. Use a leveling compound or patch where necessary to smooth out any significant dips or bumps. Uneven subfloors can cause floorboards to separate later on.
- Lay the Underlayment: Roll out the appropriate underlayment across the entire area, ensuring the edges slightly overlap if required by the manufacturer. Tape the seams of the underlayment using the recommended tape to create a proper moisture barrier.
- Determine the Starting Point: Decide the longest, straightest wall you will work from. Many experts suggest laying the planks parallel to the longest wall or perpendicular to the main light source.
- Install the First Row: Measure and mark a line a little distance from the starting wall—this gap allows for the natural expansion and contraction of the wood. Begin laying the first row of planks, using spacers against the wall to maintain the expansion gap. You may need to cut the tongue off the edge of the boards against the starting wall.
- Stagger and Lock the Planks: For a natural appearance and structural integrity, stagger the end joints of the planks in subsequent rows by at least six inches. Snap or click the new plank into the previously laid plank by angling and gently pushing down. Use the tapping block and hammer against the tongue side to ensure the joints are fully engaged and tight.
- Cut Around Obstacles: When you reach a wall or corner, measure the required length, cut the plank using the miter saw, and install. For door frames or vents, use the jigsaw to cut a custom shape, remembering to include the expansion gap.
- Finish the Space: Once all planks are laid, remove the spacers. Reinstall the baseboards or use quarter-round trim to cover the expansion gap along all edges. Use the finish nails and hammer to secure the trim to the wall, not the floor. Fill any visible nail holes with color-matched wood filler.
2. Using Repetitive Architectural Shapes
Relevant Name: Archway Alignment
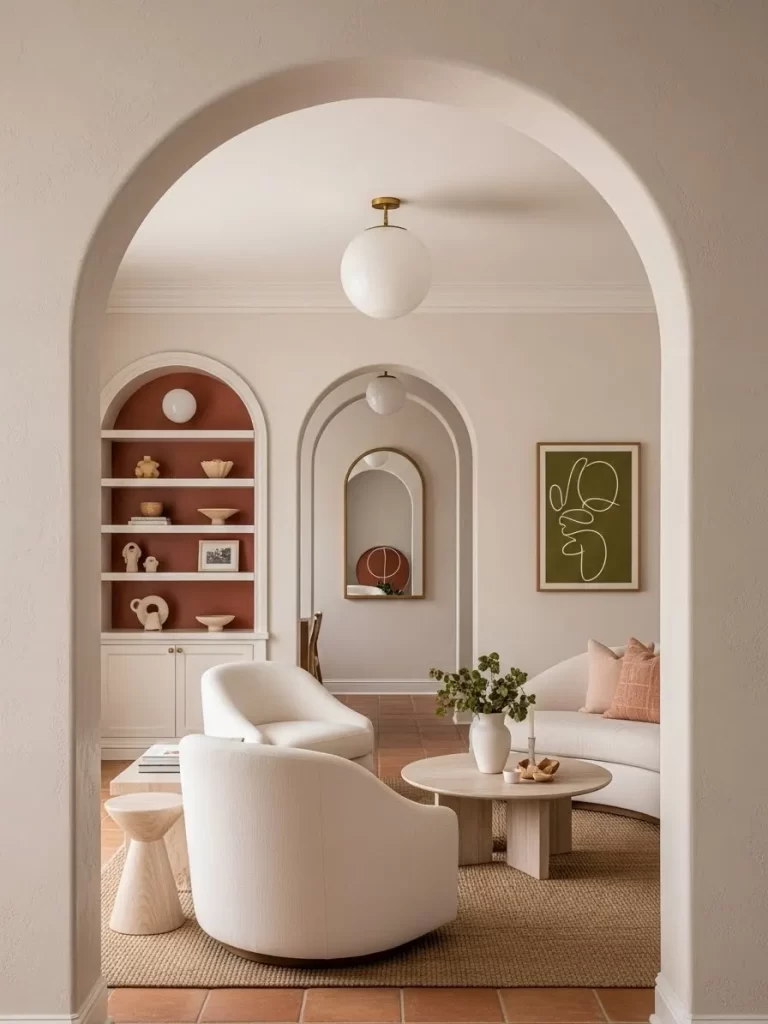
This view beautifully demonstrates how repeating soft, curved shapes can generate flow and continuity between several rooms. Multiple archways are aligned in a sequence, drawing the viewer’s eye deep into the dwelling. The gentle curve of the main entryway is mirrored by the smaller arched niche, which itself is repeated in the distant hallway mirror.
This consistent use of the arch shape offers a calm, rhythmic transition from the seating area into the space beyond. The neutral color palette, featuring warm terracotta floor tiles and soft off-white walls, is another key element that ties the various spaces together. Touches of contrasting color, like the earthy red paint inside the shelving unit and the green artwork, provide visual interest without breaking the overall peaceful atmosphere.
Notice how the soft, rounded forms of the seating and the coffee table reinforce the architectural theme. The deliberate repetition of curves establishes a visual dialogue across the floor plan. This technique ensures that even though you are moving into a different function area, the design language feels united and thoughtfully planned.
Material Required List
- Drywall (or plaster) joint compound.
- Flexible corner bead or rigid metal archway framing kit (if building from scratch).
- Sandpaper (various grits from coarse to fine).
- Primer and paint (in the desired wall and niche color).
- Drop cloths and painter’s tape.
Equipment Required List
- Utility knife.
- Trowel or putty knife (for applying joint compound).
- Measuring tape and pencil.
- Level.
- Safety goggles and dust mask.
- Electric sander or sanding block.
DIY Instruction Step by Step
- Preparation and Layout: Begin by accurately measuring the width of the doorway or opening where the arch will be installed. If you are modifying a rectangular opening, determine the radius and height of the desired arch curve. Gently trace the curve onto the wall or doorway frame for a guide.
- Rough Framing (if starting new): If you are building a new arched opening, construct the basic frame using lumber, then attach a flexible archway kit or pre-bent arch bead to form the smooth curve. Secure it firmly to the frame studs.
- Applying Drywall: Cut pieces of drywall to fit the opening, ensuring a slight overlap around the curve. Carefully score the back of the drywall strip that will cover the curve every inch or so to allow it to bend easily around the framing. Attach the drywall with screws.
- Creating the Smooth Curve: Apply the flexible corner bead along the outer edge of the curve to establish a crisp, durable edge. Mix your joint compound according to the manufacturer’s instructions until it is smooth and lump-free.
- First Coat of Compound: Using your trowel or putty knife, apply a thin, even layer of compound over the seam where the drywall meets the curve and over the flexible corner bead. Smooth it out as much as possible. Allow this coat to dry completely, typically 24 hours.
- Second and Third Coats: Lightly sand the first coat to remove high spots. Apply a second, slightly wider coat of compound to feather the edges into the existing wall, making the curve blend seamlessly. Repeat this process with a third, even wider and thinner coat, focusing on creating a truly smooth surface.
- Final Sanding and Painting: Once the final coat is dry, perform a very light, fine-grit sanding to remove all imperfections. Wipe away all dust. Prime the new arch and surrounding wall area, then apply two coats of your chosen paint color for a finished, cohesive look.
3. Highlighting the Vertical Connection with a Central Focal Point
Relevant Name: Two-Story Feature Wall

This space achieves immediate cohesion by utilizing a dramatic, vertical architectural element that stretches across two floors. The tall, fluted black fireplace surround acts as a central anchor, drawing the eye upward and connecting the main living area with the second-story landing. This strategy visually links spaces that are otherwise separated by height.
The contrast created by the dark central feature against the light surrounding walls and pale wood floors is striking and powerful. Even though the staircase and the living room have different functions, the shared sightline and the bold black element ensure they belong to a single, unified experience. This focus prevents the two levels from feeling isolated from each other.
Notice the deliberate repetition of black in the fireplace hearth, the balcony railing, and the kitchen bar stools, reinforcing the central element’s importance. Utilizing a material or color in this way generates a consistent theme throughout the open volume. The open shelving flanking the fireplace further integrates the space, offering shared display areas on both sides.
Material Required List
- Fluted or slatted wood panels (MDF or solid wood).
- Black matte paint or stain.
- Wood primer (if using raw wood/MDF).
- Construction adhesive and caulk.
- Finish nails or screws.
Equipment Required List
- Measuring tape and level (a long one is essential).
- Miter saw or circular saw (for clean, straight cuts).
- Stud finder.
- Caulk gun.
- Drill/Driver.
- Ladder or scaffolding (required for the height).
- Safety gear (glasses, gloves).
DIY Instruction Step by Step
- Measure and Plan the Area: Precisely measure the height and width of the area you intend to cover, from the floor to the top ceiling line. Use a level to mark a straight vertical line down the center of the fireplace wall as your starting guide.
- Prepare and Paint the Slats: Cut all your fluted or slatted panels to the measured height. Prime all sides of the wood pieces, then apply two coats of the black matte paint or stain, ensuring full coverage before installation. This step prevents visible raw edges later.
- Install the First Panel: Apply a strong line of construction adhesive to the back of the first panel. Align this panel perfectly with your marked center line, ensuring it is plumb (perfectly vertical) using your level. Secure it temporarily with finish nails or screws into the wall studs, if possible.
- Continue Installation: Apply adhesive to the next panel and butt it up tightly against the first one. Wipe away any excess adhesive that squeezes out immediately. Continue this process, working outward from the center line to both sides.
- Addressing Obstacles: For areas around the fireplace opening, carefully measure and cut the panels to fit precisely against the existing trim or mantel using your miter saw. This requires extremely precise measurements.
- Finishing Touches: Once all panels are adhered and secured, use black caulk to fill in any gaps where the panel edges meet the wall or ceiling, creating a seamless, professional finish. Touch up any visible nail heads or screws with the black paint.
4. Connecting Indoors and Outdoors with Shared Materials
Relevant Name: Material Overlap
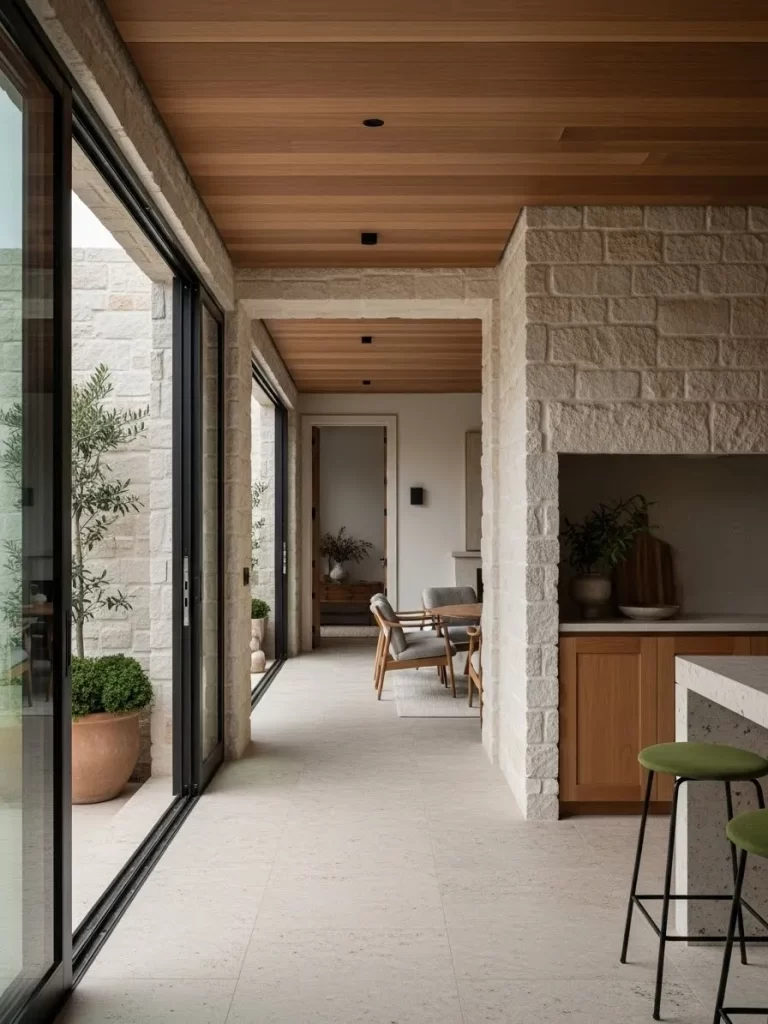
This design trick uses the powerful technique of extending interior materials to the exterior, blurring the line between the two environments. The warm, light-toned timber ceiling runs continuously from the indoor hallway through the large glass sliders, creating an immediate visual connection with the covered outdoor space. This shared material instantly generates a feeling of expansive, open flow.
The natural stone wall, while appearing primarily on the exterior, is also used inside the home, visible on the right next to the built-in cabinetry. This repeated use of texture and color reinforces the structural link between the indoor hall and the outdoor courtyard. The overall palette is kept natural and muted, relying on the organic tones of the wood and stone.
Large sliding glass doors further enhance this connection by offering expansive views and allowing natural light to flood the transitional space. By mirroring the light, neutral floor tile inside and using consistent architectural elements, the home successfully treats the patio and the hallway as an integrated, single living experience.
Material Required List
- Outdoor-rated timber or composite wood planks (with necessary weather treatments).
- Exterior-grade wood sealant or stain (matching the existing interior wood tone).
- Stainless steel screws or hidden fasteners (rust-proof).
- Stud finder and appropriate wall plugs/anchors (for exterior mounting).
Equipment Required List
- Measuring tape, pencil, and long level.
- Miter saw or circular saw (for cutting planks).
- Drill/Driver with various bits.
- Ladder.
- Safety glasses.
DIY Instruction Step by Step
- Preparation and Safety: Ensure the exterior ceiling surface is clean, dry, and structurally sound. Check local building codes for any restrictions on material usage in covered outdoor areas. Use the ladder safely for overhead work.
- Locate Joists/Supports: Use a stud finder or plans to accurately locate the ceiling joists or framing members in the exterior overhang. Mark these locations lightly on the surface, as you will be attaching the planks directly to them.
- Cut and Treat Planks: Measure and cut the exterior-rated timber or composite planks to the required length. Apply a protective coat of exterior sealant or stain, ensuring the color closely matches the indoor wood ceiling. Allow the treatment to dry completely.
- Install the First Plank: Decide on a layout—often starting from the wall closest to the interior or the most visible edge. Using the stainless steel screws or hidden fasteners, attach the first plank to the ceiling joists. Use a level to ensure it is perfectly straight.
- Maintain Consistent Gaps: If the indoor planks have a small reveal or gap between them, aim to replicate that spacing outdoors for consistency. Use small spacers (like thin pieces of wood or plastic) between each plank as you install them to maintain uniform gaps.
- Continue Installation: Apply consistent pressure and secure each plank firmly to the joists. If you need to work around light fixtures or vents, carefully measure and cut the necessary openings in the planks before installation.
- Final Sealing: Once all planks are installed, apply a final, generous coat of exterior sealant to the entire surface. This protects the wood from moisture and UV rays, ensuring the long-term color and material cohesion with the interior.
5. Utilizing Obscured Glass for Light and Privacy
Relevant Name: Diffused Transparency

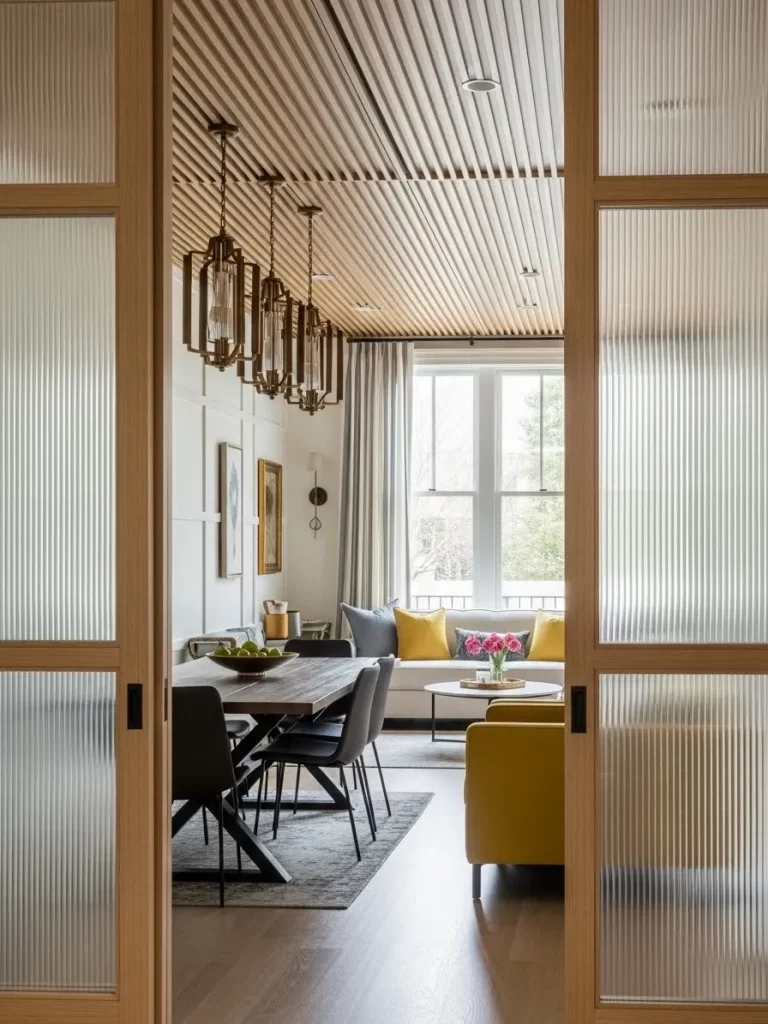
This open-concept space maintains a light, airy flow by using a large, stationary partition of reeded or fluted glass. The glass wall physically separates the kitchen/bar area from the living room, offering functional division without sacrificing a sense of connection. The ribbed texture of the glass blurs the view, creating soft privacy while allowing light to pass through.
The consistency of the overall light palette—white countertops, pale grey walls, and light terrazzo flooring—is maintained across both zones. The transparency of the partition ensures that the natural light from the large windows in the living area reaches the kitchen.
Natural woven elements, like the wicker pendant light and the rattan bar stools, are repeated across the divider. This common material language ensures that even with a physical barrier, the design theme remains unified. The glass partition successfully balances separation with shared light and style.
Material Required List
- Aluminum or wood framing pieces (for the partition grid).
- Reeded or fluted glass panels (sized to fit the frames).
- Silicone sealant (clear).
- Construction adhesive and screws.
Equipment Required List
- Measuring tape and level (a plumb line is essential).
- Miter saw (for cutting frame pieces).
- Drill/Driver.
- Glass suction cups (for handling glass).
- Safety gear (glasses, gloves).
DIY Instruction Step by Step
- Measure and Build the Frame: Precisely measure the opening where the partition will sit, from floor to ceiling and wall to wall. Cut the wood or aluminum frame pieces to create the border and any internal grid lines, using miter cuts for clean corners.
- Mount the Frame: Secure the top, bottom, and side perimeter frame pieces to the floor, ceiling, and adjacent walls. Use a level and plumb line to ensure the frame is perfectly straight and square before securing it with long screws or appropriate construction anchors.
- Install the Internal Grids: Install any internal vertical and horizontal frame pieces to create the desired grid pattern. These pieces will hold the individual glass panels.
- Place the Glass Panels: With great care (and using glass suction cups), place the reeded glass panels into the frame openings. Ensure the textured side of the glass is oriented consistently (e.g., all vertical).
- Secure and Seal: Once all panels are in place, use clear silicone sealant around the interior perimeter of each glass panel where it meets the frame. This holds the glass securely and prevents rattling. Allow the silicone to cure fully.
- Finishing Touches: Paint or finish the frame pieces to match the existing interior trim. The goal is a clean, structural element that divides the room while maintaining visual lightness.
6. Cohesion Through Pattern and Color Repetition
Relevant Name: Strategic Motif Placement
Cohesion in this living room is powerfully established through the strategic repetition of a specific graphic pattern and a core color palette. The distinctive geometric motif featured on the large area rug is repeated directly on the accent chairs and the window treatment side panels. This deliberate pattern play immediately ties three major design elements together.
The deep indigo blue is another unifying feature, appearing prominently on the sofa, the curtains, and the pattern itself. While there is a mix of patterns, the continuity of the blue color ensures that every piece feels coordinated rather than chaotic. The large, drum-shaped pendant lights, with their own subtle fabric pattern, add texture while harmonizing with the overall color scheme.
This technique proves that flow doesn’t require matching furniture. Instead, by echoing color and shape across various textiles, the designer creates a rich, layered look where every element contributes to a shared visual theme. Even the accessories, such as the blue lamp base, reinforce this central color story.
Material Required List
- Fabric (with the chosen cohesive pattern) suitable for upholstery and drapery.
- Coordinating solid color fabric (in the core color, e.g., deep blue).
- Upholstery foam or batting.
- Sewing thread.
- Curtain rods and hardware.
Equipment Required List
- Sewing machine.
- Iron and ironing board.
- Fabric scissors.
- Measuring tape.
- Staple gun and heavy-duty staples (for upholstery).
- Drill/Driver (for installing curtain rods).
DIY Instruction Step by Step
- Select and Measure: Choose a single graphic pattern and two to three core colors to anchor the room. Measure the area for the accent chairs and the windows precisely. Calculate the necessary fabric yardage, accounting for pattern matching on the chairs and curtains.
- Make the Curtains: Cut and sew the patterned fabric panels for the drapery. Ensure the pattern aligns across both panels for a clean look when they are drawn. Hem all edges. Create a rod pocket or attach header tape for curtain hooks, depending on your chosen hanging style. Install the rods and hang the curtains.
- Upholster the Accent Chairs (Cushions): If you are tackling a full chair, remove the existing fabric. If only reupholstering the seat cushions, carefully remove the cushion covers. Lay the patterned fabric flat and cut pieces large enough to wrap the cushions, allowing several inches for overlap.
- Attach the Fabric to Cushions: Pull the new fabric taut over the foam cushion. Flip the cushion over and use the staple gun to secure the fabric to the underside of the chair frame or cushion base. Start in the center of each side, pulling firmly before stapling, then working outward. Fold corners neatly like a present before stapling.
- Create Throw Pillows: Using the same patterned fabric and the solid core-colored fabric, sew complementary throw pillow covers. For the most cohesive look, use the patterned fabric for one set of pillows and the solid blue for another set. Insert pillow forms.
- Place and Accessorize: Arrange the patterned chairs and sofa. Place the patterned pillows on the solid-colored sofa and the solid-colored pillows on the patterned chairs to cross-pollinate the design. Introduce accessories like lamps or vases in the core color (blue) to complete the cohesive arrangement.
7. Maximizing Light and Space with Mirrors
Relevant Name: Reflective Walls

This sleek, modern bathroom achieves flow and openness primarily through the extensive use of mirrored surfaces. The floor-to-ceiling mirrored wardrobe door on the left is not just functional; it visually doubles the size of the room and reflects light deep into the space, generating an expansive feel. The large round mirror over the vanity repeats this reflective strategy.
By applying mirror panels across entire walls, the dwelling effectively borrows space and light from the adjacent bedroom. This continuous reflection prevents any area, especially the central wardrobe, from feeling bulky or obstructive. The mirrored panels blend seamlessly with the white cabinetry and pale flooring.
The consistent white color palette of the cabinetry, countertop, and walls further enhances the bright, minimalist aesthetic. The simple, light wood floor also extends toward the mirrored surface, leading the eye into the reflection and contributing to the feeling of uninterrupted space.
Material Required List
- Large sheets of plate glass mirror (cut to size for the wall/wardrobe).
- Mirror mastic or silicone adhesive (rated for mirrors).
- J-channel or thin metal trim (optional, for safety edges).
- Double-sided mirror mounting tape (for temporary hold).
Equipment Required List
- Measuring tape and laser level (crucial for alignment).
- Glass cleaner and clean rags.
- Caulk gun (for applying adhesive).
- Gloves and safety glasses (handling large glass is hazardous).
- Suction cups or mirror carriers (highly recommended for large panels).
DIY Instruction Step by Step
- Accurate Measurement: Measure the area for the mirror precisely. If installing a floor-to-ceiling mirror, measure the exact height at multiple points. Have the mirror professionaly cut to size with polished or safety-beveled edges.
- Prepare the Wall: Ensure the wall surface is clean, smooth, and dry. Mark the exact placement of the mirror using a laser level and pencil. For heavy mirrors, locate and mark the wall studs.
- Install Trim (Optional): If using a J-channel trim for the bottom edge, secure this to the wall studs using screws. This acts as a resting ledge for the glass.
- Apply Adhesive: Apply the mirror mastic or silicone adhesive to the back of the mirror in vertical or wavy lines. Do not cover the entire back; leave space for air circulation. Also, place small strips of double-sided mounting tape near the edges for initial temporary adhesion.
- Placement and Pressing: With assistance (large mirrors require two people and suction cups), lift the mirror and align the bottom edge into the J-channel or along your marked line. Carefully press the mirror firmly onto the wall, starting from the center and working outward to ensure good adhesive contact.
- Curing Time: Secure the mirror temporarily with painter’s tape or props until the adhesive is fully cured (check the product label, often 24-48 hours). Do not clean the mirror or put undue pressure on it during this time. Once cured, remove the tape and clean the surface.
8. Introducing a Consistent Feature Color on the Ceiling
Relevant Name: Fifth Wall Color

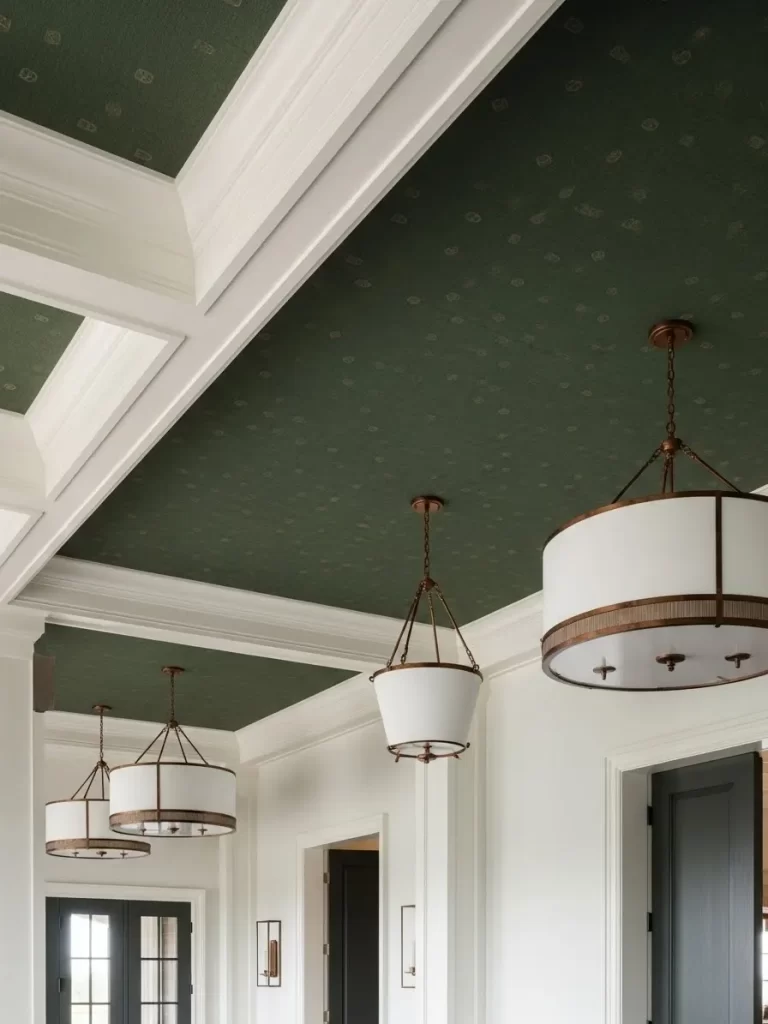
This hallway successfully connects various spaces by introducing a deep, consistent color on the ceiling, often referred to as the “fifth wall.” The rich, dark green color, coupled with a subtle pattern, provides an enveloping canopy that guides the eye through the transitional space. The color is contained within the crisp white coffered molding, which highlights the ceiling’s unique treatment.
Using a bold color overhead draws attention upward, emphasizing the height and creating a warm, cozy atmosphere. This unexpected placement of color adds drama and a unifying design element that is distinct yet repeated throughout the hall. The traditional detailing of the white molding prevents the dark color from feeling heavy.
The coordinating pendant lights with their copper accents and soft fabric shades also repeat down the hallway, reinforcing the rhythmic flow established by the ceiling’s design. The continuous white trim and dark door contrast offer another layer of consistency, framing the ceiling feature beautifully.
Material Required List
- Dark green matte or flat wall paint (enough for two coats).
- Wallpaper (with a subtle pattern, optional, for a textured look).
- Primer (tinted close to the final color is recommended).
- Painter’s tape and drop cloths.
Equipment Required List
- Long ladder or scaffolding.
- Paint rollers (with an extension pole) and paint brushes (for cutting in).
- Paint tray and roller grid.
- Measuring tape.
- Utility knife and smoothing tool (if using wallpaper).
DIY Instruction Step by Step
- Preparation and Protection: Move all furniture out of the area. Lay down drop cloths to protect the flooring. Use painter’s tape to carefully tape off all the white crown molding and wall edges where they meet the ceiling. Take extra care in ensuring the tape creates a crisp line.
- Clean and Prime: Clean the ceiling surface thoroughly to remove any dust or cobwebs. Apply a coat of primer, especially if the existing ceiling is a significantly different color. Allow the primer to dry completely according to the manufacturer’s directions.
- Cut In Edges: Using a high-quality paintbrush, carefully “cut in” along the taped edges, applying the dark green paint where the ceiling meets the molding. Do this in small sections.
- Roll the Ceiling: Use a roller with an extension pole to apply the paint evenly across the main surface of the ceiling. Roll in a consistent direction and overlap your passes slightly to avoid streaking.
- Second Coat: Allow the first coat to dry fully. Apply a second coat using the same method to ensure rich, deep color saturation and an even finish.
- Wallpaper Option (Alternative to Paint): If using wallpaper, cut the strips to size. Apply the adhesive (if not pre-pasted) and carefully hang the first strip, aligning it perfectly straight. Smooth out all bubbles and wrinkles with a smoothing tool. Continue applying strips, carefully matching the pattern as you go.
- Tape Removal: While the final coat of paint or paste is still slightly wet, carefully remove the painter’s tape. This prevents the paint from peeling off the crisp edge as it dries.
9. Repeating Fixtures and Furniture in Open Spaces
Relevant Name: Sequential Light Fixtures
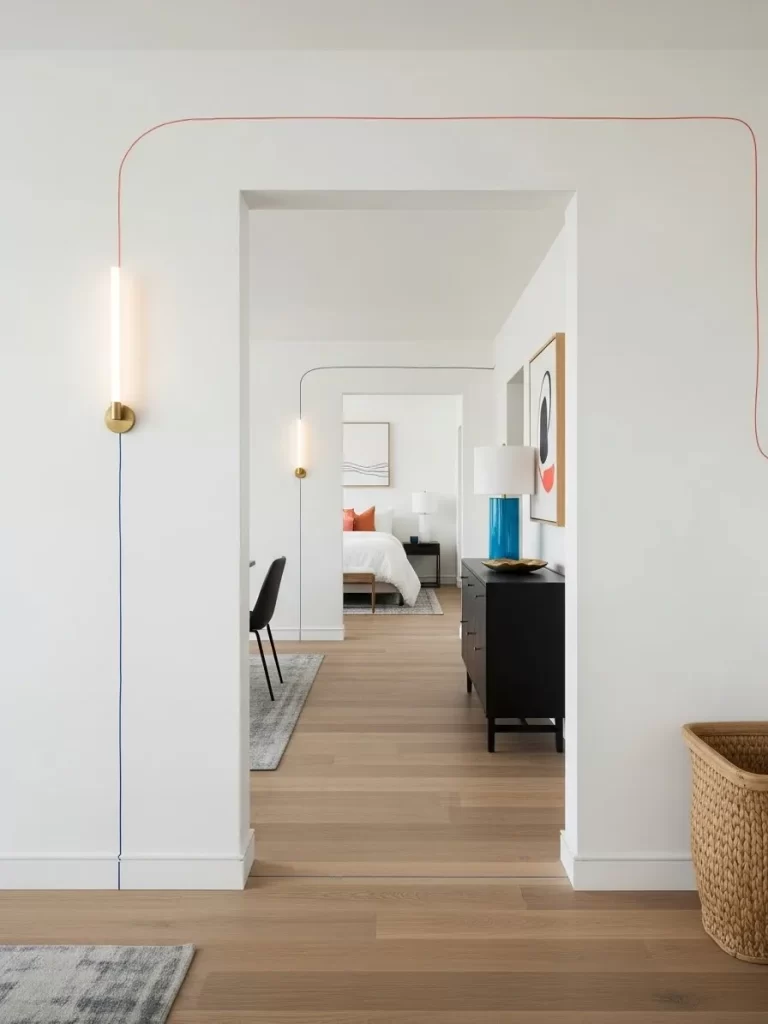
A powerful sense of rhythm and flow is established here by repeating key design elements like light fixtures and door frames along a clear line of sight. The linear arrangement of the contemporary wall sconces, placed at consistent intervals, draws the eye across the foreground space and into the area beyond. This creates a visual trail that guides movement.
The technique of framing the entrance to the bedroom with a clean, wide doorway allows for an unobstructed view into the next space. Even the furniture, such as the black dresser, is strategically placed along the sightline, offering a visual marker of progression. The consistent light wood flooring further aids this visual connection.
Small, repeated accents, like the red cable running from the sconce, reappear in the artwork, linking the architectural details with the room’s décor. By strategically duplicating lights and keeping the path clear, the design ensures the transition between functional zones feels intentional and cohesive.
Material Required List
- Linear wall sconces (two or more identical fixtures).
- Electrical wire (if surface-mounting the cable).
- Wire clamps or clips (for securing the exposed wire).
- Electrical junction boxes (if installing new wiring).
Equipment Required List
- Drill/Driver.
- Wire strippers and needle-nose pliers.
- Non-contact voltage tester (critical safety item).
- Level and measuring tape.
- Safety glasses.
DIY Instruction Step by Step
- Plan and Mark Placement: Determine the central line of sight between the two rooms. Measure the wall and mark the exact locations for each identical sconce. Use a level to ensure the vertical height of all fixtures is consistent.
- Safety First: Turn Off Power: Crucially, turn off the power to the circuit you will be working on at the main breaker panel. Use a non-contact voltage tester to confirm the power is off at the installation points.
- Prepare the Wiring (Option A – Hardwired): If hardwiring, install electrical junction boxes at the marked locations, running the necessary electrical cable through the walls to each box. Connect the fixture wires to the house wires (black to black, white to white, ground to ground).
- Prepare the Wiring (Option B – Surface Mount): For a decorative surface-mounted cable like the one pictured, you will need to run a power source (potentially from a nearby outlet or switch) to the first fixture. The wire then runs exposed along the wall, secured by small clips or clamps, to the next fixture.
- Mount the Fixture Backplates: Secure the mounting backplates for each sconce to the wall, aligning them with the level. Ensure they are firmly attached.
- Attach the Fixtures: Connect the final sconce body to the backplate. If you used the surface-mount option, gently route and secure the decorative cable along the ceiling and walls using small, color-matched clamps, following a clean, straight path.
- Final Test: Install the light bulbs. Turn the power back on at the breaker panel and test all the fixtures to ensure they work.
10. Natural Wood as a Unifying Texture
Relevant Name: Consistent Natural Grain
The warm, natural wood grain is the primary material unifying this bright kitchen space. The light oak cabinetry extends from the tall floor-to-ceiling pantry on the left to the lower drawers and cupboards, creating a continuous band of texture that circles the room. This consistent use of wood forms the backdrop for the entire design.
The repetition of the wood tone and texture is essential for cohesion; it prevents the clean white walls and backsplash from feeling too stark. The natural material introduces warmth and connects the cabinetry to the light wood floor planks. Even the open shelving above the sink incorporates the same material, ensuring unity at all levels.
Adding smaller details, like the woven jute rugs in the center, brings in another layer of natural, consistent texture. This careful application of a singular, dominant natural finish creates an effortless flow, making the various functional zones within the kitchen feel like part of a single, well-thought-out whole.
Material Required List
- Oak veneer plywood or solid oak panels (for cabinet doors and floating shelves).
- Natural wood stain or clear protective sealer (matching the chosen tone).
- Wood glue and screws.
- Heavy-duty shelf brackets (for floating shelves).
Equipment Required List
- Measuring tape and level.
- Table saw or circular saw (for cutting panels).
- Router (optional, for creating shelf edge profiles).
- Sandpaper and sanding block.
- Drill/Driver.
- Clamps.
DIY Instruction Step by Step
- Measure and Cut Cabinet Doors: Precisely measure the existing cabinet door openings. Cut the new wood panels (veneer plywood is a good budget option) to the exact size for the doors and drawer fronts. Mark the hinge locations accurately.
- Apply Finish: Sand all the cut wood pieces until smooth, starting with medium-grit and finishing with fine-grit sandpaper. Apply your chosen wood stain or clear sealer to all surfaces. Ensure the color matches the desired tone exactly and allow it to dry fully between coats.
- Attach Hardware: Drill holes for the cabinet hinges and handles/pulls. Install the hinges onto the back of the new doors and drawer fronts.
- Install the Doors and Drawers: Mount the new cabinet doors onto the existing cabinet frames, adjusting the hinges until the doors are perfectly aligned and spaced evenly. Attach the drawer fronts to the drawer boxes using screws, double-checking the alignment before final tightening.
- Build and Install Floating Shelves: Cut the wood for the floating shelves. You can create a simple box or use a cleat system. Attach the heavy-duty shelf brackets or cleat system to the wall studs using long screws, ensuring they are perfectly level.
- Secure the Shelves: Slide the finished wooden shelf box or panel over the mounted brackets or cleat, securing it from underneath with screws where possible. Use wood filler and touch-up stain to hide any visible hardware, completing the look of continuous natural wood.
11. Monochromatic Paint Application
Relevant Name: Color Drenching the Millwork
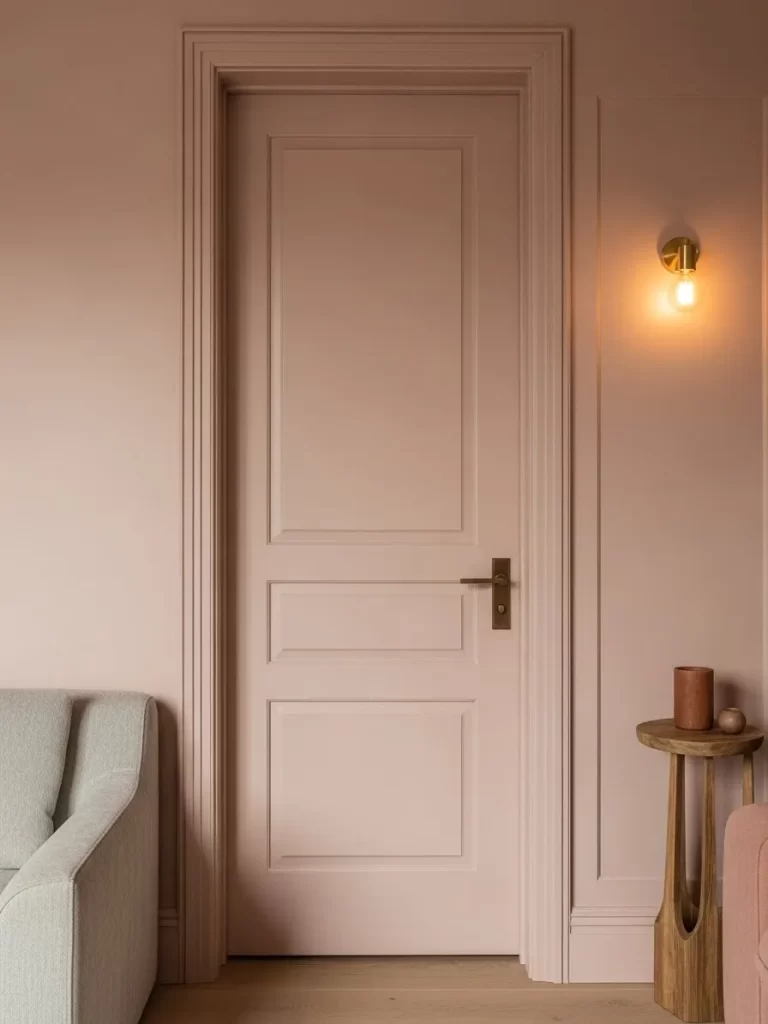
This image showcases the powerful impact of applying a single paint color to the walls, trim, and interior door. The soft, dusty pink hue completely envelops the space, creating an immediate sense of quiet sophistication and seamlessness. By painting the door, the door frame, and the surrounding wall paneling all in the same shade, the boundaries between these elements soften.
This monochromatic approach makes the door less of a focal point and more of an architectural extension of the wall itself. This reduces visual clutter and allows the eye to flow uninterrupted across the surface. The only element providing contrast is the warm brass hardware and the gentle shadow lines of the paneled door design.
The continuity established by the single color choice allows other textures, like the light wood floor and the nearby upholstered chair, to introduce subtle variation without disrupting the overall calm atmosphere. This color-drenching technique is highly effective for transitional spaces, giving them an expansive, enveloping feeling.
Material Required List
- Matte or Eggshell Finish Latex Paint (in chosen monochromatic color).
- High-quality painter’s tape (for the floor/hardware).
- Wood filler (for patching holes or gaps in the door/trim).
- Sandpaper (fine grit).
- Primer (optional, but recommended if changing from a dark color).
Equipment Required List
- Angled paintbrush (for “cutting in” around the hardware and floor).
- Small foam roller (for a smooth finish on the flat door panels).
- Drop cloths.
- Screwdriver (for removing door hardware).
DIY Instruction Step by Step
- Preparation and Hardware Removal: Use a screwdriver to carefully remove all door hardware, including the handle, hinges, and strike plates. Label the hardware pieces to make reinstallation easy. Lay drop cloths and use painter’s tape to protect the floor and base of the walls.
- Clean and Patch Surfaces: Clean the door and trim thoroughly to remove any dirt or grease. Use wood filler to patch any imperfections, nail holes, or cracks in the trim or the door itself. Once dry, lightly sand the patched areas smooth and wipe away all dust.
- Prime the Surface (If Necessary): If your current wall and trim color is very dark or the surfaces are uneven, apply one coat of primer. Allow the primer to dry fully.
- Apply the First Coat: Use the angled brush to carefully paint the edges of the trim and the recessed panels of the door. Then, use the foam roller for the flat surfaces of the walls, trim, and door, rolling in the direction of the wood grain (if applicable) for a smooth finish. Ensure the paint is applied consistently across all surfaces.
- Second Coat for Depth: Allow the first coat to dry completely. Apply a second, even coat to ensure the color is rich and uniform across the walls, trim, and door. Look for any missed spots or uneven application before finishing.
- Reinstall Hardware: Carefully remove the painter’s tape while the paint is still slightly tacky to ensure a crisp line. Wait until the paint is completely cured (often 24-48 hours) before reinstalling the clean, polished door hardware.
12. Anchoring the View with Dark Focal Points
Relevant Name: High-Contrast Gateway
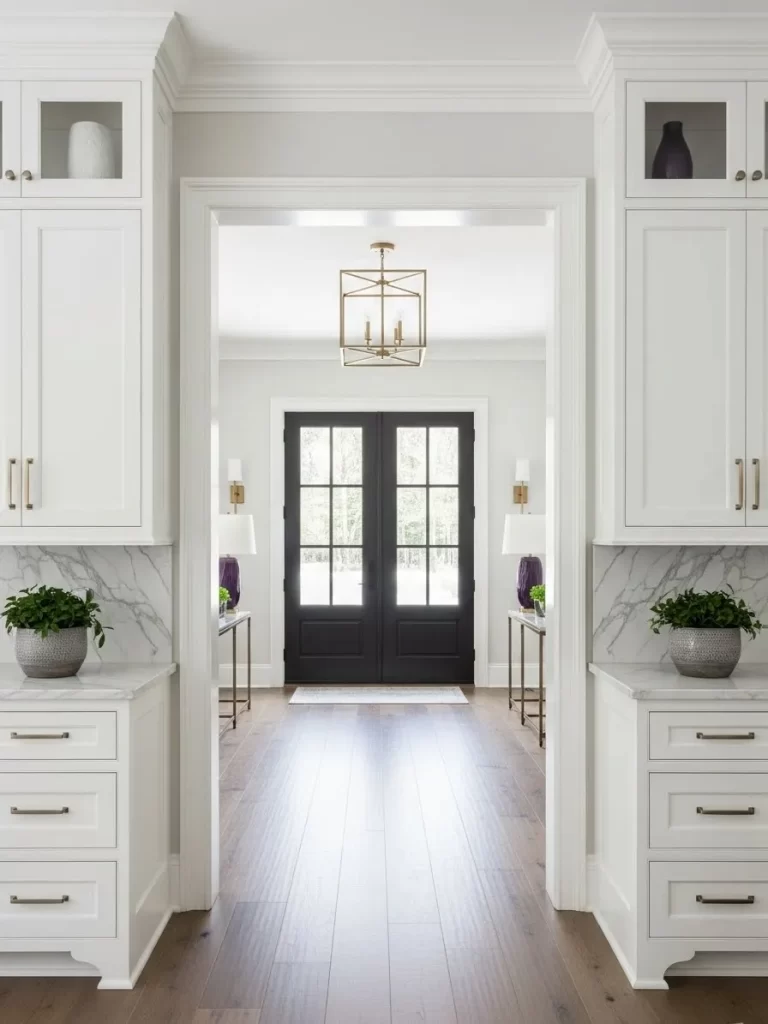
This hallway uses a high-contrast palette to create dramatic flow, drawing the eye directly toward the dark-framed entryway doors. The central element of the black French doors contrasts sharply with the bright white walls and cabinetry. This contrast acts as a visual anchor, pulling the observer through the transitional space.
The room achieves visual balance by flanking the pathway with identical white cabinetry and marble countertops. This mirrored arrangement creates a strong sense of symmetry and formal organization, guiding the eye down the corridor. Repetition in the small decorative details, such as the identical potted plants and the symmetry of the console tables, further reinforces the balanced approach.
The continuity is maintained through the dark wood flooring that runs toward the doorway and is illuminated by a central brass light fixture. The intentional use of white on the interior millwork and the dark tone on the distant door frame works together to establish a clear, compelling visual path.
Material Required List
- Dark, contrasting paint (e.g., matte black or deep charcoal).
- Painter’s tape and drop cloths.
- Fine-grit sandpaper.
- Primer (recommended if the door is currently light-colored).
Equipment Required List
- Angled paintbrush (for the trim and window grids).
- Small roller (for the main door panels).
- Screwdriver (for removing hardware).
- Safety glasses.
DIY Instruction Step by Step
- Preparation and Protection: Place drop cloths on the floor and use painter’s tape to carefully tape off the walls, door frame, and any glass in the door panels. Remove the door hardware (handles, locks) for the cleanest finish.
- Clean and Sand: Clean the door surface thoroughly with a mild degreaser. Lightly sand the entire door and trim with fine-grit sandpaper to create a better surface for the paint to adhere to. Wipe away the sanding dust completely.
- Prime the Surface: Apply a thin coat of quality primer, especially if the door is a glossy finish or a very light color. Allow the primer to dry completely.
- Paint the Details First: Using the angled brush, carefully paint the door trim, the recessed panels, and the thin grid pattern surrounding the glass. Take your time to achieve clean, crisp lines.
- Paint the Flat Surfaces: Use the small roller to apply the contrasting paint color to the main, flat surface of the door panels. Ensure you roll in a consistent direction for a smooth finish, avoiding heavy buildup of paint.
- Second Coat and Reassembly: Apply a second coat after the first has dried fully to achieve rich color depth. Once the paint is completely dry, remove the painter’s tape. Wait until the paint is fully cured before carefully reinstalling the clean hardware.
13. Unifying Industrial Texture and Warm Tones
Relevant Name: Exposed Structure Integration
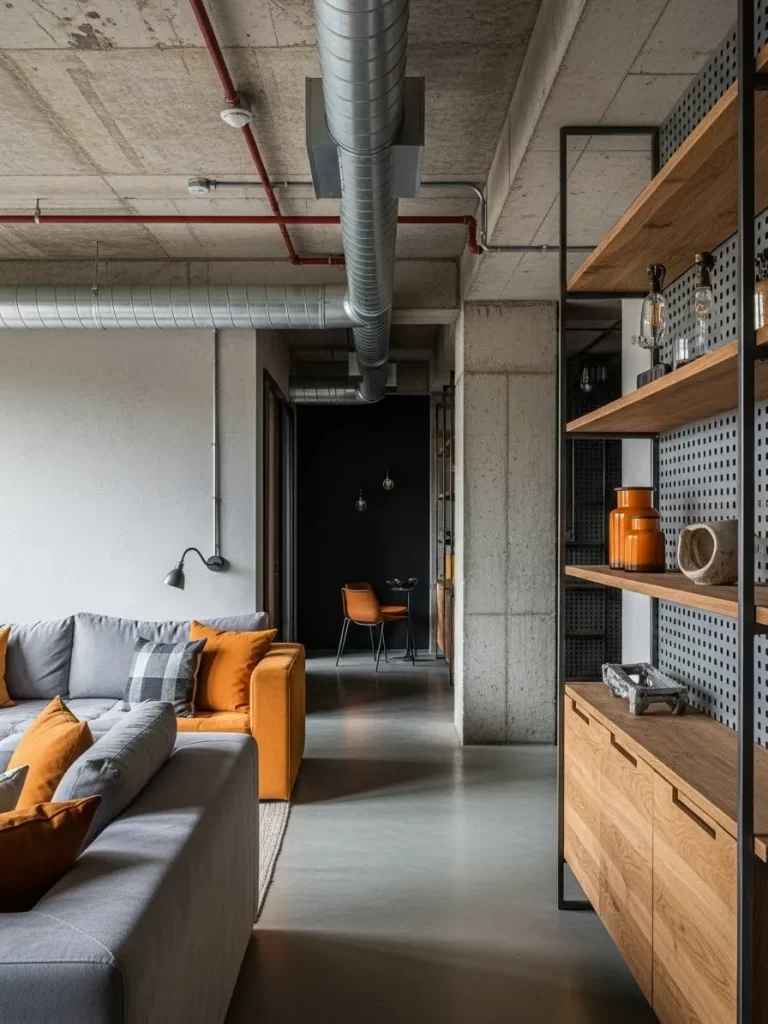
This open-concept space cleverly achieves cohesion by embracing an industrial aesthetic and softening it with a warm, repeated color. The exposed concrete ceiling, ductwork, and columns provide a raw, continuous texture that spans the entire area. This material consistency generates a strong, structural connection between the living area and the dining nook.
The crucial element of flow is the repeated use of warm orange tones in both functional zones. Orange pillows anchor the grey sectional in the foreground, and the same orange reappears on the dining chair visible through the doorway. This accent color acts as a trail, leading the eye naturally deeper into the dwelling.
The combination of the dark metal shelving frame and the light oak cabinet reinforces the industrial yet warm theme. Even the continuous polished concrete floor seamlessly ties the two zones together. The repetition of texture and a single strong accent color creates a cohesive, urban loft atmosphere.
Material Required List
- Orange-toned upholstery fabric (for sofa pillows or chair cover).
- Sewing supplies (thread, needle).
- Pillow forms (or existing pillows to cover).
- Accent chair (for re-upholstery or painting).
- Orange spray paint or furniture paint (if updating a chair frame).
Equipment Required List
- Sewing machine.
- Measuring tape.
- Safety glasses and drop cloths (if painting).
DIY Instruction Step by Step
- Select the Accent Color: Choose a vibrant, warm color (like the orange shown) that contrasts well with your existing neutral palette (grey, white, concrete). Ensure the color is used in at least two distinct zones.
- Create Cohesive Pillows: Measure and cut the orange upholstery fabric. Sew simple slipcovers for several throw pillows in the main seating area. For a unified look, make sure the fabric is consistent in tone and texture. Place these pillows strategically on the sofa.
- Update the Dining Chair: If the chair structure allows, update a dining chair or accent chair in the adjacent room to match the color. This can involve reupholstering the seat cushion with the same orange fabric or painting the chair frame itself.
- Prepping for Paint (Chair Frame): If painting a chair, lightly sand the frame. Clean off all dust. Tape off any areas you do not want to paint, such as wood seats or hardware.
- Painting the Chair: Apply a primer coat suitable for the chair’s material (wood or metal). Once dry, apply two thin, even coats of the orange furniture paint or spray paint. Allow ample drying time between coats.
- Accessorize to Complete the Flow: Place the newly colored chair in the dining nook or reading area. Introduce a few small, inexpensive accessories in the same orange tone (like a vase or bookends) in both the living space and the second zone. This provides subtle visual checkpoints that connect the two areas.
14. Reinforcing Theme with Repeated Geometric Shapes
Relevant Name: Spherical Repetition
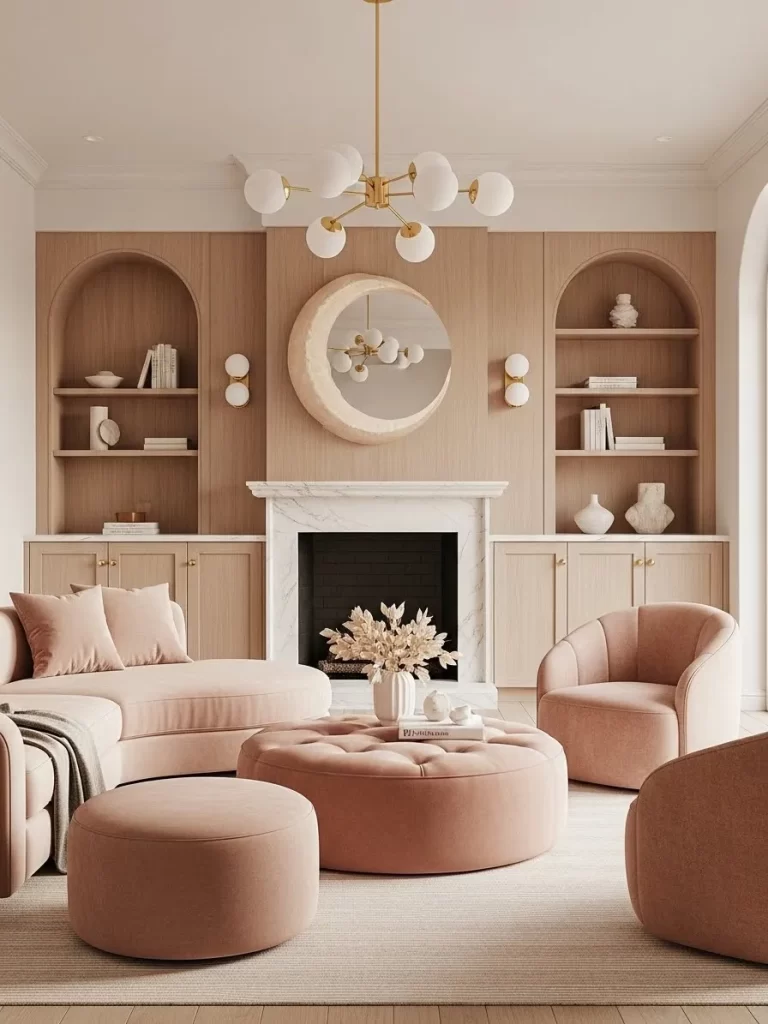
This living space achieves a soft, luxurious cohesion through the repeated use of spherical and arching geometric forms. The back wall features two arched built-in shelving units, which are mirrored by the prominent, circular moon-shaped mirror above the fireplace. The light fixture further emphasizes this theme with its multiple globe bulbs.
The overall feeling is unified by this consistent curvilinear language. The soft pink color palette of the velvet furniture, which includes a large circular ottoman, reinforces the gentle, rounded aesthetic. Repeating this theme makes the room feel intentional and harmonious.
The walls are clad in light wood paneling, which provides a cohesive backdrop for all the other elements. The combination of the continuous light wood texture and the repeated spherical shapes ensures that every piece of furniture and décor contributes to a single, delicate design statement.
Material Required List
- Round mirror or piece of plywood for the moon shape.
- MDF or lightweight wood (for the mirror frame).
- Wood glue and clamps.
- Paint (optional, to match the wood or wall color).
- Sawtooth picture wire and anchors (for hanging the mirror).
Equipment Required List
- Jigsaw (for cutting circular shapes).
- Measuring tape and pencil.
- Level.
- Drill/Driver.
- Sandpaper.
DIY Instruction Step by Step
- Source or Create the Mirror Shape: Decide on the size and shape of your feature mirror. You can purchase a large round mirror or use a piece of plywood cut into a circular or crescent moon shape using a jigsaw.
- Create the Frame/Detail: If aiming for a custom shape (like the crescent moon), draw the desired design onto MDF or thin wood. Carefully cut the shape out using a jigsaw. Sand the edges smooth.
- Attach the Mirror: If your final feature is a frame, paint or stain the frame piece to match the existing built-in wood. Once dry, carefully secure the mirror glass to the back of the frame using strong mirror adhesive, ensuring it is centered or positioned correctly within the frame.
- Integrate Arch Shapes (If Adding Shelves): If adding new arch-shaped built-ins, follow the steps provided in the earlier section (Image 1(2)) for creating smooth arch shapes in drywall or millwork. Ensure the arch radius complements the roundness of the mirror.
- Install the Light Fixture: Replace an existing fixture with a new light featuring multiple globe bulbs or spherical elements. Remember to turn off power at the breaker before working on electrical components. Follow the manufacturer’s instructions for mounting the fixture base and connecting the wires.
- Hang the Feature: Install appropriate wall anchors into the wall above the fireplace, ensuring they can support the weight of the mirror. Attach the hanging hardware (picture wire) to the back of the mirror frame and hang it, using a level to ensure it is centered and straight.
15. The Continuous White Frame Technique
Relevant Name: Unbroken White Sightline
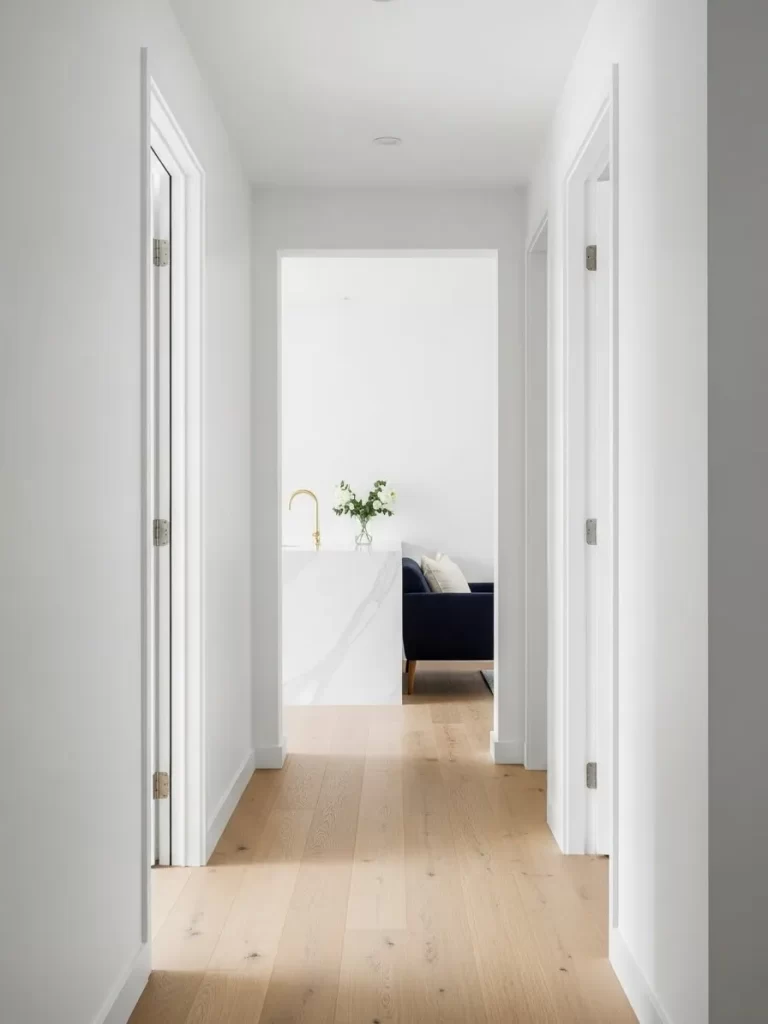
This hallway design relies on a continuous, high-contrast white frame to guide the viewer into the adjacent room. The walls, trim, and door casings are painted a crisp, uninterrupted white, which immediately draws the eye toward the open doorway ahead. This bright, consistent framework creates visual energy.
The warm, light wood flooring runs directly into the next room, ensuring no visual barrier stops the flow at the threshold. This strong, clean line created by the white boundaries and the uniform flooring successfully connects the transitional hallway with the visible kitchen or living area beyond.
A small glimpse of contrast in the next room—the dark blue sofa and the gold faucet—provides a focal point that rewards the eye’s journey down the corridor. This approach proves that keeping the structural elements white is a straightforward way to maintain bright, seamless movement between spaces.
Material Required List
- High-quality white semi-gloss or satin paint (for trim and doors).
- White matte or eggshell paint (for the walls).
- Painter’s tape and drop cloths.
- Wood filler and caulk.
Equipment Required List
- Paintbrushes (angled for trimming).
- Paint rollers and trays.
- Caulk gun.
- Sandpaper.
DIY Instruction Step by Step
- Preparation and Cleaning: Lay down drop cloths to protect the flooring. Clean all the trim, door casings, and walls thoroughly. Use wood filler on any holes in the trim and caulk any gaps where the trim meets the walls. Once dry, lightly sand and wipe clean.
- Tape and Prioritize Trim: Use painter’s tape to carefully mask off the walls where they meet the trim and the floor. Always paint the trim and doors first using the semi-gloss or satin white paint. This durable finish is easier to clean. Apply two coats.
- Paint the Walls: Once the trim paint is fully dry, remove the tape from the walls and then apply new tape to the trim and door casings to protect them. Apply two coats of the matte or eggshell white paint to the wall surfaces.
- Ensure Crisp Lines: Carefully remove the painter’s tape while the final coat of paint is still slightly tacky to avoid peeling. This method helps achieve the sharp, clean white lines essential for this look.
- Maintain the Floor: Ensure the continuous wood floor is clean and well-maintained right up to the threshold of the next room. This keeps the visual path unobstructed and bright, completing the flow created by the white frame.
16. Vertical Pattern Repetition and Color Continuity
Relevant Name: Fluted Surface Match
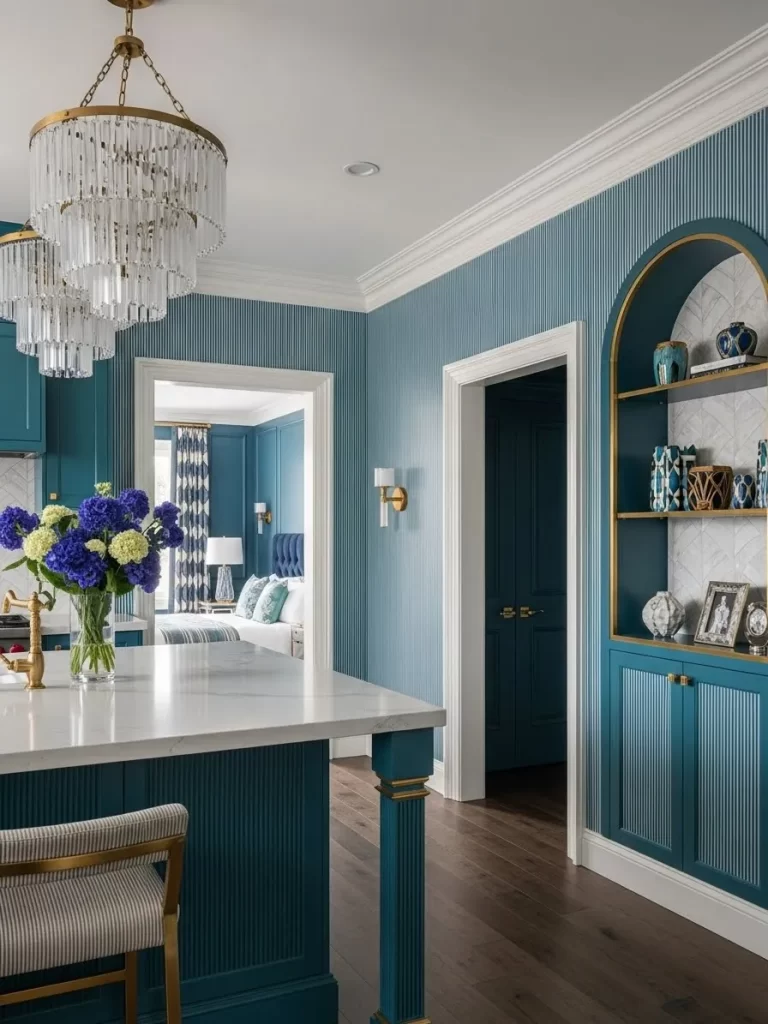
This richly colored space achieves incredible cohesion through the repetition of a fine vertical linear pattern and a deep teal color. The ribbed texture on the kitchen island base is precisely mirrored in the vertical stripe wallpaper covering the walls. This texture repetition generates a sophisticated, layered feeling of unity.
The dominant teal color is used consistently across the walls, cabinets, and island, preventing the room from feeling choppy or disconnected. The color is carried seamlessly into the adjacent bedroom, where the headboard and window treatments pick up the same intense blue-green shade. This color-matching ensures a visual link between the two functional areas.
The arching built-in cabinet provides an architectural focal point, subtly echoing the shape of the doorways and softening the strong vertical lines. Details like the brass accents on the lighting, shelving, and island legs add warmth and a subtle metallic continuity throughout the entire space.
Material Required List
- Fluted or ribbed wood paneling (for the kitchen island).
- Wallpaper (with a coordinating vertical stripe or linear pattern).
- Strong adhesive (for the paneling).
- Wallpaper paste or pre-pasted paper.
Equipment Required List
- Measuring tape and level.
- Miter saw (for clean cuts on the paneling).
- Utility knife and smoothing tool (for wallpaper).
- Caulk gun (for adhesive).
DIY Instruction Step by Step
- Prepare the Island Base: Measure the surface area of the kitchen island base you wish to cover. Cut the fluted or ribbed paneling (MDF or wood) to fit these measurements precisely, paying attention to corners and edges. Use a miter saw for clean 45-degree angle corner cuts.
- Apply the Fluted Paneling: Apply construction adhesive to the back of the fluted panels in a wavy pattern. Press the panels firmly onto the island base, ensuring they are perfectly level and plumb. You may need to use clamps or painter’s tape to hold them in place while the adhesive cures.
- Apply the Wallpaper: Prep the walls by cleaning and priming them. Measure the wall height and cut the wallpaper strips, carefully aligning the vertical linear pattern. Apply the paste (or activate the pre-paste) and hang the first strip, ensuring it is plumb using a level.
- Match the Pattern: Carefully align the next strip of wallpaper, ensuring the vertical lines and any subtle pattern elements match seamlessly with the previous strip. Use a smoothing tool to press out air bubbles and secure the paper. Continue across all desired wall areas.
- Cut Around Obstacles: Use a sharp utility knife to carefully trim the wallpaper around the door casings, windows, and the archway, ensuring clean, professional edges.
- Extend the Color: If the cabinets and island were not already the deep teal, paint them now. For the adjoining room, select textiles (like the headboard fabric or throw pillows) that are an exact match or a very close shade of the dominant teal color to carry the theme.
17. Integrated Lighting as a Seamless Flow Tool
Relevant Name: Subtle Light Integration
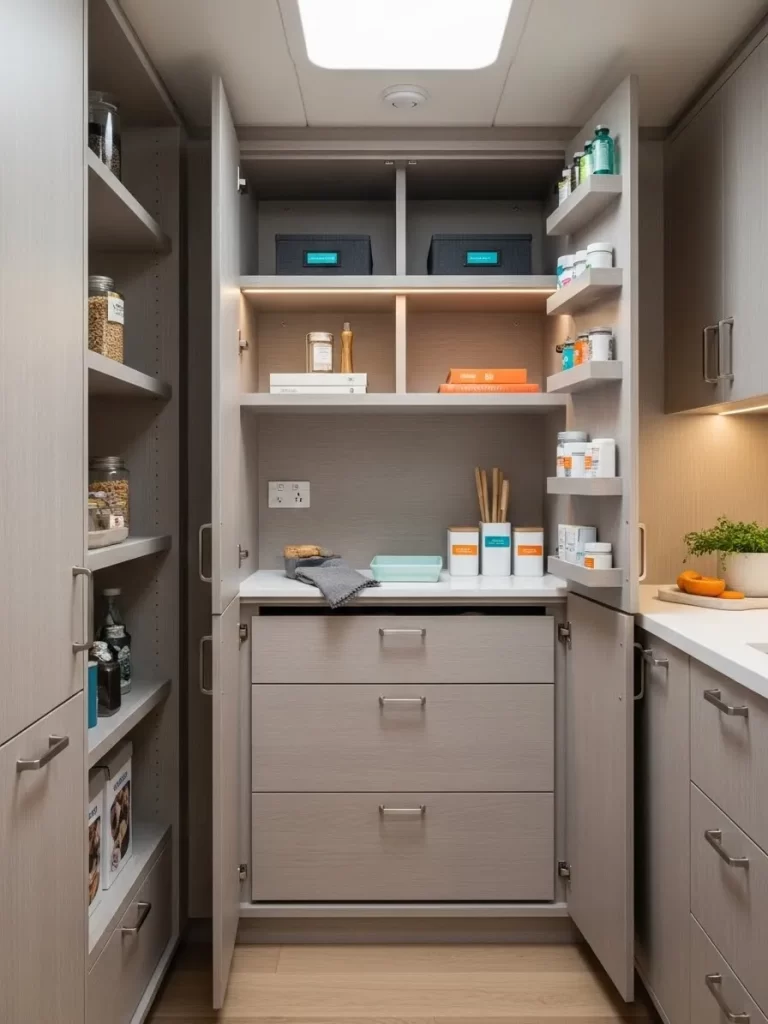
This image focuses on a highly organized pantry, where the flow is achieved through hidden and recessed lighting that creates a continuous, warm glow. Strips of LED lighting are seamlessly integrated beneath the shelves and inside the cabinet casings. This technique eliminates harsh shadows and bathes the entire space in consistent, inviting light.
The uniformity of the cabinetry material, a light, wood-grain veneer, contributes to the calm, cohesive atmosphere. The light color prevents the narrow space from feeling claustrophobic. The hidden lighting emphasizes the clean lines and the organized nature of the storage.
Even the lighting in the drawers, which likely turns on when the drawers are opened, maintains this theme of hidden, continuous illumination. This thoughtful application of lighting creates a uniform visual experience, making the utilitarian space feel like a fully integrated, bright part of the home.
Material Required List
- LED strip lighting (in warm white, dimmable preferred).
- Aluminum or plastic channel track (to house the LED strips and diffuse light).
- Power supply/transformer (correctly rated for the total length of the strips).
- Low-voltage wire and connectors.
- Cable clips or adhesive backing.
Equipment Required List
- Measuring tape and pencil.
- Wire cutters and strippers.
- Drill/Driver (for mounting tracks).
- Soldering iron (optional, for connecting strips).
- Non-contact voltage tester (for checking connections).
DIY Instruction Step by Step
- Measure and Plan: Measure the exact length beneath each shelf and inside any cabinet areas where you want the light. Plan the path of the wiring, aiming to hide the transformer inside a cabinet or pantry closet.
- Cut and Mount the Tracks: Cut the aluminum or plastic channel tracks to the measured lengths. Secure the tracks to the underside of the shelves near the front edge using small screws or the provided adhesive backing. The track helps create a clean, diffused light line.
- Install the LED Strips: Peel the adhesive backing from the LED strips and carefully press them into the mounted tracks. Run the strips as close to the measured edge as possible.
- Connect the Wiring: Using low-voltage wire, connect all the individual LED strips in sequence. Run the wiring through small, discreet holes drilled through the cabinet side walls or up the back corners of the shelves. Use cable clips to secure the wires neatly.
- Connect the Power Supply: Connect the end of the LED strip circuit to the power supply/transformer. Plug the transformer into a nearby outlet (or have an electrician hardwire it).
- Test and Conceal: Test the lights to ensure the illumination is even. Conceal the power supply and any excess wiring inside a dedicated, out-of-sight area in the pantry. The resulting light should be warm and continuous, highlighting the contents without glare.
18. Grid Pattern as a Cohesive Overlay
Relevant Name: Repetitive Linear Framework
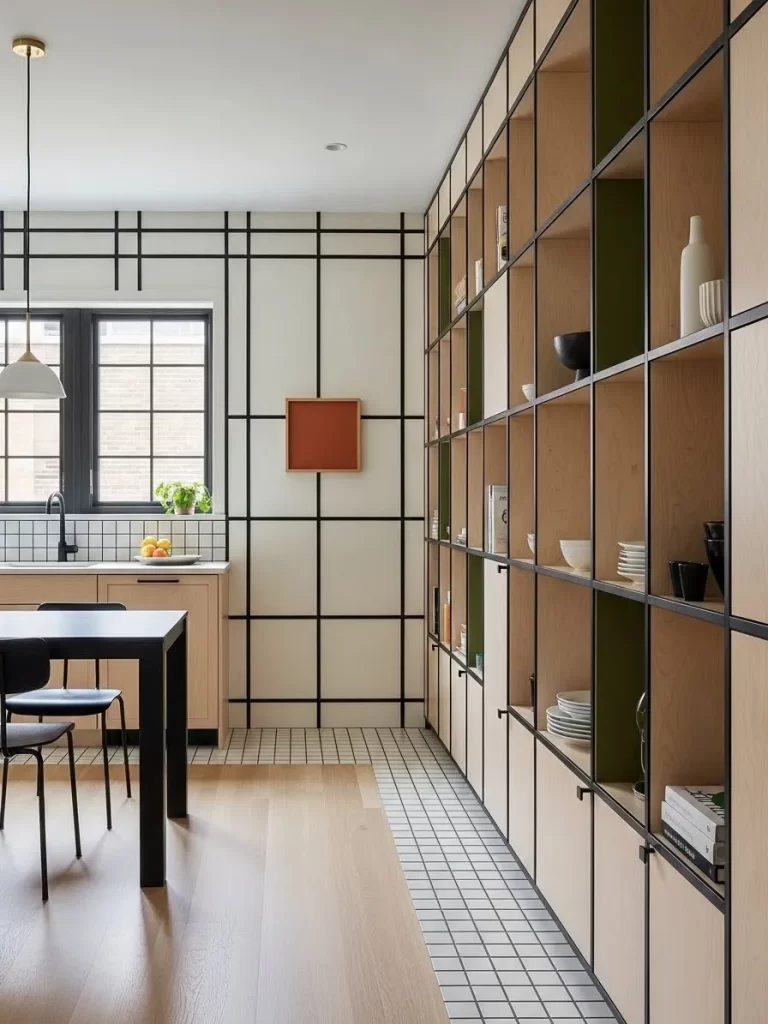
This kitchen design masterfully uses a bold, black grid pattern as a unifying overlay across multiple surfaces. The fine black lines create a continuous framework on the tiled backsplash, the walls, and the floor tile. This repeated geometric structure immediately ties together the various vertical and horizontal planes.
The consistent framework is repeated in the black window grid and the large, custom shelving unit, where black metal outlines the natural wood cubbies. This ensures that the storage, the architecture, and the surface materials all speak the same graphic language. The black grid holds the light materials—white walls, wood cabinets—together.
The unexpected shift in flooring material from wood planks to patterned tile is handled successfully by running the grid pattern across the entire floor area. The light wood tone of the cabinets and plank floor provides a warm contrast to the graphic black lines, making the overall design feel balanced and intentionally cohesive.
Material Required List
- Black matte permanent vinyl tape (thin line).
- Alternatively, black paint and fine-tipped paint markers.
- Long straightedge or metal ruler.
- Measuring tape and pencil.
Equipment Required List
- Level.
- Utility knife (for cutting tape).
- Drop cloths.
DIY Instruction Step by Step
- Measure and Plan the Grid: Measure the wall and floor surfaces where you want to apply the grid. Decide on a consistent spacing (e.g., 10 inches between lines) for the grid squares. This measurement must be used on all surfaces for cohesion.
- Mark the Grid Lines: Use a pencil and a long level or straightedge to lightly mark the vertical and horizontal grid lines on the wall. Ensure the lines are level and perfectly square to each other.
- Apply Vinyl Tape (Recommended Method): Starting from the corner, apply the thin black vinyl tape precisely along the marked pencil lines. Use the straightedge to press the tape down firmly, eliminating all bubbles. Use a sharp utility knife to cut the tape cleanly at the edges and where lines intersect.
- Paint Marker Option (Alternative): If using a paint marker or fine brush, carefully paint the lines over the pencil markings. This requires a very steady hand and multiple coats for a solid black line.
- Grid on the Floor: Extend the grid pattern onto the floor surface (if not already there). If using tape, ensure the floor is extremely clean and dry before application. Consider using a sealant over the tape in high-traffic areas for durability.
- Final Touches: Wipe away all pencil marks. Ensure the final grid lines connect visually across all surfaces, from the window frame to the shelving unit, making the pattern feel like a single, seamless design overlay.
19. Embracing Natural and Raw Textures
Relevant Name: Rough-Hewn Consistency
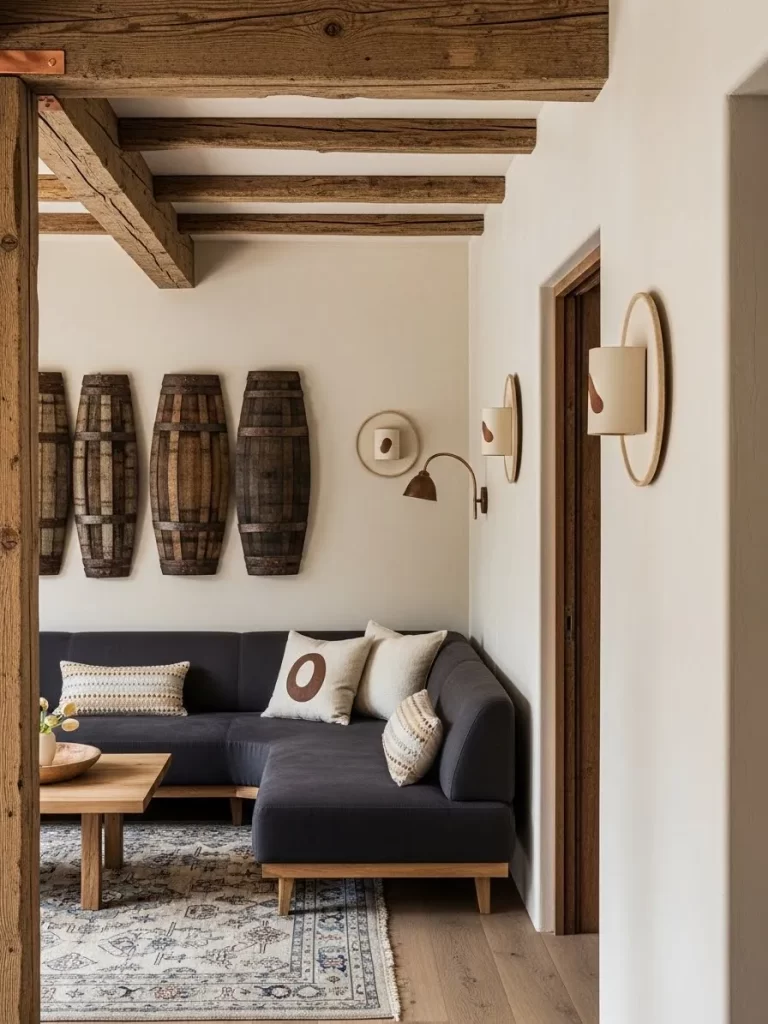
The striking cohesion in this living area stems from the consistent use of aged, rough-hewn wood textures. The exposed ceiling beams, the wide-plank wood floor, the door frame, and the raw-wood coffee table all share a distressed, earthy quality. This repeated use of natural, rustic texture instantly generates a unified, grounded atmosphere.
The large decorative barrels on the wall are made of similar aged wood, reinforcing the theme of raw material and craftsmanship. By repeating the light wood tone on smaller details, like the circular wall sconces and the sofa base, the design ensures the texture is present at every level of the room.
The darker, plush textures of the sofa and the patterned rug provide a soft contrast to the heavy wood, yet the overall palette remains warm and earthy. This technique demonstrates that consistency in texture can be just as important as consistency in color for establishing seamless flow between elements.
Material Required List
- Reclaimed wood beams (for display or non-structural ceiling application).
- Wood stain (dark and light brown, for aging).
- Protective clear matte sealant.
- Sandpaper (medium and coarse grit).
Equipment Required List
- Miter saw or circular saw.
- Wire brush or angle grinder with a wire wheel attachment (for distressing).
- Drill/Driver and long screws or heavy-duty brackets (for mounting beams).
- Safety gear (glasses, heavy gloves, dust mask).
DIY Instruction Step by Step
- Source and Cut the Wood: Obtain salvaged or reclaimed wood for the beams, or use new wood and cut it to the required lengths. If using new wood, select pieces with a strong grain.
- Distress the Wood: Use the wire brush attachment on an angle grinder to aggressively remove softer wood fibers and create deep grooves, mimicking years of wear. Alternatively, strike the wood with chains or screws to add dents and marks for a rustic appearance.
- Apply Stain and Aging: Apply a dark wood stain liberally, then immediately wipe off most of it with a rag, allowing the stain to settle into the distressed grooves. Follow up with a lighter, slightly grey wash stain in selected areas to simulate natural weathering. Allow to dry.
- Seal for Protection: Apply a matte clear sealant to all surfaces of the wood. This protects the finish while keeping the raw, unpolished look.
- Mount the Beams (Non-Structural): If mounting for decoration, locate and mark the ceiling joists. Attach heavy-duty brackets to the joists. Lift the prepared beams into place and secure them firmly to the brackets with long screws.
- Repeat the Texture: Ensure the natural or raw wood texture is present in other elements. For instance, use rough-sawn wood for the coffee table or select accessories made of unpolished, earthy materials to reinforce the cohesive theme.
20. Segmented Color Blocking in Transitional Spaces
Relevant Name: Vertical Color Zoning
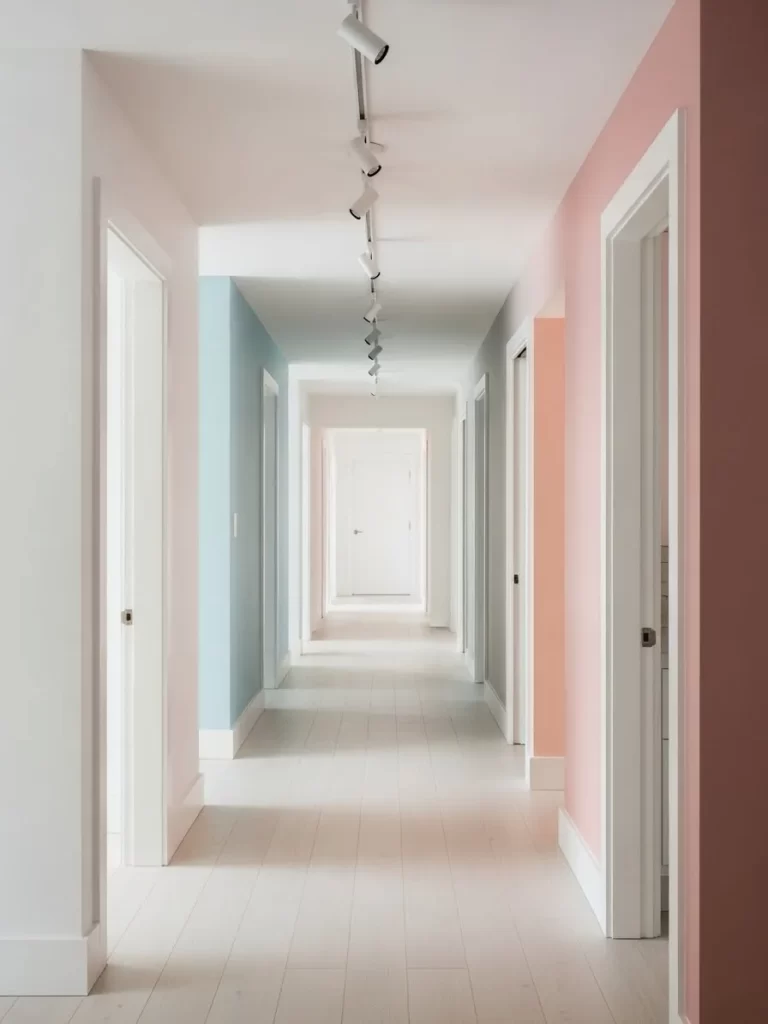
This long, narrow hallway uses vertical color blocking to create visual segments, giving structure and personality to a space that could otherwise feel monotonous. Bold blocks of color—like the dusty rose pink and the light aqua blue—are applied only to the wall sections between the door casings.
The white trim and door frames remain consistent throughout the entire length of the hallway, acting as a clean, continuous frame that separates and highlights each color zone. This technique allows for playful use of multiple colors without sacrificing a feeling of flow, as the white frame ensures all elements are visually connected.
The light wood floor runs uninterrupted down the center, providing a neutral foundation that grounds the colorful walls. The repetition of the white door frames creates a rhythmic pattern, and the track lighting overhead reinforces the linear journey toward the bright white doorway at the far end.
Material Required List
- Two or more complementary paint colors (matte finish recommended).
- Crisp white paint (for all trim and doors).
- High-quality painter’s tape.
- Drop cloths.
Equipment Required List
- Measuring tape and level.
- Paintbrushes (angled for trimming).
- Small paint rollers.
DIY Instruction Step by Step
- Prep and Paint the White Frame: Ensure all door casings, baseboards, and the ceiling are painted in the crisp, bright white. Use this as your starting point. Lay down drop cloths.
- Measure the Color Blocks: Measure the wall space between two adjacent door casings. This will be your first color block. Use a level and a pencil to mark a perfectly straight vertical line where the color block will end (where the white trim of the next door casing begins).
- Apply Tape for the Blocks: Apply painter’s tape exactly along the edge of the door casings and baseboards. Now, apply a strip of painter’s tape precisely on the pencil line you drew to define the vertical edge of the block.
- Paint the First Color: Apply the first color (e.g., dusty rose) within the taped-off wall section. Use a small roller for smooth application. Apply a second coat if needed for full coverage.
- Paint the Next Color: Once the first color is dry, carefully remove the tape defining its vertical edge. Move down the hall to the next wall segment and repeat steps 2, 3, and 4, applying the second color (e.g., aqua blue). Ensure the white door casings act as the only separator between the colors.
- Finishing the Edges: Remove all remaining painter’s tape while the final coat is still slightly tacky to achieve sharp, clean lines between the colored walls and the continuous white trim. The result is a segmented but cohesive corridor.
21. Utilizing Wainscoting to Unify Wall Space
Relevant Name: Mid-Wall Material Consistency
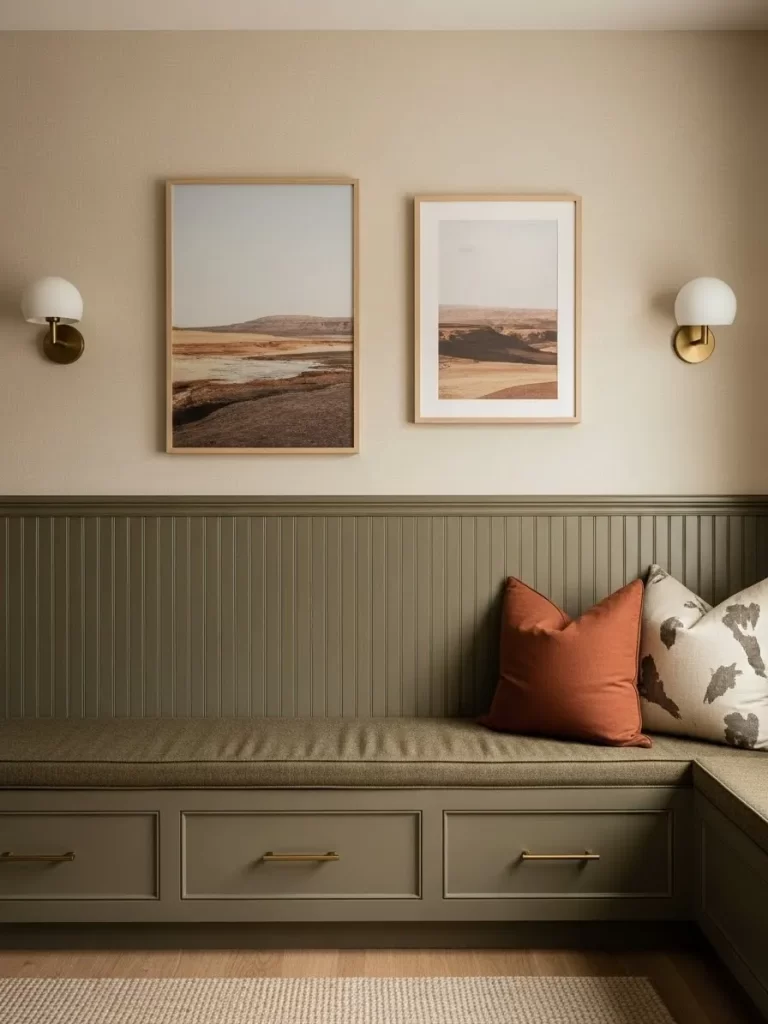
This seating area achieves immediate cohesion by applying a single, continuous material—beaded wainscoting—to the lower half of the walls. The earthy olive green color on the wainscoting creates a strong, grounding band that runs beneath the window and around the corner into the storage bench, visually linking these different architectural features.
This consistent horizontal line provides structure to the wall plane, preventing the space from feeling disjointed. The upper wall, painted a neutral warm beige, is kept light, allowing the artwork to stand out while complementing the lower section’s color. This dual-tone strategy is effective in transition areas.
The long seat cushion and matching throw pillows in complementary earth tones—burnt orange and deep taupe—reinforce the color continuity established by the wainscoting. The repeated horizontal lines of the trim and vertical lines of the paneling ensure a rhythmic, calm flow across the room.
Material Required List
- Beaded paneling (MDF or thin wood, cut to the desired height).
- Wood glue and finish nails.
- Primer and paint (in the chosen olive green color).
- Wood filler and caulk.
- Small trim pieces (for the top cap rail).
Equipment Required List
- Measuring tape and level.
- Miter saw (for clean cuts and corners).
- Caulk gun.
- Hammer and nail set (or pneumatic nailer).
- Paintbrushes and roller.
DIY Instruction Step by Step
- Measure and Mark the Height: Determine the height you want the wainscoting to reach (typically one-third to two-thirds of the wall height). Use a long level and pencil to mark a continuous, straight line around the entire room.
- Cut and Prep the Panels: Cut the beaded paneling pieces to fit the sections of the wall, ensuring the vertical lines of the paneling are straight. If building the storage bench, attach the paneling to the bench front and sides.
- Attach the Paneling: Apply construction adhesive to the back of the first panel. Press it firmly onto the wall, aligning the top edge precisely with your marked line. Secure the panel further with finish nails driven into the wall studs, sinking the nail heads slightly below the surface.
- Install the Top Cap Rail: Cut and attach a decorative trim piece (the cap rail) along the top edge of the paneling. Use a miter cut for clean corners. Secure the cap rail with wood glue and finish nails.
- Caulk and Fill: Use wood filler on all visible nail holes and caulk all seams where the trim meets the wall, floor, or bench. This seals the installation and prepares it for painting.
- Prime and Paint: Apply primer over the raw wood or MDF, then apply two coats of the olive green paint to the entire wainscoting and the baseboard trim below it, ensuring a consistent, durable finish.
22. Using Translucent Glass Partitions for Shared Light
Relevant Name: Diffused Transparency

This open-concept space maintains a light, airy flow by using a large, stationary partition of reeded or fluted glass. The glass wall physically separates the kitchen/bar area from the living room, offering functional division without sacrificing a sense of connection. The ribbed texture of the glass blurs the view, creating soft privacy while allowing light to pass through.
The consistency of the overall light palette—white countertops, pale grey walls, and light terrazzo flooring—is maintained across both zones. The transparency of the partition ensures that the natural light from the large windows in the living area reaches the kitchen.
Natural woven elements, like the wicker pendant light and the rattan bar stools, are repeated across the divider. This common material language ensures that even with a physical barrier, the design theme remains unified. The glass partition successfully balances separation with shared light and style.
Material Required List
- Aluminum or wood framing pieces (for the partition grid).
- Reeded or fluted glass panels (sized to fit the frames).
- Silicone sealant (clear).
- Construction adhesive and screws.
Equipment Required List
- Measuring tape and level (a plumb line is essential).
- Miter saw (for cutting frame pieces).
- Drill/Driver.
- Glass suction cups (for handling glass).
- Safety gear (glasses, gloves).
DIY Instruction Step by Step
- Measure and Build the Frame: Precisely measure the opening where the partition will sit, from floor to ceiling and wall to wall. Cut the wood or aluminum frame pieces to create the border and any internal grid lines, using miter cuts for clean corners.
- Mount the Frame: Secure the top, bottom, and side perimeter frame pieces to the floor, ceiling, and adjacent walls. Use a level and plumb line to ensure the frame is perfectly straight and square before securing it with long screws or appropriate construction anchors.
- Install the Internal Grids: Install any internal vertical and horizontal frame pieces to create the desired grid pattern. These pieces will hold the individual glass panels.
- Place the Glass Panels: With great care (and using glass suction cups), place the reeded glass panels into the frame openings. Ensure the textured side of the glass is oriented consistently (e.g., all vertical).
- Secure and Seal: Once all panels are in place, use clear silicone sealant around the interior perimeter of each glass panel where it meets the frame. This holds the glass securely and prevents rattling. Allow the silicone to cure fully.
- Finishing Touches: Paint or finish the frame pieces to match the existing interior trim. The goal is a clean, structural element that divides the room while maintaining visual lightness.
23. Combining Textures for Depth and Continuity
Relevant Name: Mixed Material Repetition
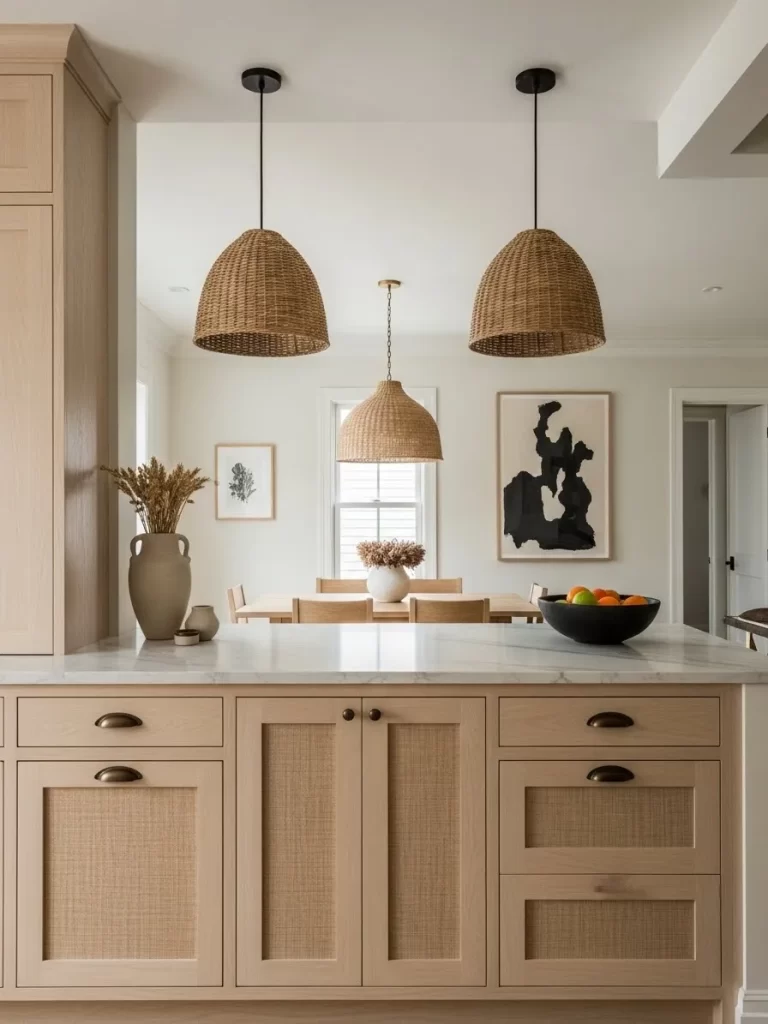
This kitchen achieves effortless flow by introducing a specific woven texture and repeating it across the cabinet fronts and the lighting fixtures. The lower cabinets feature panels of cane or rattan webbing, providing a unique tactile element. This same woven texture is then prominently featured on the large, oversized pendant lights above the island.
The consistent material—light oak wood—unites all the structural elements, from the cabinets to the central dining table visible through the doorway. This shared wooden foundation prevents the mixed textures from looking messy. The light wood grain provides a warm, neutral base for the woven patterns.
The continuous repetition of the woven element and the warm wood tone ensures that the kitchen island, the dining area, and even the entryway (suggested by the other pendant) all belong to one sophisticated design story. The neutral color palette with white marble and beige walls lets the texture do the talking.
Material Required List
- Cane webbing or rattan sheeting.
- Wood trim pieces (to create frames for the cane).
- Wood glue and small nails.
- Stain or paint (matching the existing cabinet color).
Equipment Required List
- Utility knife or sharp scissors (for cutting cane).
- Water basin (for soaking cane).
- Measuring tape.
- Clamps.
- Staple gun and staples.
DIY Instruction Step by Step
- Measure and Cut Cabinet Openings: Carefully measure the inner panels of the cabinet doors where the woven material will be inserted. Remove the existing door panels, leaving a frame, or build new door frames with an opening that will hold the cane.
- Soak the Cane: Submerge the cane or rattan webbing in warm water for about 30 minutes. This makes it flexible and easier to work with.
- Cut the Cane: While the cane is still damp, cut it to a size slightly larger than the cabinet opening, leaving at least an inch of excess around all sides.
- Attach the Cane: Lay the damp cane over the back of the cabinet door opening. Using a staple gun and small staples, pull the cane taut and staple it securely to the inside edge of the wood frame. As the cane dries, it will shrink and pull tighter, creating a drum-tight surface.
- Trim and Secure: Trim the excess cane webbing. If your door has a groove, gently press the edges of the cane into the groove. For a finished look, use small wood trim pieces (stop molding) to cover the stapled edges on the inside of the door frame, securing the trim with wood glue and tiny finish nails.
- Source Woven Lights: Find pendant lights or other accessories made from the same woven material (rattan, wicker, jute) to place in the adjacent dining area or living room, ensuring the material continuity is seen throughout the open space.
24. Maximizing Organization with Repetitive Modular Units
Relevant Name: Systematic Modular Storage

This utility room achieves supreme flow and visual coherence through the extensive use of repetitive, modular storage units. The blonde plywood units, framed with silver metal, are installed wall-to-wall and floor-to-ceiling. This uniform, systematic approach to storage is highly organizing.
The key to the cohesion is the strict repetition in the shelving design, the consistent sizing of the drawers, and the arrangement of the white storage baskets. The grid structure, with its alternating wood and metal components, is an organizing principle that repeats across the center island and the wall shelving.
The subtle use of color on the drawer pulls—small accents of yellow and red—provides visual interest without breaking the overarching theme of structured utility. The clean line of the track lighting reinforces the streamlined, highly functional atmosphere established by the uniform units.
Material Required List
- Plywood or MDF sheets (for drawer boxes and shelving).
- Aluminum or steel square tubing (for the modular frame).
- Drawer slides and handles/pulls.
- Screws and connecting hardware.
Equipment Required List
- Table saw and miter saw.
- Drill press and drill/Driver.
- Measuring tape and level.
- Clamps and square.
DIY Instruction Step by Step
- Design the Grid: Plan a simple, repetitive module size (e.g., 18 inches wide by 12 inches high) for the drawers and shelves. This ensures the design is easy to build and maintain throughout the space.
- Build the Metal Frames: Cut the square tubing to the lengths needed for the vertical and horizontal frame members. Weld or use special connecting hardware to assemble the skeletal metal framework for the wall unit and the central island. Ensure the frame is square and stable.
- Construct the Wood Modules: Cut and assemble the plywood or MDF into simple square or rectangular boxes that fit precisely into the openings of the metal frame. Construct the drawer boxes, attaching high-quality drawer slides.
- Assemble and Install: Slide the wood box modules into the metal frame. Secure the metal frame to the wall studs using strong anchors. For the island, ensure the frame is secured to the floor or is heavy enough to remain stable.
- Install Drawers and Shelves: Install the drawer fronts onto the boxes, aligning them carefully to maintain the consistent gaps between units. Install the shelf inserts.
- Accessorize for Cohesion: Purchase identical storage baskets in a neutral color (like white) to use across all open shelving. This repetition of functional accessories completes the modular, systematic look and maintains visual order.
25. Consistent Color and Contrast in Paired Rooms
Relevant Name: Shared Wall Color
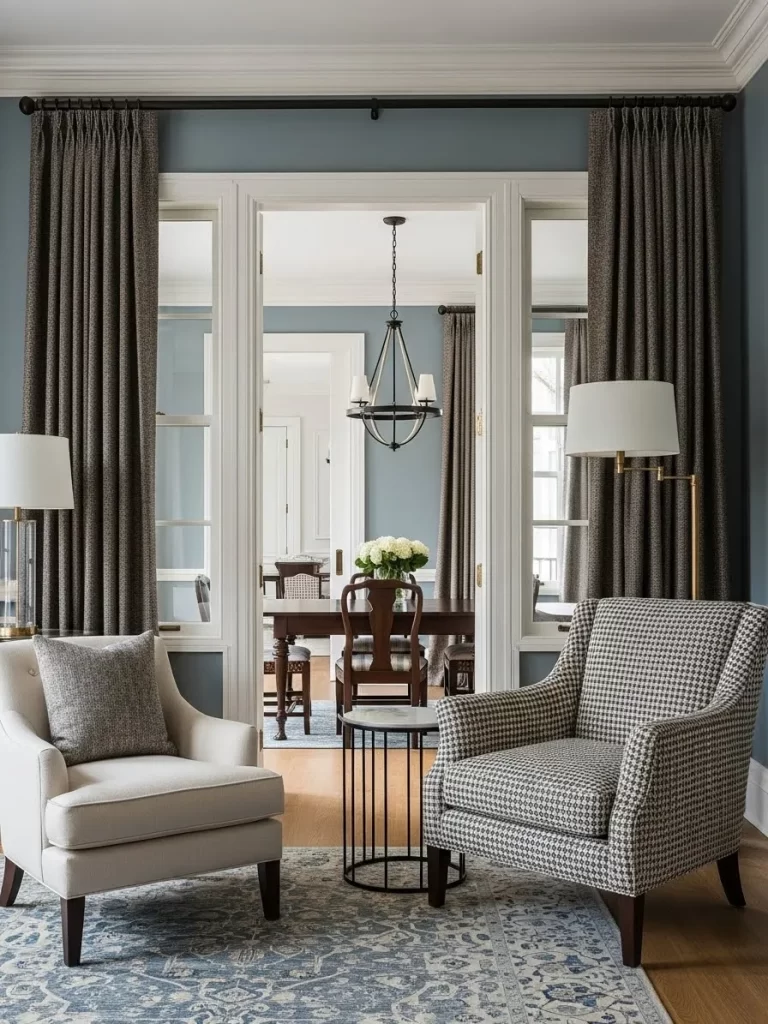
This beautiful transition between a living room and a dining room is achieved through the powerful technique of using the same soft, dusty blue paint color on the walls of both spaces. Despite the architectural separation of the double glass French doors, the shared color ensures the rooms feel like different zones within a single, continuous dwelling.
A strong contrast is created by the bright white millwork—the door frames, window frames, and crown molding—which is consistent in both rooms. This white trim acts as a clean, unifying border that frames the shared wall color.
Textiles further support the flow: the blue-grey area rug in the foreground subtly picks up the wall color, while the dining room also uses tones that harmonize with the shared blue. The repetition of window treatments, like the dark-patterned drapery flanking the opening, helps to frame the view and guide the eye from one space to the next.
Material Required List
- Soft, dusty blue interior paint (in one batch for consistency).
- Primer (optional, for coverage).
- Drop cloths and painter’s tape.
Equipment Required List
- Paintbrushes and rollers.
- Ladder or step stool.
DIY Instruction Step by Step
- Preparation and Protection: Move all furniture out of the way. Lay down drop cloths to protect the flooring in both the living room and the adjacent dining room. Use painter’s tape to carefully mask off all the white trim, crown molding, and baseboards in both rooms.
- Ensure Wall Uniformity: Before painting, repair any imperfections in the walls. Apply a coat of primer if you are covering a dark color or if the walls have different textures.
- Apply the Shared Color: Using the same roller and paint batch, apply the first coat of the soft blue paint to the walls of the living room. Immediately move to the adjacent dining room and apply the same color to those walls. Painting them concurrently ensures the color tone cures identically.
- Second Coat for Depth: Allow the first coat to dry fully. Apply a second, even coat to both rooms. Look back and forth between the doorways to ensure the color appears consistent across the threshold.
- Finishing Touches: While the paint is still slightly tacky, remove the painter’s tape to reveal the crisp white trim border. This strong contrast with the continuous blue wall color is essential for the cohesive look. Introduce new textiles that either match or complement the new shared wall color.
26. Dynamic Pattern Continuity Across Surfaces
Relevant Name: Organic Spot Pattern
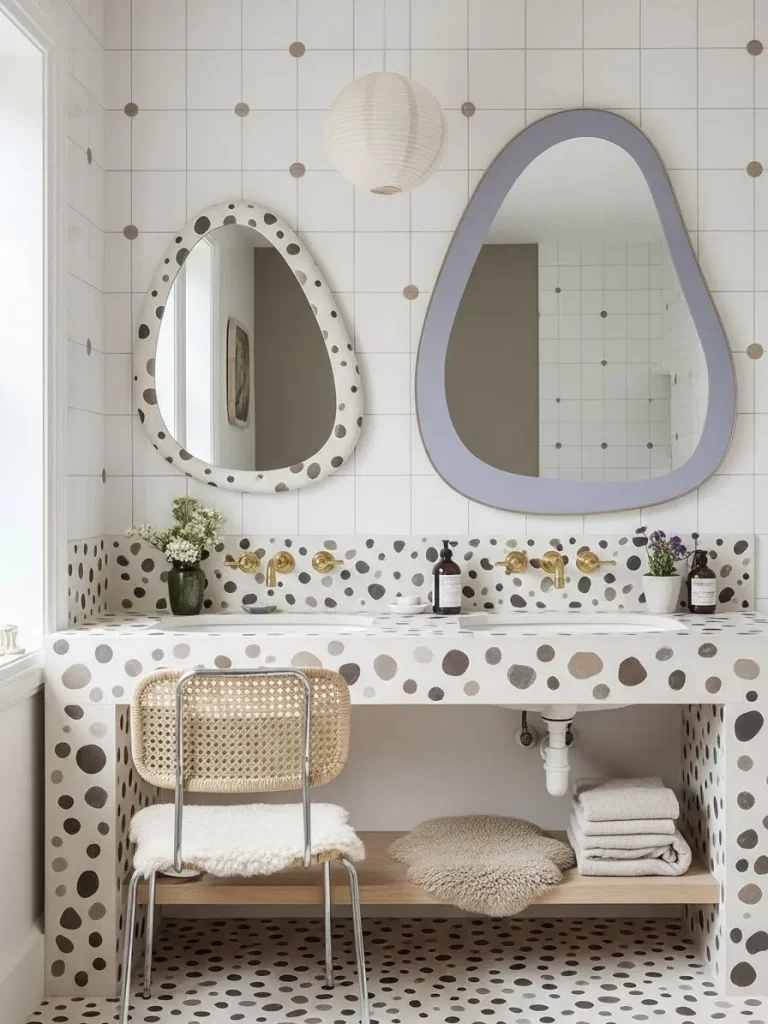
This bathroom achieves highly dynamic cohesion by using a consistent, playful organic spot pattern that spans multiple surfaces. The same pattern of various sized, earth-toned circles is used on the floor tiles, the custom countertop, and the wall accent tiles. This repeated visual motif immediately ties the lower and upper planes of the room together.
The large, amoeba-shaped mirrors, while slightly different in size and frame, reinforce the organic, rounded theme of the spot pattern. Their unique, fluid shapes prevent the repeated pattern from feeling too rigid or predictable.
The use of bright white subway tile on the upper walls and the white fixture background provides a clean, neutral contrast to the strong pattern below. The repetition of warm brass fixtures at the sinks further adds a continuous metallic accent across the vanity area.
Material Required List
- Patterned tile (or custom terrazzo material) for the floor and vanity top.
- Paint and stencils (alternative for the wall if tile is too difficult).
- Grout (matching the base color of the tile).
Equipment Required List
- Tile cutter or wet saw.
- Trowel (for spreading mortar).
- Grout float.
- Measuring tape and level.
DIY Instruction Step by Step
- Source the Pattern: Source a tile or custom stone (like a speckled terrazzo) that features a distinct, repetitive pattern. For a DIY pattern, purchase stencils and paint in the desired spot shapes and colors.
- Install the Floor and Vanity Top: Install the patterned floor tile first, ensuring the pattern flows continuously across the floor area. Install the custom vanity countertop material. If using terrazzo, ensure the edge profile is smooth.
- Extend the Pattern to the Walls: Decide how the pattern will extend upward. If using matching tile, install a band of the patterned tile above the vanity (like a backsplash). If stenciling, carefully mark the pattern alignment.
- Stenciling the Walls (Alternative): Use painter’s tape to define the stenciled area. Apply the first color of paint through the stencil, maintaining a consistent space between each spot. Allow to dry completely. Repeat with additional colors and spot sizes until the pattern density matches the floor/vanity.
- Grout and Seal: If using tile, apply grout to all tiled areas (floor and walls). Wipe clean with a sponge. Once dry, apply a protective sealant to the floor and vanity top, ensuring the finish is consistent.
- Hang the Organic Mirrors: Install the unique, organically shaped mirrors over the vanity area. Ensure their shapes complement the spots and the warm brass hardware is repeated consistently across the fixture selection.
27. Subtle Tone-on-Tone Cohesion
Relevant Name: Soft Grey Monochromatics
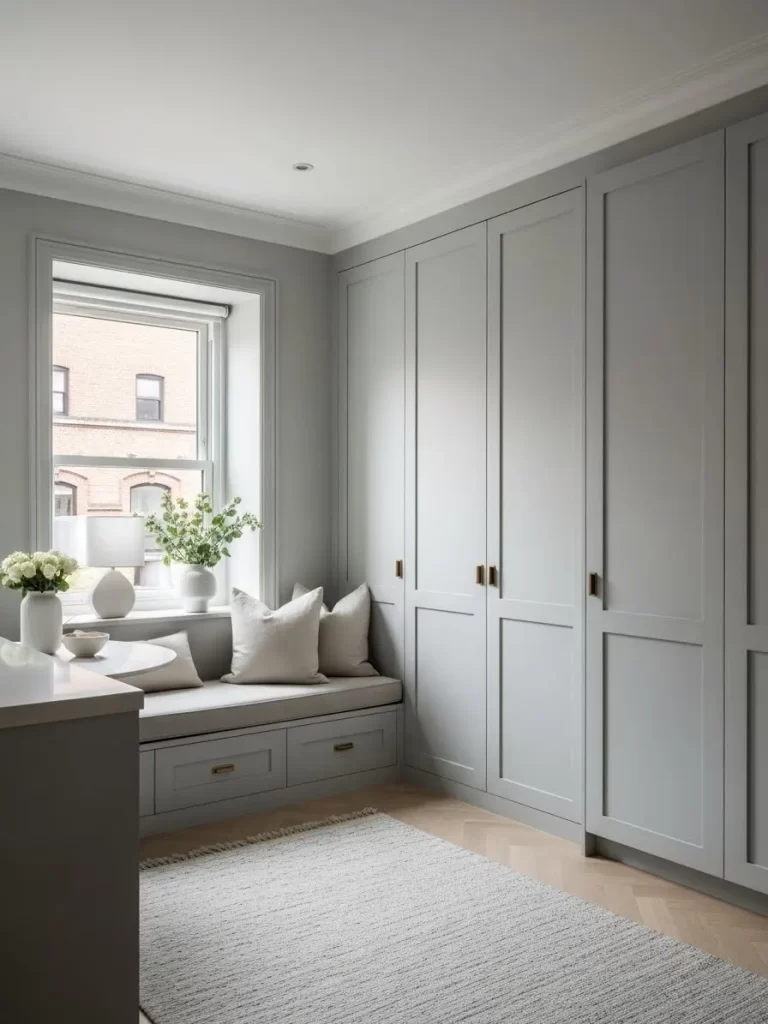
This room relies on a refined, tone-on-tone application of soft grey to achieve a seamless, quiet flow. The walls, trim, and floor-to-ceiling wardrobe cabinets are all painted in the same shade of pale, cool grey. This monochromatic color choice minimizes visual distraction and allows the eye to appreciate the architectural lines.
The continuity is so strong that the large wardrobe units feel like integrated wall paneling rather than separate furniture pieces. The only variations are the subtle shadow lines created by the shaker-style cabinet doors and the slight texture difference between the flat wall paint and the satin cabinet finish.
The warm accents are limited to the brass handles on the cabinets and the light wood herringbone floor, which runs consistently across the bottom plane. The white seating cushion on the window bench repeats the light tones, ensuring the overall atmosphere remains unified, calm, and uncluttered.
Material Required List
- Pale, cool grey satin paint (for cabinets and trim).
- Pale, cool grey matte paint (for walls).
- Primer.
- Wood filler and caulk.
Equipment Required List
- Paintbrushes and foam rollers (for the smoothest finish on cabinets).
- Sandpaper (fine-grit).
- Screwdriver (for removing and reinstalling hardware).
- Caulk gun.
DIY Instruction Step by Step
- Cabinet Preparation: If painting existing wardrobes, remove all doors, drawer fronts, and hardware. Clean the cabinet surfaces thoroughly with a degreaser. Lightly sand all surfaces to key the paint.
- Prime the Cabinets: Apply a high-quality primer formulated for cabinets. Allow it to dry completely.
- Paint the Cabinets and Trim: Apply two to three thin, even coats of the satin grey paint to the doors, drawers, frames, and all surrounding trim (baseboards, crown molding, window casing). Use a foam roller for the smoothest, brush-stroke-free finish. Allow sufficient drying time between coats.
- Paint the Walls: Once the cabinet paint is cured, tape off the trim and cabinet frames. Apply the matte grey paint to the walls. While the color is the same, the difference in sheen (matte vs. satin) will create subtle depth.
- Reinstall Hardware: Wait until the paint is completely cured. Reinstall the clean brass hardware. The brass provides a warm, consistent metallic accent against the cool grey, emphasizing the cohesive color theme.
- Accessorize Lightly: Use neutral, light-colored accessories (like the white pillows and rug) to prevent the room from feeling too dark. This ensures the focus remains on the seamless, monochromatic wall color.
28. High-Contrast Monochromatic Kitchen
Relevant Name: Black and White Block Zoning
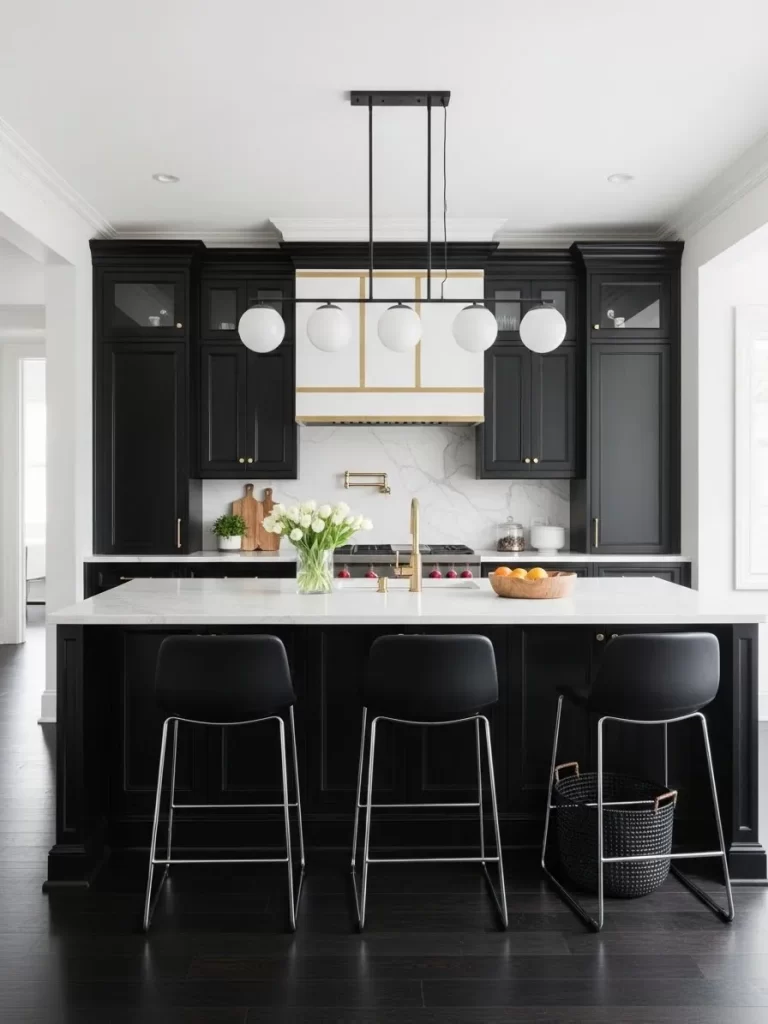
This modern kitchen achieves flow and drama through a high-contrast monochromatic design scheme using large blocks of black and white. The entire perimeter cabinetry, including the tall pantry units, is painted a deep, consistent black. This anchors the upper plane and frames the central white marble backsplash and hood area.
The contrasting white is used for the expansive island countertop and the perimeter countertops, creating a continuous light surface that runs around the room. The dramatic repetition of the globe pendant lights and the use of the same gold brass fixtures over the sink and hood maintain a material consistency.
Even the large, dark flooring ensures the lower half of the room is visually connected to the black cabinetry. By limiting the palette to just black and white, the design creates powerful, defined zones that are all intrinsically linked by their shared simplicity and high contrast.
Material Required List
- Black matte or semi-gloss cabinet paint.
- Primer (mandatory for strong color change).
- Gold or brass spray paint (optional, for updating hardware).
- Painter’s tape and drop cloths.
Equipment Required List
- Fine-finish paint rollers and high-quality angled brushes.
- Electric sander and fine-grit sandpaper.
- Screwdriver.
DIY Instruction Step by Step
- Remove and Prepare: Remove all cabinet doors, drawer fronts, and hardware. Label everything. Clean and degrease the surfaces. Use an electric sander with fine-grit paper to scuff all surfaces for paint adhesion. Wipe clean.
- Prime for Black: Apply a high-adhesion primer. Tinting the primer grey can help if you are covering a light color. Allow to dry fully.
- Paint the Black: Apply two to three thin, even coats of the black paint to the cabinet boxes, doors, and drawer fronts. Paint the cabinet frames first, then the doors, using a fine-finish roller for the smoothest result.
- Update Hardware (Optional): If needed, clean the existing metal hardware. Apply a gold or brass spray paint to all handles and pulls, ensuring they match the existing gold faucet. This repetition of the metal finish is crucial.
- Reassembly: Once the paint is completely cured, reattach the doors and drawers and reinstall the newly updated hardware. Ensure the alignment is straight and even.
- Balance the White: If installing new countertops, choose a bright white quartz or marble with minimal veining to maximize the white counter-zone. Ensure the backsplash is also a continuous white material to balance the strong black frame.
29. Combining Dark and Light in Transitional Spaces
Relevant Name: Threshold Contrast
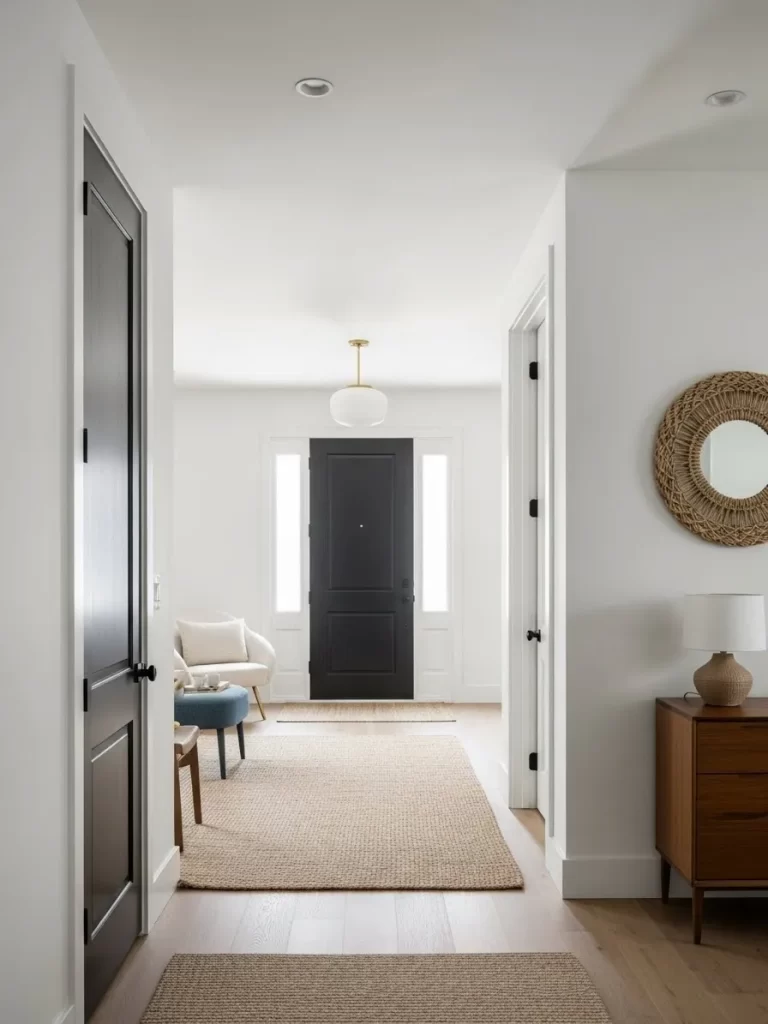
This entryway establishes immediate flow by using a high-contrast color scheme that draws the eye from a transitional hallway directly into the main, bright foyer. The interior side of the doorway and the door to the left are painted a striking matte black, which contrasts with the bright white walls and ceiling. This contrast frames the lighter space beyond.
The strong, continuous jute runner extends from the hallway and into the foyer, acting as an earthy, textured carpet that links the two zones. The natural material of the runner is echoed in the round woven mirror, which also introduces a warm texture to the white wall.
The repetition of dark elements, such as the black door and the subtle black baseboard trim, grounds the design. The contrast between the dark elements and the white walls creates visual depth, making the bright foyer appear more open and welcoming.
Material Required List
- Black matte or eggshell paint (for doors and inner frame).
- Jute or sisal runner rug (long enough to span both areas).
- Painter’s tape and drop cloths.
Equipment Required List
- Angled paintbrush.
- Screwdriver (for removing door hardware).
DIY Instruction Step by Step
- Preparation and Protection: Place drop cloths. Remove all door hardware. Use painter’s tape to carefully mask off the white walls surrounding the door and the inner door frame you wish to paint black.
- Paint the Door and Frame: Use the angled brush to apply the black paint to the door surface and the inner door jamb/frame. Ensure you apply the paint to the side that faces the hallway, maintaining a crisp line where it meets the white wall. Apply a second coat for depth.
- Install the Runner: Measure the length of the hallway and the foyer where you want the floor connection. Purchase a long jute or sisal runner rug that will cover the entire path. Lay the runner down the center of the path, ensuring it is straight and centered.
- Repeat Natural Texture: Hang a decorative mirror or place a basket made of the same natural woven material (jute, sisal, rattan) in the white foyer area. This visual echo of the runner material strengthens the flow.
- Finalize: Carefully remove the painter’s tape to reveal the sharp, high-contrast lines. Reinstall the door hardware. The strong contrast and the continuous runner will immediately enhance the visual depth and flow into the main space.
30. Subtle Texture Inset in Millwork
Relevant Name: Weave Panel Inset
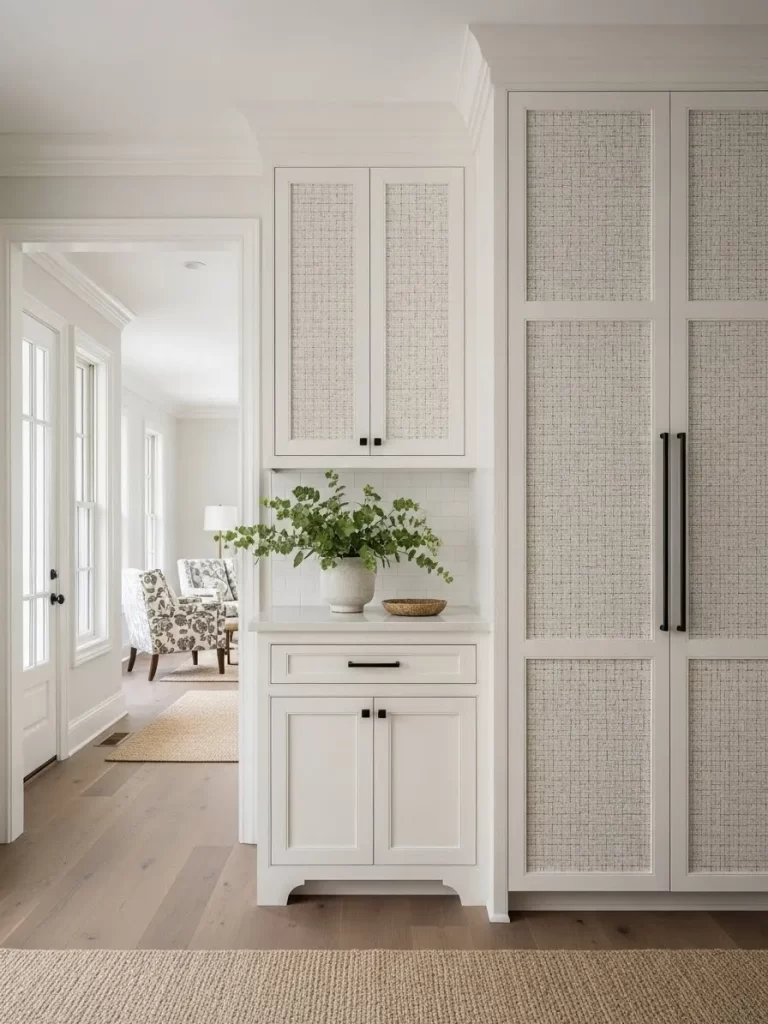
This bright, all-white hallway and storage unit achieve a subtle yet strong sense of cohesion through the use of a woven material inset into the cabinet doors. The white cabinetry is accented with a textured panel (like grasscloth or a fine woven fabric) set into the shaker-style doors. This repeated texture adds depth and visual interest without breaking the room’s monochromatic palette.
The texture is repeated seamlessly on the large, floor-to-ceiling cabinet unit and the smaller base cabinet near the doorway. This consistency ensures the large built-in appears intentional and not overwhelming. The continuous white trim and the dark hardware also tie the various units together.
The smooth, light wood floor and the natural fiber rug provide another layer of consistent, natural texture that leads the eye from the cabinet area into the bright, open living room visible beyond the doorway. This subtle technique of material repetition is highly effective for elegant transitions.
Material Required List
- Woven grasscloth, raffia, or textured wallpaper.
- MDF or thin wood panels (to back the fabric).
- Spray adhesive or wallpaper paste.
- Wood glue and small finish nails.
Equipment Required List
- Utility knife and straightedge.
- Measuring tape.
- Clamps.
DIY Instruction Step by Step
- Measure the Inset: Carefully measure the recessed inner panel of the cabinet doors you wish to cover. Cut the MDF or thin wood panels to this size; these will be your backing boards.
- Cut the Woven Material: Lay the woven grasscloth or textured wallpaper flat. Cut a piece that is slightly larger (about an inch overlap on all sides) than the MDF backing board.
- Adhere the Material: Spray a thin, even layer of spray adhesive onto the backing board (or apply paste). Carefully lay the woven material over the board, starting from the center and smoothing out any bubbles or wrinkles to the edges. Wrap the excess material around the edges of the MDF and glue it down on the back.
- Secure the Inset: Insert the finished woven panel into the recessed area of the cabinet door. Apply a thin bead of wood glue around the edges of the panel and gently press it into place. You can temporarily secure it with clamps or small pieces of painter’s tape.
- Finishing Touches: If the cabinet frame allows, use a small piece of wood trim (stop molding) to cover the edges of the panel on the inside of the door frame for a professional, secure finish. Ensure all woven panels (both large and small units) are facing the same direction for visual uniformity.
- Ground with Rugs: Place a natural woven rug (like the jute runner visible) in the hallway. This continuous texture visually links the floor to the cabinets, completing the cohesive, subtle textural scheme.
31. Dark Palette with Layered Lighting
Relevant Name: Monochromatic Depth

This dramatic space achieves cohesion through the consistent application of a deep, moody monochromatic palette, primarily using charcoal grey and matte black across all walls and millwork. The lack of high contrast forces the eye to rely on texture and light for definition, creating a powerful, enveloping flow.
The warmth of the exposed brick wall in the inner doorway provides a textured focal point, beautifully illuminated by strategic uplighting. This contrast in material—smooth black wood next to rough, warm stone—prevents the dark scheme from feeling flat. The low, warm pendant lights further define the foreground seating area.
The furniture, including the sofa and the large storage cabinets, blends seamlessly into the dark walls, making the architectural space and the layered lighting the true stars of the show. This technique creates a rich, sophisticated transition from the open room into the intimate stone-accented area.
Material Required List
- Deep charcoal or matte black paint (for walls and cabinets).
- Low-voltage LED uplights or picture lights (for highlighting the brick).
- Specialty paint or treatment (for accenting the brick, optional).
Equipment Required List
- Paintbrushes and rollers.
- Drill/Driver and wire strippers (for lighting installation).
- Non-contact voltage tester (for safety).
- Ladder.
DIY Instruction Step by Step
- Preparation and Painting: Prepare the walls and cabinet surfaces by cleaning and priming. Apply two to three coats of the matte black or charcoal paint to all walls and millwork in the room. Ensure the paint is applied smoothly for a consistent, non-reflective finish.
- Define the Focal Point: Identify the textural element you want to highlight, like the brick wall. Tape off the surrounding dark walls with painter’s tape to protect the fresh paint.
- Install Uplighting: Select low-profile LED uplights designed to be discreet. Mount them near the bottom or top of the brick wall (or similar textural feature). If they are hardwired, turn off the power and connect the wires to a switch source.
- Test and Adjust: Turn the power back on and adjust the direction of the uplights. The goal is to graze the light across the texture of the brick, enhancing the shadows and making the stone appear warm and inviting against the dark surroundings.
- Layer Ambient Lighting: Install low-hanging pendant lights (like the filament bulbs shown) or install recessed lighting with warm bulbs. Ensure the overall illumination is soft and creates defined pools of light rather than harsh overhead glare.
- Maintain Consistency: Ensure any visible storage (like the wire mesh shelving) is also a dark color or blends into the wall, maintaining the monochromatic backdrop and allowing the light and texture to provide the flow.
32. Free-Form Color Blocking with Arches
Relevant Name: Organic Shape Repetition
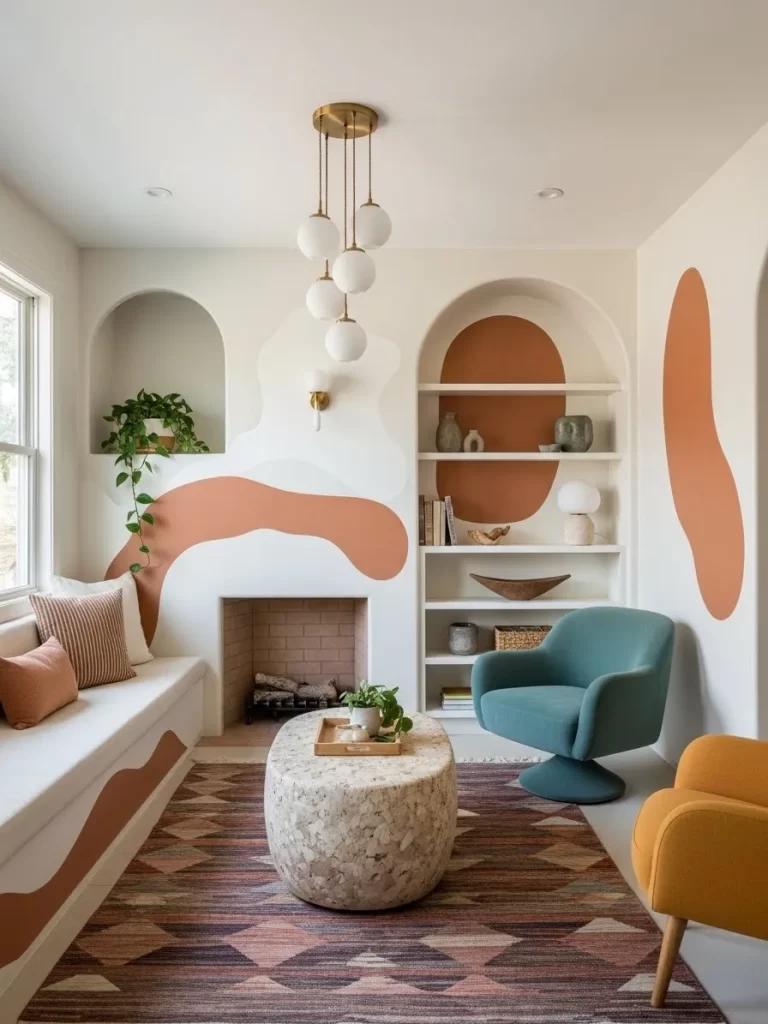
This vibrant reading nook achieves flow by contrasting rigid architectural lines with organic, free-form color blocking. Multiple arching built-in niches frame the space, providing a strong, organized background. However, the cohesion comes from the repeated use of soft, abstract orange shapes painted across the walls and the built-in seating bench.
The abstract color blocks soften the geometric features, guiding the eye in a playful, unexpected path around the room. The curved furniture—the stone coffee table, the swivel chair, and the built-in bench—reinforces the rounded, fluid theme established by the arches and the painted shapes.
The repetition of the warm terracotta and orange tones in the paint, the rug, and the pillows ensures color continuity, while the single turquoise chair provides a stimulating contrast. This clever combination of structure (arches) and fluidity (paint) creates a dynamic, cohesive space.
Material Required List
- Wall paint in chosen colors (terracotta/orange and neutral white/beige).
- Pencil and string (for drawing smooth curves).
- Painter’s tape (low tack).
Equipment Required List
- Small paintbrushes (for detailed curved work).
- Small foam rollers.
- Level.
DIY Instruction Step by Step
- Establish the Architectural Base: Ensure all built-in arches, niches, and the fireplace are framed and painted in the neutral base color (white/beige).
- Plan the Organic Shapes: Use a pencil and long string to lightly sketch the free-form, fluid color-block shapes directly onto the wall. These shapes should be large and should curve around corners or across architectural features for maximum impact. They should echo the rounded forms of the arches.
- Tape and Outline: Use a low-tack painter’s tape to mark the outer edges of the pencil-drawn shapes. For very tight curves, you may need to apply the paint directly without tape.
- Paint the Shapes: Using a small, high-quality angled paintbrush, carefully “cut in” along the curved pencil lines with the terracotta or orange paint. Once the outline is clean, use a small foam roller to fill in the rest of the shape with a thin, even coat of paint.
- Layer and Refine: Apply a second coat to ensure the color is rich and opaque. For layered shapes (like the one over the fireplace), ensure the paint is fully dry before sketching and painting the overlapping shape.
- Remove Lines: Once the paint is completely dry, erase any visible pencil lines. The organic shapes, combined with the curved furniture and rug, now create a unified and flowing artistic theme throughout the area.
33. Integrated Display Lighting for Visual Cohesion
Relevant Name: Illuminated Display Grid
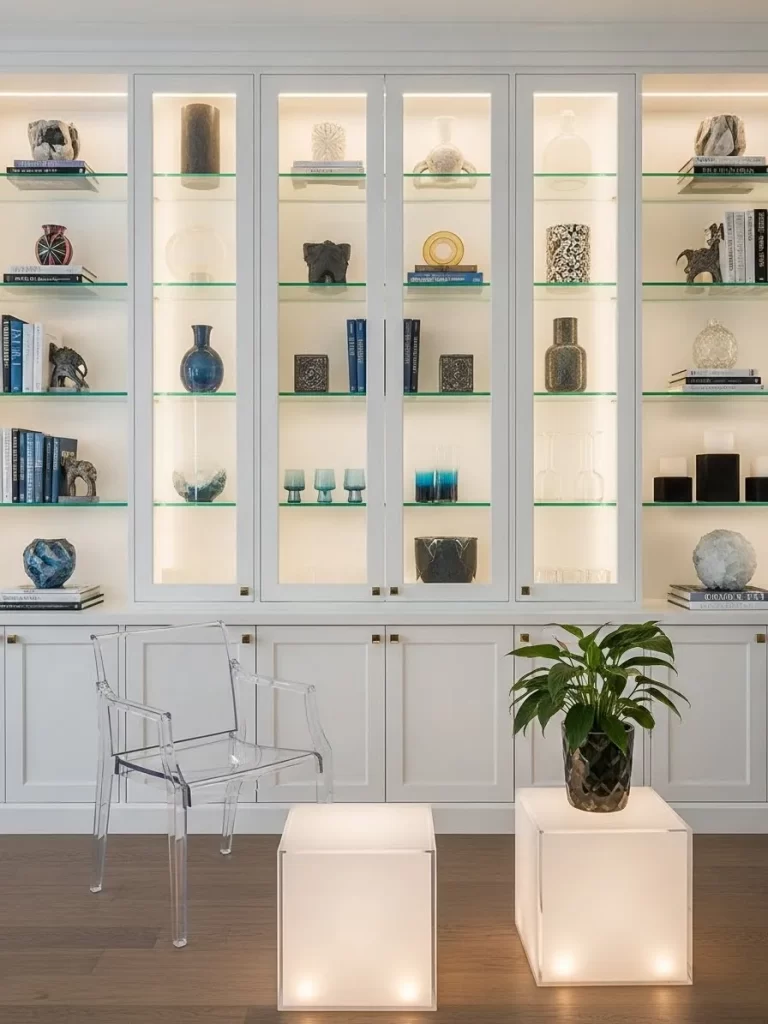
This impressive built-in shelving unit achieves seamless flow by integrating lighting into every level of the display. Thin strips of LED lighting are recessed beneath each glass shelf and within the cabinet tops, ensuring every piece of décor is evenly and dramatically illuminated. This consistent, warm lighting forms a cohesive grid across the entire wall.
The repetition of the glass shelves and the white cabinetry provides a clean, neutral structural backdrop. The glass shelves, being virtually invisible, allow the light to shine directly onto the decorative objects, creating a consistent focal point without visible hardware.
The arrangement of the décor is also cohesive, with objects repeated in size and color (deep blues, blacks, whites) across the entire span of the unit. The continuous illumination ties the entire display together, making the large unit feel like a unified art installation.
Material Required List
- LED strip lighting (warm white).
- Low-voltage wire and power supply/transformer.
- Glass shelves (cut to size).
- Shelf pins or supports (for glass shelving).
Equipment Required List
- Drill/Driver (for running wires).
- Wire cutters and strippers.
- Measuring tape.
- Non-contact voltage tester (for safety).
DIY Instruction Step by Step
- Prepare the Shelves: If the unit is new, ensure channels for the LED strips are cut into the underside of the cabinet boxes just above where the glass shelf will sit. If retrofitting, plan to install slim LED light strips directly onto the front edge of the cabinet box.
- Mount the Shelving Hardware: Install the shelf pins or supports at the same height on all vertical dividers. Place the glass shelves onto the supports.
- Install the LED Strips: Cut the LED strips to the length of the shelves. Secure them to the underside of the upper cabinet boxes or into the pre-cut channels.
- Run the Wiring: Run the low-voltage wiring discreetly along the back of the cabinet unit, connecting each strip to the next. The wires should feed down to the power supply, which is typically hidden in the bottom cabinet.
- Connect to Power: Crucially, turn off the power before connecting the wiring to the transformer and the switch. Ensure the transformer is correctly rated for the total length of the LEDs.
- Display and Test: Turn the power back on and test the illumination. Arrange your décor, consciously grouping items by color or type and repeating those groupings across the entire shelf unit. The even lighting makes the collection feel unified.
34. Repeating Archways and Wood Paneling
Relevant Name: Arch and Timber Continuity
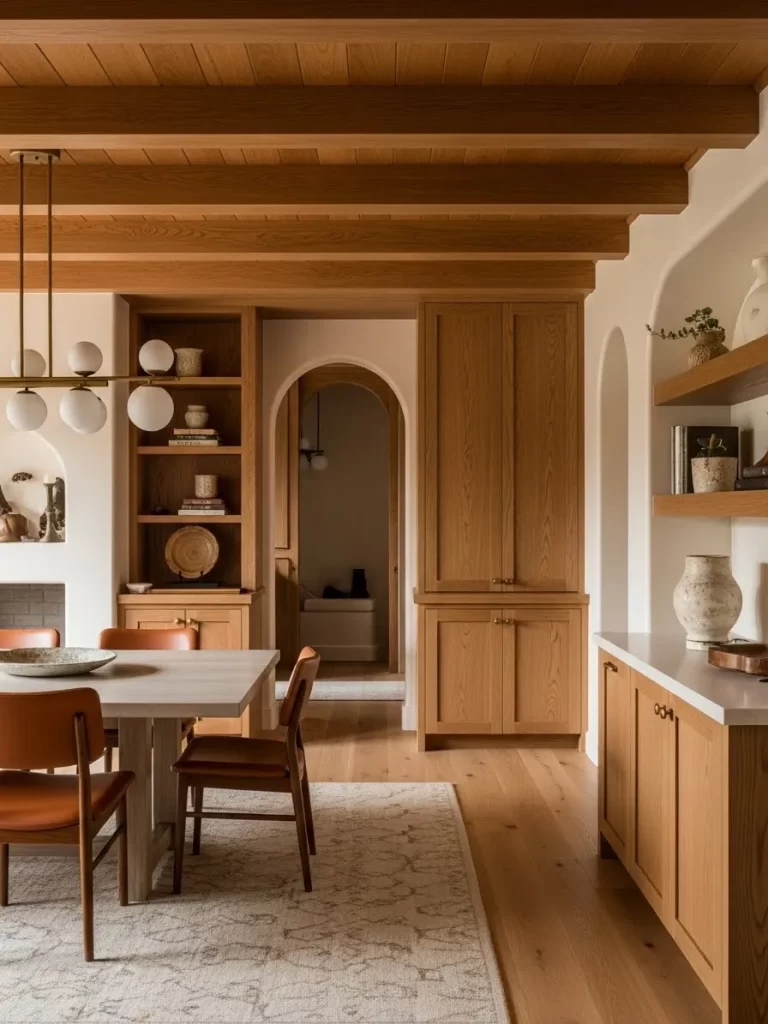
This open-plan dining and kitchen area achieves seamless flow by repeating the archway shape and utilizing a consistent wood tone across all structural elements. Multiple archways frame the doorways and internal shelving niches, creating a soft, rhythmic transition into the adjacent hallway.
The central unifying material is the warm, medium-toned wood, which is used for the ceiling beams, the kitchen cabinetry, the tall storage units, and the built-in shelves. This continuous timber application ensures every architectural piece shares the same visual identity.
The repetition of the rounded arch shape is key; it is seen in the entryways, the display niches, and even the subtle curve on the wall shelf bracket. This dual repetition of material (wood) and shape (arch) creates a rich, European-inspired cohesion. The light-colored rug and countertops provide a crisp contrast, allowing the wood and arch motifs to stand out.
Material Required List
- Plywood or MDF (for building new cabinet doors/arch profiles).
- Wood veneer or stain (to match the existing wood tone).
- Drywall or plaster (for creating arch openings).
- Flexible corner bead (for arch edges).
Equipment Required List
- Jigsaw and miter saw.
- Level.
- Trowel or putty knife (for joint compound).
- Sandpaper.
DIY Instruction Step by Step
- Plan and Draw the Arch: If adding a new archway, carefully measure the opening. Use a pencil and string to draw the desired arch curve onto the wall. If modifying cabinet doors, use a large compass or template to draw the arch top onto the wood panel.
- Cut the Arch: For doorways, carefully cut away the drywall or framing to follow the arch line. For cabinet doors, use a jigsaw to cut the arched top profile.
- Smooth the Arch Edges: Apply a flexible corner bead to the edge of the drywall arch. Apply several thin coats of joint compound, sanding lightly between coats, until the curve is perfectly smooth and feathered into the existing wall.
- Finish the Wood Elements: Ensure all new wood elements (cabinets, shelves, or decorative ceiling beams) are finished with a stain or veneer that precisely matches the existing wood tone. Consistency here is critical.
- Install Cabinetry: Install the new arched-top cabinet doors and built-in shelves. Ensure the hardware (handles) is repeated across all units for final cohesion.
- Frame the View: Ensure the archways provide a clear line of sight into the next room, framing the view and inviting movement through the space.
35. Classic Paneling and Gold Accents
Relevant Name: Framed Symmetry
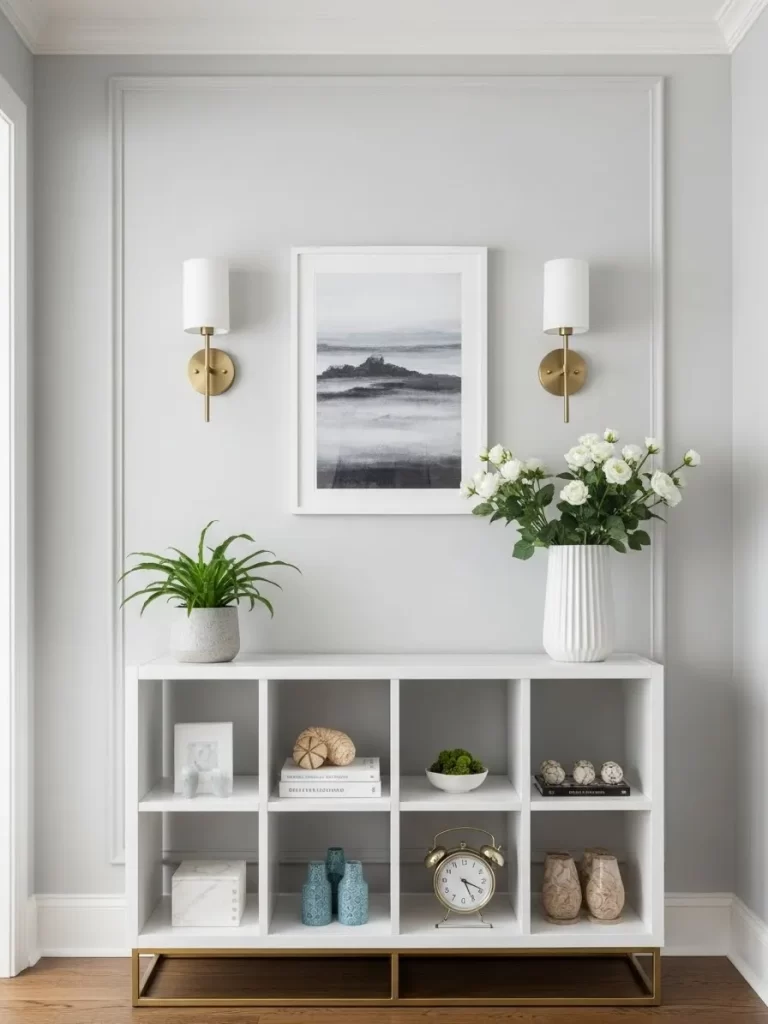
This entryway is unified by the classic technique of applied wall molding (or picture frame wainscoting) and the symmetrical placement of décor. The continuous, crisp white paneling creates a uniform structural framework that visually connects the floor, walls, and ceiling. This detailed molding adds texture and flow to the flat wall.
Symmetry is key here: the two identical brass sconces flank the central piece of artwork, ensuring perfect balance. The cube storage unit below is also symmetrically styled, with a plant on one side and flowers on the other. This strong symmetrical placement emphasizes the wall’s cohesion.
The repetition of the warm brass tone in the sconce fixtures and the base of the storage unit ensures the metallic accents are continuous. The warm wood flooring and the simple white décor complete the polished, seamless design.
Material Required List
- Molding (chair rail or picture frame molding, same profile).
- Wood glue and finish nails.
- White semi-gloss paint.
- Wood filler and caulk.
Equipment Required List
- Measuring tape and level.
- Miter saw (essential for clean corner cuts).
- Hammer and nail set (or pneumatic nailer).
- Caulk gun.
DIY Instruction Step by Step
- Measure and Design the Boxes: Determine the spacing and size of the decorative boxes you want to create with the molding. Ensure the top and bottom spacing is consistent, and the distance between the boxes is also consistent for perfect symmetry. Mark the outlines lightly with a pencil.
- Cut the Molding: Use the miter saw to cut the molding pieces. You need 45-degree angle cuts on both ends of each piece so they join perfectly to form a frame (like a picture frame).
- Install the Molding: Apply wood glue to the back of the cut molding pieces. Place the first piece (often the longest horizontal top piece) and ensure it is perfectly level before securing it with finish nails into the wall, setting the nail heads below the surface. Continue installing the pieces, ensuring the corners are tight.
- Caulk and Fill: Use wood filler on all visible nail holes. Apply a smooth bead of caulk to all seams where the molding meets the wall. This is crucial for making the applied molding look integrated.
- Paint the Finish: Apply two coats of white semi-gloss paint to the entire wall and all the new molding, making the applied frame seamless with the wall surface.
- Install Symmetrical Lights: Install two identical wall sconces, ensuring they are mounted at the same height and equidistant from the center of the framed artwork. Use the same brass finish for all metallic elements (sconce, shelf base).
36. Full Wood Paneling and Coffer Ceiling
Relevant Name: Monochromatic Timber Volume
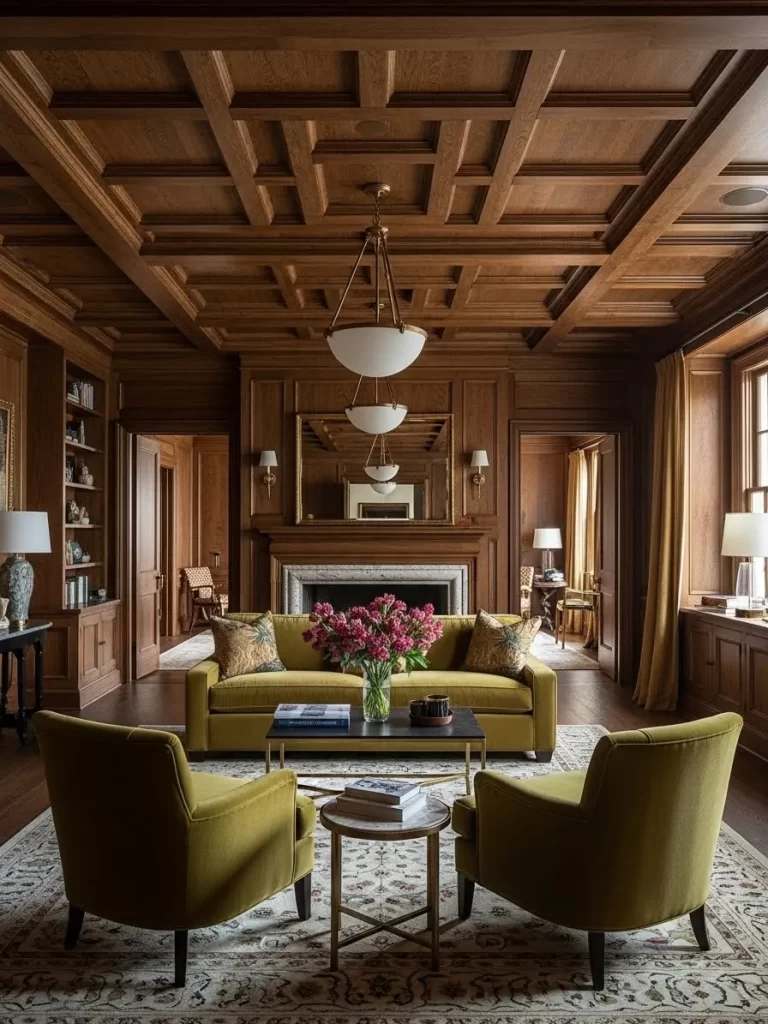
This highly luxurious space achieves flow through complete saturation in a single material: warm, dark-toned wood. The wood paneling covers all four walls, the built-in cabinetry, the doors, and the intricate coffer ceiling. This consistent material application creates a cohesive, enveloping volume that feels deliberate and grand.
The detailed geometry of the coffer ceiling is repeated in the wall paneling and even subtly in the mirror frame above the fireplace. This repetition of structure—geometric squares and rectangles—reinforces the overall architectural unity of the room.
Flow is subtly introduced with the rich color palette of the furniture, specifically the acid green sofa and chairs. These pieces provide a strong focal point against the dark wood backdrop. The large patterned rug on the floor provides a soft neutral ground, allowing the rich wood texture to remain the dominant, unifying element.
Material Required List
- Hardwood lumber or MDF panels (for ceiling and wall coffers).
- Dark wood stain and clear coat finish.
- Construction adhesive and screws.
Equipment Required List
- Miter saw (for intricate cuts).
- Table saw (for ripping panel widths).
- Long level, laser level, and measuring tape.
- Drill/Driver and pneumatic nailer.
- Ladder and scaffolding (for ceiling work).
DIY Instruction Step by Step
- Safety and Preparation (Ceiling): Start with the coffer ceiling. Locate and mark all ceiling joists. This is overhead work and requires proper scaffolding or a sturdy ladder.
- Build the Ceiling Grid: Install the main structural box frames for the coffers by screwing wood planks securely into the joists. Ensure the entire grid is perfectly level. Cut the decorative profile pieces to fit inside the grid boxes.
- Install Wall Paneling: Measure and cut the wall paneling (either flat sheet panels or a decorative profile). Install the panels vertically, starting from one corner and working your way around the room, securing them with adhesive and finish nails. Ensure the wood grain matches the ceiling stain.
- Finish All Wood: Apply the dark wood stain evenly to all the ceiling coffers, wall paneling, and built-in cabinets. Apply multiple coats of clear polyurethane or varnish for a rich, durable finish.
- Integrate Built-ins: The millwork (bookcases and cabinets) should be finished with the exact same stain and paneling profile as the walls, making them look completely integrated and flush with the wall surface.
- Furnish and Accessorize: Introduce highly contrasting furniture pieces (like the acid green sofa) to add contemporary interest. Ensure all decorative mirrors and frames echo the geometric lines of the paneling to complete the cohesive, enveloping timber volume.
Implementing these 36 essential designer tricks requires careful observation and strategic planning, not necessarily major, costly renovations. The fundamental idea is to intentionally create consistent visual echoes throughout your house. These echoes might include continuous flooring, repeated geometric shapes, or shared color palettes and lighting.
By consciously connecting spaces with these subtle elements, you actively eliminate jarring visual breaks and significantly improve the overall sense of unity. A great way to begin is by choosing one element—perhaps repeating a single brass accent or extending a wall color just into the hallway.
Over time, these deliberate connections will result in a beautifully seamless and truly cohesive home environment. Remember to prioritize material repetition, shared light sources, and architectural consistency as your primary tools for creating enduring flow.
Key Takeaways
- Material Repetition: Using the same flooring, wood tone, or woven texture in adjacent rooms ties spaces together without needing to match furniture.
- Shared Light: Integrated, consistent lighting, or using translucent glass partitions, ensures that light acts as a continuous, flowing element between areas.
- Architectural Symmetry: Repeating shapes, like arches or vertical paneling, provides a subtle, rhythmic visual trail that guides the eye naturally through the dwelling.