Is your coffee table simply a landing pad for remote controls and half-empty mugs? That centerpiece of your living room deserves so much better. It should serve as a stylish anchor, reflecting your personal taste and adding depth to your decor. The truth is, transforming a mundane table into a focal point doesn’t require purchasing expensive art.

It truly comes down to mastering the art of the vignette: balancing height, texture, and color. When you learn how to layer accessories and choose items that tell a story, even the simplest wooden surface can become a captivating gallery. Stop letting your table fade into the background.
We’ve gathered 36 specific, actionable styling secrets—ranging from glamorous metallic glares to tranquil Zen arrangements. Use these inspirations, material lists, and step-by-step instructions to elevate your space, creating a beautiful display that is both organized and highly engaging. Let’s unlock the hidden potential of this essential piece of furniture.
1. Sculptural Metal Accent and Textured Layers
Item Name: The Geometric Statement Sculpture

Creating visual interest on a flat surface starts with height and texture. This sophisticated arrangement uses an eye-catching, airy geometric metal sculpture, immediately drawing the eye upwards. The dark color of the table provides a striking contrast to the lightness of the accessories, ensuring every piece pops.
A clever stack of design books acts as a sturdy pedestal, giving the decorative bowl and the sculpture more presence. Layering pieces of varying materials—like the rough, matte finish of the paper-like bowl and the sleek brass of the tall accent piece—keeps the composition from feeling flat or static. This thoughtful curation turns a functional piece of furniture into a captivating focal point for the entire room.
Notice how the small vase holding a simple green sprig introduces a touch of organic life. This element of nature softens the strong, architectural lines of the rest of the display. Finally, the light-colored, elongated tray corrals the necessities, like remote controls and coasters, making the whole setting appear effortlessly organized and chic.
Materials Required (for a similar sculptural display)
- A striking metal geometric object (look for brass or matte black finishes).
- A stack of two to three large, hardcover coffee table books with attractive, muted spines.
- A medium-sized, highly textured bowl (ceramic, paper mâché, or stone).
- A small vase with a unique shape.
- One or two fresh sprigs or small floral stems.
- A long, oval decorative tray (wood, concrete, or light-colored stone).
- A set of simple coasters that fit the tray’s aesthetic.
Equipment Required
- No specialized tools are necessary for this simple arrangement.
DIY Instruction: Creating a Layered Focal Point
- Establish the Base and Height: Select the largest, most visually heavy items—in this case, the coffee table books. Place them slightly off-center on your table. Stack the two or three books neatly, creating a stable, raised platform.
- Introduce the Centerpiece: Gently set the geometric metal sculpture behind the book stack, making sure it leans or stands up straight. It should be the tallest element in your grouping to command attention.
- Add Mid-Level Texture: Place the highly textured decorative bowl directly on top of the stacked books. Ensure its rough finish contrasts with the smooth spines of the books beneath it. This anchors the tall sculpture visually.
- Incorporate Life and Softness: Position the small, distinct vase next to the stacked arrangement, but slightly forward. Carefully place your fresh sprig or stem into the vase, letting the natural lines break up the straight edges of the other items.
- Corral Clutter with a Tray: Place the decorative tray on the remaining open space of the table. Arrange essential items inside the tray. Put the coasters in a neat stack, and place the remote controls side by side to maintain a tidy appearance. The tray unifies the smaller, functional objects.
- Step Back and Adjust: View your finished arrangement from different angles in the room. You may need to shift the objects slightly closer together or farther apart to create a natural, balanced look. Ensure the display doesn’t obstruct the functionality of the table.
2. Global Textures and Natural Forms
Item Name: The Rattan Basket Retreat

Woven textures and organic shapes instantly bring warmth and a relaxed, welcoming feeling to any living space. This styling strategy uses a large, round rattan tray as the main anchor, its natural fibers providing a beautiful contrast against the smooth, white table surface. The circular shape softens the room’s straight lines, adding visual appeal.
Notice how height and material diversity are utilized. A matte terracotta vase holding dramatic oak leaves establishes significant verticality. Next to it, a wide, textured ceramic bowl houses an intriguing slice of petrified wood, merging art with geology. This combination ensures that the arrangement feels collected and personal, not mass-produced.
The final touches are functional yet stylish. A stack of neutral-toned hardcover books lifts a comforting candle, placing it prominently within the vignette. Finally, a neatly folded, striped linen throw and a stack of fabric coasters are ready for use, emphasizing that this focal point is also highly usable.
Materials Required (for a similar natural display)
- A large, round rattan or woven seagrass tray.
- A matte terracotta vase with two handles (an amphora shape).
- A few cuttings of large, dramatic foliage (like oak, maple, or eucalyptus).
- A wide, light-colored ceramic bowl.
- A piece of unique natural rock or petrified wood.
- A stack of three to four neutral-spined hardcover books.
- One comforting, scented candle.
- A small ceramic or stone slab to elevate the candle.
- A small linen or cotton throw blanket with fringe.
- A set of fabric or linen coasters.
Equipment Required
- None.
DIY Instruction: Building a Warm, Textured Vignette
- Define the Boundaries: Center the large rattan tray on your coffee table. This tray serves as the boundary for your display, keeping all the smaller pieces visually contained and tidy.
- Anchor with the Tallest Item: Place the terracotta vase near the back center of the tray. Arrange the foliage cuttings so they stand upright, establishing the tallest point and giving the display its main sense of movement.
- Introduce the Organic Object: Position the wide ceramic bowl to the left of the vase. Carefully place your unique natural rock or petrified wood slice inside the bowl, allowing a significant portion of the object to be visible over the bowl’s rim.
- Create Mid-Level Staging: Stack your chosen books next to the bowl and slightly in front of the vase. Place the small, solid slab (stone or ceramic) on top of the books.
- Place the Candle: Center the scented candle on the elevated slab. This positioning ensures the candle’s flame is visible and adds a cozy, ambient glow to the arrangement.
- Add Functional Layers: Place the folded linen throw blanket slightly spilling out of the tray onto the table, introducing a soft, tactile element. Arrange the fabric coasters neatly on the remaining open space around the tray.
3. Pop Art Colors and Playful Geometry
Item Name: The Contemporary Color Cube

Injecting bold color and whimsical design instantly transforms a simple coffee table into a modern art exhibition. This grouping relies on clean lines and sharp, contrasting hues to deliver visual excitement. The dark tabletop acts as a sophisticated canvas, allowing the vibrant accessories to truly shine.
Multiple, neatly stacked collections of contemporary art books provide varying elevations. These piles are topped with unexpected, playful elements, such as a stylized, slightly abstract figurine and a sculptural ceramic hand. Adding small, colorful acrylic cubes introduces a jewel-like quality, catching the light beautifully and breaking up the uniformity of the book spines.
Functionality is contained within a bright, commanding teal tray, which provides a striking color contrast to the wooden table. The coordinating geometric coasters are scattered playfully nearby, reinforcing the contemporary art theme and proving that practicality can absolutely be a powerful design tool.
Materials Required (for a similar colorful arrangement)
- A stack of three to four hardcover books with black or white spines.
- A second stack of two to three books, featuring a brightly colored spine (like yellow or blue).
- One playful, artistic figurine or small sculpture.
- Two or three colored acrylic or resin blocks (like magenta or neon yellow).
- A small metallic bowl (gold or silver).
- A bright, solid-colored square or rectangular tray (teal, cobalt, or orange).
- Two remotes and an accent object for the tray (like a wooden block).
- A set of geometric or colorful coasters.
- One small silver or chrome plate.
Equipment Required
- None.
DIY Instruction: Curating a Bold, Modern Display
- Establish Primary Platforms: Create two main stacks of books on the table, positioning them on opposite sides to create symmetry. Use the books with the dark or white spines for the larger stack and the brightly colored spine for the smaller stack.
- Top the Stacks with Flair: Place the artistic figurine and a brightly colored acrylic cube on top of the first, taller book stack. Place the sculptural hand and the other acrylic cube on the second stack. Ensure the tallest item (the figurine) is on the tallest stack to create dynamic height variation.
- Introduce Metallic Contrast: Set the small metallic bowl on the table near the first book stack. Place the small chrome plate near the second book stack. The metallic sheen adds necessary sparkle and texture.
- Define the Control Zone: Place the brightly colored square tray near the center. Arrange the remotes and the small accent object neatly inside the tray. The vivid color of the tray should make it impossible to miss, preventing clutter from spreading.
- Scatter the Coasters: Arrange the colorful, geometric coasters in a loose, casual grouping near the tray. They should look ready for use, contributing to the overall playful and graphic theme.
4. Coastal Calm and Aqua Accents
Item Name: The Ocean Breeze Vignette

Drawing inspiration from the coast is a reliable way to make a coffee table feel instantly serene and bright. The styling here uses a light, airy color palette anchored by soothing aqua and seafoam green. This creates a refreshing, restful energy in the room.
Height is beautifully managed with a tall, clear glass vase holding lush white floral arrangements and greenery. This natural element softens the hard edges of the table and the books. The addition of subtle nautical elements, like a delicate sand dollar preserved under a glass cloche, evokes a sense of collected travel memories.
A soft, fabric-lined tray provides the containment area, keeping the remote and coasters orderly without feeling cold. The books, with their pale blue and light-gray spines, maintain the overall beach-inspired theme. Finally, the textured glass candle holders echo the water color, adding a beautiful sparkle and warmth to the entire cohesive display.
Materials Required (for a similar coastal arrangement)
- A tall, light aqua or clear glass vase.
- A large, abundant bunch of white flowers and light greenery (real or high-quality faux).
- A stack of three to four books with light blue, gray, or white spines.
- A glass cloche with a solid base.
- A beach object to place under the cloche (e.g., a sand dollar, large shell).
- A piece of weathered driftwood.
- A light-colored fabric or linen-lined tray.
- A set of cork or simple white coasters.
- A set of decorative, textured glass votives or candle holders in aqua tones.
- Two or three small white or tealight candles.
Equipment Required
- None.
DIY Instruction: Crafting a Tranquil Coastal Scene
- Anchor with the Tallest Feature: Place the tall aqua vase holding the flowers toward the back of the table. Ensure the arrangement stands high, providing the primary vertical element and overall visual scale.
- Build the Reading Stack: Create a neat stack of your light-spined books next to the vase. Place the glass cloche containing your beach object on top of this book stack. This elevation highlights the small, delicate item.
- Introduce a Color and Light Block: Take one or two books from your collection and place them horizontally near the center of the table. Arrange the set of decorative aqua glass candle holders on top of this second book stack. Place a small candle inside each holder.
- Add a Driftwood Accent: Place the piece of weathered driftwood casually near the center of the table, slightly in front of the book stacks. Its organic shape and texture introduce a strong natural element.
- Contain Essentials in the Tray: Position the fabric-lined tray on the remaining open space. Place the remotes and the stack of coasters neatly inside the tray. The soft fabric ensures the functional elements blend seamlessly with the tranquil theme.
5. Vintage Charm and Rich Earth Tones
Item Name: The Library Stack Vignette

For a deep sense of history and warmth, styling with a focus on rich wood and aged objects is unmatched. This display builds dramatic height using stacked boxes and books, reminiscent of an old study or library. The overall color palette is grounding, relying on deep reds, blues, and browns.
The use of a large, lipped wooden tray acts as a unifying plinth for the entire collection, preventing the numerous smaller items from looking scattered. Within this defined boundary, the stack of dark wooden boxes serves as a powerful backdrop, giving prominence to the beautiful vintage trinkets placed on top.
A curated library of antique-looking books is arranged both horizontally (for staging) and vertically (for visual texture), adding significant character. The highly decorative, hand-painted ceramic pots introduce an unexpected cultural element, while the crackling candle provides necessary ambiance and a flickering light source to complete the cozy picture.
Materials Required (for a similar antique display)
- A large, rectangular, lipped wooden tray (ideally in a dark finish).
- Two wooden boxes of different sizes that can be stacked.
- A collection of five to seven hardcover books with rich, aged spines (reds, deep blues, greens).
- Two matching decorative ceramic pots or small teapots.
- Small vintage trinkets or figurines.
- One large, textured or cut-glass candle.
- A stack of two or three leather-bound or antique-looking books for the tabletop.
- A set of decorative tiled coasters.
- A patterned throw or small runner with fringe (like a tapestry piece).
Equipment Required
- None.
DIY Instruction: Curating a Collected, Luxurious Stack
- Lay the Foundation: Center the large wooden tray on your coffee table. This tray will hold the majority of the display.
- Build Vertical Height: Place the largest wooden box toward the back center of the tray. Stack the slightly smaller wooden box neatly on top of the first.
- Stage the Vintage Accents: Place the small vintage trinkets (the figurines) on top of the second, smaller wooden box. This height makes them a major focal point.
- Create the Book Backdrop: Line up the five to seven antique-spined books standing vertically on the tray, to the right of the wooden boxes. This creates a dense, textural wall.
- Anchor the Candle: Place a stack of two or three horizontally laid books in front of the vertical book wall. Position the large, decorative candle prominently on top of this small stack.
- Introduce Symmetry and Color: Place the two matching decorative ceramic pots or teapots on top of a stack of horizontally laid books to the left of the wooden boxes. Their bright color should balance the dark wood.
- Complete the Scene: Place the leather-bound books and the decorative tiled coasters on the table outside the tray. Finally, drape the patterned throw or runner casually, letting the fringe fall naturally to add softness and texture.
6. Minimalist Sculptural Contrast
Item Name: The Contemporary Archway

Modern, abstract forms instantly elevate a coffee table, making it feel less about clutter and more about intentional design. This vignette achieves a sophisticated, gallery-like feel through strong contrast and simple shapes. The clean, white table provides a neutral base for the highly textural objects.
The central object is a striking white sculpture, its architectural arch-like shape giving it immense visual weight and interest. Because it is monochromatic and textured, it relies on its form alone to command attention. This piece is strategically lifted on a neat stack of graphic, fashion-focused books, which serves as a sturdy, high-contrast base.
Functionality is managed using a refined, dark gray tray. The tray provides a platform for a small, earthy terracotta bowl and a smooth concrete block, which further explores the theme of varied, simple materials. A dark-hued candle and natural cork coasters complete the scene, proving that practicality can absolutely be a powerful design tool.
Materials Required (for a similar minimalist display)
- A highly textured, white or cream abstract sculpture (arch or geometric shape).
- A stack of three to four monochromatic hardcover books (black/white spines).
- A small, dark-colored rectangular tray (matte gray or black).
- A small, terracotta or rust-colored ceramic bowl.
- A small, solid concrete block or stone riser.
- One dark-colored scented candle in a glass holder.
- Two or three cork coasters and one slate coaster.
Equipment Required
- None.
DIY Instruction: Staging a Clean, Architectural Display
- Define the Primary Block: Create a neat, centralized stack with your monochromatic books. This will be the tallest part of the arrangement.
- Place the Centerpiece: Gently place the white abstract sculpture squarely on top of the book stack. Ensure it is centered and stable, making it the highest and most prominent element.
- Anchor the Functional Zone: Place the dark-colored rectangular tray on the table to the right of the book stack. This visually balances the height and bulk of the main centerpiece.
- Introduce Material Contrast: Place the small concrete block within the tray. Place the small terracotta bowl on top of the concrete block, giving it subtle lift. The mix of concrete and ceramic adds necessary material texture.
- Add Ambiance and Coasters: Position the dark-colored candle just outside the tray, slightly in front of the book stack, resting it on a small cork coaster. Arrange the other cork and slate coasters loosely around the candle and the tray, making them look accessible for guests.
7. Romantic Parisian Glamour
Item Name: The Gilded Oval Gallery

To infuse a coffee table with luxury and a touch of vintage romance, incorporating reflective surfaces and soft textures is key. This round table features a stunning gold, mirrored oval tray that instantly reflects light, amplifying the luminosity and elegance of the entire setting. The polished metal and glass evoke a feeling of old-world Parisian style.
The arrangement is centered around beautiful, soft pink roses in a simple glass vase, providing a crucial organic, living element. Next to the flowers, a decorative crystal bottle adds a glamorous vertical accent, its faceted surface catching and refracting light beautifully.
Essentials are seamlessly integrated: remotes are neatly placed on two stacks of soft-colored books (pink and white spines), ensuring they do not look like clutter. A small, delicate bowl of dried rosebuds reinforces the theme of subtle fragrance and softness. Finally, the antique-style silver and lace coasters add yet another layer of intricate detail, reinforcing the overall sumptuous aesthetic.
Materials Required (for a similar glamorous display)
- A gold or silver oval tray with mirrored glass bottom and decorative handles.
- A small, simple glass vase.
- A bunch of soft pink or cream roses or garden flowers.
- A decorative crystal or glass perfume bottle (or a decanter).
- A small glass bowl for potpourri or dried flowers.
- A stack of two to three books with white or light-colored spines.
- A second stack of two books with pink or muted spines.
- Two remote controls.
- A set of ornate silver and lace coasters.
- A small vintage brooch or accent piece.
Equipment Required
- None.
DIY Instruction: Creating a Soft, Luxurious Focal Point
- Center the Glamour: Place the gold, mirrored oval tray in the center of the coffee table. This is the main stage for the display.
- Place the Main Elements: Position the glass vase of roses toward the back left of the tray. Place the tall crystal bottle toward the back right of the tray. These elements create a lovely triangular shape and significant height.
- Stage the Functional Stack: Stack the two to three white-spined books inside the tray. Place one remote on top of this stack. Stack the second set of pink-spined books outside the tray, to the left. Place the second remote and the vintage brooch on this external stack.
- Add a Delicate Detail: Fill the small glass bowl with dried rosebuds or potpourri and place it inside the tray, in front of the crystal bottle. This introduces scent and textural detail.
- Ready the Coasters: Arrange the ornate silver and lace coasters in a slight overlapping fashion on the open space of the table near the external book stack. Their metallic sheen should complement the tray’s finish, tying the look together.
8. Serene Zen and Textured Neutrals
Item Name: The Bonsai Balance

Simplicity and a connection to nature are the hallmarks of a Zen-inspired coffee table, promoting calm and tranquility. This arrangement is visually soothing, relying on a minimal color palette of moss green, cream, and warm wood tones. The focus is entirely on texture and the beauty of the few objects present.
The primary focal point is the low, wide ceramic bowl housing a small, beautifully shaped bonsai tree surrounded by lush moss. The wide, shallow bowl emphasizes the horizontal plane of the table, creating a feeling of grounded stability. The living plant introduces an essential element of life and organic form.
The rest of the objects are simple and highly textural. A neat stack of neutral-toned books is topped with a few simple ceramic pieces, including a small dipping bowl and a slightly larger serving bowl. This careful curation ensures that the display feels edited and purposeful, never busy. The wood tray and felt coasters underscore the dedication to natural, understated materials.
Materials Required (for a similar Zen display)
- A wide, shallow ceramic bowl (cream or light gray).
- A small bonsai tree or a decorative Ficus in the bowl.
- Decorative moss or gravel to cover the soil.
- A small, dark-wood rectangular serving tray.
- Two to three small, textured ceramic bowls (one very small, one medium).
- A matching ceramic plate or saucer.
- A stack of three to four books with light gray or white spines.
- A set of gray felt or stone coasters.
Equipment Required
- Small hand trowel (for planting the bonsai).
- Fine-mist spray bottle (for watering the moss).
DIY Instruction: Achieving Tranquil Harmony
- Plant the Centerpiece: If you are using a loose bonsai, carefully plant it and cover the soil with the decorative moss in the wide ceramic bowl. Place this bowl slightly off-center on the coffee table. This is the heart of the display.
- Anchor the Books: Stack the neutral-spined books neatly to the right of the bonsai bowl. This defines the height element for the rest of the display.
- Define the Tray Zone: Place the small, dark-wood serving tray to the left of the bonsai bowl. This adds a necessary grounding block of dark color to contrast the light elements.
- Arrange the Ceramic Set: Place the smallest ceramic bowl inside the wooden tray. On the table, place the ceramic plate or saucer near the tray, and set the medium-sized ceramic bowl on top of the plate. The layered ceramics add interest without adding clutter.
- Complete with Coasters: Stack the felt or stone coasters neatly on the table, near the book stack. The soft texture of the felt complements the natural materials of the wood and moss, completing the harmonious, peaceful scene.
9. Tropical Greenery and Brass Warmth
Item Name: The Golden Oasis

A striking display that combines vibrant greenery with warm metallic accents creates an instantly uplifting focal point. This arrangement is built on a rich, mid-tone wooden table, which makes the brass and deep green elements pop beautifully. The overall effect is lively and highly textural.
The vertical height is dominated by a tall, sculptural cactus or Euphorbia plant, contained within a sleek, standing brass planter. This immediately draws the eye upward and gives the display a strong, architectural feel. The gold metal reflects ambient light, adding a warm glow to the scene.
Functionality is cleverly disguised using a large, rectangular brass tray that corrals a unique textured dish and a clear glass for drinks. On the opposite side, a deep wooden bowl holds remotes, placing everyday objects within beautiful vessels. A stack of books provides a platform for the wooden bowl, demonstrating how simple layering can make any object look purposeful and curated.
Materials Required (for a similar tropical display)
- A tall, spiky plant like a cactus, Euphorbia, or Sansevieria.
- A brass or gold-toned cylindrical planter on a stand.
- A large, rectangular brass or gold-toned metal tray.
- A deep, carved wooden bowl.
- A stack of three to four hardcover books.
- A unique, heavily textured ceramic dish (for keys or small items).
- A clear, heavy-bottomed drinking glass (preferably green-toned).
- A set of decorative ceramic coasters.
- Remote controls.
Equipment Required
- Small gardening spade.
- Watering can (for plant maintenance).
DIY Instruction: Designing a Vibrant, Contained Garden
- Position the Vertical Anchor: Place the brass planter with the tall, dramatic plant toward the center-back of your coffee table. This is the undisputed tallest element and the main source of life.
- Establish the Functional Center: Place the large brass tray on the right side of the table, slightly in front of the plant. This defines the essential organization area.
- Arrange the Tray Contents: Place the highly textured ceramic dish and the drinking glass within the brass tray. This provides a balance of hard and soft textures inside the defined boundary.
- Create the Opposite Staging: On the left side of the table, stack your three to four hardcover books. Place the deep, carved wooden bowl on top of this book stack.
- Disguise the Remotes: Place the remote controls neatly inside the wooden bowl. The remotes are functional but now stored beautifully, maintaining a tidy appearance.
- Add a Final Detail: Place the small decorative coasters near the corner of the brass tray, ready for use. Ensure the color and texture of the coasters complement the overall tropical, warm palette.
10. Moody Drama and Artistic Contrast
Item Name: The Gallery Noir

For a truly dramatic and artful statement, a coffee table can be styled using deep, moody colors, rich textures, and unexpected silhouettes. This composition uses a dark tabletop and a striking painting in warm earth tones as its backdrop, setting a sophisticated, almost painterly scene.
The display achieves immense height variation and visual rhythm through its selection of accessories. A very tall, slender green glass vase stands at the center, its unexpected shape commanding attention. It is flanked by a large, open art book displayed on wooden stands, instantly inviting a closer look and creating a personal, gallery experience.
Layered textures are key: a soft, chunky gray throw blanket is draped casually across the corner, introducing softness against the hard lines of the books and objects. Rich, dark wood is used for the candle holder and book stands, adding warmth and depth. The small, rattan basket with a red glass vase holding quills and remotes introduces an element of unexpected color and a playful, historic feel.
Materials Required (for a similar dramatic display)
- A tall, slender, colored glass vase (green or blue).
- A large, hardcover art book.
- Two small wooden book stands or easels (dark wood).
- One wooden block candle holder.
- A long, thin taper candle (brown or burgundy).
- A small rattan or woven basket.
- A short, colored glass vessel (red or amber).
- A feather quill or two (white or natural color).
- A thick, soft throw blanket (gray or deep neutral).
- Two small marble or granite coasters.
- A piece of bronze or gilded wire decor.
Equipment Required
- None.
DIY Instruction: Curating a Sophisticated, Moody Vignette
- Drape the Softness: Begin by casually draping the soft, chunky throw blanket over one corner of the table. Let it pool slightly, creating an immediate sense of inviting texture and warmth.
- Establish the Centerpiece: Place the tall, slender glass vase in the center of the table, slightly behind where the book will sit. Its height is crucial for the dramatic effect.
- Open the Book Gallery: Place the two small wooden book stands in front of the vase. Gently open the large art book to an appealing page and rest it on the stands. The open book transforms the table into an active viewing space.
- Introduce Vertical Accents: Place the wooden block candle holder to the right of the vase, inserting the taper candle. Place the small rattan basket to the far right. Place the red glass vessel inside the basket, using it to hold the remotes and the feather quills.
- Add Grounding Detail: Place the two marble coasters near the front edge of the table. Finally, place the small piece of gilded wire or bronze decor in the foreground, near the blanket, to catch the light and add a final metallic glimmer.
11. Rustic Texture and Neutral Warmth
Item Name: The Hearthside Stone Tray

Embracing natural materials and a monochromatic color scheme creates a serene and deeply inviting atmosphere, making the table feel like a calm retreat. This display uses layered stone textures and soft, weathered wood tones to achieve its sophisticated rustic look. The large, rectangular stone tray acts as the substantial anchor for the entire composition.
Height variation is achieved by using a neat stack of light-spined books, which elevates a collection of small, organically shaped ceramic vessels. A tiny, dried floral arrangement placed in a narrow-necked vase adds a delicate, vertical contrast to the chunky, horizontal lines of the books and tray. This collection feels carefully curated yet completely effortless.
The arrangement is balanced by a trio of thick pillar candles in graduated heights and earthy, marbled tones. Their flickering flames introduce movement and a cozy, ambient light, perfectly completing the warm scene. The contrasting textures, from the rough stone tray to the smooth candle wax and soft textiles in the background, prevent the neutral palette from feeling boring.
Materials Required (for a similar rustic display)
- A large, shallow tray made of light, rough-hewn stone or concrete.
- A stack of three to four hardcover books with cream or white spines.
- A collection of three small, matte ceramic vessels (different sizes and shapes).
- A small, terracotta or stoneware vase.
- A few sprigs of dried floral material (like bunny tails or dried grasses).
- Three pillar candles in graduating heights, featuring an earthy or marbled tone.
- A small, smooth concrete bowl.
- A light-colored throw blanket (optional, for the background).
Equipment Required
- None.
DIY Instruction: Building a Cozy, Textured Vignette
- Stage the Foundation: Place the large, rough stone tray centered on the coffee table. This massive piece defines the boundary for the entire display.
- Anchor the Candles: Place the three pillar candles near the right side of the tray. Arrange them from tallest at the back to shortest at the front to create a dynamic visual slope.
- Build the Elevation: Stack the three to four light-spined books neatly on the left side of the tray. This provides a clean, neutral platform.
- Arrange the Small Vessels: Place the collection of three small ceramic vessels on top of the book stack, positioning the smallest vessel slightly forward. Place the small vase holding the dried grass sprigs centrally on top of the books as the vertical accent for this section.
- Ground the Center: Place the smooth concrete bowl directly onto the tray, positioned in the middle, just in front of the book stack. The bowl acts as a grounding, weighty anchor against the vertical elements.
- Step Back and Refine: Adjust the spacing slightly, ensuring each item has a small amount of breathing room on the tray. The arrangement should feel abundant but not overcrowded.
12. Vivid Color and Modern Artistry
Item Name: The High-Contrast Bloom

This coffee table is a true celebration of modern design, using high-voltage color and strong visual contrast to create an unforgettable focal point. The dark table surface is deliberately used to make the brilliant pinks, magentas, and electric blues pop dramatically. A large, crisp white tray provides the unifying structure for this vibrant collection.
The arrangement centers around an explosion of color and life, featuring a tall, elegant white vase filled with dramatic, bright magenta peonies and thistle. This large floral arrangement is the undisputed star, establishing immediate height and organic movement. The composition is balanced by another living element: a small, glossy green-leafed plant in an intensely pink ceramic pot.
Layering is key to the modern, clean aesthetic. Books with brightly colored spines (pink, blue, and black) are stacked strategically to elevate the small plant and a smooth white accent vase. A small, silver dish holding bright green candy adds a final, playful touch, proving that even small details contribute to the overall electrifying energy of the display.
Materials Required (for a similar vibrant display)
- A large, rectangular white tray with handles.
- A tall, pure white ceramic vase.
- A generous selection of vibrant pink or magenta flowers (like peonies, garden roses, or snapdragons).
- A small, potted plant with glossy green leaves.
- A small, vibrant pink ceramic pot.
- A small, smooth white accent vase.
- A stack of three to five hardcover books with bright, solid-colored spines (pink, blue, yellow).
- A small silver or polished chrome dish.
- Brightly colored candy or decorative stones (like green or blue).
Equipment Required
- Gardening shears (for trimming flowers and plant).
DIY Instruction: Staging a Colorful, Bold Focal Point
- Define the Structure: Place the large white tray centrally on the coffee table. This crisp white boundary will make the intense colors inside appear even brighter.
- Establish the Main Centerpiece: Place the tall white vase filled with the dramatic pink and purple flowers toward the back of the tray. Ensure this is the highest element for maximum impact.
- Build the Elevation Stack: Create a neat stack of your brightly spined books to the left of the vase. The colors of the spines should be clearly visible.
- Place the Plant: Carefully place the small potted green plant into the vibrant pink ceramic pot. Place this pot directly on top of the stacked books. Place the small, smooth white accent vase next to the plant pot on the stack.
- Add Final Pop of Color: Position the small silver dish near the front right corner of the tray. Fill the dish with the brightly colored candy or decorative stones. This small detail reinforces the high-contrast color scheme.
- Balance and Clean Up: Ensure the plant and flowers are trimmed to look fresh. The dark table surface outside the white tray should be completely clean to maximize the color contrast.
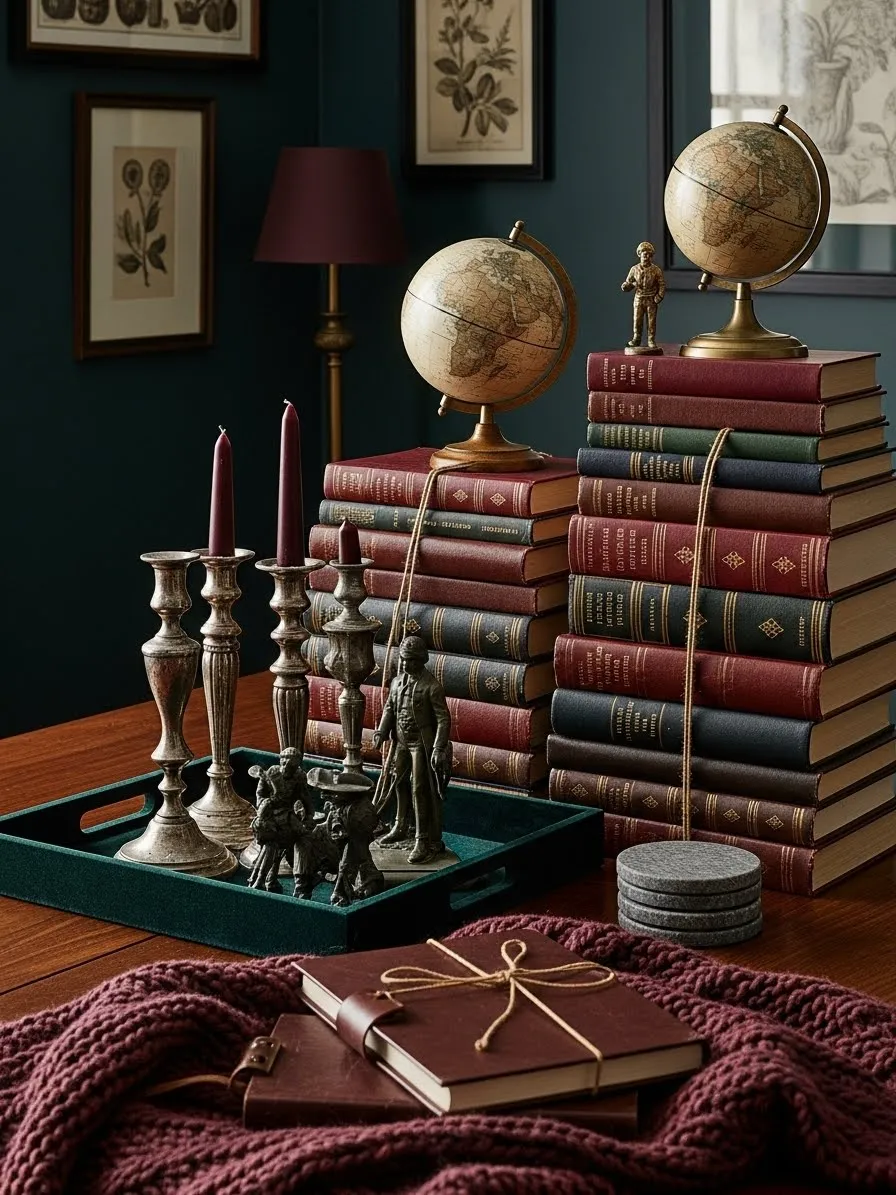
13. Scholarly Sophistication and Classic Charm
Item Name: The Antiquarian’s Library Stack

This styling strategy instantly transports the viewer to a cozy, old-world library, utilizing deep, moody colors and collected vintage objects. The dark teal wall and rich wooden table create a powerful, intimate backdrop for the display. The entire scene is focused on height, history, and symmetry.
The main feature is a dramatic, structured stack of books, featuring antique-looking spines in rich reds, greens, and burgundy. This towering stack provides immense verticality and visual texture. The books serve as the powerful pedestal for a vintage globe and a small soldier figurine, giving the antique objects significant prominence.
The arrangement is mirrored on the other side of the tray with another vintage globe and a matching figurine on a second stack of books, creating wonderful symmetry. In the foreground, a plush velvet tray holds a collection of silver candlesticks and small antique figurines, introducing soft texture and glimmering metallic accents. Finally, a richly colored throw and a leather-bound journal complete the feeling of scholarly, luxurious comfort.
Materials Required (for a similar scholarly display)
- A large collection of 20 to 30 hardcover books with rich, antique-toned spines (red, burgundy, deep green, brown).
- Two small vintage-style globes (brass or gold base).
- Two small antique figurines (like soldiers or animals).
- A rectangular tray covered in plush velvet (deep green or burgundy).
- A collection of three or four decorative silver candlesticks (varying heights).
- A set of small, dark gray felt coasters.
- A leather-bound journal or book with a decorative tie.
- A thick, textured throw blanket (burgundy or deep red).
Equipment Required
- None.
DIY Instruction: Curating a Dramatic, Vintage Library
- Build the Twin Pillars: Divide your collection of antique-spined books into two stacks of roughly equal height. Place one stack to the back right and the second stack to the back left of the table.
- Top with Antiquities: Place one vintage globe on top of each book stack. Set one soldier or accent figurine next to each globe. Ensure the two stacks look visually balanced.
- Establish the Foreground Plinth: Place the plush velvet tray centrally on the table, in front of the book stacks. This soft texture contrasts with the hard lines of the books.
- Arrange the Metalwork: Place the collection of silver candlesticks inside the velvet tray. Arrange them at varying heights to create visual rhythm. Place the small antique figurines around the candlesticks.
- Add Layers of Comfort: Place the leather-bound journal or book with the decorative tie directly in front of the velvet tray. Drape the thick, textured throw blanket over the edge of the coffee table, letting it pool slightly near the journal.
- Place the Coasters: Stack the dark gray felt coasters neatly near the base of one of the book pillars, ensuring they are easily accessible.
14. Minimalist Monochromatic Sculpture
Item Name: The Black and White Study in Form

A disciplined, monochromatic palette of black and white is used here to achieve a striking, highly contemporary look. The focus is purely on form, texture, and geometry, making the display feel incredibly clean and modern. The round black tray is the dominating element, containing the entire display and creating a strong boundary.
The arrangement uses multiple small, sculptural vases, each one a study in simple geometry. The vases are placed on a stack of books with clean, white spines, ensuring the accessories are elevated and framed clearly against the black tray. The stark contrast of the black and white ceramics—especially the round black vase placed among the white ones—makes the grouping feel dynamic.
Softness and warmth are introduced subtly with natural wood and candle glow. A small, square wooden block elevates a single, slender white taper candle, giving it significant vertical height. A small, wider candle is placed directly on a white coaster, adding a second light source. Finally, the stack of gray felt coasters and the small leather coaster add layers of neutral texture, completing this serene yet dramatic composition.
Materials Required (for a similar minimalist display)
- A large, round tray with a matte black finish.
- A stack of three to four hardcover books with white or light gray spines.
- A collection of five small, sculptural vases (mostly white, one black).
- A small, square wooden block candle holder.
- One long, slender white taper candle.
- One short, wide pillar candle (white or cream).
- A white square or round coaster (for the short candle).
- A set of gray felt coasters.
- A single brown leather coaster.
Equipment Required
- None.
DIY Instruction: Organizing a Geometric Display
- Define the Boundary: Place the large, round matte black tray centrally on the coffee table. This acts as the dramatic canvas for the white and black objects.
- Build the Main Staging Area: Stack the three to four white-spined books neatly on the left side of the tray. This provides the first layer of elevation.
- Arrange the Sculptures: Place the collection of small white and black sculptural vases on top of the book stack. Ensure the single black vase is placed strategically among the white ones for maximum visual contrast.
- Create the Tall Light Source: Position the square wooden block candle holder toward the back right of the tray. Insert the long white taper candle into the block. This should be the tallest, most commanding element.
- Place the Short Light Source: Place the white coaster centrally in the front right section of the tray. Set the short, wide pillar candle on top of the coaster.
- Add the Final Textures: Stack the gray felt coasters neatly on the tray, near the pillar candle. Place the single brown leather coaster slightly under the book stack, letting it peek out to introduce a small, warm accent color.
15. Jewel Tones and Mirrored Glamour
Item Name: The Emerald Gilded Collection

This coffee table is styled for high glamour and visual impact, using luxurious jewel tones and reflective surfaces. The large, rectangular tray features a brilliant emerald green frame and a mirrored bottom, which reflects the surrounding objects, doubling their visual presence and adding immense depth.
Height and sparkle are delivered by a pair of faceted crystal candlesticks topped with dramatic purple taper candles. These elements draw the eye vertically and introduce a sense of celebration. The tray is organized into four distinct quadrants, enhancing the sense of order and intentionality.
The display is highly functional, but the everyday objects are beautifully contained. Remotes and small calculators are stored neatly in a gleaming gold box, and a single, colorful ceramic dish is placed in a matching gold frame. A large, faceted ruby-red acrylic jewel is used as a dramatic paperweight, and a stack of books featuring fashion-forward photography completes the luxurious, high-end design.
Materials Required (for a similar glamorous display)
- A large, rectangular tray with an emerald green frame and mirrored bottom.
- Two faceted crystal candlesticks.
- Two purple or deep magenta taper candles.
- A stack of three to four hardcover books with black and white spines.
- A small gold-toned metal box with an open top.
- A decorative ceramic dish (e.g., patterned or dark blue).
- A large, faceted ruby-red acrylic or glass jewel.
- A small marble or patterned tile coaster.
- Remote controls and small calculator.
Equipment Required
- None.
DIY Instruction: Assembling a Symmetrical, Glamorous Tray
- Stage the Tray: Place the mirrored, emerald-framed tray centrally on your coffee table. Clean the mirrored surface thoroughly.
- Establish Vertical Symmetry: Place the pair of crystal candlesticks on the back center area of the tray, inserting the purple taper candles. Their height should define the maximum vertical limit.
- Build the Book Stack: Stack the black and white-spined books neatly to the right of the candlesticks, toward the back. This provides a clean, neutral anchor.
- Organize Functional Gold: Place the open gold-toned metal box in the front left corner of the tray. Neatly stack the remotes and calculator inside the box.
- Highlight the Accent Dish: Place the gold-framed decorative ceramic dish in the front right corner of the tray. This provides a wonderful small detail of color and pattern.
- Add the Finishing Glimmer: Place the faceted ruby-red jewel on top of the marble coaster. Position this stack on the tray, between the book stack and the gold box. The reflection in the mirror should amplify the jewel’s sparkle.
16. Desert Modern and Earthen Clay
Item Name: The Southwest Terracotta Stack

This coffee table style uses a warm, earthy color palette dominated by terracotta, rust, and clay tones, evoking a chic, desert-inspired aesthetic. The central piece of furniture is a soft, woven jute ottoman, replacing a traditional table to instantly add texture and a relaxed, tactile feeling.
The display is built around a collection of simple, unglazed terracotta objects. A large, beautifully shaped clay vase stands tall, flanked by a wide, shallow terracotta bowl that is used cleverly to store remote controls. This shows that even functional items can be contained within beautiful, rustic vessels.
Visual texture comes from the use of simple geological elements—a small ceramic saucer holds a piece of rough white rock, while another chunk of mossy rock sits atop a book. These natural elements are contrasted with a spikey, sculptural cactus. The entire scene is anchored by books with simple titles, reinforcing the theme of geology and nature. A cozy, patterned throw blanket introduces a final layer of soft, inviting texture.
Materials Required (for a similar desert display)
- A large, unglazed terracotta vase.
- A wide, shallow terracotta bowl (used for storage).
- A smaller terracotta bowl.
- A terracotta saucer.
- Two to three hardcover books with simple, nature-related titles.
- Two pieces of interesting natural rock (one small, one medium).
- A small, spiky cactus or succulent in a pot.
- A small carved wooden vase.
- Remote controls.
- A patterned throw blanket with tassels and pom-poms.
Equipment Required
- Small brush (to dust the terracotta).
DIY Instruction: Creating an Organic, Earthen Display
- Define the Central Mass: Place the largest terracotta vase toward the back center of the ottoman or table. This is the main source of height and the strongest color block.
- Build the Elevation: Stack the two or three nature-themed hardcover books neatly to the right of the large vase.
- Top with Nature: Place the piece of mossy rock and the small, spiky cactus on top of the book stack. The rough textures of the rock and plant should contrast beautifully with the smooth book spines.
- Stage the Remotes: Place the wide, shallow terracotta bowl to the left of the main vase. Neatly place the remote controls inside the bowl. This keeps them readily available but contained.
- Accent with Geology: Place the small terracotta saucer on the table near the front edge. Set the smaller, white piece of rough rock on the saucer, using it as a tiny pedestal. Place the small carved wooden vase near the large terracotta vase.
- Drape the Texture: Drape the patterned throw blanket with tassels and pom-poms over the nearby couch or chair (or slightly across the ottoman) to introduce softness and color against the dominance of the earth tones.
17. Cabinet of Curiosities Under Glass
Item Name: The Collector’s Glass Cloche

A coffee table can become a sophisticated display case by using glass cloches to showcase collected treasures. This styling relies on dark wood, reflective glass, and rich jewel tones to create a sense of mystery and luxury. The large, round dark wood tray grounds the entire composition, making the clear glass elements stand out sharply.
The main focal point is a massive glass dome that encapsulates a beautiful grouping of objects. Inside, a stack of books with vibrant emerald-green and black spines provides a clean pedestal for the featured item—a delicate brass armillary sphere and a single white feather. This arrangement highlights the intrinsic beauty of each item.
A second, smaller glass cloche is placed nearby, holding a simple, moss-covered watch. The juxtaposition of the two sizes and two distinct contents creates an intriguing sense of a personal museum. A heavy, reflective silver coaster placed outside the tray adds a final, polished metallic accent, completing the secretive, elegant look.
Materials Required (for a similar display case)
- A large, round dark wood tray (walnut or mahogany finish).
- One very large glass dome or cloche with a decorative finial.
- One smaller glass dome or cloche.
- A stack of two to three hardcover books with rich, jewel-toned spines (emerald, sapphire, black).
- A delicate brass armillary sphere or other gold-toned geometric object.
- A single white feather.
- A watch placed on a bed of moss (for the small cloche).
- A heavy, reflective silver or chrome coaster.
Equipment Required
- None.
DIY Instruction: Arranging a Personal Museum
- Establish the Foundation: Place the dark wood tray centrally on the coffee table. This rich wood color is crucial for the vintage, luxurious feel.
- Build the Main Exhibit: Stack the jewel-toned books neatly inside the tray, slightly off-center. Gently place the brass armillary sphere and the white feather on top of the book stack.
- Cover the Main Exhibit: Carefully place the large glass dome over the stacked books and objects. Ensure the dome is centered over the items and sits securely on the tray.
- Create the Secondary Exhibit: Place the small glass cloche (containing the watch and moss) on the tray next to the large dome. The difference in height and scale makes the grouping dynamic.
- Add Glimmering Detail: Place the heavy, reflective silver or chrome coaster just outside the tray on the tabletop. This draws the eye out from the main centerpiece and adds a final metallic touch.
18. Creative Chaos and Artistic Freedom
Item Name: The Painter’s Desk Vignette

This coffee table is styled to look like a spontaneous workspace, creating an atmosphere of vibrant creativity and artistic focus. Unlike more formal arrangements, this design is intentionally scattered and layered, suggesting that art is currently in progress. This provides an unexpected, dynamic focal point.
Height is achieved using large piles of books and canvases, which serve as pedestals for tools and materials. A tall, ceramic vase overflowing with paintbrushes immediately signals the theme and draws the eye upward. Canvases are stacked and leaned, creating a backdrop that gives the table a sense of depth and purpose.
The table surface is richly textured with materials: bowls of pigment powder, open sketchbooks with drawings, scattered tubes of paint, and a messy array of brushes. Practicality is managed through simple wooden boxes that contain items like remote controls and pencils. The entire arrangement, though seemingly chaotic, is carefully composed to highlight tools, art books, and the sheer joy of the creative process.
Materials Required (for a similar artistic display)
- A large, textured canvas or painting to lean against a wall.
- Two or three blank stretched canvases (different sizes).
- A collection of five to seven hardcover books with art-related titles.
- A tall, ceramic or stoneware vase.
- A large assortment of paintbrushes and art pencils.
- Two small wooden boxes (one for remotes, one for pencils).
- Two medium ceramic bowls (one for water, one for pigment powder).
- Small jars of paint or ink.
- Open sketchbooks with drawings.
- Small, decorative tile coasters with paint splatters.
- Remote controls.
- A simple drop cloth or neutral-colored linen throw.
Equipment Required
- None.
DIY Instruction: Staging a Creative Workshop
- Lay the Base: Drape a simple linen drop cloth or throw loosely over the coffee table surface. Let it wrinkle slightly to enhance the casual, workspace feel.
- Build the Background: Lean the large finished canvas or painting against the wall behind the table. Stack the two or three blank canvases behind the display on the table, creating a backdrop for the items.
- Create the Tool Pillars: Create two high stacks of books (one on the left, one on the right). Place the tall ceramic vase of brushes on top of the left stack. This is the tallest point.
- Organize Essentials: Place the wooden box containing the remote controls on the left side of the table, near the vase. Place the smaller wooden box with pencils on the right side.
- Scatter the Materials: Place the ceramic bowl of pigment powder centrally, in front of the canvas stacks. Scatter brushes, small paint jars, and tubes of paint organically across the table surface and the book stacks.
- Highlight the Work: Open the sketchbooks to pages with drawings and lay them flat on the table in the foreground. Place a single paintbrush across the open pages, making it look as though the artist just stepped away.
19. Geometric Brass and Marble Contrast
Item Name: The Sharp Geometric Study

This display uses strong geometric shapes and contrasting materials—rich black, gleaming brass, and cool white marble—to create a sharp, highly contemporary focal point. The dark tabletop enhances the reflective qualities of the brass and the crispness of the marble.
The core of the display features a beautiful arrangement of vertically and horizontally stacked books in deep navy and black, which creates a solid, grounding backdrop. The main sculpture is a commanding, golden geometric pyramid, placed prominently on the horizontal stack of books, drawing the eye instantly with its sharp lines and metallic sheen.
On the opposite side, the soft texture of a spiky air plant (Tillandsia) in a black geometric pot is deliberately placed on a double-stacked marble slab. This juxtaposition of soft plant life against cool, hard marble adds visual intrigue. The functional elements are contained within a sleek, rectangular brass tray, which holds remotes and a second, smaller brass geometric accent piece.
Materials Required (for a similar geometric display)
- A large, solid brass or gold-toned geometric pyramid sculpture.
- A stack of two to three large hardcover books with black or navy spines.
- A second collection of three to four books, standing vertically.
- A small, black geometric planter (ceramic or stone).
- A spiky air plant (Tillandsia).
- Two thin, square white marble slabs.
- A large, rectangular brass or gold-toned metal tray.
- A small brass accent object (like a small pyramid or cube).
- A set of three white marble coasters.
- A remote control.
Equipment Required
- None.
DIY Instruction: Building a Modern, Sculptural Display
- Define the Book Backdrop: Stack the two to three large black or navy books horizontally on the left side of the table. Stand the vertical collection of books behind this stack, forming a deep backdrop.
- Place the Primary Sculpture: Center the large brass geometric pyramid on the horizontal book stack. Its clean lines and bold color should immediately draw focus.
- Build the Marble Pedestal: Stack the two white marble slabs on the right side of the table. Place the black geometric planter containing the air plant on top of the marble stack. The contrast between the black pot and white marble is striking.
- Anchor the Functional Tray: Place the rectangular brass tray in the foreground, directly in front of the book stacks. The metallic sheen unifies the display.
- Organize the Tray Contents: Place the remote control neatly inside the tray. Stack the three white marble coasters in the tray, and place the small brass accent object on top of the coasters. This keeps the functional area tidy and stylish.
20. Lush Greenery and Natural Layers
Item Name: The Rattan Garden Centerpiece

This coffee table is transformed into a vibrant indoor garden, achieving a high-impact focal point through abundant greenery and natural textures. The entire display is unified by a large, round rattan tray with handles, which gives the arrangement a tidy, contained look. The dominance of various shades of green against the warm terracotta and natural rattan is incredibly refreshing.
Height is beautifully managed using multiple plants in varying pot sizes and colors. A tall, leafy fern in a terracotta pot is strategically placed on a white riser and a stack of books, ensuring it is the commanding vertical element. Other small, varied plants, including ivy and variegated leaves, are placed in smaller white and terracotta pots around the tray.
The arrangement is highly functional, acknowledging the need for drinks and plant care. A simple glass of water and a vintage-style brass mister bottle are placed on cork coasters, reinforcing the natural, organic theme. The dark green spines of the stacked books add another layer of deep color, completing this lush, inviting indoor garden.
Materials Required (for a similar indoor garden display)
- A large, round rattan or woven tray with handles.
- A collection of five to six small potted plants (ferns, ivy, variegated plants, succulents).
- A mix of white ceramic and terracotta pots (various sizes).
- A white ceramic riser or small pedestal.
- A stack of three to four hardcover books with dark green or nature-themed spines.
- A small, vintage-style brass or glass mister bottle.
- A clear drinking glass.
- A set of four to six round cork coasters.
- A throw blanket with natural print (optional, for the background).
Equipment Required
- Small watering can or mister bottle.
- Small hand trowel (for repotting).
DIY Instruction: Creating a Lush, Layered Garden Tray
- Lay the Foundation: Center the large rattan tray on your coffee table. This is the base of your portable garden.
- Establish the Tallest Point: Stack the books neatly on the tray, slightly off-center. Place the white ceramic riser on top of the books. Place the tallest plant (the large fern) in its terracotta pot on top of the riser.
- Arrange the Medium Plants: Place the second-largest plant in its terracotta pot directly on the tray, to the right of the book stack. Place the variegated plant in its white pot near the front center.
- Incorporate the Smallest Plants: Arrange the remaining smallest plants in their tiny pots in the open spaces on the tray, ensuring they fill the gaps without looking crowded.
- Add Functional Details: Place the clear drinking glass on a cork coaster on the front left side of the tray. Place the brass mister bottle on a cork coaster on the front right side of the tray, making it look ready for use.
- Finalize the Look: Place the remaining cork coasters neatly stacked near the glass. Ensure all pot bases are completely covered by the tray or the coasters for a finished appearance.
21. Exotic Spice Tones and Global Travels
Item Name: The Grand Spice Bazaar Platter

This coffee table is styled as a sensory experience, transporting the viewer to an exotic marketplace with rich colors, textures, and the suggestion of fragrant spices. The display is anchored by a massive, hammered brass tray that immediately introduces a luxurious, global feel. This metallic base reflects the ambient light, enhancing the drama.
A towering, dark cobalt blue ceramic jar and two smaller, patterned blue and white pots establish the main vertical structure. The books underneath provide necessary lift, featuring spines that hint at international cuisine and history. The deep blue color palette is strongly contrasted with warm tones of gold, red chilies, and cinnamon sticks.
Functional items are beautifully integrated into the theme. Small tins of turmeric and cumin are placed among the star anise and whole red chilies, turning simple spices into decorative elements. The stack of patterned black and white coasters and remotes are all neatly contained within the metallic serving tray, completing this highly textural and globally inspired scene.
Materials Required (for a similar exotic display)
- A large, round, hammered brass or gold-toned metal tray.
- A large, dark blue ceramic jar with a lid.
- Two small, patterned blue and white ceramic pots with lids.
- A stack of five to seven hardcover books with culturally rich spines (blue, yellow, red).
- Two small, labeled spice tins (e.g., Turmeric, Cumin).
- A small brass or gold-toned bowl.
- Whole dried red chili peppers and cinnamon sticks.
- Star anise pods.
- A set of patterned black and white tile coasters.
- Remote controls.
Equipment Required
- None.
DIY Instruction: Building a Fragrant, Global Vignette
- Lay the Foundation: Center the large hammered brass tray on the coffee table. This unifies the entire, complex display.
- Establish Vertical Symmetry: Place the large cobalt blue jar in the back center of the tray. Create two stacks of books to flank the jar, one stack on the left and one on the right.
- Arrange the Main Vessels: Place one small blue and white patterned ceramic pot on the left book stack. Place the other matching pot on the right book stack. The two pots should visually balance the central blue jar.
- Incorporate the Spices: Place the small spice tins, star anise, and loose whole spices strategically around the bases of the vessels. Place the small brass bowl in the foreground and fill it with the dried red chilies and cinnamon sticks, creating a strong color block.
- Organize Essentials: Place the stack of patterned coasters and the remote controls neatly in the front section of the tray. Ensure some cinnamon sticks and star anise are casually placed on the coasters to reinforce the theme.
22. Graphic Contrast and Bold Simplicity
Item Name: The Black and White Checkmate

This coffee table achieves striking elegance through a strict adherence to a black and white palette, emphasizing graphic patterns and clean forms. The crisp white tabletop provides a brilliant canvas for the dark objects, making the display feel fresh, modern, and highly architectural.
The primary structure is created by a significant stack of thick, white-spined books, forming a solid, geometric block. On top of this pedestal sits a smooth, matte black ceramic vase, its classic shape contrasting beautifully with the stark white backdrop. The use of a chunky, unfinished white abstract sculpture next to the vase adds another layer of intriguing texture.
The theme of graphic contrast is reinforced by a stack of black and white checkerboard coasters, which are prominently displayed and ready for use. A minimalist black metal tray, featuring a slim profile, corrals the remote controls. This thoughtful containment prevents the clean lines of the design from being interrupted by everyday clutter, keeping the focus squarely on the beautiful geometry.
Materials Required (for a similar graphic display)
- A stack of three to five thick, white-spined hardcover books.
- A smooth, matte black ceramic vase.
- A small, chunky white abstract sculpture (like unfinished stone or clay).
- A set of four to six black and white checkerboard patterned coasters.
- A slim, black metal tray with handles.
- A small silver or chrome dish.
- A black and white striped cloth or runner.
- Remote controls.
Equipment Required
- None.
DIY Instruction: Staging a Modern Monochromatic Scene
- Build the White Pedestal: Create a tall, neat stack of the white-spined books on the left side of the coffee table. This provides the solid, light base.
- Crown the Stack: Place the smooth, matte black vase centrally on top of the book stack. Place the chunky white abstract sculpture next to the vase. The contrast between the smooth black, rough white, and clean book spines should be sharp.
- Introduce the Pattern: Stack the black and white checkerboard coasters neatly in front of the book stack. Their bold pattern adds a dynamic visual element.
- Define the Functional Zone: Place the slim, black metal tray on the right side of the table. Place the remote controls and the small silver dish neatly inside the tray.
- Add a Grounding Pattern: Place the black and white striped runner or cloth slightly underneath the tray and stretching toward the book stack. This further reinforces the graphic, clean contrast.
- Maintain Simplicity: Ensure the table surface surrounding the display is completely clear. The power of this display comes from the starkness of the black and white objects against the white table.
23. Tranquil Zen Tea Ceremony
Item Name: The Minimalist Japanese Tea Service

This coffee table is styled to evoke a sense of deep calm and mindfulness, drawing inspiration from Japanese design and the tradition of the tea ceremony. The arrangement utilizes subtle, muted tones—sage green, natural wood, and light tan—to create a peaceful, contemplative focal point.
The entire display rests on a central, textured woven runner that defines the area and adds a crucial layer of natural texture against the dark wood table. Height is established by a simple, elegant stoneware vase holding delicate, flowering cherry blossom branches, introducing a beautiful, organic vertical line.
The rest of the items are centered on the ritual of tea. Bowls, cups, and saucers in soft sage green ceramics are placed on individual woven rattan coasters, highlighting each piece as an object of beauty. A traditional bamboo whisk is prominently displayed, reinforcing the theme. A stack of books on Japanese gardens grounds the entire scene, while a smooth river stone and a linen napkin complete the tranquil aesthetic.
Materials Required (for a similar Zen display)
- A long, textured woven table runner (tan or natural fiber).
- A simple, tall stoneware vase (muted gray or sage green).
- A few small branches of cherry blossoms or other simple floral sprigs.
- A stack of one to two hardcover books (e.g., on nature or gardening).
- Two simple ceramic tea cups and two saucers (sage green).
- Two small ceramic bowls (one for serving, one for waste).
- A small wooden spoon.
- A traditional bamboo matcha whisk.
- A set of four square rattan or woven coasters.
- A square of light linen napkin or paper.
- A smooth river stone.
Equipment Required
- None.
DIY Instruction: Arranging a Calm, Intentional Tea Service
- Lay the Groundwork: Center the woven runner lengthwise on your coffee table. This defines the display area and provides the primary texture.
- Establish the Organic Height: Place the stoneware vase with the cherry blossom branches toward the back center of the runner. The flowers should be the tallest, most delicate element.
- Anchor the Books: Place the stack of books horizontally on the runner in the front right section. The book’s theme should reinforce the calm, natural aesthetic.
- Set the Tea Service: Arrange the tea ceremony items across the runner. Place one ceramic cup and saucer on a rattan coaster in the front left. Place the other cup and saucer near the back right.
- Highlight the Tools: Position the main serving plate with the small, layered bowls and wooden spoon centrally on the runner. Place the bamboo whisk prominently on a rattan coaster near the back center.
- Add Final Details: Fold the linen napkin neatly and place it near the front left. Place the smooth river stone on the napkin. Ensure the arrangement feels spacious, allowing each object to be appreciated individually.
24. Bohemian Energy and Vibrant Patterns
Item Name: The Psychedelic Color Party

This coffee table is a burst of joyful color and pattern, instantly creating a bold, playful, and energetic focal point. The display is built upon a richly patterned tablecloth, which immediately sets the maximalist, bohemian tone for the entire grouping. This style relies on layering intense colors—fuchsia, turquoise, cobalt, and bright orange.
The center features a tall, patterned fabric-covered storage ottoman or riser, which serves as a commanding background pillar. Books are stacked dramatically in two separate columns, utilizing spine colors to create vibrant contrasts (pink on red, blue on yellow). The books are the pedestals for highly decorative items, including hand-painted patterned eggs and a fun, hot-pink figurine.
The vertical element is emphasized by a textured turquoise vase holding bright magenta flowers, reinforcing the high-energy color scheme. Small, colorful items like the bright orange geometric sculpture, a small crystal bowl, and two cobalt blue glass bottles are scattered creatively across the surface, contributing to the overall sense of unrestrained, artistic freedom.
Materials Required (for a similar bohemian display)
- A brightly patterned tablecloth or runner (paisley, floral, or ikat).
- A tall, patterned fabric-covered ottoman or box.
- Two separate stacks of five to six hardcover books with electric-colored spines (pink, magenta, turquoise, orange).
- A textured turquoise ceramic vase.
- A bunch of brightly colored flowers (e.g., fuchsia daisies or asters).
- Two large, hand-painted decorative eggs or spheres.
- A small, fun accent figurine (e.g., pink, abstract human shape).
- A bright orange geometric sculpture or toy.
- Two small cobalt blue glass bottles or votives.
- A small, clear crystal bowl.
- Decorative patterned coasters (e.g., turquoise and magenta).
- Remote controls.
Equipment Required
- None.
DIY Instruction: Layering a High-Energy, Colorful Scene
- Drape the Color Base: Cover the coffee table entirely with the brightly patterned tablecloth or runner.
- Establish the Center Pillar: Place the tall, patterned fabric-covered ottoman or box toward the back center of the table.
- Build the Book Towers: Create two tall stacks of books, one on the left and one on the right, in front of the center pillar. Strategically alternate the colors of the spines for maximum contrast.
- Crown with Art and Life: Place the textured turquoise vase with the magenta flowers on top of the right book stack. Place one hand-painted egg and the pink figurine on top of the left book stack.
- Fill the Center: Place the bright orange geometric sculpture in front of the vase. Arrange the remaining painted egg, the small crystal bowl, and the two cobalt blue glass bottles artfully between the two book stacks.
- Organize and Accessorize: Place the remote controls and a small stack of patterned coasters on the table surface in the foreground. Ensure the vibrant colors of the coasters match the overall high-energy palette.
25. Industrial Chic and Concrete Textures
Item Name: The Brutalist Concrete and Metal Study

This coffee table creates a dramatic, industrial aesthetic by exclusively using rough, unfinished textures like concrete and metal. The large, curved concrete table itself is the primary focal point, and the monochrome color scheme (black, gray, and white) emphasizes the brutalist materials and clean forms.
The arrangement uses stark verticality and geometric contrast. A stack of books with striking black and white titles (referencing concrete and architecture) elevates a small potted white orchid, contained within a rough concrete bowl. Next to this, a sculptural piece made of dark, industrial pipes draws the eye upward and reinforces the theme of engineered materials.
A shallow, wide concrete bowl is placed prominently on another stack of books, serving as a handsome place to store remotes. Ambient lighting is provided by multiple sources: four slender gray taper candles on a concrete riser, and a grouping of chunky gray pillar candles on a sleek, silver tray. This combination of raw materials and elegant lighting creates a sophisticated balance of ruggedness and warmth.
Materials Required (for a similar industrial display)
- A collection of five to seven hardcover books with black, white, and gray spines (architecture or art themes).
- A small potted white orchid.
- A small, rough concrete bowl (for the orchid).
- A sculptural piece made of dark metal pipes or fittings.
- A larger, shallow concrete bowl (for remotes).
- A concrete riser or small dish (for the taper candles).
- Four slender gray taper candles.
- A grouping of three chunky gray pillar candles (varying heights).
- A sleek, round silver or chrome metal tray.
- Two pieces of rough-hewn stone or rock.
- A thick, chunky gray knitted throw blanket.
- Remote controls.
Equipment Required
- None.
DIY Instruction: Layering a Textural, Industrial Scene
- Define the Main Book Stack: Create a high stack of books on the curved section of the table. Place the potted orchid in its concrete bowl on top of this stack.
- Introduce the Metal Sculpture: Position the dark metal pipe sculpture next to the orchid, ensuring its height is similar or slightly lower than the orchid’s.
- Create the Taper Candle Riser: Place the concrete riser near the center back of the table. Arrange the four gray taper candles on the riser, providing a clean line of light.
- Stage the Remote Bowl: On the lower, flat section of the table, create a second, smaller stack of books. Place the large, shallow concrete bowl on top of this stack and place the remote controls neatly inside.
- Anchor the Pillar Candles: Place the sleek silver tray near the front edge of the lower table section. Arrange the three chunky gray pillar candles on the tray, grouping them closely together.
- Complete the Texture: Place the two pieces of rough stone near the base of the taper candles. Drape the chunky gray knitted throw blanket over the edge of the table to introduce a soft, inviting element that contrasts with the hard concrete.
26. Cozy Cabin Comfort and Knitted Texture
Item Name: The Fireside Hygge Collection

This coffee table is the definition of warmth and comfort, perfectly styled for a cozy evening by the fire. The theme centers on soft, tactile textures like wool and wood, creating an inviting “hygge” feeling. The backdrop of a stacked stone fireplace and wood pile reinforces the rustic, cabin aesthetic.
The display is built on two stacks of deep, earth-toned books (olive green, burgundy, and tan), which serve as elevated stages for the main feature: chunky, knit-covered candles. These textile-wrapped candles introduce a highly unusual and inviting texture, giving them a homespun, comforting charm. Small pinecones and a faux antler accent are nestled around the candles, reinforcing the natural, woodland theme.
The contrast between the soft candles and the rough, natural wood is key. A large, beautifully carved wooden bowl, showcasing the natural grain of the material, is used to contain the remote controls. A rich, dark-brown fur or fleece throw is draped across the table, acting as a soft background for an open book and a stack of cork coasters, ready for a relaxed night in.
Materials Required (for a similar cozy display)
- A collection of five to seven hardcover books with rich, earthy-toned spines (green, brown, burgundy).
- Three pillar candles covered in chunky knit or cable knit sleeves (white or cream).
- Three small pinecones.
- A piece of moss and a faux antler accent piece.
- A large, beautifully carved, rustic wooden bowl.
- A stack of four to five round cork coasters.
- A dark, textured fur or fleece throw blanket.
- A small river stone or smooth rock.
- An open book or journal with a nature illustration.
- Remote controls.
Equipment Required
- None.
DIY Instruction: Curating a Warm, Textured Arrangement
- Build the Dual Stages: Create two book stacks. Place the tallest stack (e.g., with tan spines) on the back left. Place the slightly shorter stack (e.g., with green spines) on the back right.
- Stage the Knitted Candles: Place two of the knit-covered candles on the taller left book stack. Place the remaining candle on the shorter right book stack. Arrange the pinecones around the base of the candles.
- Accent the Nature Theme: Place the moss and the faux antler accent piece on the right stack, arranging them near the candles. Place the smooth river stone directly on the table, near the front of the right stack.
- Add the Wooden Anchor: Position the large, carved wooden bowl toward the front left of the table. Place the remote controls neatly inside. The bowl’s rough texture should contrast sharply with the soft throw.
- Drape the Softness: Drape the dark, textured fur or fleece throw blanket over the edge of the table, letting it pool slightly near the wooden bowl.
- Create the Reading Nook: Place the open book or journal on top of the draped throw in the foreground. Stack the cork coasters neatly near the bowl. The arrangement should feel abundant and inviting.
27. Modernist Glare and Reflective Spheres
Item Name: The Polished Chrome Nebula

This coffee table achieves a dramatic, futuristic elegance using highly reflective materials and a stark black and white palette. The focus is entirely on light, reflection, and form, creating a display that feels more like a sculptural installation than simple decor. The dark tabletop acts as a limitless black void, emphasizing the gleaming spheres.
The main object is a long, undulating silver tray filled with a collection of chrome and clear glass spheres of varying sizes. This stunning arrangement creates the illusion of a liquid, shimmering stream of metal and glass across the table. The large, black ceramic bowl on the right provides a necessary color contrast and a solid visual anchor.
A second, smaller rectangular silver tray is placed in the foreground, continuing the theme of reflection and geometric forms. This tray features a mirrored base and holds two spheres—one chrome and one black. The entire composition uses minimal elements, allowing the brilliant polish and reflected light to carry the visual weight and make the arrangement truly unforgettable.
Materials Required (for a similar reflective display)
- One long, uniquely shaped, undulating silver or chrome metal tray.
- A collection of eight to ten polished chrome spheres (various sizes).
- Three to five clear glass spheres (various sizes).
- A medium-sized, matte black ceramic bowl.
- A stack of three to four hardcover books with black and white spines.
- One small, rectangular silver or chrome tray with a mirrored base.
- One extra polished chrome sphere and one extra black sphere.
- One small silver coaster or mirror tile.
Equipment Required
- Microfiber cloth (for polishing the metal and glass).
DIY Instruction: Staging a Sculptural Reflection
- Define the Main Flow: Place the long, undulating silver tray diagonally across the coffee table. This movement is key to the dynamic feel.
- Arrange the Spheres: Fill the long tray with the polished chrome and clear glass spheres. Arrange them to create a flowing pattern, ensuring the light reflects off the chrome brightly.
- Anchor the Black Mass: Place the stack of black and white-spined books horizontally on the table, near the right end of the long tray. Place the matte black ceramic bowl on top of the books. This provides the necessary solid black element.
- Create the Secondary Reflection: Place the small, rectangular silver tray in the foreground, slightly off-center. Place the extra chrome sphere, the extra black sphere, and the small silver coaster on this tray.
- Check the Reflections: View the arrangement from several angles. Ensure the chrome surfaces are spotless and reflecting the surrounding room and light beautifully. The entire effect relies on the perfect polish and placement of the spheres.
28. Watercolor Pastels and Delicate Blooms
Item Name: The Gentle Pastel Serenity

This coffee table is a vision of soft, calming femininity, achieved through a light color palette of watercolor pastels and delicate florals. The white tabletop and surrounding watercolor artwork create a light, ethereal backdrop, allowing the subtle shades of pink, mint, and blue to truly bloom.
The display is defined by a rectangular fabric-lined tray, which creates a textured boundary for the arrangement. The central mass is a neat stack of books wrapped in soft watercolor-patterned paper, providing a beautiful, low pedestal for the main functional piece—a speckled ceramic coffee cup and saucer.
Height is introduced by a sweet collection of small glass bud vases in varying shapes and shades of pale pink and clear glass. These hold simple, elegant pink and white carnations, adding a touch of fragile life. The gentle, layered composition is completed by a small, colorful silk scarf draped on the side and a scatter of polished sea glass stones, reinforcing the theme of soft, natural beauty.
Materials Required (for a similar pastel display)
- A rectangular, fabric-lined tray (light gray or cream).
- A stack of three to four hardcover books wrapped in pastel watercolor paper.
- A small, speckled ceramic coffee cup and saucer.
- A collection of five to seven small glass bud vases (various sizes, some clear, some pale pink).
- Three to five simple, delicate flowers (e.g., carnations, small roses, or sweet peas).
- A small silk or cotton scarf in pale blue and pink tie-dye.
- A collection of polished sea glass or smooth decorative stones (mint, blue, amber).
- A stack of three to four felt coasters (pink and mint).
Equipment Required
- None.
DIY Instruction: Staging a Soft, Ethereal Vignette
- Define the Soft Boundary: Place the fabric-lined tray centrally on the coffee table.
- Build the Main Stack: Create a neat stack of the watercolor-wrapped books inside the tray, positioning them slightly off-center. Place the ceramic coffee cup and saucer on top of the book stack.
- Introduce the Florals: Arrange the collection of small glass bud vases to the right of the book stack. Vary their heights and colors (pink and clear). Fill each vase with a single delicate flower.
- Add the Draped Texture: Drape the silk or cotton scarf over the edge of the coffee table, letting the soft colors spill onto the surface outside the tray.
- Scatter the Jewels: Place the collection of polished sea glass or decorative stones in a loose, casual scatter pattern near the draped scarf, outside the tray. The light should catch their smooth surfaces.
- Add the Coasters: Stack the pink and mint felt coasters neatly near the front edge of the tray. The soft felt texture reinforces the overall gentle and inviting aesthetic.
29. Couture Tower and Minimalist Form
Item Name: The Monochromatic Couture Stack

This coffee table display is a masterclass in minimalist chic, using extreme verticality and an exclusive black and white color scheme to create a commanding and dramatic focal point. The round white table and blank wall serve as a gallery-like setting, ensuring all attention is drawn to the impressive stack of books.
The core of the display is the exceptionally tall stack of books, dominated by white and black spines, with just a hint of navy blue at the base. The sheer height of this column makes it instantly eye-catching. The inclusion of recognizable fashion brand titles (Dior, Chanel) elevates the entire piece, transforming a simple book stack into a statement of style and sophistication.
The rest of the surface is left intentionally bare, adhering to a strict minimalist philosophy. The only other objects are functional: two remotes and a single glass sphere resting on a small stack of cork coasters. The clear glass sphere and the smooth marble sphere on top of the stack introduce subtle, reflective surfaces, proving that minimal accessories can have maximum impact.
Materials Required (for a similar couture display)
- A collection of 15 to 20 hardcover books (primarily black, white, and navy blue spines).
- A small white marble sphere or decorative round object.
- Two black remote controls.
- A clear glass or crystal sphere.
- A stack of three to four round cork coasters.
- A piece of thin black ribbon or tape (optional, to mimic horizontal lines).
Equipment Required
- None.
DIY Instruction: Creating a Dramatic Vertical Column
- Select the Base: Choose the largest, thickest books (ideally the branded fashion books) to start the base of the stack.
- Build the Vertical Tower: Stack the 15 to 20 books directly in the center of the coffee table. Ensure the spine alignment is absolutely straight and neat for a sharp, architectural look. The height is the key element.
- Crown the Tower: Gently place the small white marble sphere directly on the center of the topmost book. This small detail provides a perfect, contrasting finishing touch.
- Place the Remotes: Position the two black remote controls neatly side-by-side on the table surface to the left of the book tower. Their dark color contrasts sharply with the white table.
- Stage the Final Accent: Stack the cork coasters neatly to the right of the book tower. Place the clear glass or crystal sphere on top of the cork coaster stack. The simple glass adds a subtle, beautiful reflection.
- Embrace Negative Space: Ensure the rest of the table surface is empty. The power of this display comes from the single, commanding column and the clean, unused space around it.
30. Regal Copper and Gilded Accents
Item Name: The Hammered Copper Regency

This coffee table is styled with opulence and a strong focus on metallic texture and regal colors, creating a rich, old-money aesthetic. The display is unified by a magnificent, large, hammered copper tray, which provides a deep, warm glow that contrasts beautifully with the white table surface.
Height is introduced by a tall, elegant silver candlestick holding a clean white taper candle, providing a sense of classic formality and verticality. Books are stacked to the left, utilizing luxurious colors—gold foil and deep velvet purple—to create a visually rich pedestal for a small, gleaming brass trophy cup.
The tray itself is a stage for small, precious objects. A matching small brass cup, an antique-looking gold key, and a delicate gold chain are arranged to suggest collected treasures. Small purple and black leather coasters provide a sturdy base for a remote and a small, intricate silver jewelry box, completing this lavish and highly textural scene.
Materials Required (for a similar opulent display)
- A large, round, hammered copper or brass tray.
- One tall, elegant silver or polished nickel candlestick.
- One long, white taper candle.
- A collection of three to five hardcover books with gold foil, velvet purple, and navy blue spines.
- Two small brass trophy cups or decorative bowls.
- A small antique-looking gold key.
- A delicate gold chain or piece of jewelry.
- A set of four to six navy blue or black leather coasters.
- A small, intricately carved silver jewelry box.
- A small velvet box (purple).
- Remote control.
Equipment Required
- Metal polish (for the copper and silver).
DIY Instruction: Curating a Luxurious, Metallic Scene
- Center the Warmth: Place the large hammered copper tray centrally on the coffee table.
- Build the Book Pedestal: Stack the gold-spined, purple, and navy books neatly to the left of the copper tray. Place the largest brass trophy cup on top of this book stack.
- Establish the Vertical Accent: Place the tall silver candlestick with the white taper candle to the right of the copper tray. Place the small purple velvet box on a stack of black coasters next to the candlestick to balance the height.
- Arrange the Copper Treasures: Place the second, smaller brass cup inside the copper tray. Artfully drape the gold chain and place the gold key near the cup, suggesting collected wealth.
- Organize and Accessorize: Stack the navy blue leather coasters neatly inside the tray. Place the remote control on top of the coaster stack. Place the small, intricate silver jewelry box on a stack of black coasters outside the tray, ensuring its ornate detail is visible.
- Check the Polish: Ensure all metallic surfaces—the copper tray, brass cups, and silver candlestick—are gleaming brightly for maximum luxurious effect.
31. Elevated Marble and Subtle Light
Item Name: The Illuminated Marble Riser

This sophisticated coffee table uses architectural elements and subtle illumination to create an unexpected, elegant focal point. The central piece is a long, cantilevered marble shelf that floats above the tabletop, immediately adding dramatic height and a clean, horizontal line. The unexpected addition of hidden warm lighting beneath the riser gives the display an ethereal glow.
The surface of the marble is styled minimally, featuring just two small, simple white ceramic bowls and a small wooden block accent. A single open art book rests near the center, inviting interaction but maintaining a clean aesthetic. The dark and light contrast is essential: the riser is supported by dark, matte black boxes, providing a striking contrast to the luminous white marble.
Functionality is managed using two identical, light gray fabric-lined trays positioned beneath the marble riser. Each tray contains a remote control and a round white coaster, keeping everyday items organized while maintaining the subtle, neutral color scheme. This arrangement proves that the table structure itself can be the most captivating decorative feature.
Materials Required (for a similar elevated display)
- A custom-made or fabricated long marble slab or riser (white or light gray).
- Two dark, matte black blocks or boxes (to support the riser).
- Warm-toned LED strip lighting (optional, for the underside of the riser).
- Two simple, smooth white ceramic bowls.
- A small dark-wood block and a wooden accent piece.
- One hardcover book with a monochromatic cover.
- Two matching rectangular, light gray fabric-lined trays.
- Two remote controls.
- Two round white felt or leather coasters.
Equipment Required
- Strong adhesive or brackets (if permanently installing the riser).
- Small power source for the LED lighting (battery pack or outlet connection).
DIY Instruction: Constructing the Illuminated Riser
- Establish the Base Supports: Place the two matte black blocks or boxes on the tabletop, positioning them far enough apart to support the marble slab, but close enough to create the central open space.
- Install the Lighting (Optional): If using lighting, attach the LED strip carefully to the underside of the marble slab, running it lengthwise. Conceal the battery pack or wire behind one of the support boxes.
- Position the Marble: Gently place the marble slab on top of the two black support blocks, ensuring it is level and centered on the table.
- Style the Riser Minimally: Place the two white ceramic bowls on the ends of the marble riser. Place the monochromatic book near the center. Arrange the small dark wood block and accent piece near the book.
- Organize the Functional Zone: Place the two matching light gray fabric-lined trays on the main table surface, directly in front of the marble riser. Place one remote control and one white coaster neatly inside each tray.
- Activate the Glow: Turn on the under-lighting. The warm light casting onto the tabletop highlights the functional trays and the negative space beneath the marble, completing the look.
32. Distinguished Leather and Classic Decadence
Item Name: The Gentlemen’s Decanter Display

This coffee table is styled for a sophisticated, classic, and masculine feel, using rich materials like dark leather, cut crystal, and deep, muted colors. The entire setting suggests a space for quiet reflection and enjoying fine beverages. The backdrop of framed vintage car photography reinforces the theme of timeless elegance.
The arrangement is dominated by a substantial, cognac-toned leather box, which serves as a weighty anchor and provides convenient storage for bar tools. Next to it, a beautifully cut crystal decanter filled with amber liquid stands tall on a leather coaster, commanding attention with its sparkle and traditional shape.
Height is achieved using large, antique-spined books in deep greens and browns, which elevate a classic crystal whiskey glass. Other essential elements—a heavy glass ashtray and a small, vintage cigar cutter—are placed on the table, completing the feeling of a distinguished private study. The warm plaid throw adds a soft, inviting texture against the hard leather and crystal.
Materials Required (for a similar distinguished display)
- A large, rectangular leather or faux leather storage box (cognac or dark brown).
- A crystal decanter with a faceted stopper.
- A collection of five to seven hardcover books with deep green, brown, and burgundy spines.
- A crystal whiskey glass with a faceted pattern.
- A heavy glass ashtray.
- A vintage-style metal cigar cutter or bottle opener.
- A set of four to six dark leather coasters (round or square).
- A wool or plaid throw blanket (deep reds and greens).
Equipment Required
- None.
DIY Instruction: Setting a Rich, Masculine Scene
- Anchor the Leather: Place the large leather storage box on the left side of the table. Its size makes it the most significant mass.
- Build the Book Pedestal: Stack the three largest, deep-green and brown-spined books neatly on the right side of the table.
- Place the Crystal Anchor: Position the crystal decanter on a single dark leather coaster directly in front of the leather box. Its reflective quality contrasts with the matte leather.
- Elevate the Glass: Place the crystal whiskey glass on top of the stacked books. The elevated glass adds height and ensures it catches the light.
- Stage the Accessories: Place the heavy glass ashtray near the front edge of the table. Position the cigar cutter on a separate leather coaster next to the ashtray. Stack the remaining leather coasters neatly near the decanter.
- Add the Final Touch: Drape the plaid throw blanket over the edge of the table, near the leather box. The rich pattern provides necessary color and softness against the hard, sophisticated materials.
33. Playful Pastels and Curated Clutter
Item Name: The Pastel Pop Play-Scape

This coffee table is a delightful escape into soft, playful colors and modern, rounded shapes. The aesthetic is cheerful and curated, yet intentionally scattered to suggest ongoing play or creativity. The color scheme is dominated by gentle pastels—mint green, lilac, baby blue, and pale pink.
The vertical element is a whimsical display of books stacked into a fan shape, utilizing bookends in coordinating pastel colors. A second stack of horizontally arranged books, featuring soft, pink and blue covers, serves as a platform for small, translucent glass rings. These rings, in mint and lilac, add a beautiful, delicate color accent.
Functionality is handled with a sleek, light gray tray that neatly corrals the black remote controls, providing a necessary grounding element against the soft colors. On a circular pastel tray, a collection of whimsical, rounded ceramic mugs and vases are arranged like abstract sculptures. The scatter of tiny seashells and polished stones reinforces the lighthearted, collected feel.
Materials Required (for a similar pastel display)
- A collection of 10 to 12 hardcover books wrapped in pastel covers (pink, mint, blue, yellow).
- Two triangular bookends in coordinating pastel colors.
- A collection of five to six translucent glass rings or decorative accent objects (pastel colors).
- A small, rectangular light gray tray.
- Two black remote controls.
- A circular tray (mint green or pale pink).
- A collection of small, rounded ceramic vessels (mugs, vases) in pastel shades.
- A selection of small, smooth seashells and polished stones.
- A stack of felt coasters (blue and pink).
- A small, knitted cream throw blanket.
Equipment Required
- None.
DIY Instruction: Creating a Fun, Pastel Vignette
- Build the Vertical Fan: Arrange six to eight pastel-wrapped books vertically in a fanned row, using the two triangular bookends to hold them in place. This is the main background structure.
- Create the Horizontal Stage: Stack the remaining pink and blue books horizontally to the left of the fan. Place the translucent glass rings on top of this stack, allowing them to overlap slightly.
- Anchor the Remotes: Place the sleek, light gray rectangular tray toward the front center of the table. Place the two black remote controls neatly inside. The dark remotes provide a necessary contrast.
- Stage the Whimsical Collection: Place the circular pastel tray to the right. Arrange the collection of rounded ceramic mugs and vases on this tray, stacking the smaller ones on top of the larger ones to create a playful, abstract skyline.
- Scatter the Details: Scatter the small seashells and polished stones in the open space between the two trays. Stack the pink and blue felt coasters neatly near the front left.
- Add Softness: Place the knitted cream throw blanket partially visible near the front left of the display, introducing a cozy, inviting texture.
34. Graphic Typography and Houndstooth Pattern
Item Name: The Typographic High-Contrast

This coffee table is a celebration of bold graphic design, using high-contrast black and white, sharp lines, and strong typography. The overall feeling is sleek, urban, and sophisticated, with an emphasis on structure and containment. The stark black and white artwork in the background sets the scene for this rigorous aesthetic.
The display is built on two stacks of books with contrasting black and white spines, all featuring bold, modern typography. This provides instant visual texture and a clear theme. Two matte black geometric vases of varying heights sit on the left stack, emphasizing verticality and clean, architectural forms.
A stunning houndstooth-patterned tray anchors the functional zone. This graphic pattern introduces a dense, classic print that contrasts with the clean lines of the vases. The tray neatly holds the remotes and a patterned, round storage box. A white cube pencil holder on the right stack provides essential utility, ensuring that the necessary tools are integrated into the overall monochrome design.
Materials Required (for a similar graphic display)
- A collection of five to seven hardcover books with prominent black and white typographic covers or spines.
- Two matte black geometric vases (varying heights).
- A tall, rectangular matte black vase.
- A rectangular tray featuring a houndstooth or checkerboard pattern (black and white).
- A round black and white patterned storage box.
- A white cube or square pencil holder.
- Two remote controls.
- Two black pencils.
- A stack of small, square white accent boxes.
- A thick, gray knitted throw blanket.
Equipment Required
- None.
DIY Instruction: Organizing a Sharp, Graphic Scene
- Build the Left Column: Create a stack of books, prioritizing those with black spines, on the left side of the table. Place the two matte black geometric vases on top of this stack, ensuring the taller vase is in the back.
- Build the Right Column: Create a second stack of books, prioritizing those with white spines, on the right side of the table. Place the tall, rectangular matte black vase and the white cube pencil holder on top of this stack. Place two black pencils in the holder.
- Anchor the Pattern: Place the houndstooth-patterned tray in the center foreground. This bold pattern should dominate the functional zone.
- Organize the Tray: Place the remote controls neatly inside the tray. Place the patterned round storage box inside the tray, creating a contrasting shape.
- Add Geometric Blocks: Stack the small, square white accent boxes near the front left of the table. The sharp edges of these blocks reinforce the geometric theme.
- Introduce Softness: Drape the thick, gray knitted throw blanket over the edge of the table, near the book stacks. This introduces a subtle, warm texture against the hard, graphic lines.
35. Tropical Greenery and Rattan Texture
Item Name: The Palm Frond Paradise

This coffee table is styled to be a refreshing, tropical focal point, using large, dramatic foliage and natural textures like rattan. The light, airy backdrop of blue and green watercolor botanical prints enhances the feeling of an exotic, relaxing resort.
The arrangement is centered around a very large, round rattan tray with handles, which contains the vibrant display and provides the primary natural texture. The vertical focus is immediate, thanks to a clear glass vase holding two statement leaves: a wide, fan-shaped palm frond and a dramatic Monstera leaf. The clarity of the vase allows the stems to be seen, emphasizing the fresh, organic element.
Height is also provided by a stack of coastal-themed books in shades of aqua and teal, which act as a pedestal for a whimsical, small palm tree sculpture in a rustic white finish. The functional items are kept close at hand: remotes are neatly stacked, and a small, textured blue glass votive is placed on a simple wooden coaster, completing this lush, inviting tropical scene.
Materials Required (for a similar tropical display)
- A very large, round rattan or woven seagrass tray with handles.
- A tall, clear glass cylindrical vase.
- Two large, distinct tropical leaves (e.g., Monstera, Palm Frond).
- A small, white rustic palm tree sculpture or figurine.
- A stack of three to four hardcover books with aqua or teal-colored spines.
- Two black remote controls.
- A small, textured blue glass votive or bowl.
- A set of decorative wood-slice coasters.
Equipment Required
- Gardening shears (for trimming the leaf stems).
DIY Instruction: Creating a High-Impact Tropical Scene
- Establish the Organic Focus: Place the tall, clear glass vase centrally in the rattan tray. Fill it with water and carefully insert the two large tropical leaves. The leaves should create the tallest, most dramatic lines.
- Build the Pedestal: Stack the aqua and teal-spined books neatly to the left of the vase, inside the tray.
- Place the Sculpture: Position the small, rustic palm tree sculpture on top of the stacked books. The white sculpture contrasts beautifully with the colorful book spines and the green leaves.
- Organize the Essentials: Stack the two remote controls neatly on the tray, in front of the book stack.
- Add Color and Texture: Place the textured blue glass votive on a decorative wood-slice coaster in the front right section of the tray. Stack the remaining wood-slice coasters nearby.
- Refine the Edges: The entire arrangement should feel abundant but entirely contained within the rattan boundary, creating a tidy, transportable garden focus.
36. Primary Color Pop and Toy Nostalgia
Item Name: The Primary-Colored Toy Tower

This coffee table is a burst of joyful nostalgia, styled entirely around the fundamental, highly saturated primary colors: red, yellow, and blue. The wooden table provides a warm, neutral base, allowing the bright accessories and bold book spines to pop dramatically and create an immediate, playful focal point.
The entire display is built around a magnificent, towering stack of books, featuring spines meticulously chosen for their bright red, yellow, blue, and green colors. This forms a vibrant, structural column. A simple wooden block placed atop the stack serves as the perfect pedestal for a large, brightly painted vintage spinning top, establishing the primary vertical element and the playful theme.
The arrangement is completed with whimsical toys. Two small, vintage tin robots flank the wooden block, adding a charming, retro feel. A small, handcrafted figurine in matching primary-colored wool sits on a stack of rough, brightly colored felt squares. A white ceramic plate with a fun, abstract primary-colored pattern completes the scene, turning simple items into a captivating work of pop art.
Materials Required (for a similar nostalgic display)
- A collection of seven to nine hardcover books with solid, bright primary-colored spines (red, yellow, blue, green).
- One large, colorful vintage spinning top or wind-up toy.
- A small wooden block (to elevate the toy).
- Two small vintage tin robots or other retro figurines.
- One small, handcrafted figurine made of wool or soft materials (primary colors).
- A stack of four to five small felt or fabric squares (red, yellow, blue, green).
- A small white ceramic plate with a colorful, abstract pattern.
- Two square placemats or runners (blue and green).
Equipment Required
- None.
DIY Instruction: Building a Whimsical Color Stack
- Construct the Book Tower: Stack all the primary-colored books directly in the center of the coffee table. Ensure the colors are layered to create a rainbow or visually appealing sequence.
- Establish the Tallest Toy: Place the wooden block on top of the book stack. Center the large, colorful spinning top on the block. The height of this piece is the core of the focal point.
- Flank with Figurines: Place the two small vintage tin robots on the book stack, flanking the wooden block. They should be positioned symmetrically for balance.
- Stage the Base Elements: Place the two brightly colored placemats or runners on the table surface in the foreground, overlapping slightly.
- Create the Coaster Stack: Stack the bright felt squares on the green placemat. Place the small, handcrafted figurine on top of this felt stack.
- Add the Final Plate: Place the white ceramic plate with a colorful pattern on the blue placemat. The entire arrangement should feel saturated and cheerful, celebrating bold color.
You now possess 36 distinct strategies to conquer coffee table clutter and elevate your living space. The secret to success lies in viewing the surface not as one flat space, but as a series of pedestals, platforms, and contrasting materials. Whether you favor the bold graphic lines of a monochromatic stack or the soft textures of a desert-inspired arrangement, intentional curation is the common thread.
Remember to prioritize height variation, use trays to contain functional items, and always include an element of life—be it a vibrant bloom, a sculptural plant, or a scented candle. By focusing on these principles, you ensure your coffee table moves from background utility to front-and-center statement piece. Choose the style that best reflects your unique personality and start layering today.
Key Takeaways
- Layering is Essential: Always incorporate items of different heights—stacked books, tall vases, and flat trays—to create visual rhythm.
- Trays Control Clutter: Use decorative trays (metal, rattan, or wood) to corral remotes, coasters, and small accessories, ensuring organization remains effortless.
- Contrasting Materials Win: Mix textures like rough stone with polished brass, or soft velvet with hard crystal. This contrast adds depth and prevents a flat, uninteresting look.
- Function Should Be Beautiful: Store everyday items (coasters, remotes) in vessels that match your aesthetic, such as carved wooden bowls or stylish metal boxes.
- Incorporate Organic Elements: Always add a touch of life, such as fresh flowers, a sculptural plant, or simple dried moss, to soften hard geometric lines.