Every home has those tricky spots—the narrow wall beside the door, the void beneath the stairs, or that deep, shallow alcove. These awkward corners often collect dust or simply stand empty, making a small space feel even smaller. You do not have to settle for wasted square footage any longer.

We have compiled 35 inventive solutions to help you reclaim every overlooked niche in your home. These ideas transform useless architectural quirks into highly functional and beautiful areas. Prepare to discover how custom built-ins, fold-down desks, and hidden storage can revolutionize your daily living.
1. Cozy Built-In Reading Nook
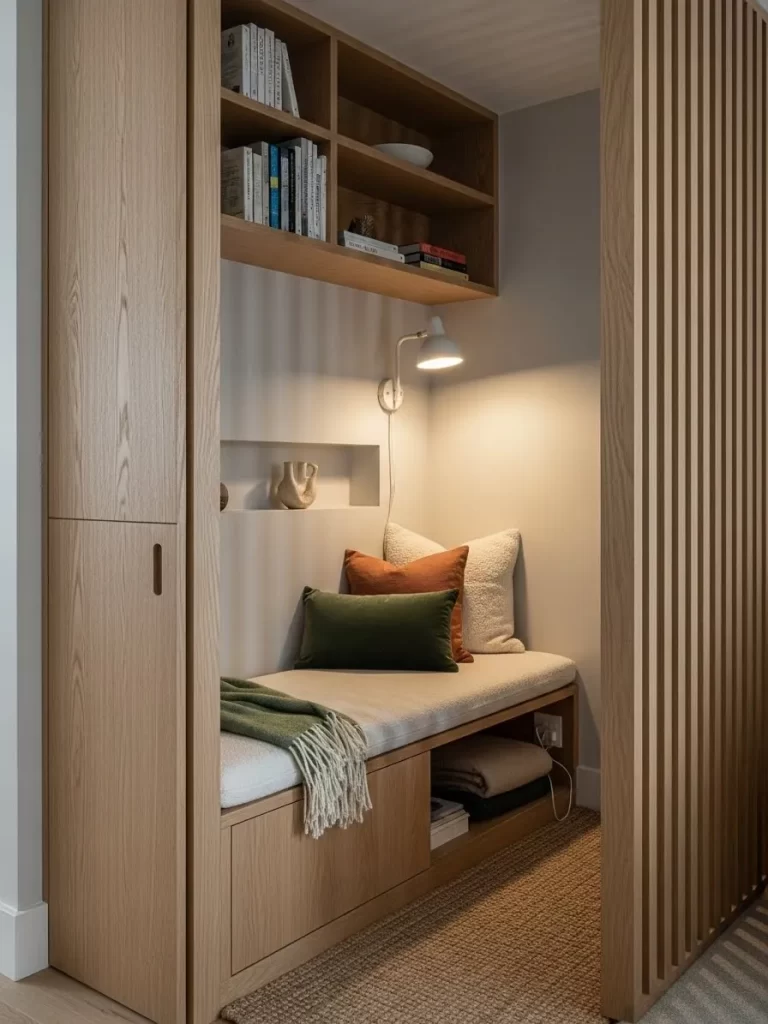
This small recess transforms a once-forgotten corner into a true sanctuary. Warm wood paneling and cabinetry establish a sophisticated, calming atmosphere that invites relaxation. The clever design utilizes vertical space with open shelving above, providing convenient storage for books and decorative objects.
The bench seating is exceptionally inviting, topped with a thick, comfortable cushion and layered with plush throw pillows in earthy tones. Beneath the seat, integrated drawers or cabinets offer discreet storage for extra blankets or electronic devices, keeping the area tidy. A wall-mounted lamp provides focused light, making this the ideal spot for curling up with a good story at any time of day.
Notice the slatted wooden screen on the right. This feature adds architectural interest and defines the space, offering a touch of privacy without completely closing off the nook. The entire setup demonstrates how custom joinery can maximize functionality and style, turning an awkward alcove into the most beloved spot in a home.
DIY Project: Creating a Simple Seated Nook with Storage
This DIY guide will help you construct a basic storage bench and install shelving to create a similar reading corner in your own home’s alcove or closet space.
Material Required
- 3/4-inch thick Plywood (Furniture grade) for the bench frame and top.
- 1/2-inch thick Plywood for the shelving units.
- Wood screws (various lengths: 1-1/4 inch and 2-inch).
- Wood glue.
- Primer and paint or wood stain/sealer.
- Comfortable foam cushion (custom-cut to the bench size).
- Fabric to cover the cushion.
- High-density foam or batting for cushion wrapping.
- Throw pillows and blanket.
- Wall-mounted reading light (sconce).
Equipment Required
- Circular saw or table saw (for cutting plywood).
- Drill/Driver with various bits.
- Measuring tape and carpenter’s square.
- Level.
- Stud finder.
- Clamps.
- Sandpaper (various grits: 80, 120, 220).
- Paint brushes or rollers.
- Staple gun (for cushion upholstery).
DIY Instruction Step-by-Step
Step 1: Measure and Cut the Plywood
Begin by carefully measuring the width and depth of your alcove. This ensures the bench fits snugly. Cut the plywood pieces for the storage bench frame: two sides, a back piece, and internal dividers if you plan on creating cubbies or drawers. The bench height should be comfortable, typically between 18 to 20 inches, including the cushion. Also, cut the pieces for your shelves, keeping the depth slightly less than the bench depth for a balanced look.
Step 2: Assemble the Storage Bench Frame
Apply wood glue to the edges of the side pieces where they meet the back piece and secure them using 1-1/4 inch wood screws. Pre-drilling pilot holes prevents the wood from splitting. Install any internal vertical dividers using glue and screws to add structural support and separate storage compartments. Ensure the structure is square using your carpenter’s square before the glue dries.
Step 3: Attach the Bench Top and Prep for Finish
Place the top piece of plywood over the assembled frame. Secure it with 2-inch screws driven down into the frame and dividers. For a clean, seamless look, countersink the screw heads slightly below the surface. Once assembled, sand all the visible surfaces thoroughly, starting with 80-grit and finishing with 220-grit sandpaper for a smooth finish.
Step 4: Install the Shelving
Determine the desired height for your first shelf above the seated area. Use a stud finder to locate wall studs for secure attachment, as books can be heavy. Mark the shelf placement using a level. Attach sturdy shelf brackets or cleats directly to the wall studs. Place the shelf onto the supports and secure it from above or below, depending on your chosen bracket type. Repeat this process for any additional shelves you plan to install.
Step 5: Apply the Finish
Wipe down the wood surfaces thoroughly to remove all sawdust. Apply a wood primer if you plan to paint. Once dry, apply two coats of your chosen paint, stain, or clear sealer, allowing ample time for drying between coats. This protects the wood and gives it a professional appearance.
Step 6: Upholster the Cushion
Wrap your pre-cut foam cushion with batting for a softer, fuller look. Lay the fabric out flat, place the foam/batting on top, and tightly pull the fabric around the foam. Using a staple gun, staple the fabric to the bottom edge of the foam, ensuring the fabric is pulled taut and smooth on the top and sides. Create neat, professional corners by folding the excess fabric like wrapping paper before stapling.
Step 7: Final Installation and Lighting
Carefully position the finished bench into the alcove. Place the upholstered cushion on top. Install the wall sconce at a height that provides comfortable reading light when you are seated. Hide the power cord by running it behind the bench or through a small, drilled hole if possible. Accessorize the nook with your books, throw pillows, and a cozy blanket to complete your new reading space.
2. Compact Kitchen Appliance Garage
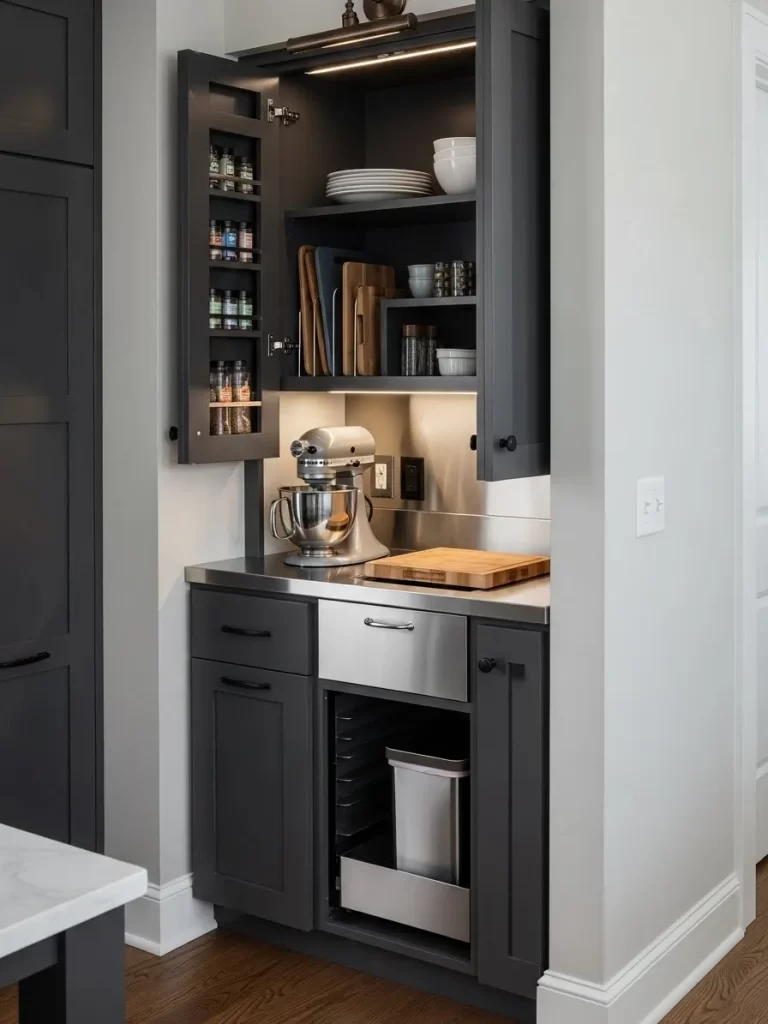
This built-in niche solves the challenge of storing large, frequently used kitchen gadgets while keeping counters clear. Rich, dark cabinetry provides a striking contrast to the stainless steel accents and backsplash, creating a sophisticated and functional prep station. The upper cabinets feature open shelving for essential items like bowls and cutting boards, easily accessible for busy cooks.
The genius of this design lies in its concealed storage. Tall cabinets flank the central area, offering deep shelves for bulkier items or a dedicated pantry space. Furthermore, the lower section includes a smart pull-out bin, likely intended for trash or recycling, maintaining the streamlined look of the kitchen.
Adjustable shelves and small spice racks on the inside of the cabinet doors maximize every available inch, ensuring that small items are not lost or forgotten. This thoughtful arrangement turns a narrow alcove into a powerful, organized extension of the main kitchen workspace.
DIY Project: Creating an Appliance Nook
This project focuses on converting a shallow closet or an unused narrow wall section into a recessed counter and cabinet area for kitchen utility.
Material Required
- 3/4-inch Plywood or MDF for cabinet boxes and doors.
- Wood stain or paint (in your desired color).
- Drawer slides and cabinet hinges.
- Small stainless steel counter section (or durable butcher block).
- Under-cabinet LED light strip.
- Cabinet pulls/knobs.
- Pegboard or specialty inserts for organizing spice jars inside doors.
- Wood screws, dowels, and wood glue.
Equipment Required
- Table saw or circular saw.
- Drill/Driver with various bits.
- Kreg Jig (for pocket holes, optional but recommended).
- Measuring tape, level, and square.
- Clamps.
- Stud finder.
- Sandpaper and finishing materials.
DIY Instruction Step-by-Step
Step 1: Frame the Opening
Measure the dimensions of the awkward nook or wall area you plan to convert. Build a simple rectangular frame using 2×4 lumber that will sit flush inside the wall opening, providing a secure anchor point for your cabinet boxes. If you are building this into a wall, ensure the wall is non-load-bearing before creating a large opening.
Step 2: Construct the Base Cabinet
Build a simple box structure for the lower cabinet using plywood, connecting the pieces with wood glue and screws (pocket holes are excellent here). The top of this box will support the counter material. Ensure the box is deep enough to accommodate a standing mixer or pull-out bin. Install the drawer slides inside the cabinet box for the pull-out bin.
Step 3: Build and Install the Upper Cabinet
Construct the upper cabinet box. This unit is typically shallower than the base to account for items like spice racks on the doors. Include internal shelving, ensuring one shelf is high enough to accommodate the height of a standing mixer. Secure the upper cabinet box directly to the wall studs using long screws, making sure it is perfectly level.
Step 4: Install Countertop and Lighting
Fit your stainless steel or butcher block counter piece onto the base cabinet structure. Secure it with construction adhesive or screws from the underside. Install the under-cabinet LED light strip underneath the upper cabinet, positioning it to illuminate the counter area where the mixer will sit. Run the wiring neatly up into the cabinet or down a hidden channel.
Step 5: Attach Doors and Finishing Touches
Attach the cabinet doors to the boxes using quality hinges. If you are adding spice racks to the inside of the doors, install those now. Sand and paint or stain all wood surfaces, including the doors, to achieve your desired finish. Finally, attach the cabinet pulls and knobs. Load your appliances and accessories to complete your organized utility station.
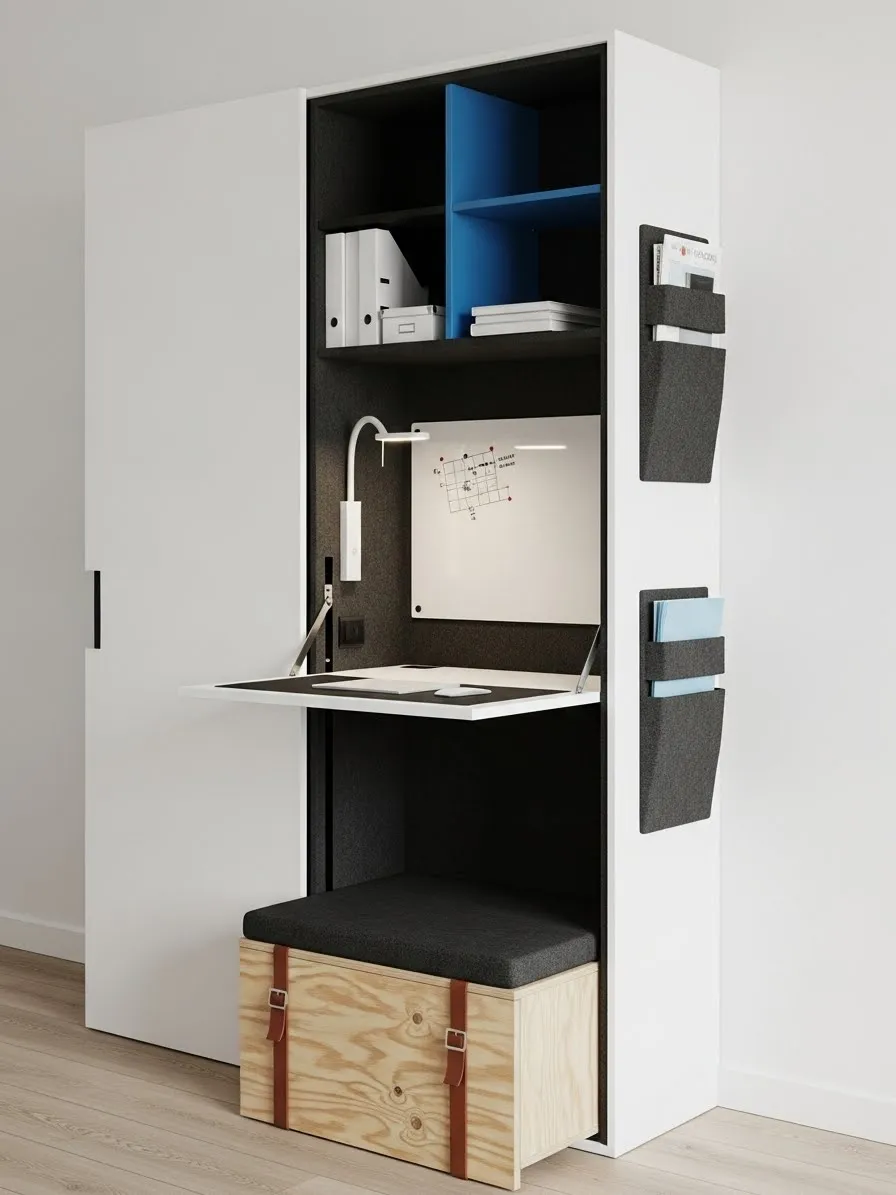
3. Convertible Home Office and Storage Unit

This clever piece of furniture masterfully hides a functional workspace within a sleek, modern wardrobe or cabinet. The clean white exterior contrasts sharply with the dark interior, which is lined with sound-dampening material for a focused work environment. When closed, the unit presents a seamless, uncluttered facade.
Upon opening, a compact desk surface folds down on sturdy hinges, instantly providing a place to work, write, or study. Above the desk, a whiteboard is installed for jotting down notes or sketching ideas. Open shelving at the top provides organized storage for binders and office supplies, with a vibrant blue shelf offering a cheerful pop of color.
A simple, portable wood storage bench sits beneath the desk area, providing comfortable seating when needed. The bench itself offers more storage space and its rustic leather straps add a handsome, handcrafted detail. This unit is a testament to maximizing vertical storage while keeping necessary functions instantly accessible but entirely out of sight when work is finished.
DIY Project: Building a Fold-Down Desk Cabinet
This project describes how to convert an existing tall, shallow cabinet or build a custom unit to house a fold-down workspace.
Material Required
- Large Plywood or MDF sheets for the main cabinet structure (if building from scratch).
- Heavy-duty piano hinge for the desk flap.
- Folding bracket supports (two, for the desk flap).
- Whiteboard material (or pre-made board) for the back panel.
- Cork or fabric lining (felt/sound-dampening material) for the interior walls.
- Desk lamp (swing-arm style is best).
- Wood screws, dowels, and wood glue.
- Primer and paint (black or dark grey for the interior, white for the exterior).
Equipment Required
- Table saw or circular saw.
- Drill/Driver.
- Measuring tape, level, and square.
- Clamps.
- Sandpaper.
- Caulk gun and construction adhesive (for lining).
DIY Instruction Step-by-Step
Step 1: Prepare or Build the Cabinet Shell
If using an existing cabinet, remove internal components and sand the interior. If building from scratch, cut and assemble the side, top, and base pieces of a tall, shallow cabinet shell, securing them with glue and screws. Create the internal shelf structure at the top.
Step 2: Line the Interior and Install the Whiteboard
Cut the sound-dampening fabric or felt to fit the back and side walls of the interior. Affix it using strong construction adhesive or spray adhesive. Measure and install the whiteboard material onto the back panel above the intended desk height.
Step 3: Build and Mount the Fold-Down Desk
Cut a piece of plywood for the desk flap. This should be slightly smaller than the internal width of the cabinet. Attach the piano hinge along the bottom edge of the desk flap and then attach the other side of the hinge to the front lip of the cabinet at the desired height (around 29 inches is standard desk height).
Step 4: Install the Desk Supports
Attach the folding bracket supports to the side walls of the cabinet, ensuring they are perfectly level and aligned with the desk flap when it is in the down position. These supports bear the weight of the desk. Test the folding mechanism several times to ensure smooth operation.
Step 5: Add Lighting and Finishing
Drill a small hole near the top or middle side panel for the lamp cord. Install the swing-arm lamp onto the interior wall panel, positioning it to illuminate the desk surface. Paint the exterior and interior (if needed) and attach any handles. Place a simple, storage-capable ottoman or stool underneath to complete your compact, hidden office.
4. Under-Stair Pet Nook and Utility Closet
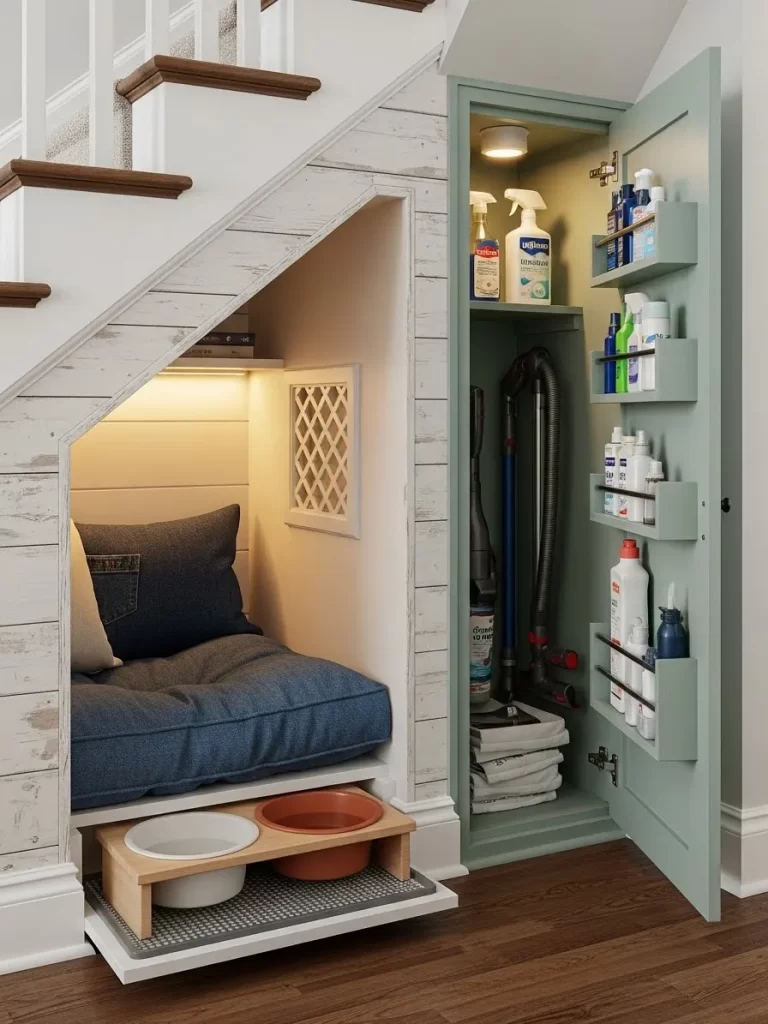
This remarkable utilization of space under a staircase offers a dual-purpose solution: a cozy pet haven and an organized utility closet. The pet nook is beautifully finished with shiplap-style paneling and features soft lighting, making it a warm, inviting den for a furry friend. A generously sized cushion and pillows ensure maximum comfort.
A custom pull-out tray beneath the cushion holds pet bowls, preventing spills on the floor and tucking neatly away when not in use. The attention to detail is evident in the small decorative grille, adding a cottage charm.
Next to the pet space, a separate, tall cabinet is installed, perfectly sized for cleaning supplies. The door of this cabinet has shallow shelves built onto the interior face, which efficiently holds dozens of small bottles and brushes. The main cavity stores larger items like a vacuum cleaner, turning a dark, unused space into a powerhouse of household organization.
DIY Project: Creating a Pet and Utility Under-Stair Storage
This DIY involves building two distinct, accessible compartments under a set of stairs: a pet bed and a utility cabinet.
Material Required
- Plywood or MDF for the cabinet structure and pet nook walls.
- Shiplap paneling or beadboard for the interior aesthetic (optional).
- Cabinet door and hinges.
- Small wooden drawer slides or simple runners for the pet bowl tray.
- Pet cushion, pillows, and bowls.
- Hooks and organizational baskets for the utility side.
- Primer and paint.
- Low-voltage LED puck light for the pet nook.
Equipment Required
- Circular saw or jigsaw (for cutting to the stair angle).
- Drill/Driver.
- Measuring tape, level, and square.
- Stud finder.
- Sandpaper.
DIY Instruction Step-by-Step
Step 1: Frame and Divide the Under-Stair Space
Determine the size you want for the pet nook and the utility closet. Build simple internal stud walls to divide the under-stair cavity into two separate spaces. Use a jigsaw to cut the top plate of the framing to match the angle of the staircase. This structure provides anchor points for the internal walls and the cabinet frame.
Step 2: Finish the Pet Nook Interior
Sheetrock the inside of the pet nook or apply shiplap paneling to the walls for a decorative touch. Install the low-voltage LED puck light, ensuring the power cord is neatly hidden and routed to a power source. Build a small box structure at the base for the cushion to sit on.
Step 3: Construct and Install the Pet Bowl Tray
Build a simple, shallow tray for the pet bowls. Install wooden runners or basic drawer slides on the floor inside the nook and on the sides of the tray so it can slide in and out smoothly under the cushion platform. Place the bowls into the tray.
Step 4: Build and Install the Utility Cabinet
Build a simple box cabinet structure for the utility side. Ensure it has enough height to store your tallest items, like a vacuum cleaner. Mount the cabinet structure securely to the internal stud framing.
Step 5: Create Door Storage and Attach the Door
Build shallow, lipped shelves for the interior side of the utility cabinet door. These shelves should be narrow enough to allow the door to close without hitting items inside the main cabinet cavity. Attach the shelves securely with glue and screws. Attach the door to the cabinet using hinges.
Step 6: Finishing Touches
Prime and paint all exterior and interior cabinet surfaces and the exposed framing around the pet nook opening. Place the cushion and pillows into the pet nook. Install hooks or organizational tools inside the utility closet to complete your multi-functional under-stair storage area.
5. Sleek Floating Entryway Command Center
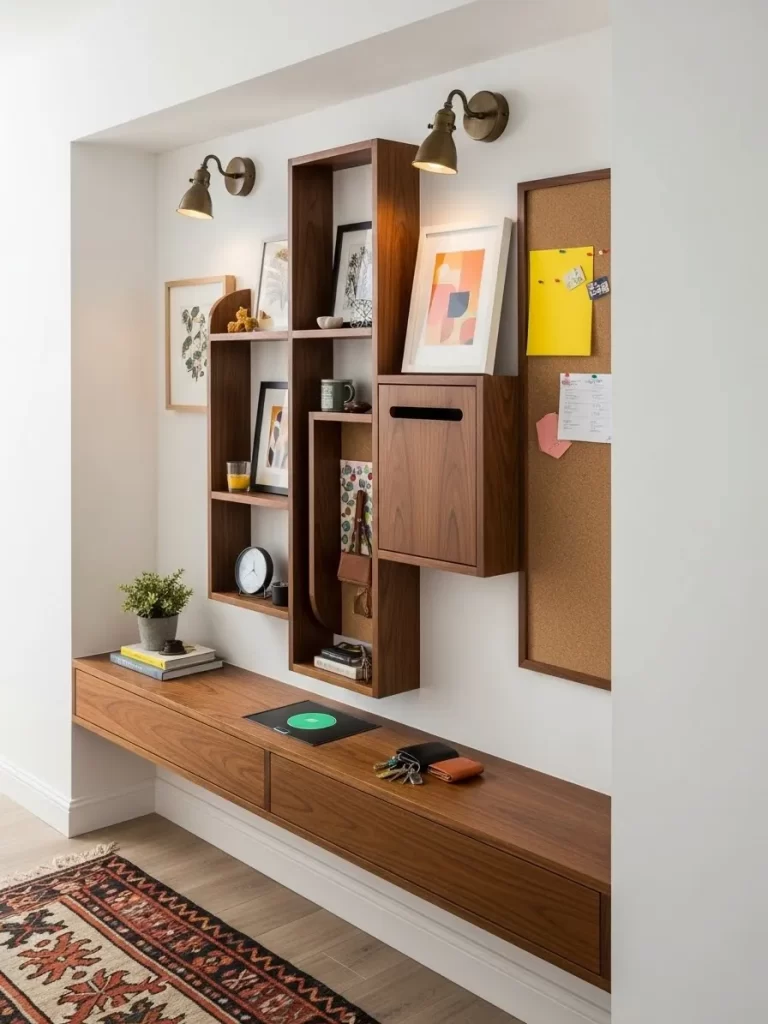
This streamlined wooden unit utilizes a narrow wall section to create a highly organized and stylish landing spot for daily essentials. The walnut-toned wood grain provides a warm, organic feel that immediately elevates the entryway. The entire unit appears to float, which creates a sense of openness and makes cleaning the floor much easier.
The lower piece acts as a shallow console table with integrated drawers, providing discrete space for keys, mail, and wallets. The small cutout to place a vinyl record or decorative object adds a personalized, artistic touch. Above the console, an abstract shelving unit features various open cubbies of different sizes, perfect for displaying small artwork, clocks, or collected treasures.
Adjacent to the shelving, a large cork board offers a spot for important reminders, notes, and photos. Two stylish brass sconces mounted high on the wall provide focused downlighting, highlighting the beautiful wood grain and ensuring the area is well-lit for quick drop-offs and retrievals. This setup combines decorative flair with crucial everyday utility.
DIY Project: Building a Floating Console and Shelving Unit
This project focuses on creating a wall-mounted console bench and an accompanying modular wall shelf for an entryway.
Material Required
- 3/4-inch Plywood or solid wood for the console bench and shelving.
- Drawer slides (optional, for the console drawers).
- Corkboard backing material and framing wood.
- Wood stain or clear polyurethane sealer.
- Floating shelf brackets (heavy-duty French cleat or similar).
- Two wall sconces and necessary wiring/junction boxes.
- Wood screws, dowels, and wood glue.
Equipment Required
- Table saw or circular saw.
- Drill/Driver.
- Measuring tape, level, and stud finder.
- Clamps.
- Sandpaper.
- Basic electrical tools for light installation.
DIY Instruction Step-by-Step
Step 1: Construct the Floating Console
Cut the plywood into the pieces needed for the console box (top, bottom, and sides). Assemble the box using wood glue and screws. If you are adding drawers, construct the drawer boxes and install the slides on the inside of the main console structure.
Step 2: Mount the Console to the Wall
Locate the wall studs. Attach the heavy-duty floating shelf brackets to the wall studs at the desired bench height. Alternatively, attach a robust wooden French cleat system to the wall. Slide or secure the assembled console box onto the brackets or cleat, ensuring it is perfectly level. The console must be very stable since it will hold weight.
Step 3: Build the Modular Shelving Unit
Cut and assemble the smaller, varied boxes that make up the abstract shelving unit. Secure all connections with glue and screws. This modular design can be customized to fit your wall space. Sand the entire unit.
Step 4: Finish and Mount the Shelving
Apply your chosen wood stain or sealer to both the console and the shelving unit for a unified look. Once dry, attach the individual shelf boxes to the wall using hidden mounting brackets or screws driven directly into wall studs, following your layout design.
Step 5: Install the Corkboard and Lighting
Frame your corkboard material using thin strips of wood for a finished edge. Mount the framed corkboard securely next to the shelving unit. Have a qualified electrician install the wall sconces high above the unit. If you are doing a surface mount, simply drill and secure the sconces in the desired locations.
Step 6: Final Setup
Install the drawers into the console. Place your decorative items, keys, and mail on the unit. Plug in and test the lighting to complete your functional entryway station.
6. Window-Side Storage Bench and Daybed
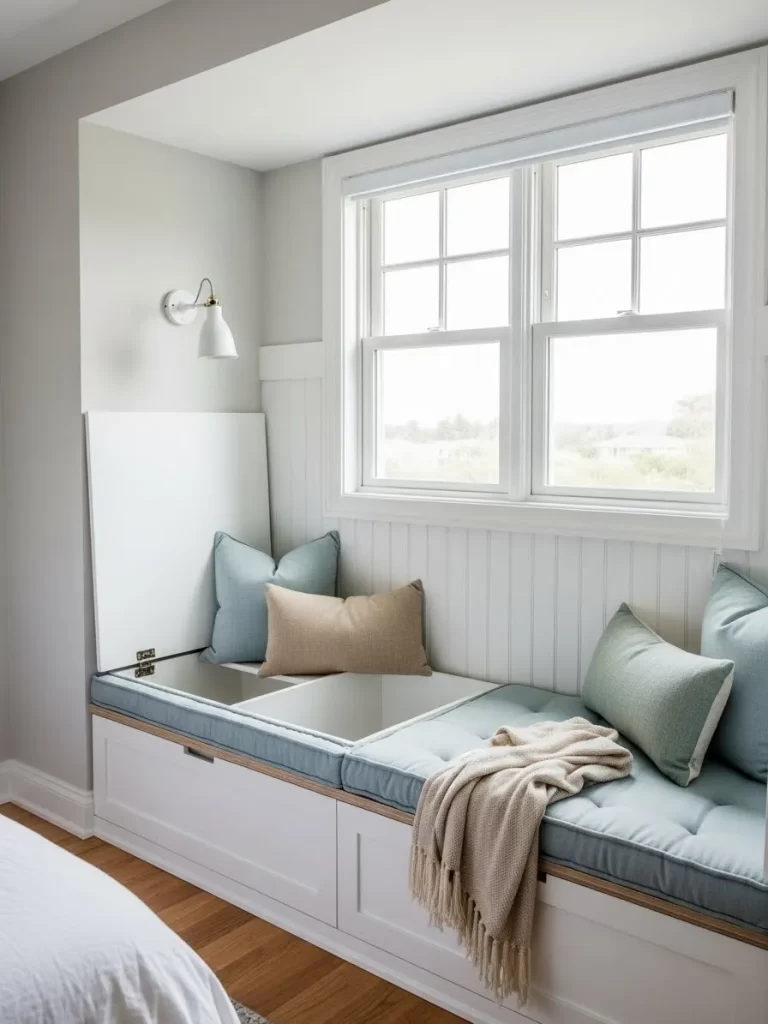
This generous window seat maximizes space in a bright bedroom or living area by providing both seating and significant hidden storage. The clean white base with classic wainscoting details ensures the unit blends seamlessly with the architecture of the room. Large, sun-drenched windows bathe the area in natural light, making it a genuinely appealing spot for reading or relaxing.
The thick, tufted cushion in a calming shade of pale blue makes the seat incredibly inviting. The storage solution is elegantly concealed: a section of the seat opens via a hinged lid, while two large pull-out drawers are built into the front face. This diverse storage allows for easy organization of extra linens, seasonal clothing, or books.
The soft color palette, featuring blue and pale green throw pillows, complements the bright white walls and trim. A simple wall sconce provides a cozy light source for evening enjoyment. This design turns a simple window wall into a luxurious, highly functional piece of furniture.
DIY Project: Constructing a Hinged and Drawer Window Seat
This DIY outlines building a window seat with a combination of hinged top access and pull-out drawers for maximum storage.
Material Required
- 3/4-inch Plywood for the bench frame, drawer boxes, and hinged lids.
- Drawer slides (heavy-duty).
- Cabinet hinges (for the lid access).
- Trim wood (beadboard or wainscoting) for the finished look.
- Cushion foam and upholstery fabric.
- Upholstery batting and staple gun staples.
- Primer and semi-gloss paint.
- Wood glue, wood screws, and nails.
Equipment Required
- Circular saw or table saw.
- Drill/Driver.
- Brad nailer (for trim).
- Measuring tape, level, and square.
- Staple gun (for upholstery).
DIY Instruction Step-by-Step
Step 1: Measure and Build the Main Frame
Measure the window alcove width and depth precisely. Build the main rectangular box frame using plywood, securing the pieces with glue and screws. Include internal vertical dividers to separate the drawer section from the hinged lid sections; these dividers also add structural stability. The frame should be level and mounted securely against the wall.
Step 2: Construct and Install the Drawers
Build your drawer boxes. Ensure they are sized to fit snugly within their allocated sections of the frame. Install the heavy-duty drawer slides inside the frame and onto the drawer boxes. Test the drawers for smooth movement.
Step 3: Create and Hinge the Lids
Cut the plywood tops for the hinged storage compartments. Attach the cabinet hinges to the back edge of these lids and then to the top back edge of the bench frame. Use piano hinges for strong, continuous support. Ensure the lids lift and close easily.
Step 4: Apply the Decorative Finish
Once the structure is complete, attach the drawer faces to the installed drawers and the decorative trim (wainscoting or beadboard) to the front and sides of the bench frame using a brad nailer. This step hides the plywood edges and gives the unit a custom, built-in appearance. Fill any gaps with caulk, then sand, prime, and paint the entire unit.
Step 5: Upholster the Cushion
Cut the foam to fit the top of the bench. Upholster the foam cushion using your chosen fabric, securing the fabric tautly underneath with a staple gun. Consider creating separate cushions for the hinged areas if you want easier access to storage.
Step 6: Final Placement
Set the finished cushion onto the bench. Add throw pillows and a blanket to complete your cozy, high-storage window seat.
7. Vertical Closet Command Center
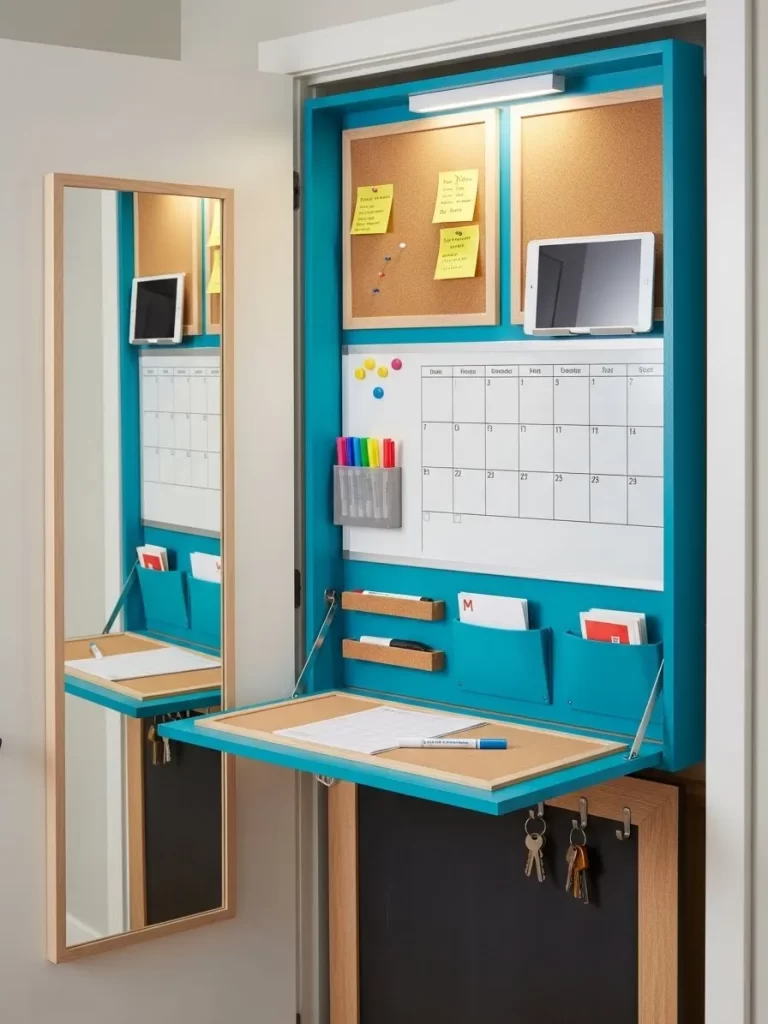
This turquoise pop-up desk provides an amazing, colorful solution for managing family schedules and mail without taking up floor space. Installed in a narrow closet opening, the bright color instantly transforms a dull utility area into an energized, central organizing hub. When closed, the door conceals all the clutter, maintaining a minimalist look.
Once opened, the hinged panel folds down to create a small, functional desk surface, held securely by brackets. The back panel is organized with two large cork boards for pinning notes, receipts, and photos. A magnetic dry-erase calendar is prominently featured, allowing for quick updates to the family schedule.
Below the calendar, various pockets and magnetic containers hold markers, pens, and incoming or outgoing mail. An integrated light strip at the top ensures the workspace is always brightly illuminated. This highly efficient organizer proves that even the shallowest space can house a fully functional, essential command center.
DIY Project: Building a Wall-Mounted Folding Command Desk
This DIY focuses on converting a shallow, narrow wall niche or the inside of a closet into a multi-functional folding desk and organization center.
Material Required
- 3/4-inch Plywood or MDF for the cabinet box and desk flap.
- Heavy-duty piano hinge for the desk flap.
- Folding bracket supports (two, for the desk flap).
- Corkboard and magnetic whiteboard material.
- Small magnetic organizers, pen cups, and mail pockets.
- LED strip light for internal illumination.
- Primer and vibrant paint color (like turquoise).
- Wood screws, glue, and sandpaper.
Equipment Required
- Circular saw or table saw.
- Drill/Driver.
- Measuring tape, level, and square.
- Clamps.
DIY Instruction Step-by-Step
Step 1: Construct the Cabinet Box
Measure your niche or closet opening. Cut and assemble the side, top, and base pieces of a shallow cabinet box. The depth should be just enough to hold the organizing components when the desk is folded up. Assemble with glue and screws.
Step 2: Prepare the Back Panel
Cut a plywood piece for the back of the cabinet. Affix the corkboard sections and the magnetic whiteboard calendar onto this back panel using strong adhesive. Mount the small organizers (pockets, pen cups) in their final positions on the back panel using glue or small screws.
Step 3: Mount the Cabinet Box and Back Panel
Secure the finished back panel into the cabinet box. Mount the entire cabinet structure securely to the wall studs inside your chosen niche or closet using long screws, making sure it is perfectly level.
Step 4: Build and Install the Folding Desk Flap
Cut the desk flap from plywood. Attach the piano hinge along the bottom edge of the flap. Attach the other side of the hinge to the bottom lip of the cabinet box. Attach the folding bracket supports to the side walls of the cabinet and ensure they align to hold the desk flap level when lowered.
Step 5: Install Lighting and Finish
Install the LED strip light on the underside of the cabinet top piece, ensuring it points down onto the desk surface. Run the wiring neatly. Apply primer, then paint the entire unit—cabinet, flap, and exposed edges—with your chosen vibrant color. Allow ample time for drying.
Step 6: Final Setup
Test the folding mechanism. Stock the command center with pens, markers, and initial calendar information. Your colorful, space-saving organizer is now ready to use.
8. Corner Kitchen Banquette Dining
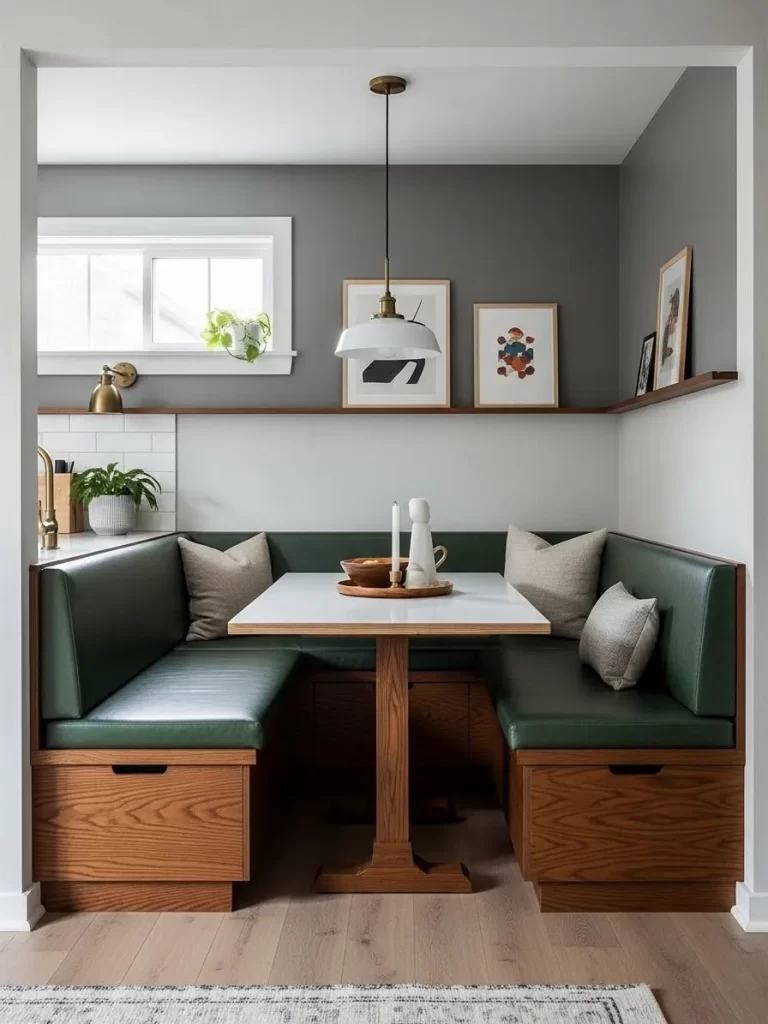
This tucked-away dining area transforms a simple corner into a stylish, space-saving breakfast nook. The deep, rich hunter-green leather upholstery on the benches creates a luxurious, sophisticated feel and maximizes seating capacity. Built-in banquettes like this use the wall itself as a support, eliminating the need for bulky chairs.
The benches are cleverly designed with deep drawers built into the wooden base cabinets, providing essential storage for placemats, napkins, or small kitchen appliances. The warm wood tone of the base and the central pedestal table provides a beautiful contrast to the cool grey walls and crisp white tiles.
A simple white pendant light hangs directly over the table, providing a focused glow. The upper wall features a shallow wooden shelf for displaying framed artwork and small objects, adding personality without crowding the space. This design is highly efficient, comfortably seating multiple people in an area where a traditional table and chair set would never fit.
DIY Project: Building a Corner Banquette with Drawer Storage
This DIY details the construction of two corner benches with drawer storage for a cozy dining nook.
Material Required
- 3/4-inch Plywood for the bench boxes and drawer boxes.
- Drawer slides and handles/pulls.
- Wood stain or paint for the bench base.
- Bench foam and upholstery material (faux leather or durable fabric).
- Upholstery batting and staple gun staples.
- Wood screws, dowels, and wood glue.
- Pedestal table (pre-made or custom-built).
Equipment Required
- Circular saw or table saw.
- Drill/Driver.
- Measuring tape, level, and carpenter’s square.
- Clamps.
- Sandpaper.
- Staple gun (heavy-duty).
DIY Instruction Step-by-Step
Step 1: Measure and Design the Bench Boxes
Measure the dimensions of your corner nook. Decide on the height and depth of the benches (usually 18-20 inches high and 24-28 inches deep). Cut the plywood pieces for the two bench boxes, ensuring they will meet perfectly in the corner.
Step 2: Assemble the Bench Frames
Assemble the two rectangular bench box frames, securing them with glue and screws. Pre-drill pilot holes to avoid splitting the wood. Build in the internal supports and guides needed to install the drawer slides and boxes.
Step 3: Construct and Install the Drawers
Build the drawer boxes, making them slightly smaller than the internal bench compartment. Install the heavy-duty drawer slides onto the bench frame and the drawer boxes. Slide the drawers into place, testing for smooth, easy operation.
Step 4: Finish the Bench Bases
Apply your chosen wood stain or paint to the exterior of the bench boxes and the drawer faces. If staining, ensure you sand smoothly first. Once dry, attach the drawer handles. Secure the completed bench structures to the wall studs using long screws to prevent movement, ensuring the tops are perfectly level.
Step 5: Upholster the Bench Tops
Cut the foam to the exact size of the bench tops. Wrap the foam with batting for extra softness. Then, tightly wrap and staple your upholstery fabric to the underside of the plywood bench tops. Ensure the fabric is pulled taut and the corners are neatly folded.
Step 6: Install the Table and Finishing Touches
Install your pedestal table in the center of the nook. Place the finished upholstered tops onto the benches. Add throw pillows for comfort and hang the pendant light directly above the table to complete your functional and stylish dining area.
9. Vertical Indoor Herb Garden Niche
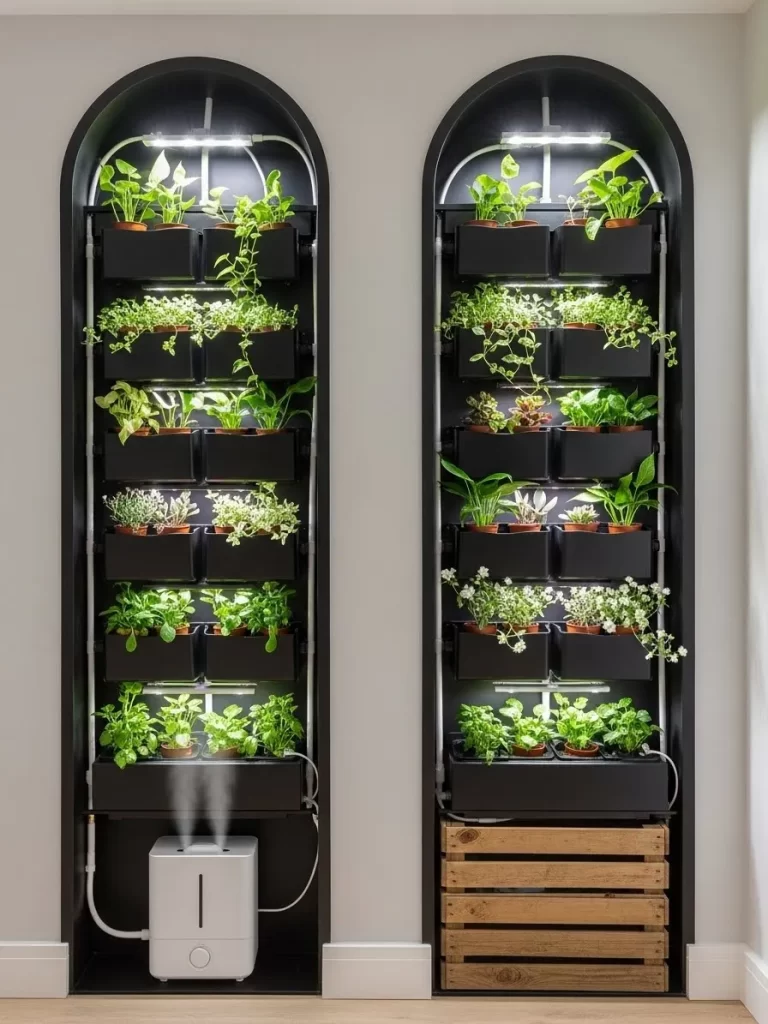
These two striking recessed niches are brilliantly used to house a vertical indoor garden, bringing life and fresh greenery into a home. The dramatic black arches provide a beautiful, architectural contrast to the pale wall, making the plants the focal point. This setup is particularly clever for small spaces, as it uses deep wall cavities rather than floor space.
Multiple rows of planters are stacked vertically, maximizing the growing area. Integrated LED grow lights are mounted directly over each shelf level, ensuring that the herbs and small plants receive sufficient light regardless of natural window exposure. This lighting system is essential for successful indoor gardening.
A small humidifier sits at the base of one column, creating an optimal environment for the plants. The entire system includes discreet irrigation lines and drainage, indicating a thoughtfully engineered solution for low-maintenance indoor agriculture. This setup proves that even dedicated gardening space can be beautifully integrated into a modern home design.
DIY Project: Creating a Recessed Vertical Garden with Grow Lights
This project details how to transform a wall niche or build a framed recess for a vertical planter system with essential lighting.
Material Required
- Plywood or MDF for the shelf frames and niche lining.
- Black paint or liner material (for a dramatic look).
- Several small, uniform plastic planters.
- Adjustable-height shelving standards and brackets.
- Waterproof LED grow lights (one for each shelf).
- Timer and power strip (for the lights).
- Soil, fertilizer, and herb plants/seeds.
- Optional: Small humidifier and shallow drainage tray.
- Wood screws, wall anchors, and wood glue.
Equipment Required
- Circular saw or table saw.
- Drill/Driver.
- Measuring tape, level, and stud finder.
- Basic wiring tools (for light installation).
DIY Instruction Step-by-Step
Step 1: Frame or Prep the Recessed Niche
If using an existing niche, simply paint the interior a dark, dramatic color. If framing a new recess, carefully cut into the drywall (avoiding studs if possible) and build a simple wooden frame to line the opening, securing it to existing wall studs. Ensure the niche is deep enough for the planters.
Step 2: Install the Shelving System
Mount the vertical shelving standards (metal tracks) securely to the side walls of the niche, ensuring they are parallel and level. Use the corresponding brackets to install adjustable-height shelves. Space the shelves vertically to accommodate the height of your mature plants and the installed grow lights.
Step 3: Install the Grow Lights
Mount the waterproof LED grow lights directly to the underside of each shelf. Ensure the lights are positioned to shine directly onto the plants below. Run the power cords discreetly down the back or sides of the niche to a power strip that is connected to a timer for automatic control.
Step 4: Plant and Load the Shelves
Fill your small planters with soil and plant your herbs or desired greenery. Ensure the planters are uniform in size to fit neatly onto the shelves. Place the planted pots onto the shelves.
Step 5: Address Drainage and Humidity (Optional)
If you plan to water in place, place a shallow drainage tray at the base of the niche to catch any excess water. If using a small humidifier, position it at the base of the niche and plug it into the power source.
Step 6: Final Setup
Set the timer for the grow lights (typically 12-16 hours per day). Arrange the plants for an appealing display. You now have a fresh, vertical garden fully integrated into your living space.
10. Hidden Home Charging Station
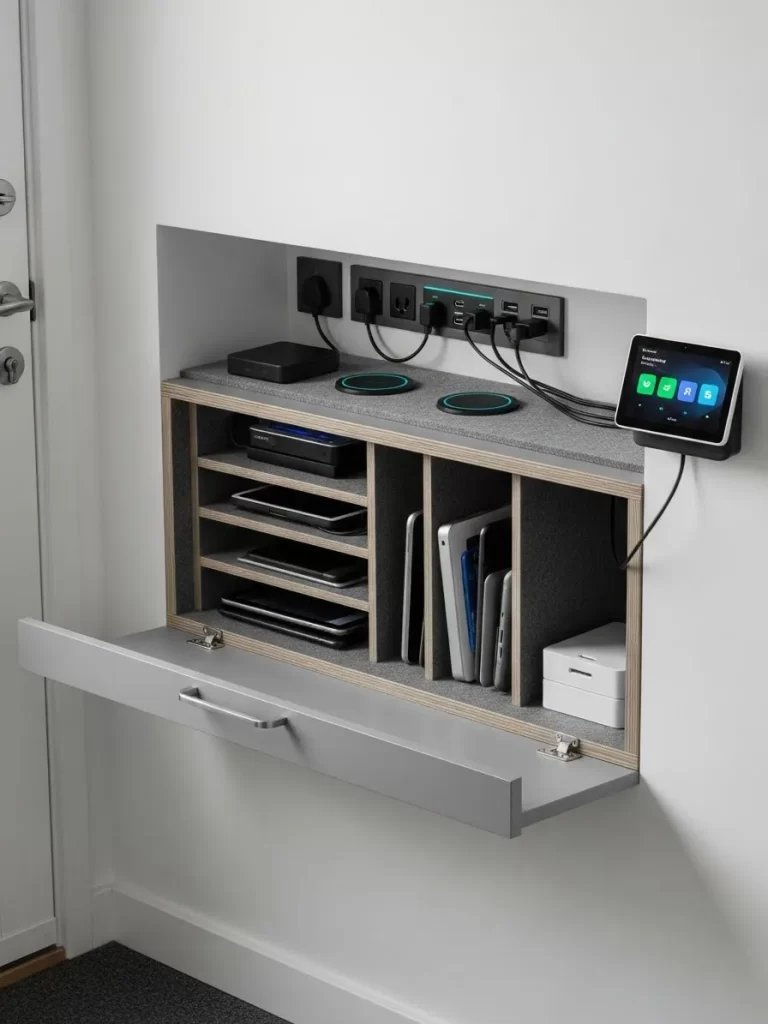
This discreet, wall-mounted cabinet solves the problem of charging cords and electronics cluttering up countertops. The unit is designed to be highly functional, utilizing a shallow wall cavity, and its neutral grey color ensures it blends seamlessly into the entryway or hallway. The flip-down door conceals the devices when not in use, keeping the space tidy.
Inside, the unit is segmented into several compartments lined with soft felt, providing individual cubbies for tablets, phones, and other electronics. This thoughtful organization prevents screens from scratching and keeps devices readily accessible.
The top of the unit houses a built-in power strip with multiple outlets and USB ports, allowing many devices to charge simultaneously. Wireless charging pads are integrated into the felt top surface, a clever addition for quick charging. A small smart home control panel is mounted adjacent to the station, making this a central hub for both power and connectivity.
DIY Project: Building a Wall-Mounted Device Charging Cabinet
This DIY outlines the construction of a sleek, wall-mounted cabinet with internal dividers and an integrated power source for charging electronics.
Material Required
- 3/4-inch Plywood or MDF for the cabinet box, dividers, and front flap.
- Piano hinge or simple magnetic catch hinges for the front flap.
- Power strip with multiple outlets and USB ports.
- Felt or soft fabric for lining the internal cubbies.
- Cabinet handle or pull.
- Wood screws, dowels, and wood glue.
- Primer and paint.
Equipment Required
- Circular saw or table saw.
- Drill/Driver.
- Measuring tape, level, and square.
- Clamps.
- Sandpaper.
- Caulk gun and construction adhesive (for lining).
DIY Instruction Step-by-Step
Step 1: Construct the Cabinet Box
Measure the space and cut the pieces for the main cabinet box (top, bottom, and sides). The box should be shallow enough to not protrude too far from the wall but deep enough to house devices. Assemble the box using glue and screws.
Step 2: Create and Install Internal Dividers
Cut small plywood pieces for the vertical dividers and horizontal shelves that create the individual charging cubbies. Lay out the spacing based on the size of your devices (phones, tablets). Install these dividers into the cabinet box using glue and small screws.
Step 3: Install the Power Strip
Cut a small opening in the upper section of the back panel or top piece of the cabinet box. Mount the power strip inside this section, ensuring the outlets are easily accessible for plugging in device cables. Route the main power cord neatly out of the cabinet (usually through a small hole in the bottom or back) to the wall outlet.
Step 4: Line the Interior
Cut the felt or soft fabric to fit the inside of the cubbies and the surfaces where devices will rest. Apply a strong construction adhesive to the wood and press the felt into place, smoothing out any bubbles. This protects the devices from scratching.
Step 5: Attach the Front Flap
Cut the front flap (the door) to fit flush with the cabinet opening. Attach the piano hinge to the bottom edge of the flap and the bottom lip of the cabinet box. Alternatively, use simple hinges and magnetic catches to hold the door closed.
Step 6: Finish and Mount
Paint the exterior of the cabinet box and the front flap. Once dry, attach a stylish handle to the front flap. Mount the entire unit securely to the wall studs using long screws, making sure it is level. Plug in the power strip, organize the charging cables, and your new hidden station is ready for use.
11. Loft Bed Integrated Office and Storage Hub
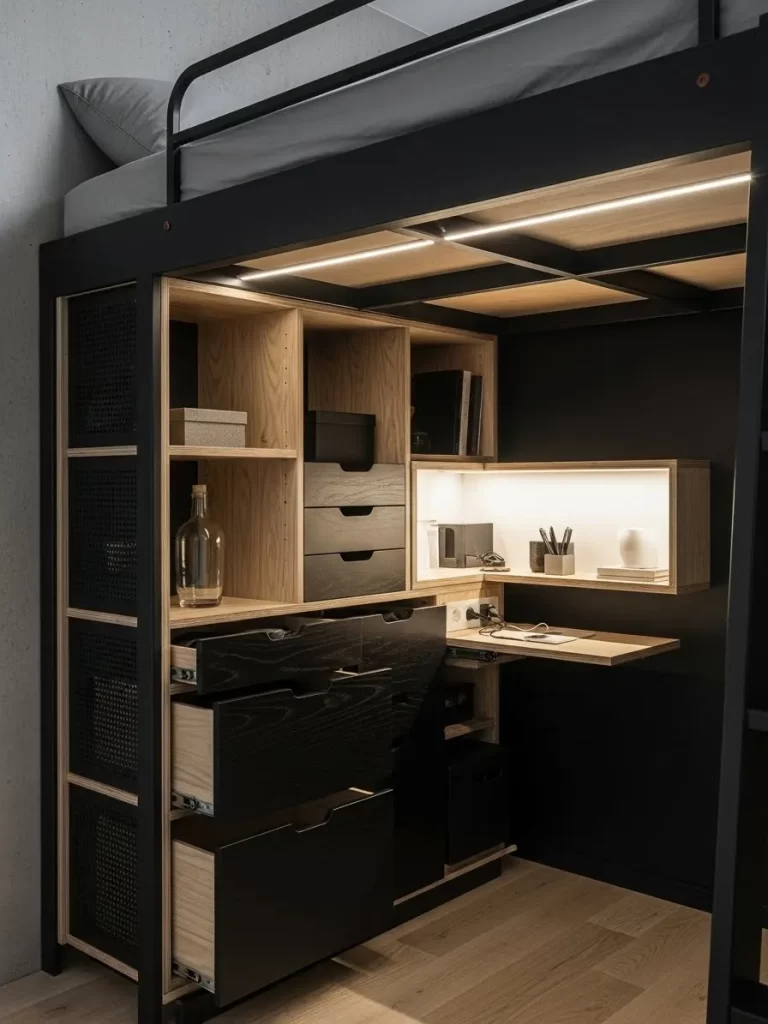
This design showcases an extremely efficient use of vertical space, placing a fully equipped office and massive storage unit directly beneath a lofted bed. The heavy black metal frame and dark painted walls create a dramatic, modern contrast with the warm, natural wood cabinetry. This setup offers dedicated zones for both rest and work within the smallest footprint.
The office space features pull-out drawers of varying sizes, maximizing organization for files, stationery, and personal belongings. Open wooden cubbies provide display areas for books and decorative items, softening the industrial look. A floating, illuminated shelf with a small pull-down desk offers a focused workspace for a laptop or writing.
Perforated metal panels on the sides add an industrial texture and allow light to filter in, preventing the lower area from feeling closed in. Integrated LED strip lighting ensures the workspace is always bright and welcoming. This unit proves that creative vertical design can accommodate an entire bedroom and office suite in a single corner.
DIY Project: Building a Loft Bed Under-Storage and Desk System
This ambitious DIY focuses on building the cabinet and desk system underneath an existing or new loft bed frame.
Material Required
- 3/4-inch Plywood (or hardwood) for cabinet boxes, drawers, and shelving.
- Drawer slides (various sizes, heavy-duty).
- Hinges and gas struts (optional, for pull-down desk).
- LED strip lighting and power supply.
- Black paint or stain for the cabinet faces and interior.
- Wood screws, dowels, and wood glue.
- Handles and pulls for drawers.
Equipment Required
- Table saw or circular saw.
- Drill/Driver with various bits.
- Kreg Jig (for pocket holes).
- Measuring tape, level, and square.
- Clamps.
- Sandpaper.
DIY Instruction Step-by-Step
Step 1: Measure and Frame the Under-Bed Space
Measure the height, width, and depth of the space beneath your loft bed. This space will define the dimensions of your cabinet system. Construct the basic vertical frames and horizontal bases for the cabinet units using plywood, ensuring they fit securely under the bed frame.
Step 2: Build and Install Cabinet Boxes and Shelves
Build the individual cabinet boxes for the drawers and open shelving sections. Assemble them using glue and pocket screws for strength. Install these units into the framed space, securing them to the walls and to each other for stability. Create and install fixed open shelves in their designated cubbies.
Step 3: Construct and Install Drawers
Build the large and small drawer boxes. Install the appropriate drawer slides onto the interior of the cabinet frames and onto the sides of the drawer boxes. Test the drawers for smooth operation. Attach the finished drawer faces and handles.
Step 4: Create the Pull-Down Desk Unit
Build a small, shallow floating cabinet box for the desk area. Install a horizontal shelf inside it. Cut a plywood piece for the desk flap. Use strong hinges and folding brackets (or gas struts for a soft close) to mount the desk flap to the bottom of the floating cabinet box. Mount the entire unit at the proper desk height to the wall or the back panel of the cabinet system.
Step 5: Install Lighting and Finish
Apply your chosen black paint or stain to the cabinet exteriors and drawer fronts. Apply a clear finish to the natural wood interiors and shelves. Install the LED strip lighting along the ceiling of the under-bed area and/or inside the pull-down desk cabinet, ensuring the wiring is discreetly routed.
Step 6: Final Organization
Place your finished desk chair (if using) and organize the shelves and drawers. This creates a fully functional, impressive workstation and storage area tucked neatly beneath your sleeping space.
12. Recessed Bathtub Niche
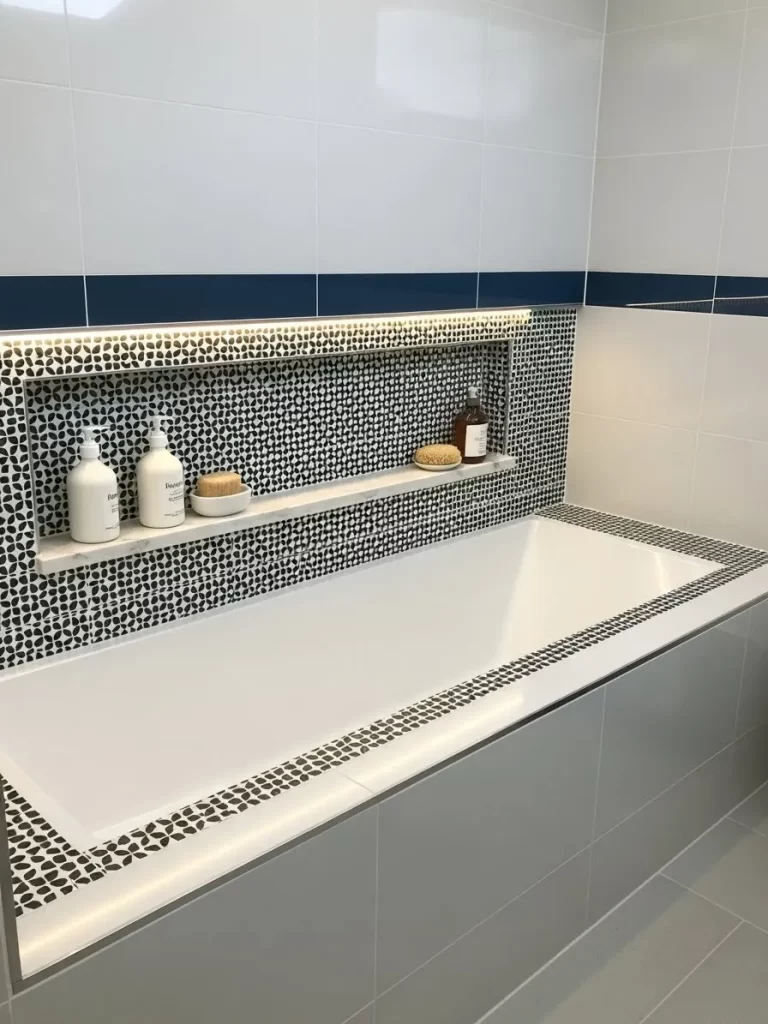
This clever bathroom detail utilizes the wall space above the tub to create built-in, clutter-free storage. Instead of messy caddies, a wide, shallow recess is cut into the wall, offering a permanent home for bath products. The niche is both functional and a key design element in the room.
The interior of the niche is lined with striking black and white mosaic tiles, providing a beautiful textural contrast to the smooth, large-format wall tiles. A subtle LED strip light runs along the top, casting a warm glow downwards that highlights the products and creates a spa-like ambiance.
A clean, light shelf runs across the center, offering ample space for shampoo, soaps, and scrub brushes. The shelf maintains the area’s neat appearance. The entire setup is waterproof and avoids taking up any vertical space in the bathing area.
DIY Project: Creating a Tiled Bathtub Niche
This project details how to cut into drywall between studs and frame a recessed shelf niche, followed by tiling for a waterproof finish.
Material Required
- 2×4 Lumber (for framing the niche).
- Waterproof backer board (cement board).
- Waterproofing membrane (liquid or sheet).
- Tile (mosaic for the back, contrasting for the shelf).
- Tile adhesive (thin-set mortar).
- Grout (waterproof/sealing type).
- LED waterproof strip light.
- Wood screws and backer board screws.
Equipment Required
- Utility knife or drywall saw.
- Drill/Driver.
- Level and tape measure.
- Trowel and grout float.
- Wet tile saw or tile cutter.
- Safety gear (gloves, safety glasses).
DIY Instruction Step-by-Step
Step 1: Frame the Niche Opening
Locate the studs in the wall above your bathtub. Use a level and measuring tape to mark the desired height and width of your niche (usually spanning the space between two studs). Cut the drywall and frame the opening using 2×4 lumber to create a sturdy box structure. Install a horizontal 2×4 at the desired shelf height for added support.
Step 2: Install Waterproof Backer Board
Cut the cement backer board to fit the back and side walls, and the shelf of the framed niche. Secure the backer board to the wooden framing using specialty backer board screws. Ensure all seams meet tightly.
Step 3: Apply Waterproofing
Apply a generous layer of liquid waterproofing membrane over all seams and screw heads, and then coat the entire interior of the niche (backer board and wood framing) according to the manufacturer’s instructions. Allow this to dry completely. This step is crucial for preventing mold and water damage.
Step 4: Tile the Niche
Mix your thin-set mortar. Starting with the back wall, apply the mortar and then press your mosaic tiles into place. Work outward to the side walls. Tile the shelf last, ensuring a slight slope toward the tub for drainage. Let the mortar cure completely.
Step 5: Grout and Seal
Apply waterproof grout to fill the spaces between the tiles. Wipe away excess grout with a damp sponge. Once dry, seal the grout and the edges of the niche with a high-quality silicone sealant where the niche meets the bathtub or surrounding wall tiles.
Step 6: Install Lighting
Install the waterproof LED strip light along the top inside edge of the niche, routing the wires discreetly through the back wall and connecting them to a nearby power source (preferably a switched light circuit) to complete your streamlined, illuminated storage.
13. Under-Stair Custom Wine Cellar
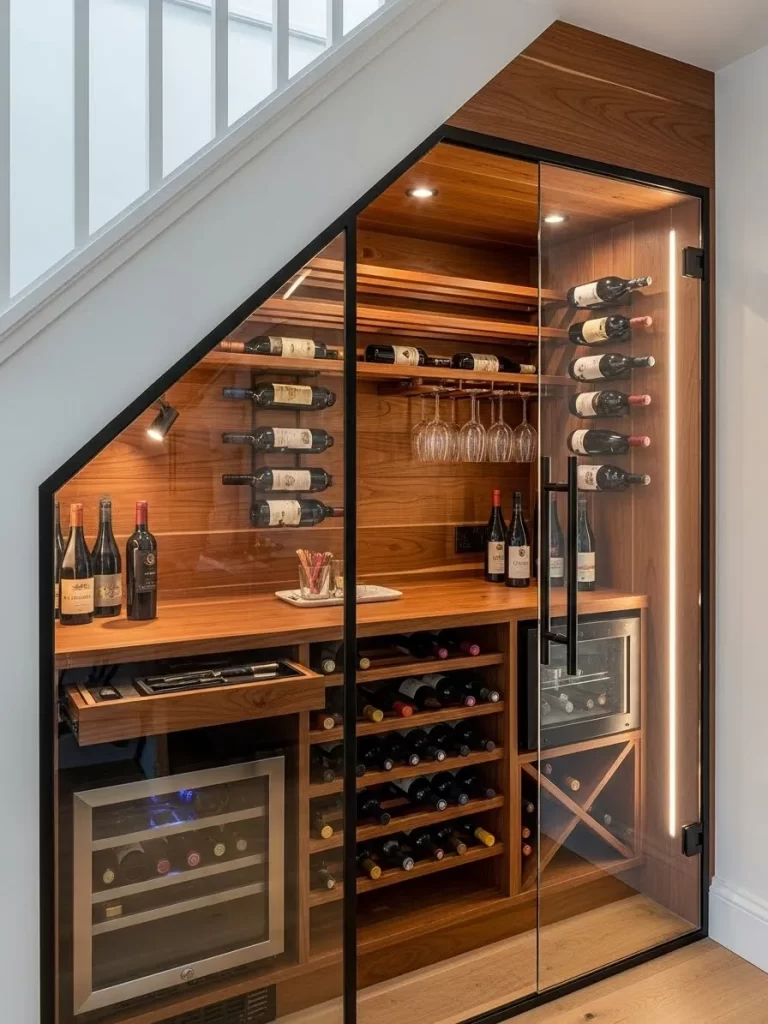
This under-stair space has been dramatically converted into an elegant, climate-controlled wine display and serving station. The beautiful walnut paneling and built-in racks showcase the wine collection in a sophisticated setting. The angled structure of the staircase creates a unique, dramatic ceiling line.
The entire collection is secured behind a floor-to-ceiling glass door framed in black, which serves to regulate the temperature and protect the bottles. Multiple storage methods are incorporated: horizontal racks, cubby holes, and a dedicated section for stemware that hangs above a shallow counter.
Integrated drawer storage and small wine refrigeration units are placed at the base, optimizing the entire volume of the space. Accent lighting—including a vertical LED strip alongside the door frame and small spotlights within—highlights the bottles and the warm wood grain, transforming a forgotten corner into a stunning feature.
DIY Project: Building a Decorative Wine Rack Under Stairs
This project describes how to frame, insulate, and install shelving/racks to convert an under-stair space into a decorative wine area. Note: Achieving true climate control often requires professional HVAC installation.
Material Required
- Plywood or hardwood lumber for all framing and shelving.
- Decorative wood paneling or veneer for the interior walls.
- Wine rack inserts (pre-made cubby or lattice style).
- Glass door (pre-hung unit is recommended).
- Insulation (rigid foam board or fiberglass).
- LED strip lighting and small spotlights.
- Wine cooler/refrigerator (small unit).
- Wood screws, nails, and wood glue.
Equipment Required
- Circular saw or table saw.
- Drill/Driver.
- Jigsaw (for angled cuts).
- Level, square, and measuring tape.
DIY Instruction Step-by-Step
Step 1: Frame and Insulate the Cavity
Clear the space under the stairs. Build internal walls and a ceiling using 2×4 lumber, matching the slope of the staircase. Install rigid foam board or insulation into the walls, ceiling, and floor to help regulate temperature, sealing gaps with expanding foam.
Step 2: Install Interior Paneling and Lighting
Cover the insulated interior walls with your chosen decorative wood paneling or veneer. Install wiring for the spotlights and LED strip lights, routing them neatly behind the panels. Install the spotlights in the ceiling and the LED strip light vertically alongside where the door frame will be.
Step 3: Construct and Install Shelving and Racks
Build the horizontal shelves, cubby racks, and stemware hanging unit. Ensure all shelves are structurally sound and capable of holding the significant weight of many bottles. Install them securely to the paneled walls using long screws. Build a counter section for serving and a dedicated niche for the small wine cooler unit.
Step 4: Install the Glass Door
Install the pre-hung glass door unit into the framed opening, ensuring it closes and seals properly. Level the frame before securing it fully.
Step 5: Finishing Touches
Install the small wine cooler unit into its niche and plug it in. Apply a protective finish (stain or clear coat) to the wood elements. Load your wine and turn on the beautiful accent lighting to showcase your under-stair wine area.
14. Corner Media Console and Display Unit
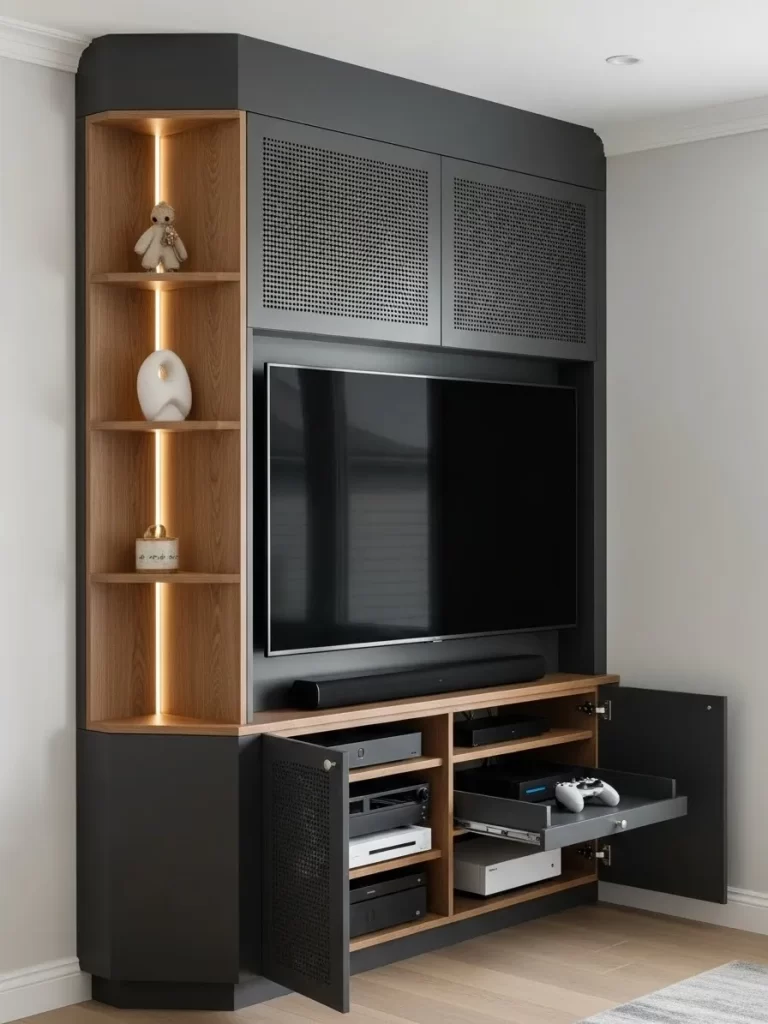
This large custom cabinet solves the issue of television and equipment clutter by integrating everything into a handsome, multi-functional unit that utilizes a corner. The dark grey finish provides a contemporary, grounded feel, while the exposed natural wood shelves add a touch of warmth and contrast.
The entertainment center features dedicated, ventilated compartments for media players, gaming consoles, and receivers, keeping them cool and organized. A pull-out drawer conveniently holds controllers and accessories, keeping them out of sight. Acoustic mesh panels cover the upper cabinets, hiding speakers or additional storage while allowing sound to pass through.
The side of the unit capitalizes on the corner space with open, staggered wooden shelving. This area is beautifully lit by vertical LED strips, creating an inviting light pillar that showcases decorative objects and keepsakes. This comprehensive unit turns a challenging corner into a highly efficient and stylish focal point.
DIY Project: Building a Corner Media and Display Cabinet
This project describes building a large, customized corner entertainment unit with a combination of open shelving and enclosed media storage.
Material Required
- Plywood or MDF for the cabinet frames and doors.
- Natural wood veneer or solid wood for the open shelving.
- Acoustic mesh or perforated metal panels.
- Drawer slides and hinges.
- LED strip lighting and power supply.
- Flat black or dark grey paint.
- Wood screws, dowels, and wood glue.
Equipment Required
- Table saw or circular saw (for corner cuts).
- Drill/Driver.
- Measuring tape, level, and square.
- Hole saw (for ventilation holes).
DIY Instruction Step-by-Step
Step 1: Design and Build the Corner Frame
Measure the corner space. The unit consists of a central flat section and a rounded corner shelving section. Build the main rectangular frame for the central media area first, leaving the center open for the TV screen. Then, build the frame for the corner shelving unit, ensuring the angles match the corner of the room.
Step 2: Construct the Media Compartments
Install internal shelves and vertical dividers for the media players and soundbar section. Build a simple drawer box for controllers and install the drawer slides. Cut openings and line the back of these compartments with a hole saw to ensure adequate ventilation for the electronic components.
Step 3: Build and Install Doors and Mesh Panels
Build the doors for the lower and upper cabinets. For the upper cabinet, cut out the center panels and secure the acoustic mesh or perforated metal from the inside using small brad nails or adhesive. Install the doors using hinges.
Step 4: Install Corner Shelving
Cut the natural wood shelves for the side corner unit. Install them using hidden shelf pins or secure brackets, ensuring they are perfectly level and spaced attractively.
Step 5: Lighting and Finishing
Paint the main cabinet frame and door fronts dark grey or black. Apply a clear coat or oil to the natural wood shelving. Install the vertical LED strip lighting along the inside edges of the corner shelves, routing the power cables neatly. Place the TV and media equipment to complete the unit.
15. Sliding Door Closet Laundry Station
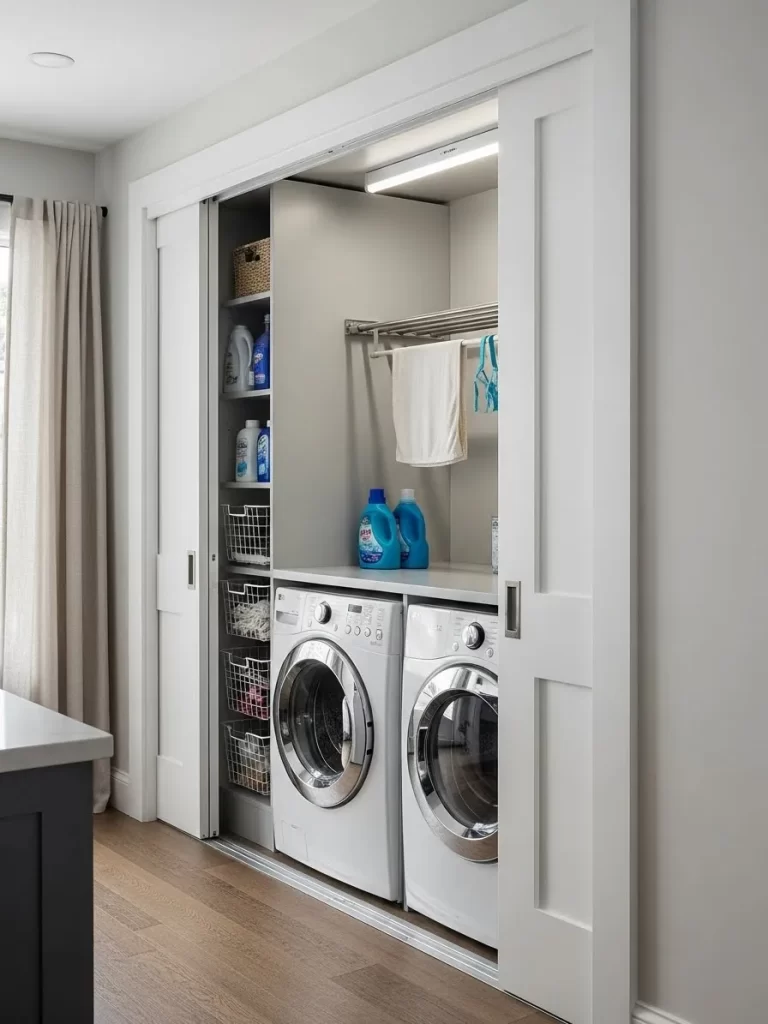
This brilliant closet conversion hides a full laundry station behind attractive sliding doors, freeing up floor space in the main room. When the doors are closed, the room maintains a clean, uniform look. The setup maximizes the narrow, deep cavity of the closet.
The design utilizes stacked organization on one side, featuring shelves and sliding wire baskets for storing detergent, cleaning supplies, and sorted laundry. This vertical storage system makes full use of the closet height.
Above the front-loading washer and dryer, a shallow countertop provides a convenient surface for folding clothes or treating stains. A stainless steel hanging rack is mounted above the counter for air-drying delicates, further enhancing functionality. Bright, focused lighting is installed at the top of the closet, ensuring the workspace is well-illuminated.
DIY Project: Converting a Closet into a Compact Laundry Center
This DIY focuses on installing storage, a countertop, and a drying rack inside an existing closet space.
Material Required
- Plywood or MDF for shelving and countertop.
- Sliding wire basket kits and shelf standards.
- Metal hanging rod or foldable drying rack.
- Laminate or durable solid surface for the countertop.
- Bright LED strip light or utility light.
- Primer and paint.
- Wood screws and mounting hardware.
Equipment Required
- Circular saw or table saw.
- Drill/Driver.
- Stud finder, level, and measuring tape.
- Sandpaper.
DIY Instruction Step-by-Step
Step 1: Prepare and Paint the Closet
Empty the closet completely. Repair any damage to the drywall. Paint the interior walls and ceiling with a durable, moisture-resistant paint (like semi-gloss) to handle potential humidity from the washer and dryer.
Step 2: Install Vertical Storage System
Locate and mark the wall studs on the side walls. Install vertical shelf standards or tracks securely into the studs. Using the corresponding brackets, install the wire baskets and fixed shelves on one side, dedicating this area to supplies and sorting.
Step 3: Install the Countertop
Measure the space over the washer and dryer precisely. Build a simple plywood frame or support structure on the back and side walls for the countertop to rest on. Cut the countertop material (plywood topped with laminate or a solid surface) to fit snugly. Secure the countertop to the support frame with screws from below.
Step 4: Mount the Drying Rack
Install a sturdy metal hanging rod or a foldable drying rack above the countertop. Ensure the hardware is drilled directly into wall studs, as the rack must support the weight of wet clothes. The rack should be high enough not to interfere with the work surface.
Step 5: Install Lighting
Mount the bright LED strip light or utility light to the ceiling of the closet. Ensure the wiring is neatly routed and connected to a wall switch or nearby power source.
Step 6: Install Appliances and Finish
Move your washer and dryer into the space, ensuring all utility connections are properly made. Load the shelves with supplies. The finished sliding doors can be reinstalled to conceal the functional laundry space when not in use.
16. Pastel Kitchen Pantry and Spice Nook

This vibrant and highly customized pantry utilizes a corner with a mix of open shelving, closed cabinetry, and specialized storage. The playful color scheme—pale mint green for the base and soft blush pink for the upper cabinets—gives the kitchen a cheerful, modern personality.
The open shelves are beautifully backlit with hidden LED strips, turning everyday items stored in clear jars into a decorative display. A section of the unit is dedicated to appliances and taller bottles, featuring shelves spaced appropriately for their contents.
The storage brilliance lies in the pull-out vertical spice rack, concealed behind a pink cabinet door. This rack provides a narrow, easy-to-access organization system for dozens of small jars. Below, natural wood drawers and wicker baskets add textural contrast and provide concealed storage for produce or bulkier goods.
DIY Project: Building a Multi-Functional Corner Pantry Unit
This DIY project focuses on building a custom corner cabinet with open shelving, a base cabinet with drawers, and a pull-out spice rack.
Material Required
- 3/4-inch Plywood or MDF for all cabinet frames, doors, and shelves.
- Full-extension drawer slides (for base drawers).
- Heavy-duty vertical pull-out hardware (for spice rack).
- Natural wood baskets (wicker or bamboo) and corresponding frames.
- LED strip lighting and power supply.
- Paint in mint green and blush pink.
- Wood screws, glue, and sandpaper.
Equipment Required
- Table saw or circular saw (for precise cuts).
- Drill/Driver.
- Measuring tape, level, and square.
- Clamps.
DIY Instruction Step-by-Step
Step 1: Construct the Base and Upper Cabinet Frames
Measure your corner space. Build the lower base cabinet frame, including internal supports for the drawers and baskets. Build the upper cabinet box. Build a tall, shallow cabinet box next to the upper unit to house the vertical spice rack. Secure all units to the wall studs.
Step 2: Build and Install Drawers and Baskets
Build the drawer boxes for the base unit and install the full-extension drawer slides. Build simple wooden frames inside the base unit to hold the wicker baskets securely, allowing them to slide in and out easily.
Step 3: Assemble the Spice Rack Unit
Construct the vertical pull-out rack structure (a tall, narrow box with small shelves on one or both sides). Install the heavy-duty vertical pull-out hardware into the shallow cabinet frame and onto the rack structure. Attach the finished pink cabinet door face to the front of the pull-out structure.
Step 4: Create and Install Open Shelving
Cut the open shelves from plywood. Paint or veneer them for a clean finish. Secure the shelves to the wall using hidden floating shelf brackets or strong wood cleat supports. Ensure the spacing is attractive and functional.
Step 5: Paint and Light Installation
Paint the base cabinet mint green and the upper and spice rack doors blush pink. Install the LED strip lighting on the underside of the upper cabinet and beneath the open shelves, routing the power cords neatly.
Step 6: Final Organization
Install all handles and pulls. Fill the shelves and drawers with your pantry staples, utilizing clear jars for maximum visual appeal.
17. Bedside Pull-Out Nightstand
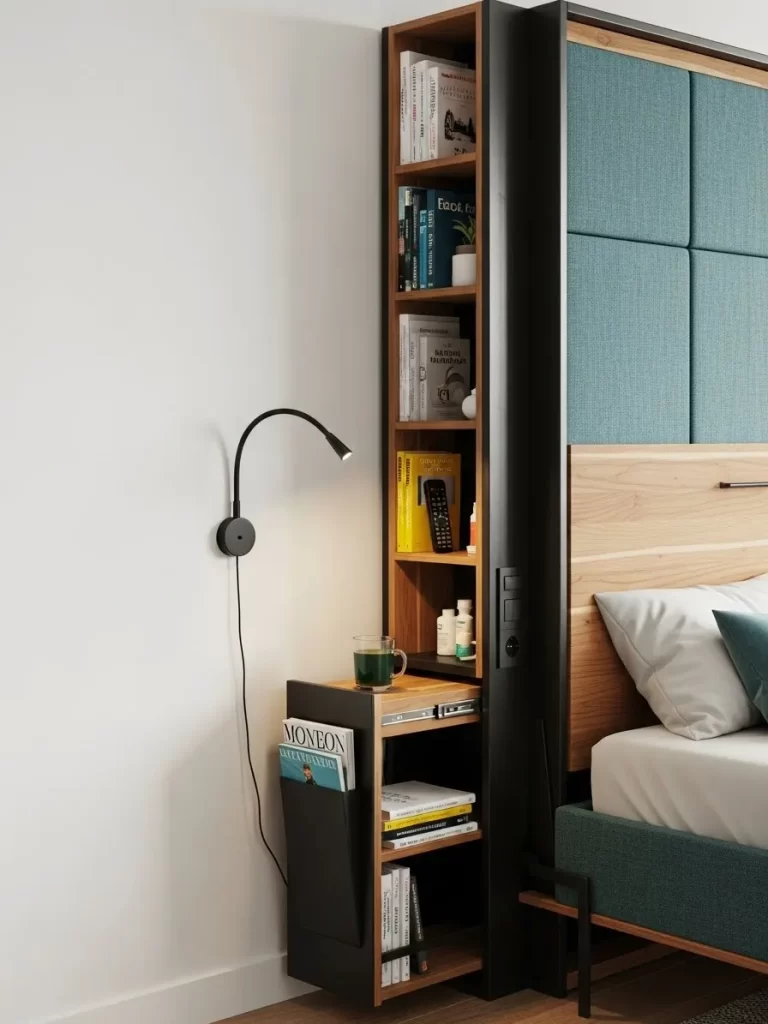
This clever furniture integration replaces a traditional nightstand, maximizing space in a narrow bedroom layout. The unit is built flush with the wall and the bed frame, utilizing the vertical space beside the mattress for storage. This sleek design ensures the floor area remains open and uncluttered.
The central feature is the pull-out console, which slides out to provide a convenient surface for a drink or book. This small shelf tucks away completely when not needed. Above this shelf, a tower of open shelving provides a small library, offering quick access to reading material, medicines, and personal items.
The lower section features an integrated magazine pocket, capitalizing on the shallow depth for accessible storage. A sleek, flexible gooseneck reading lamp is mounted to the wall, providing focused light without needing table space. The unit’s dark wood tone provides a stylish contrast to the light wood headboard and wall, turning a necessity into a sophisticated design element.
DIY Project: Building a Wall-Integrated Pull-Out Bedside Unit
This project focuses on building a narrow, multi-level storage unit with a small sliding shelf integrated next to the bed.
Material Required
- Plywood or MDF (black/dark finish recommended) for the cabinet structure and shelves.
- Natural wood for the exposed shelf interiors (optional).
- Full-extension drawer slides (for the pull-out shelf).
- Flexible gooseneck reading lamp.
- Fabric or stiffened material for the magazine pocket.
- Wood screws, dowels, and wood glue.
Equipment Required
- Circular saw or table saw.
- Drill/Driver.
- Level and measuring tape.
- Clamps.
DIY Instruction Step-by-Step
Step 1: Construct the Tall, Narrow Cabinet Box
Measure the space between the wall and the bed frame. Cut and assemble a tall, narrow cabinet box that extends from the floor up to a comfortable height, securing it with glue and screws. This box will hold the open shelves and the pull-out shelf.
Step 2: Build and Install Internal Shelves
Cut the horizontal shelves. Install the fixed shelves into the upper half of the cabinet box. Install internal supports for the magazine pocket and the full-extension drawer slides for the pull-out surface in the lower half.
Step 3: Create the Pull-Out Shelf
Cut a piece of plywood for the pull-out surface. Install the full-extension slides onto the shelf and into the cabinet supports. The shelf should slide out smoothly and fully support a cup of coffee.
Step 4: Build the Magazine Pocket
Build a shallow wooden frame on the outside lower wall of the cabinet. Use a stiffened fabric or cut a custom plywood pocket and attach it to the outside of the unit using small nails or glue to create the magazine holder.
Step 5: Mount the Unit and Lamp
Secure the entire cabinet unit to the wall studs using long screws, ensuring it is flush and stable. Install the gooseneck reading lamp onto the wall above the unit, routing the power cord neatly along the baseboard or behind the unit.
Step 6: Final Finish
Paint or stain the unit, ensuring a sleek, dark finish on the exterior. Organize the shelves with books and small essentials to complete your custom bedside solution.
18. Arched Art Deco Mini-Bar Niche
This elegant, arched recess transforms a simple wall cavity into a luxurious, bespoke home bar. The use of deep teal lacquer and gold trim immediately suggests opulence and sophistication, turning the nook into a true statement piece. The arched design adds a classic Art Deco flair.
The back of the niche is lined with mirrored glass, which beautifully reflects the light and visually expands the small space. Glass shelves are installed to hold bottles and glassware, providing a light, floating appearance.
Vertical LED strip lighting is seamlessly integrated into the back panel, dramatically illuminating the bottles and crystalware. The base of the unit features a small, integrated basin or service area, allowing for quick cocktail preparation. This stunning piece demonstrates how small, unused spaces can be elevated into areas of focused luxury and style.
DIY Project: Creating an Illuminated Bar Niche
This project details how to frame a wall recess, install lighting, glass shelves, and decorative trim to create a miniature bar.
Material Required
- Plywood or MDF for the niche lining and frame.
- Acrylic mirror sheet or mirrored glass for the back panel.
- Glass shelves and shelf clips/brackets.
- Decorative gold trim (or metallic paint).
- High-gloss paint in a deep jewel tone (teal, emerald).
- LED strip lighting (tape style) and power supply.
- Wood screws, glue, and caulk.
Equipment Required
- Jigsaw (for the arch cut).
- Drill/Driver.
- Level, measuring tape, and square.
- Paint brushes/rollers (for a smooth finish).
- Glass cutter (optional, for custom glass shelves).
DIY Instruction Step-by-Step
Step 1: Frame and Shape the Niche
Cut into the drywall between studs to create the recess. Frame the box using 2×4 lumber. Cut a piece of plywood for the top of the niche and use a jigsaw to create the arched shape before securing it to the framing.
Step 2: Prepare for Lighting and Mirror
Install wiring for the LED strip light, running it down the back panel. Attach the acrylic mirror sheet (safer and lighter than glass) to the back panel using strong construction adhesive, cutting a small groove if necessary to feed the LED wire.
Step 3: Finish and Trim the Interior
Line the rest of the niche interior with thin plywood or MDF. Paint all exposed interior wood surfaces with the high-gloss jewel-toned paint. Apply the gold trim around the arched opening and base for a decorative border.
Step 4: Install Glass Shelves
Mark the desired height for the glass shelves. Install small, secure glass shelf clips or brackets to the side walls of the niche. Place the pre-cut glass shelves onto the clips.
Step 5: Install Lighting and Finish
Apply the LED strip lighting vertically to the sides of the niche or alongside the mirror, ensuring the light highlights the bottles. Hide the power cord behind the niche and connect it. Stock the bar with bottles and glassware for a dramatic, finished look.
19. Modular Hexagon Entryway Organizer
This stunning, honeycomb-inspired storage system creates an artistic and highly functional entryway organizer. The modular hexagon shapes allow for a customized arrangement that fits the wall space perfectly. The mix of white, grey, natural wood, and bright accent colors (teal and red) is energetic and modern.
The individual cubbies serve multiple functions: some are open shelves for keys and decorative objects, some have small hinged doors for concealing clutter, and others are simply display niches. Integrated lighting inside the white cubbies highlights the items within, creating depth and visual interest.
Below the honeycomb structure, a floating bench provides a convenient spot for sitting while putting on shoes. Open cubbies beneath the bench offer quick-access storage for footwear. This entire unit reclaims a high-traffic wall, turning essential organization into an eye-catching piece of installation art.
DIY Project: Building Modular Hexagon Shelves and Bench
This project describes building individual hexagon units and a simple floating bench for a customized entryway organizer.
Material Required
- Plywood or MDF for the hexagon units and bench frame.
- Small cabinet hinges and magnetic catches (for door cubbies).
- LED puck lights (battery-operated or hardwired).
- Paint in various colors (white, grey, accent colors).
- Heavy-duty French cleats or mounting hardware for wall attachment.
- Wood screws, glue, and sandpaper.
Equipment Required
- Miter saw (crucial for precise 30-degree hexagon cuts).
- Drill/Driver.
- Measuring tape, level, and stud finder.
- Clamps.
DIY Instruction Step-by-Step
Step 1: Construct the Hexagon Units
A hexagon has six sides, requiring cuts at a 30-degree angle. Use a miter saw to cut six plywood pieces, ensuring the ends meet perfectly when assembled. Use wood glue and small finish nails to assemble each hexagon. Build a variety of hexagons, some with front pieces to add small hinged doors.
Step 2: Paint and Add Doors
Paint the exterior and interior of the hexagons in your chosen color scheme. Attach the small doors to the designated hexagons using small hinges and magnetic catches. Install battery-operated LED puck lights inside some of the cubbies.
Step 3: Build the Floating Bench
Cut and assemble a simple rectangular box for the floating bench base and the under-bench shoe cubbies. Paint or veneer the bench to match the hexagon palette.
Step 4: Mount the Bench and Hexagons
Locate wall studs. Install heavy-duty floating bench brackets or a French cleat system onto the wall at the desired bench height. Mount the bench structure securely. Arrange your finished hexagons on the wall above the bench. Mark their positions. Attach a French cleat or secure hanging hardware to the back of each hexagon and mount them to the wall according to your design, using a level to ensure straight lines.
Step 5: Final Touches
Place a small cushion on the bench and add accessories to the open cubbies. Your sculptural and organized entryway is complete.
20. Illuminated Display Recess with Glass Shelves
This simple but dramatic wall niche elevates a small alcove into an art display area. The deep recess is lined with a dark, textured wallpaper, creating a striking contrast with the bright white trim and surrounding wall. This design focuses purely on aesthetics and highlighting curated objects.
The base of the niche is finished with a natural wood plank, adding a touch of organic warmth. Several clear glass shelves are installed, which visually disappear, making the items placed on them appear to float in space. Glass shelving is an excellent choice for allowing light to pass through.
A focused, overhead spotlight is installed at the top of the recess, casting dramatic shadows and highlighting the sculptural qualities of the objects on display. This method of using light and texture turns a simple wall cutout into a museum-like showcase for small collections.
DIY Project: Creating an Illuminated Display Niche with Glass Shelves
This DIY details how to line a wall recess with wallpaper, install simple glass shelving, and add recessed lighting.
Material Required
- Plywood or MDF for the niche base and lining (if not already lined).
- Textured dark wallpaper and wallpaper adhesive.
- Glass shelves (tempered glass recommended).
- Chrome or brushed metal glass shelf clips/brackets.
- Recessed LED spotlight or puck light.
- Wood screws, construction adhesive.
Equipment Required
- Utility knife and straight edge.
- Drill/Driver.
- Level and measuring tape.
- Wallpaper tools (smoothing brush, sponge).
- Hole saw (for lighting).
DIY Instruction Step-by-Step
Step 1: Prepare and Line the Niche
Ensure the interior of the niche is smooth and ready for wallpaper. Cut the plywood for the base piece and install it if the niche floor is not already wood. Cut the dark, textured wallpaper to fit the back and side walls precisely. Apply the adhesive and carefully install the wallpaper, using a smoothing tool to eliminate bubbles and ensure tight seams.
Step 2: Install Recessed Lighting
Use a hole saw to cut an opening for the recessed LED spotlight or puck light in the ceiling of the niche. Install the light fixture, ensuring the wiring is properly connected and concealed above the ceiling line.
Step 3: Install Glass Shelves
Mark the desired height for the glass shelves on the wallpapered side walls, using a level to ensure straight lines. Install the glass shelf clips or brackets, screwing them securely into the wood lining or directly into wall studs if possible.
Step 4: Place the Shelves
Carefully place the tempered glass shelves onto the installed clips. Ensure they sit level and securely.
Step 5: Final Display
Turn on the spotlight to check the illumination. Place your chosen decorative objects onto the glass shelves to complete your dramatic, illuminated display area.
21. Multi-Functional Rolling Trundle Daybed
This creative arrangement transforms a simple bedroom corner into a versatile living, lounging, and sleeping space. The design centers around a multi-level bed system that maximizes the available floor area. The natural wood construction gives the entire unit a light, modern, and warm aesthetic.
The lower section features a wide trundle bed that easily slides out on casters, effectively doubling the sleeping or seating capacity. Colorful, patterned textiles and cushions add a vibrant, bohemian flair to the space. Integrated into the wall corner is a shallow, open shelving unit that serves as a combined nightstand and bookshelf.
Above the shelves, a modern arc floor lamp with a woven shade provides focused reading light without needing a separate table. The upholstered headboard and large mattress cushions create a comfortable, inviting nook that is truly multi-functional, ready for guests or daytime relaxation.
DIY Project: Building a Corner Daybed with Roll-Out Trundle
This project details constructing a raised bed frame with a pull-out trundle bed on casters and an integrated corner shelf unit.
Material Required
- 3/4-inch Plywood or Pine lumber for the main frame and trundle box.
- Four heavy-duty locking casters (wheels) for the trundle.
- Mattress supports (slats or pegboard).
- Wood screws, dowels, and wood glue.
- Foam mattresses and cushions (custom-sized).
- Wood stain or clear sealant.
Equipment Required
- Circular saw or table saw.
- Drill/Driver.
- Level and measuring tape.
- Sandpaper.
DIY Instruction Step-by-Step
Step 1: Construct the Main Bed Frame
Measure the corner space. Build a large rectangular box frame for the main, raised bed structure, ensuring the height allows the trundle box to fit underneath comfortably. Install internal supports and a base for the mattress slats. Assemble with glue and screws.
Step 2: Build the Trundle Box
Cut and assemble a slightly smaller, shallow rectangular box for the trundle unit. This box must fit easily inside the main frame opening. Attach the four heavy-duty casters to the bottom corners of the trundle box, making sure the entire unit rolls smoothly and is level.
Step 3: Build the Corner Shelving Unit
Cut and assemble a narrow, open shelving unit designed to sit flush against the wall in the corner next to the main bed frame. Secure the shelves using glue and screws. This unit will function as the nightstand and headboard extension.
Step 4: Stain and Finish
Thoroughly sand all wood surfaces. Apply your chosen wood stain or a clear sealant to the bed frames and the shelving unit. This protects the wood and enhances its natural appearance.
Step 5: Assemble and Place
Move the finished main bed frame into the corner. Secure the integrated shelving unit to the wall studs. Slide the finished trundle box into the main frame opening. Place the mattresses, cushions, and textiles onto the beds to complete the space-saving, multi-functional sleeping and lounging area.
22. Narrow Vertical Book Stack Niche
This design demonstrates how even the smallest, most awkward vertical gap in a wall can be transformed into a striking organizational feature. A thin, deep niche is cut into the wall, offering a dramatic solution for storing a significant number of books. This completely reclaims a non-functional sliver of space.
The niche is topped with a recessed spotlight, which illuminates the book spines and draws attention to the display. The colorful books are stacked horizontally, creating a beautiful gradient display that functions as wall art.
Clear acrylic shelves are installed at regular intervals. These shelves are virtually invisible, supporting the stacks and making the books appear to float. The bottom of the niche features a small natural wood base, providing a warm foundation for the towering collection. This clever system maximizes density while providing a unique visual experience.
DIY Project: Building a Rainbow Book Stack Niche with Invisible Shelves
This DIY focuses on framing a very narrow, deep wall niche and installing clear acrylic shelving.
Material Required
- 2×4 Lumber (for framing the niche).
- Plywood or natural wood for the niche base.
- Drywall and joint compound (if building new).
- Thick, clear acrylic sheet for shelves.
- Small, clear acrylic shelf clips or pins.
- Recessed LED puck light.
- Primer and paint.
- Wood screws, drywall screws, and caulk.
Equipment Required
- Drywall saw or utility knife.
- Drill/Driver.
- Level and measuring tape.
- Hole saw (for lighting).
DIY Instruction Step-by-Step
Step 1: Frame the Narrow Niche
Locate the wall studs and mark a very narrow, tall opening. Cut and build a simple rectangular box frame using 2×4 lumber. This creates the recessed niche. Install a natural wood piece for the floor/base of the niche. Cover the frame interior with drywall and apply joint compound to create smooth, clean walls.
Step 2: Finish and Install Lighting
Once the compound is dry and sanded, prime and paint the interior of the niche white (or your chosen color). Use a hole saw to cut an opening for the LED puck light in the niche ceiling and install the light, routing the wires neatly.
Step 3: Prepare the Acrylic Shelves
Measure the exact depth and width of the niche. Have the thick acrylic sheet professionally cut into many thin, uniform shelf pieces. If you are comfortable, you can cut them with a saw blade designed for plastics.
Step 4: Install the Invisible Shelving
Mark the vertical spacing on the niche side walls for the shelves. The spacing should be slightly more than the height of a horizontally stacked book. Drill small pilot holes and install the clear acrylic shelf clips or pins directly into the niche walls. Carefully place the acrylic shelves onto the clips.
Step 5: Load the Books
Organize your books by color to achieve the rainbow gradient effect. Stack them horizontally onto the clear shelves to complete your stunning, space-reclaiming bookshelf display.
23. Kitchen Island Extension Desk and Bookcase
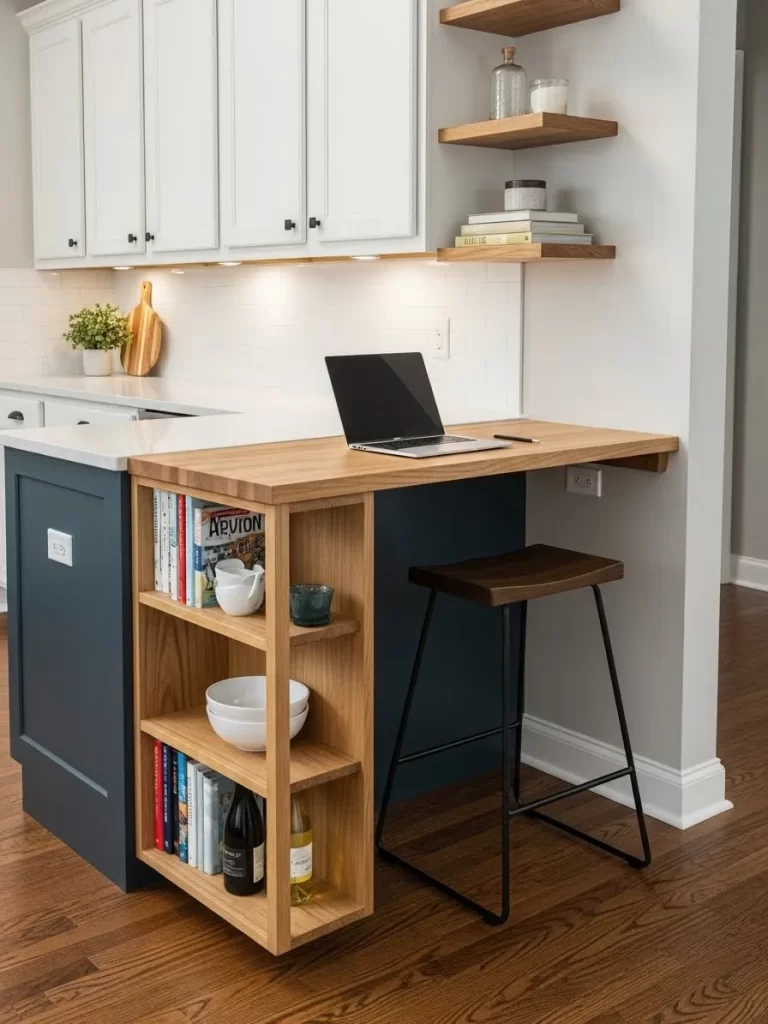
This innovative design expands the functionality of a kitchen island by integrating a multi-level extension into its end. The unit provides a casual workspace, a quick breakfast bar, and open storage, all while maintaining a cohesive look with the kitchen’s shaker cabinetry.
The cantilevered wood countertop extends outward from the island, creating a small bar-height desk area perfect for a laptop or quick meals. This surface is supported by an attractive natural wood bookcase, which utilizes the vertical space for open storage.
The bookcase features accessible shelves, making it a great spot to store cookbooks, dishware, or wine bottles. Simple wall-mounted floating shelves above the desk area continue the natural wood tone and provide additional display space. This solution successfully turns an unused corner into a highly social and productive zone.
DIY Project: Attaching a Bookcase and Counter Extension to a Kitchen Island
This project details how to build and secure a freestanding bookcase to the end of a kitchen island and attach a countertop extension.
Material Required
- Hardwood or durable plywood for the bookcase structure.
- Matching wood for the countertop extension.
- Heavy-duty L-brackets or cleats (for securing the extension).
- Wood screws, dowels, and wood glue.
- Wood stain or clear sealant.
- Stool/bar chair (for seating).
Equipment Required
- Circular saw or table saw.
- Drill/Driver.
- Level and measuring tape.
- Clamps.
- Sandpaper.
DIY Instruction Step-by-Step
Step 1: Build the Bookcase Structure
Measure the height of your kitchen island. Cut and assemble a simple, sturdy rectangular bookcase structure using plywood, ensuring the height matches the island. Install internal shelves with fixed positions for maximum strength.
Step 2: Finish and Secure the Bookcase
Sand the bookcase thoroughly and apply your chosen wood stain or sealant. Secure the finished bookcase flush against the end of the kitchen island, using long screws driven from the inside of the island cabinetry into the bookcase frame. This connection must be very strong.
Step 3: Cut and Finish the Counter Extension
Cut the countertop extension piece to the desired width and length. It should be deep enough for comfortable laptop use (around 18-24 inches). Sand and finish this piece to match the bookcase.
Step 4: Attach the Extension Counter
Attach two heavy-duty L-brackets or custom wooden support cleats to the exposed wall or the end of the island that the extension will rest on. Place the finished countertop extension on the bookcase and supports. Screw the countertop down into the top of the bookcase frame and into the support brackets for maximum stability.
Step 5: Final Touches
Install any small floating wall shelves above the extension. Add a bar stool to complete the functional, integrated workspace.
24. Wall-Mounted Fold-Down Vanity and Medicine Cabinet

This innovative piece is a dream for small bathrooms or bedrooms, combining a medicine cabinet, vanity, and lighted mirror into a single, compact unit. When closed, it is a sleek, white wall cabinet, but when opened, it reveals a comprehensive beauty station.
The cabinet doors and the internal back panel are lined with mirrors, one of which includes integrated LED lighting. The inner shelves are colored a soft blush pink, which adds a feminine touch and highlights the beauty products. Adjustable shelving maximizes the storage capacity for tall bottles and small cosmetics.
The key functional element is the large bottom panel that folds down on hinges, creating an instant countertop. This panel is stable enough to hold organizer trays and an electrical outlet and hair dryer holder are cleverly integrated into the center back panel, allowing devices to be plugged in and used immediately.
DIY Project: Building a Fold-Down Vanity Cabinet
This project describes how to build a shallow wall cabinet with a folding lower surface and integrated internal storage.
Material Required
- 3/4-inch Plywood or MDF for the cabinet box, shelves, and folding flap.
- Full-width mirror for the back and a smaller mirror for the cabinet door.
- Hinges (for door and flap) and folding brackets (for the flap support).
- Integrated LED mirror panel or separate light strip.
- Electrical outlet (with housing and wiring).
- Primer and paint (white exterior, accent color interior).
- Wood screws, glue, and magnetic door catches.
Equipment Required
- Circular saw or table saw.
- Drill/Driver and hole saw (for electrical work).
- Level and measuring tape.
- Clamps.
DIY Instruction Step-by-Step
Step 1: Build the Cabinet Shell and Interior
Measure the wall space. Cut and assemble a shallow, rectangular cabinet box. Cut and install the vertical side shelves and fixed central shelves inside the box. Paint the interior walls and shelves with the blush accent color.
Step 2: Install Electrical Components
Cut openings in the back panel for the electrical outlet. Install the outlet box and wire the outlet, ensuring safety precautions are taken or an electrician is consulted. Cut and install the LED lighted mirror panel into the central back section.
Step 3: Construct and Mount the Folding Flap
Cut the large bottom flap from plywood. Mount the folding brackets securely to the side walls of the cabinet. Attach the flap to the cabinet bottom using sturdy hinges, and then attach the brackets to the flap. The flap must open level and hold a small amount of weight.
Step 4: Build and Attach the Doors
Build two cabinet doors. Attach the smaller mirror to the inside of the left door. Install hinges to mount the doors to the main cabinet frame. Install magnetic catches to hold the doors closed securely.
Step 5: Finishing and Mounting
Paint the exterior of the cabinet and doors a crisp white. Mount the entire unit securely to the wall studs using long screws, ensuring it is at a comfortable height for sitting or standing. Place your accessories inside to finish your all-in-one vanity.
25. Hidden Home Filing Cabinet Closet

This clever solution transforms a standard, narrow closet into a professional, vertical filing station, keeping sensitive documents and home office clutter completely out of sight. The tall, wooden doors with subtle pulls give the unit the appearance of a handsome built-in wardrobe.
Behind the doors, the entire interior space is utilized for hanging file folders on two different levels. This vertical stacking maximizes the storage capacity of the tall closet cavity. Small recessed puck lights are installed at the top, ensuring that all files are brightly illuminated for quick retrieval.
Between the two levels of files, a shallow shelf provides space for essential office supplies such as a stapler, pens, and paper clips. The streamlined wood finish of the doors ensures the functional office storage integrates perfectly into any hallway or living space.
DIY Project: Converting a Closet to a Vertical Filing Cabinet
This DIY focuses on installing hanging file rails inside an existing closet space.
Material Required
- Plywood or MDF for internal shelf.
- Metal hanging file rails (two sets, long enough for the closet depth).
- Small LED puck lights or strip light.
- Primer and paint (for interior).
- Wood screws and mounting hardware.
- Hanging file folders.
Equipment Required
- Drill/Driver.
- Level and measuring tape.
- Stud finder.
DIY Instruction Step-by-Step
Step 1: Prep the Closet and Install Lighting
Empty and clean the closet. Paint the interior a neutral color. Install the LED puck lights in the ceiling or upper trim of the closet, routing the power cable discreetly.
Step 2: Mark and Install File Rails
Determine the height for your upper set of file rails. They should be high enough to allow the files to hang freely. Use a level and measuring tape to mark the placement on the side walls. Secure the file rails to the side walls using screws, ensuring they are perfectly parallel so the files slide easily.
Step 3: Install the Center Shelf
Determine the height for the small utility shelf (usually about waist height). Cut a simple plywood shelf to fit the closet width. Install strong wooden cleats or metal brackets on the side walls to support the shelf. Secure the shelf to the supports with screws.
Step 4: Mark and Install Lower File Rails
Determine the height for the lower set of file rails, which should sit just above the floor or below the utility shelf. Mark and install these rails as you did the upper set, ensuring they are level and parallel.
Step 5: Final Setup
Load the file rails with hanging file folders. Place office supplies on the center shelf. Close the doors to conceal your highly organized home filing system.
26. Under-Cabinet Pet Feeding and Baking Sheet Drawers

This multi-part solution cleverly utilizes the often-wasted space beneath base cabinets for specialized storage, focusing on both kitchen utility and pet needs. The clean white cabinetry maintains a minimalist look, while the natural wood interiors add a touch of warmth.
The drawers are customized to specific tasks. One deep drawer is vertically partitioned to store baking sheets, cutting boards, and trays on their sides, making them easily accessible without stacking. This solves the problem of retrieving items from deep drawers.
Adjacent to the baking tray drawer is a customized pull-out unit dedicated to pet bowls. The drawer pulls out on smooth casters and runners, offering a sanitary and convenient feeding station that disappears entirely when closed. This keeps the bowls and mess contained and the kitchen floor clear.
DIY Project: Building Custom Divided Drawers and Pet Feed Station
This project focuses on modifying or building deep lower cabinet drawers for specialized vertical storage and pet bowls.
Material Required
- 3/4-inch Plywood or wood for drawer boxes and drawer face.
- Heavy-duty full-extension drawer slides and caster wheels.
- Wood dividers (thin plywood) for vertical storage.
- Stainless steel pet bowls (two different sizes).
- Wood screws, dowels, and wood glue.
- Natural finish oil or varnish.
Equipment Required
- Circular saw or table saw (for precise cuts).
- Drill/Driver.
- Measuring tape and square.
- Hole saw (large diameter for pet bowls).
DIY Instruction Step-by-Step
Step 1: Build the Drawer Boxes
Build two separate, sturdy drawer boxes (one for trays, one for pet bowls). Use dovetail or simple butt joints secured with glue and screws. Install the heavy-duty full-extension drawer slides onto the base cabinet opening and the sides of the drawer boxes. For the pet bowl drawer, install casters on the bottom for added support.
Step 2: Create Vertical Tray Dividers
For the tray drawer, measure and cut thin plywood pieces to act as vertical dividers. Rout small, shallow grooves into the bottom and sides of the drawer box. Slide the dividers into the grooves and secure with a little glue for stable, vertical storage slots.
Step 3: Customize the Pet Bowl Drawer
Measure the diameter of your pet bowls. Use a large hole saw to cut two bowl-sized openings in the top panel of the pet bowl drawer box. Ensure the openings are slightly smaller than the lip of the bowls so they rest securely inside.
Step 4: Finish and Install Drawer Faces
Apply a natural wood finish (oil or varnish) to both drawer boxes. Attach the finished white drawer faces to the front of the corresponding drawer boxes, ensuring they align perfectly with the surrounding cabinet fronts.
Step 5: Final Setup
Load the tray drawer with your cutting boards and baking sheets. Drop the stainless steel bowls into the holes of the pet drawer. Slide both drawers into the cabinet openings to complete your hidden, specialized storage system.
27. Kitchen Pass-Through with Recessed Display and Storage
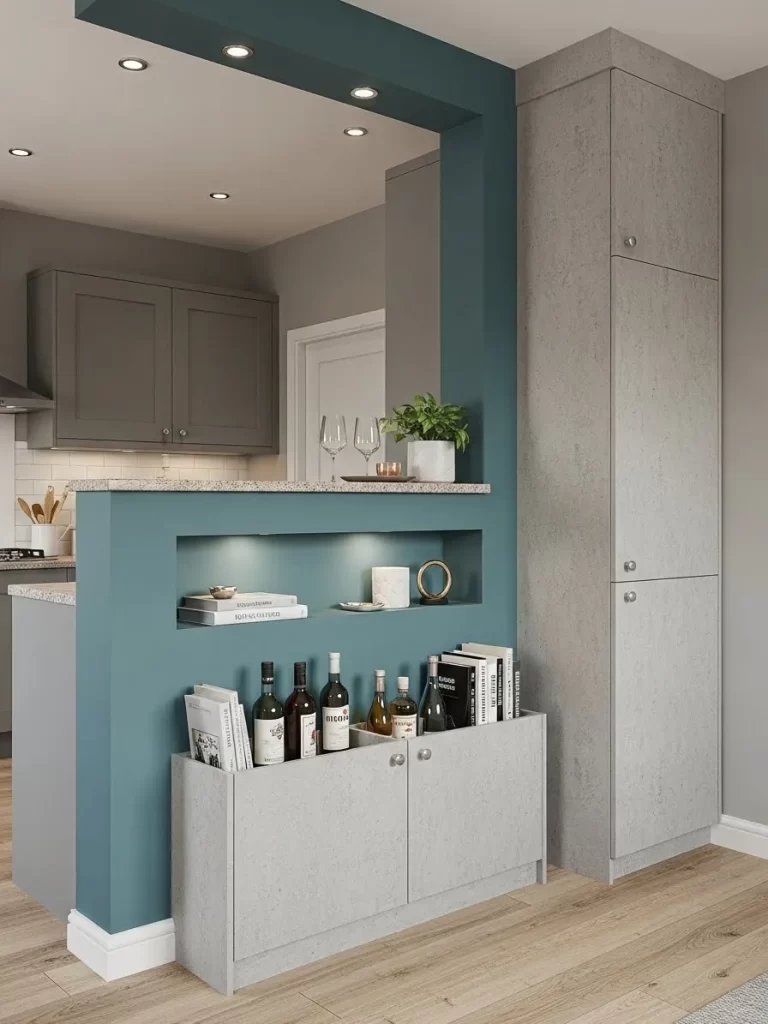
This design transforms a partial wall dividing a kitchen and living area into a highly functional focal point. The half-wall structure is utilized on both sides, creating a defined boundary with built-in storage and display niches. The moody blue-green paint color provides a beautiful accent.
A deep, horizontal recess is cut into the center of the wall, providing a sophisticated display area. Small puck lights installed in the top of the recess highlight books and curated decorative objects. This spot is perfect for items that require immediate visibility.
Below the illuminated niche, a low, streamlined cabinet provides concealed storage and a surface for displaying wine bottles and magazines. On the adjacent wall, a tall, narrow cabinet with a textured grey finish provides floor-to-ceiling storage for pantry items or cleaning supplies. This multi-level approach maximizes both display and hidden storage.
DIY Project: Building a Decorative Wall Recess and Low Storage Cabinet
This project describes how to frame an opening in an existing half-wall and build a small base cabinet for wine/book storage.
Material Required
- 2×4 Lumber (for framing the niche).
- Plywood or MDF for the base cabinet.
- Drywall, joint compound, and texture paint (for cabinet finish).
- Recessed LED puck lights.
- Primer and paint (accent color for the wall).
- Wood screws, drywall screws, and caulk.
Equipment Required
- Circular saw or drywall saw.
- Drill/Driver and hole saw.
- Level and measuring tape.
- Clamps.
DIY Instruction Step-by-Step
Step 1: Frame the Recessed Niche
Identify the location of your half-wall. Measure and mark the desired horizontal niche opening. Cut into the drywall and build a simple rectangular frame using 2×4 lumber inside the wall cavity. Cover the interior of the niche with drywall and smooth it with compound.
Step 2: Install Lighting and Paint the Wall
Install the LED puck lights into the top frame of the niche using a hole saw, routing the wiring through the wall. Paint the accent wall and the interior of the niche with your chosen moody color.
Step 3: Construct the Low Storage Cabinet
Cut and assemble a simple, low rectangular cabinet box using plywood. Build simple doors for the front and finish the exterior with a textured paint (or apply a concrete-look veneer) to match the tall cabinet, or paint it to match the wall.
Step 4: Create Slanted Magazine/Wine Storage
Modify the top of the low cabinet by adding a small wooden divider that is angled to create an open space perfect for standing wine bottles or displaying magazines and books at an angle.
Step 5: Place the Cabinet
Set the finished low cabinet flush against the accent wall, positioning it directly beneath the recessed niche. Secure it to the wall studs using long screws driven through the back of the cabinet. Install any hardware on the doors to finish the stylish display and storage unit.
28. Behind-the-Door Slim Office Organizer
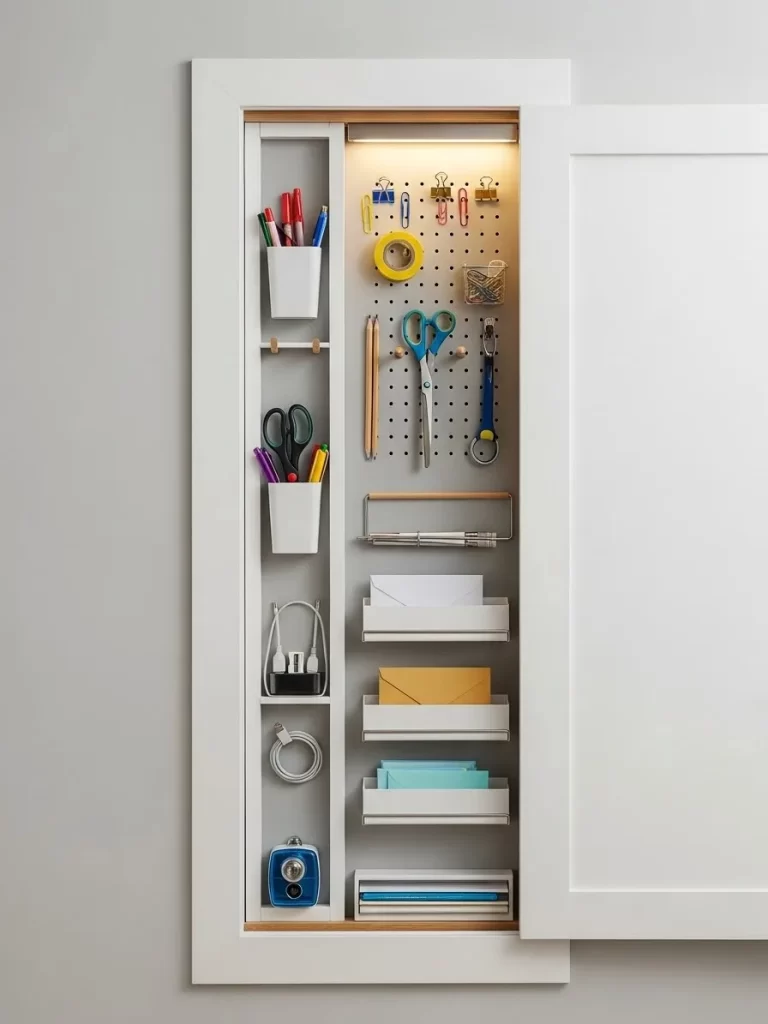
This genius solution turns the typically unusable sliver of wall space beside a doorway into a comprehensive office supply and mail sorting center. The unit is designed to be very shallow, allowing a sliding door to cover it completely when not in use.
The natural wood lining creates a warm backdrop for the efficient white organizational components. The system features a tall, narrow section with stacked bins for storing pens, markers, and scissors. Adjustable wooden rods help secure items in place.
In the center, a versatile pegboard panel provides flexible storage for scissors, tape, and keys using various hooks and clips. The lower section includes staggered mail slots and a horizontal tray for paper and small books. Integrated LED strip lighting at the top illuminates the entire system beautifully.
DIY Project: Building a Shallow Sliding Door Office Organizer
This DIY focuses on building a narrow, shallow cabinet box to fit the wall space and outfitting it with organization tools.
Material Required
- Plywood or MDF for the cabinet box and divider.
- Pegboard panel.
- Small white bins and metal hooks (for pegboard).
- Wooden dowels and small metal brackets (for securing bins).
- LED strip light and power supply.
- Wood stain or clear sealant.
- Paint for the cabinet exterior.
Equipment Required
- Circular saw or table saw.
- Drill/Driver.
- Level and measuring tape.
DIY Instruction Step-by-Step
Step 1: Construct the Shallow Cabinet Box
Measure the space beside the doorframe. Cut and assemble a very tall, narrow, and shallow cabinet box. The depth must be minimal, accommodating only small items and the sliding door track. Finish the interior with a wood stain.
Step 2: Install Internal Dividers
Cut and install a thin vertical plywood divider to separate the bin section from the pegboard/mail slot section. In the bin section, install small metal brackets to hold the white bins and wooden dowels in place.
Step 3: Install the Pegboard and Mail Slots
Cut the pegboard panel to fit its section and secure it to the back wall of the cabinet. In the lower part of this section, install simple, shallow wooden shelves or metal racks at staggered heights to create the mail slots.
Step 4: Install Lighting
Mount the LED strip light to the underside of the cabinet top, ensuring it illuminates the entire interior. Route the power cord discreetly.
Step 5: Finish and Mount
Paint the cabinet exterior white. Mount the unit securely to the wall studs. Install hooks and accessories onto the pegboard. Load the bins and mail slots to finish your hyper-organized wall unit.
29. Corner Aquarium and Utility Cabinet

This design turns a challenging corner into a striking natural focal point, combining a beautifully planted freshwater aquarium with a functional utility cabinet. The cube-shaped fish tank rests atop a sturdy, custom-built corner cabinet with a textured grey finish.
The cabinet’s open side provides an illuminated niche for accessing aquarium equipment, including power outlets, filters, and smart home hubs. The interior shelving is shallow but functional, providing easy-to-reach storage for fish food, water testing kits, and cleaning supplies.
The closed side of the cabinet offers concealed storage for bulkier items, maintaining the room’s clean aesthetic. The entire setup is positioned against a dramatic, textured wallpaper, which enhances the visual impact of the vibrant green aquatic life. This is a masterful combination of display and utility in a corner space.
DIY Project: Building a Corner Stand for an Aquarium and Utility Storage
This project details constructing a robust, custom-sized corner cabinet designed to safely support a filled aquarium and house necessary equipment.
Material Required
- 3/4-inch Plywood or MDF for the cabinet frame and doors.
- Textured cabinet veneer or textured grey paint.
- Small cabinet hinges and pull.
- Recessed LED puck light (for the open niche).
- Wood screws, dowels, and wood glue.
- Optional: Ventilation grille for the base.
Equipment Required
- Circular saw or table saw (for corner cuts).
- Drill/Driver.
- Level, square, and measuring tape.
DIY Instruction Step-by-Step
Step 1: Construct the Corner Cabinet Frame
Measure the aquarium base dimensions. Build a very strong, weight-bearing corner cabinet frame using plywood, ensuring the top surface precisely matches the aquarium footprint. The structure must be capable of supporting the immense weight of the water-filled tank. Include an internal vertical divider to separate the open utility niche from the closed storage section.
Step 2: Install Shelving and Niche Lighting
Install a fixed shelf inside the open utility niche. Use a hole saw to cut an opening in the niche ceiling and install the LED puck light, routing the wiring to the back panel where outlets are located.
Step 3: Create and Attach Door
Build a simple door for the closed storage section. Attach the door using sturdy hinges. Install a cabinet pull or knob.
Step 4: Finish and Ventilate
Apply the textured grey paint or veneer to the entire cabinet exterior. If desired, cut an opening in the base of the closed section and install a ventilation grille to allow air circulation for any internal equipment.
Step 5: Place the Aquarium and Finish
Mount the cabinet securely in the corner. Place the aquarium gently on top. Load the open niche with the filter, power strip, and supplies. The weight of the aquarium will further secure the unit, completing your functional and stylish corner focal point.
30. Ceiling-Hung Modular Storage System
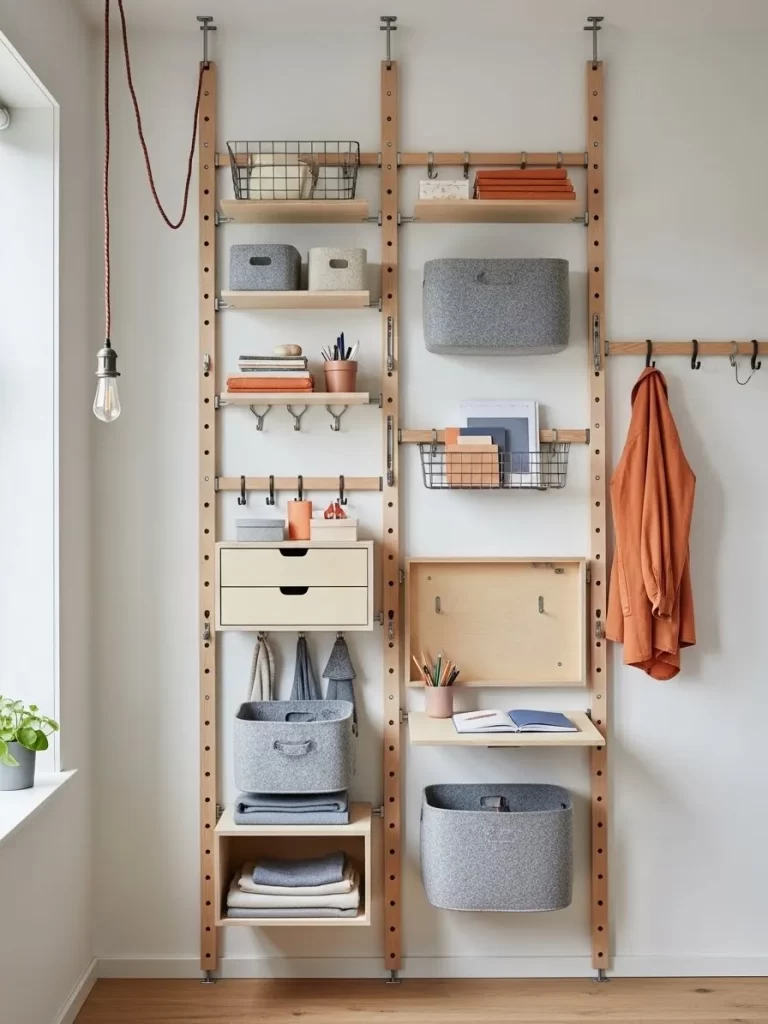
This highly adaptable organization system utilizes vertical wall space from floor to ceiling, making it a spectacular solution for maximizing storage in rental spaces or rooms where wall damage is a concern. The light wood structure is suspended from the ceiling on stylish metal rods, creating a clean, airy, and modern aesthetic.
The modular design features wooden rails with perforated holes, allowing hooks, shelves, drawers, and baskets to be infinitely reconfigured. This flexibility makes it suitable for almost any room function, from a wardrobe extension to a home office.
Included in the unit are various components: wire baskets for towels, felt storage boxes for clothes, drawers for supplies, and small display shelves. A notable element is the small hinged wooden writing surface that folds down, instantly creating a small, functional desk. A large copper-wired pendant light hanging nearby completes the contemporary, functional look.
DIY Project: Building a Ceiling-Hung Modular Organization System
This project outlines building a simple, vertically-oriented modular system with adjustable components, hanging from the ceiling for support.
Material Required
- Solid wood rails (long, vertical pieces with pre-drilled holes).
- Metal rod hangers and heavy-duty ceiling anchors.
- Small wooden shelves, drawer boxes, and a folding desk panel.
- Metal shelf brackets, S-hooks, and small cabinet hinges.
- Felt storage baskets and wire baskets.
- Wood screws, dowels, and wood glue.
Equipment Required
- Drill/Driver (with masonry bit for ceiling anchors).
- Level and measuring tape.
- Clamps.
- Miter saw (for precise cuts).
DIY Instruction Step-by-Step
Step 1: Prepare the Vertical Rails
Cut the solid wood rails to the desired height. Drill a series of evenly spaced holes down the entire length of the rails. These holes will accept the brackets for the adjustable shelves and components.
Step 2: Install Ceiling Hangers
Locate the ceiling joists. Install the heavy-duty metal rod hangers and ceiling anchors securely into the joists. Hang the wooden rails from the ceiling anchors using the metal rods, ensuring the rails hang straight and are parallel to the wall.
Step 3: Build the Components
Build the small wooden shelves, the simple drawer boxes, and the folding desk panel. For the folding desk, attach a hinge to the top edge and use metal folding brackets to secure it when open.
Step 4: Install the Modular Components
Insert the metal shelf brackets into the pre-drilled holes in the rails. Place the wooden shelves onto the brackets. Attach the drawers and baskets using the appropriate hardware, utilizing the hole system for flexible placement. Install the hinged desk component.
Step 5: Final Touches
Hang S-hooks on the rails for jackets and towels. Stock the baskets and drawers with your items. The entire system is now adjustable and ready for use.
31. Recessed Headboard Charging Nook
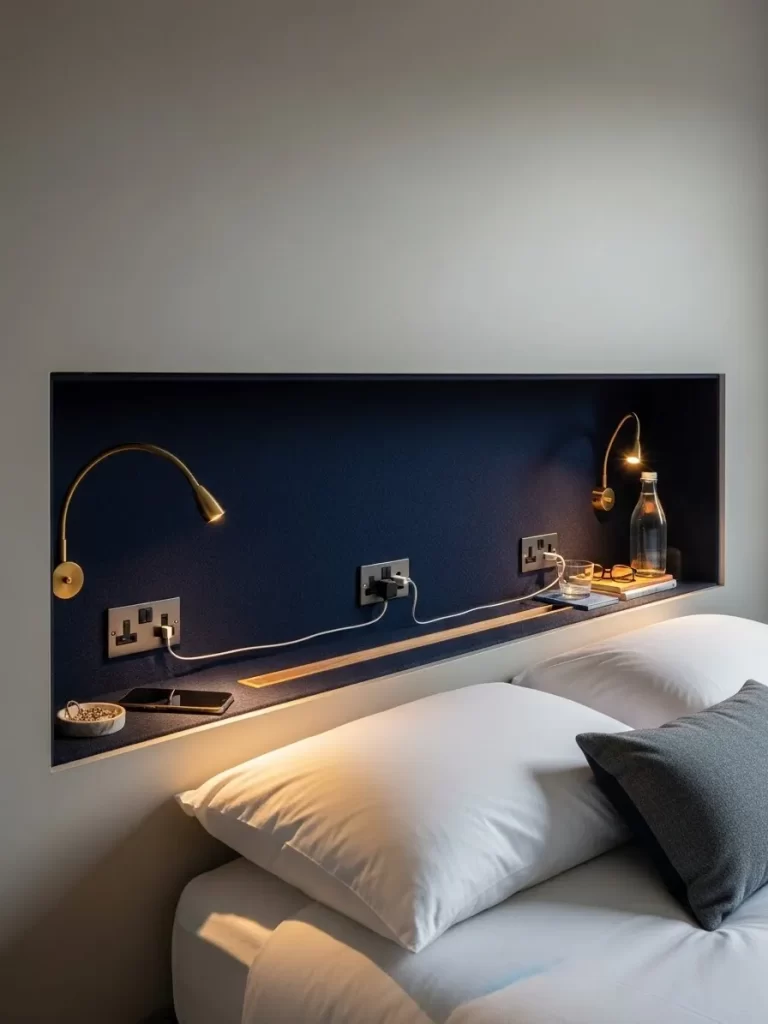
This sleek bedroom feature transforms the space behind the bed’s headboard into an essential and organized charging station. A deep, horizontal recess is cut into the wall, providing a dedicated shelf for books, phones, and water bottles, replacing the need for bulky nightstands. The dark navy blue backing creates a dramatic contrast with the crisp white trim.
The nook is outfitted with highly functional elements. Brass gooseneck reading lamps are mounted directly to the backing, offering focused illumination for reading. Multiple electrical outlets and USB ports are strategically integrated into the back panel, allowing various devices to be charged simultaneously without cluttering the shelf.
A shallow wooden ledge runs across the bottom, serving to separate and stabilize charging items. This design effectively consolidates lighting, charging, and bedside storage into one streamlined, architecturally integrated solution, keeping the bed area clean and wires out of sight.
DIY Project: Building a Recessed Headboard Niche with Power
This project describes how to frame a large, horizontal wall niche behind a bed and install custom lighting and power outlets.
Material Required
- 2×4 Lumber (for framing the niche).
- Drywall, joint compound, and caulk.
- Plywood or MDF for the back panel.
- Felt or fabric for the decorative backing (navy blue).
- Electrical outlets, USB charging ports, and wiring (requires a professional electrician).
- Gooseneck reading lamps.
- Primer and paint.
- Wood screws and drywall screws.
Equipment Required
- Drywall saw or utility knife.
- Drill/Driver and hole saw (for electrical boxes).
- Level and measuring tape.
- Staple gun and construction adhesive (for felt lining).
DIY Instruction Step-by-Step
Step 1: Frame the Horizontal Niche
Determine the size and height of the niche behind your headboard. Locate the wall studs. Cut into the drywall and build a rectangular frame using 2×4 lumber. This frame must be sturdy. Ensure the bottom 2×4 is installed to create a stable shelf base.
Step 2: Install Electrical Rough-In
Mark the locations for the outlets and lamps on the back panel. Install the electrical boxes into the framing. It is essential to have a qualified electrician wire and connect these components to your home’s electrical system. Route the wiring for the gooseneck lamps.
Step 3: Finish and Line the Interior
Cover the framing with drywall and use joint compound and paint on the exposed edges. Line the back panel with plywood or MDF. Cover this back panel with felt or fabric using construction adhesive or a staple gun for a soft, decorative finish. Cut out the holes for the pre-installed electrical boxes and lamp mounts.
Step 4: Install Fixtures and Lamps
Install the electrical outlets and USB ports into their boxes. Mount the gooseneck reading lamps onto the backing. Ensure all connections are secure.
Step 5: Final Paint and Placement
Paint the trim and surrounding wall. Place the bed against the wall, positioning the headboard neatly below the finished niche, ready for charging and reading.
32. Vertical Firewood Storage Niche

This design turns a necessity—firewood storage—into a striking, modern architectural feature. A tall, narrow recess is cut into the wall and lined with a dark metal frame, creating a minimalist showcase for the stacked logs. This solution is exceptionally clean and eliminates the need for a bulky firewood basket.
The vertical orientation emphasizes the beautiful, varied textures and tones of the cut wood pieces. The logs are stacked tightly, creating a dense, rustic pattern that contrasts beautifully with the smooth, white surrounding walls.
The niche is illuminated by strategically placed LED lighting. A strip light runs along the top, highlighting the bark textures, while a single puck light at the base casts a dramatic glow upward. This illumination elevates the natural material into a warm, structural piece of art, utilizing a typically unused vertical wall section.
DIY Project: Building a Framed Recessed Firewood Niche
This project details how to safely frame a deep wall niche and line it with a metal edge for storing firewood indoors.
Material Required
- 2×4 Lumber (for framing the niche).
- Plywood or MDF for the niche lining.
- Drywall and joint compound.
- Dark-colored sheet metal or metal edge trim.
- Recessed LED strip light and puck light.
- Primer and paint.
- Wood screws, drywall screws, and construction adhesive.
Equipment Required
- Drywall saw or utility knife.
- Drill/Driver and hole saw.
- Level and measuring tape.
- Metal snips or grinder (for cutting metal trim).
DIY Instruction Step-by-Step
Step 1: Frame the Deep Niche
Measure the desired location and size for the tall, narrow niche. If the wall is shallow, you may need to build out a false wall to achieve the required depth for storing firewood (around 12-18 inches). Build a sturdy rectangular frame using 2×4 lumber.
Step 2: Line the Interior and Install Lighting
Cover the interior of the frame with plywood or MDF. Install wiring for the top LED strip light and the bottom puck light, routing the wires neatly behind the lining. Install the lights. Paint the interior lining black or a dark color for contrast.
Step 3: Apply the Metal Edge Trim
Cut the sheet metal or metal trim pieces to fit the perimeter of the niche opening precisely. Secure the metal trim to the front edges of the framed opening using construction adhesive or small finish nails. This gives the niche its sleek, finished look.
Step 4: Finish the Surrounding Wall
Apply joint compound to all seams where the new framing meets the existing wall, creating a smooth transition. Sand, prime, and paint the surrounding wall area.
Step 5: Load the Wood
Stack the firewood neatly inside the finished niche, ensuring it sits flush or slightly recessed from the metal trim. Turn on the lights to showcase the natural texture of the wood.
33. Window Bench Pet Den and Storage

This built-in window seat incorporates functional seating, concealed storage, and a cozy pet den into one contiguous unit. The bright white trim and surrounding walls emphasize the natural light flooding through the large window, making the space airy and inviting.
The entire unit features large cushions for comfortable seating. On one side, deep wooden drawers are integrated beneath the seat, offering ample storage for dog toys, blankets, or household items.
The central section is creatively converted into a painted pet den with a small swinging door. This dedicated area features a soft pet bed, providing a quiet retreat that is seamlessly integrated into the family living space. The top of the den is covered with a textured carpeted surface, providing an additional seat or display area. The cheerful yellow and blue throw pillows add a fun splash of color.
DIY Project: Building a Window Seat with Drawers and a Pet Den
This project details constructing a multi-compartment bench frame to include drawers and a specific open space for a pet bed.
Material Required
- 3/4-inch Plywood for the bench frame, drawers, and pet den.
- Drawer slides and handles.
- Hinges and latch for the pet den door.
- Bench foam and upholstery fabric (for cushions).
- Accent paint (lime green/yellow).
- Wood screws, dowels, and wood glue.
- Pet bed (sized to fit the den).
Equipment Required
- Circular saw or table saw.
- Drill/Driver.
- Level and measuring tape.
- Sandpaper.
DIY Instruction Step-by-Step
Step 1: Build the Main Bench Frame
Measure the area beneath the window. Build a long rectangular bench frame with internal supports, ensuring the height is comfortable for seating. The frame must include two distinct sections: one for the drawers and one open box for the pet den.
Step 2: Construct and Install Drawers
Build the drawer boxes for the storage section. Install the drawer slides onto the frame and the drawer boxes. Attach the wooden drawer faces and handles.
Step 3: Build and Finish the Pet Den
Assemble the open box for the pet den. Cut and attach the small swinging door, using hinges and a latch to secure it. Paint the exterior of the den box with your chosen accent color (like lime green). Attach a piece of carpet or a thin cushion to the top of the den structure.
Step 4: Final Assembly and Finish
Place the finished drawer unit and the pet den unit side-by-side beneath the window. Secure them to the wall studs using long screws through the back of the frames. Apply a white paint finish to the drawer units. Place the cushions on the seated sections and the pet bed inside the den.
34. Overhead Display Ledge with Integrated Lighting
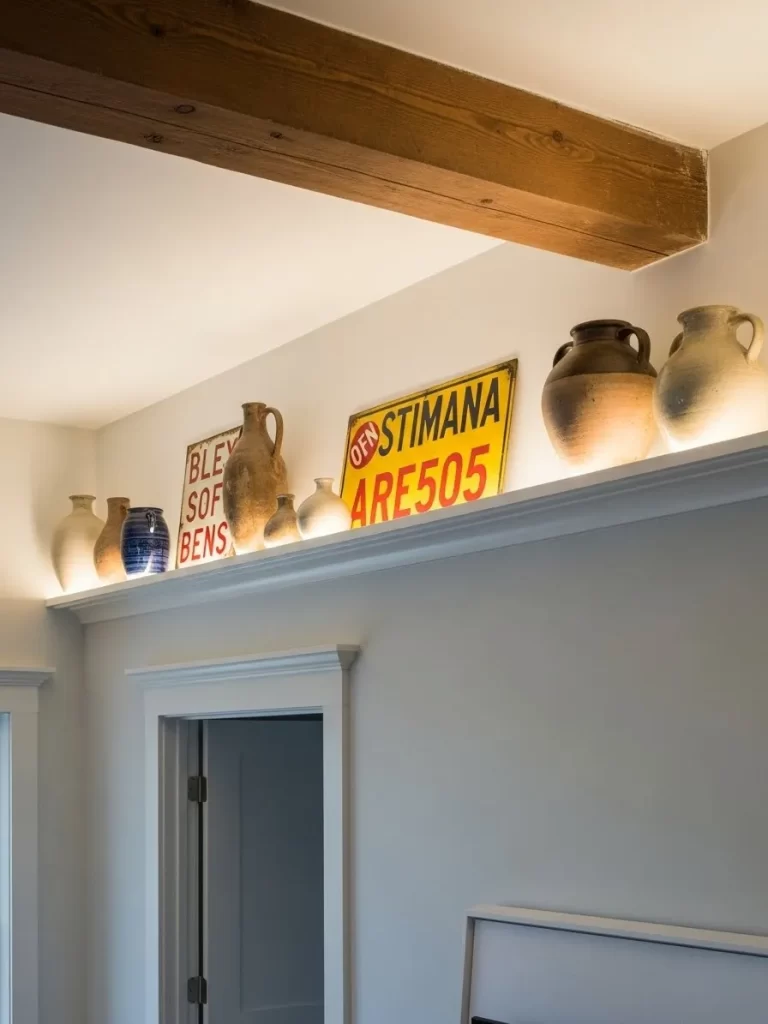
This simple yet effective design utilizes the often-neglected space above doorways and windows to create a high-level display area. The shallow shelf runs across the entire wall, visually drawing the eye upward and creating a sense of height in the room. This is a subtle way to add architectural interest.
The ledge is used to display a collection of antique ceramic jugs and unique vintage signage. The high placement turns these personal collections into statement art without taking up valuable floor or table space.
The key to this design is the integrated lighting. A continuous strip of LED light is concealed beneath the shelf’s lip, casting a warm, dramatic wash of light onto the objects and the wall below. This downlighting illuminates the collection and accentuates the architectural molding and the rustic exposed wooden beam above.
DIY Project: Installing an Illuminated High-Level Display Shelf
This project details how to install a sturdy, continuous shelf above a doorway and integrate hidden LED lighting.
Material Required
- Solid wood plank or Plywood/MDF for the shelf.
- Long wooden cleats (or heavy-duty metal brackets) for support.
- LED strip lighting (flexible, low-profile).
- Primer and paint (to match the trim).
- Wood screws, finish nails, and wood glue.
Equipment Required
- Circular saw or miter saw.
- Drill/Driver.
- Level and measuring tape.
- Stud finder.
DIY Instruction Step-by-Step
Step 1: Measure and Cut the Shelf and Cleats
Measure the entire width of the wall or the length you want the shelf to span. Cut the shelf plank to this length. Cut two long wooden cleats (pieces of wood that will attach to the wall) that are slightly shorter than the shelf length.
Step 2: Mount the Support Cleats
Use a level to mark the height for the shelf (typically 1-2 feet above the door trim). Locate and mark the wall studs. Secure the first cleat directly to the wall studs using long wood screws, ensuring it is perfectly level. Secure the second cleat parallel to the first, installing it on the wall where the shelf edge will sit.
Step 3: Install the Shelf
Place the shelf plank onto the two support cleats. Secure the shelf to the cleats using screws driven down from the top and nails driven through the sides into the cleats. Use wood filler to conceal any visible screw heads.
Step 4: Install Hidden Lighting
Run the LED strip light along the underside of the front lip of the shelf. The shelf material should be thick enough to completely conceal the strip light from view below. Route the power cord discreetly down the wall and connect it to a switched outlet.
Step 5: Finishing
Caulk any gaps between the shelf and the wall. Prime and paint the shelf to match the existing trim color. Place your decorative items onto the shelf, and enjoy the dramatic, illuminated display.
35. Walk-In Closet Craft and Art Studio
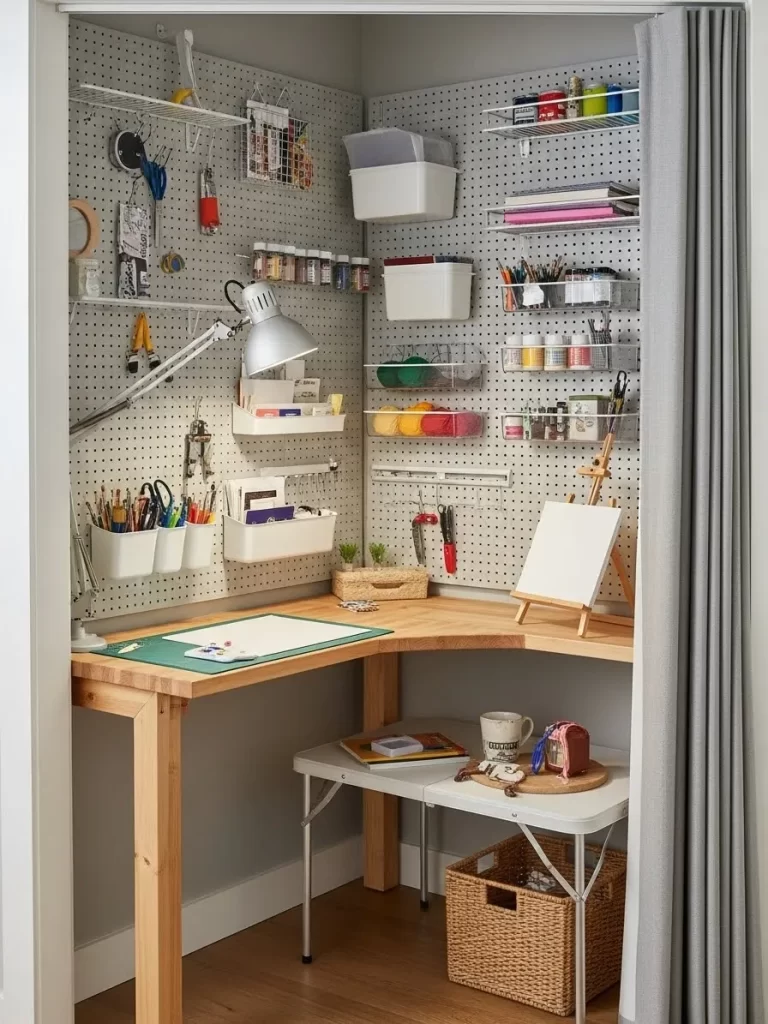
This ingenious design converts an ordinary walk-in closet into a fully functional, highly organized craft and art studio. The closet doors are removed and replaced with a curtain, providing easy access and soft closure. The entire space is lined with pegboard, transforming every square inch into customizable storage.
A custom-built wooden corner desk provides a generous, stable workspace. The desk is reinforced by a small, fold-out table underneath, which can be deployed to expand the work surface for larger projects. This maximizes the floor area when not in use.
The pegboard walls are utilized with an array of hooks, shelves, and baskets, organizing everything from paints and glues to papers and tools. Bright task lighting is provided by an adjustable swing-arm lamp mounted to the wall, ensuring the work surface is always well-lit. This compact setup successfully creates a dedicated creative haven.
DIY Project: Converting a Closet to a Pegboard Craft Nook
This project details lining a closet with pegboard and installing a custom corner desk and organization system.
Material Required
- Pegboard sheets (enough to cover the closet walls).
- 1×3 Furring strips or small wooden spacers.
- Plywood or butcher block for the corner desk surface.
- Wooden legs (for the desk).
- Foldable small table (for extension).
- Pegboard hooks, baskets, and small shelves.
- Adjustable swing-arm lamp.
- Curtain and curtain rod (to replace the door).
- Wood screws, drywall screws, and mounting hardware.
Equipment Required
- Circular saw or jigsaw.
- Drill/Driver.
- Level and measuring tape.
- Stud finder.
DIY Instruction Step-by-Step
Step 1: Install Pegboard Walls
Cut the pegboard sheets to fit the back and side walls of the closet. Before attaching the pegboard, secure 1×3 furring strips (spacers) horizontally to the wall studs. This creates a gap behind the pegboard, allowing the hooks to be inserted easily. Attach the pegboard sheets to the furring strips, not directly to the wall.
Step 2: Build and Install the Corner Desk
Measure the depth and width for a comfortable corner desk. Cut the plywood or butcher block into the desired L-shape. Build simple wooden legs for support. Secure the desk surface to the legs and the side walls of the closet using heavy-duty L-brackets or screws driven into wall studs, ensuring the desk is level and stable.
Step 3: Install Organization and Lighting
Install the curtain rod and hang the curtain at the closet entrance. Mount the adjustable swing-arm lamp to the wall beside the desk at a comfortable height. Arrange the various pegboard hooks, baskets, and shelves onto the pegboard walls, customizing the layout to hold all your craft supplies.
Step 4: Final Setup
Place the small foldable table underneath the desk, ready to pull out when extra workspace is required. Organize all your supplies onto the pegboard system and desktop to complete your functional and creative art studio.
Seeing these 35 unique projects confirms a single important truth: no space is too small or too awkward to be useful. Each design proves that a thoughtful approach to verticality and customization yields huge rewards, adding both convenience and sophistication.
Whether you decide to build an illuminated wine niche or simply hang a streamlined charging station, focus on integrating function seamlessly into your home’s existing structure. Do not let another corner go neglected. You now have the inspiration and the step-by-step instructions to turn architectural challenges into amazing, personalized assets.
Key Takeaways
- Embrace verticality: Use tall, narrow spaces for stacked storage or dramatic displays.
- Custom built-ins are often the best solution for awkward alcoves and corners.
- Prioritize hidden function: Use fold-down desks and sliding units to keep clutter out of sight.
- Lighting and texture elevate simple niches into dramatic focal points and showcases.
- Every inch counts, especially in smaller homes where multi-functional design is essential.