The Christmas tree is the heart of holiday decor. It stands as a bright and cheerful canvas, ready for creativity, memories, and personal expression.

Finding a new theme each year can be an exciting challenge. It keeps the cherished tradition feeling fresh and offers a wonderful opportunity for the whole family to get involved.
This list is here to spark your imagination with 40 gorgeous ideas. You will find everything from the quiet elegance of a traditional design to the bold fun of a modern, quirky theme.
To make it even more special, each idea comes with a simple DIY project. These instructions make it easy for anyone to add a personal, handmade touch to their tree this holiday season.
1. Starry Night Celestial Glow

This tree captures the quiet magic of a clear winter night. A dark tree provides a beautiful backdrop for a celestial theme. It is decorated with shining silver moons and stars. The look feels both elegant and dreamy.
Blue and silver ornaments are mixed in with the celestial shapes. Tiny, fiber-optic lights create a magical twinkle, like distant stars. It’s a sophisticated and peaceful way to bring the night sky indoors.
DIY Glittery Crescent Moon Ornament
Step 1: Gather Your Stargazing Tools! You will need a piece of cardboard (an old cereal box works great), a pencil, a cup or something round to trace, scissors, white school glue, silver glitter, and a piece of string.
Step 2: Draw Your Moon! Place the cup on the cardboard and trace around it with your pencil to make a circle. Now, move the cup over just a little bit, so it overlaps the first circle, and trace it again. The overlapping part will look like a crescent moon.
Step 3: Cut Out the Moon! Carefully cut out your crescent moon shape from the cardboard.
Step 4: Get Ready for Glitter! Put your cardboard moon on a piece of newspaper to keep things tidy. Use a paintbrush or your finger to spread a thin, even layer of glue all over one side of the moon.
Step 5: Make it Sparkle! While the glue is still wet, sprinkle the silver glitter all over it. Make sure you cover the whole moon. Gently tap the moon to shake off any extra glitter. Let it dry completely. You can do the other side too if you want!
Step 6: Add a Hanger! Once your moon is dry, carefully poke a small hole in the top point of the crescent. Thread your piece of string through the hole and tie the ends together to make a loop.
Step 7: Hang it on the Tree! Your beautiful, sparkly moon is now ready to hang among the stars on your tree!
2. Ballerina Dream in Pink

This tree is a dancer’s dream, full of grace and charm. A frosted white tree is the stage for a soft and pretty ballet theme. The design feels delicate and sweet. It brings a touch of fairytale magic to the holidays.
The branches are decorated with soft pink roses, pearl garlands, and delicate ballerina slipper ornaments. A huge, beautiful pink bow sits at the top, with its ribbons cascading down the tree like a dancer’s costume. It’s a lovely theme for anyone who loves pink and all things elegant.
DIY Simple Ribbon Bow
Step 1: Gather Your Dance Supplies! You will need a wide, silky ribbon (pink is a great choice), a pair of scissors, and a thin piece of wire or a pipe cleaner.
Step 2: Make Your First Loop! Take your ribbon and make a loop, about the size you want half of your bow to be. Pinch the bottom of the loop together with your fingers.
Step 3: Make a Second Loop! Without cutting the ribbon, make another loop of the same size on the other side. It should look like a figure-8 or a floppy bow tie. Keep pinching it all together in the middle.
Step 4: Keep Making Loops! Keep making loops on each side, stacking them on top of each other. Four to six loops on each side will make a nice, full bow. Remember to keep pinching the center tightly.
Step 5: Secure the Center! Once you have all your loops, take your thin wire or pipe cleaner. Wrap it very tightly around the center of the bow where you have been pinching it. Twist the wire at the back to hold everything securely in place.
Step 6: Make the Tails! Decide how long you want the bow’s tails to be and cut the ribbon from the spool. You can cut the ends of the tails into a “V” shape to make them look extra fancy.
Step 7: Fluff and Shape! Now, gently pull and fluff each of the loops. Twist them and arrange them so your bow looks full and round. Your beautiful bow is now ready to be the star of your tree!
3. Arctic Fox Winter Wonderland

Step into a frosty, magical forest with this beautiful tree. A snow-covered, or “flocked,” tree creates a chilly winter scene. The design feels peaceful and looks like it’s straight out of a storybook. It is a stunning tribute to the beauty of winter animals.
The tree is decorated in shades of icy blue, silver, and white. You can see cute white arctic foxes and deer nestled among the branches. Glistening icicles and sparkly snowflakes add to the frozen feel. A magnificent, starry tree topper completes this enchanting winter wonderland.
DIY Sparkly Icicle Ornament
Step 1: Get Your Winter Craft Supplies! You will need some silver pipe cleaners, some clear or silver beads with holes big enough for the pipe cleaner, and a piece of string or a metal ornament hook.
Step 2: Start Your Icicle! Take one silver pipe cleaner. At the very bottom, make a tiny fold or twist a small bead on tightly. This will stop your other beads from sliding off.
Step 3: Add Some Beads! Start threading your clear and silver beads onto the pipe cleaner. You can make a pattern or just add them randomly. Don’t fill the pipe cleaner all the way to the top. Leave about an inch of space.
Step 4: Give it an Icicle Shape! Gently twist your beaded pipe cleaner. This will make it look like a real, twisty icicle.
Step 5: Make a Hanger! Take the empty part of the pipe cleaner at the top. Bend it into a small loop and twist the end around the main part of the icicle to secure it.
Step 6: Get it Ready for the Tree! You can now either thread a piece of pretty string through the loop you made, or you can simply use a metal ornament hook.
Step 7: Let it Freeze! Your sparkly, beaded icicle is all done! Hang it on your tree to add some frosty, winter magic.
4. Enchanted Garden Blooms

This tree brings the beauty of a summer garden into your home for Christmas. A natural green tree is covered in soft, romantic flowers. The design feels fresh and unexpected. It’s a creative way to decorate for the holidays.
Large, beautiful flowers in shades of pink, cream, and green are the main focus. You can also spot delicate, glittery butterflies and dragonflies resting on the branches. A long, pink velvet ribbon winds its way down the tree. The whole look is very soft and pretty.
DIY Easy Fabric Flower
Step 1: Gather Your Garden Tools! You will need a piece of soft fabric (like felt or an old t-shirt), scissors, and a hot glue gun (make sure a grown-up helps you with this part!).
Step 2: Cut Out Your Petals! Cut your fabric into a few circles. They don’t have to be perfect. Make three different sizes: a few large, a few medium, and a few small.
Step 3: Shape the Petals! Take one of your circles and cut a wavy, scalloped edge around it, like a cloud. Do this for all of your circles.
Step 4: Make a Slit! In each of your wavy circles, cut one small slit from the outside edge to the very center.
Step 5: The Grown-Up Part (Hot Glue)! This is where you need your adult helper. Take one of your large petal circles. Put a tiny dot of hot glue on one side of the slit you just cut. Overlap the other side of the slit just a little bit and press it into the glue. This will make the flat circle pop up into a shallow cup shape. Do this for all your petal circles.
Step 6: Build Your Flower! Your helper will put a dot of hot glue in the center of one of the large petal cups. Then, they will press a medium petal cup on top. Then, they’ll put another dot of glue in the center of that one and press a small petal cup on top.
Step 7: Add a Center! For the very center, you can use a button, a bead, or a small pom-pom. Your helper can put one last dot of glue in the middle and press the center in. Your beautiful flower is ready to bloom on your tree!
5. Alchemist’s Celestial Celebration

This tree is full of mystery and magic. A bare, black tree creates a spooky and dramatic look. The theme is like a peek into a wizard’s laboratory. It’s a very unique and creative way to celebrate the holidays.
The ornaments are vials of colorful glitter “potions,” old-fashioned keys, and shining sun and moon symbols. A golden armillary sphere, an old astronomical tool, sits at the top. The whole display has a magical, mystical feeling that is perfect for a different kind of Christmas.
DIY Glitter Potion Bottle
Step 1: Gather Your Potion Ingredients! You will need a very small glass or plastic bottle with a cork (you can find these at a craft store), some glitter in your favorite color, a small piece of paper, and some string or twine.
Step 2: Make a Funnel! Roll your small piece of paper into a cone shape, leaving a tiny hole at the bottom. This will be your funnel to help get the glitter into the bottle without making a big mess.
Step 3: Fill Your Bottle! Place the tip of your paper funnel into the opening of the bottle. Carefully pour your glitter into the funnel. Tap the funnel gently to help the glitter fall into the bottle. Fill it about halfway.
Step 4: Cork It! Put the cork securely into the top of the bottle. You can ask a grown-up to add a tiny bit of glue around the cork to make sure it never spills.
Step 5: Add the Hanger! Take your piece of string or twine. Tie one end tightly around the neck of the bottle, right under the lip. Tie the other end in a knot to create a loop for hanging.
Step 6: Label Your Potion! If you want, you can make a tiny paper label. Write something mysterious on it like “Felix Felicis” or “Wolfsbane” and tie it onto the bottle’s neck.
Step 7: Add it to Your Collection! Your magical glitter potion is ready! Hang it on your tree and let it catch the light.
6. Roaring Twenties Art Deco

This decoration is all about glamour and glitz. It is not a traditional tree, but a cone-shaped form decorated in the style of the 1920s. The design is elegant, bold, and luxurious. It feels like a party at Gatsby’s mansion.
The golden cone is wrapped in strands of pearls. Ornaments with black and white geometric patterns add to the Art Deco feel. Black and white feathers at the top give it a final touch of flapper-era flair. It’s a very stylish and sophisticated holiday statement.
DIY Faux Pearl Garland
Step 1: Gather Your Glamorous Supplies! You will need a bag of plastic craft pearls with holes in them (you can find these at a craft store), a long piece of fishing line or thin string, scissors, and a needle (this makes it easier!).
Step 2: Cut Your String! Decide how long you want your garland to be. Cut a piece of fishing line or string that is a little bit longer, so you have extra room to tie knots.
Step 3: Tie a Stopper! At one end of your string, tie a big knot. You might need to tie it three or four times in the same spot to make it big enough so that your first pearl won’t slide off.
Step 4: Start Stringing! Thread the other end of your string through your needle. Start sliding the pearls onto the string, one by one. Push them all the way down to the knot at the end.
Step 5: Leave Some Space! For a classic pearl necklace look, it’s nice to leave a little space between each pearl. After you add a pearl, you can tie a small, simple knot right next to it to hold it in place. Then string the next one.
Step 6: Keep Going! Continue stringing your pearls until your garland is the length you want it to be. You can make it long enough to wrap around your whole tree.
Step 7: Finish It Off! When you’ve added your last pearl, tie another big knot at the end of the string to make sure none of them can slide off. Your elegant pearl garland is now ready to add a touch of 1920s glamour to your tree!
7. Royal Menagerie Majesty

This Christmas tree looks like it belongs in a king’s castle. A traditional green tree is decorated with a rich and royal theme. The design feels grand and luxurious. It is a celebration of opulent colors and majestic animals.
A wide, velvety ribbon in royal blue and green wraps around the tree. The ornaments are unique and stunning, featuring jeweled peacocks, and glittering panthers and deer. The deep greens, blues, and golds create a very rich and elegant color scheme. A golden crown on top is the perfect finish for this regal tree.
DIY Glitter Animal Silhouette
Step 1: Gather Your Royal Craft Supplies! You will need a piece of stiff black paper or thin cardboard, a pencil, scissors, white school glue, glitter in a color like gold or blue, and a piece of string.
Step 2: Choose Your Animal! Find a simple picture of an animal in a side-view pose, like a deer or a panther. You can find these in a coloring book or online.
Step 3: Trace and Cut! Trace the outline of the animal onto your black paper. Then, carefully cut the animal shape out. This is your silhouette.
Step 4: Prepare for Glitter! Place your animal silhouette on a piece of newspaper to keep your table clean.
Step 5: Add Glue and Glitter! Use a paintbrush or your finger to spread a thin layer of glue all over one side of your animal silhouette. While the glue is still wet, sprinkle it with lots of glitter until it’s completely covered.
Step 6: Shake it Off and Let it Dry! Gently tap your silhouette to shake off the extra glitter. Set it aside and let the glue dry completely.
Step 7: Add a Hanger! Once it’s dry, poke a small hole near the top of your animal. Thread a piece of string through the hole and tie it in a loop. Your majestic, glittering animal is now ready to join the royal menagerie on your tree!
8. Shimmering Ice Palace

This tree looks like it was carved from ice and snow. A beautiful flocked tree is covered in shimmering silver and crystal. The design is elegant, frosty, and magical. It feels like you’ve stepped into the castle of an ice queen.
The decorations are all in shades of silver, white, and clear crystal. There are sparkling snowflakes, dripping crystal icicles, and shiny silver baubles. Icy, bare branches stick out from the tree, adding to the wintry feel. The topper is a stunning blue and silver dome, like the top of a frozen palace.
DIY Beaded Crystal Branch
Step 1: Gather Your Frozen Supplies! You will need a small, bare branch from your yard, some silver spray paint (with a grown-up’s help!), a hot glue gun (another grown-up job!), and some clear, crystal-like plastic beads.
Step 2: Paint Your Branch! (Grown-up Step!) This is a job for an adult, and it needs to be done outside. Ask your helper to take the branch and spray paint it completely silver. Let it dry thoroughly.
Step 3: The Icy Crystals! (Grown-up Step!) This part also needs your adult helper and the hot glue gun. Be very careful, as the glue is hot!
Step 4: Create a Drip! Your helper will put a long, thin line of hot glue along one of the little twigs on your branch, letting it drip a bit at the end, just like a real icicle.
Step 5: Add the Beads! While the glue is still hot, quickly and carefully press the clear crystal beads into the line of hot glue. The glue will hold them in place.
Step 6: Keep Going! Continue adding more lines of hot glue and crystal beads to different parts of your silver branch. It will start to look like it’s covered in dripping ice and crystals.
Step 7: Let it Cool! Let the whole branch sit until the glue is completely cool and hard. Your beautiful, icy branch is now ready. You don’t need a hanger; just gently nestle it among the branches of your Christmas tree.
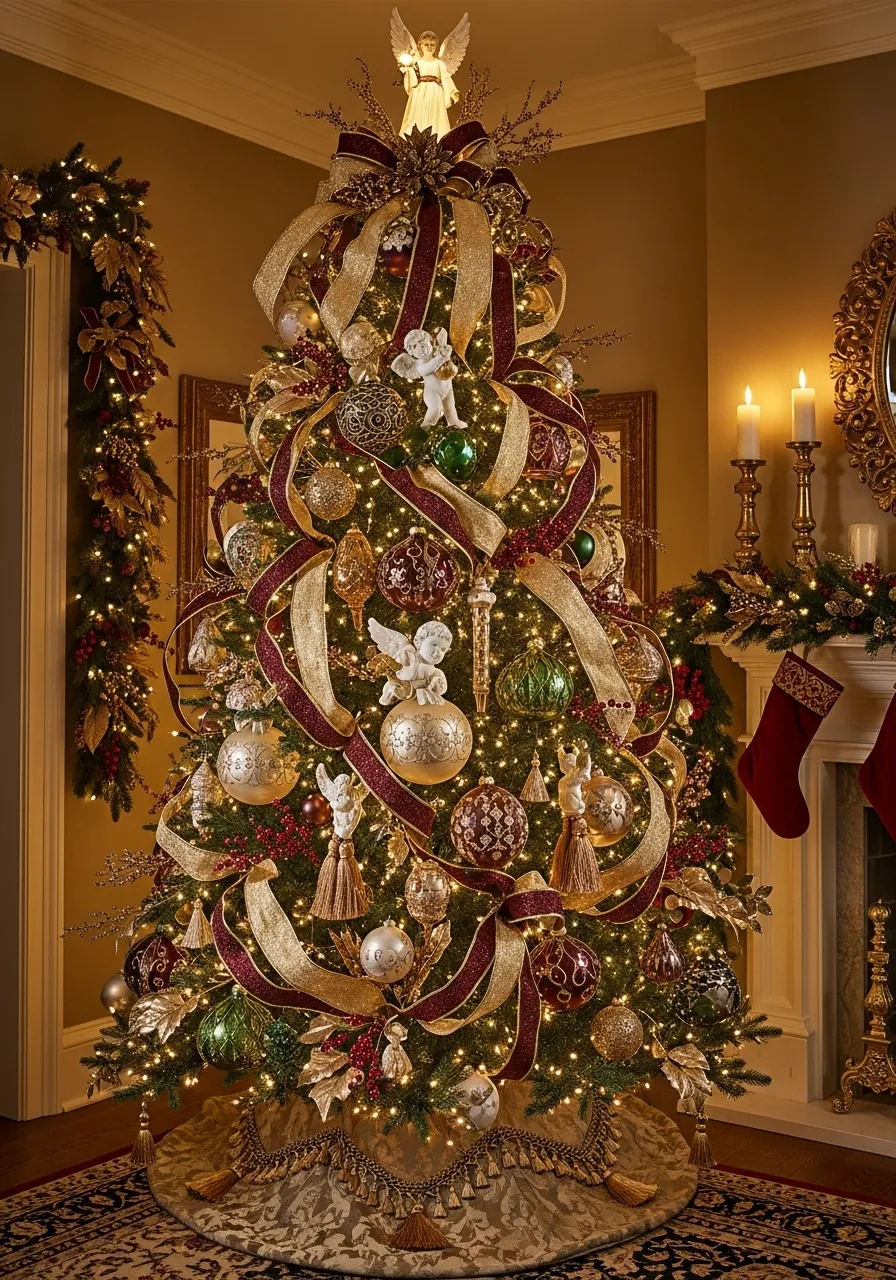
9. Angelic Elegance in Gold

This tree is a vision of classic Christmas beauty. A full, green tree is lavishly decorated in traditional shades of burgundy and gold. The style is timeless, elegant, and full of warmth. It feels like a picture from a classic holiday storybook.
Wide, glittering gold ribbons cascade down the tree, woven in and out of the branches. The ornaments are a beautiful mix of ornate red and gold baubles. Sweet little cherub angels are tucked in all over the tree. An angel topper provides the finishing touch to this heavenly theme.
DIY Golden Angel Tassel
Step 1: Gather Your Heavenly Supplies! You will need some gold or cream-colored yarn, a large wooden bead for the head, a small piece of cardboard, scissors, and a gold pipe cleaner for the halo.
Step 2: Make the Tassel Body! Take your piece of cardboard (about 4 inches tall). Start wrapping your yarn around the cardboard. Keep wrapping until you have a nice, thick bundle.
Step 3: Tie the Top! Cut a separate, 10-inch piece of yarn. Thread it under the wrapped yarn at the top of the cardboard and tie a tight knot. This piece will be your hanger. Slide the whole yarn bundle off the cardboard.
Step 4: Create the Angel’s Head! About an inch down from the top knot, tie another piece of yarn very tightly around the bundle. This will create the angel’s “neck” and a poof of yarn on top.
Step 5: Add the Head! Take the two ends of your hanger string from the very top. Thread both of them through the hole in your wooden bead. Slide the bead down until it sits right on top of the “neck” you created.
Step 6: Cut the Skirt! Take your scissors and cut through all the loops of yarn at the bottom of the bundle. This will create the angel’s flowing skirt. Trim the ends so they are all even.
Step 7: Make a Halo! Take your gold pipe cleaner and form it into a small circle. Leave a little “stem” at the bottom. You can tuck this stem into the hole of the wooden bead, or ask a grown-up to help you glue it to the back of the head. Your sweet tassel angel is ready to watch over your tree!
10. Vineyard Harvest Holiday

This tree is a celebration of rich colors and fruitful abundance. A classic green tree is decorated with a warm and sophisticated vineyard theme. The design feels lush and welcoming. It is inspired by a bountiful harvest.
A large, deep red velvet bow sits at the top of the tree. The ornaments include clusters of deep red and golden grapes, and beautiful baubles in shades of burgundy and gold. Bunches of mistletoe tied with cream ribbons add a classic holiday touch. It is a very warm and inviting theme.
DIY Faux Grape Cluster
Step 1: Gather Your Vineyard Supplies! You will need some small purple or green pom-poms (or you can use beads or marbles), a hot glue gun (with a grown-up’s help!), a small, real twig from your yard, and a piece of green felt.
Step 2: The Grown-Up Part (Hot Glue)! This whole craft needs a grown-up’s help because the hot glue gun is very hot!
Step 3: Start Your Cluster! Ask your adult helper to take two pom-poms and glue them together. Then, they will glue a third pom-pom next to them, making a small triangle shape. This is the bottom of your grape cluster.
Step 4: Build Up the Grapes! Your helper will keep gluing more pom-poms on top, building up in rows. Each row should get a little wider than the one below it, creating a triangle or bunch shape, just like real grapes.
Step 5: Add the Stem! At the very top and back of your grape cluster, your helper will put a nice big line of hot glue. They will then press the small twig into the glue to be the stem.
Step 6: Add a Leaf! From your green felt, cut out a simple leaf shape. Your helper can add a dot of hot glue to the top of the grape cluster, near the stem, and stick the leaf on.
Step 7: Add a Hanger! You can tie a ribbon or string around the twig stem to create a hanger. Your beautiful bunch of grapes is now ready to bring a touch of the harvest to your Christmas tree!
11. Scandinavian Winter Calm

This tree celebrates the beauty of simplicity. With its sparse branches and natural look, it brings a sense of peaceful, minimalist style. It feels like a quiet winter morning in a cozy Nordic cabin. This design shows that you don’t need a lot to create a magical feeling.
The decorations are light and thoughtful. Simple paper stars, soft felt reindeer, and round wool baubles hang gently from the branches. A string of small, warm star-shaped lights adds a gentle glow. The tree sits in a woven basket, adding to its humble, handmade charm.
DIY Folded Paper Star
Step 1: Gather Your Stargazing Tools! You will need a square piece of paper (any color you like, but white or craft brown looks nice), a pair of scissors, and a small piece of string.
Step 2: Fold Your Square! Take your square paper and fold it in half to make a triangle. Unfold it. Now fold it in half the other way to make another triangle. Unfold it again. You should have an “X” shape creased on your paper.
Step 3: Fold it Again! Now, fold the paper in half to make a rectangle. Unfold it. Fold it in half the other way to make another rectangle. Unfold it. Now your paper should have an “X” and a “+” creased on it.
Step 4: A Little Snip! Look at the “+” creases (the ones that make a rectangle). With your scissors, cut a little slit along each of these four lines. Stop cutting about halfway to the center of the paper. Don’t cut all the way through!
Step 5: Make the Star Points! You now have eight little flaps. Take the corner of one flap and fold it over to the center crease line, making a pointy shape. Do this for all eight flaps. Your paper will start to look like a pinwheel.
Step 6: Glue the Points! This part can be a little tricky. Take two of the little folded flaps that are next to each other and glue them together, one on top of the other, to make one 3D star point. Do this all the way around. You will have four points. (For a more advanced star, you can glue every other flap together to make an 8-pointed star).
Step 7: Add a Hanger! Poke a small hole in the top of one of your star points. Thread your string through the hole and tie a knot to make a loop. Your simple, beautiful paper star is ready to hang!
12. Cozy Cabin Getaway

This Christmas tree is wrapped in the warmth of a rustic mountain lodge. It is cozy and inviting, filled with textures from the great outdoors. The design feels classic and comfortable. It brings the charm of a winter cabin right into your living room.
A wide plaid ribbon with burlap edges winds around the tree. Natural pinecones and bunches of bright red berries add pops of color and texture. You can spot cute ornaments like tiny snowshoes and little white ceramic trees. A rustic twig star at the top finishes the look with simple, woodsy style.
DIY Tiny Twig Star Topper
Step 1: Gather Your Forest Supplies! Go outside and find five small, straight sticks or twigs. They should all be about the same thickness and length (around 6 inches long is good). You’ll also need some twine or brown string and a pair of scissors.
Step 2: Build a Star Shape! Take two of your twigs and cross them near the top to make an “X”. Wrap your twine around the spot where they cross several times and tie a tight knot.
Step 3: Add the Third Twig! Now, lay a third twig across your “X” horizontally, so it looks like a star with a line through it. Tie this twig securely to the other two where they cross.
Step 4: Weave Your Star! Take your fourth twig. Place it so one end goes over the top point of your “X” and the other end goes under one of the bottom legs. Weave it in. Now take the fifth twig and do the opposite, weaving it so it goes under the top point and over the other bottom leg. Adjust them until they form a five-pointed star shape.
Step 5: Tie It All Together! This is the most important part. Go to each spot where two twigs cross. Wrap your twine tightly around each of these crossing points. Tie a strong knot and snip the extra twine. Do this for all five points of the star.
Step 6: Make It Secure! Wrap more twine around the very center of the star, where all the twigs meet, to make it extra strong and sturdy.
Step 7: Crown Your Tree! Your rustic twig star is finished! You can gently nestle it among the top branches of your tree. The branches will hold it in place. It adds a wonderful, natural touch to your cozy cabin tree.
13. Spiced Citrus Aroma

This tree is a feast for the senses, bringing the warm scents of Christmas baking to life. The decorations are natural and fragrant. It is a simple, yet beautiful, way to celebrate the season’s traditional aromas. The whole design feels both fresh and spicy.
Garlands of dried citrus slices, including oranges and grapefruit, are draped around the tree. Bundles of cinnamon sticks are tied together and hung as ornaments. You can also spot little star anise pieces tucked into the branches. The mix of deep oranges, warm browns, and the green of the pine is simply lovely.
DIY Dried Orange Slice Ornaments
Step 1: Get Your Kitchen Supplies! (Grown-up help needed!) You will need one or two large oranges, a sharp knife, a cutting board, paper towels, and a baking sheet. You’ll also need a toothpick and some twine or ribbon for hanging. This is a great project to do with an adult!
Step 2: Slice the Oranges! (Grown-up Step!) Ask your grown-up helper to carefully slice the oranges. The slices should be about a quarter of an inch thick. You don’t want them too thick or too thin.
Step 3: Pat Them Dry! Lay your orange slices on a few layers of paper towels. Take another paper towel and gently press down on the slices. This will soak up some of the extra juice and help them dry faster in the oven.
Step 4: Slow Bake! (Grown-up Step!) Your helper should preheat the oven to a very low temperature, around 200°F (or 95°C). Place the orange slices directly on the oven rack or on a baking sheet. Let them bake for about 2 to 3 hours. Your helper should flip them over every 30 minutes so they dry evenly. They are done when they are dry to the touch and no longer sticky.
Step 5: Let Them Cool! Once they are done baking, your helper will take them out of the oven. Let the slices cool down completely on a wire rack. They will get a little harder as they cool.
Step 6: Make a Hanger! Take a toothpick and carefully poke a small hole near the edge of one of the dried orange slices. Be gentle so it doesn’t break.
Step 7: Add the String! Cut a piece of twine or ribbon. Thread it through the hole you just made and tie the ends together to make a loop. Your beautiful, sweet-smelling orange slice ornament is ready to hang!
14. Botanical Aviary Garden

This tree looks as though it was gathered from a beautiful, wild garden. It is covered in natural textures and muted colors. The design feels peaceful and organic. It’s a lovely way to celebrate the quiet beauty of nature during winter.
Clumps of soft green moss are tucked into the branches, next to dried hydrangeas in soft blues and greens. Tiny, empty bird nests are nestled safely on the limbs. The topper is a spray of dried eucalyptus, grasses, and a few long feathers. A simple burlap wrap around the base completes the earthy feel.
DIY Little Bird’s Nest Ornament
Step 1: Gather Your Nesting Materials! You will need some brown twine or jute string, a small balloon, white school glue, a small bowl, a little bit of water, and scissors.
Step 2: Blow Up Your Balloon! Blow up your balloon just a tiny bit, so it’s about the size you want your little nest to be—maybe the size of a small lime. Tie it shut.
Step 3: Prepare Your Glue Mixture! In your small bowl, pour some white school glue. Add just a splash of water and mix it together. You want the glue to be a little thinner and runnier, like a thin pancake batter.
Step 4: Get Messy with Twine! Cut a few long pieces of your twine. Dip one piece of twine into the glue mixture and use your fingers to make sure it’s completely covered in glue. It’s going to be sticky!
Step 5: Weave Your Nest! Take your gluey twine and start wrapping it around the bottom half of your little balloon. Crisscross the twine in every direction. Keep adding more gluey twine pieces until you have a nice, messy, nest-like shape on the balloon.
Step 6: Let It Dry Completely! Place your balloon, twine-side-up, in a cup or bowl to hold it steady. Now you have to wait. Let the glue and twine dry completely. This might take a whole day, but it’s very important for the nest to get hard.
Step 7: Pop the Balloon! Once you are sure the twine is hard and dry, take a pin or your scissors and carefully pop the balloon! The balloon will pull away from the inside of your nest, leaving you with a perfect little twine bowl.
Step 8: Add a Hanger! Take another small piece of twine, loop it through the side of your nest, and tie a knot. Now your lovely little bird’s nest is ready to find a home on a branch of your tree.
15. Scottish Highland Fling

This tree is a proud tribute to the beautiful Scottish Highlands. It is filled with iconic patterns and symbols from Scotland. The design feels cozy and full of heritage. It’s like a warm wool blanket on a chilly winter day.
A classic red tartan plaid ribbon wraps around the tree, setting the theme. The ornaments celebrate Scottish nature and culture, with proud stags, fluffy sheep, and the national flower, the thistle. You can even see some wooden ornaments carved with Celtic knots. A spray of purple heather at the top is a beautiful finishing touch.
DIY Fluffy Sheep Ornament
Step 1: Gather Your Flock’s Supplies! You will need some white cotton balls, a piece of black construction paper or felt, two clothespins (the springy kind), googly eyes, white school glue, and scissors.
Step 2: Build the Sheep’s Body! Take a cotton ball and gently stretch it out a little to make it fluffier and bigger. This will be your sheep’s woolly body.
Step 3: Create the Head! On your black paper or felt, draw and cut out a small oval shape for the sheep’s head. It should be about the size of your thumbnail.
Step 4: Give Your Sheep a Face! Glue two small googly eyes onto the black oval head. Then, put a dot of glue on the back of the head and stick it onto the front of your fluffy cotton ball body.
Step 5: Make Some Legs! Take your two clothespins. These are going to be your sheep’s legs! Clip them onto the bottom of the cotton ball, one near the front and one near the back. The clothespins will also help your ornament stand up if you want.
Step 6: Let It All Dry! Set your little sheep aside for about 20 minutes to let the glue dry so the head and eyes are stuck on well.
Step 7: Add a Hanger! Cut a small piece of string or ribbon and tie it into a loop. You can carefully clip this loop into one of the clothespins, or put a little dot of glue on the sheep’s back and attach the loop there. Now your fluffy sheep is ready to join the flock on your tree!
16. Gingerbread Candyland Village

This tree looks sweet enough to eat! A snowy flocked tree becomes a winter wonderland for a whole village of gingerbread creations. The design is playful, cheerful, and full of delicious fun. It is a dream come true for anyone with a sweet tooth.
The branches are covered with adorable gingerbread houses, smiling gingerbread men, and cheerful peppermint swirl candies. A red and white gingham ribbon weaves in and out, just like a picnic blanket. It’s a delightful mix of classic baking and candy shop treats that makes everyone smile.
DIY Salt Dough Gingerbread Man
Step 1: Mix Your Dough! (Grown-up help needed!) In a big bowl, mix together 1 cup of flour, 1/2 cup of salt, and 1/2 cup of water. Knead it all together with your hands until it forms a smooth, soft dough. If it’s too sticky, add a little more flour.
Step 2: Roll and Cut! Sprinkle a little flour on your counter or a cutting board. Use a rolling pin to roll out your salt dough until it’s about a quarter of an inch thick. Use a gingerbread man cookie cutter to cut out your shapes.
Step 3: Add a Hole for Hanging! Before you bake them, use a straw or a toothpick to poke a hole at the top of your gingerbread man’s head. This is where the ribbon will go later.
Step 4: Bake Your Ornaments! (Grown-up Step!) Ask your adult helper to preheat the oven to 250°F (or 120°C). Place your salt dough shapes on a baking sheet and bake them for about 2 hours. They need to be completely hard and dry. Let them cool down completely.
Step 5: Time to Decorate! Now for the fun part! Use brown paint to paint your gingerbread man. Once the brown paint is dry, you can use white paint (or puffy paint) to add a smile, buttons, and squiggly lines on his arms and legs. Be creative!
Step 6: Let the Paint Dry! Let your decorated gingerbread man dry completely. Puffy paint can take a few hours to dry, so be patient.
Step 7: Add a Ribbon! Once everything is dry, cut a piece of ribbon or string. Thread it through the hole you made earlier and tie it in a knot to make a loop for hanging. Your salt dough gingerbread man is ready for the tree!
17. Whimsical Woodland Friends

This Christmas tree is home to a charming gathering of forest animals. It has a sweet, storybook quality that feels both natural and magical. The design is full of personality and life. It is like taking a peek into a secret party in the woods.
The branches are filled with adorable felted creatures. You can see clever foxes, wise owls, and sturdy little bears. Red and white toadstool mushrooms add a pop of color, while little golden fairies hide among the branches. The whole tree sits in a simple wicker basket, adding to its rustic, handmade charm.
DIY Simple Felt Owl
Step 1: Gather Your Forest Craft Supplies! You will need a few colors of felt (like brown for the body, white for the belly, and a little orange for the beak), scissors, craft glue, and a piece of ribbon.
Step 2: Cut Out the Owl’s Body! Take your main color of felt (we’ll use brown). Cut out two identical body shapes. A simple oval with two pointy triangle ears at the top works great.
Step 3: Cut Out the Details! From your white felt, cut out a smaller oval shape for the owl’s belly. From the orange felt, cut a tiny triangle for the beak. You can also cut out two small white circles and two even smaller black circles for the eyes.
Step 4: Glue Your Owl Together! Take one of your brown body pieces. Glue the white belly oval onto the middle of it. Then, glue the orange beak on, just above the belly. Now, glue the white circles for the eyes on the face, and the tiny black circles on top of the white ones.
Step 5: Prepare the Hanger! Cut a piece of ribbon about 5 inches long. Fold it in half to make a loop. Put a line of glue along the top edge of the back of your decorated owl piece, and press the two ends of the ribbon into the glue.
Step 6: Make it an Ornament! Take your second plain brown body piece. Put glue all over one side of it. Carefully place it on the back of your decorated piece, sandwiching the ribbon hanger in between them. Press it all together firmly.
Step 7: Let it Dry! Let your owl ornament sit for about an hour to make sure all the glue is completely dry. You’ve made a wise new friend for your woodland tree!
18. Mid-Century Tinsel Flash

This tree is a blast from the past! The shiny silver tinsel and bright colors capture the fun and futuristic style of the 1950s and 60s. This look is all about being bold, bright, and a little bit quirky. It’s a cool, retro celebration.
A slim, silver tinsel tree is the star of the show. It is decorated with glass ornaments in funky shapes and bright colors like turquoise, orange, and lime green. Next to the tree is a classic color wheel projector, which would have been used to cast changing colors onto the sparkly branches.
DIY Retro Sputnik Ornament
Step 1: Gather Your Space-Age Supplies! You’ll need a small styrofoam ball, a box of round wooden toothpicks, silver spray paint, and a paper clip. Please ask a grown-up to help you with the spray paint and to do it outside!
Step 2: Build Your Satellite! Take your styrofoam ball and your toothpicks. Start sticking the toothpicks into the styrofoam ball. Stick them in all over, so they are pointing out in every direction, just like the rays of a starburst. Keep going until your ball is covered.
Step 3: The Silver Coating! (Grown-up Step!) This part is for an adult. Take your finished toothpick ball outside and place it on some newspaper. Your helper will spray it all over with the silver spray paint. They might have to turn it a few times to get it covered from every angle.
Step 4: Let it Dry! Leave your ornament outside to dry completely. This might take an hour or two. Make sure it’s not sticky before you touch it.
Step 5: Create a Hanger! Take your paper clip. Unbend the outer loop of the paperclip so you have a straight piece with a hook at the end.
Step 6: Attach the Hanger! Carefully push the straight end of the paper clip deep into the styrofoam ball, in between some of the toothpick spikes. The little hook part should be sticking out at the top. You can add a little dot of strong glue where it goes into the ball to make it extra secure.
Step 7: Launch it Onto the Tree! Your cool, retro Sputnik ornament is ready for its mission! Hang it on your tinsel tree to add some real mid-century modern flair.
19. Santa’s Busy Workshop

This Christmas tree is buzzing with the cheerful energy of Santa’s workshop at the North Pole. It is filled with toys, tools, and hardworking elves. The design is playful and tells a story. It is sure to make any child dream of Christmas Eve.
The tree is decorated with all sorts of handmade-looking toys, like rocking horses, spinning tops, and little elves. You can even see tiny saws and hammers. Two scrolls hang on the tree, showing who has been naughty and who has been nice. A big yellow measuring tape runs down the middle, and a Santa hat sits right on top!
DIY “Naughty or Nice” Scroll
Step 1: Gather Your Elf Materials! You will need a small piece of paper (about 4 inches wide and 6 inches long), a used tea bag, a pen, two small twigs or dowels, and some string or twine.
Step 2: Make Your Paper Look Old! Ask a grown-up to help you with this part. Brew a cup of tea with the tea bag and let it cool down. Once it’s cool, gently dab the wet tea bag all over your piece of paper. This will stain the paper and make it look like an old, important scroll from the North Pole. Let the paper dry completely.
Step 3: Write Your List! Once the paper is dry, you can gently crumble it up and then smooth it out to make it look even older. Now, take your pen and write “NICE” at the top. Below it, write the names of your family members, friends, and pets who have been good this year!
Step 4: Roll the Top of the Scroll! Put a thin line of glue along the top edge of your paper. Place one of your twigs on the glue and roll the paper around it once or twice. Hold it for a minute to make sure it sticks.
Step 5: Roll the Bottom! Now do the same thing for the bottom edge of the paper. Put a line of glue, place the other twig on it, and roll it up. Now your paper should have a twig at the top and the bottom.
Step 6: Add a Hanger! Cut a piece of string or twine. Tie one end to the left side of the top twig. Tie the other end to the right side of the top twig. This will make a little hanger for your scroll.
Step 7: Hang It for Santa to See! Your North Pole scroll is finished! Hang it on your tree so Santa can double-check his list when he visits.
20. Vintage Storybook Holiday

This tree looks like it jumped right out of the pages of a classic children’s book. It is filled with handmade charm and nostalgic details. The design feels personal and full of heart. It celebrates the simple joy of holiday stories.
The ornaments are wonderfully crafty. You can see little wooden soldiers and nutcrackers. Cards with vintage Christmas illustrations are clipped to the branches. The topper is a beautiful angel made from the folded pages of an old book. A simple green paper chain garland adds to the old-fashioned, homemade feeling.
DIY Classic Paper Chain Garland
Step 1: Gather Your Chain-Making Supplies! You will need a few sheets of construction paper (green and red are classic Christmas colors), scissors, and a glue stick or a stapler.
Step 2: Cut Your Strips! Take a sheet of construction paper. With your scissors, cut the paper into long strips. Each strip should be about 1 inch wide. The easiest way is to cut along the shorter side of the paper. Cut up a bunch of strips in different colors.
Step 3: Make Your First Link! Take your very first paper strip. Bring the two ends together to form a circle or a loop. Overlap the ends just a little bit and use your glue stick or one staple to connect them.
Step 4: Add the Next Link! Now take a second paper strip, maybe in a different color. Before you glue its ends together, slide it through the first circle you made. Then, bring the ends of the second strip together to make another loop, and glue or staple them.
Step 5: Keep Building Your Chain! You’ve started a chain! Just keep going. Take a new strip, loop it through the last link you made, and then connect the ends. You can make a pattern with your colors, like red-green-red-green, or just make it random.
Step 6: Make it Long! Keep adding new links until your paper chain is as long as you want it to be. You can make a really long one to wrap all the way around your tree, or a few shorter ones to hang from the branches.
Step 7: Decorate Your Tree! Once your chain is finished, you can gently drape it over the branches of your tree. It’s a simple, fun decoration that you can be proud you made all by yourself.
21. Pop Art Holiday Pow

This Christmas tree is an explosion of color and fun. It breaks all the traditional rules and brings the bold energy of a comic book to the holidays. The design is bright, graphic, and full of attitude. It is a super fun and modern take on Christmas decorating.
The tree itself is half hot pink and half bright blue. It’s covered in ornaments that look like speech bubbles from a comic strip, with words like “POW!”, “BAM!”, and “LCHMA?!”. Matte baubles in yellow, blue, and pink add to the vibrant look. A speech bubble topper completes this loud and lively theme.
DIY Comic Book Word Art
Step 1: Gather Your Superhero Supplies! You’ll need some stiff felt in bright colors like yellow, red, and blue. You will also need some white felt, scissors, craft glue, and a piece of ribbon for hanging.
Step 2: Design Your Action Word! Think of a fun comic book word like “POW!” or “ZAP!”. Cut out a flashy, explosive shape from your main color of felt, like yellow. This will be the background for your word.
Step 3: Cut Out Your Letters! Now, take a different color of felt, like red. Carefully cut out the letters for your word. For “POW!”, you’ll cut out a ‘P’, an ‘O’, and a ‘W’. It’s okay if they are a little wiggly; that’s part of the comic book style!
Step 4: Make the Letters Pop! To make your letters stand out, you can cut out a slightly bigger version of each letter from white felt. Glue your red letters right on top of the slightly bigger white letters, so it looks like they have a white outline.
Step 5: Assemble Your Word Art! Take your felt letters and arrange them on your flashy background shape. Once you like how they look, glue them down.
Step 6: Add a Hanger! Cut a small piece of ribbon and tie it into a loop. Flip your finished word art over. Put a dot of glue on the back, near the top, and press the knot of your ribbon loop into it.
Step 7: Let it Dry! Let your ornament sit for about an hour to make sure the glue is all dry. Now you have a fun, comic book-style ornament that will add a real punch of color to your tree!
22. Midnight Garden Gothic Romance

This tree is dark, dramatic, and full of mysterious beauty. A black tree serves as a shadowy canvas for a rich and moody design. It feels like a scene from a gothic fairytale. This style is for those who love elegance with a touch of the dramatic.
Jewel-toned flowers in deep magenta and turquoise stand out against the black branches. Glistening silver insects and butterflies add a touch of sparkle. Matte black ornaments create depth, while peacock feathers bring in a hint of iridescent color. The topper is a stunning silver crown, fit for a gothic queen.
DIY Glistening Spider Ornament
Step 1: Get Your Gothic Craft Supplies! You will need four black pipe cleaners, one large black pom-pom for the body, one smaller black pom-pom for the head, craft glue, some silver glitter glue, and a piece of thin black string.
Step 2: Build the Spider’s Legs! Take your four black pipe cleaners. Lay them all together and find the middle. Twist them all together right in the center a few times. Now, spread them out so you have eight spider legs sticking out from the center.
Step 3: Make the Body! Take your large black pom-pom. Put a big blob of craft glue on the twisted center of your pipe cleaner legs. Press the large pom-pom firmly onto the glue. This is your spider’s body.
Step 4: Add the Head! Put a smaller dot of glue on the front of the large pom-pom body. Stick the smaller pom-pom here for the spider’s head.
Step 5: Bend the Legs! Once the glue has started to set, you can bend your spider’s legs. Give each leg two little bends to make them look like they have knobby knees. This will make your spider look more realistic.
Step 6: Add Some Sparkle! Take your silver glitter glue. Carefully draw a cool design on your spider’s back, like a cross or a starburst. This will make it look extra fancy and a little bit spooky.
Step 7: Add a Hanger and Let it Dry! Tie your piece of thin black string into a loop. Put a dot of glue on the very top of the spider’s body and attach the string. Let your whole creation dry for a few hours. Now your glistening spider is ready to crawl onto your gothic tree.
23. Desert Holiday Fiesta

This isn’t your typical Christmas tree, but it is full of charm and personality. A sparse, potted pine branch brings the simple beauty of the desert indoors. The style is unique, colorful, and festive. It is a celebration of a warm and sunny Christmas.
The tree is decorated with ornaments inspired by the American Southwest. You can see little green cacti, cute llamas, and colorful yarn tassels. Pom-pom garlands in bright colors add to the festive, fiesta feel. A simple tin star on top is the rustic finishing touch.
DIY Colorful Yarn Tassel
Step 1: Gather Your Fiesta Supplies! You will need some yarn in a few bright colors, a small, flat piece of cardboard (about 3 inches tall), and a pair of scissors.
Step 2: Start Wrapping! Take your first color of yarn. Hold the end of the yarn against the cardboard and start wrapping the yarn around the cardboard. Keep wrapping until you have a nice, thick bundle of yarn. The more you wrap, the fluffier your tassel will be. Snip the yarn from the ball.
Step 3: Tie the Top! Cut another small piece of yarn. Carefully slide it under all the wrapped yarn at the top of the cardboard. Push it all the way to the top edge and tie a tight double knot. This will hold all your loops together.
Step 4: Snip the Bottom! Now, carefully slide the whole bundle of yarn off the cardboard. You will have a bunch of loops at the top and a bunch of loops at the bottom. Take your scissors and cut through all the loops at the bottom.
Step 5: Make the Tassel’s “Neck”! Cut one more piece of yarn. About an inch down from the top of your tassel, wrap this piece of yarn around the whole bundle very tightly several times. Tie a secure knot to create the little “head” of the tassel. You can let the ends of this yarn just hang down with the rest of the tassel fringe.
Step 6: Give it a Haircut! Your tassel might look a little messy at the bottom. Hold it all together and use your scissors to give the ends a little trim to make them all even.
Step 7: Hang Your Tassel! The loop of yarn you tied in Step 3 is your hanger! Your colorful tassel is now ready to add some fiesta fun to your desert holiday tree.
24. Coastal Driftwood Christmas

Bring the serene feeling of a winter beach into your home with this creative tree. This isn’t a traditional pine tree, but a sculpture made from pieces of driftwood. The design is natural, airy, and calming. It is a beautiful way to celebrate a coastal Christmas.
The “tree” is made of stacked driftwood pieces, getting smaller toward the top. It is decorated with ornaments in shades of seafoam green and sandy white. Garlands of wooden beads look like seafoam bubbles. Real starfish and sand dollar ornaments complete the seaside theme.
DIY Simple Beaded Garland
Step 1: Get Your Beachcomber Supplies! You will need some wooden beads in different sizes (you can find these at a craft store), a long piece of twine or jute string, and scissors. It’s also helpful to have a large needle with a big eye.
Step 2: Plan Your Garland! Decide how long you want your garland to be. Cut a piece of twine that is a little bit longer than that, so you have extra room for tying knots at the ends.
Step 3: Tie the First Knot! At one end of your twine, tie a big, thick knot. This will act as a stopper so your first bead doesn’t slide off.
Step 4: Thread Your Needle! If you are using a needle, thread the other end of your twine through the eye. A needle makes it much easier and faster to string the beads. If you don’t have a needle, you can wrap a tiny piece of tape around the end of the twine to make it stiff.
Step 5: Start Beading! Start sliding your wooden beads onto the twine. You can create a pattern, like “big bead, small bead, big bead,” or you can just add them randomly for a more natural look. Push each bead all the way down until it rests against the knot at the end.
Step 6: Keep Going! Continue stringing beads until your garland is almost the length you want it to be. You can mix in beads of different colors if you like, but using all natural wood beads gives a nice driftwood feel.
Step 7: Finish It Off! When you are done adding beads, tie another big, thick knot right after the last bead to keep them all from sliding off the other end. Snip off any extra twine. Your beautiful, coastal-inspired garland is ready to be draped on your driftwood tree.
25. Wizard’s Enchanted Yule

This Christmas tree is filled with subtle magic and scholarly charm. It feels like it belongs in the cozy common room of a wizarding school. The design is dark, moody, and full of clever details. It is a sophisticated nod to a world of witches and wizards.
Deep burgundy velvet ribbon cascades down the tree. The ornaments are unique and magical. You can spot tiny spellbooks, round wizard glasses, and dark, mysterious baubles. At the very top, a wise old owl stands guard. The whole scene is lit by the warm glow of candlelight.
DIY Tiny Spellbook Ornament
Step 1: Gather Your Magical Materials! You’ll need a very small piece of cardboard (from a food box), a piece of brown or black construction paper, a few small strips of plain white paper, a glue stick, scissors, and a piece of string.
Step 2: Create the Book Cover! Cut a small rectangle out of your cardboard, about 1 inch wide and 1.5 inches tall. Then, cut a slightly larger rectangle from your brown or black paper. This will be the cover.
Step 3: Make the Cover! Put glue all over one side of the cardboard. Place it in the center of your colored paper. Snip the corners of the colored paper off. Then, fold the edges of the paper over the cardboard and glue them down, like you are wrapping a tiny present.
Step 4: Fold Your Pages! Take your strips of white paper. They should be just a little bit smaller than your cover. Fold them in half, all together, to create the pages of your book.
Step 5: Add the Hanger! Cut a small piece of string and tie it into a loop. Open up your folded pages. Put a line of glue right down the center crease and press the knot of your string loop into the glue.
Step 6: Bind Your Book! Put glue on the two outside pages of your folded paper stack. Now, fold your book cover in half to crease it. Carefully place your stack of pages inside the cover, pressing them against the glue.
Step 7: Close the Book and Let it Dry! Close your tiny book and press it firmly. You can even place it under a heavy object for about an hour to make sure it dries flat and the glue holds strong. Your magical little spellbook is now ready to hang on the tree!
26. Retro Kitchen Cheer

This tree is a cheerful throwback to a 1950s kitchen. A bright white tree creates a clean backdrop for a fun and nostalgic theme. The design is bright, happy, and full of personality. It is a sweet tribute to holiday baking and vintage style.
The ornaments are all inspired by a retro kitchen. You can see tiny stand mixers in mint green and red, vintage-style toasters, and bunches of bright red cherries. A garland made of red wooden beads and tiny rolling pins adds to the baking theme. A sparkly starburst topper completes the mid-century modern look.
DIY Tiny Rolling Pin Garland
Step 1: Gather Your Baking Supplies! You will need some wooden craft dowels (about the thickness of a pencil), a small handsaw or very strong scissors (ask a grown-up for help!), some red paint, a small paintbrush, and a long piece of red string or twine.
Step 2: Cut Your Rolling Pins! (Grown-up Step!) This is a job for an adult. Ask your helper to cut the wooden dowel into small pieces, each about 2 inches long. These will be your tiny rolling pins.
Step 3: Paint the Handles! Take your red paint and your small paintbrush. Carefully paint a little red handle on each end of your tiny wooden dowels. Leave the middle part plain wood. Let them dry completely. You can stand them up in a piece of play-doh to dry so they don’t roll away.
Step 4: Prepare Your String! Decide how long you want your garland to be and cut a piece of red string. Tie a loop at one end.
Step 5: Start Your Garland! Take your first tiny rolling pin. Tie it to the string by wrapping the string around the center of the rolling pin and making a simple knot.
Step 6: Add More Pins! Leave a few inches of empty string, and then tie on your next rolling pin. Keep doing this until you have tied all your little rolling pins onto the string. Try to space them out evenly.
Step 7: Finish the Garland! Once all your rolling pins are attached, tie another loop at the other end of the string. Your adorable retro kitchen garland is now ready to be draped on your tree!
27. Teddy Bear Christmas Parade

This tree is overflowing with cuddly friends and classic childhood toys. It has a sweet and innocent charm that feels warm and comforting. The design is all about nostalgia and the simple joy of a beloved teddy bear. It is a hug in Christmas tree form.
The branches are filled with teddy bears of all shapes and sizes. Some are brown, some are white, and all of them are adorable. You can also spot classic wooden toys like alphabet blocks and little rocking horses. A sweet angel teddy bear sits at the very top, watching over all her friends.
DIY Little Alphabet Block
Step 1: Gather Your Toy-Making Tools! You will need a small wooden cube (you can find these at a craft store), some paint in different colors, a smaller paintbrush, and a small screw eye hook.
Step 2: Paint Your Block! Choose a bright color and paint all sides of your wooden cube. Let it dry completely. You might need to give it a second coat of paint.
Step 3: Add Your Letters! Once the main color is dry, it’s time to add the letters. With a different color of paint and a very small paintbrush, carefully paint a letter on each side of the block. You can spell a short word like “JOY” or just use random letters of the alphabet.
Step 4: Let the Letters Dry! Be very careful not to smudge your letters! Let the block sit for a few hours until the letter paint is completely dry.
Step 5: Add a Hanger! (Grown-up Step!) This is a job for an adult. Ask your helper to take the small screw eye hook. They will carefully twist the pointy, threaded end of the hook into the top of your wooden block. Keep twisting until the little circle (the “eye”) is right down against the wood.
Step 6: Add a Ribbon! Cut a piece of ribbon or string. Thread it through the metal eye hook you just added and tie the ends together in a knot to make a loop.
Step 7: Join the Parade! Your classic alphabet block ornament is finished! Make a few more with different letters and colors, and hang them on your tree to add to the toy-filled fun.
28. Sugar Rush Sweet Shop

This Christmas tree is a vibrant explosion of candy-colored delight. A bright white tree provides the canvas for a rainbow of sweet treats. The design is playful, colorful, and over-the-top in the best way possible. It is like stepping into your very own candy store.
The branches are loaded with every kind of candy you can imagine. There are giant lollipops, colorful ice cream cones, sweet little cupcakes, and candy-swirl ornaments. A garland made of rainbow pom-poms adds to the fun. The topper is a giant, swirly lollipop that makes a big, bold statement.
DIY Swirly Lollipop Ornament
Step 1: Get Your Candy-Making Supplies! You will need two or three different colors of pipe cleaners, a wooden popsicle stick, scissors, and a hot glue gun (with a grown-up’s help!).
Step 2: Twist Your Colors Together! Take two different colored pipe cleaners. Hold them together and start twisting them around each other from one end to the other. You will end up with one striped, twisted pipe cleaner.
Step 3: Start the Swirl! Take your twisted pipe cleaner. Start at one end and begin to roll it up tightly into a flat, round spiral, like a snail’s shell. Keep rolling it up until you have a flat, swirly circle.
Step 4: Add More Colors! If you want to make your lollipop bigger, you can add another twisted pipe cleaner. Just tuck the end of the new one into the coil and keep rolling.
Step 5: Secure the End! When your lollipop swirl is as big as you want it, take the very end of the pipe cleaner and carefully tuck it into the back of the coil so it doesn’t unravel.
Step 6: Add the Stick! (Grown-up Step!) This is a job for an adult. Ask your helper to use the hot glue gun to put a line of hot glue on the top part of the popsicle stick. Then, they will press the back of your pipe cleaner swirl firmly onto the glue.
Step 7: Add a Hanger and Let it Cool! Before the glue cools, you can press a small loop of ribbon or string into the glue on the back of the lollipop. Let it cool down completely. Your super sweet lollipop ornament is now ready to hang!
29. North Pole Express Mail

This Christmas tree is all about the magic of writing to Santa Claus. It celebrates the tradition of sending hopes and wishes to the North Pole. The design is charming, nostalgic, and full of heartfelt details. It connects the whole family to the spirit of giving.
The tree is covered in tiny envelopes and postcards, all addressed to the North Pole. You can see little red mailboxes and gold bells tucked into the branches. A large star in the center is covered in vintage-style letters and postage stamps. A “North Pole Express” tree skirt completes this special delivery theme.
DIY Little Letter to Santa
Step 1: Gather Your Mail Supplies! You will need a small piece of white paper, a pen, a small envelope (you can make one if you need to), a piece of string, and a glue stick. You can also use a fun Christmas sticker as a “stamp.”
Step 2: Write Your Letter! On your small piece of paper, write a tiny letter to Santa. You can ask for your biggest wish or just say hello!
Step 3: Fold and Mail! Fold your tiny letter up so it will fit inside your small envelope. Tuck it inside. You don’t have to seal the envelope all the way.
Step 4: Address it to the North Pole! On the front of the envelope, write “Santa Claus, The North Pole.” In the corner where the stamp goes, you can draw a little picture of a star or use a Christmas sticker.
Step 5: Add a Hanger! Cut a piece of string and tie it into a loop. Put a dot of glue on the back of your envelope, near the top. Press the knot of your string loop into the glue and hold it for a minute.
Step 6: Let it Dry! Let your little letter ornament sit for a few minutes to make sure the glue is dry.
Step 7: Send it to the Tree! Your special letter to Santa is now a beautiful ornament. Hang it on the tree where the elves are sure to see it and collect it on Christmas Eve!
30. ‘Twas the Night Before Christmas

This tree captures the cozy, magical feeling of Christmas Eve. A snowy flocked tree is filled with classic holiday characters and details. The design is warm, traditional, and tells the famous story of Santa’s visit. It is filled with anticipation and wonder.
A wide, glittering gold ribbon winds around the tree, complemented by a soft red velvet one. The ornaments are full of character, with tiny Santas in their sleighs, cheerful mice, and classic holiday symbols. A big Santa hat sits on top, and a plate of cookies for Santa is waiting at the bottom.
DIY Little Mouse Ornament
Step 1: Gather Your Mouse-Making Supplies! You will need one gray or white pom-pom, a small piece of felt in the same color, a tiny pink pom-pom for the nose, two small googly eyes, a long piece of string or yarn for the tail, craft glue, and a shorter piece of ribbon for hanging.
Step 2: Create the Ears! From your piece of felt, cut out two small teardrop or circle shapes for the mouse’s ears.
Step 3: Give Your Mouse a Face! Take your main pom-pom. Put two small dots of glue on top for the ears and press the felt shapes into them. Put two more dots of glue on the front for the eyes and stick on the googly eyes. Finally, put one more dot of glue right at the front and press on the tiny pink pom-pom for the nose.
Step 4: Add a Tail! Take your long piece of string for the tail. Put a dot of glue on the back of the mouse’s body and press one end of the string into the glue.
Step 5: Make a Hanger! Take your shorter piece of ribbon and tie it into a loop. Put another dot of glue on the top of the mouse’s back, in between the ears. Press the knot of the ribbon loop into the glue.
Step 6: Let it Dry! Let your little mouse sit for about an hour to make sure all the glue is completely dry and all its parts are stuck on well.
Step 7: Not a Creature Was Stirring… Your cute little mouse is ready! Hang it on the tree. You can make a few so that not even one mouse is stirring on Christmas Eve!
31. Vibrant Gradient Rainbow

This tree is a stunning display of modern color theory. The tree itself creates a beautiful ombre effect, smoothly blending from one color to the next. The design is bold, artistic, and incredibly eye-catching. It is a true statement piece.
The tree begins with a deep, dark blue at the base, transitioning up through lighter blues, into purples, pinks, and finally a shimmering gold at the top. The ornaments on each section match the color of the branches perfectly. This creates a seamless and unified gradient of color that is both organized and magical.
DIY Painted Ombre Ornaments
Step 1: Gather Your Painting Supplies! You will need some plain, smooth ornaments (glass or plastic), three different shades of acrylic paint that are in the same color family (like dark blue, medium blue, and light blue), a paper plate, and a small sponge or paintbrush.
Step 2: Prepare Your Paint Palette! On your paper plate, squeeze out a little bit of each of your three paint colors, leaving some space between them.
Step 3: Paint the Bottom! Take your ornament and hold it by the little metal cap. Dip your sponge or brush into your darkest paint color. Dab the paint all around the bottom third of the ornament.
Step 4: Blend the Middle! Now, without cleaning your brush, dip it into your medium paint color. Start dabbing this color just above the dark color, blending it down into the dark color a little bit. Cover the middle third of the ornament with this color.
Step 5: Paint the Top! Finally, dip your brush into the lightest color. Paint the top third of the ornament with this color, blending it down into the middle color. You should have a nice, smooth transition from dark to light.
Step 6: Let It Dry! Carefully hang your ornament somewhere it can dry without being touched. A clothes hanger works well for this. Let it dry completely.
Step 7: Add a Ribbon! Once it’s dry, you can tie a pretty ribbon to the hanger loop. Your beautiful, custom-colored ombre ornament is ready to find its spot on the tree!
32. Modern Monochrome Graphic

This Christmas tree makes a bold statement with a simple color palette. A crisp white tree provides the perfect canvas for a striking black and white design. The style is modern, clean, and very graphic. It is a chic and sophisticated take on holiday decorating.
The ornaments are a playful mix of patterns, including stripes, polka dots, and checks, all in black and white. A large, plush striped tube winds down the tree like a giant candy cane. Even the presents underneath are wrapped to match the theme perfectly.
DIY Striped Garland Tube
Step 1: Gather Your Graphic Supplies! You will need an old pair of black leggings or a long black sock, a bag of polyester stuffing (like you’d use for a pillow), scissors, and some white electrical tape or white fabric paint.
Step 2: Create Your Tube! (Grown-up Step!) This is a job for an adult. Ask your helper to cut one of the legs off the black leggings. If you are using a sock, you’re all set!
Step 3: Stuff It! Take your polyester stuffing and start pushing it into the black fabric tube. Keep adding stuffing until it is nicely filled out, but not so tight that it can’t bend.
Step 4: Seal the Ends! (Grown-up Step!) Once it’s stuffed, ask your helper to either tie a tight knot at each end of the tube, or to sew the ends shut.
Step 5: Add the Stripes! Now it’s time to make the stripes. Take your white electrical tape. Start at one end of your stuffed tube and begin wrapping the tape around it in a spiral, just like the stripe on a candy cane. Keep the spaces between the tape even. Keep wrapping until you reach the other end. (If you’re using fabric paint, you can paint the white stripes on instead, but you will have to let it dry completely).
Step 6: Display Your Creation! Your bold, striped garland is complete! You can now gently weave and wrap it around the branches of your modern monochrome tree.
33. Gilded Botanical Minimalism

This tree celebrates the simple, elegant beauty of nature. A sparse, natural-looking tree allows each individual ornament to be seen and appreciated. The design is minimalist, airy, and sophisticated. It brings a touch of quiet, gilded nature indoors.
The decorations are few but chosen with care. Large, metallic gold leaves, like monstera and fern, hang from the branches. A few white, green, and gold baubles are mixed in for a touch of classic Christmas. The overall effect is very calm and artistic, proving that less can truly be more.
DIY Golden Leaf Ornament
Step 1: Gather Your Botanical Supplies! You will need a few large, interesting-shaped leaves from your yard (magnolia or oak leaves work well), gold spray paint (ask a grown-up for help!), a small piece of string, and a hot glue gun (another grown-up job!).
Step 2: Press Your Leaves! To make your leaves nice and flat, you should press them first. Place your leaves flat between two pieces of paper and put them inside a heavy book. Leave them there for a few days.
Step 3: The Midas Touch! (Grown-up Step!) This part is for an adult and must be done outside. Lay your pressed leaves on some newspaper. Your helper will take the gold spray paint and give the leaves a light, even coat on one side. Let them dry, then flip them over and spray the other side.
Step 4: Let Them Dry Completely! Let your golden leaves sit until they are completely dry and not sticky at all. They will look like they have been turned to solid gold!
Step 5: Add a Hanger! (Grown-up Step!) Cut a small piece of string and tie it into a loop. Ask your helper to use the hot glue gun to put a very small dot of hot glue on the back of the leaf, near the stem.
Step 6: Attach the Loop! Gently press the knot of your string loop into the hot glue. Hold it for a few seconds until the glue cools and hardens.
Step 7: Hang Your Gilded Treasure! Your beautiful, simple golden leaf ornament is finished. Hang it on your tree where it can catch the light and show off its elegant shape.
34. Rainbow Bauble Brilliance

This tree is a perfectly organized explosion of color. A white, cone-shaped tree is completely covered in shiny ornaments, creating a solid wall of rainbow brilliance. The design is precise, cheerful, and very impactful. It is a joyful and modern celebration of color.
The tree is decorated with rows upon rows of simple, glossy baubles. The ornaments are arranged in the order of the rainbow, starting with red at the top and flowing down through orange, yellow, green, blue, and finally purple at the bottom. A simple silver star on top is the only other decoration needed.
DIY Easy Rainbow Pinecone
Step 1: Gather Your Rainbow Supplies! You will need a pinecone, some small craft pom-poms in all the colors of the rainbow (red, orange, yellow, green, blue, purple), some craft glue, and a piece of string.
Step 2: Start with Red! Take your pinecone. Look at the little scales that stick out. Put a small dot of glue on the very tip of a scale near the top of the pinecone. Press a red pom-pom onto the glue.
Step 3: Add More Colors! Working your way around the pinecone in a circle, glue more red pom-poms onto the tips of the scales in the top row.
Step 4: Work Your Way Down! Now move to the next row of scales down. Start gluing on your orange pom-poms. After orange, do a row of yellow, then green, then blue, and finally purple at the bottom. You are creating a rainbow that goes down your pinecone.
Step 5: Let the Glue Dry! Once your pinecone is covered in its rainbow pom-poms, set it aside and let the glue dry completely.
Step 6: Add a Hanger! Cut a piece of string and tie it into a loop. Put a blob of glue on the very top of the pinecone, right in the center. Press the knot of your string loop into the glue and hold it for a minute.
Step 7: Hang Your Rainbow! Once the hanger is dry, your cheerful rainbow pinecone is all ready to be hung on the tree. It’s a fun way to add a little rainbow pop to any branch!
35. Simply Glowing Lights

This tree proves that sometimes, all you need is light. A beautiful, full green pine tree is decorated with nothing but an abundance of warm, glowing lights. The design is incredibly simple, yet breathtakingly beautiful. It creates a magical, enchanting atmosphere in any room.
There are no ornaments, no tinsel, and no topper. The focus is entirely on the thousands of tiny lights that are wrapped around every branch. A few small pinecones can be seen, but they are part of the tree’s natural beauty. This style is all about creating a warm, peaceful, and magical glow.
DIY Twinkling Light Ball
Step 1: Get Your Glowing Supplies! You will need a small styrofoam ball, a string of battery-powered “fairy” lights (the kind on a thin wire), and some small pins or a hot glue gun (with a grown-up’s help!).
Step 2: Find the End of Your Lights! Unwind your string of fairy lights. Find the end of the wire that does not have the battery pack.
Step 3: Start Wrapping! Secure the end of the light string to the styrofoam ball. You can do this by pushing a pin through the wire into the ball, or by asking a grown-up to use a tiny dot of hot glue.
Step 4: Wrap It All Up! Now, start wrapping the string of lights all around the styrofoam ball. Go in every direction—up, down, and all around. Keep wrapping until the whole ball is covered in the wire and the little light bulbs.
Step 5: Secure the Other End! When you get to the battery pack, secure the last bit of the wire to the ball using another pin or another dot of hot glue. The battery pack will just hang down from the ball.
Step 6: Tuck Away the Battery Pack! You can hide the battery pack by tucking it deep inside the branches of your Christmas tree, right behind where you want to hang your light ball.
Step 7: Let It Glow! Switch on your lights! You have created a beautiful, glowing ball of light that looks like a giant, magical dewdrop hanging on your tree.
36. Serene Japanese Garden

This decoration is a quiet, peaceful celebration of Japanese artistry. A simple, sparse pine branch in a rustic wooden base brings a feeling of calm and nature. The design is delicate, thoughtful, and full of grace. It is like a small, tranquil garden for your tabletop.
The ornaments are inspired by Japanese culture. You can see beautiful origami paper cranes, small decorative fans, and round baubles with cherry blossom designs. Tiny brass bells add a hint of sound. A small paper lantern even hangs from one branch, casting a soft glow.
DIY Simple Origami Crane
Step 1: Gather Your Folding Supplies! You will need a perfect square of origami paper. If you don’t have origami paper, any thin square of paper will do.
Step 2: Fold a Triangle! Place your paper square on the table. Fold it in half diagonally to make a triangle. Unfold it. Now fold it in half along the other diagonal to make another triangle. Unfold it.
Step 3: Fold a Rectangle! Fold your paper in half to make a rectangle. Unfold it. Now fold it in half the other way to make another rectangle. Unfold it.
Step 4: Make a Square Base! This is the trickiest part. Gently push the sides of your square in along the creases. The top will come down, and you will be able to flatten the whole thing into a smaller square shape with flaps. This is called a square base.
Step 5: Make it Pointy! Take the top layer of one of the open corners and fold it in to the center line. Do the same with the other side. It will look like a kite. Flip the paper over and do the same thing on the back.
Step 6: Fold the Head and Tail! You will have two pointy “legs” at the bottom. Fold them both up as far as they will go. Then, open up the side flaps and fold these points up inside the model. These will become the head and neck.
Step 7: Fold the Wings and Shape the Head! Fold the two side flaps down to create the wings. Take one of the skinny points that is sticking up and bend the very tip of it down to create the crane’s head. Pull the wings out gently. Your beautiful paper crane is ready to fly onto a branch!
37. Moroccan Bazaar Brights

This Christmas tree is a vibrant, colorful journey to a bustling Moroccan market. It is full of rich textures, bright colors, and exotic patterns. The design is bohemian, festive, and full of life. It is a warm and worldly celebration.
Instead of tinsel, the tree is wrapped in garlands of colorful, ruffled fabric in shades of magenta, orange, turquoise, and blue. The ornaments include beaded Hamsa hands for good luck, colorful tassels, and intricate disco-ball-style baubles. The whole tree sits in a large, hammered brass pot, completing the exotic look.
DIY Colorful Fabric Garland
Step 1: Get Your Bazaar Supplies! You will need some old, colorful t-shirts or scrap fabric in bright colors, a pair of fabric scissors, and a long piece of twine.
Step 2: Cut Your Fabric Strips! (Grown-up Step!) Ask an adult to help you cut your fabric into long strips. Each strip should be about 2 inches wide and about 1 foot long. You will need a lot of strips!
Step 3: Stretch Your Strips! Take each fabric strip and pull it hard from both ends. If you are using t-shirt material, this will make the edges curl in and turn your flat strip into a soft fabric tube.
Step 4: Start Your Garland! Take your long piece of twine. Find the middle of your first fabric strip. Lay the twine over the middle of the strip.
Step 5: Tie a Simple Knot! Fold the two ends of the fabric strip up over the twine. Tuck the ends through the little loop you made, and pull it tight. You have just tied your first piece of fabric onto the garland!
Step 6: Add More Colors! Take your next strip of fabric, maybe in a different color. Slide it right up next to the first one and tie it on in the exact same way. Keep adding more and more fabric strips.
Step 7: Make it Full! Keep scrunching your tied-on fabric pieces close together. The closer they are, the fuller and more ruffled your garland will look. Keep going until your garland is as long as you want it to be. Now it’s ready to bring a splash of color to your tree!
38. Dutch Delft Blue Charm

This Christmas tree is a charming tribute to the classic beauty of the Netherlands. It combines the iconic blue and white pottery style with fresh, cheerful touches. The design is crisp, clean, and full of national pride. It is a lovely and unique holiday theme.
The ornaments are the star of the show. Round baubles are painted with traditional Dutch scenes, like windmills and sailboats, in the famous blue and white Delft style. You can also see tiny wooden clogs hanging from the branches. Fresh, bright yellow tulips are tucked into the tree, adding a wonderful pop of color.
DIY Faux Delft Blue Ornament
Step 1: Gather Your Dutch Art Supplies! You will need a plain white, smooth Christmas bauble, a blue permanent marker with a fine tip, and a piece of blue and white striped ribbon.
Step 2: Get Inspired! Look up some pictures of real Delft Blue pottery. Notice the simple little pictures, like flowers, windmills, and curly lines. You don’t have to be a great artist to draw these!
Step 3: Start Drawing! Take your white ornament and your blue marker. Start by drawing a simple design. A little windmill is a fun choice. You can draw the body, the blades, and a little door.
Step 4: Add Some Details! Around your main picture, you can add some simple decorations. Try drawing some little leaves, curly scrolls, or simple flower shapes. You can also draw some lines around the top and bottom of the ornament to create a border.
Step 5: Be Patient! Take your time and have fun with it. It’s okay if your lines are not completely straight. The handmade look is part of the charm of Delft pottery.
Step 6: Let it Dry! Even though it’s a permanent marker, it’s a good idea to let the ink dry for about an hour so you don’t smudge it.
Step 7: Add a New Hanger! Take off the plain metal hanger that came with the ornament. Tie your piece of blue and white striped ribbon through the loop to create a new, matching hanger. Your beautiful Dutch-inspired ornament is ready for the tree!
39. Emerald Isle Luck

This Christmas tree is a festive celebration of all things Irish. It is filled with symbols of luck, heritage, and the beautiful Emerald Isle. The design is a wonderful mix of green and gold. It brings a bit of Irish luck to the holiday season.
The tree is decorated with classic Irish symbols. You can see golden harps, silver Celtic crosses, and bright green shamrocks. A garland made of shiny gold coins is draped around the branches. A few fluffy sheep ornaments are also tucked in, reminding us of the green hills of Ireland.
DIY Lucky Shamrock Salt Dough
Step 1: Mix Your Dough! (Grown-up help needed!) In a big bowl, mix together 1 cup of flour, 1/2 cup of salt, and 1/2 cup of water. Knead it all together until it forms a smooth dough. Add a few drops of green food coloring and keep kneading until the color is mixed in evenly.
Step 2: Roll and Cut! Sprinkle a little flour on your counter. Roll out your green dough until it’s about a quarter of an inch thick. If you have a shamrock cookie cutter, use it to cut out your shapes. If not, you can make three small balls of dough for the leaves and one tiny snake of dough for the stem, and press them together to make a shamrock shape.
Step 3: Add a Hole! Use a straw or a toothpick to poke a hole at the top of your shamrock. This is for the ribbon.
Step 4: Bake Your Shamrocks! (Grown-up Step!) Ask your adult helper to preheat the oven to 250°F (or 120°C). Place your salt dough shapes on a baking sheet and bake them for about 2 hours, or until they are completely hard and dry. Let them cool down completely.
Step 5: Add Some Sparkle! Once your shamrocks are cool, you can decorate them! Use some green glitter glue to add some sparkle to them.
Step 6: Let Them Dry! Let the glitter glue dry completely. This might take a few hours.
Step 7: Add a Ribbon! Cut a piece of green or gold ribbon. Thread it through the hole you made earlier and tie it in a knot to make a loop. Your lucky shamrock ornament is ready to bring some Irish cheer to your tree!
40. Mardi Gras Masquerade Ball

This Christmas tree is a dramatic and glamorous celebration. It captures all the mystery and excitement of a Venetian masquerade ball. The design is opulent, rich, and full of flair. It is a true holiday showstopper.
The tree is draped in wide, luxurious velvet ribbons in deep red and royal blue. The main decorations are ornate, feathered masquerade masks in gold, blue, and black. Intricate baubles in purple, gold, and green add to the rich color scheme. The entire display feels like an invitation to a grand and mysterious party.
DIY Mini Masquerade Mask
Step 1: Get Your Masquerade Supplies! You will need some stiff felt or craft foam, a pencil, scissors, a glue gun (with a grown-up’s help!), and some fun decorations like glitter, sequins, and a small feather. You’ll also need a thin wooden skewer or dowel.
Step 2: Draw Your Mask Shape! On your piece of felt or foam, use a pencil to draw a simple mask shape. It should look a bit like a pair of glasses, with two eye holes.
Step 3: Cut It Out! Carefully cut out your mask shape. Then, gently fold the mask in half and make a small snip in the middle of each eye hole. Open the mask up and cut out the eye holes completely.
Step 4: Time to Decorate! (Grown-up help may be needed!) This is the fun part! Use your glue to add glitter, sequins, and other sparkly things to your mask. Be as fancy as you want!
Step 5: Add the Feather! (Grown-up Step!) Ask your adult helper to use the hot glue gun to glue a small, pretty feather to one side of your mask.
Step 6: Attach the Handle! (Grown-up Step!) Your helper will use the hot glue gun to attach the wooden skewer to the back of the mask on one side. This will be the handle to “hold” the mask up to your face.
Step 7: Add a Hanger and Let it Dry! You can tie a small loop of ribbon around the handle, or ask your helper to glue a loop to the back of the mask. Let all the glue dry completely. Your mysterious and glamorous masquerade mask is ready to hang on the tree!
Decorating the Christmas tree is a cherished tradition. It brings family and friends together in a creative spirit, filling the home with warmth and excitement.
With these 40 unique ideas, there is a style for every home and personality. You can mix and match different elements or go all-in on a single, stunning theme.
The most important thing is to have fun with the process. Let your personality shine through your choices and create a tree that brings you and your loved ones joy.
Happy decorating, and may your holiday season be filled with magic, light, and beautiful memories centered around your gorgeous tree.
Key Takeaways
- Embrace Your Style: Your Christmas tree is a reflection of you. Choose a theme that you truly love, whether it’s traditional, modern, or completely unique and quirky.
- DIY Adds Heart: Creating your own ornaments adds a personal and meaningful touch that you can’t buy in a store. The simple DIY projects included here are a great way to make lasting memories with family.
- Think Outside the Box: Don’t be afraid to use unconventional materials like flowers, dried fruit, driftwood, or even comic book cutouts. A Christmas tree can be anything you imagine it to be.
- Color is Key: A well-chosen color palette can instantly elevate your tree’s design, whether you opt for a sophisticated monochrome look, a soft pastel dream, or a vibrant rainbow.